[Motherboard] How to use USB BIOS FlashBack™?
How to use USB BIOS FlashBack™?
Note: The easiest way to update the BIOS is provided. You do not need to enter the BIOS screen of the motherboard or use the EZFlash software in the operating system to use the hardware functions of the motherboard to update the BIOS.
Use situation: If your Motherboard cannot be turned on or the power light is on but not displayed, you can use the USB BIOS FlashBack™ function.
Requirements Tool: Prepare a USB flash drive with a capacity of 1GB or more. *Requires a single sector USB flash drive in FAT16 / 32 MBR format.
To provide you more detailed instruction, you can also click ASUS Youtube video link below to know more about How to use USB BIOS FlashBack™
https://www.youtube.com/watch?v=FPyElZcsW6o
(A)、How to get (BIOS)?
You can get the latest software, manuals, drivers and firmware at the ASUS Download Center.
How to search for the drivers, manuals and spec information on ASUS Support site? Please refer to this link.
*How to Find Model Name: https://www.asus.com/support/article/565/
(B)、Operation method:
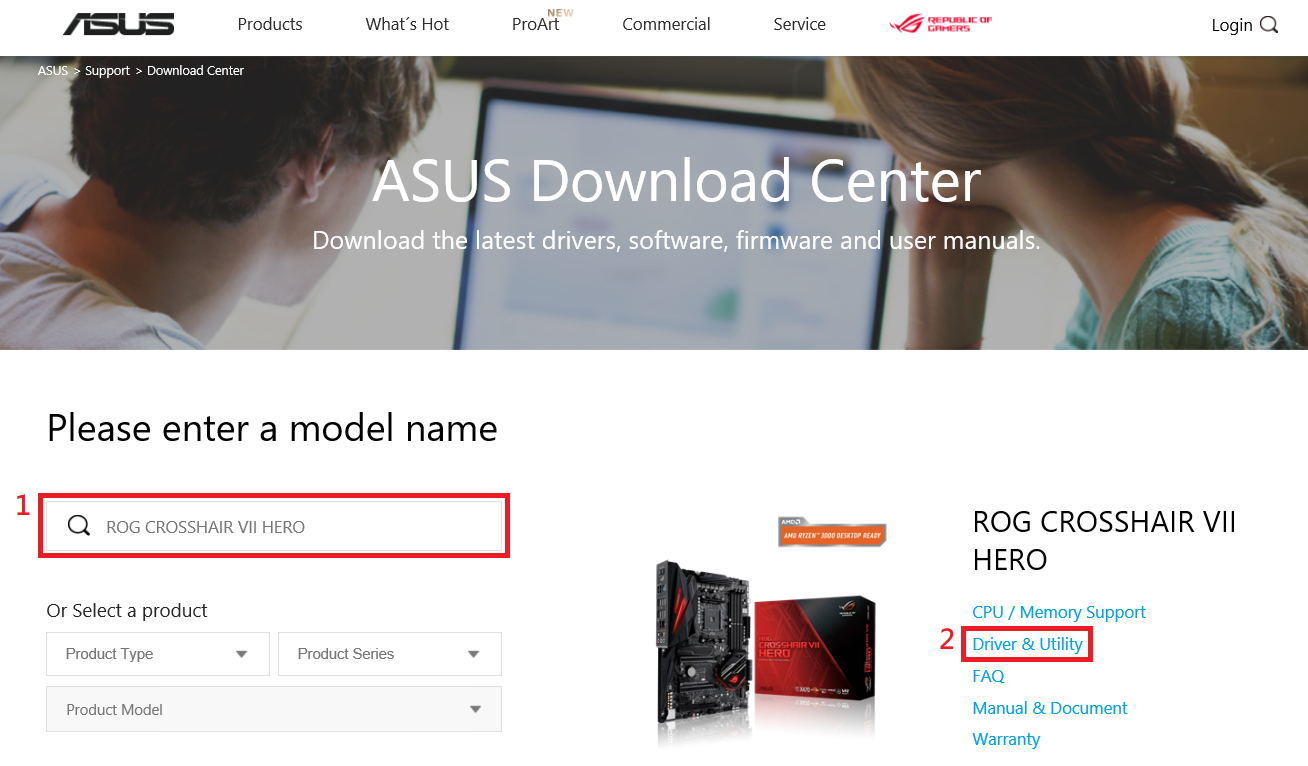
1. Download the latest BIOS file corresponding to your motherboard model from the ASUS Download Center and save it to a USB flash drive.
Enter a model name -> click on the driver and utility.
(Ex: ROG CROSSHAIR VII HERO model)
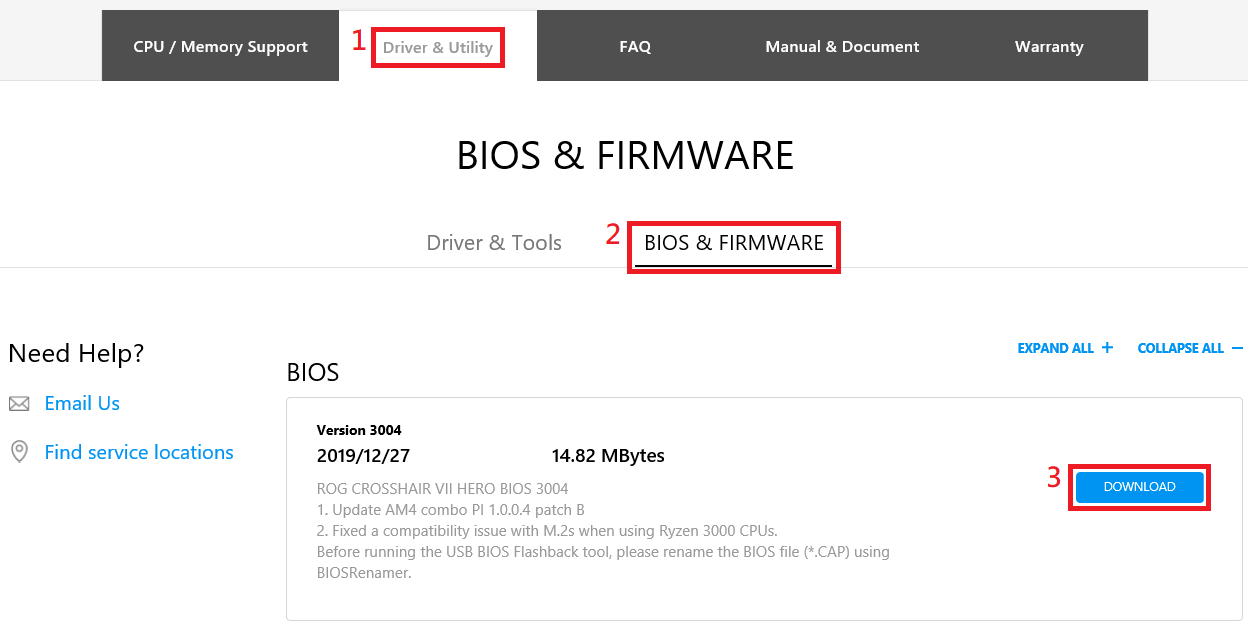
1-1 Click Driver and Utility -> BIOS and FIRMWARE, select the required BIOS version and download (the latest version is recommended).
1-2 Put the downloaded compressed BIOS file into a USB flash drive.
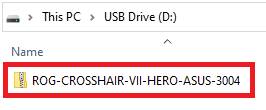
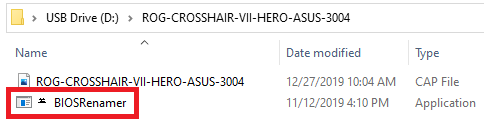
2. Extract the compressed BIOS file, which contains a BIOS file (.CAP) and a BIOS rename tool (BIOSRenamer).
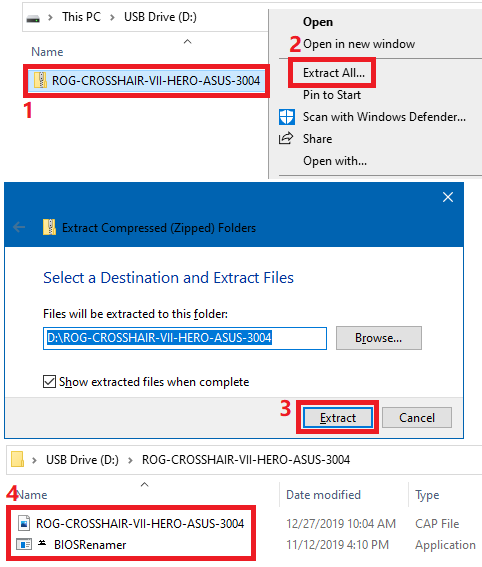
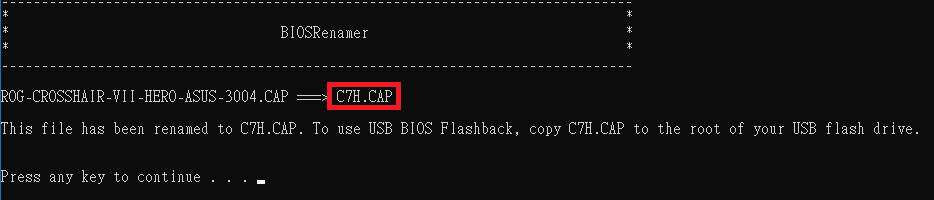
3. Double click on “BIOSRenamer” to automatically rename the BIOS file (.CAP).
Automatically rename the BIOS file (.CAP) is completed -> press any key to end the naming window.
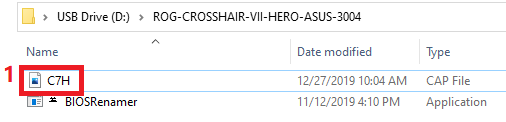
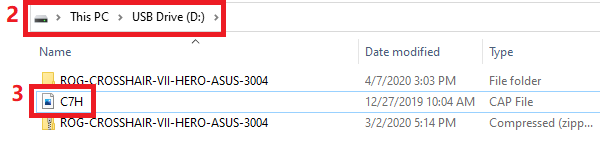
4. Copy or move the renamed BIOS file (.CAP) to the root directory of the USB flash drive.
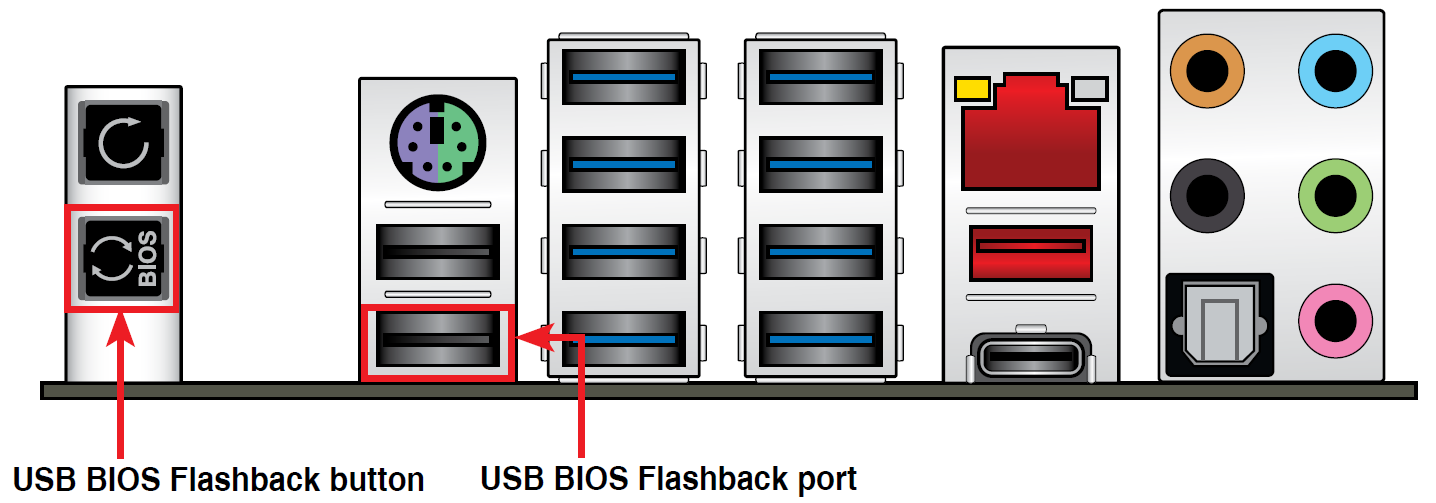
5. Connect the USB flash drive to the USB FlashBack™ port on the motherboard. (Please refer to the FlashBack location of the model manual)
(Ex: ROG CROSSHAIR VII HERO model)
6. Please shut down before using the USB BIOS FlashBack™ tool, but do not remove the power.
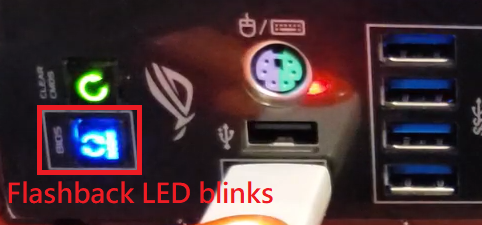
7. Press the BIOS FlashBack™ button for three seconds until the FlashBack LED blinks three times, indicating that the BIOS FlashBack™ function is enabled.
*The BIOS file size will affect the update time. It can be completed in 8 minutes. Please do not remove the USB flash drive, unplug the power supply, turn on the power or press the CLR_CMOS button during the execution. This will cause the update to be interrupted and the system will not boot.
(Ex: ROG CROSSHAIR VII HERO model, Flashback indicator flashes)
8. Wait until the light goes out, indicating that the BIOS updating process is completed.
Q&A:
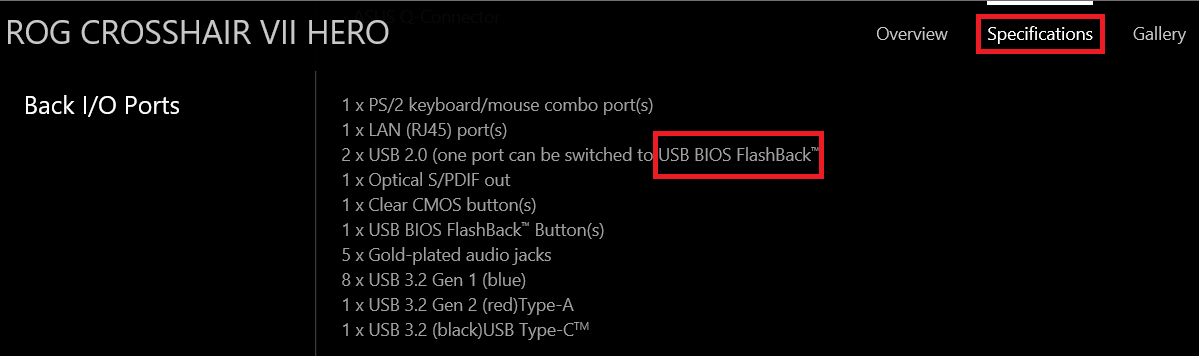
Q1: Which motherboards support Flashback function? Query the Flashback position.
A1: You can check the official website product specifications or user manual instructions.
(Ex: ROG CROSSHAIR VII HERO model)
Q2: How to make a FAT16 / 32 format USB flash drive.
A2: Please refer to the following steps:
1. Format the USB flash drive. On the USB flash drive, right-click and select Format FAT16 / 32. *Formatting will delete all data in the USB flash drive.
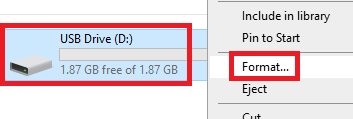
2. File system format, select FAT32, and then click start.

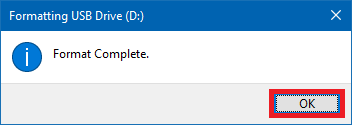
3. Formatting is complete.
Q3: What should I do if the BIOS update process is interrupted and I cannot boot? Or the power light is on but there is no display?
A3: Please confirm if there are any omissions in the USB BIOS FlashBack™ operation steps. If it still cannot be resolved, please contact your local ASUS service center.
Q4: If the light flashes for five seconds and turns into a solid light, this means that the BIOS FlashBack™ is not operating properly.
A4: Suggest the following items to confirm the cause:
1. Is the format of the USB flash drive FAT16 / 32 and the BIOS file and name of the motherboard model correct?
2. Re-execute the USB BIOS FlashBack™ operation steps. If the problem still persists, please contact your local ASUS service center.
Q5: How to confirm whether the BIOS update was successful?
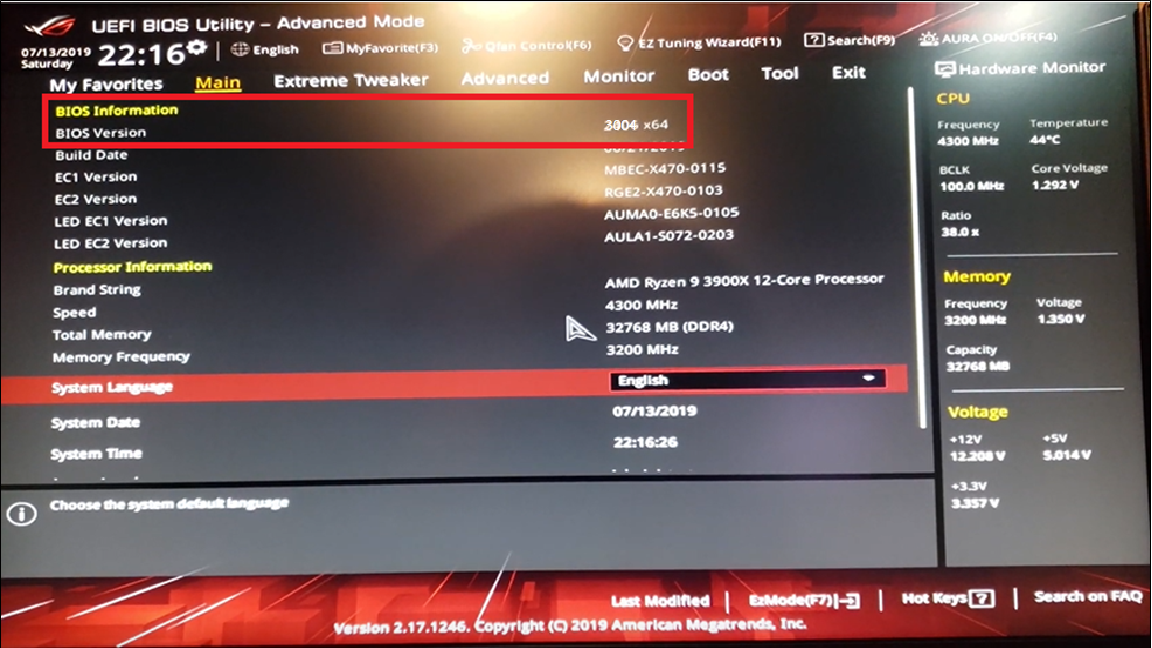
A5: After booting, press F2 or Del key to enter the Main menu of the BIOS setting page, and confirm whether it is consistent with the latest BIOS version.
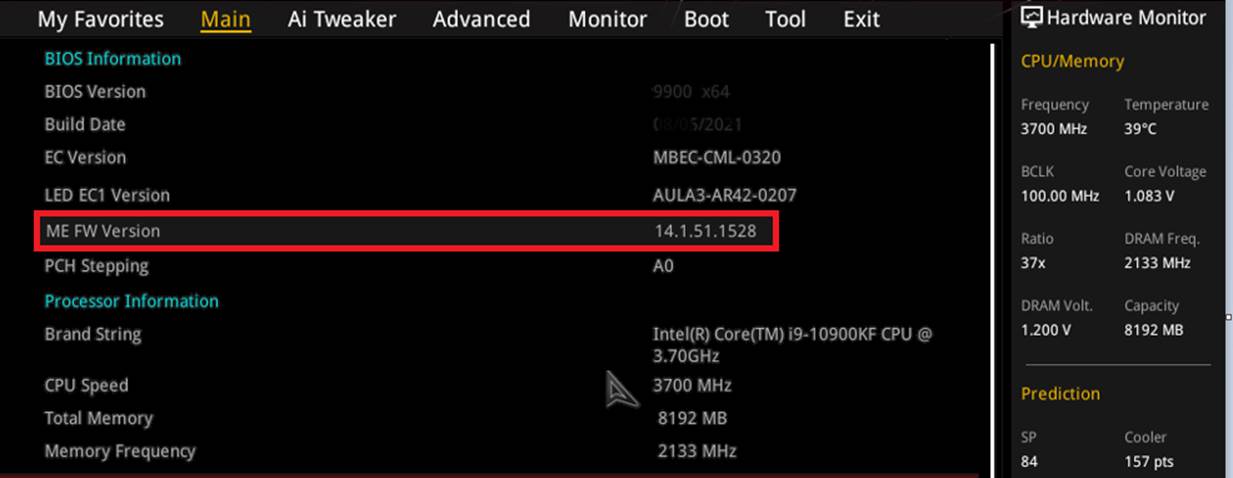
Q6: After the ASUS 400 series motherboard uses USB BIOS FlashBack™ to update the BIOS, the Intel 11th CPU cannot be used?
A6: Please confirm the ME FW version contained in the UEFI BIOS before updating. It must be version 14.1.51.1528 or newer to perform the BIOS update action and use Intel 11th CPU.
The following models need to confirm and update the ME version to support this function.
PRIME B460M-A R2.0
PRIME H410M-K R2.0
PRIME H470M2/FPT
PRIME H470M-PLUS
PRIME H470-PLUS
PRIME Z490M-PLUS
PRIME Z490-P
PRIME Z490-V
ROG STRIX H470-I GAMING
ROG STRIX Z490-E GAMING
TUF GAMING H470-PRO
TUF GAMING H470-PRO (WI-FI)
TUF GAMING Z490-PLUS
TUF GAMING Z490-PLUS (WI-FI)
Z490-GUNDAM (WI-FI)
Z490-PRO GAMING
(Ex: ROG STRIX Z490-E GAMING model)