Related Topics
[Wireless Router] How to set up an Internet Connection?(WAN connection types)
To provide you more detailed instruction, you can also click ASUS Youtube video link below to know more about How to set up an Internet Connection?
https://www.youtube.com/watch?v=Z7dXk3r4xJI
Before you begin setup, check with your Internet Service Provider (ISP) for an WAN connection type, and if you're not sure how your network connection is, check with your Internet Service Provider (ISP)
You can use QIS (Quick Internet Setup) to connect your wireless router to the Internet, please refer to the FAQ below:
[Wireless Router] How to use the QIS (Quick Internet Setup) to set up Router ? (Web GUI)
[Wireless Router] How to set up ASUS Wi-Fi router via ASUS Router App? (QIS, Quick Internet Setup)
List of WAN connection Types:
Frequently Asked Question(FAQ)
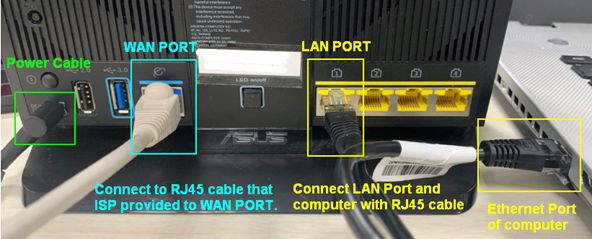
1. Please connect your computer to wireless router via wired connection.
Kindly refer to the following picture to check if all the devices (Modem and router) are all connected via RJ-45 cable.
Note: Different models have different specifications, please refer to ASUS Download Center to download the product user manual to check the specifications.
- Connect the RJ45 cable to WAN port of router.
- Connect LAN port and laptop(computer) with another network RJ45 cable.
- Insert your wireless router’s AC adapter to the DC-IN port and plug it to a power outlet.
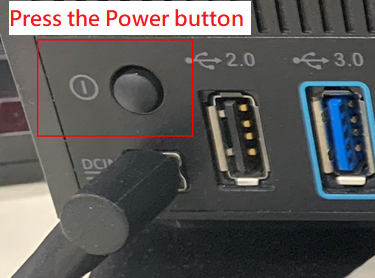
- After connecting to the power supply, remember to press the Power button to turn on the router.
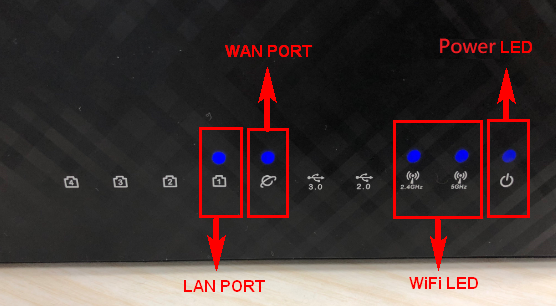
- Make sure the power LED indicator on the front of the router is on. The WiFi 2.4G/5G LED indicators flashes, and it indicates that the router is turned on.
In addition, the two network cables that you just connected to the WAN Port and LAN Port will have corresponding LED lights on. (Please check the user manual to confirm the LED light instructions for the wireless router)
2. Open the browser, enter your router LAN IP or router URL http://www.asusrouter.com to the WEB GUI.

Please refer to How to enter the router setting page(Web GUI) to learn more.
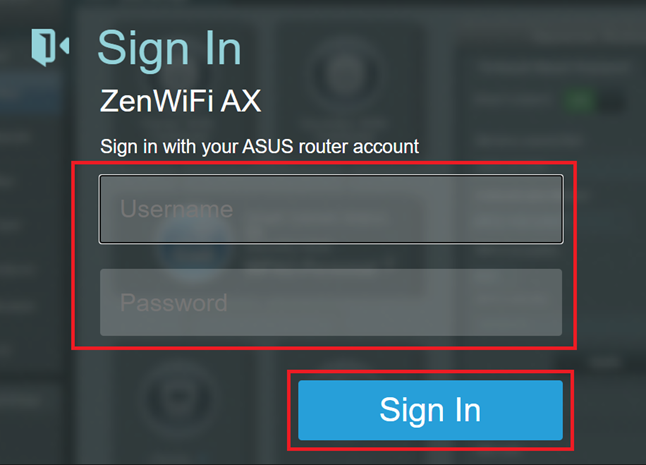
3. Key in your router's username and password to log in.
When you login to the Web GUI for the first time, you will be automatically directed to the Quick Internet Setup (QIS) page. Please refer to How to use the QIS (Quick Internet Setup) to set up Router ? (Web GUI)
Note: If you forget the user name and/or password, please restore the router to the factory default status and setup.
Please refer to How to reset the router to factory default setting for how to restore the router to default status.
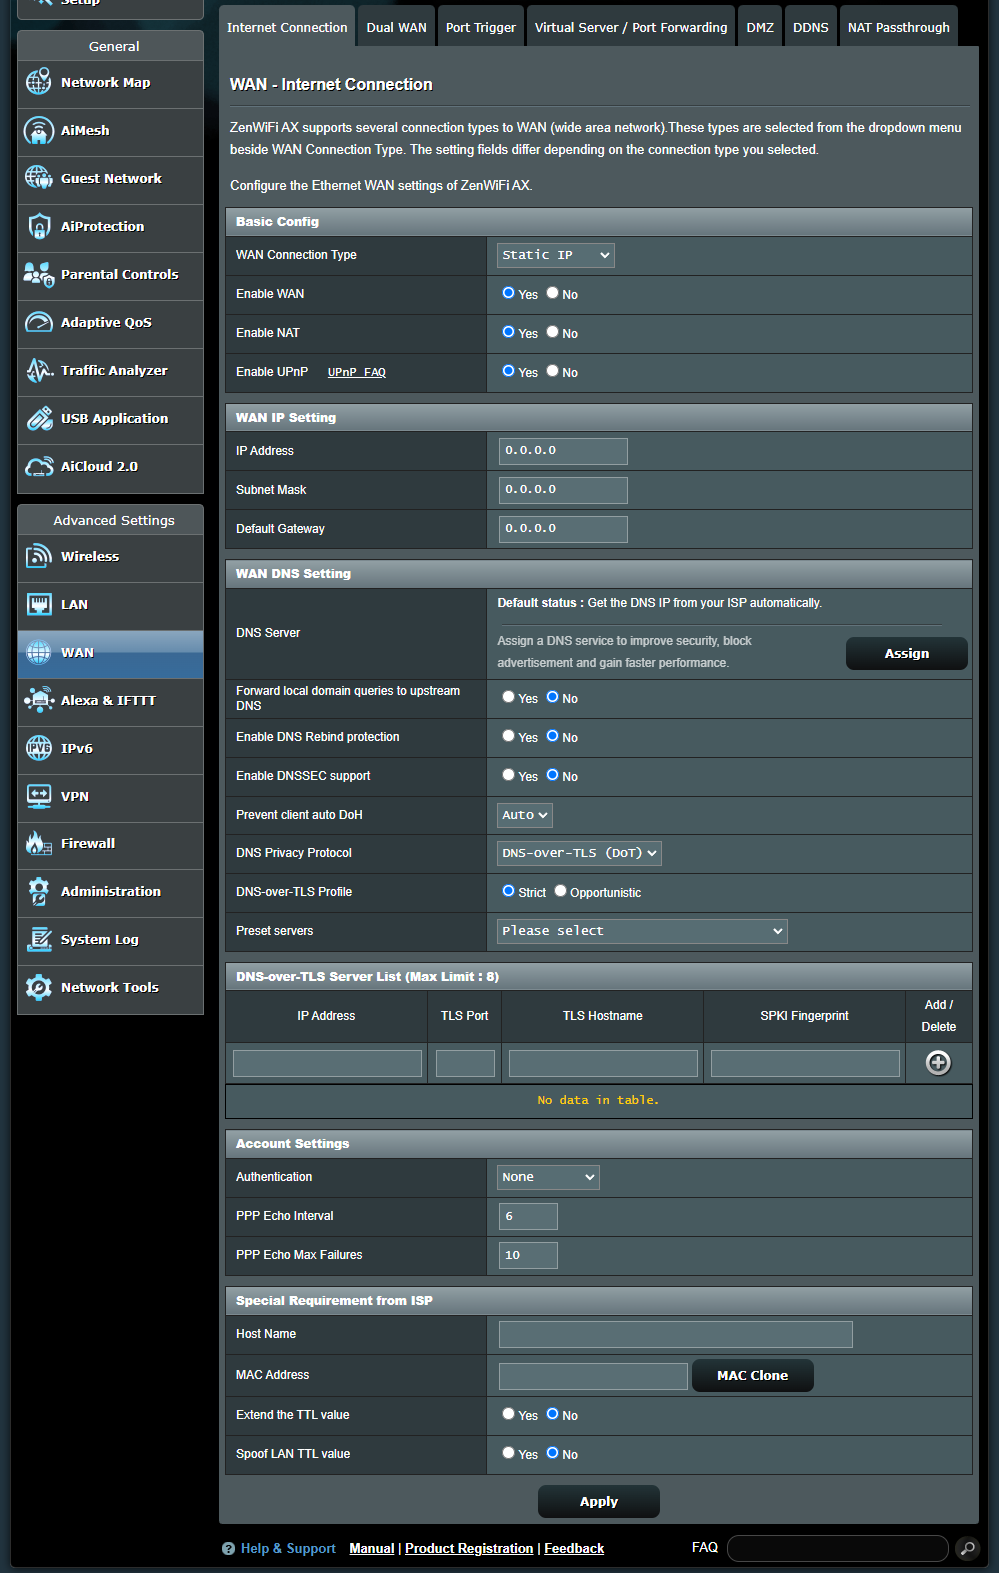
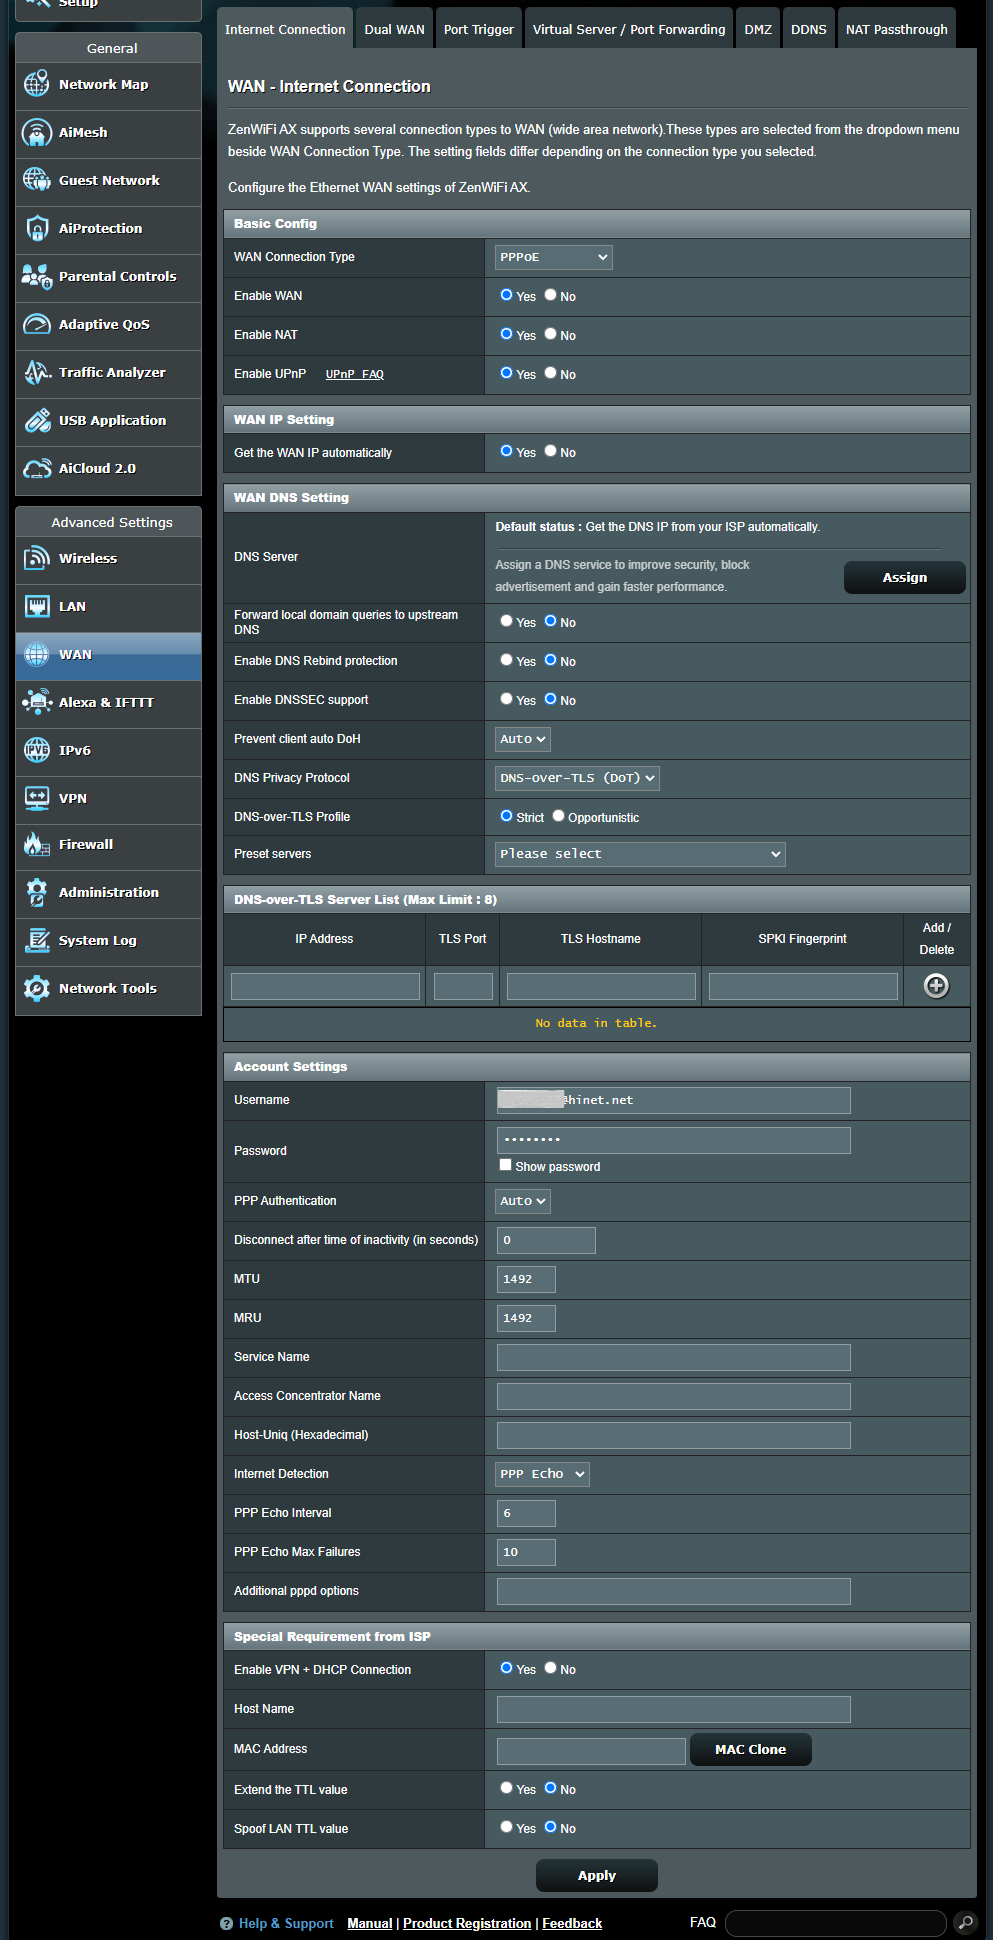
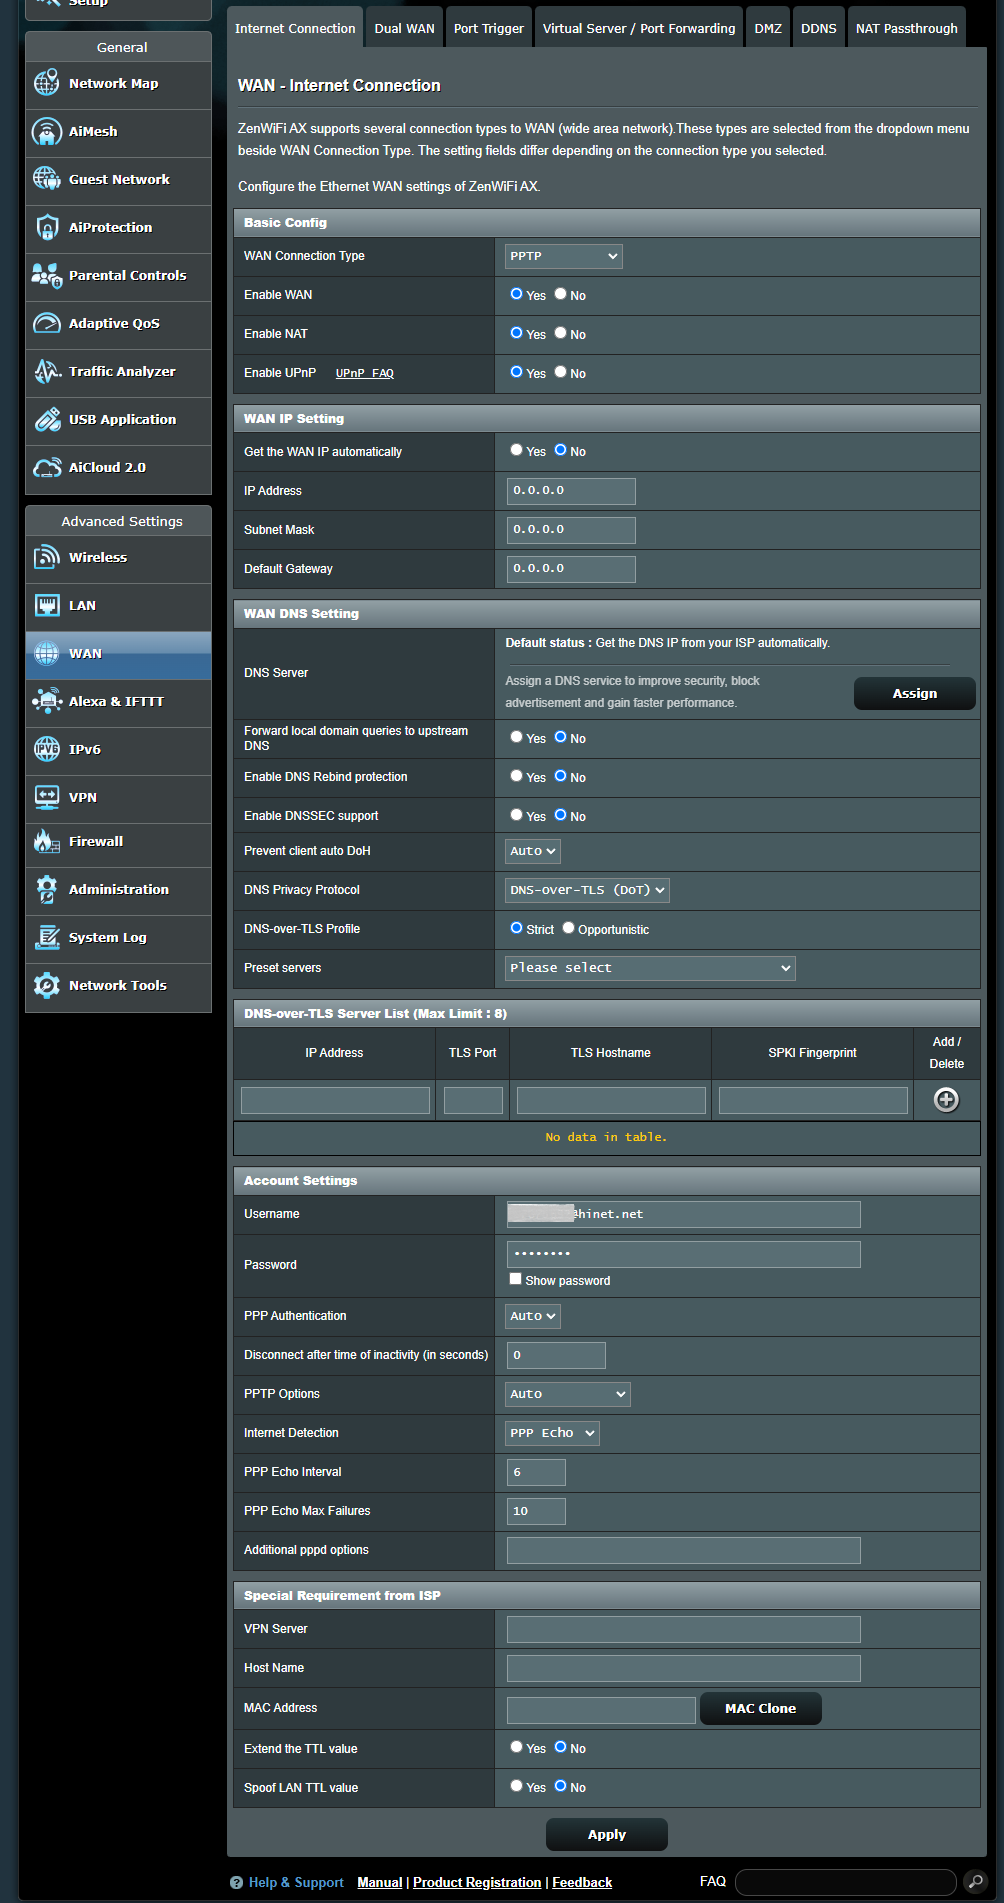
4.Go to [ WAN ] > [ Internet Connection ] > [ WAN Connection Type ]
Note: The related information needs to be confirmed with your Internet Service Provider (ISP)
List of WAN connection Types:

a. Basic Config
(a1) Enable WAN: Enable and disable WAN. Under some connection types, you can get a new IP address by using Enable and Disable WAN.
(a2) Enable NAT: NAT(Network Address Translation) is a process used in routers to replace the address information of network packets with new address information. Typical applications for NAT is for routers which connect to LAN with the WAN. In LAN, every network device had a private IP (LAN IP) but there’s only one public IP (WAN IP). To grant internet access to the network devices, the router replaces the private IP address of the sender with its own public IP address in all outgoing data packets. The router saves all necessary information in a table (NAT table) so that incoming data packets can then be assigned to the correct network device.
(a3) Enable UPnP: UPnP(Universal Plug and Play) allows several devices(routers, televisions, stereo systems, game consoles, cellular phone) to be controlled via an IP-based network with or without a central control through a gateway.
b. WAN DNS Setting
(b1) DNS Server : Allows this router to get the DNS IP address from the Internet Service Provider (ISP) automatically. Please refer to FAQ How to manually assign WAN DNS server to ASUS Router
(b2) Forward local domain queries to upstream DNS: Tell dnsmasq that hostname lookups within the router’s local domain should be forwarded to the upstream DNS configured on your WAN interface. Useful if your upstream DNS is, for example, a Windows server.
(b3) Enable DNS Rebind protection: Enabling this will protect your LAN against DNS rebind attacks, however it will prevent upstream DNS servers from resolving queries to any non-routable IP (for example, 192.168.1.1)
(b4) Enable DNSSEC support: Ensures that DNS lookups haven’s been hijacked by a malicious third party when querying a DNSSEC-enabled domain. Make sure your WAN/ISP DNS are DNSSEC-compatible, otherwise DNS lookups will always fail.
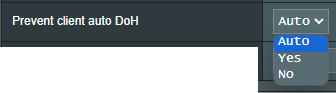
(b5) Prevent client auto DoH: Some clients will automatically switch to DNS over HTTPS, bypassing your preferred DNS servers. This option may prevent that. If set to Auto (the default), it will only prevent it if either DNSPrivacy or DNSFilter in global mode are enabled.
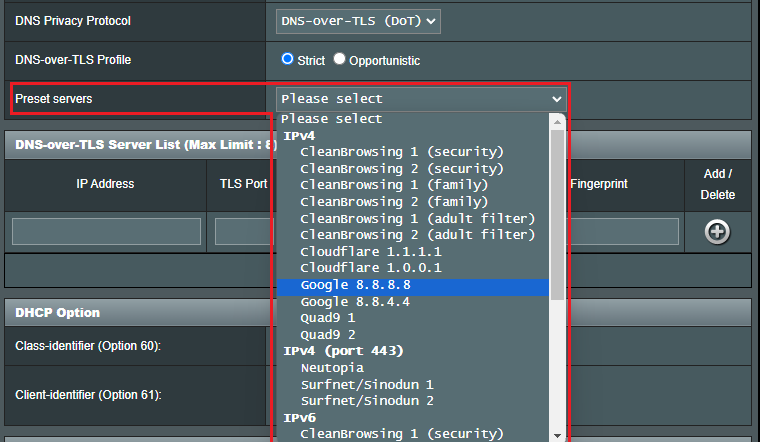
(b6) DNS Privacy Protocol: You can configure your router to use a third party DNS server that supports encryption to prevent snooping on your DNS queries. While this increases privacy, note that it might decrease general DNS performance.

(b6-1) DNS-over-TLS Profile: The default is [ Strict ] mode. In Strict Mode, only allow the use of a DNS server if the identity of the remote server can be authenticated. In Opportunistic Mode it will attempt to authenticate, but will still use that server if it fails to authenticate its identity , allowing name resolution to still work properly.
(b6-2) Preset servers: Pre-configured servers, select one to pre-fill the fields below for you, then click on the Add button to add it to the list.
c. DHCP Option: The length of content that can be filled in with Class-identifier (Option 60) and Client-identifier (Option 61) options is 126 characters, click the [ AID/DUID ] option to send it with the default value.
d. Account Settings
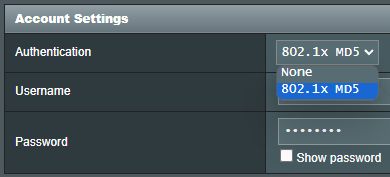
(d1) Authentication: The default is [ None ]. This item may be specified by some ISPs. Check with your Internet Service Provider (ISP) and fill them in if required.
(d2) PPP Echo Interval: Send an LCP Echo-Request frame to the peer every n seconds.
(d3) PPP Echo Max Failures: Presume the peer to be dead if n LCP Echo- Requests are sent without reviving a valid LCP Echo-Reply. Use of this option requires a non-zero value for the Echo Interval parameter.
e. Special Requirement from ISP
(e1) Host Name: You can provide a host name for your router. It’s usually requested by your Internet Service Provider (ISP).
(e2) MAC Address: MAC(Media Access Control) address is a unique identifier that identifies your computer or device in the network. ISPs monitor the MAC addresses of devices that connect to their services, and would disallow Internet Connection for new MAC addresses. To fix this issue, you can do either of the following:
* Contact your Internet Service Provider (ISP) and request to update the MAC address associated with your ISP subscription.
* Clone or change the MAC address of the new device to match the MAC address of the original device.
(e3) DHCP query frequency: Some Internet Service Providers block MAC addresses if the device makes DHCP queries too often. To prevent this, change the DHCP query frequency.
In the default Aggressive mode, if the router does not get a response from the Internet Service Provider (ISP), it sends another query after 20 seconds and then makes three more attempts.
In Normal mode, if the router doesn’t get a response from the Internet Service Provider (ISP), it makes a second query after 120 seconds and then makes two more attempts.
(e4) Extend the TTL value: The default is [ No ].
(e5) Spoof LAN TTL value: The default is [ No ].
a. Basic Config
(a1) Enable WAN: Enable and disable WAN. Under some connection types, you can get a new IP address by using Enable and Disable WAN.
(a2) Enable NAT: NAT(Network Address Translation) is a process used in routers to replace the address information of network packets with new address information. Typical applications for NAT is for routers which connect to LAN with the WAN. In LAN, every network device had a private IP (LAN IP) but there’s only one public IP (WAN IP). To grant internet access to the network devices, the router replaces the private IP address of the sender with its own public IP address in all outgoing data packets. The router saves all necessary information in a table (NAT table) so that incoming data packets can then be assigned to the correct network device.
(a3) Enable UPnP: UPnP(Universal Plug and Play) allows several devices(routers, televisions, stereo systems, game consoles, cellular phone) to be controlled via an IP-based network with or without a central control through a gateway.
b. WAN IP Setting
(b1) IP Address: If your WAN connection requires a static IP address, key in the IP address in this field.
(b2) Subnet Mask: If your WAN connection requires a static IP address, key in the subnet mask in this field.
(b3) Default Gateway: If your WAN connection requires a static IP address, key in the gateway IP address in this field.
c. WAN DNS Setting
(c1) DNS Server : Allows this router to get the DNS IP address from the Internet Service Provider (ISP) automatically. Please refer to FAQ How to manually assign WAN DNS server to ASUS Router
(c2) Forward local domain queries to upstream DNS: Tell dnsmasq that hostname lookups within the router’s local domain should be forwarded to the upstream DNS configured on your WAN interface. Useful if your upstream DNS is, for example, a Windows server.
(c3) Enable DNS Rebind protection: Enabling this will protect your LAN against DNS rebind attacks, however it will prevent upstream DNS servers from resolving queries to any non-routable IP (for example, 192.168.1.1)
(c4) Enable DNSSEC support: Ensures that DNS lookups haven’s been hijacked by a malicious third party when querying a DNSSEC-enabled domain. Make sure your WAN/ISP DNS are DNSSEC-compatible, otherwise DNS lookups will always fail.
(c5) Prevent client auto DoH: Some clients will automatically switch to DNS over HTTPS, bypassing your preferred DNS servers. This option may prevent that. If set to Auto (the default), it will only prevent it if either DNSPrivacy or DNSFilter in global mode are enabled.
(c6) DNS Privacy Protocol: You can configure your router to use a third party DNS server that supports encryption to prevent snooping on your DNS queries. While this increases privacy, note that it might decrease general DNS performance.
(c6-1) DNS-over-TLS Profile: The default is [ Strict ] mode. In Strict Mode, only allow the use of a DNS server if the identity of the remote server can be authenticated. In Opportunistic Mode it will attempt to authenticate, but will still use that server if it fails to authenticate its identity , allowing name resolution to still work properly.
(c6-2) Preset servers: Pre-configured servers, select one to pre-fill the fields below for you, then click on the Add button to add it to the list.
d. Account Settings
(d1) Authentication: The default is [ None ]. This item may be specified by some ISPs. Check with your Internet Service Provider (ISP) and fill them in if required.
(d2) PPP Echo Interval: Send an LCP Echo-Request frame to the peer every n seconds.
(d3) PPP Echo Max Failures: Presume the peer to be dead if n LCP Echo- Requests are sent without reviving a valid LCP Echo-Reply. Use of this option requires a non-zero value for the Echo Interval parameter.
e. Special Requirement from ISP
(e1) Host Name: You can provide a host name for your router. It’s usually requested by your Internet Service Provider (ISP).
(e2) MAC Address: MAC(Media Access Control) address is a unique identifier that identifies your computer or device in the network. ISPs monitor the MAC addresses of devices that connect to their services, and would disallow Internet Connection for new MAC addresses. To fix this issue, you can do either of the following:
* Contact your Internet Service Provider (ISP) and request to update the MAC address associated with your ISP subscription.
* Clone or change the MAC address of the new device to match the MAC address of the original device.
(e3) DHCP query frequency: Some Internet Service Providers block MAC addresses if the device makes DHCP queries too often. To prevent this, change the DHCP query frequency.
In the default Aggressive mode, if the router does not get a response from the Internet Service Provider (ISP), it sends another query after 20 seconds and then makes three more attempts.
In Normal mode, if the router doesn’t get a response from the Internet Service Provider (ISP), it makes a second query after 120 seconds and then makes two more attempts.
(e4) Extend the TTL value: The default is [ No ].
(e5) Spoof LAN TTL value: The default is [ No ].
a. Basic Config
(a1) Enable WAN: Enable and disable WAN. Under some connection types, you can get a new IP address by using Enable and Disable WAN.
(a2) Enable NAT: NAT(Network Address Translation) is a process used in routers to replace the address information of network packets with new address information. Typical applications for NAT is for routers which connect to LAN with the WAN. In LAN, every network device had a private IP (LAN IP) but there’s only one public IP (WAN IP). To grant internet access to the network devices, the router replaces the private IP address of the sender with its own public IP address in all outgoing data packets. The router saves all necessary information in a table (NAT table) so that incoming data packets can then be assigned to the correct network device.
(a3) Enable UPnP: UPnP(Universal Plug and Play) allows several devices(routers, televisions, stereo systems, game consoles, cellular phone) to be controlled via an IP-based network with or without a central control through a gateway.
b. WAN IP Setting
(b1) Get the WAN IP automatically: The default is [ Yes ]. Allows the router to get the WAN IP address from the ISP automatically. Set to [ No ], please contact your Internet Service Provider (ISP) for the following information.
(b1-1) IP Address: If your WAN connection requires a static IP address, key in the IP address in this field.
(b1-2) Subnet Mask: If your WAN connection requires a static IP address, key in the subnet mask in this field.
(b1-3) Default Gateway: If your WAN connection requires a static IP address, key in the gateway IP address in this field.
c. WAN DNS Setting
(c1) DNS Server : Allows this router to get the DNS IP address from the Internet Service Provider (ISP) automatically. Please refer to FAQ How to manually assign WAN DNS server to ASUS Router
(c2) Forward local domain queries to upstream DNS: Tell dnsmasq that hostname lookups within the router’s local domain should be forwarded to the upstream DNS configured on your WAN interface. Useful if your upstream DNS is, for example, a Windows server.
(c3) Enable DNS Rebind protection: Enabling this will protect your LAN against DNS rebind attacks, however it will prevent upstream DNS servers from resolving queries to any non-routable IP (for example, 192.168.1.1)
(c4) Enable DNSSEC support: Ensures that DNS lookups haven’s been hijacked by a malicious third party when querying a DNSSEC-enabled domain. Make sure your WAN/ISP DNS are DNSSEC-compatible, otherwise DNS lookups will always fail.
(c5) Prevent client auto DoH: Some clients will automatically switch to DNS over HTTPS, bypassing your preferred DNS servers. This option may prevent that. If set to Auto (the default), it will only prevent it if either DNSPrivacy or DNSFilter in global mode are enabled.
(c6) DNS Privacy Protocol: You can configure your router to use a third party DNS server that supports encryption to prevent snooping on your DNS queries. While this increases privacy, note that it might decrease general DNS performance.
(c6-1) DNS-over-TLS Profile: The default is [ Strict ] mode. In Strict Mode, only allow the use of a DNS server if the identity of the remote server can be authenticated. In Opportunistic Mode it will attempt to authenticate, but will still use that server if it fails to authenticate its identity , allowing name resolution to still work properly.
(c6-2) Preset servers: Pre-configured servers, select one to pre-fill the fields below for you, then click on the Add button to add it to the list.
d. Account Settings
(d1) User Name: Fill-in the information which Internet Service Provider (ISP)provided.
(d2) Password: Fill-in the information which Internet Service Provider (ISP)provided.
(d3) PPP Authentication: The default is [ Auto ]. Other options are [PAP] and [CHAP], which are used to verify the identity of the PPP device.
(d4) Disconnect after time of inactivity (in seconds): This field is optional and allows you to configure to terminate your Internet Service Provider (ISP) connection after a specified period of time. A value of zero allows infinite idle time.
(d5) MTU: The Maximum Transmission Unit(MTU) of PPPoE packet. The default value is 1492. Change this value only if your Internet Service Provider (ISP) requires it.
(d6) MRU: The Maximum Receive Unit(MRU) of PPPoE packet. The default value is 1492. Change this value only if your Internet Service Provider (ISP) requires it.
(d7) Service Name: This field is optional and may be specified by some ISPs. Check with your ISP and fill them in if required.
(d8) Access Concentrator Name: This field is optional and may be specified by some ISPs. Check with your Internet Service Provider (ISP) and fill them in if required.
(d9) Host-Uniq (Hexadecimal): This item may be specified by some ISPs. Check with your Internet Service Provider (ISP) and fill them in if required.
(d10) Internet Detection: Options are [ Disable ], [ PPP Echo ], [ DNS Probe ]
[ Disable ]: Disable it to turn of Internet Detection.
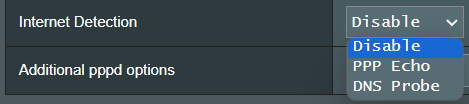
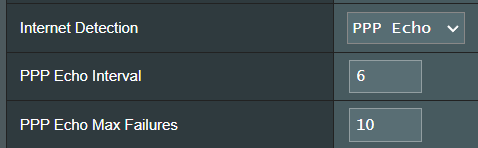
[ PPP Echo ]: Use Echo-Request and Echo-Reply message defined in PPP Link Control Protocol(LCP) to test the PPP connection.
PPP Echo Interval: Send an LCP Echo-Request frame to the peer every n seconds.
PPP Echo Max Failures: Presume the peer to be dead if n LCP Echo- Requests are sent without reviving a valid LCP Echo-Reply. Use of this option requires a non-zero value for the Echo Interval parameter.
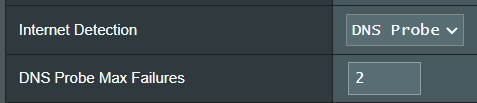
[ DNS Probe ]: Performs a DNS lookup request and resolved IP address to test DNS connection.
DNS Probe Max Failures: If DNS resolution fails or returns the wrong address to n times, then it is assumed that the internet connection is completely unsuccessful.
(d11) Additional pppd options: This item may be specified by some ISPs. Check with your ISP and fill them in if required.
e. Special Requirement from ISP
(e1) Enable VPN + DHCP Connection: Decied you want to enable VPN and DHCP connection or not.
(e2) Host Name: You can provide a host name for your router. It’s usually requested by your Internet Service Provider (ISP).
(e3) MAC Address: MAC(Media Access Control) address is a unique identifier that identifies your computer or device in the network. ISPs monitor the MAC addresses of devices that connect to their services, and would disallow Internet Connection for new MAC addresses. To fix this issue, you can do either of the following:
* Contact your Internet Service Provider (ISP) and request to update the MAC address associated with your ISP subscription.
* Clone or change the MAC address of the new device to match the MAC address of the original device.
(e4) Extend the TTL value: The default is [ No ].
(e5) Spoof LAN TTL value: The default is [ No ].
a. Basic Config
(a1) Enable WAN: Enable and disable WAN. Under some connection types, you can get a new IP address by using Enable and Disable WAN.
(a2) Enable NAT: NAT(Network Address Translation) is a process used in routers to replace the address information of network packets with new address information. Typical applications for NAT is for routers which connect to LAN with the WAN. In LAN, every network device had a private IP (LAN IP) but there’s only one public IP (WAN IP). To grant internet access to the network devices, the router replaces the private IP address of the sender with its own public IP address in all outgoing data packets. The router saves all necessary information in a table (NAT table) so that incoming data packets can then be assigned to the correct network device.
(a3) Enable UPnP: UPnP(Universal Plug and Play) allows several devices(routers, televisions, stereo systems, game consoles, cellular phone) to be controlled via an IP-based network with or without a central control through a gateway.
b. WAN IP Setting
(b1) Get the WAN IP automatically: The default is [ No ]. Please contact your Internet Service Provider (ISP) for the following information. Set to [ Yes ], allows the router to get the WAN IP address from the ISP automatically.
(b1-1) IP Address: If your WAN connection requires a static IP address, key in the IP address in this field.
(b1-2) Subnet Mask: If your WAN connection requires a static IP address, key in the subnet mask in this field.
(b1-3) Default Gateway: If your WAN connection requires a static IP address, key in the gateway IP address in this field.
c. WAN DNS Setting
(c1) DNS Server : Allows this router to get the DNS IP address from the Internet Service Provider (ISP) automatically. Please refer to FAQ How to manually assign WAN DNS server to ASUS Router
(c2) Forward local domain queries to upstream DNS: Tell dnsmasq that hostname lookups within the router’s local domain should be forwarded to the upstream DNS configured on your WAN interface. Useful if your upstream DNS is, for example, a Windows server.
(c3) Enable DNS Rebind protection: Enabling this will protect your LAN against DNS rebind attacks, however it will prevent upstream DNS servers from resolving queries to any non-routable IP (for example, 192.168.1.1)
(c4) Enable DNSSEC support: Ensures that DNS lookups haven’s been hijacked by a malicious third party when querying a DNSSEC-enabled domain. Make sure your WAN/ISP DNS are DNSSEC-compatible, otherwise DNS lookups will always fail.
(c5) Prevent client auto DoH: Some clients will automatically switch to DNS over HTTPS, bypassing your preferred DNS servers. This option may prevent that. If set to Auto (the default), it will only prevent it if either DNSPrivacy or DNSFilter in global mode are enabled.
(c6) DNS Privacy Protocol: You can configure your router to use a third party DNS server that supports encryption to prevent snooping on your DNS queries. While this increases privacy, note that it might decrease general DNS performance.
(c6-1) DNS-over-TLS Profile: The default is [ Strict ] mode. In Strict Mode, only allow the use of a DNS server if the identity of the remote server can be authenticated. In Opportunistic Mode it will attempt to authenticate, but will still use that server if it fails to authenticate its identity , allowing name resolution to still work properly.
(c6-2) Preset servers: Pre-configured servers, select one to pre-fill the fields below for you, then click on the Add button to add it to the list.
d. Account Settings
(d1) User Name: Fill-in the information which Internet Service Provider (ISP)provided.
(d2) Password: Fill-in the information which Internet Service Provider (ISP)provided.
(d3) PPP Authentication: The default is [ Auto ]. Other options are [PAP] and [CHAP], which are used to verify the identity of the PPP device.
(d4) Disconnect after time of inactivity (in seconds): This field is optional and allows you to configure to terminate your Internet Service Provider (ISP) connection after a specified period of time. A value of zero allows infinite idle time.
(d5) PPTP Options: This item may be specified by some ISPs. The default is [ Auto ], other options are [ No Encryption ],[ MPPE 40 ] and [ MPPE 128 ]. Check with your Internet Service Provider (ISP) and fill them in if required.
(d10) Internet Detection: Options are [ Disable ], [ PPP Echo ], [ DNS Probe ]
[ Disable ]: Disable it to turn of Internet Detection.
[ PPP Echo ]: Use Echo-Request and Echo-Reply message defined in PPP Link Control Protocol(LCP) to test the PPP connection.
PPP Echo Interval: Send an LCP Echo-Request frame to the peer every n seconds.
PPP Echo Max Failures: Presume the peer to be dead if n LCP Echo- Requests are sent without reviving a valid LCP Echo-Reply. Use of this option requires a non-zero value for the Echo Interval parameter.
[ DNS Probe ]: Performs a DNS lookup request and resolved IP address to test DNS connection.
DNS Probe Max Failures: If DNS resolution fails or returns the wrong address to n times, then it is assumed that the internet connection is completely unsuccessful.
(d11) Additional pppd options: This item may be specified by some ISPs. Check with your ISP and fill them in if required.
e. Special Requirement from ISP
(e1) VPN Server: If your WAN connection type is PPTP or L2TP, please enter the server name or server IP of the VPN Server.
(e2) Host Name: You can provide a host name for your router. It’s usually requested by your Internet Service Provider (ISP).
(e3) MAC Address: MAC(Media Access Control) address is a unique identifier that identifies your computer or device in the network. ISPs monitor the MAC addresses of devices that connect to their services, and would disallow Internet Connection for new MAC addresses. To fix this issue, you can do either of the following:
* Contact your Internet Service Provider (ISP) and request to update the MAC address associated with your ISP subscription.
* Clone or change the MAC address of the new device to match the MAC address of the original device.
(e4) Extend the TTL value: The default is [ No ].
(e5) Spoof LAN TTL value: The default is [ No ].
1. Port Forwarding only works within the internal network/intranet(LAN) but cannot be accessed from Internet(WAN).
- First, make sure that Port Forwarding function is set up properly. Please refer to related FAQ: How to set up Virtual Server/Port Forwarding Rules?
- Please note that if the router is using a private WAN IP address (such as connected behind another router/switch/modem with built-in router/Wi-Fi feature), could potentially place the router under a multi-layer NAT network. DDNS service and Port Forwarding will not function properly under such environment. Related FAQ: [Wireless Router] DDNS introduction and set up
Private IPv4 network ranges:
Class A: 10.0.0.0 – 10.255.255.255
Class B: 172.16.0.0 – 172.31.255.255
Class C: 192.168.0.0 – 192.168.255.255
How to get the (Utility / Firmware)?
You can download the latest drivers, software, firmware and user manuals in the ASUS Download Center.
If you need more information about the ASUS Download Center, please refer this link.