Related Topics
[Windows 11/10] Troubleshooting - Solid State Drive (SSD) problems
Applicable Products: Notebook, Desktop, All-in-One PC, Gaming Handheld, MiniPC, ASUS NUC
If you encounter issues with the solid-state drive (SSD) of your device, please follow the symptoms and troubleshooting methods outlined below.
To provide you more detailed instruction, you can also click ASUS YouTube video link below to know more about How to Fix Drives Not Detected or Running Slow on Windows 11.
https://www.youtube.com/watch?v=03MnqnAXq84
Please go to the corresponding instruction based on the current Windows operating system on your device:
Windows 11 operating system
SSD is not recognized
Update BIOS, Windows packages, and drivers
Regularly updating BIOS, Windows, and drivers can enhance system stability and performance. Ensure that your device is using the latest versions. Learn more about updating BIOS:
How to update the BIOS version in Windows system
How to update BIOS with ASUS Firmware Update/EZ Flash
(For desktop products, please refer to ASUS Motherboard EZ Flash 3 Introduction.)
Learn more about updating Windows Update and drivers:
How to update drivers via System Update in MyASUS
If you have updated the BIOS, Windows packages, and drivers to the latest version, but the issue persists, please proceed to the next troubleshooting step.
Check SSD in Disk Management
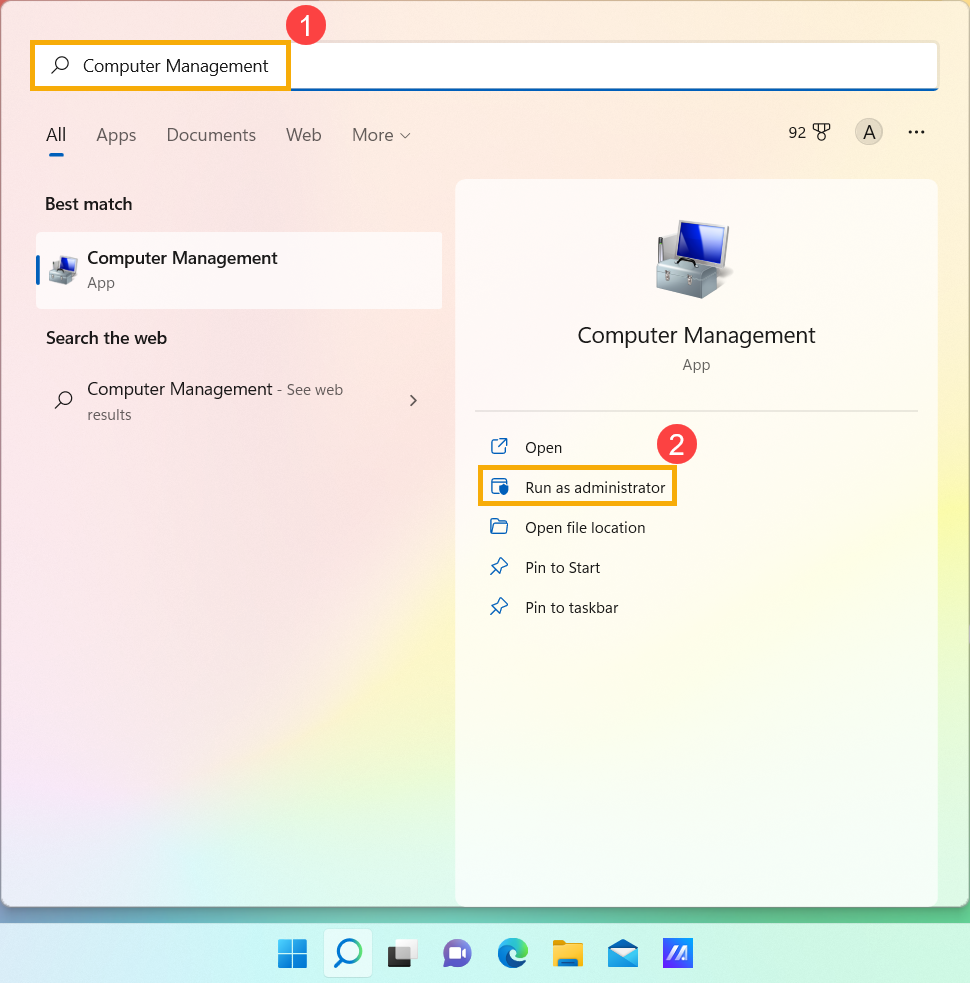
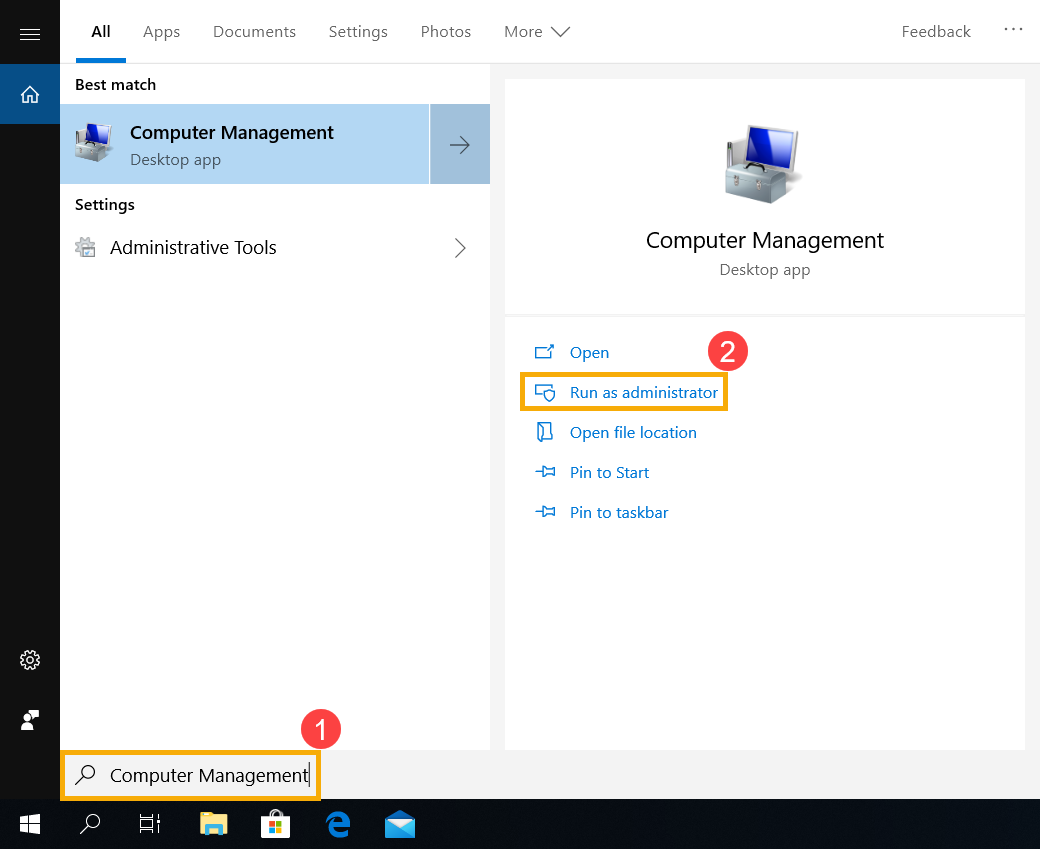
- Type and search [Computer Management]① in the Windows search bar, then click [Run as administrator]②.
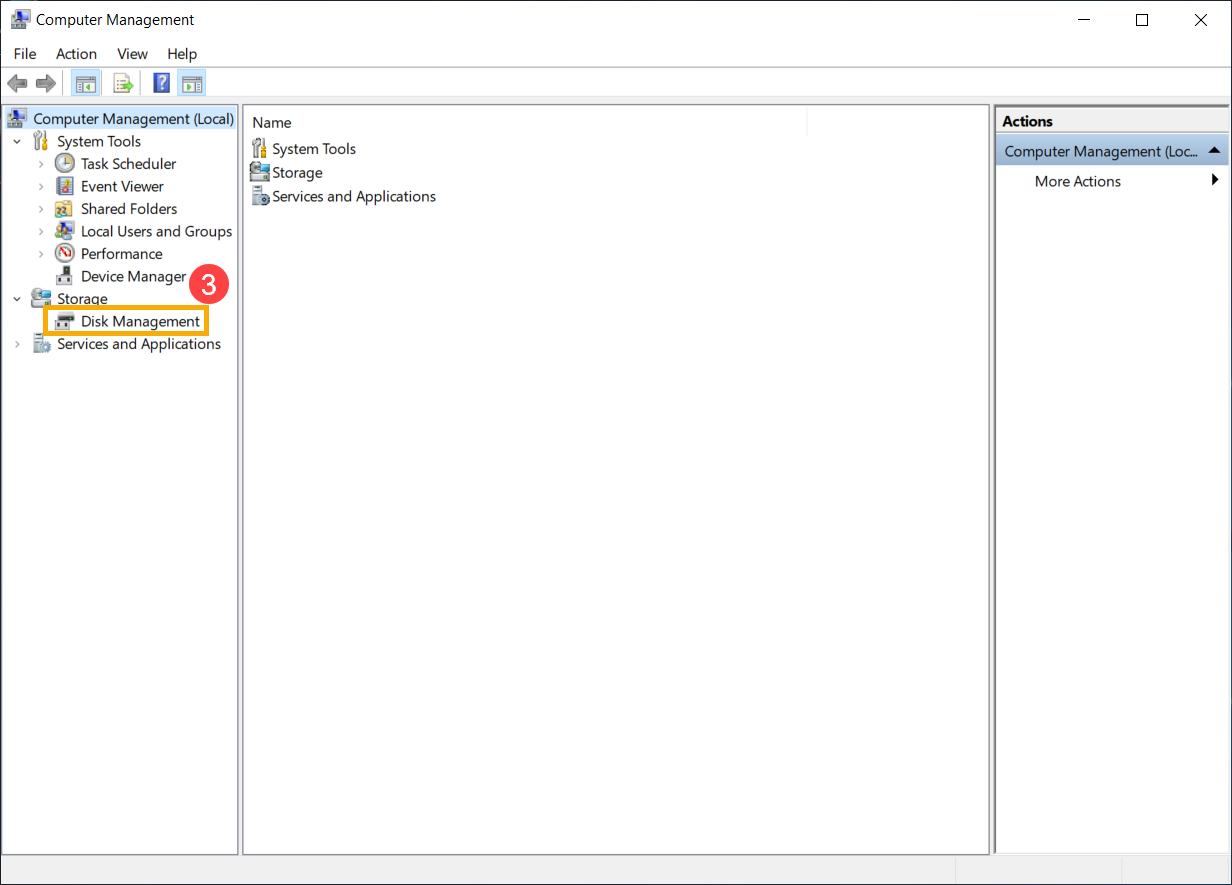
- In the Computer Management window, select [Disk Management]③.
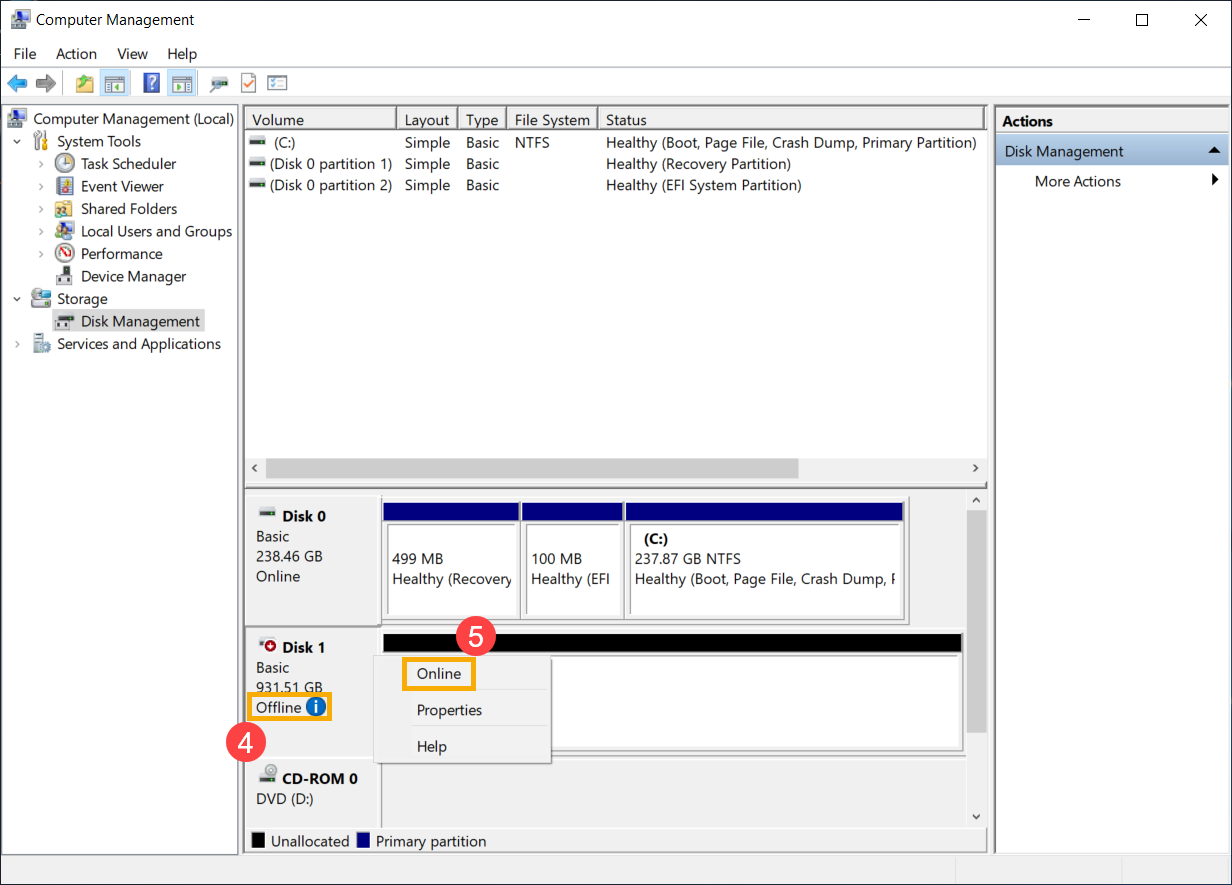
- Check the disk in Disk Management. If it shows [Offline]④, please try to right-click it and select [Online]⑤.
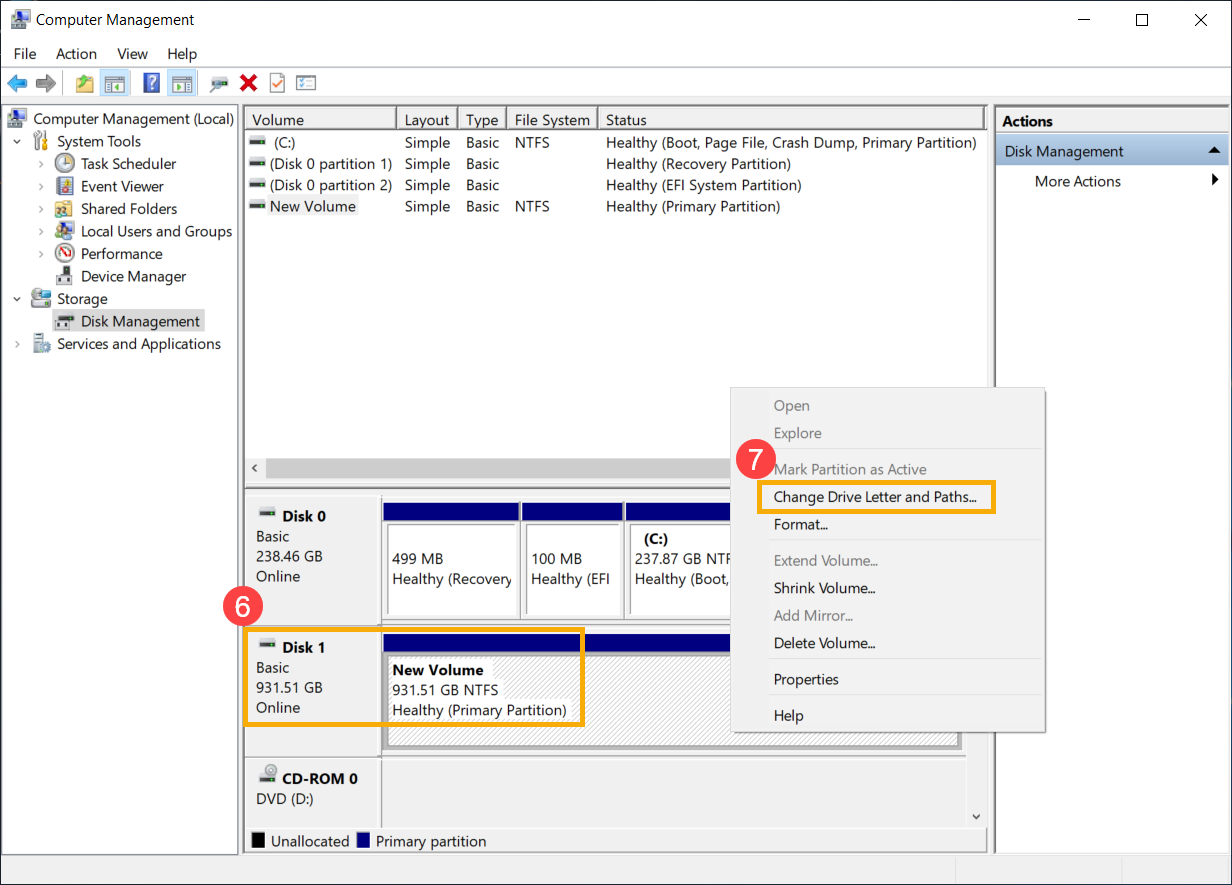
- If it shows online, but no drive letter (such as E:)⑥. Please try to right-click it and select [Change Drive Letter and Paths]⑦.
Click [Add]⑧.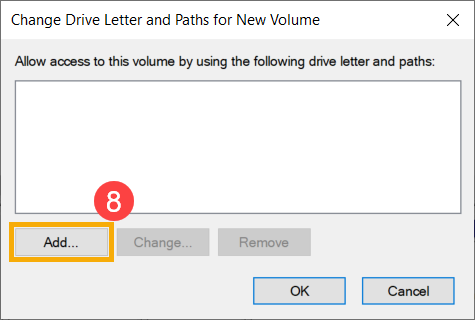
Confirm the drive letter and select [Assign the following drive letter]⑨, then click [OK]⑩.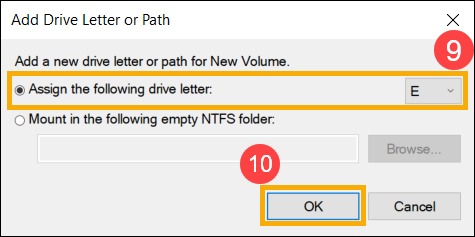
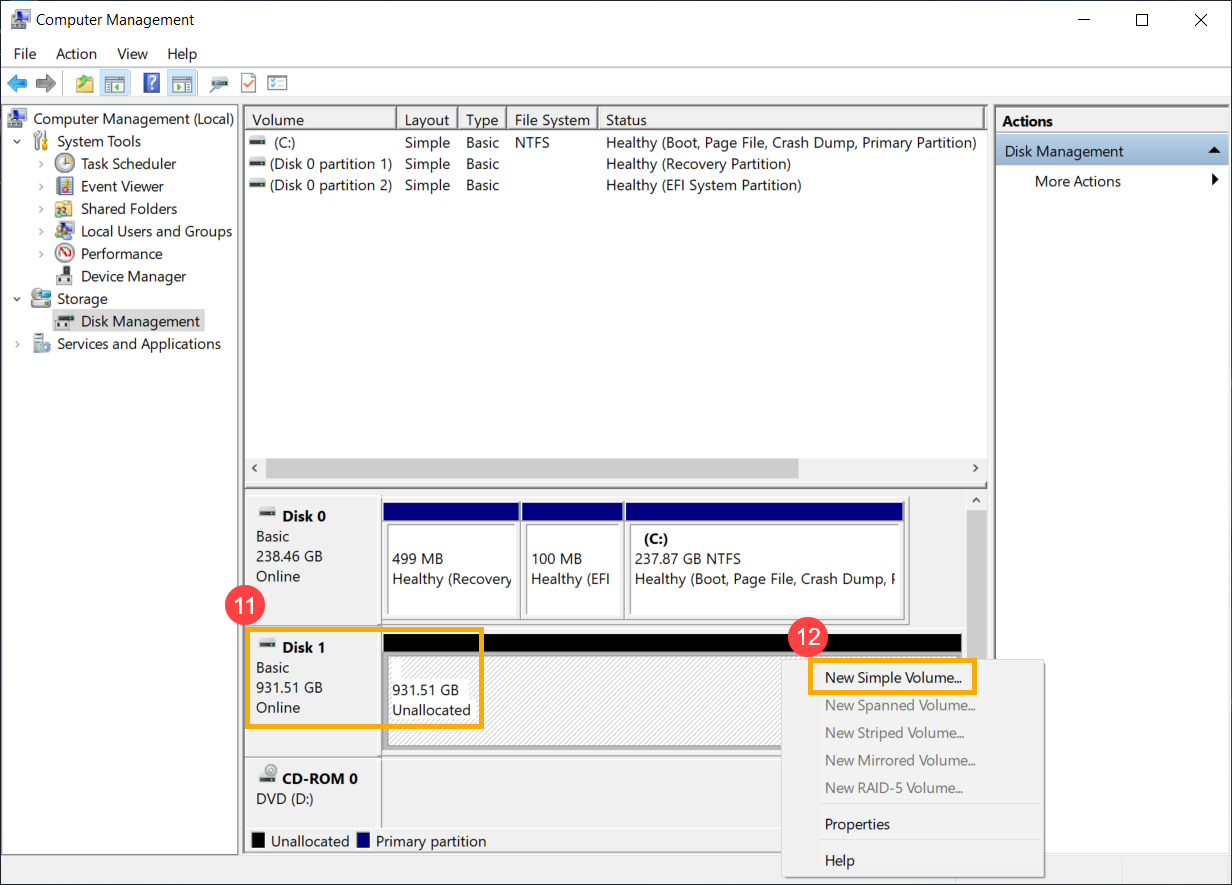
- If the partition is listed as [Unallocated]⑪, and you know that the partition is empty. Please right-click it and select [New Simple Volume]⑫, then follow the instructions to create a volume in the free space.
- Check the disk in Disk Management. If it shows [Offline]④, please try to right-click it and select [Online]⑤.
- If the problem persists, please continue to the next troubleshooting step.
Enable and reinstall driver in Device Manager
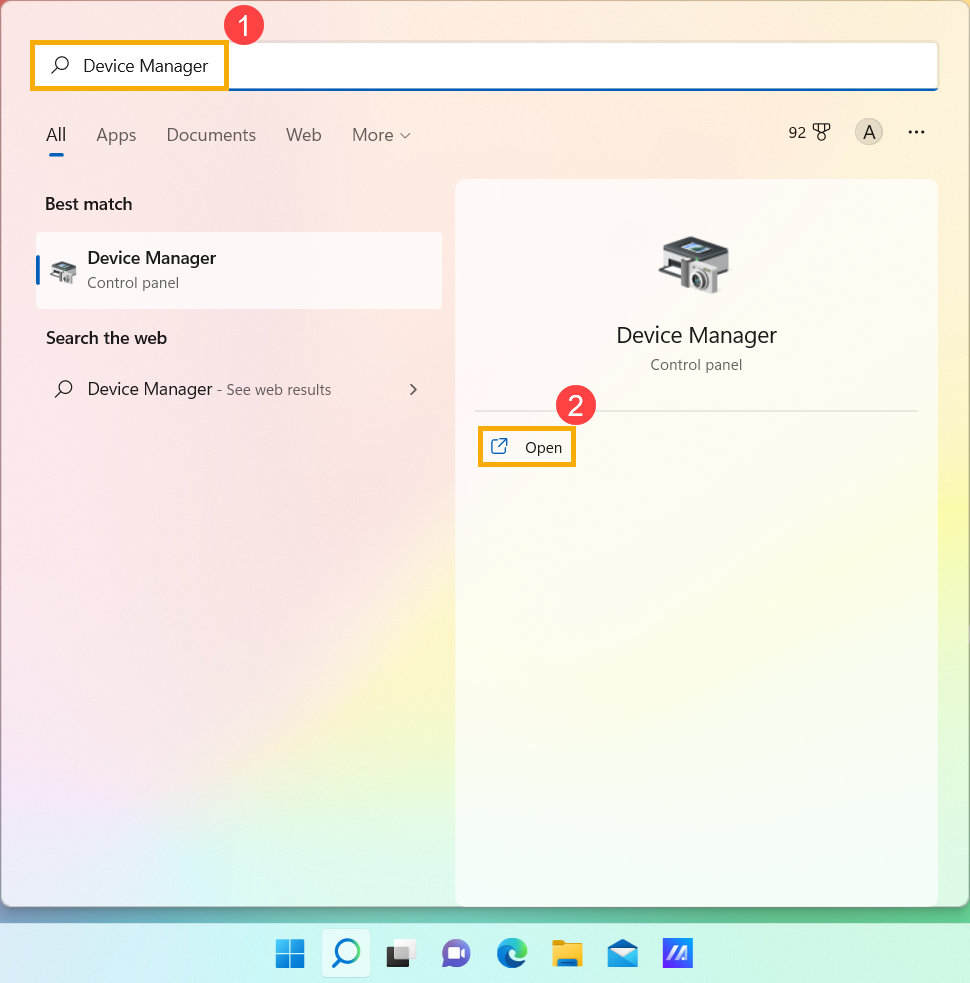
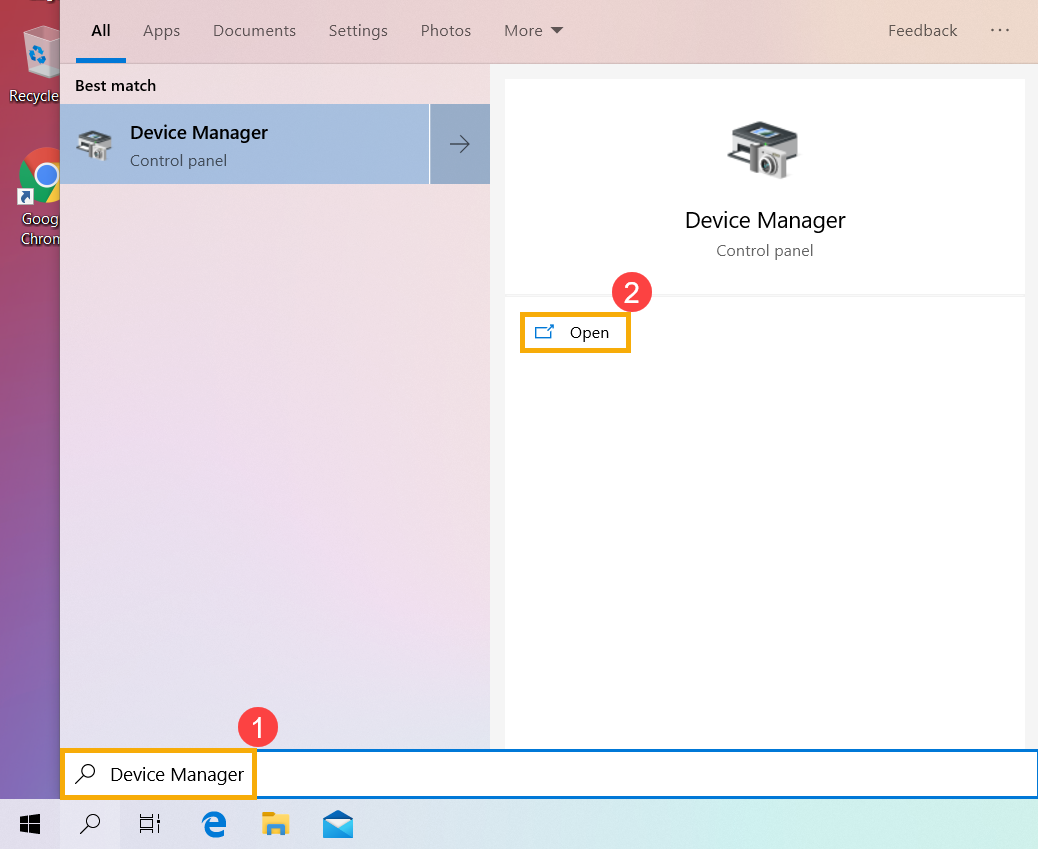
- Type and search [Device Manager] in the Windows search bar①, then click [Open]②.
- Check the arrow next to [Disk drives]③, then right-click the disk drive that is not recognized④ and select [Enable device]⑤. To test if Windows is able to recognize the disk drive.
If the [Enable device] option does not display that means the disk drive is enabled already, please continue to the next troubleshooting step.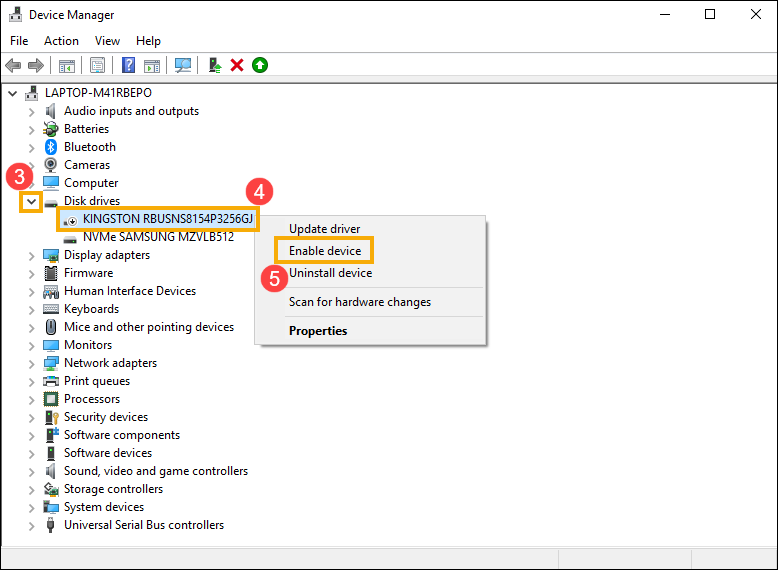
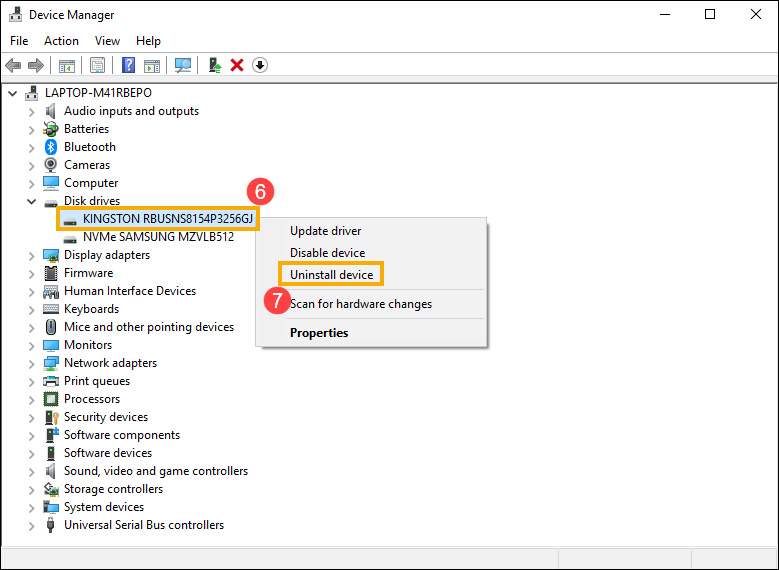
- Uninstall the driver of disk drive. Right-click the disk drive that is not recognized⑥ and select [Uninstall device]⑦.
- Click [Uninstall]⑧.
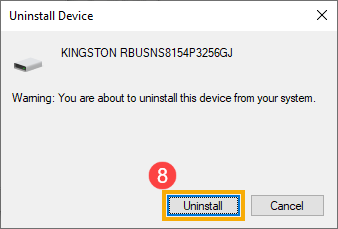
- Restart the device. The driver will be automatically installed after the device restarts. Please confirm if Windows is able to recognize the disk drive. If problems persist, please continue to the next troubleshooting step.
Run Hardware Diagnosis in MyASUS
- Type and search [MyASUS] in the Windows search bar①, then click [Open]②.
Note: If you cannot find MyASUS, it may not be installed on your device. Refer to How to install MyASUS.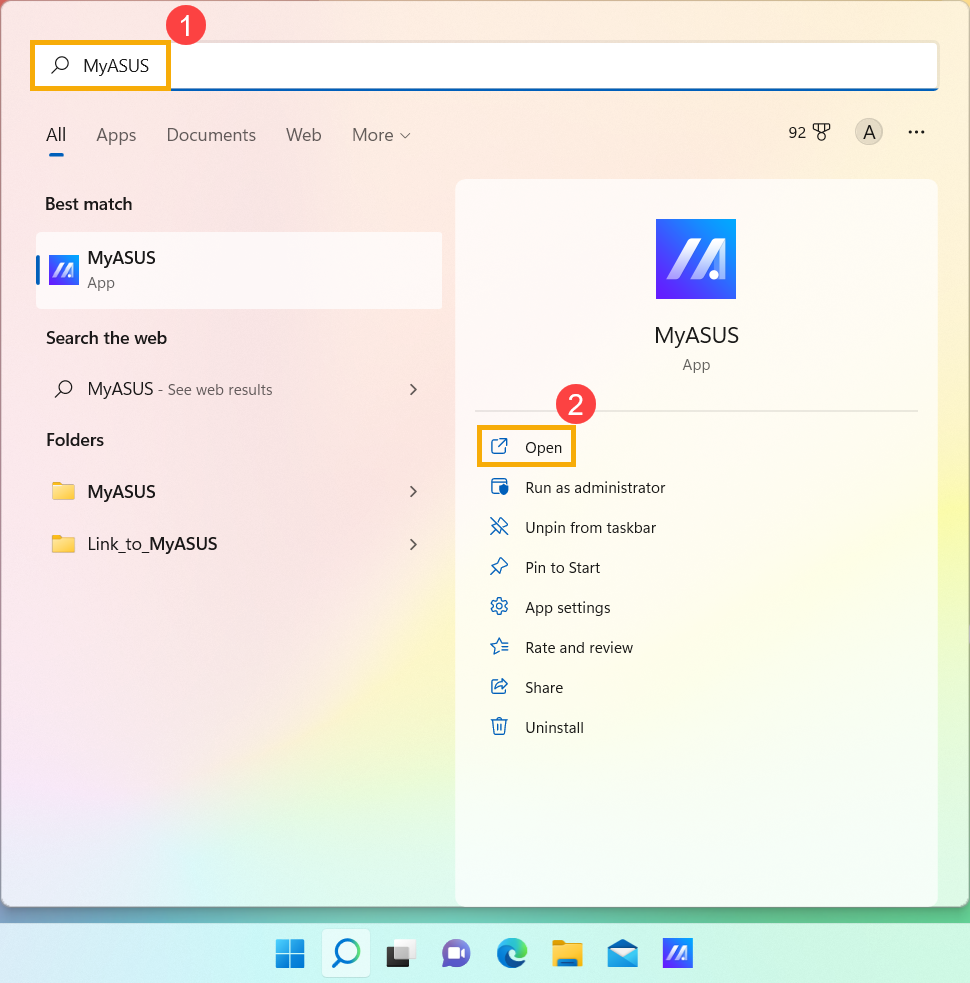
- In the MyASUS app, click [System Diagnosis]③.
Note: The following MyASUS interface may vary slightly depending on the product.
Note: If your device does not display the system diagnosis page in MyASUS software, it means your device does not support this feature. Continue to the next section for further troubleshooting. Here you can learn more about Why can I only see the partial features in the MyASUS app.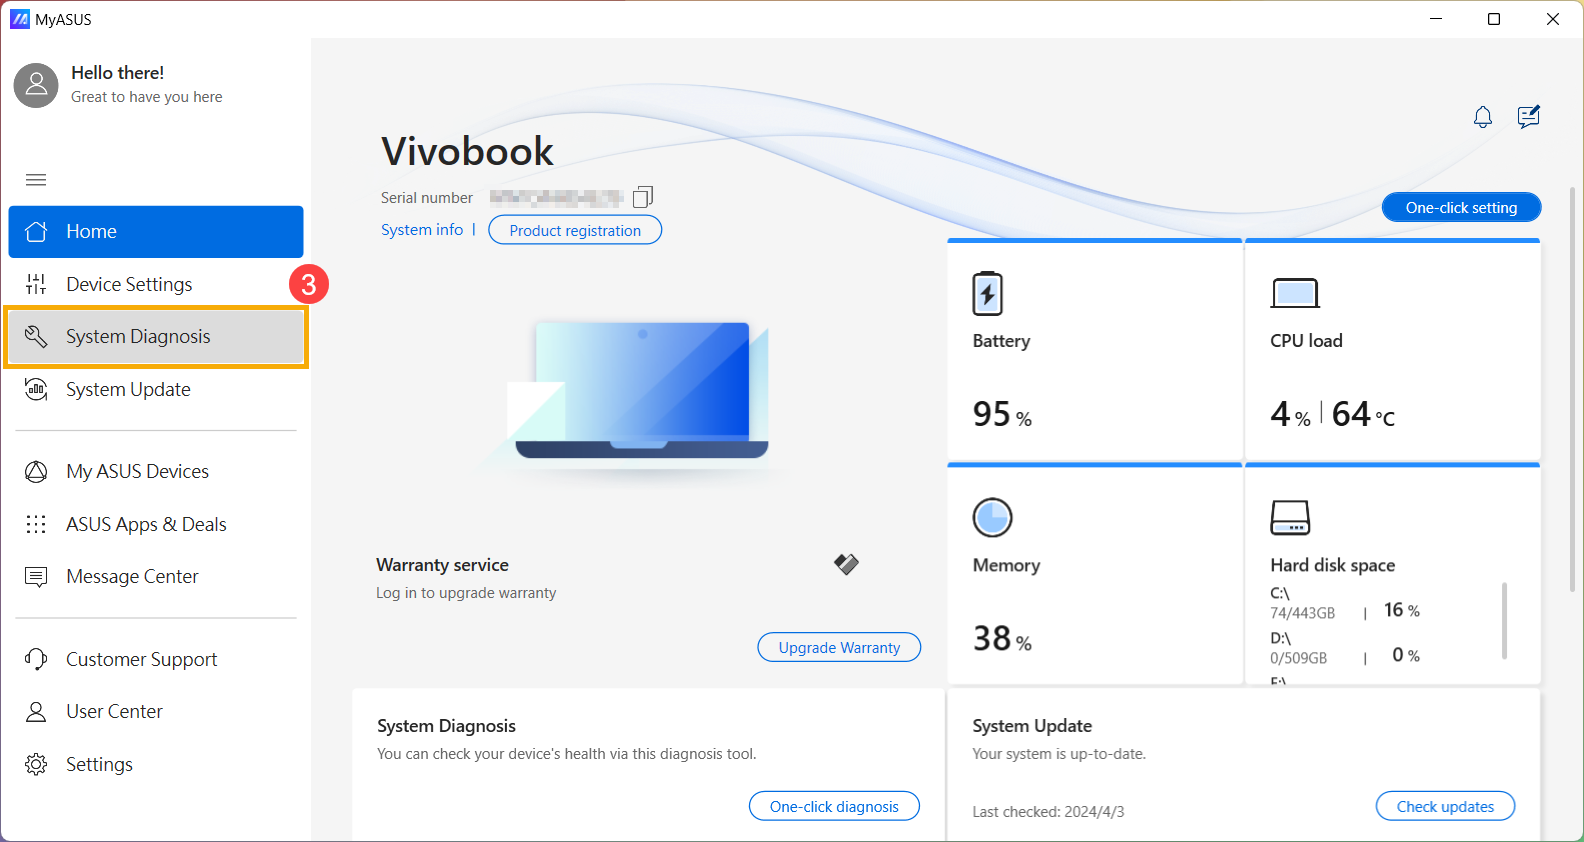
- In [Diagnostic Tool]④, select [Solid state disk] check items of Customized diagnosis⑤, and then click [Checkup]⑥. Here you can learn more about MyASUS System Diagnosis - Introduction.
Note: The following Diagnostic Tool may vary slightly depending on the product.
- If any error occurs, please try the troubleshooting suggestions and possible approaches to resolve the problem in MyASUS. If the problem persists, please continue the next troubleshooting step.
Restore the system from restore point
If the problem happens recently, and if you have ever created a restore point or there is an automatic system restore existed, try to restore the device to a point before the problem began to resolve the problem. Here you can learn more about How to use restore point to restore the system.
If the problem persists, please continue to the next troubleshooting step.
Reset the system
If the problem persists after all troubleshooting steps are completed. Please backup your personal files, then reset the device to back to its original configuration. Here you can learn more about How to reset the system.
SSD is running slowly or an error message appears
Update BIOS, Windows packages, and drivers
Regularly updating BIOS, Windows, and drivers can enhance system stability and performance. Ensure that your device is using the latest versions. Learn more about updating BIOS:
How to update the BIOS version in Windows system
How to update BIOS with ASUS Firmware Update/EZ Flash
(For desktop products, please refer to ASUS Motherboard EZ Flash 3 Introduction.)
Learn more about updating Windows Update and drivers:
How to update drivers via System Update in MyASUS
If you have updated the BIOS, Windows packages, and drivers to the latest version, but the issue persists, please proceed to the next troubleshooting step.
Update driver in Device Manager
- Type and search [Device Manager] in the Windows search bar①, then click [Open]②.
- Check the arrow next to [Disk drives]③, then right-click the disk drive that is with problems④ and select [Update driver]⑤.
Note: Make sure your device is in an available network environment, then connect to internet because it is an online update process.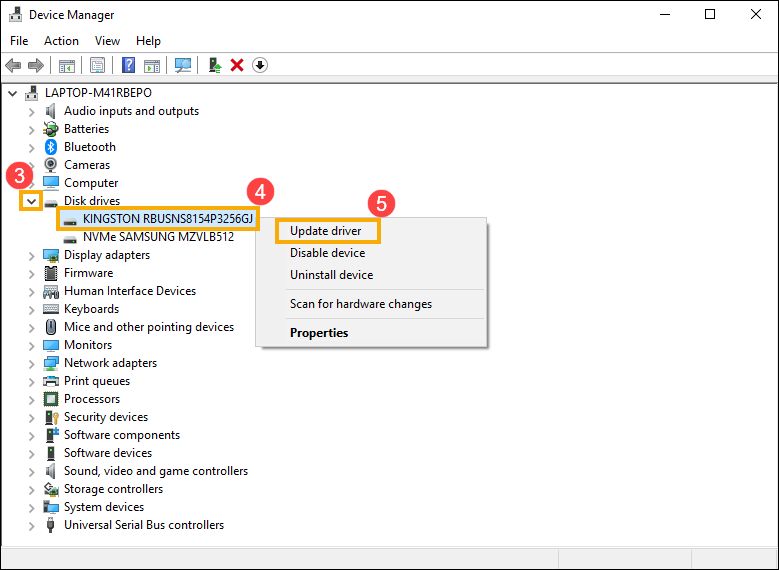
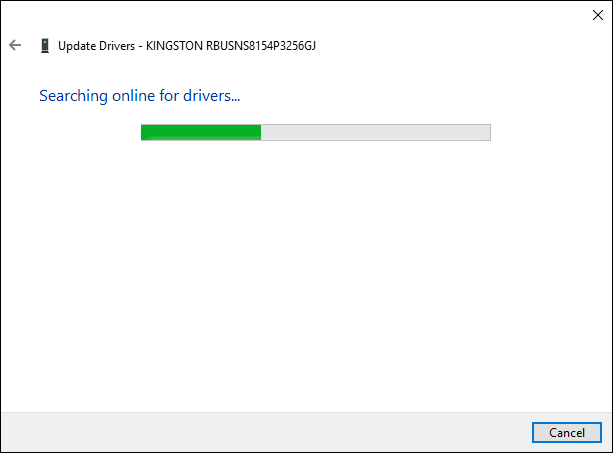
- Click [Search automatically for updated driver software]⑥.

- Windows is searching drivers online and will install the proper driver.
- The automatic update is completed and please click [Close]⑦.
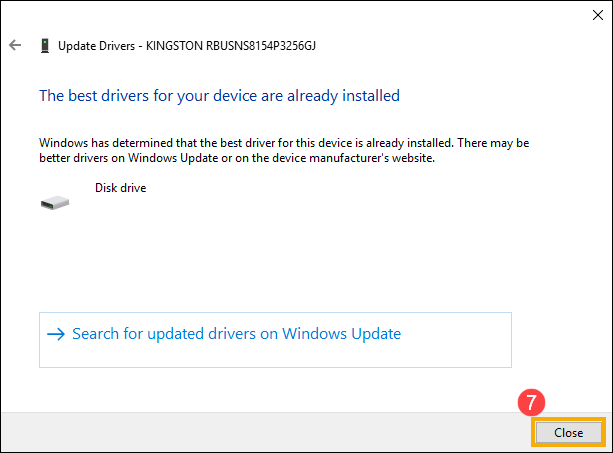
- If problems persist, please continue to the next troubleshooting step.
Run the disk error checking in Windows
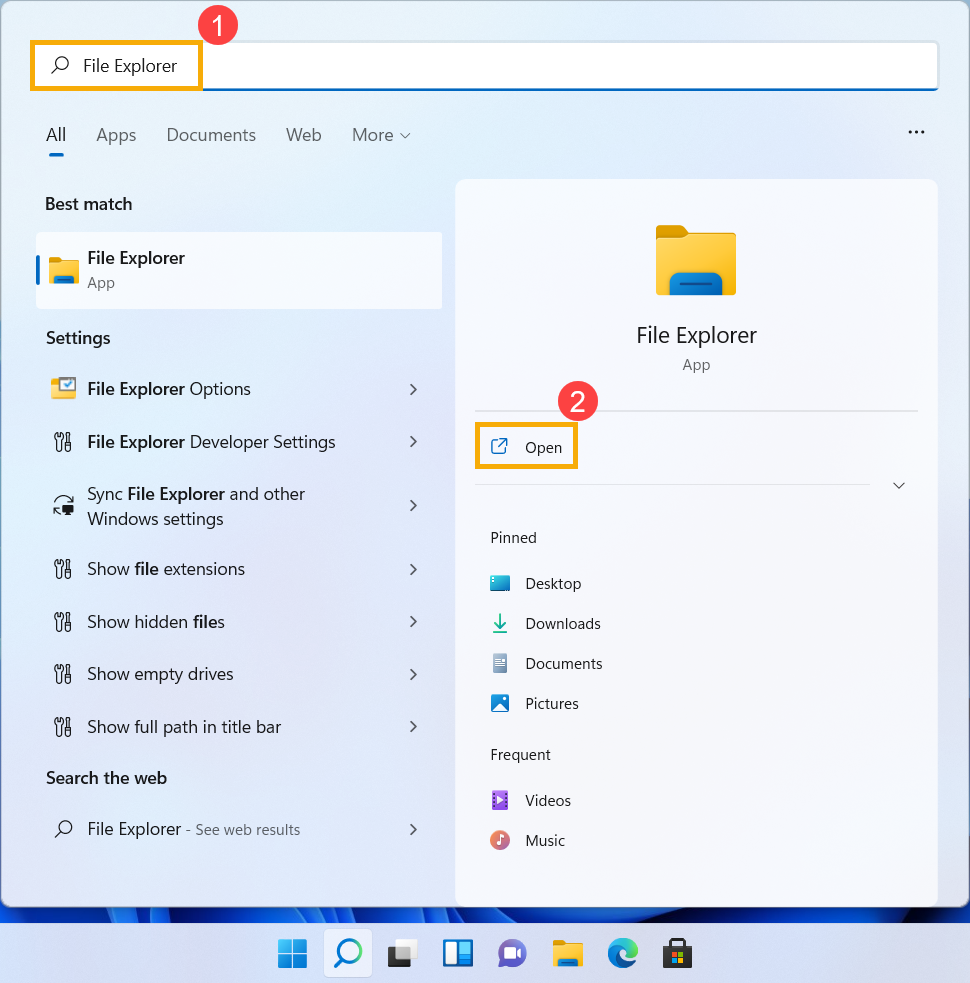
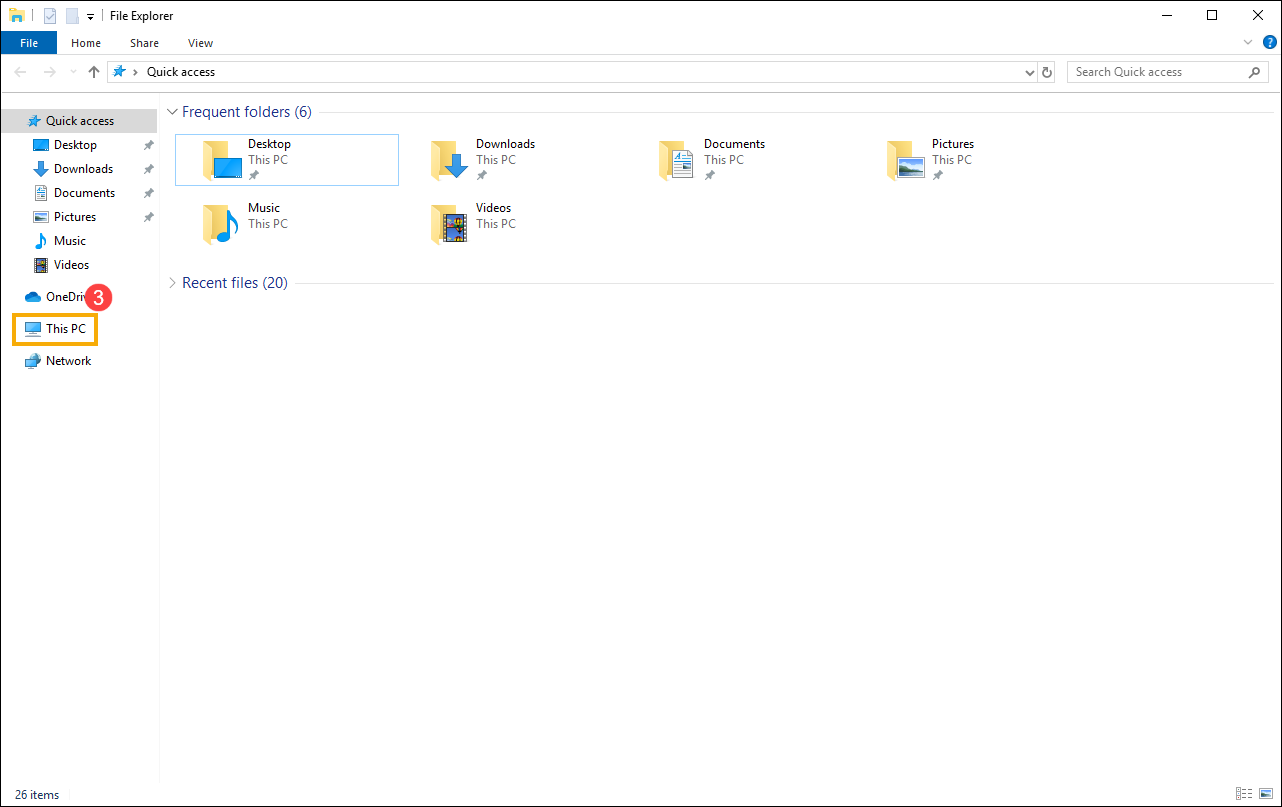
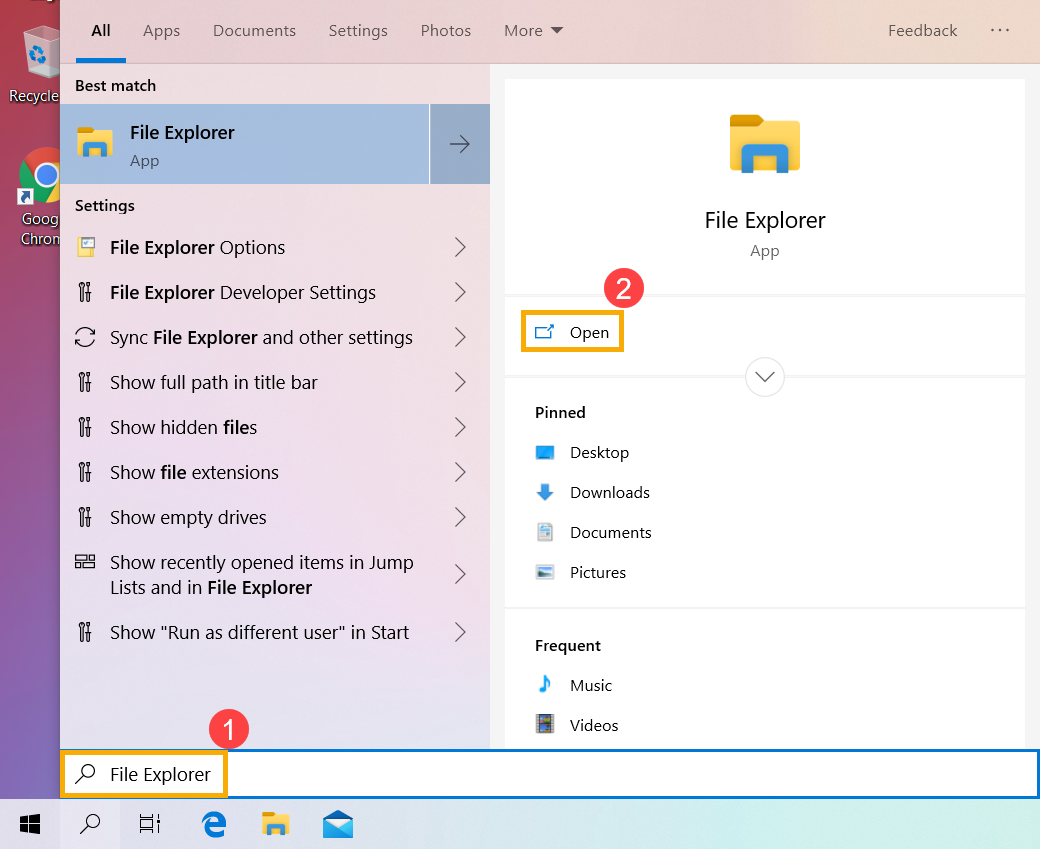
- Type and search [File Explorer]① in the Windows search bar, then click [Open]②.
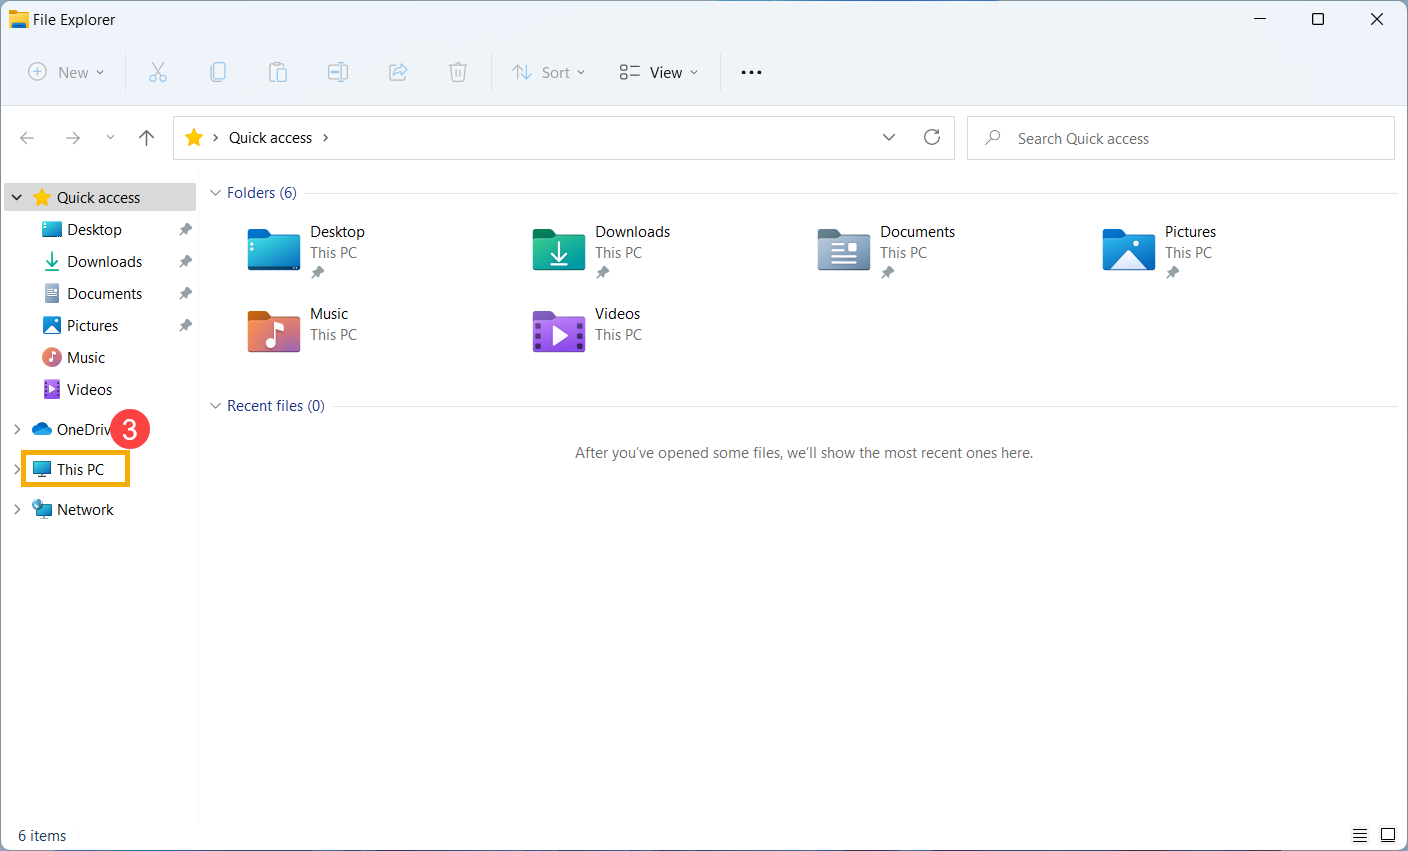
- In the File Explorer window, click [This PC]③.
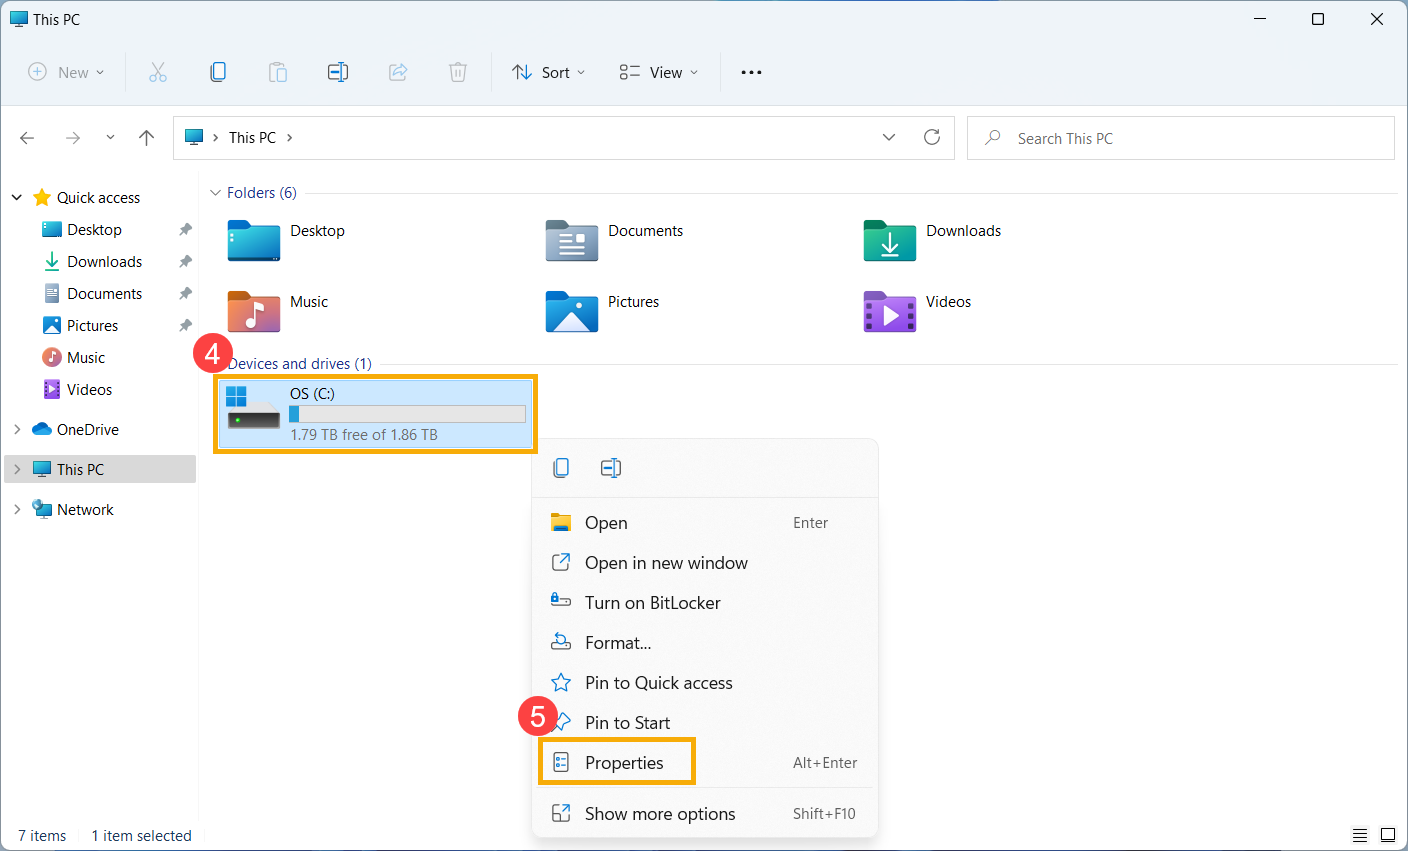
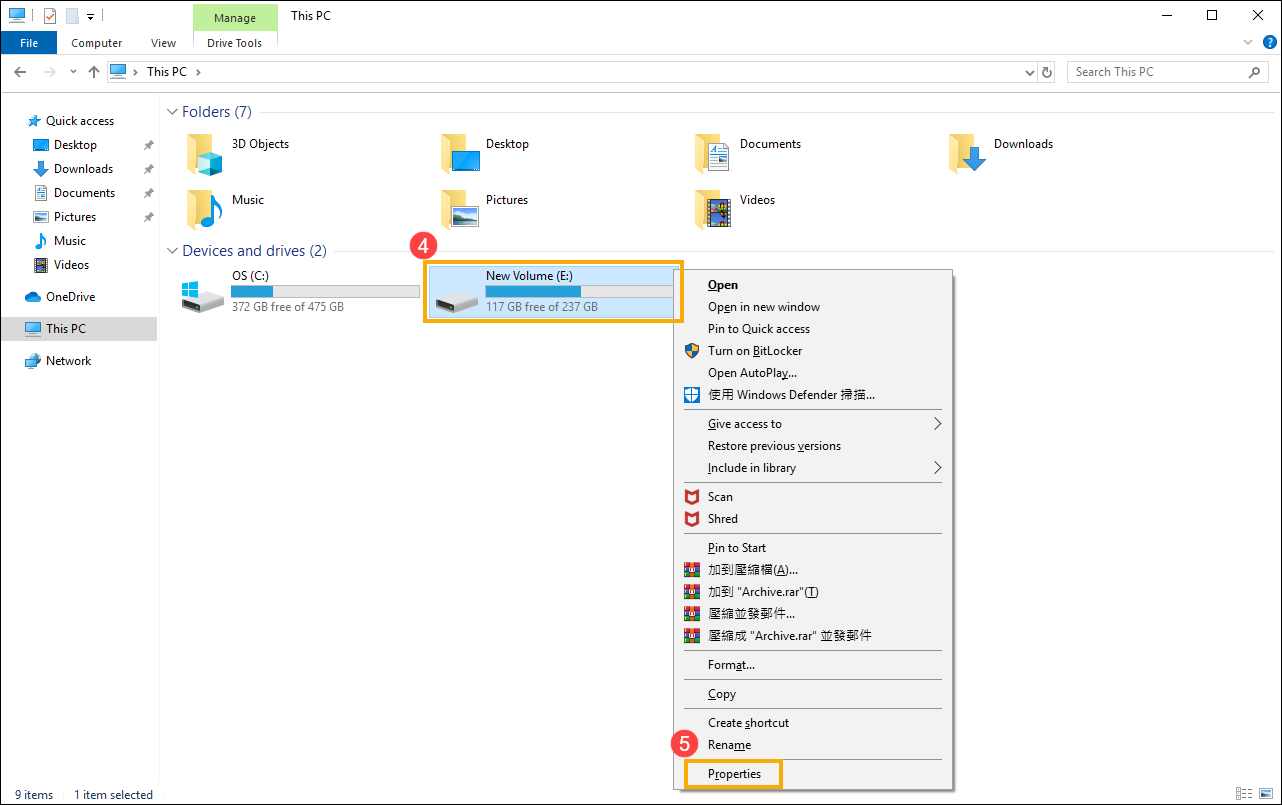
- In the This PC window, select the disk drive that is with problems and right-click the mouse④, then select [Properties]⑤.
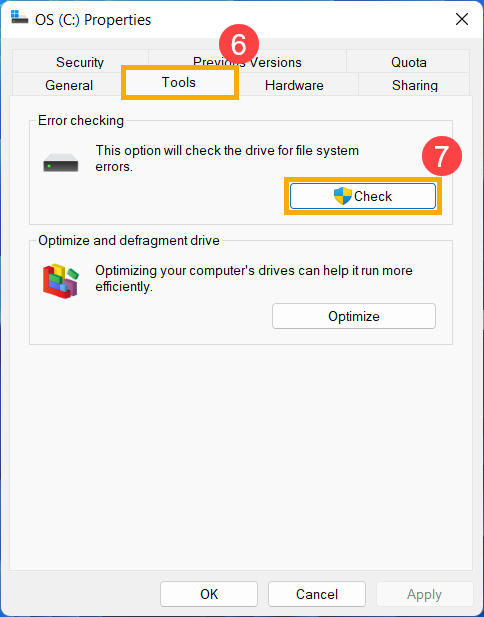
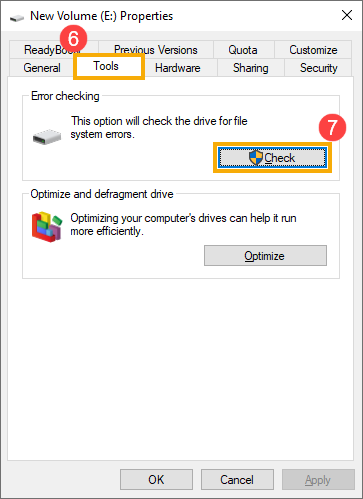
- Select [Tools] tab⑥, then click [Check] in the error checking section⑦.
- Click [Scan drive]⑧, Windows will start checking the drive for errors.
In some conditions, it may start checking after restarting the device, so please follow the on-screen prompts to scan the drive.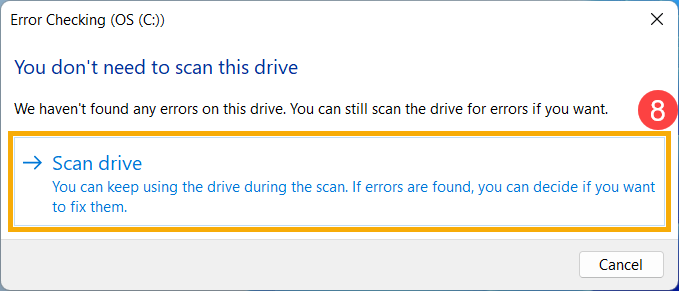
- If problems persist, please continue to the next troubleshooting step.
Optimize and defragment drive in Windows
- Type and search [File Explorer]① in the Windows search bar, then click [Open]②.
- In the File Explorer window, click [This PC]③.
- In the This PC window, select the disk drive that is with problems and right-click the mouse④, then select [Properties]⑤.
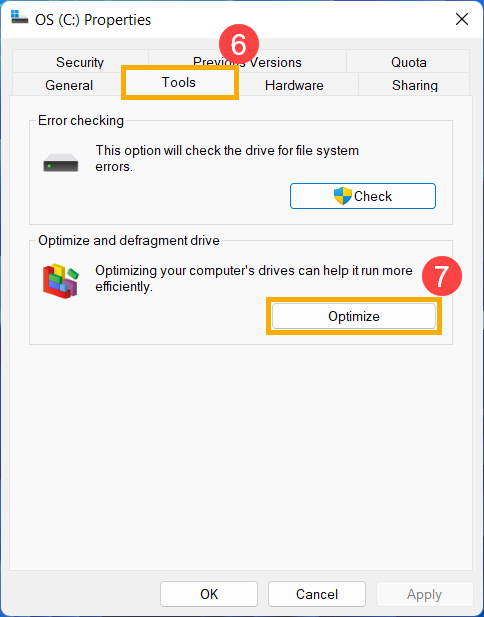
- Select [Tools] tab⑥, then click [Optimize] in the Optimize and defragment drive section⑦.
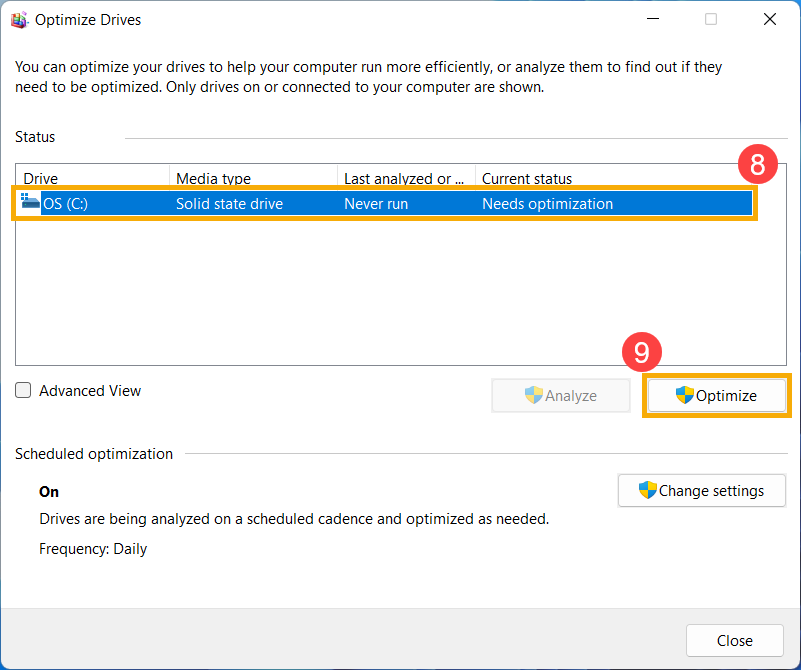
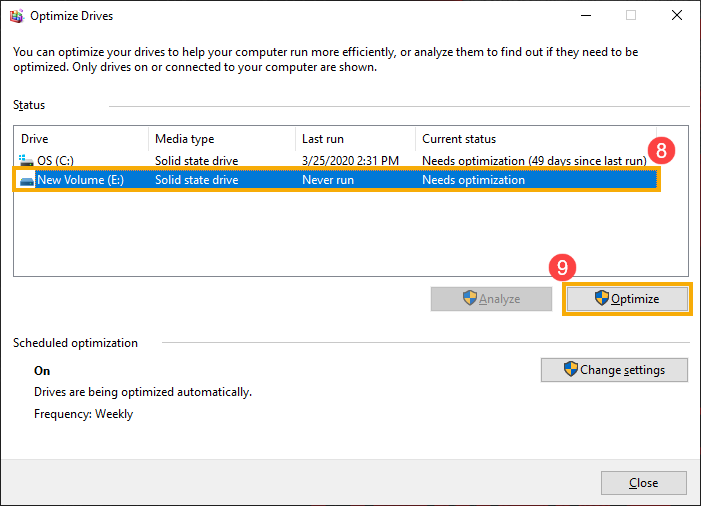
- Select the disk drive that is with problems⑧, then click [Optimize]⑨. The system will start optimizing your drives automatically.
- If problems persist, please continue to the next troubleshooting step.
Run Hardware Diagnosis in MyASUS
- Type and search [MyASUS] in the Windows search bar①, then click [Open]②.
Note: If you cannot find MyASUS, it may not be installed on your device. Refer to How to install MyASUS. - In the MyASUS app, click [System Diagnosis]③.
Note: The following MyASUS interface may vary slightly depending on the product.
Note: If your device does not display the system diagnosis page in MyASUS software, it means your device does not support this feature. Continue to the next section for further troubleshooting. Here you can learn more about Why can I only see the partial features in the MyASUS app. - In [Diagnostic Tool]④, select [Solid state disk] check items of Customized diagnosis⑤, and then click [Checkup]⑥. Here you can learn more about MyASUS System Diagnosis - Introduction.
Note: The following Diagnostic Tool may vary slightly depending on the product. - If any error occurs, please try the troubleshooting suggestions and possible approaches to resolve the problem in MyASUS. If the problem persists, please continue the next troubleshooting step.
Restore the system from restore point
If the problem happens recently, and if you have ever created a restore point or there is an automatic system restore existed, try to restore the device to a point before the problem began to resolve the problem. Here you can learn more about How to use restore point to restore the system.
If the problem persists, please continue to the next troubleshooting step.
Reset the system
If the problem persists after all troubleshooting steps are completed. Please backup your personal files, then reset the device to back to its original configuration. Here you can learn more about How to reset the system.
Windows 10 operating system
SSD is not recognized
Update BIOS, Windows packages, and drivers
Regularly updating BIOS, Windows, and drivers can enhance system stability and performance. Ensure that your device is using the latest versions. Learn more about updating BIOS:
How to update the BIOS version in Windows system
How to update BIOS with ASUS Firmware Update/EZ Flash
(For desktop products, please refer to ASUS Motherboard EZ Flash 3 Introduction.)
Learn more about updating Windows Update and drivers:
How to update drivers via System Update in MyASUS
If you have updated the BIOS, Windows packages, and drivers to the latest version, but the issue persists, please proceed to the next troubleshooting step.
Check SSD in Disk Management
- Type and search [Computer Management]① in the Windows search bar, then click [Run as administrator]②.
- In the Computer Management window, select [Disk Management]③.
- Check the disk in Disk Management. If it shows [Offline]④, please try to right-click it and select [Online]⑤.
- If it shows online, but no drive letter (such as E:)⑥. Please try to right-click it and select [Change Drive Letter and Paths]⑦.
Click [Add]⑧.
Confirm the drive letter and select [Assign the following drive letter]⑨, then click [OK]⑩. - If the partition is listed as [Unallocated]⑪, and you know that the partition is empty. Please right-click it and select [New Simple Volume]⑫, then follow the instructions to create a volume in the free space.
- Check the disk in Disk Management. If it shows [Offline]④, please try to right-click it and select [Online]⑤.
- If the problem persists, please continue to the next troubleshooting step.
Enable and reinstall driver in Device Manager
- Type and search [Device Manager] in the Windows search bar①, then click [Open]②.

- Check the arrow next to [Disk drives]③, then right-click the disk drive that is not recognized④ and select [Enable device]⑤. To test if Windows is able to recognize the disk drive.
If the [Enable device] option does not display that means the disk drive is enabled already, please continue to the next step. - Uninstall the driver of disk drive. Right-click the disk drive that is not recognized⑥ and select [Uninstall device]⑦.
- Click [Uninstall]⑧.
- Restart the device. The driver will be automatically installed after the device restarts. Please confirm if Windows is able to recognize the disk drive. If problems persist, please continue to the next troubleshooting step.
Run Hardware Diagnosis in MyASUS
- Type and search [MyASUS] in the Windows search bar①, then click [Open]②.
Note: If you cannot find MyASUS, it may not be installed on your device. Refer to How to install MyASUS.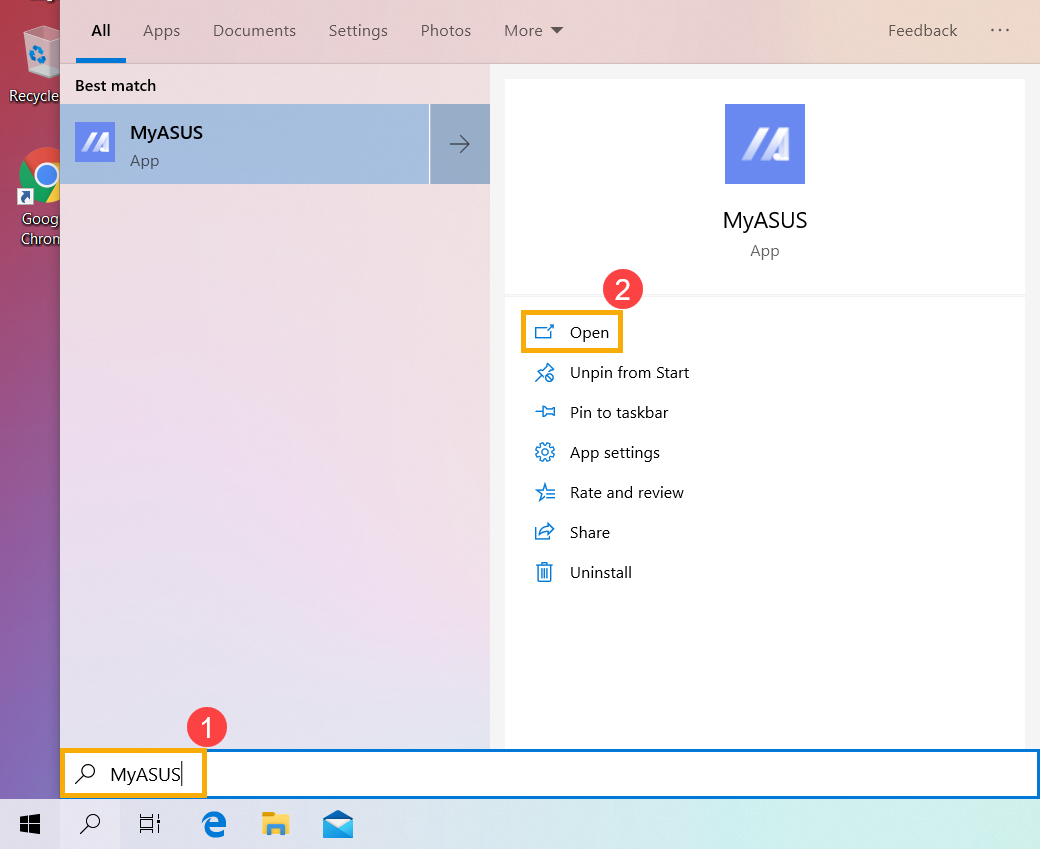
- In the MyASUS app, click [System Diagnosis]③.
Note: The following MyASUS interface may vary slightly depending on the product.
Note: If your device does not display the system diagnosis page in MyASUS software, it means your device does not support this feature. Continue to the next section for further troubleshooting. Here you can learn more about Why can I only see the partial features in the MyASUS app. - In [Diagnostic Tool]④, select [Solid state disk] check items of Customized diagnosis⑤, and then click [Checkup]⑥. Here you can learn more about MyASUS System Diagnosis - Introduction.
Note: The following Diagnostic Tool may vary slightly depending on the product. - If any error occurs, please try the troubleshooting suggestions and possible approaches to resolve the problem in MyASUS. If the problem persists, please continue the next troubleshooting step.
Restore the system from restore point
If the problem happens recently, and if you have ever created a restore point or there is an automatic system restore existed, try to restore the device to a point before the problem began to resolve the problem. Here you can learn more about How to use restore point to restore the system.
If the problem persists, please continue to the next troubleshooting step.
Reset the system
If the problem persists after all troubleshooting steps are completed. Please backup your personal files, then reset the device to back to its original configuration. Here you can learn more about How to reset the system.
SSD is running slowly or an error message appears
Update BIOS, Windows packages, and drivers
Regularly updating BIOS, Windows, and drivers can enhance system stability and performance. Ensure that your device is using the latest versions. Learn more about updating BIOS:
How to update the BIOS version in Windows system
How to update BIOS with ASUS Firmware Update/EZ Flash
(For desktop products, please refer to ASUS Motherboard EZ Flash 3 Introduction.)
Learn more about updating Windows Update and drivers:
How to update drivers via System Update in MyASUS
If you have updated the BIOS, Windows packages, and drivers to the latest version, but the issue persists, please proceed to the next troubleshooting step.
Update driver in Device Manager
- Type and search [Device Manager] in the Windows search bar①, then click [Open]②.
- Check the arrow next to [Disk drives]③, then right-click the disk drive that is with problems④ and select [Update driver]⑤.
Note: Make sure your device is in an available network environment, then connect to internet because it is an online update process. - Click [Search automatically for updated driver software]⑥.
- Windows is searching drivers online and will install the proper driver.
- The automatic update is completed and please click [Close]⑦.
- If problems persist, please continue to the next troubleshooting step.
Run the disk error checking in Windows
- Type and search [File Explorer]① in the Windows search bar, then click [Open]②.

- In the File Explorer window, click [This PC]③.
- In the This PC window, select the disk drive that is with problems and right-click the mouse④, then select [Properties]⑤.
- Select [Tools] tab⑥, then click [Check] in the error checking section⑦.
- Click [Scan drive]⑧, Windows will start checking the drive for errors.
In some conditions, it may start checking after restarting the device, so please follow the on-screen prompts to scan the drive.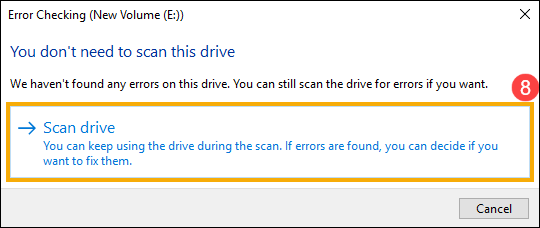
- If problems persist, please continue to the next troubleshooting step.
Optimize and defragment drive in Windows
- Type and search [File Explorer]① in the Windows search bar, then click [Open]②.
- In the File Explorer window, click [This PC]③.
- In the This PC window, select the disk drive that is with problems and right-click the mouse④, then select [Properties]⑤.
- Select [Tools] tab⑥, then click [Optimize] in the Optimize and defragment drive section⑦.

- Select the disk drive that is with problems⑧, then click [Optimize]⑨. The system will start optimizing your drives automatically.
- If problems persist, please continue to the next troubleshooting step.
Run Hardware Diagnosis in MyASUS
- Type and search [MyASUS] in the Windows search bar①, then click [Open]②.
Note: If you cannot find MyASUS, it may not be installed on your device. Refer to How to install MyASUS.
- In the MyASUS app, click [System Diagnosis]③.
Note: The following MyASUS interface may vary slightly depending on the product.
Note: If your device does not display the system diagnosis page in MyASUS software, it means your device does not support this feature. Continue to the next section for further troubleshooting. Here you can learn more about Why can I only see the partial features in the MyASUS app. - In [Diagnostic Tool]④, select [Solid state disk] check items of Customized diagnosis⑤, and then click [Checkup]⑥. Here you can learn more about MyASUS System Diagnosis - Introduction.
Note: The following Diagnostic Tool may vary slightly depending on the product. - If any error occurs, please try the troubleshooting suggestions and possible approaches to resolve the problem in MyASUS. If the problem persists, please continue the next troubleshooting step.
Restore the system from restore point
If the problem happens recently, and if you have ever created a restore point or there is an automatic system restore existed, try to restore the device to a point before the problem began to resolve the problem. Here you can learn more about How to use restore point to restore the system.
If the problem persists, please continue to the next troubleshooting step.
Reset the system
If the problem persists after all troubleshooting steps are completed. Please backup your personal files, then reset the device to back to its original configuration. Here you can learn more about How to reset the system.
If your problem is not worked out with above solution and information, please contact ASUS customer service center for further information.