المواضيع ذات الصلة
استكشاف الأخطاء وإصلاحها - بطارية الجهاز لا توفر الطاقة/لا تشحن، البطارية لا تشحن بالكامل، غير قادر على التشغيل عبر البطارية
المنتجات المعنية: لابتوب، جهاز الألعاب المحمول
إذا كنت تواجه مشاكل في البطارية مثل عدم توفير الطاقة أو عدم الشحن أو عدم الشحن بالكامل، يرجى اتباع خطوات استكشاف الأخطاء التالية:
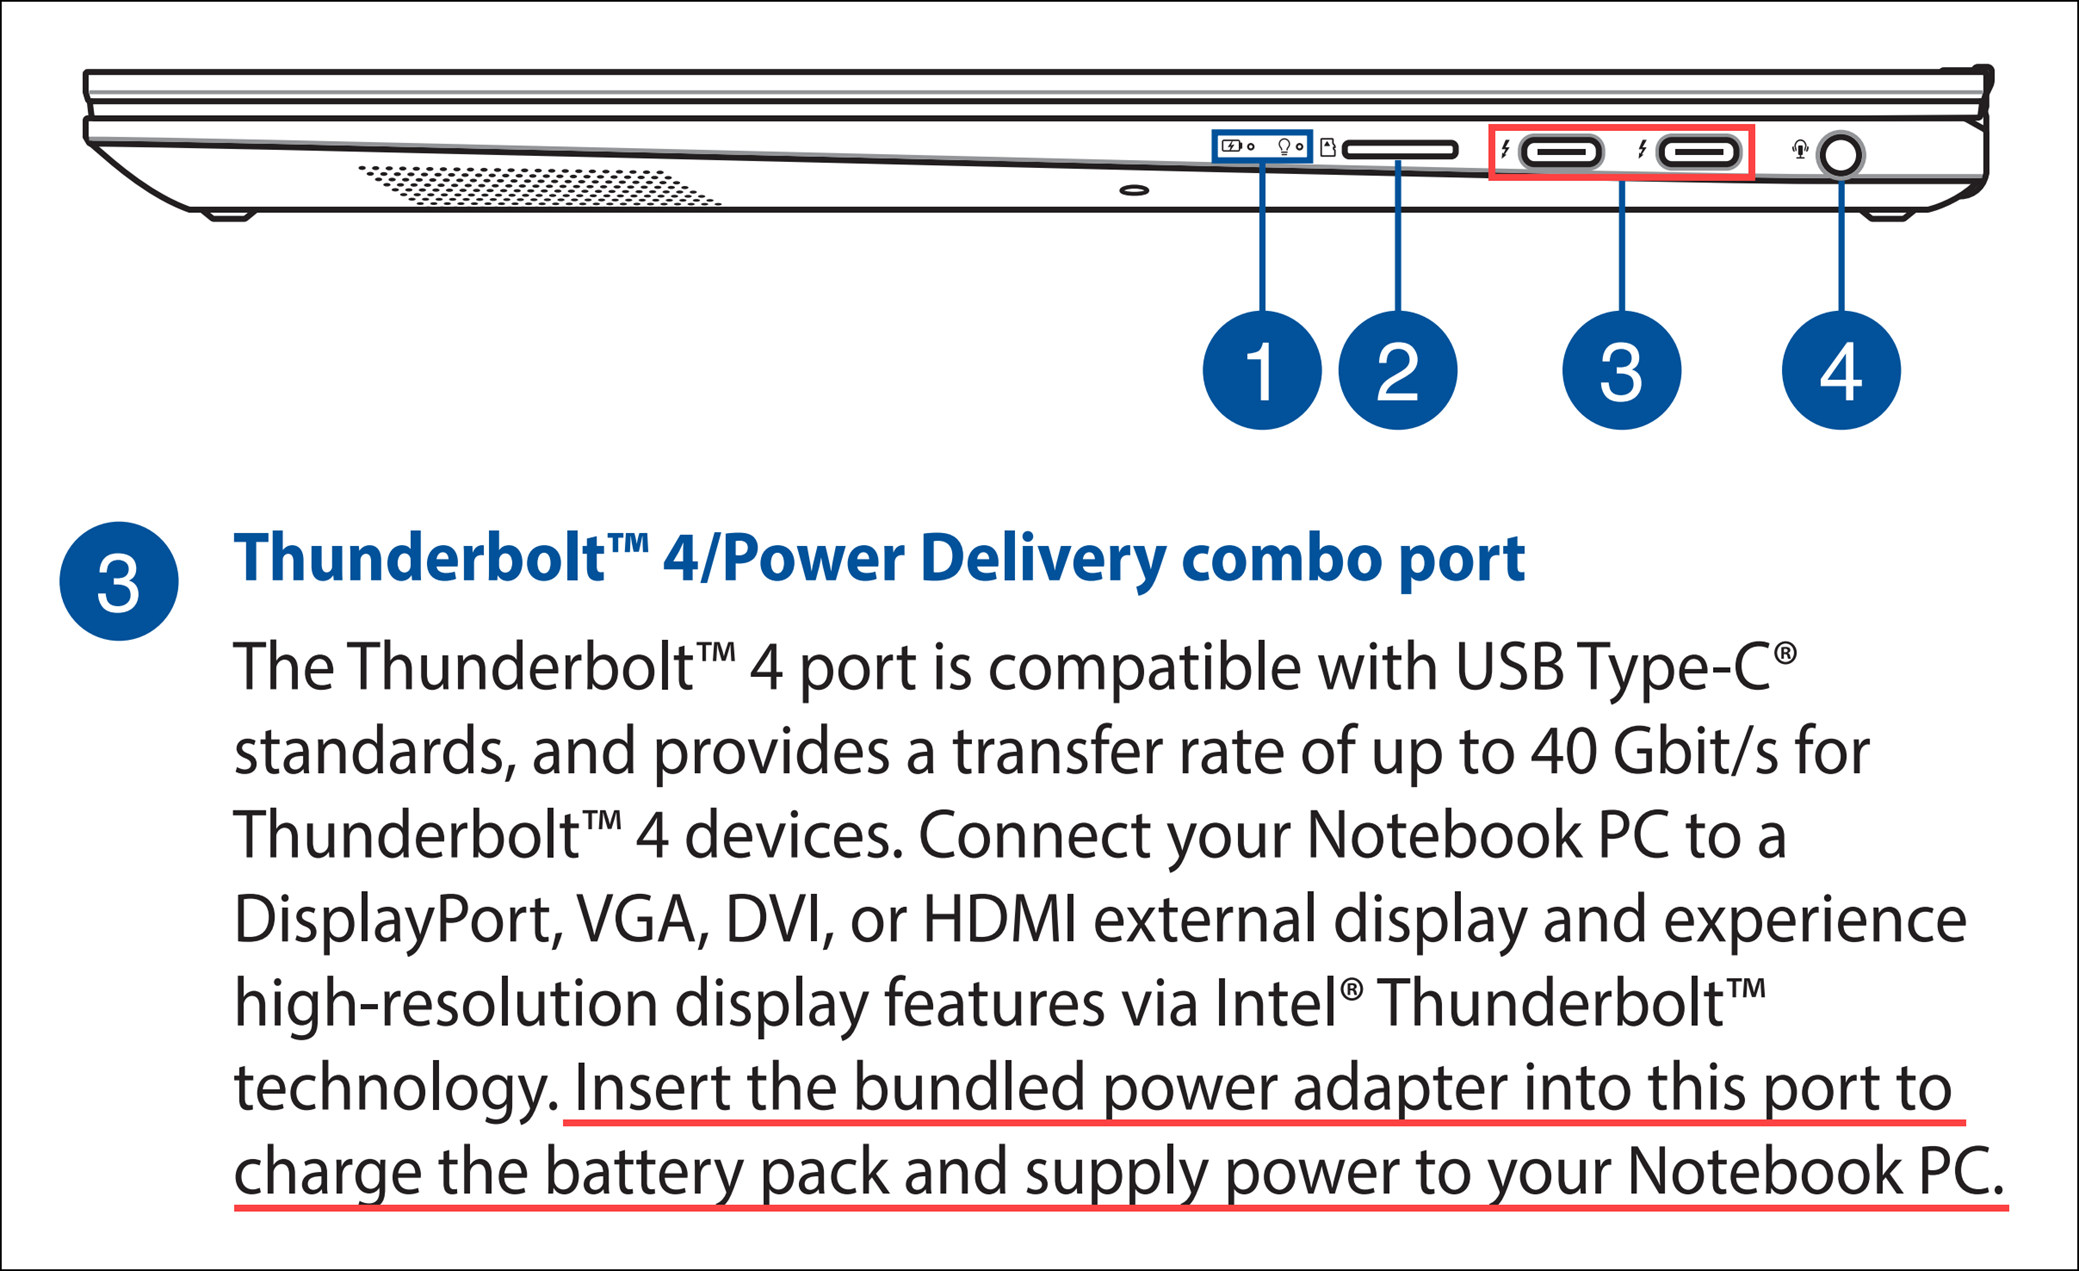
ملاحظة: إذا كنت تستخدم الشحن عبر USB Type-C، يرجى التأكد من أن منفذ USB Type-C على جهازك يدعم شحن البطارية. إذا لم تكن متأكدًا من وظيفة USB Type-C، يرجى الرجوع إلى دليل المستخدم لجهازك. راجع هذه المقالة لتحميل دليل المستخدم الخاص بطراز جهاز الكمبيوتر الخاص بك: كيفية البحث عن وتحميل أدلة المستخدم.
لتزويدك بتعليمات أكثر تفصيلاً، يمكنك أيضاً الضغط على رابط فيديو ASUS على YouTube أدناه لمعرفة المزيد حول كيفية حل مشاكل شحن البطارية على أجهزة الكمبيوتر المحمولة.
https://www.youtube.com/watch?v=vvd8fhQ51VU
البطارية لا توفر الطاقة / لا تشحن
تحقق من اتصال ومظهر المحول وسلك الطاقة (الكابل)
- استخدم محول وسلك الطاقة (الكابل) الأصلي من ASUS لتجنب مشاكل التوافق. إذا كان لديك منتجات مختلفة من ASUS، لا تخلط بين المحولات وأسلاك الطاقة (الكابلات) لأن مواصفات خرج الطاقة قد تختلف.
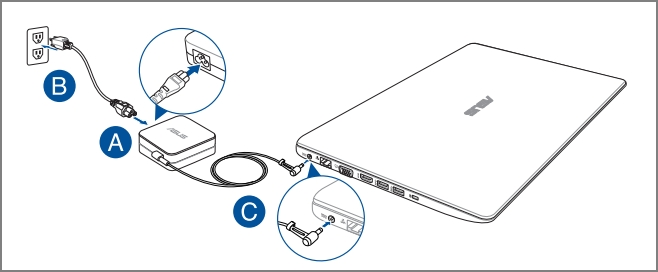
- تحقق من فتحة المحول من أي ارتخاء عند قابس سلك الطاقة (أ)، قابس جهة المقبس (ب)، أو جهة الجهاز (ج). حاول تجربة مقابس مختلفة. (تُستخدم الرسوم التوضيحية التالية كمثال على جهاز كمبيوتر محمول. لمزيد من المعلومات التفصيلية، يرجى الرجوع إلى [دليل المستخدم] لجهازك المحدد.)
- افحص المحول والكابلات بحثًا عن أي علامات تلف. إذا كانت تالفة، يُوصى بزيارة مركز خدمة ASUS لاستبدالها.
- بعد التأكد من ما سبق، حاول إعادة توصيل نهايات كابل/قابس/الجهاز.
- إذا كان جهاز الكمبيوتر المحمول يحتوي على بطارية قابلة للإزالة، حاول إعادة تركيبها. تخطَّ هذه الخطوة إذا كانت البطارية غير قابلة للإزالة.

- إذا لم يتم شحن الجهاز/البطارية لفترة من الوقت، قم بتوصيله بالطاقة واتركه يشحن طوال الليل. قد يساعد ذلك في إحياء البطارية.
- إذا استمرت المشكلة بعد إجراء الفحوصات أعلاه، انتقل إلى خطوة استكشاف الأخطاء التالية.
إجراء مسح CMOS (إعادة ضبط EC)
حاول إجراء إعادة ضبط EC [المتحكم المدمج]، إعادة ضبط RTC [الساعة الحقيقية]، أو إعادة ضبط كاملة لاستعادة إعدادات الأجهزة الافتراضية وحل مشكلات شحن البطارية.
راجع هذه المقالة للحصول على خطوات مفصلة: كيفية إعادة ضبط المتحكم المدمج (EC)، الساعة الحقيقية (RTC)، وإجراء إعادة ضبط كاملة.
إذا استمرت المشكلة بعد إجراء مسح CMOS (إعادة ضبط EC)، انتقل إلى خطوة استكشاف الأخطاء التالية.
تحديث BIOS، حزم Windows، وdrivers
التحديث المنتظم لـ BIOS، Windows، وdrivers يمكن أن يعزز من استقرار النظام وأدائه. تأكد من أن جهازك يستخدم أحدث الإصدارات. تعرف على المزيد حول تحديث BIOS:
كيفية تحديث إصدار BIOS في نظام Windows
كيفية تحديث BIOS باستخدام تحديث ASUS Firmware/EZ Flash
تعرف على المزيد حول تحديث Windows وdrivers:
كيفية تحديث برامج التشغيل عبر تحديث النظام في MyASUS
إذا استمرت المشكلة بعد تحديث حزم BIOS/Windows/برامج التشغيل حتى تاريخه، انتقل إلى الخطوة التالية في استكشاف الأخطاء وإصلاحها.
إجراء إعادة ضبط BIOS
- الدخول إلى شاشة إعداد BIOS على الجهاز.
عندما يكون الجهاز غير مشغل، اضغط مع الاستمرار على زر [F2] على لوحة المفاتيح، ثم اضغط زر التشغيل لتشغيل الجهاز. استمر في الضغط على زر [F2] حتى تظهر شاشة إعداد BIOS، ثم قم بإفلات زر [F2]. لمعرفة المزيد حول كيفية الدخول إلى شاشة إعداد BIOS.
ملاحظة: أجهزة الألعاب المحمولة تحتاج إلى الضغط مع الاستمرار على زر الصوت (-)، ثم الضغط على زر التشغيل لتشغيل الجهاز. - بعد الدخول إلى شاشة إعداد BIOS، يرجى الرجوع إلى المقالات التالية لفهم كيفية استعادة إعدادات BIOS: كيفية استعادة إعدادات BIOS.
- عند الانتهاء من إعادة ضبط إعدادات BIOS، سيعاد تشغيل الكمبيوتر ويدخل إلى Windows. يرجى التحقق من المشكلة مرة أخرى. إذا استمرت المشكلة، يرجى متابعة خطوة استكشاف الأخطاء التالية.
تشغيل تشخيص مشكلات البطارية عبر MyASUS
- اكتب وابحث [MyASUS] في شريط بحث ويندوز①، ثم اضغط [فتح]②. (الصورة التوضيحية على الجانب الأيسر أدناه في ويندوز 11، وعلى الجانب الأيمن في ويندوز 10.)
ملاحظة: إذا لم تتمكن من العثور على MyASUS، فقد لا يكون مثبتًا على جهازك. راجع كيفية تثبيت MyASUS.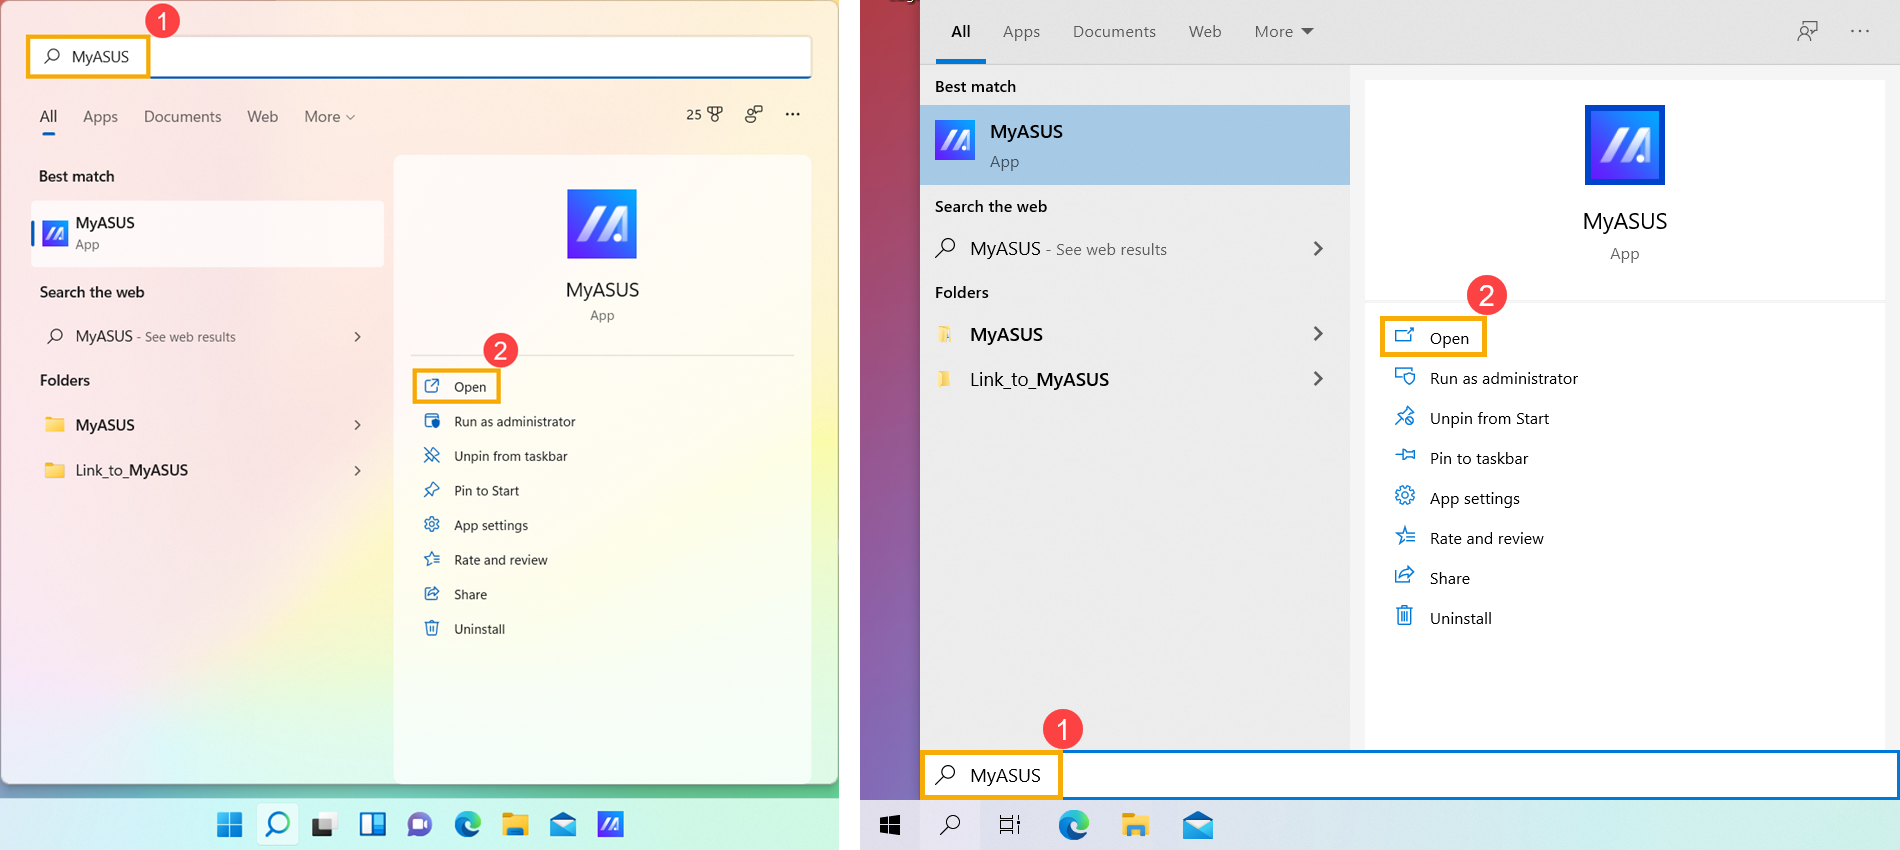
- في تطبيق MyASUS، اضغط[تشخيص النظام]③.
ملاحظة: إذا لم تظهر صفحة تشخيص النظام في برنامج MyASUS، فهذا يعني أن جهازك لا يدعم هذه الخاصية. تابع إلى القسم التالي لمزيد من خطوات استكشاف الأخطاء وإصلاحها. يمكنك هنا معرفة المزيد حول لماذا أرى فقط ميزات جزئية في تطبيق MyASUS.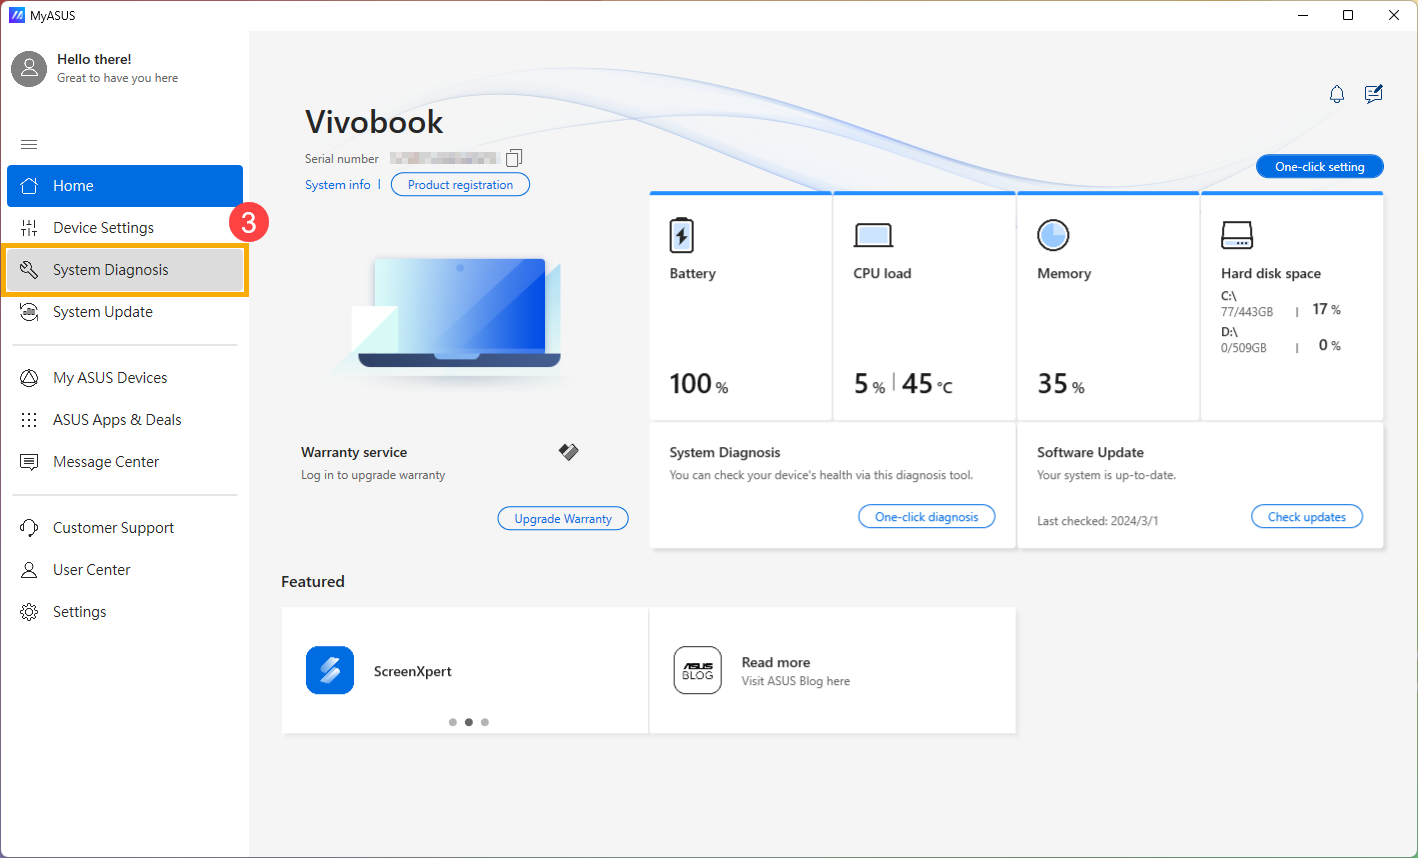
- في [أداة التشخيص]④، اضغط على عنصر [مشاكل البطارية]⑤. هنا يمكنك معرفة المزيد عن مقدمة تشخيص نظام MyASUS.
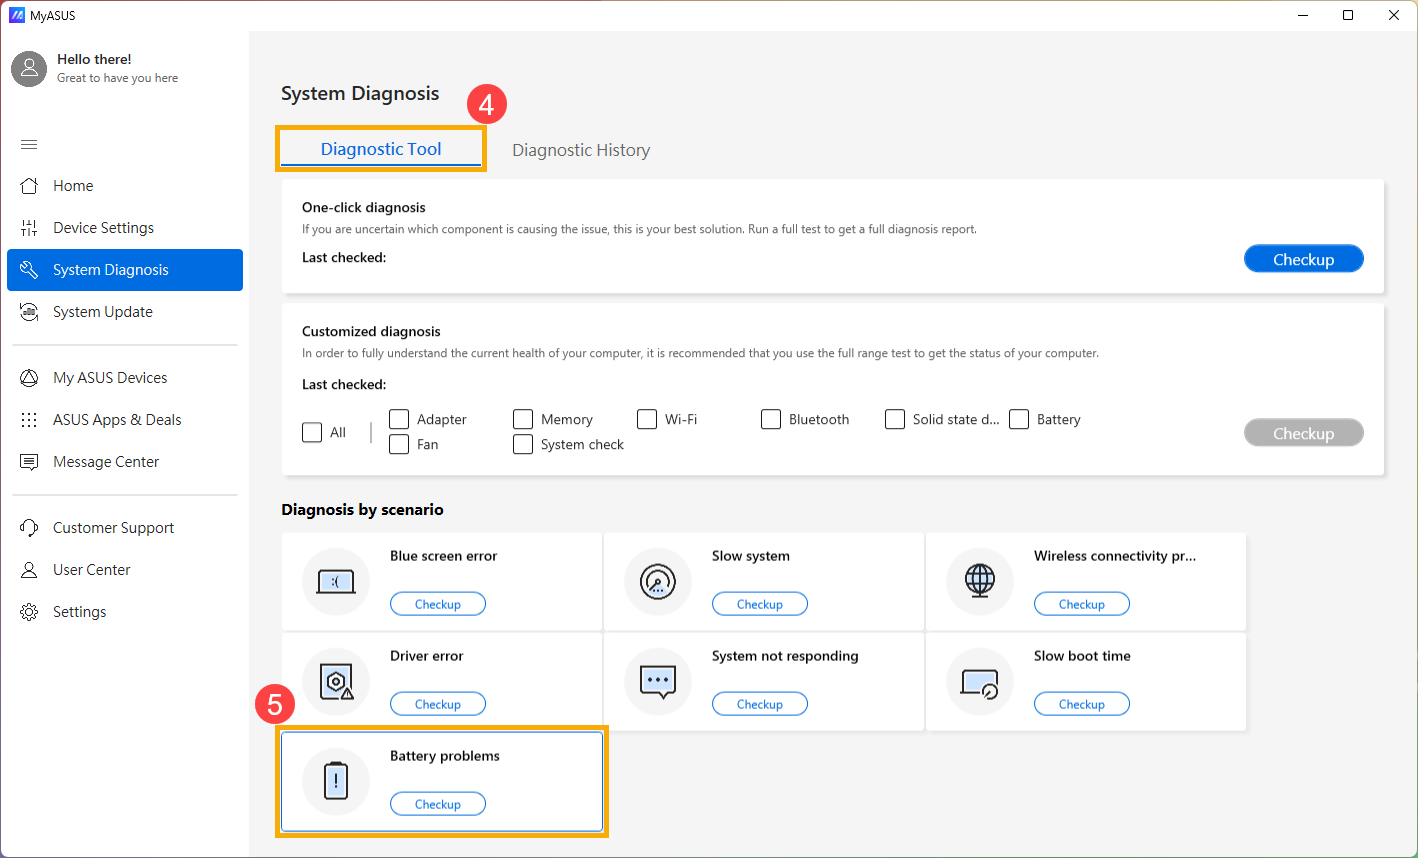
- قم بتوصيل الجهاز بالطاقة وانقر [الفحص]⑥.
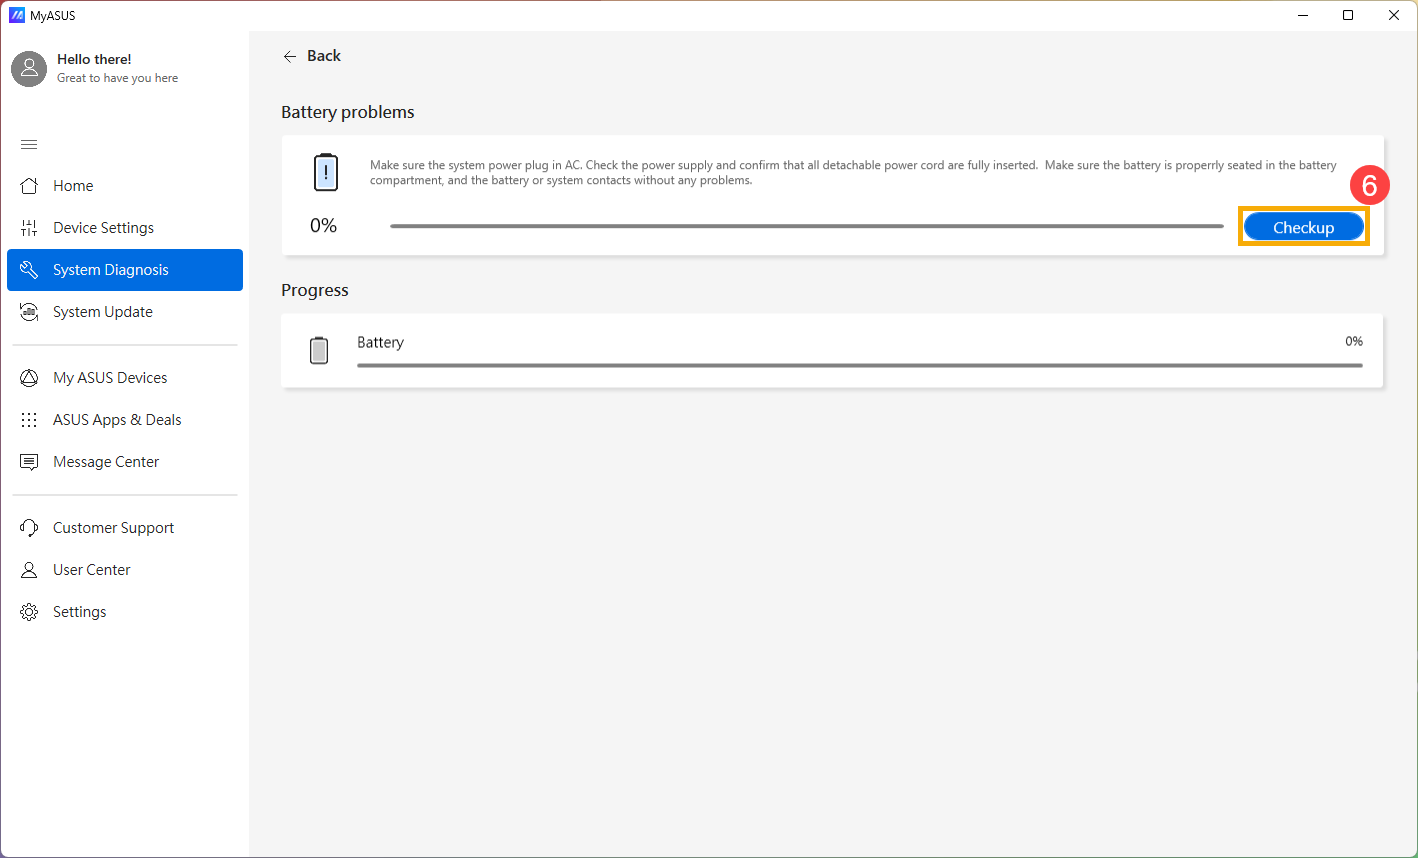
- بعد الفحص، انقر [النتائج]⑦. إذا تم اكتشاف أخطاء، جرّب اقتراحات استكشاف الأخطاء التي يقدمها MyASUS. إذا استمرت المشكلة، انتقل إلى خطوة استكشاف الأخطاء التالية.

إعادة تثبيت برامج تشغيل البطارية / محول التيار الكهربائي عبر إدارة الأجهزة
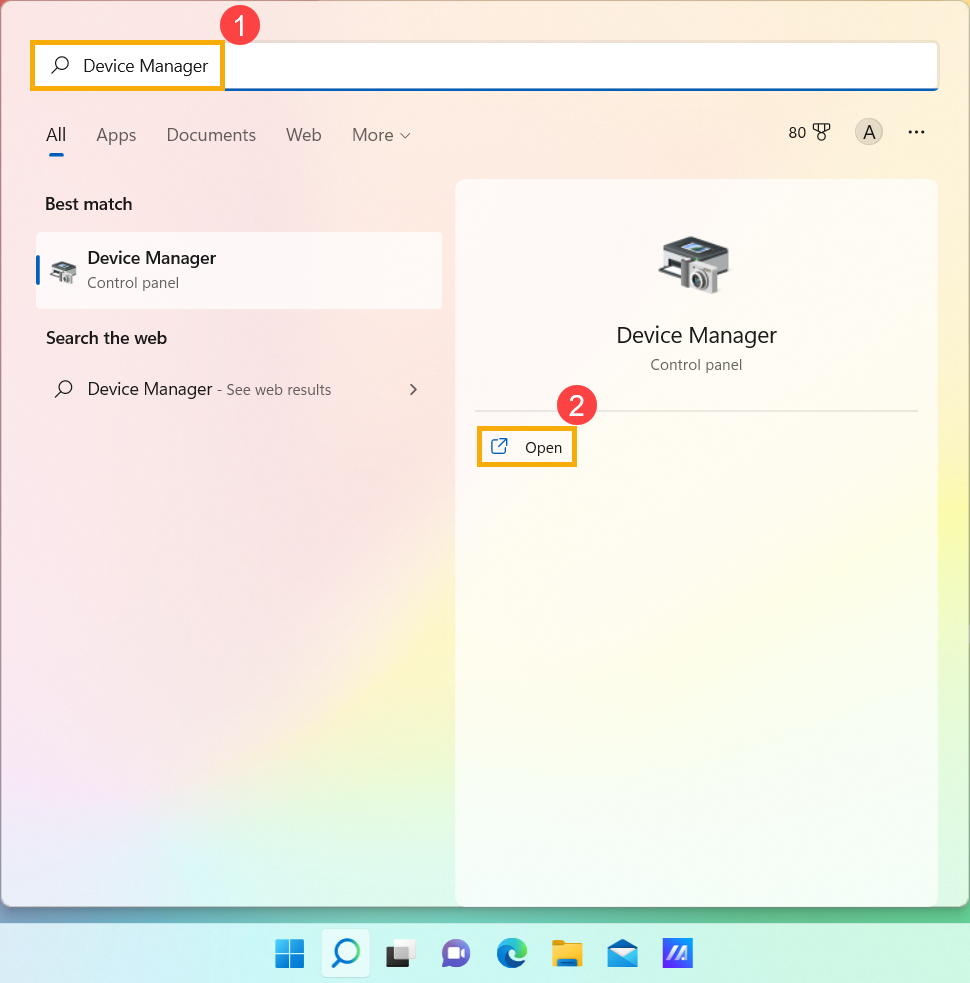
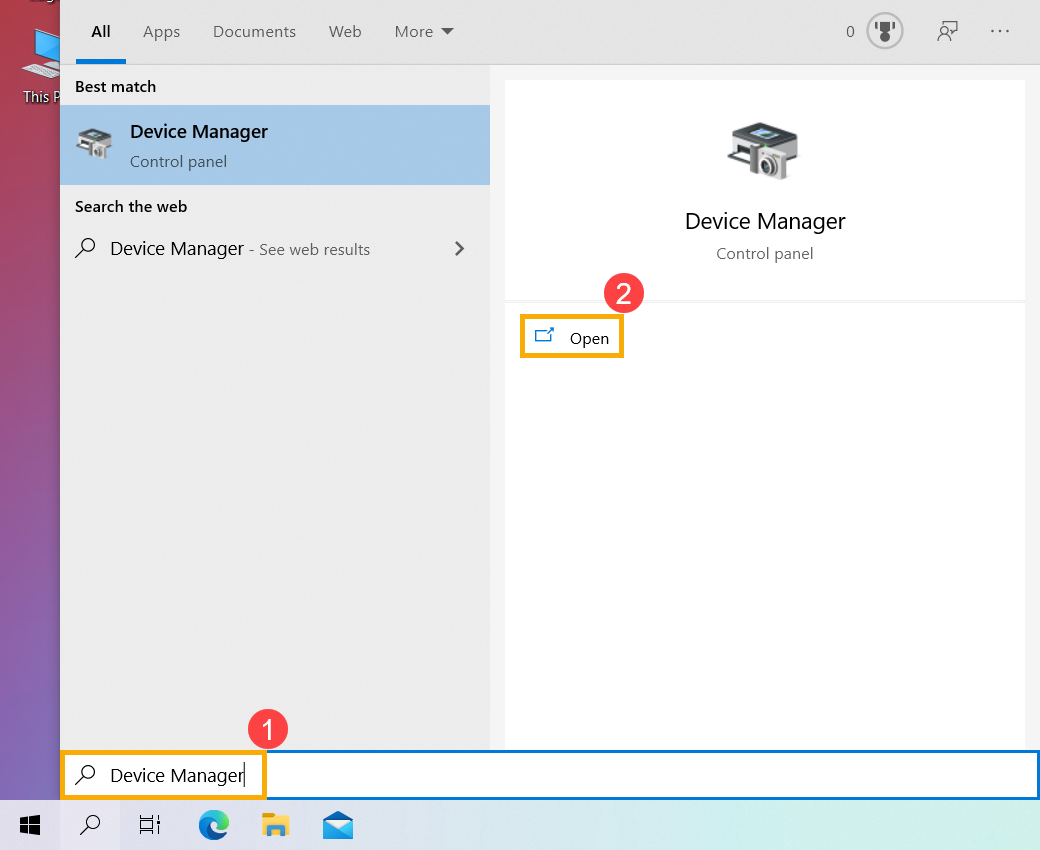
- اكتب وابحث [إدارة الأجهزة] في شريط بحث Windows①، ثم انقر [فتح]②. (توضيح البحث في الجانب الأيسر أدناه في [ويندوز 11]، والجانب الأيمن في [ويندوز 10].)
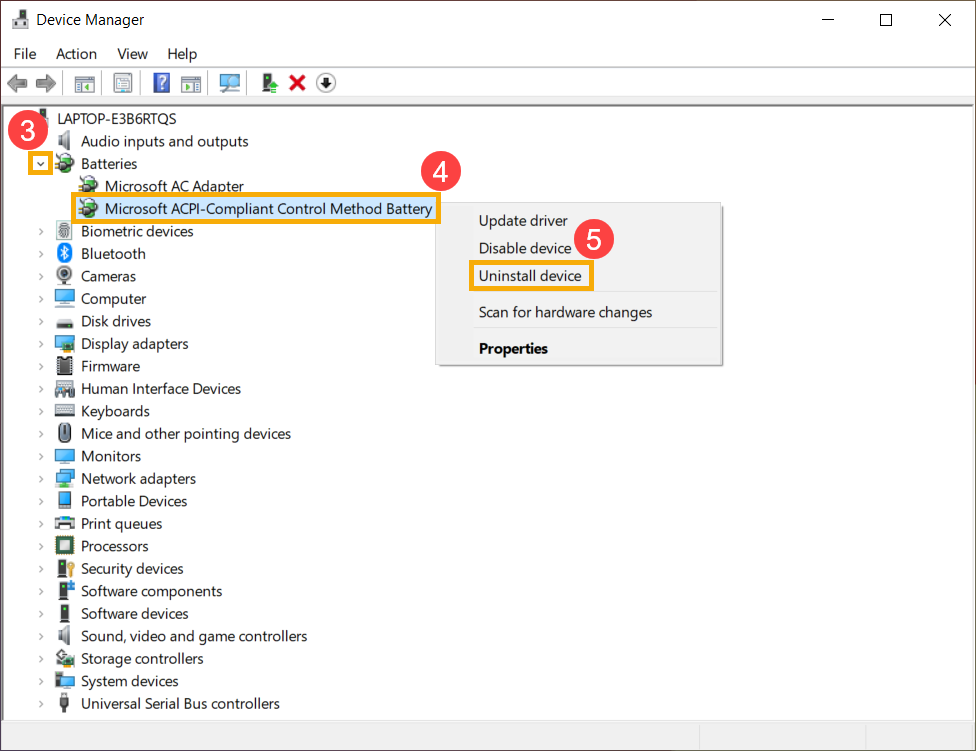
- إلغاء تثبيت تعريفات البطارية. تحقق من السهم بجانب [البطاريات]③، ثم انقر بزر الماوس الأيمن على [بطارية Microsoft متوافقة مع معيار ACPI للتحكم]④ واضغط على [إلغاء تثبيت الجهاز]⑤.
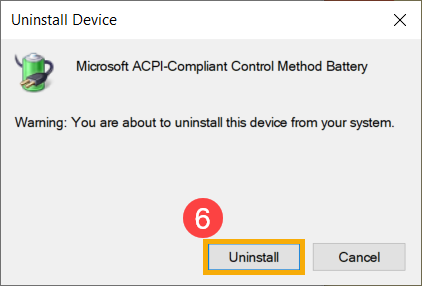
- انقر على [إلغاء التثبيت]⑥.
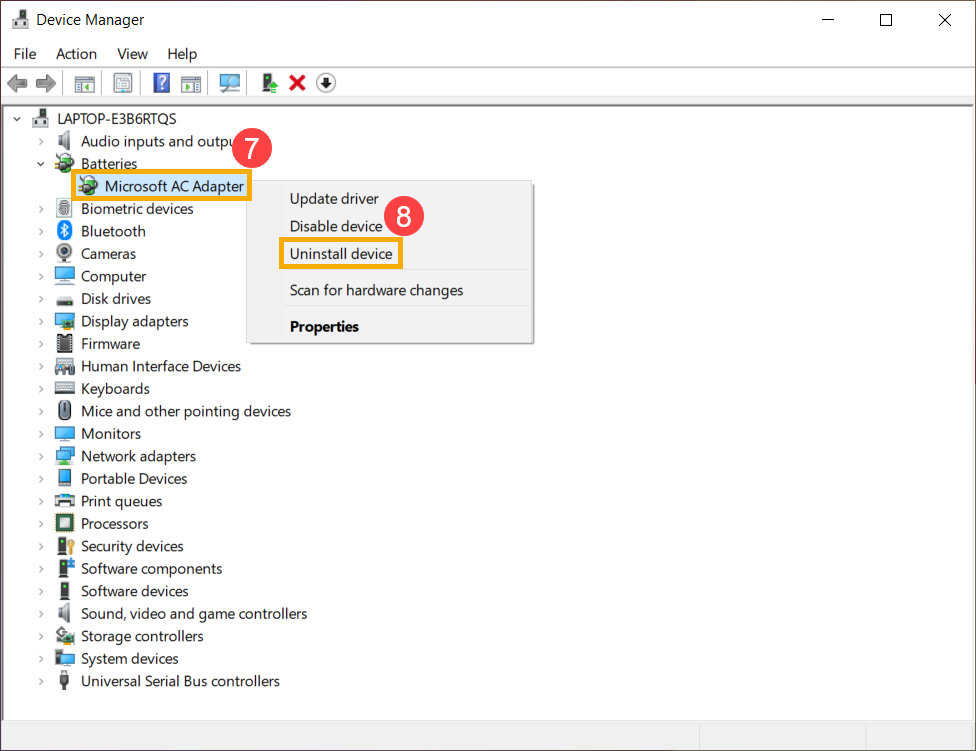
- في فئة البطاريات، انقر بزر الماوس الأيمن على [محول Microsoft AC]⑦ واضغط على [إلغاء تثبيت الجهاز]⑧.
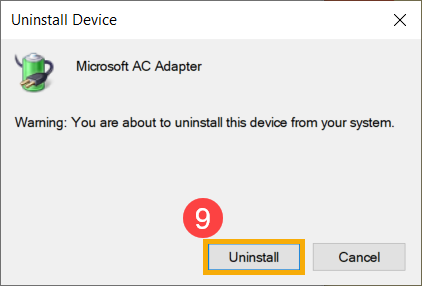
- انقر على [إلغاء التثبيت]⑨.
- بعد إلغاء تثبيت برنامجي التشغيل Microsoft ACPI-Compliant Control Method Battery و Microsoft AC Adapter، يُرجى إعادة تشغيل الكمبيوتر، وسيتم إعادة تثبيت برامج التشغيل تلقائياً، ثم تحقق من المشكلة مرة أخرى.
إذا لم تُحل مشكلتك مع الحل والمعلومات أعلاه، يُرجى التواصل مع مركز خدمة عملاء ASUS لمزيد من المعلومات.
إذا واجهت المشكلة التي هي البطارية لا تُشحن عندما تكون نسبة الطاقة أعلى من 95% مع توصيل محول الطاقة.
هذا وضع طبيعي لحماية البطارية، وليس مشكلة في البطارية نفسها أو وظيفة الشحن.
عندما يتم شحن البطارية إلى 100%، ستتوقف عملية الشحن. في هذا الوقت، ستفرغ البطارية نفسها ببطء شديد بسبب الخصائص الكيميائية لبطارية أيون الليثيوم حتى لو لم يستهلك الجهاز أي طاقة من البطارية.
التصميم الحالي لأجهزة ASUS يأتي مع ميزة مدمجة RSOC (نسبة الشحن النسبي) والغرض منها هو إطالة عمر البطارية الإجمالي. الوصف أدناه يمكن أن يوضح هذه الظاهرة:
- عندما تكون سعة البطارية أقل من 95% مع توصيل محول التيار المتردد، سيتم شحن البطارية حتى 100%، ثم يتوقف الشحن.
- عندما تنخفض سعة البطارية من 100% إلى 99%~95% مع توصيل محول التيار المتردد، لن يتم شحن البطارية حتى ينخفض مستوى الطاقة إلى أقل من 95%.
- عندما تبقى سعة البطارية حول 94% إلى 97%، لن يتم شحن البطارية مع توصيل محول التيار المتردد. يمكنك فصل وإعادة توصيل محول التيار المتردد عدة مرات لاستئناف الشحن إلى 100%.
إذا واجهت مشكلة وهي توقف شحن البطارية بعد وصول مستوى الشحن إلى 60% أو 80%.
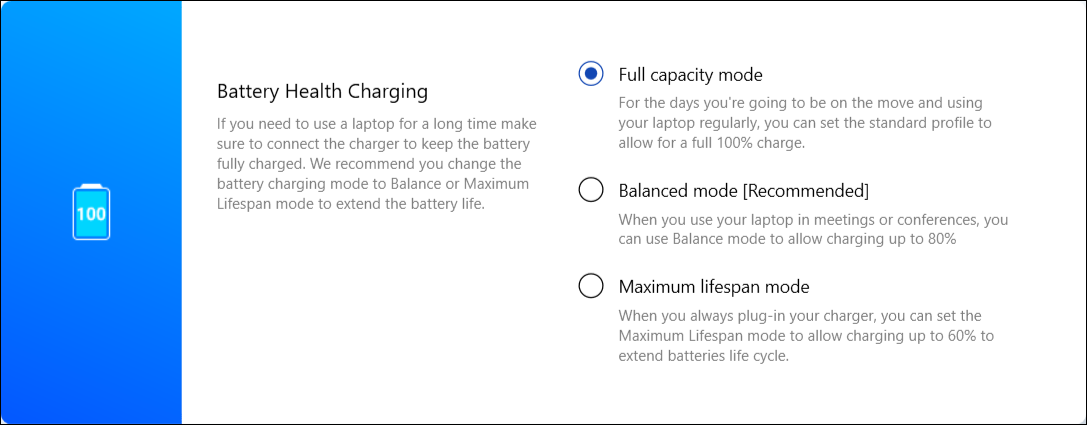
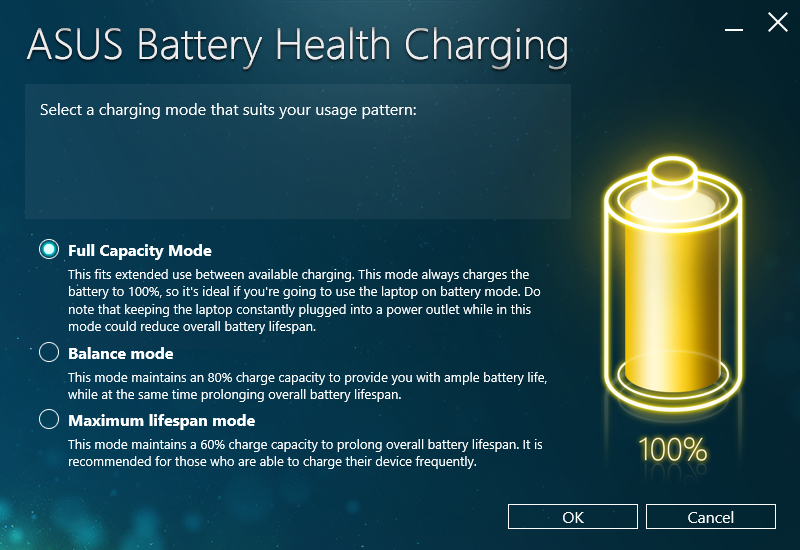
يرجى التأكد مما إذا كنت قمت بضبط وضع العناية بالبطارية في MyASUS (لبعض الطرازات، يكون شحن صحة البطارية تطبيقًا منفصلًا). من أجل حماية البطارية، يسمح شحن صحة البطارية لك بضبط أقصى مستوى طاقة للبطارية من ROSC (نسبة الشحن النسبي) مما يساعد على إطالة عمر البطارية. هنا يمكنك معرفة المزيد حول إعدادات جهاز MyASUS - مقدمة.
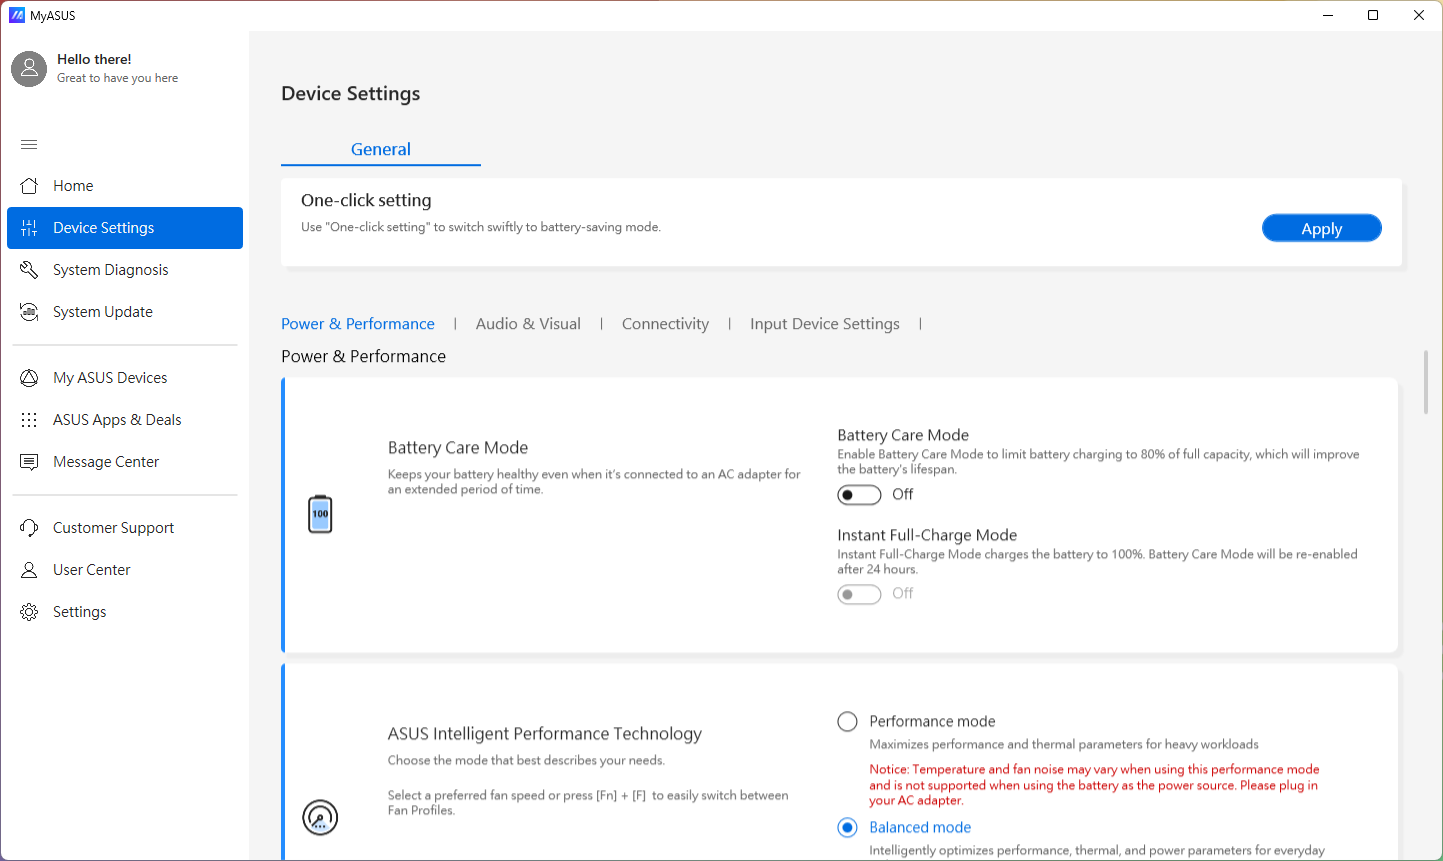
ملاحظة: بالنسبة لطرازات مع Intel Alderlake أو AMD Rembrandt CPU وما قبله، يُشار إلى هذا باسم الشحن الصحي للبطارية في MyASUS (قد تستخدم بعض النماذج برنامجًا منفصلًا). هنا يمكنك معرفة المزيد عن مقدمة حول الشحن الصحي للبطارية من ASUS.
- وضع السعة الكاملة: يمكن شحن البطارية حتى 100%.
- وضع التوازن: يمكن شحن البطارية حتى 80%.
- وضع العمر الافتراضي الأقصى: يسمح للبطارية بالشحن حتى 60% فقط.
إذا لم يتم حل مشكلتك باستخدام الحل والمعلومات أعلاه، يرجى الاتصال بمركز خدمة العملاء ASUS للحصول على مزيد من المعلومات.