[Wireless Router] How to do Professional Wireless settings
NOTE: Some features may vary due to different models and different firmware versions.
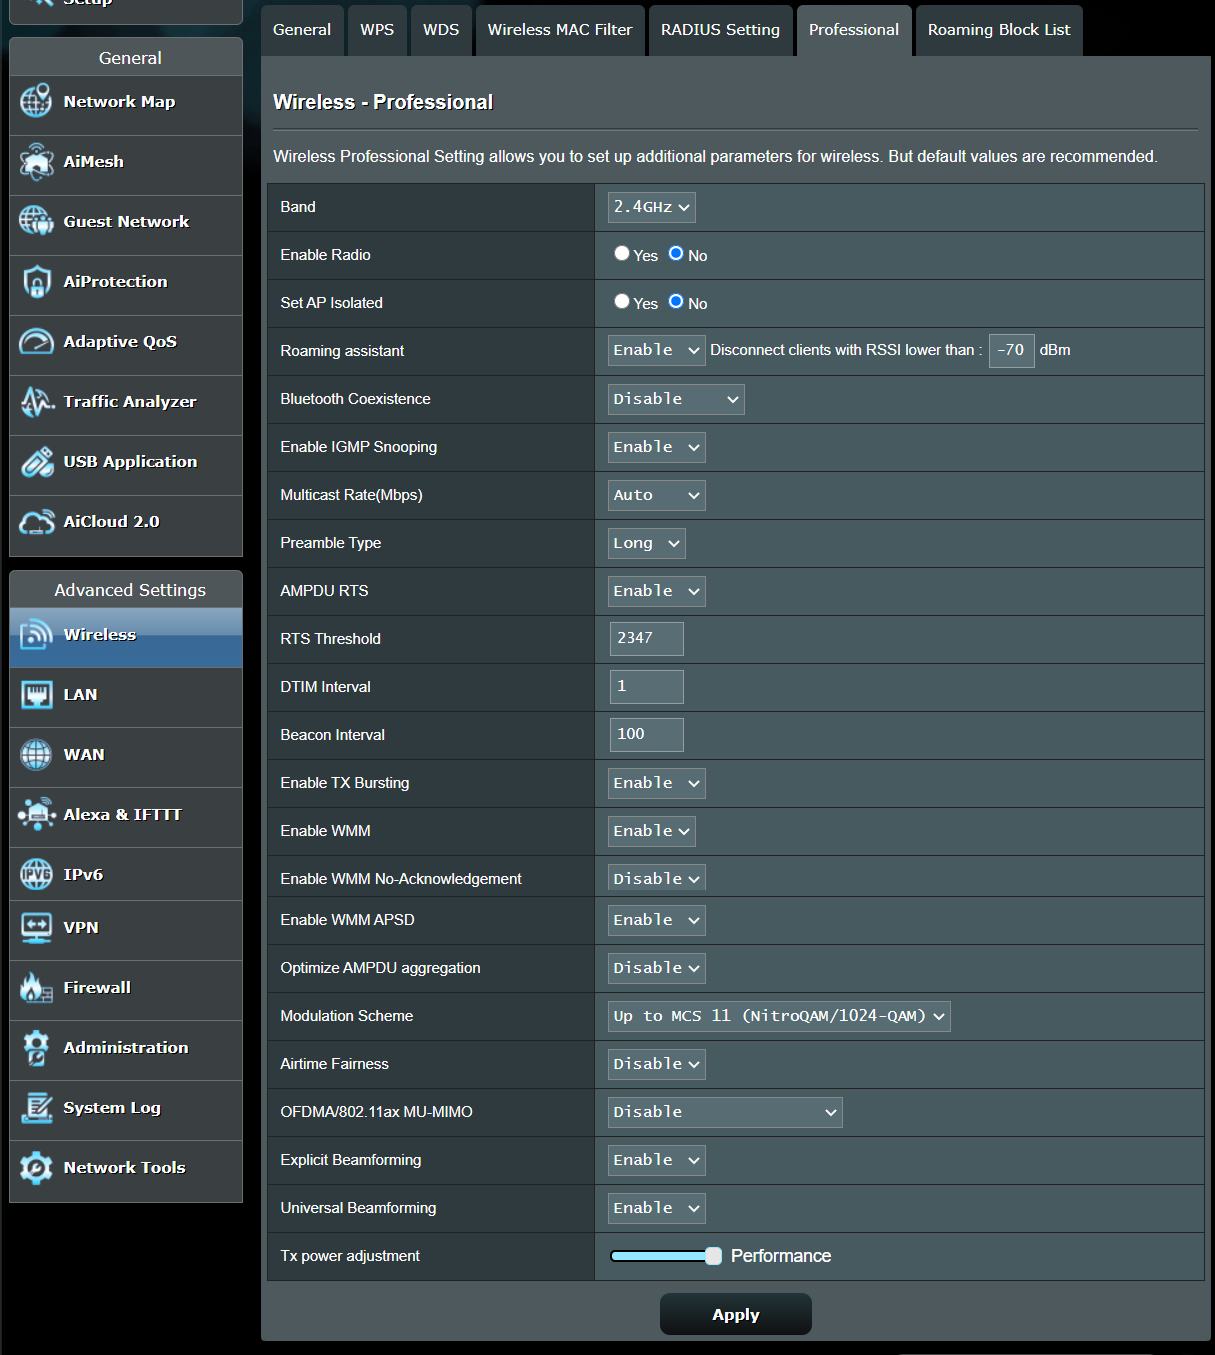
In [Wireless] > [Professional] settings, we provide several functions for each band.

1. Band: Select the band 2.4GHz or 5GHz you want to set up
2. Enable Radio: Select [Yes] to enable radio
3. Enable wireless scheduler: Allow administrators to specify when the wireless network will power off to conserve energy and maintain network security.
4. Date to Enable Radio (week days): This field defines the dates the wireless network is enabled.
5. Time of Day to Enable Radio: This field defines the time interval that wireless function is enabled.
6. Date to Enable Radio (weekend): This field defines the dates the wireless network is enabled.
7. Set IP Isolated: When this feature is enabled, wireless clients or devices will not be able to communicate with each other. You may want to utilize this feature if you have many guests frequently using your wireless network.
8. Roaming assistant: In network configurations that involve multiple Access Points or wireless repeaters, wireless clients sometimes cannot automatically connect to the best available AP because they are still connecting to the main wireless router. Enable this feature so the clients will disconnect automatically from the main wireless router if the signal strength is under specific threshold and connect to a stronger signal.
9. Enable IGMP Snooping: When enabled, IGMP Snooping monitors IGMP Communication among devices and optimizes wireless multicast traffic.
10. Multicast Rate (Mbps): Select the multicast transmission rate.
11. Preamble Type: The Preamble type defines the length of the CRC (Cyclic Redundancy Check), which is a technique for detecting data transmission errors among wireless devices. We recommend that you configure all wireless devices to the same preamble type. Use short preamble for wireless devices in high network traffic areas. Use long preamble for older wireless devices.
12. AMPDU RTS: Use RTS for every AMPDU
13. RTS Threshold: Lower the signal RTS (Request To Send) to promote the transmission efficiency in condition of noisy environment or too many clients.
14. DTIM Interval: Delivery traffic indication message is a countdown field notifying wireless clients of when they can expect the next window for listening to broadcast and multicast messages from the wireless router. This feature is useful for computers configured to enter sleep mode as a DTIM message will notify the client that the wireless router has information that must be sent.
15. Beacon Interval: Beacon Interval means the period of time between one beacon and the next one. The default value is 100 (the unit is in milliseconds, or 1/1000 second). Lower the Beacon Interval to improve transmission performance in unusable environments or roaming clients, but it will be client consuming.
16. Enable TX Bursting: Selecting [Enable] enables TX Bursting to improve the Transmission speed (from AP to client) of 802.11g devices.
17. Enable WMM APSD: Enable or Disable WMM APSD (Automatic Power Save Delivery).
18. Reducing USB 3.0 interference: Enabling this feature ensures the best wireless performance on the 2.4GHz band. Disabling this feature increases USB 3.0 port’s transmission speed and may affect the 2.4GHz wireless range.
19. Optimize AMPDU Aggregation: Optimize max number of MPDUs in an AMPDU.
20. Optimize Ack Suppression: Optimize max number of Ack to suppress in a row.
21. Turbo QAM: 256-QAM (MCS 8/9) support. Wireless Mode must be set to Auto.
22. Airtime Fairness: Provide Airtime Fairness between multiple links.
23. Explicit beamforming: The client’s WLAN adapter and router both support beamforming technology. The technology allows these devices to communicate channel estimation and steering direction to each other to improve download and upload speed. (It’s also called [Explicit Beamforming])
24. Universal Beamforming: For Legacy wireless network adapter that do no support beamforming, the router estimates the channel and determines the steering direction to improve the downlink speed. (It’s also called [Implicit Beamforming])
25. Tx power adjustment: Tx power adjustment for TPC(Transmit power control) and power saving.