Related Topics
[Windows 11/10] Hard disk Partition, Shrink, and Extend
Applicable Products: Notebook, Desktop, All-in-One PC, Gaming Handheld, MiniPC
Disk Management is a built-in tool which Windows provides, it allows you to create a hard disk partition, or shrink the existing hard disk to create new unallocated space that can be used for a new partition.
Note: If you would like to do disk partition or shrink, we recommend that you should back up your personal files first to prevent data lost.
To provide you more detailed instruction, you can also click ASUS YouTube video link below to know more about How to manage Hard Disk Partition in Windows 11.
https://www.youtube.com/watch?v=4IWuTQkNiEs
Please go to the corresponding instruction based on the current Windows operating system on your device:
Create a new partition
If you have a new disk or there is an unallocated disk, you are able to create the new partition by the following steps.
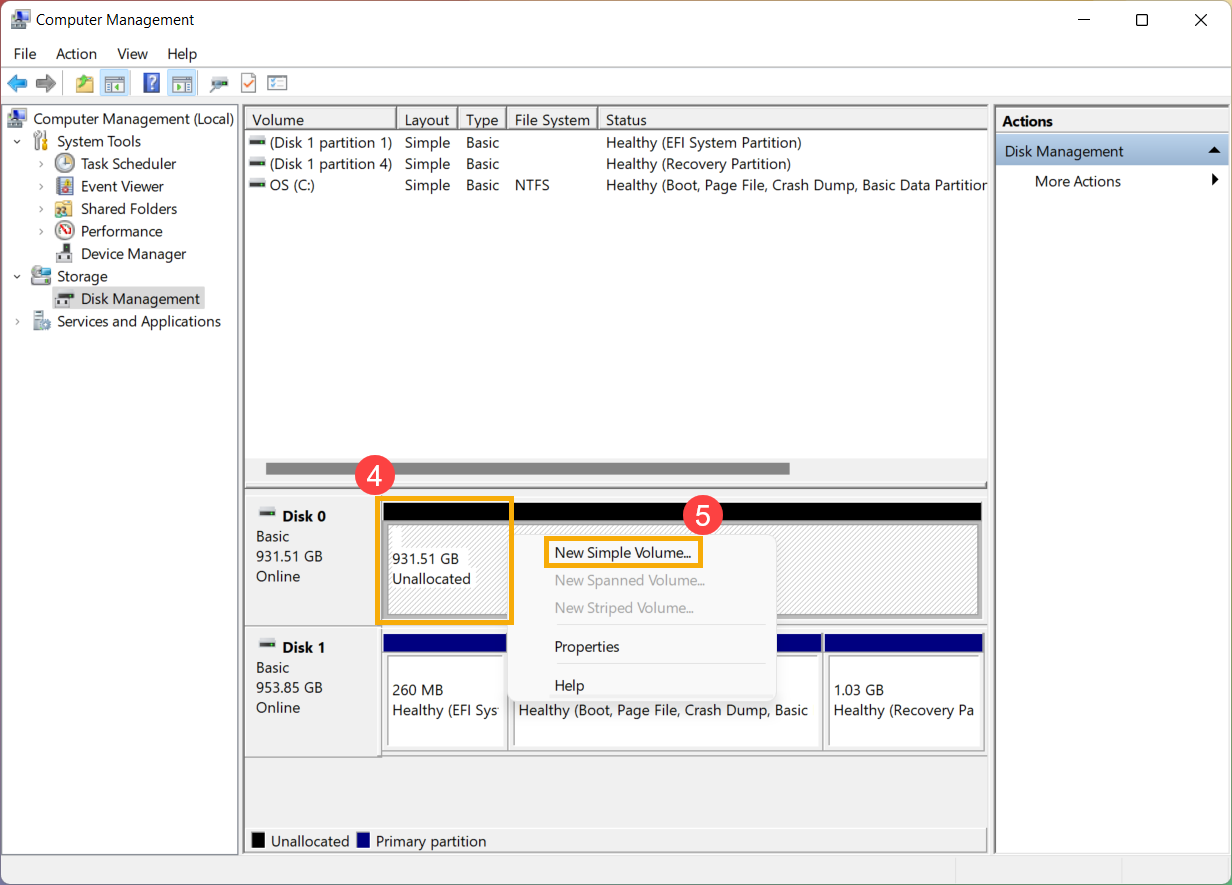
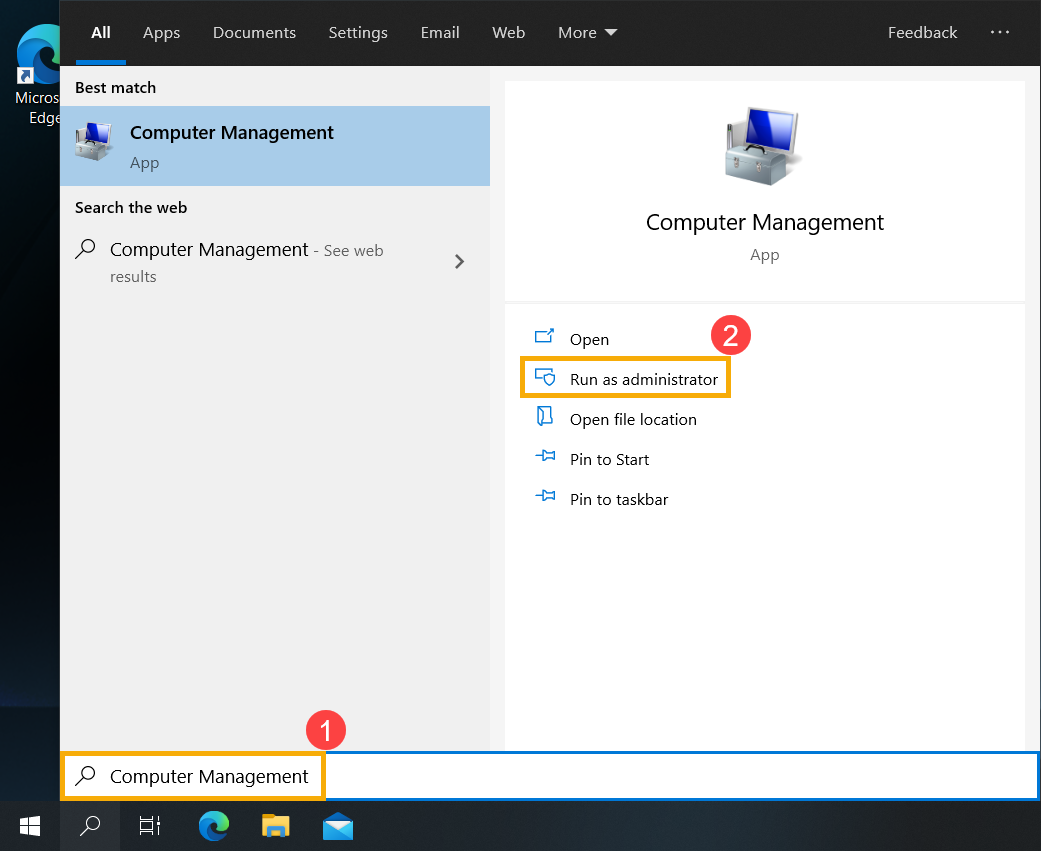
- Type and search [Computer Management] in the Windows search bar①, then click [Run as administrator]②.

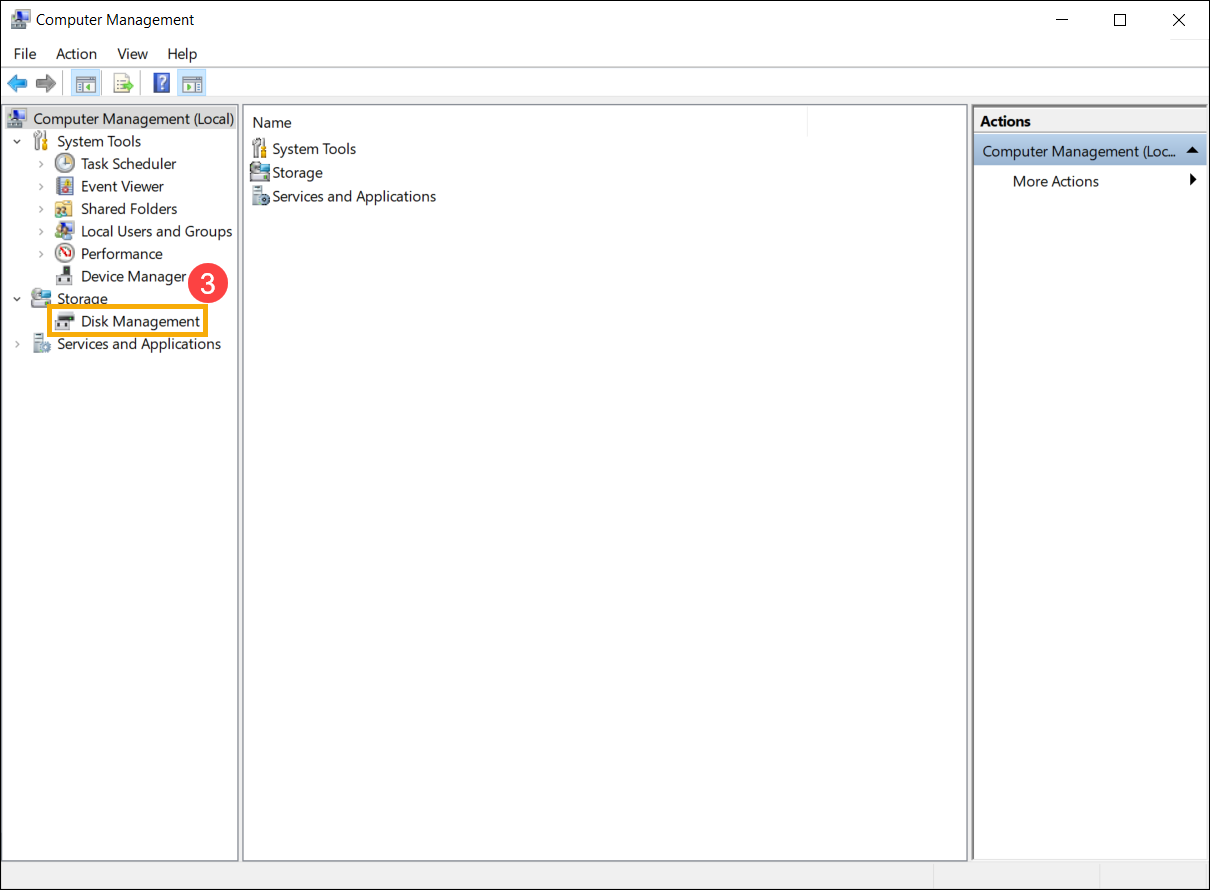
- In Computer Management, select [Disk Management]③.

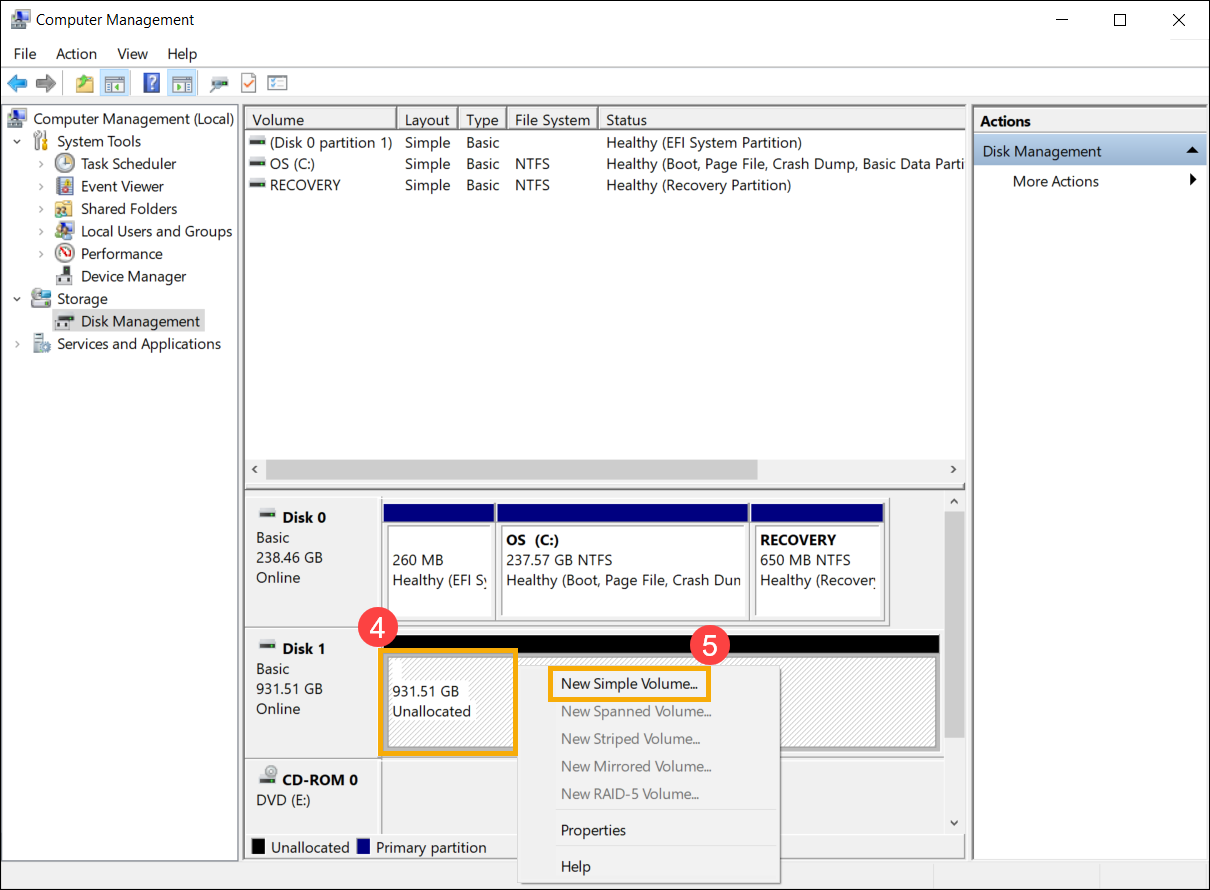
- In Disk Management, right-click an unallocated region on your hard disk④, then select [New Simple Volume]⑤.
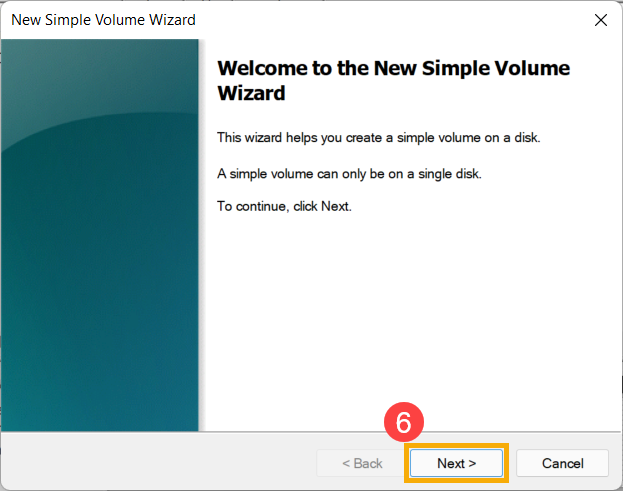
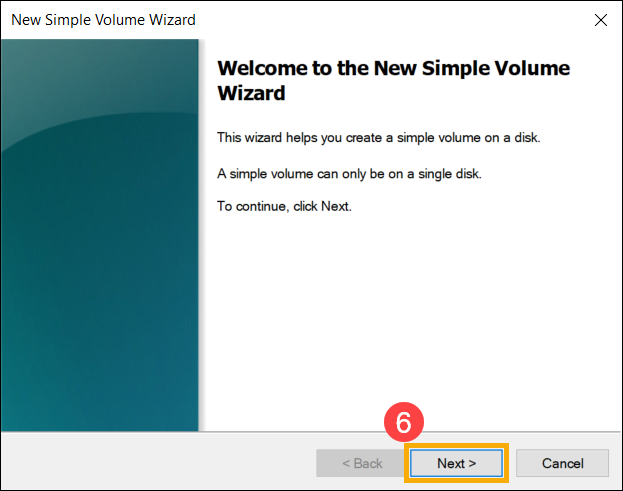
- In New Simple Volume Wizard, select [Next]⑥.
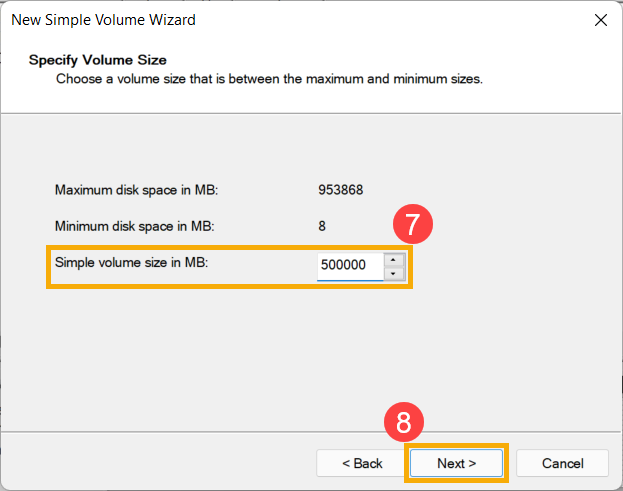
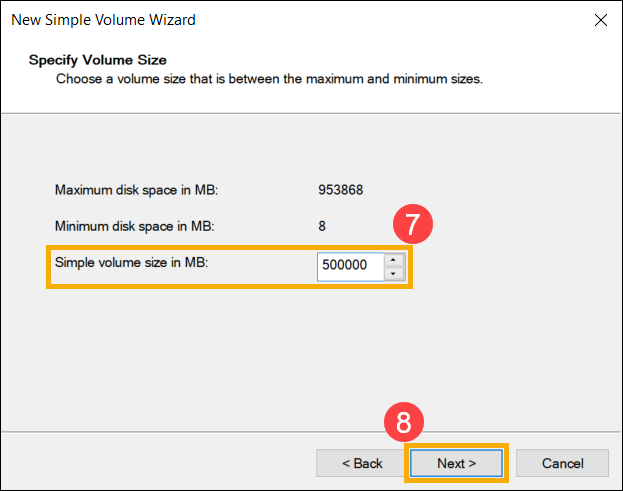
- Enter the size of the volume you want to create or accept the maximum default size⑦, then select [Next]⑧. If the size of the volume you create does not reach the maximum default size, the remaining space will still be the unallocated region.
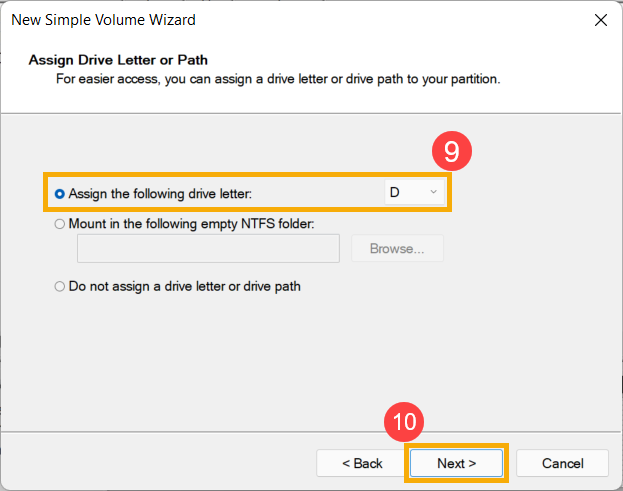
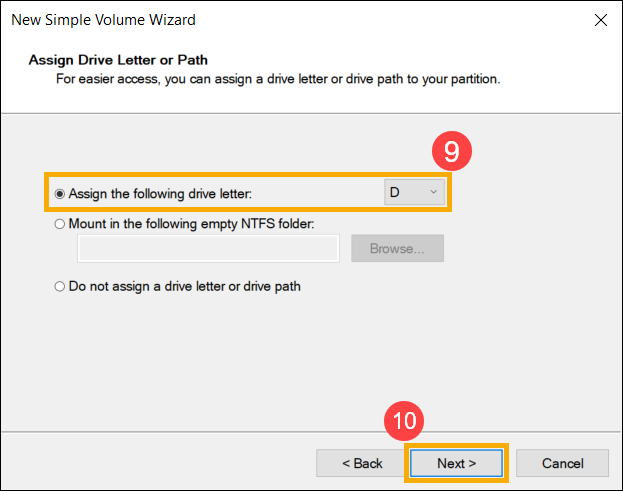
- Select a drive letter or accept the default drive letter to identify the new partition⑨, then select [Next]⑩.
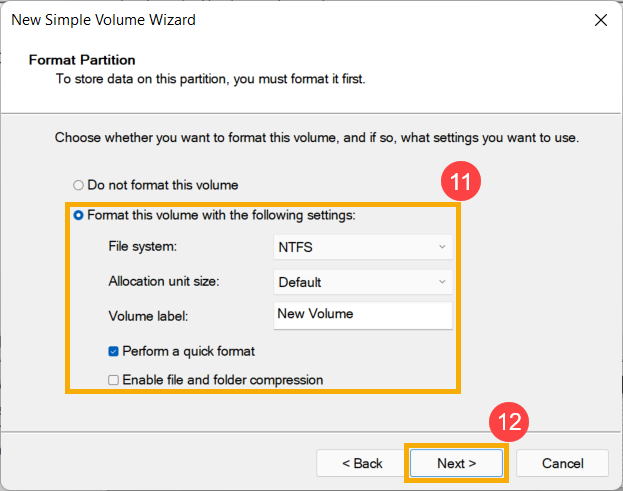
- To format the volume with the default settings, you also can customize the volume label⑪, and then select [Next]⑫.
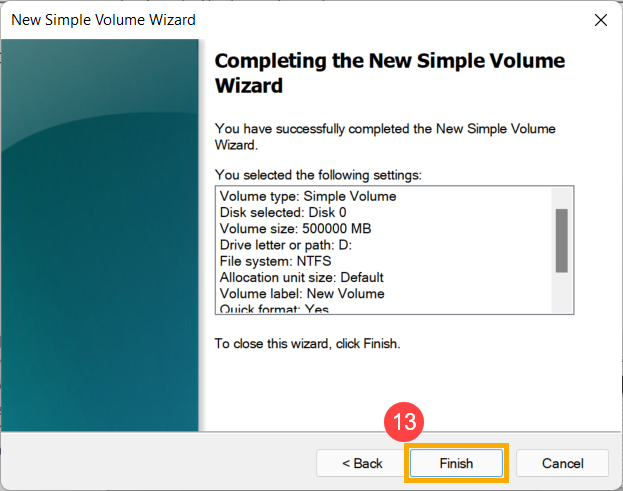
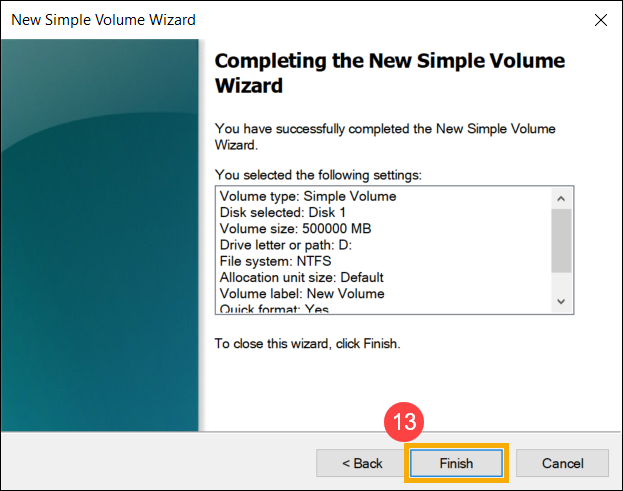
- The new simple volume creation is completed, confirm the following settings you set up, and then select [Finish]⑬.
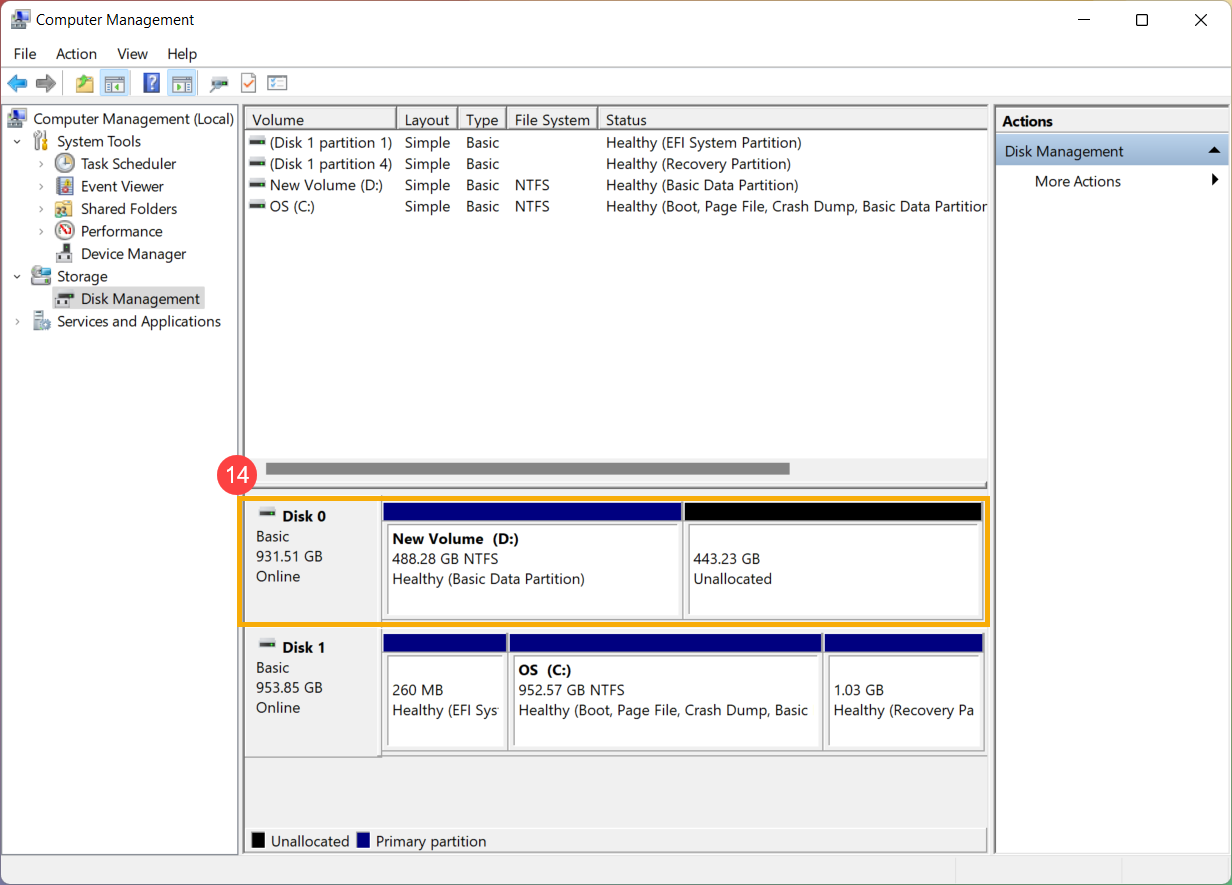
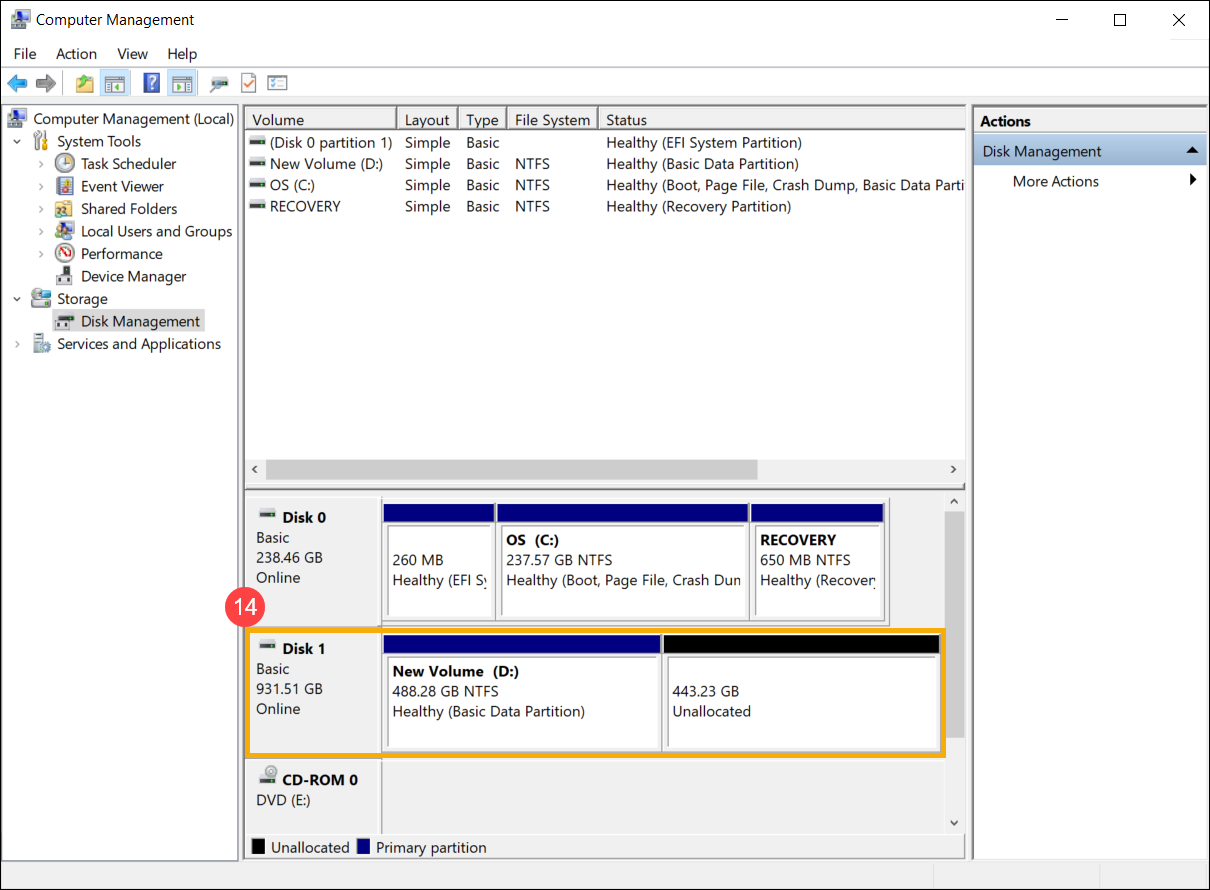
- You can find the new volume that has been created in Disk Management⑭. If there is the remaining space, it will still be the unallocated region, and then the unallocated region that can be created as another partition.
Shrink the existing volume
Shrink Volume allows you to create a new disk space from the existing disk and it will be an unallocated region. If you discover that you need an additional partition but do not have additional disks, you can refer to the following steps to create it.
Note: If the existing partition contains data, to shrink the partition might destroy the data. We recommend that you should back up data before shrinking the partition.
- Type and search [Computer Management] in the Windows search bar①, then click [Run as administrator]②.

- In Computer Management, select [Disk Management]③.

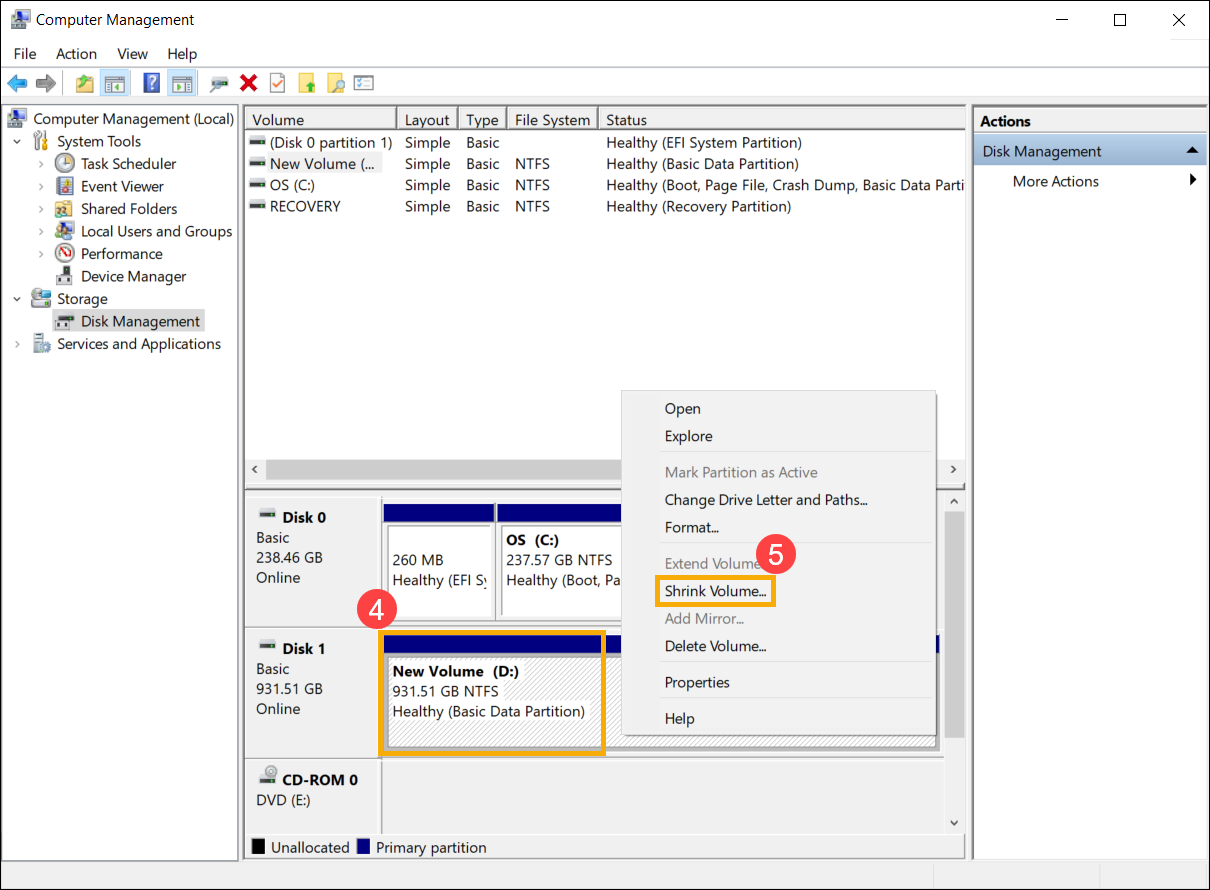
- In Disk Management, right-click the existing volume you want an additional partition④, then select [Shrink Volume]⑤.
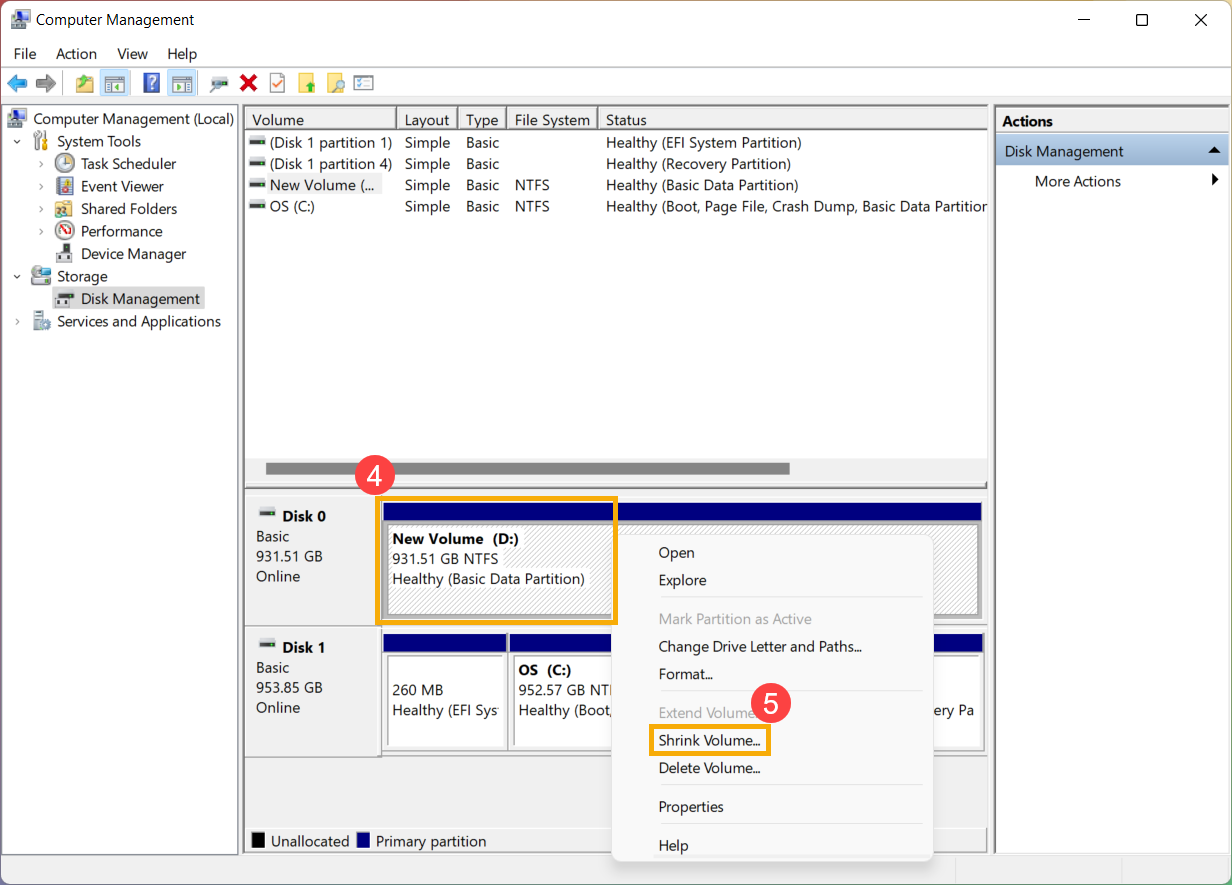
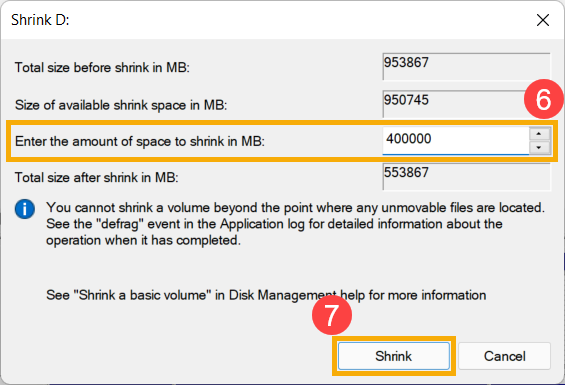
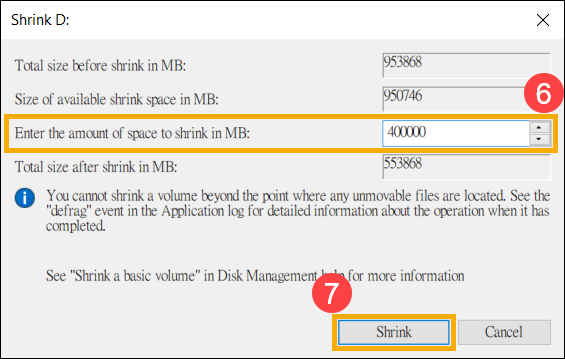
- Shrink volume will automatically calculate the maximum space that you can shrink, you also can enter the size you want to shrink⑥, and then select [Shrink]⑦.
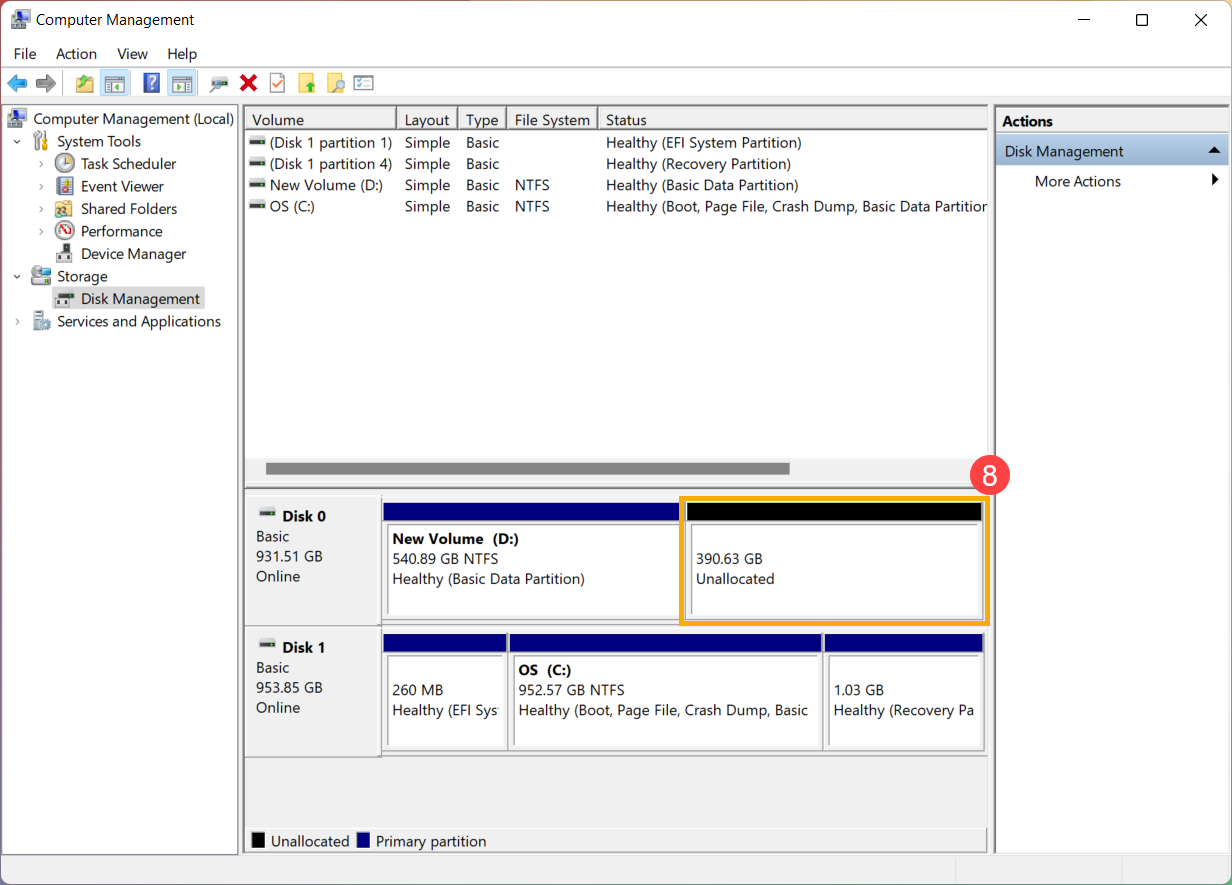
- After the shrink is completed, an unallocated region will be created in Disk Management, and then you can use the unallocated region to create a new partition⑧.
Extend the existing volume
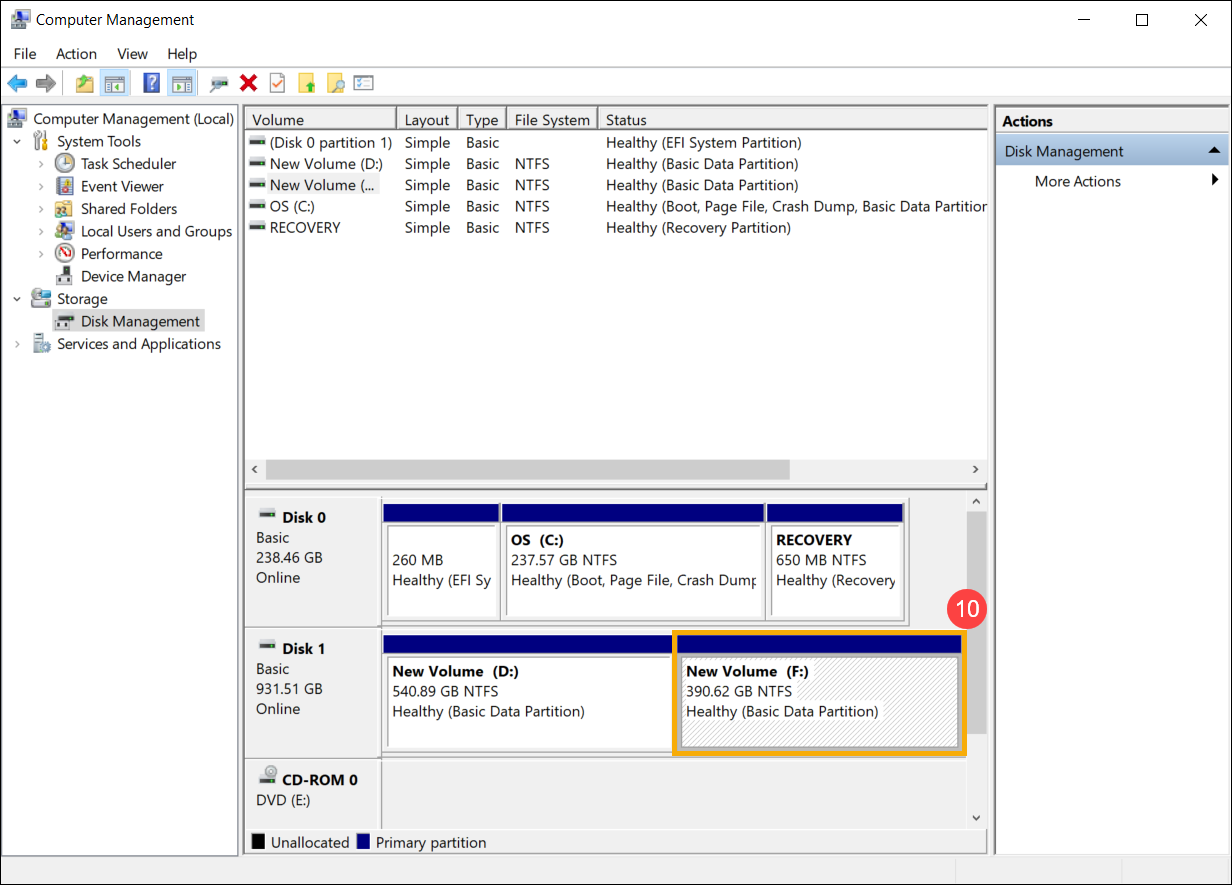
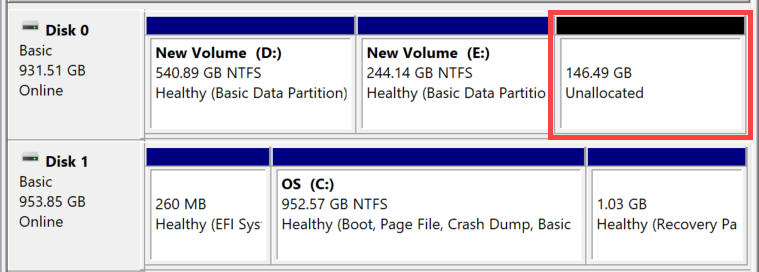
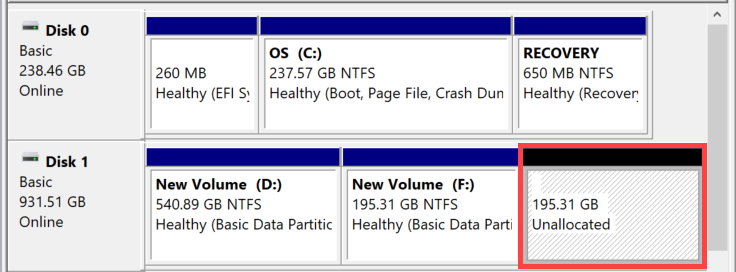
Extend Volume allows you to add space to an existing volume, extending it into empty space on the drive, but only if the empty space doesn’t have a volume on it and comes immediately after the volume you want to extend, with no other volumes in-between, as shown in the following image.
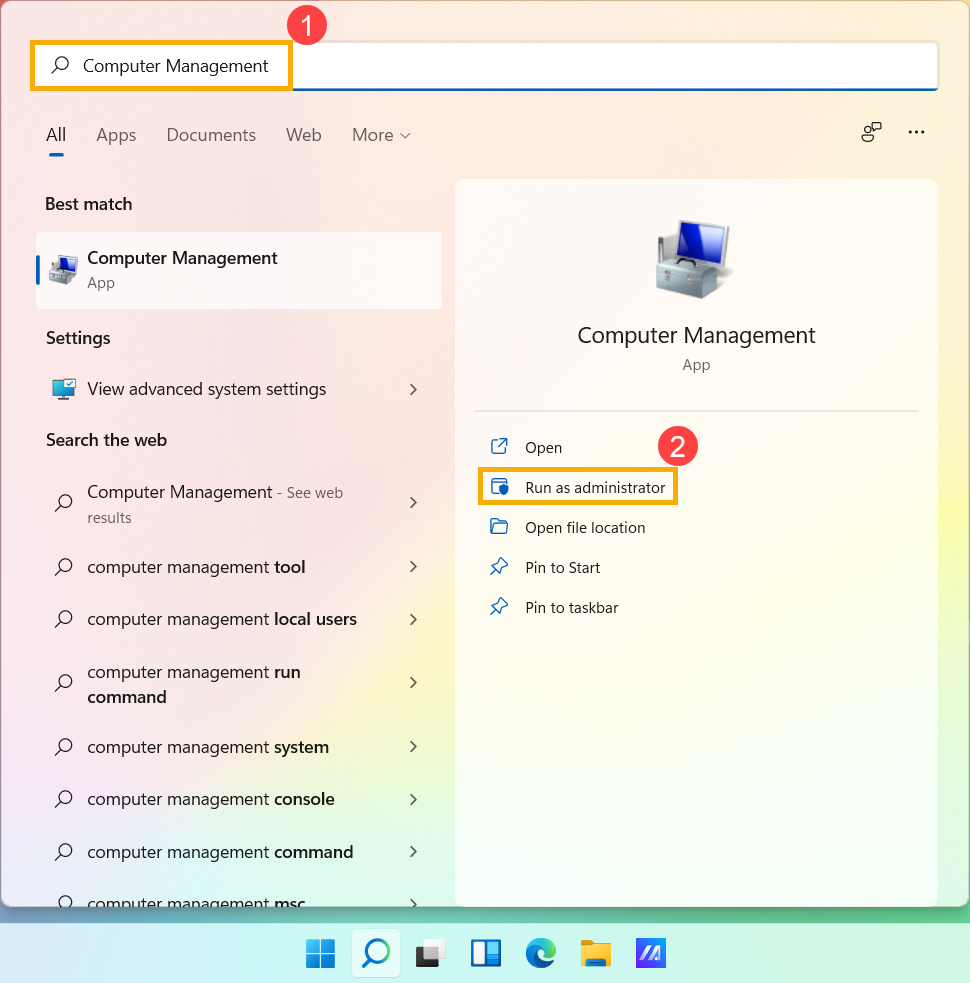
- Type and search [Computer Management] in the Windows search bar①, then click [Run as administrator]②.
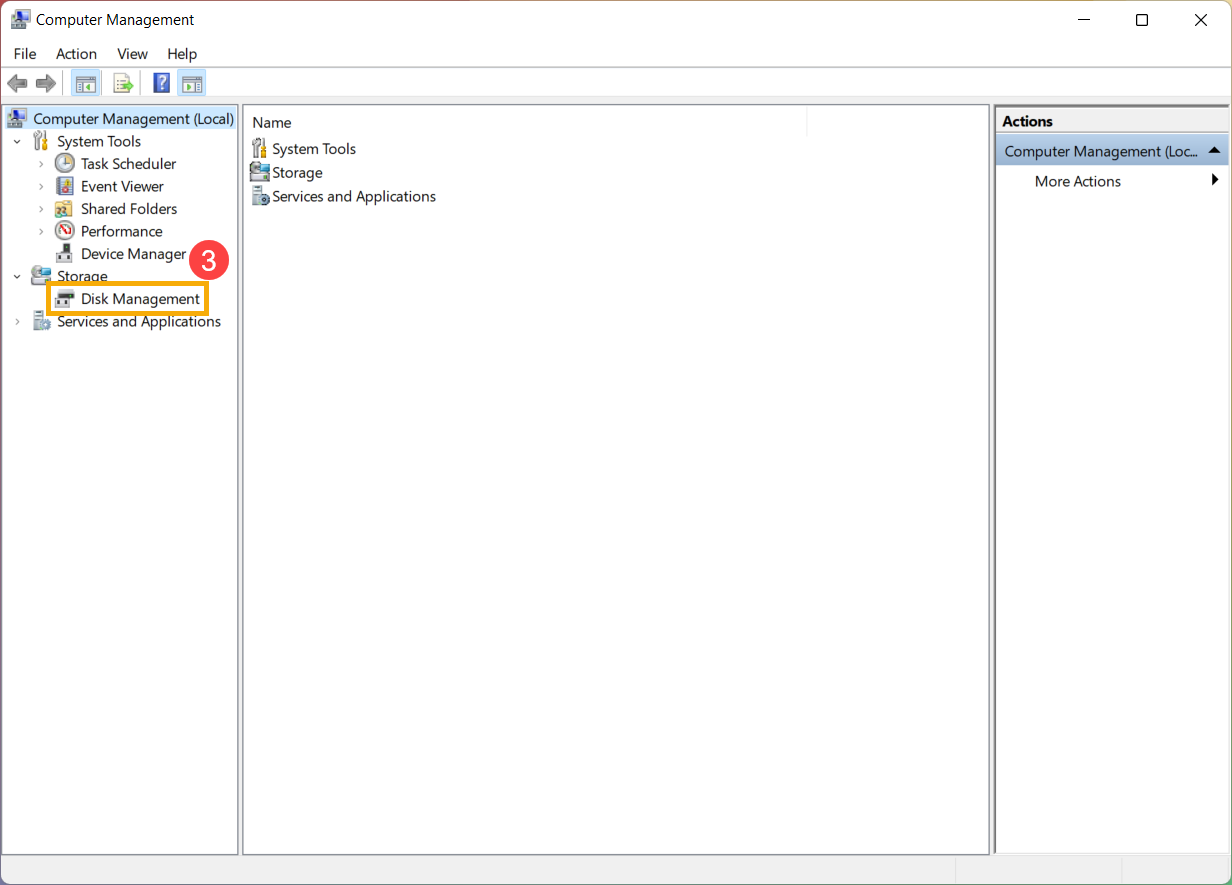
- In Computer Management, select [Disk Management]③.
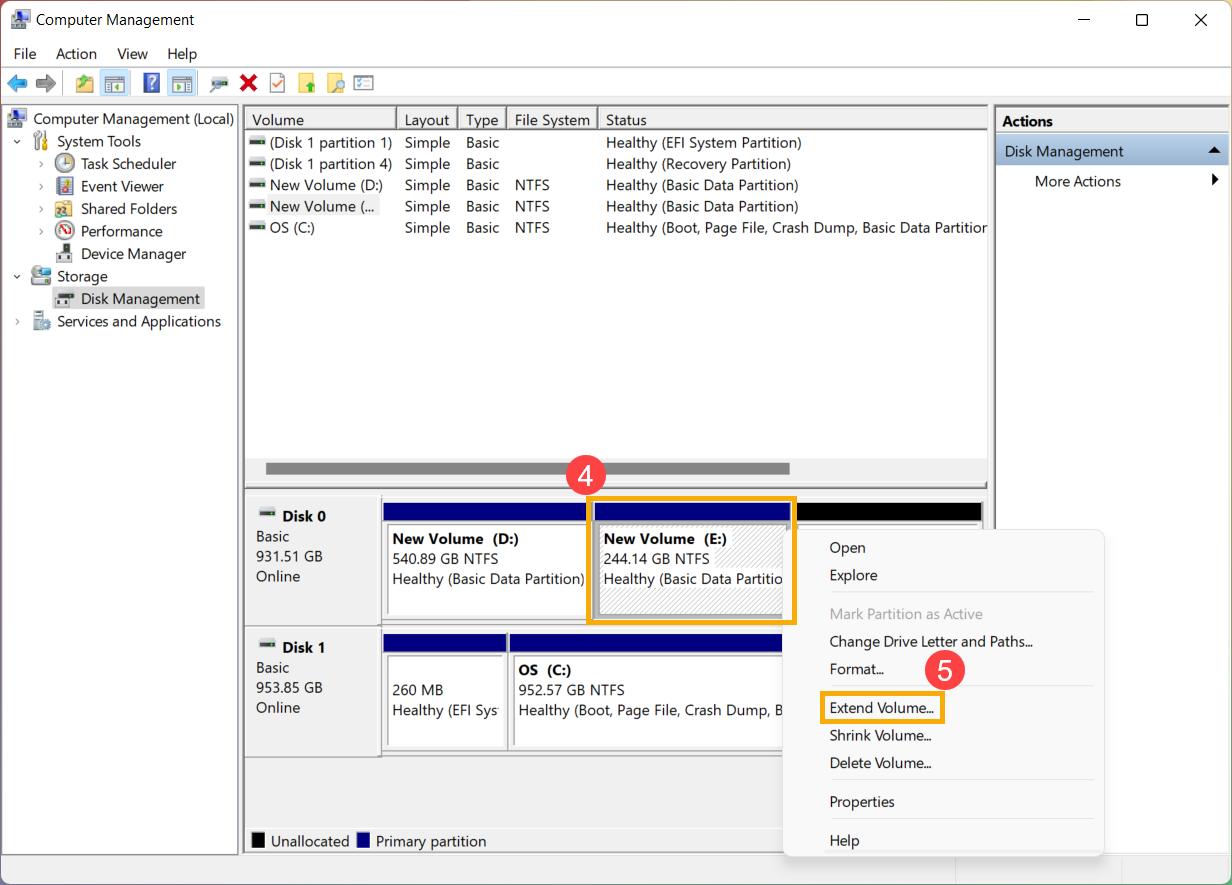
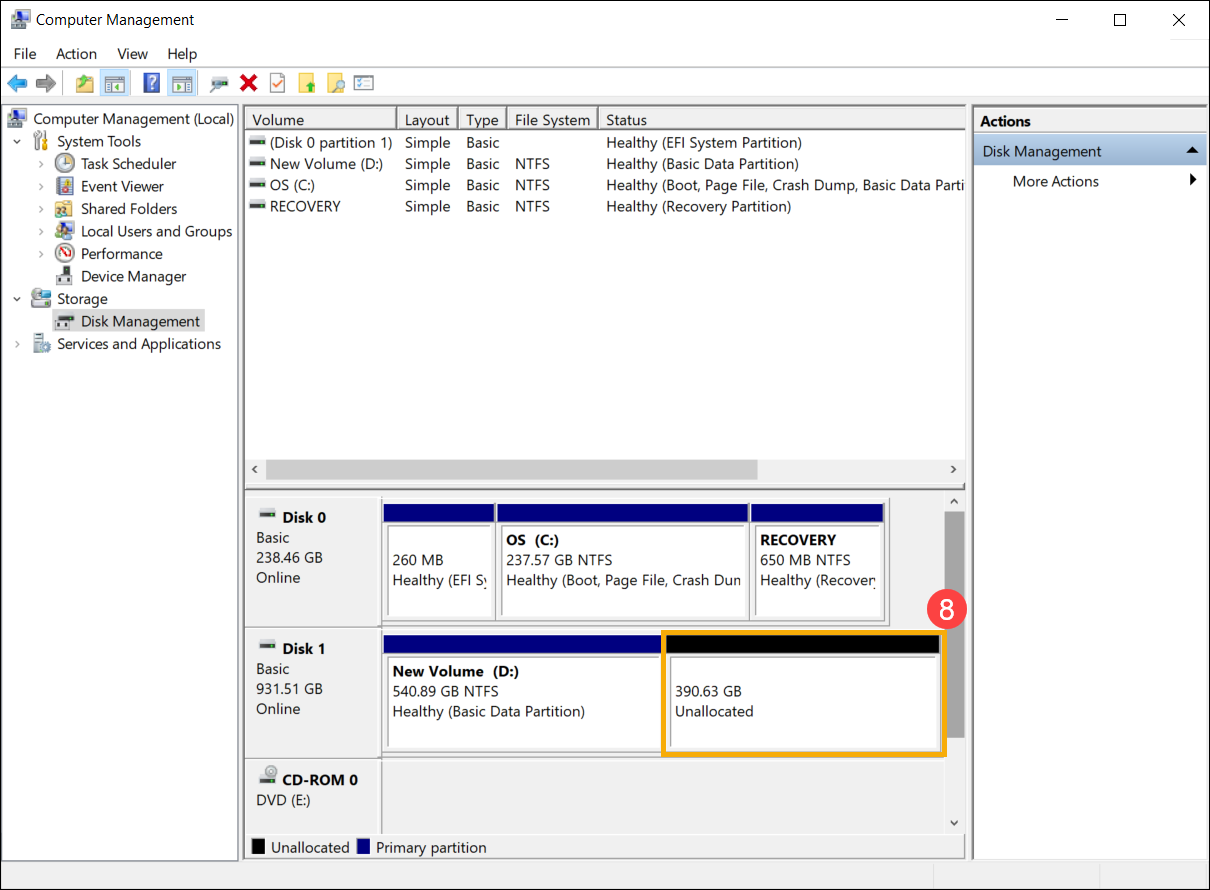
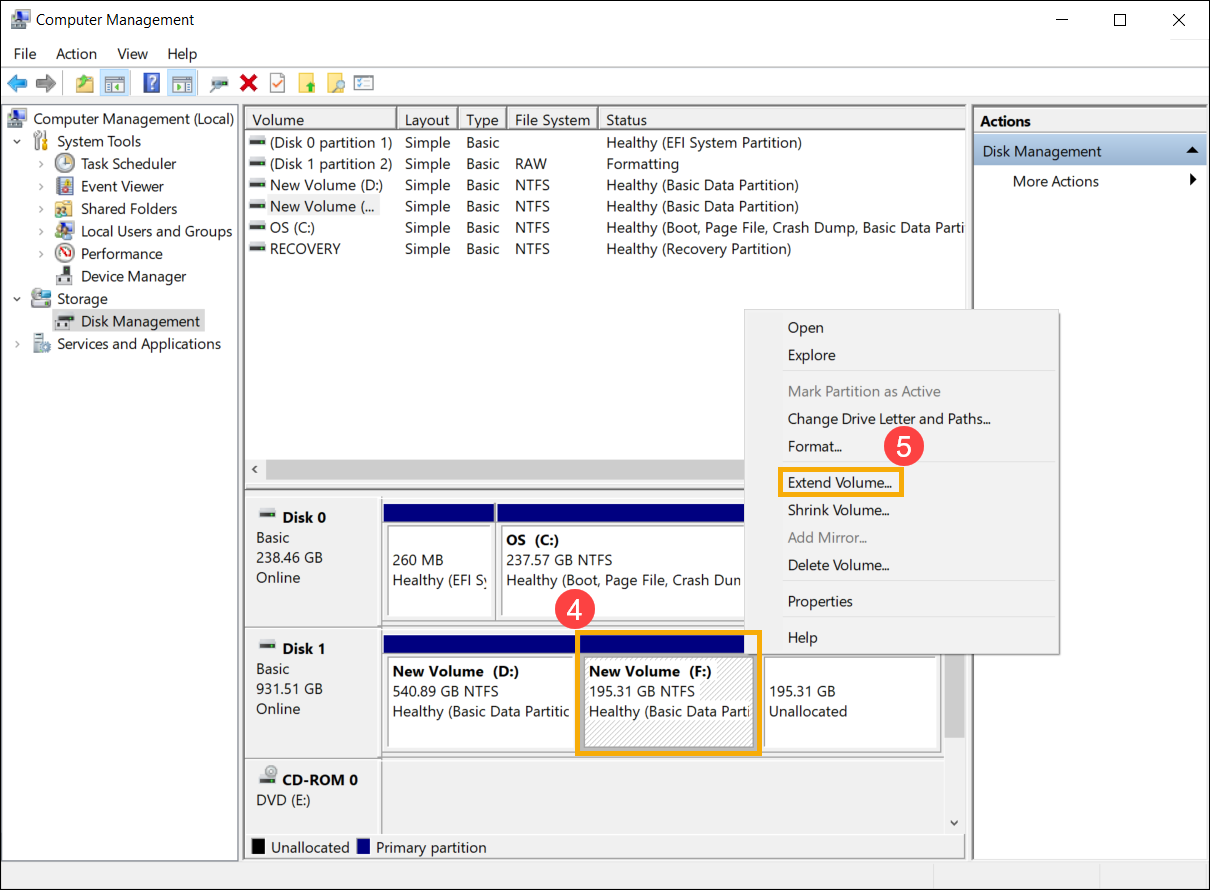
- In Disk Management, right-click the existing volume you want to extend④, then select [Extend Volume]⑤.
If there is no unallocated space, but you want to extend the existing volume, you are able to delete a separate volume, and then it will become unallocated space. However, only if the deleted volume comes immediately after the volume you want to extend, with no other volumes in-between.
Note: The data on it will be deleted if you delete an existing volume, please back up your files first.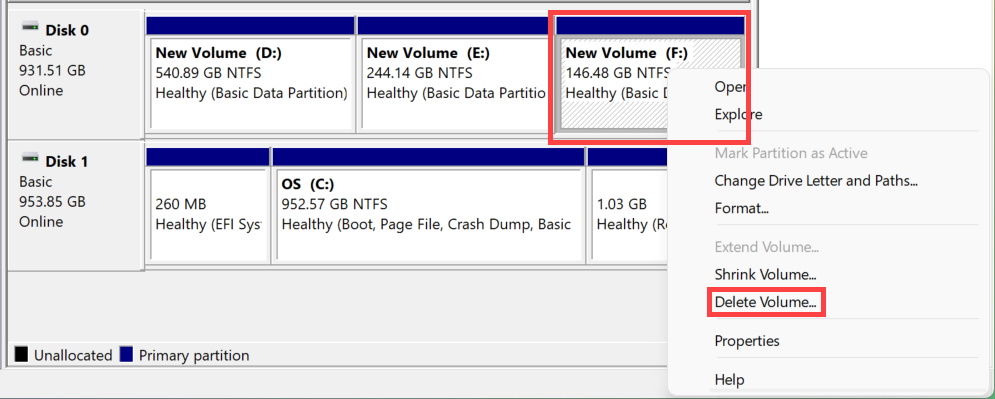
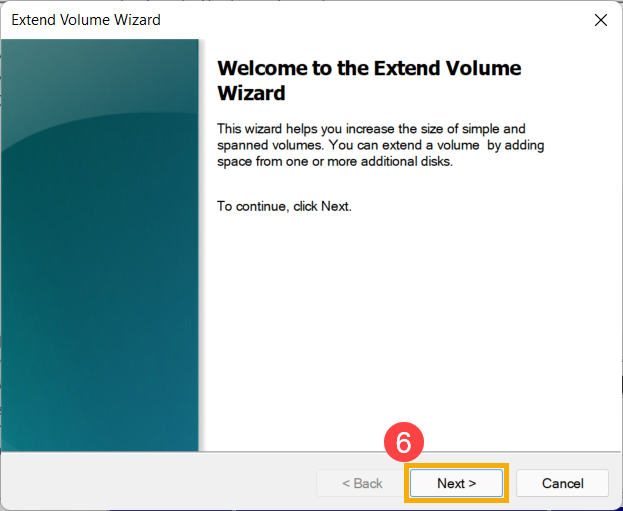
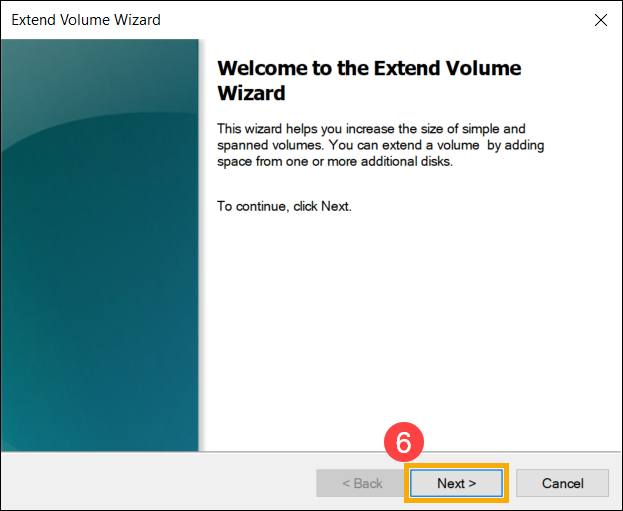
- In Extend Volume Wizard, select [Next]⑥.
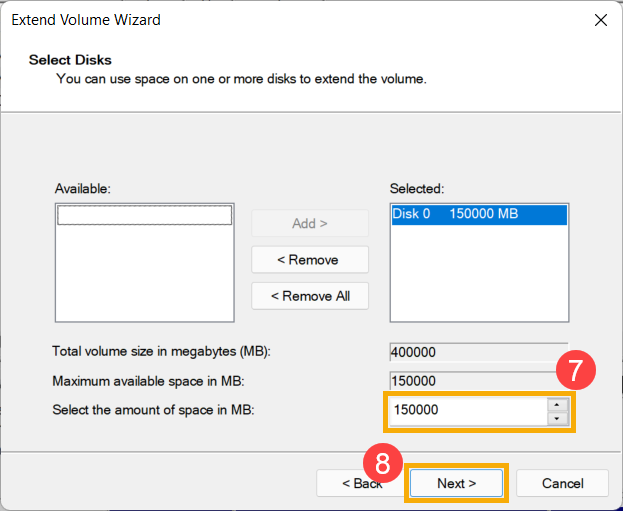
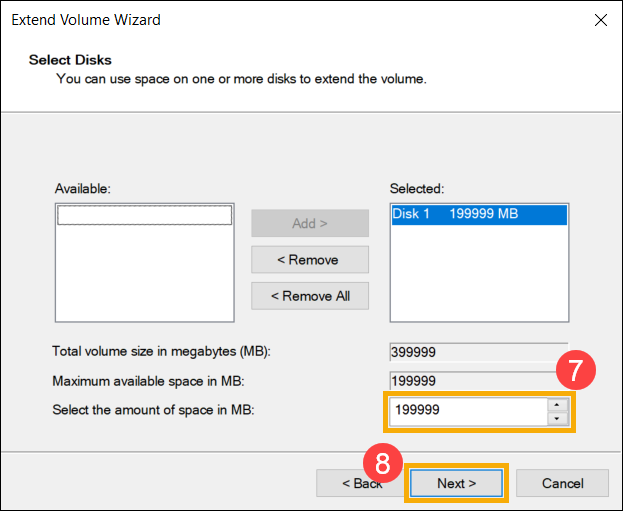
- Enter the size of the volume you want to extend or accept the maximum default size⑦, and then select [Next]⑧. If the size of the volume you extend does not reach the maximum default size, the remaining space will still be the unallocated region.
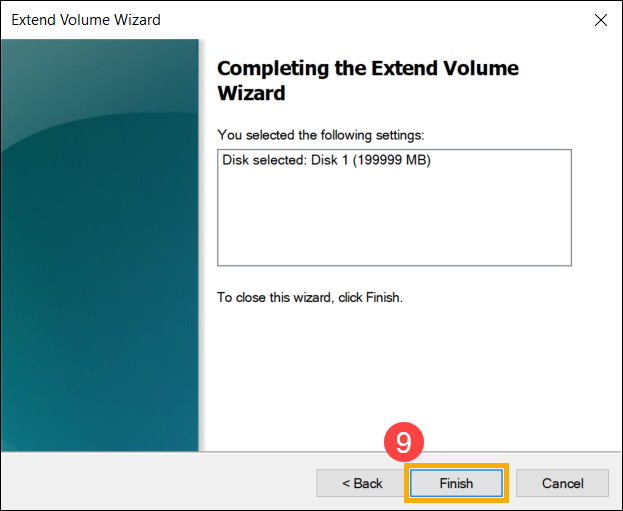
- The volume extension is completed, confirm the following settings you set up, and then select [Finish]⑨.

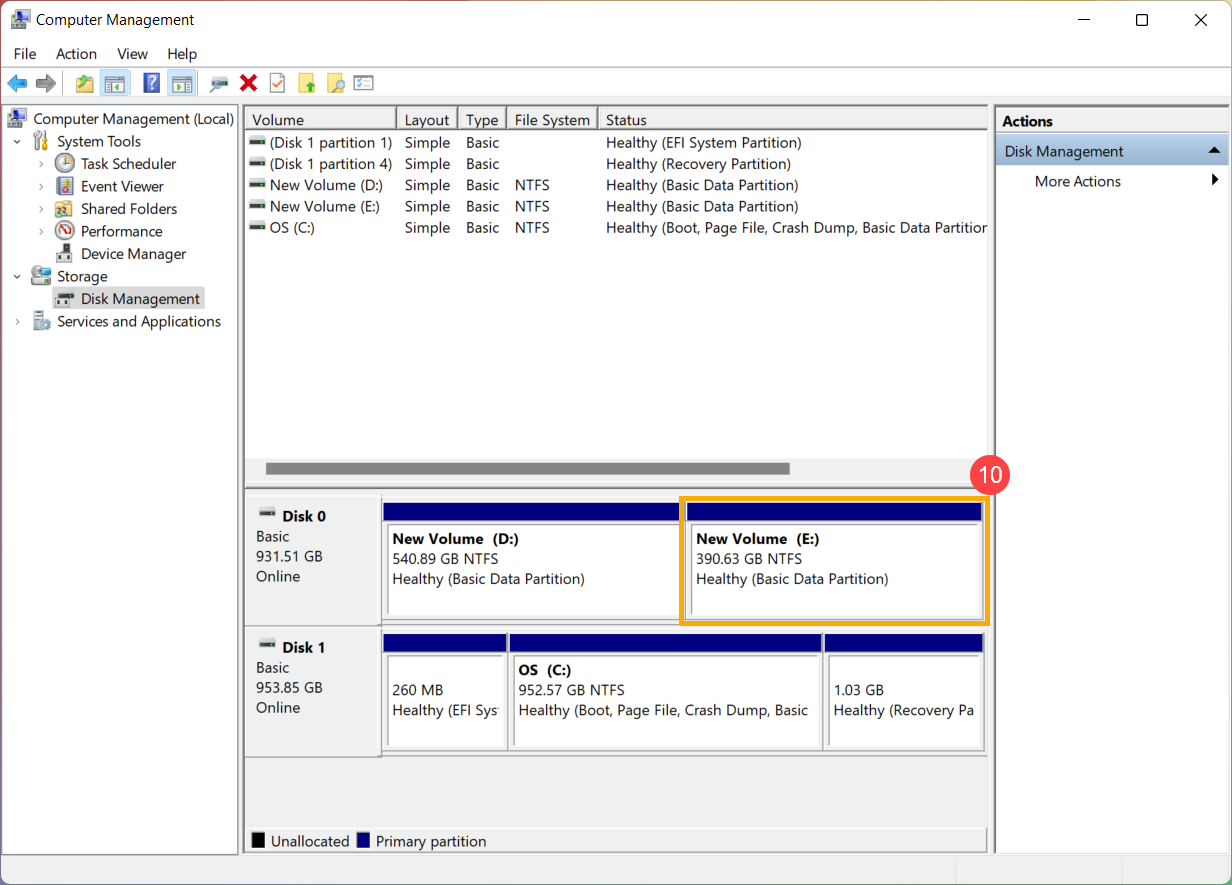
- You can find the volume that has been extended in Disk Management⑩. If there is the remaining space, it will still be the unallocated region, and then the unallocated region that can be created as another partition.
Create a new partition
If you have a new disk or there is an unallocated disk, you are able to create the new partition by the following steps.
- Type and search [Computer Management] in the Windows search bar①, then click [Run as administrator]②.

- In Computer Management, select [Disk Management]③.

- In Disk Management, right-click an unallocated region on your hard disk④, then select [New Simple Volume]⑤.
- In New Simple Volume Wizard, select [Next]⑥.
- Enter the size of the volume you want to create or accept the maximum default size⑦, then select [Next]⑧. If the size of the volume you create does not reach the maximum default size, the remaining space will still be the unallocated region.
- Select a drive letter or accept the default drive letter to identify the new partition⑨, then select [Next]⑩.
- To format the volume with the default settings, you also can customize the volume label⑪, and then select [Next]⑫.

- The new simple volume creation is completed, confirm the following settings you set up, and then select [Finish]⑬.
- You can find the new volume that has been created in Disk Management. If there is the remaining space, it will still be the unallocated region, and then the unallocated region that can be created as another partition⑭.
Shrink the existing volume
Shrink Volume allows you to create a new disk space from the existing disk and it will be an unallocated region. If you discover that you need an additional partition but do not have additional disks, you can refer to the following steps to create it.
Note: If the existing partition contains data, to shrink the partition might destroy the data. We recommend that you should back up data before shrinking the partition.
- Type and search [Computer Management] in the Windows search bar①, then click [Run as administrator]②.
- In Computer Management, select [Disk Management]③.

- In Disk Management, right-click the existing volume you want an additional partition④, then select [Shrink Volume]⑤.
- Shrink volume will automatically calculate the maximum space that you can shrink, you also can enter the size you want to shrink⑥, and then select [Shrink]⑦.
- After the shrink is completed, an unallocated region will be created in Disk Management, and then you can use the unallocated region to create a new partition⑧.
Extend the existing volume
Extend Volume allows you to add space to an existing volume, extending it into empty space on the drive, but only if the empty space doesn’t have a volume on it and comes immediately after the volume you want to extend, with no other volumes in-between, as shown in the following image.
- Type and search [Computer Management] in the Windows search bar①, then click [Run as administrator]②.

- In Computer Management, select [Disk Management]③.
- In Disk Management, right-click the existing volume you want to extend④, then select [Extend Volume]⑤.
If there is no unallocated space, but you want to extend the existing volume, you are able to delete a separate volume, and then it will become unallocated space. However, only if the deleted volume comes immediately after the volume you want to extend, with no other volumes in-between.
Note: The data on it will be deleted if you delete an existing volume, please back up your files first.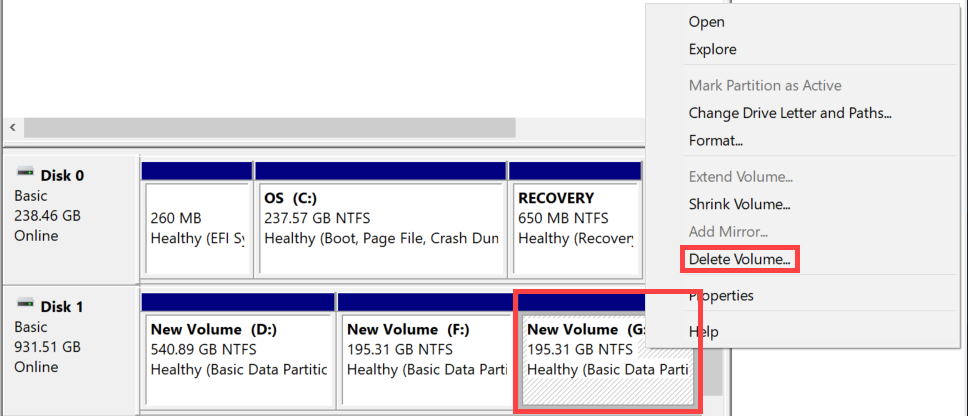
- In Extend Volume Wizard, select [Next]⑥.
- Enter the size of the volume you want to extend or accept the maximum default size⑦, and then select [Next]⑧. If the size of the volume you extend does not reach the maximum default size, the remaining space will still be the unallocated region.
- The volume extension is completed, confirm the following settings you set up, and then select [Finish]⑨.
- You can find the volume that has been extended in Disk Management. If there is the remaining space, it will still be the unallocated region, and then the unallocated region that can be created as another partition⑩.