Relaterte emner
[Windows 11/10] Troubleshooting - Cannot Find Drives When Installing Windows OS
Applicable Products: Notebook, Desktop, All-in-One PC, Gaming Handheld, MiniPC, ASUS NUC
Note: The solutions described in this article for resolving issues where no disk drive is found during Windows installation apply only to Intel 11th generation (Tiger Lake, TGL), 12th generation (Alder Lake, ADL), 13th generation (Raptor Lake, RPL), and 14th generation (Arrow Lake, ARL) x86/x64 architecture processors. When installing a retail version of Windows, you must first load the Intel Rapid Storage Technology (IRST) driver to complete the installation successfully.
For Intel 15th generation (Lunar Lake Core Ultra) series processors or newer platforms, Windows now utilizes the native NVMe storage architecture, and manual installation of the IRST driver is no longer required. Simply use Windows 11 version 24H2 or later to complete the OS installation.
For ARM architecture devices (such as Qualcomm® CPU platforms), please refer to this article for reinstallation instructions: Cloud Recovery within MyASUS in WinRE - Introduction.
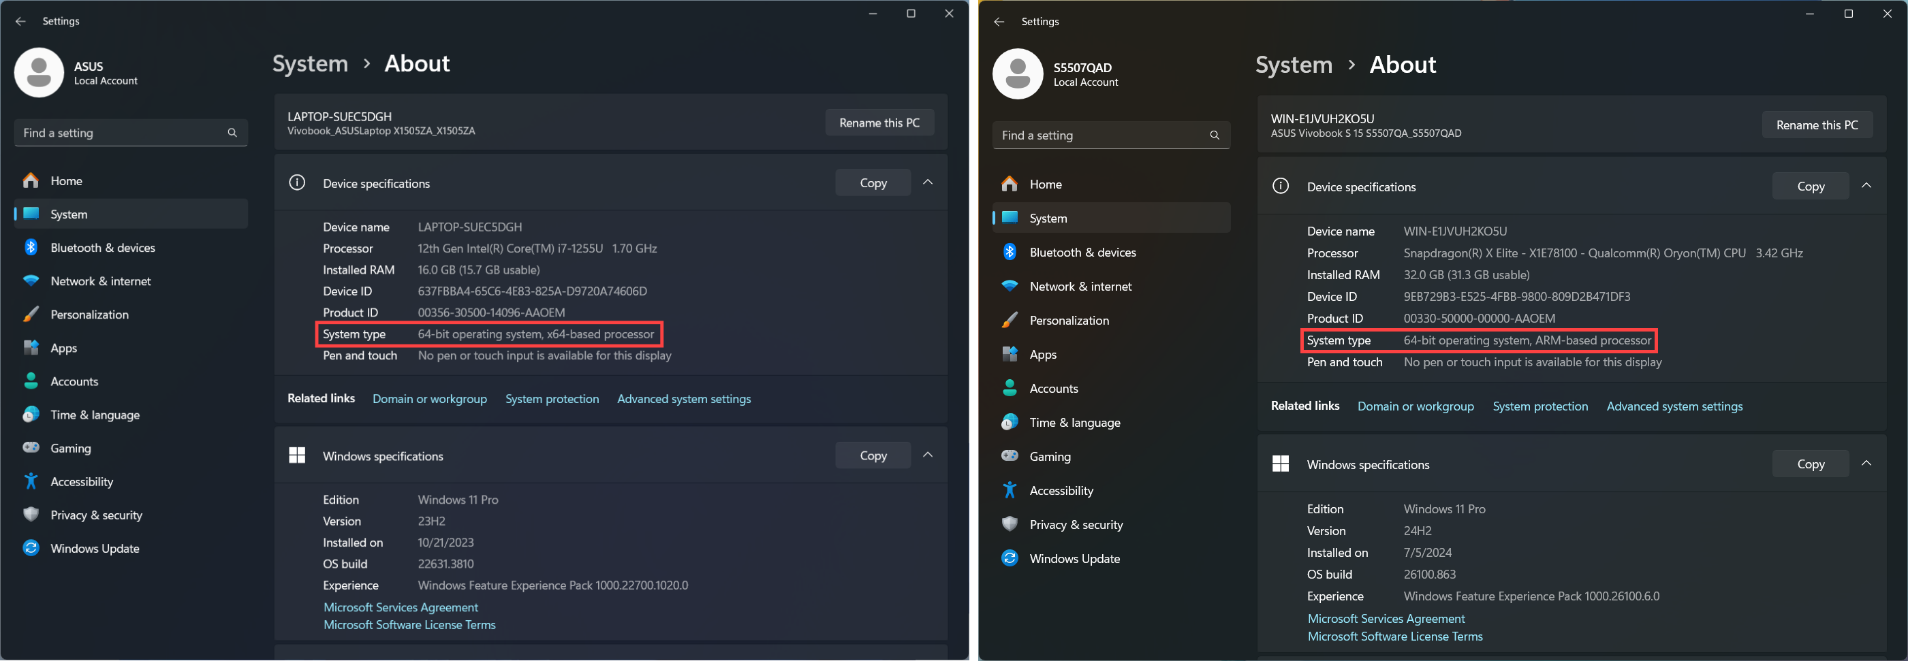
Note: How to determine the architecture of your device.
Navigate to Windows Settings > System > About. Here, you can view the architecture of your device under System type. (The image on the left shows an x64 architecture; the image on the right shows an ARM architecture.)
This article provides a troubleshooting guide on how to solve the issue of not being able to find a disk drive during the installation of Windows 11/10. The solution is to load the corresponding driver during the installation process.
To provide you more detailed instruction, you can also click ASUS YouTube video link below to know more about How to fix cannot find drives when installing Windows 11/10:
https://www.youtube.com/watch?v=HuCY0ChsqAM
For the Intel CPU platform, you need to manually install Intel Rapid Storage Technology (IRST) driver during the Windows installation process. You can also refer to the Intel document of How to Configure RAID or Intel Optane Memory with Intel RST on an Intel VMD Capable Platform.
Note: The following pictures are a reference, it may be various depending on the different versions.
Method 1: Manually install Intel Rapid Storage Technology (IRST) driver
Download and Extract Intel Rapid Storage Technology (IRST) driver
- Please refer to this article: How to search and download drivers. Afterwards, visit the support page of your device model and download the Intel Rapid Storage Technology (IRST) driver from the Chipset category.
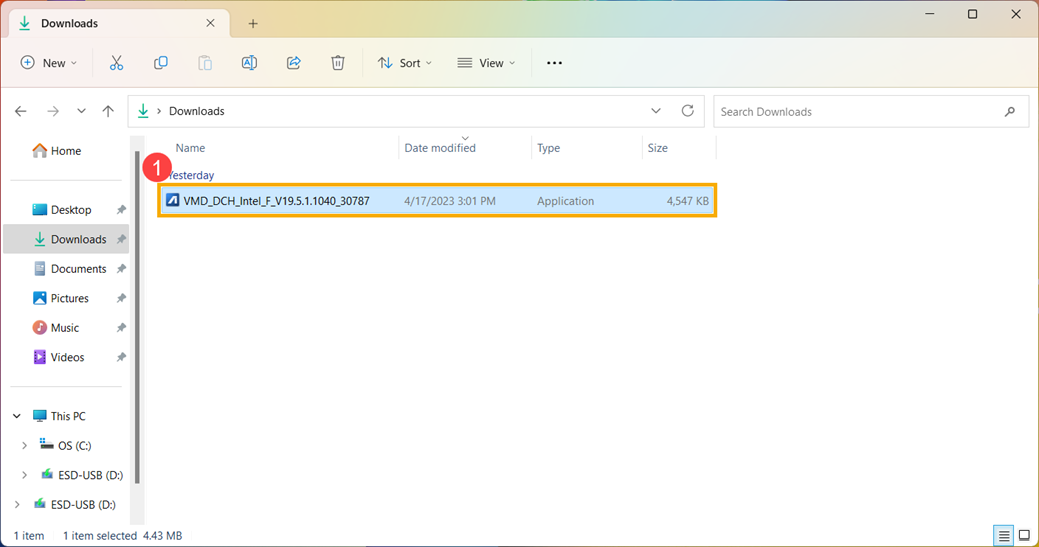
Note: The following steps use version V19.5.1.1040 as an example, and the images are for reference only. You should download the latest version for your device model.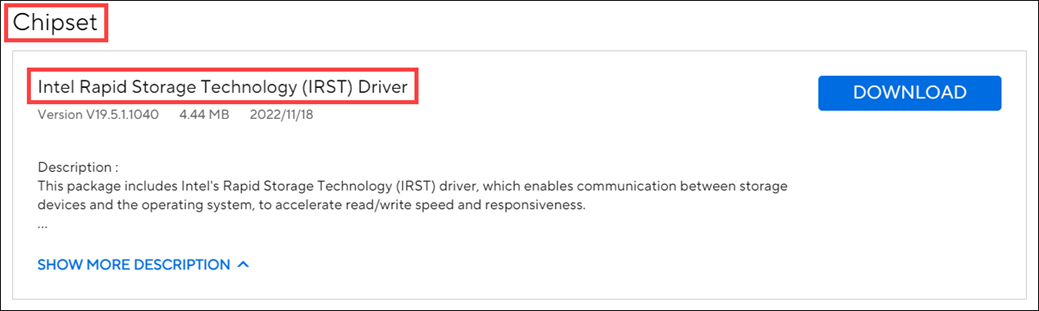
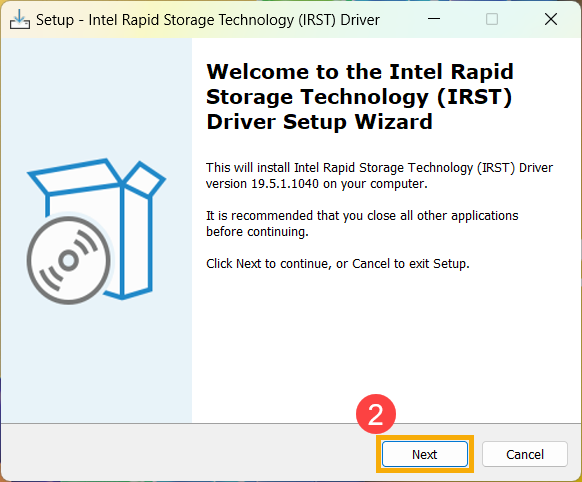
- After the download is complete, double-click on the downloaded file [VMD_DCH_Intel_F_V19.5.1.1040_30787]①.
- When the IRST Setup Wizard opens, click [Next]②.
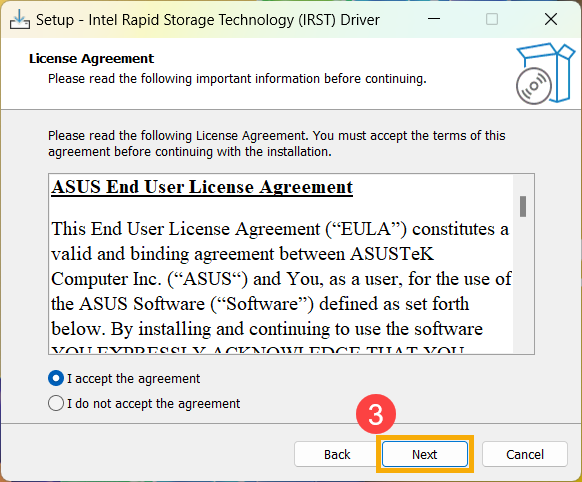
- Read and accept the Asus software license agreement, and then click [Next]③.
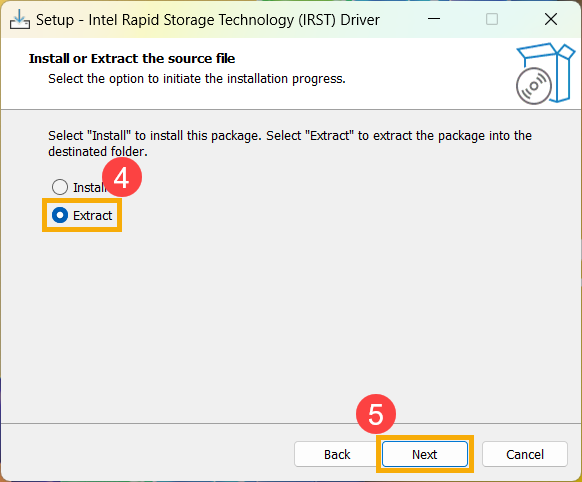
- Choose [Extract]④ and then click [Next]⑤.
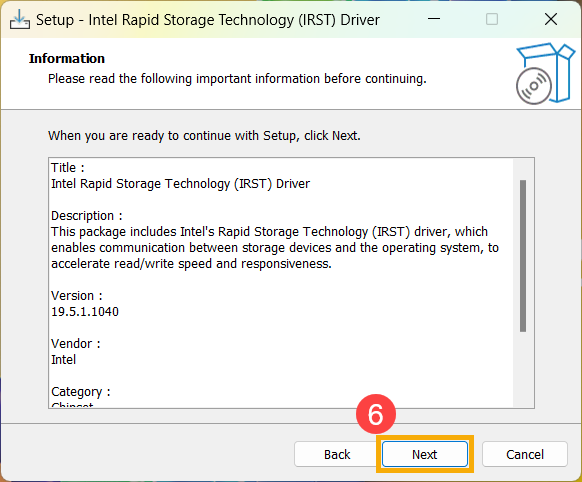
- Read the important information and then click [Next]⑥.
- When selecting the destination folder, connect the USB flash drive to the device and click [Browse]⑦.
Note: If your Windows 11/10 installation media is also using a USB flash drive, you can choose to extract the package to the same flash drive.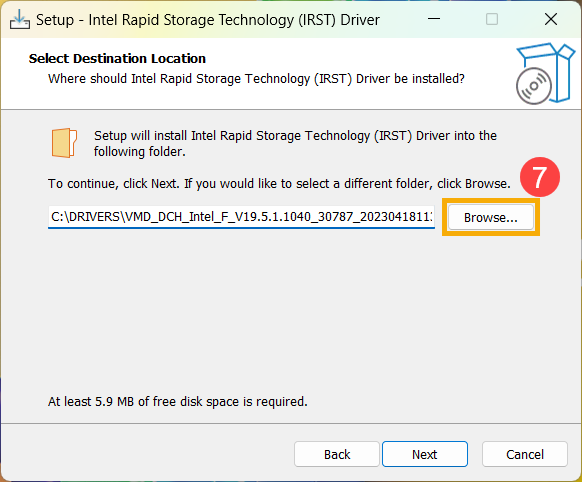
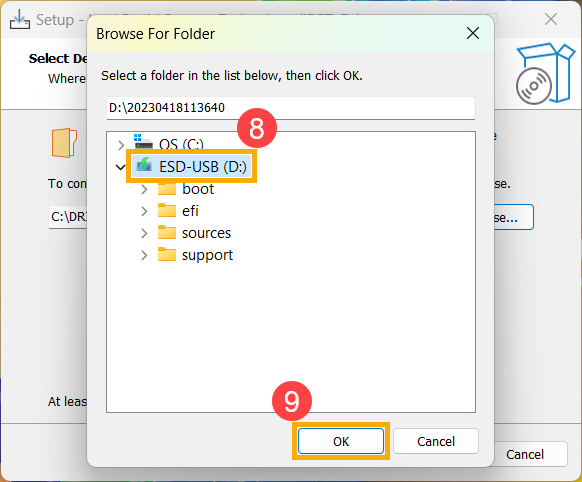
- Choose the root directory of the USB flash drive⑧ and then click [OK]⑨.
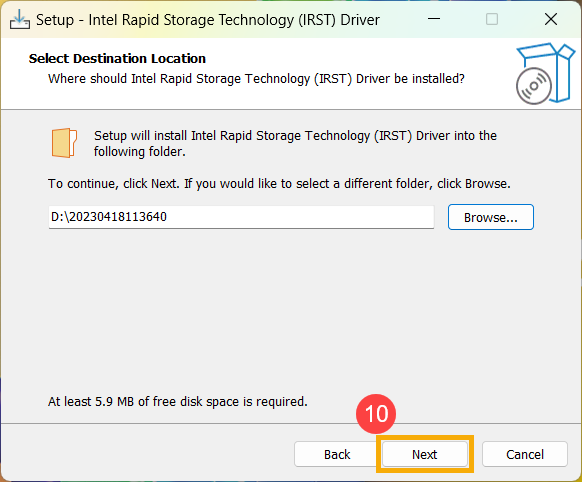
- After selecting the destination folder, click [Next]⑩.
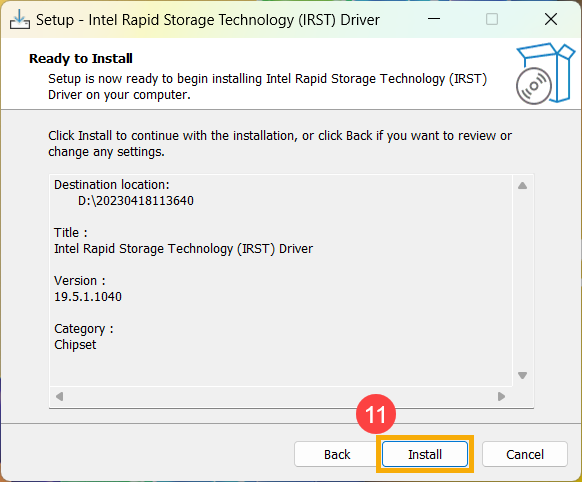
- Click [Install]⑪, and the IRST driver will be extracted to the USB flash drive.
- When the extraction is complete, click [Finish]⑫ to close the installation program.
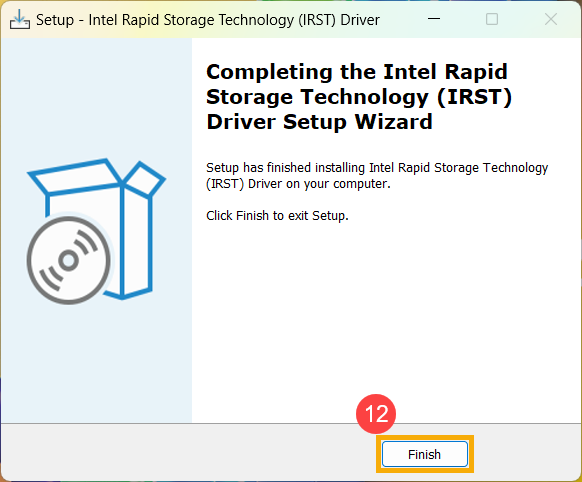
- Continue with the next section, Installing the Intel Rapid Storage Technology (IRST) driver.
Install Intel Rapid Storage Technology (IRST) driver
- Connect the USB flash drive containing the Windows 11/10 installation media and the extracted Intel Rapid Storage Technology (IRST) driver (VMD_DCH_Intel_F_V19.5.1.1040_30787) to the device . (If you are installing using a Windows 11/10 CD, please insert the CD along with the USB flash drive mentioned above.)
Note: The version numbers and images below are for reference only. Please download the latest version from the support page for your device model when performing the actual operation. - Proceed with the Windows 11/10 installation process again. If you need to know how to install Windows 11/10 using installation media, please refer to this article: How to use installation media to install Windows 11/10.
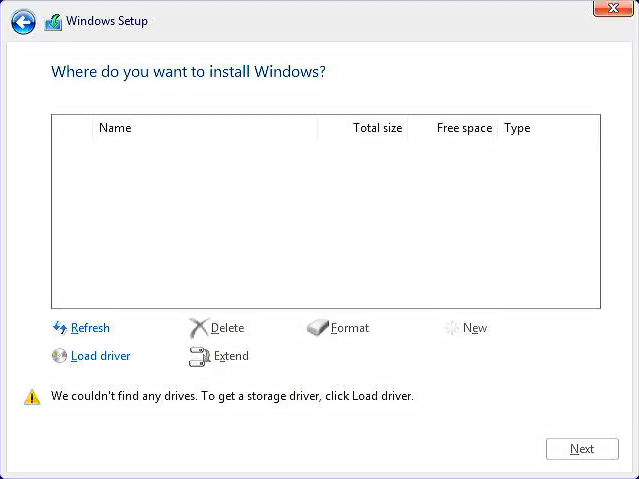
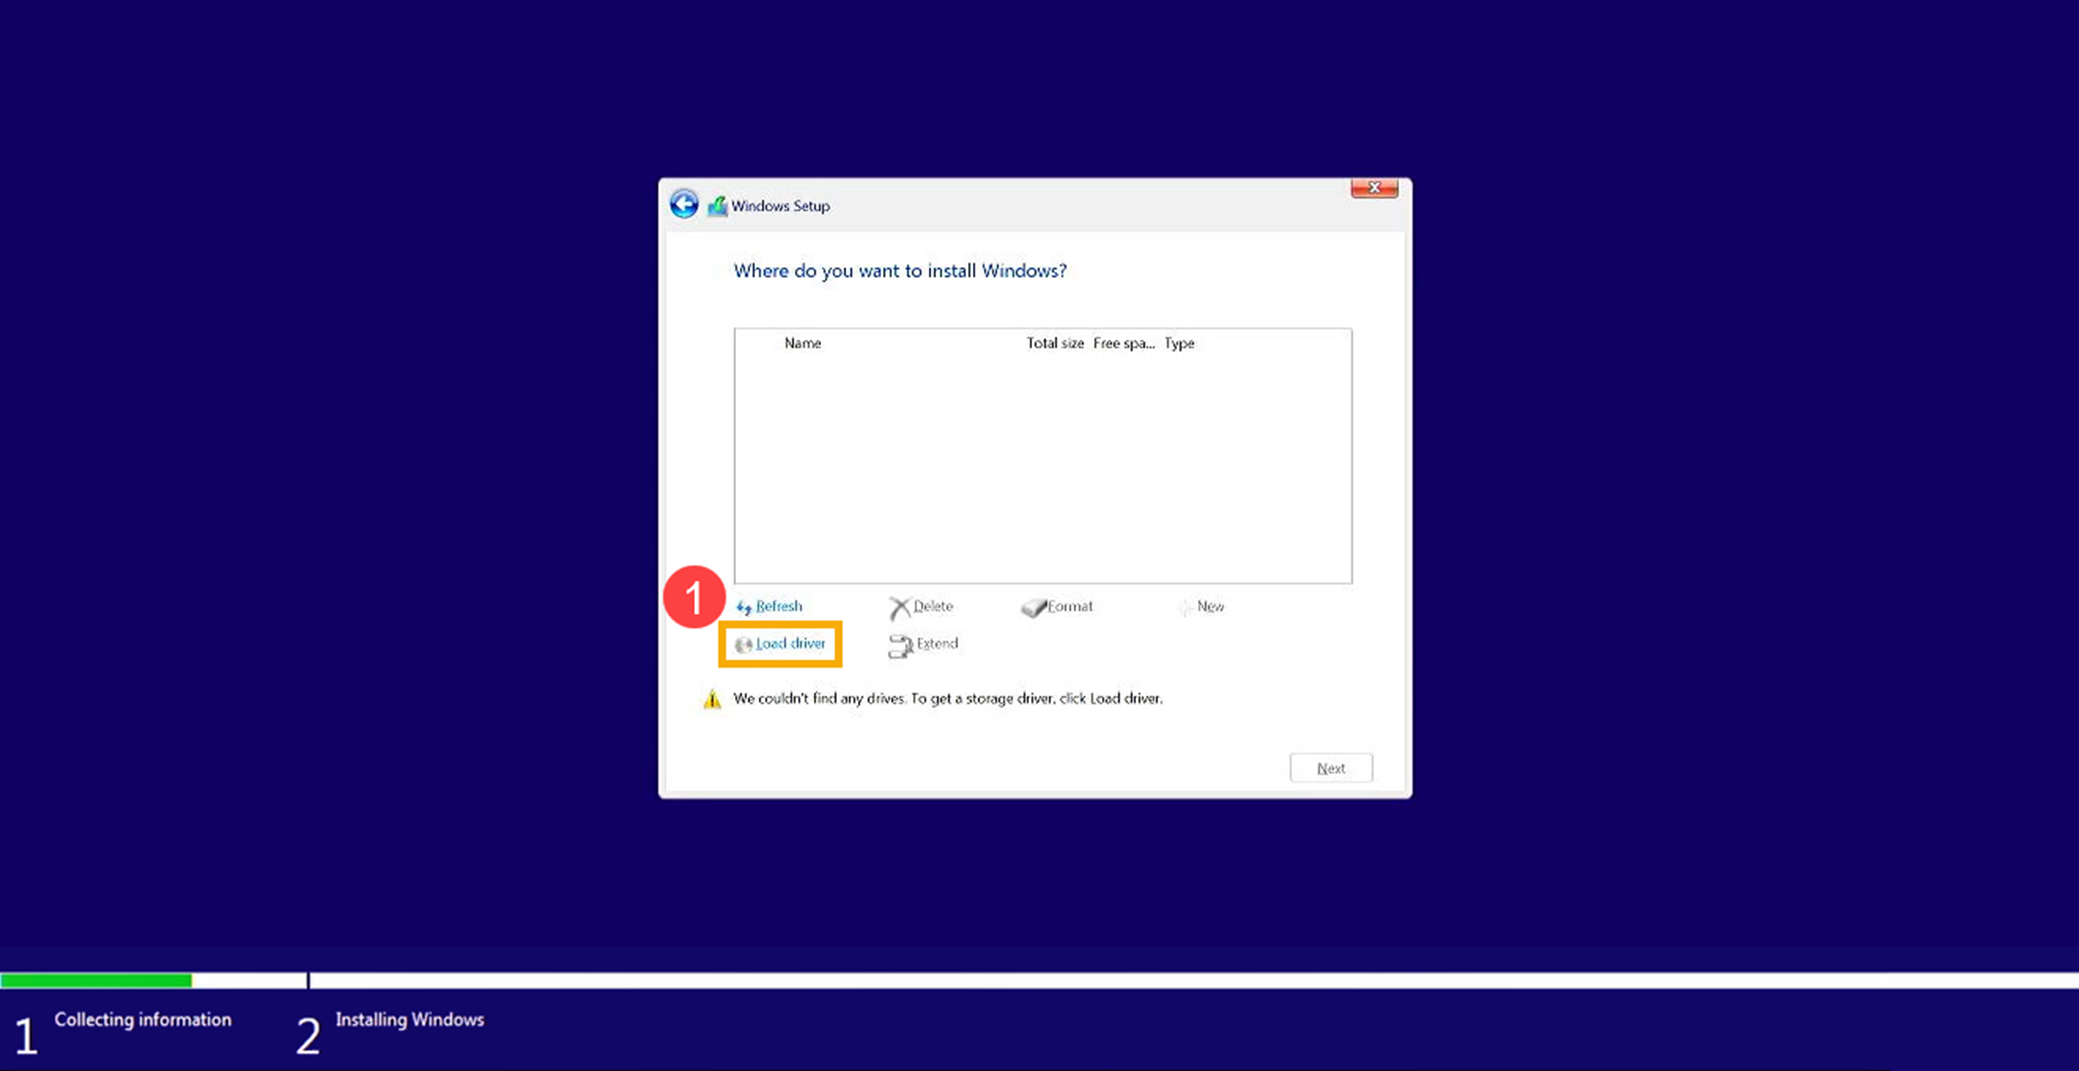
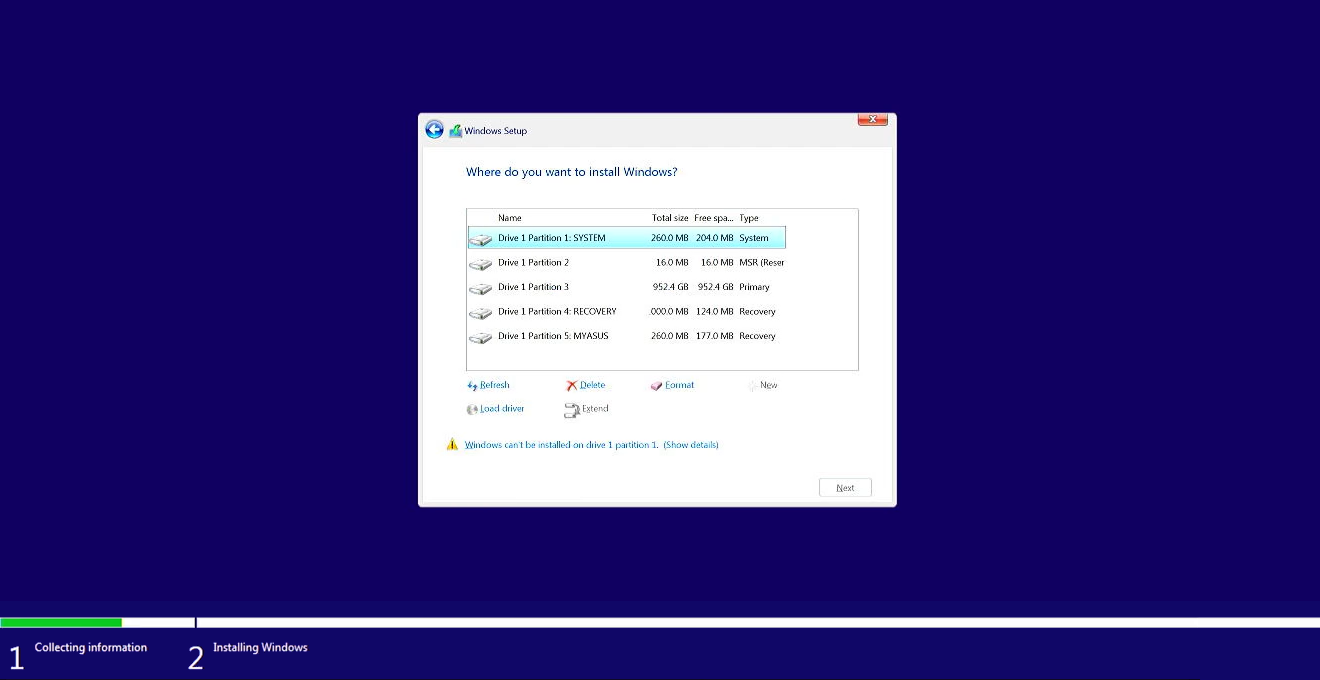
- When you see the screen 'Where do you want to install Windows' and Windows cannot find any drives, please click [Load driver]①.
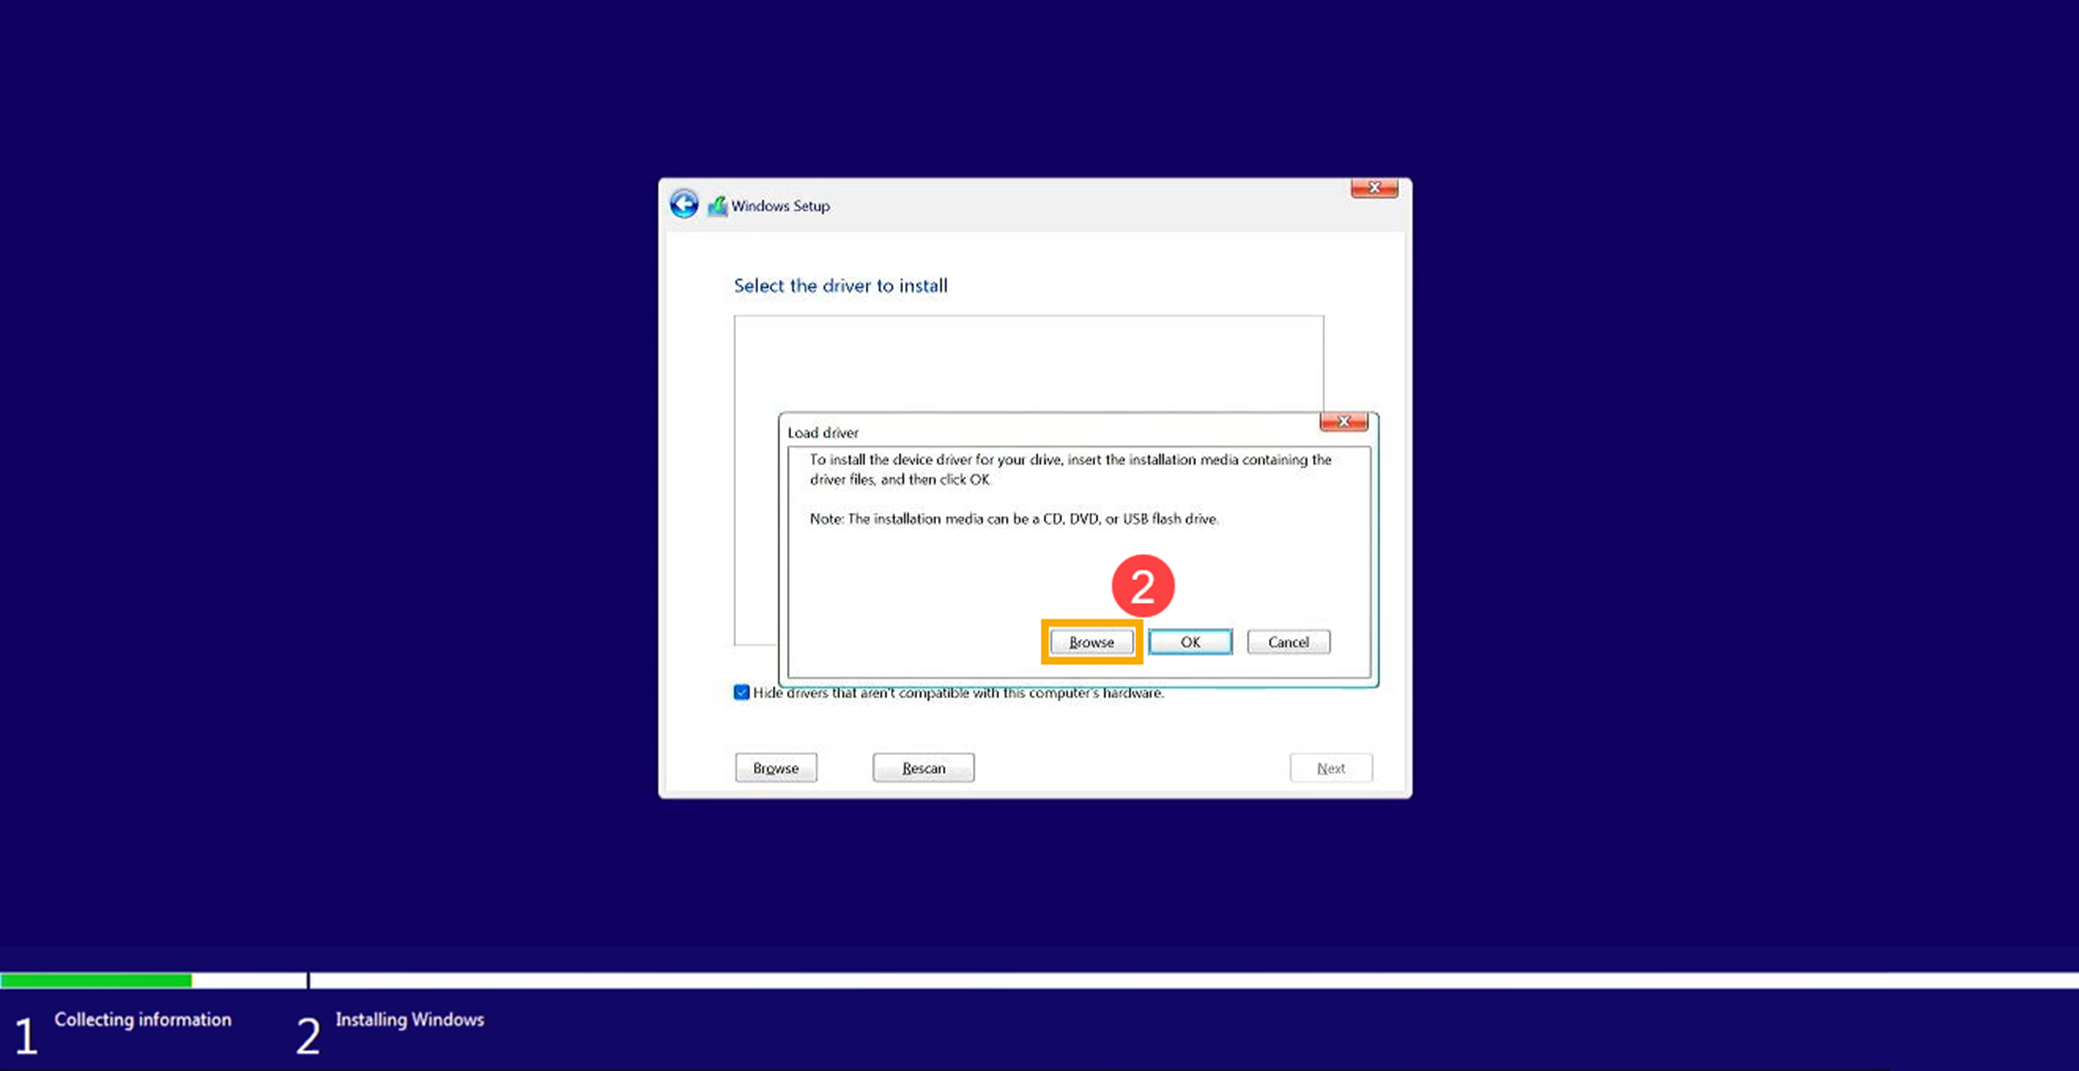
- Select [Browse]②.
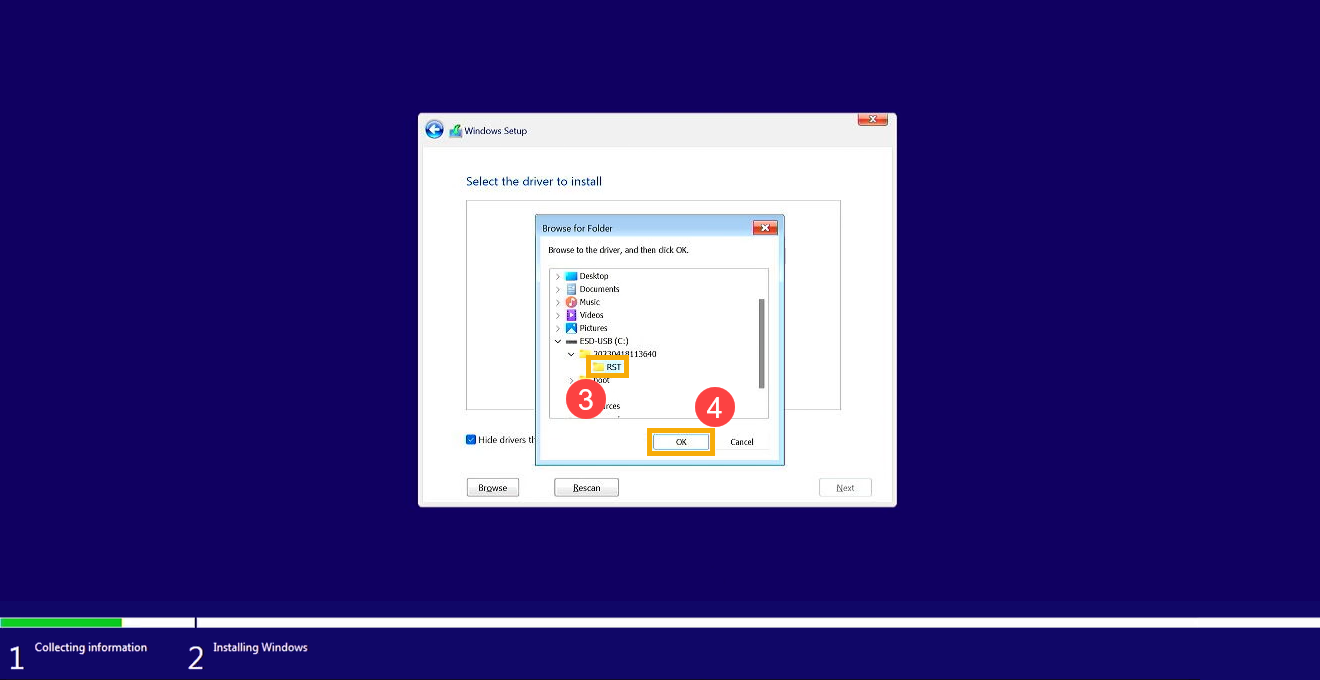
- Find the folder where you extracted the IRST driver earlier, select the [RST] folder③, and then click [OK]④.
- Select [Intel RST VMD Controller]⑤, and then click [Next]⑥ to start installing the driver.
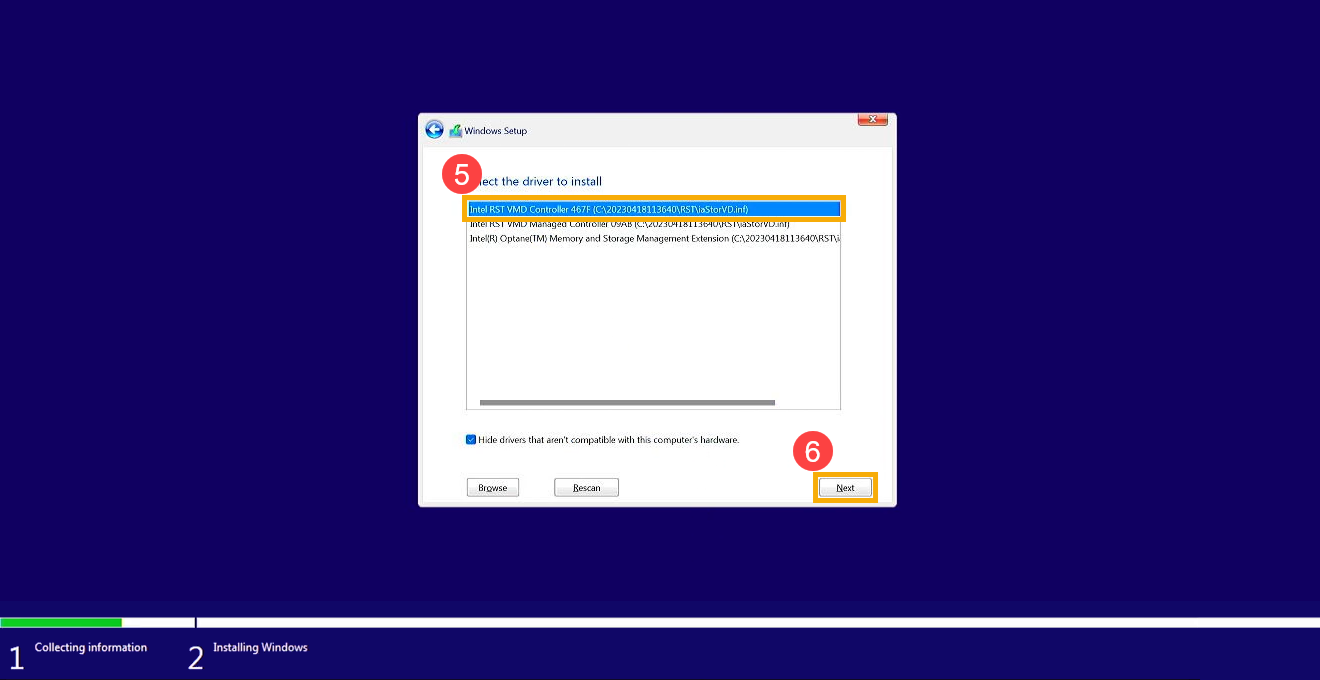
- Once the driver installation is complete, the disk drive will be displayed normally.
If you still cannot find the disk drive during Windows installation, consider referring to this section: Disable Intel Volume Management Device (VMD) technology to continue with the installation of Windows.
Method 2: Disable Intel Volume Management Device (VMD) technology
Note: Disable VMD technology will make your device can’t utilize RAID Array.
- Firstly, the device needs to enter BIOS configuration.
While the device isn’t powered on yet, press and hold the F2 button of the keyboard, and then press the Power button to enter the BIOS configuration. Here you can learn more about How to enter the BIOS configuration.
Note: Gaming handhelds need to press and hold the volume (-) key, then press the power button to turn on the device. - After entering the BIOS setup screen, please follow the steps based on your device's BIOS interface:
Note: The BIOS screens may vary slightly depending on the model.
How to Disable VMD Technology in the UEFI Interface
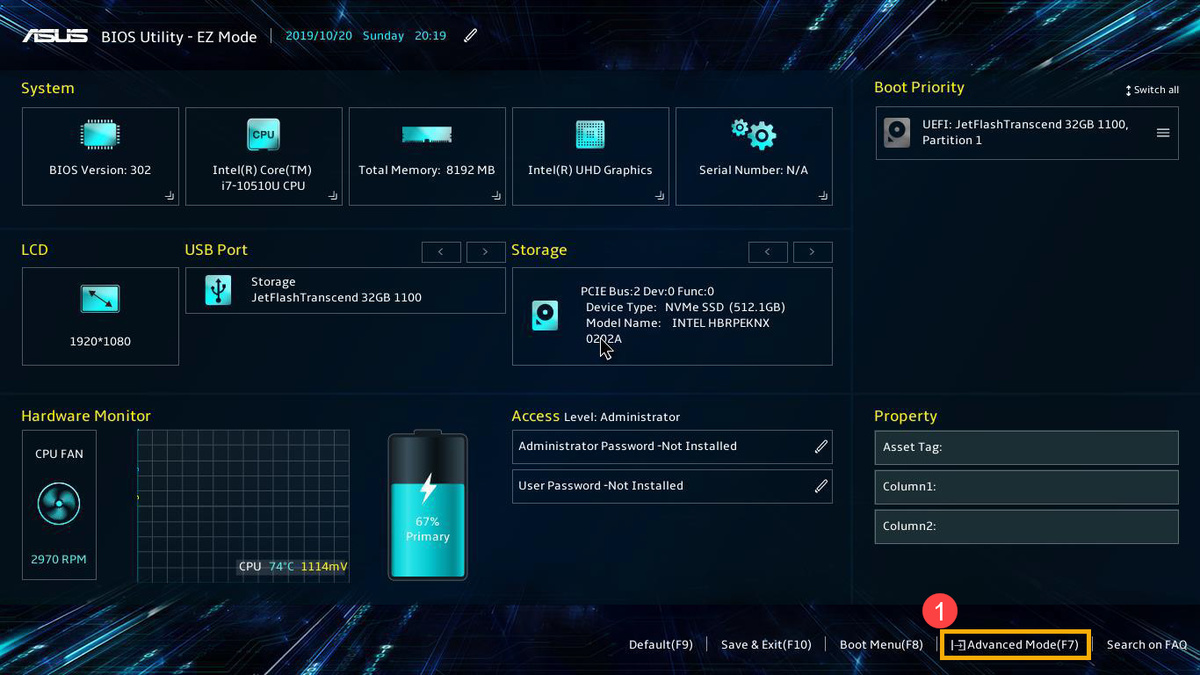
- After entering the BIOS configuration, press Hotkey[F7], or use the cursor to click [Advanced Mode]① that the screen displayed.
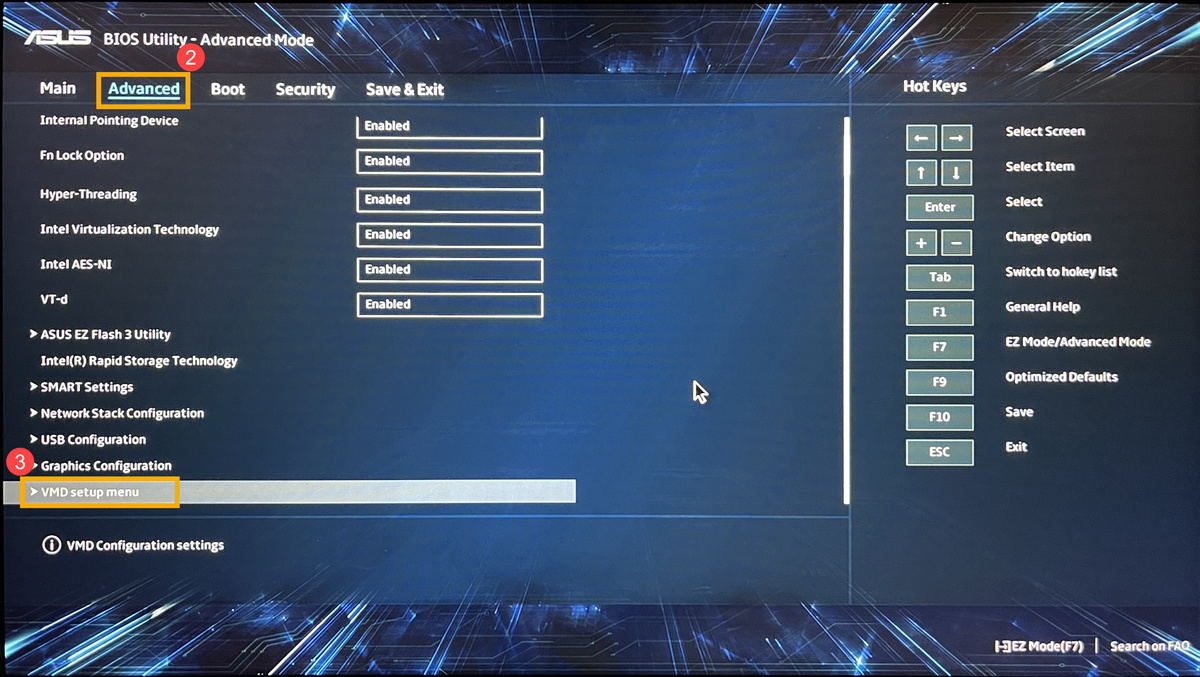
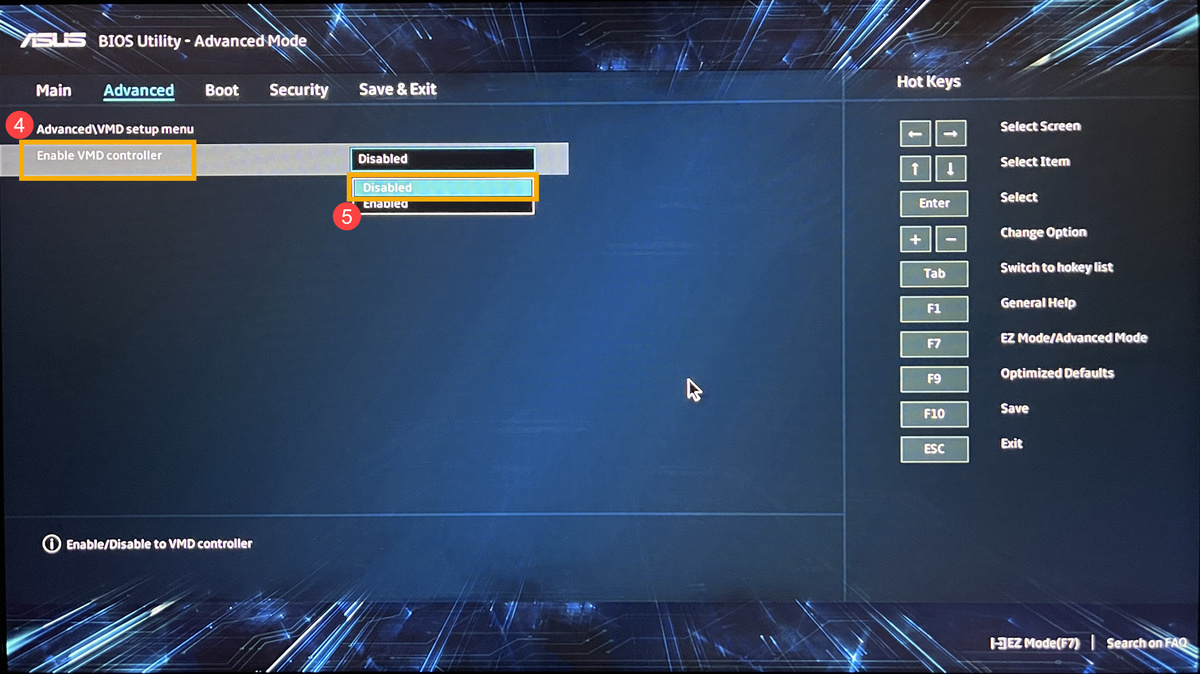
- Go to [Advanced]② screen, and then select [VMD setup menu]③.
- Select [Enable VMD controller]④, and then select [Disabled]⑤.
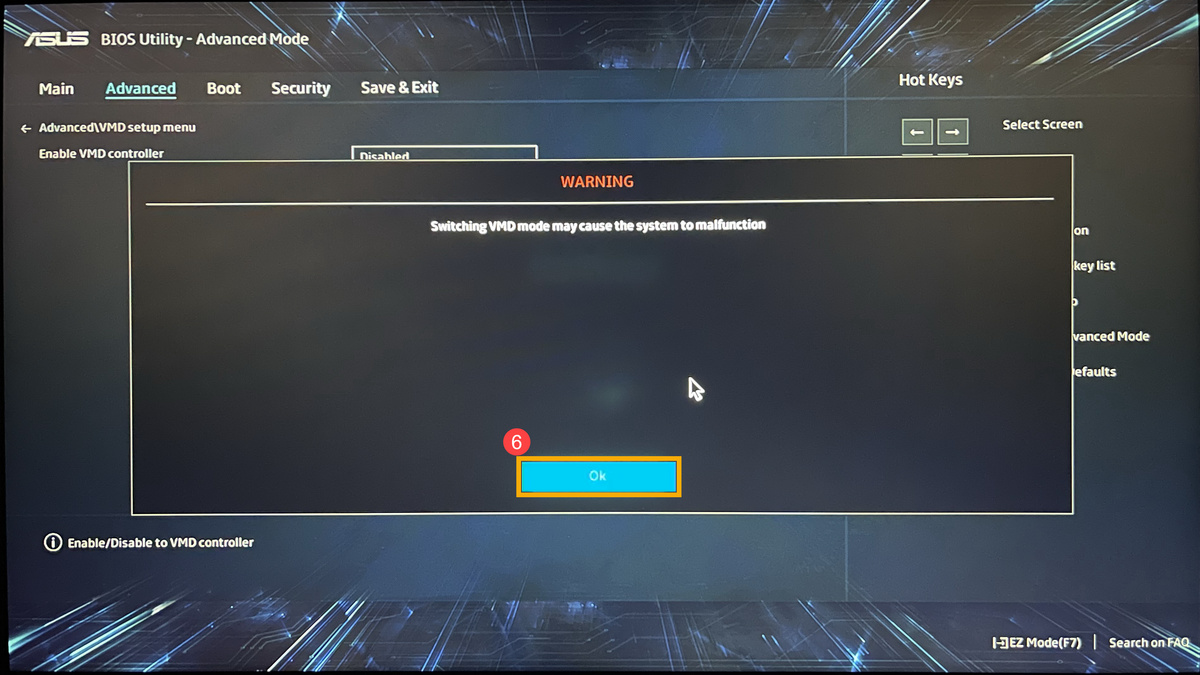
- Click [Ok]⑥ to disable Intel Volume Management Device (VMD) technology.
- Save & Exit Setup. Press Hotkey[F10] and select [Ok]⑦, the device will restart. After that, you will be able to find drives on this device when installing Windows 11/10. Here you can learn more about How to use installation media to insatll Windows 11/10.
Note: You can also navigate to the ‘Save & Exit’ page and select the ‘Save Changes and Exit’ option.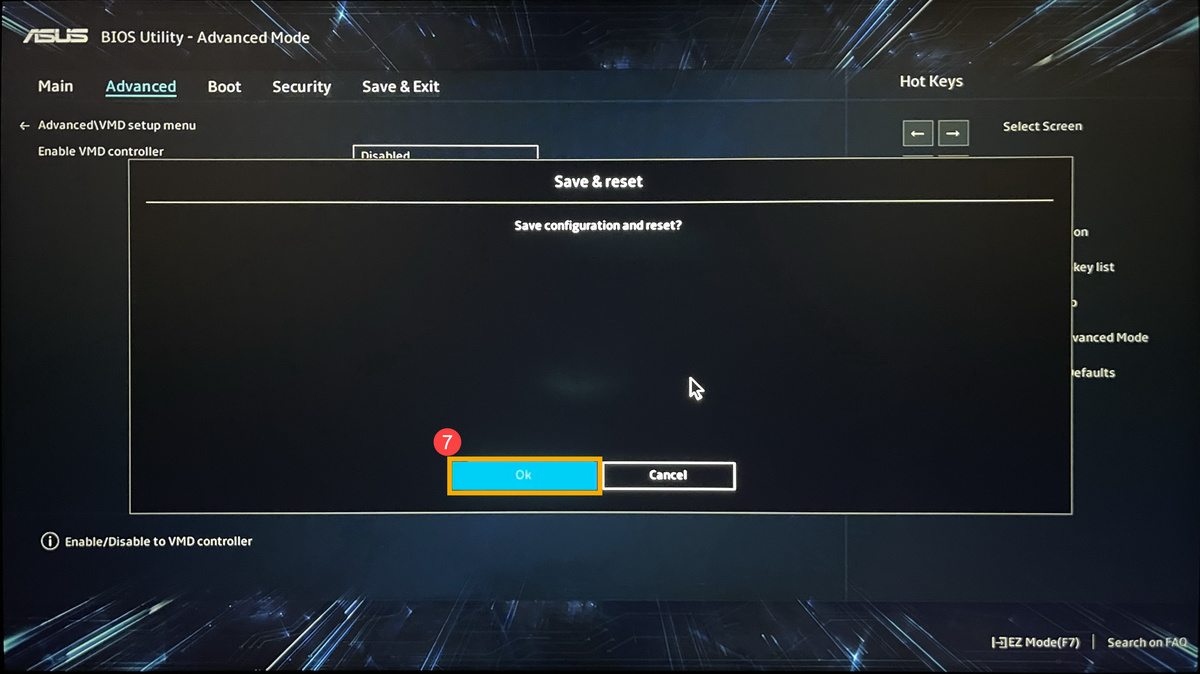
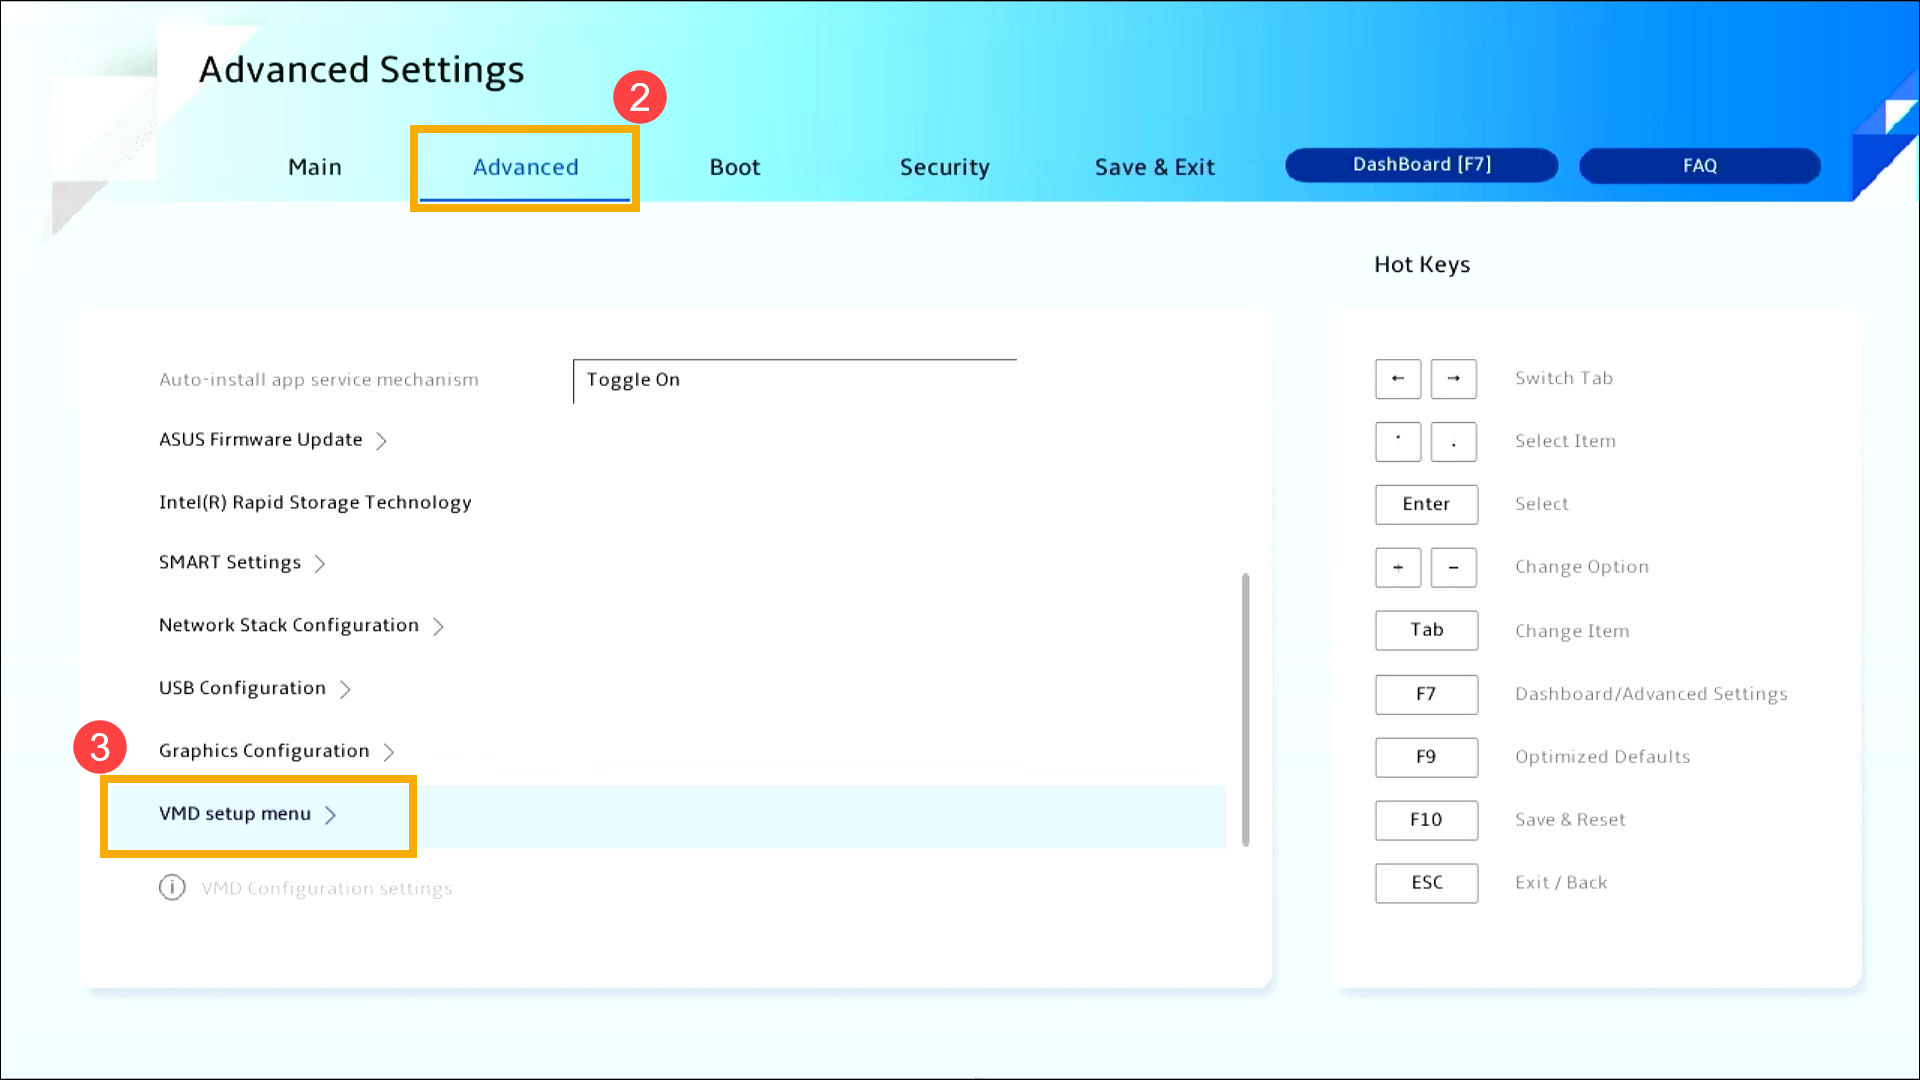
How to Disable VMD Technology in the MyASUS in UEFI Interface
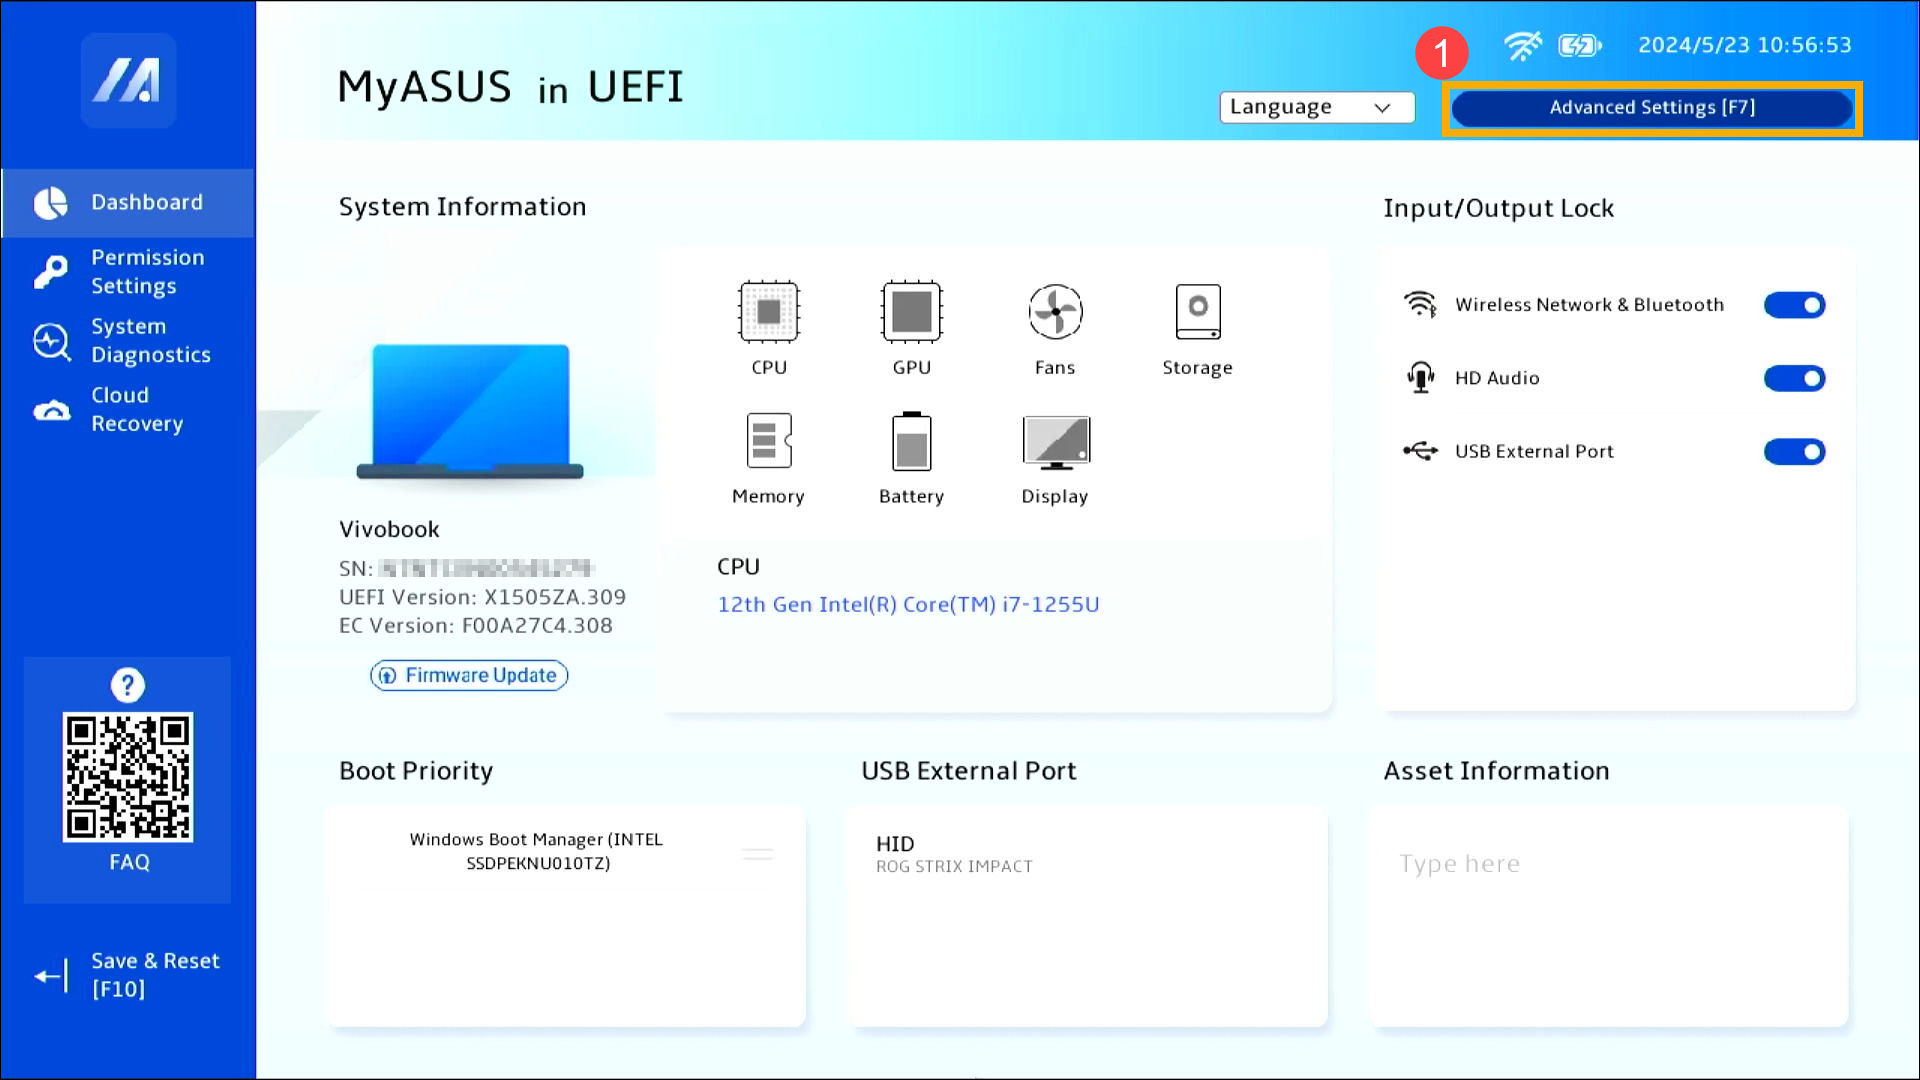
- After entering the BIOS configuration, press Hotkey[F7], or use the cursor to click [Advanced Settings]① that the screen displayed.
- Go to [Advanced]② screen, and then select [VMD setup menu]③.
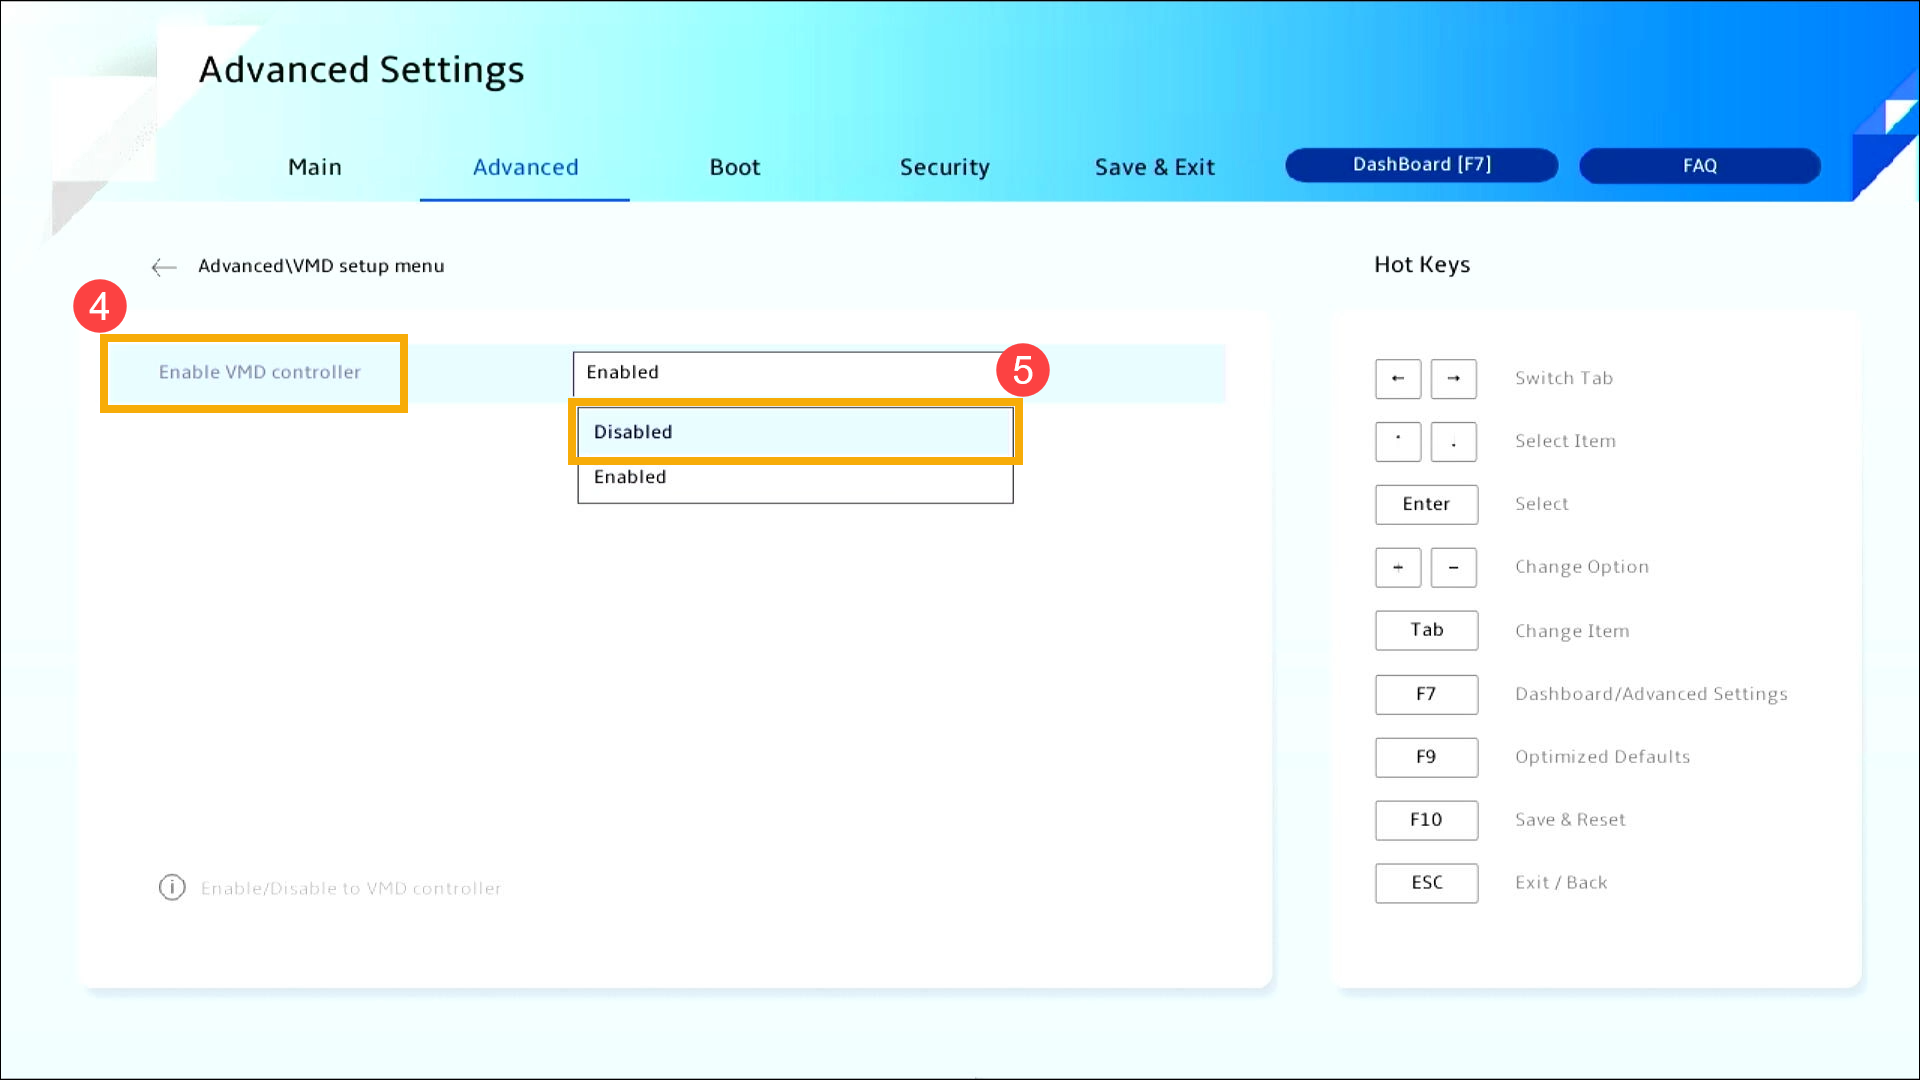
- Select [Enable VMD controller]④, and then select [Disabled]⑤.
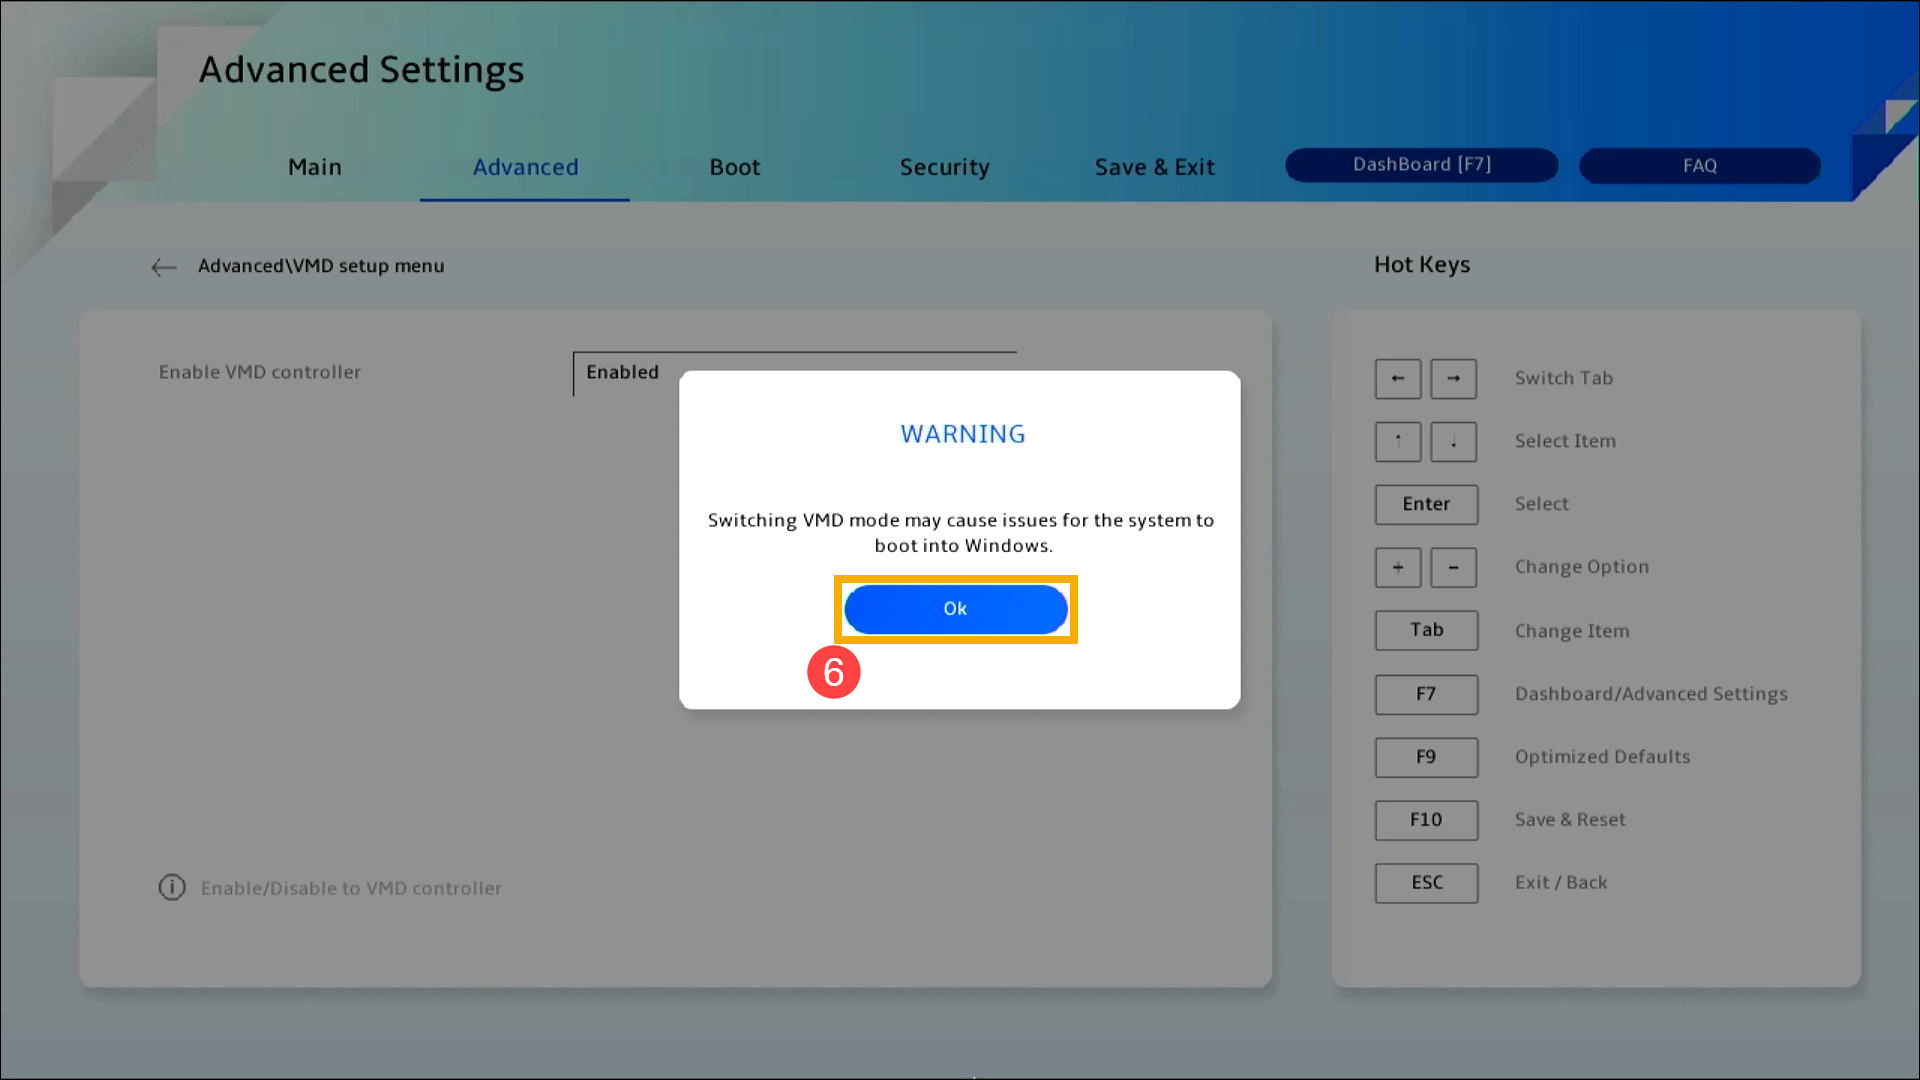
- Click [Ok]⑥ to disable Intel Volume Management Device (VMD) technology.
- Save & Exit Setup. Press Hotkey[F10] and select [Confirm]⑦, the device will restart. After that, you will be able to find drives on this device when installing Windows 11/10. Here you can learn more about How to use installation media to insatll Windows 11/10.
Note: You can also navigate to the ‘Save & Exit’ page and select the ‘Save Changes and Exit’ option.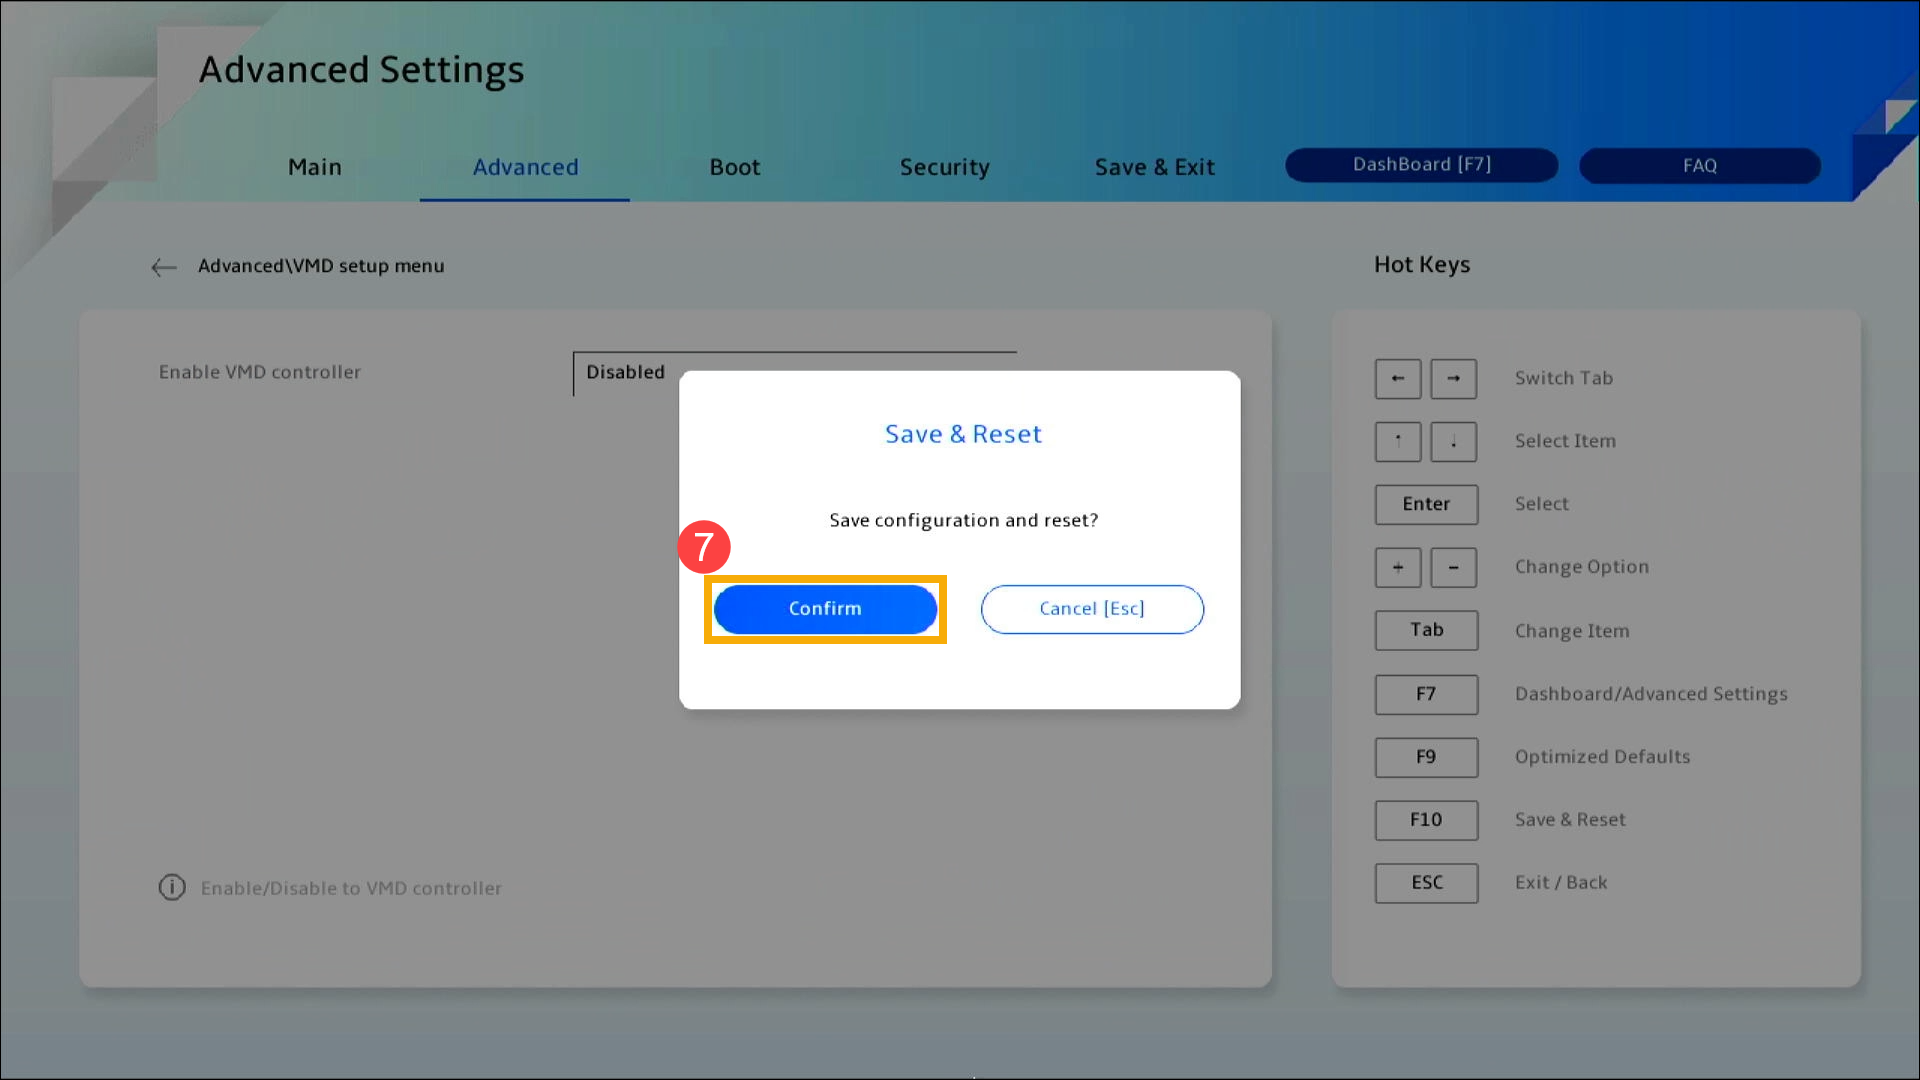
If your problem is not worked out with above solution and information, please contact ASUS customer service center for further information.