Category
[Windows 11/10] Windows Hello (Biometrics, Facial recognition, Fingerprint scanner) Settings
Windows Hello is a more personal, more secure way to get instant access to your Windows 11/10 devices using fingerprint or facial recognition. You will be able to just show your face or touch your finger, no more to input a password to unlock your device.
Note: The sign-in options of Windows 11/10 may vary depended on the different hardware devices. If you want to sign in via the fingerprint or facial recognition, the fingerprint scanner or IR (Infrared) camera is necessary on your computer. If you haven’t yet set up PIN yet, you need to add PIN before using other sign-in options.
Please go to the corresponding instruction based on the current Windows operating system on your computer:
- Sign in with facial recognition
- Remove facial recognition
- Sign in with fingerprint scanner
- Remove fingerprint scanner
- Set up Dynamic lock
Sign in with facial recognition
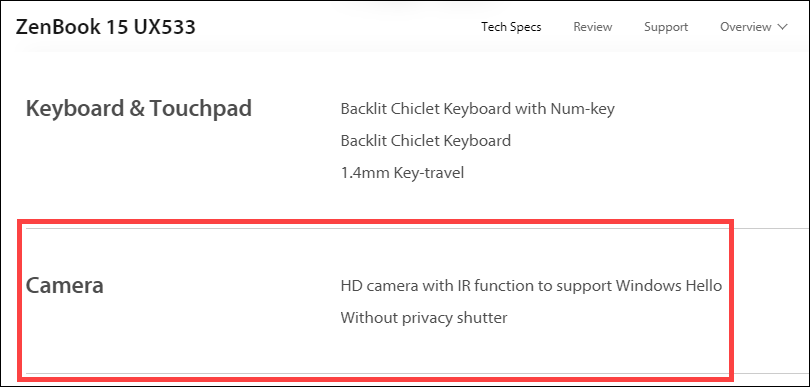
This feature is only available on the selected models equipped with IR camera. If you don’t see the facial sign-in option or this option is unavailable displayed, it means that your computer doesn’t have an IR camera.
- You can find the product specification of your computer on the ASUS official website.

- You can also check Device Manager to see whether your PC is equipped with an IR camera. Right-click the [Start] icon
 on the taskbar①, then select [Device Manager]②.
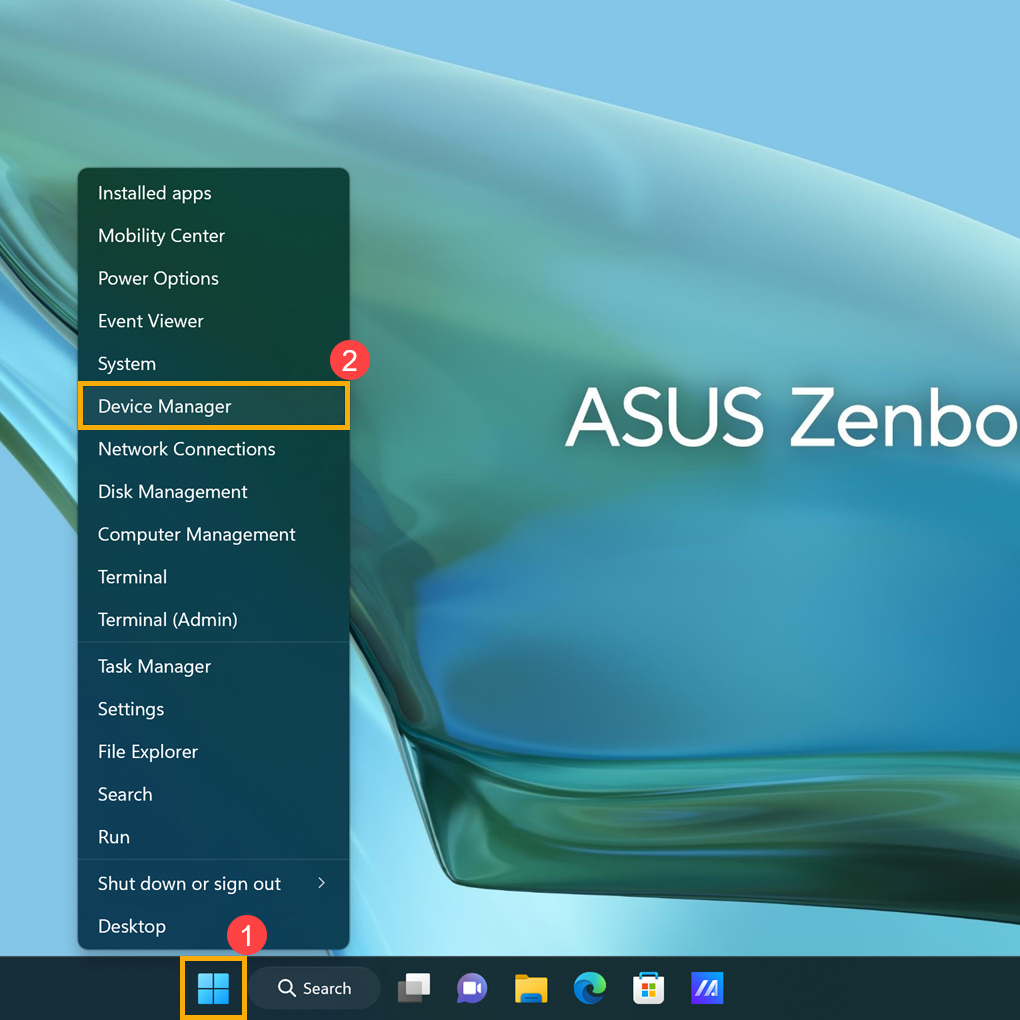
Check the arrow next to [Cameras]③, then you can see whether your PC has an IR camera.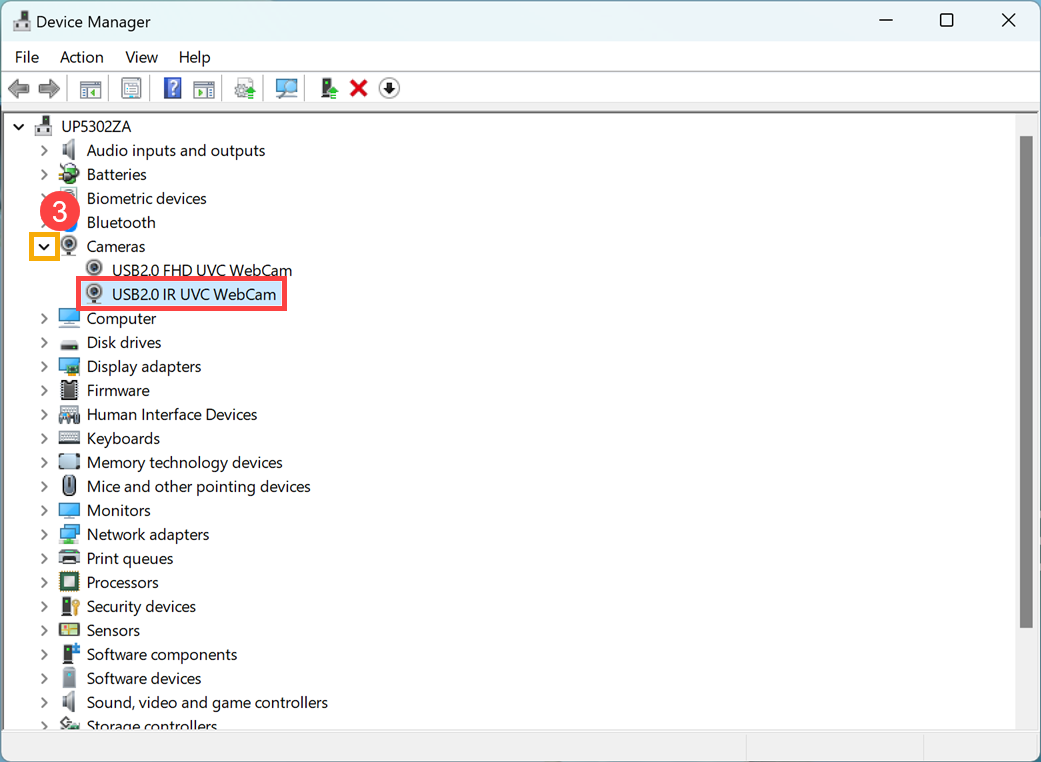
Start setting facial recognition
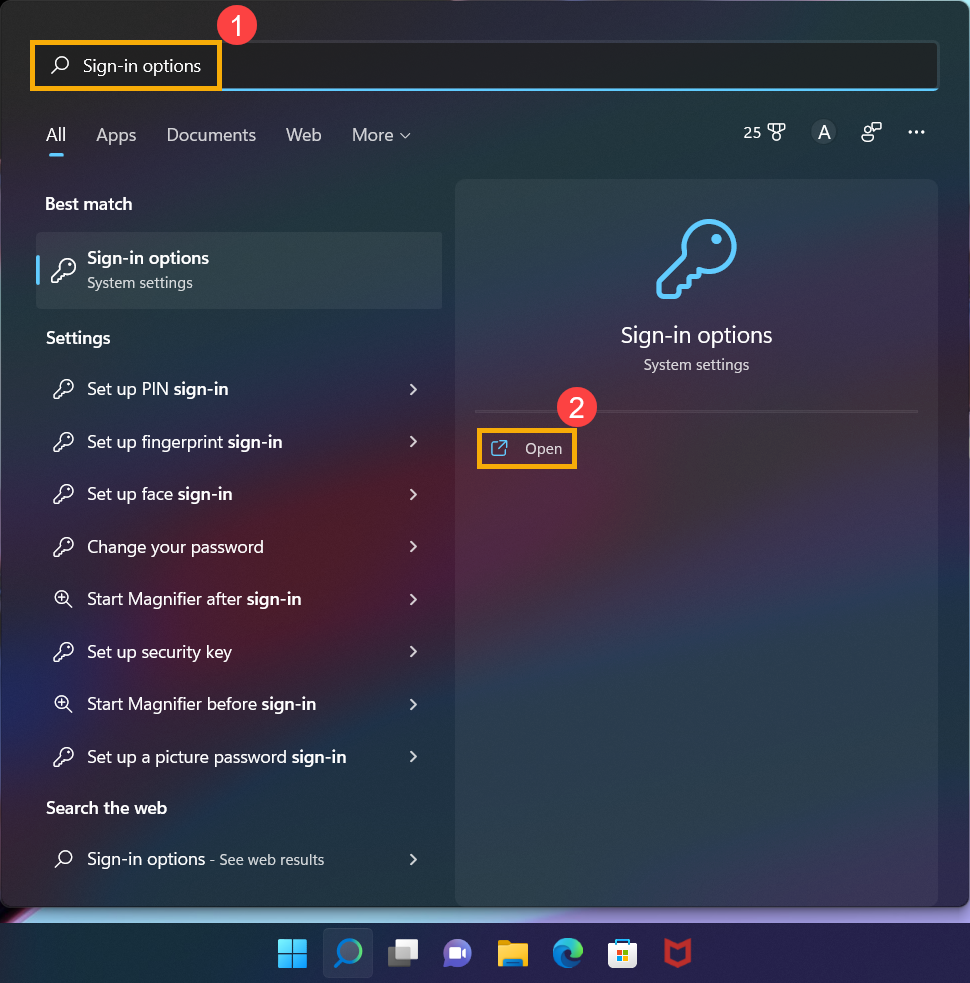
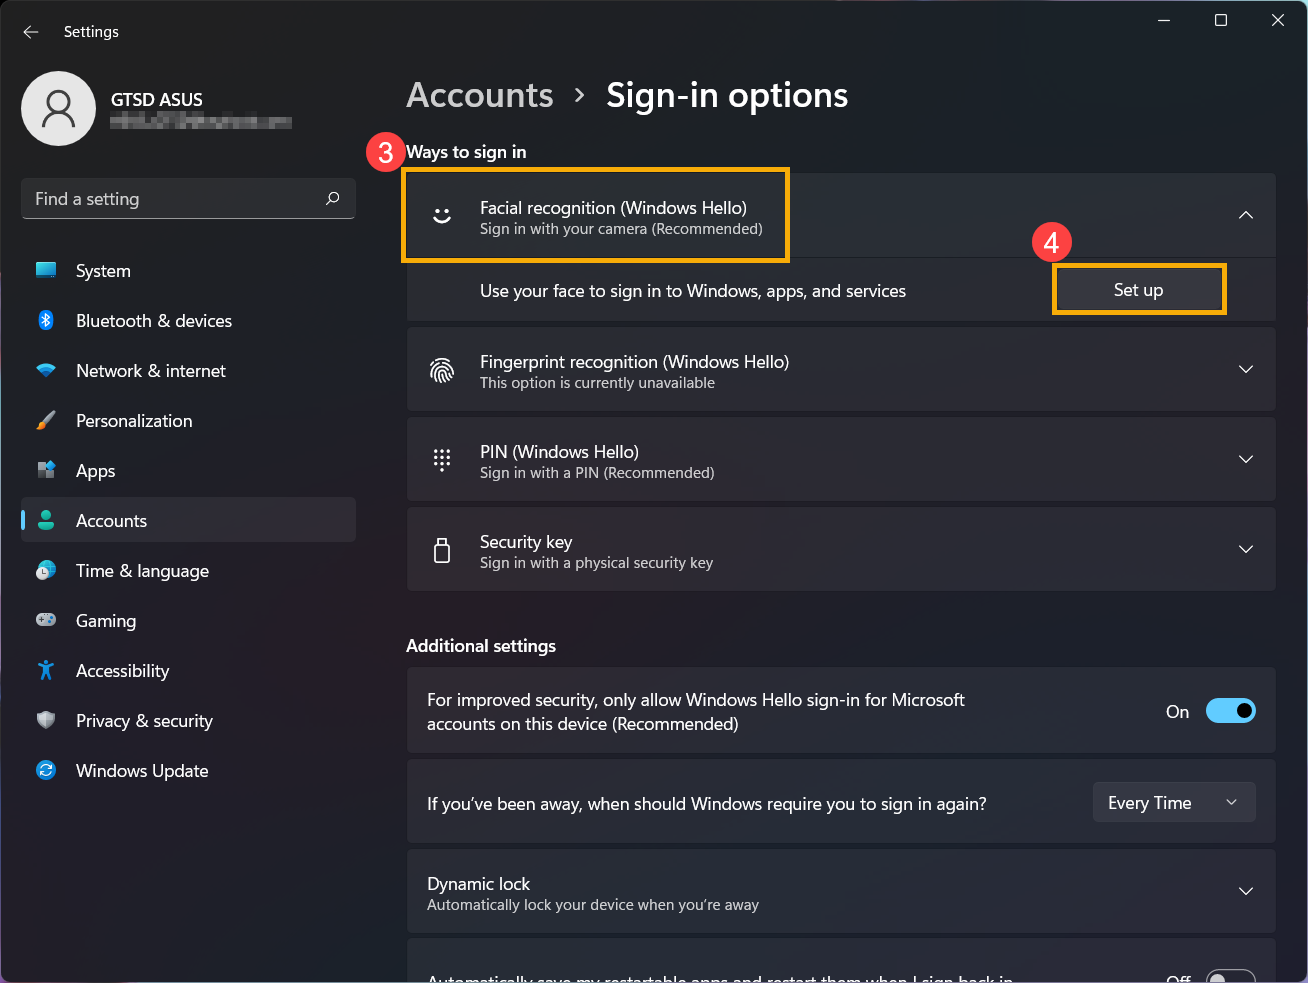
- Type and search [Sign-in options]① in the Windows search bar, then click [Open]②.
- Select [Facial recognition (Windows Hello)]③, then click [Set up]④.
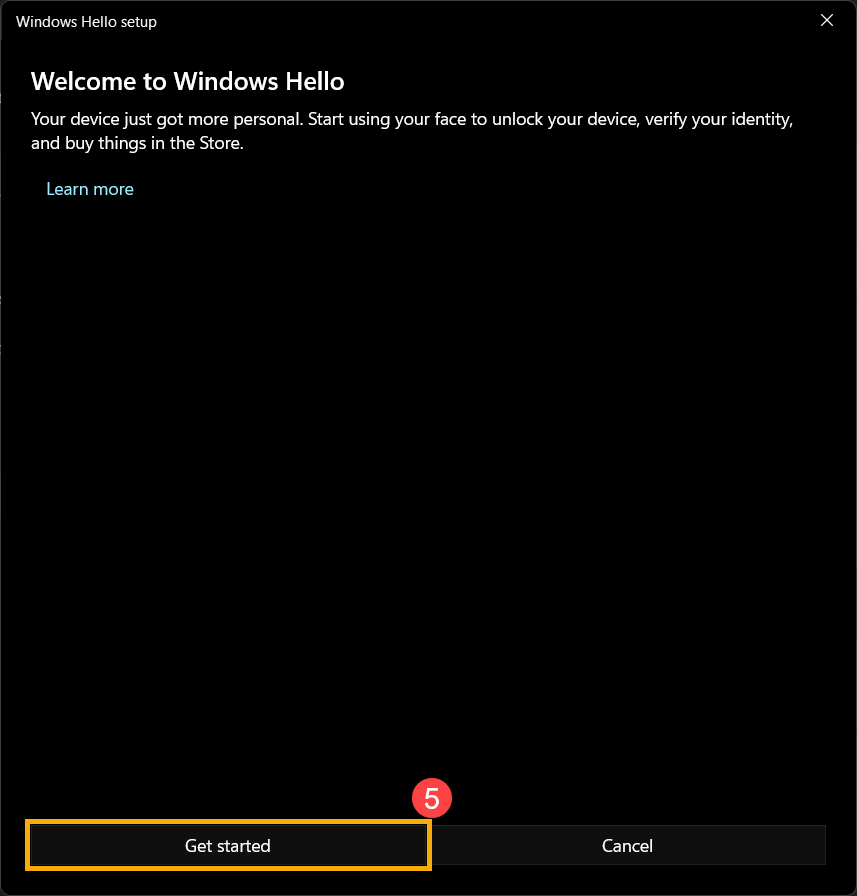
- Select [Get started]⑤.
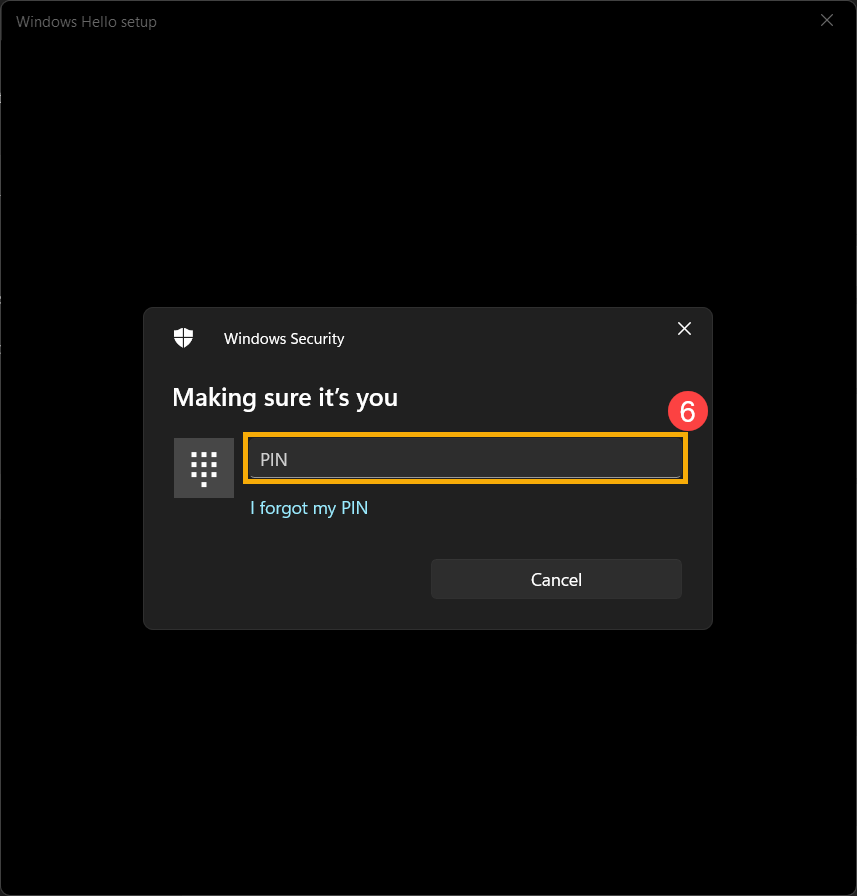
- Enter the PIN code you use currently to verify your identity⑥.
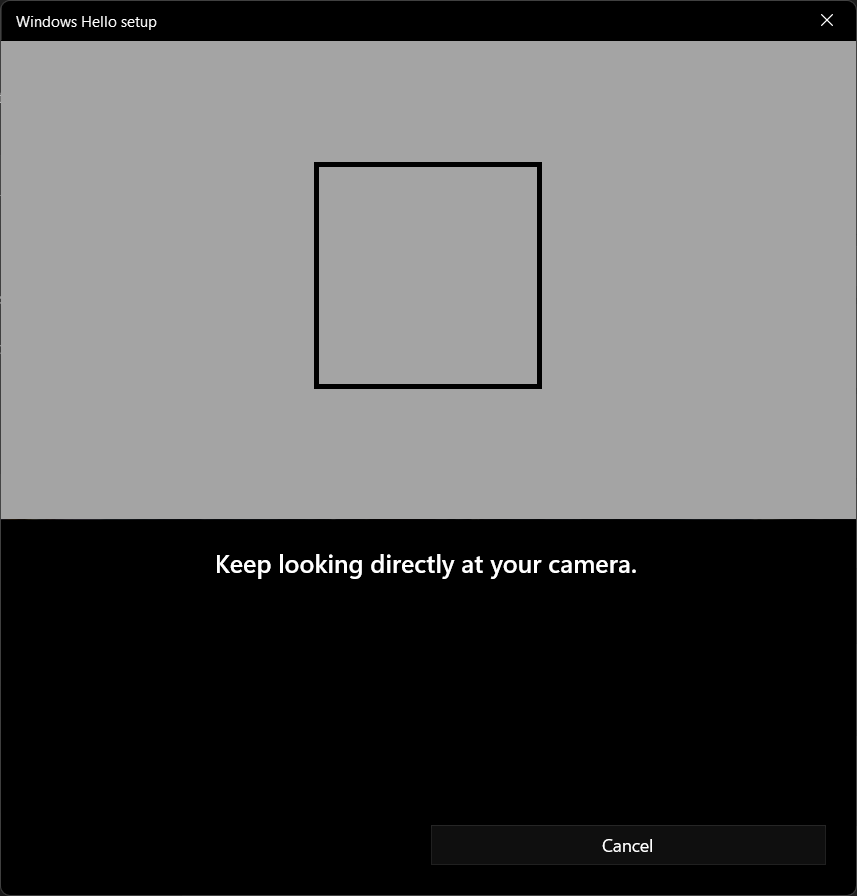
- Please position your face in the center of the frame that appears on screen, then the camera will capture your facial features.
- The recognition of your facial features is completed, please click [Close]⑦.
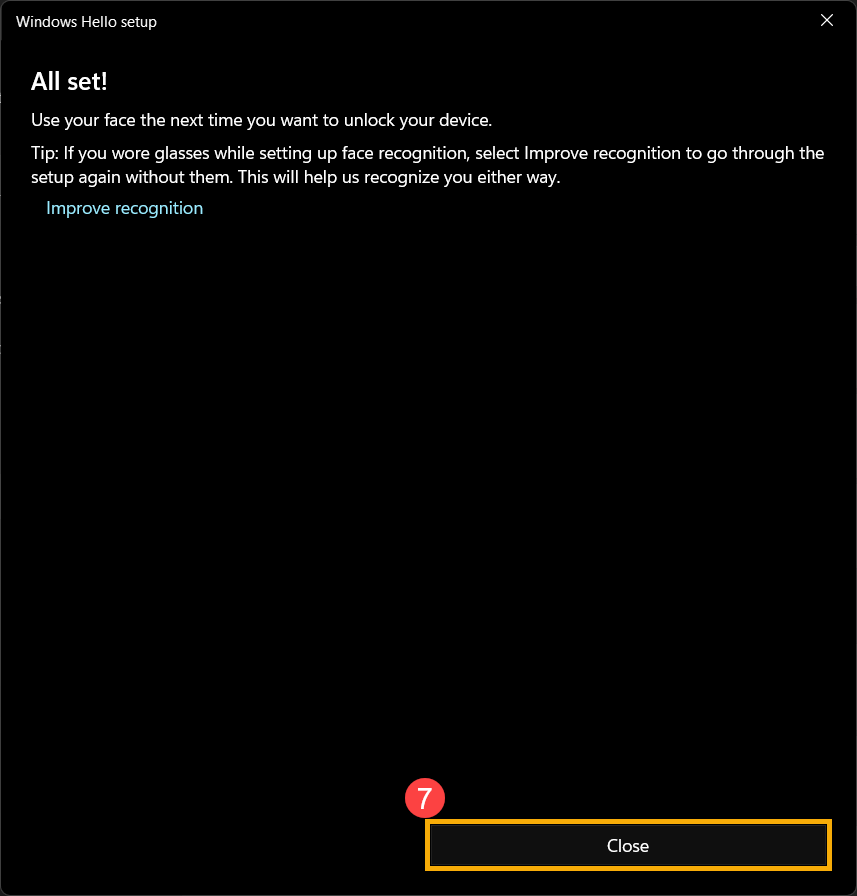
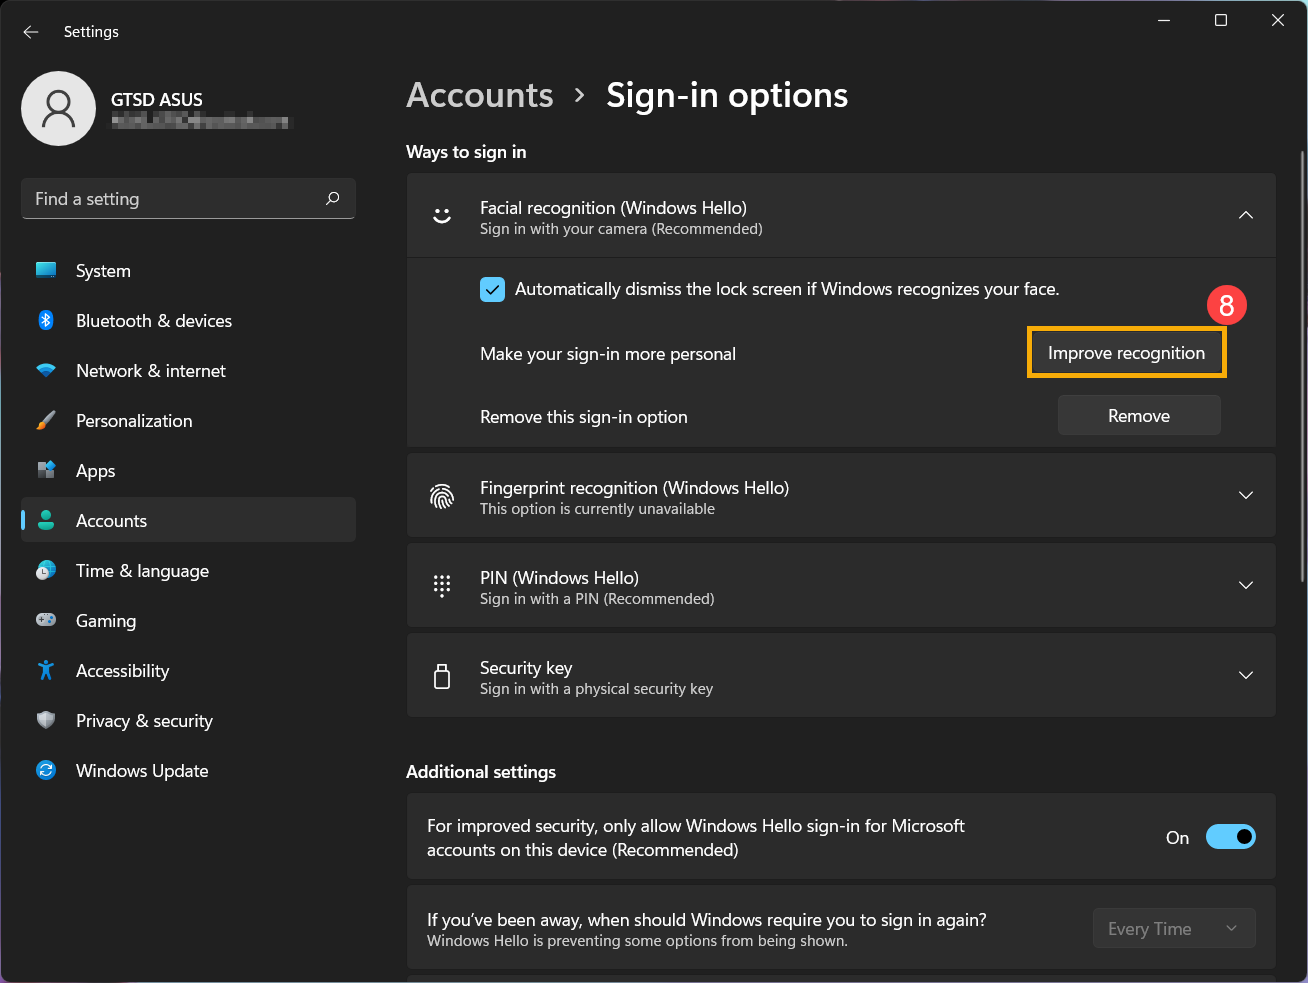
- The setup of facial sign-in is completed. There is another option [Improve recognition]⑧, this feature allows you to be recorded with and without your glasses on. If you wore glasses while setting up face recognition, select this option to go through the setup again without them. This will help Windows to recognize you no matter wearing glasses on or not.
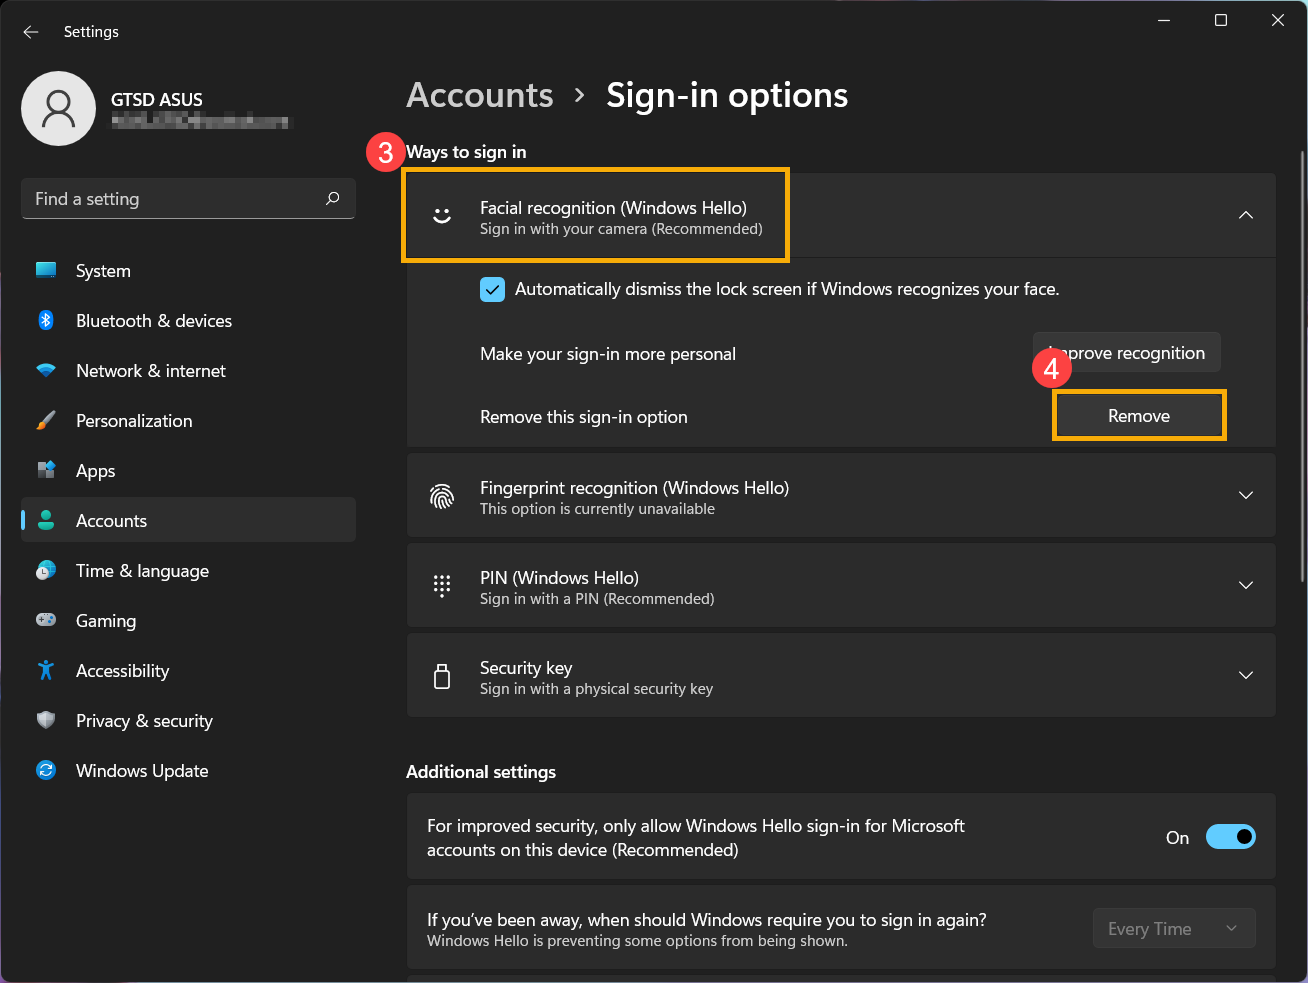
- Type and search [Sign-in options]① in the Windows search bar, then click [Open]②.

- Select [Facial recognition (Windows Hello)]③, then click [Remove]④, the face sign-in option will be removed.
Sign in with fingerprint scanner
This feature is only available on the selected models equipped with Fingerprint scanner. If you don’t see the fingerprint sign-in option or this option is unavailable displayed, it means that your computer doesn’t have an fingerprint scanner.
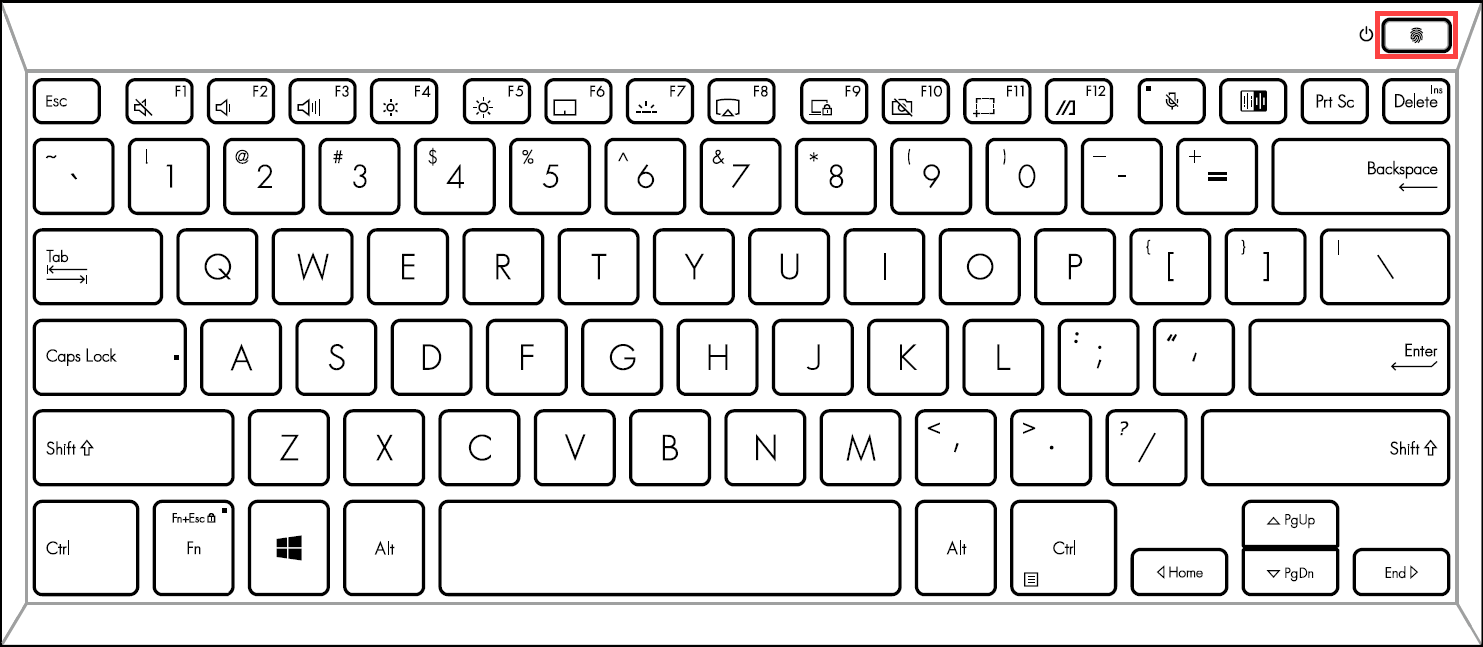
Please find your computer’s fingerprint scanner. Most ASUS laptops’ fingerprint scanner located around the touchpad.
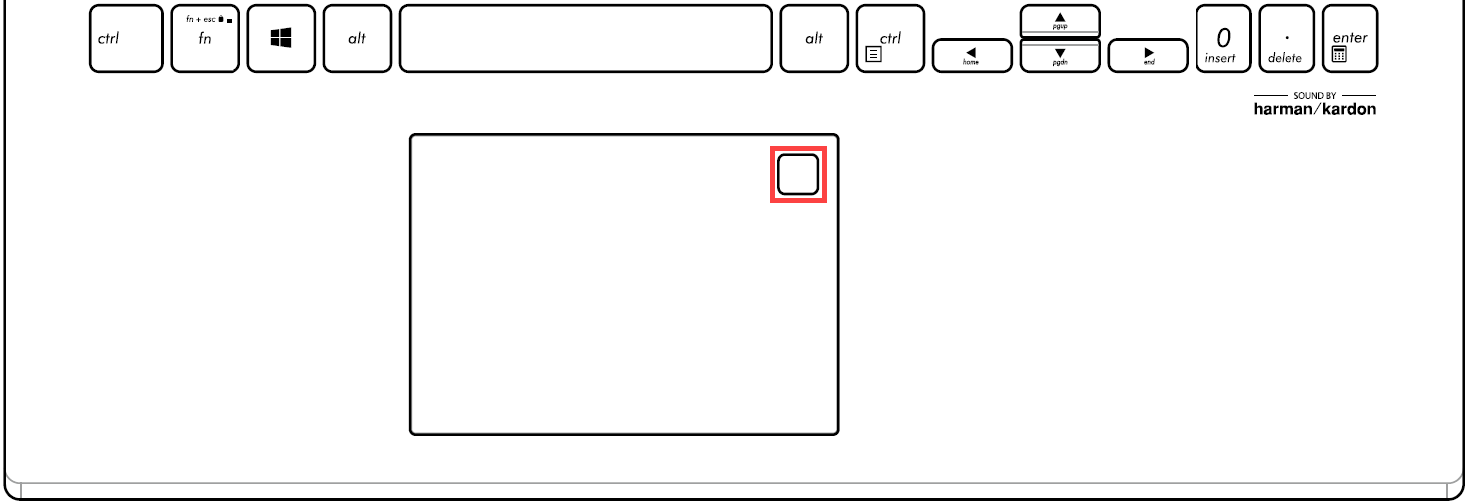
The Fingerprint sensor has been integrated with Power key on some ASUS laptops.
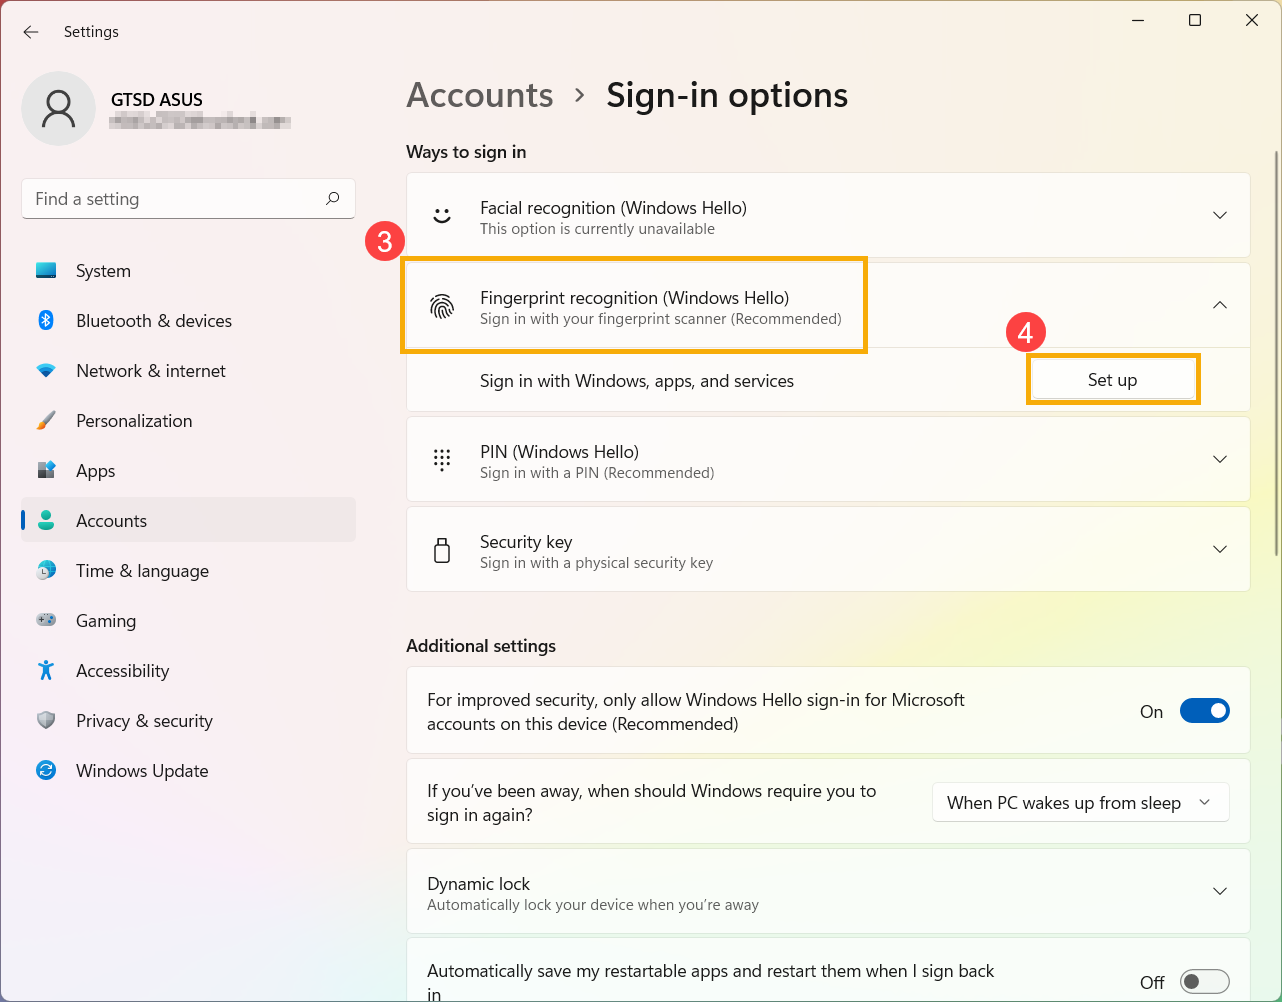
- Type and search [Sign-in options]① in the Windows search bar, then click [Open]②.

- Select [Fingerprint recognition (Windows Hello)]③, then click [Set up]④.
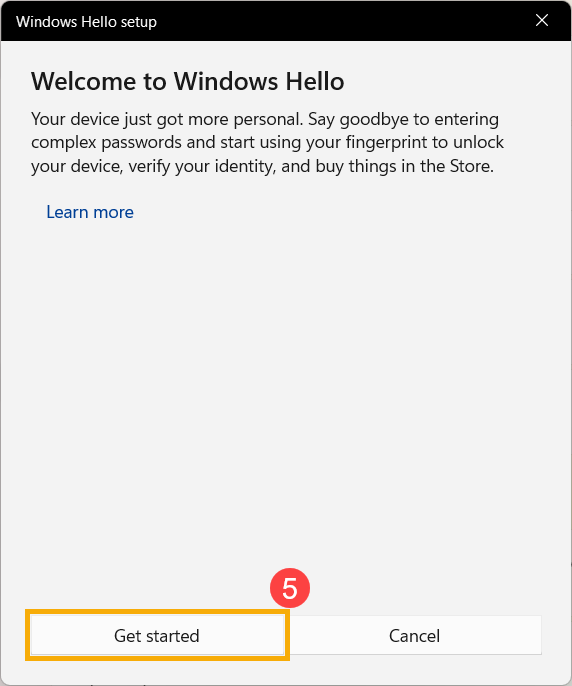
- Select [Get started]⑤.
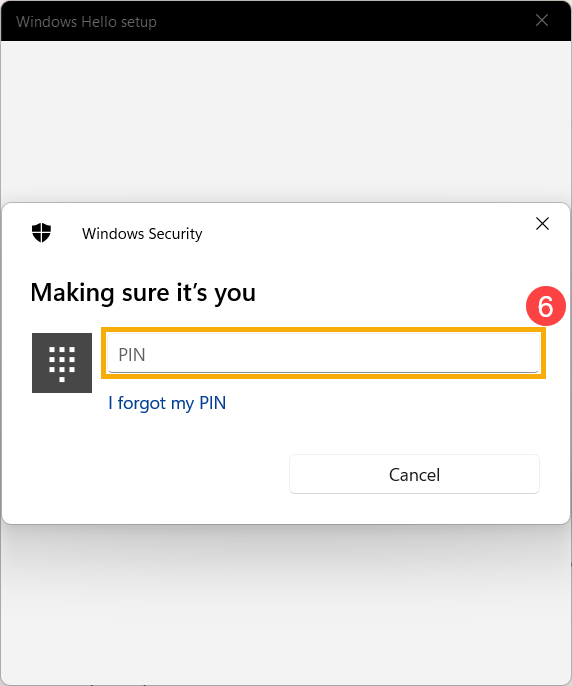
- Enter the PIN code you use currently to verify your identity⑥.
- Please make sure your fingers are clean and dry, then lift and rest only one finger on the sensor.
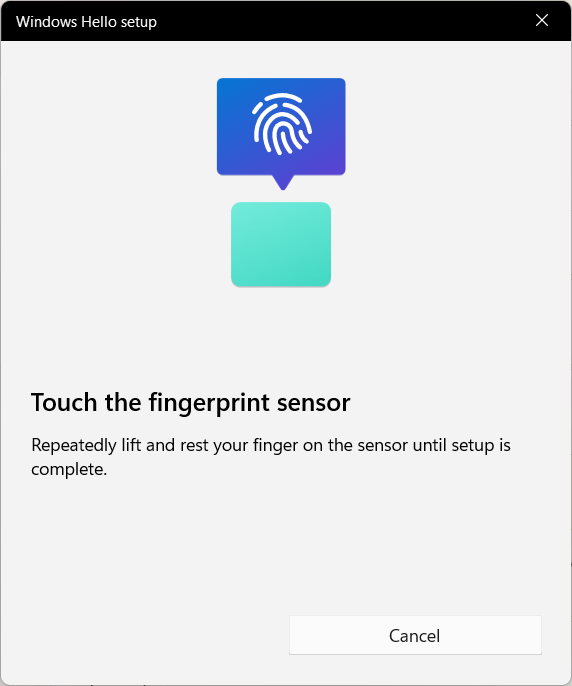
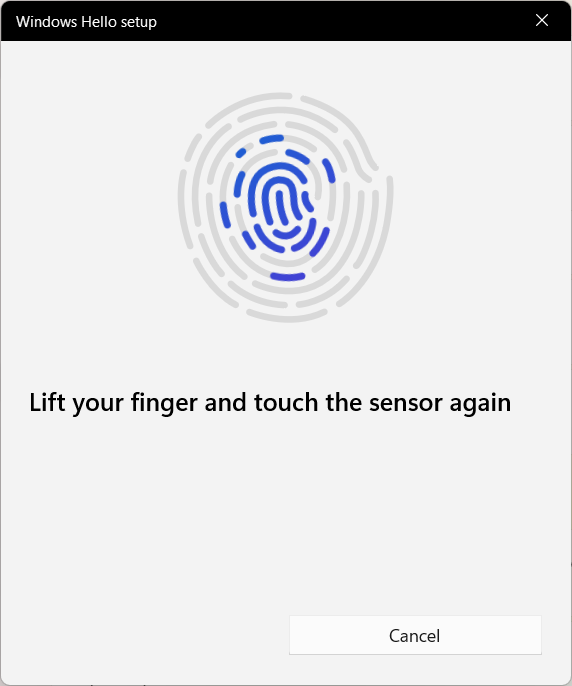
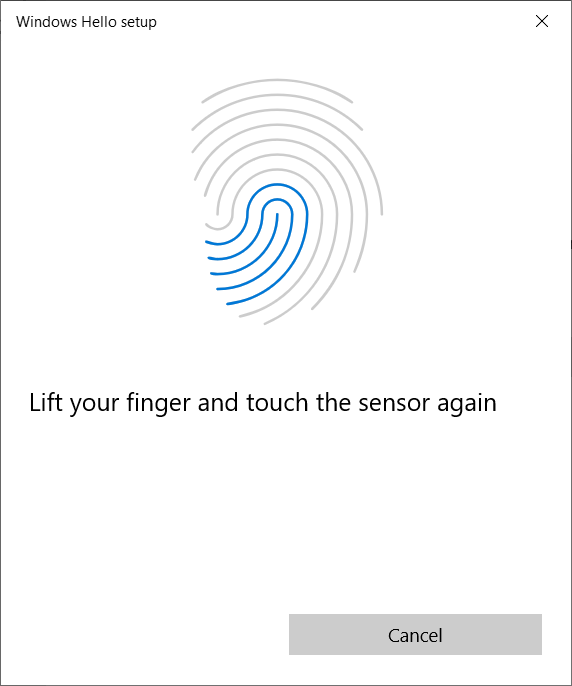
- Please follow the on-screen prompts to repeatedly lift and rest your finger on the sensor.
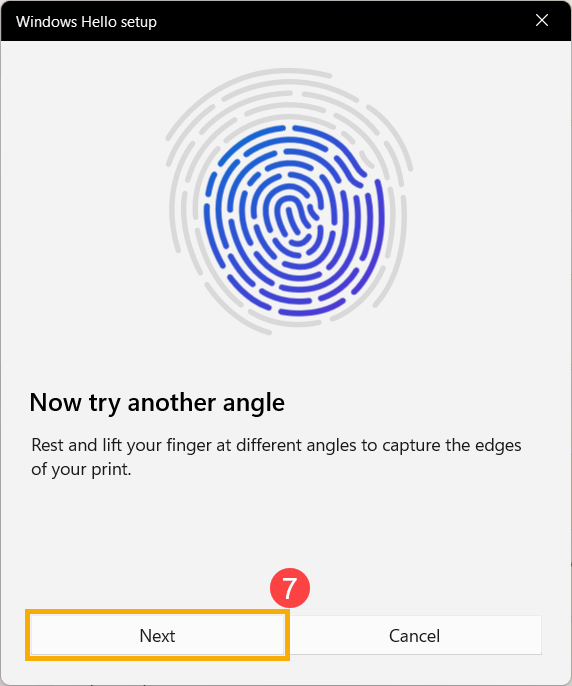
- Select [Next]⑦ and try to use different angles of your finger to capture the edges of your fingerprint when pressing on the sensor.
- The recognition of your fingerprint is completed, please click [Close]⑧.
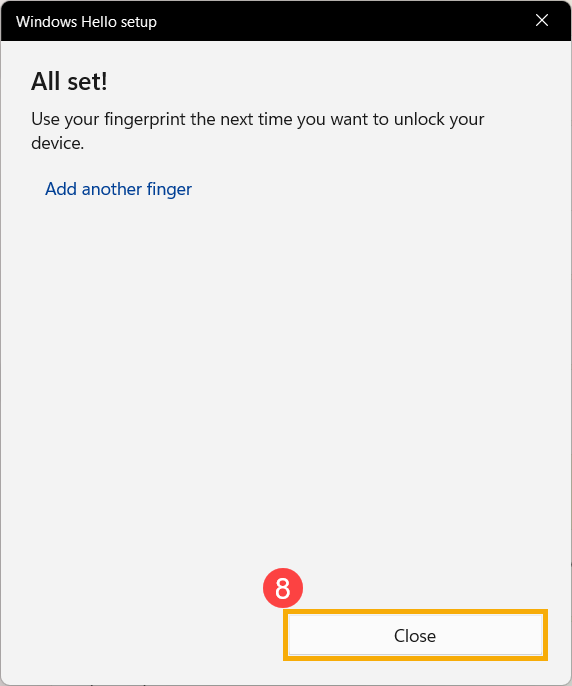
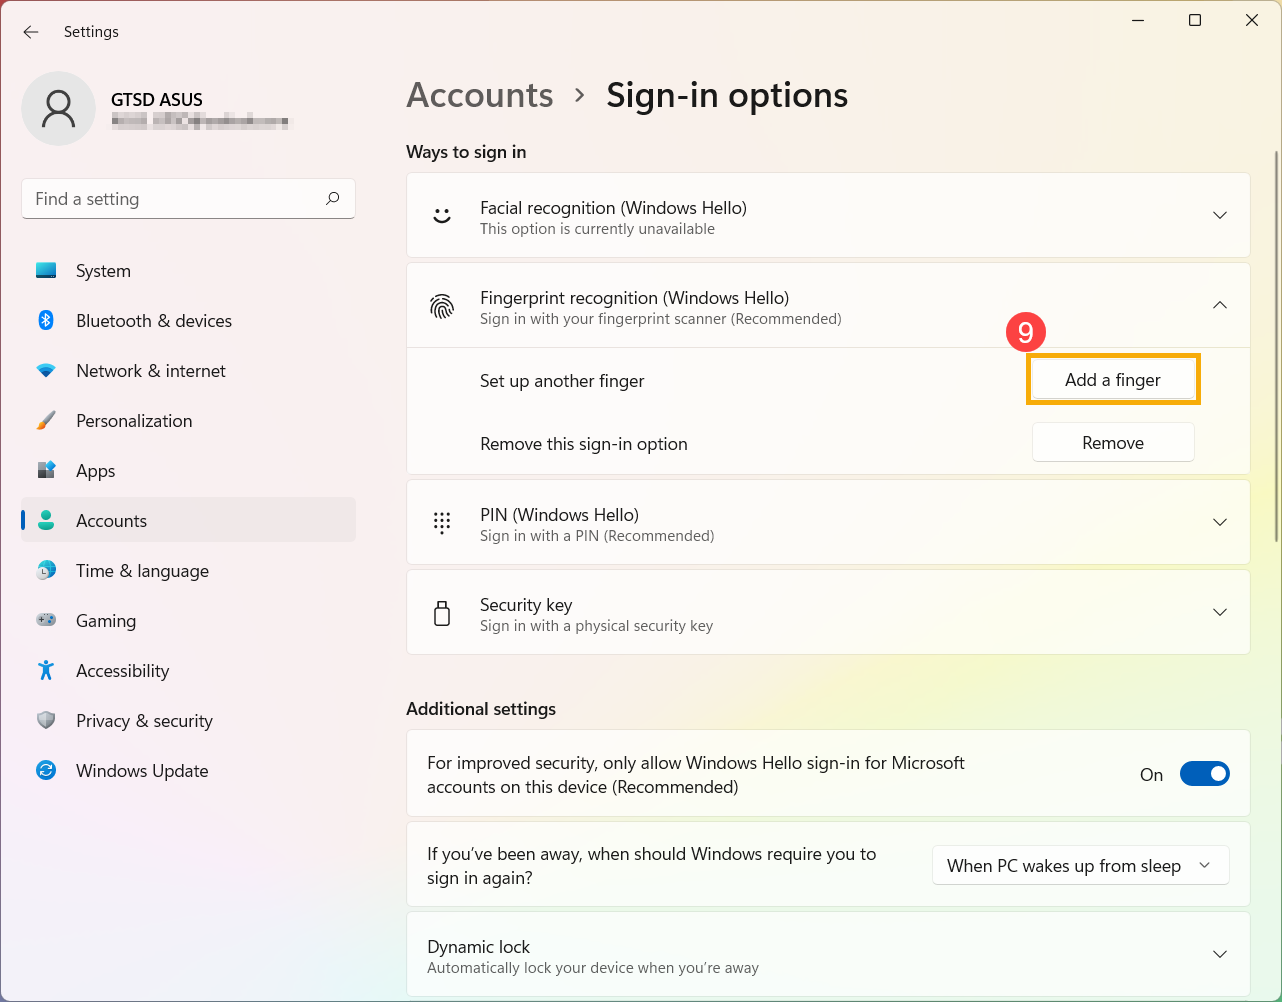
- The setup of fingerprint sign-in is completed. There is another option [Add a finger]⑨, you can set up a fingerprint of your other fingers.
- Type and search [Sign-in options]① in the Windows search bar, then click [Open]②.

- Select [Fingerprint recognition (Windows Hello)]③, then click [Remove]④, the fingerprint sign-in option will be removed.

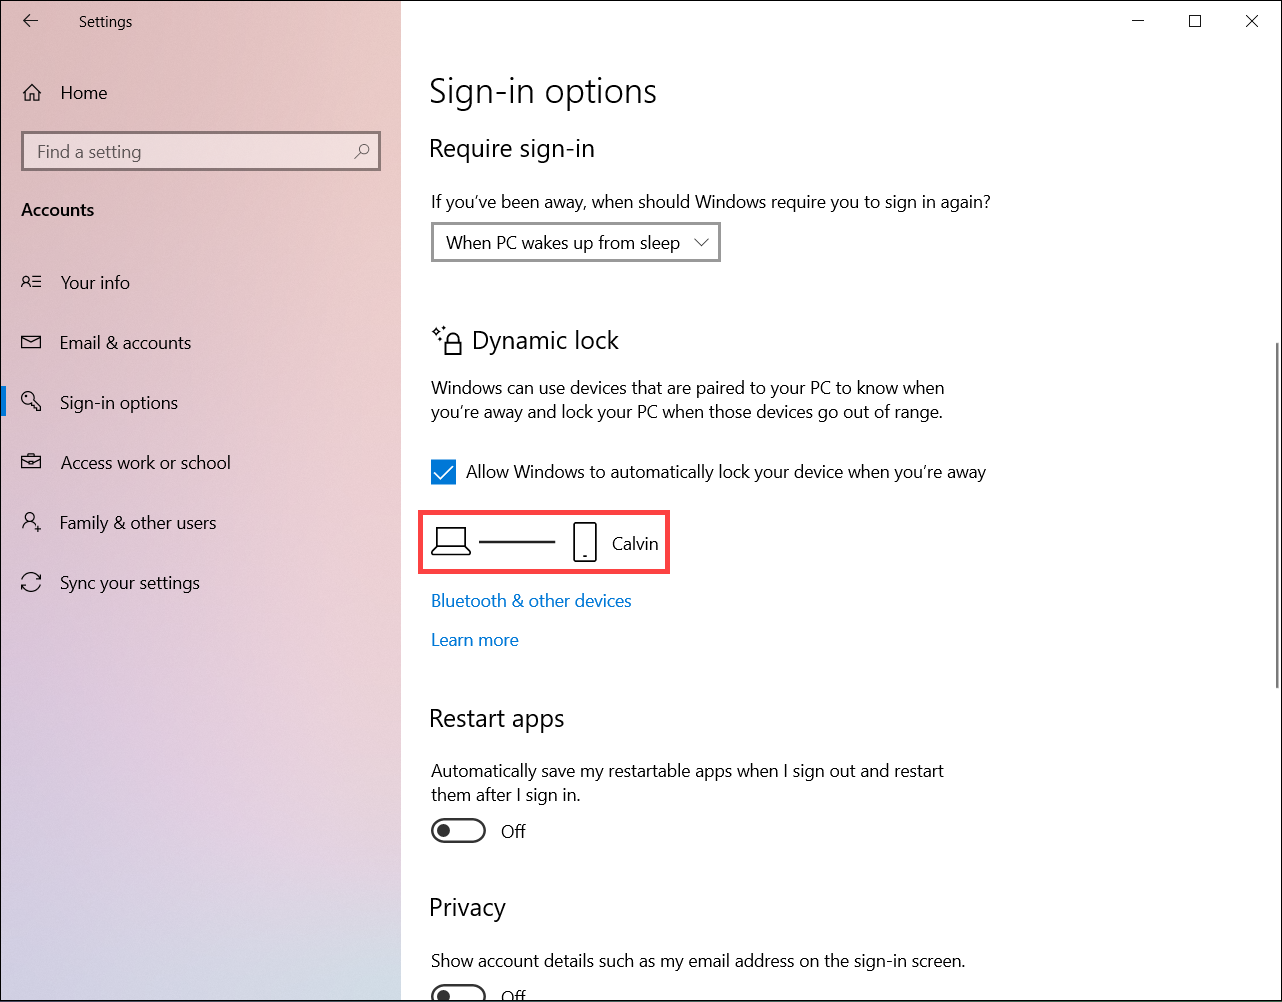
Dynamic lock allows you can use devices that are paired with your computer to help detect when you are away, and lock your computer shortly after your paired device is out of Bluetooth range. Via this feature, makes it more difficult for someone to gain access to your device if your step away from your computer and forget to lock it.
- Type and search [Sign-in options]① in the Windows search bar, then click [Open]②.

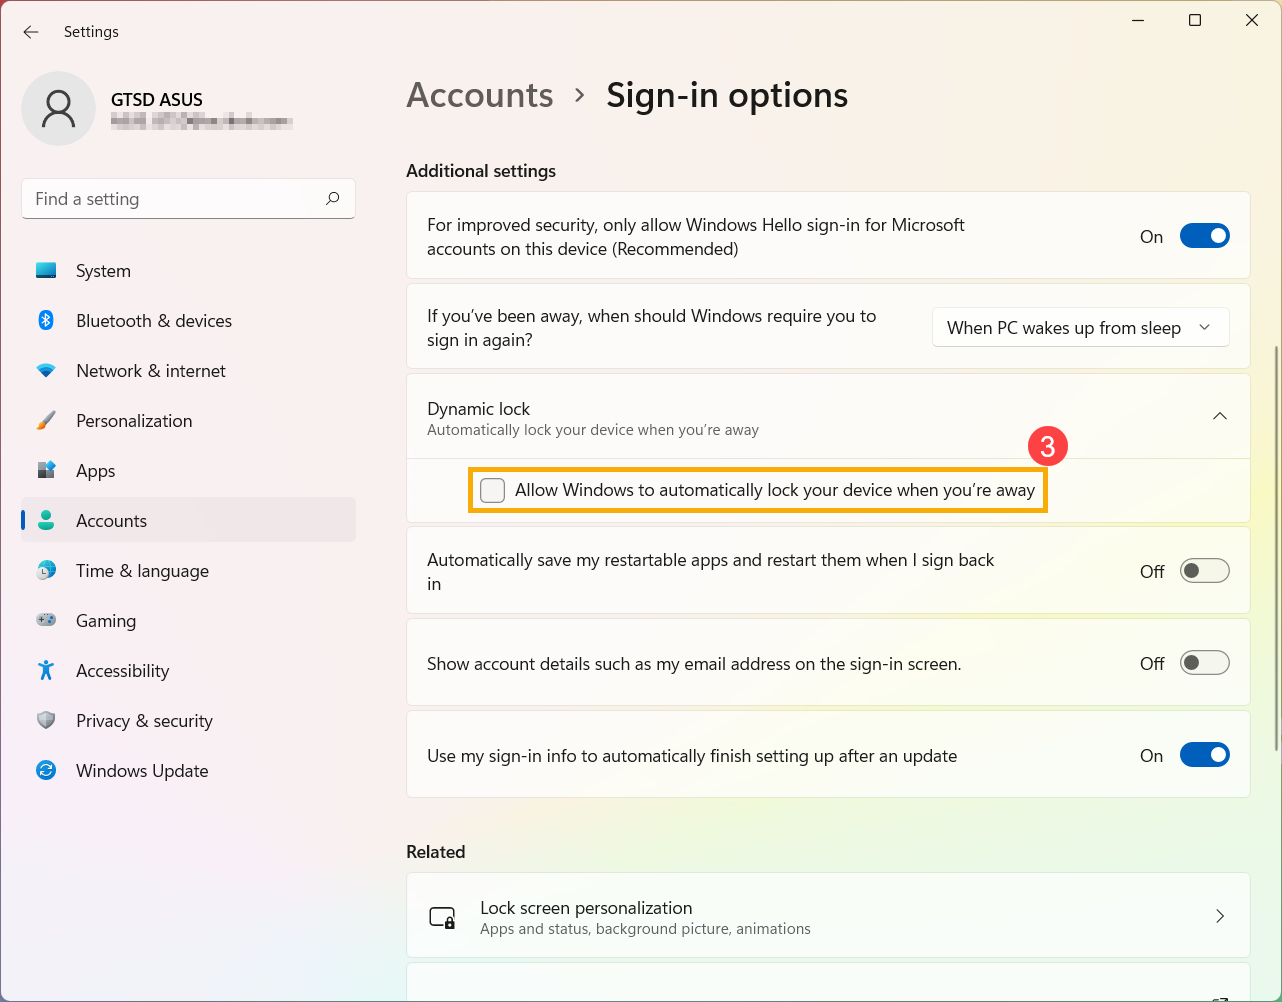
- In sign-in options, scroll down to the Dynamic lock section and then check the box to [Allow Windows to automatically lock your device when you’re away]③.
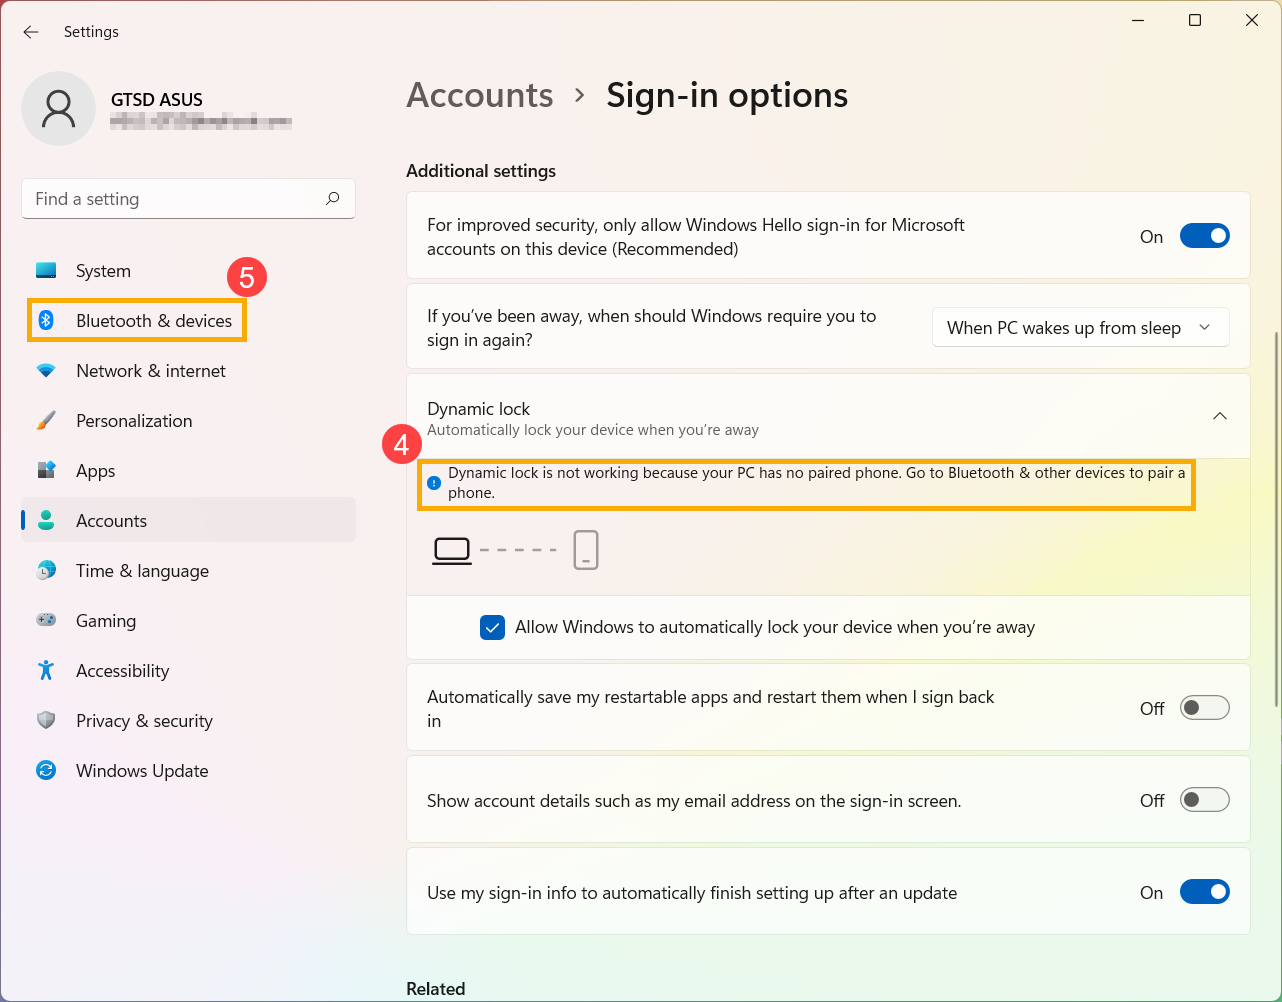
- If you see the notice that Dynamic lock is not working because your PC has no paired phone④, please select [Bluetooth & devices]⑤ to pair a phone with your computer. Here you can learn more about How to pair devices using Bluetooth.
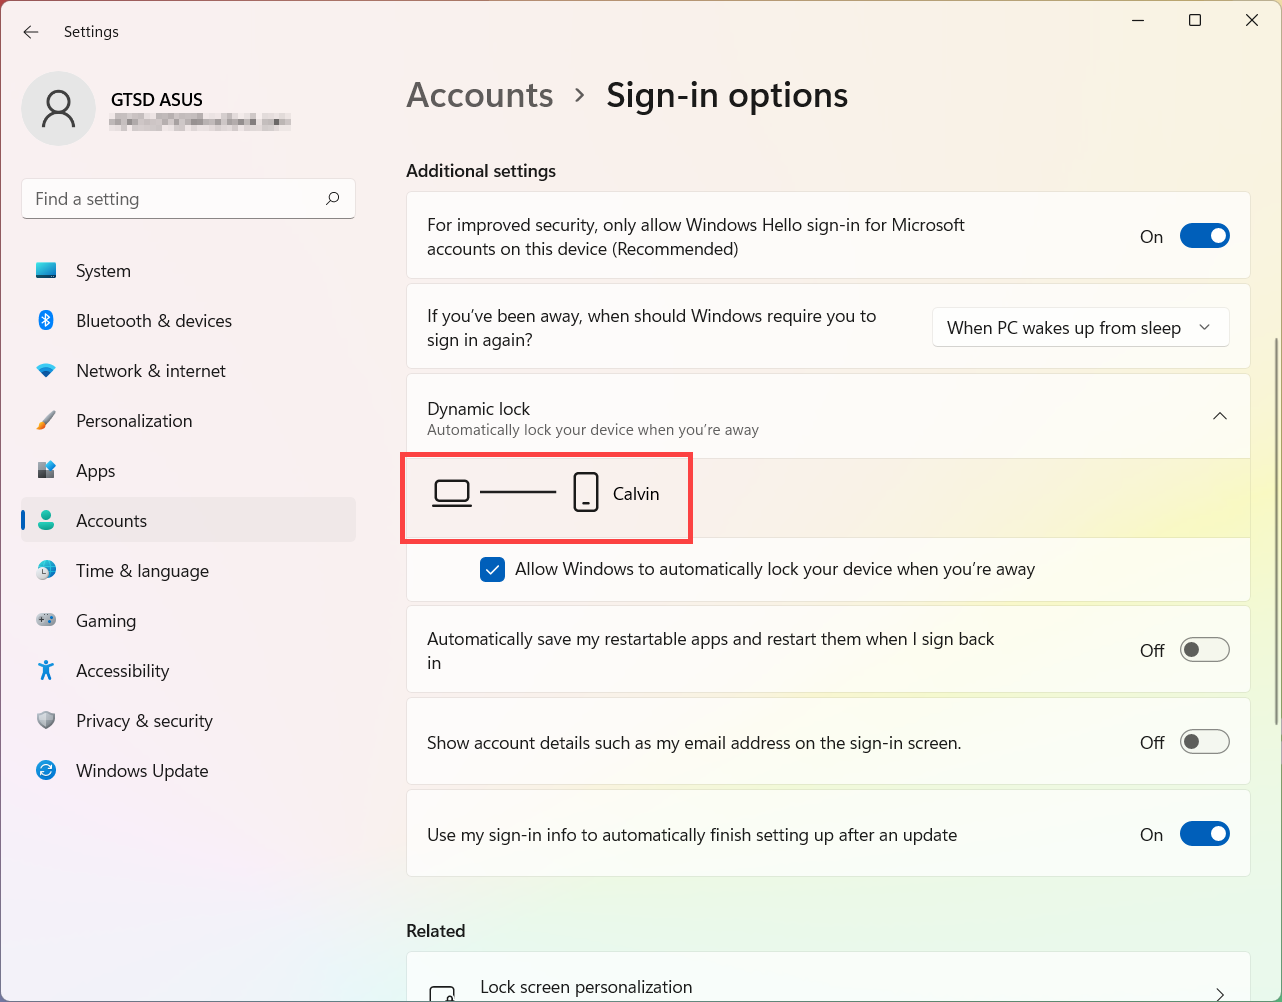
- After the pairing is completed, it will display as below. Please take your phone with you when you walk away, and your computer will automatically lock a minute or so after you’re out of Bluetooth range.
- Sign in with facial recognition
- Remove facial recognition
- Sign in with fingerprint scanner
- Remove fingerprint scanner
- Set up Dynamic lock
Sign in with facial recognition
This feature is only available on the selected models equipped with IR camera. If you don’t see the facial sign-in option or this option is unavailable displayed, it means that your computer doesn’t have an IR camera.
- You can find the product specification of your computer on the ASUS official website.
- You can also check Device Manager to see whether your PC is equipped with an IR camera. Right-click the [Start] icon
 on the taskbar①, then select [Device Manager]②.
Check the arrow next to [Cameras]③, then you can see whether your PC has an IR camera.
Start setting facial recognition
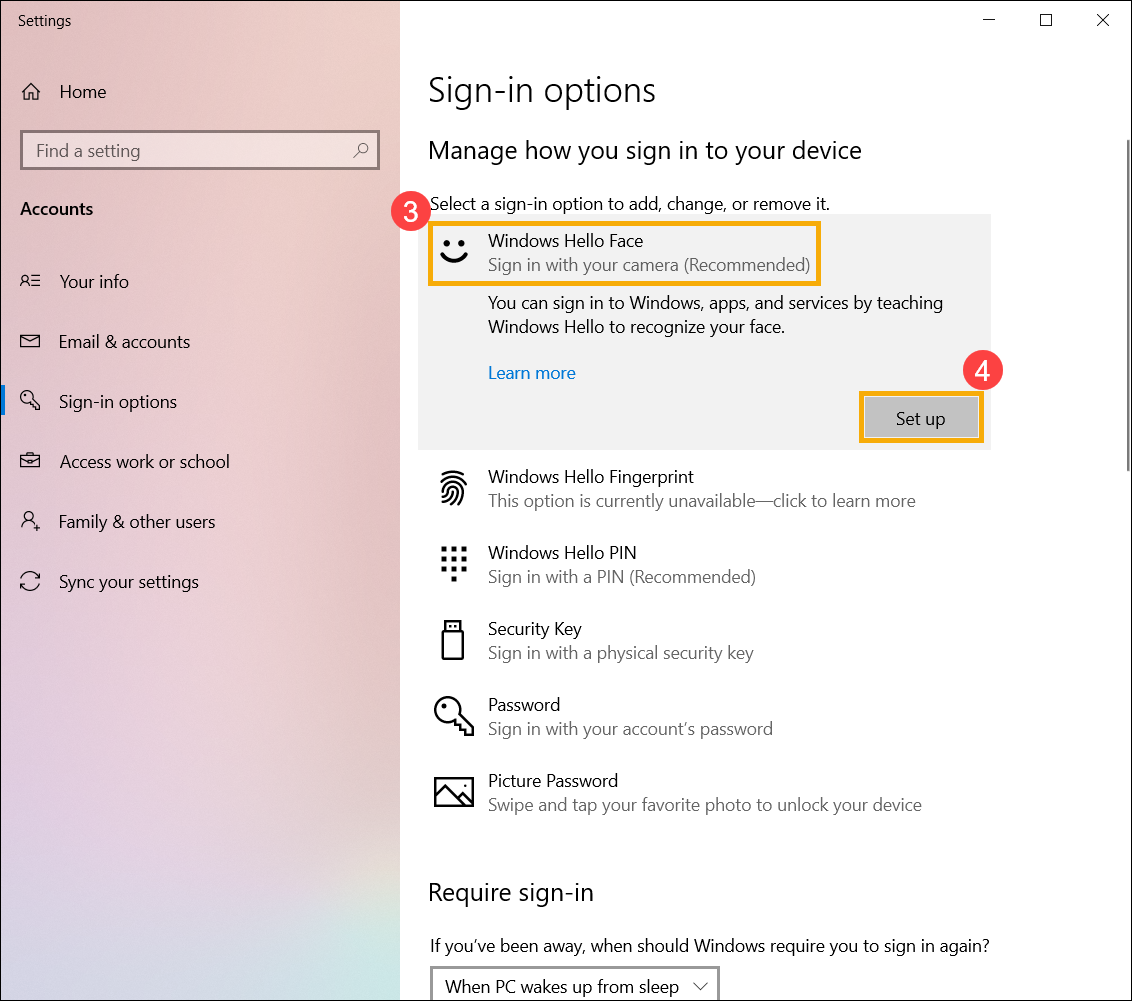
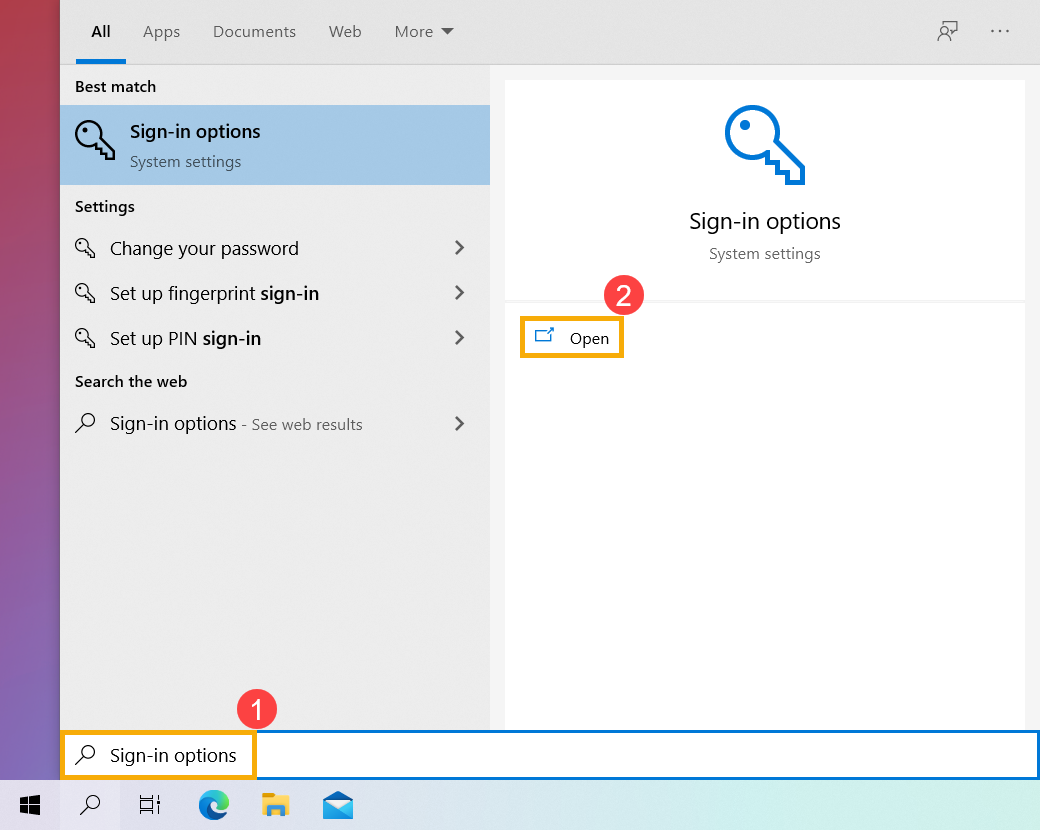
- Type and search [Sign-in options]① in the Windows search bar, then click [Open]②.

- Select [Windows Hello Face]③, then click [Set up]④.
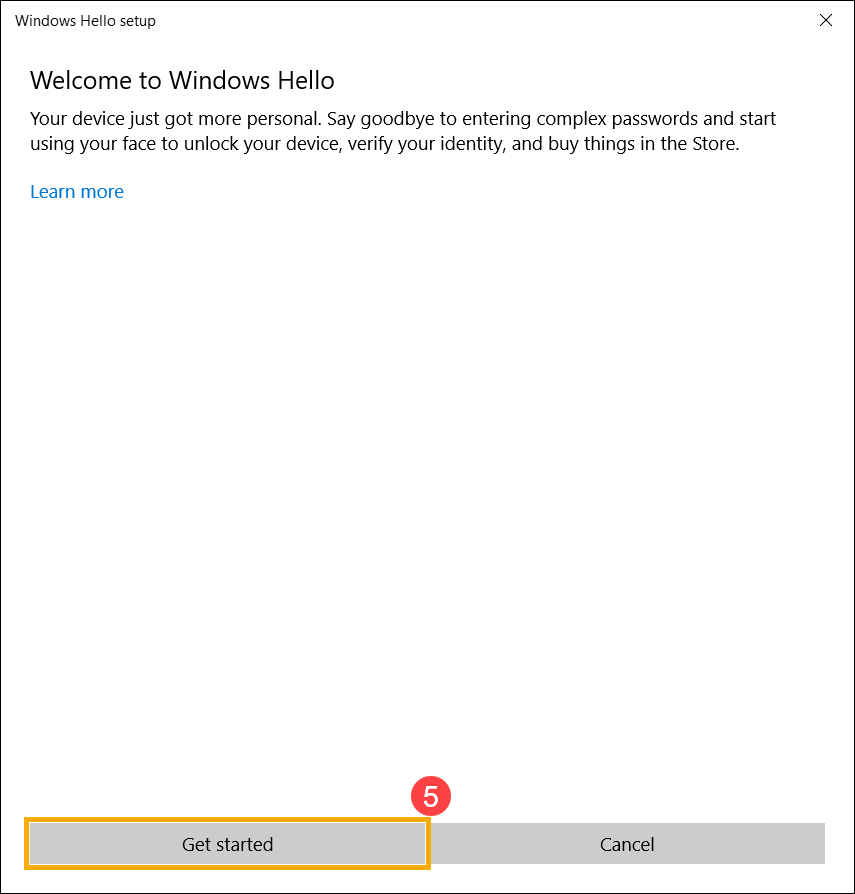
- Select [Get started]⑤.
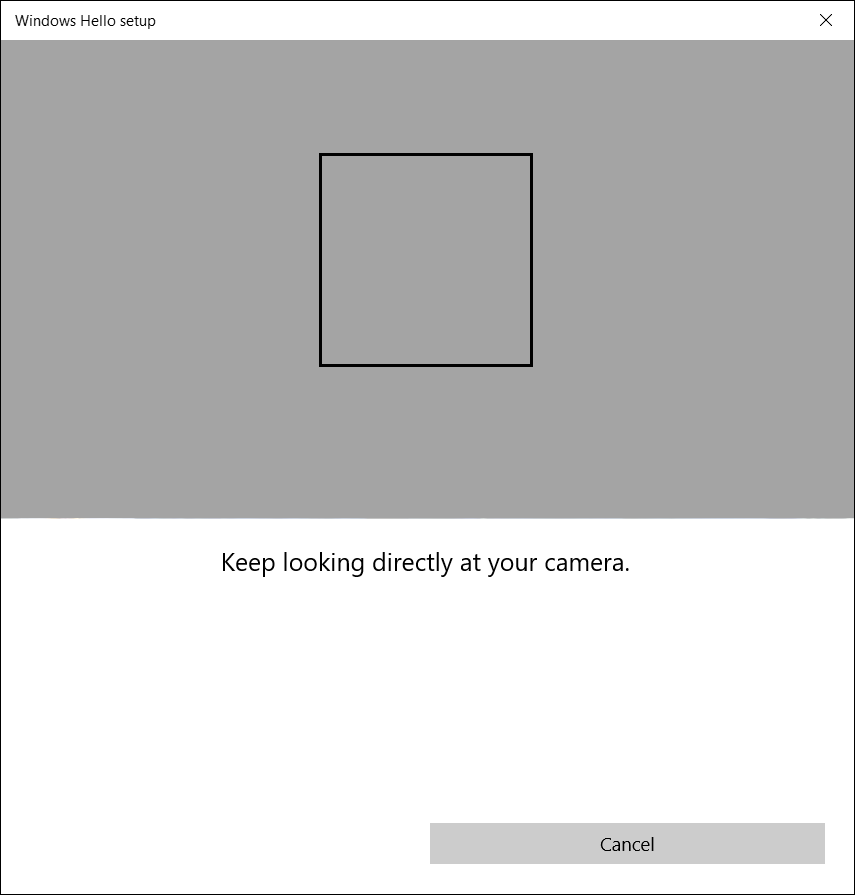
- Please position your face in the center of the frame that appears on screen, then the camera will capture your facial features.
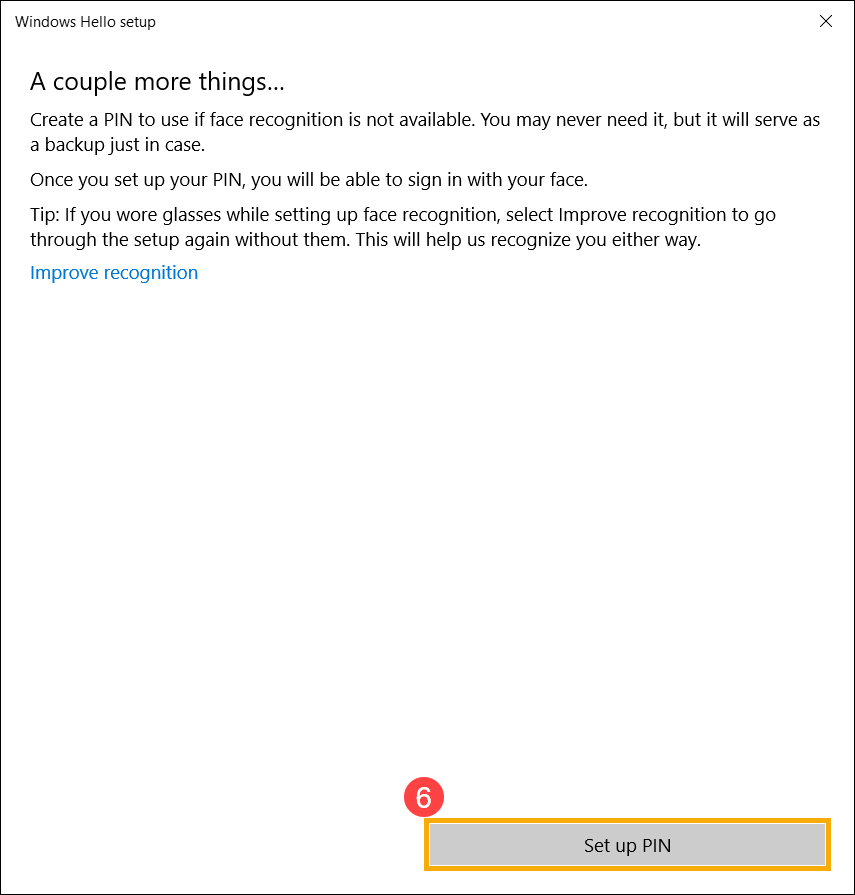
- The recognition of your facial features is completed, please select [Set up PIN]⑥ to create a PIN to sign in if face recognition is not available.
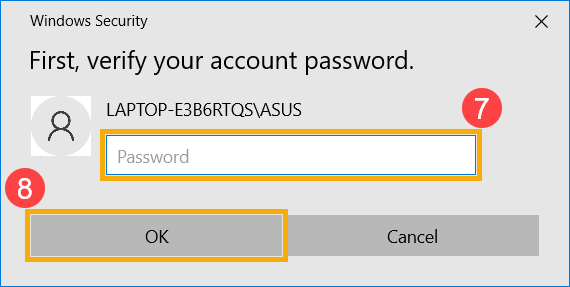
- Please input your account’s password⑦, then select [OK]⑧.
- Please add a new PIN you want to set up⑨, then select [OK]⑩.

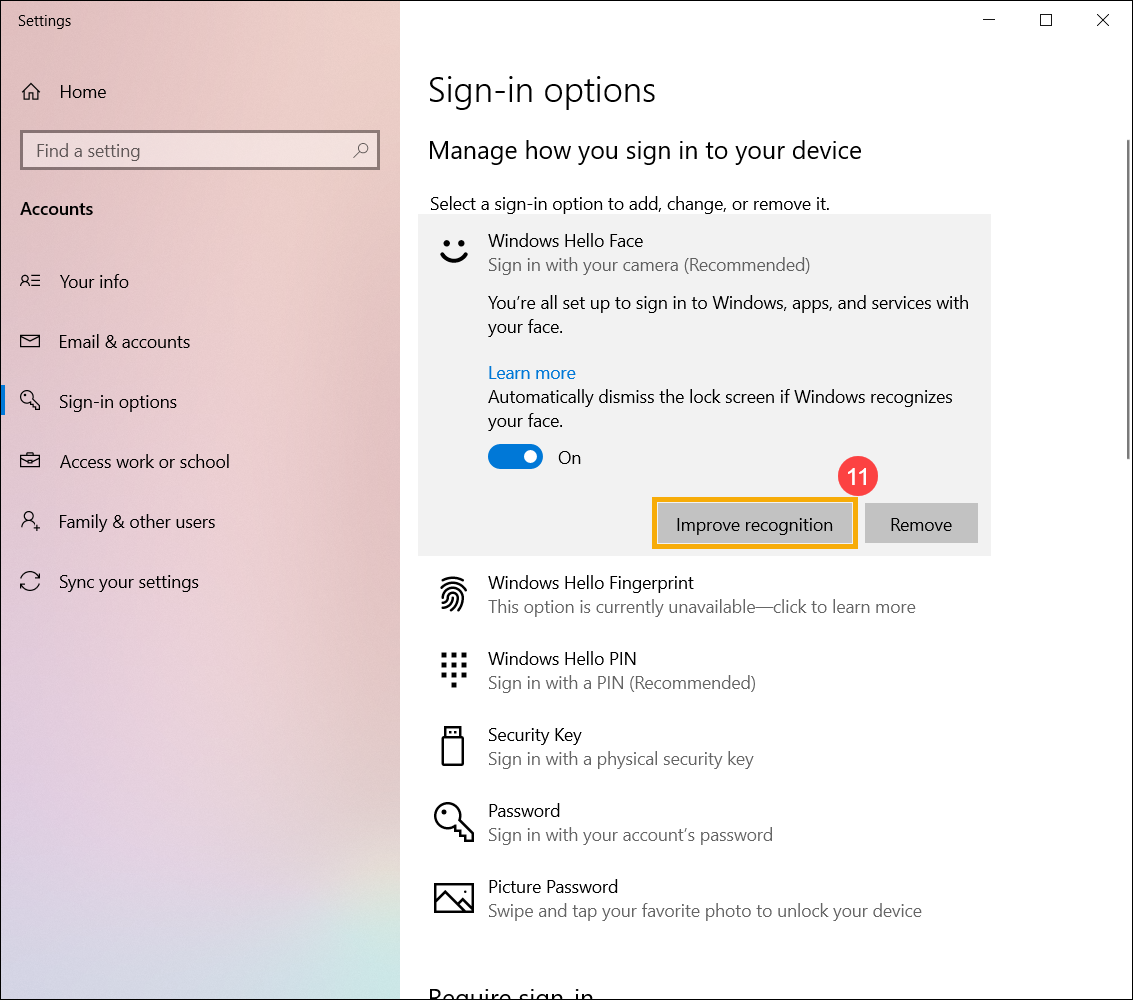
- The setup of facial sign-in is completed. There is another option [Improve recognition]⑪, this feature allows you to be recorded with and without your glasses on. If you wore glasses while setting up face recognition, select this option to go through the setup again without them. This will help Windows to recognize you no matter wearing glasses on or not.
- Type and search [Sign-in options]① in the Windows search bar, then click [Open]②.
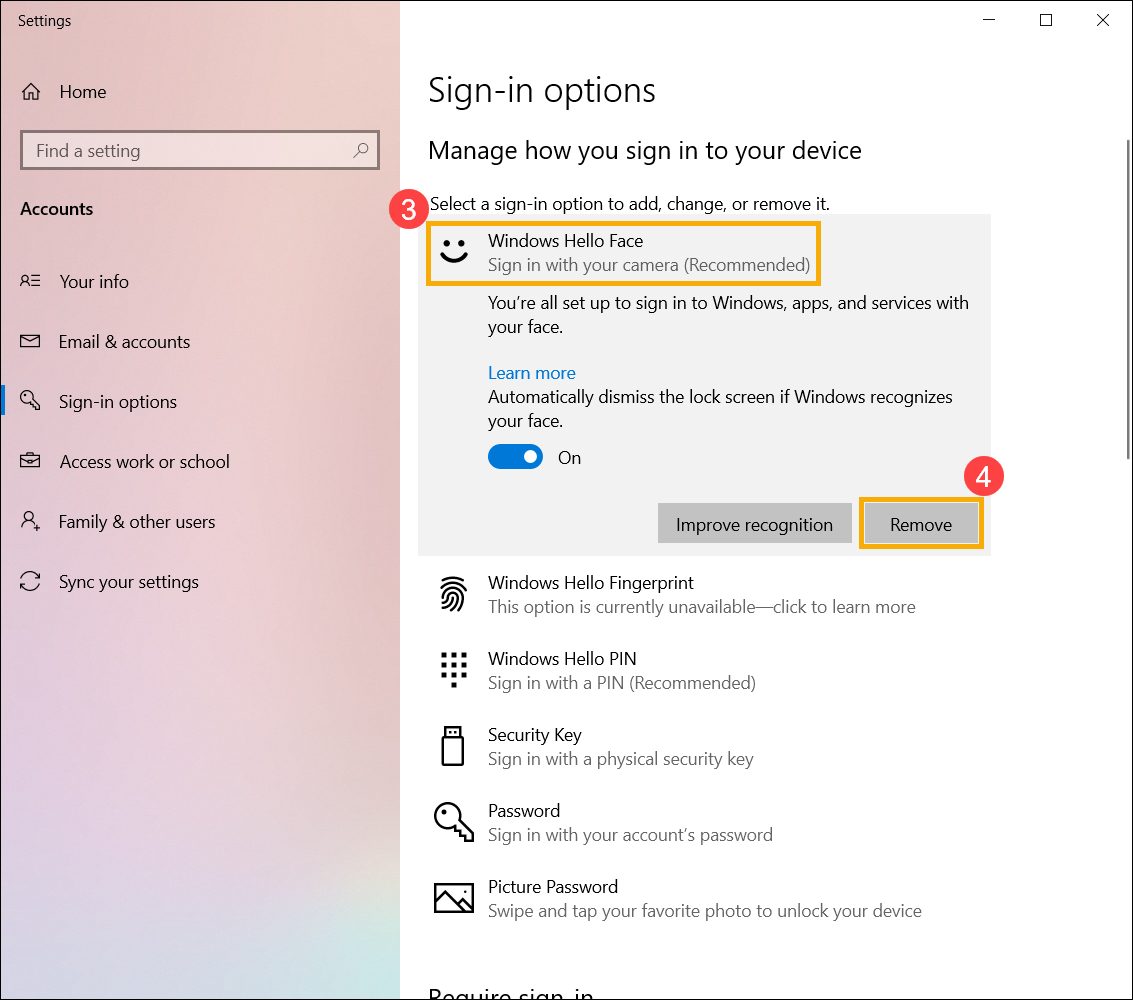
- Select [Windows Hello Face]③, then select [Remove]④, the face sign-in option will be removed.
Sign in with fingerprint scanner
This feature is only available on the selected models equipped with Fingerprint scanner. If you don’t see the fingerprint sign-in option or this option is unavailable displayed, it means that your computer doesn’t have an fingerprint scanner.
Please find your computer’s fingerprint scanner. Most ASUS laptops’ fingerprint scanner located around the touchpad.

The Fingerprint sensor has been integrated with Power key on some ASUS laptops.

- Type and search [Sign-in options]① in the Windows search bar, then click [Open]②.

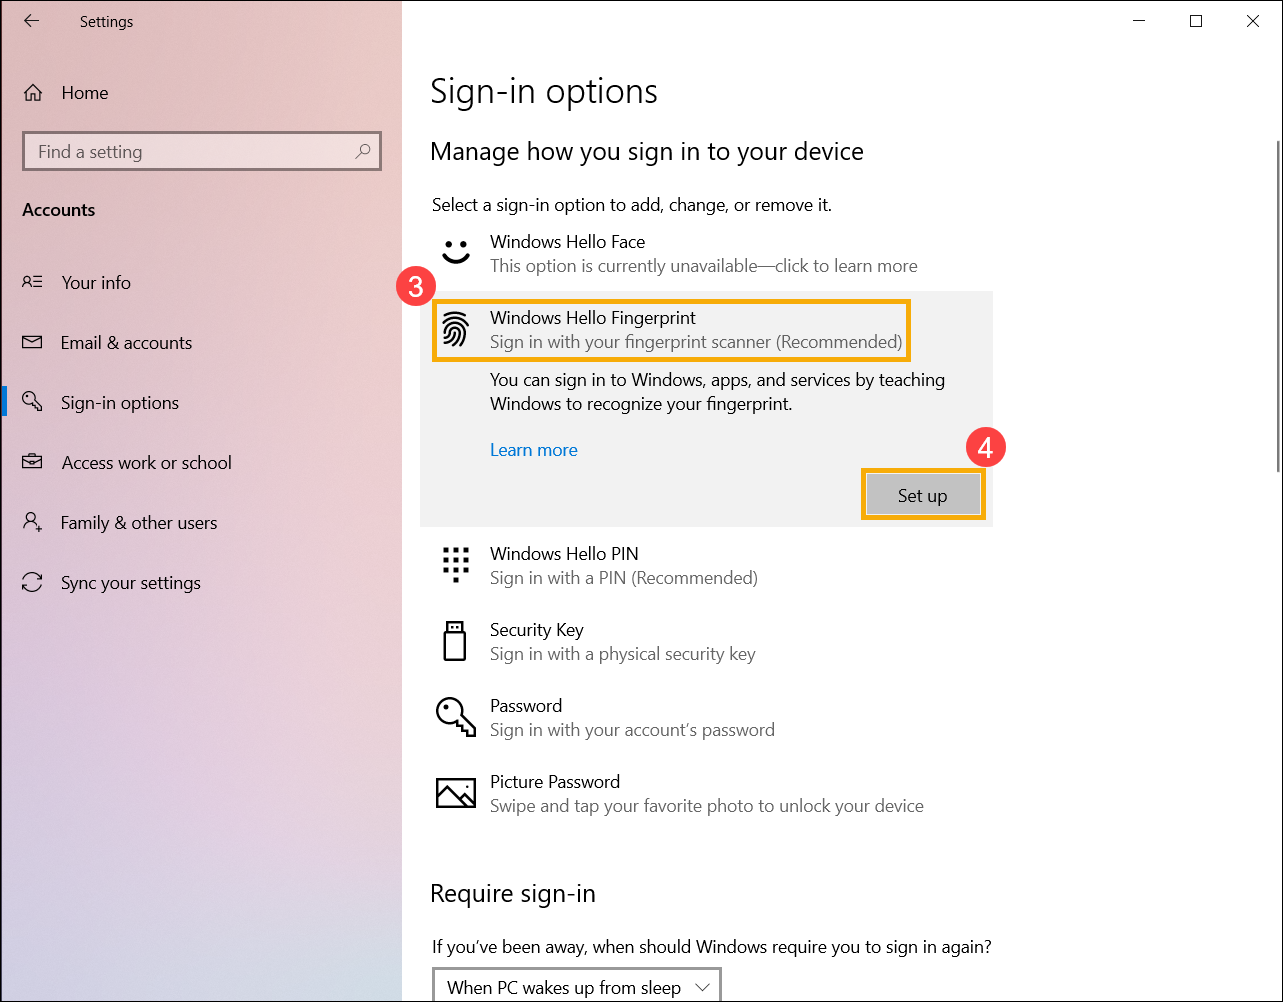
- Select [Windows Hello Fingerprint]③, then click [Set up]④.
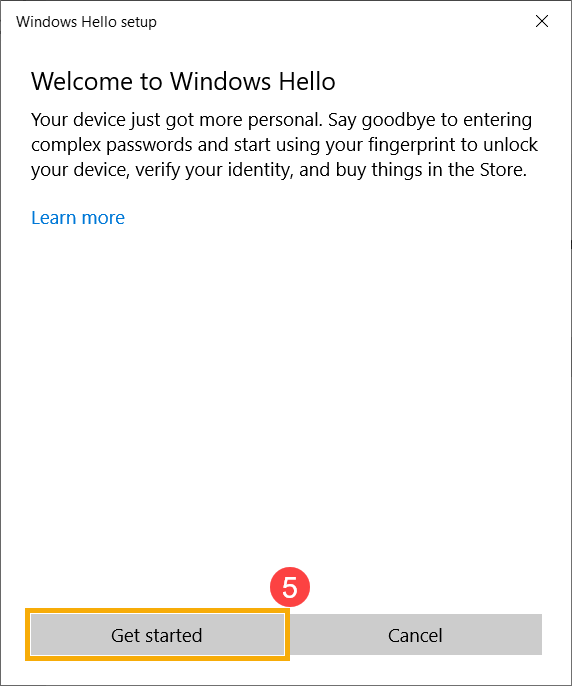
- Select [Get started]⑤.
- Please make sure your fingers are clean and dry, then lift and rest only one finger on the sensor.
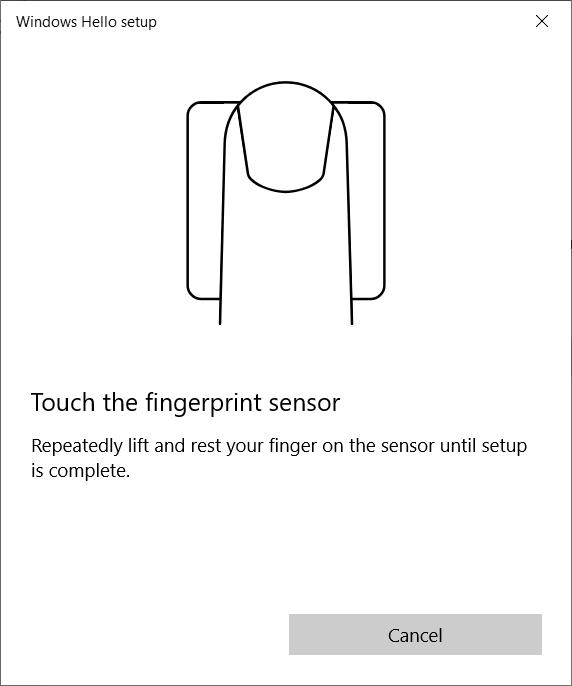
- Please follow the on-screen prompts to repeatedly lift and rest your finger on the sensor.
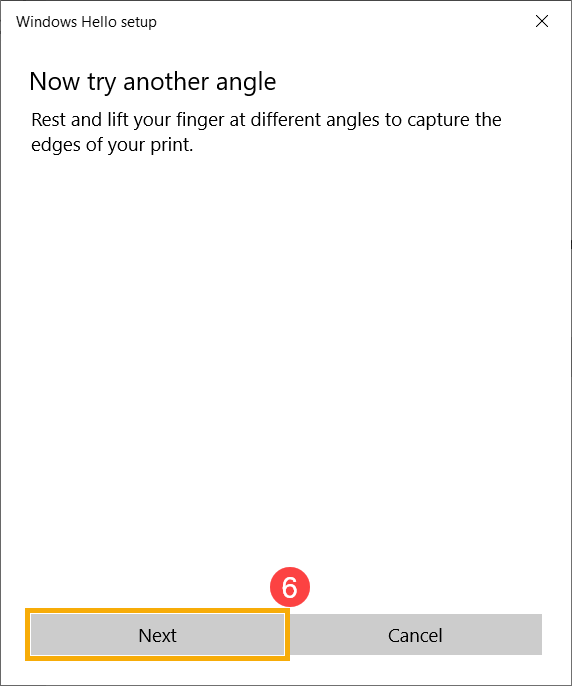
- Select [Next]⑥ and try to use different angles of your finger to capture the edges of your fingerprint when pressing on the sensor.
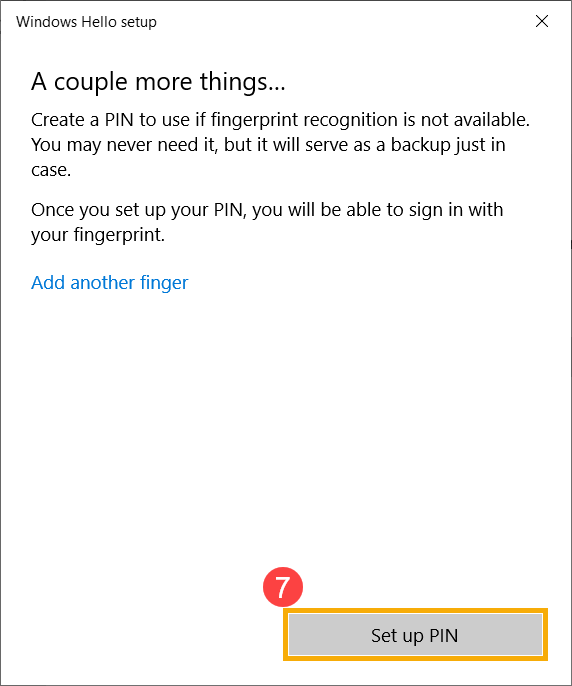
- The recognition of your fingerprint is completed, please select [Set up PIN]⑦ to create a PIN to sign in if fingerprint recognition is not available.
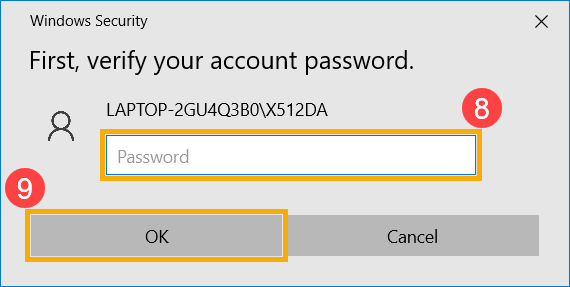
- Please input your account’s password⑧, then select [OK]⑨.
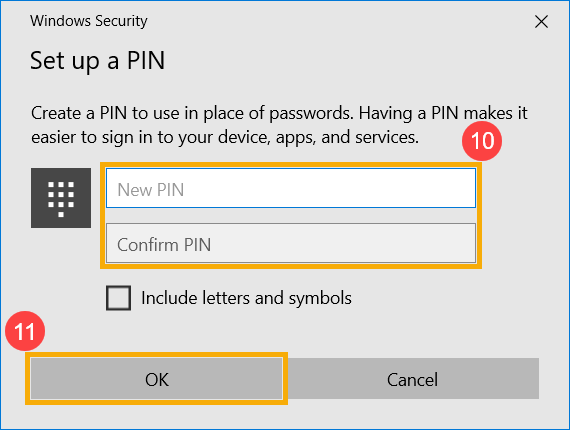
- Please add a new PIN you want to set up⑩, then select [OK]⑪.
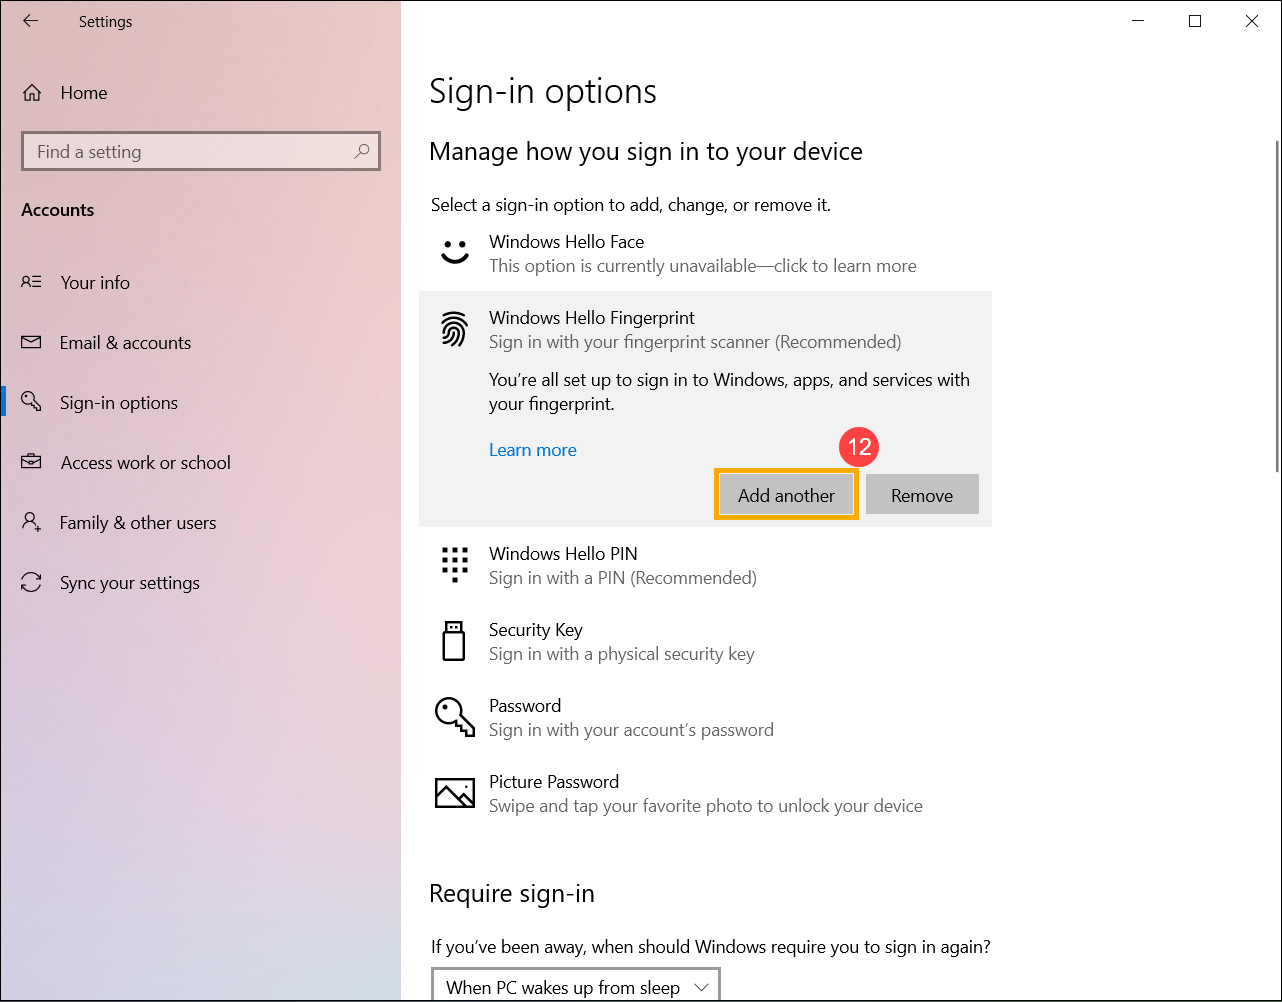
- The setup of fingerprint sign-in is completed. There is another option [Add another]⑫, you can set up a fingerprint of your other fingers.
- Type and search [Sign-in options]① in the Windows search bar, then click [Open]②.

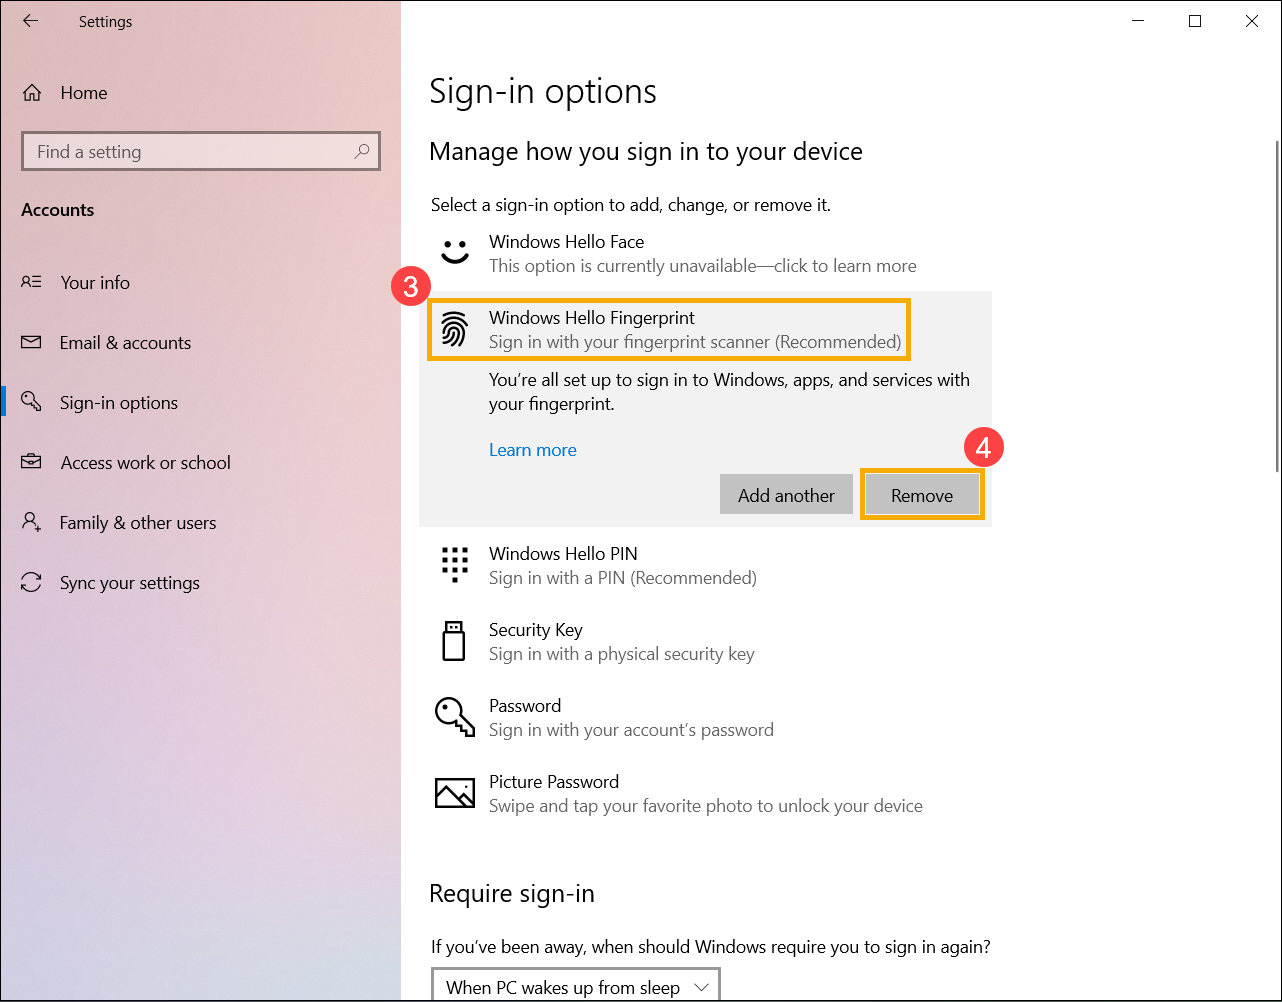
- Select [Windows Hello Fingerprint]③, then select [Remove]④, the fingerprint sign-in option will be removed.
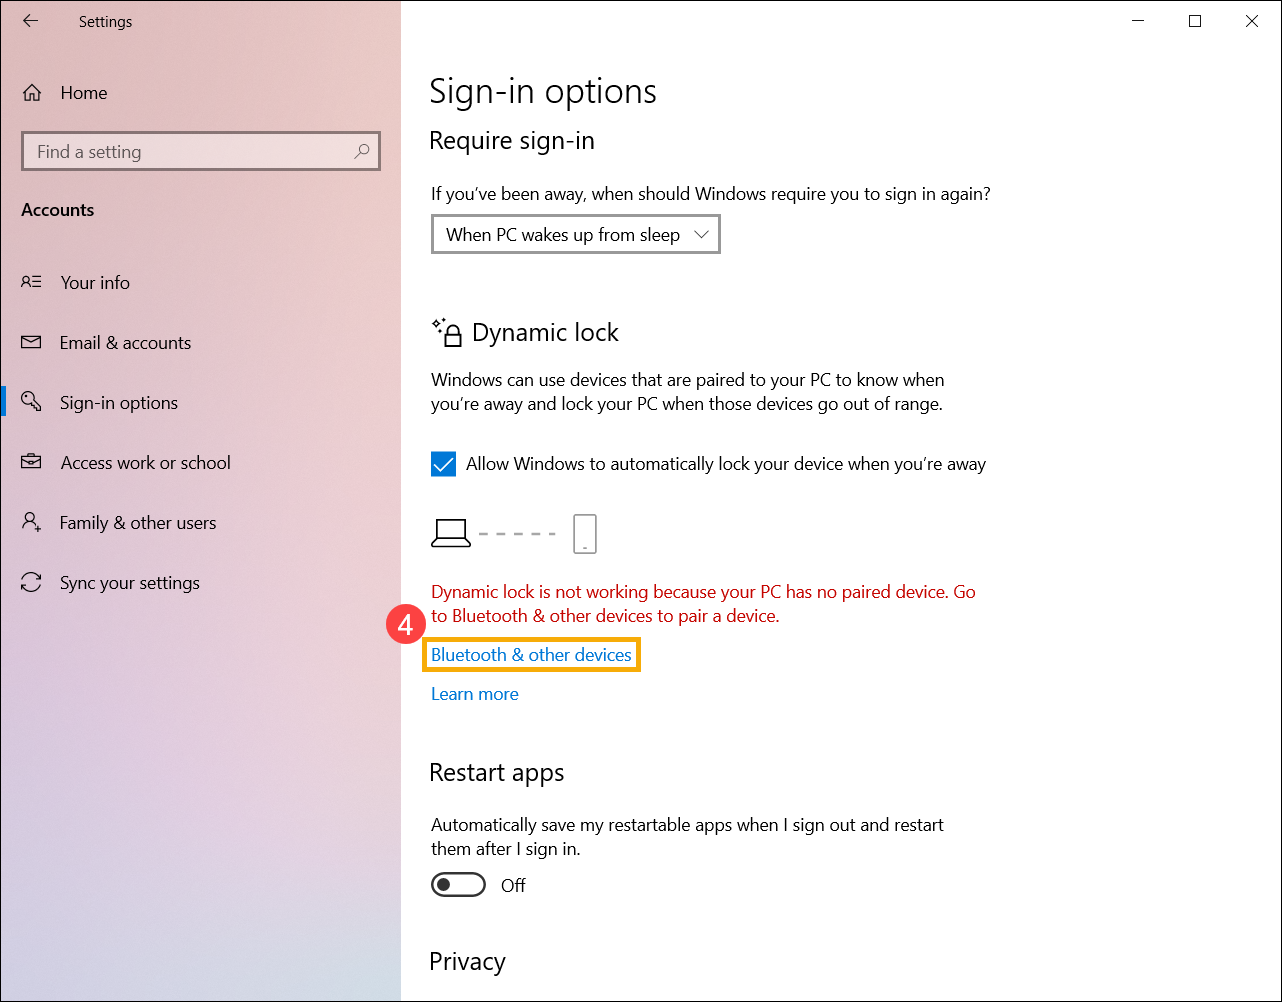
Dynamic lock allows you can use devices that are paired with your computer to help detect when you are away, and lock your computer shortly after your paired device is out of Bluetooth range. Via this feature, makes it more difficult for someone to gain access to your device if your step away from your computer and forget to lock it.
- Type and search [Sign-in options]① in the Windows search bar, then click [Open]②.

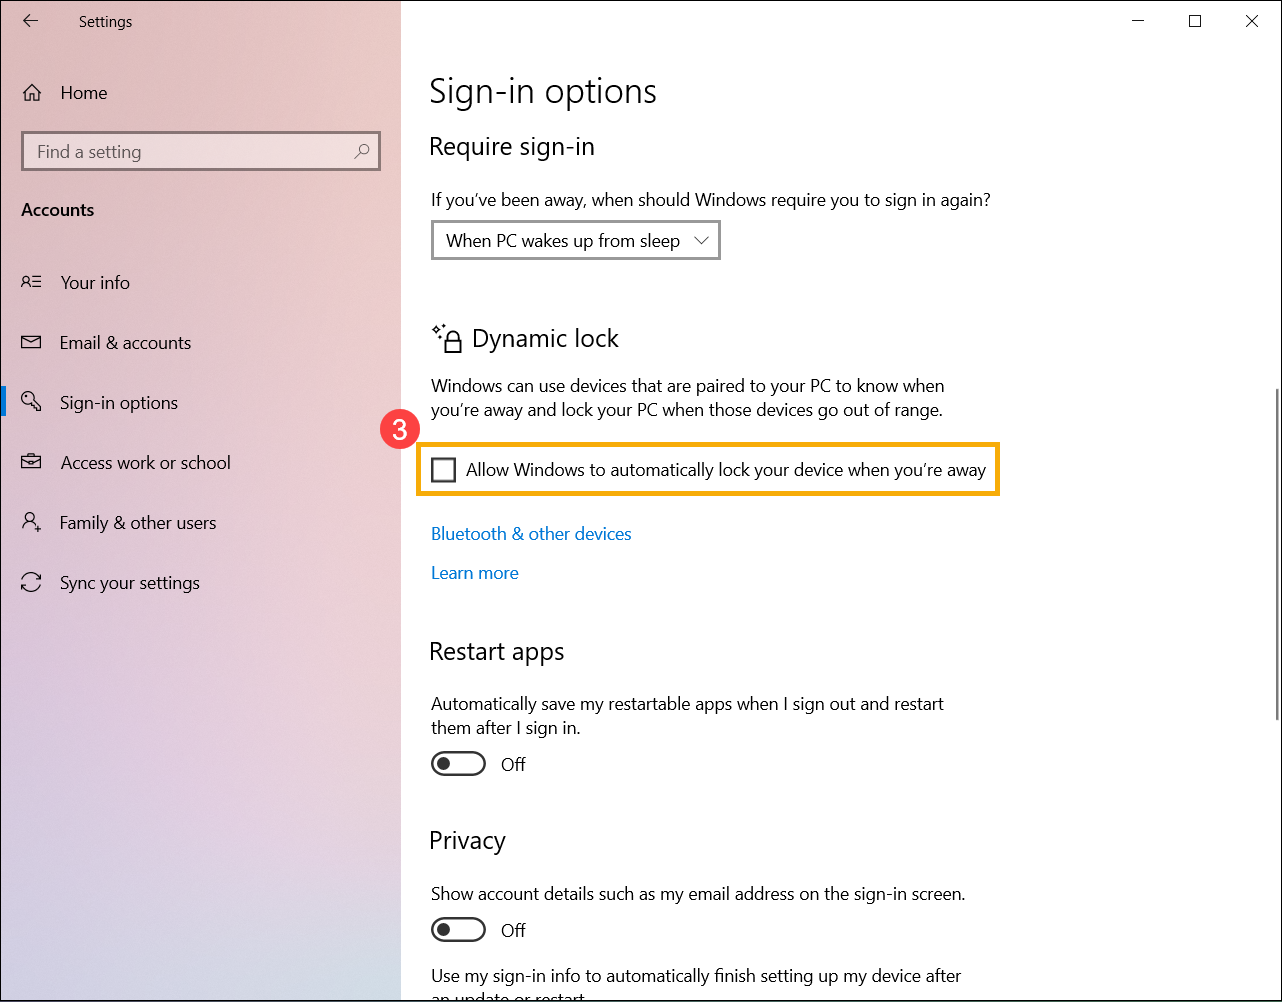
- In sign-in options, scroll down to the Dynamic lock section and then check the box to [Allow Windows to automatically lock your device when you’re away]③.
- If you see the notice that Dynamic lock is not working because your PC has no paired device, please select [Bluetooth & other devices]④ to pair a Bluetooth device with your computer. Here you can learn more about How to pair devices using Bluetooth.
- After the pairing is completed, it will display as below. Please take your Bluetooth device with you when you walk away, and your computer will automatically lock a minute or so after you’re out of Bluetooth range.