[Notebook] MyASUS v UEFI BIOS – Představení
MyASUS v UEFI poskytuje uživatelům notebooků ASUS nové rozhraní v systému UEFI.
Design obrazovky MyASUS v UEFI umožňuje uživatelům zbavit se staré zelenobílé obrazovky operačníhos ystému BIOS a používat bohatou grafiku a barvy, které umožňují uživatelům využívat rozhraní UEFI podobné operačnímu systému. Ani lidé, kteří si s počítačem zase tolik nerozumí, se nebudou muset obávat, že by si neporadili.
Kromě úpravy nastavení hardwaru MyASUS v UEFI poskytuje také funkce pro systémovou diagnostiku a obnovení z cloudu v prostředí UEFI.
Pokud se systém nebude moct dostat do prostředí operačního systému, můžete použít obnovení z cloudu v MyASUS v UEFI a operační systém tím obnovit. Stačí se řídit pokyny v prostředí. Díky připojení k internetu pak rychle obnovíte tovární nastavení. Díky technické podpoře můžete přeinstalovat operační systém vlastními silami.
- Požadavky na systém
- Jak otevřít MyASUS v UEFI BIOS
- Ovládací panel
3.1 Jak otevřít stránku nastavení BIOSu
3.2 Jak upgradovat systém BIOS - Nastavení oprávnění
- Diagnostika systému
- Obnovení z cloudu
- Podpora procesorů Intel 12. generace Intel® Core™ (Alder lake) nebo novějších (Některé modely tuto funkci nepodporují)
- Podpora procesorů AMD Ryzen 6000 (Rembrandt) nebo novějších (Některé modely tuto funkci nepodporují)
- Místní záloha vyžaduje externí úložné zařízení
- Obnovení z cloudu vyžaduje síť LAN nebo WiFi
- Zdroj napájení
2. Jak se dostat do MyASUS v UEFI BIOS
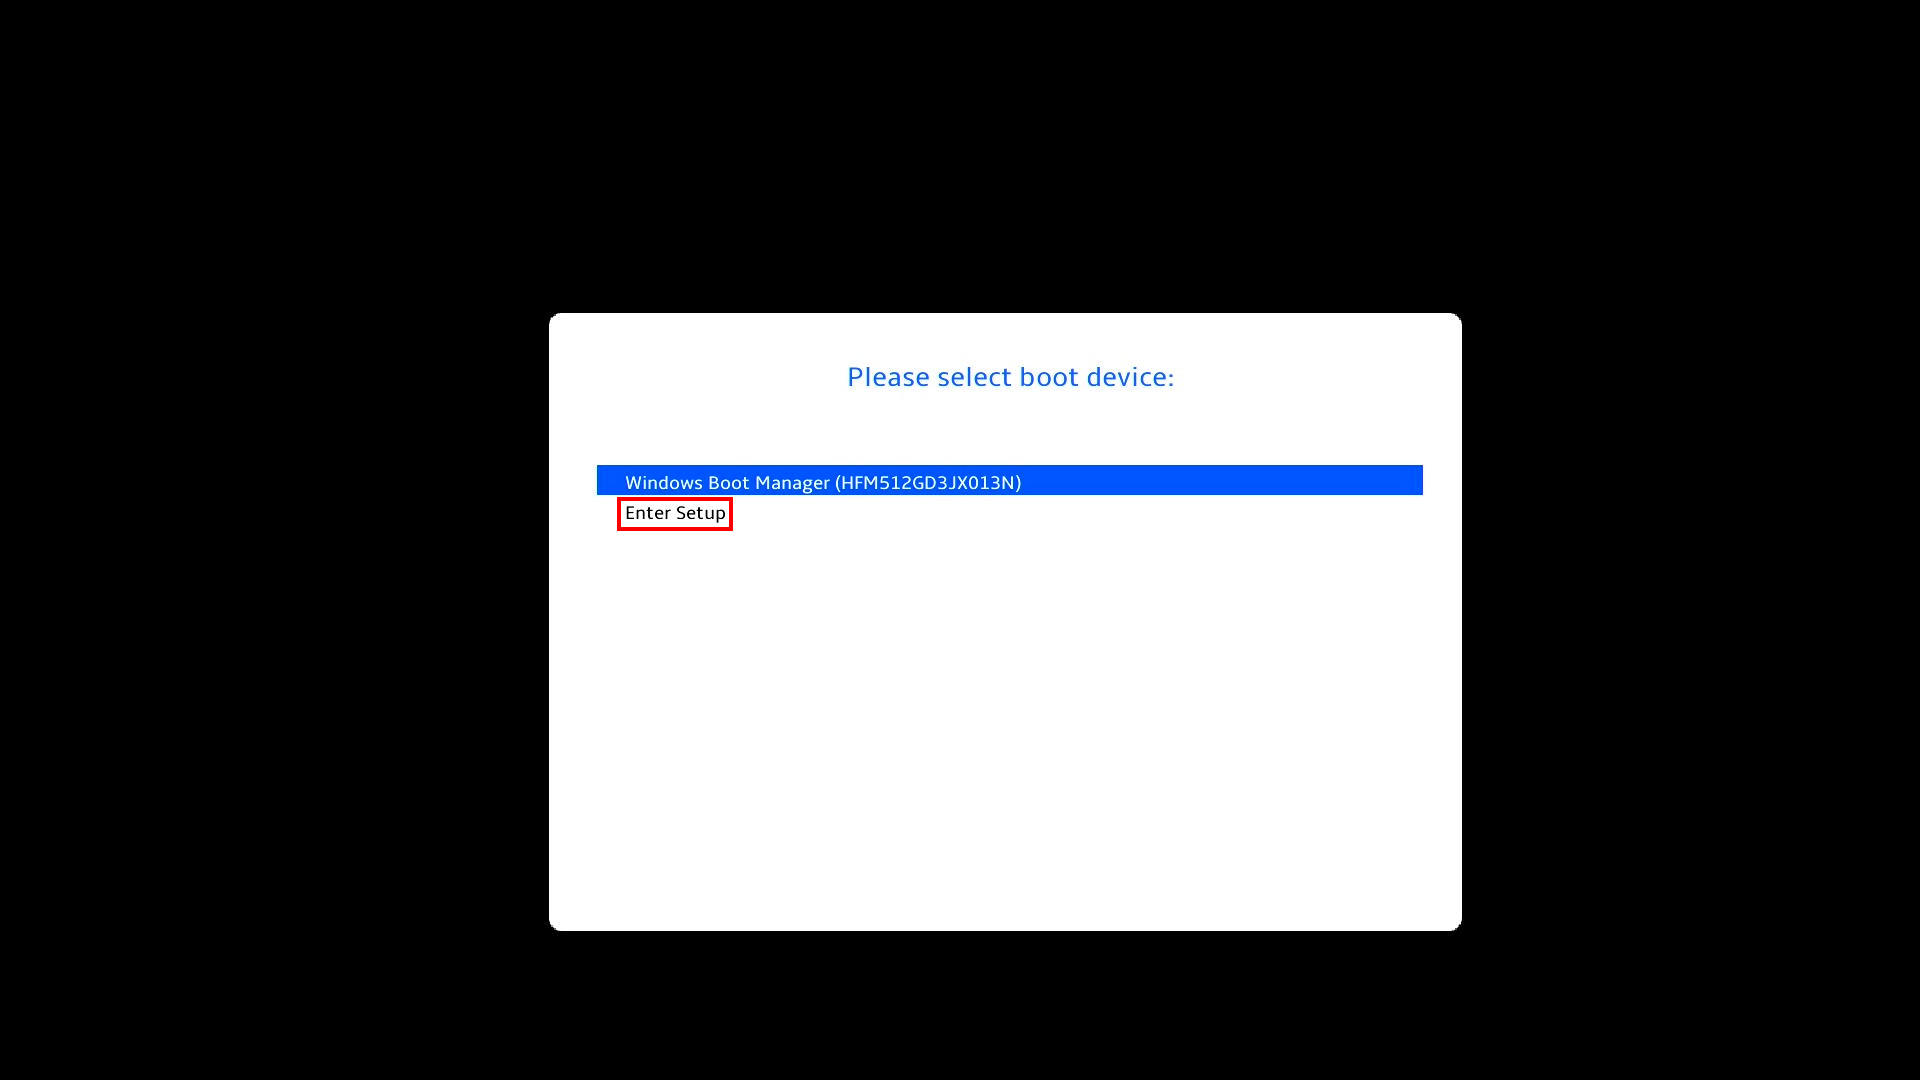
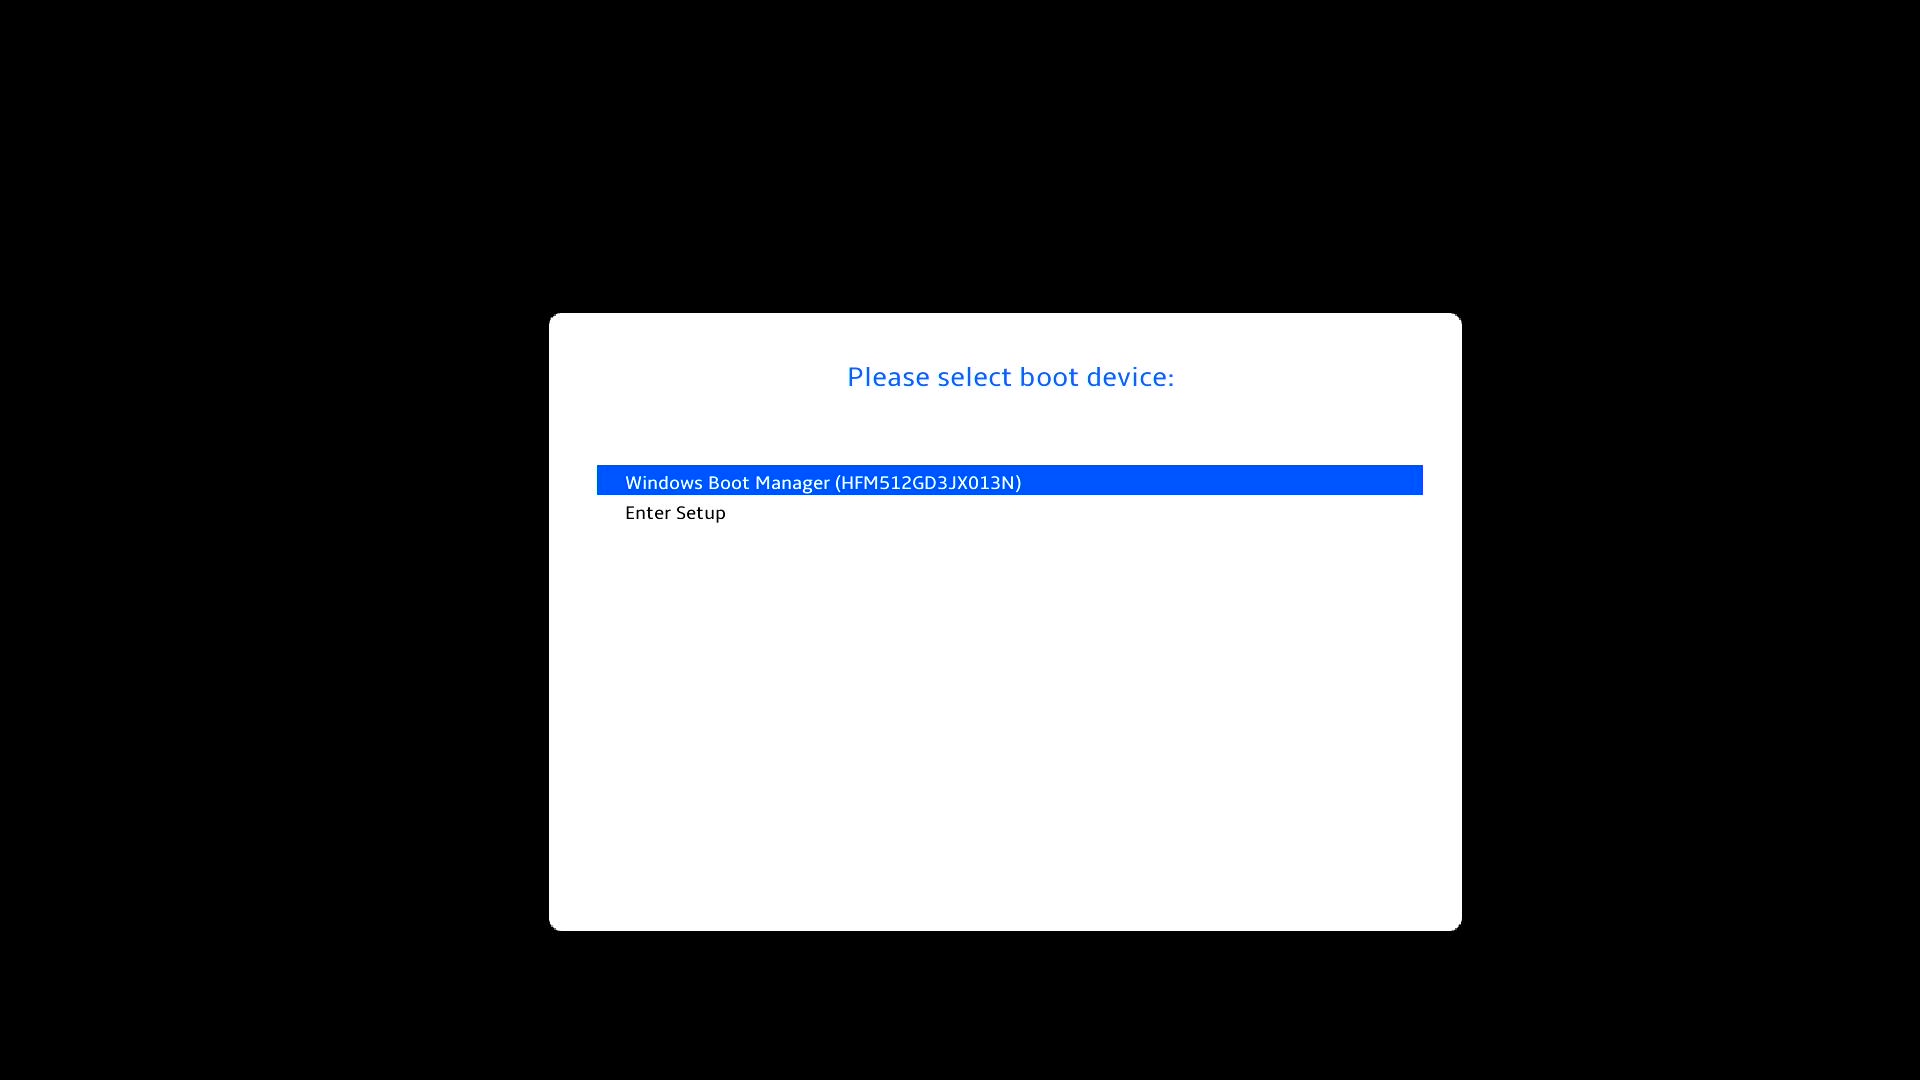
Stiskněte klávesu [ESC] nebo [F2] na klávesnici při bootování a objeví se následující obrazovka. Pomocí šipek na klávesnici vyberte možnost [Vstoupit do nastavení] a pak stiskněte Enter. Tím se otevře MyASUS v UEFI BIOSu.
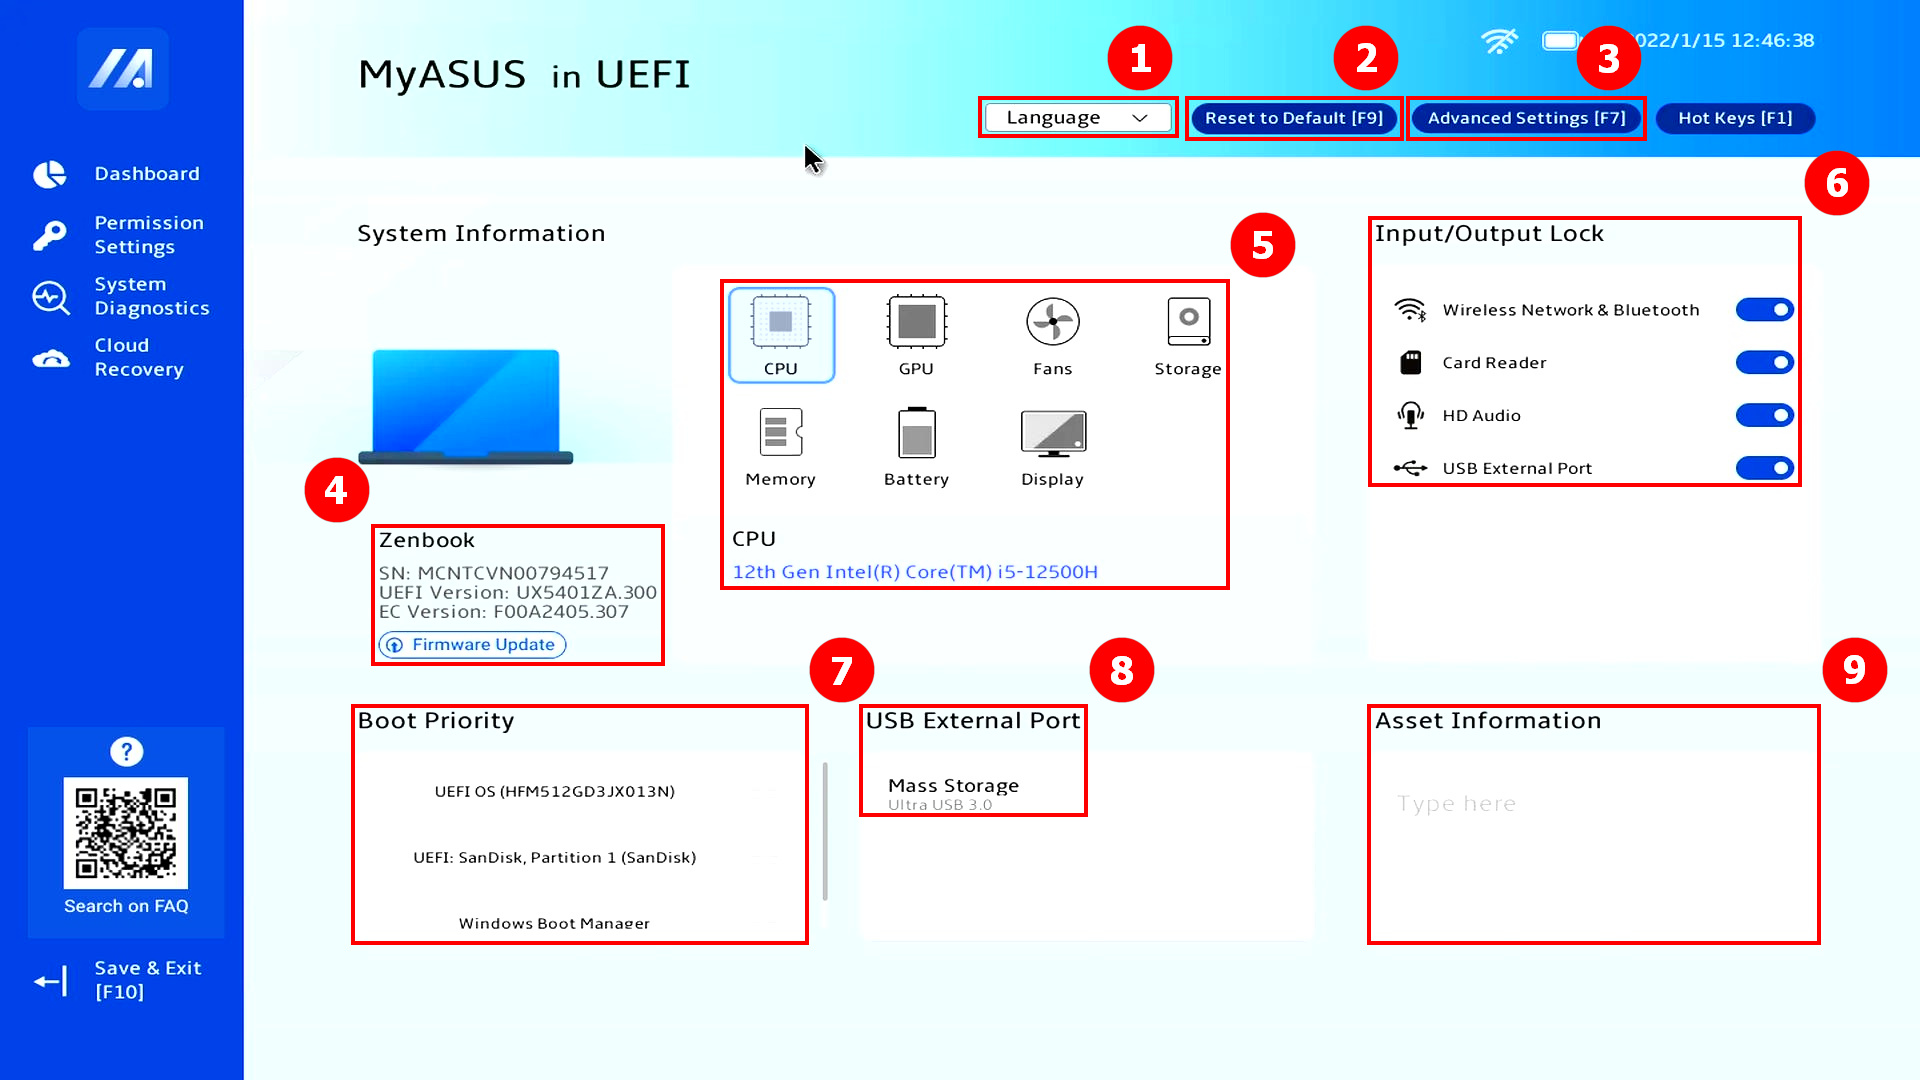
Přejděte do hlavního rozhraní [MyASUS v UEFI BIOSu] – do ovládacího panelu. Jazyky můžete přepnout v nabídce ①[Jazyk]. Klikněte na ②[Obnovit výchozí] a obnovte výchozí nastavení systému. Kliknutím na ③[Pokročilé nastavení] se dostanete na stránku nastavení BIOSu. V nabídce ④[Aktualizace firmwaru] si můžete prohlédnout název počítače, verzi BIOSu a další údaje. Kliknutím na ④[Aktualizace firmwaru] můžete upgradovat verzi BIOSu. V nabídce ⑤[Informace o hardwaru] se můžete podívat na podrobnosti o hardwaru počítače. V nabídce ⑥[Zámek vstupu/výstupu] můžete rychle vypínat nebo zapínat funkce jako WiFi nebo Bluetooth, ale pokud je vypnete, nebudou v systému Windows k dispozici. V nabídce ⑦[Pořadí bootování] můžete určit priority spouštěných položek. V nabídce ⑧[Externí USB port] můžete zobrazit zařízení připojená k USB portu. V sekci ⑨[Informace o aktivu] můžete vyplnit údaje, které chcete aznamenat. Po provedení nastavení funkcí v ovládacím panelu nebo BIOSu své změny stiskem klávesy F10 uložte.
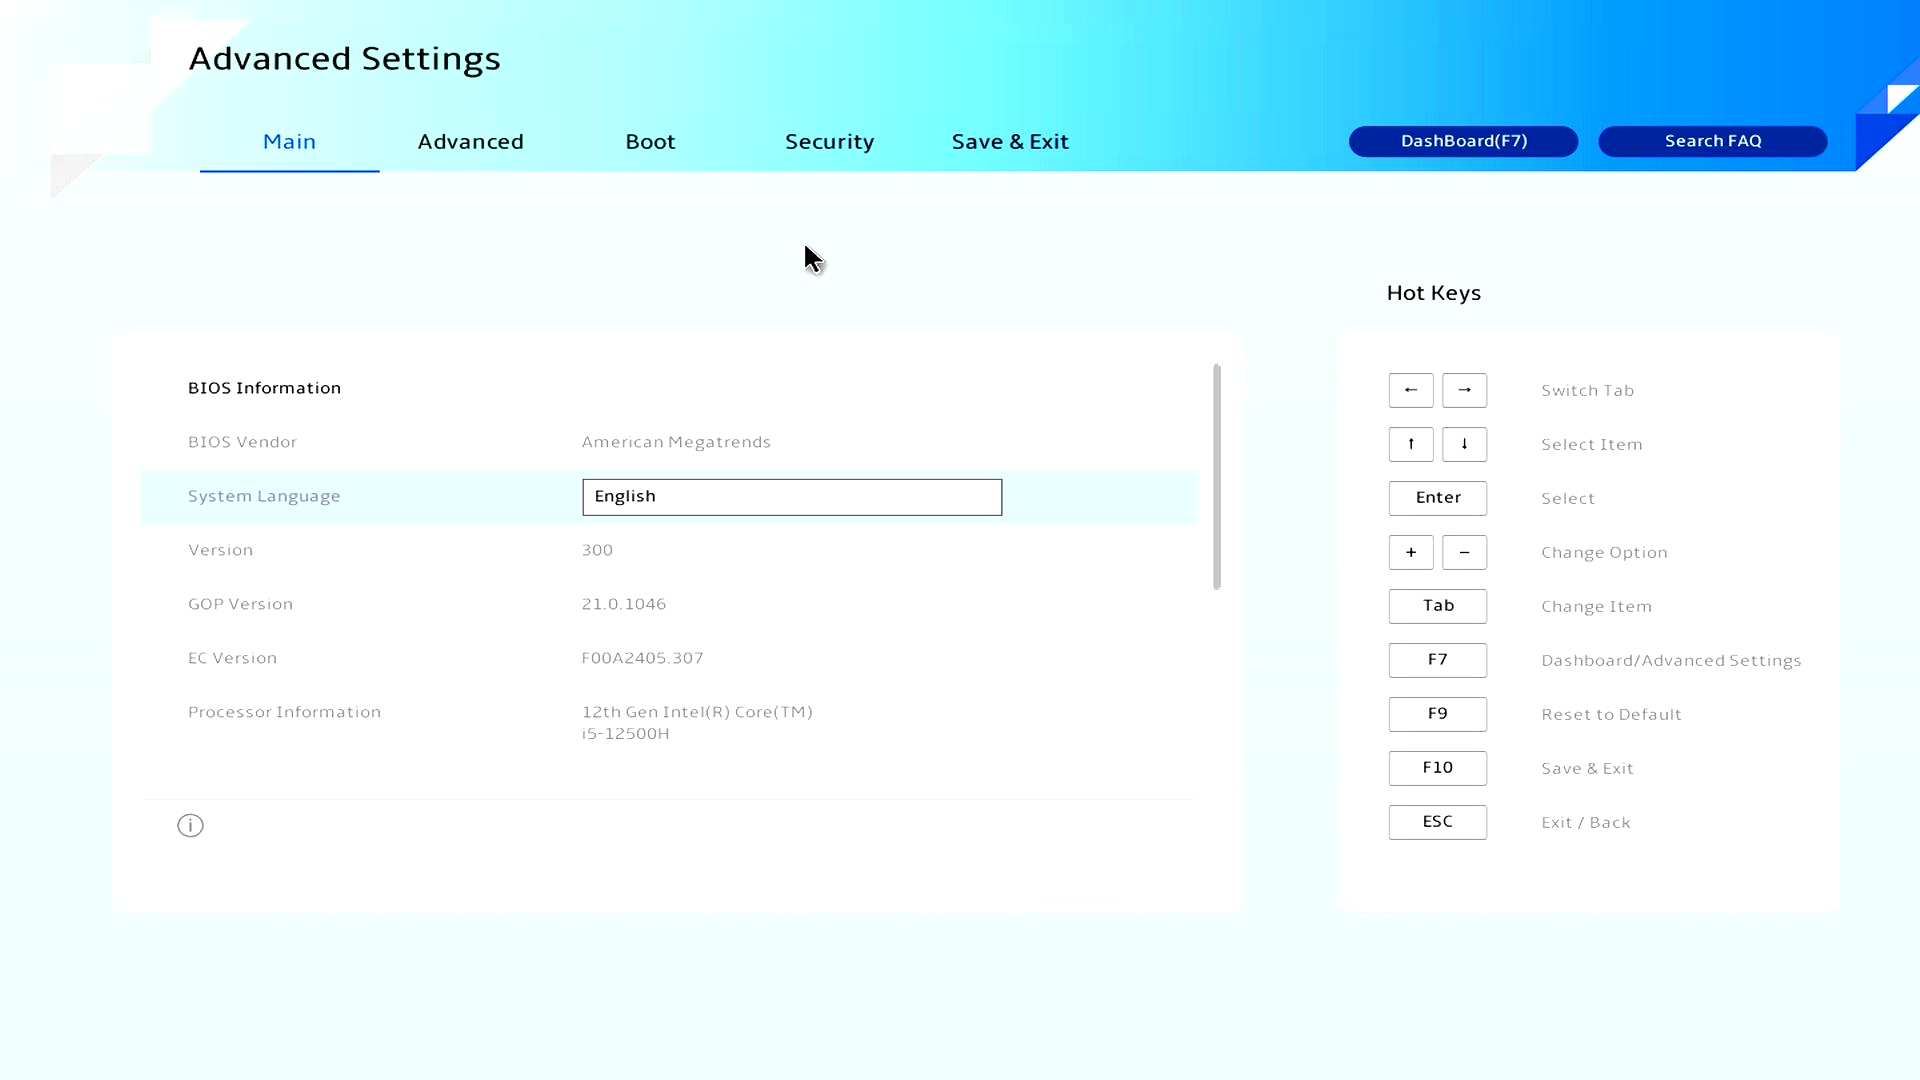
3.1 Jak se dostat na stránku nastavení BIOSu
Stiskem klávesy F7 se dostanete na stránku pokročilých nastavení, kde můžete nastavovat funkce v rámci systému BIOS. Až to budete mít, můžete stiskem F10 nastavení uložit a odejít.
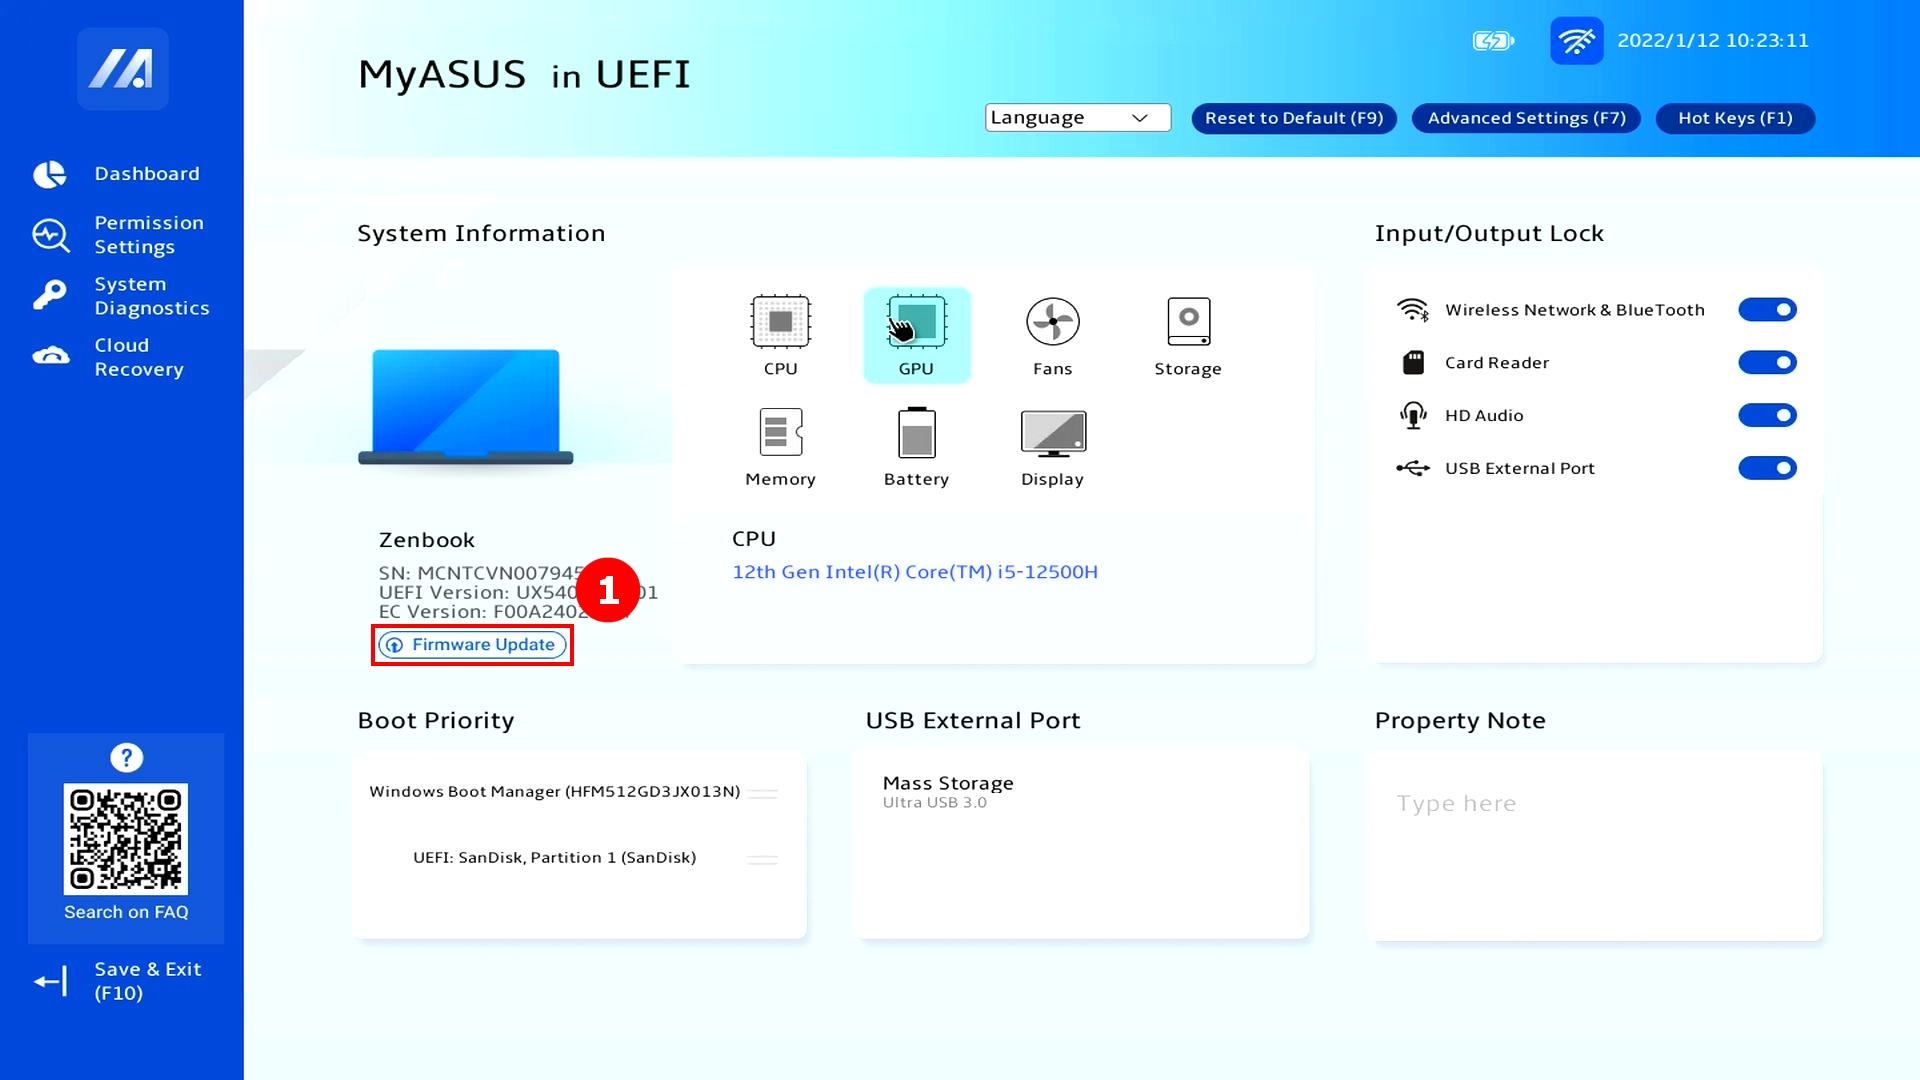
3.2 Jak upgradovat systém BIOS
(1) Klikněte na ①[Aktualizovat firmware].
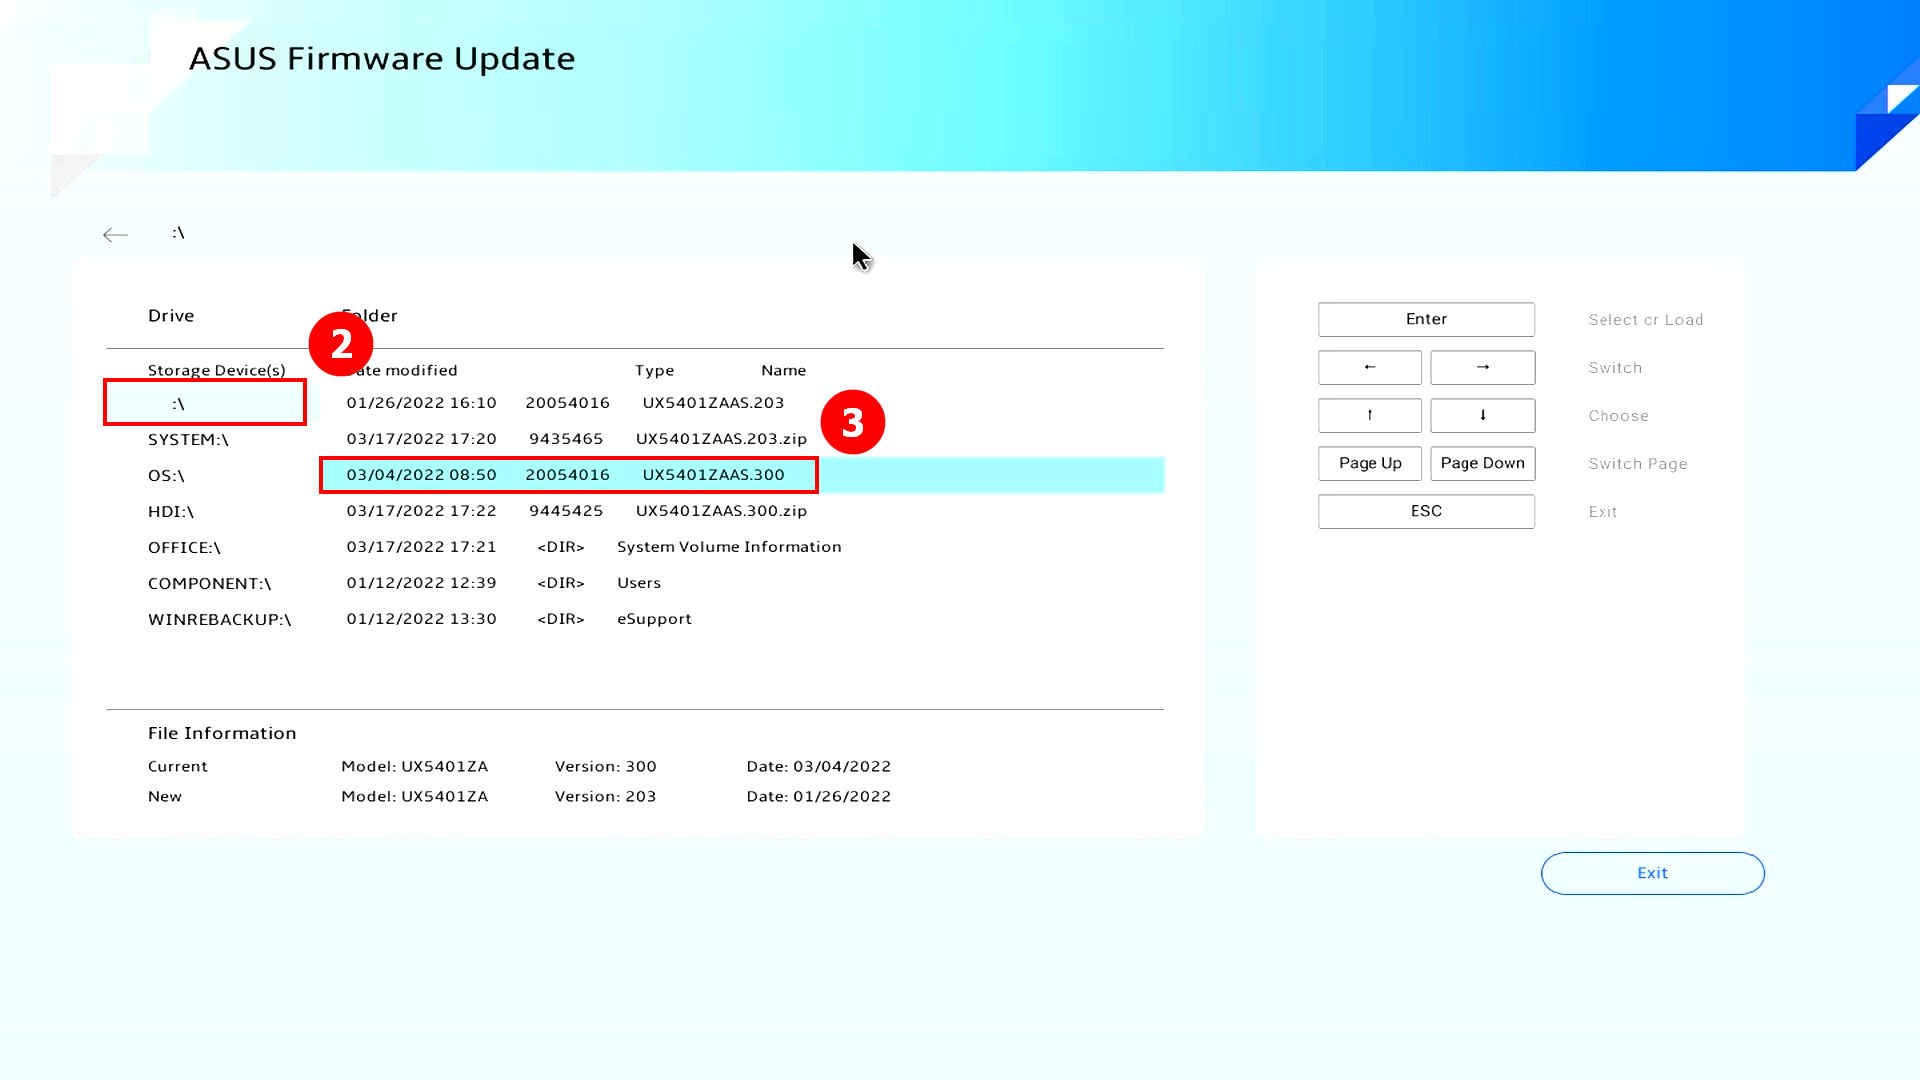
(2) V nabídce Úložná zařízení najděte ②[cestu], kde se nachází dokument o upgradu BIOSu, vyberte možnost ③[Soubor upgradu BIOSu] a stiskněte Enter.
Jak stáhnout soubor pro upgrade BIOSu:
- Soubor pro upgrade BIOSu najdete v nabídce Aplikace MyASUS -> Uživatelské služby -> Živé aktualizace.
- Můžete také přejít na web ASUS -> vyhledat název svého počítače - > stáhnout soubor upgradu BIOSu v nabídce podpory.
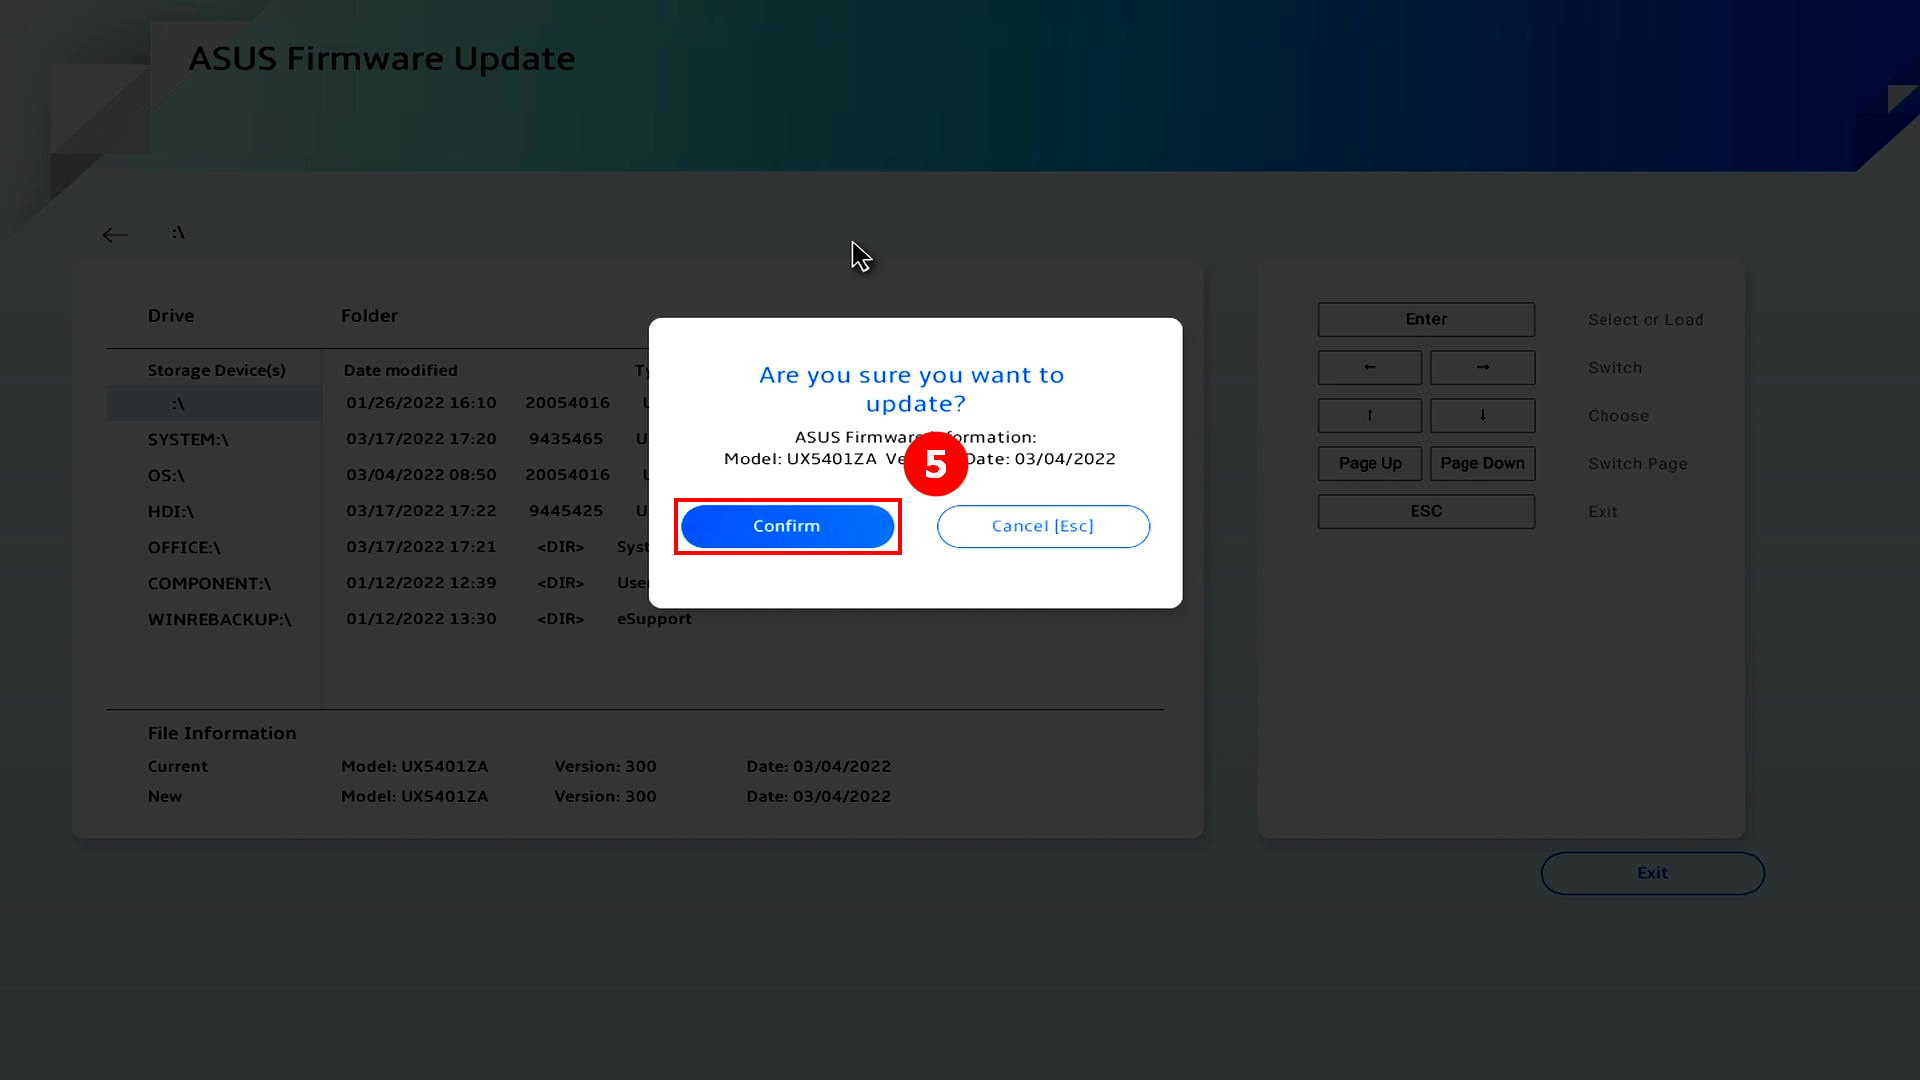
(3) Klikněte na ④[Potvrdit].

(4) Klikněte na ⑤[Potvrdit].
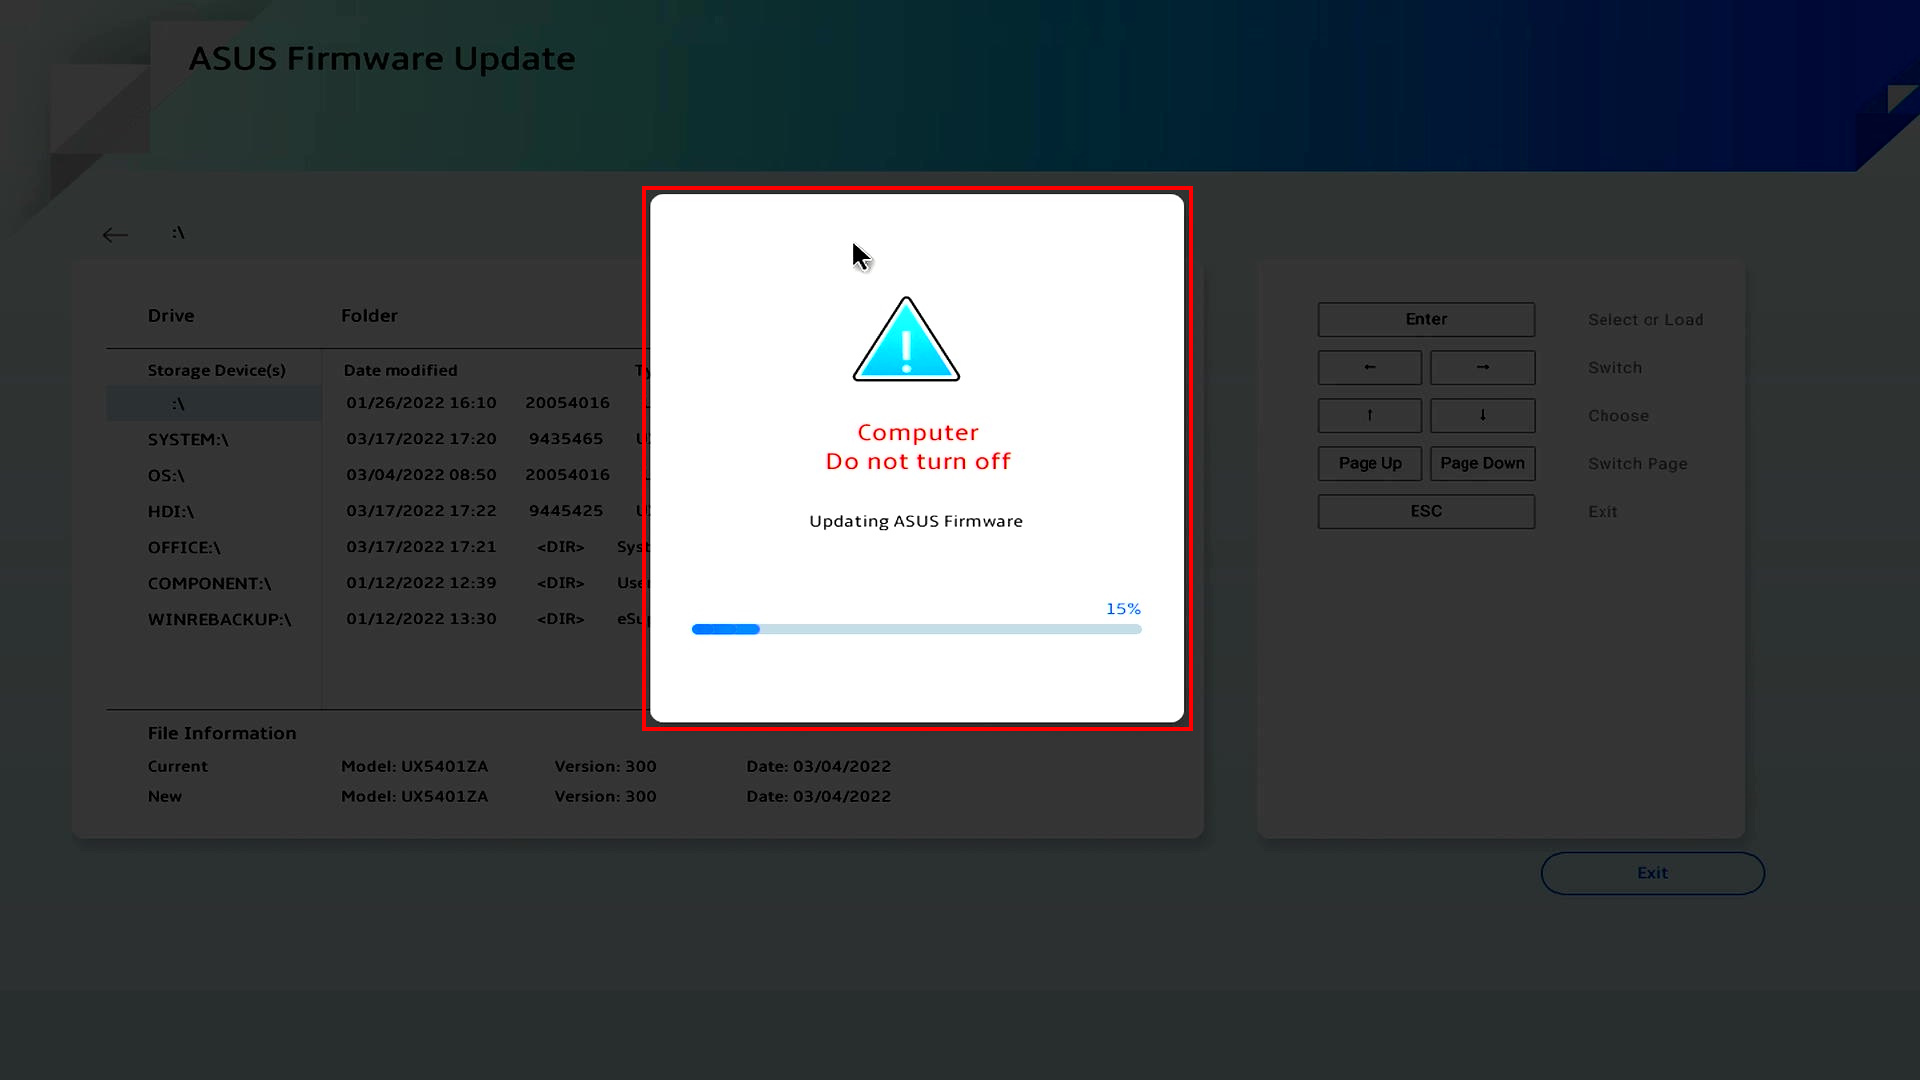
(5) Upgrade systému BIOS se začne provádět. Udržujte nabíječku počítače připojenou, nedotýkejte se počítače a trpělivě vyčkejte, než se upgrade systému BIOS dokončí. Po dokončení upgradu se spustí systém Windows.
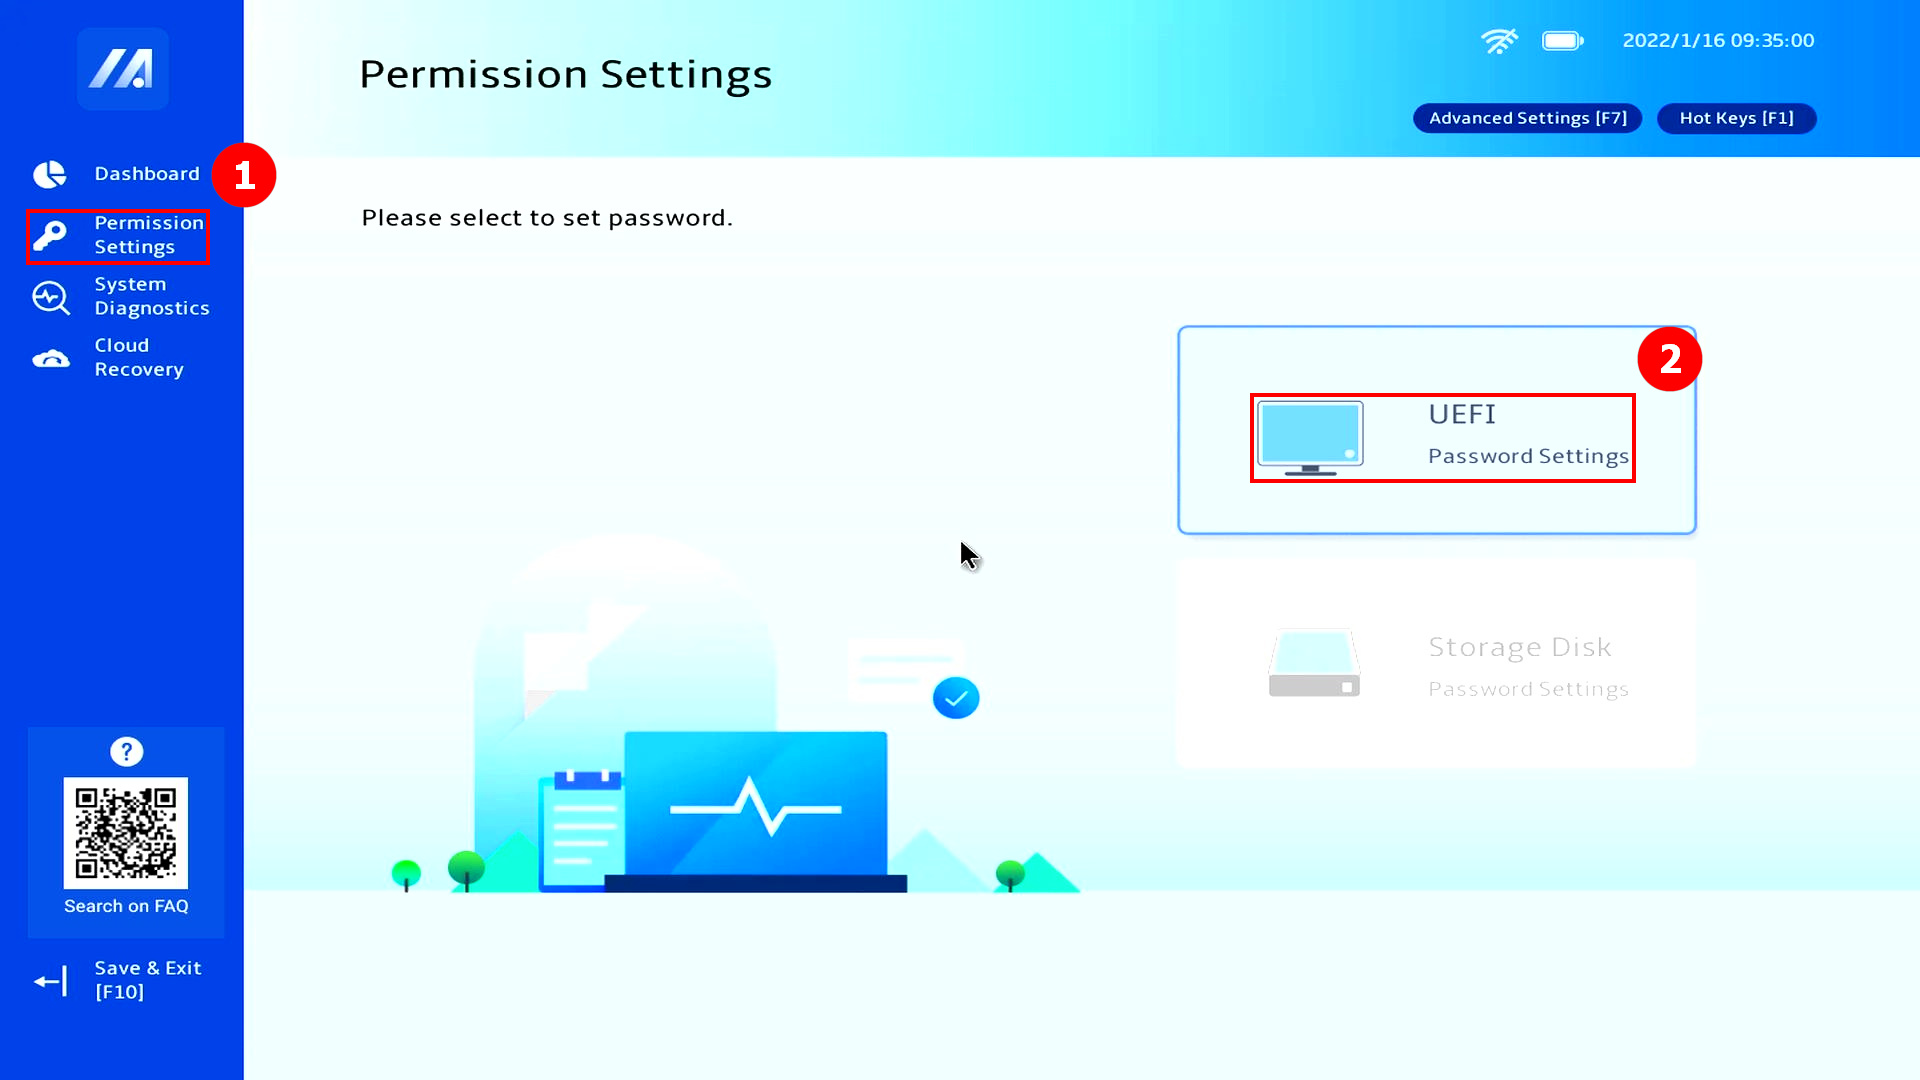
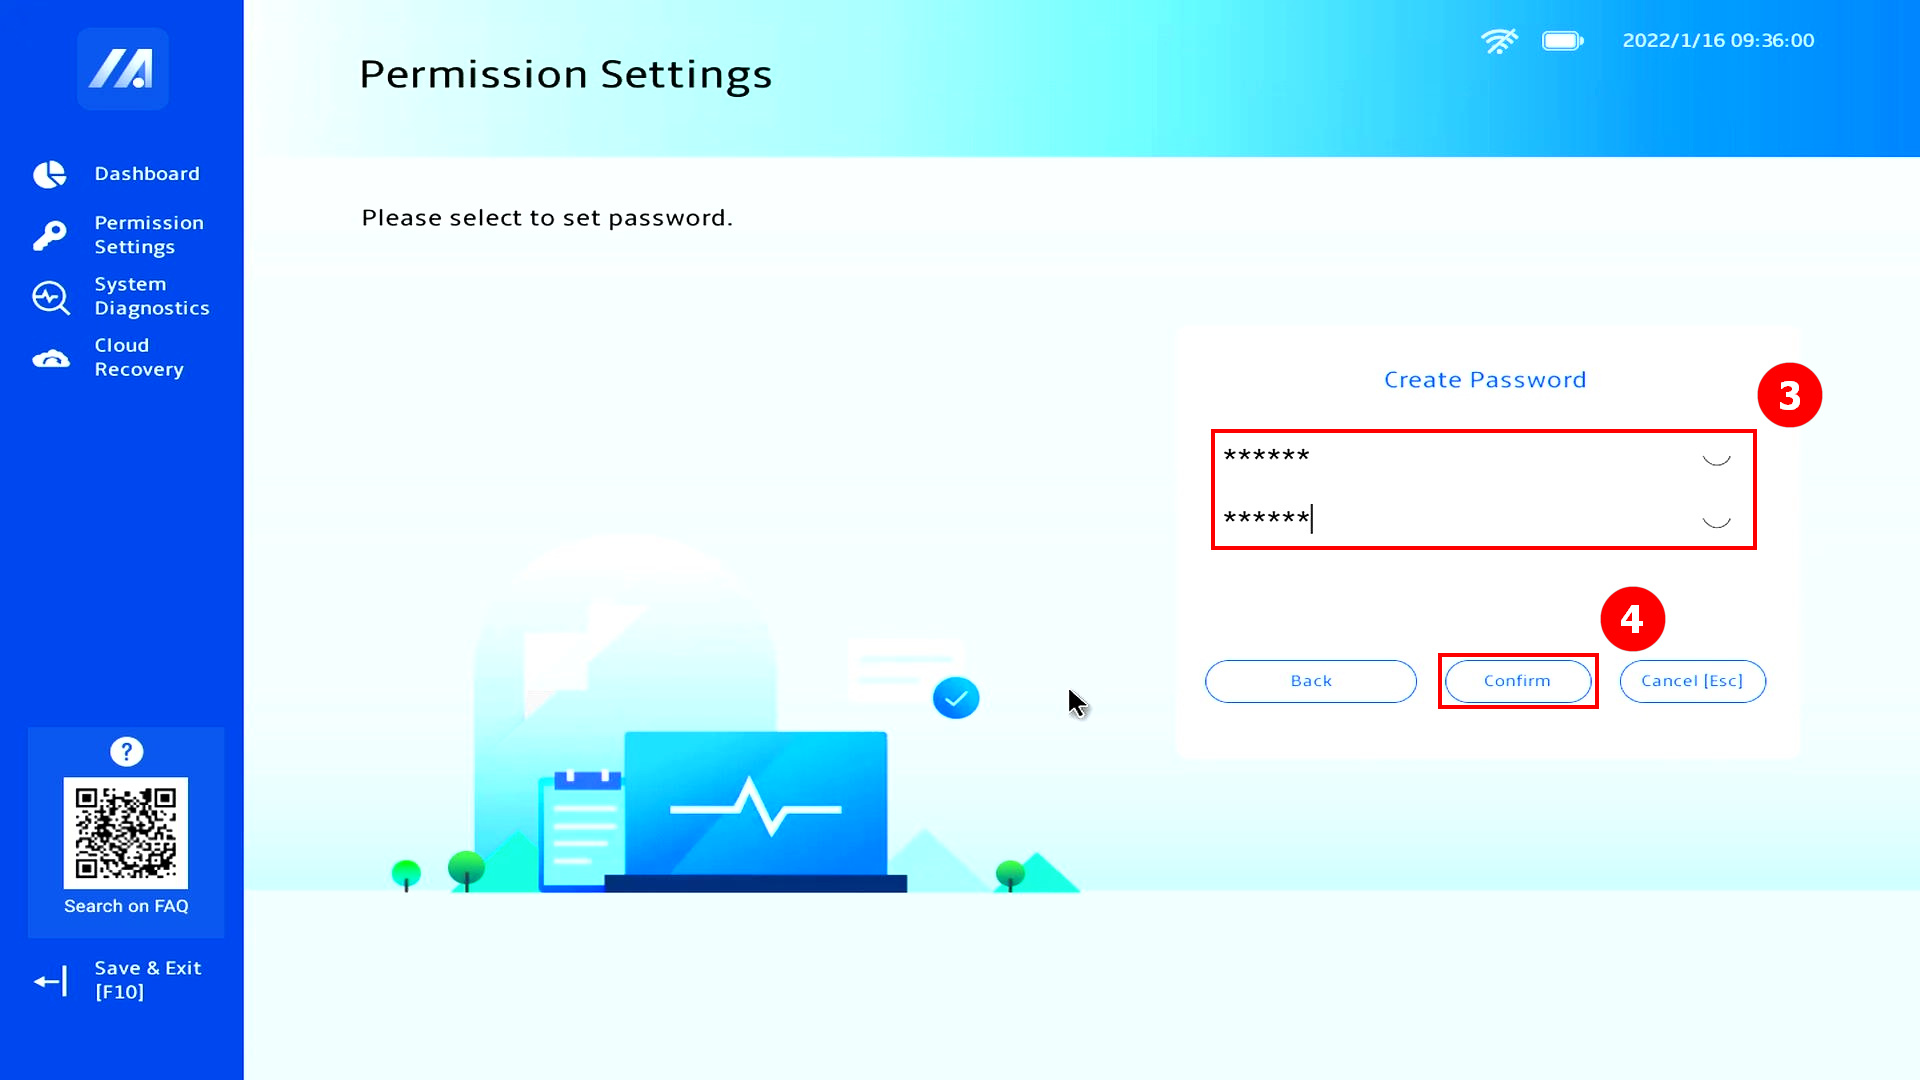
(1) Klikněte na ①[Nastavení oprávnění], klikněte na ②[nastavení hesla UEFI].
(2) Nastavte své ③[heslo] a klikněte na ④[Potvrdit].
(3) Objeví se vyskakovací okno. Klikněte na ⑤[Potvrdit] a stiskem F10 nastavení uložte a systém opusťte.

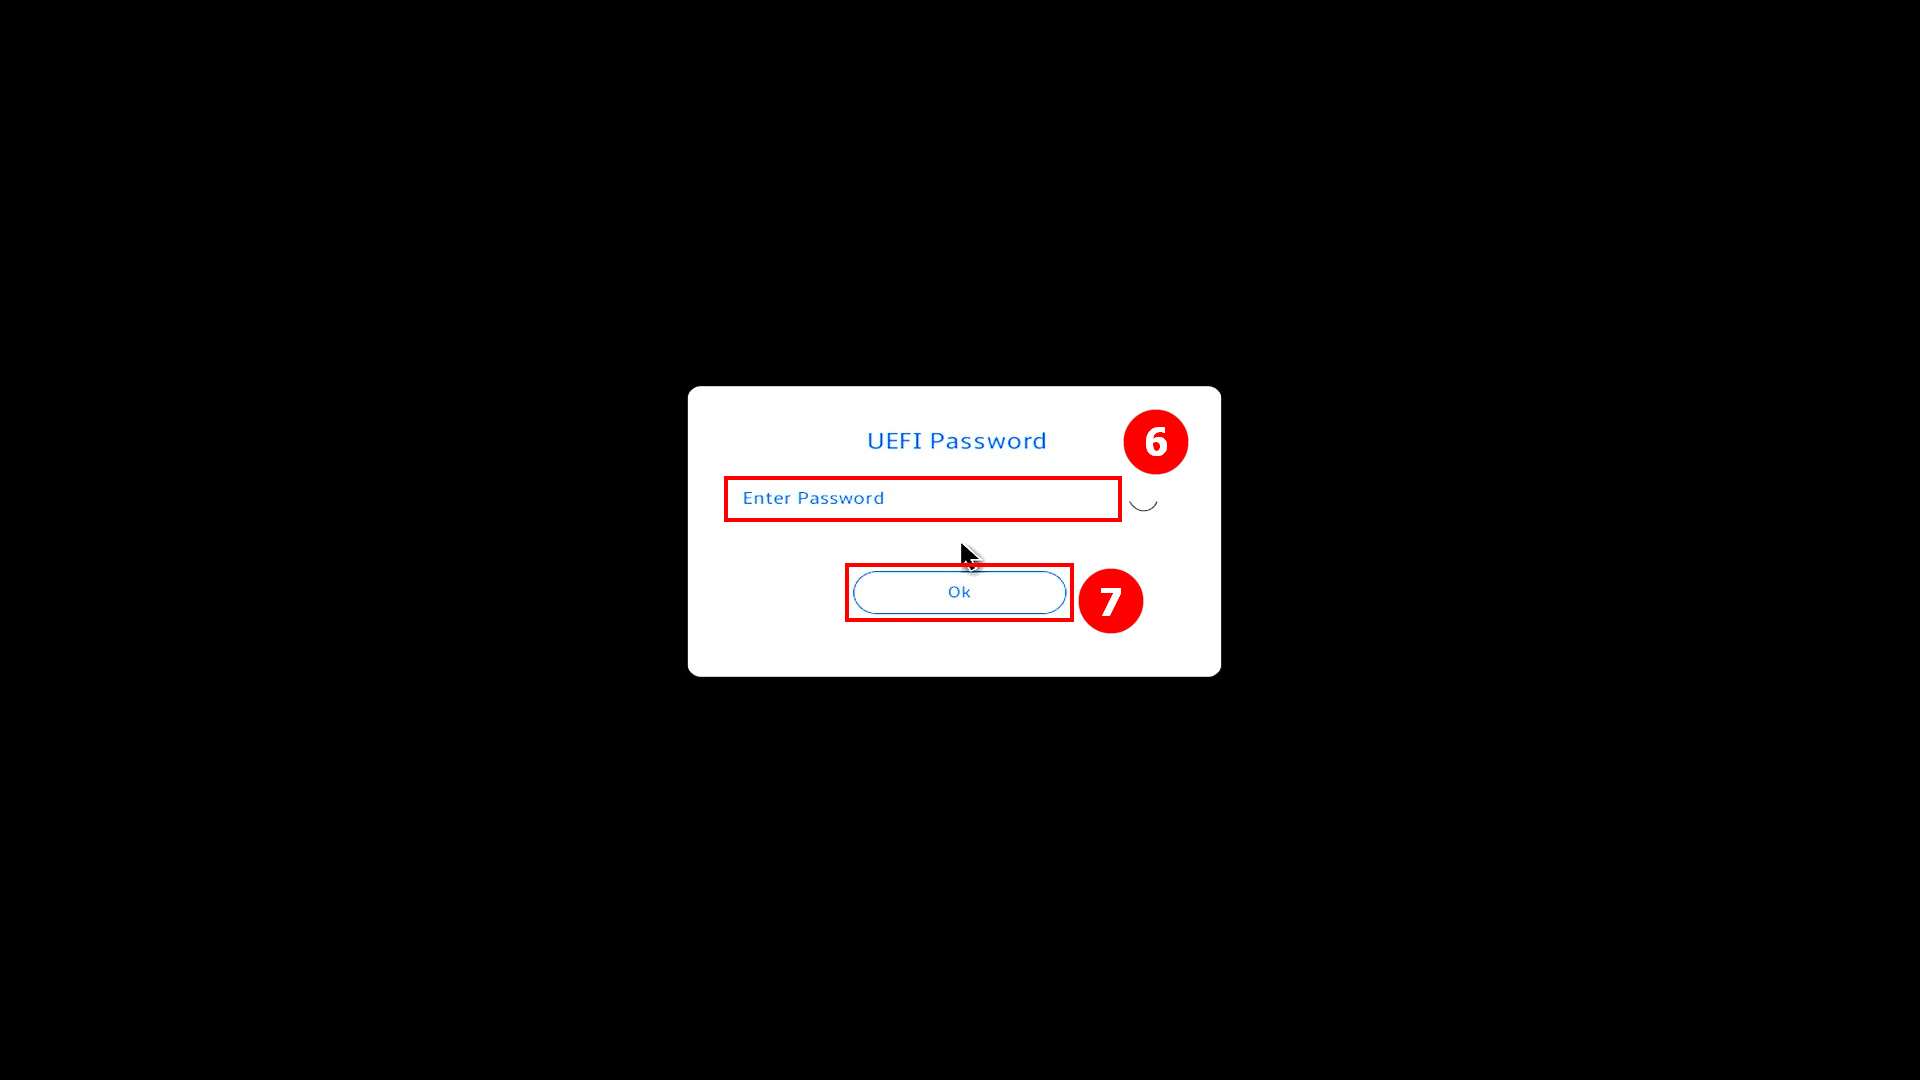
(4) Když stisknete na klávesnici [ESC] nebo [F2] při příštím spuštění systému, dostanete se do správce bootování. Objeví se následující obrazovka. Zadejte ⑥[heslo UEFI] a klikněte na ⑦[OK].
Když klávesy [ESC] nebo [F2] nestisknete, počítač se automaticky dostane do systému Windows a zobrazí se následující obrazovka.
Pokud zapomenete heslo, obraťte se s žádostí o pomoc na zákaznický servis společnosti ASUS.
(5) Když jste nyní vstoupili do správce bootování, vyberte akci, kterou chcete provést.
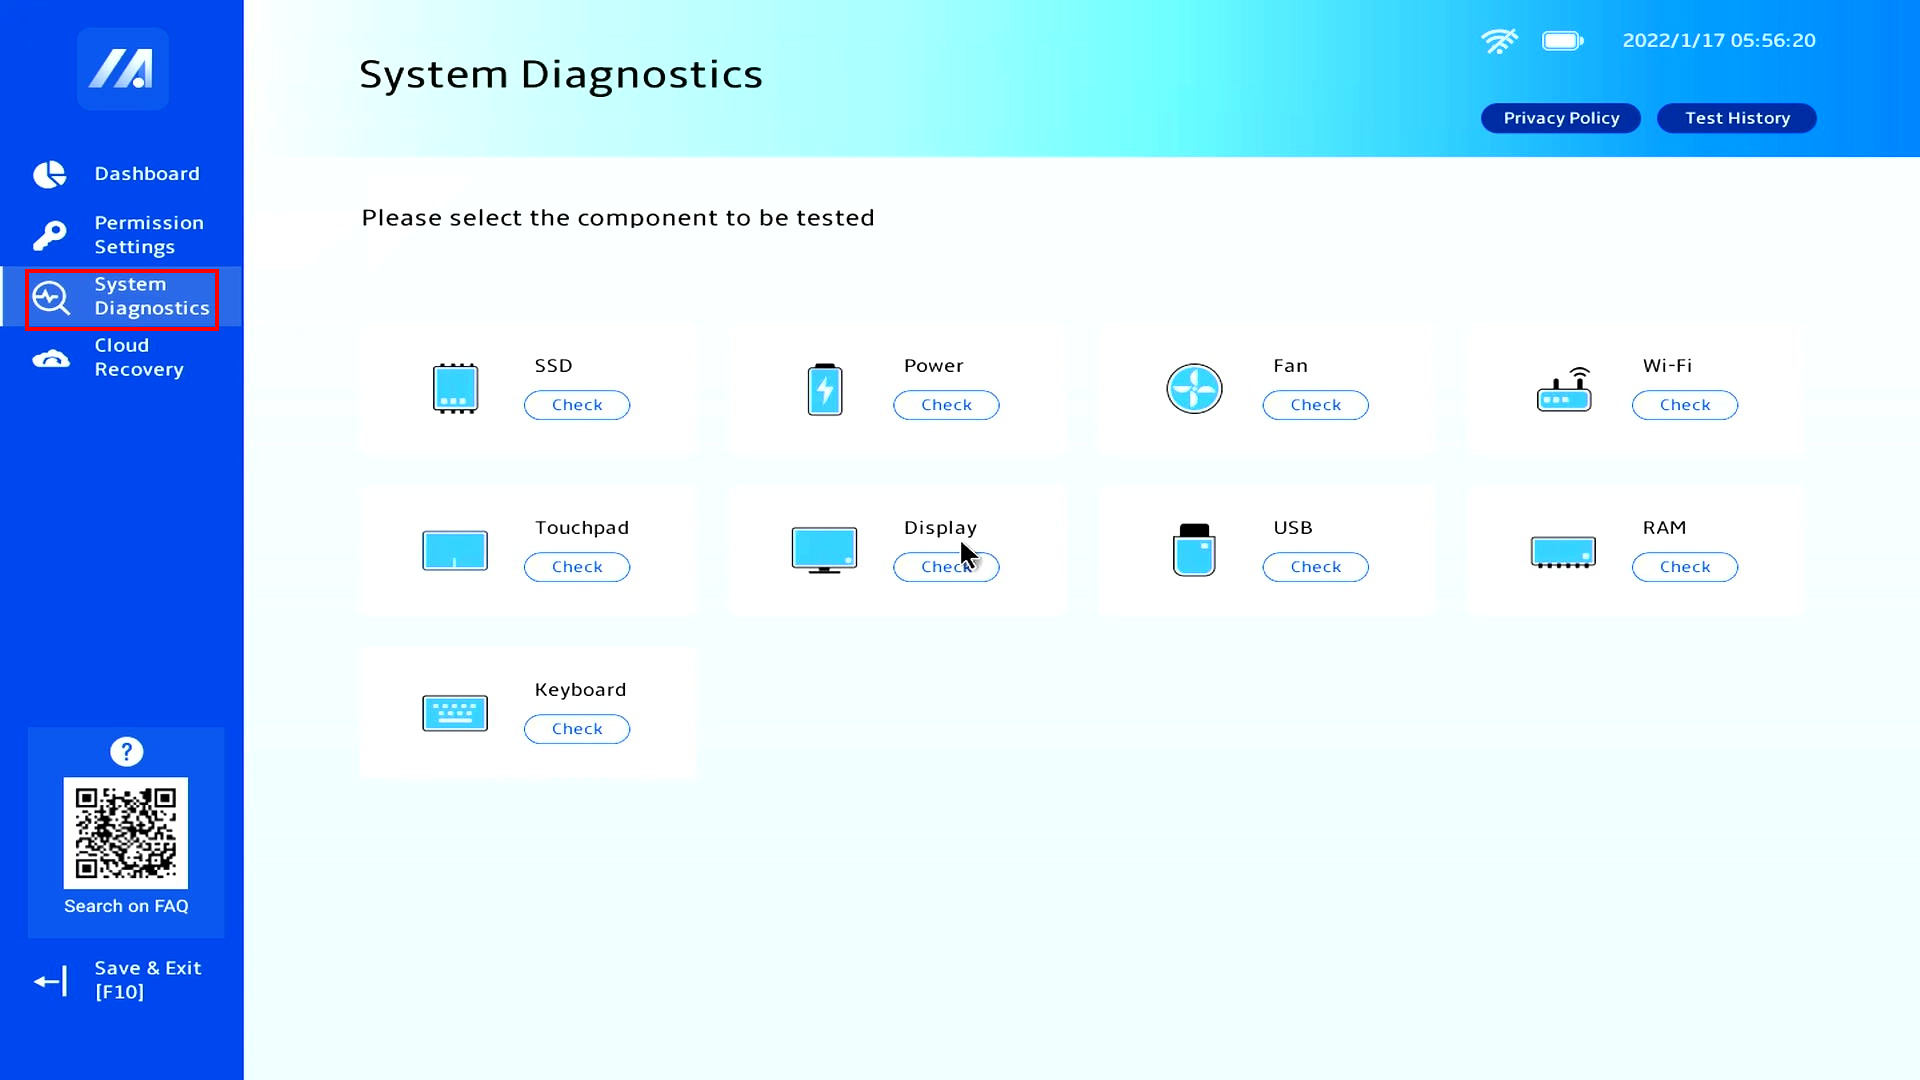
Klikněte na tlačítko [Diagnostika systému] a otestujte komponentu na této stránce. Podrobné testovací metody najdete po kliknutí sem: [Notebook] MyASUS ve WinRE – Představení
*Některé modely u diagnostiky komponenty Wi-Fi podporují pouze funkci kontroly zařízení
Klikněte na [Obnovení z cloudu], abyste mohli použít tuto funkci k obnovení operačního systému vašeho počítače. Podrobnosti k metodě najdete zde: [Notebook] Obnovení z cloudu v rámci MyASUS v UEFI – Představení
※Některé modely funkci obnovení z cloudu nepodporují
