[Notebook] Creating and Deleting RAID Array
- [INTEL Platform] Creating RAID Array
- [INTEL Platform] Deleting RAID Array
- [AMD Platform] Creating RAID Array
- [AMD Platform] Deleting RAID Array
- Appendix
***To support and obtain the best experience for RAID configuration, two hard drives of the same size and capacity must be installed in the laptop. If the computer cannot install more than one hard drive, then RAID mode is not going to be possible and it will only operate in AHCI mode.
[INTEL Platform] Creating RAID Array
WARNING! Be cautious when creating a RAID Array , your all data in storage devices will be deleted.
1. Enter BIOS setup: Restart your laptop then press <F2> key during POST (Power-On Self-Test), get into BIOS setup.
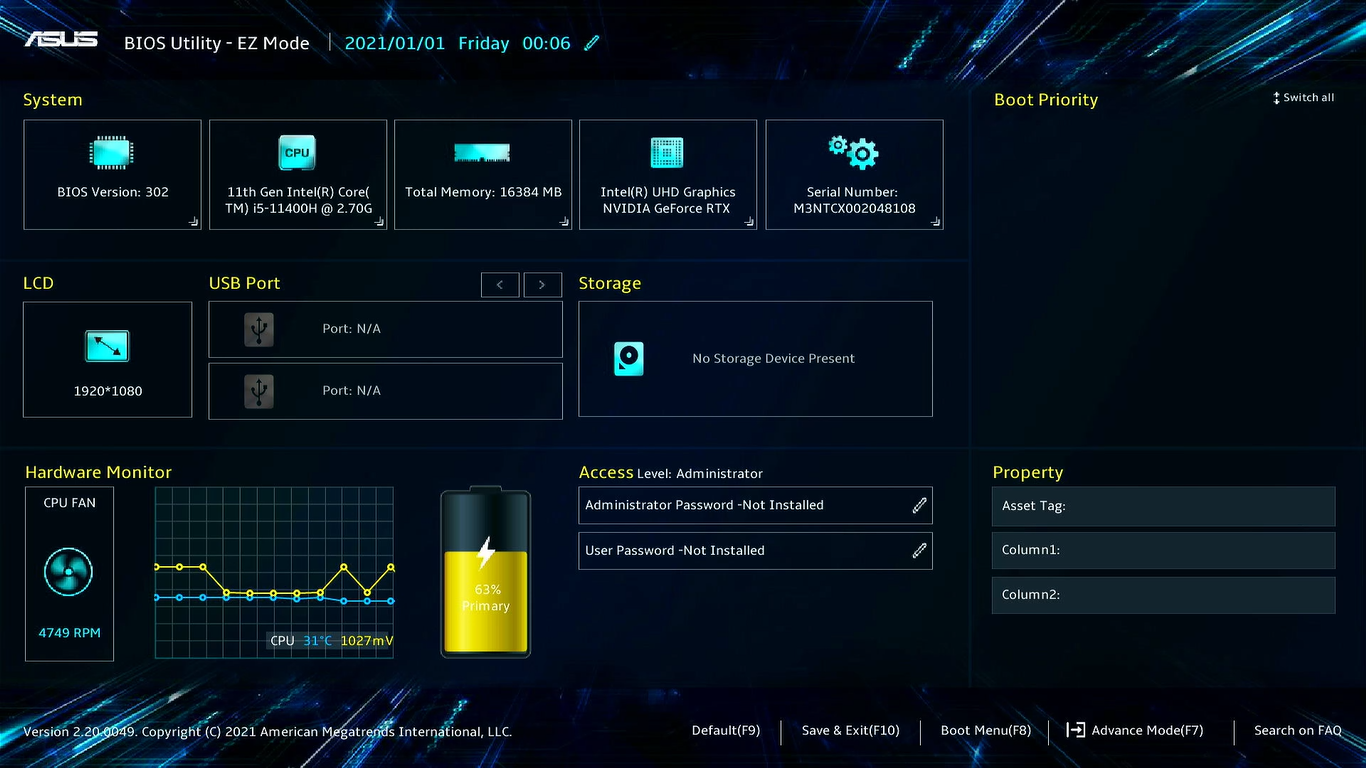
2. When you enter the BIOS setup, the laptop system configuration will show as below, and then press <F7> key to enter [Advanced Mode].
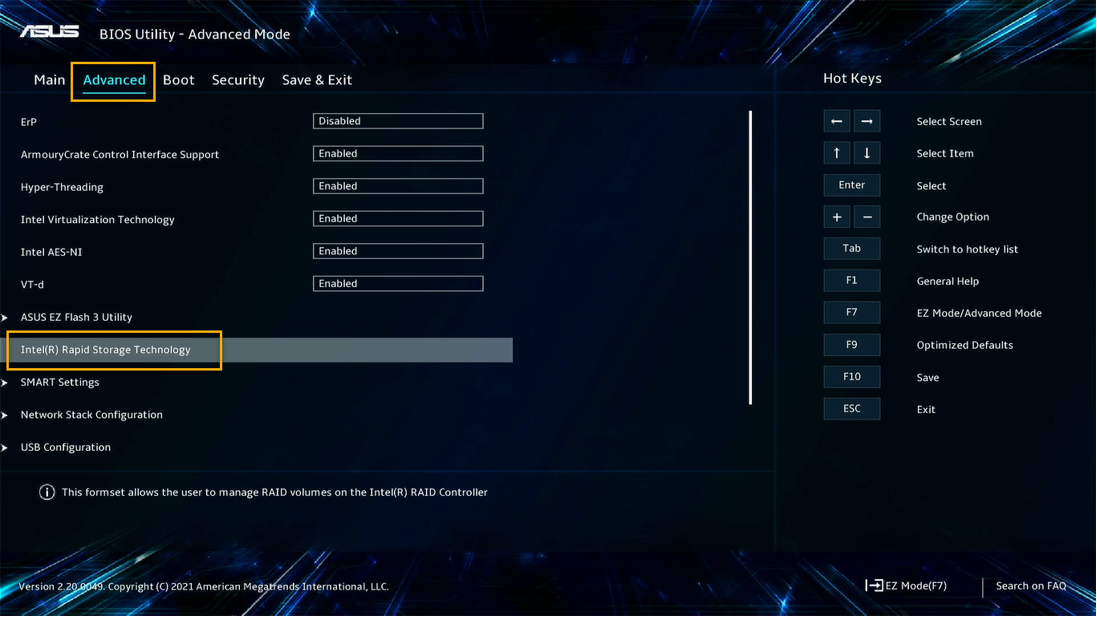
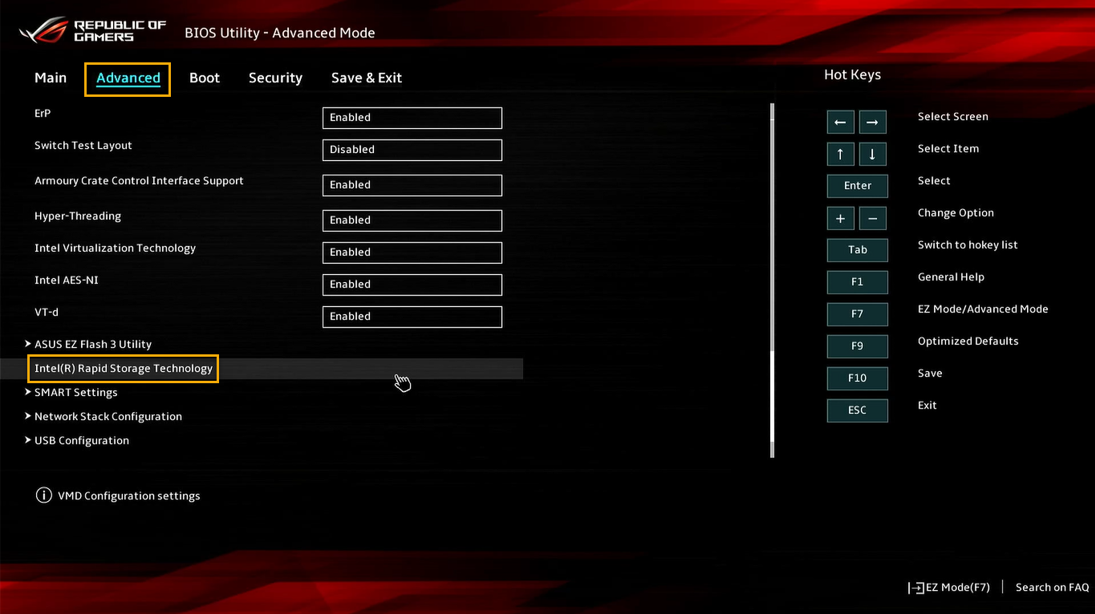
3. In [Advanced Mode] page, select [Intel(R) Rapid Storage Technology] then press <Enter> key.
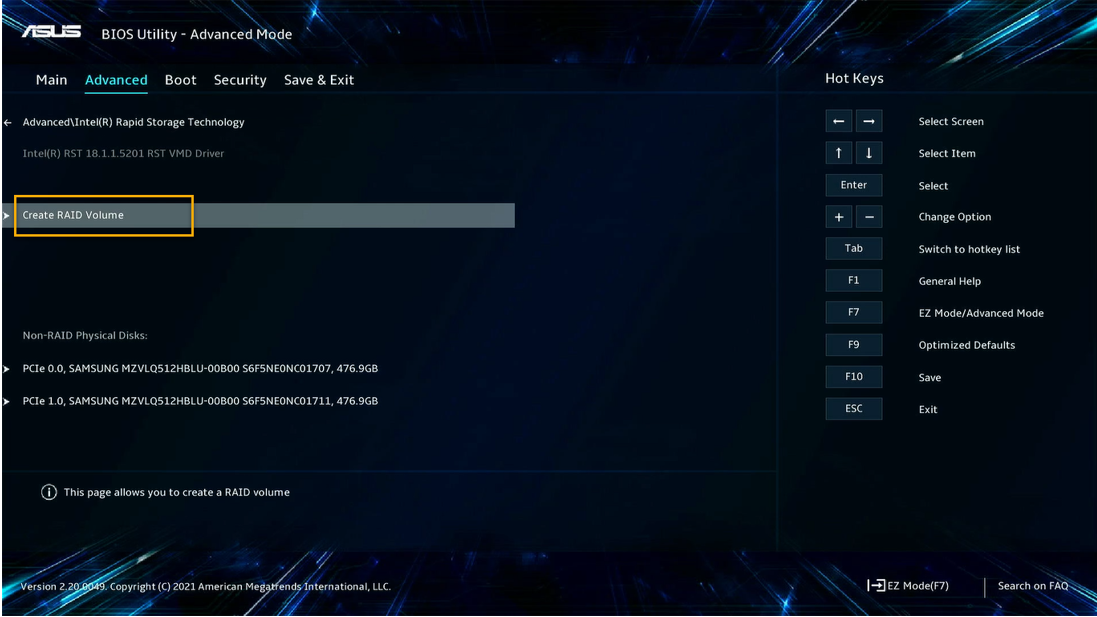
4. In [Intel(R) Rapid Storage Technology] page, select [Create RAID Volume] then press <Enter> key.
5. In [Create RAID Volume] page, setup your RAID Volume with [Name]、[RAID Level]、[Select Disk]、[Strip Size] and [Capacity (MB)].
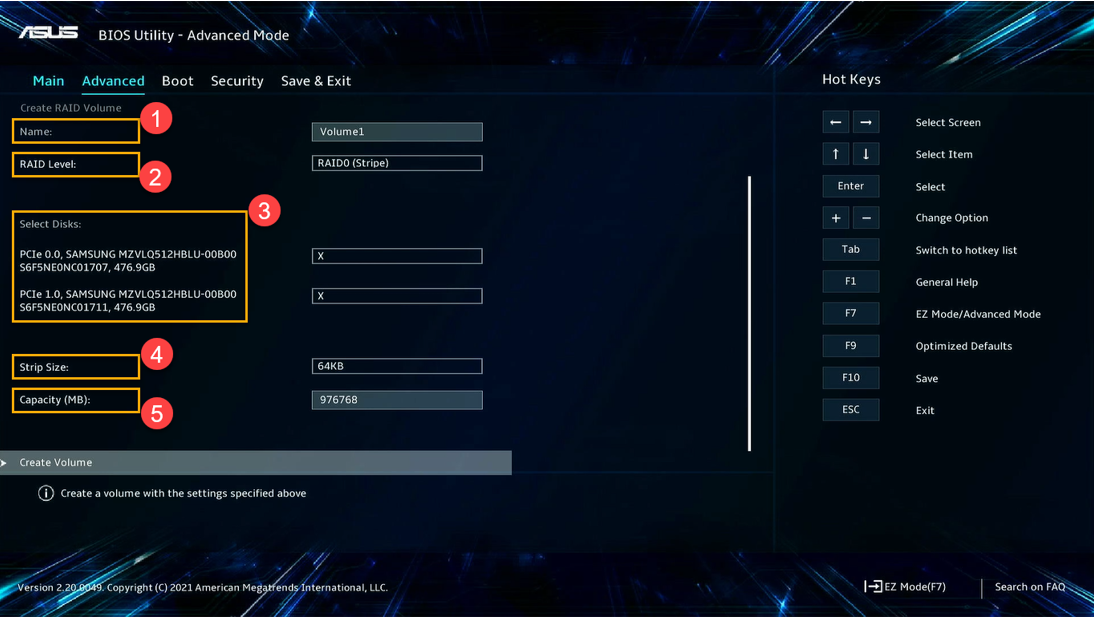
①[Name]: Key in your RAID Volume name.
②[RAID Level]: Select the RAID Level.
③[Select Disk]: Choose the disk you would like to create RAID by Select [X].
④[Strip Size]: Select the RAID Strip Size from 4 KB to 128 KB.
⑤[Capacity (MB)]: Key in your RAID Capacity, and the default value is maximum.
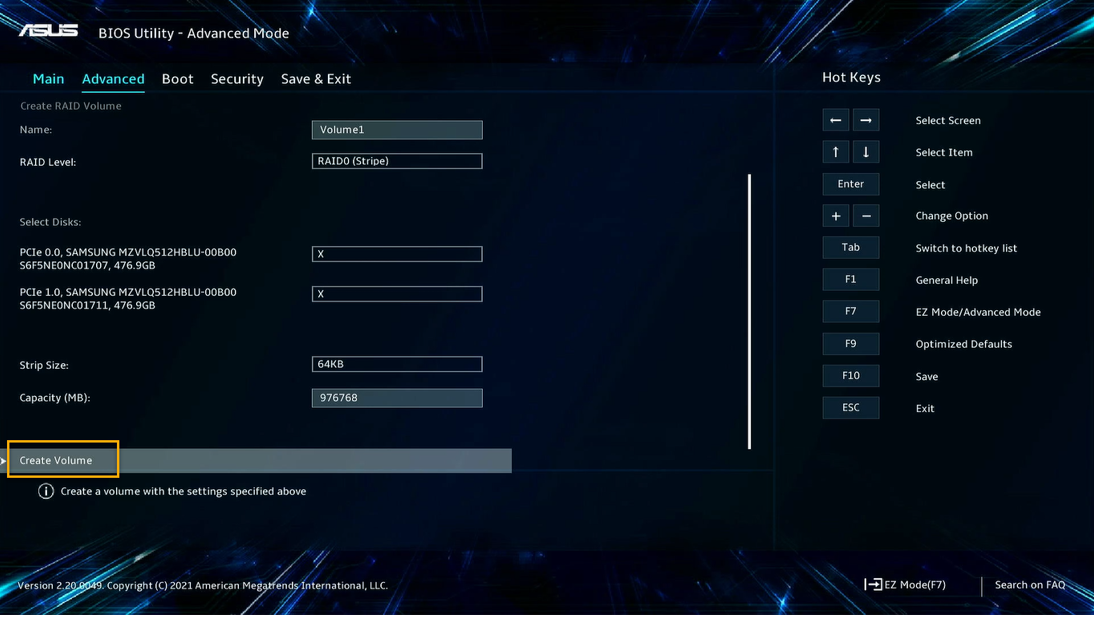
6. After all setup done, select [Create Volume] then press <Enter> key to create, and back to [Intel(R) Rapid Storage Technology] page.
7. In the end, press <F10> key to save your change and exit BIOS setup.

8. After creating or deleting RAID Array Volume, you may need to install operation system next.
Here is an installation example about Windows 10 OS for your reference.
[How to create and use installation media to reinstall Windows 10 via USB drive]
[No drives can be found during Windows 10 installation]- Manually install IRST driver
[INTEL Platform] Deleting RAID Array
WARNING! Be cautious when delete a RAID Array, your all data in storage devices will be deleted.
1. Enter BIOS setup: Restart your laptop then press <F2> key during POST (Power-On Self-Test), get into BIOS setup, and then press <F7> key to enter [Advanced Mode].
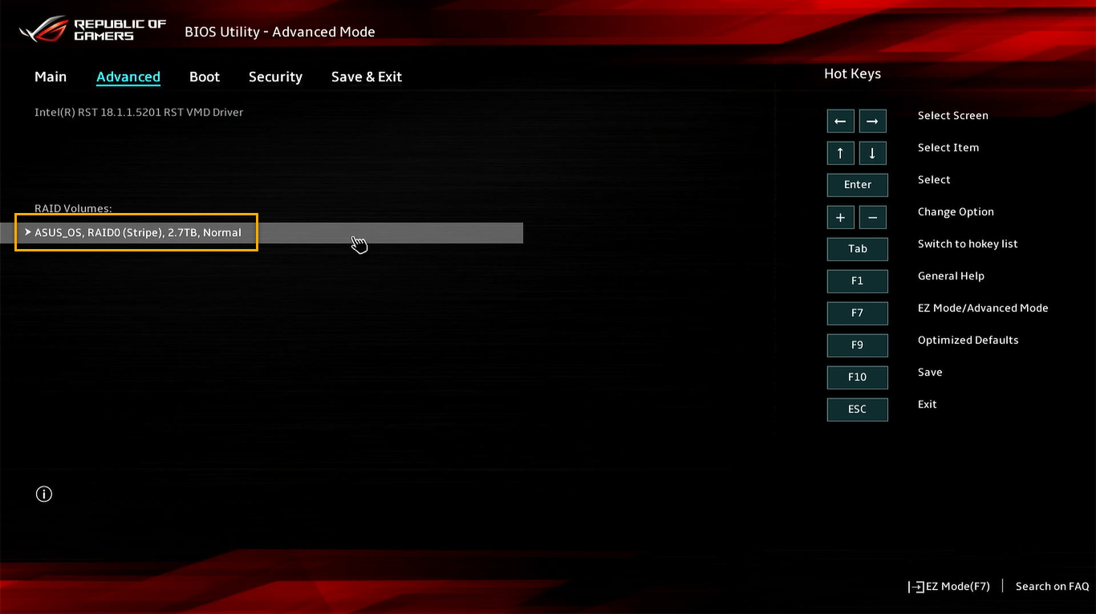
2. In [Advanced Mode] page, select [Intel(R) Rapid Storage Technology] then press <Enter> key.
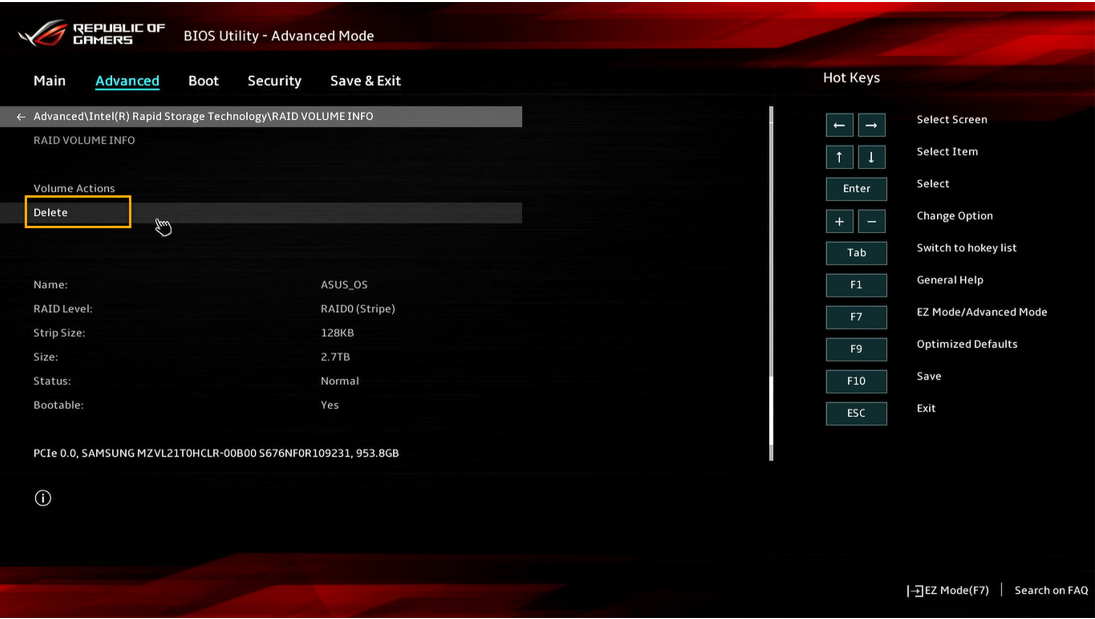
3. In [Intel(R) Rapid Storage Technology] page, select the RAID Volume you would like to delete then press <Enter> key.
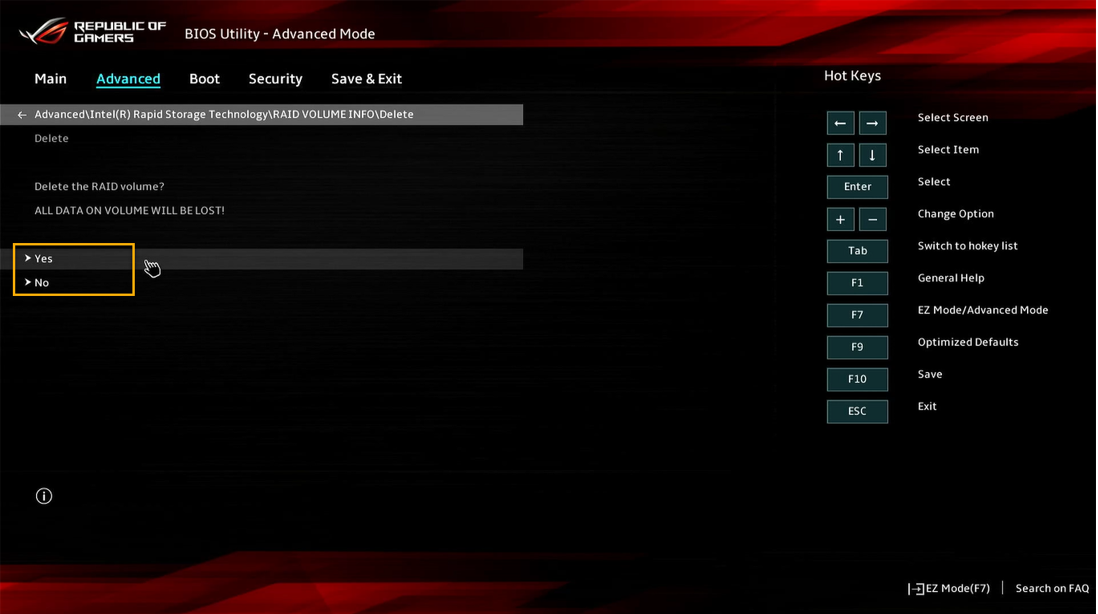
4. Select [Delete] then press <Enter>.
5. Once select [Yes], the RAID Volume will be deleted, then will retune to [Intel(R) Rapid Storage Technology] page.
6. After creating or deleting RAID Array Volume, you may need to install operation system next.
Here is an installation example about Windows 10 OS for your reference.
[How to create and use installation media to reinstall Windows 10 via USB drive]
[No drives can be found during Windows 10 installation]- Manually install IRST driver
[INTEL Platform] FAQ
Q1: Why my [Advanced Mode] setup page is without [Intel(R) Rapid Storage Technology] item?
A1: Please follow direction below to enable [Intel(R) Rapid Storage Technology].
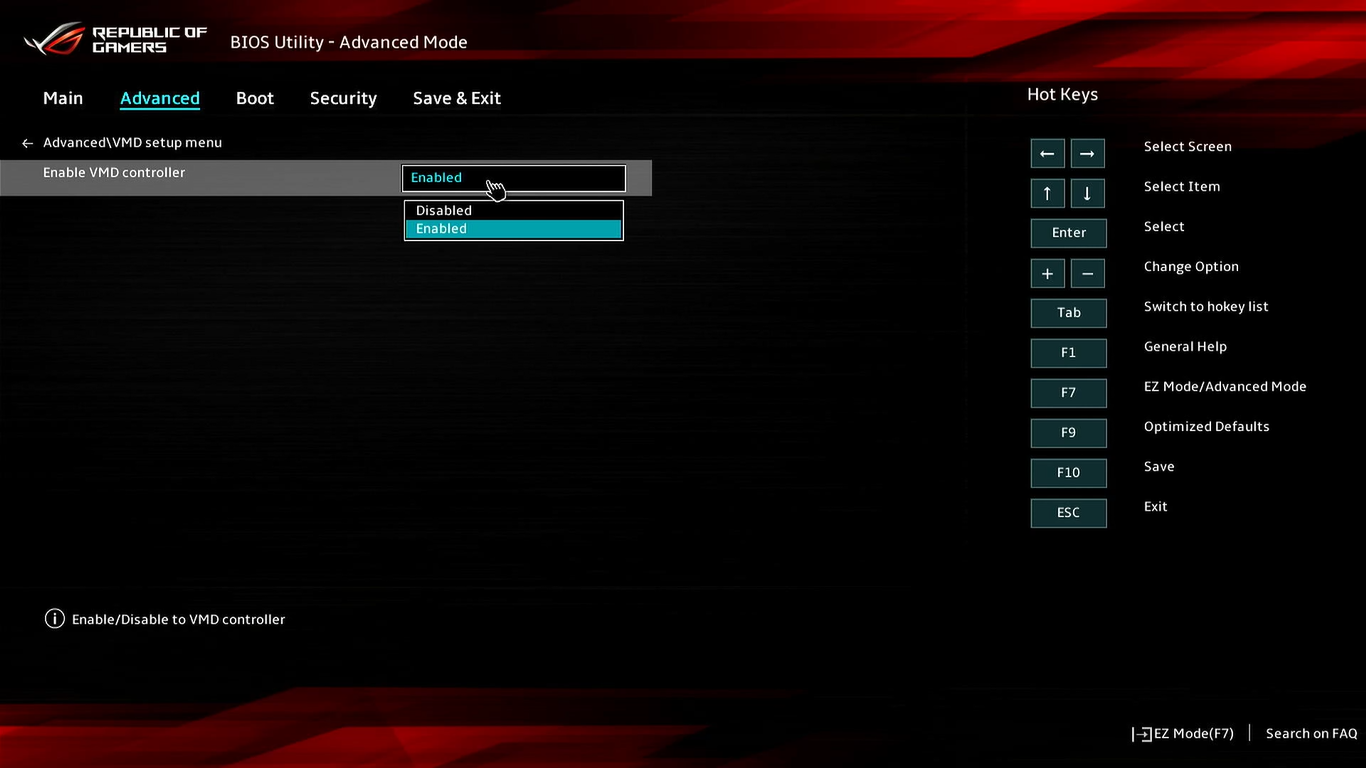
i, In [Advanced Mode] setup, select [VMD Setup Menu] then press <Enter> key.
If no [Enable VMD Controller] item, it means function unsupported.
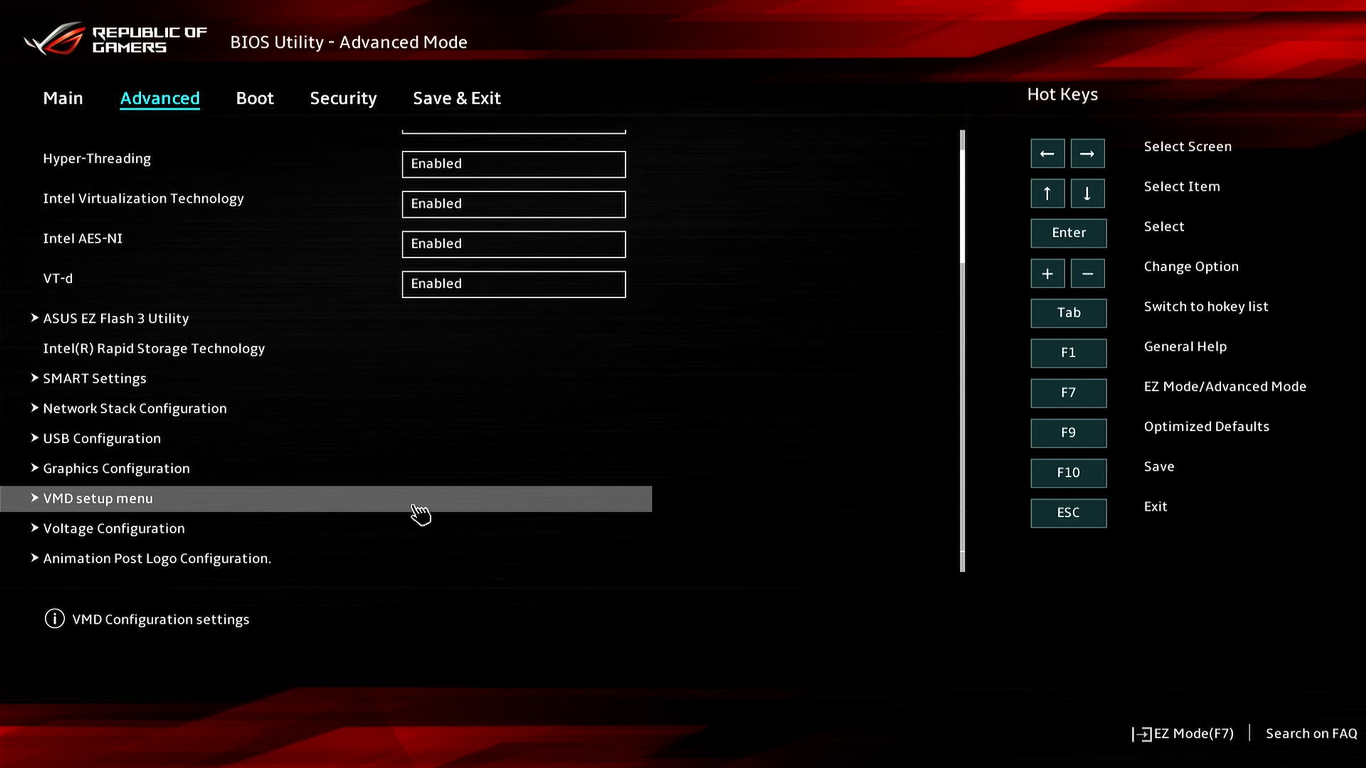
Ii, In [VMD Setup Menu] setup, please switch [Enable VMD Controller] to [Enabled], and then press <F10> key to save configuration and exit to complete IRST enable.
[AMD Platform] Creating RAID Array
WARNING! Be cautious when creating a RAID Array , your all data in storage devices will be deleted.
1. Enter BIOS setup: Restart your laptop then press <F2> key during POST (Power-On Self-Test), get into BIOS setup.
2. When you enter the BIOS setup, the laptop system configuration will show as below, and then press <F7> key to enter [Advanced Mode].

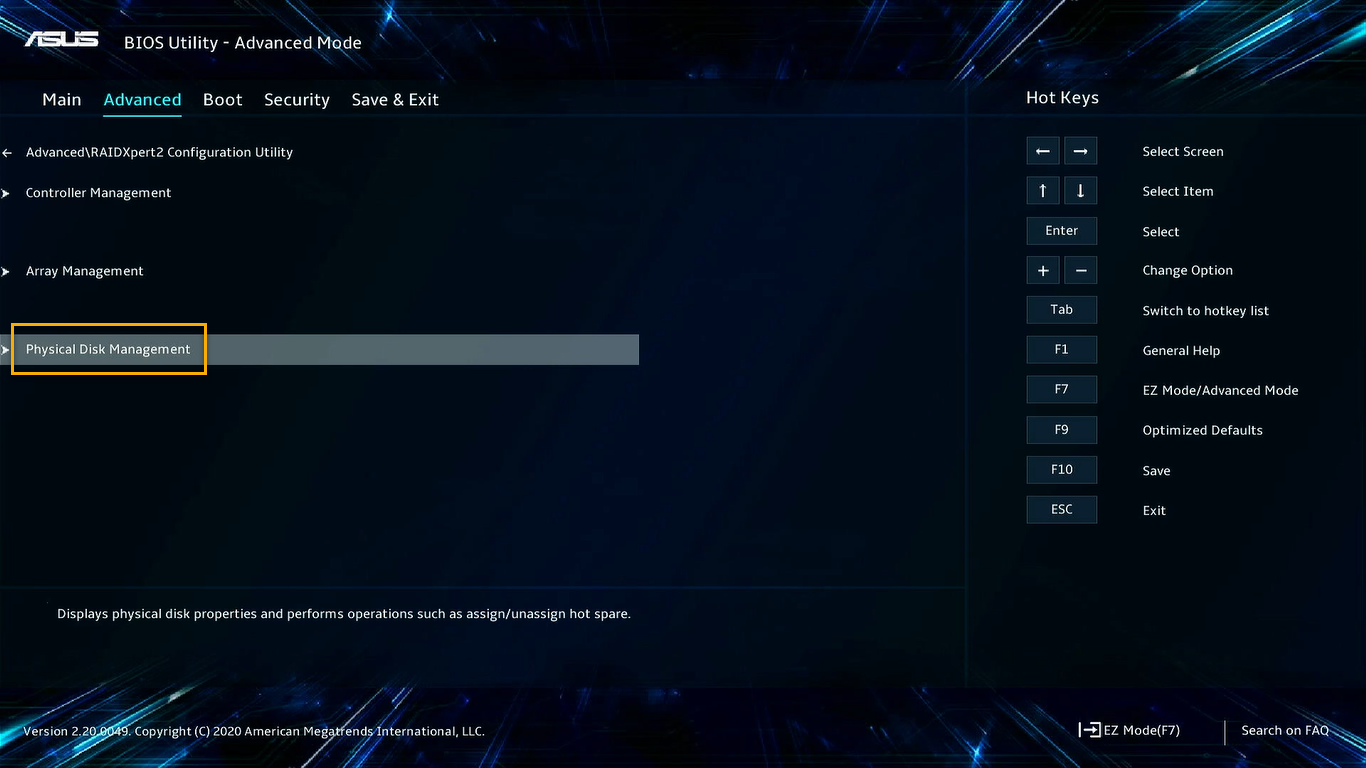
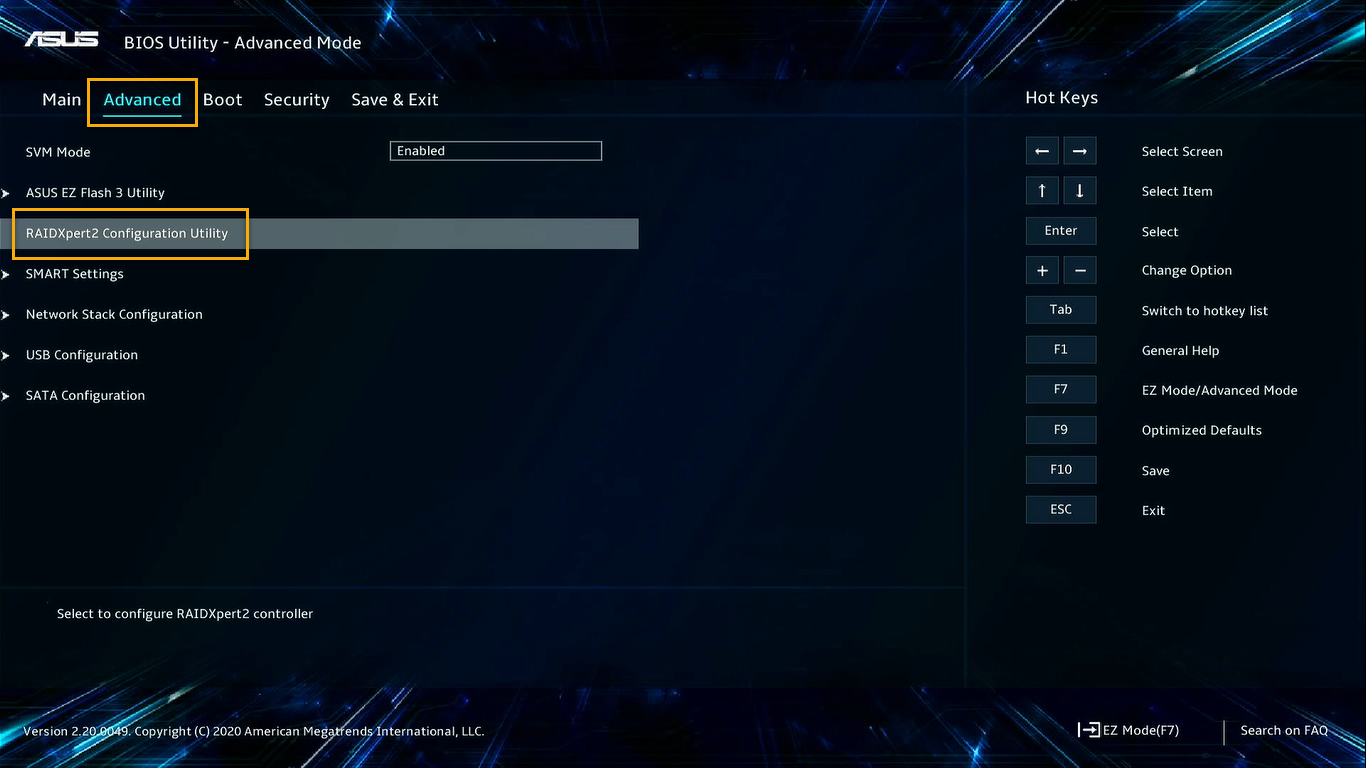
3. In [Advanced Mode] page, select [RAIDXpert2 Configuration Utility] then press <Enter> key.

4. In [RAIDXpert2 Configuration Utility] page, select [Physical Disk Management] then press <Enter> key.
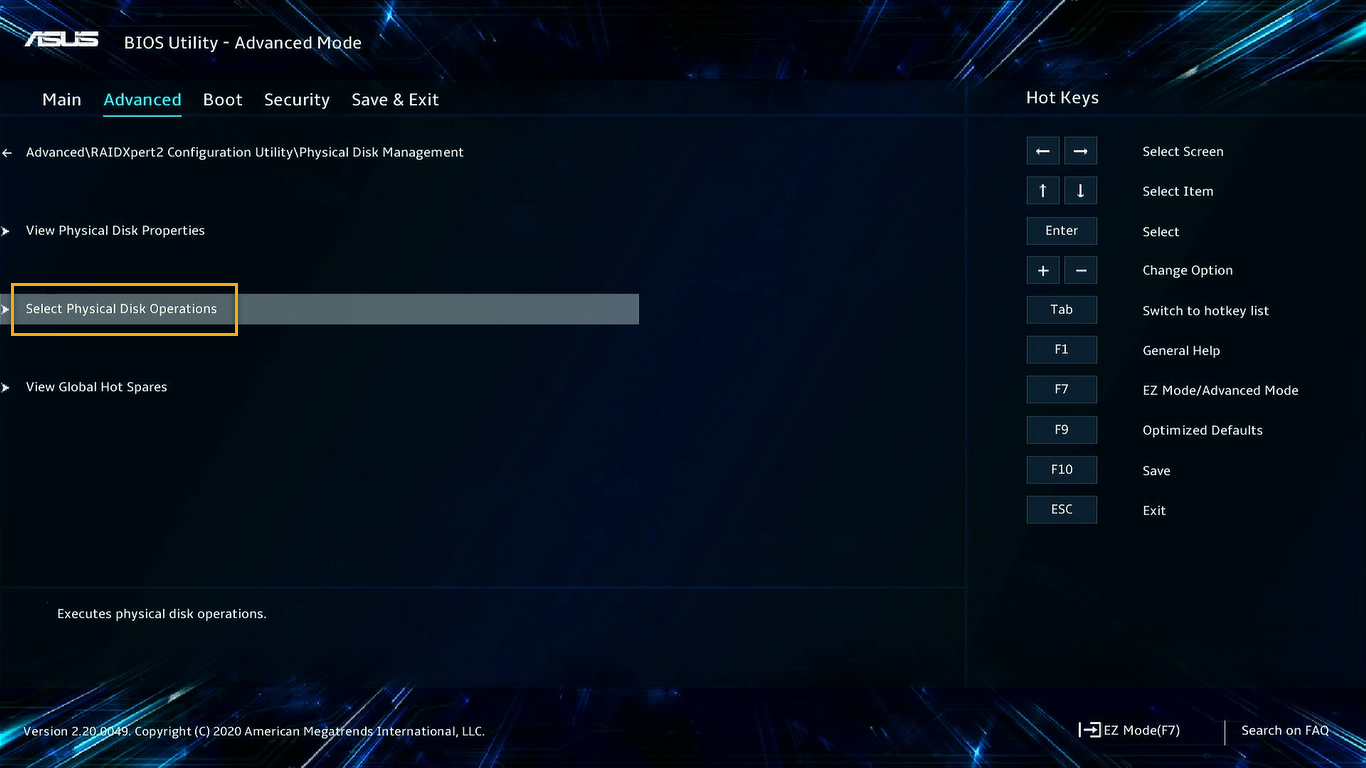
5. In [Physical Disk Management] page, select [Select Physical Disk Operations] then press <Enter> key.
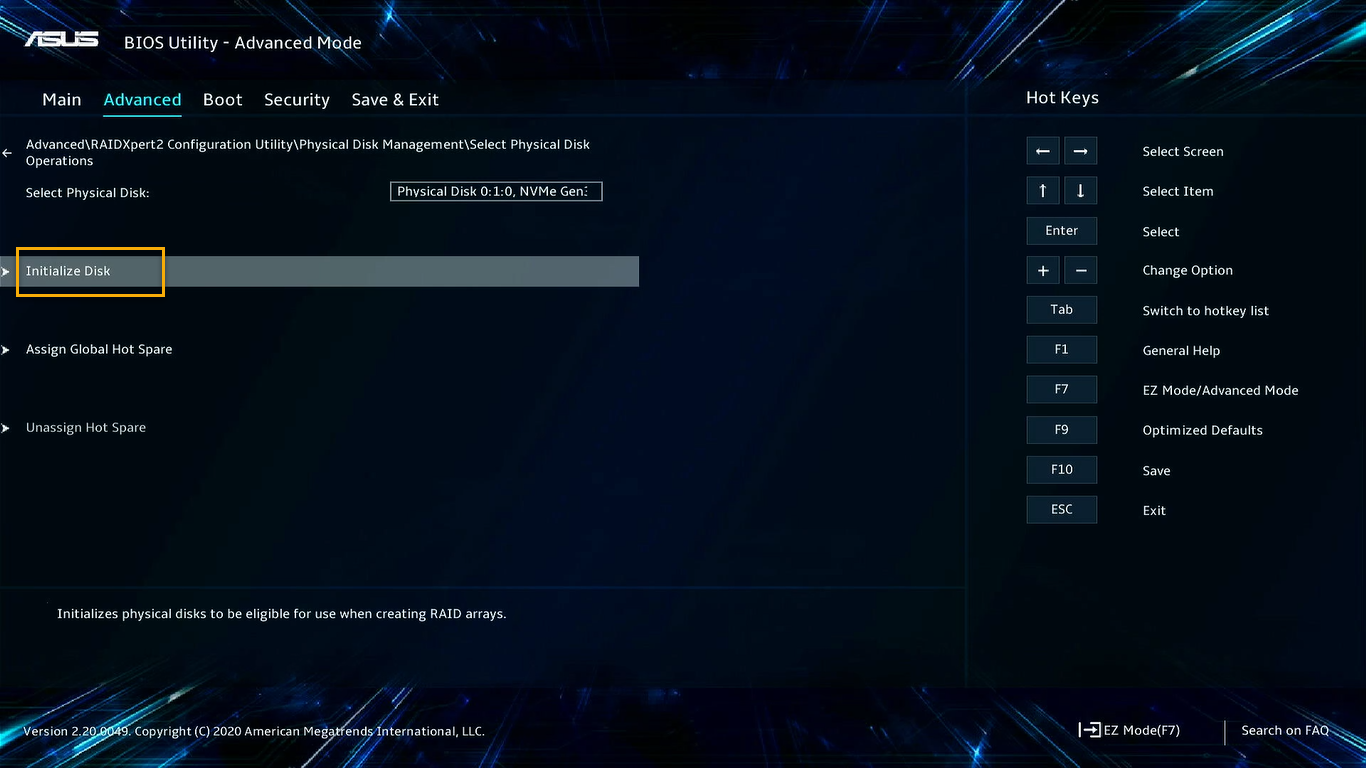
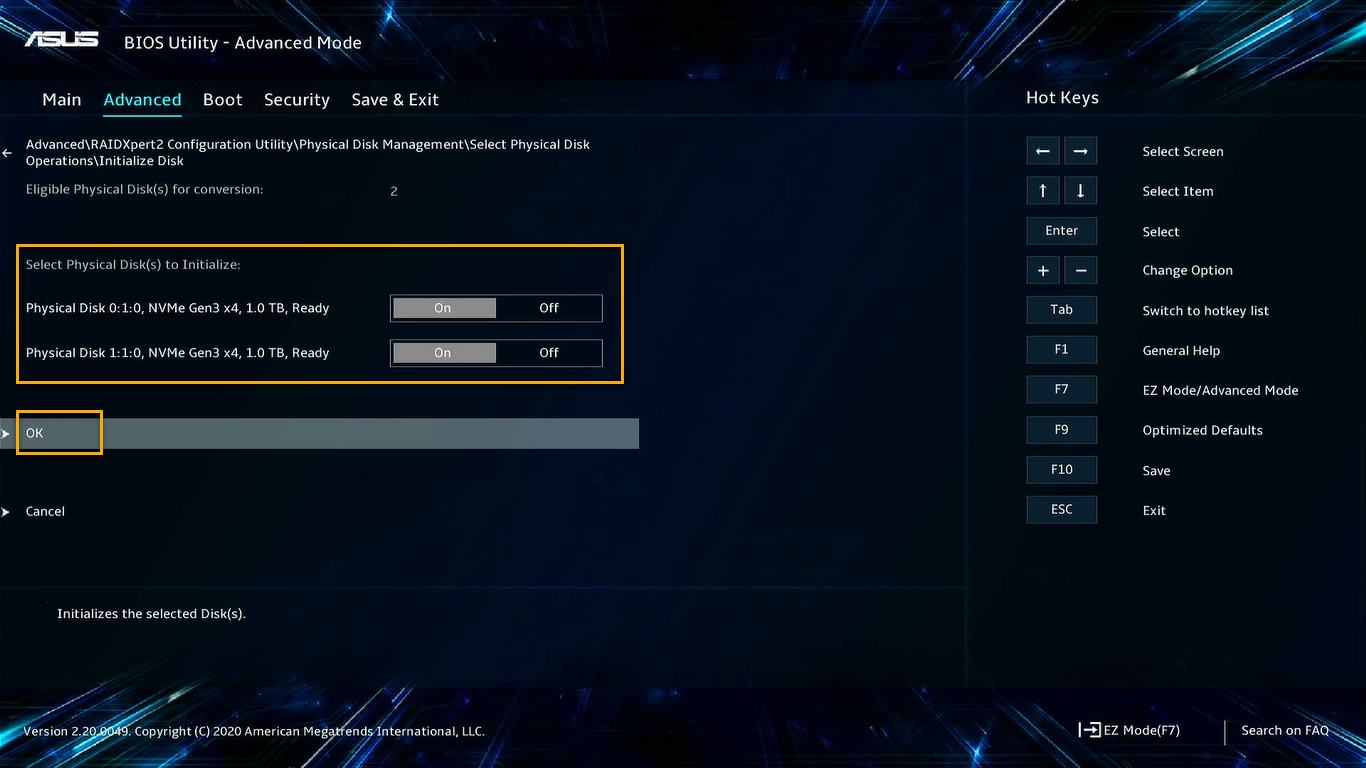
6. In [Select Physical Disk Operations] page, select [Initialize Disk] then press <Enter> key.
7. In [Initialize Disk] page, select the storage disk you require in [Select Physical Disk to Initialize] and switch to [On] then select [OK].
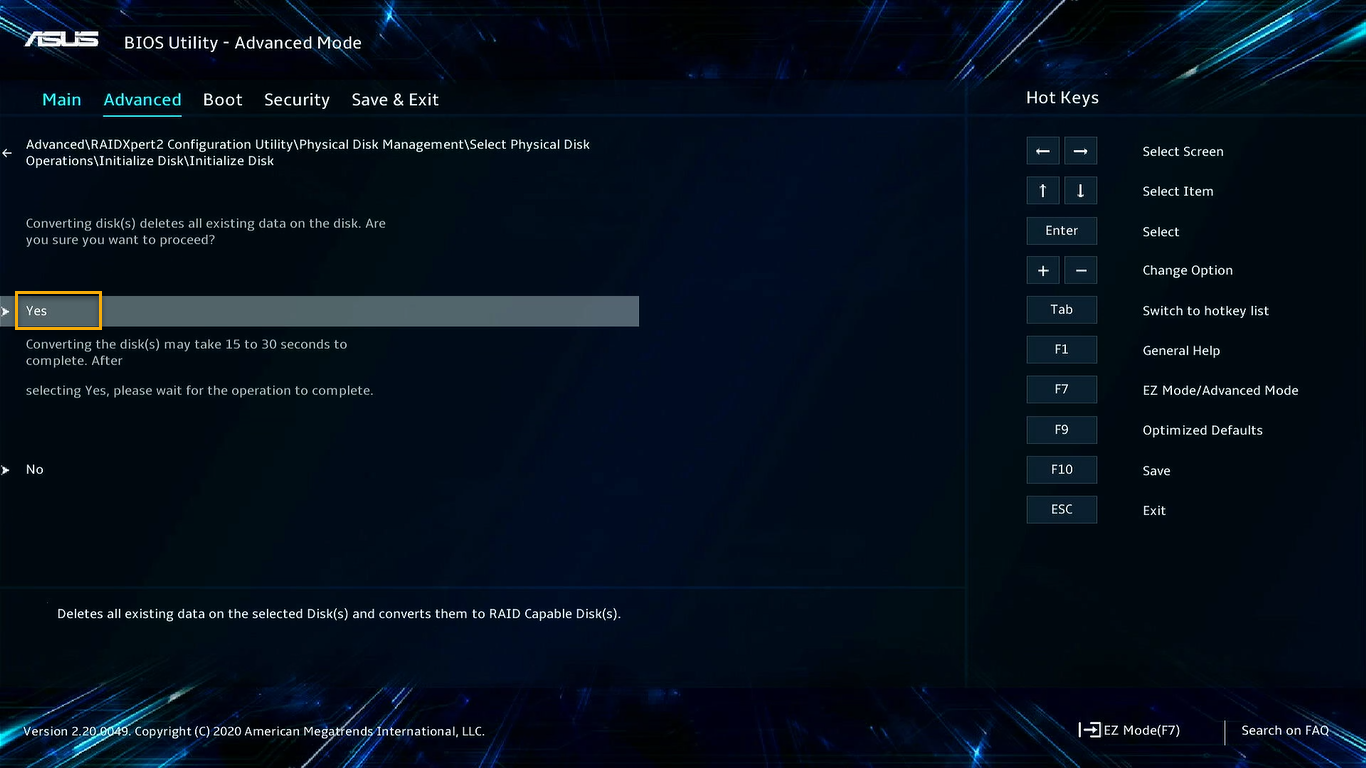
8. Check the information again, and select [Yes] to process, then return to [Select Physical Disk to Initialize] page after done.
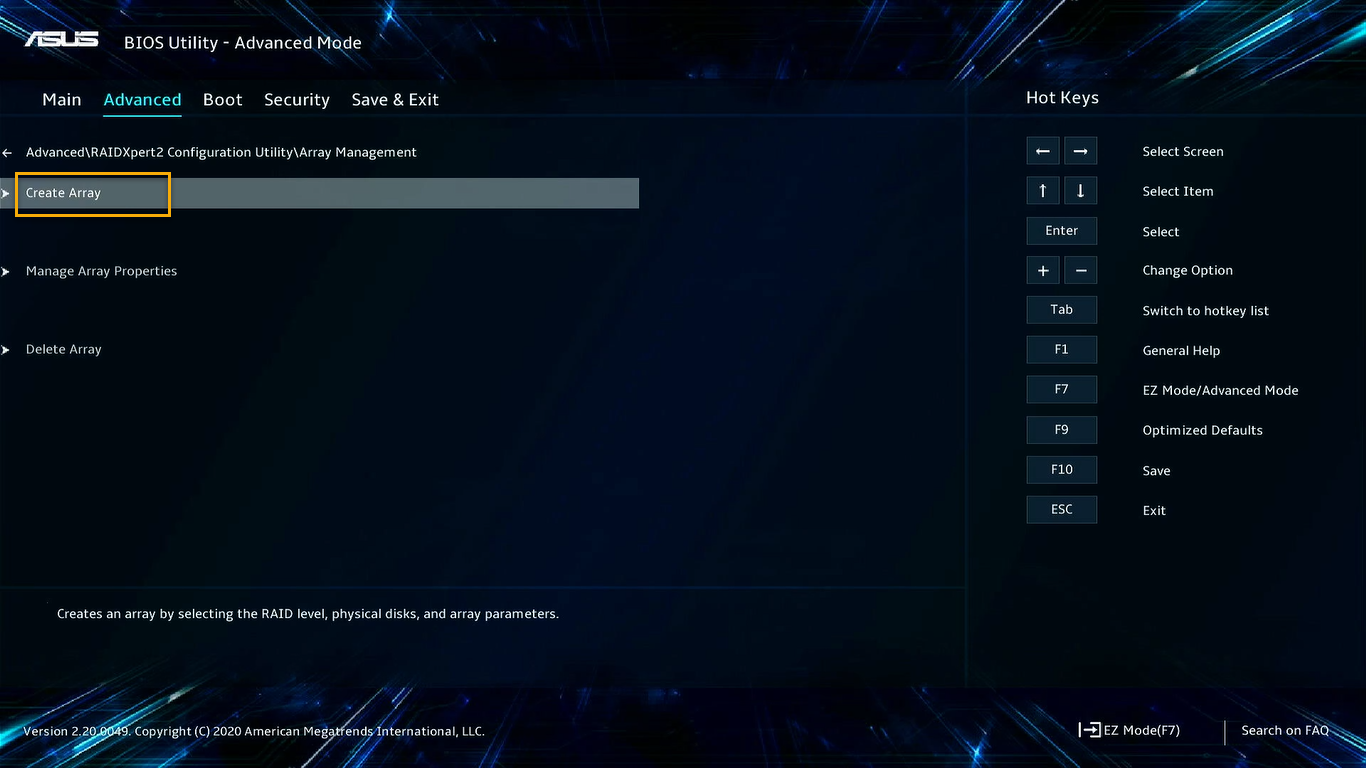
9. Please go back to [RAIDXpert2 Configuration Utility] page, and select [Array Management] then press [Enter] key.

10. In [Array Management] page, select [Create Array] then press <Enter> key.
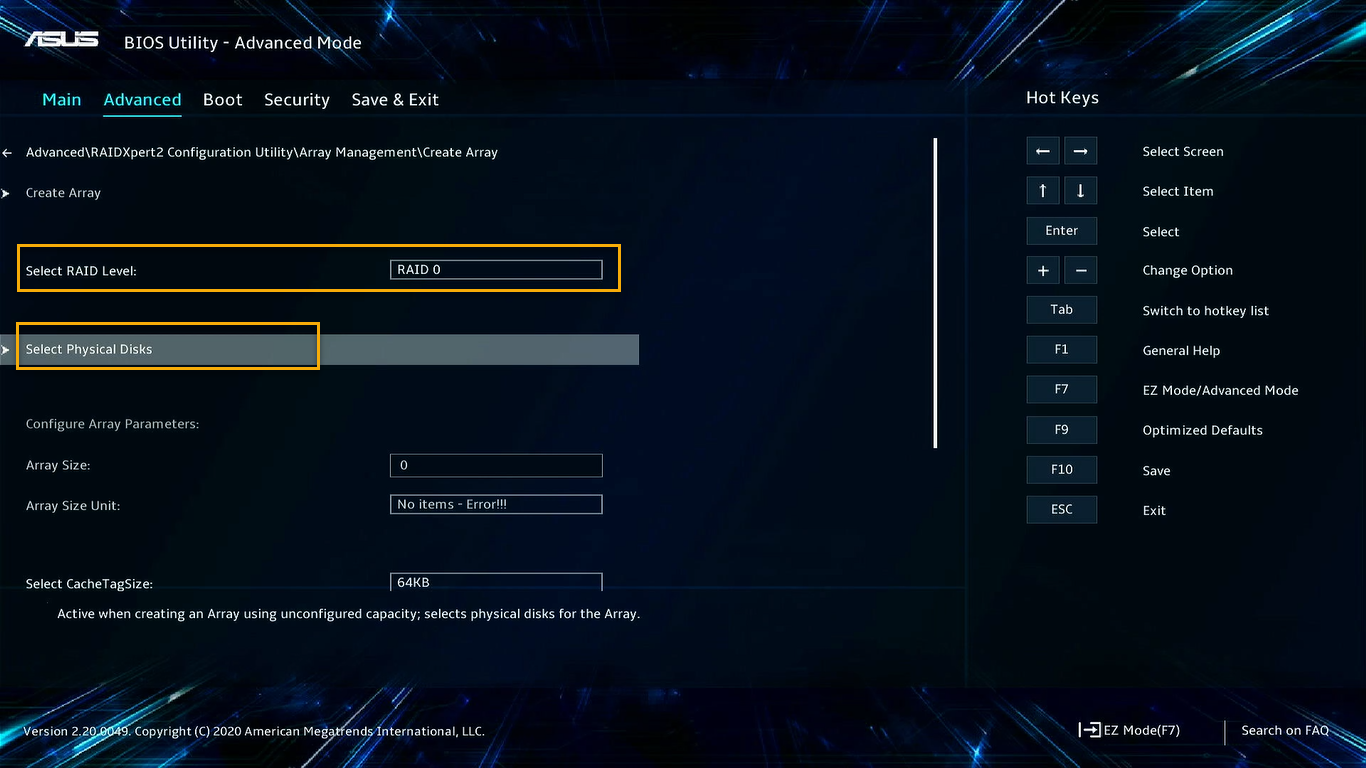
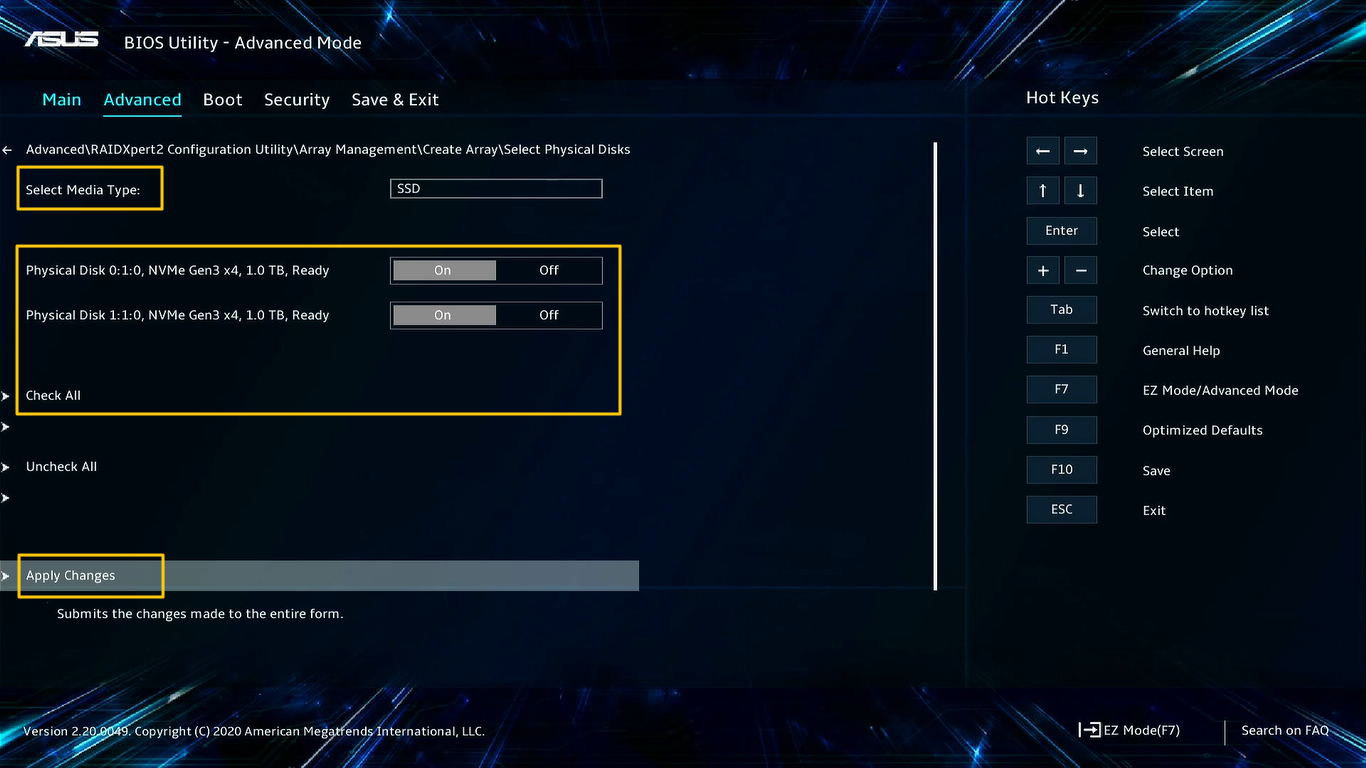
11. In [Create Array] page, under [Select RAID Level] to choose the RAID Level, and select [Select Physical Disk] then press <Enter> key.
12. In [Select Physical Disk] page, select the storage disk to switch [ON] or [Check All] under [Select Media Type] item, and then select [Apply Changes] after.
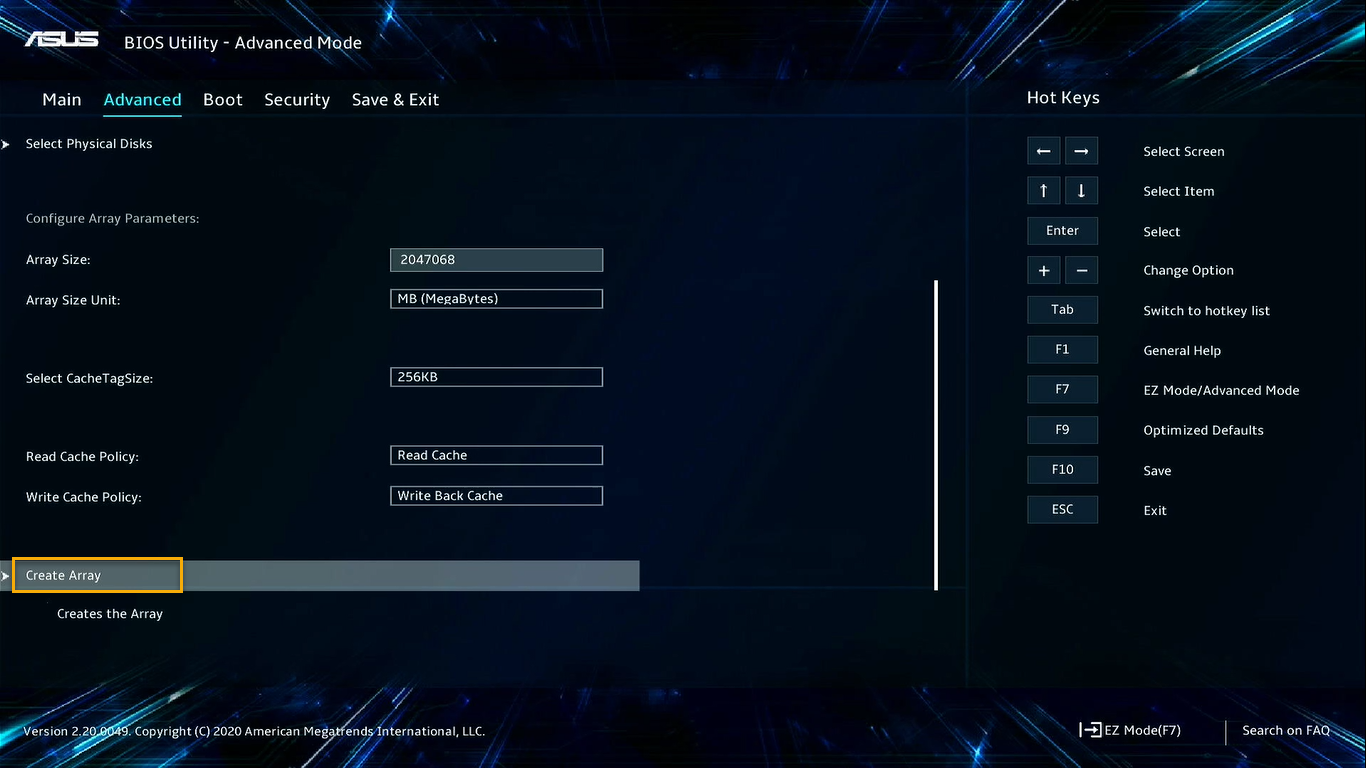
13. In [Create Array] page, setup your Array Parameters with [Array Size]、[Array Size Unit]、[Select Cache Tag Size]、[Read Cache Policy] and [Write Cache Policy].

①[Array Size]: Key in required Array size, and the default value is maximum.
②[Array Size Unit]: Select required Array size unit.
③[Select Cache Tag Size]: Select the Cache Tag Size from 64 KB to 256 KB.
④[Read Cache Policy]: To select the desire read policy. The configuration utility no cache and read cache.
⑤[Write Cache Policy]: To select the desire write policy. The configuration utility no cache and write back cache.
14. After all setup done, select [Create Array] then press <Enter> key to create RAID array.
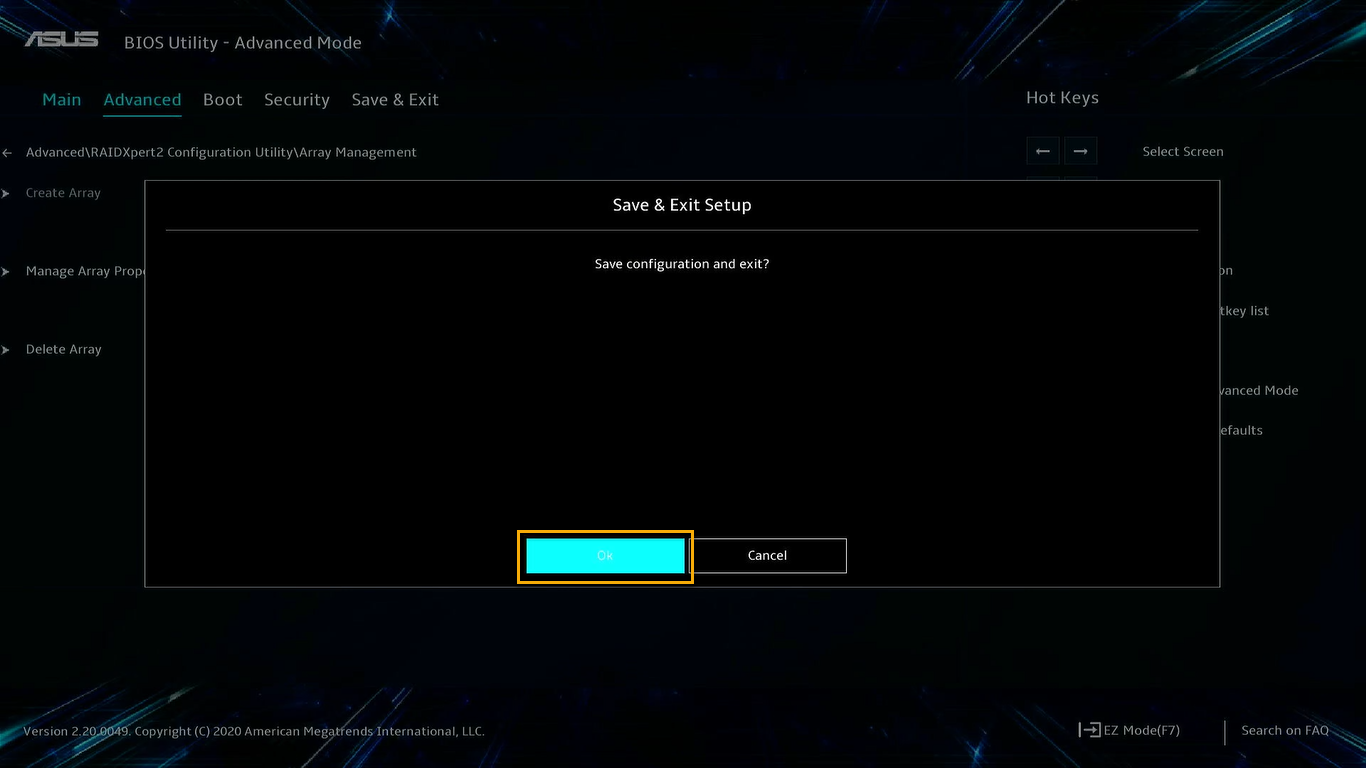
15. In the end, press <F10> key to save your change and exit BIOS setup.
16. After creating or deleting RAID Array, you may need to install operation system next.
During Windows OS installation, please install AMD RAID Driver (SATA, NVMe RAID), and refer to step here.
[AMD Platform] Deleting RAID Array
WARNING! Be cautious when delete a RAID Array, your all data in storage devices will be deleted.
1. Enter BIOS setup: Restart your laptop then press <F2> key during POST (Power-On Self-Test), get into BIOS setup, and then press <F7> key to enter [Advanced Mode].
2. In [Advanced Mode] page, select [RAIDXpert2 Configuration Utility] then press <Enter> key.
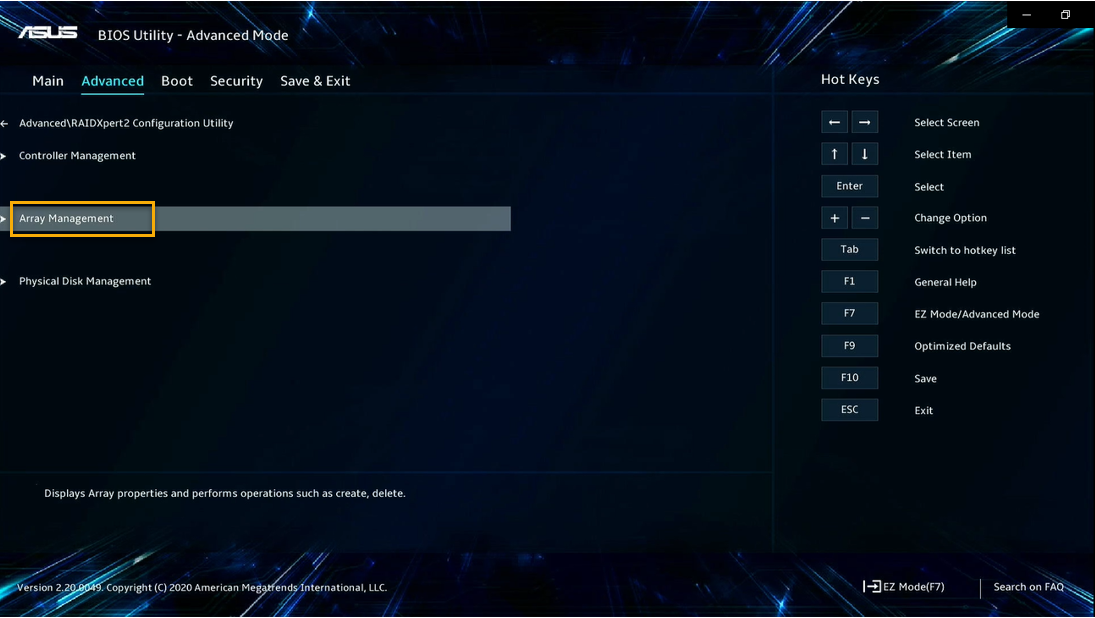
3. In [RAIDXpert2 Configuration Utility] page, select [Array Management] then press <Enter> key.
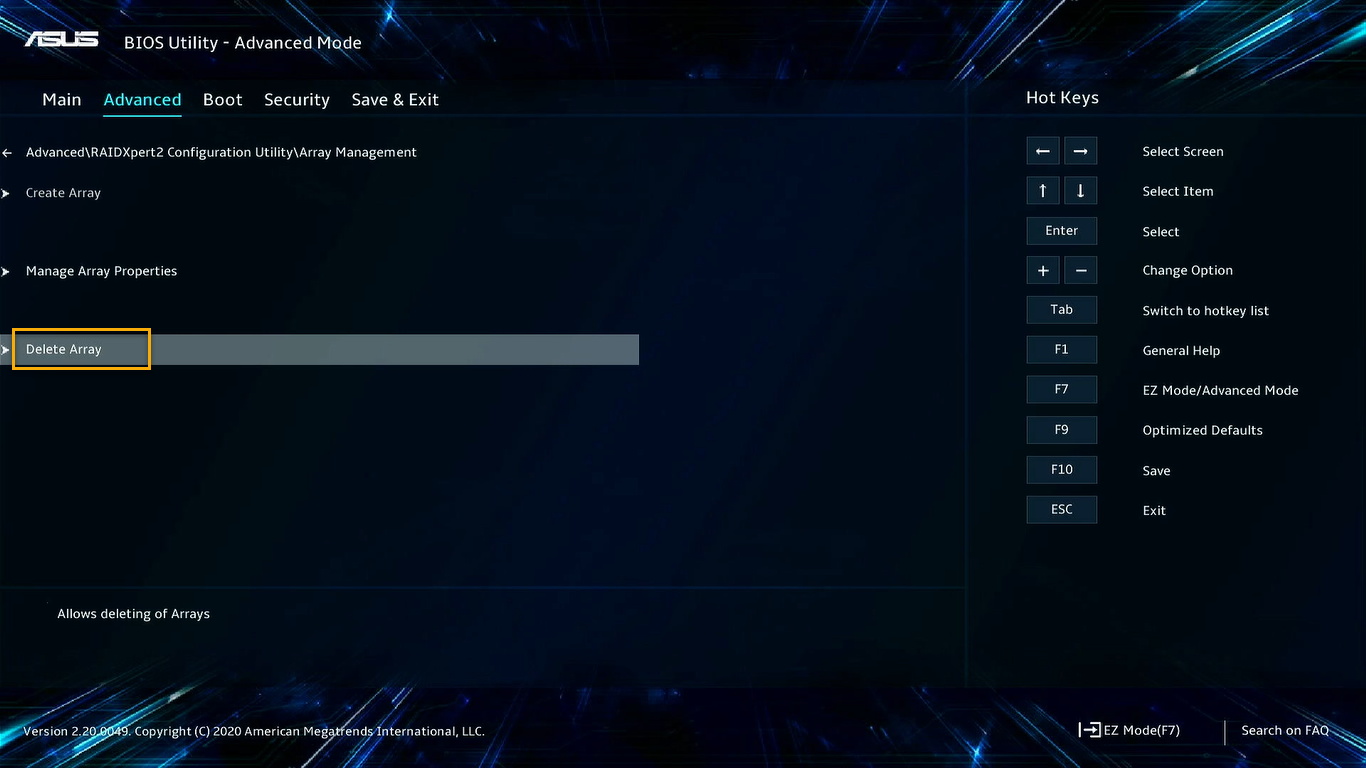
4. In [Array Management] page, select [Delete Array] then press <Enter> key.
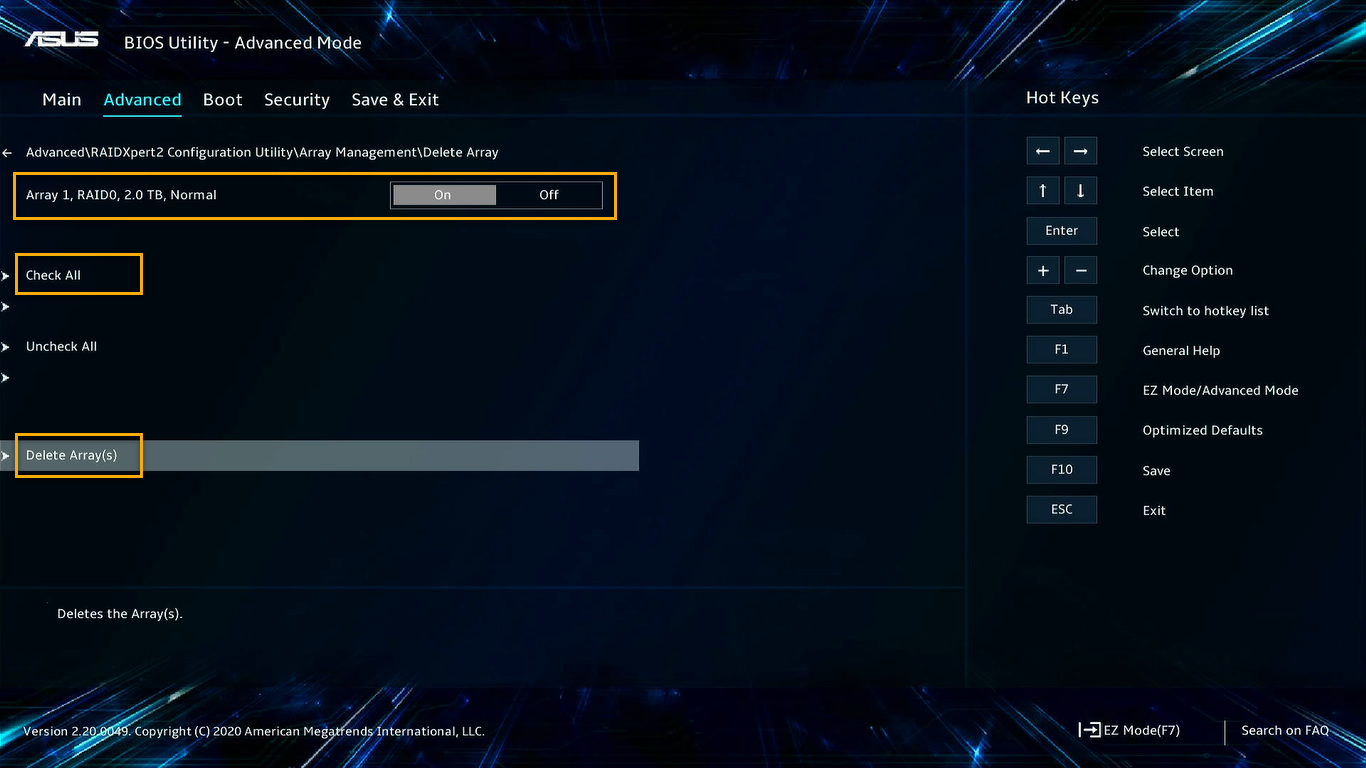
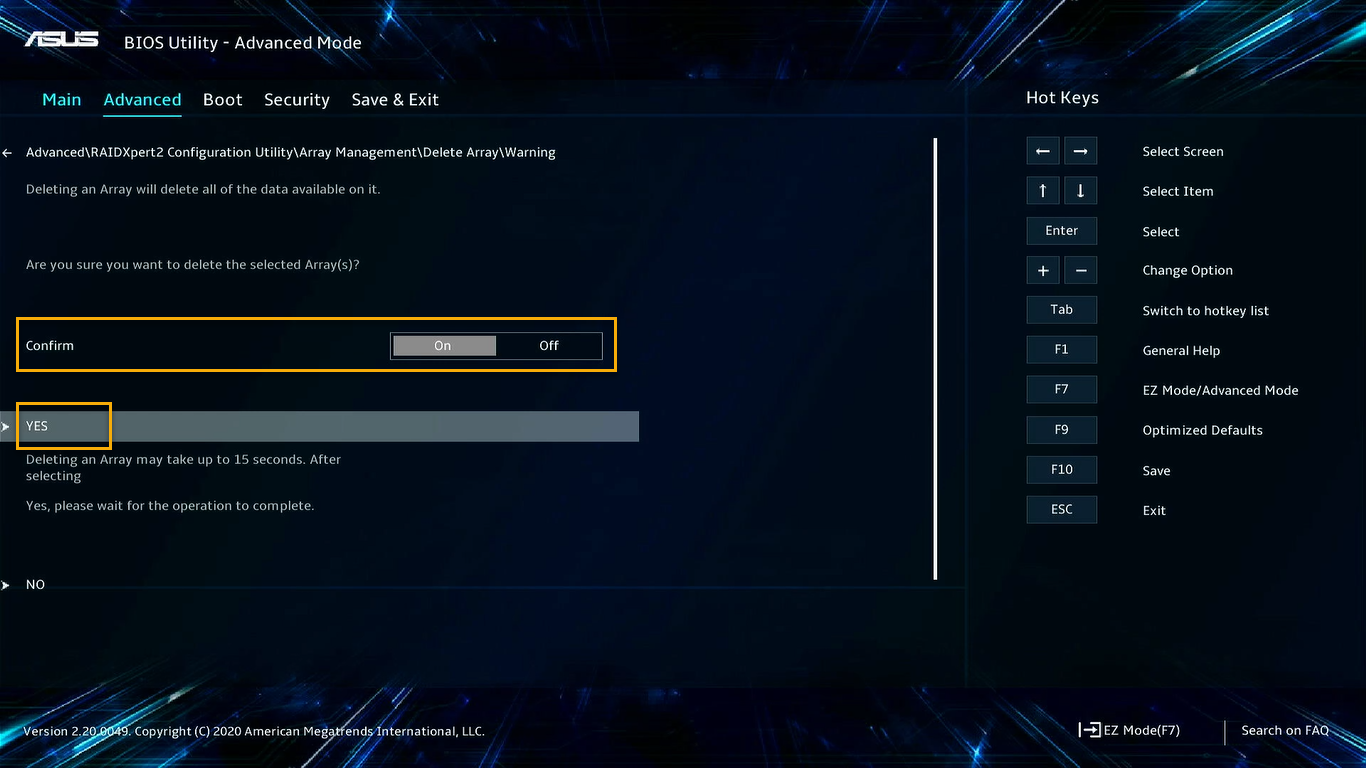
5. In [Delete Array] page, select the RAID Array and switch to [ON] or [Check All], and select [Delete Array(s)] then press <Enter> to delete.
6. Please confirm all information In [Warning] page, and then switch to [On] at [Confirm] item. In the end, select [Yes] to process delete.
7. After creating or deleting RAID Array, you may need to install operation system next.
During Windows OS installation, please install AMD RAID Driver (SATA, NVMe RAID), and refer to step here.
[AMD Platform] FAQ
Q1: Why my [Advanced Mode] setup page is without [RAIDXpert2 Configuration Utility] item?
A1: Please follow direction below to enable [RAIDXpert2 Configuration Utility].
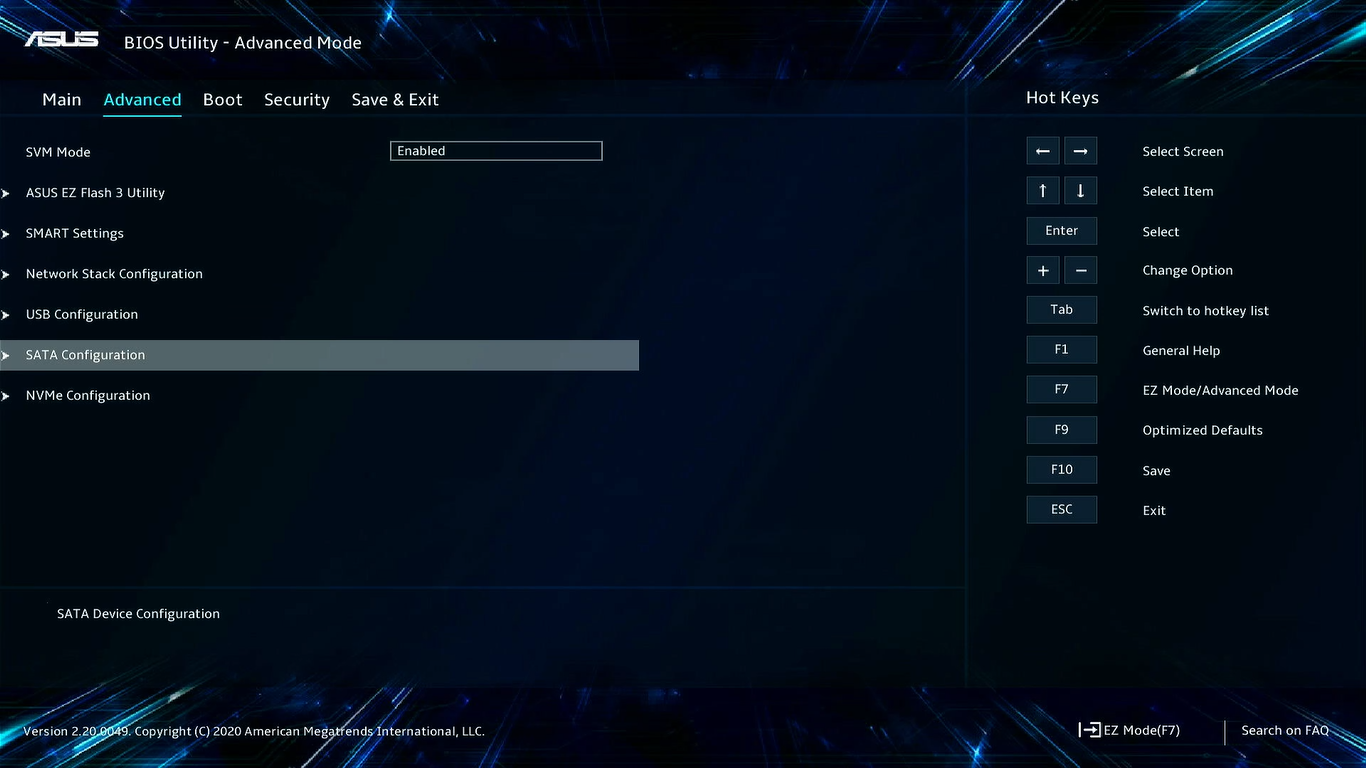
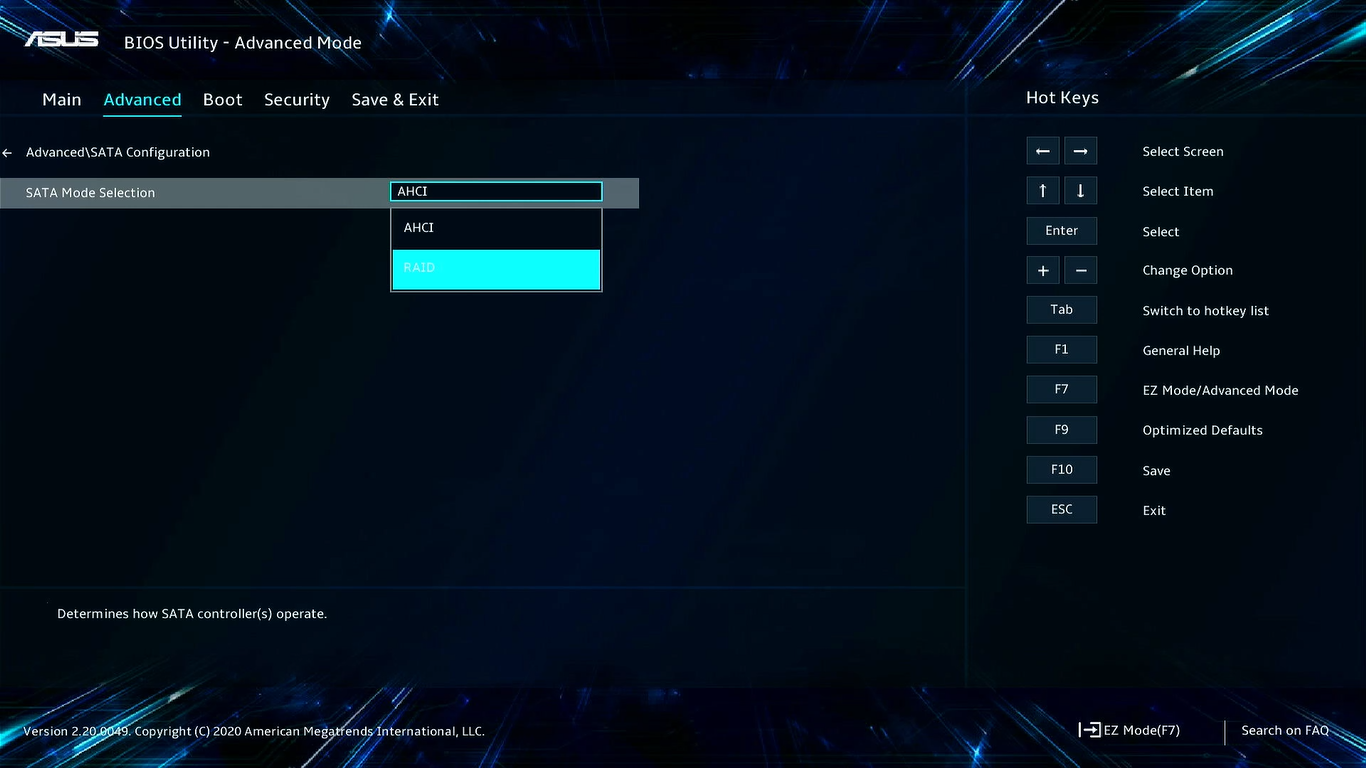
i, In [Advanced Mode] setup, select [SATA Configuration] then press <Enter> key.
ii, In [SATA Configuration] setup, please switch [SATA Mode Selection] to [RAID], and then press <F10> key to save configuration and exit to complete [RAIDXpert2 Configuration Utility] enable.
If no [RAID] item, it means function unsupported.
<Appendix>
Manually install AMD RAID driver
Download AMD RAID driver
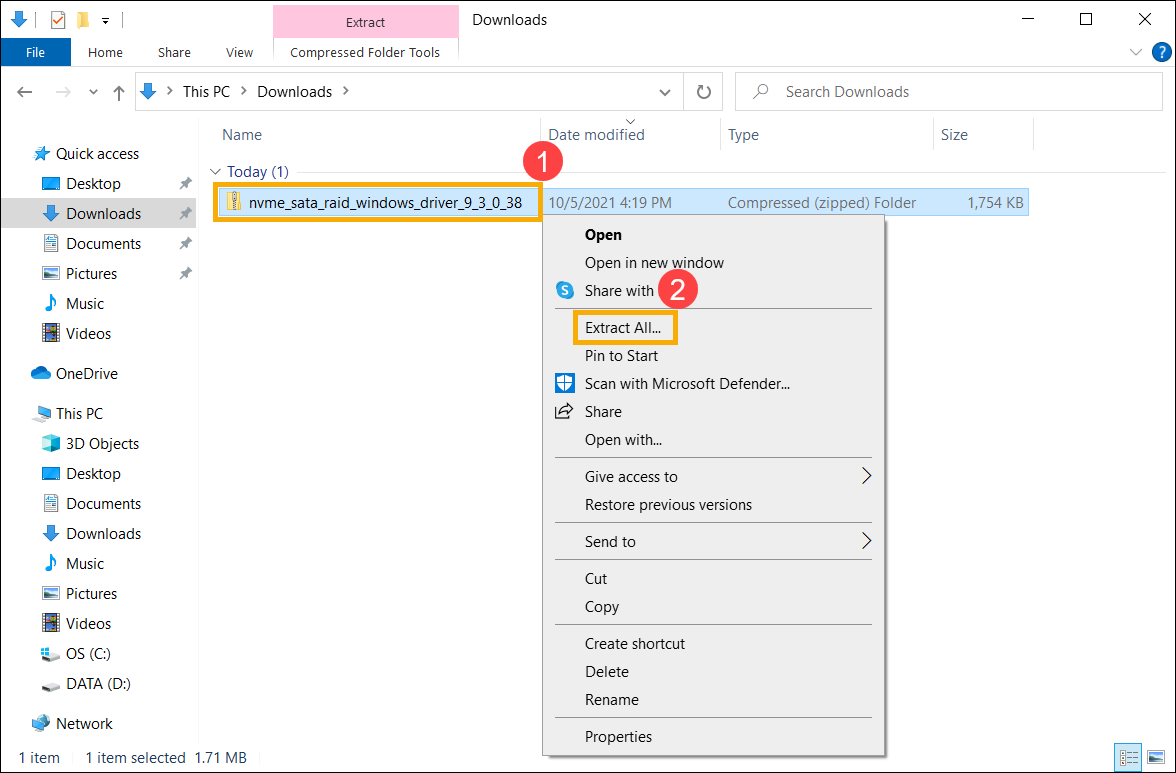
- Please download AMD RAID driver, Download Link.
- After downloading the driver, right-click [nvme_sata_raid_windows_driver_9_3_0_38] compressed file① and select [Extract All]②.
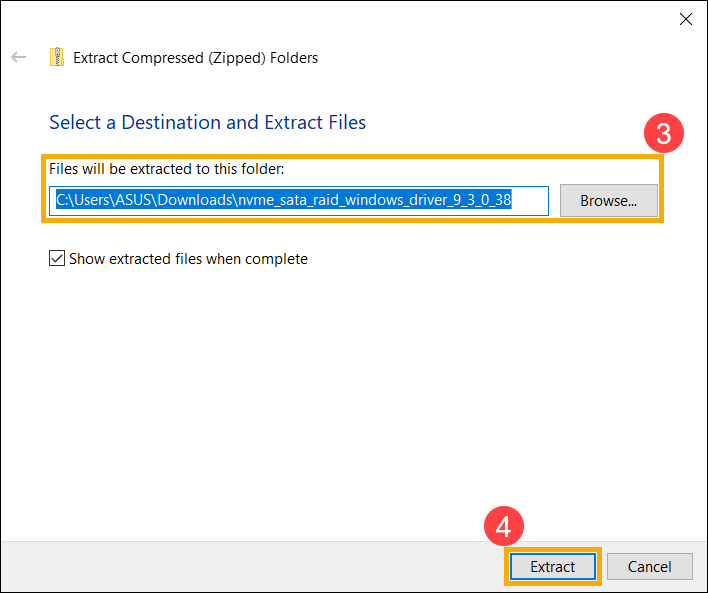
- Select a Destination③ and click [Extract]④.
- After the extraction is completed, please copy the entire folder (nvme_sata_raid_windows_driver_9_3_0_38) to a USB flash drive.
If you used a USB flash drive to create the Windows 11/10 installation media as well, please copy the entire folder to the same USB flash drive which is created as the Windows 11/10 installation media.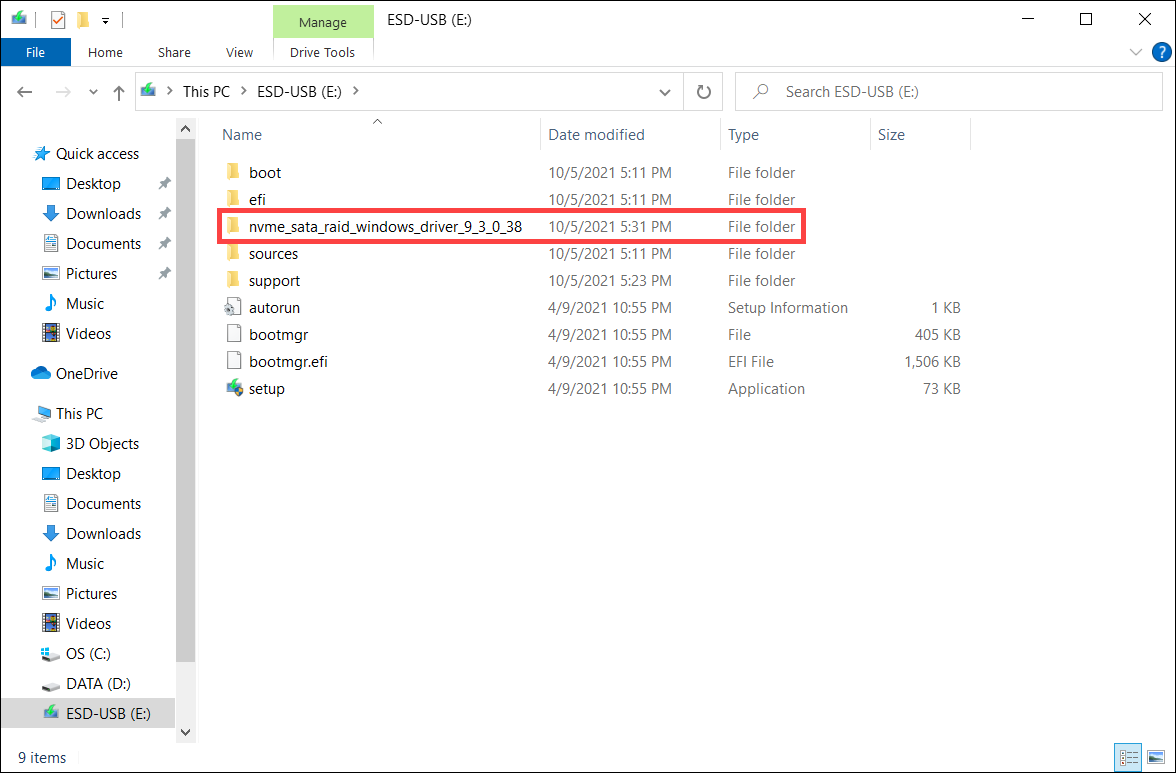
Install AMD RAID driver
- Connect the USB flash drive which includes the Windows 11/10 installation media and AMD RAID driver (nvme_sata_raid_windows_driver_9_3_0_38) to the target computer. (If you used a DVD to install Windows 11/10, please insert the DVD and consist of the above files USB flash drive to the target computer together.)
- Restart the Windows 11/10 installation process, here you can learn more about How to use installation media to insatll Windows 11/10.
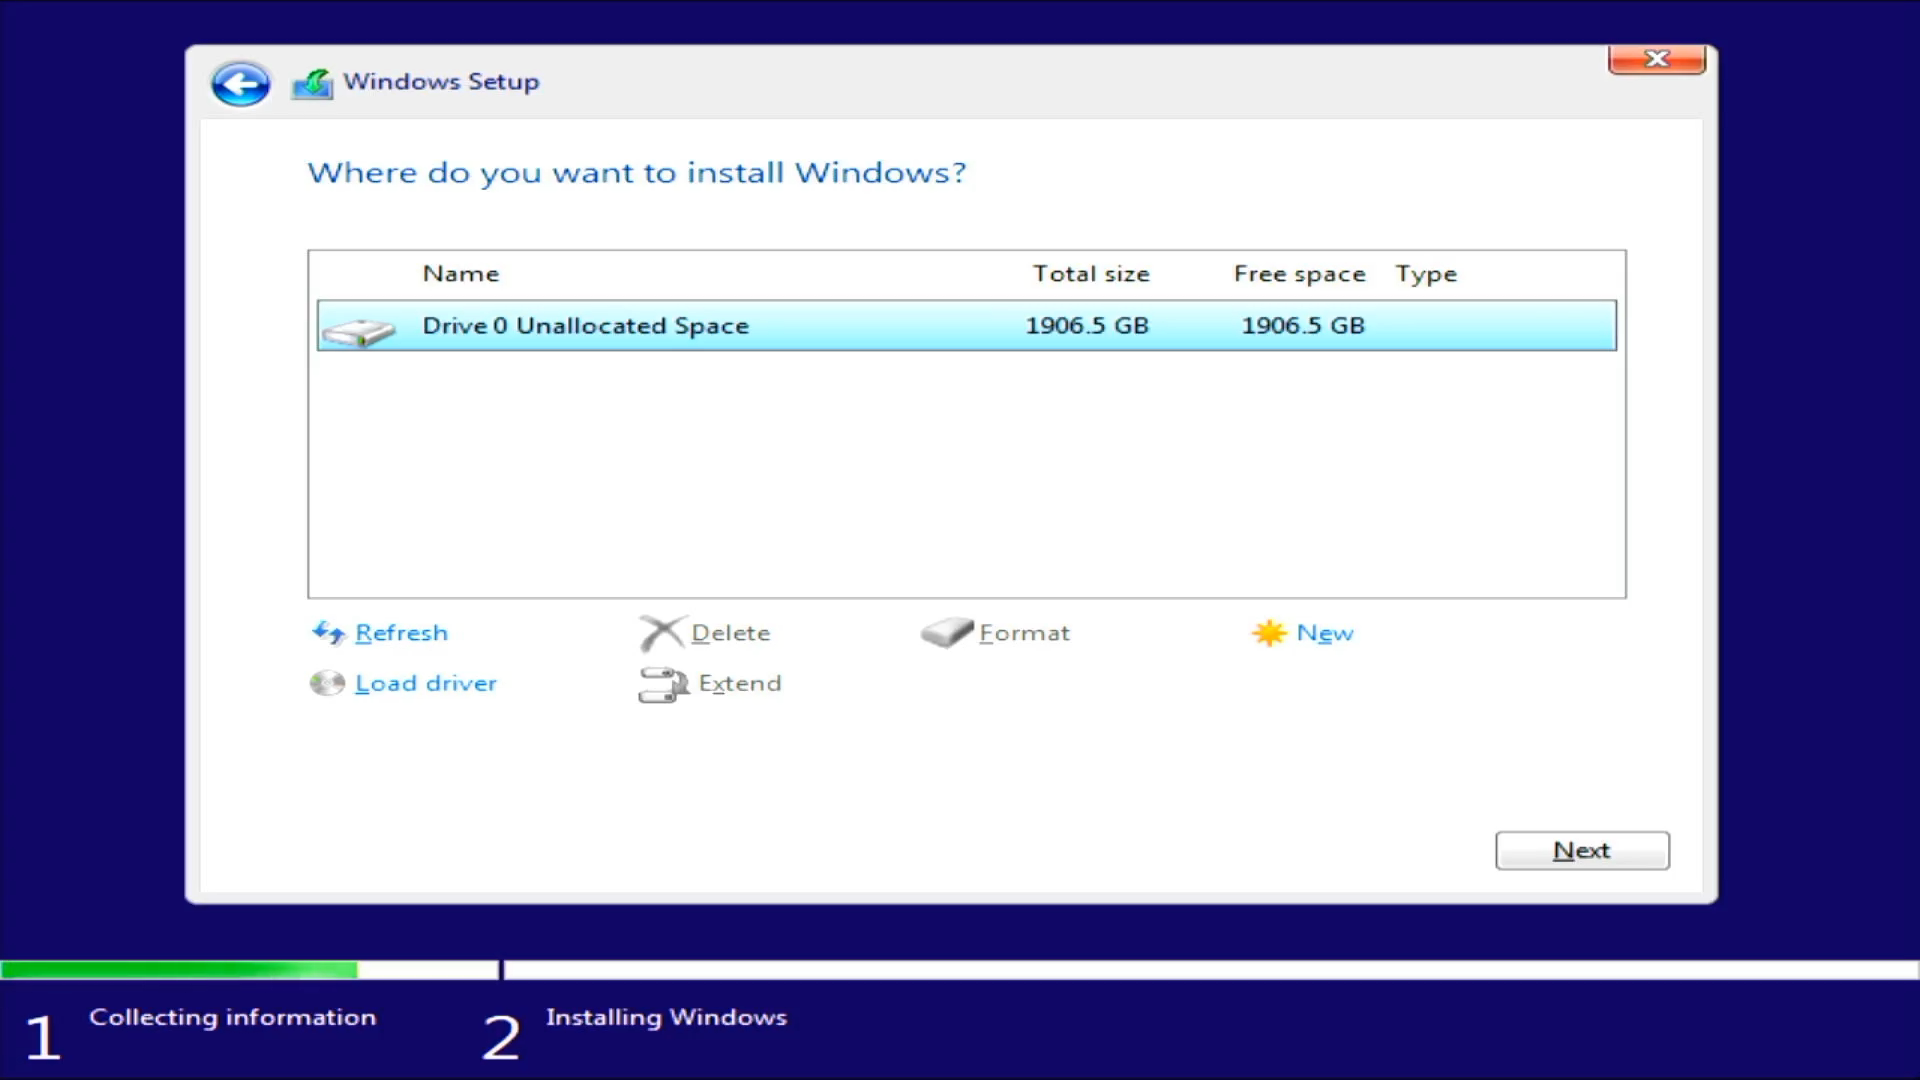
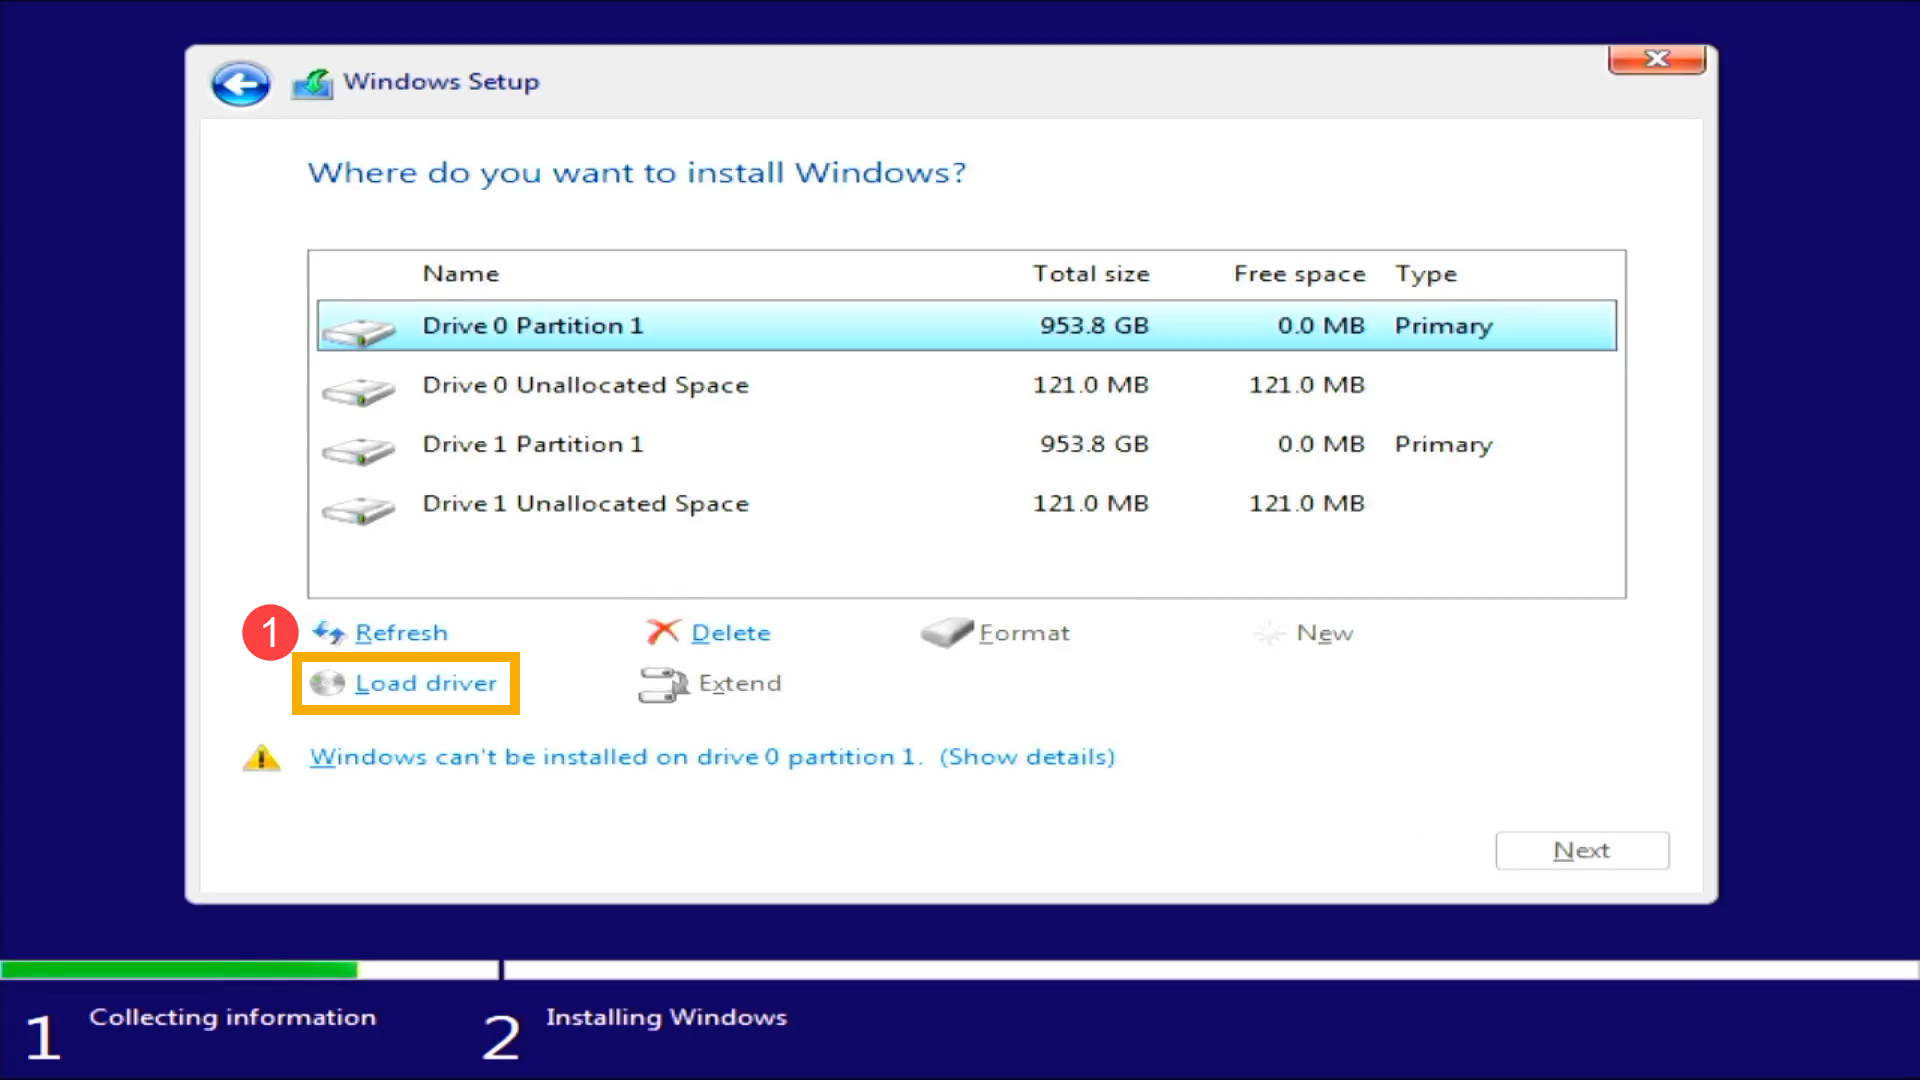
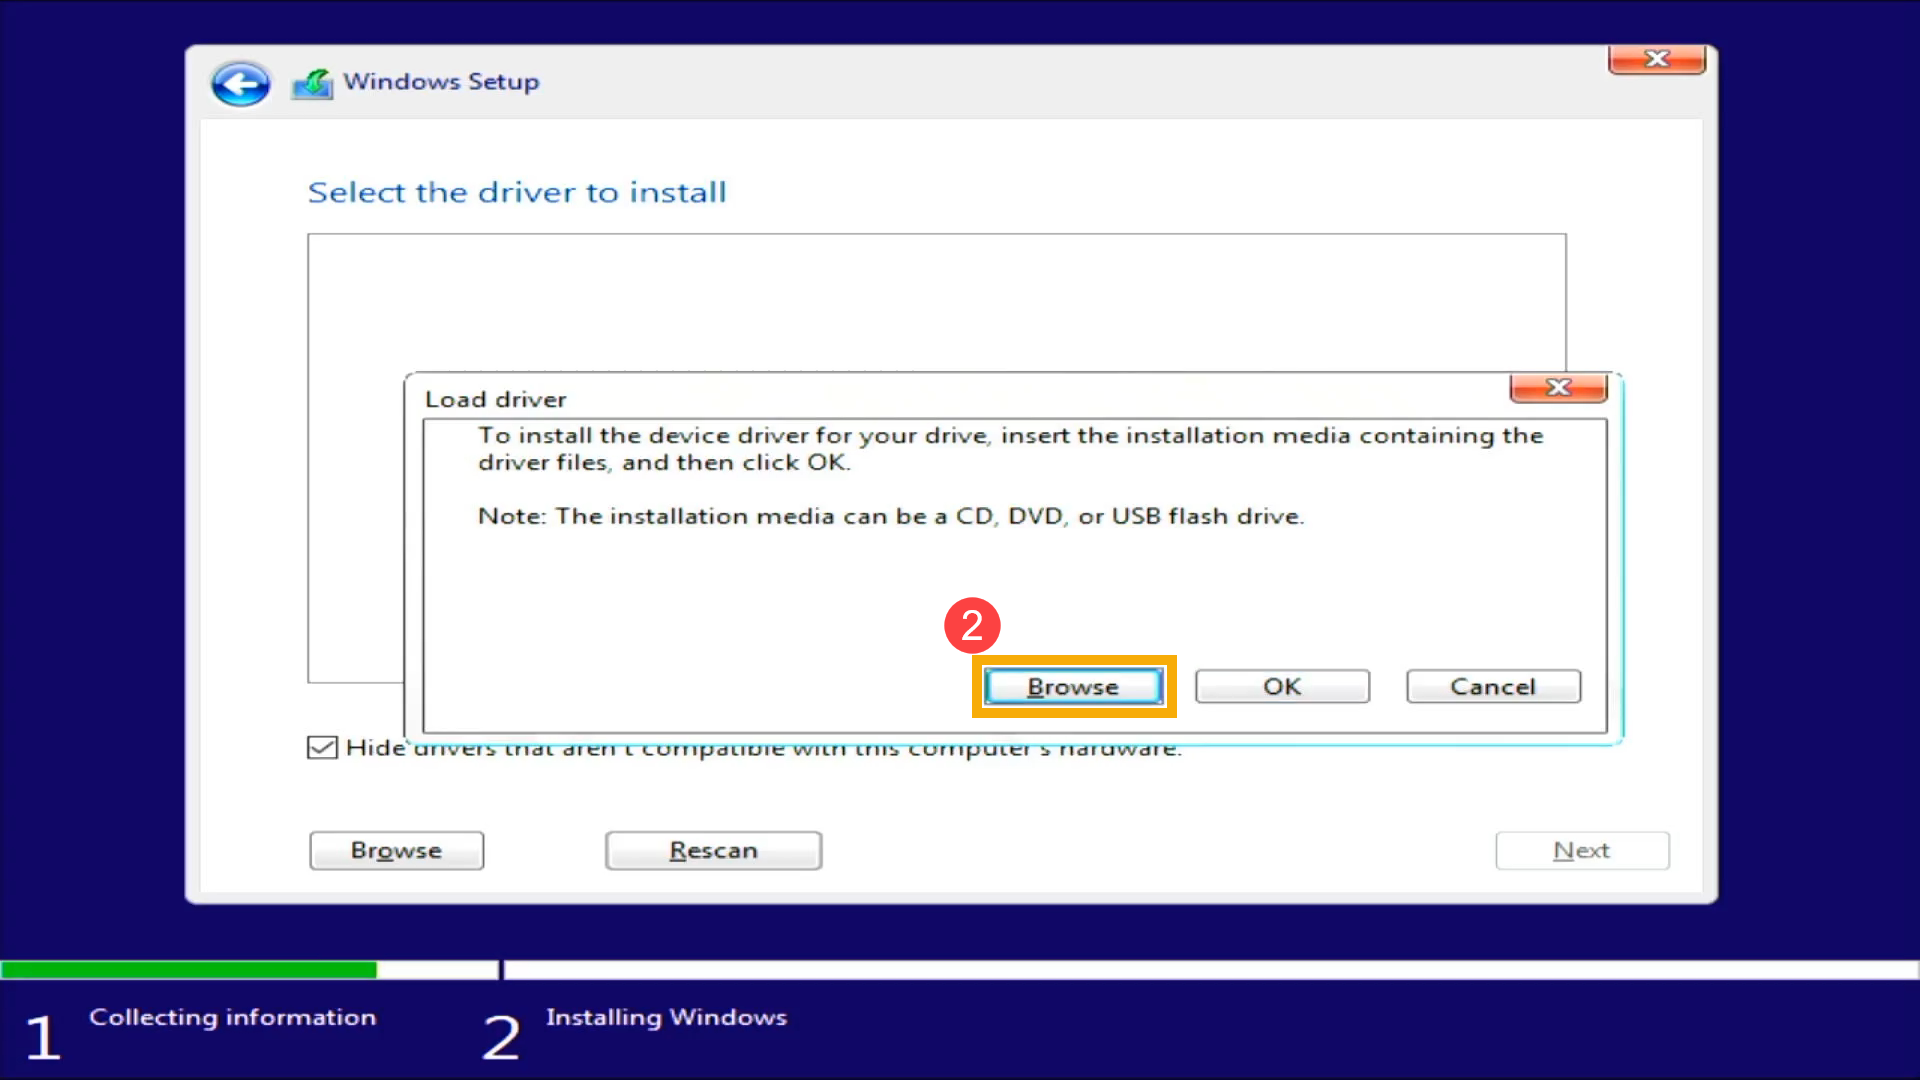
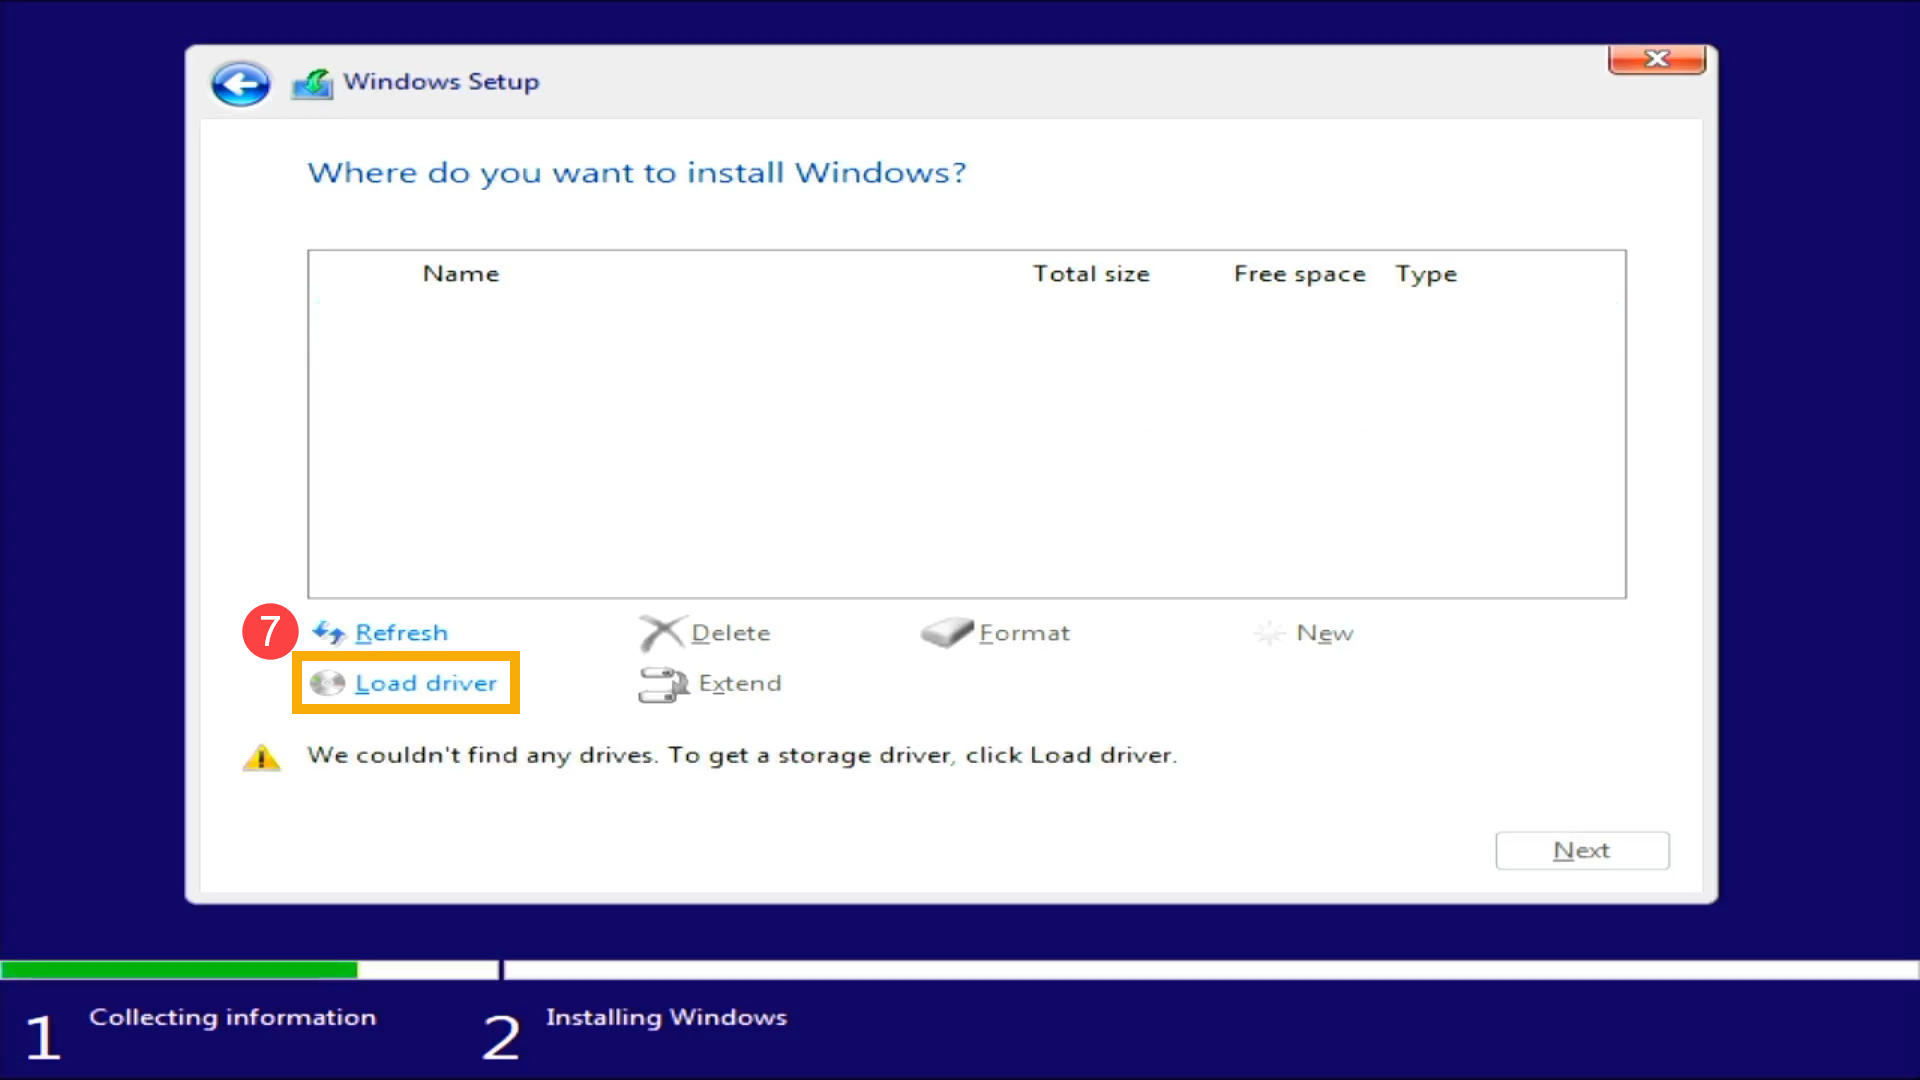
- On the screen of Where do you want to install Windows and Windows cannot find the RAID drive, please select [Load driver]①.
- Select [Browse]②.
- Choose your USB flash drive, then follow the below path to select [rcbottom] folder③ and select [OK]④.
[nvme_sata_raid_windows_driver_9_3_0_38] > [WTx64] > [RAID_NVMe] > [rcbottom]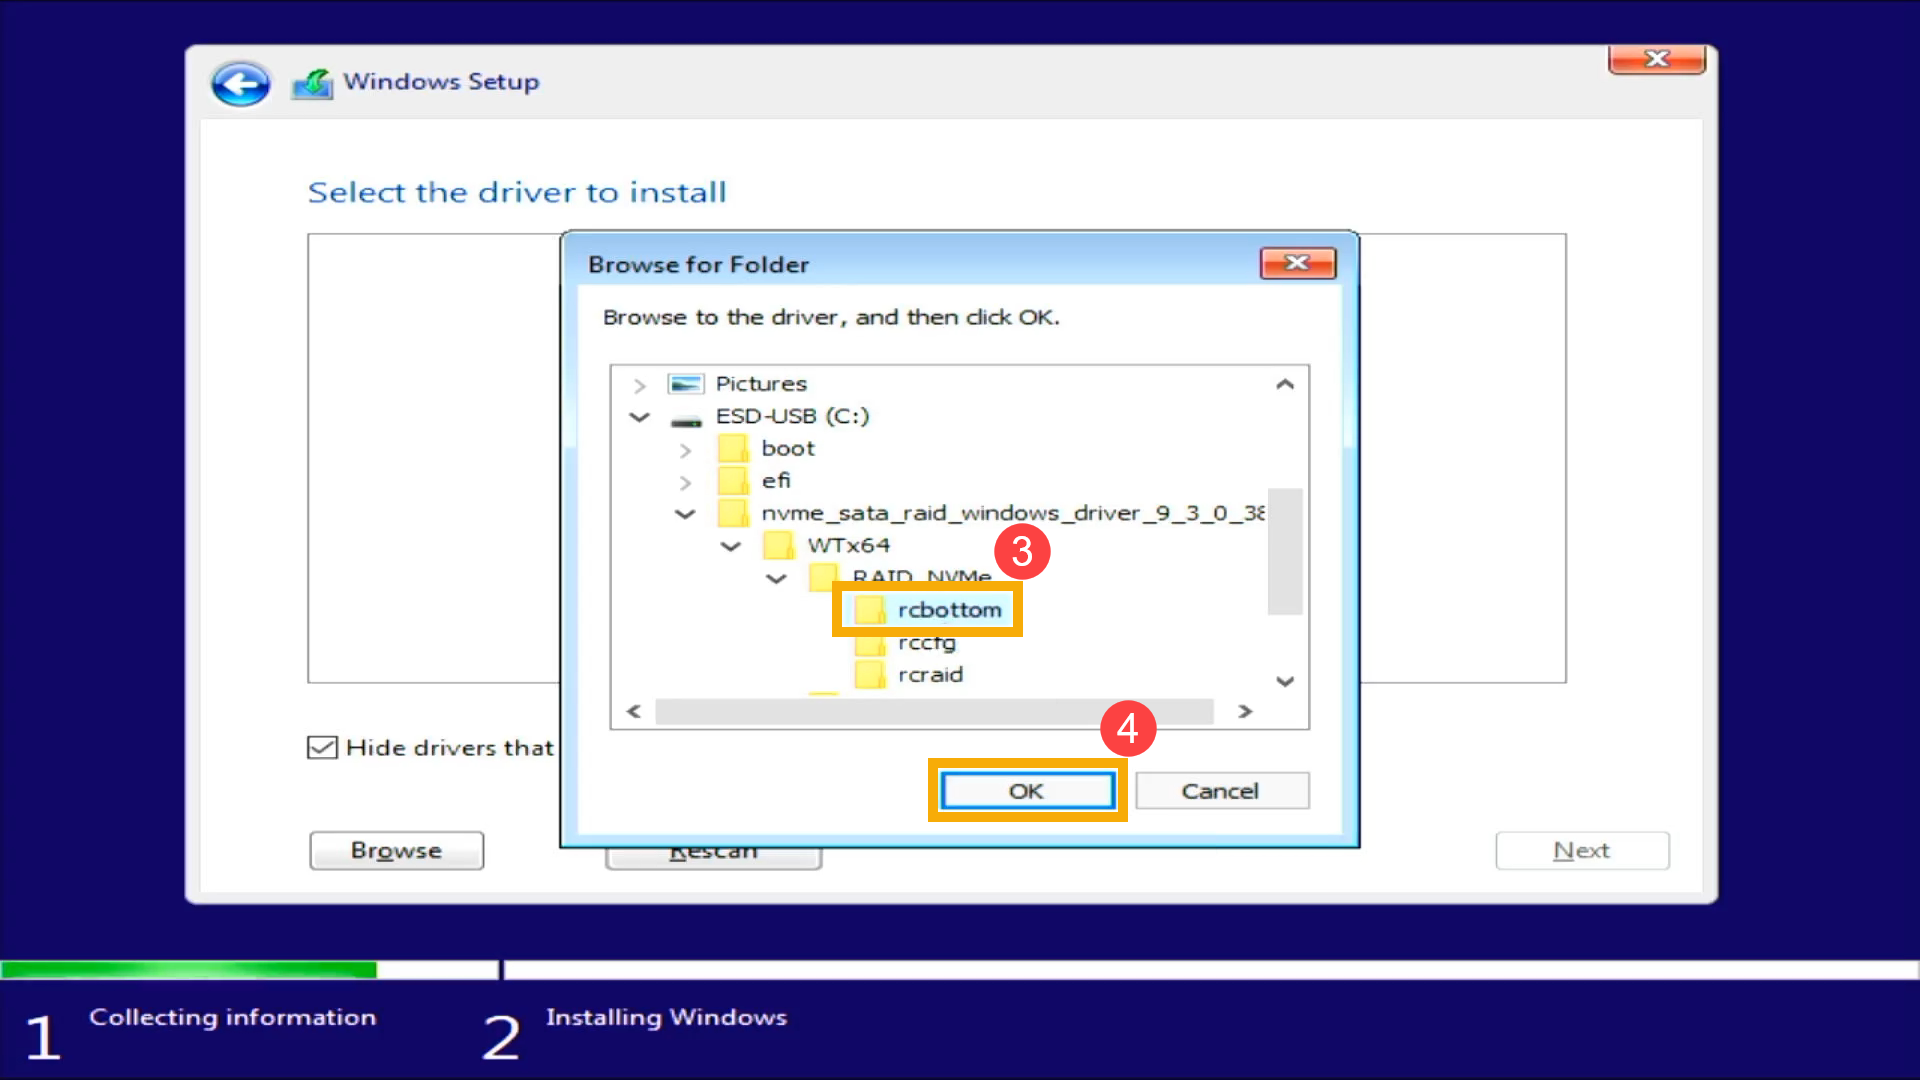
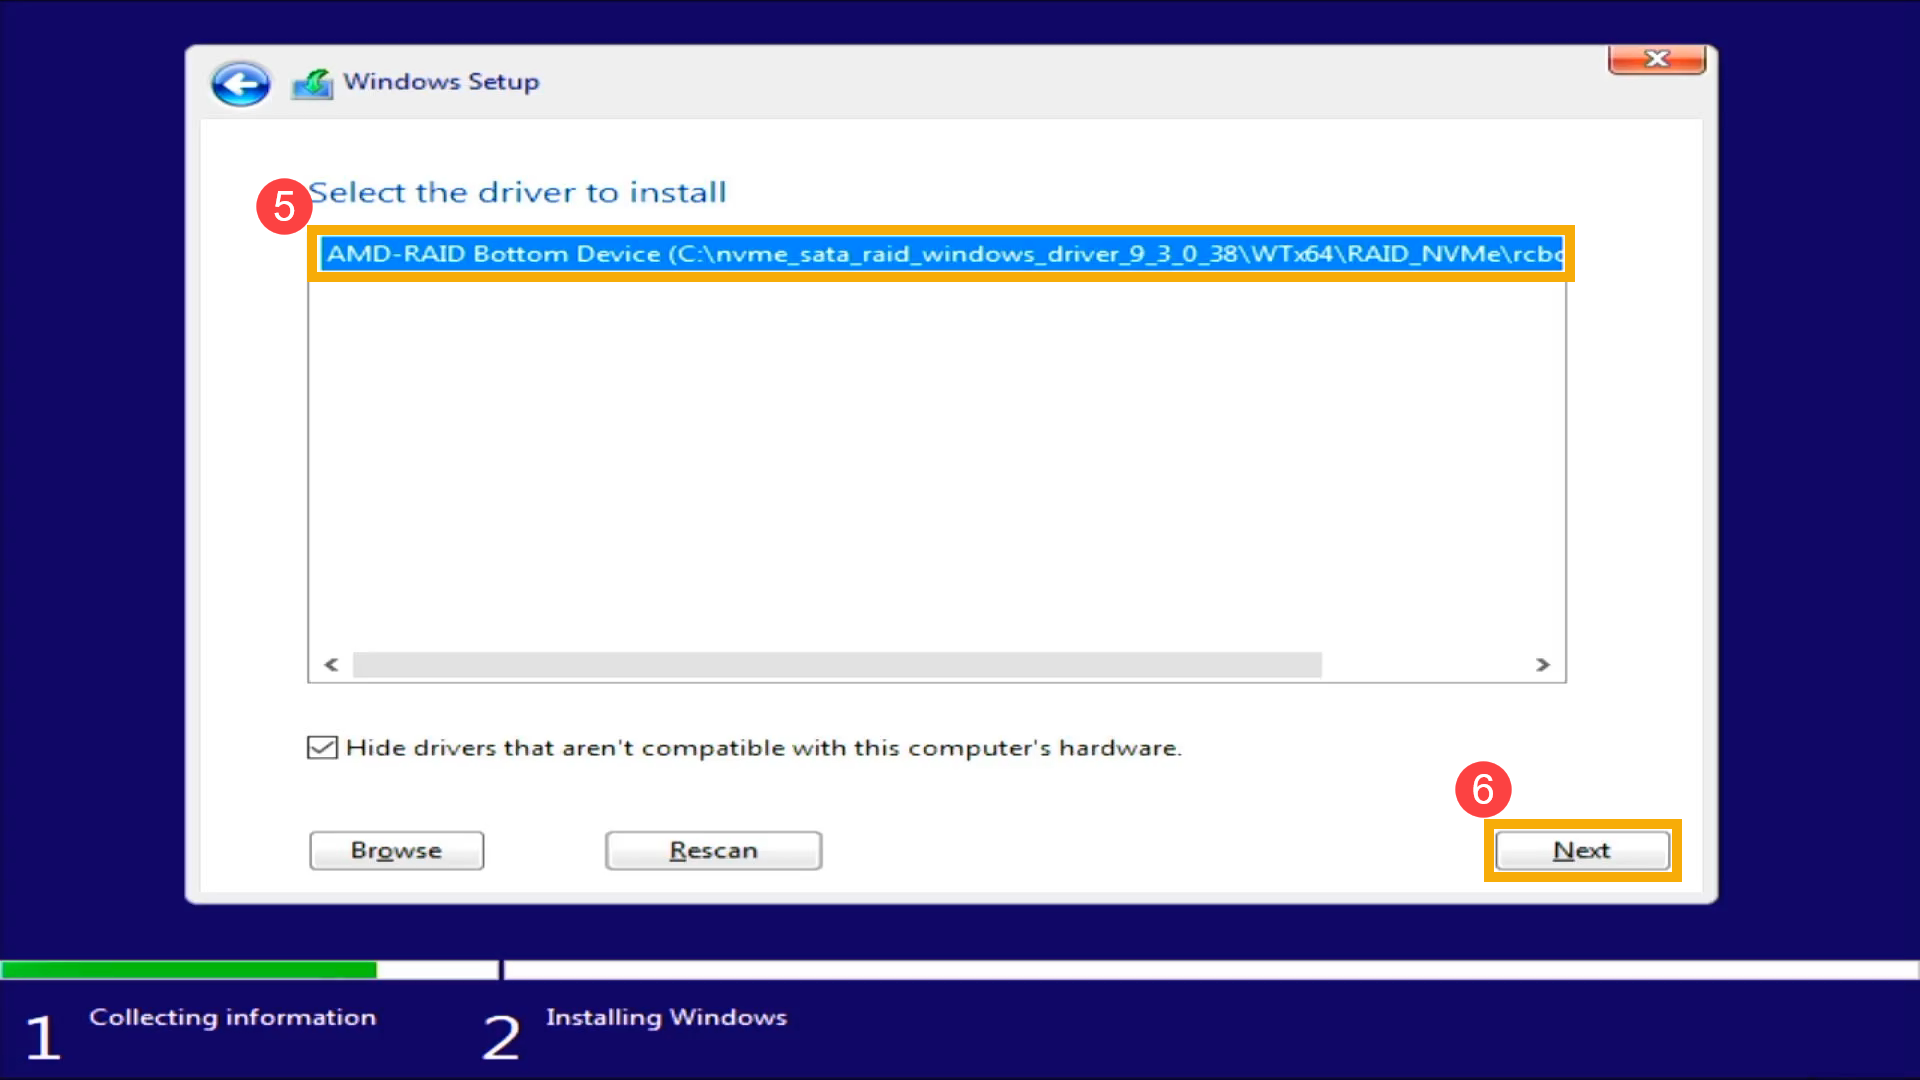
- Select [AMD-RAID Bottom Device]⑤, then select [Next]⑥ to install the driver.
- After the AMD-RAID Bottom Device driver installation is completed, please select [Load driver]⑦ again.
- Select [Browse]⑧.

- Choose your USB flash drive, then follow the below path to select [rcraid] folder⑨ and select [OK]⑩.
[nvme_sata_raid_windows_driver_9_3_0_38] > [WTx64] > [RAID_NVMe] > [rcraid]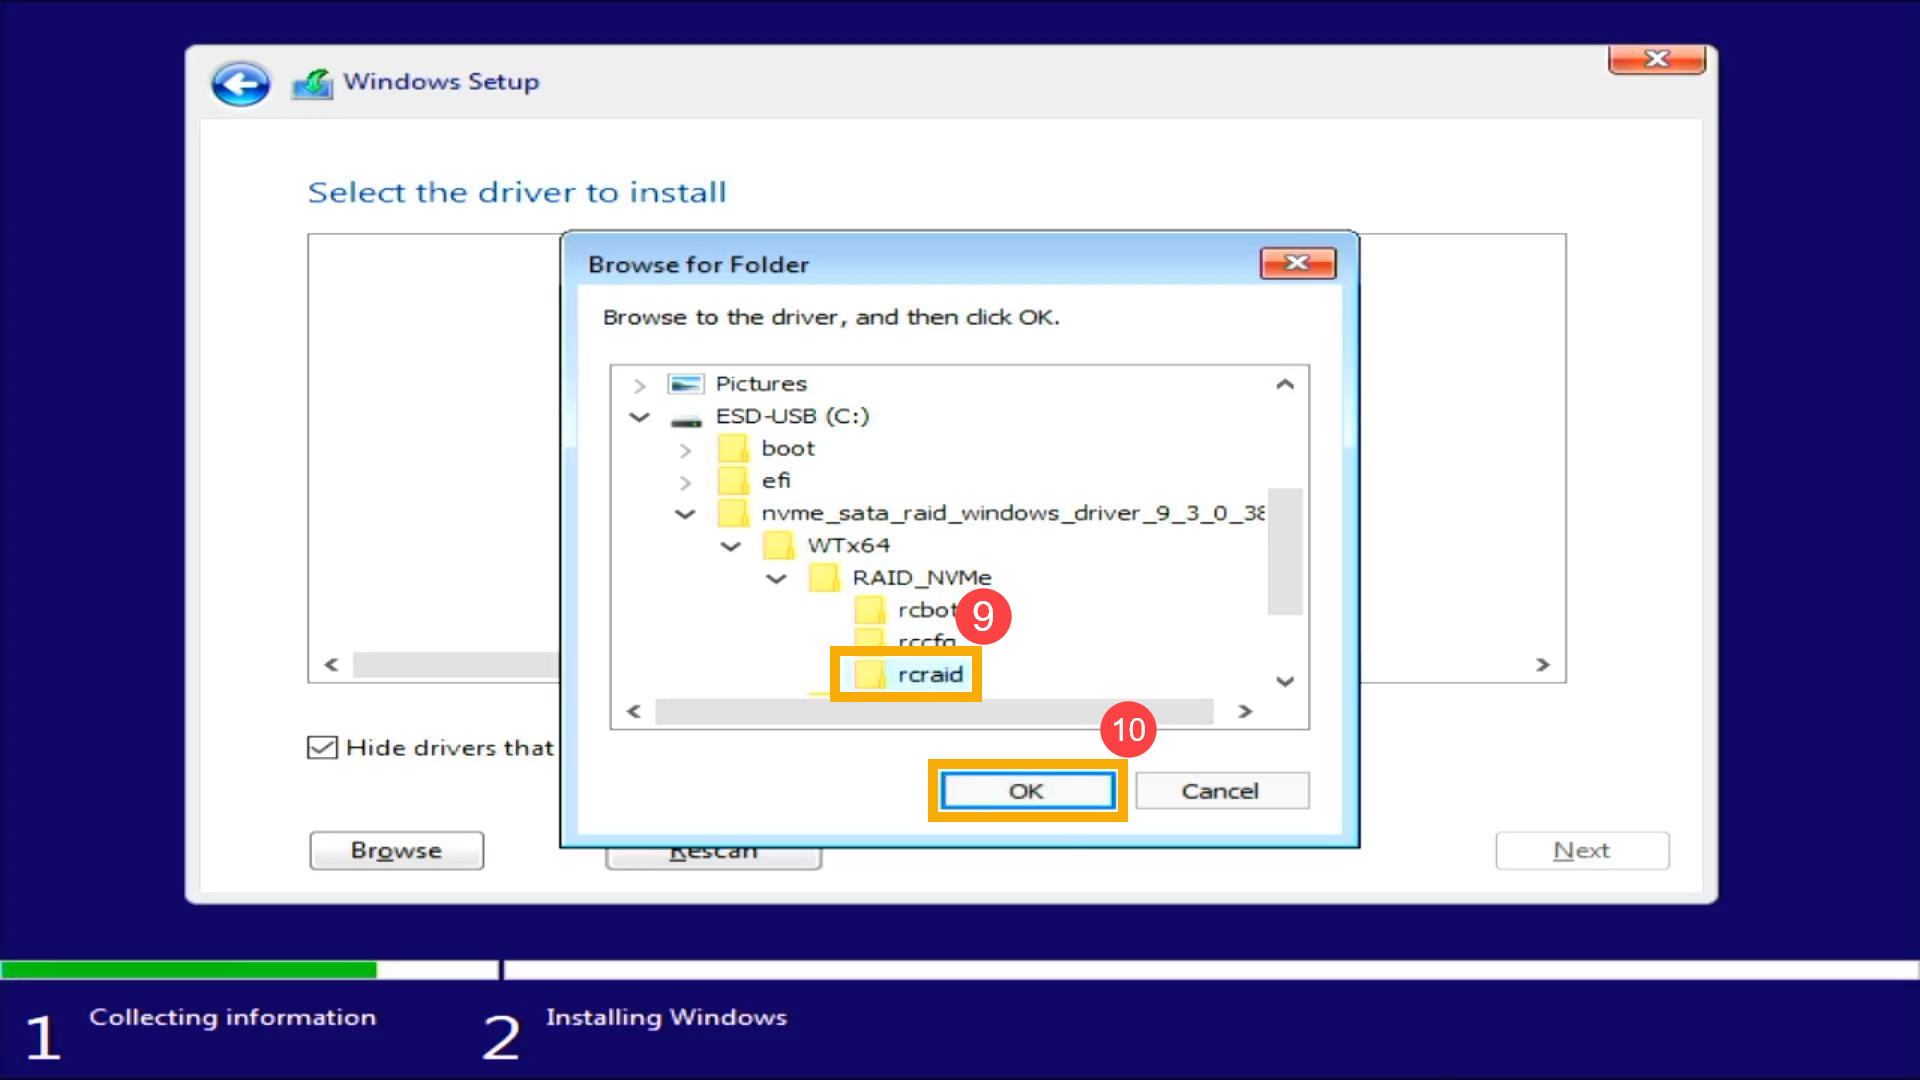
- Select [AMD-RAID Controller]⑪, then select [Next]⑫ to install the driver.
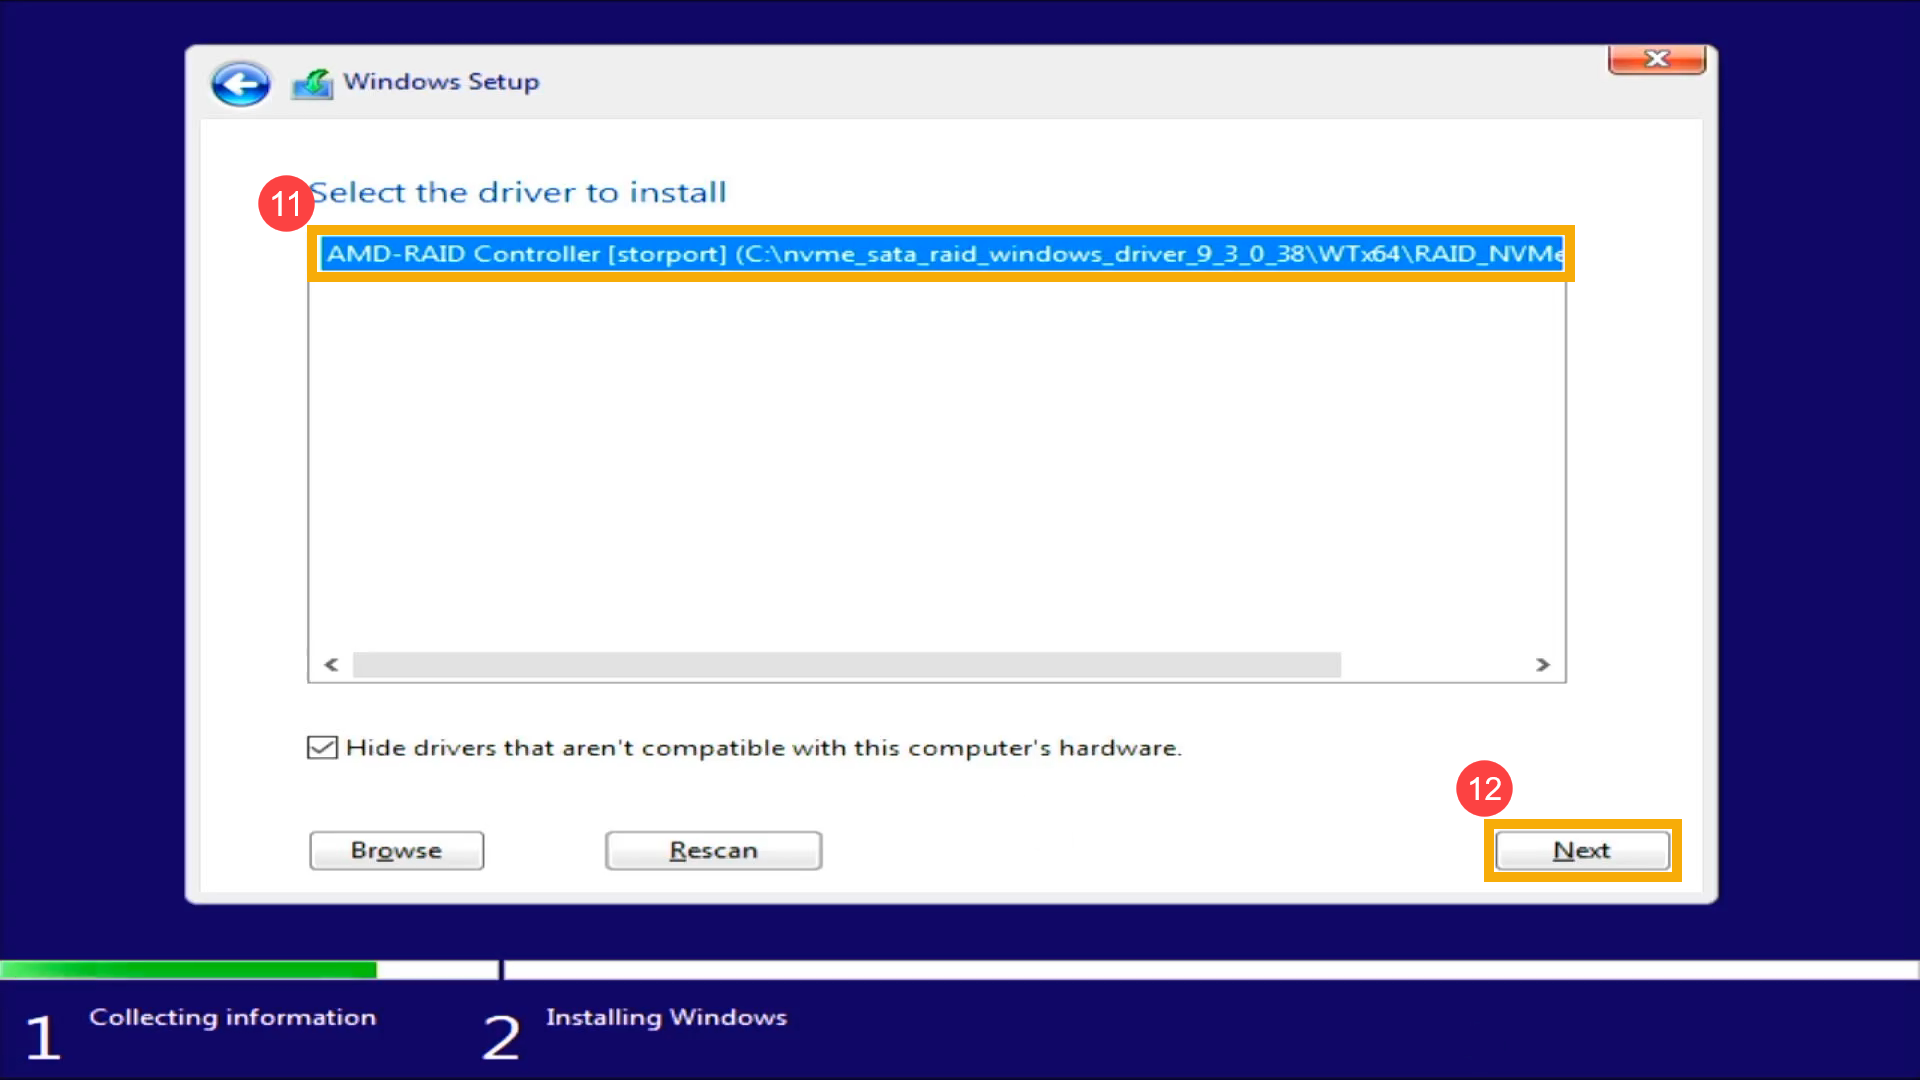
- After the AMD-RAID Controller driver installation is completed, please select [Load driver]⑬ again.

- Select [Browse]⑭.

- Choose your USB flash drive, then follow the below path to select [rccfg] folder⑮ and select [OK]⑯.
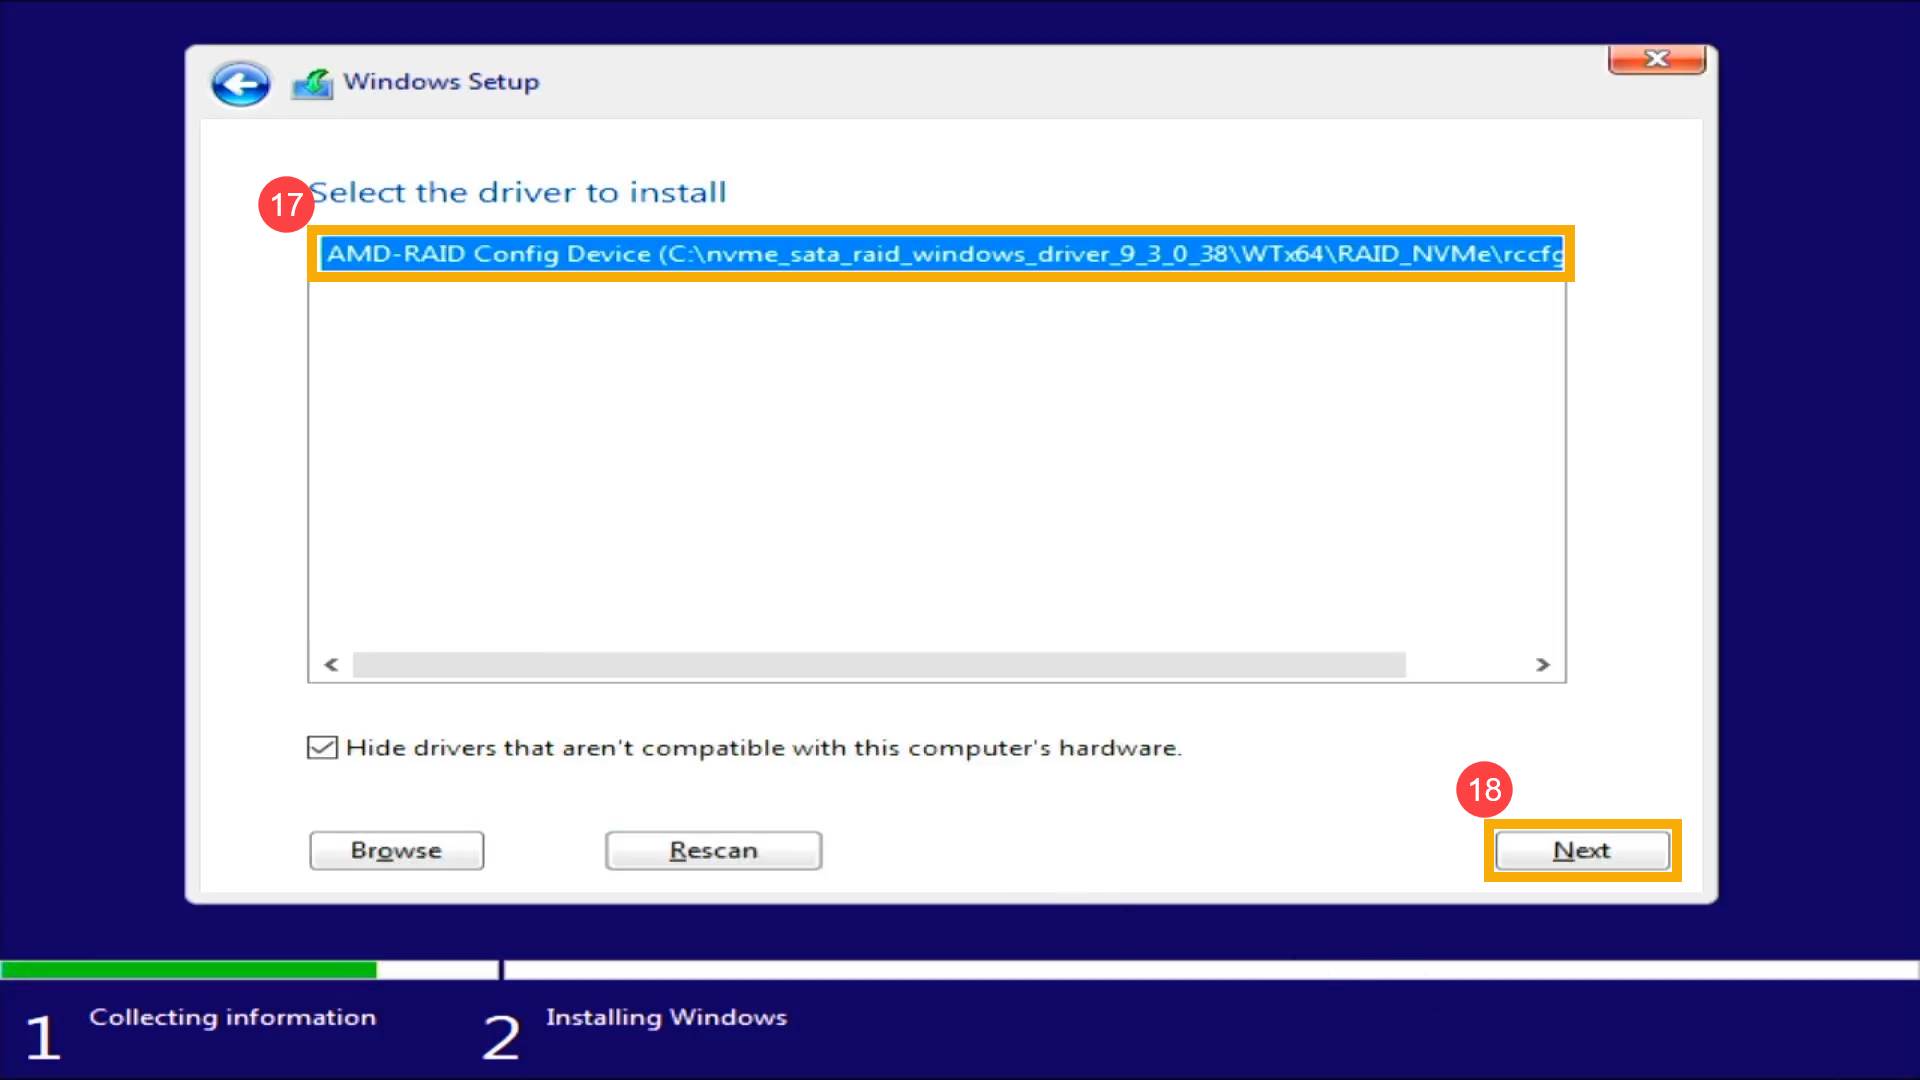
[nvme_sata_raid_windows_driver_9_3_0_38] > [WTx64] > [RAID_NVMe] > [rccfg]
- Select [AMD-RAID Config Device]⑰, then select [Next]⑱ to install the driver.
- After the AMD-RAID Config Device driver installation is completed, the RAID drive will appear normally.