ProArt Creator Hub - Introduction
Product Applicability: Notebook/Desktop/Motherboard/Display/Mouse
The ProArt Creator Hub will present different interfaces based on the various products you own, integrating information accordingly.
The ProArt Creator Hub stands as a bespoke integration, offering a synthesis of system functionality adjustments and annual recommended hues. It provides a unique color absorption tool, an up-to-date color database, and advanced color calibration technology, ensuring the efficient sharing of professional color configurations across multiple devices. Users can effortlessly access the latest fashionable color references, applying them to their endeavors in professional design. Simultaneously, it oversees performance and optimizes workflow, economizing time and resources. It aspires to craft, for creators, a dedicated and personalized creative control center and process.
Please refer to the video introduction as below:
1. Launching ProArt Creator Hub
2.2 Memory Allocated to iGPU(old version)
2.3 Memory Allocated to Integrated GPU
2.5 Advanced Touchpad Settings
6.3 Clean Files - Disk Cleanup
6.4 File Cleanup - File Organizer
10. How to Download and Uninstall ProArt Creator Hub
11. Minimum Specifications for ProArt Creator Hub Support
13. Other Introductions to ProArt Series Products
1. Launching ProArt Creator Hub
You can press the [ProArt Creator Hub] key on your keyboard to quickly open the ProArt Creator Hub software.
If your computer does not have this button, please find the ProArt Creator Hub software in the Windows start menu and open.

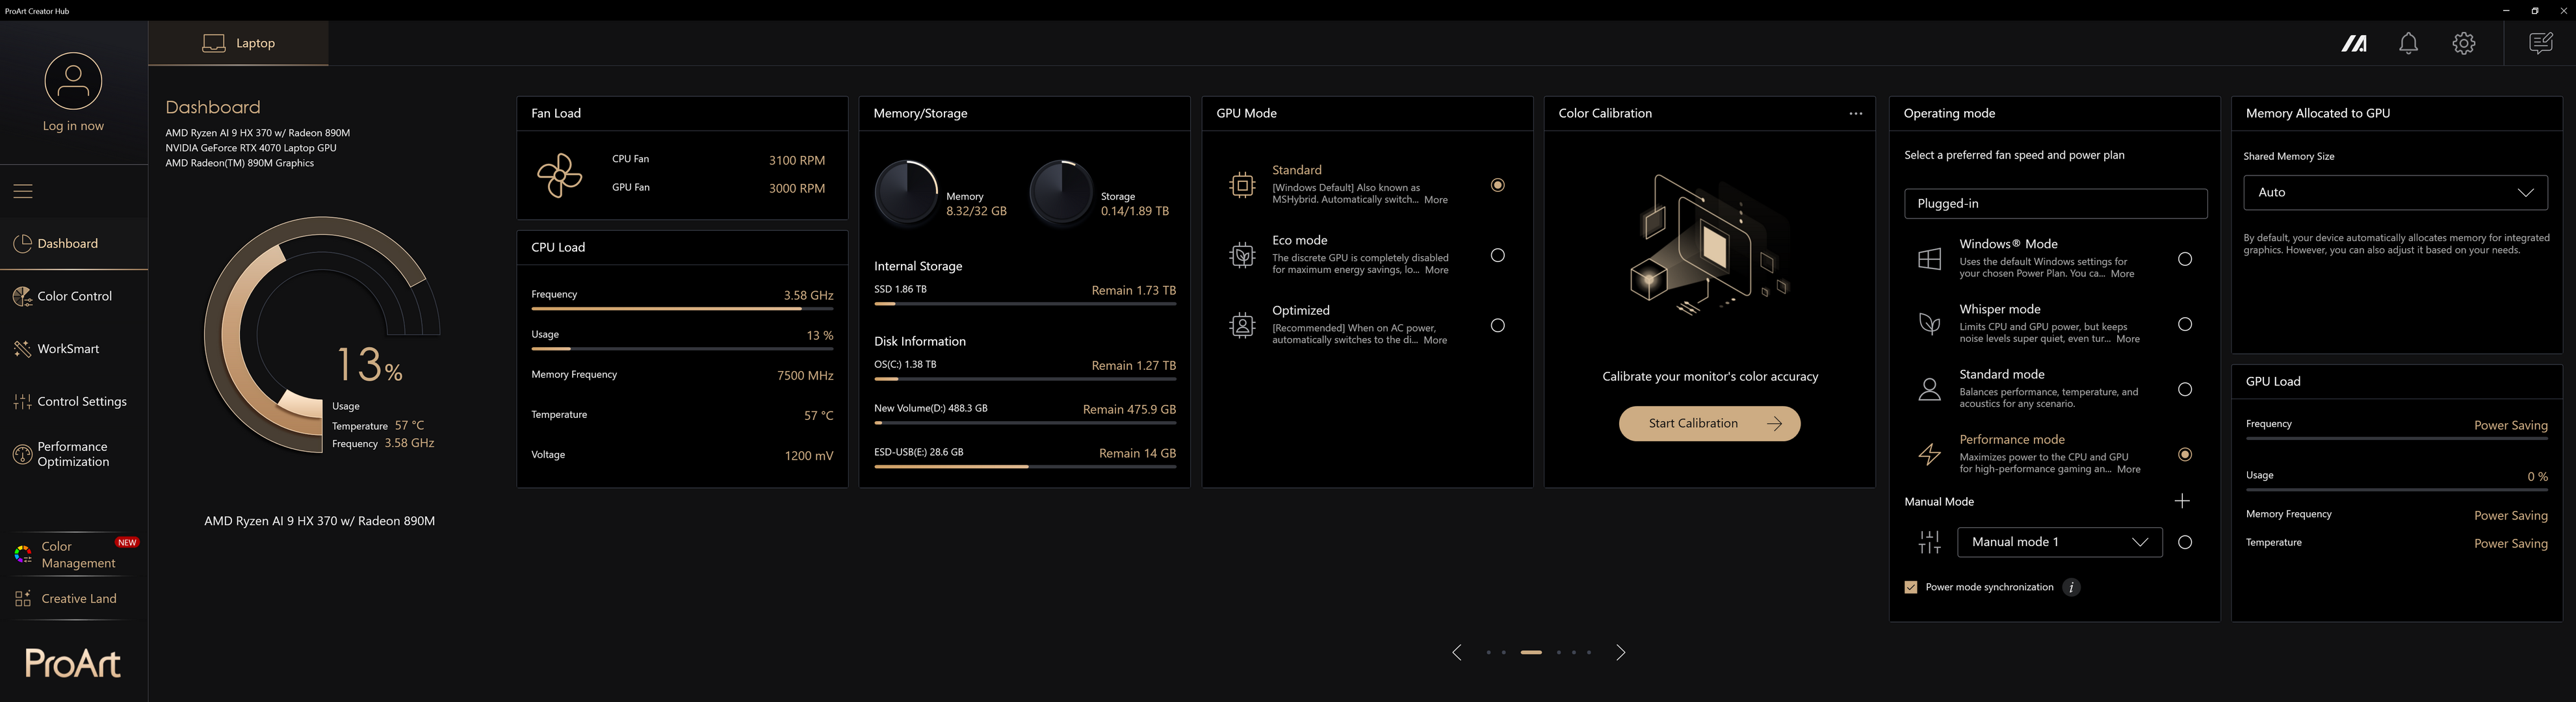
(1) The home page of the ProArt Creator Hub software will bring you a dashboard that provides you with the current monitoring status of your computer system.
※ The dashboard may have a different interface depending on the product you are purchasing.
Information displayed on the dashboard:
Platform Information (CPU/ GPU Model) - CPU usage, CPU temperature, CPU frequency.
Fan Load - CPU fan speed, GPU fan speed
CPU Load - CPU frequency , usage, and other information
GPU Load - GPU frequency , usage, and other information
Task Groups - Quickly open pre-configured
Task Groups Memory/ Storage - Memory usage, disk usage
Color Calibration - Color calibration information (results of the latest calibration)
Operating mode - Select a preferredfan speed and power plan
Memory Allocated to GPU - ajust Shared Memory Size
※ The information cards on the dashboard can be freely dragged and adjusted for display order.
※ Task Groups need to be set up in WorkSmart before they will be displayed in the dashboard.
Note: Versions after 2.1.46.0 have been updated to the new 2026 interface, including the following content :
- System Information: Moved to the top-left corner and displayed with graphical visualization, you can click the 'Free up' to free the memory.
- Quick Switches: Maintains the commonly used Operating Mode switch and introduces a quick switch to free up memory. For details, please refer to 2.1 Operating mode .
- Right-side Cards: Added a feature for recommending creator tools, displaying a combined list of recommended tools from all devices. ※ MuseTree and StoryCube are only shown when supported.

(2) The Dashboard Advanced Settings provides an overview of your laptop, with tabs at the top for other connected ProArt devices. Click the Dashboard info cards to access the advanced settings page.

Windows Mode - Uses the default Windows settings for your chosen Power Plan. You can change these options in Settings > System > Power & Sleep.
Whisper mode - LimitsCPU and GPU power, but keeps noise levels super quiet, even turning off the fan entirely for 0dB workloads on 2021 models and later. Perfect for presentations, movies, or casual light gaming.
Standard mode - Balances performance,temperature, and acoustics for any scenario.
Performance mode - Maximizes power to the CPU and GPU for high-performance gaming and work, with maximum airflow from fans.
※ Performance mode will not be available when the charger is removed.
※Only available on ProArt Laptop after 2024 (ex. HN7306、H7606、HT5306), and modes may vary by model.
You can select the Operating mode according to your needs.

Manual Mode
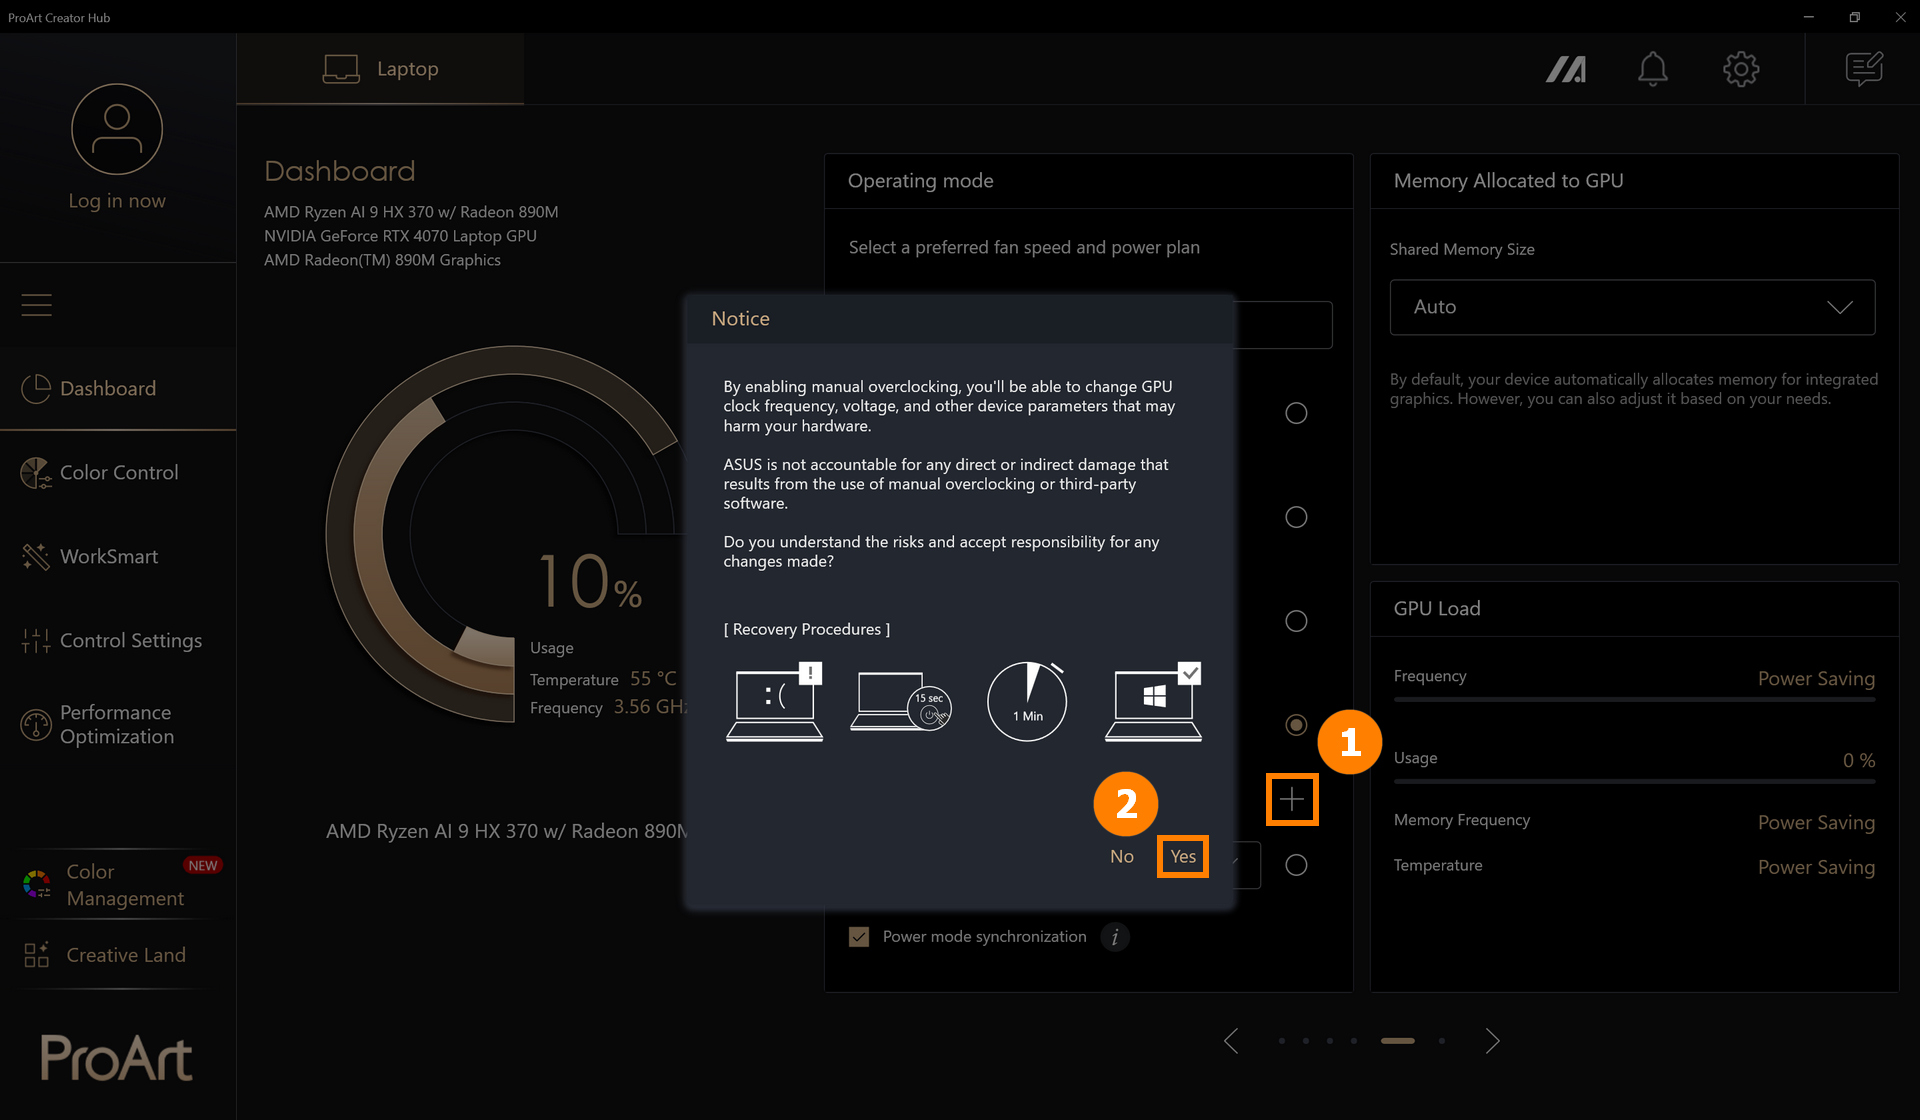
※ Manual mode will unlock CPU and GPU power consumption and other restrictions, which may damage your device. In general, it is recommended that you use Performance mode.
※ If your device has problems after turning on Manual mode, press and hold the power button for 15 seconds, and the computer still cannot boot after waiting for one minute, please contact ASUS Customer Service.
(1) Click ①[+], click ②[Yes].
For versions after 2.1.46.0, you can also click ③[Edit Manual Mode] to modify Manual Mode.

(2) You can click ④[Create New] to add a new mode, and select ⑤[CPU/GPU/3rd Fan/System] to configure your desired power consumption. ※ These settings are independent; please configure each speed individually..
Adjust the fan ⑥[Speed], the app provides three preset fan speeds for different temperature curves. You can select any temperature and then manually adjust the User Customize curve.
Adjust the ⑦[Fan Hysteresis Control] to set up custom fan profiles and power settings that optimally meet your requirements.
After the modification, click ⑧[Save and Apply].

2.2 Memory Allocated to iGPU(old version)
By default, your device automatically allocates memory for integrated graphics. However, you can also adjust it based on you rneeds.
You can manually adjust the Shared Memory Size. For more detailed information, please refer to: How to adjust the Memory Allocation Management of ASUS notebook? | Official Support | ASUS Global
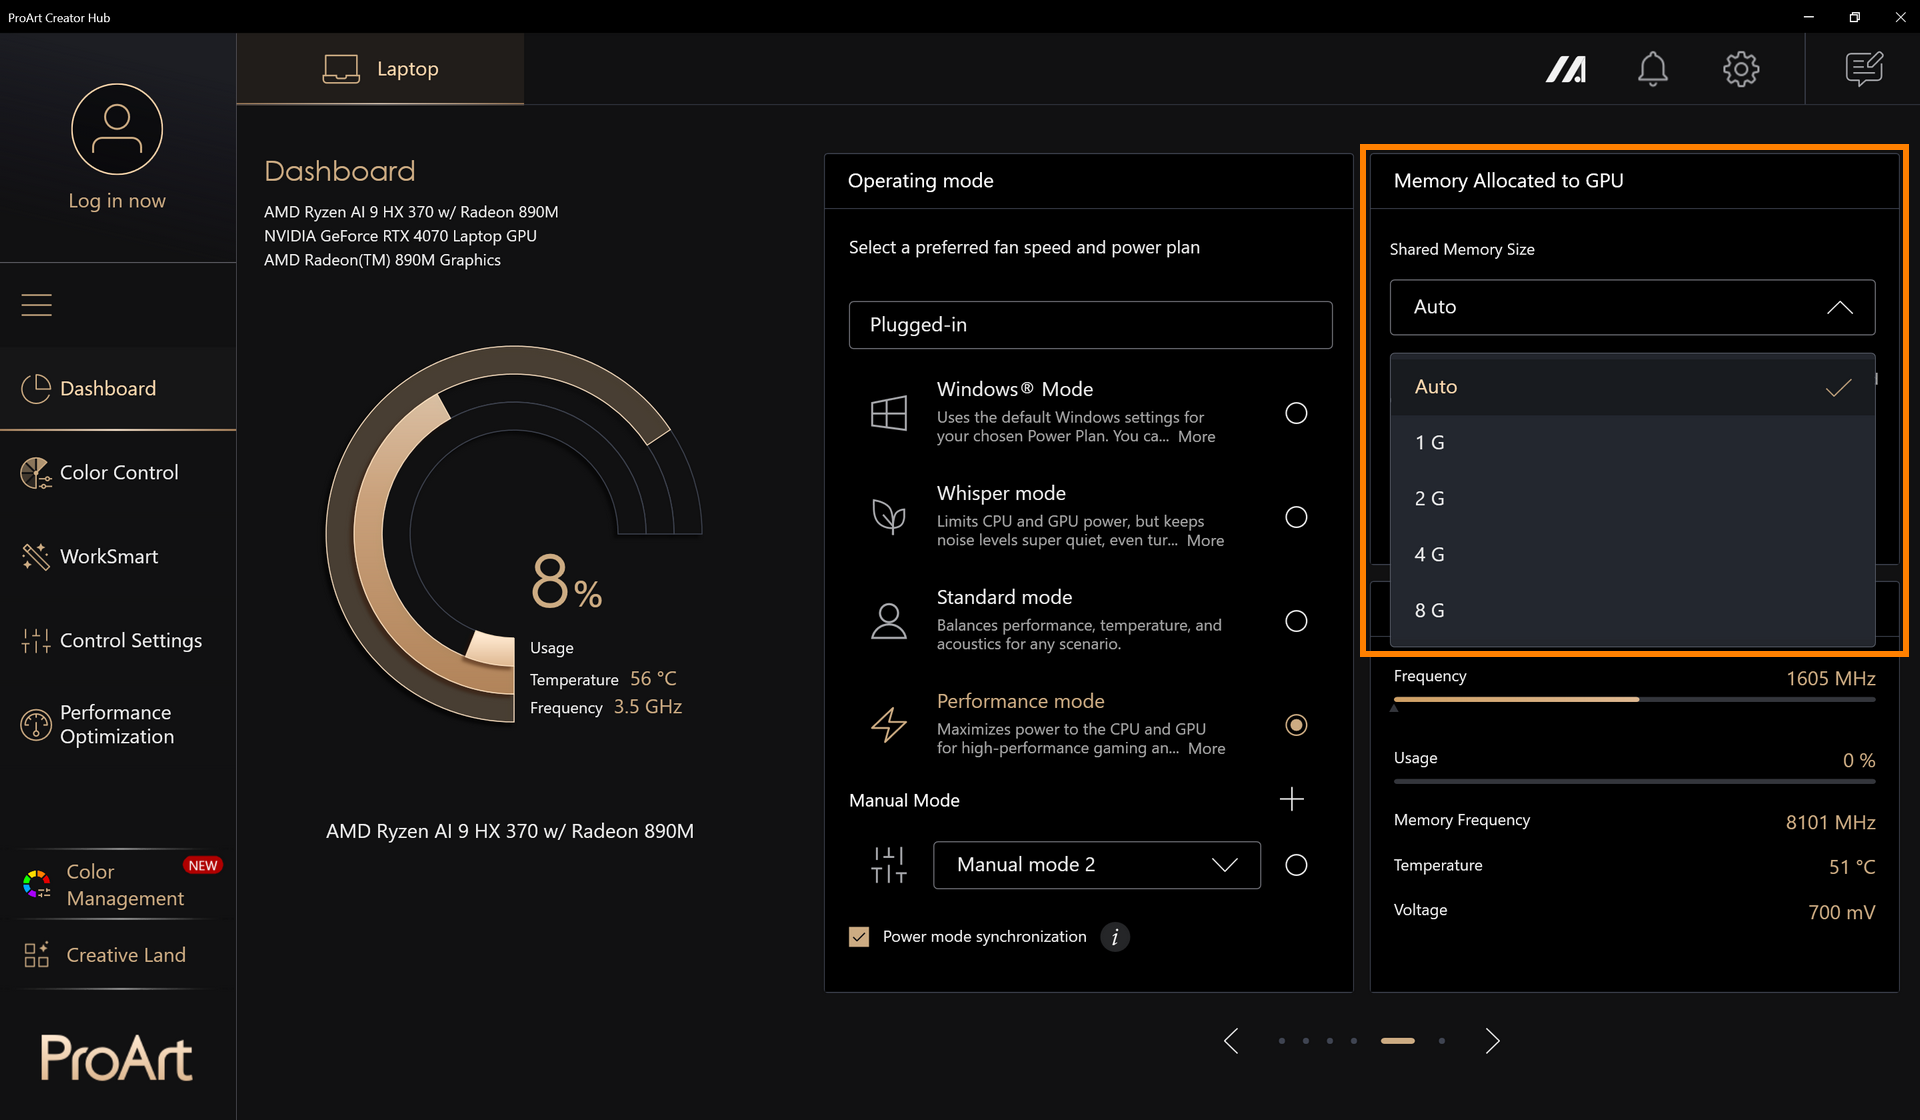
2.3 Memory Allocated to Integrated GPU
Starting from 2026 models, a new Shared Memory Allocation feature is introduced, allowing the system to dynamically adjust the memory size assigned to the integrated GPU (iGPU). Gamers can dynamically assign the system memory to the GPU that suits their needs.
Before you set up this feature, please notice :
- Support need: Proart Creator Hub 2.1.40.0 (or above)
- For Qualcomm platform, only shared memory is supported
- Dedicated memory needs to set to “Recommended” before setting Shared Memory
(1) Choose the ①[Memory panel]

(2) You can ②[manually set up] the system memory, or choose the the ③[preset options], in the end please click on ④[apply] to save your setting.


Proart Creator Hub version V2.1.40.0 and above, as well as transformers from 2026 onwards, will support the Recommended Charger Power feature only if the transformers are USB PD and square-headed.
Currently supported features include:
①When the transformer provides sufficient wattage: the homepage displays the recommended wattage.
②When the transformer provides insufficient wattage: a toast notification appears with an additional information button guiding users to the PCH software homepage. The recommended wattage on the homepage turns red and is accompanied by a small notice icon.


2.5 Advanced Touchpad Settings
In the ProArt Creator Hub dashboard, you can easily enable or disable the Haptic Touchpad's file preview & Click to do function.
※ This feature requires a Haptic Touchpad, available on ProArt P14 and P16 NV models, launching in 2026(ex. H7407BA, H7607BA, H7407IA, H7607IA). 
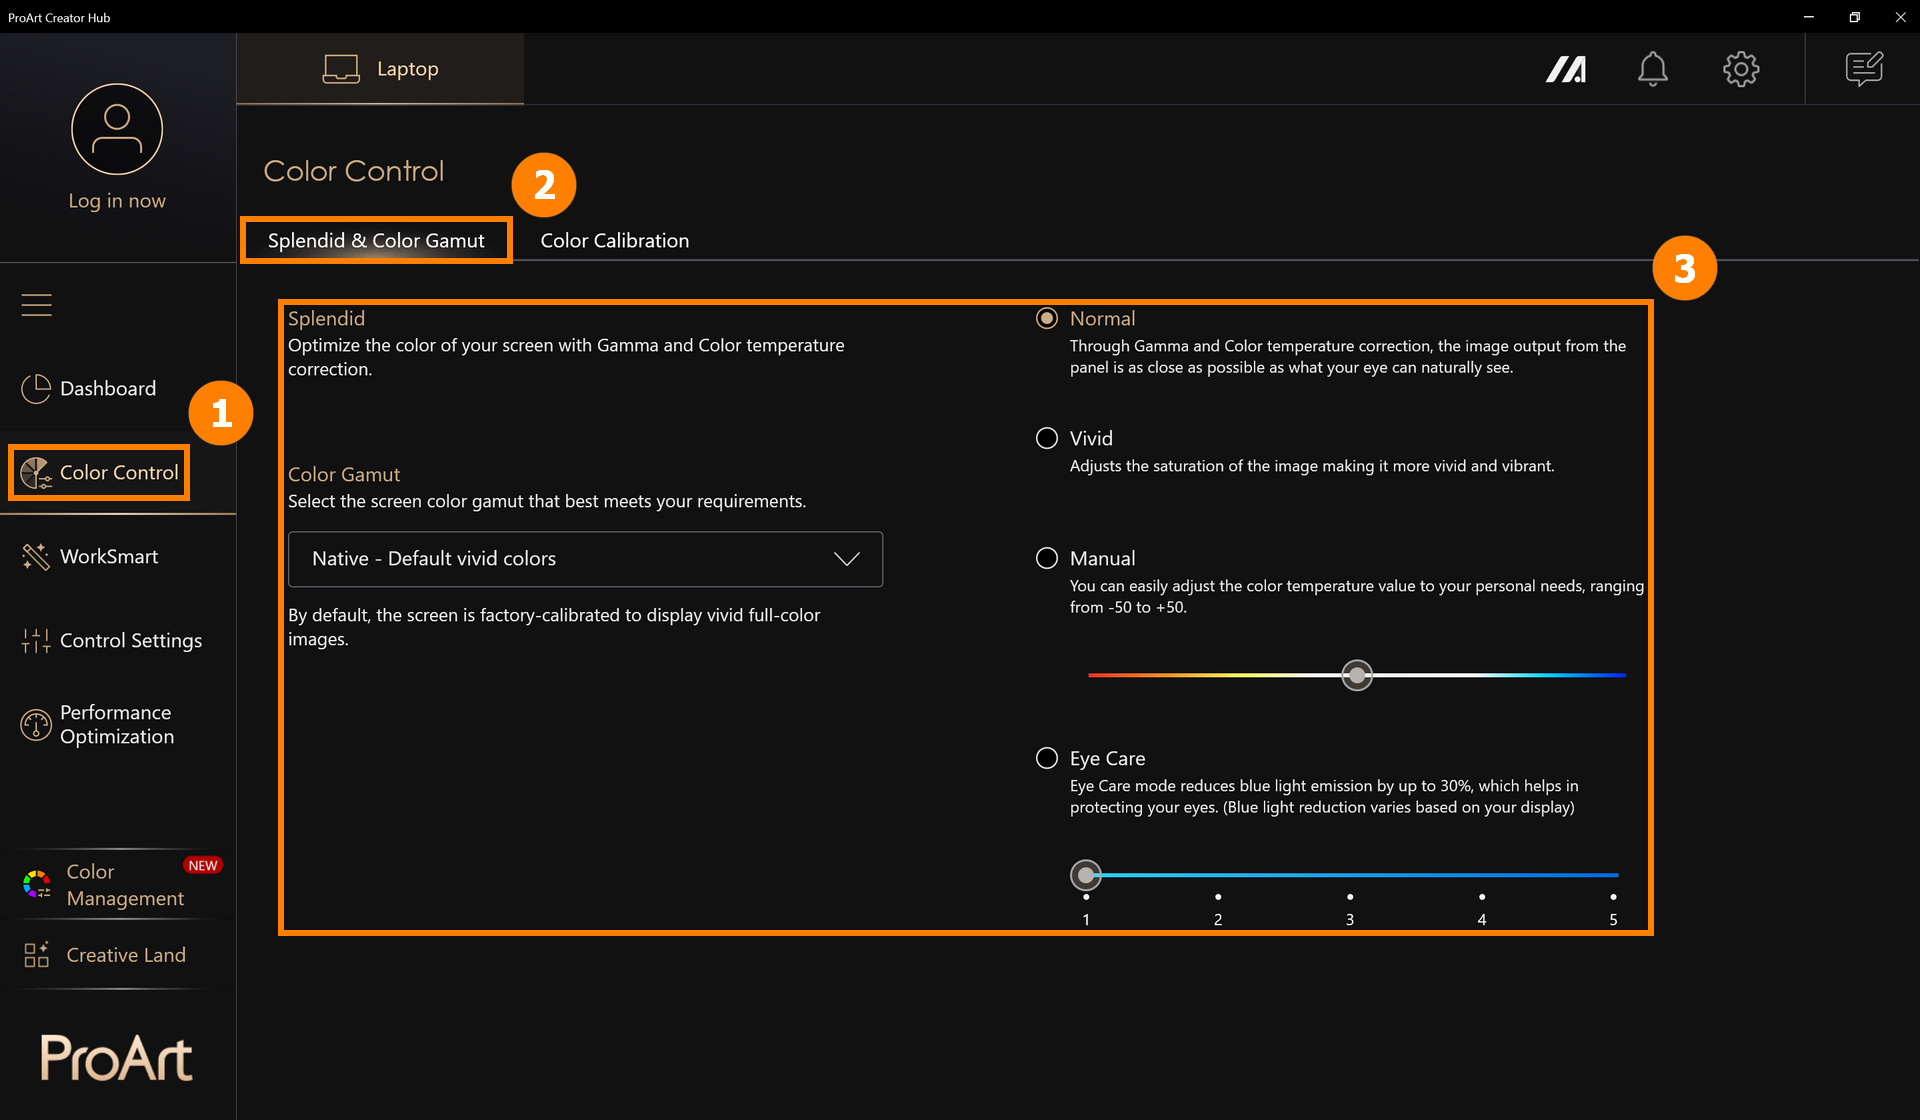
3.1 Splendid & Color Gamut
Click ①[Color Control], click ②[Splendid & Color Gamut], and modify the screen display mode in ③[Splendid & Color Gamut].
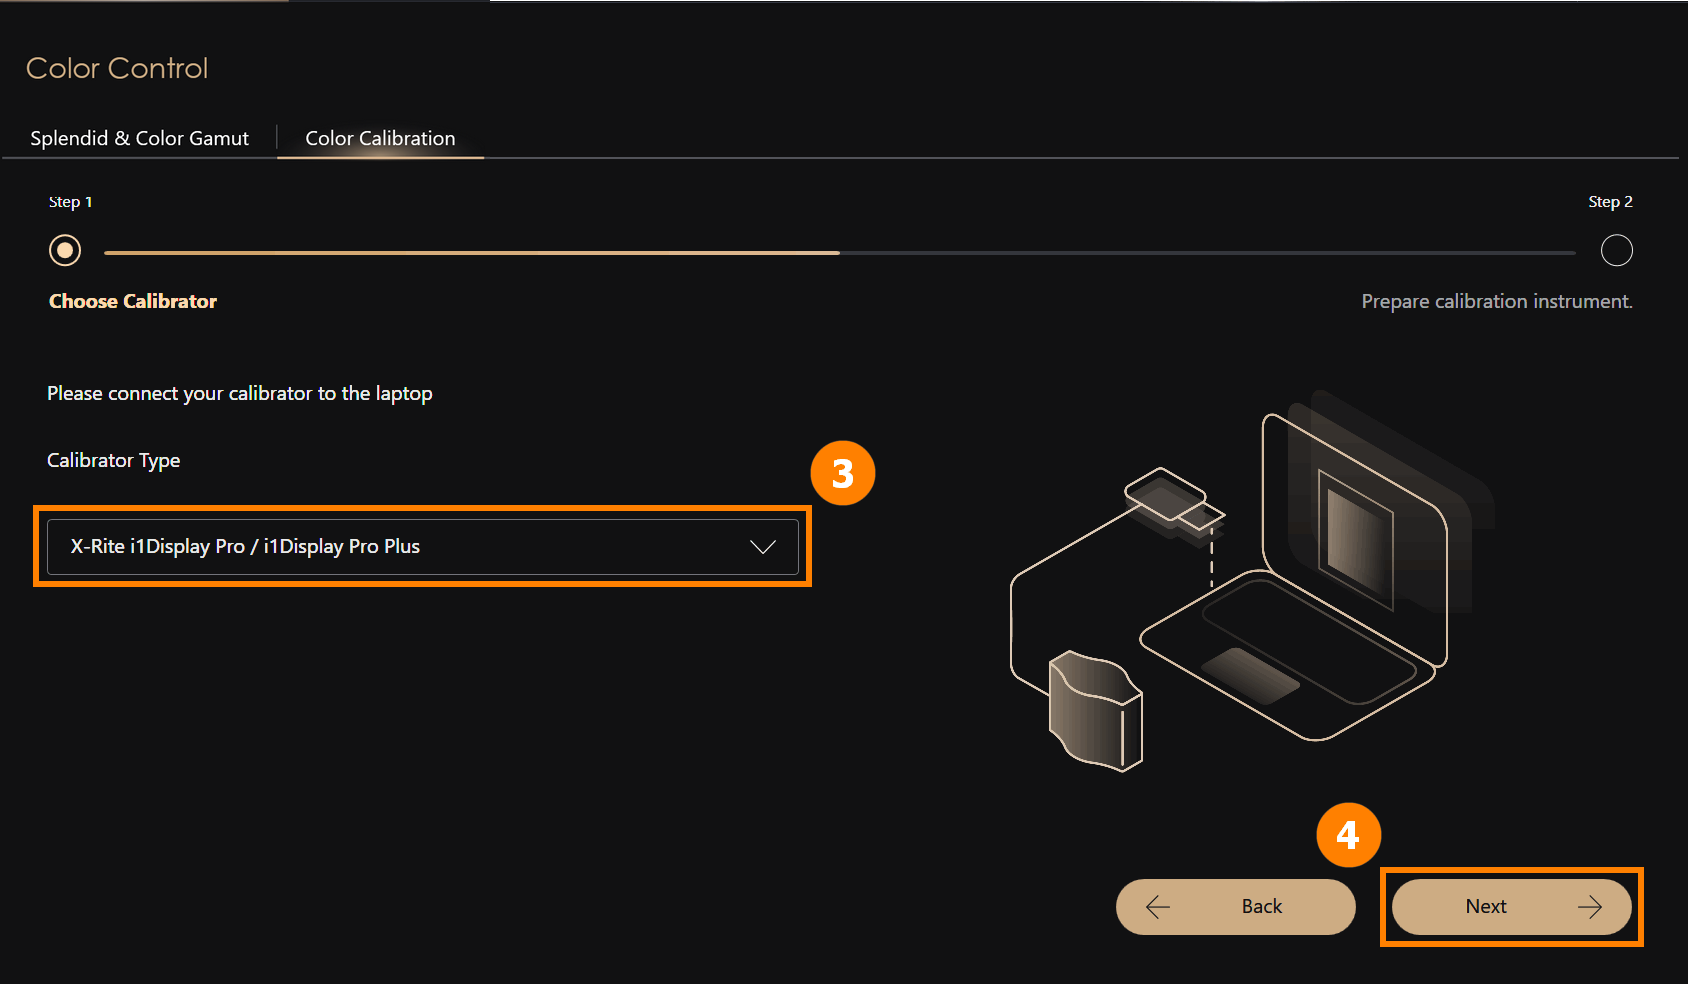
3.2 Color Calibration
Color Calibration requires preparation: the latest version of MyASUS, built-in factory default calibration files, built-in factory default ICM files, connected power supply, i1Display color calibration device.
※ Correcting will reset your ASUS Splendid settings to standard mode.
(1) Click ①[Color Control], click ②[Start Calibration].

(2) Connect ③[i1Display color calibration] to your computer and place it in the appropriate position, click ④[Next] to start calibration. Begin the color calibration process (the entire calibration process takes about 1 minute and 30 seconds). When completed, the calibration report will be displayed.
※ Currently, only i1Display color calibration is supported for correction.
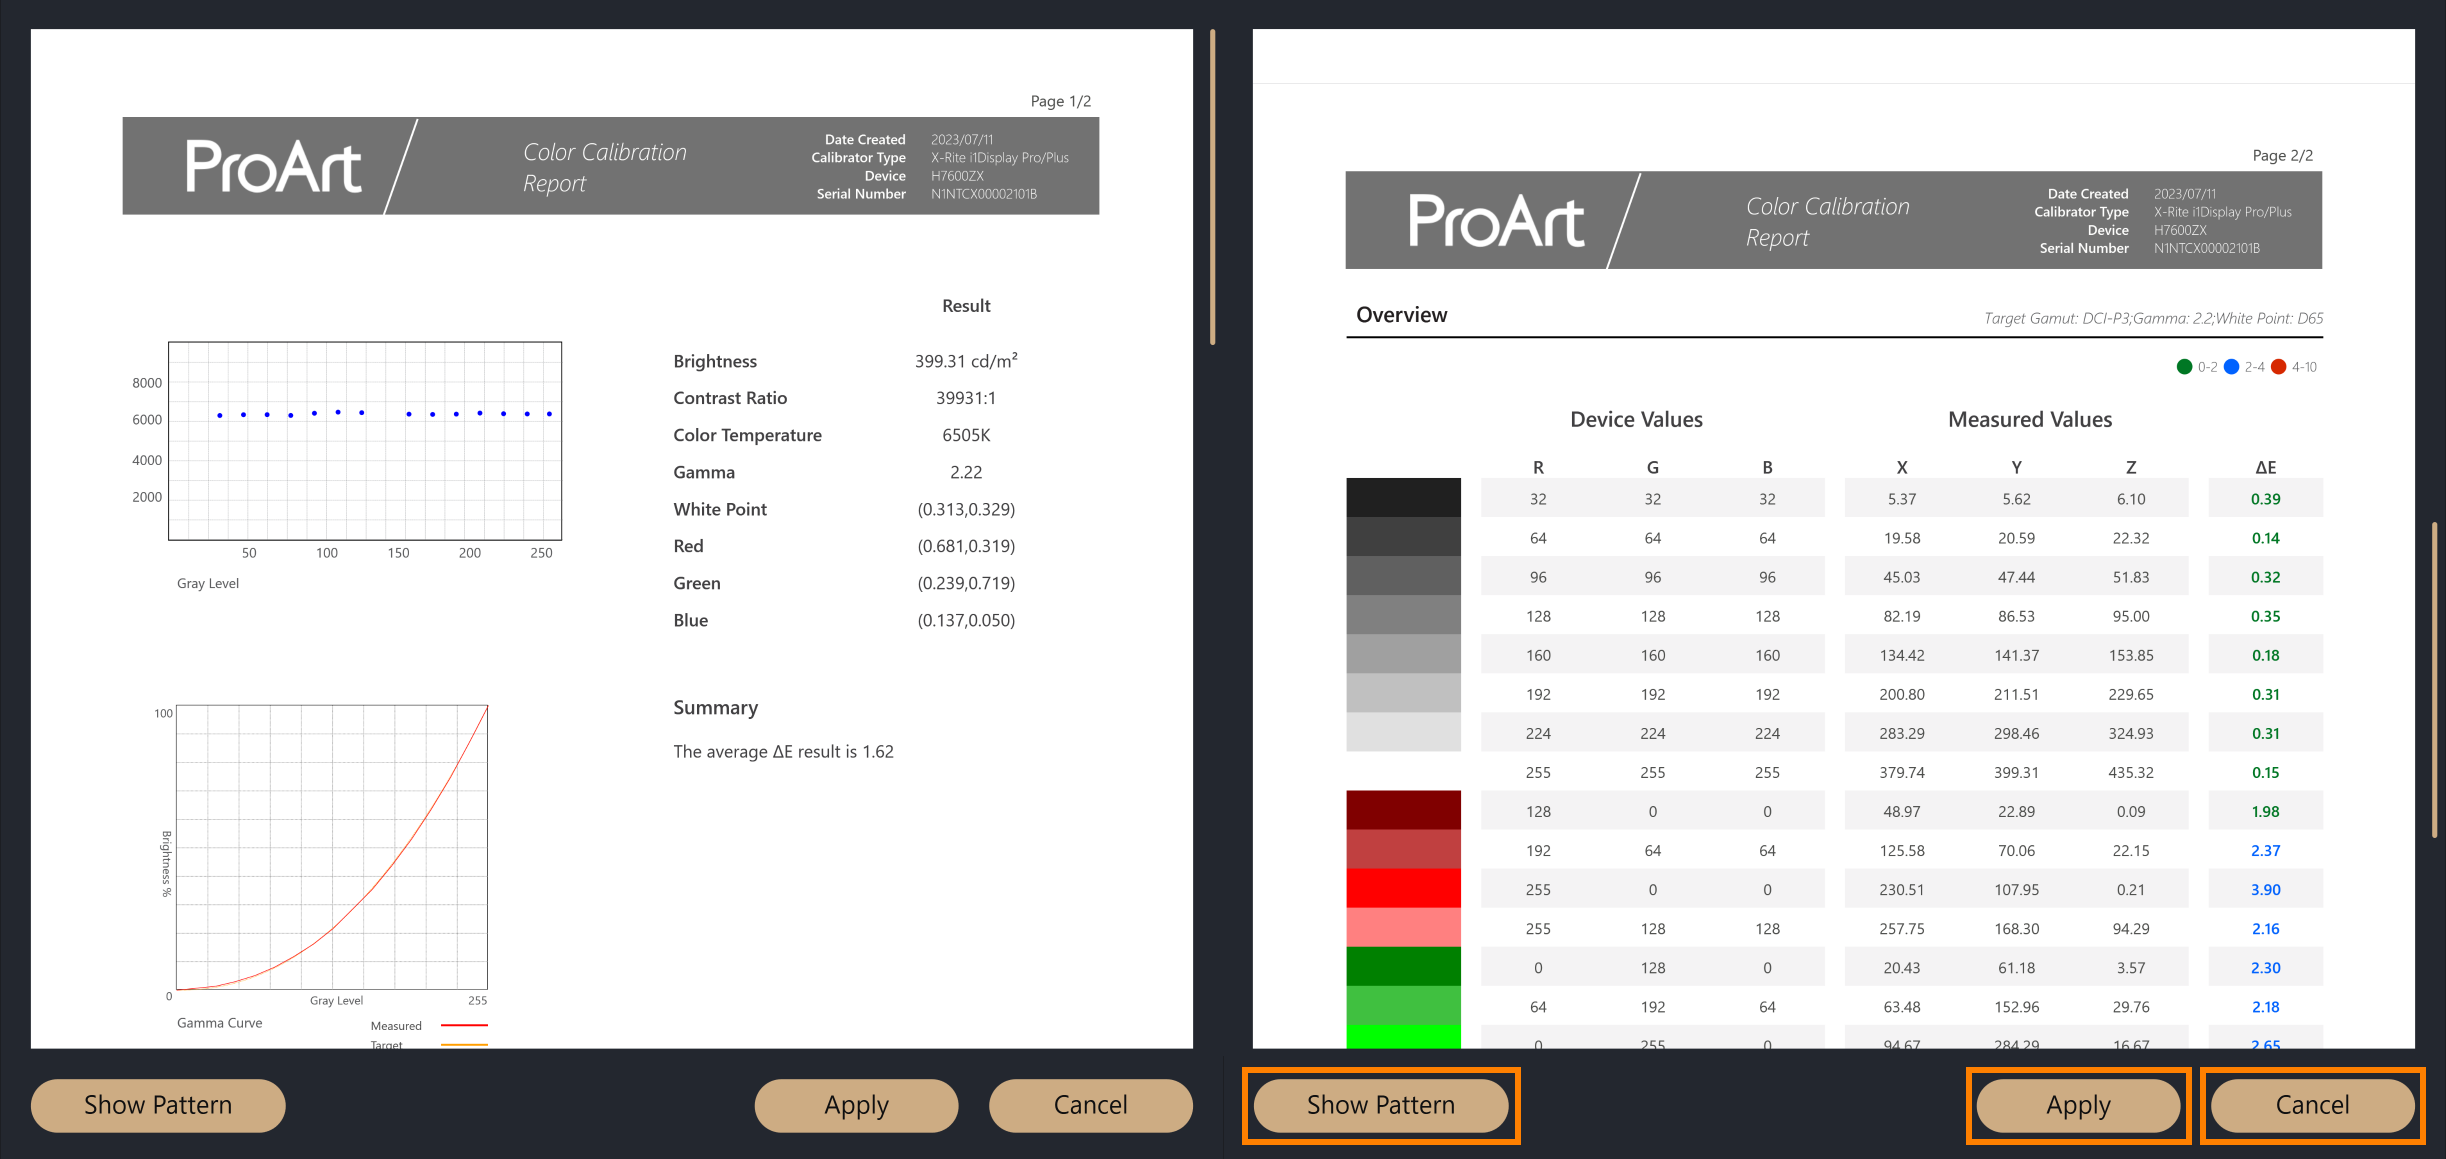
(3) After the color calibration is completed, the color correction report will be displayed, the report is divided into two pages, which will display the calib ration data and results, and there are three options to choose from at the bottom of the report.
·Show Pattern: will display the comparison of pictures before and after color calibration
·Apply: Apply the parameters of this color calibration and overwrite the previous setting parameters
·Close: Close the report
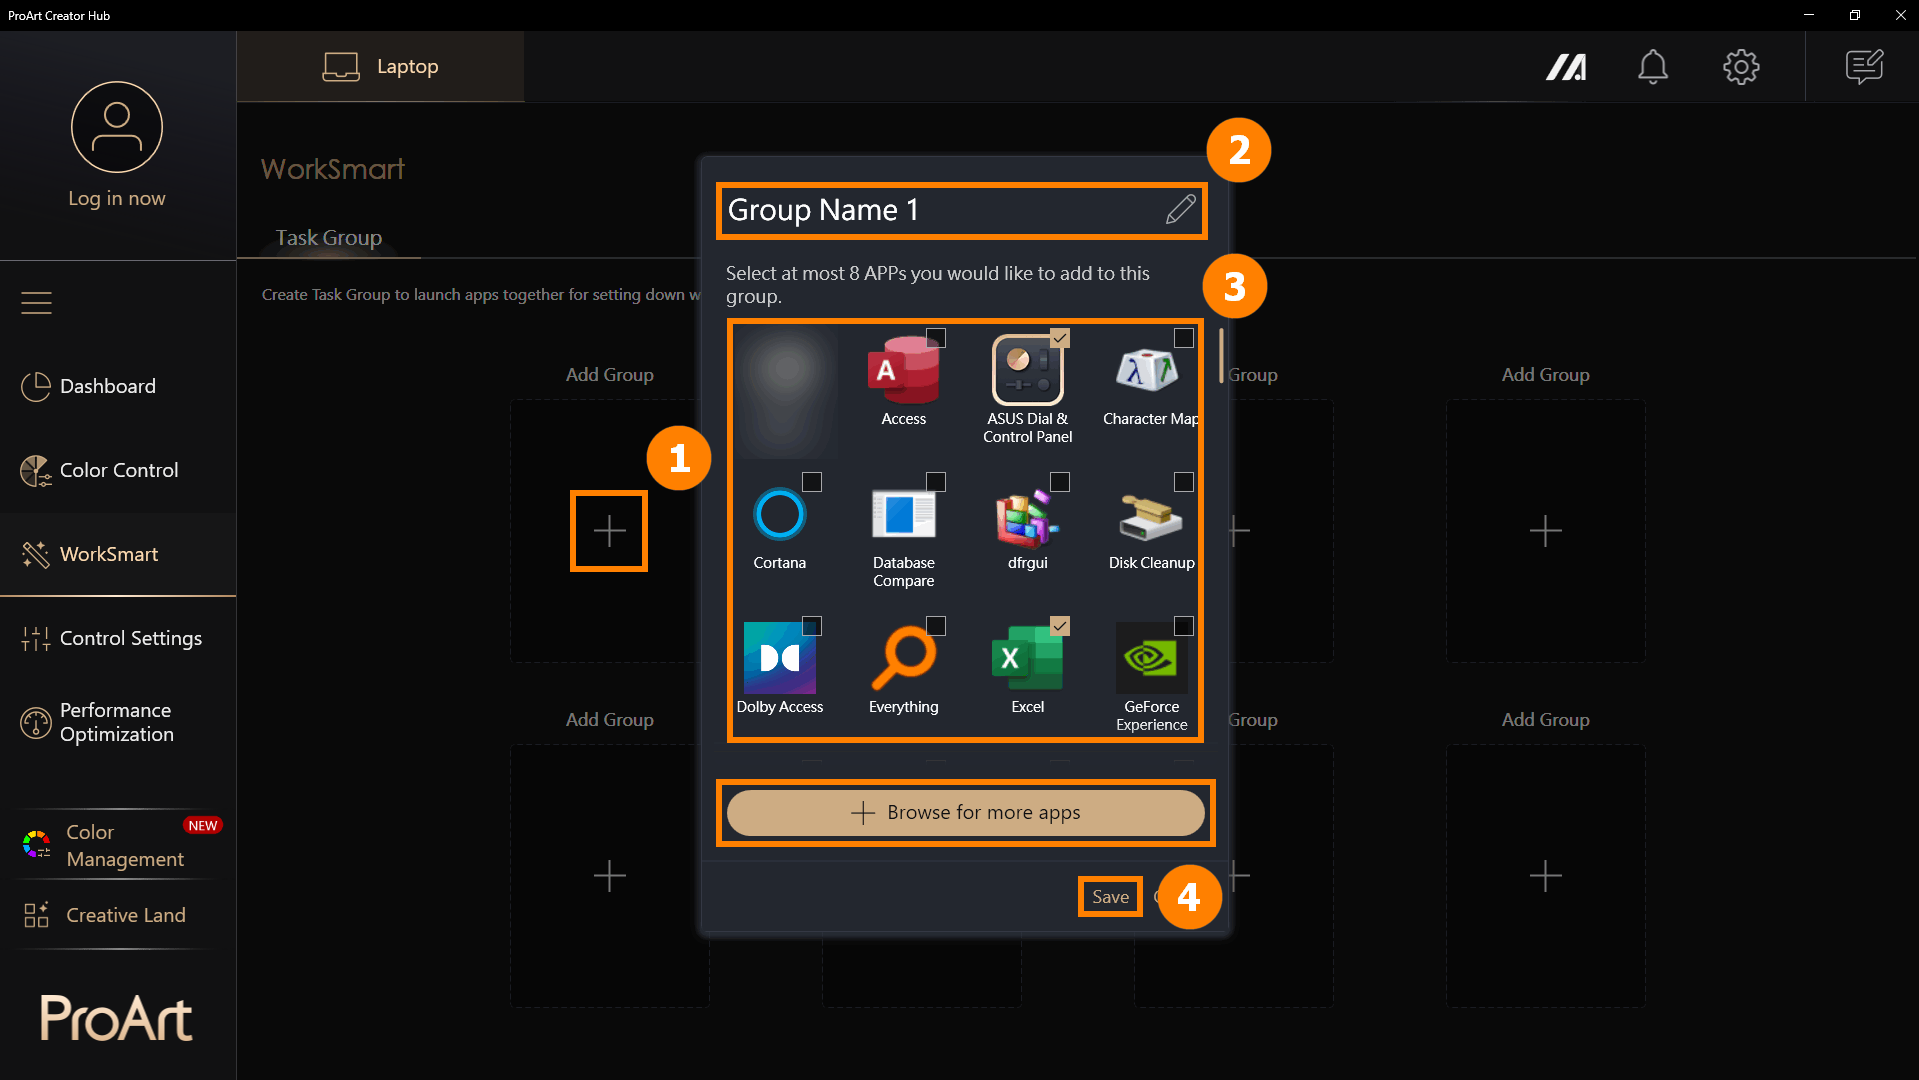
(1) Click [WorkSmart], click ①[+] to add a new group. You can modify ②[Group Name], select ③[Programs] you want to bundle, and click ④[Save] to create a group.
Browse for more apps: If you don't find the app you want to add, you can click [Browse for more apps] to add a program (only apps with the suffix exe)
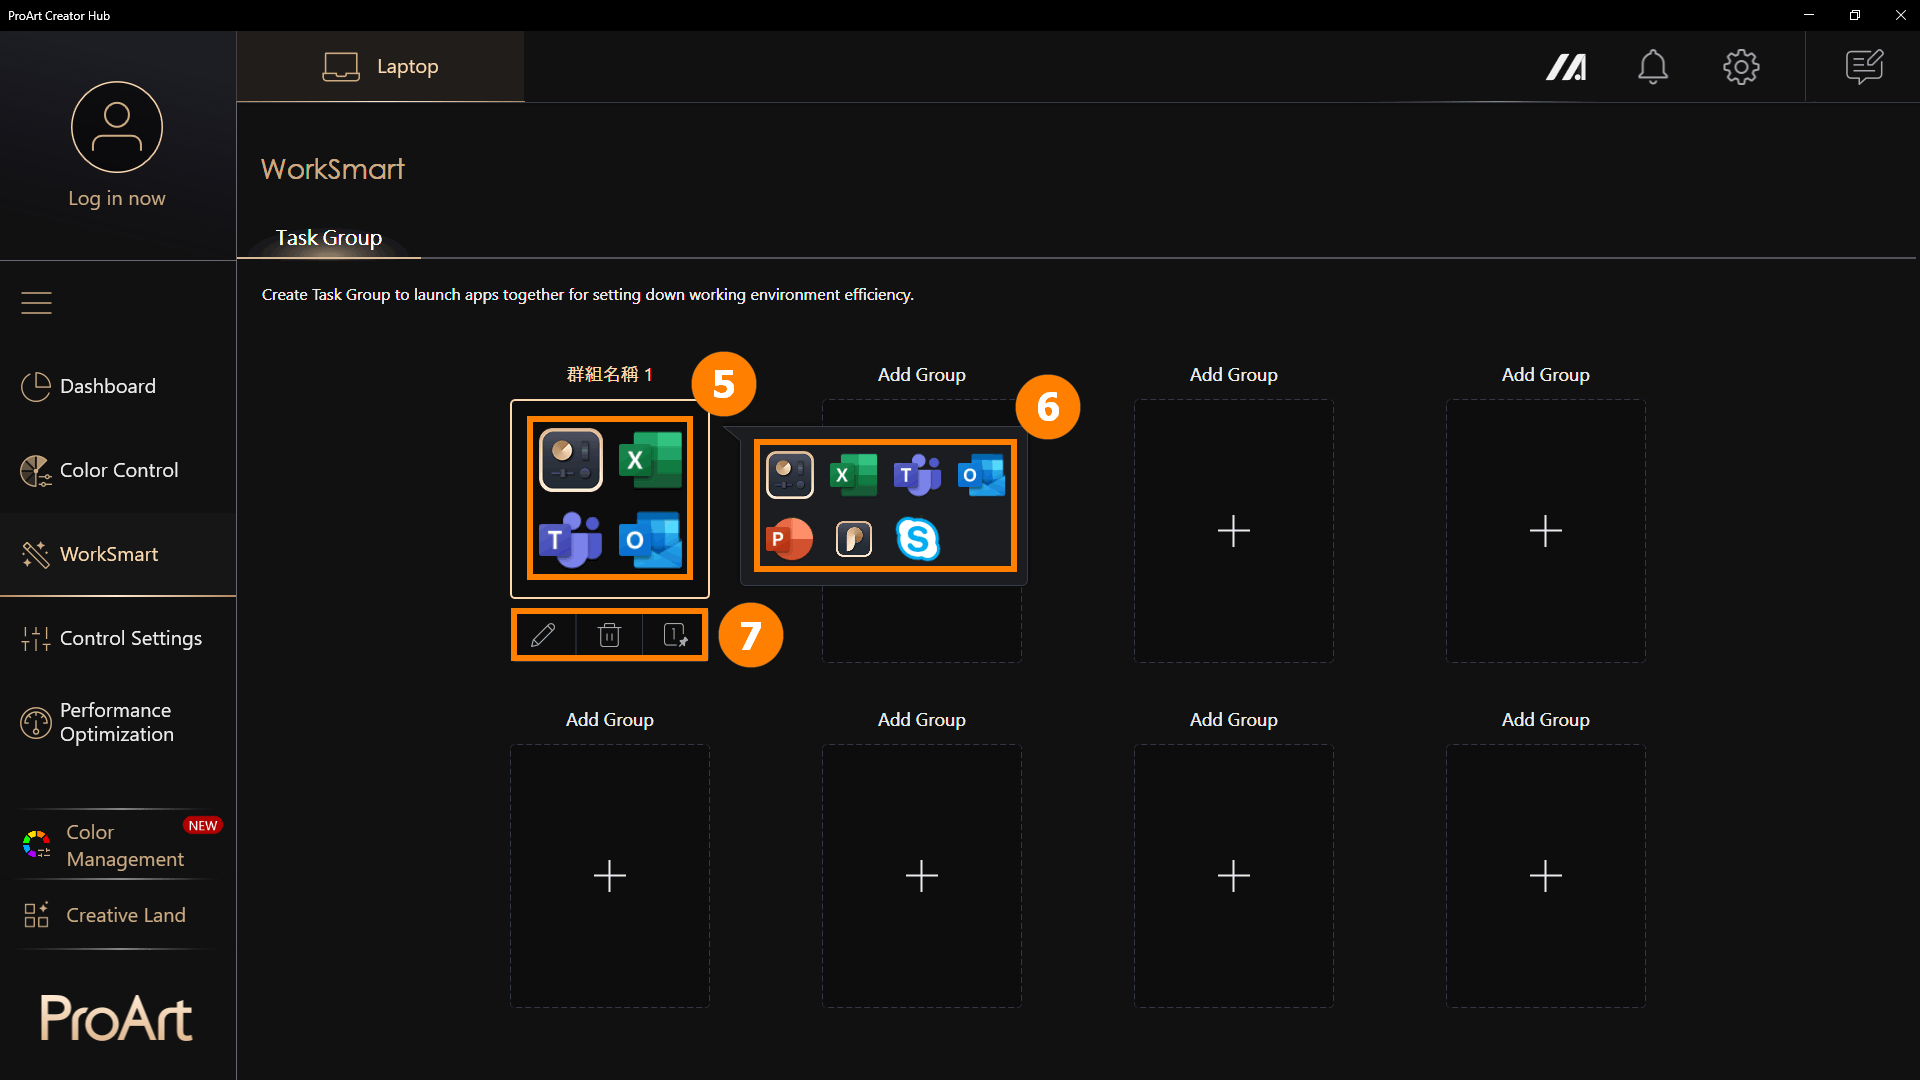
(2) Click ⑤[Group] to open all programs in the group. If you hover over [Group] without clicking, it will display ⑥[Thumbnail Previews] of programs in the group. Task groups support ⑦[Edit Group, Delete Group, Create Shortcut].
※ Create Shortcut: Create a shortcut on your desktop, you just need to click the desktop shortcut to open the application group. For example, when you turn on your computer, you can click on a preset group to open all the programs you need for today's work with one click.
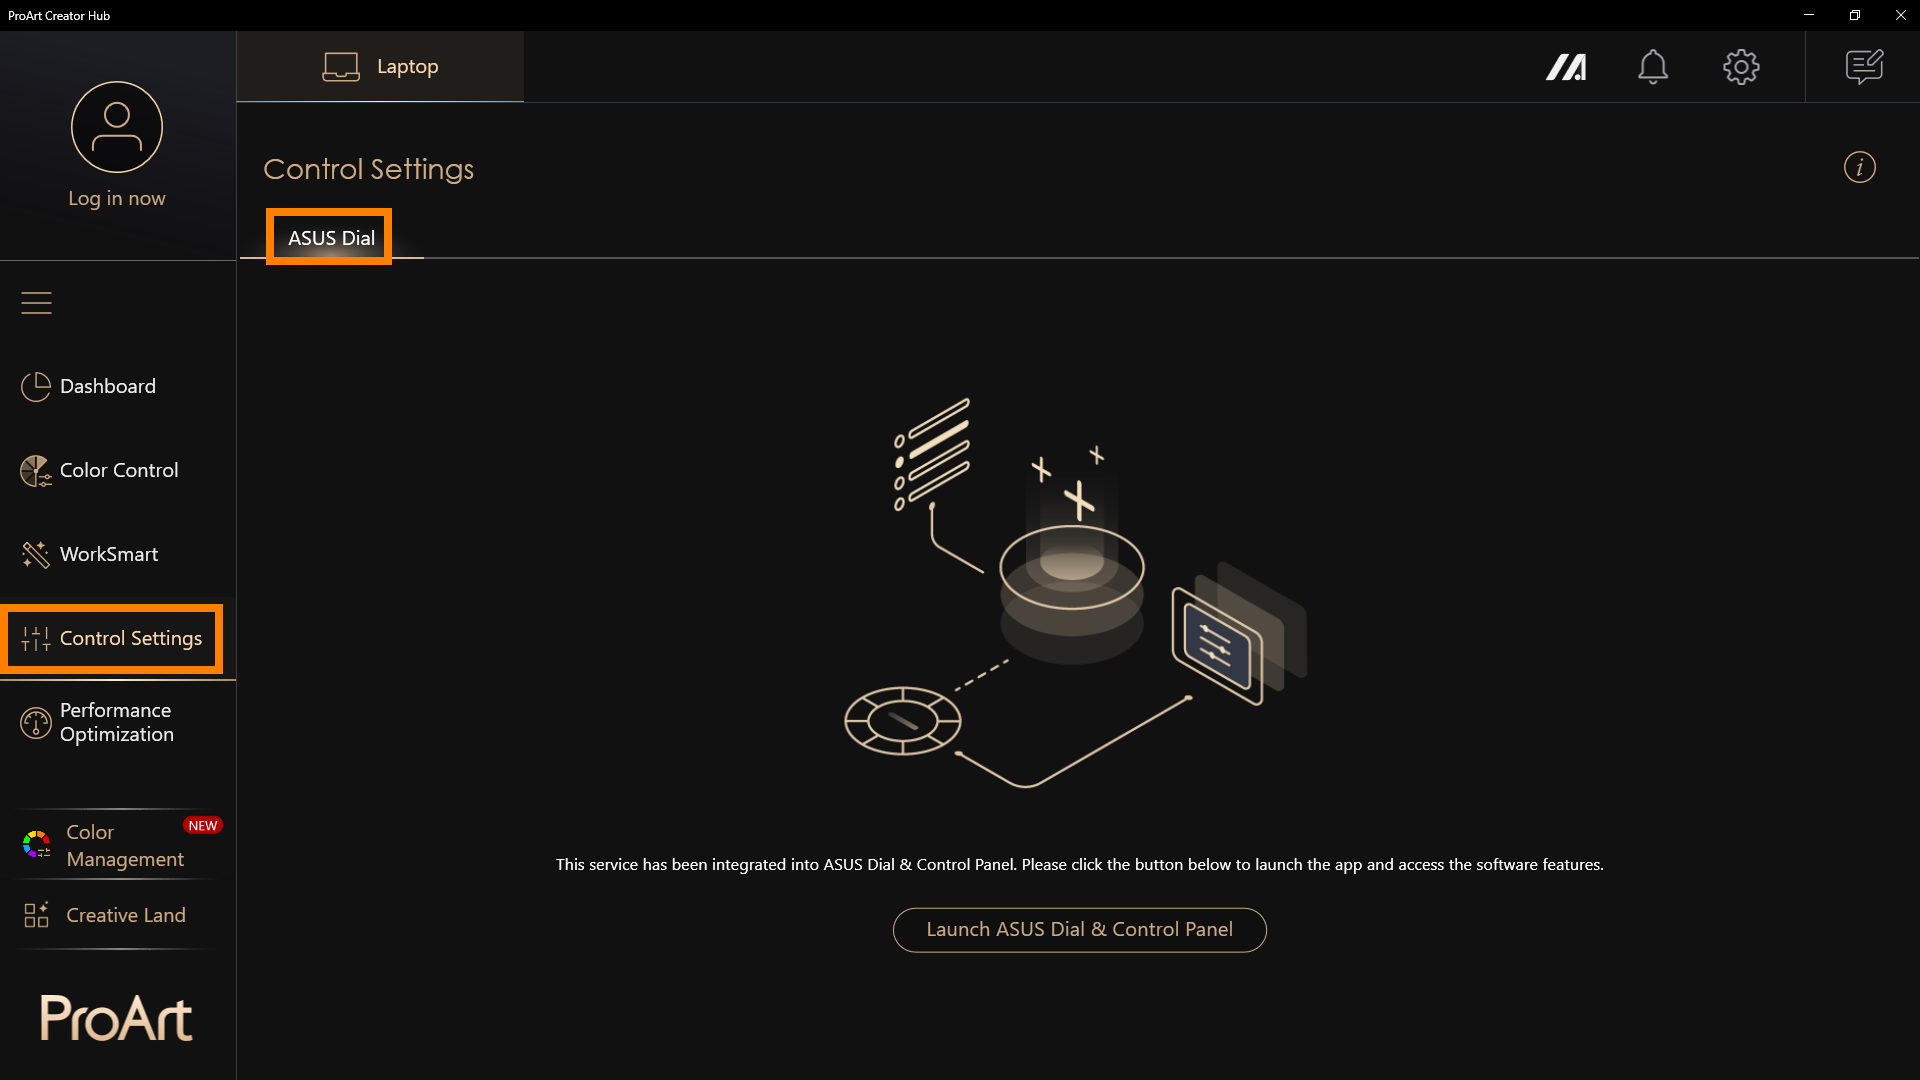
※ ASUS Dial may present different functions depending on the product you purchase.
ASUS Dial has now become an independent program, please refer to: [Notebook] ASUS Dial - Introduction | Official Support | ASUS Global
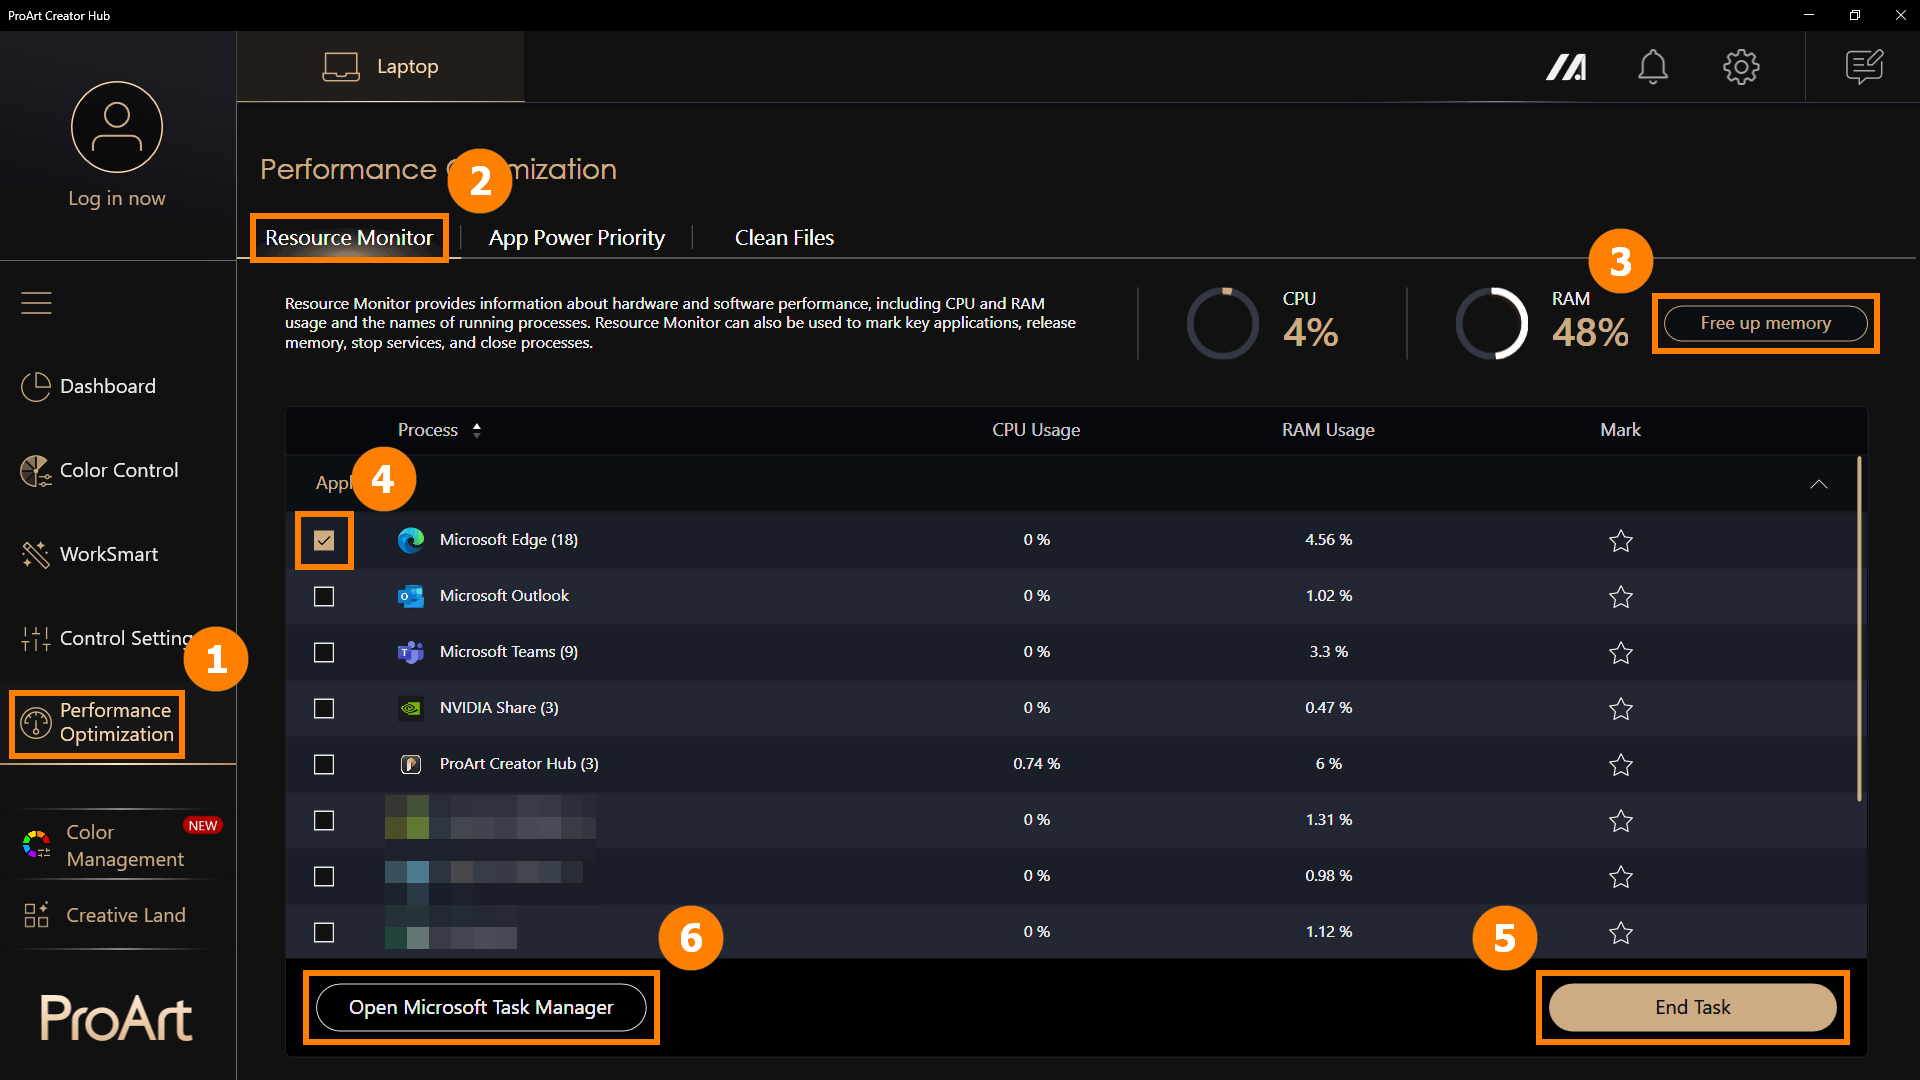
Click ①[Performance Optimization], click ②[Resource Monitor]. Click ③[Free Memory] to clear cached memory. Click ④[Applications], click ⑤[End Task] to close selected applications. You can also click ⑥[Open Microsoft Task Manager] to open the bulit-in Windows Task Manager.
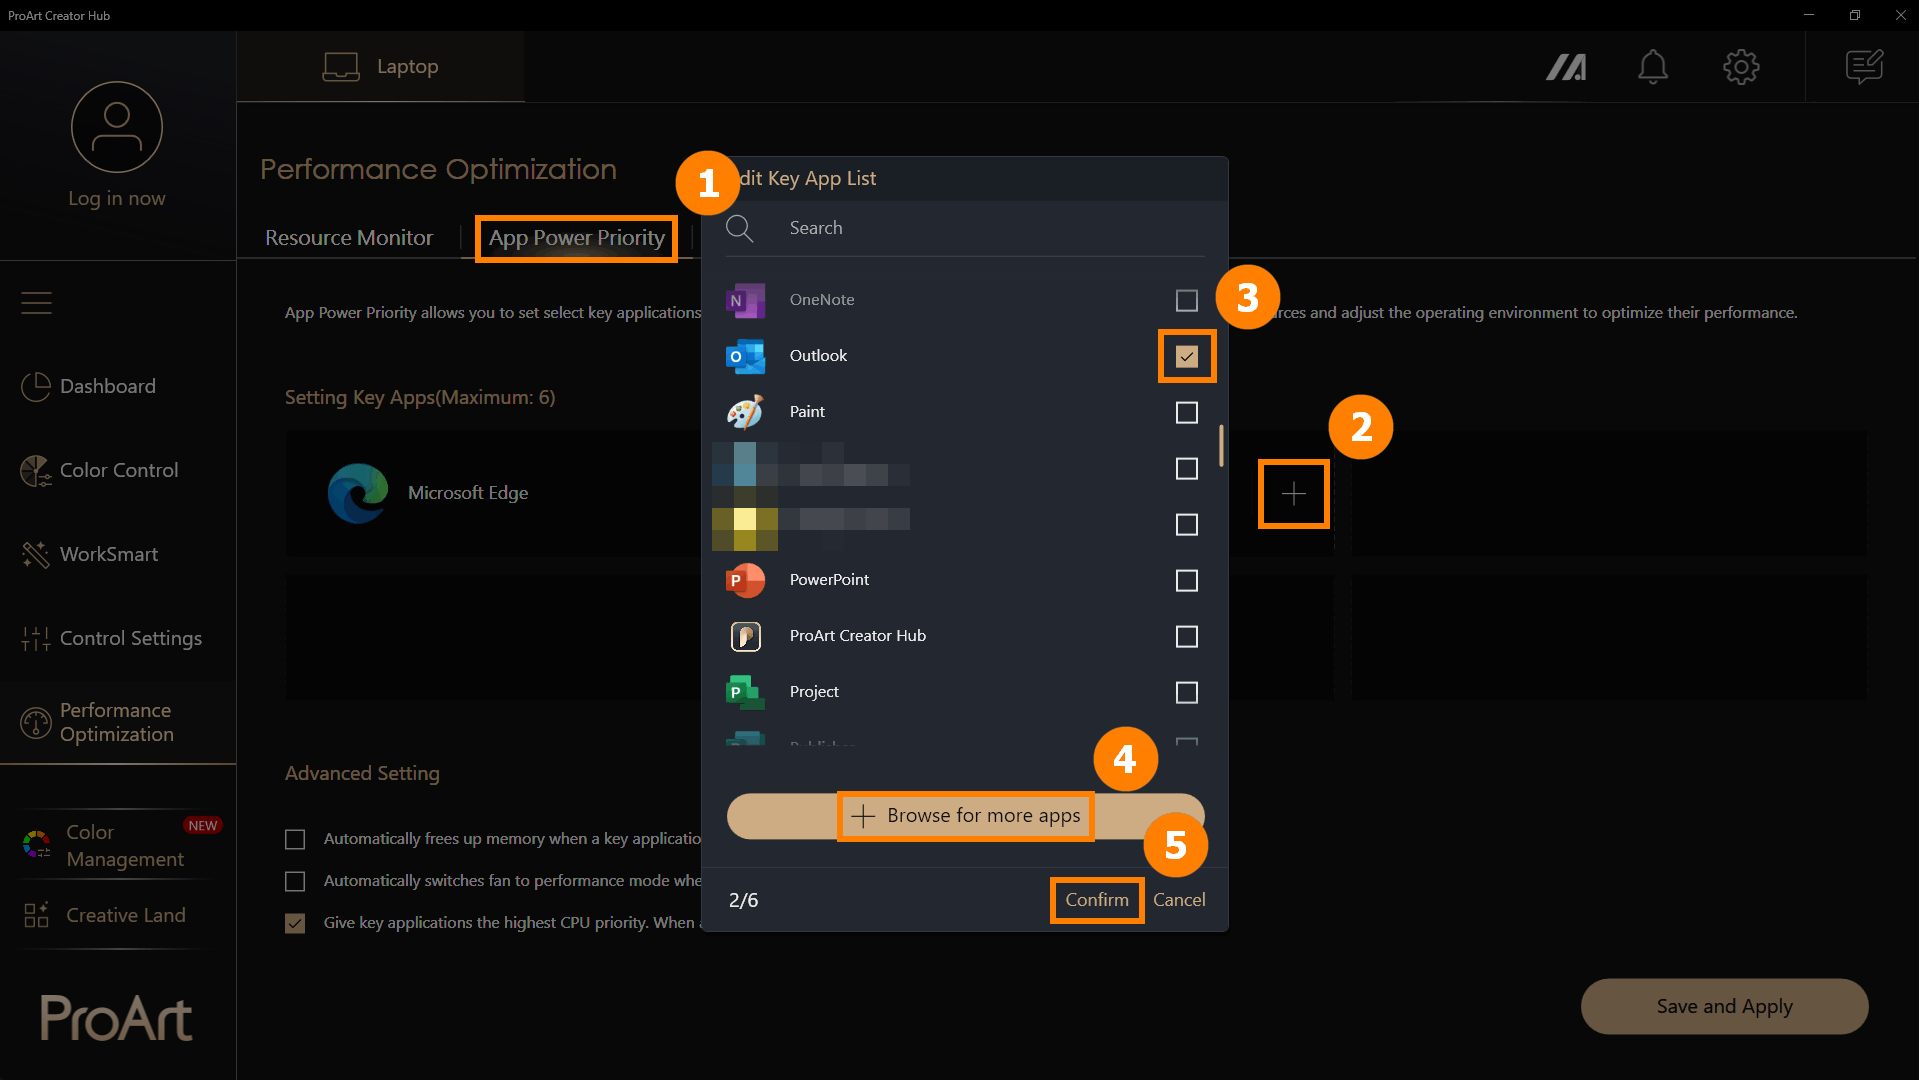
(1) Click ①[App Power Priority], click ②[+] to add a new application. Choose ③[Application] or click ④[Browse for more apps] to add a new apps, click ⑤[Confirm].
※ Browse for more apps: If you don't find the app you want to add, you can click [Browse for more apps] to add a program (only apps with the suffix exe)
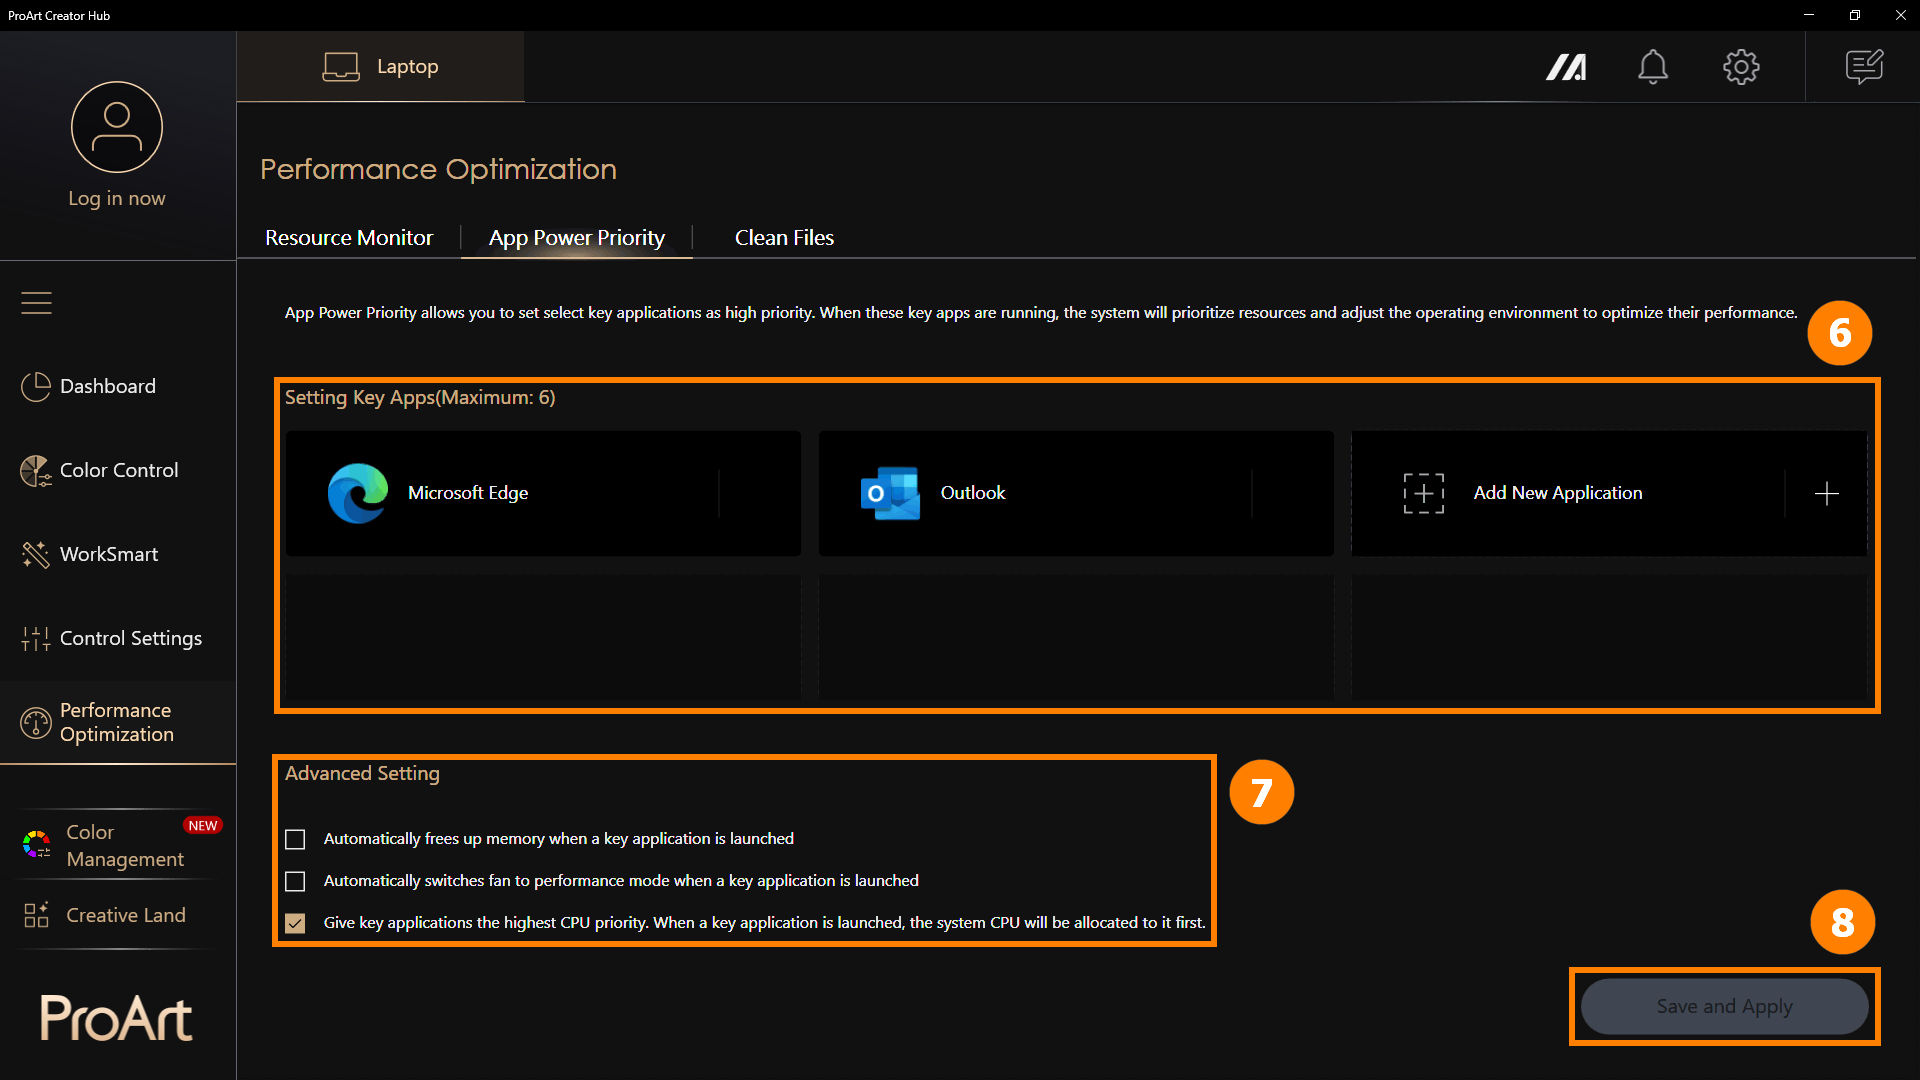
(2) The application is added ⑥[New], and you can click [+] to continue adding new applications. When these applications are running, they will run at high priority. You can manually adjust ⑦[ Advanced Setting] and click ⑧[Save and Apply].
Advanced settings provide three options for you to better adjust the application performance allocation.
·Automatically frees up memory when a key application is launched.
·Automatically switches fan to performance mode when a key application is launched.
·Give key applications the highest CPU priority. When a key application is launched, the system CPU will be allocated to it first.
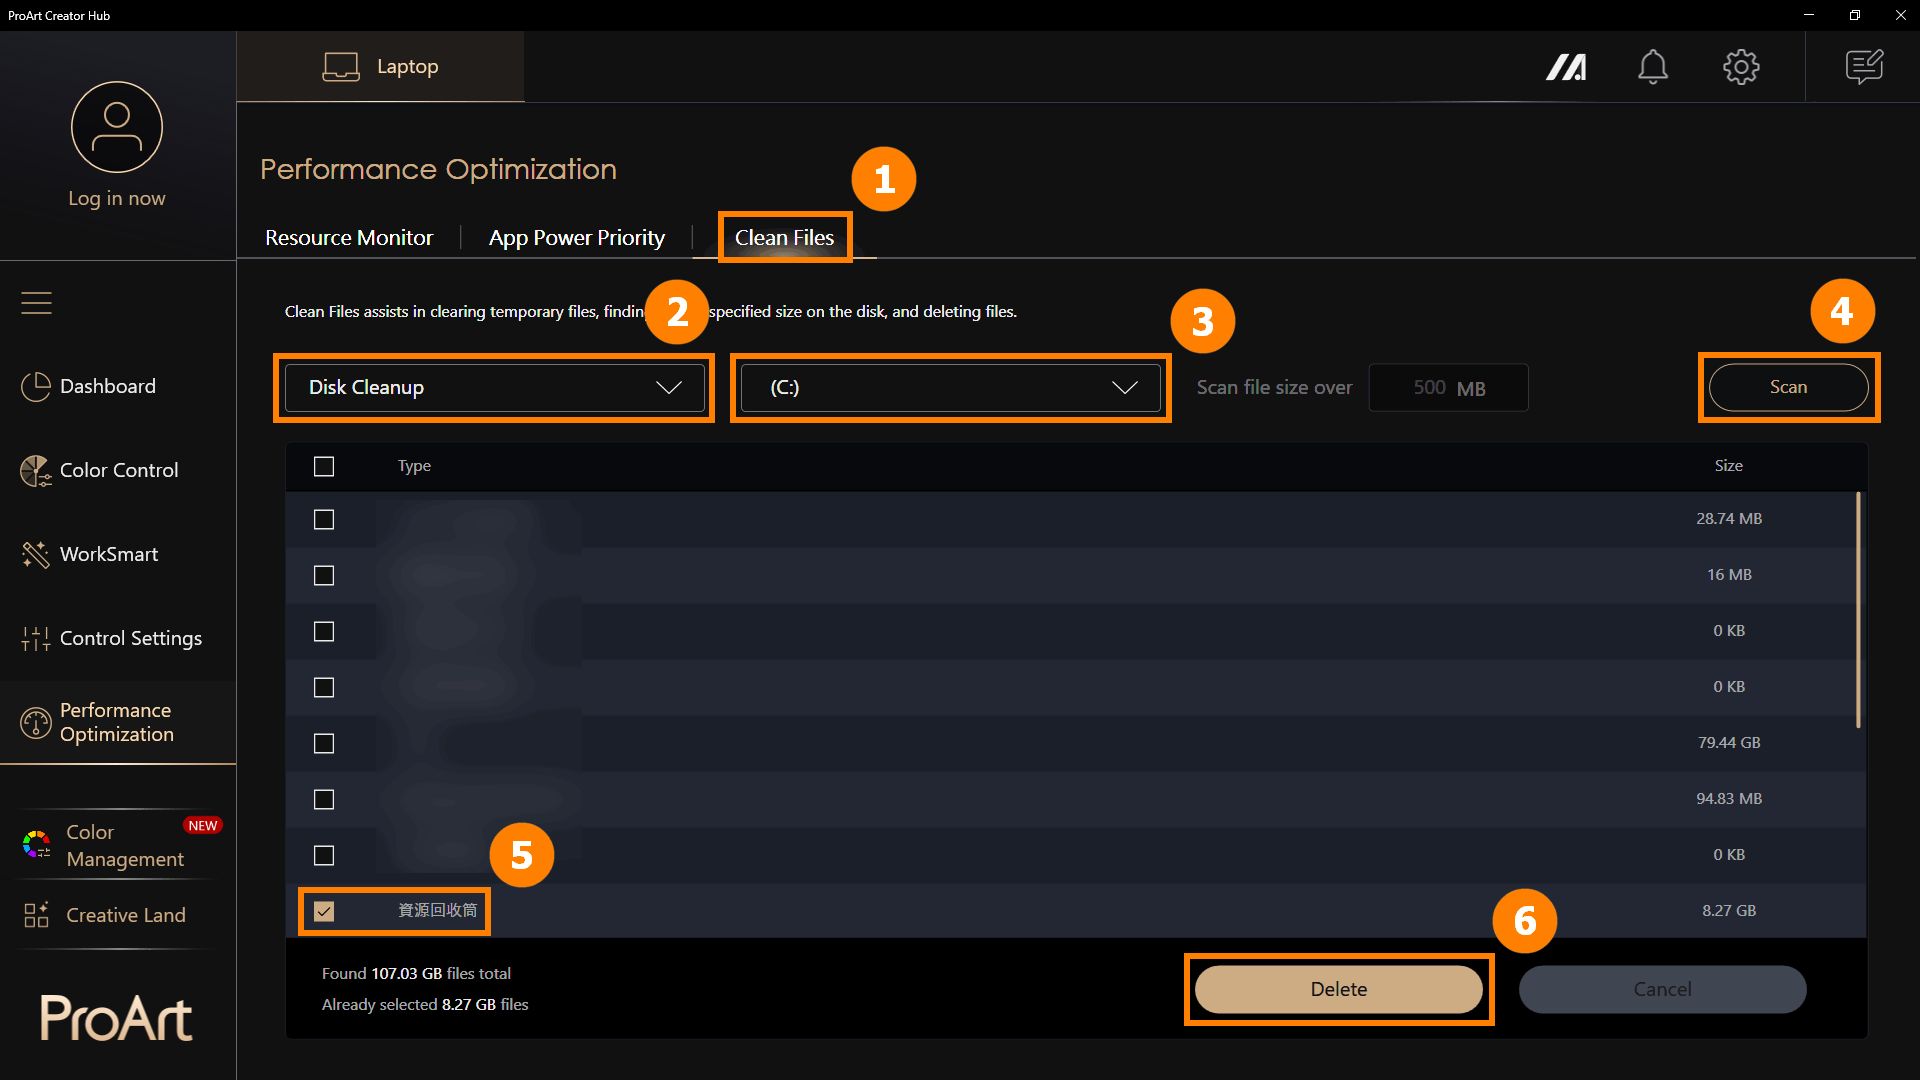
6.3 Clean Files - Disk Cleanup
Click ①[Clean Files], select the ②[Disk Cleanup] , click ③[Disk], click ④[Scan], and select the ⑤[Files] click ⑥[Delete] to remove files.
※ Disk Cleanup removes temporary files from the disk. Deleting temporary files may have irreversible effects, so use the Disk Cleanup feature with caution.
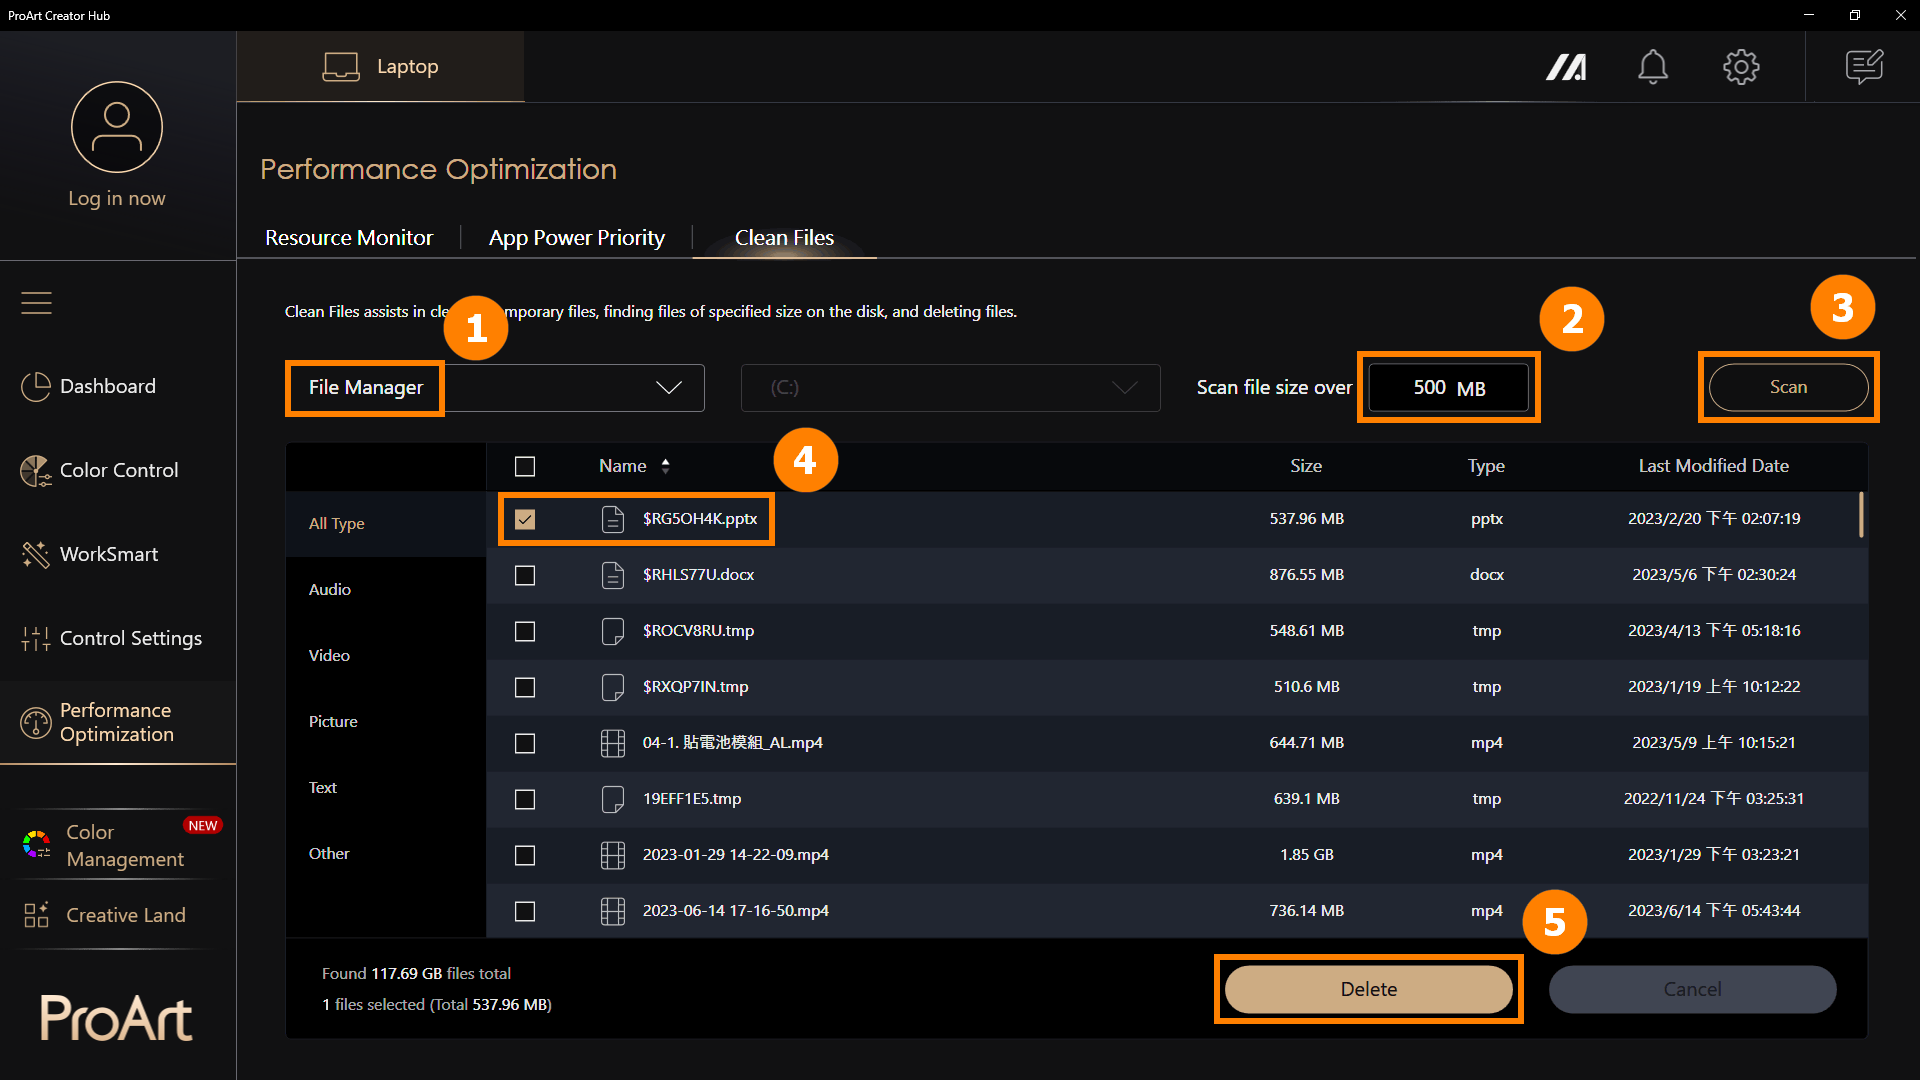
6.4 File Cleanup - File Organizer
Click ①[File Manager], select the ②[File Size], click ③[Scan]. select ④[Files], and click ⑤[Delete] to remove files.
※ Disk Cleanup removes temporary files from the disk. Deleting temporary files may have irreversible effects, so use the Disk Cleanup feature with caution.
※ One of the most important things for creators is color. At the top right corner is easy access to the Color Management feature. This includes the Screen Color Picker and Image Color Extractor that make it simple to get a detailed color analysis and color information, and you can use the Color Palette to build your personal color preferences. You will also find color trends and color palettes created by the professionals at the ASUS Design Center.
Image Color Extractor - Upload an image, choose a favorite image, and perform color analysis to create a color palette .
Personal Color Palette - Manually select a color on the screen and create a personal color palette.
Explore Colors - View color trends provided by ASUS's color research team to stay updated on the latest trends.

(1) Click on ①[Color Management] and select ②[My Color Palette], then click ③[Create New Project].

(2) Double-click the left mouse button on ④[Project] to edit it.

(3) You may change the ⑤[Project name]. Please click on the ⑥[Screen Color Picker] to choose your desired color.

(4) After clicking on the [Screen Color Picker], the screen will leave the ProArt Creator Hub. Please ⑦[left-click] with your mouse to select your desired color.
If you do not wish to choose a color, please right-click the mouse button to exit.

(5) All colors you select will be displayed on the ⑧[Color chip], and you can select the top-right corner to ⑨[Delete/Copy/Cancel] the color.
If you wish to copy a color to another project, please click the ⑩[Confirm] button to proceed.

(6) You may click on ⑪[Save As] to save this project.

(7) Please click ⑫[Export], choose the folder where you want to save the project, and then click ⑬[OK].
※ This project will be saved in PNG format.

Whether you are working in architecture, textiles, or graphic design, Color Card provides you with the flexibility to experiment with different color combinations on shapes such as circles, triangles, rectangles, and more.
(1) Click on ①[Color Card], where you will find two types: ②[Basic and Professional]. All the colors come from the Color Chip of the previous layer.


(2) Below, we take Professional as an example. First, ③[select a layout]. If you want to change the color, select ④[Color] and then ⑤[drag it] to the area you wish to replace.


(3) Additionally, you can ⑥[drag point] to change the area and position of each section.

(4) Please click ⑦[Export], choose the folder where you want to save the project, and then click ⑧[OK].
※ This project will be saved in PNG format.

Find harmonious color combinations quickly in a 3D color space, then save and manage your favorite color schemes.
Including Analogous, Complementary, Split, Triadic, Tetradic, Monochromatic.
(1) Click on ①[Color Harmony], then the ②[Focus color] will display the Color Palette chosen from the Color Chip. After selecting one of the Focus color, you can then choose a ③[color harmony mode] from the dropdown menu.
(2) Once a mode is selected, it will generate color palettes based on the two colors and create color schemes in three harmony modes, displayed on the ④[3D color sphere]. ※The color sphere can be rotated.
Clicking ⑤[Reset Angle] will return the color wheel to its default angle.
Clicking ⑥[Save as] to export the color palette you just generated.

(3) Please click ⑦[Export], choose the folder where you want to save the project, and then click ⑧[OK].
※ This project will be saved in PNG format.

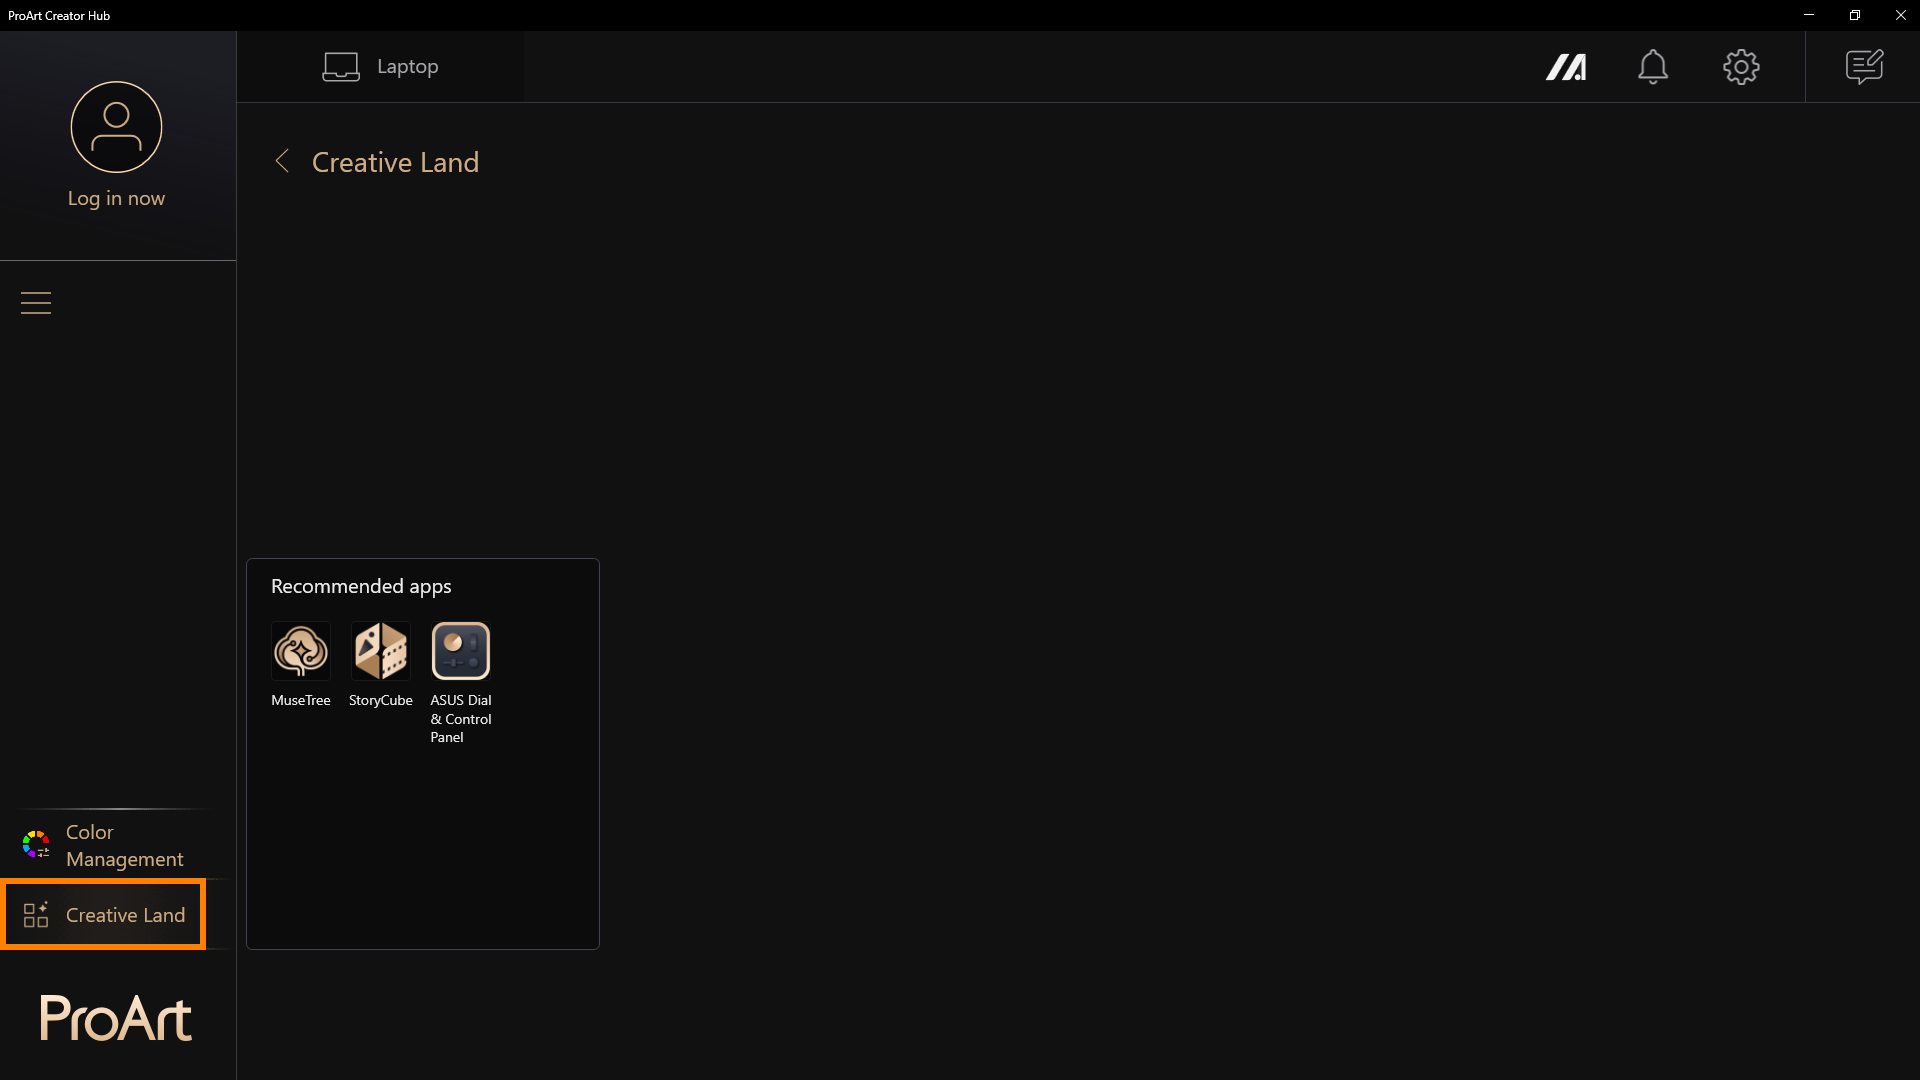
In [Creative Land], there are apps recommended by ASUS. Click them to launch or download them.
Don’t know how to use these apps? Please refer to the following:
MuseTree introduction | Official Support | ASUS Global
[Notebook] StoryCube - Introduction | Official Support | ASUS Global
[Notebook] ASUS Dial - Introduction | Official Support | ASUS Global
ASUS Control Panel - Introduction | Official Support | ASUS Global
9.1 General Settings
Click ①[Settings], click ②[General Settings]. You can choose ③[Application Language].

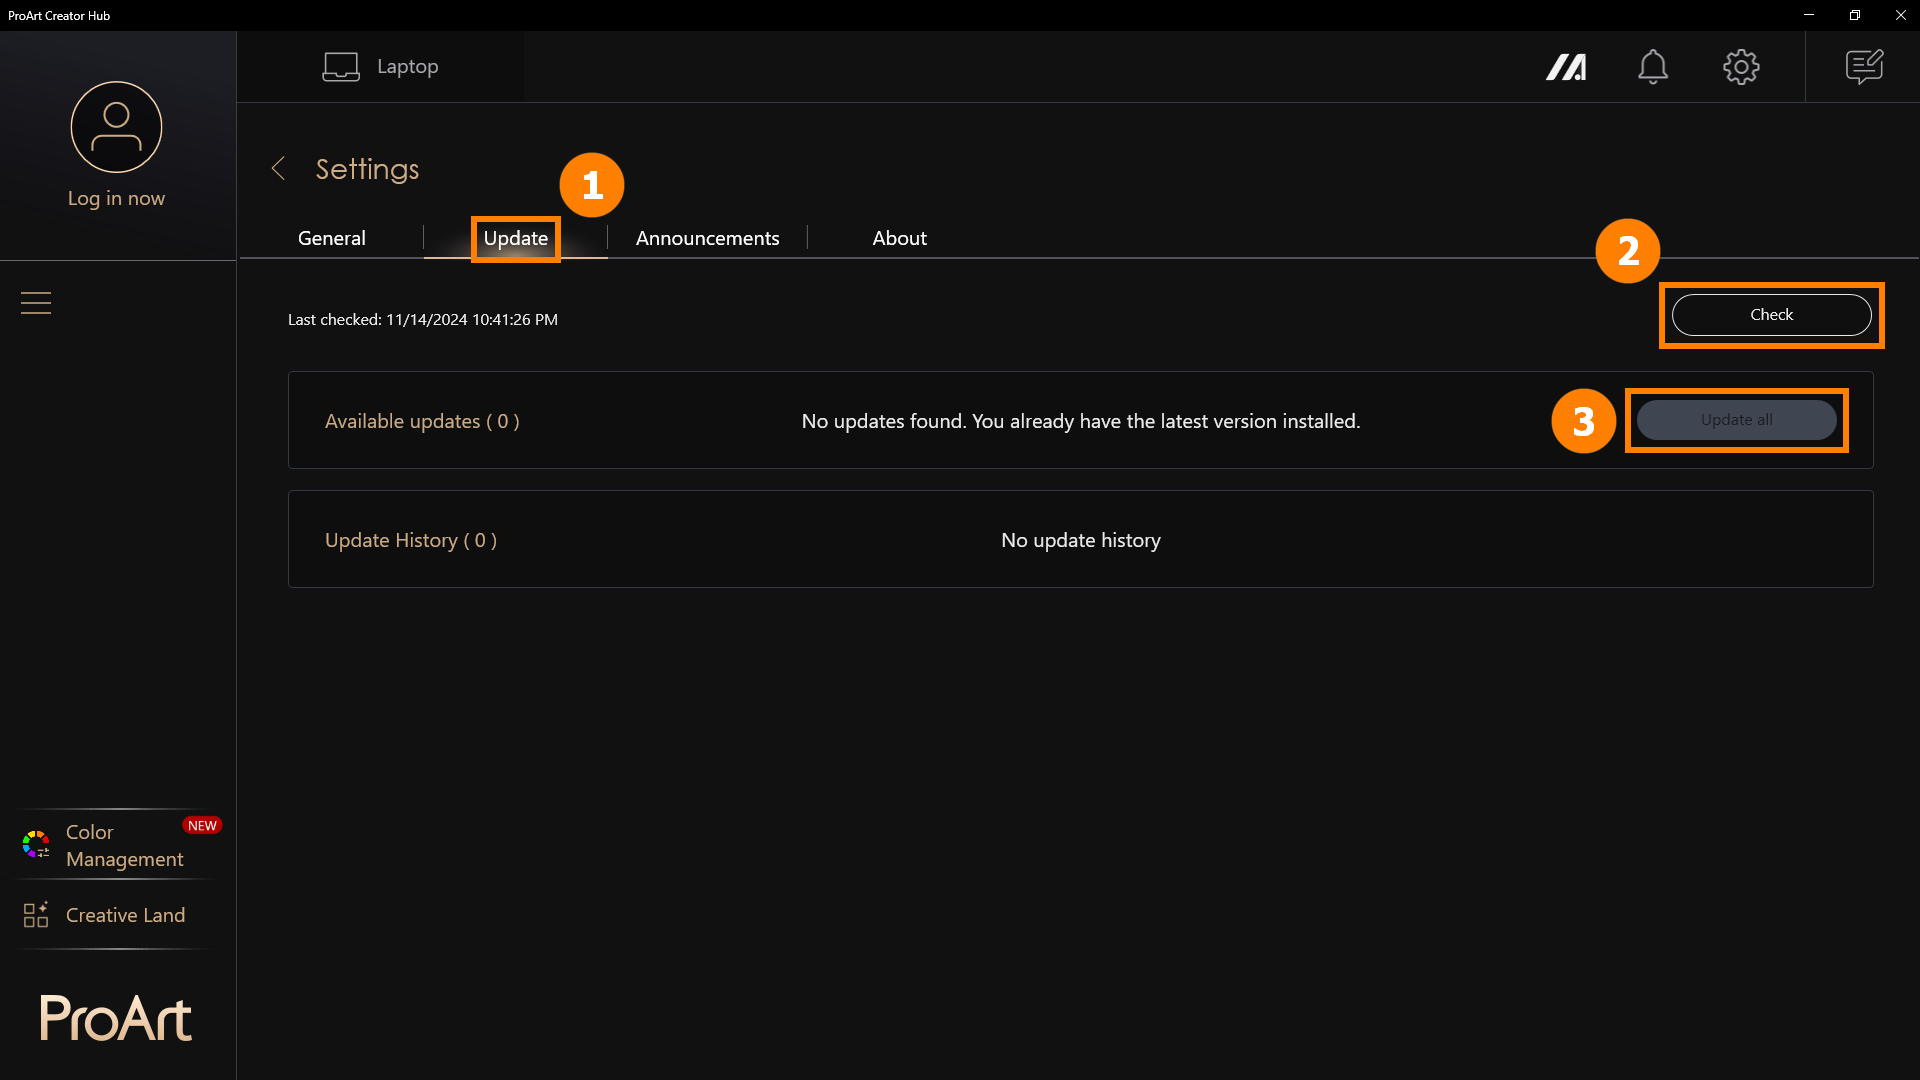
9.2 Updates
Click ①[Updates], click ②[Check]. You can click ③[Update All] to update the application to the latest version.
10. How to Download and Uninstall ProArt Creator Hub
·ProArt Creator HubDownload ProArt Creator Hub: Download the current latest version of ProArt Creator Hub through the Microsoft Store
·Uninstall ProArt Creator Hub: If you want to remove this application, click: [Windows 11/10] How to uninstall Apps, Windows installed updates, Drivers | Official Support | ASUS Global
Note: ProArt Creator Hub can only be used on ASUS ProArt/Feature By ProArt series products. Click ASUS ProArt Global for more information.
·Operating System: Windows 10 19H2 64-bit (inclusive) and above
·ASUS System Control Interface v2: Version 2.2.2.0 (inclusive) and above
·Adobe Software: 2020 and above
Q1: When using functions such as [Save As] and [Create New Project] in color management, you may encounter issues with these features.
A1: You can click the following link to download and install the .N ET Framework software to resolve the issue
Download .NET Framework 4.8.1 | Free official downloads (microsoft.com)
Q2: How to enlarge the font of ProArt Creator Hub?
A2: Right-click the computer desktop, left-click [Display settings], and select the size you want in Scale & Layout.
13. Other Introductions to ProArt Series Products
·[Notebook] ASUS Dial - Introduction | Official Support | ASUS Global
·[ProArt Motherboard] ProArt Creator Hub - Introduction | Official Support | ASUS Global
·[ProArt Display] ProArt Creator Hub - Introduction of display function | Official Support | ASUS Global
·[Notebook] ASUS Control Panel Introduction | Official Support | ASUS Global