Related Topics
[Windows 11/10] How to create and use Windows recovery drive
Applicable Products: Notebook, Desktop, All-in-One PC, Gaming Handheld, MiniPC
If your device encounters severe issues, such as an inability to access the operating system, you can utilize a recovery drive to access the Windows Recovery Environment (WinRE). It assists in the restoration of Windows or the execution of system restore points. To use a recovery drive, you must first prepare an empty USB flash drive (with a minimum of 16GB of space) to create a Windows recovery drive. As Windows undergoes periodic updates to enhance security and device performance, it is recommended to periodically create a new recovery drive.
Note: The recovery drive does not back up personal files and applications not included with the device. Learn more about How to back up your files via File History.
Note: When restoring the device via a recovery drive, the original disk partition data on the system drive may be deleted. (If your device supports MyASUS in WinRE or ASUS Recovery, functionalities built into the disk partitions on the system drive will be removed.) If you wish to preserve these functionalities, you can restore the device through a system image, thereby backing up the data in the disk partitions. Learn more about How to create and use Windows System Image to restore your device.
To provide you more detailed instruction, you can also click ASUS Youtube video link below to know more about How to create and use Windows recovery drive
https://www.youtube.com/watch?v=pjvNQ--wZfM
Please go to the corresponding instruction based on the current Windows operating system on your device:
Create a recovery drive
- Type and search [Recovery Drive] in the Windows search bar①, then click [Open]②.
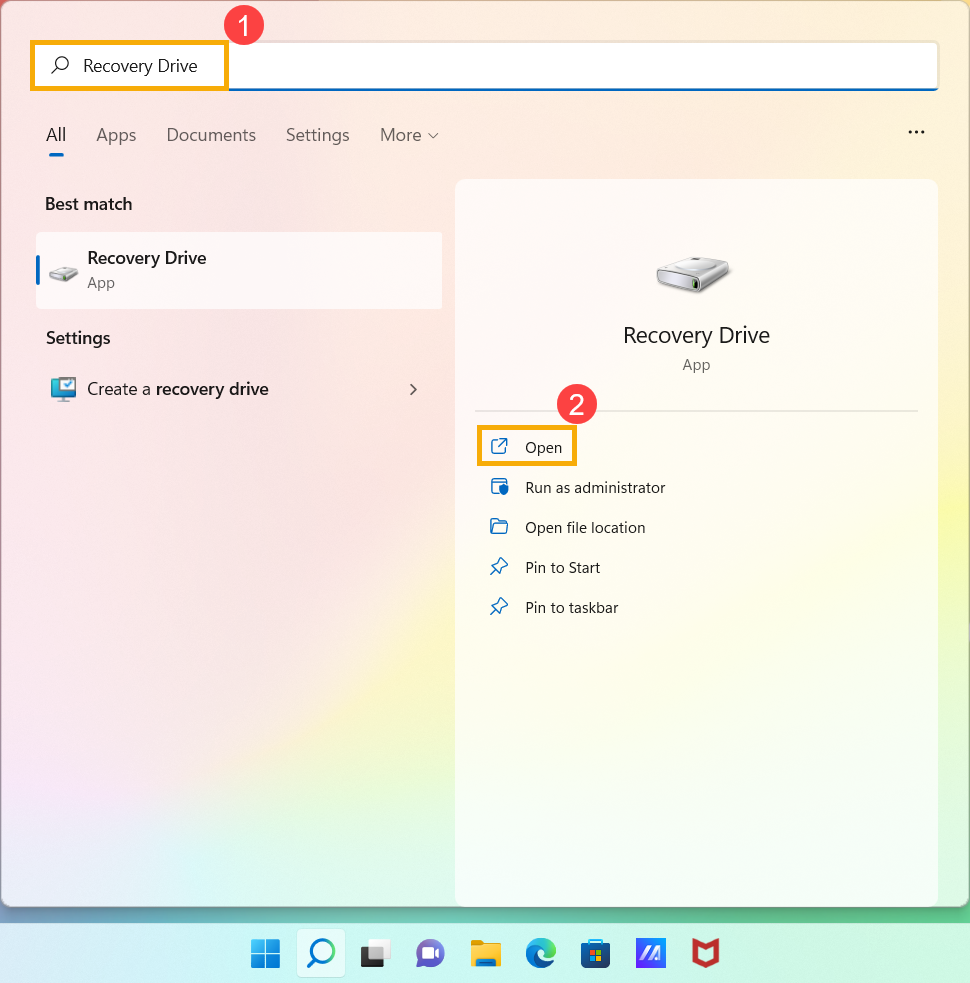
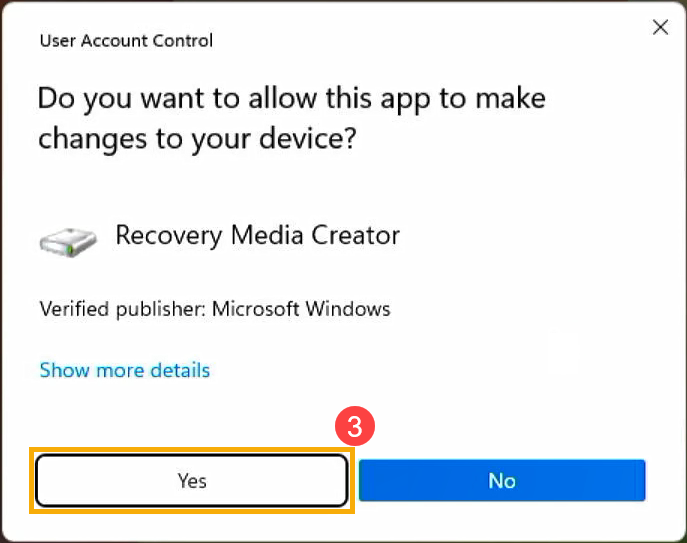
- If the User Account Control window displayed, please select [Yes]③.
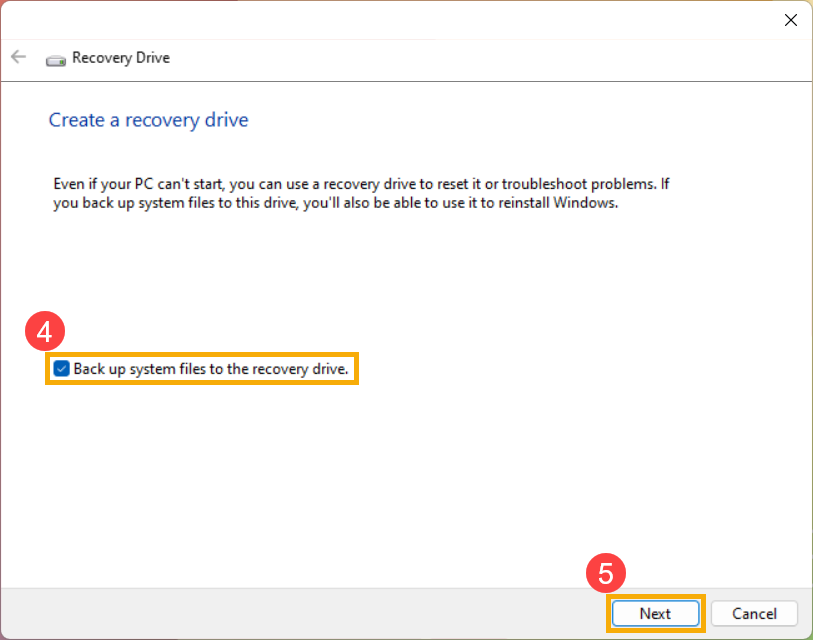
- Check the box to [Back up system files to the recovery drive]④, then select [Next]⑤.
- Connect the USB flash drive that you want to create as a recovery drive to your device.
Note: All files on the USB flash drive will be deleted during the process, so please back up your files first if you have data inside originally.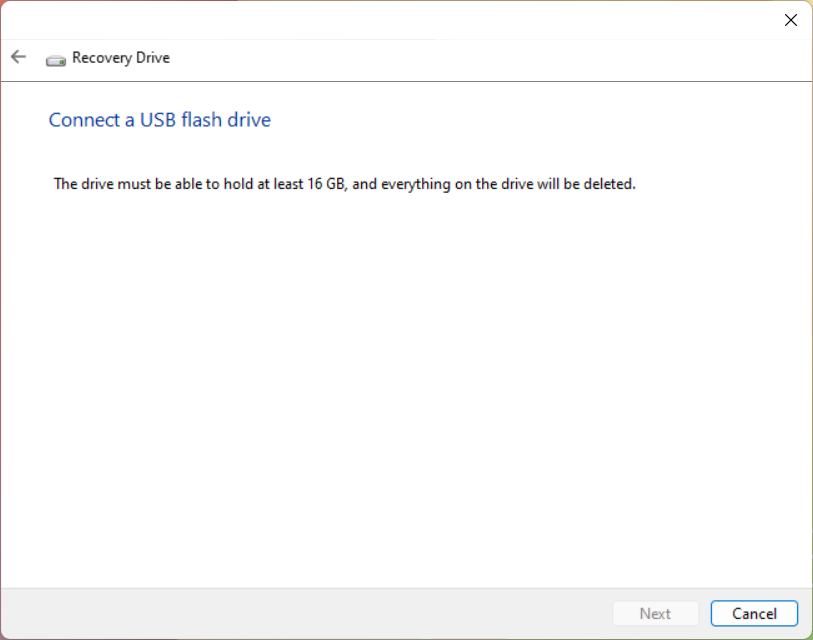
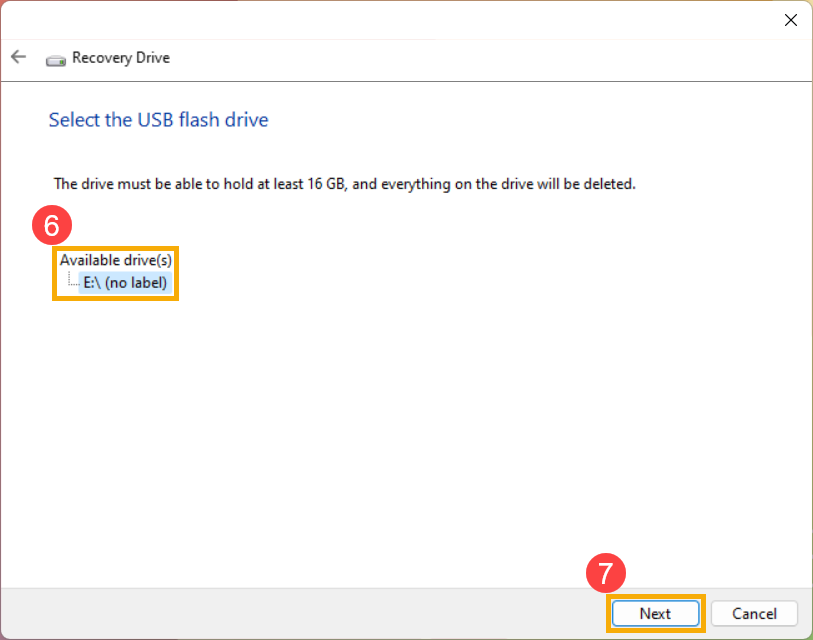
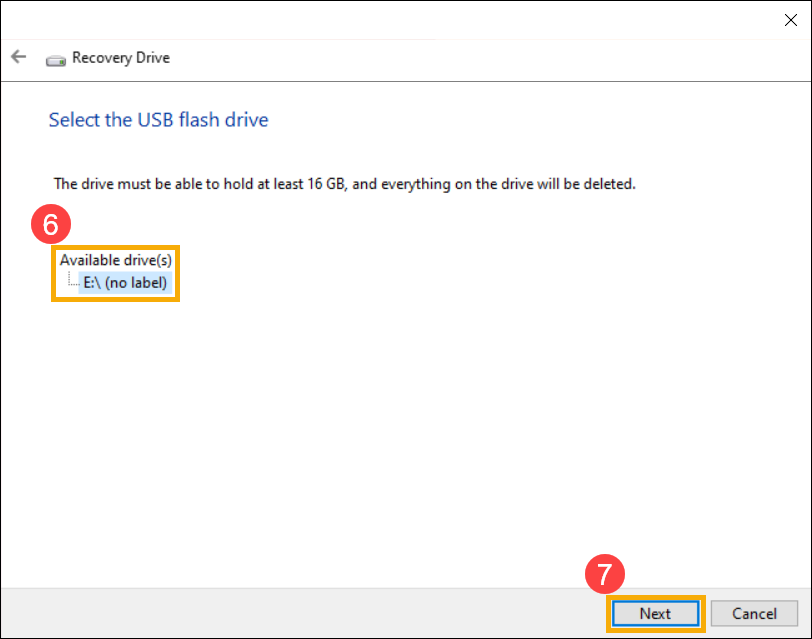
- In Available drive(s), confirm and select the USB flash drive that you want to use⑥, and then select [Next]⑦.
- Select [Create]⑧, and the system will start to create the recovery drive. The recovery image and necessary repair tools will be copied to your USB flash drive, and it will take a while, which depends on your device and the size of the recovery image.
Note: Please make sure the AC adapter is connected during the process, and do not force to shut down to prevent the creation is incomplete.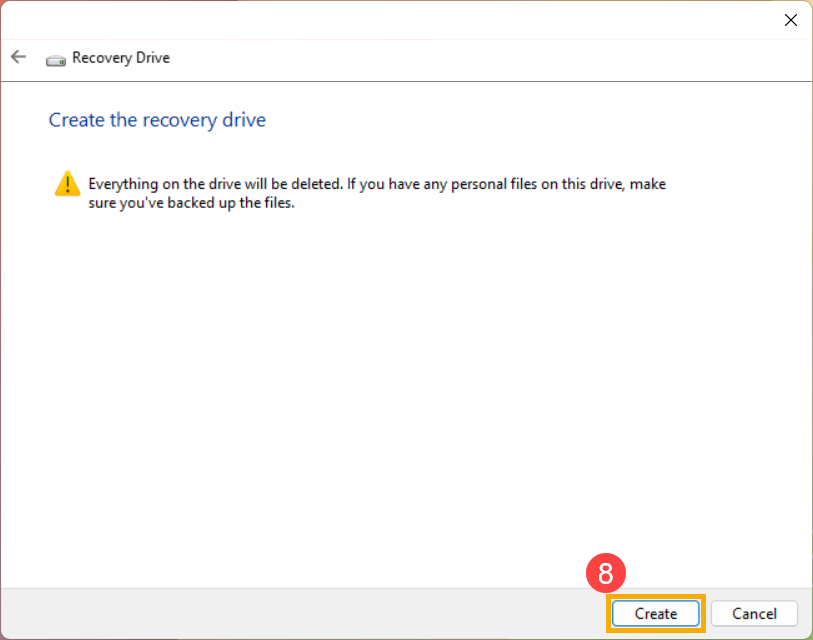
- The recovery drive has been created, please click [Finish]⑨.

- We recommend that you reproduce above steps to recreate the new recovery drive periodically because Windows will regularly update and improve security and performance.
Use the recovery drive to recover / restore your device
If you experience the device cannot boot, you can use the recovery drive to enter Windows Recovery Environment (WinRE), and then restore from a system restore point or reinstall Windows via the recovery drive.
- Connect the recovery drive (USB flash drive) to your device.
- Power on the device and select the boot option as the USB flash drive, here you can learn more about How to boot the system from USB drive/CD-ROM.
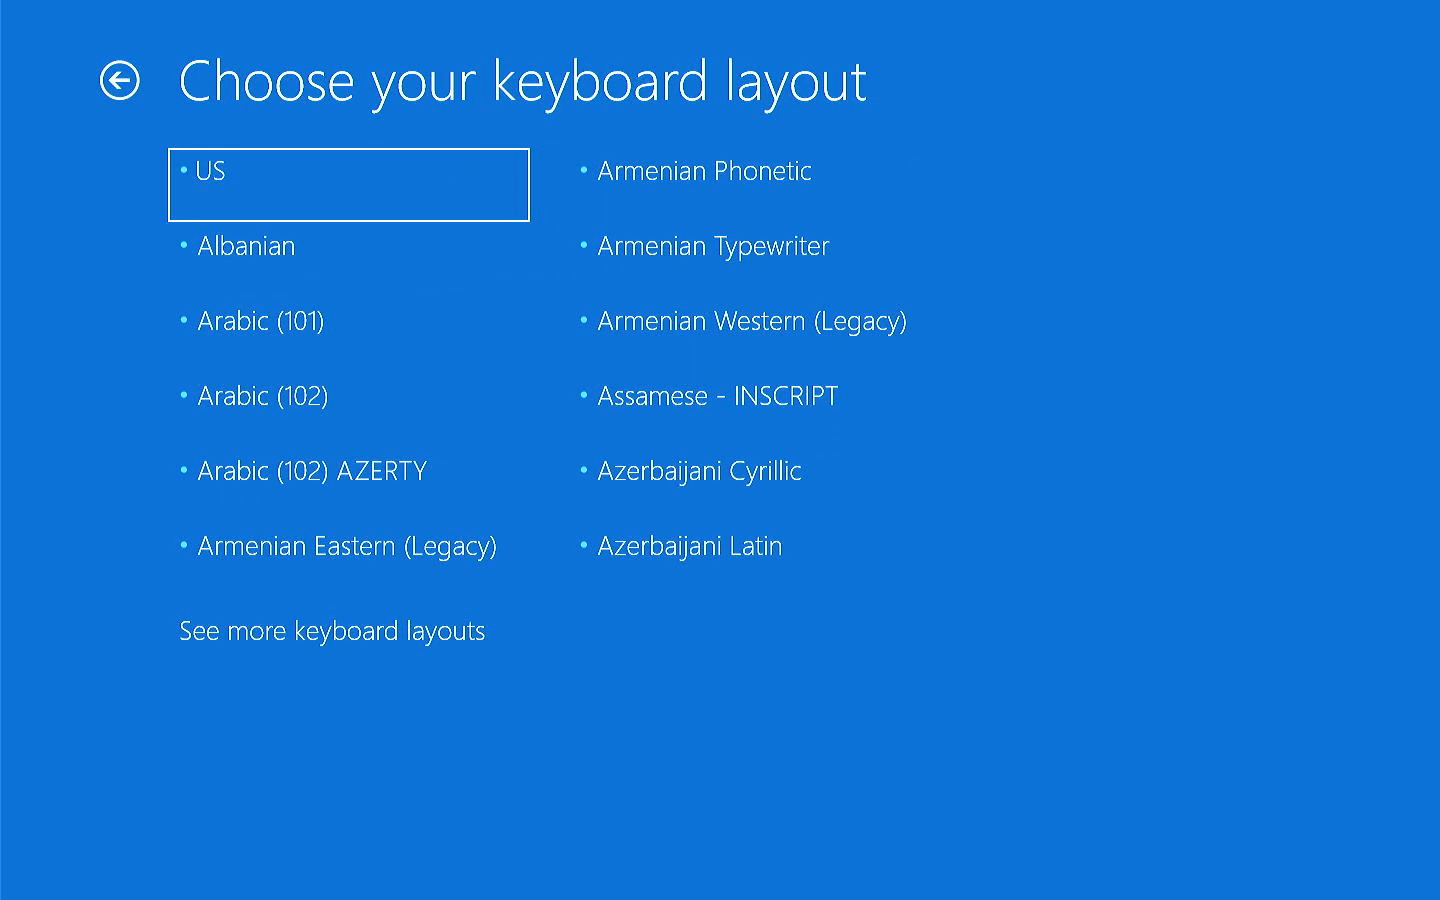
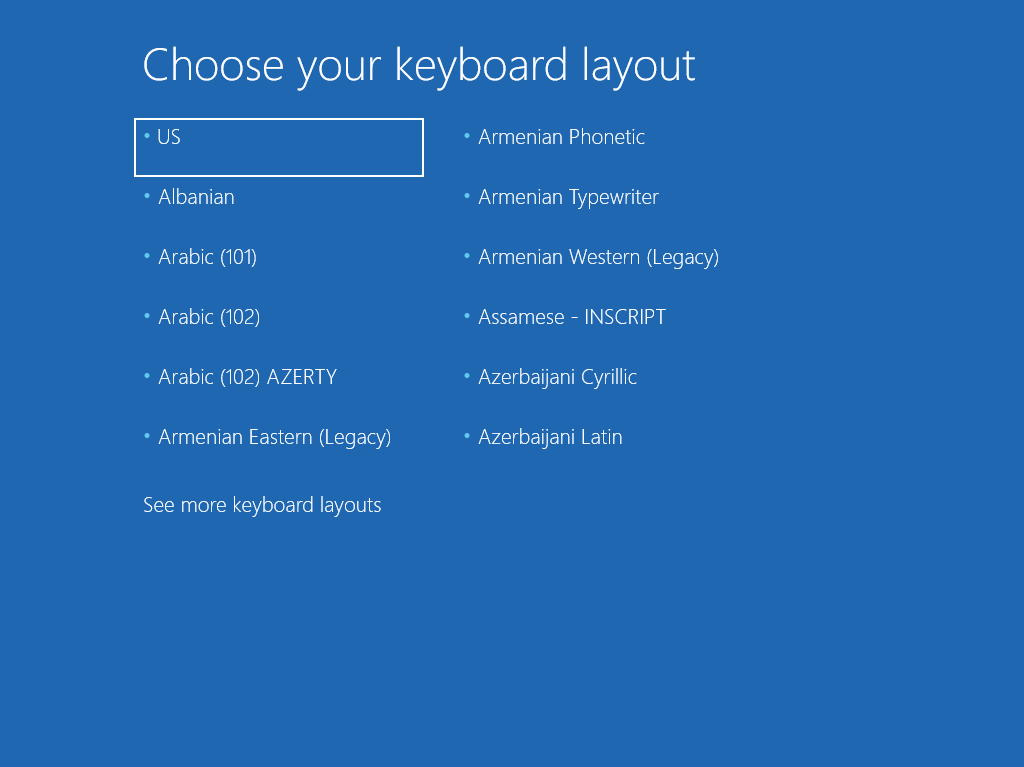
- The device will enter Windows Recovery Environment, and then please choose your language and keyboard layout.

- Then, you are able to select one of the following to recover your device: restore from a system restore point or reinstall Windows via the recovery drive.
If using the system restore point, your personal files will not be affected, but it will remove recently installed applications, drivers, and updates that might cause the problems to the device.
If reinstalling Windows, it will remove your personal files, applications and drivers you installed, and changes you did to settings.
Using the system restore point to restore the device
Note: The restore points mean the ones were created and recorded in your device, not the ones backed up inside the USB recovery drive.
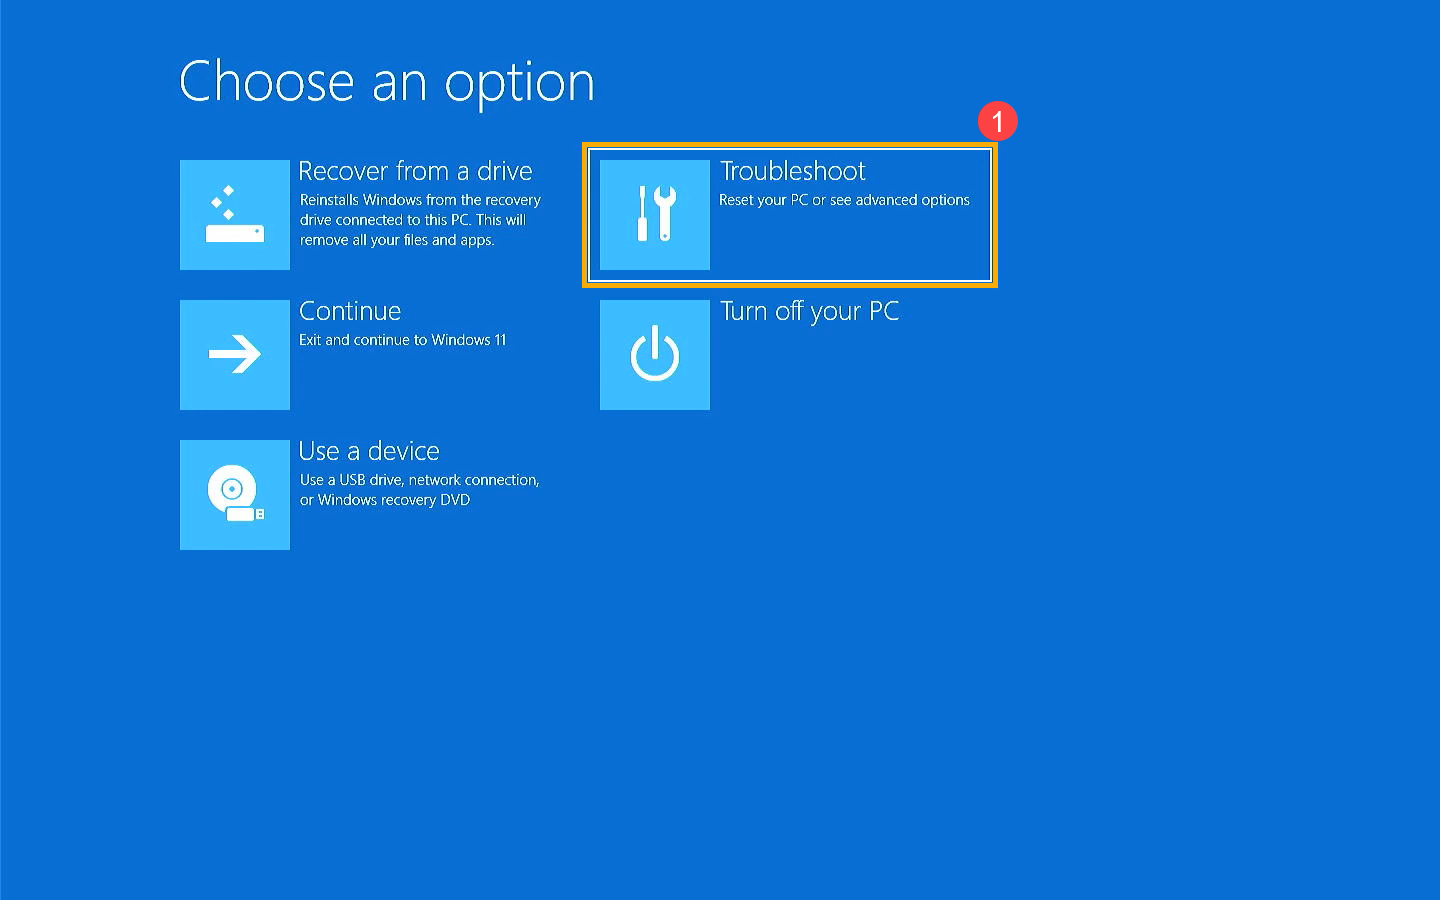
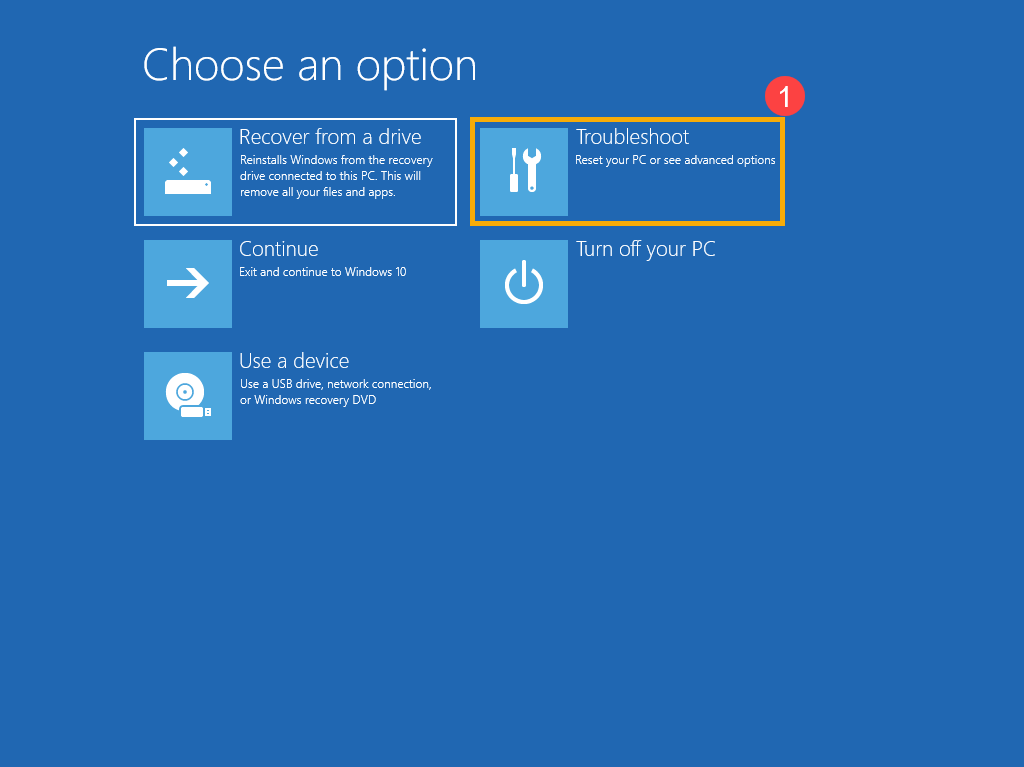
- Select [Troubleshoot]①.
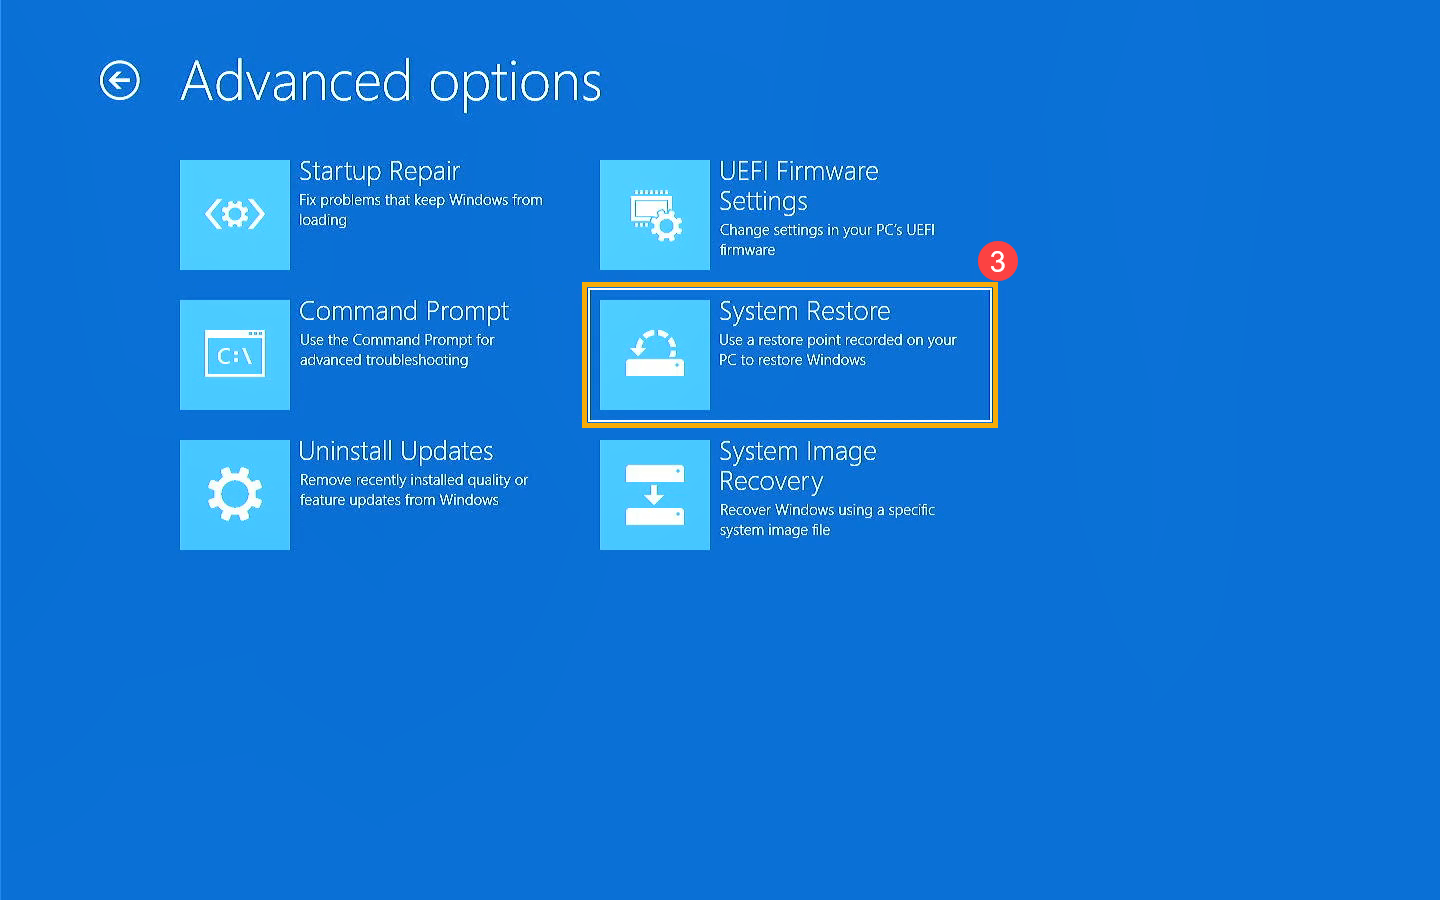
- Select [Advanced options]②.

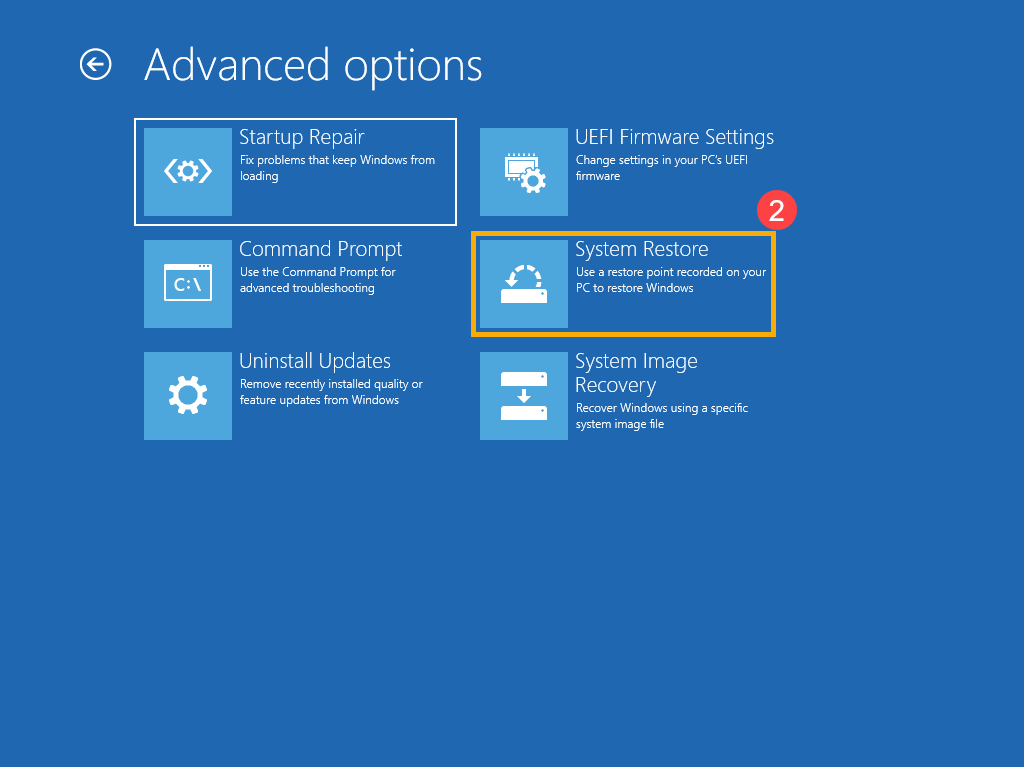
- Select [System Restore]③.
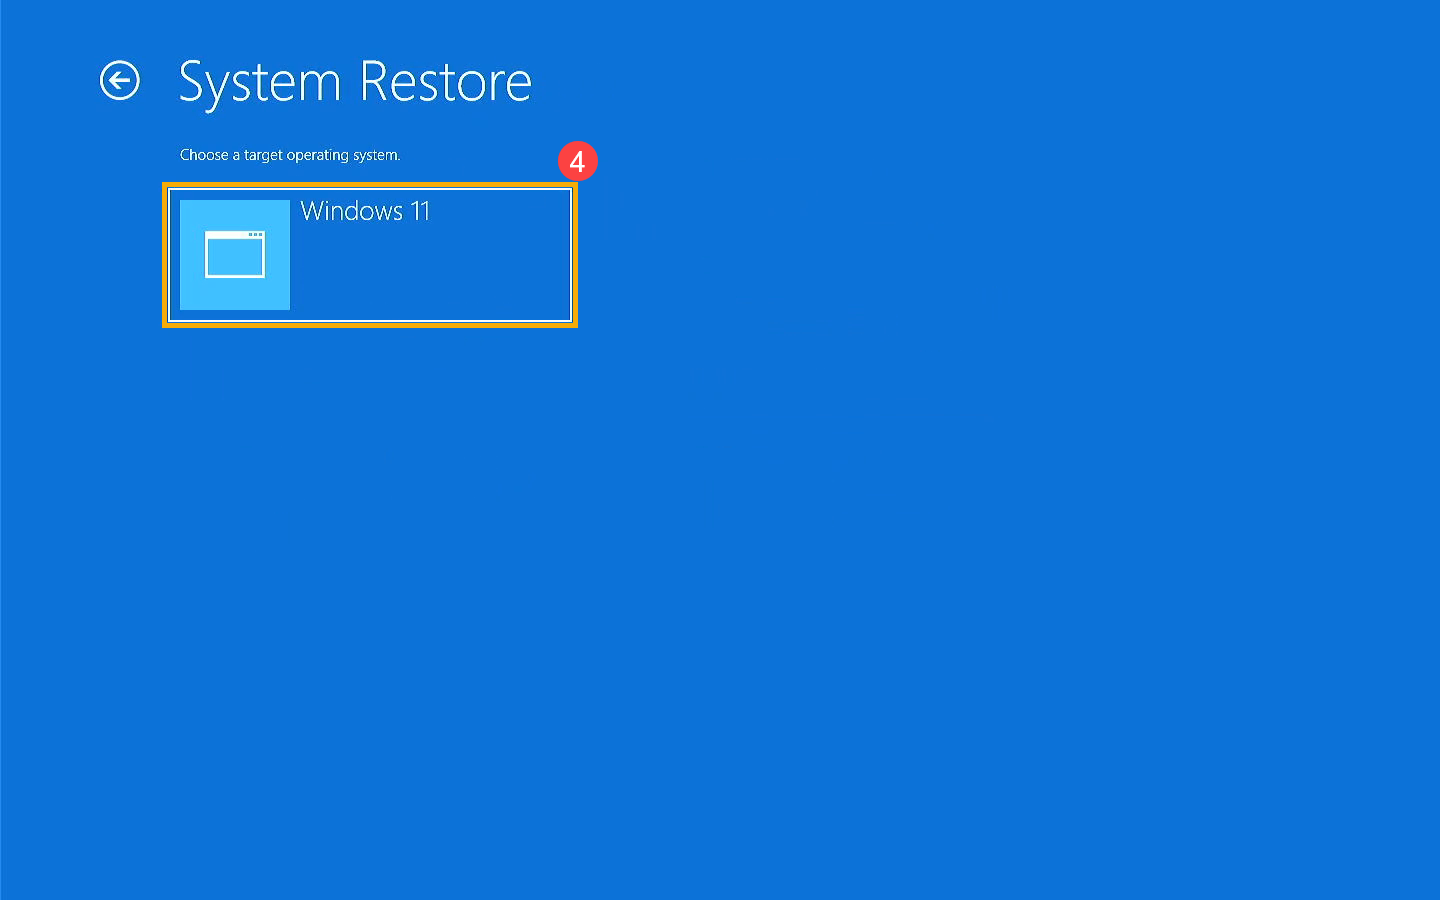
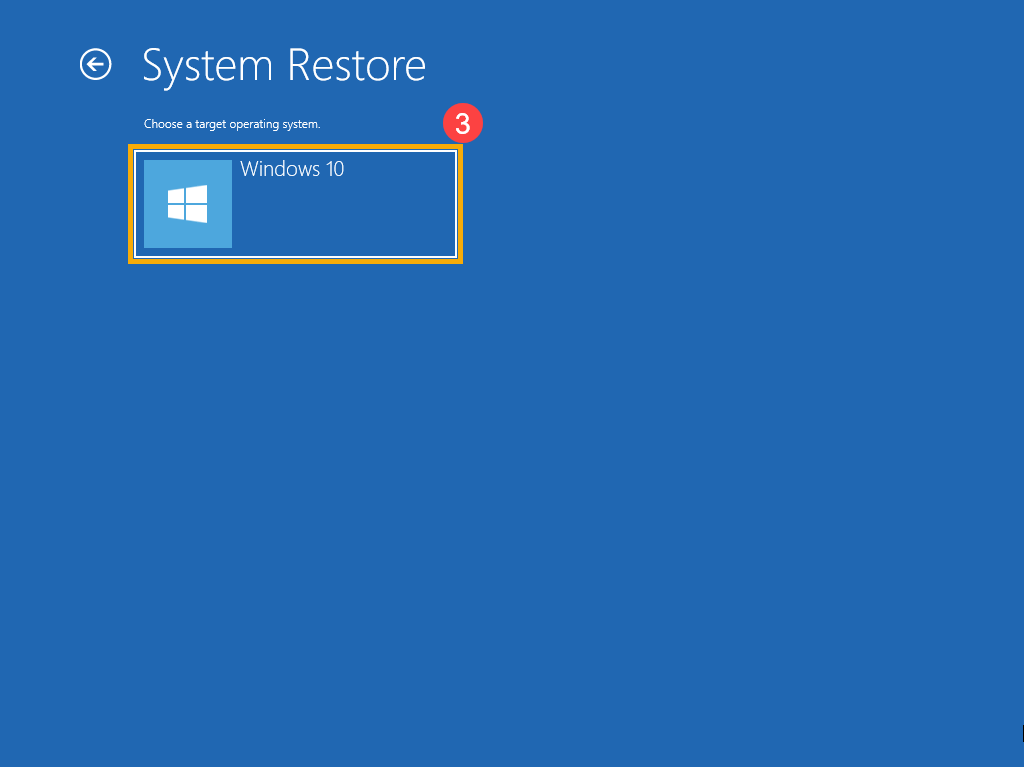
- Click [Windows 11]④.
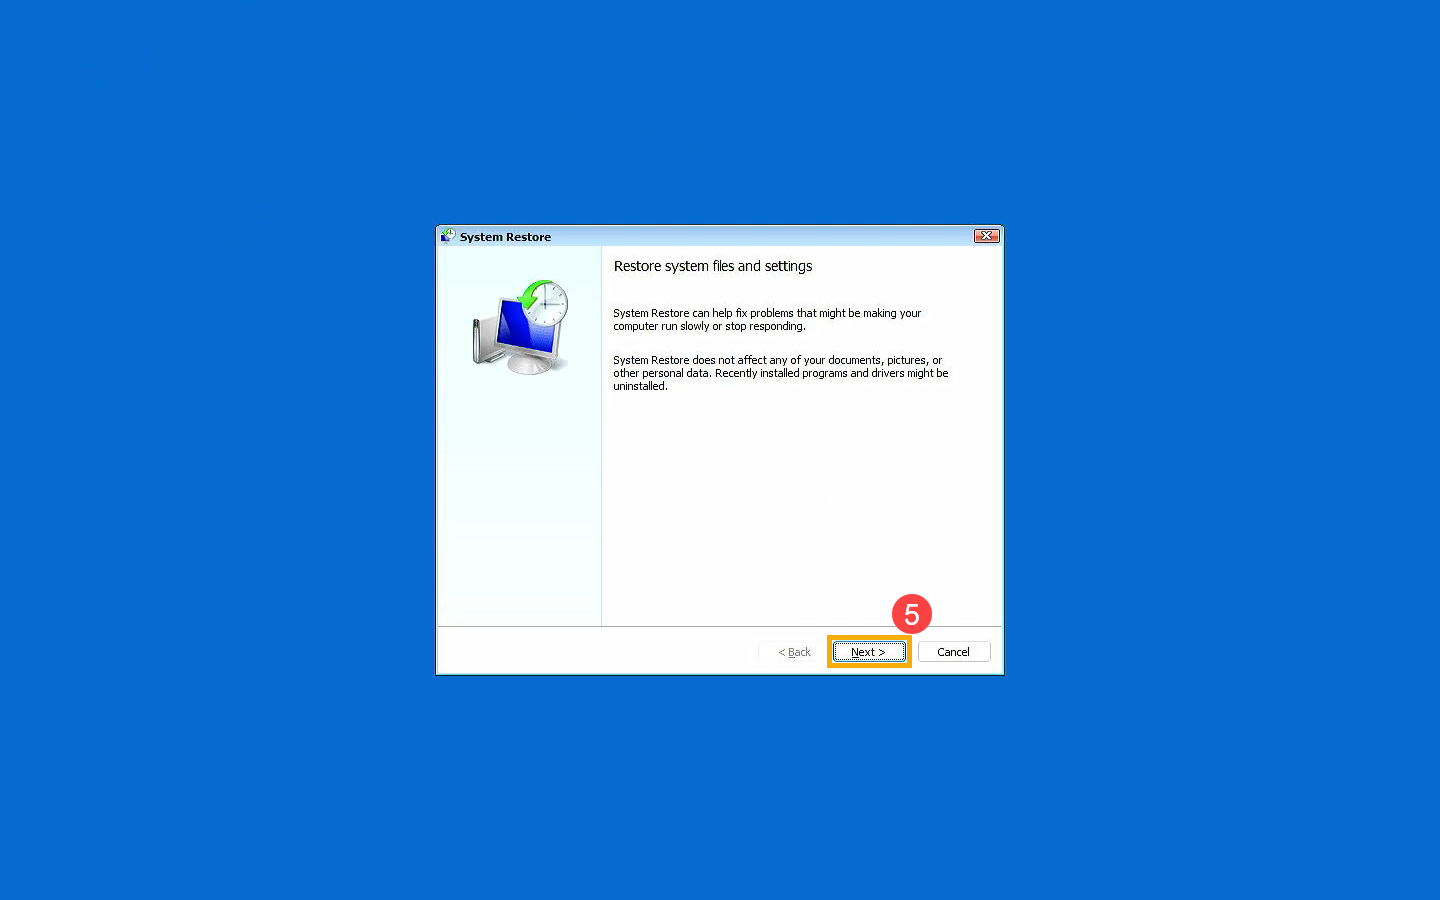
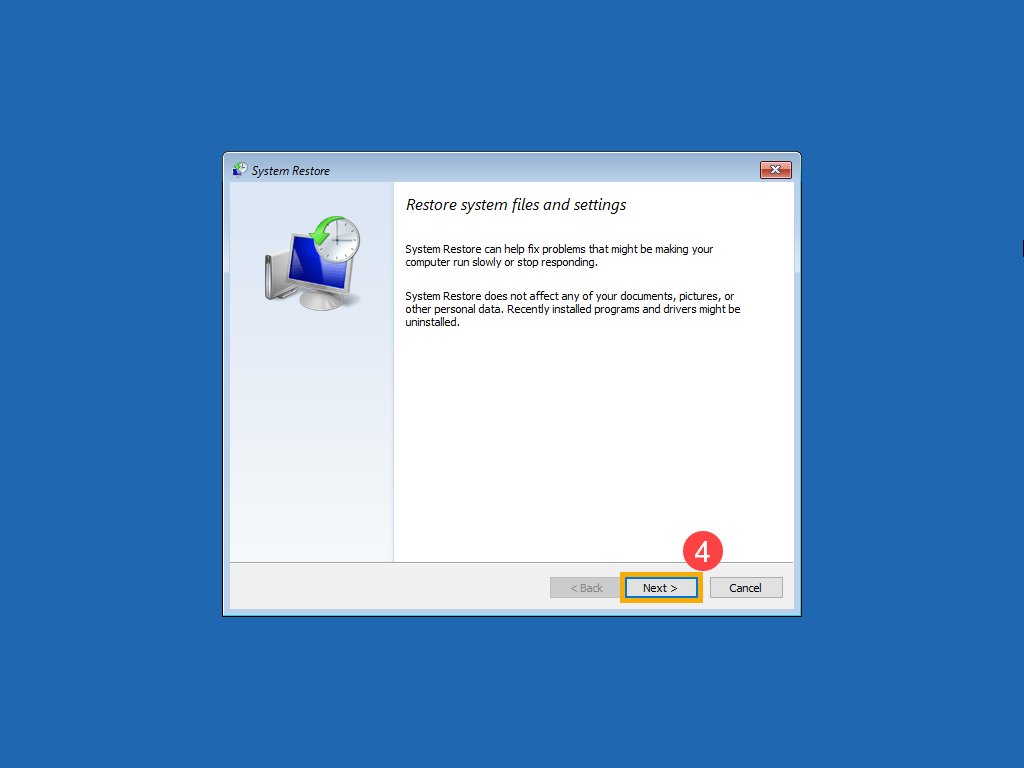
- Start the restore system setting process, please select [Next]⑤.
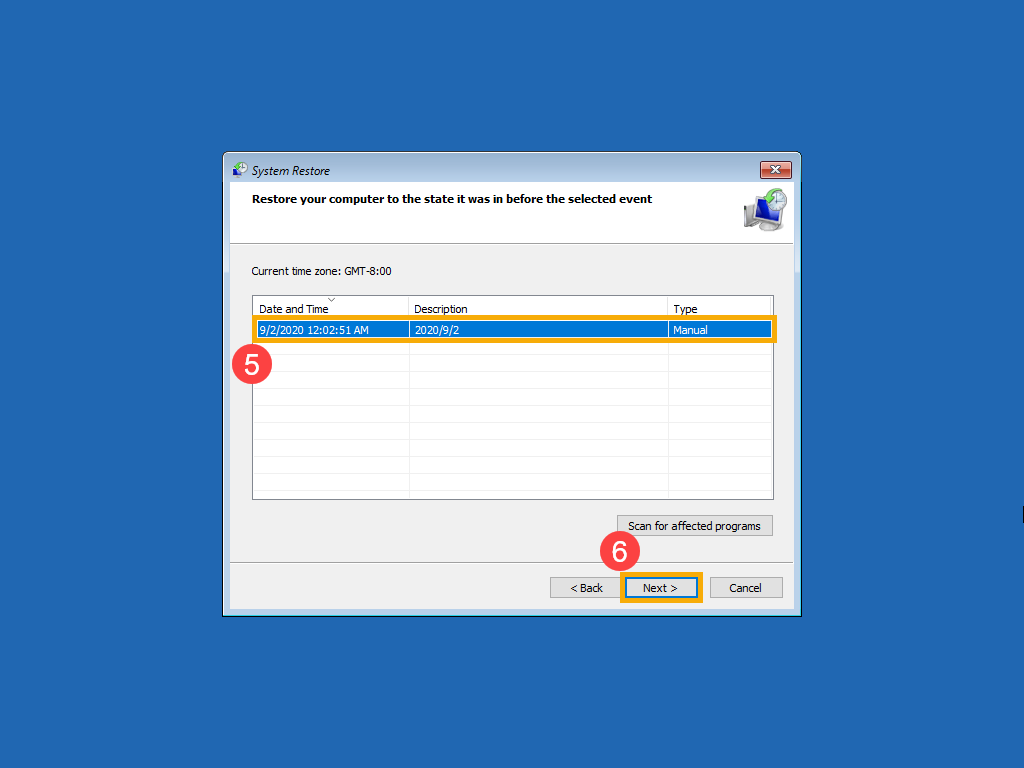
- You will see the lists of all restore points, and please choose the one that you want to use⑥, and then select [Next]⑦. You also can select Scan for affected programs to check the affected result after choosing this restore point.

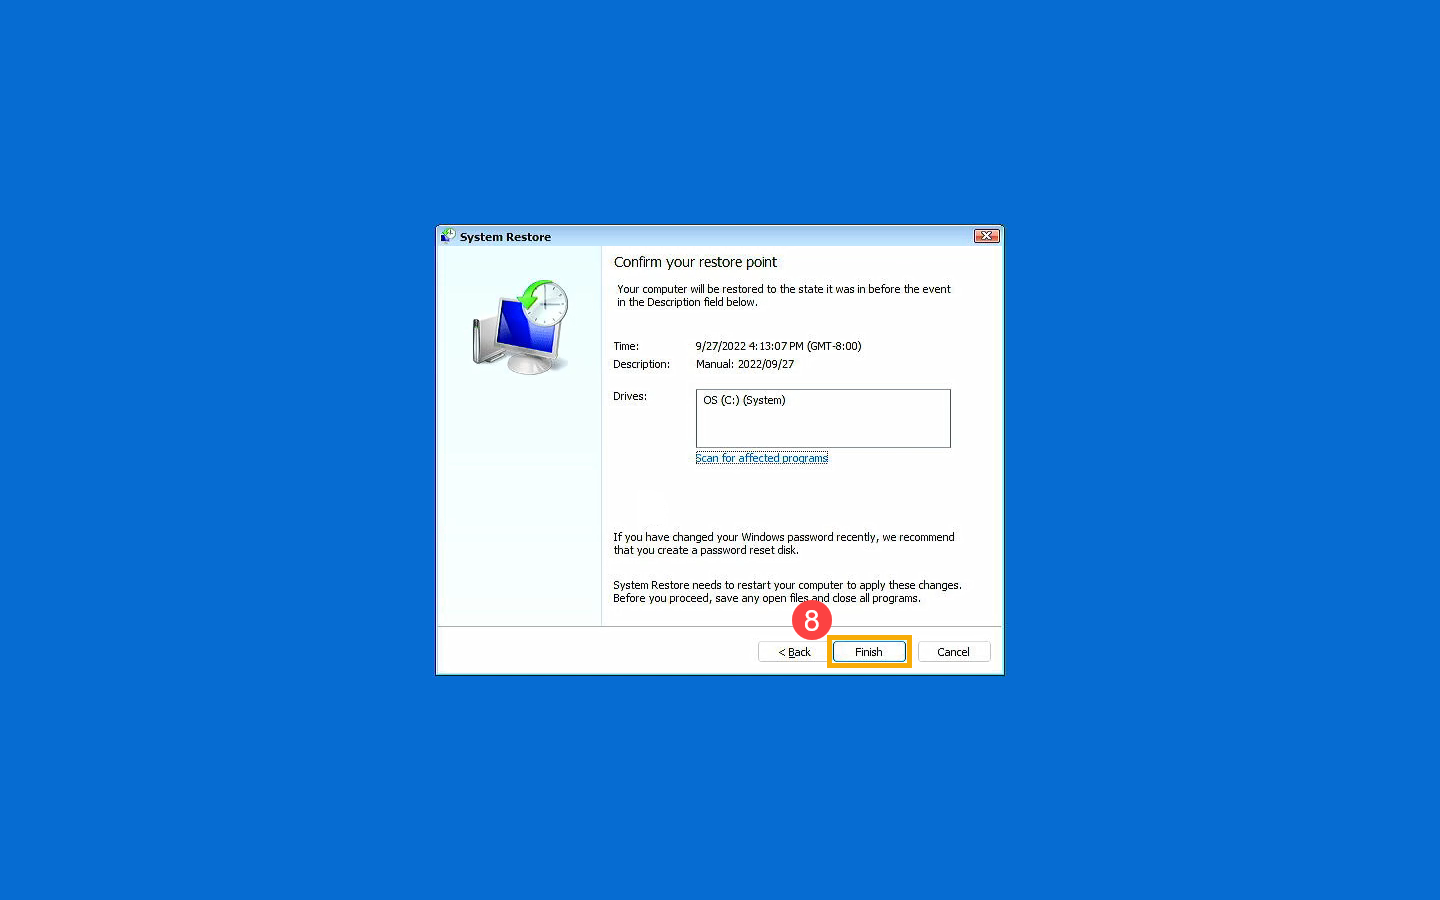
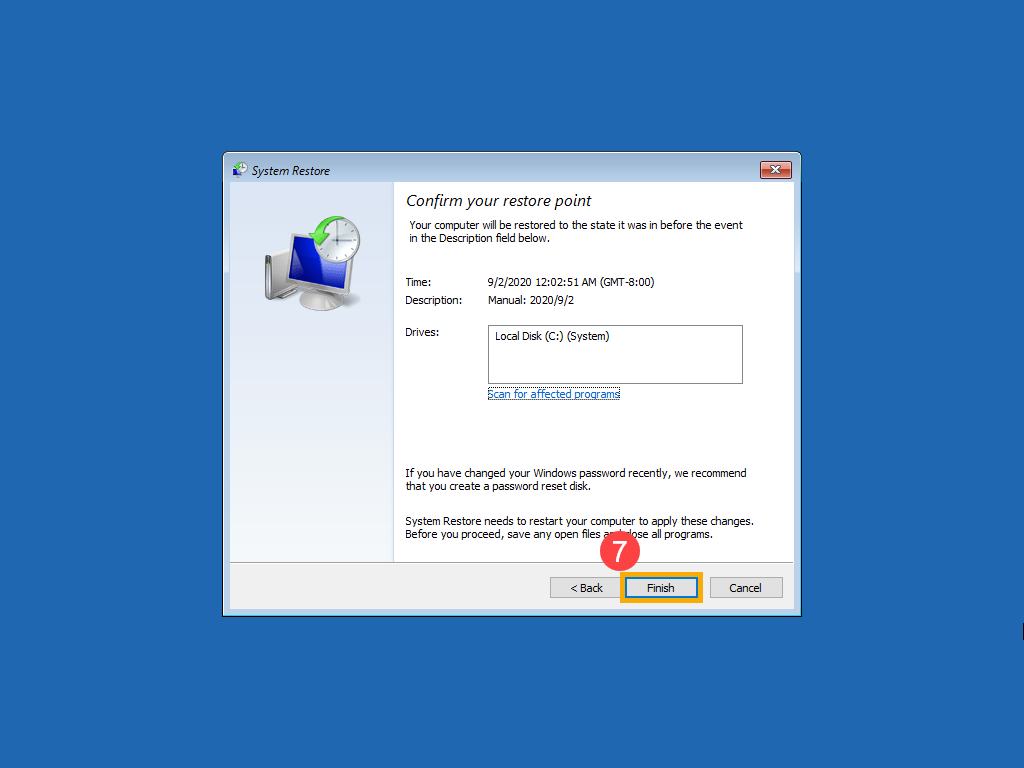
- Confirm the selected restore point information is correct or not, then select [Finish]⑧.
- Click [Yes]⑨ to start the restore process. The device will restart and enter Windows after the restore is completed.
Note: Please make sure the AC adapter is connected during the process, and do not force to shut down to prevent any issues.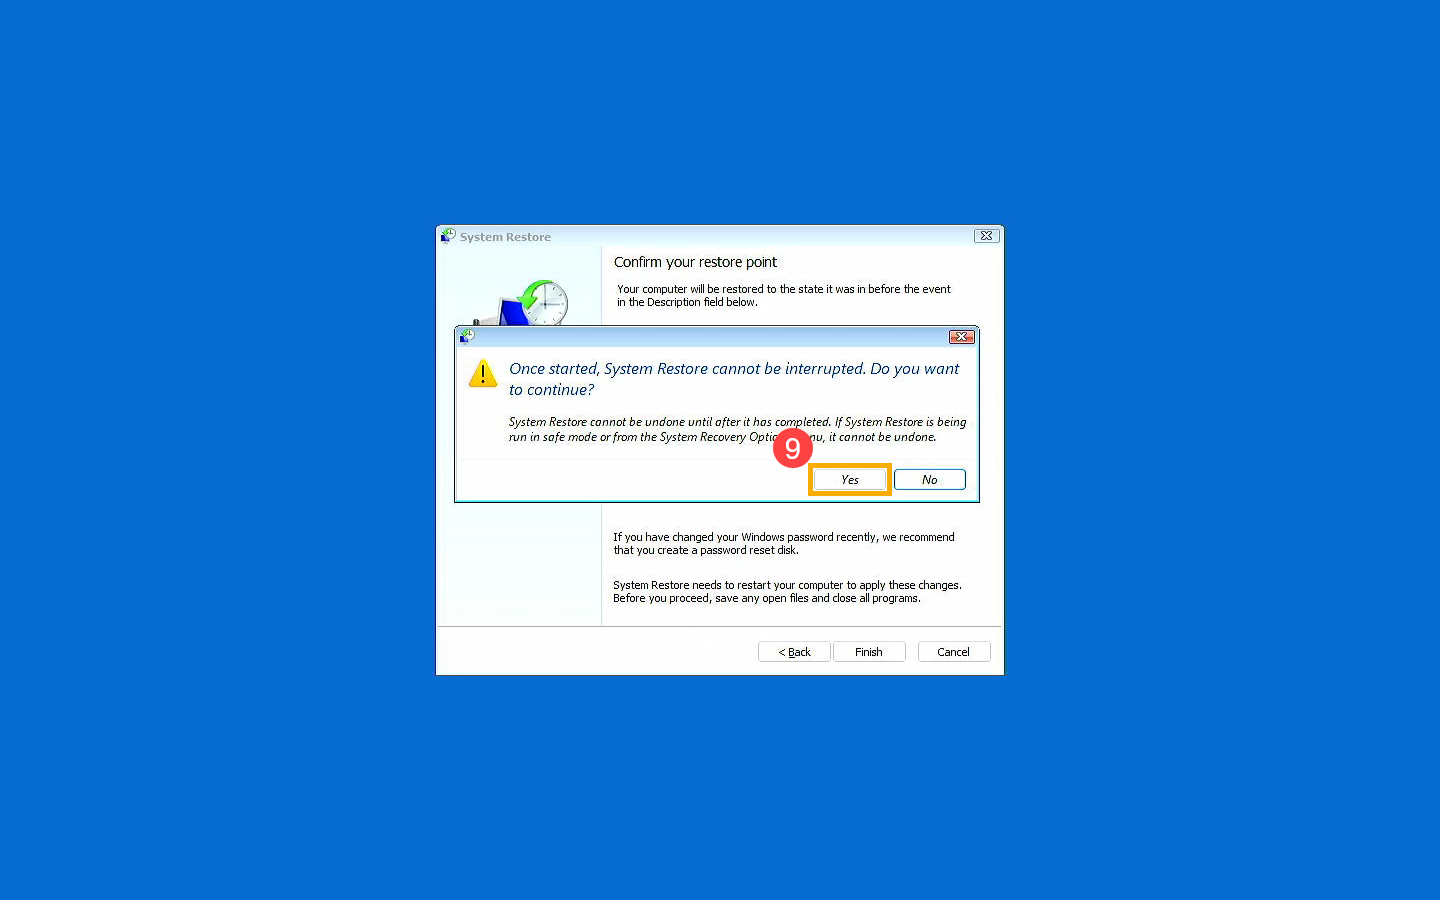
Using the recovery drive to reinstall Windows
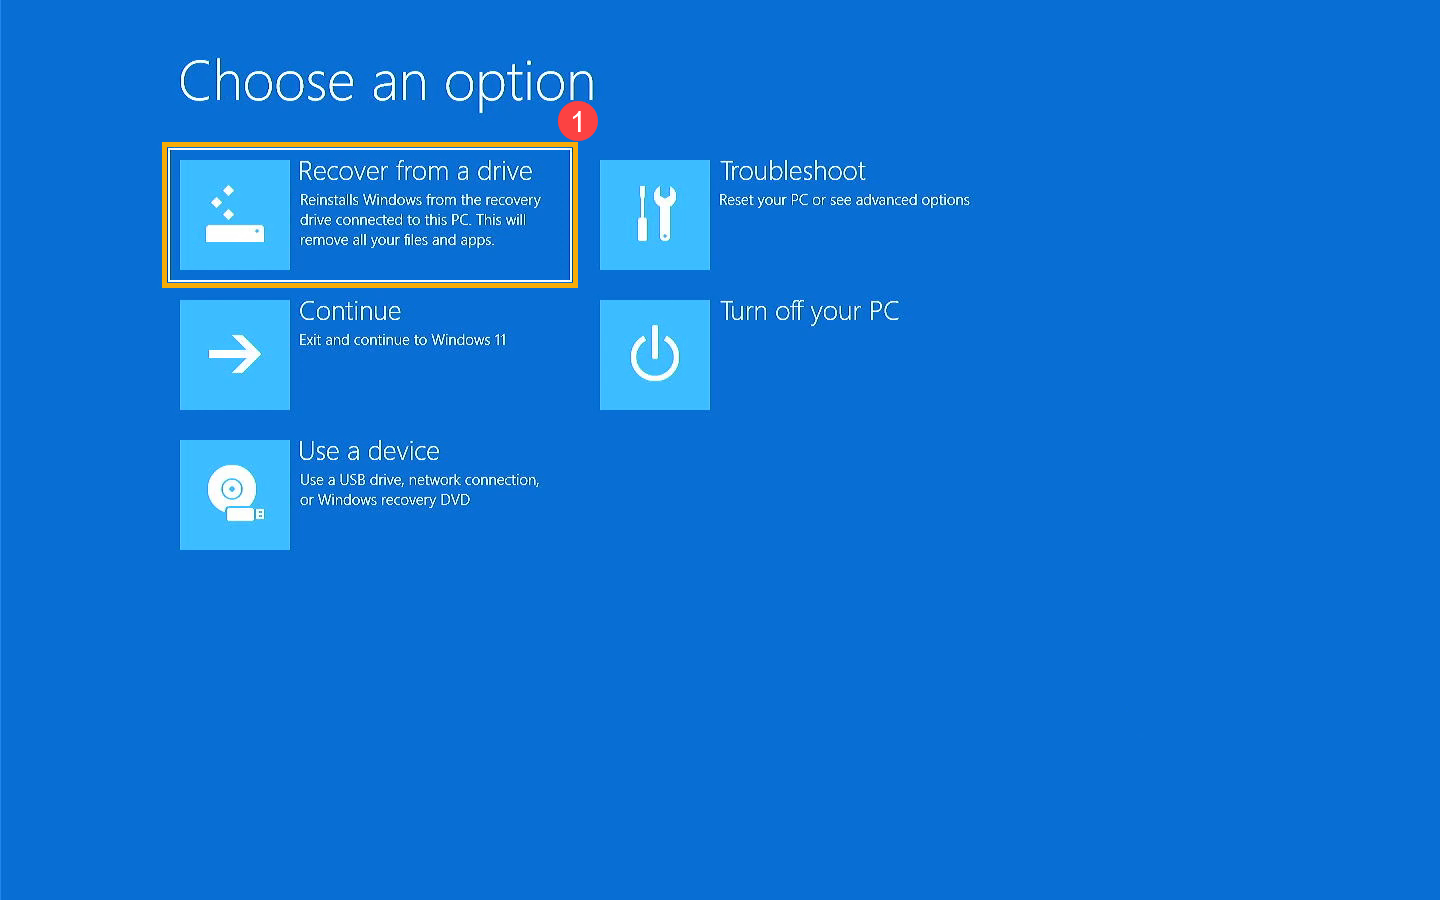
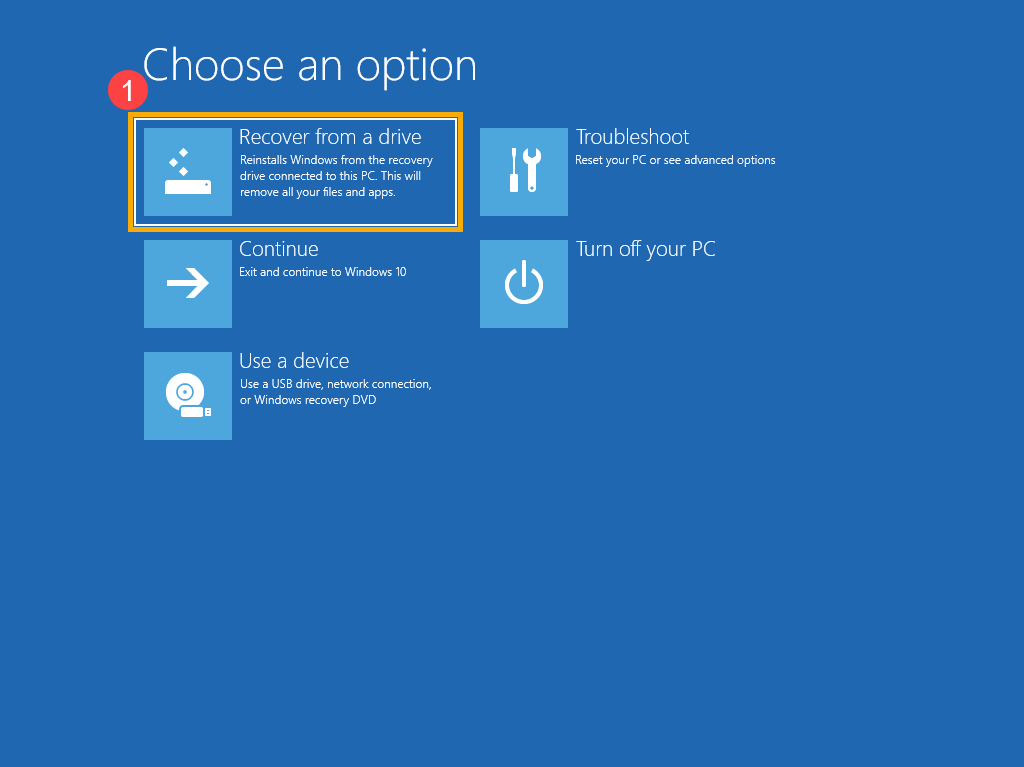
- Select [Recover from a drive]①.
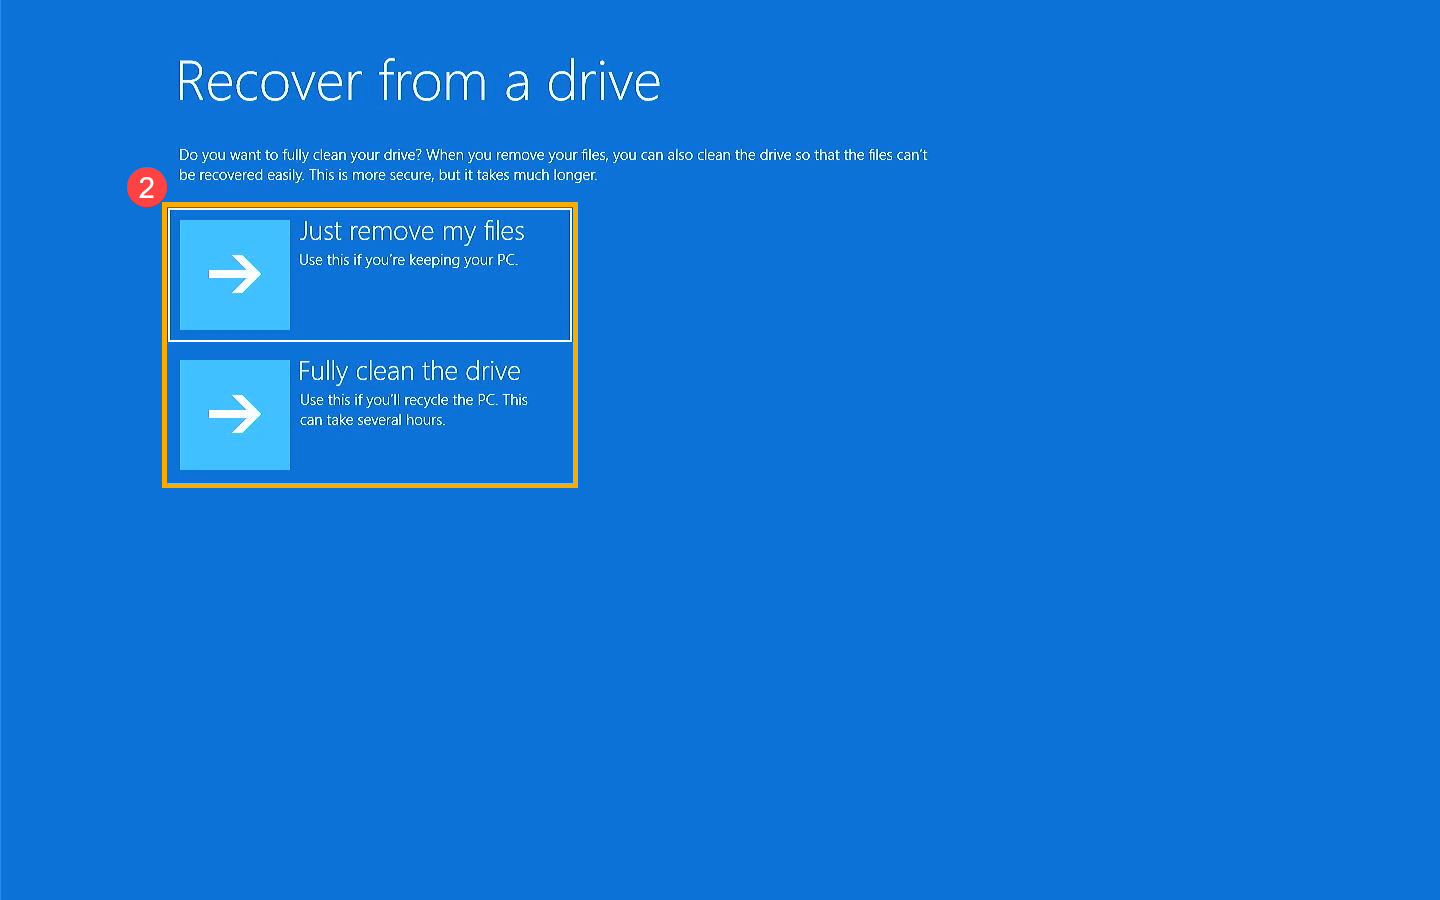
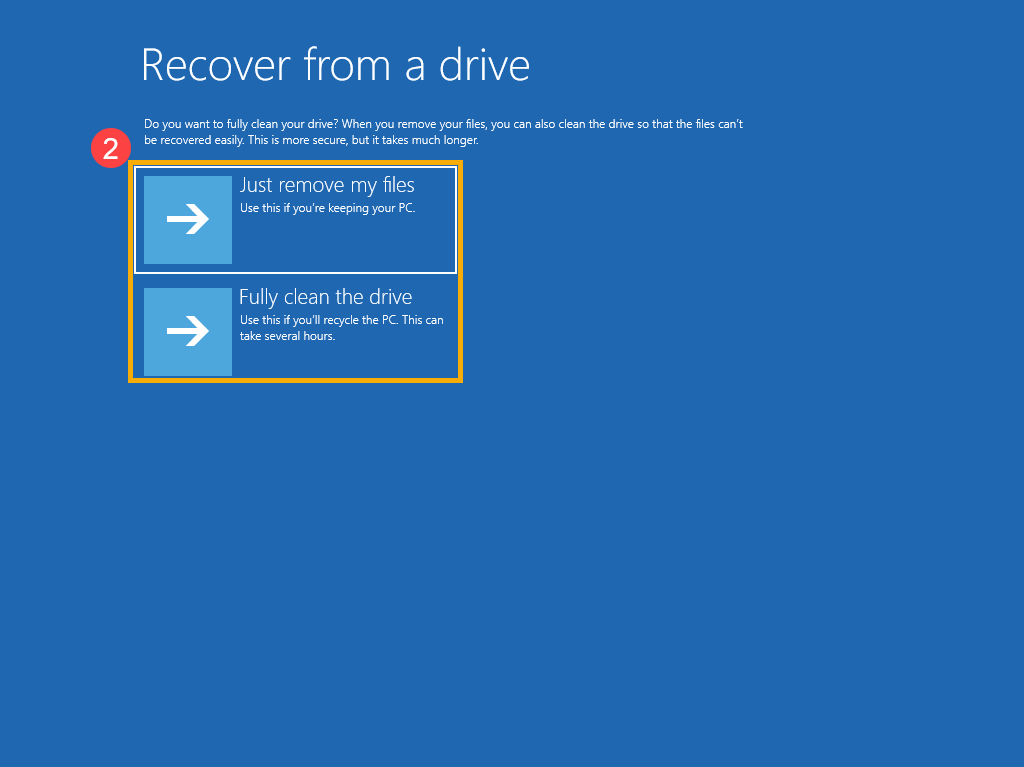
- You can choose Just remove my files or Fully clean the drive that is based on your demand②.
- Windows will remind you the following information about what will happen after recovering from a drive. Please select [Recover]③ to reinstall Windows.
Note: Please make sure the AC adapter is connected during the process, and do not force to shut down to prevent any issues.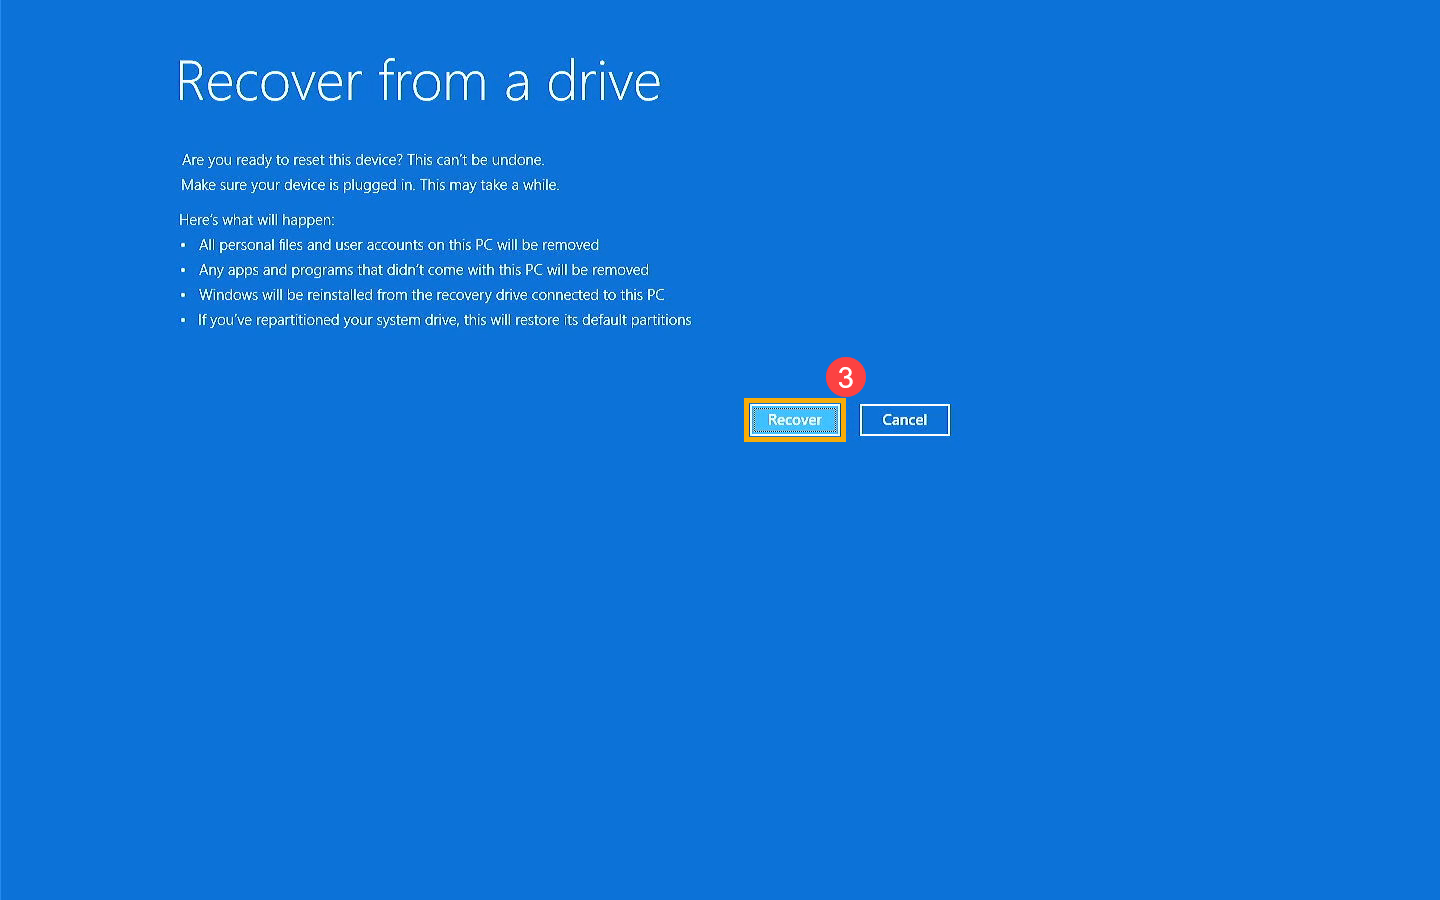
- The device will restart and enter the basic setting page of Windows after the recovery is completed, here you can learn more about Start for the first time (Windows OOBE).

Create a recovery drive
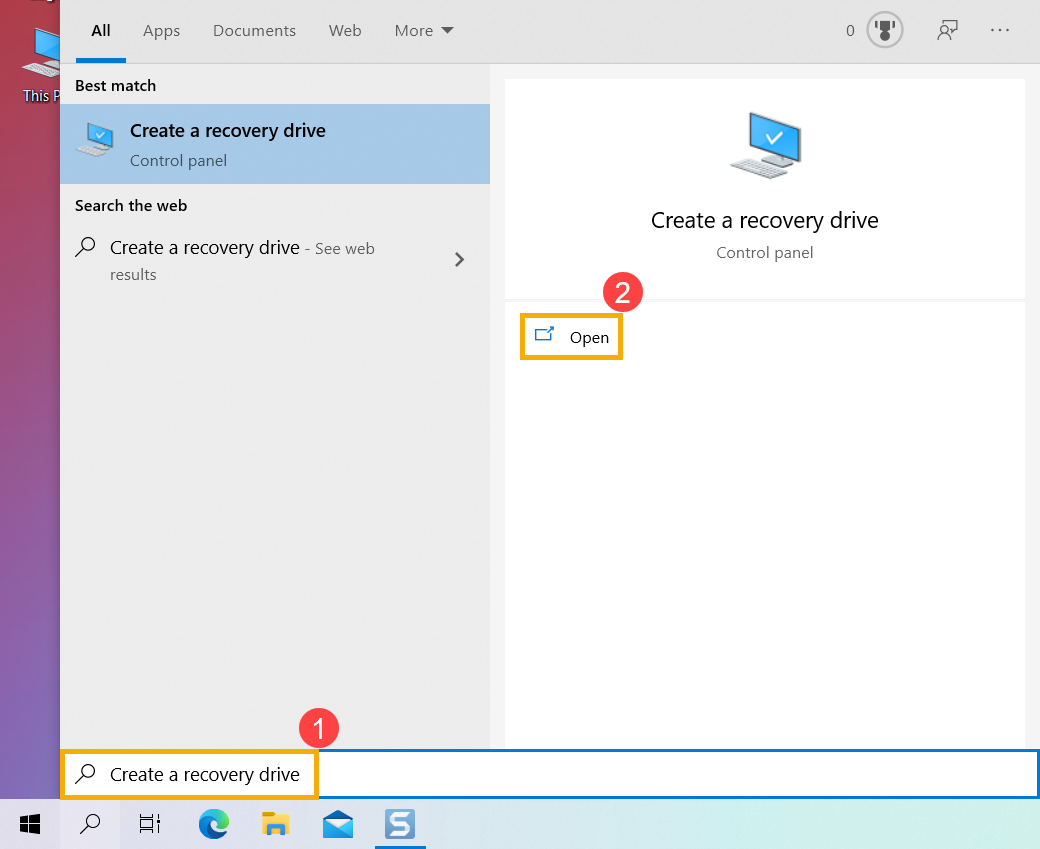
- Type and search [Create a recovery drive] in the Windows search bar①, then click [Open]②.
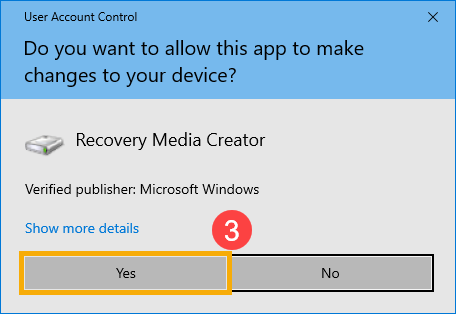
- If the User Account Control window displayed, please select [Yes]③.
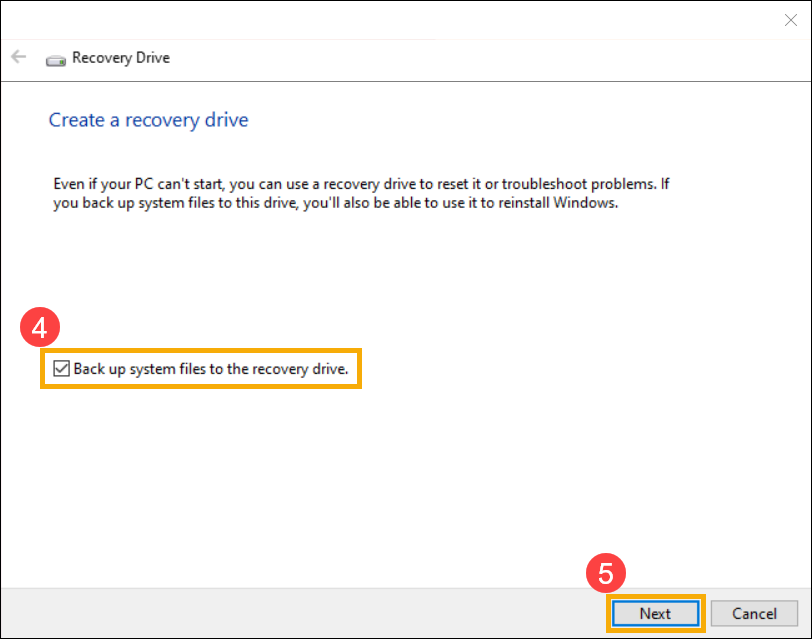
- Check the box to [Back up system files to the recovery drive]④, then select [Next]⑤.
- Connect the USB flash drive that you want to create as a recovery drive to your device.
Note: All files on the USB flash drive will be deleted during the process, so please back up your files first if you have data inside originally.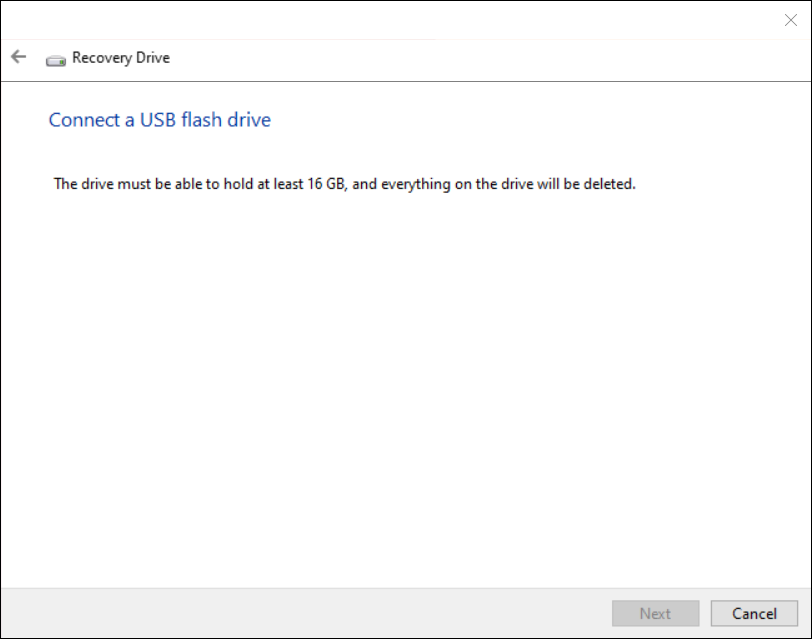
- In Available drive(s), confirm and select the USB flash drive that you want to use⑥, and then select [Next]⑦.
- Select [Create]⑧, and the system will start to create the recovery drive. The recovery image and necessary repair tools will be copied to your USB flash drive, and it will take a while, which depends on your device and the size of the recovery image.
Note: Please make sure the AC adapter is connected during the process, and do not force to shut down to prevent the creation is incomplete.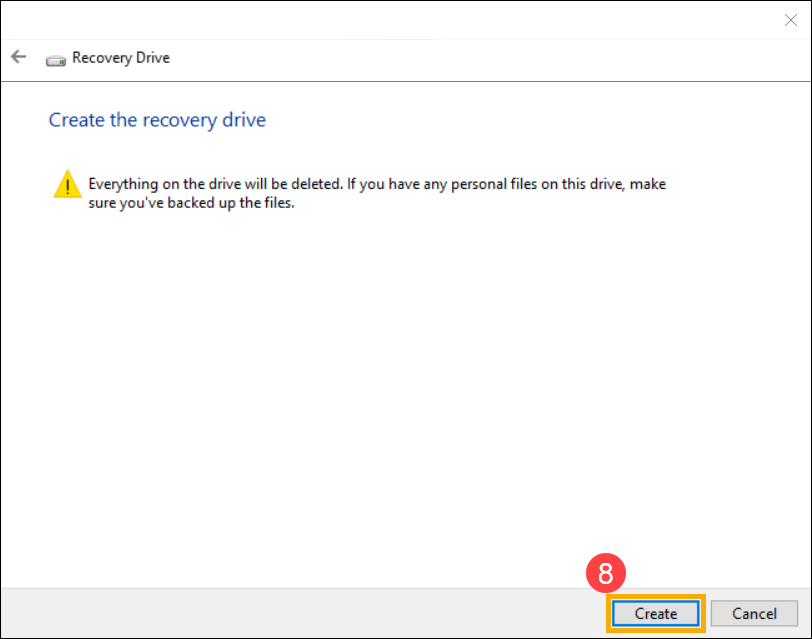
- The recovery drive has been created, please click [Finish]⑨.

- We recommend that you reproduce above steps to recreate the new recovery drive periodically because Windows will regularly update and improve security and performance.
Use the recovery drive to recover / restore your device
If you experience the device cannot boot, you can use the recovery drive to enter Windows Recovery Environment (WinRE), and then restore from a system restore point or reinstall Windows via the recovery drive.
- Connect the recovery drive (USB flash drive) to your device.
- Power on the device and select the boot option as the USB flash drive, here you can learn more about How to boot the system from USB drive/CD-ROM.
- The device will enter Windows Recovery Environment, and then please choose your keyboard layout.
- Then, you are able to select one of the following to recover your device: restore from a system restore point or reinstall Windows via the recovery drive.
If using the system restore point, your personal files will not be affected, but it will remove recently installed applications, drivers, and updates that might cause the problems to the device.
If reinstalling Windows, it will remove your personal files, applications and drivers you installed, and changes you did to settings.
Using the system restore point to restore the device
Note: The restore points mean the ones were created and recorded in your device, not the ones backed up inside the USB recovery drive.
- Select [Troubleshoot]①.
- Select [System Restore]②.
- Click [Windows 10]③.
- Start the restore system setting process, please select [Next]④.
- You will see the lists of all restore points, and please choose the one that you want to use⑤, and then select [Next]⑥. You also can select Scan for affected programs to check the affected result after choosing this restore point.
- Confirm the selected restore point information is correct or not, then select [Finish]⑦.
- Click [Yes]⑧ to start the restore process. The device will restart and enter Windows after the restore is completed.
Note: Please make sure the AC adapter is connected during the process, and do not force to shut down to prevent any issues.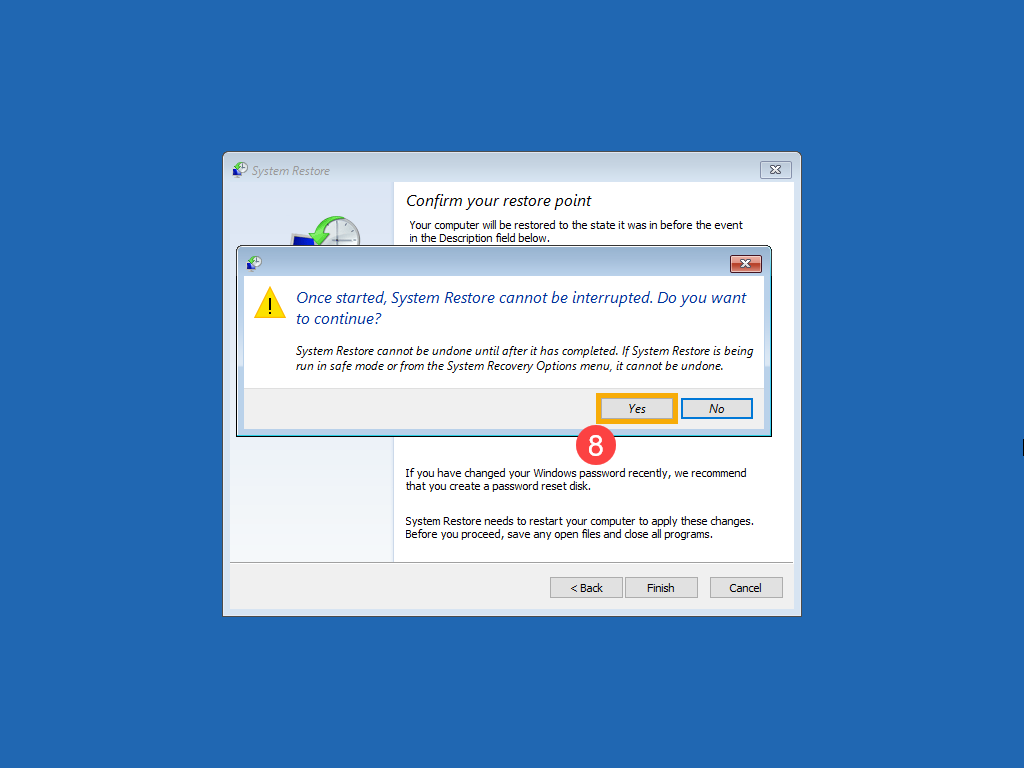
Using the recovery drive to reinstall Windows
- Select [Recover from a drive]①.
- You can choose Just remove my files or Fully clean the drive that is based on your demand②.
- Windows will remind you the following information about what will happen after recovering from a drive. Please select [Recover]③ to reinstall Windows.
Note: Please make sure the AC adapter is connected during the process, and do not force to shut down to prevent any issues.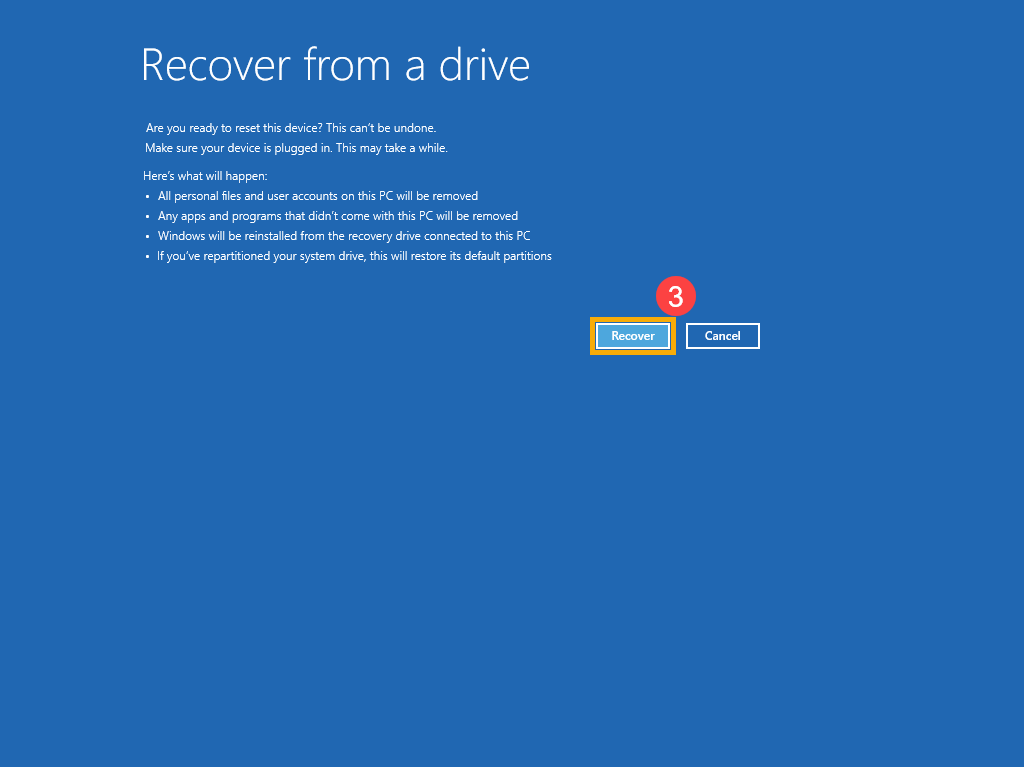
- The device will restart and enter the basic setting page of Windows after the recovery is completed, here you can learn more about Start for the first time (Windows OOBE).