[Motherboard]Intel 500 series and before and AMD board of how to create RAID in BIOS Setup
RAID:Redundant Arrays of Independent Disks
RAID define
RAID 0 : (Data striping) optimizes two identical hard disk drives to read and write data in parallel, interleaved stacks.
RAID 1 : (Data mirroring) copies and maintains an identical image of data from one drive to a second drive.
RAID 5 :strips both data and parity information across three or more hard disk drives.
RAID 10 is data striping and data mirroring combined without parity (redundancy data) having to be calculated and written.
RAID level | Min Drive | Security | merits | demerits |
|---|---|---|---|---|
| 0 | 2 | Low | High Speed | No Data mirroring |
| 1 | 2 | High | High security | Low disk capacity utilization |
| 5 | 3 | middle | High Speed | Slow write to single disk |
| 10 | 4 | High | Data striping Data mirroring | Need more disk |
※Note:Be cautious when create or deleting a RAID set. You will lose all data on the hard disk drives when you delete a RAID set, so please back up your data before create or deleting a RAID set.
Follow below setup to create RAID in BIOS setup:
Content
Q1: How to Install the RAID controller driver during Windows® 10 or Windows® 11 OS installation?
Q2: How to delete a RAID set?
(PRIME Z490M-PLUS as example)
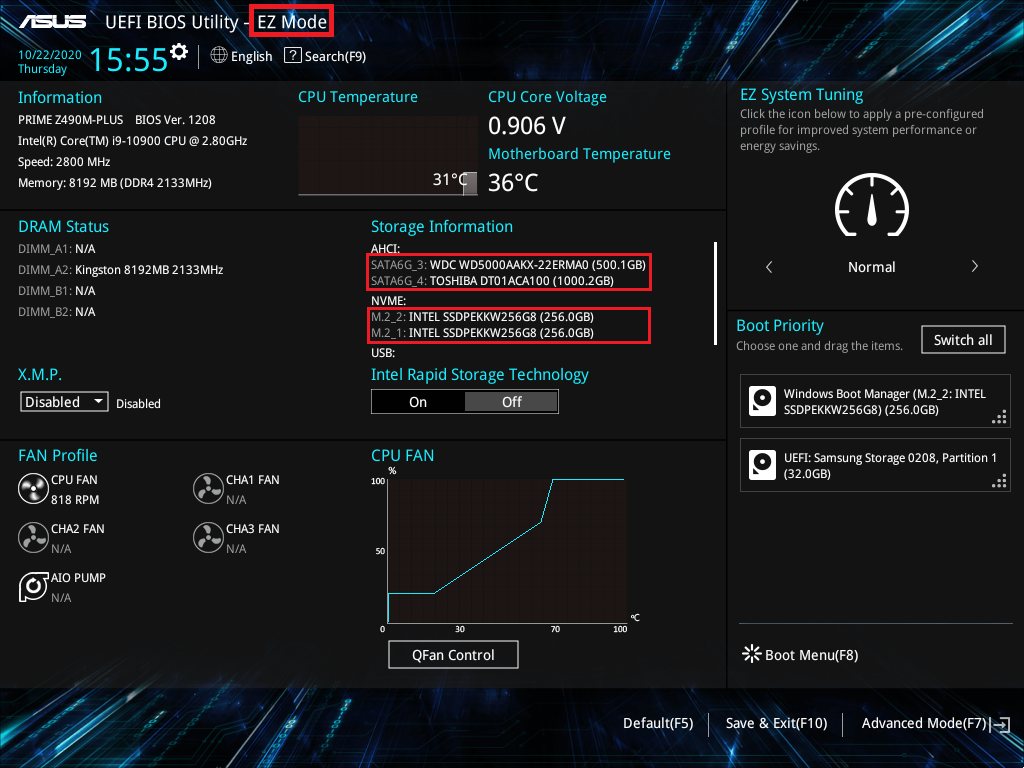
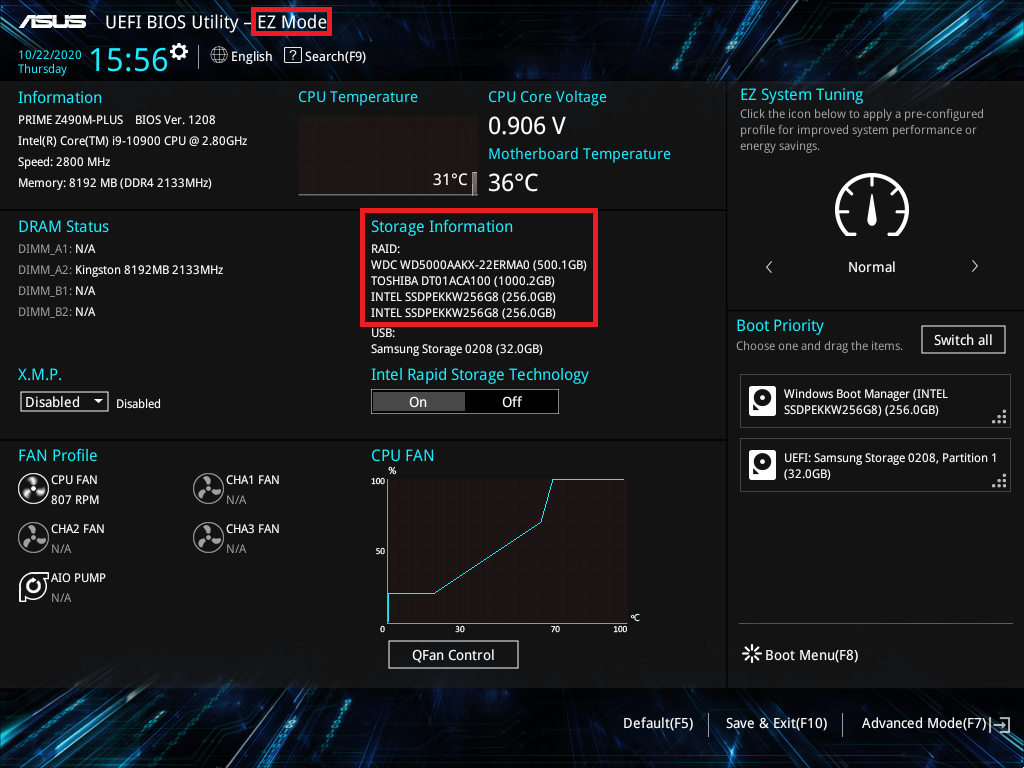
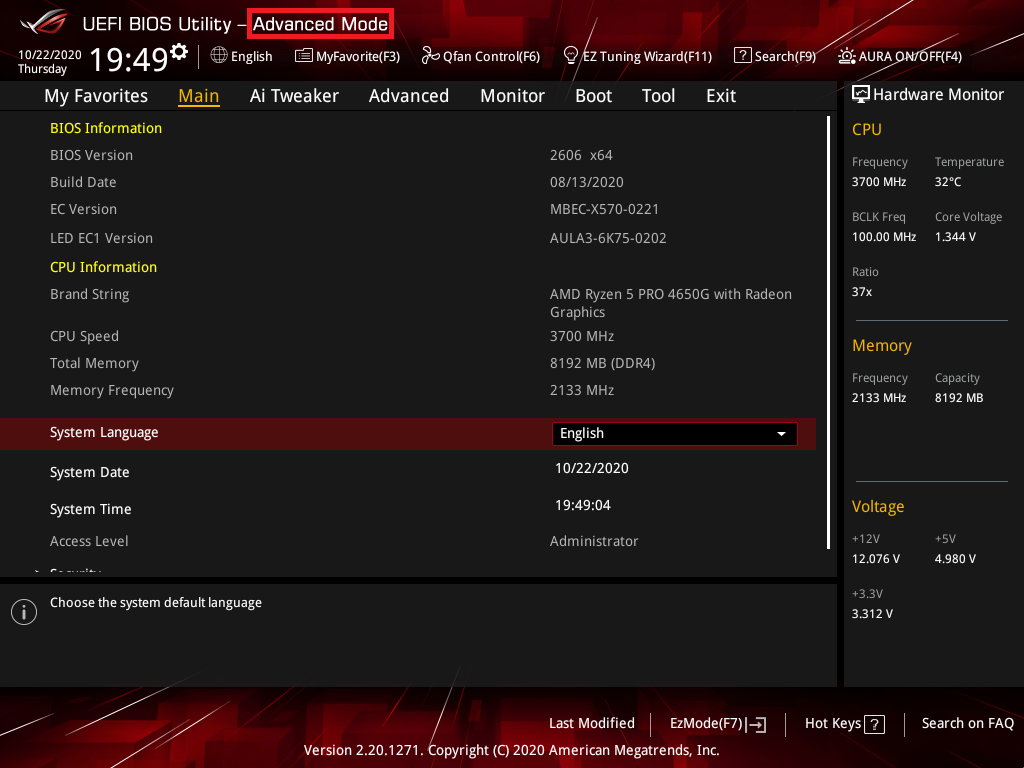
1. Power on the system and press“delete”key to enter BIOS [EZ Mode],check the connect drive in Storage Information
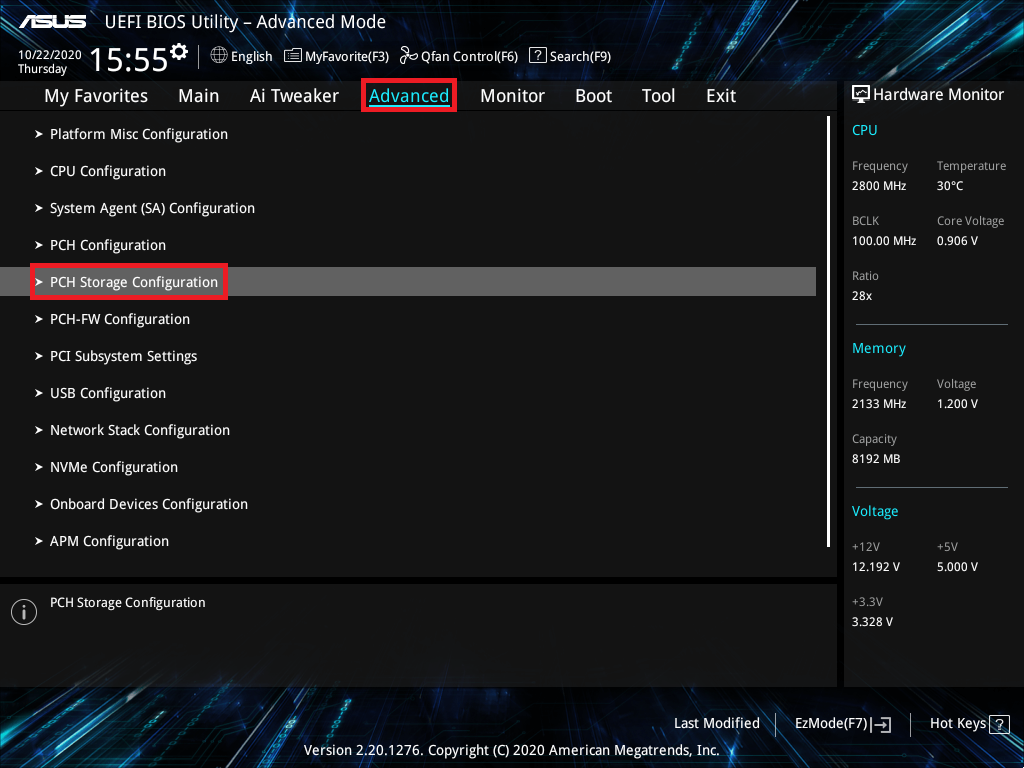
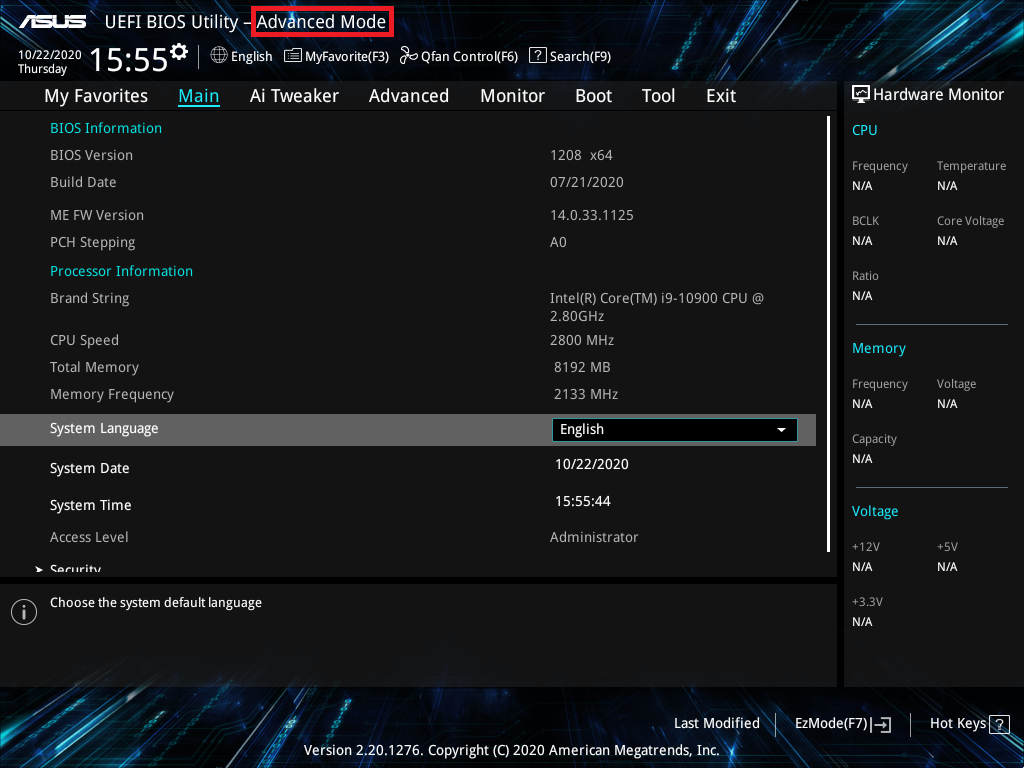
2. Press F7 key and enter [Advanced Mode] as below picture

(If press “delete” key enter [Advanced Mode] directly and then no need to press F7 key)
3. Click [PCH Storage Configuration] item on Advanced page
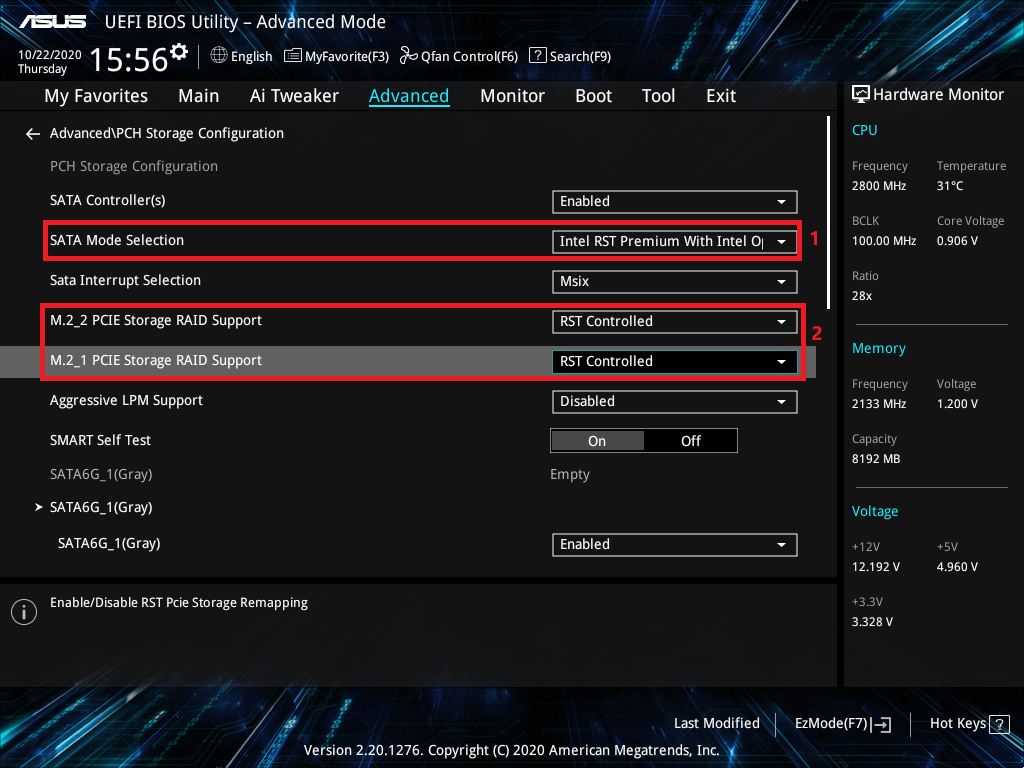
4. [SATA Mode Selection] item and set to [Intel RST Premium With Intel Optane System Acceleration(RAID)],as below picture mark red 1
If you only create SATA RAID , then just follow next setup
If you want to create M.2 Storage RAID to [Enabled],as below picture mark red 2
As below:click [M.2_1 PCIE Storage RAID Support] and set to [RST Controlled]
Click [M.2_2 PCIE Storage RAID Support] and set to [RST Controlled]
5. Click [Boot] page and set [Launch CSM] item to [Disabled]
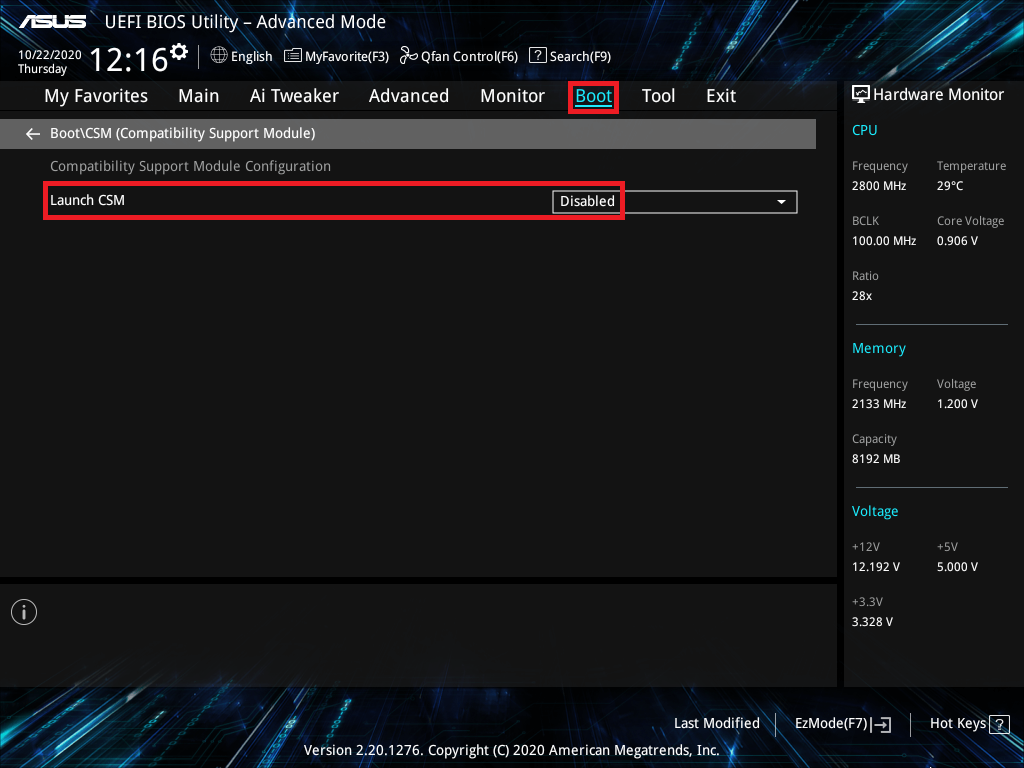
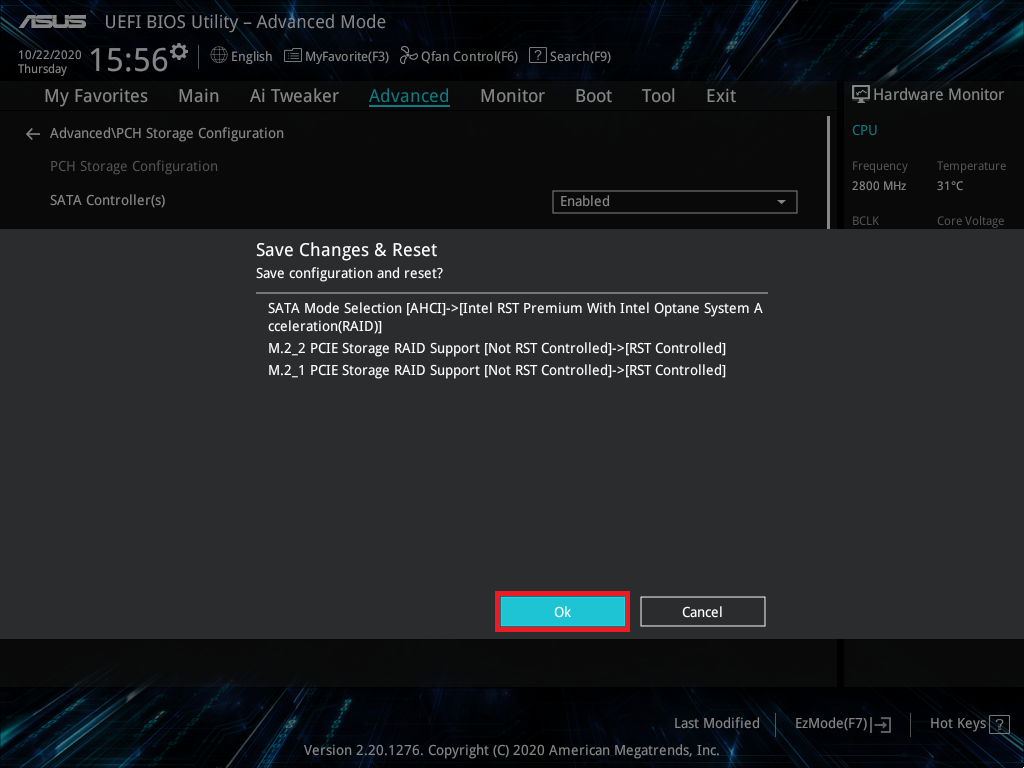
6. Press F10 key and click OK then the system will auto reboot
7. Press “delete”key after the system reboot and enter BIOS [EZ Mode]
8. Press F7 key and enter [Advanced Mode] as below picture
(If press “delete” key enter [Advanced Mode] directly and then no need to press F7 key)
9. Click [Advanced] page and click [Intel(R) Rapid Storage Technology] item
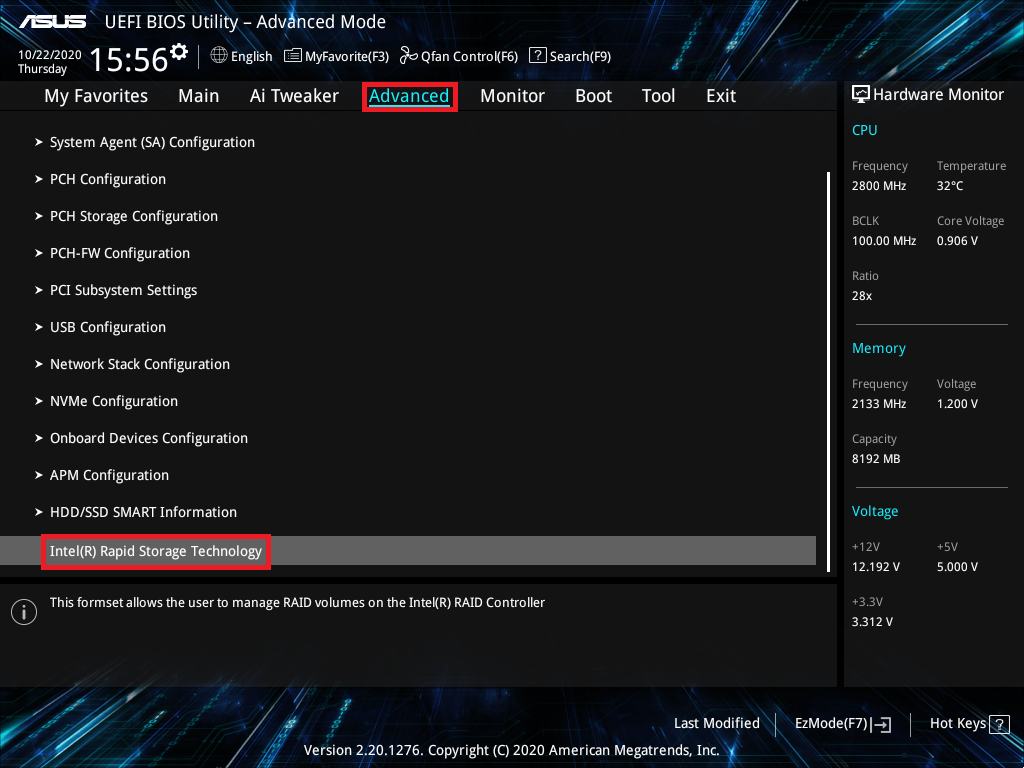
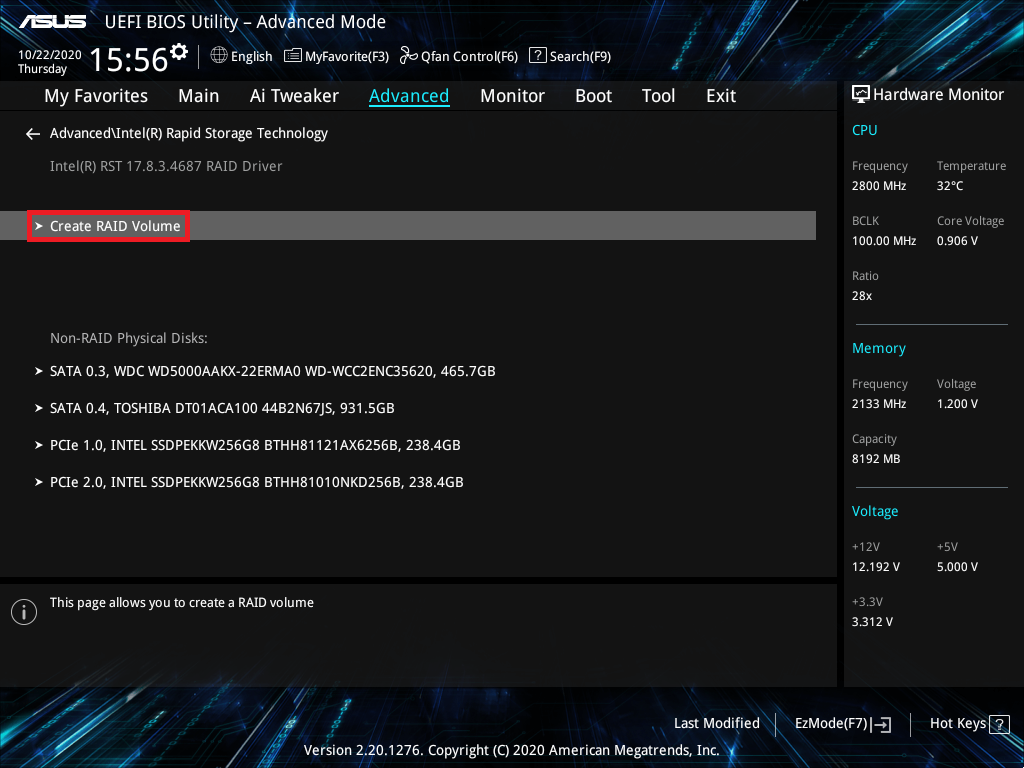
10. Click [Create RAID Volume] item
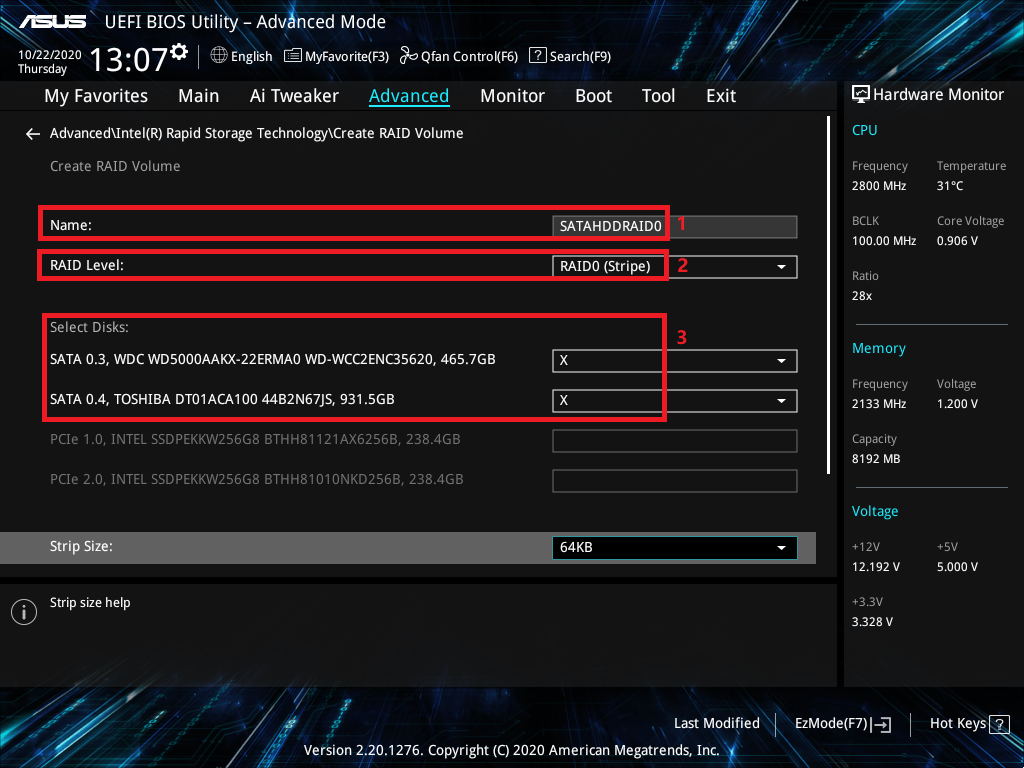
11. Set RAID name ,for example :SATAHDDRAID0,as below picture mark red 1
Choose RAID Level, for example :RAID0(Stripe),as below picture mark red 2
Select the disks that you want to create and set to [X],as below picture mark red 3
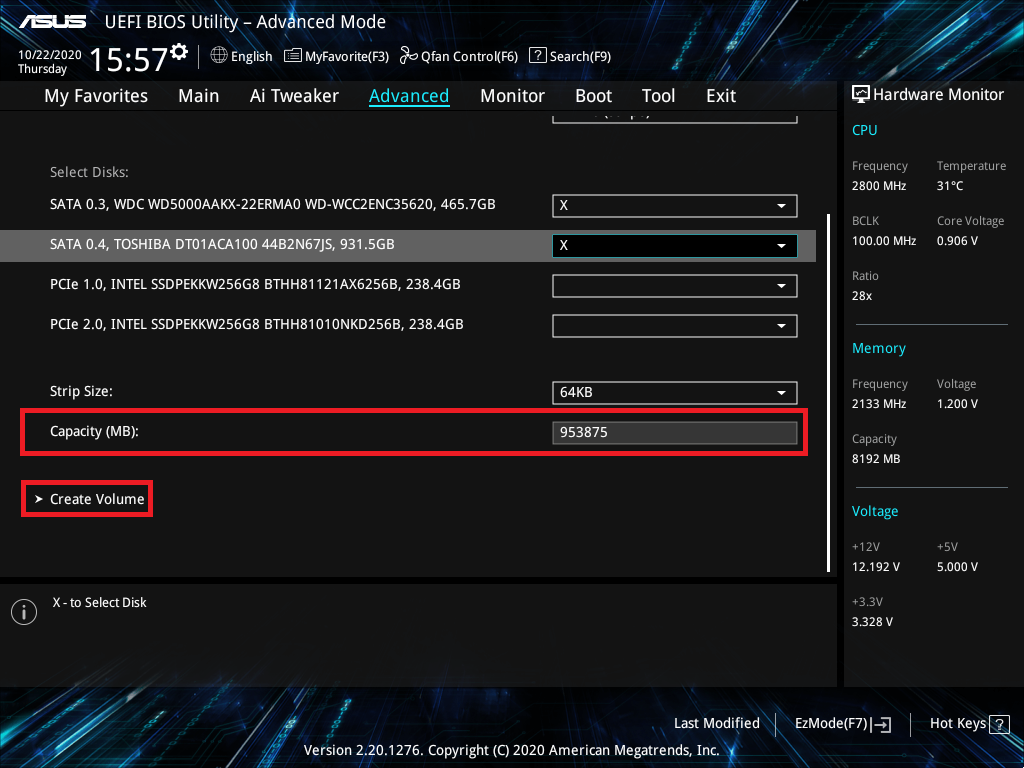
12. Set RAID capacity and click [Create Volume] to create RAID
Below is set the max RAID capacity
※Note:Be cautious when create or deleting a RAID set. You will lose all data on the hard disk drives when you delete a RAID set, so please back up your data before create or deleting a RAID set.
(ROG STRIX X570-E GAMING as example)
1. Power on the system and press“delete”key to enter BIOS [Advanced Mode]
(If press “delete”key and enter BIOS [EZ Mode] ,then please press F7 key again to enter BIOS [Advanced Mode])
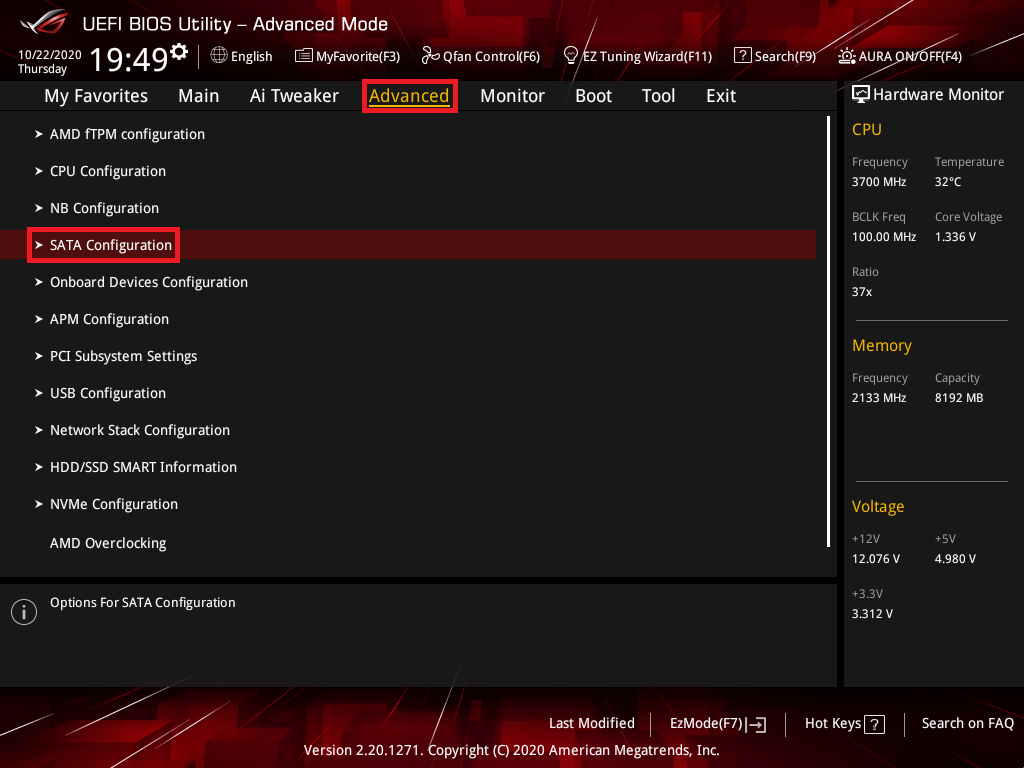
2. Click [Advanced] page and click [SATA Configuration] item
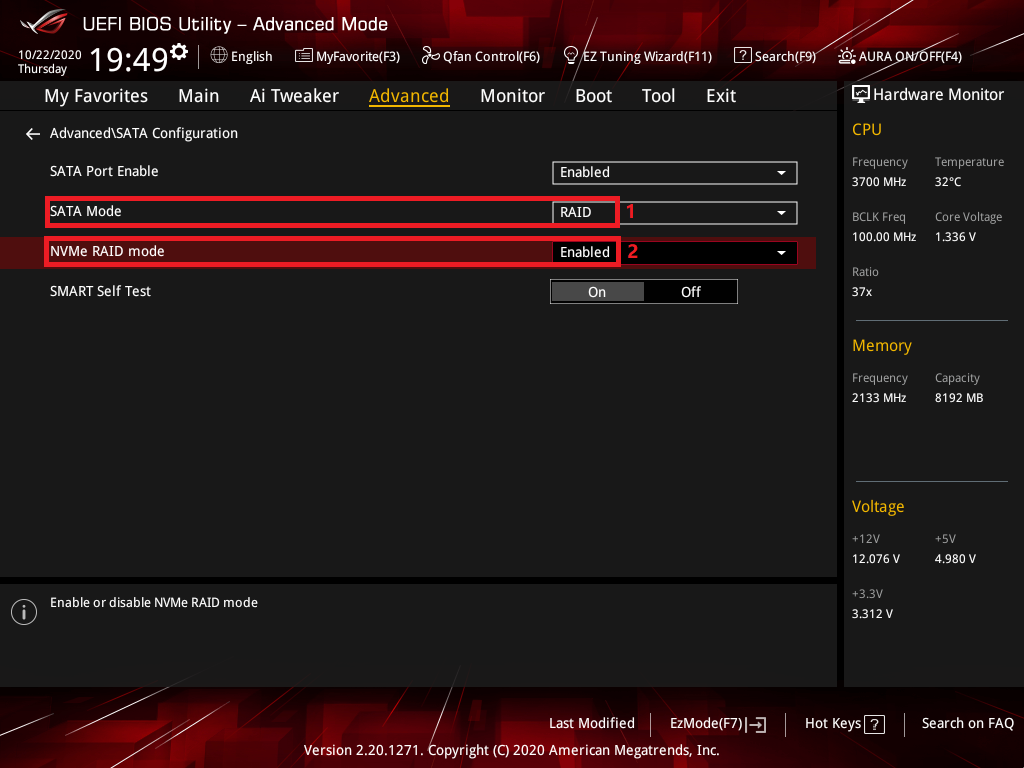
3. Click [SATA Mode] item and set to [RAID],as below picture mark red 1
If you only create SATA RAID , then just follow next setup
If you want to create M.2 Storage RAID to [Enabled],as below picture mark red 2
4. Click [Boot] page and set [Launch CSM] item to [Disabled]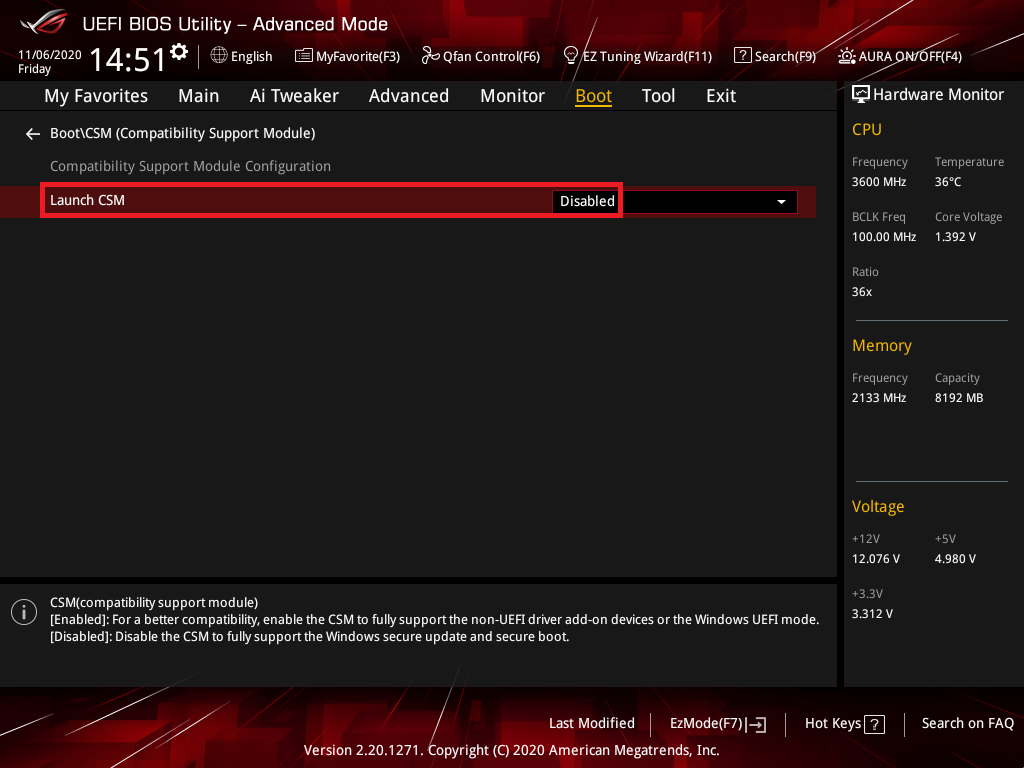
5. Press F10 key and click OK ,then the system will auto reboot

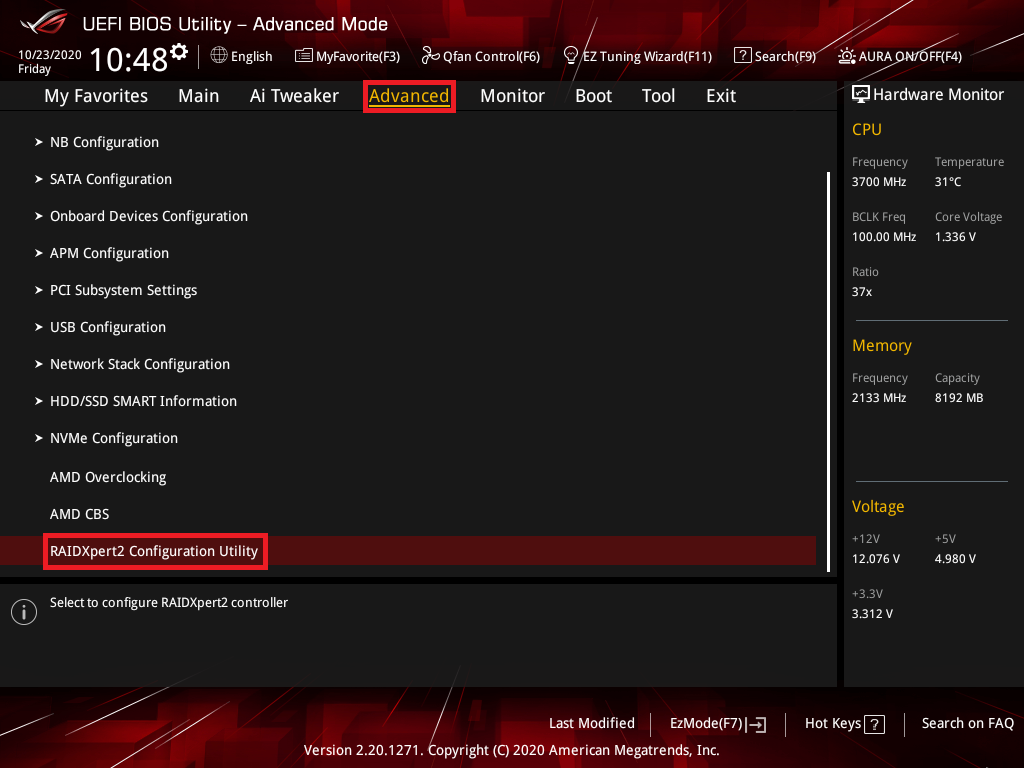
6. Press “delete”key to enter BIOS [Advanced Mode]when the system reboot,click [Advanced] page and click [RAIDXpert2 Configuration Utility] item
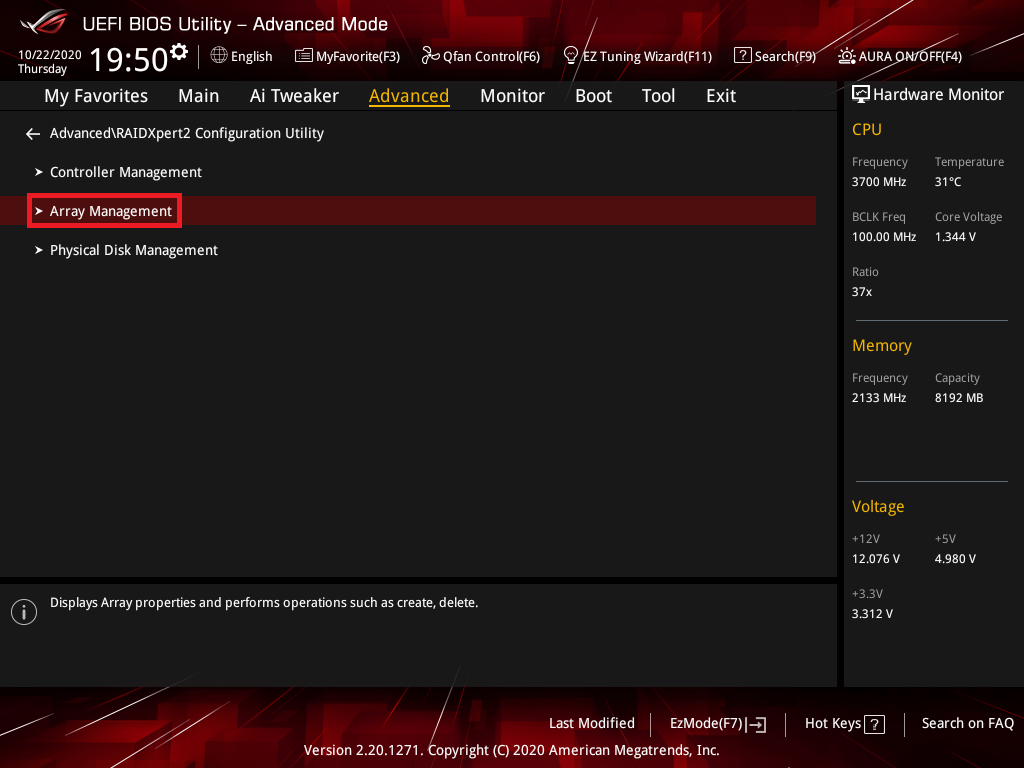
7. Click [Array Management] item
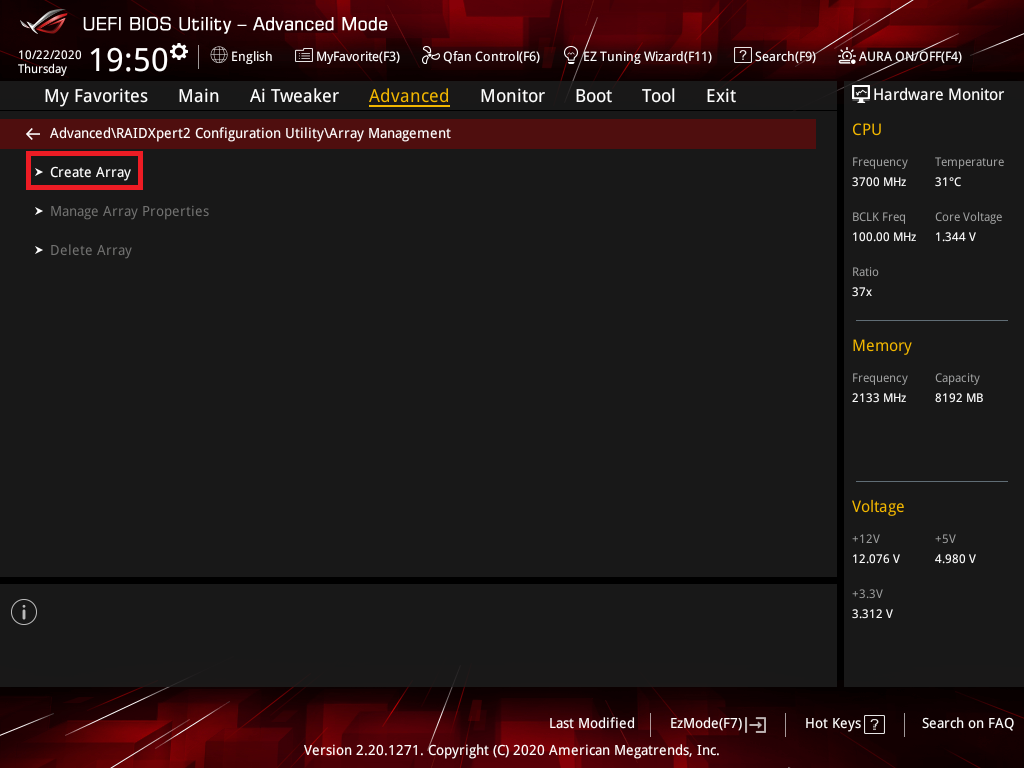
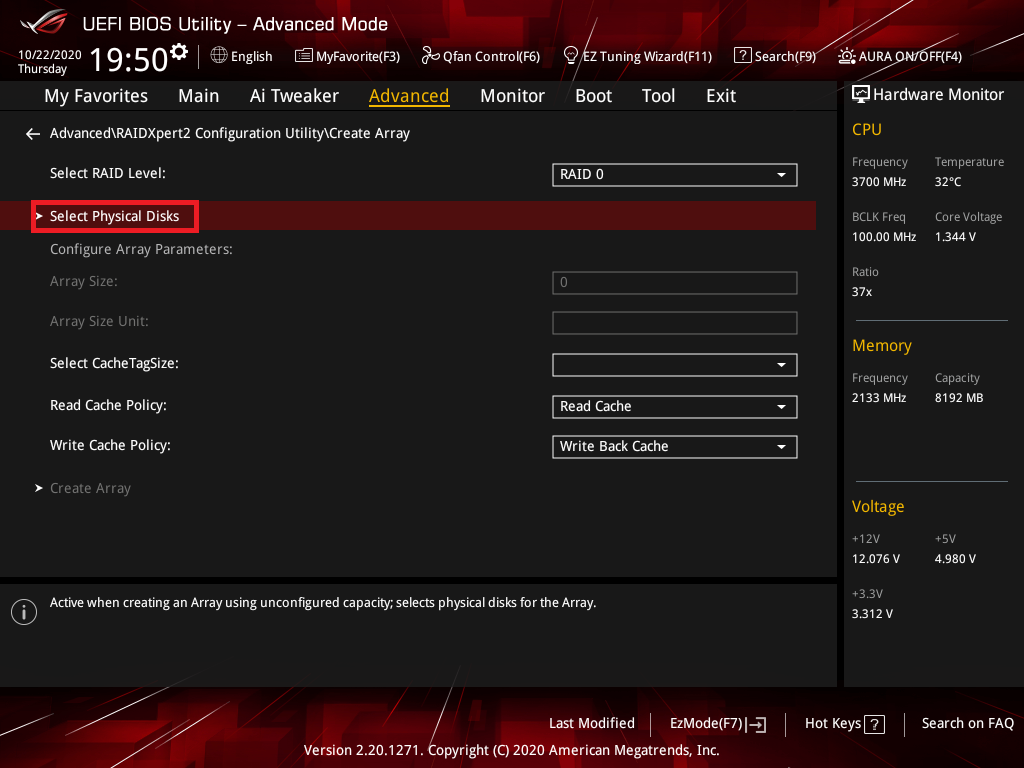
8. Click [Create Array] item
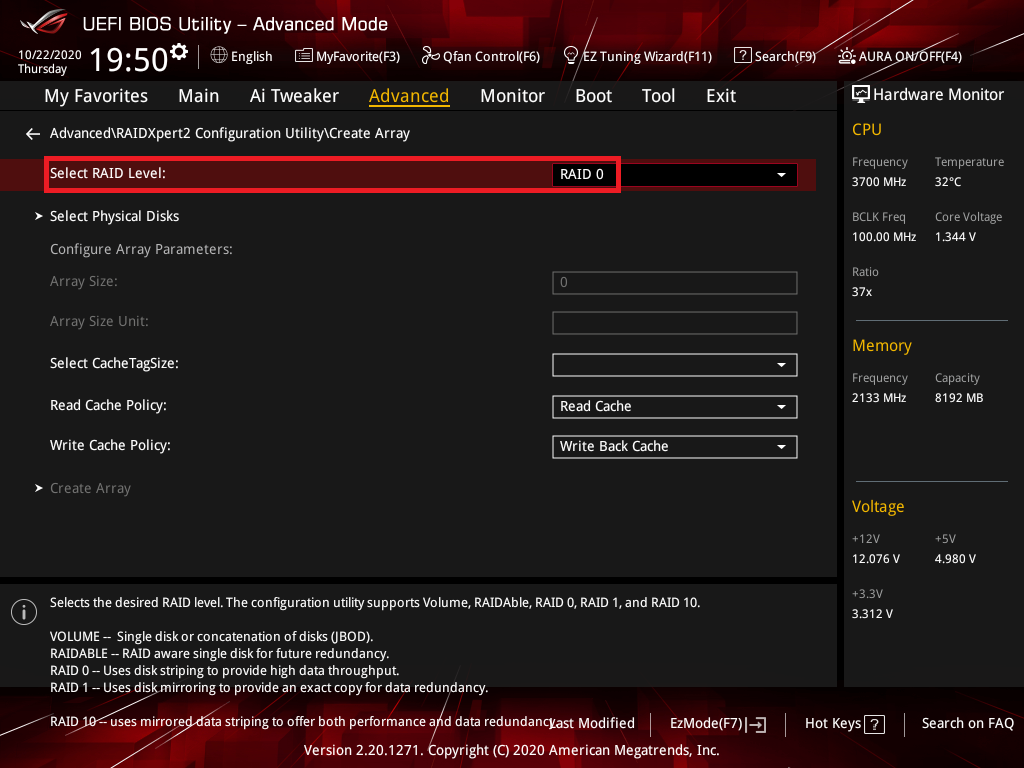
9. Click [Select RAID Level] item and set RAID level,below is set [RAID 0] as example
10. Click [Select Physical Disks] item
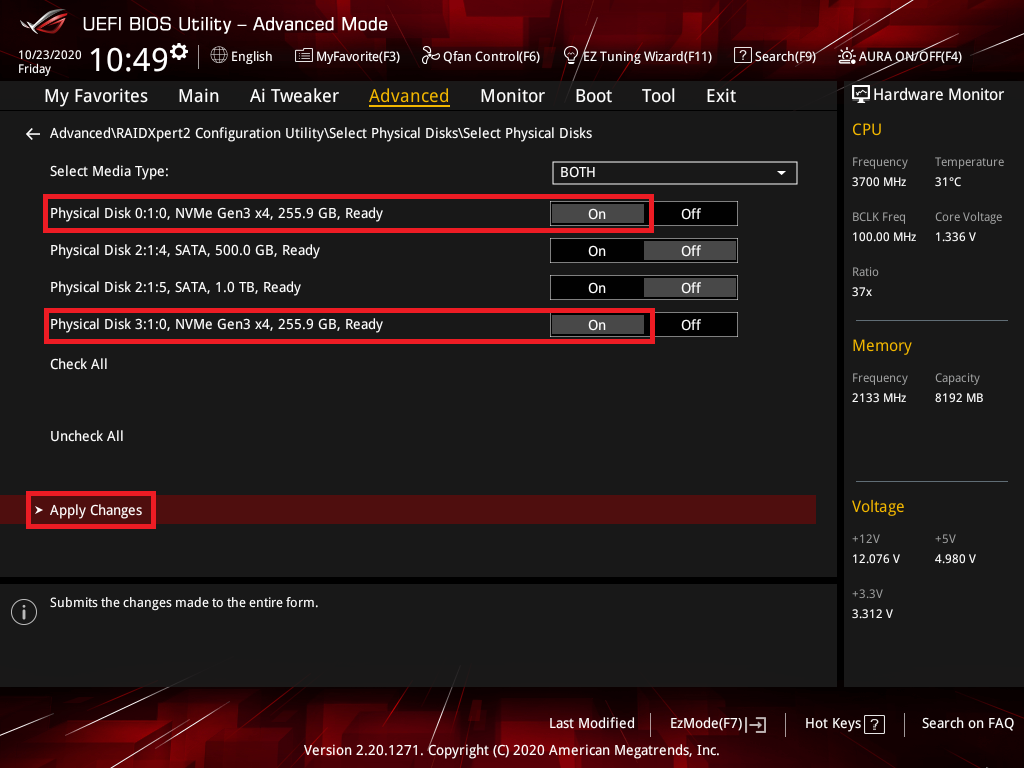
11. Select the disks that you want to create and set to [On] ,click [Apply Changes] item
(Select Disk0 and Disk3 as example)
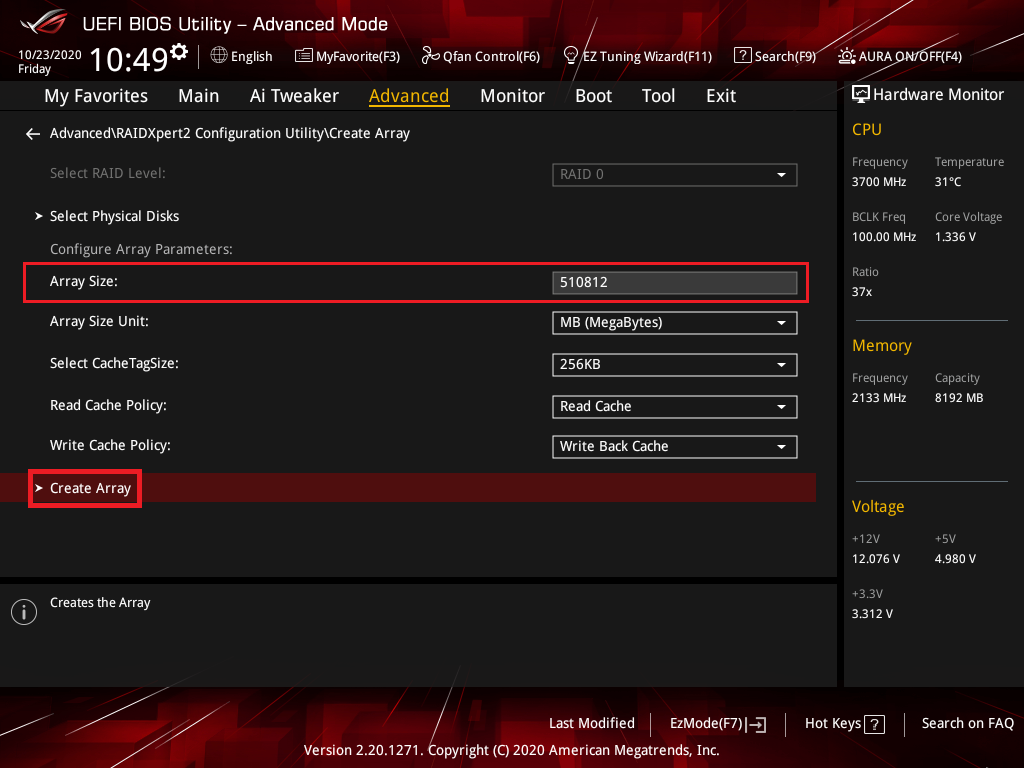
12. Set Array Size and click [Create Array] item
Below is set the max Array Size
※Note:Be cautious when create or deleting a RAID set. You will lose all data on the hard disk drives when you delete a RAID set, so please back up your data before create or deleting a RAID set.
Q1: How to Install the RAID controller driver during Windows® 10 or Windows® 11 OS installation?
A1:
Intel Mother:
Please follow Windows Setup to Install the RAID controller driver during Windows® 10 or Windows® 11 OS installation:
- Boot the computer using the Windows® 10 or Windows® 11 OS installation disc. Follow the screen instructions to start installing Windows® 10 or Windows® 11
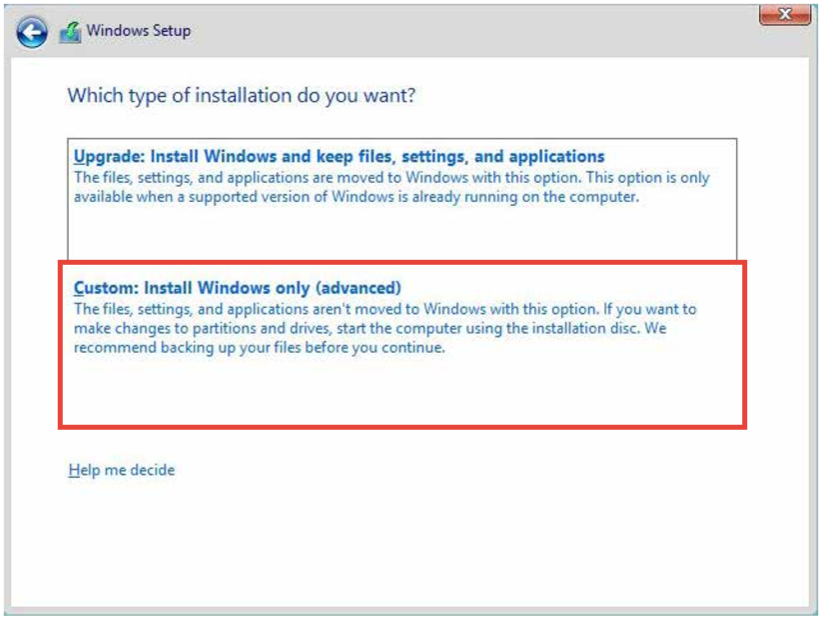
- When prompted to choose a type of installation, click Custom: Install Windows only (advanced).

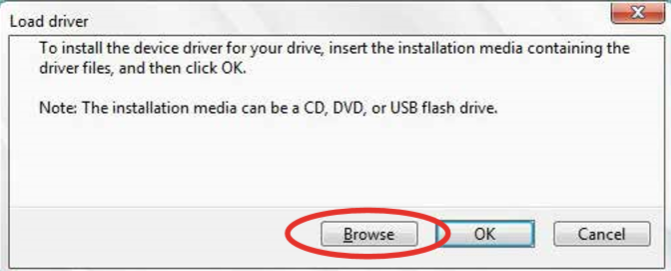
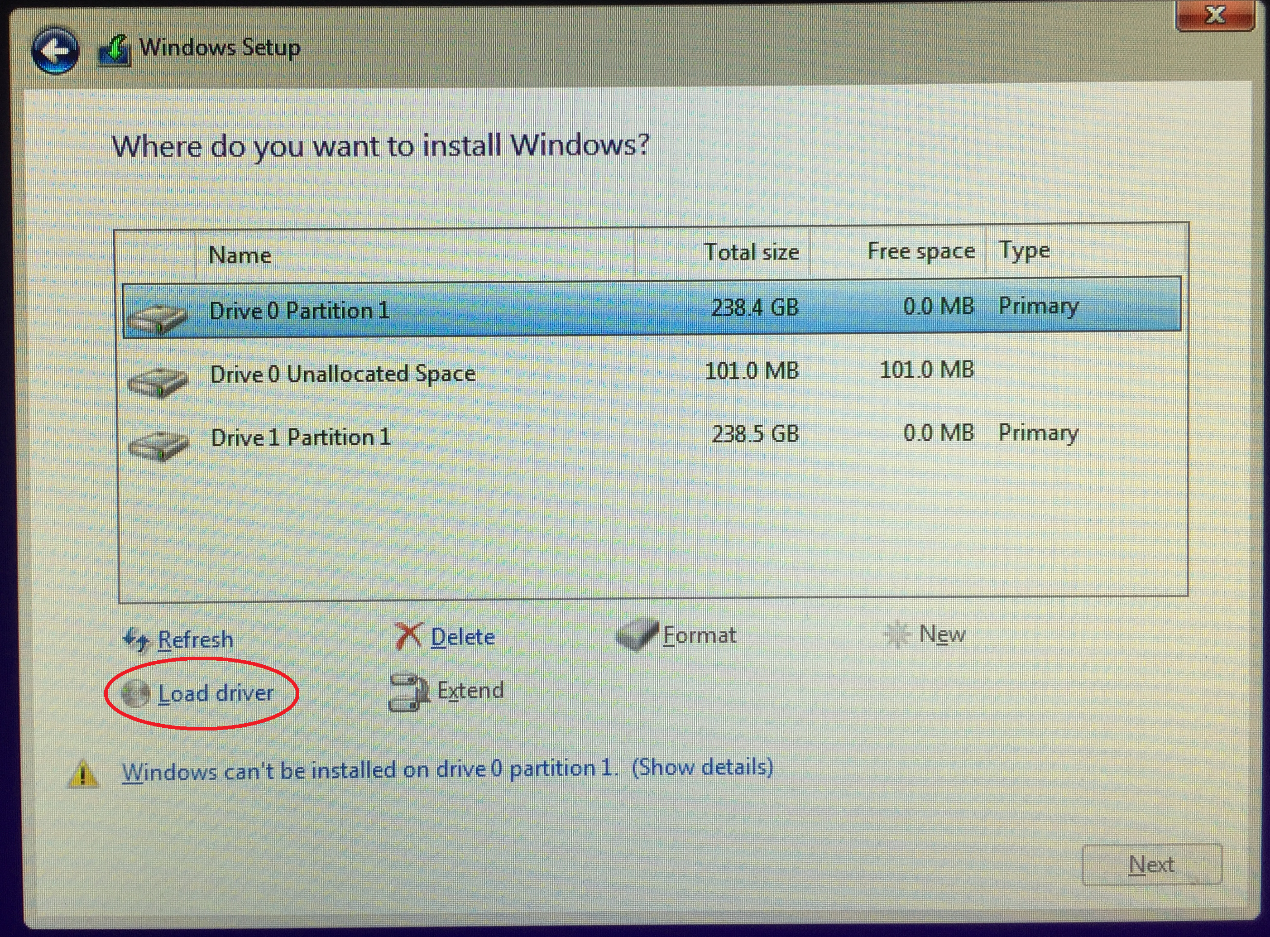
3. Click [Load Driver]
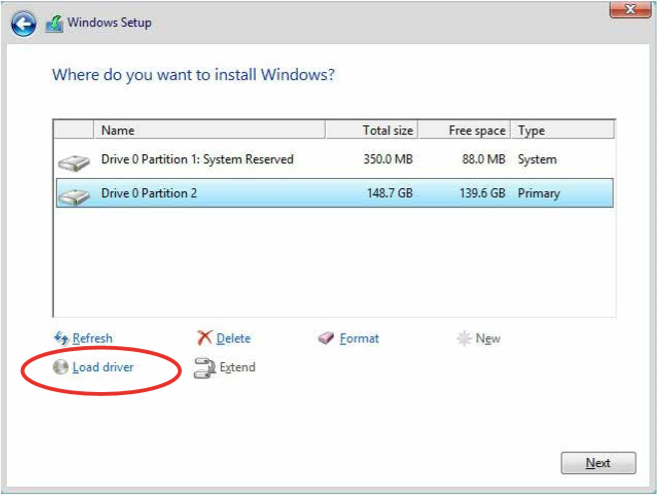
4. A message appears, reminding you to insert the installation media containing the driver of the RAID controller driver , Click Browse to continue
a. If you have only one optical drive installed in your system, eject the Windows OS installation disc and replace with the motherboard Support DVD into the optical drive
b.If you don’t have optical drive ,please copy the RAID driver to a USB Drive
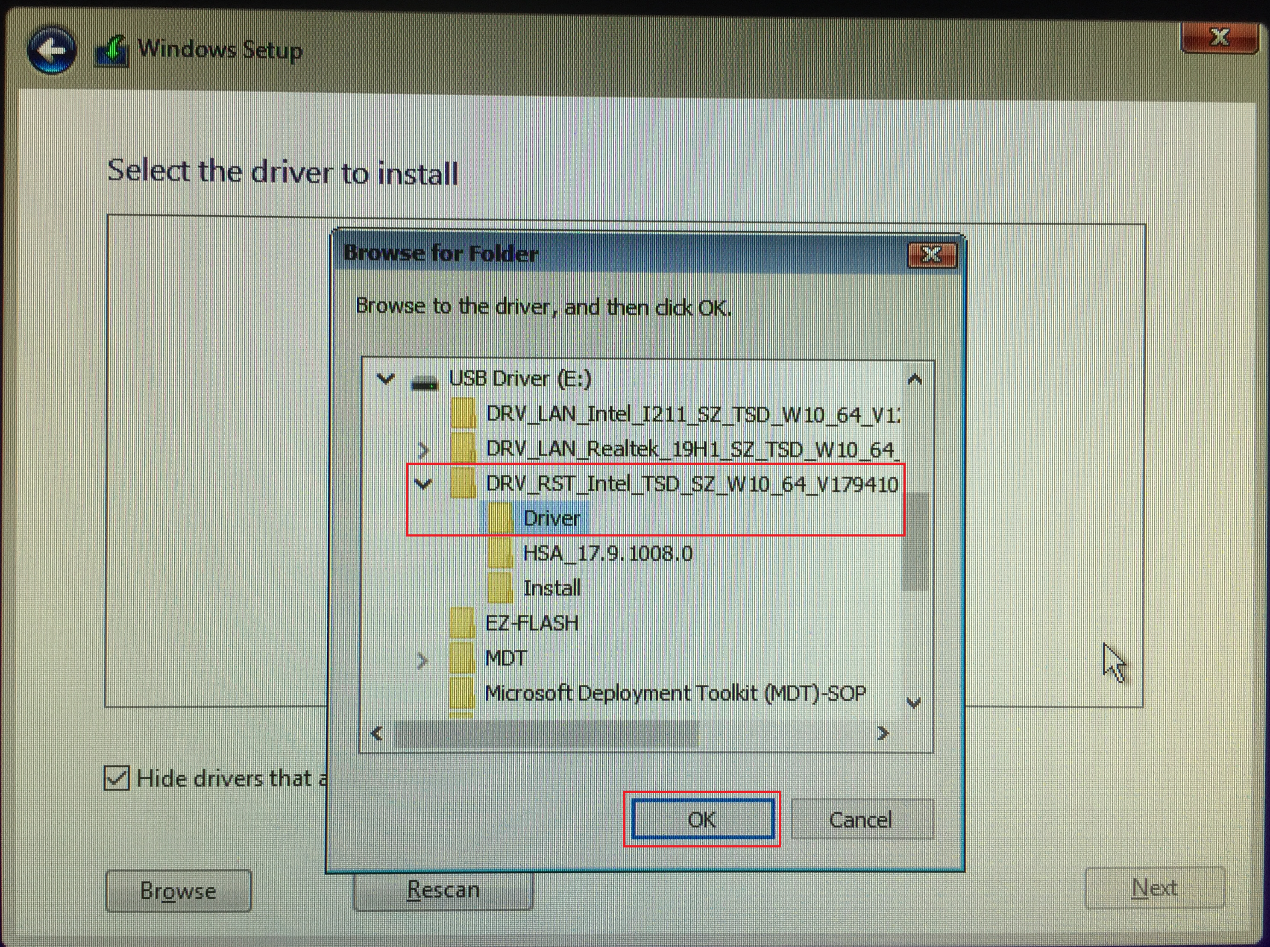
5. Locate the driver in the corresponding folder of the Support DVD then click OK to continue
AMD Motherboard:
Please follow Windows Setup to Install the RAID controller driver during Windows® 10 or Windows® 11 OS installation:
- Boot the computer using the Windows® 10 or Windows® 11 OS installation disc. Follow the screen instructions to start installing Windows® 10 or Windows® 11
- When prompted to choose a type of installation, click Custom: Install Windows only (advanced).
3. Click [Load Driver]
4. A message appears, reminding you to insert the installation media containing the driver of the RAID controller driver , Click Browse to continue
a. If you have only one optical drive installed in your system, eject the Windows OS installation disc and replace with the motherboard Support DVD into the optical drive
b. If you don’t have optical drive ,please copy the RAID driver to a USB Drive

5. Locate the driver in the corresponding folder of the Support DVD
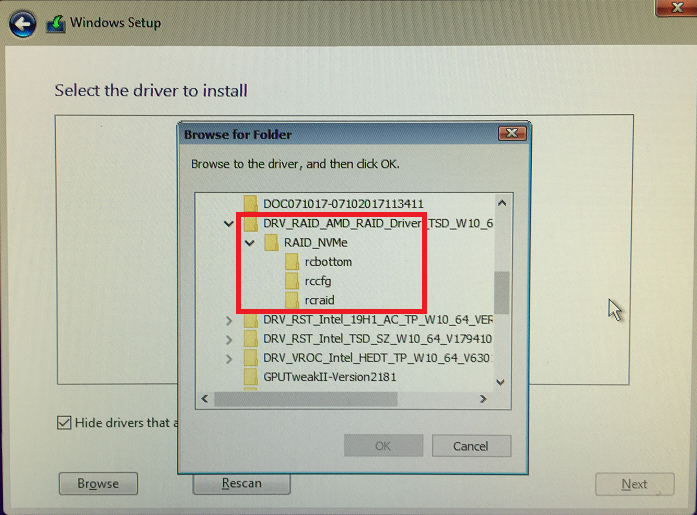
5. Select rcbottom folder and click OK to Load driver
6. Repeat Setup 3 to 5 and Select rcraid folder and click OK to Load driver
7. Repeat Setup 3 to 5 and Select rccfg folder and click OK to Load driver
Q2: How to delete a RAID set?
A2:
Intel Platform,
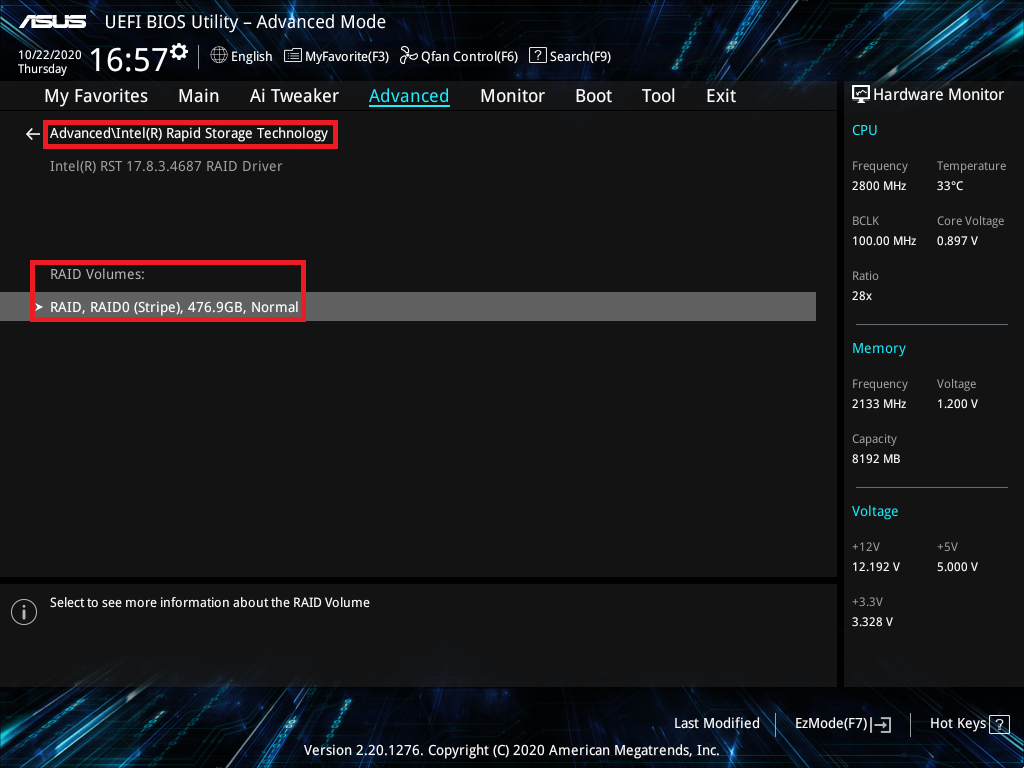
1. From the Intel® Rapid Storage Technology menu, select the RAID volume you want to delete and press <Enter>. The following screen appears:
2. When the Delete item is selected, press <Enter>, then select Yes to delete the RAID volume and return to the Intel® Rapid Storage Technology menu, or select No to cancel
※Note:Be cautious when create or deleting a RAID set. You will lose all data on the hard disk drives when you delete a RAID set, so please back up your data before create or deleting a RAID set.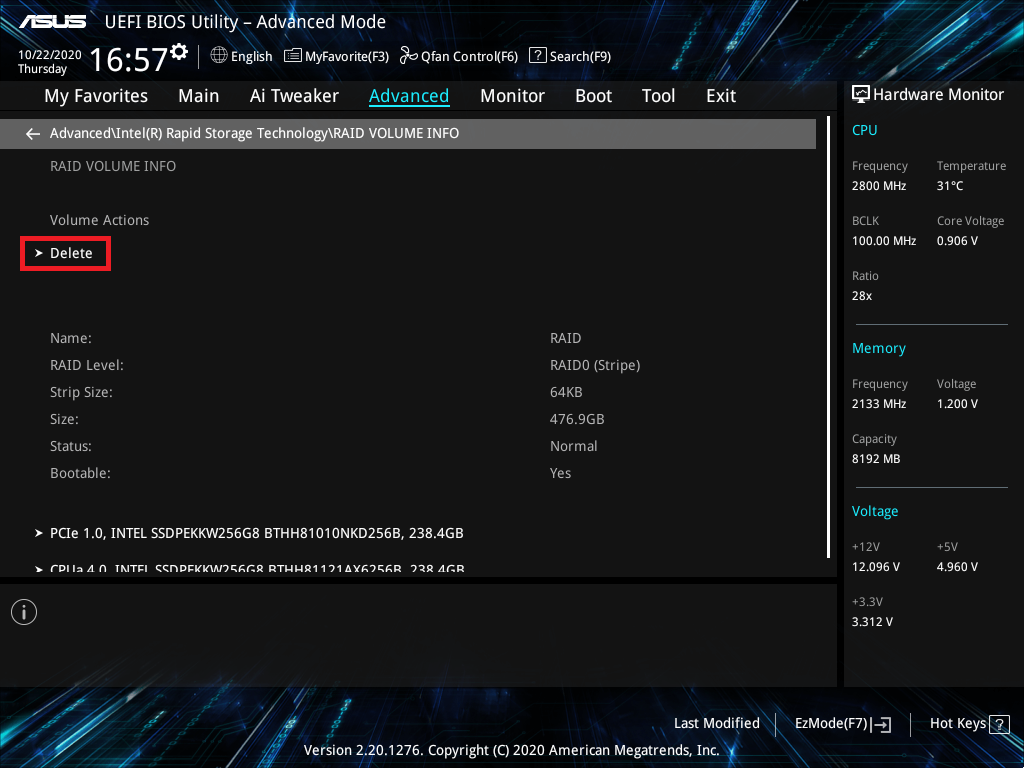
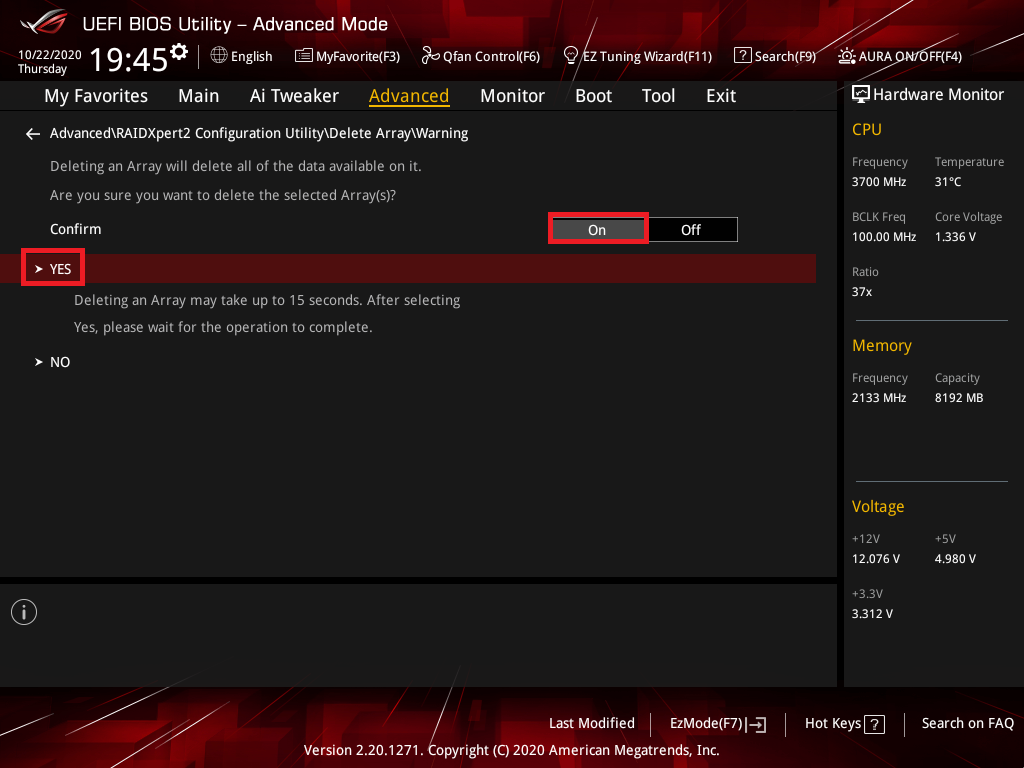
AMD Platform
1. From the RAIDXpert2 Configuration menu, select the [Delete Array] item and press <Enter>:
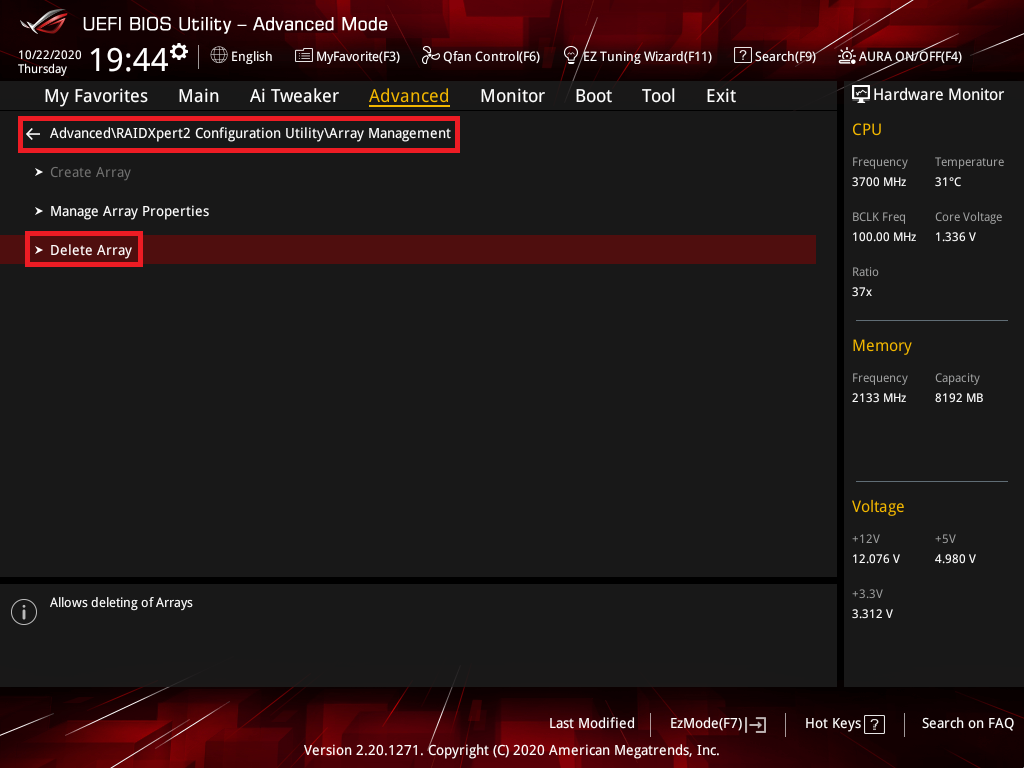
2. Select the RAID Array that you want to delete and set to [On]
Select [Delete Array(S)] item and press <Enter> key

3. Set Confirm item to on,and select [Yes] to delete RAID or NO to cancel
※Note:Be cautious when create or deleting a RAID set. You will lose all data on the hard disk drives when you delete a RAID set, so please back up your data before create or deleting a RAID set.
Q&A
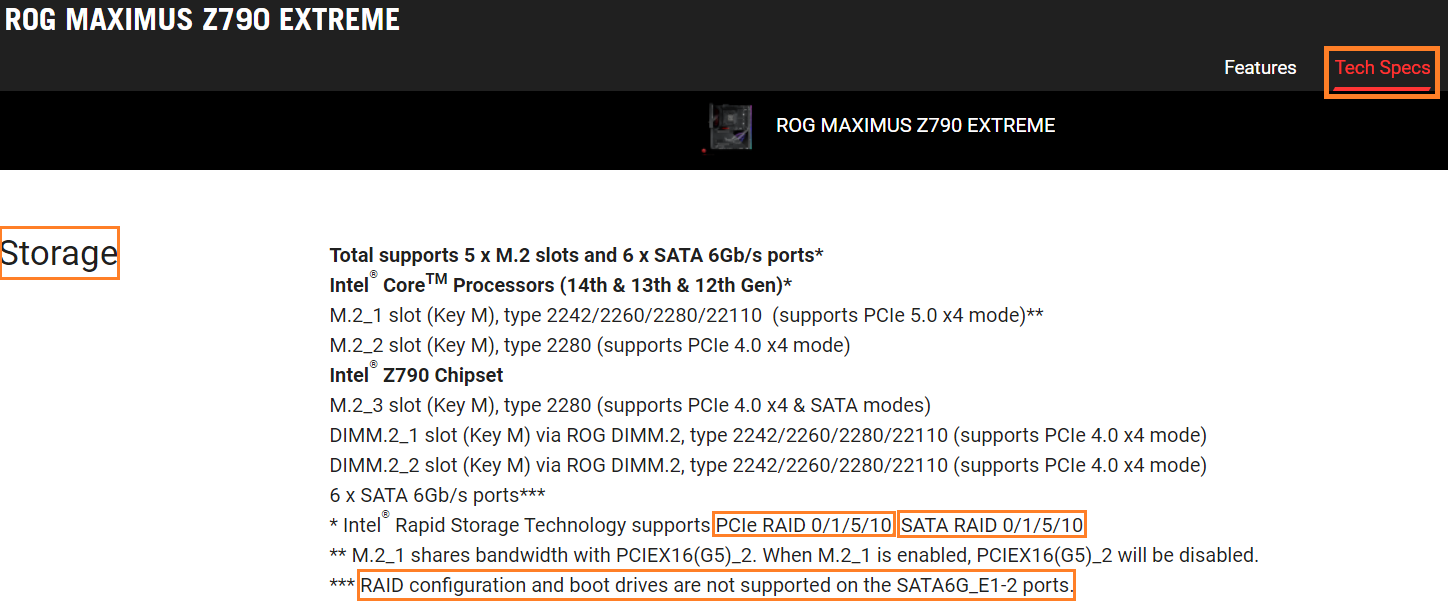
Q: How to verify motherboard support which kind RAID mode ?
A: Please refer to Tech Specs of motherboard