Related Topics
[Windows 11/10] Troubleshooting - Camera problem
Applicable Products: Notebook, Desktop, All-in-One PC, Gaming Handheld, MiniPC
Camera is integrated on laptops and All-in-One PCs, and you can use external USB camera on desktops. If you experience the following camera problems (picture is upside down, no image, camera not recognized, abnormal display, etc.), please refer to the following troubleshooting steps in order:
To provide you more detailed instruction, you can also click ASUS YouTube video link below to know more about How to Fix Camera Problems on ASUS Laptops.
https://www.youtube.com/watch?v=7Da7PIcW4UA
How to Troubleshoot Issues with the Built-in Camera
Inspect the Camera’s Appearance
- Verify whether the camera is obstructed, for instance, by a screen protector or a privacy film.
Sometimes, if the camera lens is covered in dust or dirt, it may affect the image quality. Please use a clean, soft cloth to gently wipe the camera lens, ensuring it remains pristine.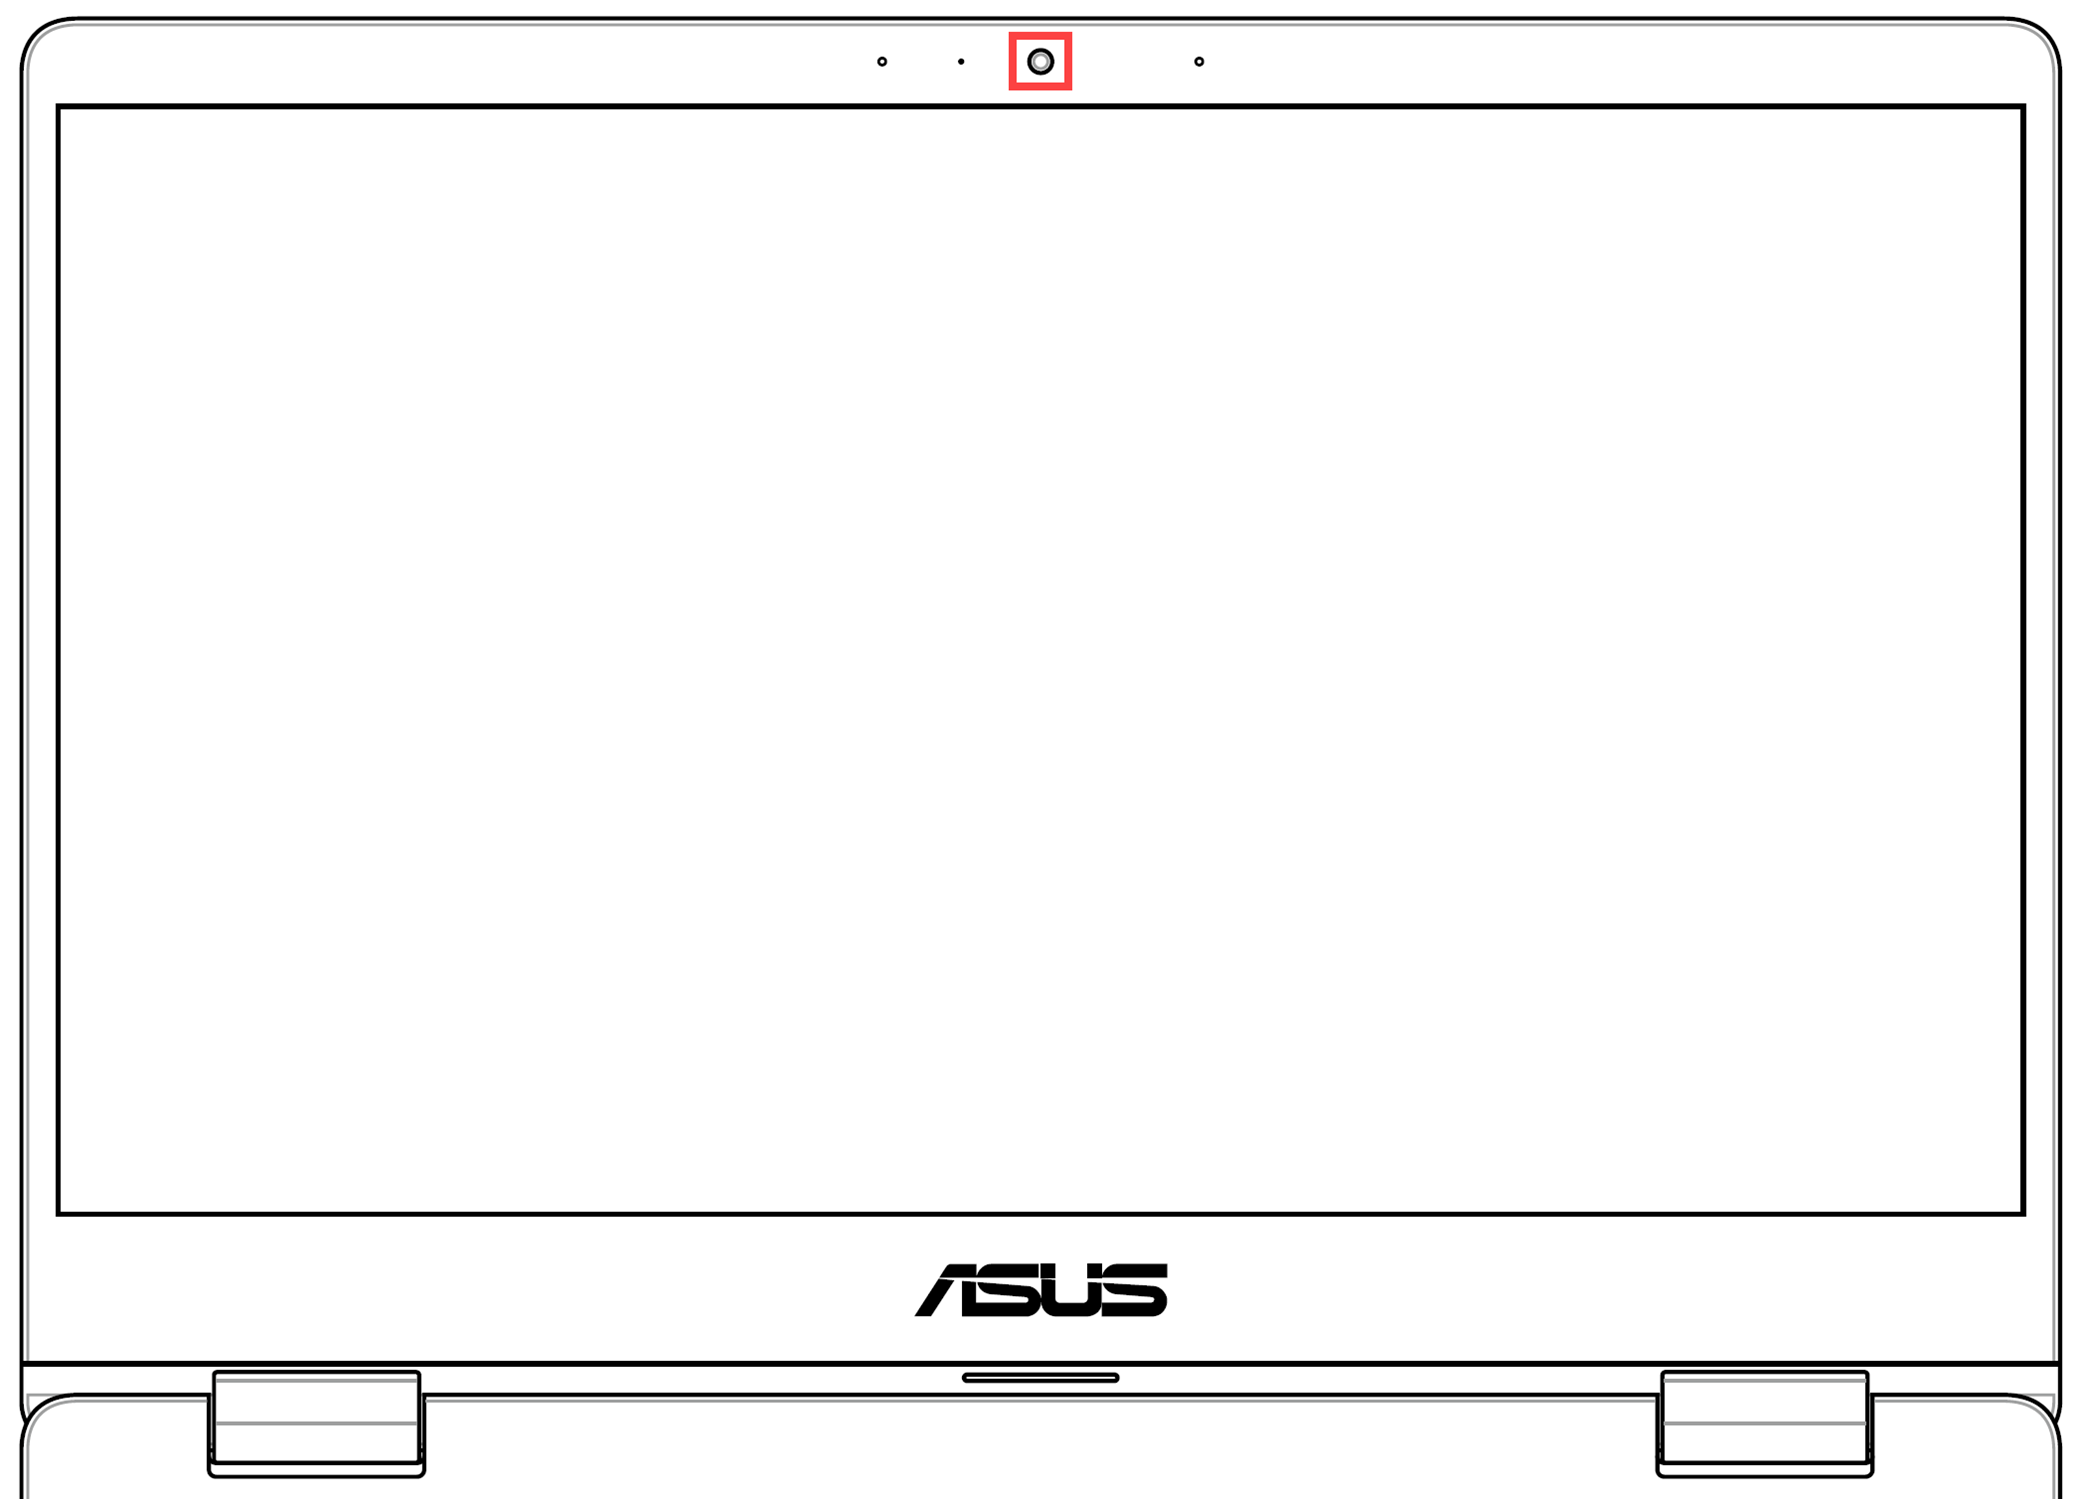
- Certain devices may be equipped with a physical privacy shield for the camera. When you intend to use the camera, ensure that the privacy shield is in the open position.
Note: The location of the privacy shield may vary depending on the model. If you are uncertain whether your device is equipped with a physical privacy shield, please refer to the instructions in the User Manual.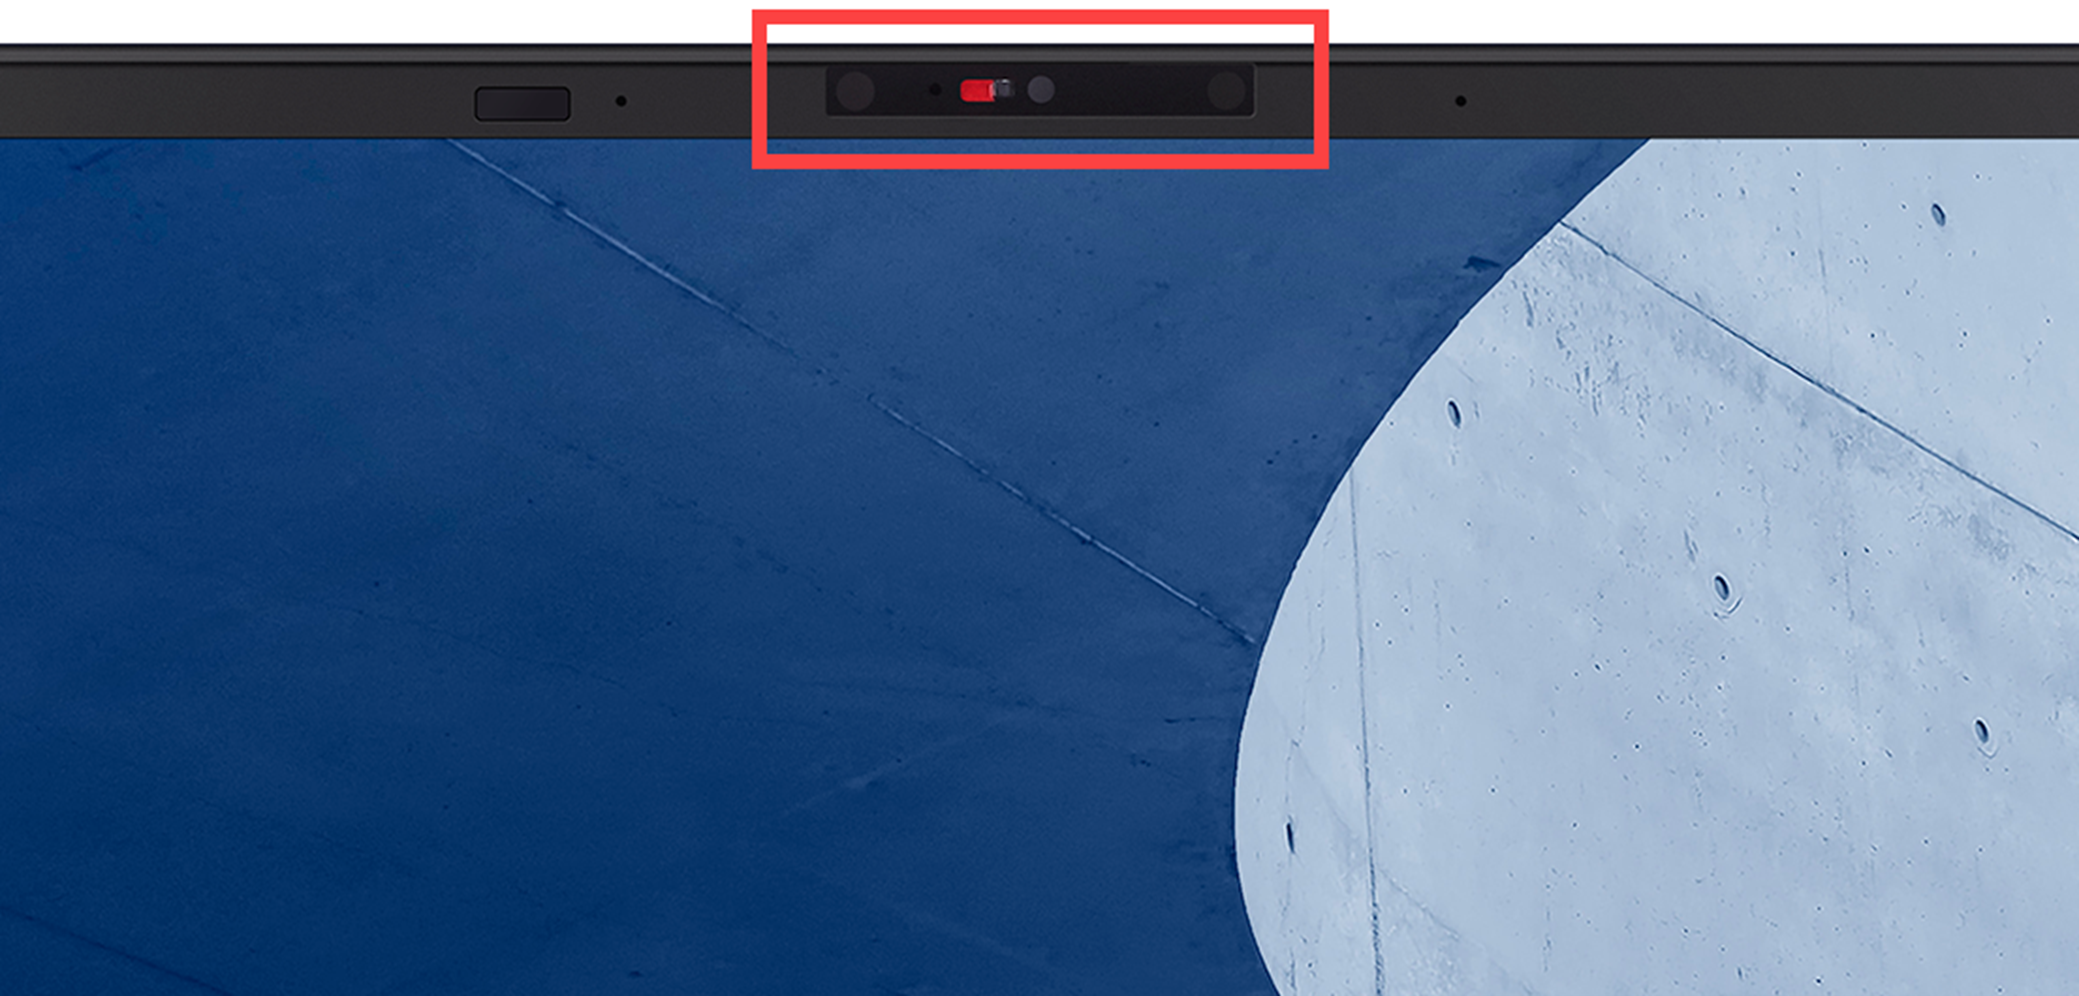
Check the status of F10 Camera Hotkey (for ASUS laptops only)
- Please check whether there is a [F10 Camera Hotkey]
 ① on your keyboard of the laptop. If no, please go to the next chapter.
Note: The hotkeys functions may be different based on different models, please refer to the User Manuals.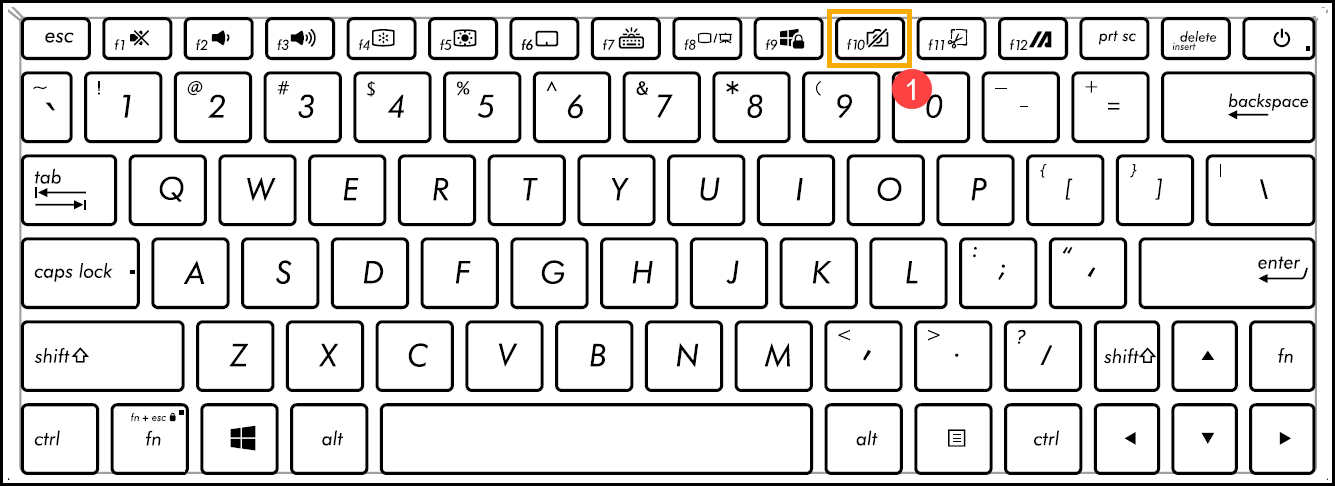
- Press F10 key or press the function key
 + F10 key (It depends on what your hotkey option selected is.), then check whether there is a message of [Camera on]② on the screen. Here you can learn more about ASUS Keyboard hotkeys Introduction.
- If the problem persists, please continue the next troubleshooting step.
Update and confirm BIOS / Windows packages / drivers with the latest version on your PC
Regularly updating BIOS, Windows, and drivers can enhance system stability and performance. Ensure that your device is using the latest versions. Learn more about updating BIOS:
How to update the BIOS version in Windows system
How to update BIOS with ASUS Firmware Update/EZ Flash
Learn more about updating Windows and drivers:
How to update drivers via System Update in MyASUS
If the problem persists after you have updated BIOS/Windows packages/drivers to the date, please continue the next troubleshooting step.
Please refer to the relevant instructions below according to the version of Windows currently installed on your device:
Windows 11 operating system
Use the built-in camera application
- Type and search [Camera] in the Windows search bar①, then click [Open]②.
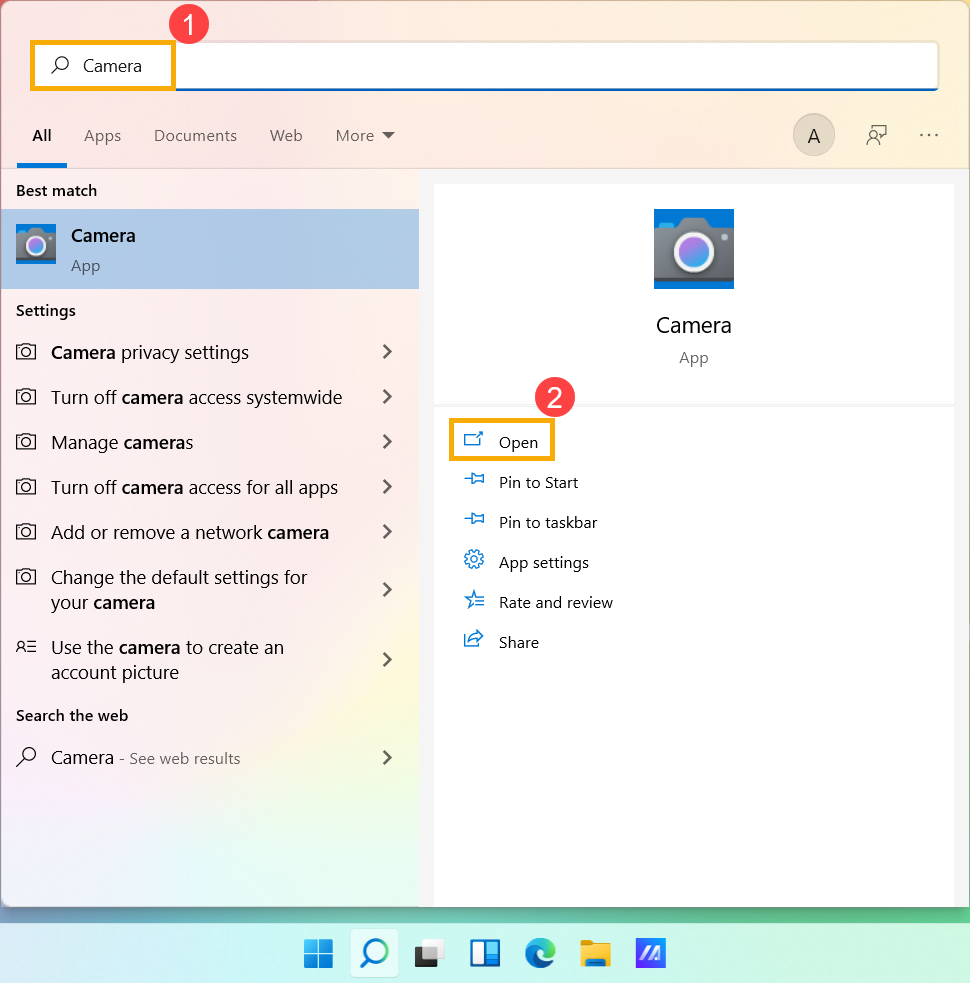
- Confirm that the camera is working properly after executing [Camera] application. If your camera is working properly, the issue may be related to the settings of a specific application. If any issues occur, please proceed to the next troubleshooting step.
Note: Camera errors include Upside down image, No image, Cannot recognize camera, Display abnormal, etc.
Give your apps permission
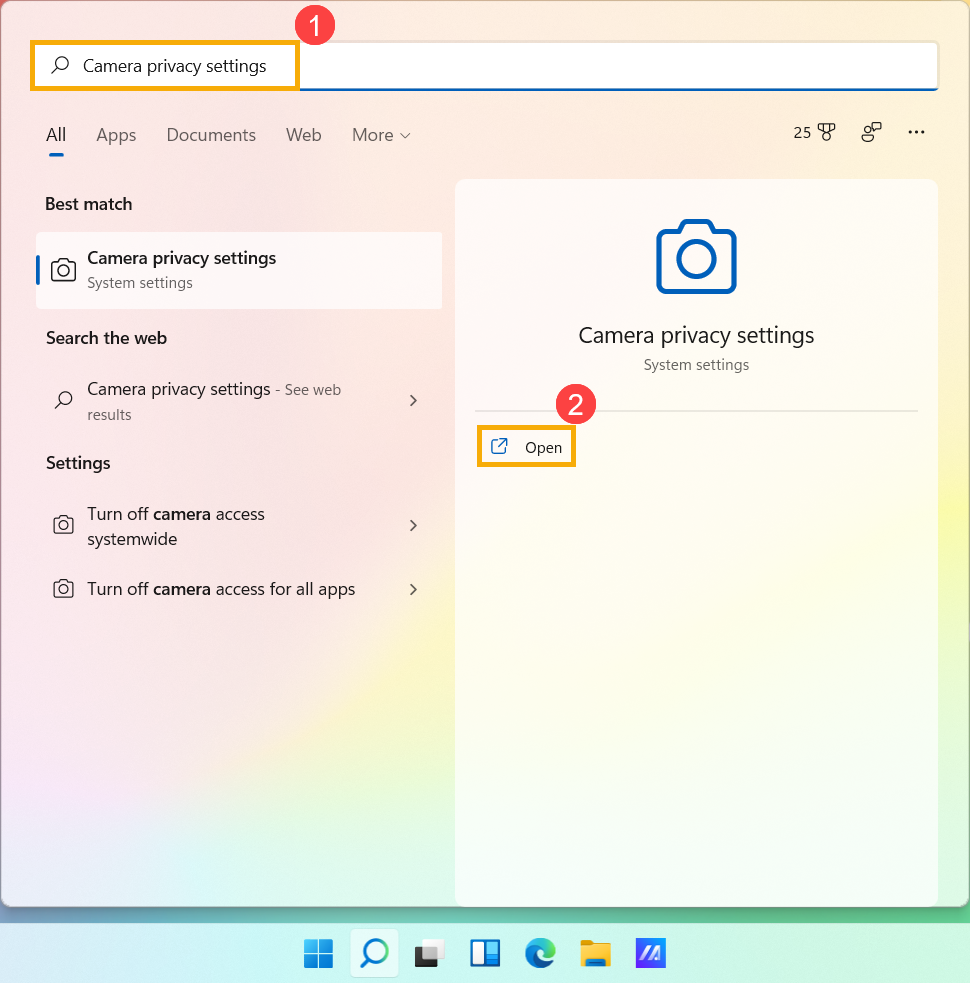
- Type and search [Camera privacy settings] in the Windows search bar①, then click [Open]②.
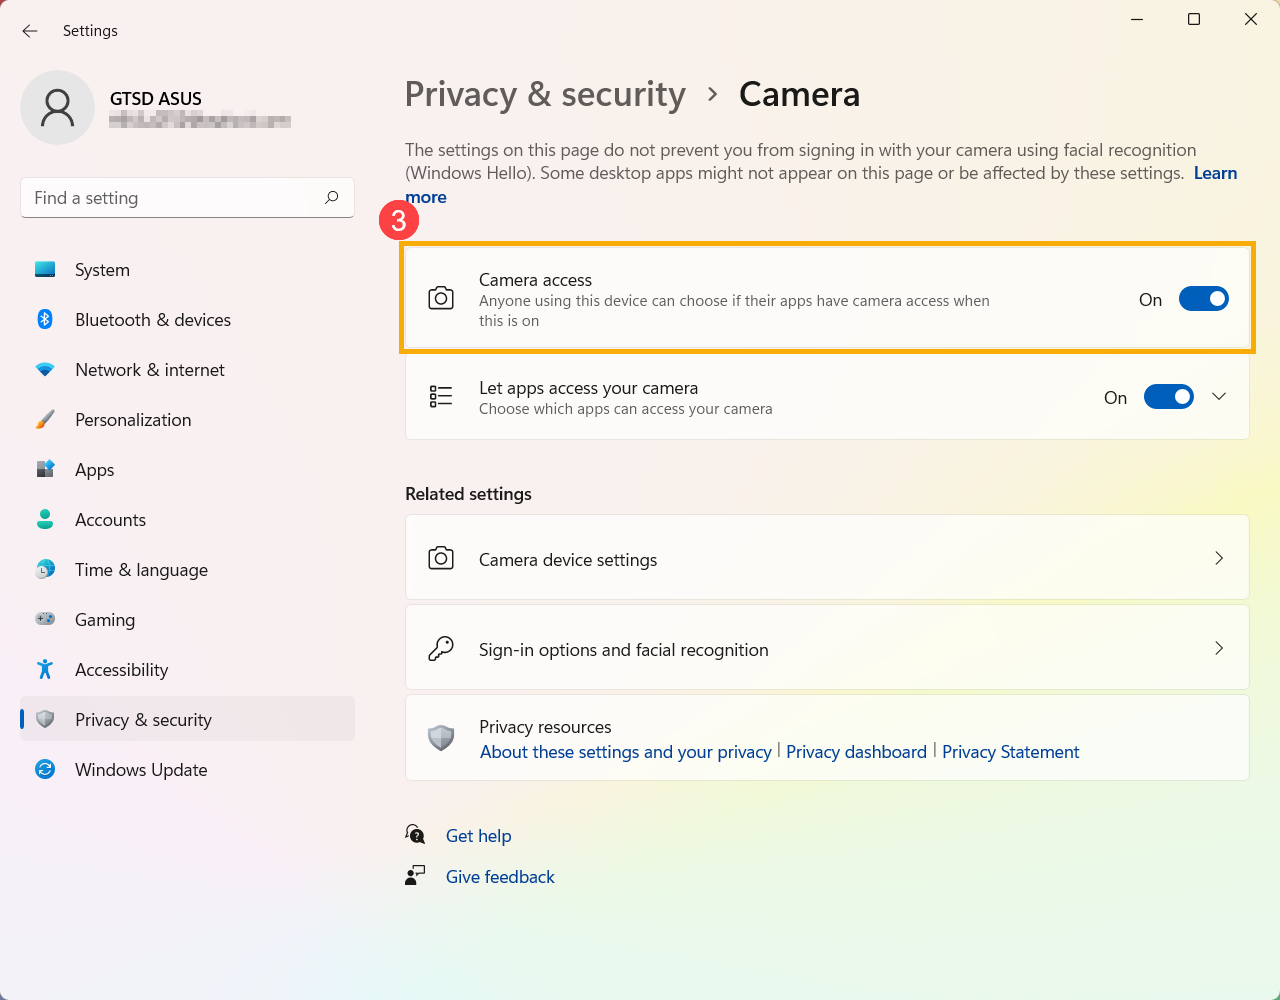
- Turn on [Camera access]③.
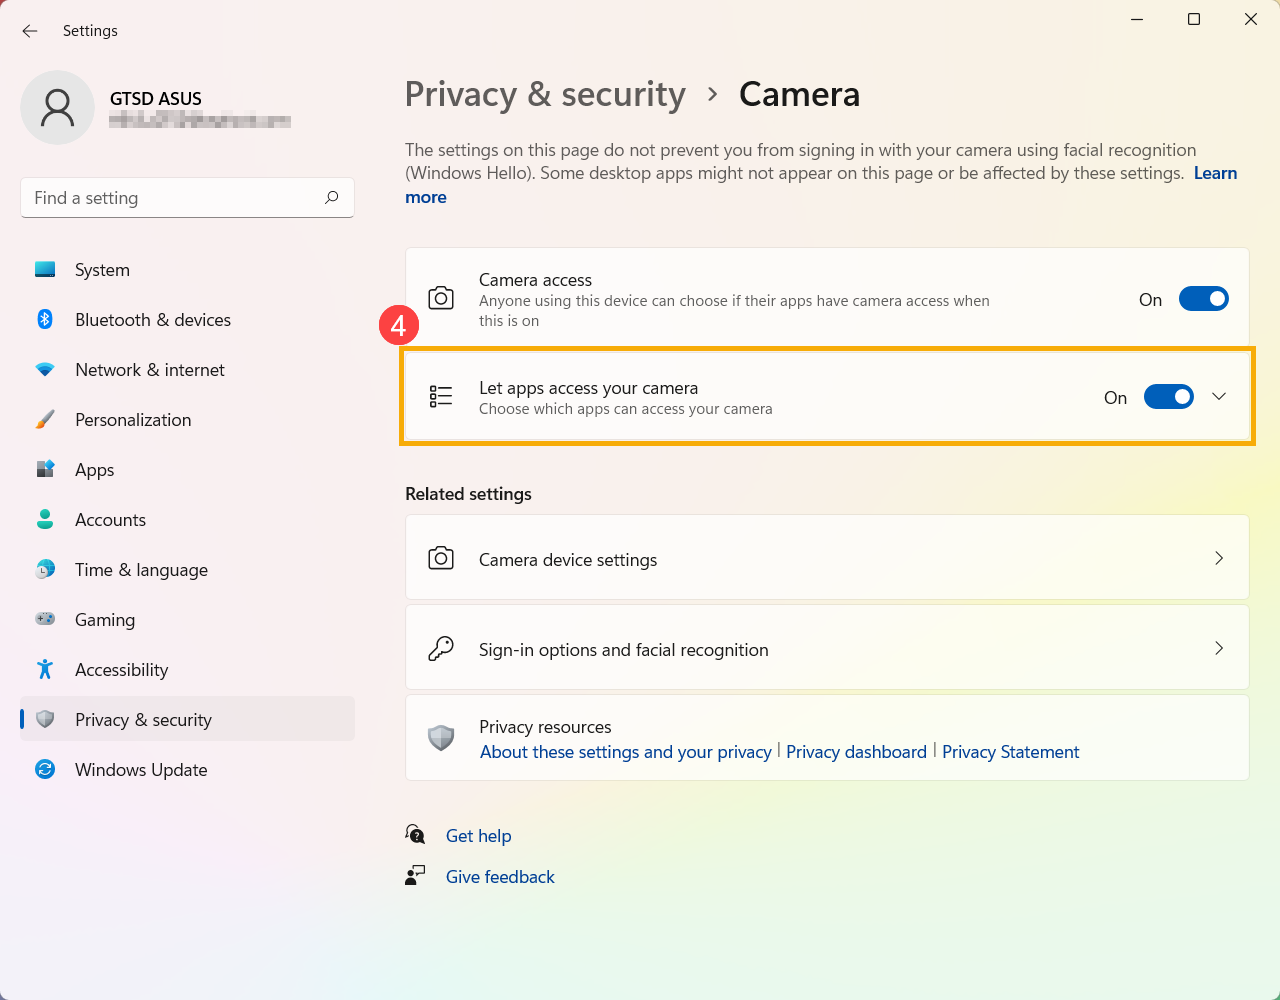
- Turn on [Let apps access your camera]④.
- Expand the Let apps access your camera filed, here you can turn on/off which apps can using camera⑤.
Note: Only apps that were installed from the Microsoft Store will appear in this list. If you're having problems with an app that you did not install from Microsoft Store, make sure that Let desktop apps access your camera is turned on.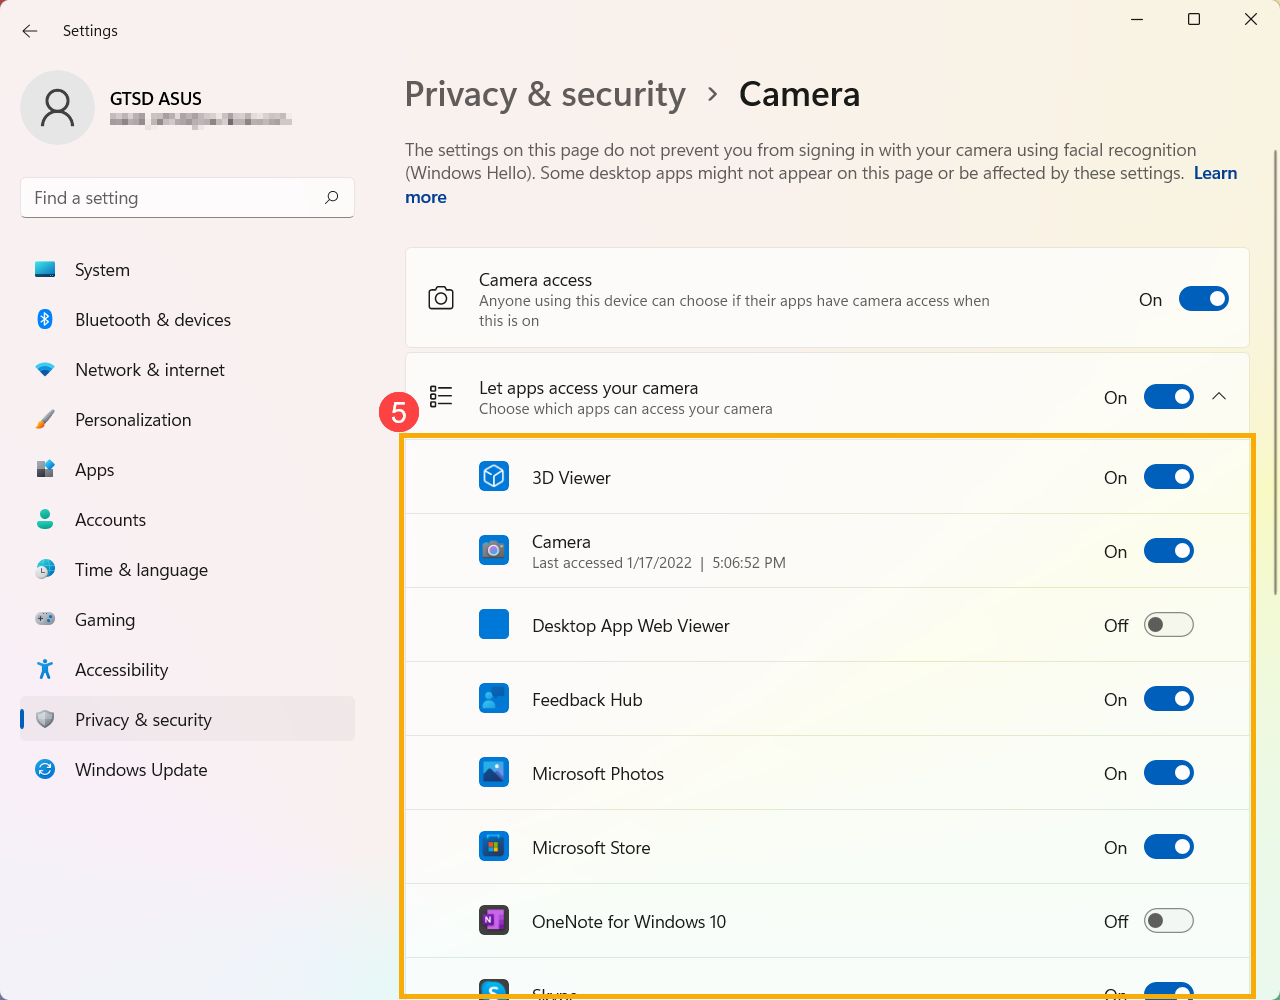
- If the problem persists, please continue the next troubleshooting step.
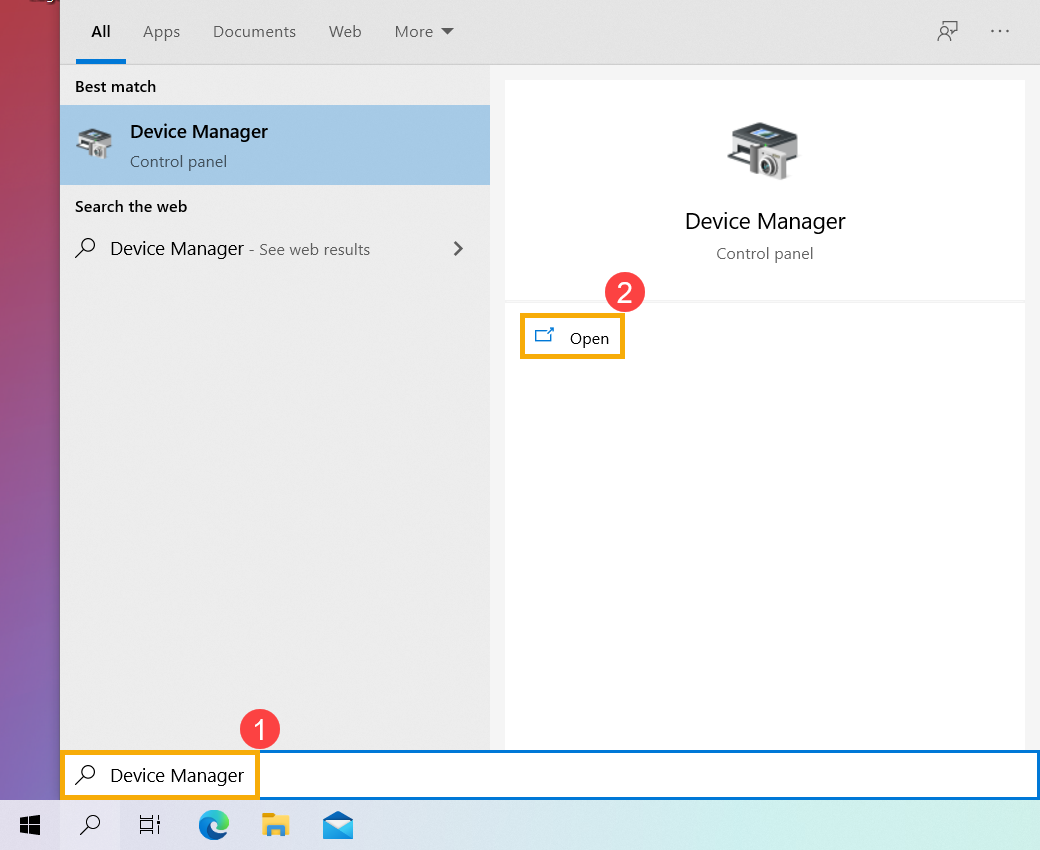
Enable and reinstall Camera driver in Device Manager
- Type and search [Device Manager] in the Windows search bar①, then click [Open]②.
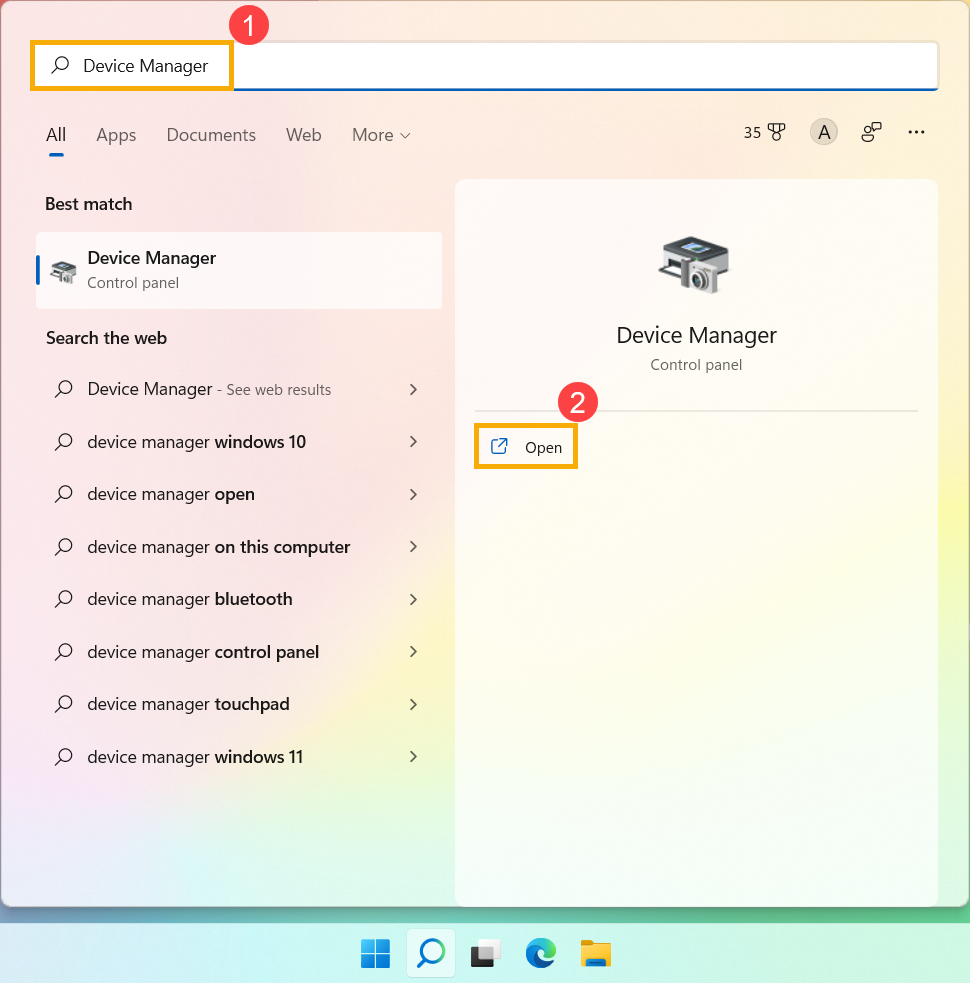
- Click the arrow next to [Camera]③, then right-click the [your camera device name]④ and select [Enable device]⑤. To test if the camera work normally.
If the [Enable device] option does not display that is meaning the camera is enabled already, please continue to the next step.
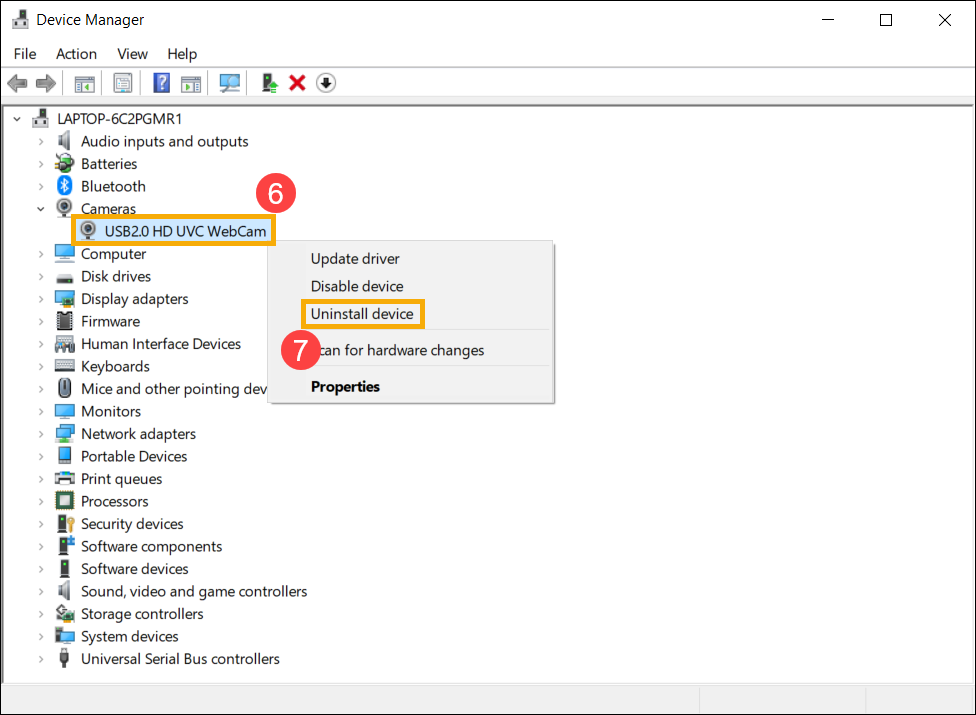
- Uninstall the camera driver. Right-click the [your camera device name]⑥ and select [Uninstall device]⑦.
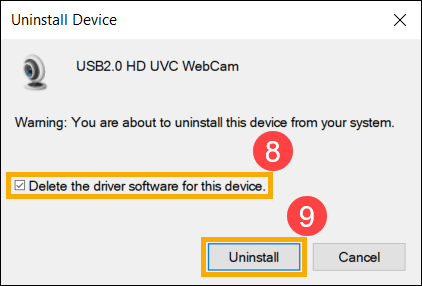
- Check the box to [Delete the driver software for this device]⑧, then click [Uninstall]⑨.
- Select [Action] on the top of Device Manager⑩, and select [Scan for hardware changes]⑪, then system will automatically install the camera driver.
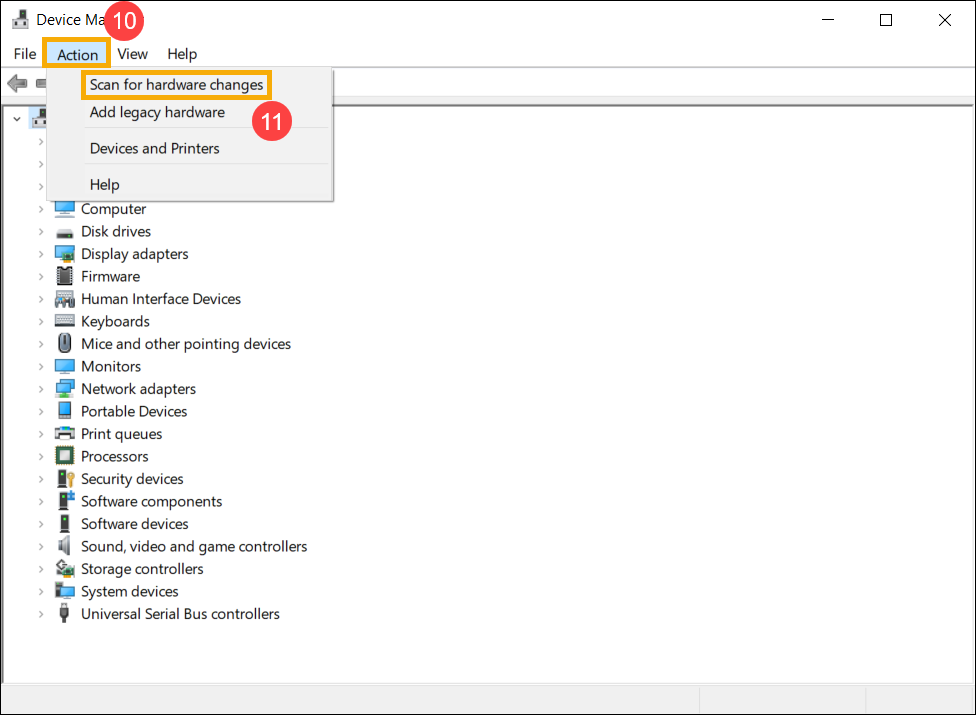
- After the camera driver installation is completed, please restart your computer and then try opening the Camera application again. If the problem persists, please continue to the next troubleshooting.
Run Camera Troubleshooter
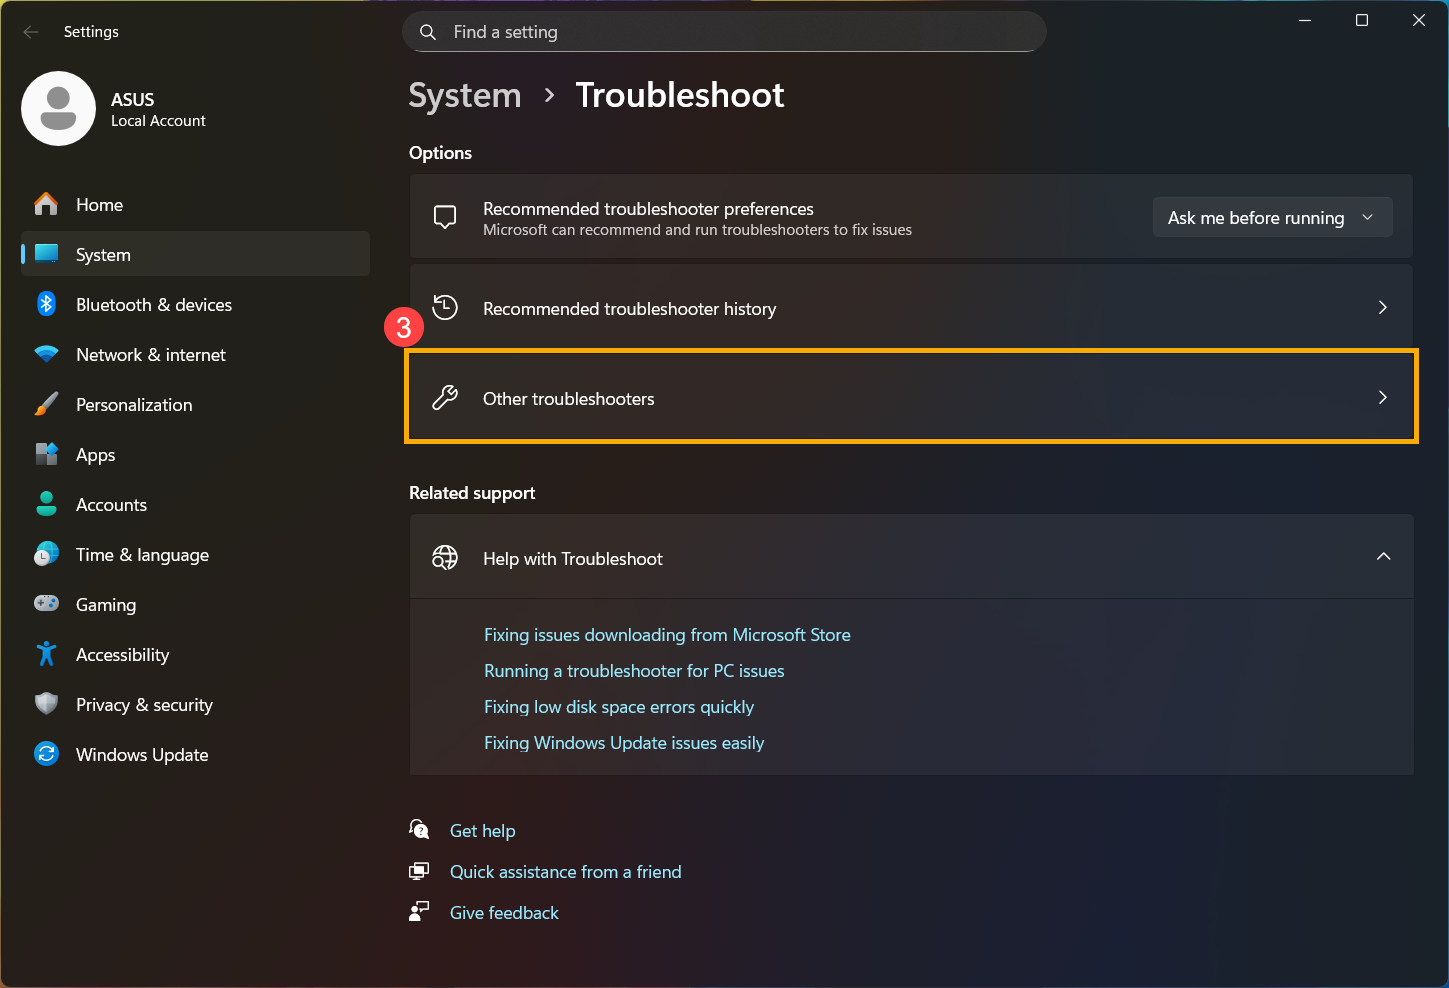
- Type and search [Troubleshoot settings] in the Windows search bar①, then click [Open]②.
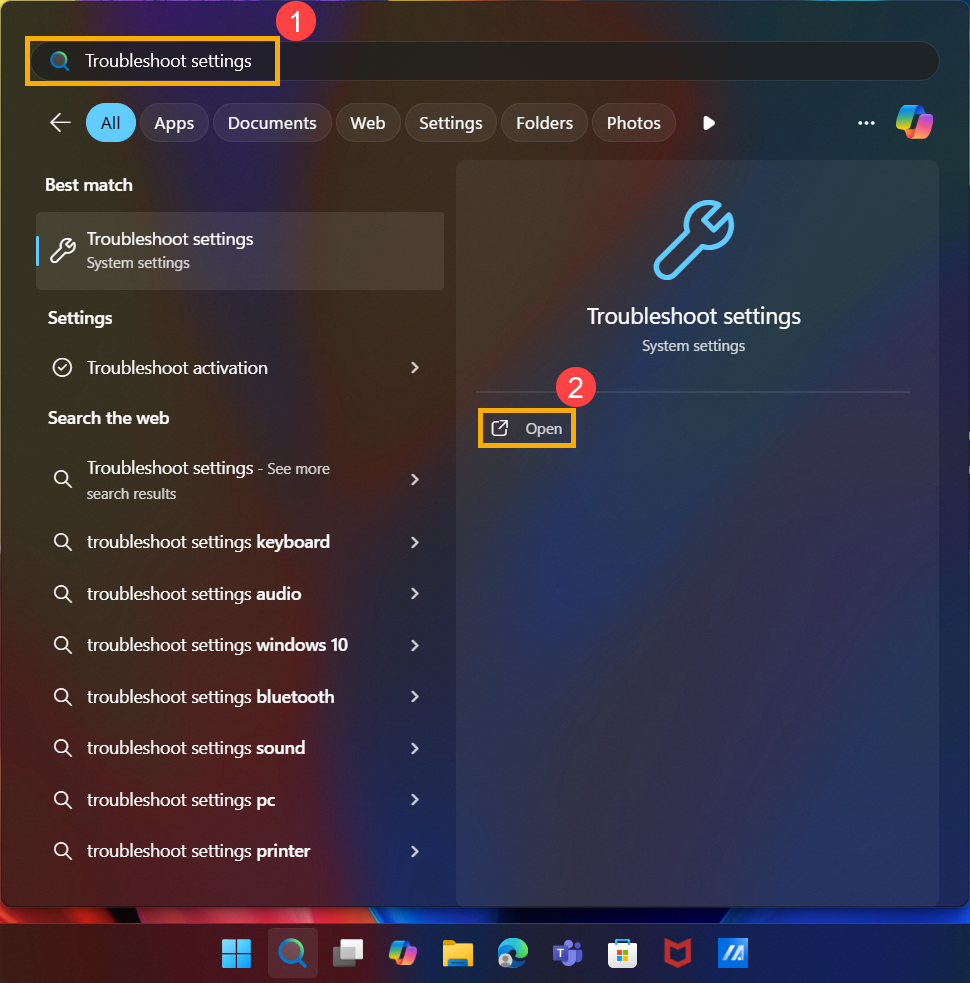
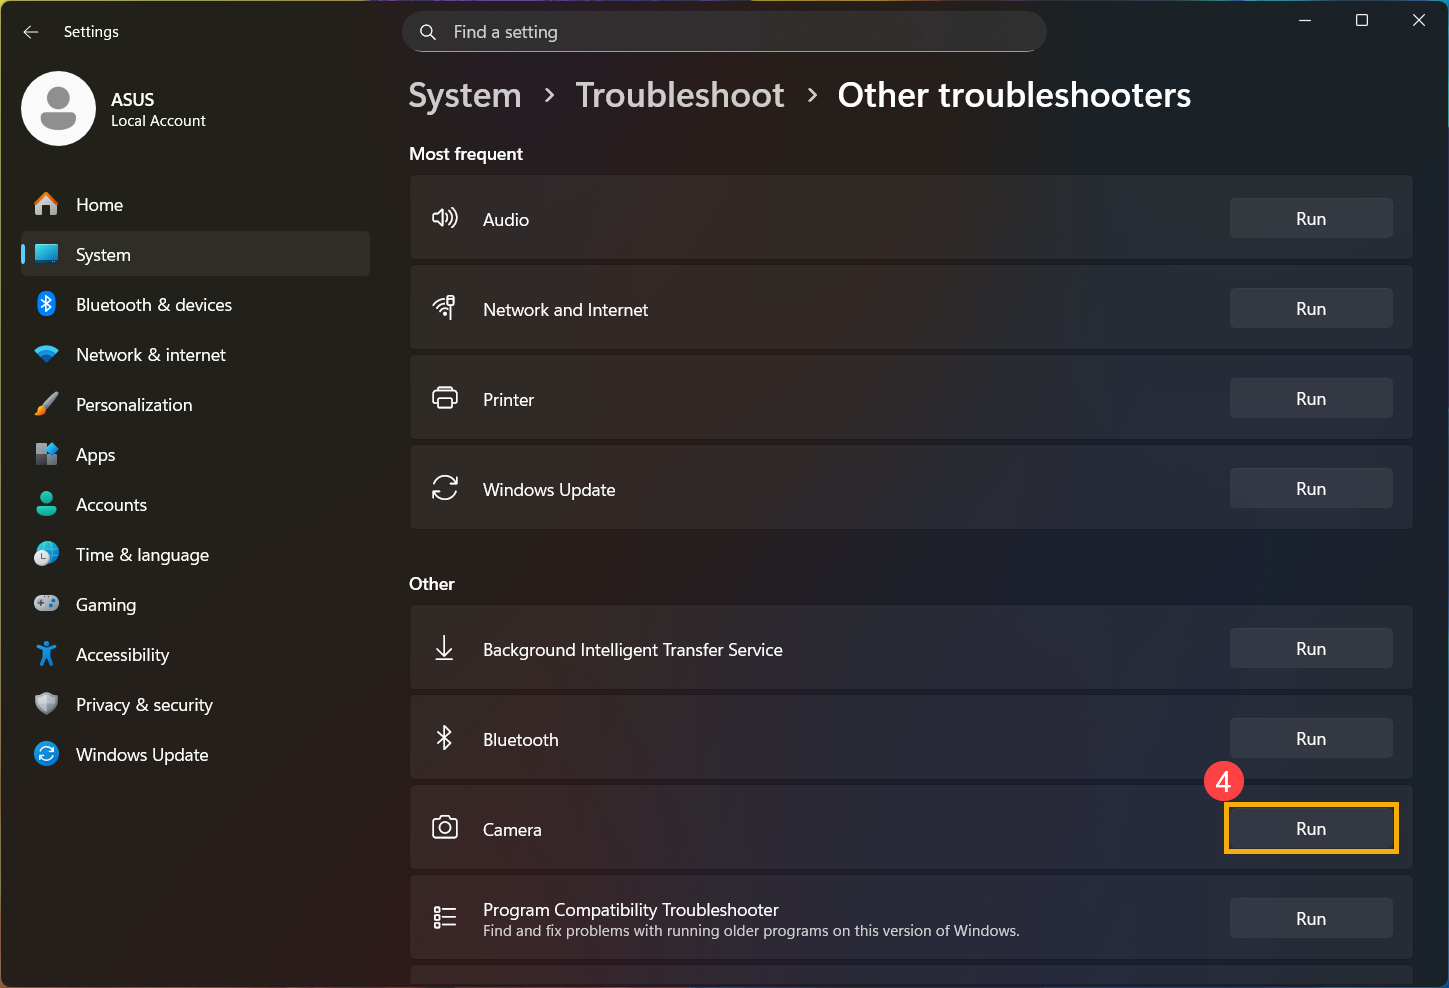
- Select [Other troubleshooters]③.
- Click [Run]④ on the Camera option.
- Follow the on-screen prompts to detect and resolve problems. If the problem persists, please continue the next troubleshooting step.
Use Restore Point to restore the system
If the camera problem happens recently, and if you have ever created a restore point or there is an automatic system restore existed, try to restore the computer to a point before the problem began to resolve the problem. Here you can learn more about How to use restore point to restore the system. If the problem persists, please continue the next troubleshooting step.
Reset the system
If the problem persists after all troubleshooting steps are completed. Please backup your personal files, then reset the PC to back to its original configuration. Here you can learn more about How to reset the system.
Windows 10 operating system
Use the built-in camera application
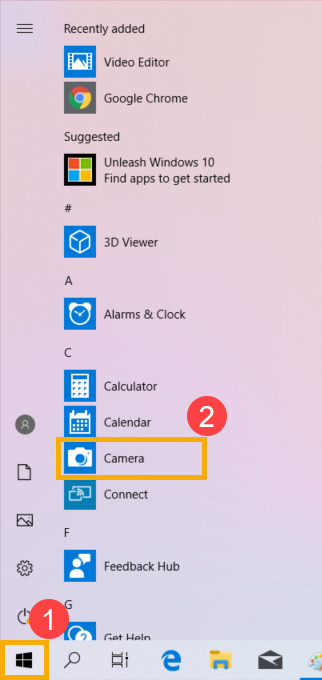
- Click [Start menu]①, then execute [Camera] application②.
- Confirm that the camera is working properly after executing [Camera] application. If your camera is working properly, the issue may be related to the settings of a specific application. If any issues occur, please proceed to the next troubleshooting step.
Note: Camera error (Upside down image, No image, Cannot recognize camera, Display abnormal, etc.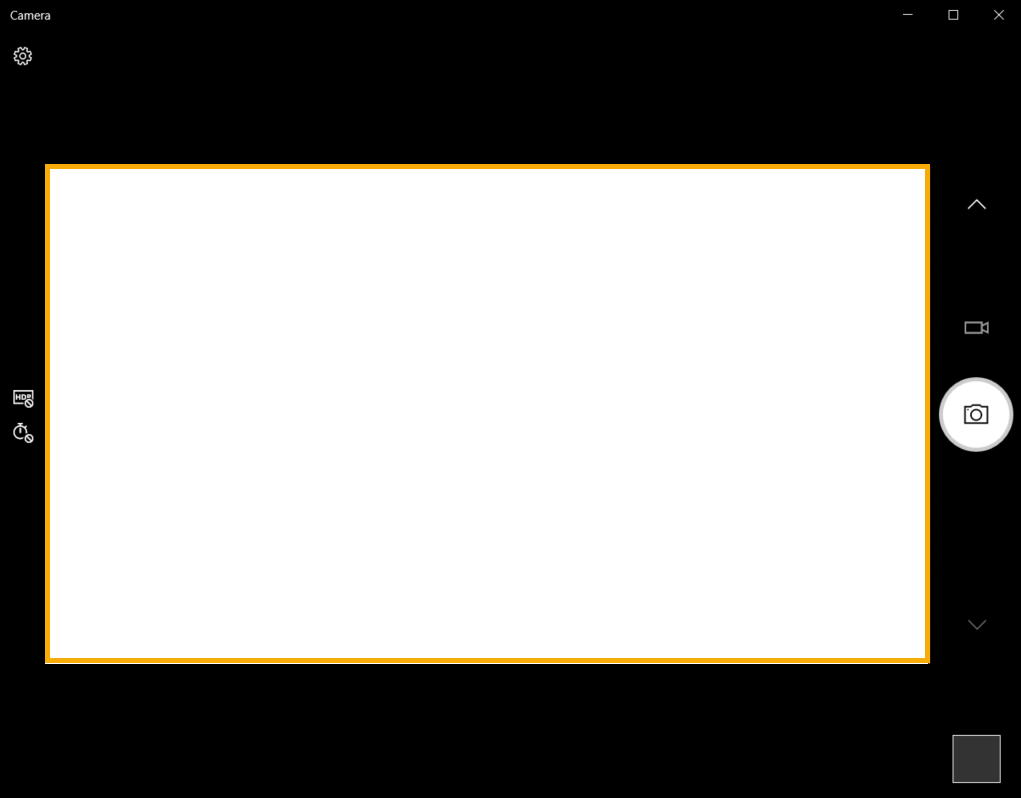
Give your apps permission
- Click on [Start] button①, then select [Settings]②.
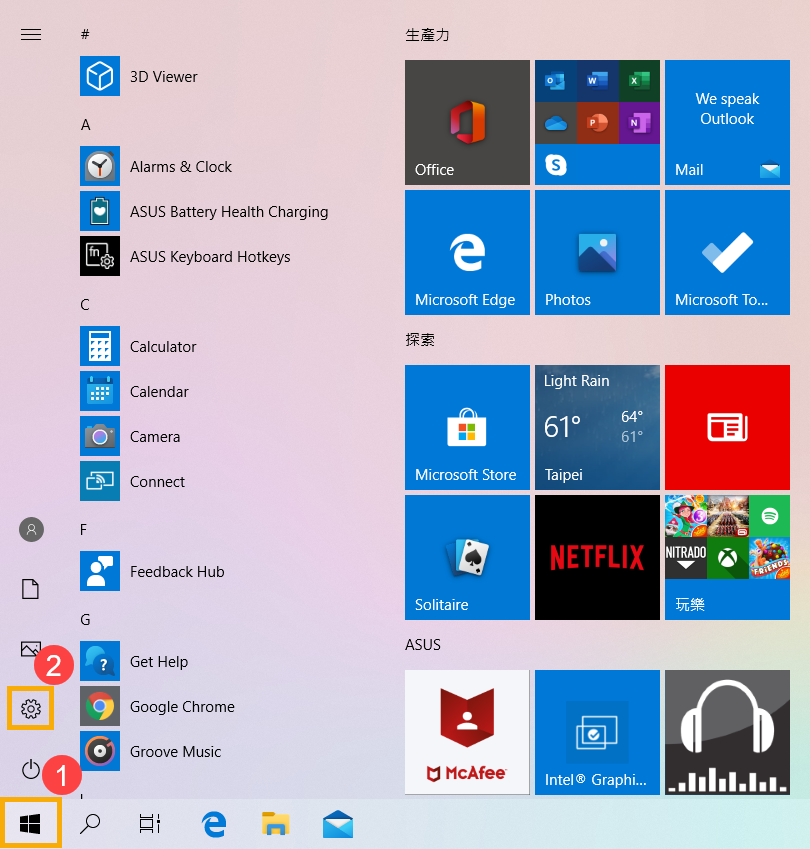
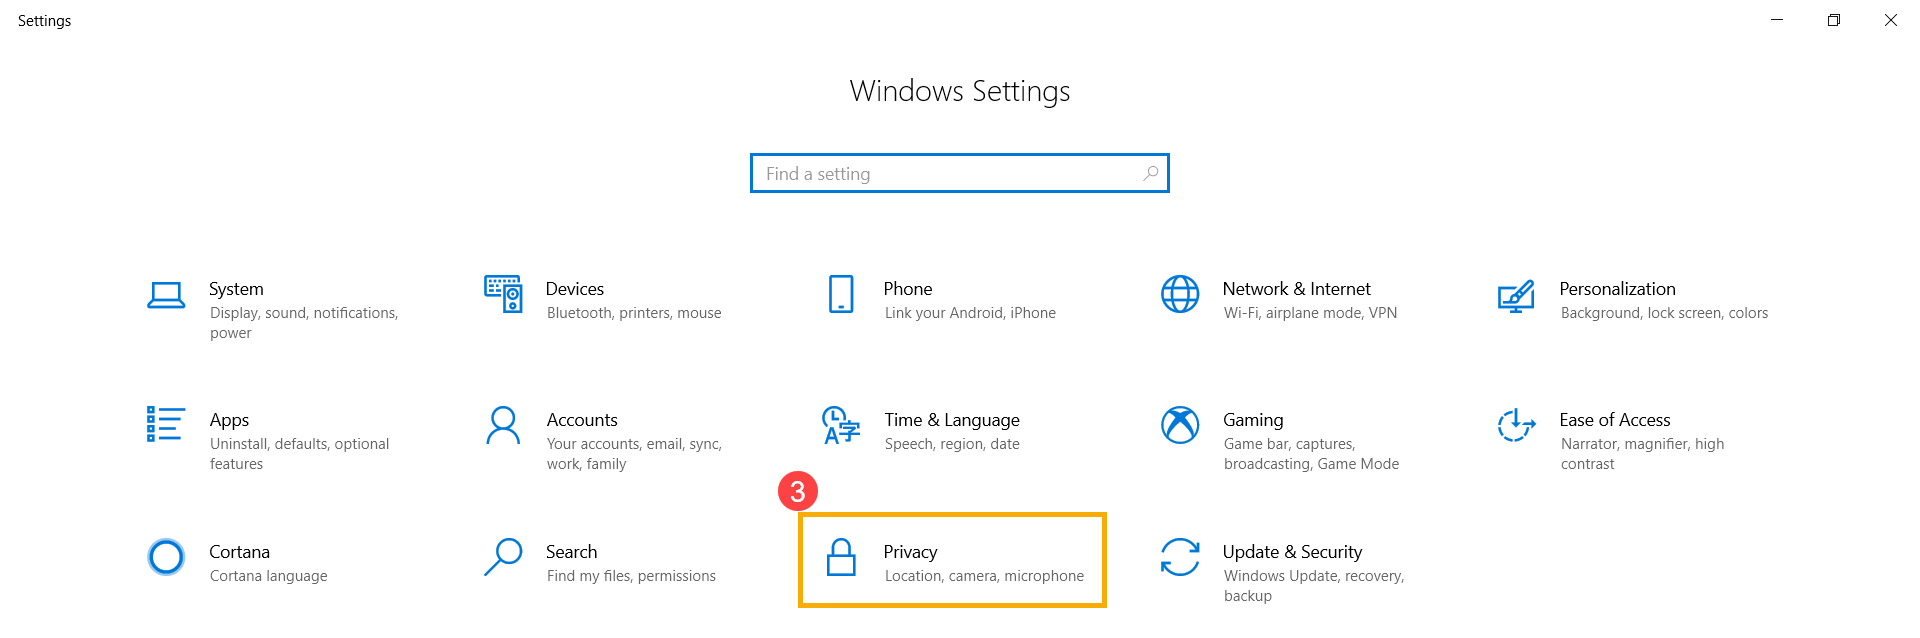
- Select [Privacy]③.
- Select [Camera]④, then click change and turn on [Camera access for this device]⑤.
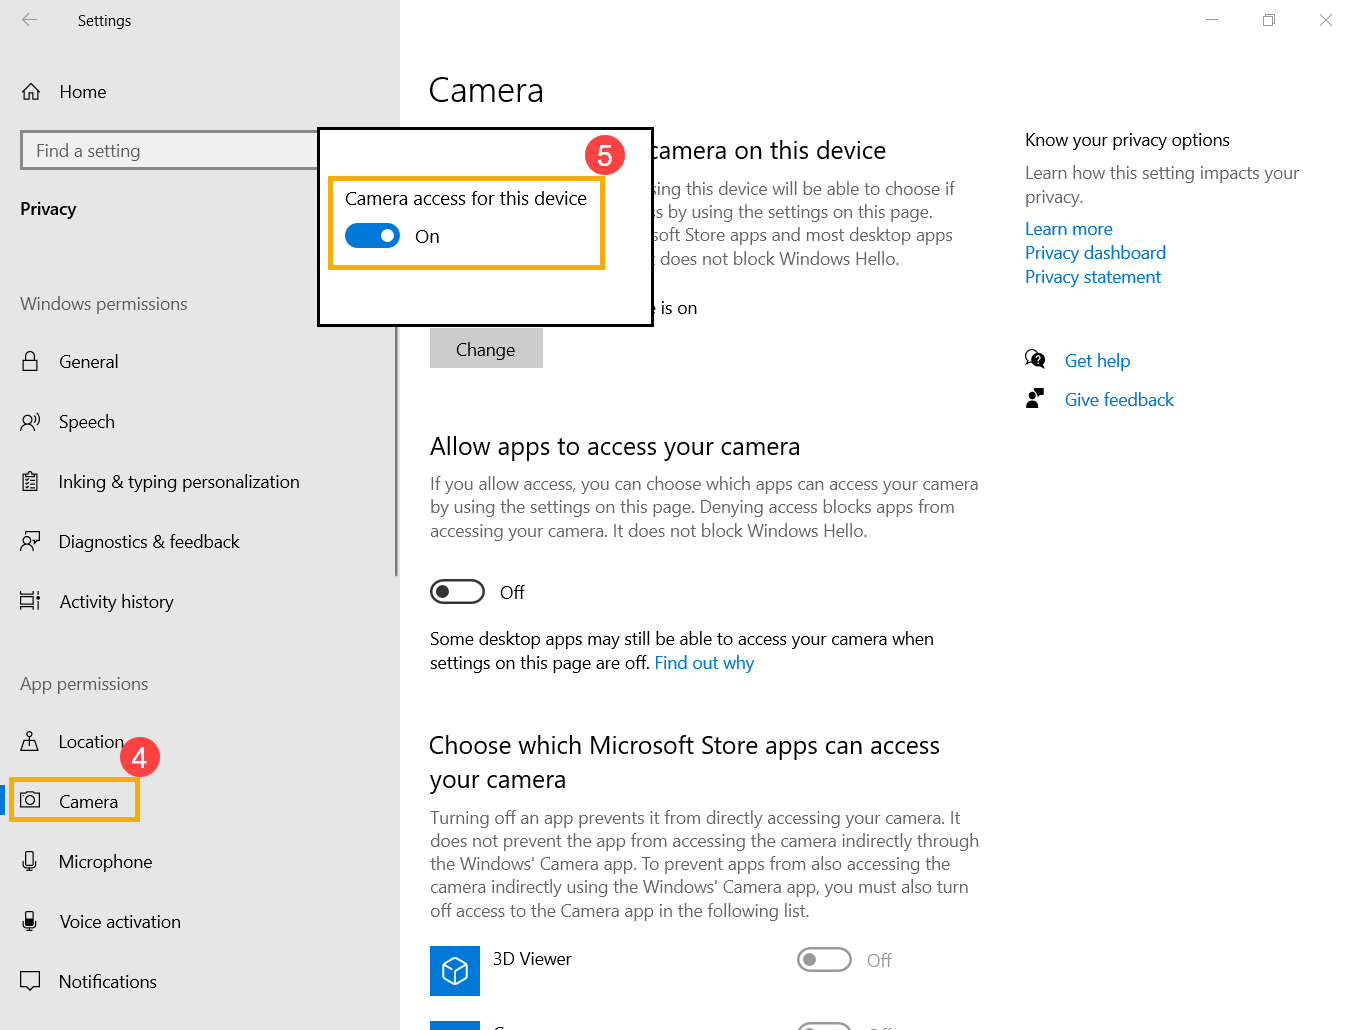
- To allow access for individual apps, turn on [Allow apps to access your camera]⑥.
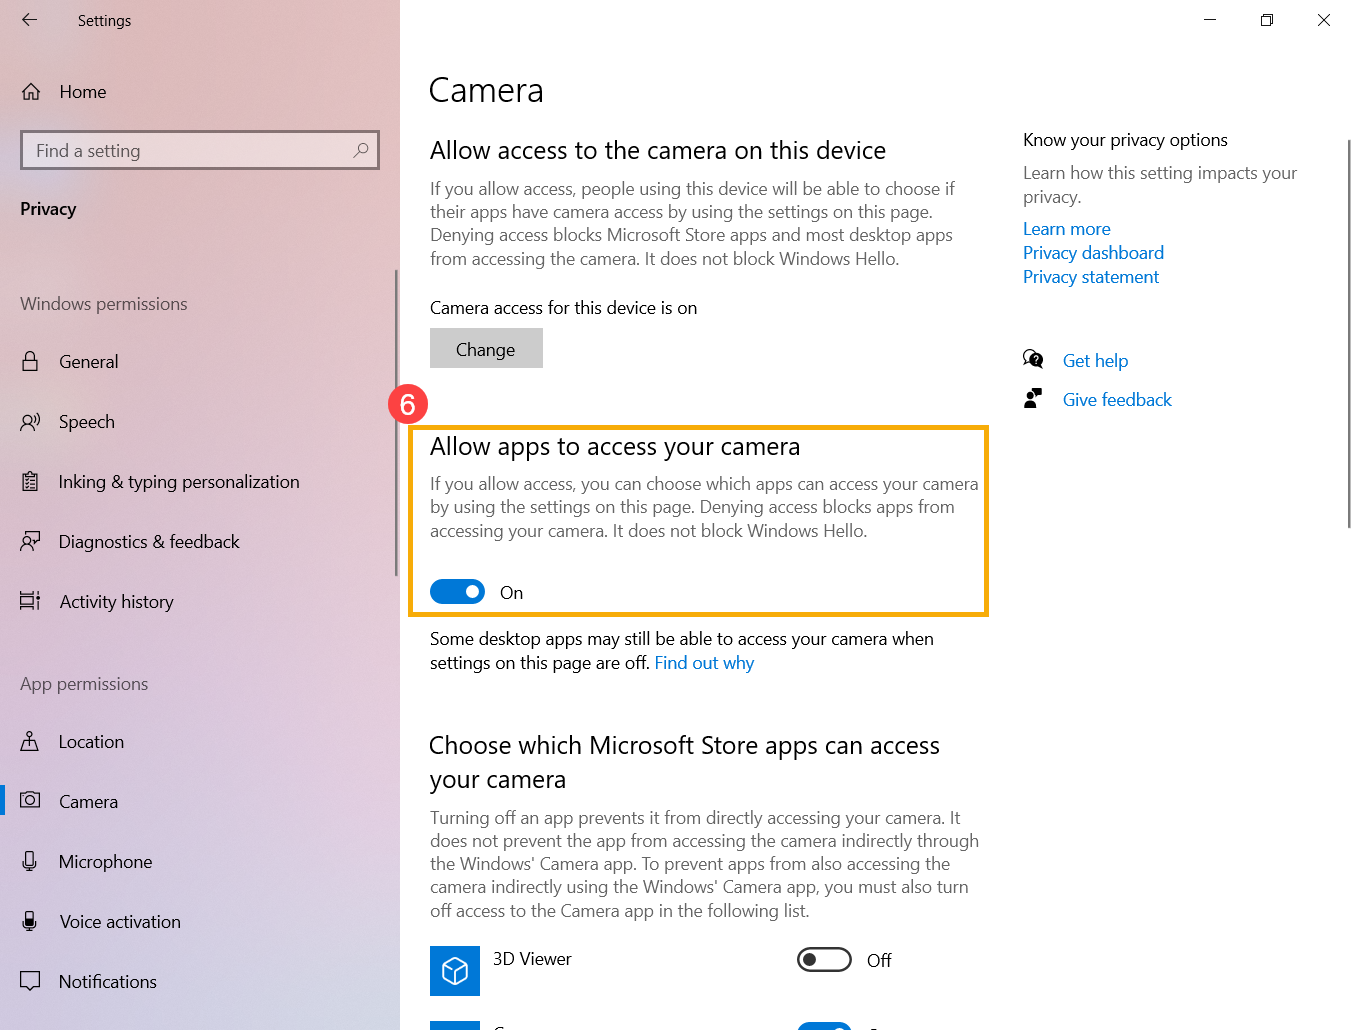
- After allowing access to the camera, scroll down to [Choose which Microsoft Store apps can access your camera]⑦ and turn on camera access for the apps you want.
Note: Only apps that were installed from the Microsoft Store will appear in this list. If you're having problems with an app that you did not install from Microsoft Store, make sure that Let desktop apps access your camera is turned on.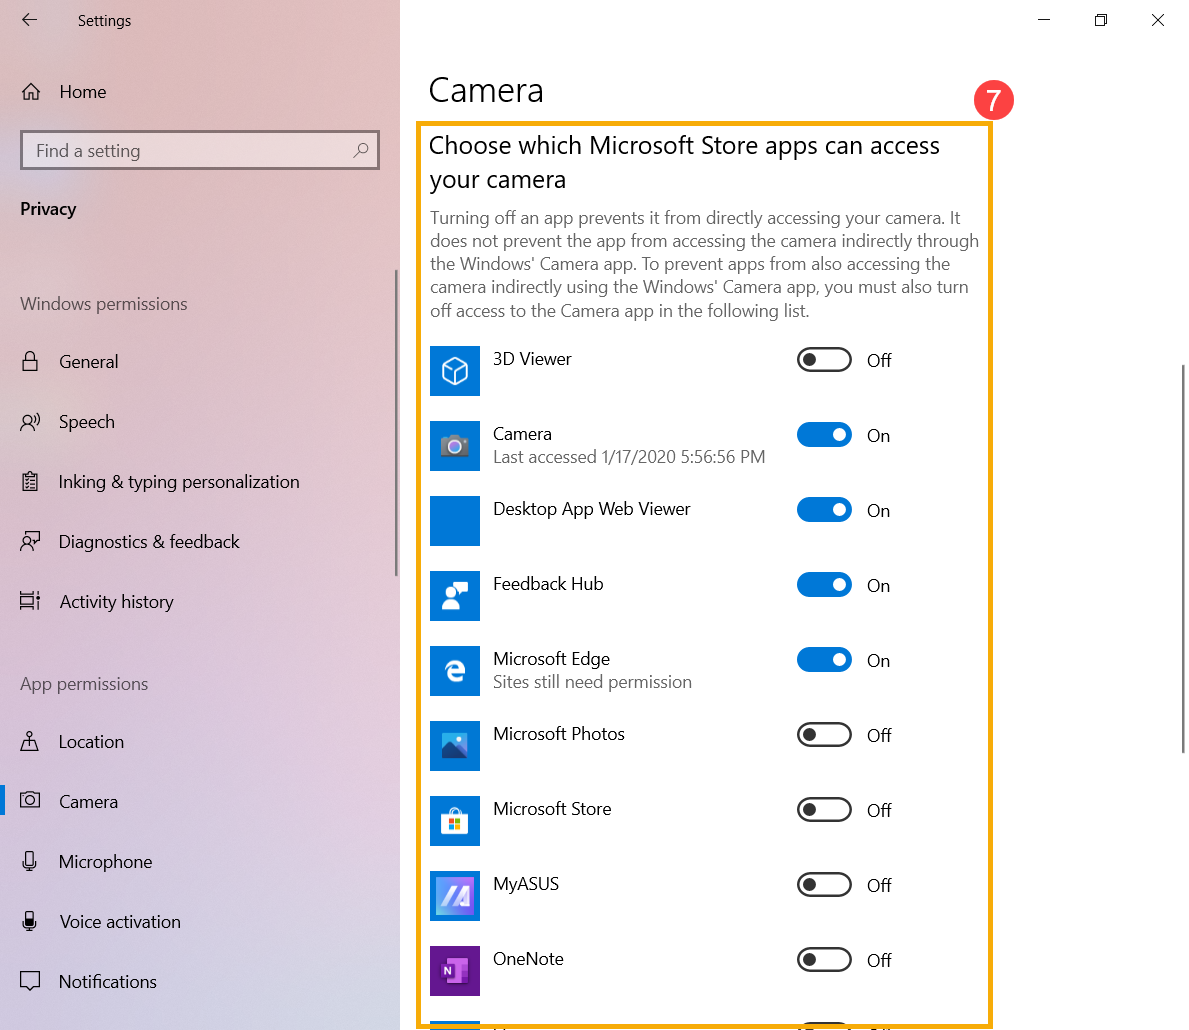
- If the problem persists, please continue the next troubleshooting step.
Enable and reinstall Camera driver in Device Manager
- Type and search [Device Manager] in the Windows search bar①, then click [Open]②.
- Click the arrow next to [Camera]③, then right-click the [your camera device name]④ and select [Enable device]⑤. To test if the camera work normally.
If the [Enable device] option does not display that is meaning the camera is enabled already, please continue to the next step.
- Uninstall the camera driver. Right-click the [your camera device name]⑥ and select [Uninstall device]⑦.

- Check the box to [Delete the driver software for this device]⑧, then click [Uninstall]⑨.

- Select [Action] on the top of Device Manager⑩, and select [Scan for hardware changes]⑪, then system will automatically install the camera driver.

- After the camera driver installation is completed, please restart your computer and then try opening the Camera application again. If the problem persists, please continue to the next troubleshooting.
Use Restore Point to restore the system
If the camera problem happens recently, and if you have ever created a restore point or there is an automatic system restore existed, try to restore the computer to a point before the problem began to resolve the problem. Here you can learn more about How to use restore point to restore the system. If the problem persists, please continue the next troubleshooting step.
Reset the system
If the problem persists after all troubleshooting steps are completed. Please backup your personal files, then reset the PC to back to its original configuration. Here you can learn more about How to reset the system.
How to Troubleshoot Issues with an External Camera
Note: If you are using an external camera, you may need to install the device software or drivers provided by the manufacturer. Please ensure your device has been set up according to the manufacturer's installation instructions.
Inspect the Camera’s Appearance and Connection
Verify whether the camera is obstructed. Sometimes, if the camera lens is covered in dust or dirt, it may affect the image quality. Please use a clean, soft cloth to gently wipe the camera lens, ensuring it remains pristine.
Ensure that the external camera is properly connected and that the plug is firmly in place (such as the USB port or connecting cable). If you suspect a USB connection issue, please refer to this article: Troubleshooting - USB Functionality Issues.
Update and confirm BIOS / Windows packages / drivers with the latest version on your PC
Regularly updating BIOS, Windows, and drivers can enhance system stability and performance. Ensure that your device is using the latest versions. Learn more about updating BIOS:
How to update the BIOS version in Windows system
How to Update BIOS with ASUS Firmware Update/EZ Flash
(For desktop products, please refer to ASUS Motherboard EZ Flash 3 Introduction.)
Learn more about updating Windows and drivers:
How to update drivers via System Update in MyASUS
If the problem persists after you have updated BIOS/Windows packages/drivers to the date, please continue the next troubleshooting step.
Check USB Function Settings in BIOS
- Enter the BIOS configuration utility:
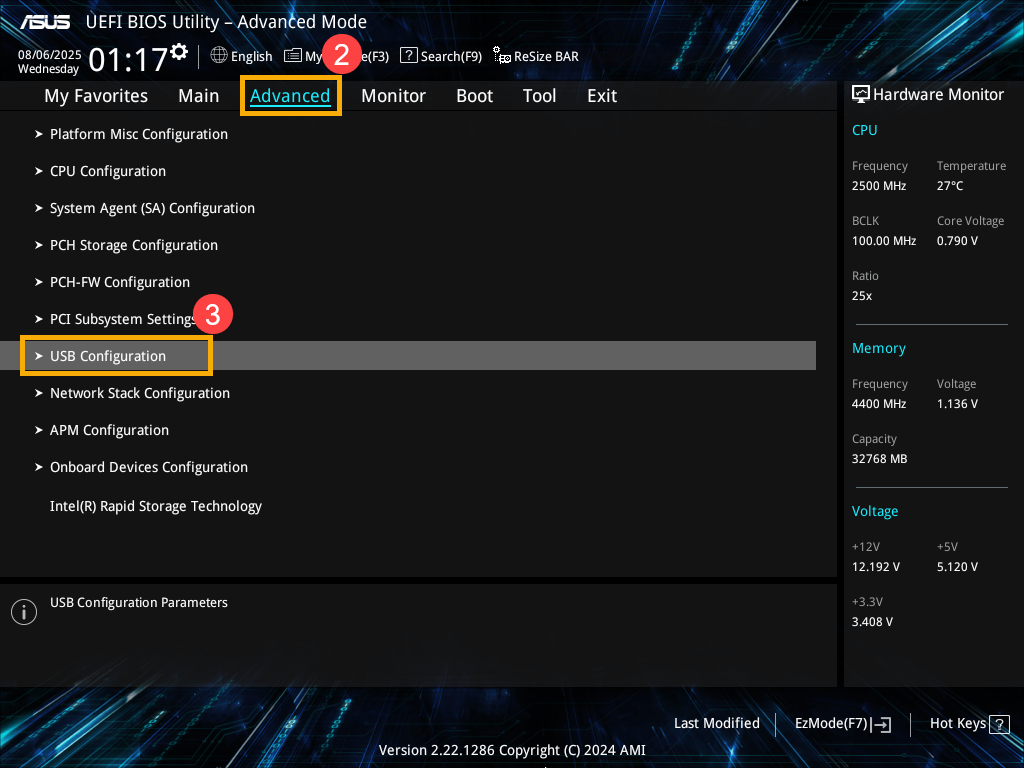
With the computer powered off, press and hold the [F2] key, then press the [Power button]. Release [F2] once the BIOS configuration screen appears. For detailed instructions, please refer to the relevant article on How to access the BIOS configuration screen. - In the BIOS setup screen, press the [F7] key on your keyboard, or click [Advanced Mode] on the screen①.
Note: The BIOS interface may vary slightly depending on the model.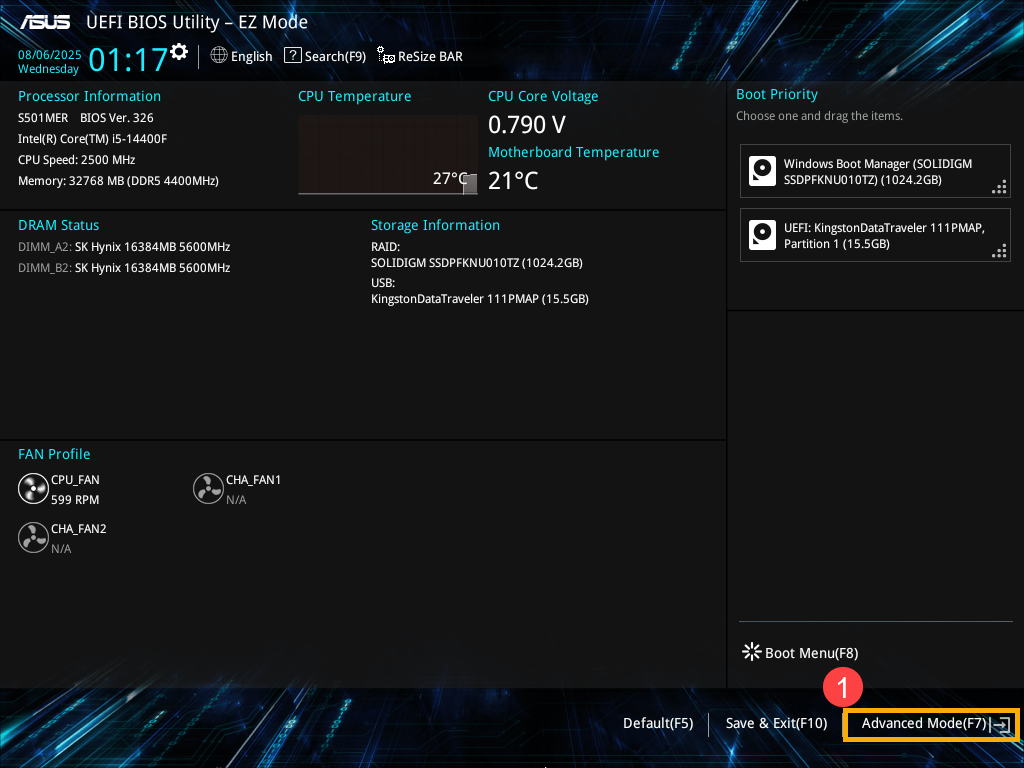
- Navigate to the [Advanced] tab②, then select [USB Configuration]③.
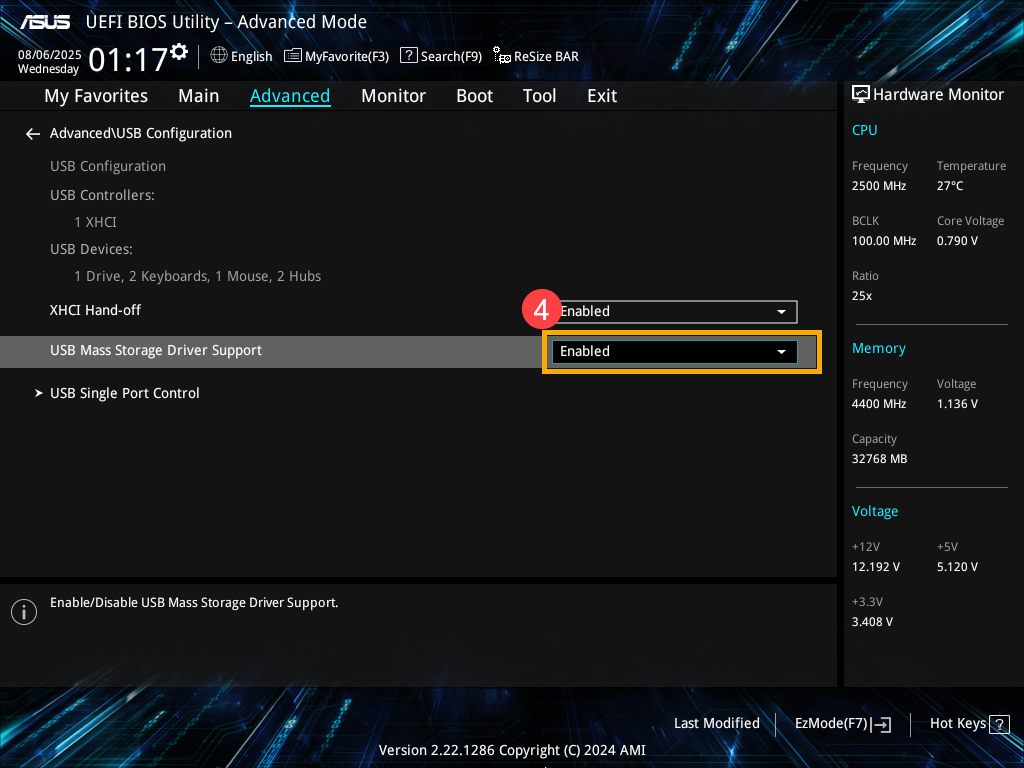
- In the USB Configuration menu, ensure that USB Mass Storage Driver Support is set to [Enabled]④.
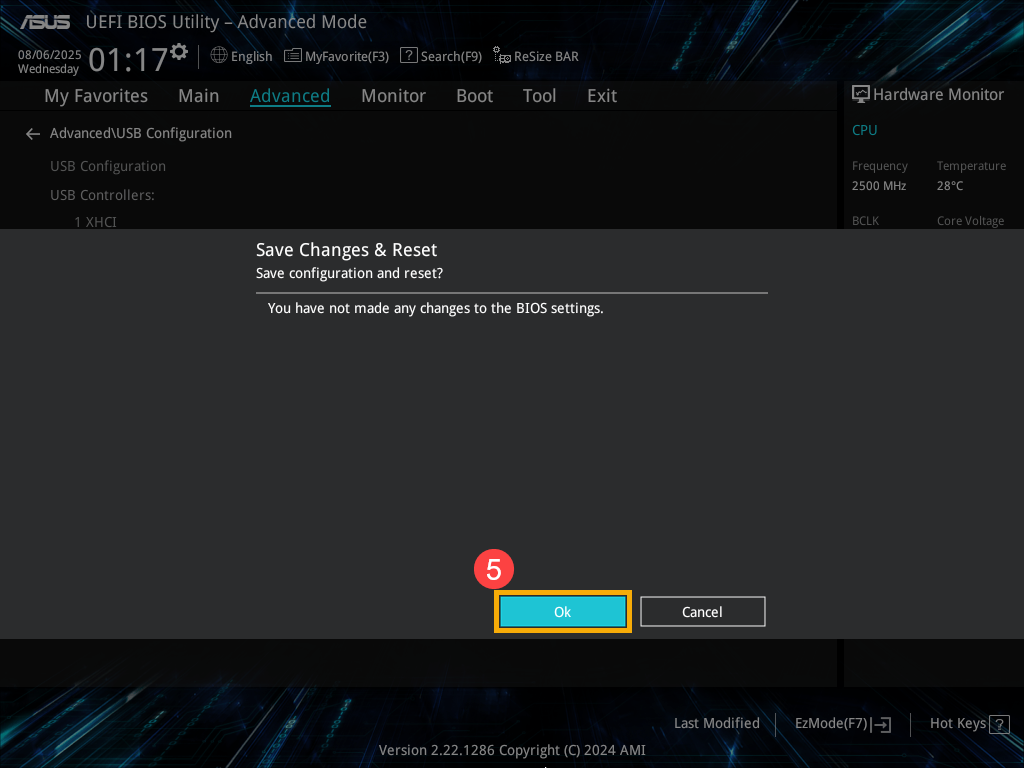
- Save the settings and exit. Press the [F10] key, then select [Ok]⑤. The device will reboot and the new settings will take effect.
Please refer to the relevant instructions below according to the version of Windows currently installed on your device:
Windows 11 operating system
Use the built-in camera application
- Type and search [Camera] in the Windows search bar①, then click [Open]②.
- Confirm that the camera is working properly after executing [Camera] application. If your camera is working properly, the issue may be related to the settings of a specific application. If any issues occur, please proceed to the next troubleshooting step.
Note: Camera errors include Upside down image, No image, Cannot recognize camera, Display abnormal, etc.
Give your apps permission
- Type and search [Camera privacy settings] in the Windows search bar①, then click [Open]②.
- Turn on [Camera access]③.
- Turn on [Let apps access your camera]④.
- Expand the Let apps access your camera filed, here you can turn on/off which apps can using camera⑤.
Note: Only apps that were installed from the Microsoft Store will appear in this list. If you're having problems with an app that you did not install from Microsoft Store, make sure that Let desktop apps access your camera is turned on. - If the problem persists, please continue the next troubleshooting step.
Enable and reinstall Camera driver in Device Manager
- Type and search [Device Manager] in the Windows search bar①, then click [Open]②.
- Click the arrow next to [Camera]③, then right-click the [your camera device name]④ and select [Enable device]⑤. To test if the camera work normally.
If the [Enable device] option does not display that is meaning the camera is enabled already, please continue to the next step.
Note: The device category for an external camera may vary. You can look for your camera under [Cameras], [Imaging devices], or [Sound, video and game controllers]. - Uninstall the camera driver. Right-click the [your camera device name]⑥ and select [Uninstall device]⑦.
- Check the box to [Delete the driver software for this device]⑧, then click [Uninstall]⑨.
- Select [Action] on the top of Device Manager⑩, and select [Scan for hardware changes]⑪, then system will automatically install the camera driver.
- After the camera driver installation is completed, please restart your computer and then try opening the Camera application again. If the problem persists, please continue to the next troubleshooting.
Run Camera Troubleshooter
- Type and search [Troubleshoot settings] in the Windows search bar①, then click [Open]②.
- Select [Other troubleshooters]③.
- Click [Run]④ on the Camera option.
- Follow the on-screen prompts to detect and resolve problems. If the problem persists, please continue the next troubleshooting step.
Use Restore Point to restore the system
If the camera problem happens recently, and if you have ever created a restore point or there is an automatic system restore existed, try to restore the computer to a point before the problem began to resolve the problem. Here you can learn more about How to use restore point to restore the system. If the problem persists, please continue the next troubleshooting step.
Reset the system
If the problem persists after all troubleshooting steps are completed. Please backup your personal files, then reset the PC to back to its original configuration. Here you can learn more about How to reset the system.
Windows 10 operating system
Use the built-in camera application
- Click [Start menu]①, then execute [Camera] application②.
- Confirm that the camera is working properly after executing [Camera] application. If your camera is working properly, the issue may be related to the settings of a specific application. If any issues occur, please proceed to the next troubleshooting step.
Note: Camera error (Upside down image, No image, Cannot recognize camera, Display abnormal, etc.
Give your apps permission
- Click on [Start] button①, then select [Settings]②.
- Select [Privacy]③.
- Select [Camera]④, then click change and turn on [Camera access for this device]⑤.
- To allow access for individual apps, turn on [Allow apps to access your camera]⑥.
- After allowing access to the camera, scroll down to [Choose which Microsoft Store apps can access your camera]⑦ and turn on camera access for the apps you want.
Note: Only apps that were installed from the Microsoft Store will appear in this list. If you're having problems with an app that you did not install from Microsoft Store, make sure that Let desktop apps access your camera is turned on. - If the problem persists, please continue the next troubleshooting step.
Enable and reinstall Camera driver in Device Manager
- Type and search [Device Manager] in the Windows search bar①, then click [Open]②.
- Click the arrow next to [Camera]③, then right-click the [your camera device name]④ and select [Enable device]⑤. To test if the camera work normally.
If the [Enable device] option does not display that is meaning the camera is enabled already, please continue to the next step.
Note: The device category for an external camera may vary. You can look for your camera under [Cameras], [Imaging devices], or [Sound, video and game controllers]. - Uninstall the camera driver. Right-click the [your camera device name]⑥ and select [Uninstall device]⑦.
- Check the box to [Delete the driver software for this device]⑧, then click [Uninstall]⑨.
- Select [Action] on the top of Device Manager⑩, and select [Scan for hardware changes]⑪, then system will automatically install the camera driver.
- After the camera driver installation is completed, please restart your computer and then try opening the Camera application again. If the problem persists, please continue to the next troubleshooting.
Use Restore Point to restore the system
If the camera problem happens recently, and if you have ever created a restore point or there is an automatic system restore existed, try to restore the computer to a point before the problem began to resolve the problem. Here you can learn more about How to use restore point to restore the system. If the problem persists, please continue the next troubleshooting step.
Reset the system
If the problem persists after all troubleshooting steps are completed. Please backup your personal files, then reset the PC to back to its original configuration. Here you can learn more about How to reset the system.