Related Topics
How to Update BIOS with ASUS Firmware Update/EZ Flash
Applicable Products: Notebook, All-in-One PC, Gaming Handheld, MiniPC
The BIOS (Basic Input/Output System) is firmware preinstalled on a computer’s motherboard and is the very first foundational system program executed during startup. Its primary responsibilities include initializing hardware components, performing the Power-On Self-Test (POST), and, once system integrity is confirmed, handing control over to the operating system to begin the boot process.
As products evolve and usage environments change, updating the BIOS can be beneficial in several ways:
- Enhancing overall system stability and compatibility
- Resolving known issues or defects
- Enabling support for new hardware
- Improving specific features or the overall user experience
Therefore, when an official BIOS update is released and aligns with actual usage requirements, it is recommended to perform the update in accordance with the provided instructions.
There are two methods to update BIOS:
- Update BIOS in BIOS Utility (with ASUS Firmware Update/EZ Flash)
- Update BIOS in Windows
Since some models are not able to update BIOS in Windows, this article will introduce how to update BIOS in BIOS Utility.
Note:
- It is not allowed to downgrade the BIOS version.
- Please back up your personal file before upgrading BIOS to prevent any unexpected issue.
- After updating the BIOS, you may be prompted to enter the BitLocker recovery key to unlock and access the operating system. For detailed steps, please refer to this article: How to Find the BitLocker Key.
You can also disable Device Encryption and Standard BitLocker Encryption before updating the BIOS, and then re-enable encryption after the BIOS update to protect your data security. For detailed steps, please refer to this article: Introduction to Device Encryption and Standard BitLocker Encryption. - The operation interface may be different because of the model version.
- Please keep the power supply / AC adapter connected during the BIOS update process.
- If you have any issue about the content below, please consult with ASUS Service Center.
To provide you more detailed instruction, you can also click ASUS YouTube video link below to know more about How to update BIOS with ASUS Firmware Update/EZ Flash:
https://www.youtube.com/watch?v=eR19bBJU-DA
Please follow the steps below to learn how to update the BIOS using ASUS Firmware Update/EZ Flash:
Method 1: Manually update the BIOS using ASUS Firmware / EZ Flash
Step 1. Download the BIOS file from ASUS support site
- Go to the ASUS support site with your device's model name, here you can learn more about How to search and download BIOS.
Note: To download the corresponding BIOS file, please refer to How to check the model name. - In the support page, please search for [BIOS for ASUS EZ Flash Utility] or [BIOS version] file which is located in the BIOS category①, and then click [Download]②

Step 2. Save BIOS file to portable storage device and start updating
Before starting to use ASUS Firmware Update/EZ Flash to update BIOS, please extract the downloaded BIOS file, and then copy the extracted file to a portable storage device (USB flash drive or external hard drive).
Note: The USB flash drive format must be FAT32 so that you are able to update BIOS in the BIOS utility. Here you can learn more about How to convert the USB flash drive format to FAT32.
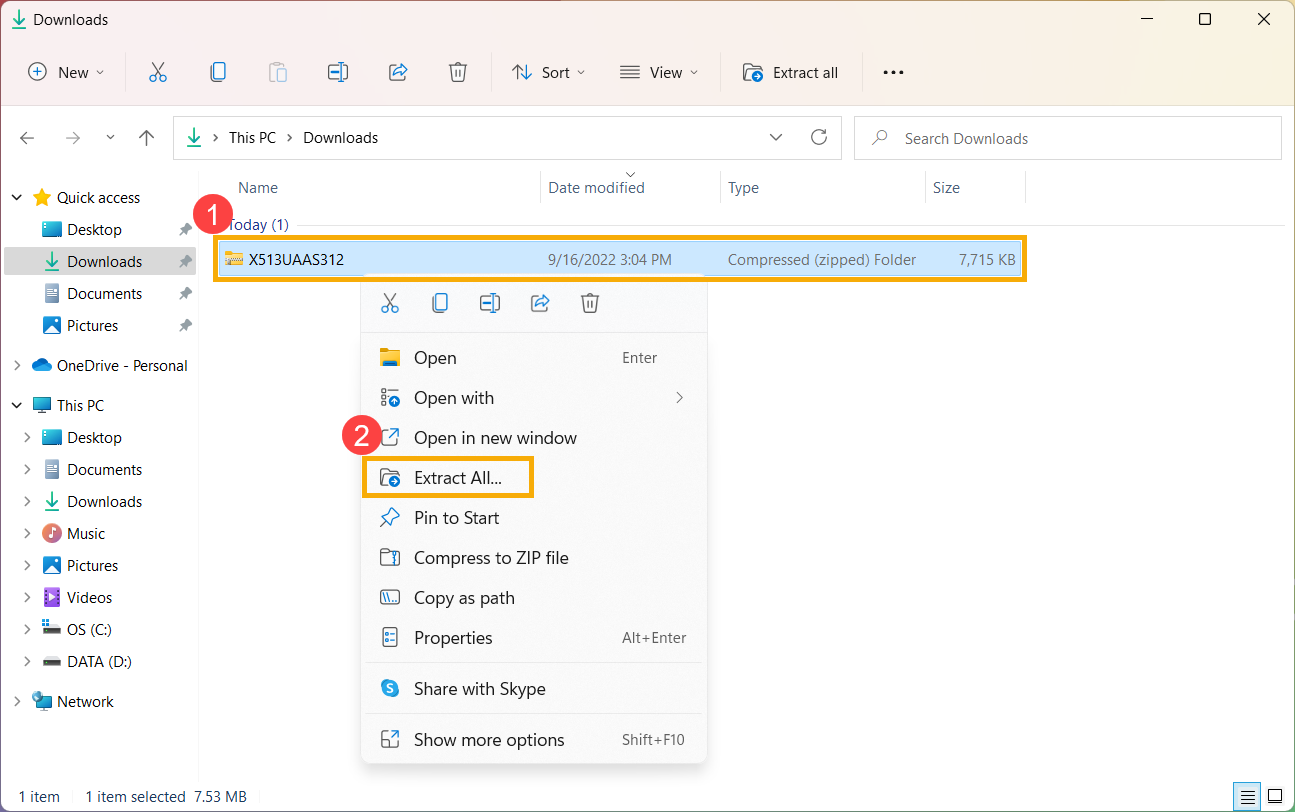
- After downloading the BIOS file, right-click the file① and then select [Extract All]②.
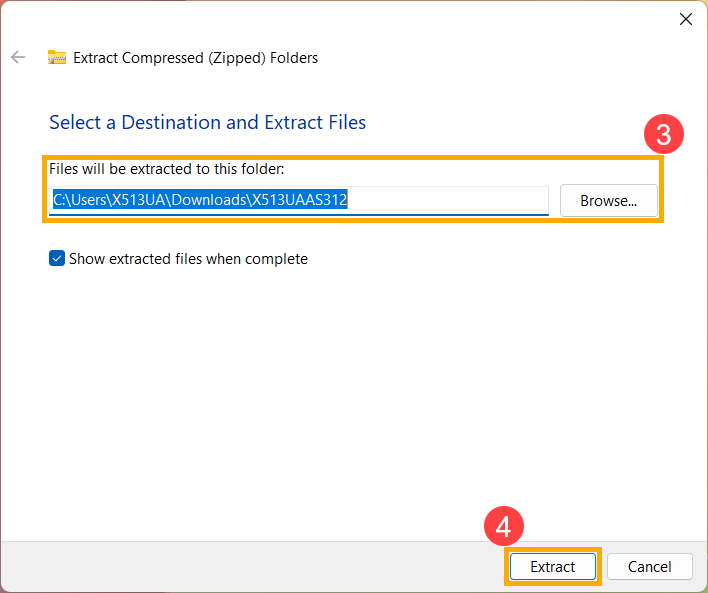
- Select a Destination③ and then click [Extract]④.
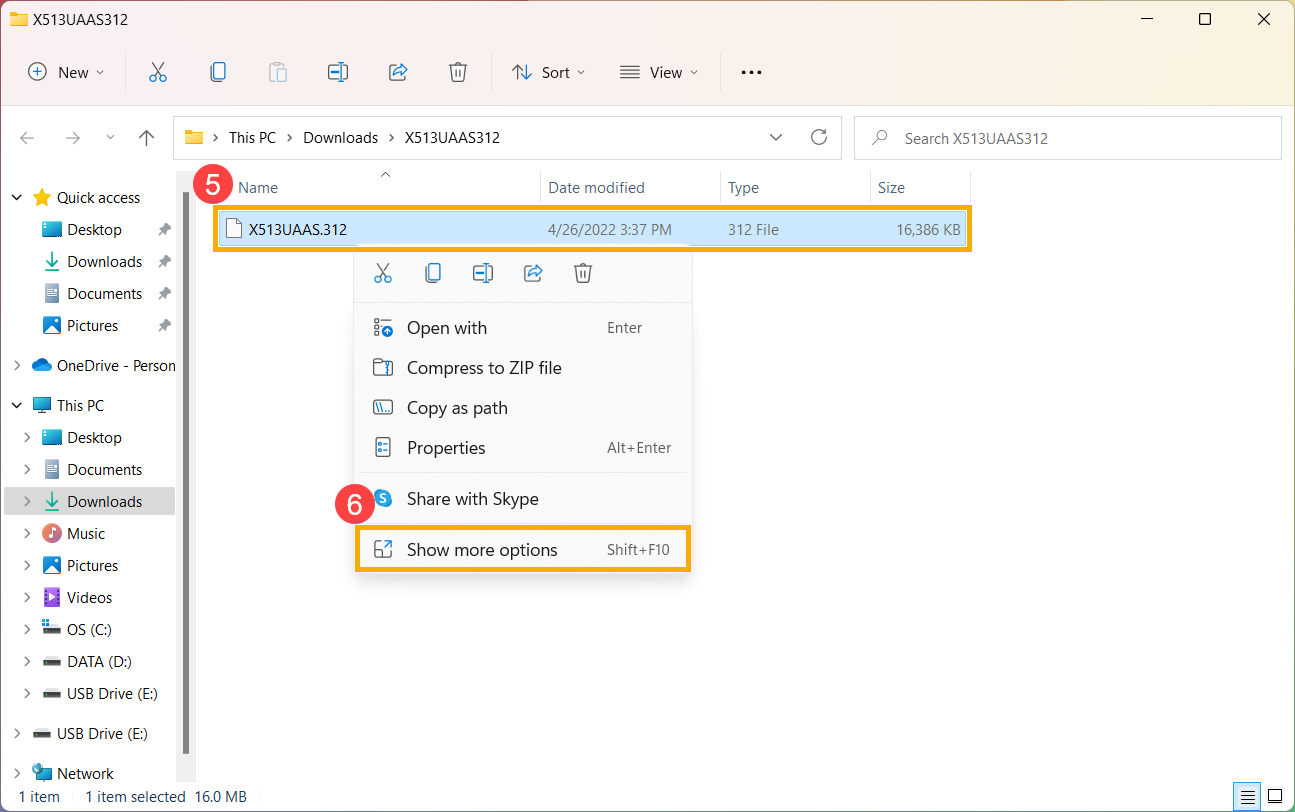
- After the extraction is completed, please go to the folder and connect the portable storage device to your ASUS device. Right-click the BIOS file⑤, then select [Show more options]⑥.
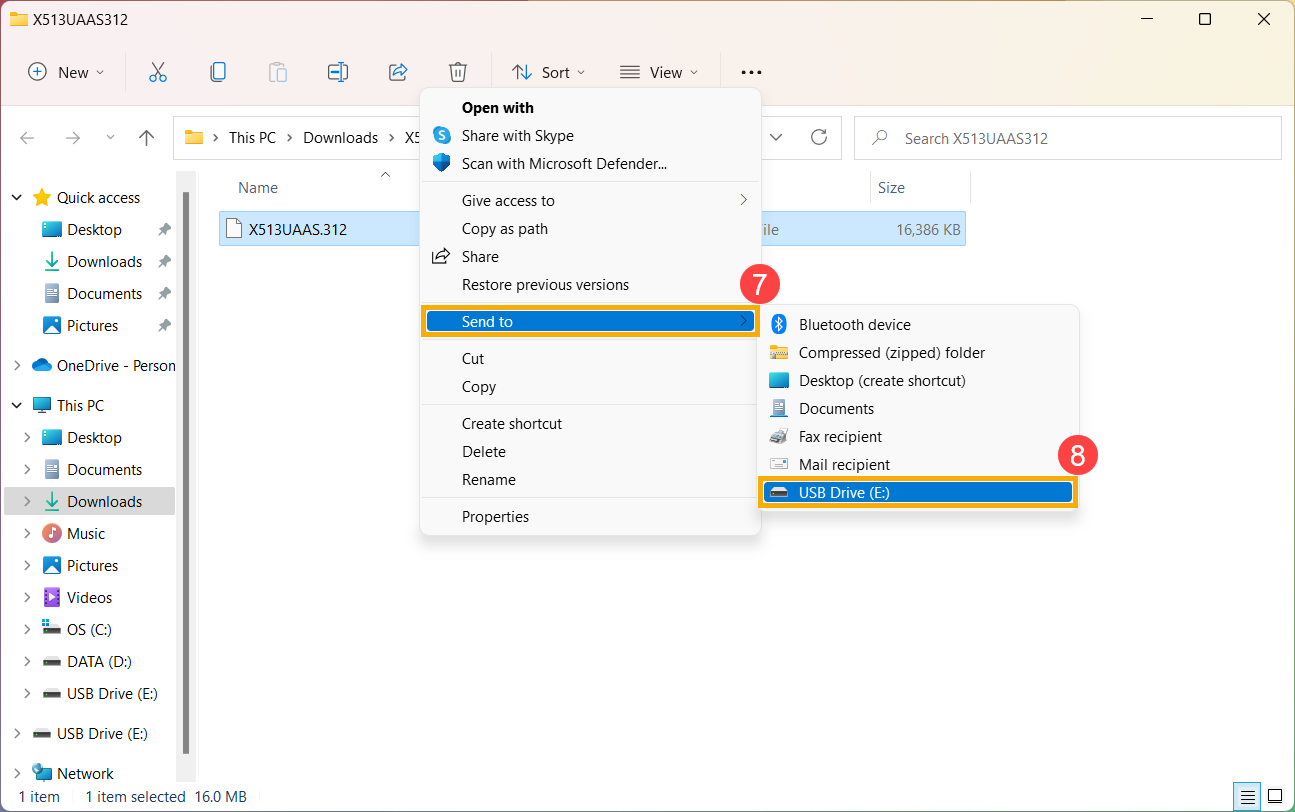
- Select [Send to]⑦, then select [Your portable device]⑧.
- The preparation is finished, please access the BIOS setup screen on the device.
When the device is not powered on, press and hold the [F2] key on the keyboard, then press the power button to turn on the device. Keep holding the [F2] key until the BIOS setup screen appears, then release the [F2] key. Learn more about How to enter the BIOS setup screen.
Note: Gaming handhelds need to press and hold the volume (-) key, then press the power button to turn on the device. - Upon entering the BIOS setup screen, you will encounter three types of interfaces: UEFI interface, legacy interface, and MyASUS in UEFI. Please refer to the following steps based on the BIOS screen of your device:
How to update BIOS in the UEFI mode
In the UEFI interface, you can navigate and confirm using the Arrow Keys and Enter key on the keyboard, Touchpad, or Mouse.
Note: The BIOS update screen below may vary slightly depending on the model.
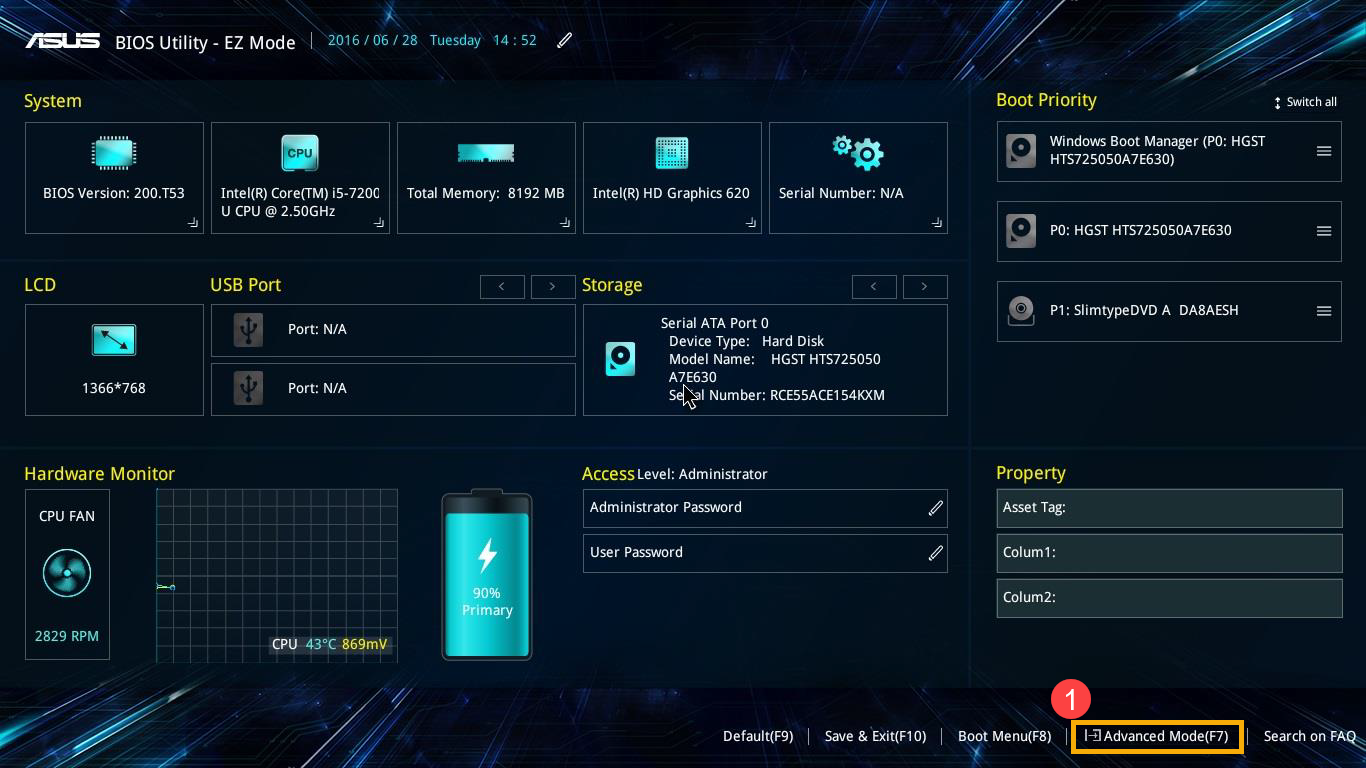
- After entering the BIOS Utility, go to the Advanced Mode by pressing Hotkey[F7] or use cursor to click①.
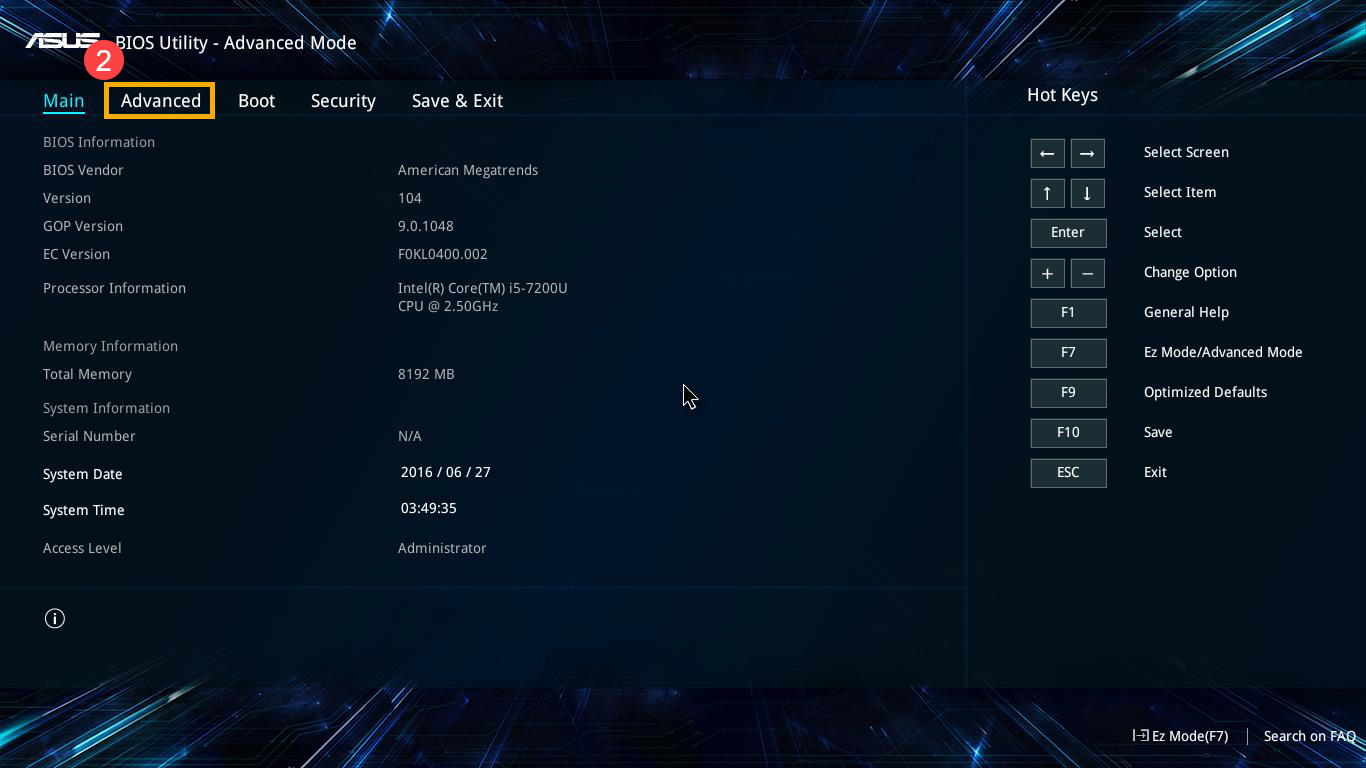
- After entering the Advanced Mode, select [Advanced] screen②.
- Select [ASUS Firmware Update] item③.
Note: Some models are displayed as the [ASUS EZ Flash 3 Utility] item.
- Select the storage device where the BIOS file located④, then click the BIOS file⑤.
The BIOS file naming convention for ASUS devices follows the format of 'Model'AS.'BIOS Version', as illustrated by the example B9450FAAS.302, where the model is B9450FA and the BIOS version is 302.
Note: Ensure that the device maintains a battery level of 20% or higher and is connected to a power source before proceeding with the BIOS update.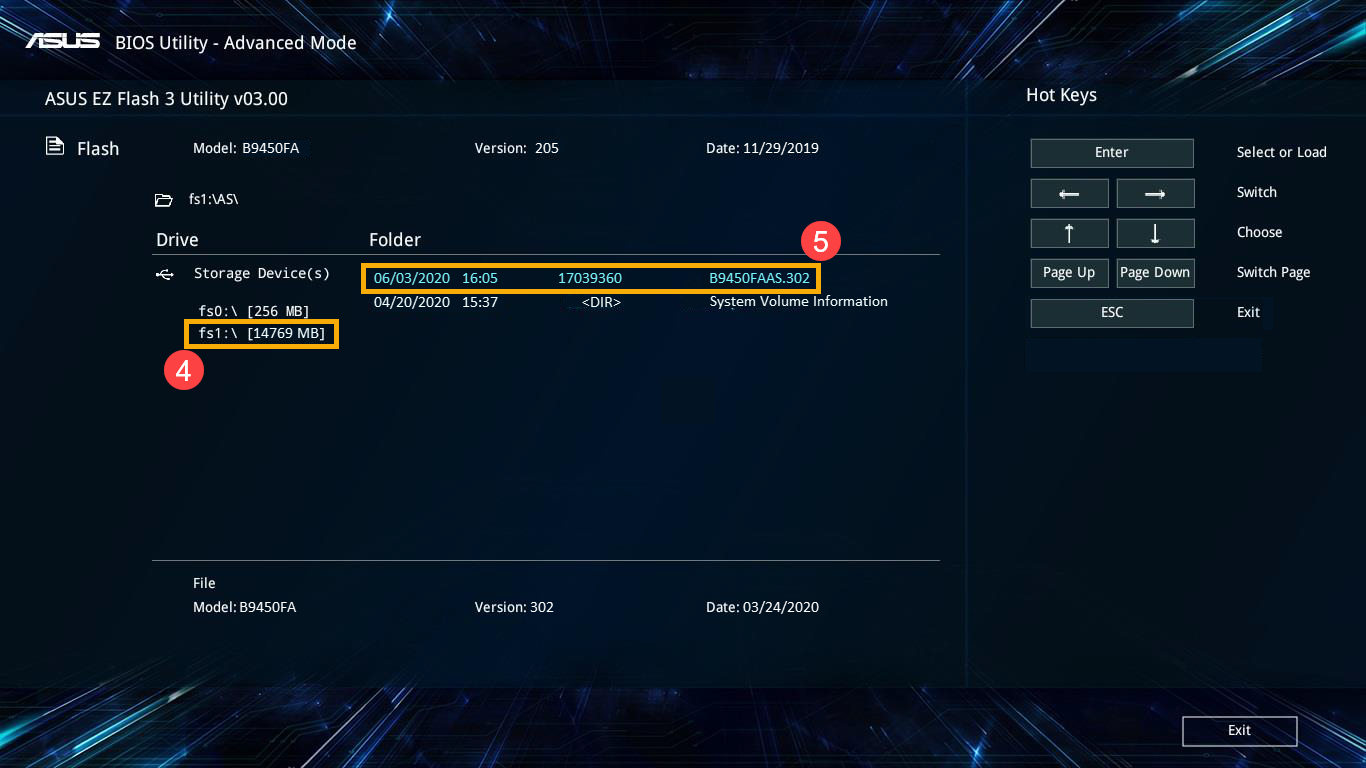
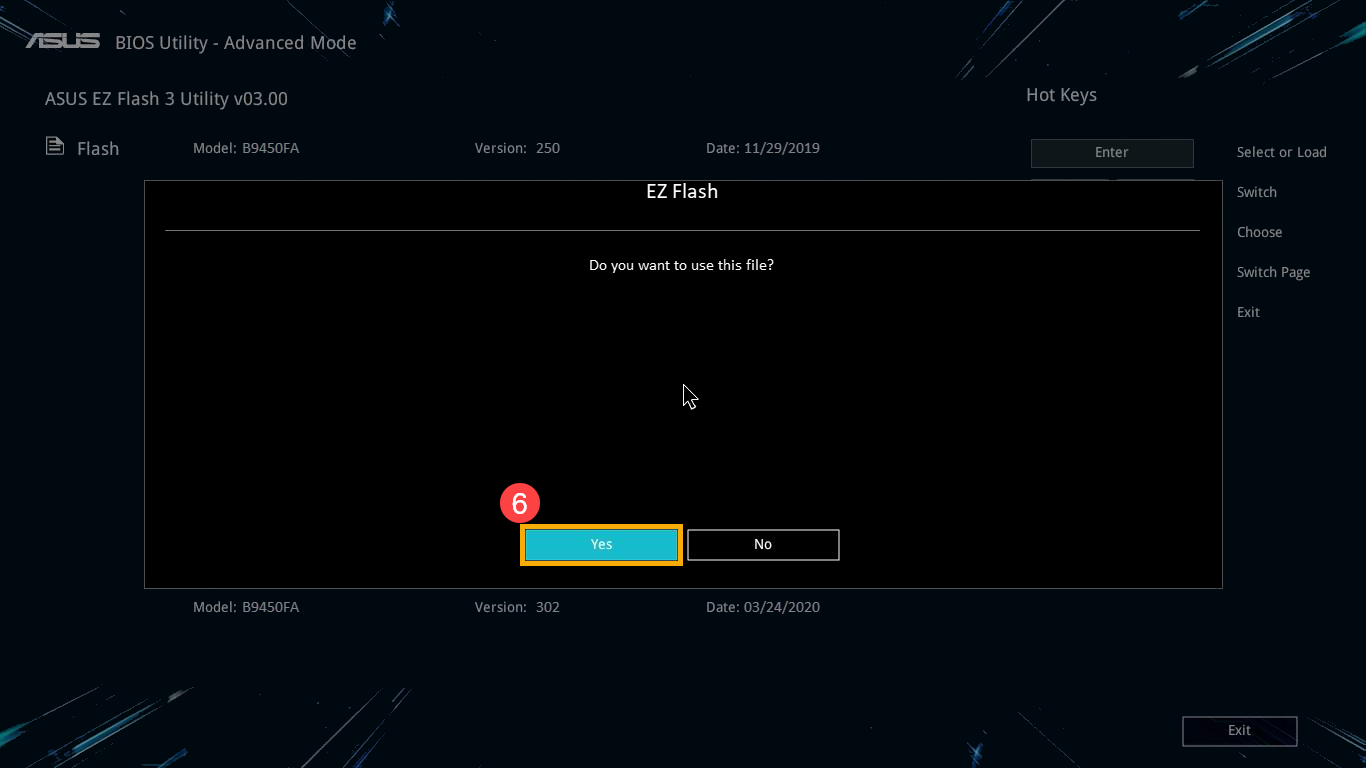
- When prompted to confirm whether you wish to proceed with the update, please click on [Yes]⑥.
- Verify whether the BIOS file information for updating is correct, then click on [Yes]⑦.

- The device is currently performing a BIOS update. Please wait patiently for the BIOS update to complete. Once the update is finished, the device will automatically restart and boot into the Windows operating system.
Note: Ensure that the device is connected to power and do not force shutdown during the BIOS update to prevent any abnormal issues.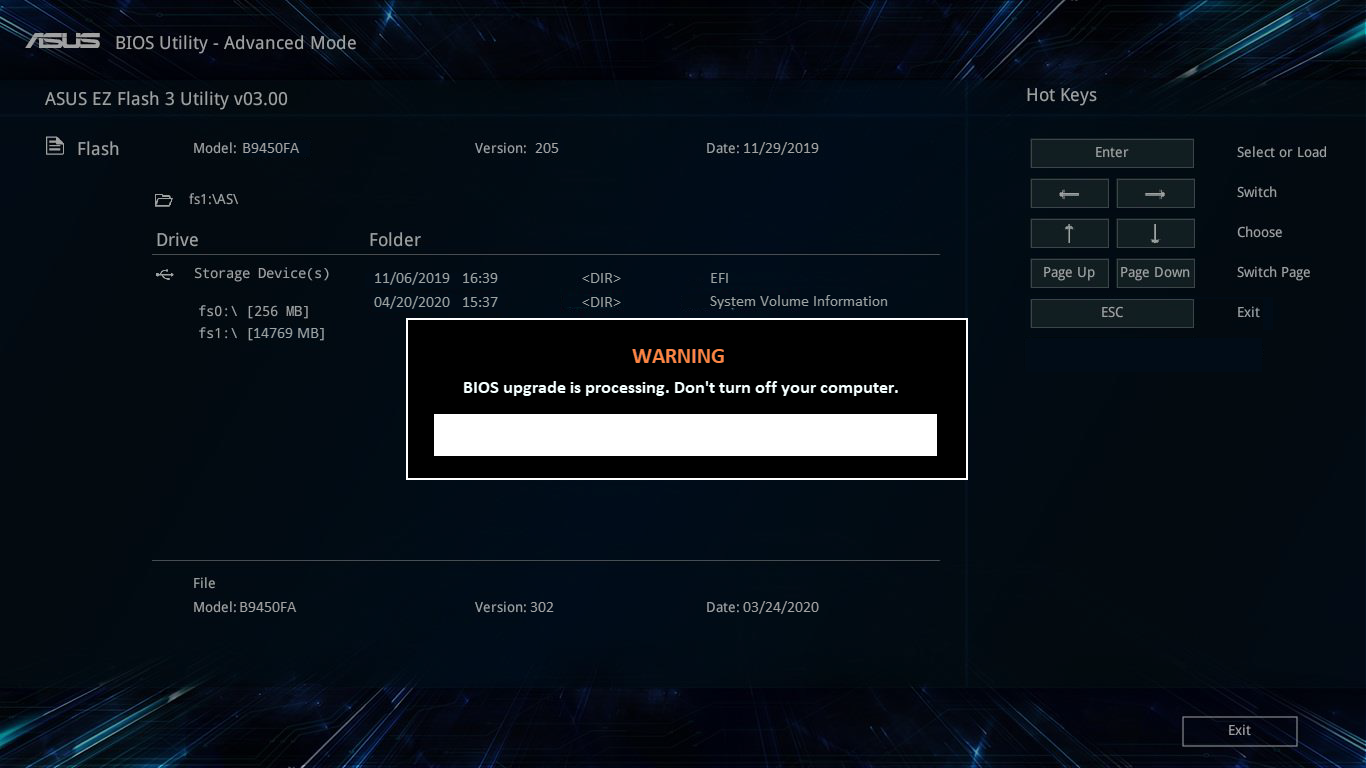
How to update BIOS in the Legacy mode
In the Legacy mode, you can only select and choose item via Arrow Keys and Enter of keyboard.
Note: The BIOS update screen below may vary slightly depending on the model.
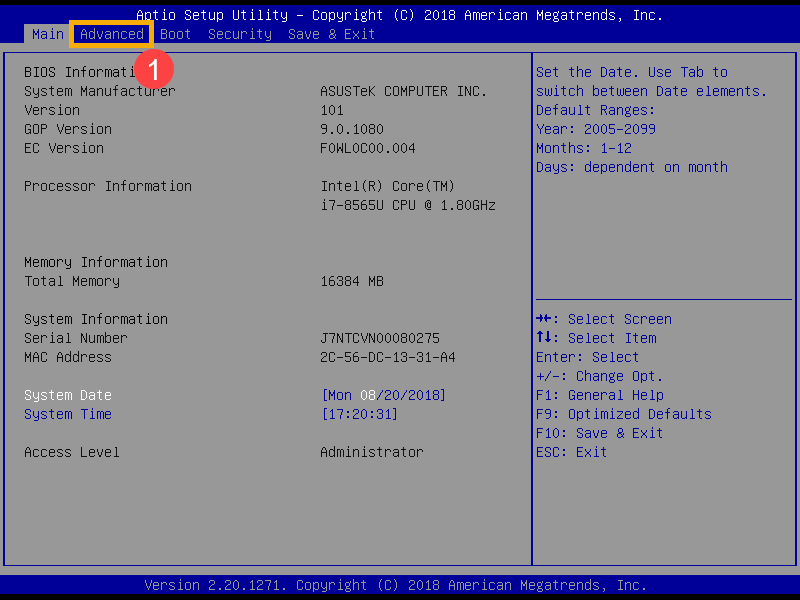
- After entering the BIOS Utility, select [Advanced] screen①.
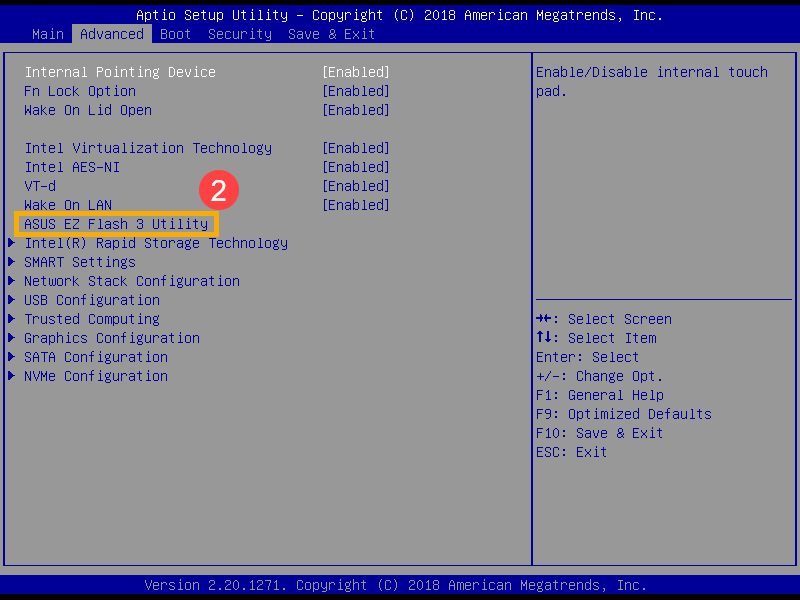
- Select [ASUS EZ Flash 3 Utility] item and press Enter②.
- Select the storage device where the BIOS file located③, then select the BIOS file④.
The BIOS file naming convention for ASUS devices follows the format of 'Model'AS.'BIOS Version', as illustrated by the example UX32LNAS.203, where the model is UX32LN and the BIOS version is 203.
Note: Ensure that the device maintains a battery level of 20% or higher and is connected to a power source before proceeding with the BIOS update.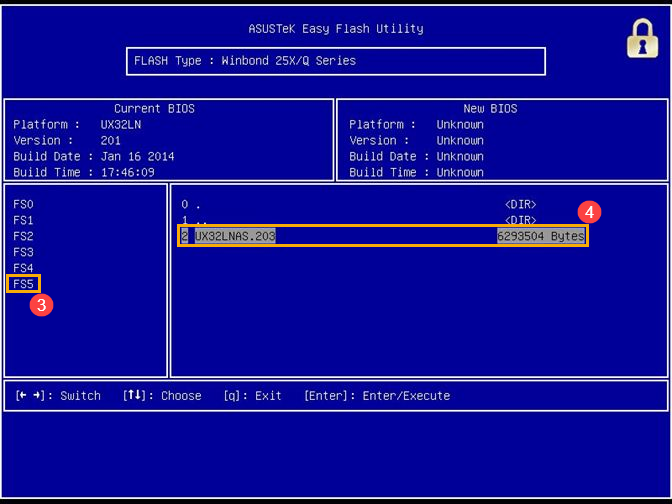
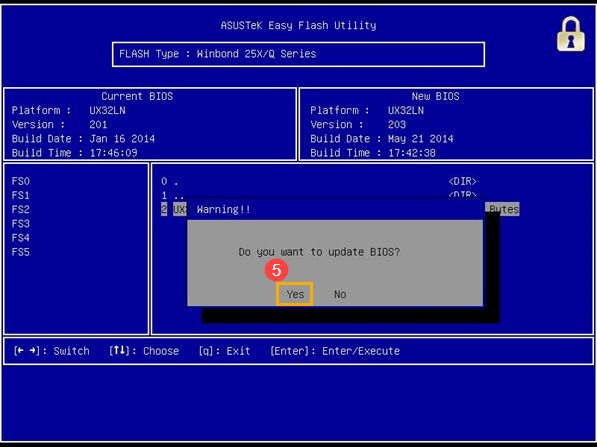
- Select [Yes] and press Enter to confirm and update BIOS⑤.
- The device is currently performing a BIOS update. Please wait patiently for the BIOS update to complete. Once the update is finished, the device will automatically restart and boot into the Windows operating system.
Note: Ensure that the device is connected to power and do not force shutdown during the BIOS update to prevent any abnormal issues.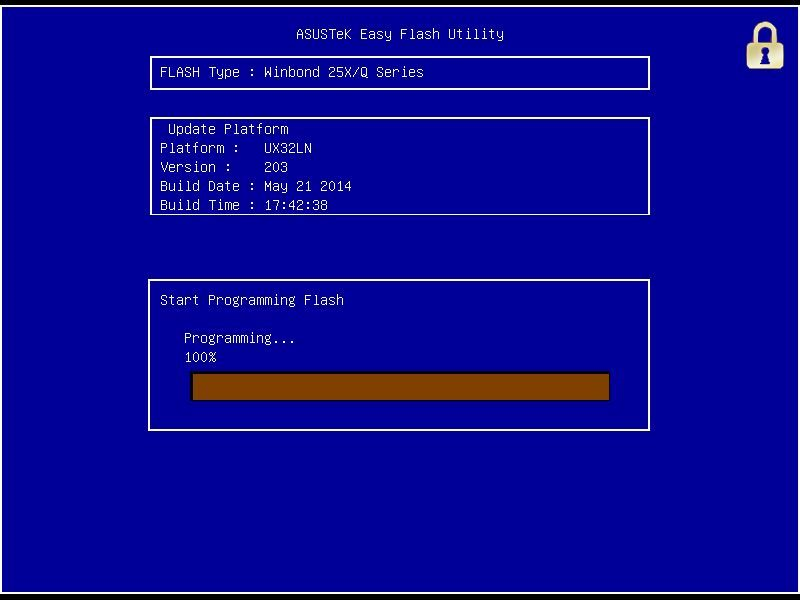
How to update BIOS in the MyASUS in UEFI mode
In the MyASUS in UEFI interface, you can navigate and confirm using the Arrow Keys and Enter key on the keyboard, Touchpad, or Mouse.
Note: The BIOS update screen below may vary slightly depending on the model.
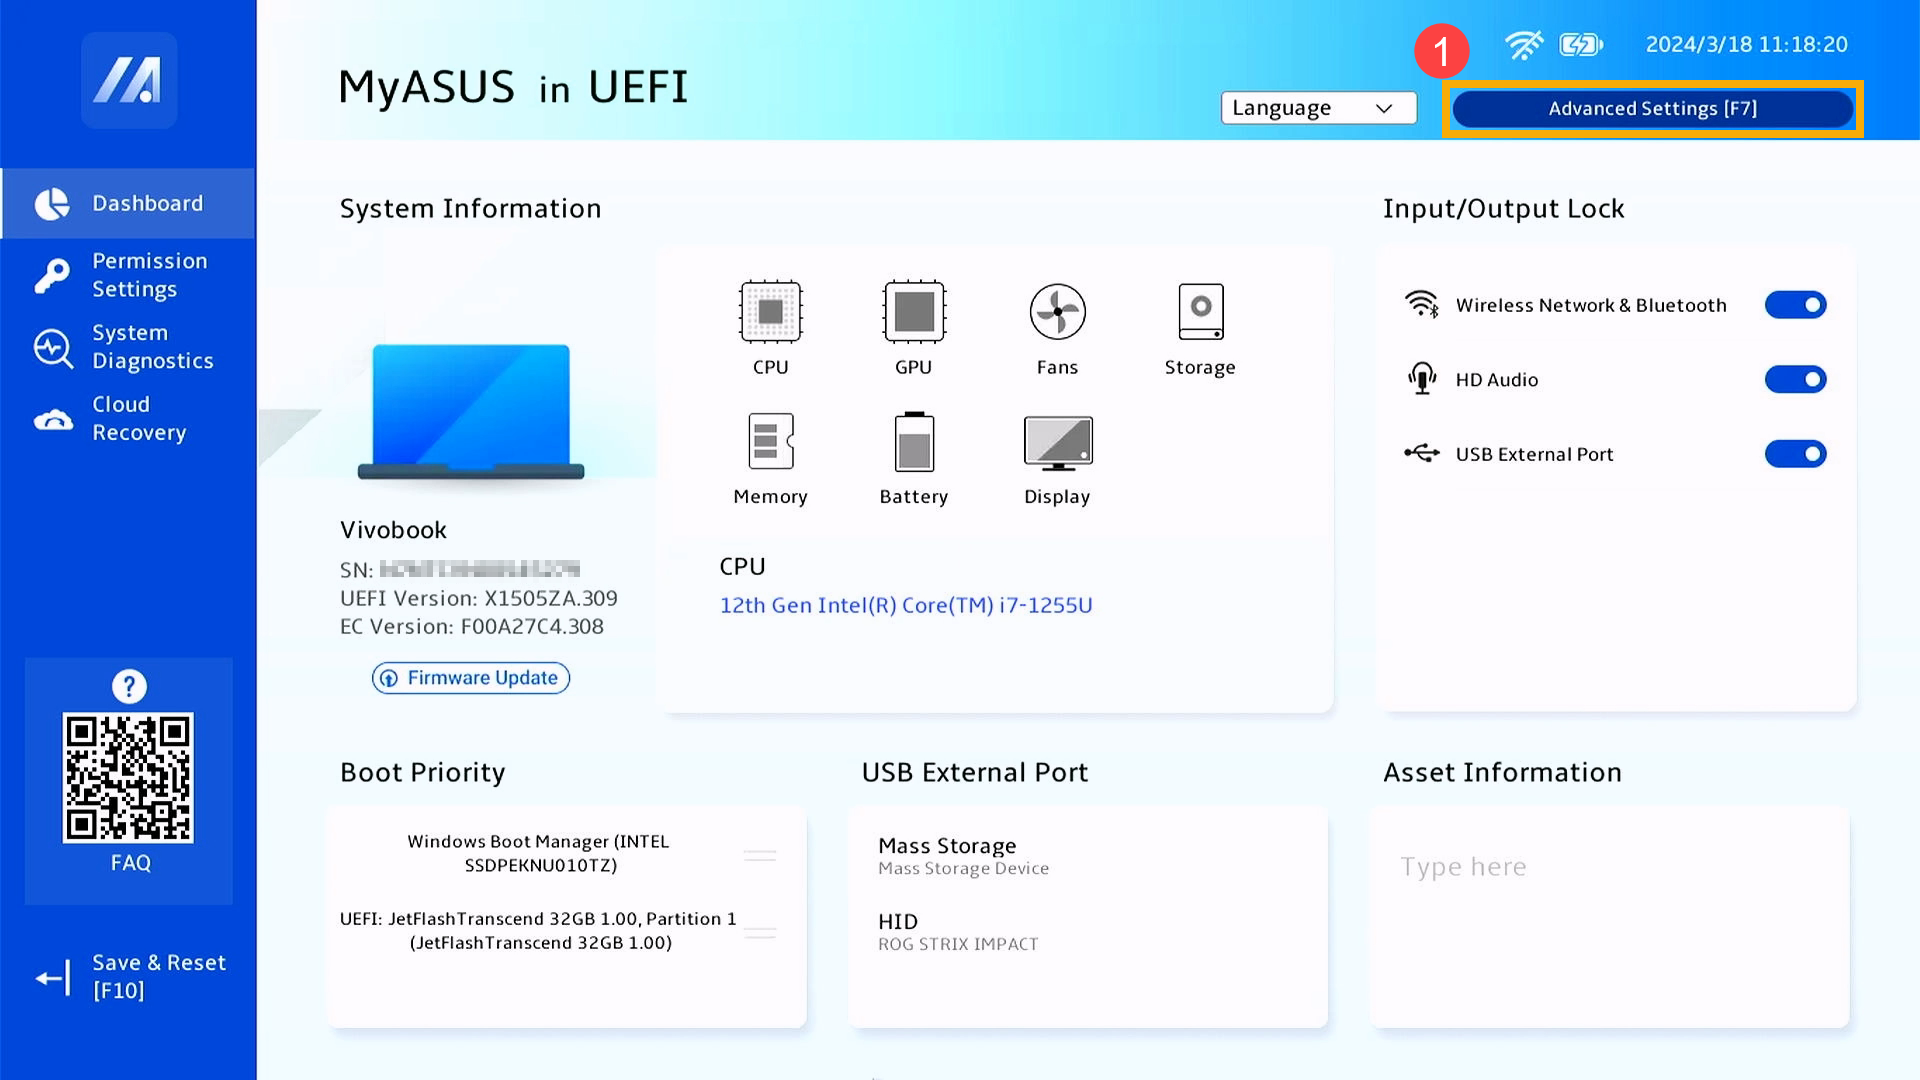
- After entering the BIOS Utility, go to the Advanced Settings by pressing Hotkey[F7] or use cursor to click①.
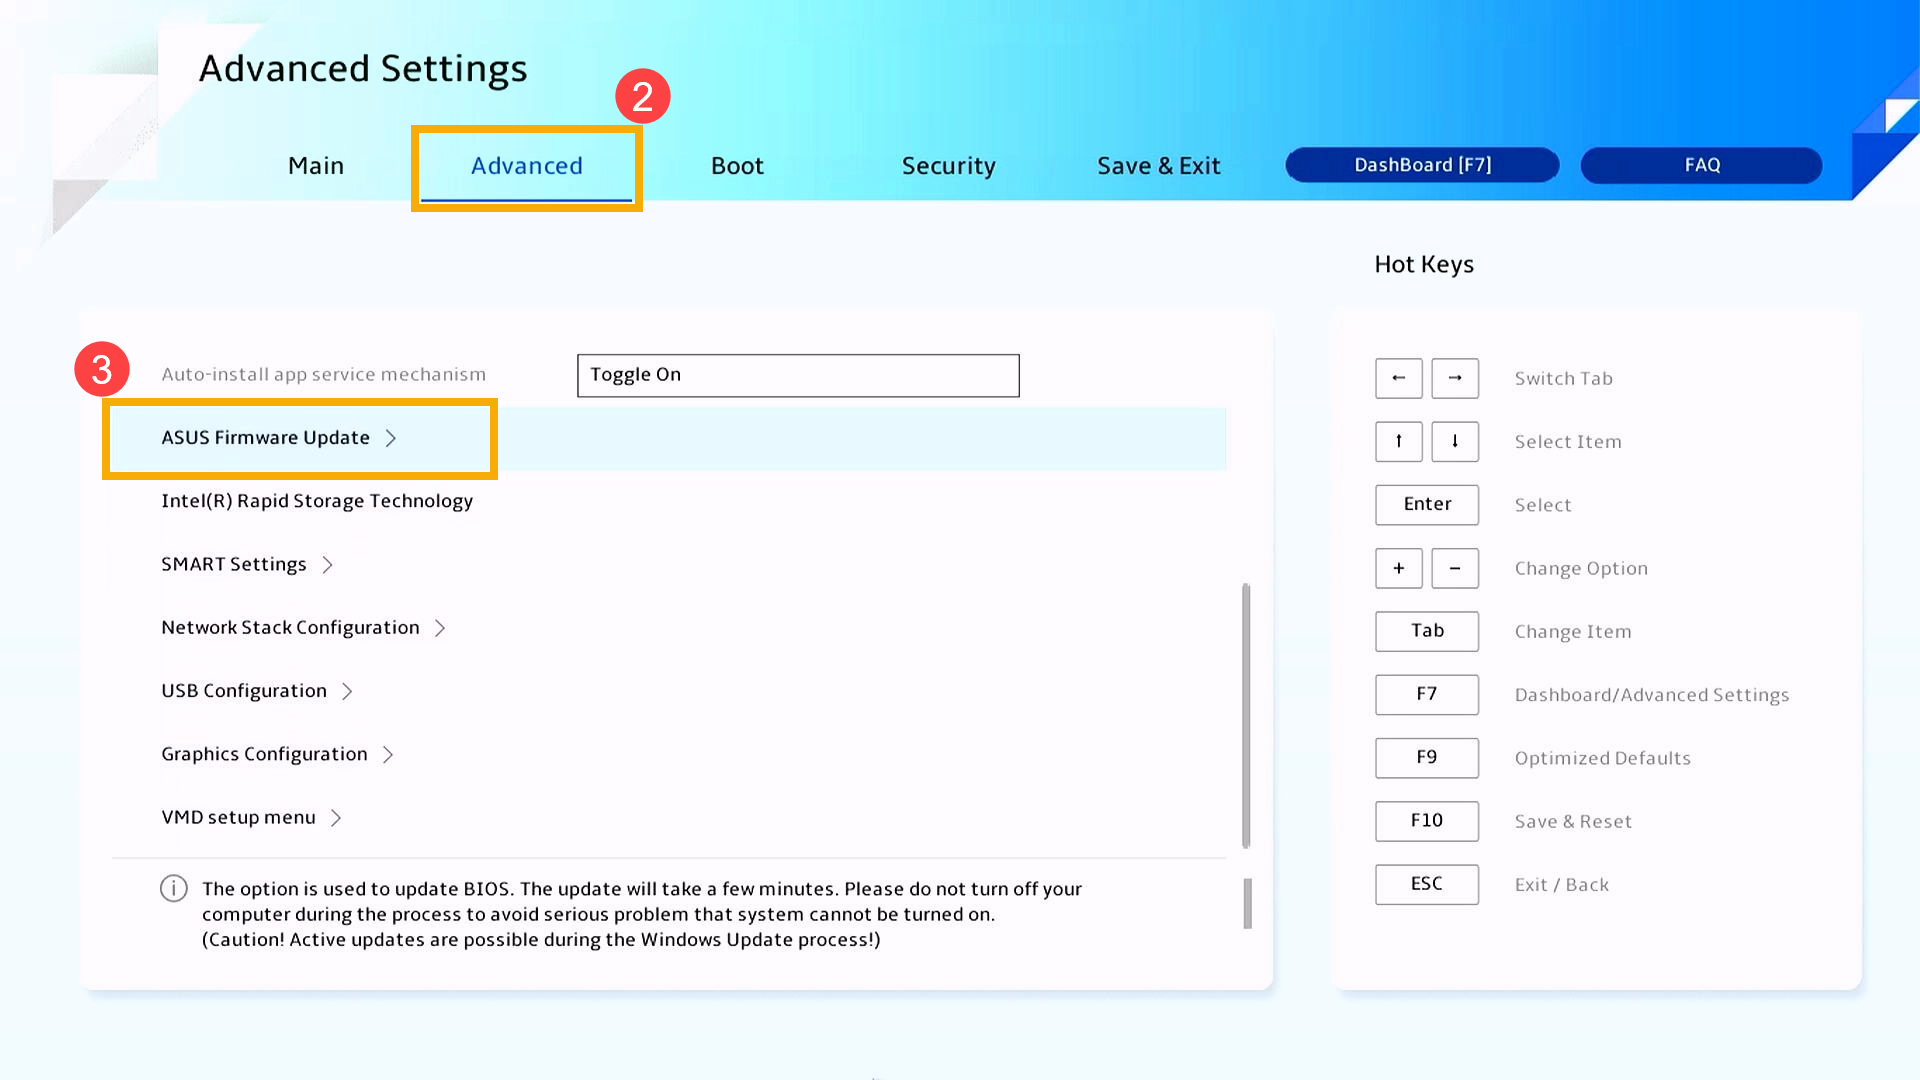
- After entering the Advanced Settings, select [Advanced] screen②, and then select [ASUS Firmware Update] item③.
- Select the storage device where the BIOS file located④, then click the BIOS file⑤.
The BIOS file naming convention for ASUS devices follows the format of 'Model'AS.'BIOS Version', as illustrated by the example X1505ZAAS.310, where the model is X1505ZA and the BIOS version is 310.
Note: Ensure that the device maintains a battery level of 20% or higher and is connected to a power source before proceeding with the BIOS update.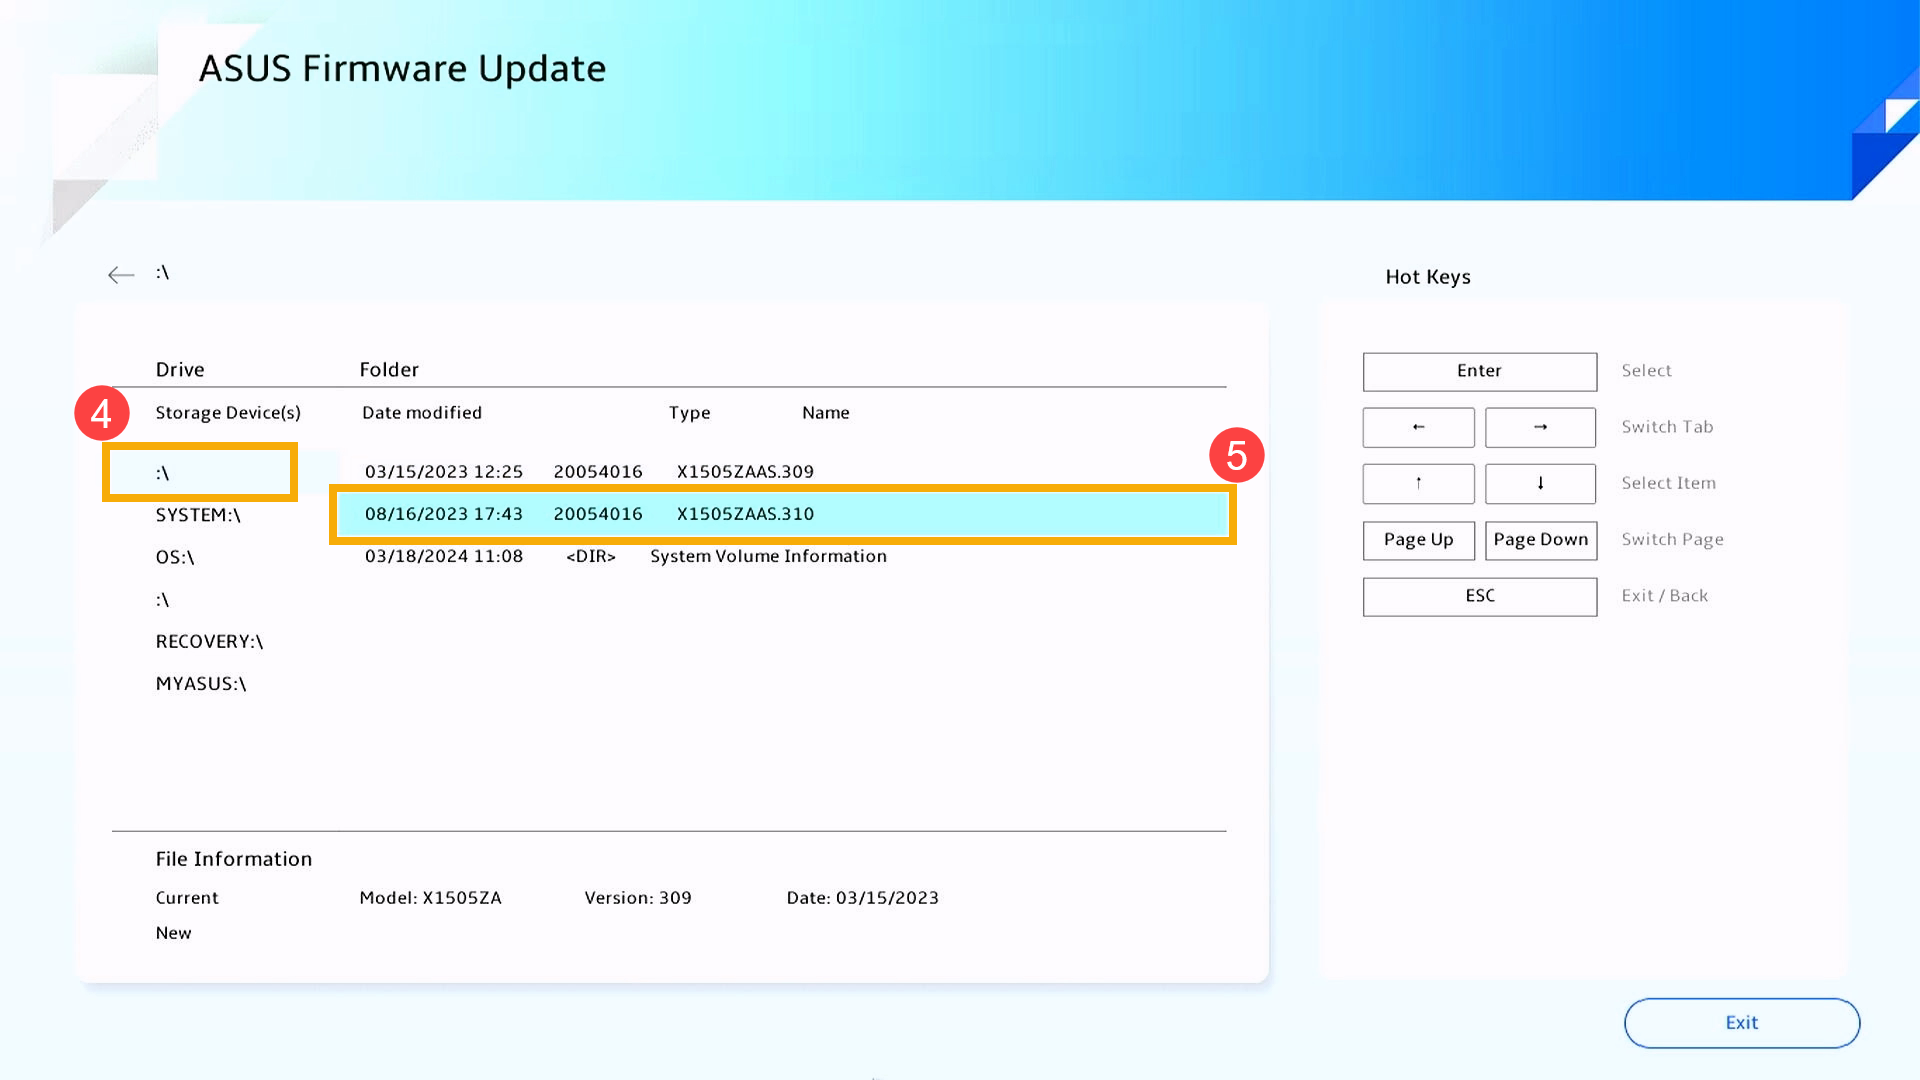
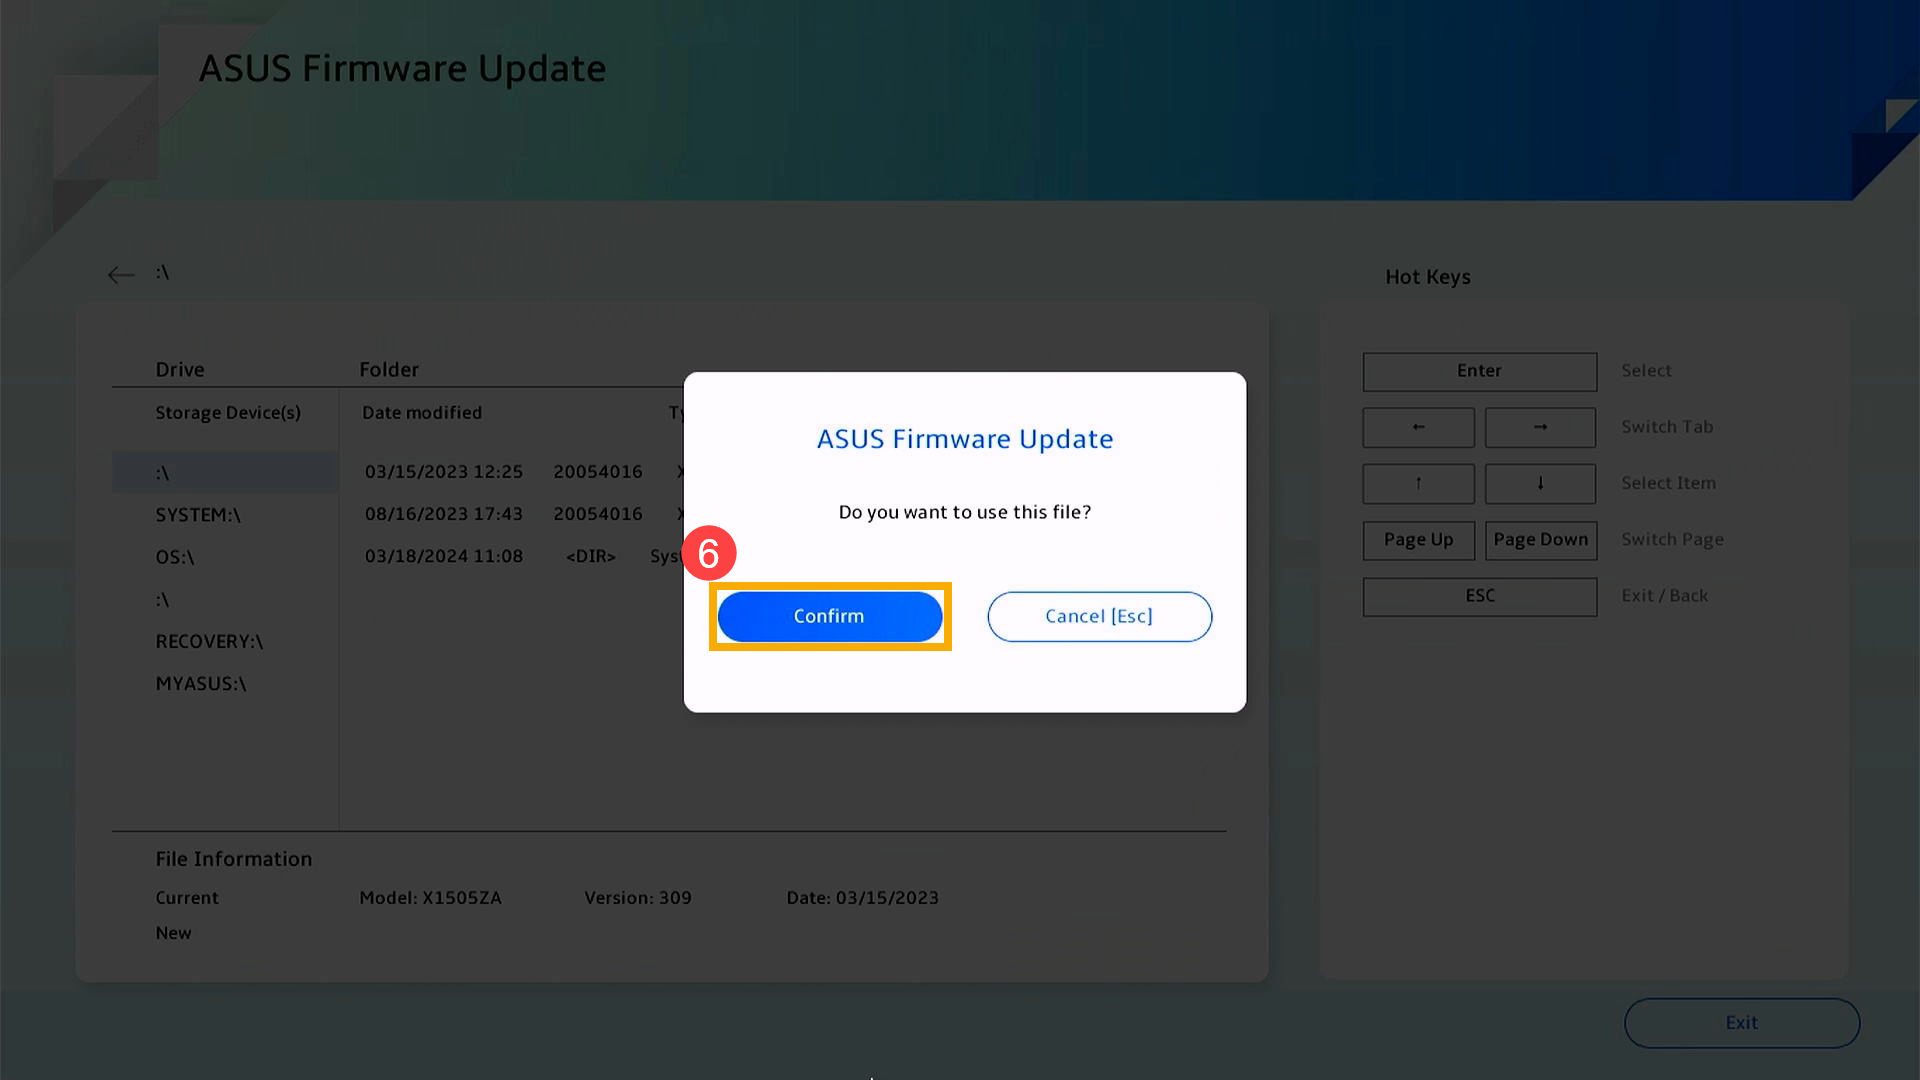
- When prompted to confirm whether you wish to proceed with the update, please click on [Confirm]⑥.
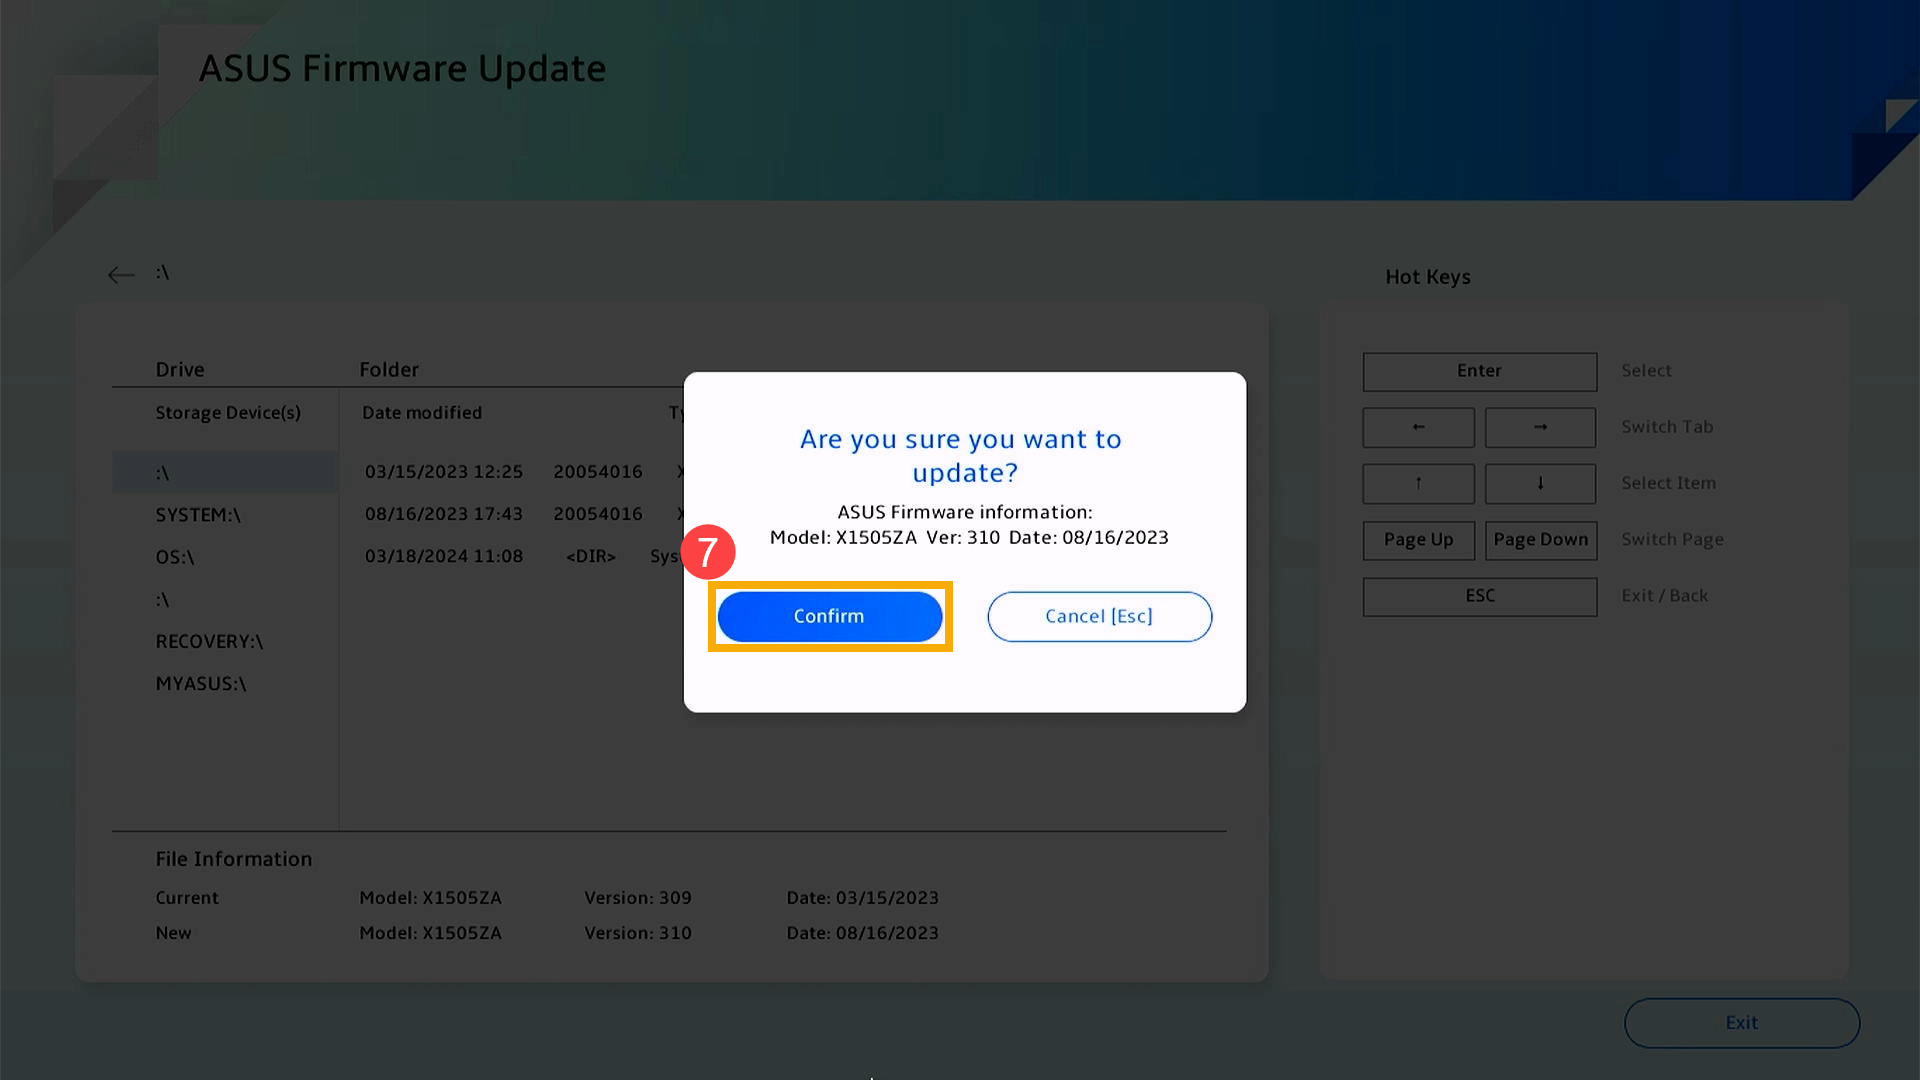
- Verify whether the BIOS file information for updating is correct, then click on [Confirm]⑦.
- The device is currently performing a BIOS update. Please wait patiently for the BIOS update to complete. Once the update is finished, the device will automatically restart and boot into the Windows operating system.
Note: Ensure that the device is connected to power and do not force shutdown during the BIOS update to prevent any abnormal issues.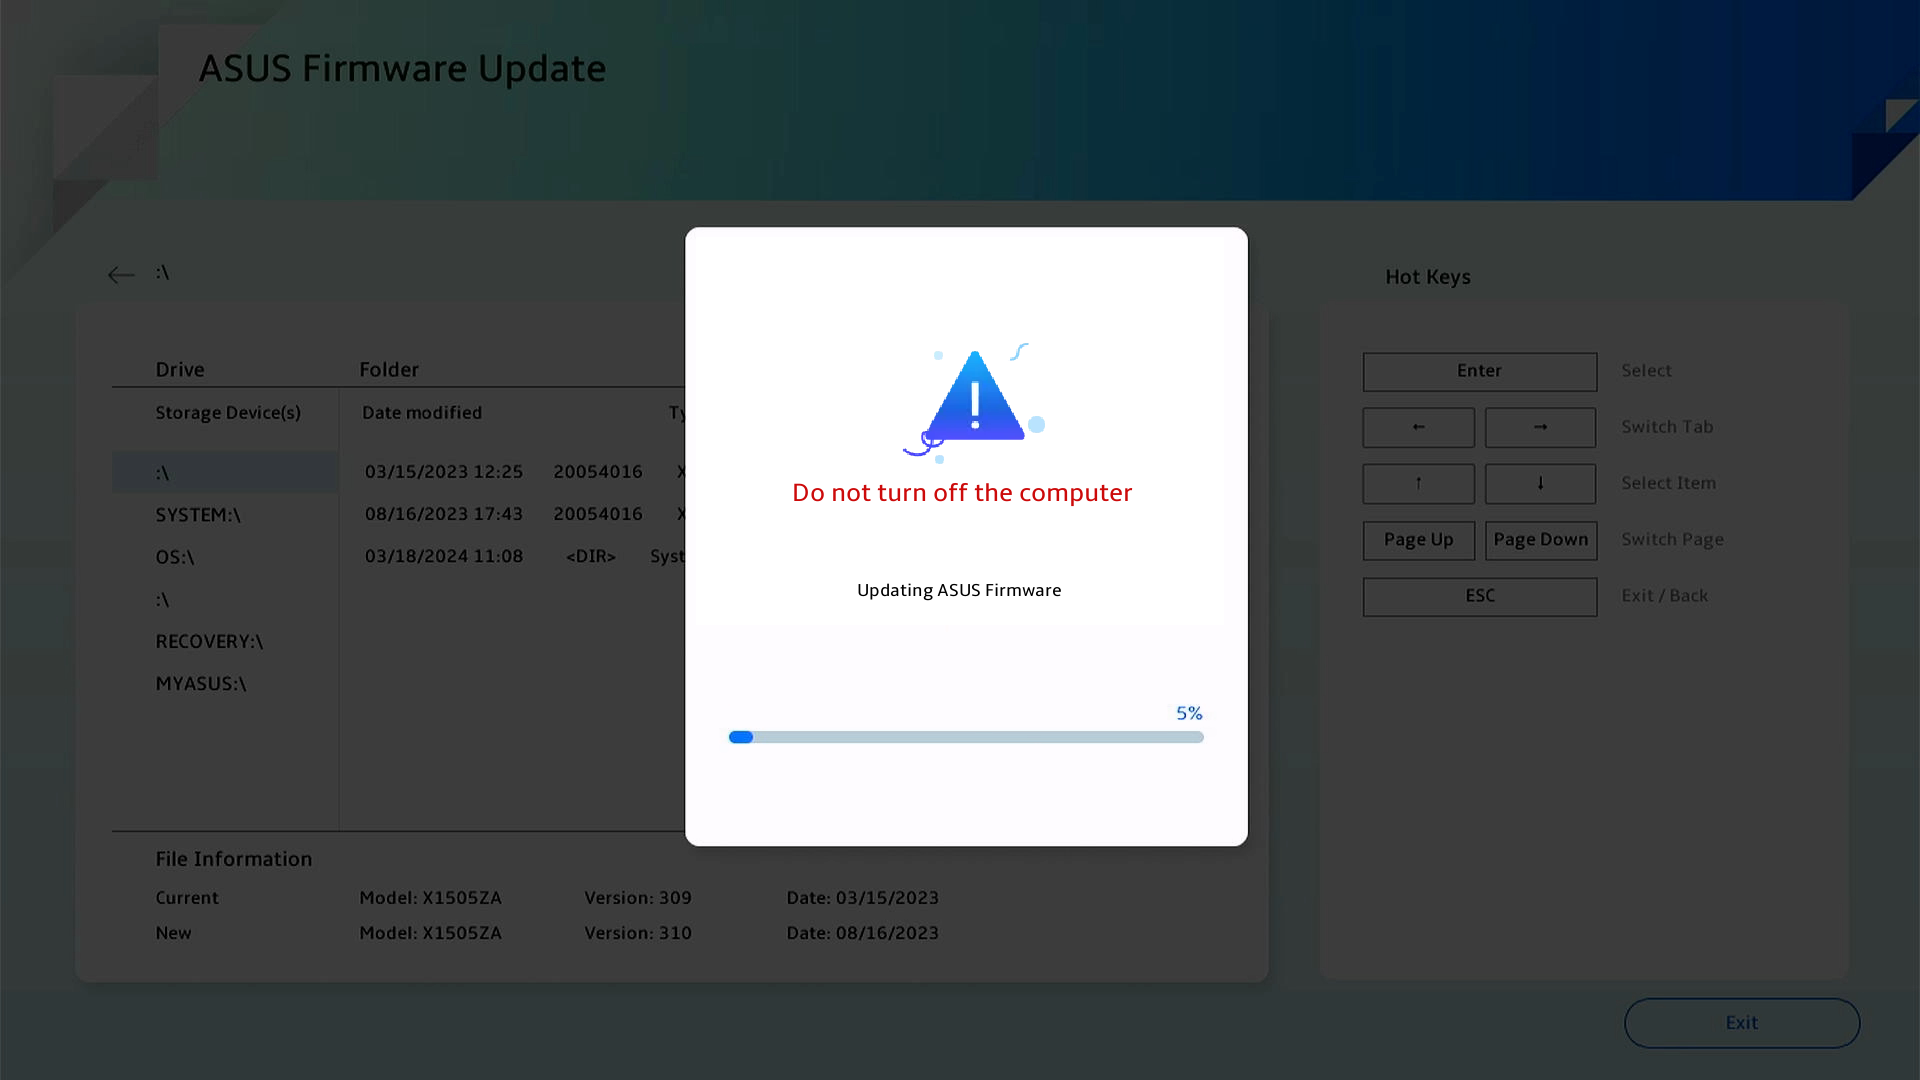
Method 2: Update the BIOS via the Cloud
Applicable products: Devices equipped with Intel Arrow Lake, AMD Krackan Point, and subsequent CPU platforms
Note: The BIOS update screens below may differ slightly depending on the model. If your device’s BIOS interface does not include the relevant options, please use Method 1: Manually update the BIOS using ASUS Firmware / EZ Flash.
- With the device powered off, press and hold [F2] on the keyboard, then press the power button to turn on the device. Release [F2] once the BIOS setup screen appears. Learn more about How to enter the BIOS Configuration screen.
- In the BIOS utility screen, click [Firmware Update]①.

- Select [Cloud Update]②.
Note: Cloud Update supports a wired network connection. If your computer does not have an Ethernet port, you will need an ASUS USB-to-Ethernet adapter. Due to compatibility considerations, non-ASUS adapters may not be supported. Alternatively, you may switch to a wireless connection in the next step.
- Select a wireless access point③, then click [Confirm]④.
Note: If your wireless card is Wi‑Fi 6/6E, you may experience connection failures or be unable to locate a Wi‑Fi 7 router. In such cases, it is recommended to use a different wireless access point or a mobile hotspot.
- Enter the password for the selected wireless network⑤, then click [Confirm]⑥.

- After the wireless connection is established, click [OK]⑦ to continue.

- The system will begin checking the connection to the BIOS server.

- If an available update is detected, click [Next]⑧ to begin the download.

Note: If the screen displays 「No update required」, your BIOS is already up to date.
- The system will start downloading the BIOS; please wait patiently.
Note: This process typically takes 1–5 minutes, depending on your network quality and system configuration. Approximately 32MB of data will be used; if you are on a metered connection, please monitor your data usage.
Note: If you see 「Can not connect network」 during the download, the network connection is likely unstable. Please switch to another network and try again.
- Once the BIOS download is complete, the update will begin automatically. Please allow the process to finish. When completed, the system will reboot automatically and enter Windows.
Note: During the BIOS update, ensure the device is connected to a power source and do not force a shutdown, as this may lead to unexpected issues.