المواضيع ذات الصلة
[Windows 11/10] كيفية استخدام Windows Update لتحديث النظام و BIOS
المنتجات المطبقة: لابتوب، جهاز مكتبي، الحاسوب الكل في واحد، جهاز الألعاب المحمول، MiniPC
الحفاظ على أحدث حالة لنظام التشغيل يساعد في ضمان أمان الجهاز وأدائه. يوفر نظام تشغيل Windows آلية تحديث مريحة من خلال Windows Update، مما يمكّن المستخدمين من الوصول بسهولة إلى أحدث الميزات والتحديثات والإصلاحات الأمنية.
سيقوم هذا المقال بإرشادك حول كيفية استخدام Windows Update للحصول على آخر التحديثات و BIOS لجهازك.
ملاحظة: إذا تلقيت إشعارًا بأن إصدار Windows الخاص بك قد وصل إلى نهاية الخدمة، يمكنك استخدام مساعد تثبيت Windows 11 لمساعدتك في ترقية النظام إلى أحدث إصدار مدعوم لمواصلة تلقي الدعم. لمزيد من المعلومات، يرجى الرجوع إلى دليل دعم Microsoft.
يرجى الانتقال إلى التعليمات المطابقة بناءً على نظام التشغيل Windows الحالي على جهازك:
نظام تشغيل Windows 11
الحصول على آخر التحديثات عبر Windows Update
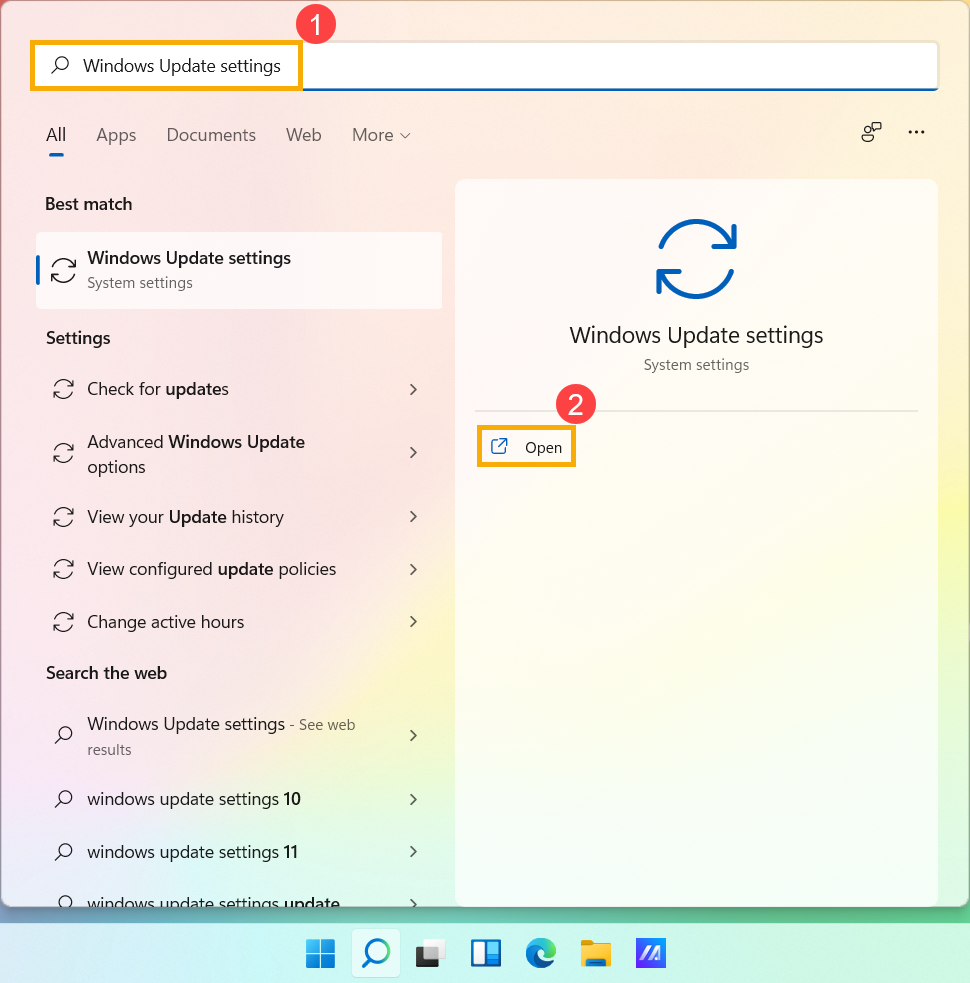
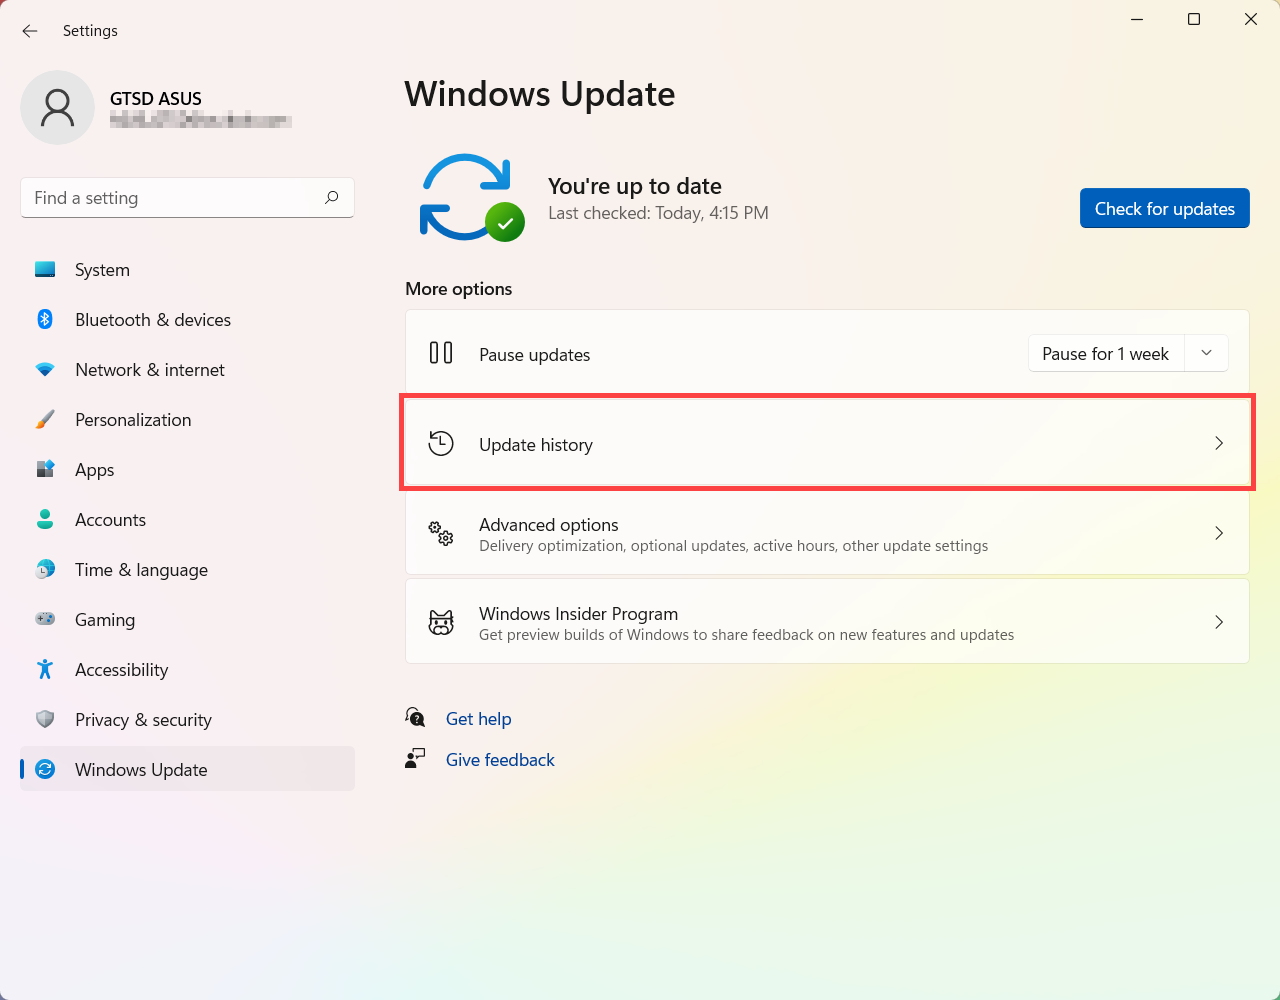
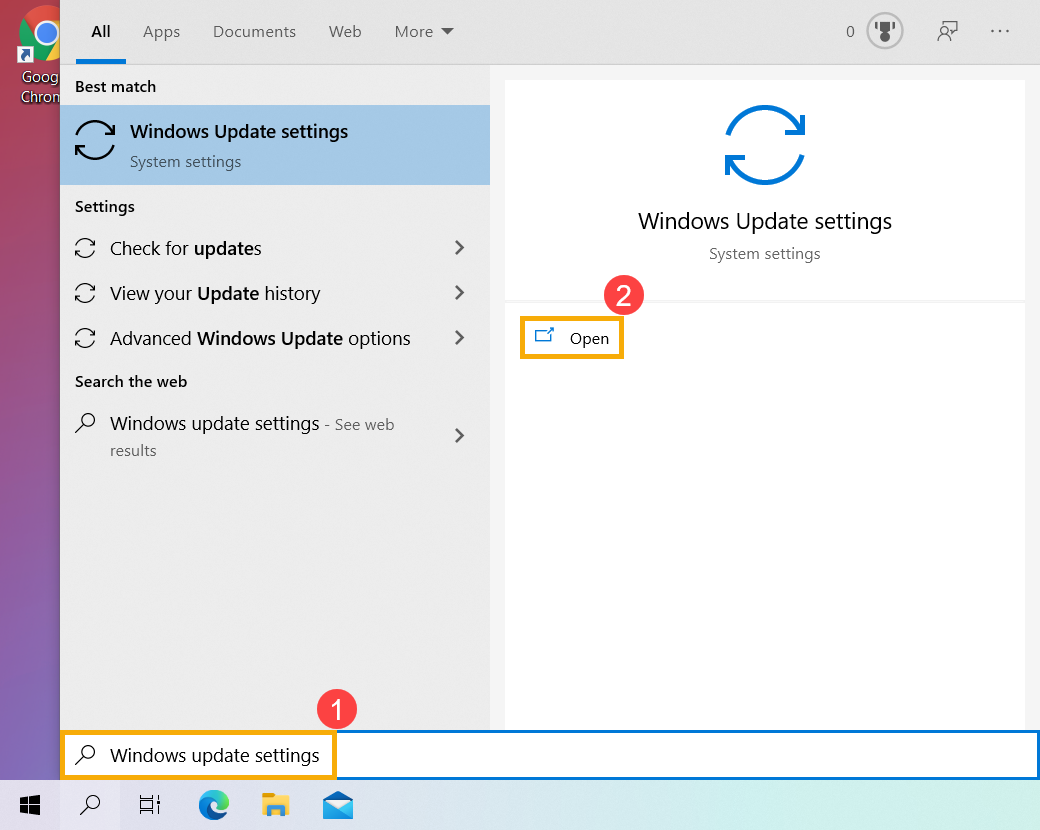
- اكتب وابحث [إعدادات Windows Update]① في شريط بحث Windows، ثم اضغط [فتح]②.
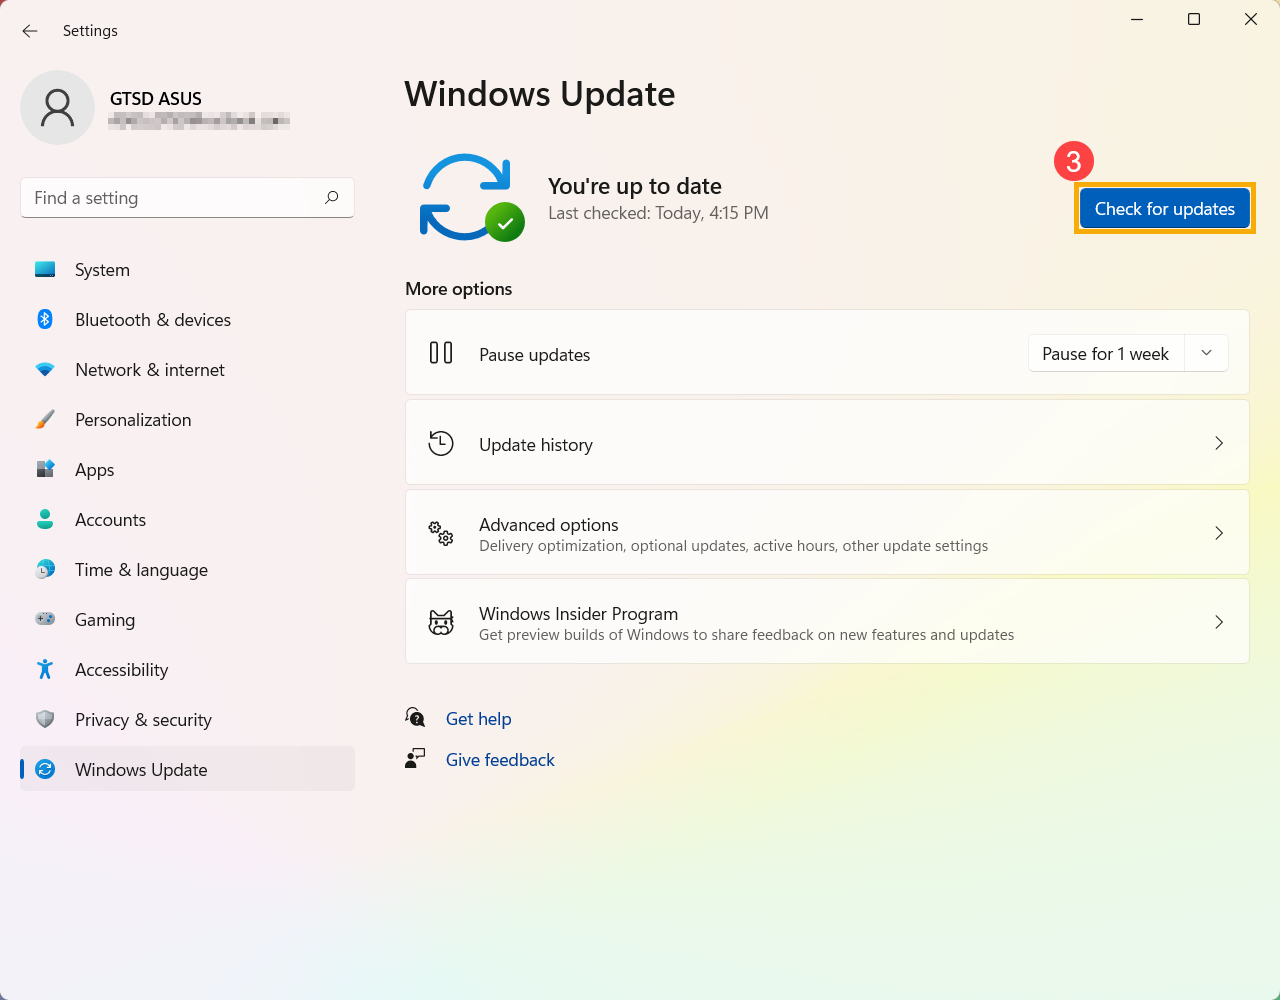
- انقر [التحقق من وجود تحديثات]③.
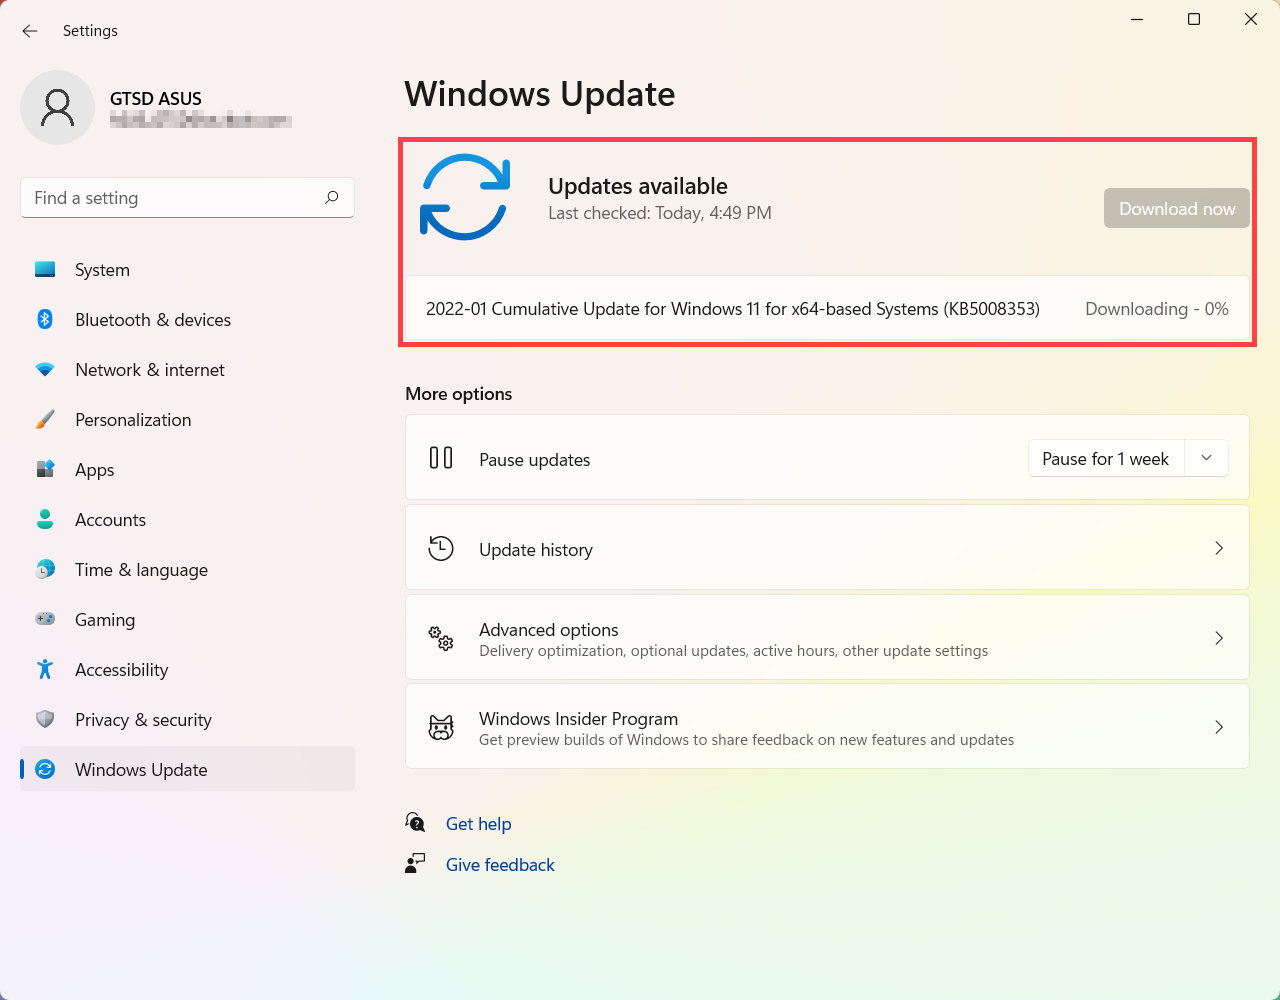
- إذا كان هناك تحديث للميزات متوفر لجهازك، سيظهر بشكل منفصل في صفحة تحديث Windows وسيبدأ في التنزيل والتثبيت. قد تحتاج بعض التحديثات إلى النقر على "تثبيت الآن" بنفسك.
- قد تطلب بعض التحديثات إعادة تشغيل الجهاز، لذا يمكنك اختيار [إعادة التشغيل الآن]④. إذا لم ترغب في إعادة تشغيل الجهاز الآن، يمكنك اختيار جدولة إعادة التشغيل لتحديد جدول إعادة التشغيل.
ملاحظة: قبل إعادة تشغيل الجهاز، يرجى حفظ عملك الحالي.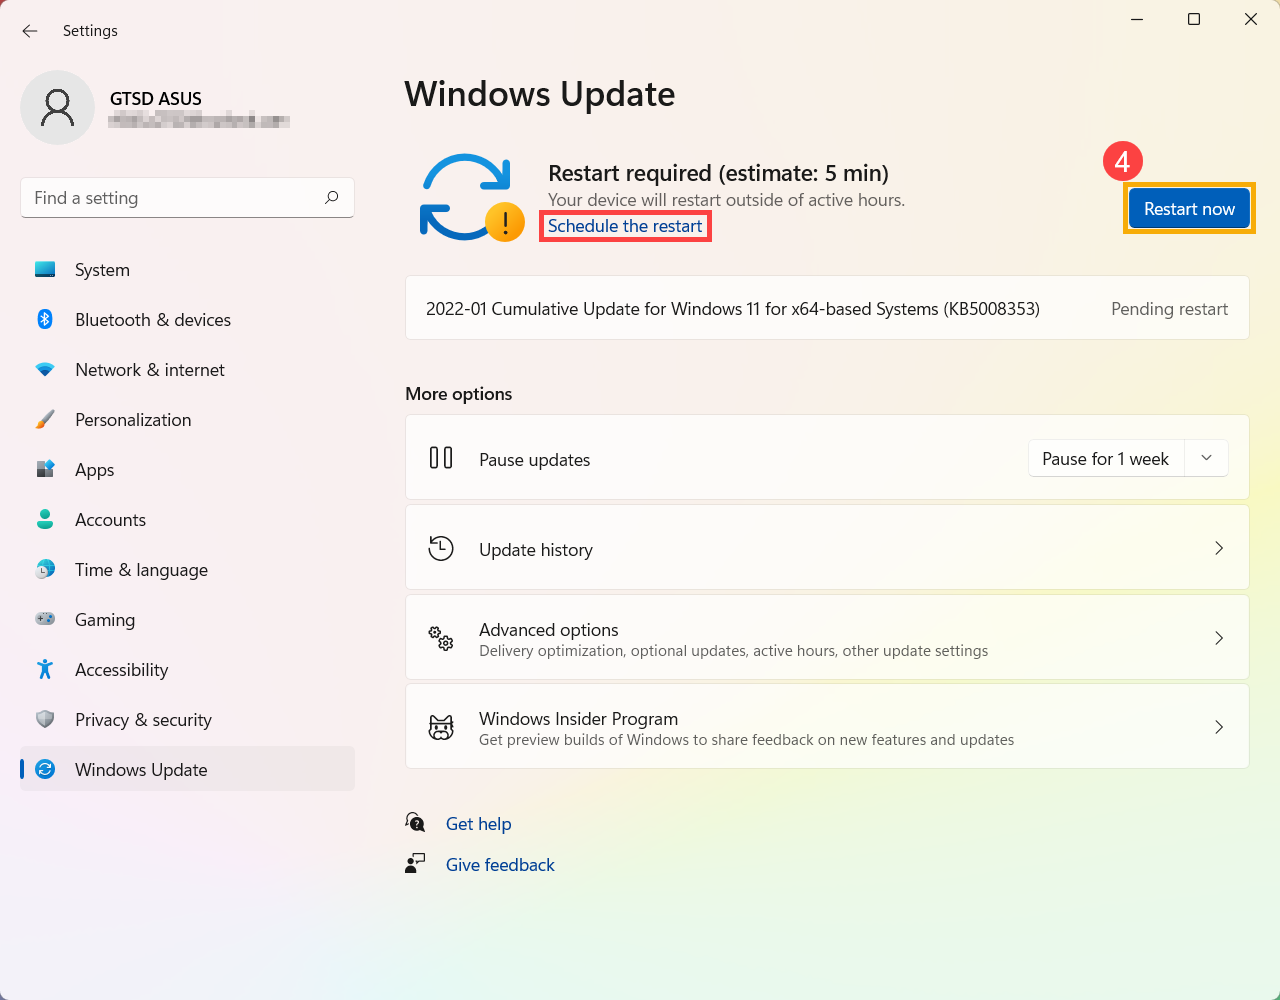
- بعد الانتهاء من إجراءات التحديث، يمكنك اختيار سجل التحديثات لرؤية معلومات بيانات التحديثات السابقة.
تحديث BIOS عبر تحديث Windows
إصدارات أنظمة التشغيل [ويندوز 8.1 وما قبلها] لا يمكنها تحديث BIOS تلقائياً من خلال تحديث Windows. فقط منتجات ASUS المثبت عليها مسبقاً [ويندوز 10/11] يمكنها تحديث BIOS عبر تحديث Windows.
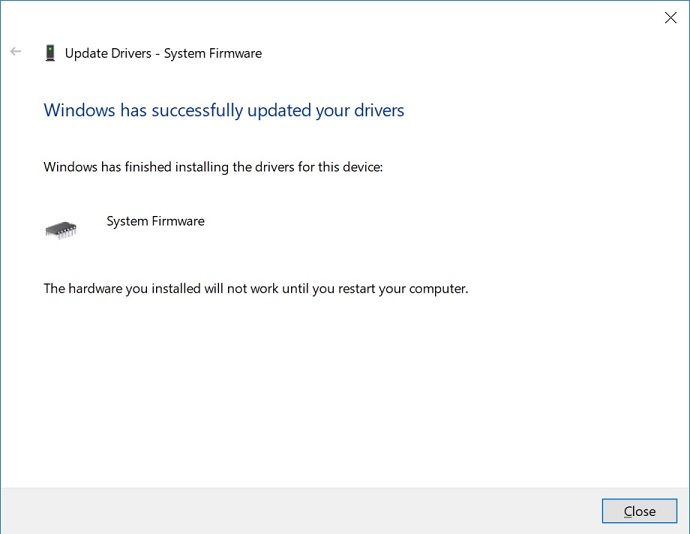
- عند تنزيل تحديث BIOS وجاهز للتثبيت، قد تتلقى رسالة مشابهة للتي تظهر أدناه، تشير إلى أن النظام يحتاج إلى إعادة تشغيل قبل تحديث BIOS.
بدلاً من ذلك، قد تجد رسالة مشابهة عند فحص مدير الجهاز > البرنامج الثابت > البرنامج الثابت للنظام > الخصائص.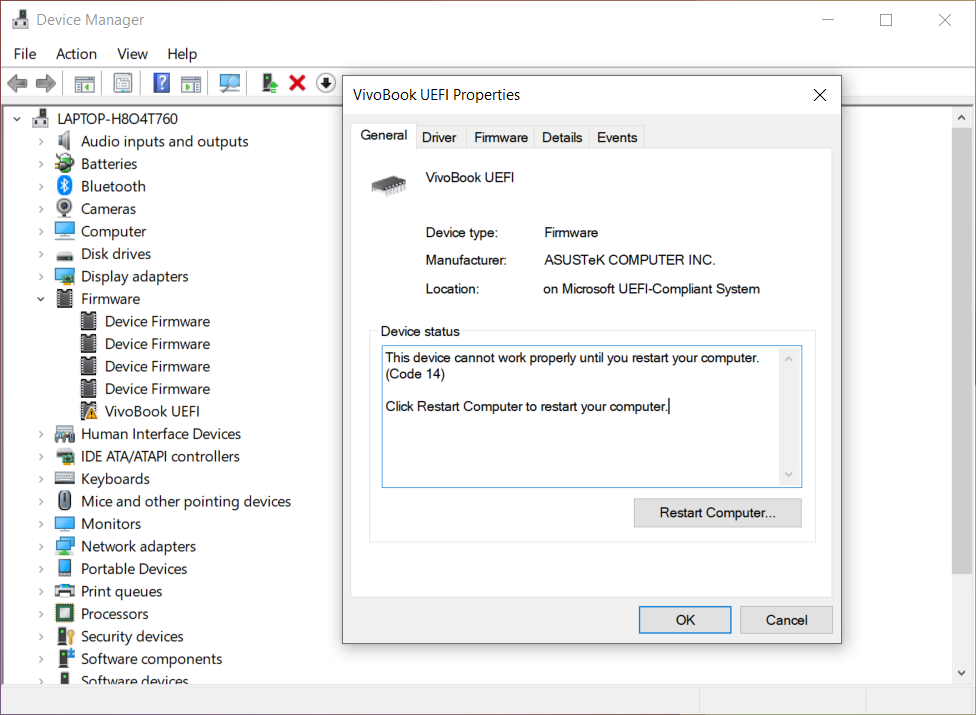
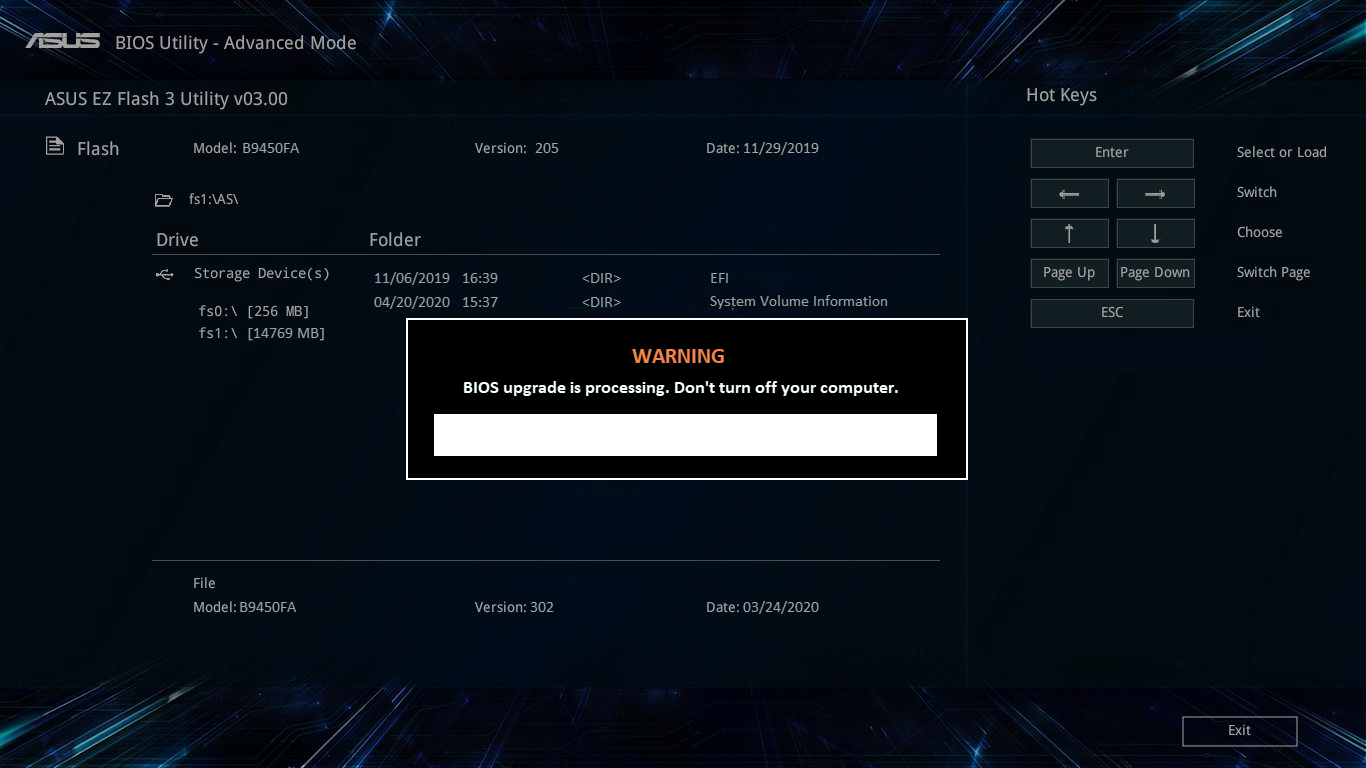
- احفظ عملك الحالي وأعد تشغيل جهازك. سيعرض جهازك شاشة مشابهة لما يلي لتحديث BIOS. (قد تختلف شاشة تحديث BIOS قليلاً بناءً على الطراز)
أثناء تحديث BIOS، سيتحرك شريط التقدم من اليسار إلى اليمين تلقائياً. لا حاجة لأي تدخل يدوي، حيث سيتم تحديث BIOS تلقائياً.
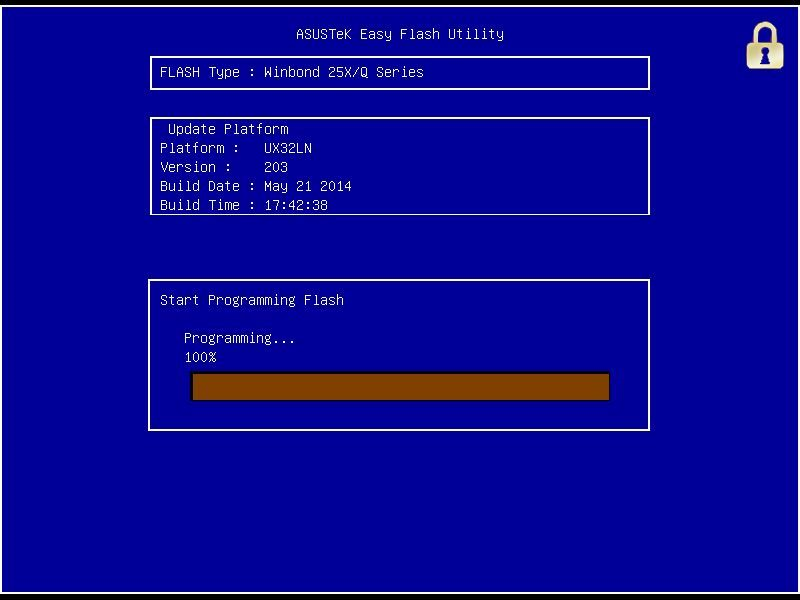
ملاحظة: تأكد من توصيل جهازك بالطاقة أثناء تحديث BIOS، ولا تقم بفصل مصدر الطاقة. إذا تم مقاطعة تحديث BIOS، قد لا يعمل النظام بشكل صحيح، وسيتطلب خدمة في مركز الصيانة.- شاشة تحديث BIOS في واجهة UEFI
- شاشة تحديث BIOS في الواجهة القديمة
- شاشة تحديث BIOS في MyASUS في واجهة UEFI
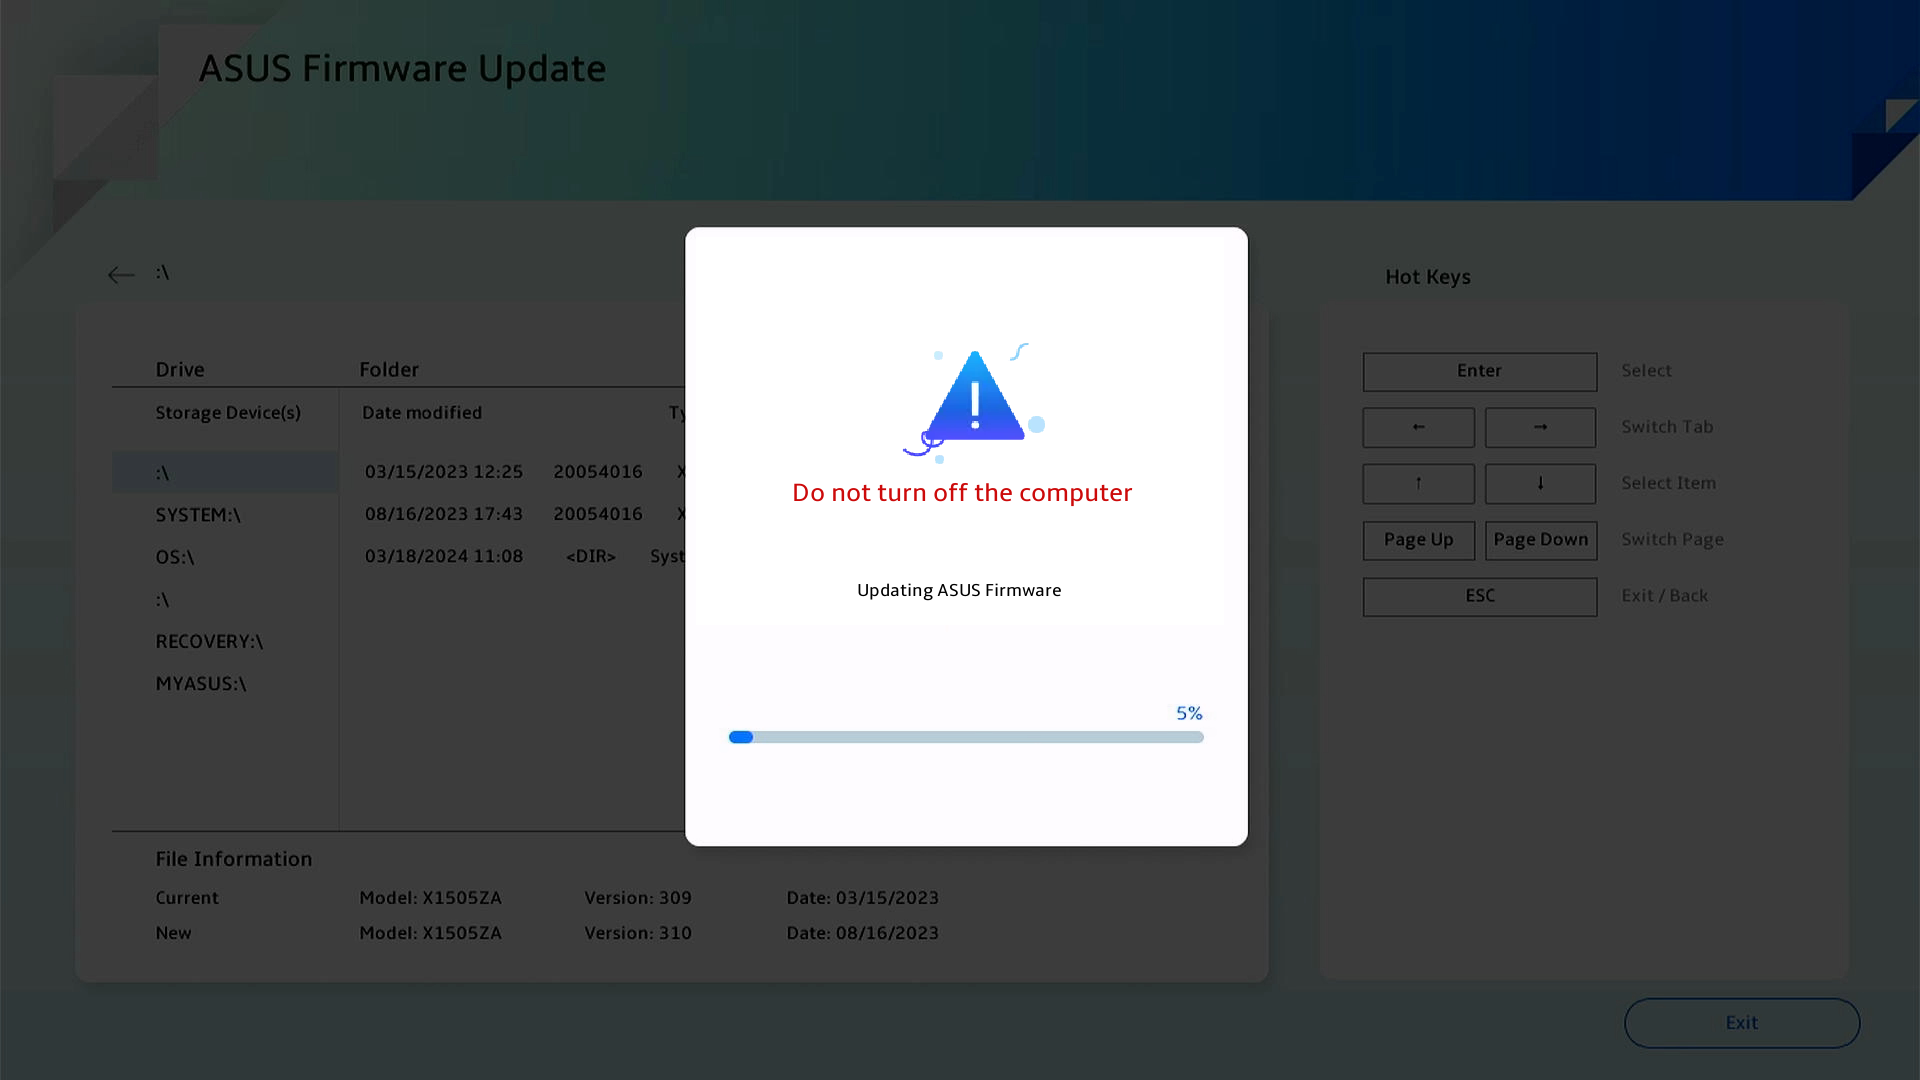
- شاشة تحديث BIOS في واجهة UX 2025
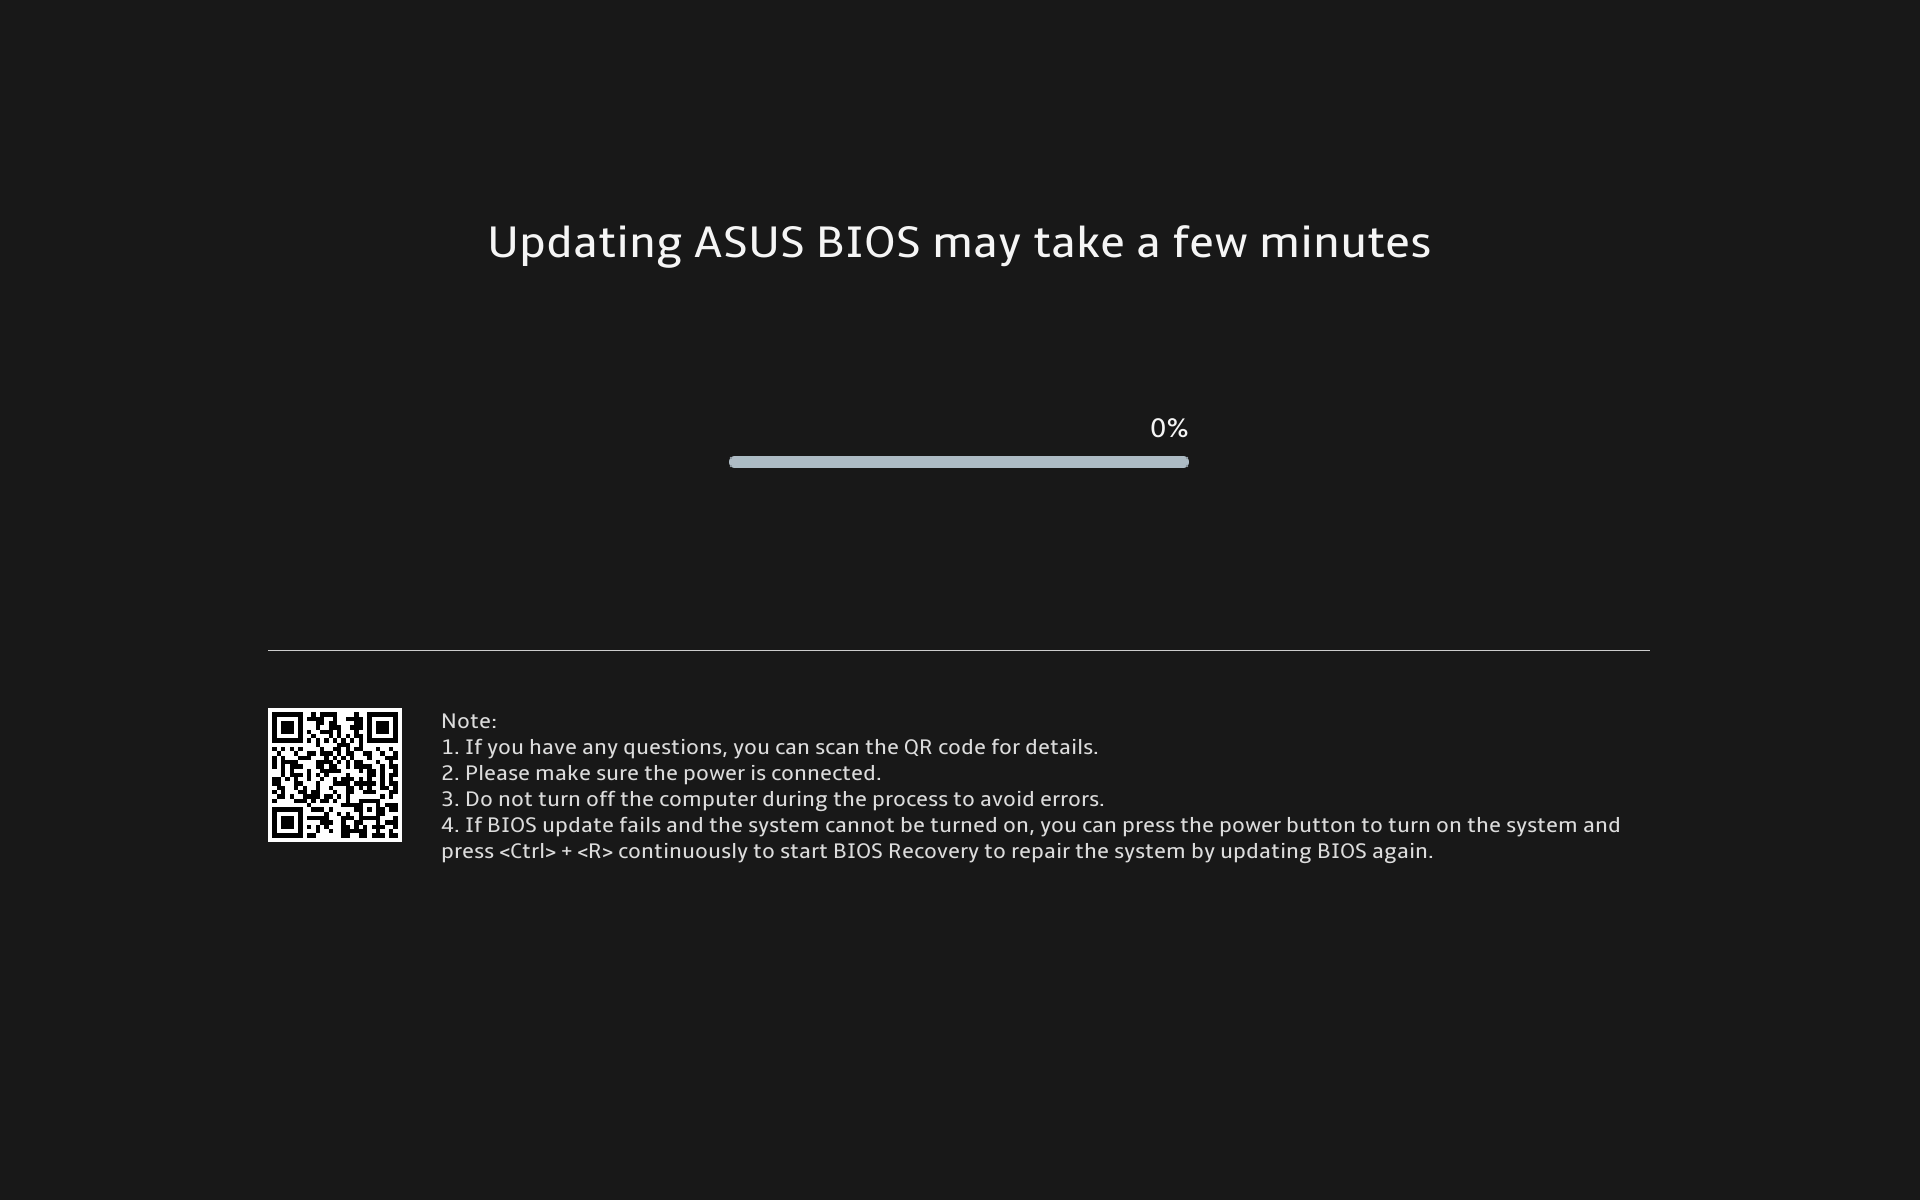
- شاشة تحديث BIOS في واجهة UEFI
- عند إعادة تشغيل جهازك والتمهيد إلى نظام تشغيل Windows، يكون تحديث BIOS قد اكتمل. تعرف على المزيد حول كيفية التحقق من إصدار BIOS للتأكد من اكتمال التحديث بنجاح.
إذا تم تعطيل تحديث BIOS لأي سبب، تأكد من توصيل الطاقة وأعد التشغيل للتحقق مما إذا كان التحديث سيستأنف تلقائيًا. إذا لم يتمكن التحديث من الاستمرار، ولم يظهر النظام، يرجى إرسال الجهاز إلى مركز الصيانة للخدمة.
نظام تشغيل Windows 10
الحصول على آخر التحديثات عبر Windows Update
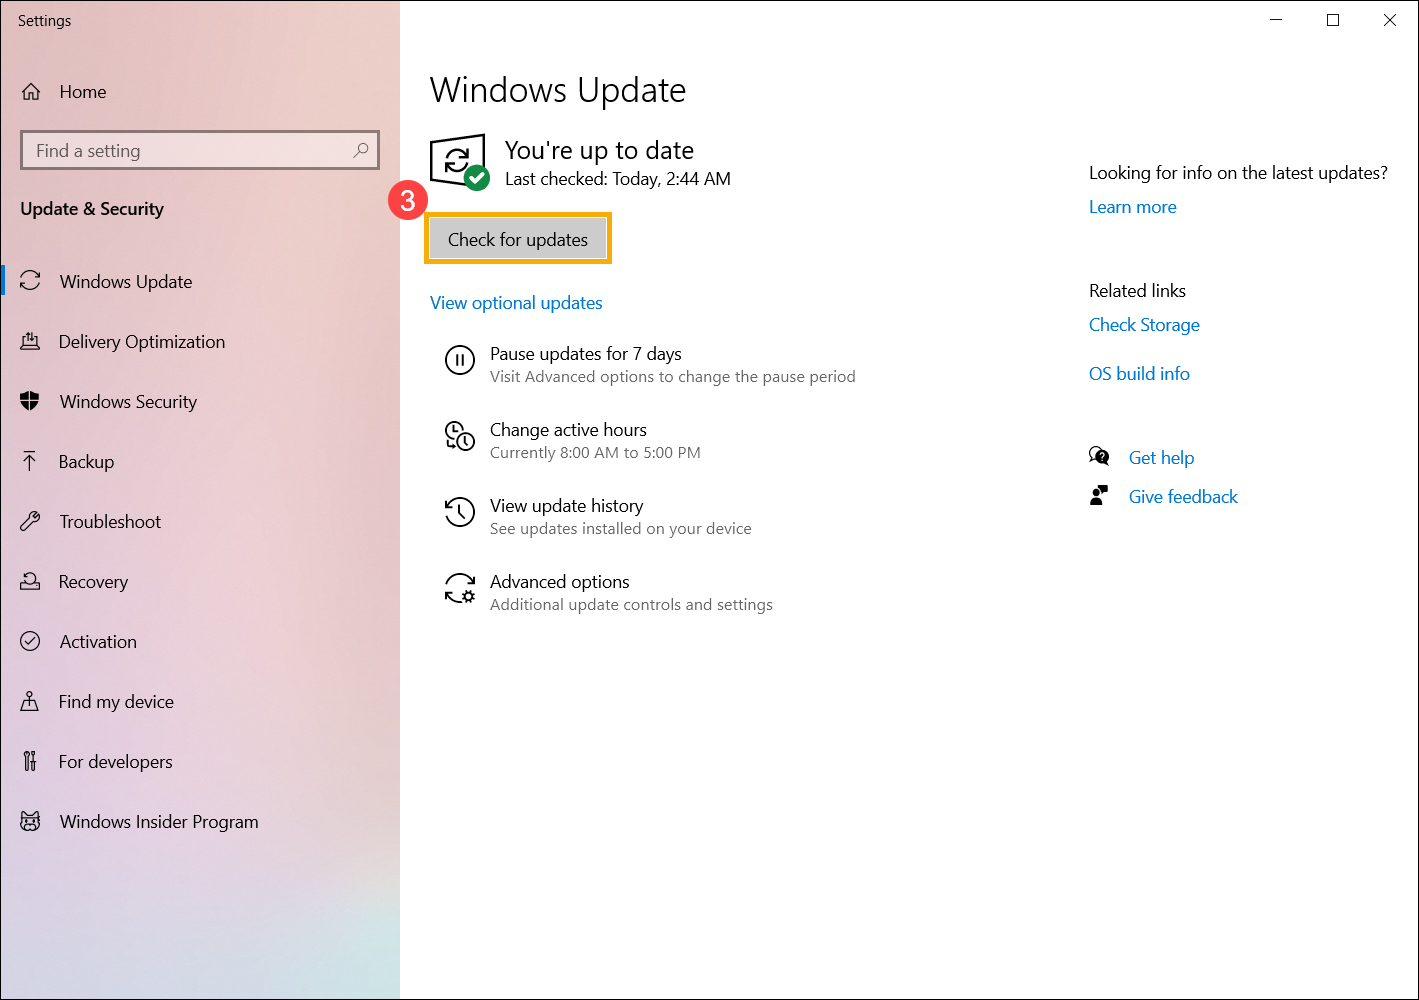
- اكتب وابحث [إعدادات Windows Update]① في شريط بحث Windows، ثم انقر [فتح]②.
- انقر [التحقق من وجود تحديثات]③.
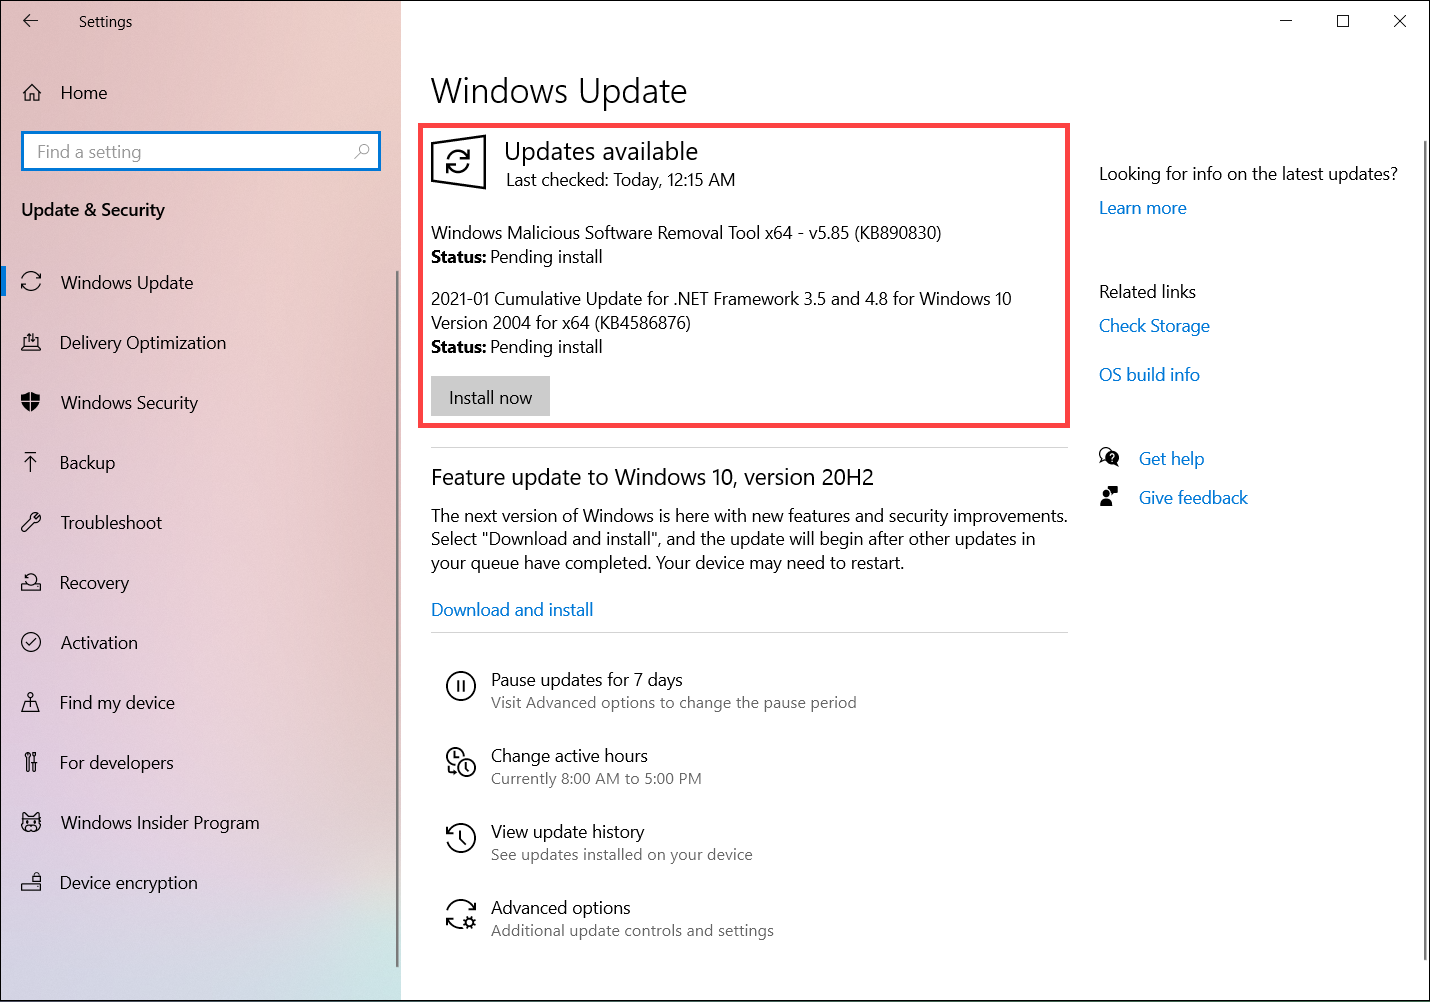
- إذا كان هناك تحديث للميزات متاح لجهازك، سيظهر بشكل منفصل في صفحة Windows Update وسيبدأ التحميل والتثبيت. بعض التحديثات قد تتطلب منك الضغط على 'تثبيت الآن' بنفسك.
- بعض التحديثات قد تطلب إعادة تشغيل الجهاز، يمكنك اختيار [إعادة التشغيل الآن]④. إذا كنت لا ترغب في إعادة التشغيل حالياً، يمكنك اختيار جدولة إعادة التشغيل لتحديد موعد إعادة التشغيل.
ملاحظة: قبل إعادة تشغيل الجهاز، يرجى حفظ عملك الحالي.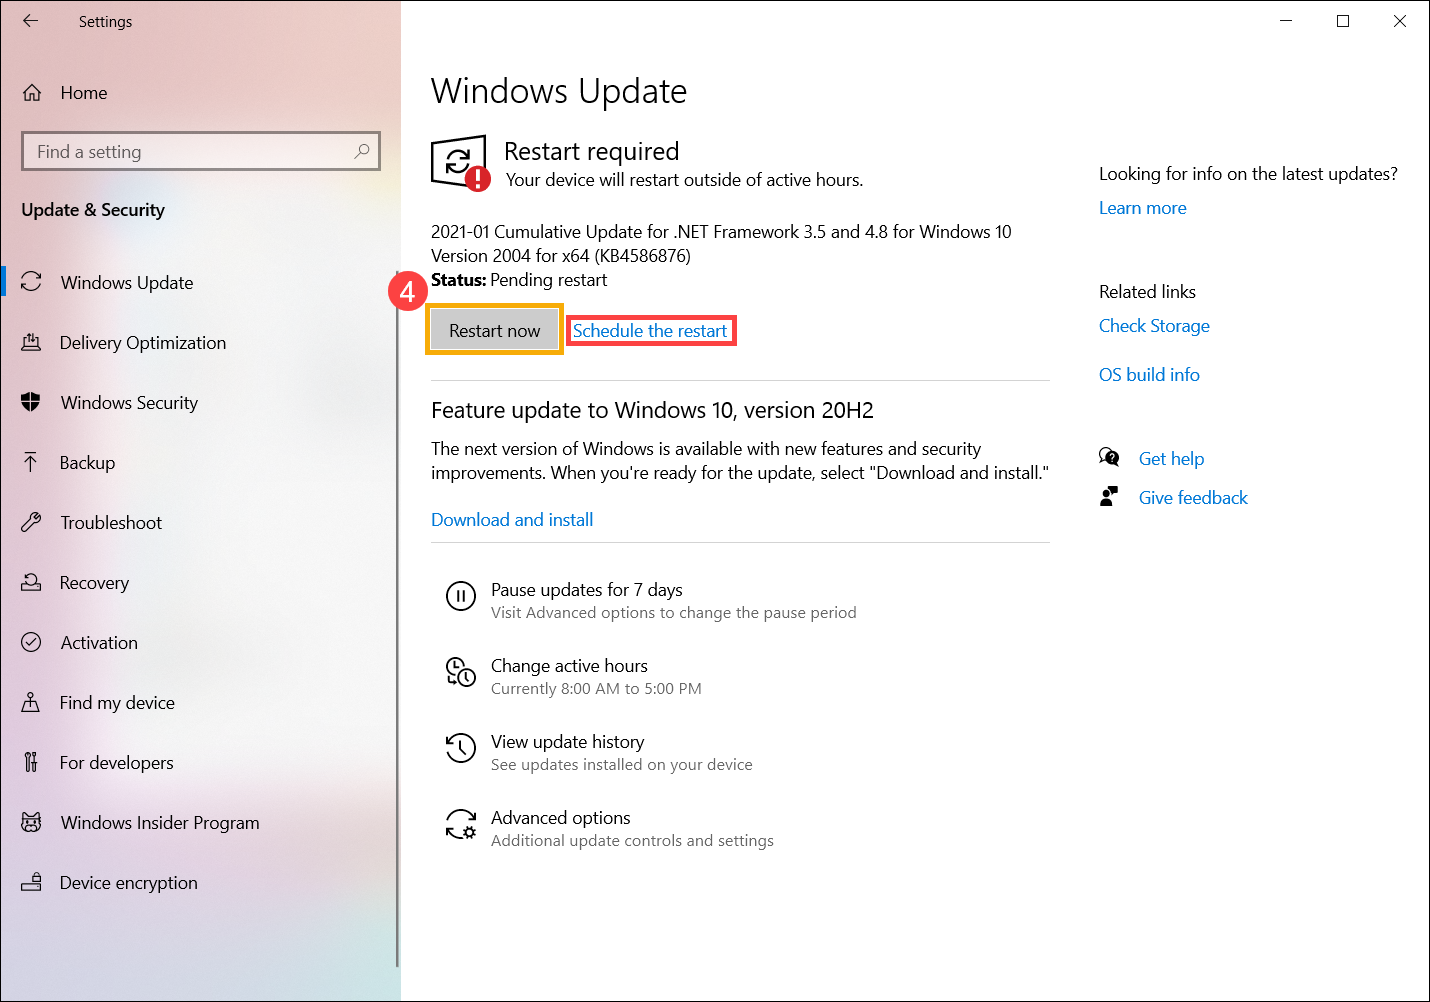
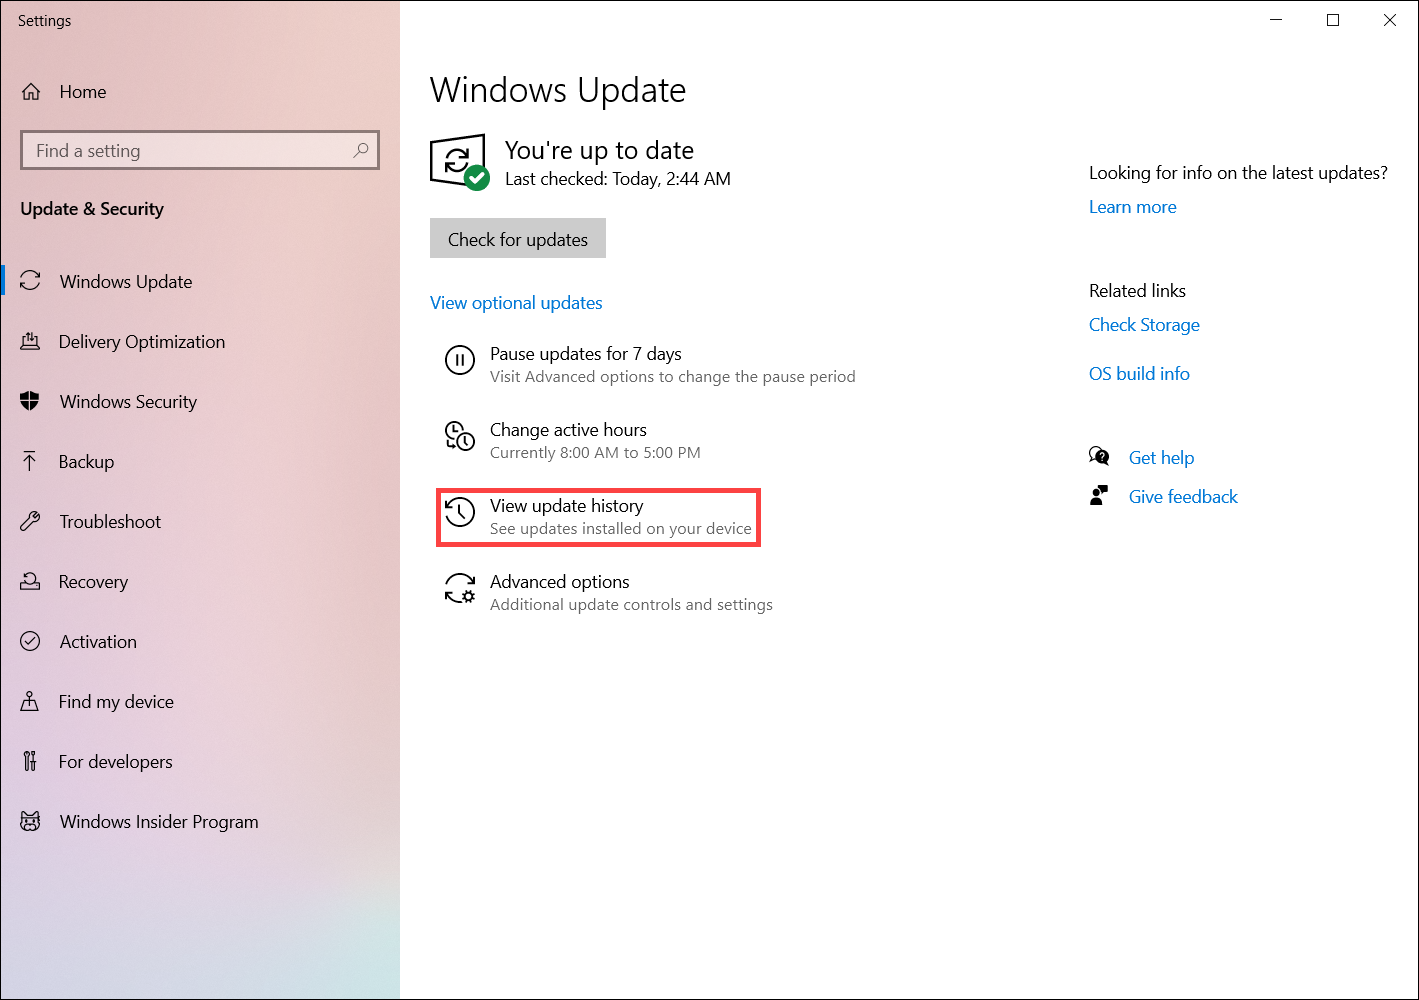
- بعد الانتهاء وإكمال إجراءات التحديث، يمكنك اختيار عرض سجل التحديثات لرؤية معلومات بيانات التحديثات السابقة.
تحديث BIOS عبر Windows Update
إصدارات أنظمة التشغيل Windows 8.1 وما قبلها لا يمكنها تحديث BIOS تلقائياً من خلال Windows Update. فقط منتجات ASUS المثبت عليها Windows 10/11 مسبقاً يمكنها تحديث BIOS عبر Windows Update.
- عندما يتم تنزيل تحديث BIOS ويكون في انتظار التثبيت، قد تتلقى رسالة مشابهة للرسالة الموضحة أدناه، تشير إلى أن إعادة تشغيل النظام مطلوبة قبل تحديث BIOS.
بدلاً من ذلك، قد تجد رسالة مماثلة عند التحقق من إدارة الأجهزة > البرنامج الثابت > البرنامج الثابت للنظام > الخصائص. - احفظ عملك الحالي وأعد تشغيل جهازك. سيعرض جهازك شاشة مشابهة لتلك الموجودة أدناه لتحديث BIOS. [قد تختلف شاشة تحديث BIOS قليلاً حسب الطراز]
أثناء تحديث BIOS، سيتحرك شريط التقدم من اليسار إلى اليمين تلقائيًا. لا حاجة للتدخل اليدوي، حيث سيتم تحديث BIOS تلقائيًا.
ملاحظة: تأكد من توصيل جهازك بمصدر الطاقة أثناء تحديث BIOS، ولا تقم بفصل مصدر الطاقة. إذا تم قطع عملية تحديث BIOS، قد لا يعمل النظام بشكل صحيح، وسيتطلب ذلك خدمة في مركز الصيانة.- شاشة تحديث BIOS في واجهة UEFI
- شاشة تحديث BIOS في واجهة Legacy
- شاشة تحديث BIOS في MyASUS في واجهة UEFI
- شاشة تحديث BIOS في واجهة UX 2025
- شاشة تحديث BIOS في واجهة UEFI
- بمجرد إعادة تشغيل جهازك وإقلاعه إلى نظام تشغيل Windows، يكون تحديث BIOS قد اكتمل. لمعرفة المزيد حول كيفية التحقق من إصدار BIOS لتأكيد الانتهاء بنجاح من التحديث.
إذا تم تعطل تحديث BIOS لأي سبب من الأسباب، تأكد من توصيل الطاقة وأعد التشغيل للتحقق مما إذا كان التحديث سيستأنف تلقائيًا. إذا لم يتمكن التحديث من الاستمرار ولم يعرض النظام شيئًا، يُرجى إرسال الجهاز إلى مركز الصيانة للخدمة.