Related Topics
- Laptop Frequently Asked Question (FAQ)
- Troubleshooting - Stuck on ASUS/ROG Logo Screen During Boot
- [Windows 11/10] Troubleshooting - Unable to Wake Up from Sleep or Hibernate Mode
- Troubleshooting - Device Boots Directly into BIOS, Aptio Setup Utility, or MyASUS in UEFI Screen
- [Windows 11/10] Troubleshooting - BitLocker Recovery Screen Appears After Startup/Find BitLocker Recovery Key
- [Windows 11/10] Troubleshooting - Unable to Shut Down
- [Windows 11/10] Troubleshooting - Automatic Repair (Startup Repair) on Boot
- [Windows 11/10] Troubleshooting - Device Cannot Enter Windows System
Troubleshooting - Device Boot Failure or No Display After Boot (Black Screen)
Applicable Products: Notebook, Desktop, All-in-One PC, Gaming Handheld, MiniPC
To provide you more detailed instruction, you can also click ASUS YouTube video link below to know more about Notebook cannot power on and shows black screen:
https://www.youtube.com/watch?v=ADSvlvRuiGI
If your device encounters issues with booting or displays a black screen after booting, please refer to the following solutions based on your situation:
Scenario 1: Prior to encountering the issue, actions such as updating BIOS, disconnecting the battery connector, replacing the memory modules, or performing resets of the Embedded Controller (EC) and the Real-Time Clock (RTC) might have been executed. The lack of display during boot-up could be attributed to the memory training process (or displays Working on Memory Training).
The following troubleshooting steps are only applicable if your device doesn't display anything upon booting (or displays Working on Memory Training), but the power indicator is lit. If you have performed any of the following steps prior to encountering this issue, please refer to the instructions below:
- BIOS update
- Disconnecting the battery interface or replacing the battery (including CMOS battery)
- Replacing memory modules with different capacities or brands
- Perform an Embedded Controller (EC Reset) or Real-Time Clock (RTC) reset to restore the hardware in your device to its default state. You can refer to the following articles to understand how to clear it:
Notebook/All-In-One PC/Gaming Handheld: How to Reset Embedded Controller (EC Reset), Real-Time Clock (RTC), and Hard Reset
Desktop: How to clear CMOS
If you have performed any of the above three operations, your device will need to undergo a complete memory training during the next boot-up.
During the memory training process, your device will not display anything, and the training duration is approximately 5 to 10 minutes, depending on the size of your device’s memory (e.g., up to 10 minutes for 64GB). Please connect the device to power, avoid forced shutdown, and patiently wait for the system to complete memory training and enter the operating system.
Note: If your device is equipped with the Intel Lunar Lake CPU platform or higher, and the screen resolution is below 2880x1800 with a refresh rate below 120 Hz, you may see the text 'Working on Memory Training' displayed on the screen during memory training. Please be patient and allow the device to complete the memory training on its own before accessing the operating system. If your device does not meet these hardware specifications, no text will be displayed during memory training.

Scenario 2: Prior to the problem, a BIOS update was performed, and due to an unsuccessful update (such as a forced shutdown), the system is now unable to boot into the Windows operating system.
If you have encountered a situation where your device is unable to enter the Windows operating system upon booting due to a failed BIOS update (such as a forced shutdown), please refer to the three different boot screens below to continue the BIOS update process. Once the BIOS update is completed, you will be able to enter the Windows operating system smoothly.
Please note: During the BIOS update process, ensure that your device is connected to a power source and avoid forcefully shutting it down to prevent any abnormal issues.
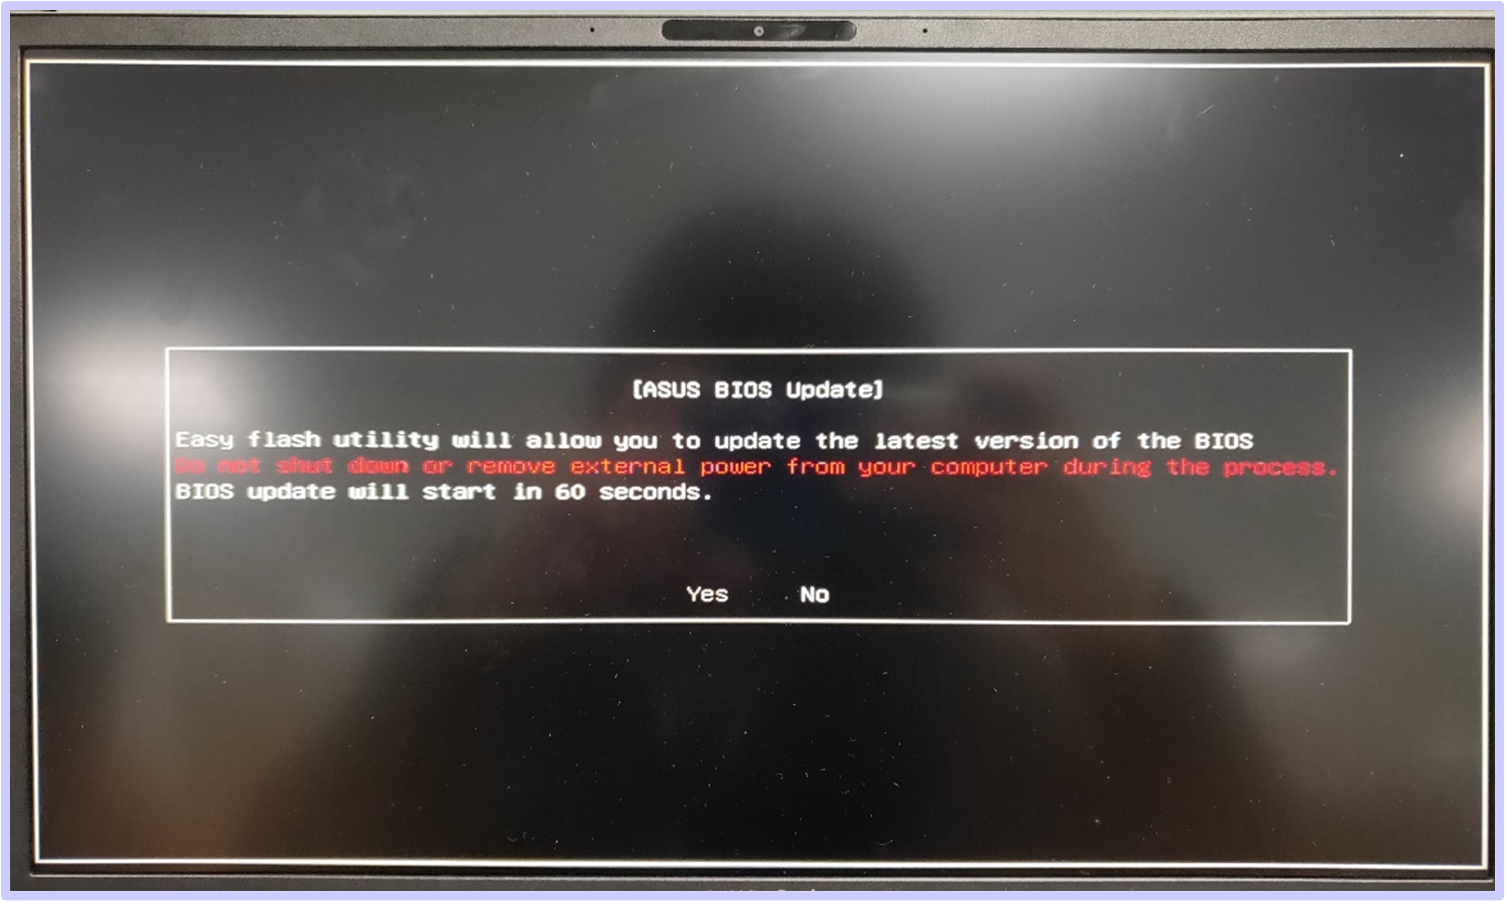
Screen 1: If you encounter the following screen, it indicates a failed BIOS update. Please wait for 60 seconds or click 「Yes」 on the screen to initiate an automatic BIOS update. (Ensure that your device is connected to the power source)
Screen 2: If you encounter the following screen, it indicates a failed BIOS update. Please follow the steps below to complete the BIOS update:


- Use another computer to visit the ASUS Support site and download the corresponding BIOS file for your specific model. Once downloaded, place the BIOS file in the root directory of a USB flash drive formatted as FAT32. You can refer to this article to learn How to convert a USB flash drive to the FAT32 format and save the downloaded BIOS file to the USB flash drive.
Note: If your device displays a recommended BIOS version, please download that version. If not, download the latest version of the BIOS. Learn more: How to search for and download BIOS files. - Turn off the device displaying the above screen. Press and hold the power button for 15 seconds until the power indicator goes off.
- Insert the USB flash drive containing the BIOS file into the device and ensure that the power cable is connected.
- Power on the device, and the system will automatically complete the BIOS update process.
Note: If the device directly enters the ASUS Firmware Update (ASUS EZ Flash) screen after restarting, you can refer to this article to learn How to update the BIOS file using EZ Flash (For desktop computers, please refer to ASUS Motherboard EZ Flash 3 introduction).
Screen 3: If you are experiencing a black screen after booting (power indicator is lit, but no text is displayed), due to a failed BIOS update, you can try performing an Embedded Controller (EC Reset) or Real-Time Clock (RTC) clear to resolve the issue:
- Notebook/All-In-One PC/Gaming Handheld: How to Reset Embedded Controller (EC Reset), Real-Time Clock (RTC), and Hard Reset
- Desktop: How to clear CMOS
Scenario 3: If you have previously installed or replaced a discrete graphics card (for desktop computer products only) and encounter issues
For desktop computers equipped with Intel 13th generation CPUs (and subsequent platforms), if you have installed or replaced a discrete graphics card and the monitor's display output is connected to the discrete graphics card's port, you may experience a no-display issue upon startup. This occurs because the system needs to recognize the graphics card before it can properly output the display for the first time.
If you encounter the aforementioned situation, please follow the steps below:
- Connect to the integrated graphics card: Initially, connect the monitor's display output to the integrated graphics card (port on the motherboard).
- Power on: Start the computer; the system should boot normally.
- Confirm graphics card recognition: Access Device Manager; if 「Microsoft Basic Display Adapter」 appears, it indicates that the system has recognized the new discrete graphics card.
Note: If the new graphics card does not appear, please refer to this article: Troubleshooting - Graphics Card Not Detected.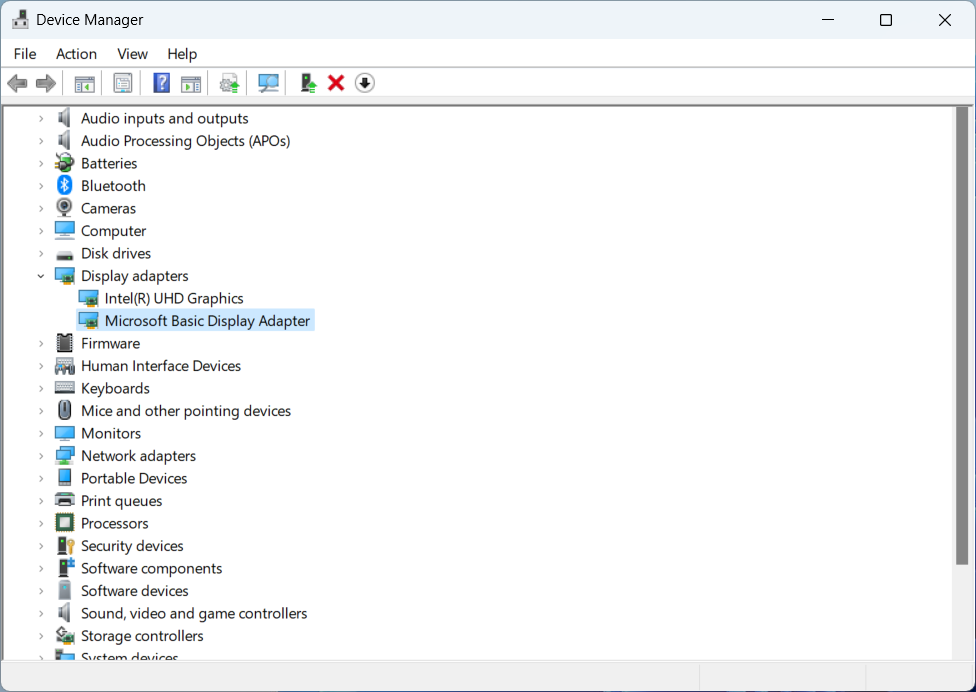
- Switch display output: At this point, you can switch the monitor's display output to the discrete graphics card's port.
- Install the driver: Install the driver for the graphics card. The new graphics card should now function properly.
Following these steps will resolve the no-display issue at startup and enable normal use of your discrete graphics card.
If you have not encountered the aforementioned scenarios, please explore the common troubleshooting methods for boot failure
When your device fails to power on (won't turn on/can't be started), please refer to the following different solutions based on the status of the power indicator or the display screen:
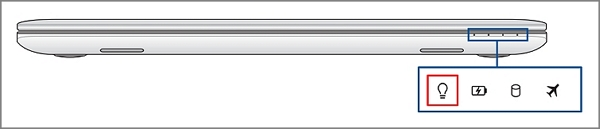
Note: The power indicator light may vary among different products or models (the image below uses a laptop as an example). For detailed information, please consult the user manual for your specific device model. Refer to this article to learn How to search for and download the user manual.
Pressing the power button results in no display and no power indicator light
The absence of illumination in the power indicator light may stem from either the adapter’s inability to supply power or a malfunction in the primary components, resulting in the failure to boot. Please proceed with the following steps:
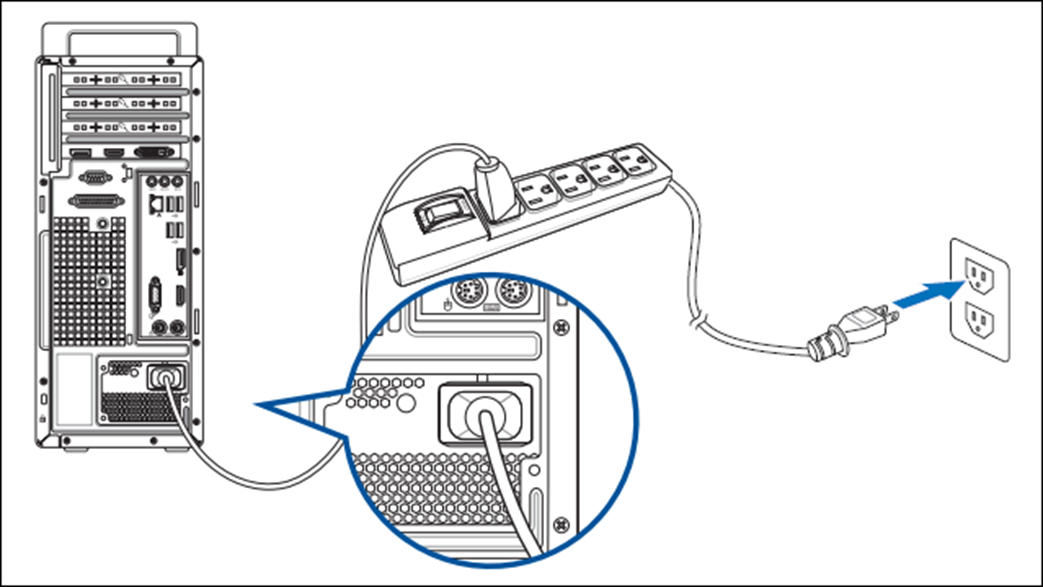
Kindly verify that the power cord, adapter, extension cord, and wall socket connected to the device are securely and properly plugged in. If an extension cord is being utilized, ensure that its switch is in the open position.
- Please utilize the adapter and power cord that adhere to the original manufacturer's specifications and configuration.
- Inspect whether the power connector is loose, or consider replacing the extension cord and socket to troubleshoot the issue. As shown in the figure below, ensure that the power cord is securely connected at the outlet end and the device end.
Note: Different models may exhibit variations in the style of their adapters. Please consult the User Manual for further instructions.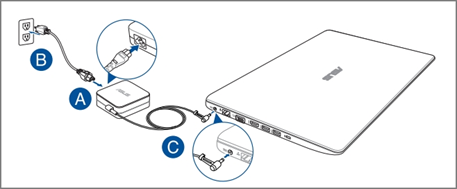
- Examine the adapter or cable for any signs of damage. If such damage is observed, it is advisable to seek replacement at an authorized service center.
- Remove all external devices, including keyboards, mice, external hard drives, printers, memory cards, optical discs inside the optical drive, and also the adapter cards in the card reader.
Note: Simultaneously detach all external monitors. In the case of a desktop computer, connect an external monitor initially to confirm whether the computer can boot properly and display the screen. - Prior to the occurrence of the problem, have you installed any additional hard drives or memory? If so, please remove or restore that hardware to its factory default settings.
- Disconnect the adapter or power cord, then Perform an Embedded Controller (EC Reset) or Real-Time Clock (RTC) reset to restore the hardware in your device to its default state. You can refer to the following articles to understand how to clear it:
Notebook/All-In-One PC/Gaming Handheld: How to Reset Embedded Controller (EC Reset), Real-Time Clock (RTC), and Hard Reset
Desktop: How to clear CMOS - Reconnect the adapter or power cord, then press the power button to verify if the device can boot up normally.
Pressing the power button results in no display but the power indicator light is on
The presence of illumination in the power indicator light signifies that the motherboard is receiving power. However, it is possible that certain devices are causing the inability to boot. Please follow the applicable troubleshooting methods based on the product you are using:
Notebook, All-In-One PC, Gaming Handheld
- If you have an external monitor, attempt to connect the device to it and use the Windows logo key
 + P shortcut to toggle the display mode, ensuring that the external monitor can display correctly. If you don't have an external monitor or if the external monitor also has no display, proceed to the next step.
If the external monitor is functioning properly, try downloading and installing the display driver from the ASUS Support site. Learn more about How to search for and download drivers.
Note: If your device is equipped with two graphics cards (commonly known as integrated and dedicated, such as Intel and NVIDIA), you can view them in the Device Manager. Make sure both are updated to the latest version released on the ASUS website.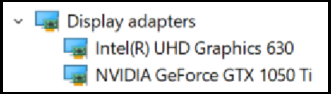
- Try executing Microsoft's shortcut key: Windows logo key + Ctrl + Shift + B. This shortcut key can restore display-related settings and sometimes resolve display issues.
- Remove all external devices, including keyboards, mice, external hard drives, printers, memory cards, optical discs inside the optical drive, and also the adapter cards in the card reader.
Note: Simultaneously detach all external monitors. - Prior to the occurrence of the problem, have you installed any additional hard drives or memory? If so, please remove or restore that hardware to its factory default settings.
- Disconnect the adapter or power cord, then perform an Embedded Controller (EC Reset) or Real-Time Clock (RTC) reset to restore the hardware in your device to its default state. You can refer to this article to gain a better understanding of how to clear it: How to Reset Embedded Controller (EC Reset), Real-Time Clock (RTC), and Hard Reset.
- Reconnect the adapter or power cord, then press the power button to verify if the device can boot up normally.
If you have tried the previous solutions and are still unable to resolve the booting issue, you can attempt to use the BIOS recovery mode to update the BIOS in your device. Here are the detailed steps:
Note: You will need another computer to download the BIOS file and a USB flash drive (formatted in FAT32) to store the BIOS file. Learn more about converting the format of a USB flash drive to FAT32.
Windows 11 operating system
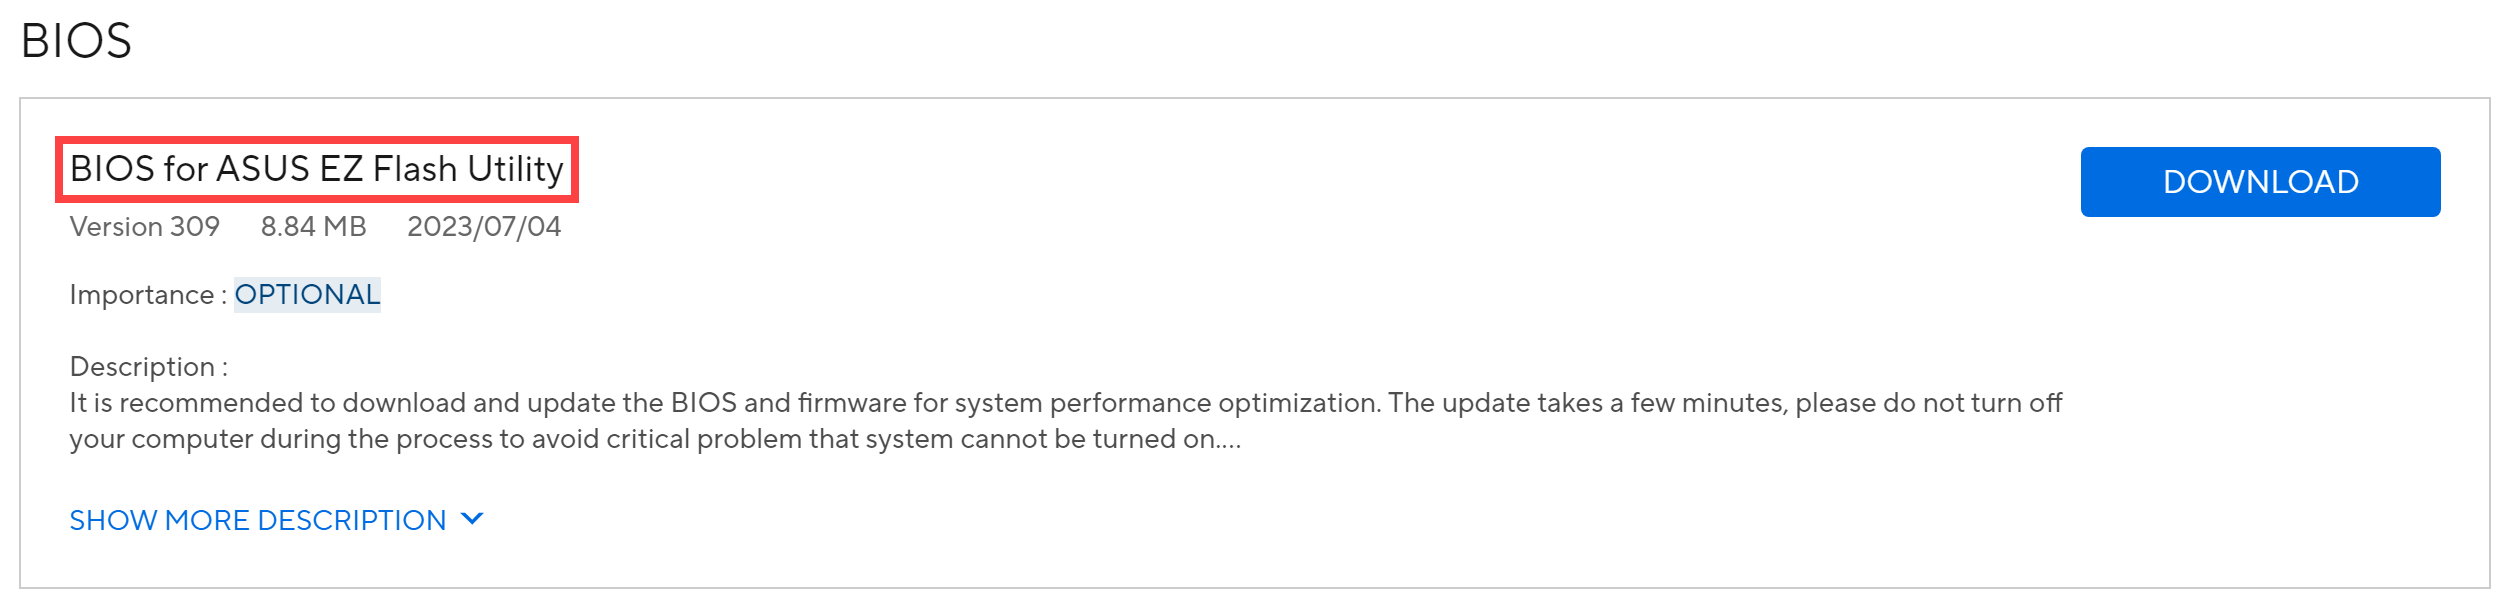
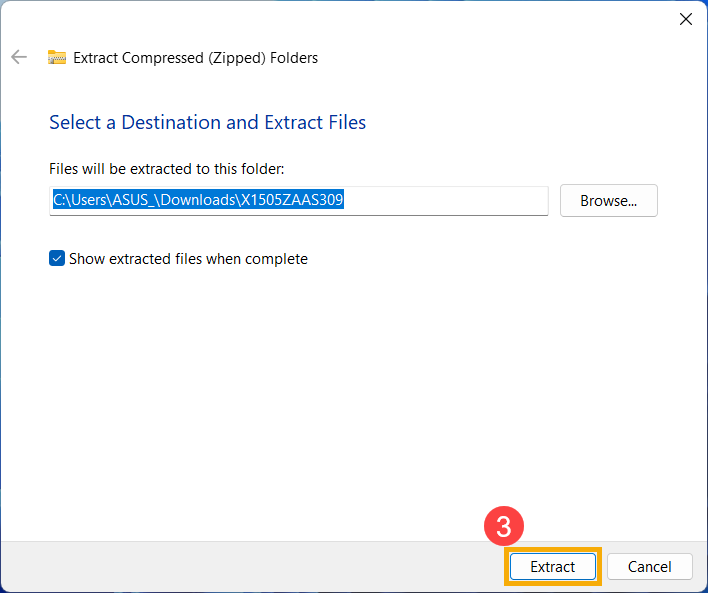
- Visit the ASUS Support website, look for the latest BIOS file under the BIOS category that is for the ASUS EZ Flash Utility, and learn more about How to search for and download BIOS files. (The following instructions use the X1505ZA model as an example.)
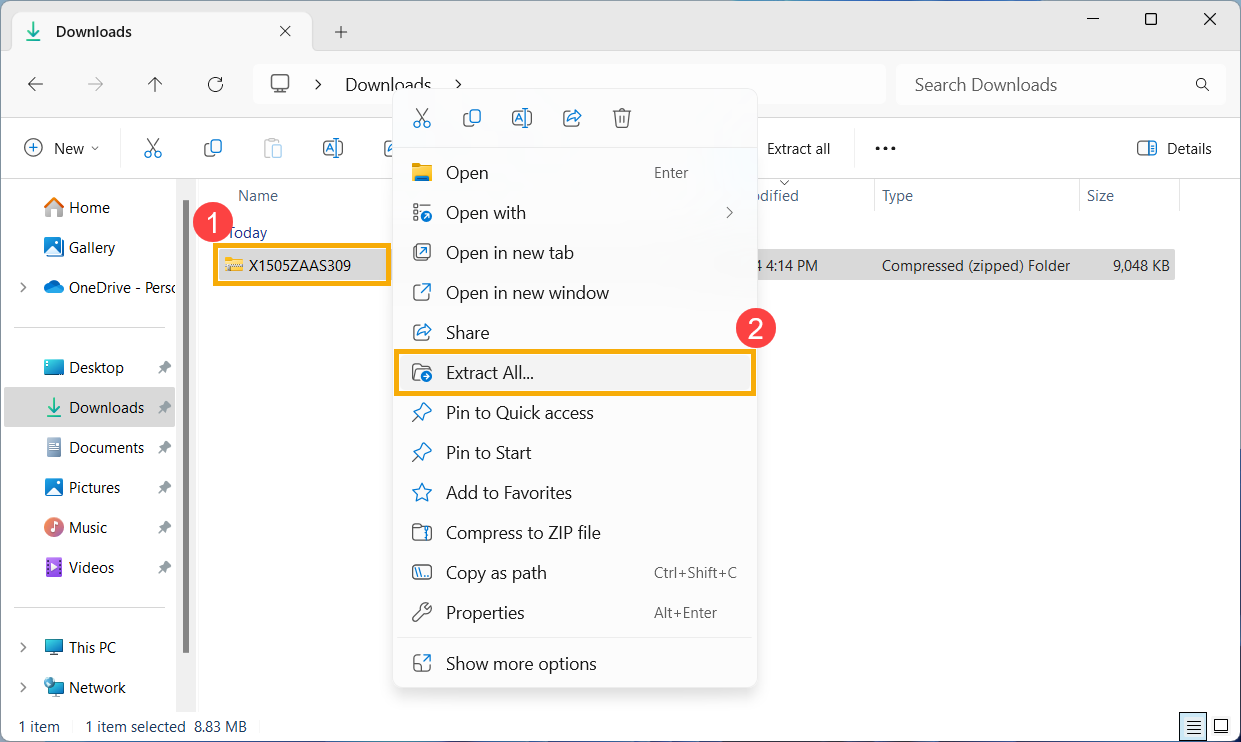
- After the download is complete, right-click on the downloaded BIOS file① and select [Extract All]②.
- Click on [Extract]③.
- Once the extraction is complete, rename the file extension of the file to 「.bin」. Right-click on the extracted file④, select [Rename]⑤.
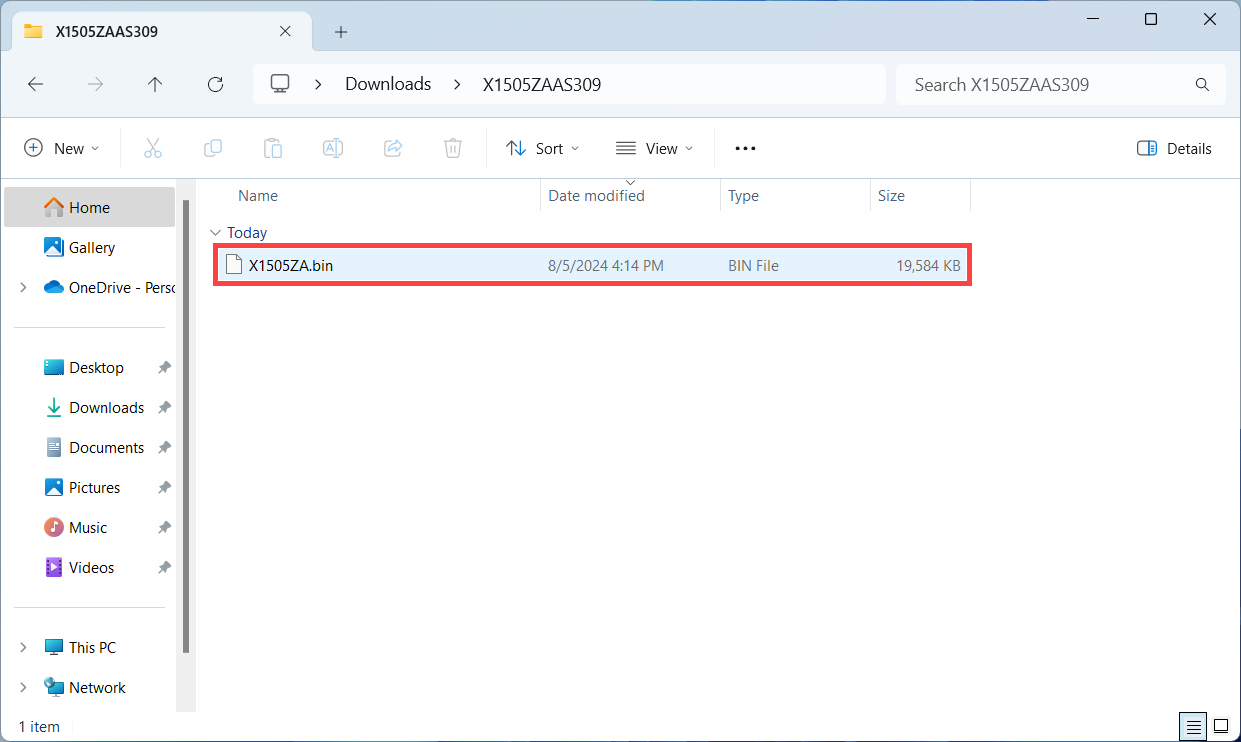
Modify the file name following the model number to 「.bin」. (Example: X1505ZAAS.309 → X1505ZA.bin)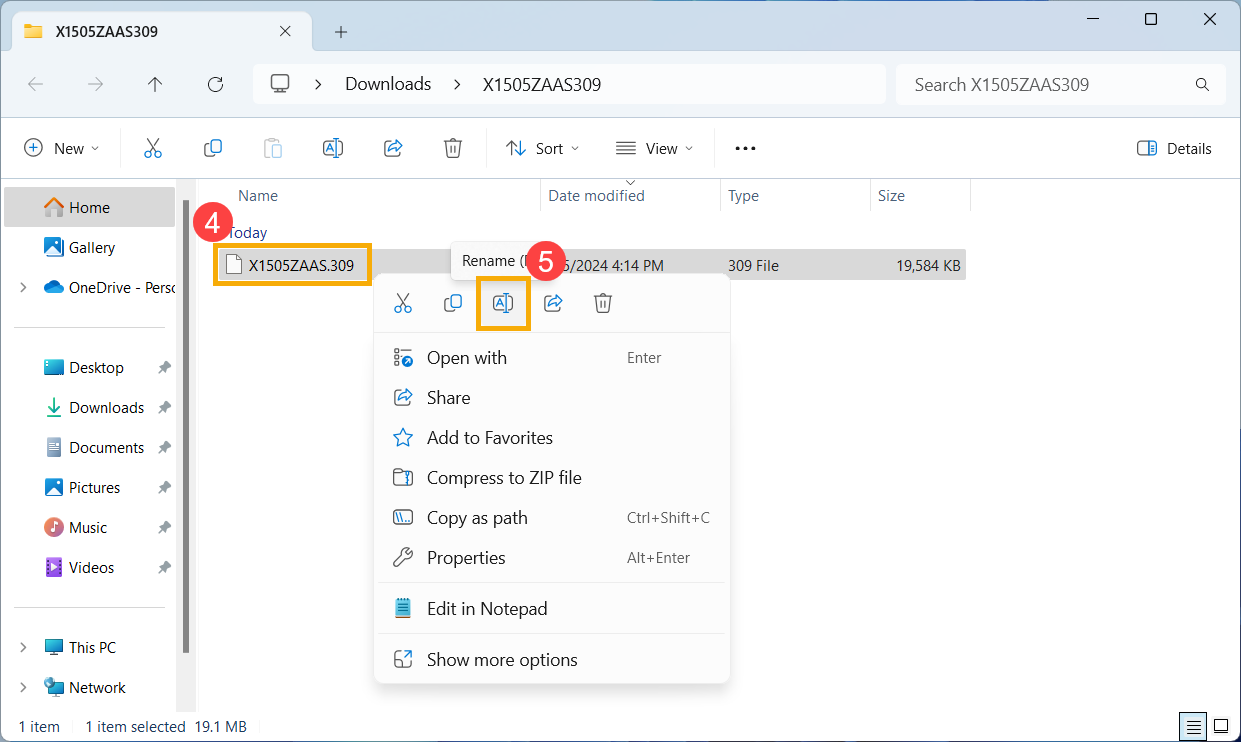
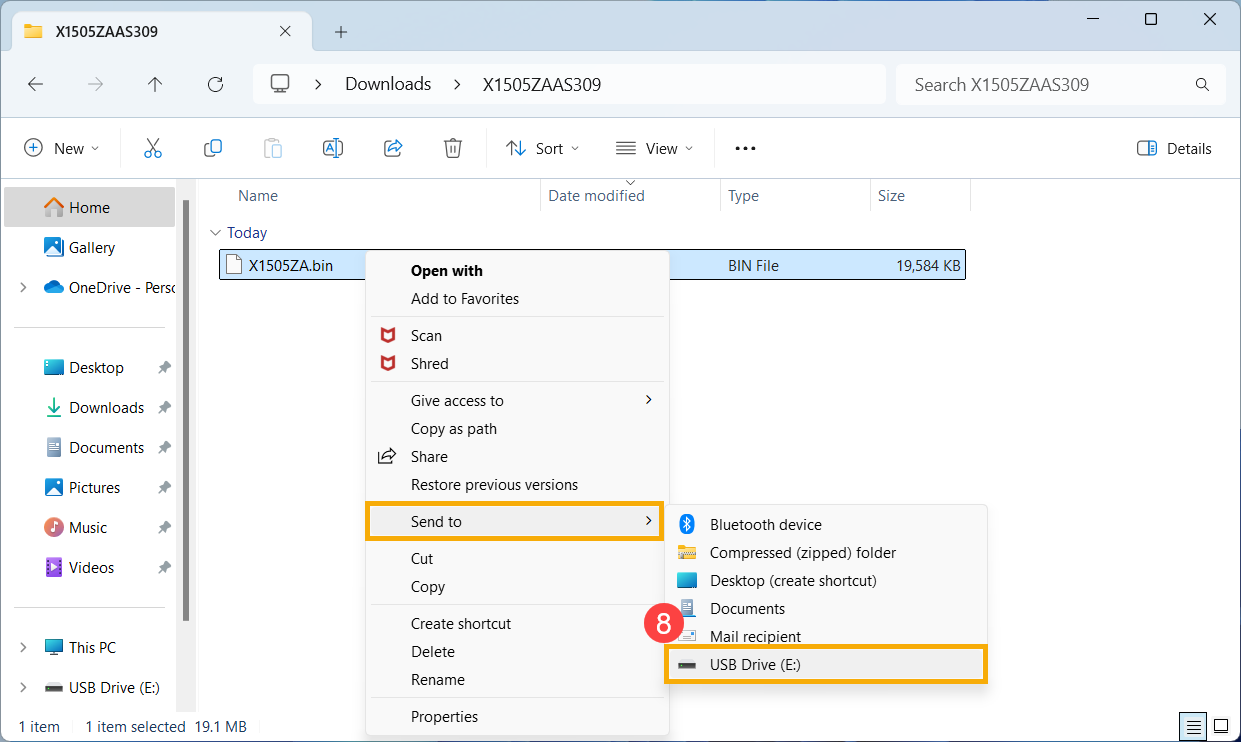
- After renaming, connect the USB flash drive to your device. Right-click the 「.bin」 file⑥, select [Show more options]⑦, and then choose your USB flash drive from the Send to option⑧. This will copy the BIOS file to the root directory of the USB flash drive.
Note: The USB flash drive should be formatted in FAT32. Learn more about converting the format of a USB flash drive to FAT32.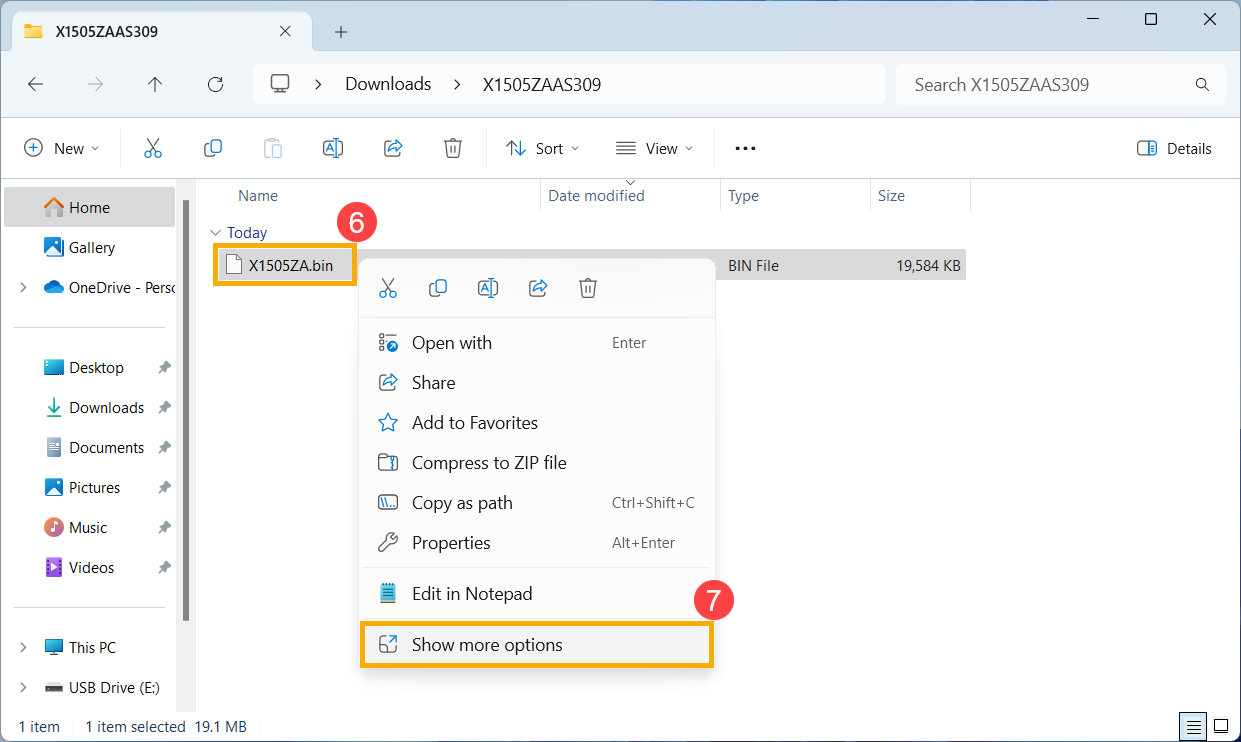
- Connect the USB flash drive to the device with the booting issue, then turn on the device and press the shortcut key combination (Ctrl + R) repeatedly. If you successfully enter the BIOS recovery mode, the device will restart and enter the ASUS Firmware Update screen (ASUS EZ Flash).
Note: For certain models, if pressing Ctrl + R does not enter BIOS recovery mode, please try using Ctrl + Home or Ctrl + Fn + ◀Arrow key instead.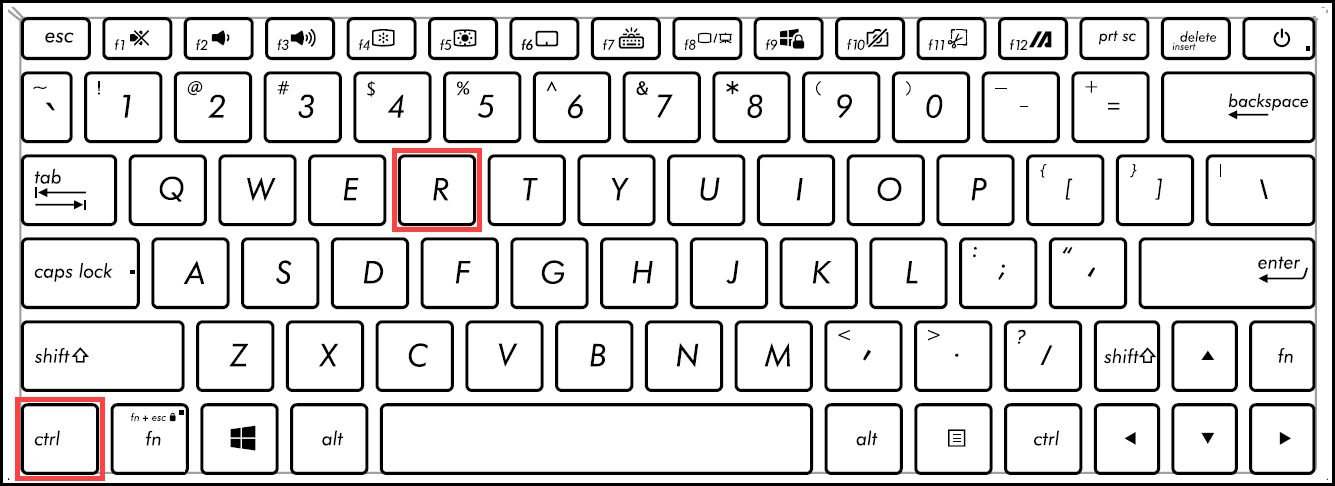
- Upon entering the BIOS setup screen, you will encounter two types of interfaces: UEFI interface and MyASUS in UEFI. Please refer to the following steps based on the BIOS screen of your device:
How to update BIOS in the UEFI mode
- Once in the ASUS Firmware Update screen (ASUS EZ Flash), select the 「.bin」 file from the USB flash drive⑨.
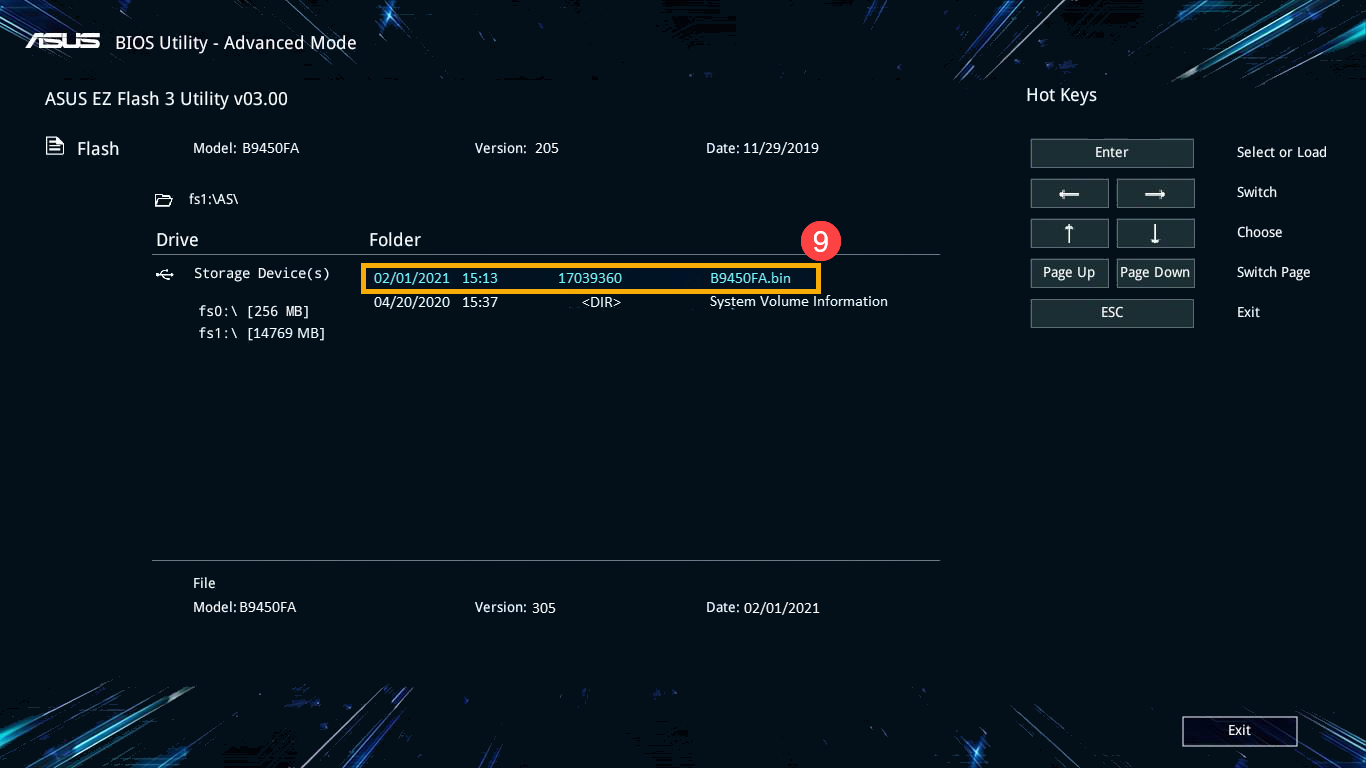
- Click on [Yes]⑩ to start the BIOS update.
Note: During the BIOS update, ensure that the device has a battery charge of 20% or more, and keep the power connected without forcing a shutdown to avoid any abnormal issues.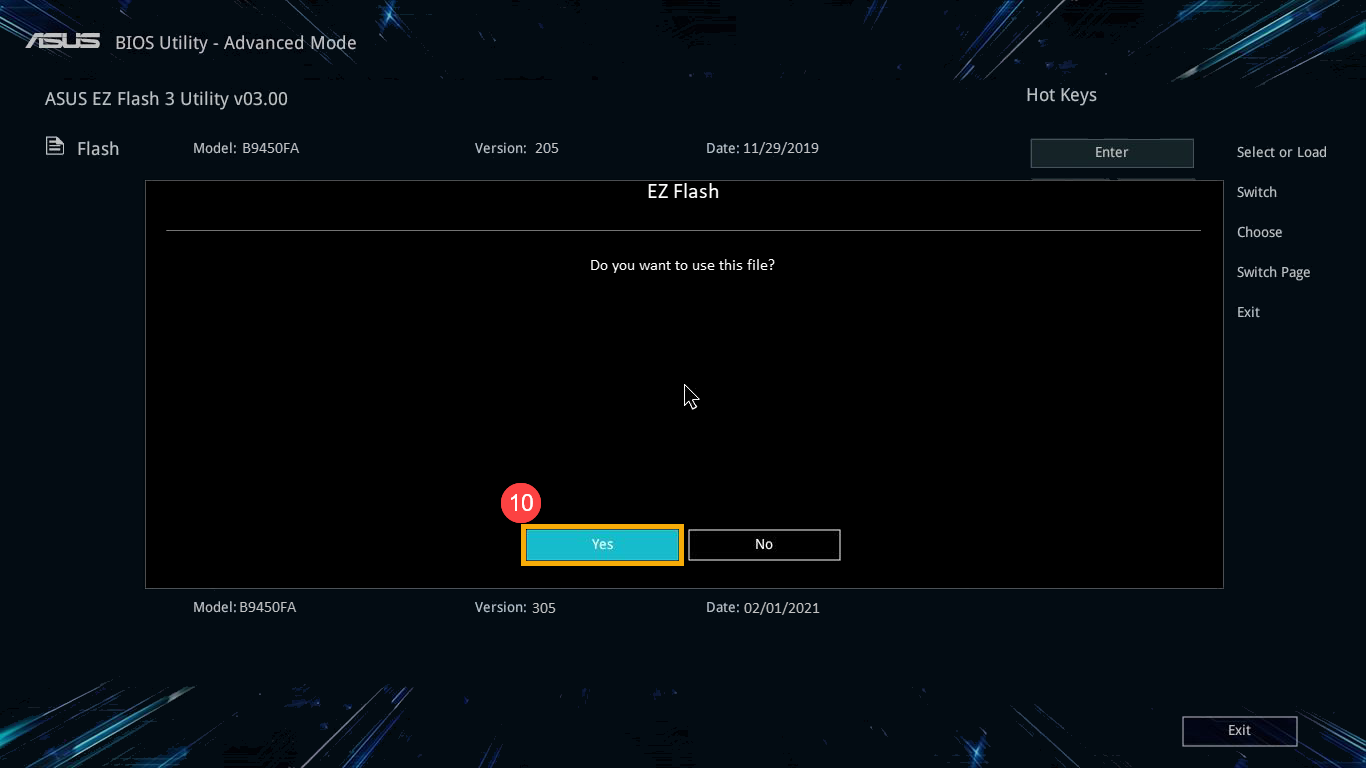
- After the BIOS update is complete, the device will automatically restart. Please verify if your issue has been resolved.
How to update BIOS in the MyASUS in UEFI mode
- Once in the ASUS Firmware Update screen (ASUS EZ Flash), select the 「.bin」 file from the USB flash drive⑨.
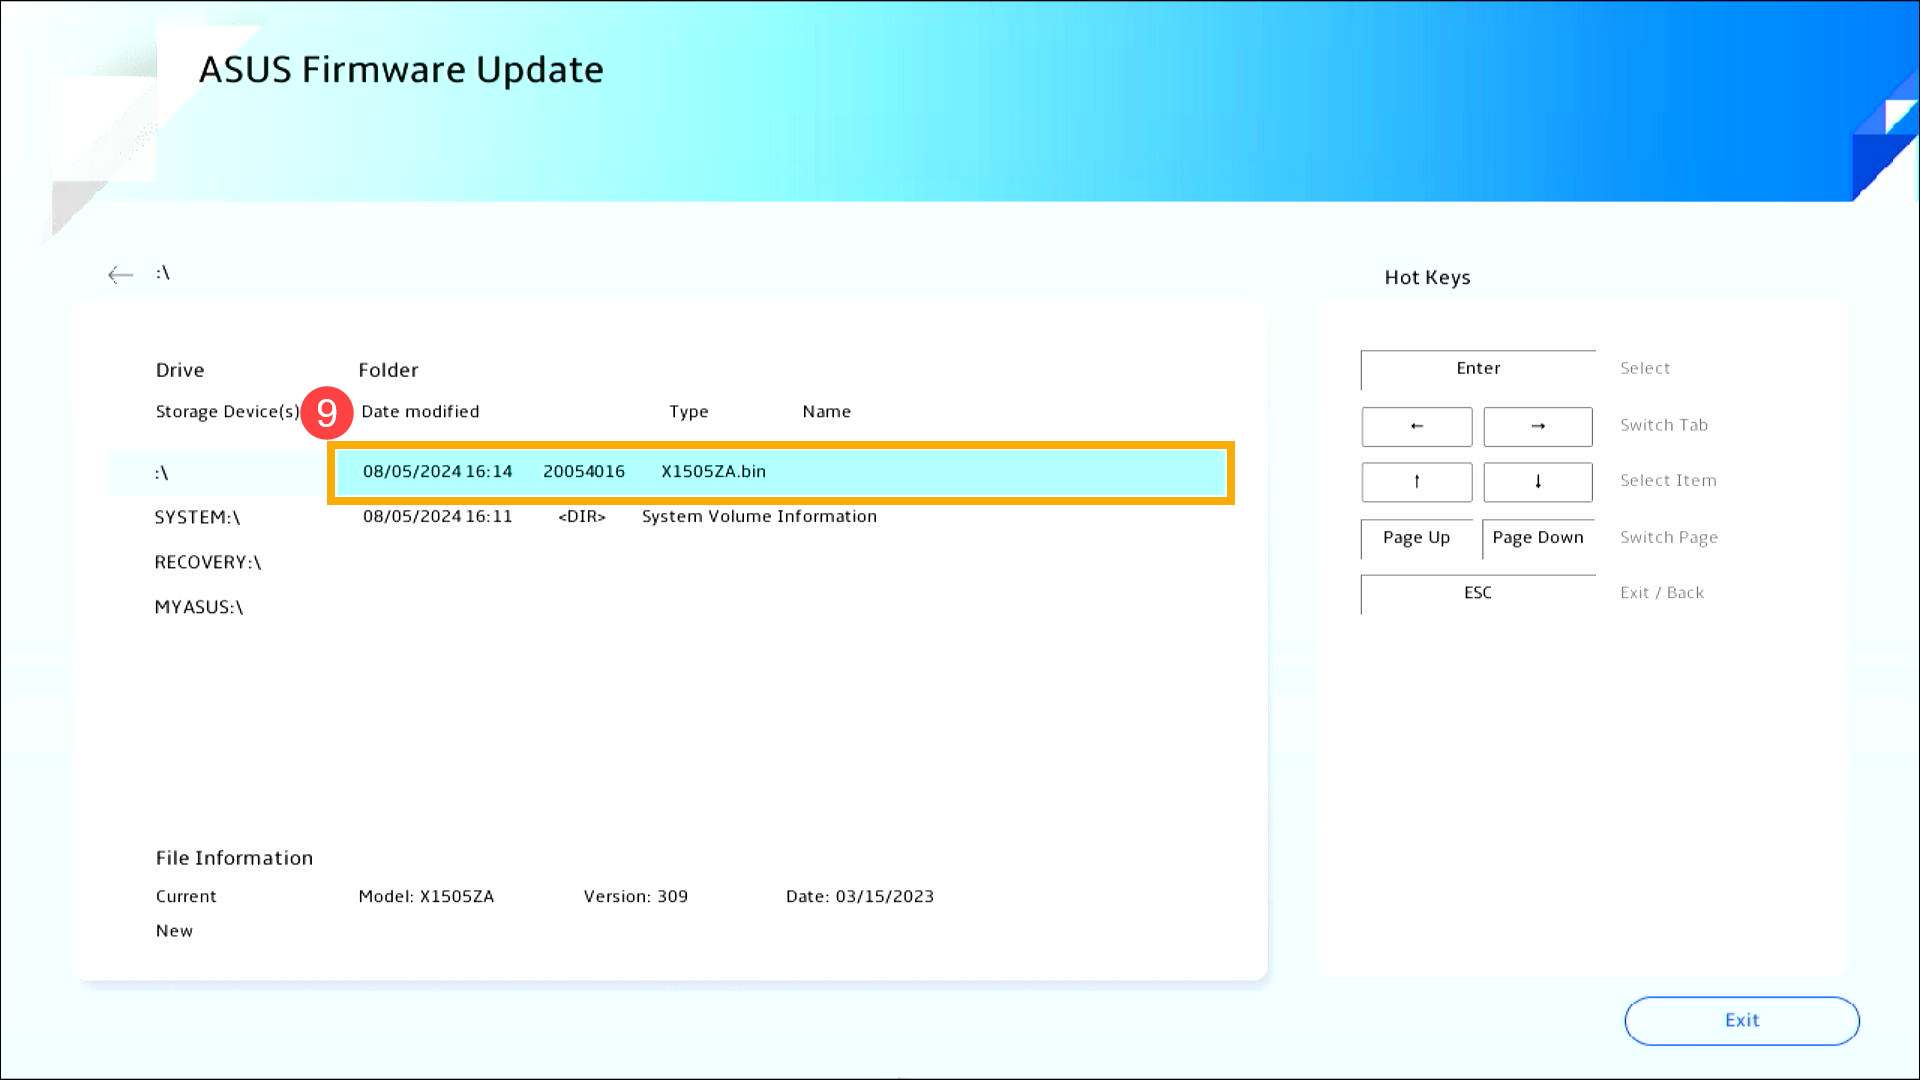
- Click on [Confirm]⑩ to start the BIOS update.
Note: During the BIOS update, ensure that the device has a battery charge of 20% or more, and keep the power connected without forcing a shutdown to avoid any abnormal issues.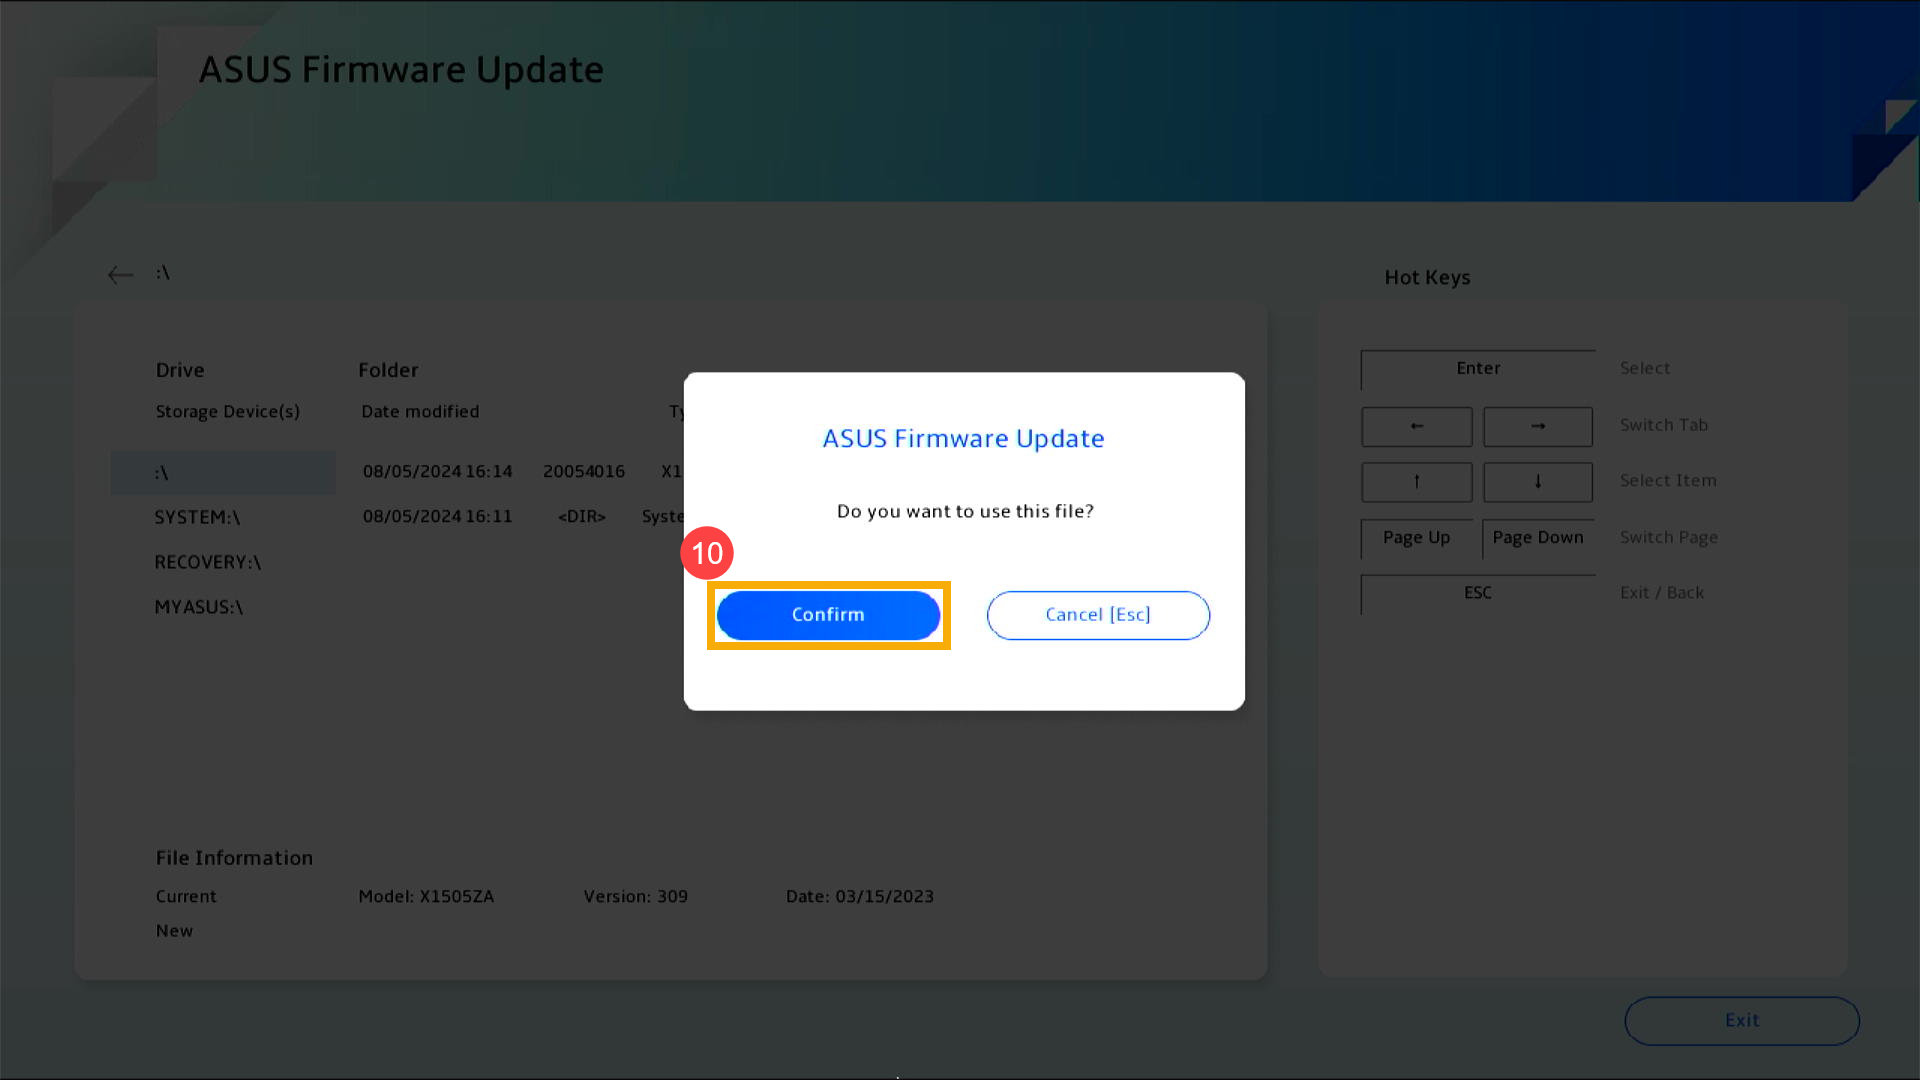
- After the BIOS update is complete, the device will automatically restart. Please verify if your issue has been resolved.
Windows 10 operating system
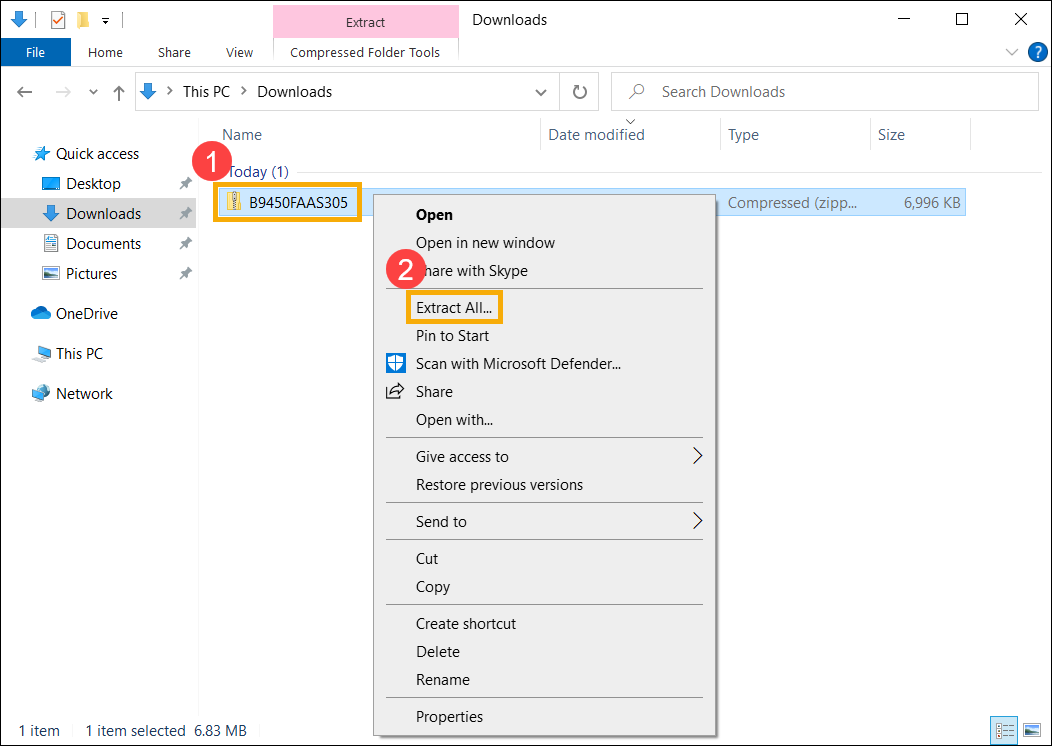
- Visit the ASUS Support website, look for the latest BIOS file under the BIOS category that is for the ASUS EZ Flash Utility, and learn more about How to search for and download BIOS files. (The following instructions use the B9450FA model as an example.)

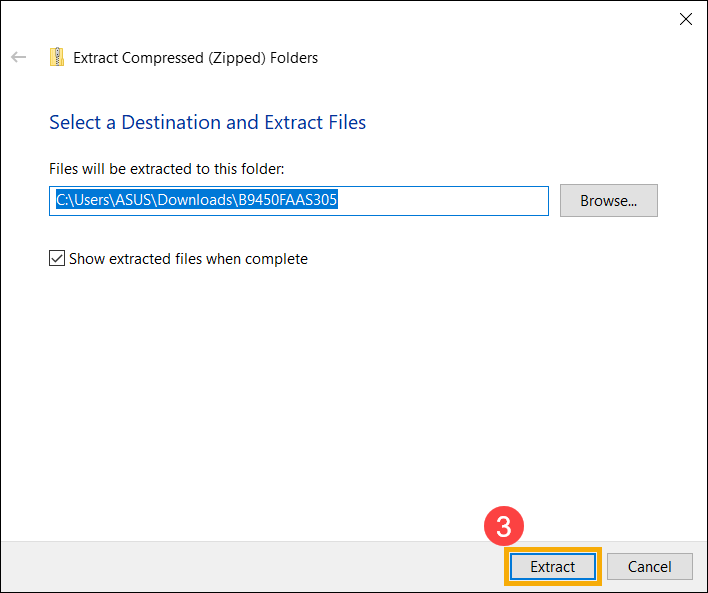
- After the download is complete, right-click on the downloaded BIOS file① and select [Extract All]②.
- Click on [Extract]③.
- Once the extraction is complete, rename the file extension of the file to 「.bin」. Right-click on the extracted file④, select [Rename]⑤.
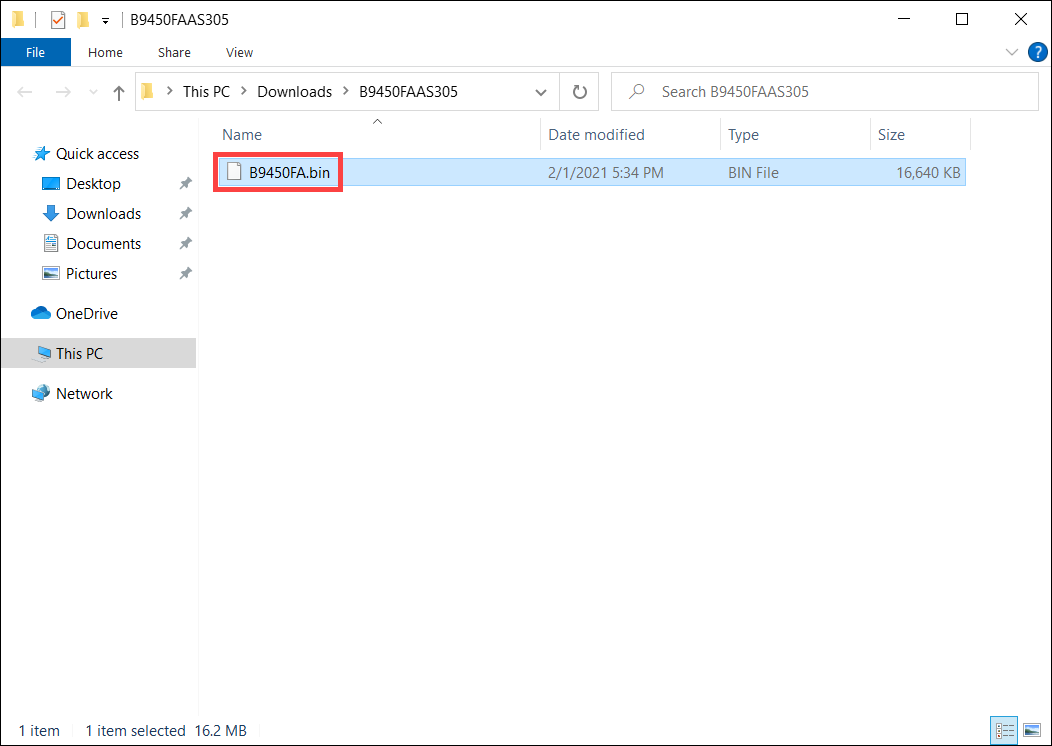
Modify the file name following the model number to 「.bin」. (Example: B9450FAAS.305 → B9450FA.bin)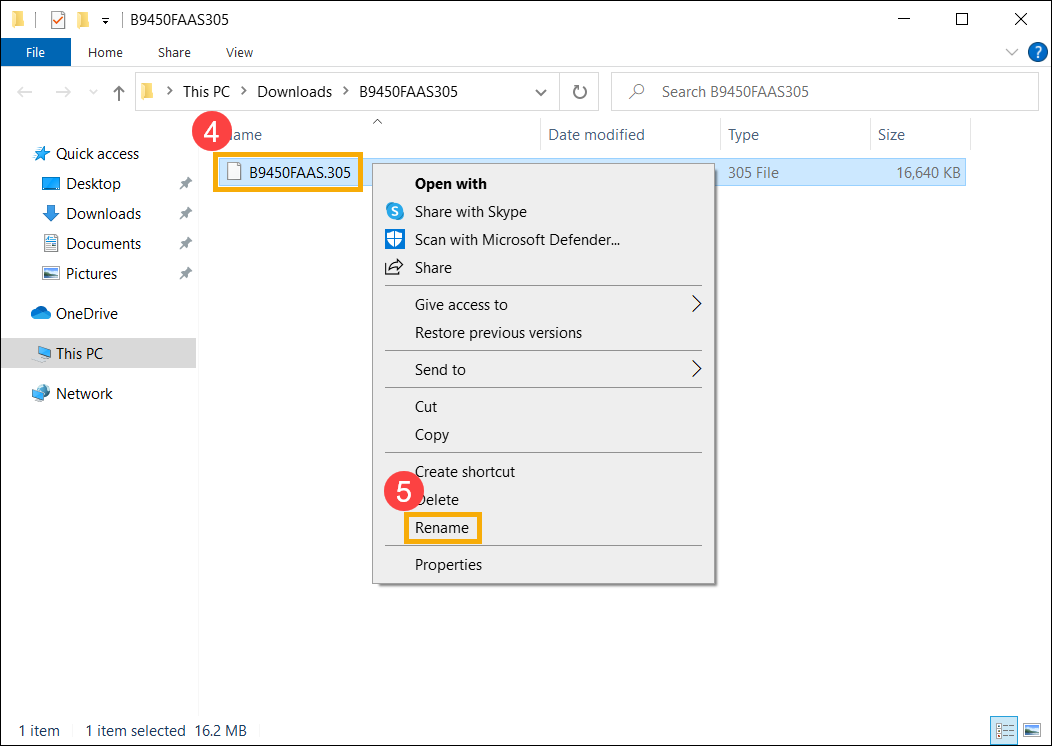
- After renaming, connect the USB flash drive to your device, right-click on the 「.bin」 file⑥, select [Send to]⑦, and choose your USB flash drive⑧. This will copy the BIOS file to the root directory of the USB flash drive.
Note: The USB flash drive should be formatted in FAT32. Learn more about converting the format of a USB flash drive to FAT32.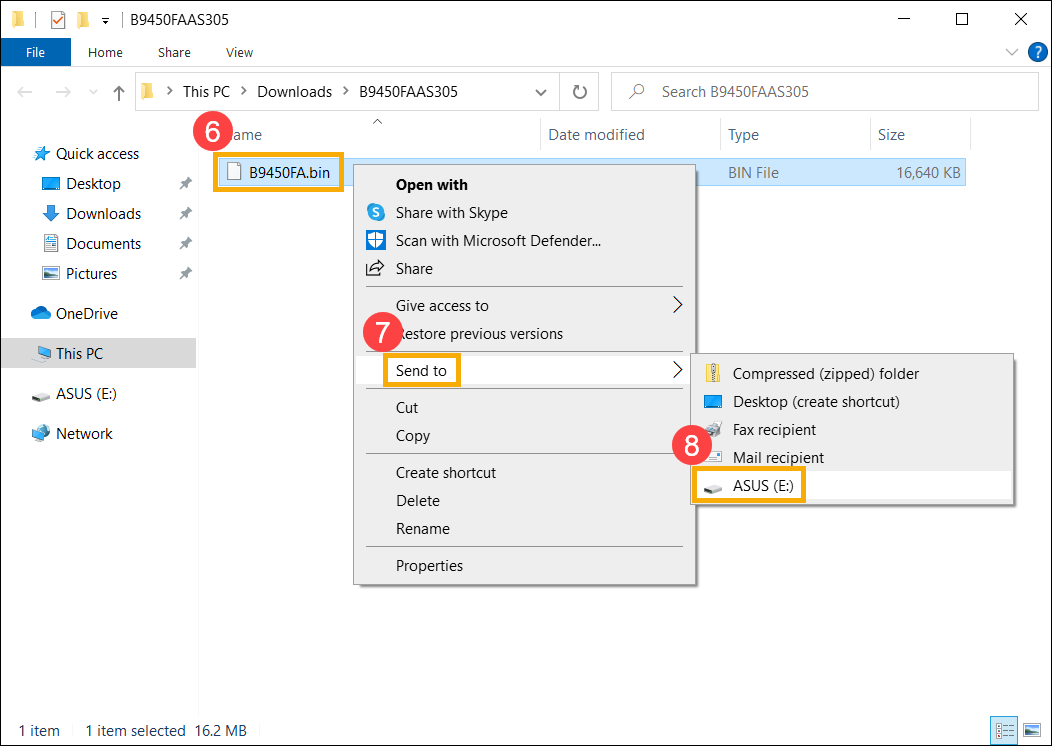
- Connect the USB flash drive to the device with the booting issue, then turn on the device and press the shortcut key combination (Ctrl + R) repeatedly. If you successfully enter the BIOS recovery mode, the device will restart and enter the ASUS Firmware Update screen (ASUS EZ Flash).
Note: For certain models, if pressing Ctrl + R does not enter BIOS recovery mode, please try using Ctrl + Home or Ctrl + Fn + ◀Arrow key instead. - Upon entering the BIOS setup screen, you will encounter two types of interfaces: UEFI interface and MyASUS in UEFI. Please refer to the following steps based on the BIOS screen of your device:
How to update BIOS in the UEFI mode
- Once in the ASUS Firmware Update screen (ASUS EZ Flash), select the 「.bin」 file from the USB flash drive⑨.
- Click on [Yes]⑩ to start the BIOS update.
Note: During the BIOS update, ensure that the device has a battery charge of 20% or more, and keep the power connected without forcing a shutdown to avoid any abnormal issues. - After the BIOS update is complete, the device will automatically restart. Please verify if your issue has been resolved.
How to update BIOS in the MyASUS in UEFI mode
- Once in the ASUS Firmware Update screen (ASUS EZ Flash), select the 「.bin」 file from the USB flash drive⑨.
- Click on [Confirm]⑩ to start the BIOS update.
Note: During the BIOS update, ensure that the device has a battery charge of 20% or more, and keep the power connected without forcing a shutdown to avoid any abnormal issues. - After the BIOS update is complete, the device will automatically restart. Please verify if your issue has been resolved.
Desktop or MiniPC
- Make sure the signal cable and power cable of the external display are correctly connected. If possible, try connecting the computer to another external display to determine if the issue is related to the display itself.
Desktop computers have different interfaces for connecting to built-in or dedicated graphics cards. Refer to your product's User Manual for detailed connection instructions based on the supported configuration of your computer.
Note: The support for built-in or dedicated graphics cards may vary depending on the model as mentioned in the user manual.
If you have confirmed the correct display output connection or do not have another external display for testing, proceed to the next step.
- Try using the Microsoft shortcut key combination: Windows logo key + Ctrl + Shift + B. This shortcut can reset display-related settings and sometimes resolve display issues.
- Remove all external devices, including the keyboard, mouse, external hard drive, printer, memory cards, optical discs from the optical drive, and adapter cards in the card reader, etc.
Note: Please connect the desktop computer to a single external monitor to verify that the system boots up and displays correctly. - Check if any hard disk or memory expansion was performed before the issue occurred. If yes, remove the hardware or restore it to its factory default state.
- Remove the power cord, then perform a CMOS reset to restore the hardware in your computer to its default state. You can refer to this article: How to Clear CMOS.
- Connect the power cord, then press the power button to check if the computer can boot properly.
Pressing the power button results in no display but the power indicator light or battery charge indicator light is flashing
The power indicator light or battery charge indicator light being lit and flashing indicates that the motherboard is receiving power. At this time, the BIOS ROM is preparing to execute recovery, so the screen will remain black. Please wait for approximately 5-8 minutes until the progress window of the BIOS ROM recovery mechanism appears.
Note: For Notebook products, please check the battery charge indicator light flashes; for Desktop products, please check the power indicator light flashes.
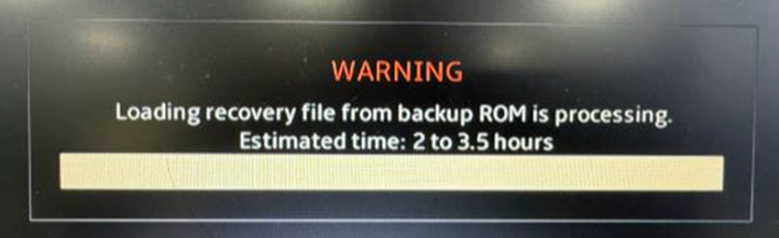
Once the BIOS ROM recovery window appears, please refer to the system's estimated recovery processing time (approximately 2.5 to 3.5 hours). The system will then automatically proceed with the repair.
Please note: During recovering process, ensure that your device is connected to a power source and avoid forcefully shutting it down to prevent any abnormal issues.
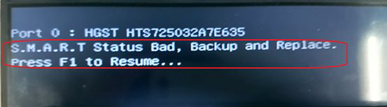
After pressing the power button, a white text on a black background screen appears
If you see a black screen with white text after booting up your device, first refer to Scenario 2: Failure to Boot Due to Improper BIOS Update and Failure section to see if it matches the screen displayed on your device. If it doesn't match, proceed to the following steps.
- If the screen displays 「S.M.A.R.T Status Bad」, you can refer to this article to resolve the issue: Boot Displaying Error Message 「S.M.A.R.T Status Bad」.
- If the error message prompts you to press F1 to enter setup during boot, it indicates that there is a hardware configuration problem detected by the BIOS during startup. The prompt on the screen will indicate which hardware setting is abnormal, and you can follow the instructions to correct it.
Additionally, you can try pressing F1 to enter the BIOS setup screen and restore the BIOS settings to their default state. You can refer to this article to learn how to restore BIOS settings: How to restore BIOS settings. (For desktop computers, refer to: How to restore BIOS settings)
After pressing the power button, the device boots up with a display, but the screen goes blank after entering the desktop
If you can see the Windows welcome screen during boot but the screen goes black after entering the desktop, it may be a problem caused by the graphics card driver. It is recommended to enter Safe Mode, and you can refer to this article for instructions on how to enter Safe Mode: How to enter Safe Mode when unable to enter the system.
Once in Safe Mode, reinstall the graphics card driver. You can refer to this article to learn How to search for and download drivers.
If the above steps do not resolve your issue, please contact your local ASUS customer service center for technical support.