Related Topics
- [Windows 11/10] Troubleshooting - Resolving System Error Messages or Unresponsiveness (Freeze/Black Screen/White Screen during usage)
- Laptop Frequently Asked Question (FAQ)
- [Windows 11/10] Troubleshooting - Automatic Shutdown/Restart Issues
- [Windows 11/10] Troubleshooting - BitLocker Recovery Screen Appears After Startup/Find BitLocker Recovery Key
- [Windows 11/10] Troubleshooting - Automatic Repair (Startup Repair) on Boot
[Windows 11/10] Troubleshooting - Blue Screen Errors in Windows (BSOD)
Applicable Products: Notebook, Desktop, All-in-One PC, Gaming Handheld, MiniPC, NUC
A Blue Screen Error will occur if a problem causes your system abnormal or restart unexpectedly due to software or hardware problems. It’s also called BSOD (Blue Screen of Death, as following picture).
Note: If the screen freezes on the following display and becomes unresponsive, preventing any actions, please first attempt a forced shutdown. Press and hold the power button until the power light turns off to shut down the device. Once the device has restarted, follow the troubleshooting steps below to avoid future issues.

There are some reasons that may cause Blue Screen Errors:
- From Windows packages, such as caused by Windows Update
- The compatibility problem between new extended hardware and the device, or the hardware devices have error
- The compatibility problem between installed software and system
- System virus
Please try the following video and troubleshooting steps to solve your problems.
To provide you more detailed instruction, you can also click ASUS YouTube video link below to know more about How to Fix Blue Screen Errors in Windows.
https://www.youtube.com/watch?v=BMe6aEB4bPg
Please go to the corresponding instruction based on the current Windows operating system on your device:
Windows 11 operating system
Change Intel VMD Controller settings in the BIOS
If during the startup process, you encounter a blue screen error with the stop code 'INACCESSIBLE BOOT DEVICE', try changing the current Intel VMD Controller settings to another option. (For example, if VMD is currently enabled in the BIOS, try changing it to disabled to see if it resolves the issue.)
Note: If you encounter a different stop code than 'INACCESSIBLE BOOT DEVICE', please continue to the next chapter for troubleshooting.
- When the device is completely shut down, persistently hold the [F2] key
 on the keyboard and simultaneously press the [Power button]
 to boot up. Once the BIOS configuration screen appears, you may release the [F2] key. Learn more about How to enter the BIOS configuration.
Note: For some older desktop models, you may need to press and hold the [Del] key during startup to access the BIOS configuration screen.
Note: For gaming handhelds, press and hold the [Volume Down] button and then press the power button. - Upon entering the BIOS configuration screen, you will encounter two types of interfaces: UEFI interface and MyASUS in UEFI. Please refer to the following steps based on the BIOS screen of your device:
How to Configure VMD Settings within the UEFI Interface
Note: The BIOS configuration screen below may vary slightly depending on the model.
- Once in the BIOS settings screen, press the [F7] key on your keyboard, or you can also click on [Advanced Mode]① on the screen.
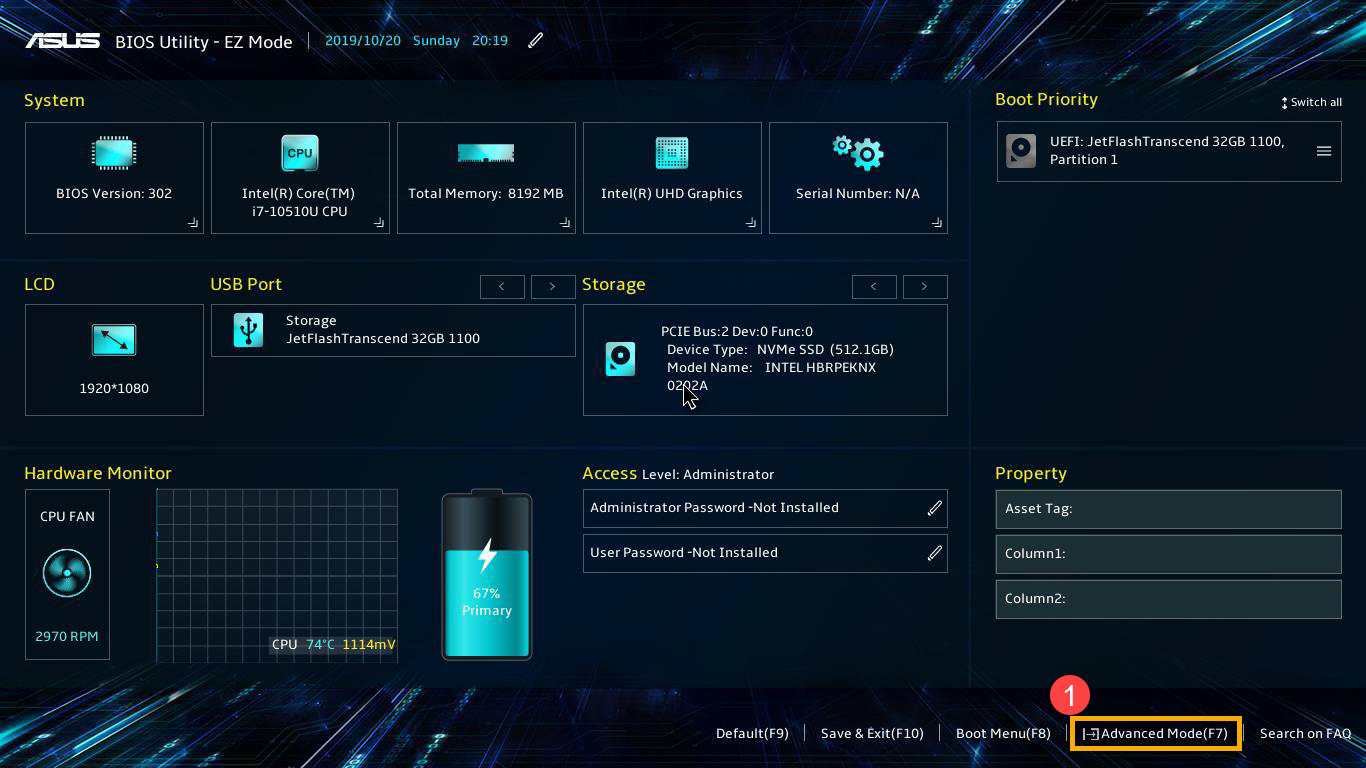
- Navigate to the [Advanced] page② and click on [VMD setup menu]③.
Note: If the BIOS configuration does not include a VMD option, it means your device does not support this feature. Please continue to the next chapter for troubleshooting.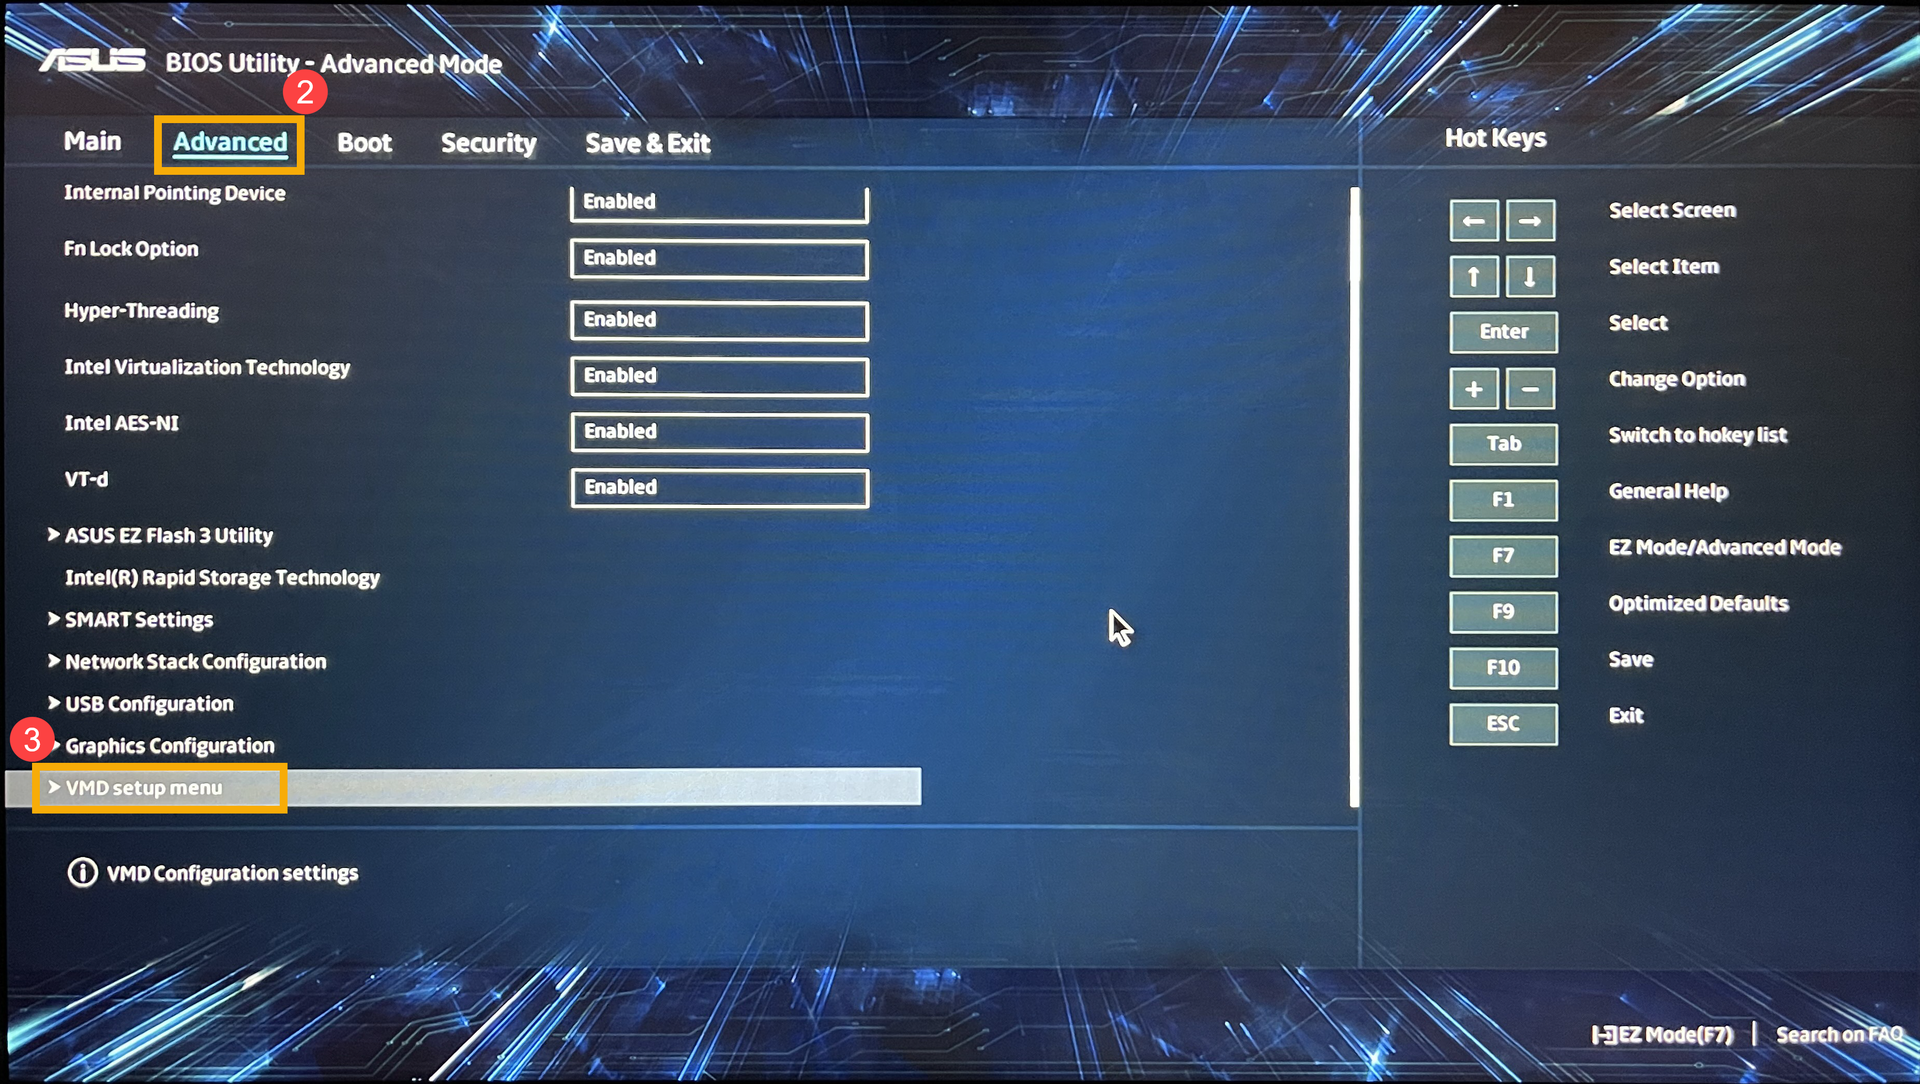
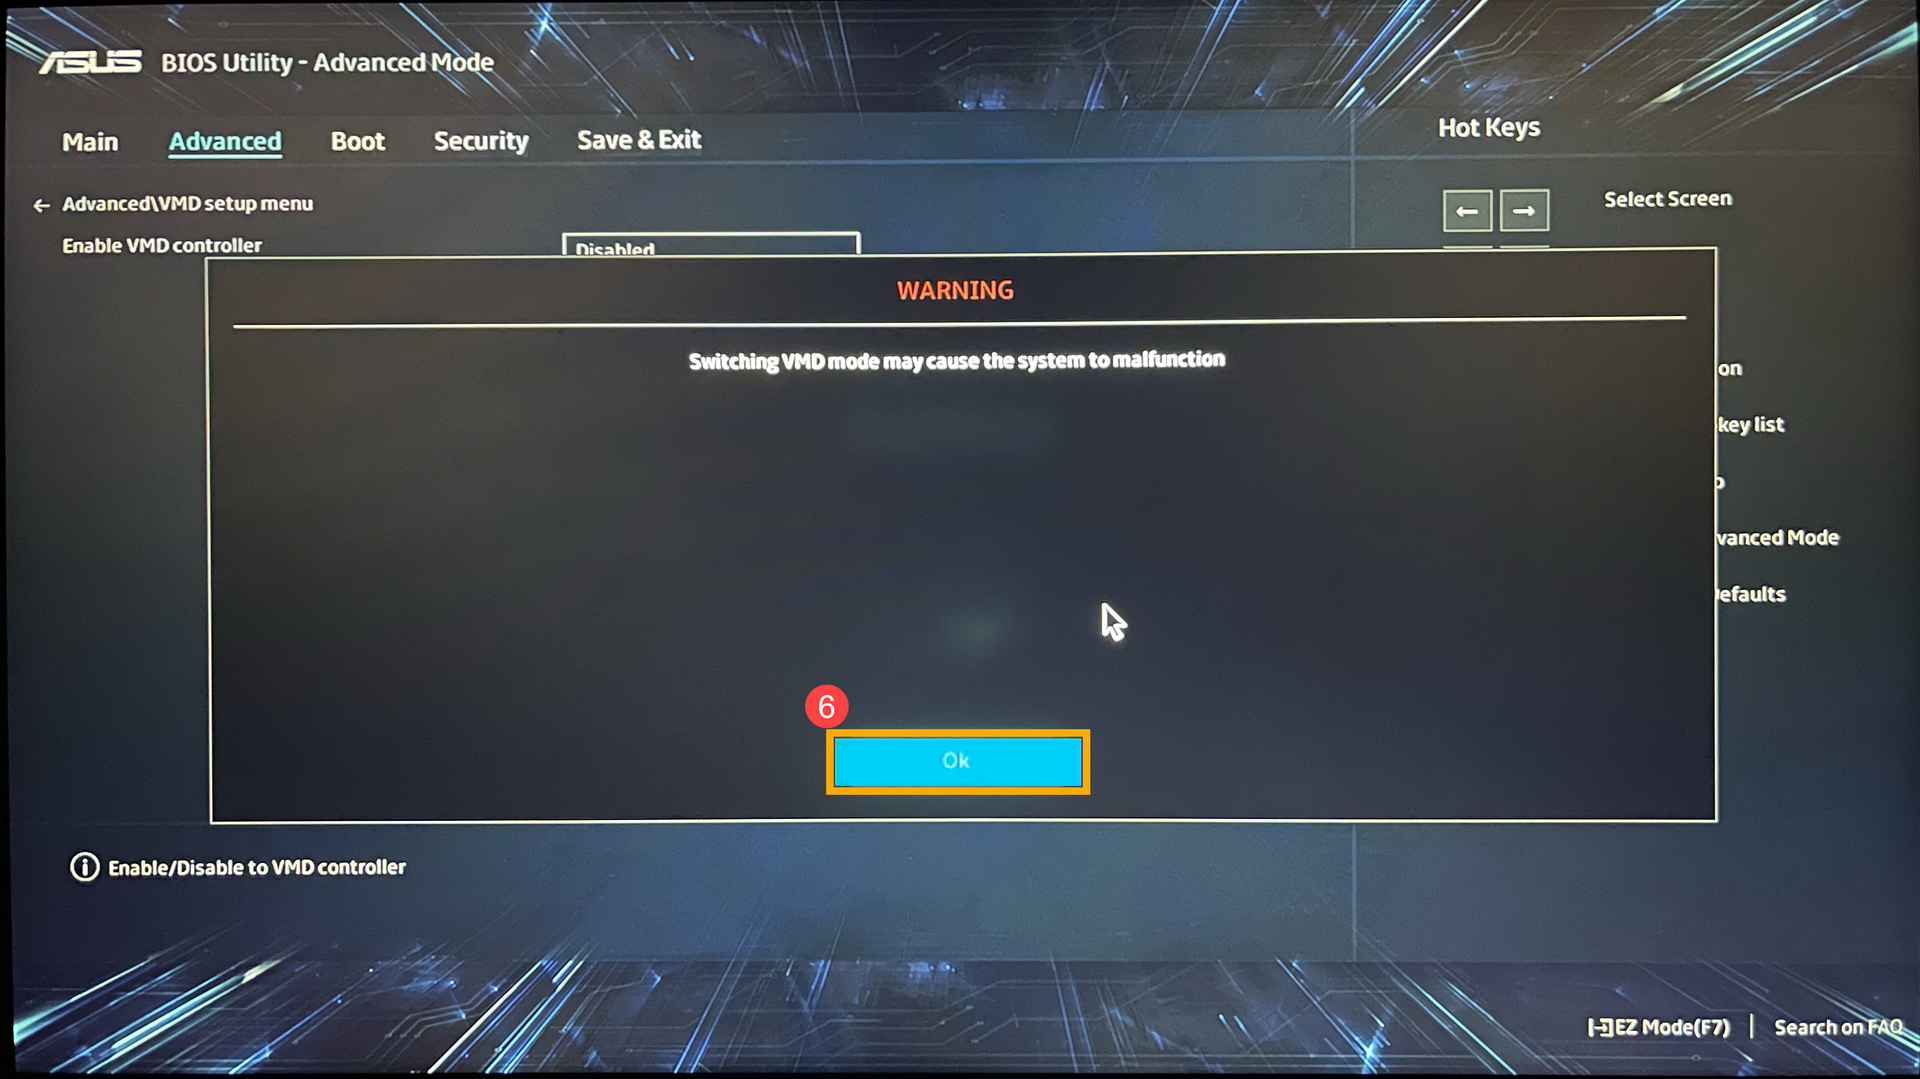
- Within the [Enable VMD controller] section④, select an option that differs from your current configuration⑤. (For example, if VMD is currently enabled in the BIOS, try changing it to disabled to see if it resolves the issue.)

- Click [Ok]⑥ to apply the changes to the Intel Volume Management Device (VMD) technology.
- Save the settings and exit. Press the [F10] key on your keyboard and click [Ok]⑦, then the device will reboot. Afterward, check if the Windows blue screen error is resolved.
You can also go to the ‘Save & Exit’ page and choose the ‘Save Changes and Exit’ option to save your settings and exit.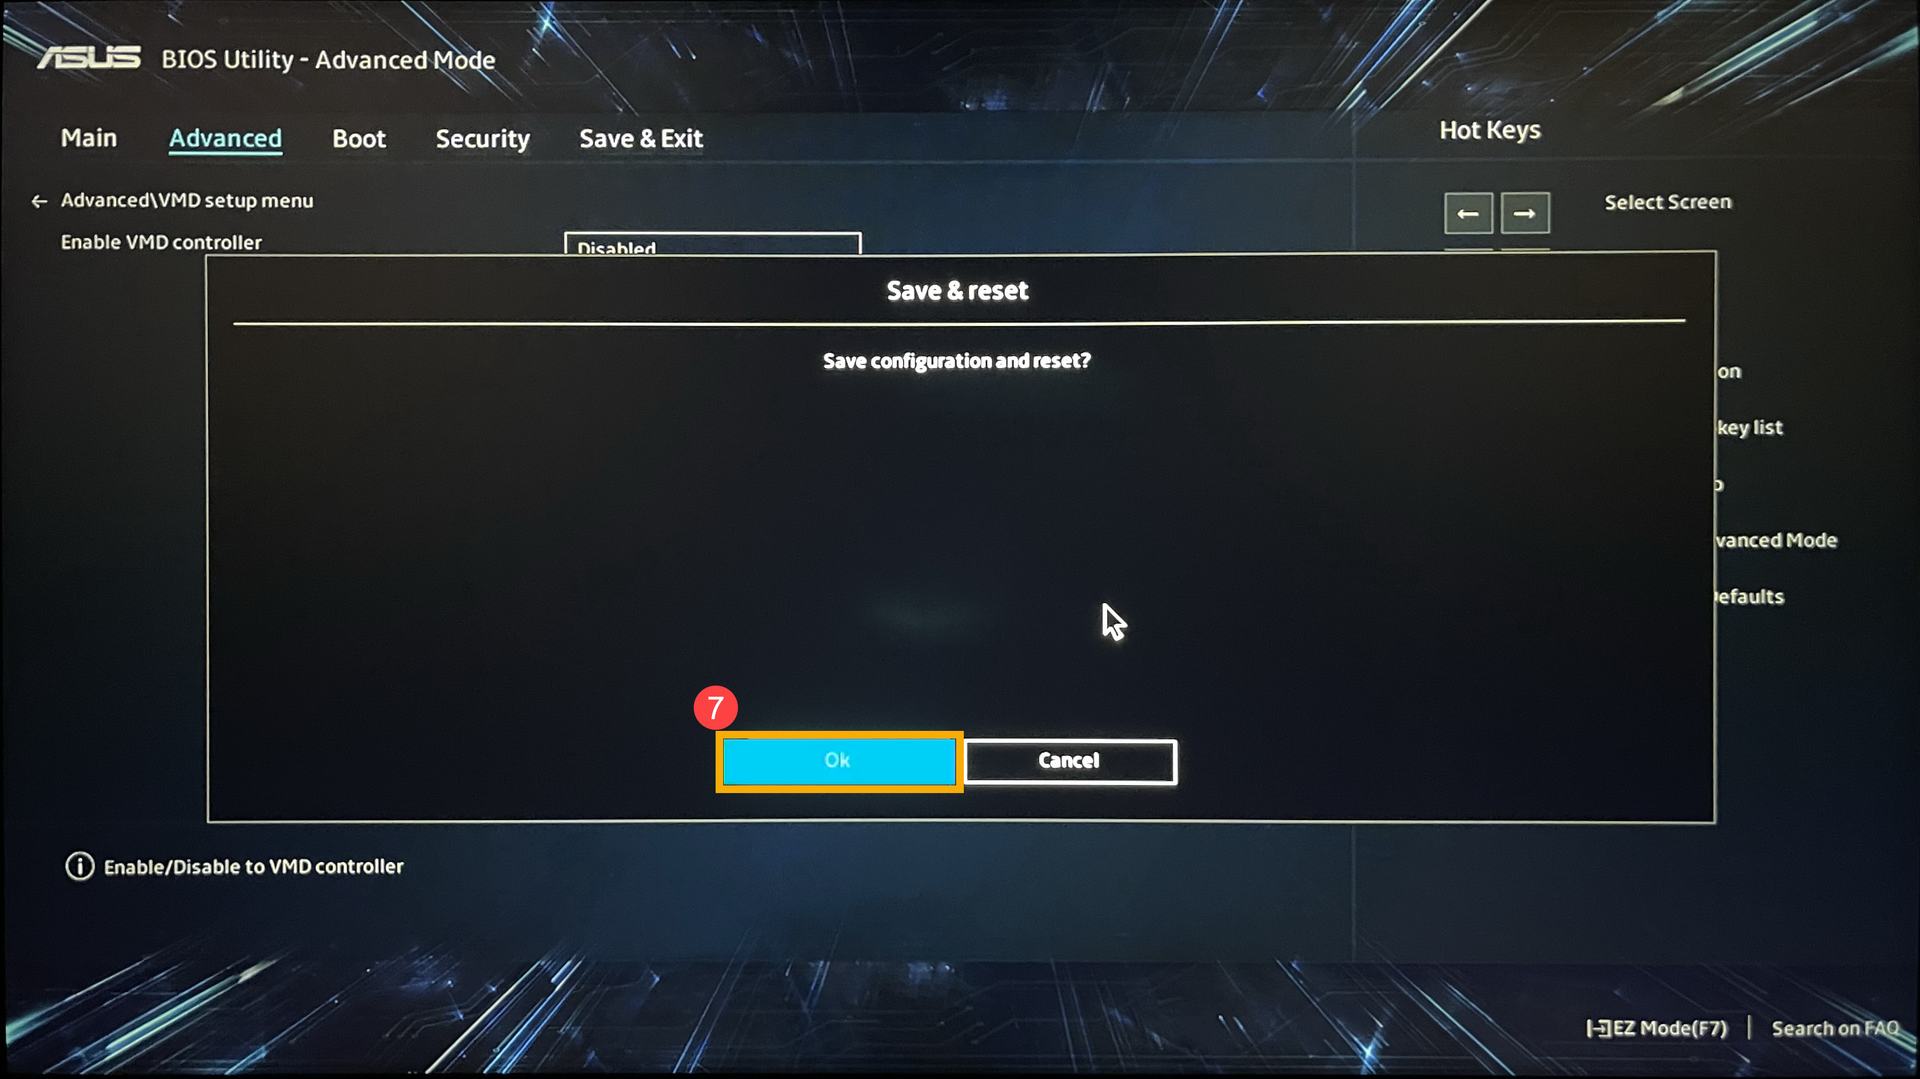
- If the Windows blue screen error still persists, revert the VMD settings back to their original configuration and continue to the next chapter for troubleshooting.
How to Configure VMD Settings within the MyASUS in UEFI Interface
Note: The BIOS configuration screen below may vary slightly depending on the model.
- Once in the BIOS settings screen, press the [F7] key on your keyboard, or you can also click on [Advanced Settings]① on the screen.
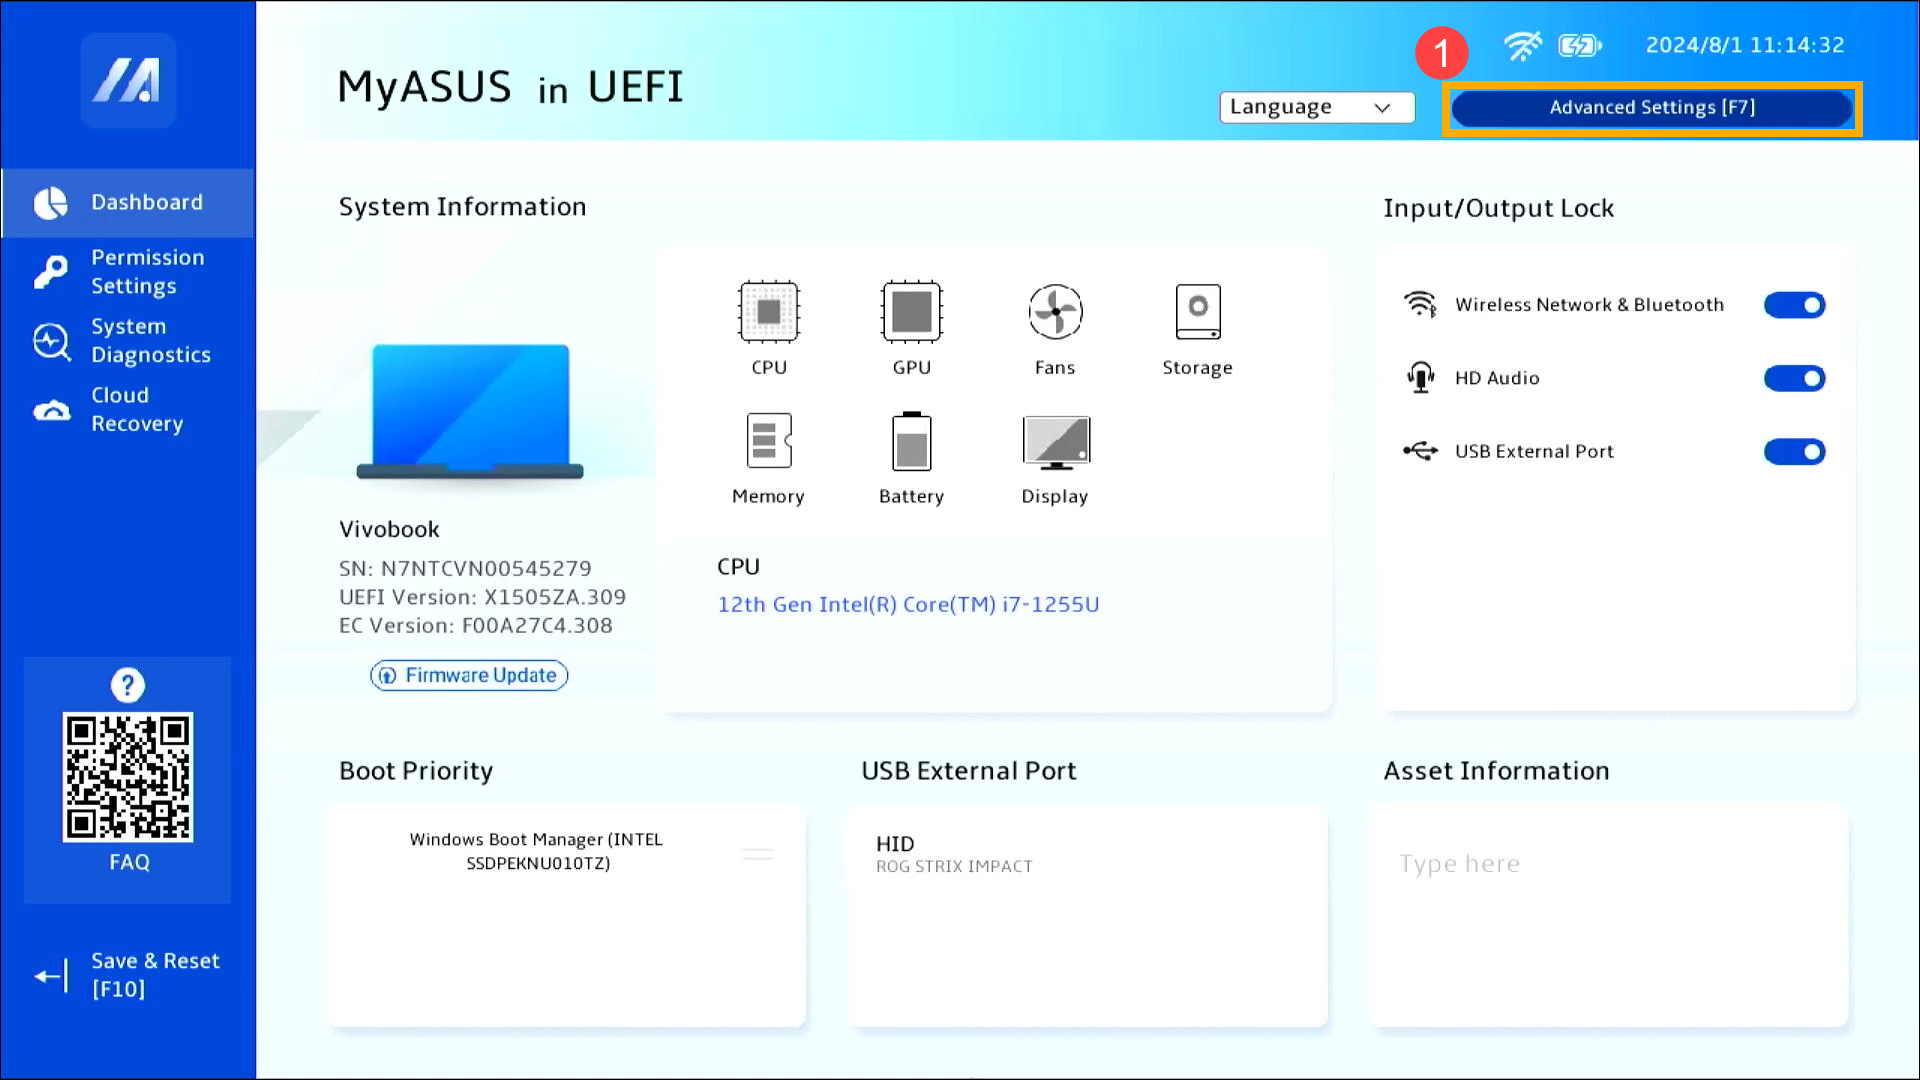
- Navigate to the [Advanced] page② and click on [VMD setup menu]③.
Note: If the BIOS configuration does not include a VMD option, it means your device does not support this feature. Please continue to the next chapter for troubleshooting.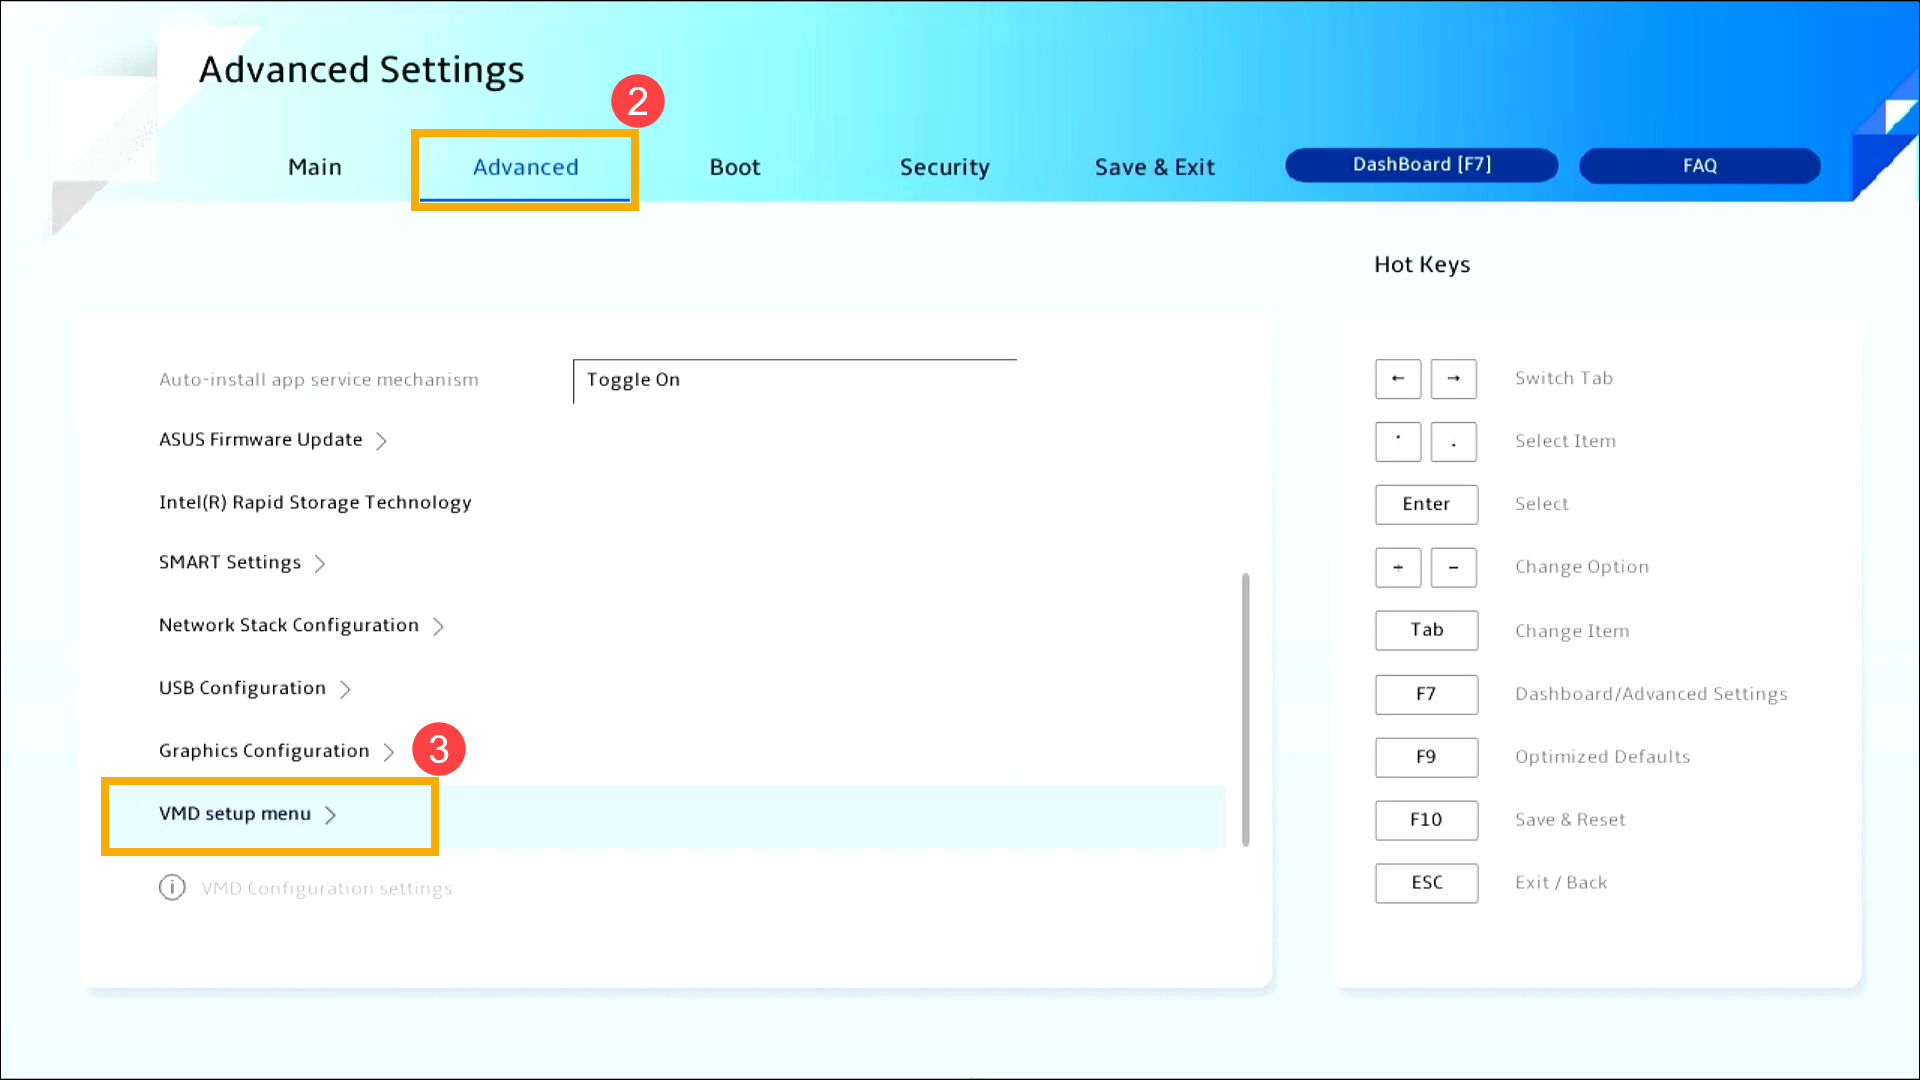
- Within the [Enable VMD controller] section④, select an option that differs from your current configuration⑤. (For example, if VMD is currently enabled in the BIOS, try changing it to disabled to see if it resolves the issue.)
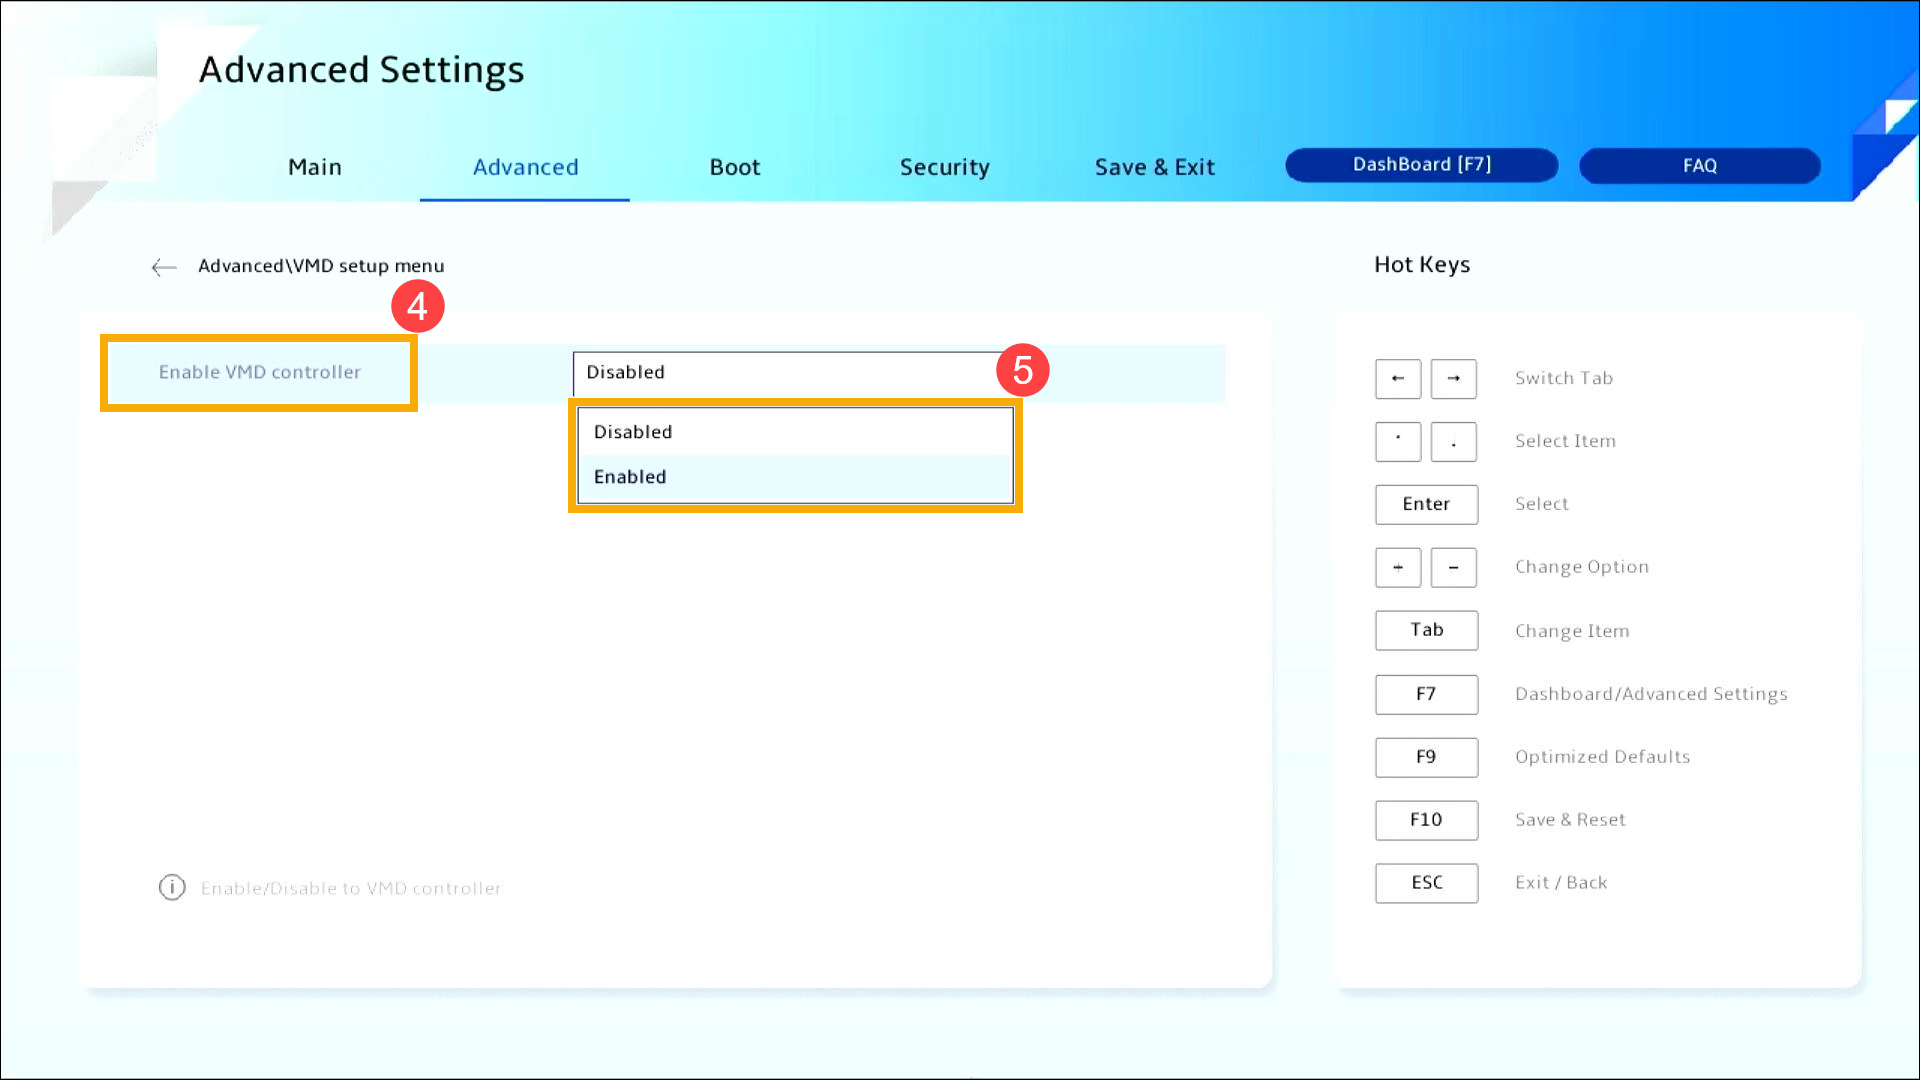
- Click [Ok]⑥ to apply the changes to the Intel Volume Management Device (VMD) technology.

- Save the settings and exit. Press the [F10] key on your keyboard and click [Confirm]⑦, then the device will reboot. Afterward, check if the Windows blue screen error is resolved.
You can also go to the ‘Save & Exit’ page and choose the ‘Save Changes and Exit’ option to save your settings and exit.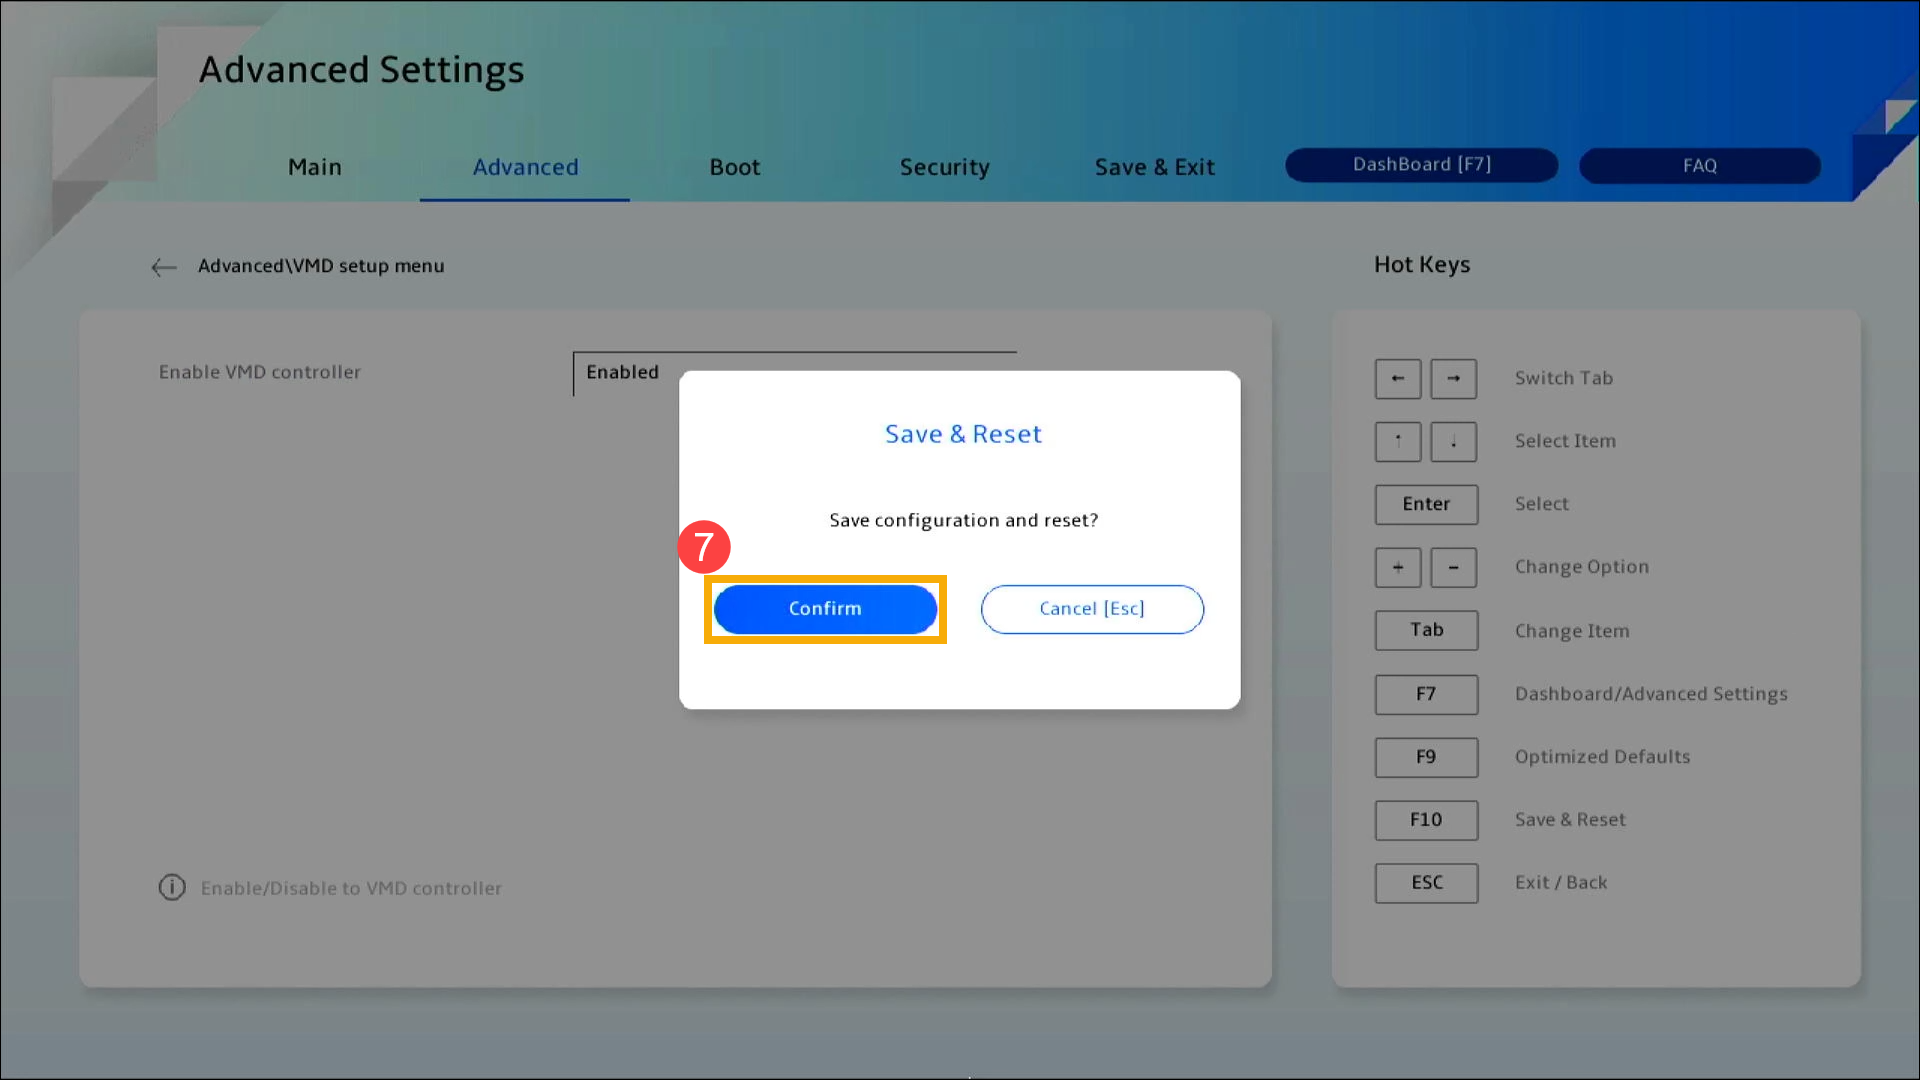
- If the Windows blue screen error still persists, revert the VMD settings back to their original configuration and continue to the next chapter for troubleshooting.
Update BIOS, Windows packages, and drivers
Regularly updating BIOS, Windows, and drivers can enhance system stability and performance. Ensure that your device is using the latest versions. Learn more about updating BIOS:
How to update the BIOS version in Windows system
How to use EZ Flash to update the BIOS version
(For desktop products, please refer to ASUS Motherboard EZ Flash 3 Introduction.)
Learn more about updating Windows and drivers:
How to update drivers via System Update in MyASUS
If the problem persists after you have updated BIOS/Windows packages/drivers to the date, please continue to the next chapter for troubleshooting.
Run System Diagnosis via MyASUS
User can inspect whether the hardware device is good by the Hardware Diagnostic via MyASUS, and run further checking on Blue Screen Error. If any error occurs after diagnosing, we recommend that you visit ASUS repair center to replace the hardware device.
- Type and search [MyASUS] in the Windows search bar①, then click [Open]②.
Note: If you cannot find MyASUS, it may not be installed on your device. Refer to How to install MyASUS.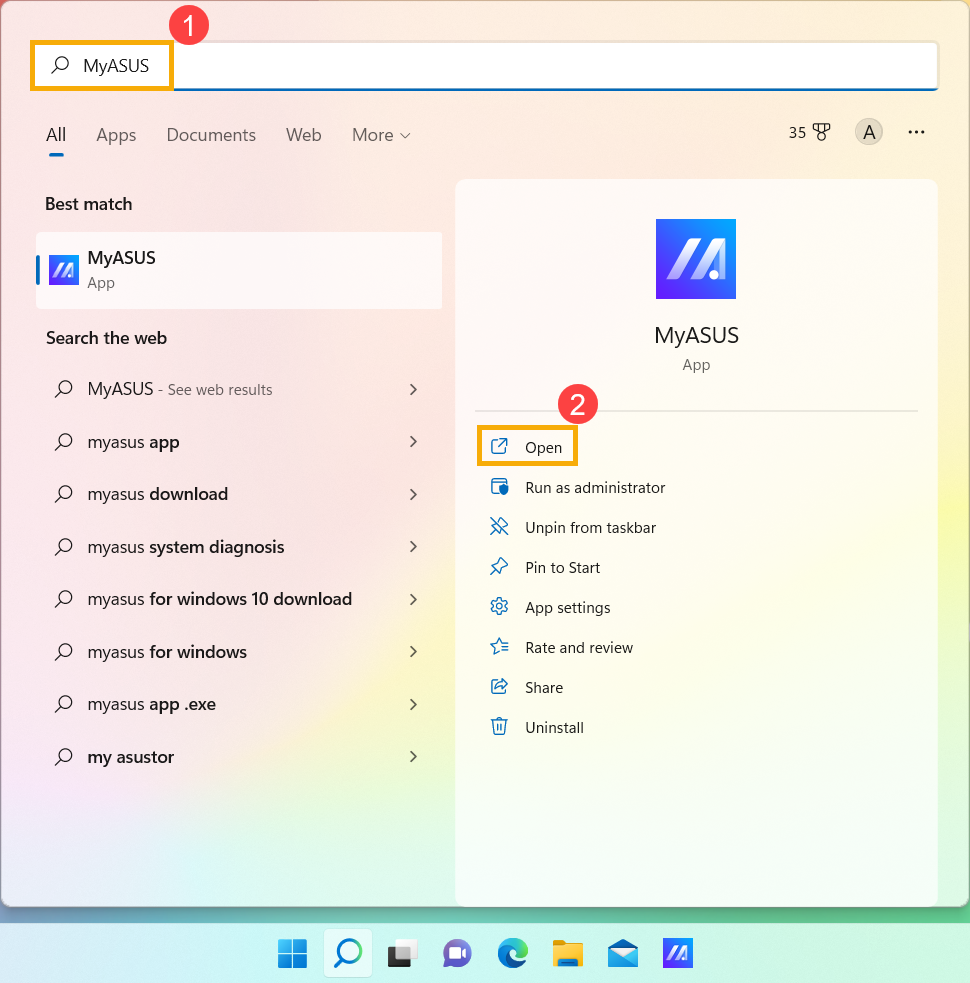
- In the MyASUS app, click [System Diagnosis]③.
Note: If your device does not display the system diagnosis page in MyASUS software, it means your device does not support this feature. Continue to the next chapter for troubleshooting. Here you can learn more about Why can I only see the partial features in the MyASUS app.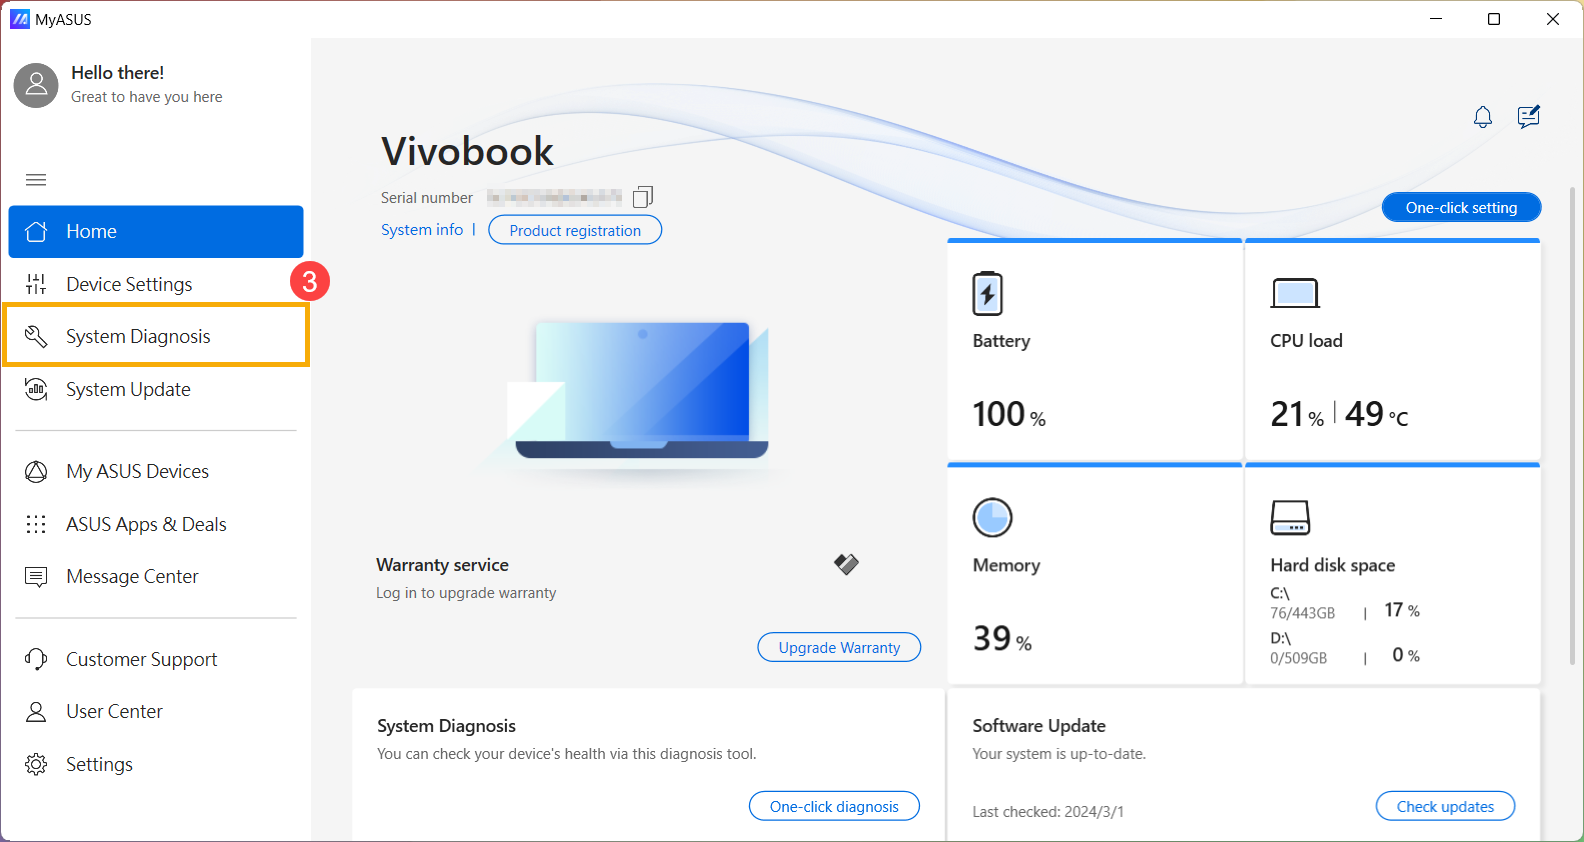
- In [Diagnostic Tool]④, select [All] check items of Customized diagnosis⑤, and then click [Checkup]⑥. Here you can learn more about MyASUS System Diagnosis - Introduction.
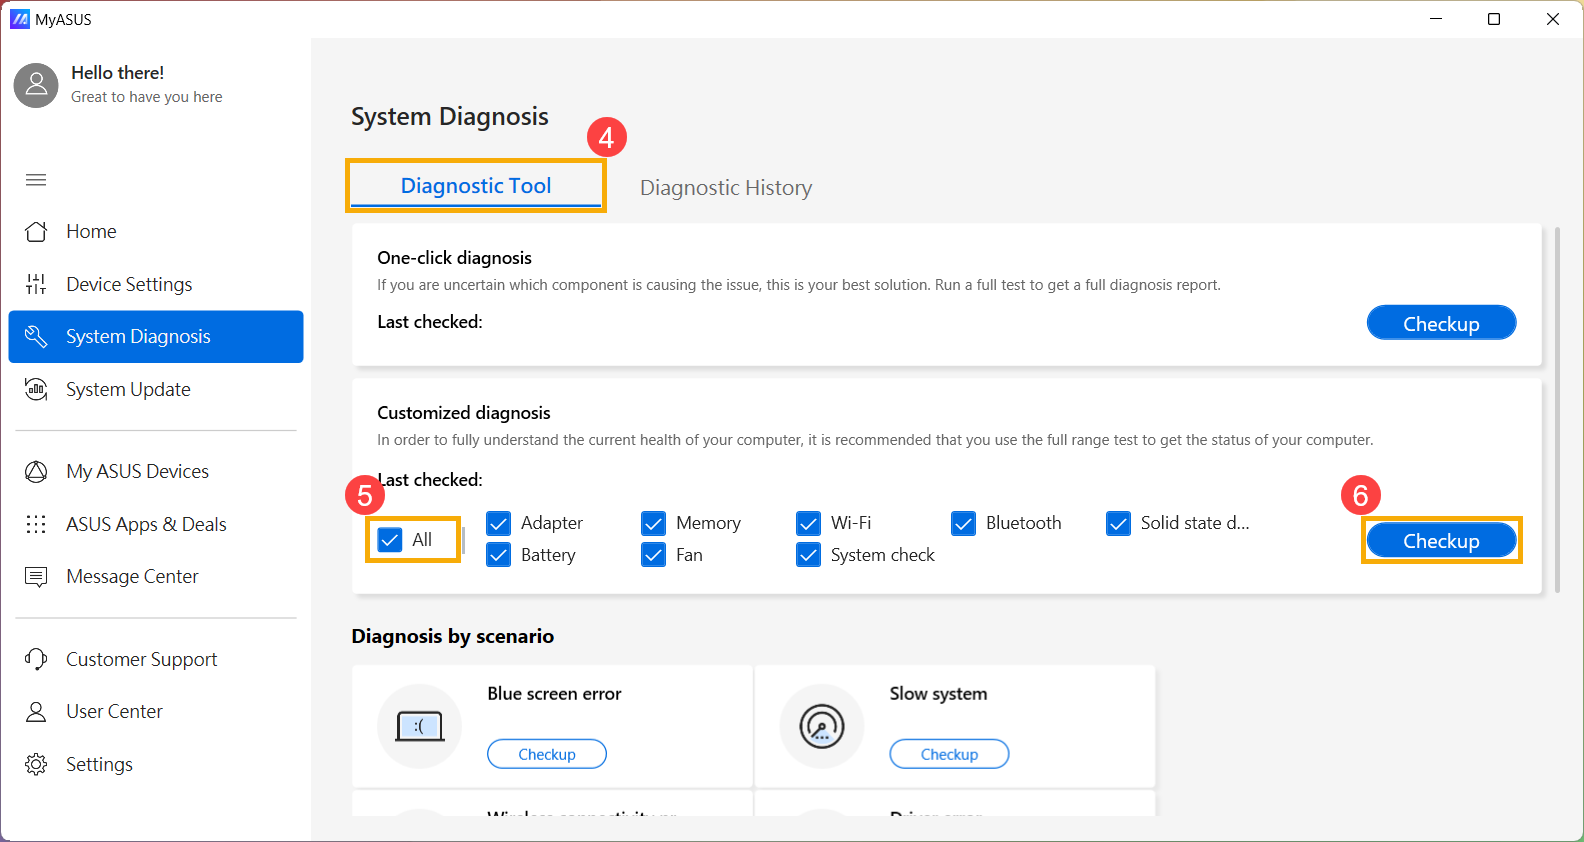
- If any error occurs, please visit ASUS repair center to replace the hardware device. Here you can learn more about How to use Customer Support to contact ASUS for the further repair request.
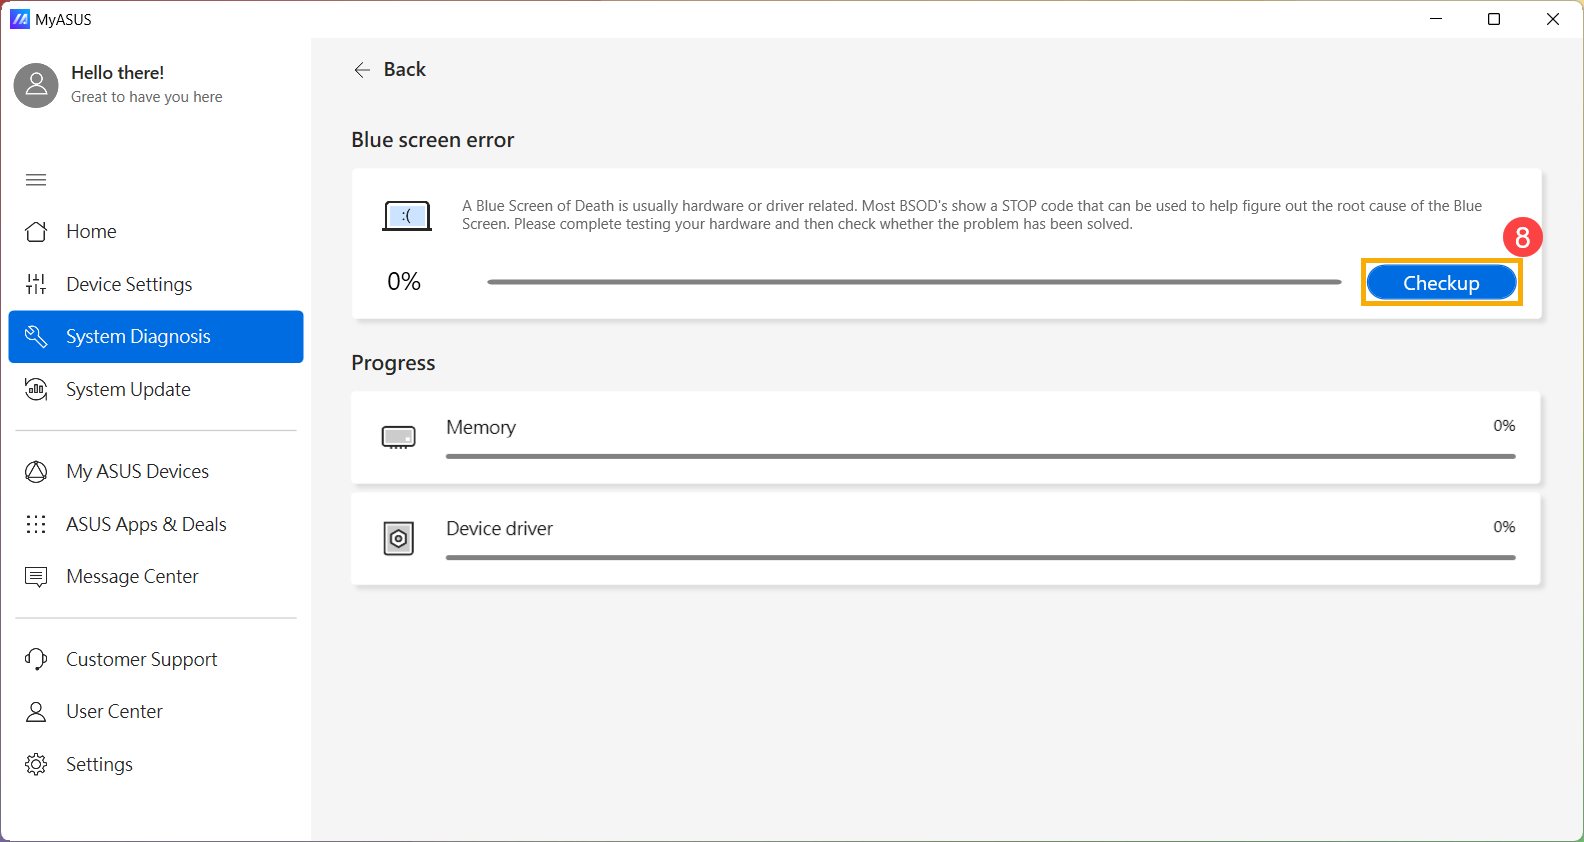
If no issue found after 'Hardware diagnostic', please go back to the System Diagnosis screen and select [Blue screen error]⑦ for the further check.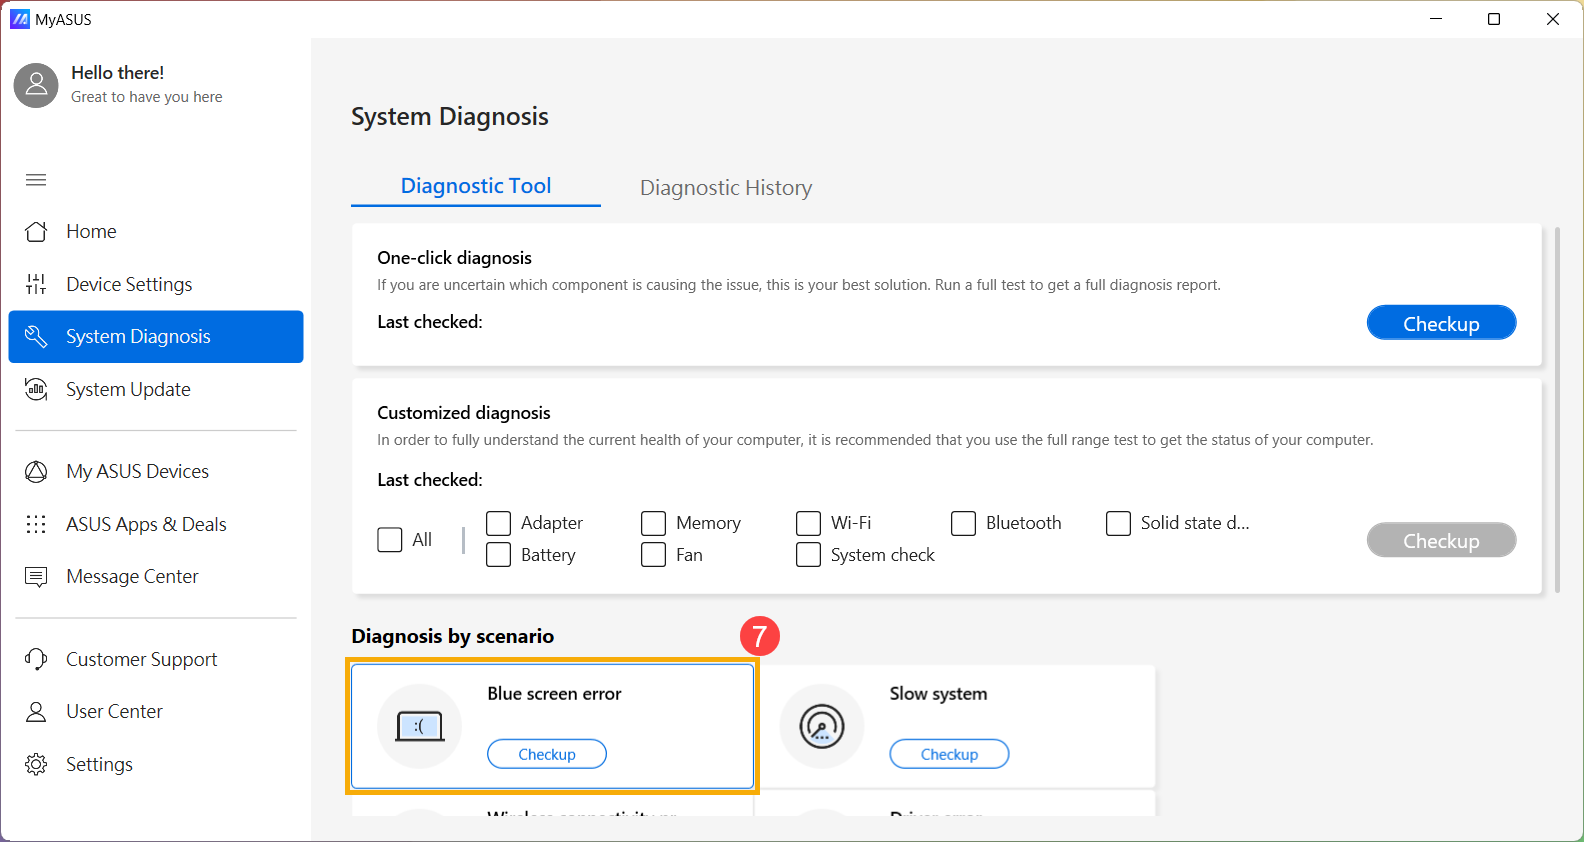
- Click [Checkup]⑧.
- If any error occurs, please visit ASUS repair center to replace the hardware device. Here you can learn more about How to use Customer Support to contact ASUS for the further repair request.
If no issue found after 'Blue screen error' check, it means your hardware devices are good. Please continue to the next chapter for troubleshooting.
Check external peripherals or any hardware devices installed / changed
Sometimes, the external devices connected to your device can be the cause of Blue Screen Errors, so please try to remove them, such as external hard drives, printers, memory cards, external ODD (if your device is with internal ODD, please remove CD/DVDs), dongles, etc. After that, restart your device. If you don’t experience the issue after restarting your device, the external device may be the cause of the problem. We recommend that you do not use this device and contact your device manufacturer for support.
If you do not use any external devices or the problem still persists after removing them, please confirm whether you had ever installed / replaced any hardware devices, such as disk drives (HDD or SSD) or Memory modules. The compatibility problem could be the cause and exist between new hardware devices and ASUS products / system, so please try to remove the hardware device. If you don’t experience the issue after removing the hardware device, we recommend that you do not use this device and contact your device manufacturer for support.
If the problem persists after above steps, please continue to the next chapter for troubleshooting.
Check the installed antivirus software
Installing multiple antivirus programs at the same time can slow down the system, cause errors, and may lead to the risk of protection mechanisms failing due to conflicts between antivirus software. Therefore, it is not recommended to install multiple antivirus programs on the same device.
If you already have antivirus software installed on your device and wish to install another antivirus program, it is advisable to completely remove the original antivirus software before installing the new one. Here you can learn more about The Impact of Installing Multiple Antivirus Programs on the System.
If you are uncertain about which antivirus programs are installed on your system, please refer to this article: How to Check if Your Device Has Antivirus Software Installed.
Should you wish to uninstall an antivirus application, you might find a dedicated uninstaller on the software's official website, or you could employ the built-in uninstallation method provided by Windows (Windows Settings > Apps > Installed apps). For more detailed instructions, please refer to this article: How to Uninstall Applications.
Check recently installed / updated software or applications
Some problems may occur after Windows Update or a specific application installed in your device, including the compatibility issue between applications and system, or Windows core programs may be crashed.
You can view update history to check recently installed updated items.
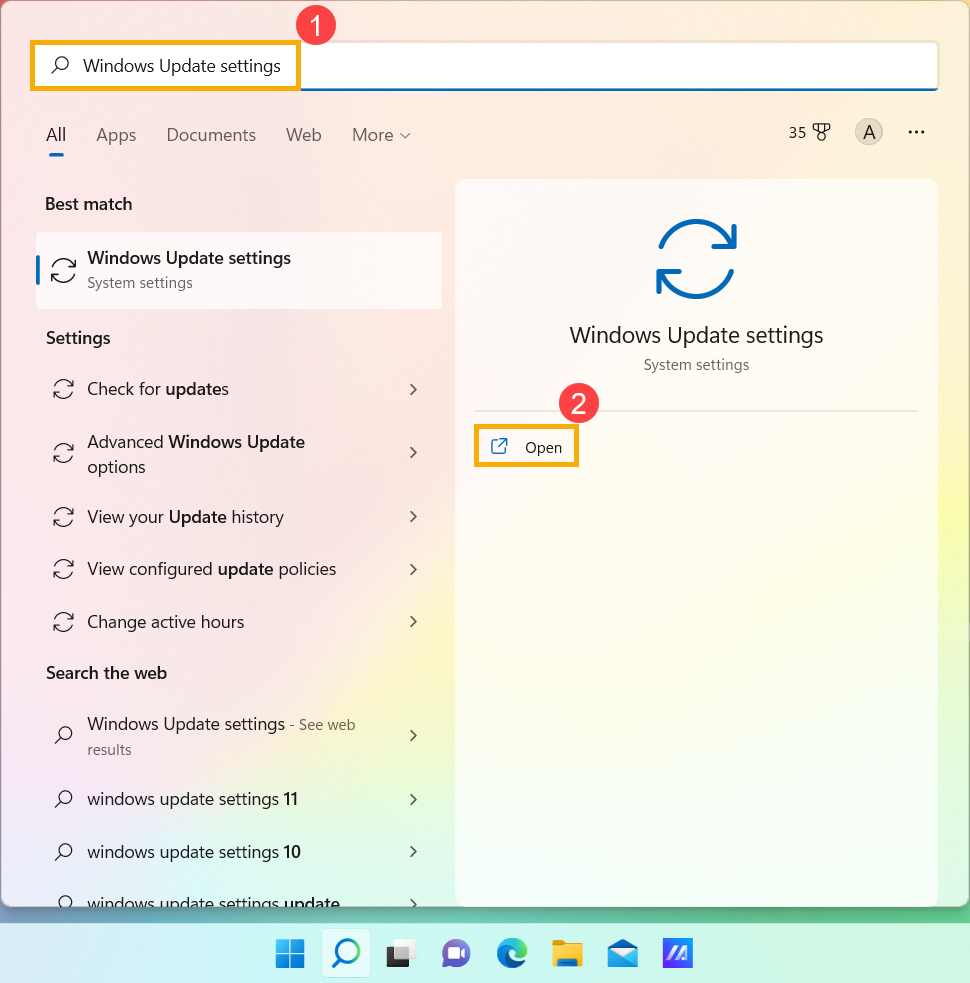
- Type and search [Windows Update settings] in the Windows search bar①, then click [Open]②.
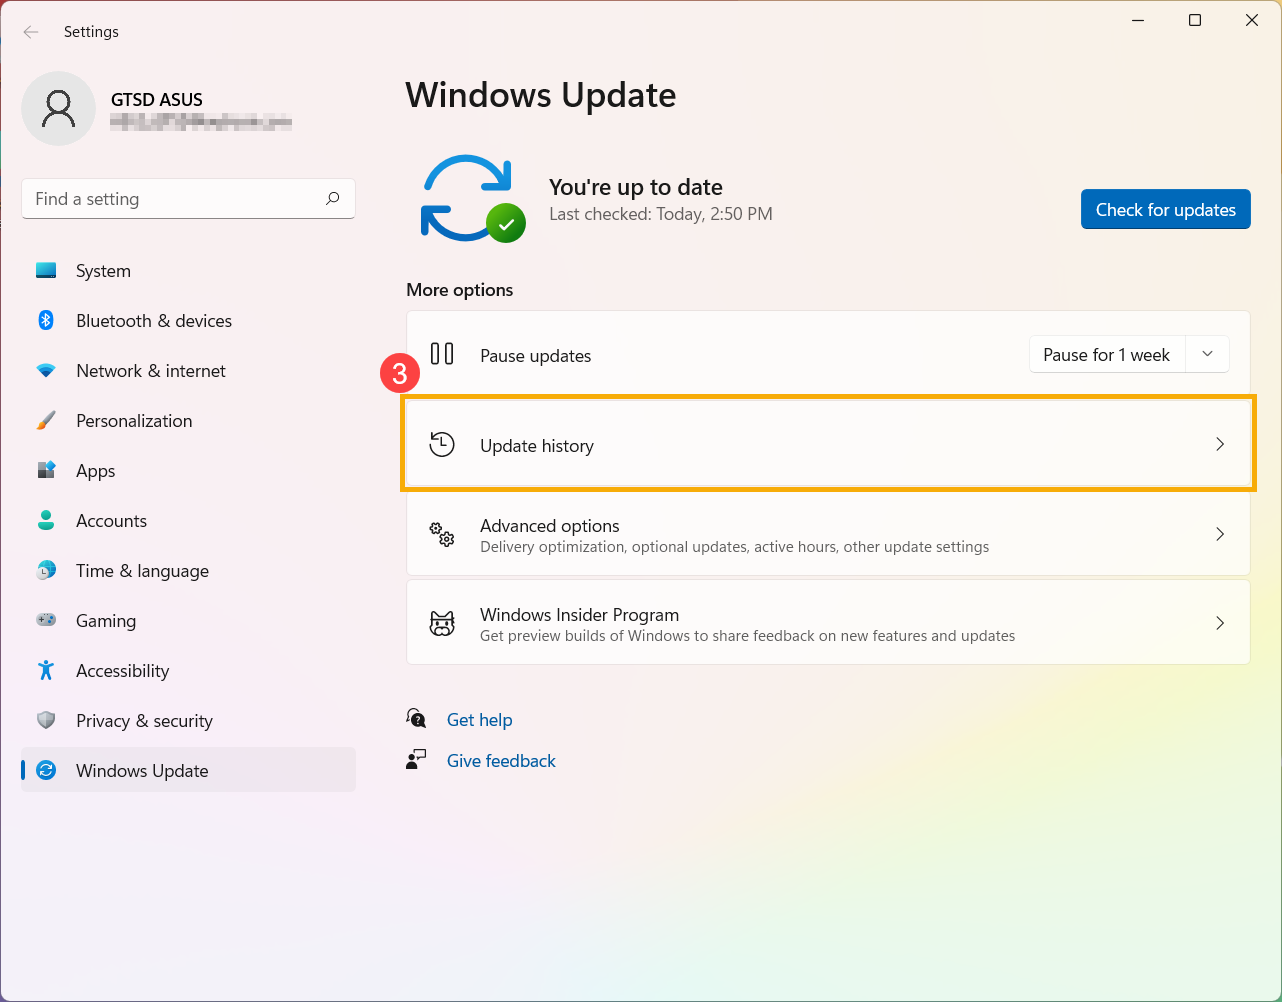
- Select [Update history]③.
- In Update history, it will list Feature Updates, Quality Updates and Driver Updates, etc. that had been installed in your device.
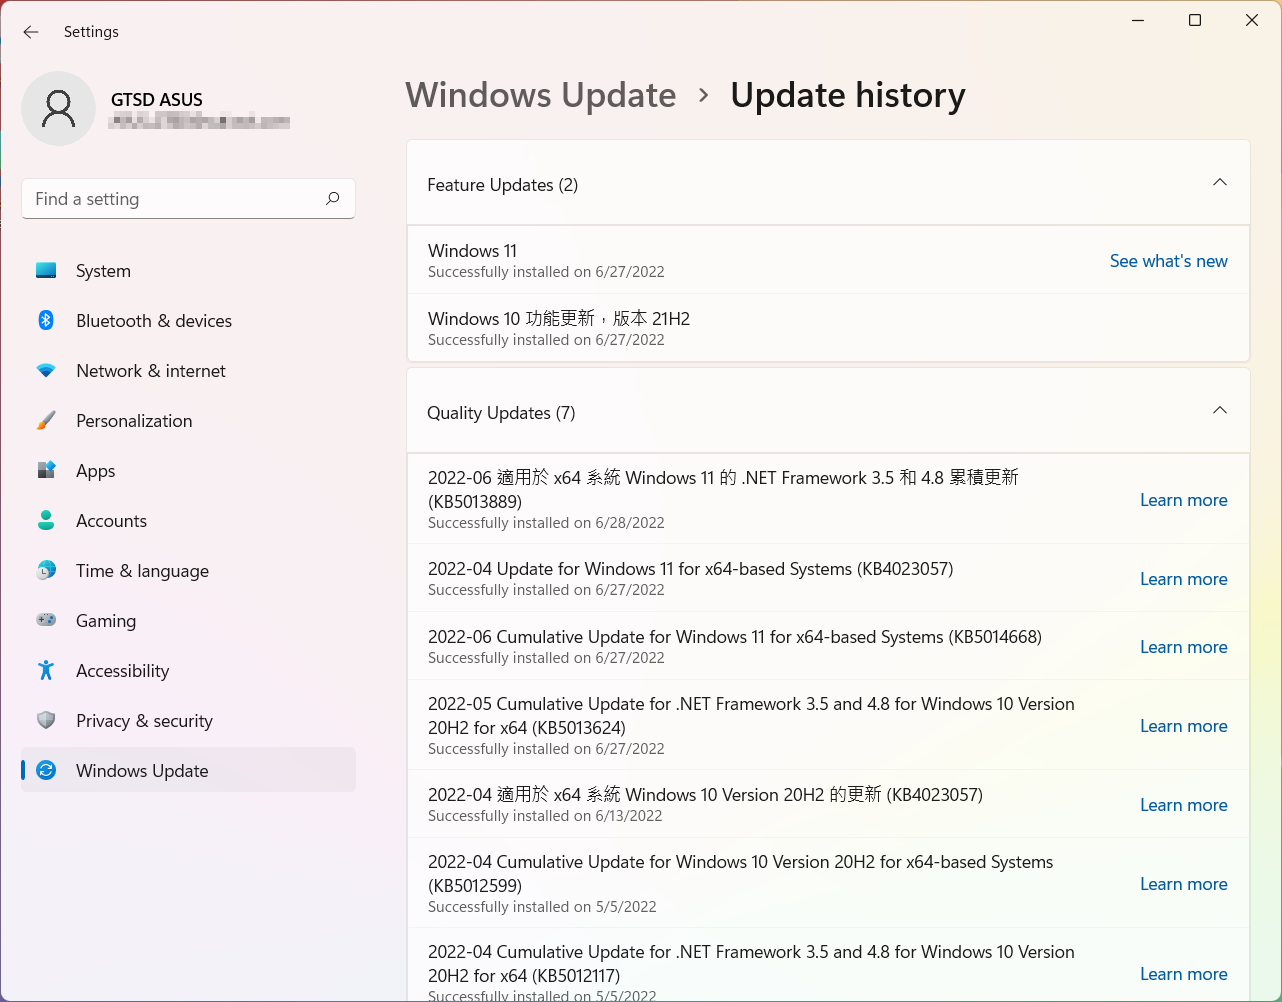
- You can confirm the installed date and whether you experience Blue Screen Errors after that, and then refer to the following steps to know how to uninstall or go back to the previous version.
Go back to the previous version of Feature Updates
If you experience Blue Screen Errors after installing feature updates in Windows, we recommend that you go back to the previous version and wait for the modification from Microsoft in order to prevent any initial unstable problem. Here you can learn more about How to go back to the previous version of Windows.
If you cannot go back to the previous version of Windows, we recommend that you restore the system from restore point, here you can learn more about How to use restore point to restore the system.
Uninstall Quality Windows Updates
If you experience Blue Screen Errors after installing quality updates in Windows, we recommend that you uninstall the update and wait for the modification from Microsoft, please refer to the following steps to know how to uninstall it.
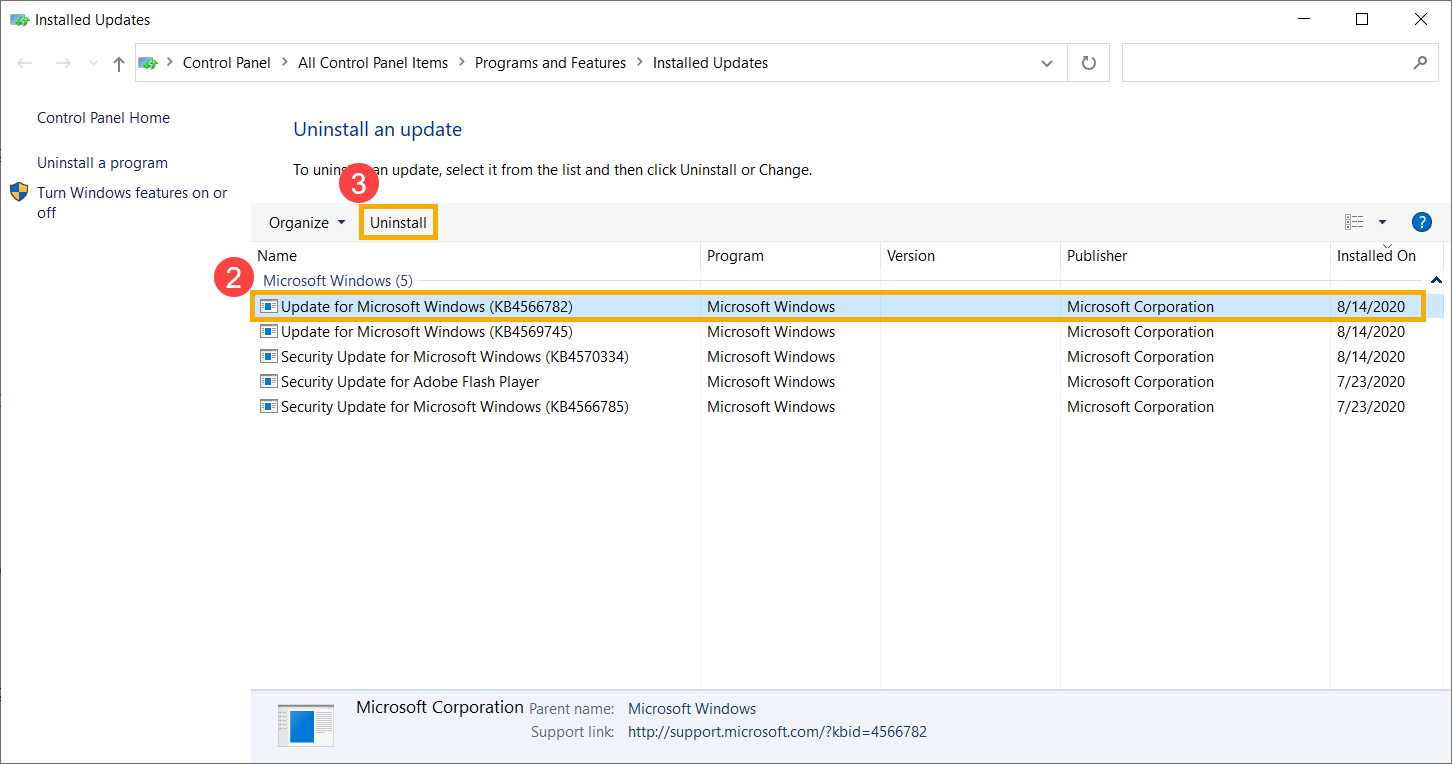
- In Update history, click [Uninstall updates]①.
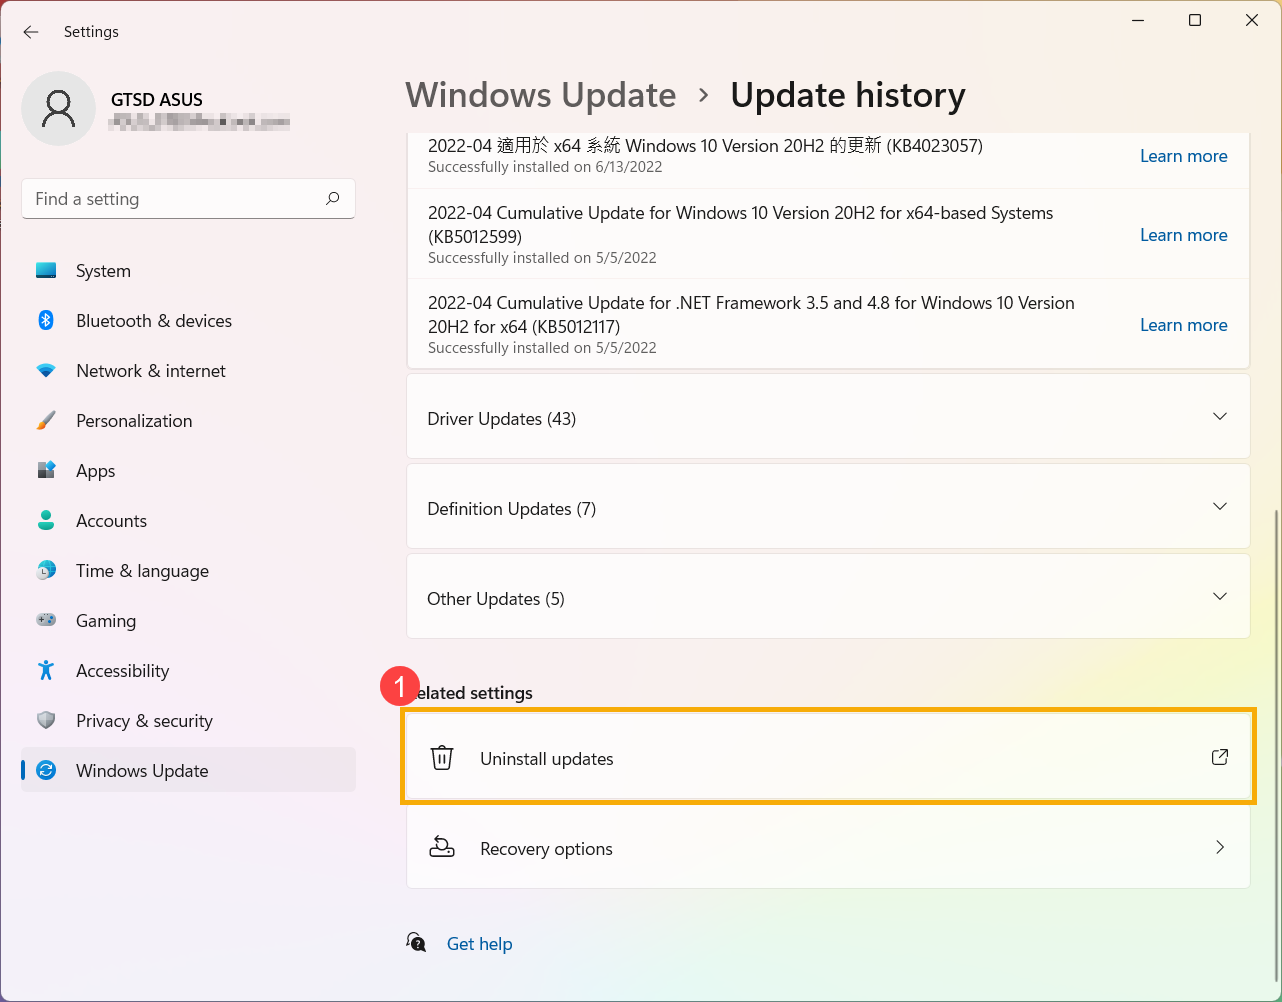
- Select the item which you want to remove②, then click [Uninstall]③.

Go back to the previous drivers version
If you experience Blue Screen Errors after updating drivers in Windows, we recommend that you go back to the previous version and wait for the fixed one. Please refer to the following steps to know how to go back to the previous driver version.
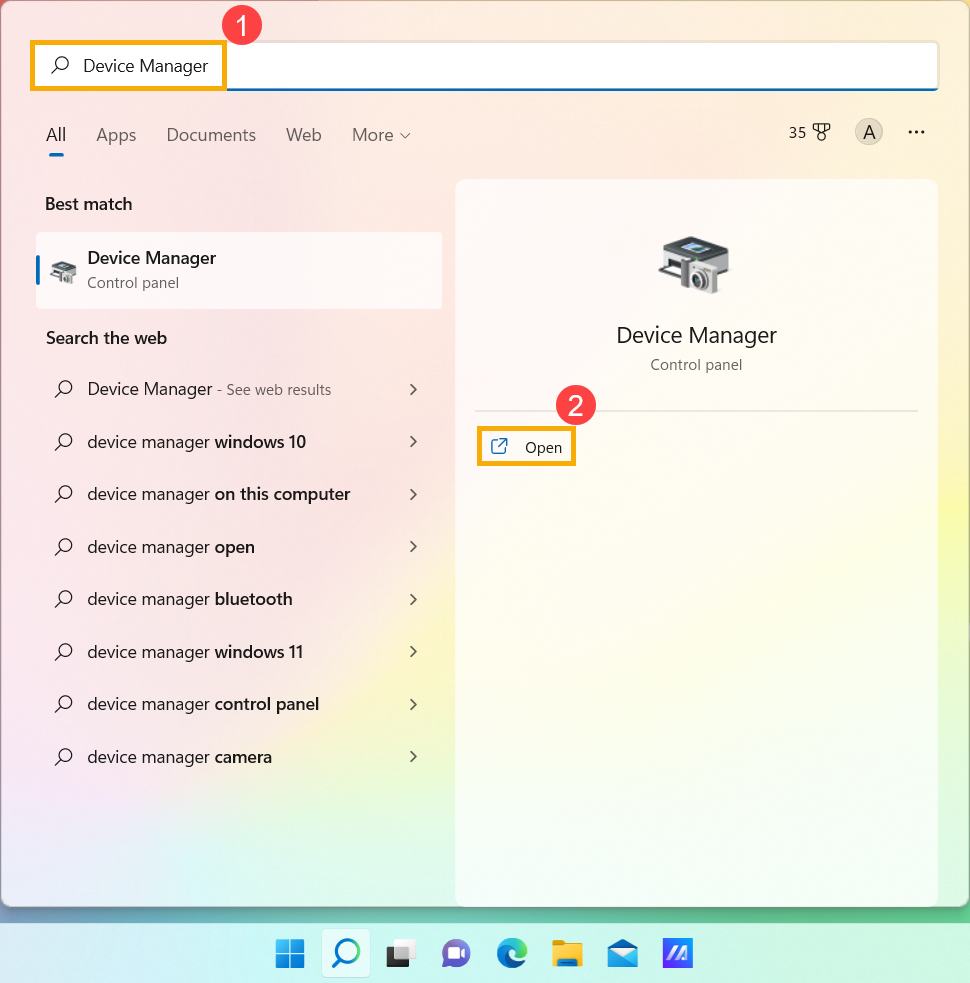
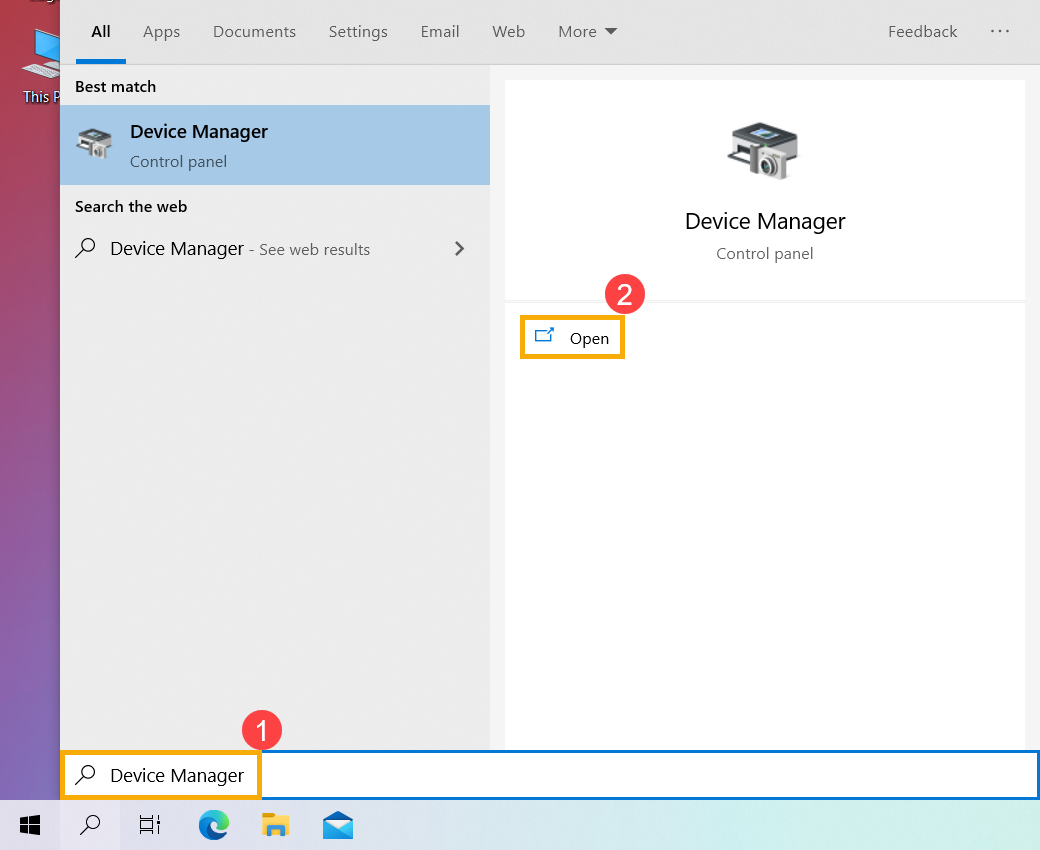
- Type and search [Device Manager] in the Windows search bar①, then click [Open]②.
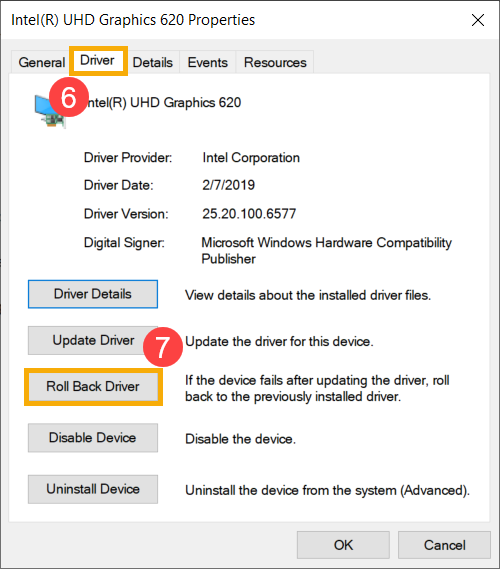
- Check the arrow next to [Display adapters]③, then right-click the [Intel(R) UHD Graphics 620]④ and select [Properties]⑤.
The following steps are used Intel graphics as an example, please select the defective driver which you would like to roll back to the previous version.
- Select [Driver]⑥, then select [Roll Back Driver]⑦.
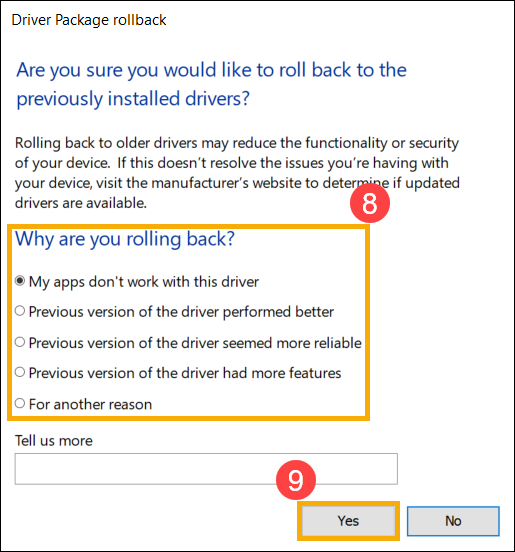
- Select the reason of [Why are you rolling back?]⑧, then click [Yes]⑨. The system will start rolling back to the previously installed driver.
Uninstall a specific application
Blue Screen Errors may occur if there is a compatibility issue between an initial installed application and Windows system, so we recommend that you uninstall this application first. Here you can learn more about How to search or uninstall recently installed applications.
If the problem is gone after uninstalling this application, we recommend that you check the supported Operating System or specification in this application’s official website, or contact the application manufacturer for support.
Restore the system from restore point
If the problem happens recently, and if you have ever created a restore point or there is an automatic system restore existed, try to restore the device to a point before the problem began to resolve the problem. Here you can learn more about How to use restore point to restore the system.
If the problem persists, please continue to the next chapter for troubleshooting.
Reset your PC
If the problem persists after all troubleshooting steps are completed. Please backup your personal files, then reset the device to back to its original configuration. Here you can learn more about How to reset the system.
Windows 10 operating system
Change Intel VMD Controller settings in the BIOS
If during the startup process, you encounter a blue screen error with the stop code 'INACCESSIBLE BOOT DEVICE', try changing the current Intel VMD Controller settings to another option. (For example, if VMD is currently enabled in the BIOS, try changing it to disabled to see if it resolves the issue.)
Note: If you encounter a different stop code than 'INACCESSIBLE BOOT DEVICE', please continue to the next chapter for troubleshooting.
- When the device is completely shut down, persistently hold the [F2] key on the keyboard and simultaneously press the [Power button] to boot up. Once the BIOS configuration screen appears, you may release the [F2] key. Learn more about How to enter the BIOS configuration.
Note: For some older desktop models, you may need to press and hold the [Del] key during startup to access the BIOS configuration screen.
Note: For gaming handhelds, press and hold the [Volume Down] button and then press the power button. - Upon entering the BIOS configuration screen, you will encounter two types of interfaces: UEFI interface and MyASUS in UEFI. Please refer to the following steps based on the BIOS screen of your device:
How to Configure VMD Settings within the UEFI Interface
Note: The BIOS configuration screen below may vary slightly depending on the model.
- Once in the BIOS settings screen, press the [F7] key on your keyboard, or you can also click on [Advanced Mode]① on the screen.
- Navigate to the [Advanced] page② and click on [VMD setup menu]③.
Note: If the BIOS configuration does not include a VMD option, it means your device does not support this feature. Please continue to the next chapter for troubleshooting. - Within the [Enable VMD controller] section④, select an option that differs from your current configuration⑤. (For example, if VMD is currently enabled in the BIOS, try changing it to disabled to see if it resolves the issue.)
- Click [Ok]⑥ to apply the changes to the Intel Volume Management Device (VMD) technology.
- Save the settings and exit. Press the [F10] key on your keyboard and click [Ok]⑦, then the device will reboot. Afterward, check if the Windows blue screen error is resolved.
You can also go to the ‘Save & Exit’ page and choose the ‘Save Changes and Exit’ option to save your settings and exit. - If the Windows blue screen error still persists, revert the VMD settings back to their original configuration and continue to the next chapter for troubleshooting.
How to Configure VMD Settings within the MyASUS in UEFI Interface
Note: The BIOS configuration screen below may vary slightly depending on the model.
- Once in the BIOS settings screen, press the [F7] key on your keyboard, or you can also click on [Advanced Settings]① on the screen.
- Navigate to the [Advanced] page② and click on [VMD setup menu]③.
Note: If the BIOS configuration does not include a VMD option, it means your device does not support this feature. Please continue to the next chapter for troubleshooting. - Within the [Enable VMD controller] section④, select an option that differs from your current configuration⑤. (For example, if VMD is currently enabled in the BIOS, try changing it to disabled to see if it resolves the issue.)
- Click [Ok]⑥ to apply the changes to the Intel Volume Management Device (VMD) technology.
- Save the settings and exit. Press the [F10] key on your keyboard and click [Confirm]⑦, then the device will reboot. Afterward, check if the Windows blue screen error is resolved.
You can also go to the ‘Save & Exit’ page and choose the ‘Save Changes and Exit’ option to save your settings and exit. - If the Windows blue screen error still persists, revert the VMD settings back to their original configuration and continue to the next chapter for troubleshooting.
Update BIOS, Windows packages, and drivers
Regularly updating BIOS, Windows, and drivers can enhance system stability and performance. Ensure that your device is using the latest versions. Learn more about updating BIOS:
How to update the BIOS version in Windows system
How to use EZ Flash to update the BIOS version
(For desktop products, please refer to ASUS Motherboard EZ Flash 3 Introduction.)
Learn more about updating Windows and drivers:
How to update drivers via System Update in MyASUS
If the problem persists after you have updated BIOS/Windows packages/drivers to the date, please continue to the next chapter for troubleshooting.
Run System Diagnosis via MyASUS
User can inspect whether the hardware device is good by the Hardware Diagnostic via MyASUS, and run further checking on Blue Screen Error. If any error occurs after diagnosing, we recommend that you visit ASUS repair center to replace the hardware device.
- Type and search [MyASUS] in the Windows search bar①, then click [Open]②.
Note: If you cannot find MyASUS, it may not be installed on your device. Refer to How to install MyASUS.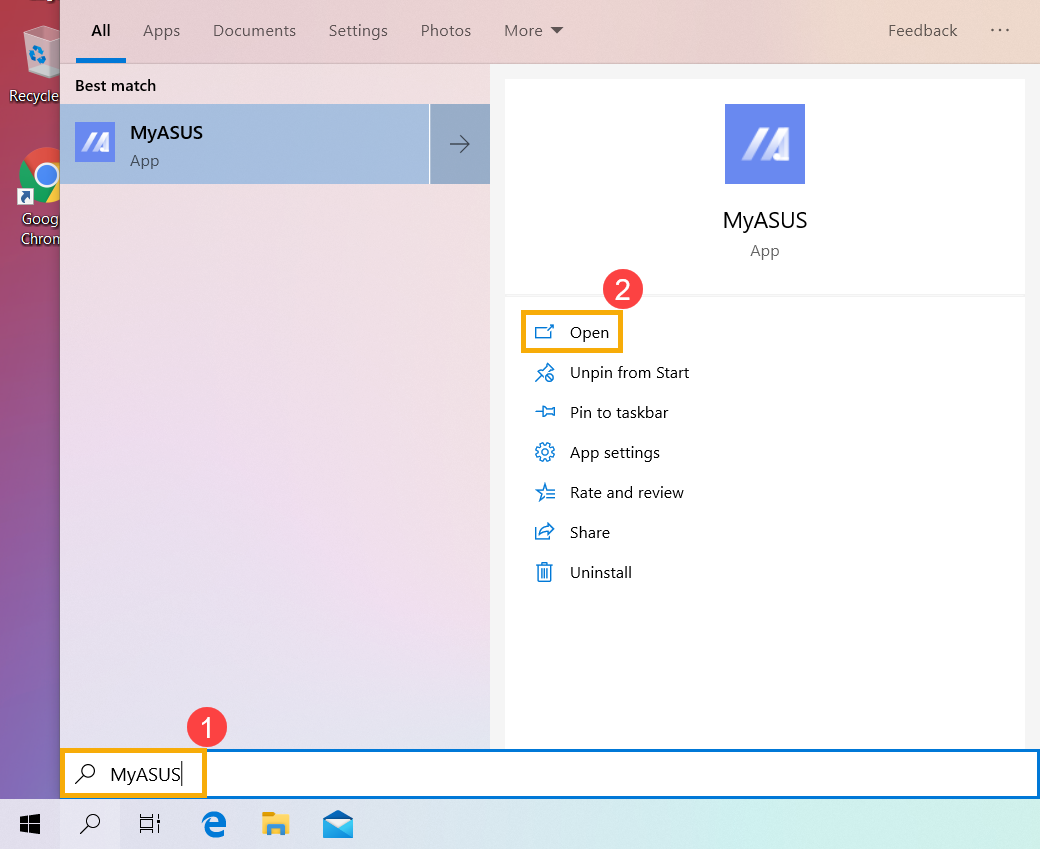
- In the MyASUS app, click [System Diagnosis]③.
Note: If your device does not display the system diagnosis page in MyASUS software, it means your device does not support this feature. Continue to the next chapter for troubleshooting. Here you can learn more about Why can I only see the partial features in the MyASUS app. - In [Diagnostic Tool]④, select [All] check items of Customized diagnosis⑤, and then click [Checkup]⑥. Here you can learn more about MyASUS System Diagnosis - Introduction.
- If any error occurs, please visit ASUS repair center to replace the hardware device. Here you can learn more about How to use Customer Support to contact ASUS for the further repair request.
If no issue found after 'Hardware diagnostic', please go back to the System Diagnosis screen and select [Blue screen error]⑦ for the further check. - Click [Checkup]⑧.
- If any error occurs, please visit ASUS repair center to replace the hardware device. Here you can learn more about How to use Customer Support to contact ASUS for the further repair request.
If no issue found after 'Blue screen error' check, it means your hardware devices are good. Please continue to the next chapter for troubleshooting.
Check external peripherals or any hardware devices installed / changed
Sometimes, the external devices connected to your device can be the cause of Blue Screen Errors, so please try to remove them, such as external hard drives, printers, memory cards, external ODD (if your device is with internal ODD, please remove CD/DVDs), dongles, etc. After that, restart your device . If you don’t experience the issue after restarting your device, the external device may be the cause of the problem. We recommend that you do not use this device and contact your device manufacturer for support.
If you do not use any external devices or the problem still persists after removing them, please confirm whether you had ever installed / replaced any hardware devices, such as disk drives (HDD or SSD) or Memory modules. The compatibility problem could be the cause and exist between new hardware devices and ASUS products / system, so please try to remove the hardware device. If you don’t experience the issue after removing the hardware device, we recommend that you do not use this device and contact your device manufacturer for support.
If the problem persists after above steps, please continue to the next chapter for troubleshooting.
Check the installed antivirus software
Installing multiple antivirus programs at the same time can slow down the system, cause errors, and may lead to the risk of protection mechanisms failing due to conflicts between antivirus software. Therefore, it is not recommended to install multiple antivirus programs on the same device.
If you already have antivirus software installed on your device and wish to install another antivirus program, it is advisable to completely remove the original antivirus software before installing the new one. Here you can learn more about The Impact of Installing Multiple Antivirus Programs on the System.
If you are uncertain about which antivirus programs are installed on your system, please refer to this article: How to Check if Your Device Has Antivirus Software Installed.
Should you wish to uninstall an antivirus application, you might find a dedicated uninstaller on the software's official website, or you could employ the built-in uninstallation method provided by Windows (Windows Settings > Apps > Installed apps). For more detailed instructions, please refer to this article: How to Uninstall Applications.
Check recently installed / updated software or applications
Some problems may occur after Windows Update or a specific application installed in your device, including the compatibility issue between applications and system, or Windows core programs may be crashed.
You can view update history to check recently installed updated items.
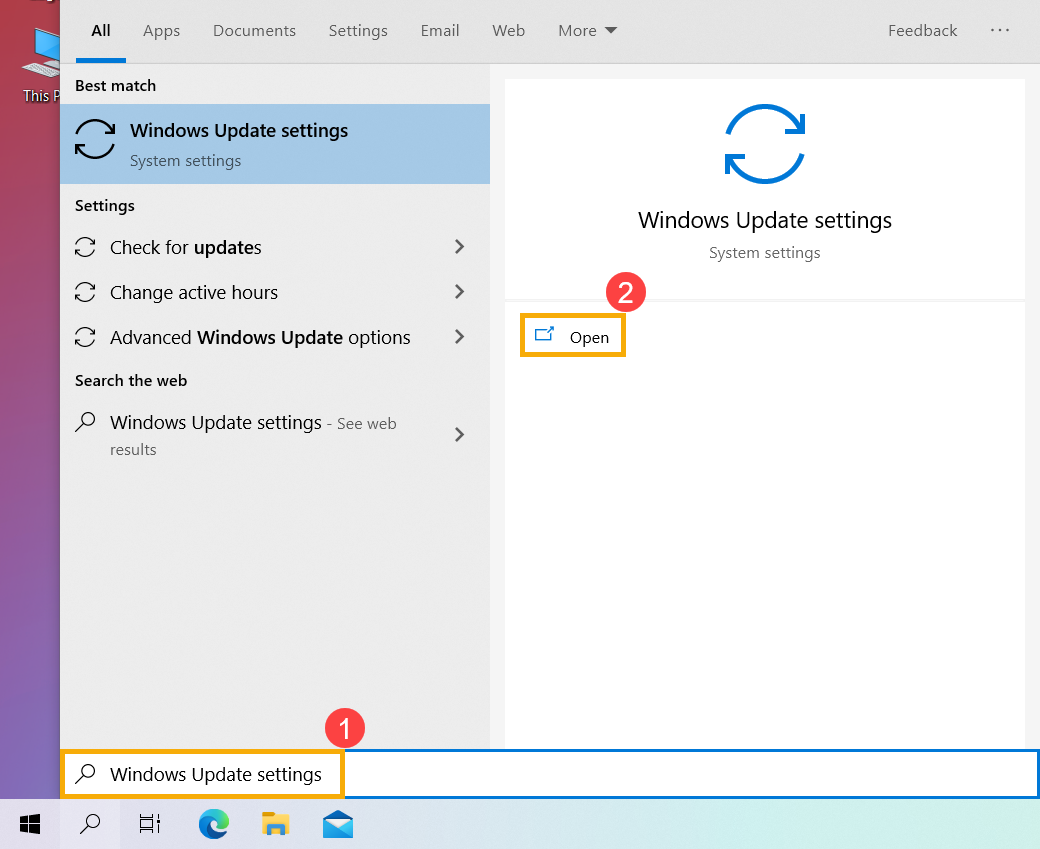
- Type and search [Windows Update settings] in the Windows search bar①, then click [Open]②.
- Select [View update history]③.

- In View update history, it will list Feature Updates, Quality Updates and Driver Updates, etc. that had been installed in your device.
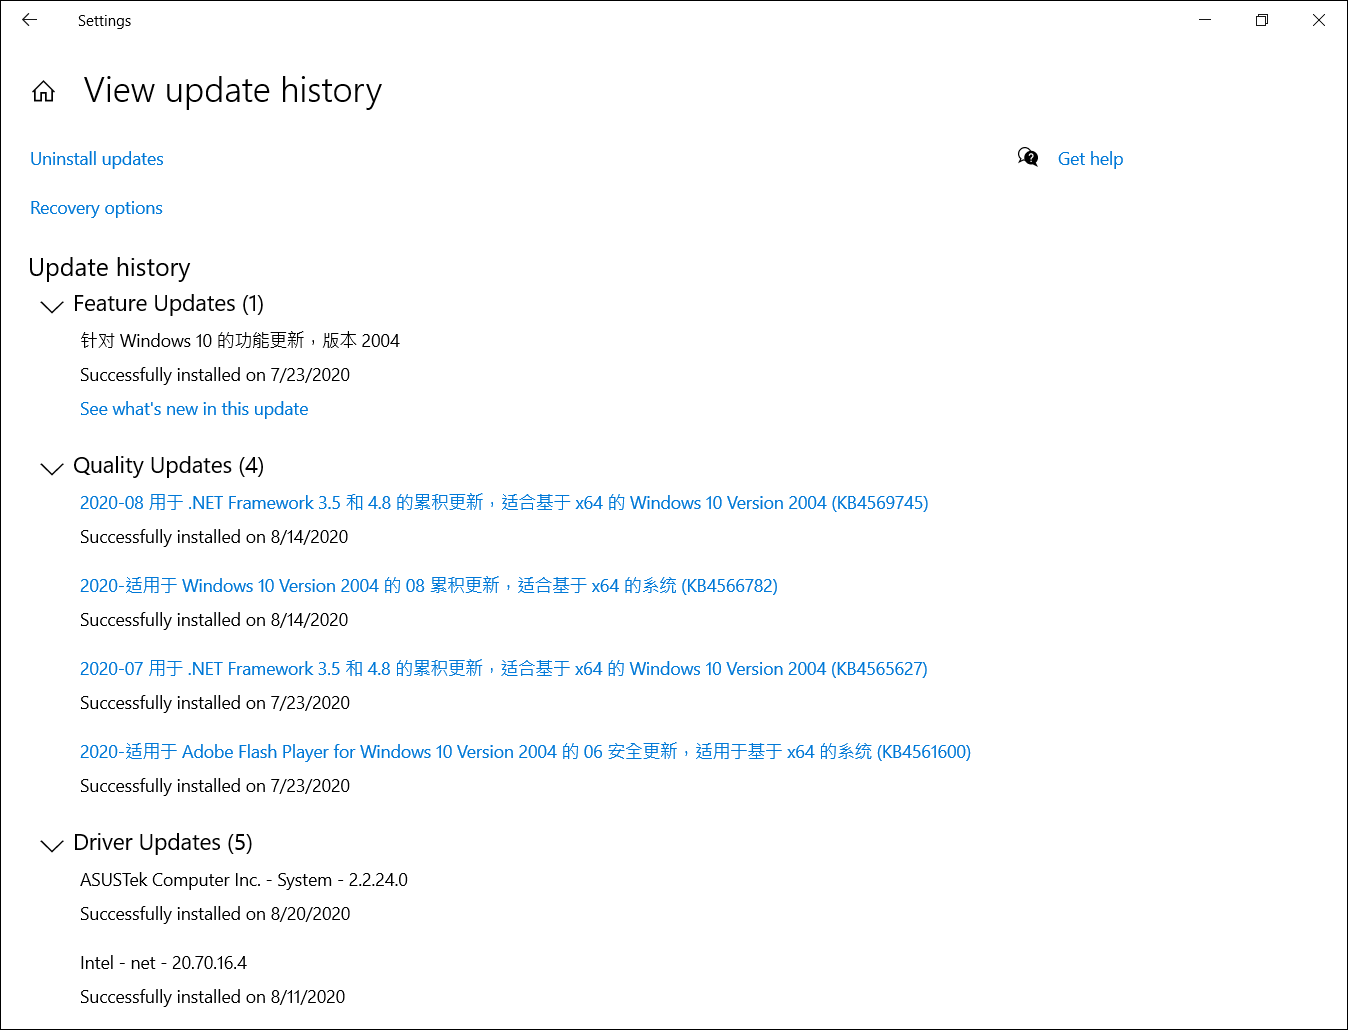
- You can confirm the installed date and whether you experience Blue Screen Errors after that, and then refer to the following steps to know how to uninstall or go back to the previous version.
Go back to the previous version of Feature Updates
If you experience Blue Screen Errors after installing feature updates in Windows, we recommend that you go back to the previous version and wait for the modification from Microsoft in order to prevent any initial unstable problem. Here you can learn more about How to go back to the previous version of Windows.
If you cannot go back to the previous version of Windows, we recommend that you restore the system from restore point, here you can learn more about How to use restore point to restore the system.
Uninstall Quality Windows Updates
If you experience Blue Screen Errors after installing quality updates in Windows, we recommend that you uninstall the update and wait for the modification from Microsoft, please refer to the following steps to know how to uninstall it.
- In View update history, click [Uninstall updates]①.
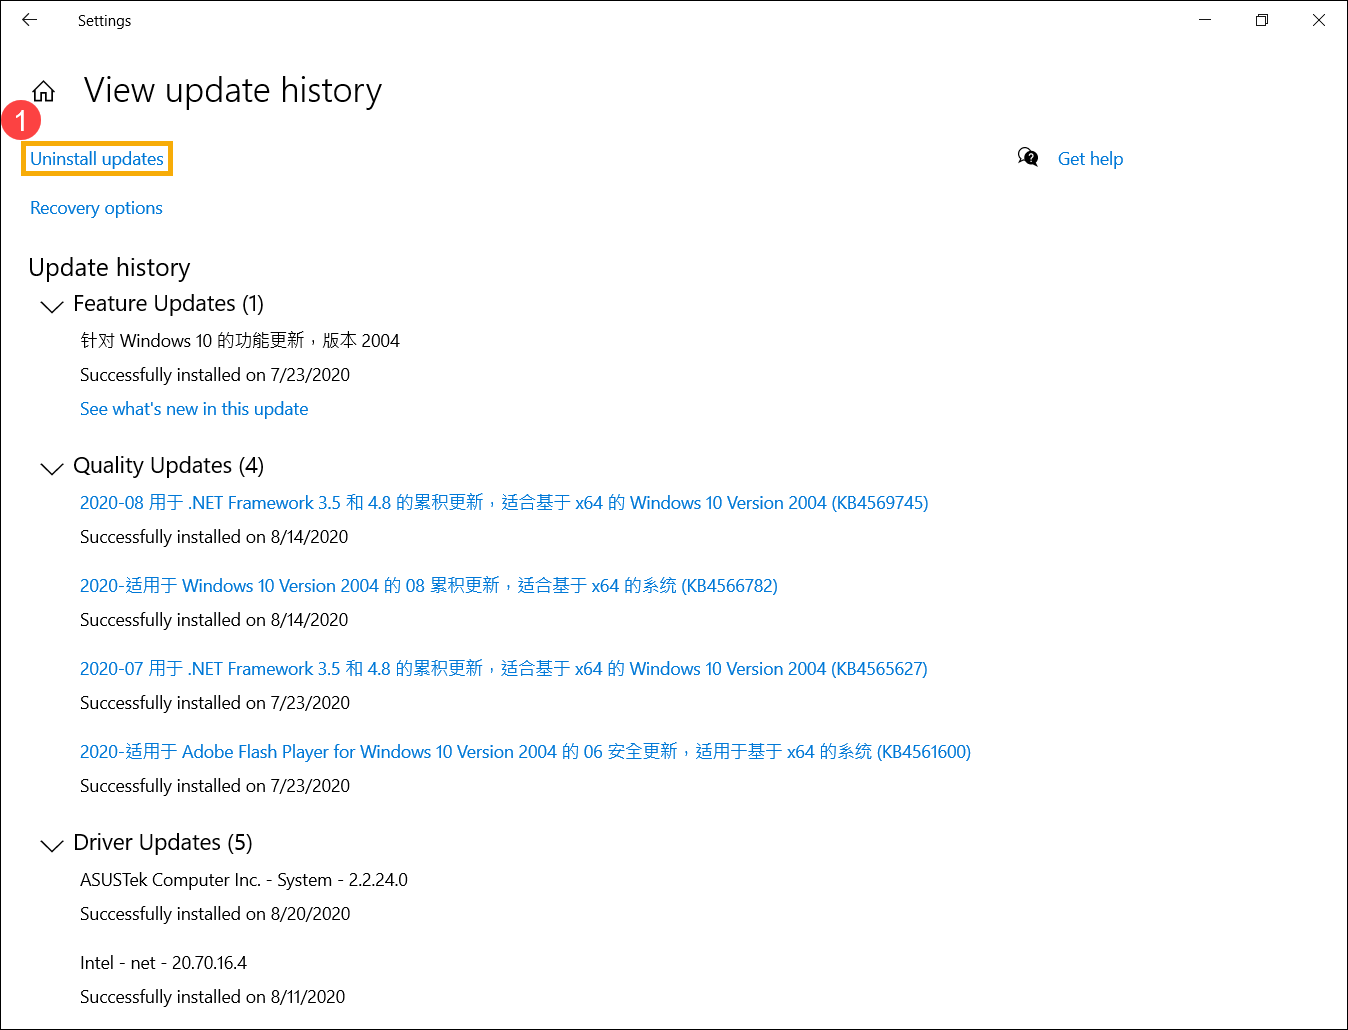
- Select the item which you want to remove②, then click [Uninstall]③.
Go back to the previous drivers version
If you experience Blue Screen Errors after updating drivers in Windows, we recommend that you go back to the previous version and wait for the fixed one. Please refer to the following steps to know how to go back to the previous driver version.
- Type and search [Device Manager] in the Windows search bar①, then click [Open]②.
- Check the arrow next to [Display adapters]③, then right-click the [Intel(R) UHD Graphics 620]④ and select [Properties]⑤.
The following steps are used Intel graphics as an example, please select the defective driver which you would like to roll back to the previous version. - Select [Driver]⑥, then select [Roll Back Driver]⑦.
- Select the reason of [Why are you rolling back?]⑧, then click [Yes]⑨. The system will start rolling back to the previously installed driver.
Uninstall a specific application
Blue Screen Errors may occur if there is a compatibility issue between an initial installed application and Windows system, so we recommend that you uninstall this application first. Here you can learn more about How to search or uninstall recently installed applications.
If the problem is gone after uninstalling this application, we recommend that you check the supported Operating System or specification in this application’s official website, or contact the application manufacturer for support.
Restore the system from restore point
If the problem happens recently, and if you have ever created a restore point or there is an automatic system restore existed, try to restore the device to a point before the problem began to resolve the problem. Here you can learn more about How to use restore point to restore the system.
If the problem persists, please continue to the next chapter for troubleshooting.
Reset your PC
If the problem persists after all troubleshooting steps are completed. Please backup your personal files, then reset the device to back to its original configuration. Here you can learn more about How to reset the system.
If your issue remains unresolved, please contact ASUS Customer Service for further assistance.