Related Topics
[Notebook/Desktop] Troubleshooting - Optical Drive Issues
If you're experiencing issues with the optical drive on your computer, here are some common problems and troubleshooting methods.
Please follow the instructions that correspond to your current Windows operating system version:
Optical Drive Tray/Door Won’t Open
If the optical drive tray/door is stuck and won't open when you press the eject button, try the following solutions.
Note: The eject button's location may vary depending on your computer model, so consult the User Manual for details.
![]()
![]()
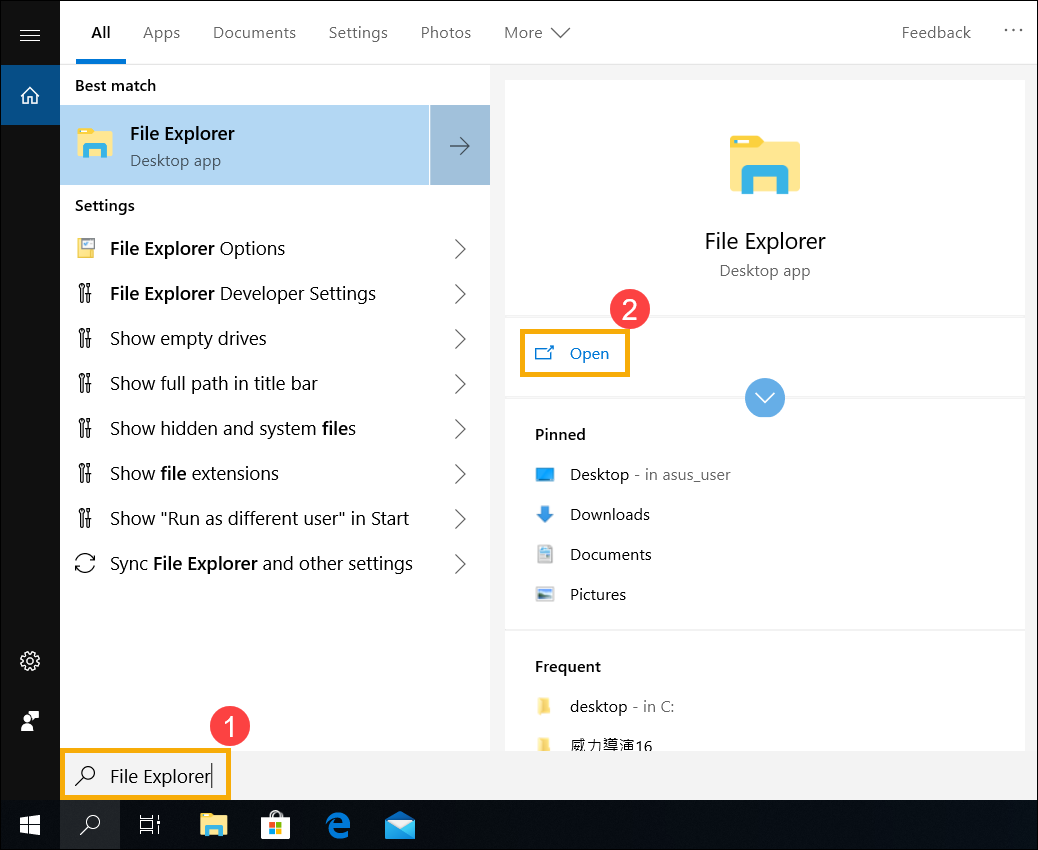
- Type and search [File Explorer] in the Windows search bar①, then click [Open]②.

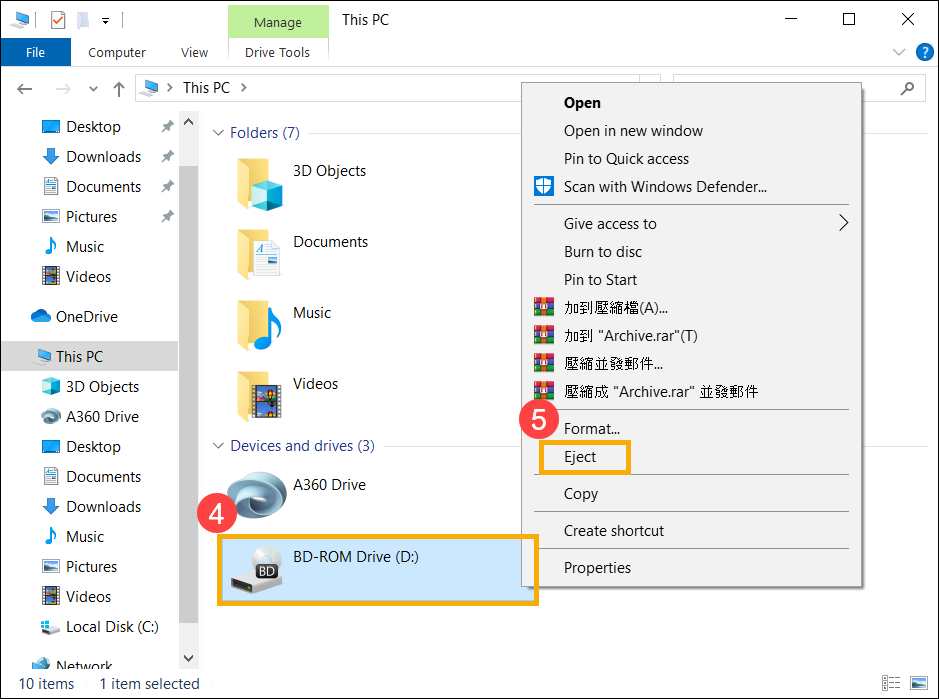
- In the File Explorer window, click [This PC]③.
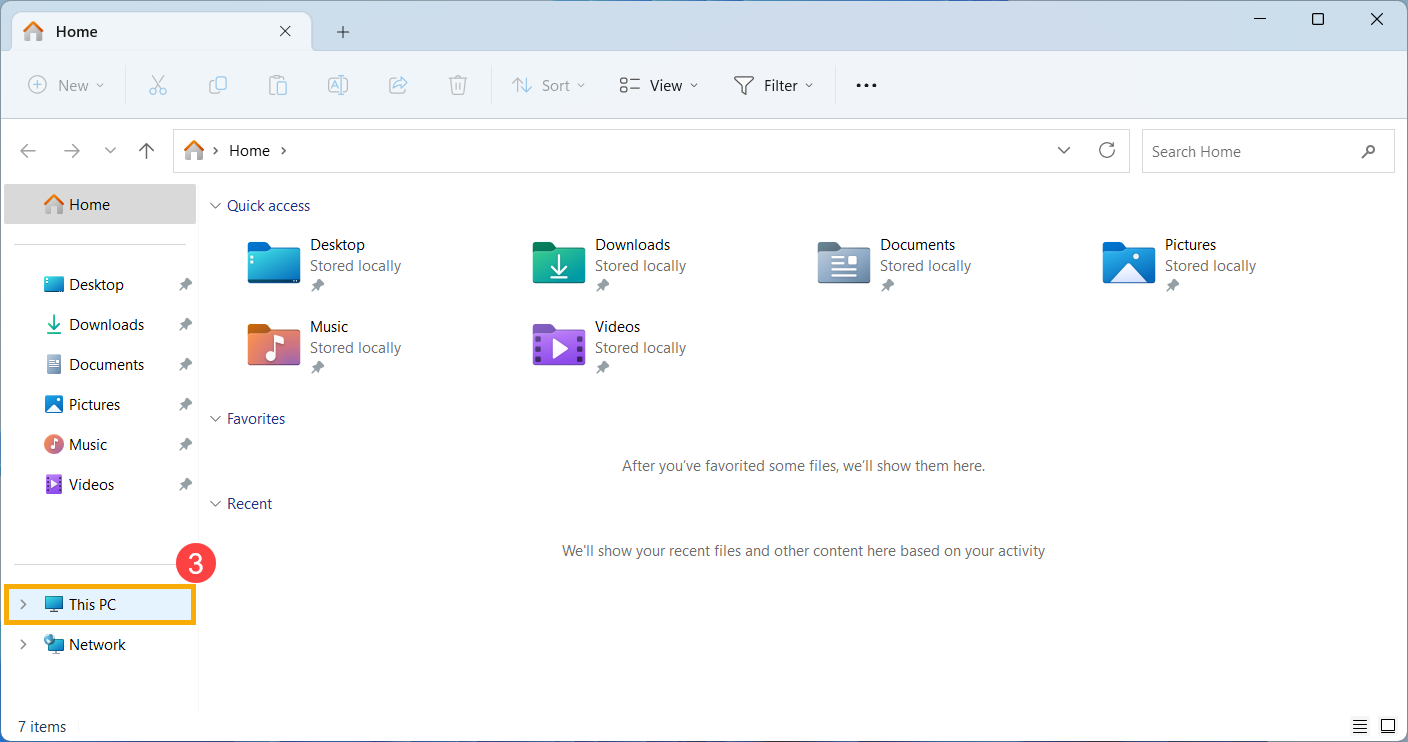
- In the This PC window, right-click on the icon for the stuck optical drive④ and select [Eject]⑤.
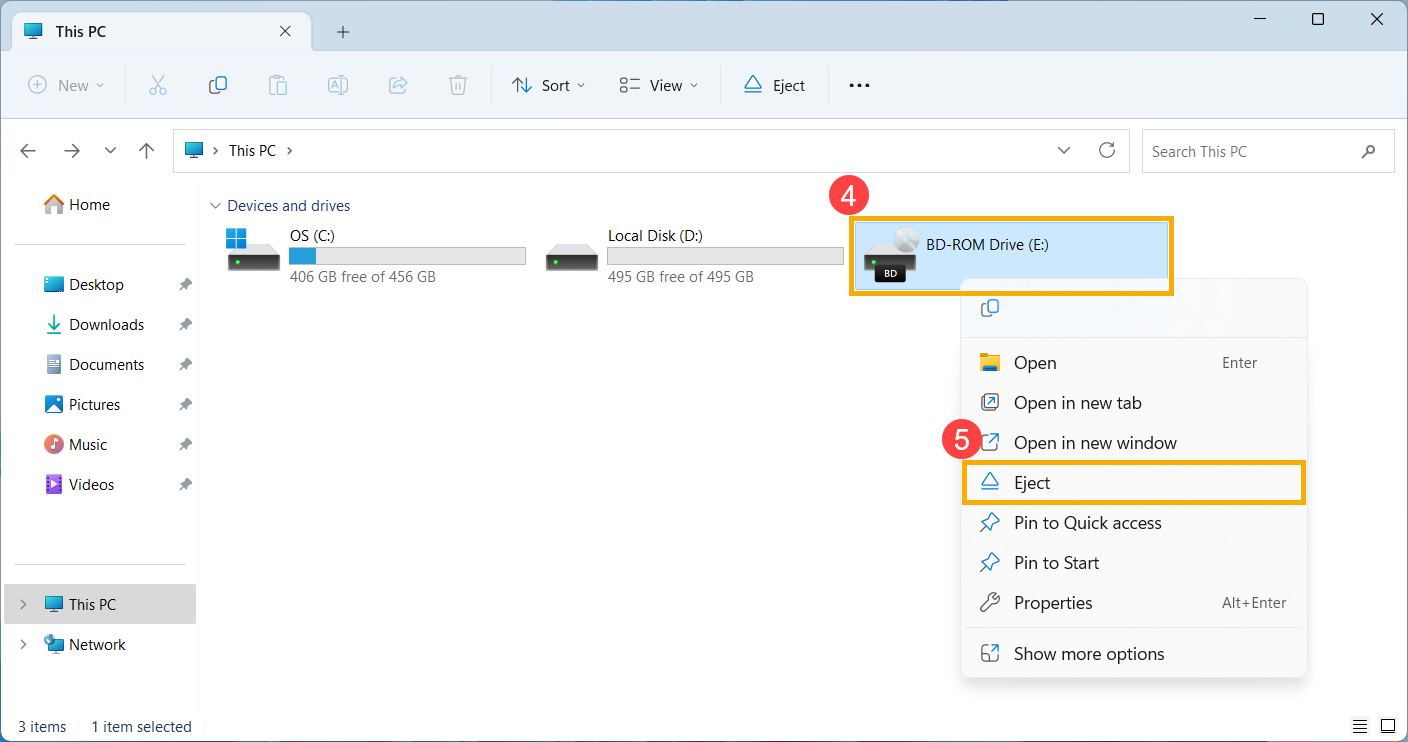
- The optical drive tray/door should automatically pop open. If it remains stuck, continue to the next steps.
- Locate a small hole on the optical drive panel; this is the manual eject hole.
Note: Use the manual eject hole only when the electronic eject button does not work.
Note: Not all computer models have this hole, so consult the User Manual for guidance.
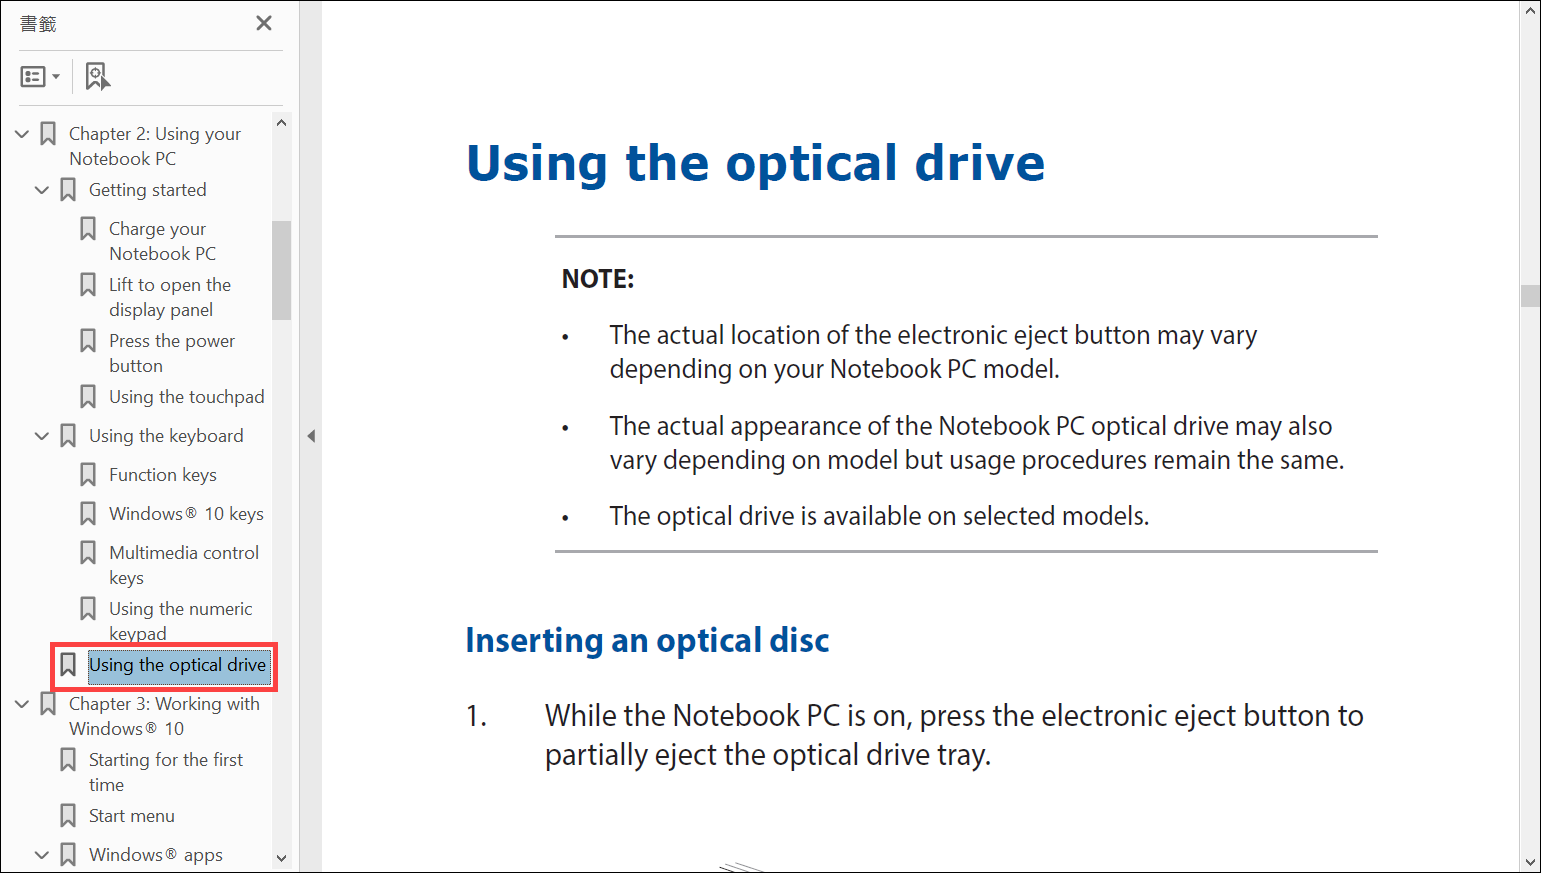
- To manually eject the optical drive tray, insert a straightened paper clip into the manual eject hole until the drive tray opens For more details, refer to the Using the optical drive section.
Optical Drive Not Detected
If the optical drive is not displayed in File Explorer, it means that Windows cannot recognize the drive. Try the following solutions:
Update and Confirm BIOS, Windows Updates, and Drivers
Software updates often improve system stability and optimization, so it's recommended to regularly check for the latest versions for your device. Learn more about how to update BIOS:
How to update the BIOS version in Windows system
How to use EZ Flash to update the BIOS version
(For desktop products, please refer to ASUS Motherboard EZ Flash 3 Introduction.)
For executing Windows update and drivers update, here you can learn more about:
How to update drivers via System Update in MyASUS
Enable and Reinstall Drivers in Device Manager
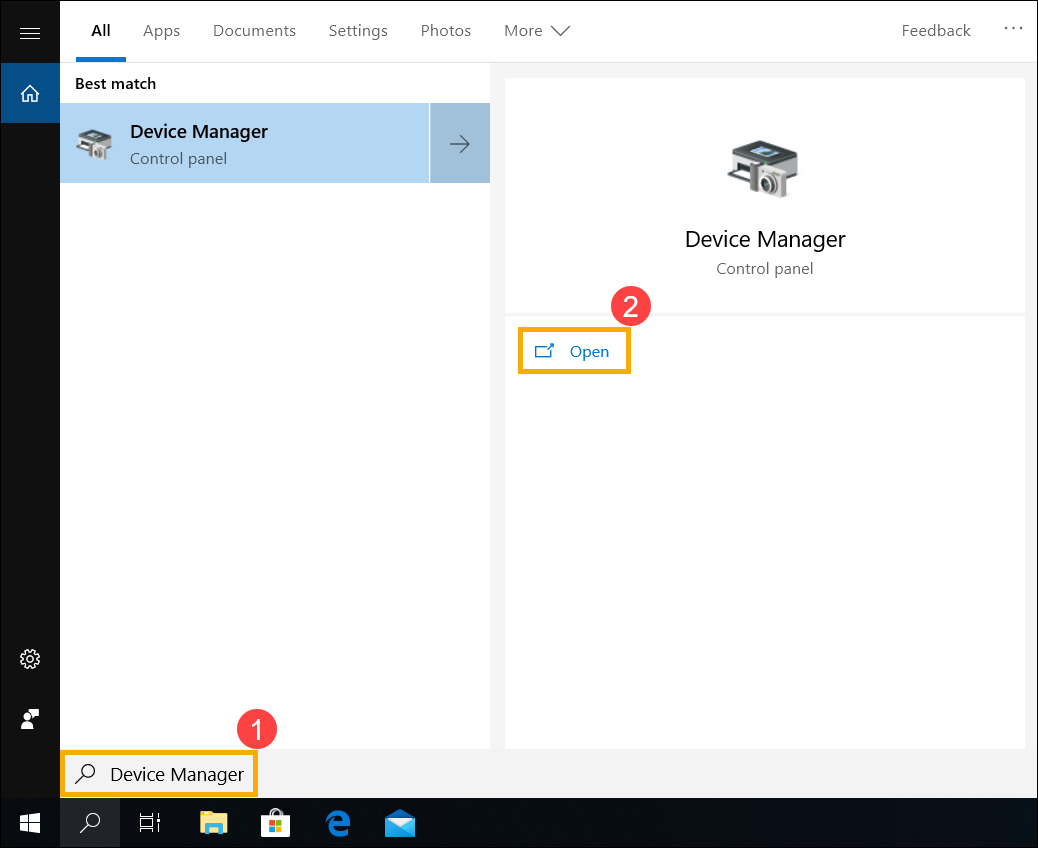
- Type and search [Device Manager] in the Windows search bar①, then click on [Open]②.
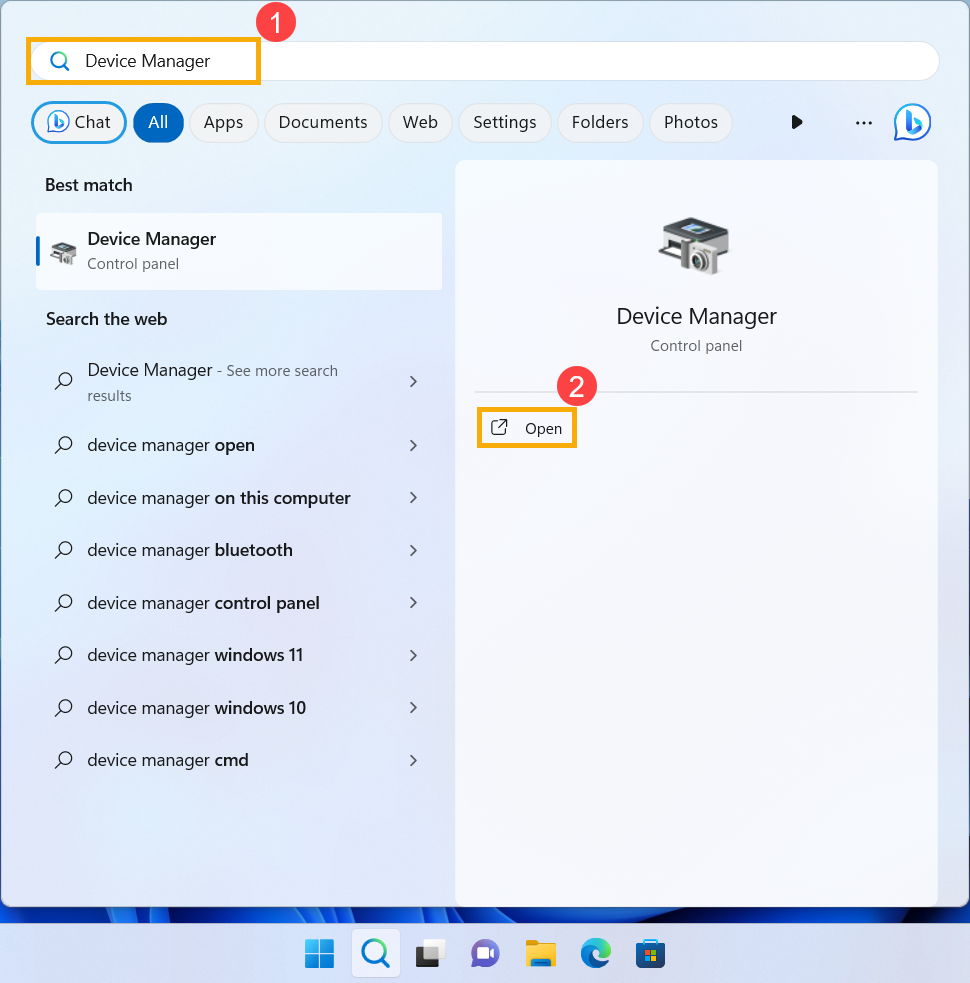
- Expand the category for [DVD/CD-ROM drives]③ by clicking the arrow next to it. Right-click on the undetected optical drive④ and select [Enable device]⑤ to see if the drive becomes detectable.
If the Enable device option is not shown, it means your optical drive is already enabled. Continue to the next steps.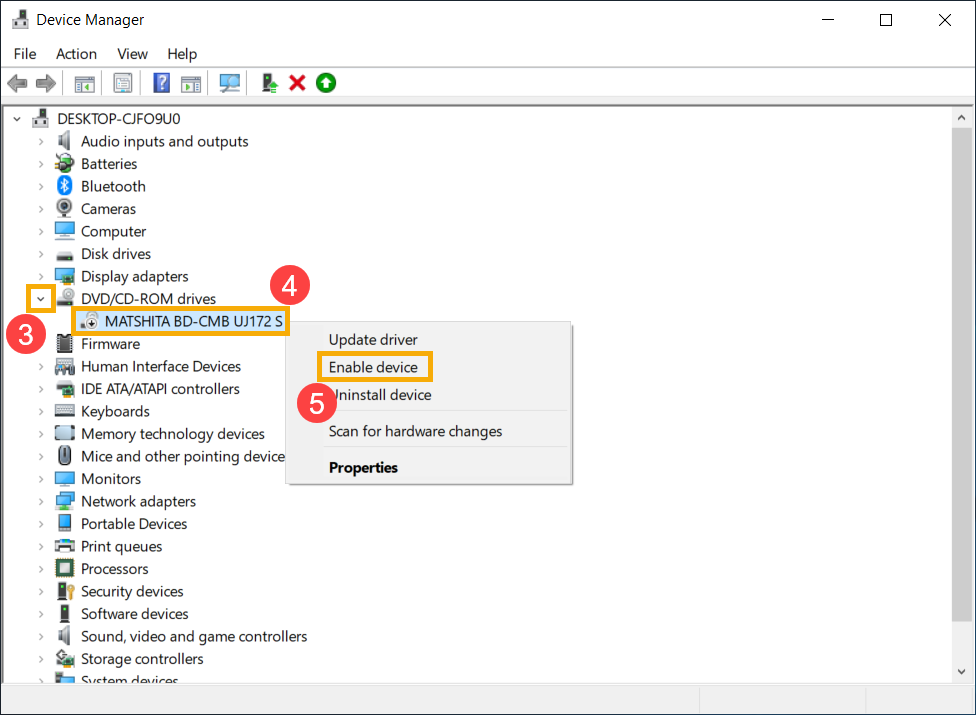
- Uninstall the driver for the optical drive. Right-click on the undetected optical drive⑥ and select [Uninstall device]⑦.
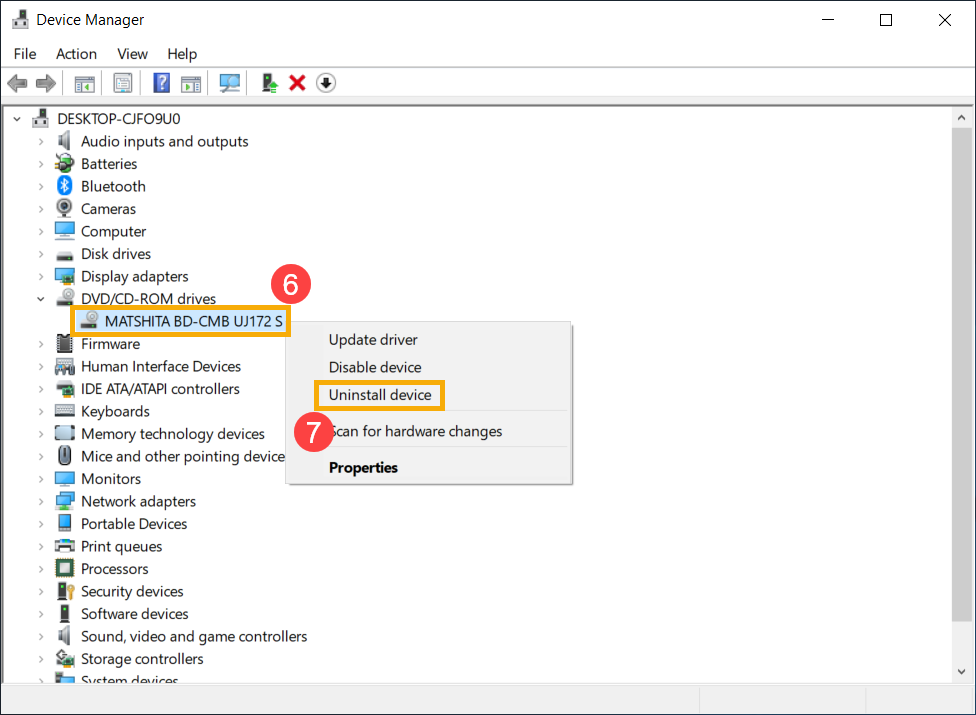
- Click [Uninstall]⑧ in the confirmation window.

- Restart your computer. Upon reboot, the system will automatically reinstall the driver. Check if the optical drive is now detectable.
Use the Hardware and Devices Troubleshooter
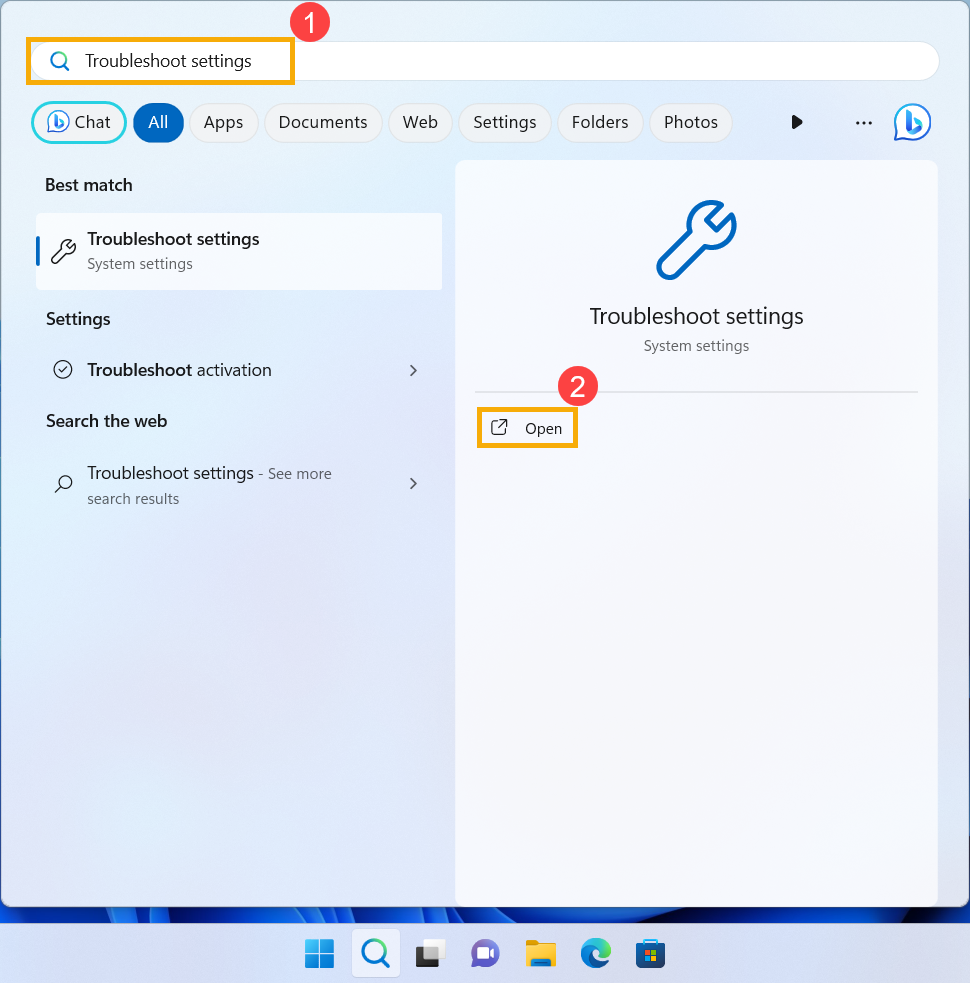
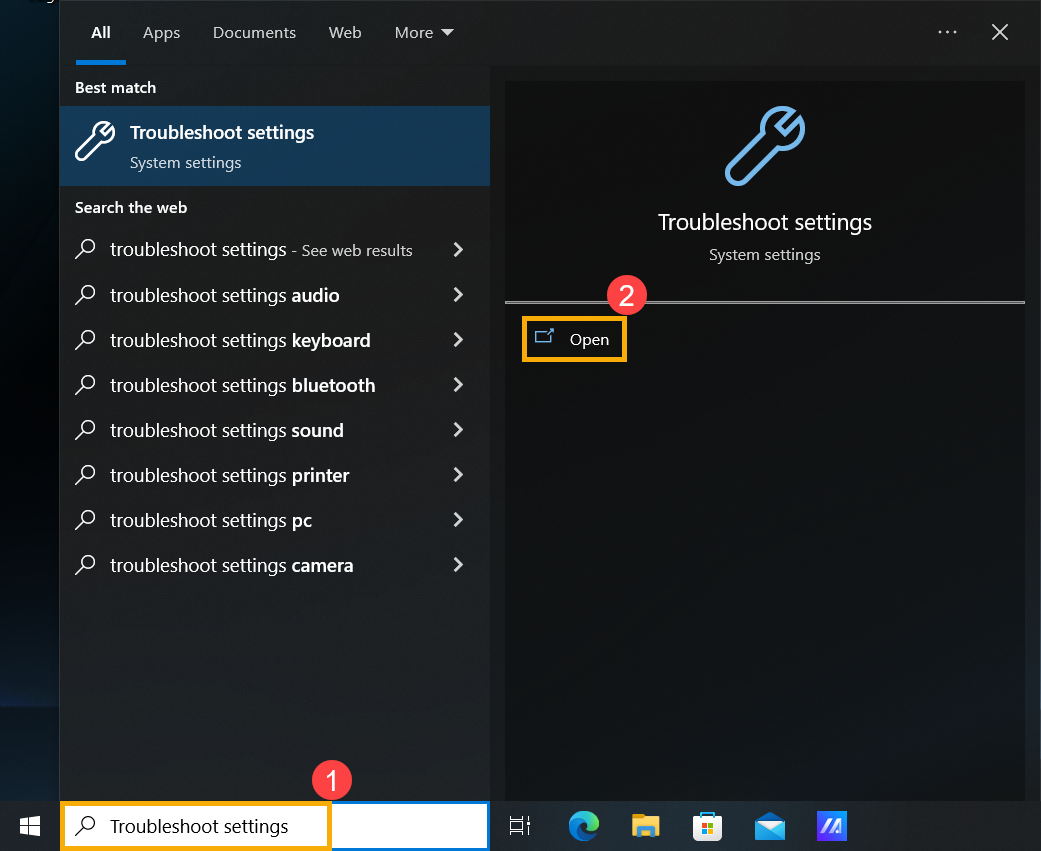
- Type and search [Troubleshoot settings] in the Windows search bar①, then click [Open]②.
- In the Troubleshoot window, click on [Other troubleshooters]③.
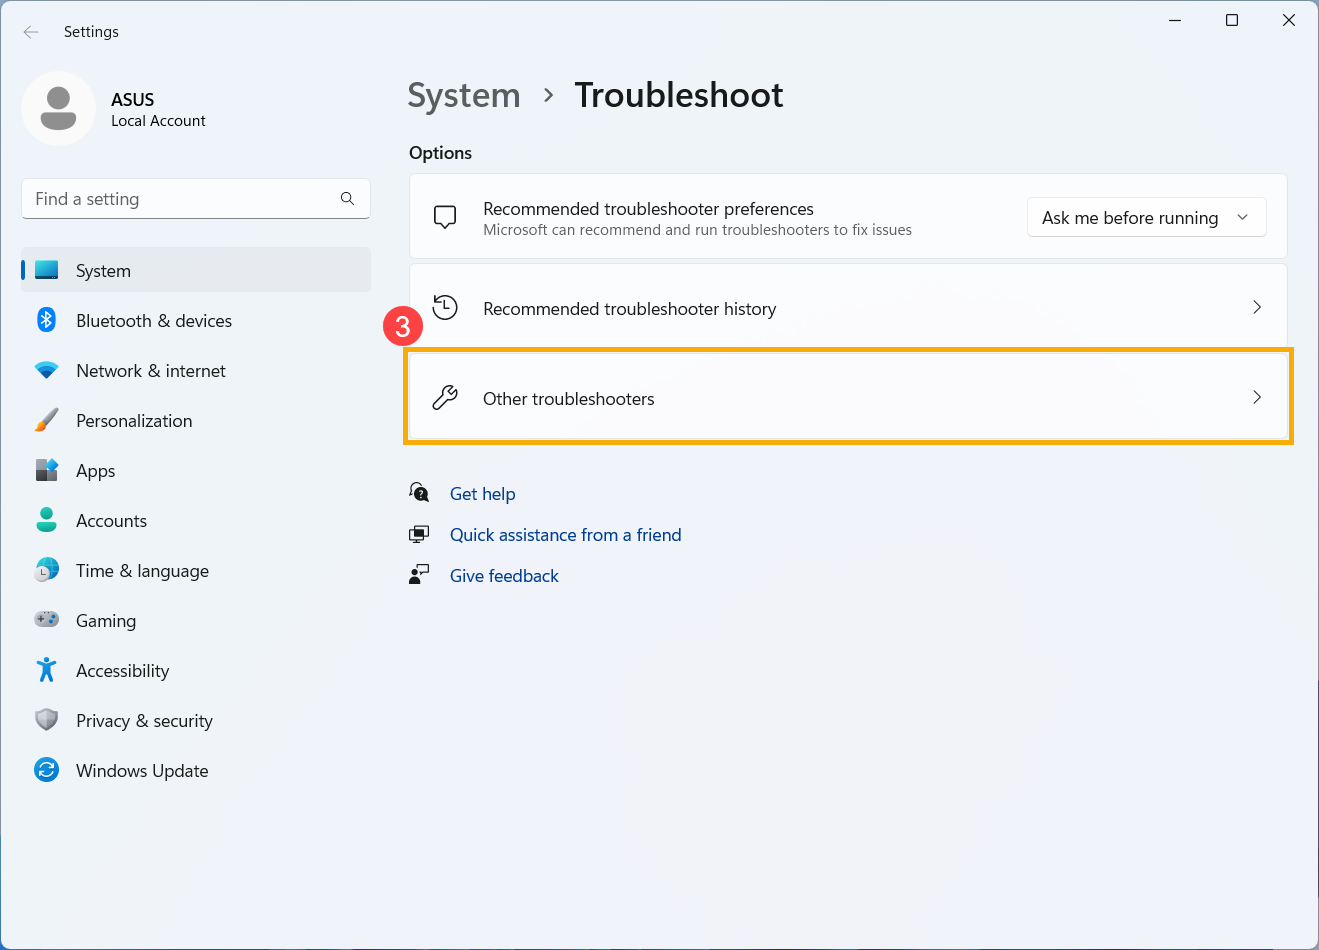
- Locate Video Playback within the Other category and proceed to select [Run]④.
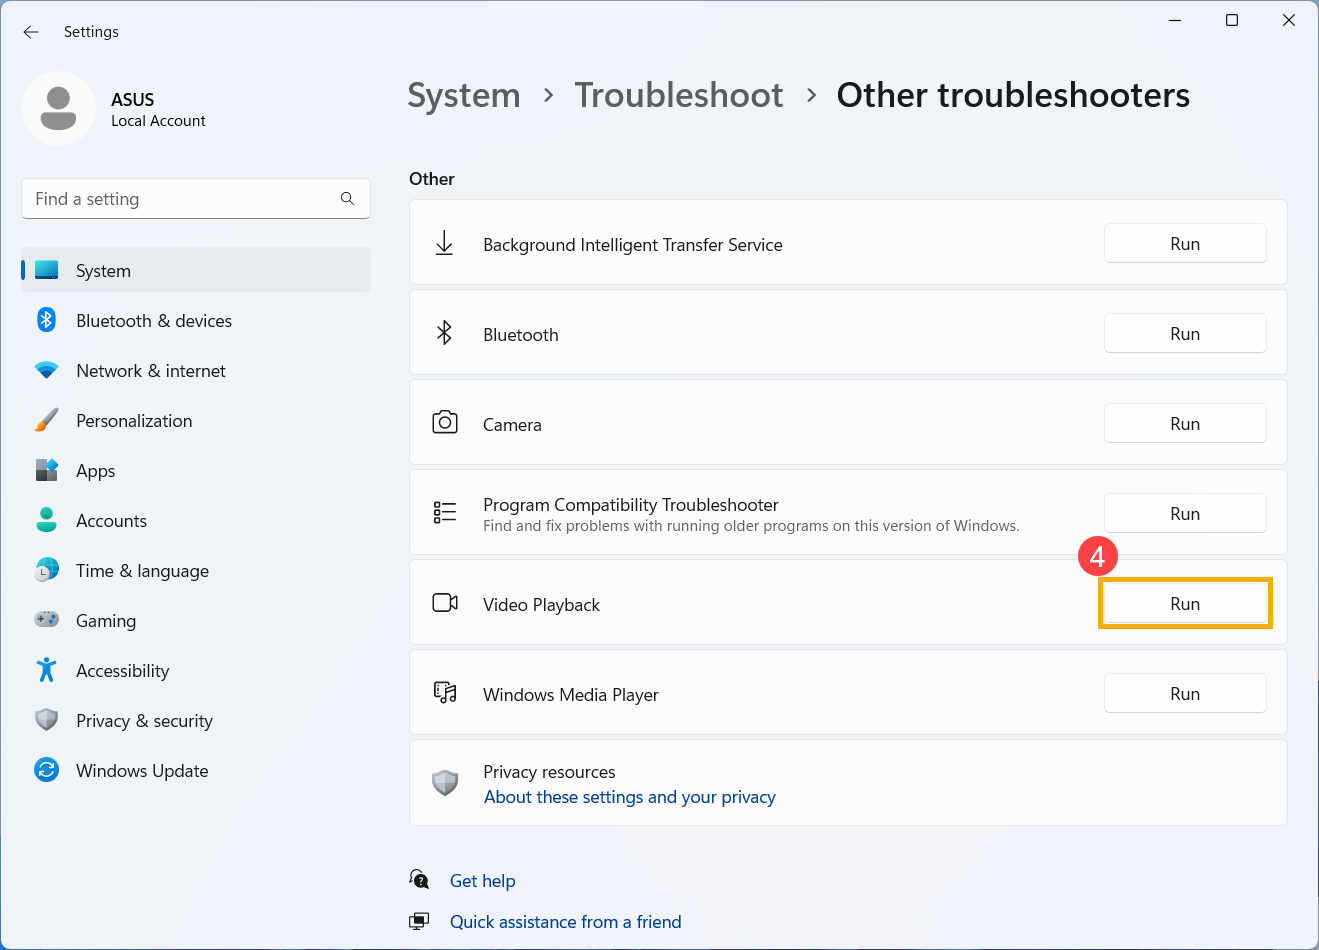
- Follow the on-screen instructions to attempt to fix the issue. If the optical drive is still not detected, proceed to the next steps.
Use System Restore to Restore the System
If the issue started recently and you have previously created a system restore point or if the system has created an automatic restore point, you can try restoring the system to a point in time before the issue occurred. Learn more about How to restore the system from a created system restore point.
Perform a Windows System Restore
If all troubleshooting steps have been completed but the issue persists, back up your personal files and perform a system restore to return your computer to its original configuration. Learn more: How to Restore (Reinstall) the System.
Unable to Read Disc
If you insert a disc into the CD/DVD optical drive and it doesn't run or play, try the following solutions:
Check if the Disc Is the Issue
- Clean the disc and check for any damage. Use a disc cleaning solution or a lint-free cloth to clean dust or dirt from the disc's surface. If the disc is heavily damaged, try using a different, undamaged disc to verify if the issue persists.
- Ensure that the disc type (e.g., CD, DVD, Blu-ray) is supported by your optical drive. Refer to the User Manual for details.

- Confirm if your computer has been installed compatible playback software.
Update and Confirm BIOS, Windows Updates, and Drivers
Software updates often improve system stability and optimization, so it's recommended to regularly check for the latest versions for your device. Learn more about how to update BIOS:
How to update the BIOS version in Windows system
How to use EZ Flash to update the BIOS version
(For desktop products, please refer to ASUS Motherboard EZ Flash 3 Introduction.)
For executing Windows update and drivers update, here you can learn more about:
How to update drivers via System Update in MyASUS
Enable and Reinstall Drivers in Device Manager
- Type and search [Device Manager] in the Windows search bar①, then click on [Open]②.
- Expand the category for [DVD/CD-ROM drives]③ by clicking the arrow next to it. Right-click on the undetected optical drive④ and select [Enable device]⑤ to see if the drive becomes detectable.
If the Enable device option is not shown, it means your optical drive is already enabled. Continue to the next steps. - Uninstall the driver for the optical drive. Right-click on the undetected optical drive⑥ and select [Uninstall device]⑦.
- Click [Uninstall]⑧ in the confirmation window.
- Restart your computer. Upon reboot, the system will automatically reinstall the driver. Check if the optical drive is now detectable.
Use the Hardware and Devices Troubleshooter
- Type and search [Troubleshoot settings] in the Windows search bar①, then click [Open]②.
- In the Troubleshoot window, click on [Other troubleshooters]③.
- Locate Video Playback within the Other category and proceed to select [Run]④.
- Follow the on-screen instructions to attempt to fix the issue. If the optical drive is still not detected, proceed to the next steps.
Use System Restore to Restore the System
If the issue started recently and you have previously created a system restore point or if the system has created an automatic restore point, you can try restoring the system to a point in time before the issue occurred. Learn more about How to restore the system from a created system restore point.
Perform a Windows System Restore
If all troubleshooting steps have been completed but the issue persists, back up your personal files and perform a system restore to return your computer to its original configuration. Learn more: How to Restore (Reinstall) the System.
Optical Drive Tray/Door Won’t Open
If the optical drive tray/door is stuck and won't open when you press the eject button, try the following solutions.
Note: The eject button's location may vary depending on your computer model, so consult the User Manual for details.
![]()
![]()
- Type and search [File Explorer] in the Windows search bar①, then click [Open]②.
- In the File Explorer window, click [This PC]③.

- In the This PC window, right-click on the icon for the stuck optical drive④ and select [Eject]⑤.
- The optical drive tray/door should automatically pop open. If it remains stuck, continue to the next steps.
- Locate a small hole on the optical drive panel; this is the manual eject hole.
Note: Use the manual eject hole only when the electronic eject button does not work.
Note: Not all computer models have this hole, so consult the User Manual for guidance. - To manually eject the optical drive tray, insert a straightened paper clip into the manual eject hole until the drive tray opens For more details, refer to the Using the optical drive section.
Optical Drive Not Detected
If the optical drive is not displayed in File Explorer, it means that Windows cannot recognize the drive. Try the following solutions:
Update and Confirm BIOS, Windows Updates, and Drivers
Software updates often improve system stability and optimization, so it's recommended to regularly check for the latest versions for your device. Learn more about how to update BIOS:
How to update the BIOS version in Windows system
How to use EZ Flash to update the BIOS version
(For desktop products, please refer to ASUS Motherboard EZ Flash 3 Introduction.)
For executing Windows update and drivers update, here you can learn more about:
How to update drivers via System Update in MyASUS
Enable and Reinstall Drivers in Device Manager
- Type and search [Device Manager] in the Windows search bar①, then click on [Open]②.
- Expand the category for [DVD/CD-ROM drives]③ by clicking the arrow next to it. Right-click on the undetected optical drive④ and select [Enable device]⑤ to see if the drive becomes detectable.
If the Enable device option is not shown, it means your optical drive is already enabled. Continue to the next steps. - Uninstall the driver for the optical drive. Right-click on the undetected optical drive⑥ and select [Uninstall device]⑦.
- Click [Uninstall]⑧ in the confirmation window.
- Restart your computer. Upon reboot, the system will automatically reinstall the driver. Check if the optical drive is now detectable.
Use the Hardware and Devices Troubleshooter
- Type and search [Troubleshoot settings] in the Windows search bar①, then click [Open]②.
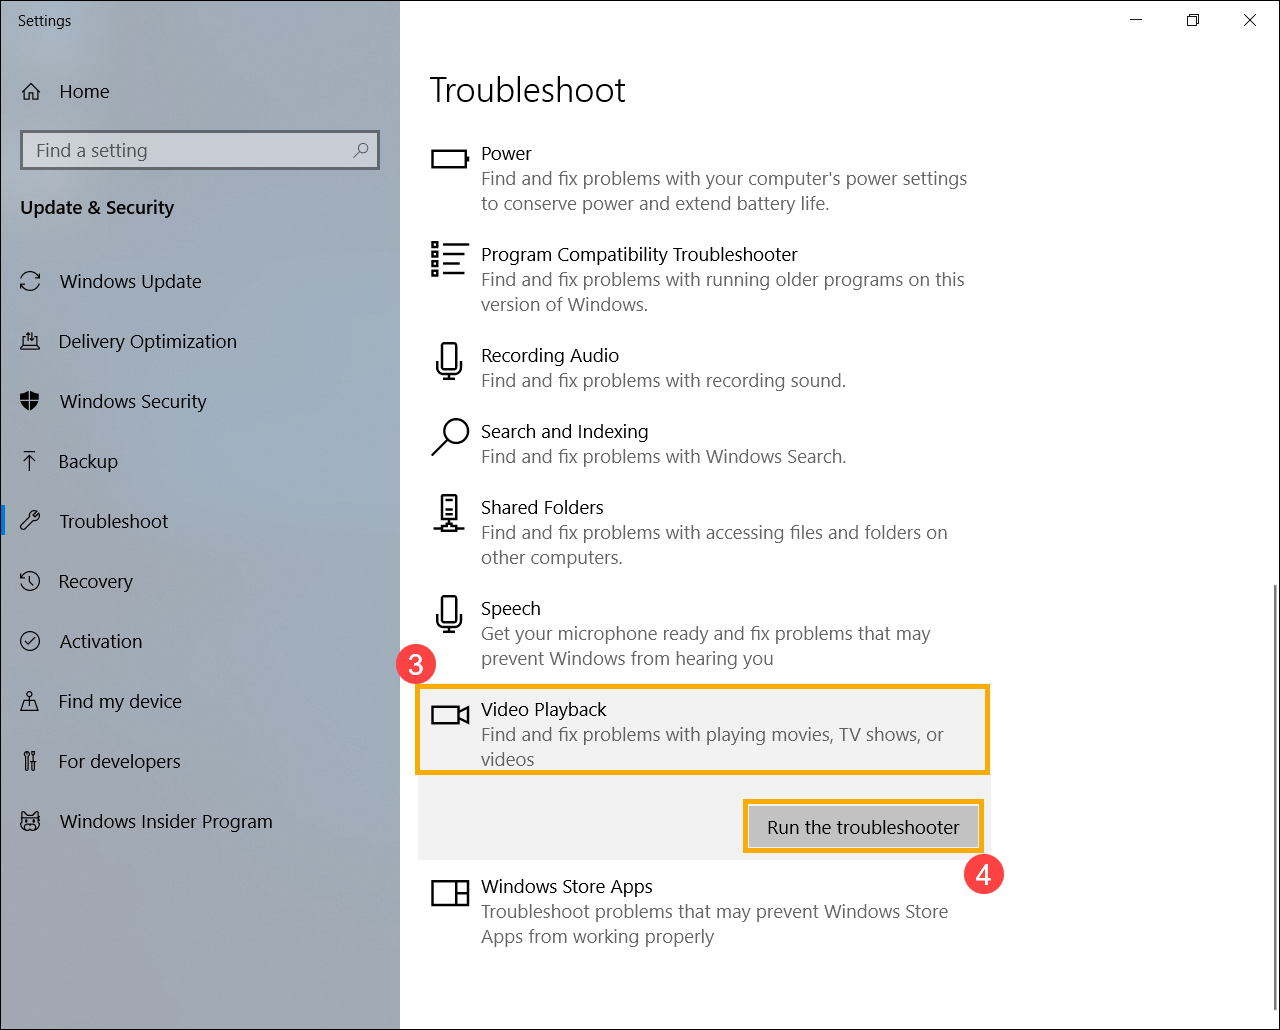
- Within the Troubleshoot window, select [Video Playback]③, and subsequently click [Run the troubleshooter]④.
- Follow the on-screen instructions to attempt to fix the issue. If the optical drive is still not detected, proceed to the next steps.
Use System Restore to Restore the System
If the issue started recently and you have previously created a system restore point or if the system has created an automatic restore point, you can try restoring the system to a point in time before the issue occurred. Learn more about How to restore the system from a created system restore point.
Perform a Windows System Restore
If all troubleshooting steps have been completed but the issue persists, back up your personal files and perform a system restore to return your computer to its original configuration. Learn more: How to Restore (Reinstall) the System.
Unable to Read Disc
If you insert a disc into the CD/DVD optical drive and it doesn't run or play, try the following solutions:
Check if the Disc Is the Issue
- Clean the disc and check for any damage. Use a disc cleaning solution or a lint-free cloth to clean dust or dirt from the disc's surface. If the disc is heavily damaged, try using a different, undamaged disc to verify if the issue persists.
- Ensure that the disc type (e.g., CD, DVD, Blu-ray) is supported by your optical drive. Refer to the User Manual for details.
- Confirm if your computer has been installed compatible playback software.
Update and Confirm BIOS, Windows Updates, and Drivers
Software updates often improve system stability and optimization, so it's recommended to regularly check for the latest versions for your device. Learn more about how to update BIOS:
How to update the BIOS version in Windows system
How to use EZ Flash to update the BIOS version
(For desktop products, please refer to ASUS Motherboard EZ Flash 3 Introduction.)
For executing Windows update and drivers update, here you can learn more about:
How to update drivers via System Update in MyASUS
Enable and Reinstall Drivers in Device Manager
- Type and search [Device Manager] in the Windows search bar①, then click on [Open]②.
- Expand the category for [DVD/CD-ROM drives]③ by clicking the arrow next to it. Right-click on the undetected optical drive④ and select [Enable device]⑤ to see if the drive becomes detectable.
If the Enable device option is not shown, it means your optical drive is already enabled. Continue to the next steps. - Uninstall the driver for the optical drive. Right-click on the undetected optical drive⑥ and select [Uninstall device]⑦.
- Click [Uninstall]⑧ in the confirmation window.
- Restart your computer. Upon reboot, the system will automatically reinstall the driver. Check if the optical drive is now detectable.
Use the Hardware and Devices Troubleshooter
- Type and search [Troubleshoot settings] in the Windows search bar①, then click [Open]②.
- Within the Troubleshoot window, select [Video Playback]③, and subsequently click [Run the troubleshooter]④.
- Follow the on-screen instructions to attempt to fix the issue. If the optical drive is still not detected, proceed to the next steps.
Use System Restore to Restore the System
If the issue started recently and you have previously created a system restore point or if the system has created an automatic restore point, you can try restoring the system to a point in time before the issue occurred. Learn more about How to restore the system from a created system restore point.
Perform a Windows System Restore
If all troubleshooting steps have been completed but the issue persists, back up your personal files and perform a system restore to return your computer to its original configuration. Learn more: How to Restore (Reinstall) the System.
If your issue persists, please contact ASUS customer support for further assistance.