ASUS Control Panel - Introduction
Applicable Products: Notebook, Desktop, All-in-One PC, Gaming Handheld
ASUS Dial & Control Panel provides easy access to Adobe software, Microsoft Office software, entertainment software, browsers and many more applications to optimize user workflows.
You can freely use it with the installed application on the ASUS computer, and a number of customized, personalized functions allow you to build your own Control Panel.
For example, when using Adobe Photoshop on the main interface of a computer, users can use the Control Panel on the second screen to quickly manipulate Adobe Photoshop. When you open Photoshop on the main screen of your computer, the Control Panel on the second screen will simultaneously enable the set functions to assist Photoshop and perform related software functions.
※ The new version of the Control Panel supports the linkage function with the GlideX App, please refer to this article for detailed steps:7. Linked with GlideX App
For how to use GlideX, please refer to: [Notebook/Desktop/AIO] GlideX - Introduction | Official Support | ASUS Global
- Required system environment for Control Panel
- Open ASUS Dial & Control Panel App
- Control Panel function settings
- Add App
- Add Function
- Preference Settings
- Linked with GlideX App
- How to download and remove ASUS Dial & Control Panel
1. Required system environment for Control Panel:
ASUS Dial ASUS Control Panel Toolkit: V2.1.0.0 and above
2. Open ASUS Dial & Control Panel App
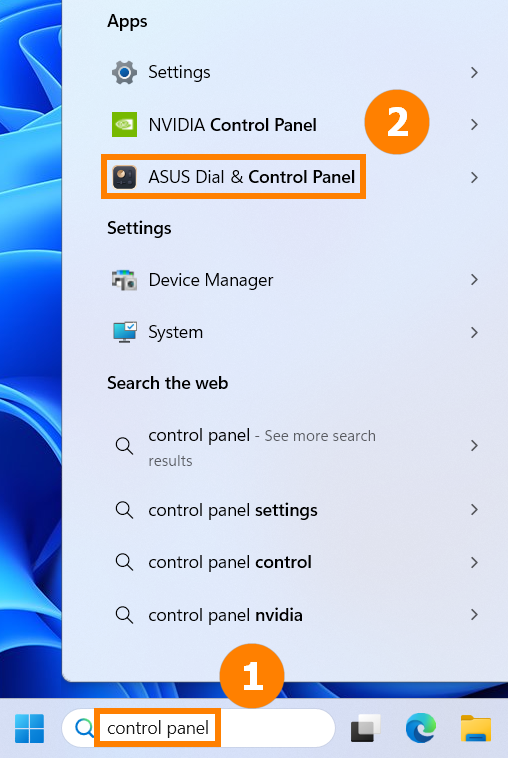
(1) Enter ①[Control Panel] in the Windows search bar, and then click to open the ②[ASUS Dial & Control Panel] App.
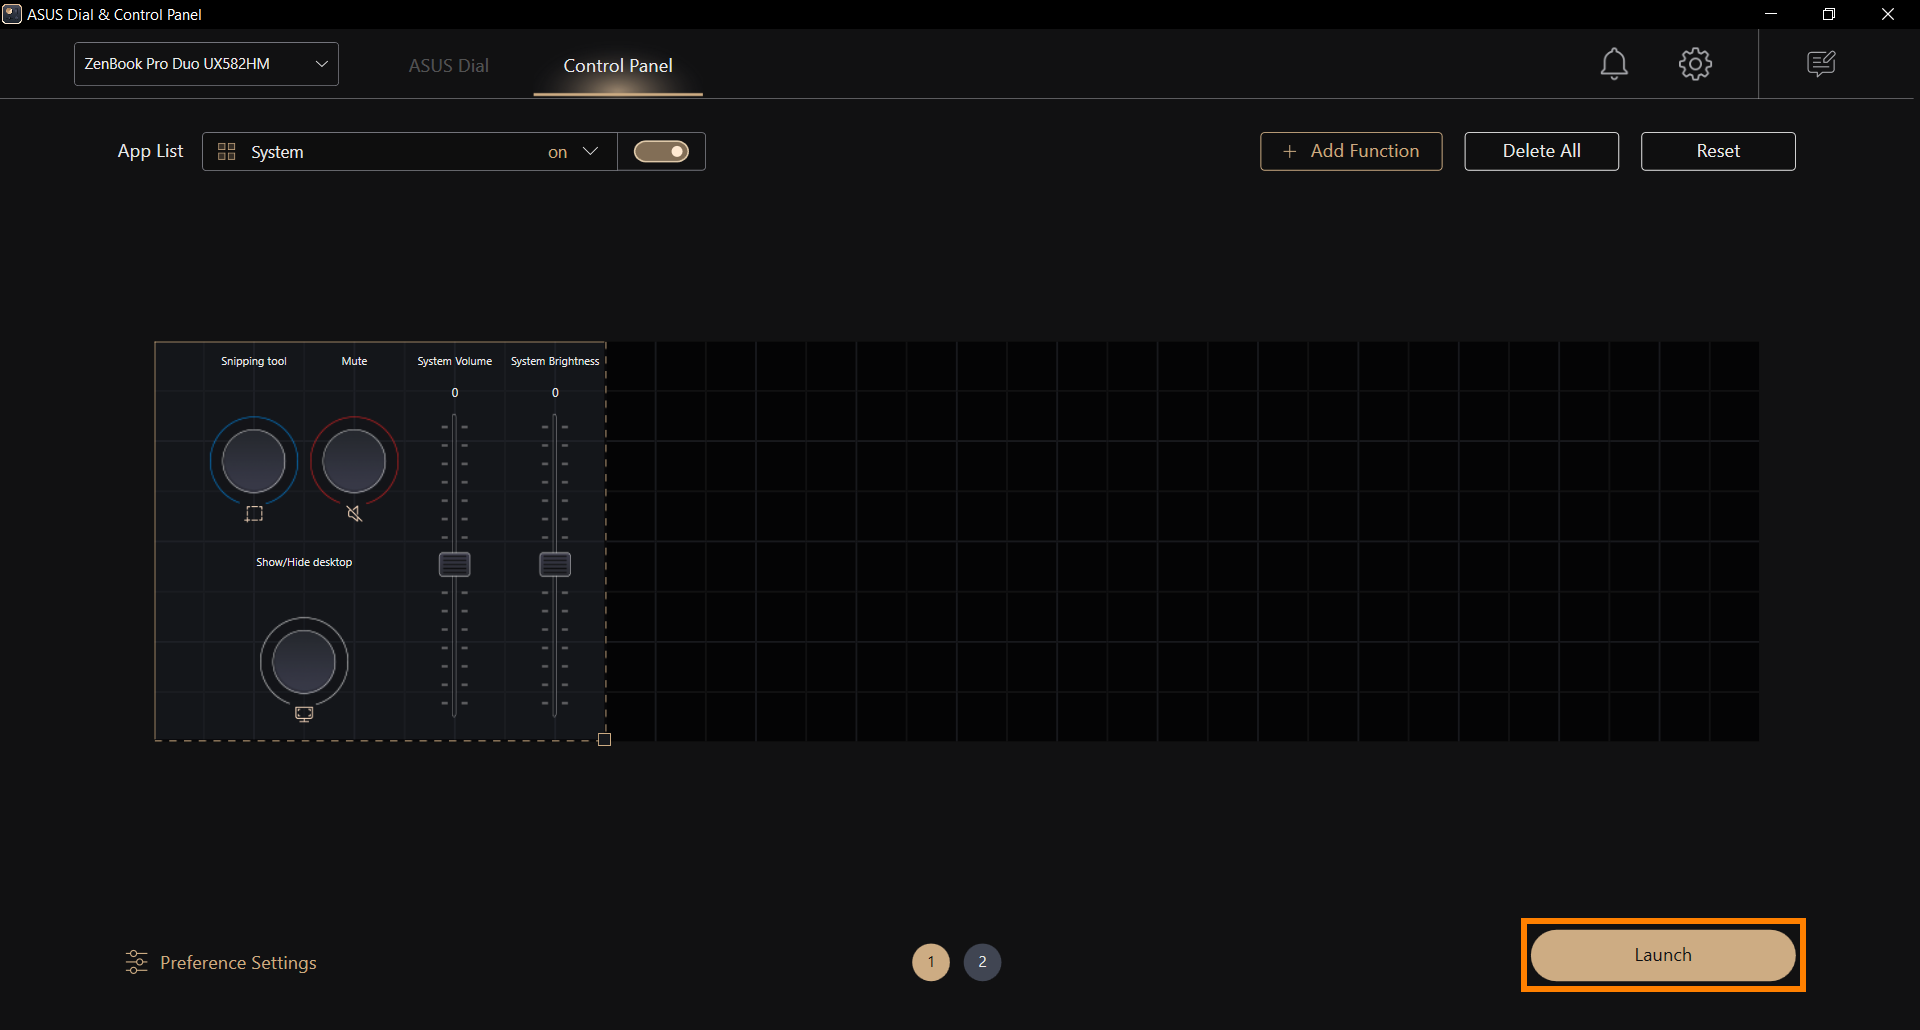
(2) Windows launches the Control Panel setting interface, where you can set the position and function of the icon according to your personal habits. Click [launch] to enable the Control Panel function.
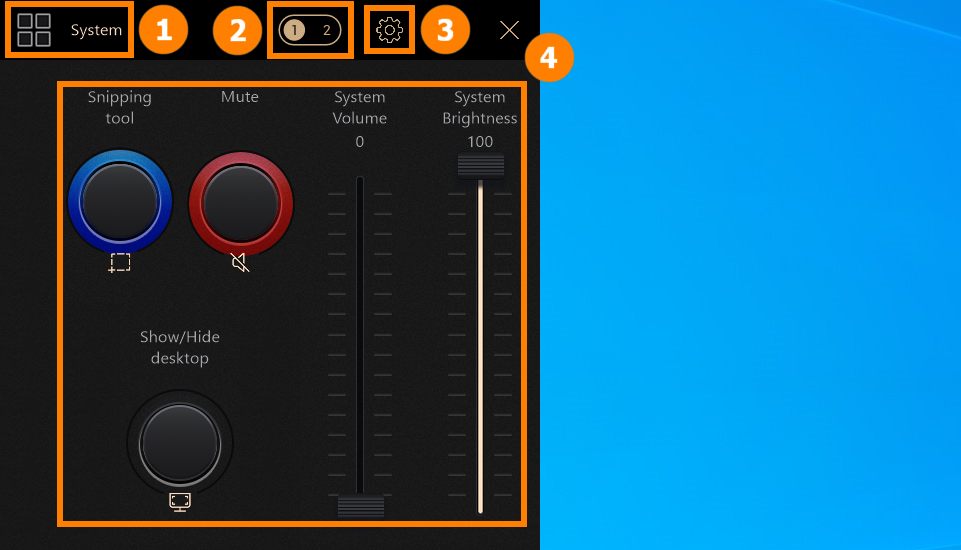
(3) On the Extended screen, the ASUS Dial & Control Panel App is launched. ①[Software] Display the name of the software you are currently using, click ②[Page] to switch to the module page, click ③[Settings] to open ASUS Dial & Control Panel, and ④[Ribbon] to use the Control Panel function.
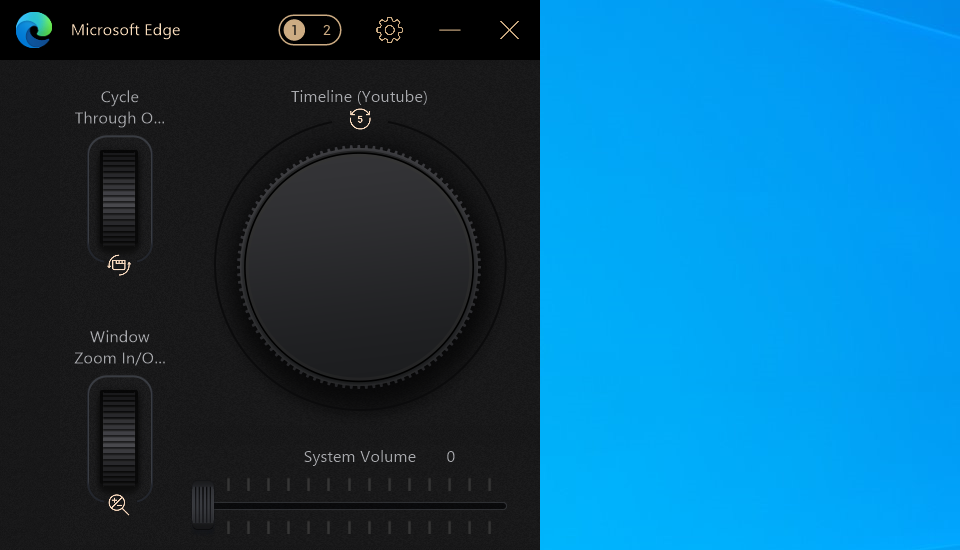
(4) When Microsoft Edge is running on the front end of the system, the Control Panel will also automatically switch to the corresponding function for you to use.
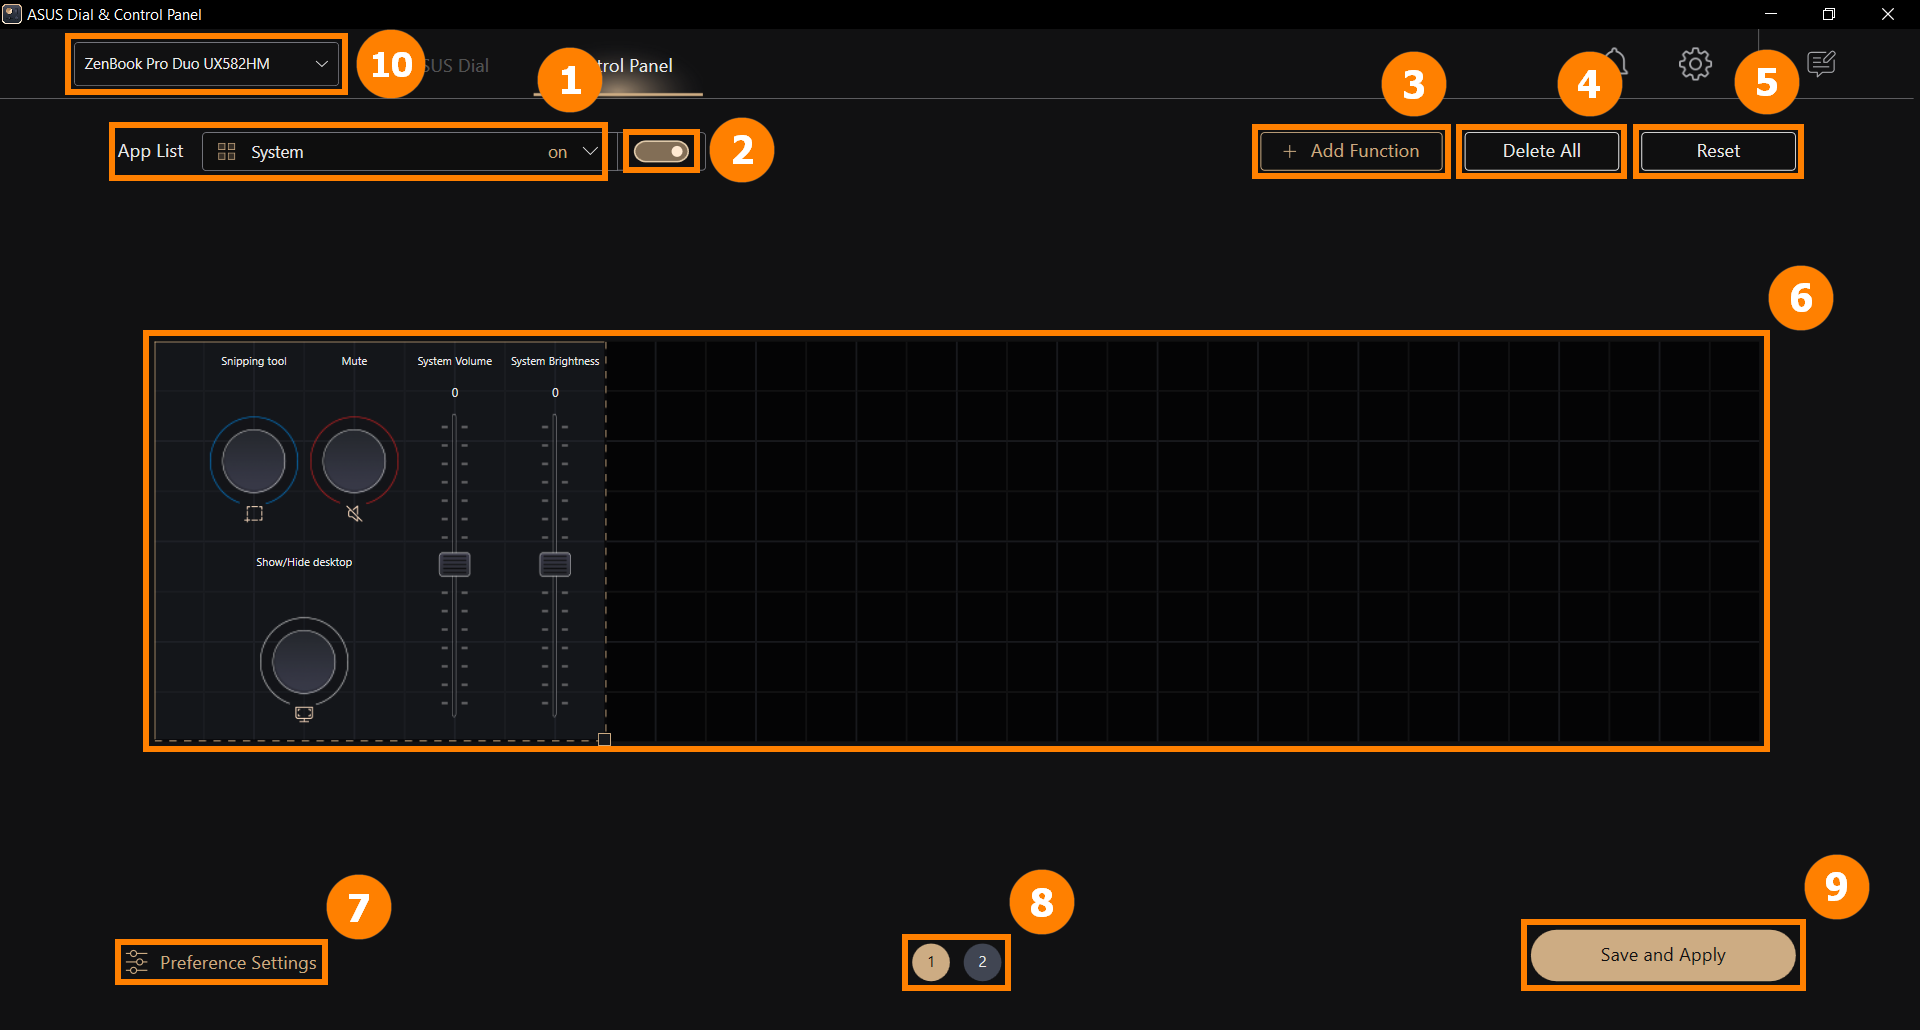
3. Control Panel function settings
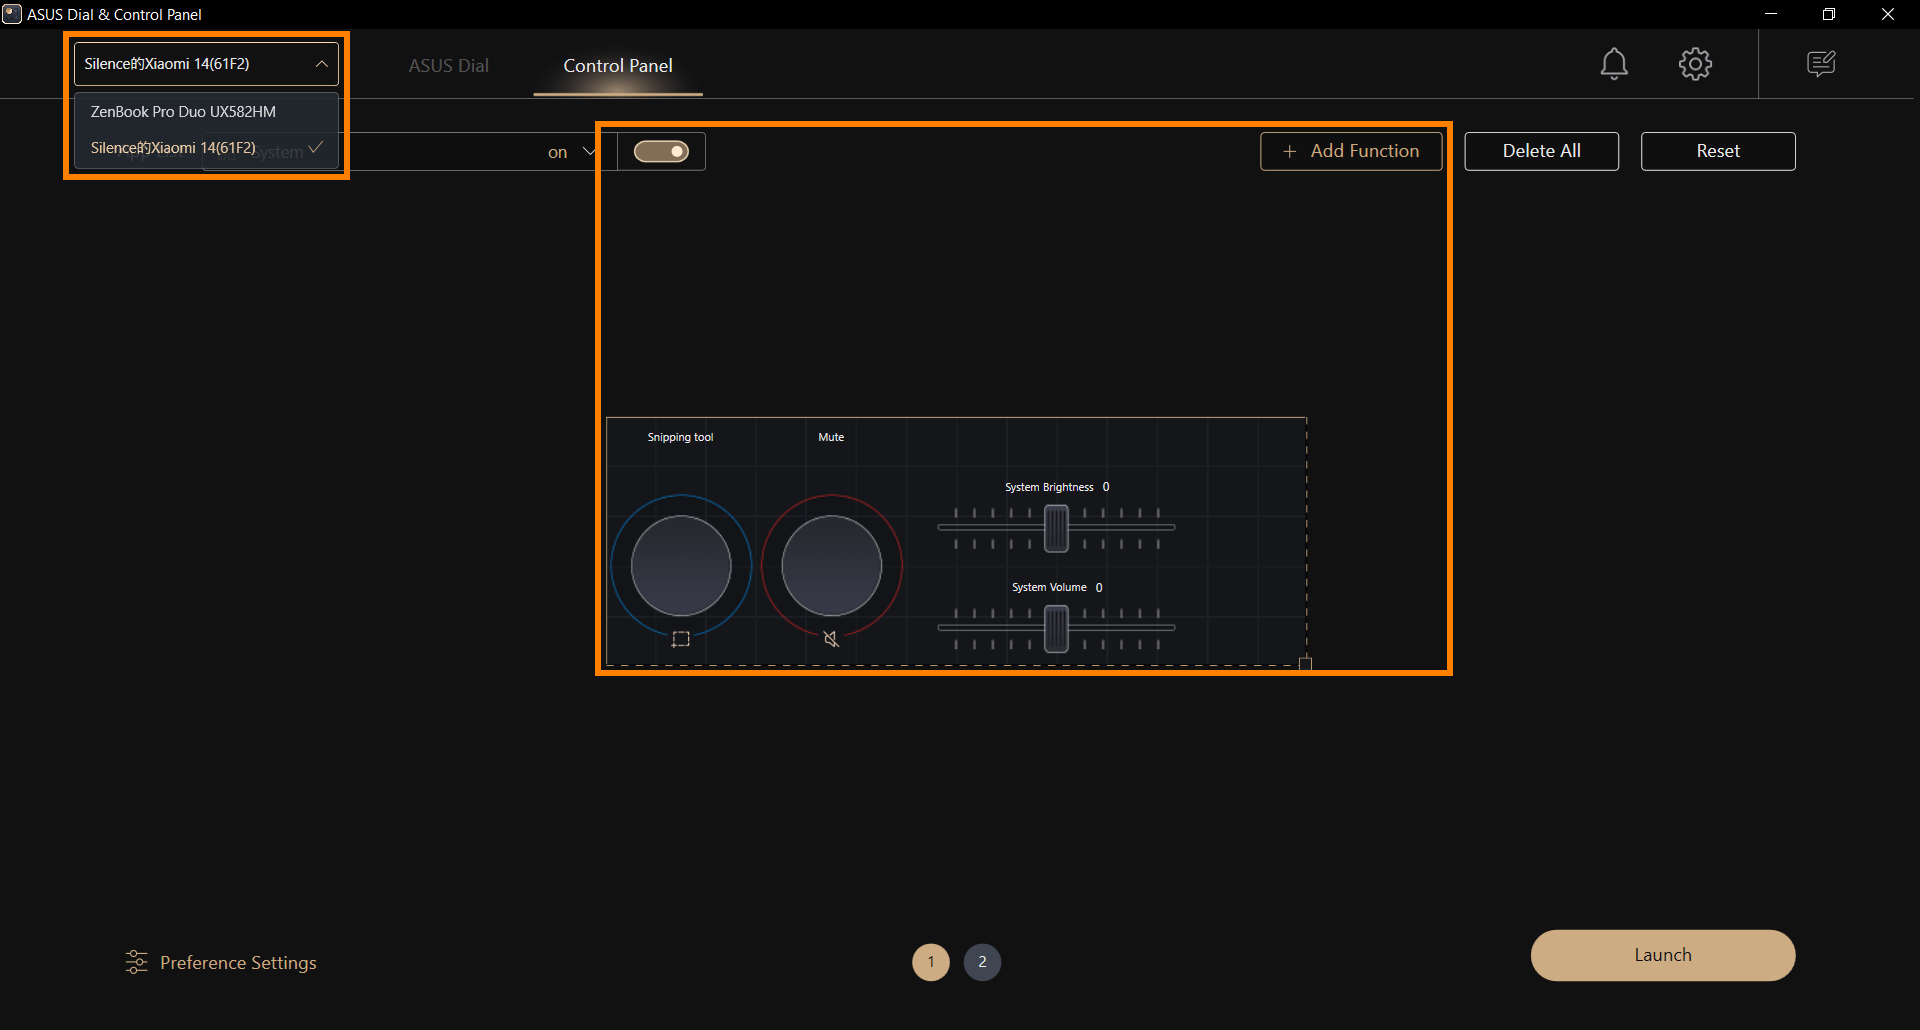
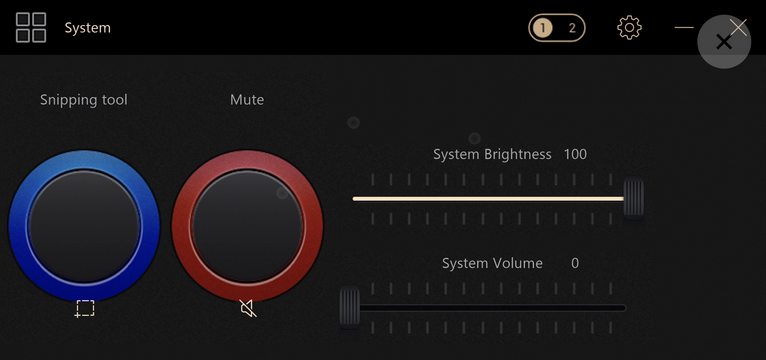
In the main interface of Control Panel, there are ①[Add App], ②[Software Switch], ③[Add Function], ④[Delete All], ⑤[Reset], ⑥[Module Area], ⑦[Preference Settings], ⑧[Page], ⑨[Save and Apply]. ⑩[Device Switch] and other functions.
②[Software Switch], you can independently turn the Control Panel function of the software on or off.
④[Delete All], you can clear all currently configured modules.
⑤[Reset], you can reset and restore the original Control Panel defaults.
⑧[Page], Control Panel supports two-page module function editing.
⑨[Save and Apply], when you are finished editing, click ⑨[Save and Apply].
⑩[Device Switch], when you use the Extend function of GlideX, you can switch to a mobile device and set it. For detailed steps, please refer to this article 7. Linked with GlideX App
(1) Click ①[Software List], and click ②[Add Application].
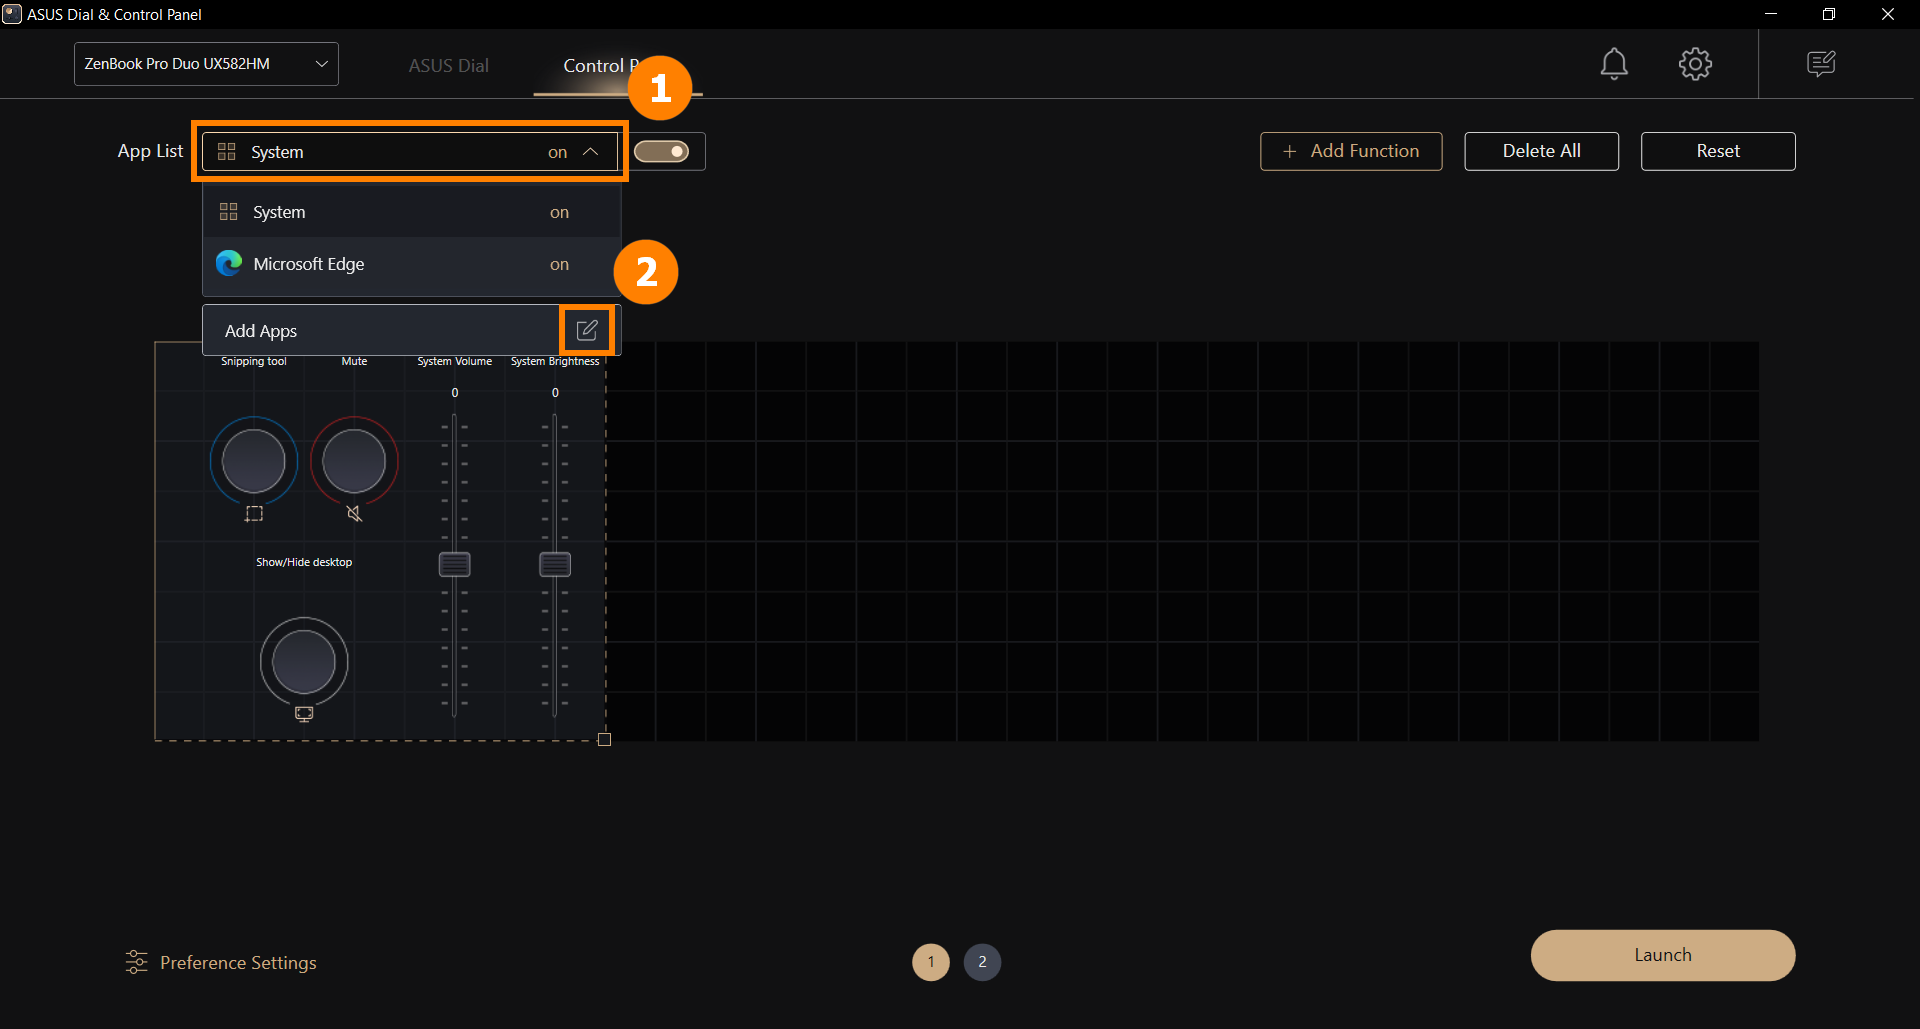
(2) Find the App you want to add, click ③[App], if there is no App you need in the list, you can click ④[Add More Apps] (only programs with the suffix exe), and then click ⑤[Confirm] to complete the addition.
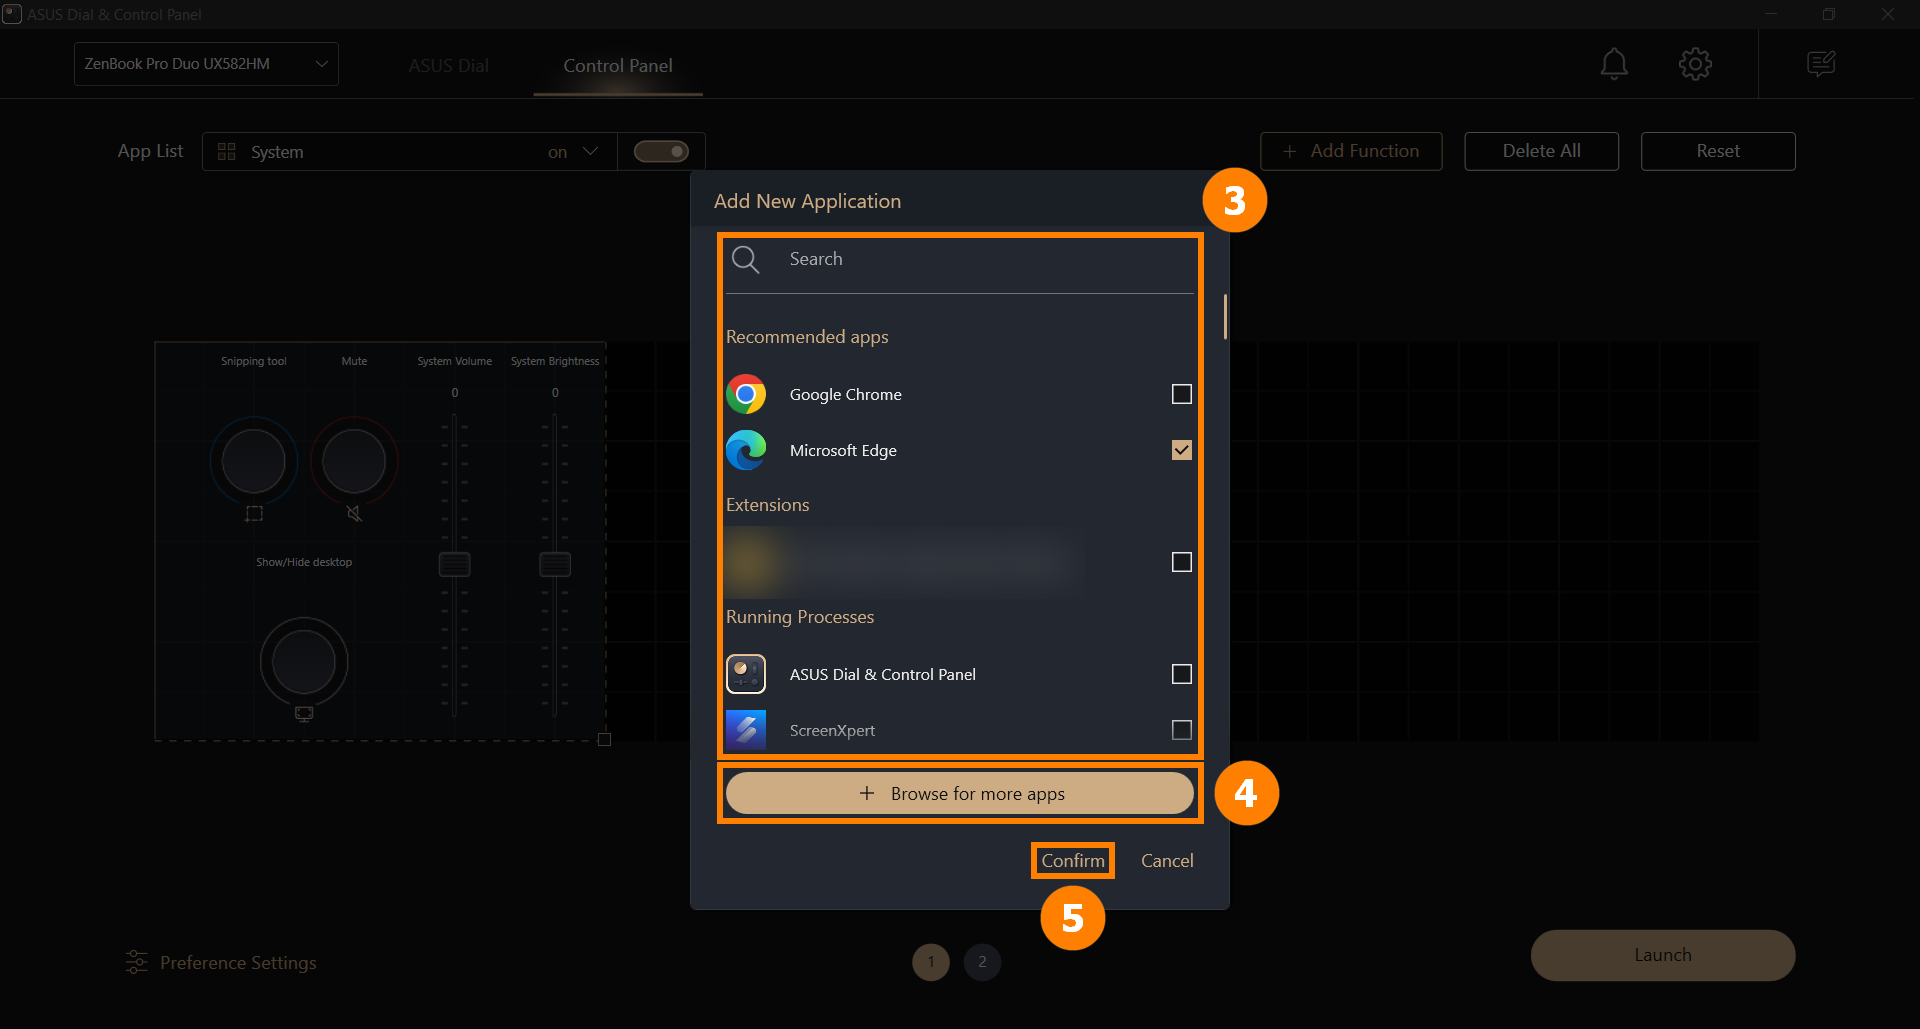
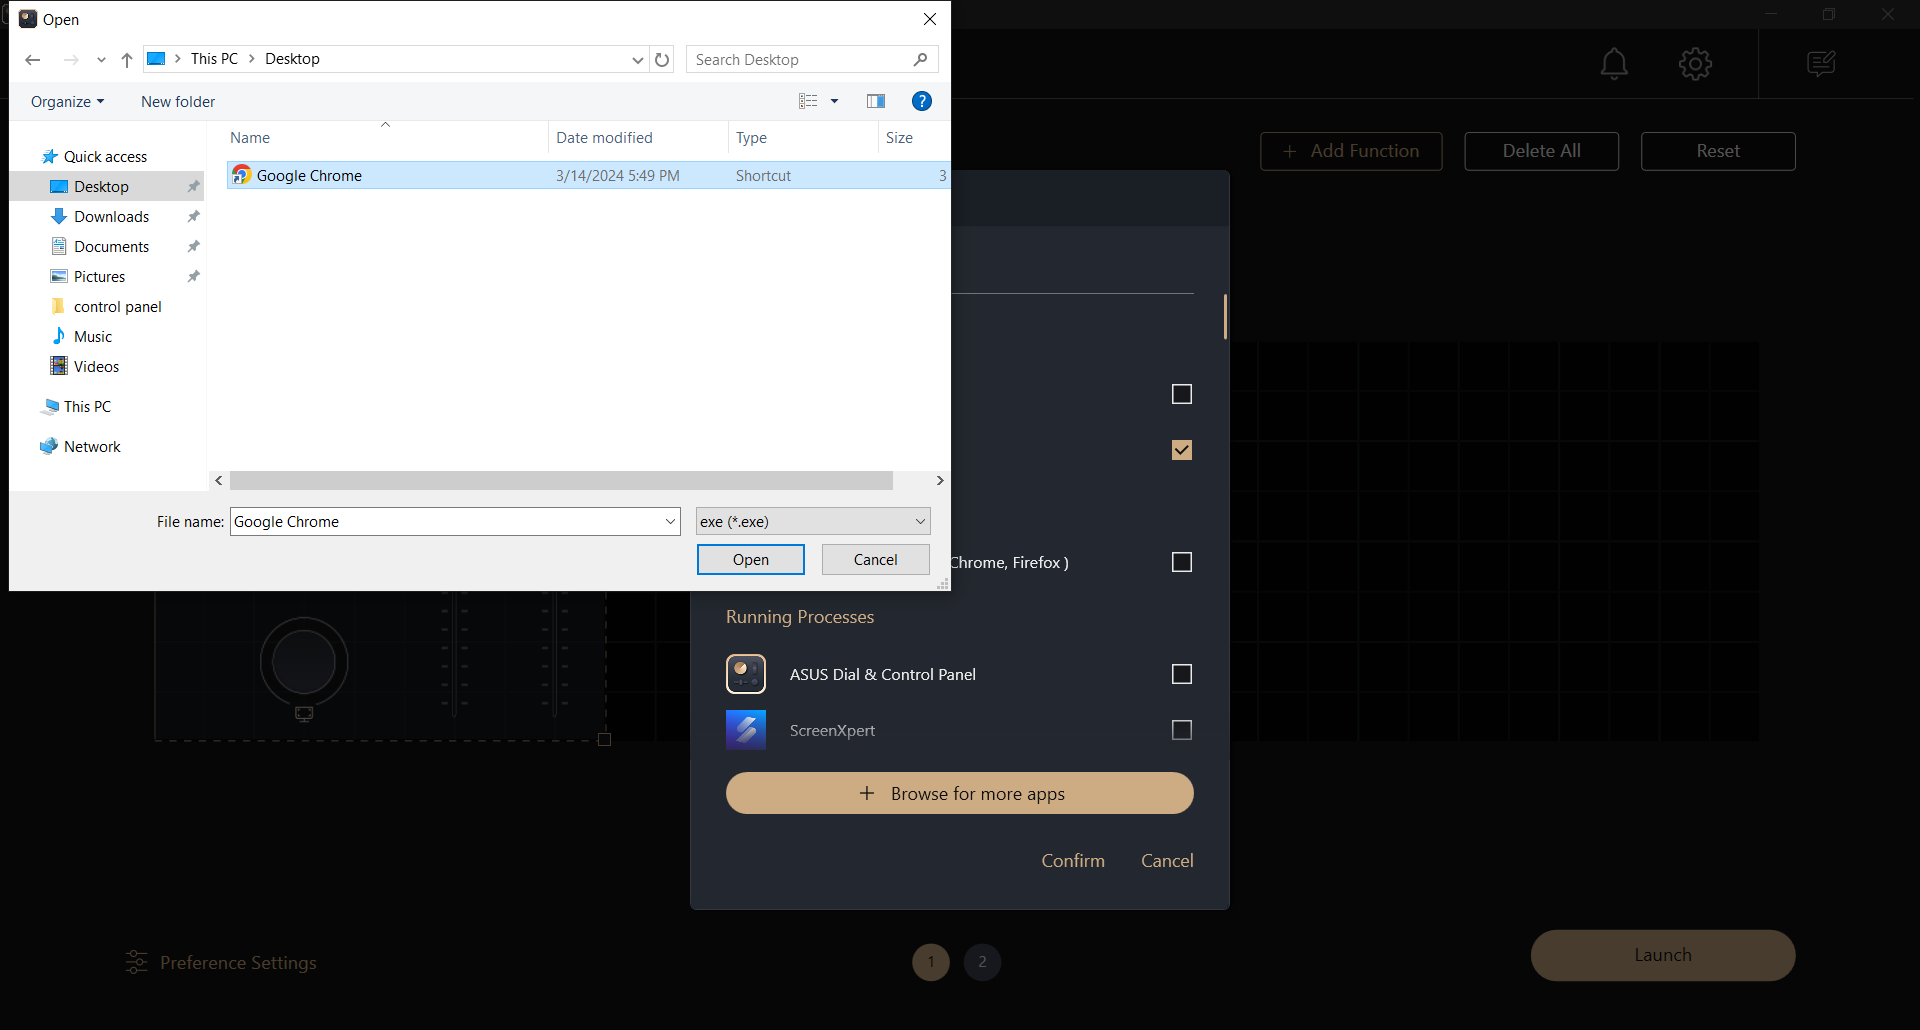
(3) After clicking [Browse for more apps], a pop-up window will pop up, and you can manually add the application with the suffix exe to [Software list].
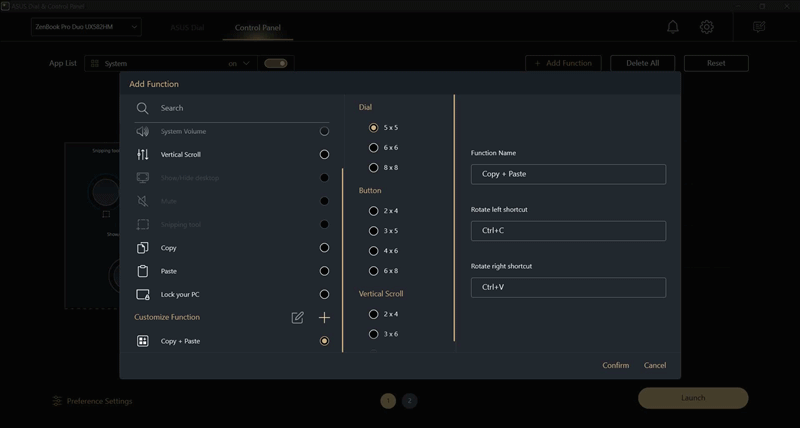
(1) Click ①[Add Function], add a default function in ②[Function List], you can manually add the function you want, click ③[Add]. In the ④[Module] area, select a suitable module for your new function, then edit ⑤[Function], after editing, click ⑥[Confirm].
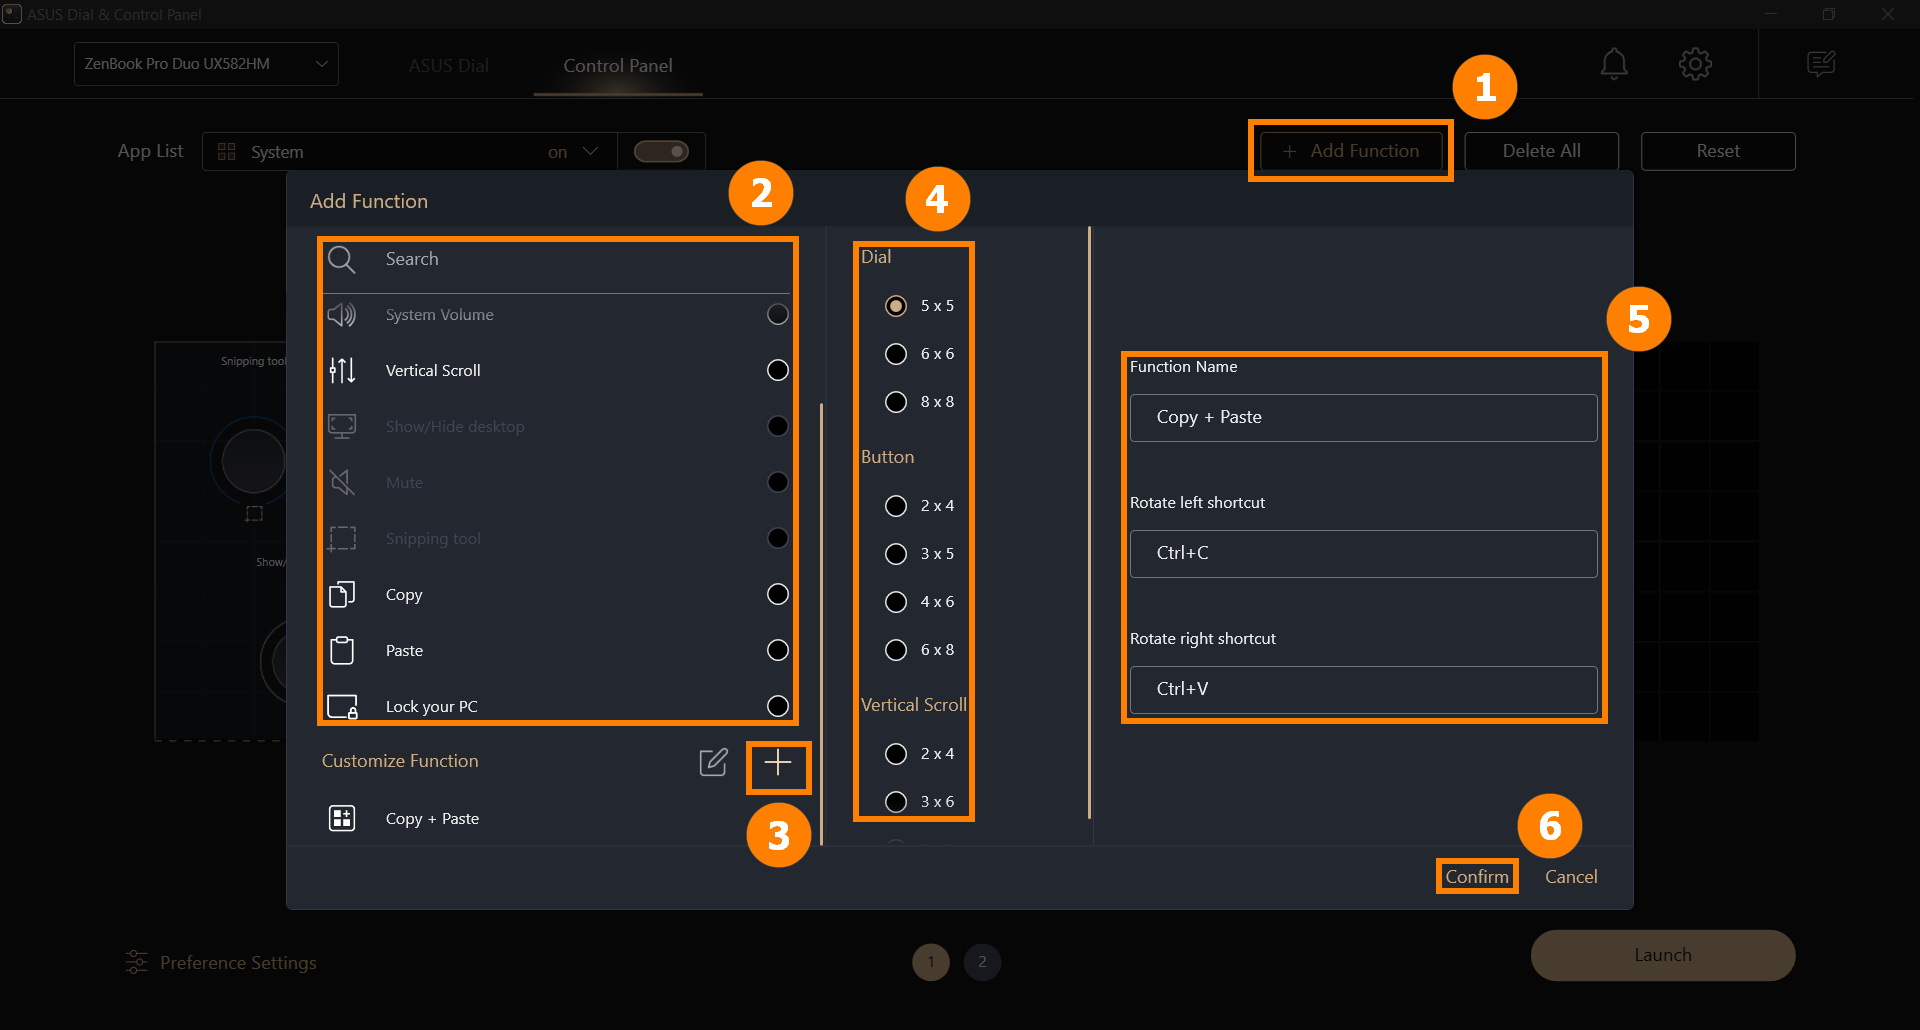
(2) When you click [Confirm], the added function will appear in the module area and be duplicated with other functions. We need to move the new functionality to the empty space and expand the module area before we can use it. Adjust the position of the [Module Area] and click [Save and Apply] to complete the editing.
※ [Custom Function] has been displayed in the module area, you can Edit, Delete, and Move the module.
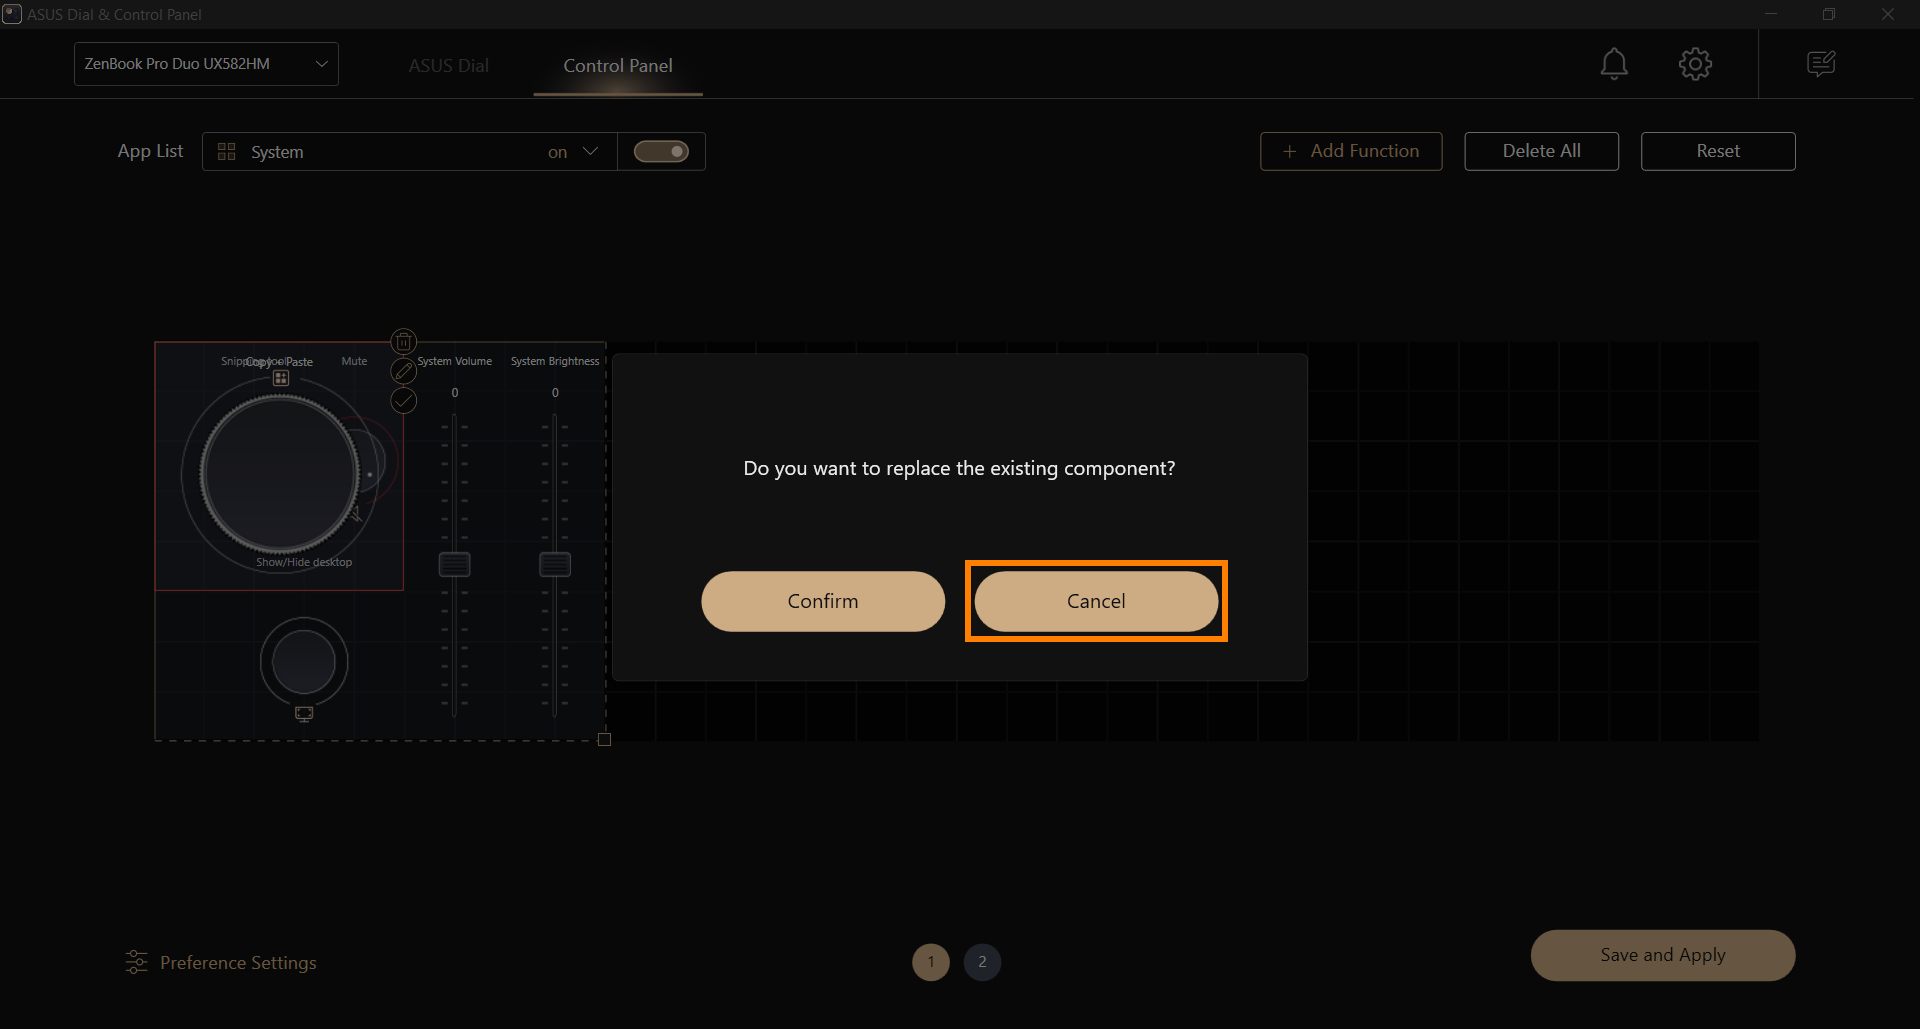
(3) If you are moving a module, the following screen appears. If you do not want to replace the existing module, click [Cancel], and then drag the new module to an empty space.
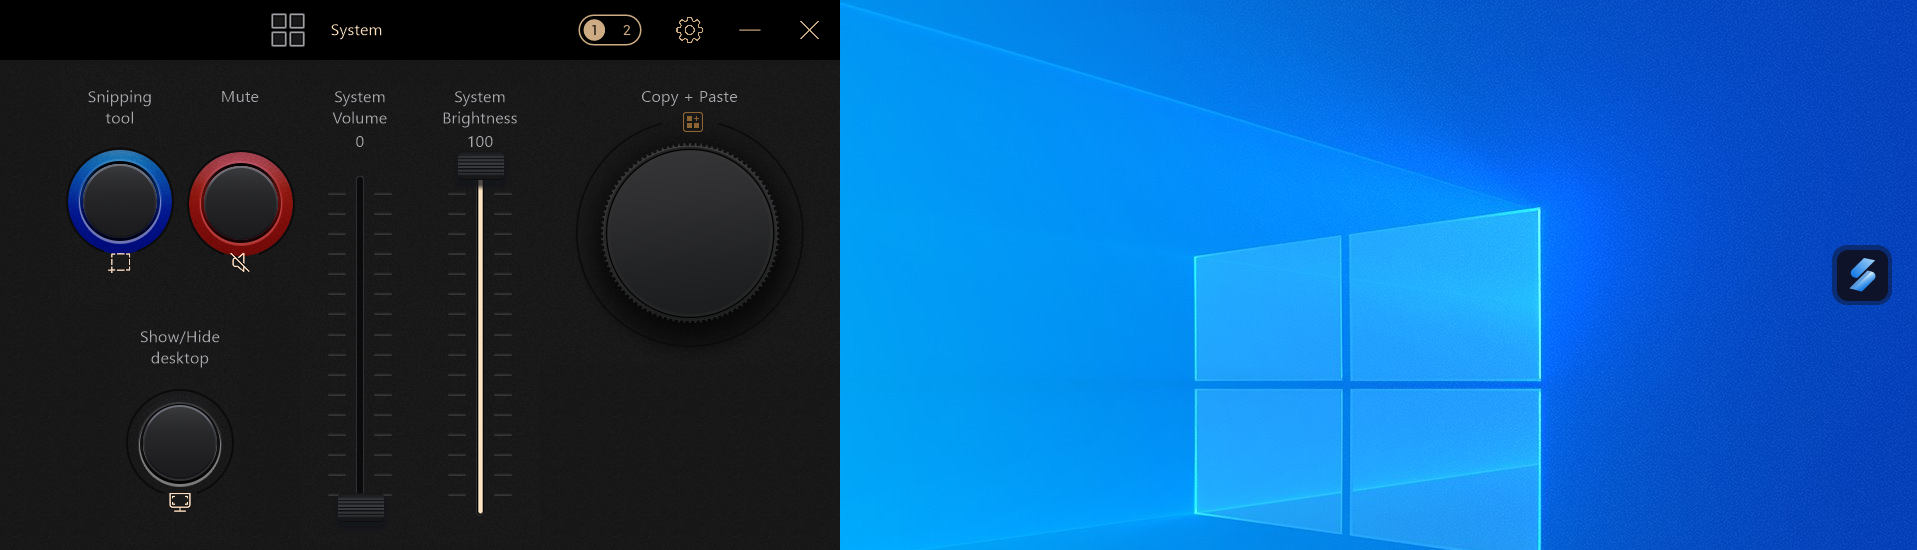
(4) When we open the Control Panel interface in ScreenPad Plus, we can use the [Copy+Paste] feature that has been added.
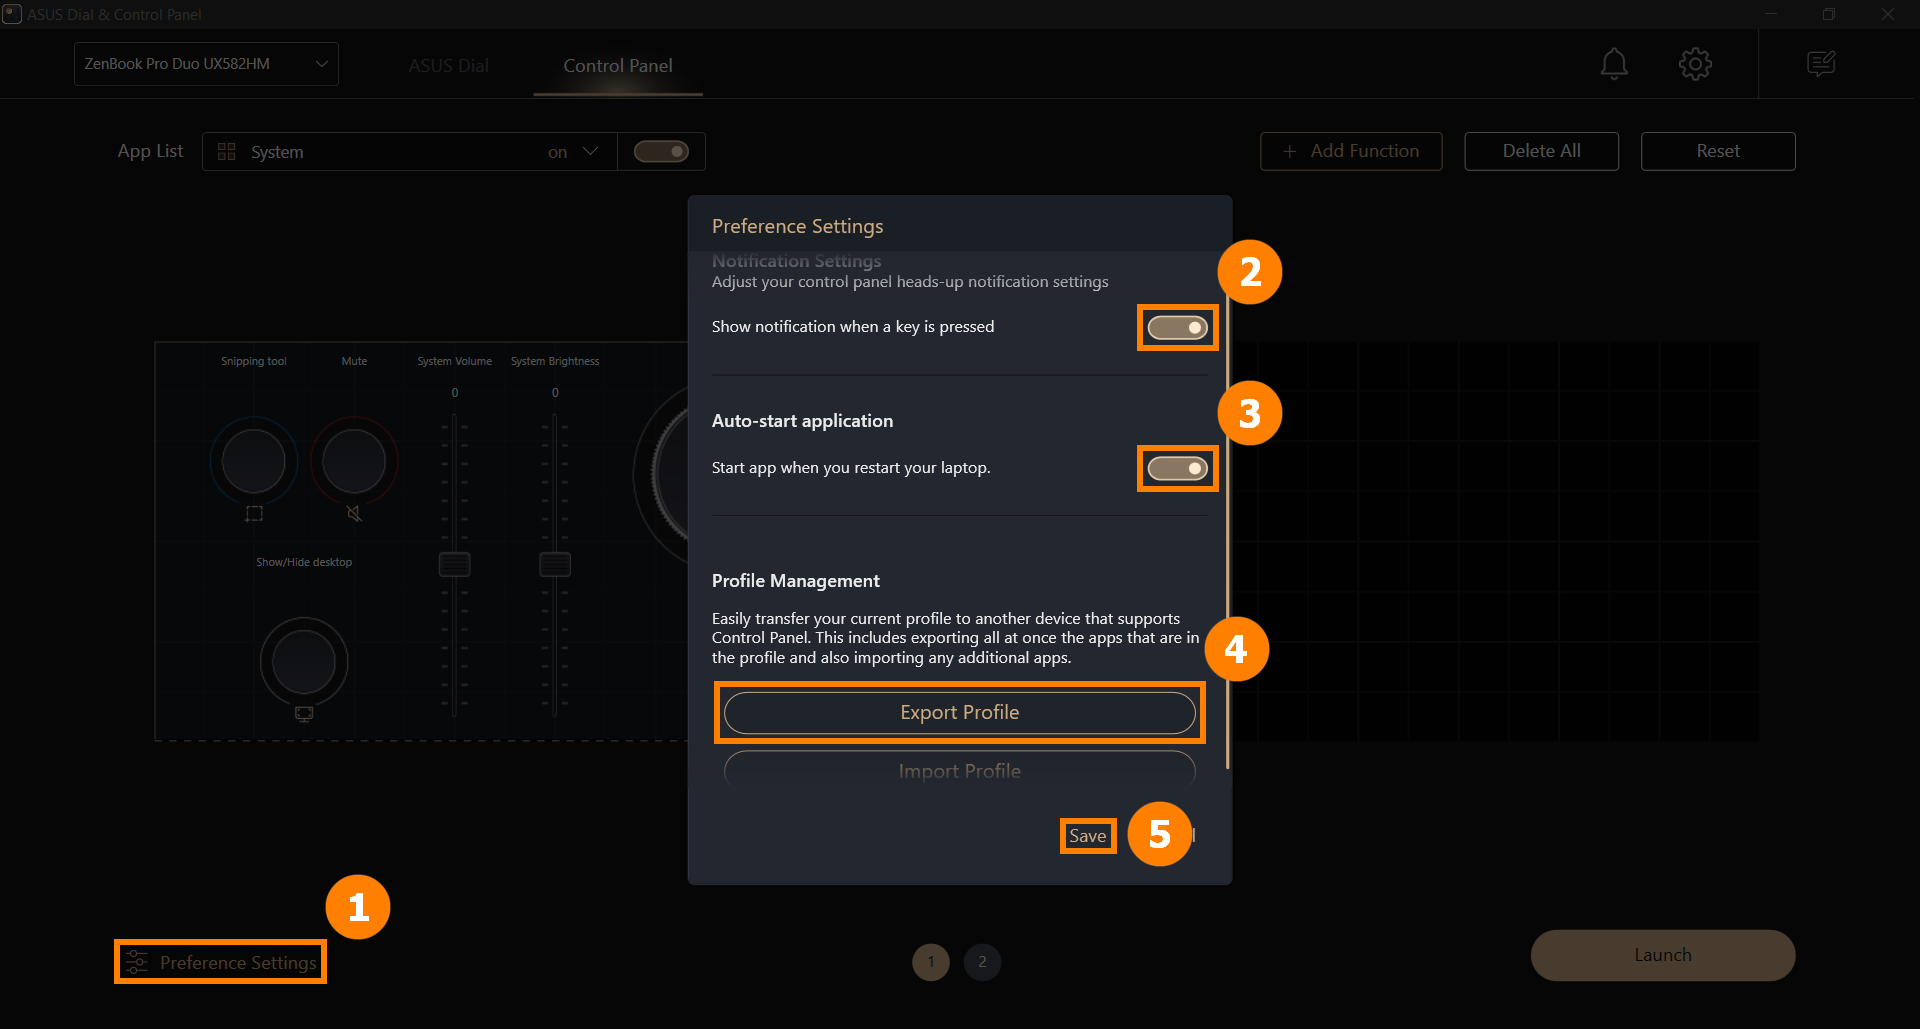
(1) Click ①[Preference Settings], turn on or off ②[Notification Settings] function, enable or disable ③[Auto-start application], tap ④[Export Profile] to save the existing settings, click ⑤[Save] to complete this edit.
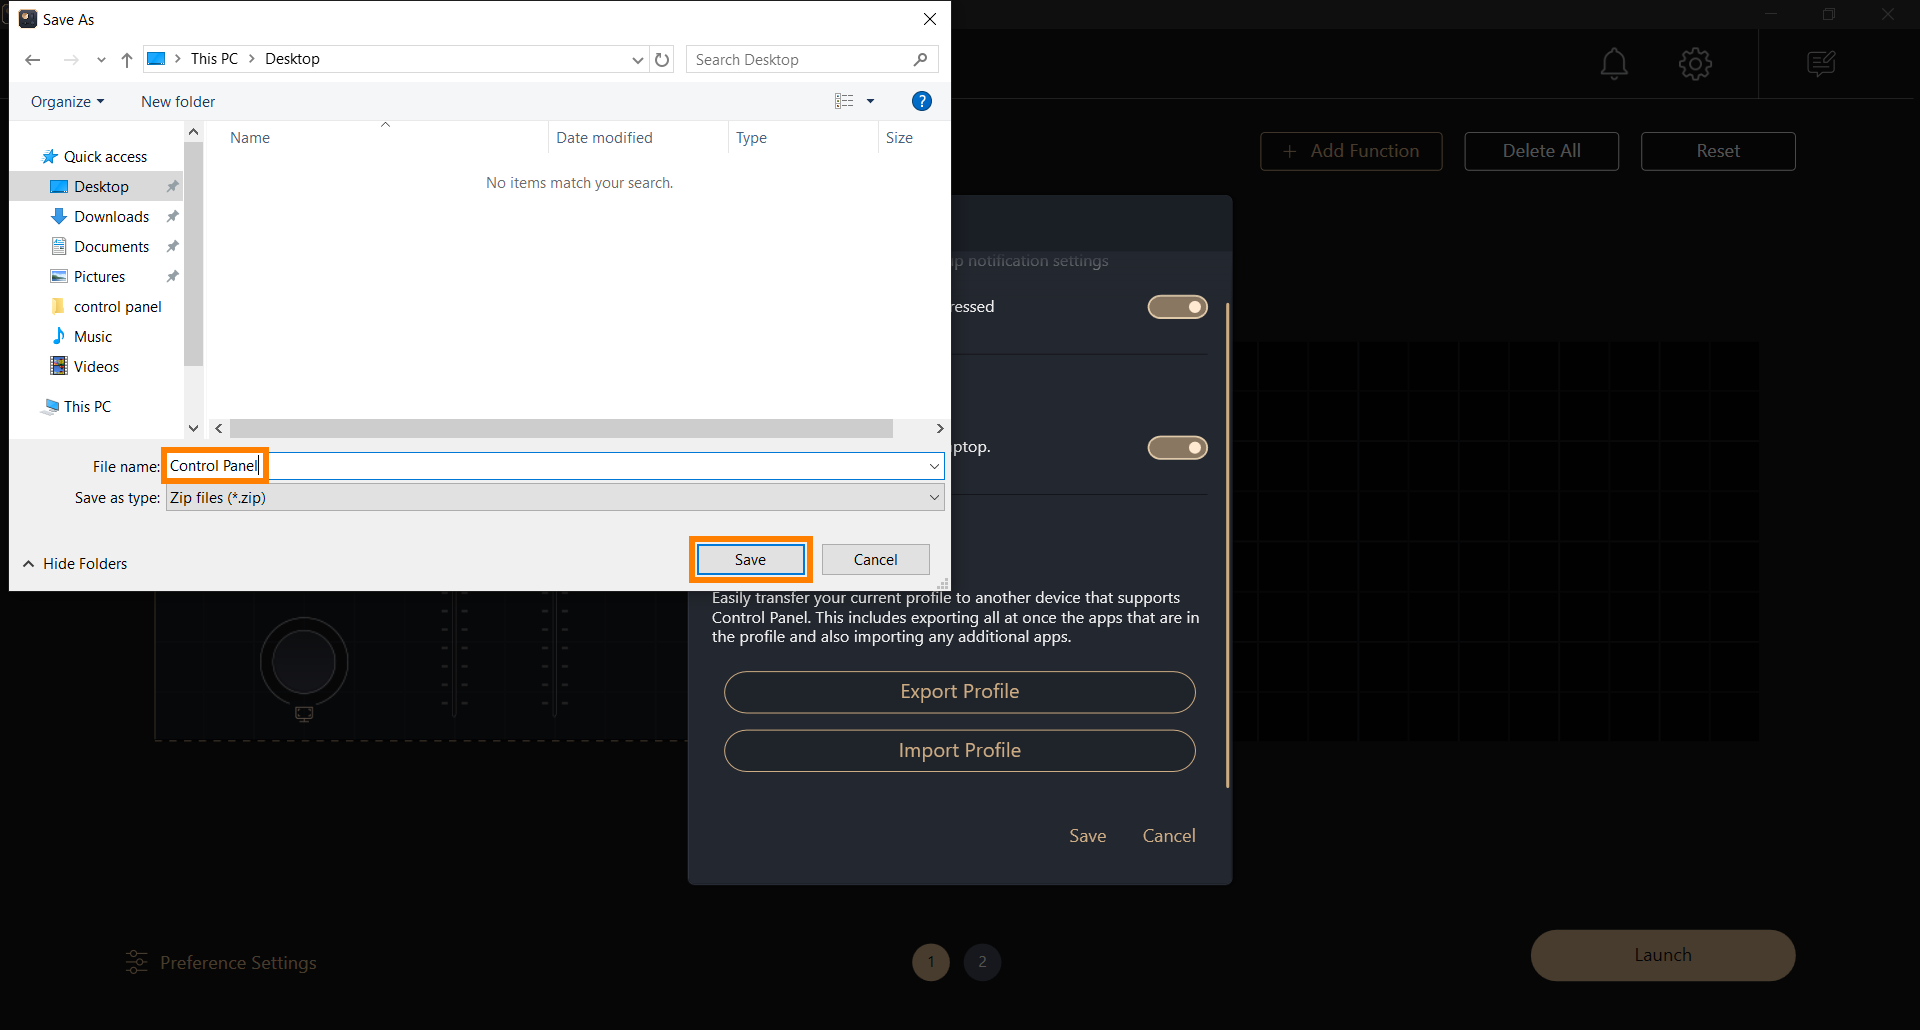
(2) After clicking [Export Profile], a pop-up window will appear, find the folder where your configuration file is saved, enter [file name], click [Save], and save the settings file.
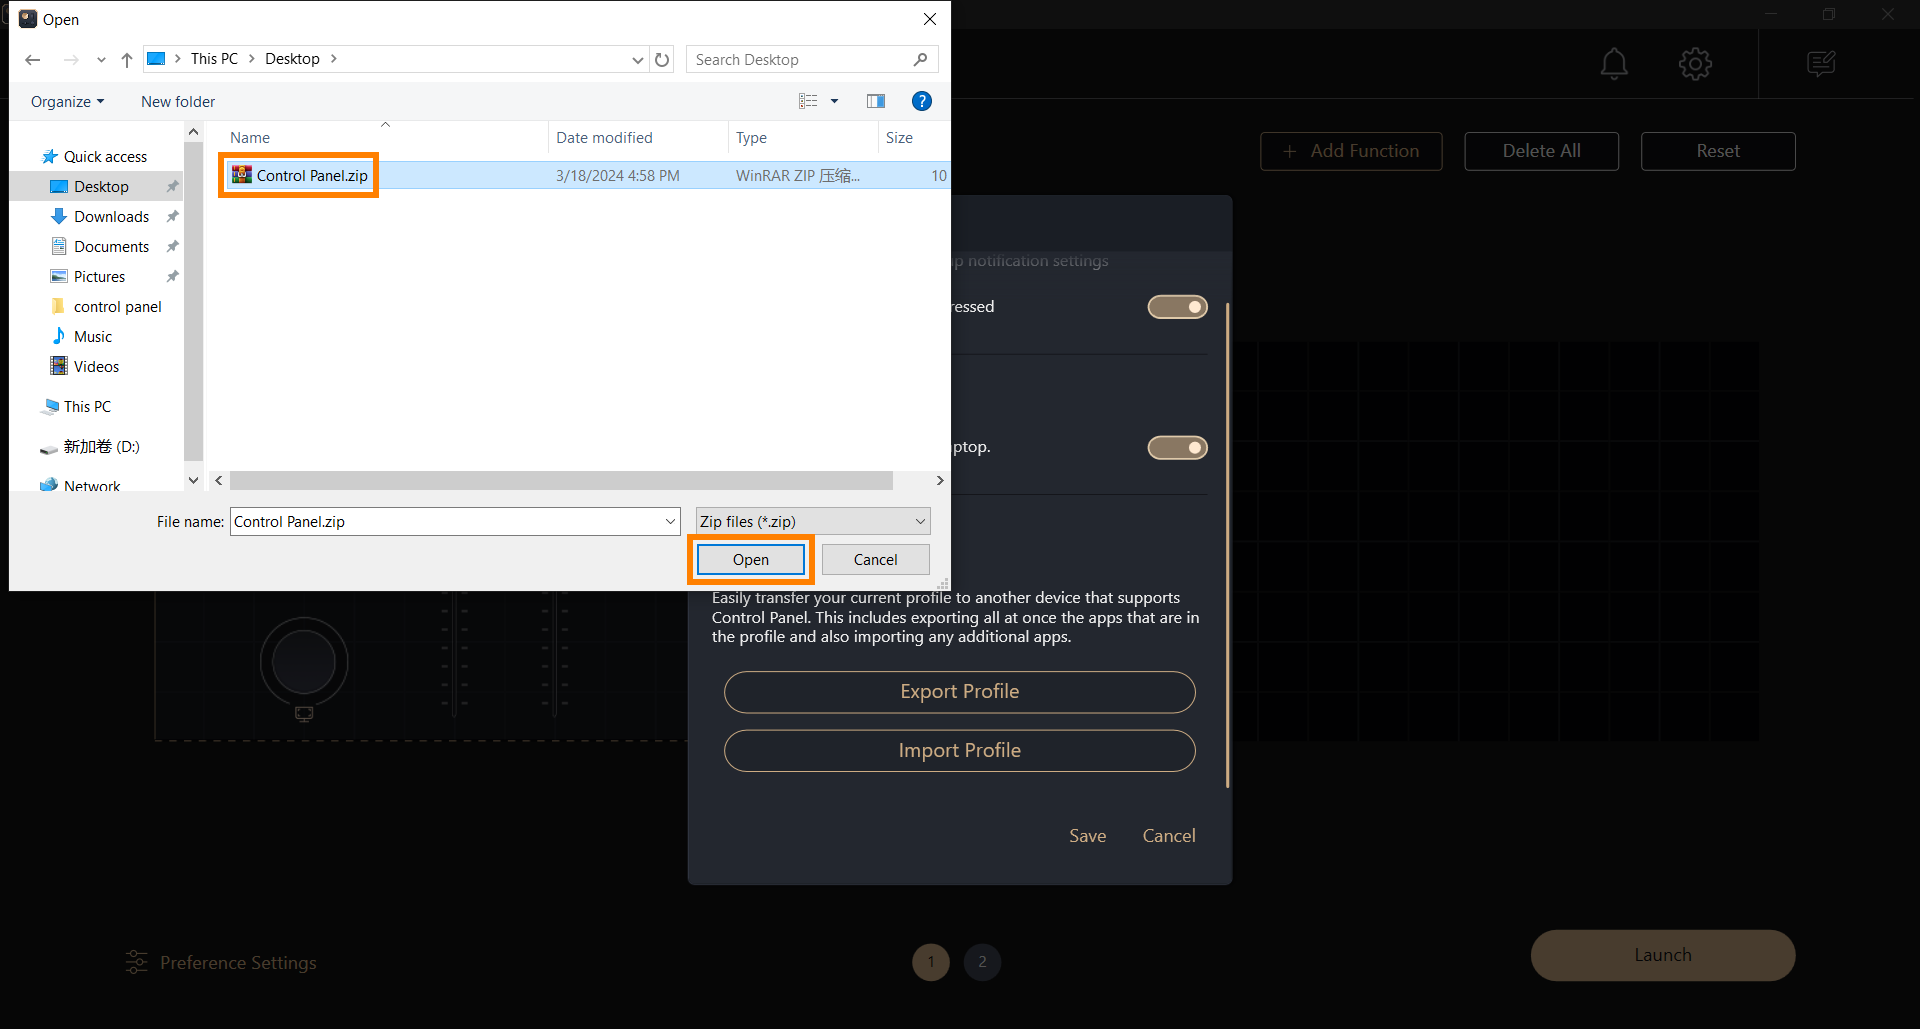
(3) When you have reinstalled the ASUS Dial & Control Panel software, you can click [Import Profile], find and select the configuration file you saved earlier, and click [Open] to restore the software to the desired state.
How to download and use GlideX, please refer to: [Notebook/Desktop/AIO] GlideX - Introduction | Official Support | ASUS Global
(1) When you are using the extended function of GlideX, you can select your [Mobile Device] in the upper left corner of the main interface of the Control Panel, modify the functions to be performed by the [Module], and click [Start].
※ To add software to the Control Panel mobile device to add or modify modules, please read this article 4. Add App, 5. Add Function.
(2) When you click [Launch], the Control Panel function will be displayed on your mobile device, and you can tap the function you want to perform on the screen of your mobile device with your finger.
※ The following screen is displayed in full screen on the mobile device.
8. How to download and remove the ASUS Dial & Control Panel App
8.1 Download the ASUS Dial & Control Panel App
Please go to the Microsoft App Store to download the ASUS Dial & Control Panel App.
8.2 Remove ASUS Dial & Control Panel App
If you want to remove ASUS Dial & Control Panel App, go to System Settings > App > ControlPanelToolkit and ASUS Dial & Control Panel > to uninstall it. Or refer to this link.