[ASUS Vivowatch]FAQ for ASUS VivoWatch 5 AERO
[ASUS VivoWatch 5 AERO] Setup and personalization
[ASUS VivoWatch 5 AERO] Precautions for wearing ASUS VivoWatch 5 AERO
[ASUS VivoWatch 5 AERO] How to Restart and Restore Factory Settings on ASUS VivoWatch 5 AERO
[ASUS VivoWatch 5 AERO] VivoWatch Screen Sensors Functions
[ASUS VivoWatch 5 AERO] Measuring Pulse Transit Time Index (PTT)
[ASUS VivoWatch 5 AERO] Monthly Calibration to Maintain Accurate Pulse Transit Time Index (PTT)
[ASUS VivoWatch 5 AERO] Sharing Data With ASUS Healthy Group in the ASUS HealthConnect App
[ASUS VivoWatch 5 AERO] How to find the product's serial number (SN)
[ASUS VivoWatch 5 AERO] Setup and personalization
[ASUS VivoWatch 5 AERO] How do I charge my ASUS VivoWatch?
ASUS VivoWatch 5 AERO Setup and personalization
This guide will take you through setting up and personalizing your VivoWatch 5 AERO. It will also explain how to connect VivoWatch 5 AERO with the ASUS HealthConnect mobile App.
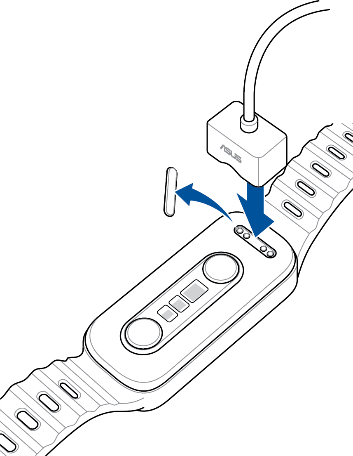
Step 1: Activation
Power up your ASUS VivoWatch 5 AERO by connecting it to the included USB cable and plugging it into a power source.
Step 2: Basic Setup
This includes language, time, gender, and wearing mode for the VivoWatch. When the "Pairing" message appears, your VivoWatch setup is complete.
Step 3: Download and install the ASUS HealthConnect app 
The ASUS HealthConnect App is available in the App Store or via Google Play. Android and iOS is supported.

Step 4: Pairing ASUS VivoWatch 5 AERO with the ASUS HealthConnect App
Choose your region, pair your ASUS VivoWatch, review the privacy policy, log in to your ASUS account, and accept the terms of use.
Note: By logging into your ASUS HealthConnect account and connecting your VivoWatch, your collected health data will be securely backed up and accessible on the ASUS cloud. This data will activate the "Health Circle" feature, allowing you to share your data and stay connected with your loved ones' health status.
ASUS VivoWatch series complies with the international Health Insurance Portability and Accountability Act (HIPAA) regulations for information security. You can share your collected health data with your doctor for medical care and reference purposes.
Step 5: Calibration
For optimal accuracy, calibrate your pulse index using a reliable device before initial use and once a month on your ASUS VivoWatch 5 AERO. Refer to FAQ section 4, "Maintaining Pulse Index Accuracy through Calibration," for step-by-step instructions.
Step 6: Using your ASUS VivoWatch
When steps 1-5 have been completed, put on the ASUS VivoWatch 5 AERO. The screen will light up when you raise your wrist. You can also activate the device by tapping the watch's face.
Swipe the main screen from left to right to access the physiological measurement menu. Swipe upward to track your Pulse Transit Time Index, heart rate, blood oxygen levels.
Access the exercise menu by swiping the main screen from right to left. Swipe upward to view recent exercise data or choose from various exercise modes, including Running, Swimming, Walking, Cycling, and more.
Swipe upward on the main screen to enter the activity overview and system functions page. Here, you can track your step count, calorie burns, and sleep data. You can also access lifestyle features like an alarm, stopwatch, camera, and you can control the watch's brightness or adjust language settings. Swipe downward on the main screen to see recent phone messages and notifications.
Step 7: Setting up personal information
To input a comprehensive profile, including your nickname, height, weight, daily step target, and calorie objective, tap the top-left icon on the main screen of the ASUS HealthConnect App. Then, hit the Save button on the top-right corner. A fully completed personal profile will aid the VivoWatch in tracking your usage more accurately.
[ASUS VivoWatch 5 AERO] Precautions for wearing ASUS VivoWatch 5 AERO
Precautions for wearing ASUS VivoWatch 5 AERO
The ASUS VivoWatch health wearables are carefully crafted with materials selected with research, and they are certified to ensure quality. However, some users may experience skin irritation from prolonged contact with certain metals, which could be due to personal sensitivity (allergies, for example) or environmental factors.
Every material used in the ASUS VivoWatch undergoes careful evaluation and the devices are compliant with the following regulations: allergy prevention (ISO10993 biocompatibility), optical safety (IEC/EN 62471 photobiological safety testing), and medical equipment basic safety (IEC60601-1 3rd).
If you have a history of skin sensitivities or allergies, wearing devices such as the ASUS VivoWatch may increase the likelihood of experiencing an allergic reaction. To reduce this risk, it is recommended to follow these precautions:
(1) Take off the ASUS VivoWatch periodically to allow your skin to breathe.
(2) Keep your wrist clean and dry regularly to minimize the risk of skin irritation.
(3) Regular cleaning of the watch and wristband is necessary. Prolonged exposure to residual sweat, soap, lotion, and other substances on the wristband can cause skin irritation if not cleaned.
(4) Despite selecting materials based on biocompatibility test standards for this product, some users may still exhibit an allergic reaction to certain materials. If you have a confirmed case of sensitive skin, exercise caution when wearing the ASUS VivoWatch. Pay close attention to any signs of an allergic reaction during the first three days of use. If a severe allergic reaction such as skin itching occurs, promptly remove the ASUS VivoWatch and seek medical advice before wearing it again.
(5) If you experience redness, itching, or other allergic symptoms around your wrist or under the device while wearing the ASUS VivoWatch, take it off immediately and consult a doctor before using it again.
(6) If you have sensitive or delicate skin, it is advisable to assess your condition and determine a suitable duration for wearing the ASUS VivoWatch. The optical sensor on the device continuously takes readings, and if you experience light sensitivity, remove the device immediately and seek medical attention before continuing to wear it.
(7) Wearing the ASUS VivoWatch with an overly tight band can cause discomfort from prolonged skin friction and hinder the evaporation of sweat. Additionally, long exposure to moist and warm conditions can increase bacterial growth and skin sensitivity, leading to short-term allergic reactions. For optimal sensor performance and comfort, wearing the ASUS VivoWatch with a properly fitting band is essential. The back cover should be snug against your wrist.
• If the band fits correctly, the ASUS VivoWatch should be on your wrist securely, accurately measure your heart rate, and provide a comfortable wearing experience.
• If the band is too loose, the ASUS VivoWatch may slip, or the sensors may not accurately detect your heart rate. In this situation, adjust the band to a tighter fit.
(8) Adjust the wristband tighter during exercise to prevent the VivoWatch from moving and affecting measurement stability. Loosen the band after the workout to reduce pressure on the skin.
(9) The materials used in the manufacture of the ASUS VivoWatch are as follows:
ASUS VivoWatch BP
Body: Corning Gorilla 3 Glass, medical-grade stainless steel plate, skin-friendly composite nylon bottom case, high-penetration nylon lens
Wristband: medical-grade silicone and medical-grade stainless steel
ASUS VivoWatch SE
Body: Corning Gorilla 3 Glass / Zirconia Ceramic Bezel / Medical-grade Stainless Steel Plate / Skin-friendly Composite Nylon bottom case / High-penetration Nylon Lens
Wristband: Medical-grade Silicone and Medical-grade Stainless Steel
ASUS VivoWatch SP
Body: Corning Gorilla 3 Glass / Zirconia Ceramic Bezel / Medical-grade Stainless Steel Plate / Skin-friendly composite nylon bottom case / High-penetration Nylon Lens
Wristband: Skin-friendly silicone and Medical-grade Stainless Steel
ASUS VivoWatch 5
Body: Corning DX+ High-strength Glass / Zirconia Ceramic Bezel / Medical-grade Stainless Steel Plate / Skin-friendly Composite Nylon bottom case / High-penetration Nylon Lens
Wristband: Skin-friendly Silicone and Medical-grade Stainless Steel / Leather and Medical-grade Stainless Steel
ASUS VivoWatch 5 AERO
Body: Medical-grade Stainless Steel Plate / Skin-friendly composite nylon bottom case / High-penetration Nylon Lens
Wristband: Skin-friendly Silicone and Medical-grade Stainless Steel
[ASUS VivoWatch 5 AERO] How to Restart and Restore Factory Settings on ASUS VivoWatch 5 AERO
Restarting the device
To restart your VivoWatch, follow these steps:
1. From the main screen of your VivoWatch, swipe down to access "Settings."
2. Scroll down on the settings page.
3. Tap the Restart button on the screen.
4. Your VivoWatch will restart.
Restoring to original factory settings
To reset your VivoWatch to its original factory settings, follow these steps:
1. From the main screen of your VivoWatch, swipe down to access "Settings."
2. Scroll down and click on "Factory Reset".
3. On the Factory Reset page, swipe the blue button down and hold it for 3
seconds.
4. The VivoWatch will reset and be restored to its original factory settings.
Please note that personal data stored on the VivoWatch will be erased after restoring
to the factory settings.
[ASUS VivoWatch 5 AERO] VivoWatch Screen Sensors Functions
VivoWatch Screen Sensors Functions
The combination of sensors on the screen of the ASUS VivoWatch 5 AERO consists of an ECG micro-electrode sensor (in the ring-shaped metal area) and PPG optical sensors (in the three transparent elongated regions).
The sensors on the screen have the following two functions:
(1) After selecting the health measurement, a user can place their finger on the sensor and the wristband will start collecting data.
(2) In addition to the health measurement, the sensors on the screen can serve as a Home Key to
[ASUS VivoWatch 5 AERO] Measuring Pulse Transit Time Index (PTT)
Measuring Pulse Transit Time Index (PTT)
Understanding Pulse Transit Time Index (PTT)
Stay on top of your physical and mental well-being with ASUS VivoWatch 5 AERO. The VivoWatch employs advanced wearable measurement technologies, utilizing ECG electronics and PPG optical sensors to determine the difference in time between signals and calculate the velocity and pressure of blood flow. The wristband's PTT measurement is valuable for assessing overall health and emotional stress levels.
Measuring Pulse Transit Time Index (PTT)
1. Choose the Pulse Transit Time Index measurement option
2. Tap the Start button on the screen
3. Gently place your index finger on the sensor below the screen
4. Onscreen will be displayed your real-time Pulse Transit Time Index, heart rate, blood oxygen reference value, and relaxation index. This data will also instantly synchronize to your ASUS HealthConnect App.
How to get accurate Pulse Transit Time Index (PTT) readings with the ASUS VivoWatch 5 AERO
1. Ensure the device is clean and free of dirt or debris.
2. Before starting the measurement, place your arm with the wristband flat on a table to minimize any movement that could affect the accuracy of the readings. It's best to sit in a chair with a backrest, relax your back against it, keep your feet flat on the floor, and minimize physical exertion. A relaxed and seated position is ideal for Pulse Transit Time Index (PTT) measurement.
3. To begin the measurement, gently touch the sensor on the screen with your index finger and maintain a still, relaxed state, keeping the watch snug on your wrist.
Incorrect methods of Pulse Transit Time Index measurement
1. Avoid using excessive force when touching the sensor with your index finger. When you apply too much pressure, the small blood vessels at the tip of your finger can become compressed, causing the sensor to give inaccurate readings.
2. During Pulse Transit Time Index measurement, keep your index finger on the sensor. Breaking contact can lead to the sensor receiving the wrong signals, which may result in inaccurate measurements.
3. Minimize talking, eating, or other activities during Pulse Transit Time Index measurement. Avoid intense physical activity, smoking, or drinking coffee before measuring.
Troubleshooting
1. Verify that your ASUS VivoWatch 5 AERO's MCU FW has been updated to the latest firmware version by visiting ASUS HealthConnect > Devices > Software Update > Check for Updates.
2. Make sure your personal information in ASUS HealthConnect is accurate, including gender, age, height, weight, and the wrist you prefer to wear the VivoWatch.
3. Make sure the wristband is fastened securely and that the back of the watch is comfortably pressed against your wrist during measurement.
[ASUS VivoWatch 5 AERO] Monthly Calibration to Maintain Accurate Pulse Transit Time Index (PTT)
Monthly Calibration to Maintain Accurate Pulse Transit Time Index (PTT)
The ASUS VivoWatch utilizes your pre-entered personal information, such as gender and age, as a base and fine-tunes the Pulse Transit Time Index calculation using AI and advanced algorithms.
For the most accurate readings, it is recommended to calibrate the ASUS VivoWatch 5 AERO once a month using a trustworthy device.
By inputting high and low values into ASUS HealthConnect, the ASUS VivoWatch 5 AERO software is supplied with comparison parameters, enabling its algorithms to stay in tune with the wearer's condition and offer the most precise PTT readings.
How to Calibrate Pulse Transit Time Index (PTT)
1. Open the ASUS HealthConnect App and access the calibration: Devices > Pulse Transit Time Index Calibration.
2. Read the Pulse Transit Time Index (PTT) calibration instructions and input the "high value" and "low value" obtained from a reliable device in the dialog box. After pressing "Understood," it will be transmitted to the ASUS VivoWatch.
3. Next, perform a Pulse Transit Time Index (PTT) measurement on the ASUS VivoWatch 5 AERO. The calibration of the PTT will be completed after the measurement is finished.
4. To ensure data accuracy, calibration the Pulse Transit Time Index (PTT) once a month.
Consequences of Not Calibrating Pulse Transit Time Index (PTT) Regularly
Prolonged use of the ASUS Health Band without regular Pulse Transit Time Index (PTT) calibrations may cause the device to fail to compare parameters. The user may still be able to perform Pulse Transit Time Index (PTT) measurements, but the readings may be less precise.
For Best Results Have Only One User Per ASUS VivoWatch
The Pulse Transit Time Index (PTT) readings from the ASUS VivoWatch are generated by gathering signals from the VivoWatch sensor and incorporating personalized user information. AI and predictive algorithms then process these readings. The accuracy of PTT may fluctuate based on factors such as the frequency of wear, calibration, and duration of use.
Reset ASUS VivoWatch to Factory Settings Before Transferring to Another User
It is essential to remove personal data from the ASUS VivoWatch 5 AERO before transferring ownership to another person. Having incorrect personal information settings, such as gender, age, height, weight, and dominant hand, can impact the accuracy of Pulse Transit Time Index (PTT) measurements.
Before transferring ownership of the ASUS VivoWatch 5 AERO to another person, it is essential to reset the device to its original factory settings. Only after the device has been initialized and calibrated can it accurately measure the Pulse Transit Time Index (PTT).
[ASUS VivoWatch 5 AERO] Sharing Data With ASUS Healthy Group in the ASUS HealthConnect App
What is the ASUS Healthy Group?
The ASUS Healthy Group feature of ASUS VivoWatch is an innovative service that combines IoT technology and cloud-based information sharing. Health data collected by ASUS VivoWatch is transmitted to the user's mobile phone through Bluetooth and uploaded to the ASUS cloud when the user logs on to the ASUS HealthConnect App.
The benefit of cloud sharing allows the user to invite friends and family to join their ASUS Healthy Group on the ASUS HealthConnect App.
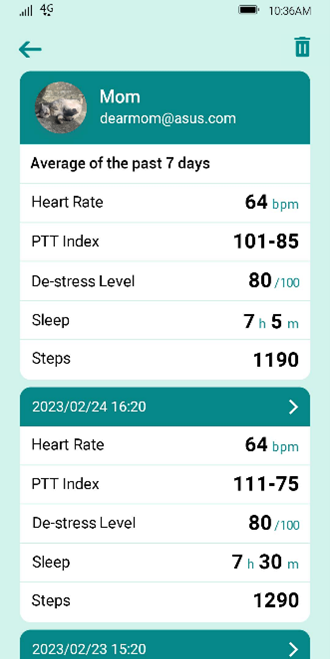
Participants can view each other's health data of the past seven days, including pulse index, heart rate, relaxation index, sleep, steps, and more. The data is presented in daily reports and a comprehensive overview of the past week.
Setting up the ASUS Healthy Group in ASUS HealthConnect App
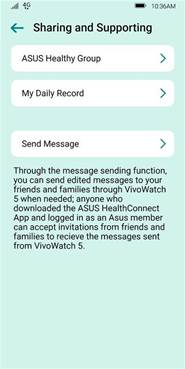
(1) Open the ASUS HealthConnect App and click on the top right icon on the main screen to enter the Share & Support page. Then, select the ASUS Healthy Group feature and go to the setup screen.
•To enter the ASUS Healthy Group page: Homepage > Dual person icon in the upper right corner > ASUS Healthy Group |
|
(2) The page displays a list of approved members in the ASUS Healthy Group. To add a friend or relative to the ASUS Healthy Group, click the upper right corner icon and add their ASUS account. Once approved, you can view their health information.
•Set up screen for " ASUS Healthy Group."
•ASUS Healthy Group List 1. Friends and Family: The person whose health data I can see. For example, if my father is on my Friends and Family list, I can see his health data. 2. Authorized List: People who can see my health data. For example: If I allow my son to view my health data, he will appear in the Authorized list.
|


Add a Friend in the ASUS Healthy Group
•Press the icon in the upper right corner and add the person's account (email or personal phone number with country code).
•The recipient will receive a notification (represented by a red dot) on their ASUS HealthConnect App's health data page. They can go to the ASUS Healthy Group page and view the invitation.
•Invitees simply press "Confirm" to agree to share their health information with you. You will then appear in their "Authorized List." Also, this person will appear in your Friends and Family list, and you can start to view their health data.
(1) A son wants to add his father to his Friends and Family list: The son goes to the ASUS Healthy Group page in the App and clicks the dual-person icon in the upper right corner. Then, he clicks "Add Account" and inputs the father's ASUS account in the dialogue box.
(2) The father authorizes his son to view his health data:
The father opens the ASUS HealthConnect App on his phone and taps on the top right corner of the screen to access the "Share and Support" page. Then, he taps the ASUS Healthy Group to view the red dot notification.
After reading the content and pressing "Confirm" to allow access, his son can view his father's health data.
(3) After the father allows the son to access his information, the father will appear in the son's Friends and Family list.
|

•A son wants to view his father's health data:
(1) A son wants to add his father to his Friends and Family list: The son goes to the ASUS Healthy Group page in the App and clicks the dual-person icon in the upper right corner. Then, he clicks "Add Account" and inputs the father's ASUS account in the dialogue box.
(2) The father authorizes his son to view his health data:
The father opens the ASUS HealthConnect App on his phone and taps on the top right corner of the screen to access the "Share and Support" page. Then, he taps the " ASUS Healthy Group " to view the red dot notification.
After reading the content and pressing "Confirm" to allow access, his son can view his father's health data.
(3) After the father allows the son to access his information, the father will appear in the son's "Friends and Family" list.
|
Deleting a Person from the ASUS Healthy Group:
• Navigate to the person's name in the Friends and Family list; click on the person's name; and then click on the trash bin icon in the top right corner to remove them from your list.
• By clicking the trash bin icon after highlighting the person's name, that person will no longer be able to see your health information.
• No notification will be sent to that person.
Why I can’t see my friend's latest health information even though they are already on my Friends and Family list?
• Verify that "Automatic Backup" in the Backup Data settings is active. If "Automatic Backup" is off, the App's data will not be uploaded to the cloud. Therefore, your friends and family's recent health information cannot be viewed in the ASUS Healthy Group feature.
Protecting User Privacy in the ASUS Healthy Group:
(1) To utilize the sharing feature in the ASUS Healthy Group, it is necessary for users to create an ASUS account, the system will then upload their data to the ASUS cloud.
Without logging into an ASUS account, the system cannot establish a connection with the cloud and, as a result, will not be able to use the ASUS Healthy Group sharing feature.
(2) Health data is highly personal and private information. To align with privacy principles, the sharing and receipt of health data requires the consent of the parties involved.
(3) Due to privacy principles, personal health information in the ASUS Healthy Group cannot be directly shared or forwarded to others. Access to a friend or family member's data is only possible through the ASUS Healthy Group.
[ASUS VivoWatch 5 AERO] How to find the product's serial number (SN)
VivoWatch serial number (SN)
The product serial number is a unique identifier for the product and serves as its ID. You can retrieve specific product information using the product’s SN.
How to find the Serial Number of the ASUS VivoWatch 5 AERO?
(1) See the bottom of the packaging box.
(2) On the main screen of the VivoWatch, go to Settings > About > Serial Number.
(3) The serial number also appears on the ASUS HealthConnect App when connected to the VivoWatch.
[ASUS VivoWatch 5 AERO] How do I charge my ASUS VivoWatch?
Please connect the charging cable in the ASUS VivoWatch box to the USB slot on your personal computer or a wall-mounted USB charger to charge your ASUS VivoWatch Aero
At the same time, we also recommend that you avoid using chargers that are too cheap or have no safety certification, as they cannot ensure stable and safe power input. Product damage caused by using a charger that is not authorized by UL and is not marked with the LPS mark is not covered by the warranty.
*The charging cable included in the ASUS VivoWatch box is for charging only