Related Topics
[Windows 11/10] Troubleshooting - Automatic Repair (Startup Repair) on Boot
Applicable Products: Notebook, Desktop, All-in-One PC, Gaming Handheld
Automatic Repair is a Windows feature designed to assist in resolving operating system and software issues to ensure the stability of your device. When your Windows operating system encounters errors, problems, or crashes, the Automatic Repair feature will attempt to automatically detect, identify, and fix these issues. For further automatic repair details, you may refer to the official documentation provided by Microsoft.
To provide you more detailed instruction, you can also click ASUS YouTube video link below to know more about How to Troubleshoot ASUS PC Startup Issues? (Windows Welcome Screen/Automatic Repair).
https://www.youtube.com/watch?v=Mi8UgUtm6us
If you're experiencing any of the following symptoms of Automatic Repair, here are some common troubleshooting methods to help you resolve the issue:
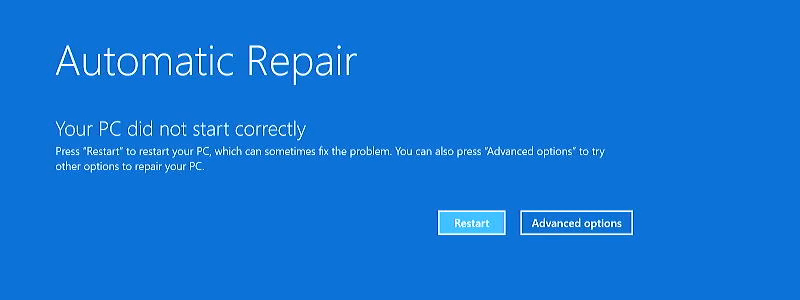
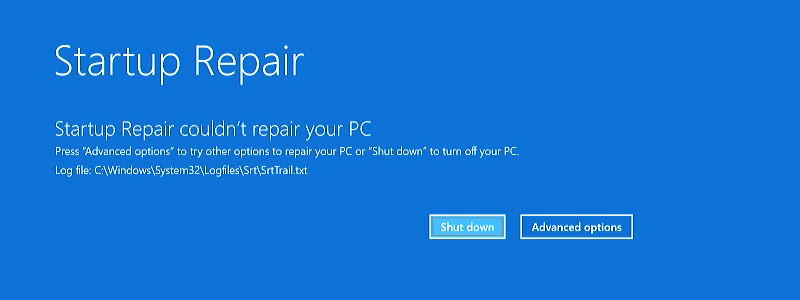
Device displaying a blue screen with "Automatic Repair" or "Startup Repair couldn't repair your PC”
Solution 1: Remove External Devices and Restart
- Disconnect all external devices, including the keyboard, mouse, external hard drive, printer, memory cards, CDs in the optical drive, and any adapter cards in card readers. Sometimes, external devices can prevent your device from booting into Windows.
Note: Also, disconnect all external displays. If it's a desktop computer, start with one external display to verify that your computer can boot and display properly. - Restart the device:
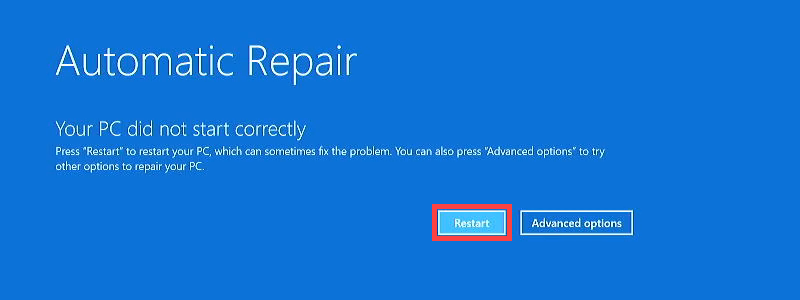
- If you see the "Automatic Repair" screen, select [Restart] on the screen. If your device can boot into Windows after the restart, make sure to update the BIOS, Windows updates, and drivers to their latest versions to prevent future issues.
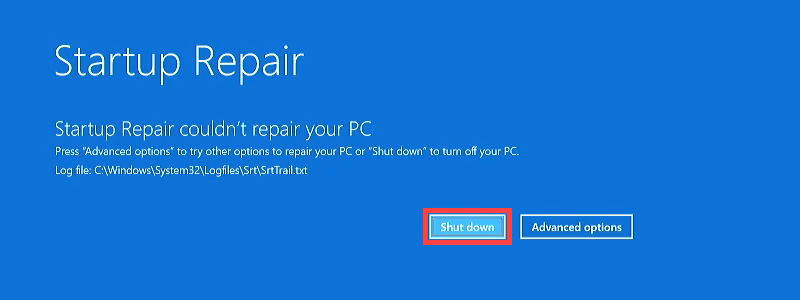
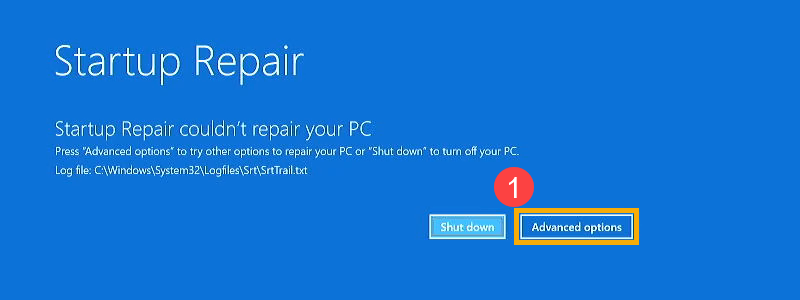
- If you see the "Startup Repair couldn't repair your PC" screen, select [Shut down] to turn off your device, then turn it back on. If your device can boot into Windows after the restart, make sure to update the BIOS, Windows updates, and drivers to their latest versions to prevent future issues.
- If you still can't enter the Windows operating system, proceed to the next solution.
- If you see the "Automatic Repair" screen, select [Restart] on the screen. If your device can boot into Windows after the restart, make sure to update the BIOS, Windows updates, and drivers to their latest versions to prevent future issues.
- Update BIOS, Windows updates, and drivers:
Software updates often improve system stability and optimization, so it's recommended to regularly check for the latest versions for your device. Learn more about how to update BIOS:
How to update the BIOS version in Windows system
How to use EZ Flash to update the BIOS version
(For desktop products, please refer to ASUS Motherboard EZ Flash 3 Introduction.)
For executing Windows update and drivers update, here you can learn more about:
How to execute Windows Update
How to update drivers via System Update in MyASUS
Solution 2: Continue to Windows
- Select [Advanced options]① on the "Startup Repair" screen.
- In the Choose an option screen, select [Continue]②. The system will exit the selection screen and continue running Windows.
If your device can boot into Windows after the restart, make sure to update the BIOS, Windows updates, and drivers to their latest versions to prevent future issues.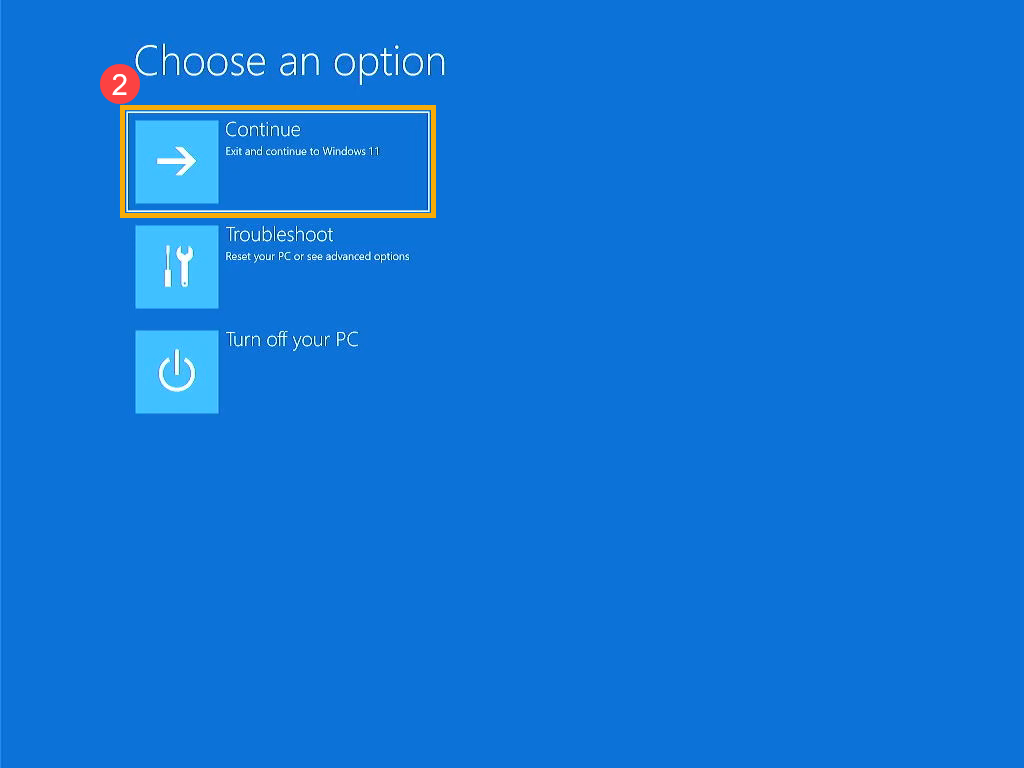
If you still cannot access the Windows operating system, proceed to the next solution. - Update BIOS, Windows updates, and drivers:
Software updates often improve system stability and optimization, so it's recommended to regularly check for the latest versions for your device. Learn more about how to update BIOS:
How to update the BIOS version in Windows system
How to use EZ Flash to update the BIOS version
(For desktop products, please refer to ASUS Motherboard EZ Flash 3 Introduction.)
For executing Windows update and drivers update, here you can learn more about:
How to execute Windows Update
How to update drivers via System Update in MyASUS
Solution 3: Run Startup Repair
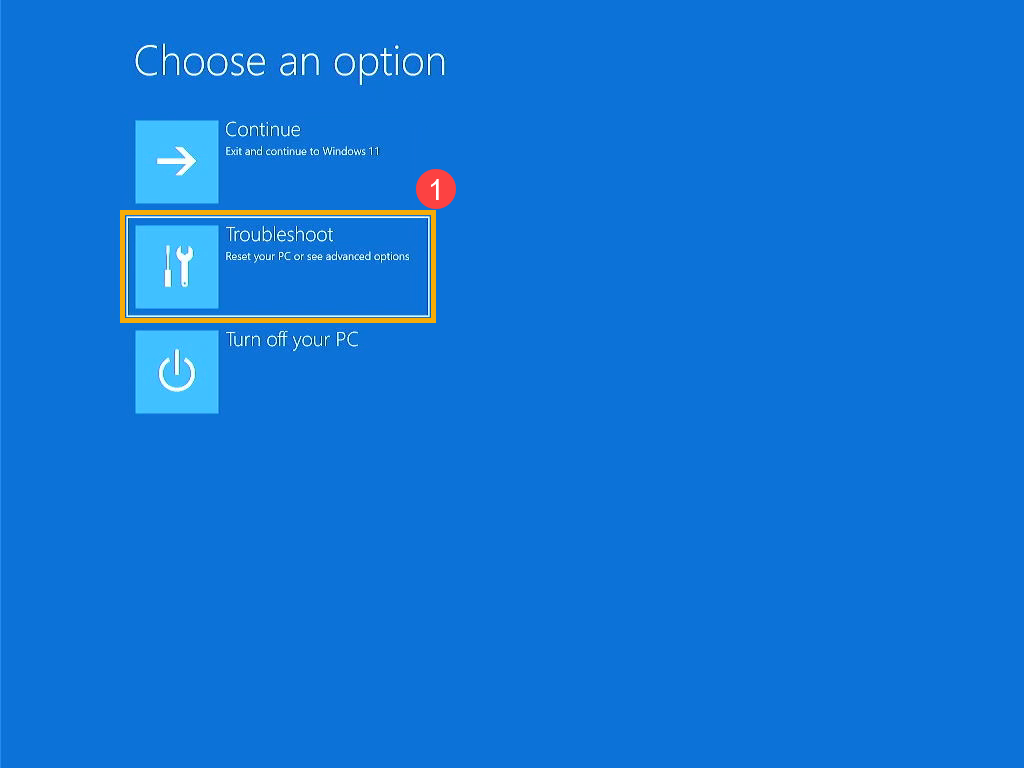
- Select [Advanced options]① on the "Startup Repair" screen.
- In the Choose an option screen, select [Troubleshoot]②.

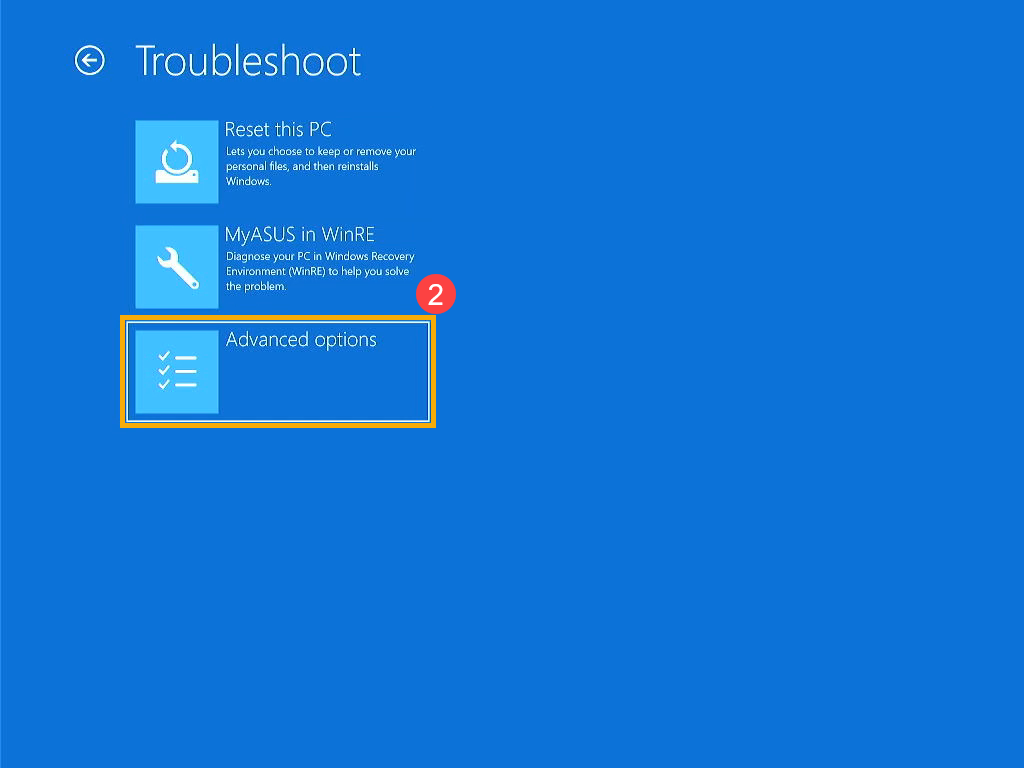
- In the Troubleshoot screen, select [Advanced options]③.

- In the Advanced options screen, select [Startup Repair]④. Follow the on-screen instructions; Windows will attempt to locate and repair issues.
If your device can boot into Windows after the restart, make sure to update the BIOS, Windows updates, and drivers to their latest versions to prevent future issues.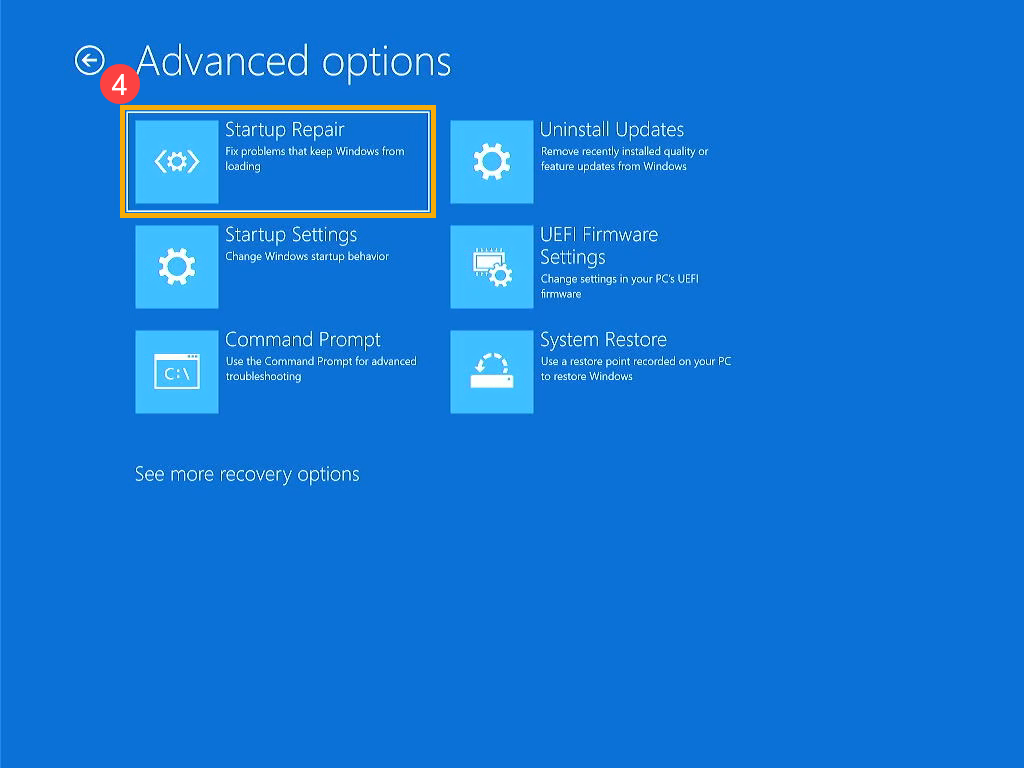
If you still cannot access the Windows operating system, proceed to the next solution. - Update BIOS, Windows updates, and drivers:
Software updates often improve system stability and optimization, so it's recommended to regularly check for the latest versions for your device. Learn more about how to update BIOS:
How to update the BIOS version in Windows system
How to use EZ Flash to update the BIOS version
(For desktop products, please refer to ASUS Motherboard EZ Flash 3 Introduction.)
For executing Windows update and drivers update, here you can learn more about:
How to execute Windows Update
How to update drivers via System Update in MyASUS
Solution 4: Perform System Restore
If the issue started recently and you have previously created a system restore point or a system-created restore point, you can try to restore the system to a point in time before the problem started to resolve it.
Note: Performing a system restore will not change your personal files but might remove recently installed applications and drivers.
- Select [Advanced options]① on the "Startup Repair" screen.
- In the Choose an option screen, select [Troubleshoot]②.
- In the Troubleshoot screen, select [Advanced options]③.
- In the Advanced options screen, select [System Restore]④. Follow the on-screen instructions and select a restore point before the issue occurred. Learn more about How to restore the system from a created system restore point.
If your device can boot into Windows after the restore, make sure to update the BIOS, Windows updates, and drivers to their latest versions to prevent future issues.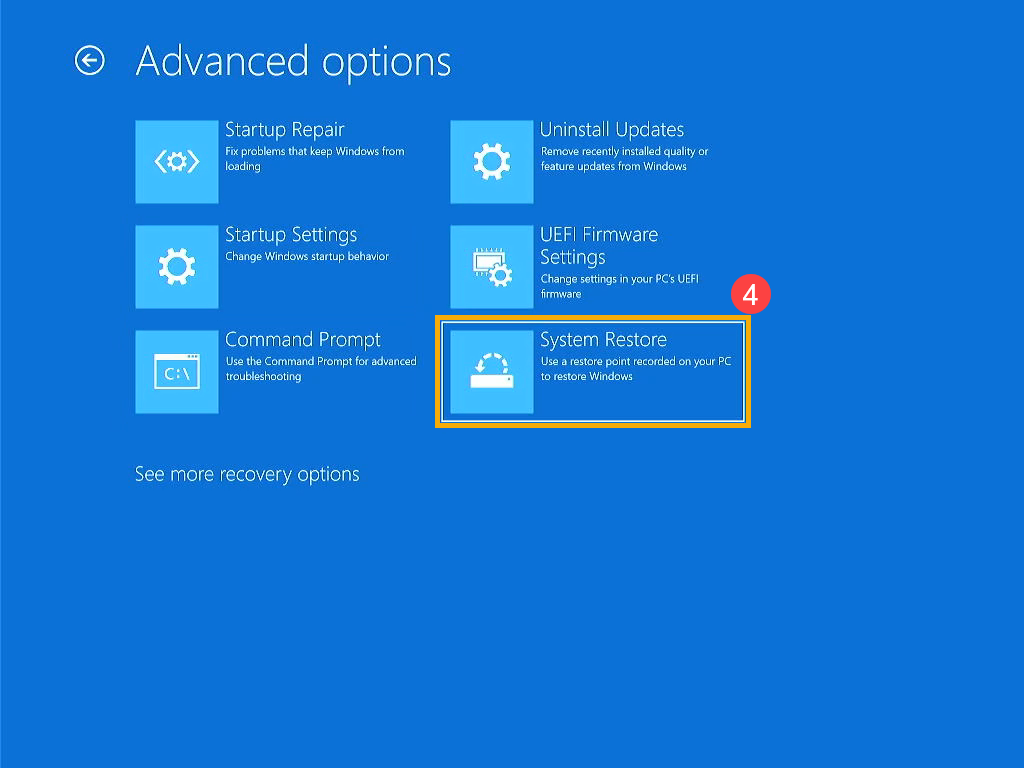
If you still cannot access the Windows operating system, proceed to the next solution. - Update BIOS, Windows updates, and drivers:
Software updates often improve system stability and optimization, so it's recommended to regularly check for the latest versions for your device. Learn more about how to update BIOS:
How to update the BIOS version in Windows system
How to use EZ Flash to update the BIOS version
(For desktop products, please refer to ASUS Motherboard EZ Flash 3 Introduction.)
For executing Windows update and drivers update, here you can learn more about:
How to execute Windows Update
How to update drivers via System Update in MyASUS
Solution 5: Perform a Windows Reset
If all troubleshooting steps have been completed, and the issue persists, you can try reinstalling the operating system to return the system to its original configuration.
When using the built-in Windows reset feature, you can choose from two reset options:
- Keep my files: This option reinstalls Windows and removes installed applications and settings but retains your personal files.
- Remove everything: This option thoroughly erases all personal files, applications, and settings before reinstalling Windows.
- Select [Advanced options]① on the "Startup Repair" screen.
- In the Choose an option screen, select [Troubleshoot]②.
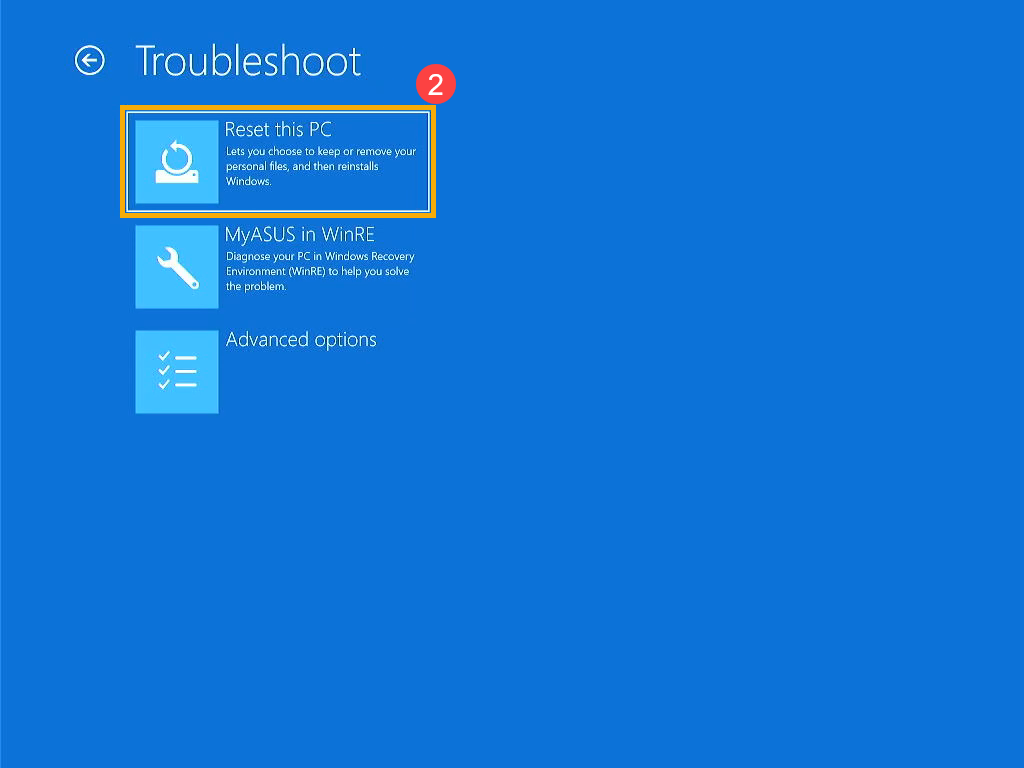
- In the Troubleshoot screen, select [Reset this PC]③.

- Choose whether you want to keep your personal files or remove everything④, and then follow the on-screen instructions. Learn more about How to Restore (Reinstall) the System.
If your device can boot into Windows after the reset, make sure to update the BIOS, Windows updates, and drivers to their latest versions to prevent future issues.
- Update BIOS, Windows updates, and drivers:
Software updates often improve system stability and optimization, so it's recommended to regularly check for the latest versions for your device. Learn more about how to update BIOS:
How to update the BIOS version in Windows system
How to use EZ Flash to update the BIOS version
(For desktop products, please refer to ASUS Motherboard EZ Flash 3 Introduction.)
For executing Windows update and drivers update, here you can learn more about:
How to execute Windows Update
How to update drivers via System Update in MyASUS
Screen stuck on the black screen with "Preparing Automatic Repair"
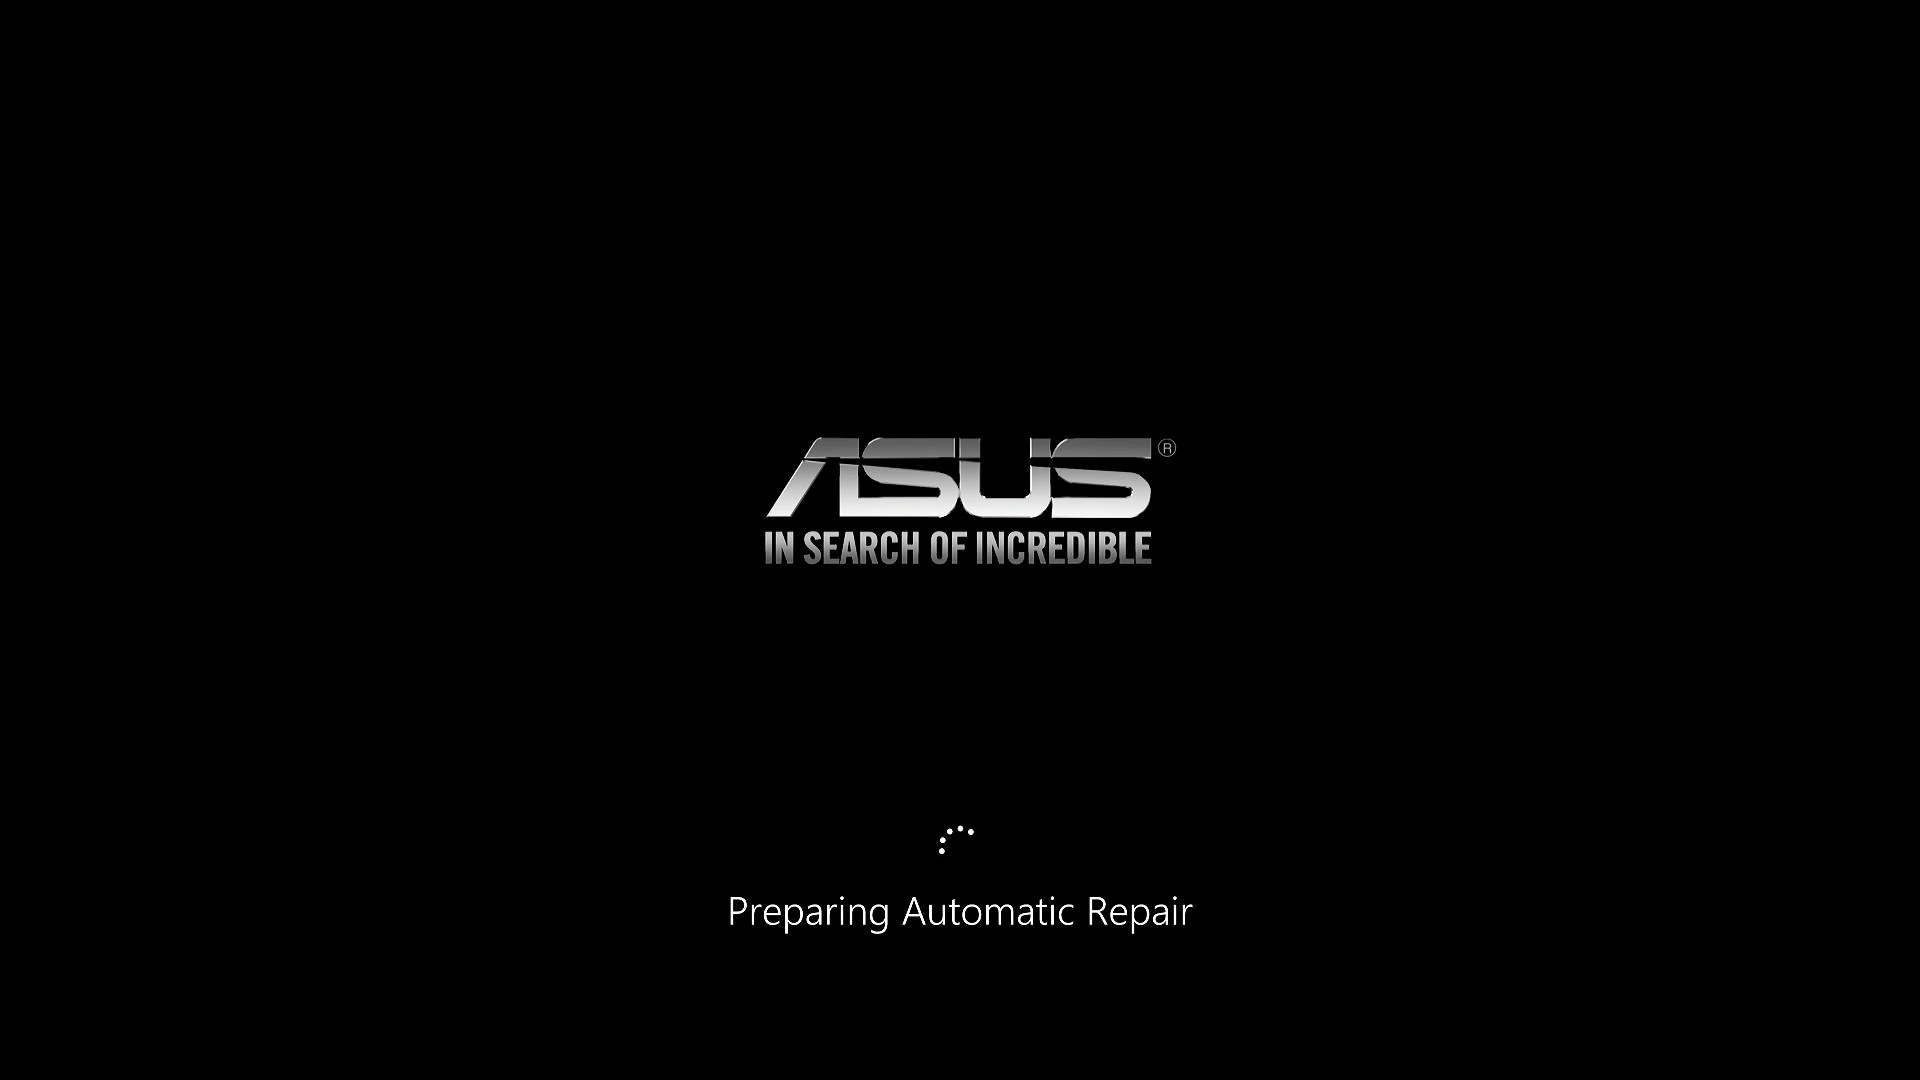
Generally, when your device displays "Preparing Automatic Repair," it should proceed to "Diagnosing your PC," and you might then see a blue "Automatic Repair" or "Recovery" screen.
However, if the screen remains stuck on the black screen with "Preparing Automatic Repair" for an extended period, you can try the following solutions:
Solution 1: Remove External Devices and Restart
- Turn off the device. Press and hold the power button until the power light goes off to shut down the device.
- Remove all external devices, including the keyboard, mouse, external hard drive, printer, memory cards, CDs in the optical drive, and any adapter cards in card readers. Sometimes, external devices can prevent your device from entering the repair screen.
Note: Also, disconnect all external displays. If it's a desktop computer, start with one external display to verify that your computer can boot and display properly. - After removing the connected devices, power on the device and check if this resolves your issue. If not, proceed to the next solution.
Solution 2: Force Shutdown and Perform CMOS Reset
- Attempt a force shutdown. Press and hold the power button until the power light goes off to shut down the device.
- Perform an Embedded Controller (EC Reset) or Real-Time Clock (RTC) reset to restore the hardware in your device to its default state. You can refer to the following articles to understand how to clear it:
- For Notebook/All-in-One PC/Gaming Handheld: How to Reset Embedded Controller (EC Reset), Real-Time Clock (RTC), and Hard Reset
- For Desktop: How to clear CMOS
If your device can boot into Windows after the restart, make sure to update the BIOS, Windows updates, and drivers to their latest versions to prevent future issues. If the problem persists, proceed to the next solution.
- Update BIOS, Windows updates, and drivers:
Software updates often improve system stability and optimization, so it's recommended to regularly check for the latest versions for your device. Learn more about how to update BIOS:
How to update the BIOS version in Windows system
How to use EZ Flash to update the BIOS version
(For desktop products, please refer to ASUS Motherboard EZ Flash 3 Introduction.)
For executing Windows update and drivers update, here you can learn more about:
How to execute Windows Update
How to update drivers via System Update in MyASUS
Solution 3: Run Startup Repair
- Manually boot your device into the Windows Repair Environment (WinRE). When your device hasn't booted, press and hold F9
 on your keyboard, then press the Power button
 to start your device.
Note: Some models may require F12 on the keyboard to enter the Windows Repair Environment. If F9 doesn't work, use F12 instead of F9 to enter the Windows Repair Environment.
Hold F9/F12 until you see the Windows Repair Environment screen.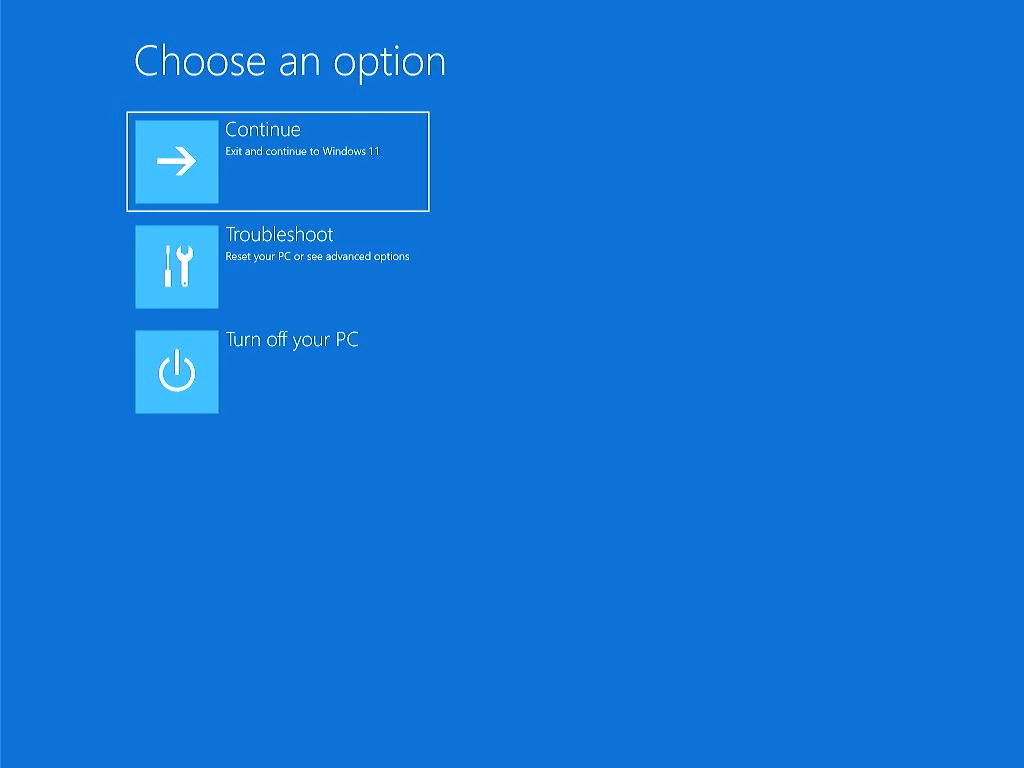
Note: After two failed system boot attempts, the third boot will guide the device to the Windows Repair Environment. If you can't enter the Windows Repair Environment using the keyboard method, you can also try the following steps:
A. After your device starts, press and hold the power button for 15 seconds to force the device to shut down.
B. Press the power button again to turn on the device.
C. After the ASUS logo first appears on the screen, press and hold the power button for 15 seconds to force the device to shut down.
D. Press the power button again to turn on the device.
E. When Windows restarts, press and hold the power button for 15 seconds to force the device to shut down.
F. Press the power button again to turn on the device.
G. Your device will fully reboot and enter the Windows Repair Environment. - In the Choose an option screen, select [Troubleshoot]①.
- In the Troubleshoot screen, select [Advanced options]②.
- In the Advanced options screen, select [Startup Repair]③. Follow the on-screen instructions; Windows will attempt to locate and repair issues.
If your device can boot into Windows after the restart, make sure to update the BIOS, Windows updates, and drivers to their latest versions to prevent future issues.
If you still cannot access the Windows operating system, proceed to the next solution. - Update BIOS, Windows updates, and drivers:
Software updates often improve system stability and optimization, so it's recommended to regularly check for the latest versions for your device. Learn more about how to update BIOS:
How to update the BIOS version in Windows system
How to use EZ Flash to update the BIOS version
(For desktop products, please refer to ASUS Motherboard EZ Flash 3 Introduction.)
For executing Windows update and drivers update, here you can learn more about:
How to execute Windows Update
How to update drivers via System Update in MyASUS
Solution 4: Perform System Restore
If the issue started recently and you have previously created a system restore point or a system-created restore point, you can try to restore the system to a point in time before the problem started to resolve it.
Note: Performing a system restore will not change your personal files but might remove recently installed applications and drivers.
- Manually boot your device into the Windows Repair Environment (WinRE). Detailed steps for entering Windows Repair Environment can be found in Solution 3.
- After entering the Windows Repair Environment, select [Troubleshoot]① from the Choose an option screen.
- In the Troubleshoot screen, select [Advanced options]②.
- In the Advanced options screen, select [System Restore]③. Follow the on-screen instructions and select a restore point before the issue occurred. Learn more about How to restore the system from a created system restore point.
If your device can boot into Windows after the restore, make sure to update the BIOS, Windows updates, and drivers to their latest versions to prevent future issues.
If you still cannot access the Windows operating system, proceed to the next solution. - Update BIOS, Windows updates, and drivers:
Software updates often improve system stability and optimization, so it's recommended to regularly check for the latest versions for your device. Learn more about how to update BIOS:
How to update the BIOS version in Windows system
How to use EZ Flash to update the BIOS version
(For desktop products, please refer to ASUS Motherboard EZ Flash 3 Introduction.)
For executing Windows update and drivers update, here you can learn more about:
How to execute Windows Update
How to update drivers via System Update in MyASUS
Solution 5: Perform a Windows Reset
If all troubleshooting steps have been completed, and the issue persists, you can try reinstalling the operating system to return the system to its original configuration.
When using the built-in Windows reset feature, you can choose from two reset options:
- Keep my files: This option reinstalls Windows and removes installed applications and settings but retains your personal files.
- Remove everything: This option thoroughly erases all personal files, applications, and settings before reinstalling Windows.
- Manually boot your device into the Windows Repair Environment (WinRE). Detailed steps for entering Windows Repair Environment can be found in Solution 3.
- After entering the Windows Repair Environment, select [Troubleshoot]① from the Choose an option screen.
- In the Troubleshoot screen, select [Reset this PC]②.
- Choose whether you want to keep your personal files or remove everything③, and then follow the on-screen instructions. Learn more about How to Restore (Reinstall) the System.
If your device can boot into Windows after the reset, make sure to update the BIOS, Windows updates, and drivers to their latest versions to prevent future issues.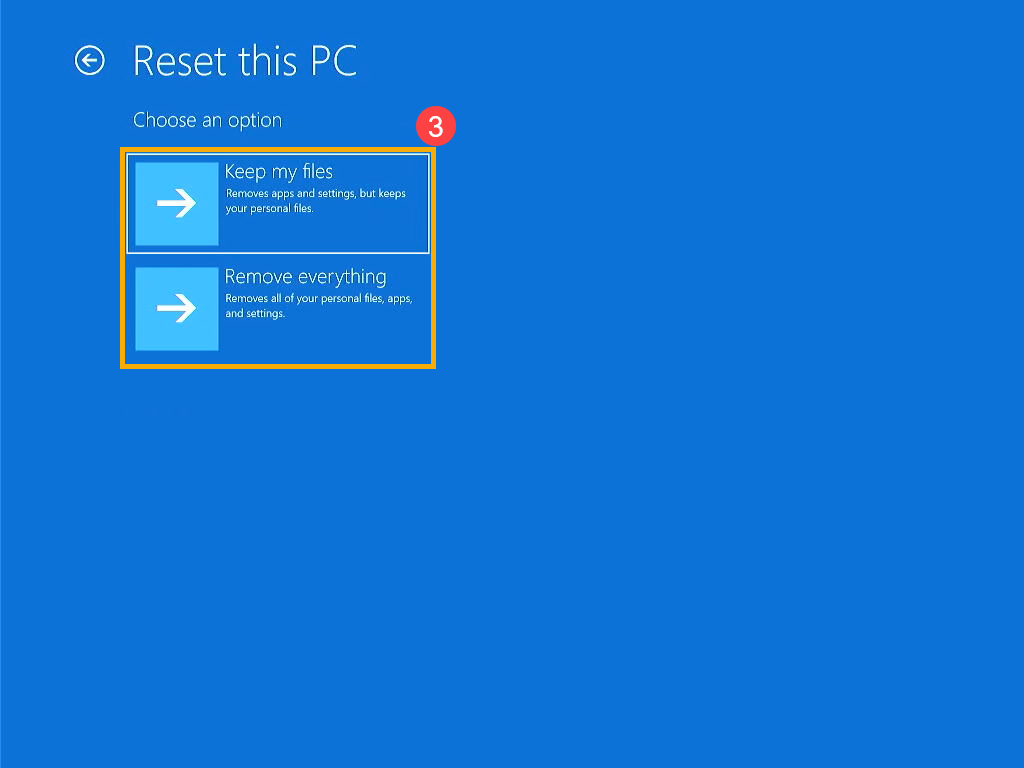
- Update BIOS, Windows updates, and drivers:
Software updates often improve system stability and optimization, so it's recommended to regularly check for the latest versions for your device. Learn more about how to update BIOS:
How to update the BIOS version in Windows system
How to use EZ Flash to update the BIOS version
(For desktop products, please refer to ASUS Motherboard EZ Flash 3 Introduction.)
For executing Windows update and drivers update, here you can learn more about:
How to execute Windows Update
How to update drivers via System Update in MyASUS
If your issue remains unresolved, please contact ASUS Customer Service for further assistance.