[NUC] RAID Setup Procedure for NUC Kits
Software RAID technology allows the combination of multiple physical disks into one logical unit, or disk. You can use this technology for the purpose of redundancy, performance, or both.
All NUC products that have multiple drives allow for the creation of a software RAID. This guide shows the process for setting up software RAID using the SATA (AHCI) method and the PCIe (NVMe) method and provides resources to setup RAID in Linux*.
If you want to configure Optane™ Technology on supported Intel NUCs, see Installing Optane™ Memory on NUC Kits.
What's needed?
- USB flash drive
- The latest Rapid Storage Technology Driver Installation Software with Optane™ Memory or Rapid Storage Technology (RST) User Interface and Driver, available on Download Center
- Windows 7*, Windows 8.1*, or Windows® 10 64-bit* Installer
- Drives (one of the following combinations):
- One 2.5" SATA drive and one M.2 SATA drive
- Two M.2 NVMe SSDs (supported by NUC11PHKi7C[x], NUC9i[x]QNX, NUC9V[x]QNX, NUC8i7HNK, NUC8i7HVK, and NUC6i7KYK only)
| Notes |
|
Caution | Creating a new RAID, SATA, or PCIe, will format your discs and erase all content. |
Aptio® V UEFI Firmware Core (BIOS) for 11th Generation NUC
SATA (AHCI) RAID
- Press F2 during boot to enter the BIOS setup.
- Navigate to, Advanced > Storage.
- Set, Enable VMD controller (Enable for RAID and Optane Memory), to Enabled.
- Change, Map this Root Port under VMD, to Enabled.
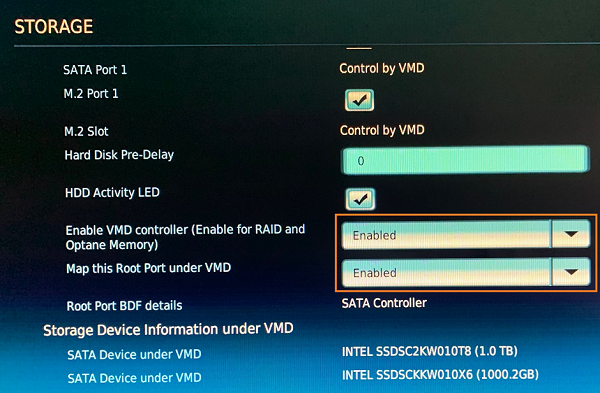
- Press F10 to save the changes, then select OK and the system will reboot.
- Press F2 during boot to enter the BIOS setup.
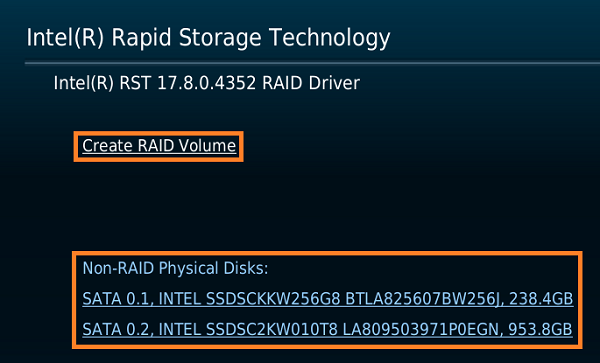
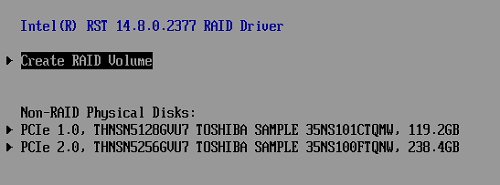
- Navigate to Advanced > Add-in config > Intel(R) Rapid Storage Technology, then select Create RAID Volume.
| Note | If you do not see two discs in the Non-RAID Physical Disks section, turn off the NUC, open the chassis and check the connections for both discs. You must see two discs to continue. |
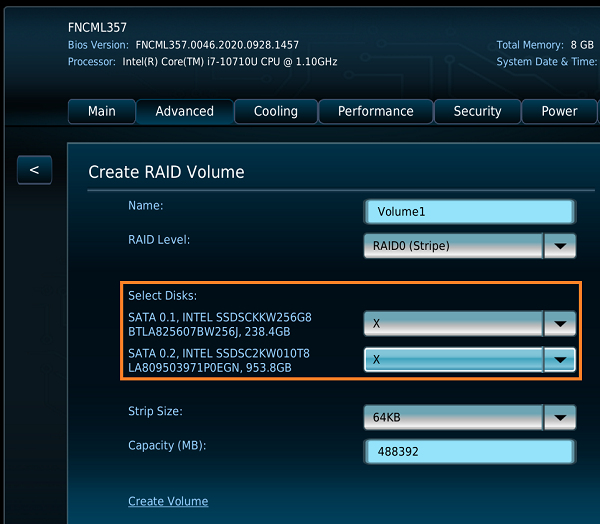
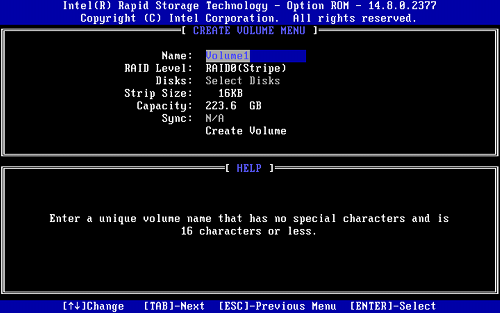
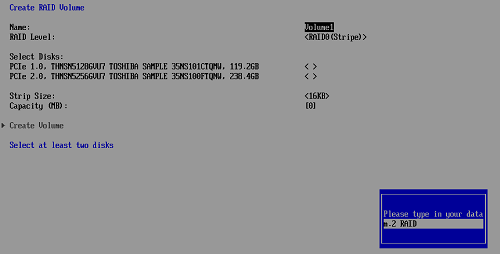
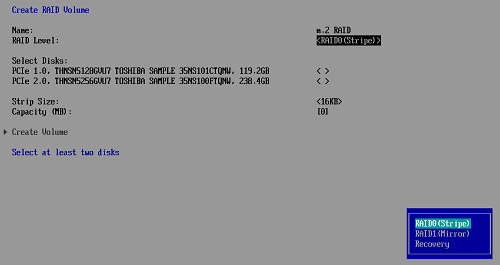
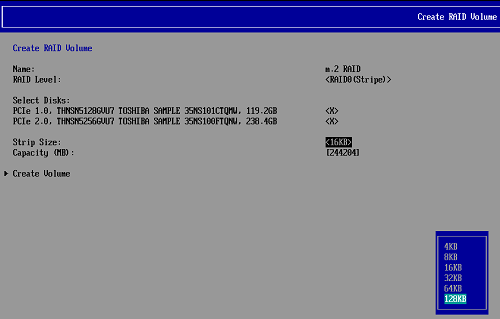
- Name the volume and set the RAID Level.
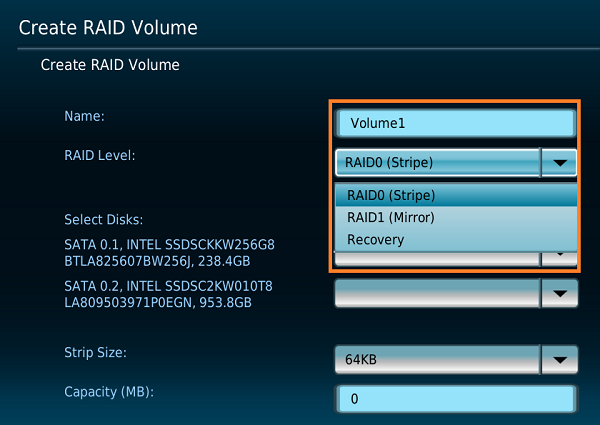
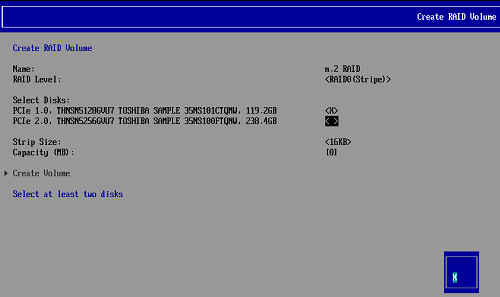
- For both Disks, click the pull-down menu and select X.
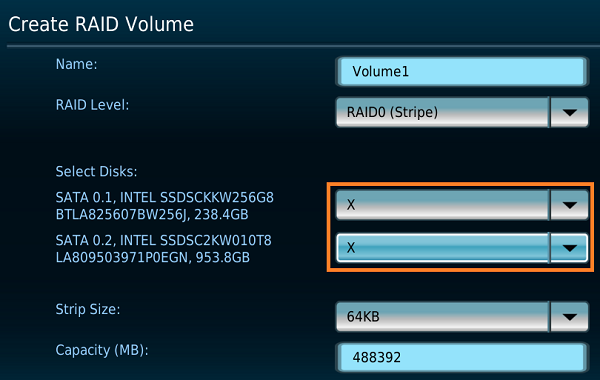
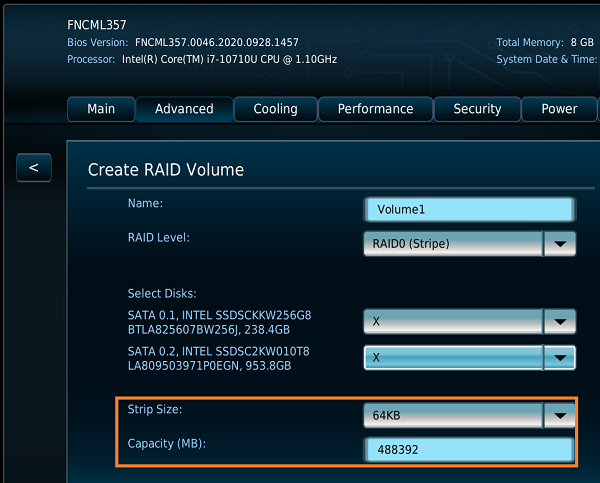
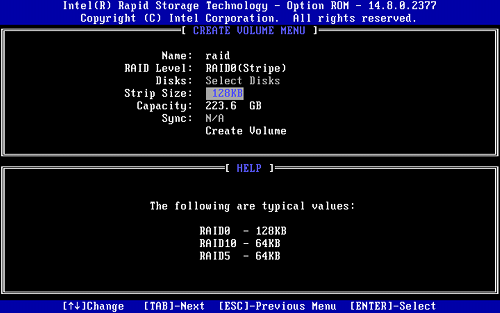
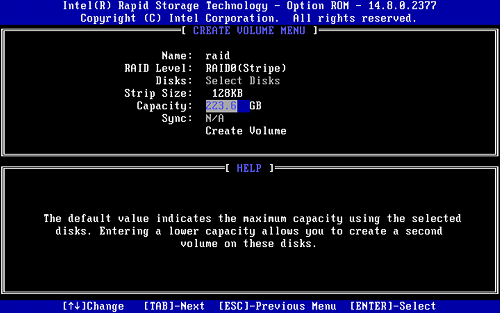
- Select the stripe size, and if desired, Capacity.
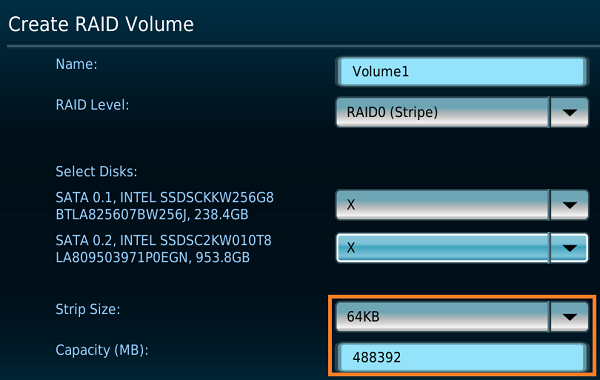
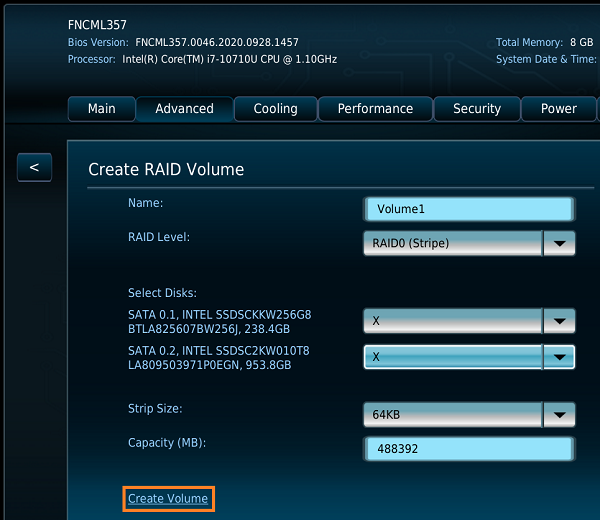
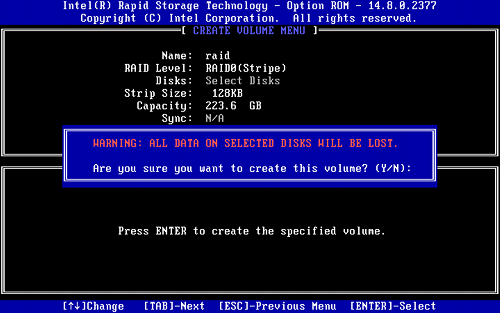
- Select, Create Volume.
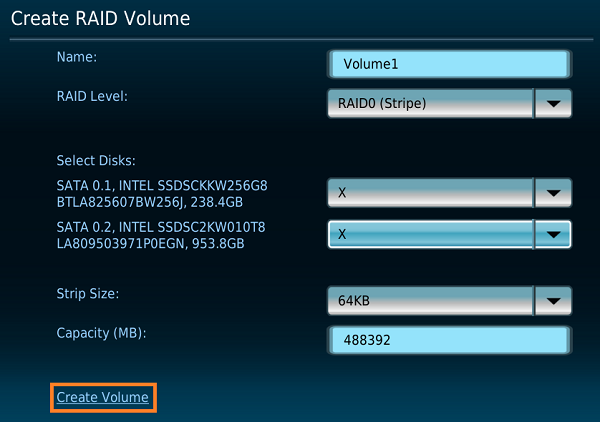
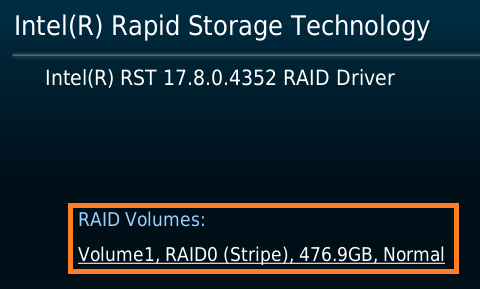
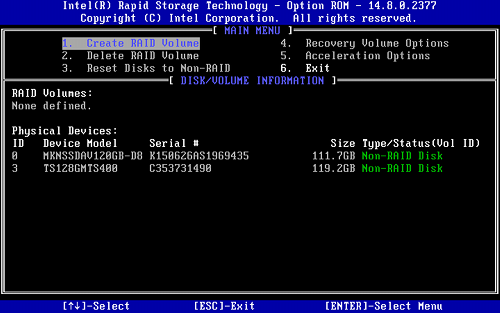
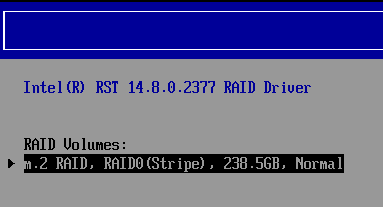
- You will see the completed RAID Volume.
- Press F10 to Save and Exit BIOS Setup.
- The Intel NUC will restart. Turn off the Intel NUC.
- Connect the USB flash drive or USB optical drive that has the Windows* installation files.
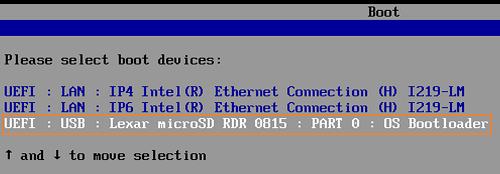
- Power on the Intel NUC and press the F10 key during boot.
- Follow the Windows Installation instructions.
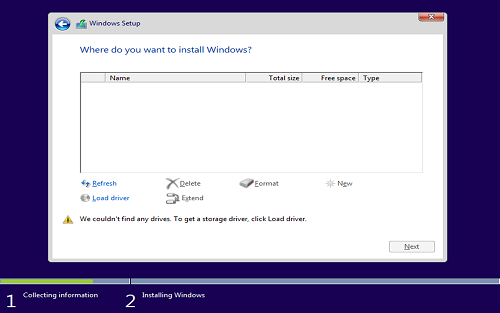
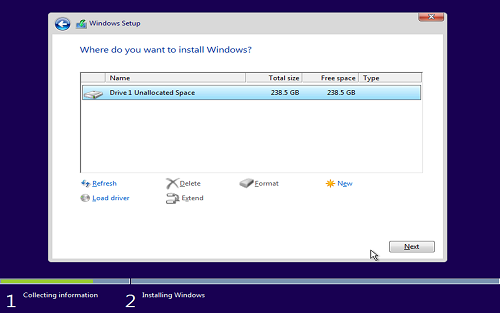
| Note | When you get to the Where do you want to install Windows? screen below, Windows may not see your Disks. Continue following the instructions below. |
- Navigate to Rapid Storage Technology Driver Installation Software with Optane™ Memory, and Download, F6flpy-x64 (VMD).zip.
- Unzip F6flpy-x64 (VMD).zip and drag the unzipped folder on to a USB device.
- Insert the USB device, with the latest F6flpy-x64 (VMD) driver, into the Intel NUC.
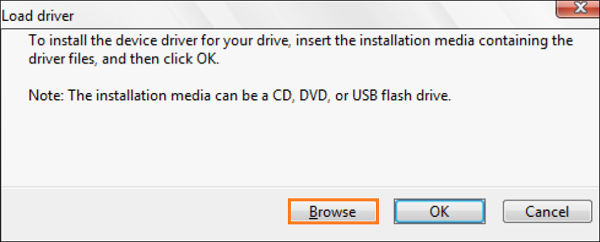
- Select Load Driver > Browse > (your USB drive) > F6flpy-x64 (VMD) Folder

| Note | You will see the screen below if Windows finds the Rapid Storage Driver. |
- Select Next. It can take a minute or two for the driver to load. When the screen below displays, Windows is ready to be installed. Select Next to start the installation.
PCIe (NVMe) RAID
| Note |
|
- Press F2 during boot to enter the BIOS setup.
- Click Advanced > Storage.
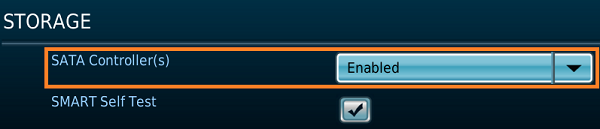
- Set SATA Controller(s) to Enabled.
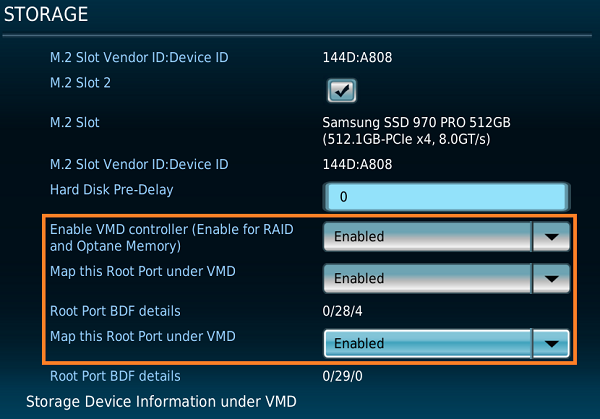
- Scroll down, then, set the following options to, Enabled
- VMD controller (Enable for RAID and Optane Memory)
- Both, Map this Root Port under VMD
- Press F10 to save the changes, then select OK and the system will reboot.
- Press F2 during boot to enter the BIOS setup.
- Select Advanced > Add-in Config > Intel(R) Rapid Storage Technology.
- Select, Create RAID Volume.
- Name the RAID Volume.
- Select the RAID level.
- Select the discs, by selecting X, in the pull-down menu.
- Set the Stripe Size and Capacity.
- Select, Create Volume. Note You will see the completed RAID Volume.
- Press F10 to Save and Exit BIOS Setup.
- Shutdown the Intel NUC.
- Plug your Windows installer into any of the USB ports on the Intel NUC and press the power button to boot the Intel NUC.
- Follow the Windows Installation instructions.
- When you get to the Where do you want to install Windows? screen, on a different computer navigate to https://downloadcenter.intel.com
- Select, Memory and Storage, and navigate to the latest, Intel Rapid Storage Technology Driver Installation Sowtware with Optane Memory installer.
- Download; F6flpy-x64 (VMD).zip.
- Unzip the folder
- Copy the unzipped folder to a USB flash drive
- Insert the USB flash drive into the Intel NUC.
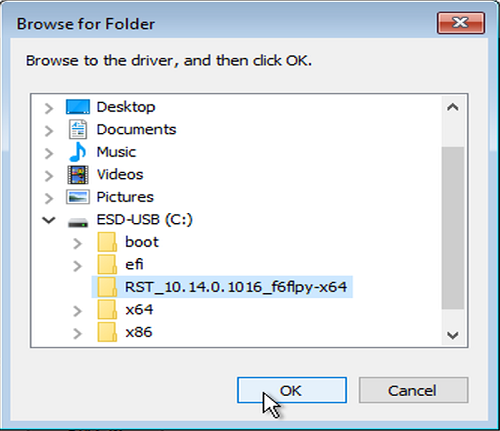
- Select Load Driver > Browse > USB drive > RSTxxxx Folder.
| Note | The USB flash drive is the C: drive: for example, xxxxx (C:) |
The screen below shows if Windows finds the Rapid Storage Driver.
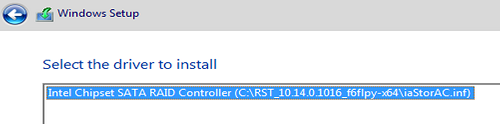
- Select Next. It can take a minute or two for the driver to load. When the screen below displays, Windows is ready to be installed. Select Next to start the installation.
Aptio® V UEFI Firmware Core (BIOS) for some 8th, 9th and 10th Generation Intel NUC
SATA (AHCI) RAID
- Press F2 during boot to enter the BIOS setup.
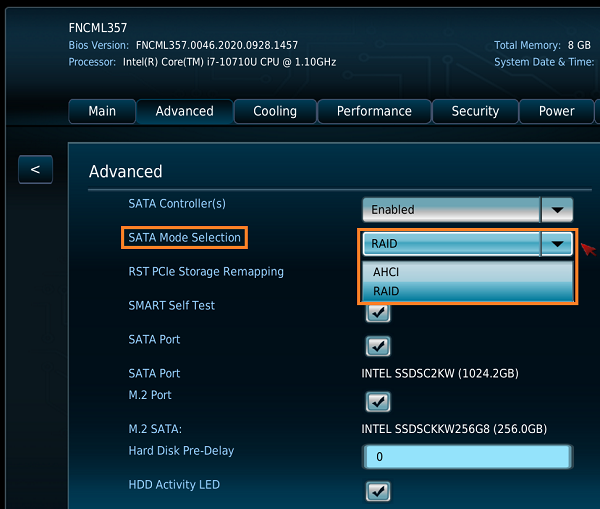
- Click Advanced > Storage.
- Set SATA Mode Selection to RAID.
Press F10 to Save and Exit BIOS Setup.
- The system will reboot. Press F2 during boot to enter the BIOS setup.
| Note | You must see two discs in the Non-RAID Physical Disks: section in order to create the RAID volume. |

- Name the volume.

- Select the RAID Level.
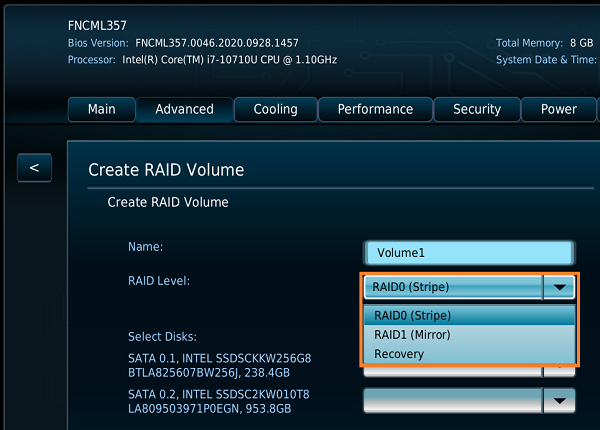
- Select the discs, by selecting X in the pull-down menu.

- Set the stripe size and disc space.

- Select Create Volume

- You will see the completed RAID Volume.
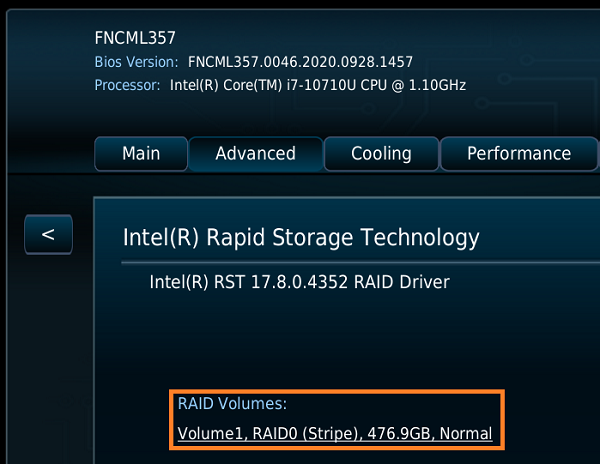
- Press F10 to Save and Exit BIOS Setup.
PCIe (NVMe) RAID
| Note | PCIe (NVMe) RAID is only supported via UEFI boot. Windows 7* must be installed via UEFI. For instructions, see a Guide to Create a Windows 7* UEFI Installer. |
- Press F2 during boot to enter the BIOS setup.
- Click Advanced > Storage.
- Set SATA Mode Selection to RAID and select both M.2 Slot 1 RST PCIe Storage Remapping and M.2 Slot 2 RST PCIe Storage Remapping.
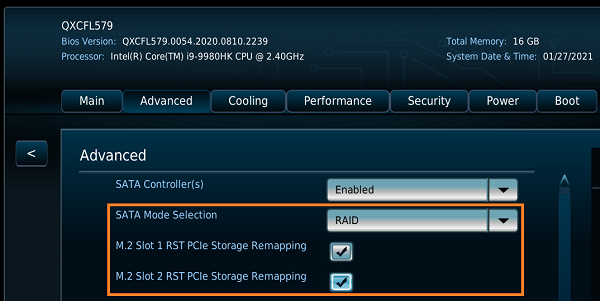
- Press F10 to Save and Exit BIOS Setup.
- The system will reboot. Press F2 during boot to enter the BIOS setup.
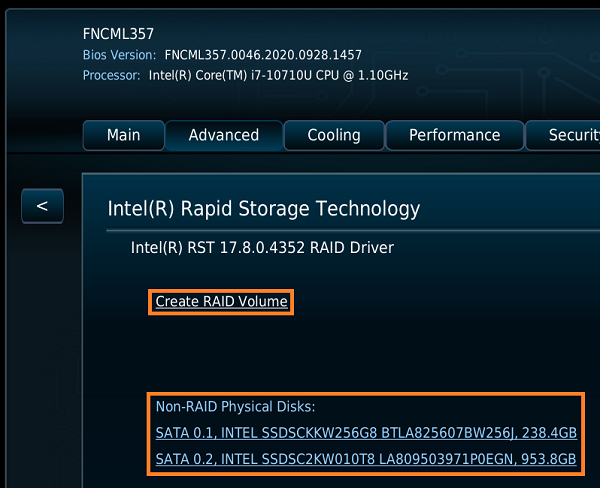
- Click Advanced > Add-in Config > Intel(R) Rapid Storage Technology > Create RAID Volume.
| Note | You must see two discs in the Non-RAID Physical Disks: section in order to create the RAID volume. |
- Name the RAID Volume.
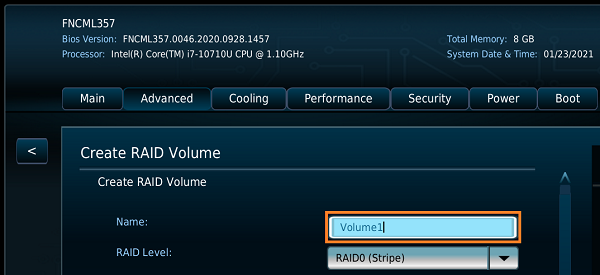
- Select the RAID level.

- Select the discs by selecting X in the pull-down menu.
- Set the Stripe Size and Capacity.
- Select Create Volume.
- You will see the completed RAID Volume.

- Press F10 to Save and Exit BIOS Setup.
Visual BIOS for NUC8i7HVK & NUC8i7HNK, NUC8i7DN and all 7th Generation products and earlier
SATA (AHCI) RAID
- Press F2 during boot to enter the BIOS setup.
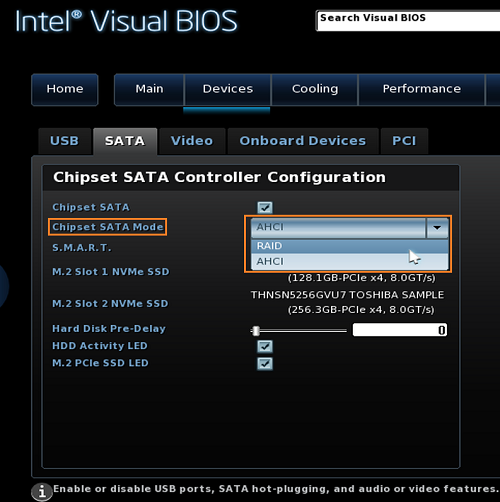
- Click Advanced > Devices > SATA.
- Set Chipset SATA Mode to RAID.

- Press F10 to Save and Exit BIOS Setup.
- The system will reboot. Press CTRL+I during boot (repeatedly, if necessary) until the RAID Option ROM utility opens.
- Select Create RAID Volume.
- Name the RAID volume.
- Set the Strip Size.
- Set the Capacity.
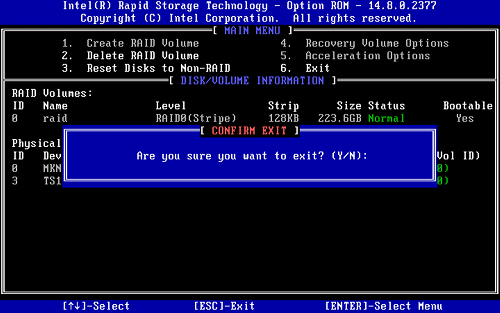
- Select Create Volume and press Y to confirm.
- Exit the RAID Option ROM utility and press Y to confirm.
- Install Windows*.
PCIe (NVMe) RAID
| Note | PCIe (NVMe) RAID is only supported via UEFI boot. Windows 7* must be installed via UEFI. For instructions, see a Guide to Create a Windows 7* UEFI Installer. |
- Press F2 during boot to enter BIOS setup.
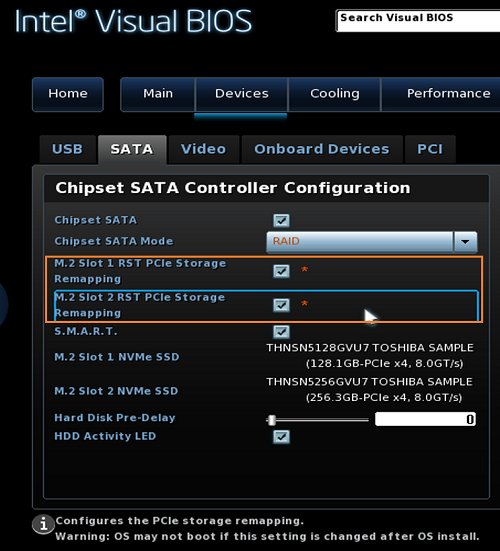
- Click Advanced > Devices > SATA.
- Set Chipset SATA Mode to RAID.
- Enable M.2 Slot 1 RST PCIe Storage Remapping and M.2 Slot 2 RST PCIe Storage Remapping.
- Press F10 to Save and Exit BIOS setup.
- Enter BIOS Setup again, by pressing F2 during boot.
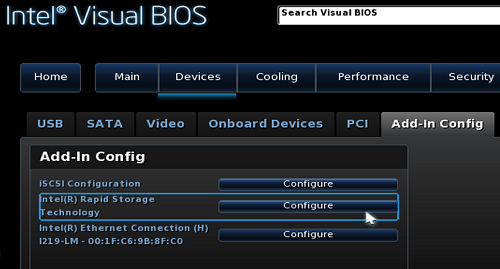
- Click Advanced > Devices > Add-In Config.
- Click Configure next to Intel® Rapid Storage Technology
- Select Create RAID Volume.
- Name the RAID.
- Select which RAID version to use.
| Note | Only RAID0 and RAID1 are supported. |
- Select the disks to be part of the RAID by pressing Enter on the disk, then selecting X. Repeat for the second disk.
- Select the Strip Size and the Capacity.
- Select Create Volume.
- Press ESC to exit and pressY to confirm.
- Press F10 to Save and Exit BIOS Setup.
- The Intel NUC will restart. Turn off the Intel NUC.
- Connect the USB flash drive or USB optical drive that has the Windows* installation files.
- Turn on the Intel NUC.
- At the prompt during boot, press F10 to open the boot menu and select the UEFI USB.
- Follow the Windows Installation instructions.
- When you get to the Where do you want to install Windows? screen below:
Insert the USB flash device with the Rapid Storage Technology driver: RST_f6floppy_Win7_8.1_10_64_14.8.0.1042.zip.
| Note | Make sure the driver is unzipped. |
- Select Load Driver > Browse > USB drive > RSTxxxx Folder.
| Note | The USB flash drive is the C: drive: for example, xxxxx (C:) |
- The screen below shows if Windows finds the Rapid Storage Driver.
- Select Next. It can take a minute or two for the driver to load.
- When the screen below displays, Windows is ready to be installed. Select Next to start the installation.
RAID on Linux
Software RAID on Linux is supported on all Intel NUCs with multiple drives.
To create and manage a software RAID in Linux see the following links:
Rapid Storage Technology (RST) in Linux*.
| Note | To enable RAID on an NUC8i5INH or NUC8i7INH:
Then continue to step 4 of both scenarios above. |
| Note | On NUC9V[x]QNX or NUC9i[x]QNX, the RAID0 and RAID1 volumes can be built only on storage available on the NUC Element. If you connect additional storage drives to the base board, they can't be added to the same RAID0 or RAID1 volume as the built-in drive on the NUC Element. More information is available in the Technical Product Specification. |