[VPN] How to set up a VPN server on ASUS router – PPTP
1. Some functions of VPN will be different due to firmware version
Interface 1: Supports routers with firmware later than 3.0.0.4.388.xxxx (including), please refer to here for the setting instructions.
Interface 2: Supports routers with firmware earlier than 3.0.0.4.388.xxxx, please refer to here for the setting instructions.
2. For information on how to upgrade the firmware, please refer to the FAQ [Wireless Router] How to update the firmware of your router to the latest version
3. FAQ
Please follow the steps below to set up a VPN server - PPTP on your ASUS router.
1. Connect your computer to the router via wired or WiFi connection and enter your router LAN IP or router URL http://www.asusrouter.com to the WEB GUI.

Note: Please refer to How to enter the router setting page(Web GUI) to learn more.
2. Key in your router's username and password to log in.
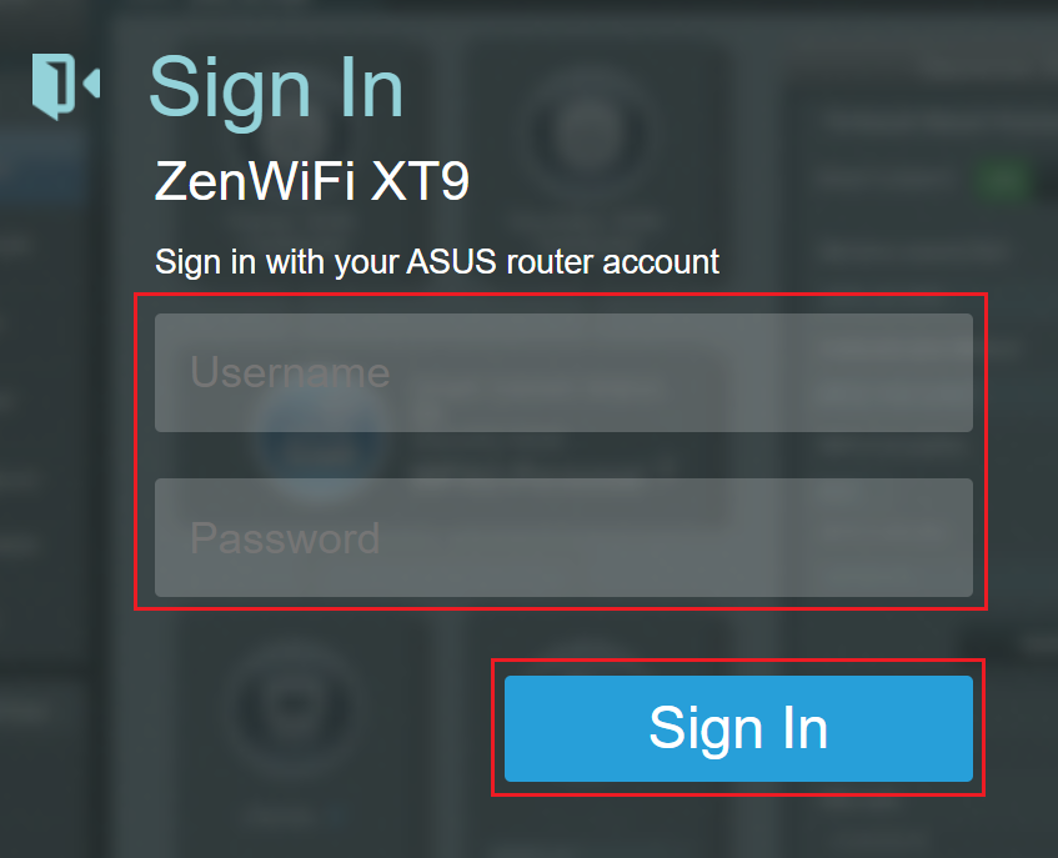
Note: If you forget the user name and/or password, please restore the router to the factory default status and setup.
Please refer to [Wireless Router] How to reset the router to factory default setting? for how to restore the router to default status.
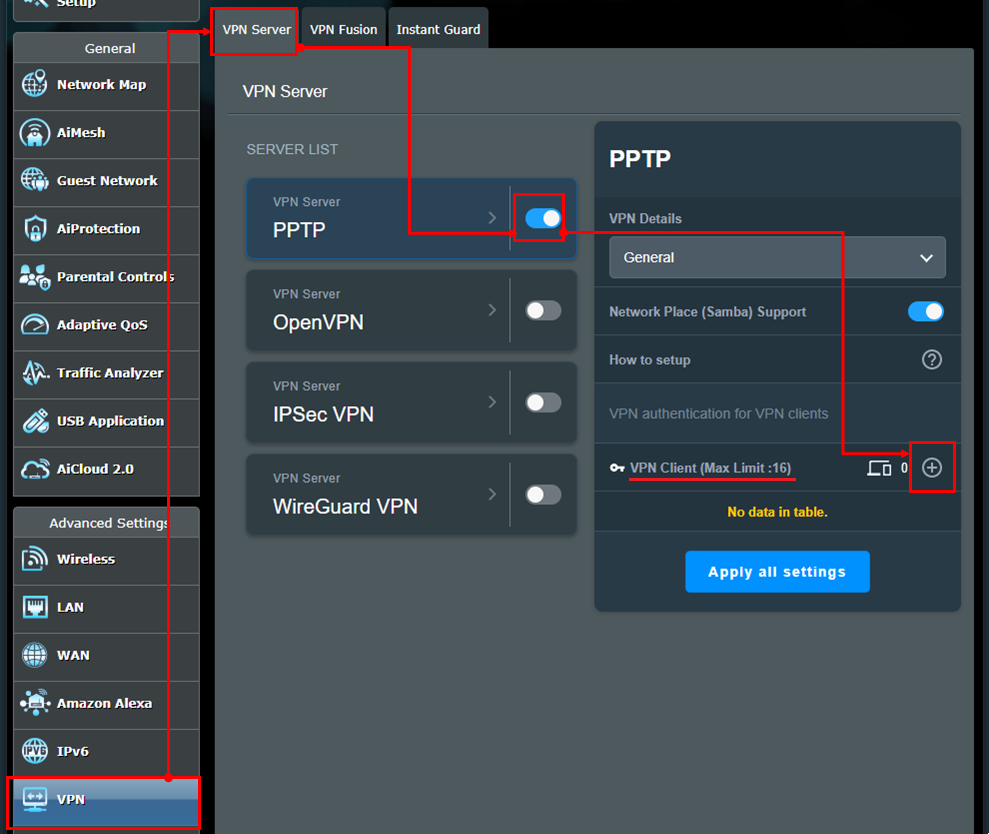
3. Click [VPN] > [VPN Server] > [PPTP] > Click  [ON] icon in the VPN Server PPTP section to enable the function (default is OFF) > [VPN Client (Max Limit: 16)] Click "+" to add an account.
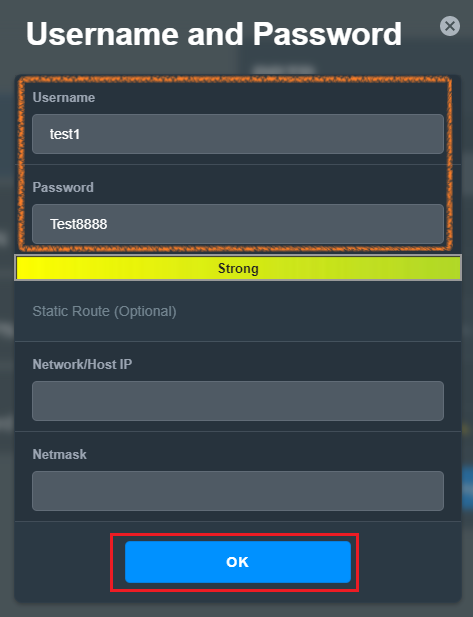
4. Enter your custom [Username] and [Password] and click [OK]. Reminder: Once the [Username] and [Password] are set, they cannot be modified.
Note: [Network/Host IP] and [Network Mask] under Static Route (Optional) are not mandatory and can be left blank.
(1) Network/Host IP: Enter the IP address or network segment of the VPN client device (e.g., router).
(2) Network mask: It is recommended to enter 255.255.255.0.
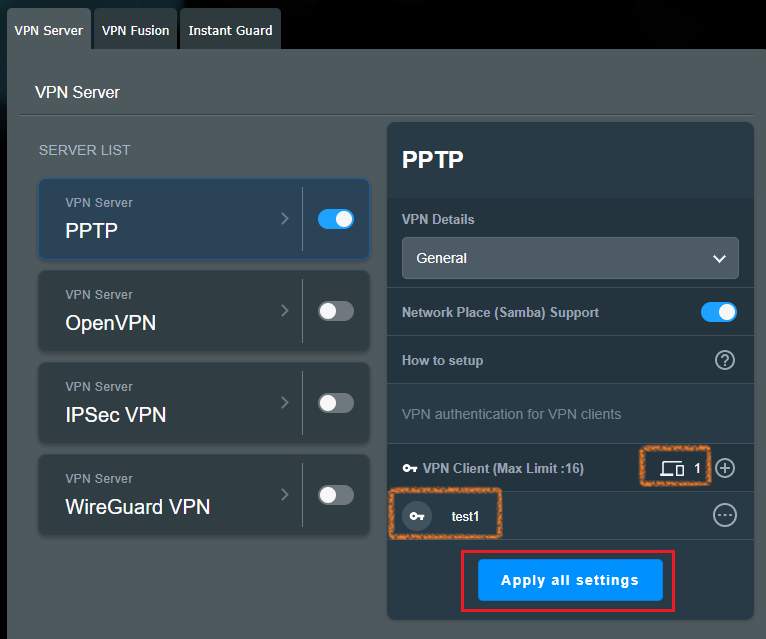
5. In the bottom right corner, the VPN client will display the number of newly added accounts, as shown in the figure, showing 1 group of accounts 
The VPN client will show the newly added username, as shown in the figure 
Finally, click [Apply all settings] to complete the settings on the router.
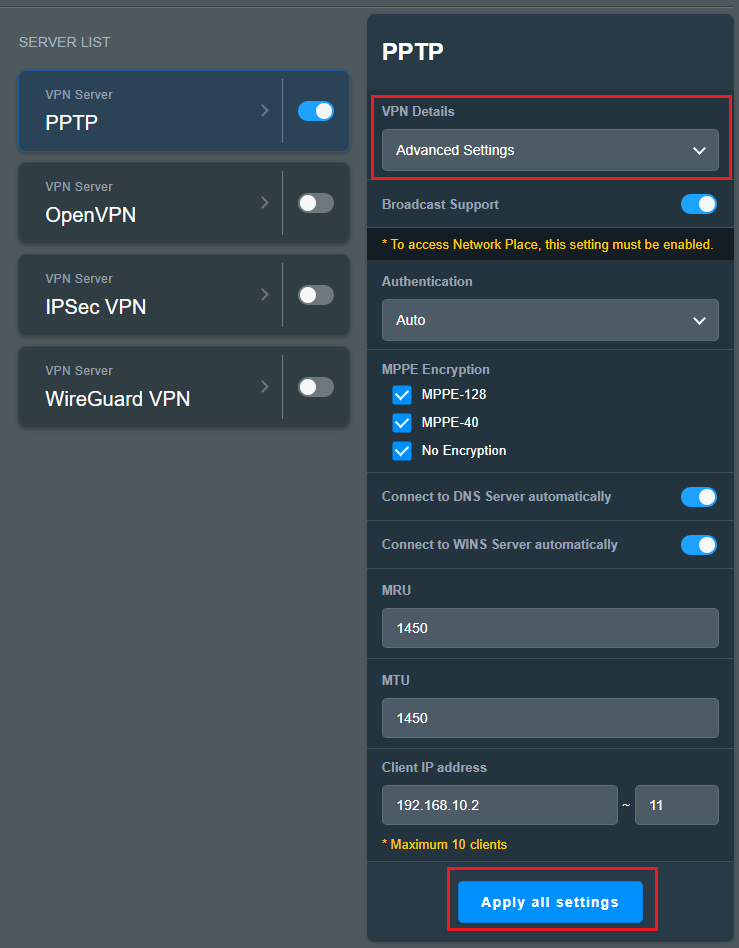
6. If you need advanced settings after completing the PPTP VPN server settings, click [Advanced Settings] in the VPN Detailed Settings dropdown menu.
The option settings shown in the figure below are all default items. After modifying the settings, click [Apply all current settings] to complete the settings on the router.
Broadcast Support: Enabled by default.
Authentication: The default is [Auto], options include [MS-CHAPv1], [MS-CHAPv2].
MPPE Encryption: You can refer to the VPN Client encryption setting table to set.
Connect to DNS Server automatically: Enabled by default.
Connect to WINS Server automatically: Enabled by default.
MRU: Maximum Receive Unit for data packets, default value is 1450.
MTU: Maximum Transmission Unit for data packets, default value is 1450.
Client IP address: Up to a maximum of 10 client IP addresses can be allocated, default range is 192.168.10.2~11
Please follow the steps below to set up a VPN server - PPTP on your ASUS router.
1. Connect your computer to the router via wired or WiFi connection and enter your router LAN IP or router URL http://www.asusrouter.com to the WEB GUI.
Note: Please refer to How to enter the router setting page(Web GUI) to learn more.
2. Key in your router's username and password to log in.
Note: If you forget the user name and/or password, please restore the router to the factory default status and setup.
Please refer to [Wireless Router] How to reset the router to factory default setting? for how to restore the router to default status.
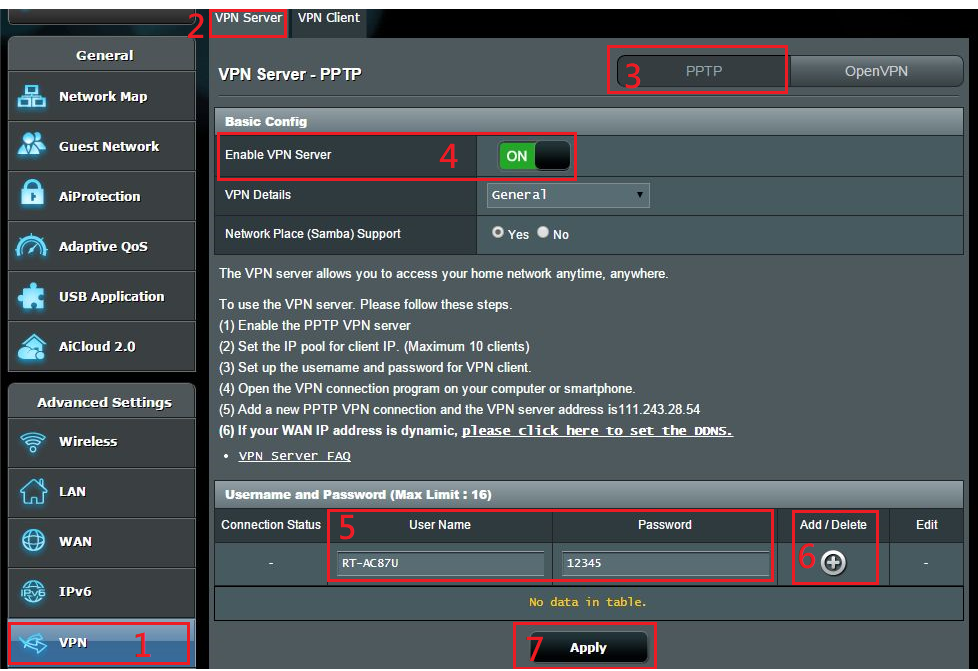
3. Go to VPN
(1) Click "VPN”
(2) Click the lable of “VPN Sever”
(3) Here select [PPTP] as VPN Server type.
(4) Click “ON” in item—“Enable VPN Sever”
(5) Enter “User Name” and “Password”
(6) Click “+”
(7) Click “Apply”to save.
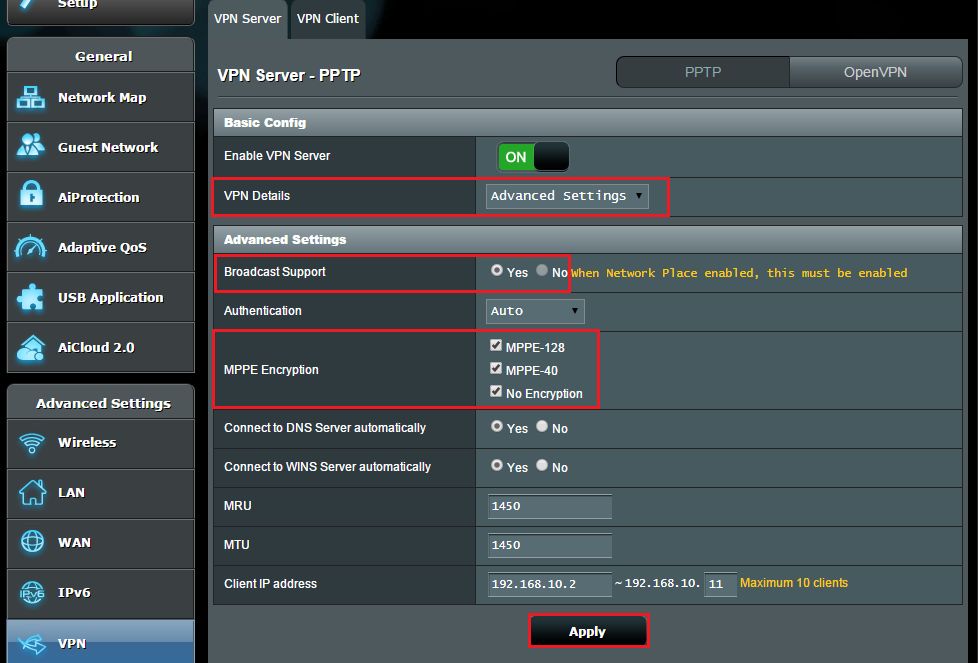
4. Advanced Settings
(1) If you want to do advanced settings for VPN Server, please select "VPN Details"
(2) Select “Yes” in item—“Broadcast Support”(When Network Place enable, this option must be enable.)
(3) Choose “MEPPE Encryption”, we will recommend to select all the options.
(4) Click button—“Apply"
Note 1: If your ISP is providing a Dynamic IP address to your network, your WAN IP address may change even after applying the settings. Configure the ASUS DDNS setting to set up a fixed domain name.
Note 2: The Broadcast Support setting in 3-(2) allows broadcast packet transfers between VPN clients and local clients.
For example, the PC needs to send the broadcast packets to all LAN PCs to know which PC enables the Network Place Service.
The VPN client cannot send broadcast packets to the LAN while the Broadcast Support setting is disabled.
When Broadcast Support is disabled, VPN clients cannot detect the PC running Windows Network Place and will not be able to locate other PCs in the network. To connect to PCs in the LAN, VPN clients will manually have to type the IP address to connect to a PC in the LAN.
Note 3: In Step 3-(3), administrators can set up VPN MPPE encryption settings and VPN client encryption settings based on the table below:
VPN Client encryption setting (VPN connection -> Properties -> Security -> Data encryption) | ||||
| Windows | iOS, OS X | Android | ||
ASUS router VPN encryption setting (Force MPPE Encryption) | Auto |
|
|
|
| No encryption |
|
|
| |
| MPPE 40 |
|
|
| |
| MPPE 128 |
|
|
| |
1. Can I connect to my home router from the external network using VPN if it has a private WAN IP address such as 192.168.x.x, 10.x.x.x, or 172.16.x.x?
When your router WAN IP is a private/virtual IP, it means that your router may be in the connection environment as shown in the figure below, and there is another router in front that assigns an IP address to your router. In this case, you must set up port forwarding on another router's virtual server page in order to use VPN to connect back to your own router from a remote external network. Please refer to the instructions on How to set up VPN server with port forwarding?
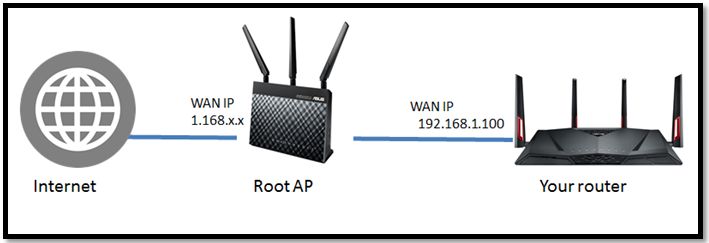
Note: To use VPN Server on your ASUS router, your router needs to have a public IP(WAN IP) from your ISP's internet service. This will allow devices on the internet to locate your ASUS router via a public IP(WAN IP).
If you are not sure of your public IP type, please check your Internet Service Provider (ISP).
2. Can the router use the private IP to set up the remote connection function?
Please note that if the router is using a private WAN IP address (such as connected behind another router/switch/modem with built-in router/Wi-Fi feature), could potentially place the router under a multi-layer NAT network. This feature will not function properly under such environment.
Private IPv4 network ranges:
Class A: 10.0.0.0 – 10.255.255.255
Class B: 172.16.0.0 – 172.31.255.255
Class C: 192.168.0.0 – 192.168.255.255
CGNAT IP network ranges:
The allocated address block is 100.64.0.0/10, i.e. IP addresses from 100.64.0.0 to 100.127.255.255.
How to get the (Utility / Firmware)?
You can download the latest drivers, software, firmware and user manuals in the ASUS Download Center.
If you need more information about the ASUS Download Center, please refer this link.