Related Topics
[Windows 11/10] How to create and use Windows System Image to restore your system
Applicable Products: Notebook, Desktop, All-in-One PC, Gaming Handheld, MiniPC
If a critical issue occurs on your device (such as unable to enter Windows Operating System), you can enter Windows Recovery Environment (WinRE) and then recover Windows from a system image. The system image includes the current Windows, system settings, programs, and personal files when you create it. If you would like to use this feature, you need to prepare an empty USB flash drive (at least 2 GB) first to create a bootable device, which can enter Windows Recovery Environment, and another local drive to save the system image (if your device has two local drives or above). We also recommend that you recreate the new Windows system image periodically because Windows will regularly update and improve security as well as performance.
Note: If your device only has one local drive, you'll need to prepare an external USB hard drive to save the Windows system image (make sure that the free space on the external hard drive must be more than the used space on the current system disk). If you are not sure how many disks are on your device , please refer to Appendix: How many disks on my device.
Please go to the corresponding instruction based on the current Windows operating system on your device:
Create a system repair USB flash drive, which can enter Windows Recovery Environment
Create a system repair USB flash drive, which can enter Windows Recovery Environment, by the built-in 'Create a recovery drive' feature in Windows.
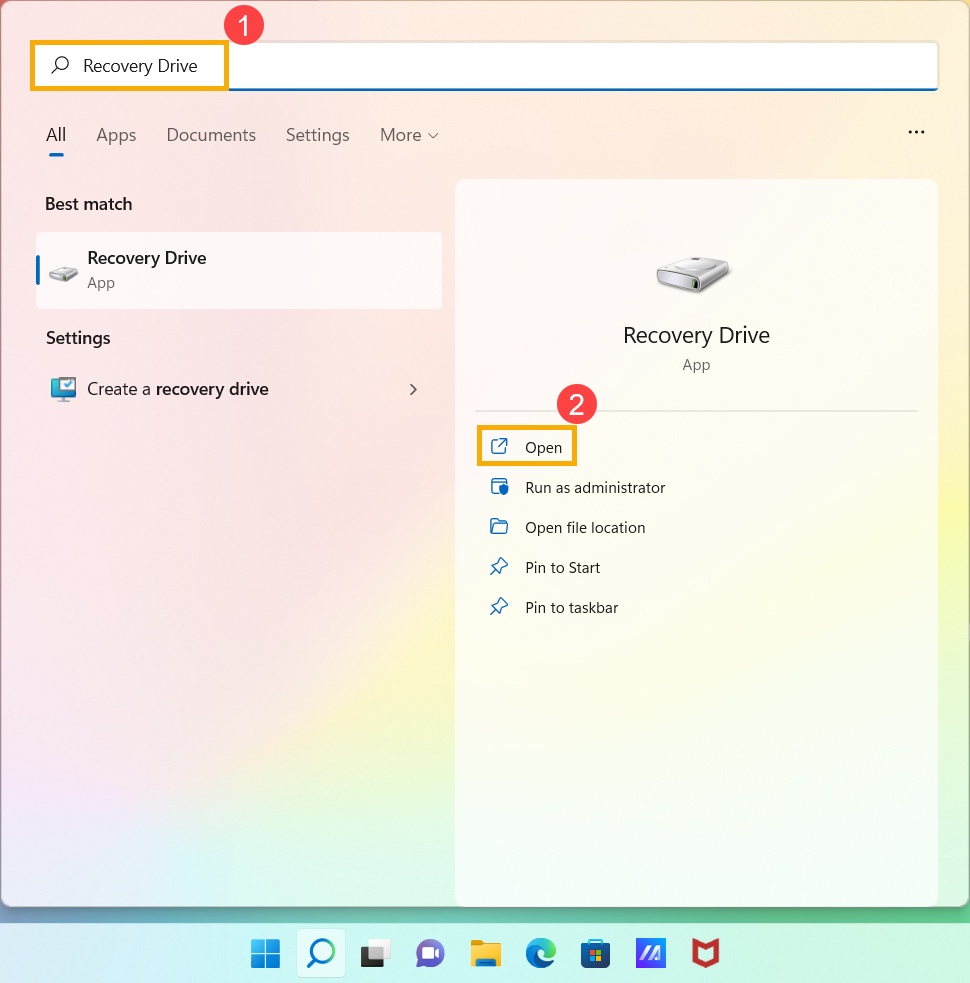
- Type and search [Recovery Drive] in the Windows search bar①, then click [Open]②.
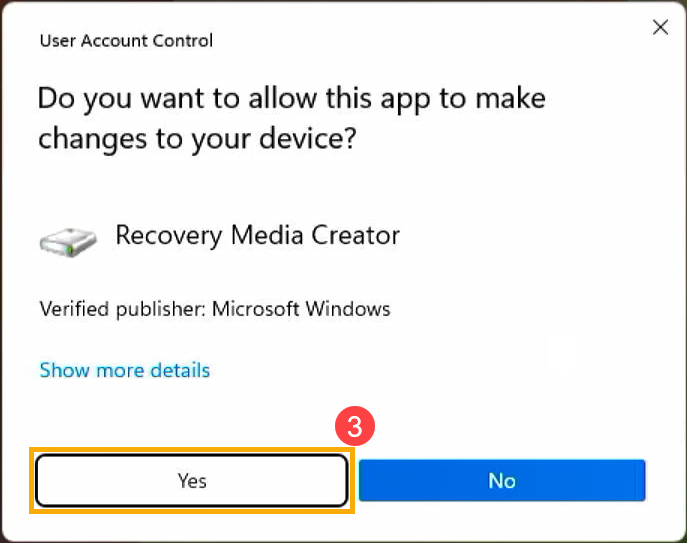
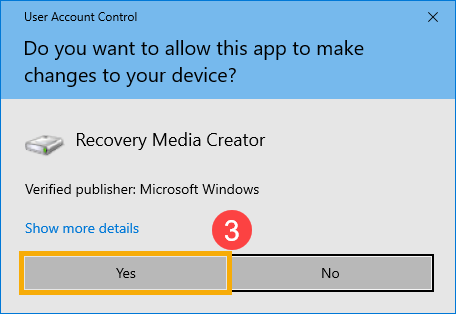
- If the User Account Control notification pops up, please select [Yes]③.
 recovery
 - Do not check the box to [Back up system files to the recovery drive]④, and then select [Next]⑤.
Note: The following steps will back up your system via system image (including your programs and personal file), so you don’t need to back up the system to a recovery drive in this step (system backup won’t include your programs and personal files).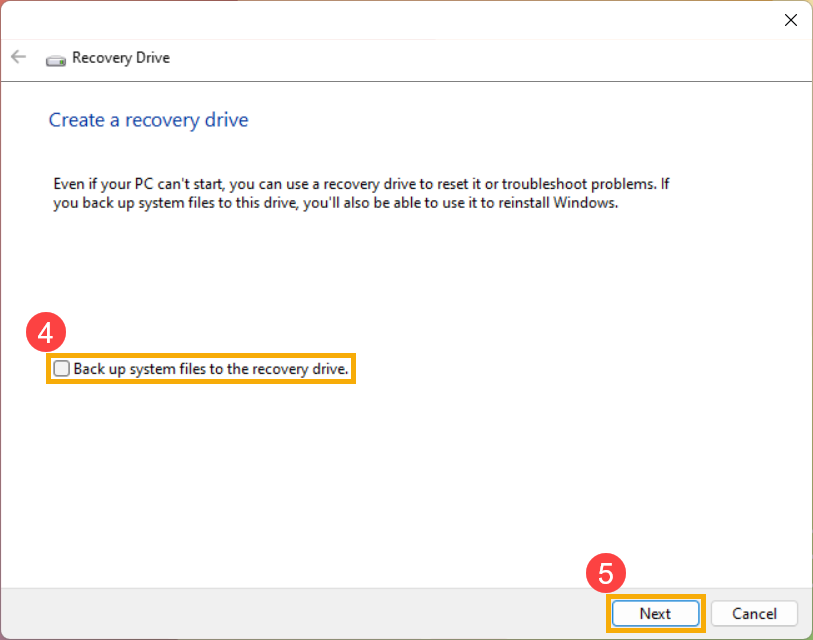
- Connect the USB flash drive that you want to create a bootable device to enter Windows Recovery Environment to your device.
Note: All files on the USB flash drive will be deleted during the process, so please back up your files first if you have data inside originally.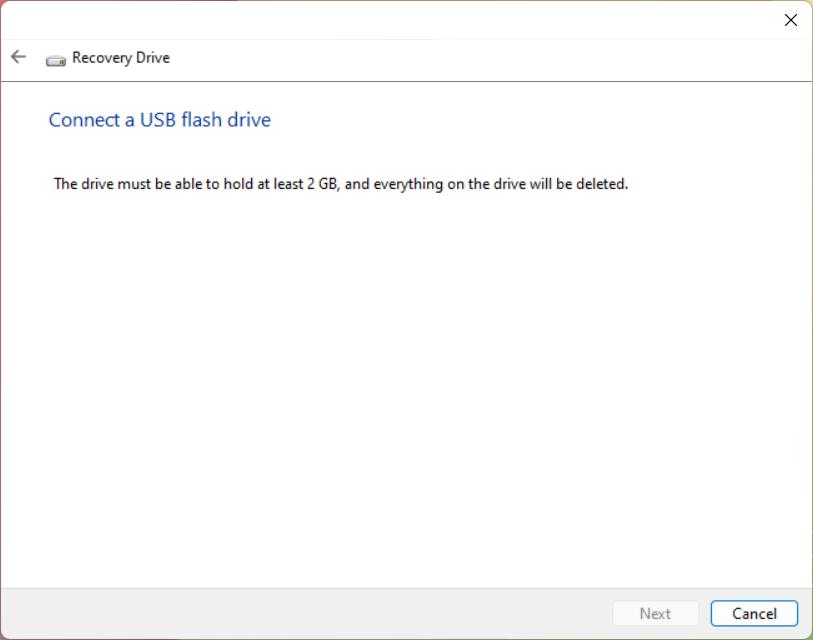
- In Available drive(s), confirm and select the USB flash drive that you want to use⑥, and then select [Next]⑦.
Note: If you will use an external USB hard drive to save the system image, you can connect the same one to create the bootable device to enter Windows Recovery Environment (Windows will automatically create a new partition on the external USB hard drive).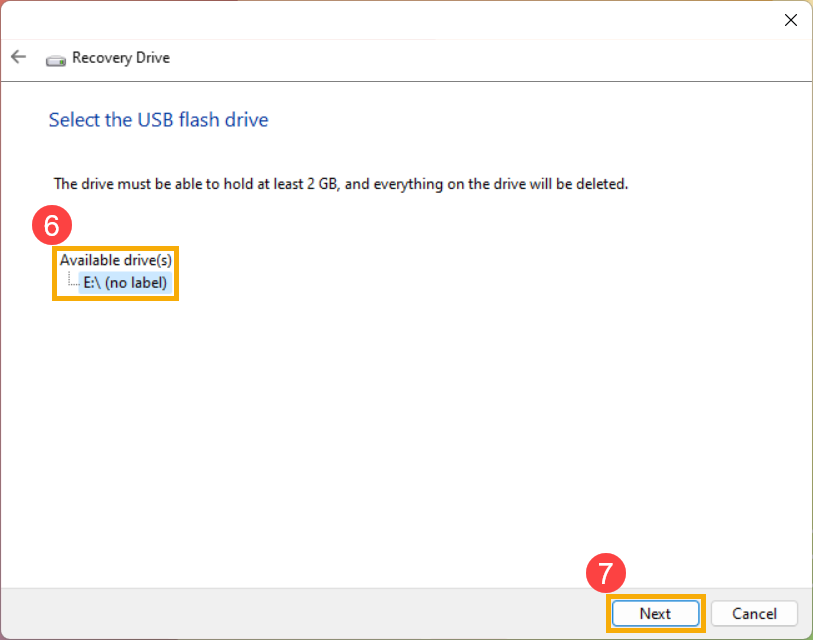
- Select [Create]⑧, and the system will start to create the recovery drive. It will take a while, and it depends on your device specification and the size of the repair tools.
Note: Please make sure the AC adapter is connected during the process and do not force shut down to prevent any errors.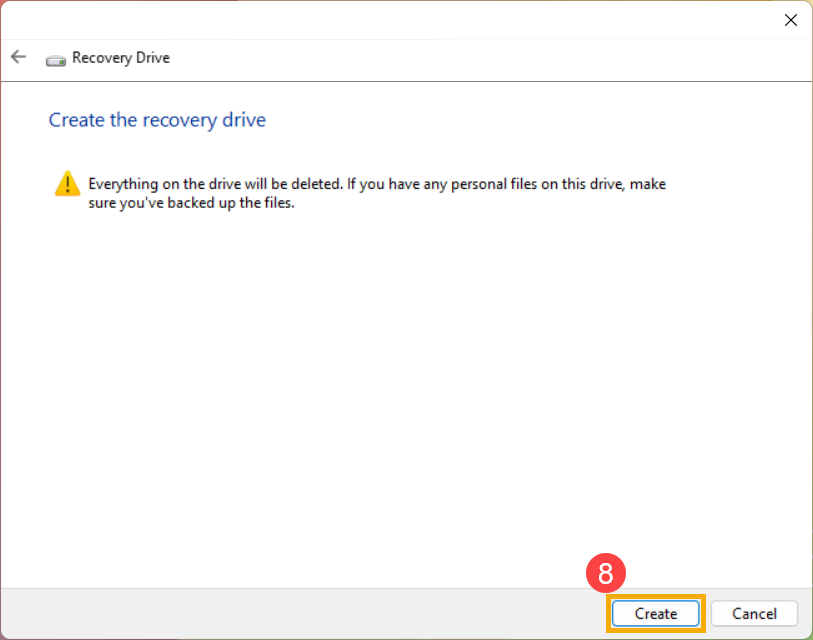
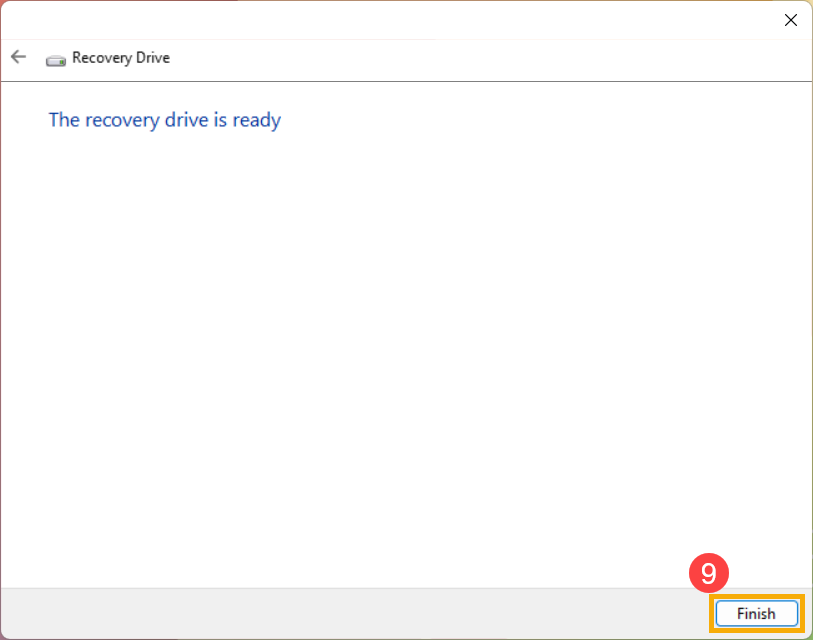
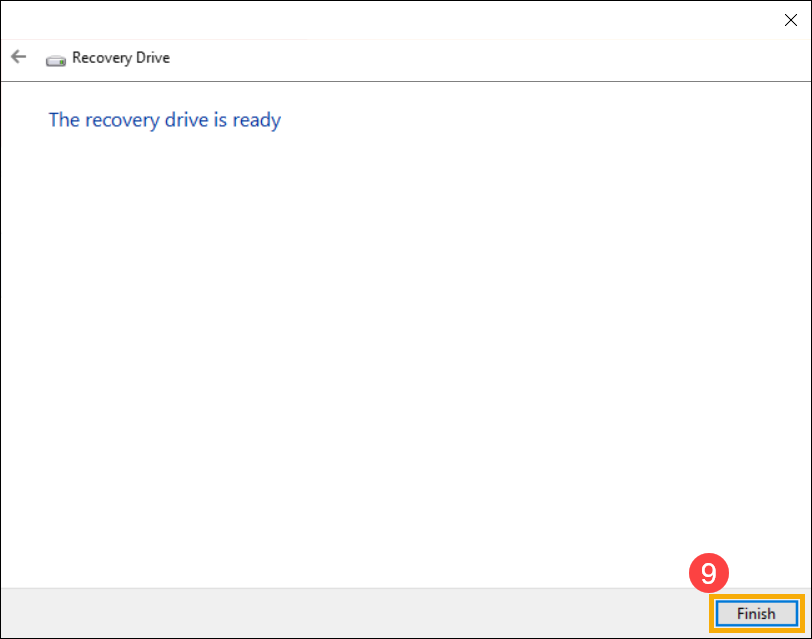
- The recovery drive (bootable device) is created, and please click [Finish]⑨.
- If you create the bootable device via the external USB hard drive and you use the same drive to save system image, please continue with the following step.
The remaining space is unallocated status in the external USB hard drive because of creating a recovery drive.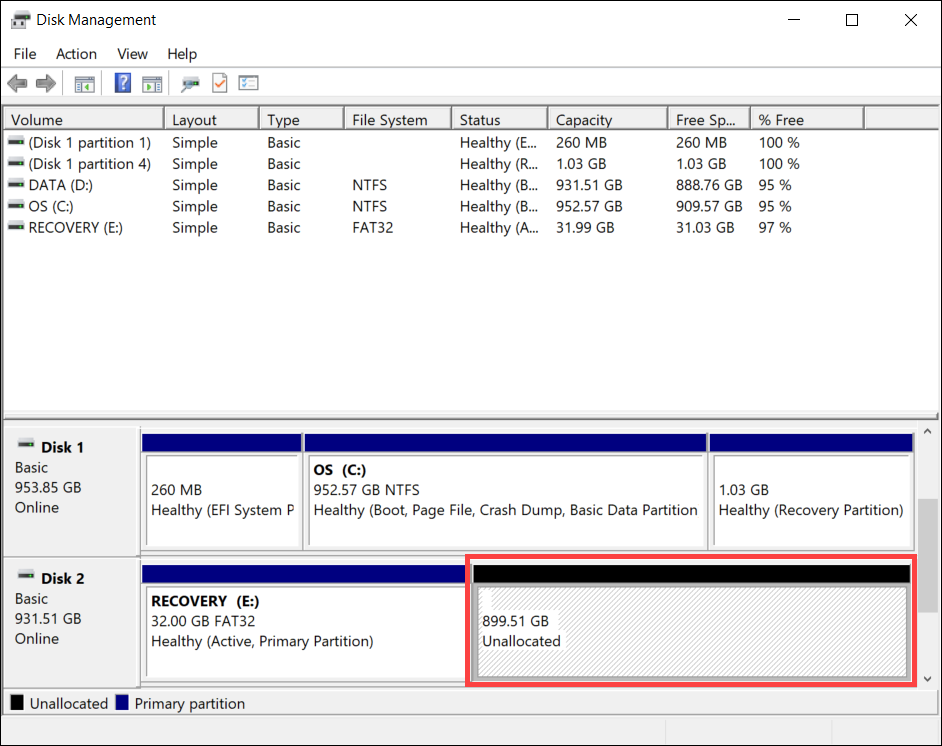
Before creating a system image, you need to manually create a new partition and set the format to NTFS type. Here you can learn more about [Windows 11/10] Hard disk partition, Shrink, and Extend to create a new partition.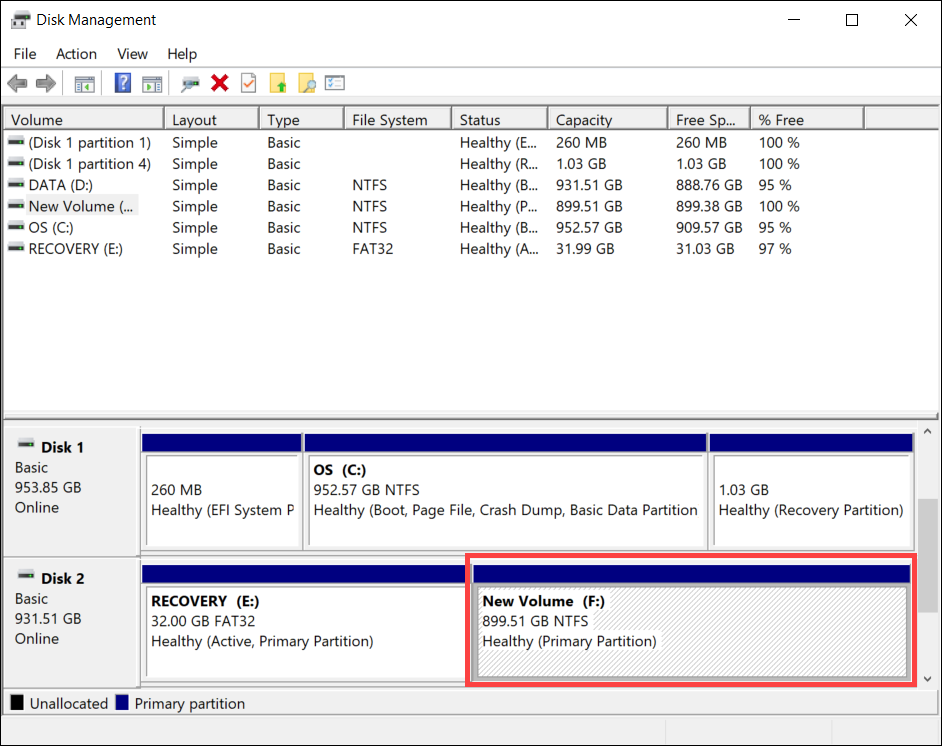
Create System Image
Because Windows will regularly update and improve security as well as performance, we recommend that you periodically repeat the following steps to create a new system image and back up your programs and personal files.
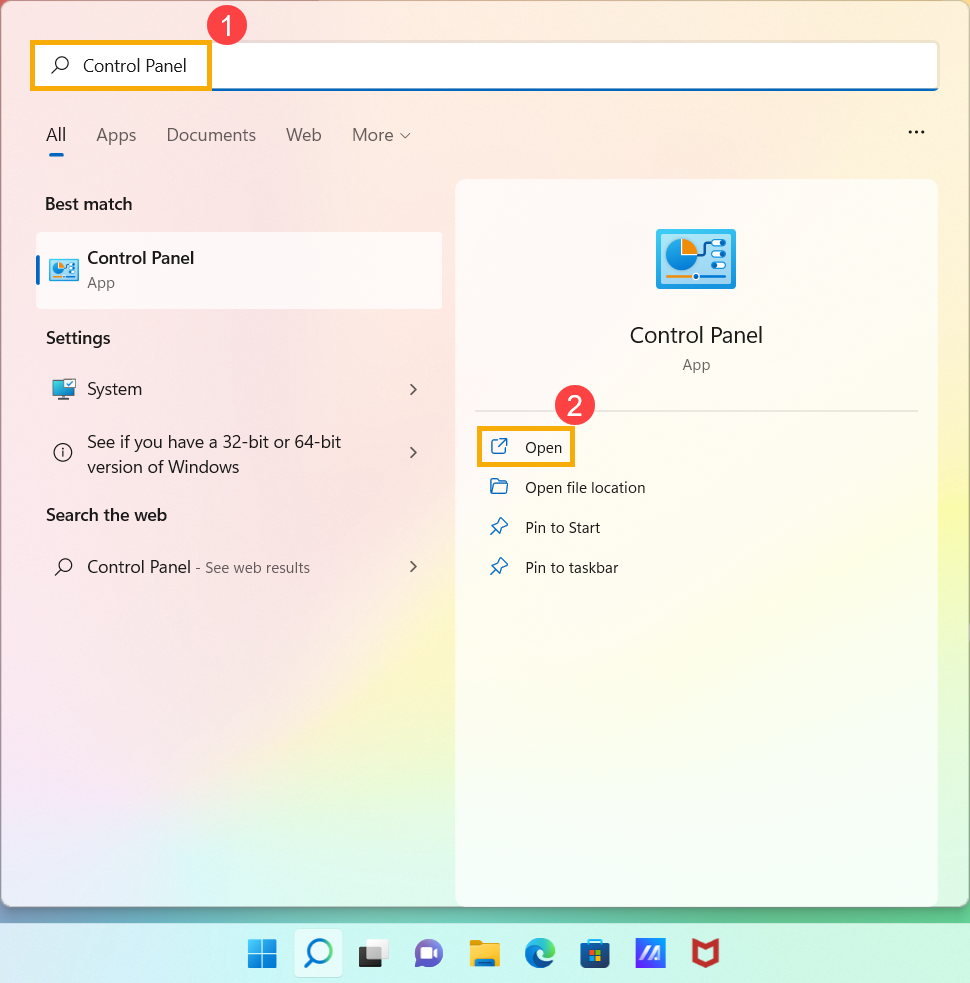
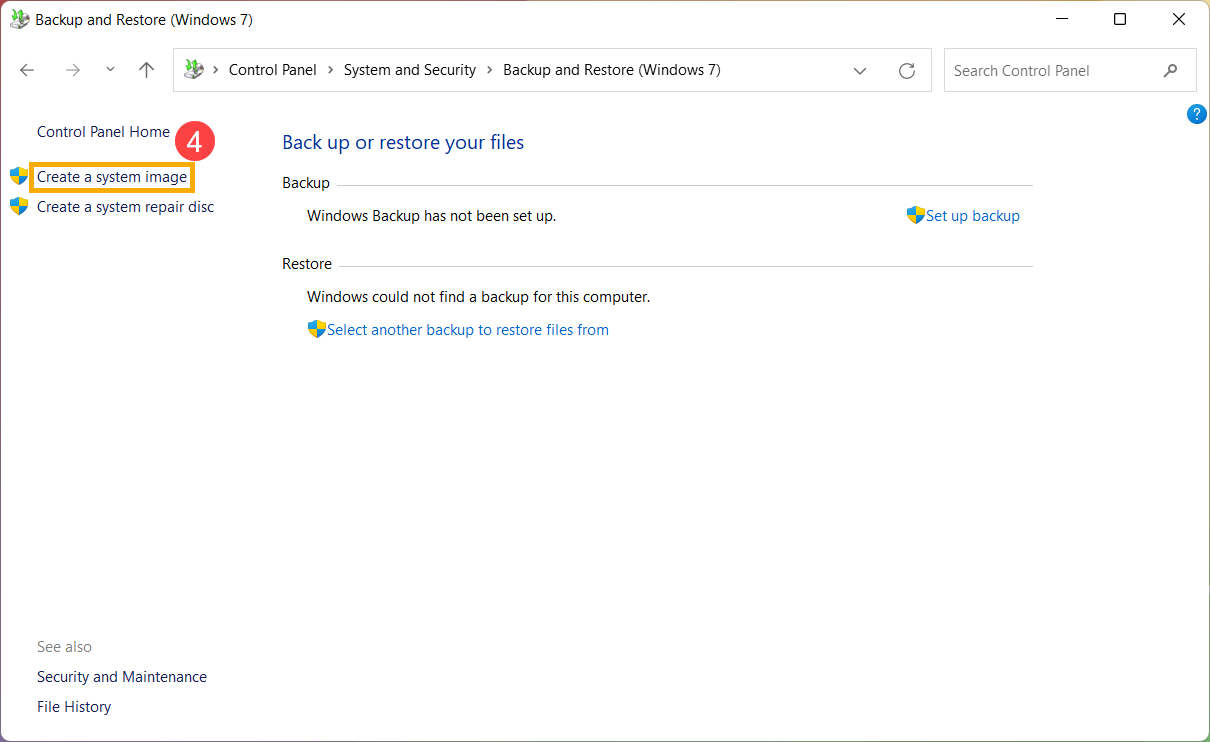
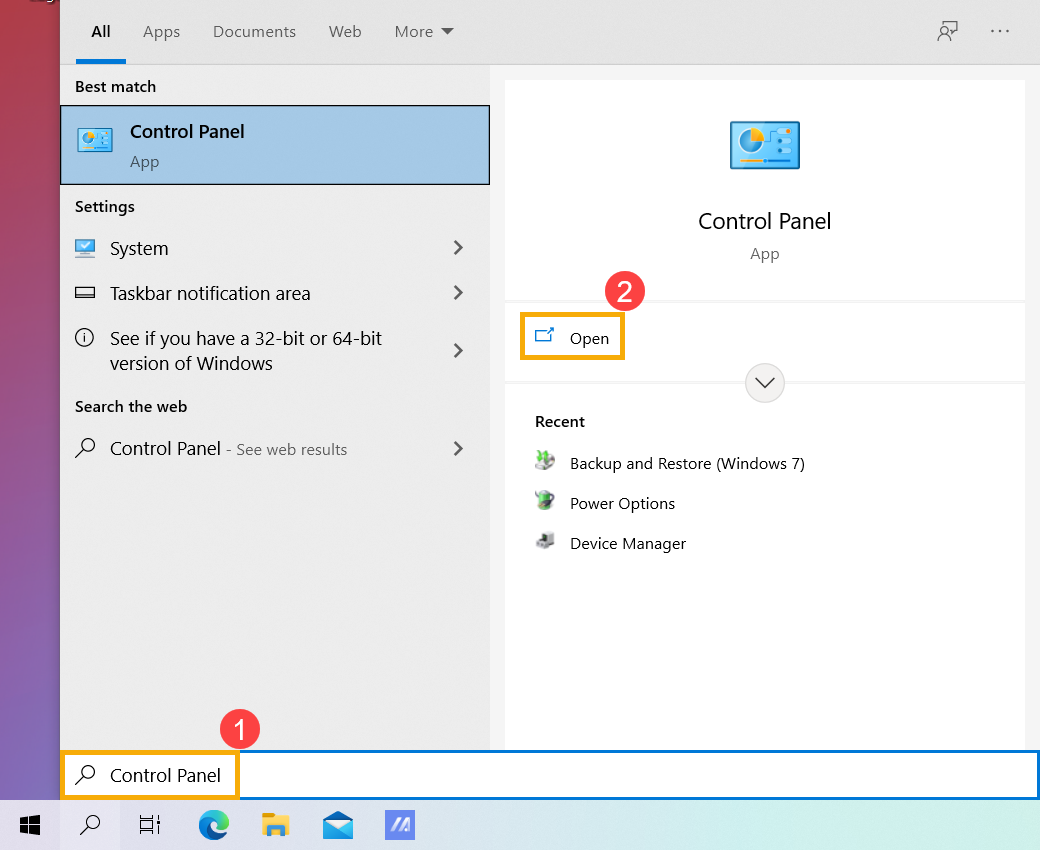
- Type and search [Control Panel] in the Windows search bar①, then click [Open]②.
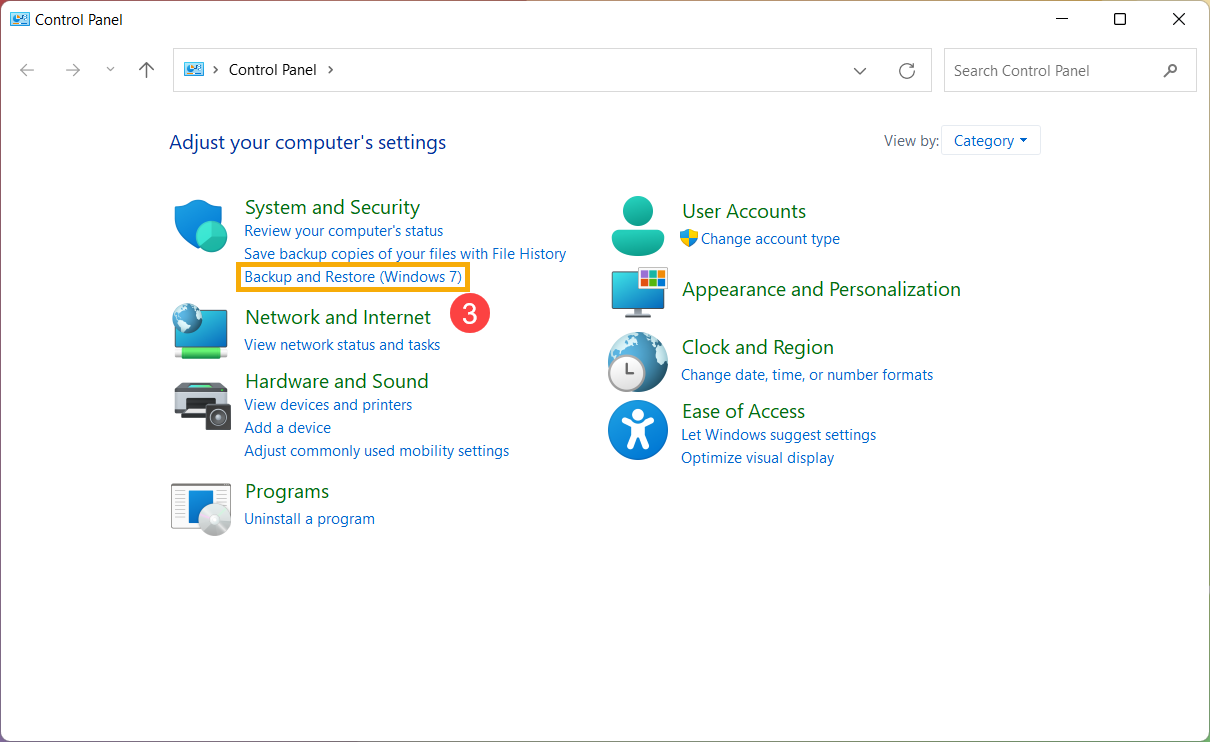
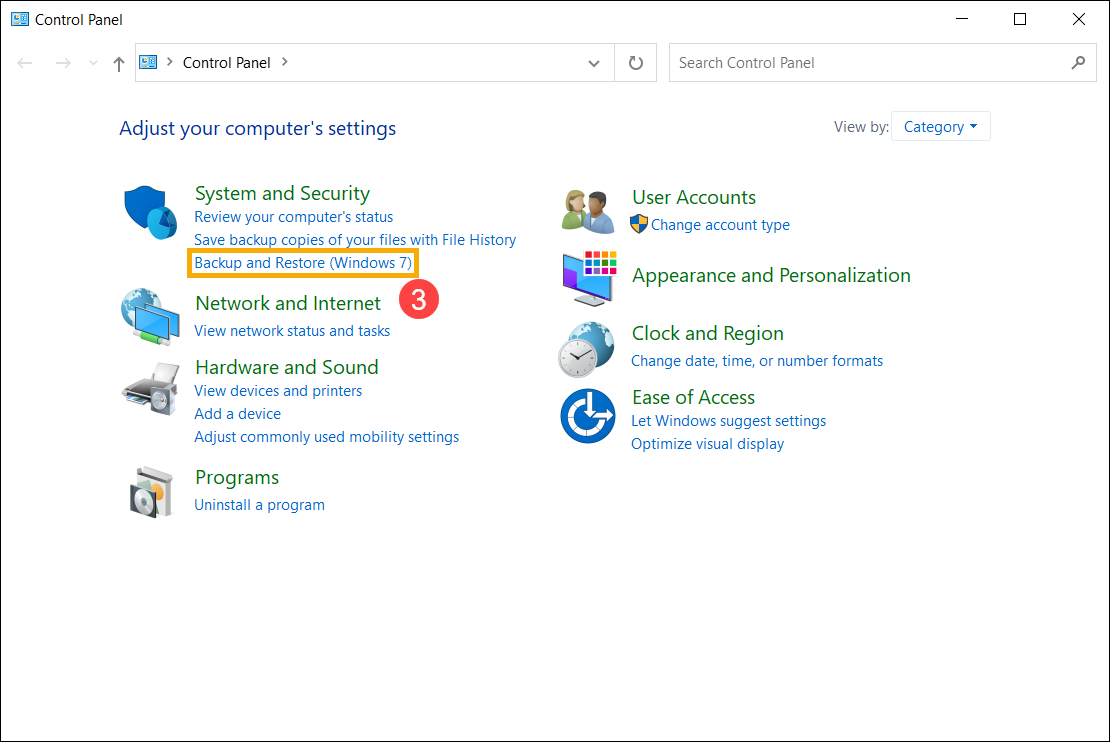
- In the System and Security field, select [Backup and Restore (Windows 7)]③.
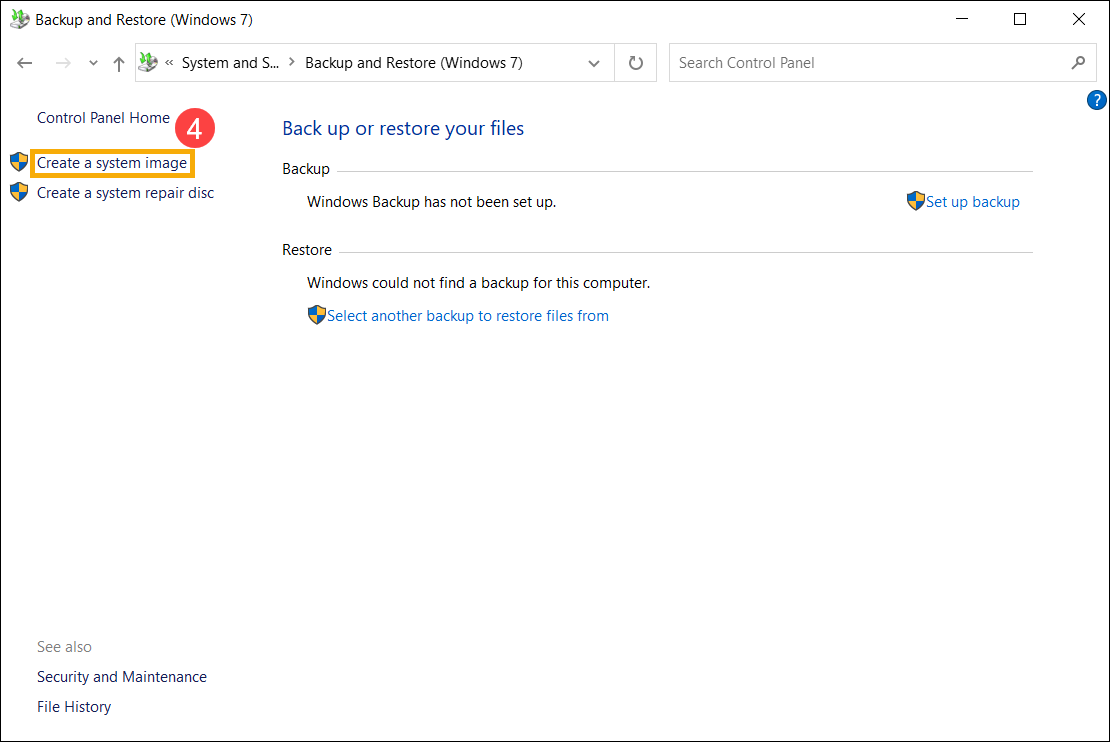
- Select [Create a system image]④.
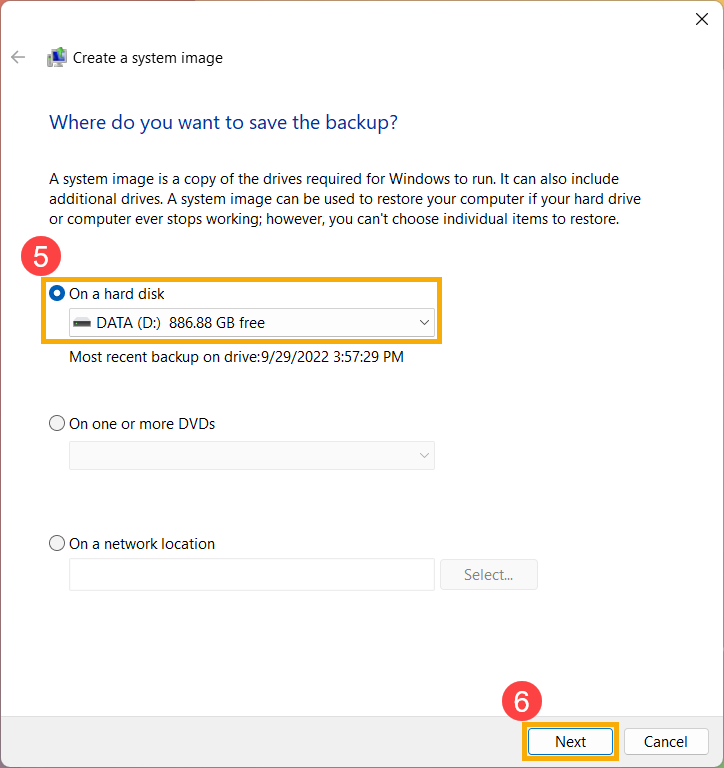
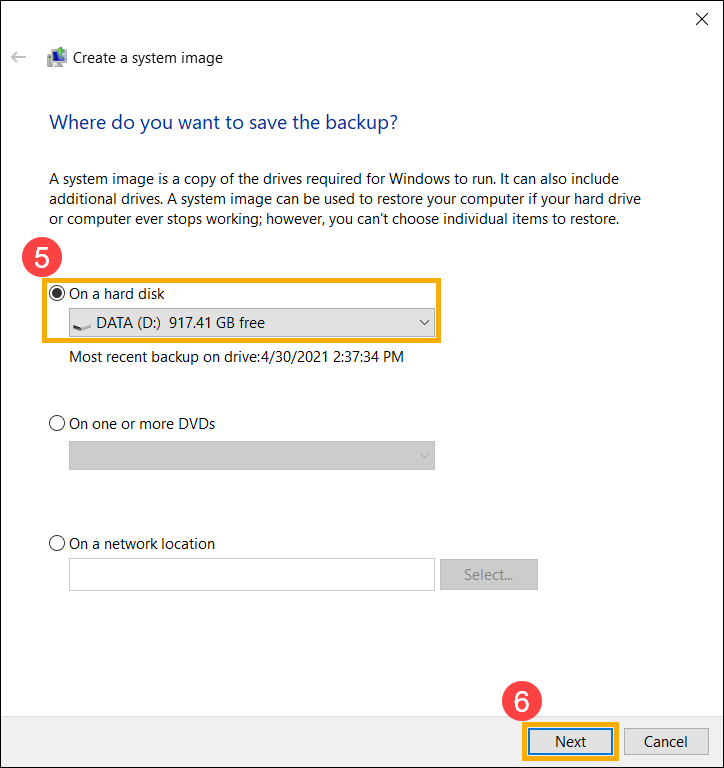
- In the On a hard disk field, select a drive where you want to save the system image⑤, and then select [Next]⑥.
- The system lists the drives which will be backed up and the required disk space. Please select [Start backup] to start to create a system image⑦. It will take a while, and it depends on your device specification and the size of system image. In this example, it may take 1 hour to back up the system image of 63 GB disk space.
Note: Please make sure the AC adapter is connected during the process and do not force shut down to prevent any errors.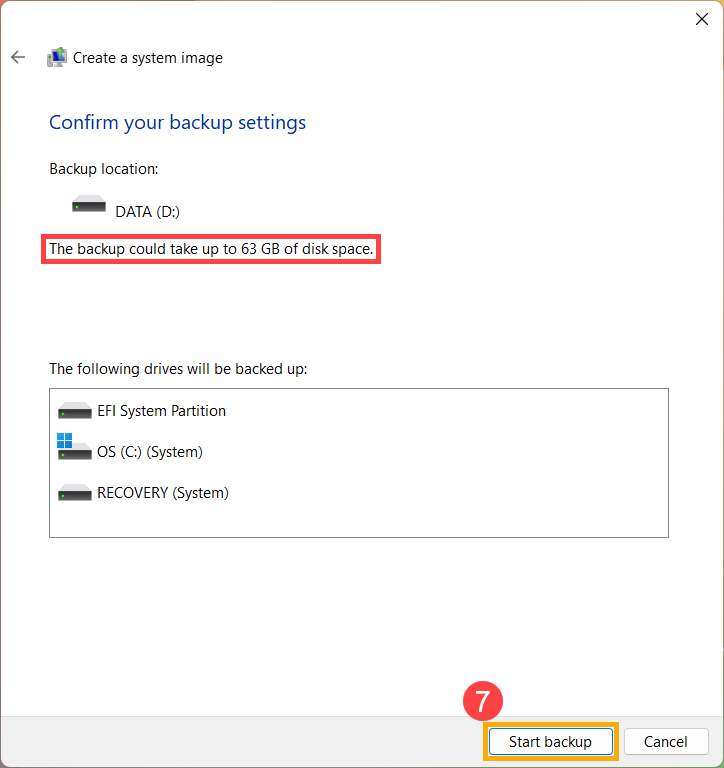
- You may receive the following notification during the creation process, and please select [No]⑧.
This step is to create a system repair CD/DVD, which can enter Windows Recovery Environment. However, we already create a system repair USB flash drive in the last chapter, so we do not need to create a system repair CD/DVD.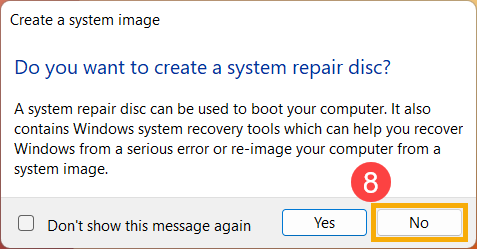
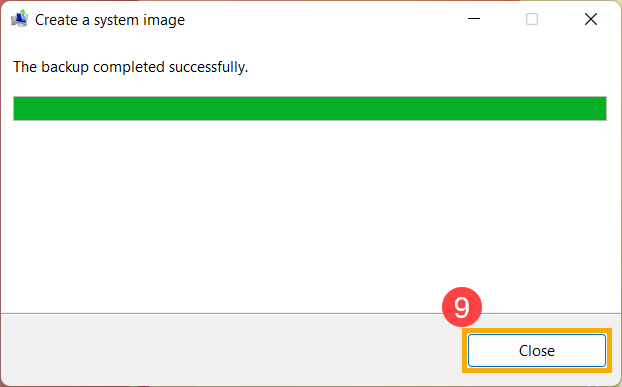
- The system image creation is completed, please select [Close]⑨.
- On the drive you save the backup, it will generate a WindowsImageBackup folder, which is where the system image is located.
If you want to keep the old system image, you can copy the entire WindowsImageBackup folder to a new location, and then create a new system image.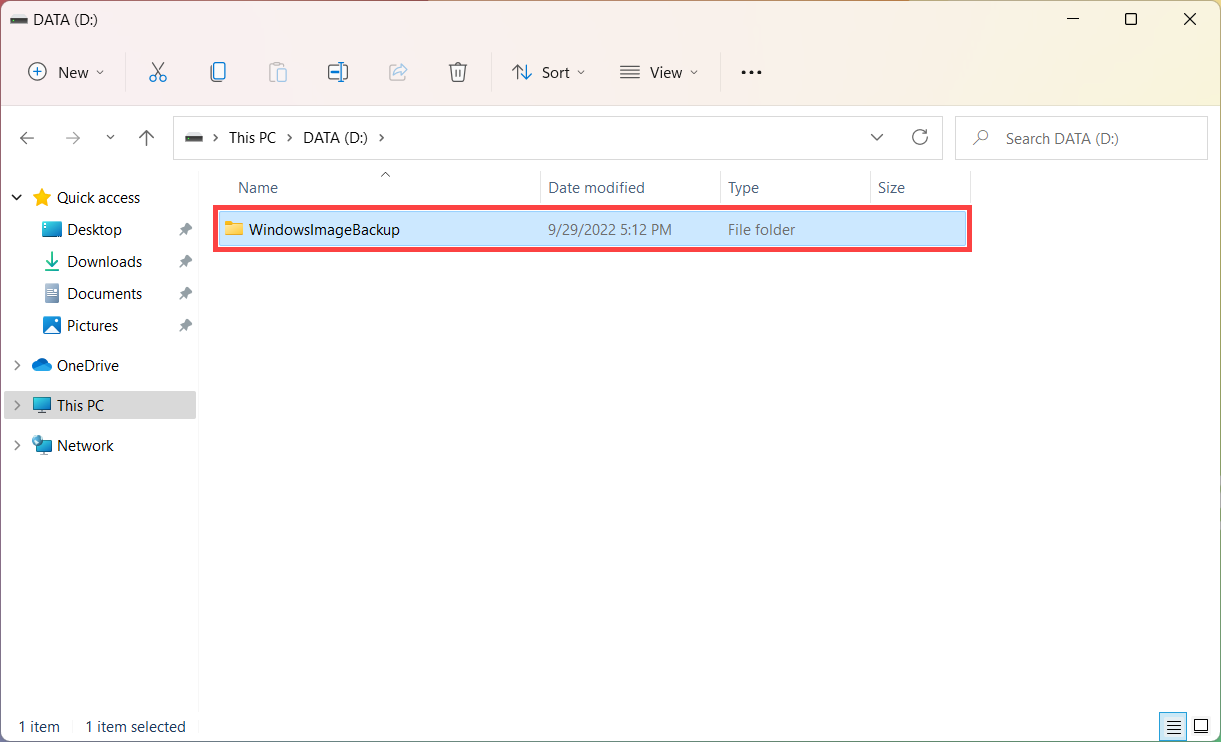
Use System Image to recover your system
If you experience the device cannot boot, you can use the recovery drive to enter Windows Recovery Environment (WinRE), and then restore your system via the system image.
- Connect the recovery drive (USB flash drive) you created to your device. Here you can learn more about How to create a system repair USB flash drive, which can enter Windows Recovery Environment.
- Power on the device and select the boot option as the USB flash drive, here you can learn more about How to boot the system from USB drive/CD-ROM.
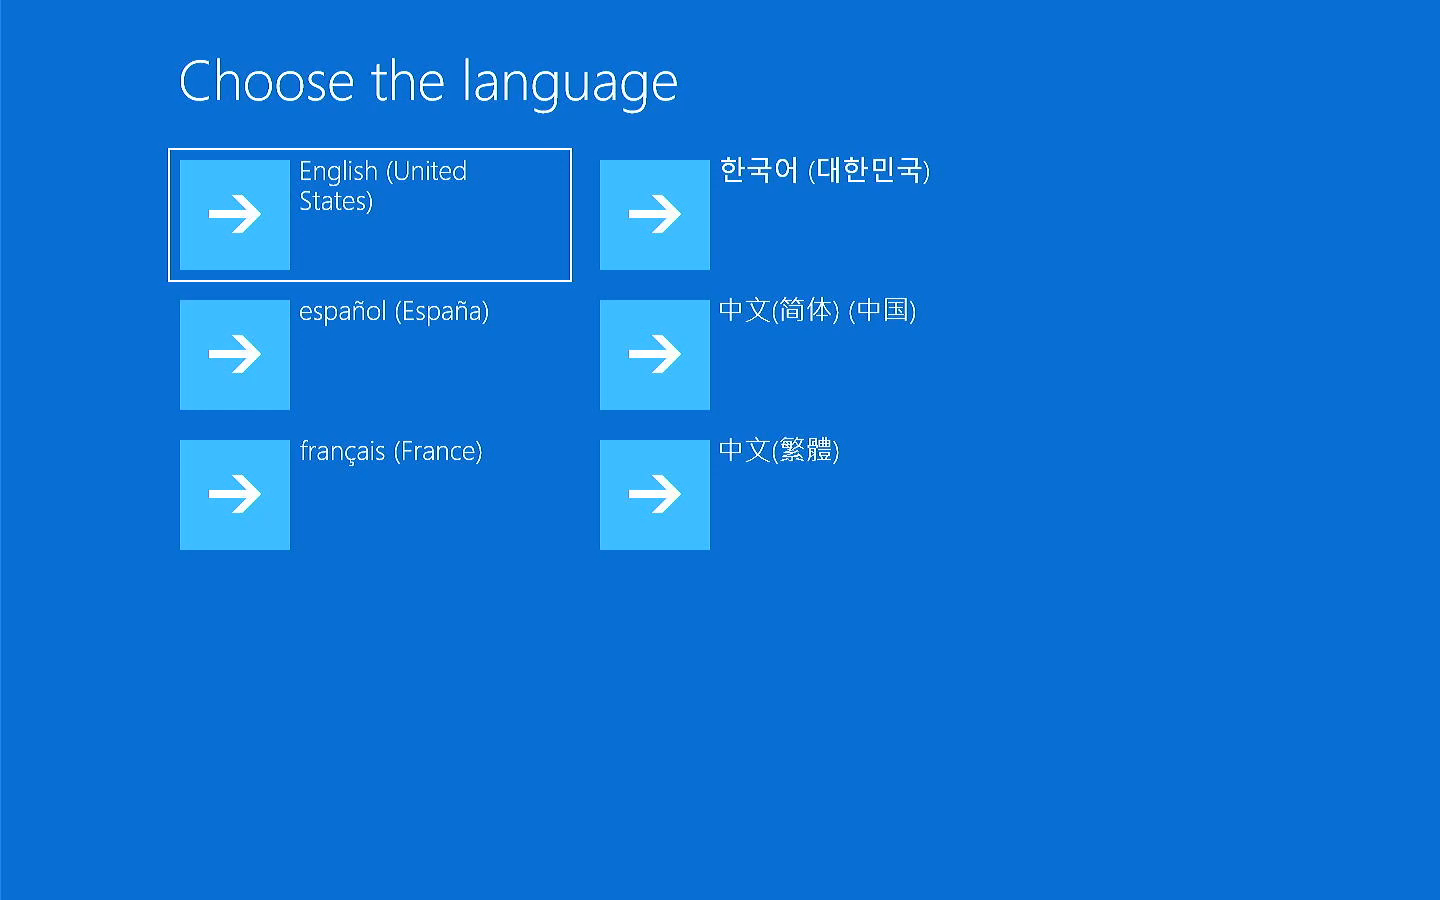
- The device will enter Windows Recovery Environment, and then please choose the language.
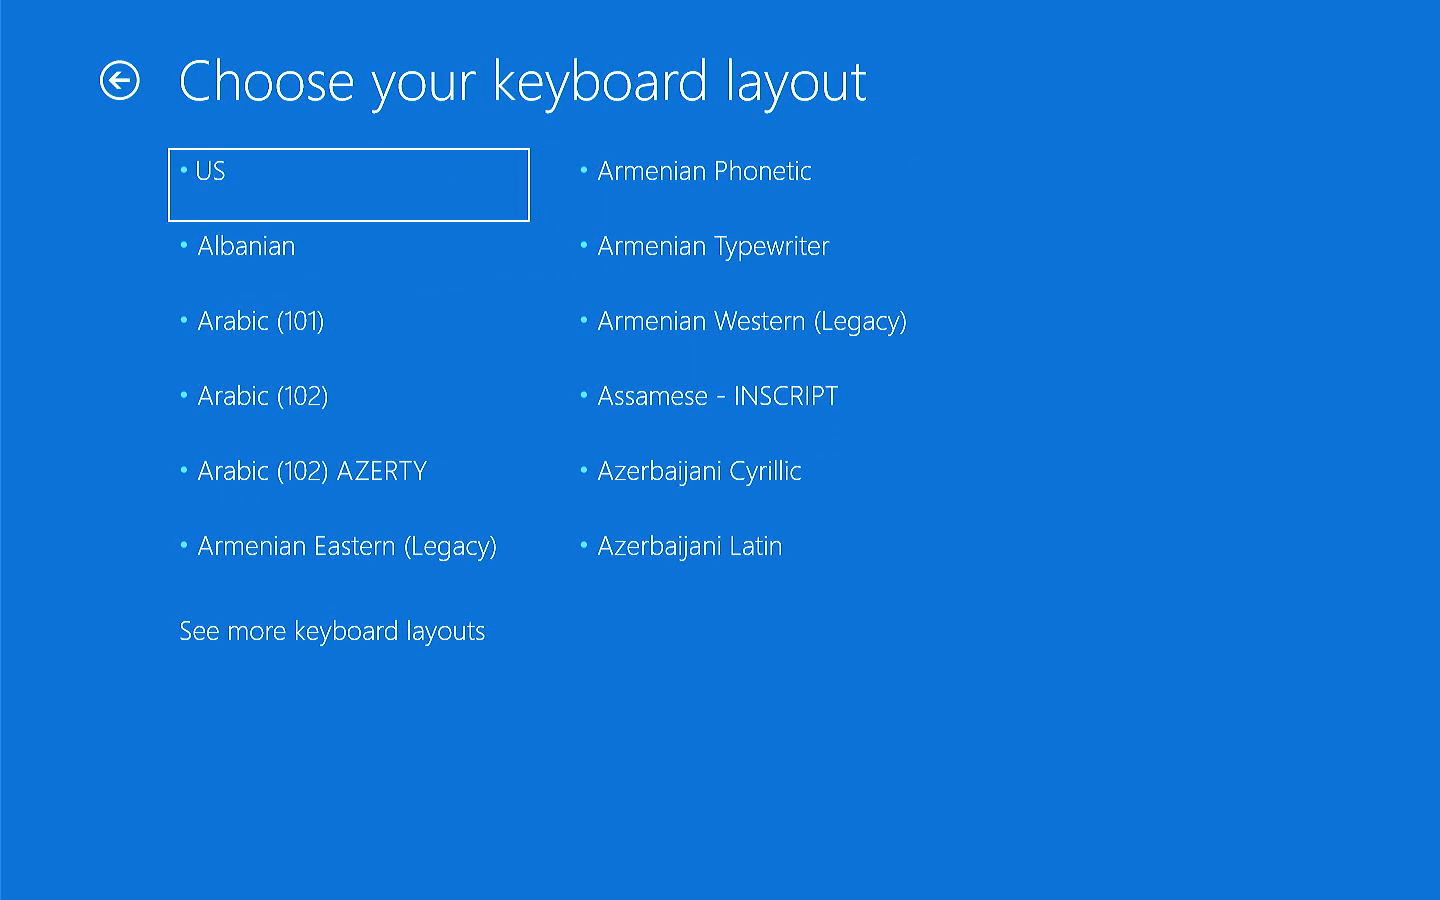
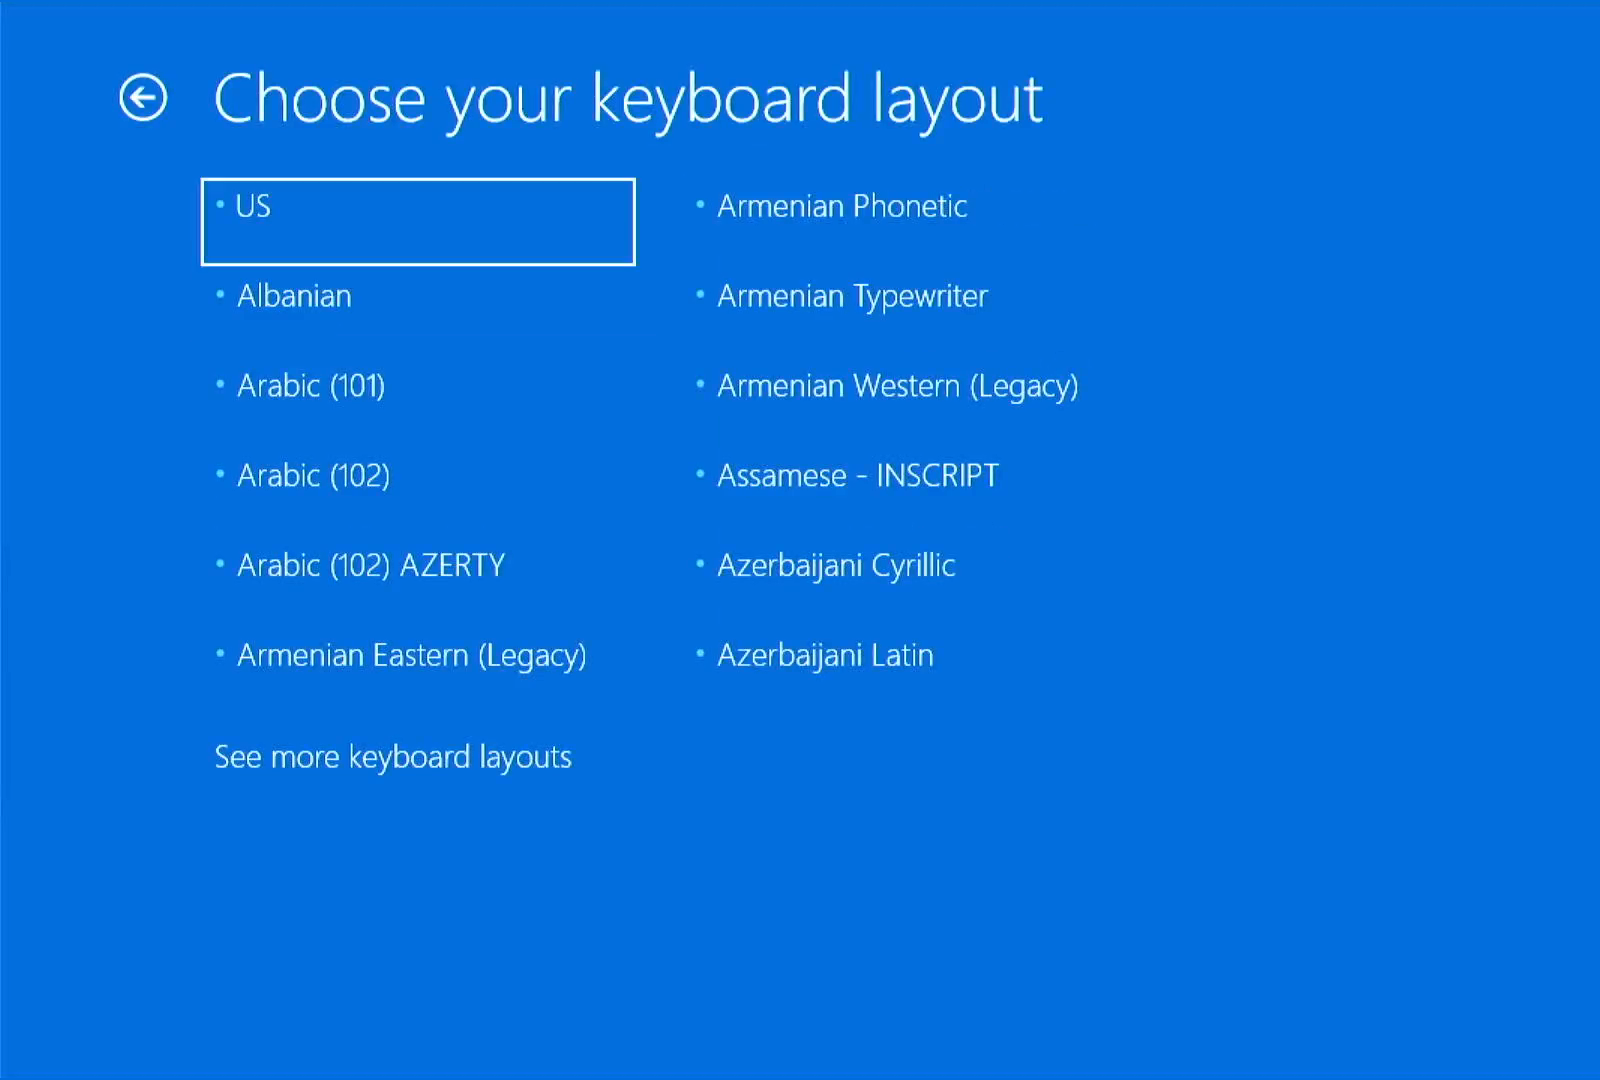
- Choose your keyboard layout.
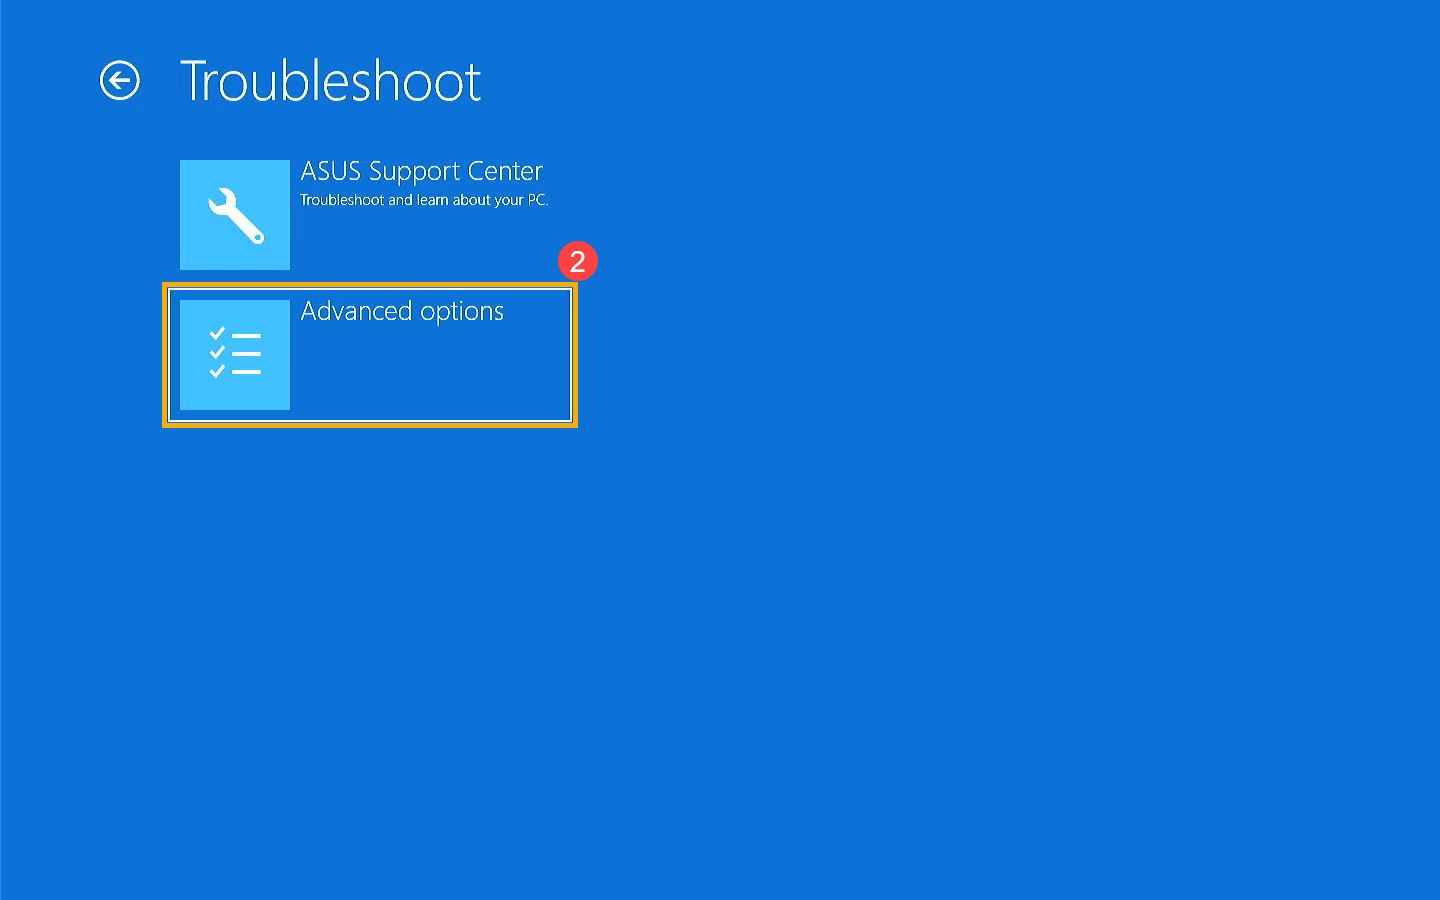
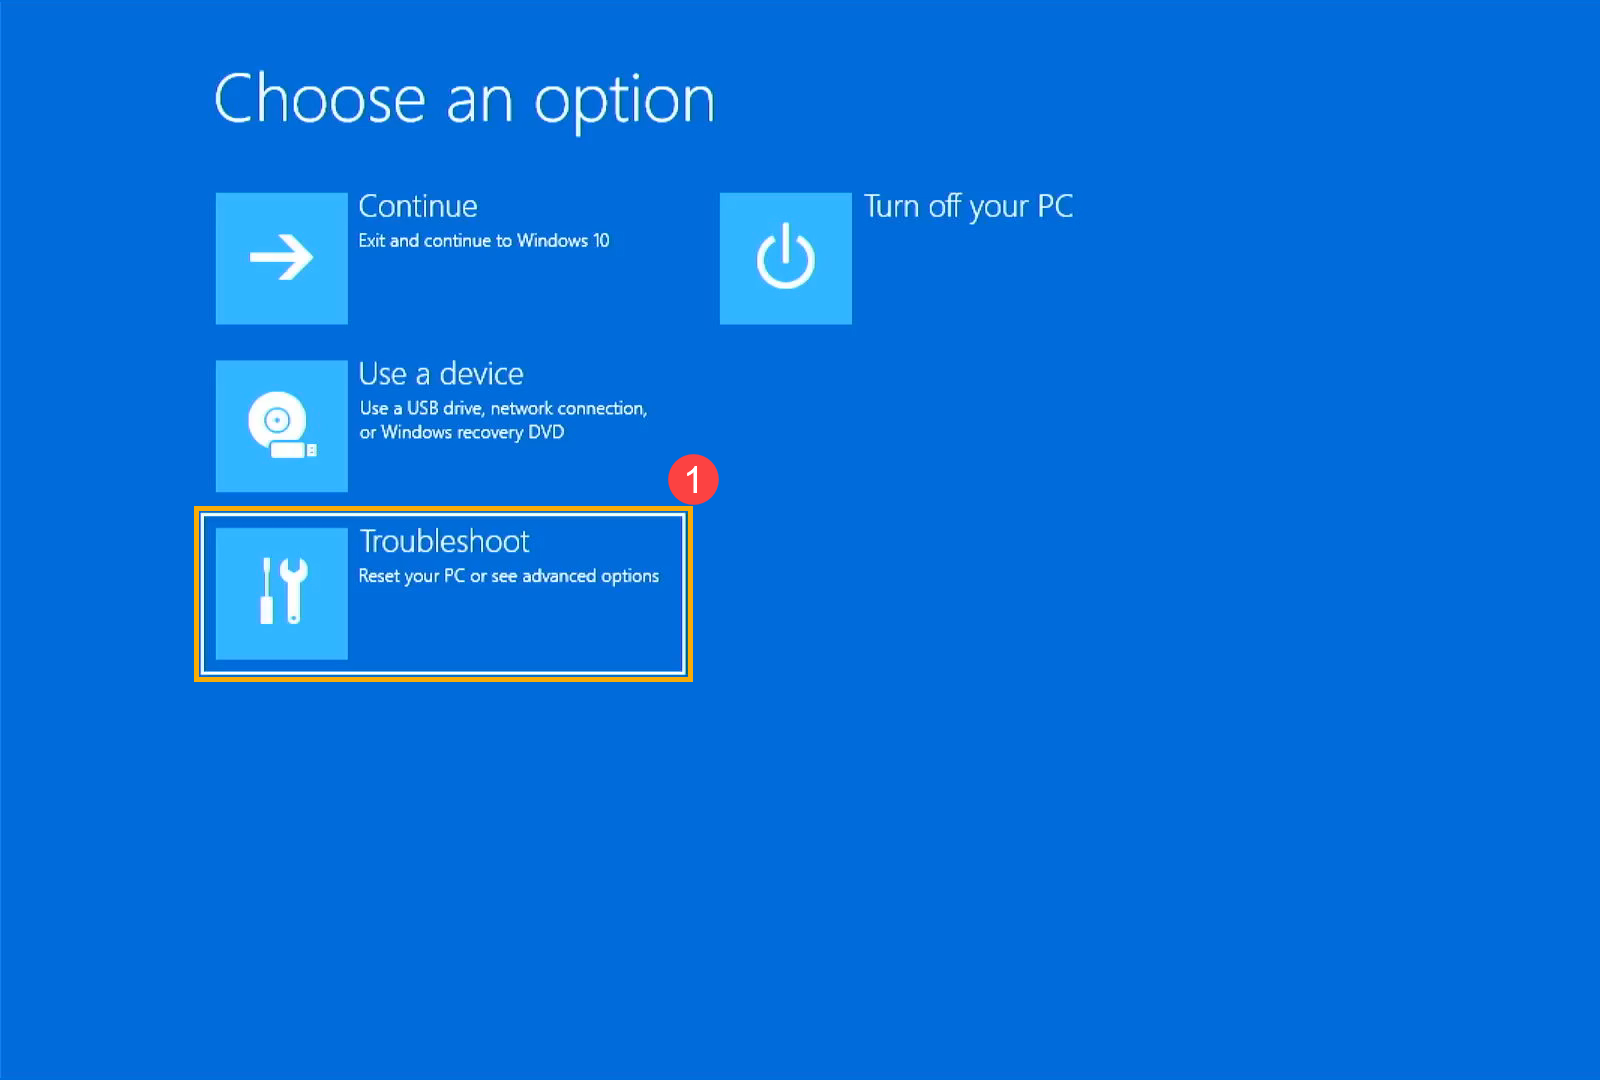
- Select [Troubleshoot]①.

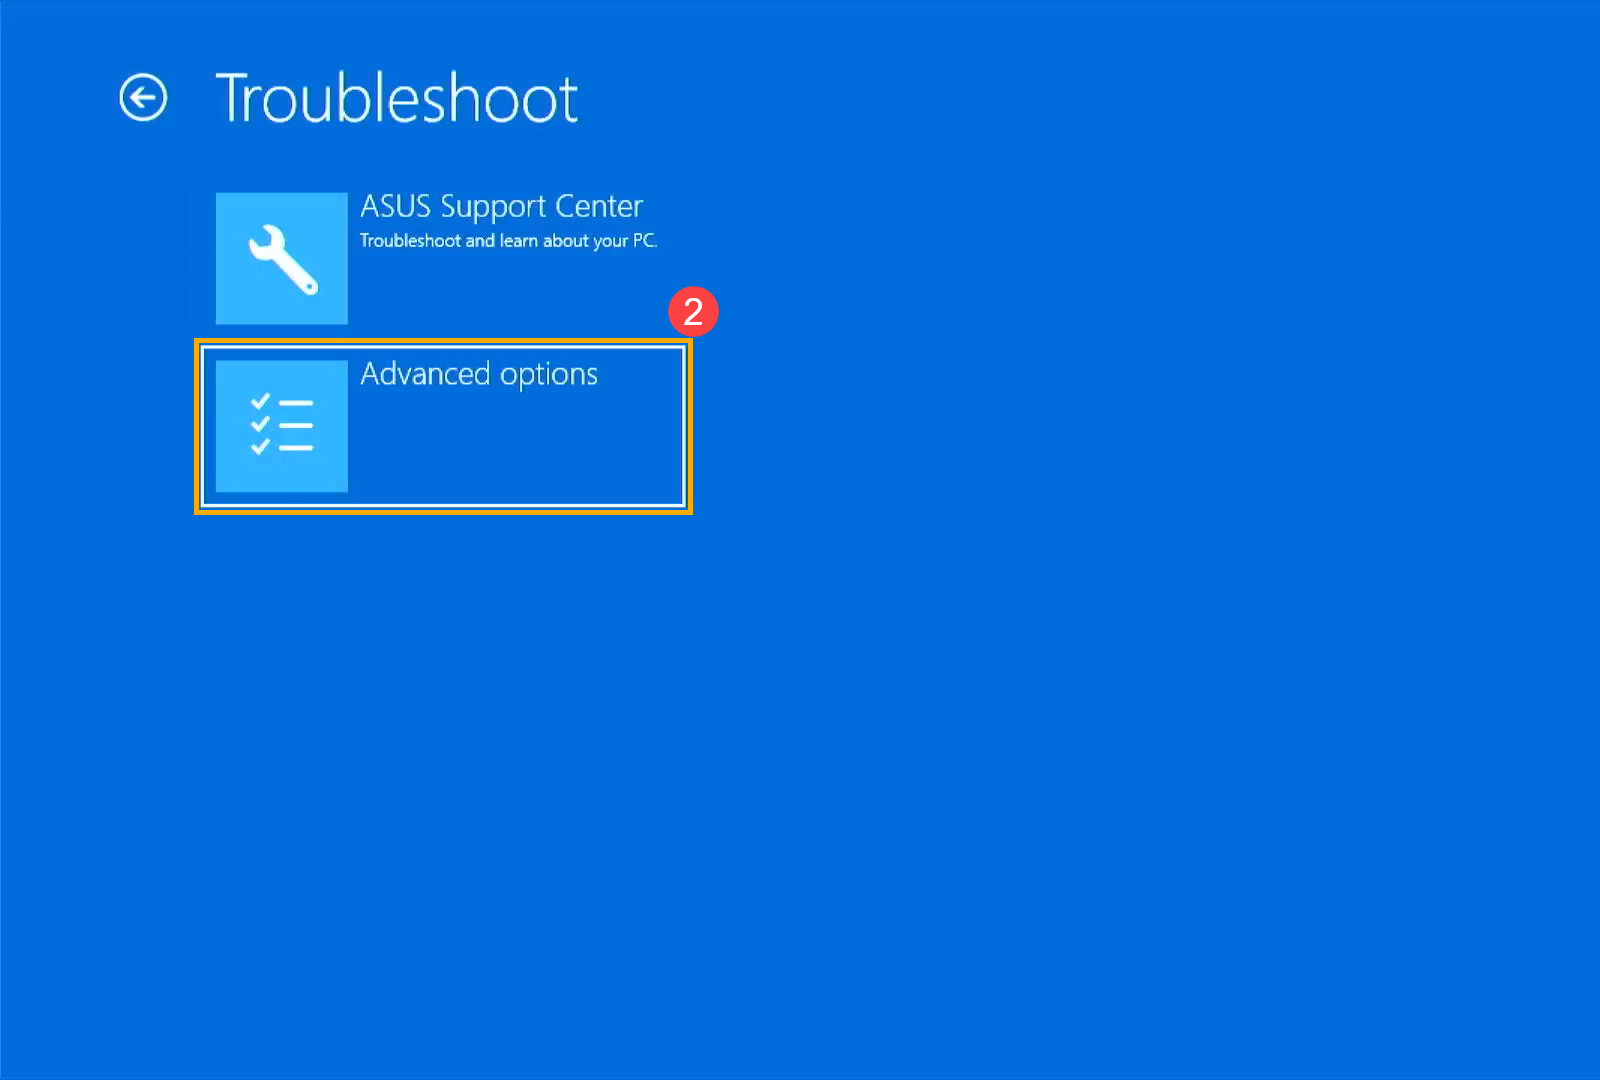
- Select [Advanced options]②.
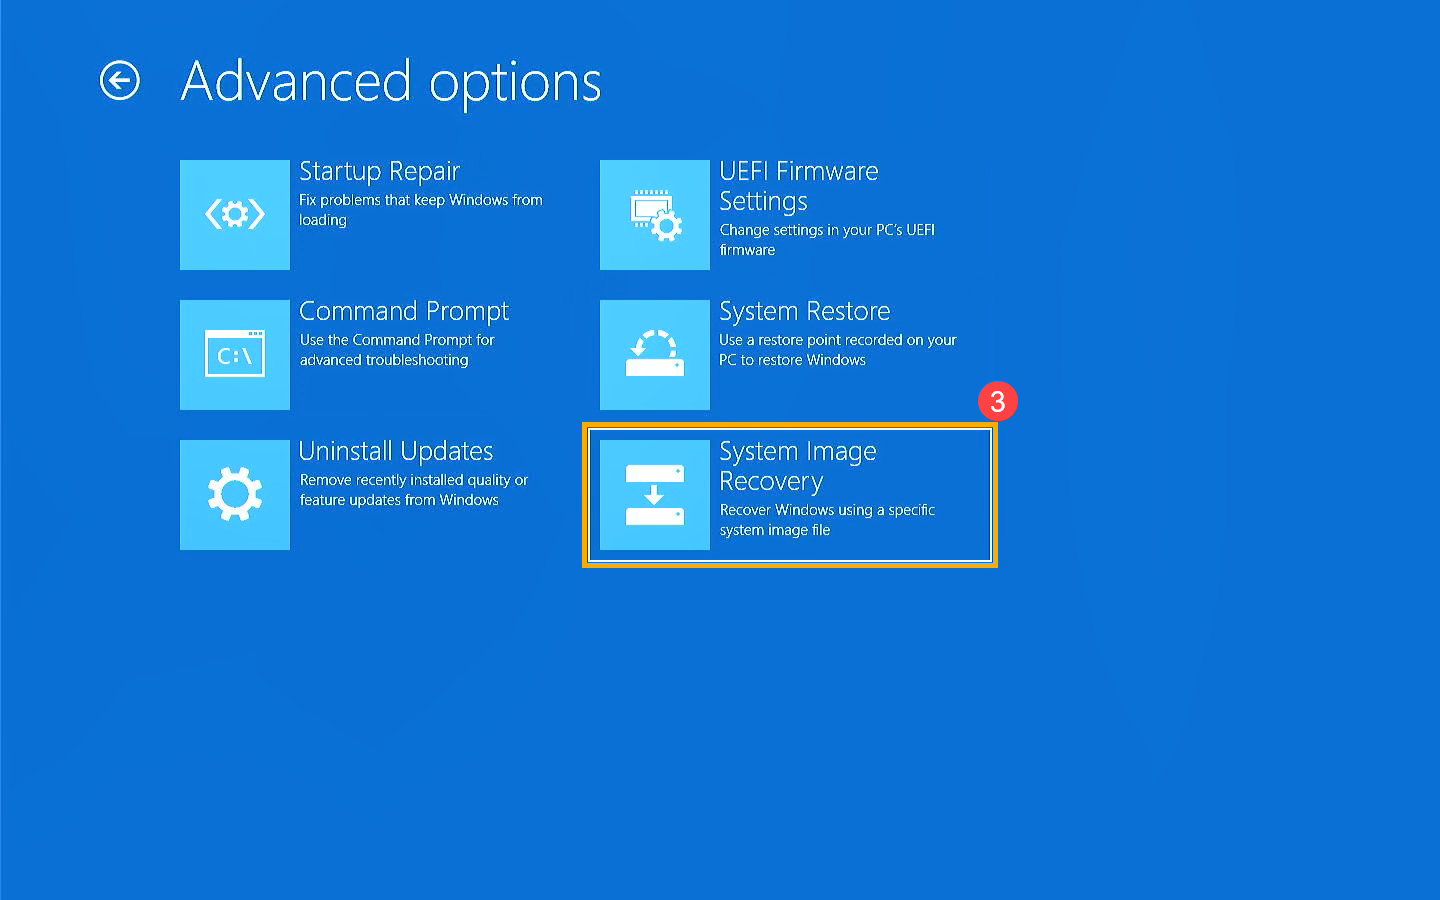
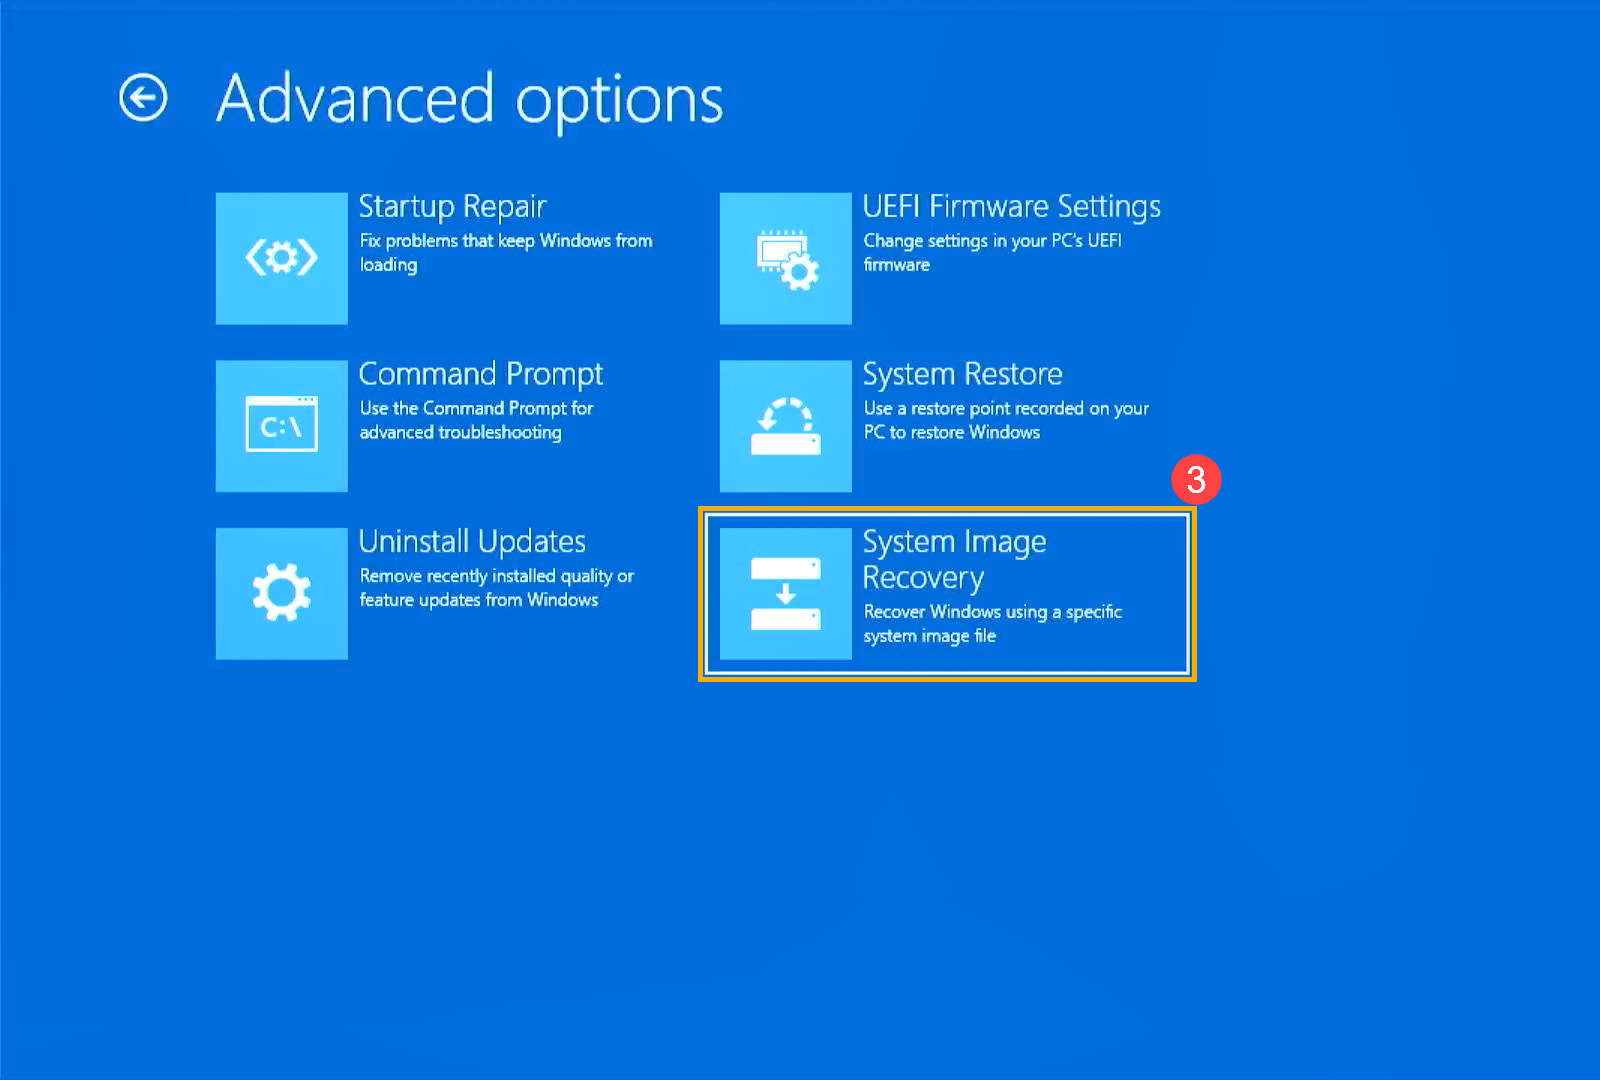
- Select [System Image Recovery]③.
- Select [Windows 11]④.
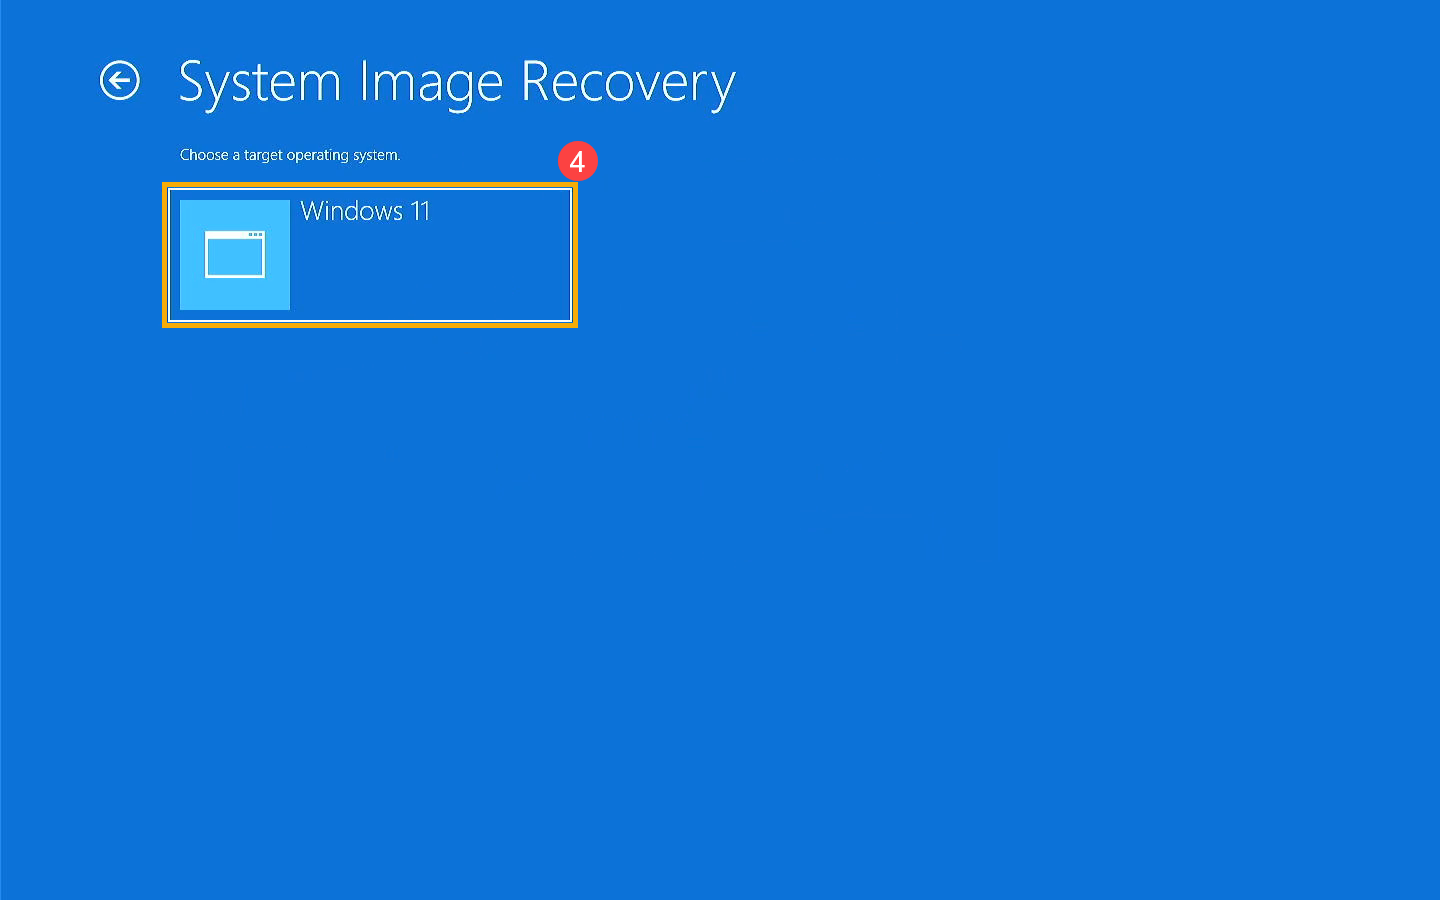
- The system will automatically search the latest available system image.

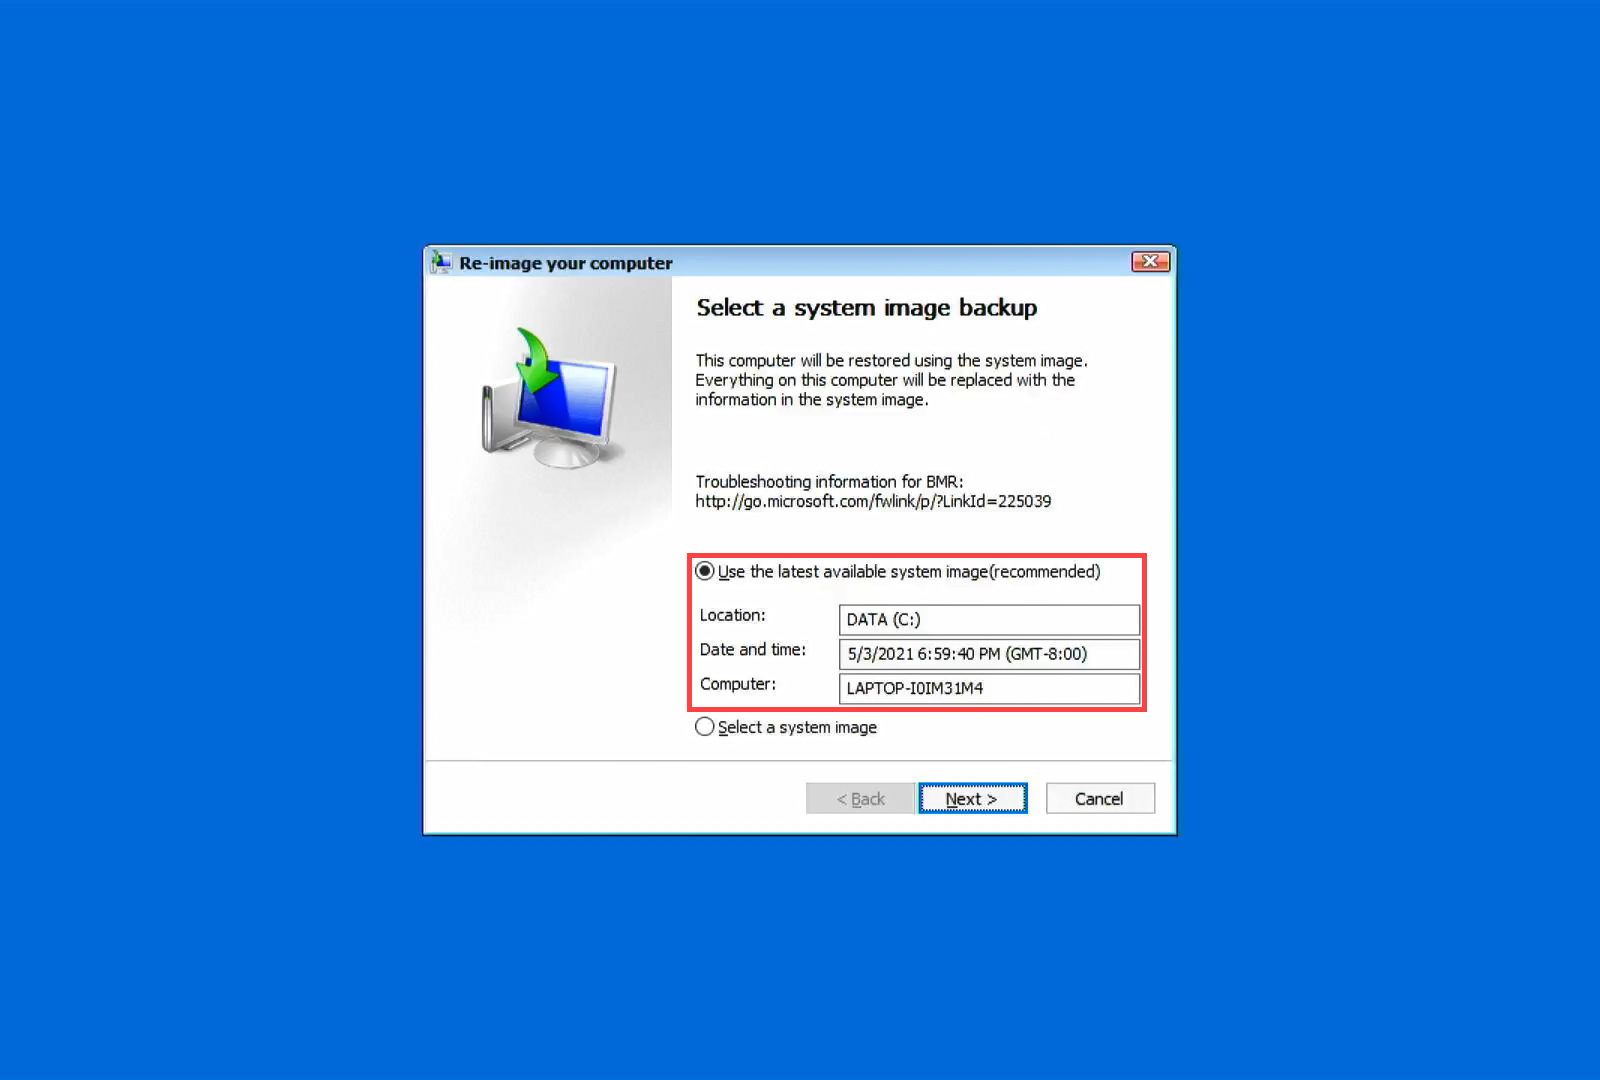
You can manually select a system image as well. Select [Select a system image]⑤, and then select [Next]⑥.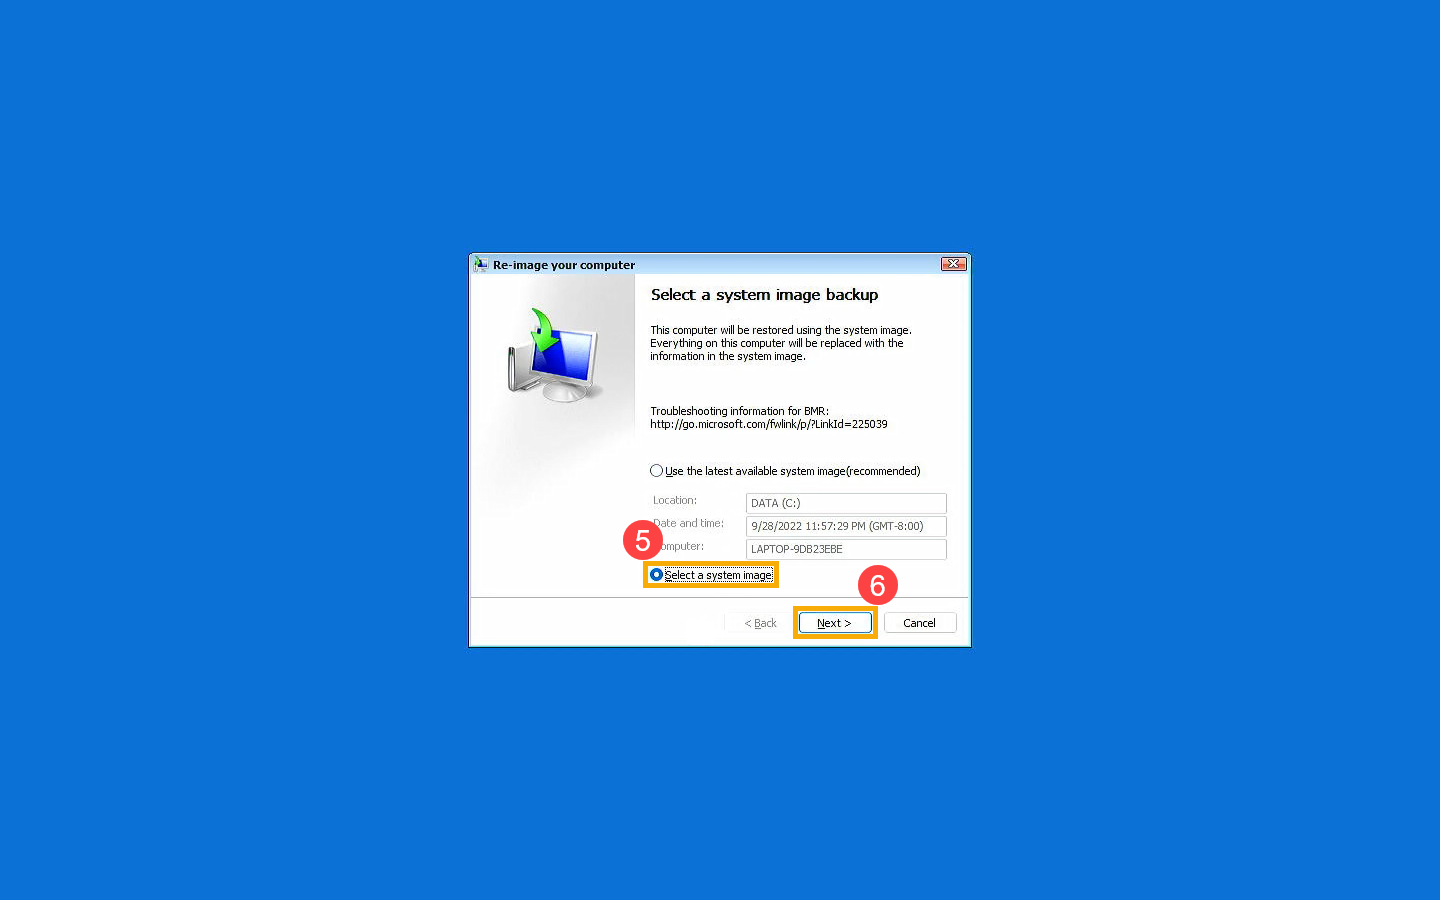
- Select a system image location where you want to use⑦, and then click [Next]⑧.
If your system image is saved on the external hard drive, please connect it to your device, and then click Refresh.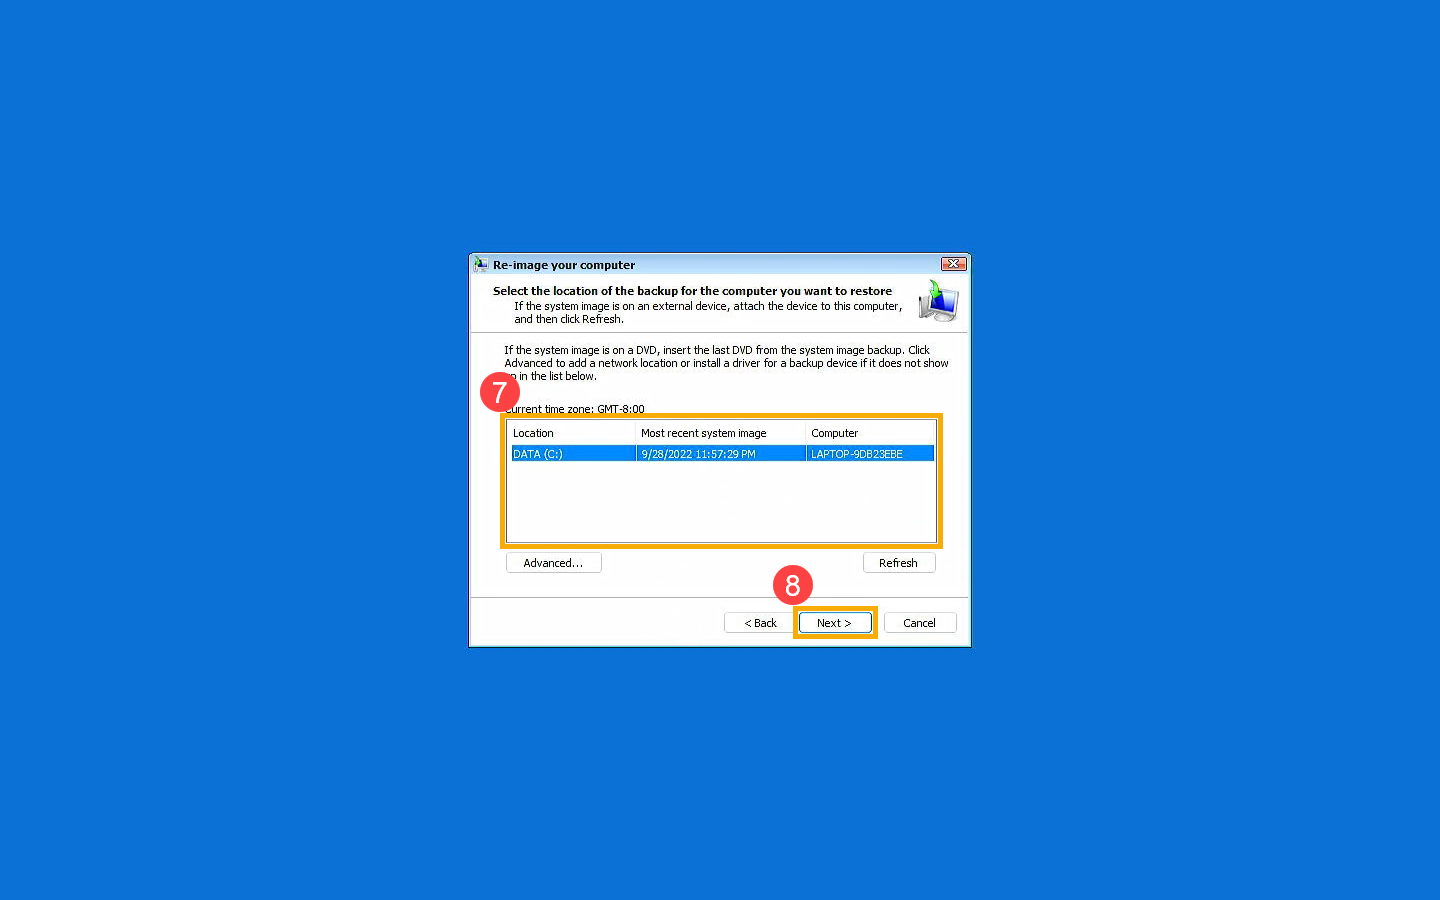
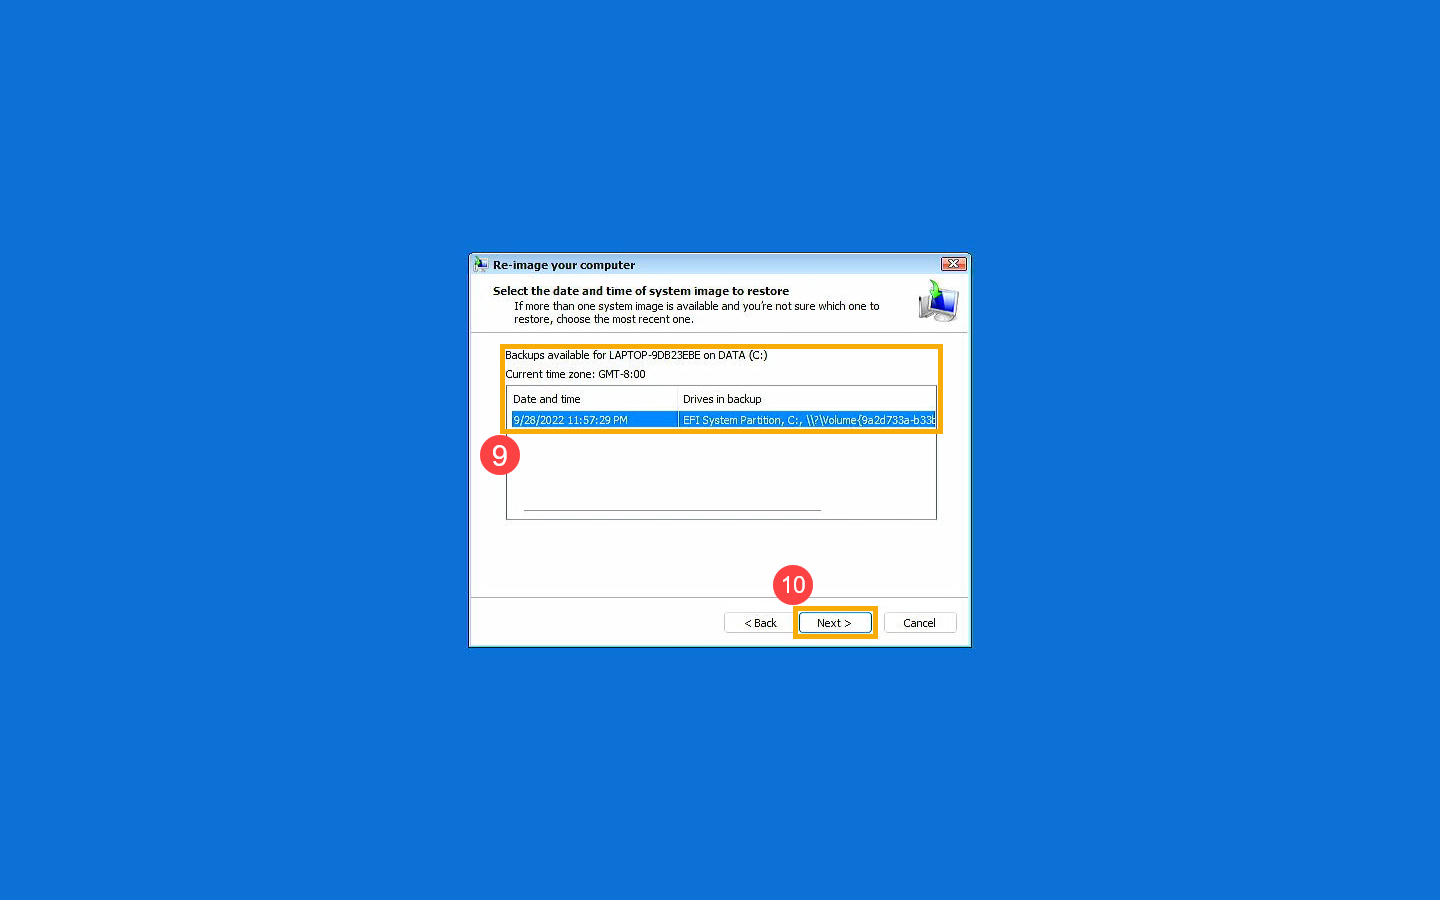
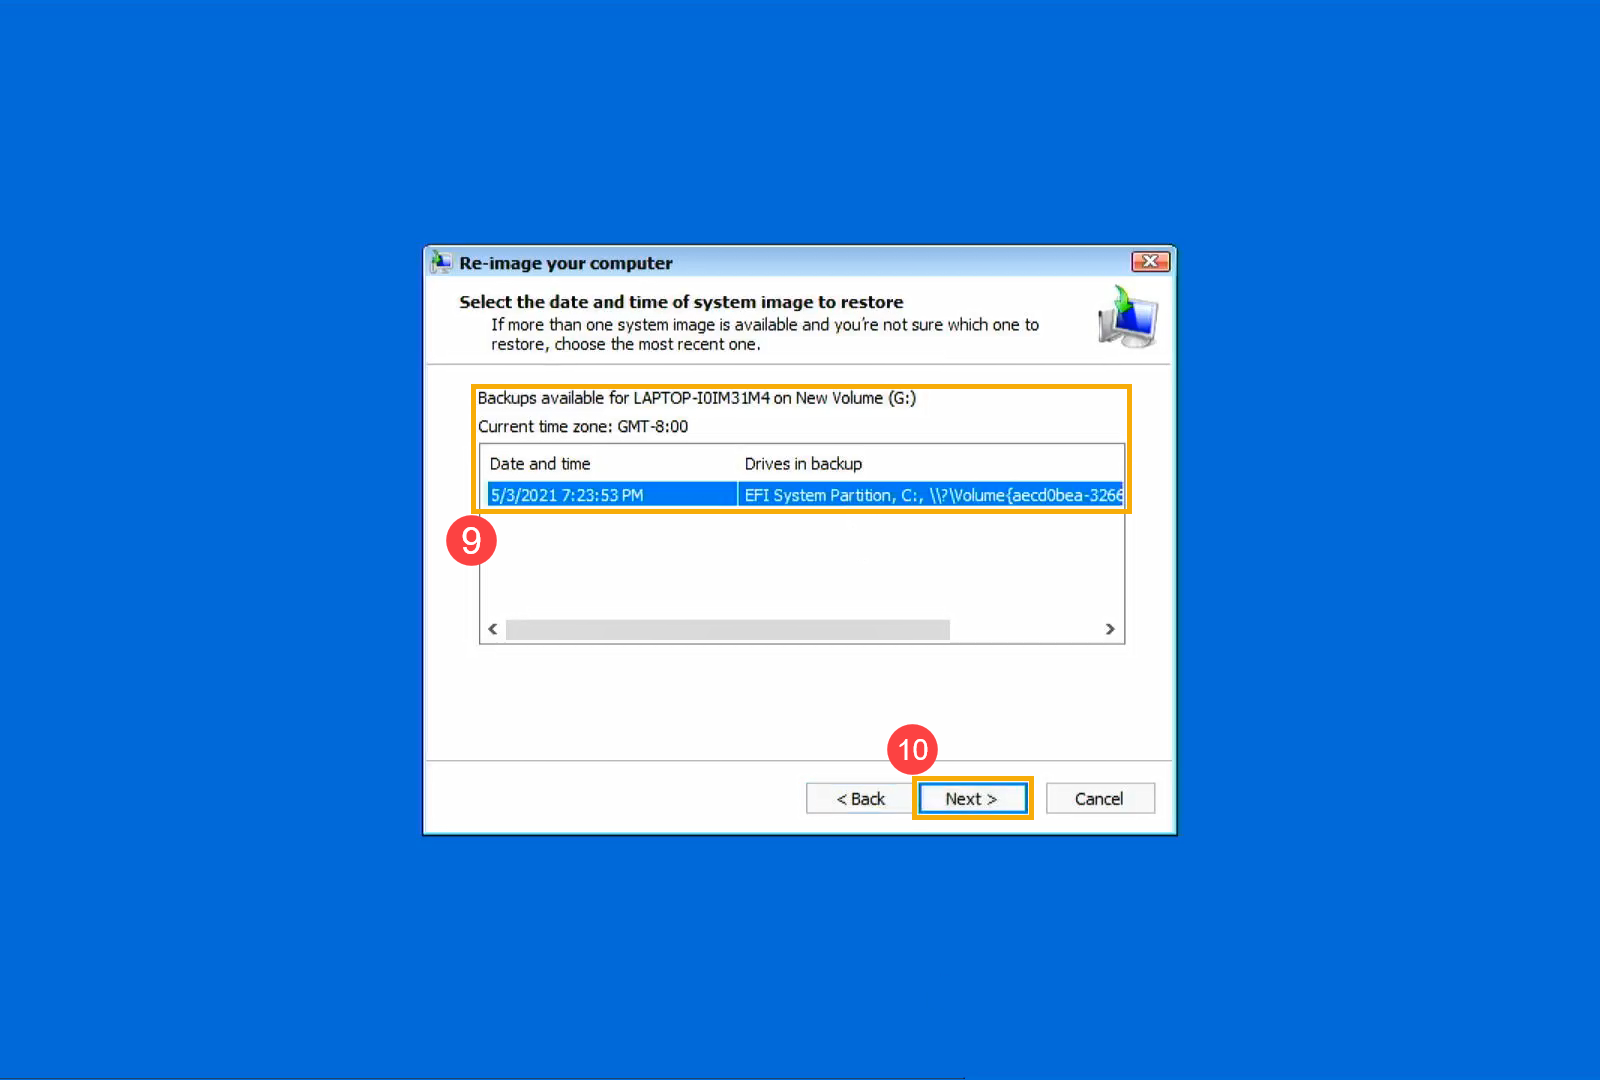
- The system will list all available system images on this drive, and please select a system image you want to recover⑨, and then click [Next]⑩.
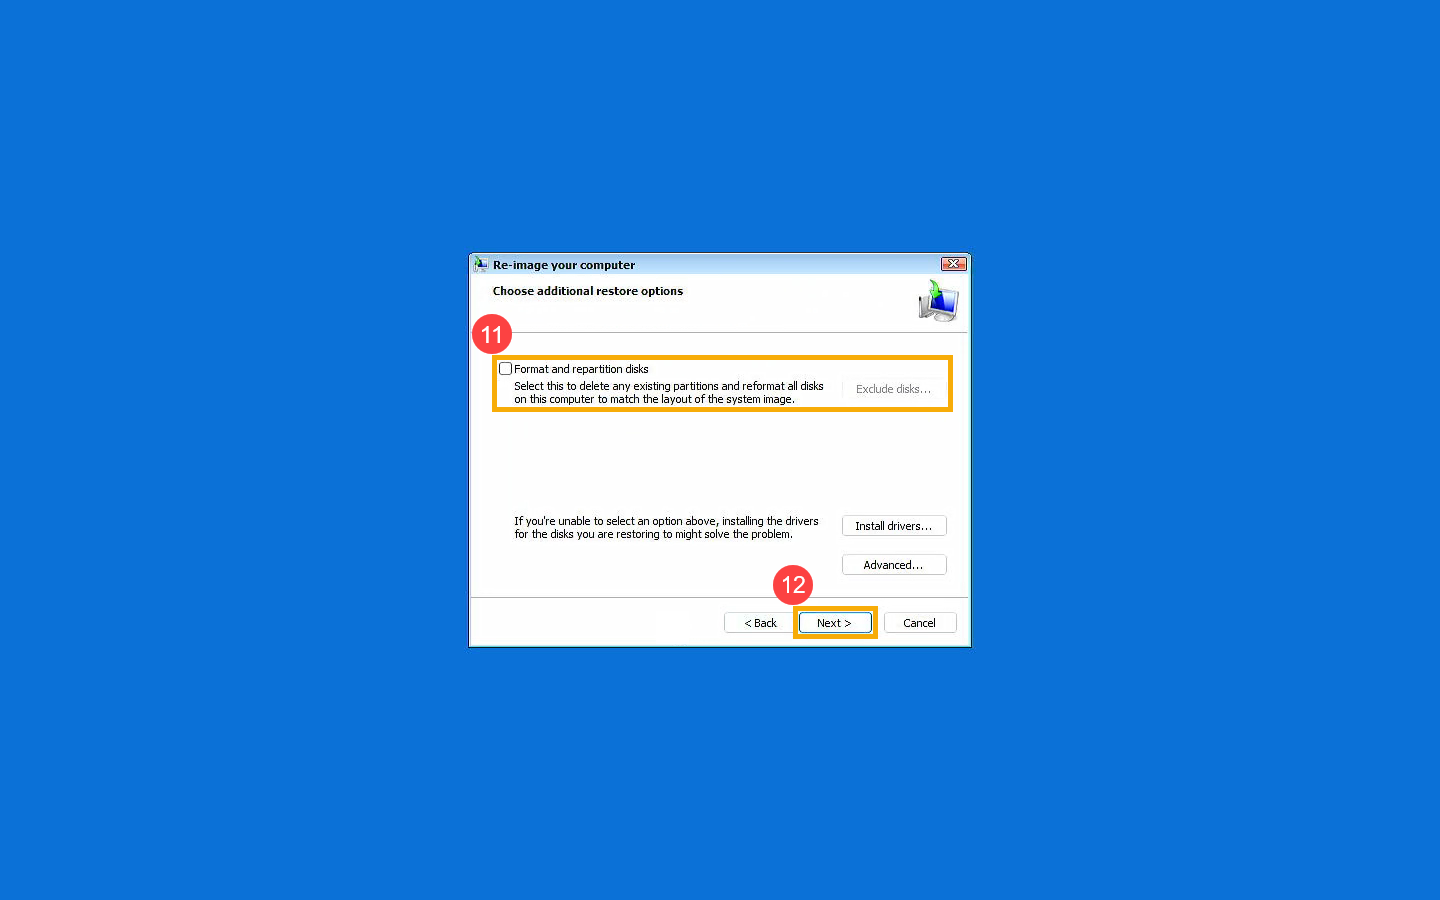
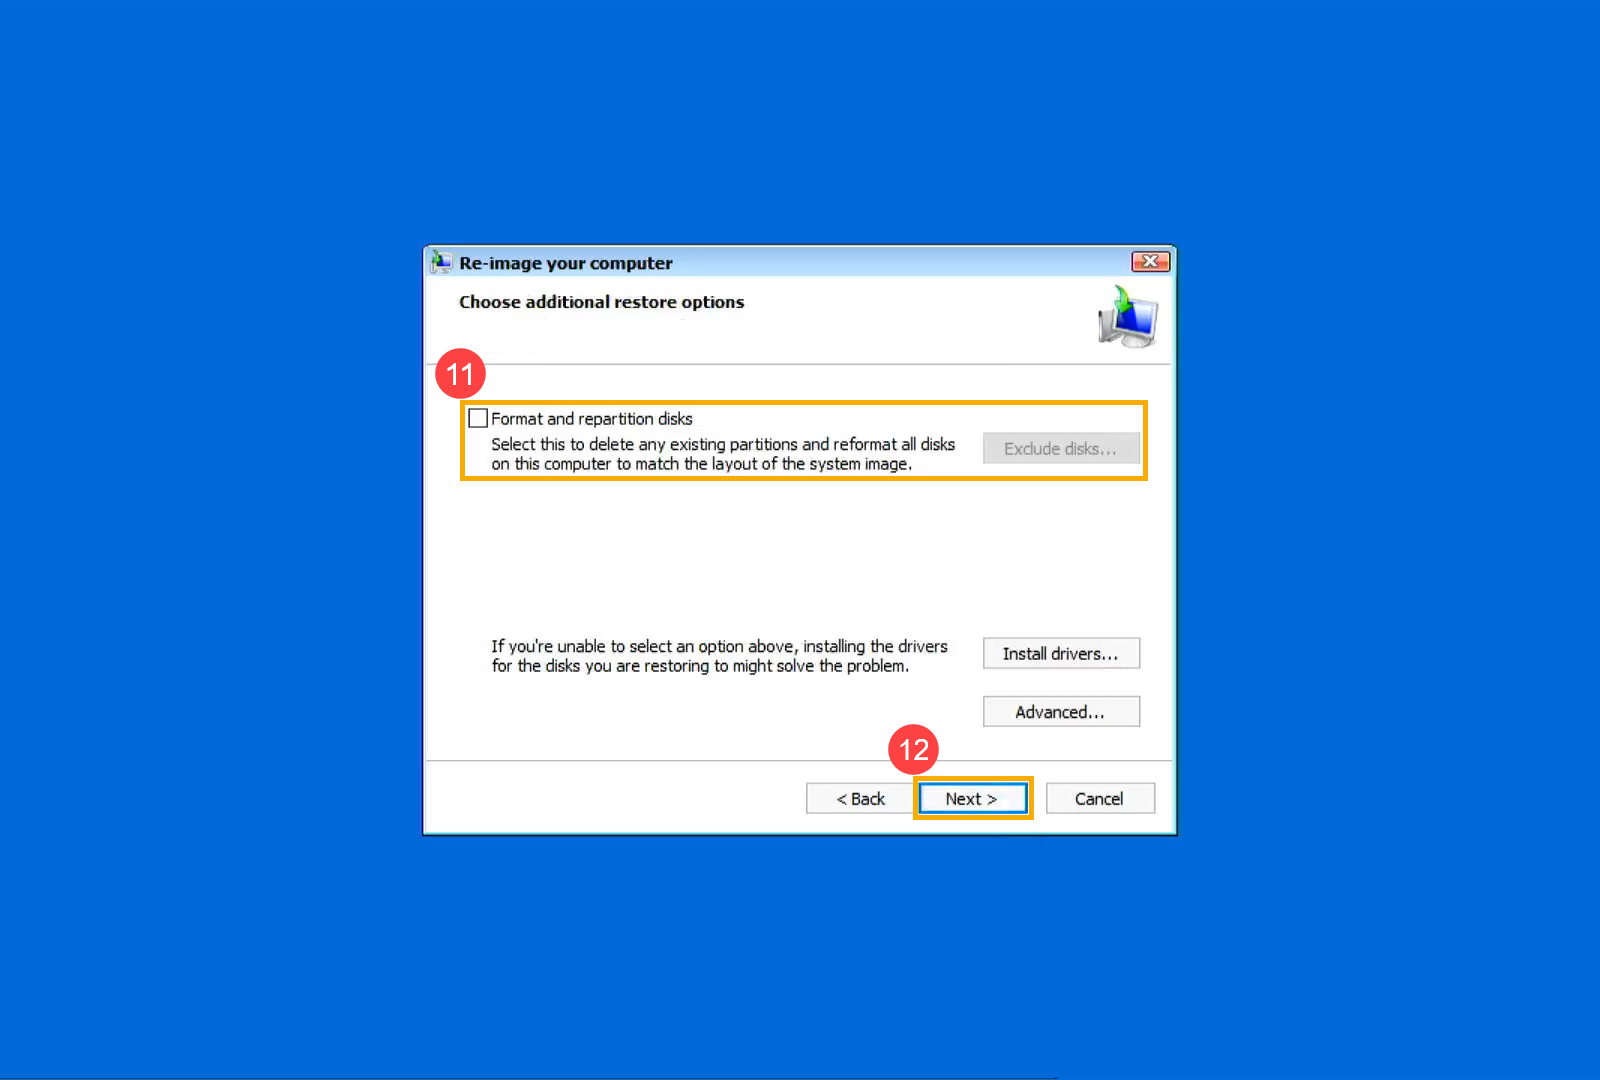
- You are able to format and repartition the existing disks⑪, and then click [Next]⑫.
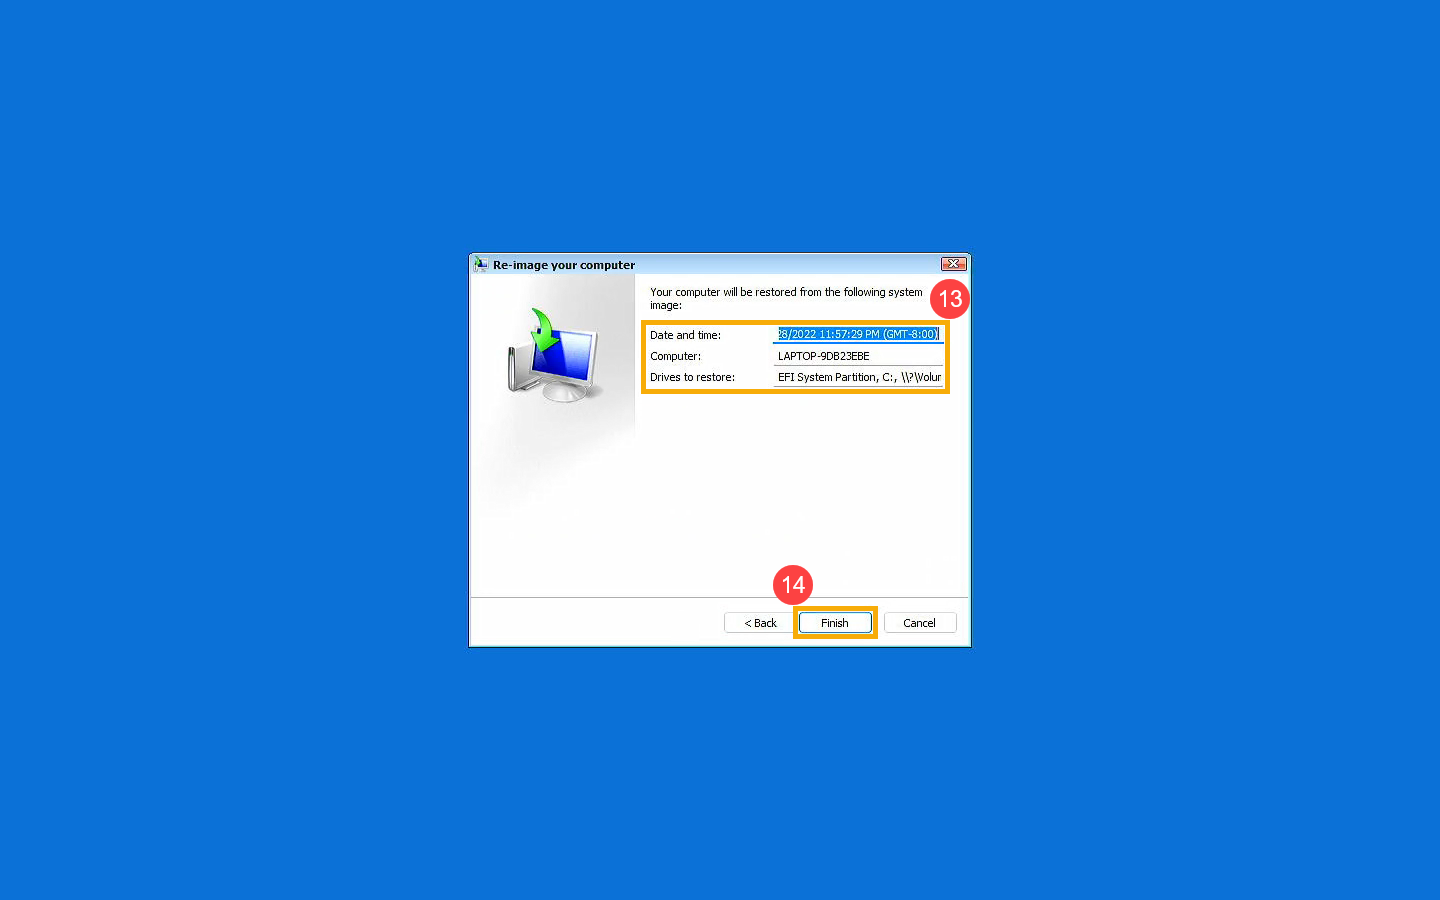
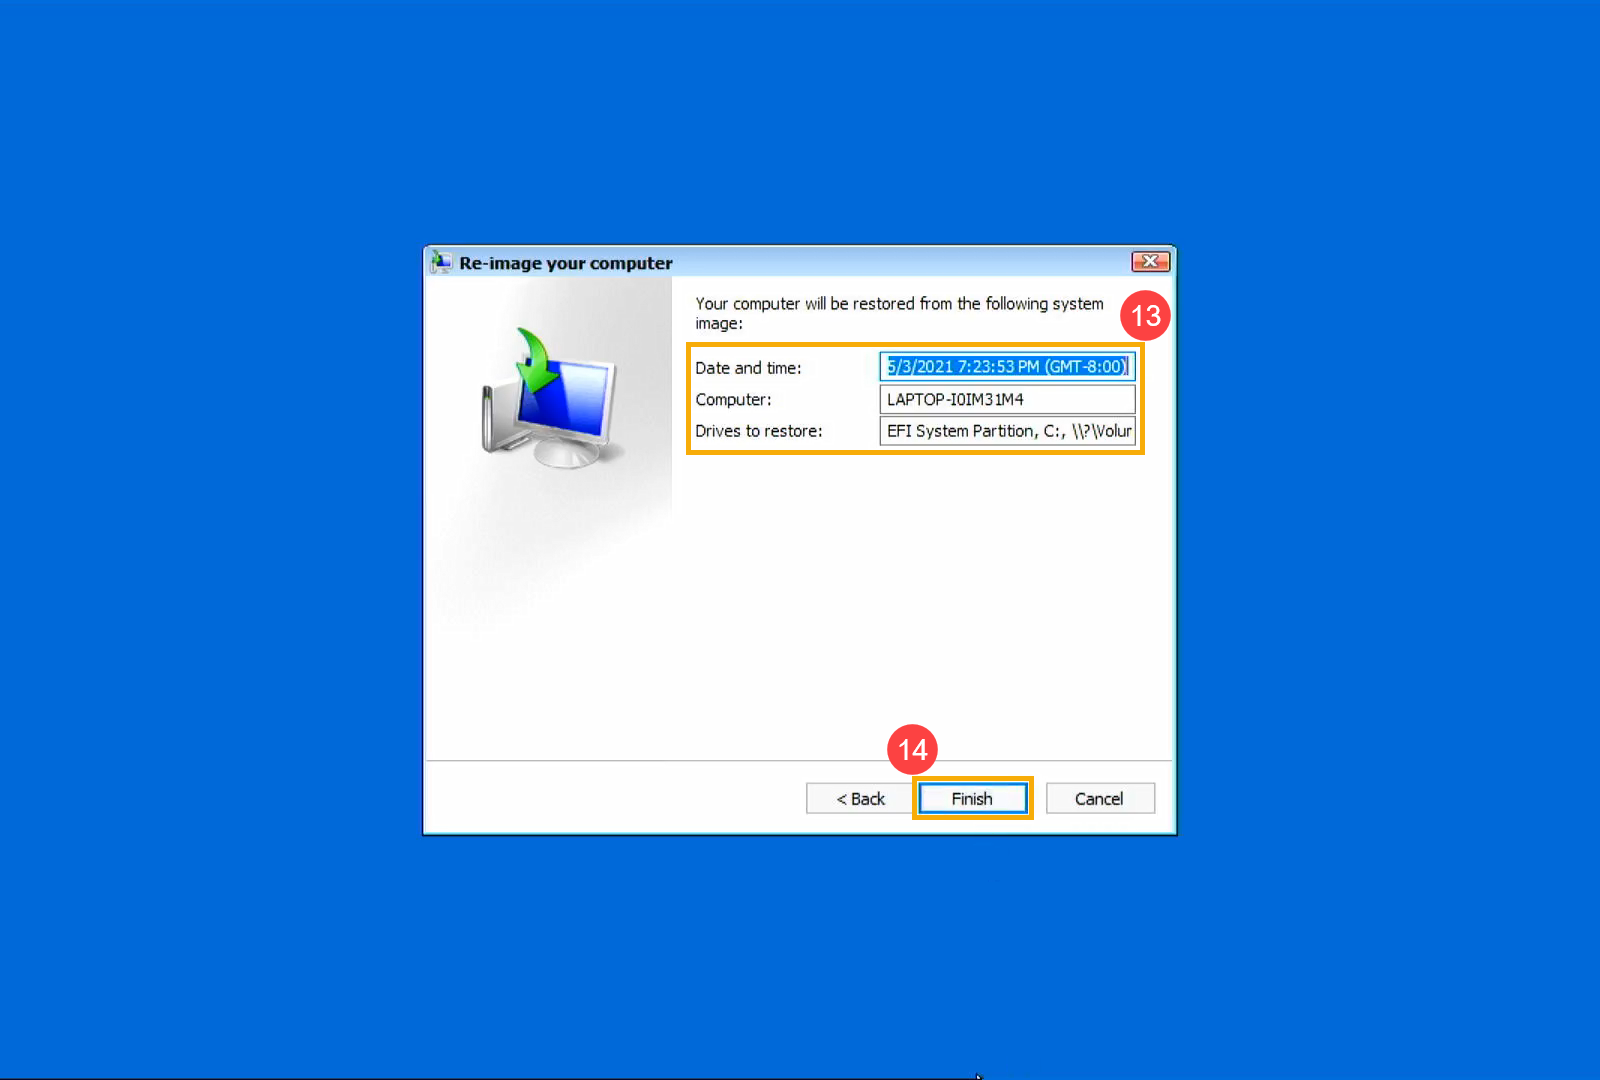
- Make sure that the restored system image information⑬, and then select [Finish]⑭.
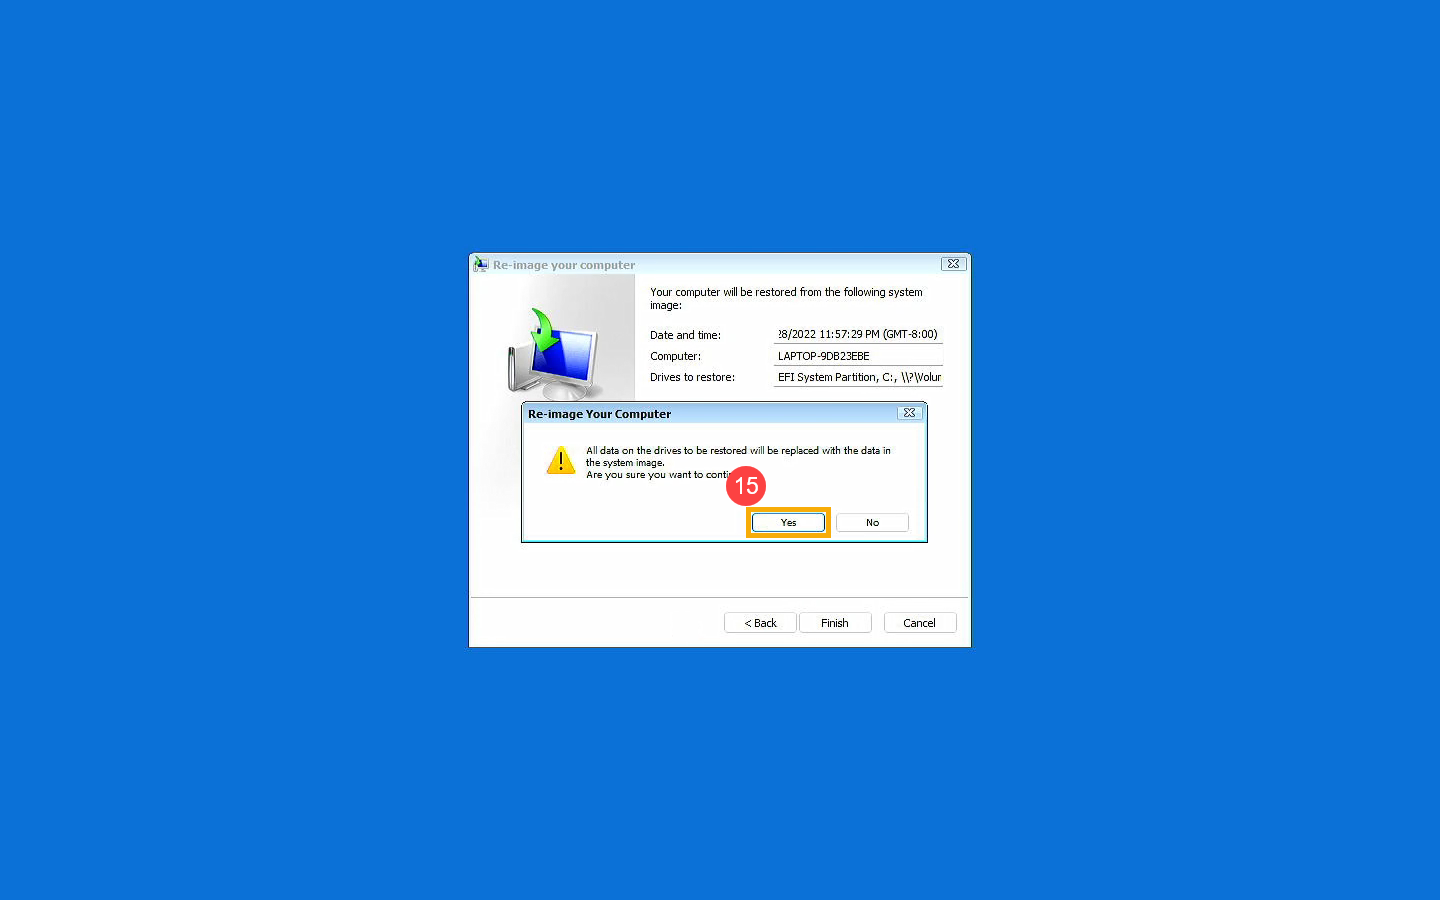
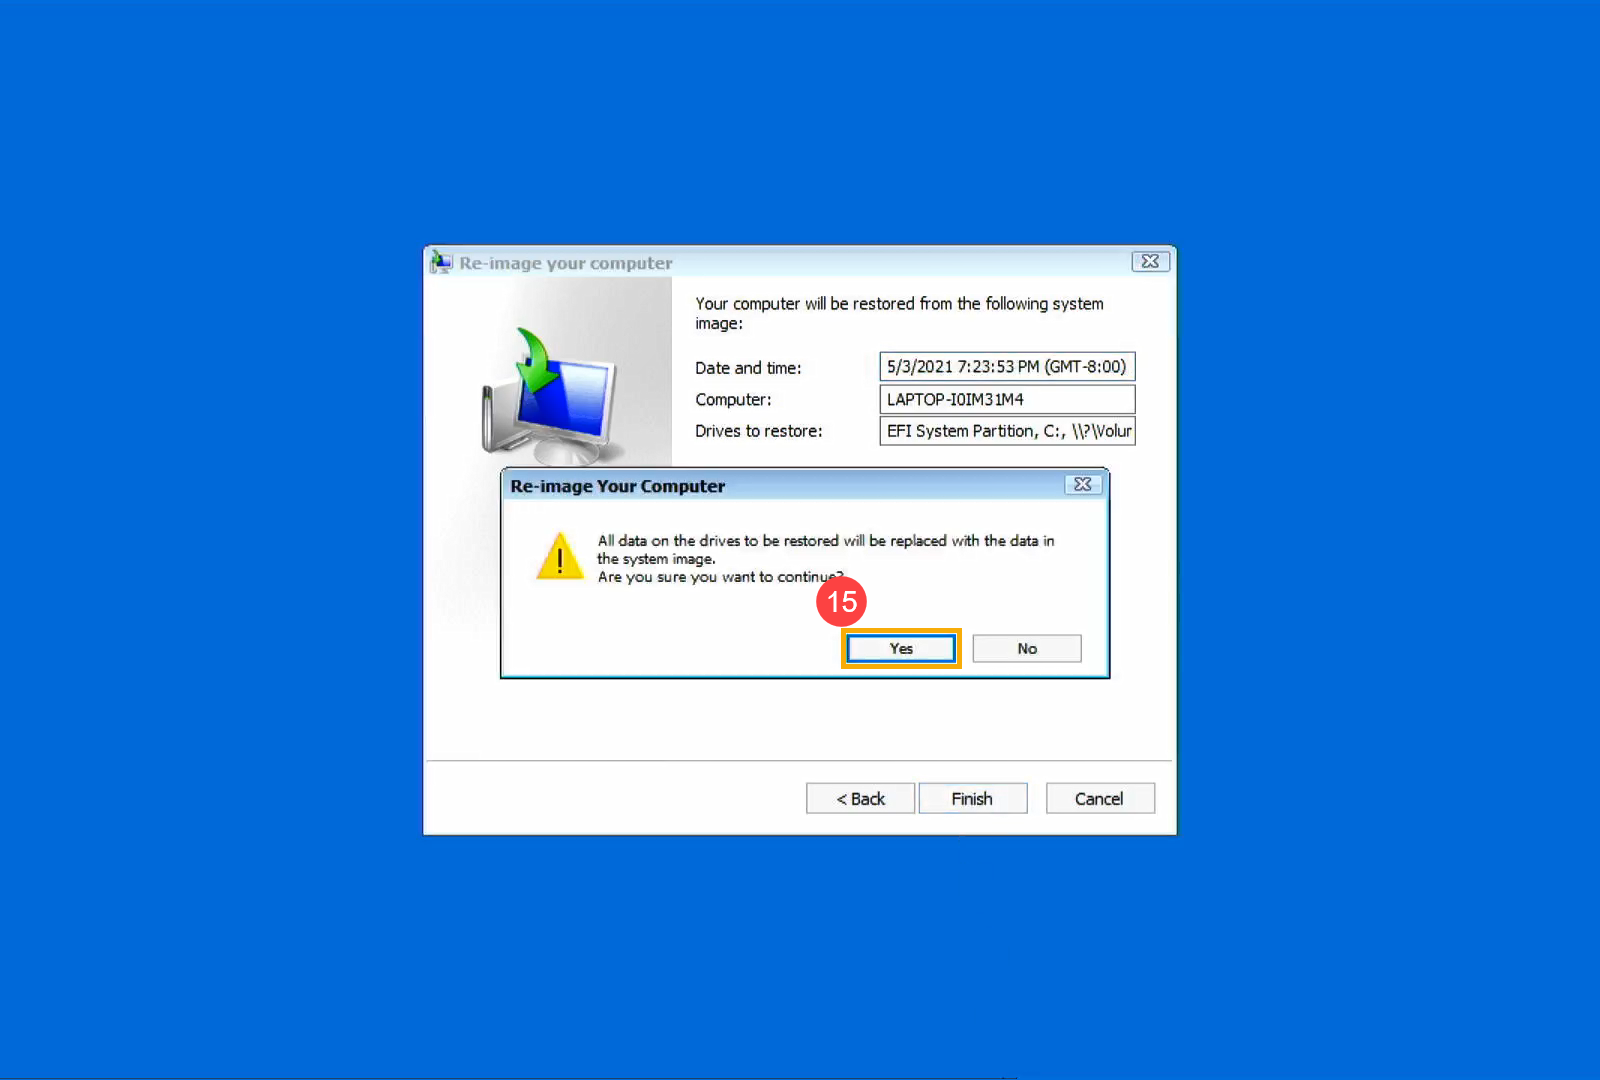
- The system will remind you that all data on the drives to be restored will be replaced with the data in the system image, select [Yes] to start the restore process⑮.
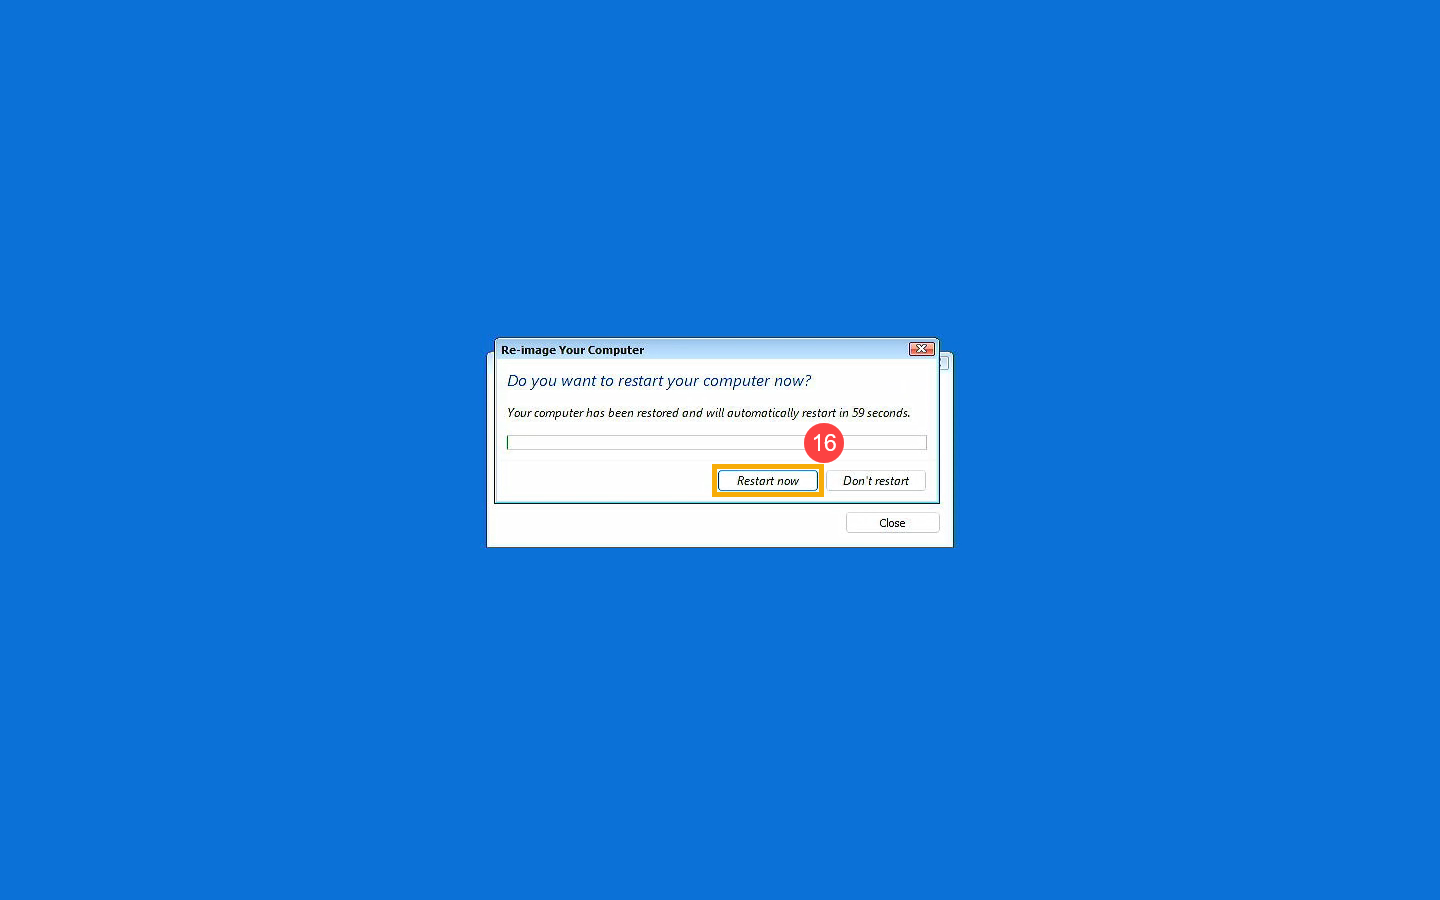
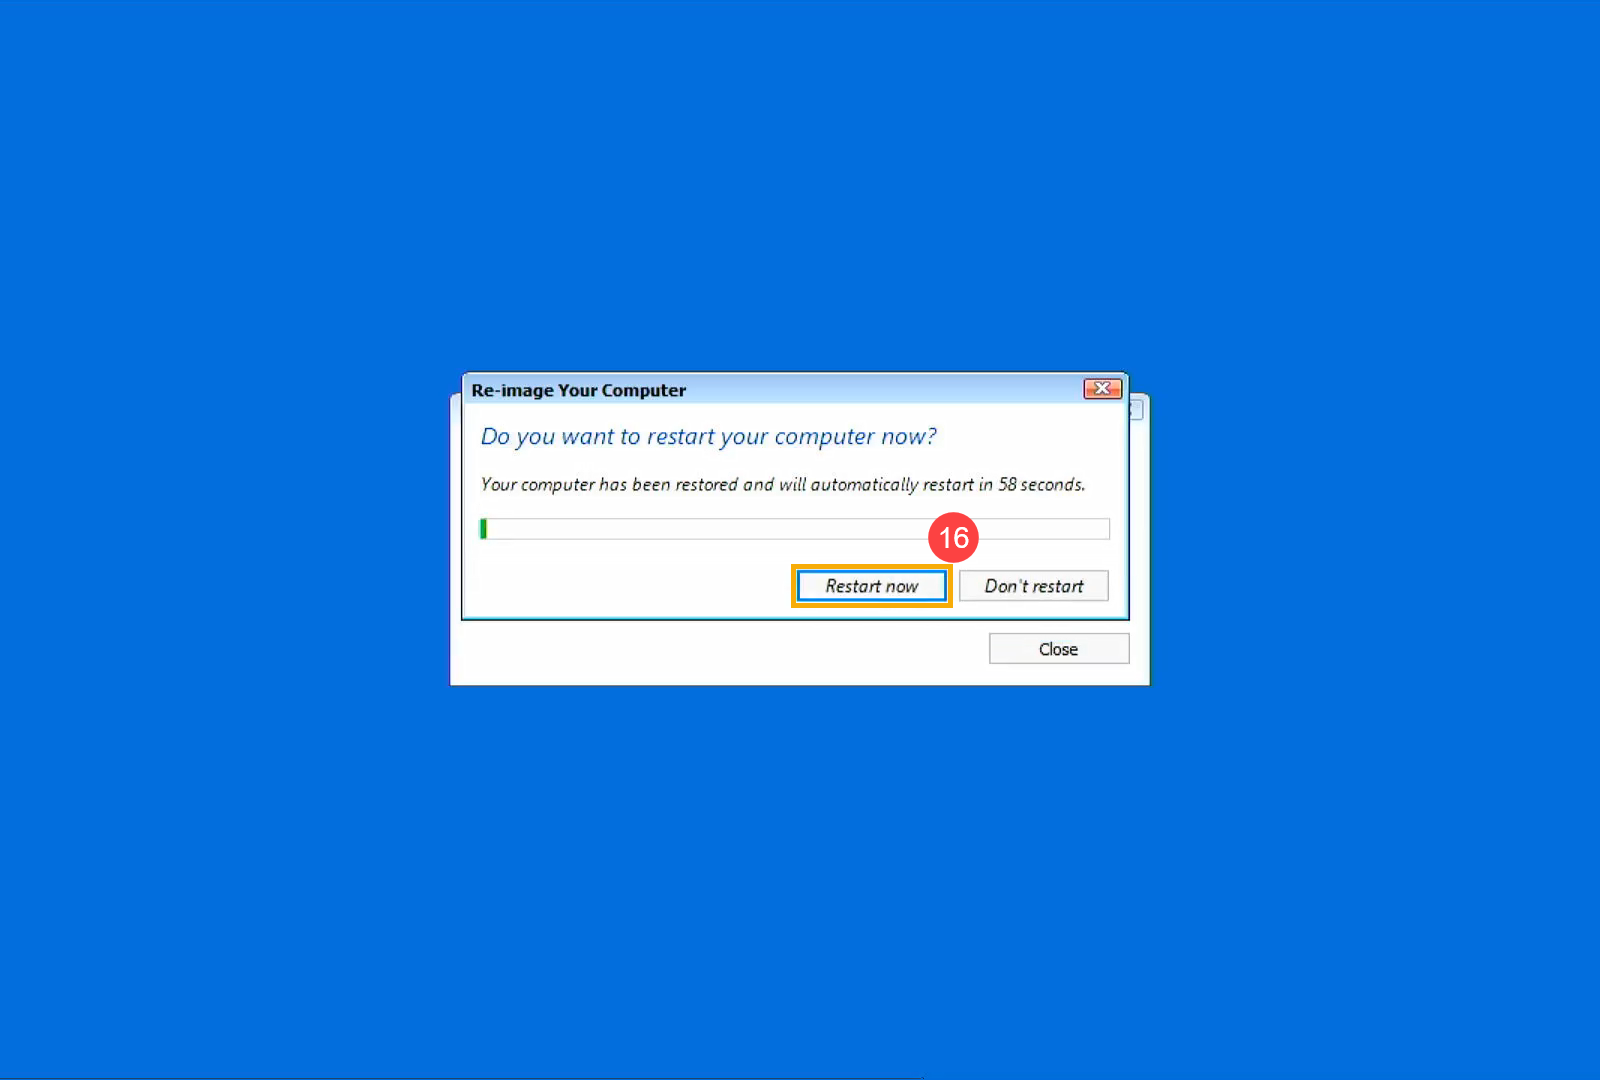
- Your system has been successfully restored and will automatically restart in 60 seconds. You can also select [Restart now]⑯, and your device will enter the Windows operating system after restart.
Create a system repair USB flash drive, which can enter Windows Recovery Environment
Create a system repair USB flash drive, which can enter Windows Recovery Environment, by the built-in 'Create a recovery drive' feature in Windows.
- Type and search [Create a recovery drive] in the Windows search bar①, then click [Open]②.

- If the User Account Control notification pops up, please select [Yes]③.
- Do not check the box to [Back up system files to the recovery drive]④, and then select [Next]⑤.
Note: The following steps will back up your system via system image (including your programs and personal file), so you don’t need to back up the system to a recovery drive in this step (system backup won’t include your programs and personal files).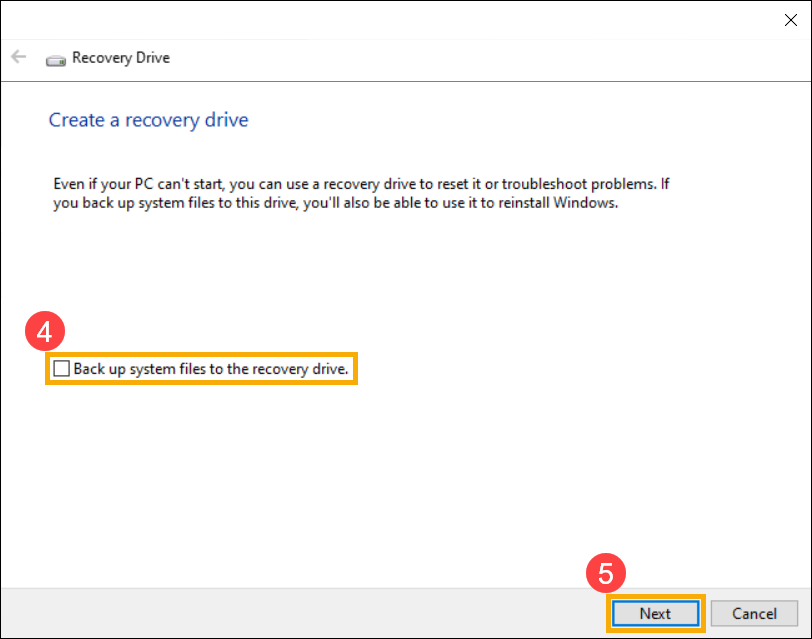
- Connect the USB flash drive that you want to create a bootable device to enter Windows Recovery Environment to your device.
Note: All files on the USB flash drive will be deleted during the process, so please back up your files first if you have data inside originally.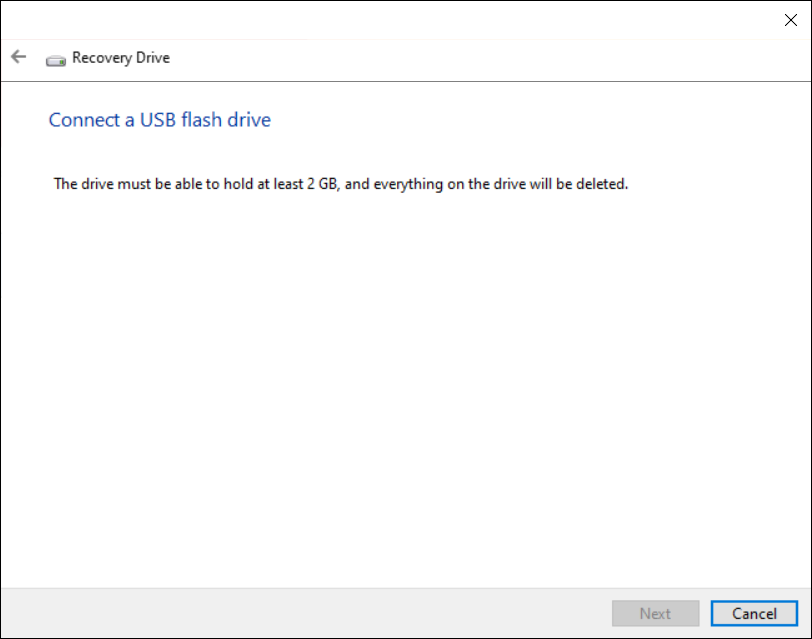
- In Available drive(s), confirm and select the USB flash drive that you want to use⑥, and then select [Next]⑦.
Note: If you will use an external USB hard drive to save the system image, you can connect the same one to create the bootable device to enter Windows Recovery Environment (Windows will automatically create a new partition on the external USB hard drive).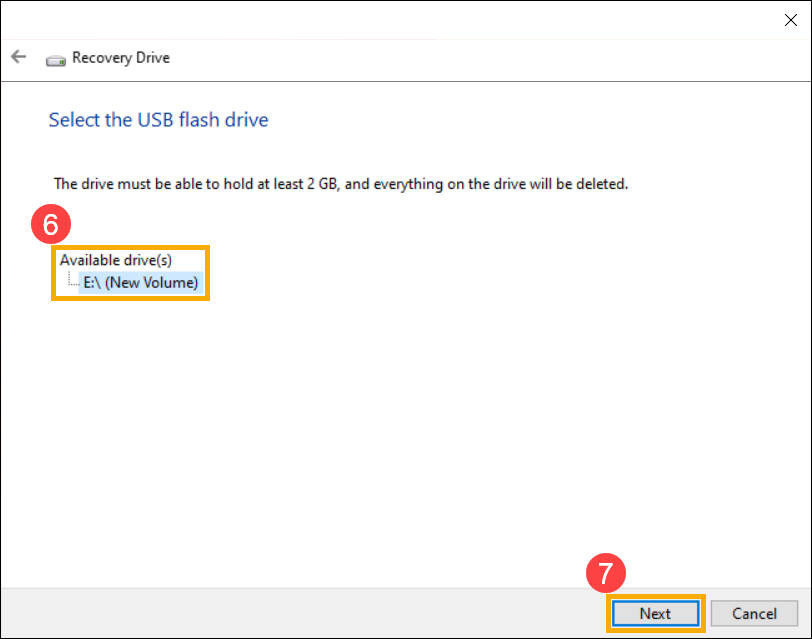
- Select [Create]⑧, and the system will start to create the recovery drive. It will take a while, and it depends on your device specification and the size of the repair tools.
Note: Please make sure the AC adapter is connected during the process and do not force shut down to prevent any errors.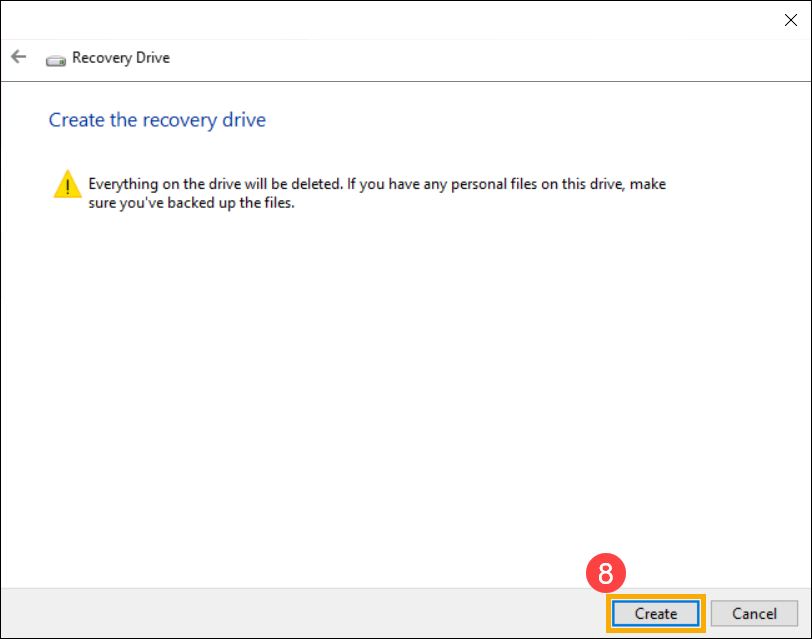
- The recovery drive (bootable device) is created, and please click [Finish]⑨.
- If you create the bootable device via the external USB hard drive and you use the same drive to save system image, please continue with the following step.
The remaining space is unallocated status in the external USB hard drive because of creating a recovery drive.
Before creating a system image, you need to manually create a new partition and set the format to NTFS type. Here you can learn more about [Windows 11/10] Hard disk partition, Shrink, and Extend to create a new partition.
Create System Image
Because Windows will regularly update and improve security as well as performance, we recommend that you periodically repeat the following steps to create a new system image and back up your programs and personal files.
- Type and search [Control Panel] in the Windows search bar①, then click [Open]②.
- In the System and Security field, select [Backup and Restore (Windows 7)]③.
- Select [Create a system image]④.
- In the On a hard disk field, select a drive where you want to save the system image⑤, and then select [Next]⑥.
- The system lists the drives which will be backed up and the required disk space. Please select [Start backup] to start to create a system image⑦. It will take a while, and it depends on your device specification and the size of system image. In this example, it may take 1 hour to back up the system image of 44 GB disk space.
Note: Please make sure the AC adapter is connected during the process and do not force shut down to prevent any errors.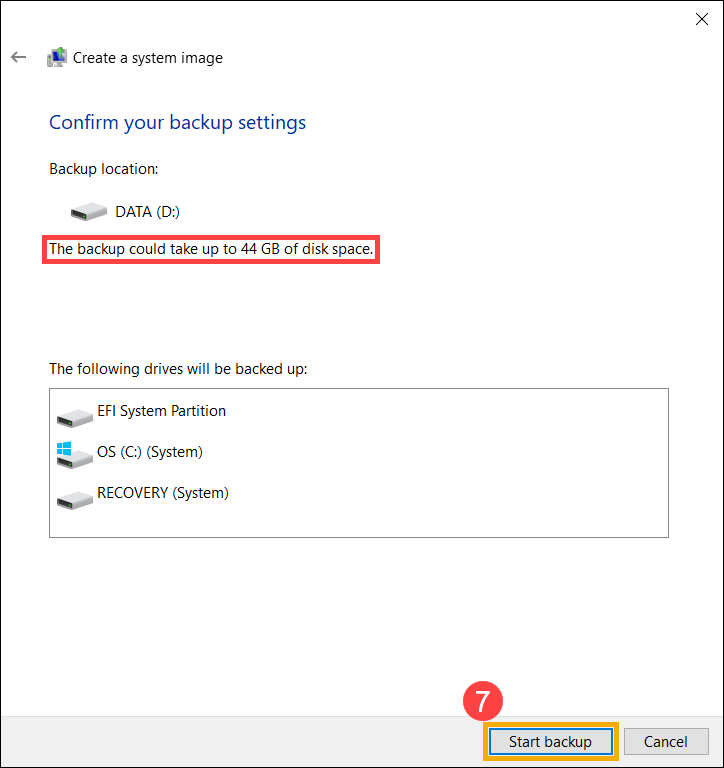
- You may receive the following notification during the creation process, and please select [No]⑧.
This step is to create a system repair CD/DVD, which can enter Windows Recovery Environment. However, we already create a system repair USB flash drive in the last chapter, so we do not need to create a system repair CD/DVD.
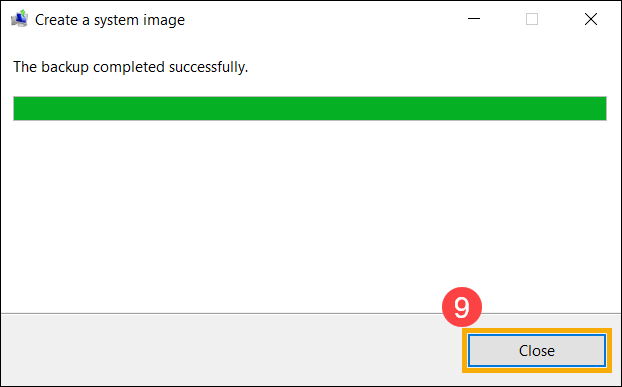
- The system image creation is completed, please select [Close]⑨.
- On the drive you save the backup, it will generate a WindowsImageBackup folder, which is where the system image is located.
If you want to keep the old system image, you can copy the entire WindowsImageBackup folder to a new location, and then create a new system image.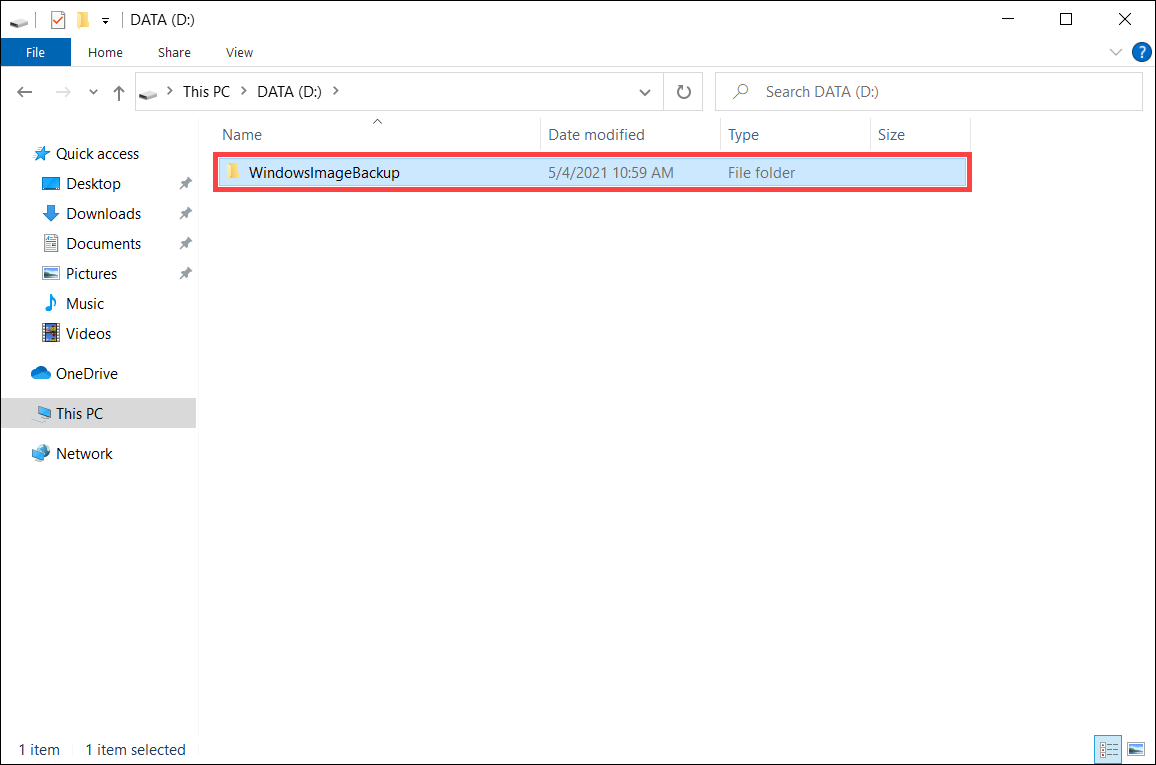
Use System Image to recover your system
If you experience the device cannot boot, you can use the recovery drive to enter Windows Recovery Environment (WinRE), and then restore your device via the system image.
- Connect the recovery drive (USB flash drive) you created to your device. Here you can learn more about How to create a system repair USB flash drive, which can enter Windows Recovery Environment.
- Power on the device and select the boot option as the USB flash drive, here you can learn more about How to boot the system from USB drive/CD-ROM.
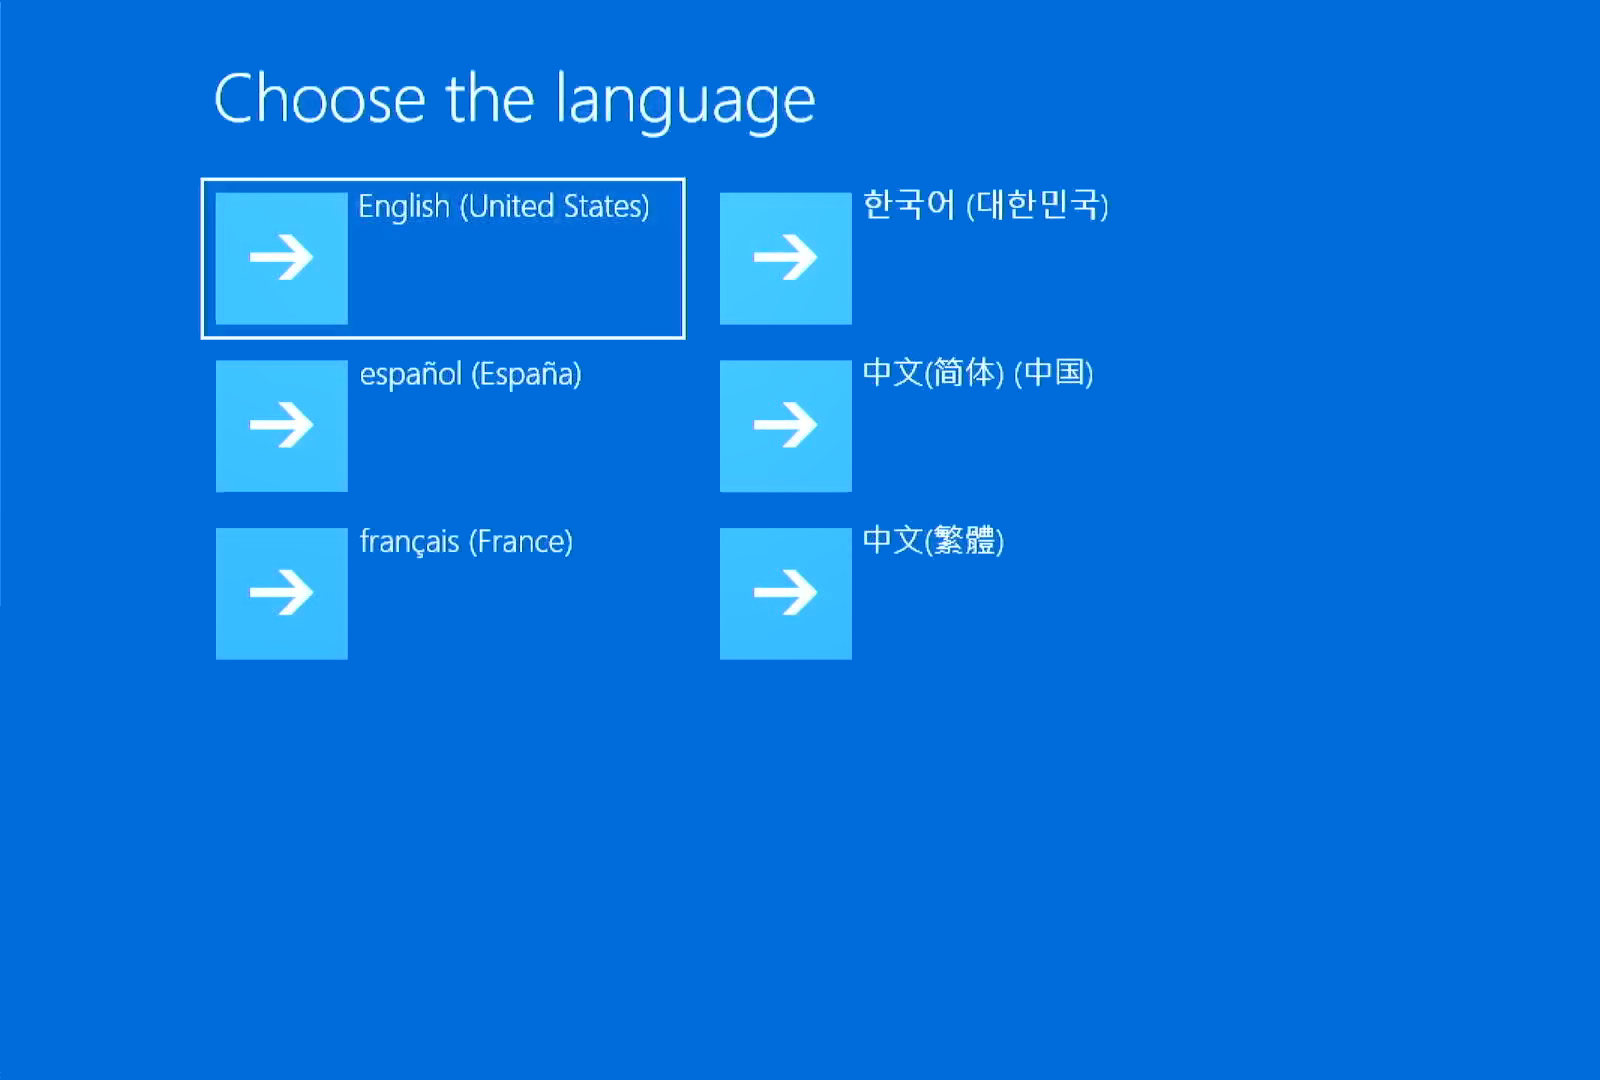
- The device will enter Windows Recovery Environment, and then please choose the language.
- Choose your keyboard layout.
- Select [Troubleshoot]①.
- Select [Advanced options]②.
- Select [System Image Recovery]③.
- Select [Windows 10]④.

- The system will automatically search the latest available system image.
You can manually select a system image as well. Select [Select a system image]⑤, and then select [Next]⑥.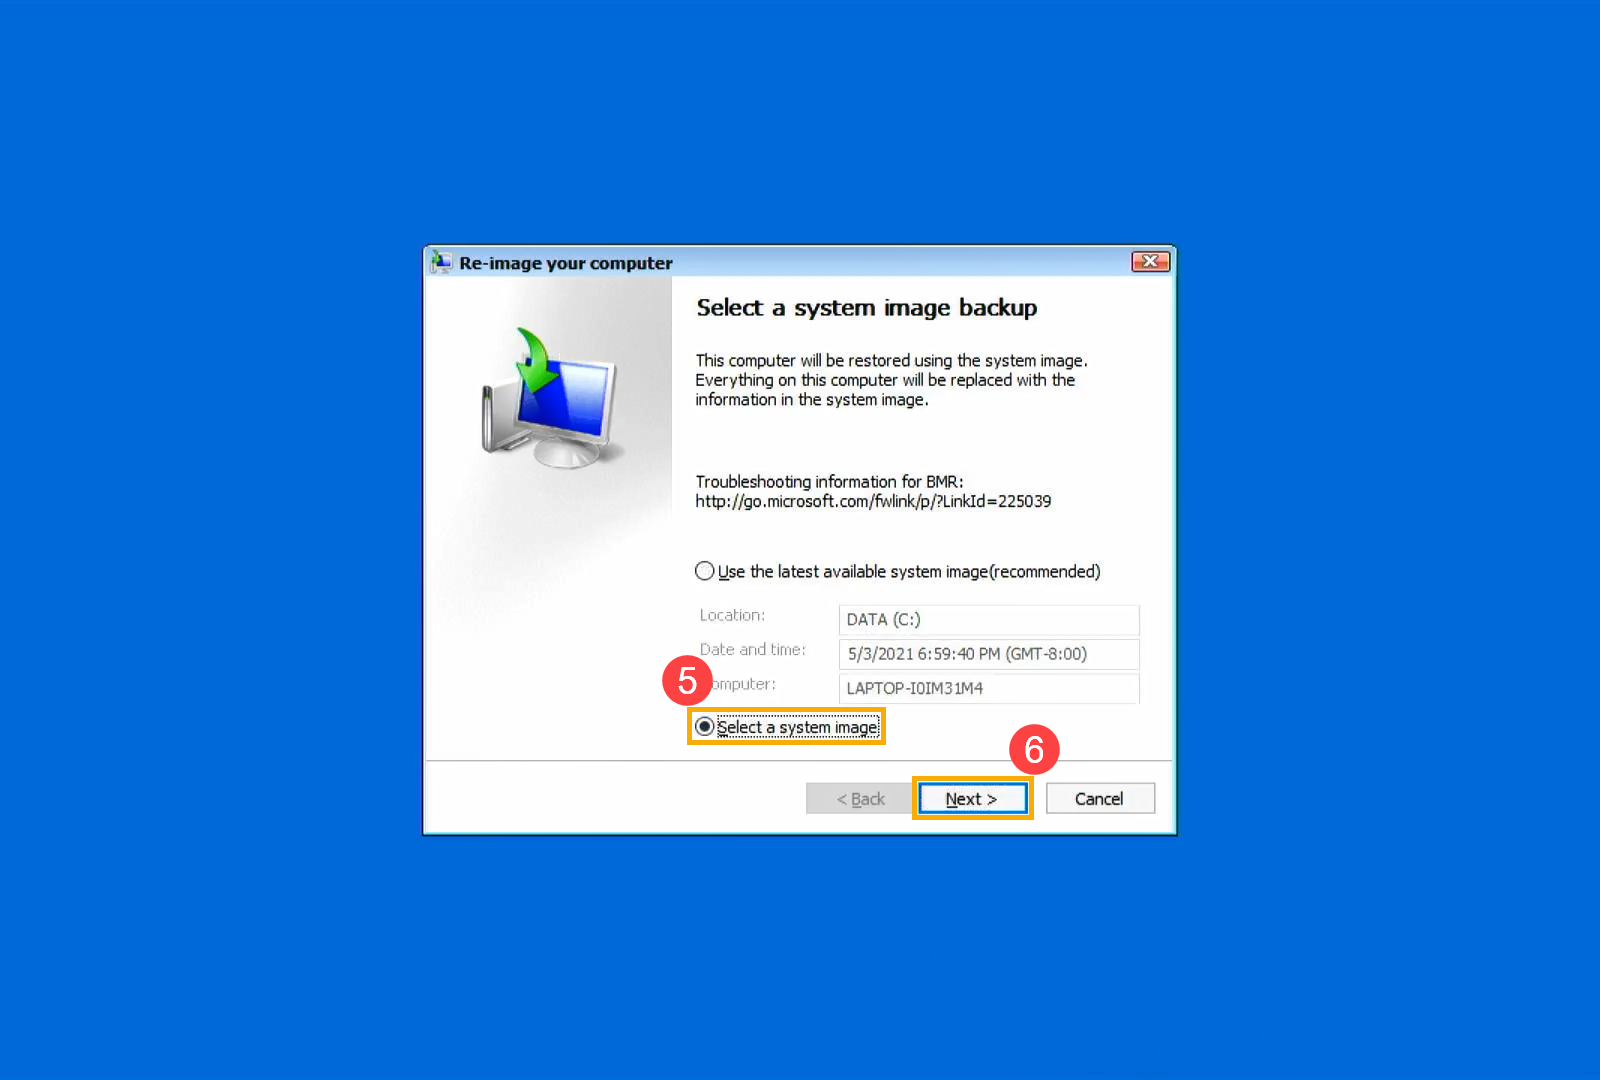
- Select a system image location where you want to use⑦, and then click [Next]⑧.
If your system image is saved on the external hard drive, please connect it to your device, and then click Refresh.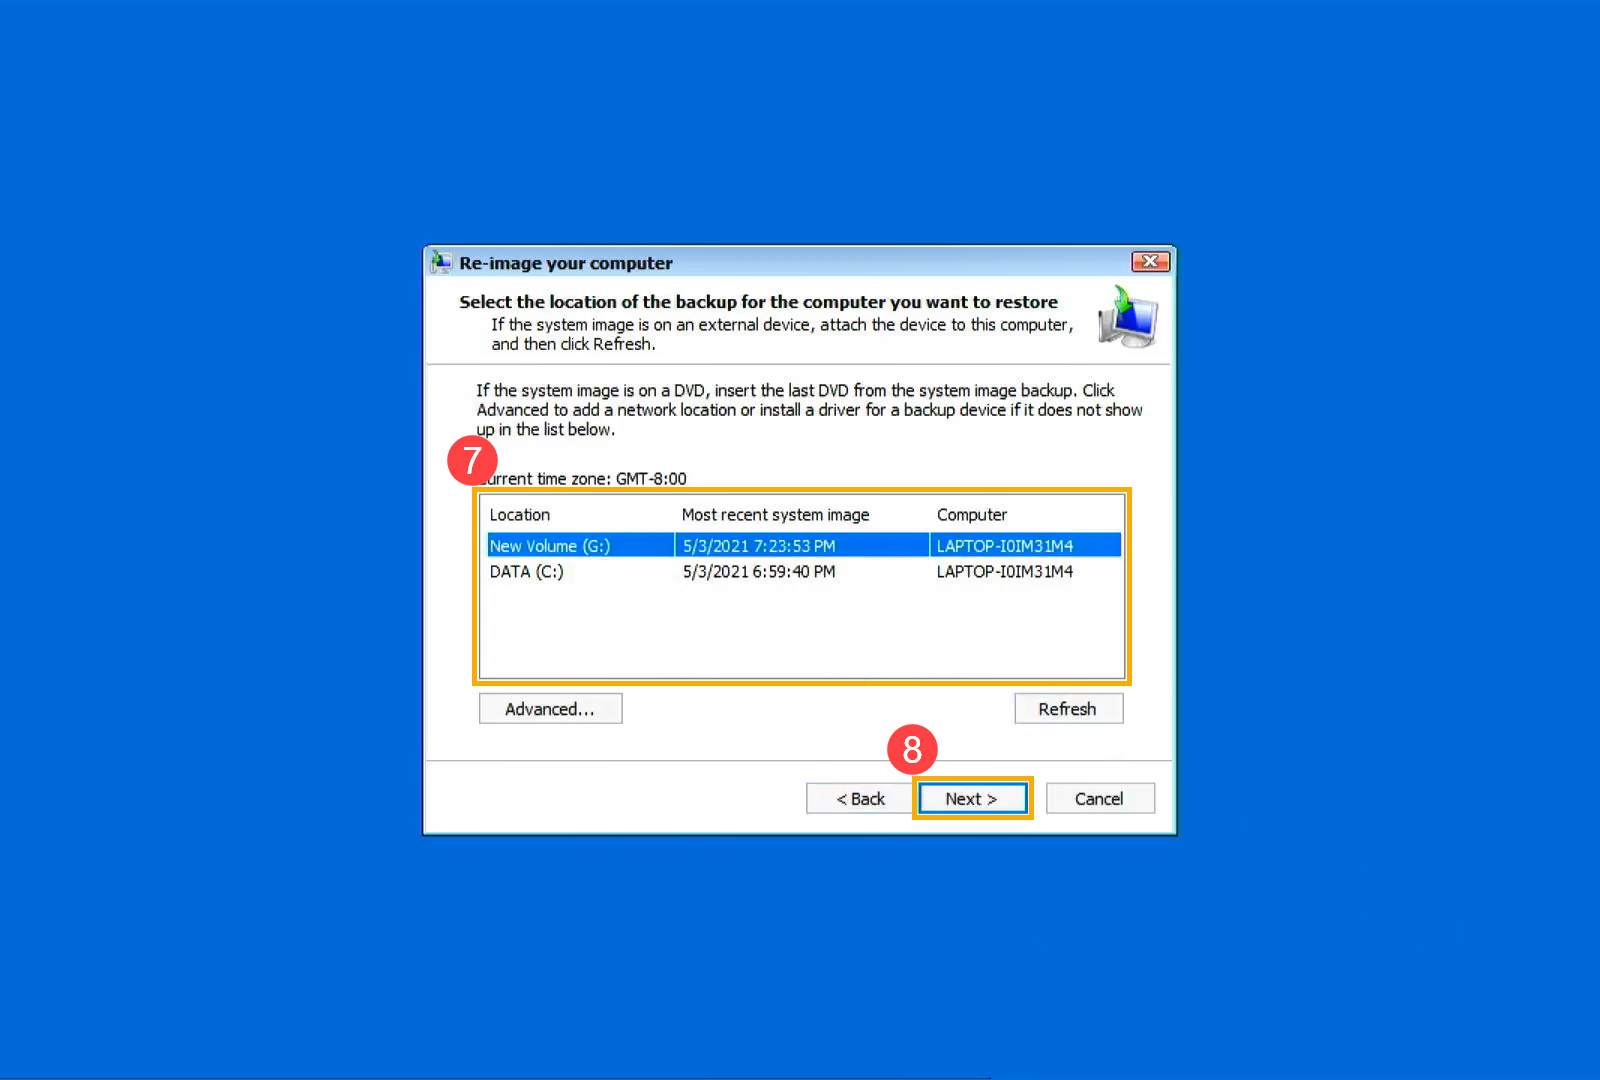
- The system will list all available system images on this drive, and please select a system image you want to recover⑨, and then click [Next]⑩.
- You are able to format and repartition the existing disks⑪, and then click [Next]⑫.
- Make sure that the restored system image information⑬, and then select [Finish]⑭.
- The system will remind you that all data on the drives to be restored will be replaced with the data in the system image, select [Yes] to start the restore process⑮.
- Your system has been successfully restored and will automatically restart in 60 seconds. You can also select [Restart now]⑯, and your device will enter the Windows operating system after restart.
Appendix: How many disks on my device
Some devices may have a hard drive only, but it was divided into two partitions by default (such as there are drive C and drive D on the same disk). You can refer to the following method to confirm how many disks on your device.
- Right-click the [Start]
 icon on the taskbar, and then select [Disk Management]①. (The left-side illustration below is in Windows 11, and the right-side is Windows 10.)
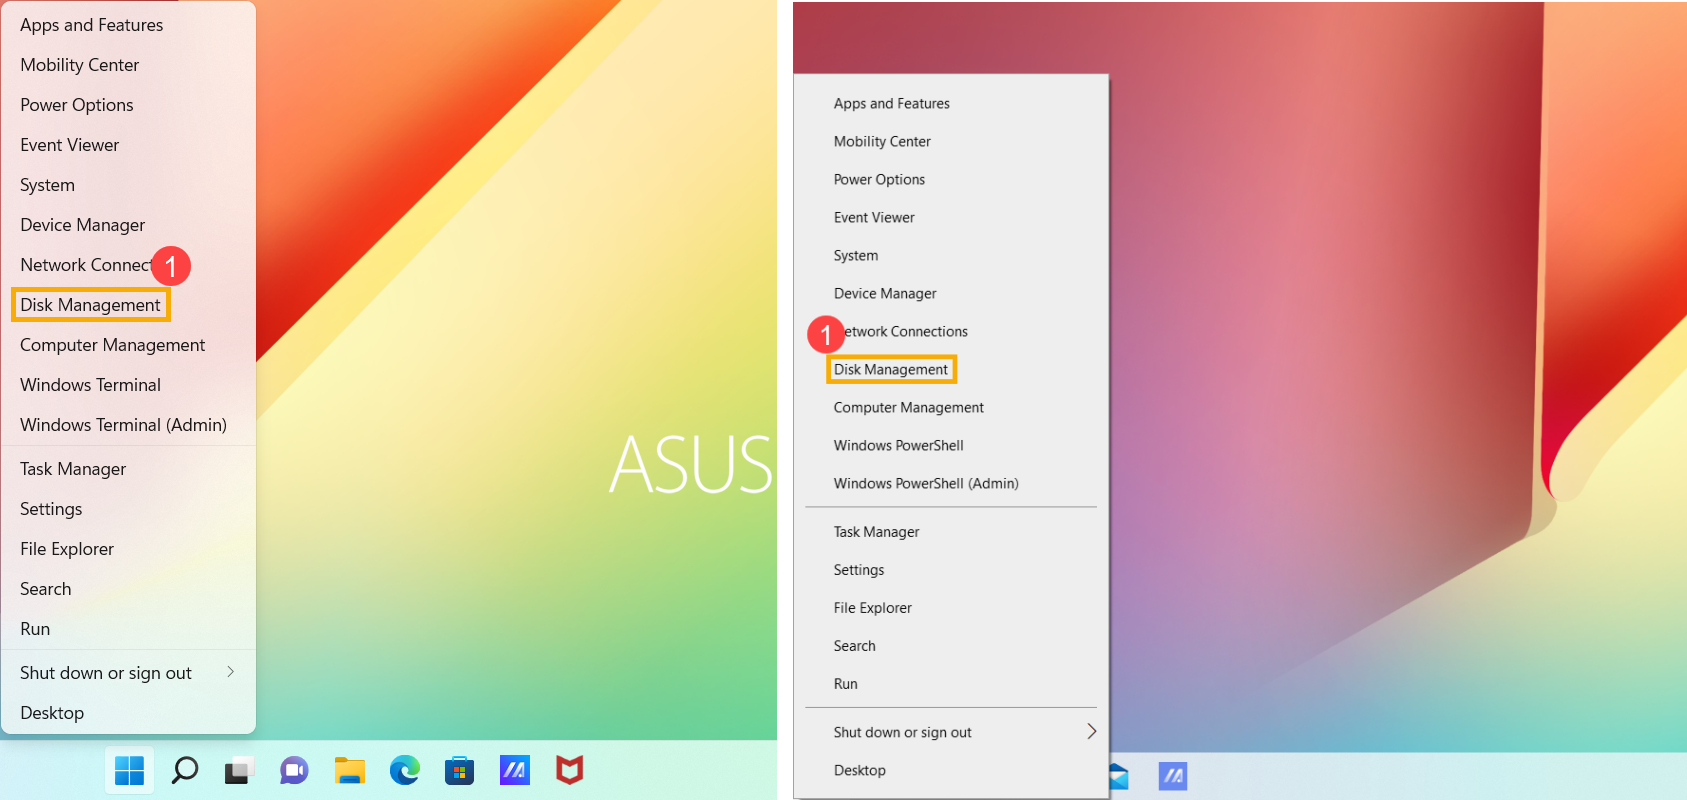
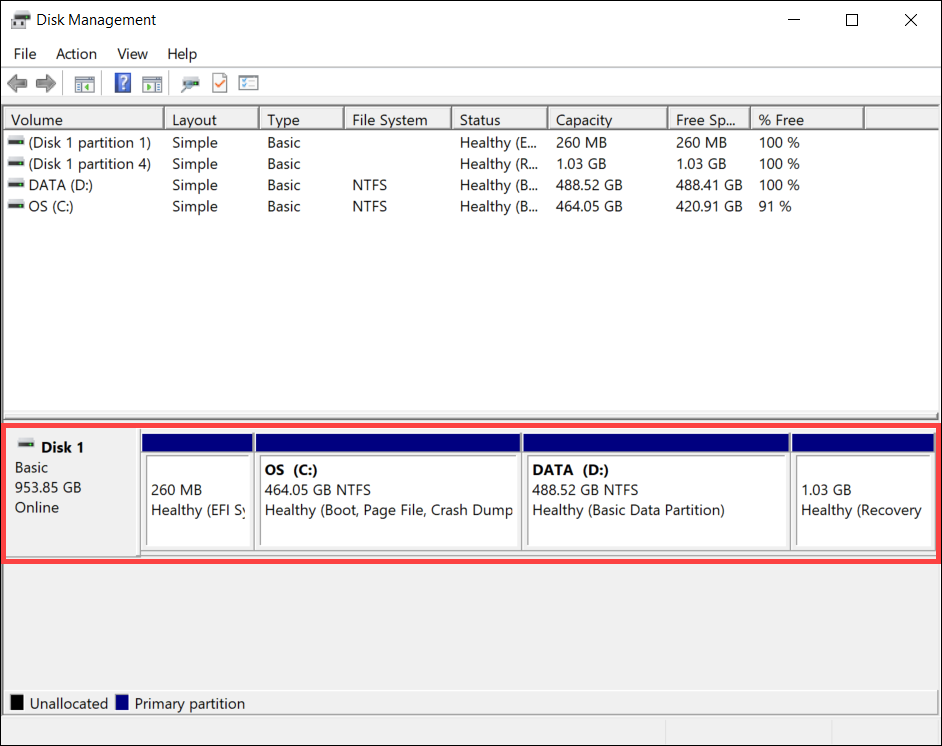
- If drive C and drive D on different disks, it means there are two physical hard drives / SSDs on your device. (Such as the following example, drive C is on disk 1, and drive D is on disk 0.)
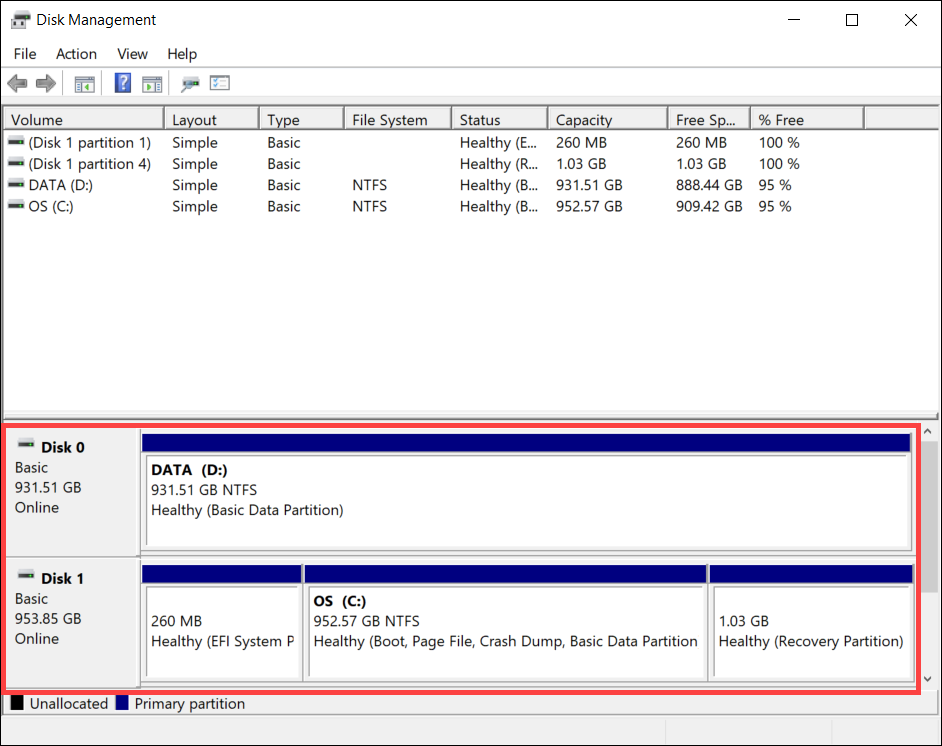
If drive C and drive D on the same disk, it means there is only one physical hard drive / SSD on your device. (Such as the following example, drive C and drive D both are on disk 1.)