Relative Topices
[Notebook/AIO] Troubleshooting - Computer occurs black screen when the BIOS update process is interrupted
If your computer cannot enter the Windows operating system because the BIOS update is failed (such as force to shut down) while you had ever updated BIOS, you are able to follow the steps below to continue the BIOS update process, and your computer will enter the Windows operating system after the BIOS update is completed.
Note: Please make sure that the AC adapter is connected during the BIOS updating process on your unit. Also, please do not force shut down during the update process to prevent any issue.
To provide you more detailed instruction, you can also click ASUS Youtube video link below to know more about solution when Laptop occurs black screen and the BIOS update process is interrupted
https://www.youtube.com/watch?v=18-lOq1XQiA
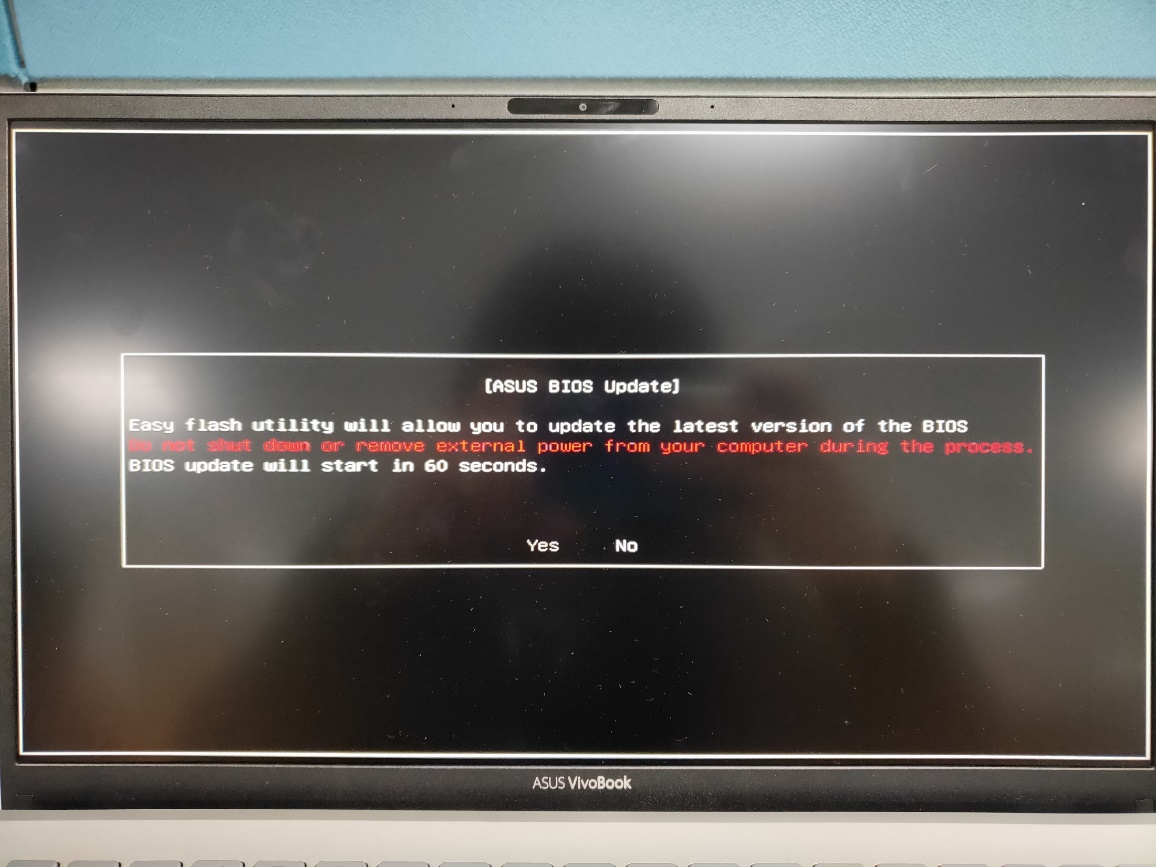
Scenario 1: If you experience that after the computer boots up, the following image displays, please wait for 60 seconds or select Yes on the screen, and then your computer will start to resume the BIOS update automatically. (make sure the AC adapter is connected)
Scenario 2: If you experience that the computer boots up, the following image displays after the BIOS update process is failed, please refer to the following steps to successfully complete the BIOS update.

- Refer to this FAQ: How to update BIOS with EZ Flash. To use another PC and go to the ASUS support site to download the BIOS file corresponding to the computer model with the above symptom. After downloading, put this BIOS file under the root directory of USB flash drive (the USB flash drive formatted type should be FAT32).
Note: If the screen displays a recommended version of recovery BIOS, please download this version. If not, please download the latest version of BIOS. - Please turn off the computer with the above symptom, then press and hold the power button for 15 seconds until the power LED indicator is off.
- Plug the USB flash drive with the BIOS file to this computer, and make sure the AC adapter is connected.
- Turn on your computer, then it will start to resume the BIOS update automatically.
Scenario 3: If you experience that the computer powers on and boots to a black screen (power LED indicator is on, but there is nothing displayed on the screen) after the BIOS update is failed, please try below steps to see if the issue can be resolved:
- Please remove the AC adapter and battery (for removable battery models) first, then press and hold the power button for 40 seconds.
Note: Please don’t remove the AC adapter for ASUS laptop TP420IA and UX425IA model. (These models need to plug in the AC adapter to do the Hard reset process.) - Re-connect the AC adapter and battery, then power on the computer. After that, your computer should automatically start to resume the BIOS update. Do not unplug the AC adapter or interrupt the process until the BIOS update completes, and then your computer will restart.
- After the BIOS update is completed, we recommend you to load the BIOS default settings on this unit. Here you can learn more about How to restore the BIOS settings.
If your problem is not worked out with above solution and information, please contact ASUS customer service center for further information.