Assuntos relacionados
[Windows 11/10] Como criar e usar a unidade de recuperação do Windows
Produtos aplicáveis: Notebook, desktop, PC tudo-em-um, dispositivo portátil para jogos, MiniPC
Se o seu dispositivo apresentar problemas graves, como a incapacidade de acessar o sistema operacional, você poderá utilizar uma unidade de recuperação para acessar o Windows Recovery Environment (WinRE). Ele auxilia na restauração do Windows ou na execução de pontos de restauração do sistema. Para usar uma unidade de recuperação, você deve primeiro preparar uma unidade flash USB vazia (com um mínimo de 16 GB de espaço) para criar uma unidade de recuperação do Windows. Como o Windows passa por atualizações periódicas para melhorar a segurança e o desempenho do dispositivo, é recomendável criar periodicamente uma nova unidade de recuperação.
Nota: a unidade de recuperação não faz backup de arquivos pessoais e aplicativos não incluídos no dispositivo. Saiba mais sobre Como fazer backup de seus arquivos por meio do Histórico de arquivos.
Nota: Ao restaurar o dispositivo por meio de uma unidade de recuperação, os dados originais da partição do disco na unidade do sistema podem ser excluídos. (Se o seu dispositivo for compatível com MyASUS in WinRE ou ASUS Recovery, as funcionalidades incorporadas às partições de disco na unidade do sistema serão removidas). Se desejar preservar essas funcionalidades, você poderá restaurar o dispositivo por meio de uma imagem do sistema, fazendo assim o backup dos dados nas partições de disco. Saiba mais sobre Como criar e usar a imagem do sistema Windows para restaurar seu dispositivo.
Para fornecer instruções mais detalhadas, você também pode clicar no link do vídeo da ASUS no YouTube abaixo para saber mais sobre Como criar e usar a unidade de recuperação do Windows
https://www.youtube.com/watch?v=pjvNQ--wZfM
Consulte a instrução correspondente com base no sistema operacional Windows atual do seu dispositivo:
Sistema operacional Windows 11
Criar uma unidade de recuperação
- Digite e pesquise [Unidade de recuperação] na barra de pesquisa do Windows①, depois clique em [Abrir]②.
- Se a janela de Controle de conta de usuário for exibida, selecione [Sim]③.
- Marque a caixa para [Fazer backup dos arquivos do sistema na unidade de recuperação]④, então selecione [Próximo]⑤.
- Conecte a unidade flash USB que você deseja criar como uma unidade de recuperação ao seu dispositivo.
Nota: Todos os arquivos na unidade flash USB serão excluídos durante o processo, portanto, faça backup dos seus arquivos primeiro se tiver dados dentro dela originalmente.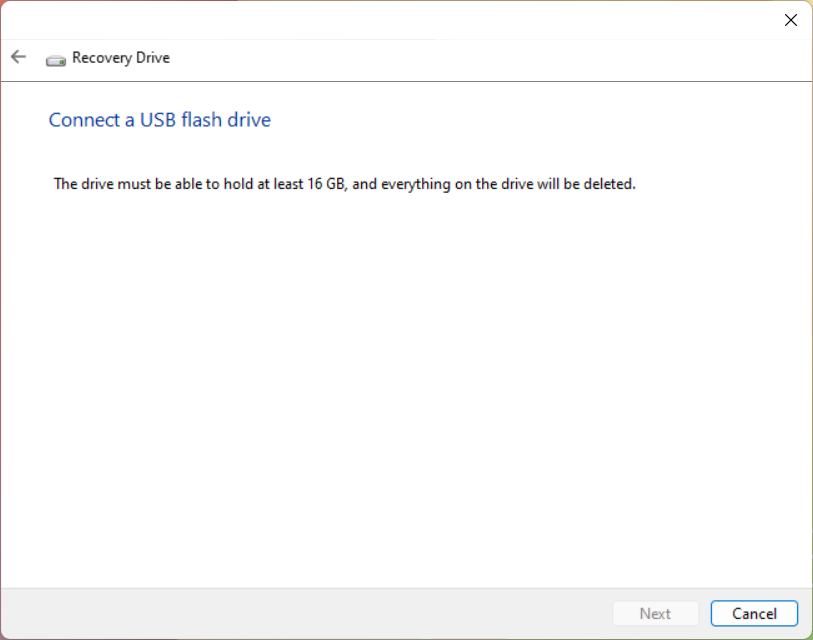
- Em Available drive(s) (Unidades disponíveis), confirme e selecione a unidade flash USB que você deseja usar⑥, e então selecione [Próximo]⑦.
- Selecione [Criar]⑧, e o sistema começará a criar a unidade de recuperação. A imagem de recuperação e as ferramentas de reparo necessárias serão copiadas para a unidade flash USB, o que levará algum tempo, dependendo do seu dispositivo e do tamanho da imagem de recuperação.
Observação: certifique-se de que o adaptador CA esteja conectado durante o processo e não force o desligamento para evitar que a criação fique incompleta.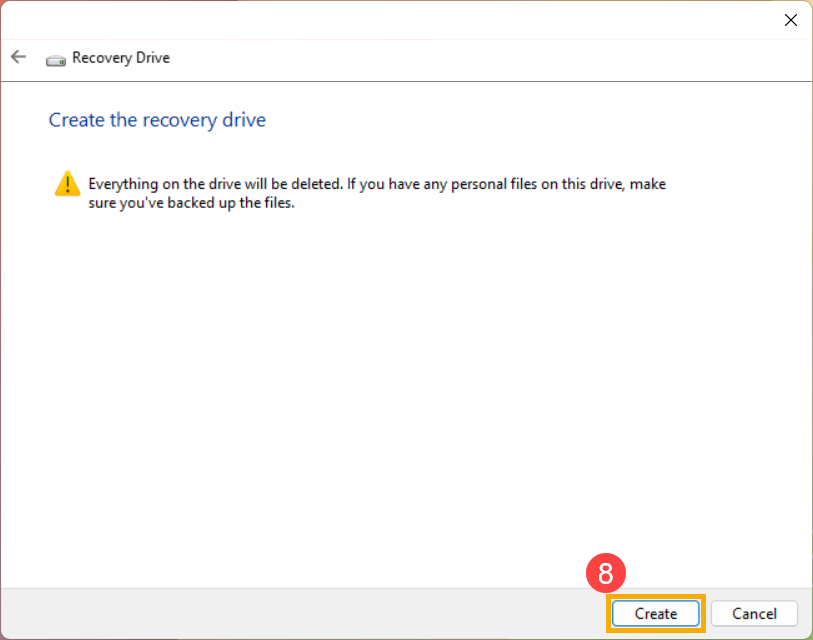
- A unidade de recuperação foi criada, clique em [Concluído]⑨.

- Recomendamos que você reproduza as etapas acima para recriar a nova unidade de recuperação periodicamente, pois o Windows atualiza e melhora a segurança e o desempenho regularmente.
Use a unidade de recuperação para recuperar/restaurar seu dispositivo
If you experience the device cannot boot, you can use the recovery drive to enter Windows Recovery Environment (WinRE), and then restore from a system restore point or reinstall Windows via the recovery drive.
- Connect the recovery drive (USB flash drive) to your device.
- Power on the device and select the boot option as the USB flash drive, here you can learn more about How to boot the system from USB drive/CD-ROM.
- The device will enter Windows Recovery Environment, and then please choose your language and keyboard layout.

- Then, you are able to select one of the following to recover your device: restore from a system restore point or reinstall Windows via the recovery drive.
If using the system restore point, your personal files will not be affected, but it will remove recently installed applications, drivers, and updates that might cause the problems to the device.
If reinstalling Windows, it will remove your personal files, applications and drivers you installed, and changes you did to settings.
Using the system restore point to restore the device
Note: The restore points mean the ones were created and recorded in your device, not the ones backed up inside the USB recovery drive.
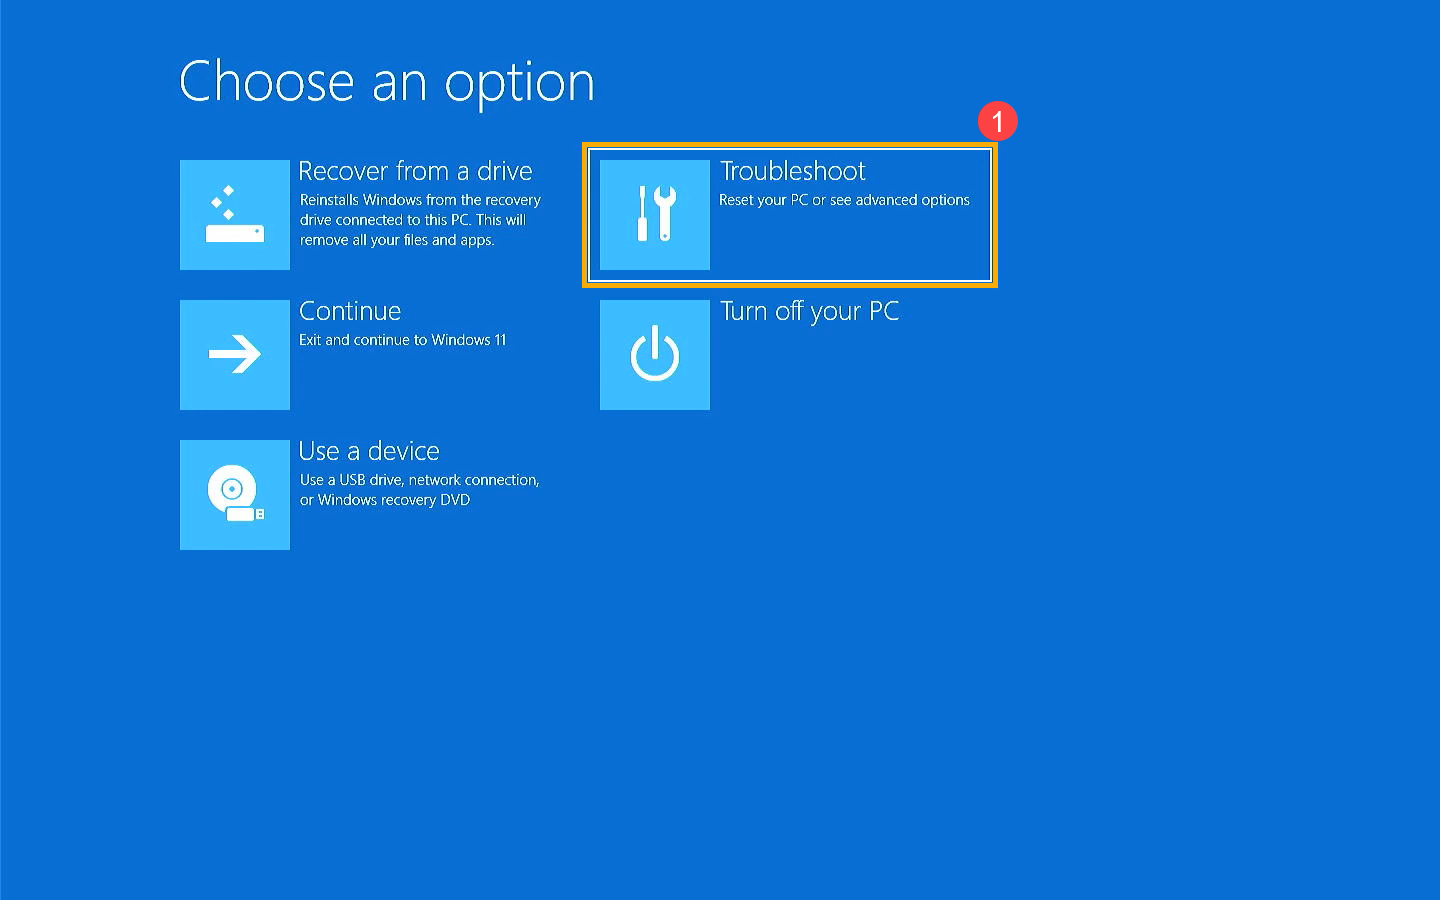
- Select [Troubleshoot]①.
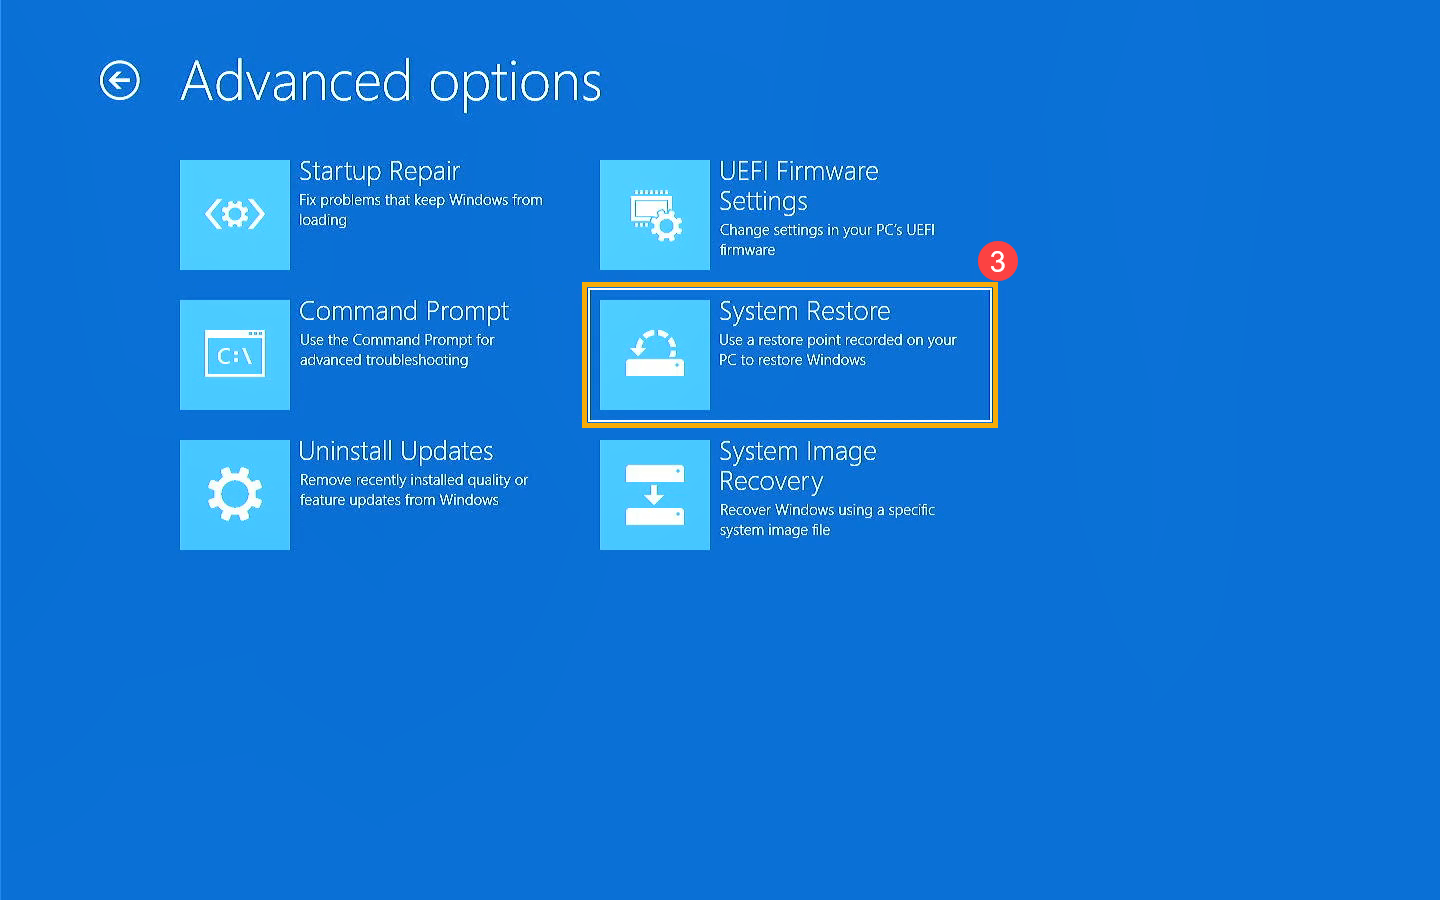
- Select [Advanced options]②.

- Select [System Restore]③.
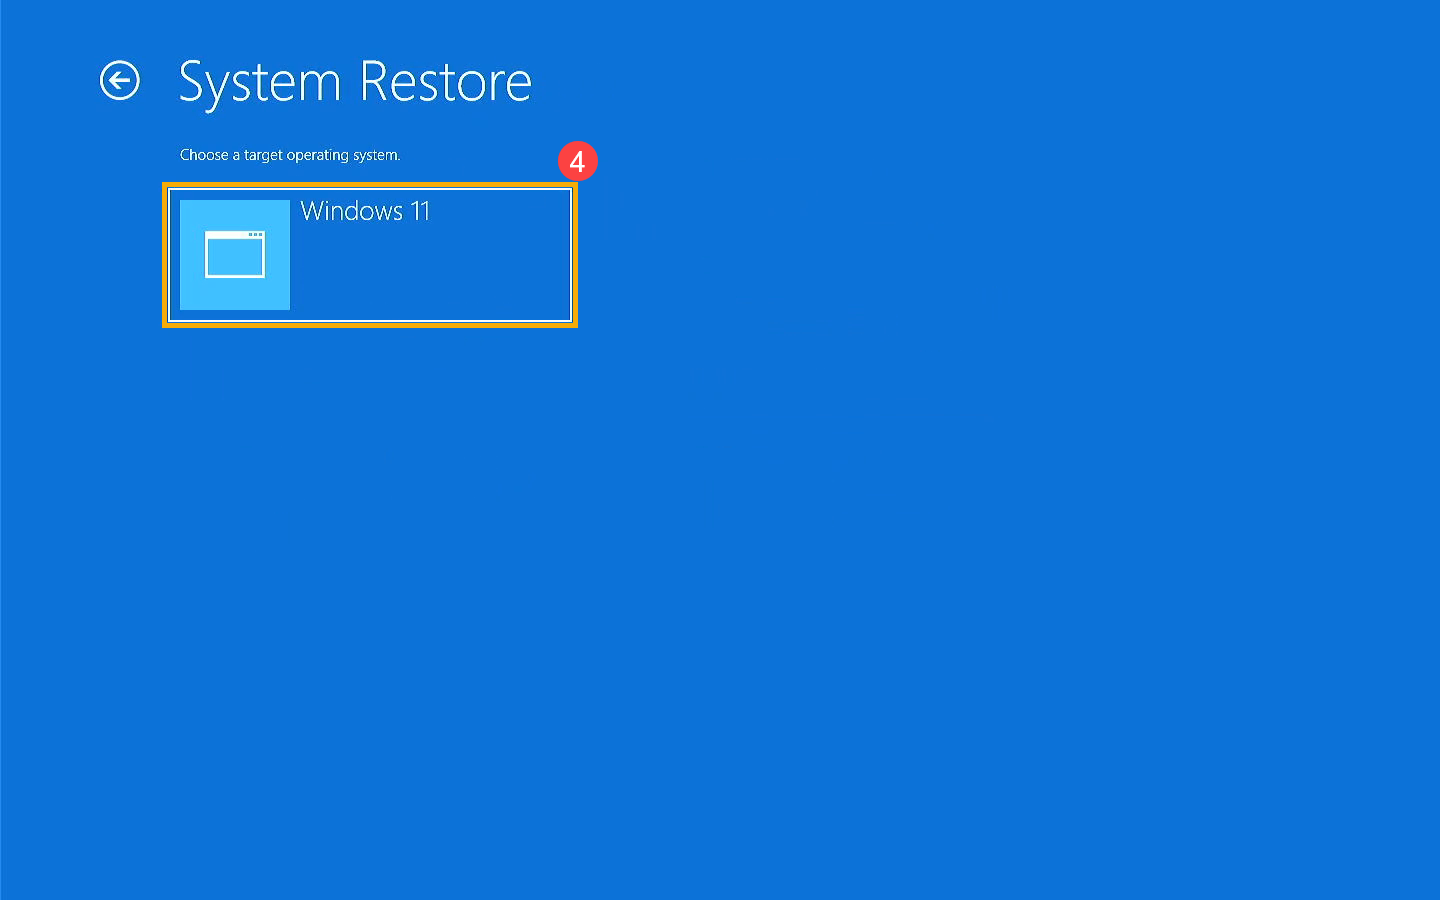
- Click [Windows 11]④.
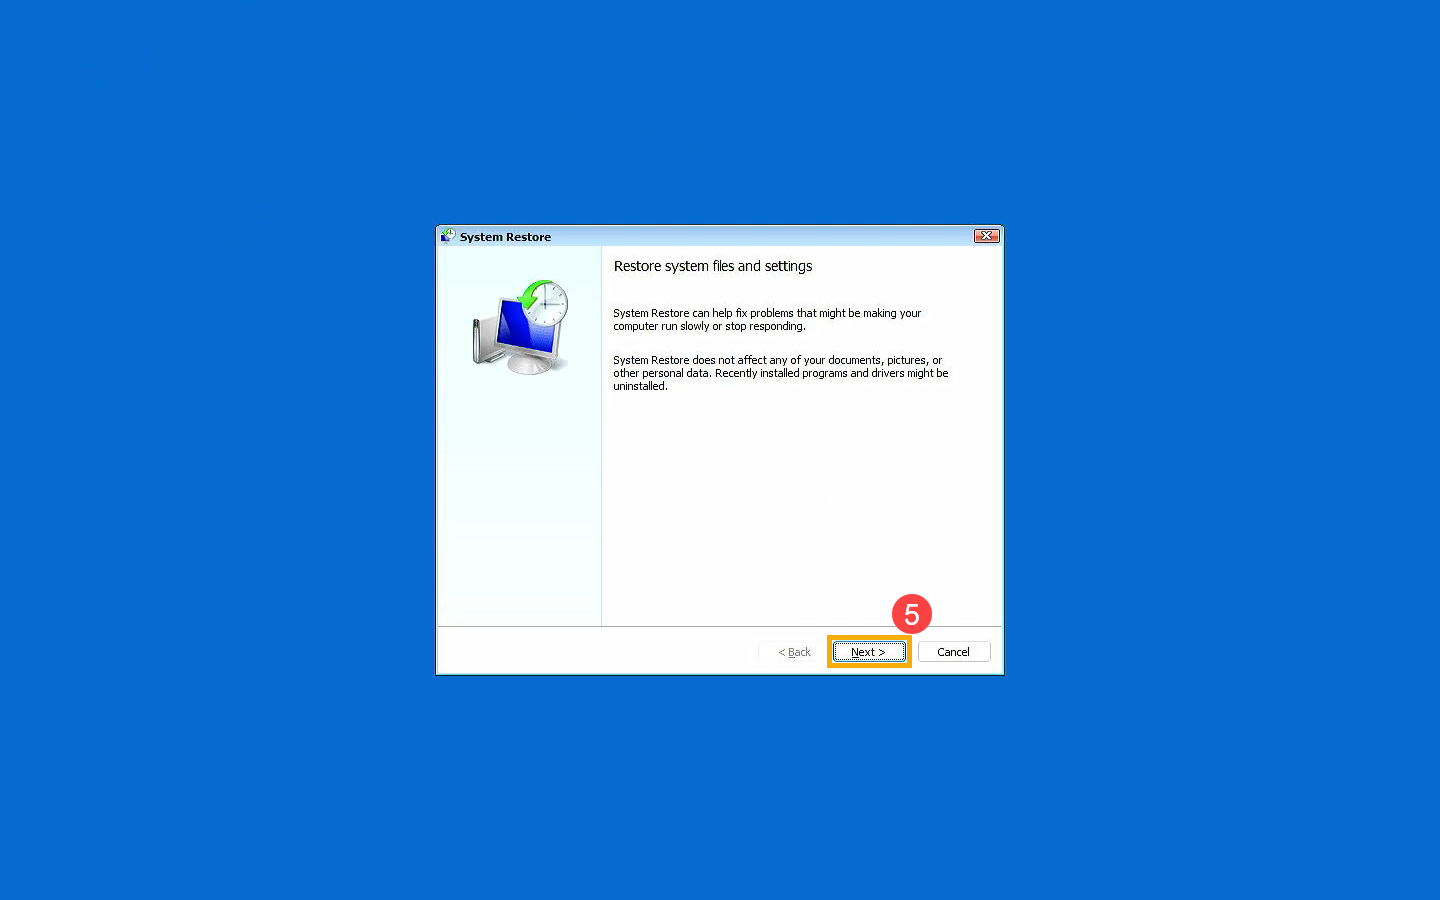
- Start the restore system setting process, please select [Next]⑤.
- You will see the lists of all restore points, and please choose the one that you want to use⑥, and then select [Next]⑦. You also can select Scan for affected programs to check the affected result after choosing this restore point.

- Confirm the selected restore point information is correct or not, then select [Finish]⑧.
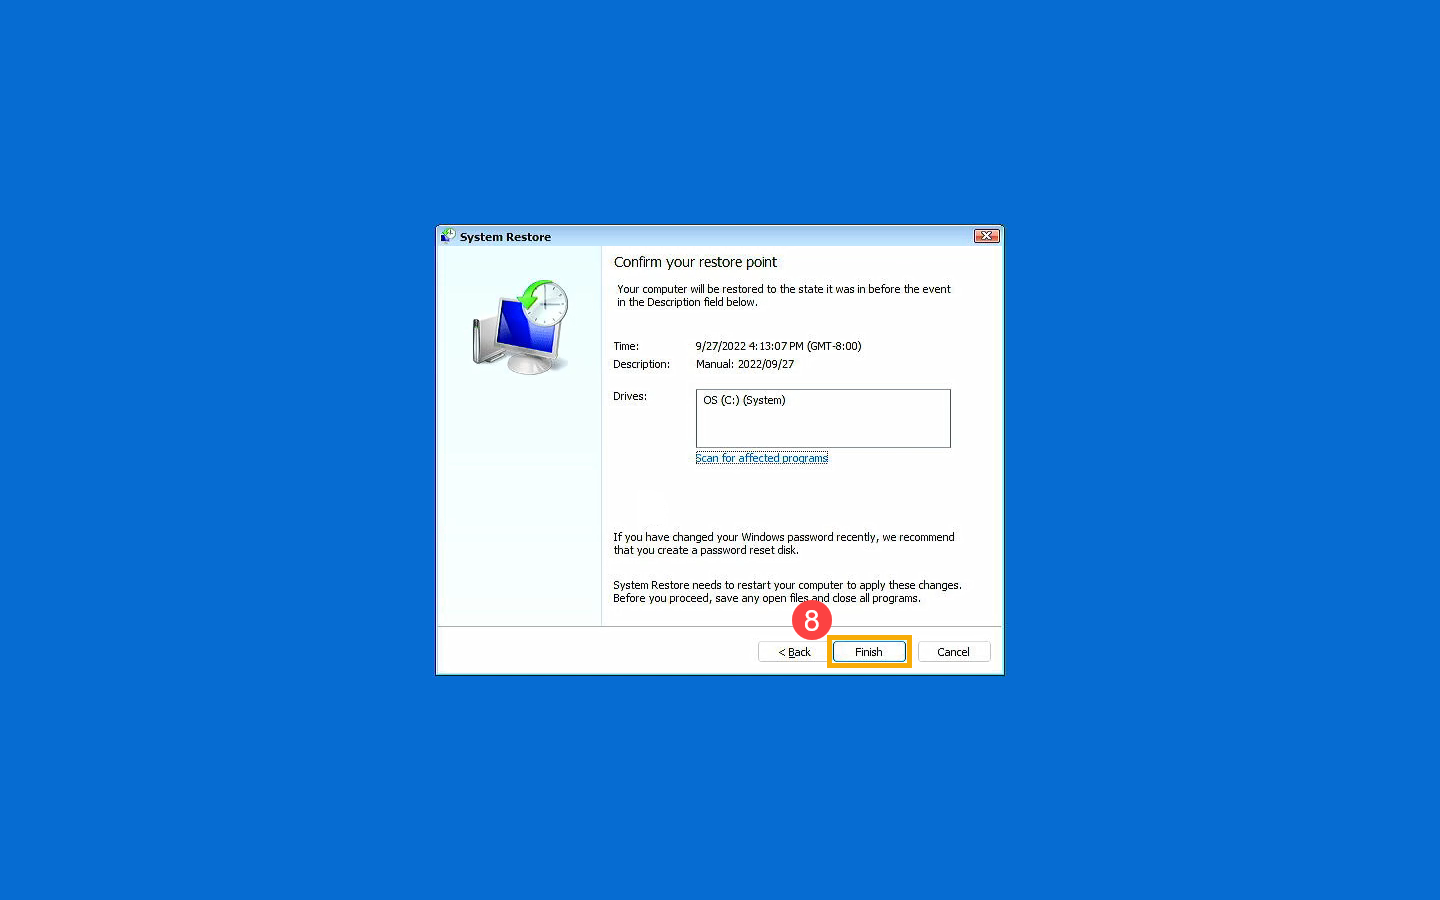
- Click [Yes]⑨ to start the restore process. The device will restart and enter Windows after the restore is completed.
Note: Please make sure the AC adapter is connected during the process, and do not force to shut down to prevent any issues.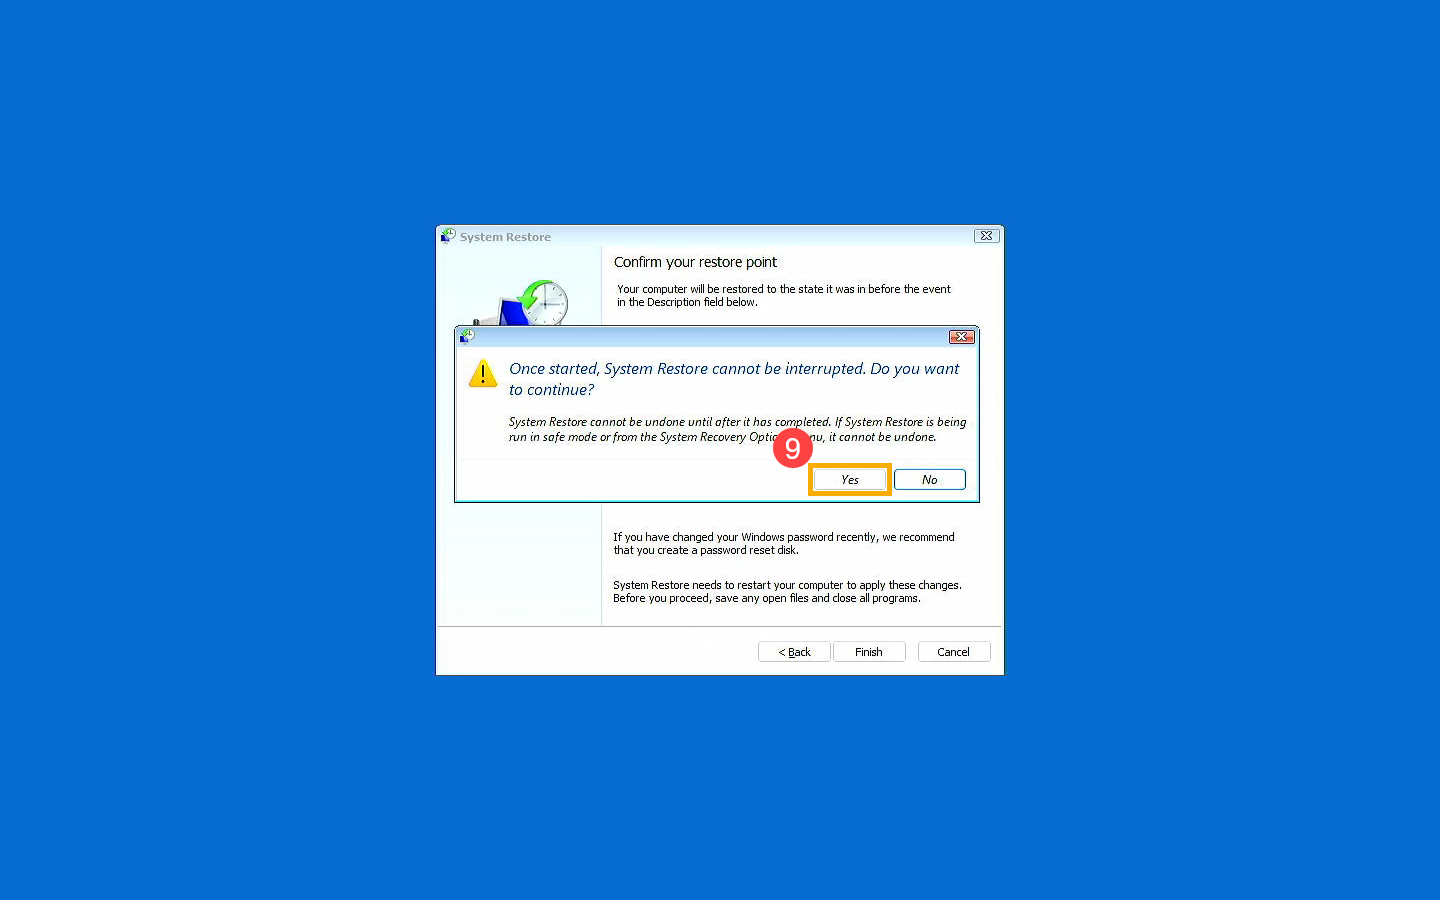
Using the recovery drive to reinstall Windows
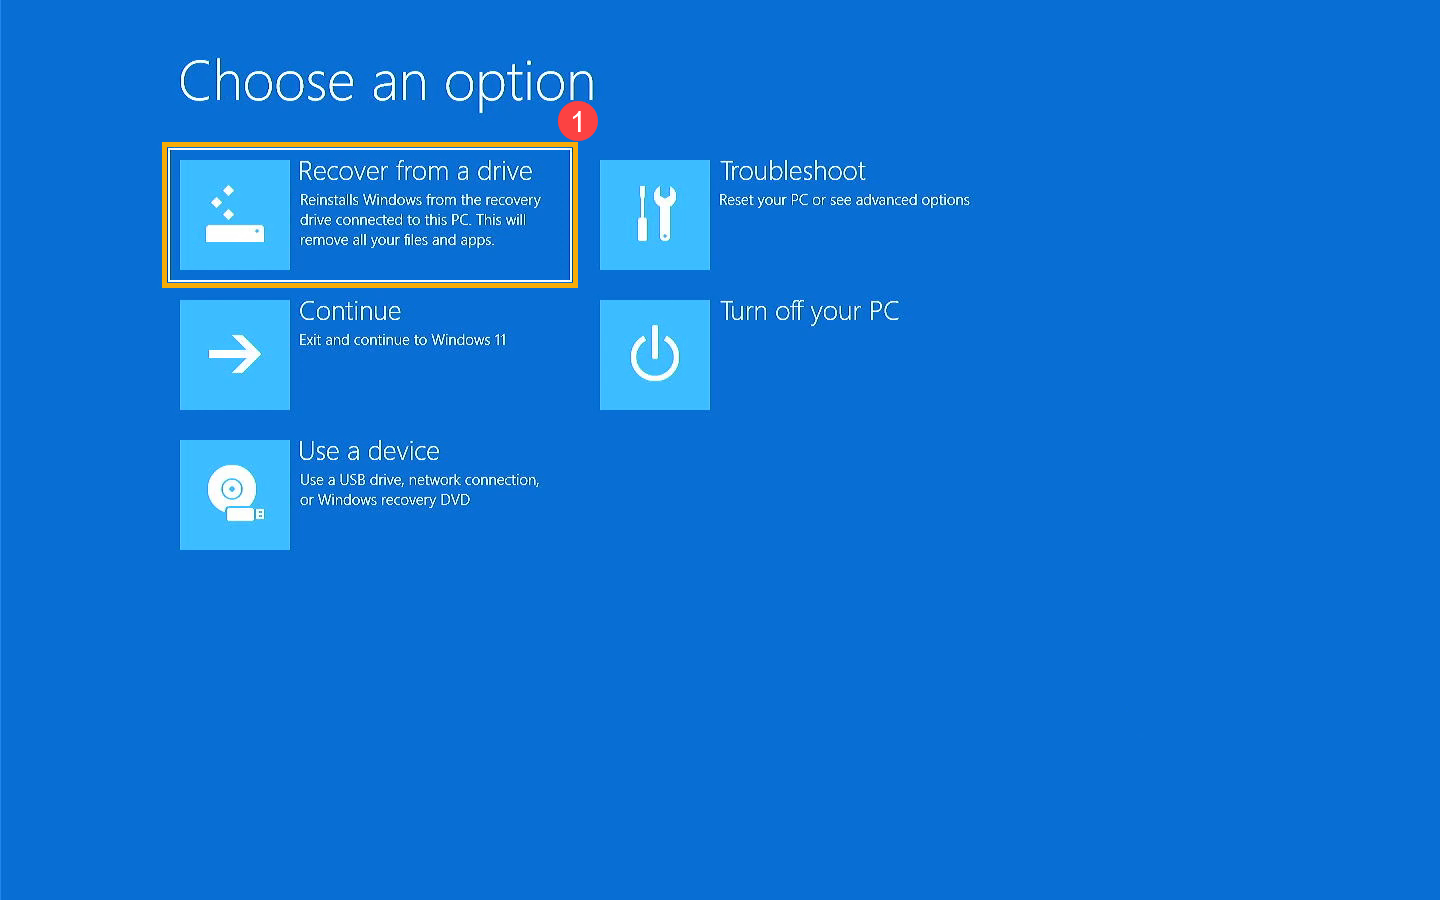
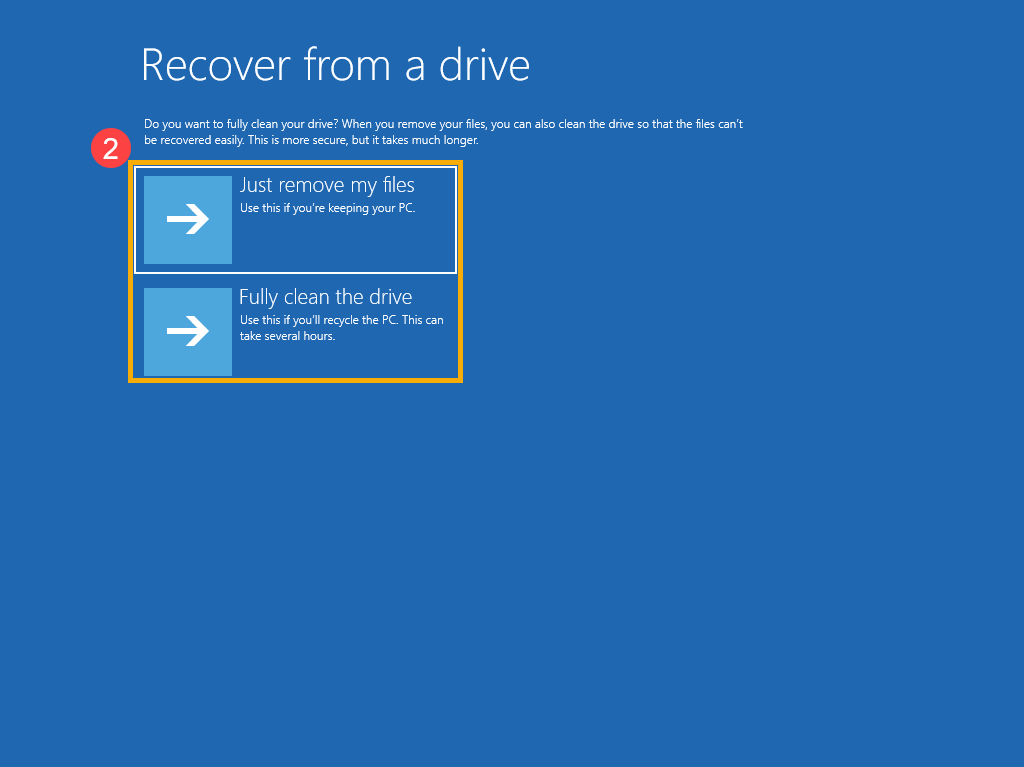
- Select [Recover from a drive]①.
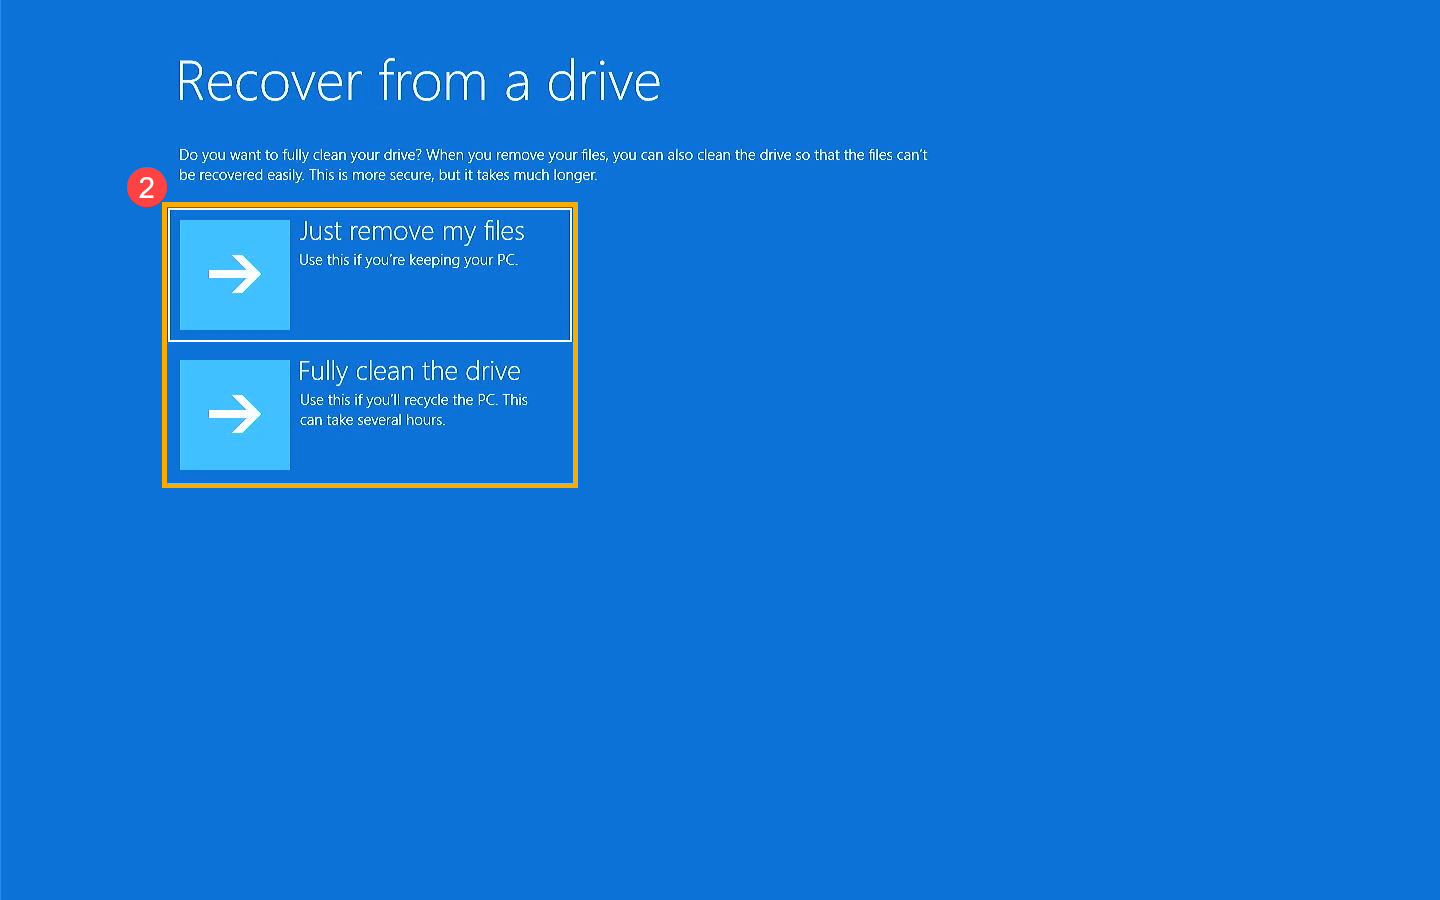
- You can choose Just remove my files or Fully clean the drive that is based on your demand②.
- Windows will remind you the following information about what will happen after recovering from a drive. Please select [Recover]③ to reinstall Windows.
Note: Please make sure the AC adapter is connected during the process, and do not force to shut down to prevent any issues.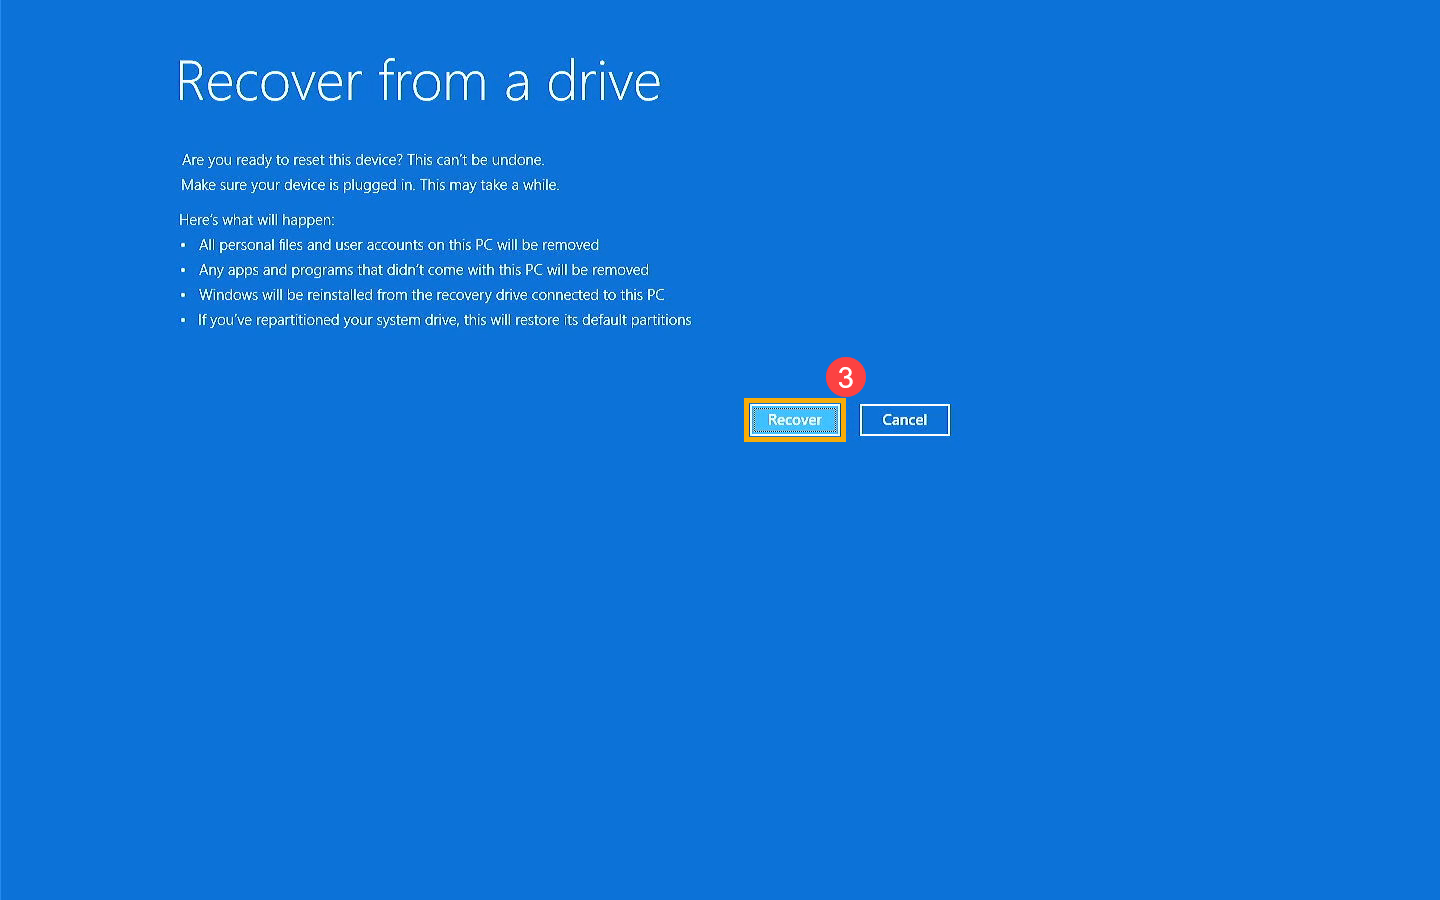
- The device will restart and enter the basic setting page of Windows after the recovery is completed, here you can learn more about Start for the first time (Windows OOBE).

Create a recovery drive
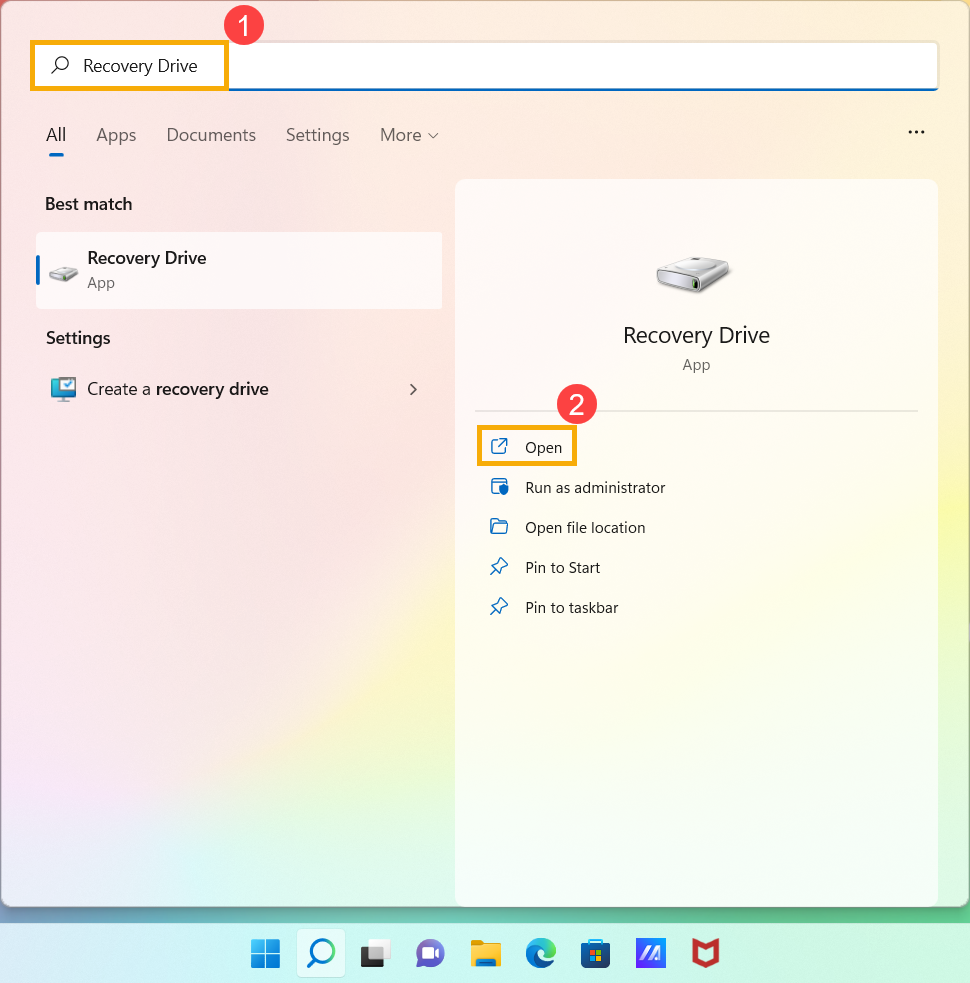
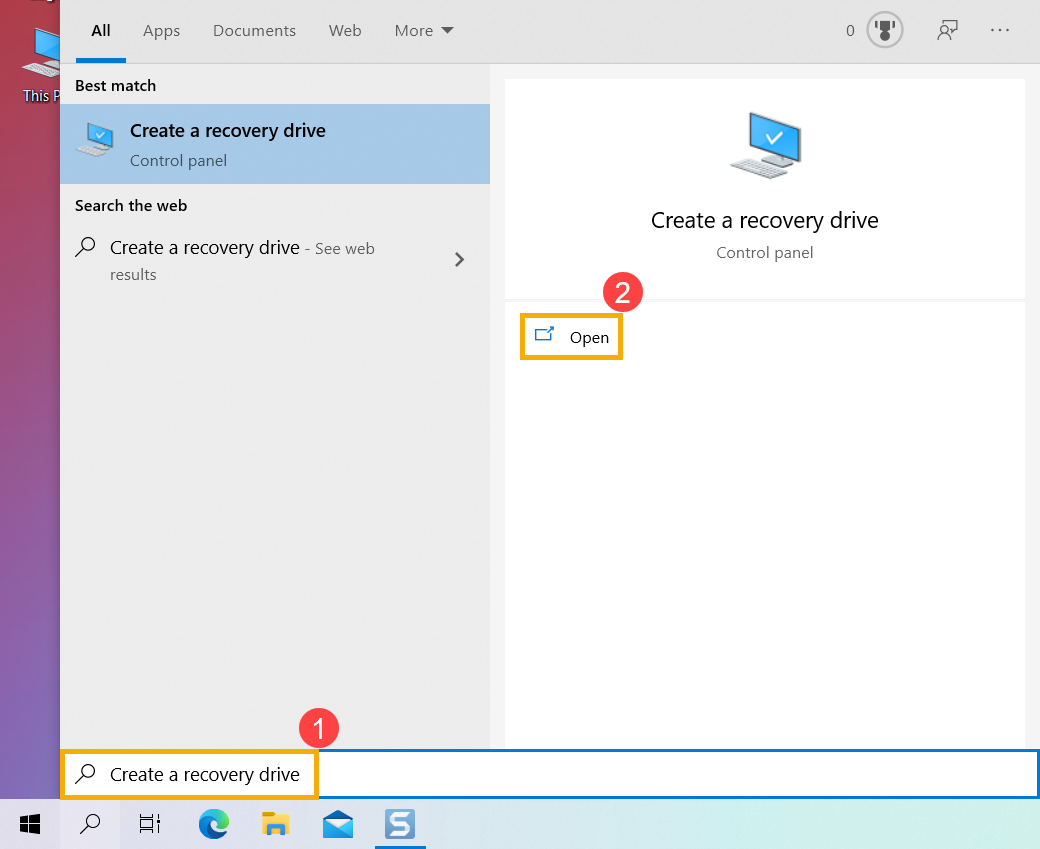
- Type and search [Create a recovery drive] in the Windows search bar①, then click [Open]②.
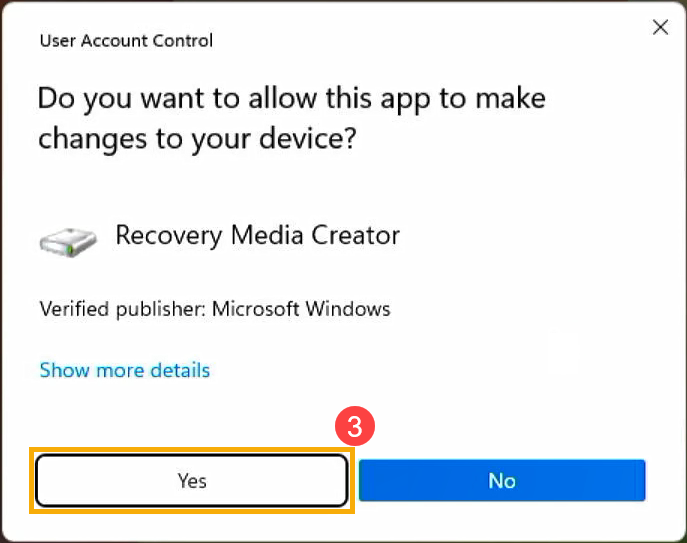
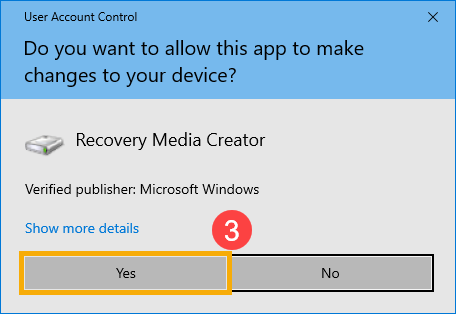
- If the User Account Control window displayed, please select [Yes]③.
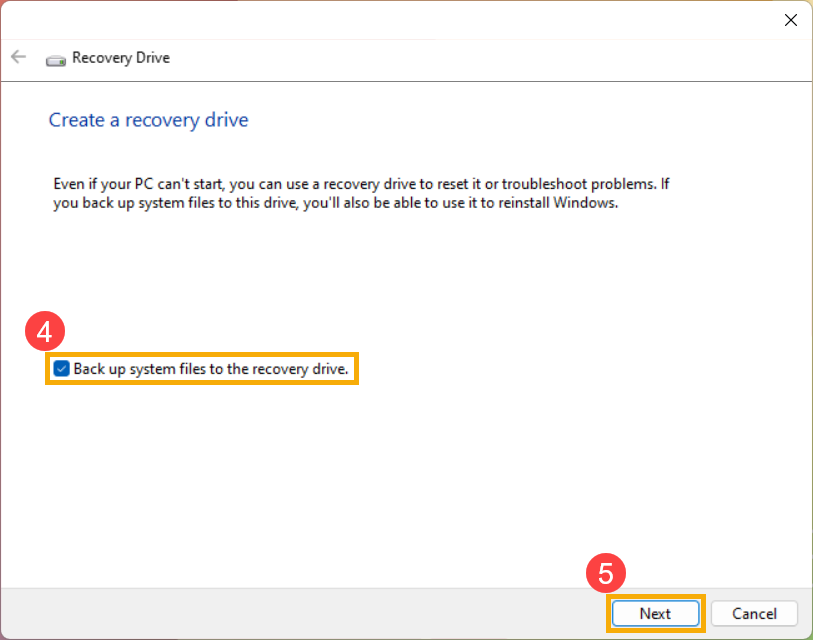
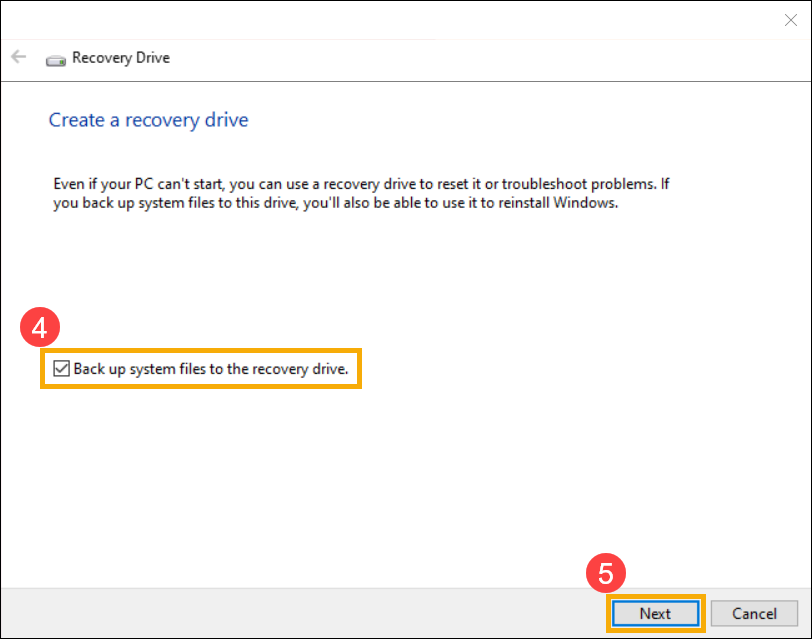
- Check the box to [Back up system files to the recovery drive]④, then select [Next]⑤.
- Connect the USB flash drive that you want to create as a recovery drive to your device.
Note: All files on the USB flash drive will be deleted during the process, so please back up your files first if you have data inside originally.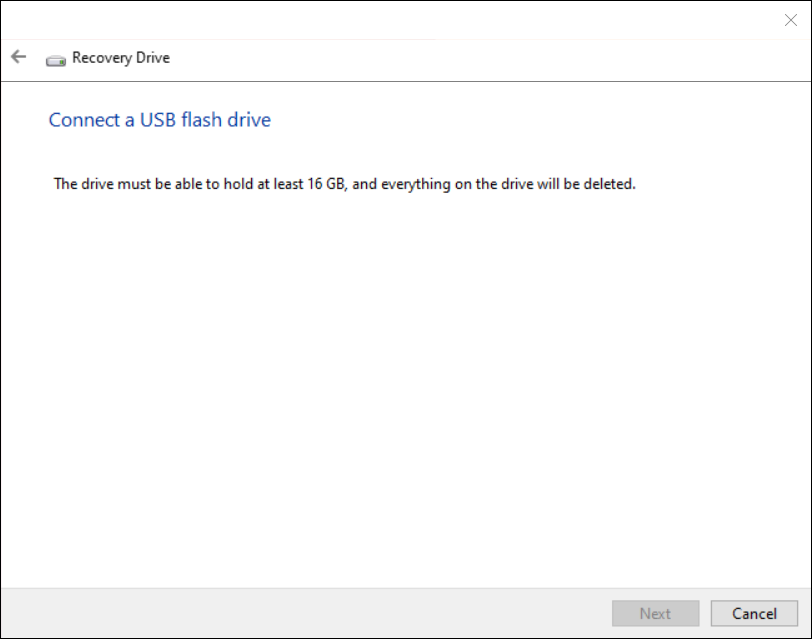
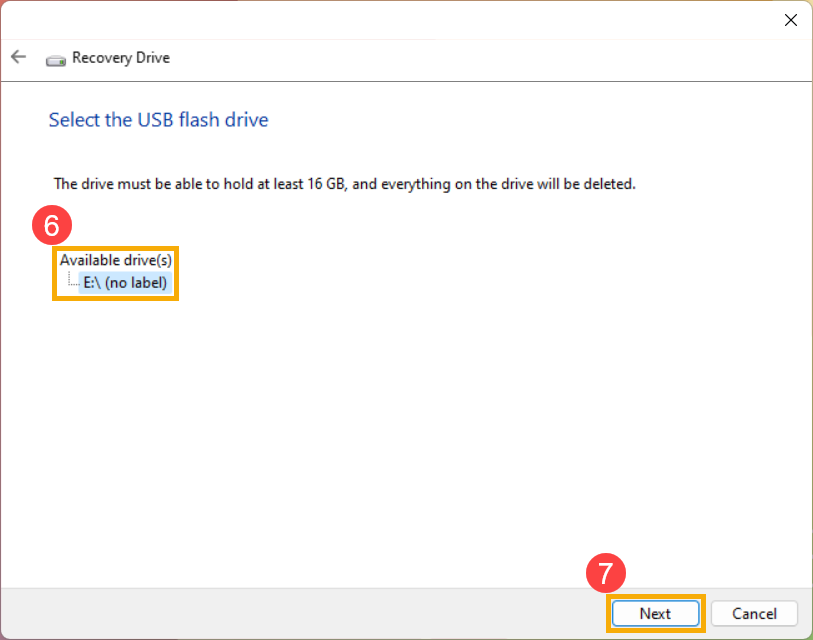
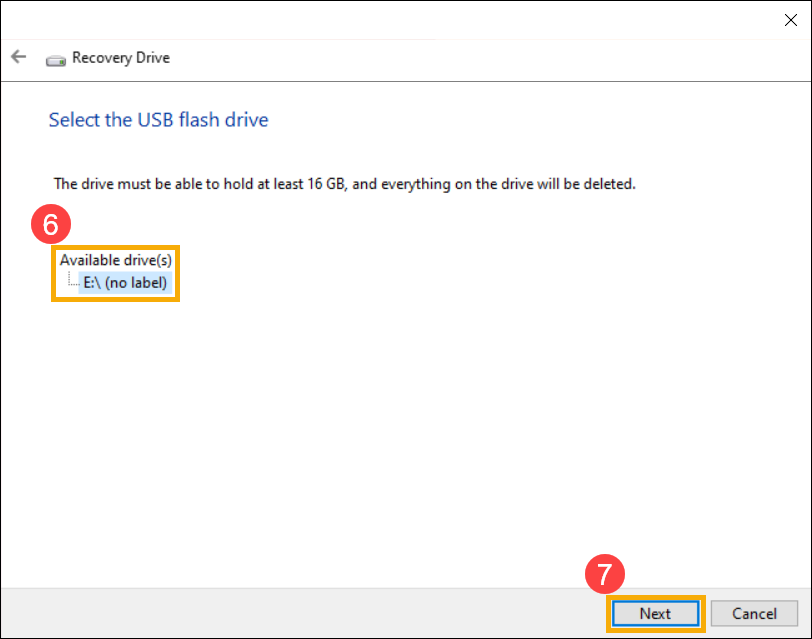
- In Available drive(s), confirm and select the USB flash drive that you want to use⑥, and then select [Next]⑦.
- Select [Create]⑧, and the system will start to create the recovery drive. The recovery image and necessary repair tools will be copied to your USB flash drive, and it will take a while, which depends on your device and the size of the recovery image.
Note: Please make sure the AC adapter is connected during the process, and do not force to shut down to prevent the creation is incomplete.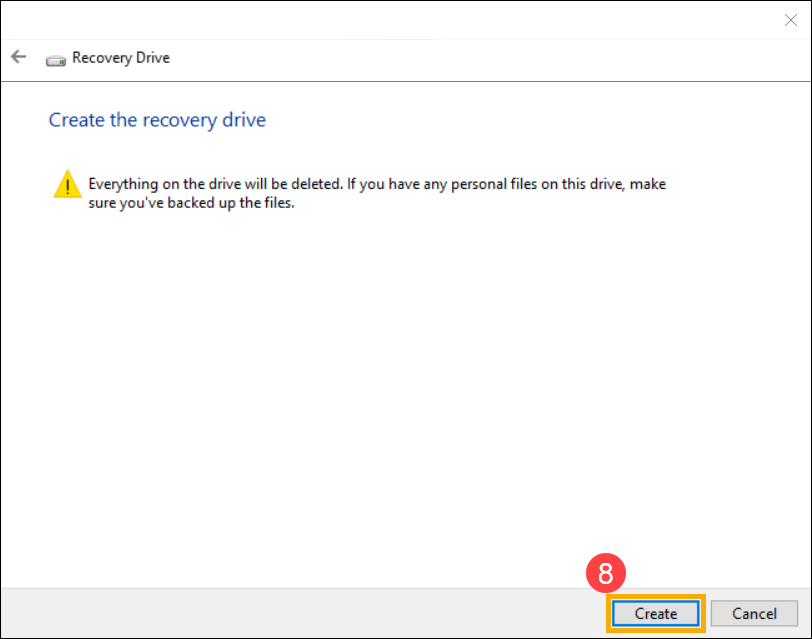
- The recovery drive has been created, please click [Finish]⑨.

- We recommend that you reproduce above steps to recreate the new recovery drive periodically because Windows will regularly update and improve security and performance.
Use the recovery drive to recover / restore your device
If you experience the device cannot boot, you can use the recovery drive to enter Windows Recovery Environment (WinRE), and then restore from a system restore point or reinstall Windows via the recovery drive.
- Connect the recovery drive (USB flash drive) to your device.
- Power on the device and select the boot option as the USB flash drive, here you can learn more about How to boot the system from USB drive/CD-ROM.
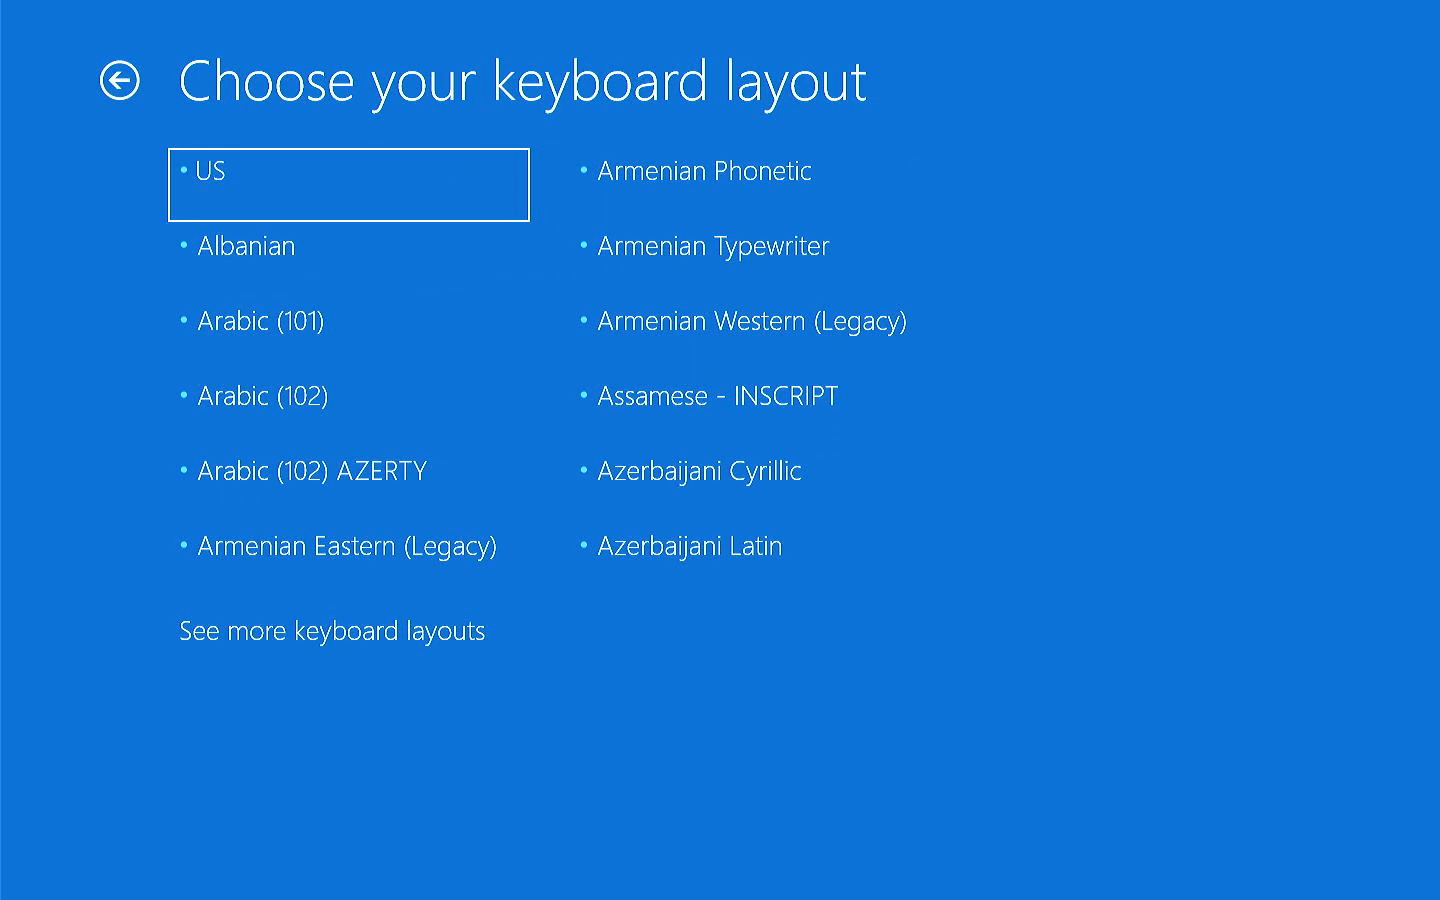
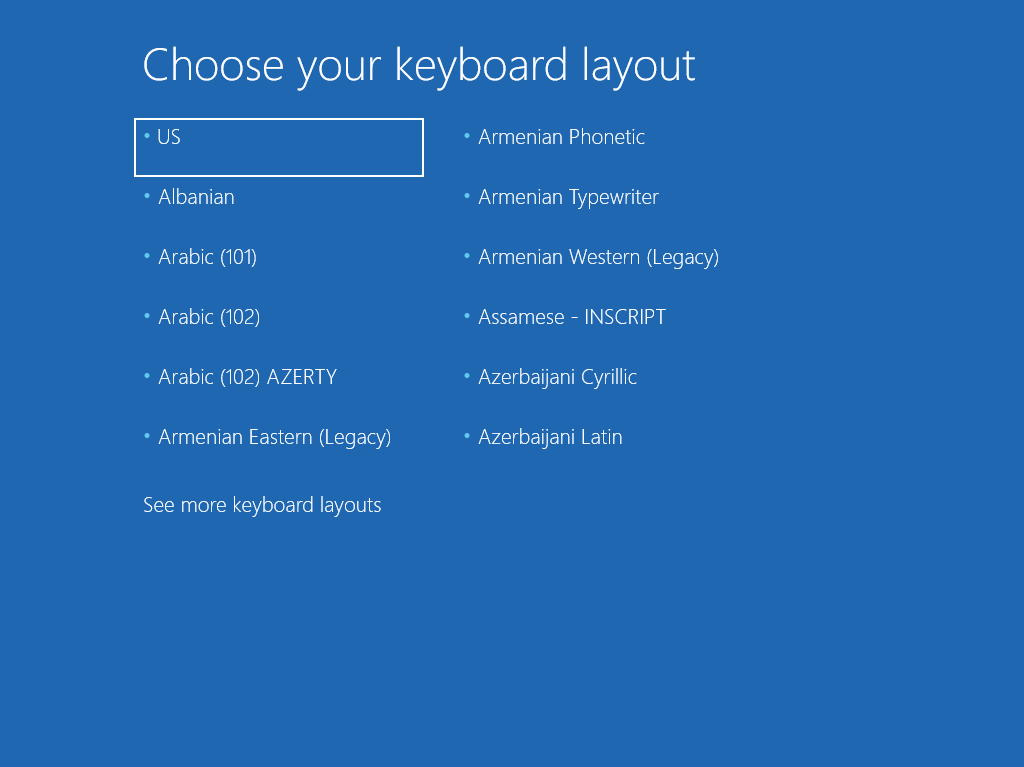
- The device will enter Windows Recovery Environment, and then please choose your keyboard layout.
- Then, you are able to select one of the following to recover your device: restore from a system restore point or reinstall Windows via the recovery drive.
If using the system restore point, your personal files will not be affected, but it will remove recently installed applications, drivers, and updates that might cause the problems to the device.
If reinstalling Windows, it will remove your personal files, applications and drivers you installed, and changes you did to settings.
Using the system restore point to restore the device
Note: The restore points mean the ones were created and recorded in your device, not the ones backed up inside the USB recovery drive.
- Select [Troubleshoot]①.
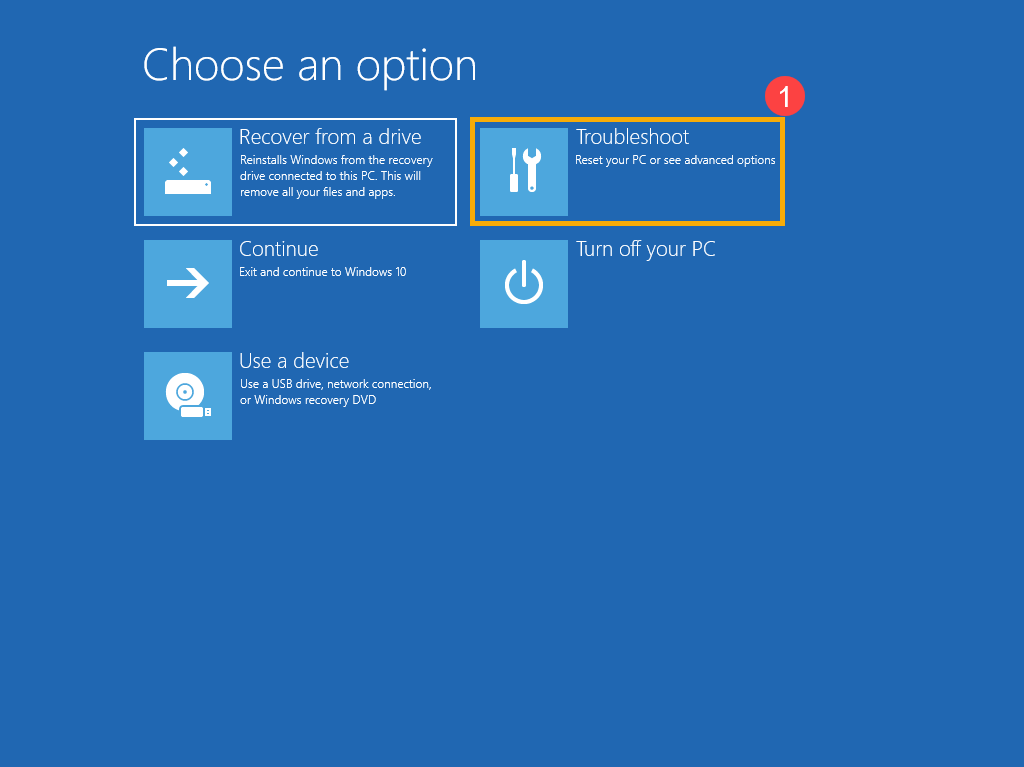
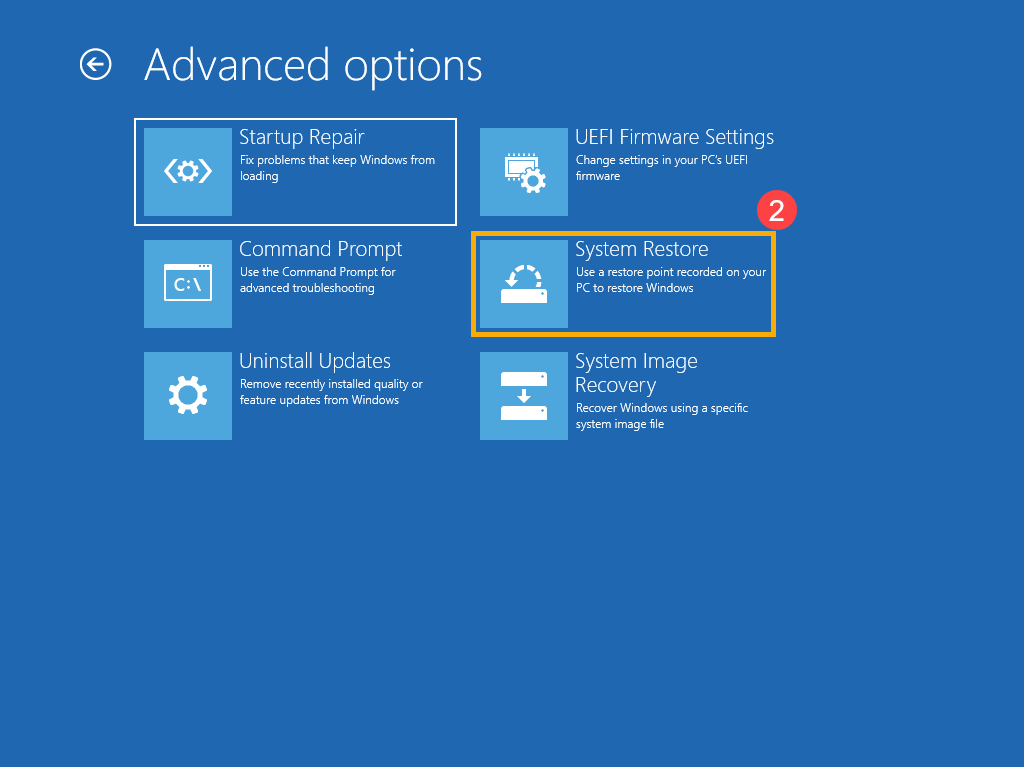
- Select [System Restore]②.
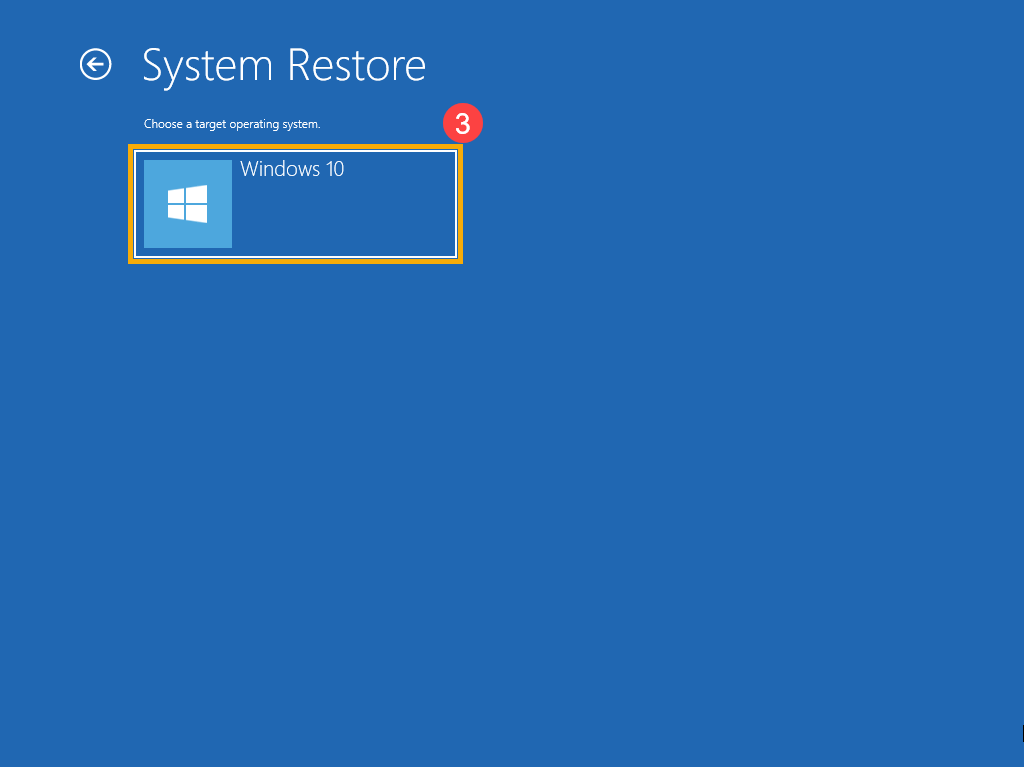
- Click [Windows 10]③.
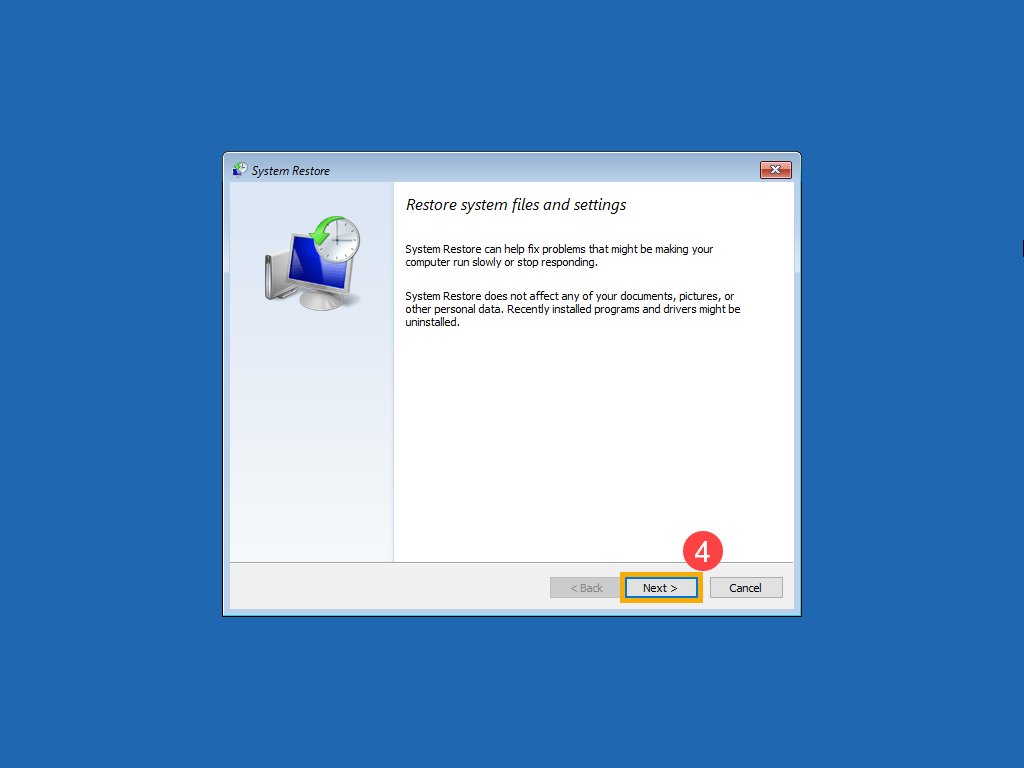
- Start the restore system setting process, please select [Next]④.
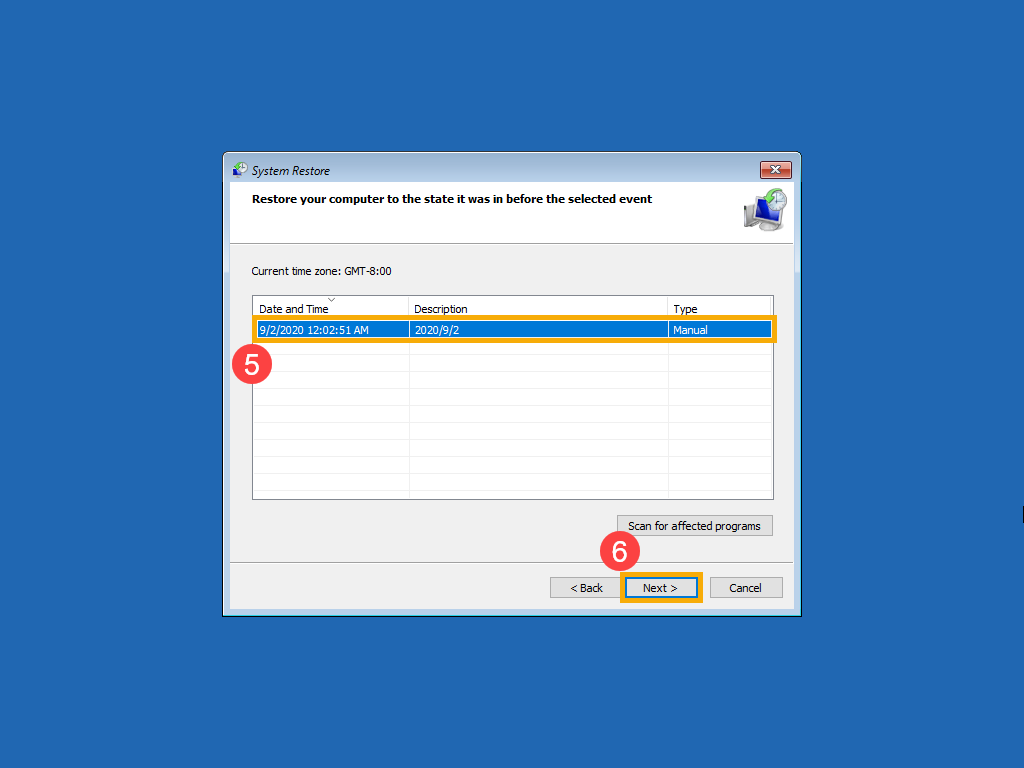
- You will see the lists of all restore points, and please choose the one that you want to use⑤, and then select [Next]⑥. You also can select Scan for affected programs to check the affected result after choosing this restore point.
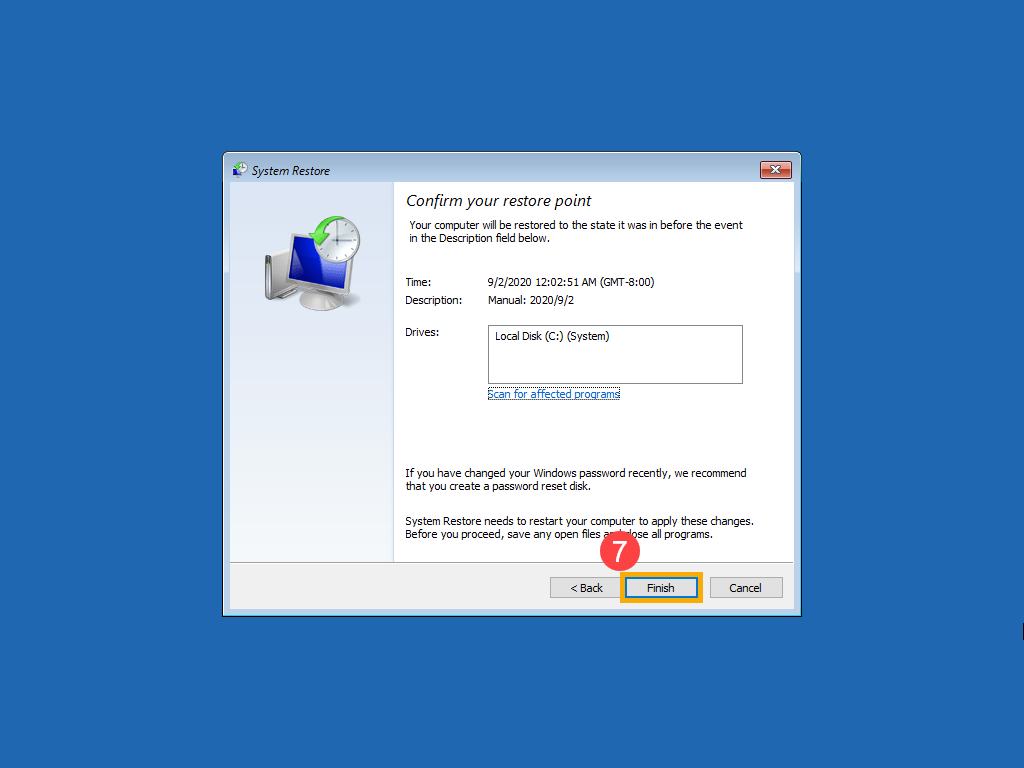
- Confirm the selected restore point information is correct or not, then select [Finish]⑦.
- Click [Yes]⑧ to start the restore process. The device will restart and enter Windows after the restore is completed.
Note: Please make sure the AC adapter is connected during the process, and do not force to shut down to prevent any issues.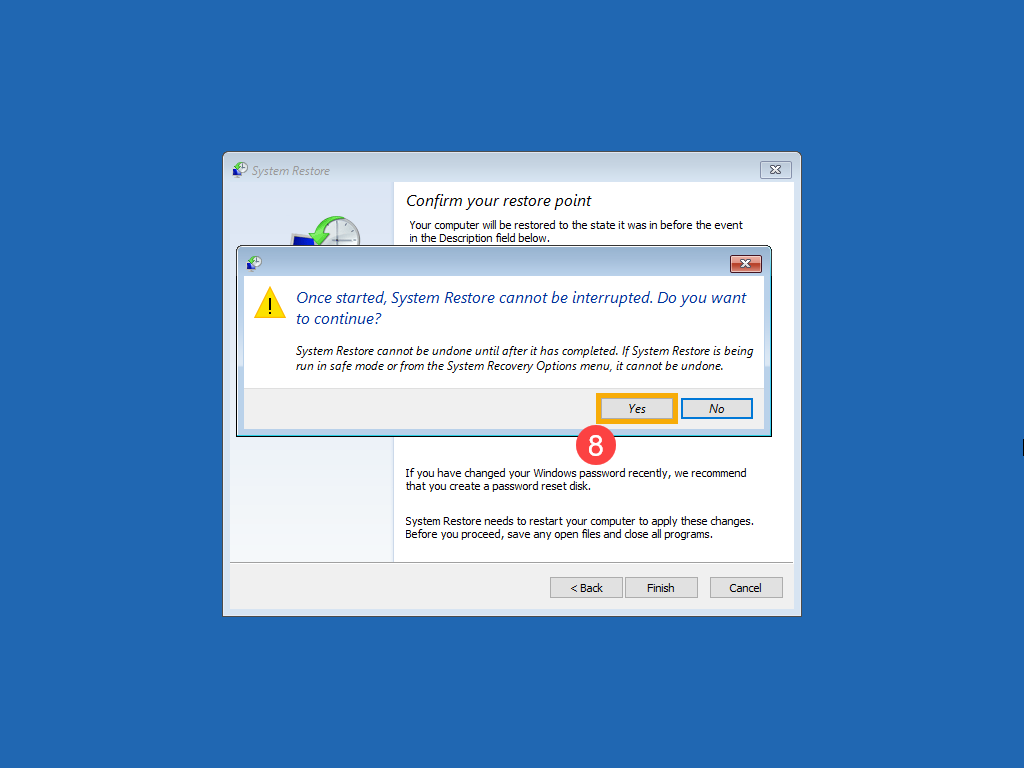
Using the recovery drive to reinstall Windows
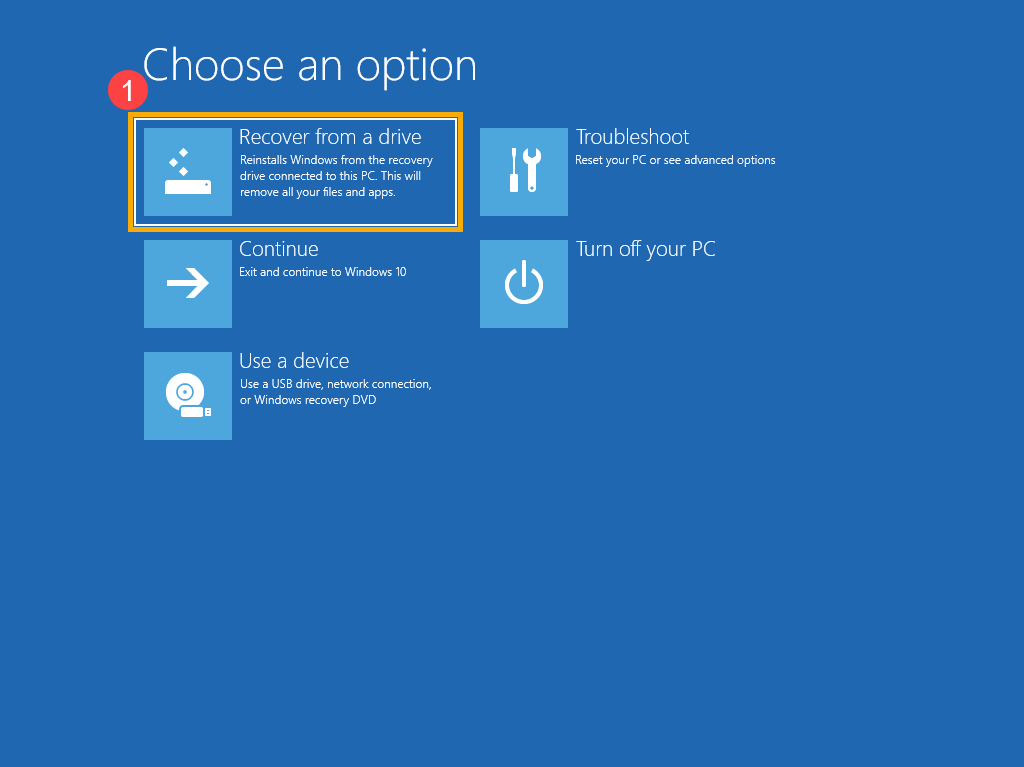
- Select [Recover from a drive]①.
- You can choose Just remove my files or Fully clean the drive that is based on your demand②.
- Windows will remind you the following information about what will happen after recovering from a drive. Please select [Recover]③ to reinstall Windows.
Note: Please make sure the AC adapter is connected during the process, and do not force to shut down to prevent any issues.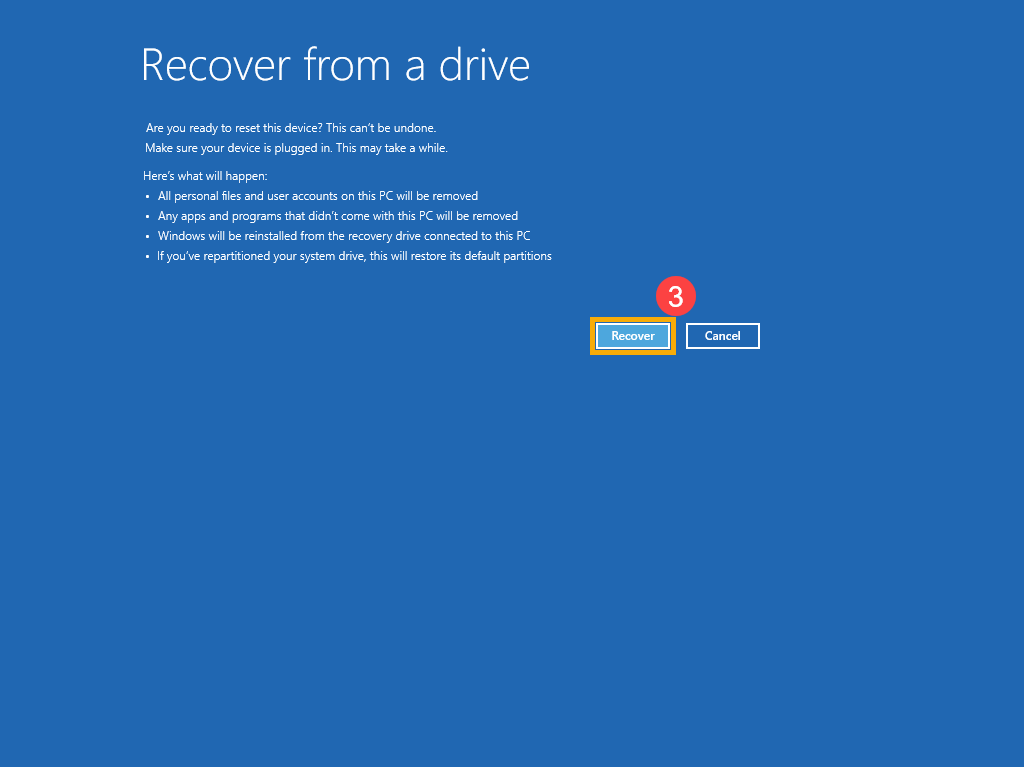
- The device will restart and enter the basic setting page of Windows after the recovery is completed, here you can learn more about Start for the first time (Windows OOBE).