Related Topics
How to Enable/Disable Secure Boot
Applicable Products: Notebook, Desktop, All-in-One PC, Gaming Handheld
The primary purpose of Secure Boot is to prevent unauthorized operating systems and malicious software from loading during the device's boot process. Enabling Secure Boot ensures that only software and drivers validated with Microsoft's signature can run at startup, thereby effectively safeguarding against malware infiltration. Additionally, enabling Secure Boot contributes to the system's overall stability and reliability.
If you need to run certain operating systems or tools that do not support Secure Boot, you may need to temporarily disable it. However, be fully aware of the security risks involved in doing so. In the absence of specific requirements, it is recommended to keep Secure Boot enabled to ensure the security and stability of your system.
If you encounter Secure Boot status as Not Active, please refer to Solution for Secure Boot Displaying as "Not Active".
If you need to enable or disable Secure Boot, please follow the steps provided in this article.
Note: If your hard drive is encrypted with Device Encryption or BitLocker, modifying BIOS settings may require you to enter the BitLocker key to unlock the drive. You can refer to this article to find the BitLocker key: Troubleshooting - BitLocker Recovery Screen Appears After Startup/Find BitLocker Recovery Key. If you wish to disable Device Encryption or BitLocker, you can refer to this article: Introduction to Device Encryption and Standard BitLocker Encryption.
For those utilizing Notebook, All-in-One PC, or Gaming Handheld devices, the following are the methods to Enable/Disable Secure Boot
- First of all, the device needs to enter BIOS configuration. When the device is completely shut down, persistently hold the [F2] key
 on the keyboard and simultaneously press the [Power button]
 to boot up. Once the BIOS screen appears, you may release the [F2] key. Here you can learn more about How to enter the BIOS utility.
Note: For gaming handhelds, press and hold the [Volume Down] button and then press the power button. - Upon entering the BIOS configuration screen, you will encounter two types of interfaces: UEFI interface and MyASUS in UEFI. Please refer to the following steps based on the BIOS screen of your device:
How to Enable or Disable Secure Boot in the UEFI mode
In the UEFI interface, you can navigate and confirm using the Arrow Keys and Enter key on the keyboard, Touchpad, or Mouse.
Note: The BIOS configuration screen below may vary slightly depending on the model.
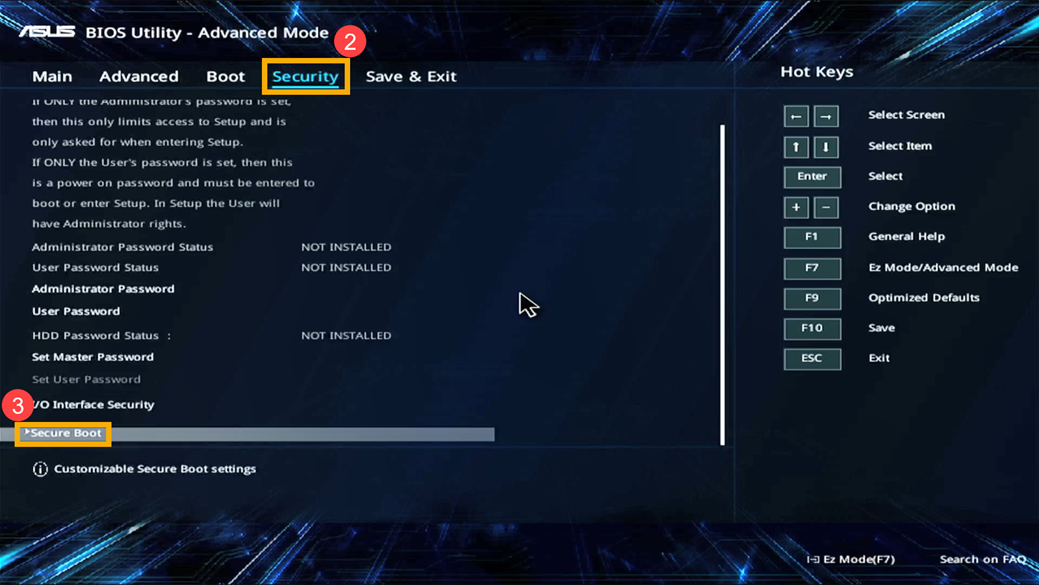
- After entering the BIOS utility, press the [F7] key on your keyboard, or you can click on the [Advanced Mode] option on the screen①.

- Enter the [Security]② screen, and then select [Secure Boot]③.
- After entering Secure Boot, select [Secure Boot Control]④, then adjust the setting you wish⑤.
Note: Setting to 「Enabled」 will activate Secure Boot; setting to 「Disable」 will deactivate Secure Boot.
Note: The Secure Boot state (Active or Not Active) displayed on the screen cannot be changed manually but will change according to the Secure Boot Control setting you configure. After changing the Secure Boot Control setting, you must save the configuration and exit for the Secure Boot state to be updated accordingly.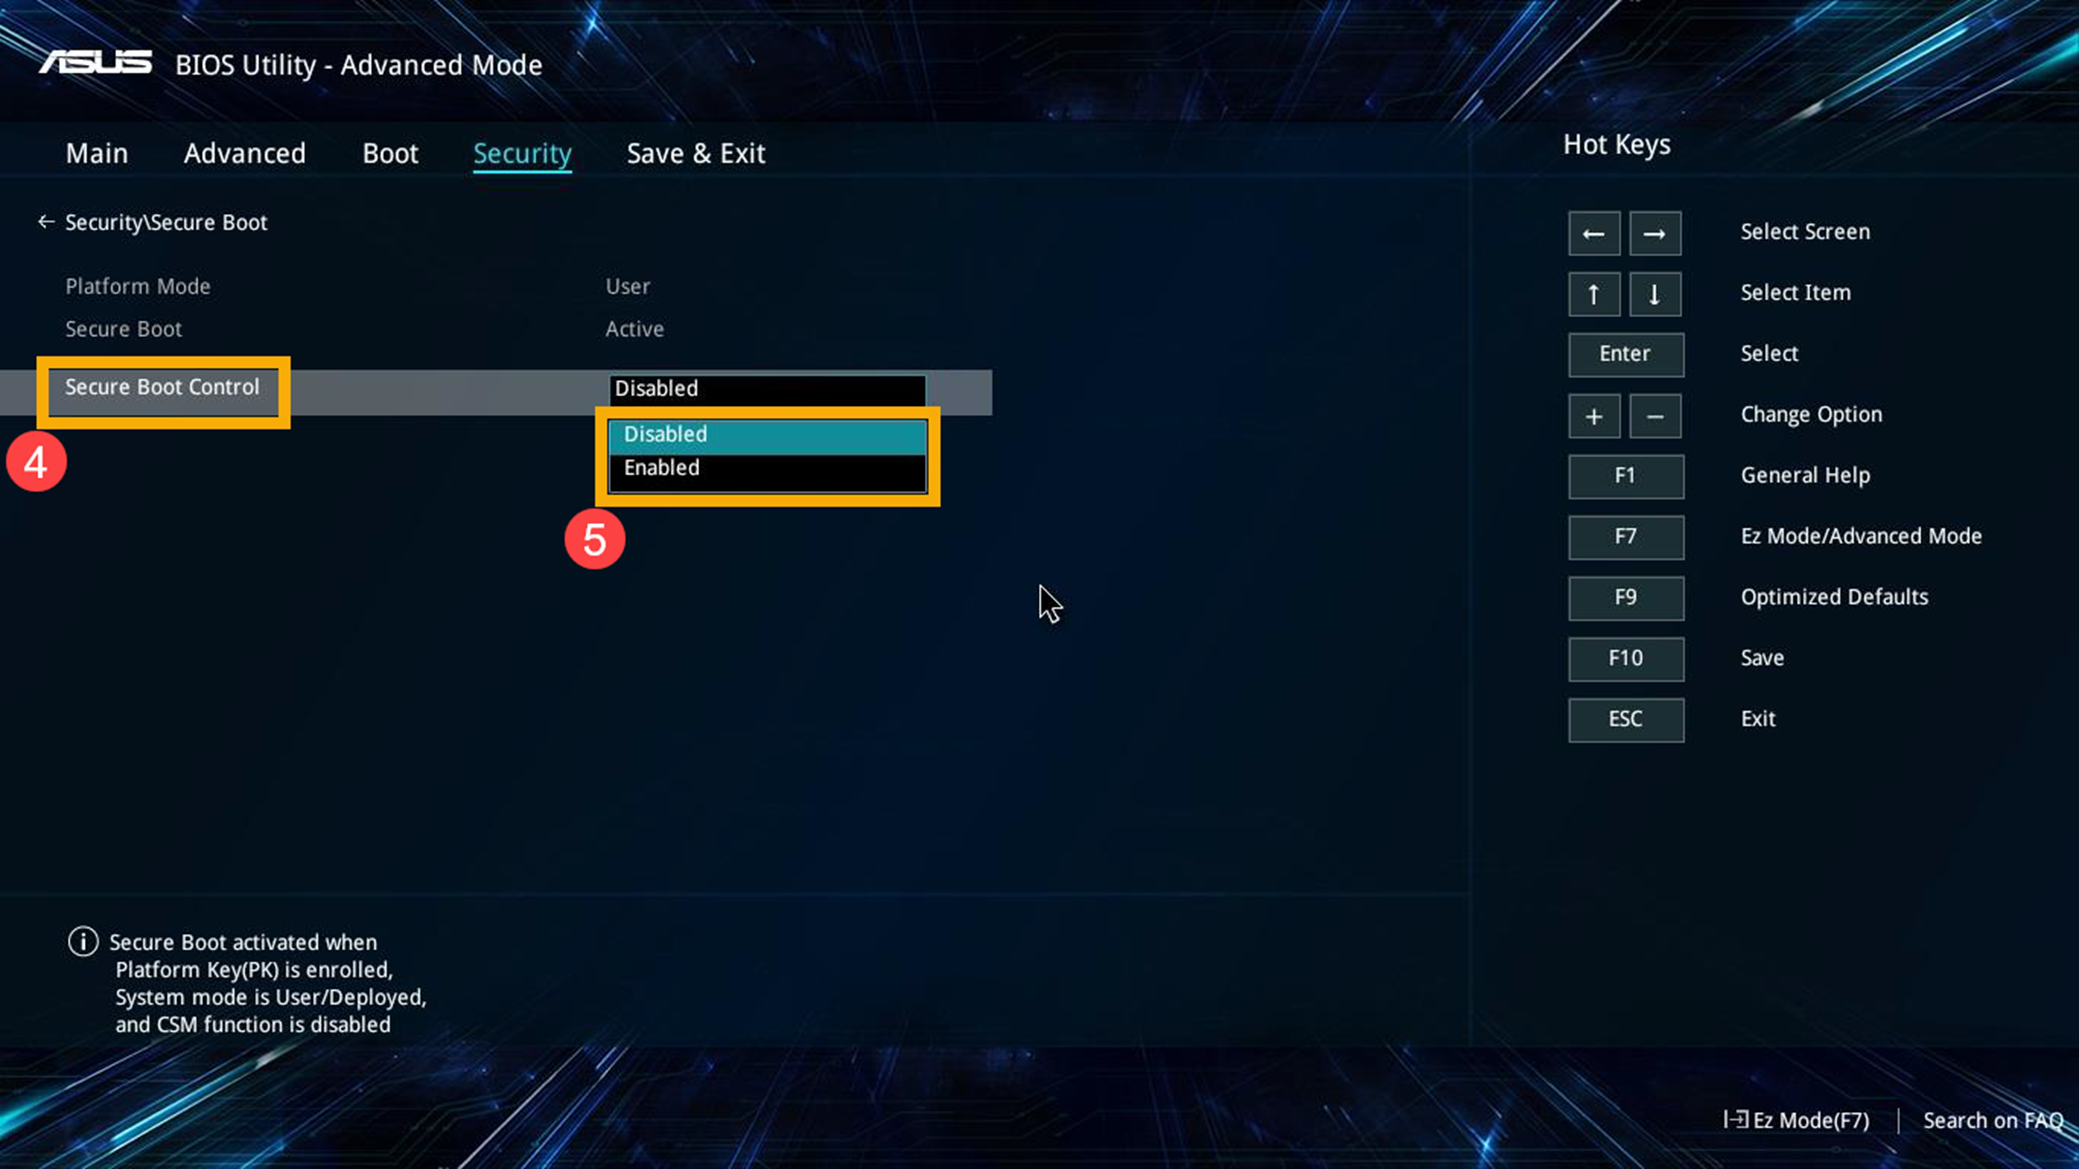
- Save the settings and exit. Press the [F10] key on your keyboard, click [Ok]⑥, and the device will restart and the settings will take effect.
You can also go to the 「Save & Exit」 page and choose the 「Save Changes and Exit」 option to save your settings and exit.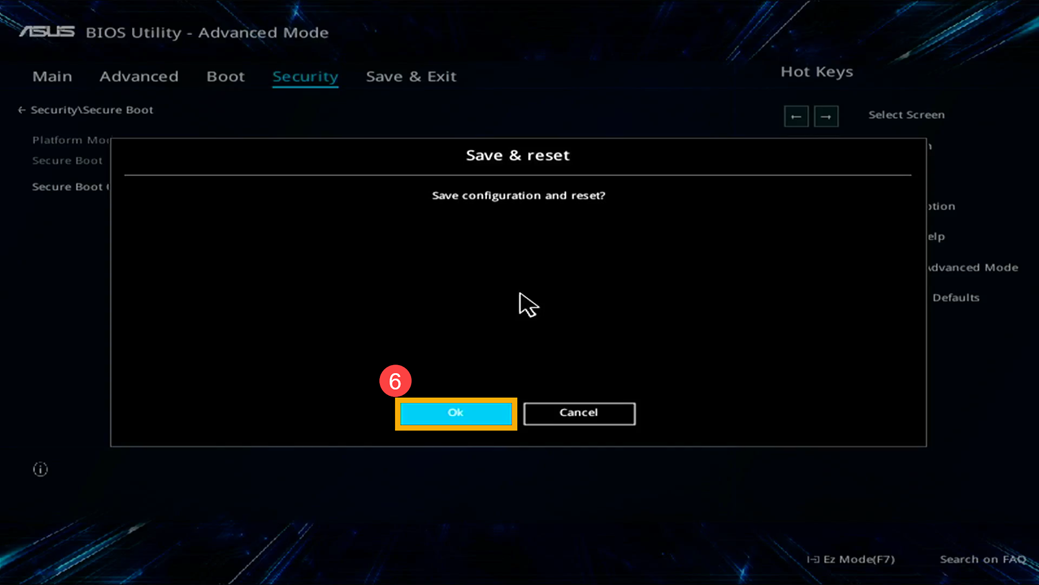
How to Enable or Disable Secure Boot in the MyASUS in UEFI mode
In the MyASUS in UEFI interface, you can navigate and confirm using the Arrow Keys and Enter key on the keyboard, Touchpad, or Mouse.
Note: The BIOS configuration screen below may vary slightly depending on the model.
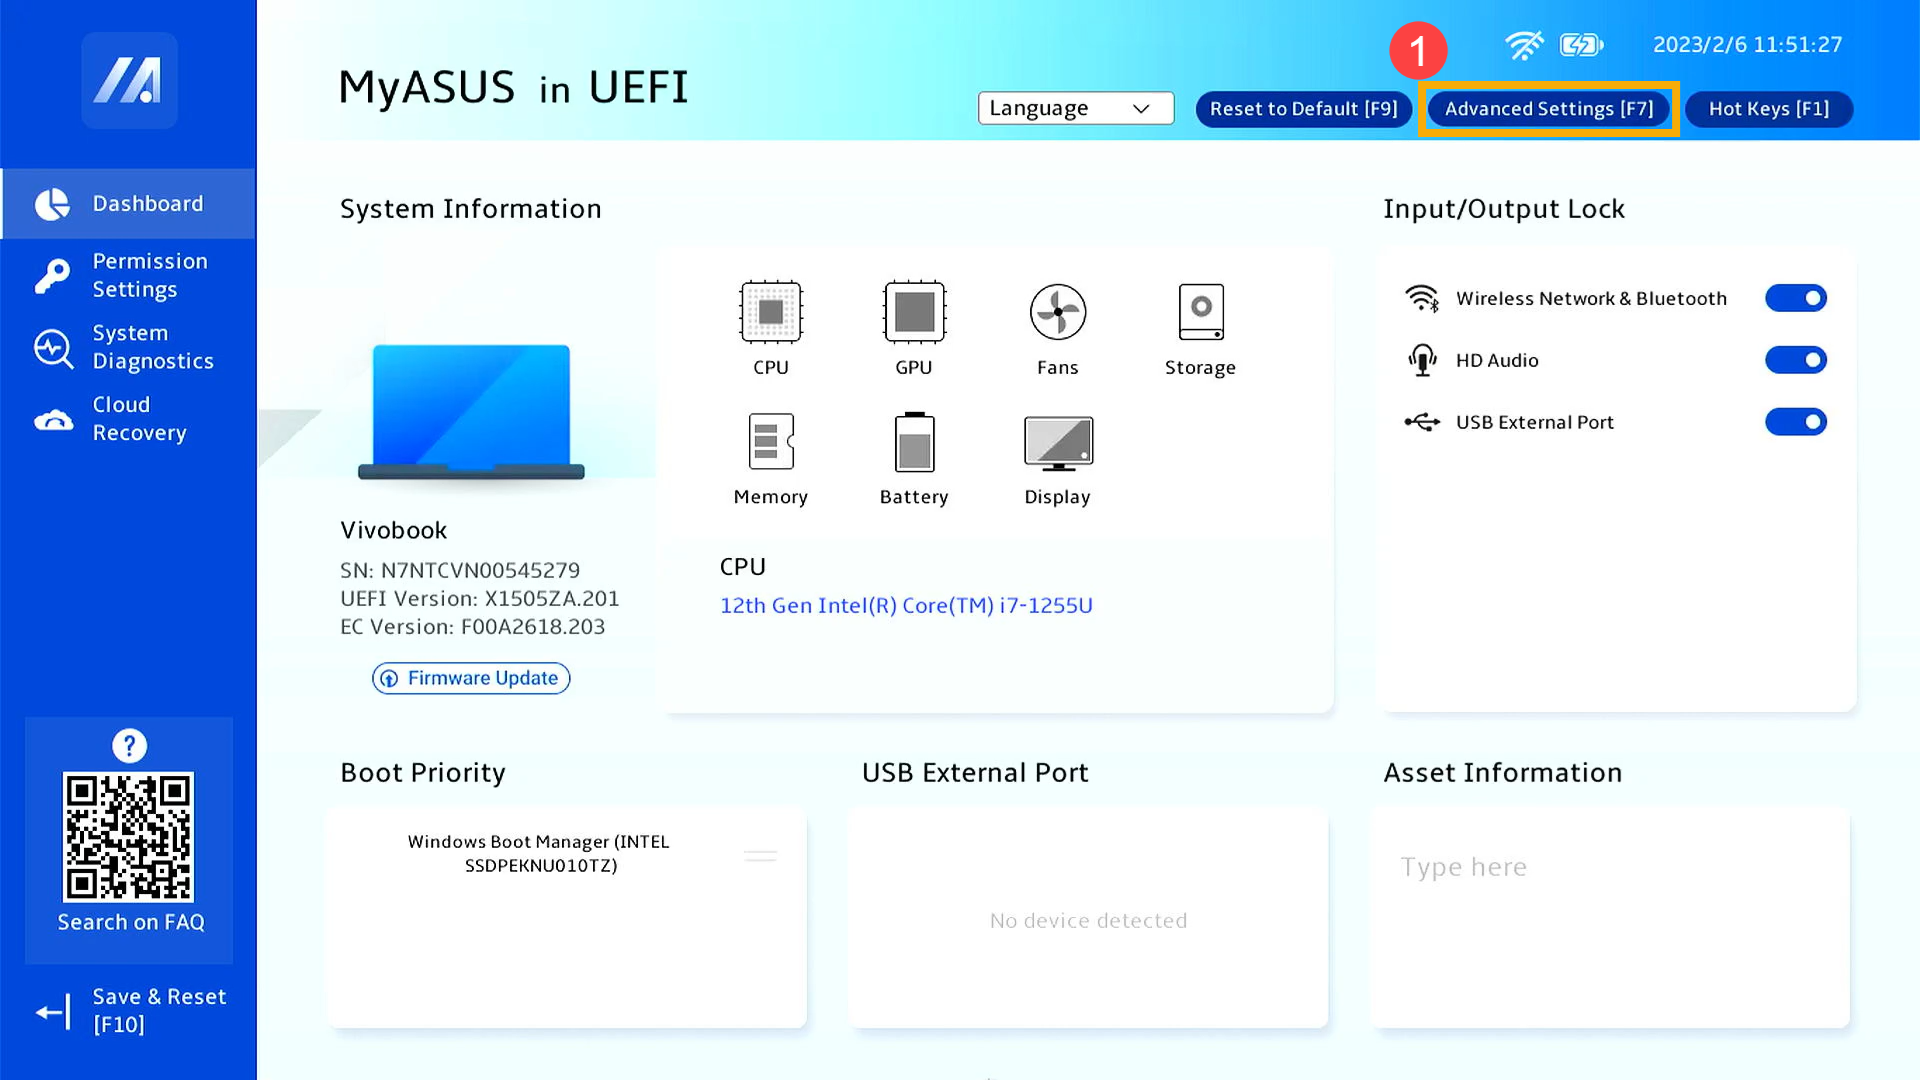
- After entering the BIOS utility, press the [F7] key on your keyboard, or you can click on the [Advanced Settings] option on the screen①.
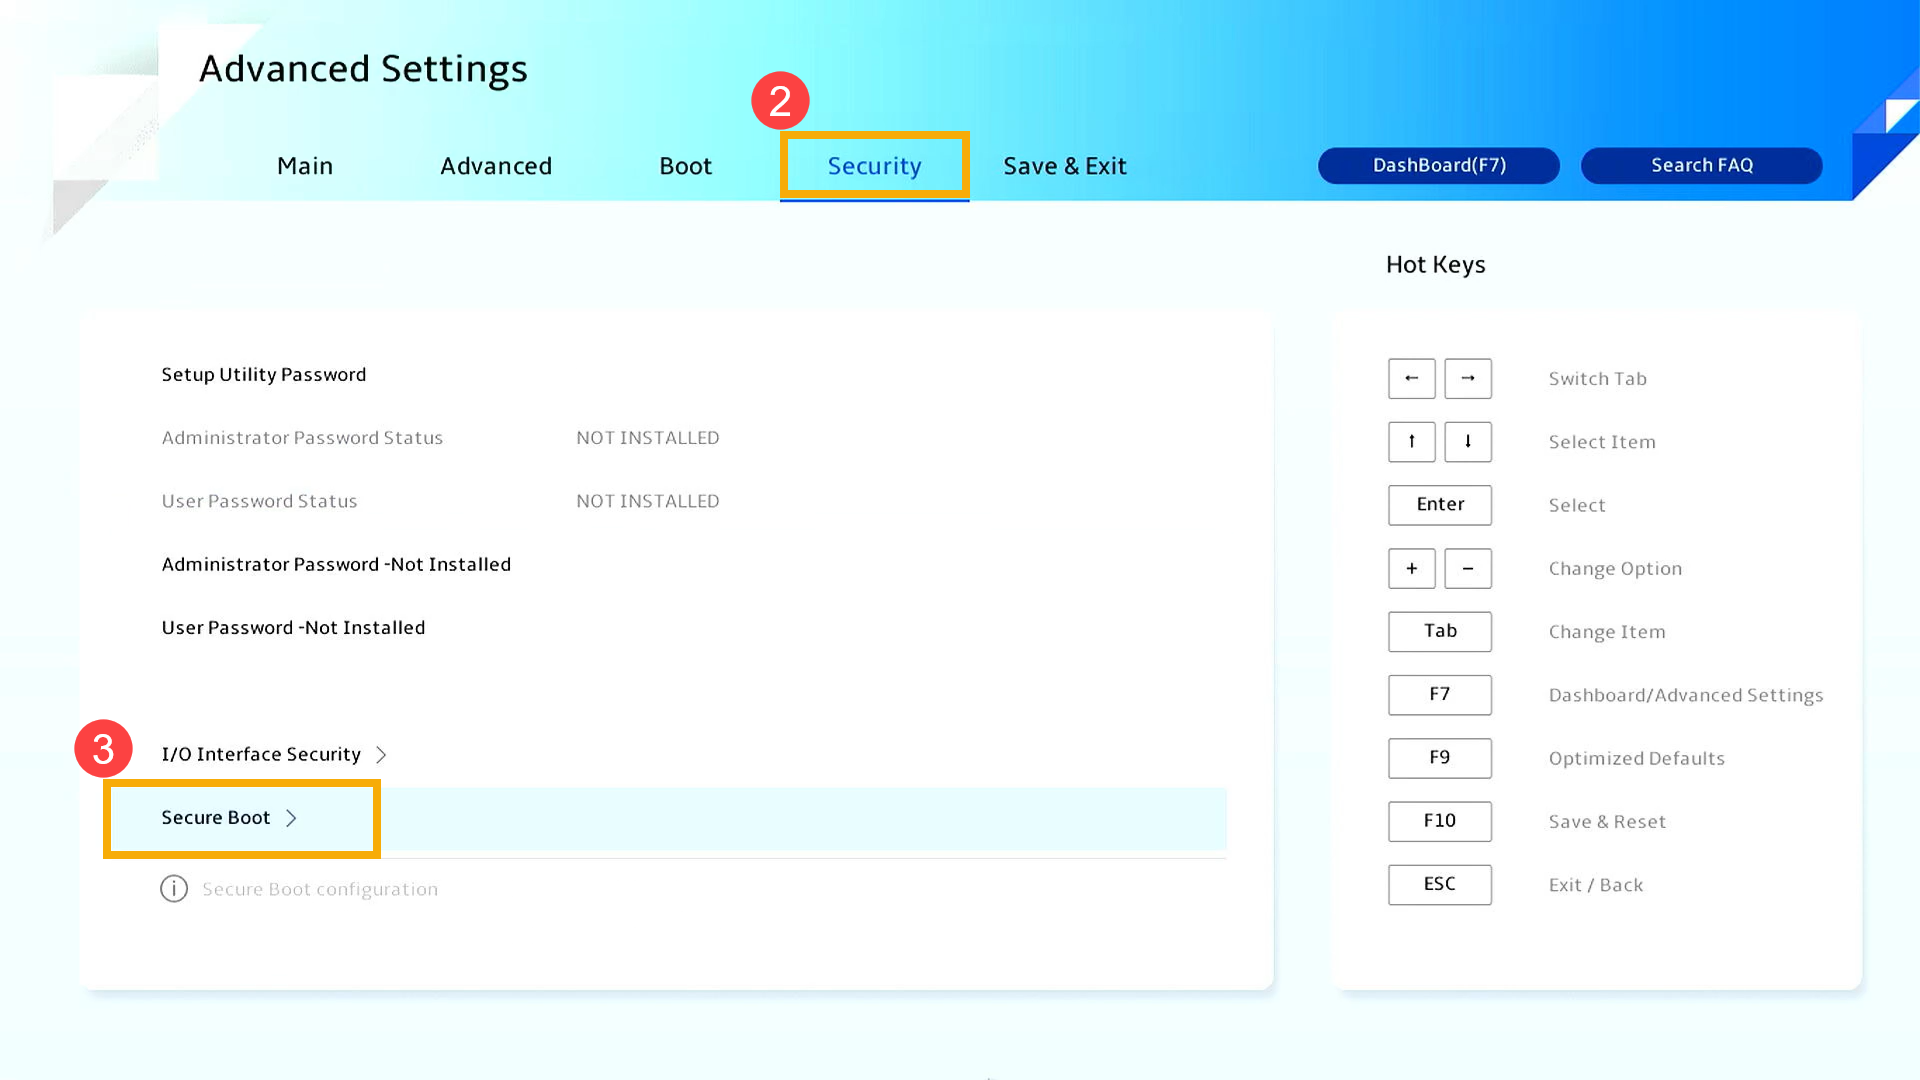
- Enter the [Security]② screen, and then select [Secure Boot]③.
- After entering Secure Boot, select [Secure Boot Control]④, then adjust the setting you wish⑤.
Note: Setting to 「Enabled」 will activate Secure Boot; setting to 「Disable」 will deactivate Secure Boot.
Note: The Secure Boot state (Active or Not Active) displayed on the screen cannot be changed manually but will change according to the Secure Boot Control setting you configure. After changing the Secure Boot Control setting, you must save the configuration and exit for the Secure Boot state to be updated accordingly.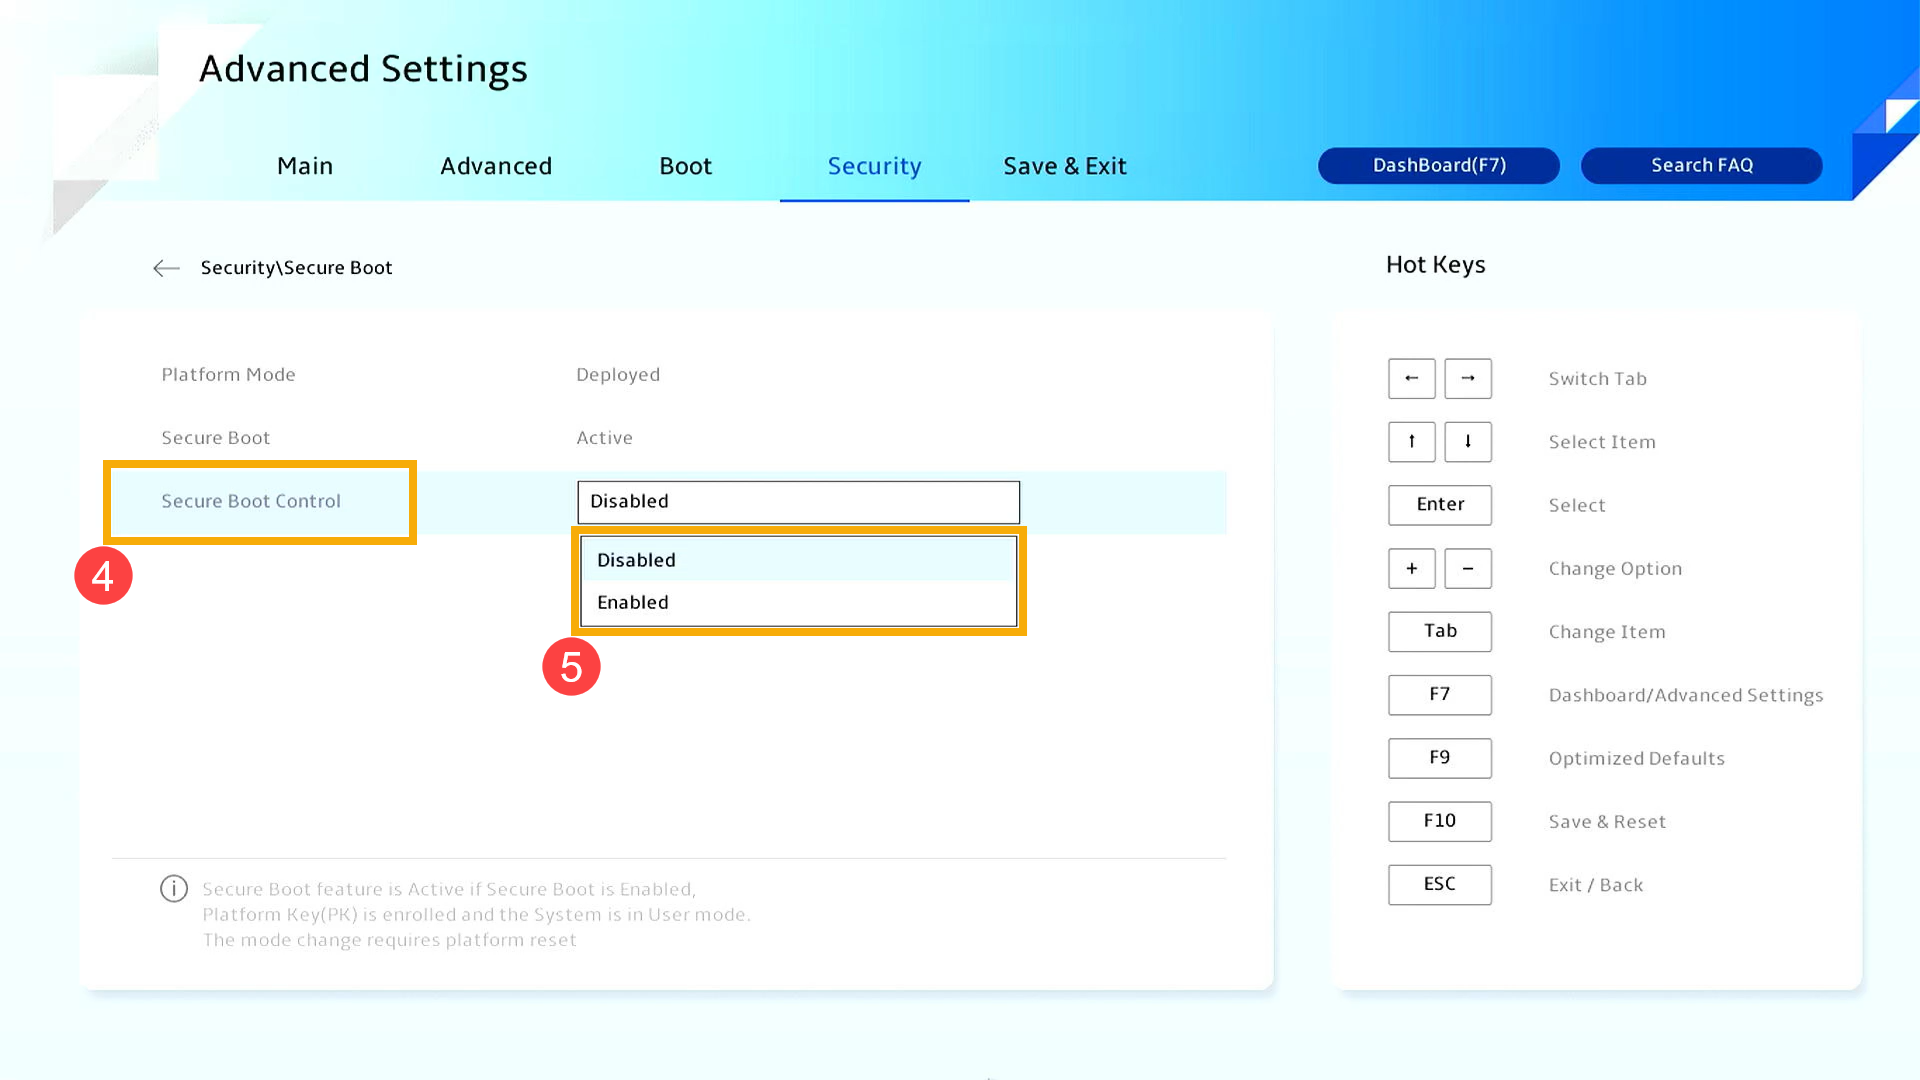
- Save the settings and exit. Press the [F10] key on your keyboard, click [Confirm]⑥, and the device will restart and the settings will take effect.
You can also go to the 「Save & Exit」 page and choose the 「Save Changes and Exit」 option to save your settings and exit.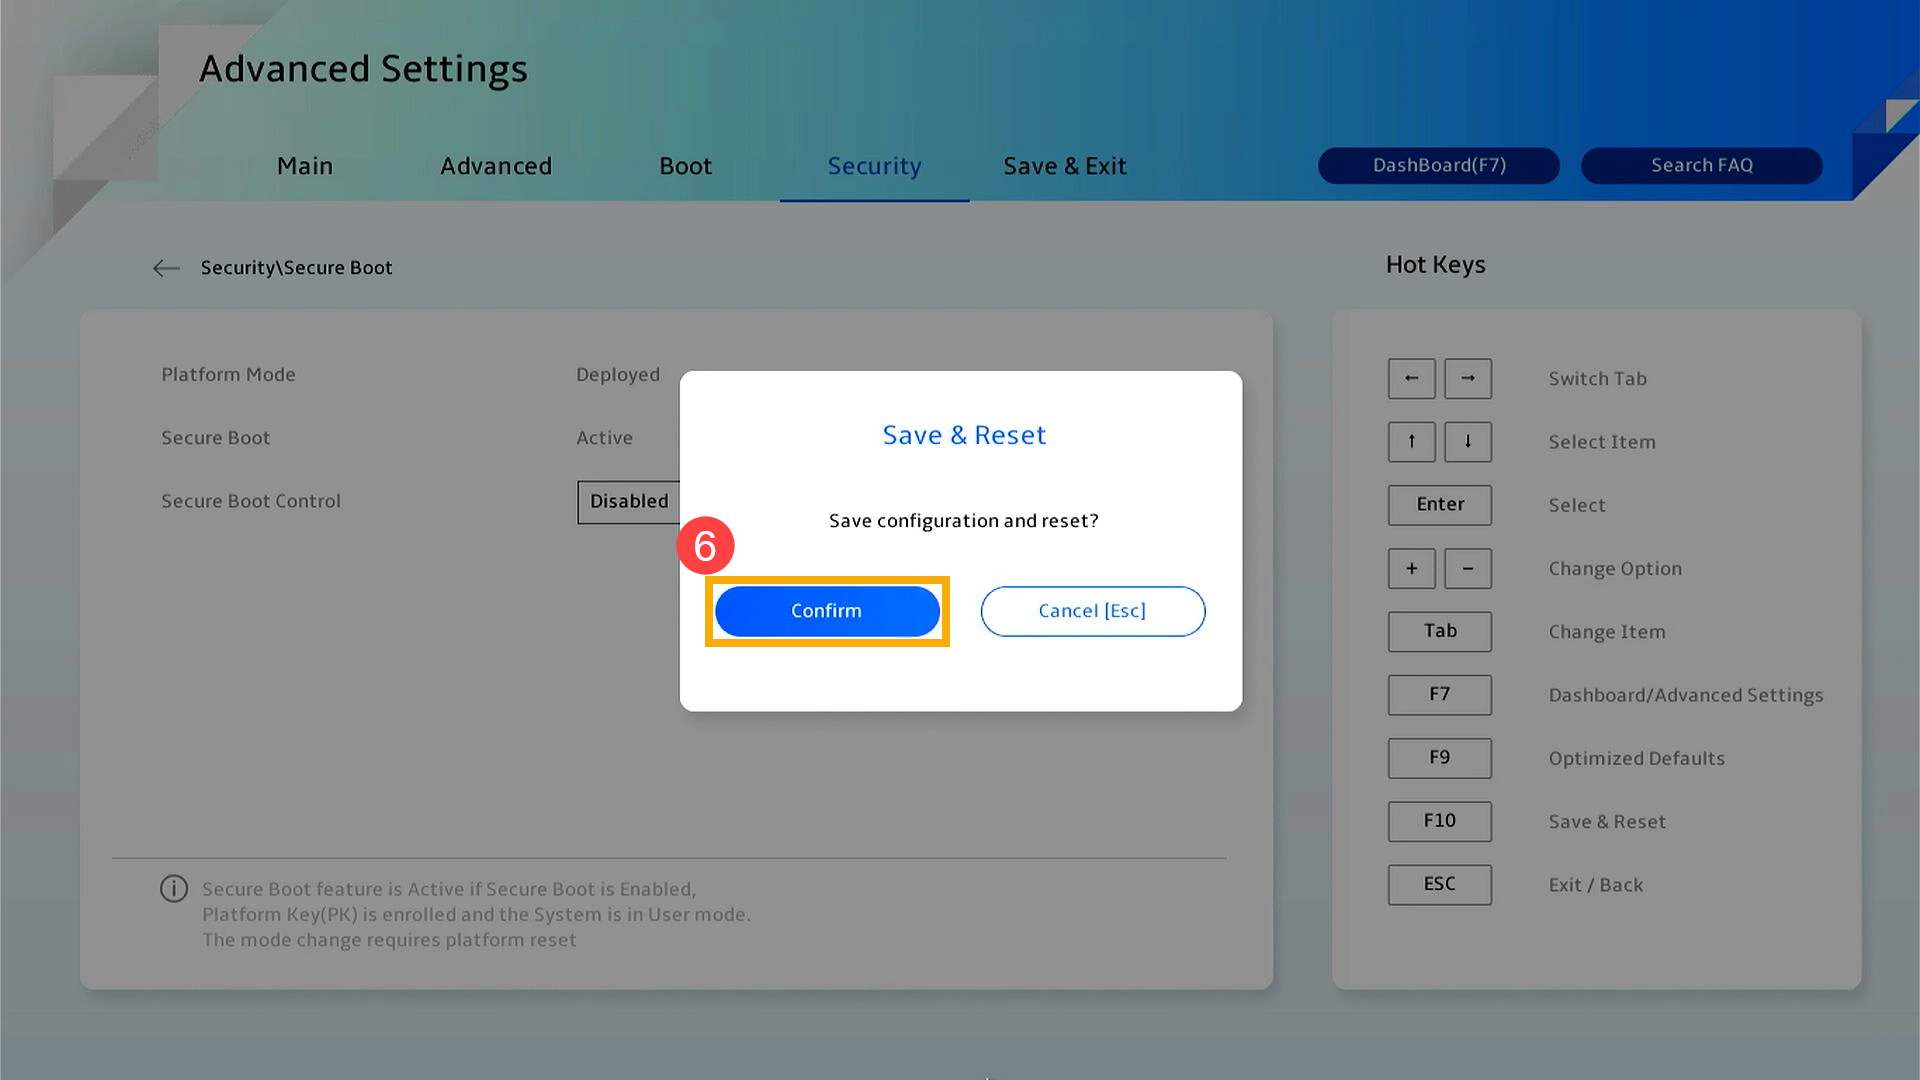
Enable/Disable Secure Boot on a Desktop Computer
First of all, the device needs to enter BIOS configuration. When the device is completely shut down, persistently hold the [F2] key on the keyboard and simultaneously press the [Power button] to boot up. Once the BIOS screen appears, you may release the [F2] key. Here you can learn more about How to enter the BIOS utility. Upon entering the BIOS configuration screen, please refer to the following steps:
Note: For some older desktop models, you may need to press and hold the [Del] key during startup to access the BIOS configuration screen.
How to Enable or Disable Secure Boot in the UEFI mode
In the UEFI interface, you can navigate and confirm using the Arrow Keys and Enter key on the keyboard or Mouse.
Note: The BIOS configuration screen below may vary slightly depending on the model.
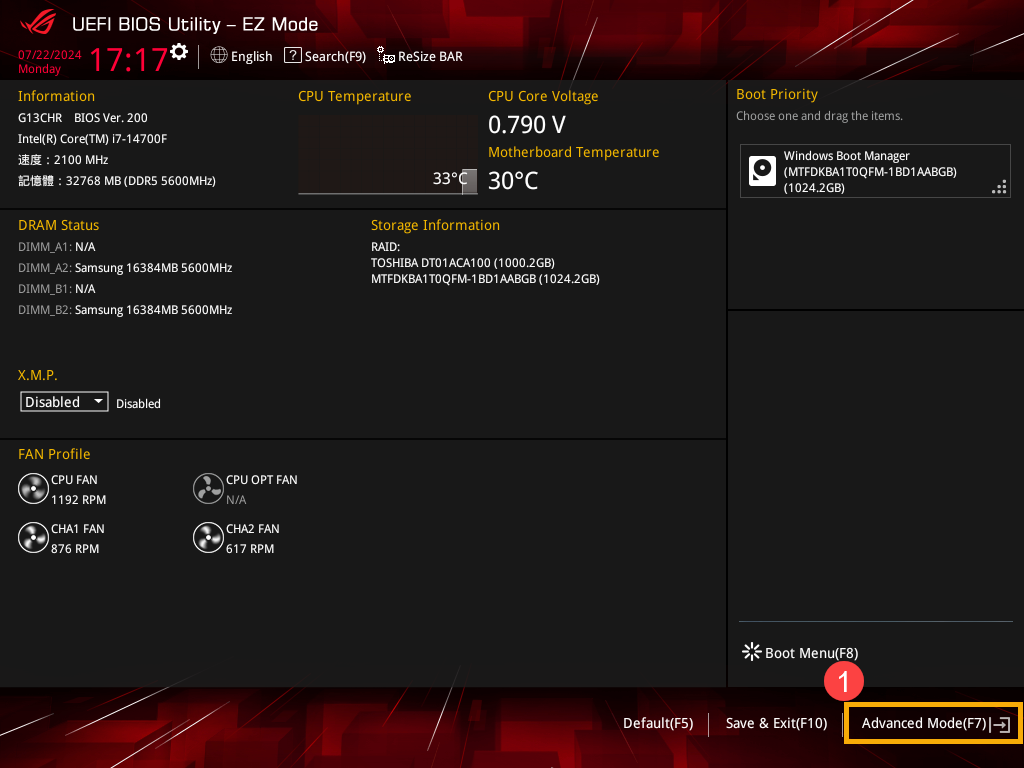
- After entering the BIOS utility, press the [F7] key on your keyboard, or you can click on the [Advanced Mode] option on the screen①.
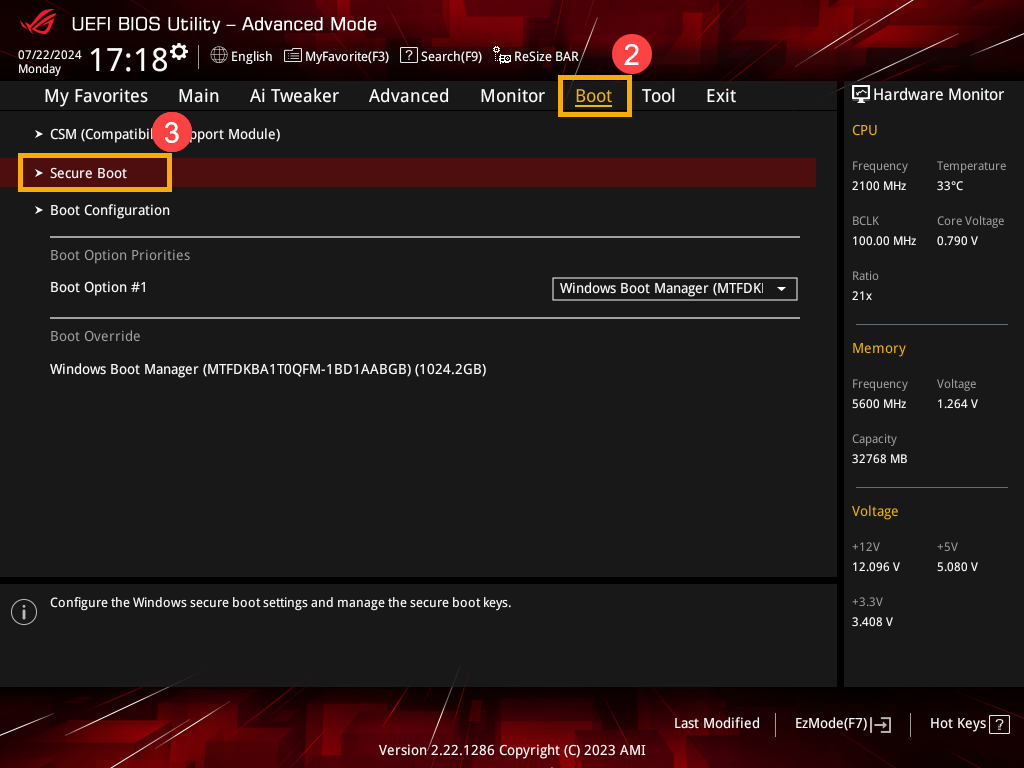
- Enter the [Boot]② screen, and then select [Secure Boot]③.
- After entering Secure Boot, select [OS Type]④, then adjust the setting you wish⑤.
Note: Setting to 「Windows UEFI mode」 will activate Secure Boot; setting to 「Other OS」 will deactivate Secure Boot.
Note: The Secure Boot state displayed on the screen cannot be changed manually but will change depending on whether there is a 「Secure Boot Key」 present. If a Secure Boot Key is present, the state will be 「User」; if there is no Secure Boot Key, the state will be 「Setup」.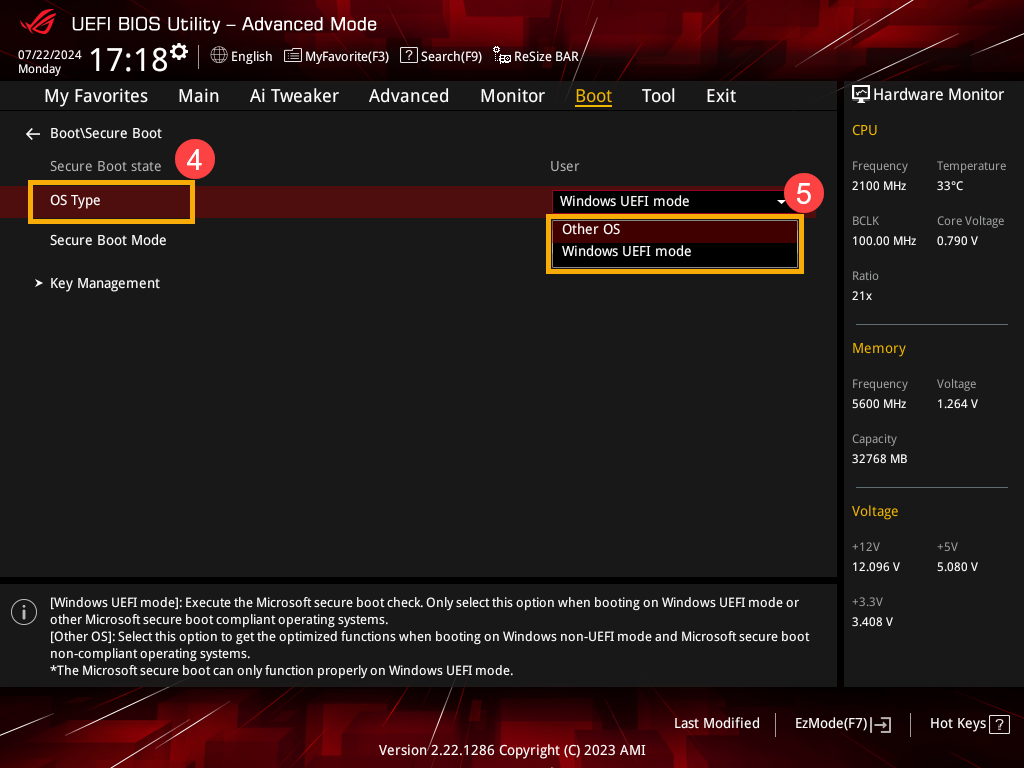
- Save the settings and exit. Press the [F10] key on your keyboard, click [Ok]⑥, and the device will restart and the settings will take effect.
You can also go to the 「Exit」 page and choose the 「Save Changes and Exit」 option to save your settings and exit.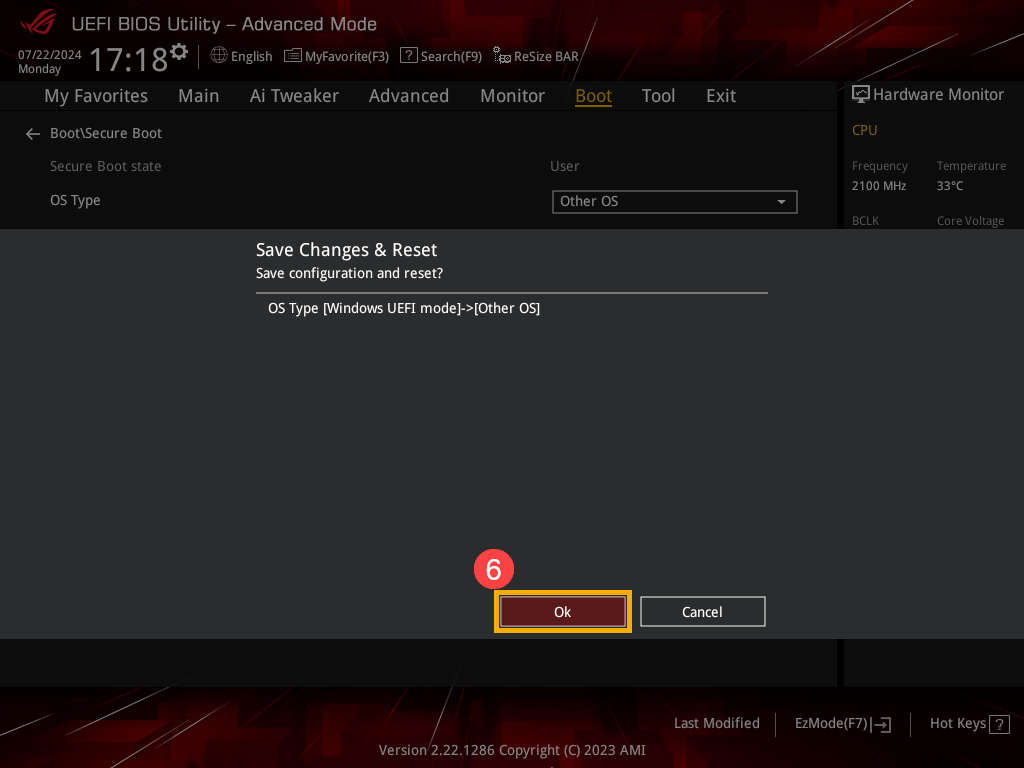
Solution for Secure Boot Displaying as "Not Active"

First, enable Secure Boot Control, then restore the Secure Boot keys to their default values. Please follow the corresponding solution based on the device you are using.
Enabling Secure Boot Control and Restoring Keys for a Notebook, All-in-One PC, or Gaming Handheld Device
Please refer to the following steps based on the BIOS screen of your device:
How to Enable Secure Boot Control and Restore Keys in the UEFI mode
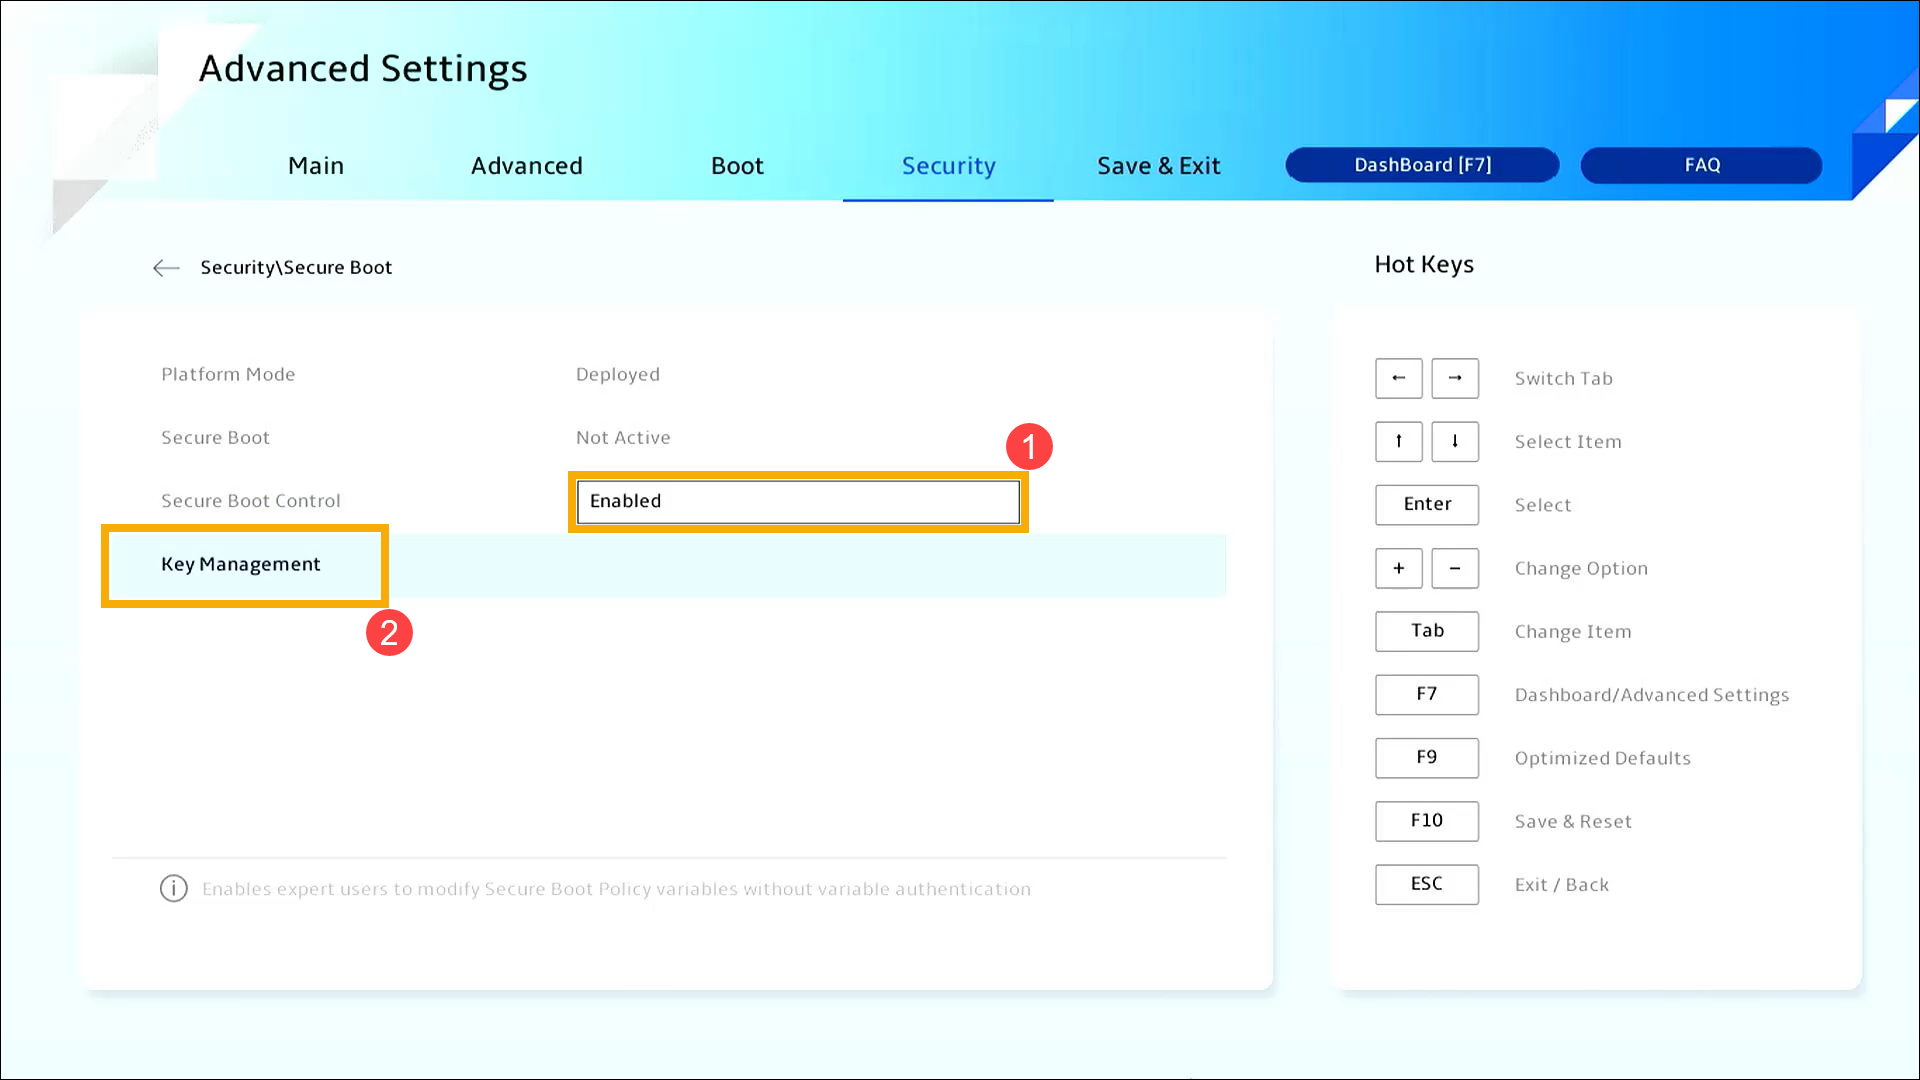
- On the Secure Boot page, set Secure Boot Control to [Enabled]①, then select [Key Management]②.
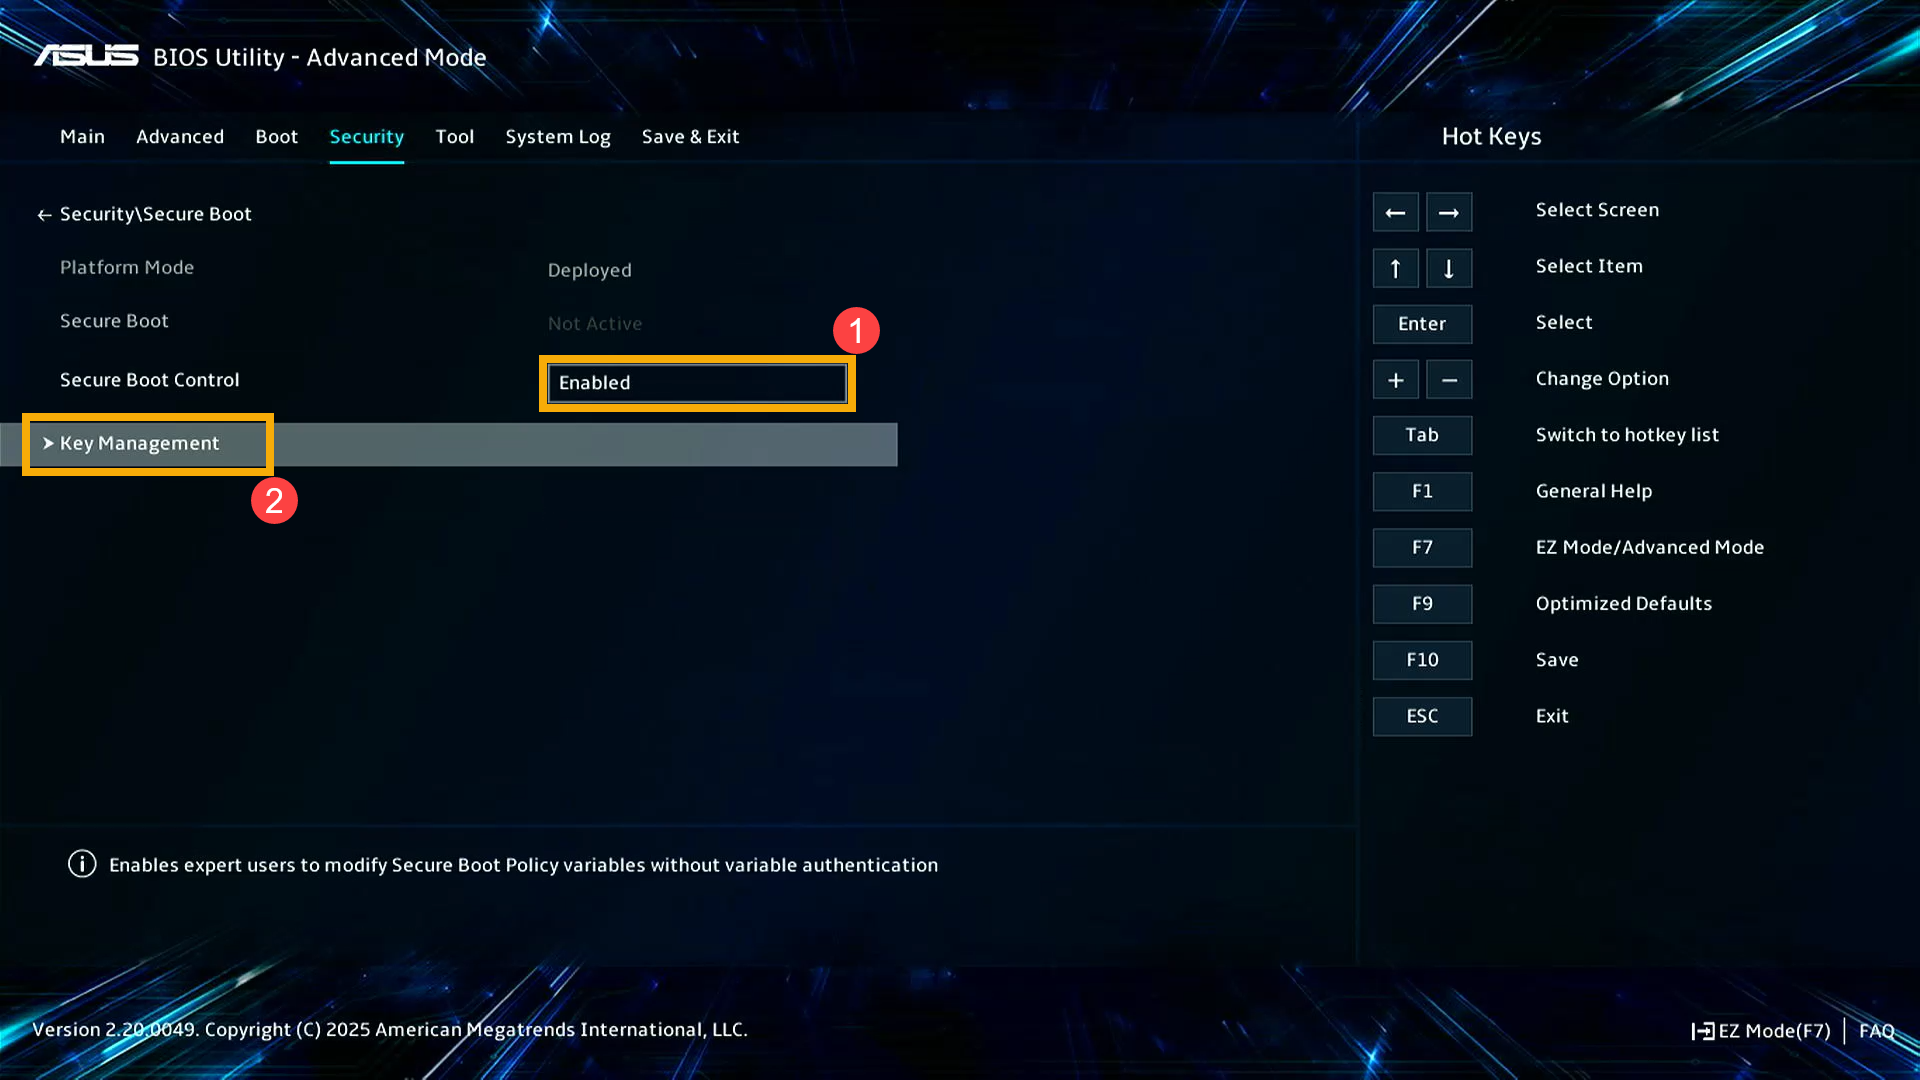
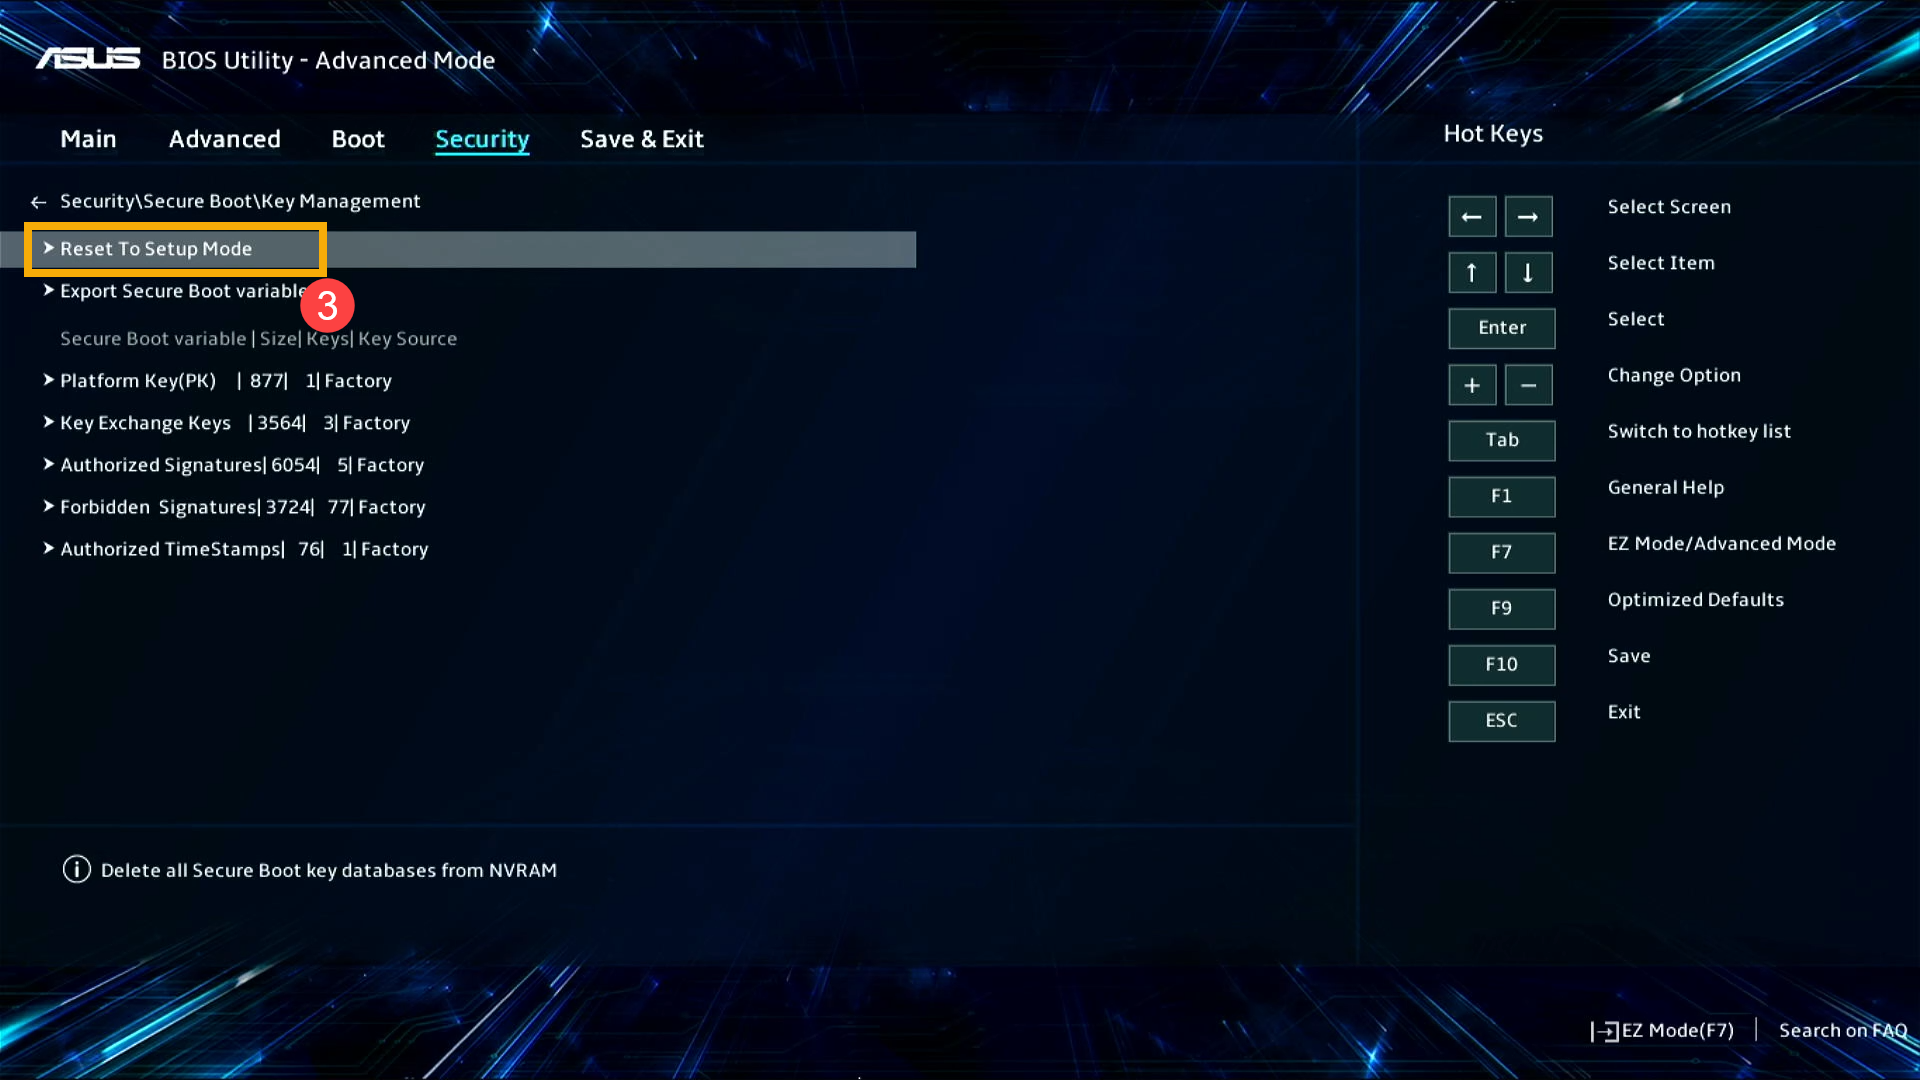
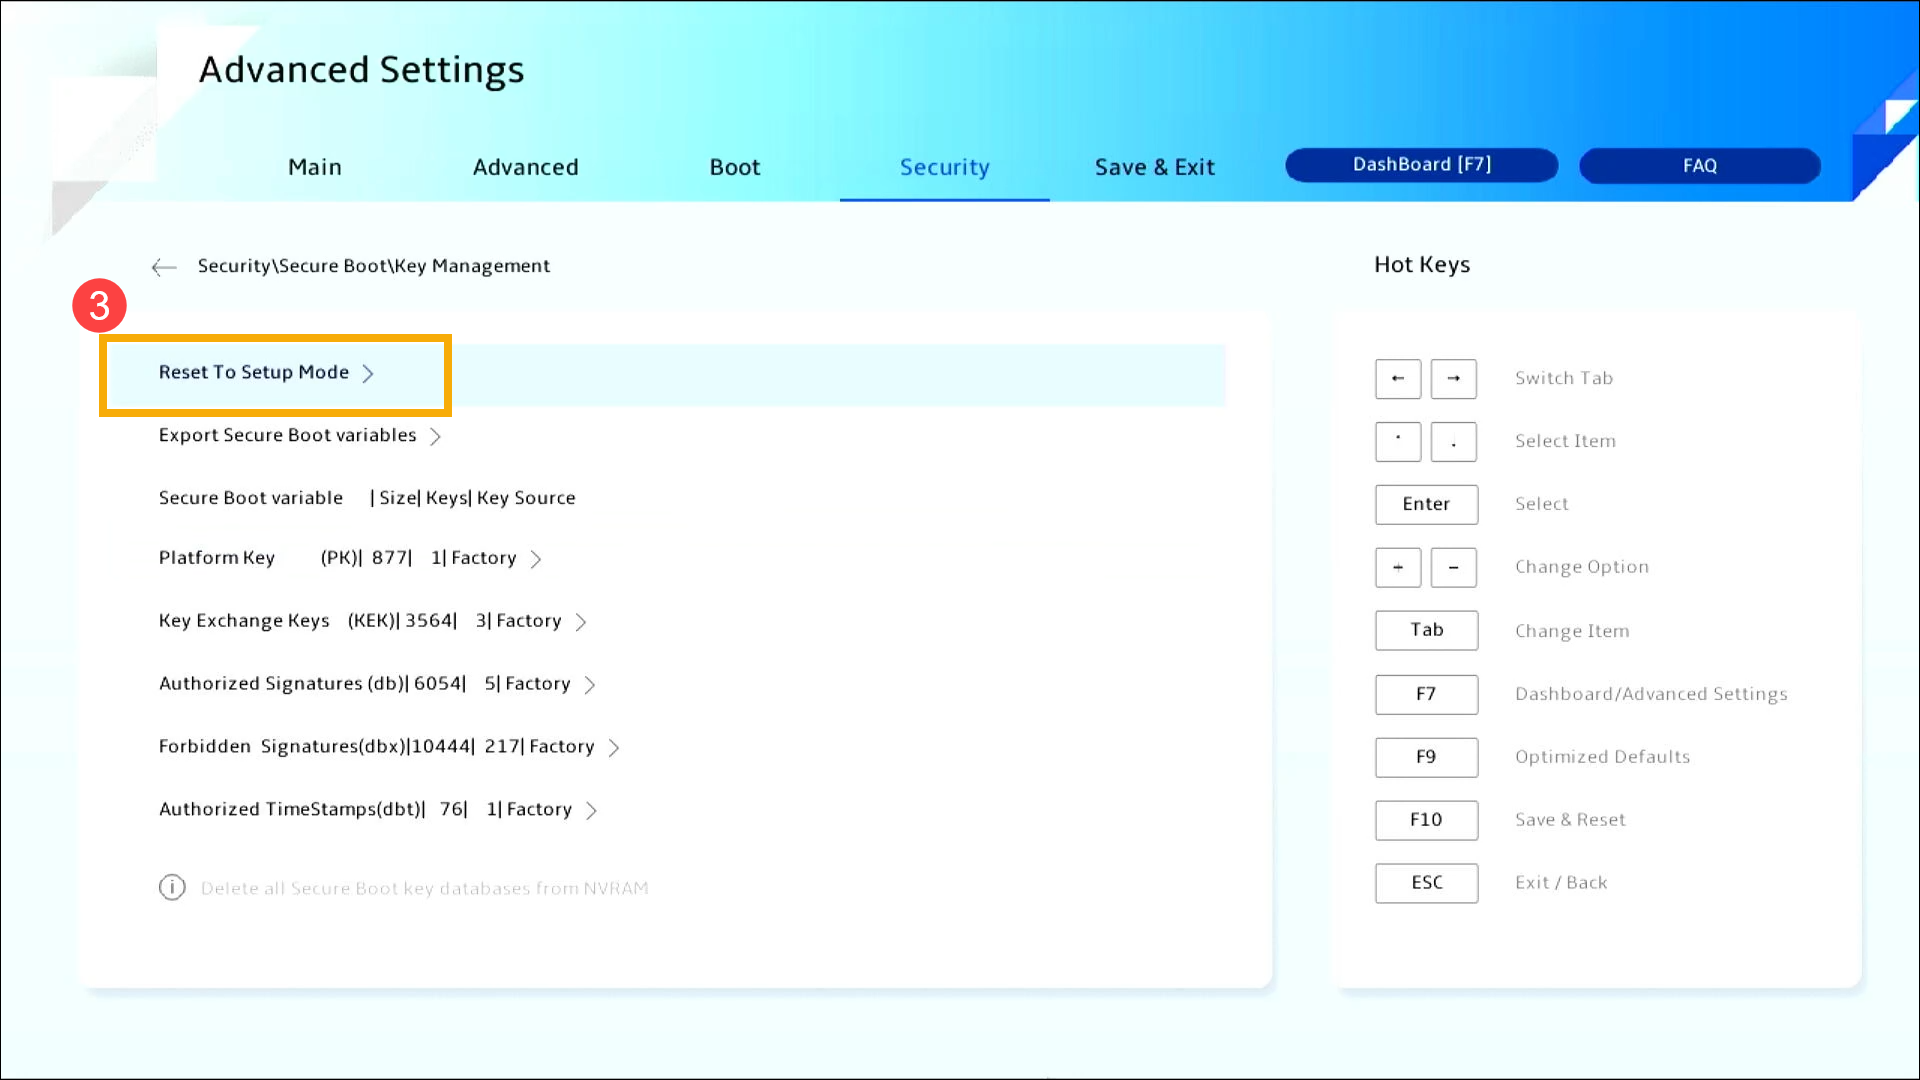
- Once in Key Management, select [Reset To Setup Mode]③.
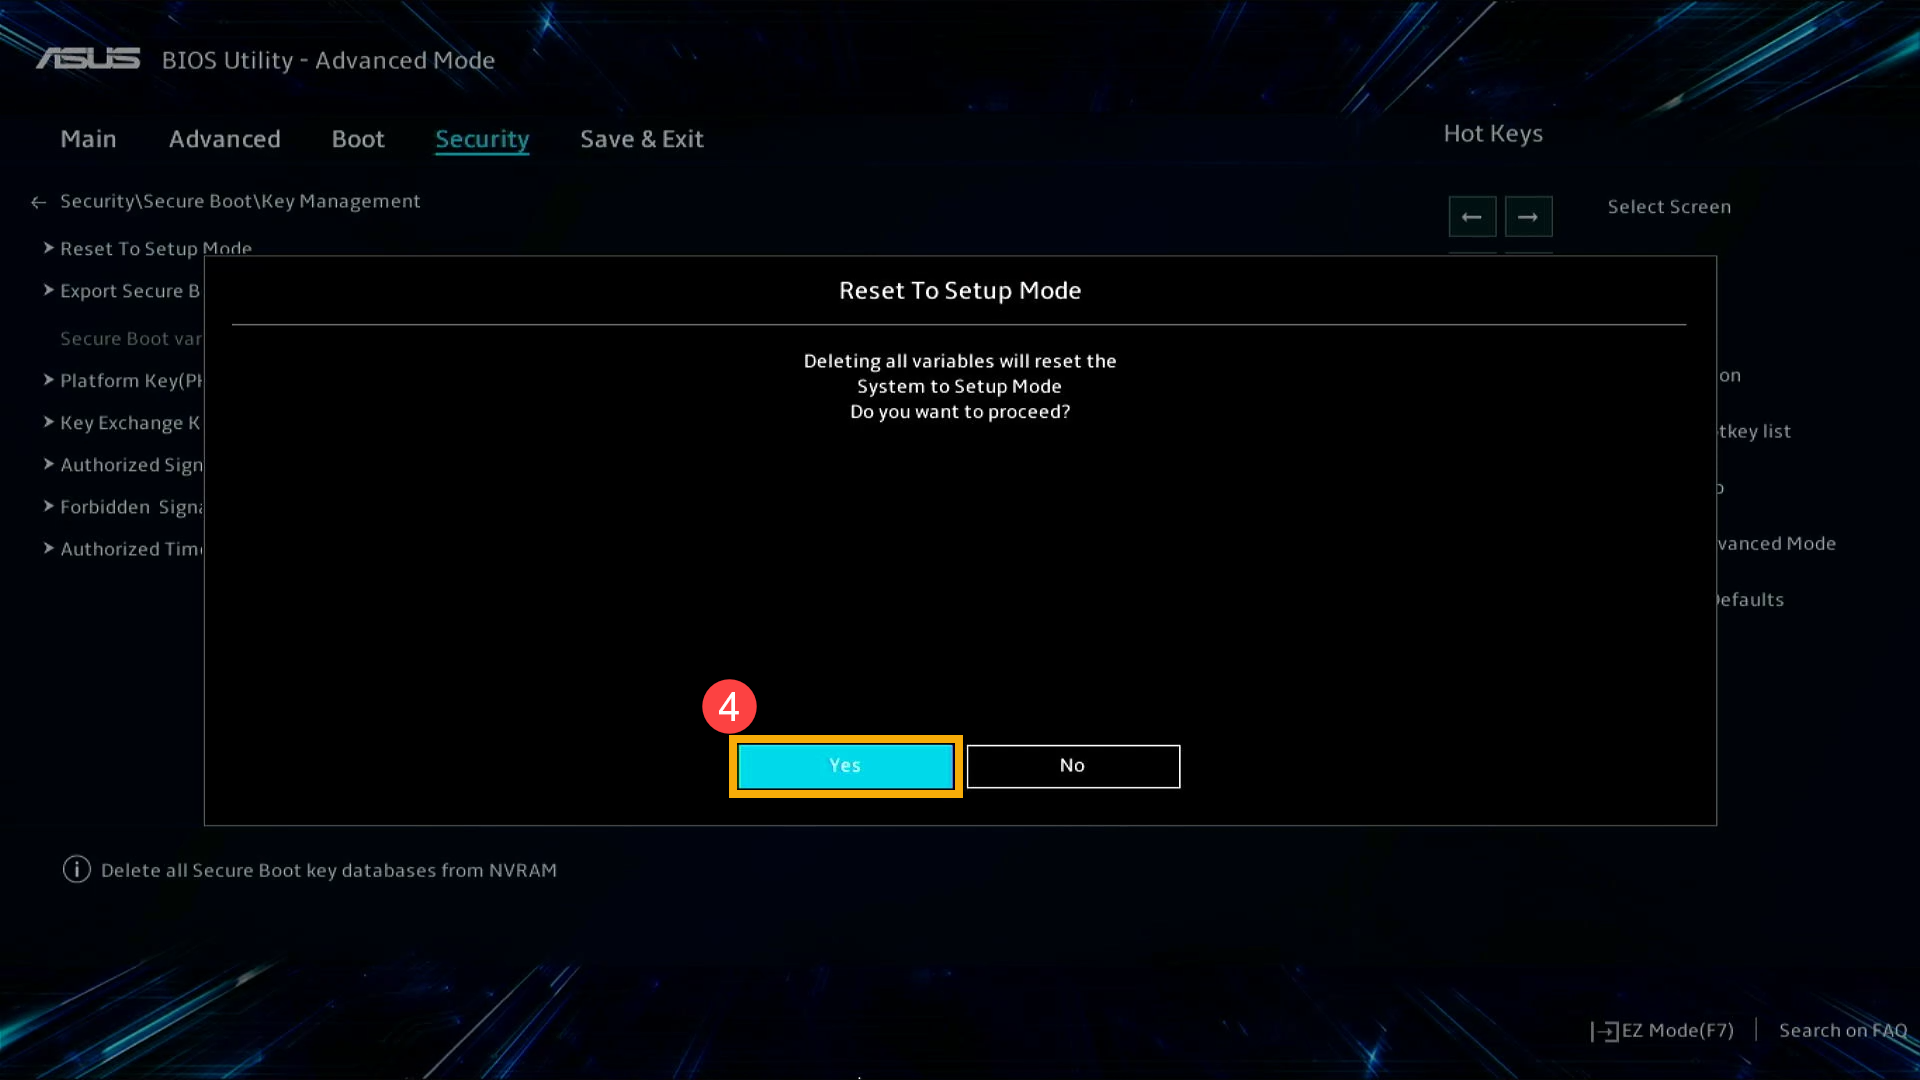
- Choose [Yes]④ to confirm the deletion of all Secure Boot key databases.
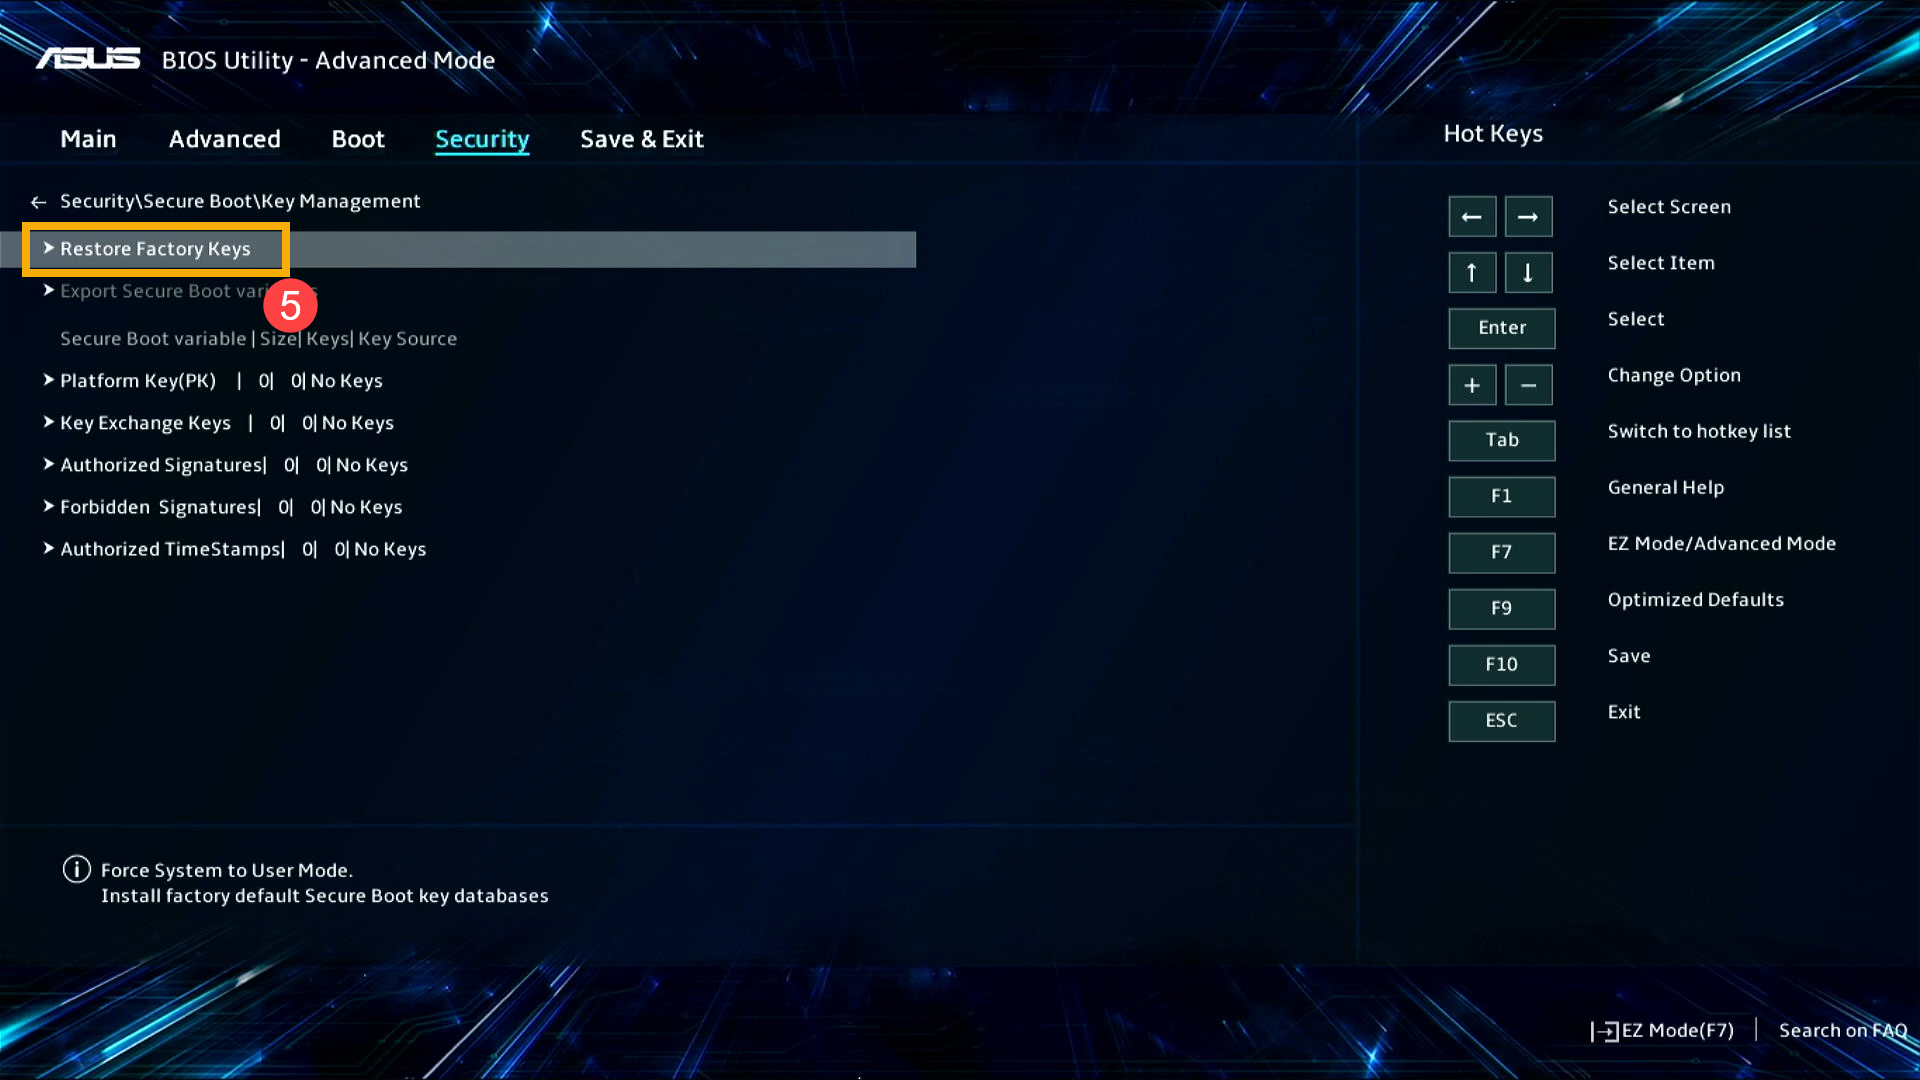
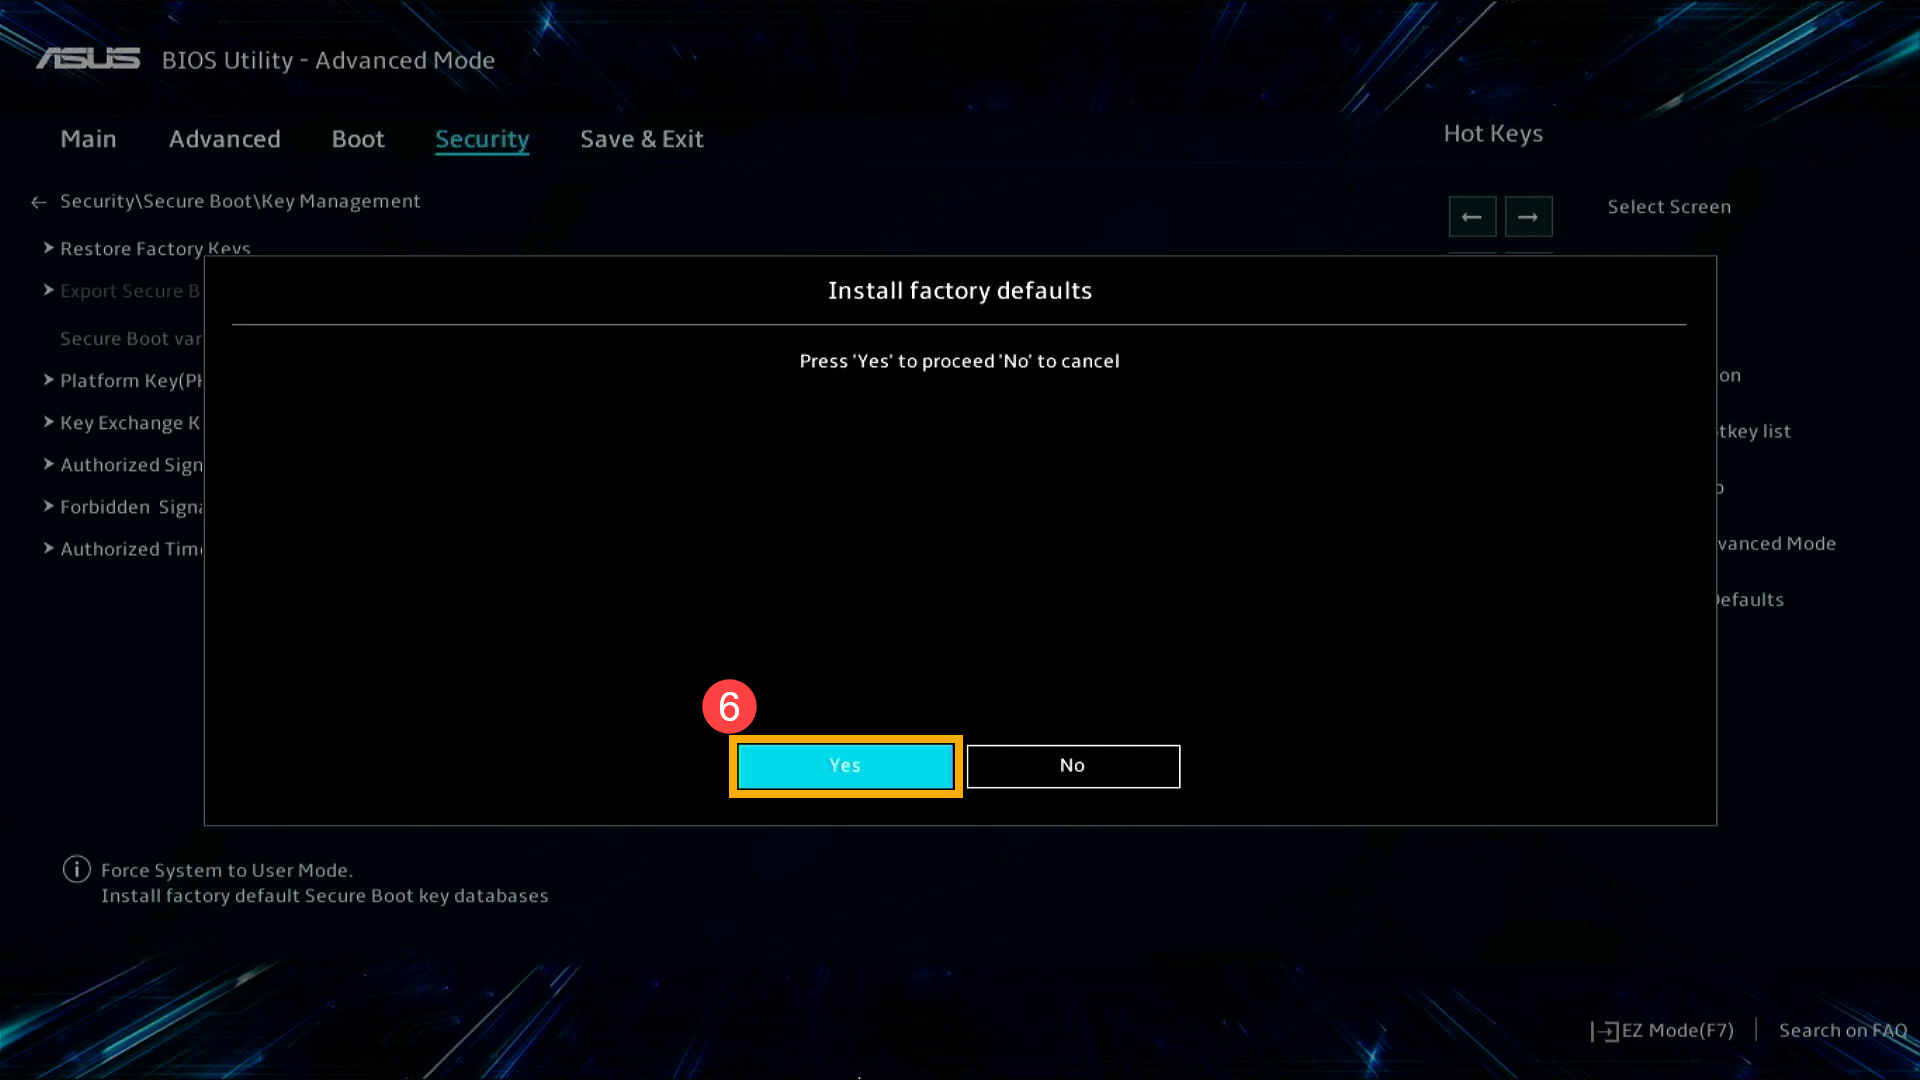
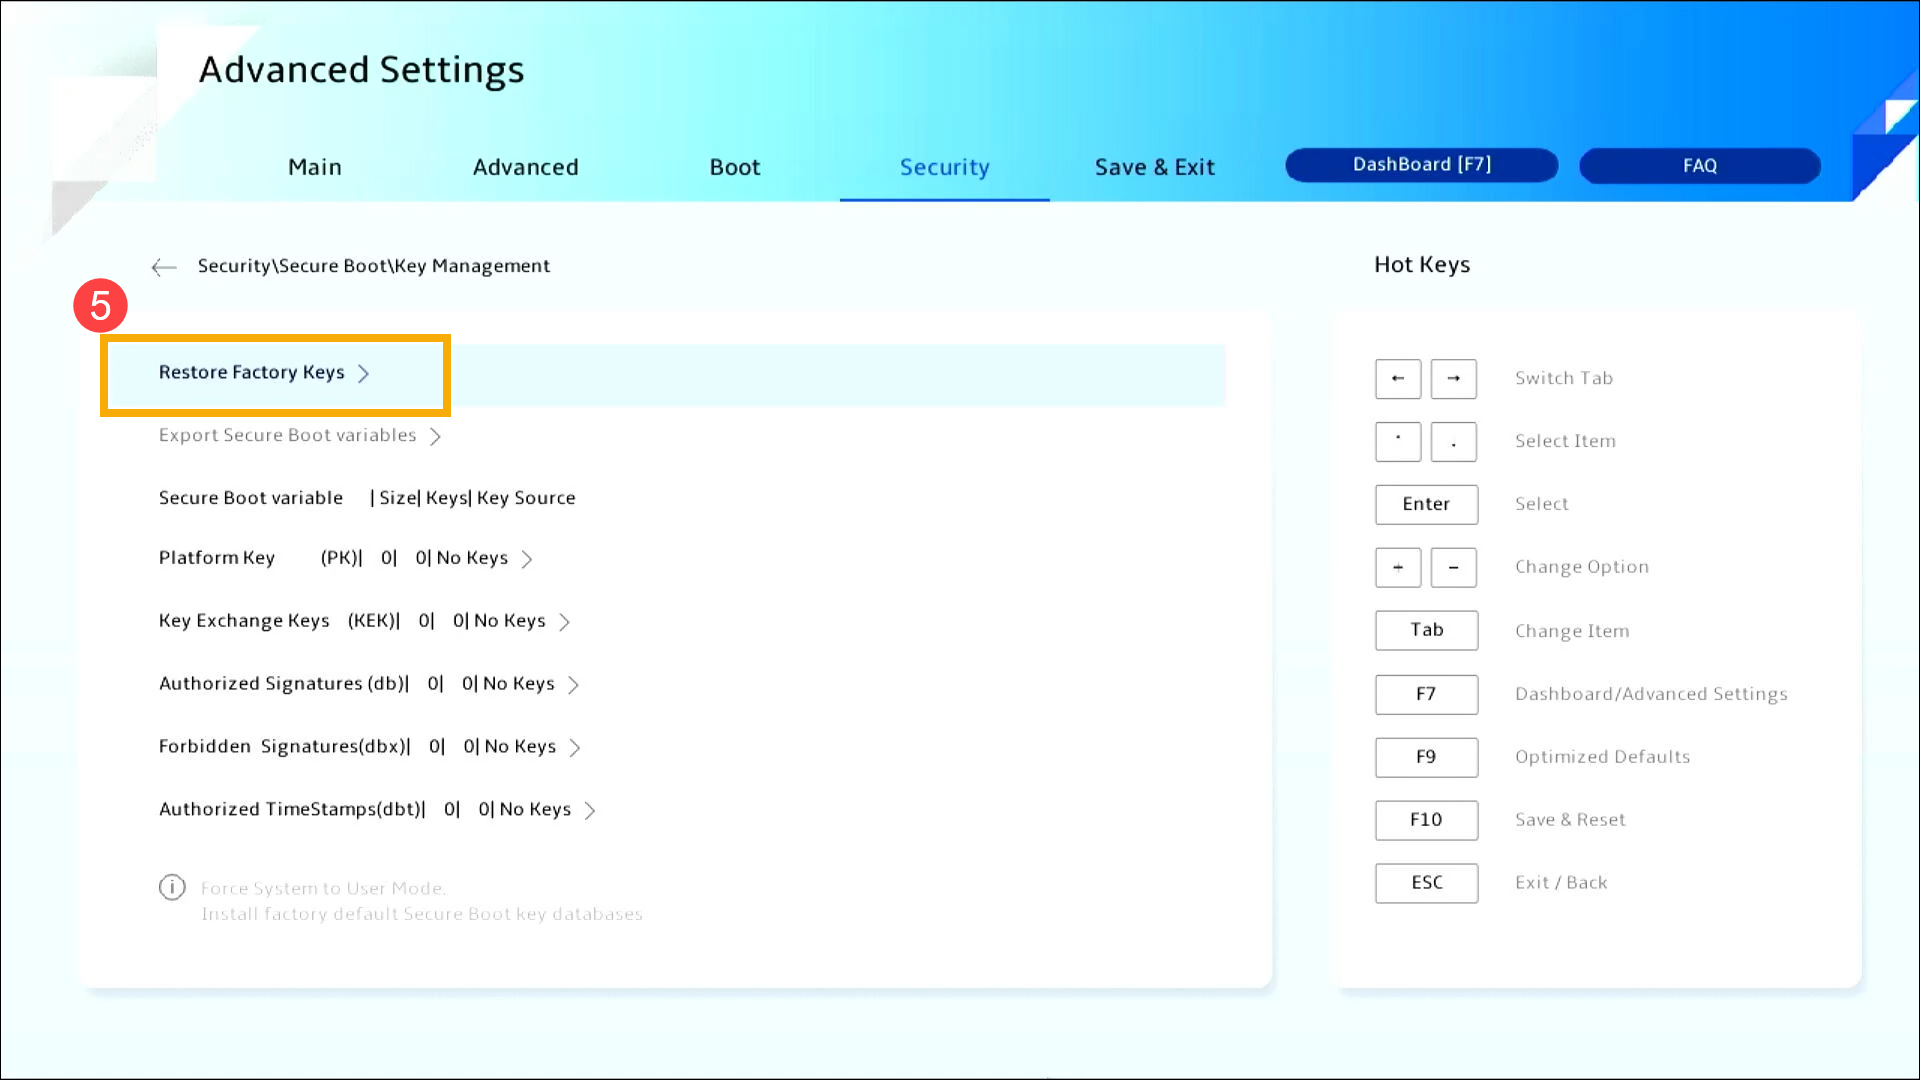
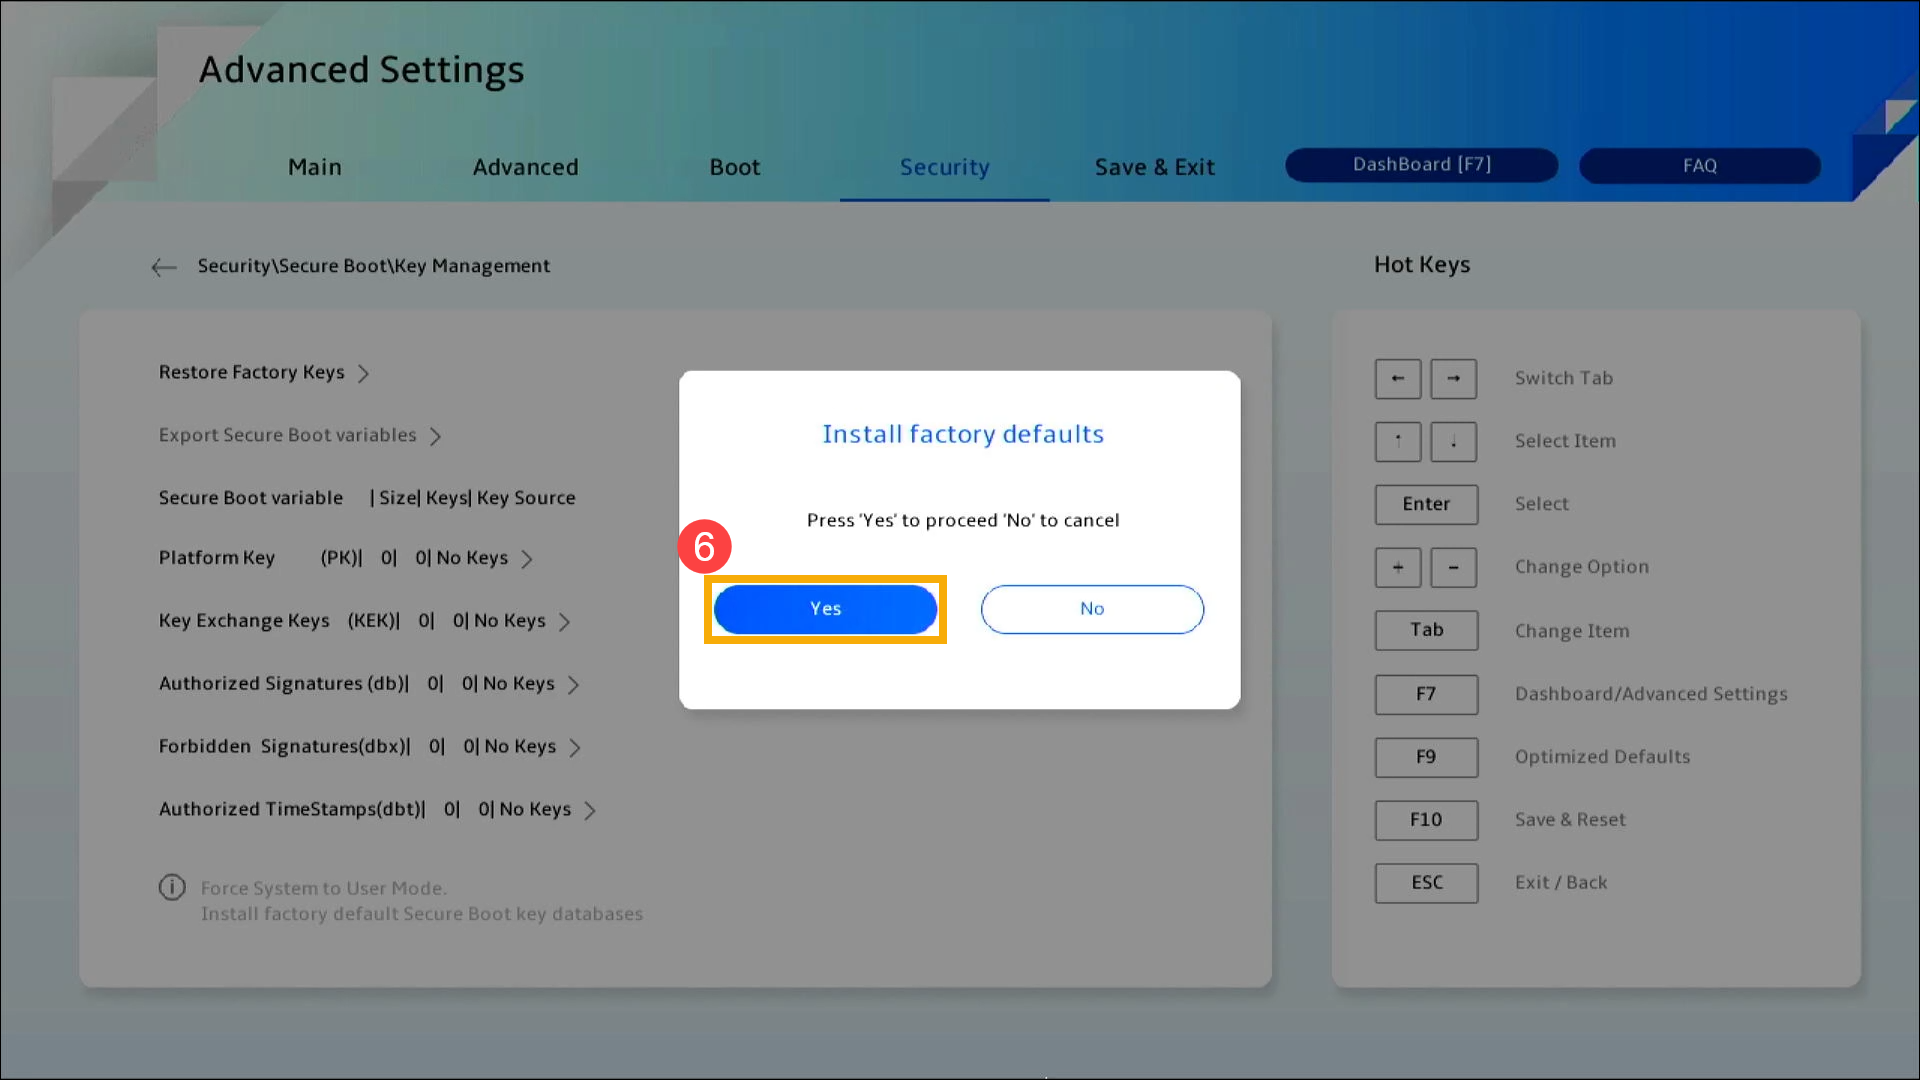
- After deleting all Secure Boot key databases, select [Restore Factory Keys]⑤.
- Choose [Yes]⑥ to confirm the installation of the factory default Secure Boot key database.
- Save the settings and exit. Press the [F10] key on your keyboard, click [Ok]⑦, and the device will restart and the settings will take effect.
You can also go to the 「Save & Exit」 page and choose the 「Save Changes and Exit」 option to save your settings and exit.
How to Enable Secure Boot Control and Restore Keys in the MyASUS in UEFI mode
- On the Secure Boot page, set Secure Boot Control to [Enabled]①, then select [Key Management]②.
- Once in Key Management, select [Reset To Setup Mode]③.
- Choose [Yes]④ to confirm the deletion of all Secure Boot key databases.

- After deleting all Secure Boot key databases, select [Restore Factory Keys]⑤.
- Choose [Yes]⑥ to confirm the installation of the factory default Secure Boot key database.
- Save the settings and exit. Press the [F10] key on your keyboard, click [Confirm]⑦, and the device will restart and the settings will take effect.
You can also go to the 「Save & Exit」 page and choose the 「Save Changes and Exit」 option to save your settings and exit.
Enabling Secure Boot Control and Restoring Keys for Desktop Computer
How to Enable Secure Boot Control and Restore Keys in the UEFI mode
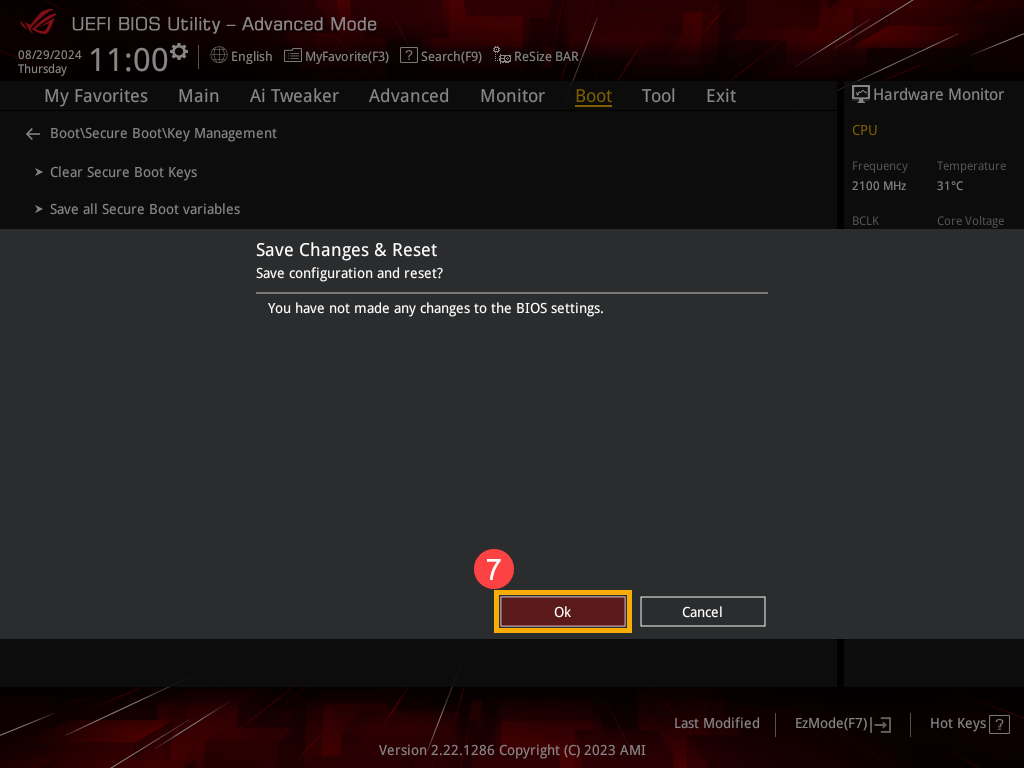
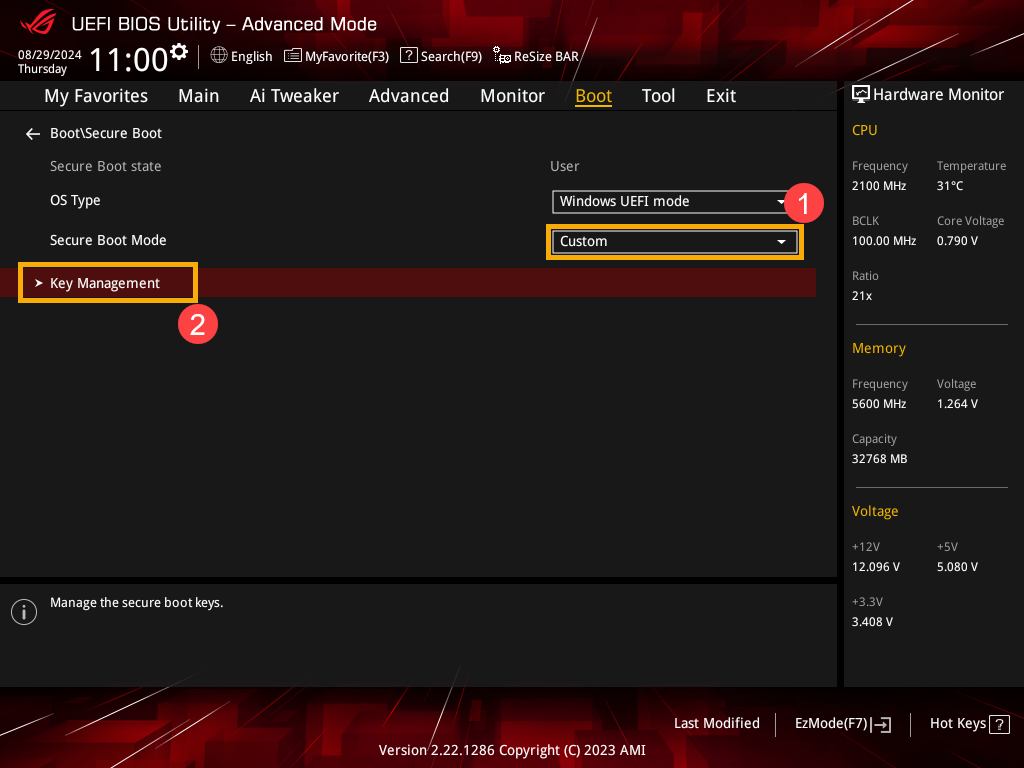
- On the Secure Boot page, set Secure Boot Mode to [Custom]①, then select [Key Management]②.
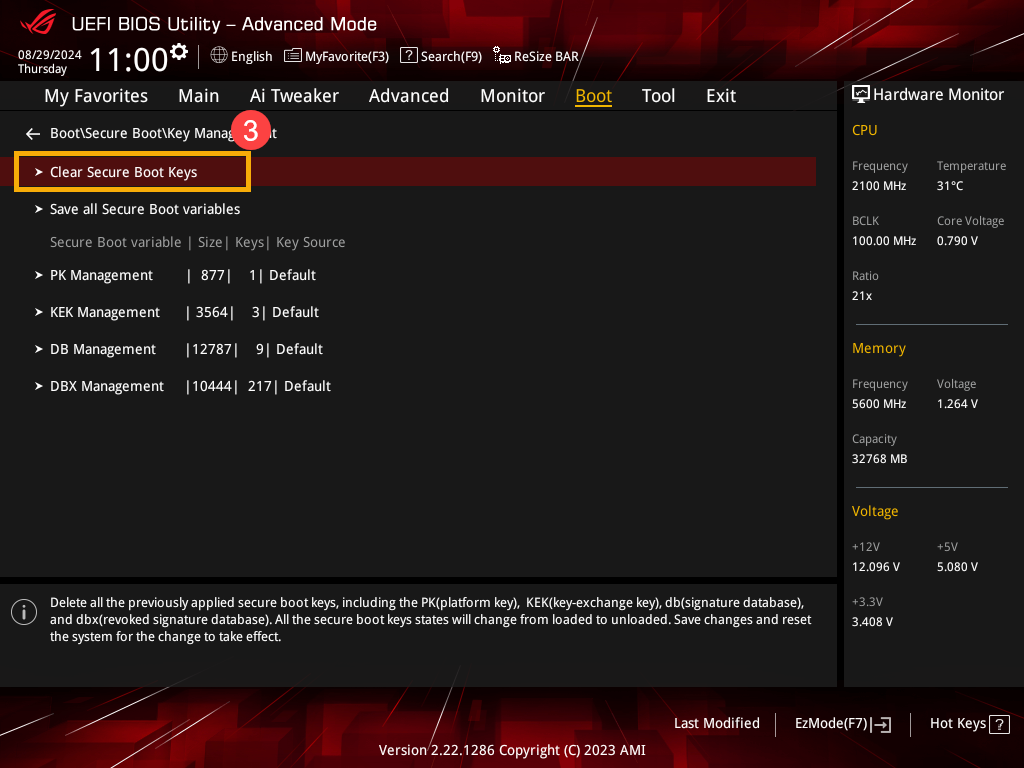
- Once in Key Management, select [Clear Secure Boot Keys]③.
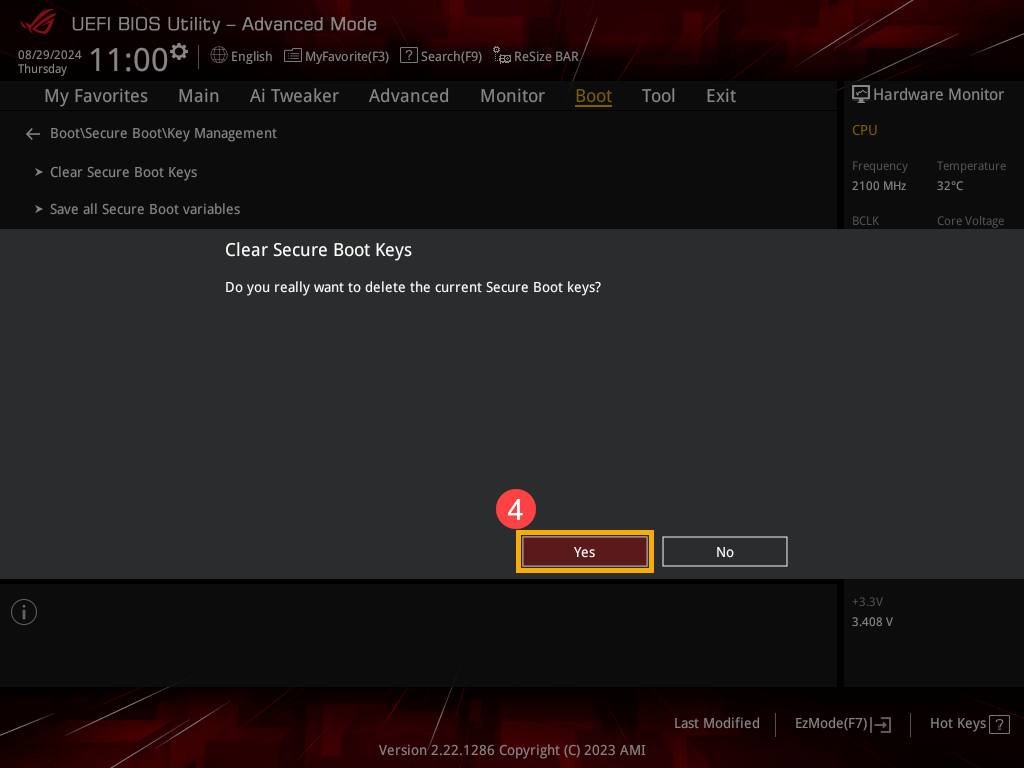
- Choose [Yes]④ to confirm the deletion of all Secure Boot key databases.
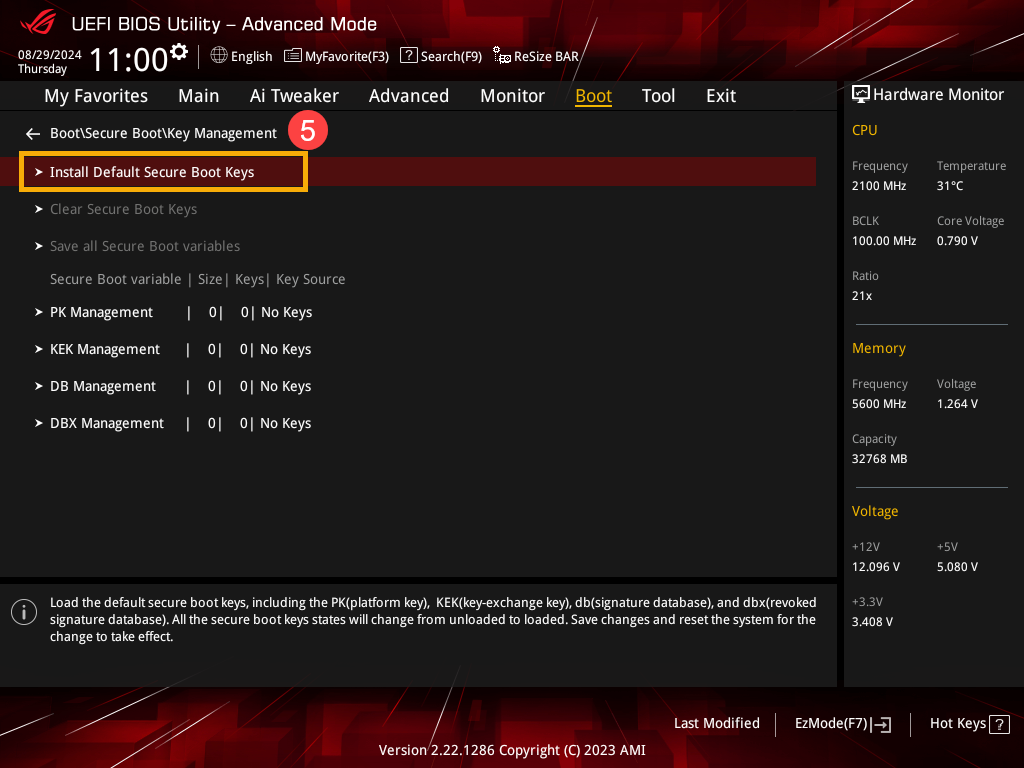
- After deleting all Secure Boot key databases, select [Install Default Secure Boot Keys]⑤.
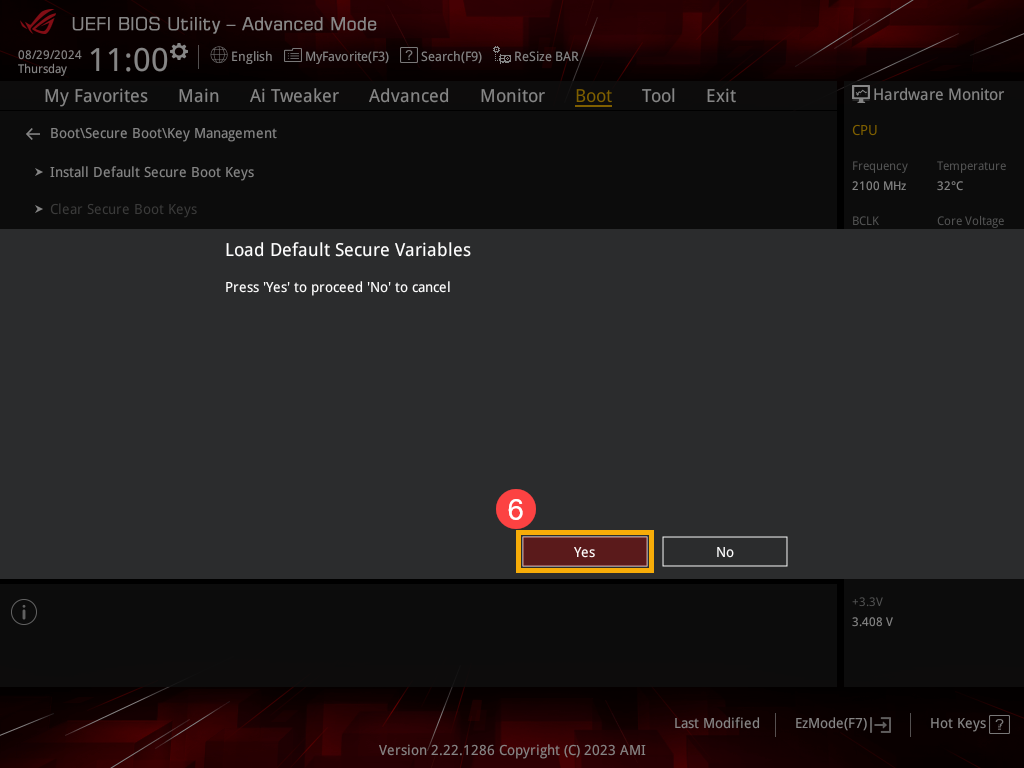
- Choose [Yes]⑥ to confirm the installation of the factory default Secure Boot key database.
- Save the settings and exit. Press the [F10] key on your keyboard, click [Ok]⑦, and the device will restart and the settings will take effect.
You can also go to the 「Save & Exit」 page and choose the 「Save Changes and Exit」 option to save your settings and exit.