ScreenXpert Frequently Asked Question (FAQ)
[Notebook] ScreenXpert 3 - Introduction
[Notebook] ScreenPad Plus with ScreenXpert 3 - Introduction
[Notebook] ASUS ScreenXpert (Screenpad 2.0) - Introduction
[Notebook] ScreenXpert 3 - Introduction
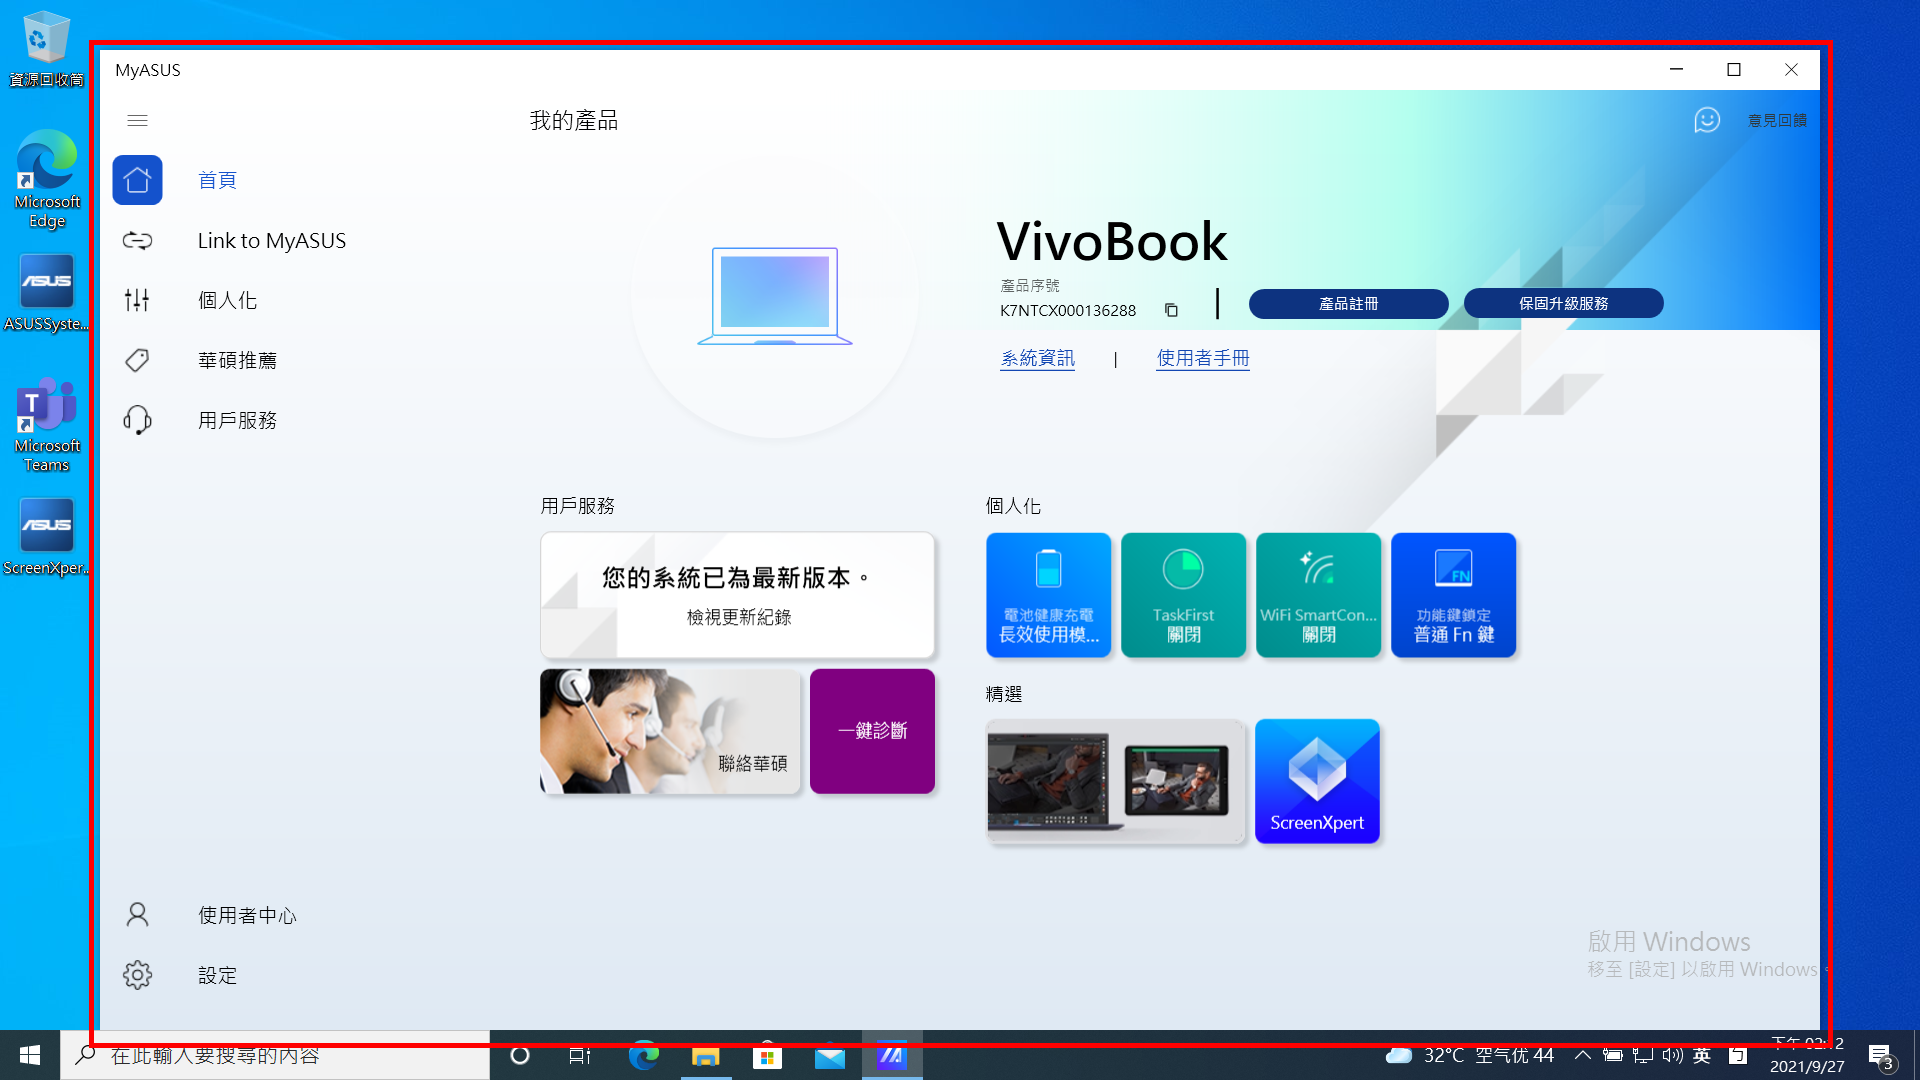
In the past, ScreenXpert 2 was used as an application to support and assist ASUS dual-screen models but now we have ScreenXpert 3 expanded its support so that general users can also use it on general single-screen models. We hope to provide users of ASUS models with a more efficient experience when dealing with multi-window-related operations. In the single-screen version of ScreenXpert 3, we combine the most popular design language with functional elements of ScreenXpert in the past, provide a quick entrance on the home screen of the user's model, and display all the ScreenXpert functions we have prepared for single-screen models. Users can also adjust and select the list of functions presented on it from settings, which we believe it can provide users with higher flexibility and operation experience.
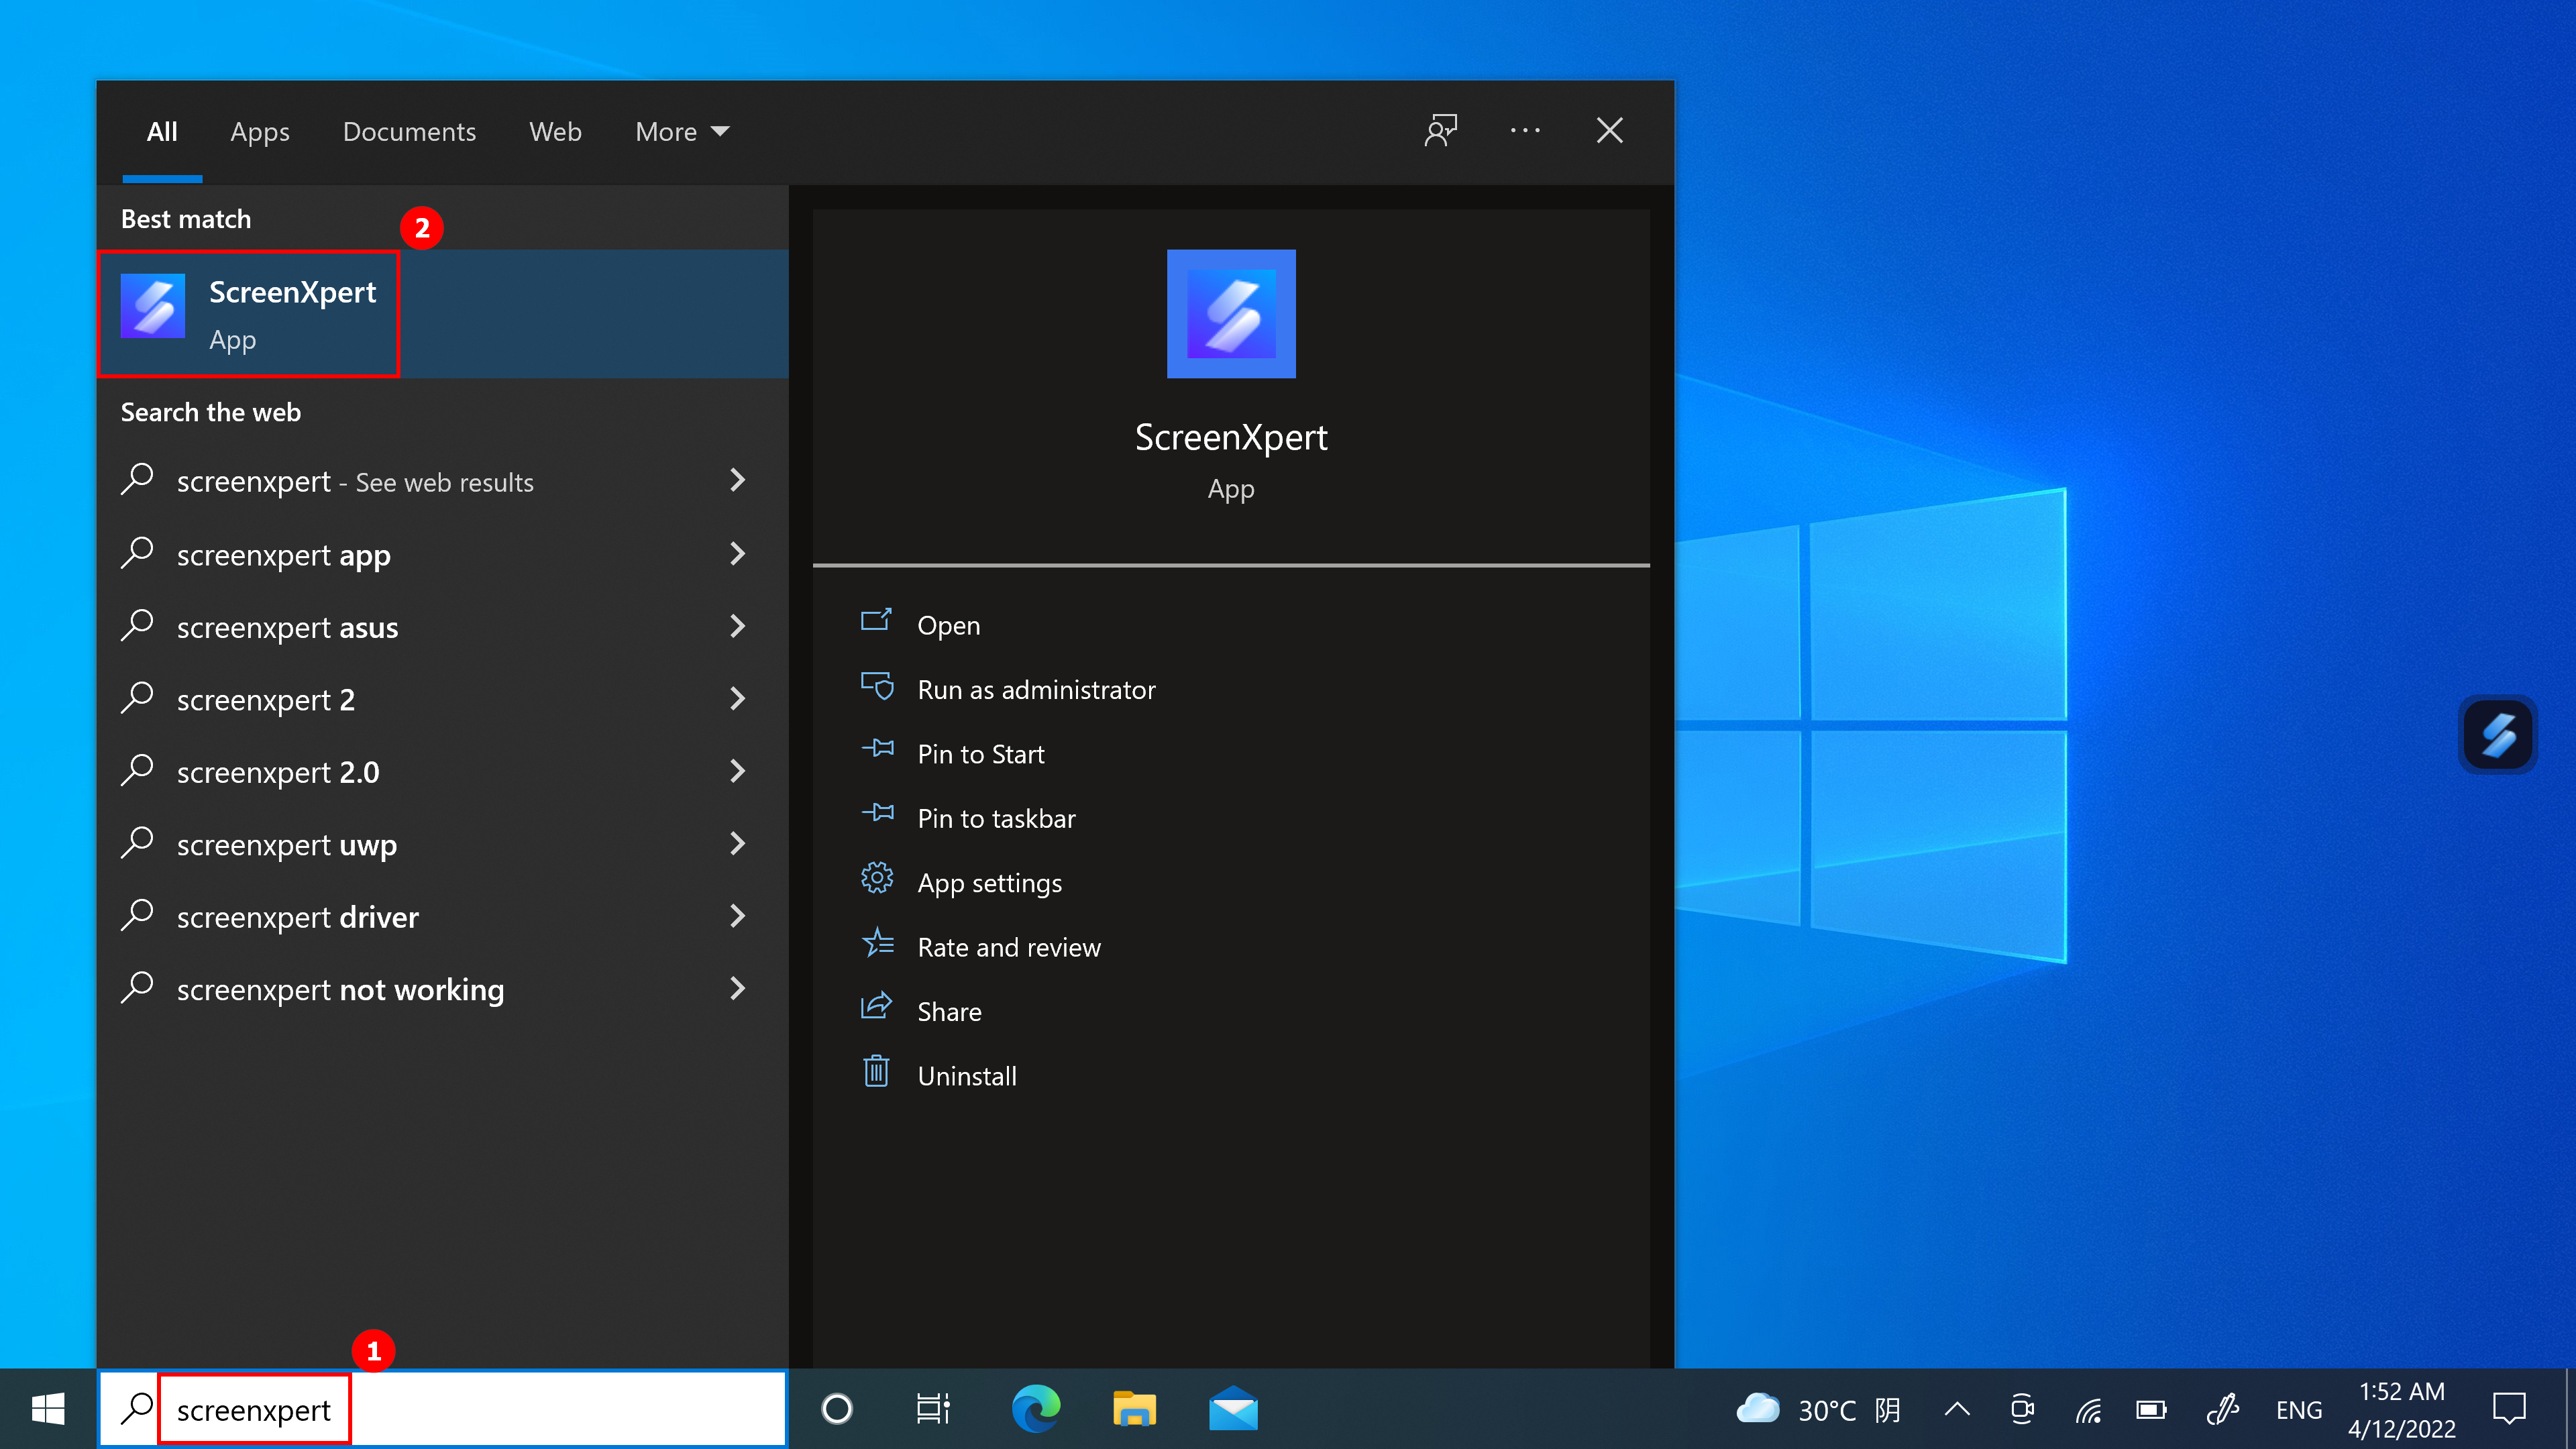
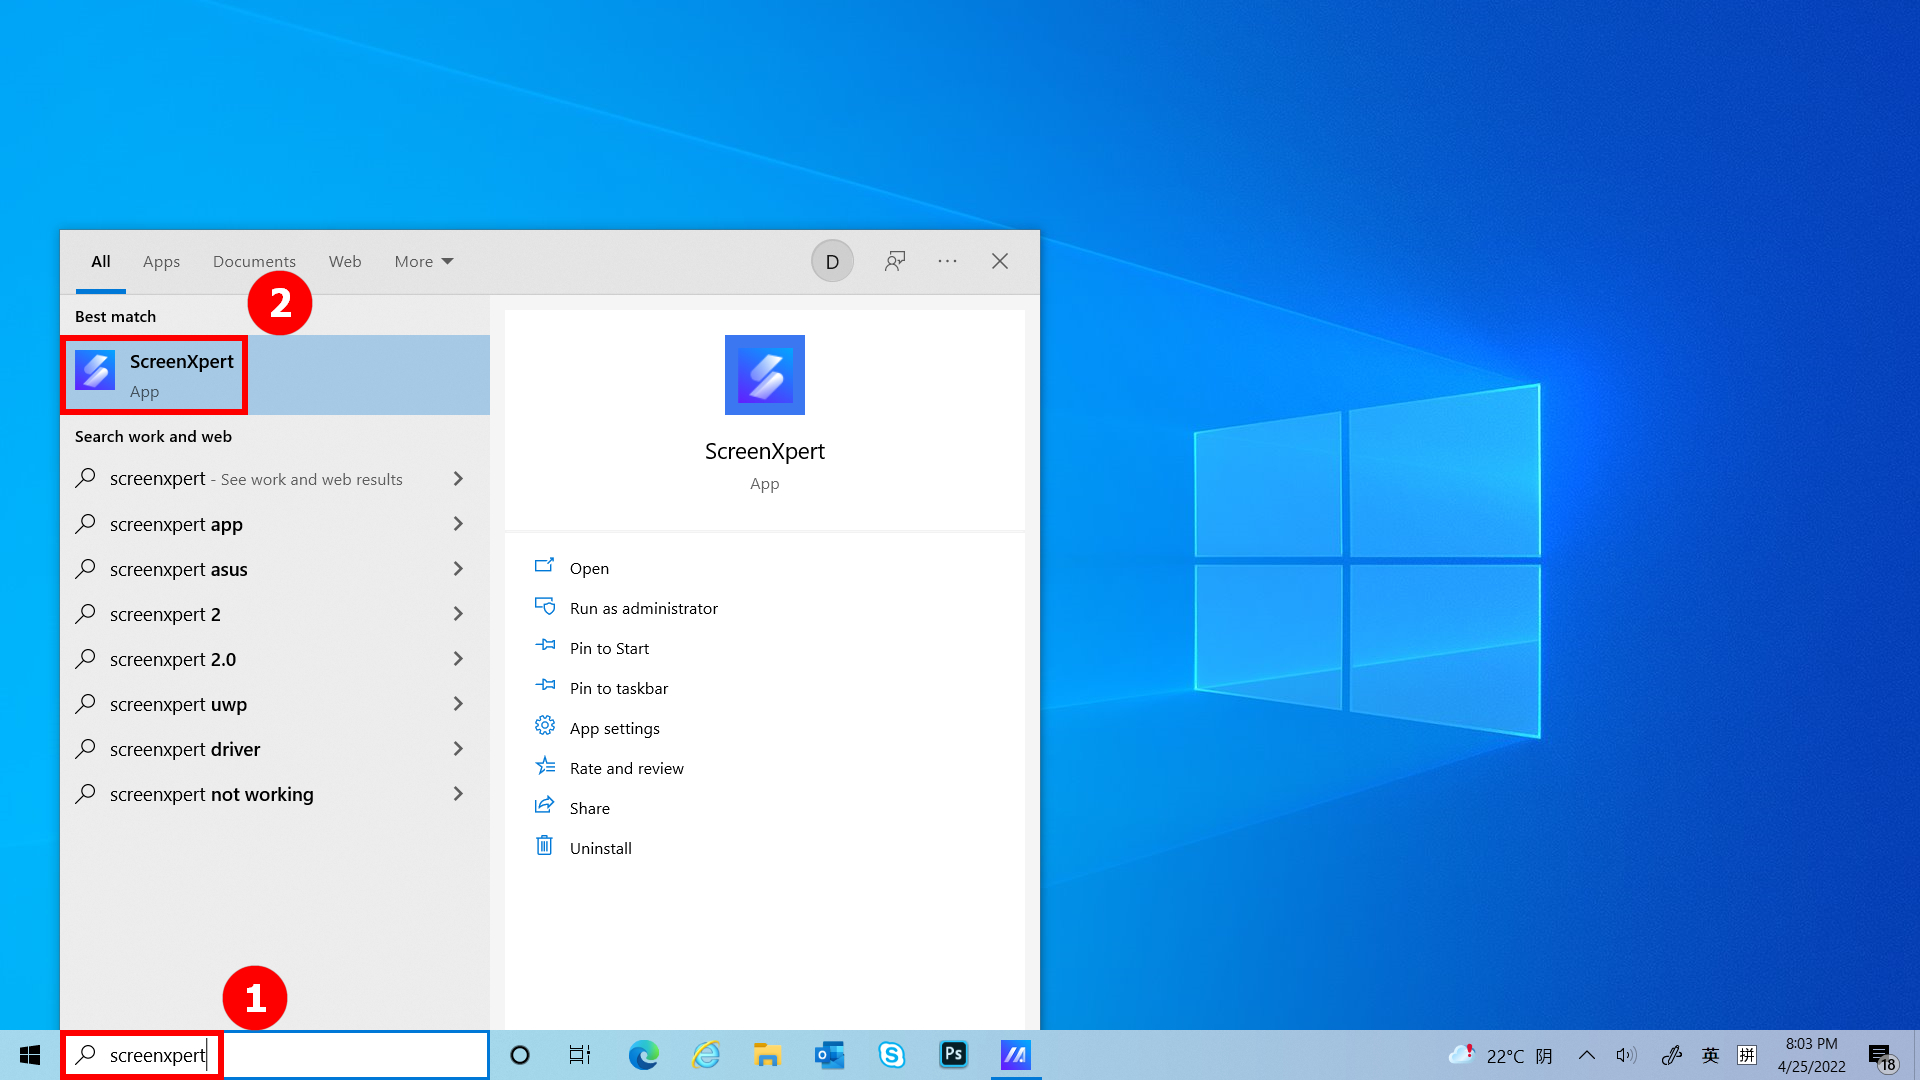
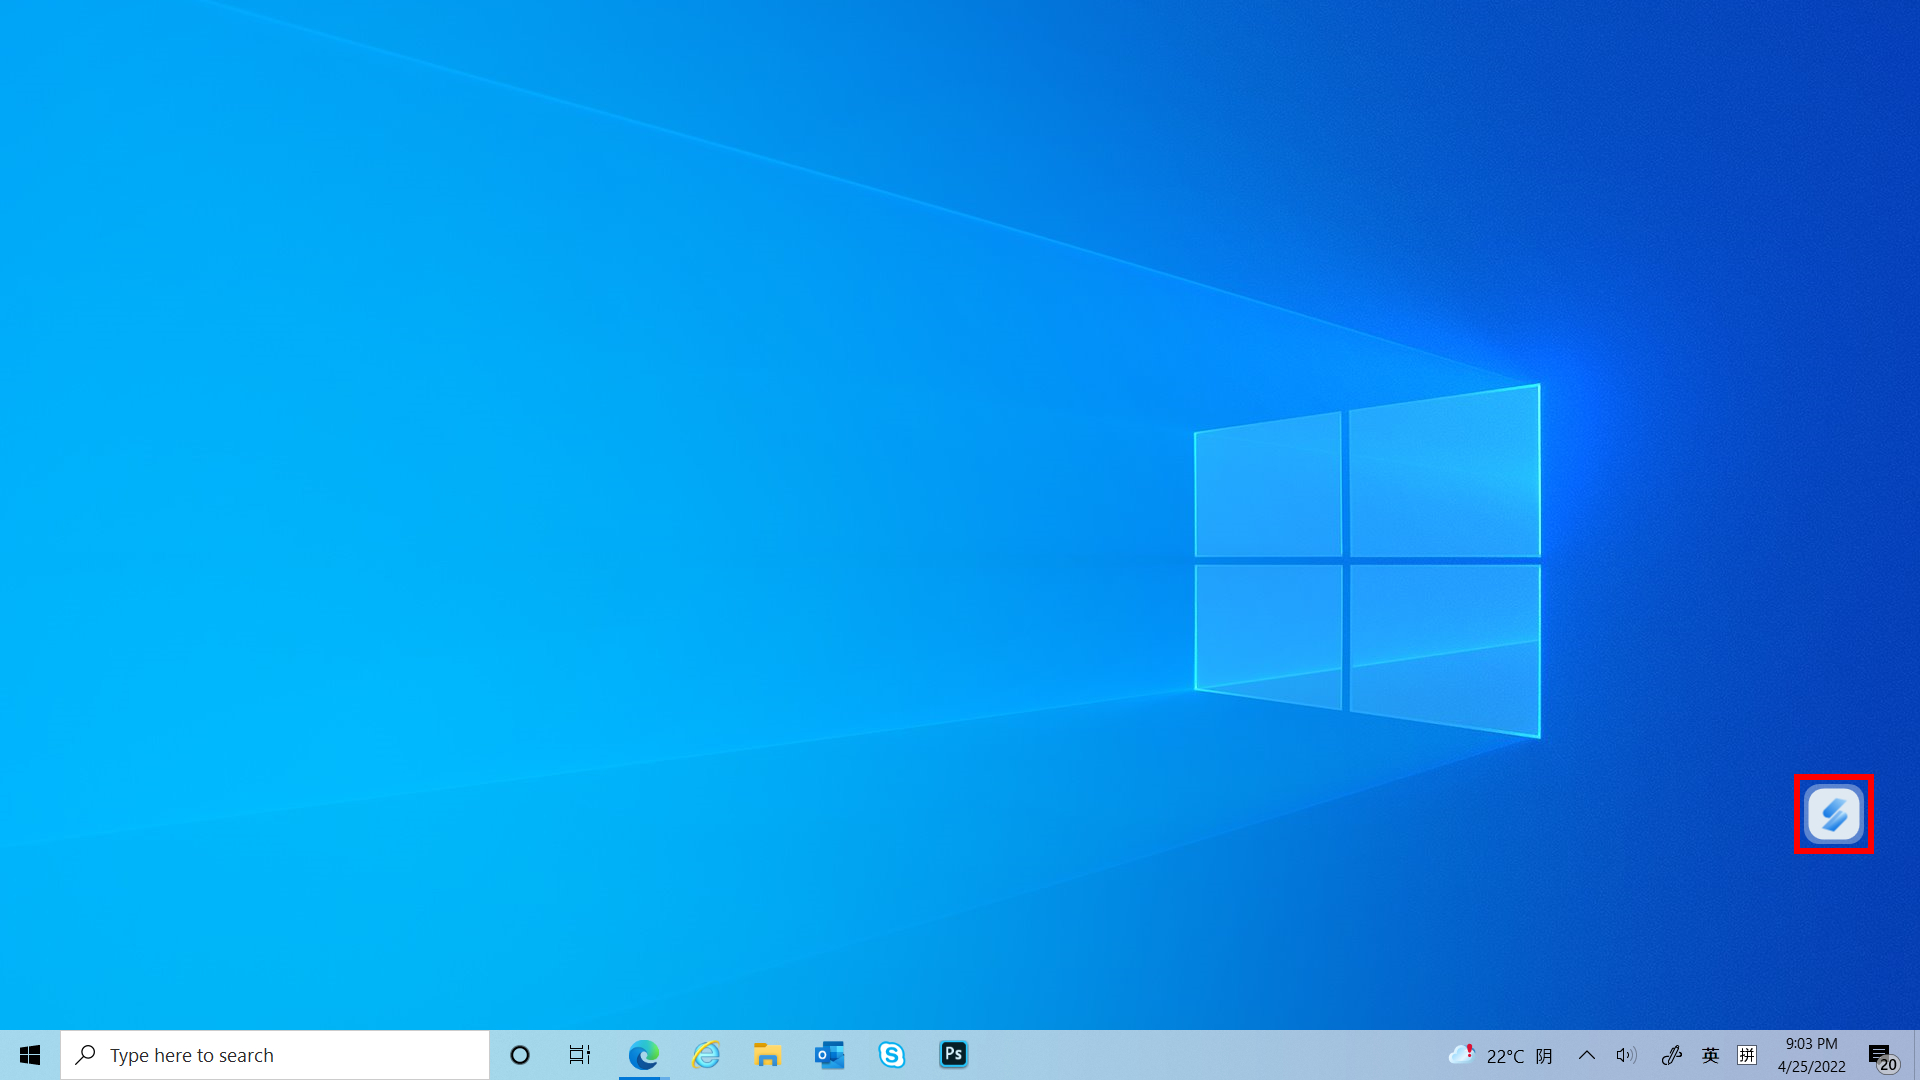
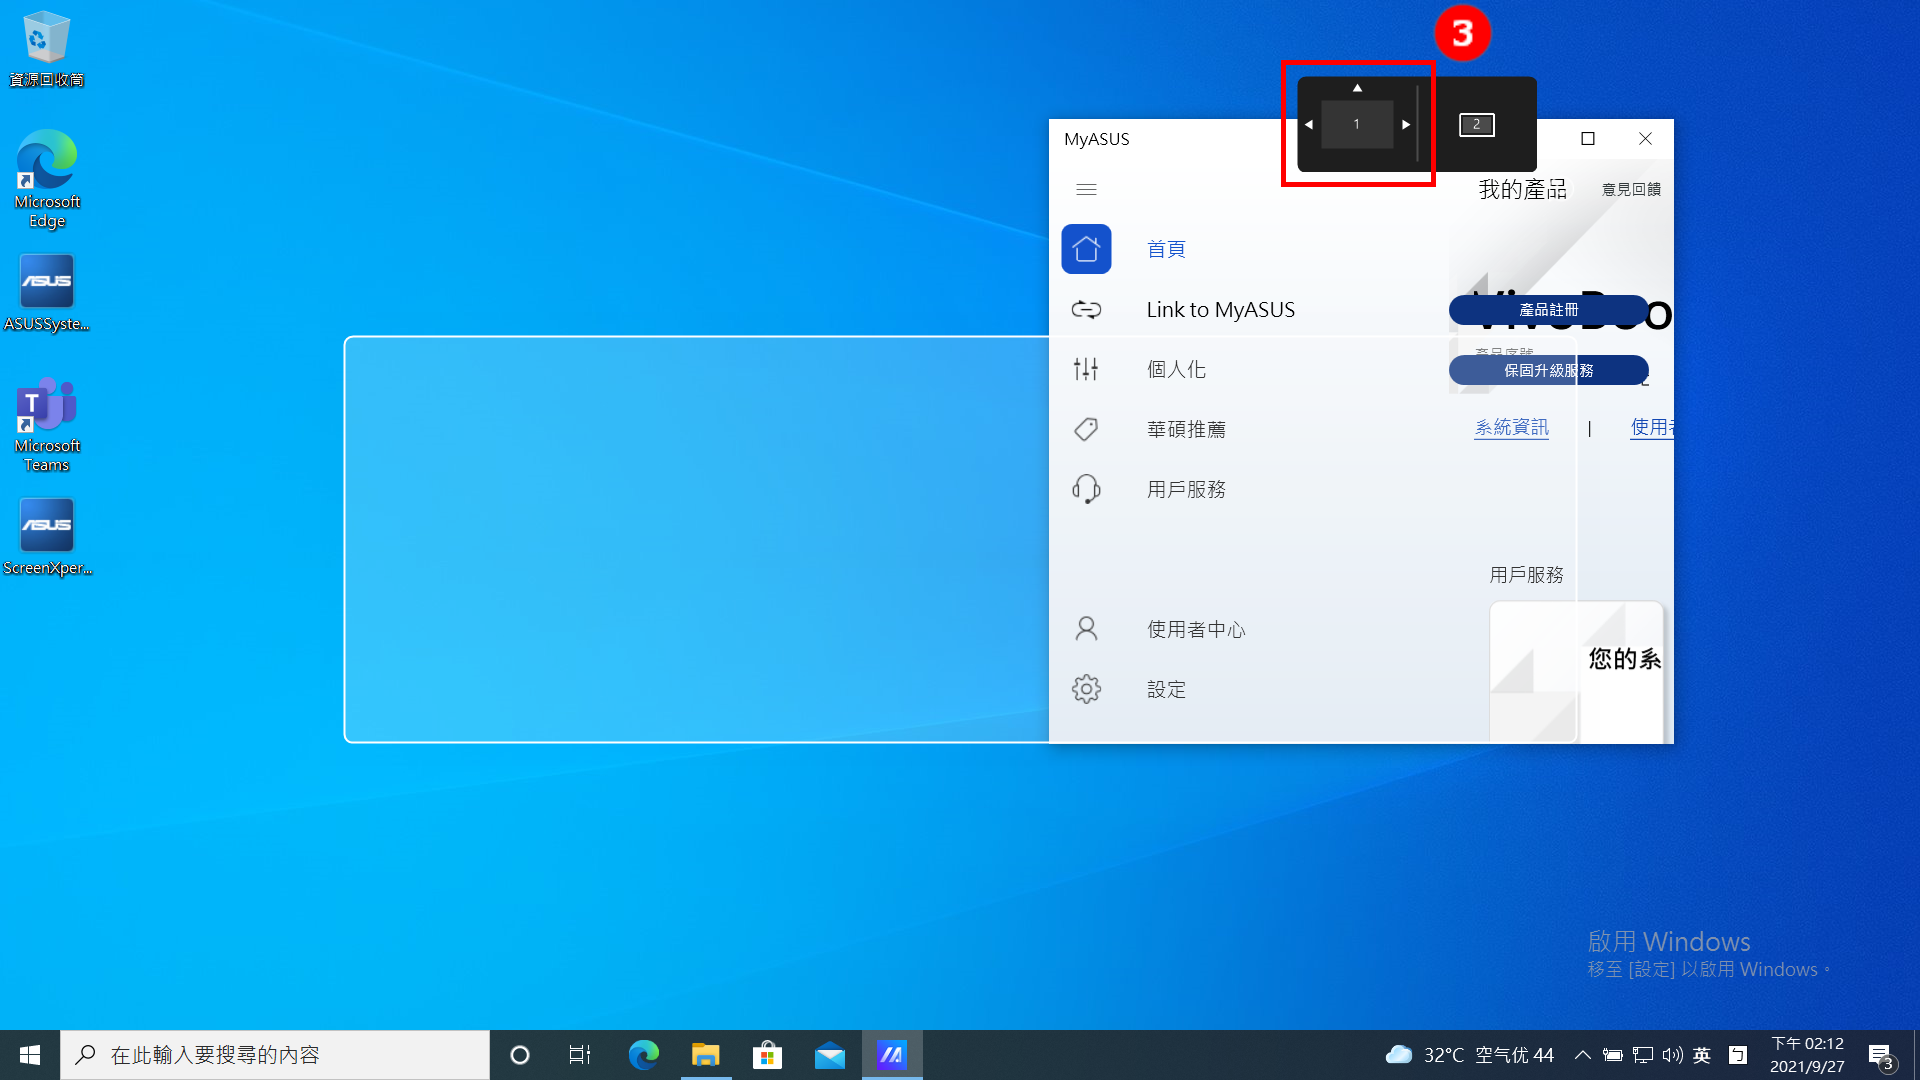
(1) Enter ①[ScreenXpert] in the search bar in the lower left corner of the desktop. Click ②[ScreenXpert], and ScreenXpert will activate.
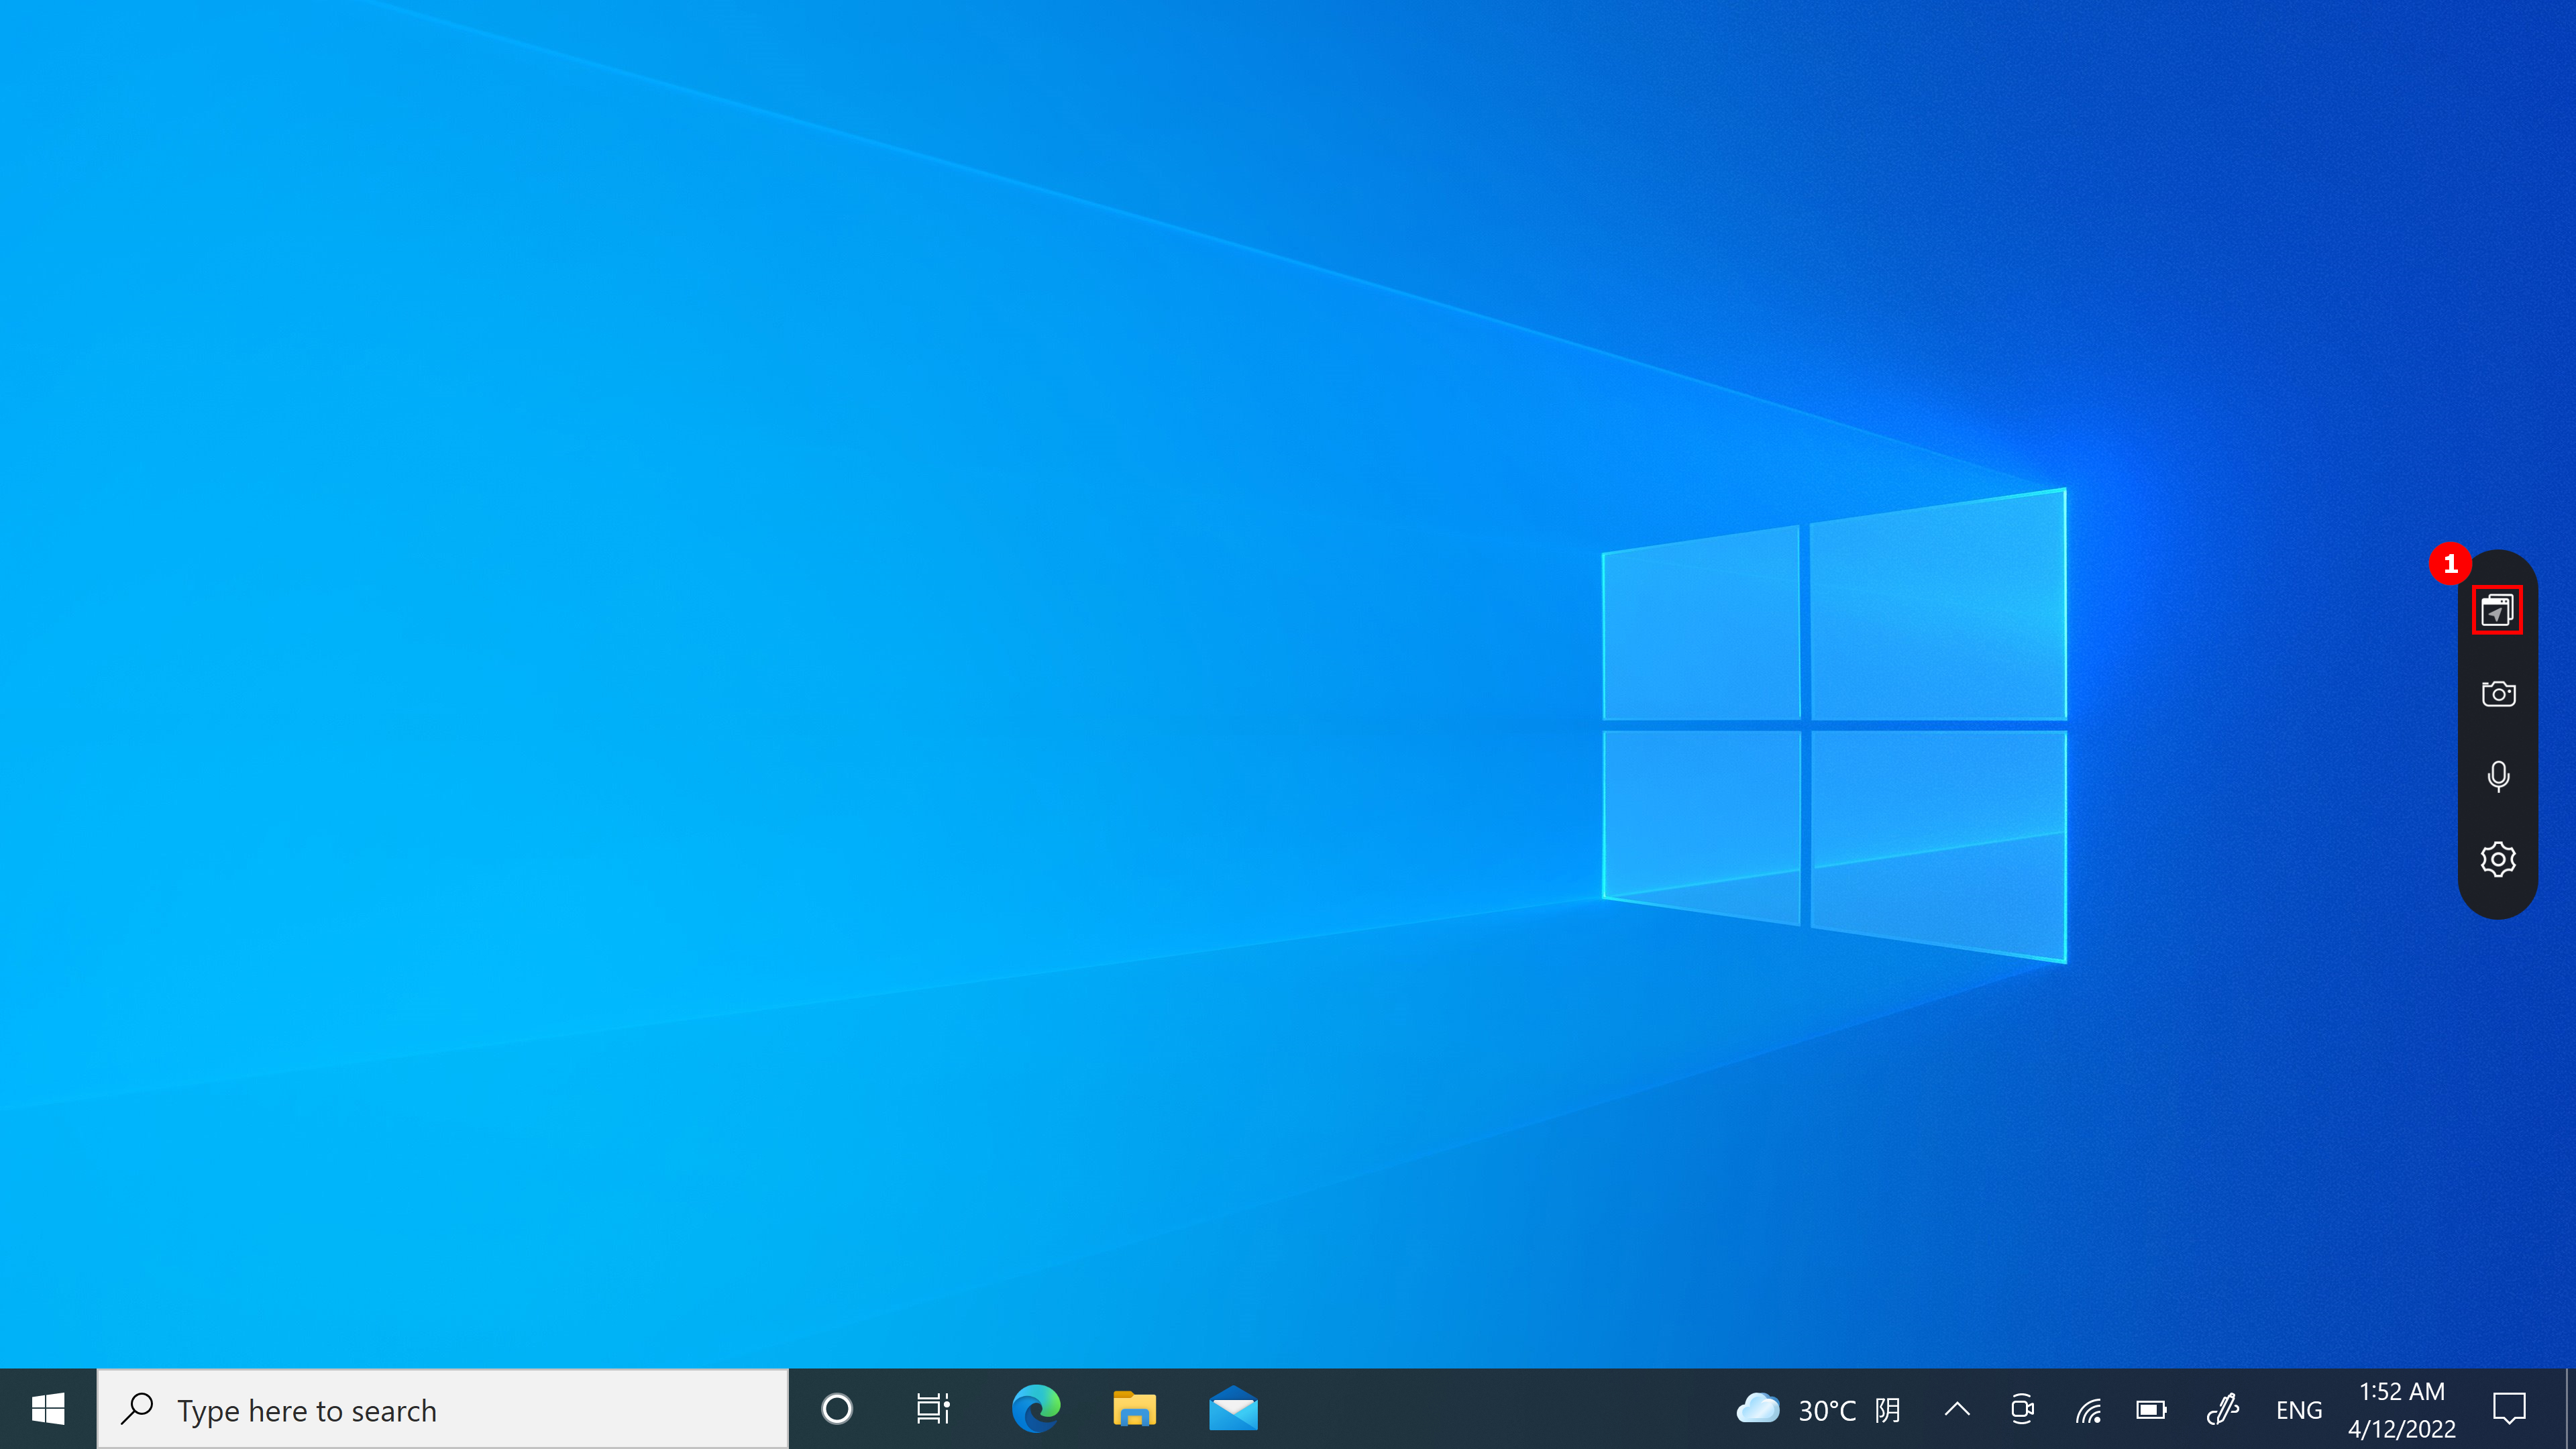
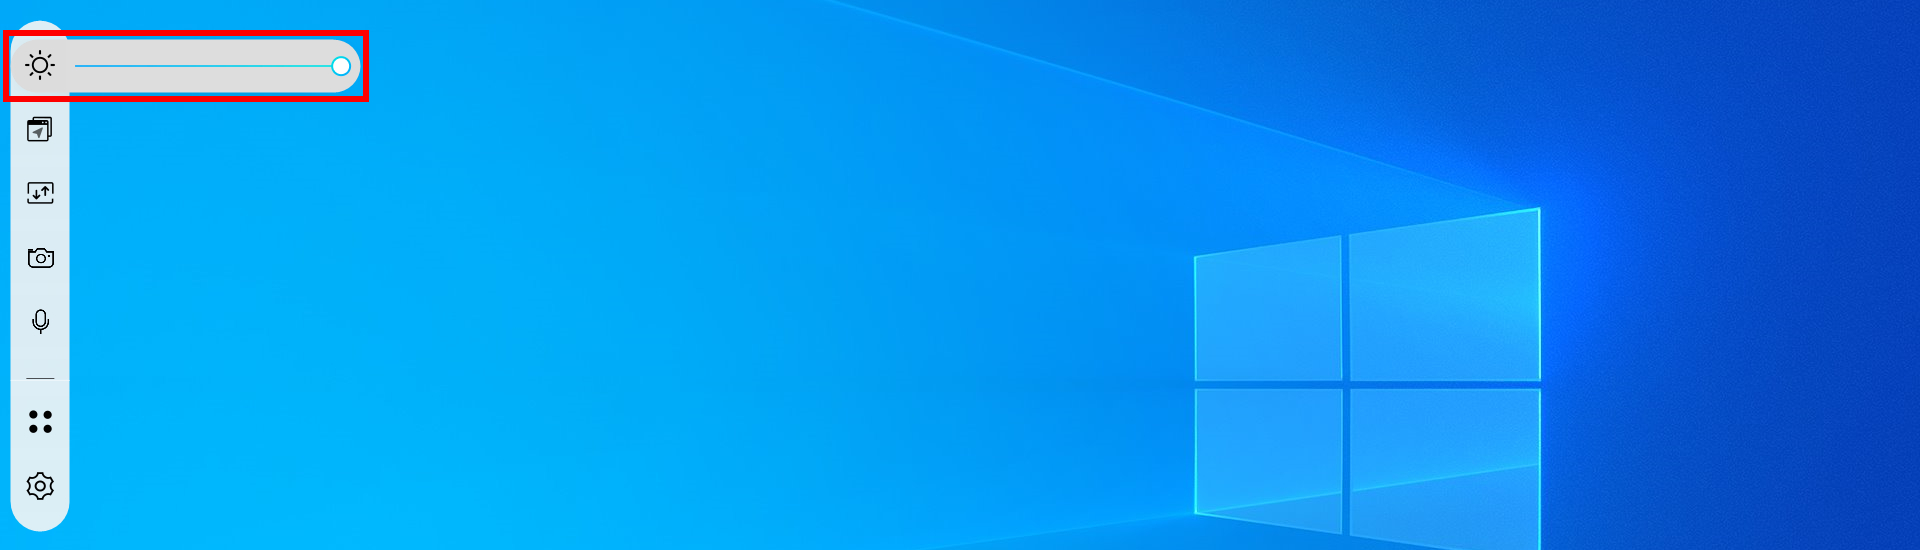
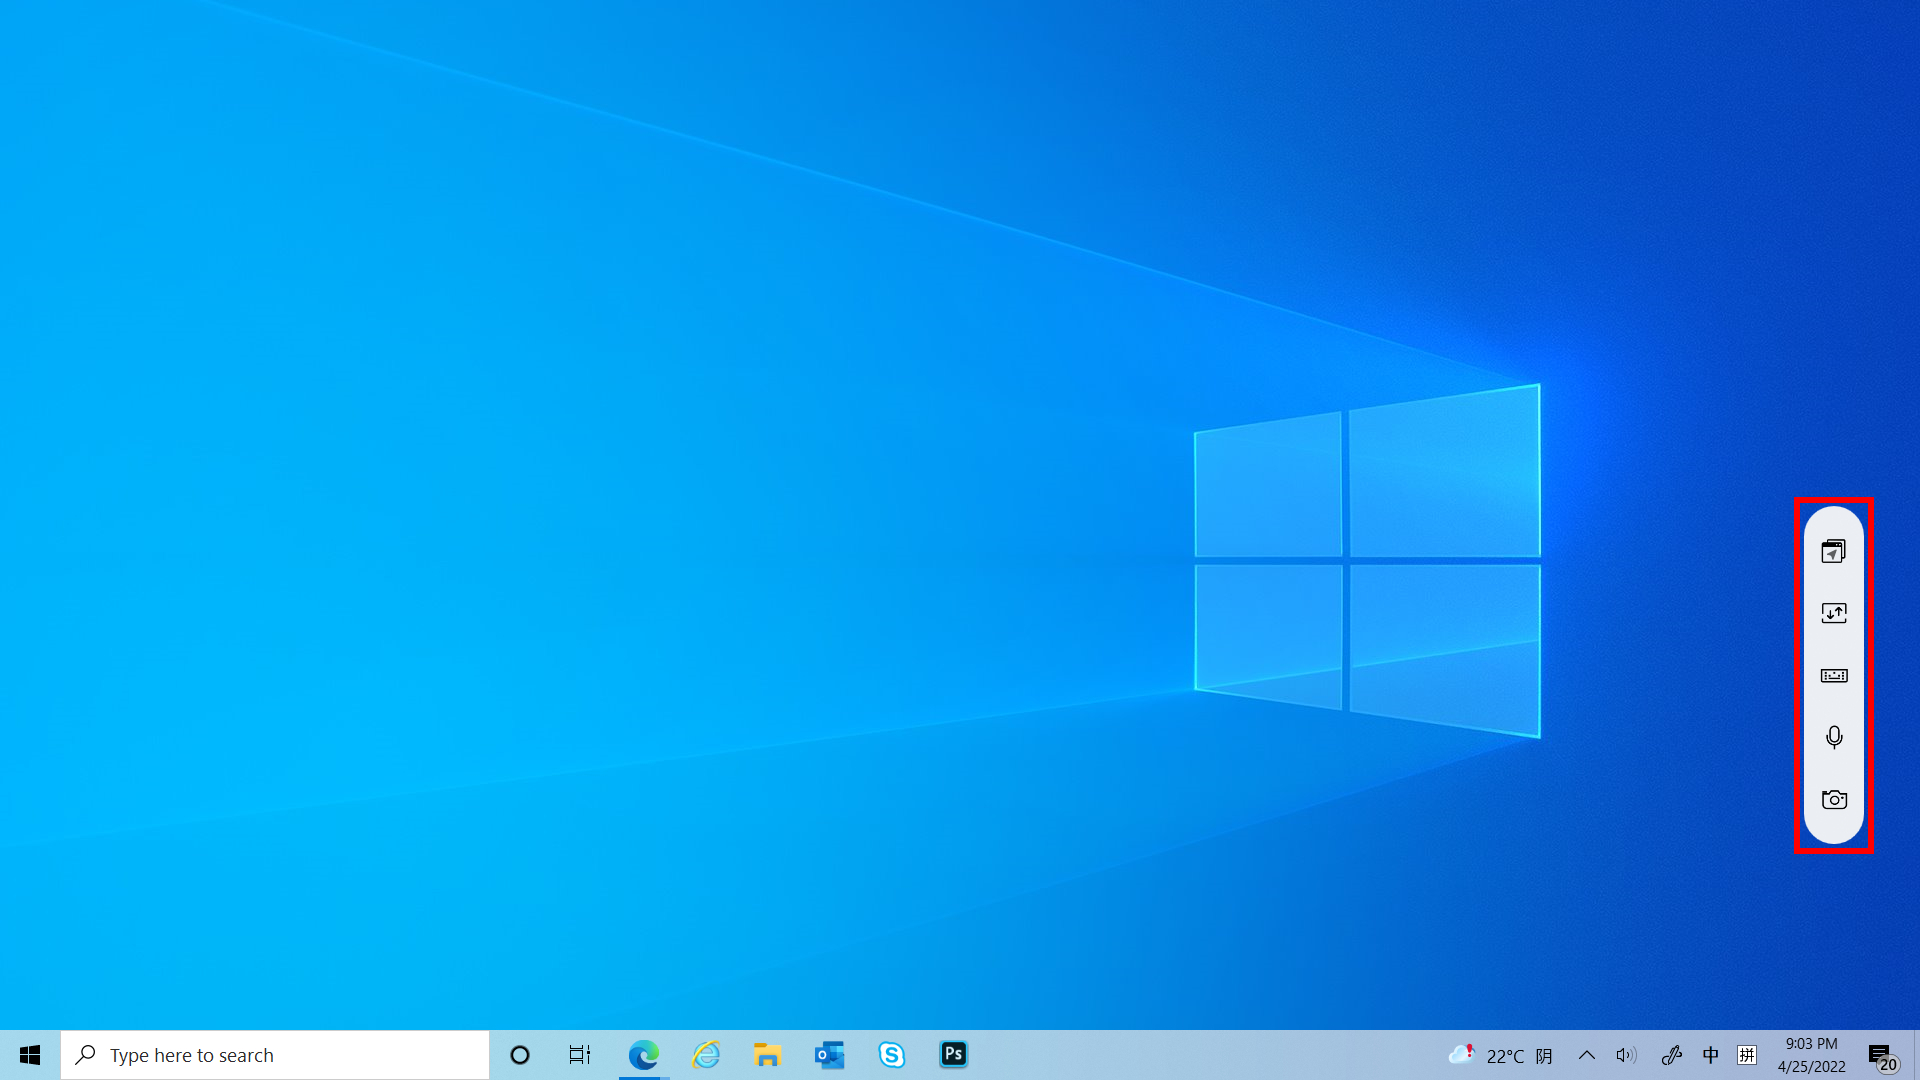
(2) Click icon and you can see four icons extended. From left to right: App Navigator, Camera, Microphone, Settings.

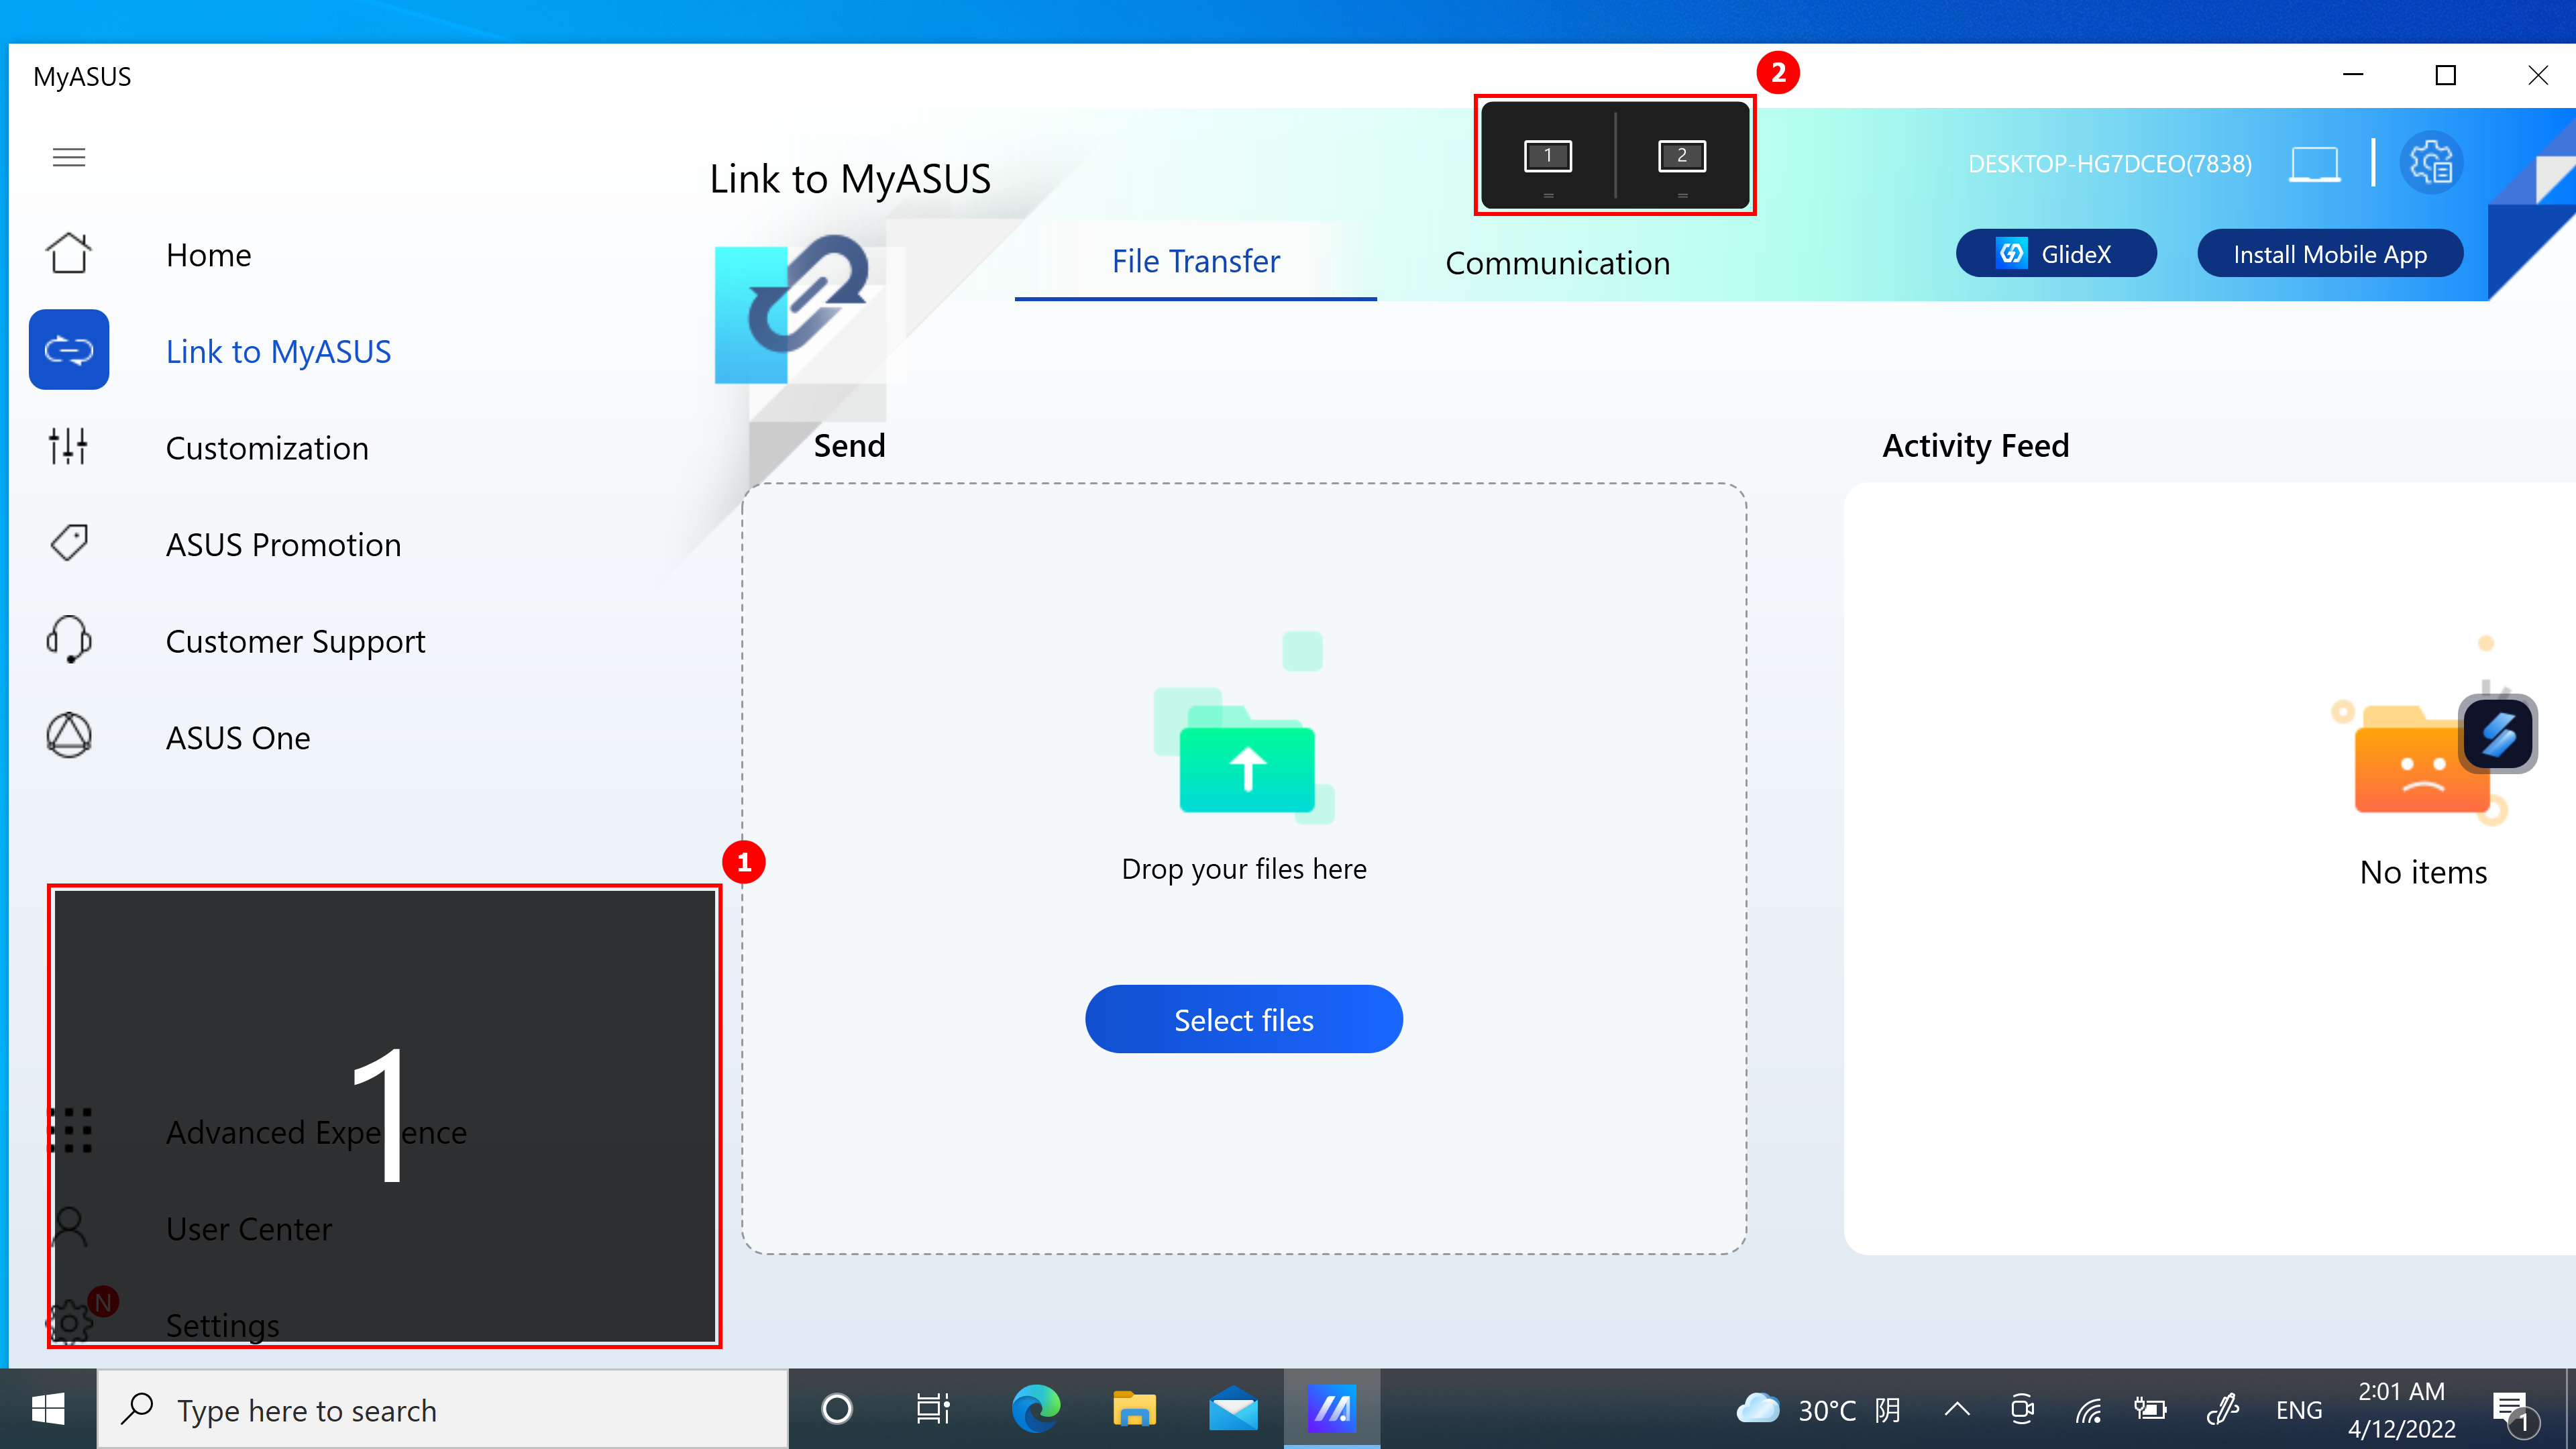
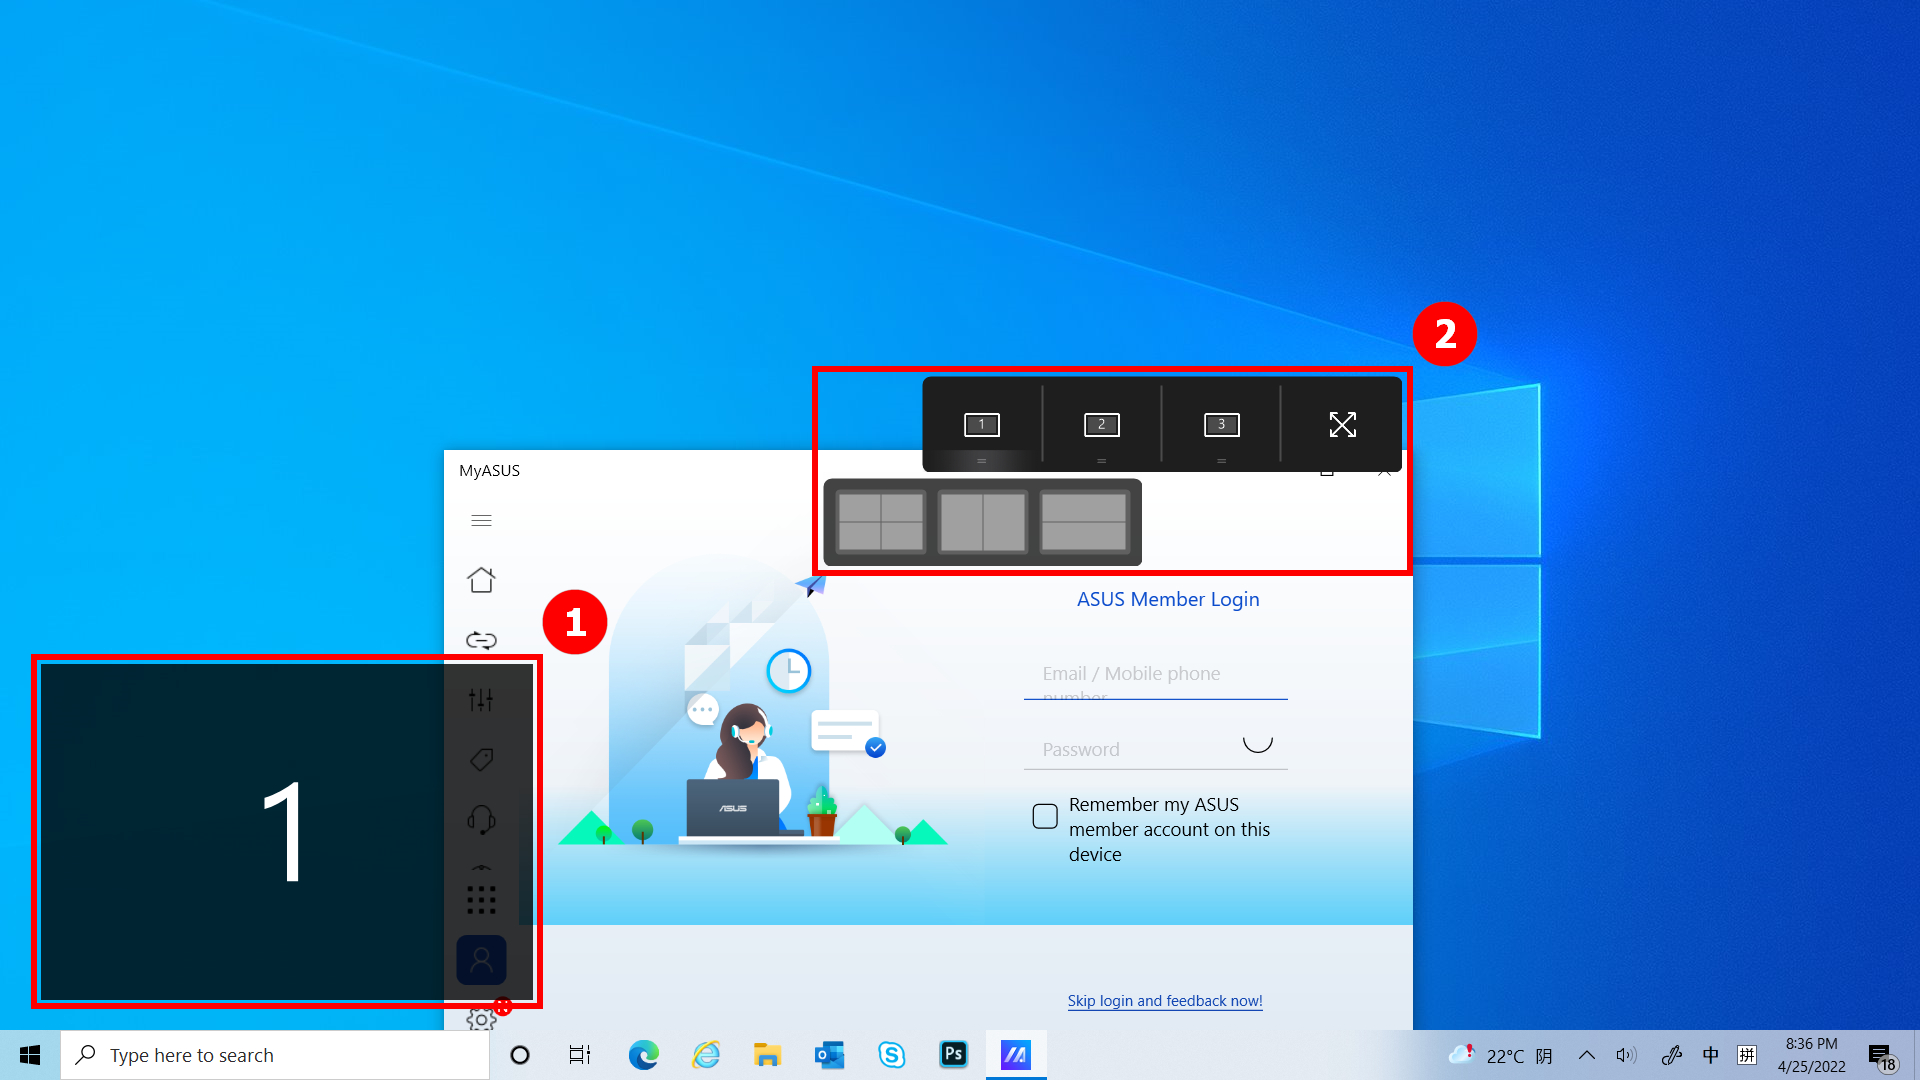
(1) If your computer can control more than one screen, when you drag the App window on the home screen, ①[Screen Markings] will display and allow you to confirm the location of the screen. The ②[App Switcher] menu function is also displayed, which contains screen 1 and screen 2 icons. (In the example, the computer has two screens)
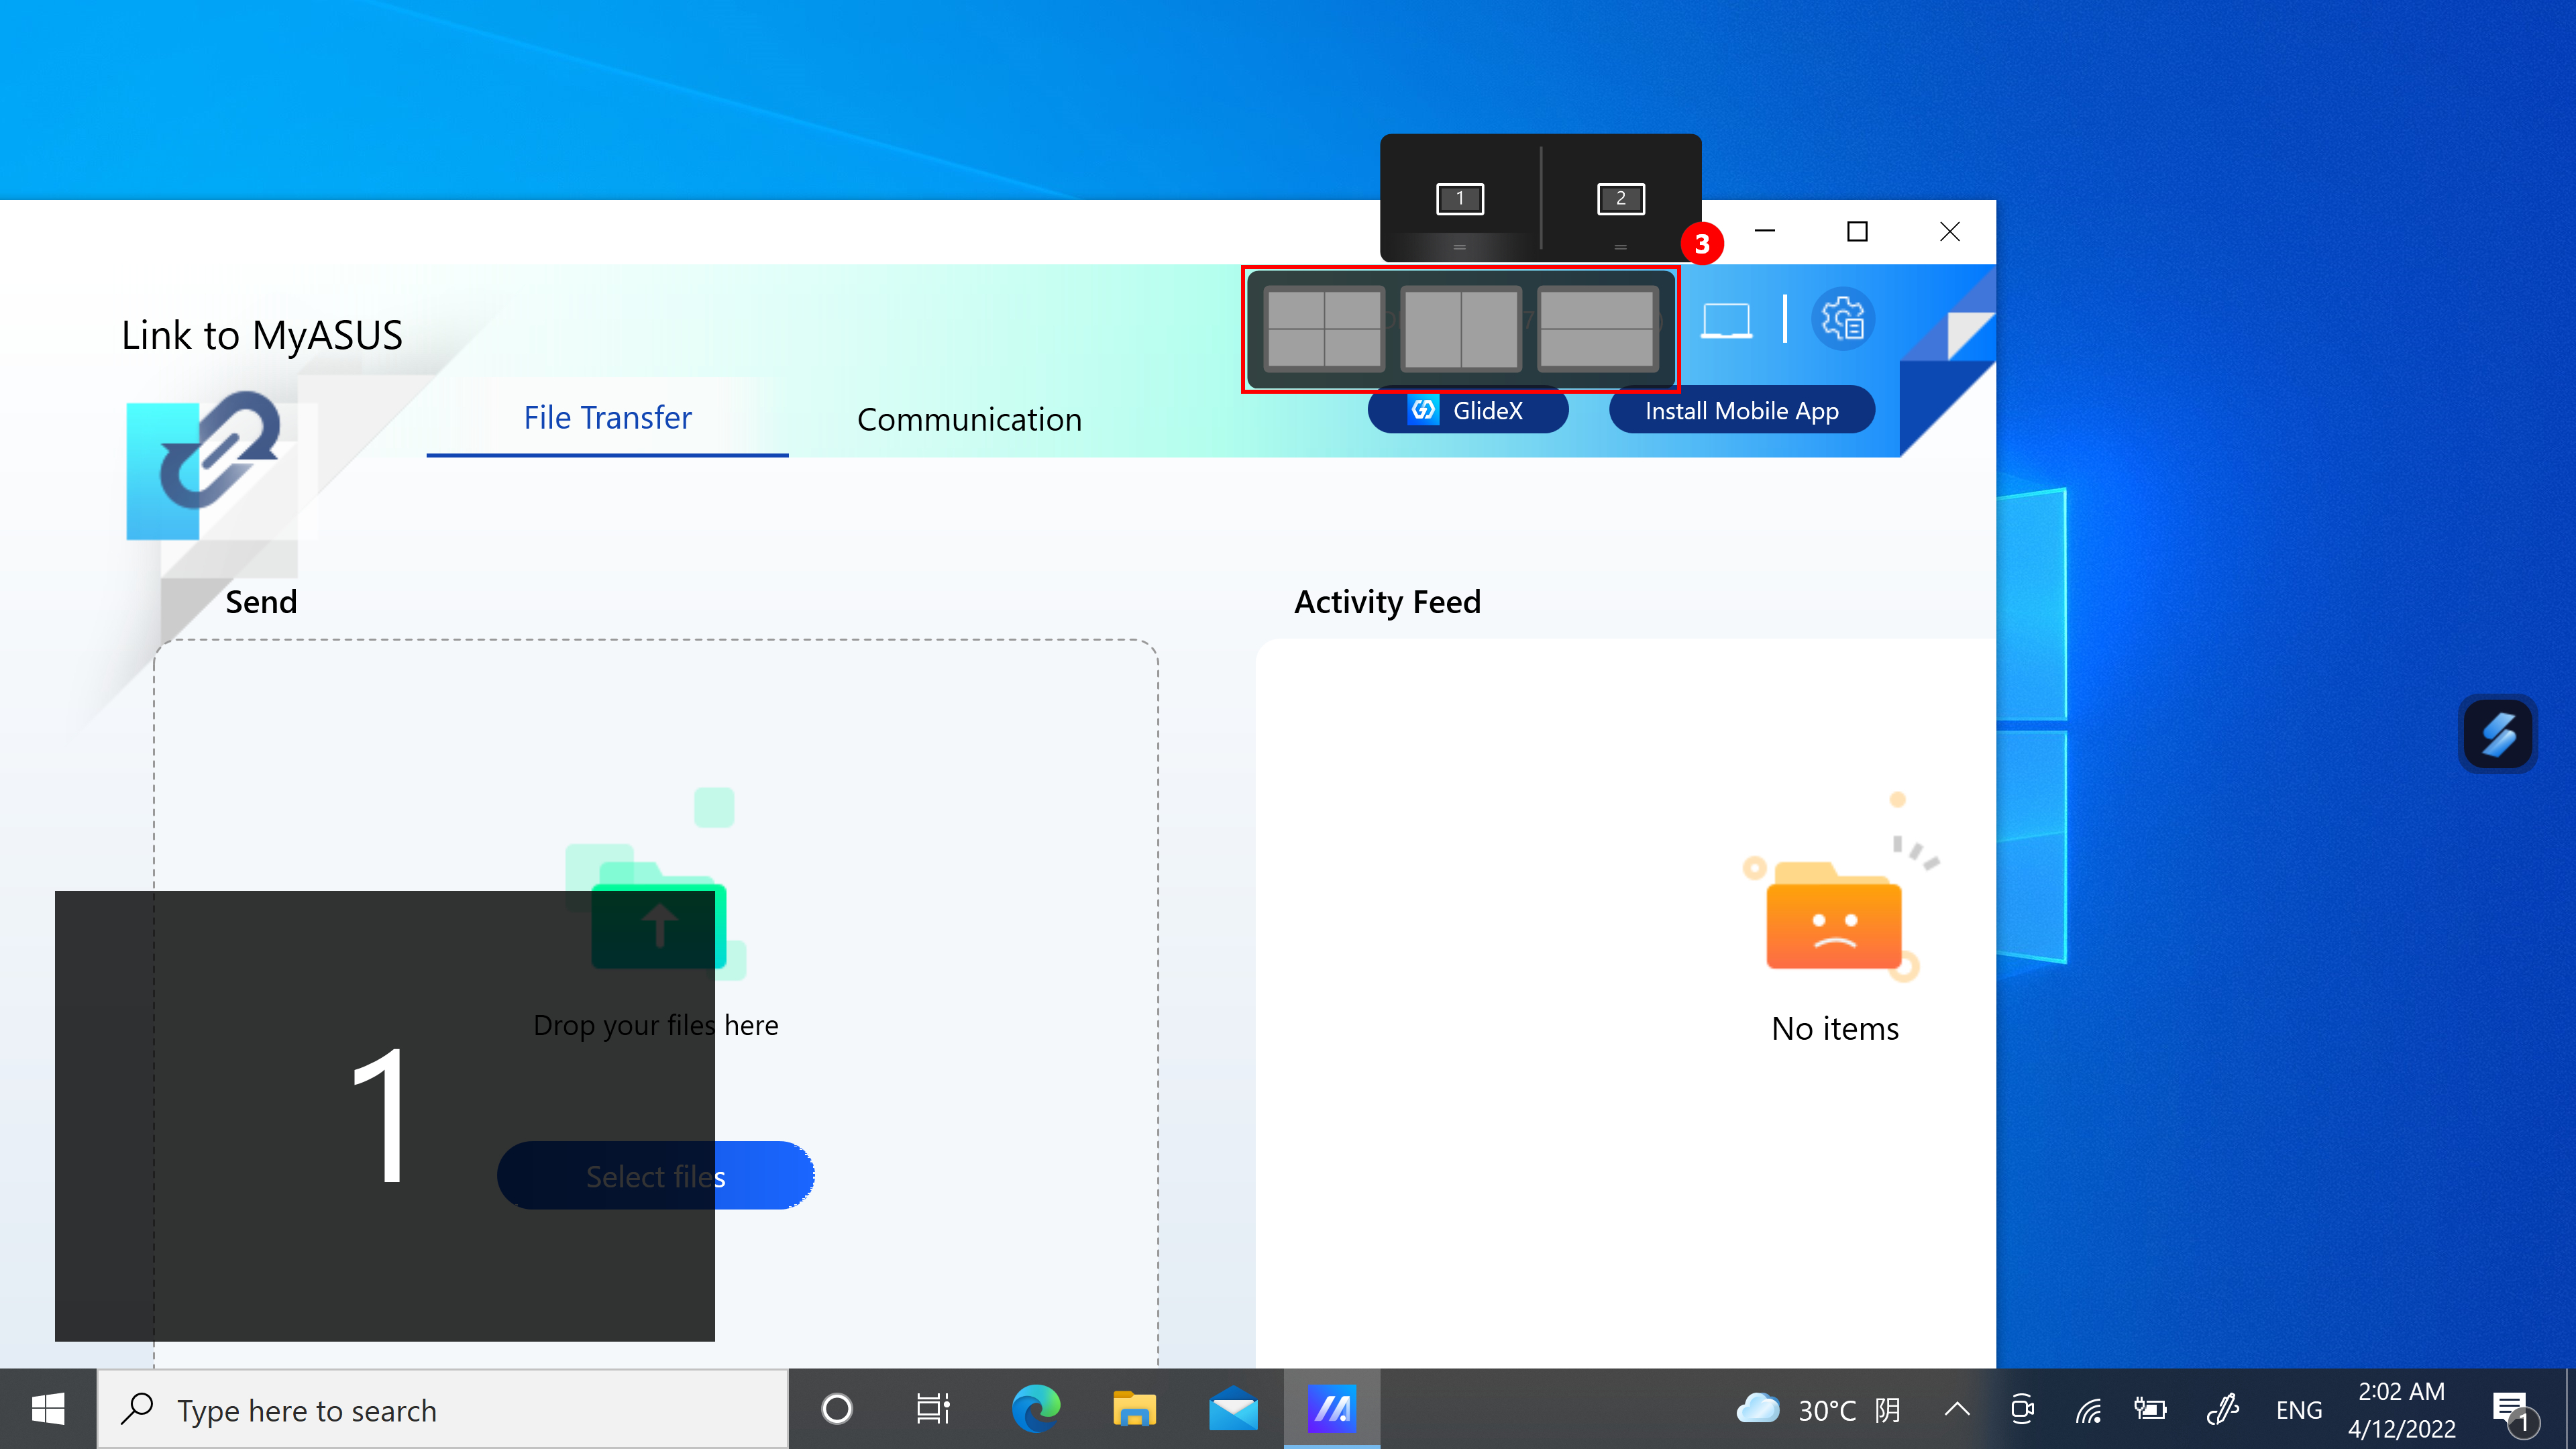
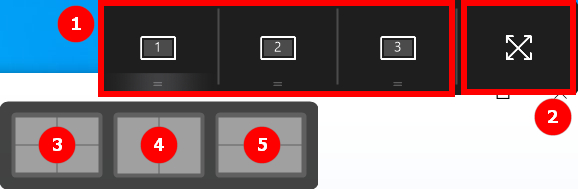
(2) ScreenXpert supports interaction between single or multiple screens. When you drag a window on the desktop, the [App Switcher] icon appears. If you drag the mouse into the range of ③[Screen 1], 3 usable icons will display. You can also drag the mouse into [Screen 2] and the window will be transferred to [Screen 2] for display.

- Drag the mouse inside ①, and the App window will display within screen 1 to occupy a quarter of the screen.
- Drag the mouse to the ②, and the App window will display within screen 1 to occupy one-half of the left and right of the screen.
- Drag the mouse inside ③, and the App window will display within screen 1 to occupy one-half of the top and bottom of the screen.
(3) The window is already in [Screen 1], occupied the left half of the display.
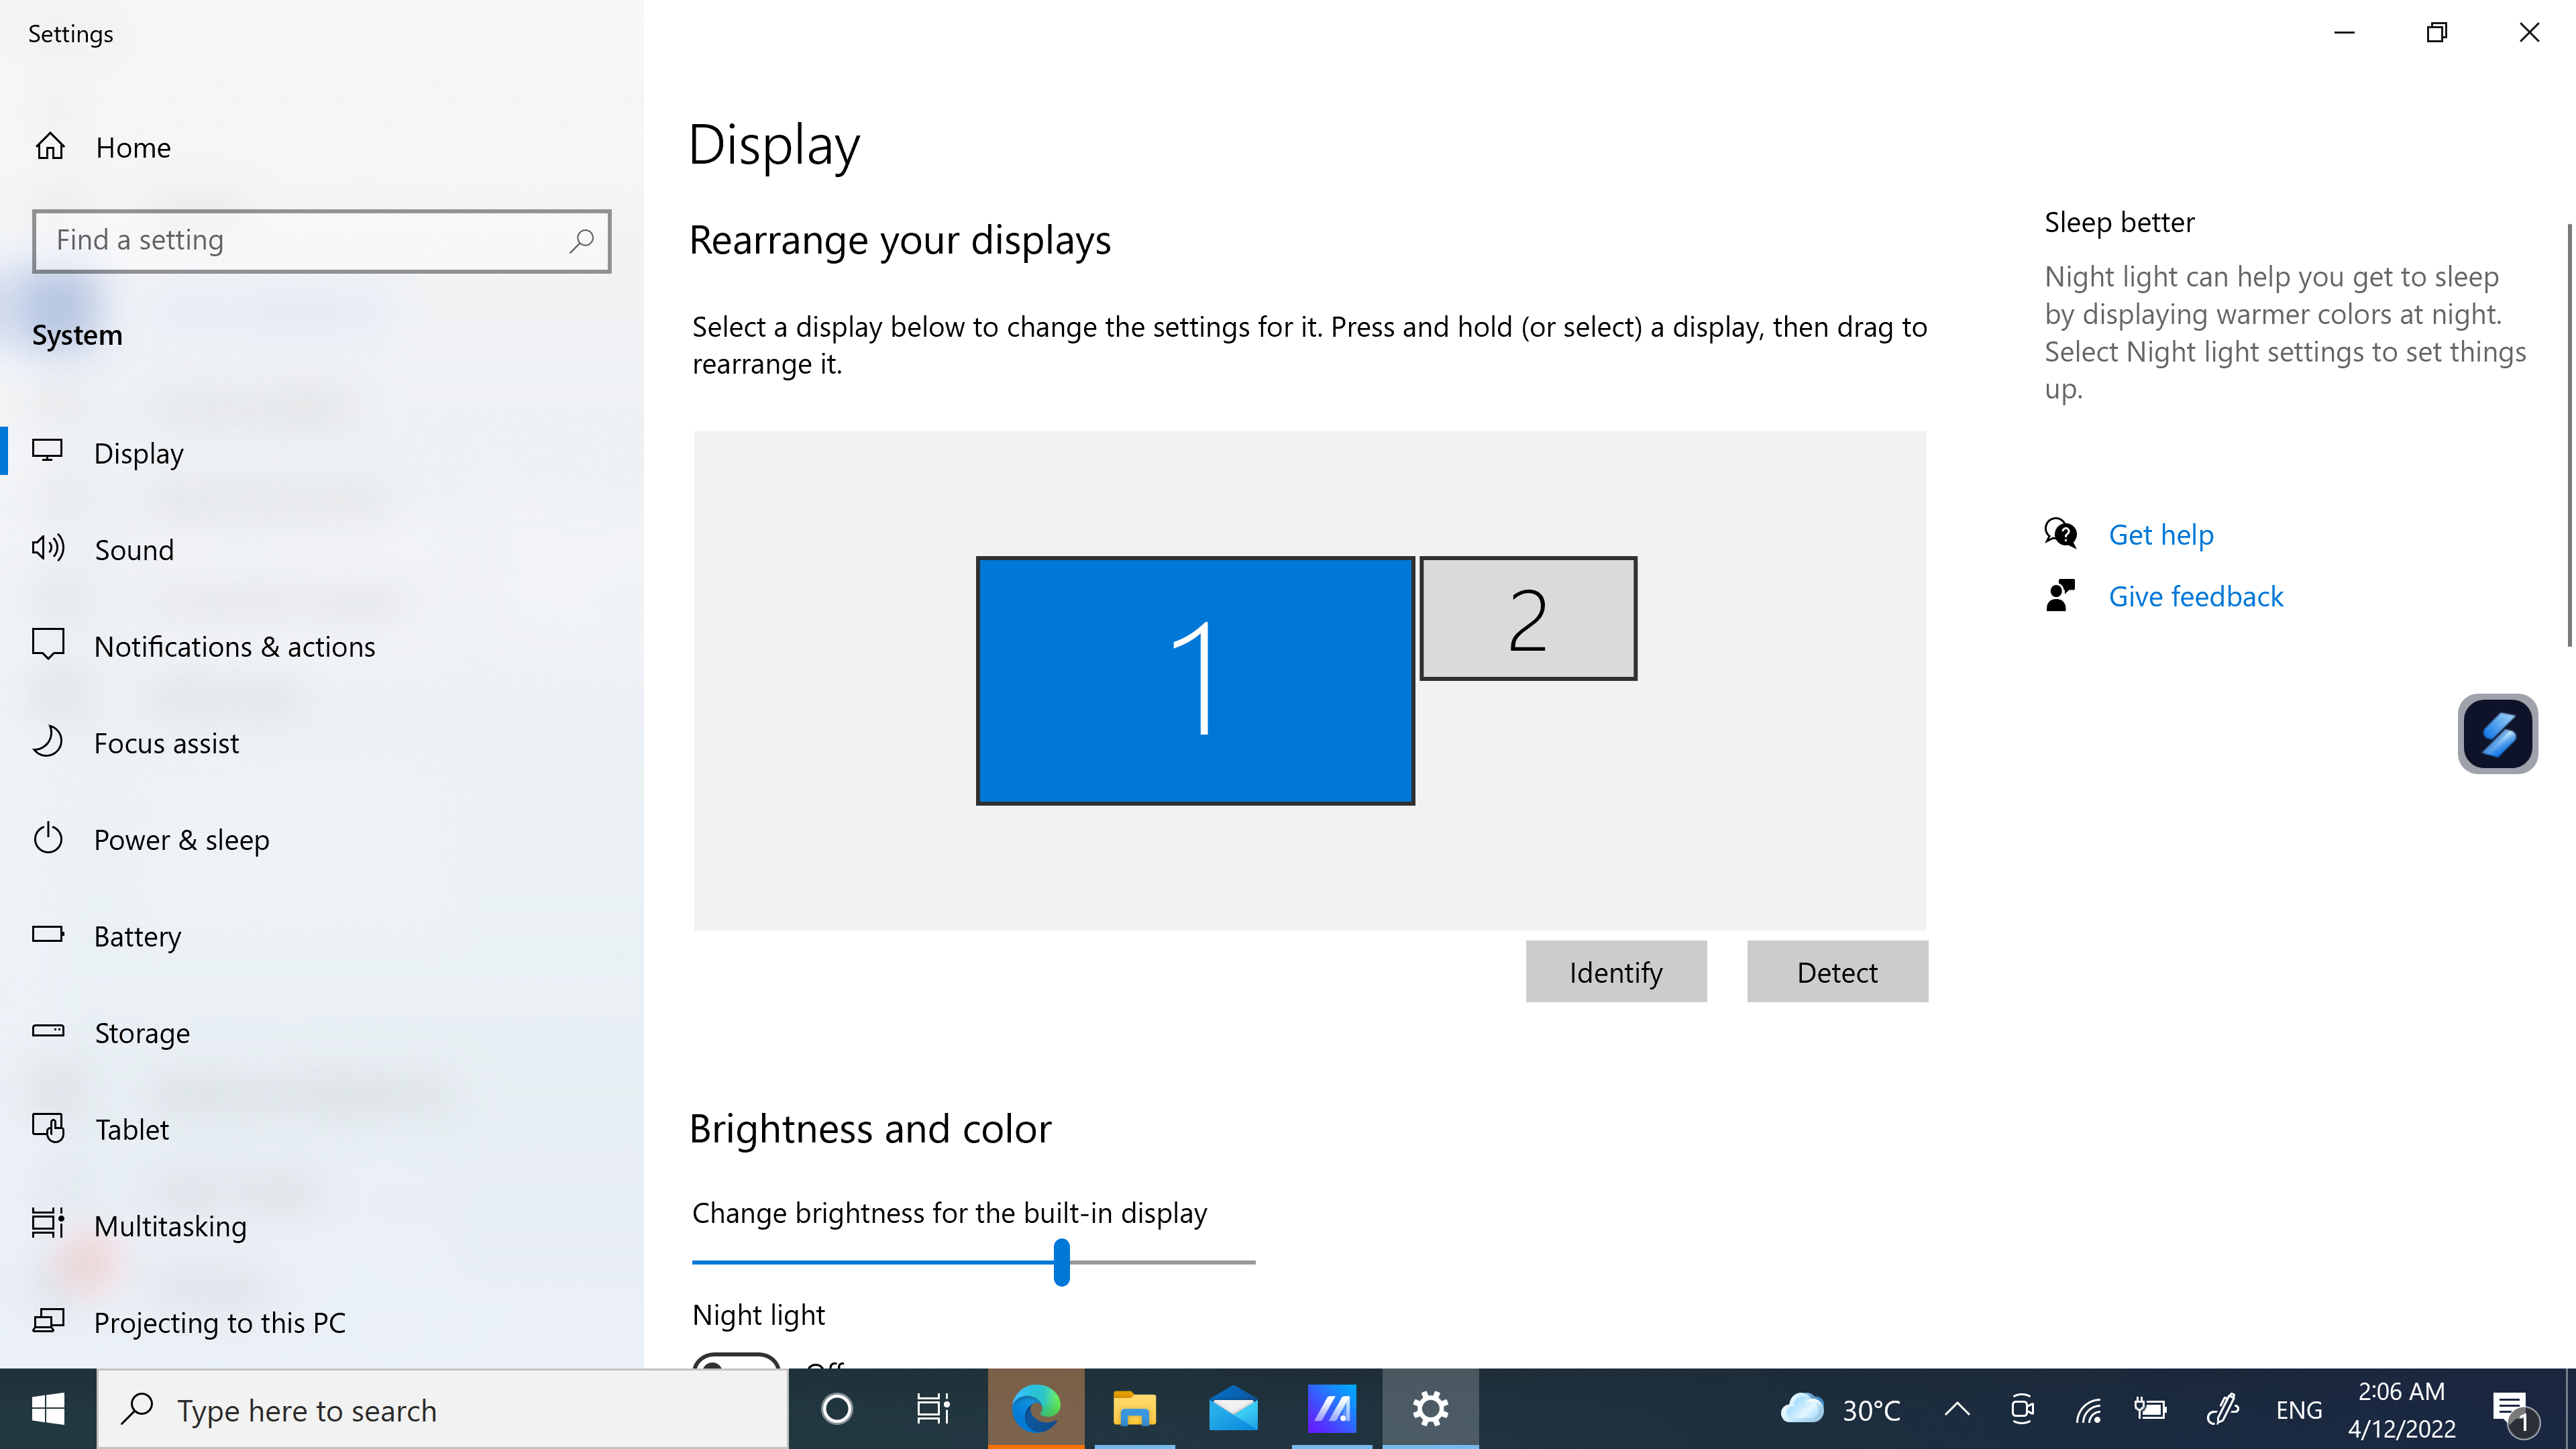
(4) If you are using two screens at this time but the label displayed on both screens are 1. You need to right-click on the desktop and then click Display Settings. On the Display Settings page, you can see that your two screens are working as duplicate screens.
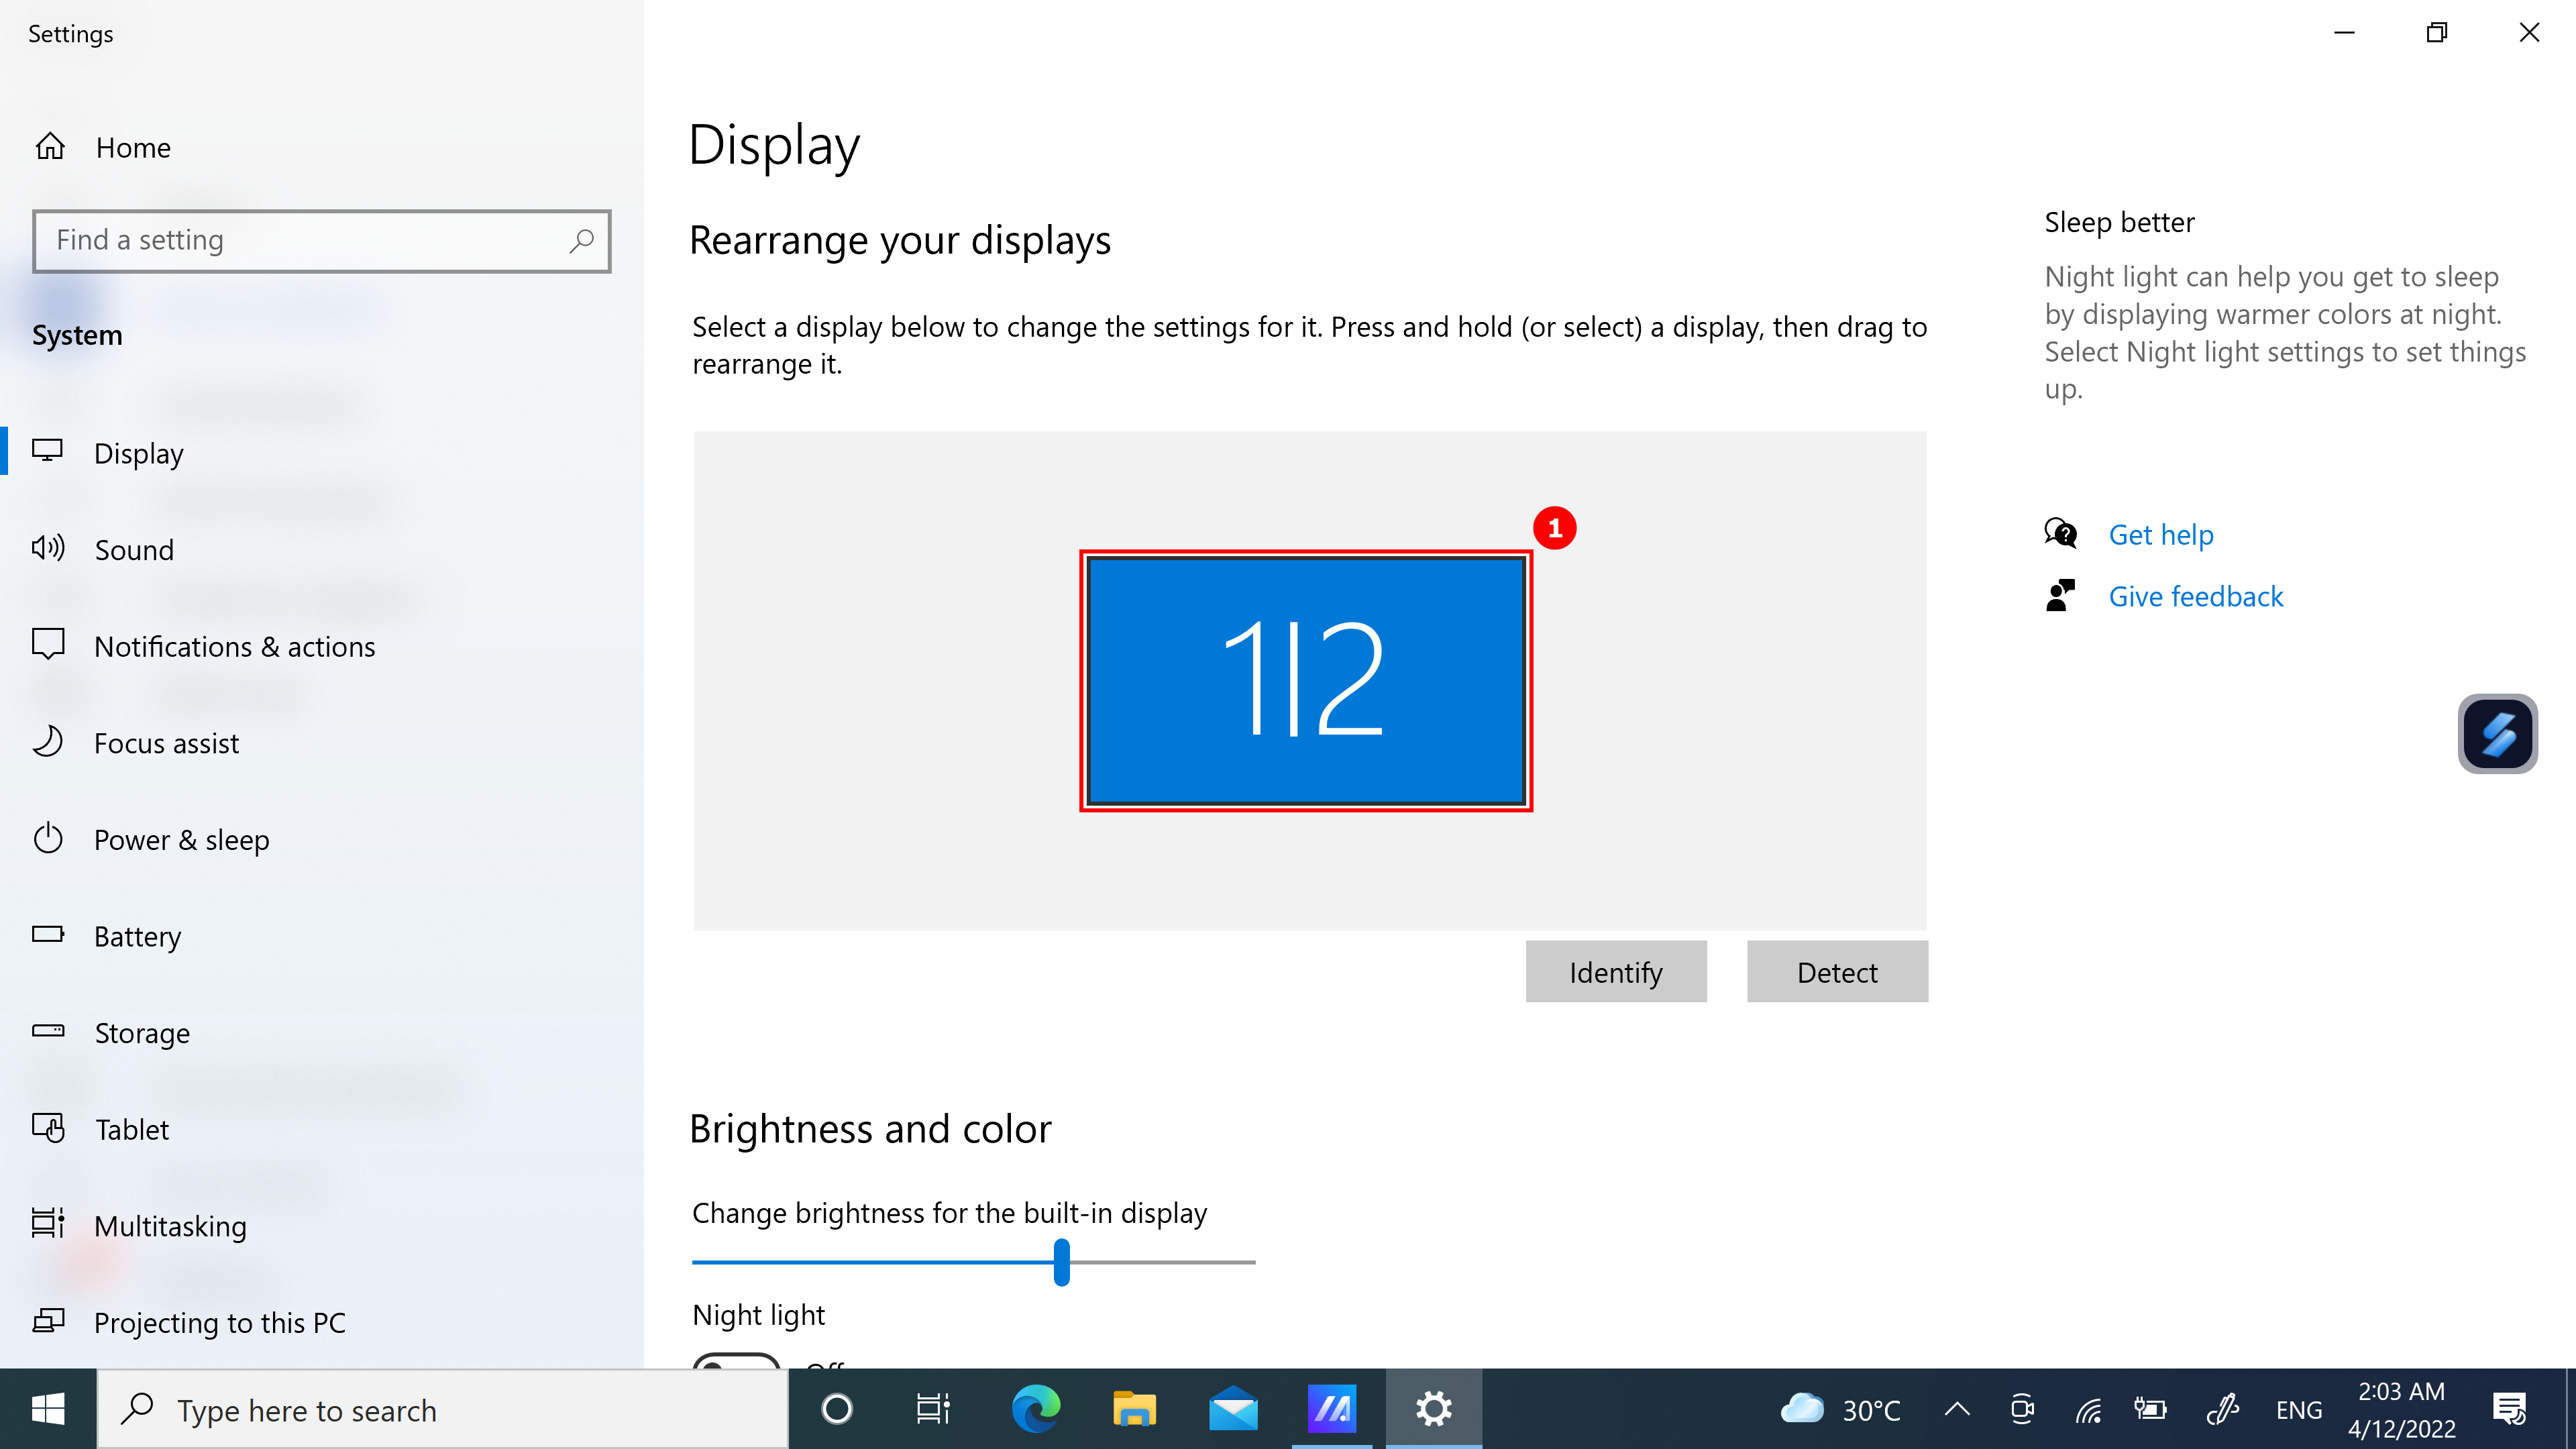
(5) Please scroll down the page to see the ②[Multiple displays] function, select ③[Extend these displays], drag the window on the desktop, and the screen icon will display normally.

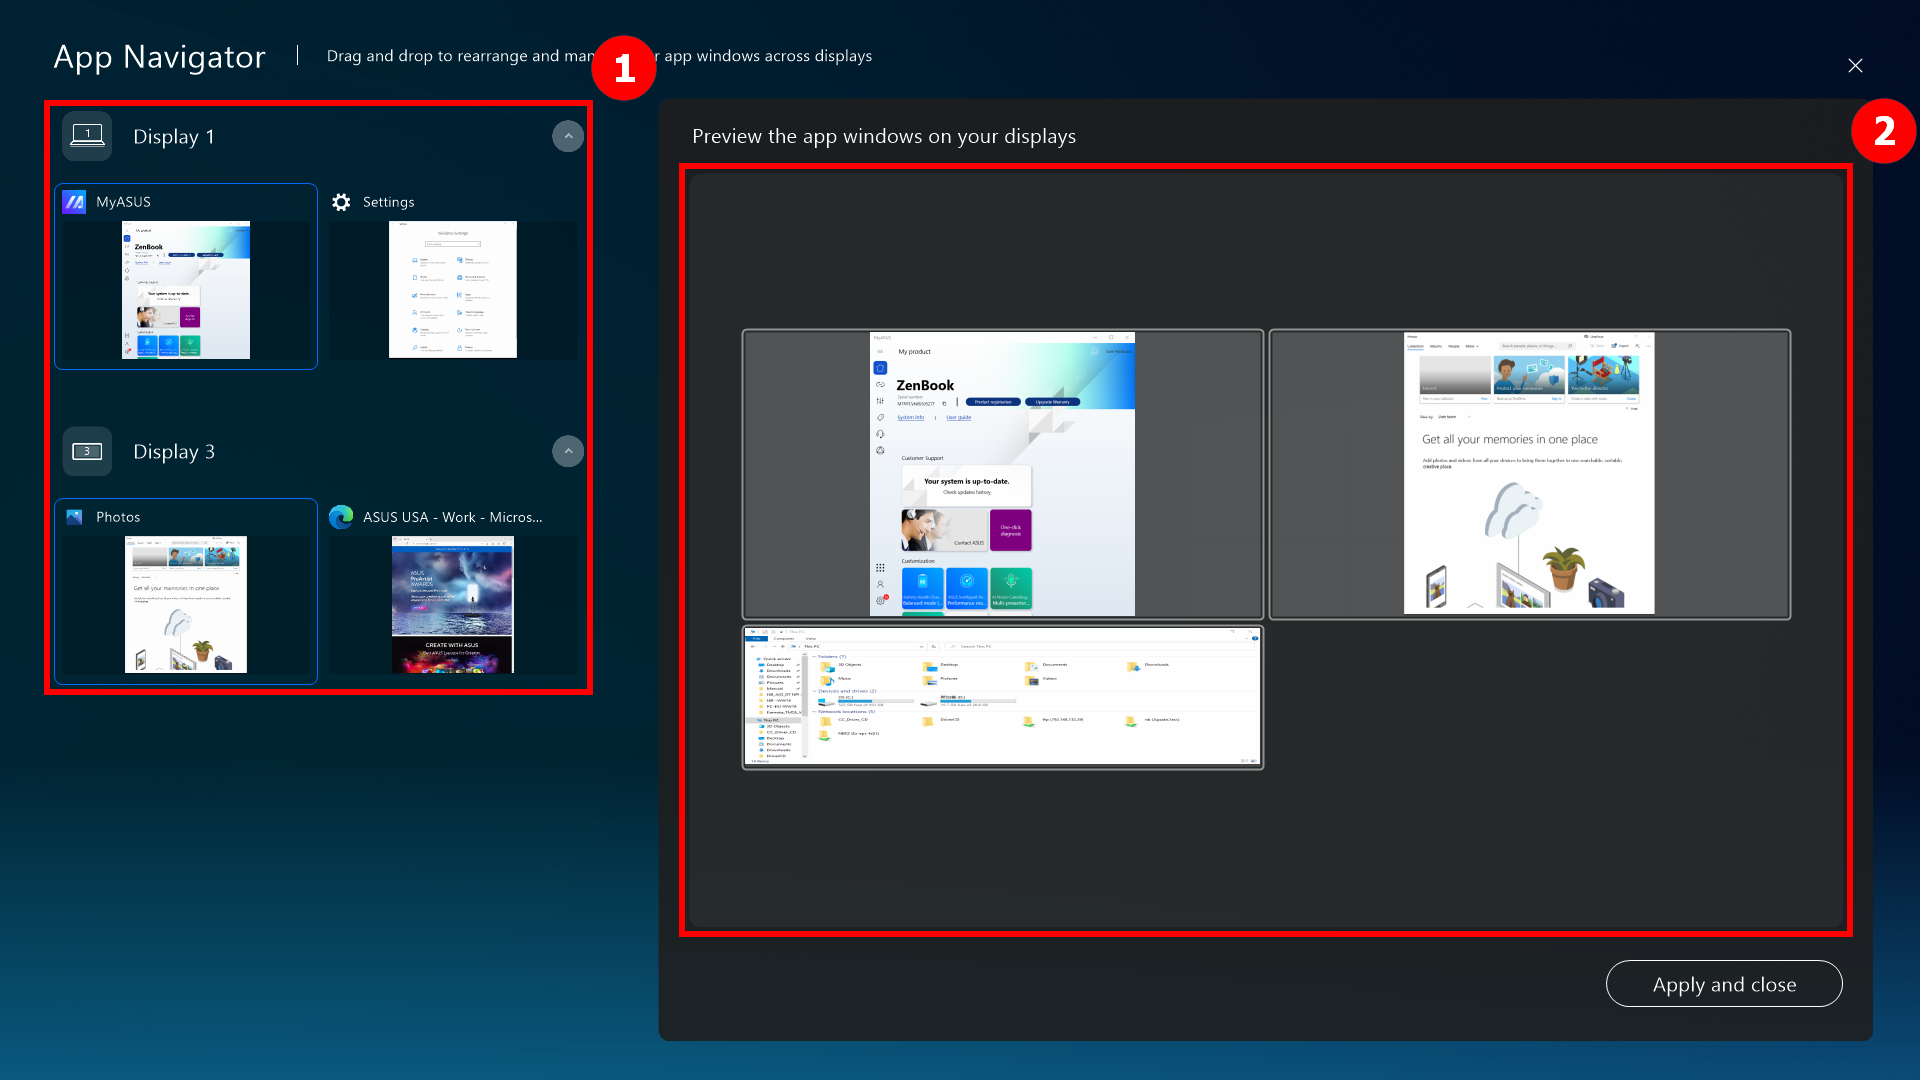
(1) When you have multiple windows open on your computer and want to quickly switch windows between different screens, use App Navigator function and click ①[App Navigator].
(2) When App Navigator is opened, ②[Area] is the area marked by the screen in the computer, and ③[Area] is the window displayed on the screen.
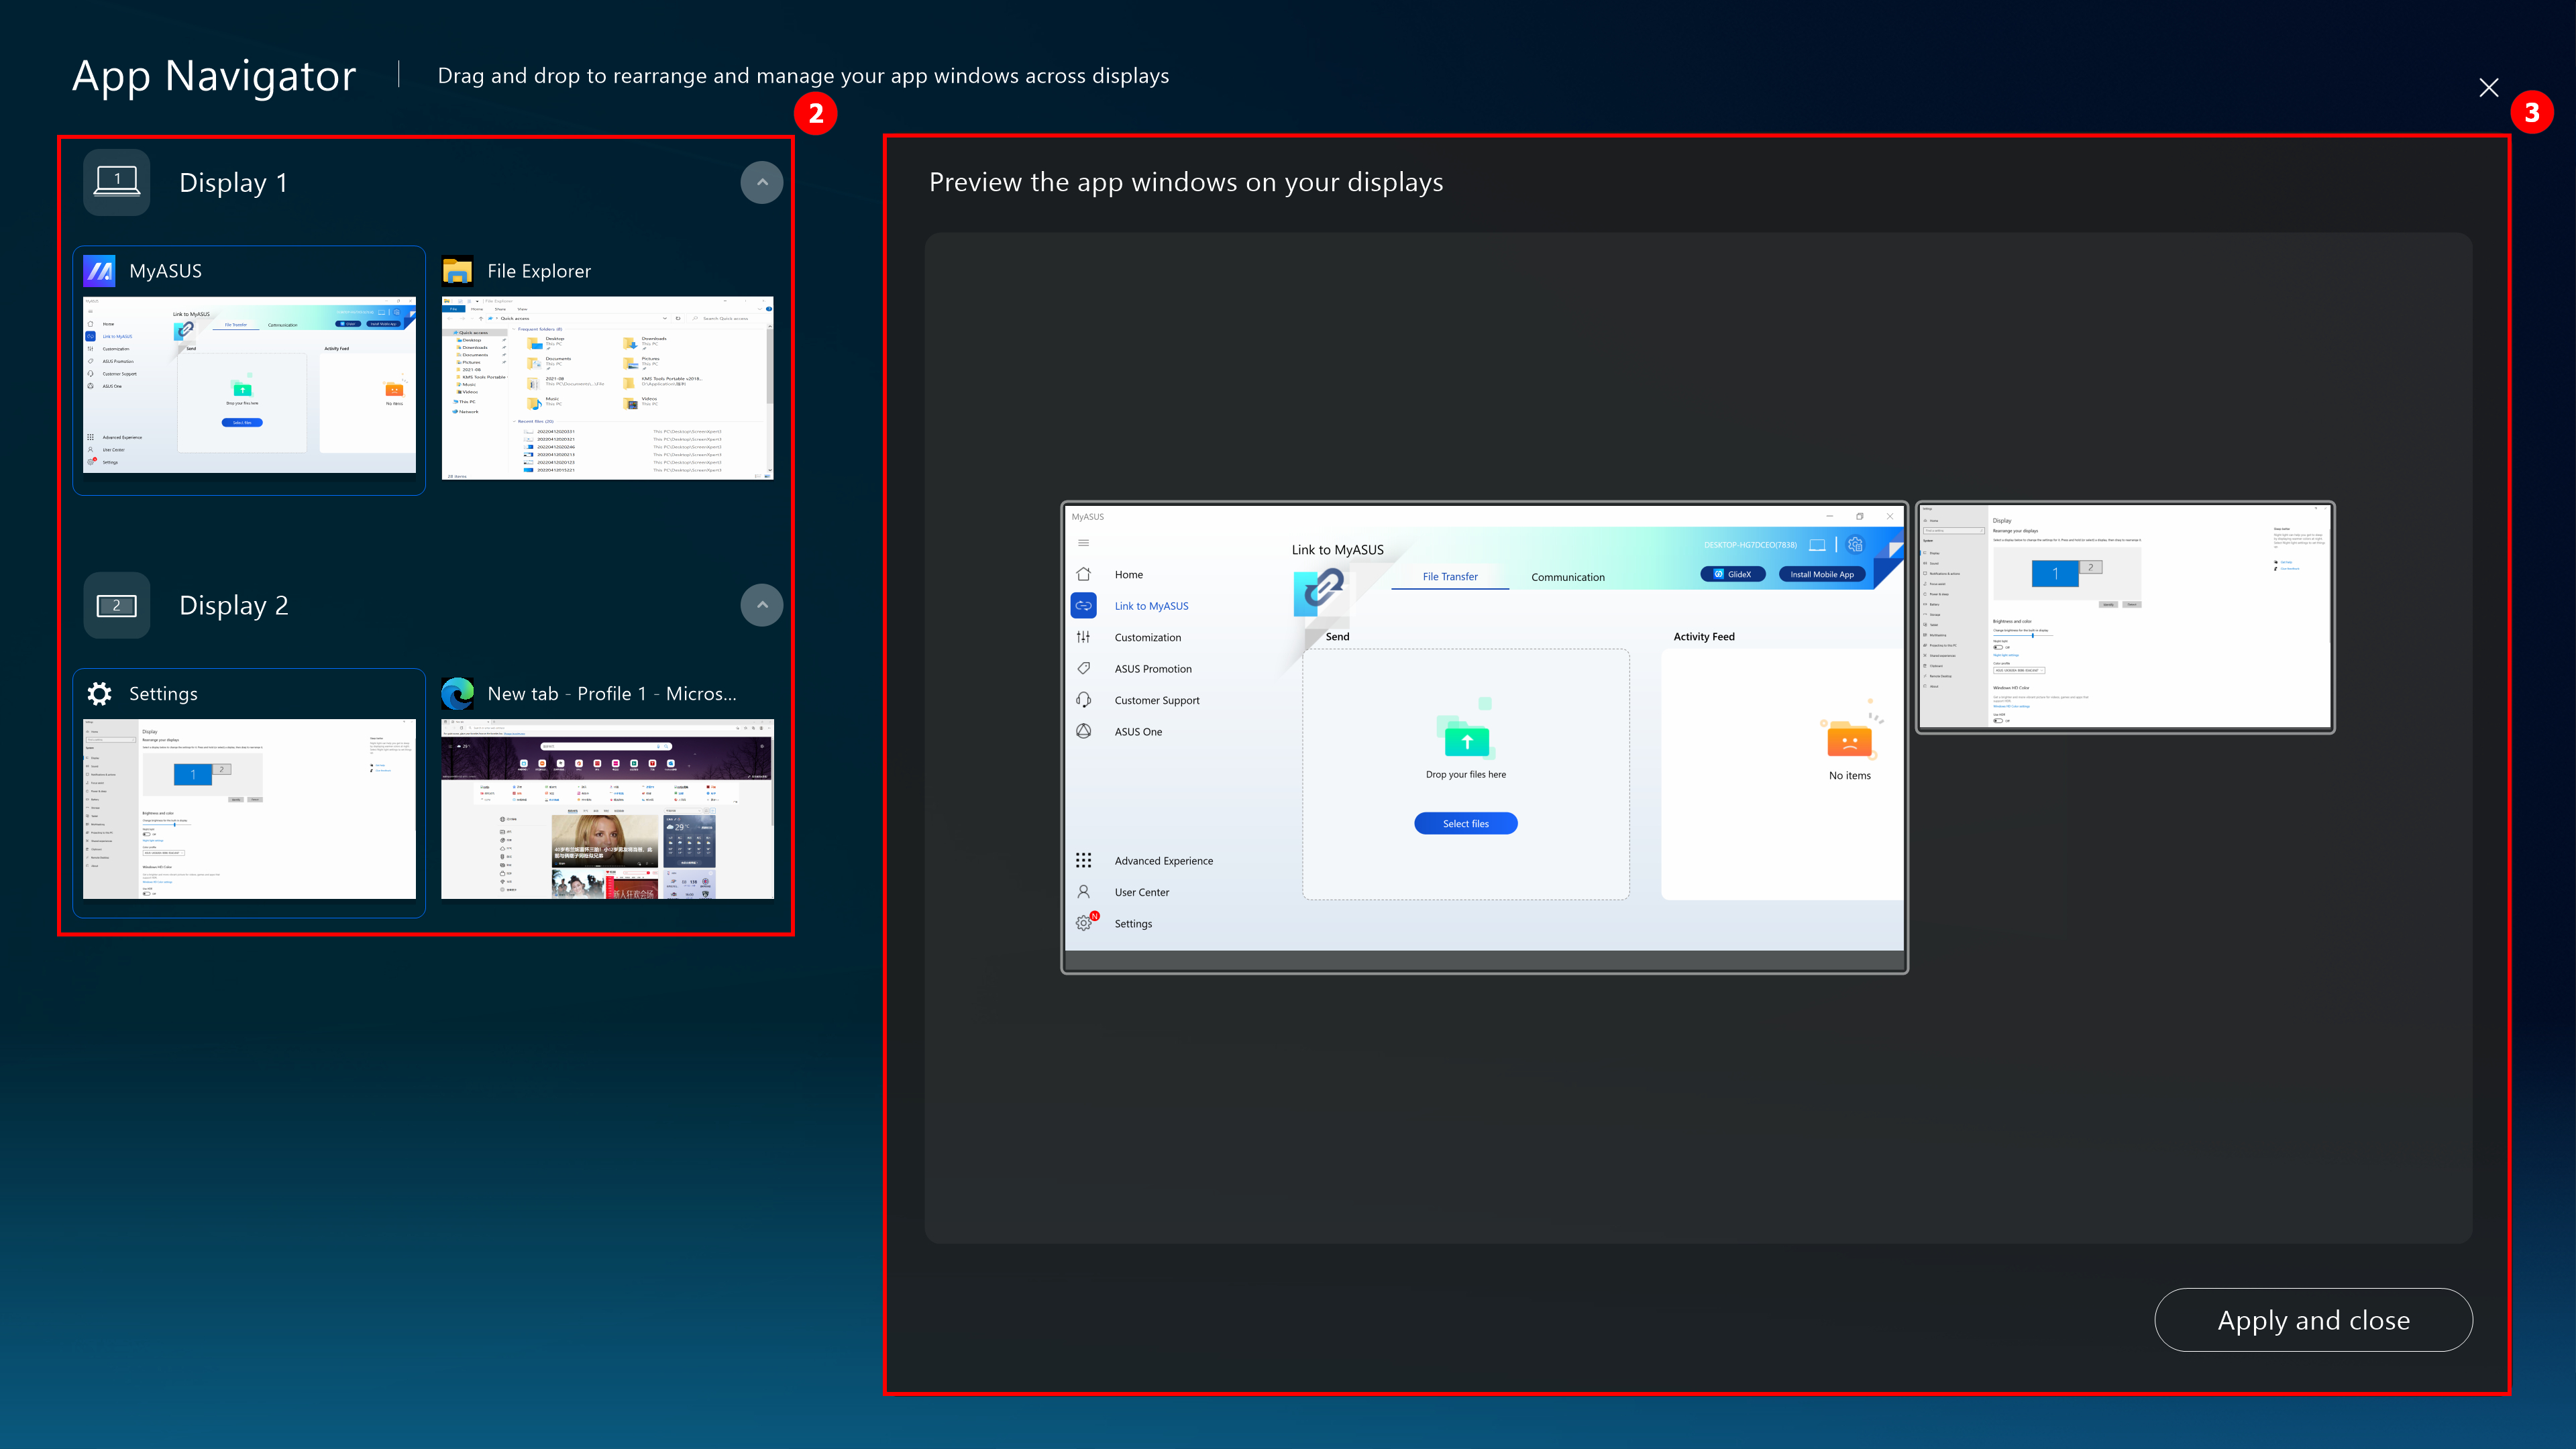
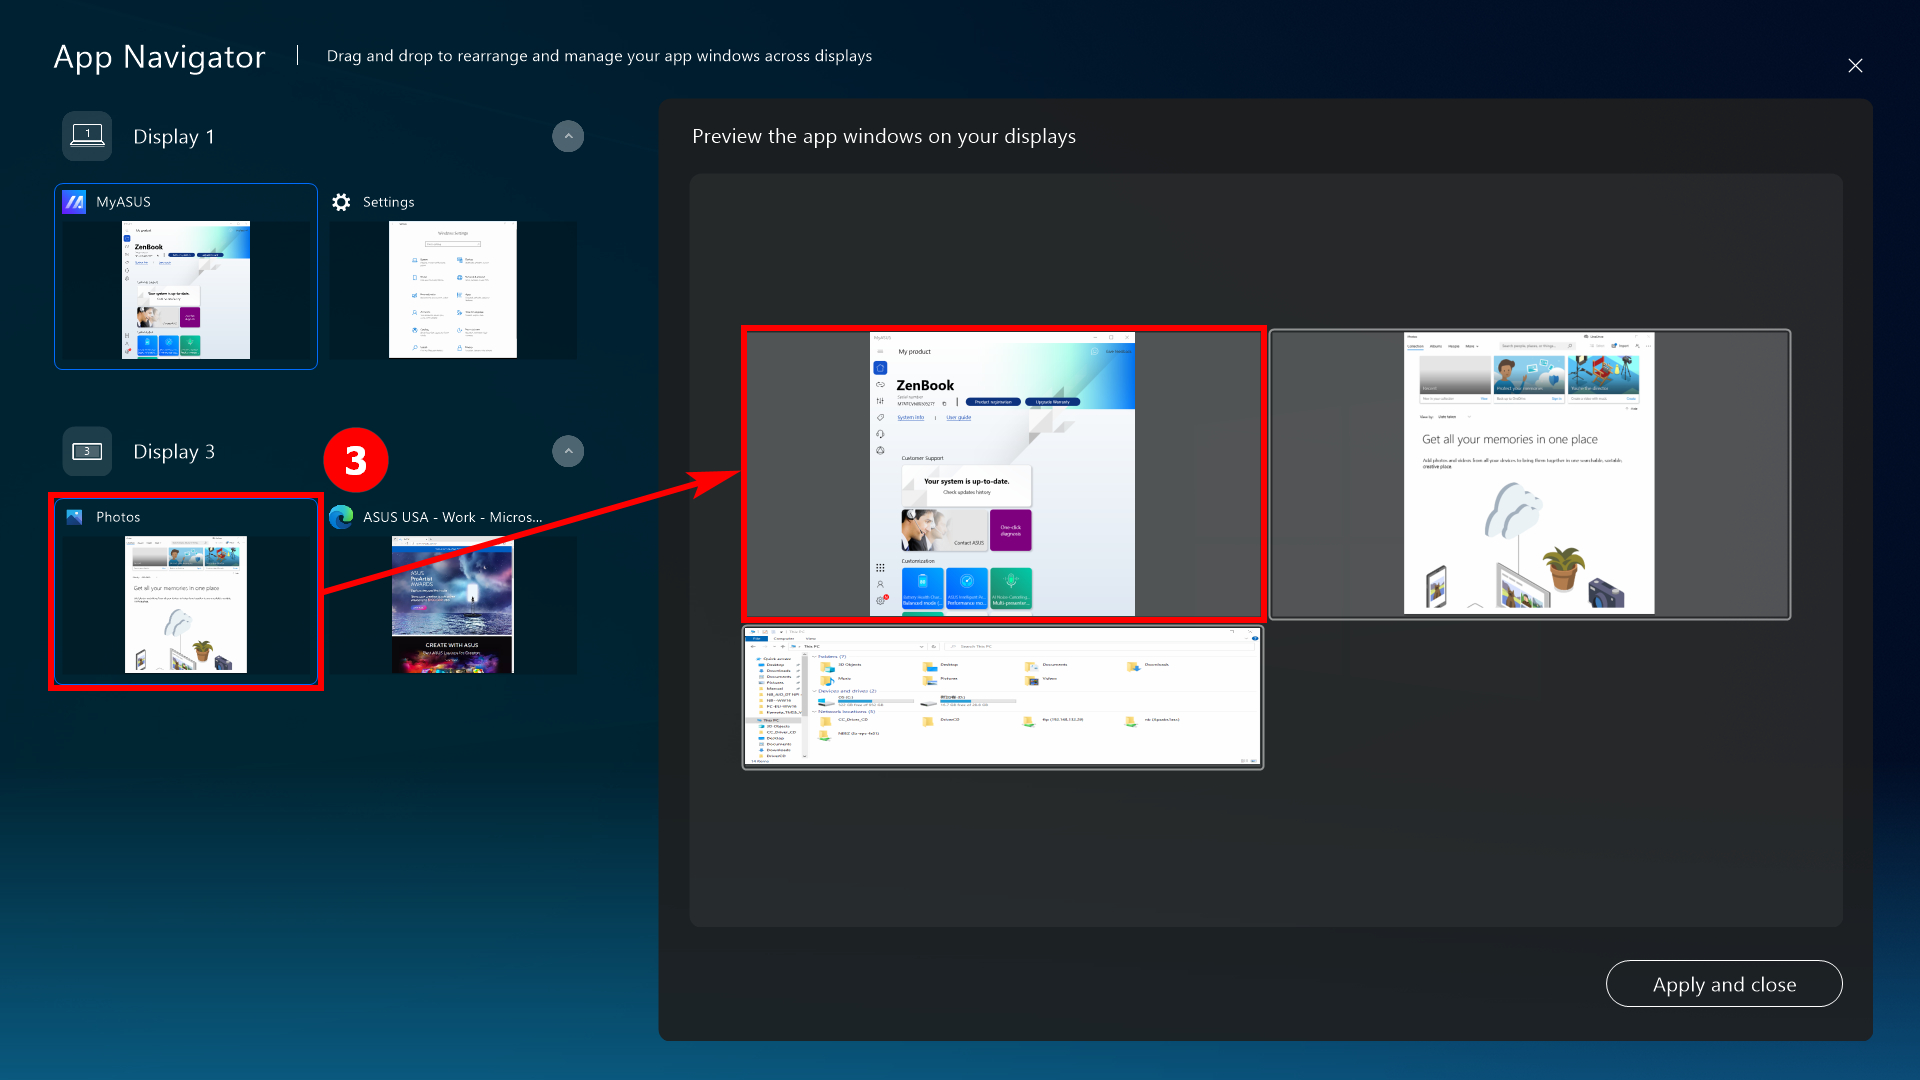
(3) Drag ④[Window] displayed in [Screen 2] to [Screen 1].
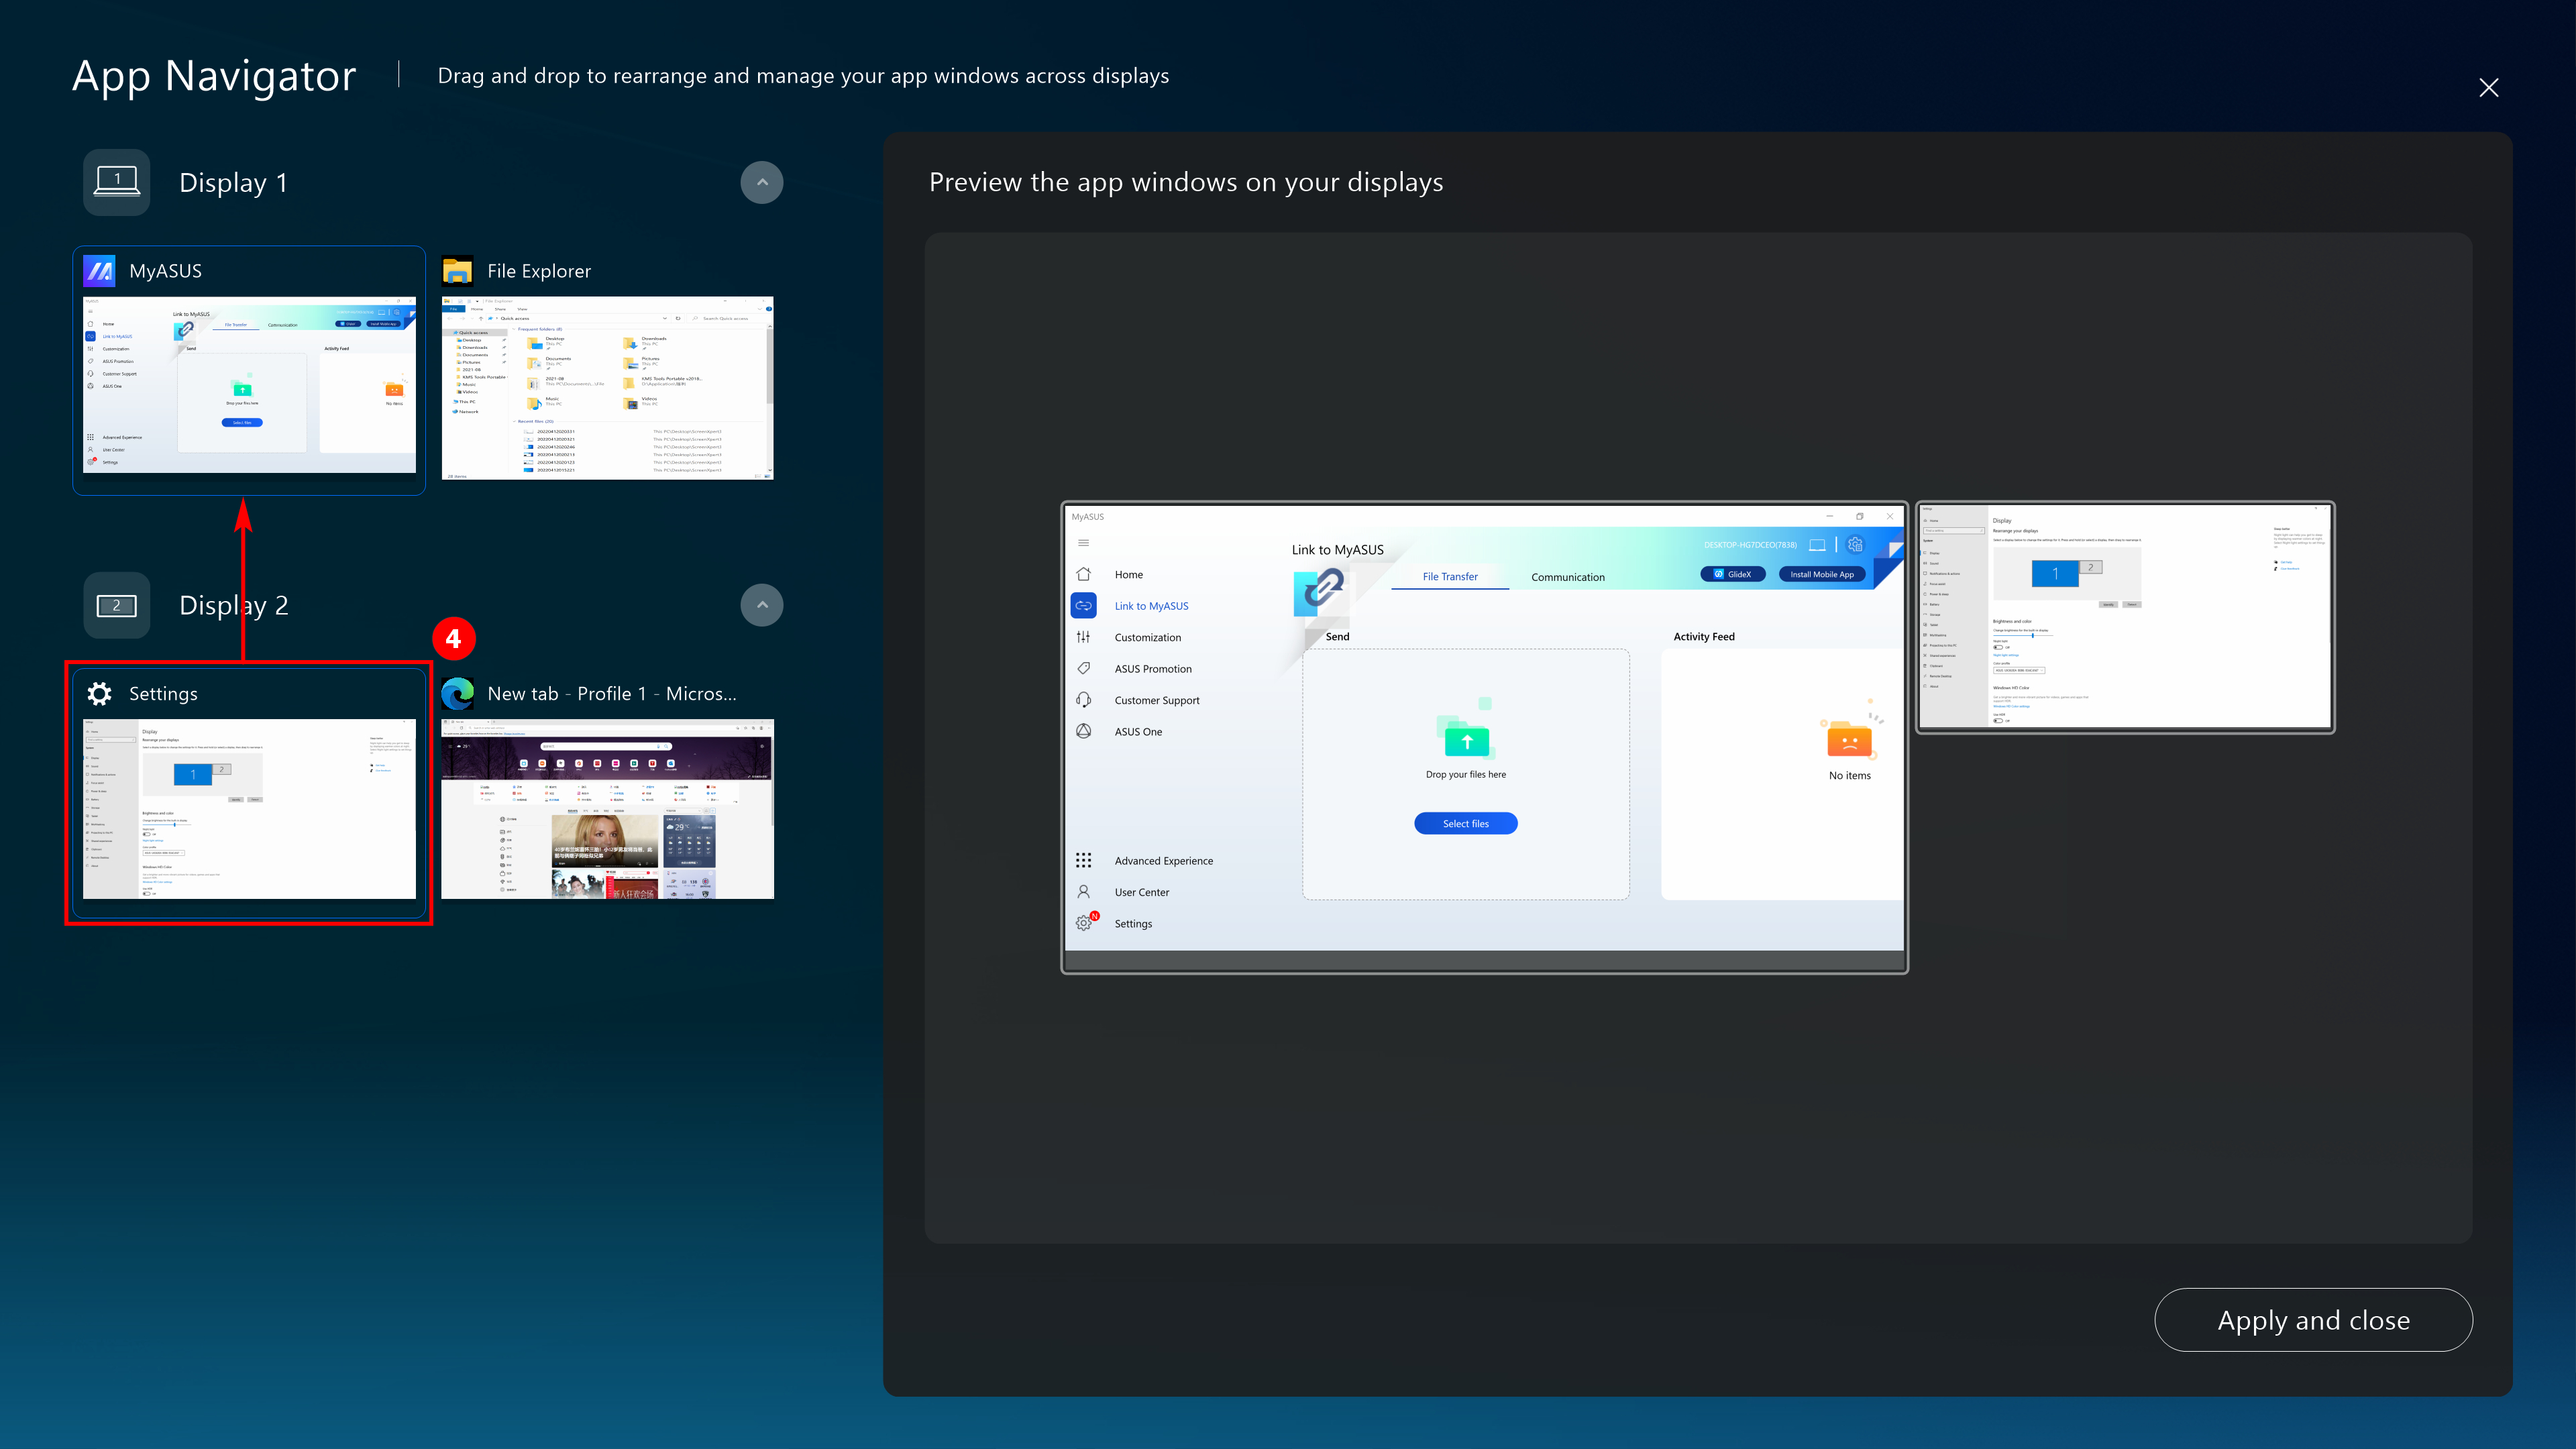
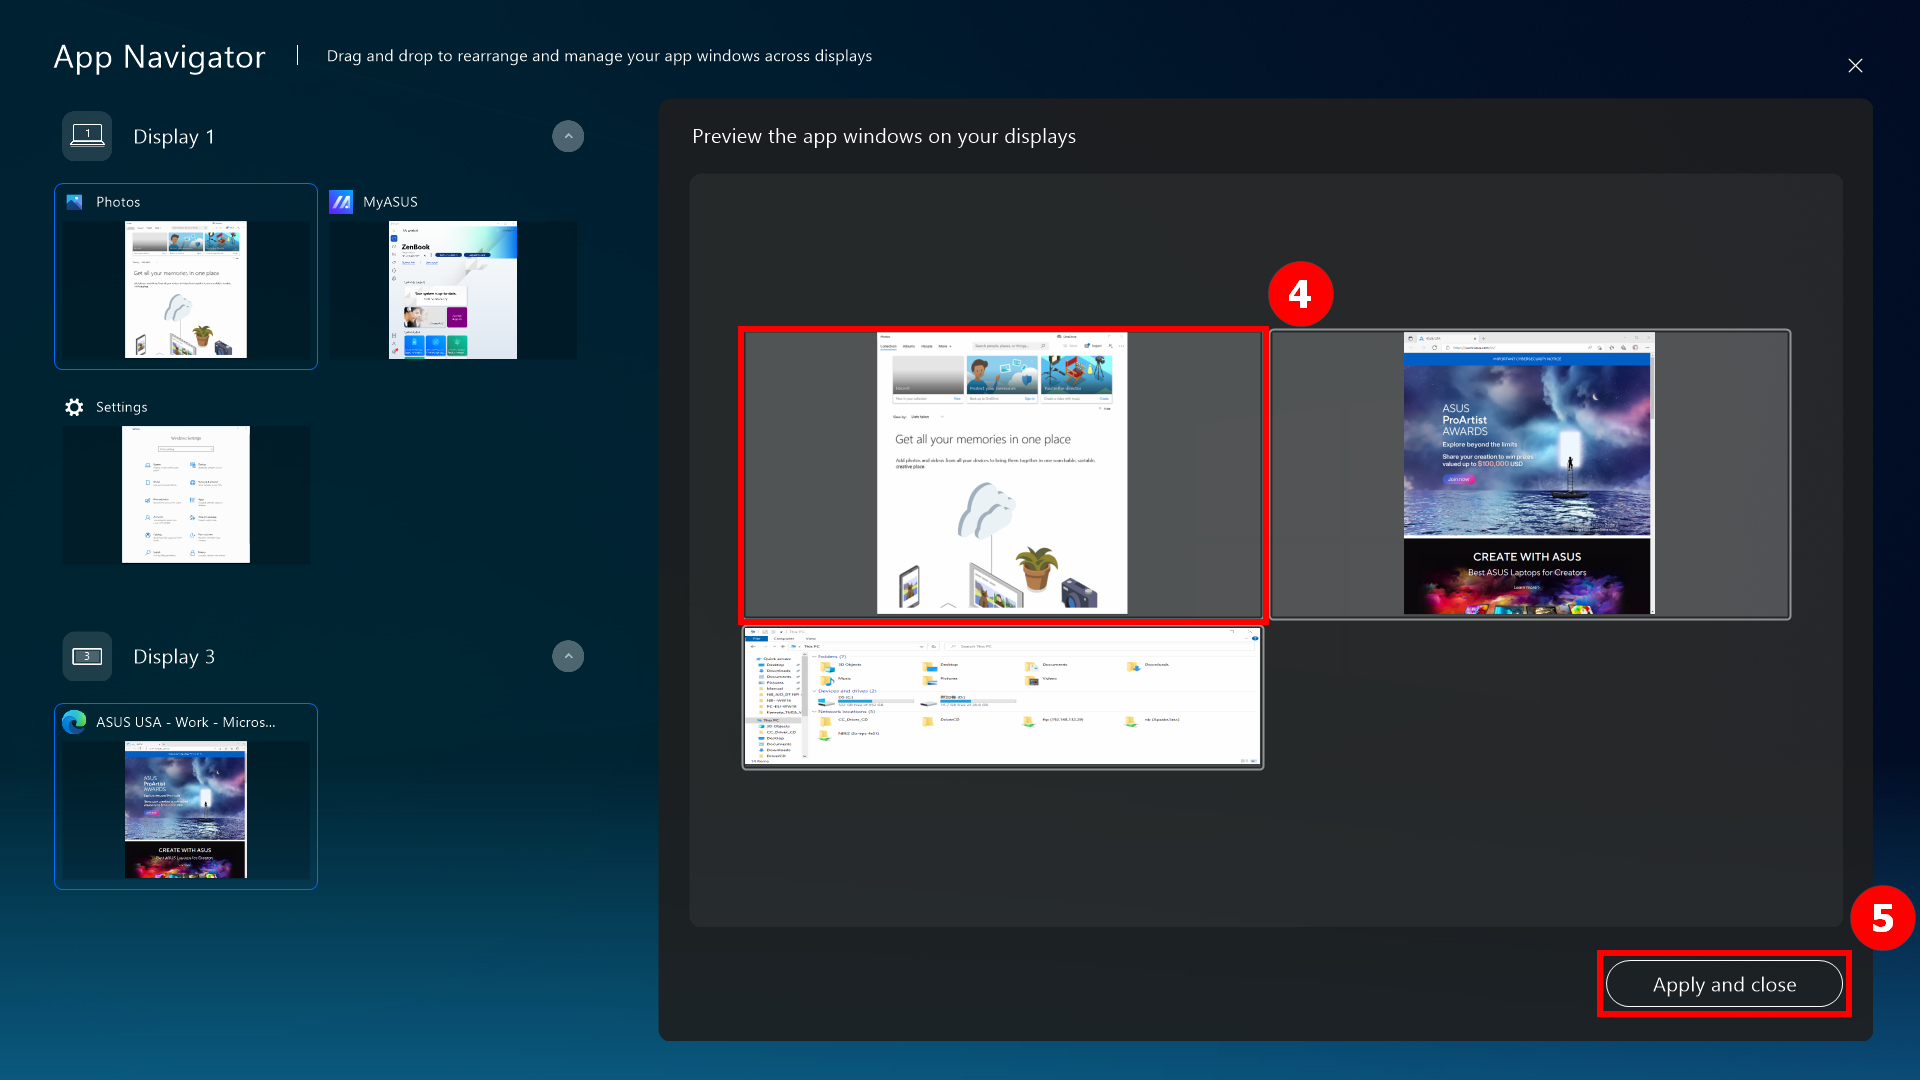
(4) The ⑤[window] is already displayed on the front of [Screen 1]. Click ⑥[Apply an close] to close App Navigator.
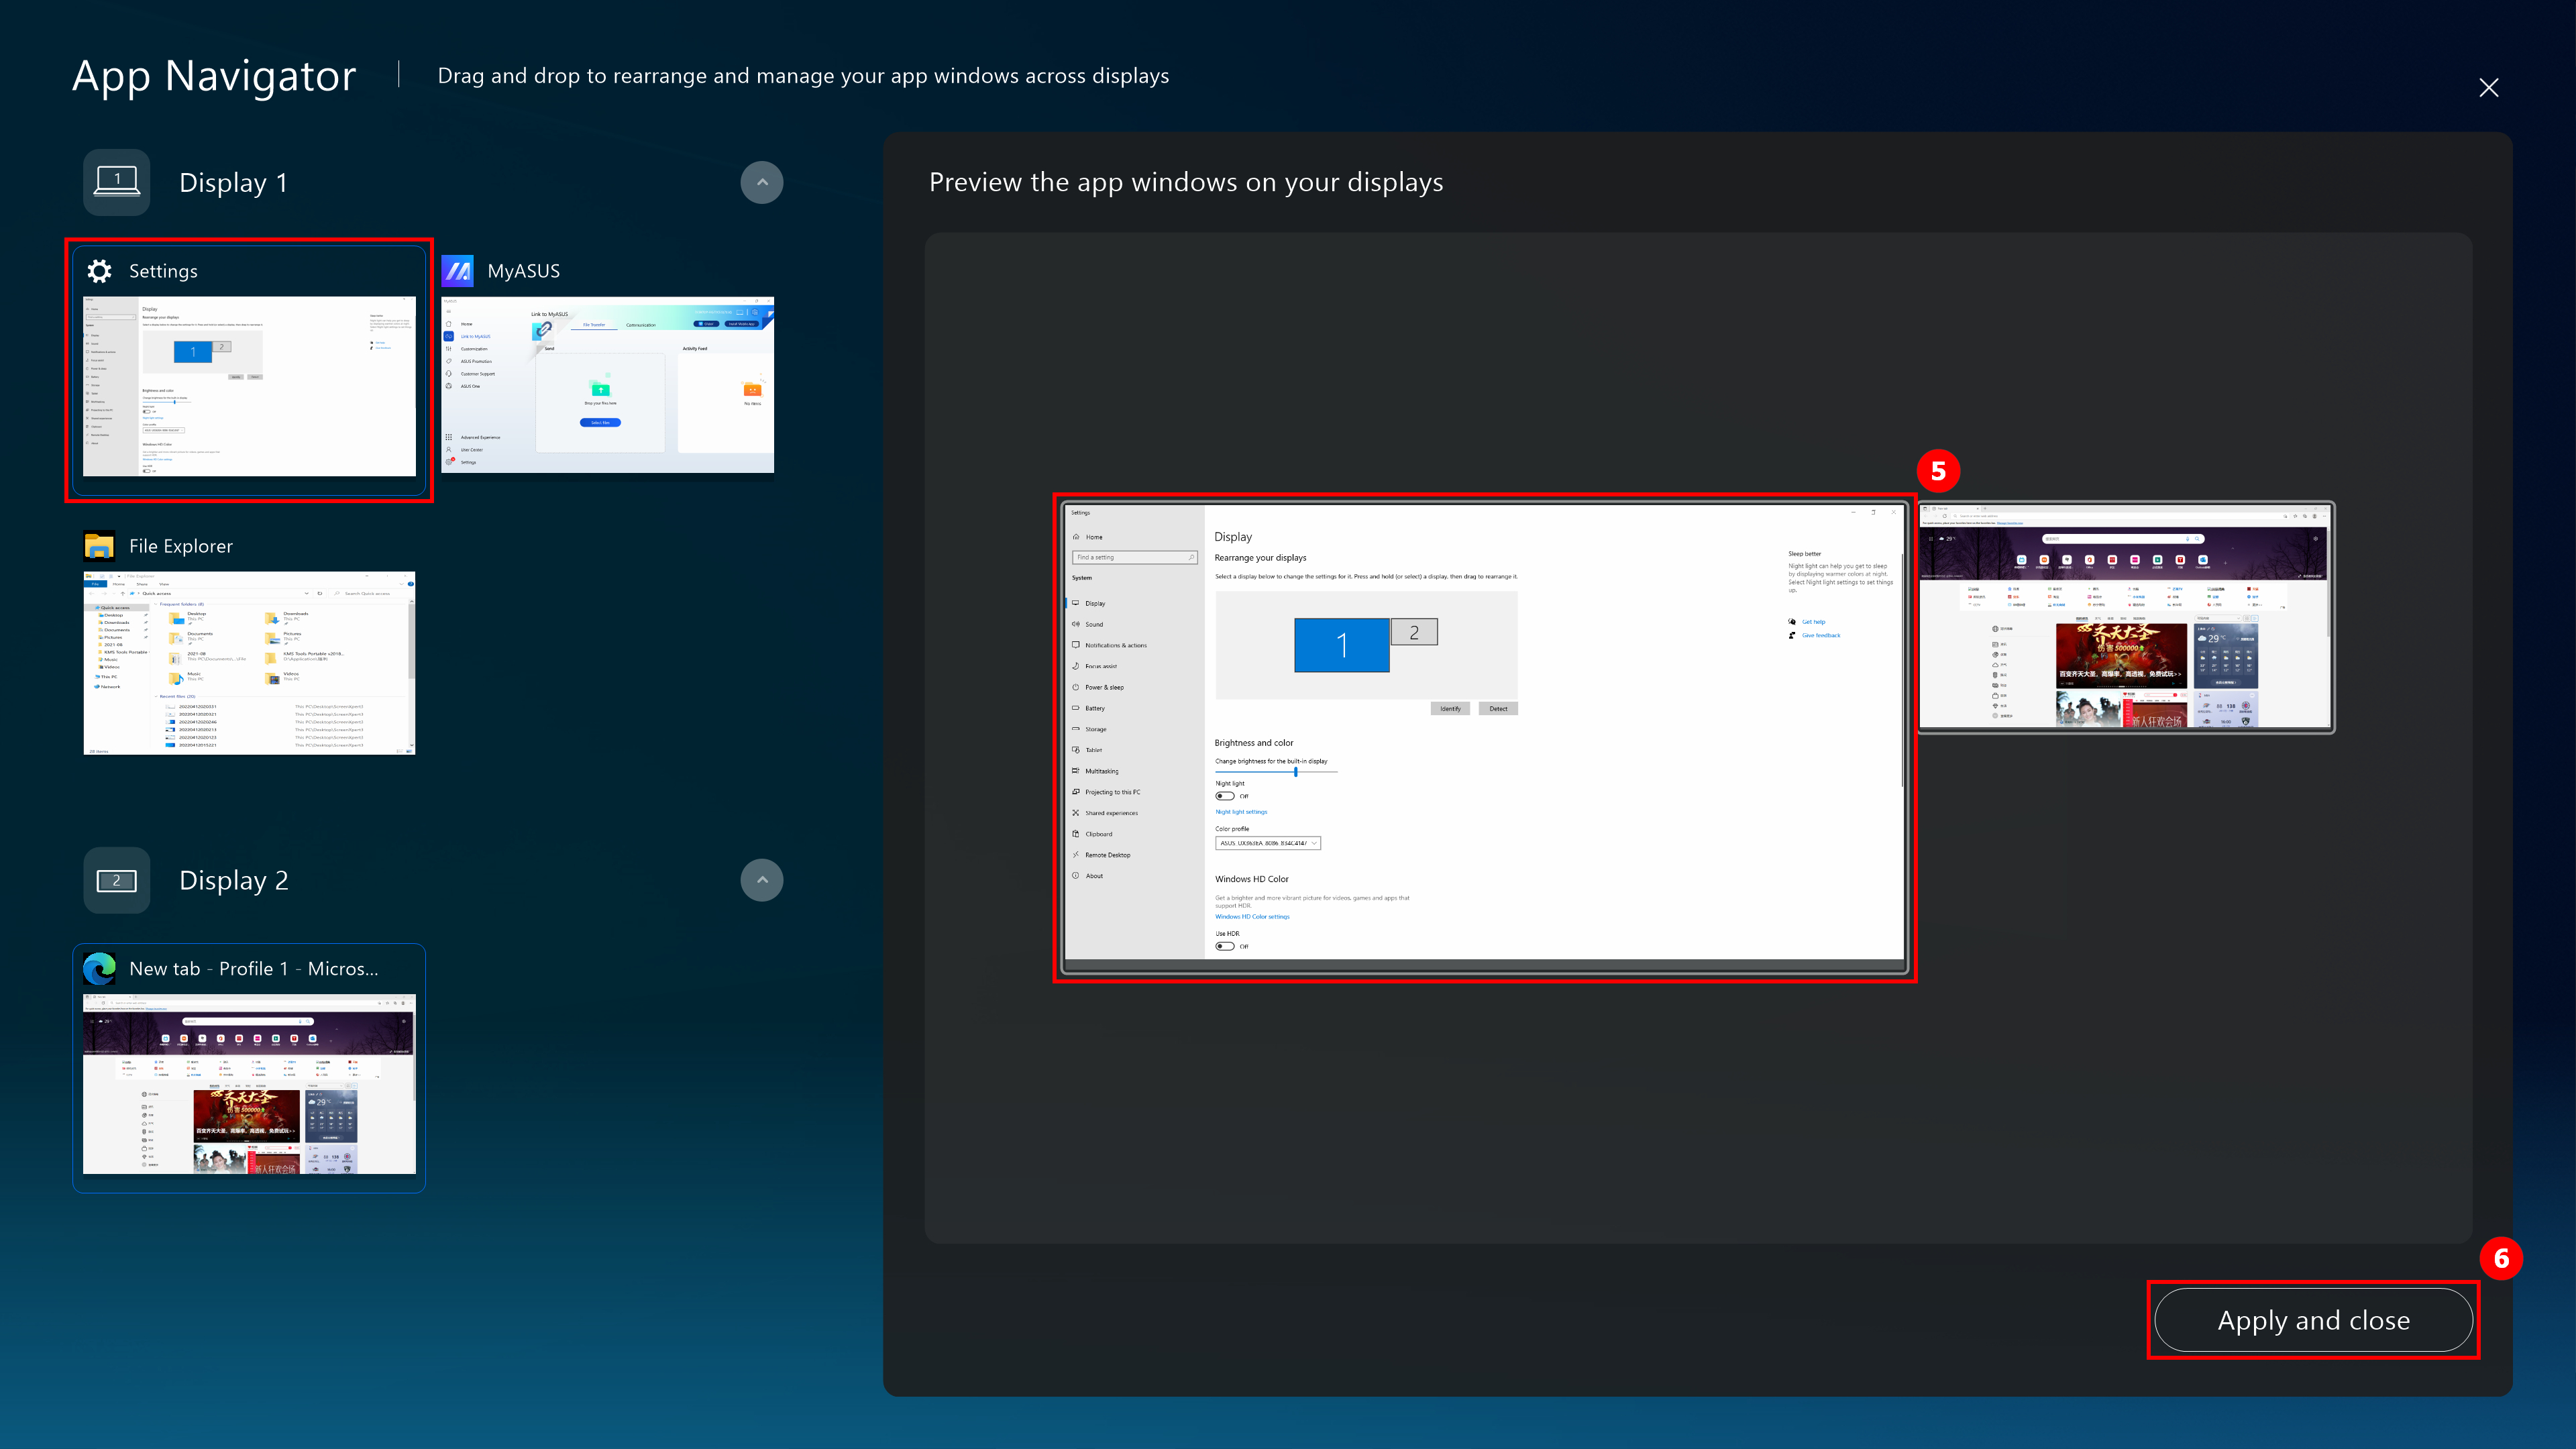
(5) This window is already centered in front of [Screen 1].
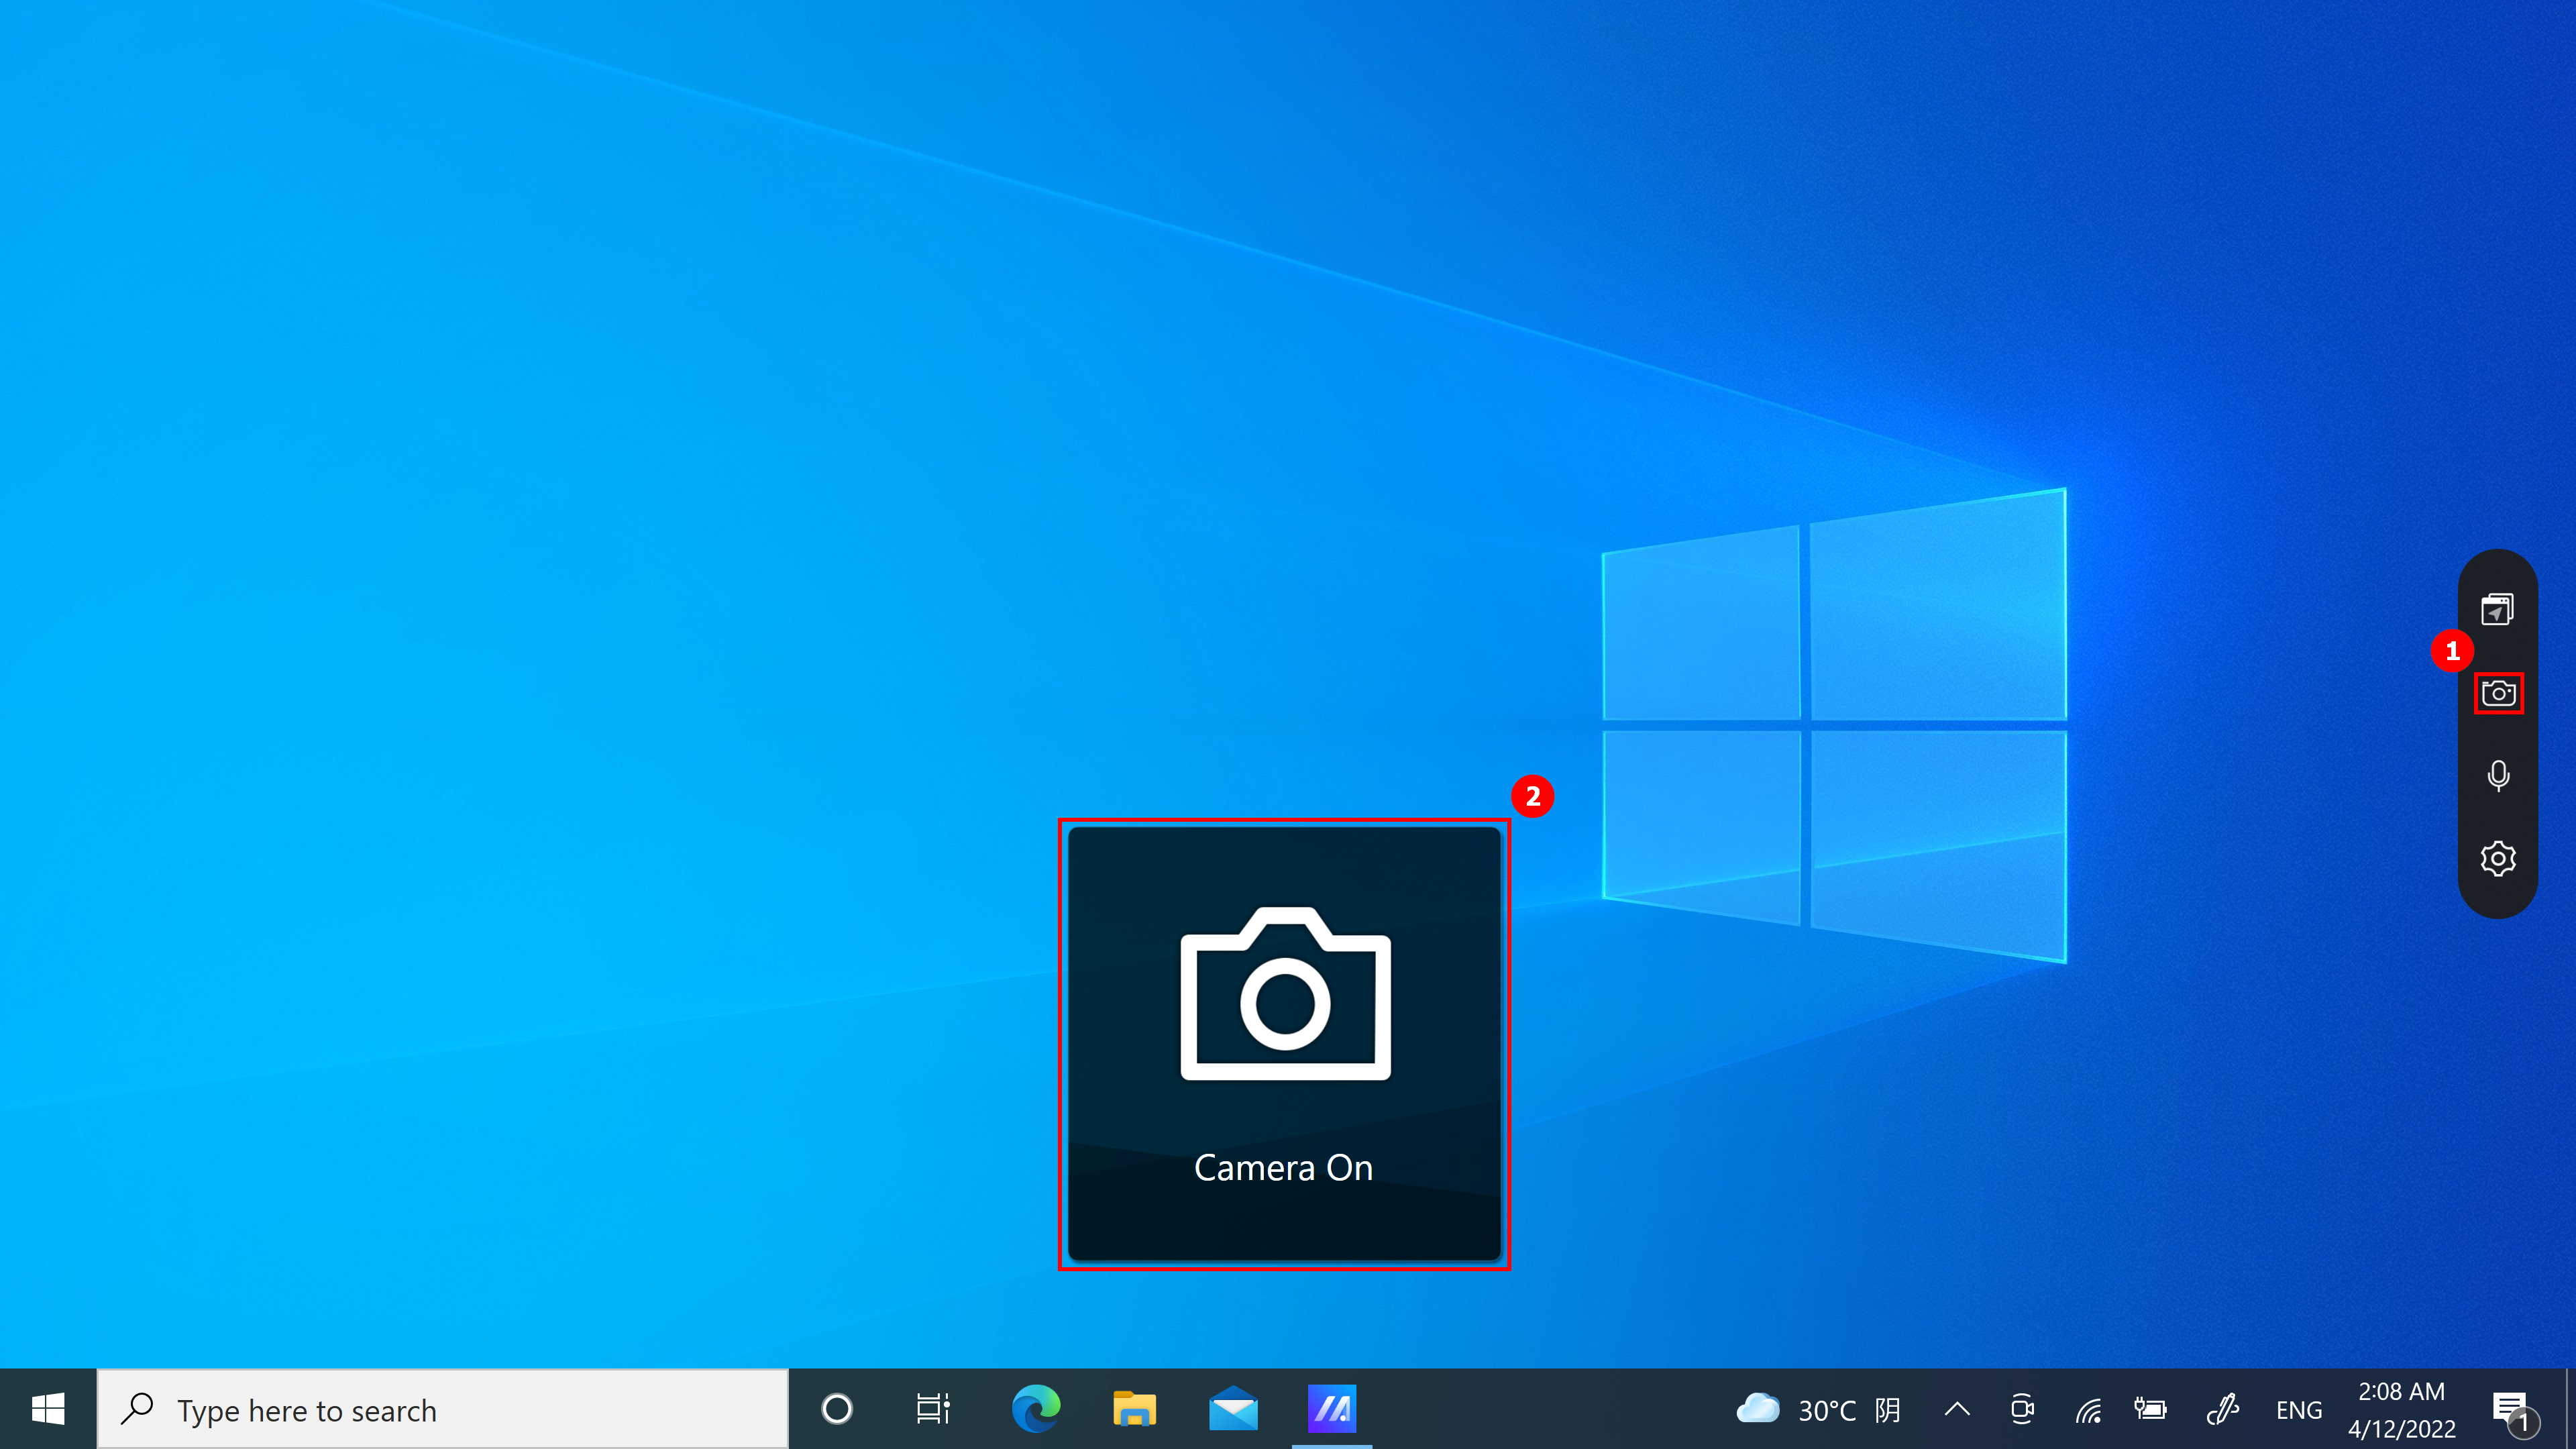
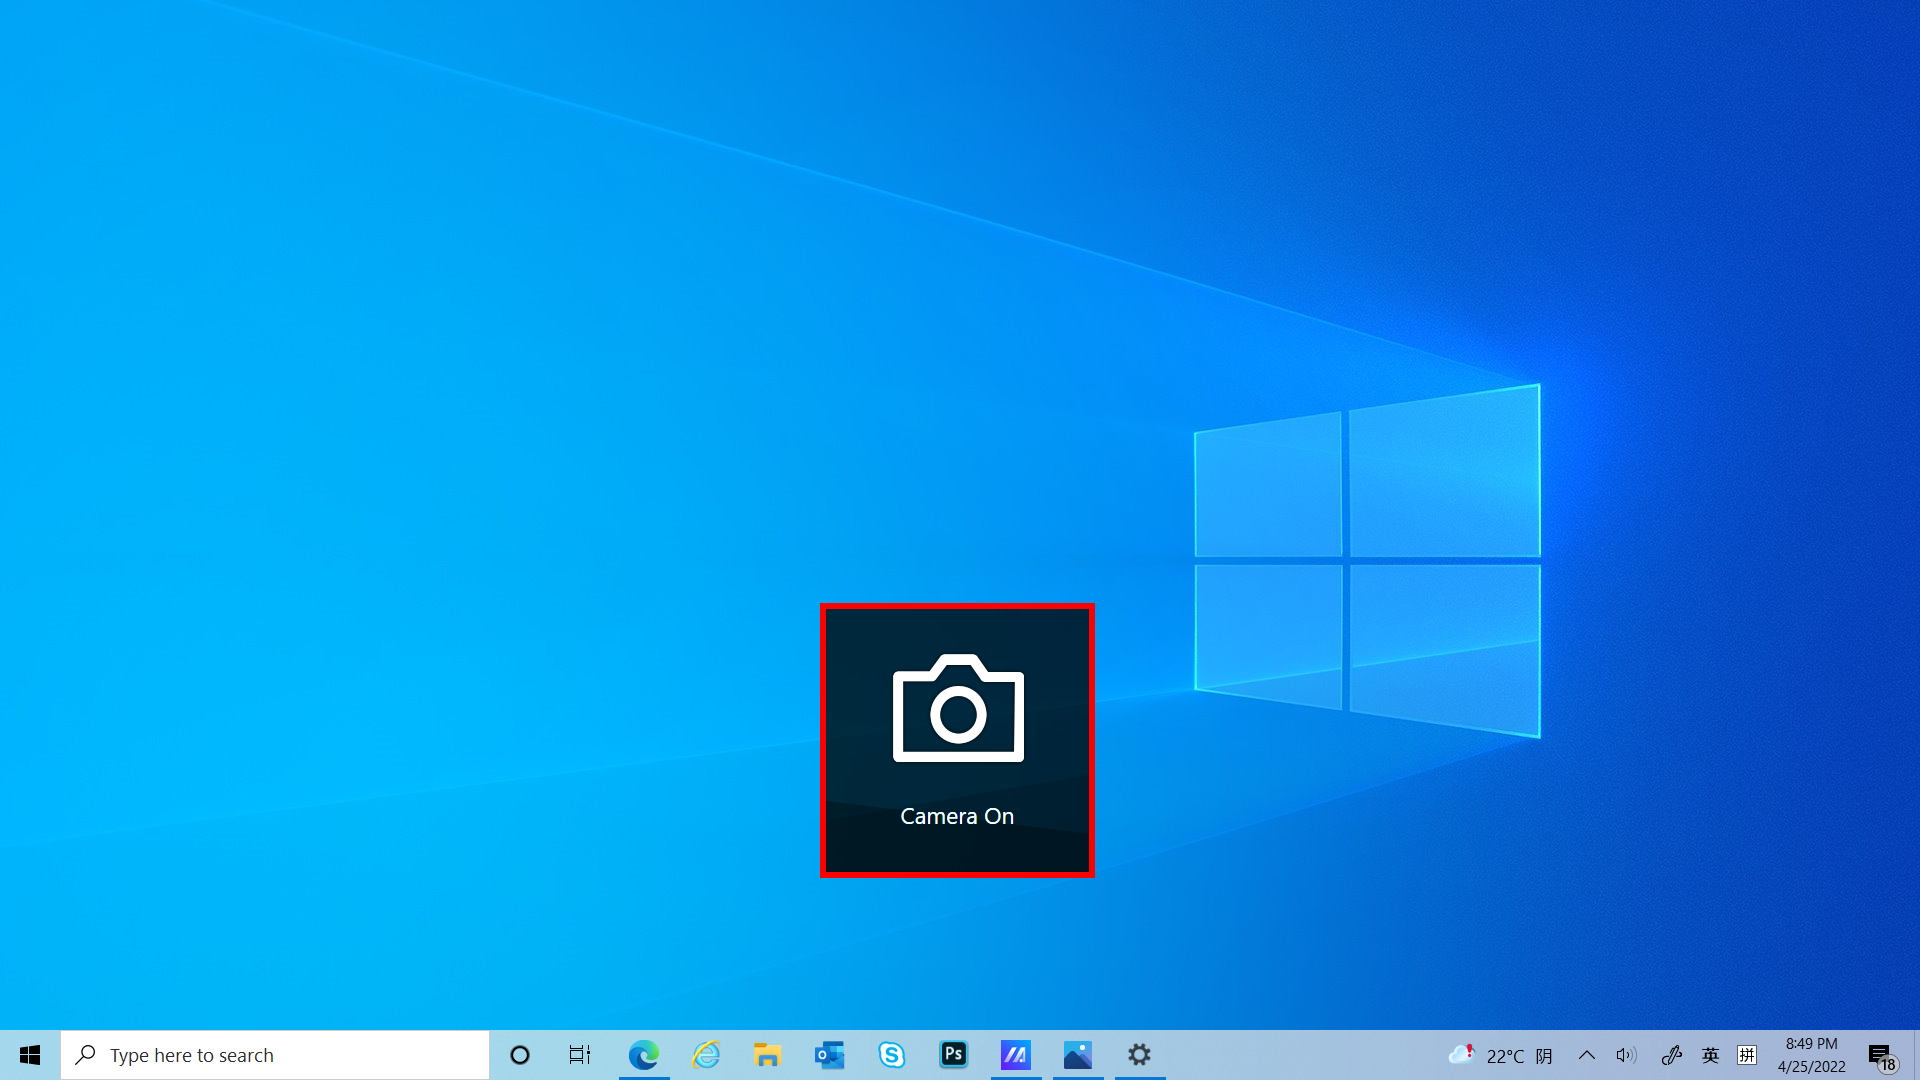
(1) Click ① [Camera] to quickly switch the Camera function, and ②[Camera On/Off] will be displayed on the desktop.
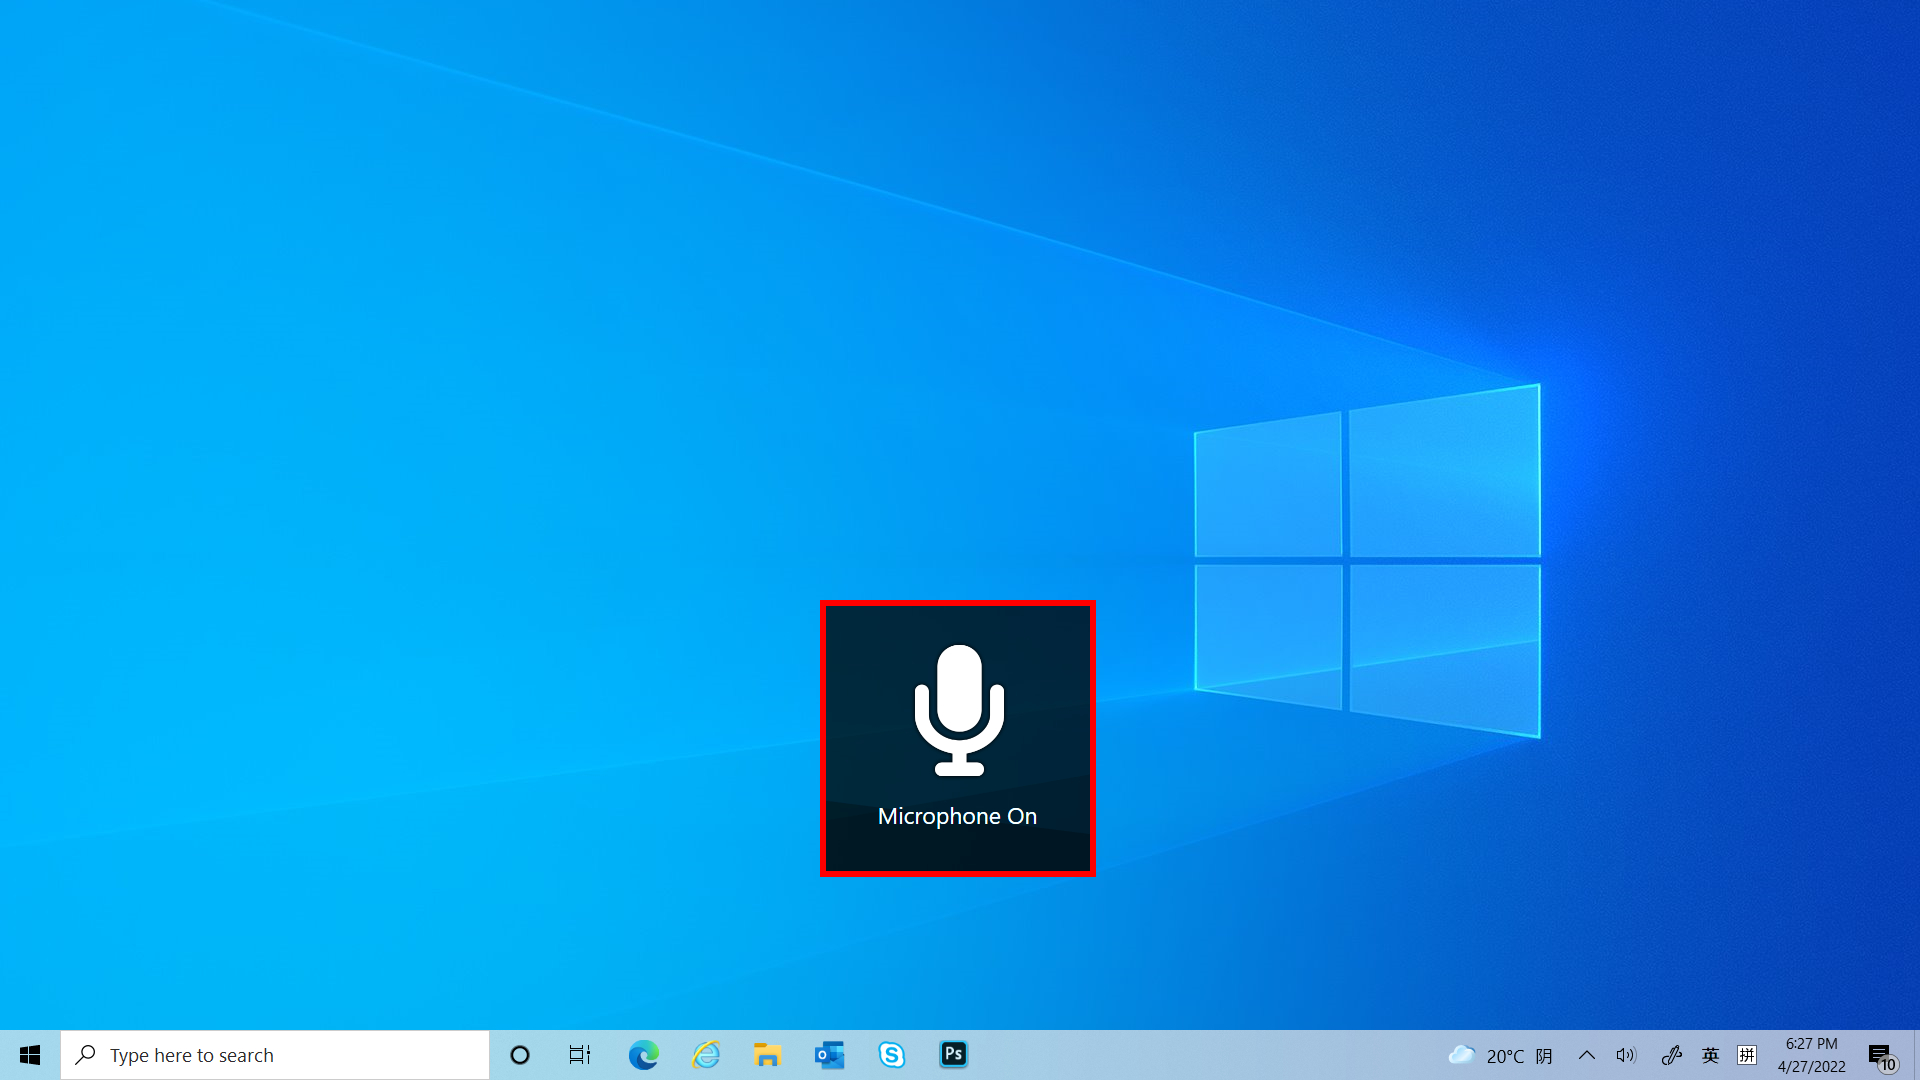
(1) Click ①[Microphone] to quickly switch the Microphone function on and off, and ②[Microphone On/Off] will display on the desktop.

The following features are available on the settings page:
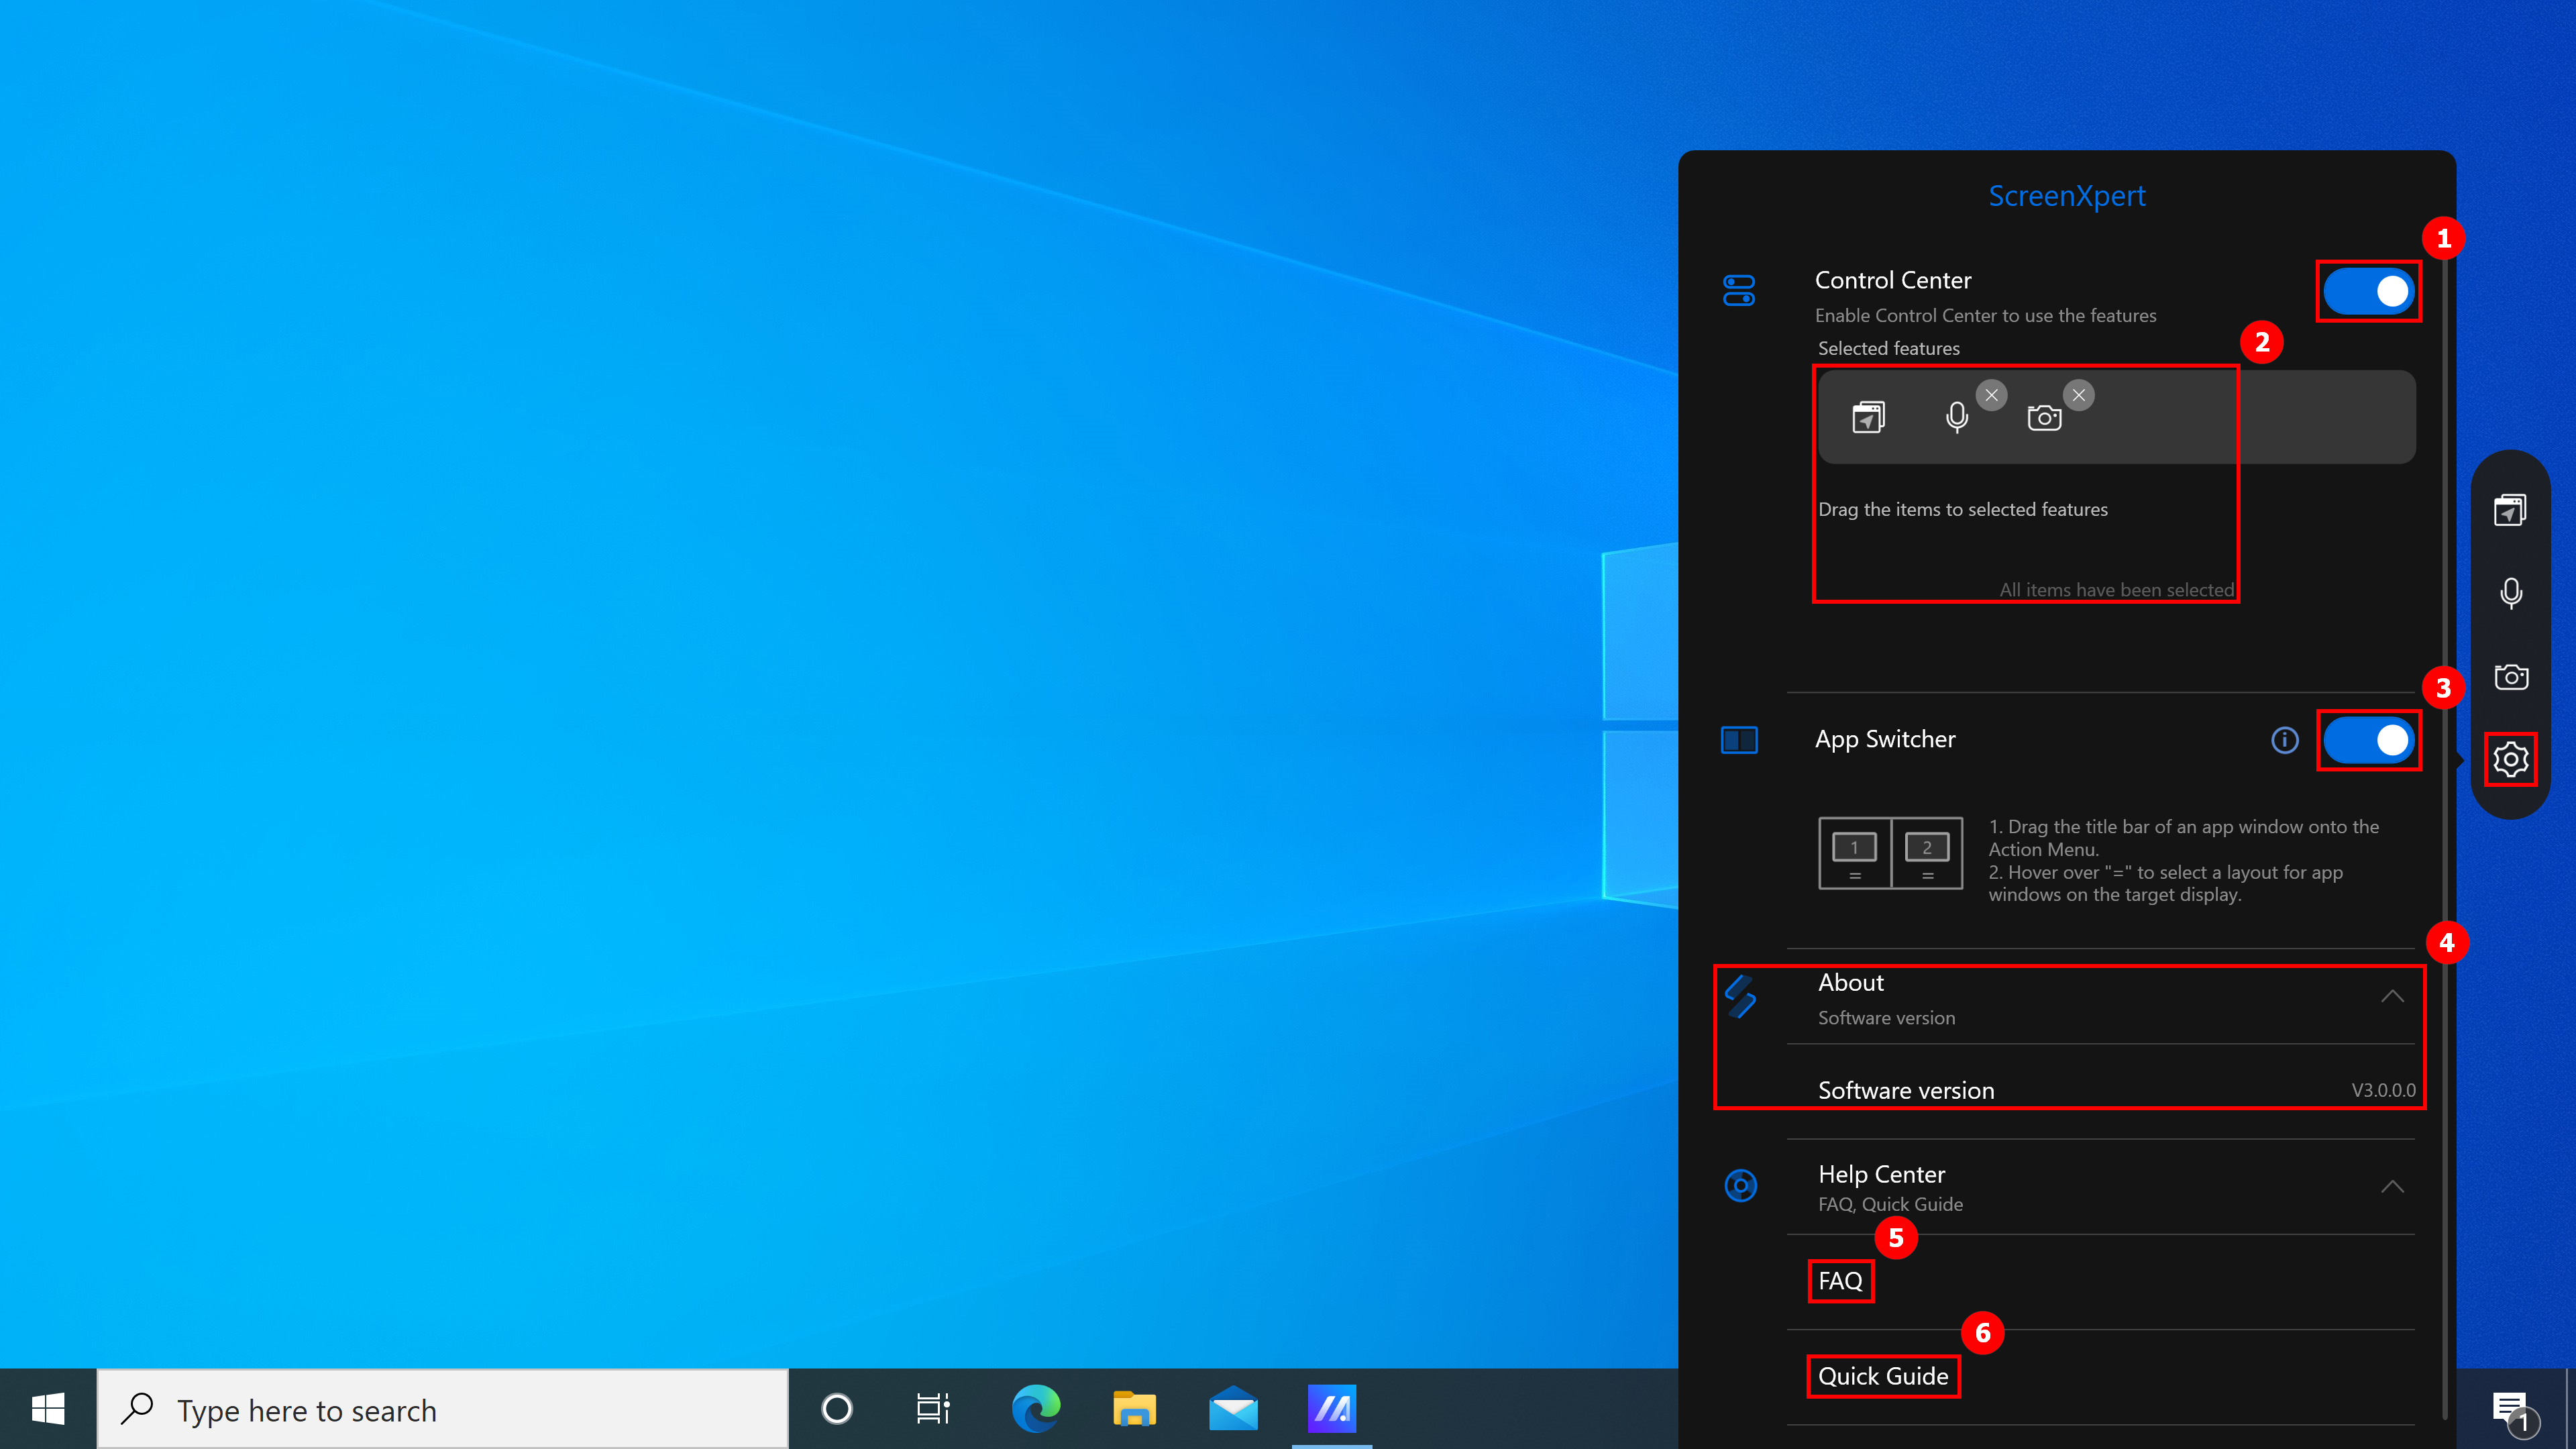
- Click ①[Control Center] the small icon on the desktop will disappear. If you want to turn on the desktop icon, follow the instructions in the first section of this article to manually turn on ScreenXpert, and then turn on Control Center.
- In ②[Selected features], you can turn Microphone and Camera on or off, or change their position.
- Turn ③[App Switcher] on or off.
- The Software version can be viewed in ④[About].
- Clicking on the ⑤[FAQ] will quickly open this article using a browser.
- Click ⑥[Quick Guide] to open the ScreenXpert Guide.
7. ScreenXpert Download and Uninstall
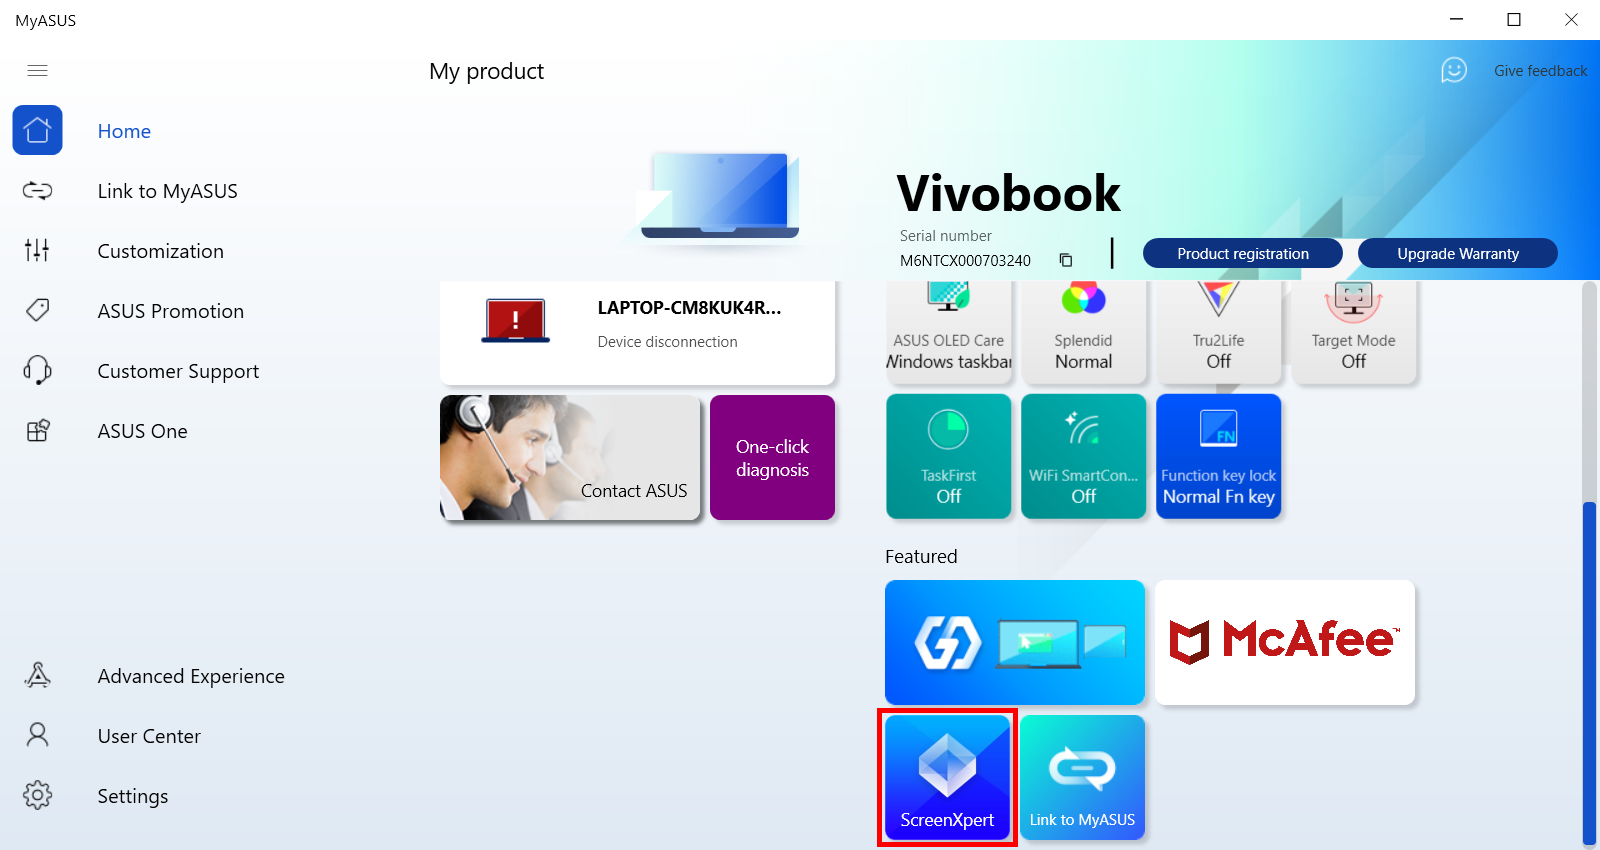
(1) Please go to the MyASUS homepage, find and click ScreenXpert in the featured column, and you will be taken to the Microsoft App Store to download ScreenXpert.
(2)To uninstall ScreenXpert, please click on the link for more information.
[Notebook] ScreenPad Plus with ScreenXpert 3 - Introduction
Designed to give you the ultimate edge in workflow efficiency, the unique full-width ASUS ScreenPad™ Plus secondary touchscreen works seamlessly with the main display. The interactive ScreenPad Plus enhances your productivity and allows for endless possibilities using an enhanced collection of handy quick controls for intuitive interactions between the main display and ScreenPad Plus. Now you can drag any discrete app or in-app toolbar onto your ScreenPad Plus to give you more room to work on the main display.
- System Requirement
- Main Screen and ScreenPad Plus
- Open ScreenPad Plus
- App Switcher
- Brightness
- App Navigator
- Task Swap
- Camera
- Microphone
- Keyboard Lock
- Show Desktop
- Phone Call
- TouchPad
- Launcher
- Settings
- Install & Uninstall ScreenXpert
1. ScreenPad Xpert required driver and App version requirements, and how to download and install.
- ScreenXpert UWP: v3.0.1.0 (Download or upgrade in the Microsoft store)
- ScreenXpert Driver: v2.0.30.0 (Download or upgrade in the MyASUS)
- ASUS Control Panel Toolkit: v1.0.14.0 (Download or upgrade in the MyASUS) (For Control Panel Setting)
- ASUS System Control interface V3: v3.0.24.0 (Download or upgrade in the MyASUS)
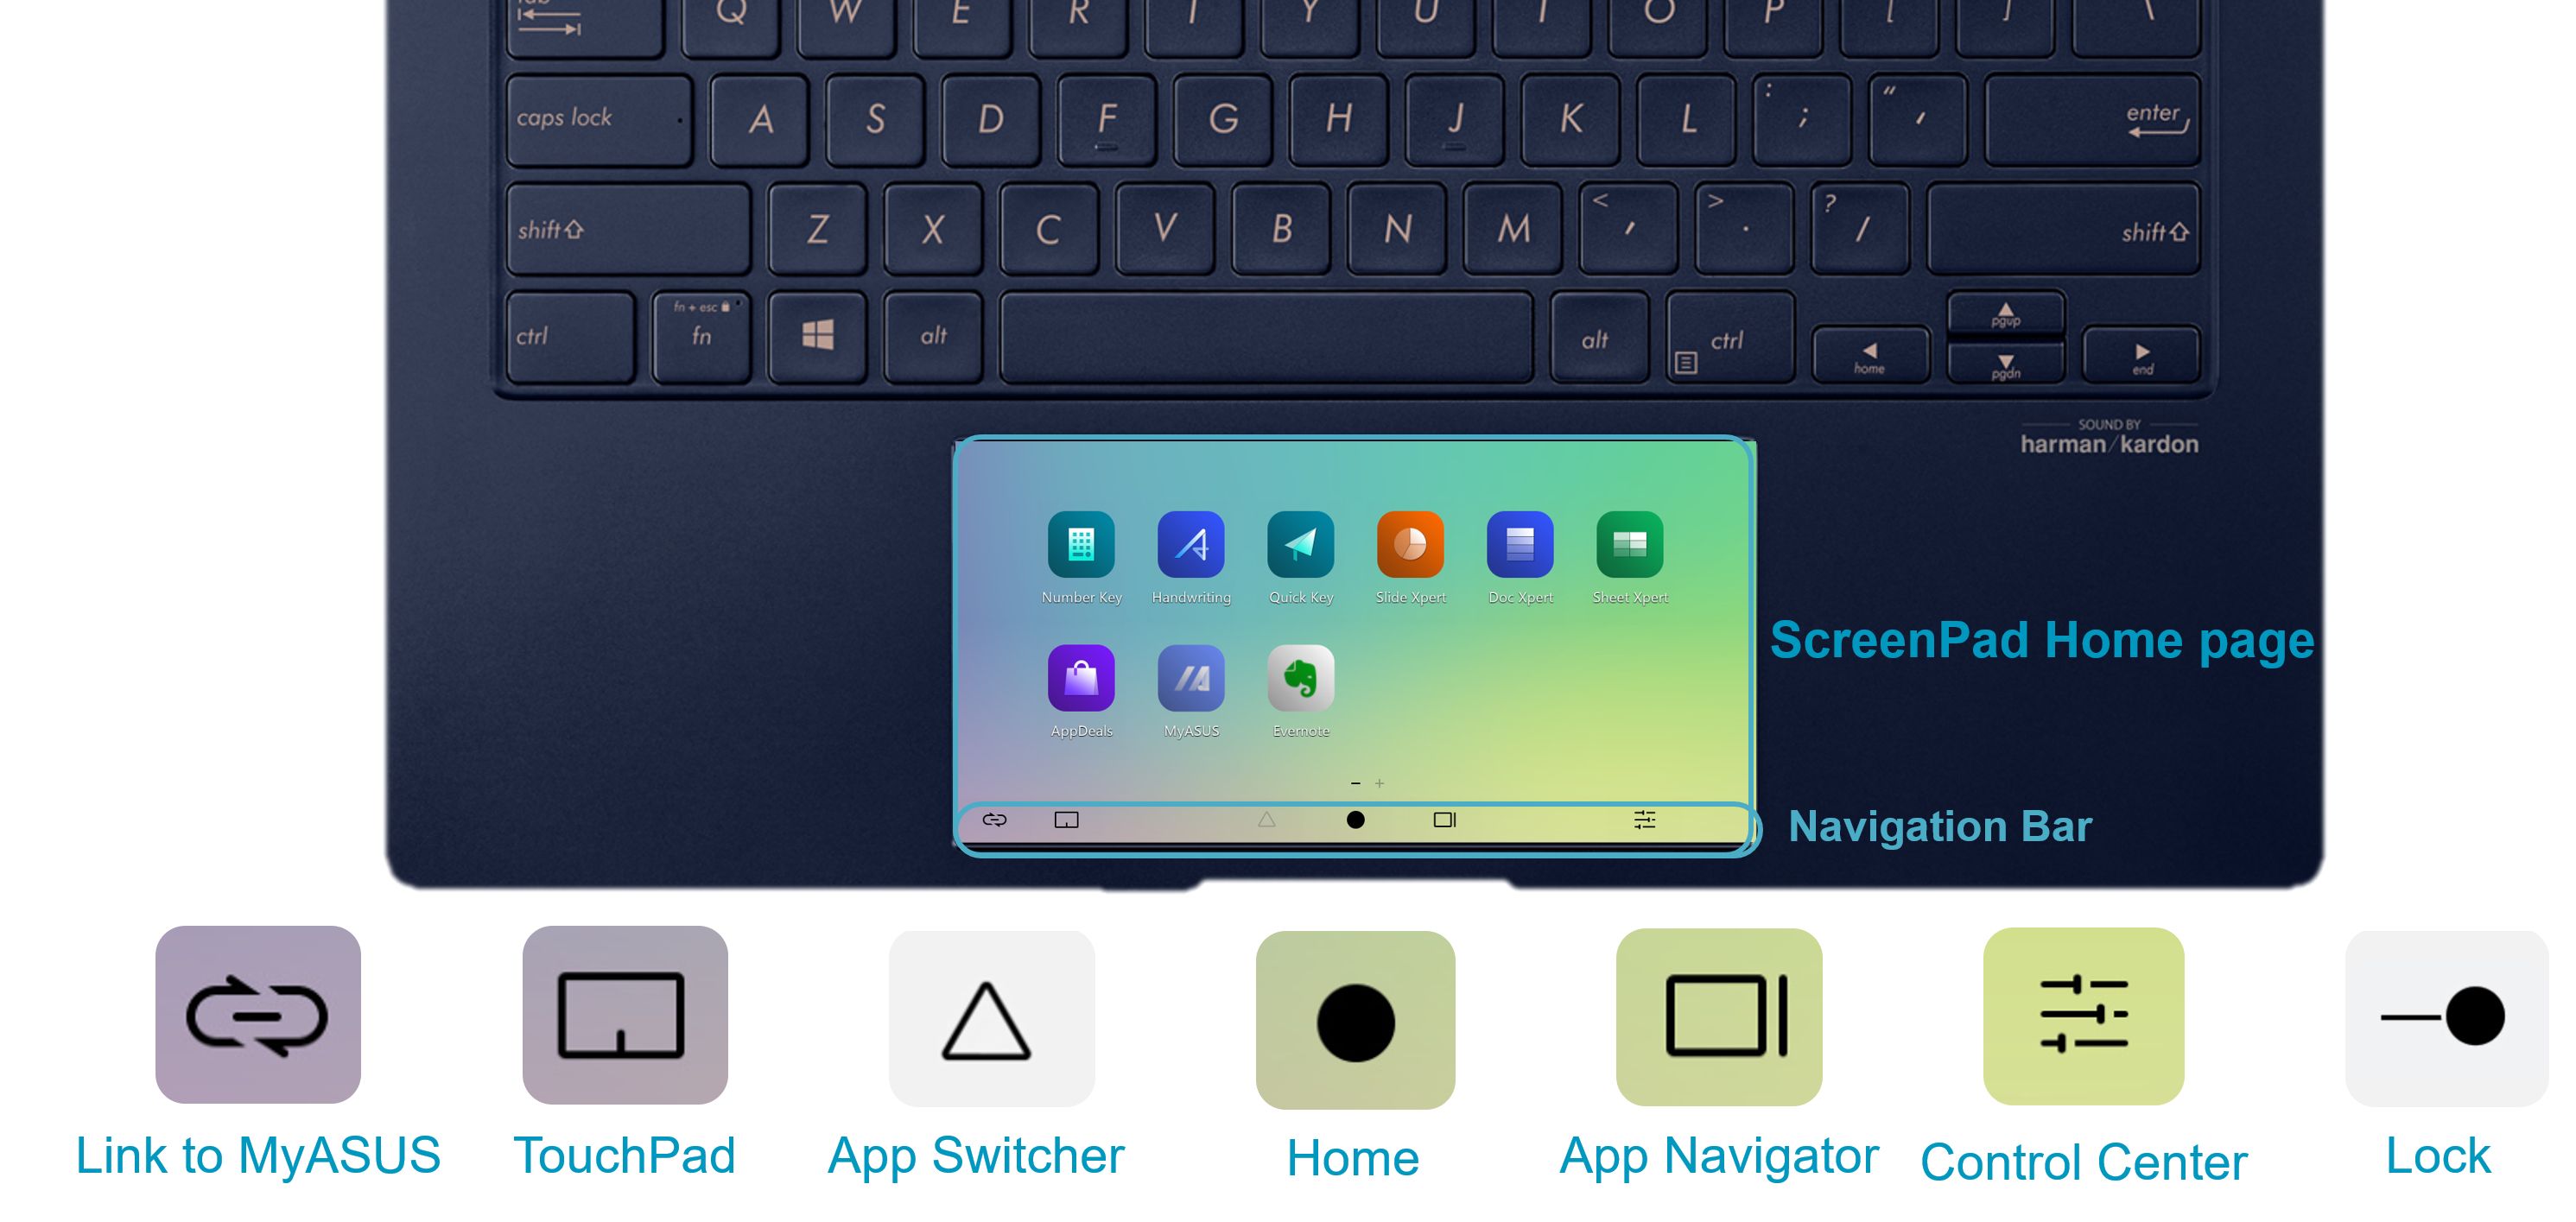
2. Main Screen and ScreenPad Plus
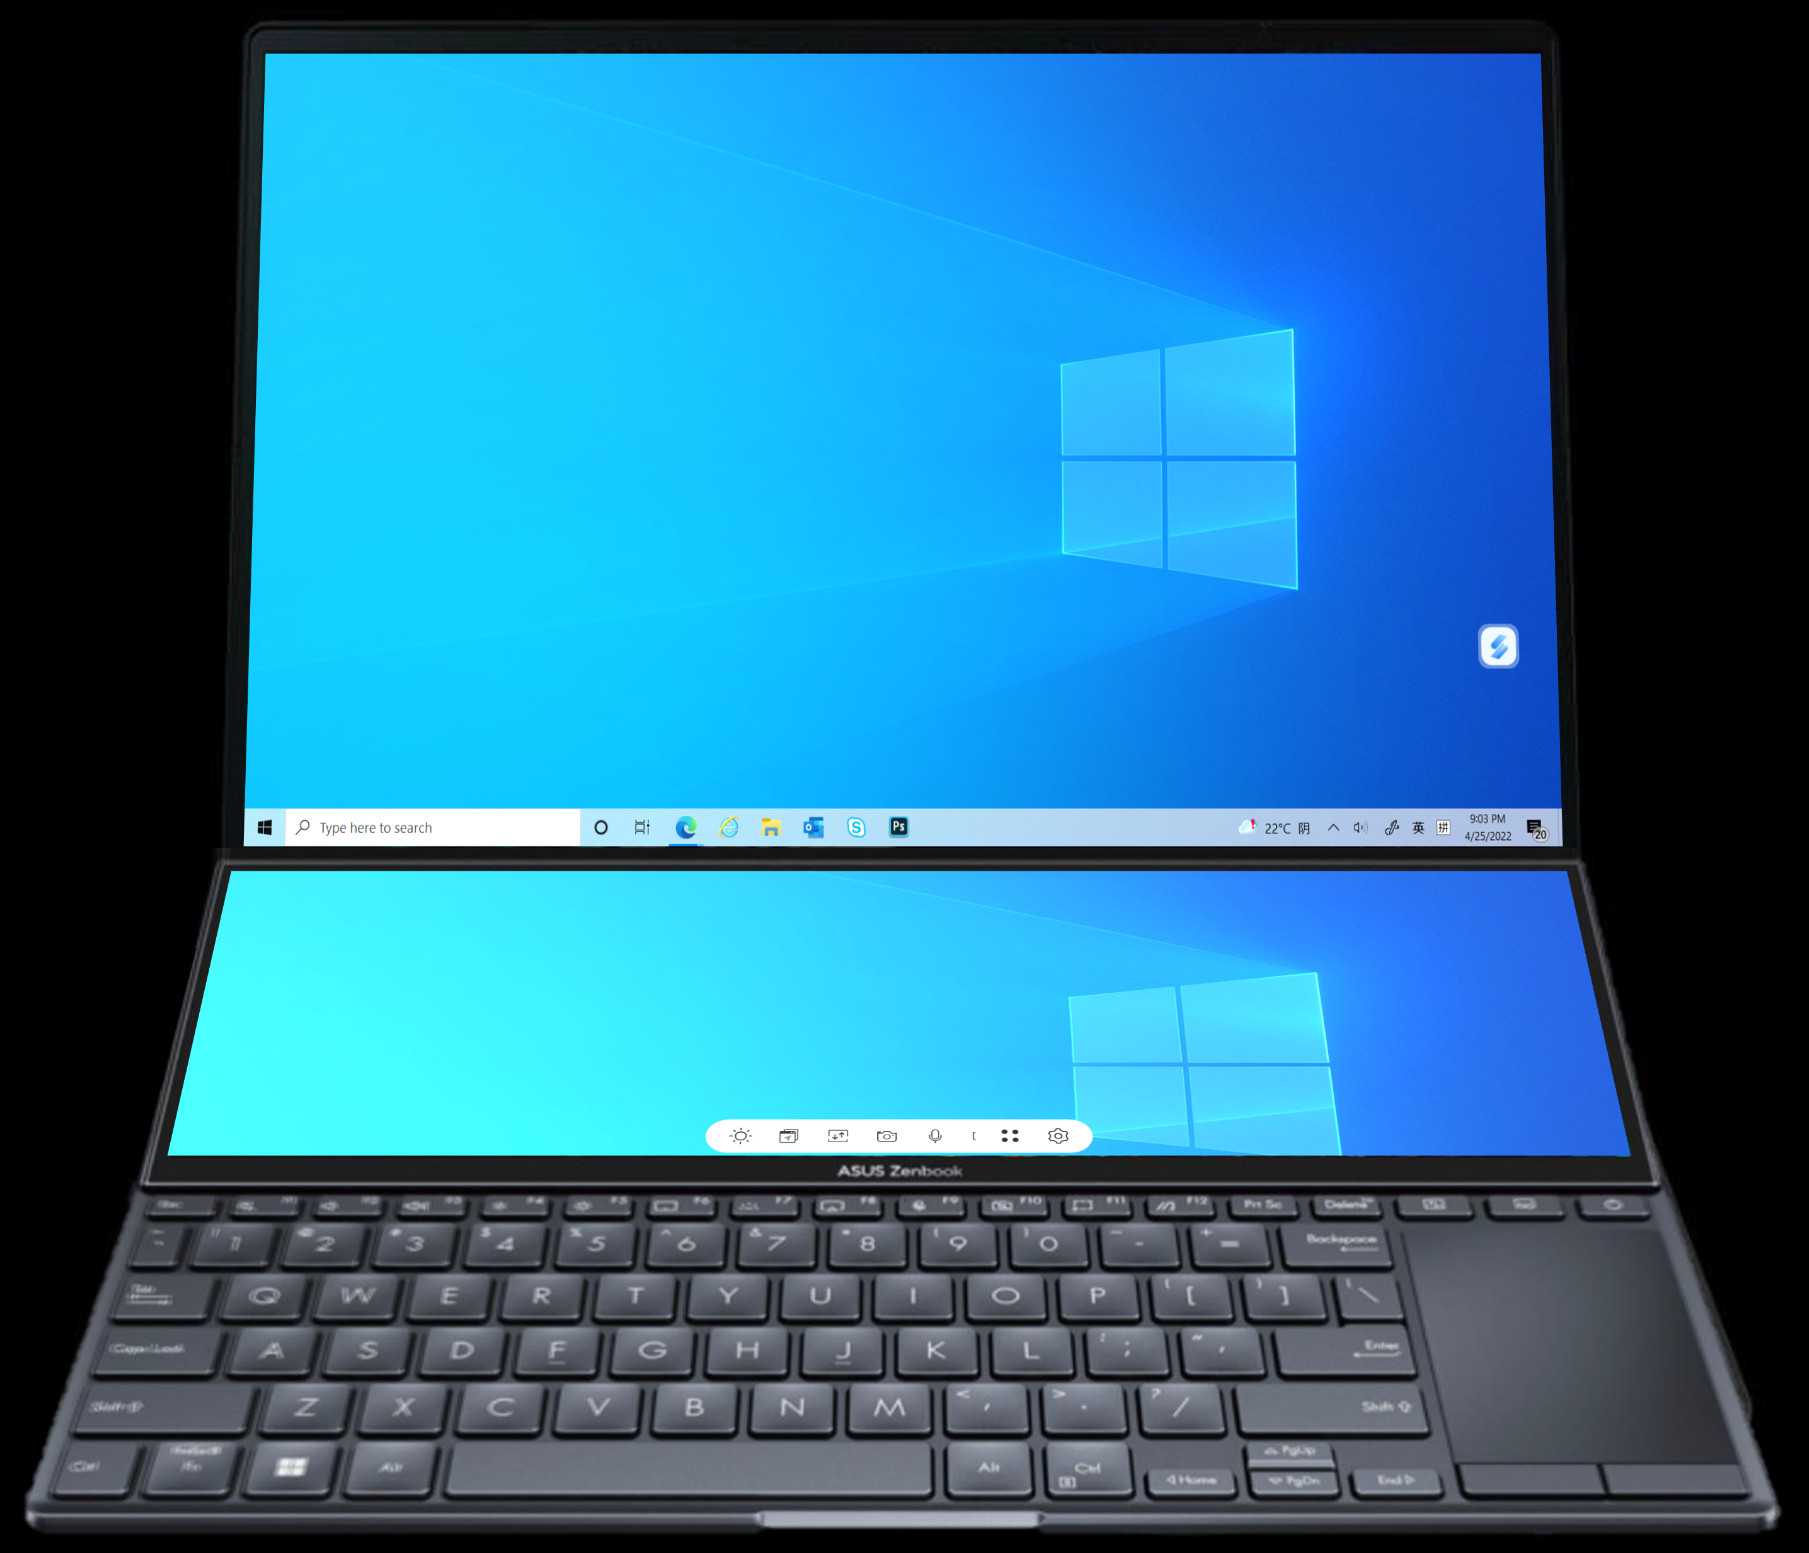
From left to right: Brightness, App Navigator, Task Swap, Camera, Microphone, Keyboard Lock, Show Desktop, Link to MyASUS, TouchPad, Utilities, Settings.

(1) Enter ①[ScreenXpert] in the search bar in the lower left corner of the desktop. Click ②[ScreenXpert], and ScreenPad Plus will activate.
(1) When you drag the App window on the Main screen, ①[Screen Markings] will display and allow you to confirm the location of the screen. The ②[App Switcher] menu function is also displayed, which contains Screen 1, Screen 2, Screen3 and ViewMax icons. (In the example, the computer has an extend screen)
(2) ScreenXpert supports interaction between screens. When you drag a window on the desktop, the [App Switcher] icon appears. If you drag the window to ①[Screen], the window will be displayed in full screen in Screen. If you drag the window to ②[ViewMax], the window will be displayed in full screen on Main Screen and Screen Pad Plus.
- Drag the mouse to the ③, and the App window will display within screen 1 to occupy a quarter of the screen.
- Drag the mouse to the ④, and the App window will display within screen 1 to occupy one-half of the left and right of the screen.
- Drag the mouse to the ⑤, and the App window will display within screen 1 to occupy one-half of the top and bottom of the screen.
Drag the mouse to the ④, and the App window will display within screen 1 to occupy one-half of the left of the screen.
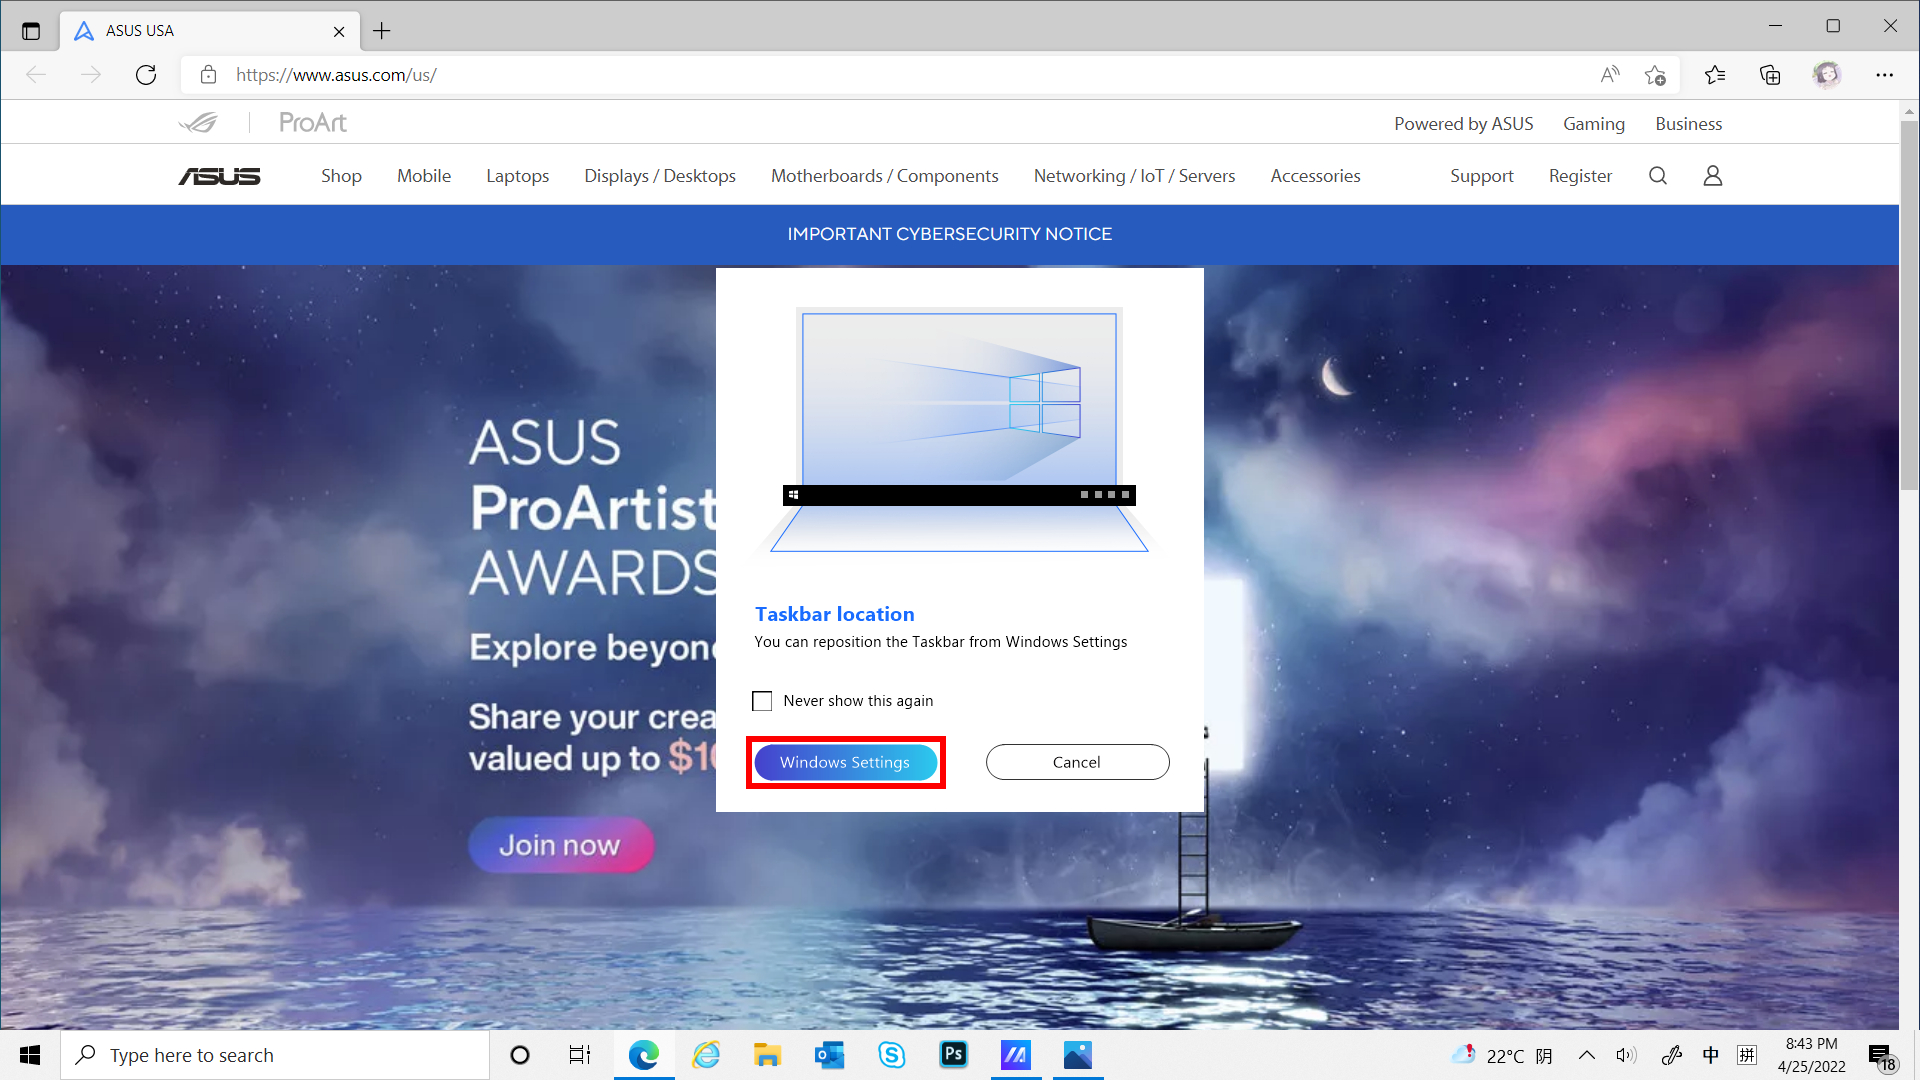
(3) Drag the window to [ViewMax], the window will be displayed in full screen on Main Screen and Screen Pad Plus. The Taskbar Location pop-up window will appear, click [Windows Settings] to quickly modify the Taskbar.
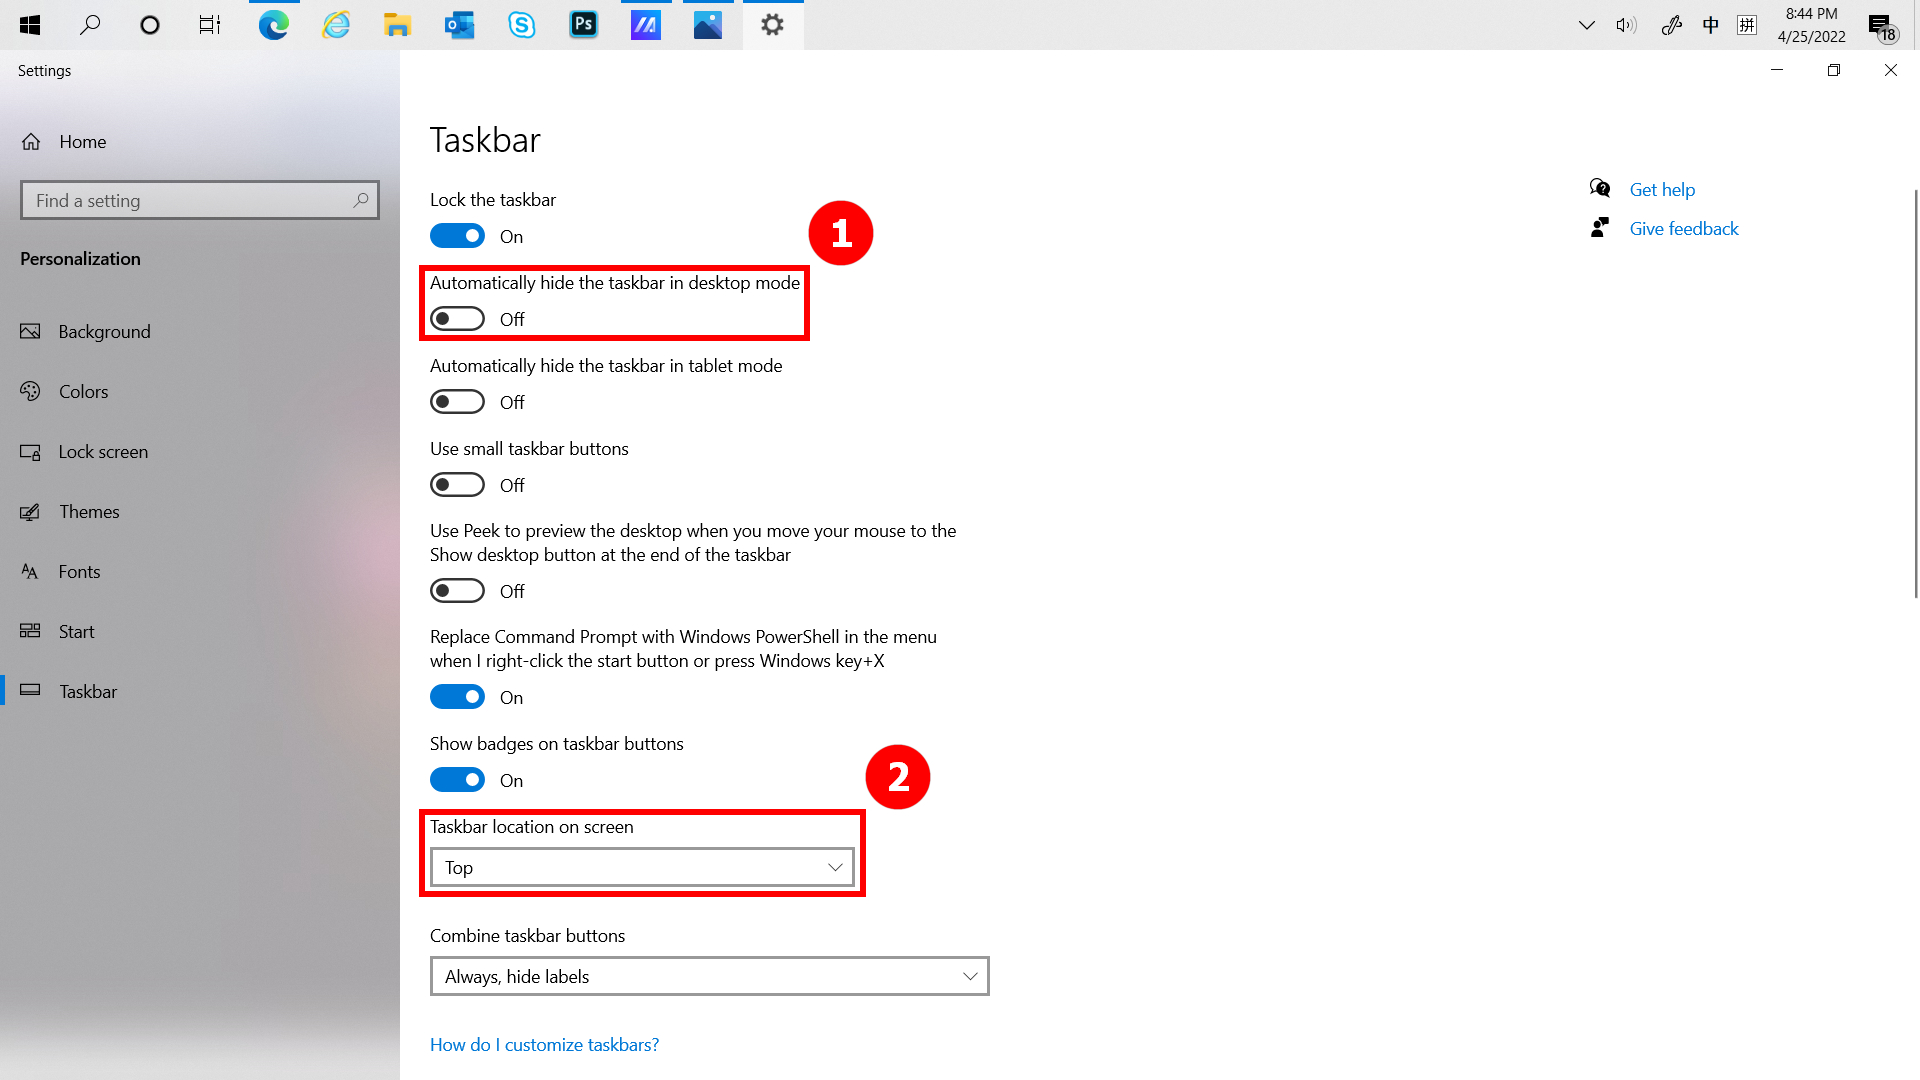
(4) You can modify the location of the Taskbar in ①[Automatically hide the taskbar in desktop mode] or ②[Taskbar location on screen] to improve your experience when using the ViewMax feature.
Click Brightness to quickly adjust the brightness of the Screenpad Plus.
(1) When you have multiple windows open on your computer and want to quickly switch windows between different screens, use App Navigator function and click  [App Navigator]. When App Navigator is opened, ①[Area] is the area marked by the screen in the computer, and ②[Area] is the window displayed on the screen.
(2) Drag ③[Window] displayed in [Screen 2] to [Screen 1].
(3) The ⑤[window] is already displayed on the front of ④[Screen 1]. Click ⑤[Apply and close] to close App Navigator.
(4) This window is already centered in front of [Screen 1].
(1) Click ① [Task Swap] to move the window that is displayed on the ScreenPad Plus to be displayed in full screen on the Main Screen.
(2) The window is already displayed in full screen on the Main Screen.
Click  [Camera] to quickly switch the Camera function, and [Camera On/Off] will be displayed on the desktop.
Click  [Microphone] to quickly switch the Microphone function on and off, and [Microphone On/Off] will display on the desktop.
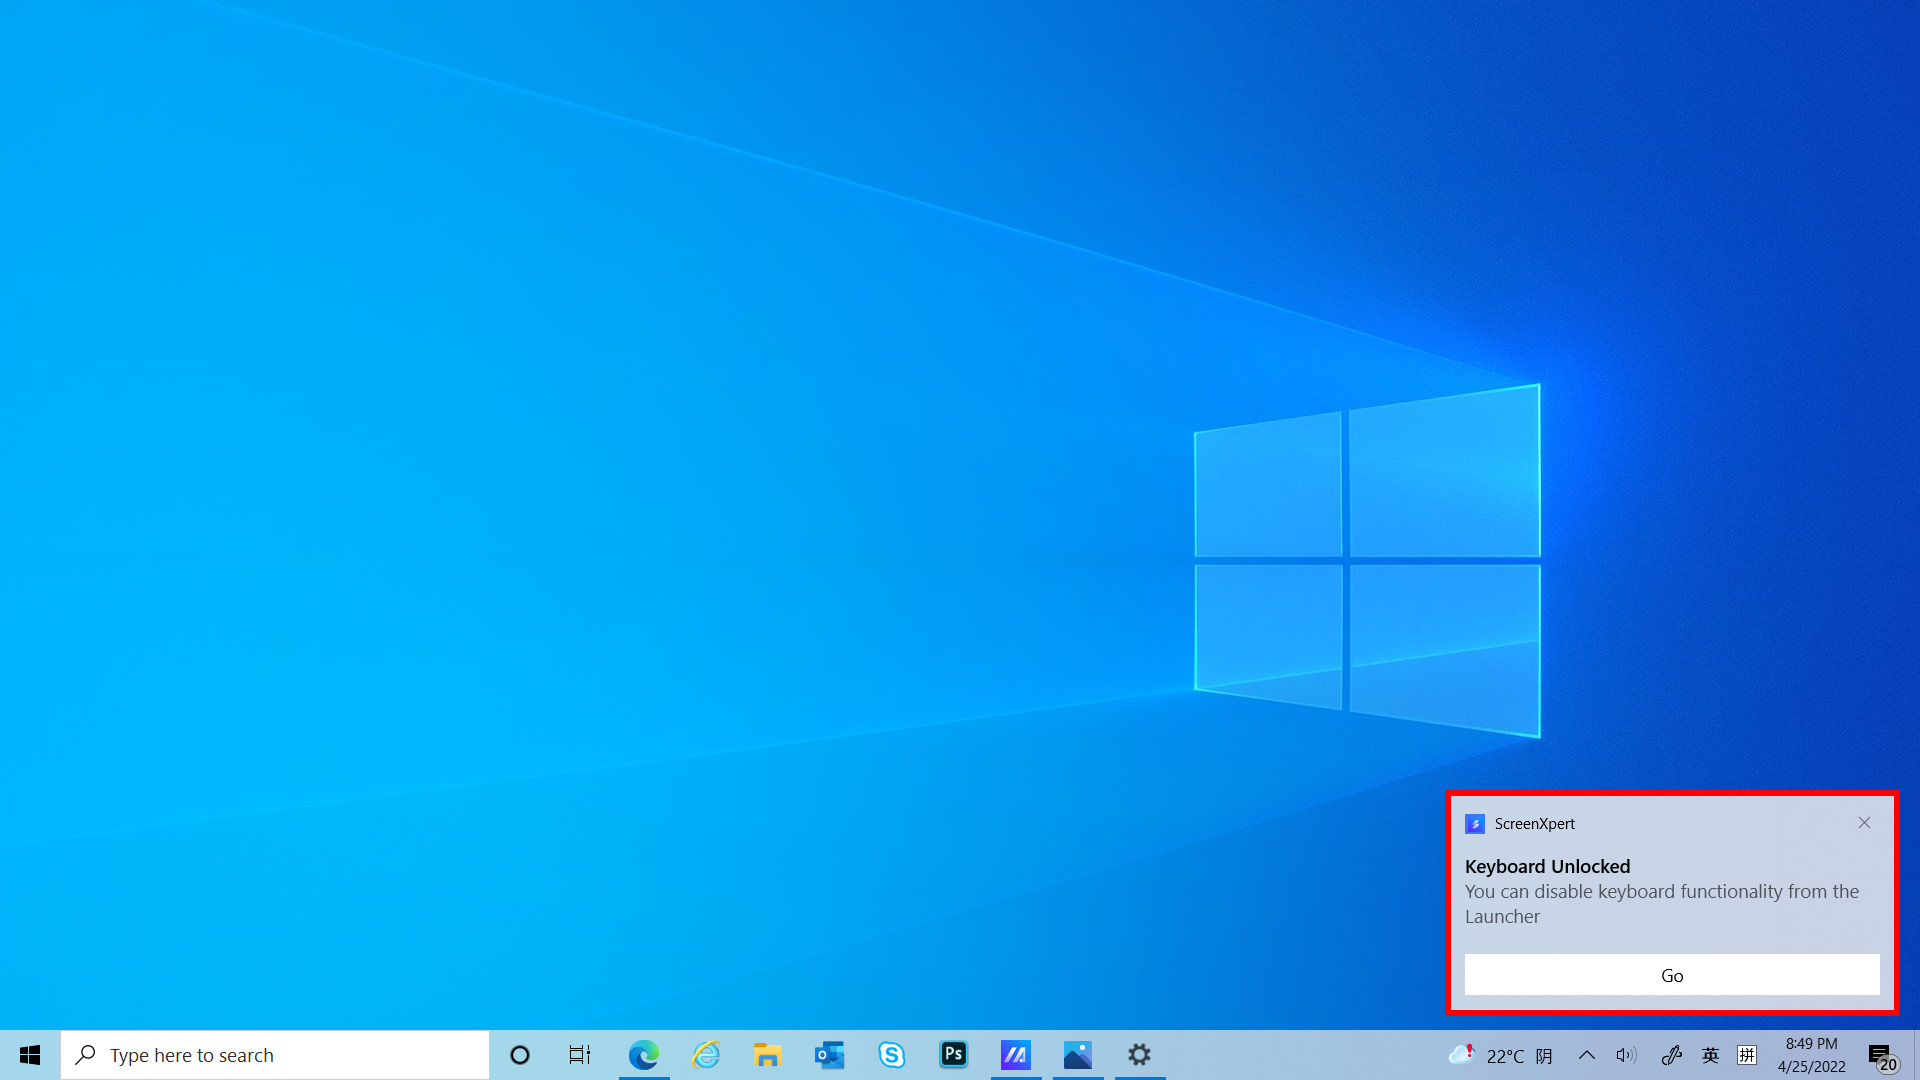
Click  [Keyboard] to quickly switch the Keyboard function lock and unlock, and [Keyboard Lock/Unlock] will display on the desktop.
If a window is displayed on the ScreenPad Plus, you can quickly minimize the window by clicking [Show Desktop].
ScreenPad Plus already shows the desktop.
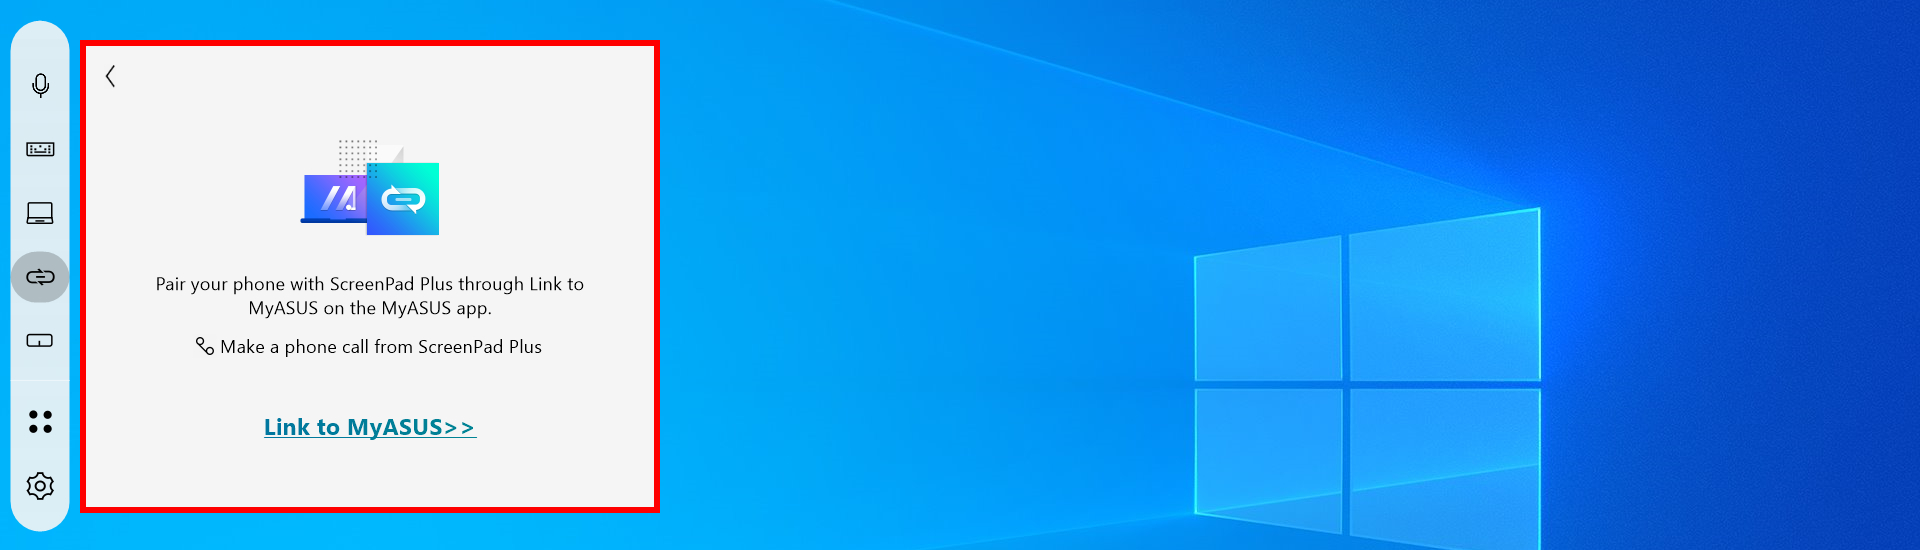
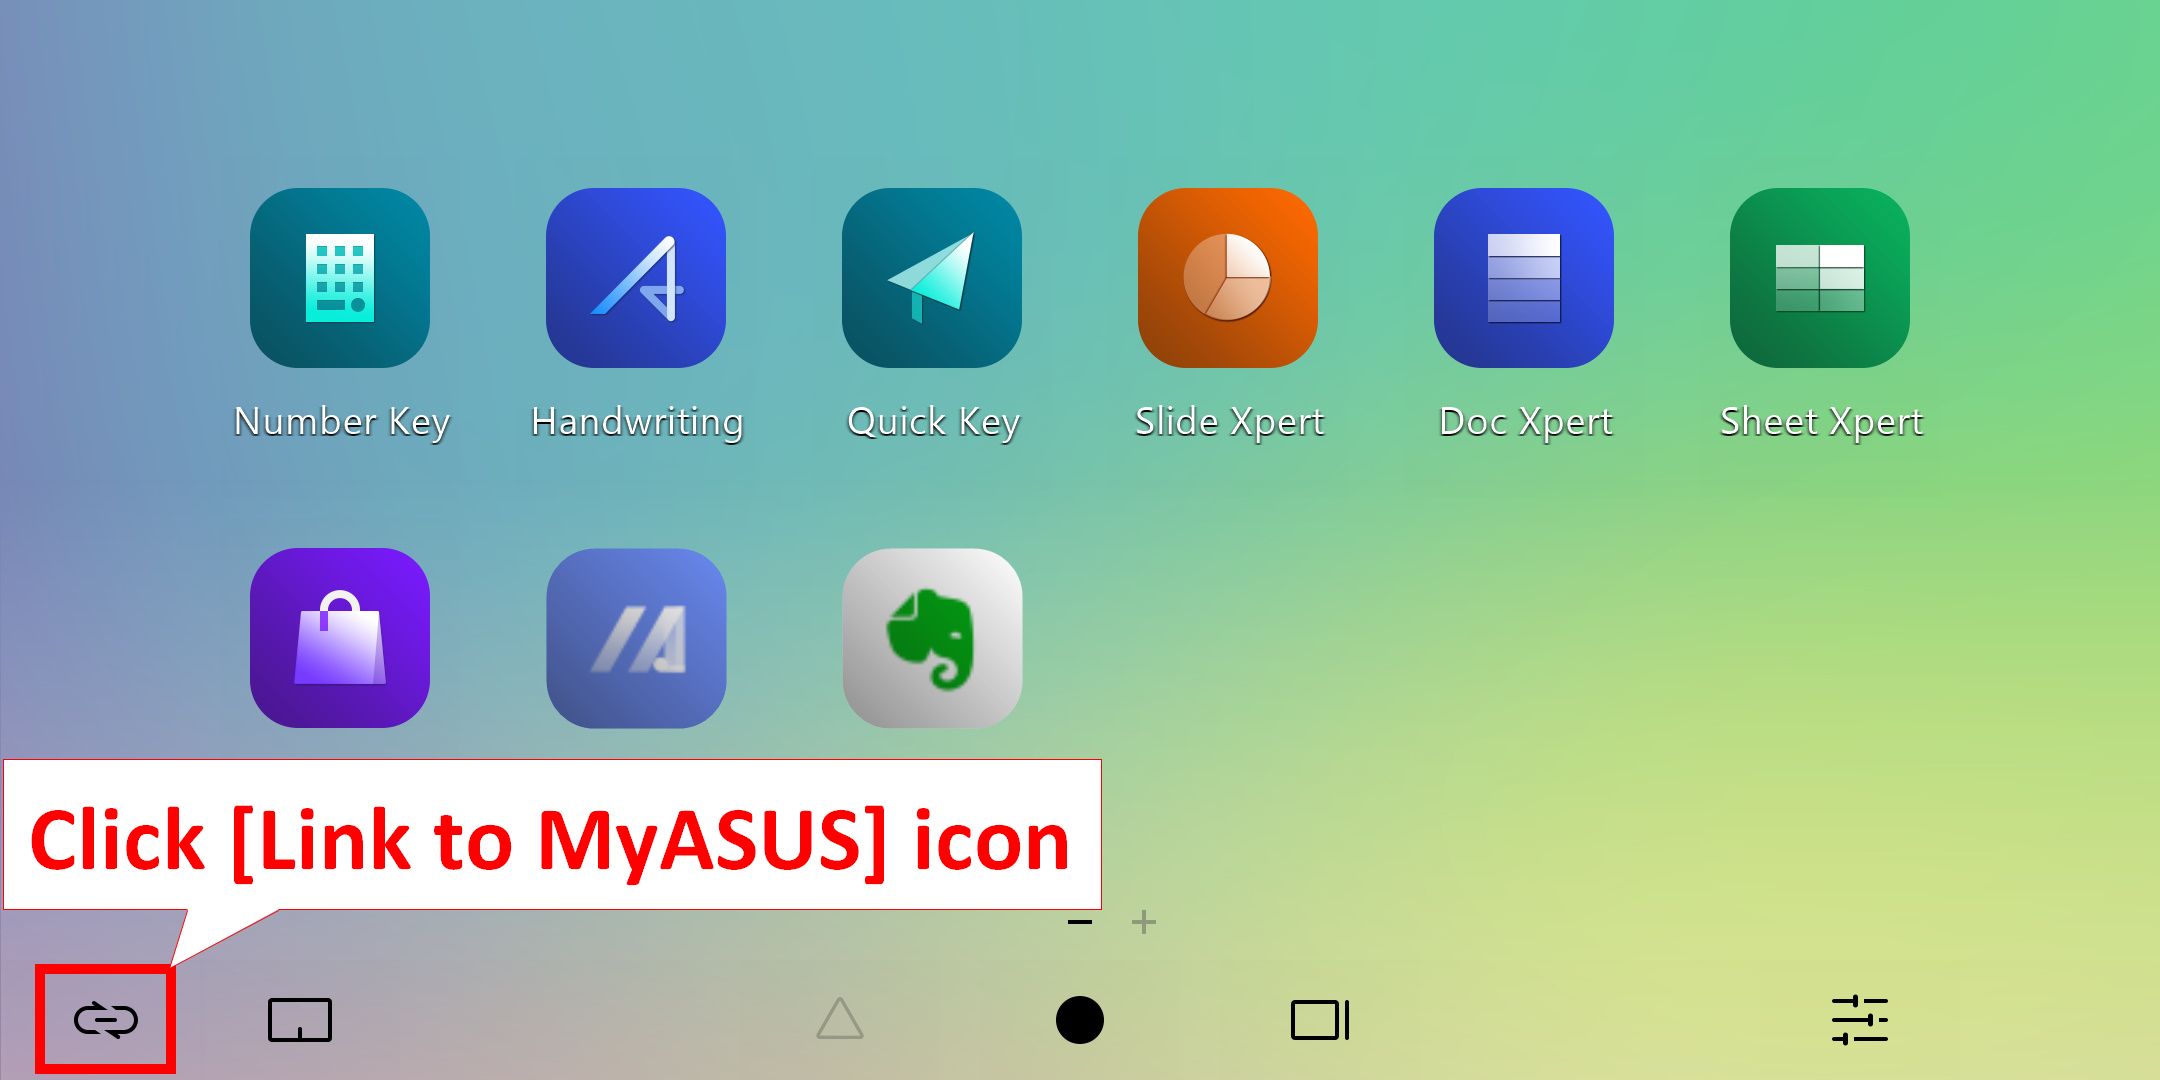
Clicking  [Link to MyASUS] allows you to quickly open the window to make a phone call, if you would like to learn more about Link to MyASUS, please click here.
Click  [TouchPad] will turn on ScreenPad Plus's TouchPad mode, which you can turn off by tapping the X in the top right corner.

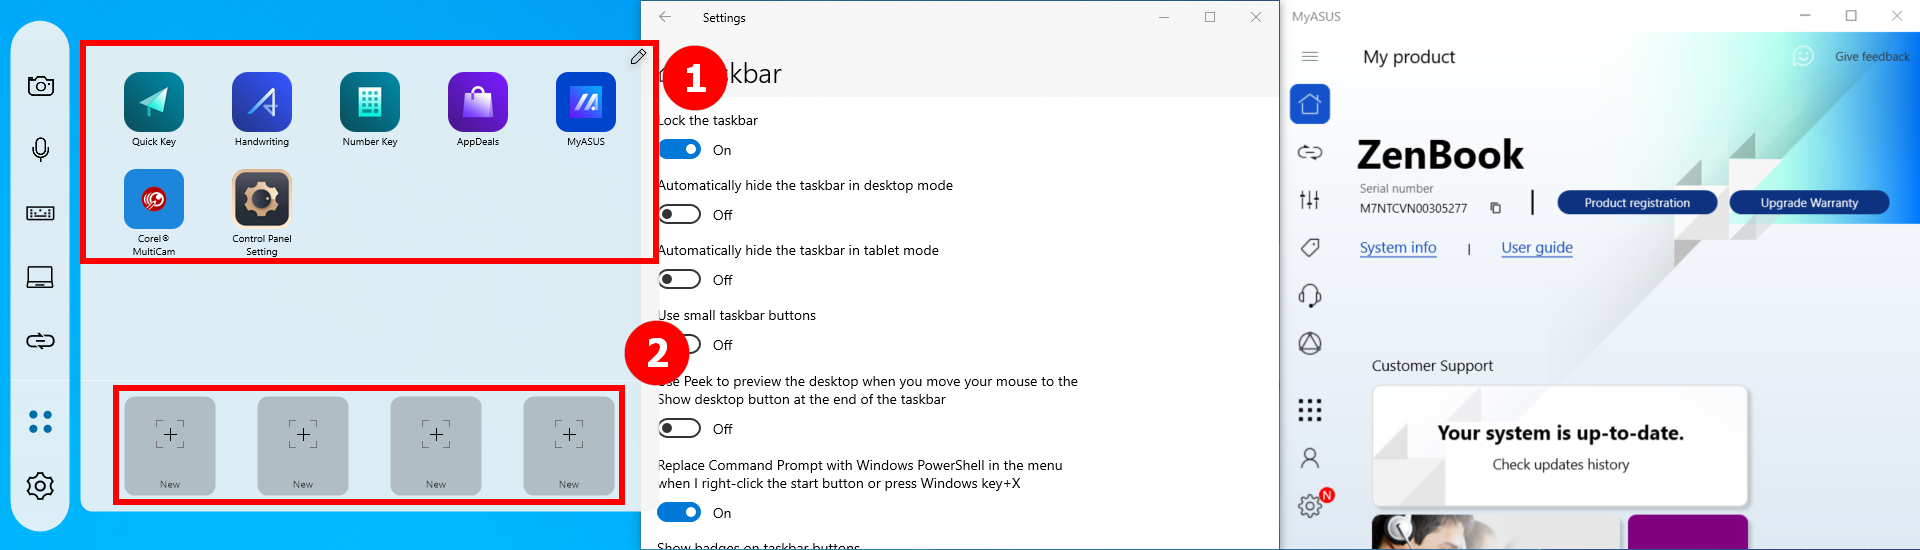
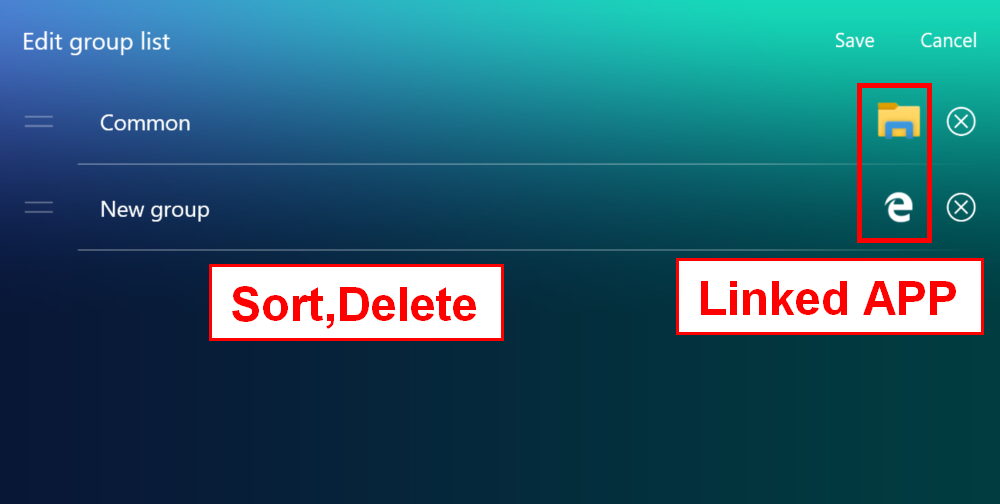
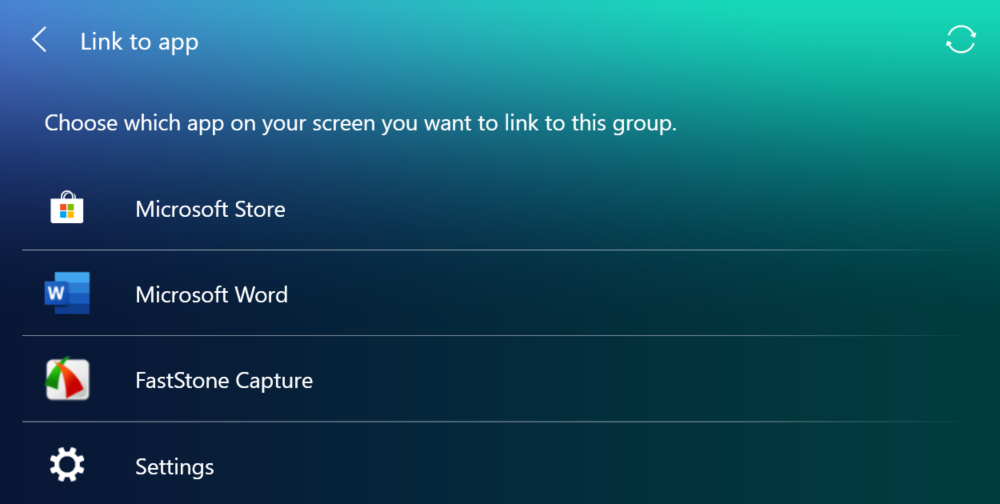
(1) Click  [Utilities]. You can see ①[Asus Built-in Apps], where you can add additional app icons, or you can delete or modify the location of the app. Click ②[+] to add new Task Group.
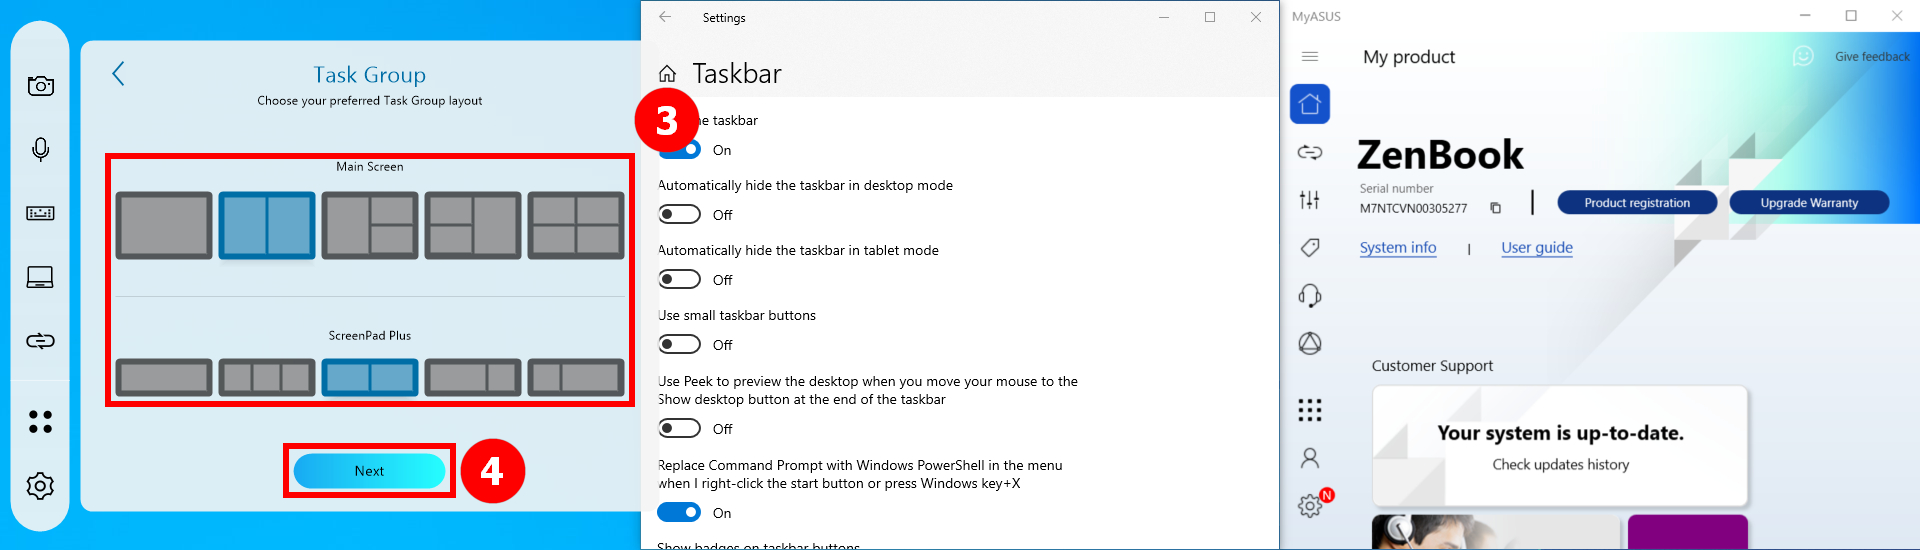
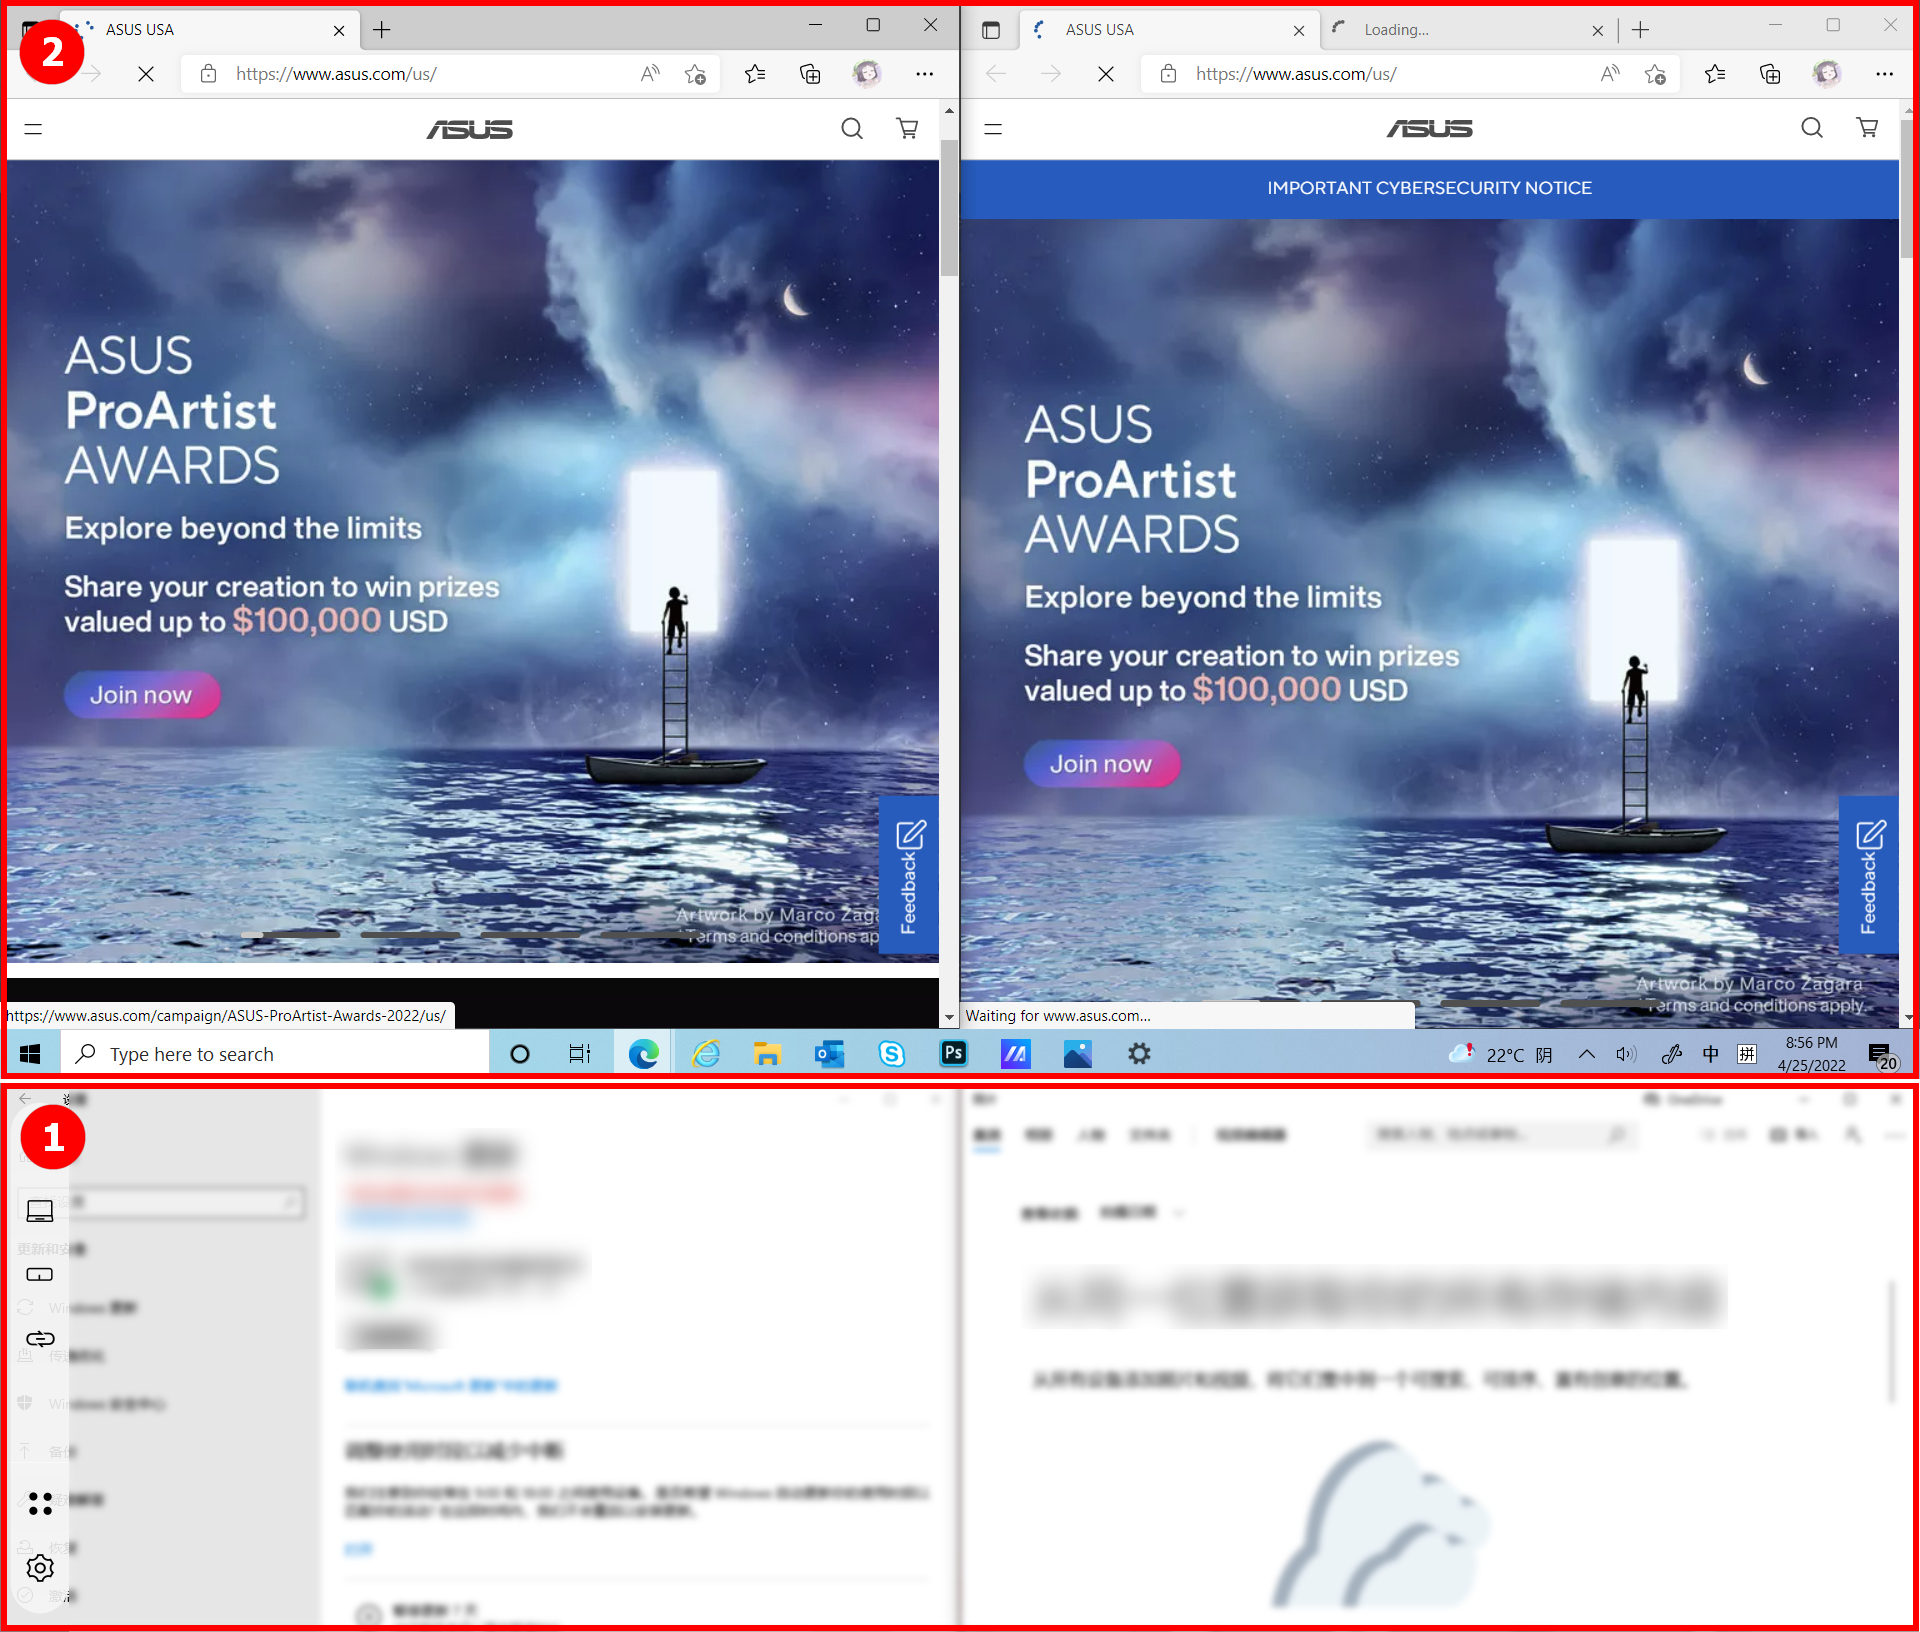
(2) In the ③[area], select your preferred Task Gourp layout and click ④[Next].
(3) Click ⑤[Capture].
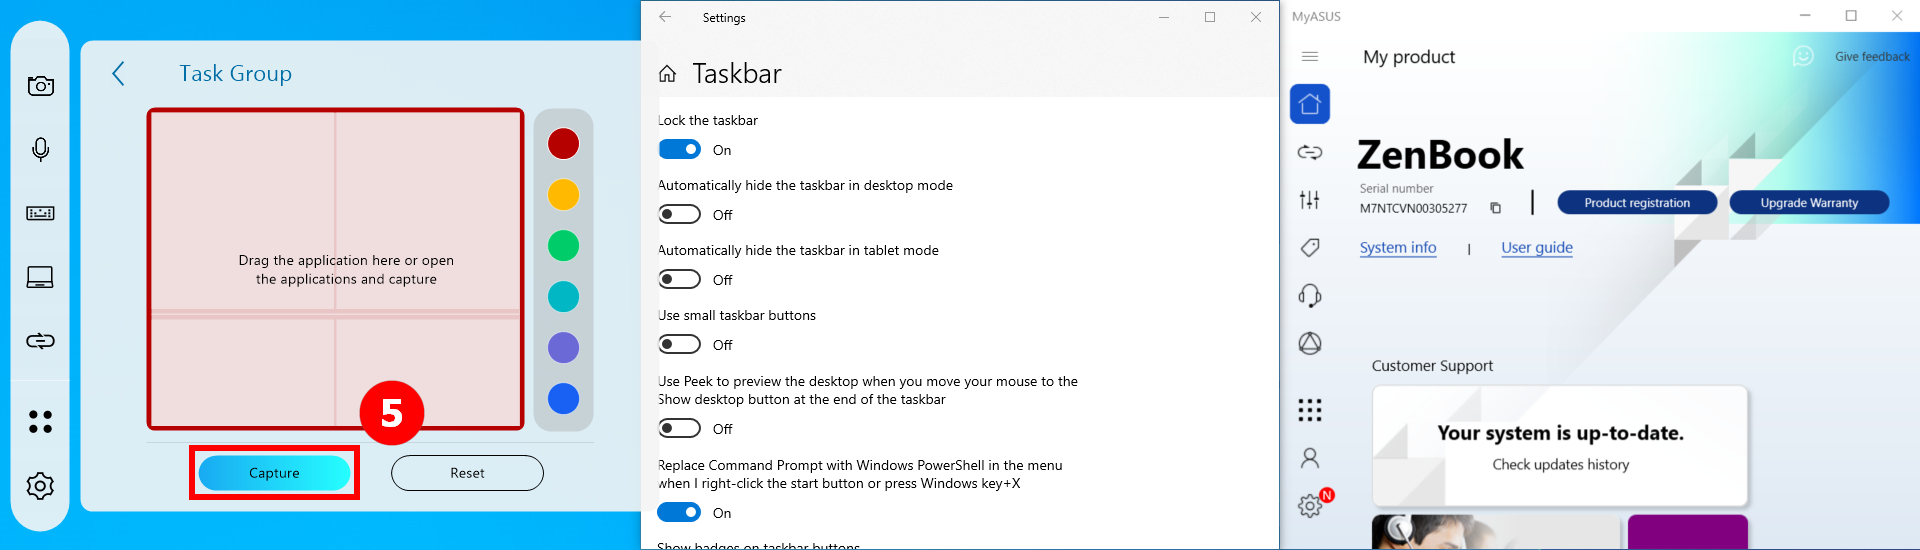
(4) The window that appears on your computer will be captured, such as ⑥[Area], where you can delete or reposition the app, or modify the name of the Task Group. When you're done editing, click ⑦[Done].
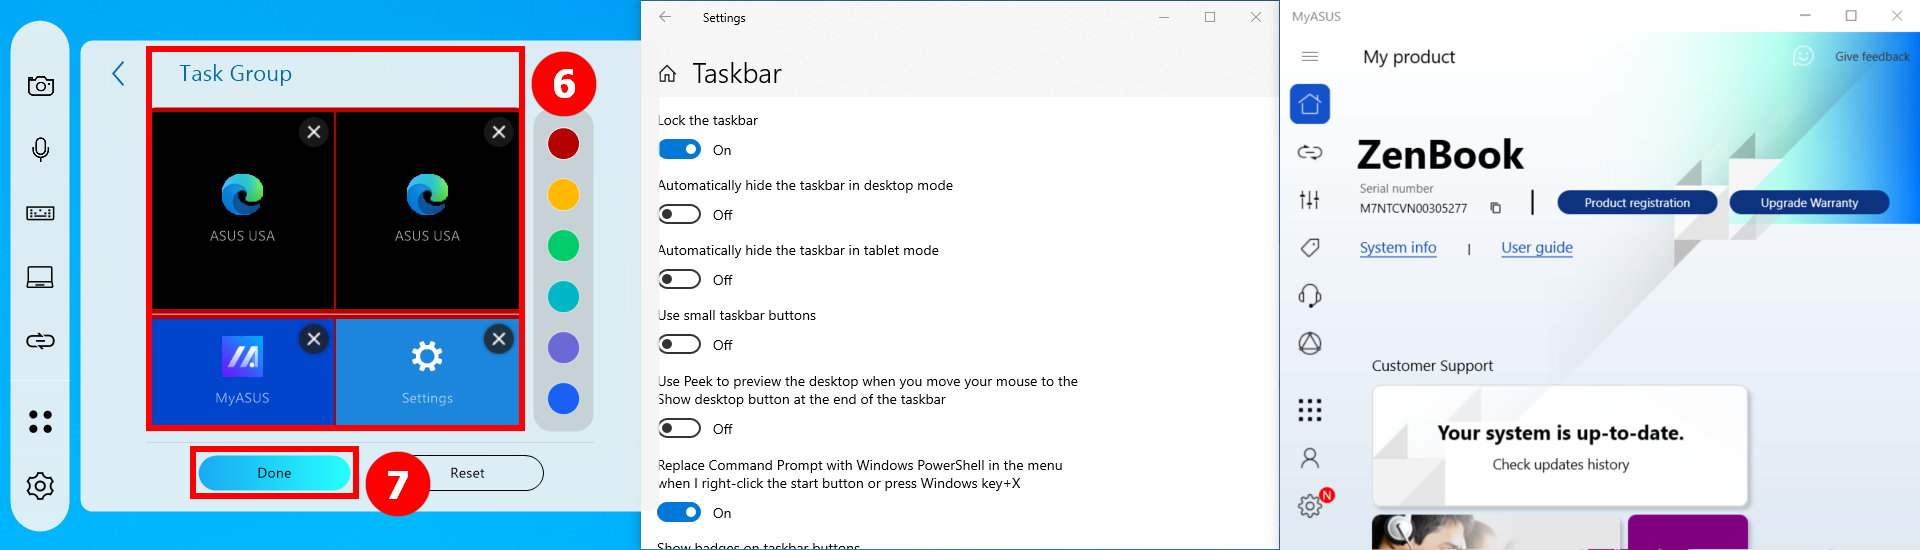
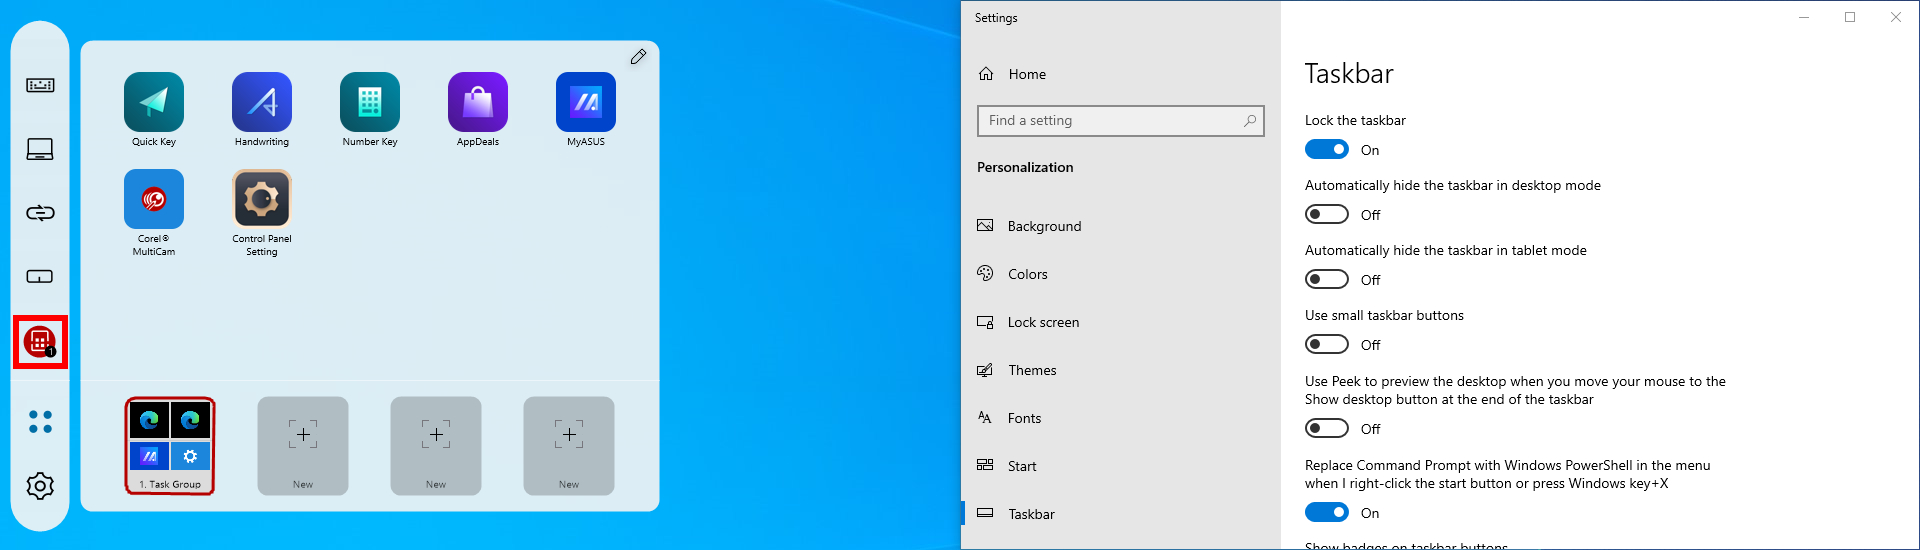
(5) Task Group is already established, click ⑧[Task Group].
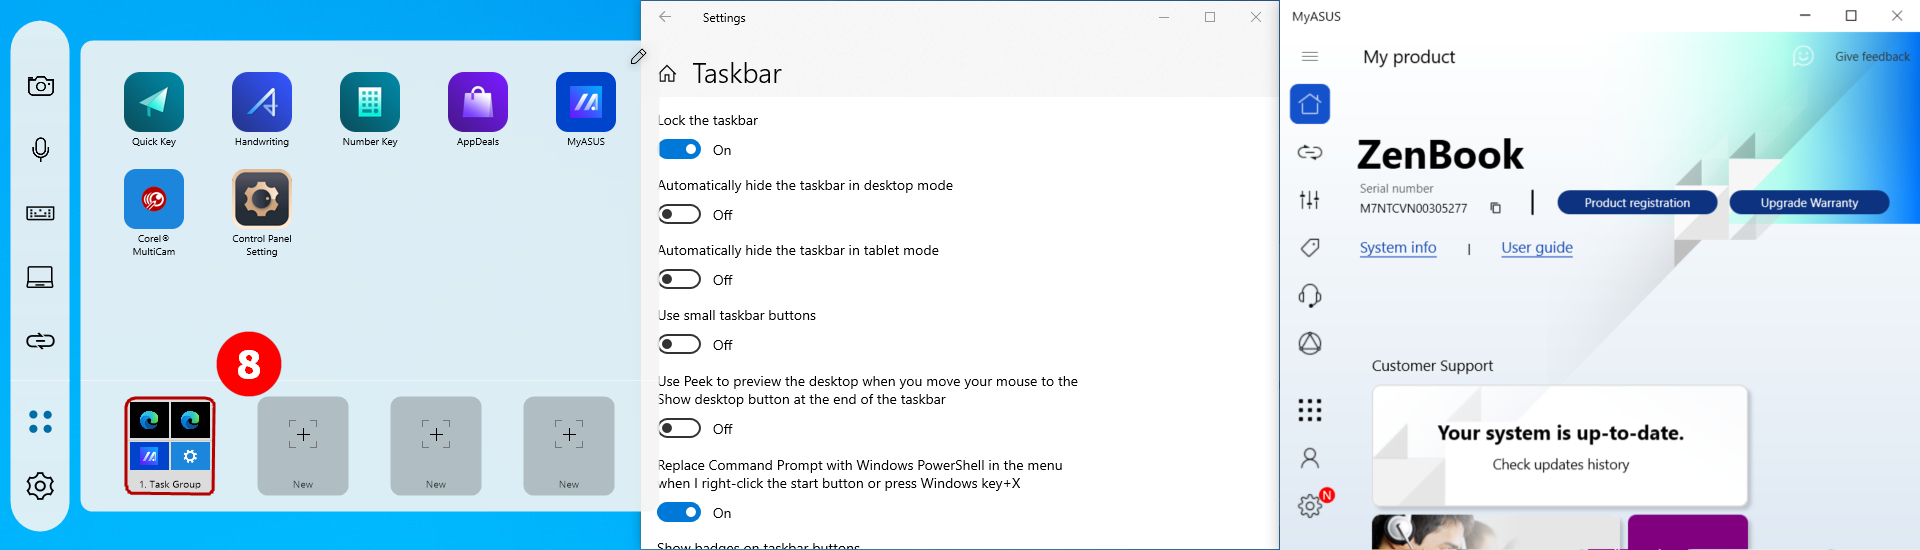
(6) The computer's ②[Main Screen] and ①[ScreenPad Plus] will press your previous settings to show the app.
(7) Right-click [Task Group], click [Add as favorite to Control Center].

(8) You can see the icon of the [Task Group], which is displayed in the toolbar. You can use the feature quickly and easily by clicking the [Task Group] icon in the toolbar.
(9) Right-click the [Task Group] icon, click [Remove favorite from control center] to remove the [Task Group] icon from TheTolbbar.
(1) Click  [Settings].
(2) In [ScreenPad Plus Display], you can adjust the brightness, change the background, modify the theme.
(3) In [Control Center]. You can adjust the ScreenPad Plus's features at the ①[Customisze Control Center]. Toggle ②[Control Center on main display]. Modifications to the Control Center icon are in ③[Control Center on ScreenPad Plus].
(5) Control Center icon already display on main screen, click [Control Center].
(6) You can see that the set-up features are already shown on the main screen.
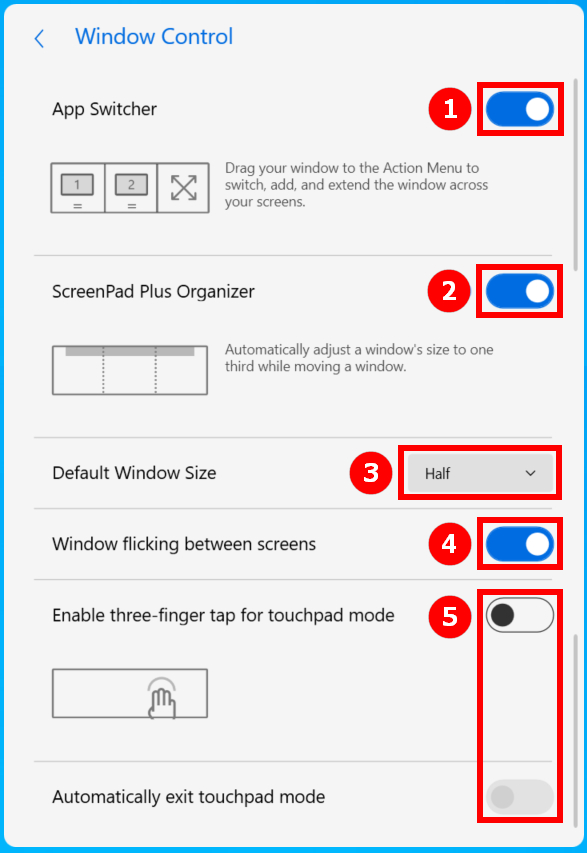
(7) In [Window Control], switch ①[App Switcher], switch ②[ScreenPad Origanizer], switch ③[Default Window Size], switch ④[Window Flicking between screens], switch ⑤[Enable three-finger tap for touchpad mode].
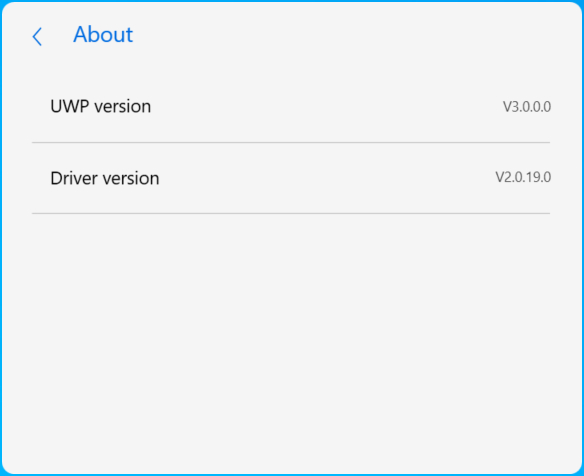
(8) In [About], you can view the UWP and Driver version.
(9) In [Help], you can click on the FAQ to access this article quickly, or click quick guide.
16. Install & Uninstall ScreenXpert
To install the ScreenXpert app ond driver:
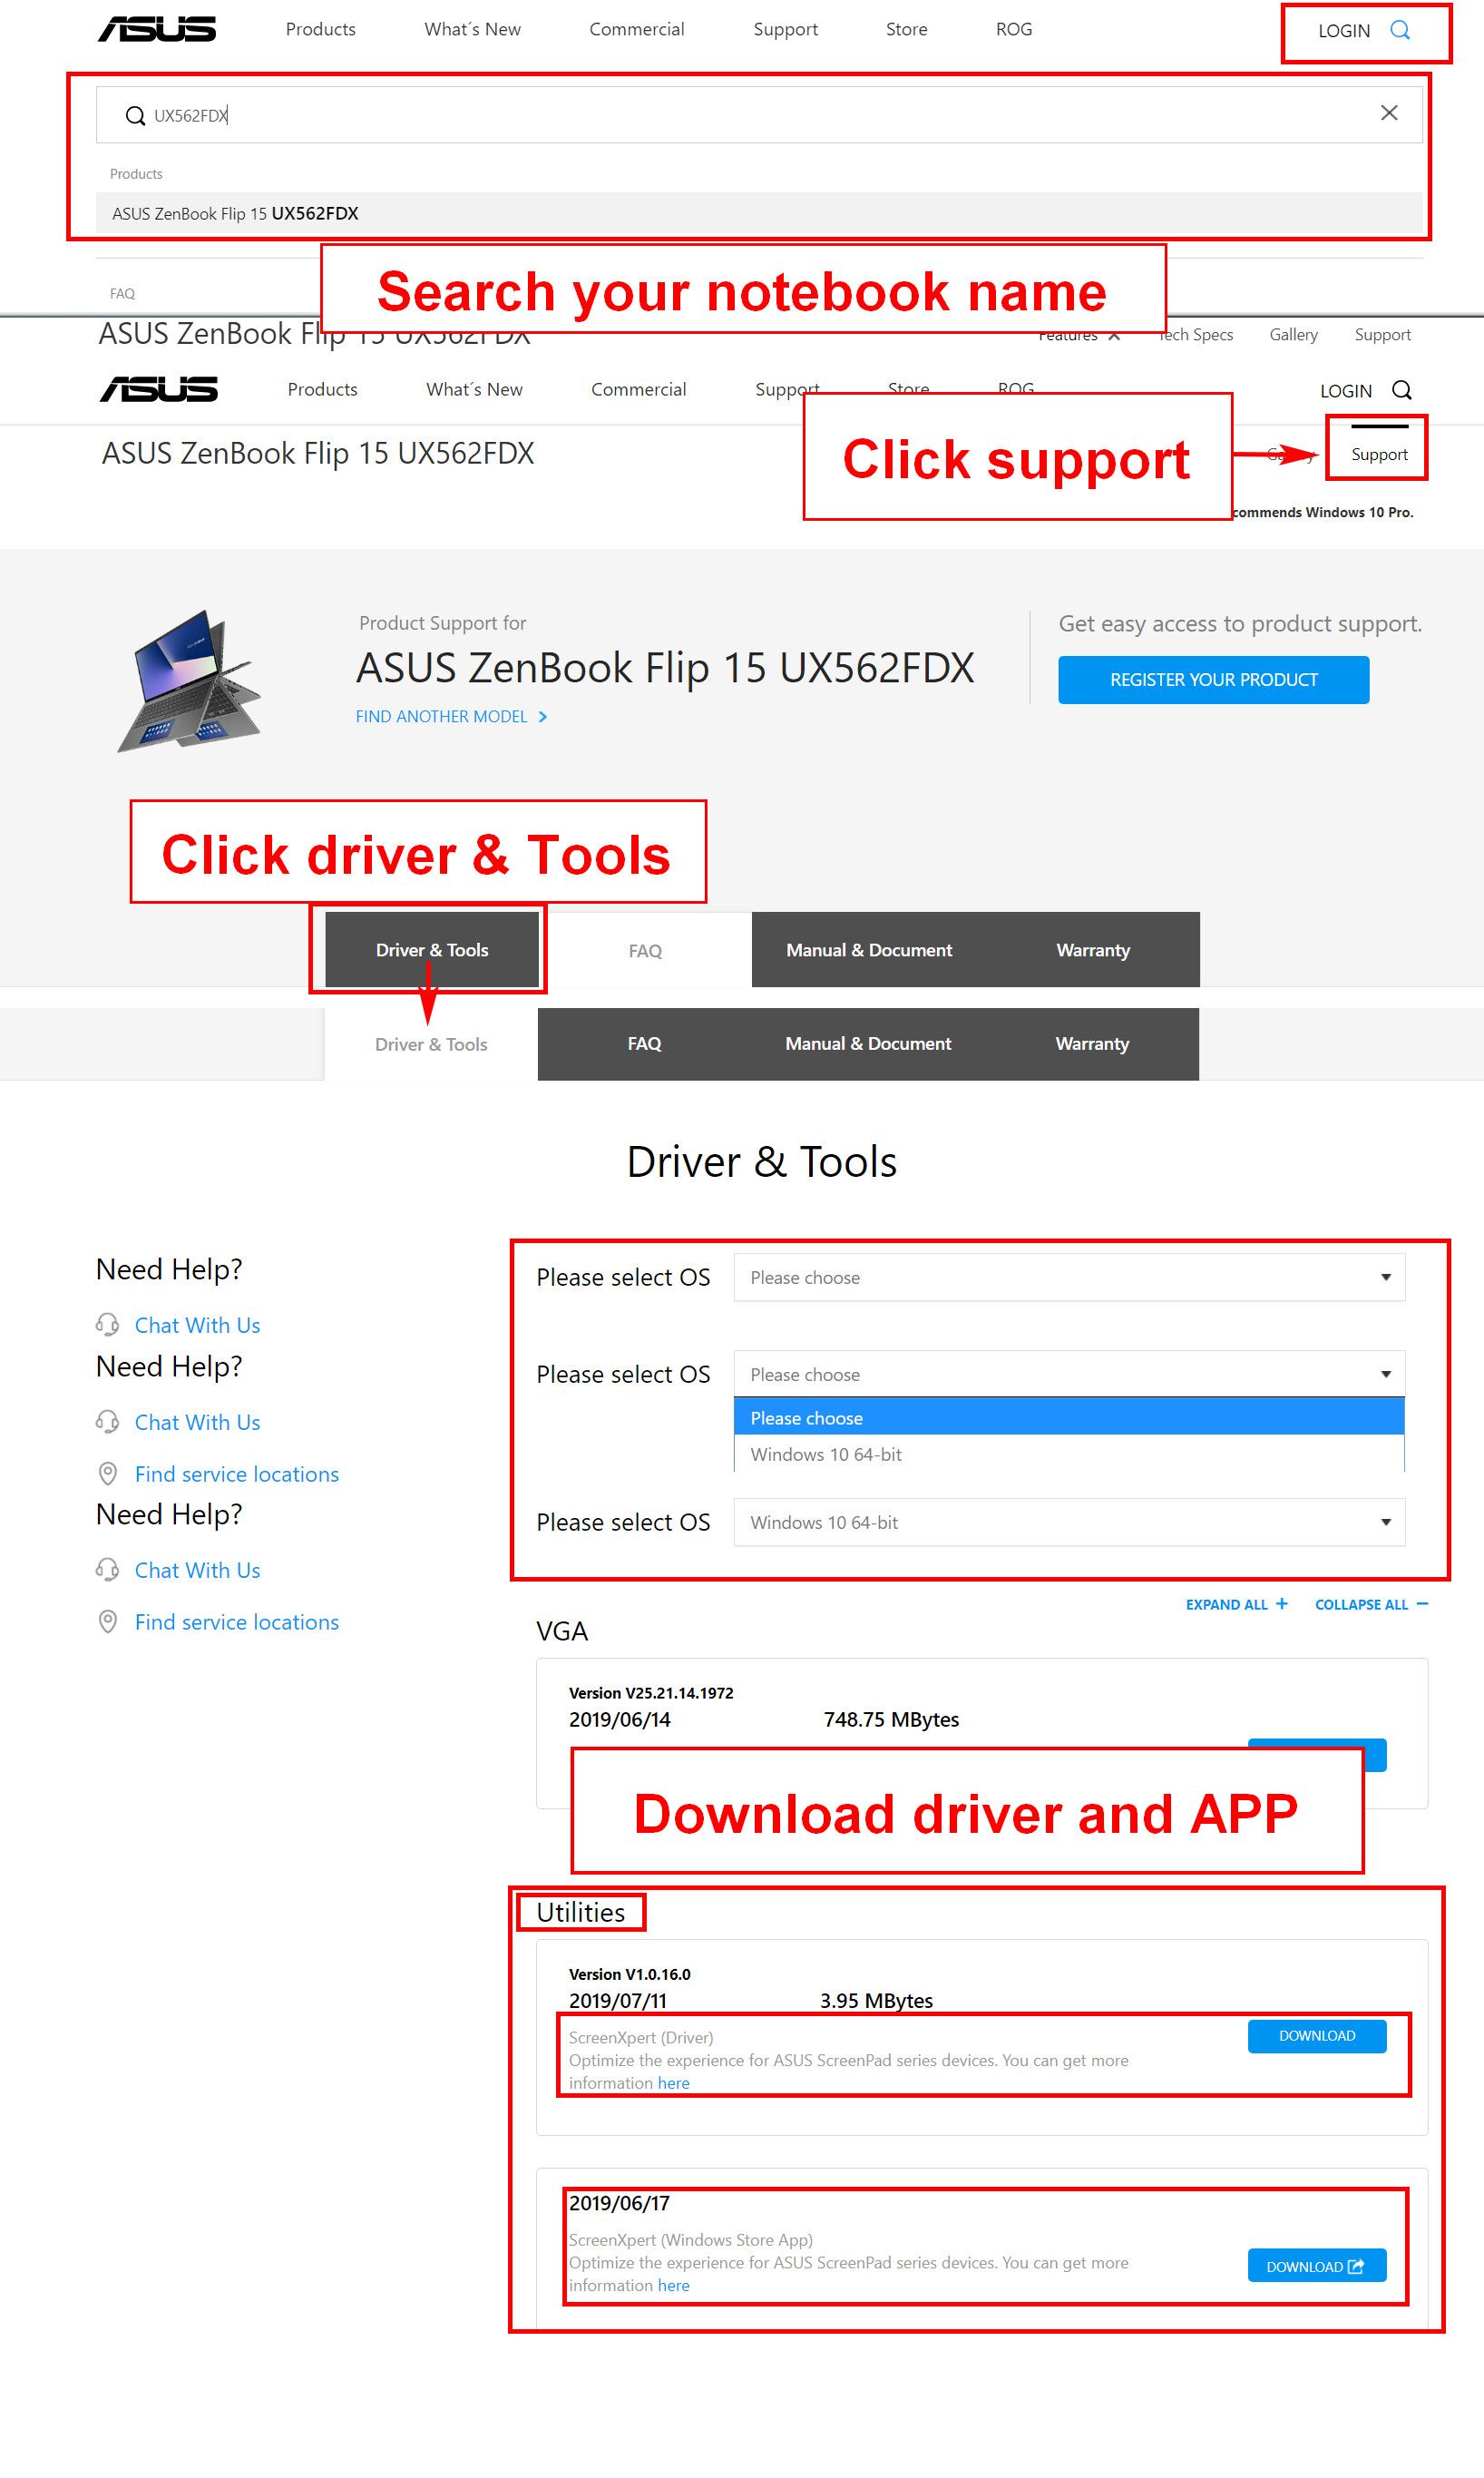
1.Go to the ASUS Official website and search your notebook model.
2.Click [support] then click [Driver & Tools].
3.Choose your notebook OS.
4.Download the driver and app, then install both.
You can uninstall ScreenXpert from the content provided at the following link:https://www.asus.com/support/faq/1013598
[Notebook] ASUS ScreenXpert (Screenpad 2.0) - Introduction
Powered by the new ScreenXpert software, ScreenPad 2.0 now has a larger touchscreen that offers many new features and benefits. This interactive secondary touchscreen enhances productivity, allowing for more efficient workflow. It includes a collection of handy ASUS utilities to boost productivity: Quick Key enables one-tap automation of complex keyboard sequences, Handwriting for natural text input, and Number Key for rapid data entry. The revised smartphone-like interface is more intuitive for improved ease of use. Third party developers can also use ASUS API to optimize their software and user experiences for ScreenPad. The hardware is now also more energy efficient than its predecessor, allowing for longer battery life when ScreenPad is in use.
Please Note: Office Xpert (Doc Xpert, Sheet Xpert, Slide Xpert) has been removed from the service after V2.2.6.0 and later version.
If you want to continue to use Office Xpert, you can click the link to download it, unzip it and install it. After the installation completes, please restart your computer.
If the Office Xpert function is abnormal after the installation completes, please confirm whether the ScreenXpert APP is 2.2.10.0 and above, and whether the ASUS ScreenXpert Interface Driver is 2.0.22.0 and above. If either of the driver version does not meet the requirements, please go to the second section of this article "Application and Driver Version Requirements" to download the latest version of the driver.
- ScreenPad main interface content
- Application and driver version requirements
- Link to MyASUS
- TouchPad
- App Switcher
- Home
- Task View
- Control center
- Navigation bar lock
- Added App icon and homepage editing in ScreenPad
- Touch function & External screen
- ScreenPad Built-in App function
- Install & Uninstall ScreenXpert
- Comparison between ScreenPad 1.0 & ScreenPad 2.0
- FAQ
ScreenPad main interface content
The minimum driver version for the latest ScrfeenPad application as below:
ScreenXpert App V2.0.9.0 and above (updated in Microsoft store)
MyASUS App V2.2.35.0 and above (updated in the Microsoft store)
ScreenXpert Driver V2.0.9.0 and above (The update method is at the end of this article, you can click here to get there quickly)
ASUS System Control Interface V2 Driver v2.2.27.0 and above (the update method is at the end of this article, you can click here to get there quickly)
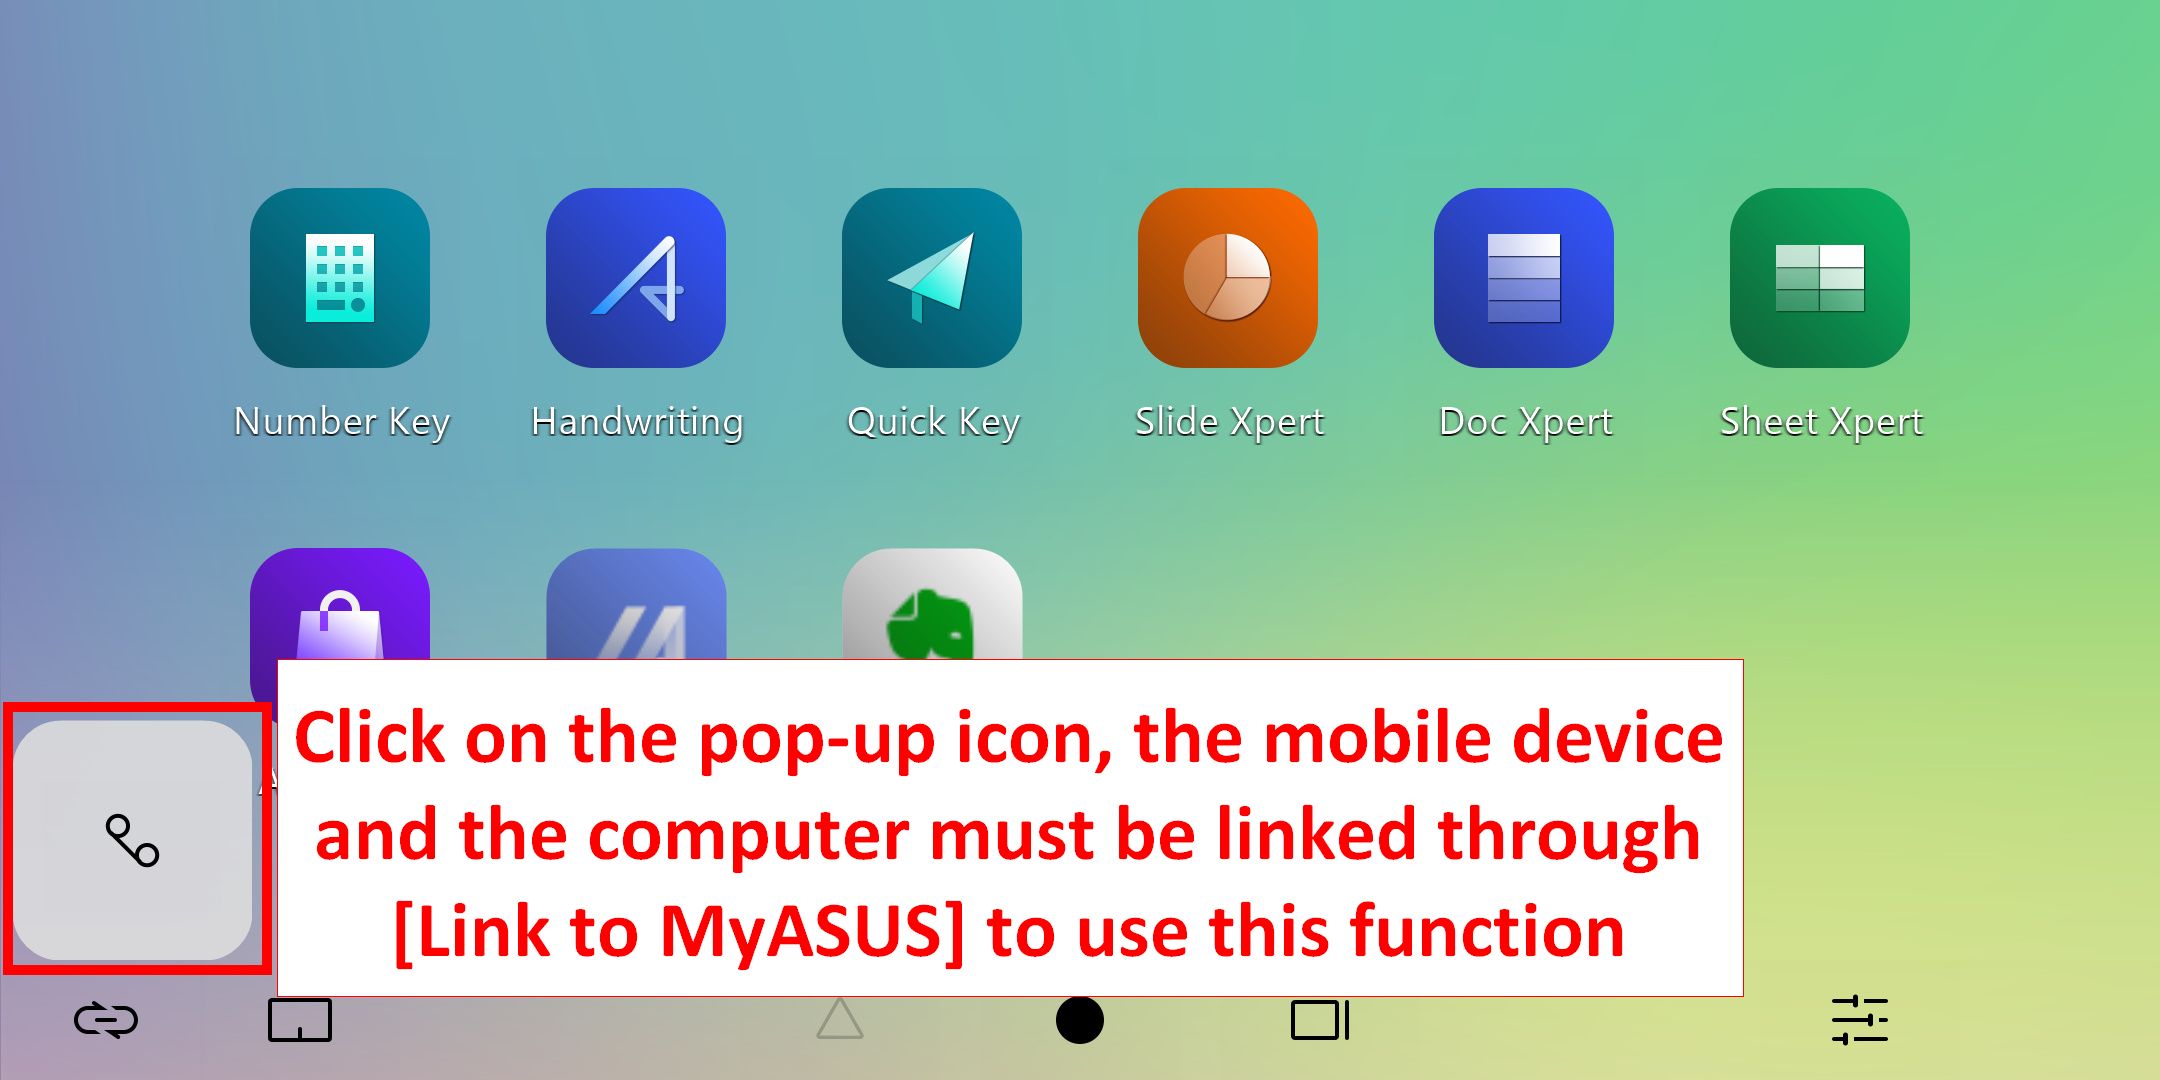
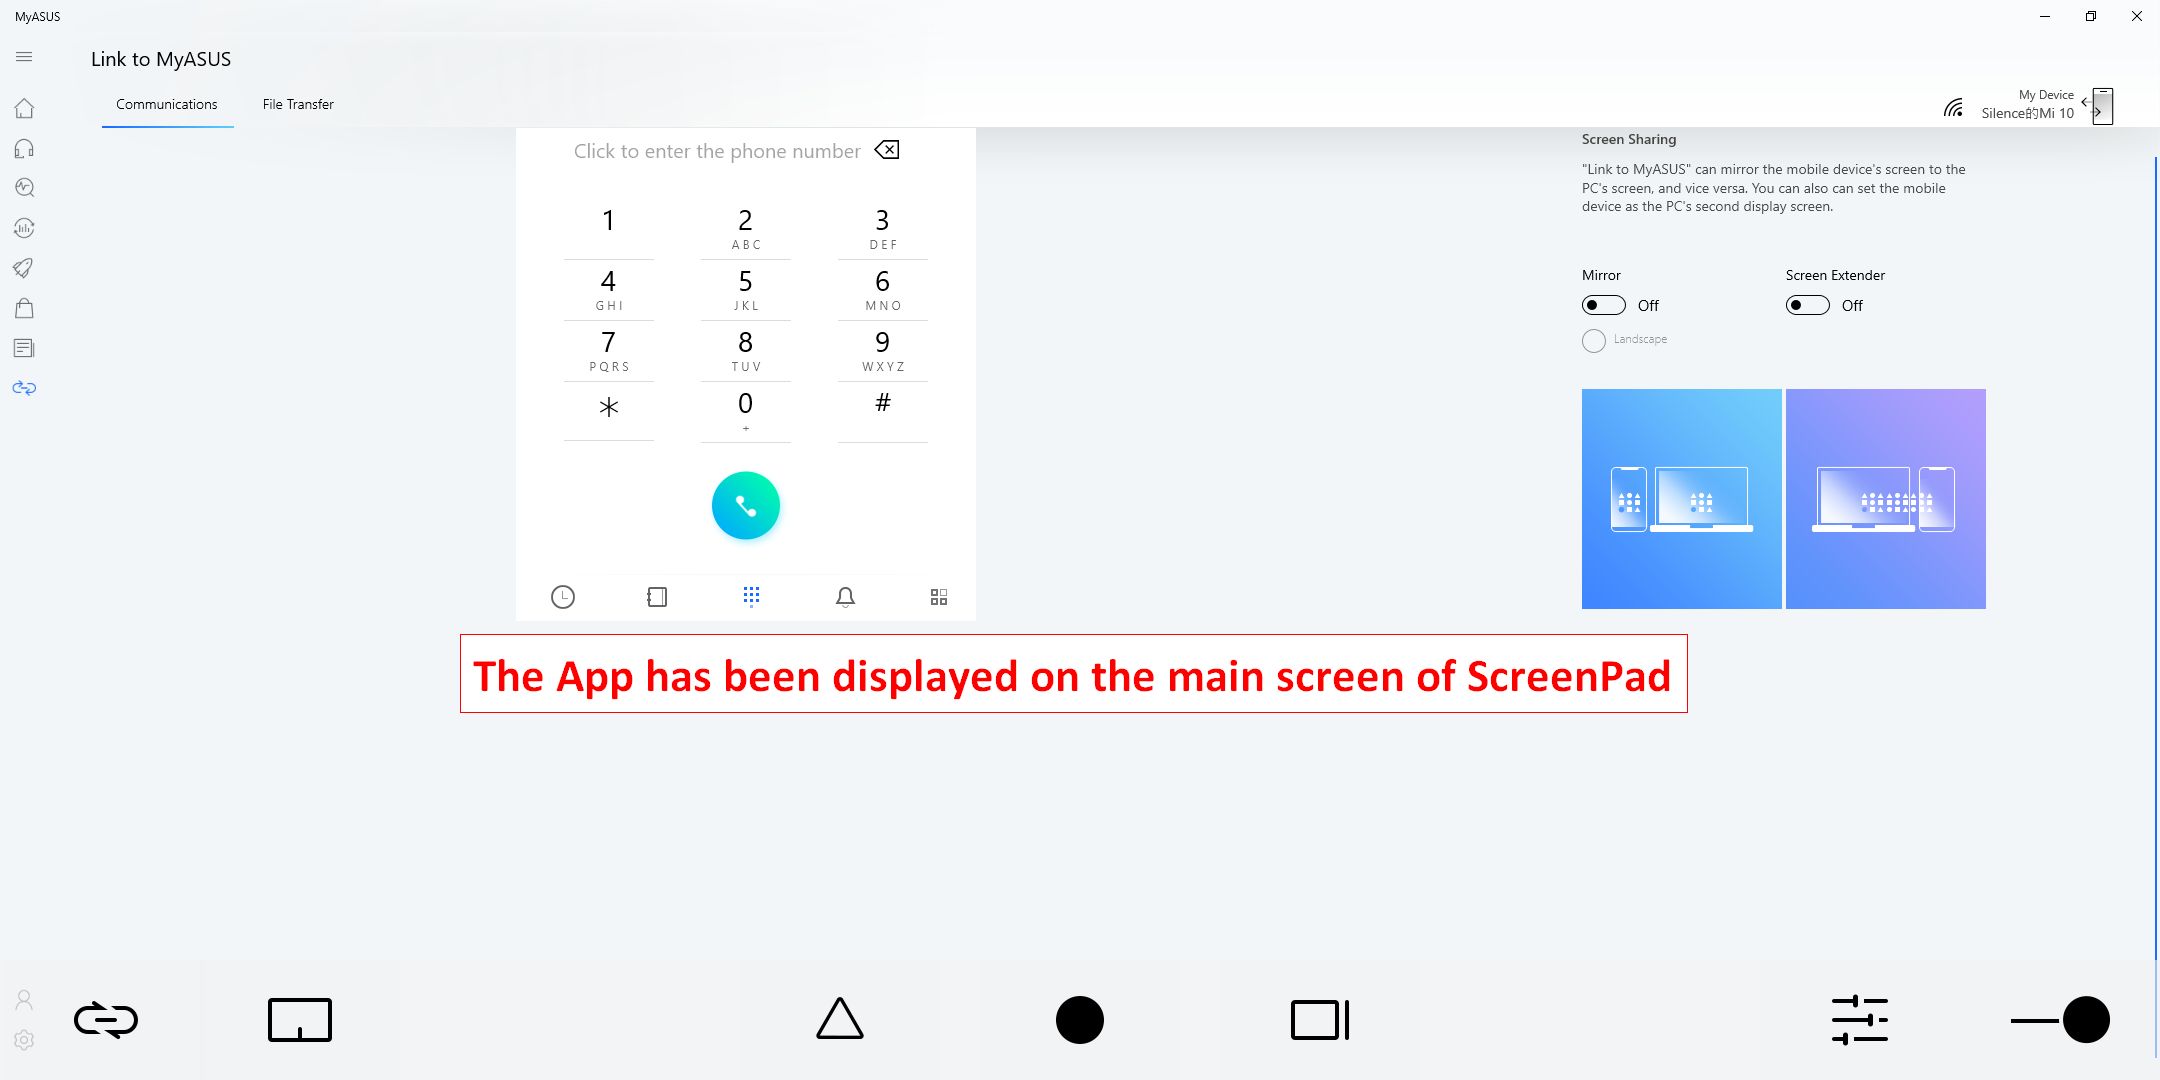
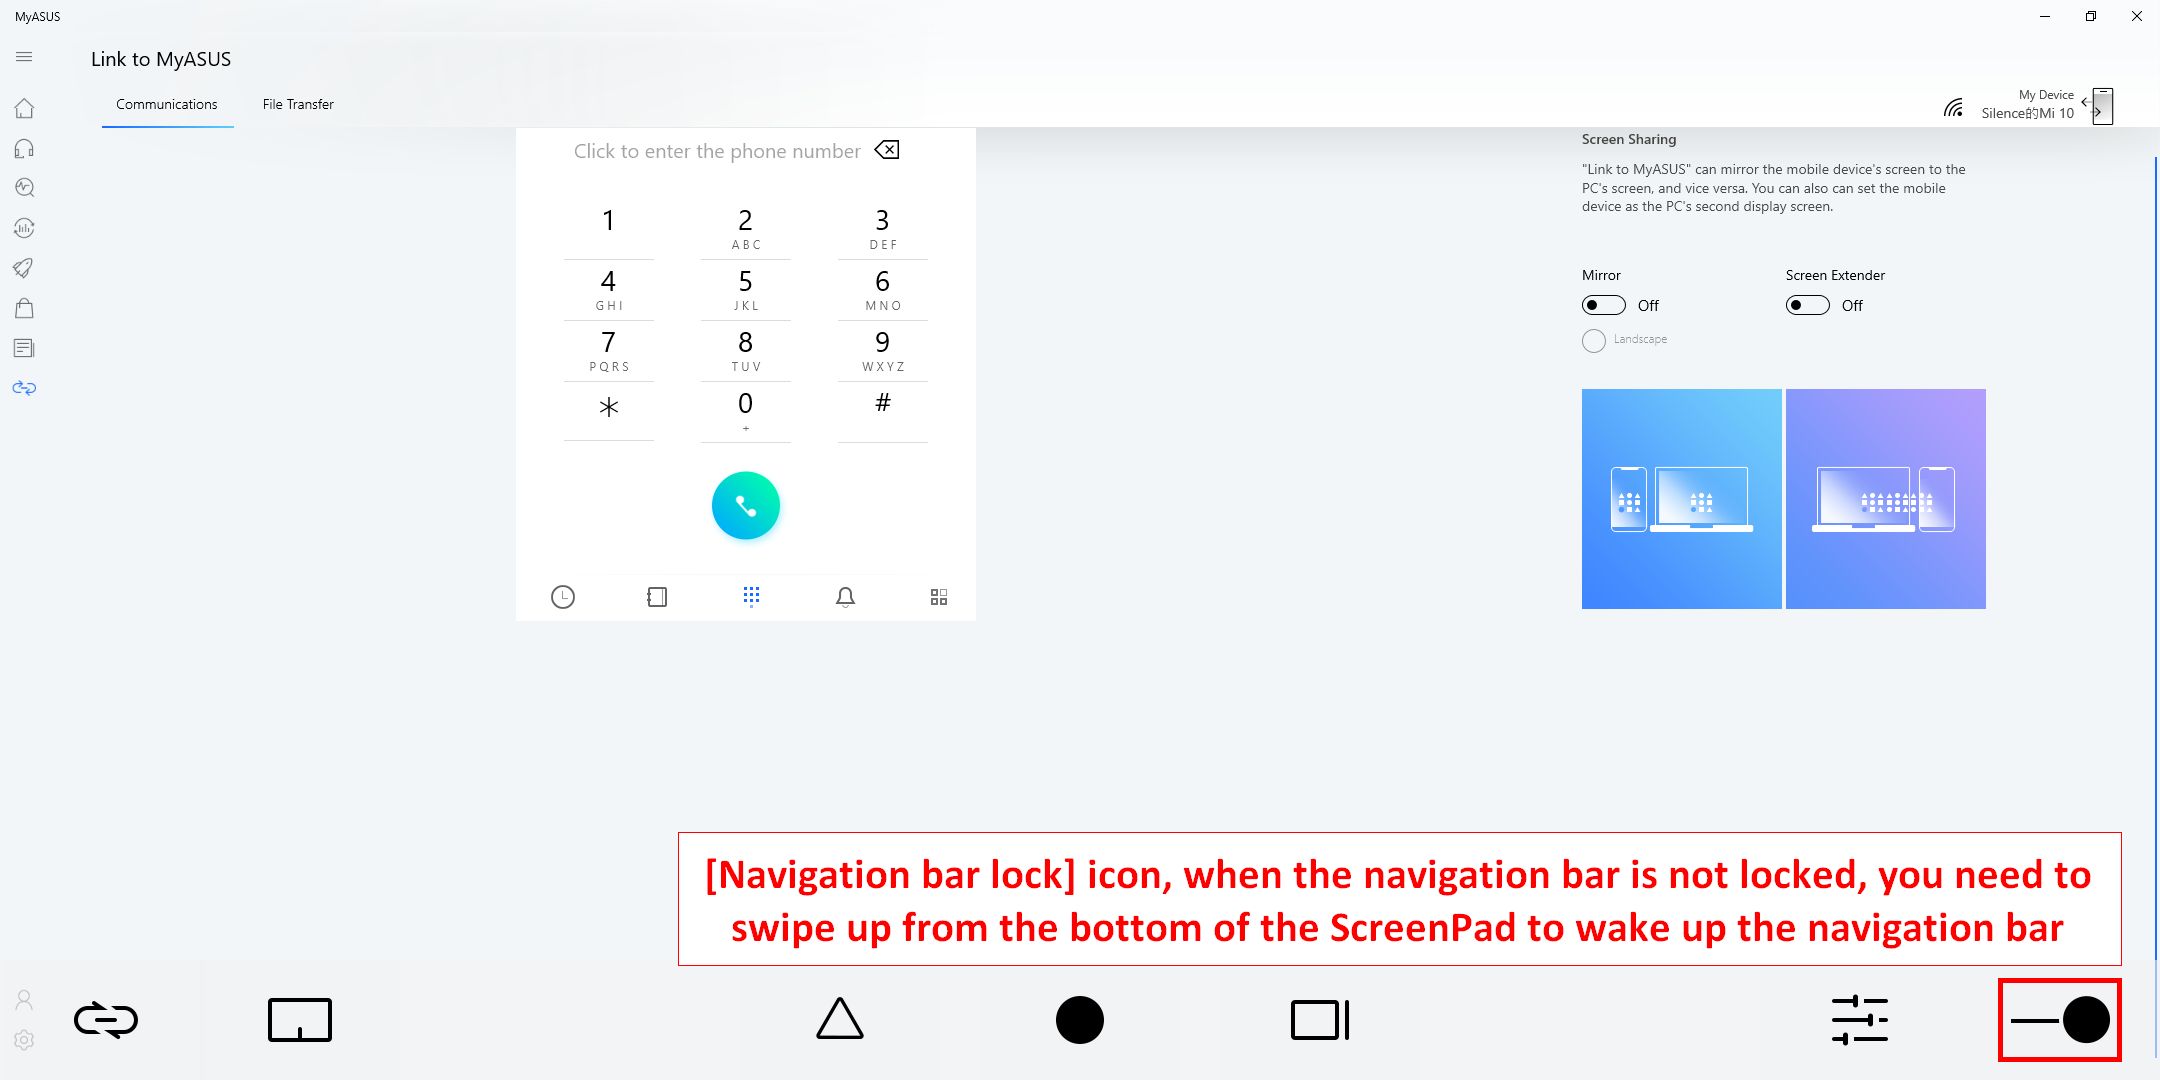
1.  [Link to MyASUS] provides functions such as address book, call log, and dialing. (The mobile device must be able to make calls and be connected to the la[top via Link to MyASUS)
(How to connect the Link to MyASUS laptop to the mobile device and how to use this function please refer to the content in the link: https://www.asus.com/support/FAQ/1041686/)
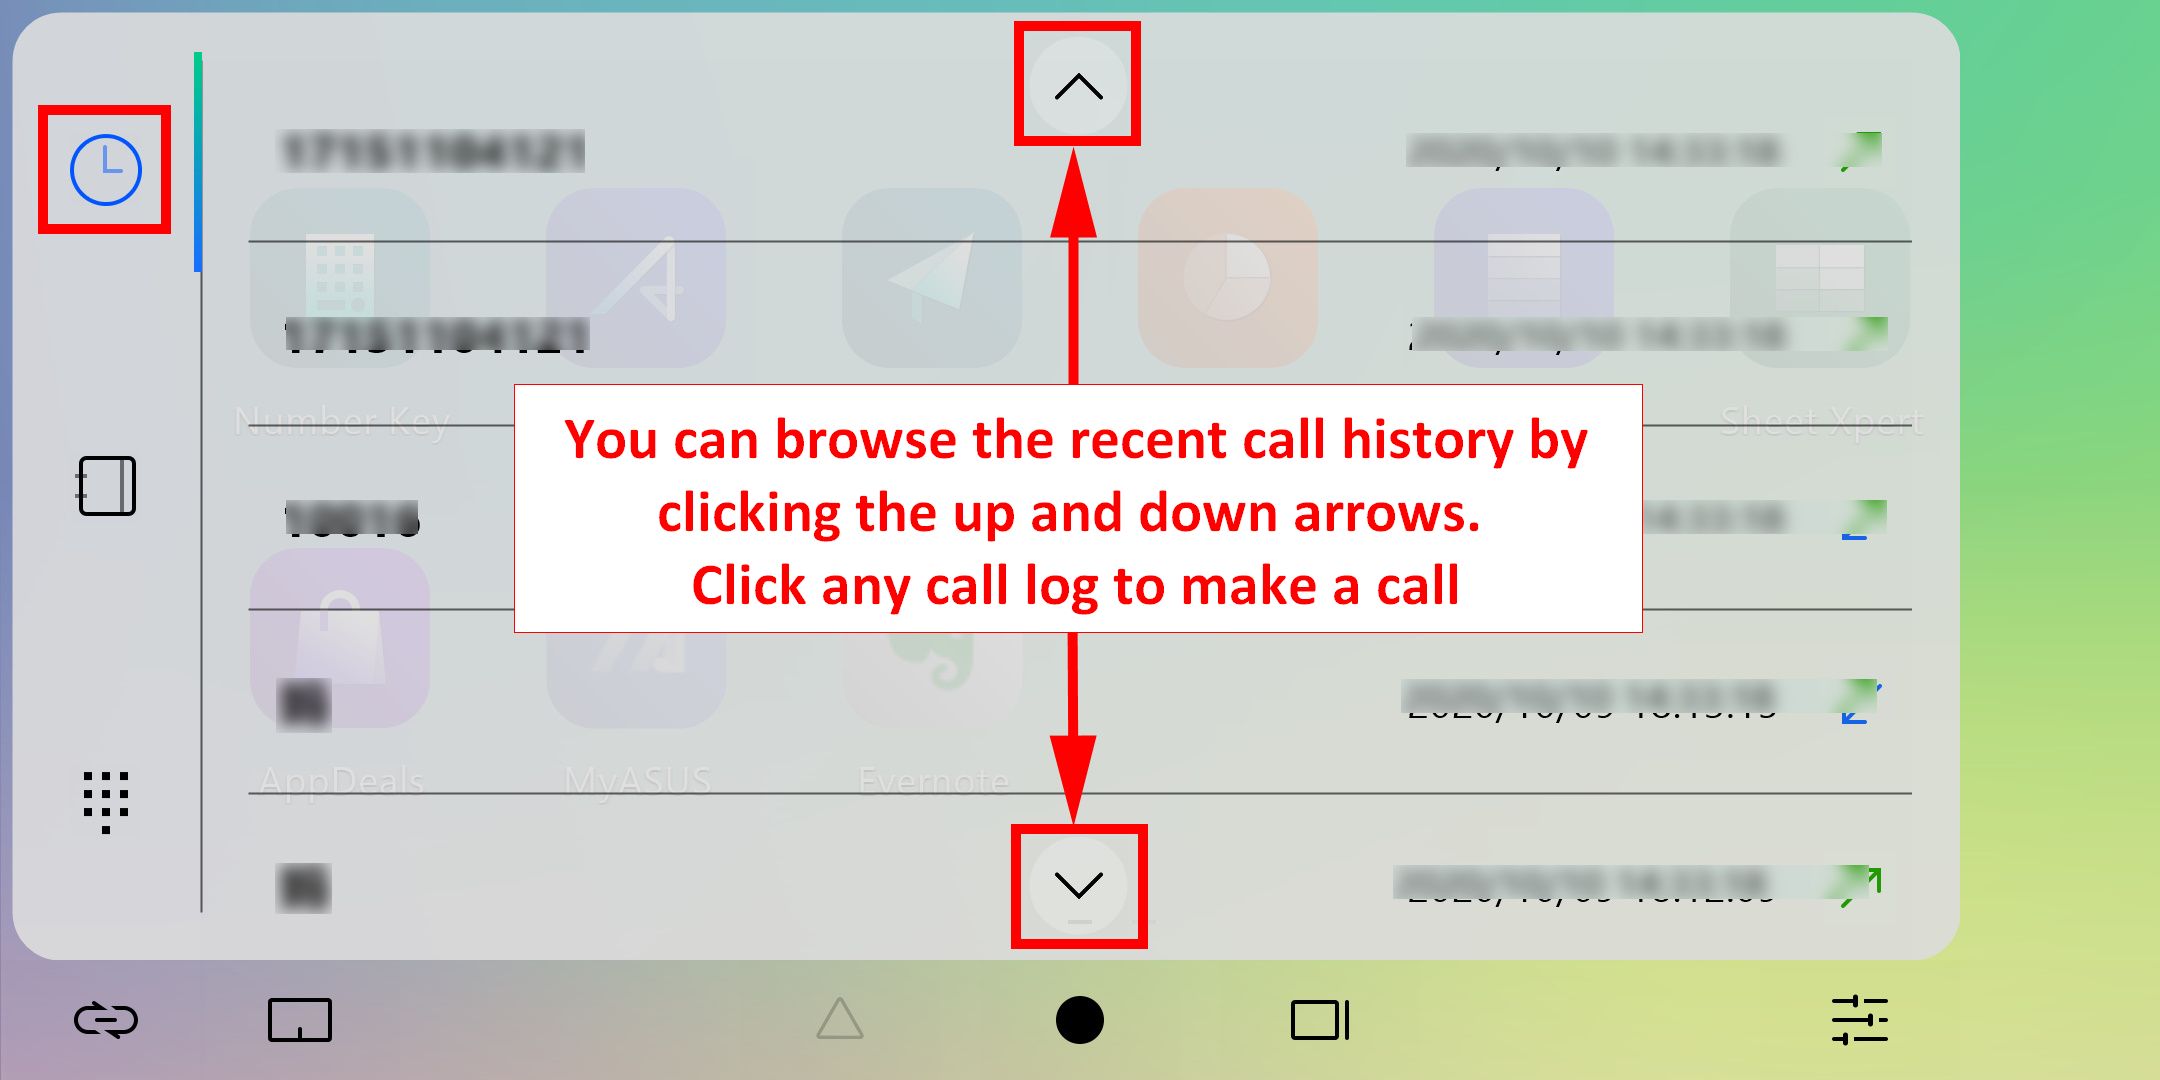
1.1 Click the [Call History] icon to browse the call history of the mobile device. Click the small arrows at the top and bottom to browse the call history up and down, and click any call history to make a call. (This function requires your mobile device to enable related permissions. For specific operations, you can click here to browse related questions about Link to MyASUS permissions and the complete operation SOP)
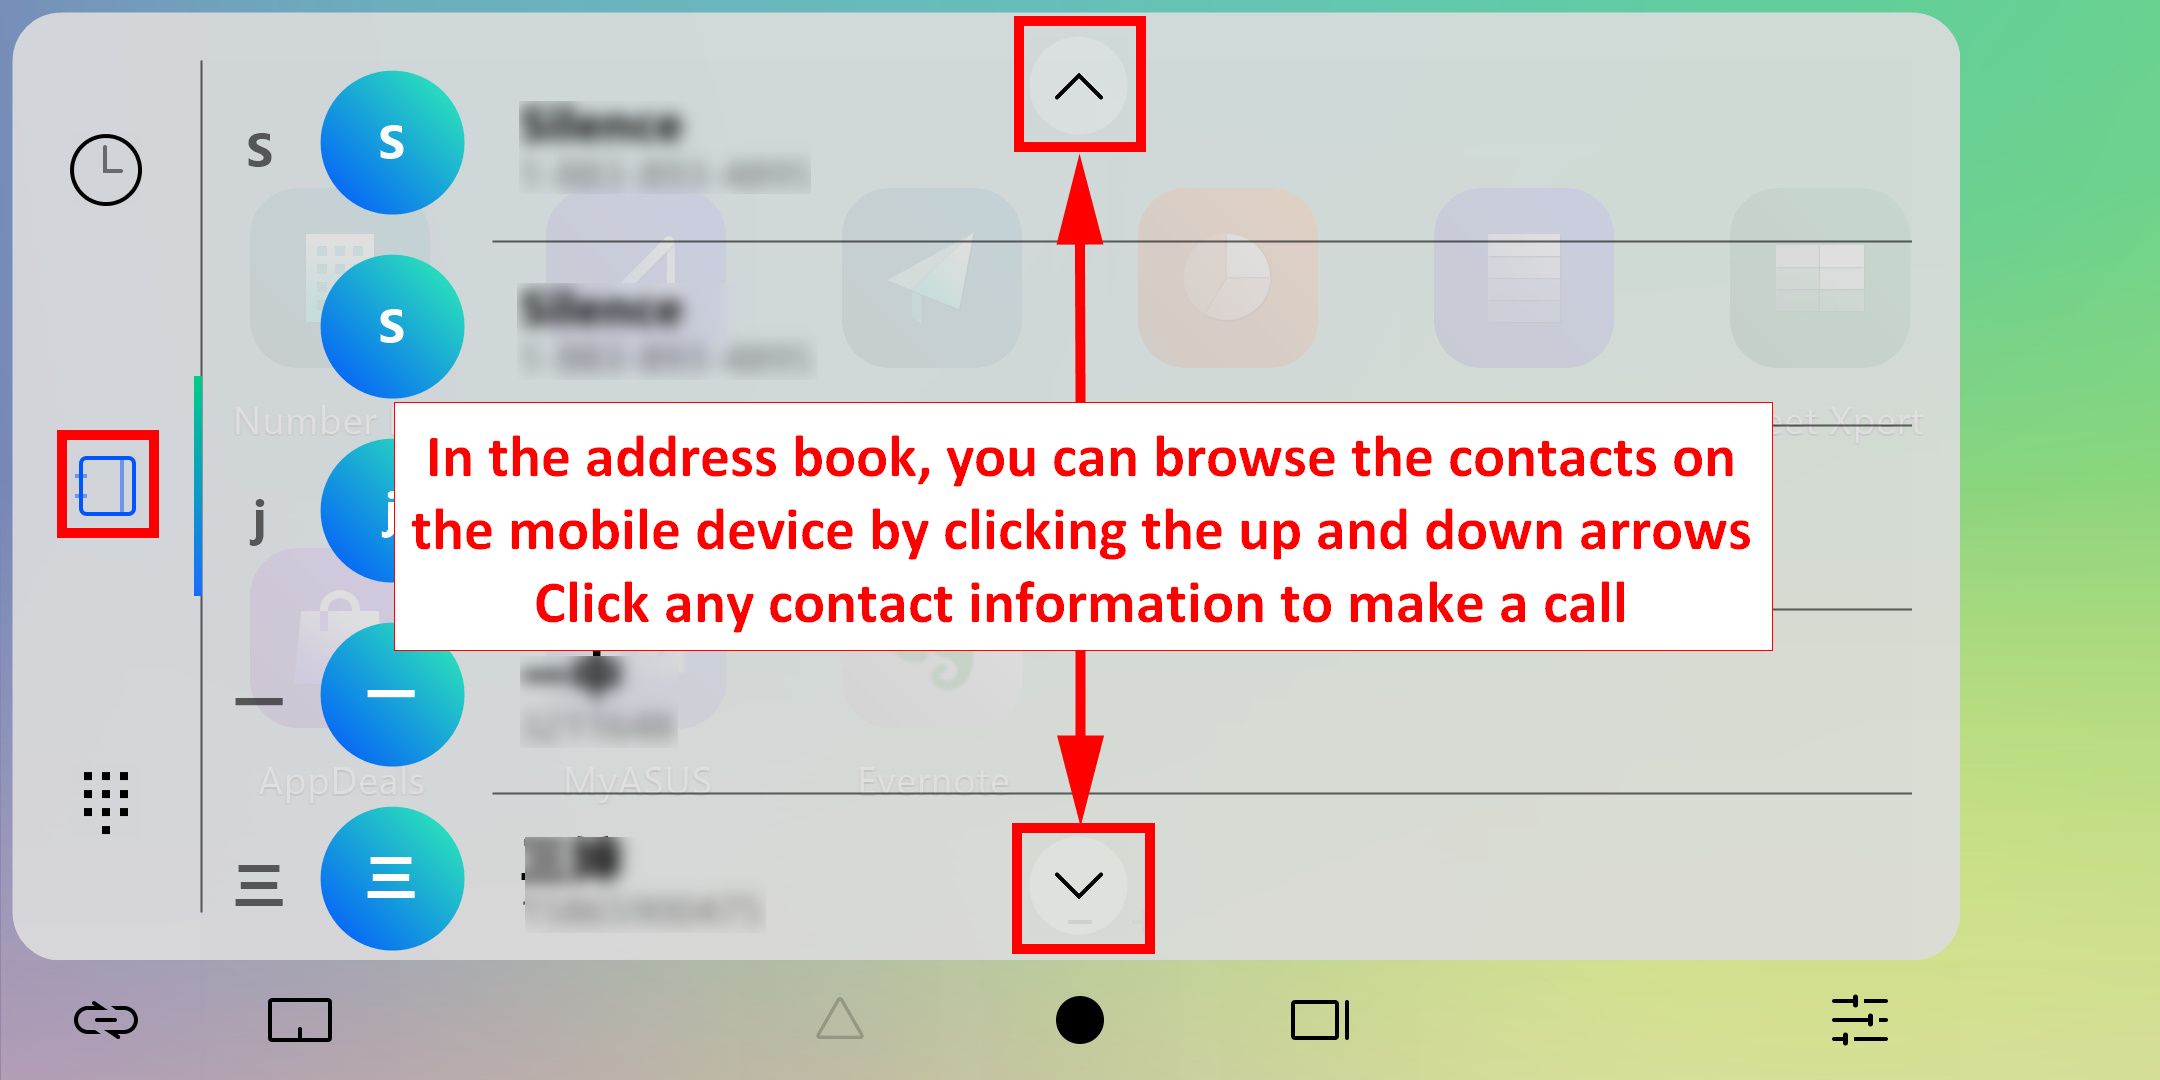
1.2 Click the [Address Book] icon to browse the list of contacts on the mobile device. Click the small arrows at the top and bottom to browse the contacts on the mobile device up and down. Click any contact to make a call. (This function requires your mobile device to enable related permissions. For specific operations, you can click here to browse related questions about Link to MyASUS permissions and the complete operation SOP)
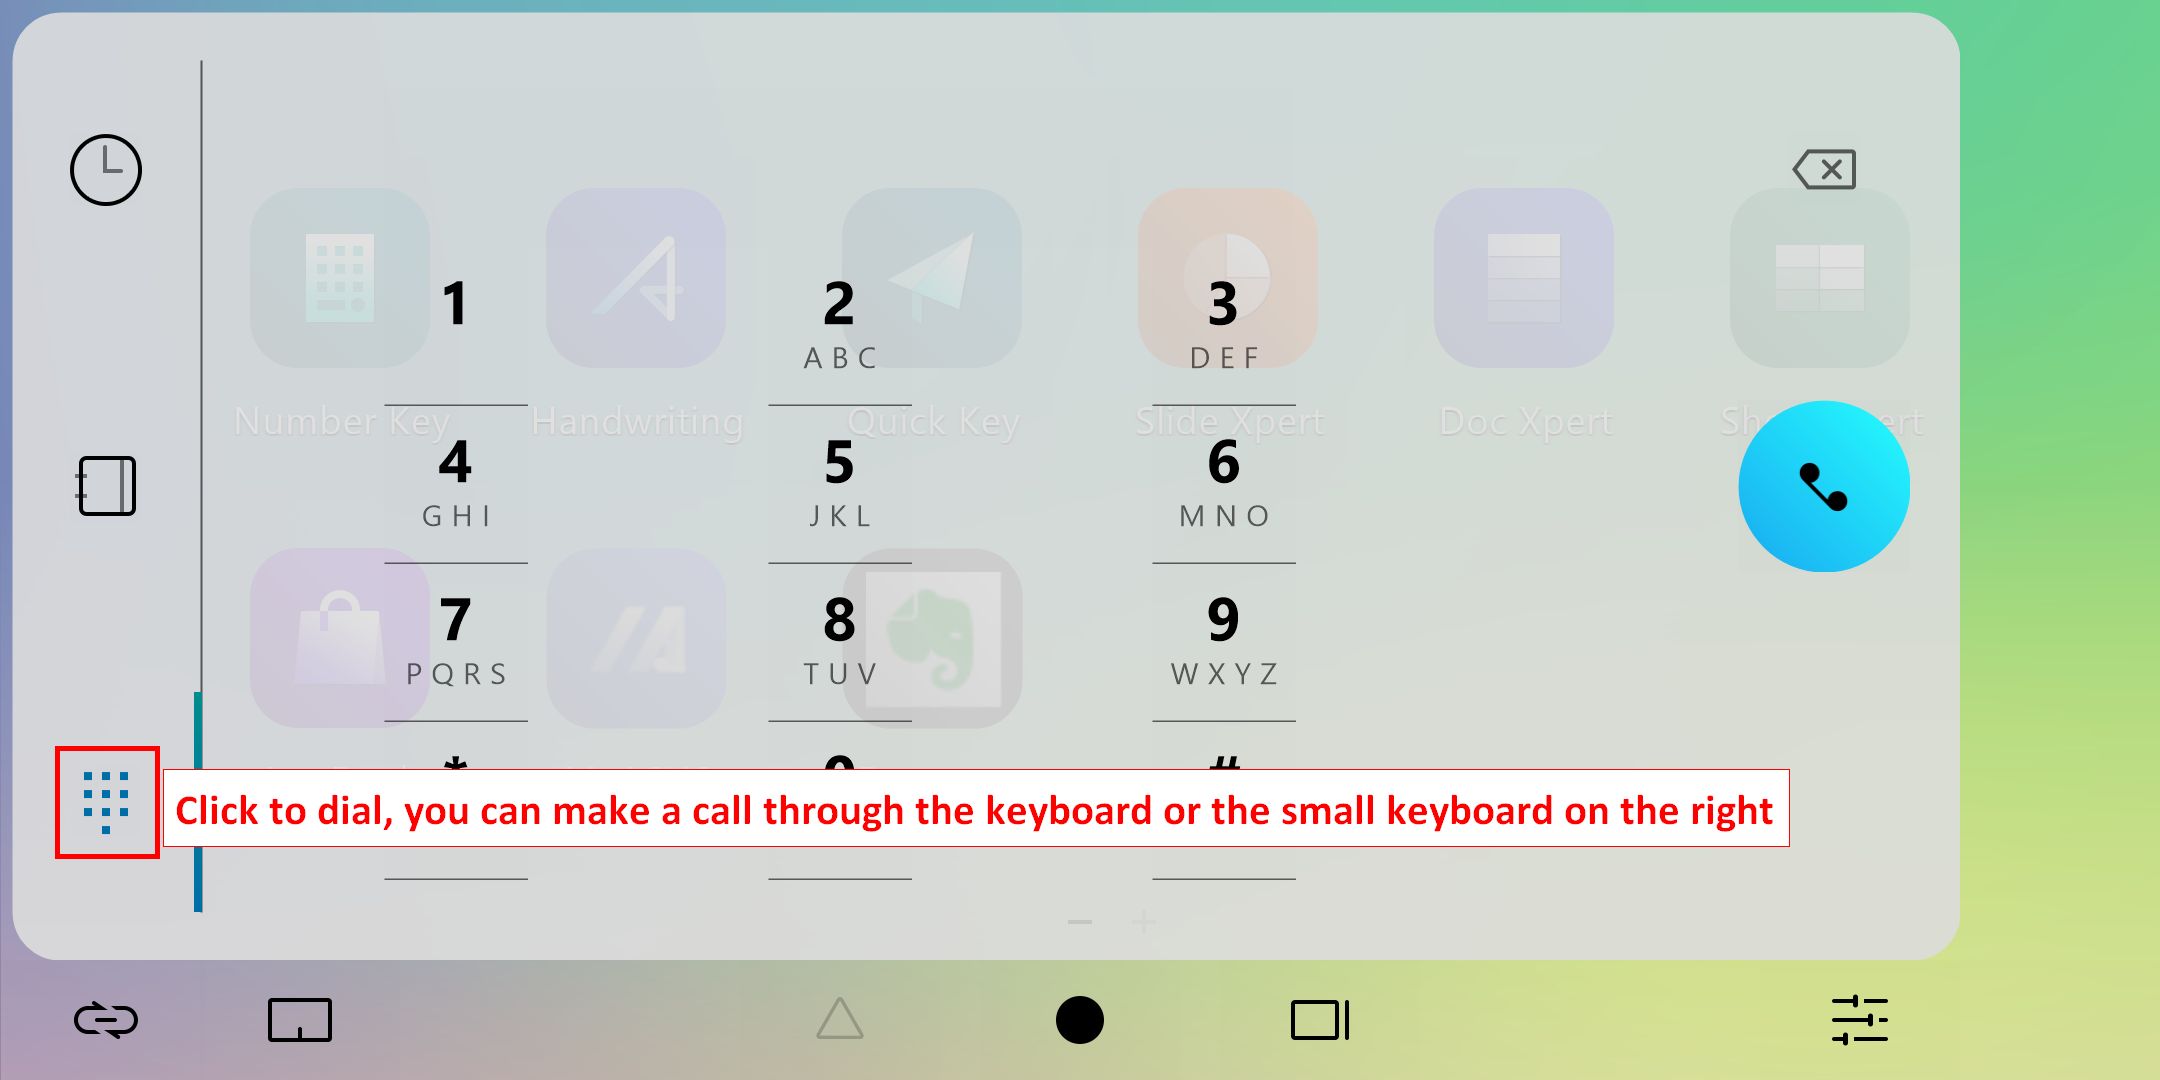
1.3 Click [Dial] to make a call through the laptop. It should be noted that the communication between the mobile device and the laptop is connected by Bluetooth, and the quality of the call will be affected by the connection quality.
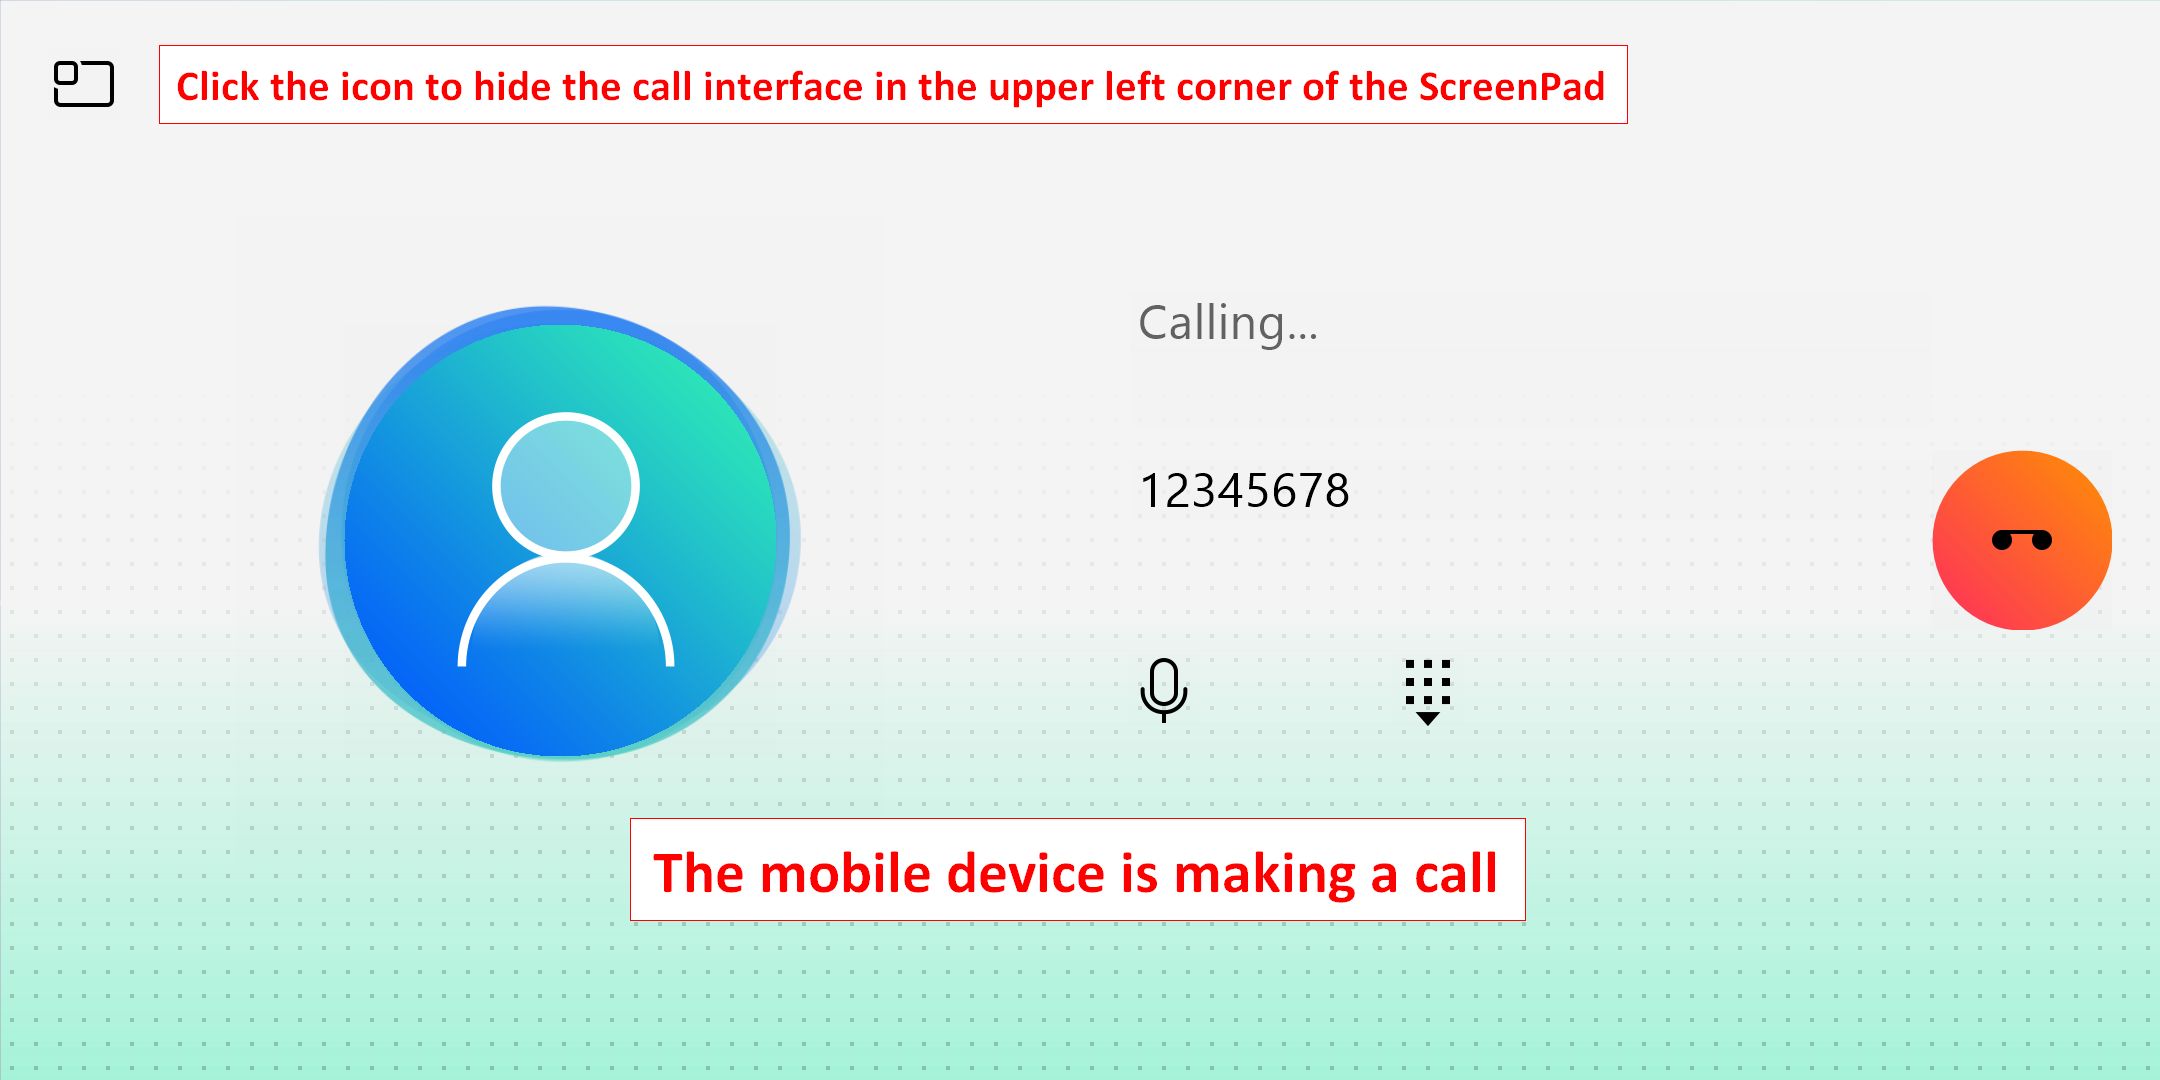
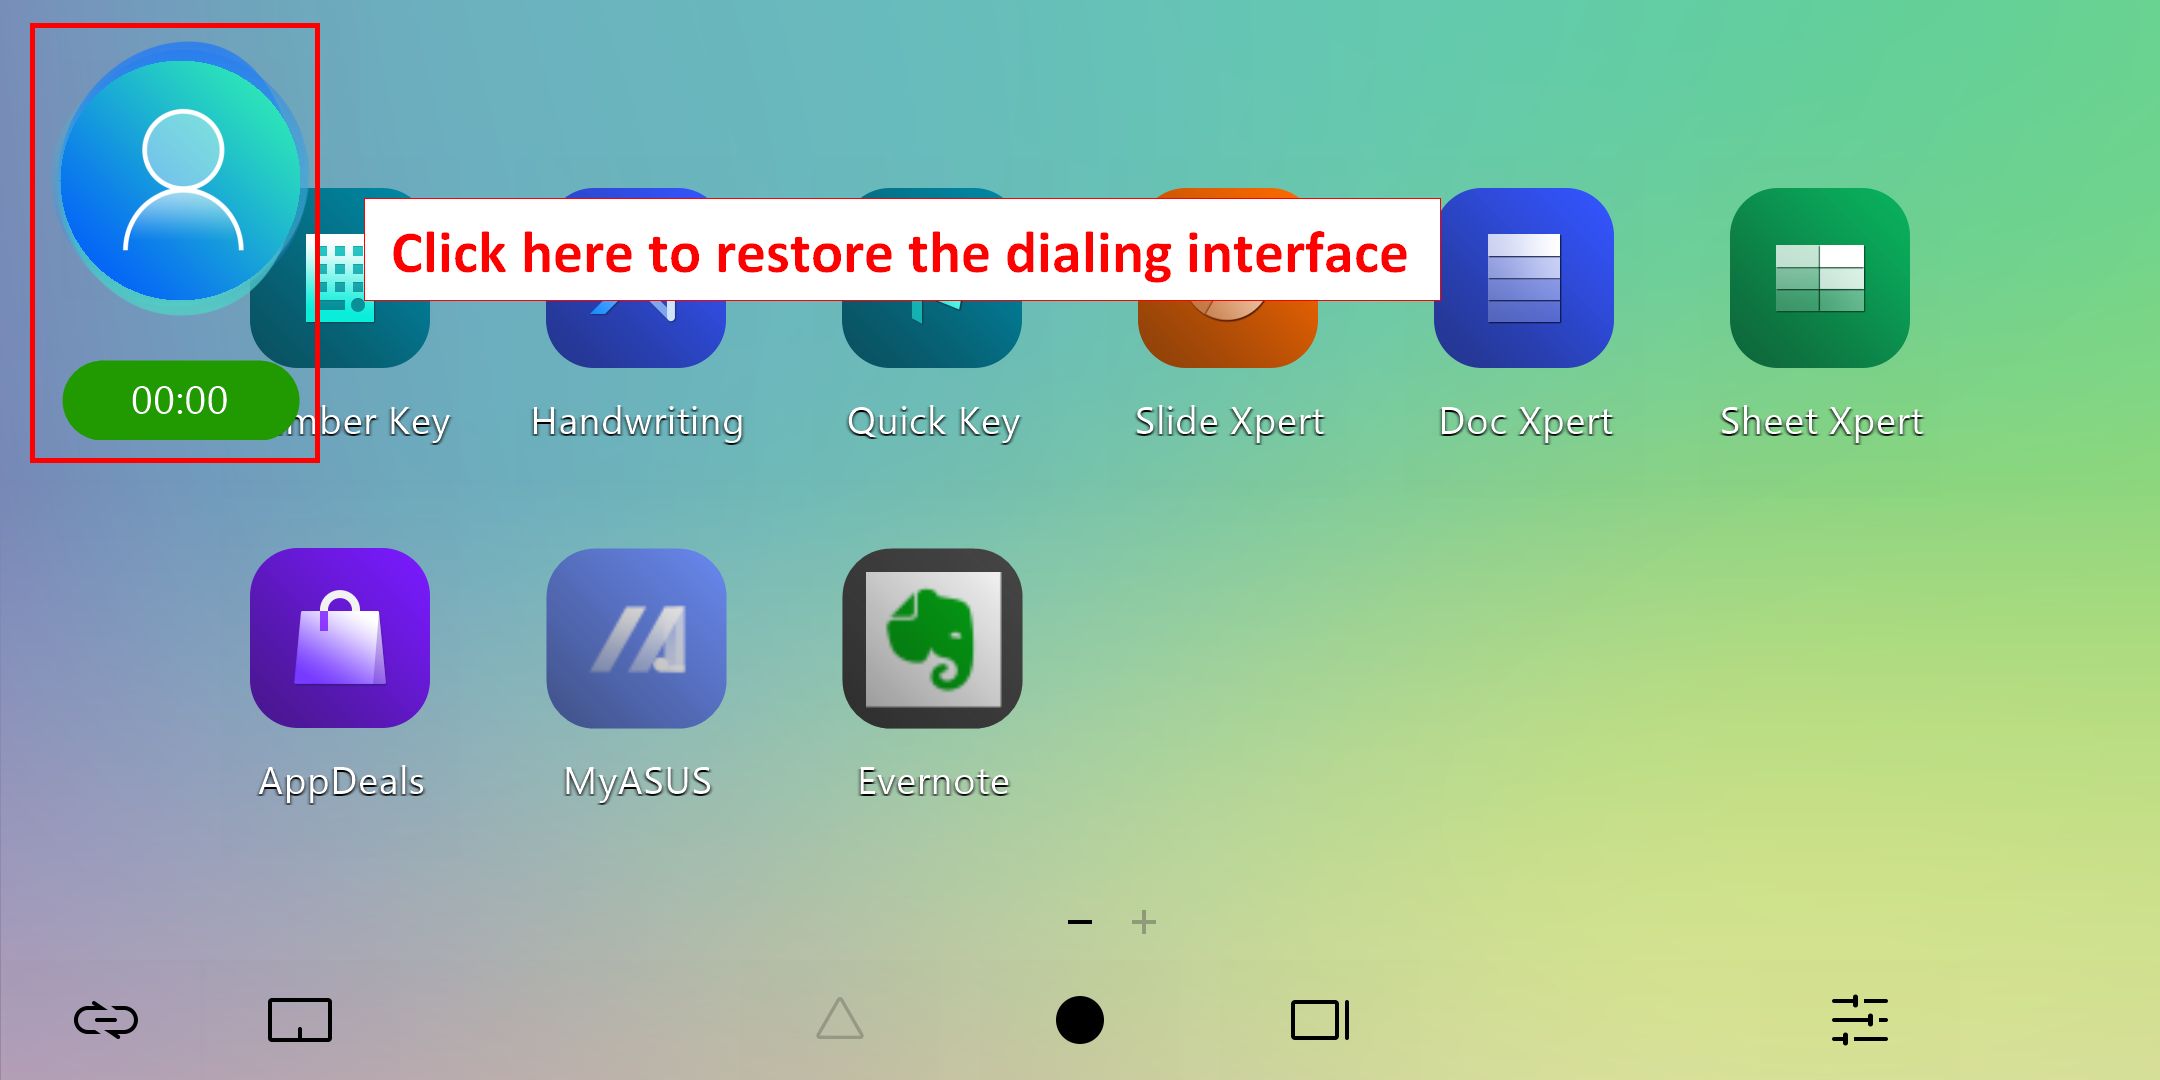
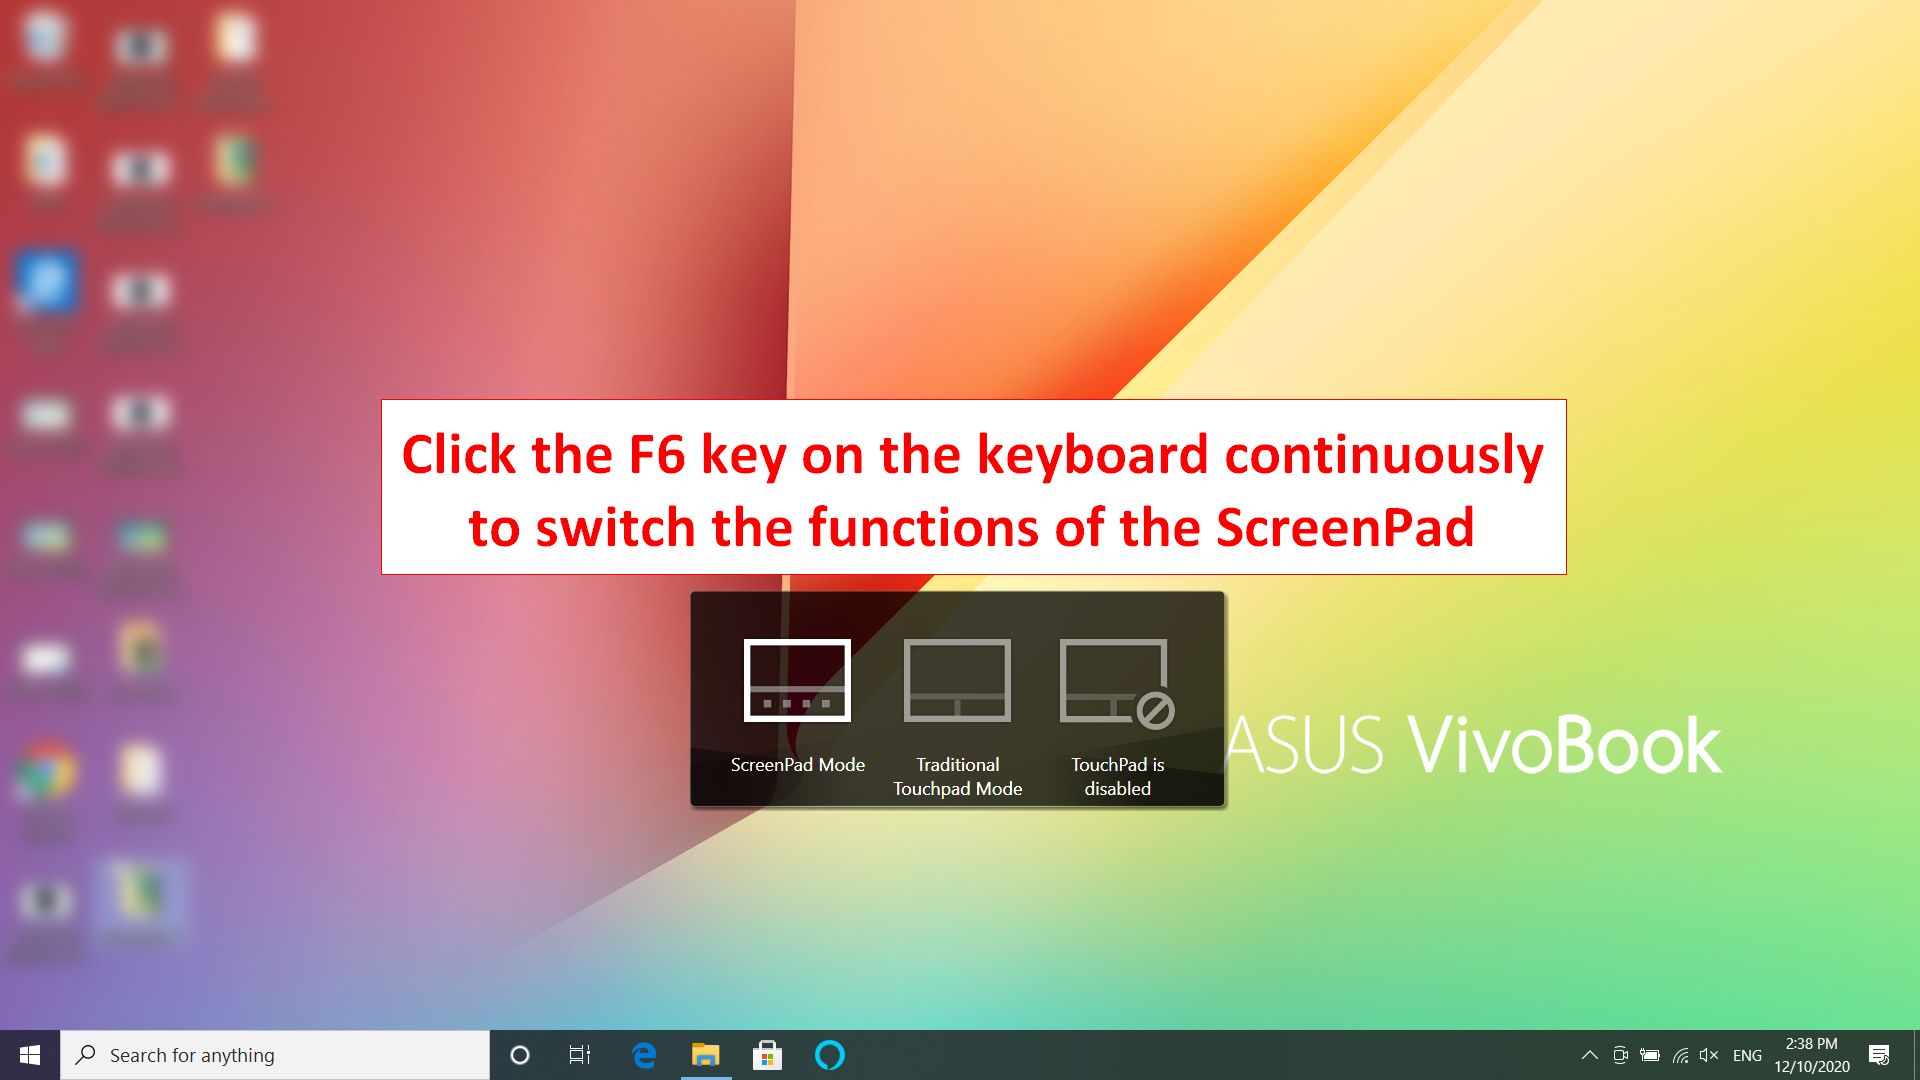
2.  [TouchPad]
2.1 After clicking the icon, the screen will enable the touchpad function.
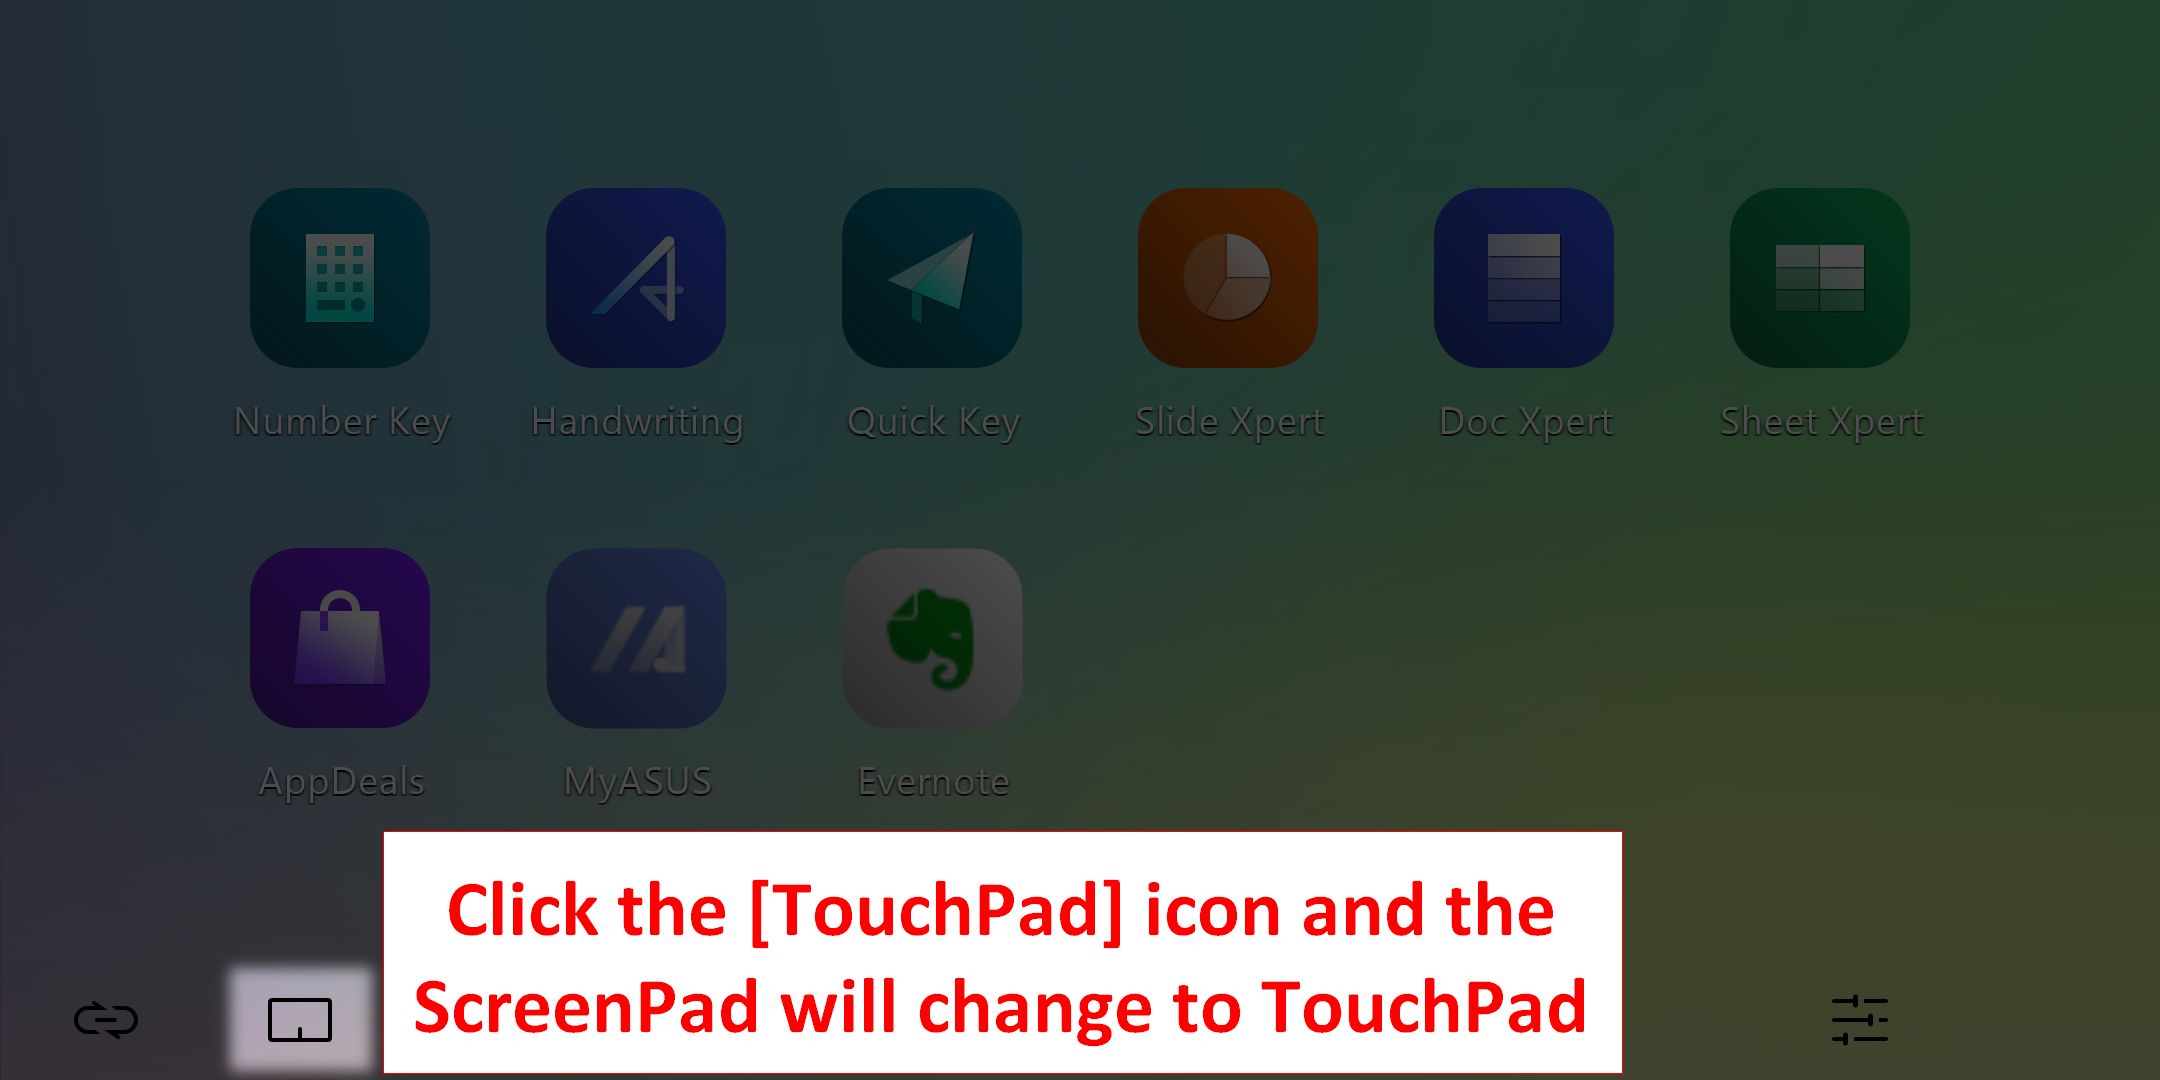
You can turn off the touchpad function by clicking the [x] in the upper right corner.

2.2 You can also click the keyboard F6 key to select ScreenPad mode, traditional touchpad mode, and touchpad disabled three ScreenPad modes.
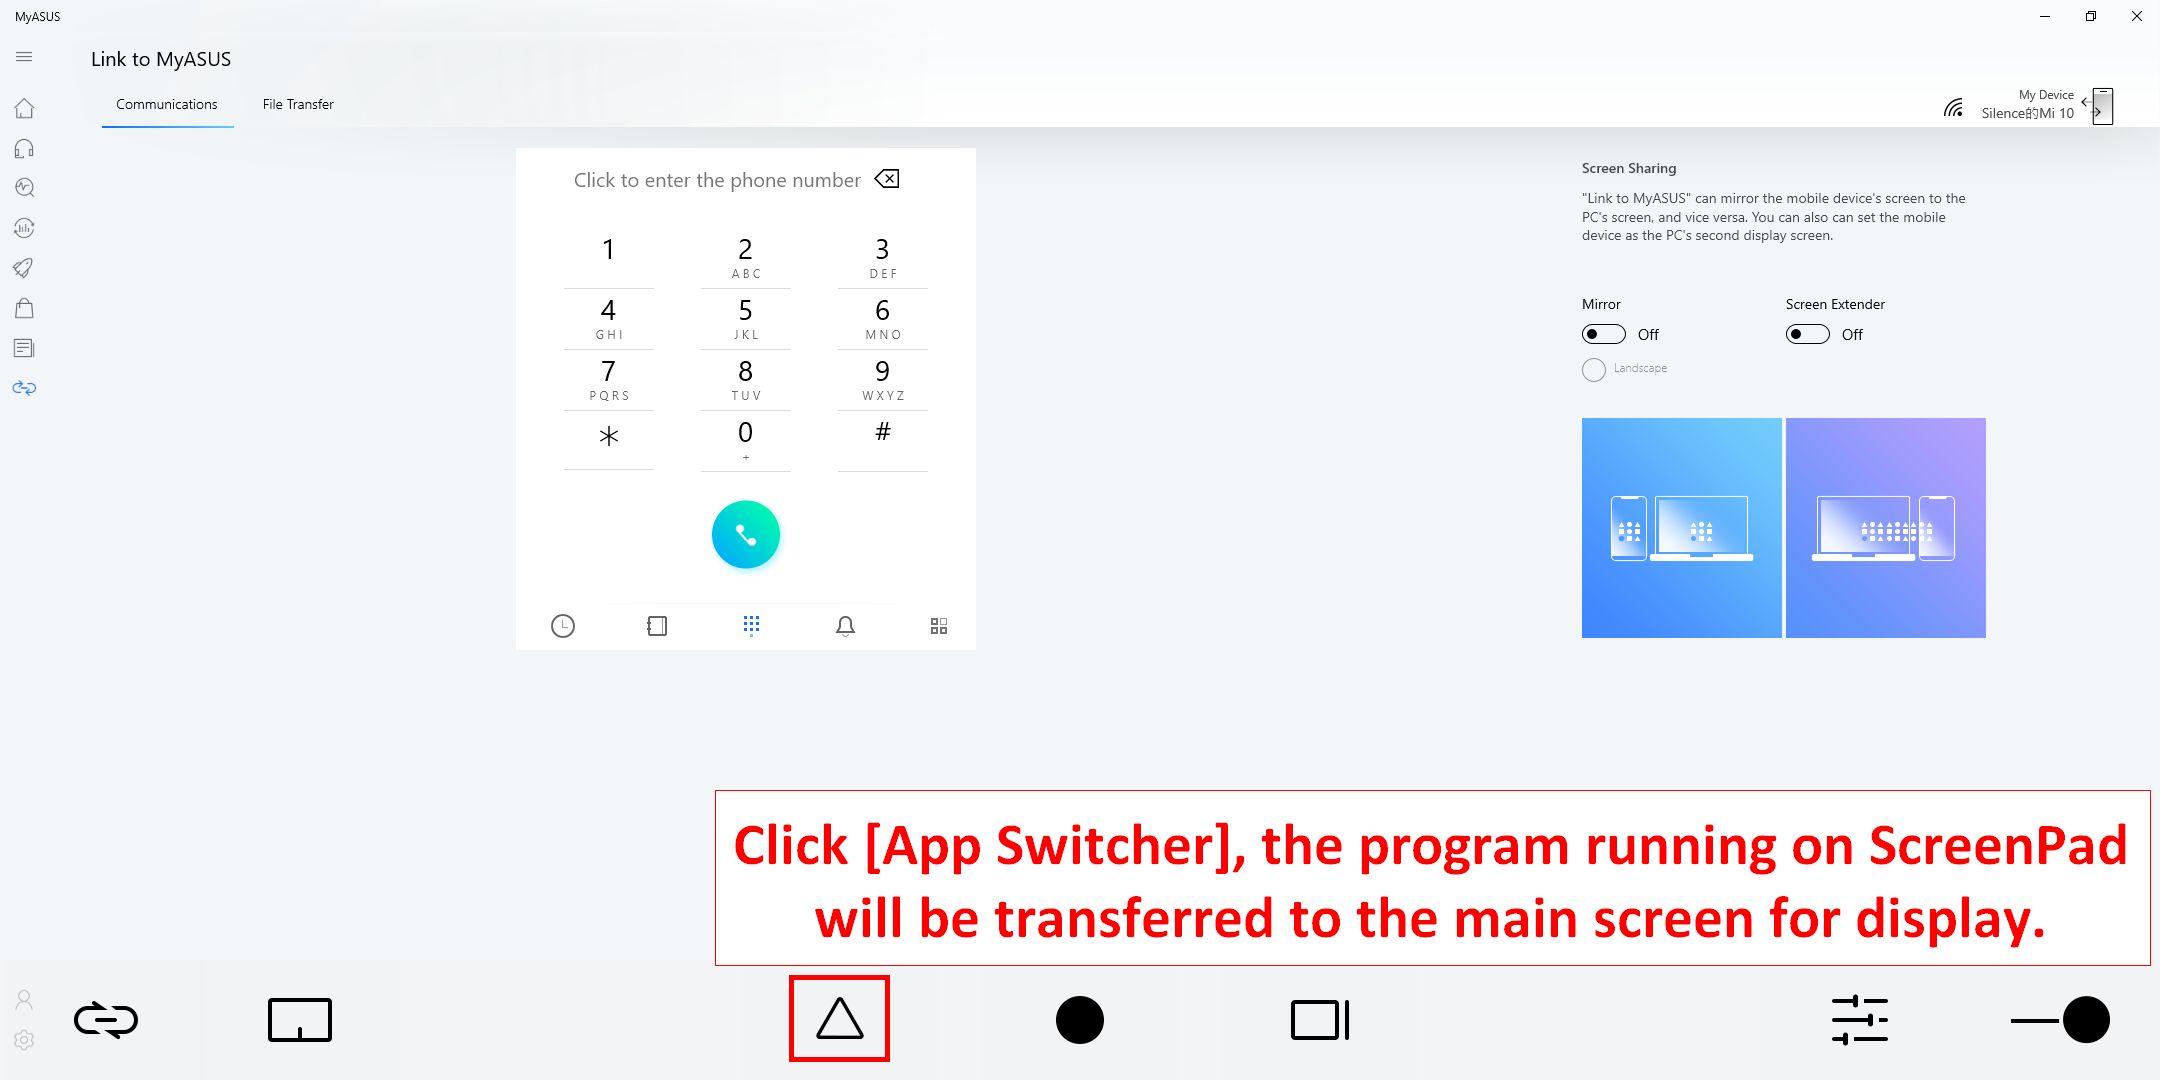
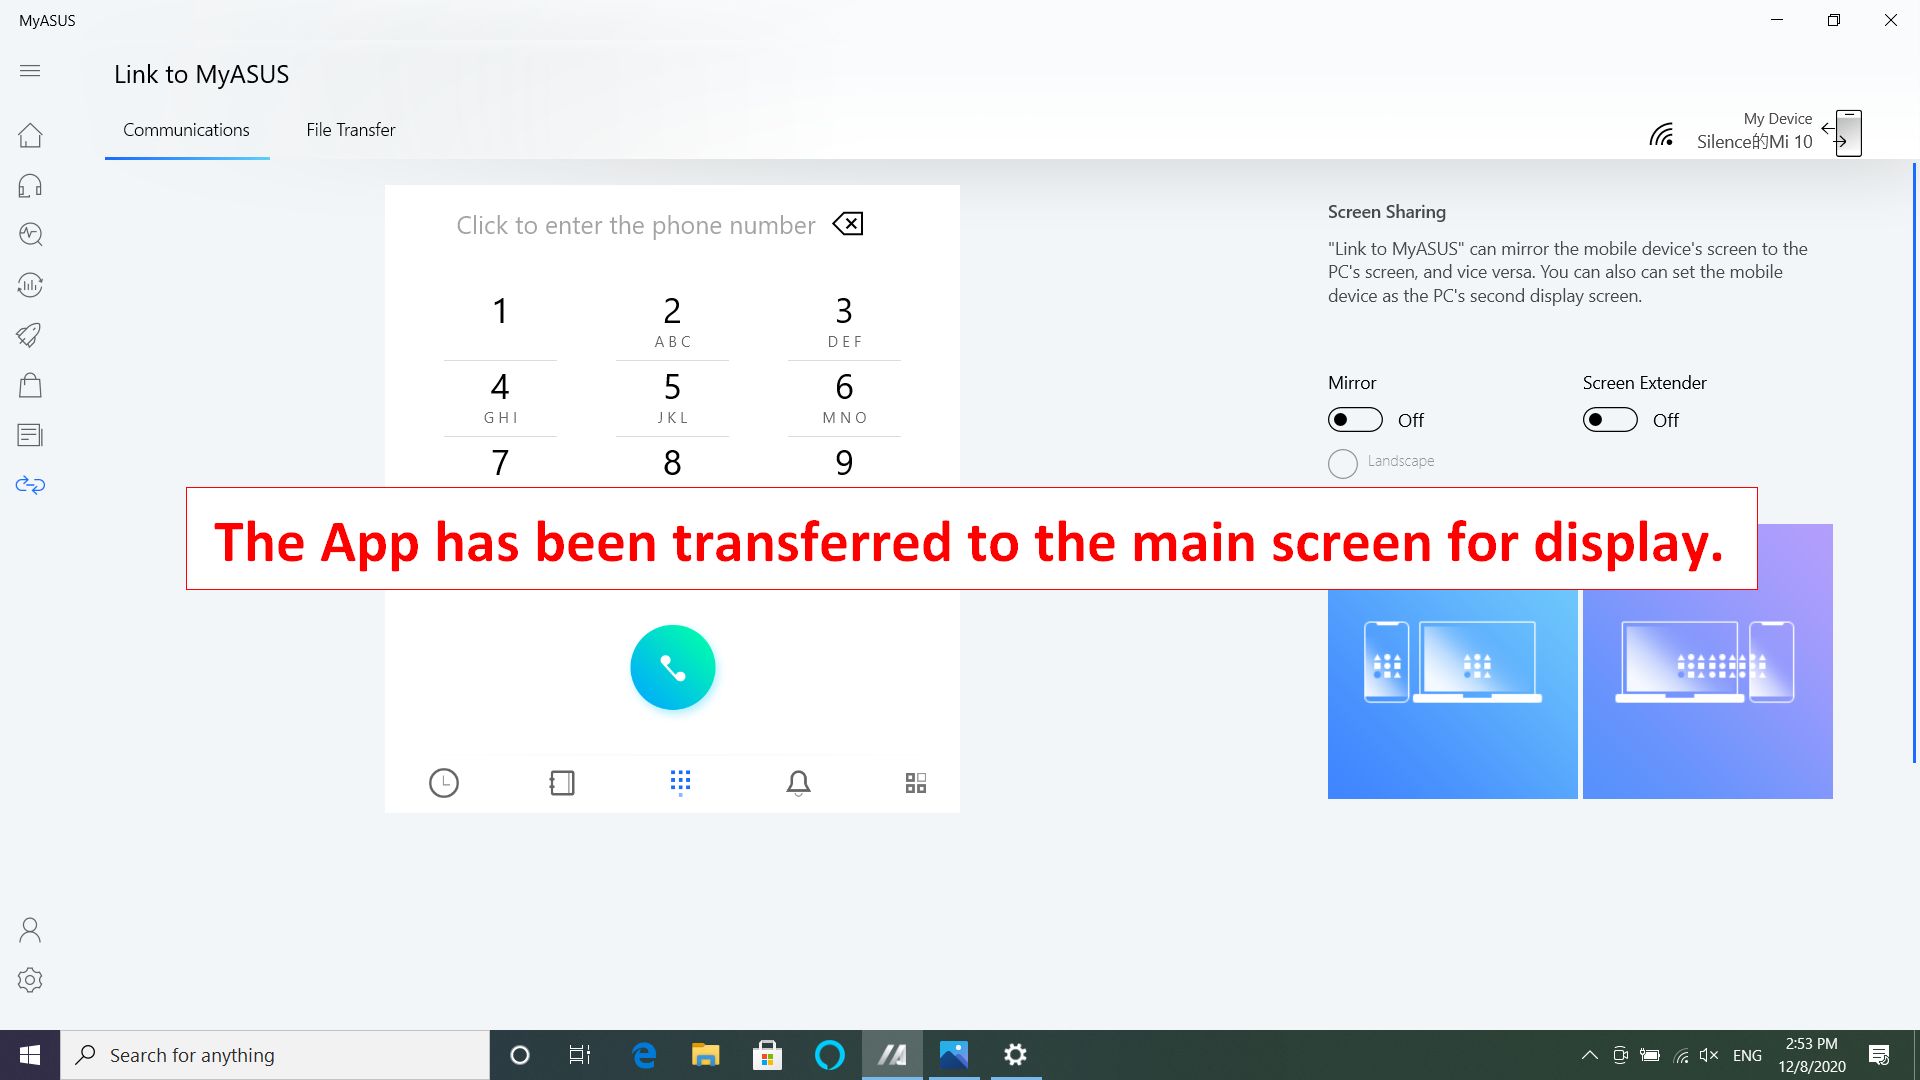
3.  [App Switcher]
3.1 Click [App Switcher], the program running on ScreenPad will be transferred to the main screen for display.
3.2 Dragging the App window on the home screen displays ①[Screen Indicator] to confirm the location of the screen. It will also display the ②[App Switcher] menu feature, which contains screen 1 and screen 2 icons.
3.3 If you drag the mouse into the range of ③[Screen 1], four usable icons will be displayed.
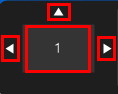
Drag the mouse into the [Left Arrow], and the app window will appear in Screen 1 to occupy half of the left side of the screen.
Drag the mouse into the [Up Arrow], and the app window will be displayed in full screen within Screen 1.
Drag the mouse into the [Right Arrow], and the app window will appear in Screen 1 to occupy half of the right side of the screen.
Drag the mouse into the [Middle Area] and the app window will be centered within Screen 1. The following image will be illustrated as an example of the [Middle Area].
3.4 The app window is already centered within Screen 1.
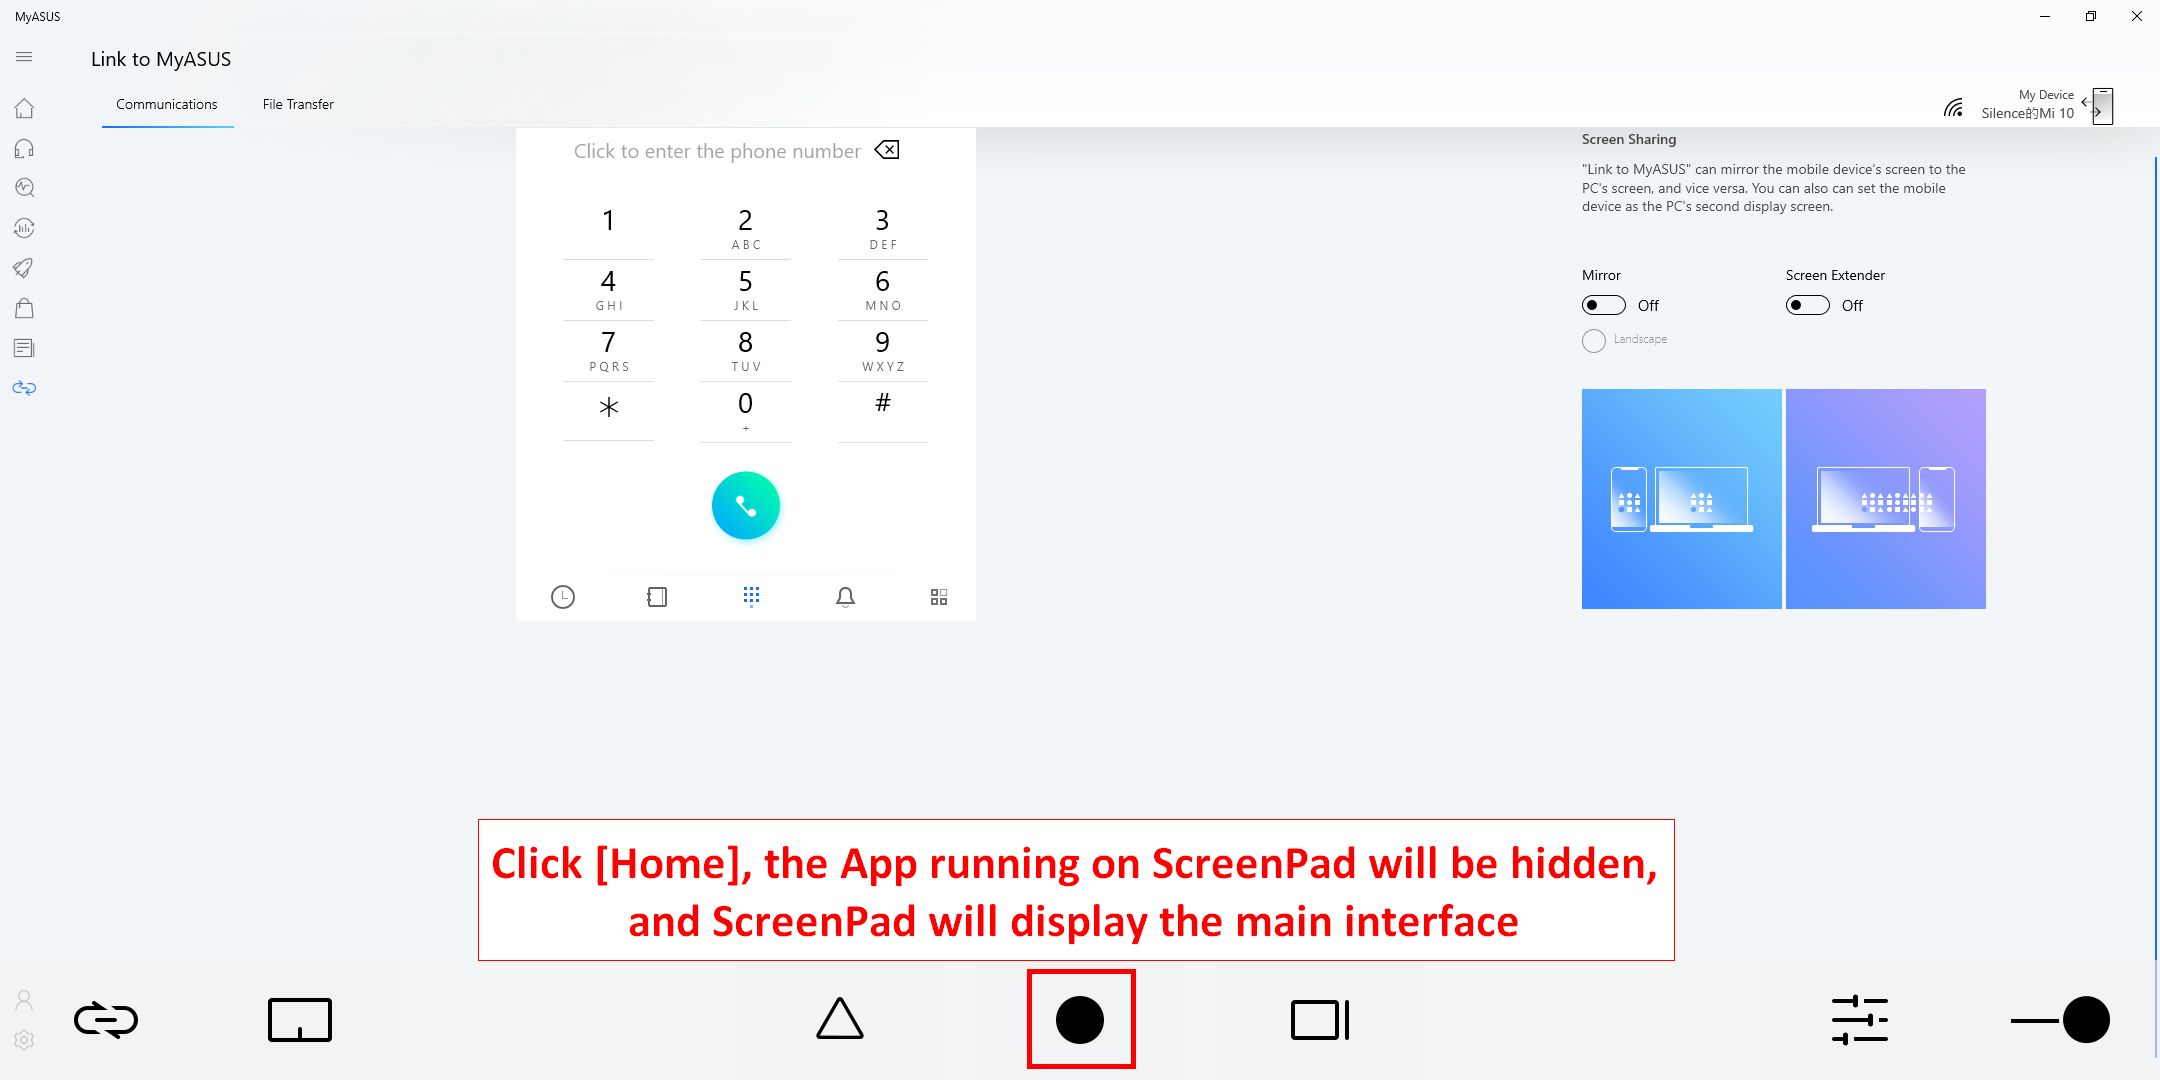
4.  [Homepage] icon, when a window was displayed on the ScreenPad, click the icon, the ScreenPad will back to the main interface.
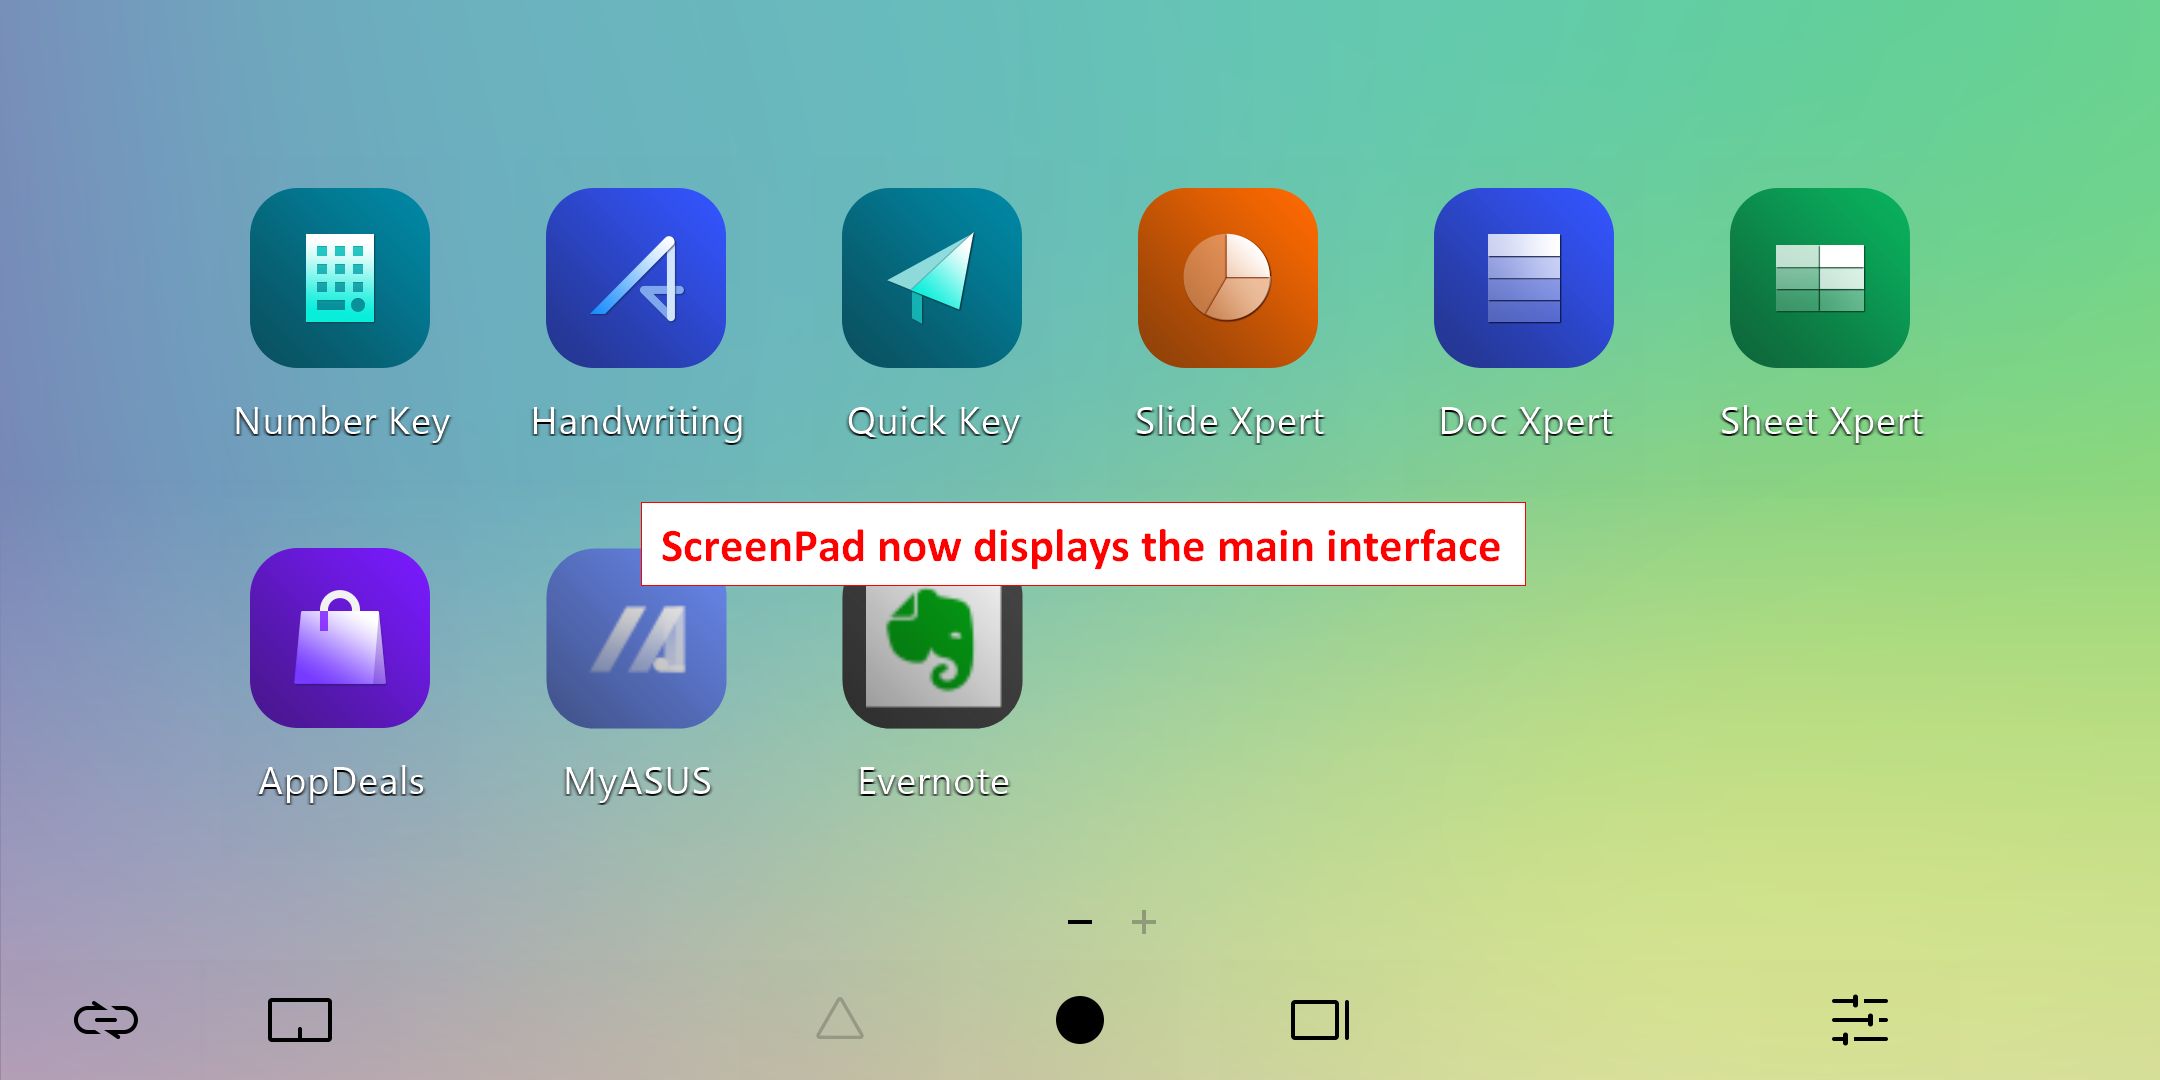
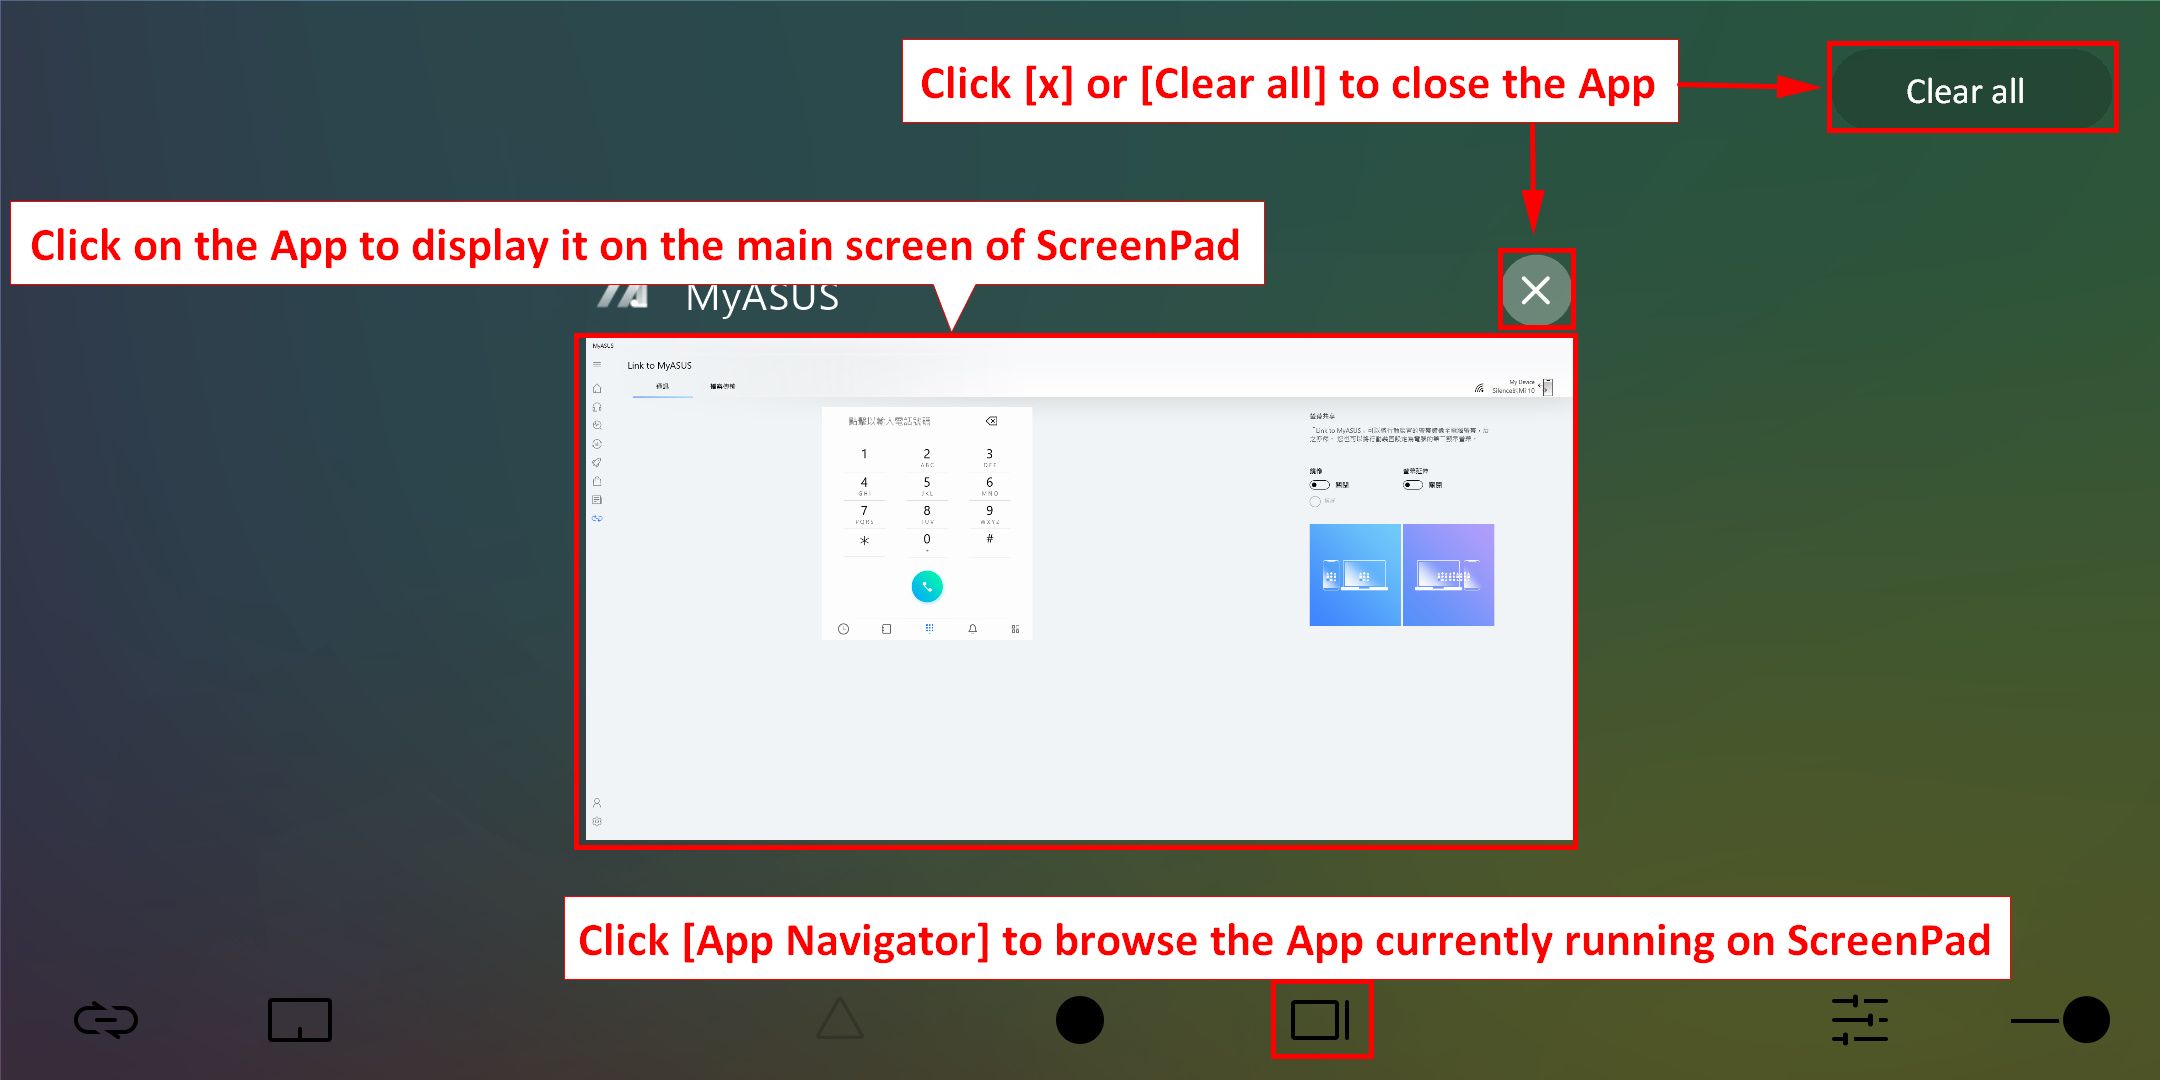
5.  [App Navigator] icon, you can browse the Apps running on ScreenPad at this time. You can click the apps to display it on the ScreenPad, or click [X] or [Clear All] in the upper right corner to close the application running on the ScreenPad.
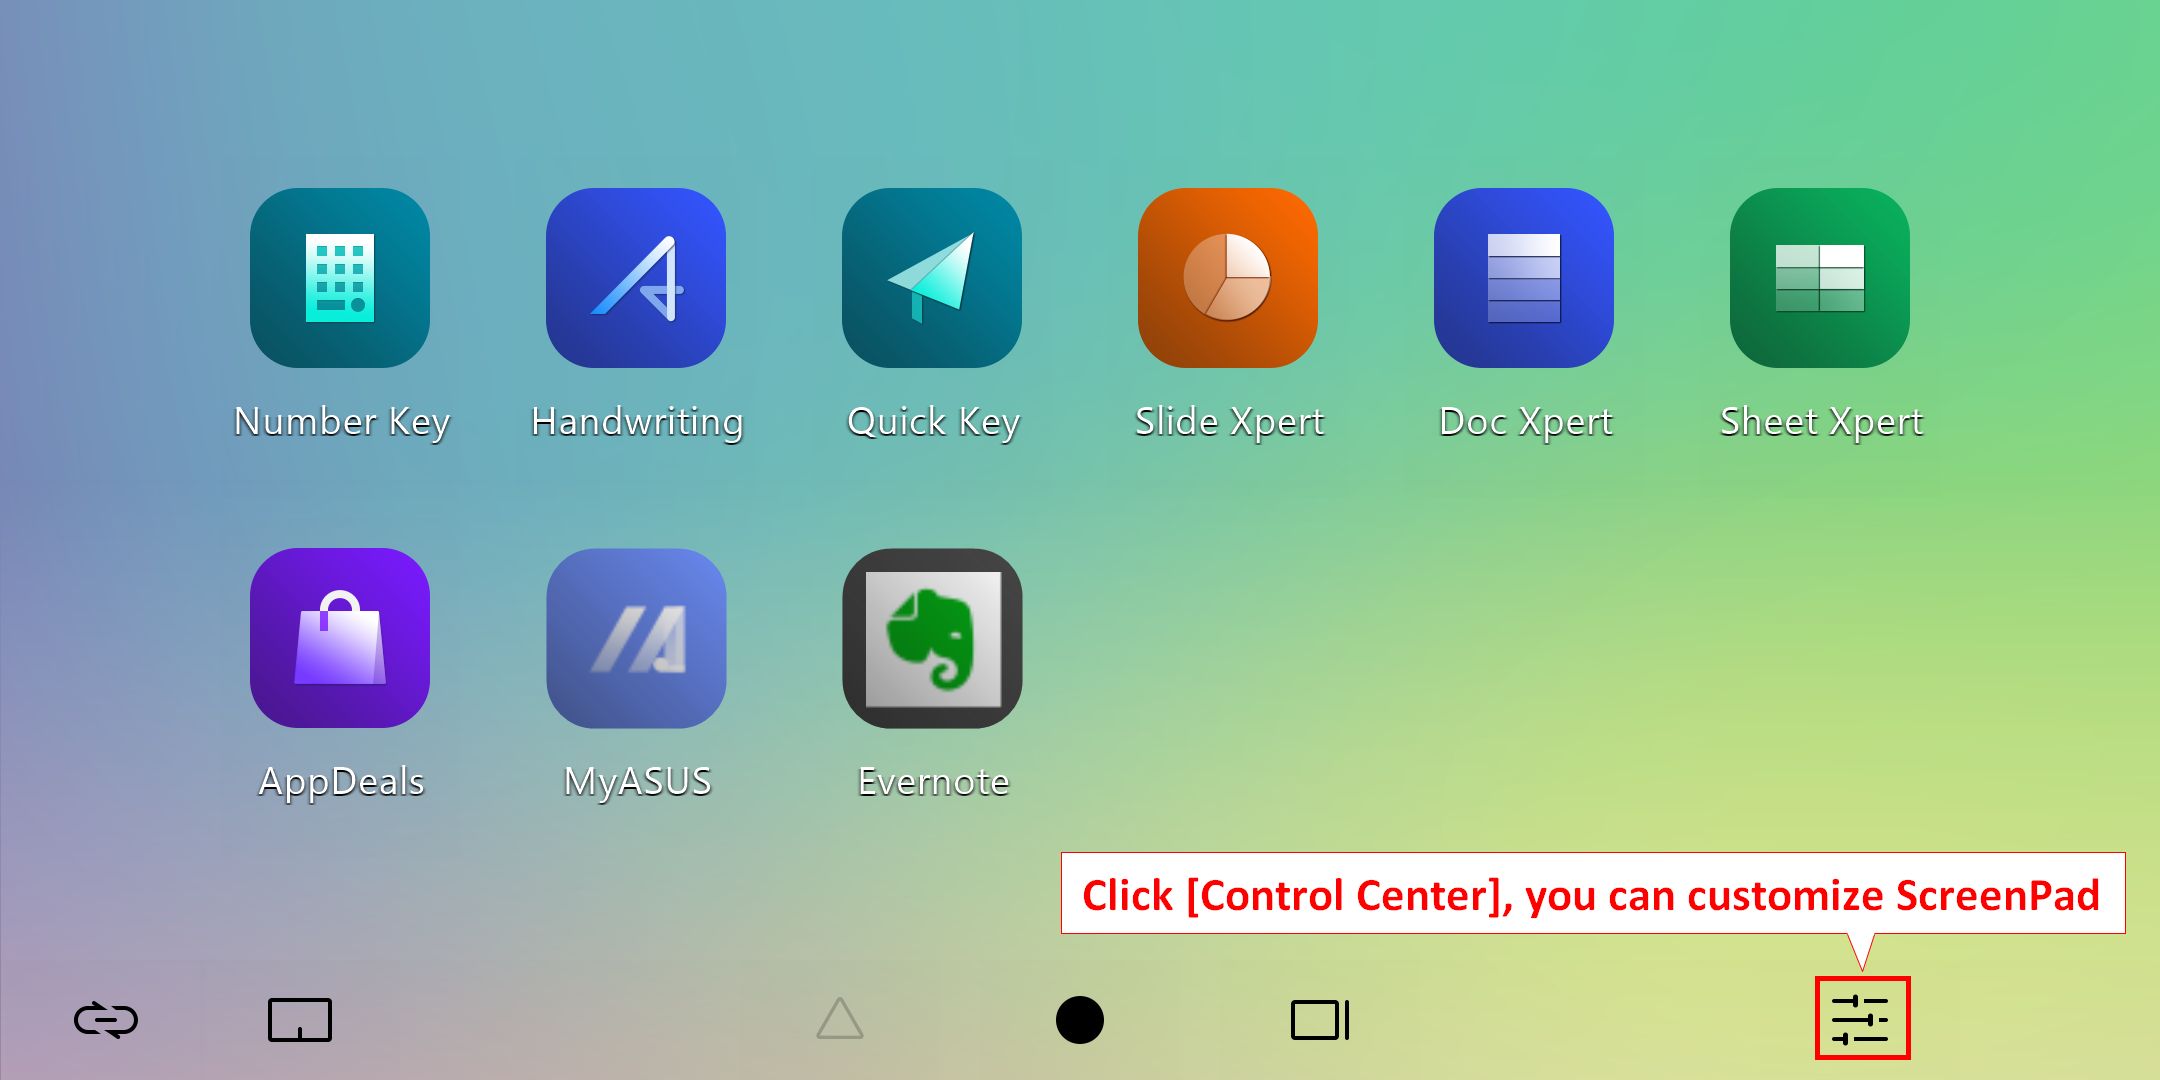
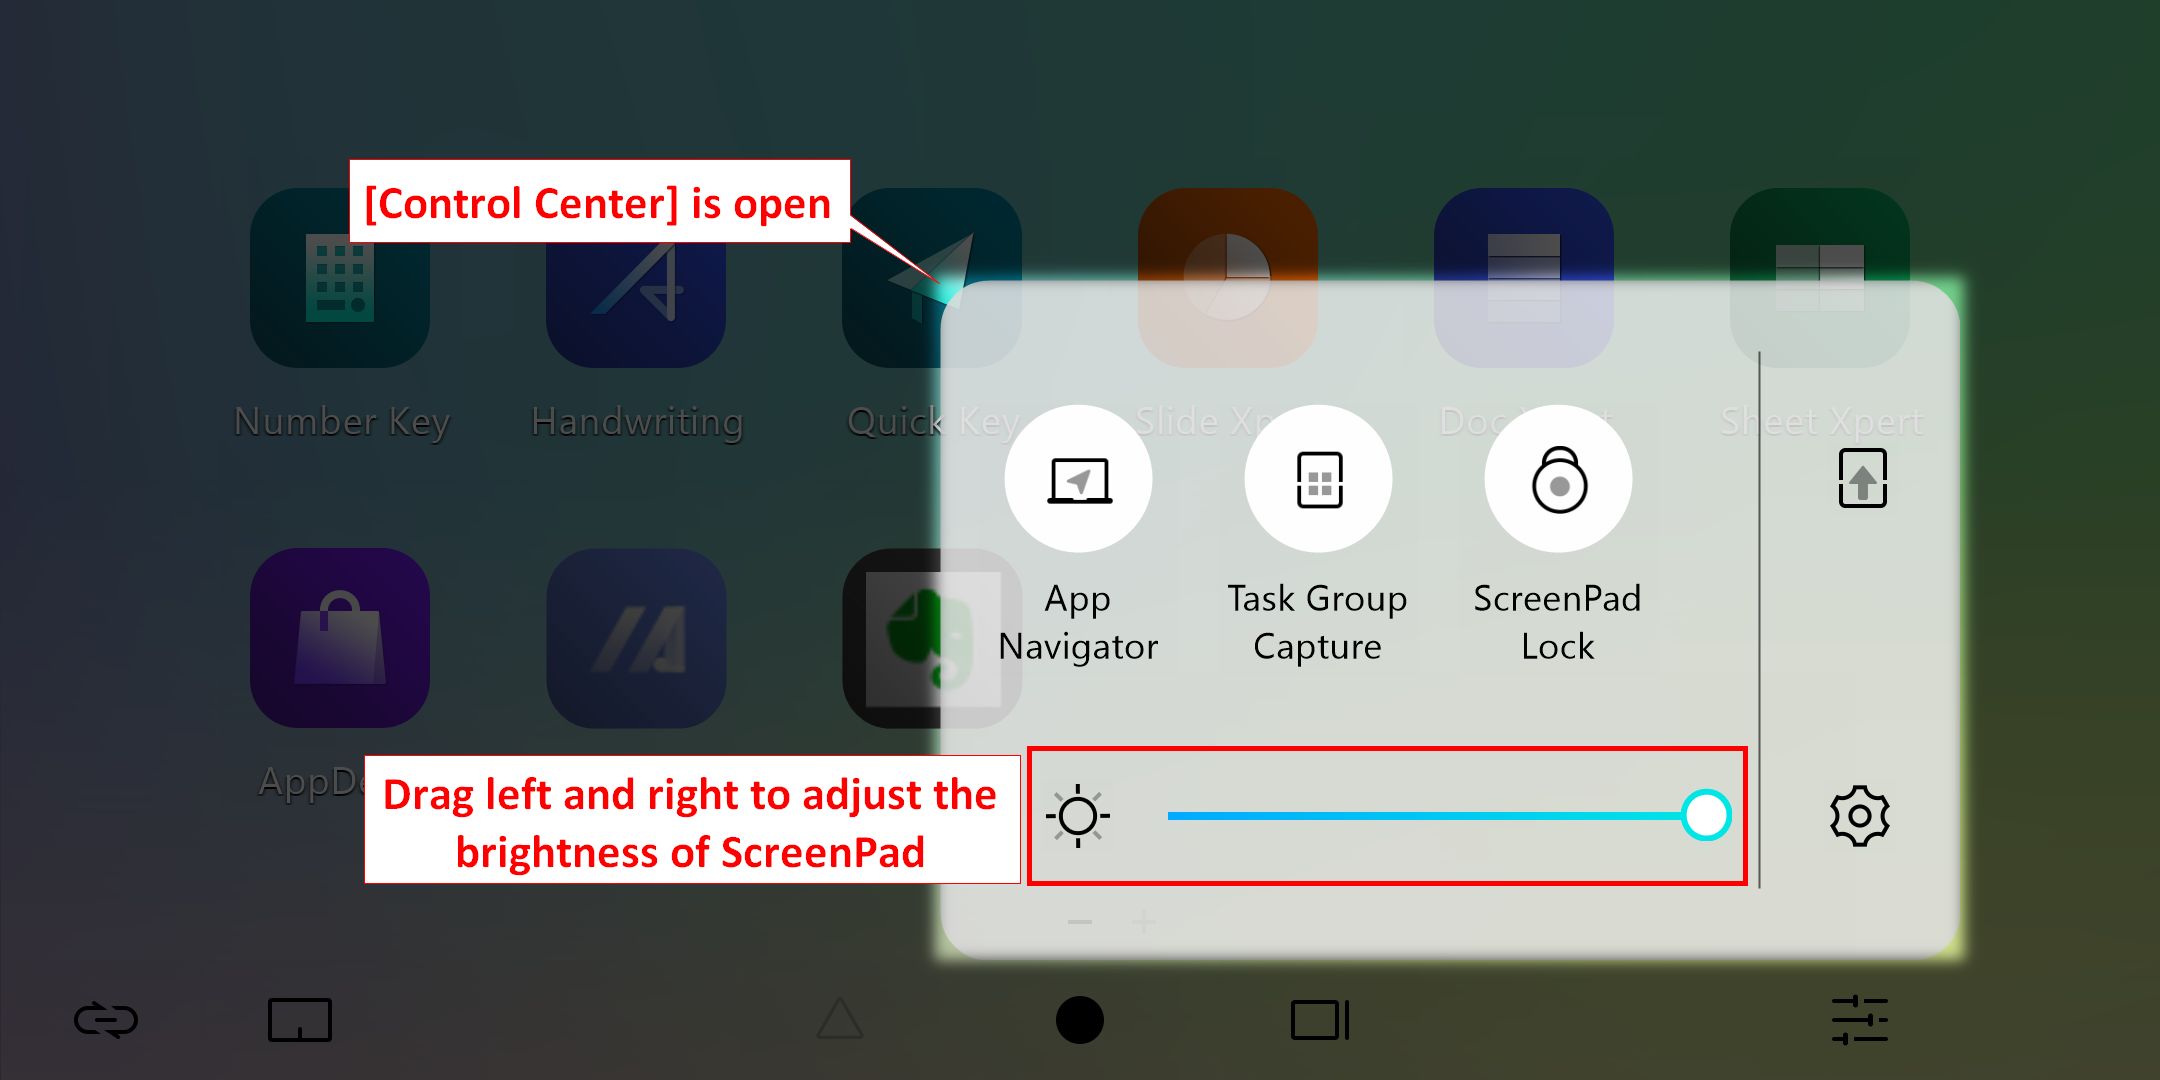
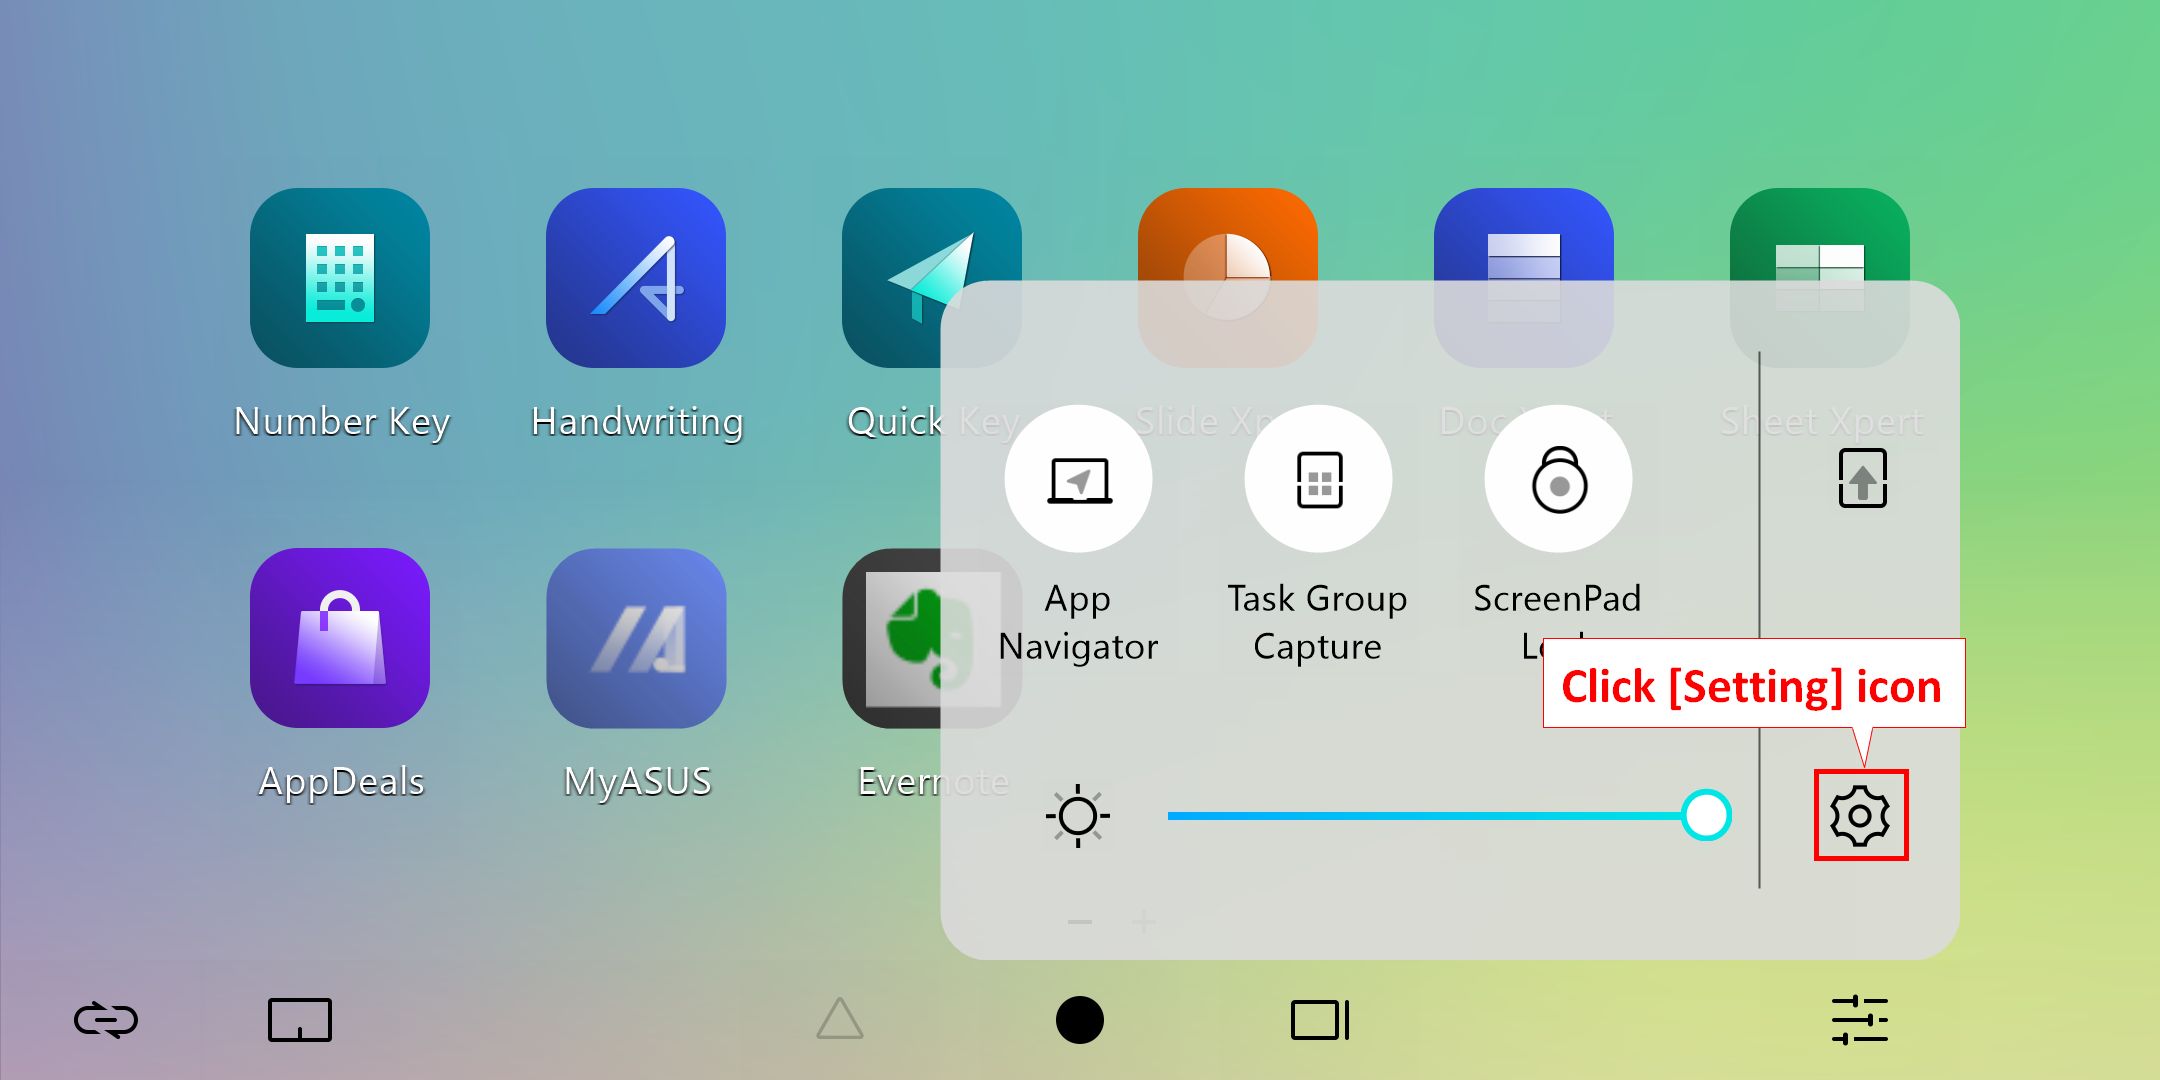
6.  [Control Center] icon, to setup and personalize your ScreenPad.
6.1 Drag left and right with your finger to adjust the brightness of ScreenPad.
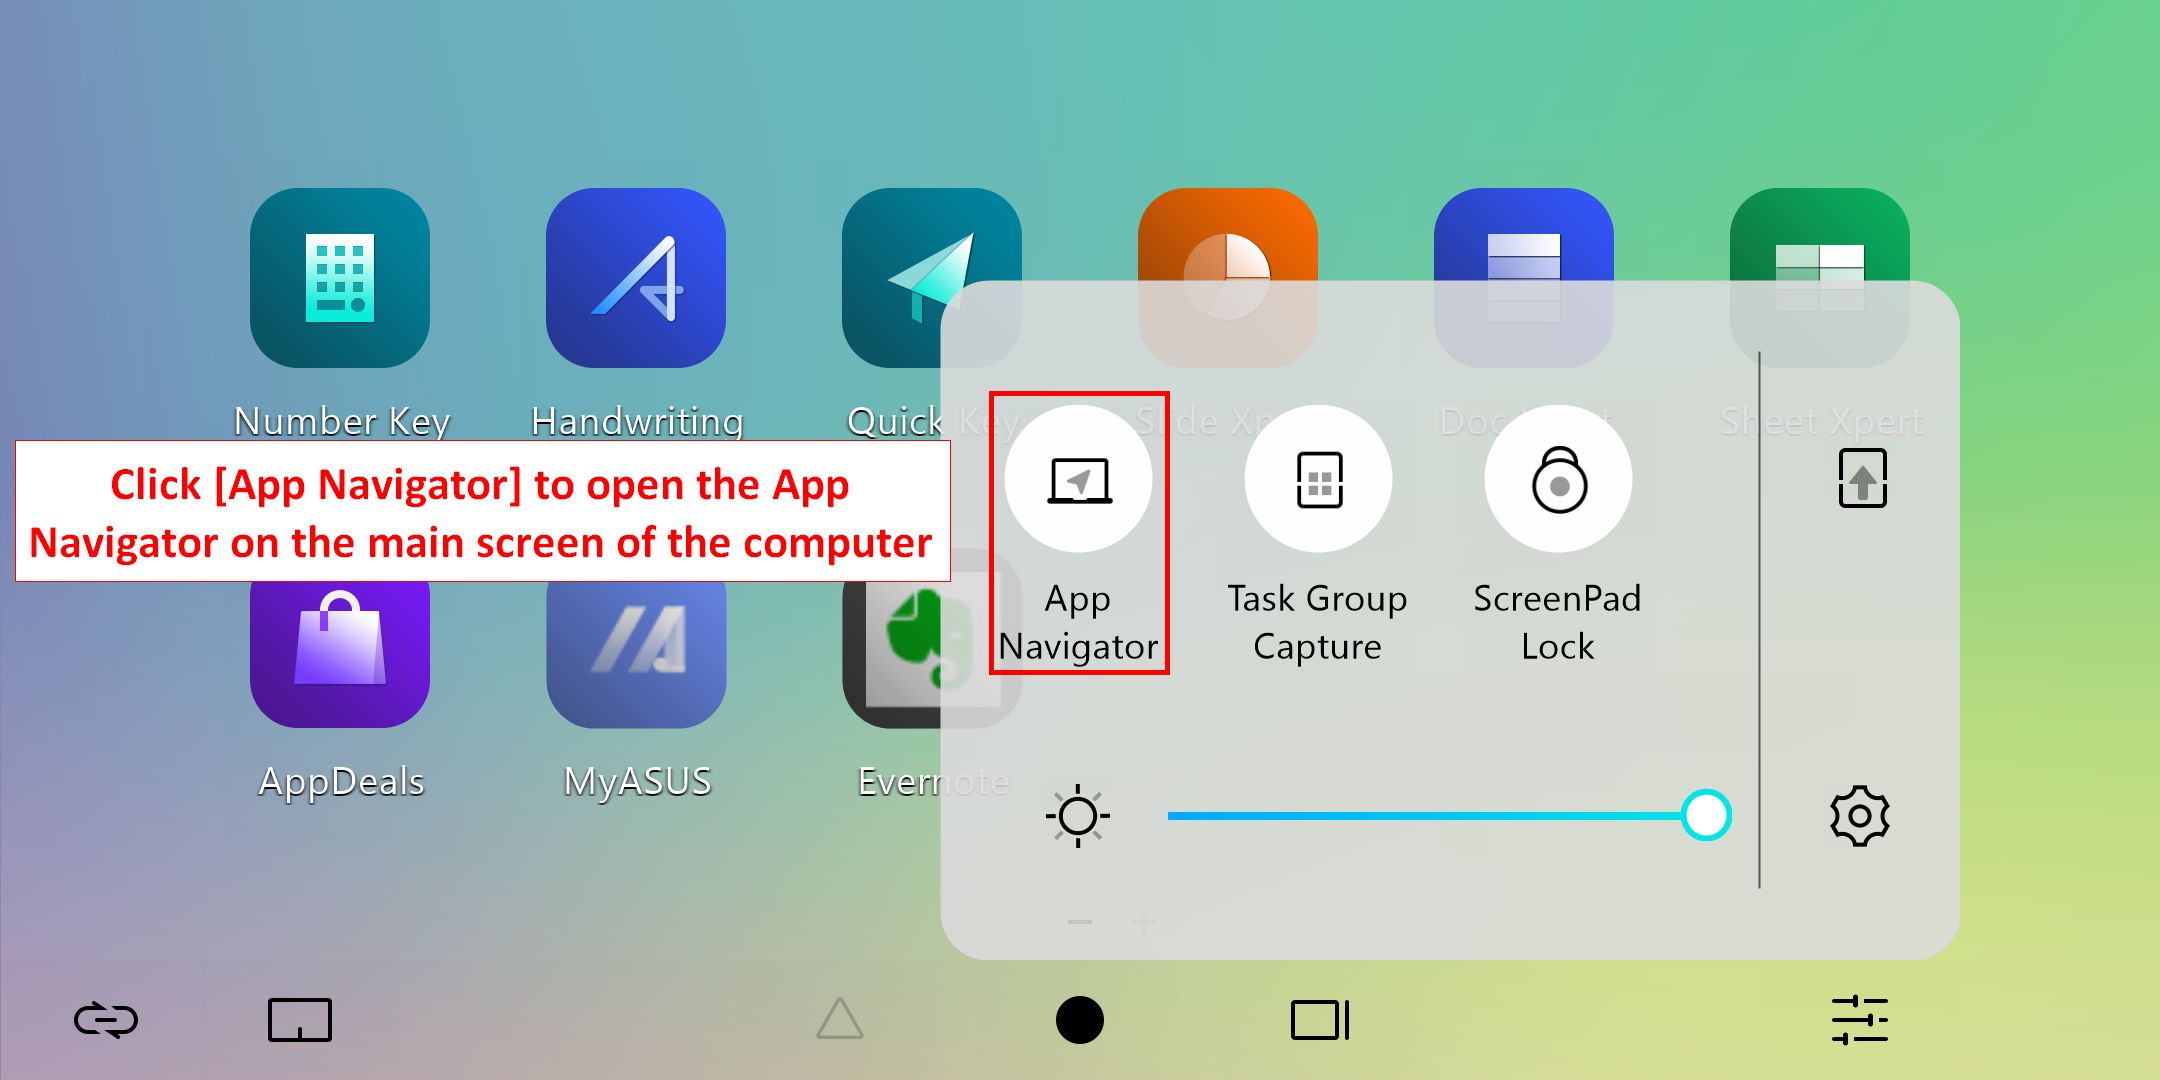
6.2.1 Click [App Navigator] to open the App Navigator on the main screen of laptop
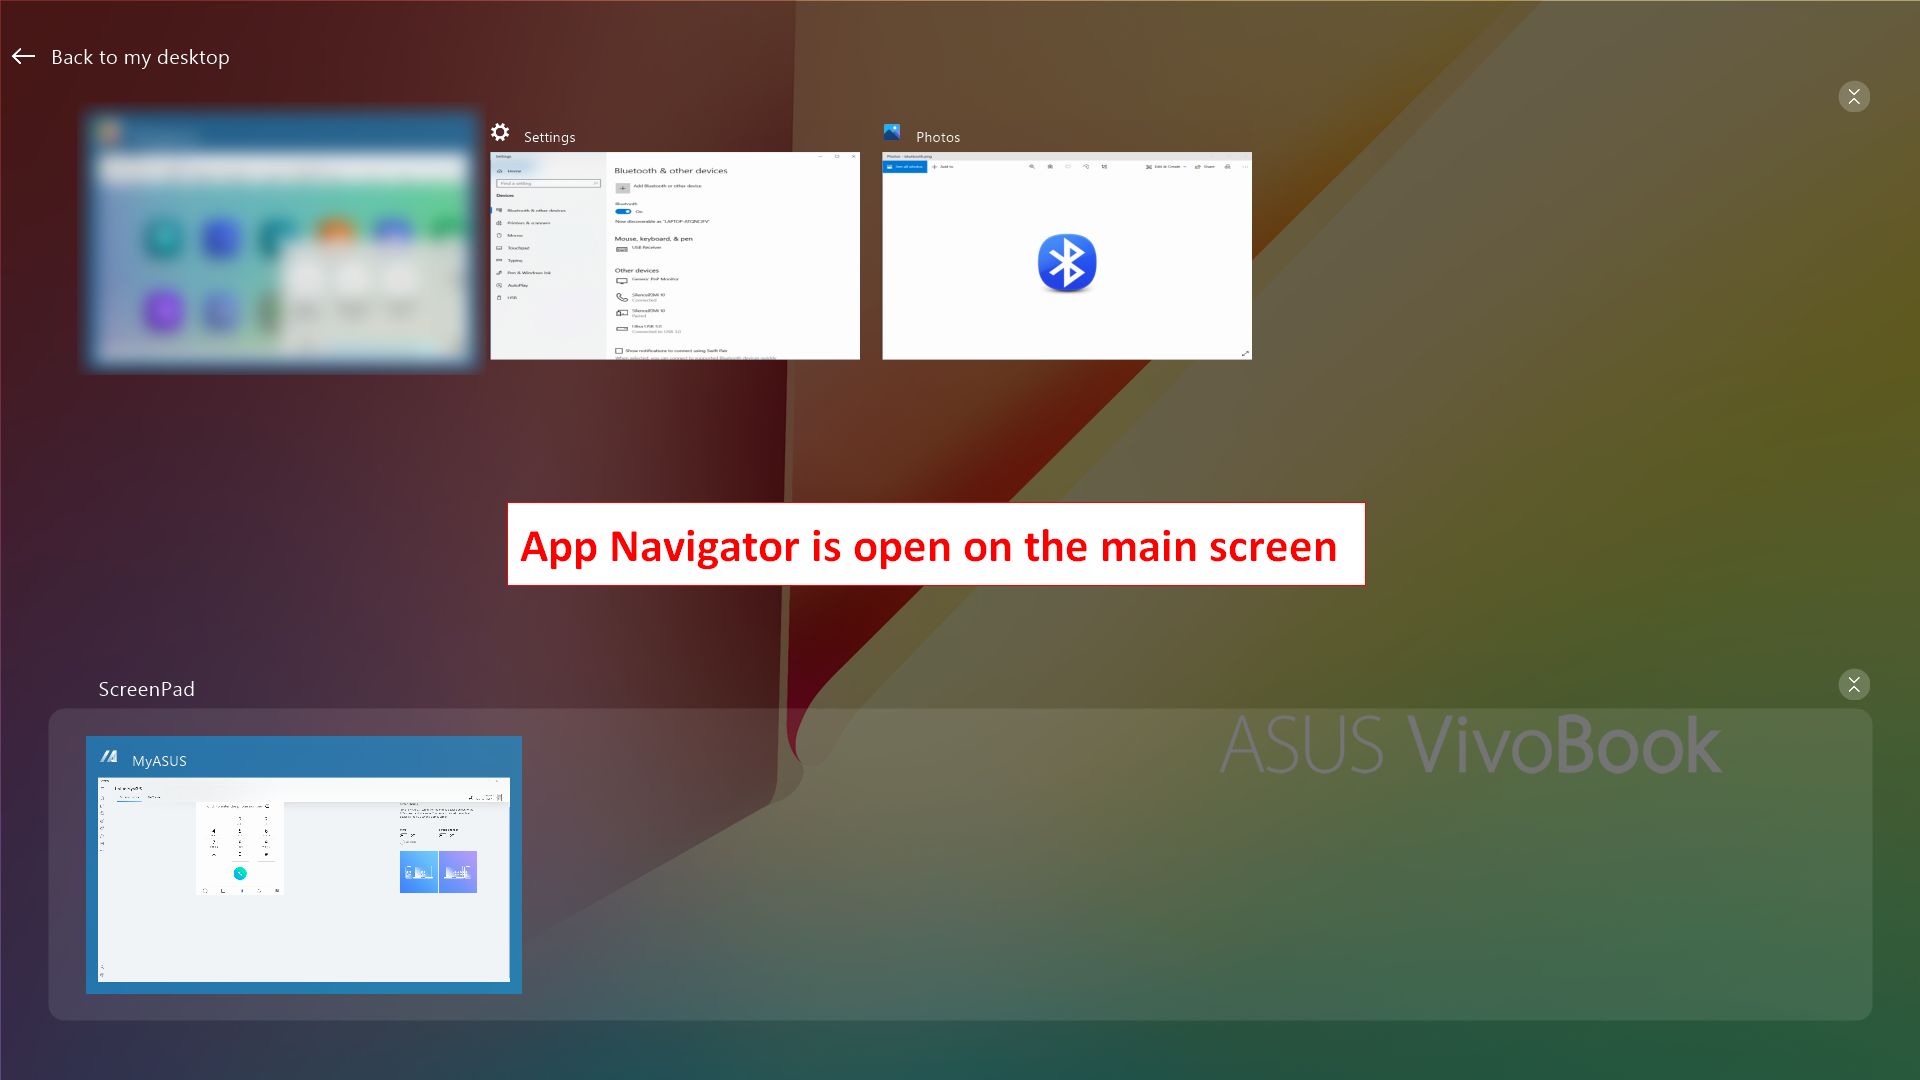
6.2.2 The App Navigator has been opened on the main screen of the laptop. The upper part is the main screen display area of the laptop, and the lower part is the ScreenPad display area. You can drag the application with the mouse to decide whether to display on the main screen or the ScreenPad.
6.3.1 Click [Task Group Capture] to layout all applications currently running on the laptop in a group for you to open these applications quickly.
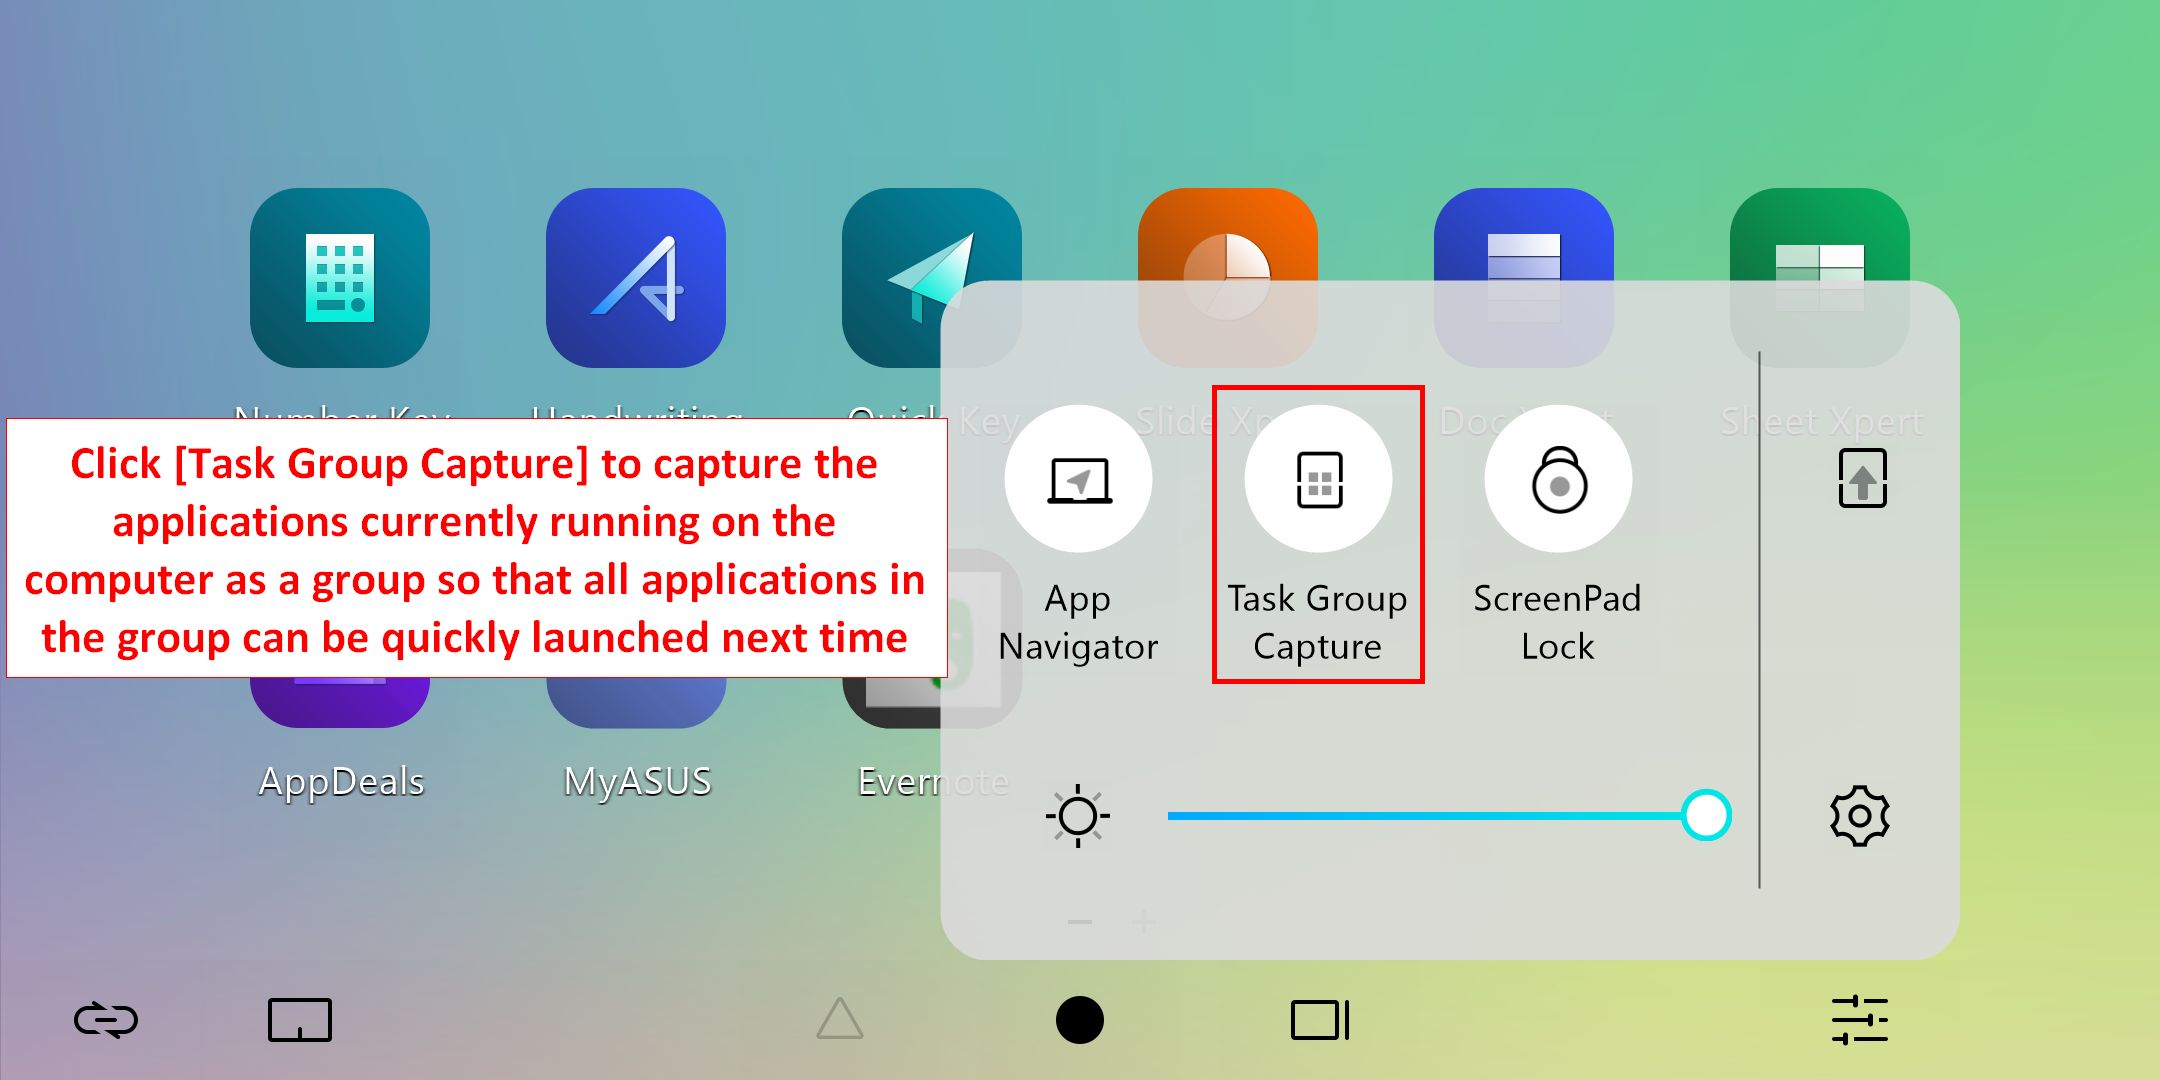

6.3.2 Swipe your finger to the right on the main ScreenPad to open the group editing interface. Click any group to open all programs in the group on the laptop. Click the [+] icon to add all applications currently running on your laptop as a group, so that you can quickly launch those applications next time.

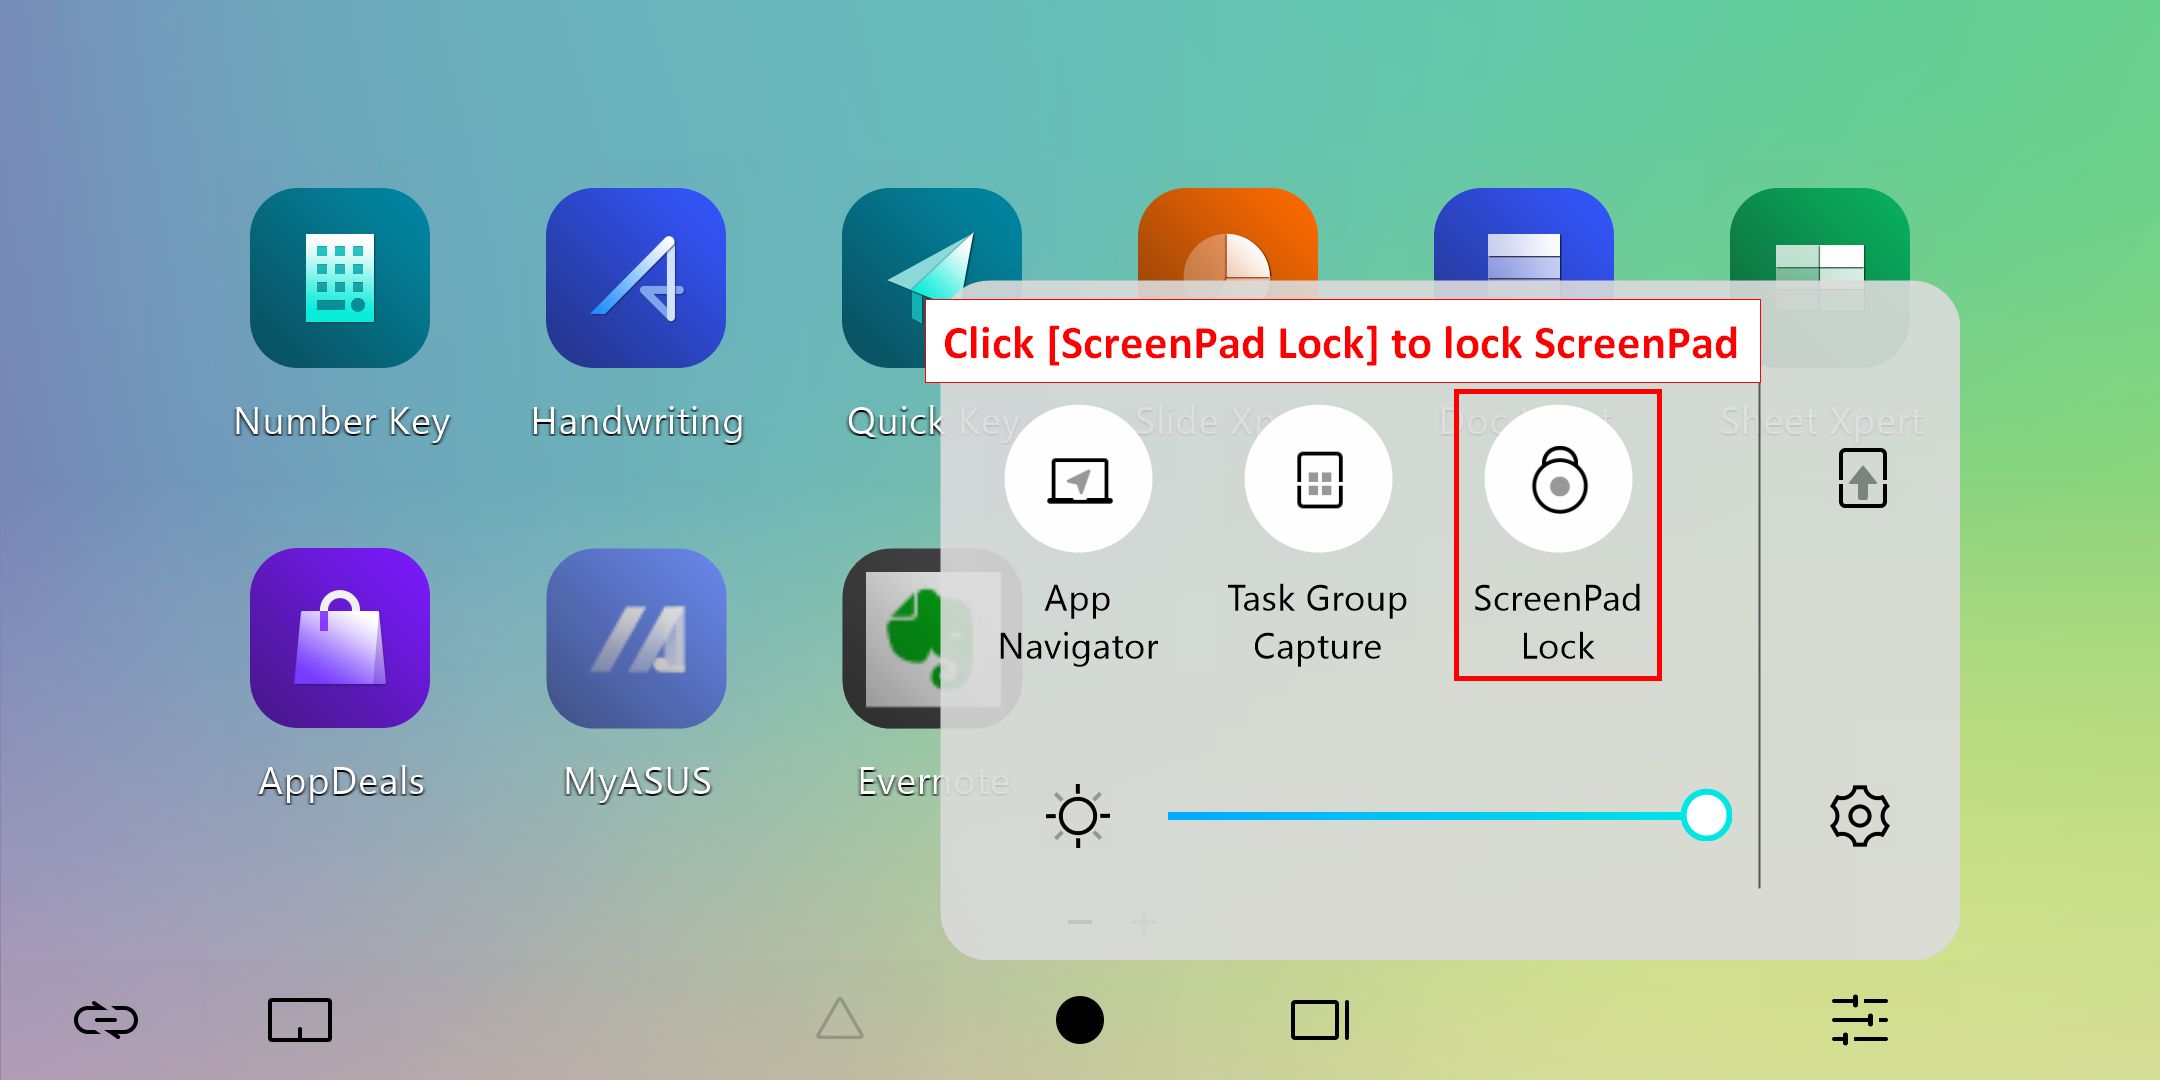
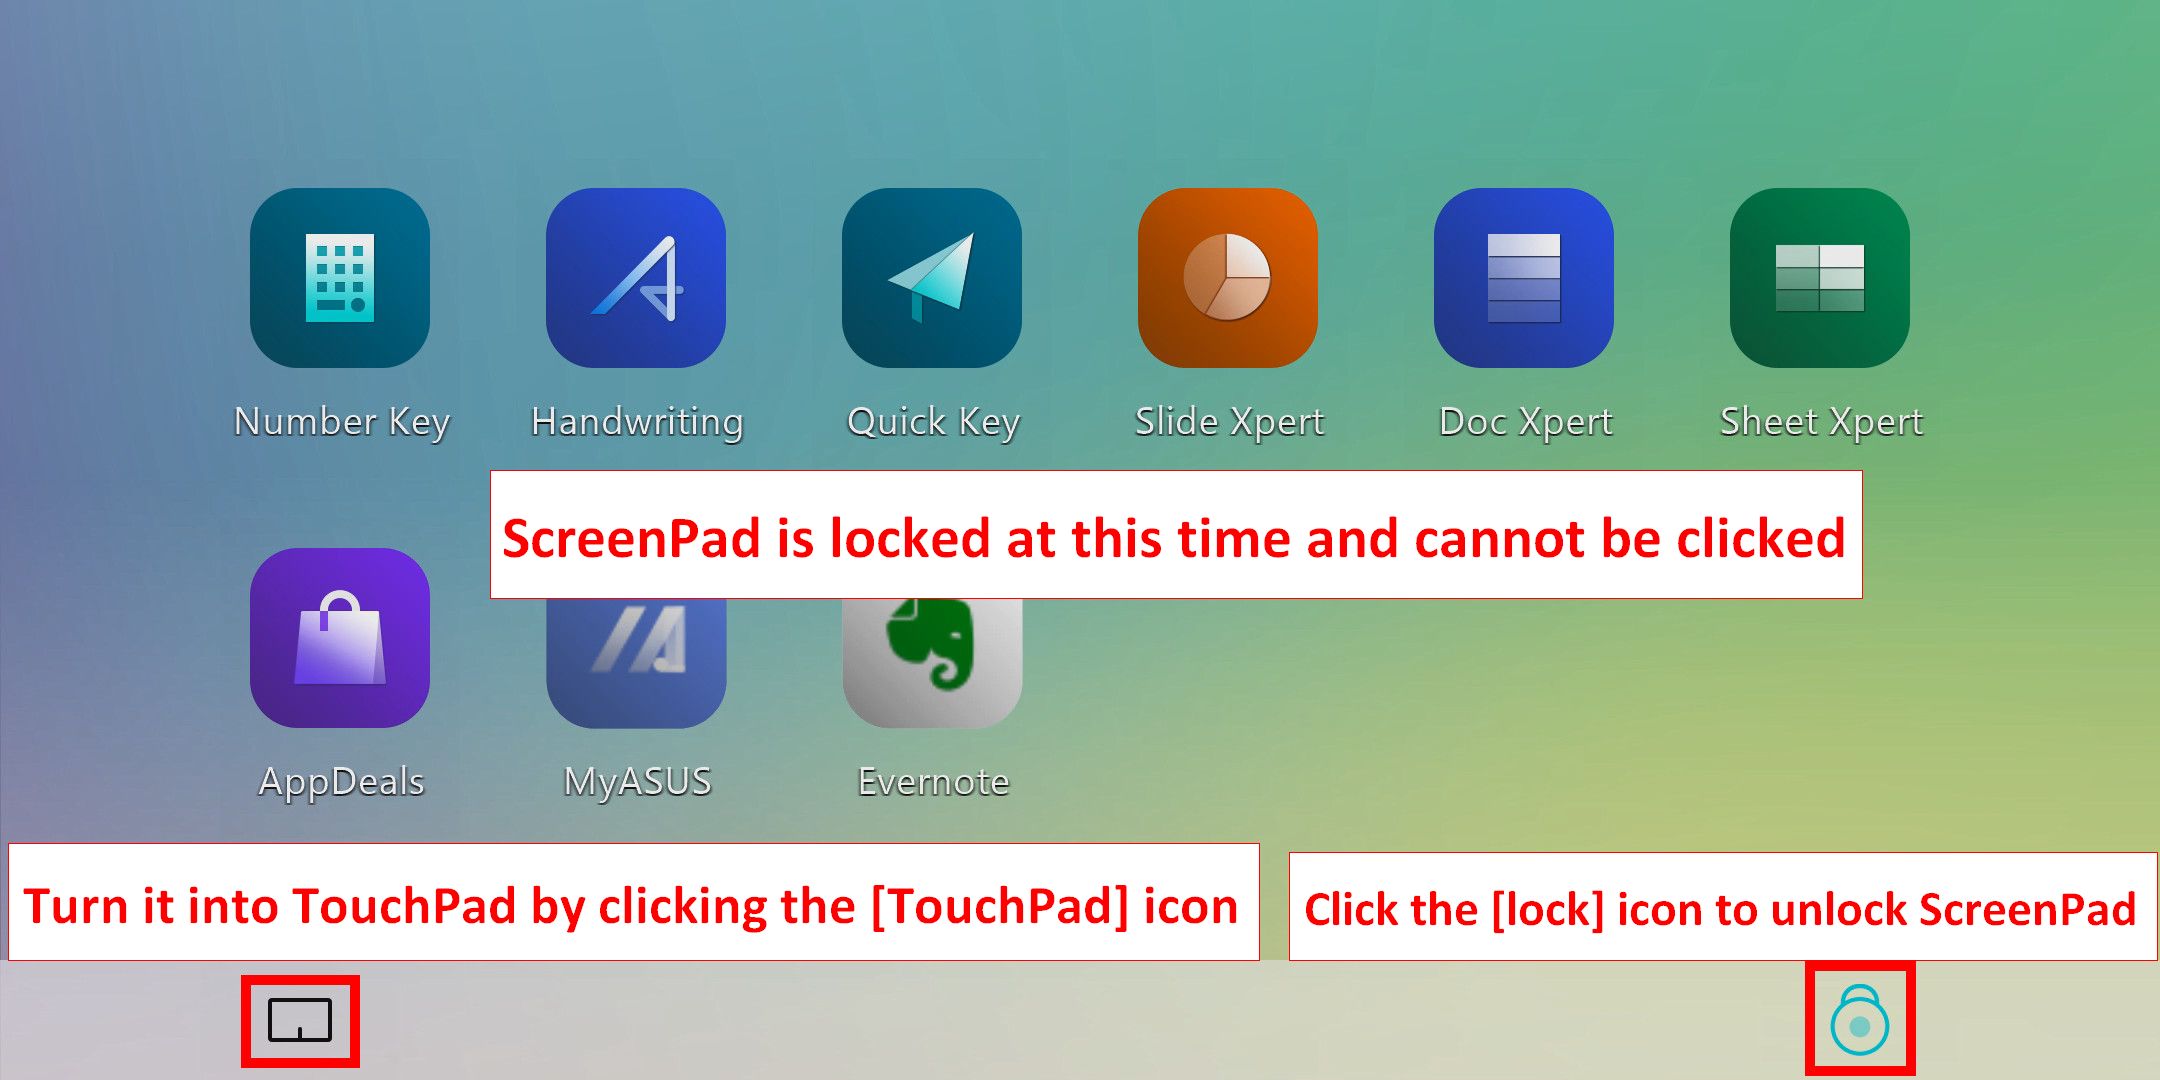
6.4 Click [ScreenPad Lock] to lock or unlock the ScreenPad touch function.. Click the [TouchPad] icon in the lower left corner to turn on TouchPad, and click the [Lock] icon in the lower right corner to unlock the ScreenPad.
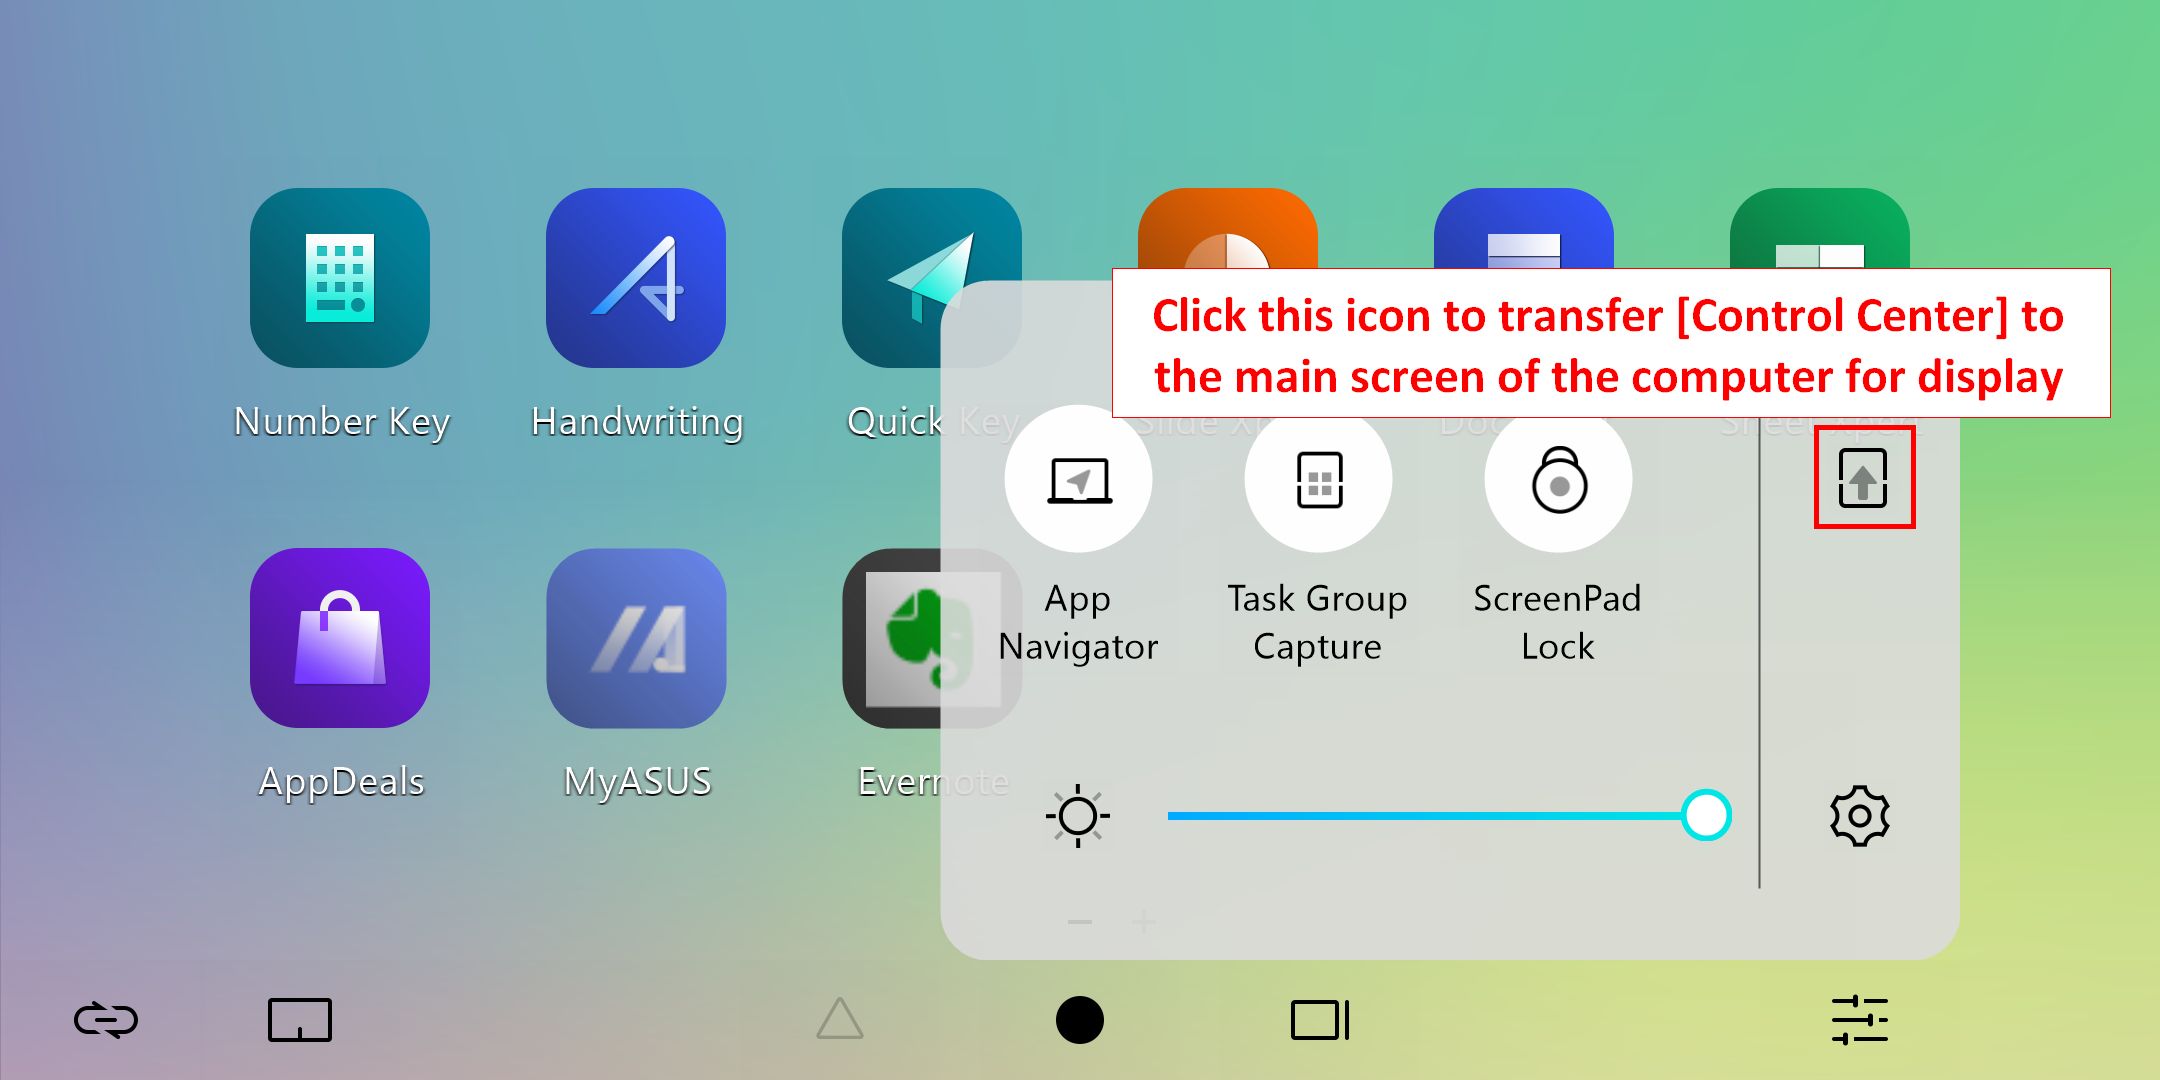
6.5.1 Click  to transfer the [Control Center] display to laptop main screen.
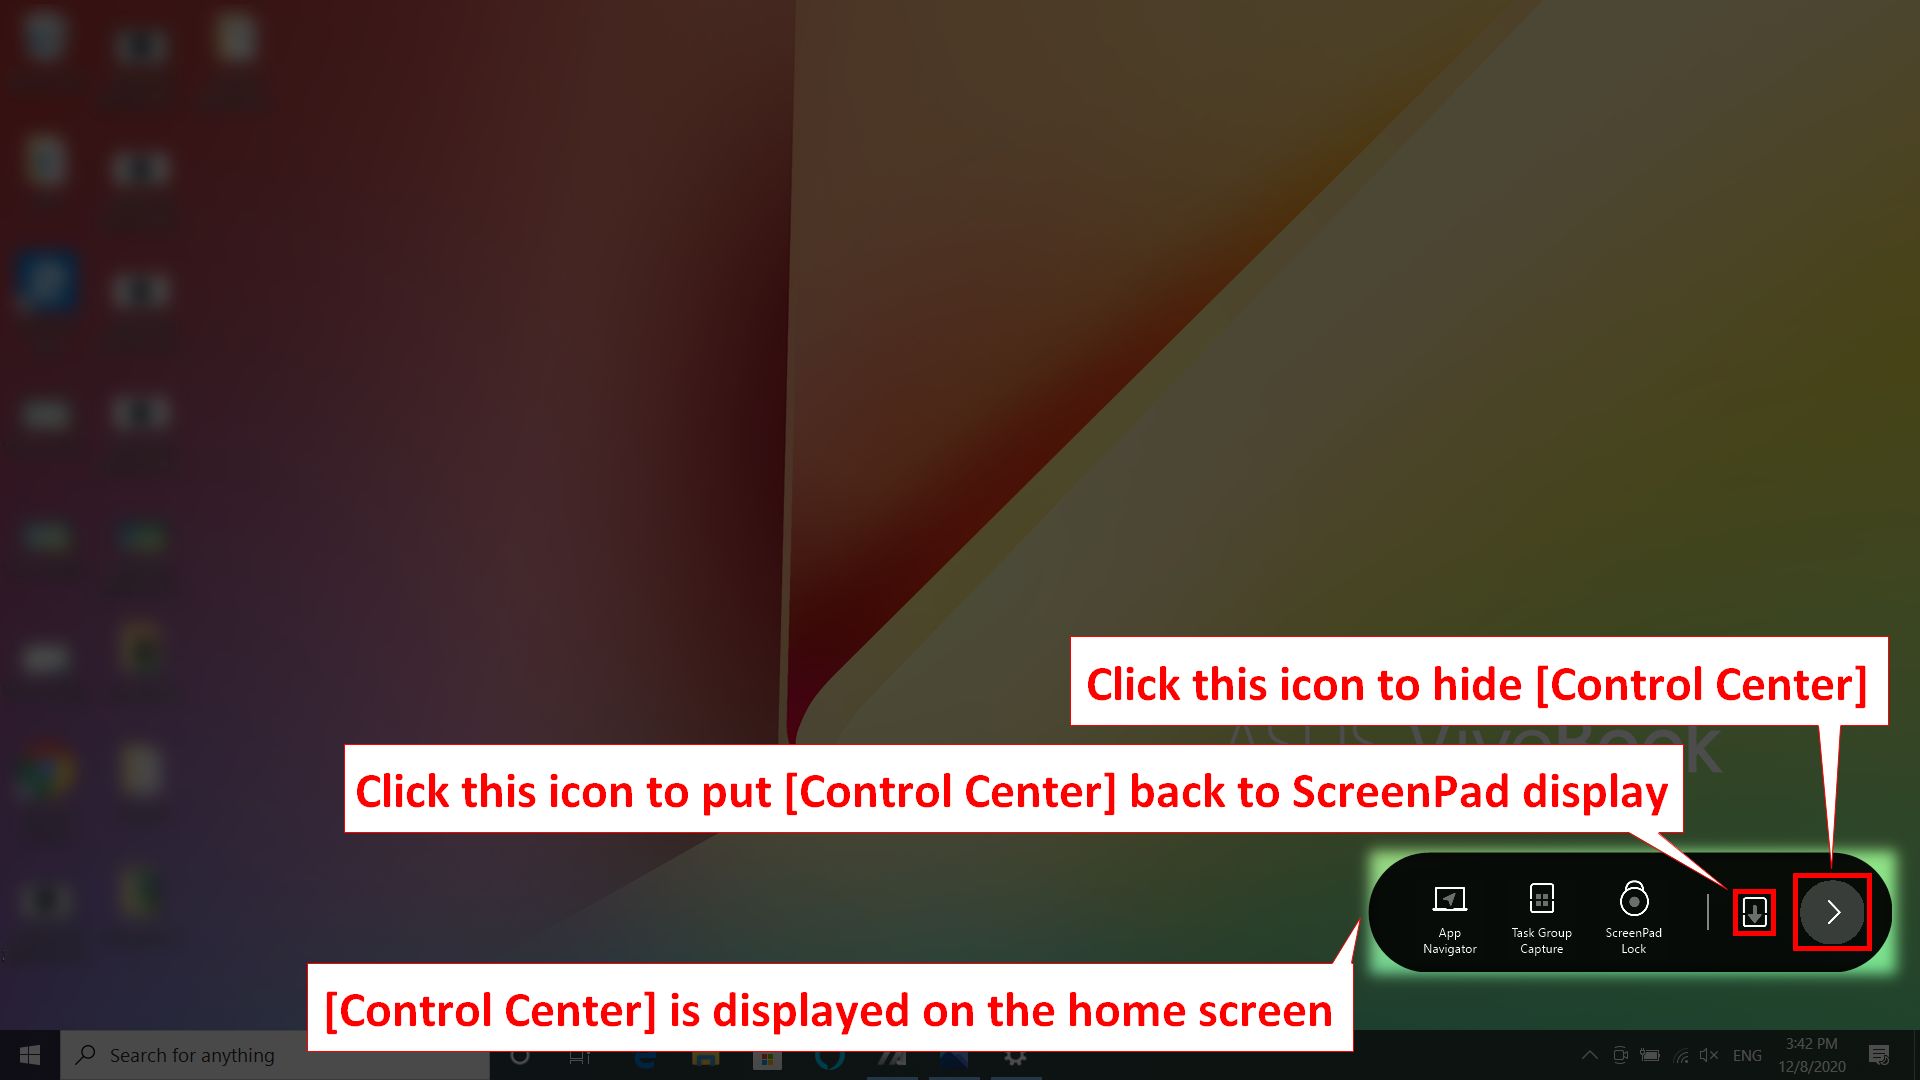
6.5.2 Click  to transfer [Control Center] display to ScreenPad. Click
  to hide the [Control Center] on the laptop main screen in the lower right corner.
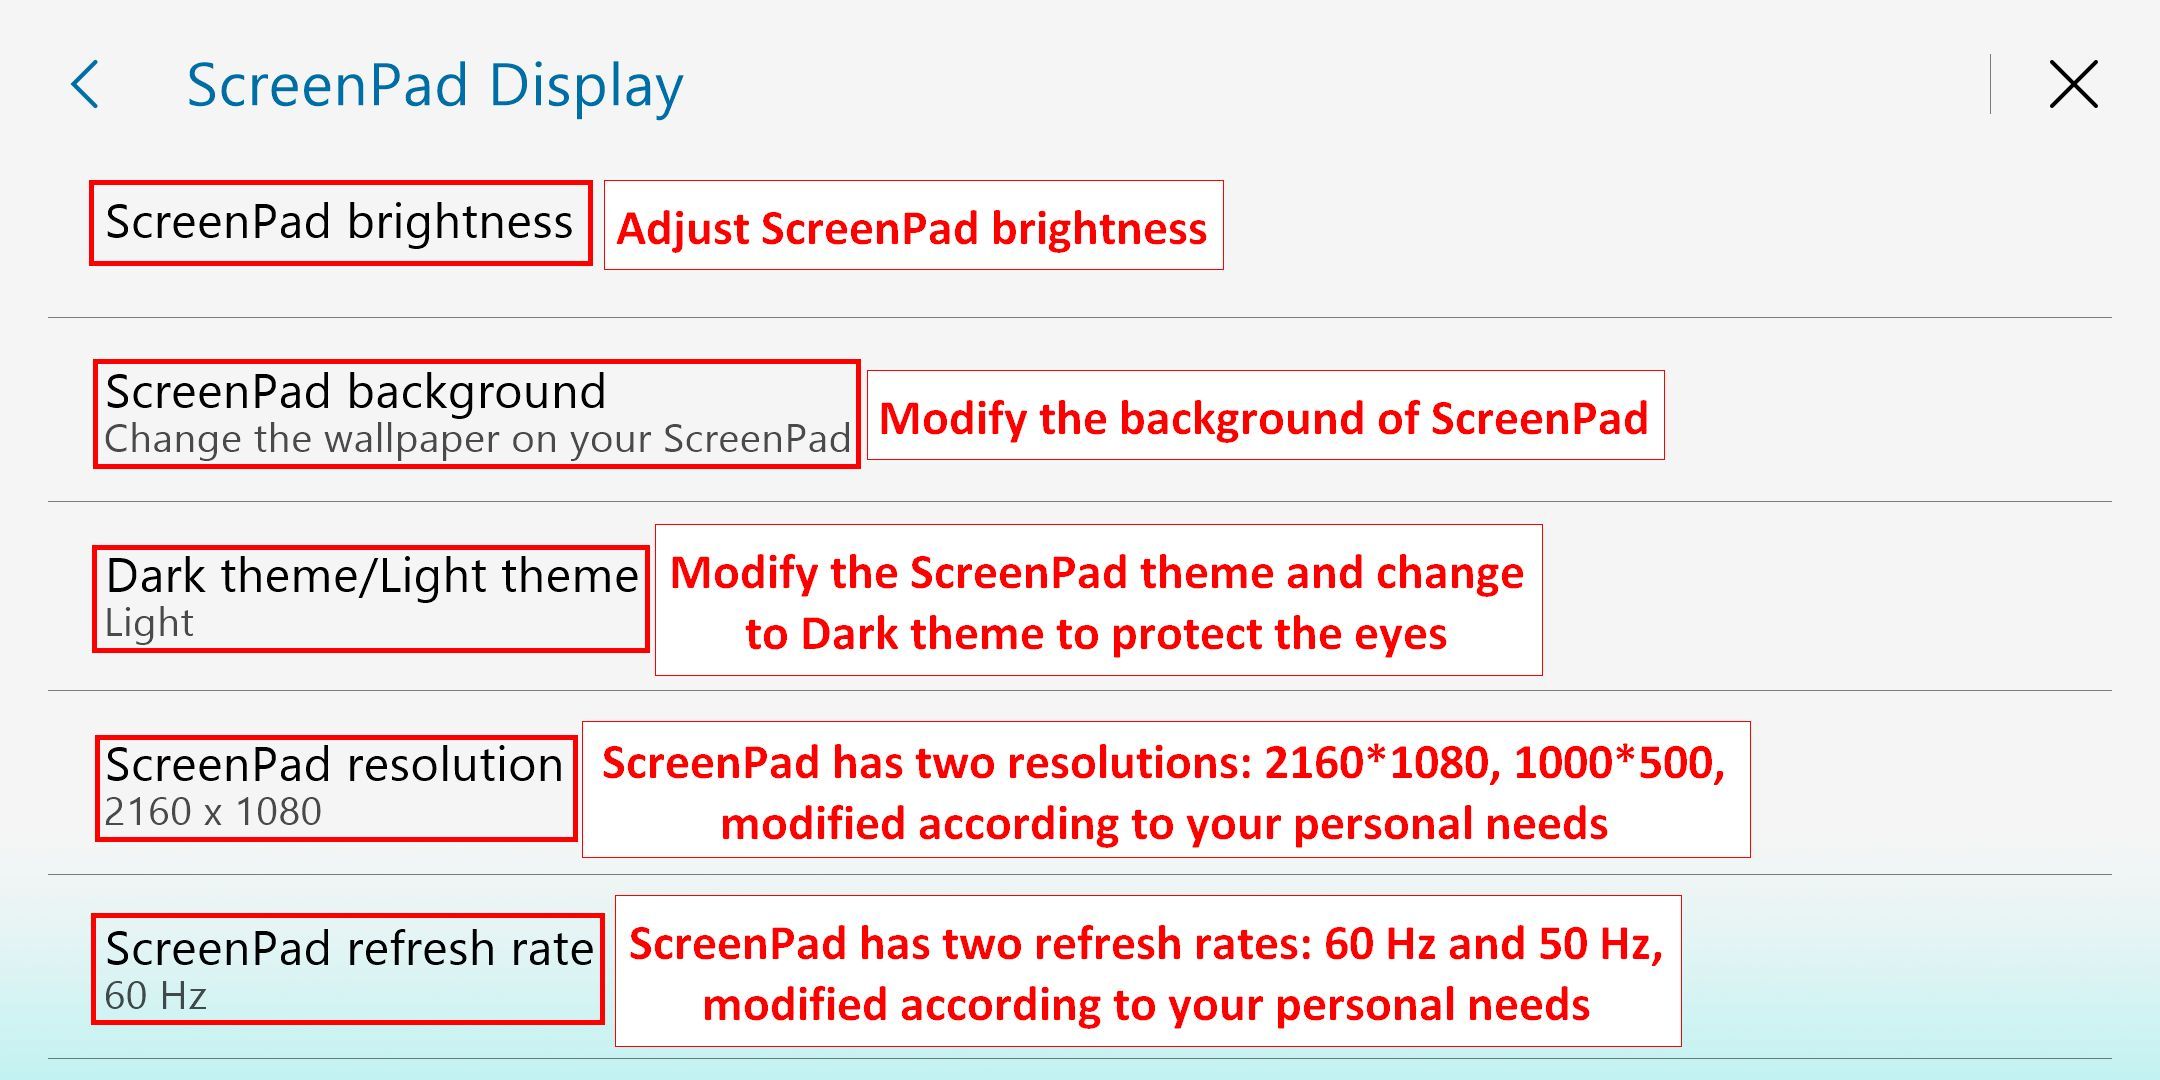
6.6.1 Click [Settings] to setup ScreenPad and personalize the brightness, background and others.
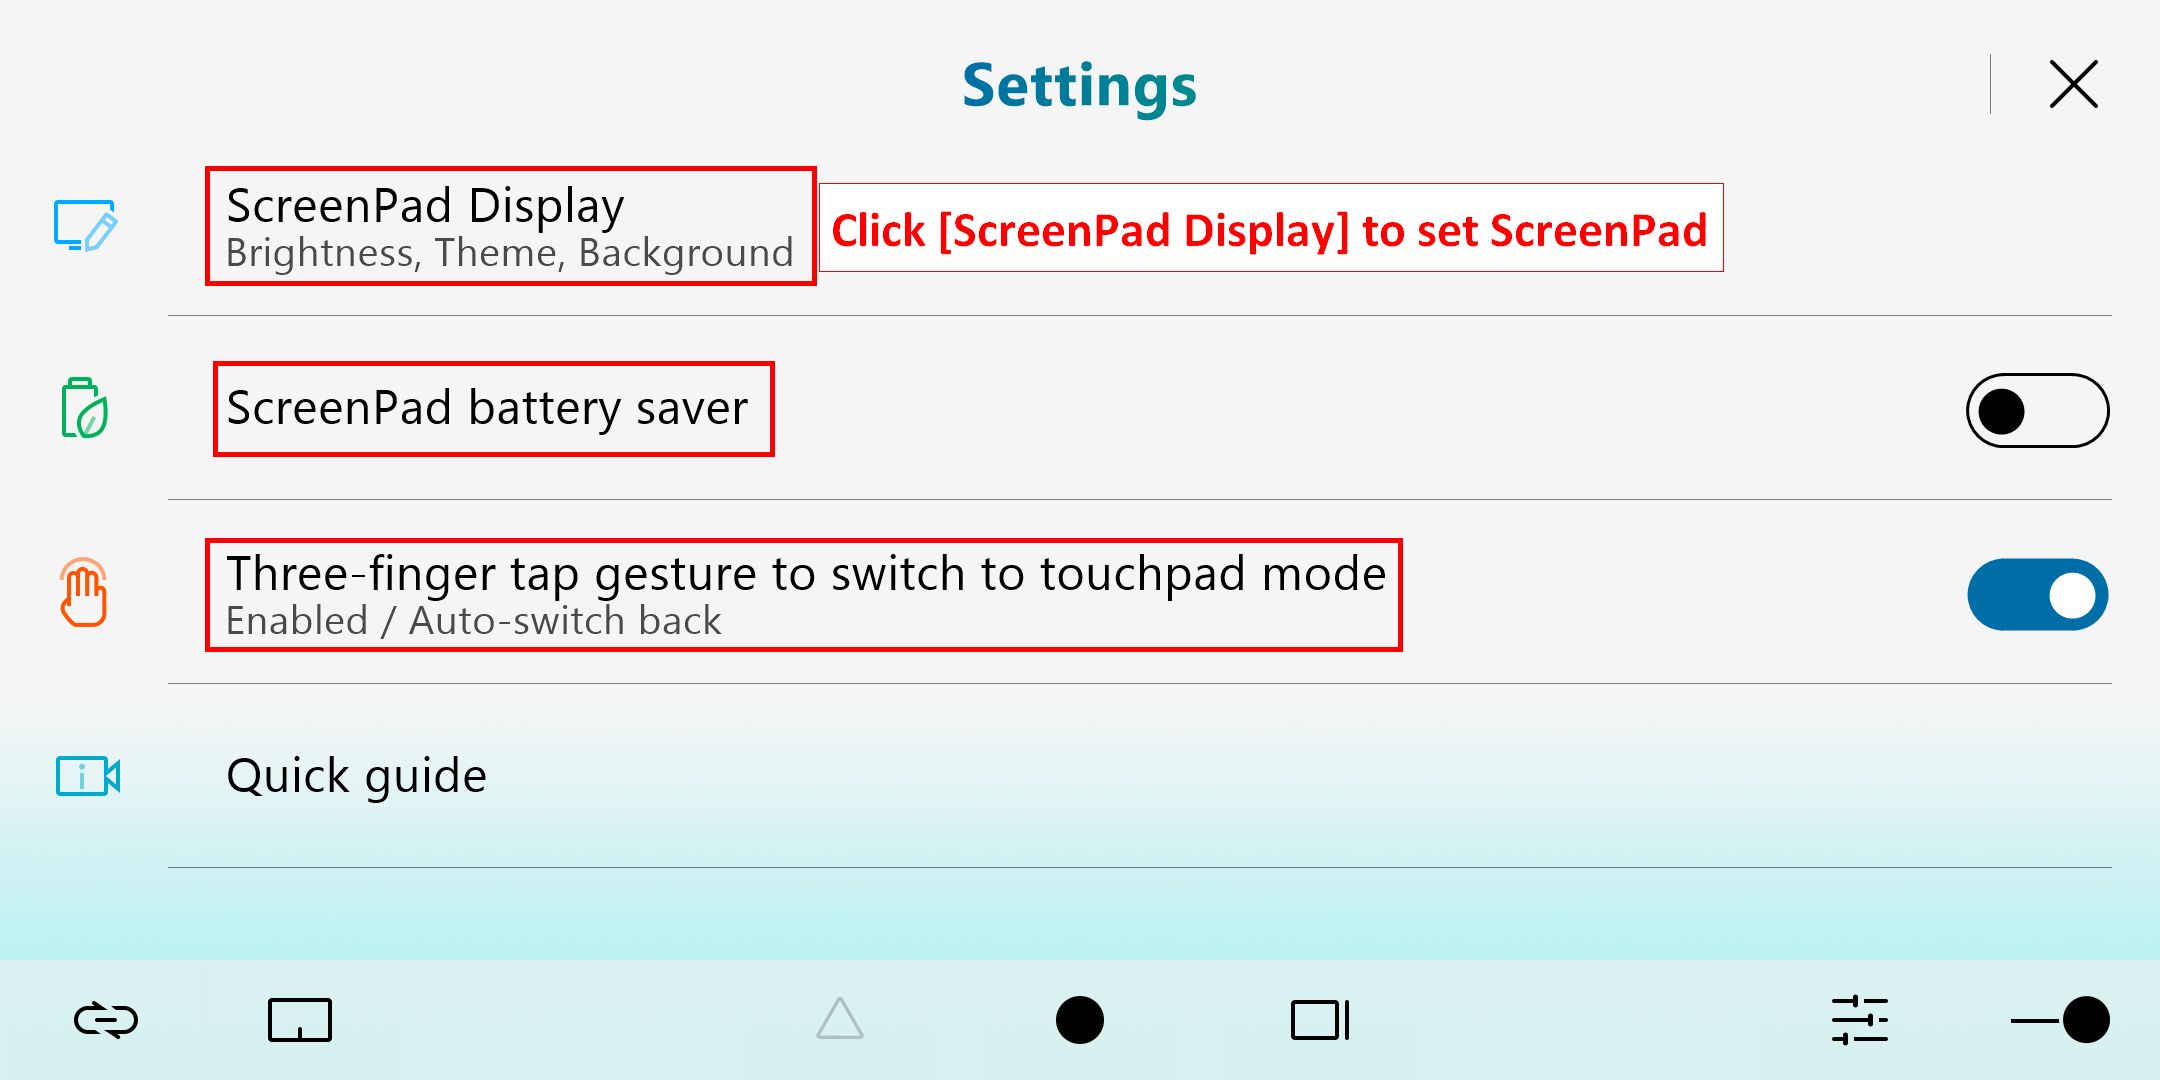
6.6.2 After clicking the ScreenPad display, the following setup options will appear.
7.  Click the [Navigation Bar Lock] icon, when there are apps displayed on the ScreenPad, the navigation bar at the bottom will still be displayed. If you do not enable the lock, you need to swipe up from the bottom of the ScreenPad to wake up the navigation bar.
8. Added App icon and homepage editing in ScreenPad
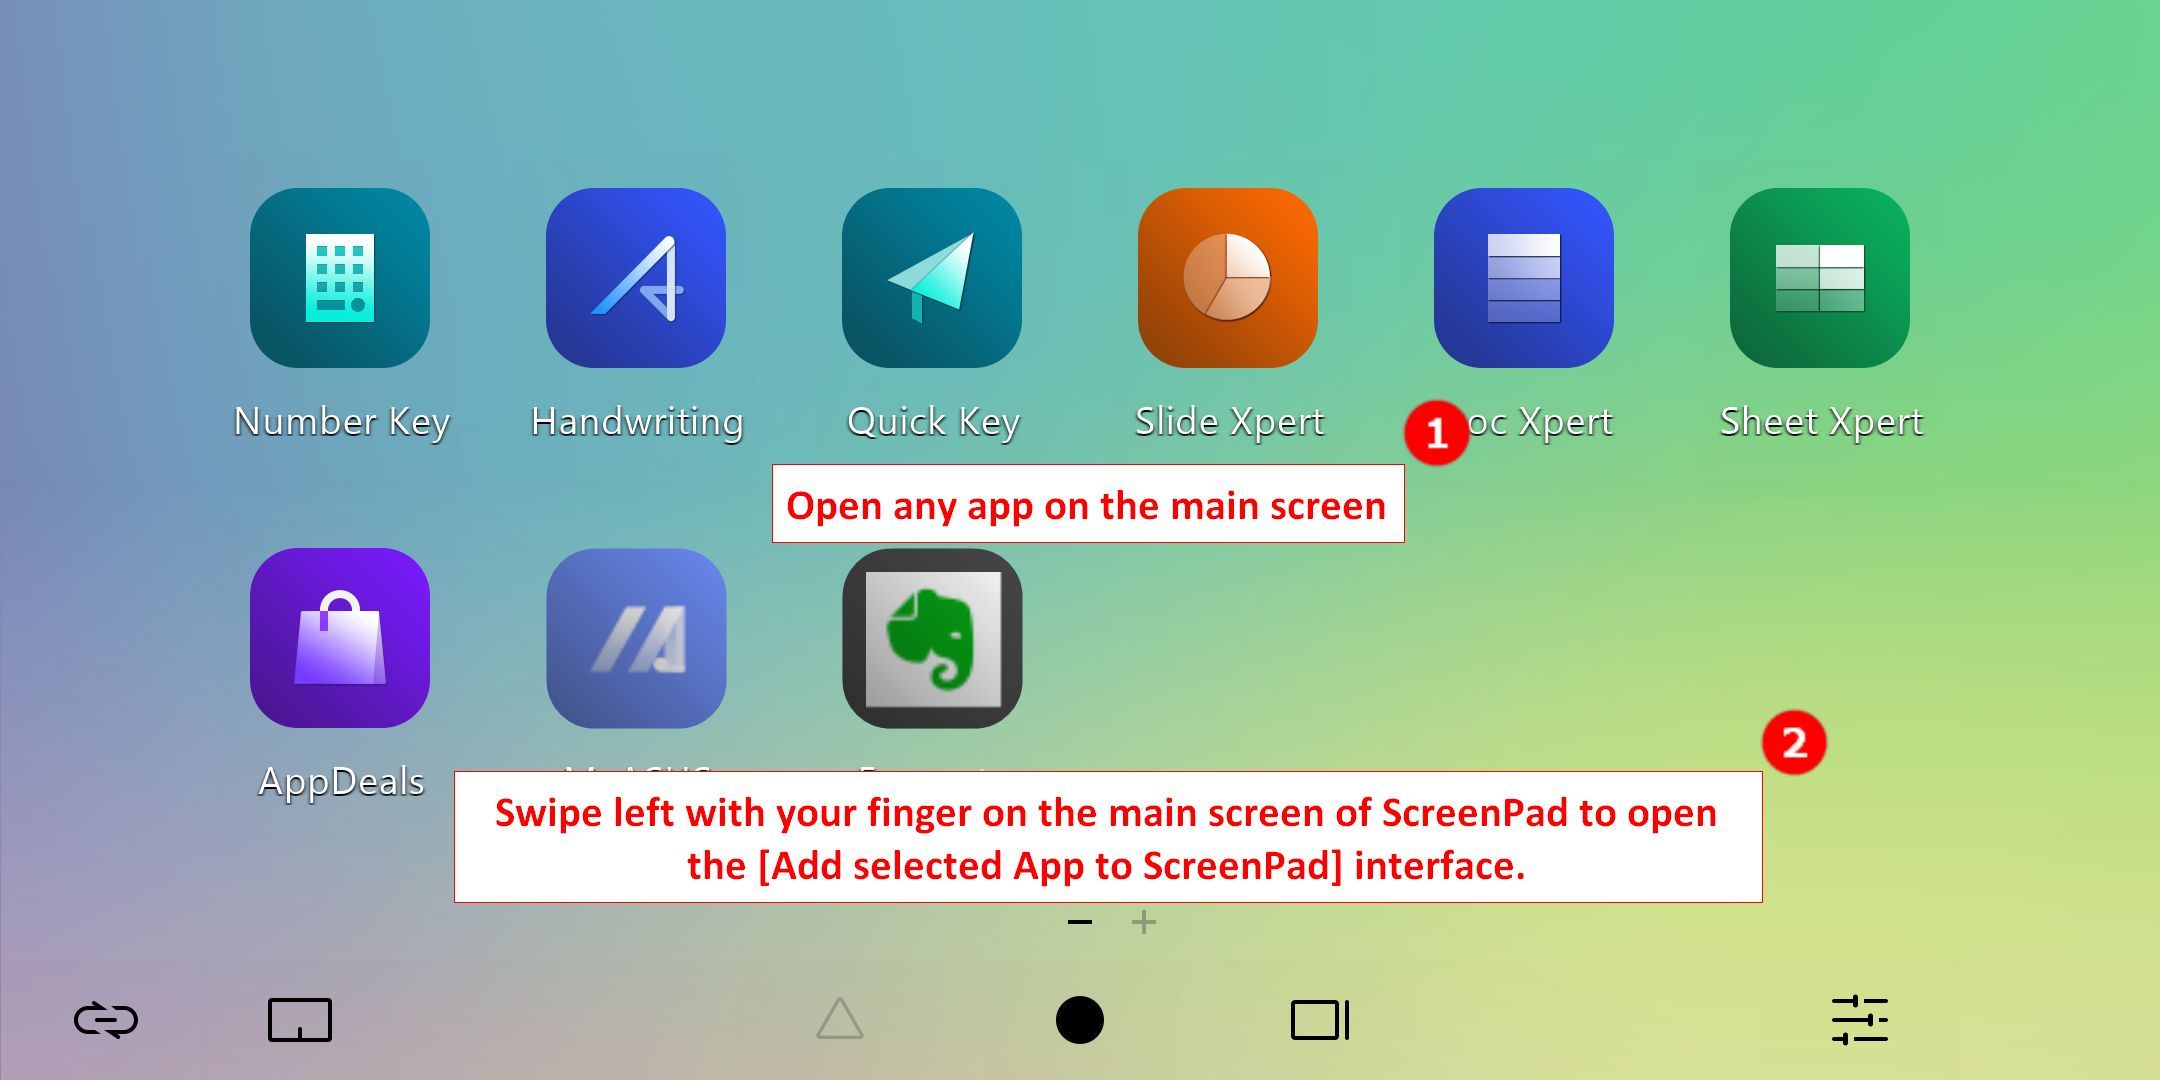
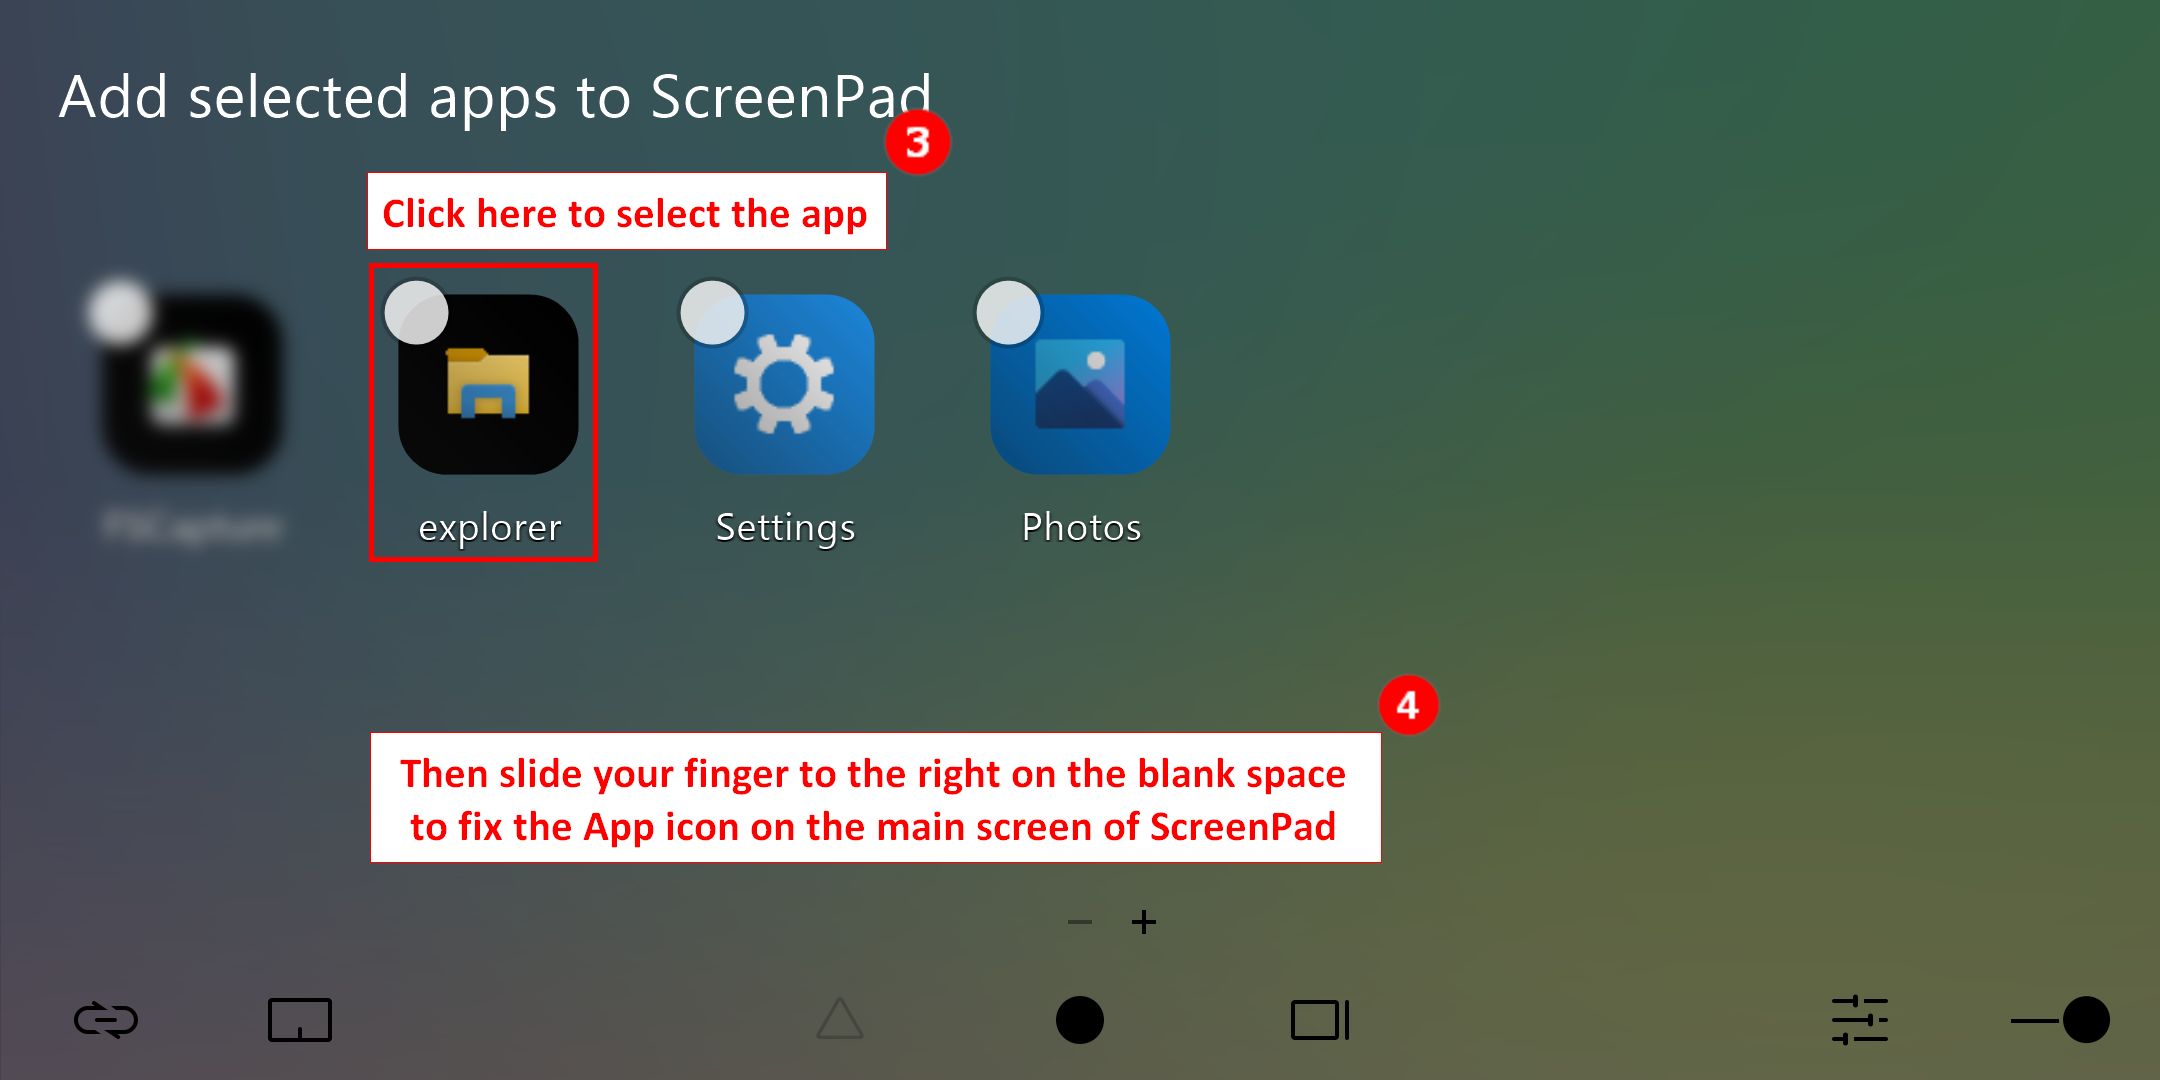
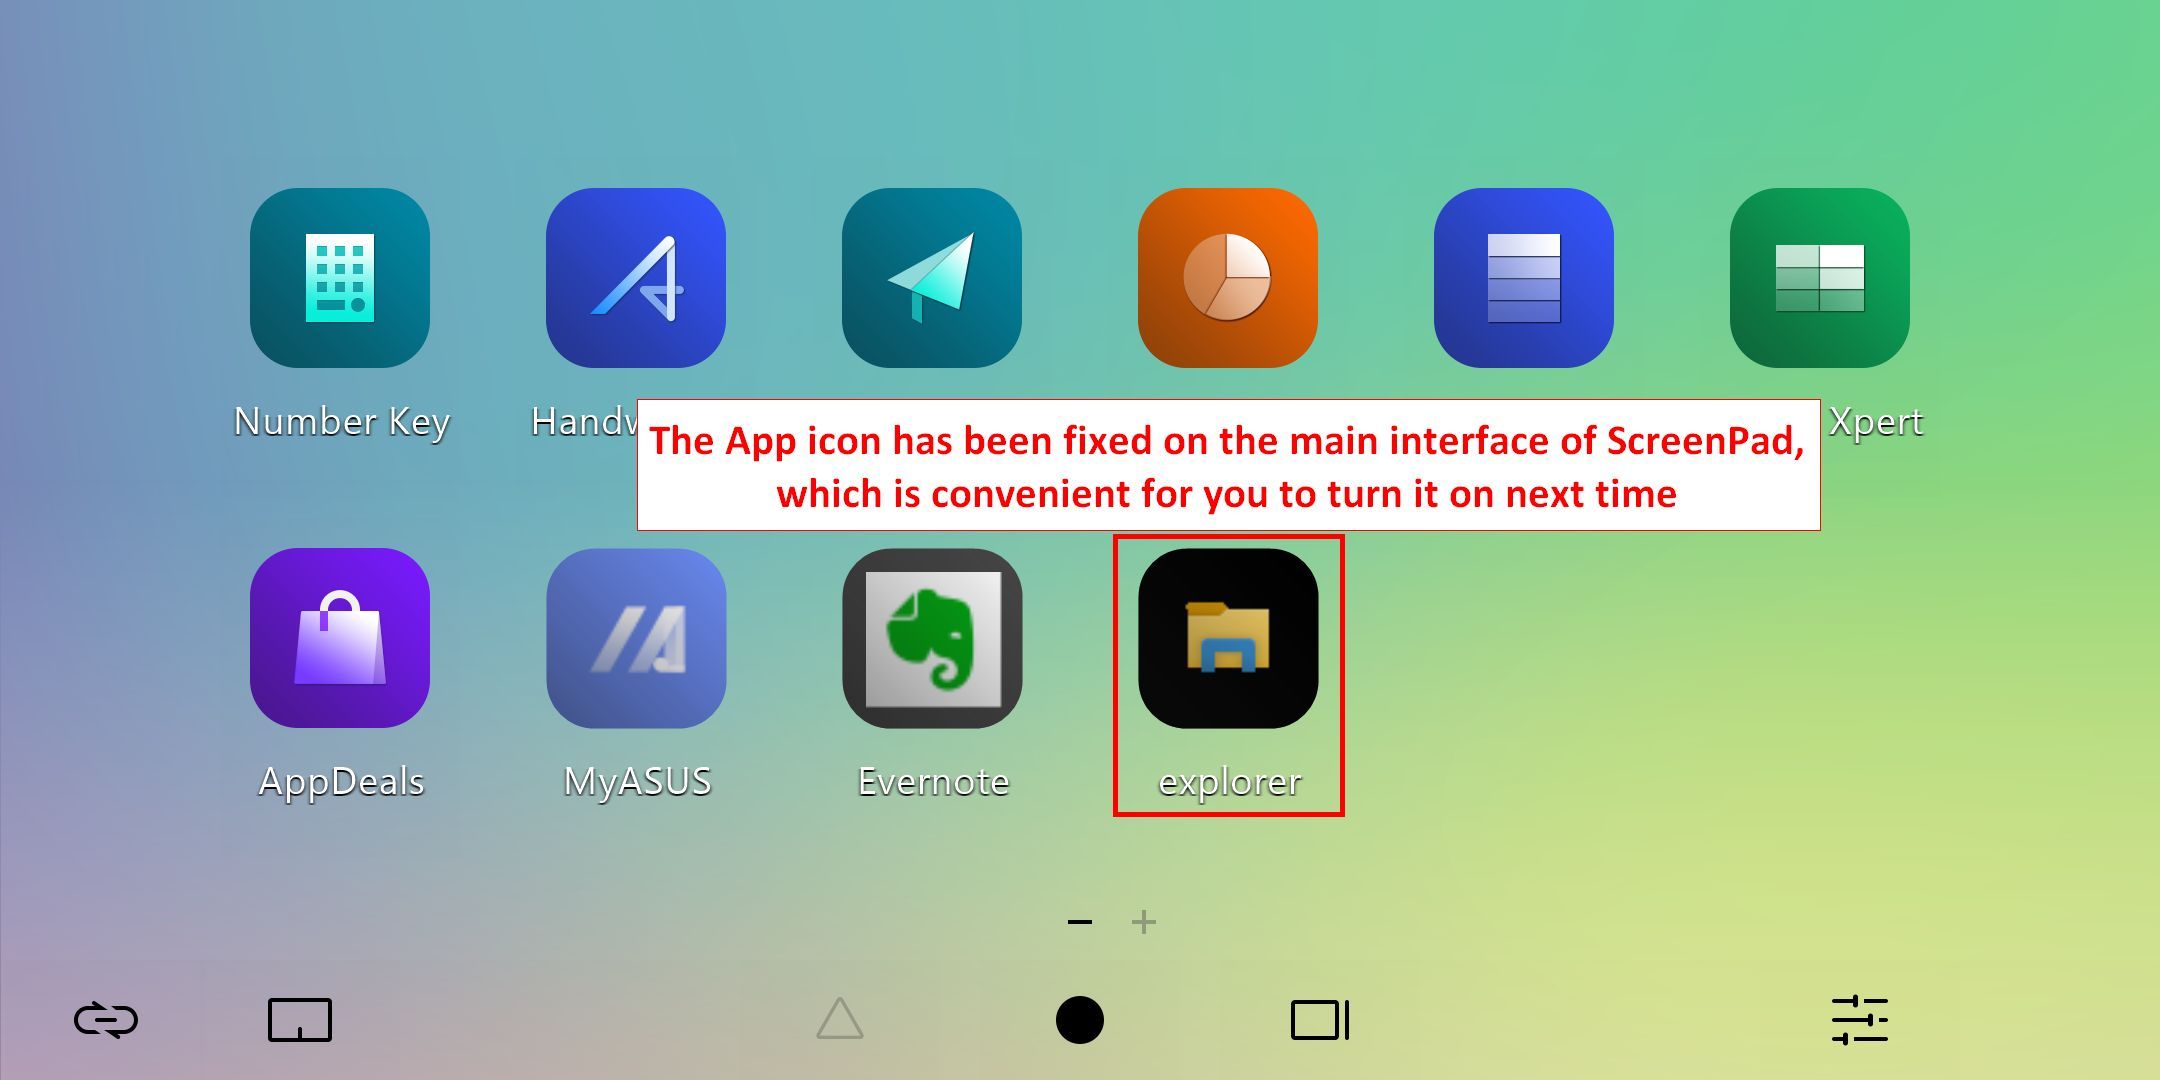
8.1 If you want to fix any App icon on the main ScreenPad interface, you need to ①open the application on the main screen, and then ②swipe your finger to the left on the main ScreenPad interface to open [Add selected app to ScreenPad]. In the interface, click the ③application icon, and ④slide your finger to the right on the blank space to fix the application icon on the main screen of the ScreenPad, so that you can quickly open the application on the ScreenPad next time.
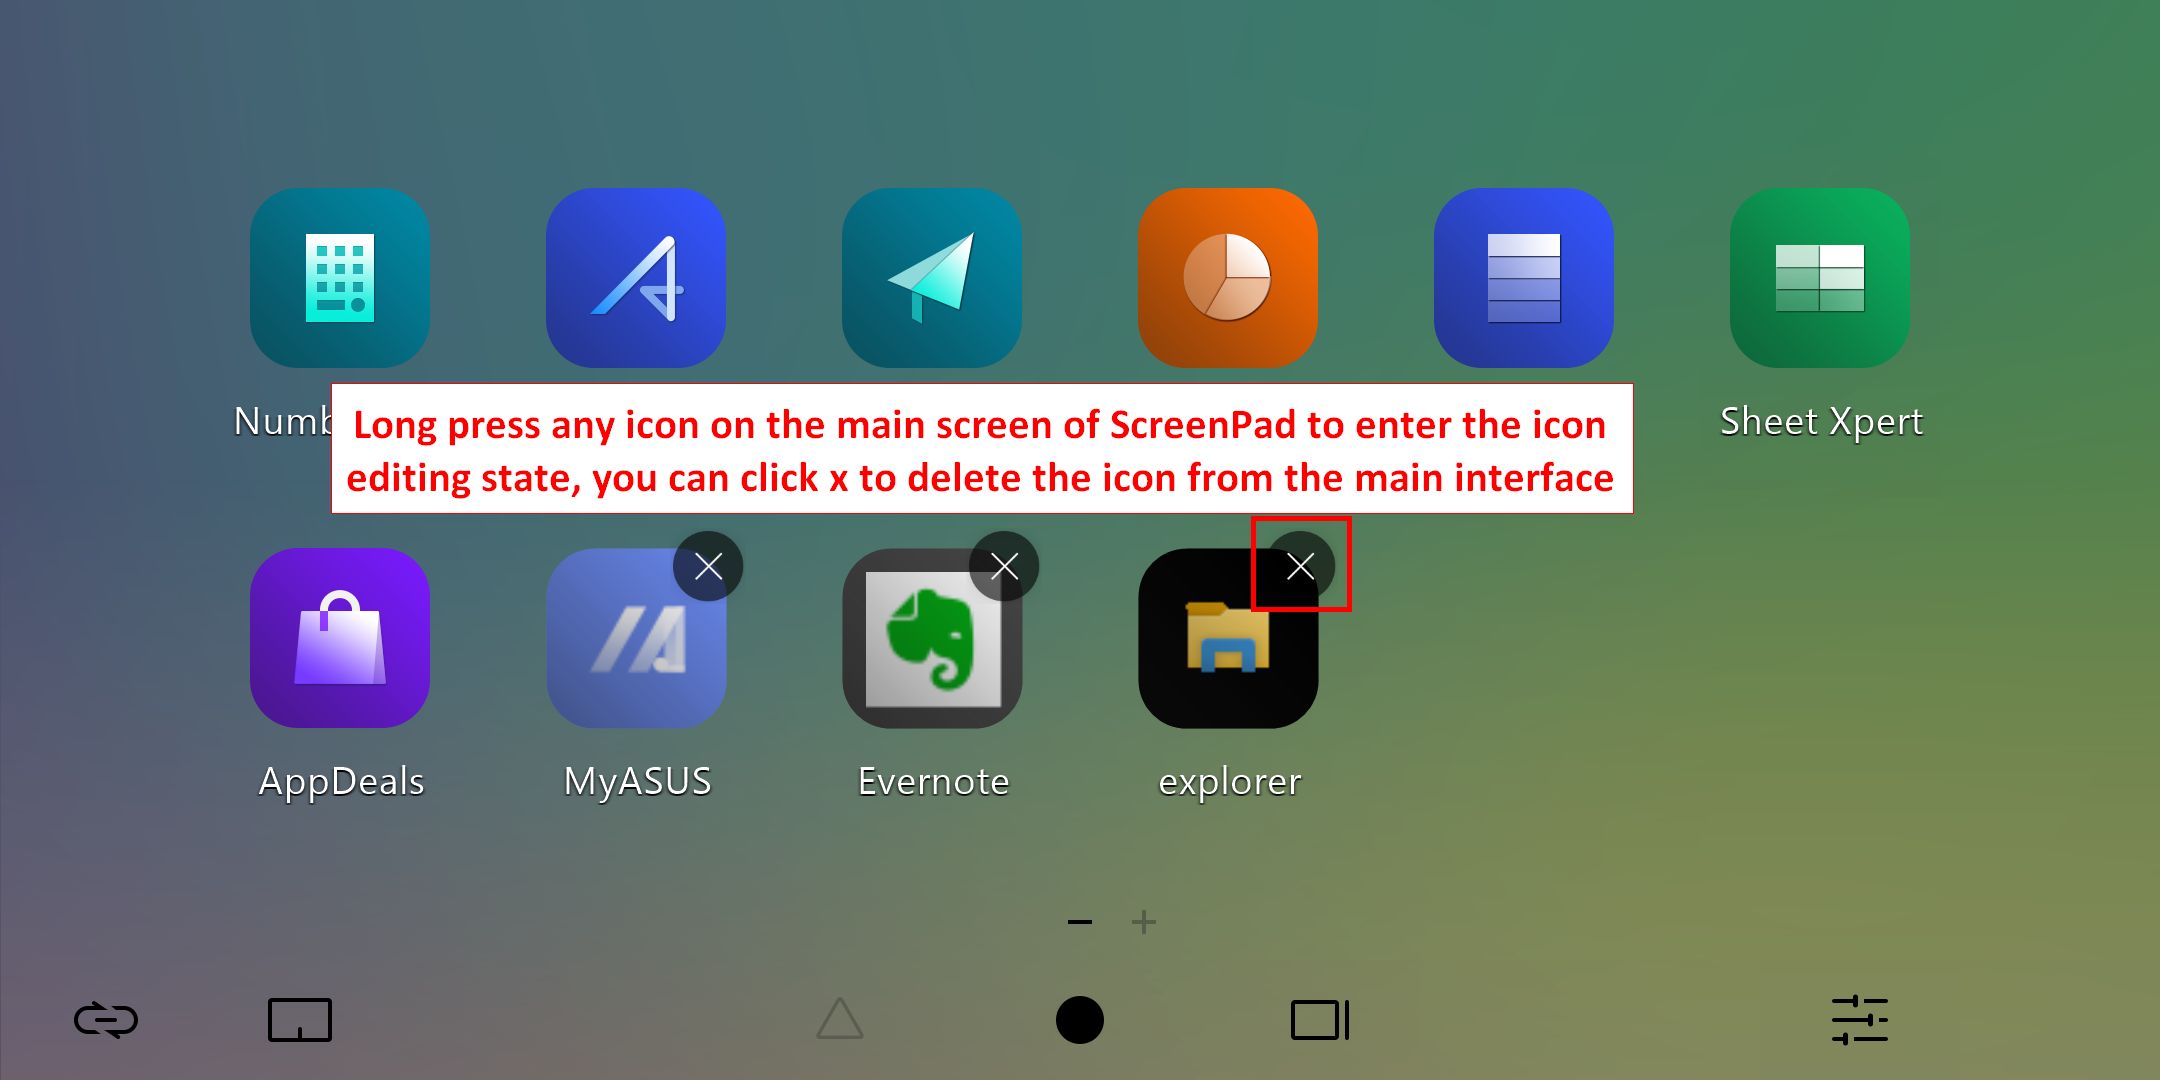
8.2 Press and hold any icon on the ScreenPad main interface to enter the icon editing state. You can click [X] to delete the icon from the main interface, or drag the icon with your finger to sort it.
Touch function & External screen
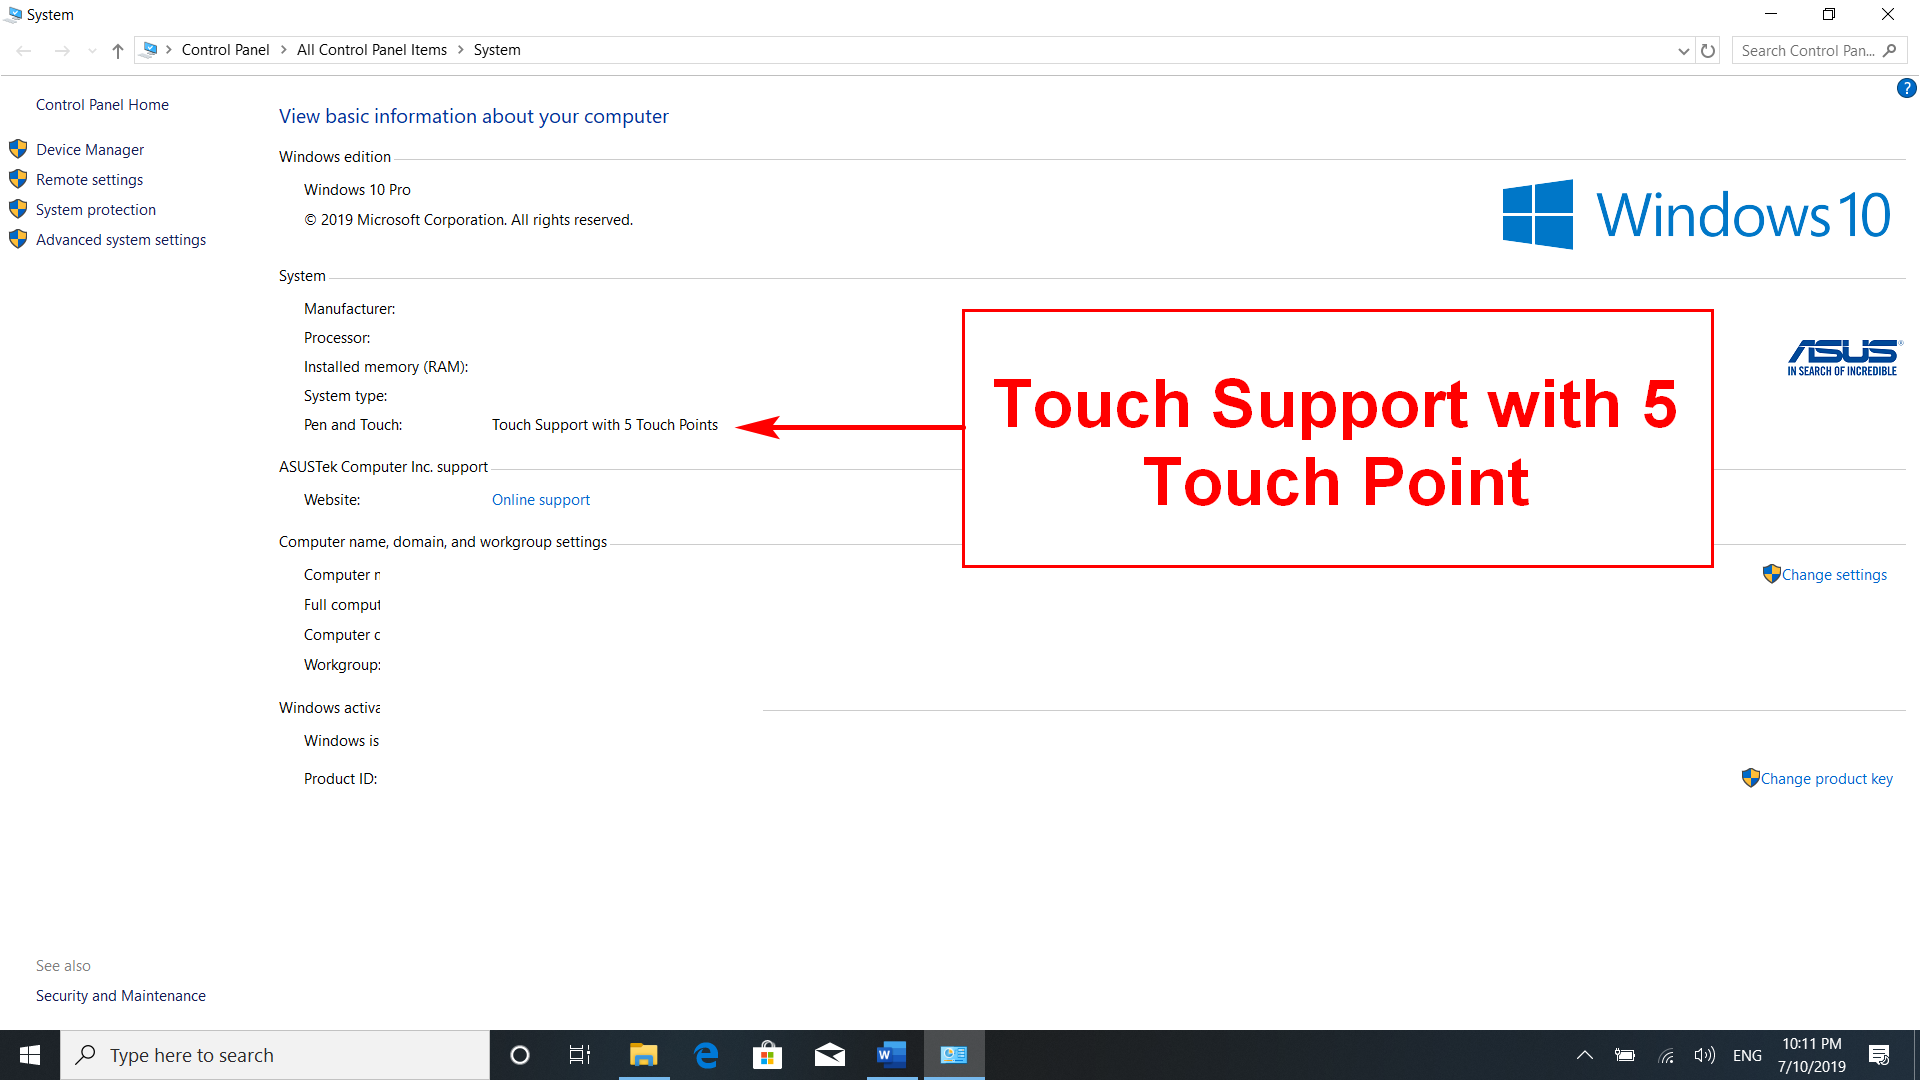
1. This screen supports up to 5 touch points.
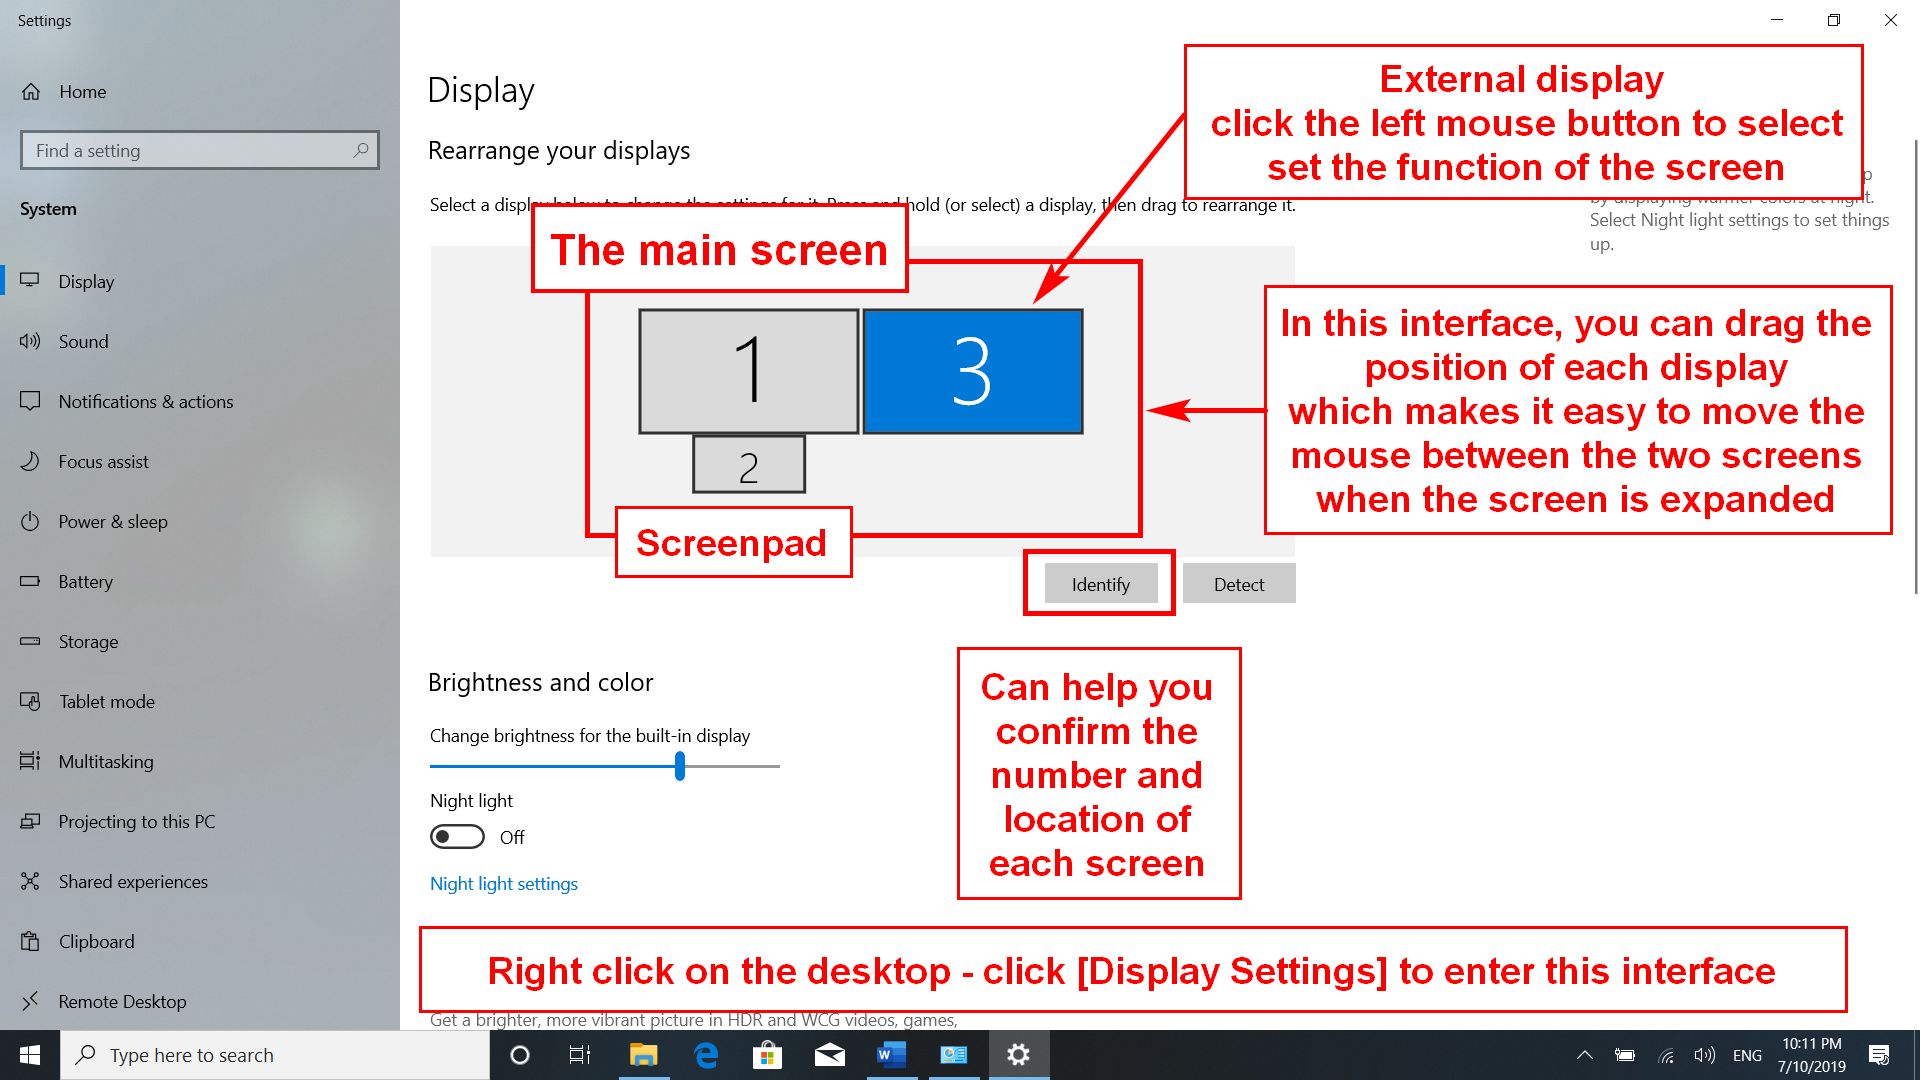
2. Windows defines this screen as the extended one for the main screen. It is also the second screen of the system. When you connect to the external screen, it becomes the third screen of the system. You can access the system in [Display Settings].

ScreenPad Built-in App function
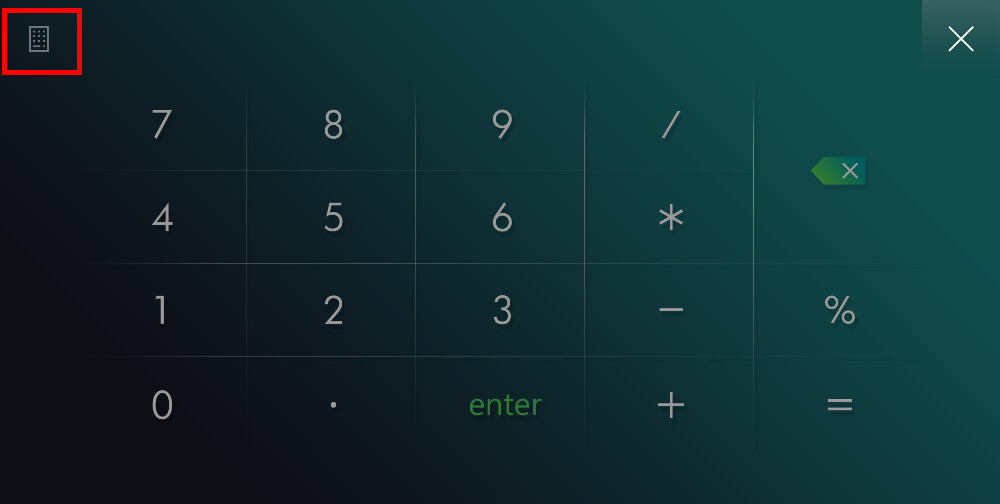
1.  Number Key
Click the Number Key icon on the main interface of ScreenPad to use the number key function on the ScreenPad.
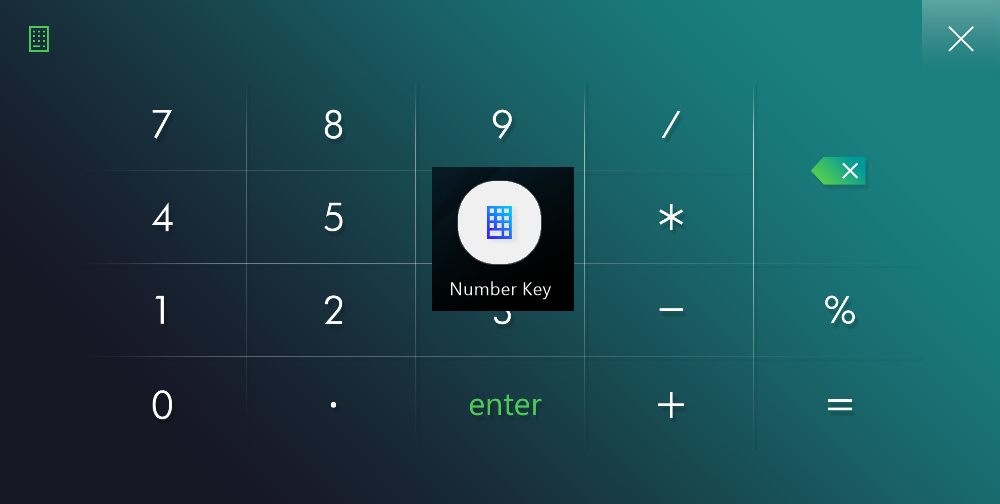
After clicking this icon, the Number Key function will be disabled to restrict any accidental touch
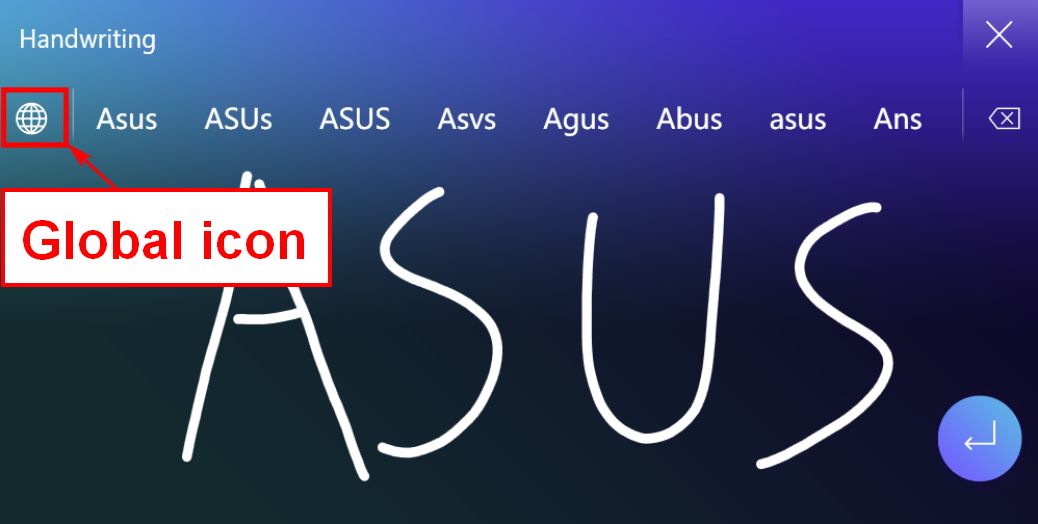
2.  Handwriting Click the Handwriting icon on the main interface to execute the handwriting function on the ScreenPad.
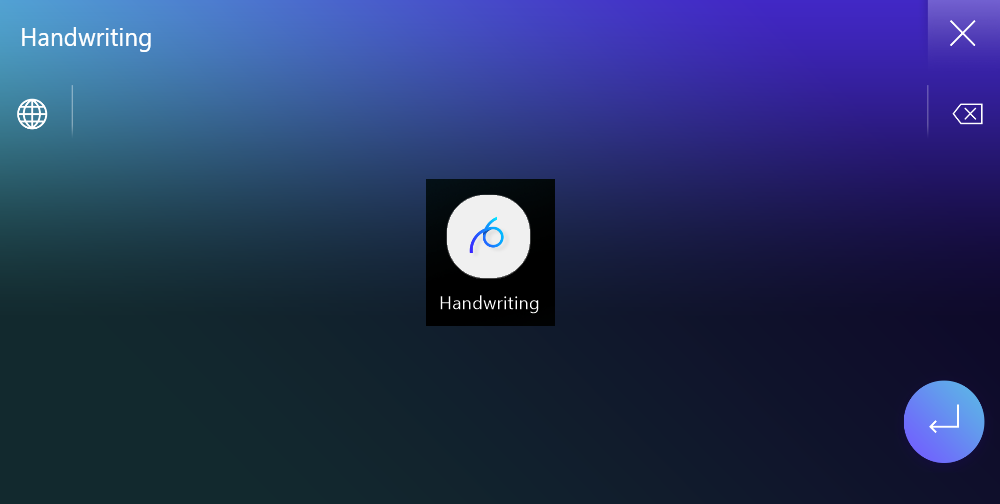
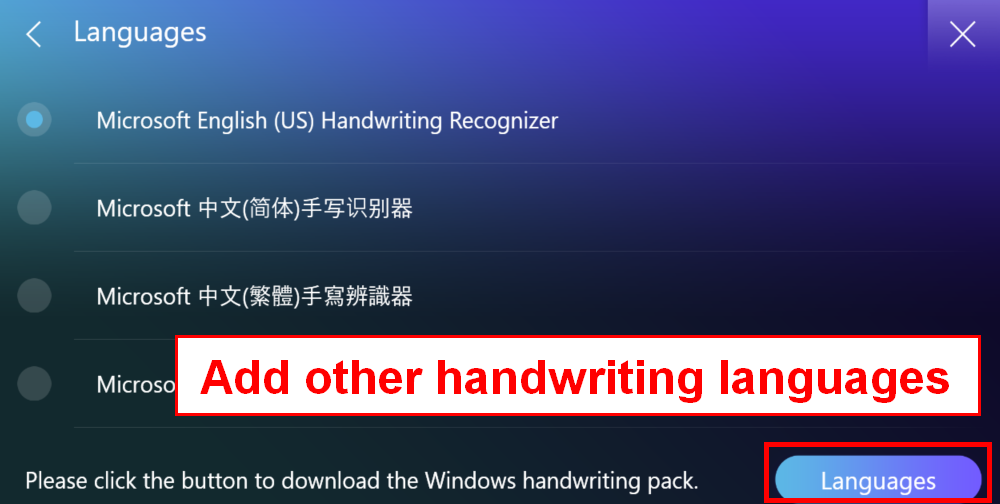
You can click on the Global icon to select a preferred language.

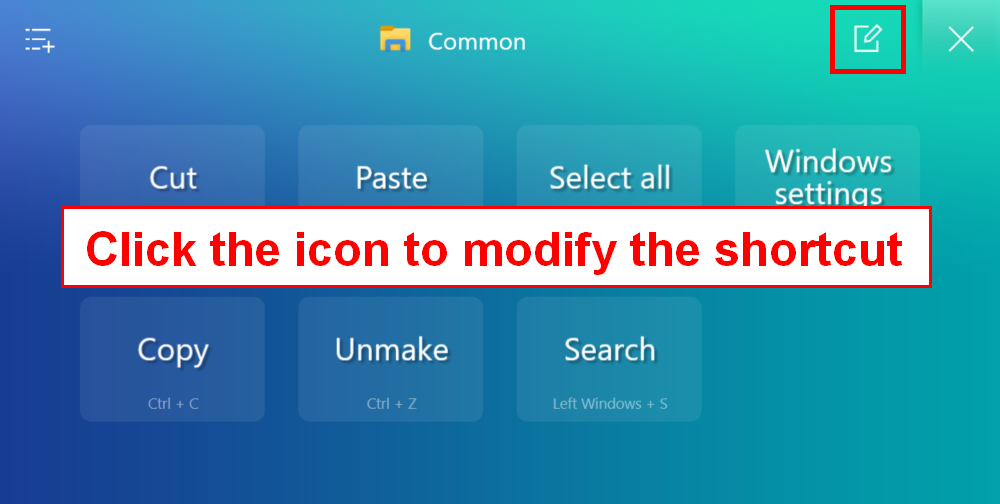
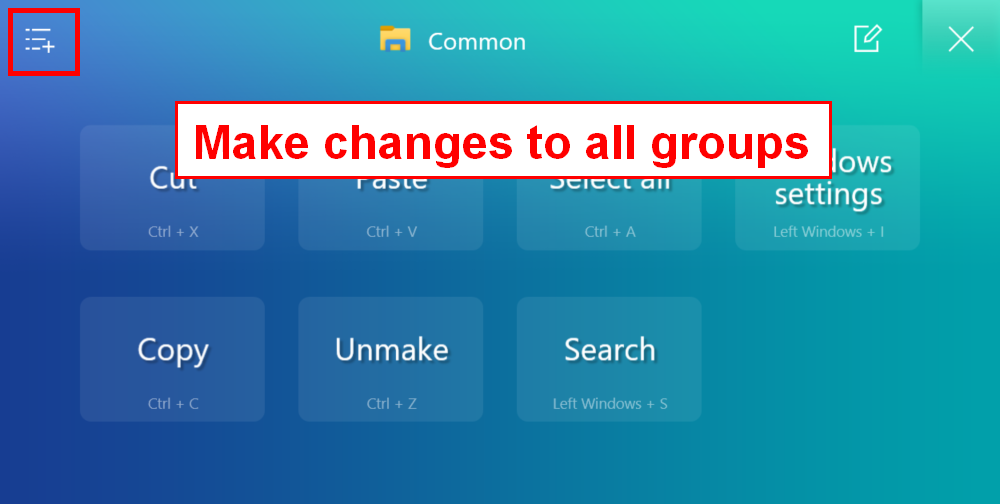
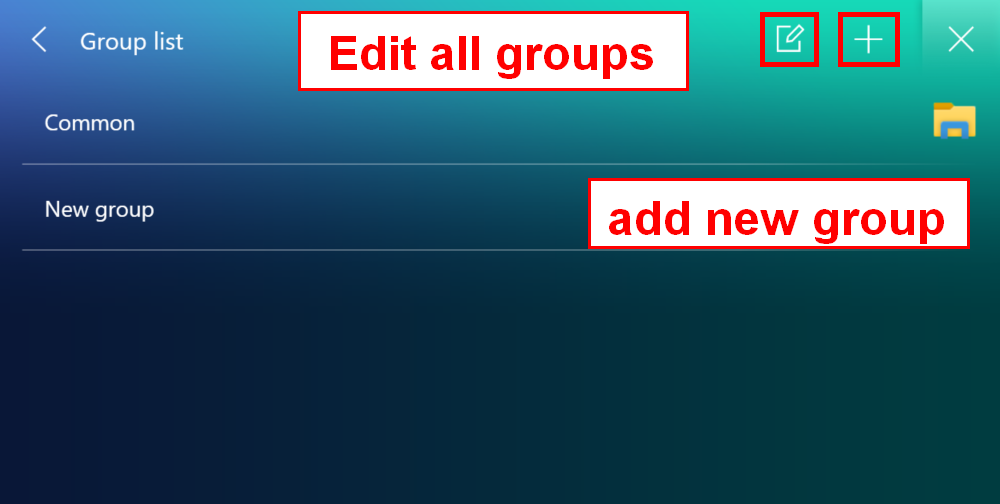
3.  Quick Key Click the [Quick Key] icon in the ScreenPad to enable the [Quick Key] function
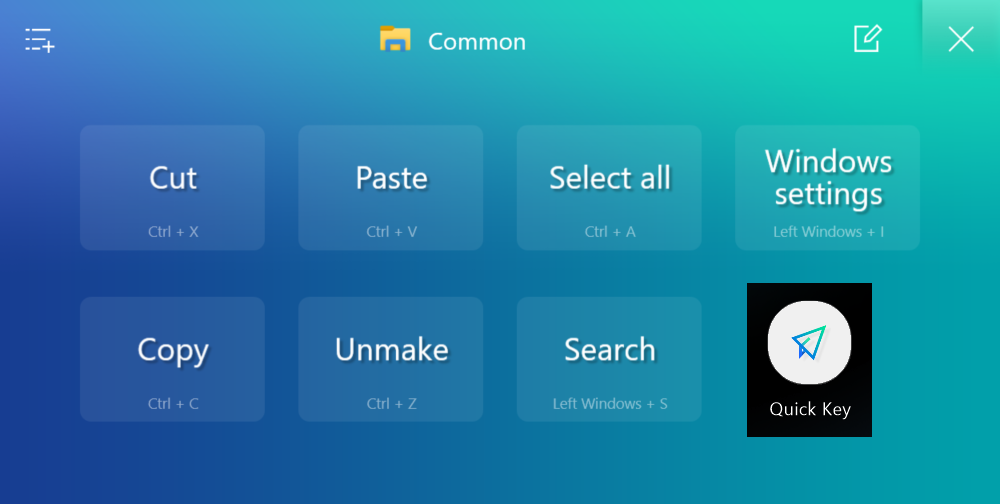
Modify the shortcut keys for this group.

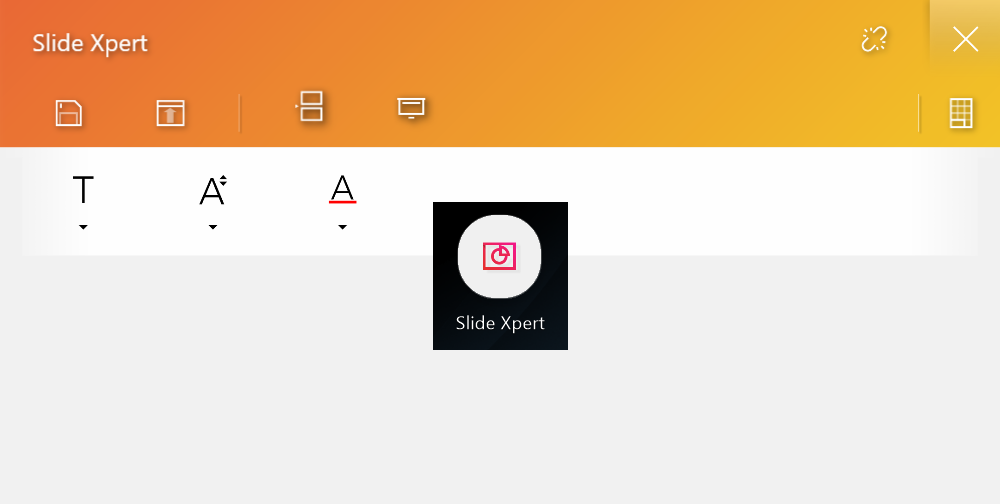
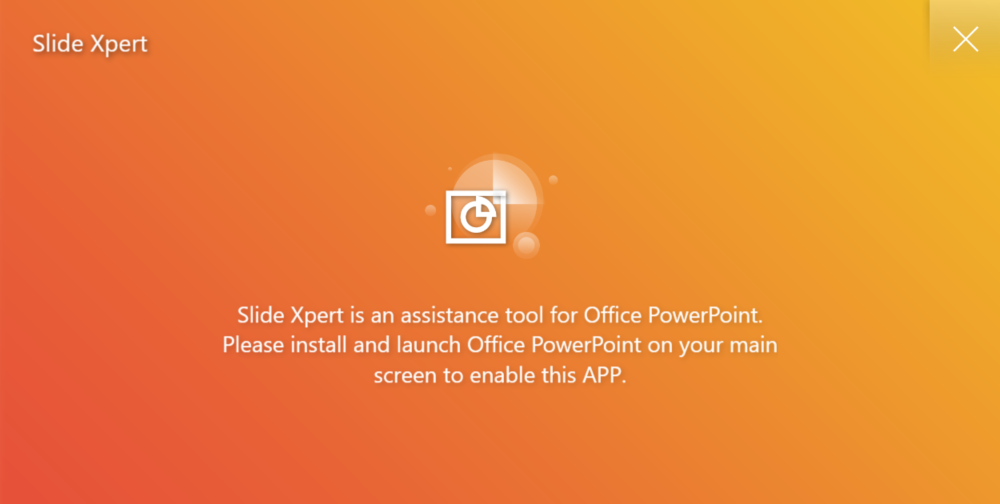
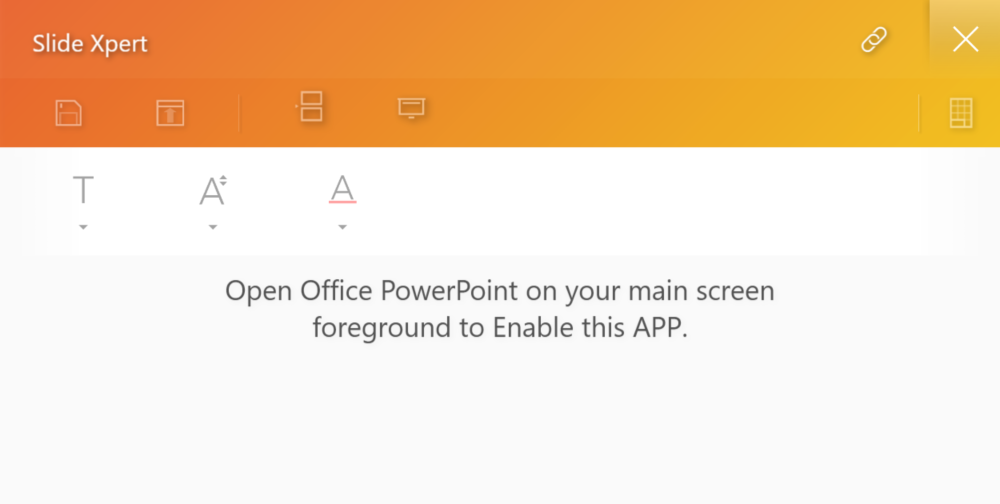
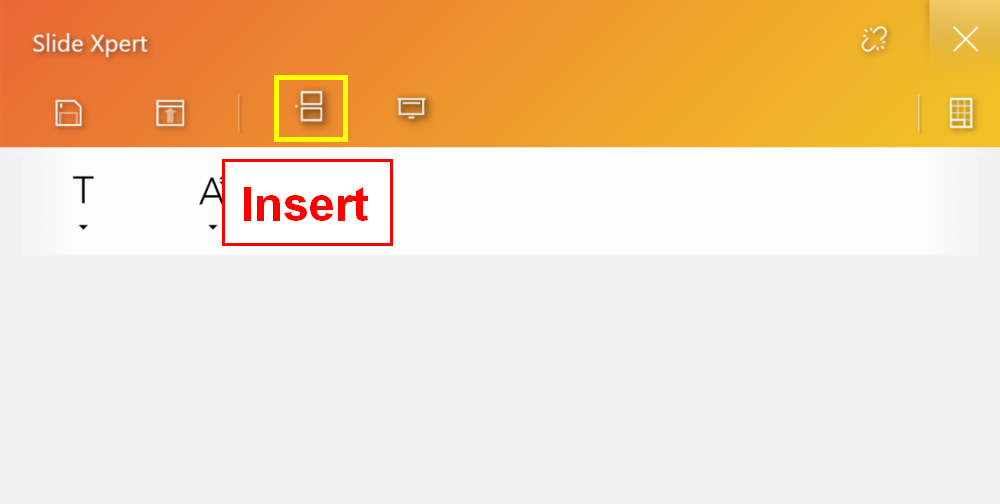
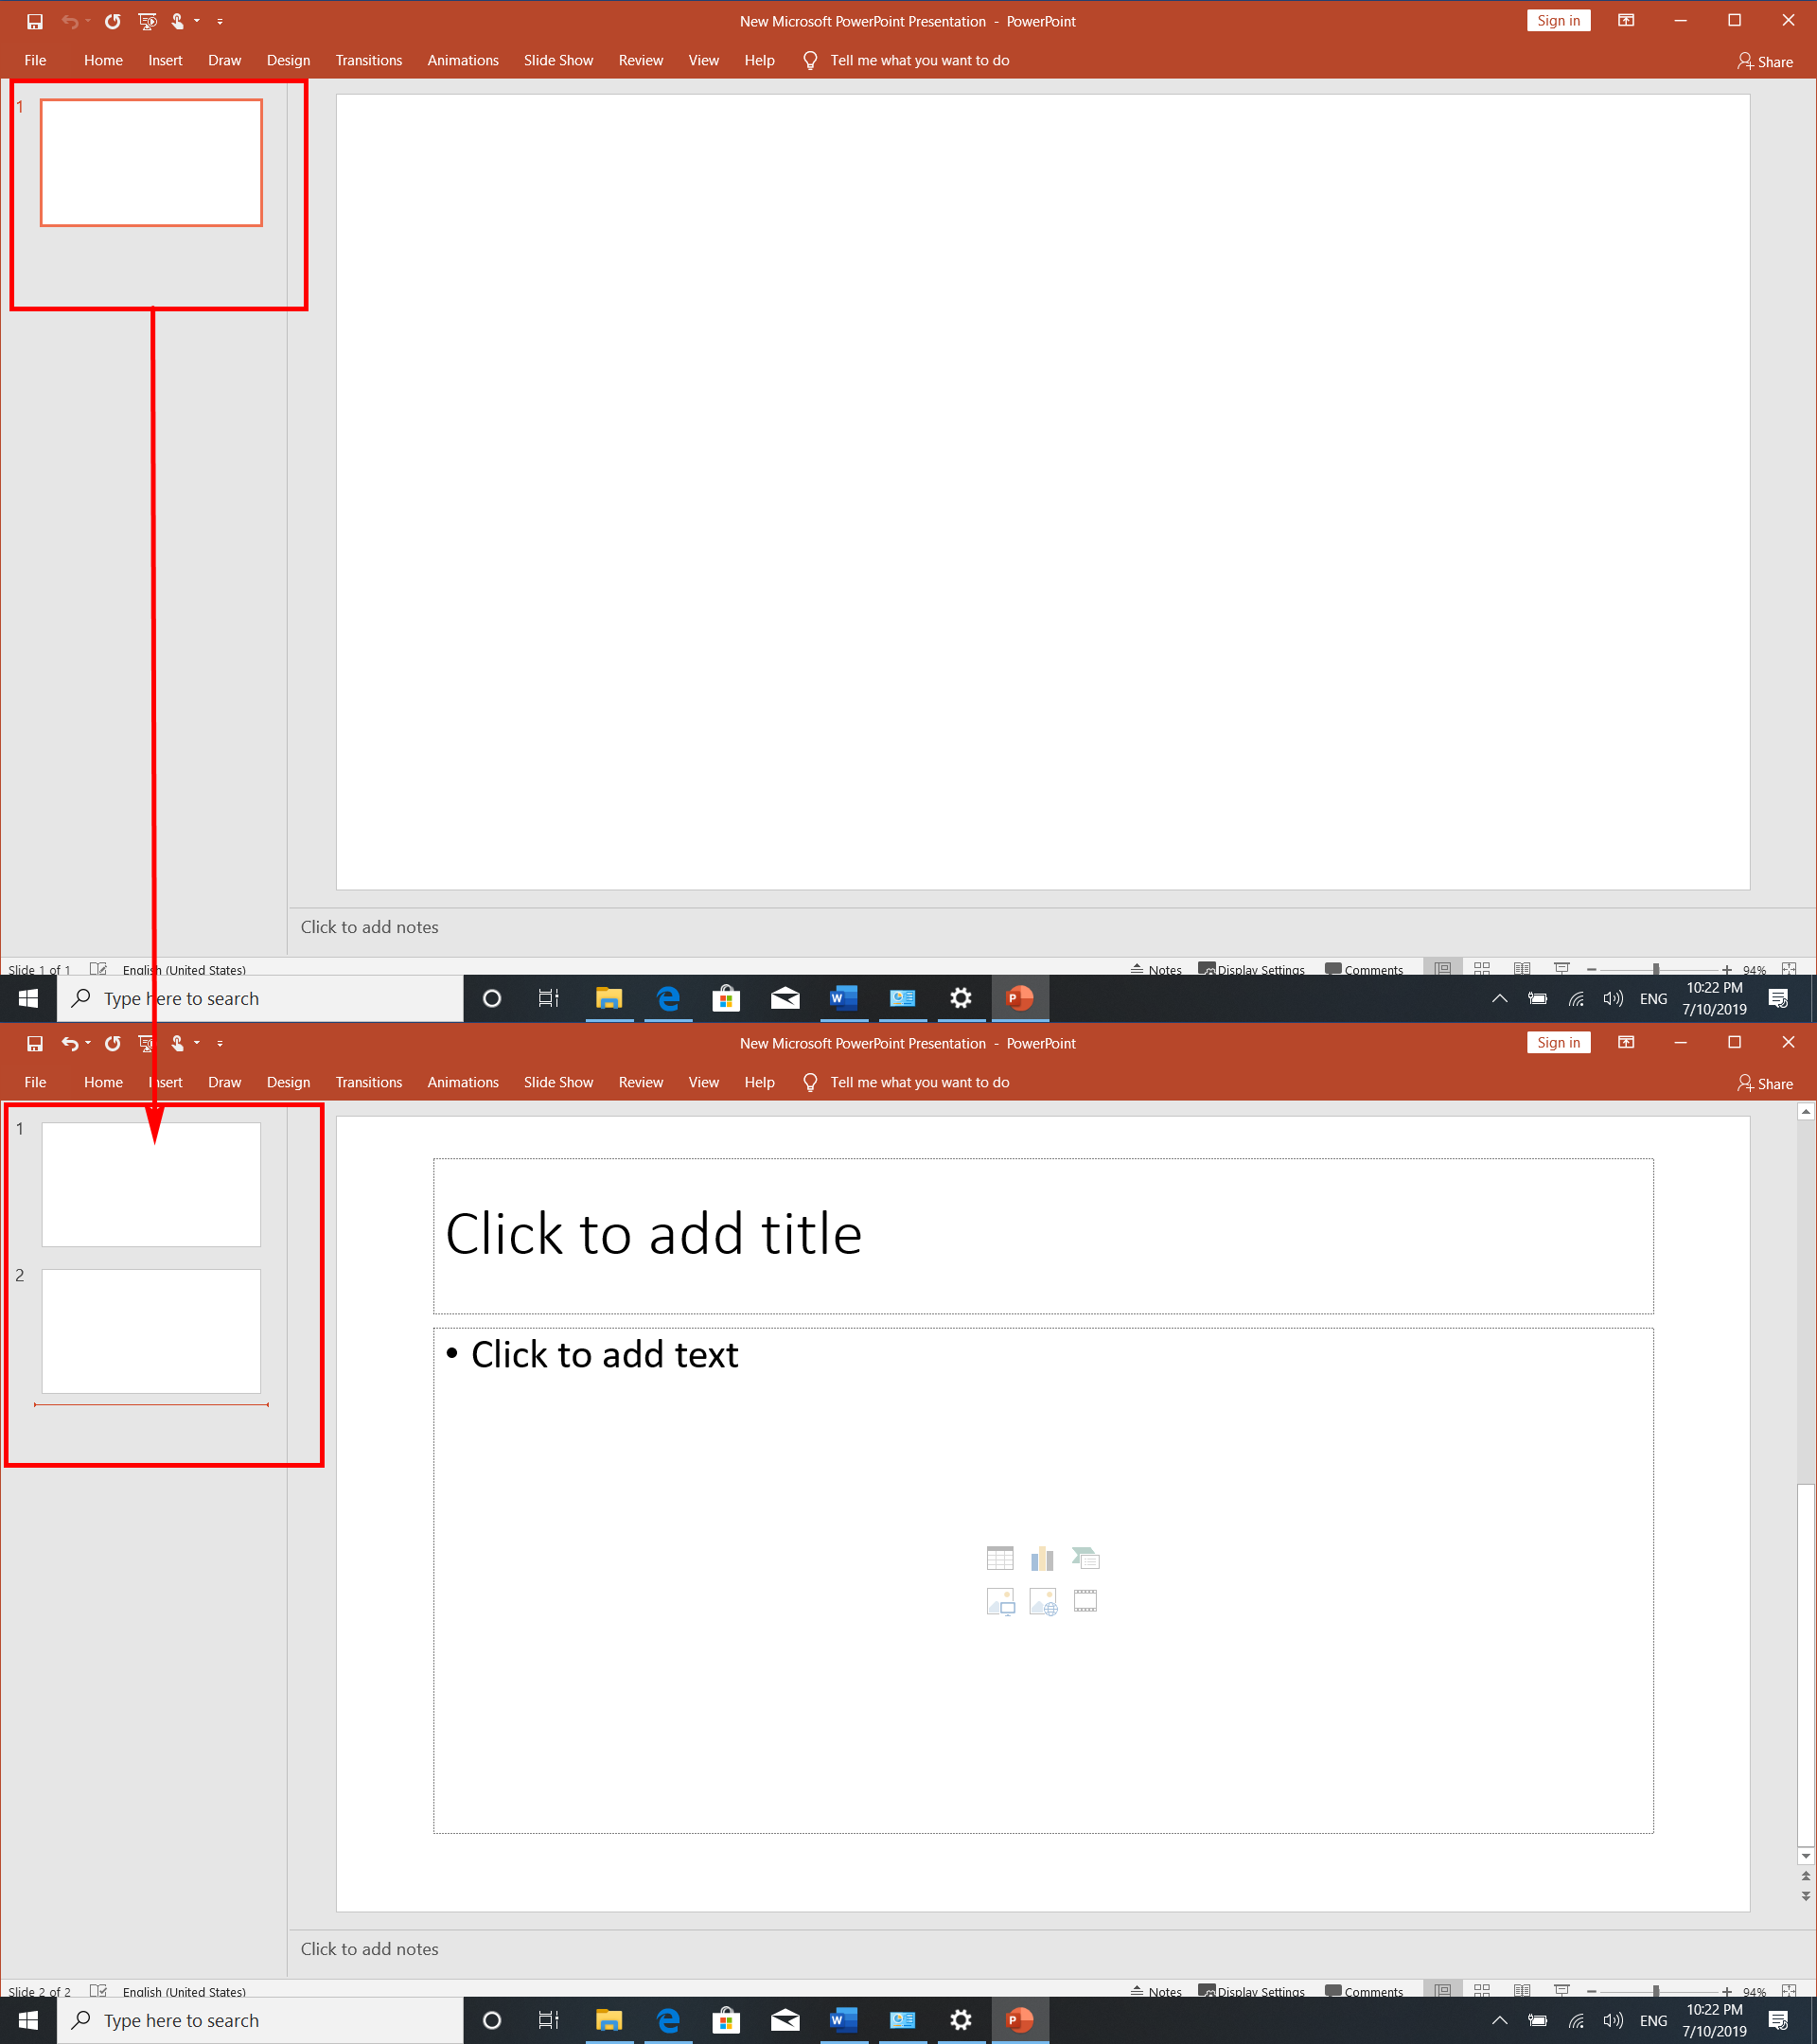
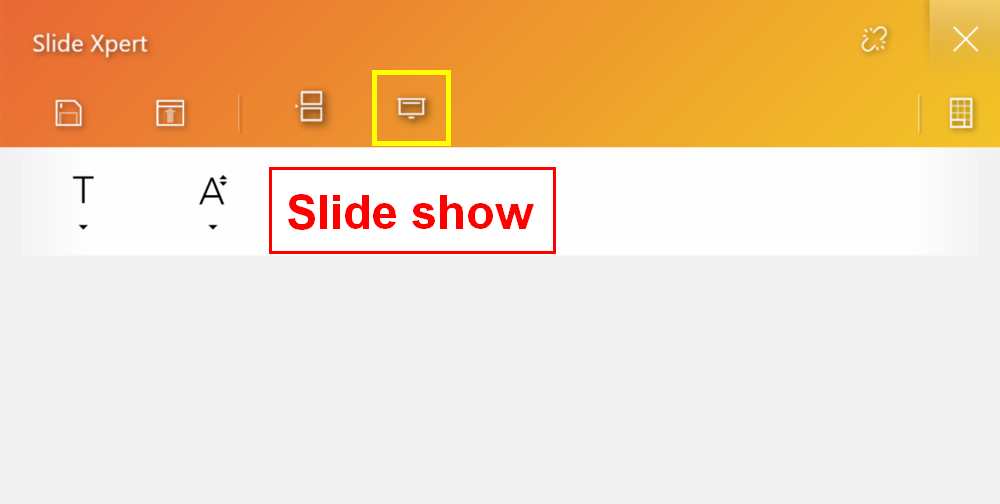
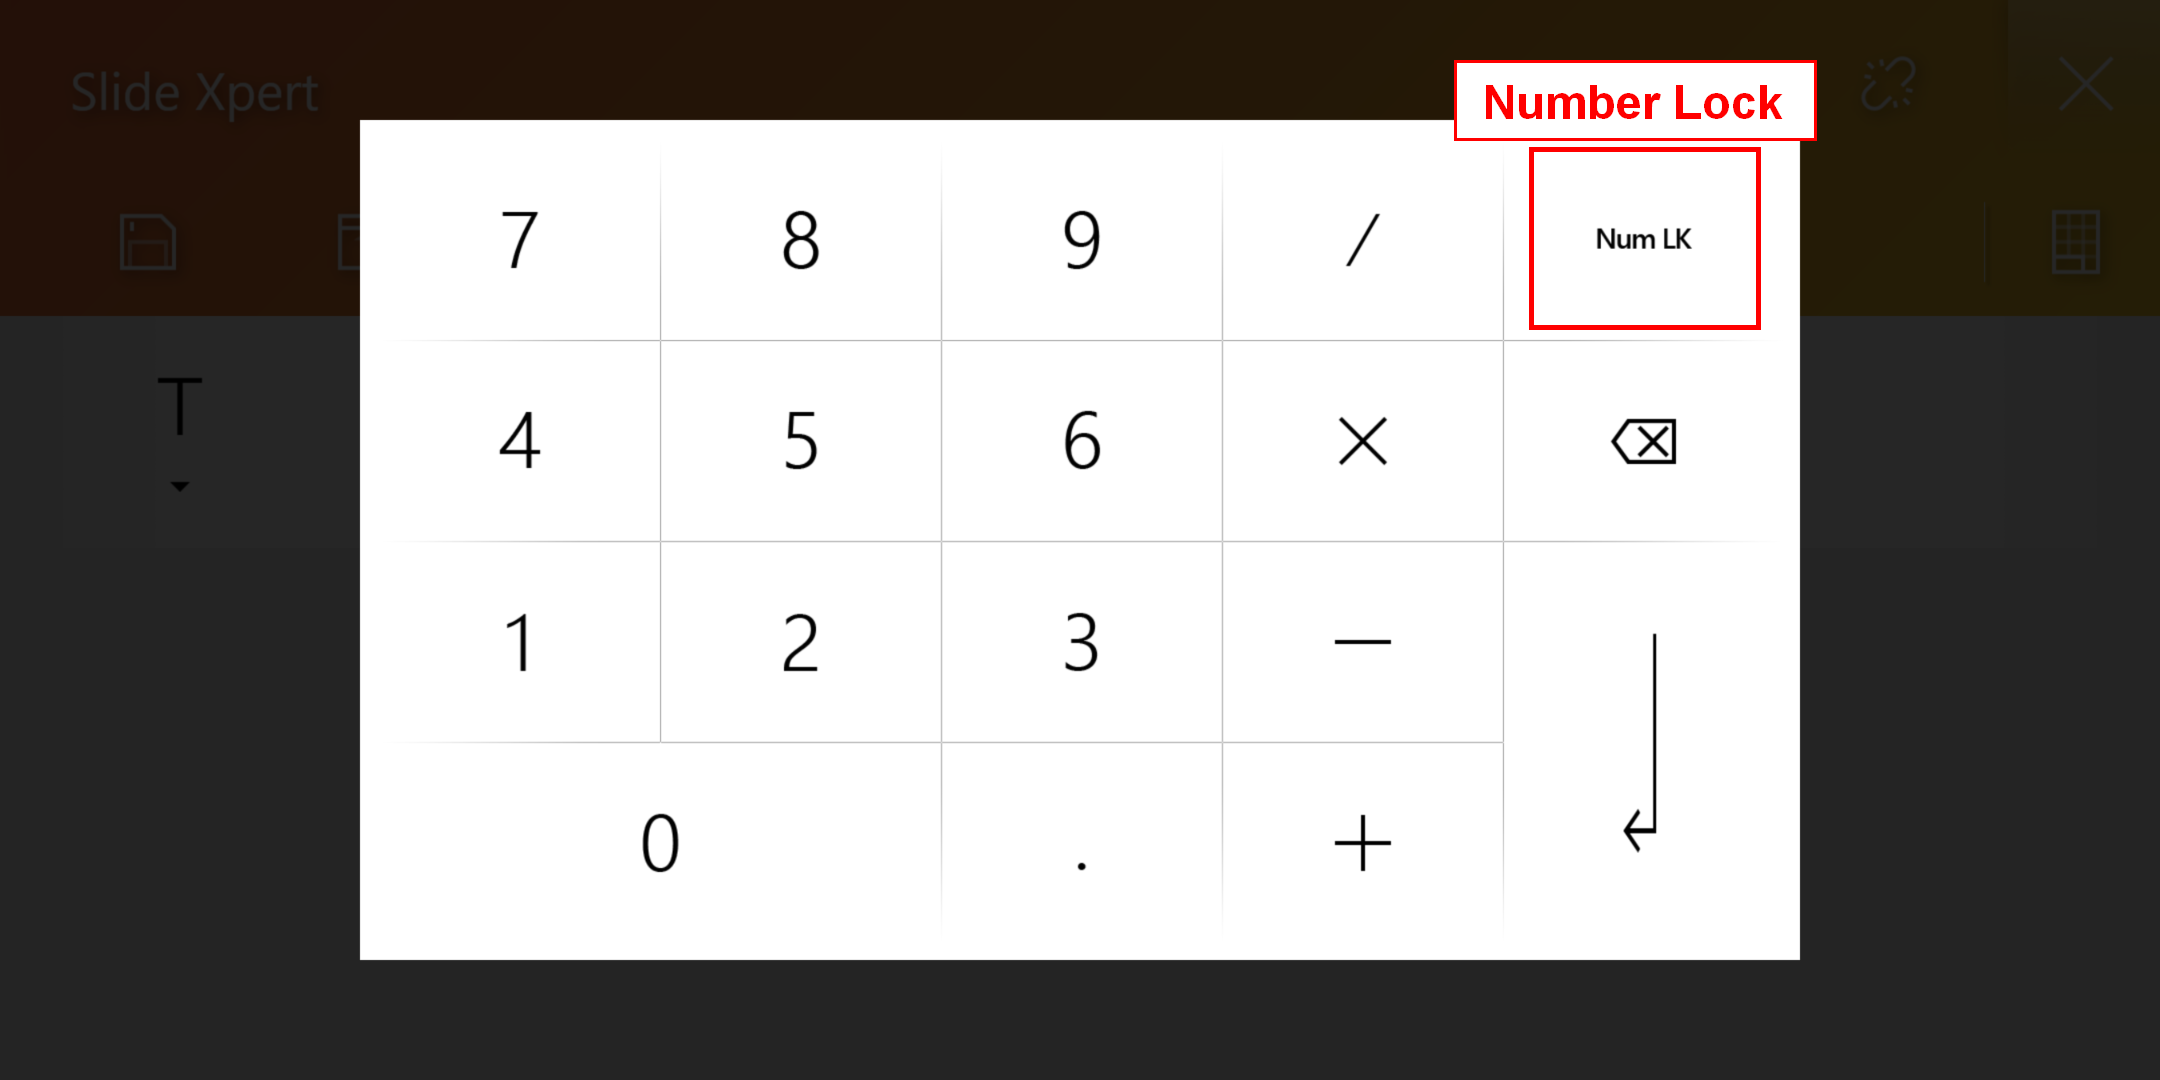
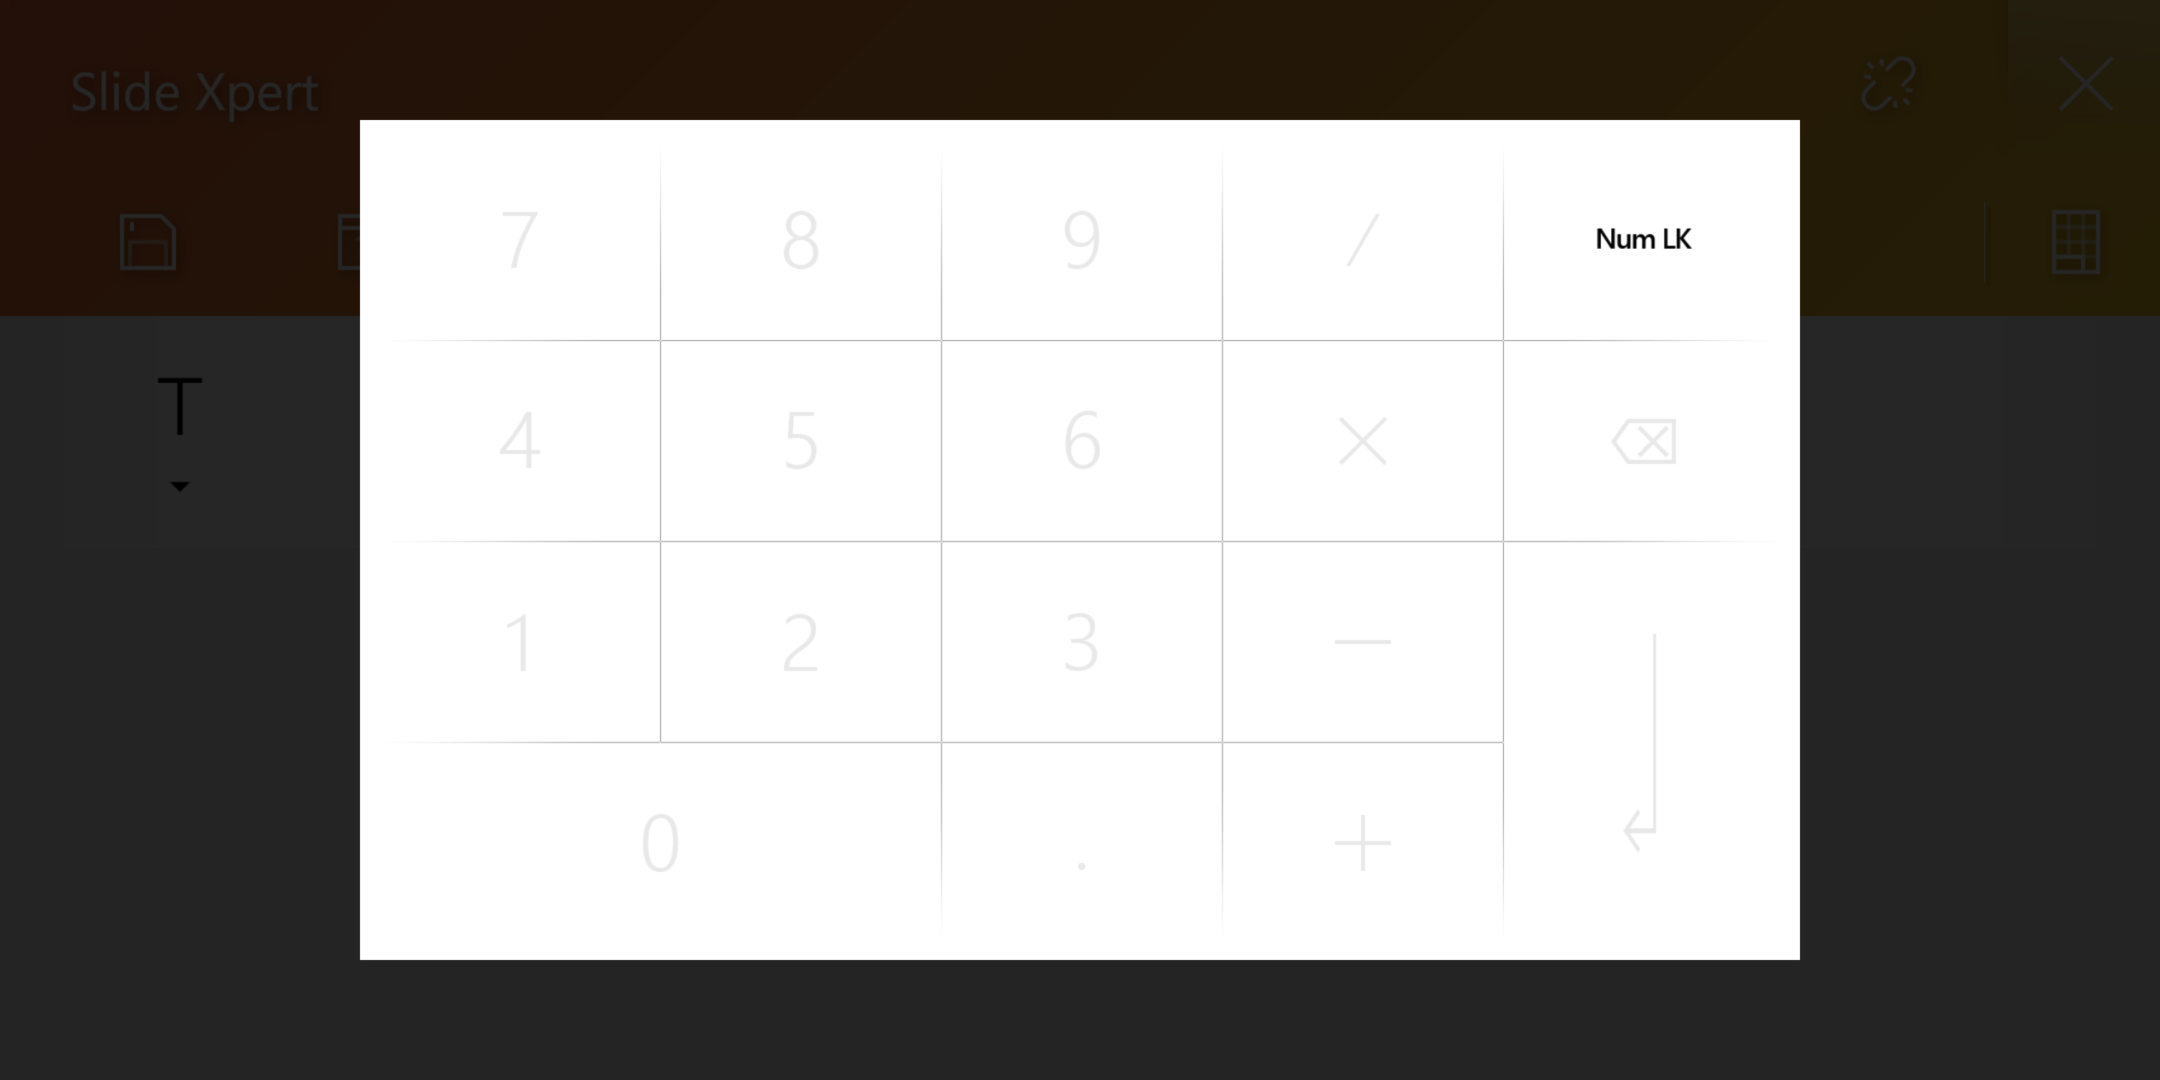
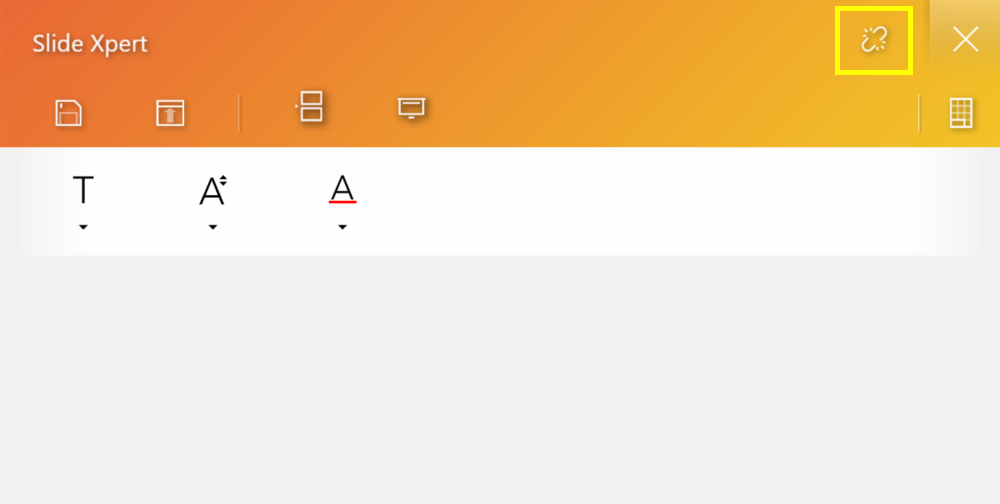
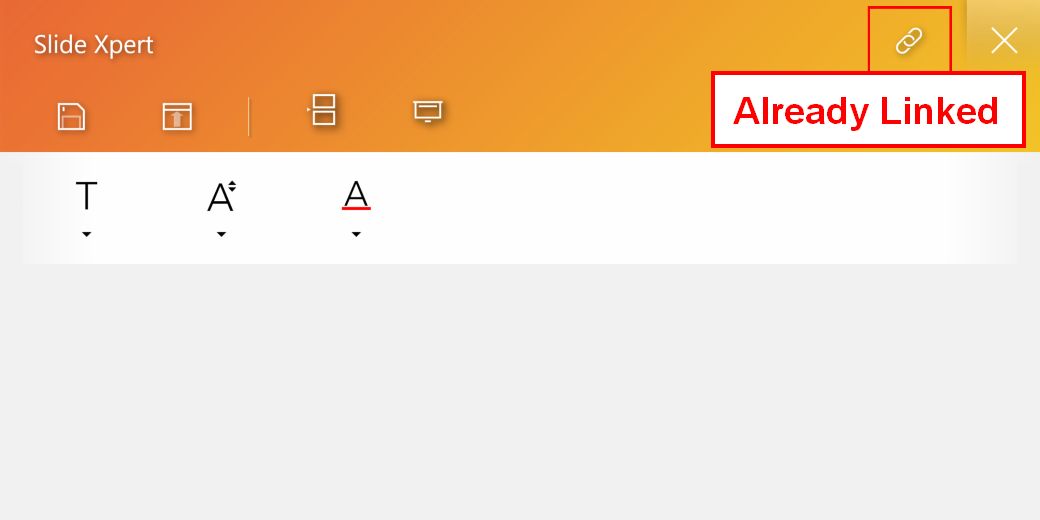
4.  Slide Xpert, an efficient Power Point auxiliary application.
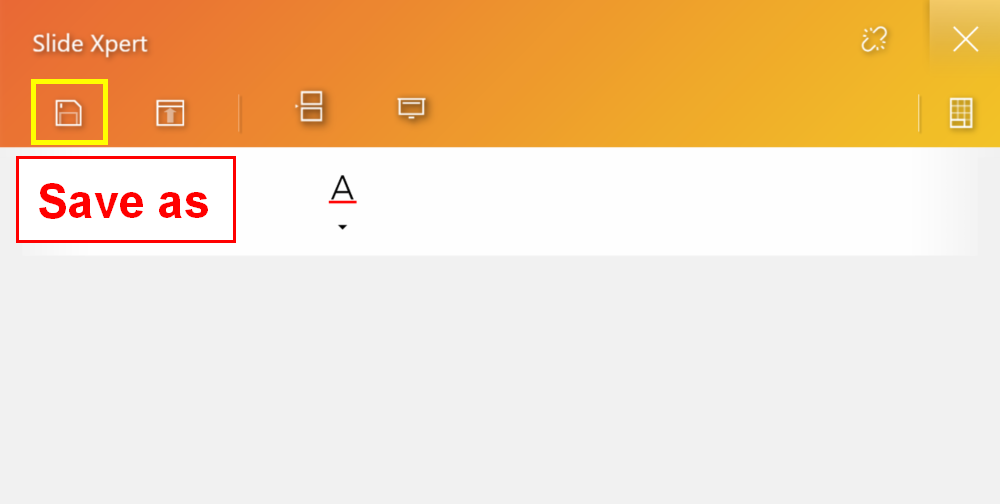
Save icon.
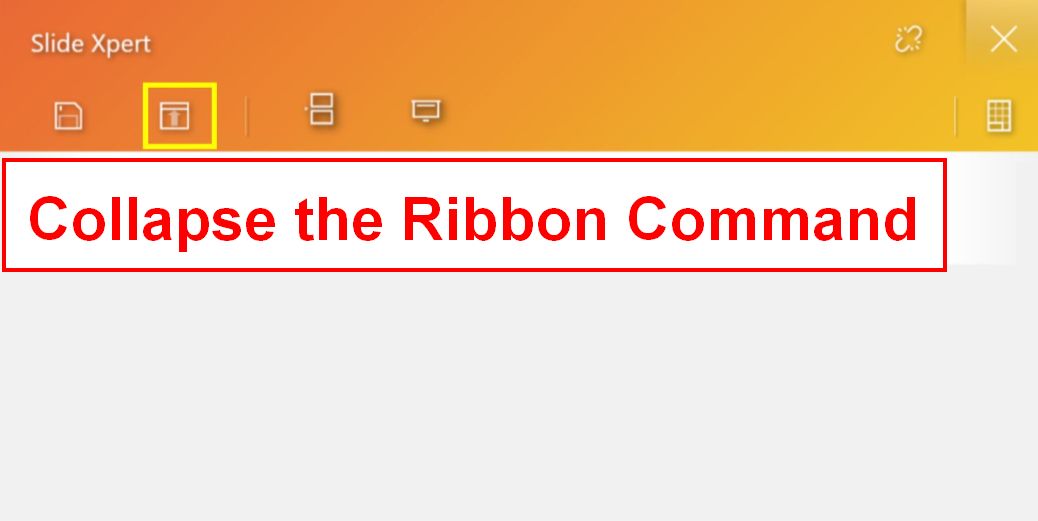
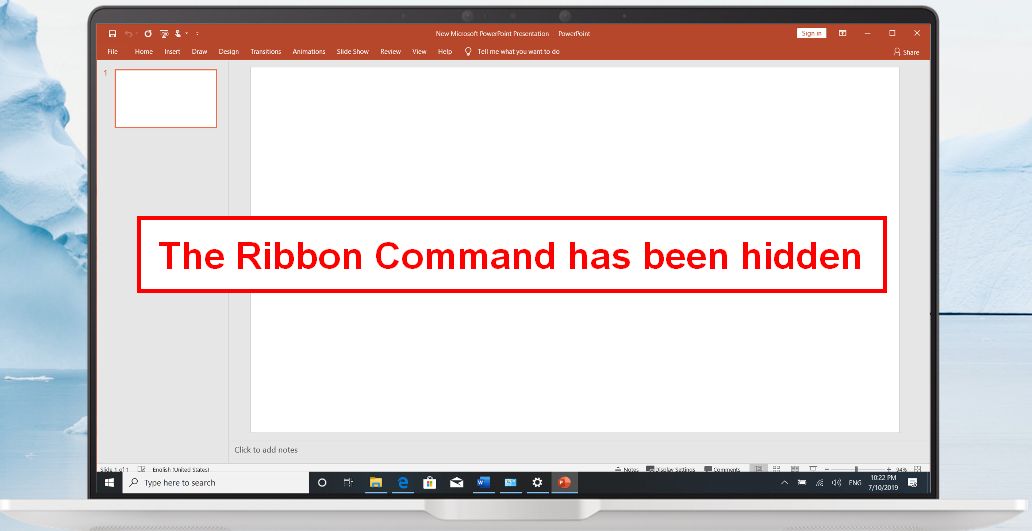
Collapse the Ribbon Command.
Insert icon, you can quickly add a new slide in the PPT.
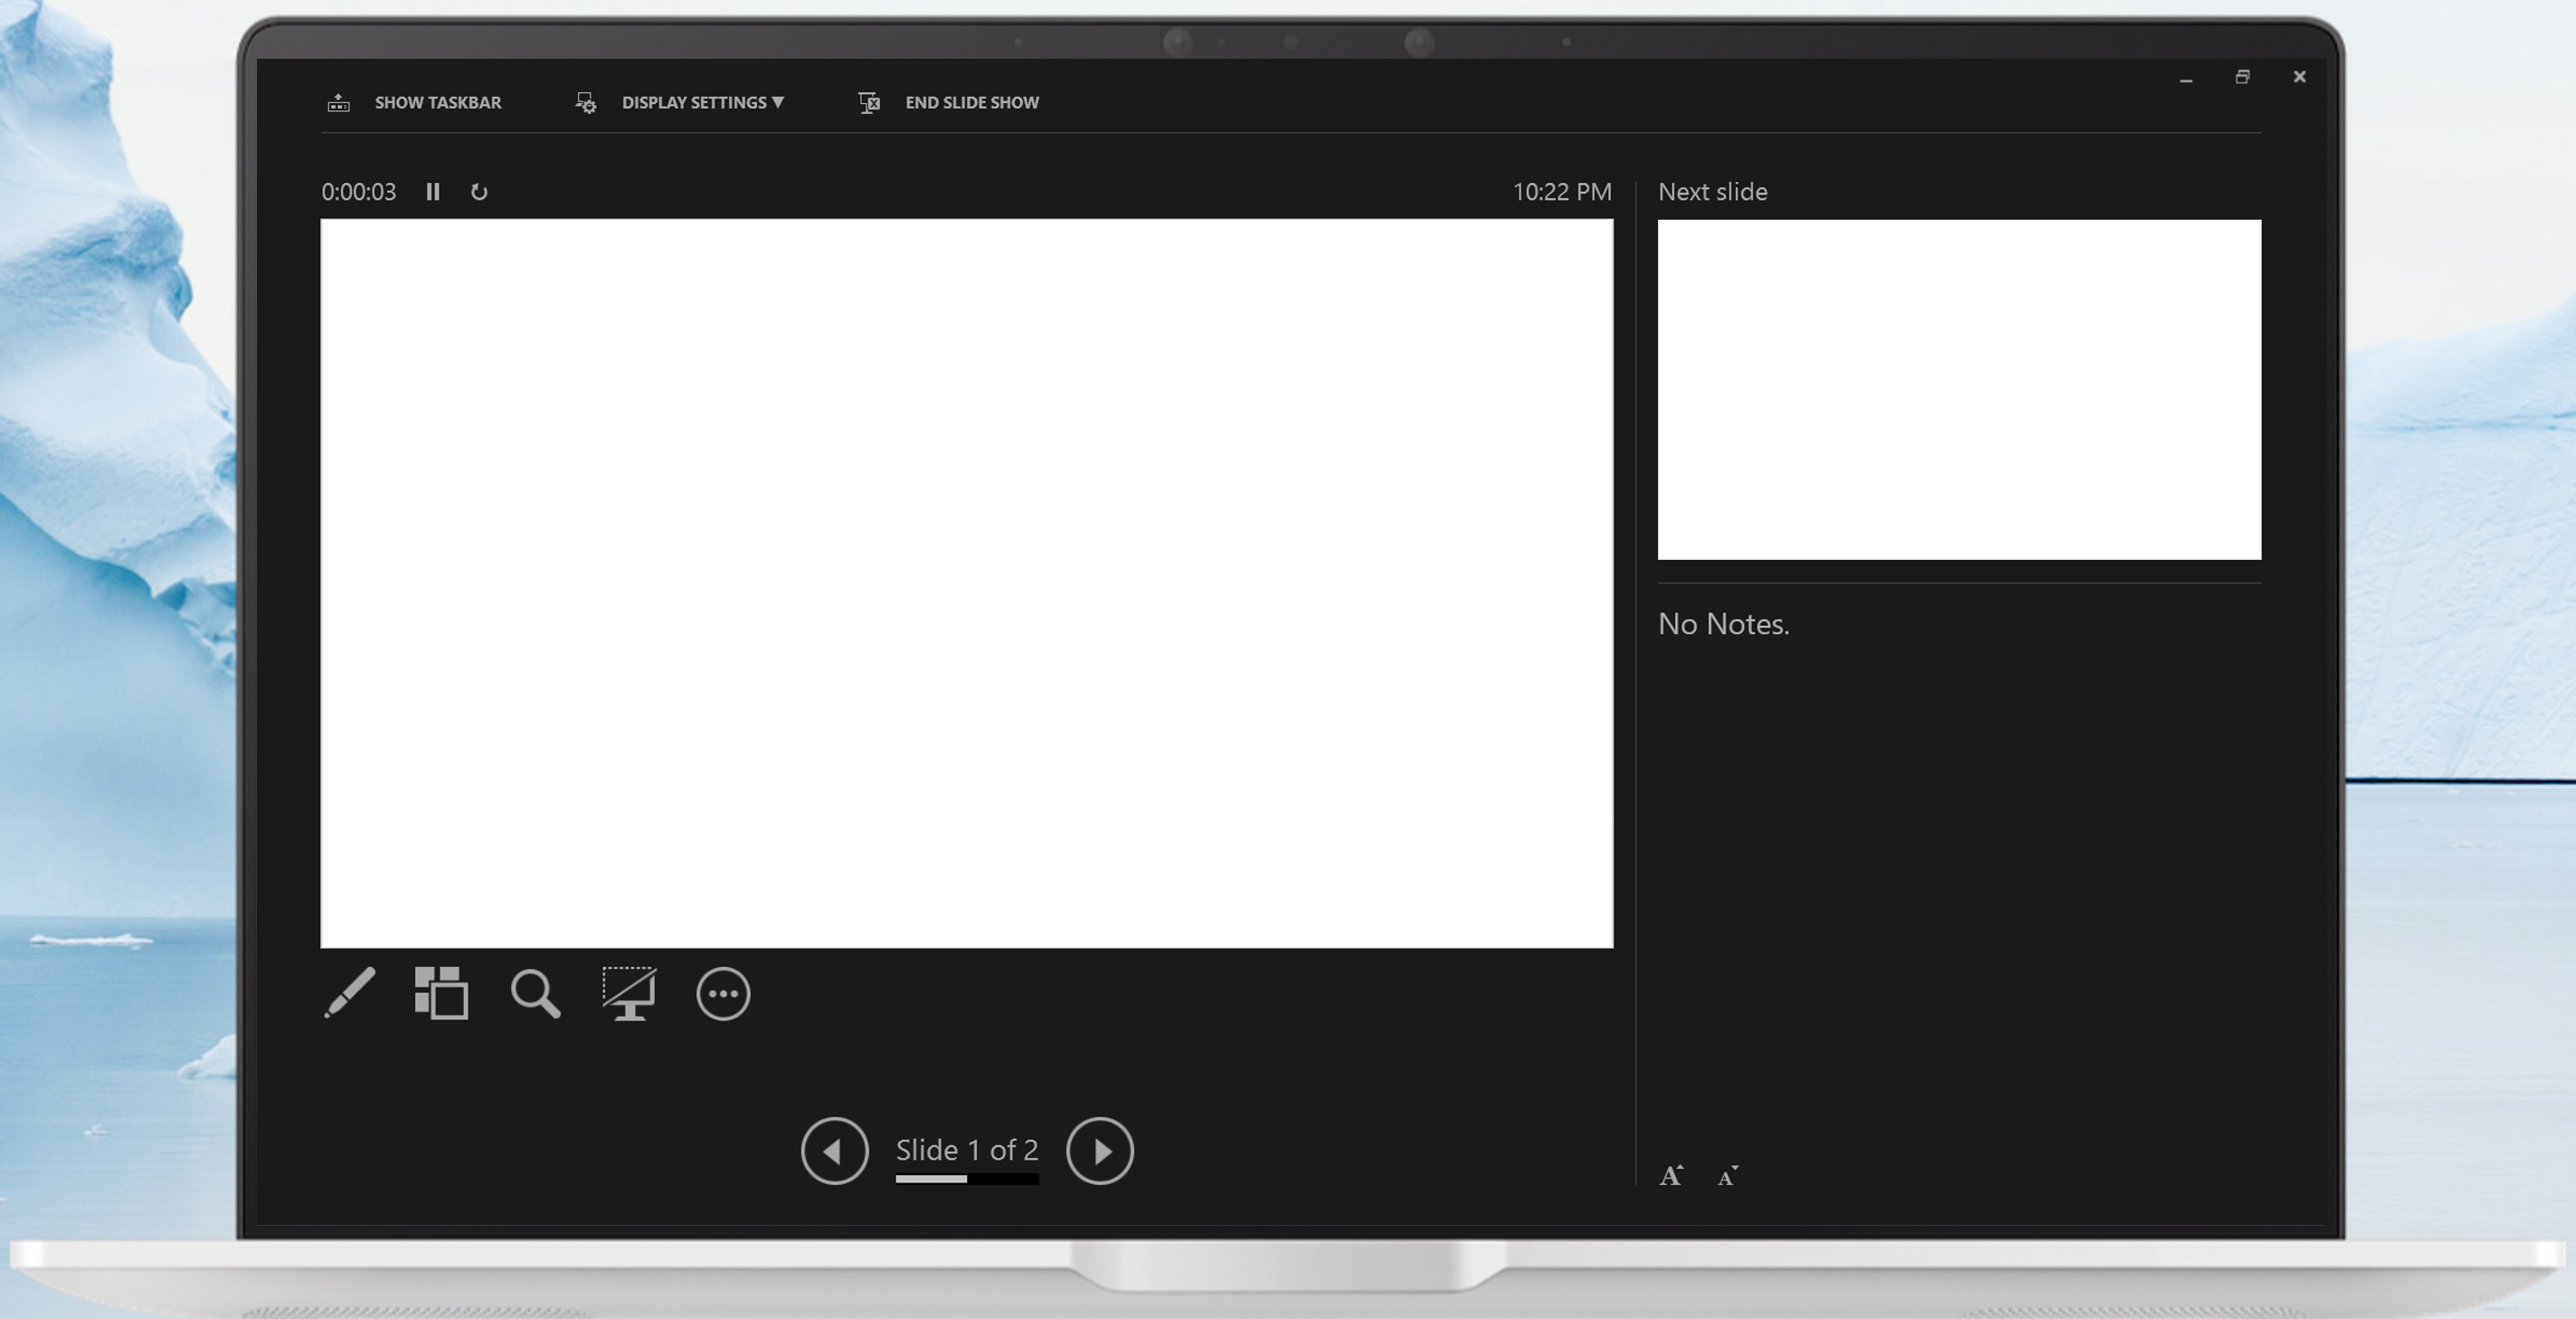
The Slide show icon, you can quickly open the slide show function.
Toolbar, you can quickly modify the font options.
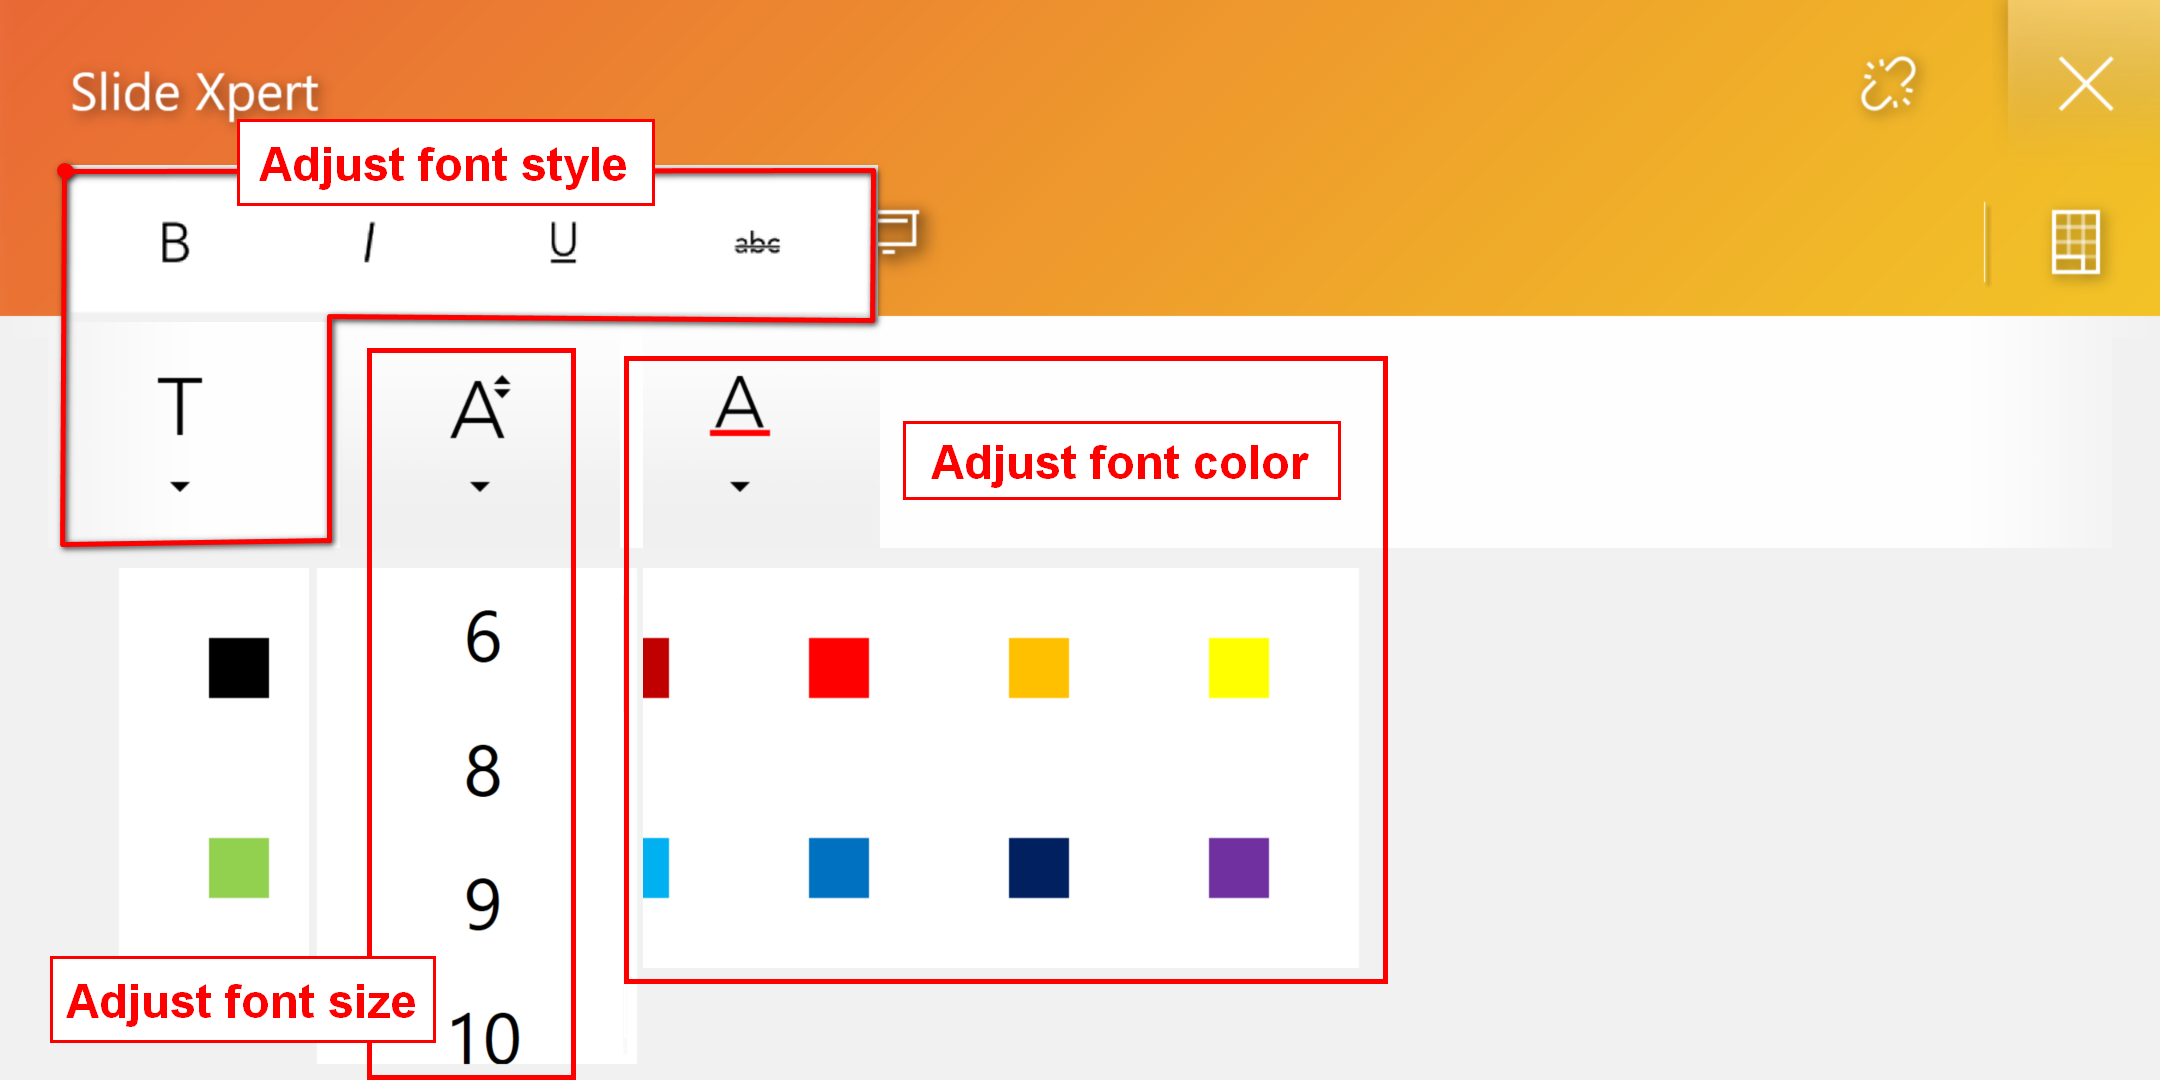
Number Key icon, digital keypad.
Link icon, when switching to PowerPoint on the main screen, ScreenPad will automatically open Slide Xpert.

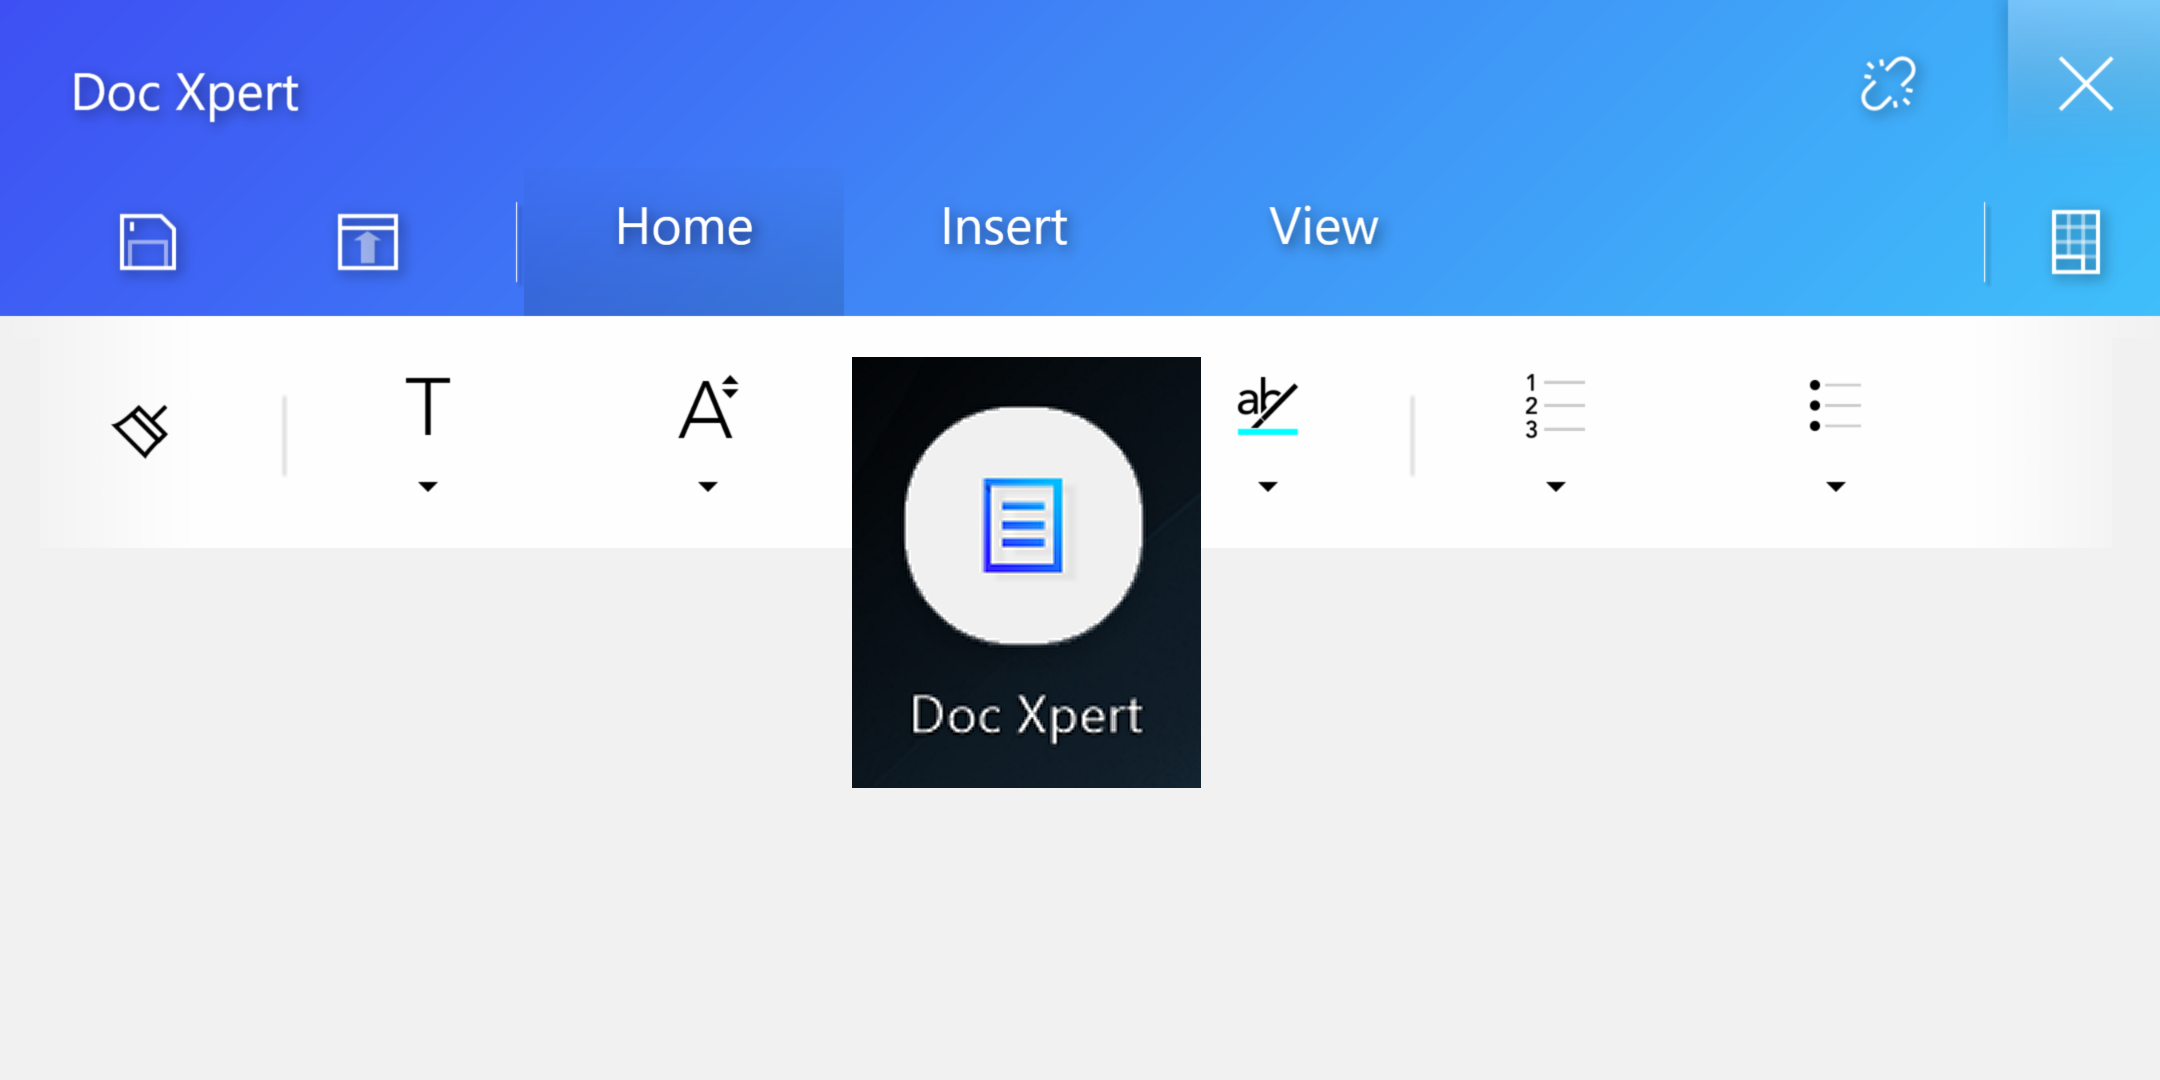
5.  Doc Xpert is an efficient Word auxiliary application. (The built-in functions of the App are very similar to Slide Xpert, please refer to the introduction of Slide Xpert)
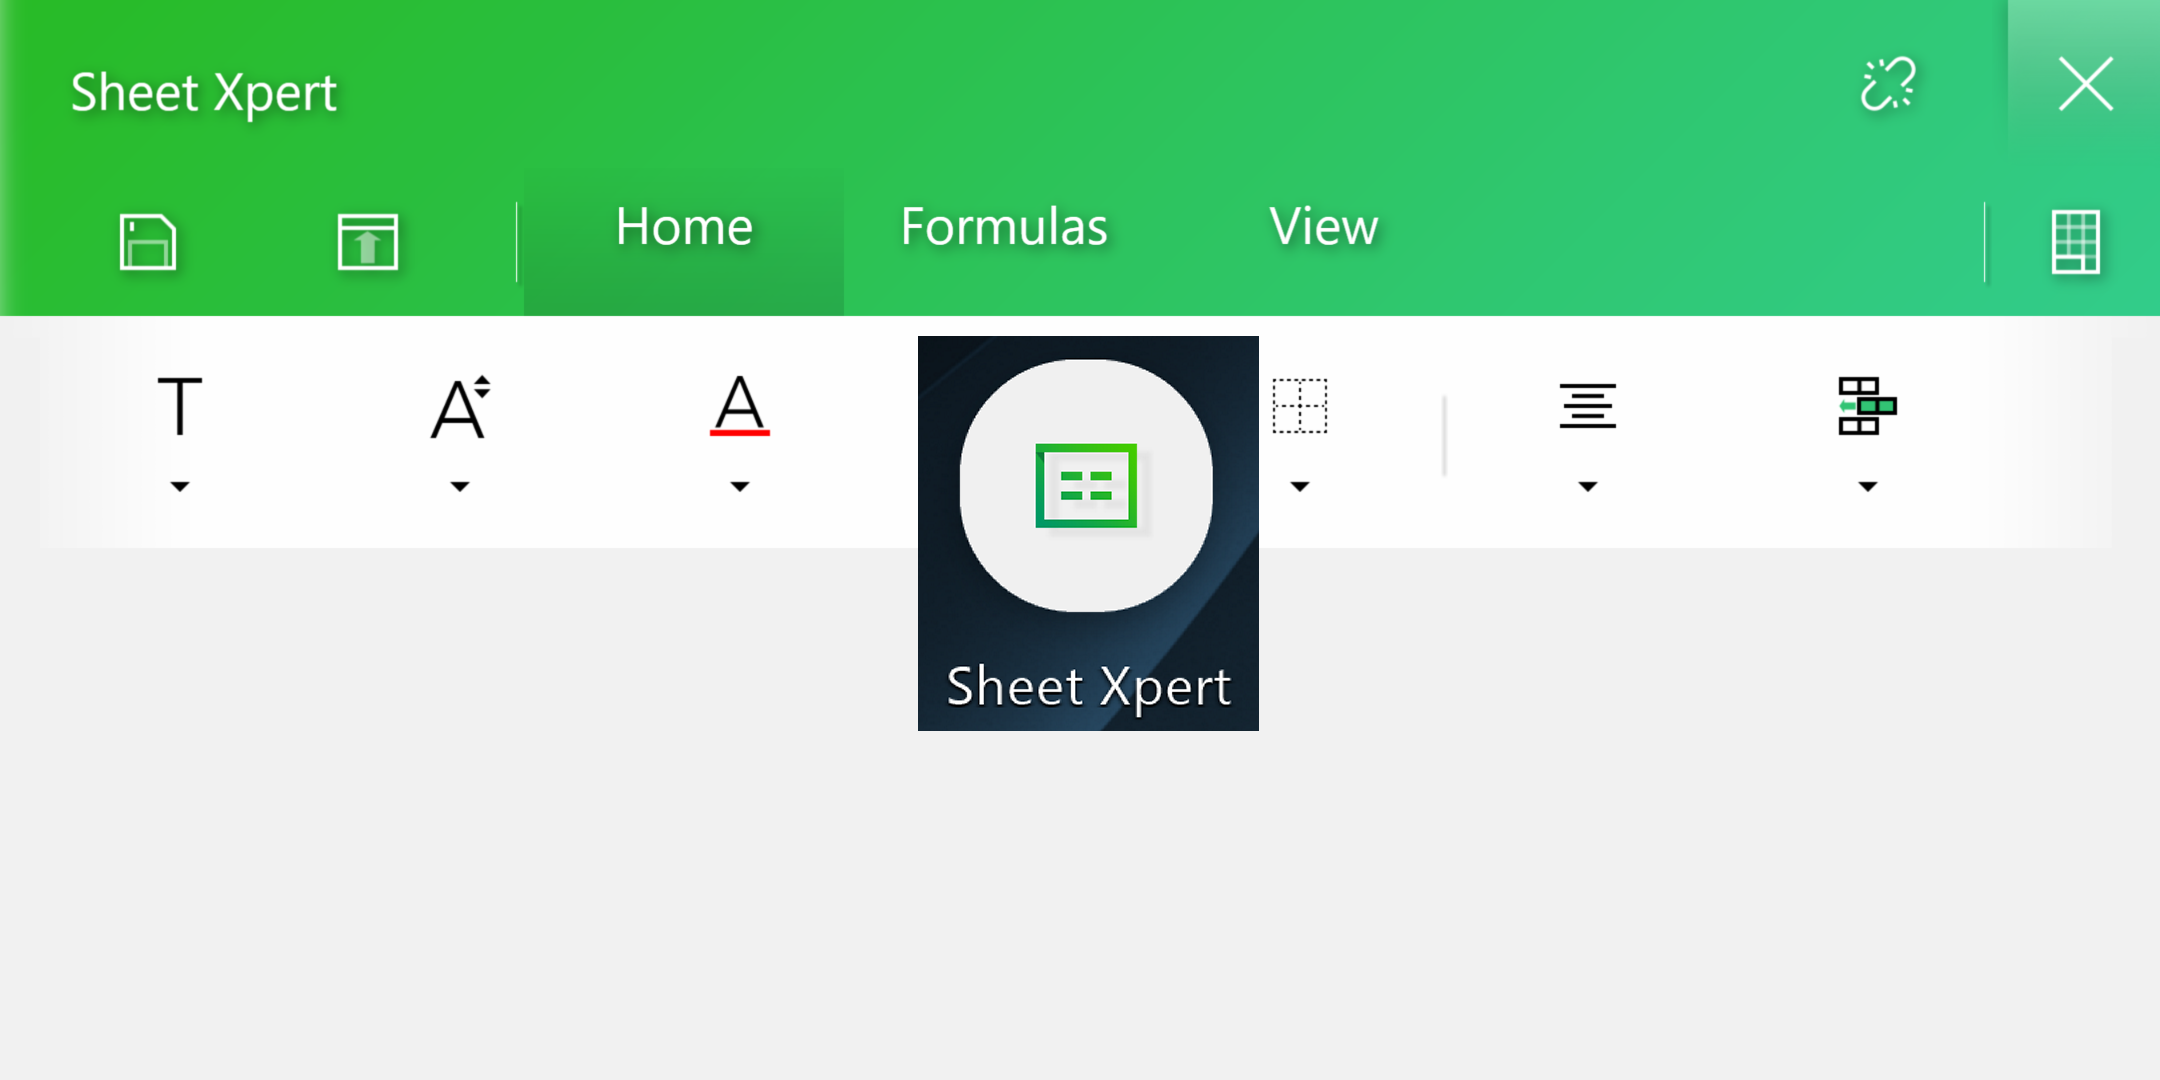
6.  Sheet Xpert is an efficient Excel auxiliary application. (The built-in functions of the App are very similar to Slide Xpert, please refer to the introduction of Slide Xpert)
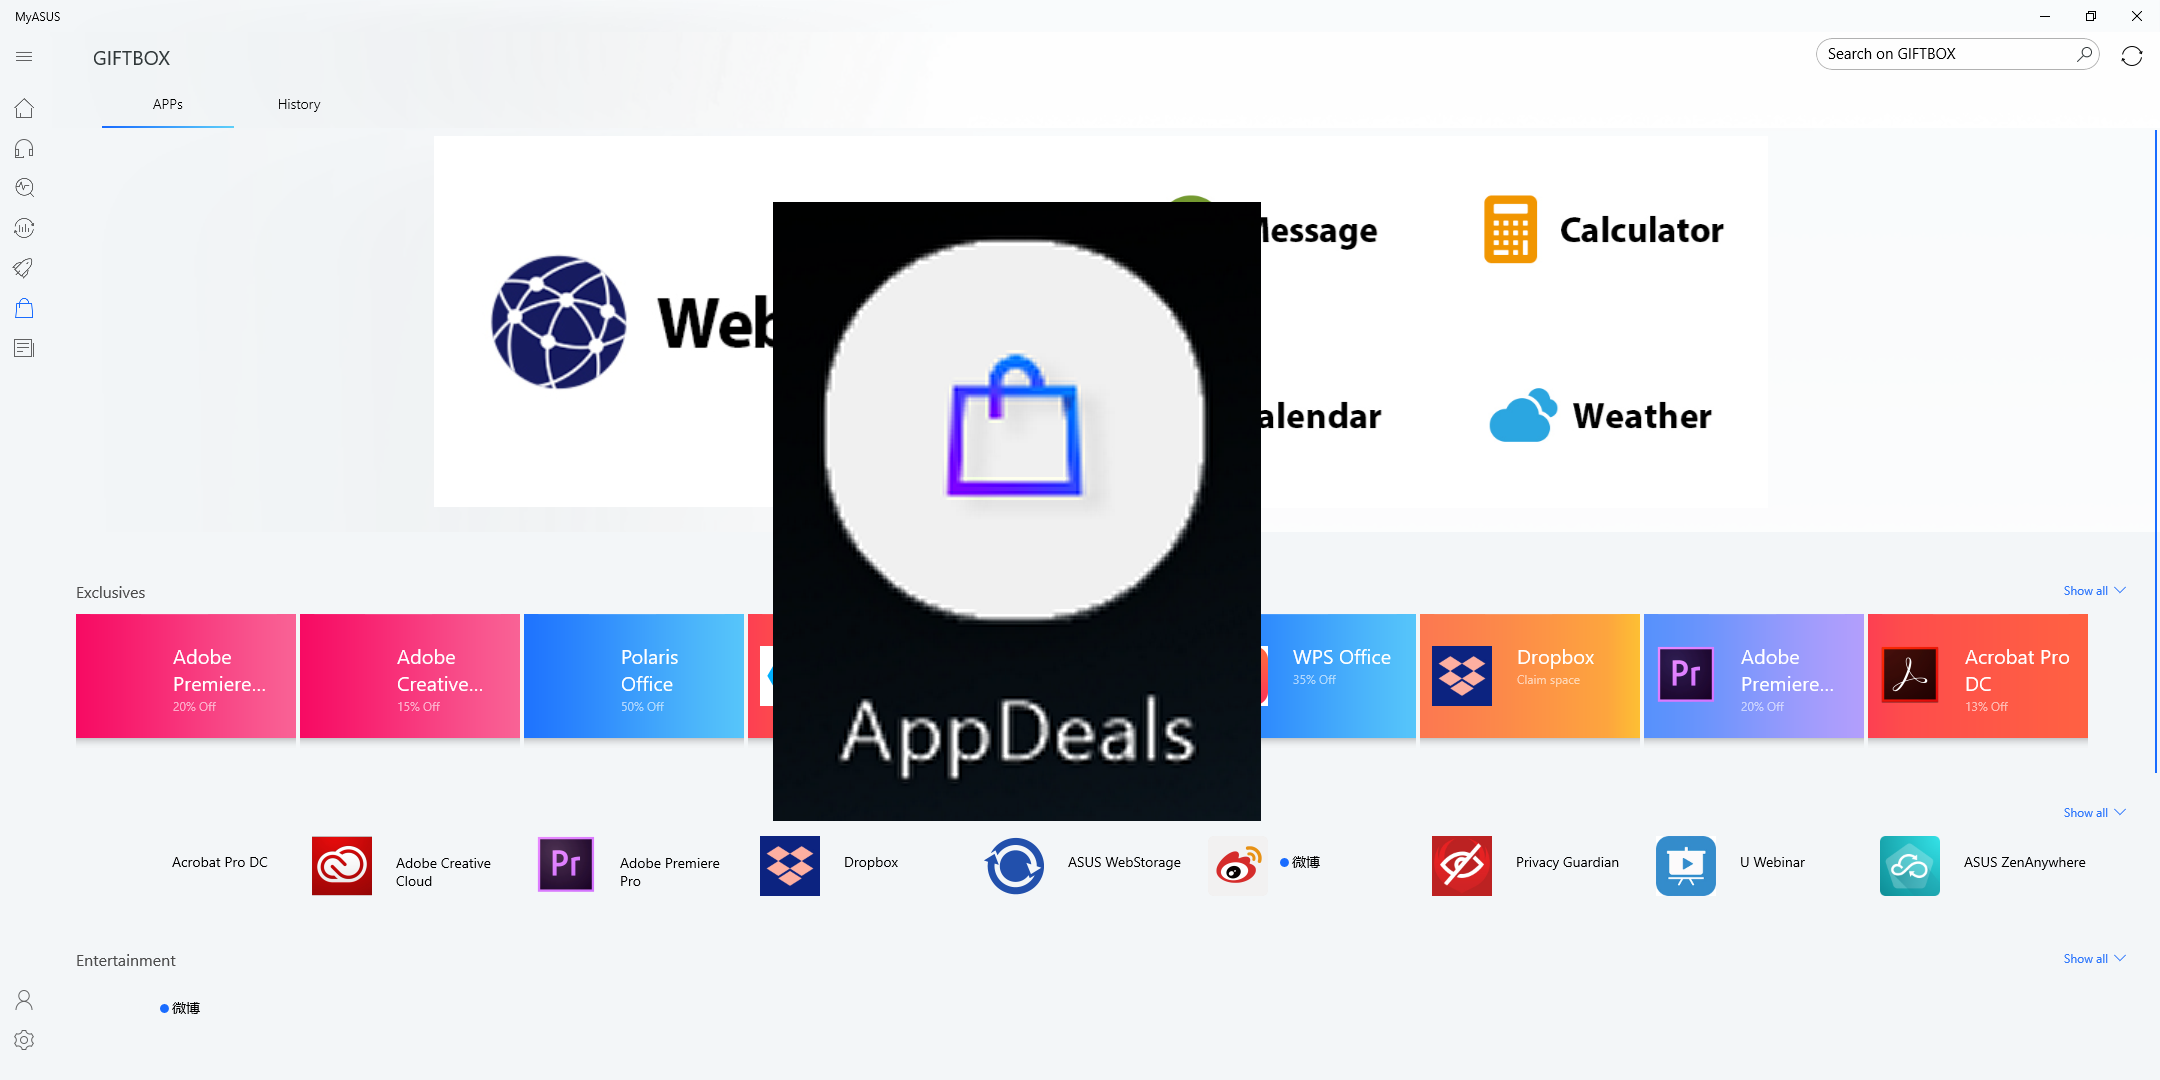
7.  App Deals. In the AppDeals, you can manually download the application you want and then pin it onto the main screen of the ScreenPad for quick startup and improve your efficiency.
You can refer to this FAQ for the detailed introduction of AppDeals : https://www.asus.com/support/FAQ/1031975
Install & Uninstall ScreenXpert
To install the ScreenXpert app ond driver:
1.Go to the ASUS Official website and search your notebook model.
2.Click [support] then click [Driver & Tools]
3.Choose your notebook OS
4.Download the driver and app, then install both.
You can uninstall ScreenXpert from the content provided at the following link:https://www.asus.com/support/faq/1013598
Comparison between ScreenPad 1.0 & ScreenPad 2.0
| No. | AP Name (Feature) | ScreenPad 1.0 | ScreenPad 2.0 |
| 1 | Music player (offline) | V | X |
| 2 | Calendar | V | X |
| 3 | Number Key | V | V |
| 4 | Calculator | X | V |
| 5 | Word | V | V |
| Excel | V | V | |
| PowerPoint | V | V | |
| 6 | ASUS sync | V | X |
| 7 | Spotify | X | V |
| 8 | Adobe sign | V | X |
| 9 | Youtube | X | V |
| 10 | Launcher | V | X |
| 11 | Handwriting | X | V |
| 12 | Quick Key | V | V |
| 13 | KKBox | X | V |
| 14 | AppDeals | X | V |
| 15 | MyASUS | X | V |
| 16 | Alarms & Clocks | X | V |
| 17 | Weather | X | V |
| 18 | Movies & TV | X | V |
| 19 | Voice Recorder | X | V |
| 20 | Solitaire | X | V |
1. Q: The ScreenPad is blinking when 1) I plug in/remove the power source ,2) plug the external screen into my laptop and remove, or 3) when the laptop wakes up or restarts. Is it the normal situation?
A: It is normal that ScreenPad is defined as the external screen of the system, and when you do the above actions, you will let the operating system detect the screen hardware, which will cause the screen to be black or flash. Similar flickers occur when your la[top uses an HDMI external screen.
2. Q: Is it normal for your laptop make sounds when powered-off and powered on, or when ScreenPad switches to laptop Screen Only mode?
A: It is normal phenomenon. To make ScreenPad more power-saving, ScreenPad is power-off when it's not used, turn on. This tone is a power-on tone When the laptop uses USB external device, there will be a similar tone.
3. Q: What should I do when the ScreenPad resolution (2160x1080) is higher than the resolution of an app?
A: It is recommended to use 1000x500 resolution and 2160x1080 resolution in special situations such as watching movies.
4. Q: When using the ScreenPad, the text appears blurry.
A: The ScreenPad resolution can be adjusted to 2160 x 1080, which is 2K resolution. You can also manually adjust the resolution in your laptop's Display Settings.
5. Q: When I watch a movie, sometimes I feel a slight lag, what do I do?
A: In the ScreenPad settings you can adjust the screen refresh rate, the factory default 50Fps, which is based on power saving considerations. You can manually change to 60Fps so there isn't any lag.
6. Q: When an app is displayed full-screen on ScreenPad, system notifications (such as headphone plug-in, etc.) are hidden, what should I do?
A: To locate the hidden notification feature (Windows 1903 version), please right-click the Start menu, select System and go into Focus Assistant to set full-screen mode to still receive notifications.
7. Q: Mouse down on ScreenPad is not easy to find, what should I do?
A: When using the Home screen instead of using ScreenPad, you can temporarily switch to TouchPad Mode via the TouchPad icon or the F6 shortcut.
8. Q: When setting "only second screen" by setting the "Fn" and "F8" shortcut when the function key is locked, the main screen is displayed on the ScreenPad, when the external monitor is connected and "only second screen" is switched. Is it OK that the picture is still displayed on the ScreenPad instead of the external monitor?
A: Because the system defines ScreenPad as the second screen and the external display as the third screen, the main screen display is normal on screenpad when switching "only second screen" mode. You can go to Show Settings to adjust the screen order settings.
9. Q: What can I do to switch other modes by setting "Computer Screen Only" by setting "Fn" and "F8" shortcuts when the function key is locked, and then using "Win + P" may not be effective?
A: Due to the "Computer Screen Only" mode ScreenPad power loss, please go to the Display Settings to adjust the screen order settings and use the F6 shortcut (or function key lock with the "Fn" and "F6" shortcut) to switch mode. To avoid this, you can update the ScreenXpert driver to 1.0.26.0, the ScreenXpert App to 1.0.20.0 or higher.
10. Q: What if I switch the display screen with the F8 shortcut (or the function key lock when you lock it) and get stuck in "Only Second Screen" or "Computer Screen Only"?
A: Because "Computer Screen Only" mode will power off the ScreenPad, re-powering back to the pre-power-off state, and the F8 shortcut can only be switched sequentially, so it is stuck between "second screen only" or "computer screen only" mode. At this point, please switch to another mode by "Win + P", or use the F6 shortcut (or the "Fn" and "F6" shortcut when the function key is locked). To avoid this, you can update the ScreenXpert driver to 1.0.26.0 and the ScreenXpert App to 1.0.20.0 or higher.
11. Q: When I play the game on the full screen, if I touch the second screen, the game will automatically jump back to the desktop?
A: If you want to use the second screen synchronously when you play the game on the main screen, it is recommended that the main screen enters the window mode (including the infinite mode); if you do not need to use the second screen, in the full screen mode, in order to avoid accidental touch, it is recommended to close the second screen.
12. Q: Why do I open my laptop after it goes to sleep, and the window originally displayed on the second screen will be displayed on the main screen?
A: In order to make the model with the ScreenPad more power-saving, the system is designed to be powered off when the ScreenPad is not in use, and is powered on when it is turned on. Therefore, when the notebook is sleeped, the window displayed on the second screen will be transferred to the main screen display due to the power failure of the second screen.
13. Q: The ScreenPad will blink a few times when the notebook is turned on. Is this normal?
A: It is normal, if your notebook uses HDMI external screen, the external screen will also flash, the same reason.
14. Q: When dragging some Microsoft applications on the main screen, you may not be able to open the two functions of "Windows Switcher" and "Add to Launcher". Why?
A: The reason why some Microsoft applications do not have open permissions. however, ASUS provides other alternatives. For details, refer to this article "Drag the window on the main screen."
15. Q: Why is it that after my laptop updates the Windows system, I find that ScreenXpert cannot start automatically after booting up? Why?
A: The startup of ScreenXpert requires the support of Windows Service. the service startup speed of the upgraded Windows system is slower than that of ScreenXpert, which will cause ScreenXpert to fail to start automatically. solution as below :
1. Manually open ScreenXpert after the laptop is turned on.
2. Roll back the system. Go to Settings > Update & Security > Windows Update, Click on "Recovery" in Left hand column, Click “Get Started” under Go Back to the Previous Version of Windows 10.
If you had the OS re-installed, installed with an OS other than the preinstalled version, updated Windows, or due to any circumstances the ScreenPad Plus fails to work properly(such as ScreenPad Plus not responding, error on the screen, function inside the ScreenPad Plus not working, touch not working), please follow the steps below to re-install the ScreenPad Plus. If you experience the ScreenPad display or user interface issues after the computer upgrades to Windows 11, version 22H2, please refer to here.
Note: Please download and install the necessary drivers and utility programs in the order shown below:
Model Supported: The article is only applicable to ASUS notebook equipped with ScreenPad Plus. Please visit ASUS website and search for your product model. Click [Tech Specs] to check whether your model supports ScreenPad Plus.
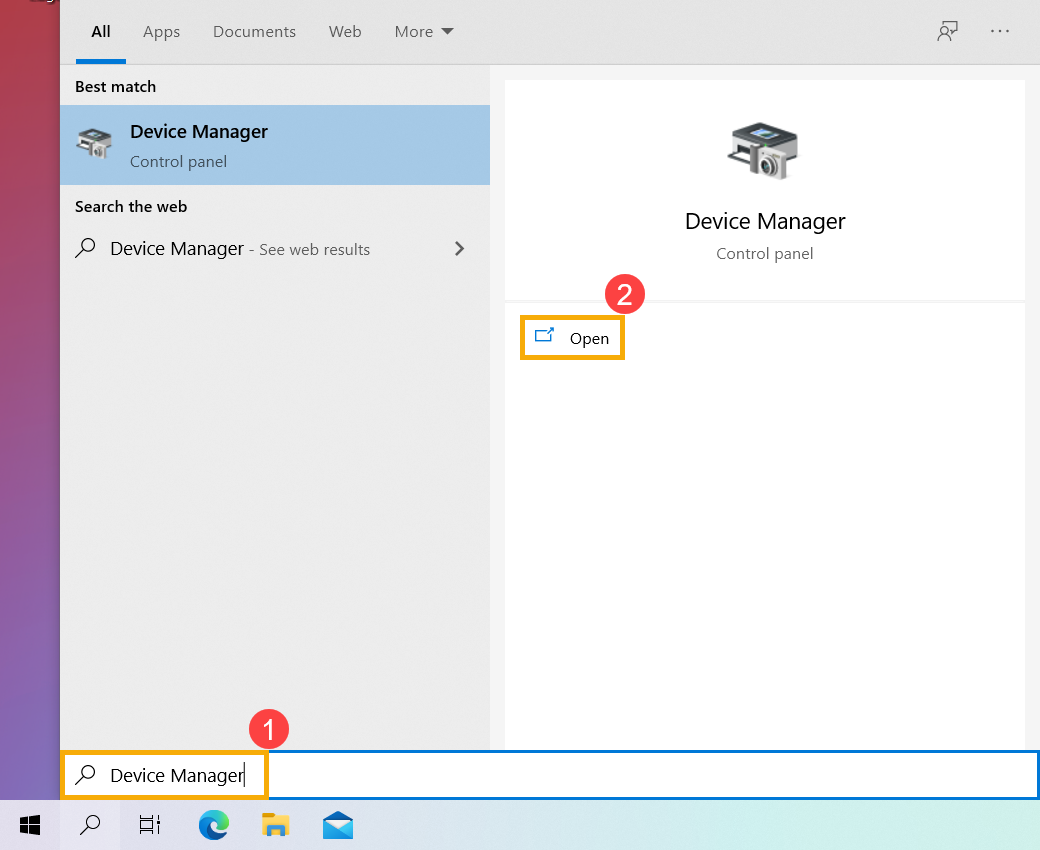
First of all, install the [Intel Graphic] Driver with version 26.20.100.6952 or above. Please go to Device Manager and check the driver version first.
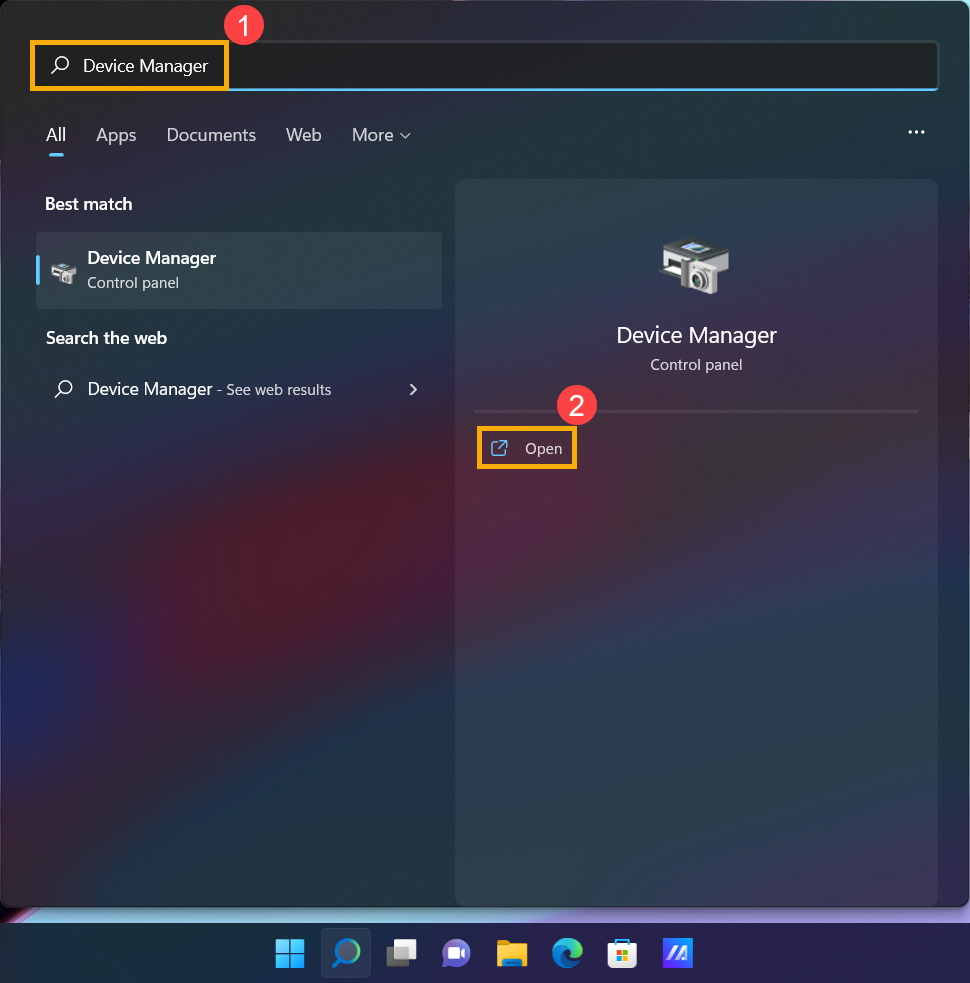
- Type and search [Device Manager] in the Windows search bar①, then click [Open]②. (The left-side search illustration below is in Windows 11, and the right-side is Windows 10.)

- In the Device Manager, find the [Display adapters] and right click on the [Intel UHD Graphics]③. On the drop-down menu, select [Properties]④.
Note: The device name may be different based on different models.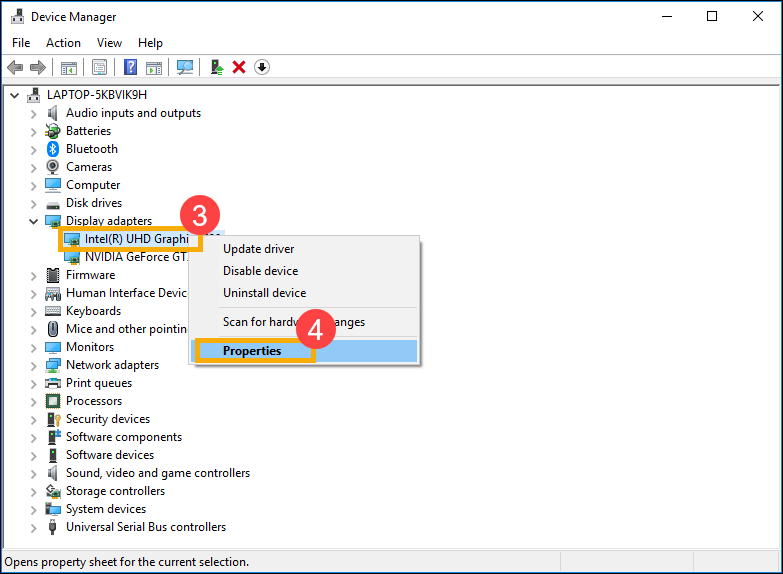
- Select [Driver] tab⑤, then check the [Driver Version]⑥.
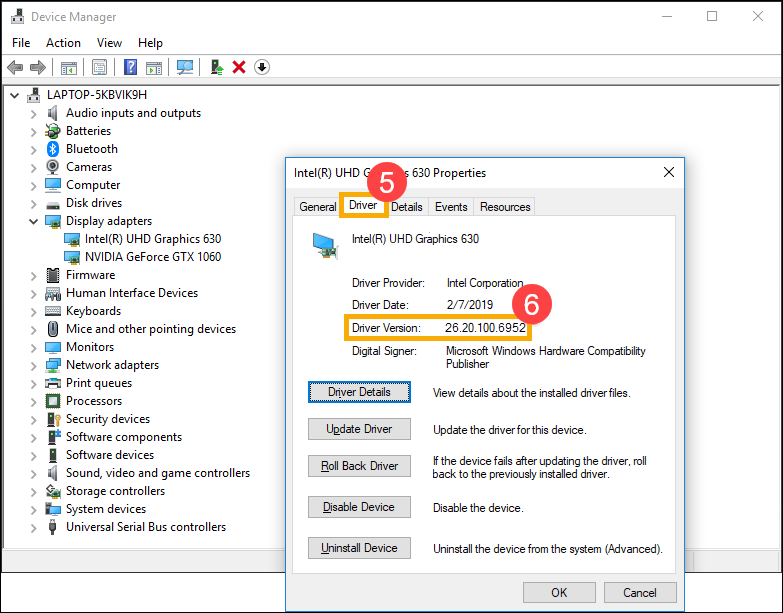
- If the driver version is higher than the version 26.20.100.6952, please go to the next chapter to download and install the necessary drivers and utility programs.
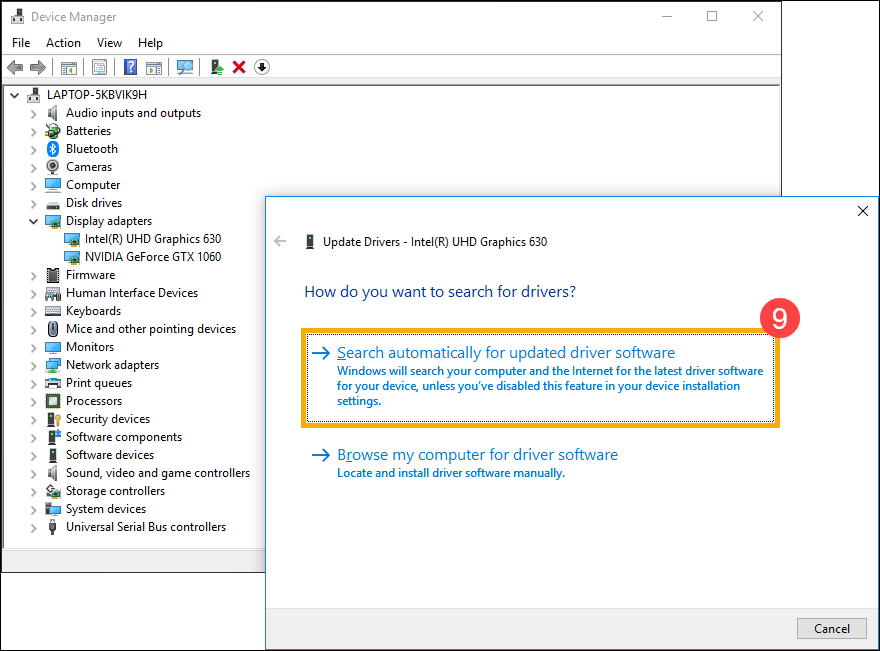
If the driver version is lower than the version 26.20.100.6952, please go back to the Device Manager and right click on the [Intel UHD Graphics]⑦, then select [Update driver]⑧.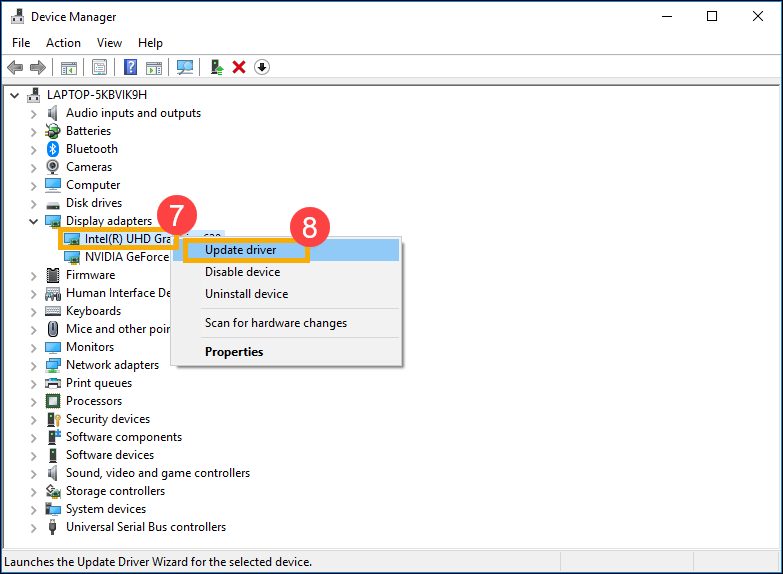
- Click on [Search automatically for updated driver software]⑨ to update drivers online.
Please go to the ASUS Support Site to download and install the necessary drivers and utility programs, here you can learn more about How to search and download drivers and utilities. (The following pictures are the current version as a reference, please download the latest version from the ASUS Support Site.)
Note: Please follow the below order to download and install the drivers and utilities program.
- Please download and install [Intel(R) Serial IO I2C driver] driver.

- Please download and install [ScreenXpert (Windows Store App)] utility program.
Note: You will go to the Microsoft Store to download and install this utility program after clicking the DOWNLOAD button.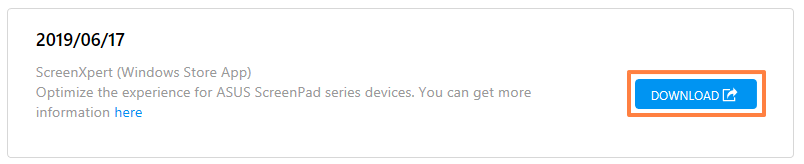
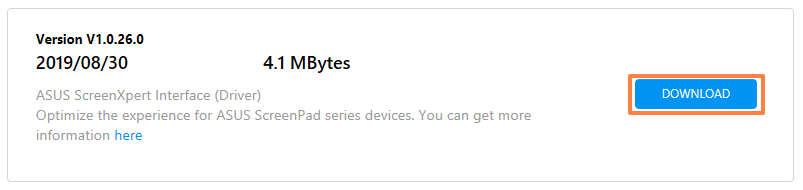
- Please download and install [ASUS ScreenXpert Interface (Driver)] driver.

- Please download and install [MyASUS (Windows Store App)] utility program.
Note: You will go to the Microsoft Store to download and install this utility program after clicking the DOWNLOAD button.**
- Please download and install [ASUS System Control Interface V3(Driver)] driver.

- Please download and install [ScreenPad2 Optimizer] correction program. Click here to download ScreenPad Optimizer.
Note: This tool will be able to correct the ScreenPad Plus resolution, rotation, ScreenPad Plus abnormal display, and ScreenPad Plus cannot operate, in order to ensure the operation of ScreenPad Plus.
Q1: Why the UI of 2nd panel is abnormal?
A1: Because of the behavior of Windows 11, version 22H2 changed, it caused 'Active signal mode' to be changed. If a user changes ScreenPad Plus resolution or FPS, the UI on ScreenPad Plus becomes abnormal. You can choose the following either to solve this issue.
- Update the ASUS ScreenXpert Interface driver to V.3.0.2.0 or the latest version, then reboot your computer.
- Click here to download and excute ScreenPad Optimizer to V1.2.3.0 or the latest version.
Q2: Why the UI of ScreenXpert App Switcher and Microsoft Snap layouts overlapping?
A2: When a user drags the application window, it will show Snap layouts from the top of the screen. This is Microsoft Windows 11, version 22H2 new feature. The pop-up UI will overlap with ScreenXpert App Switcher.
You could turn off snap layouts function form Windows Settings > System > Multitasking > Snap window and uncheck "Show snap layouts when I drag a window to the top of my screen".
[Notebook] How to install ScreenXpert boot up animation
- Please go to the ASUS support website, then search your product model. Here you can learn more about How to check the model name.
- Go to the Driver & Utility download page, and find the ScreenXpert boot up animation in the Software and Utility category, then click download. Here you can learn more about How to search and download utilities.
(The following takes Zenbook Pro Duo 15 OLED UX582 as a reference, please download the available file from your product page.)
- After downloading, double-click the file and then follow the on-screen instruction of the setup wizard to install the ScreenXpert boot up animation.
If you had the OS re-installed, installed with an OS other than the preinstalled version, updated Windows, or due to any circumstances the ScreenPad 2.0 fails to work properly (such as ScreenPad not responding, error on the screen, function inside the ScreenPad not working, touch not working), please follow the steps below to re-install the ScreenPad 2.0. If you experience the ScreenPad display or user interface issues after the computer upgrades to Windows 11, version 22H2, please refer to here.
Note: Please download and install the necessary drivers and utility programs in the order shown below:
Model Supported: The article is only applicable to ASUS notebook equipped with ScreenPad 2.0. Please visit ASUS website and search for your product model. Click [Tech Specs] to check whether your model supports ScreenPad 2.0.
First of all, install the [Intel Graphic] Driver with version 25.20.100.6619 or above. Please go to Device Manager and check the driver version first.
- Type and search [Device Manager] in the Windows search bar①, then click [Open]②. (The left-side search illustration below is in Windows 11, and the right-side is Windows 10.)
- In the Device Manager, find the [Display adapters] and right click on the [Intel UHD Graphics]③. On the drop-down menu, select [Properties]④.
Note: The device name may be different based on different models. - Select [Driver] tab⑤, then check the [Driver Version]⑥.

- If the driver version is higher than the version 25.20.100.6619, please go to the next chapter to download and install the necessary drivers and utility programs.
If the driver version is lower than the version 25.20.100.6619, please go back to the Device Manager and right click on the [Intel UHD Graphics]⑦, then select [Update driver]⑧. - Click on [Search automatically for updated driver software]⑨ to update drivers online.
Please go to the ASUS Support Site to download and install the necessary drivers and utility programs, here you can learn more about How to search and download drivers and utilities. (The following pictures are the current version as a reference, please download the latest version from the ASUS Support Site.)
Note: Please follow the below order to download and install the drivers and utilities program.
- Please download and install [Intel(R) Serial IO I2C driver] driver.
Note: If you cannot search for Intel(R) Serial IO I2C driver on the ASUS support site that is meant some models have been built-in I2C driver in Windows, so, you don't need to install it manually.
- Please download and install [ScreenXpert (Windows Store App)] utility program.
Note: You will go to the Microsoft Store to download and install this utility program after clicking the DOWNLOAD button.
- Please download and install [ASUS ScreenXpert Interface (Driver)] driver.
- Please download and install [MyASUS (Windows Store App)] utility program.
Note: You will go to the Microsoft Store to download and install this utility program after clicking the DOWNLOAD button.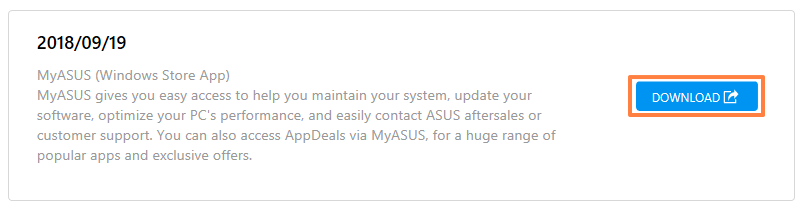
- Please download and install [ASUS System Control Interface V3 (Driver)] driver.
- Please download and install [ScreenPad2 Optimizer] correction program. Click here to download ScreenPad Optimizer.
Note: This tool will be able to correct the ScreenPad 2.0 resolution, rotation, ScreenPad 2.0 abnormal display, and ScreenPad 2.0 cannot operate,in order to ensure the operation of ScreenPad 2.0.
Q1: Why the UI of 2nd panel is abnormal?
A1: Because of the behavior of Windows 11, version 22H2 changed, it caused 'Active signal mode' to be changed. If a user changes ScreenPad resolution, it will show a black screen on the ScreenPad. You can choose the following either to solve this issue.
- Update the ASUS ScreenXpert Interface driver to V.3.0.2.0 or the latest version, then reboot your computer.
- Click here to download and excute ScreenPad Optimizer to V1.2.3.0 or the latest version.
Q2: Why the UI of ScreenXpert App Switcher and Microsoft Snap layouts overlapping?
A2: When a user drags the application window, it will show Snap layouts from the top of the screen. This is Microsoft Windows 11, version 22H2 new feature. The pop-up UI will overlap with ScreenXpert App Switcher.
You could turn off snap layouts function form Windows Settings > System > Multitasking > Snap window and uncheck "Show snap layouts when I drag a window to the top of my screen".
Q3: Why the Start menu will show up together when I swipe up from the ScreenPad bottom to call the navigation bar?
A3: ASUS change the ScreenXpert swiping up gesture to clicking an arrow icon for showing the navigation bar. Please update ScreenXpert App to V3.0.7.0 or the latest version, then get a better experience.