Related Topics
[VPN] How to set up a VPN server on ASUS router – OpenVPN
What is a VPN?
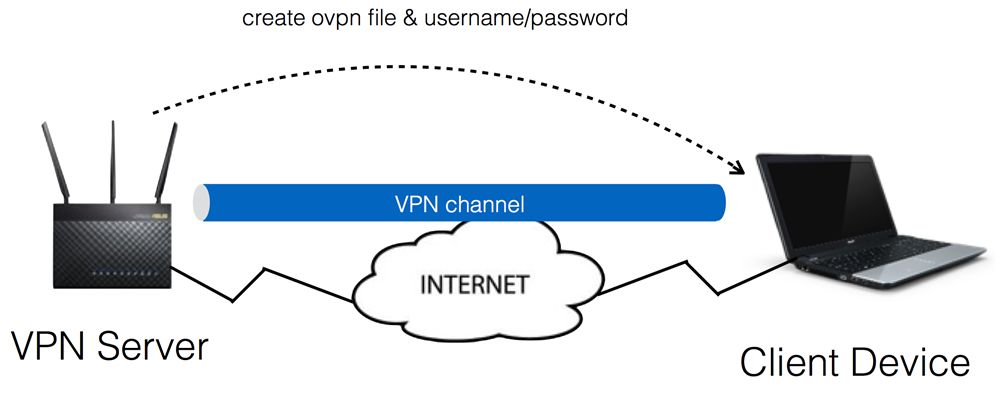
Virtual Private Network : Virtual private networks encrypt your network connection, ensuring the secure transmission of important information and preventing your information from being stolen. Allows remote consumers(VPN clients) to securely connect to VPN servers.
VPN has a variety of connection methods, this article with ASUS router support OpenVPN server to do the setup related to the introduction, and other supported servers (PPTP VPN, IPSec VPN, WireGuard VPN)) settings can refer to the following related FAQ.
For PPTP VPN server settings, please refer to: How to set up a VPN server on ASUS router – PPTP
For IPSec VPN server settings, please refer to: How to set up a VPN server on ASUS router –IPSec VPN
For WireGuard VPN server settings, please refer to: How to set up WireGuard® server?
For more information about VPNs, please refer to [Wireless Router] How to set up VPN server/VPN client on ASUS router and connect using different devices
Prepare
1) The VPN servers supported by ASUS routers vary by model, and it is recommended that you refer to ASUS product specifications to confirm that your router is supported.
2) To use VPN Server on your ASUS router, your router needs to have a public IP(WAN IP) from your ISP's internet service.
This will allow devices on the internet to locate your ASUS router via a public IP(WAN IP).
If you are not sure of your public IP type, please check your Internet Service Provider (ISP).
3) Please update your router firmware to the latest version. For instruction about how to update the firmware, please refer the following FAQ
[Wireless Router] How to update the firmware of your router to the latest version ? (WebGUI)
4) The OpenVPN server configuration needs to be completed before you can export the OpenVPN settings file.
Introduction
a. Some functions of VPN will be different due to firmware version
Interface 1: Supports routers with firmware later than 3.0.0.4.388.xxxx (including), please refer to here for the setting instructions.
Interface 2: Supports routers with firmware earlier than 3.0.0.4.388.xxxx, please refer to here for the setting instructions.
b. FAQ
1. Connect your device (laptop or phone) to the router via wired or Wi-Fi connection and enter your router LAN IP or router URL http://www.asusrouter.com to the WEB GUI.

Note: Please refer to How to enter the router setting page(Web GUI)to learn more.
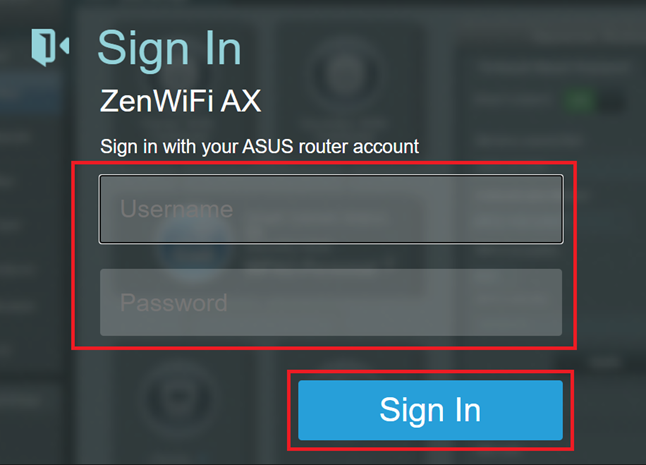
2. Key in your router's username and password to log in.
Note: If you forgot the username and/or password, please restore the router to the factory default status and setup.
Please refer to [Wireless Router] How to reset the router to factory default setting? for how to restore the router to default
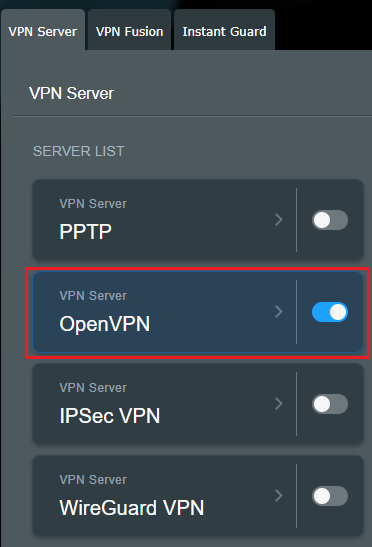
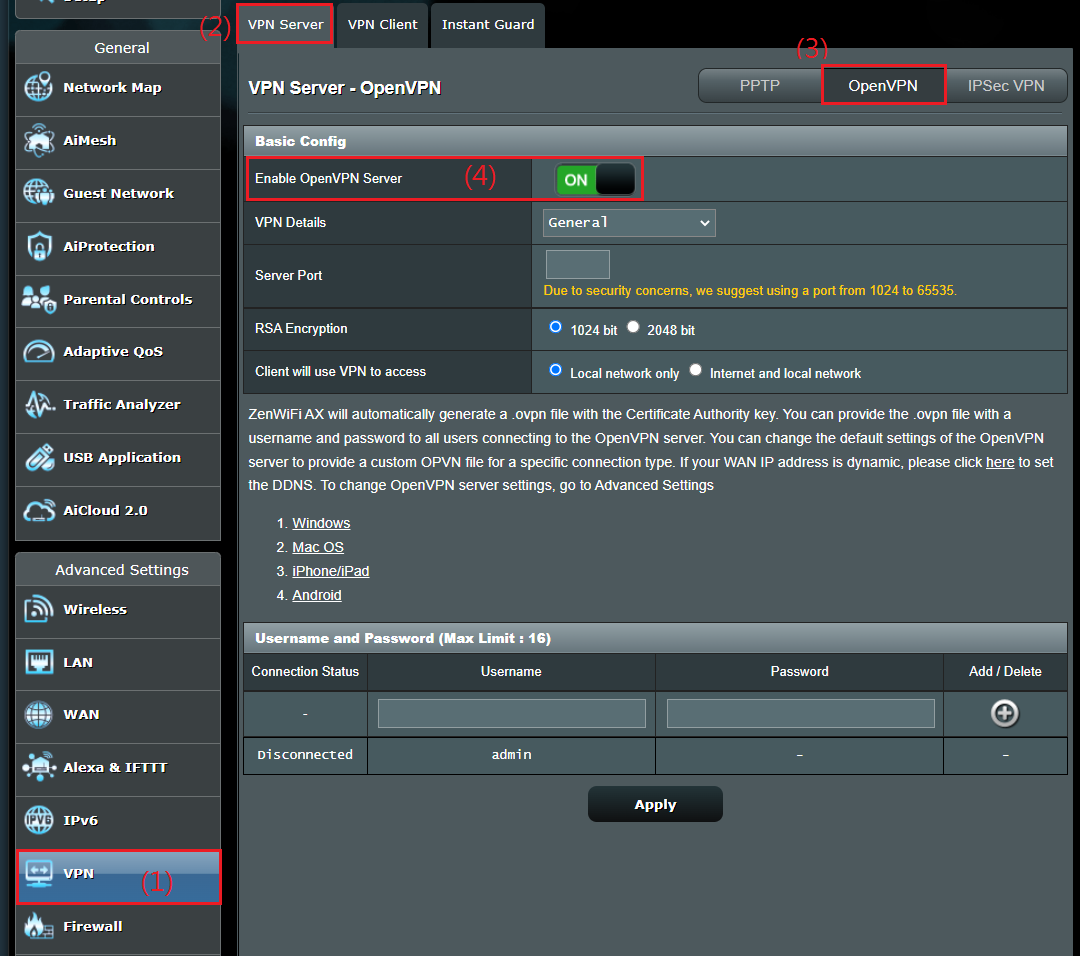
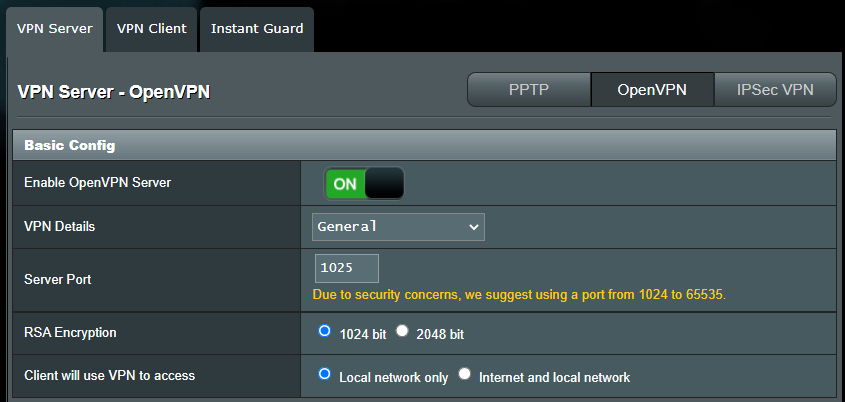
3. Click [VPN] > [VPN Server], click OpenVPN button to enable it (default is off).
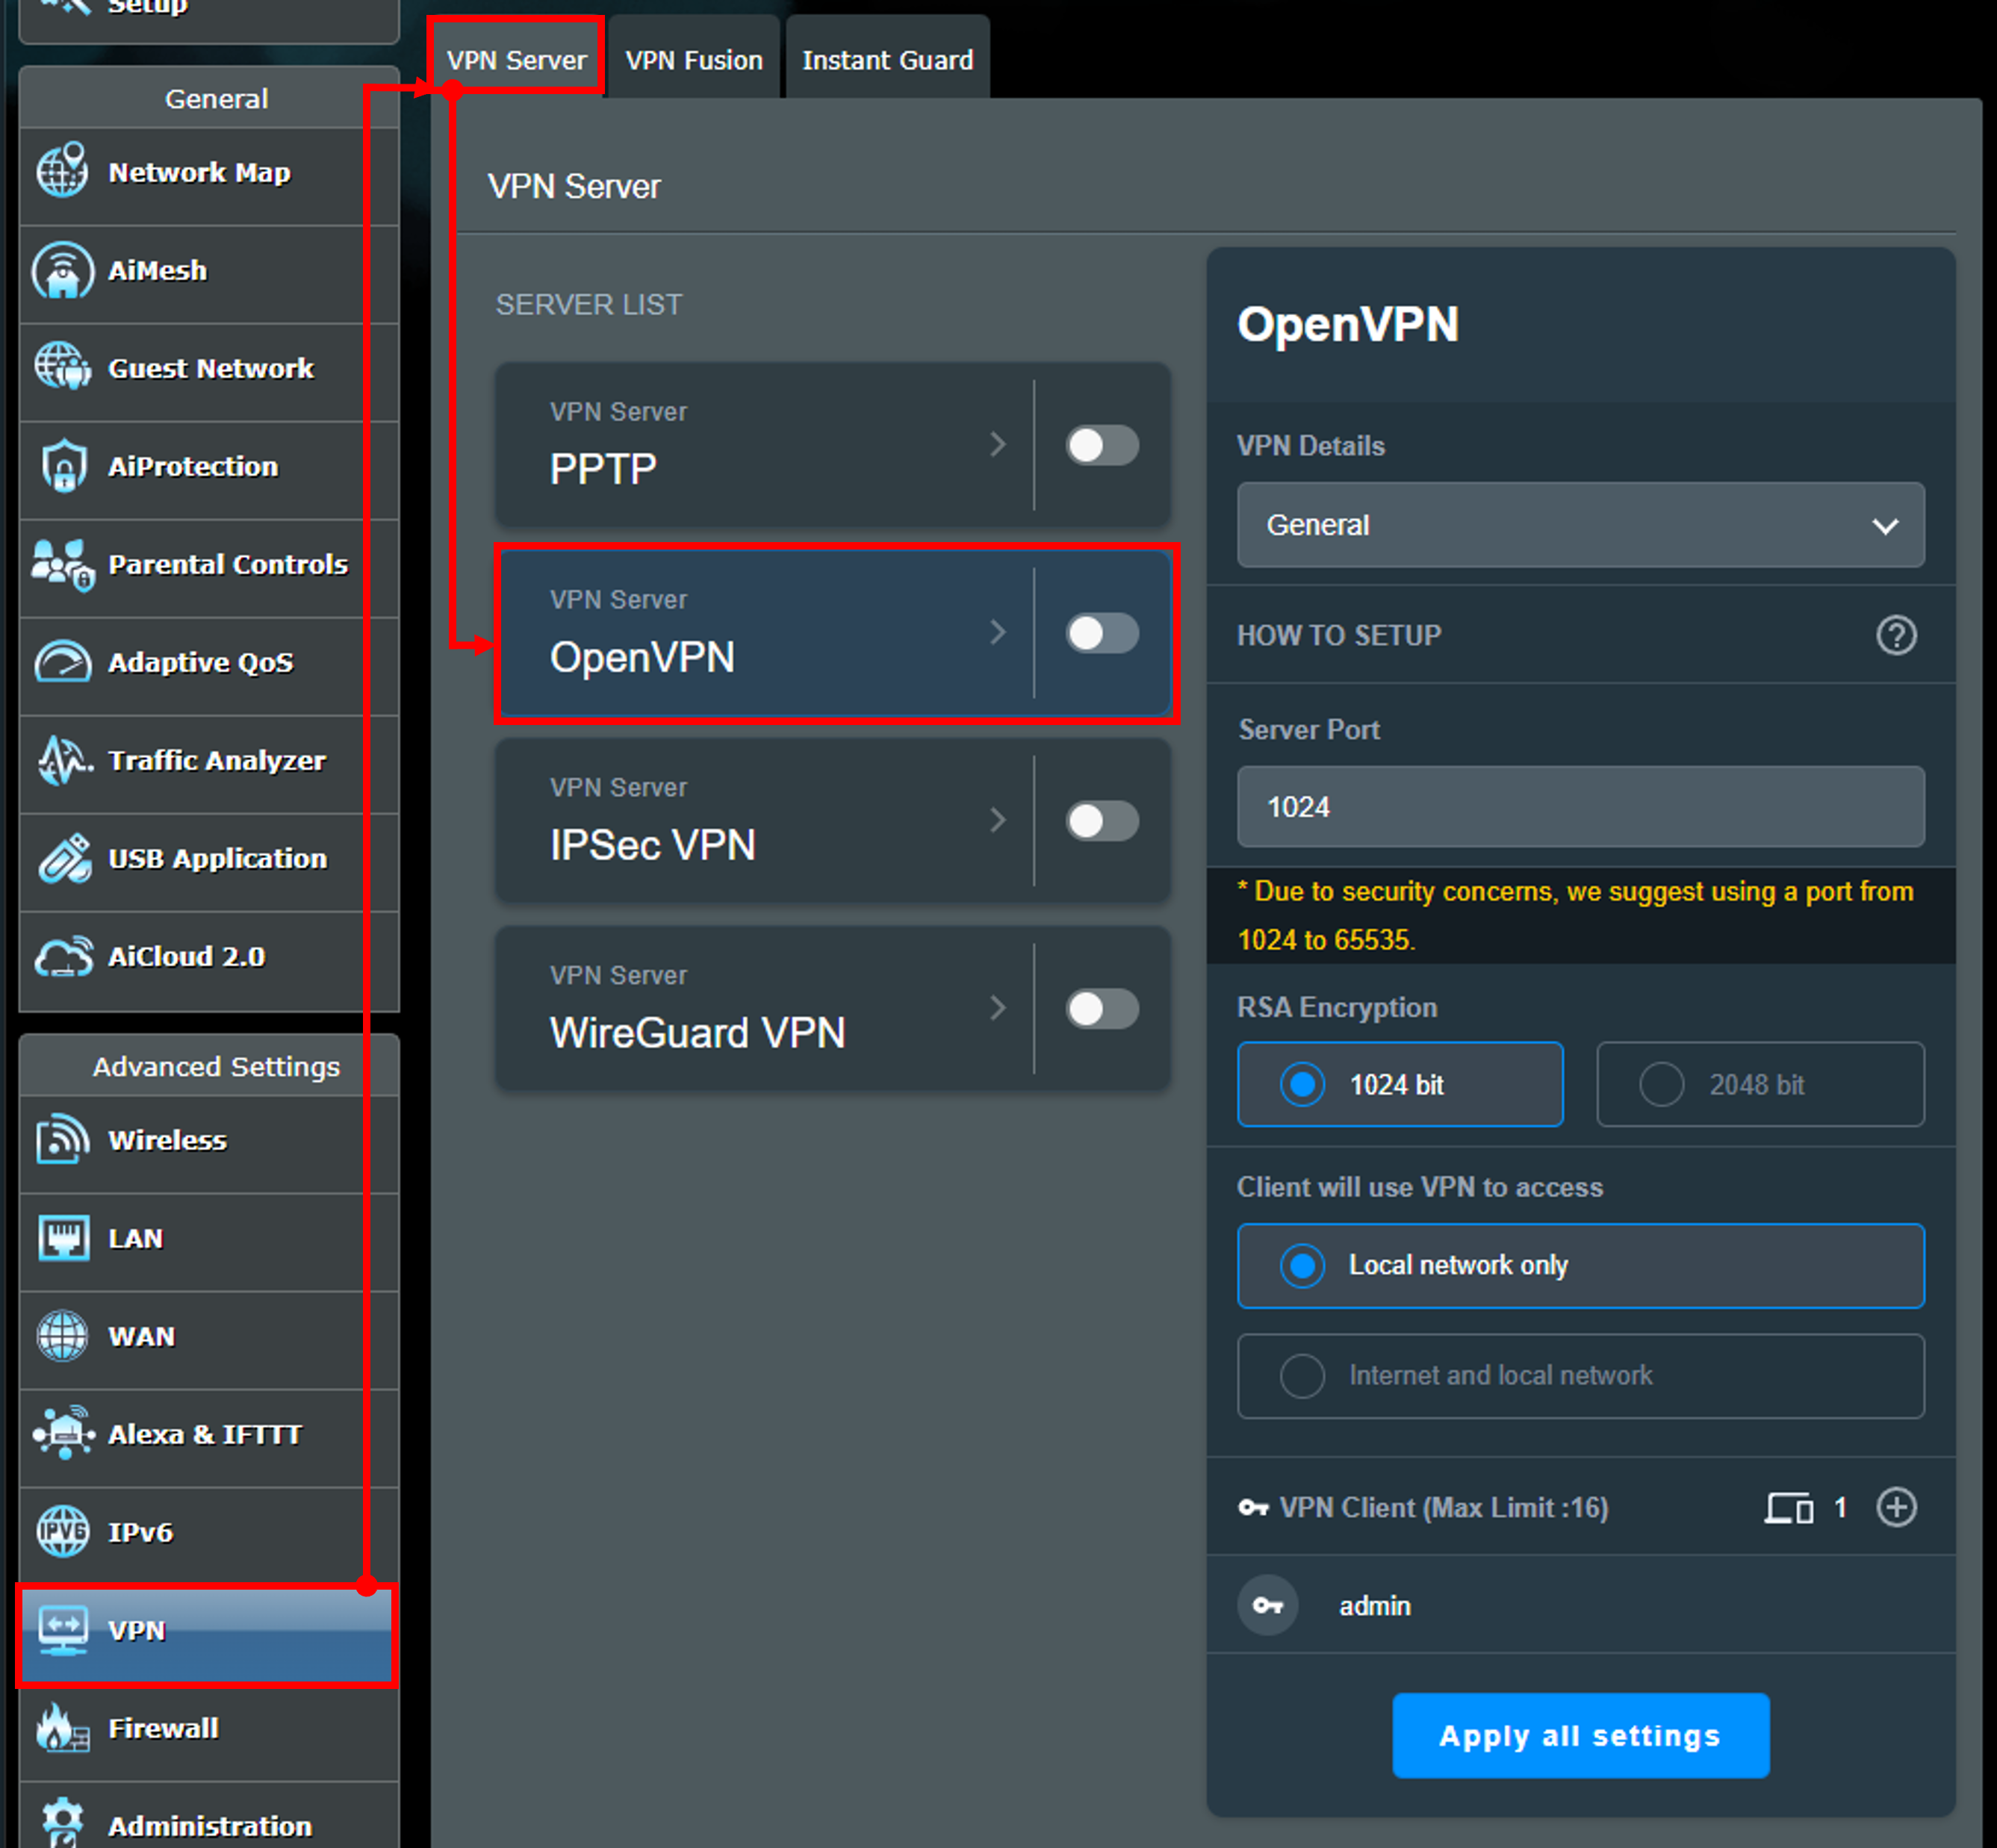
4. After setting, click [ Apply all settings ] button to save OpenVPN settings.
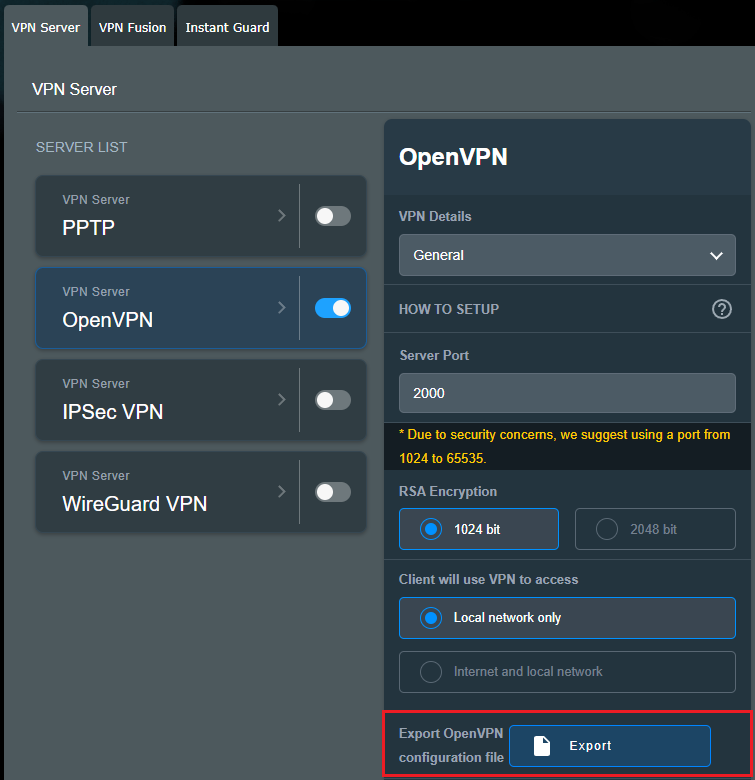
a. VPN Details : The default is [ General ], and [ Advanced Settings ] can be selected.
b. Server Port : In the example below, fill in the port as 2000. We suggest using a port from 1024 to 65535.
c. RSA Encryption : Default as [ 1024 bit ]。
d. Client will use VPN to access : Default as[ Local network only ]. When the VPN client connects to the VPN server, it can only access the LAN under the VPN server.
[Internet and local network]: When the client connects to the VPN server, it can access the LAN under the VPN server at the same time, and can also access the Internet through the VPN server.
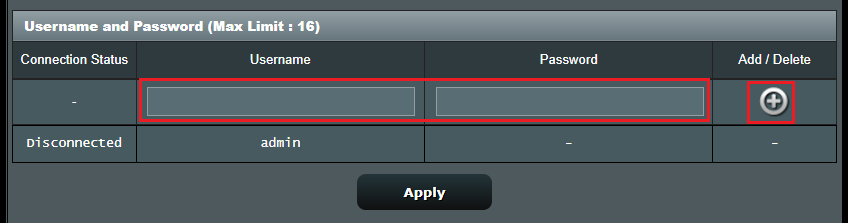
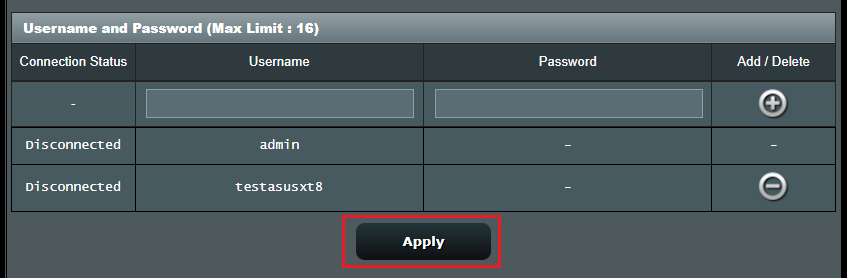
e. VPN client : The default OpenVPN client account and password are the same as the account and password used to log in to the router.
The quick setting method is to enter the customized [Server Port] port number and click [ Apply all settings ] to save the settings.
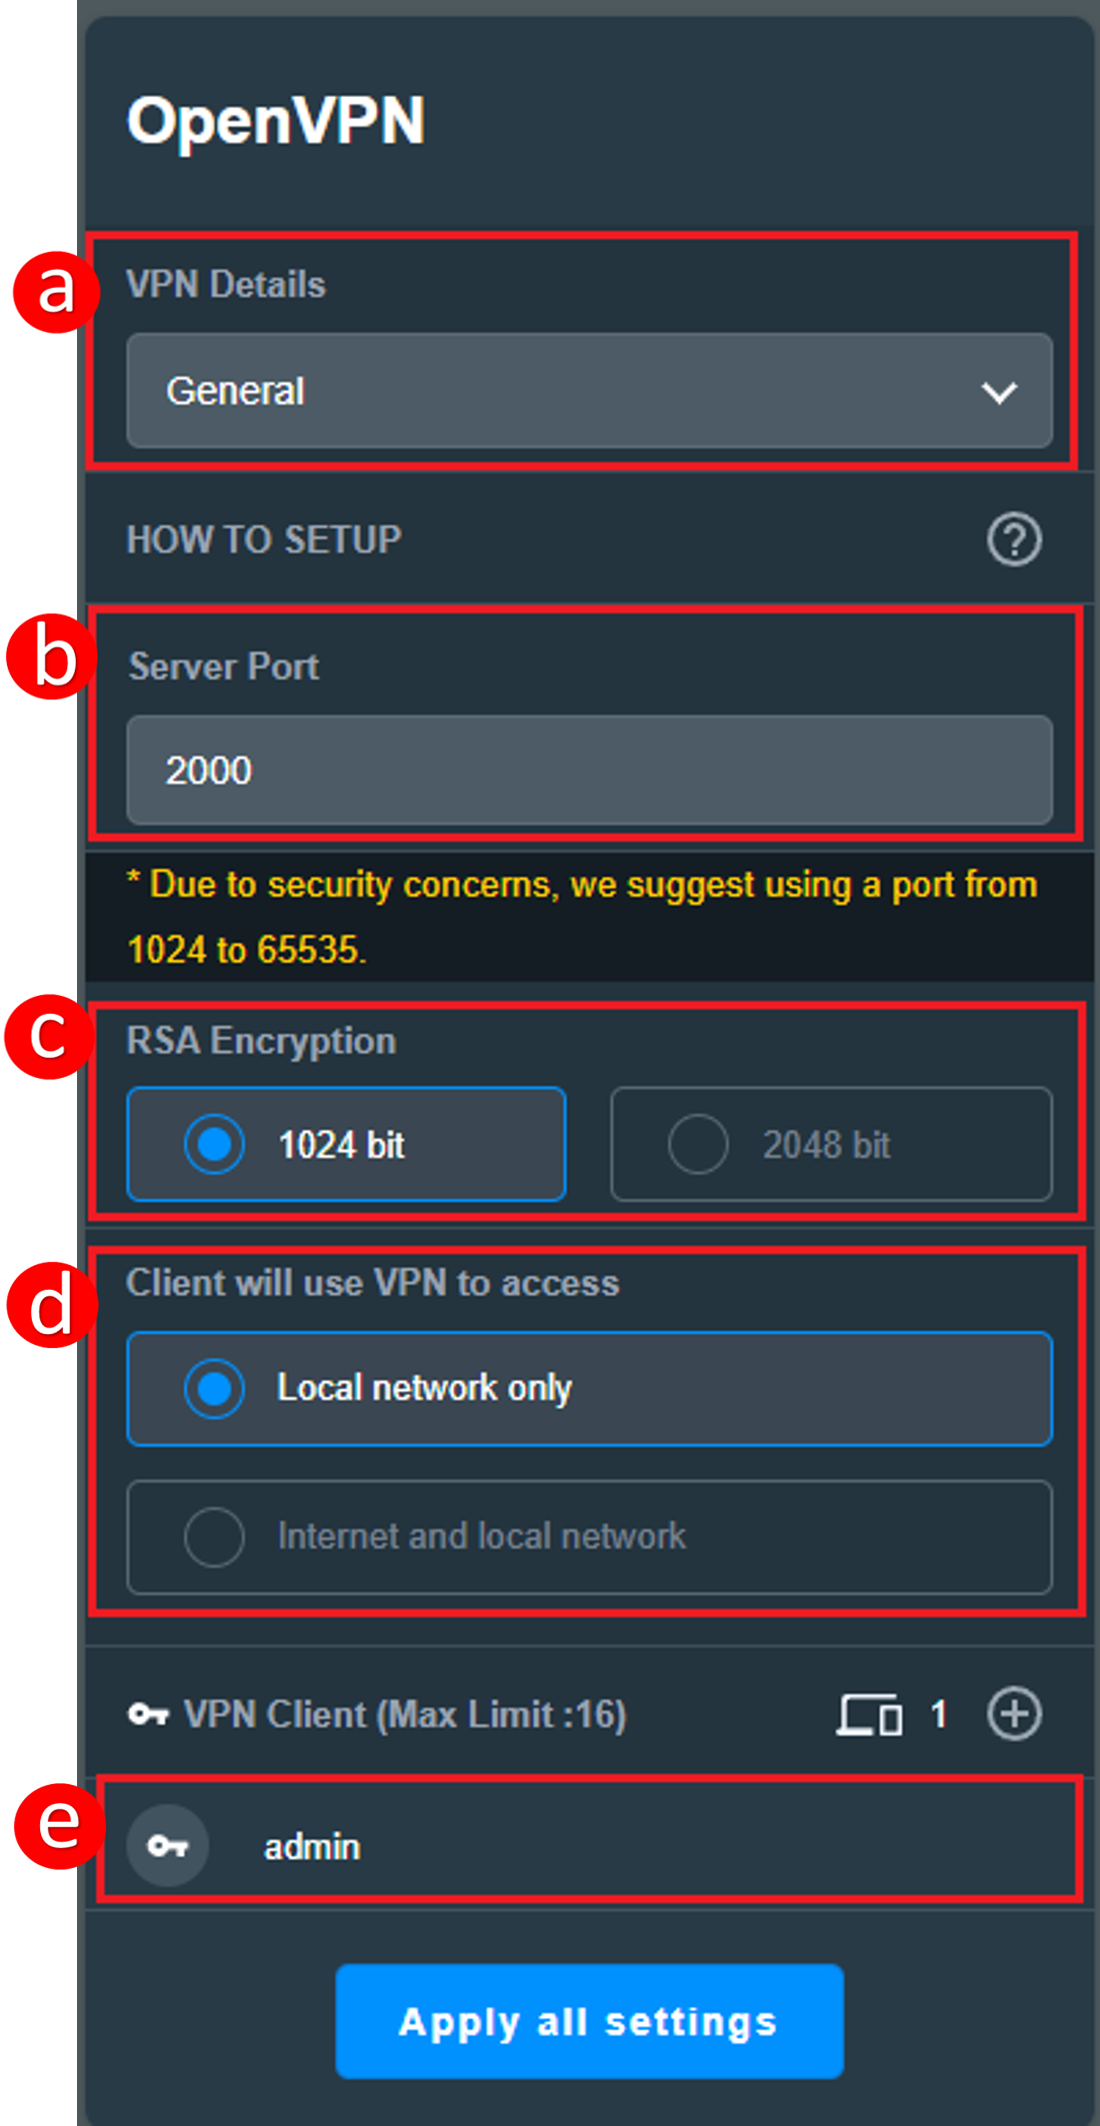
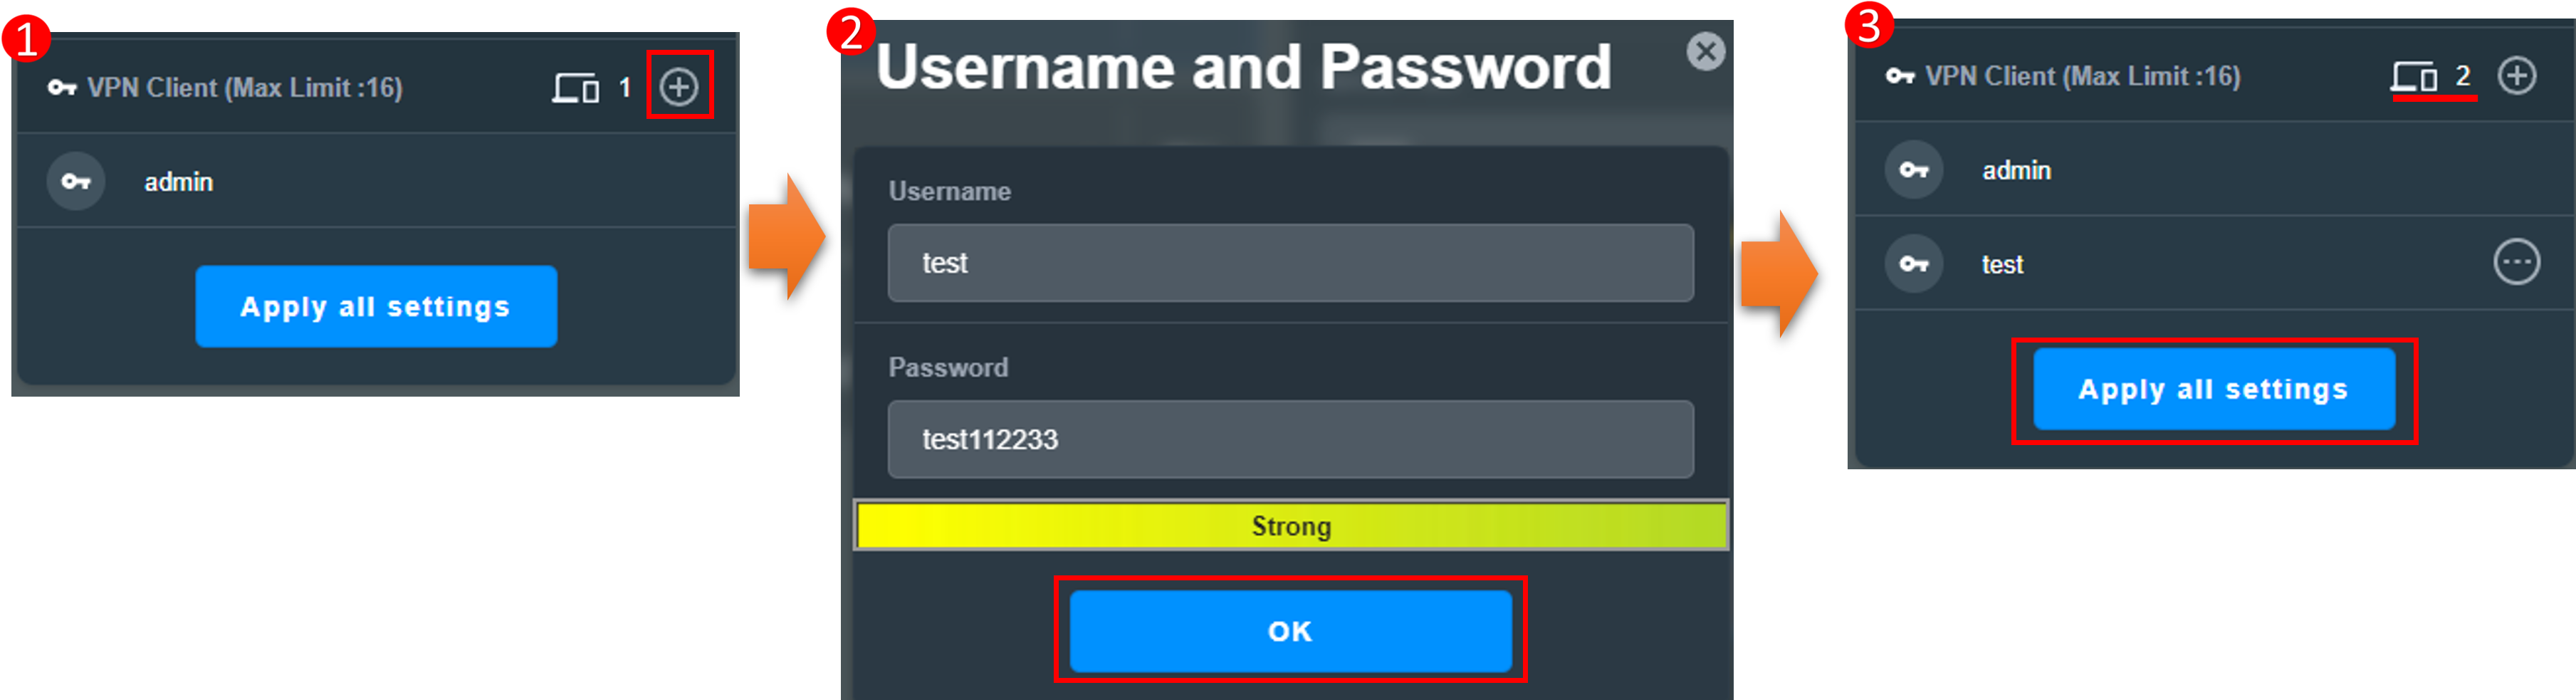
To add a new username and password for OpenVPN client login, click add  button to create a new account for your OpenVPN server.
5. Click the OpenVPN server button  to enable the function, and the OpenVPN server setup is completed.
6. Export OpenVPN configuration file
After the OpenVPN server configuration is completed, you can export the OpenVPN configuration file so that your VPN client can obtain the OpenVPN configuration file to establish a VPN connection.
Note: Whenever the OpenVPN server settings are adjusted, the OpenVPN configuration file needs to be re-exported.
Please refer to [Wireless router] How to set up a OpenVPN Client in VPN Fusion
Step 1 . Connect your computer to the router via wired or WiFi connection and enter your router LAN IP or router URL http://www.asusrouter.com to the WEB GUI.
Note: Please refer to How to enter the router setting page(Web GUI)to learn more.
Step 2. Key in your router's username and password to log in.
Note: If you forgot the username and/or password, please restore the router to the factory default status and setup.
Please refer to [Wireless Router] How to reset the router to factory default setting? for how to restore the router to default status.
Step 3. Go to [ VPN ] > [ VPN Server ] > [ OpenVPN ], Set Enable OpenVPN Server as [ ON ]
Step 4. General Settings
a. VPN Details: Default as [General]
b. Server Port: Set port number to bind. The current default of 1194 represents the official IANA port number assignment for OpenVPN.
c. RSA Encryption: Default as [1024 bit]。
d. Client will use VPN to access: Default as[Local network only]. When the VPN client connects to the VPN server, it can only access the LAN under the VPN server.
[Internet and local network]: When the client connects to the VPN server, it can access the LAN under the VPN server at the same time, and can also access the Internet through the VPN server.
Step 5. Enter your username and password in blank column, and click button to create a new account for your OpenVPN server.
Step 6. The password is automatically hidden, click [Apply] button to save OpenVPN settings.
Export OpenVPN configuration file
It will take a few minutes to initialinze the settings of OpenVPN server and generate a openv VPN configuration file. After that, please click [Export] button to save the ovpn configuration file named "client.ovpn".
Now you finish OpenVPN server side setting. Please turn to client side to build your OpenVPN client connection.
For ASUS Router VPN client settings, please refer to [VPN] How to set up VPN Client in ASUS Router (Web GUI)?

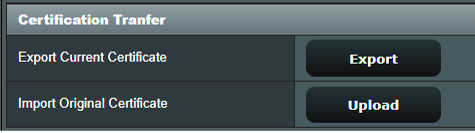
1. How to save OpenVPN server configuration file?
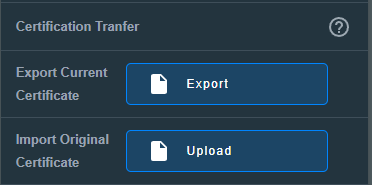
When you would restore or replace router, you can keep original certification of OpenVPN server via Export Current Certification and import it to new router.
Interface 1: Supports routers with firmware later than 3.0.0.4.388.xxxx (including).
Interface 2: Supports routers with firmware earlier than 3.0.0.4.388.xxxx.
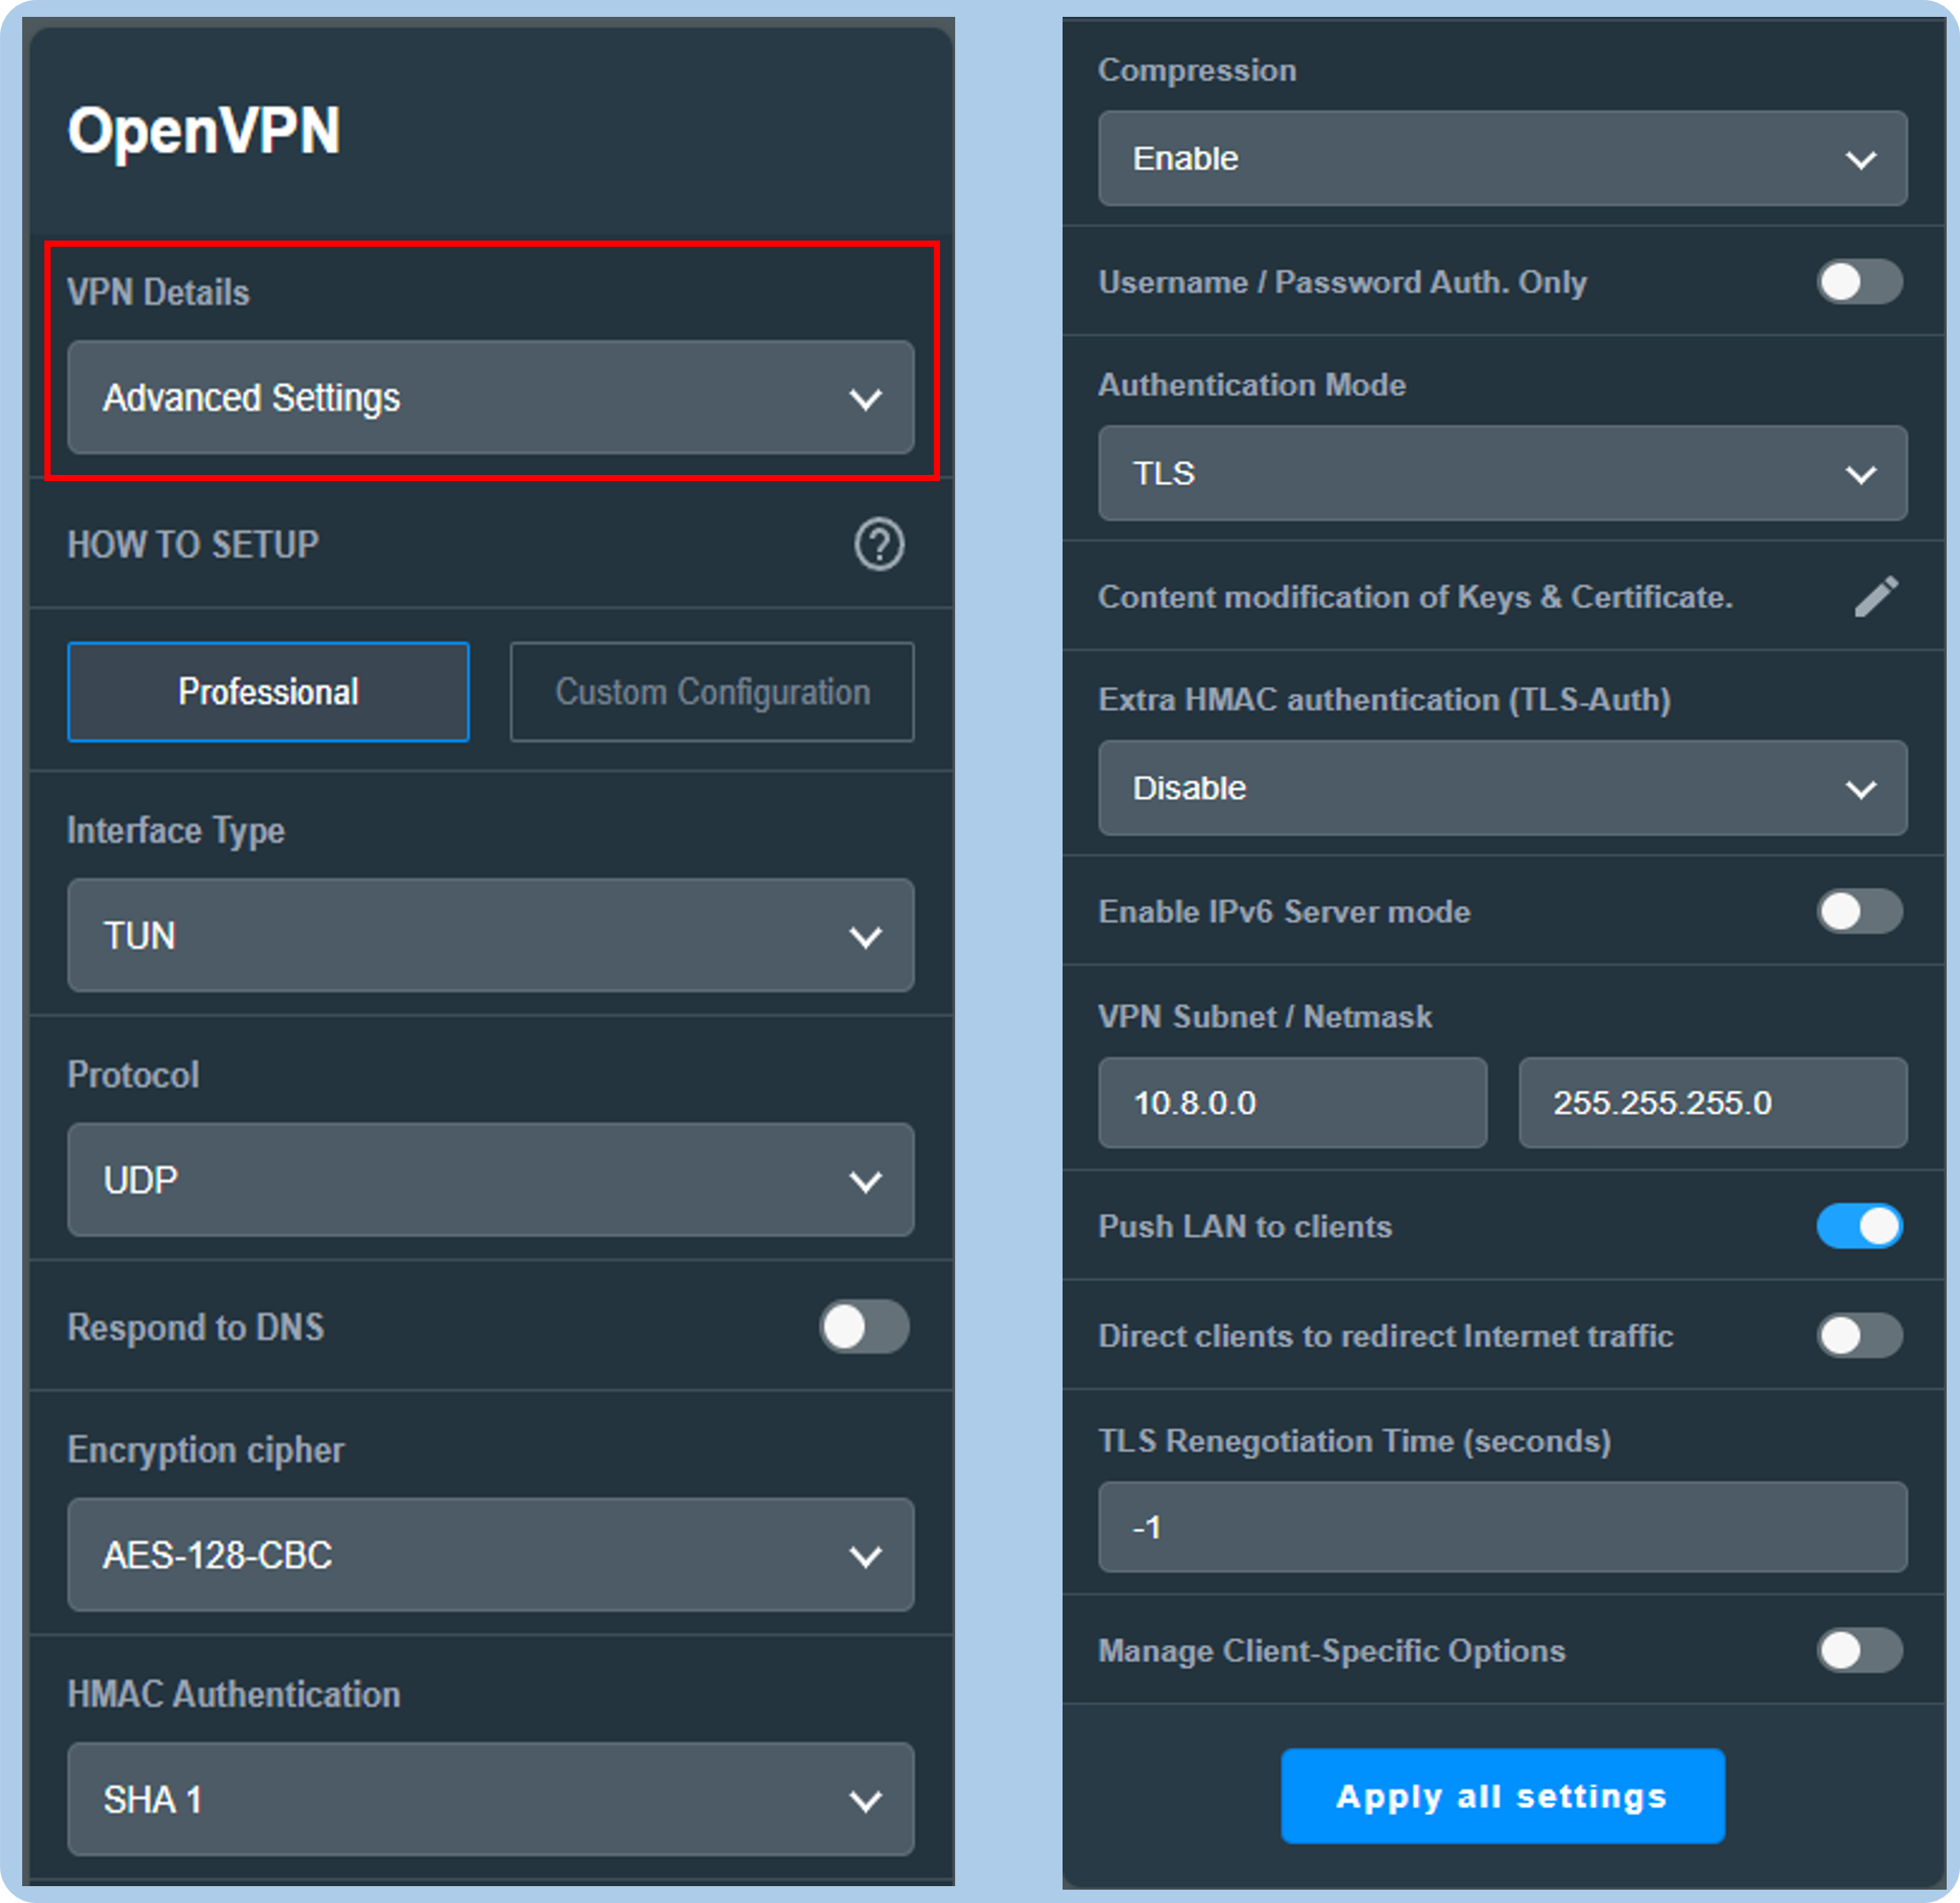
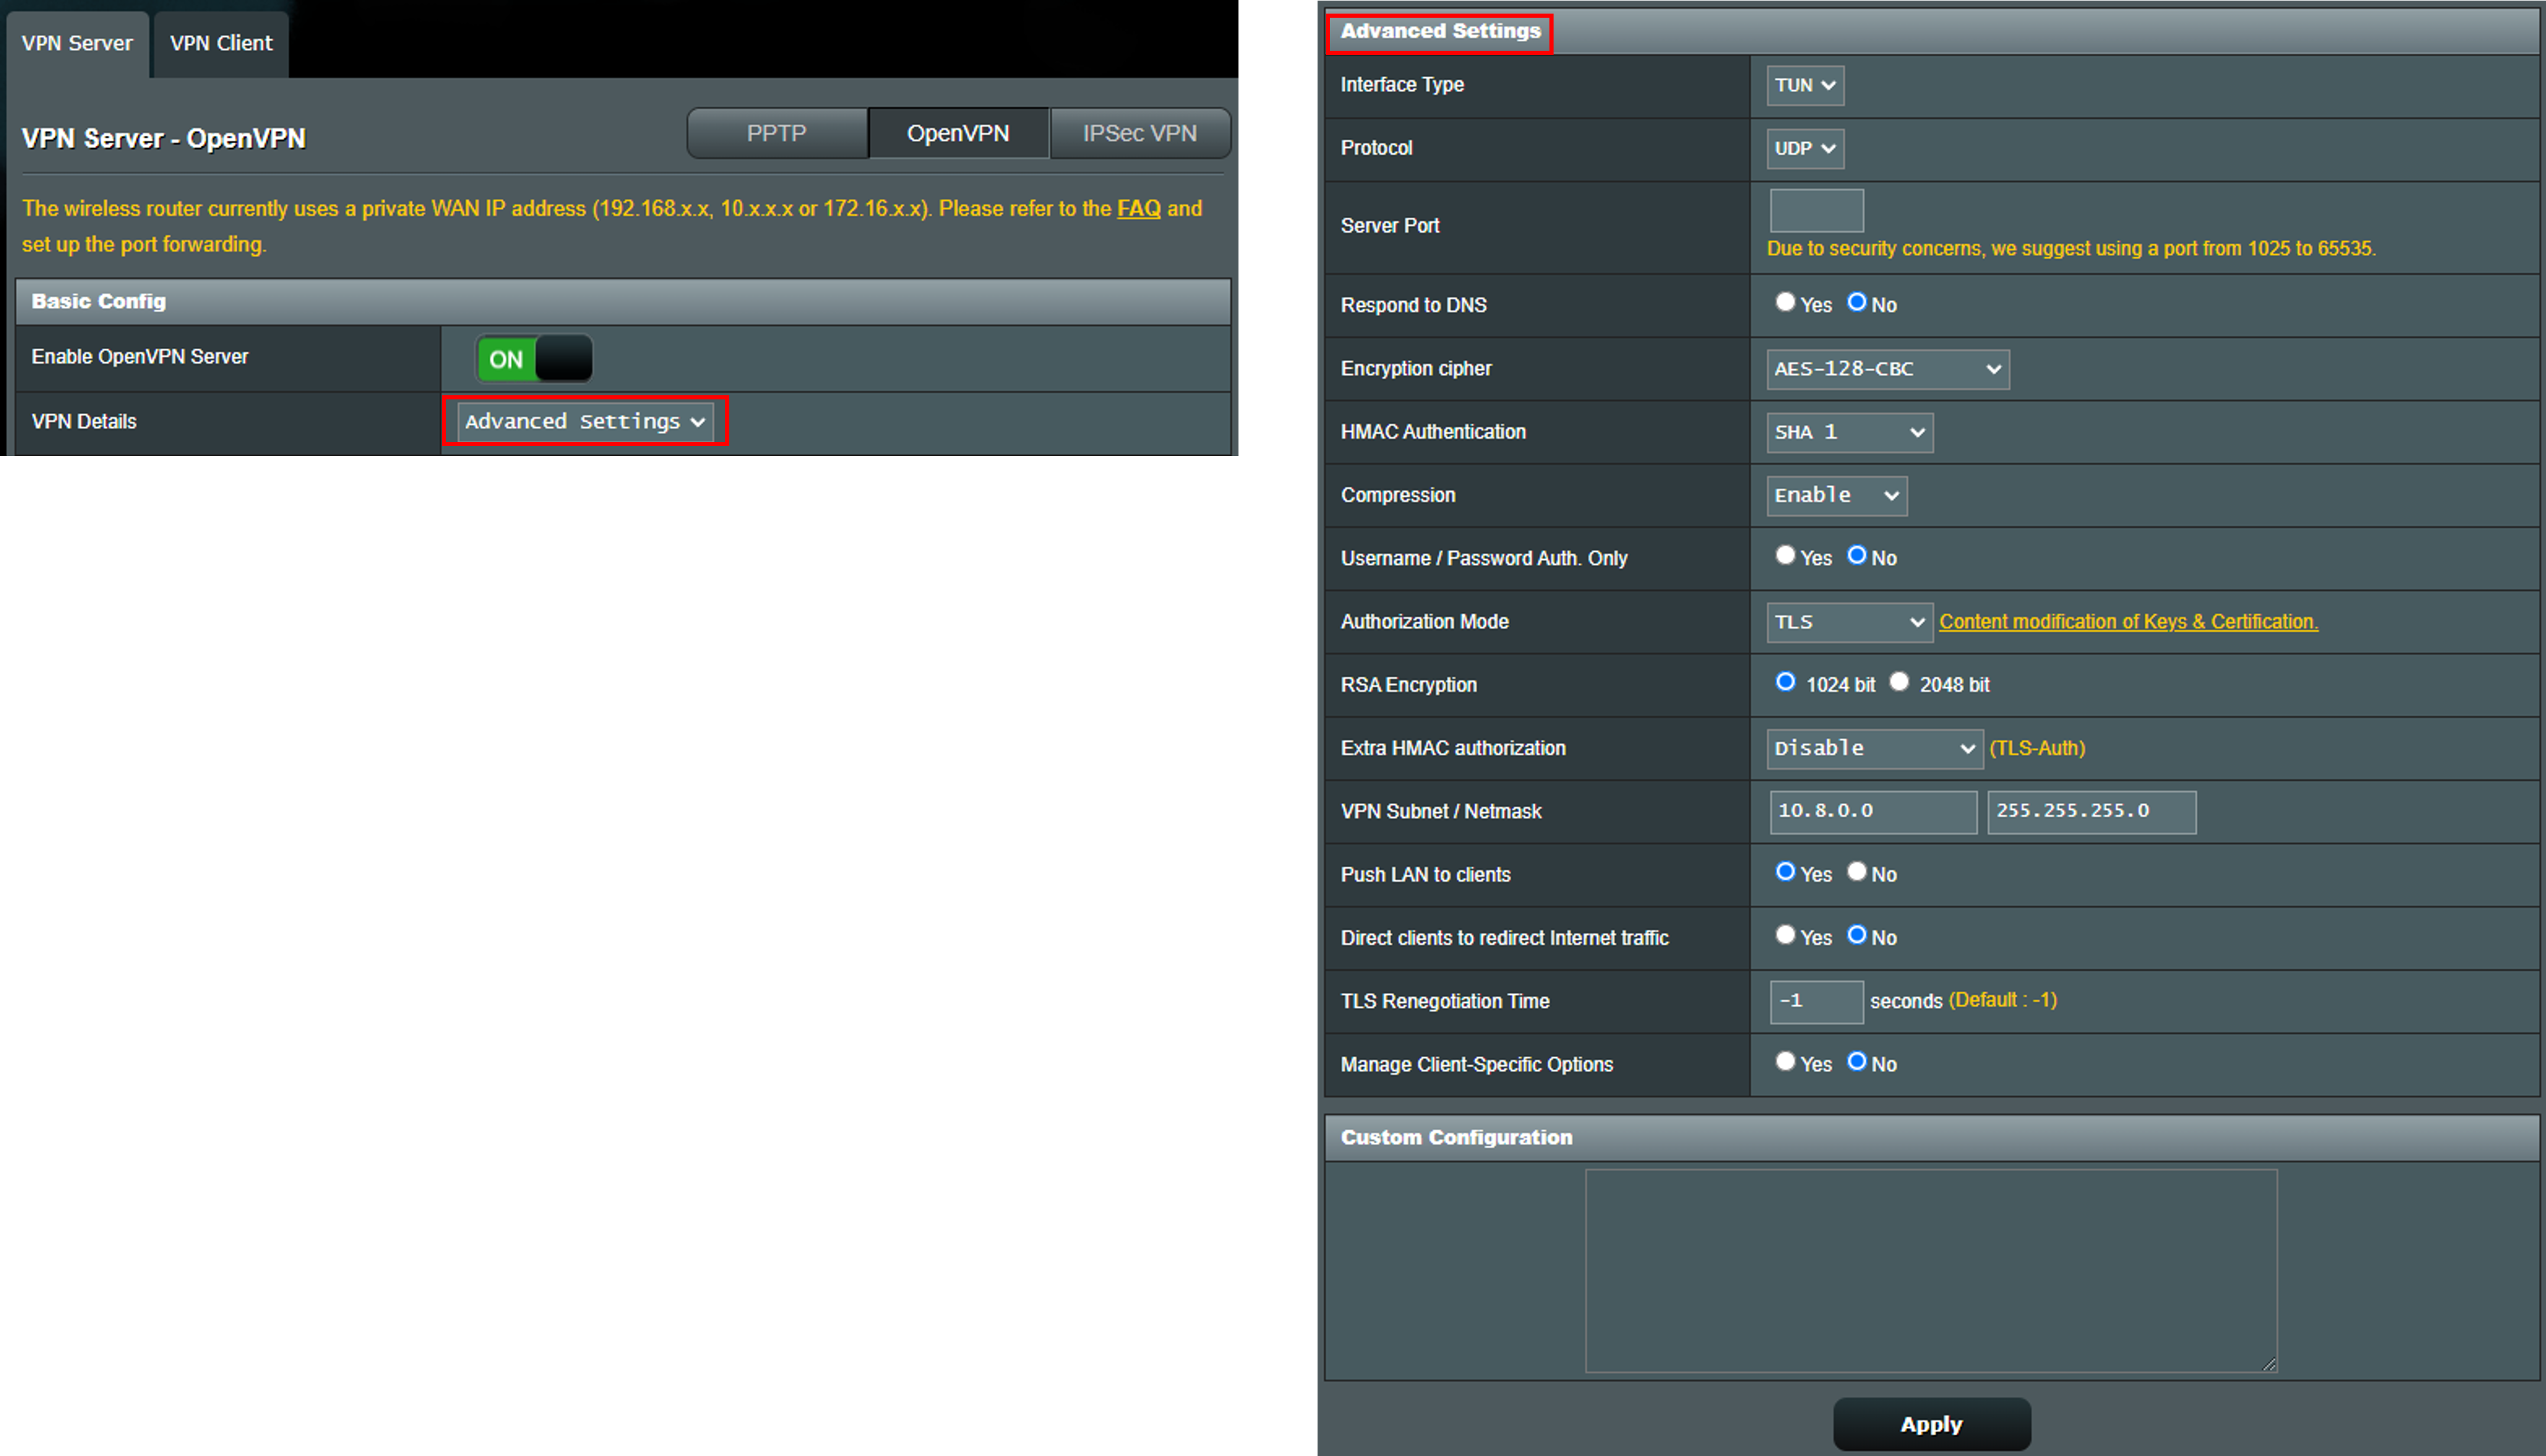
2. Where is the advanced setting of OpenVPN?
We provide more advanced settings for OpenVPN. If necessary, please go to [VPN Details] >[Advanced Settings] page and do further configuration.
Interface 1: Supports routers with firmware later than 3.0.0.4.388.xxxx (including).
Interface 2: Supports routers with firmware earlier than 3.0.0.4.388.xxxx.
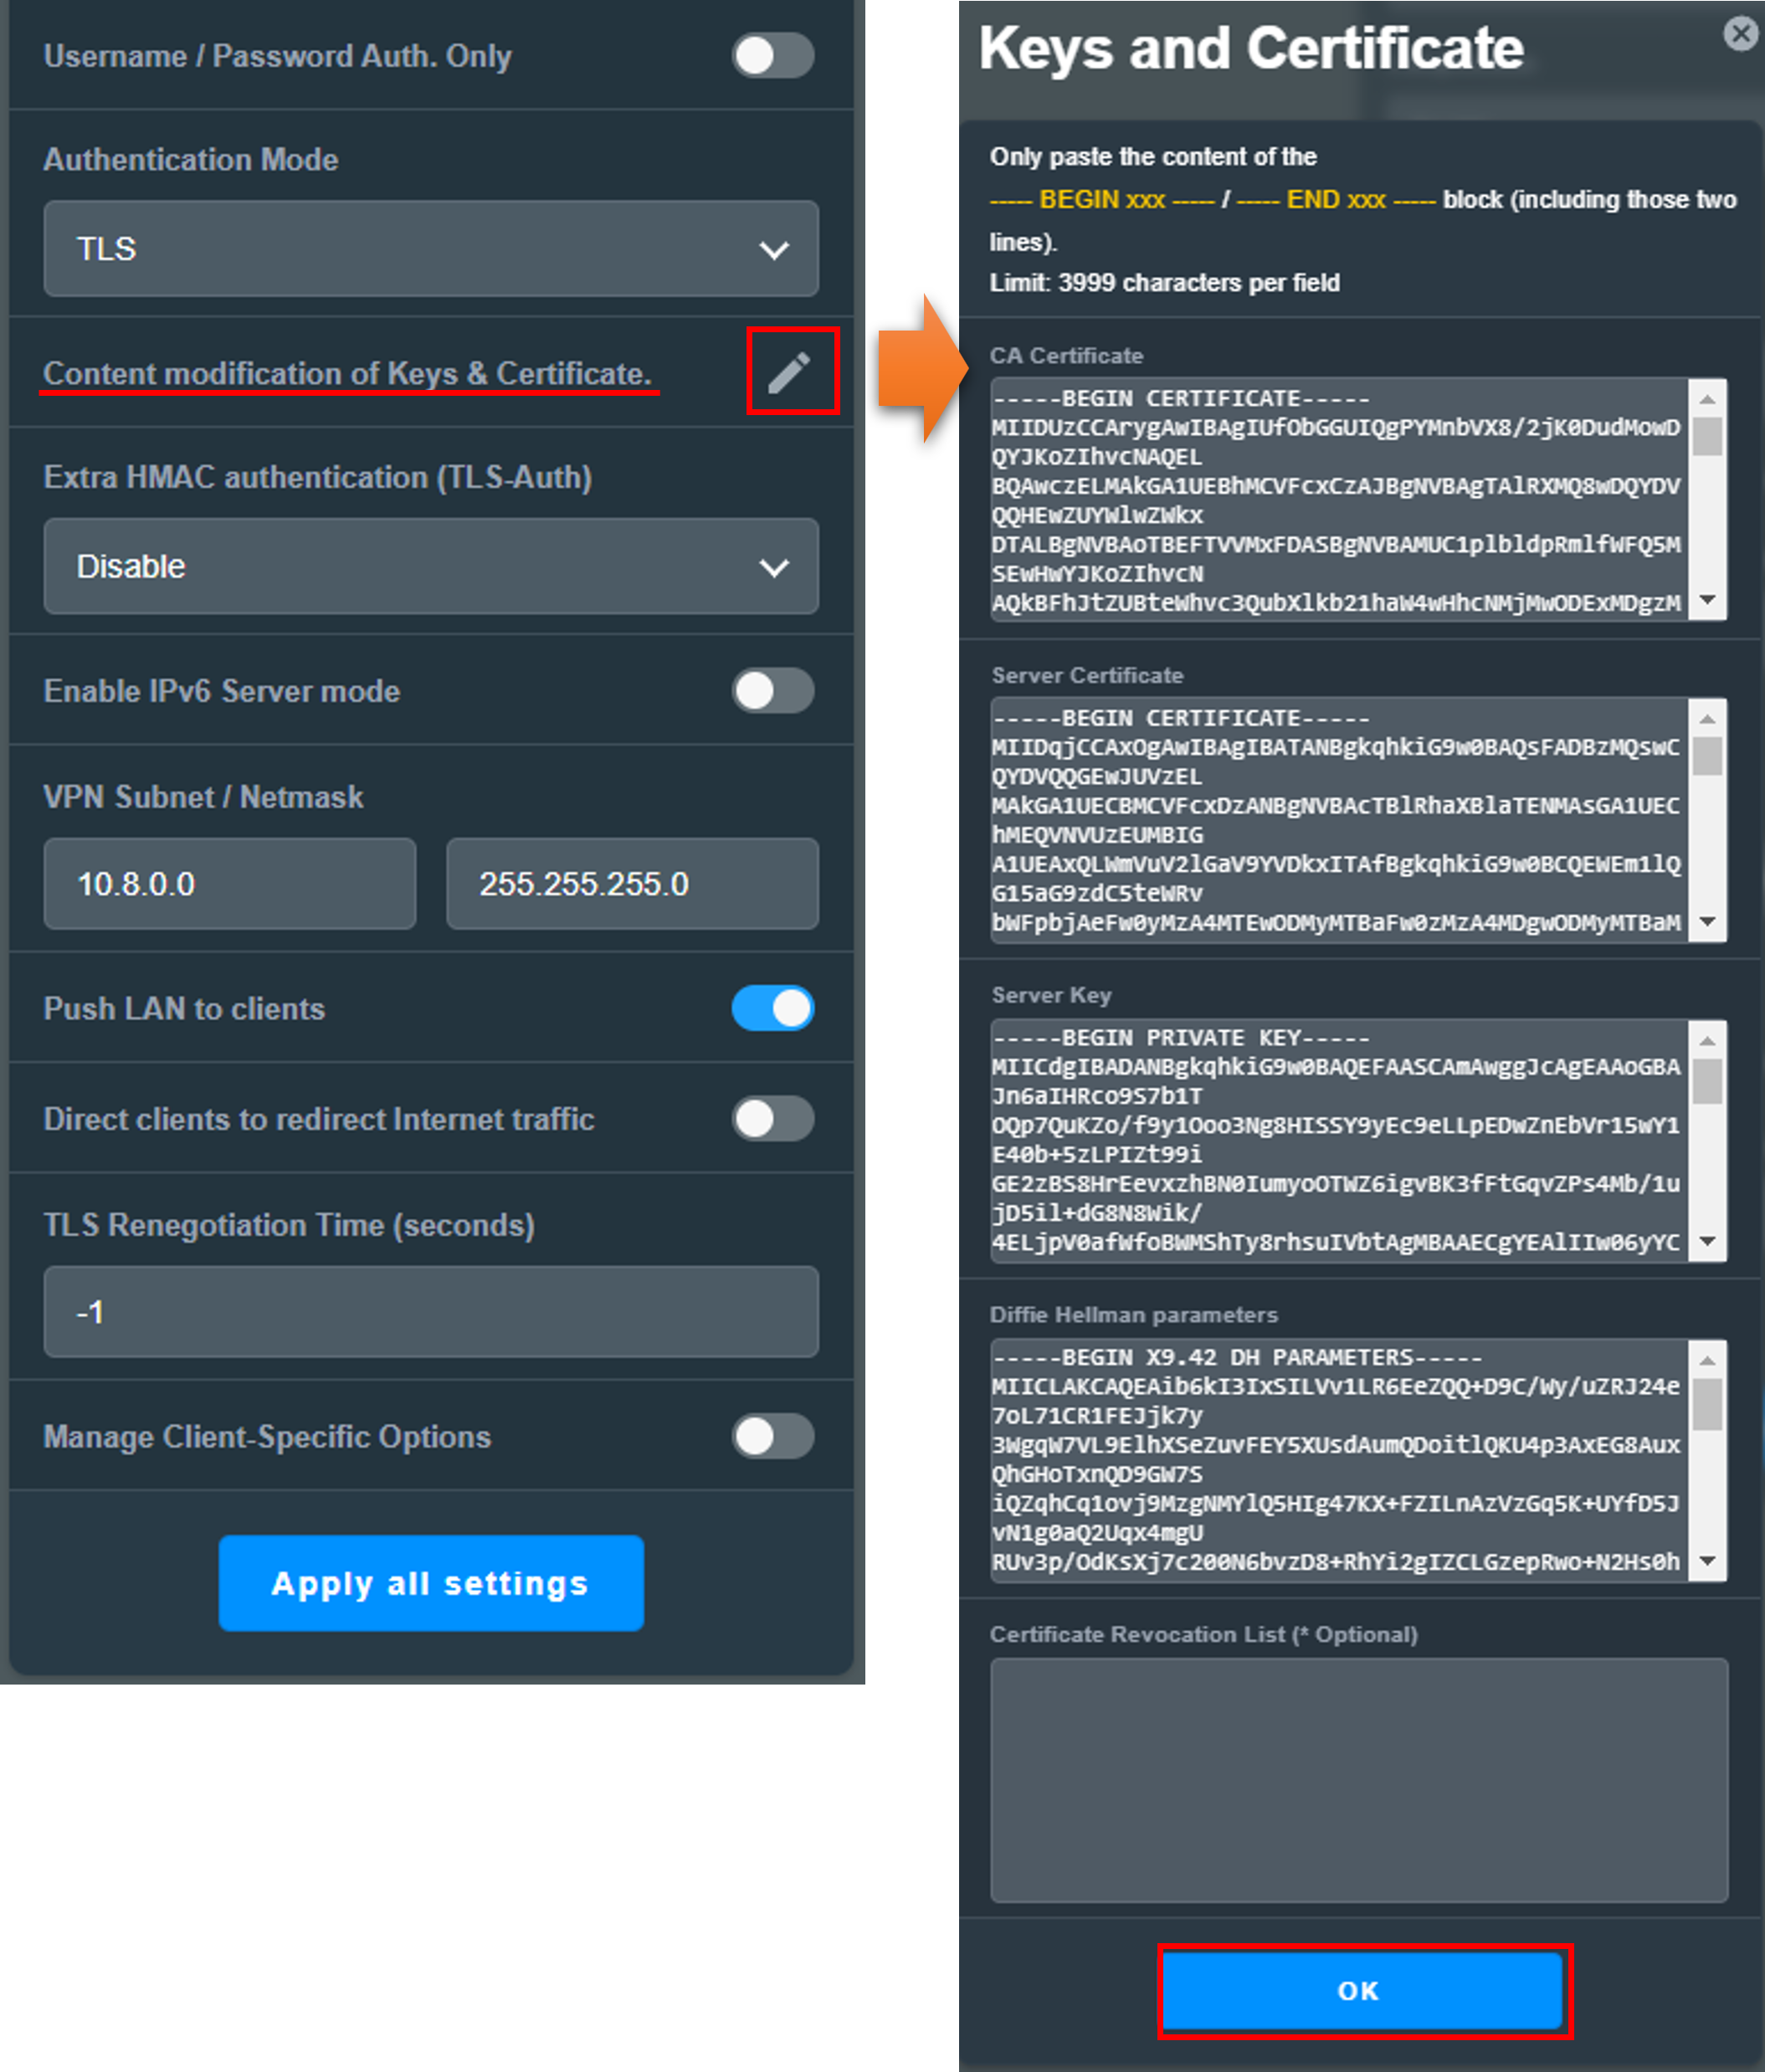
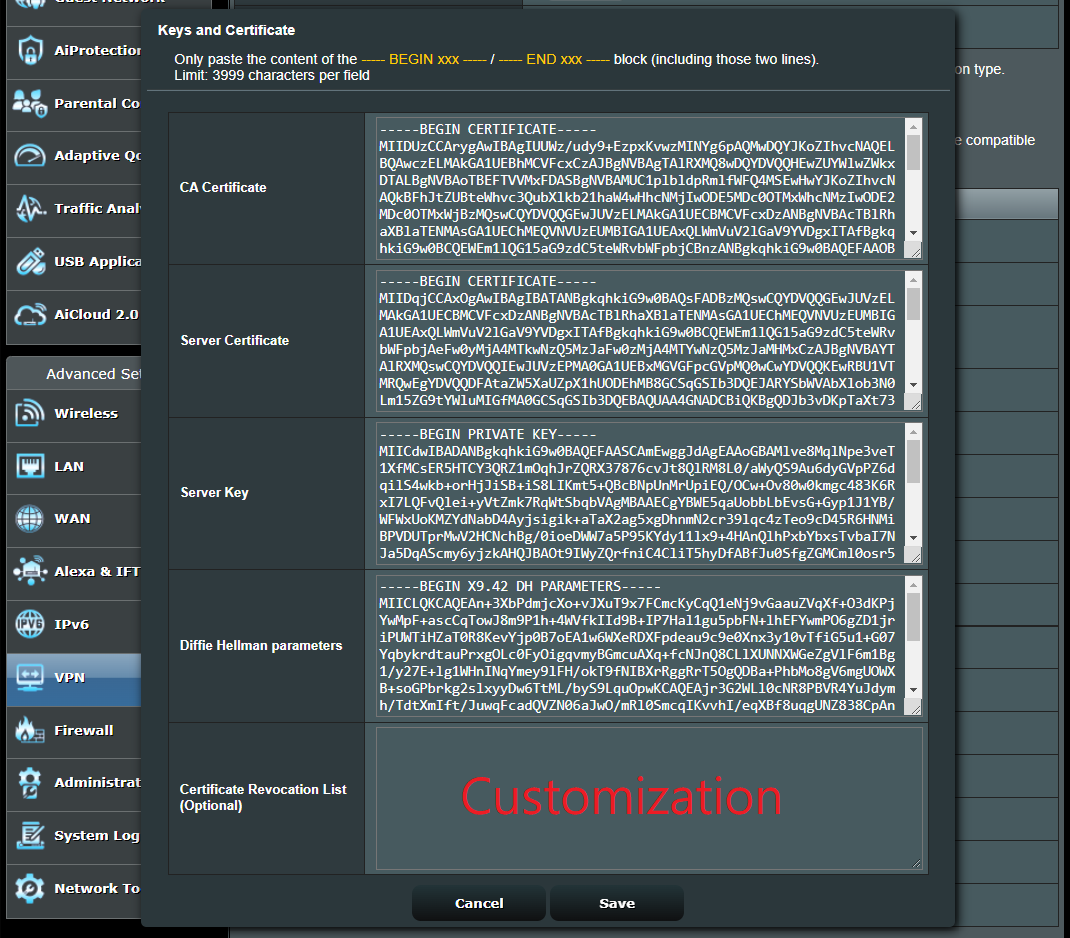
3. How to modify the Keys & Certificate of OpenVPN server?
Interface 1: Supports routers with firmware later than 3.0.0.4.388.xxxx (including).
Go to [VPN Details] >[Advanced Settings] > [Content modification of Keys & Certifiate]
Modify the content and click [Save] button to save settings. Finally, click [ Apply all settings ] to complete.
Interface 2: Supports routers with firmware earlier than 3.0.0.4.388.xxxx.
Go to [VPN Details] >[Advanced Settings] > [Content modification of Keys & Certificate]

Modify the content and click [Save] button to save settings. Finally, click [ Apply ] to complete.
4. If the VPN server I want to use is not in my router, can I add it manually?
No, currently ASUS wireless routers support different specifications depending on the model. If the VPN server is not supported by your router, you cannot manually add it.
5. Can I set my ASUS router as multiple VPN servers at the same time? For example, it can be used as a PPTP VPN server, OpenVPN server, and IPsec VPN server at the same time.
Yes, as long as your router supports the VPN server, you can set the router to different VPN servers at the same time.
Note : Only one of the VPN servers and VPN clients of the same type can be configured on the router. For example, if you have set the router as a PPTP VPN server, you cannot also set the router as a PPTP VPN client.
How to get the (Utility / Firmware)?
You can download the latest drivers, software, firmware and user manuals in the ASUS Download Center.
If you need more information about the ASUS Download Center, please refer this link.