Related Topics
[Chromebook] Troubleshooting - Chromebook Audio (Speaker/Microphone) Issues
If you encounter issues with the speakers or microphone on your Chromebook, such as unclear sound, silent speakers, or microphone not working properly, please refer to the following troubleshooting steps.
Before troubleshooting, if you are using external speakers, a microphone, or headphones/earphones, please ensure they are connected correctly.
Note: The support may vary depending on different models; please refer to the User Manual for detailed instructions.
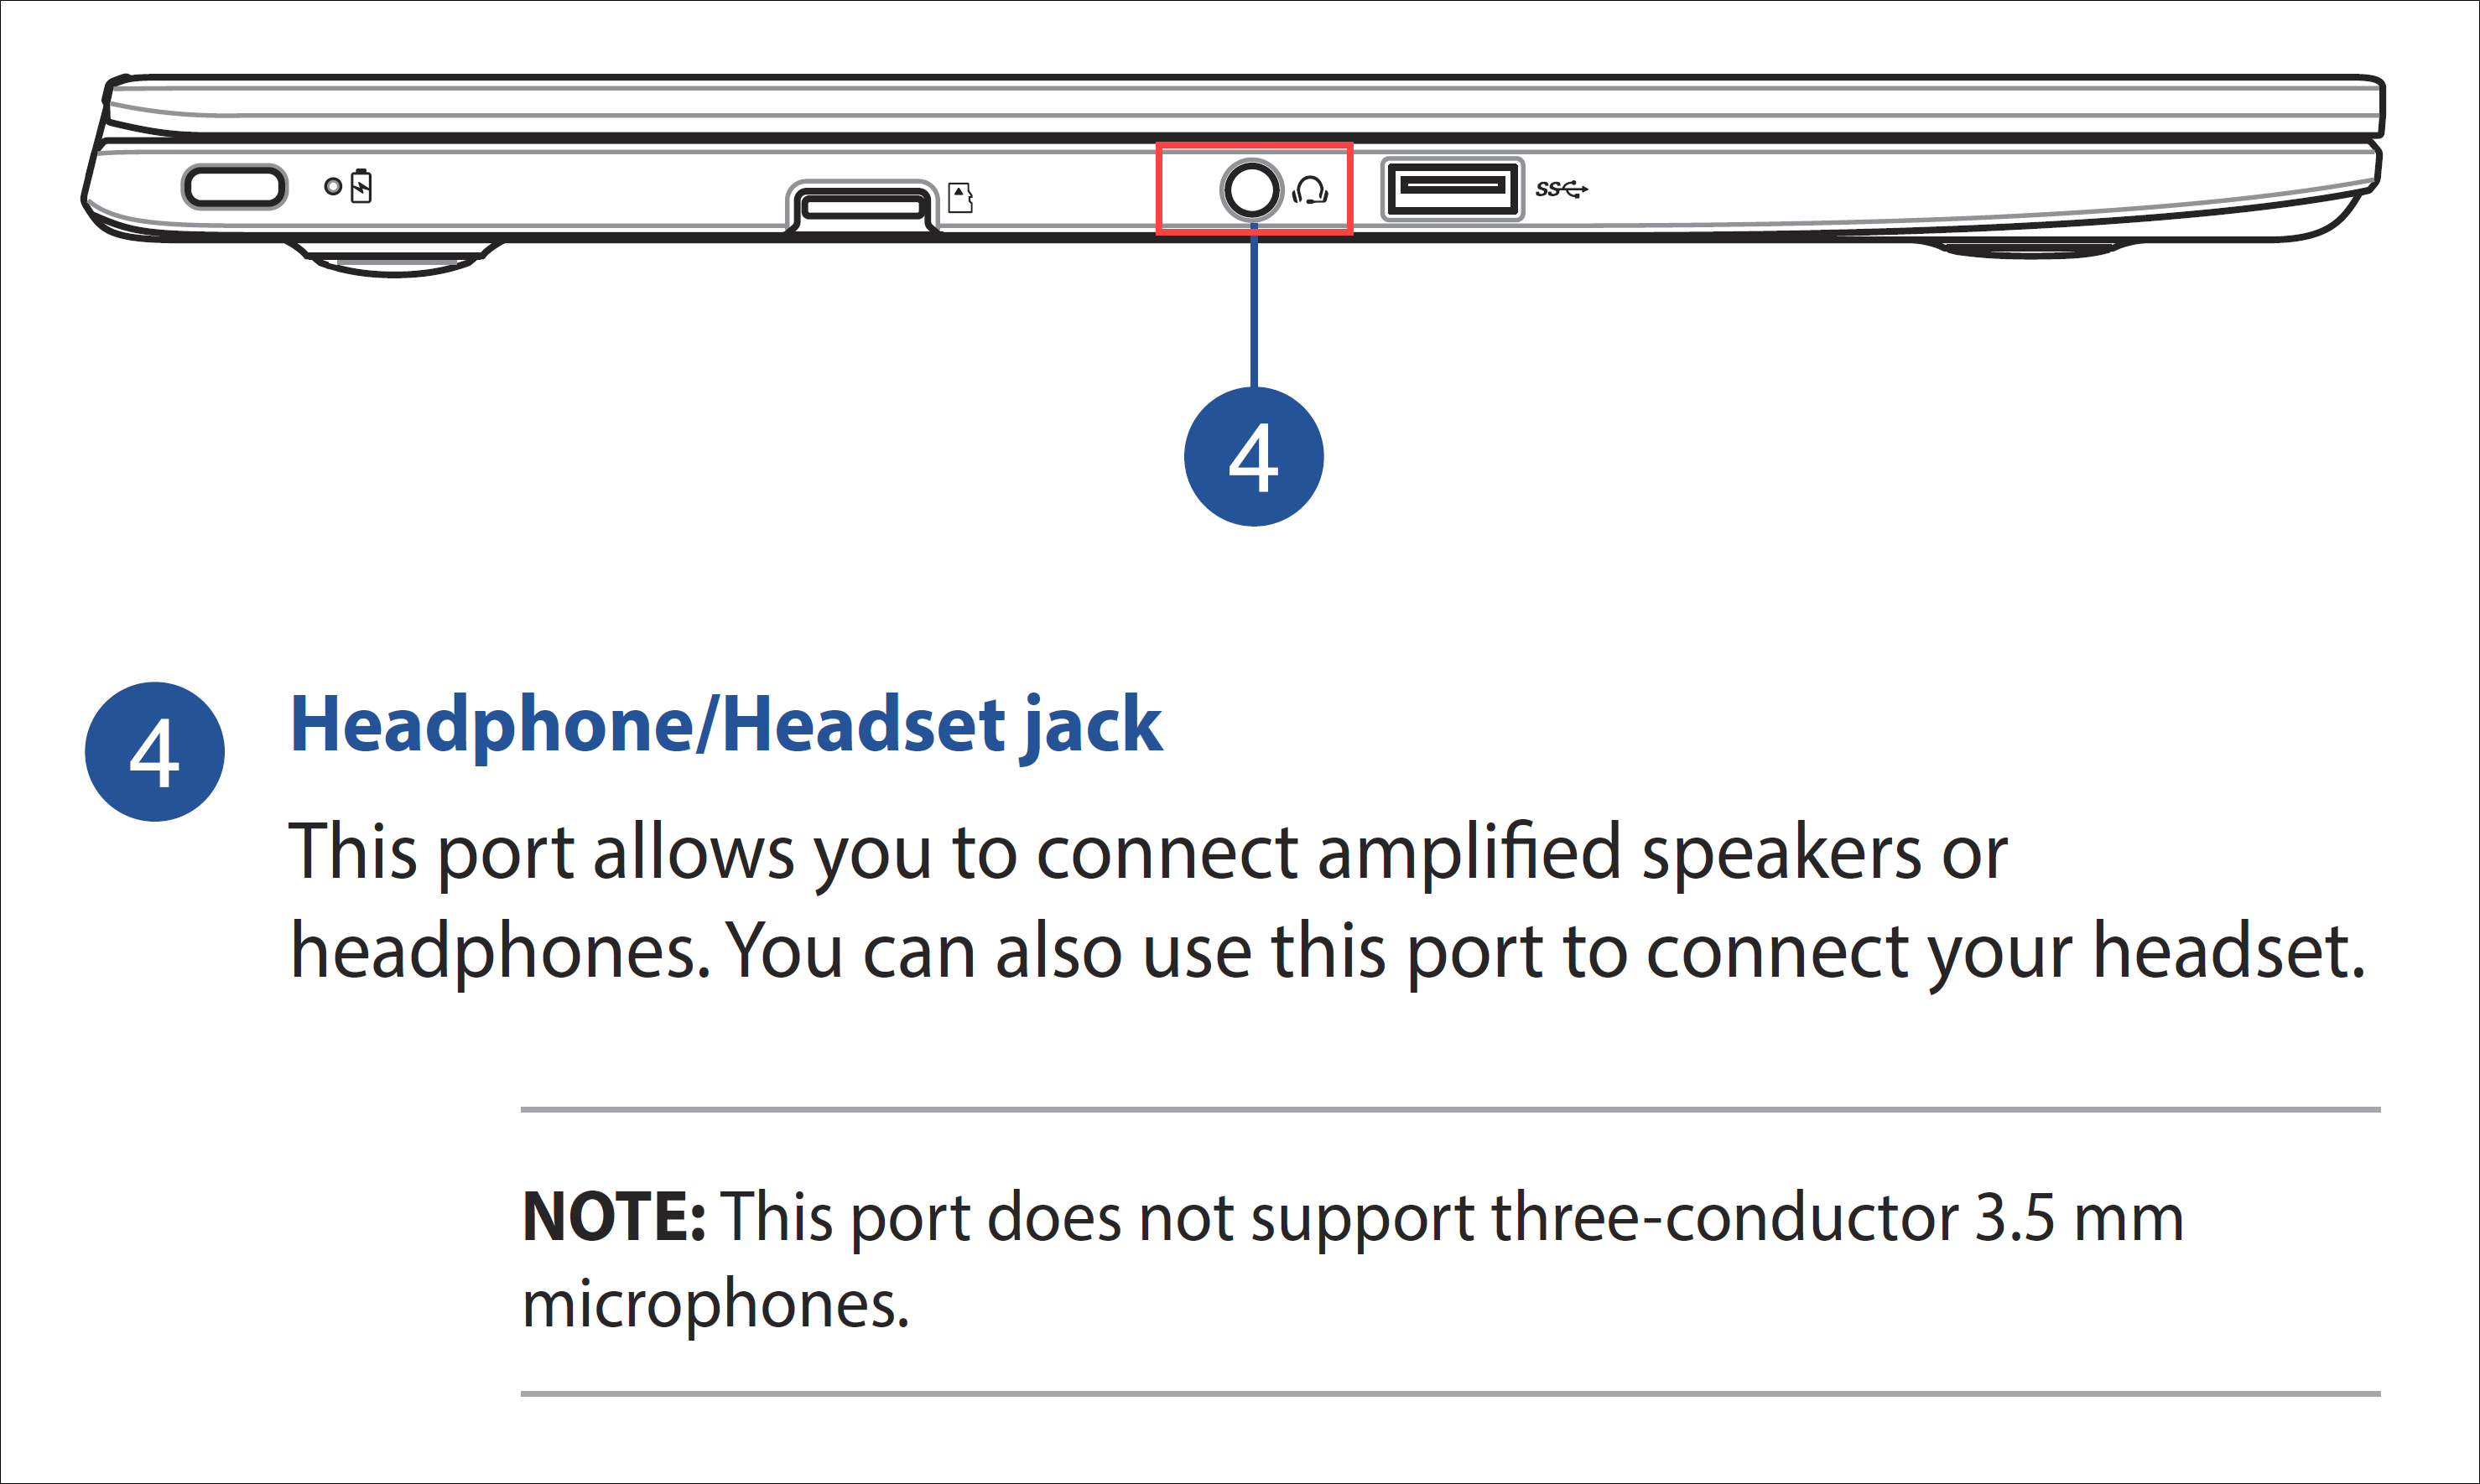
Table of Contents:
Abnormal Speaker Functionality
Check Speaker/Headphone Volume Settings
Please ensure that your Chromebook's volume settings are correct.
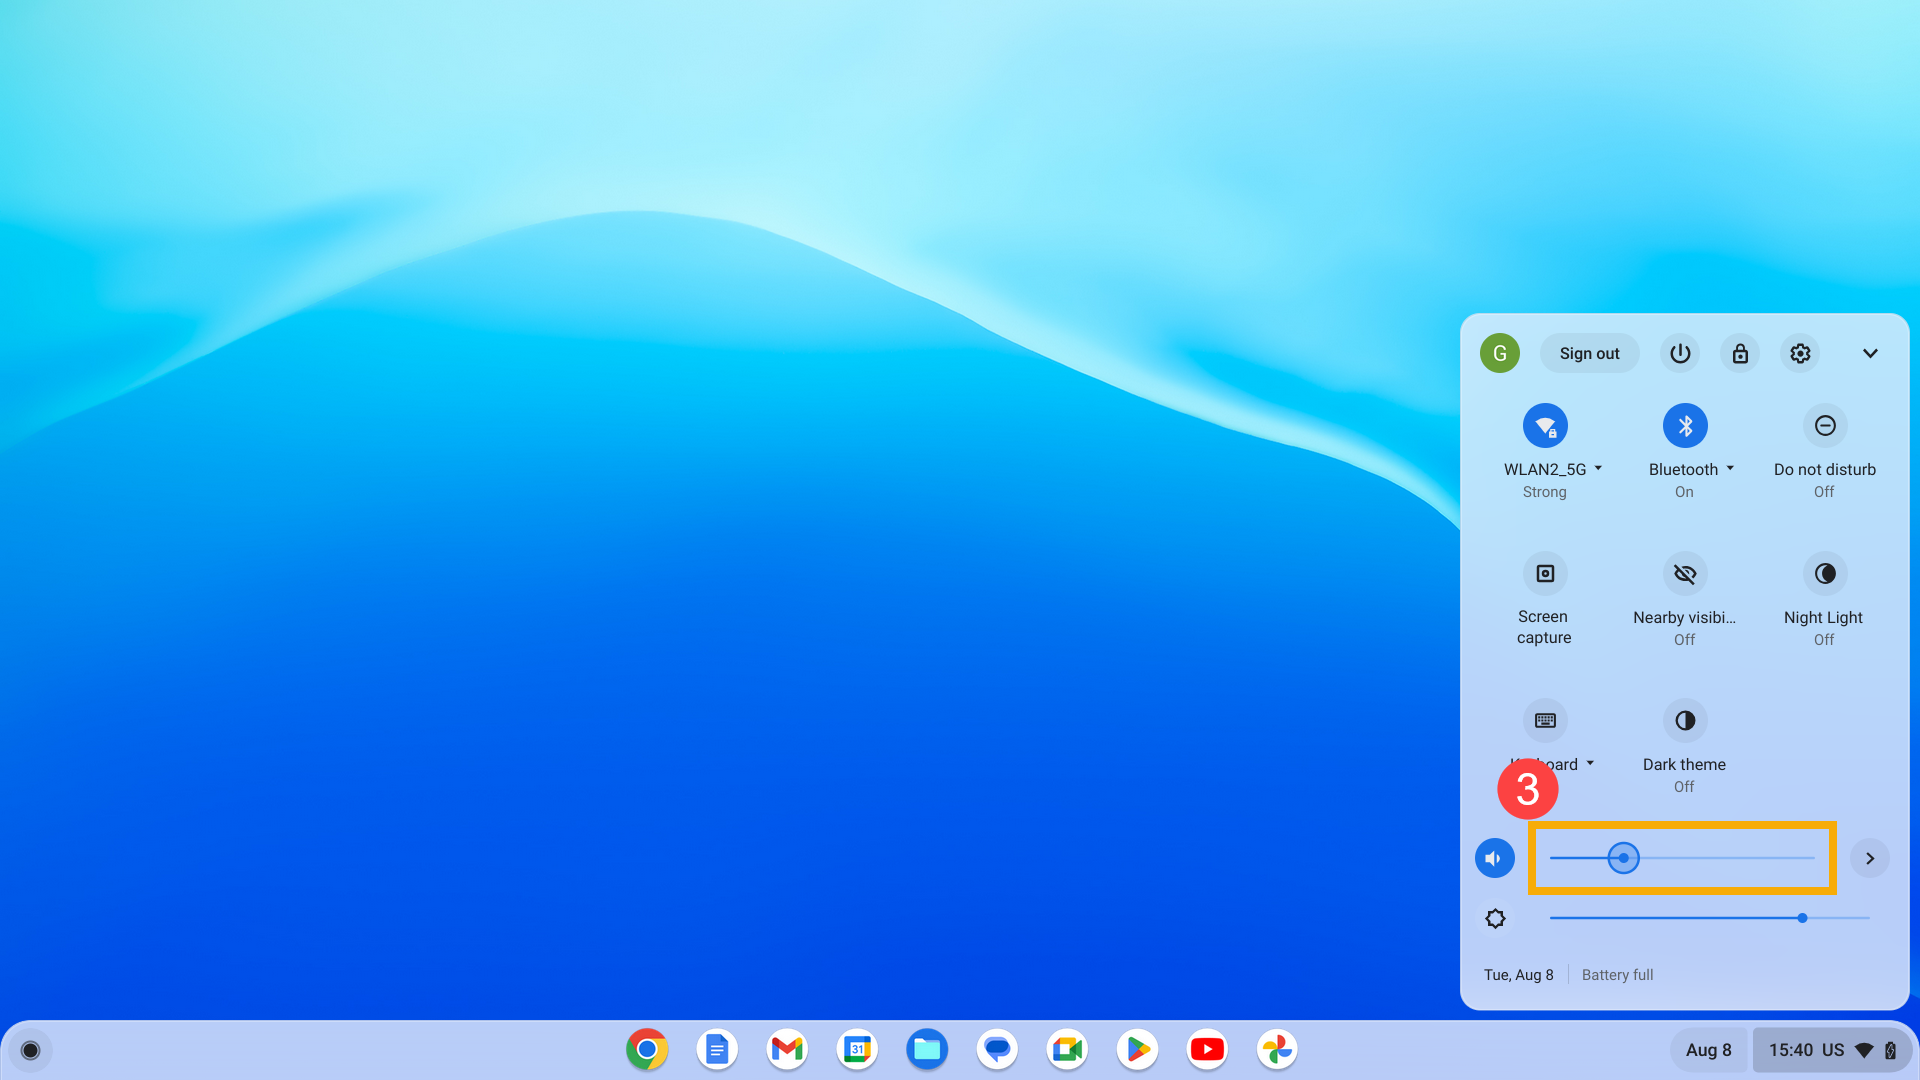
- Click on the [Status Bar]① in the lower right corner of the screen. If the volume icon appears grayed out
 ②, it indicates that the sound is muted. Click the volume icon again to unmute the sound.
- Drag the volume slider to the appropriate output level by sliding it to the left or right③.
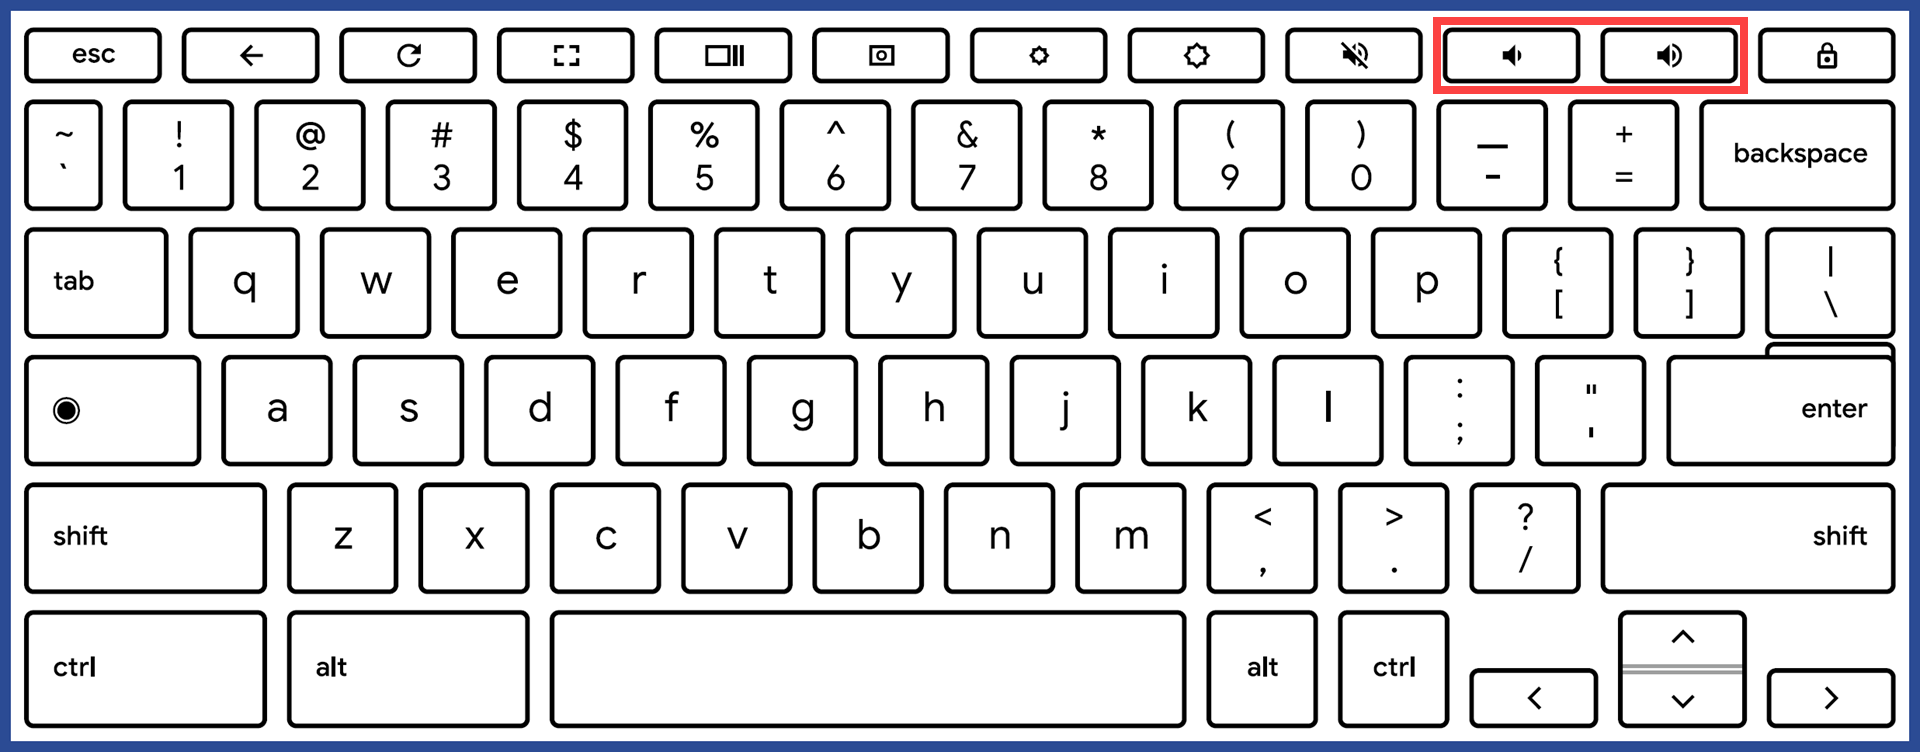
Alternatively, you can adjust the output volume using the top row keys (hotkeys) on your keyboard. To increase the volume, press , and to decrease the volume, press
  .
. 
Verify Audio Output Device
If you are using external speakers or headphones, try reinserting the external devices and ensure that they are properly connected to the audio jack of your Chromebook. Also, check the volume settings of these external devices to ensure they are not set to minimum or muted.
Note: If you have another set of external speakers or headphones, try to determine if the issue lies with the external devices.
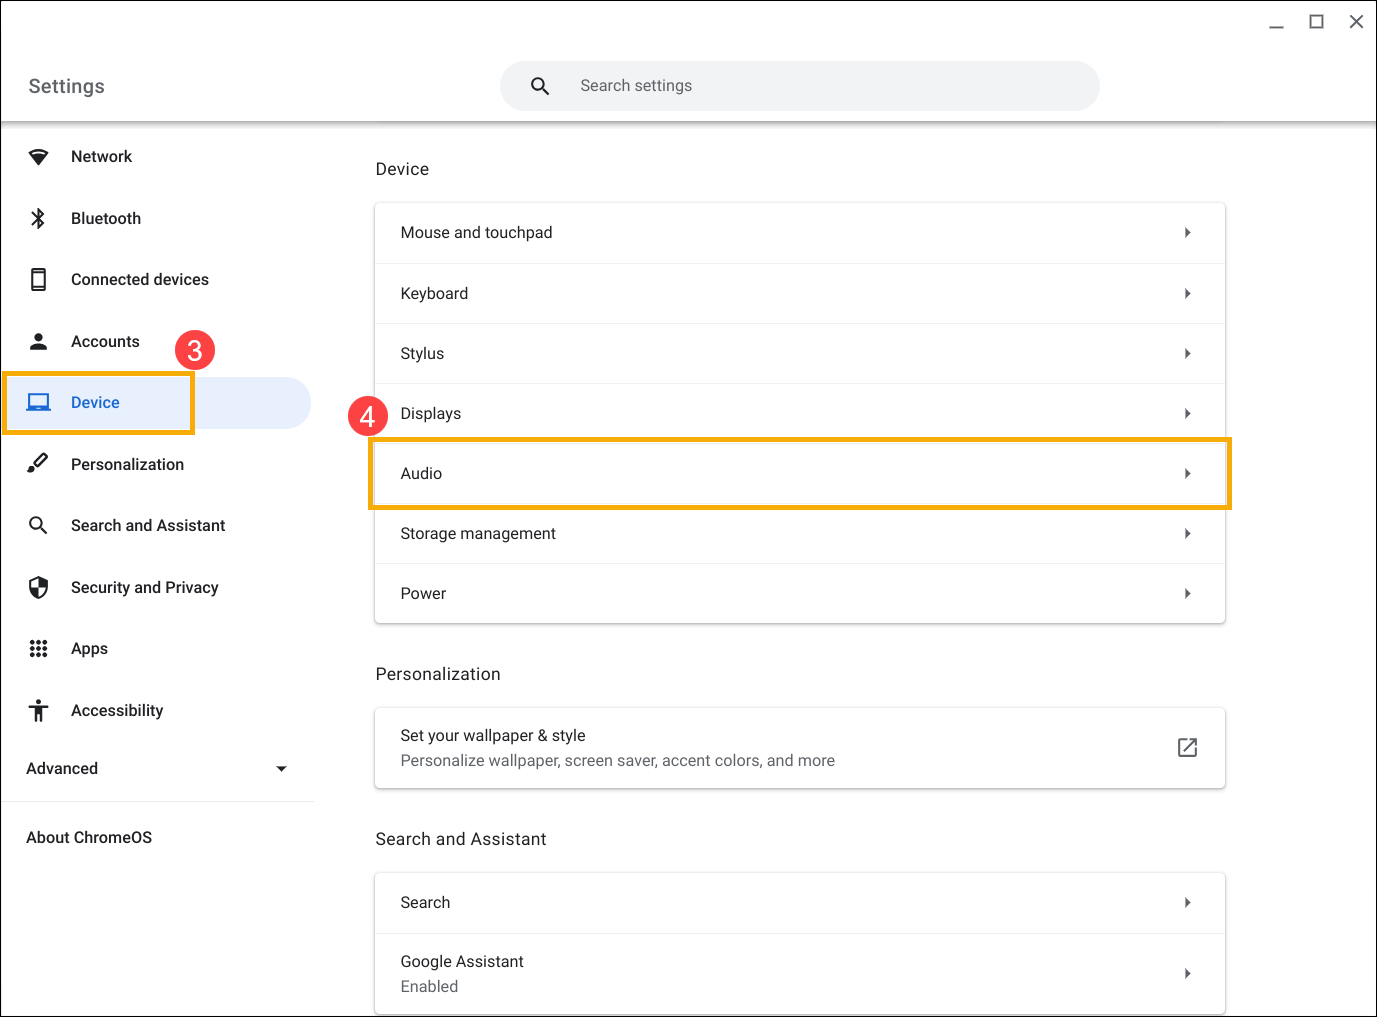
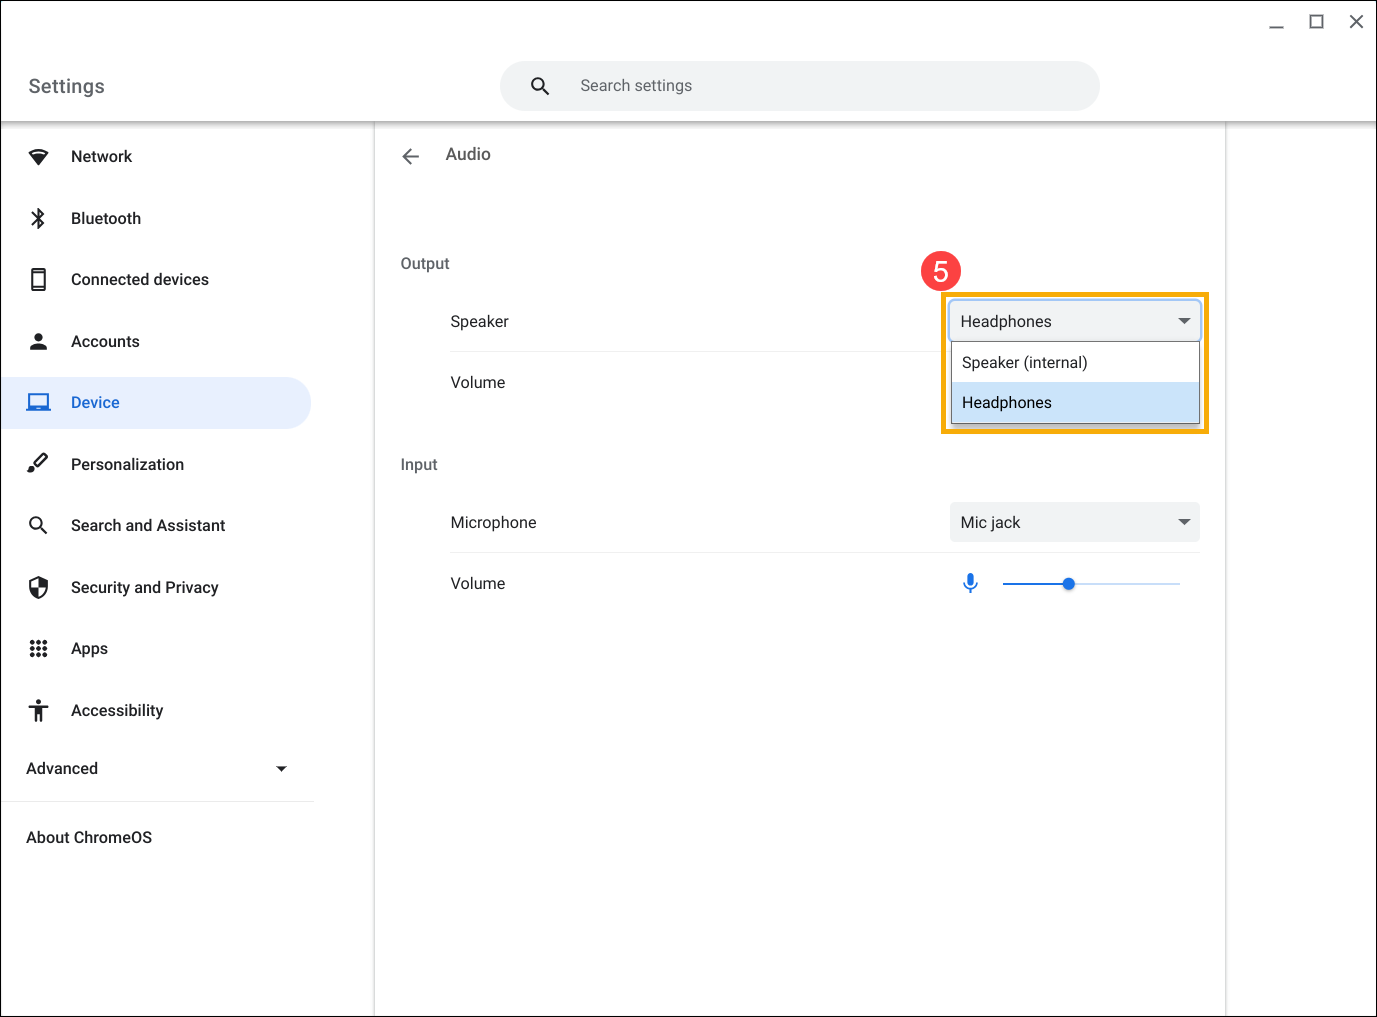
- Click on the [Status Bar]① in the lower right corner of the screen, then click [Settings]
 ②.
②. 
- Click [Device]③, then select [Audio]④.
- Click on the dropdown menu for the Speaker and choose the correct output device⑤.
Granting 'Audio' Access to Applications
Applications must acquire relevant permissions to utilize audio functionalities in the Chrome operating system. Usually, when an application requires access to speakers for the first time, the system may prompt you to grant the required permission.
If you have not provided the necessary access or need to modify settings, the following steps demonstrate using the Google Meet application as an example.
- Click on the [Status Bar]① in the lower right corner of the screen, then click [Settings]②.
- Click [Apps]③, and then select [Manage your apps]④.

- Choose the application for which you want to modify settings⑤.

- Click [More settings and permissions]⑥.
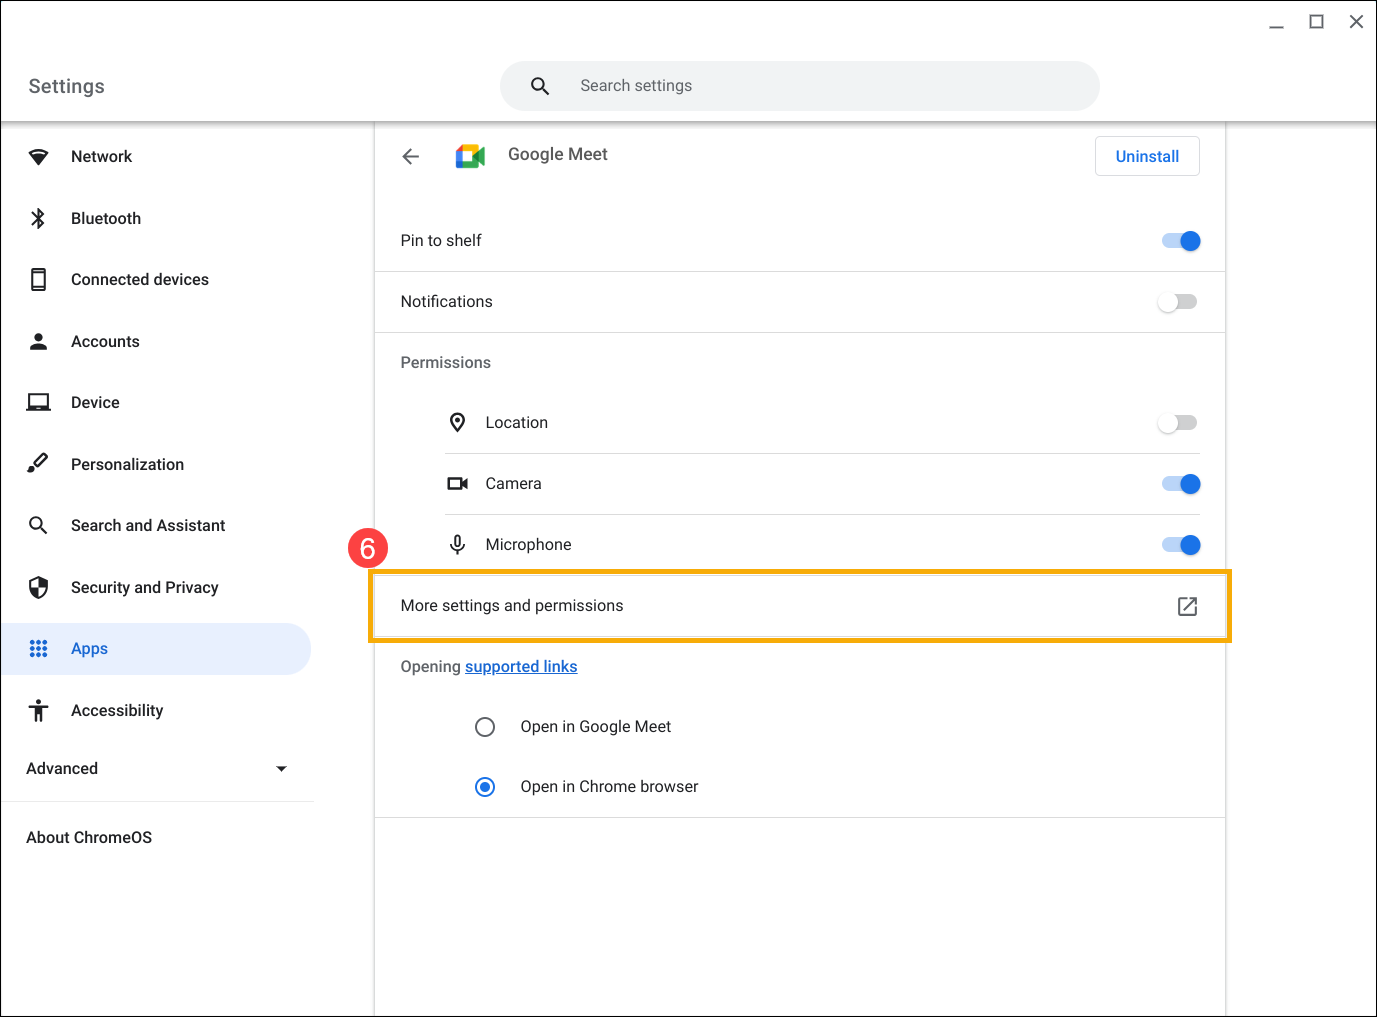
- Locate the Sound permission settings and select either Automatic (default) or Allow⑦.
- If other applications can use the camera properly, consider uninstalling the app where it doesn’t work, then reinstalling the app.
Chrome Browser or Tabs with No Sound
While using web audio or video, the browser's cache may cause audio issues. Try clearing the browser's cache and browsing data, then reload the web page to test the audio.
- Launch Google Chrome browser. Click on the [Customize and control Google Chrome] icon
 ① in the upper right corner of the browser, select [More tools]②, and then click [Clear browsing data]③.
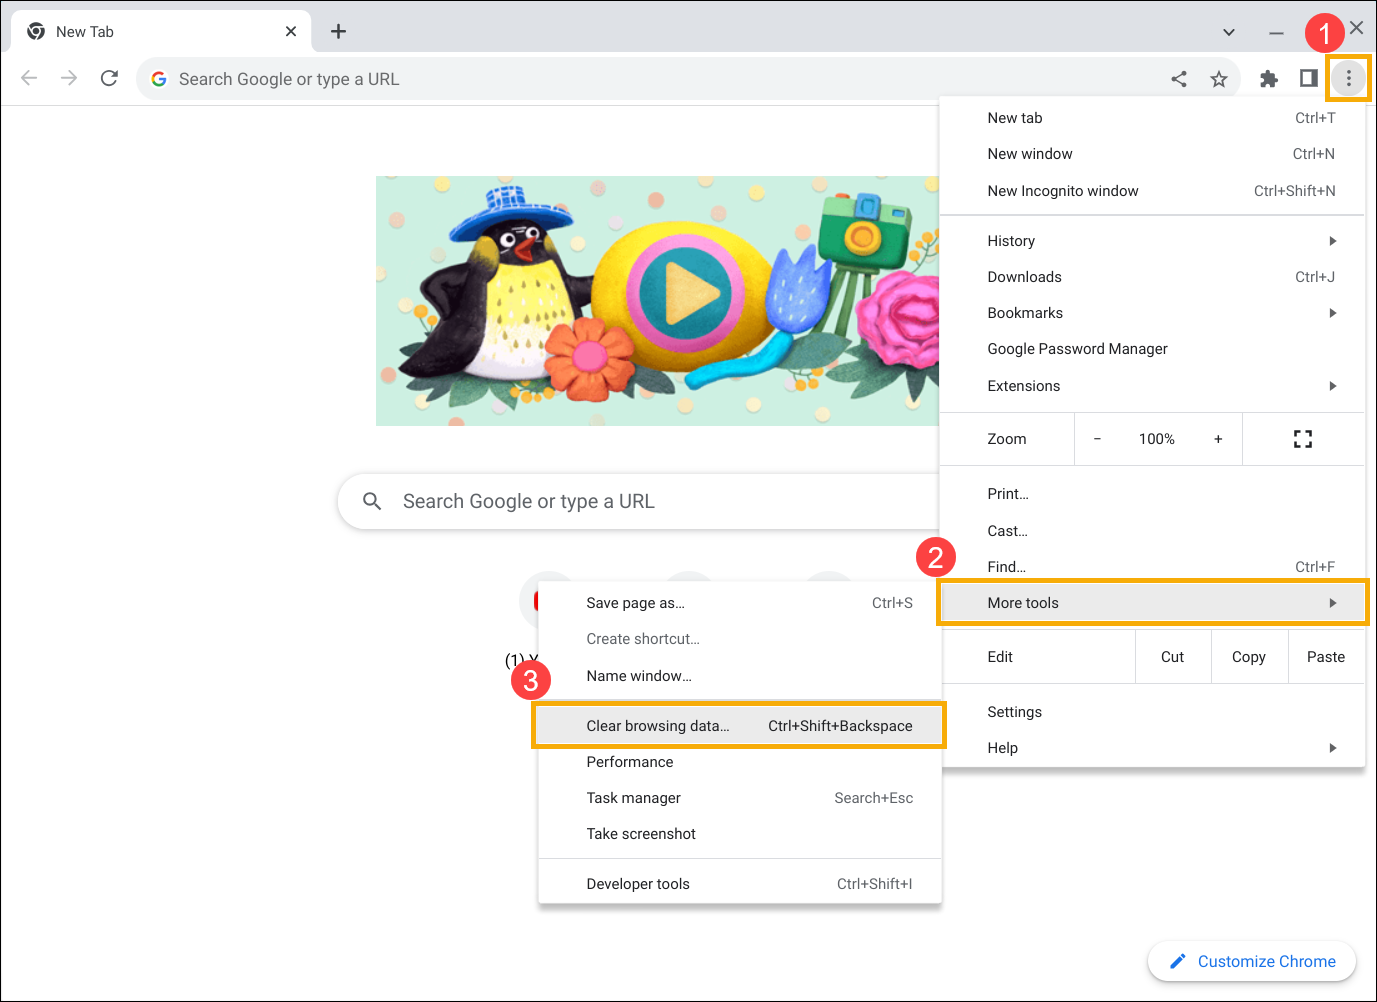
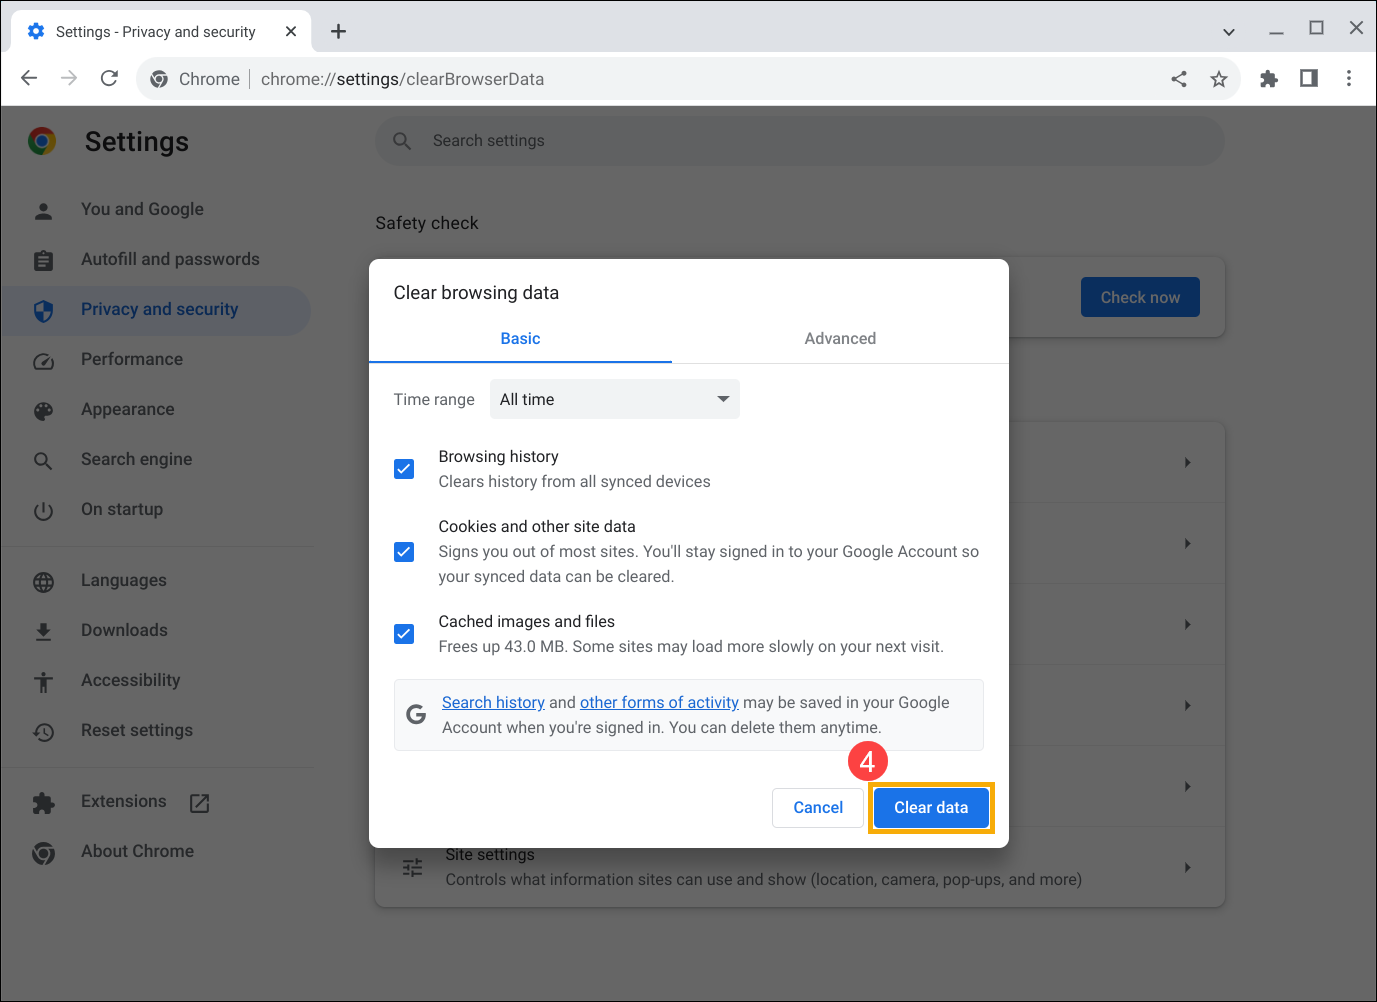
- In the 'Time range' section, choose 'All time,' and select both 'Cookies and other site data' and 'Cached images and files.' Finally, click [Clear data]④.
Further Audio Troubleshooting for Chrome Browser
If the above solution does not resolve your sound issue, you can try the following steps to verify relevant settings:
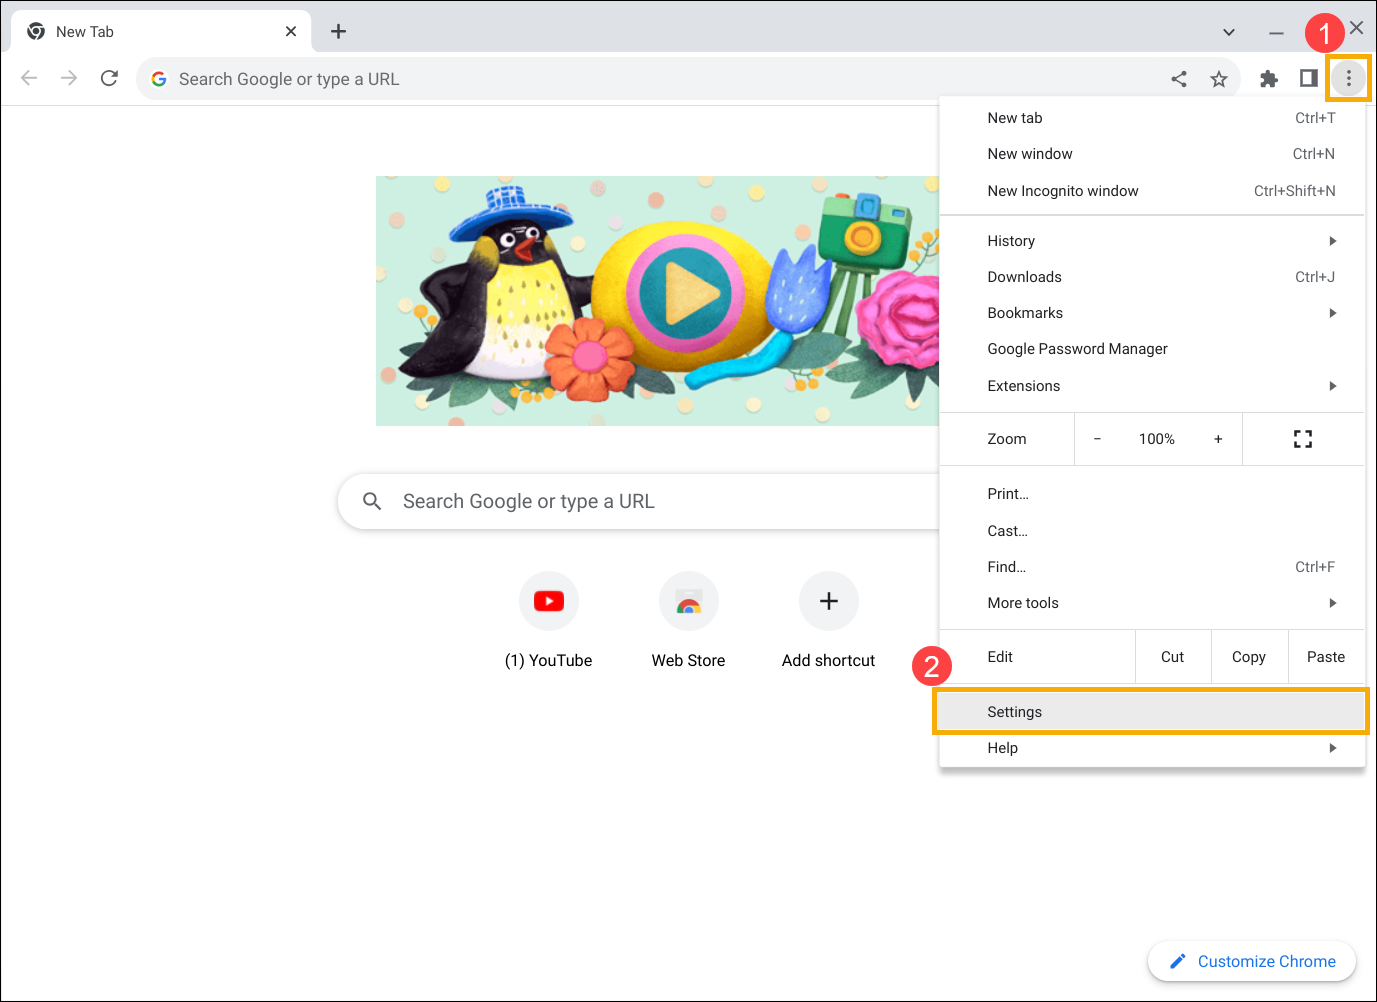
- Launch Google Chrome browser. Click on the [Customize and control Google Chrome] icon① in the upper right corner of the browser, and then click [Settings]②.
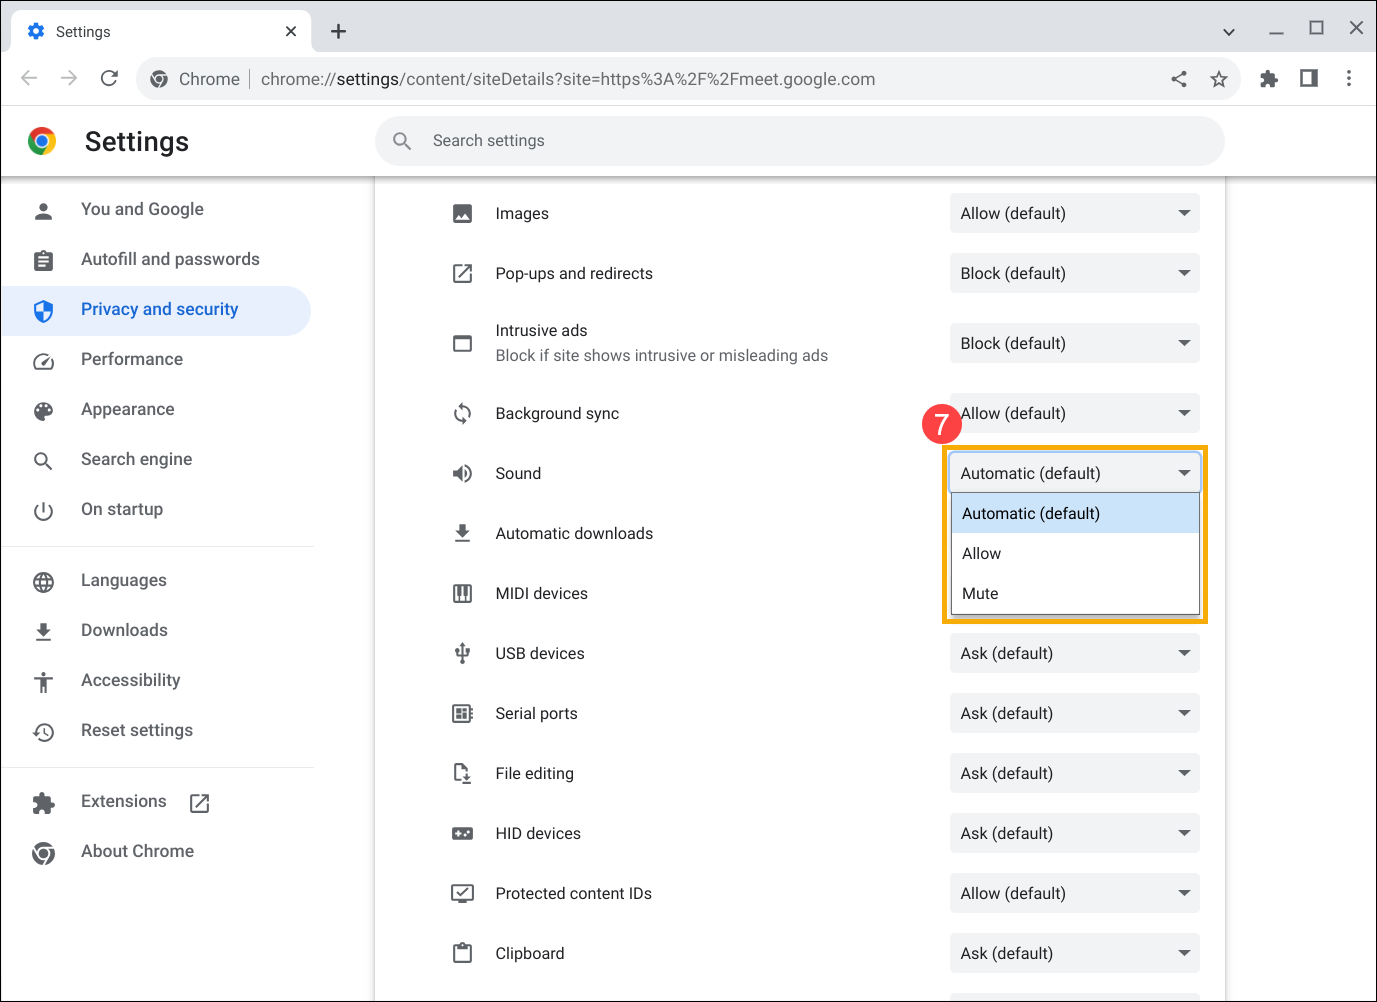
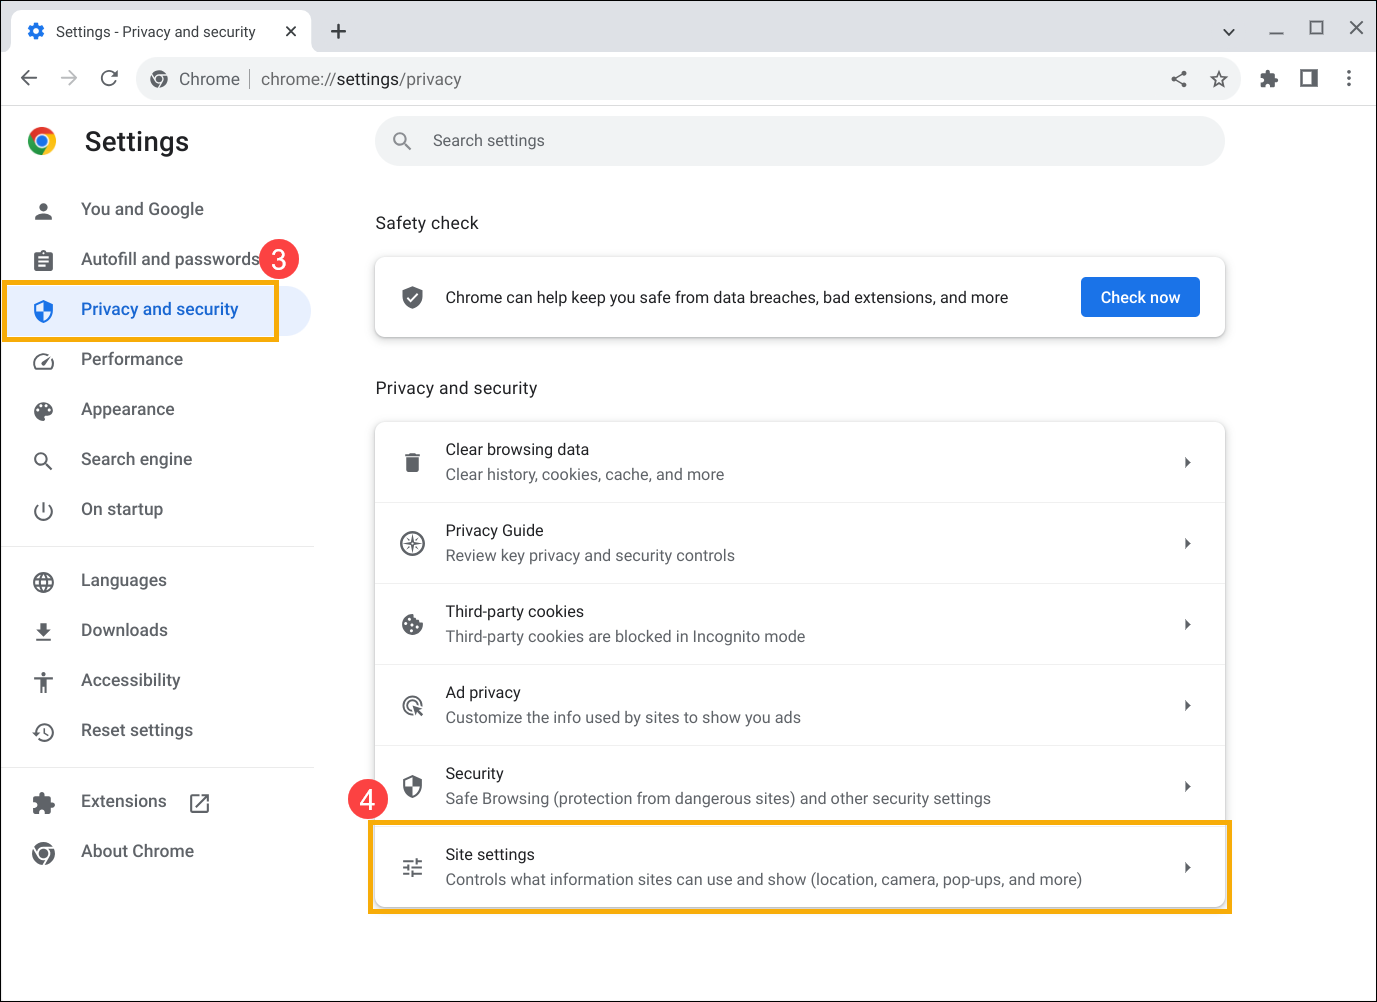
- Click [Privacy and security]③, and then select [Site settings]④.
- Click [Additional content settings] to expand further options⑤.
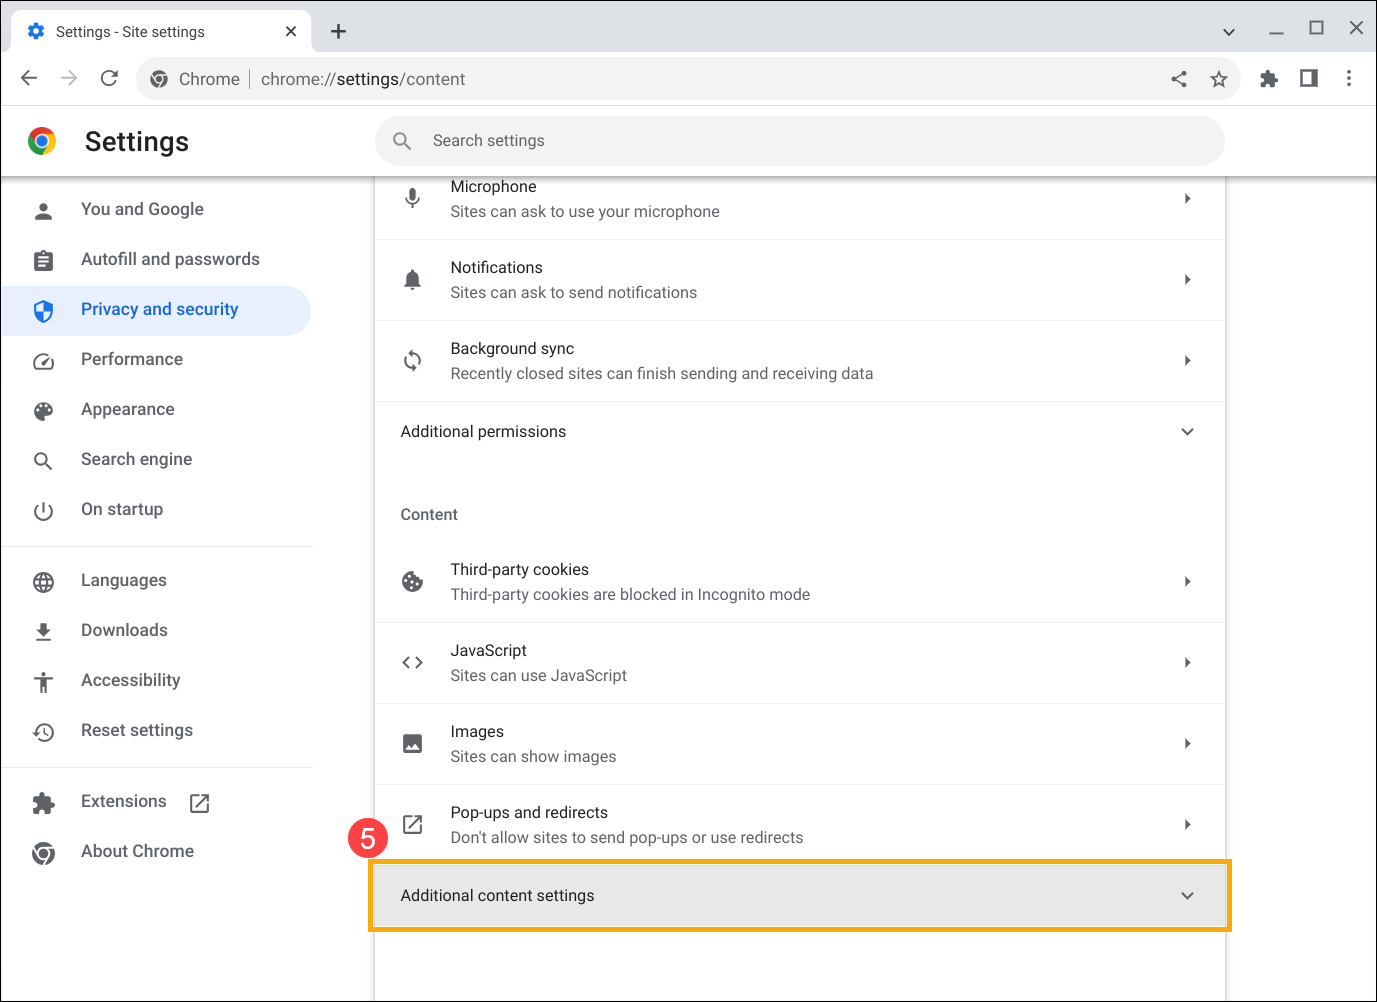
- In the 'Additional content settings,' click on [Sound]⑥.
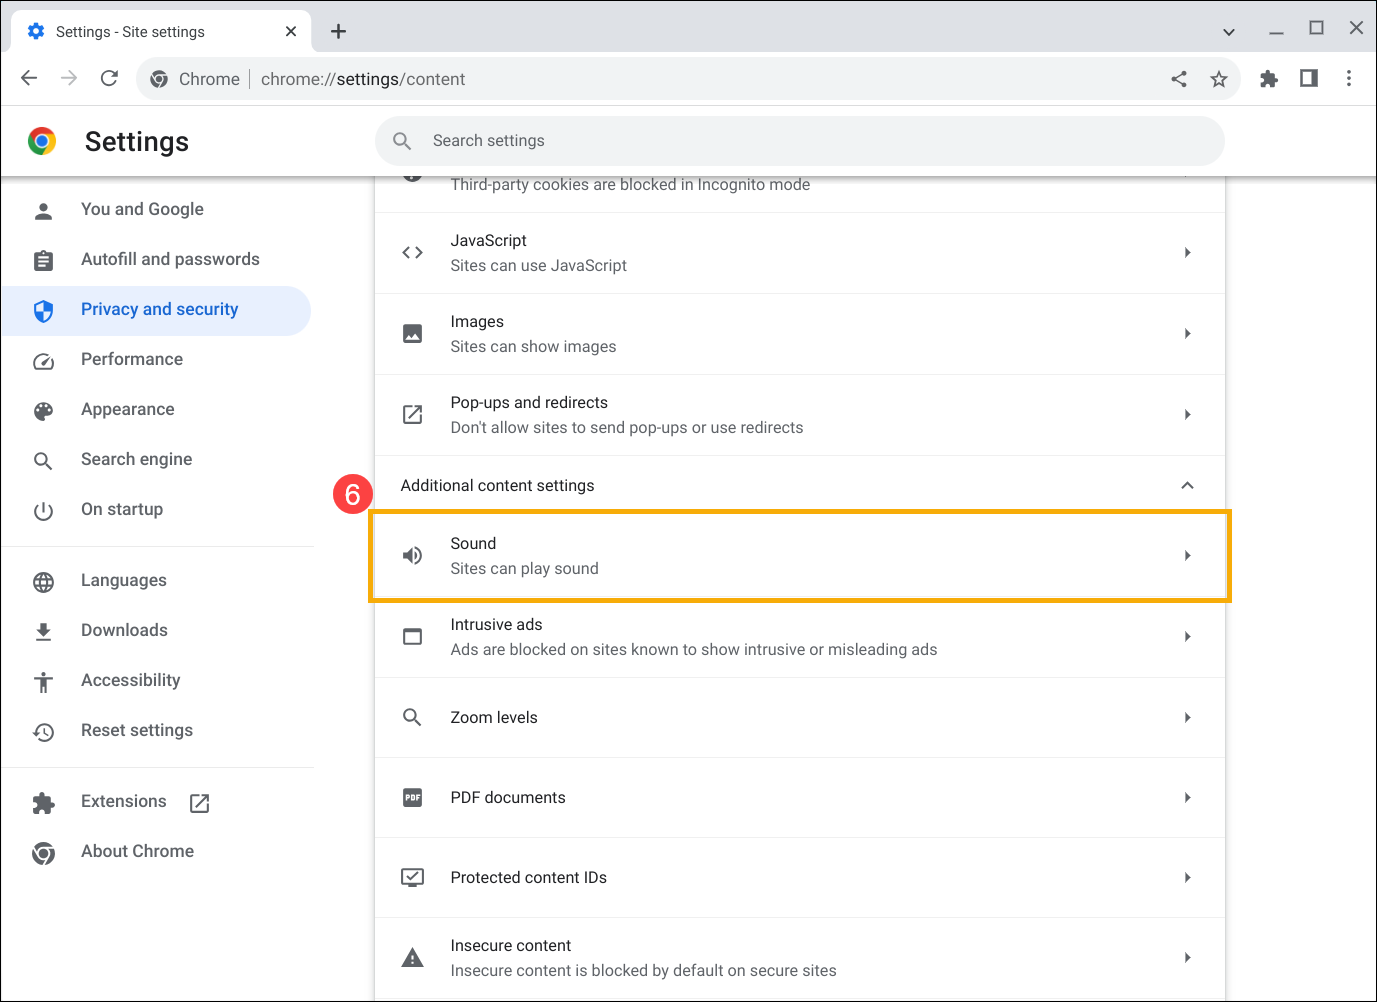
- Check the box for [Sites can play sound]⑦.

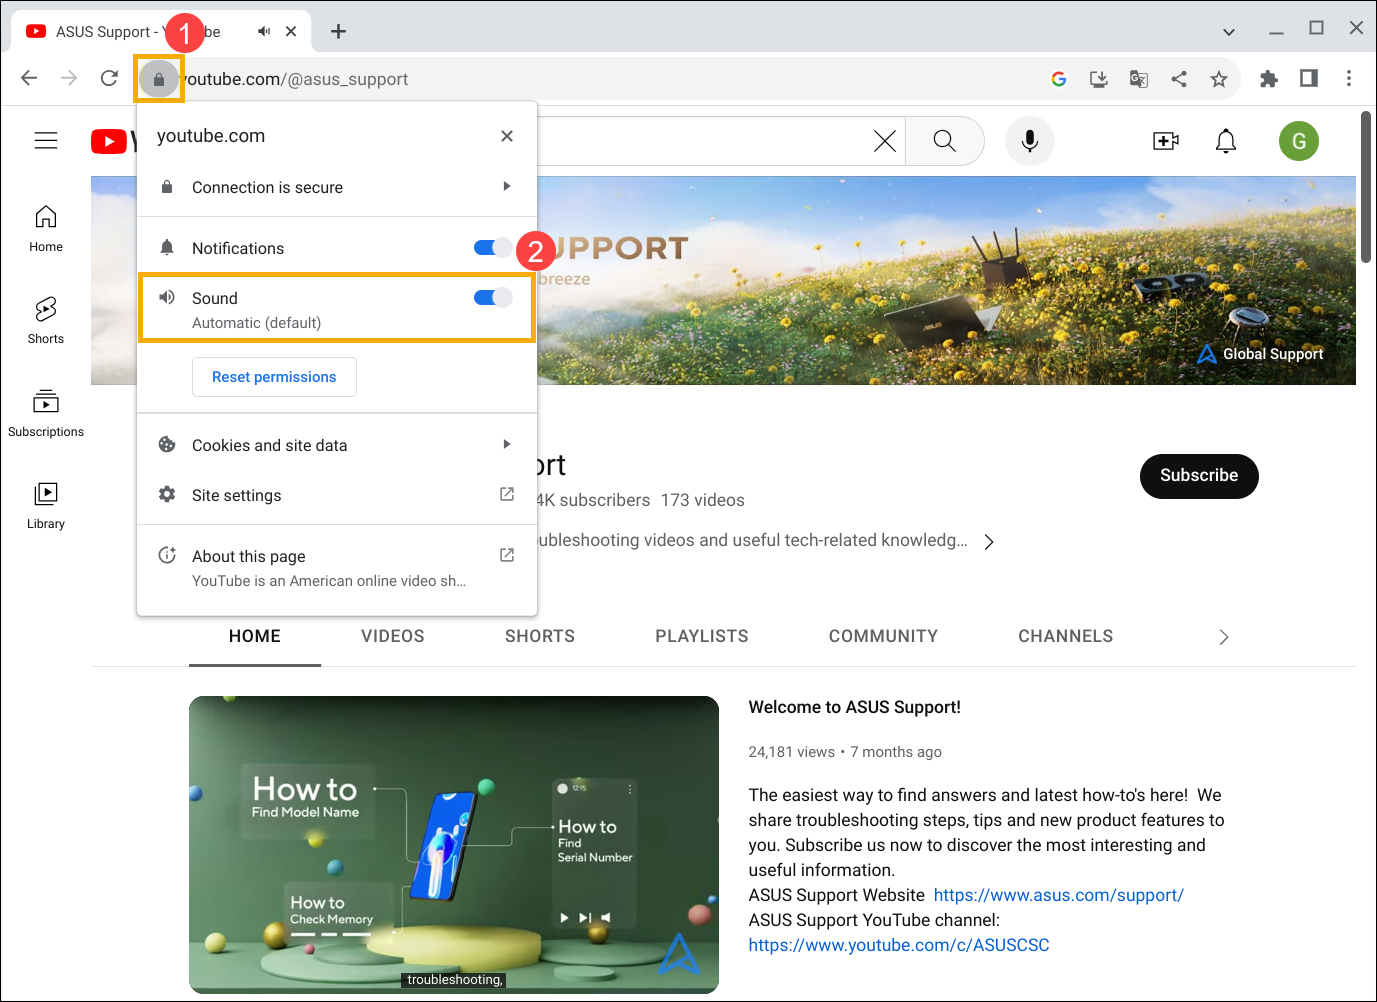
If sound issues persist only on specific tabs, click on the [View site information] icon![]() ① within that tab, and then enable the [Sound] permission②.
① within that tab, and then enable the [Sound] permission②.
Additional troubleshooting methods
If your audio issue persists despite trying the above methods, please attempt the following steps:
- Restart your Chromebook. Turn off your Chromebook, then wait a few seconds before restarting them.
Note: To restart the Chromebook, hold the [Power button] until the device turns off, then turn it on again.
 - Update Chrome OS. Ensure your Chromebook has the latest version of Chrome OS installed. To check for available updates, refer to this article: Updating Chromebook's Operating System.
- Perform a hardware reset on your Chromebook. Refer to this article for instructions: How to Reset Chromebook Hardware Settings.
- If the above troubleshooting steps have been completed but the problem persists, consider resetting or recovering your Chromebook.
Reset (Powerwash) your Chromebook to factory settings. - Recovery Chromebook operating system.
You can also refer to the Google Chromebook Help on the official website for more detailed information:
https://support.google.com/chromebook/answer/6309225
If your issue remains unresolved, please contact the ASUS customer service center for further assistance.
Abnormal Microphone Functionality
If you are using the built-in microphone, please ensure that the microphone is not obstructed
Typically, the microphone is located on either side of the camera lens.
Note: The exact microphone location may vary depending on the model, so please refer to the User Manual for specific details.
![]()
Check Microphone Input Device and Volume Settings
If you are using a headset, try unplugging and re-plugging the external device, ensuring that it is correctly connected to the audio jack of your Chromebook. Also, check the volume settings of these external devices to ensure they are not set to the minimum or muted.
Note: If you have another headset available, try using it to verify if the issue lies with the external device.
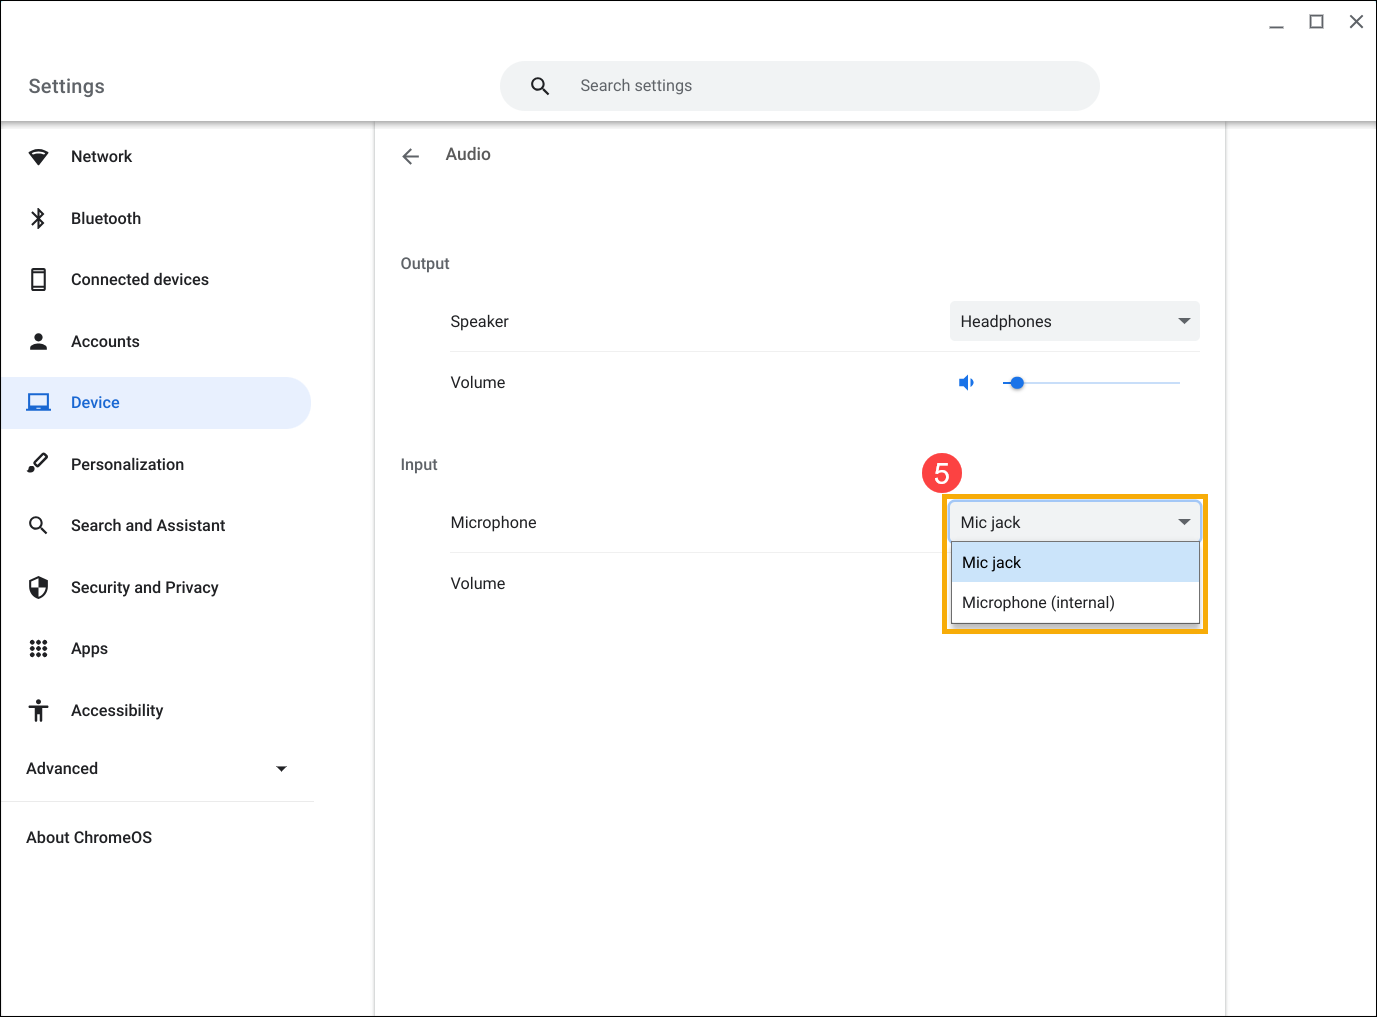
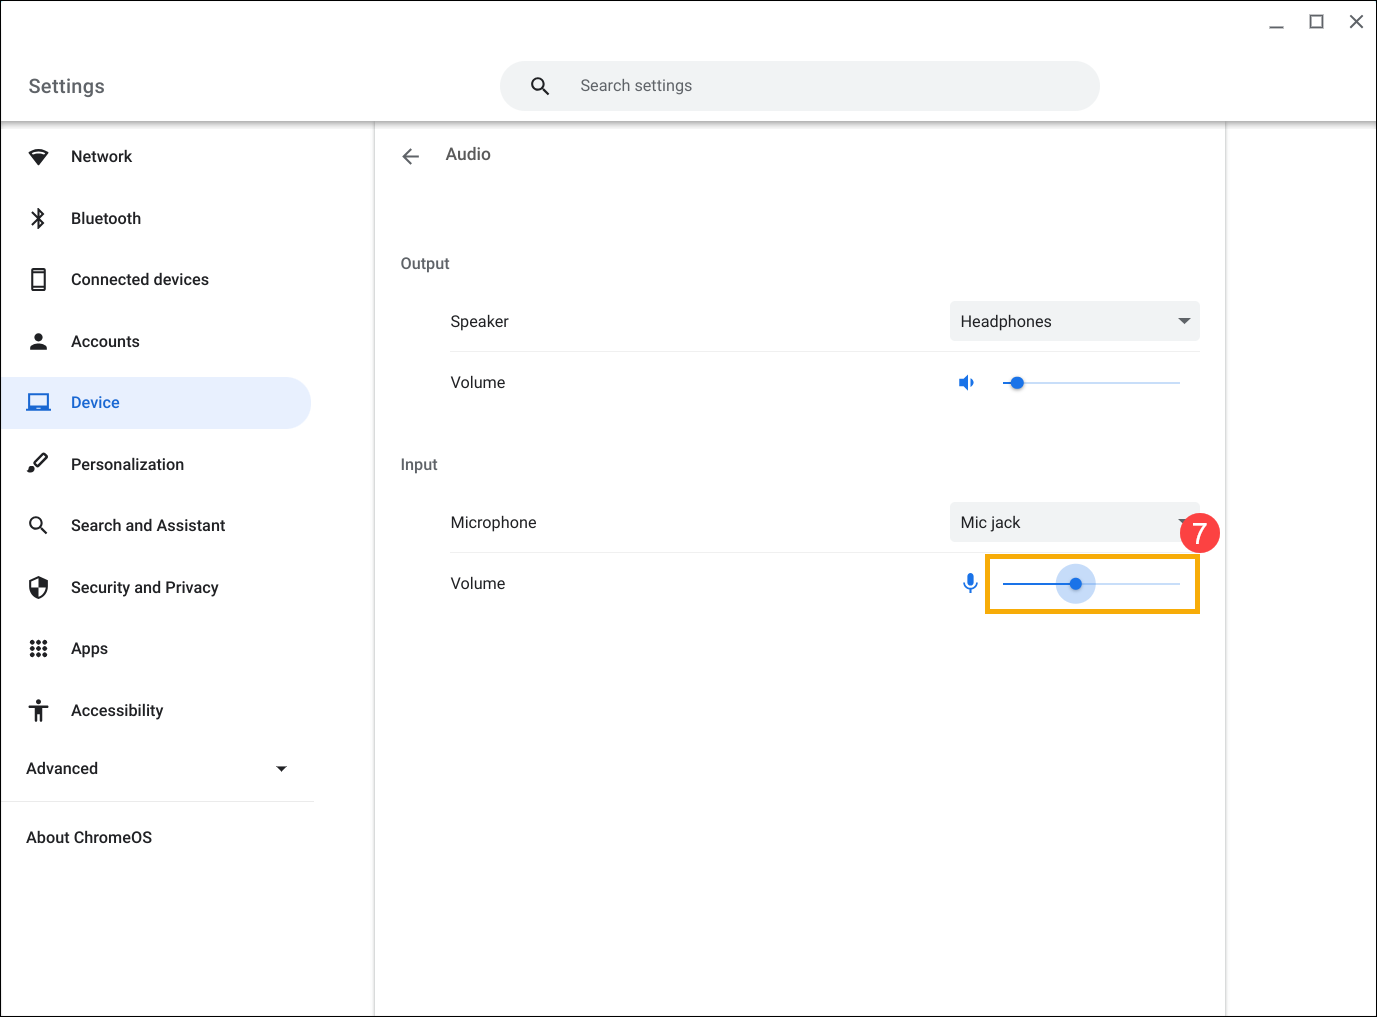
- Click on the [Status Bar]① in the lower right corner of the screen, then click [Settings]②.
- Click [Device]③, then select [Audio]④.

- Click the drop-down menu for the Microphone and select the correct input device⑤.
- If the volume icon appears grayed out
 ⑥, it indicates that the microphone is muted. Click the volume icon again to unmute it.
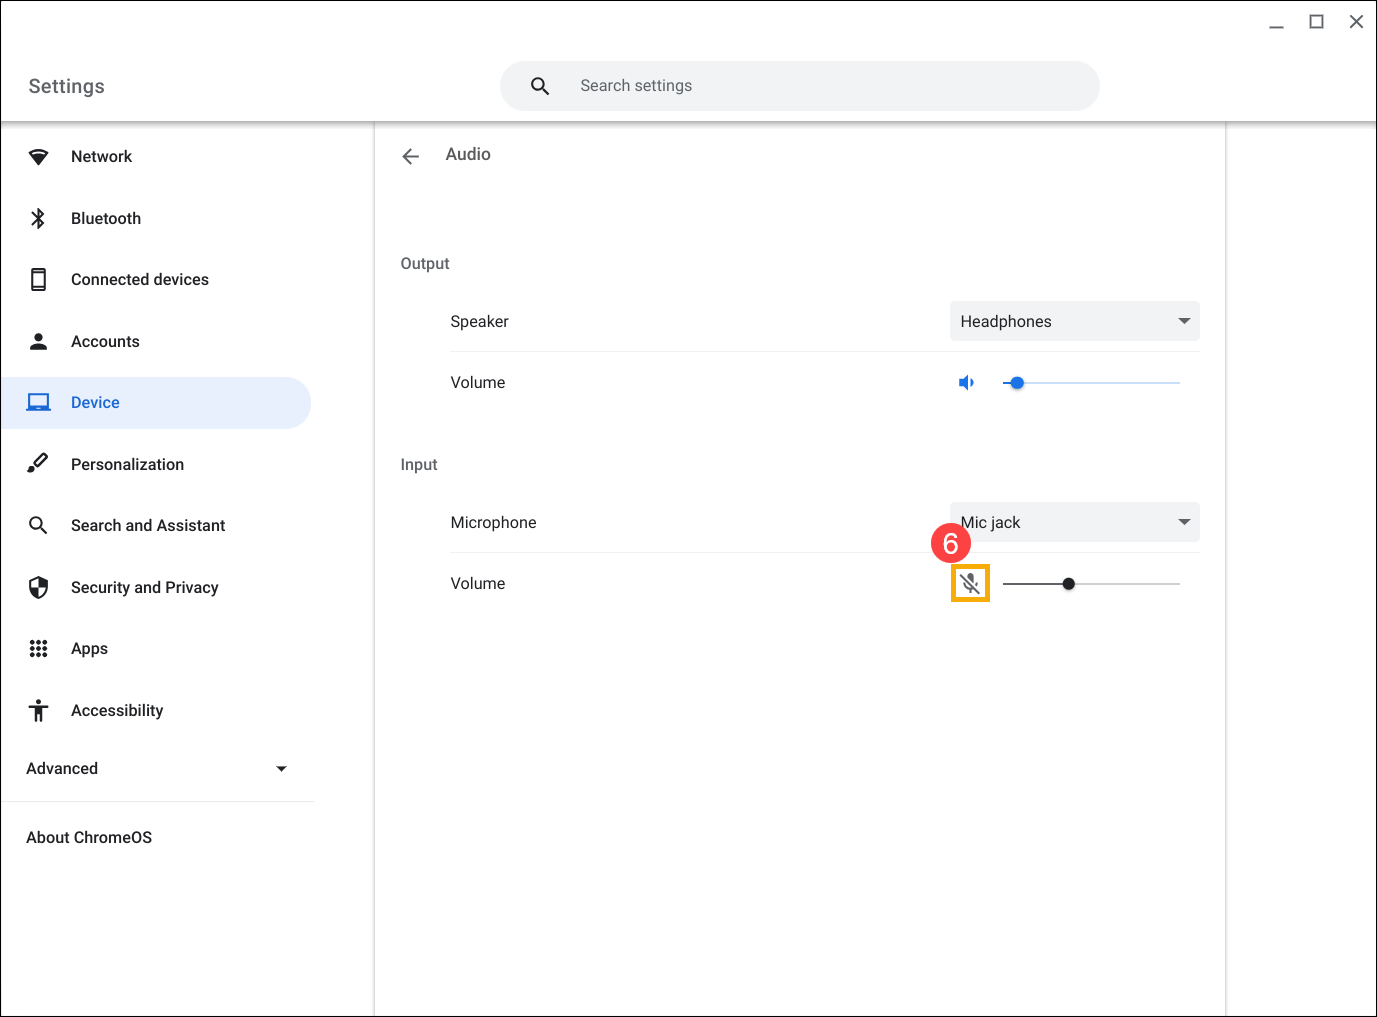
- Adjust the input volume by dragging the volume slider left or right to the appropriate level⑦.
Granting 'Microphone' Access to Applications
Applications must acquire the relevant permissions to utilize the microphone on the Chrome operating system. Frequently, the system will prompt you to grant access when an application requires microphone usage for the first time.
If you haven't provided access or require modifying settings, the following steps utilize the Google Meet application as an example.
- Click on the [Status Bar]① in the lower right corner of the screen, then click [Settings]②.
- Click [Apps]③, and then select [Manage your apps]④.
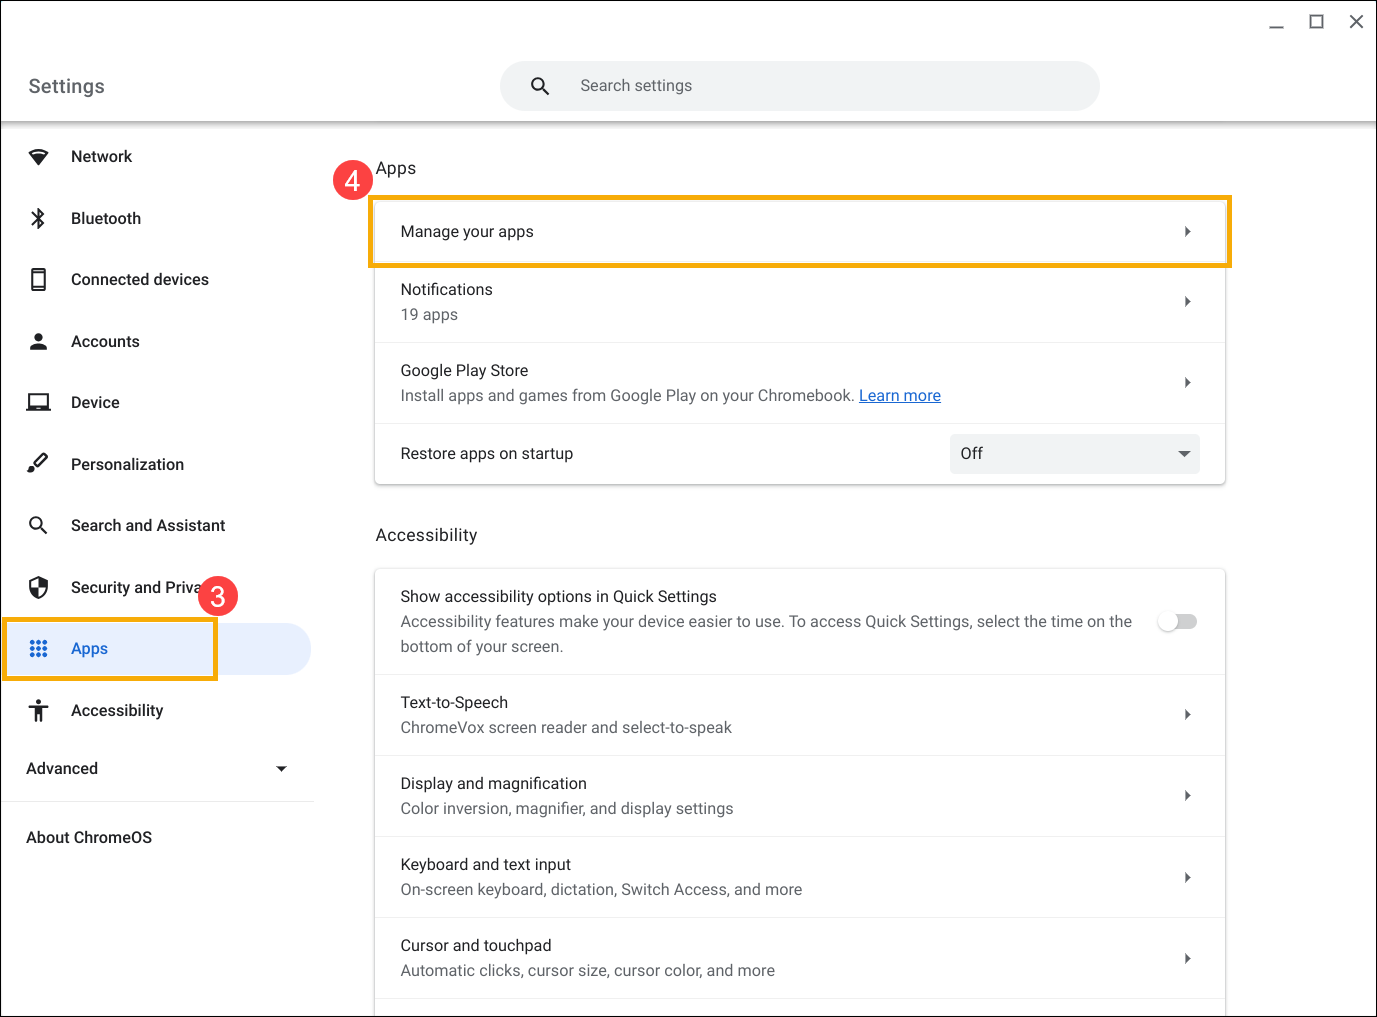
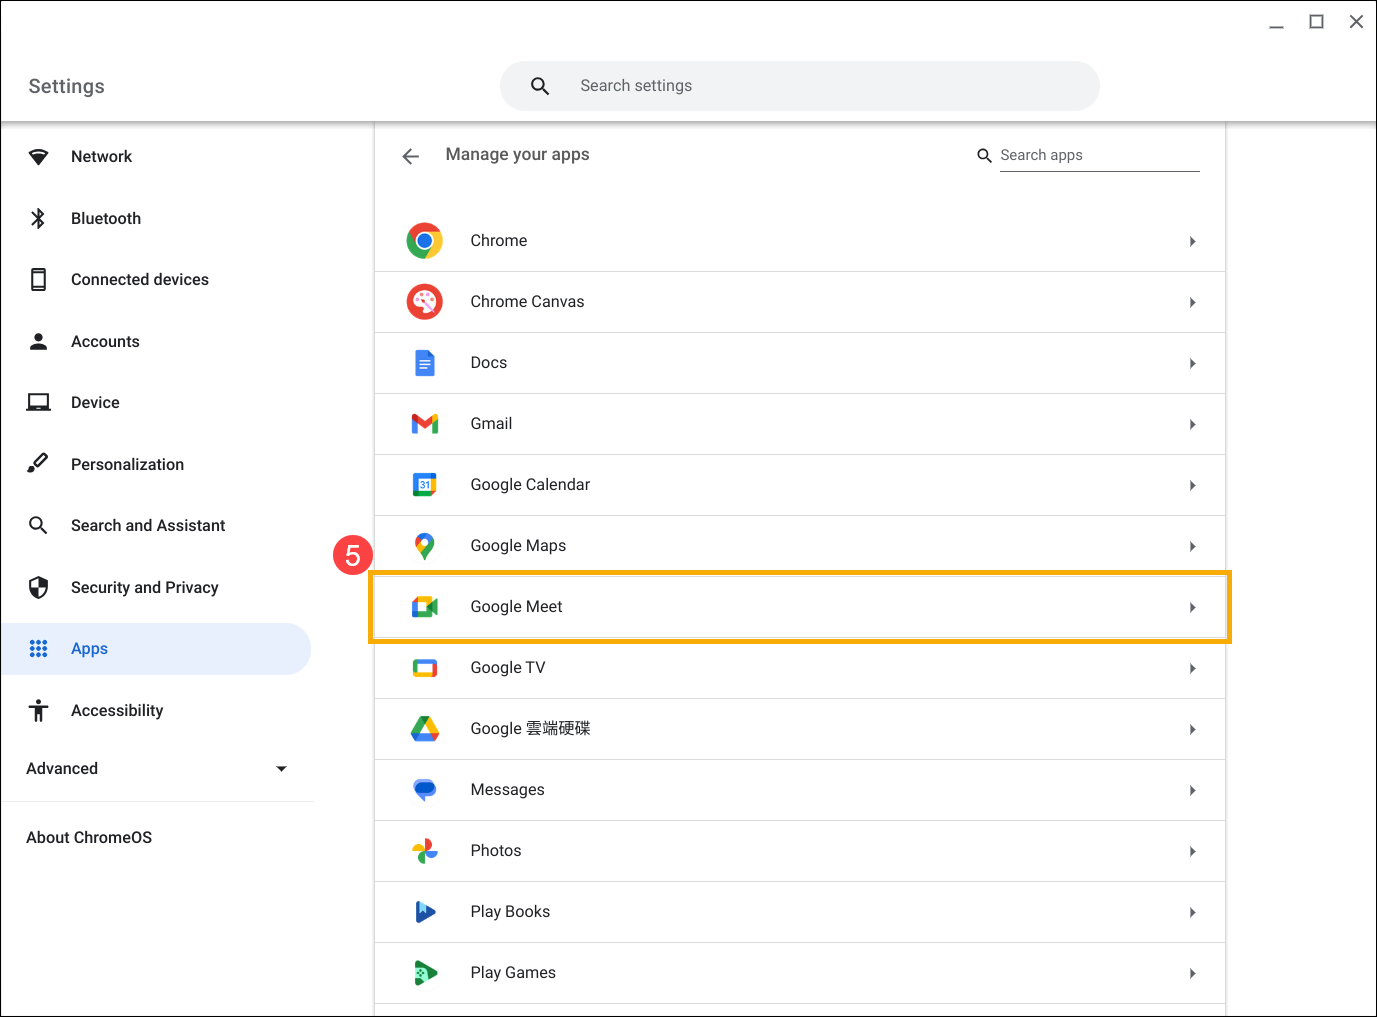
- Choose the application for which you want to modify settings⑤.
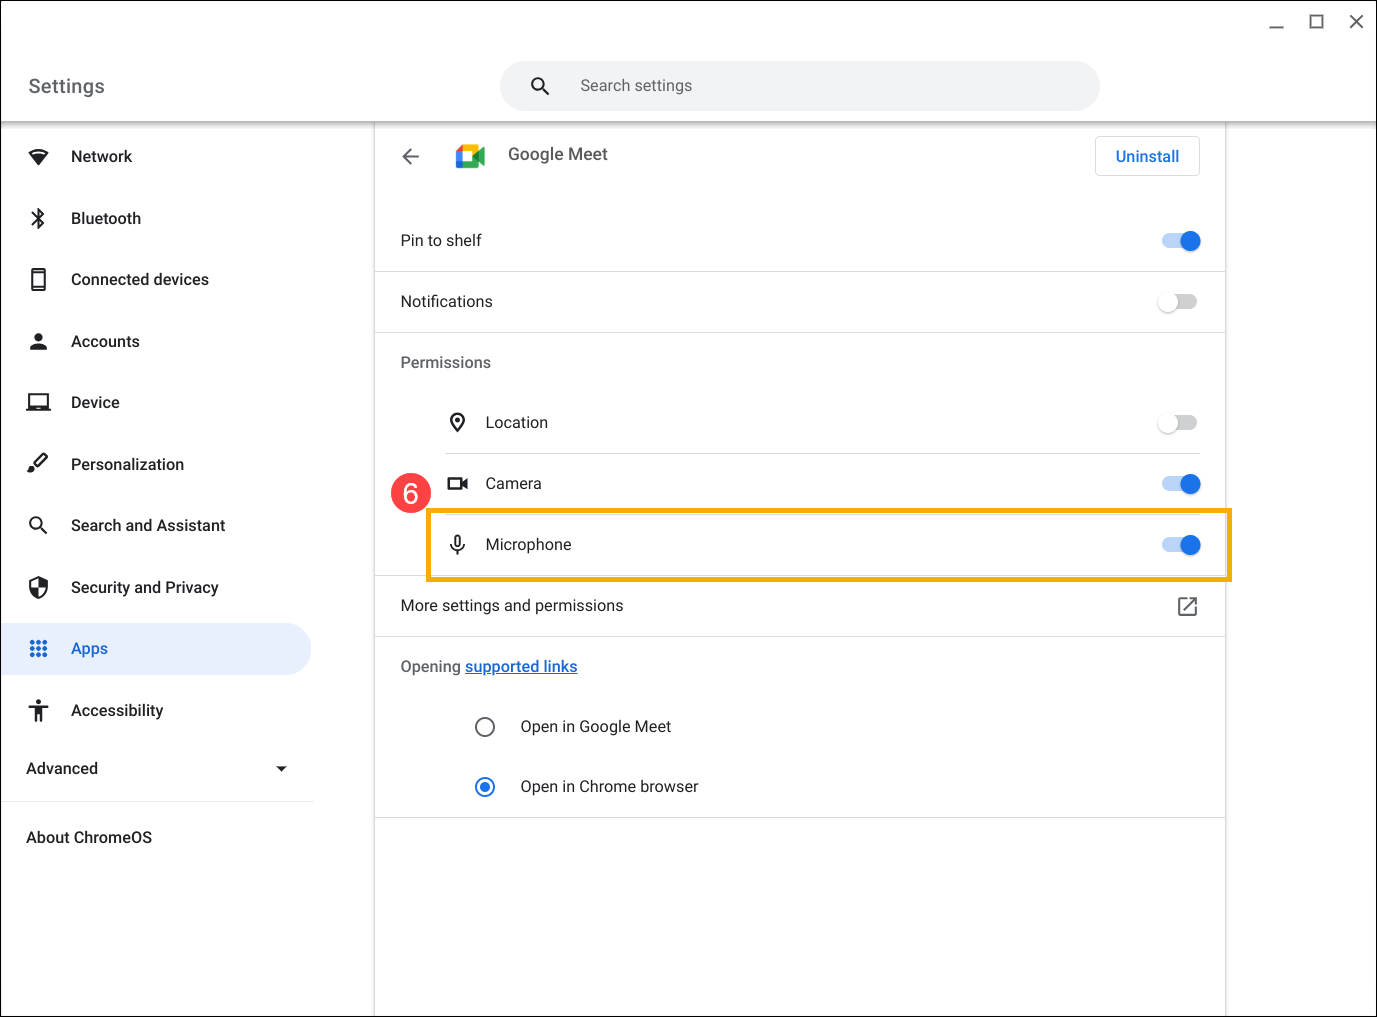
- Verify that the permission setting for [Microphone] is enabled⑥.
- If other applications can use the camera properly, consider uninstalling the app where it doesn’t work, then reinstalling the app.
Chrome Browser or Tabs unable to utilize Microphone
When attempting to use the microphone within the browser, cached data can sometimes lead to audio issues. Try clearing the browser's cache and browsing data, then reload the webpage to test the audio.
- Launch Google Chrome browser. Click on the [Customize and control Google Chrome] icon① in the upper right corner of the browser, select [More tools]②, and then click [Clear browsing data]③.

- In the 'Time range' section, choose 'All time,' and select both 'Cookies and other site data' and 'Cached images and files.' Finally, click [Clear data]④.

Further Audio Troubleshooting for Chrome Browser
If the above solution does not resolve your microphone issue, you can try the following steps to verify relevant settings:
- Launch Google Chrome browser. Click on the [Customize and control Google Chrome] icon① in the upper right corner of the browser, and then click [Settings]②.

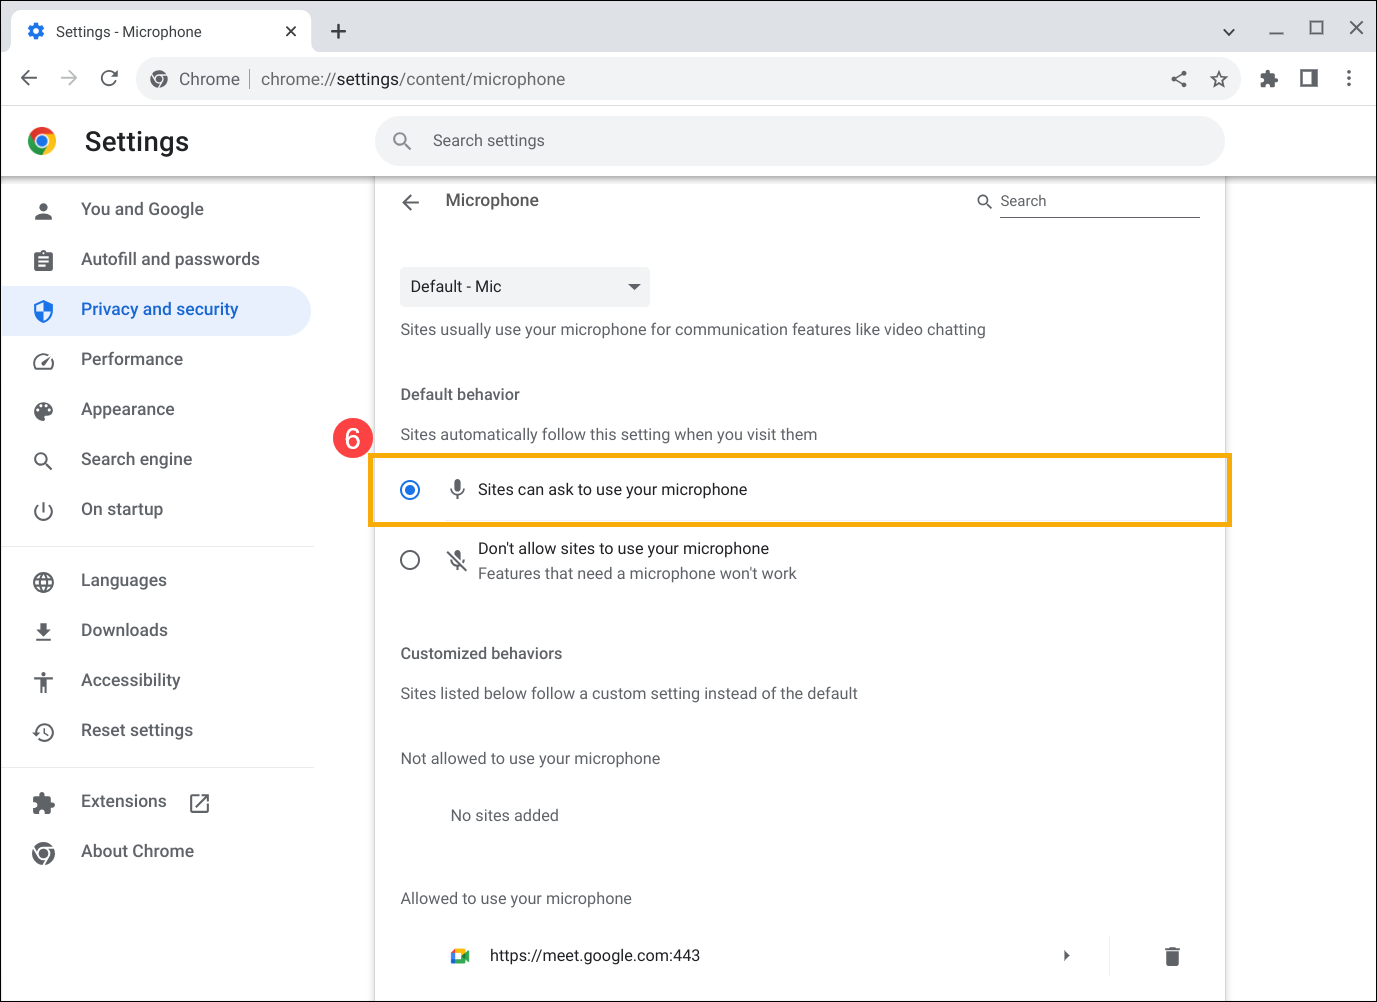
- Click [Privacy and security]③, and then select [Site settings]④.

- Under Permissions settings, click [Microphone]⑤.
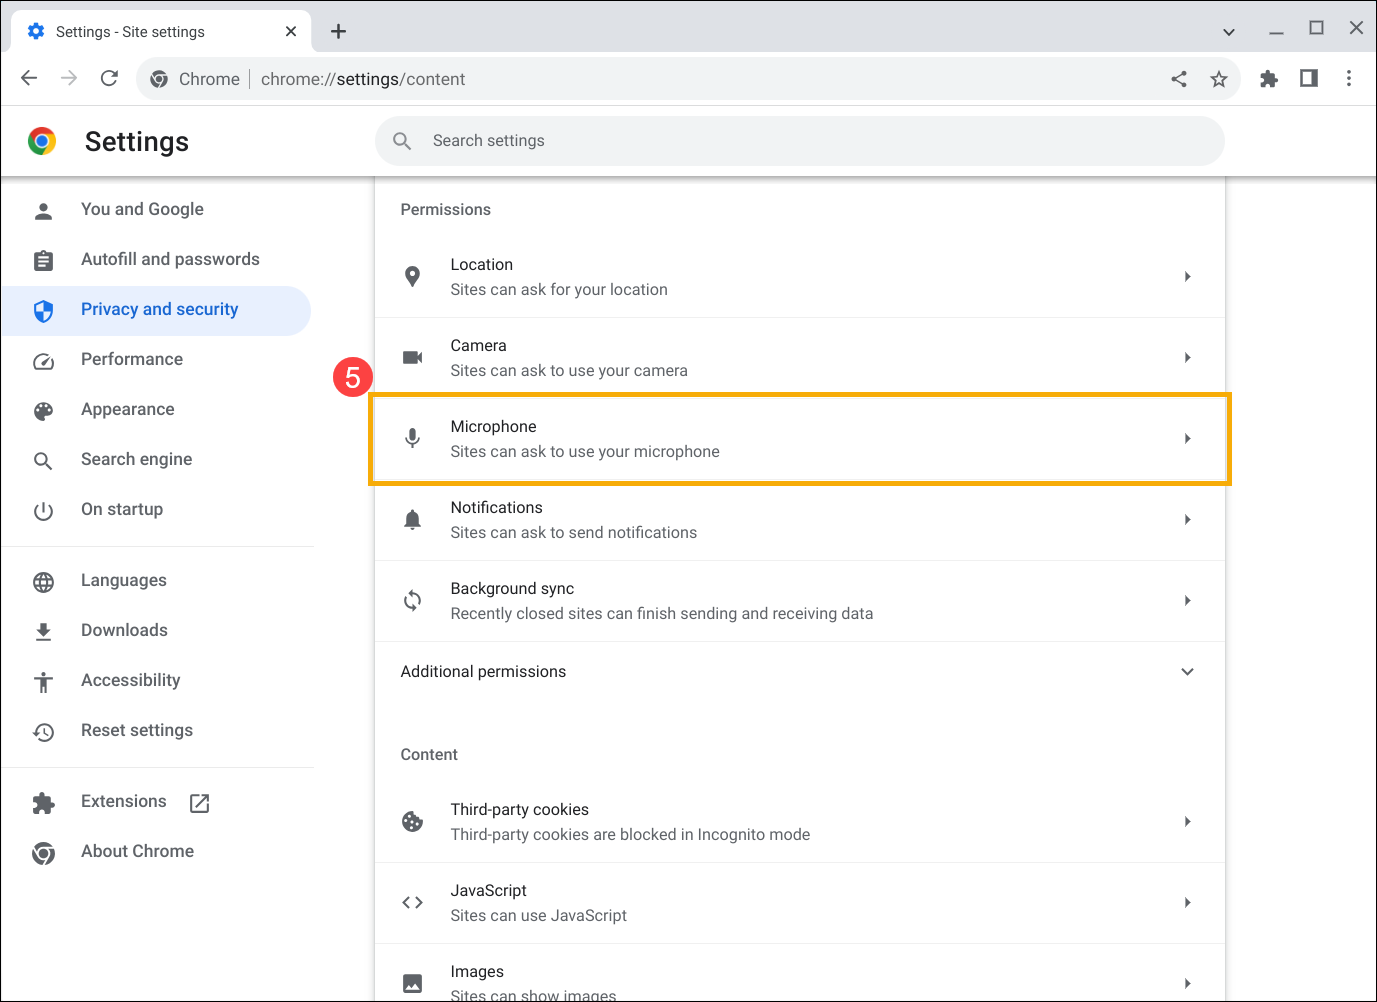
- Check [Sites can ask to use your microphone]⑥.
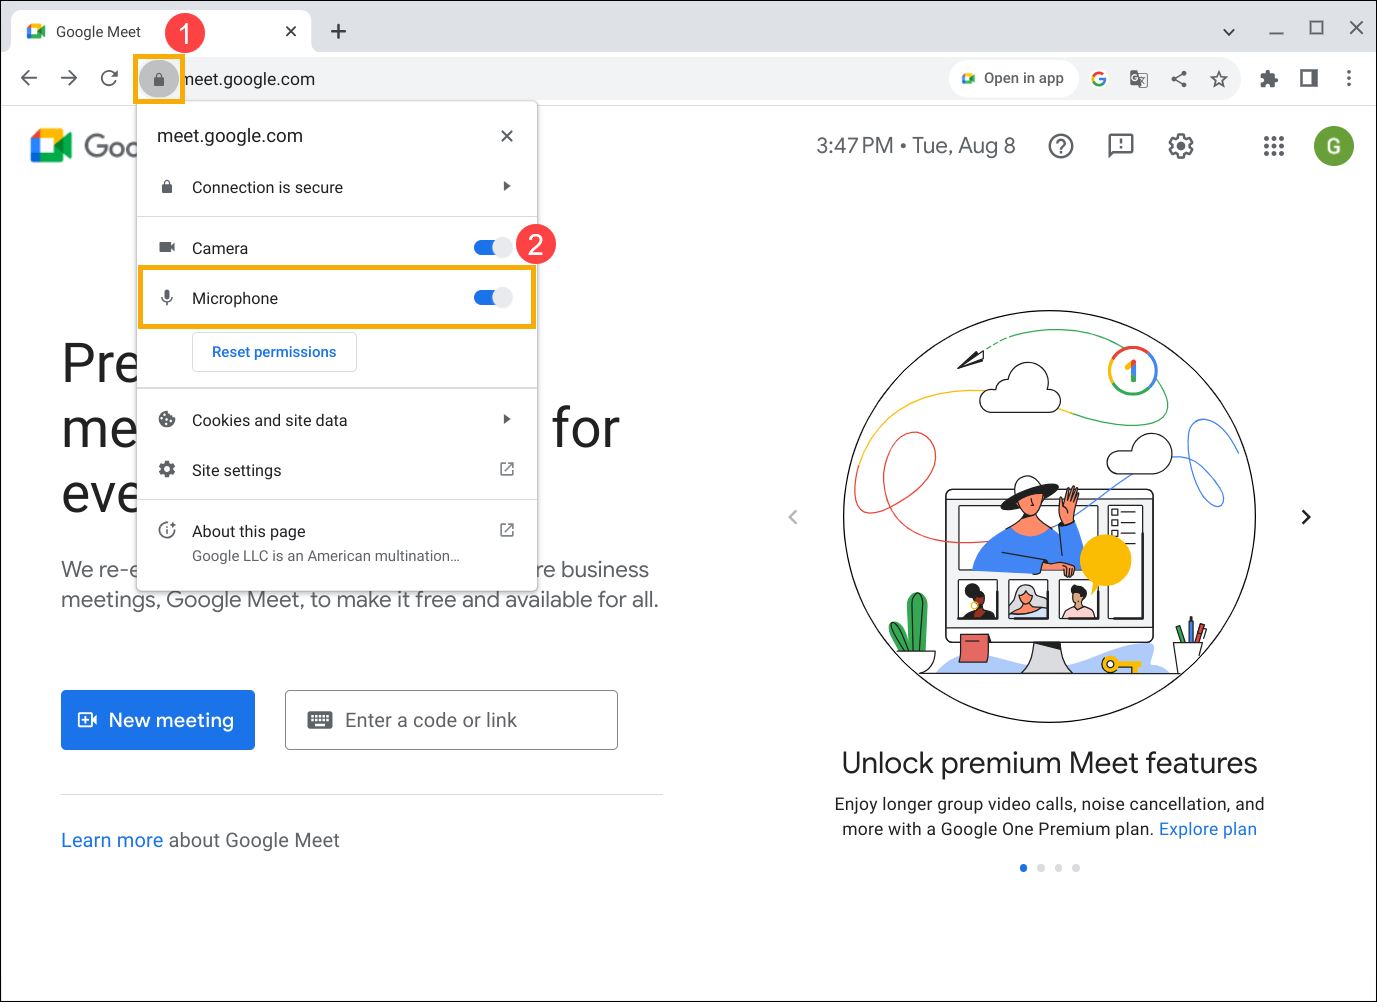
If audio issues persist only on specific tabs, click on the [View site information] icon![]() ① within that tab, and then enable the [Microphone] permission②.
① within that tab, and then enable the [Microphone] permission②.
Additional troubleshooting methods
If your microphone issue persists despite trying the above methods, please attempt the following steps:
- Restart your Chromebook. Turn off your Chromebook, then wait a few seconds before restarting them.
Note: To restart the Chromebook, hold the [Power button] until the device turns off, then turn it on again. - Update Chrome OS. Ensure your Chromebook has the latest version of Chrome OS installed. To check for available updates, refer to this article: Updating Chromebook's Operating System.
- Perform a hardware reset on your Chromebook. Refer to this article for instructions: How to Reset Chromebook Hardware Settings.
- If the above troubleshooting steps have been completed but the problem persists, consider resetting or recovering your Chromebook.
Reset (Powerwash) your Chromebook to factory settings. - Recovery Chromebook operating system.
You can also refer to the Google Chromebook Help on the official website for more detailed information:
https://support.google.com/chromebook/answer/6309225
If your issue remains unresolved, please contact the ASUS customer service center for further assistance.