Related Topics
[Windows 11/10] Troubleshooting - Unable to Enter Sleep or Hibernate Mode
Applicable Products: Notebook, Desktop, All-in-One PC, Gaming Handheld
If you experience that the device doesn’t go into Sleep or Hibernate modes, please refer to the following troubleshooting steps.
Please go to the corresponding instruction based on the current Windows operating system on your device:
Windows 11 operating system
Table of Contents:
Check power plan settings
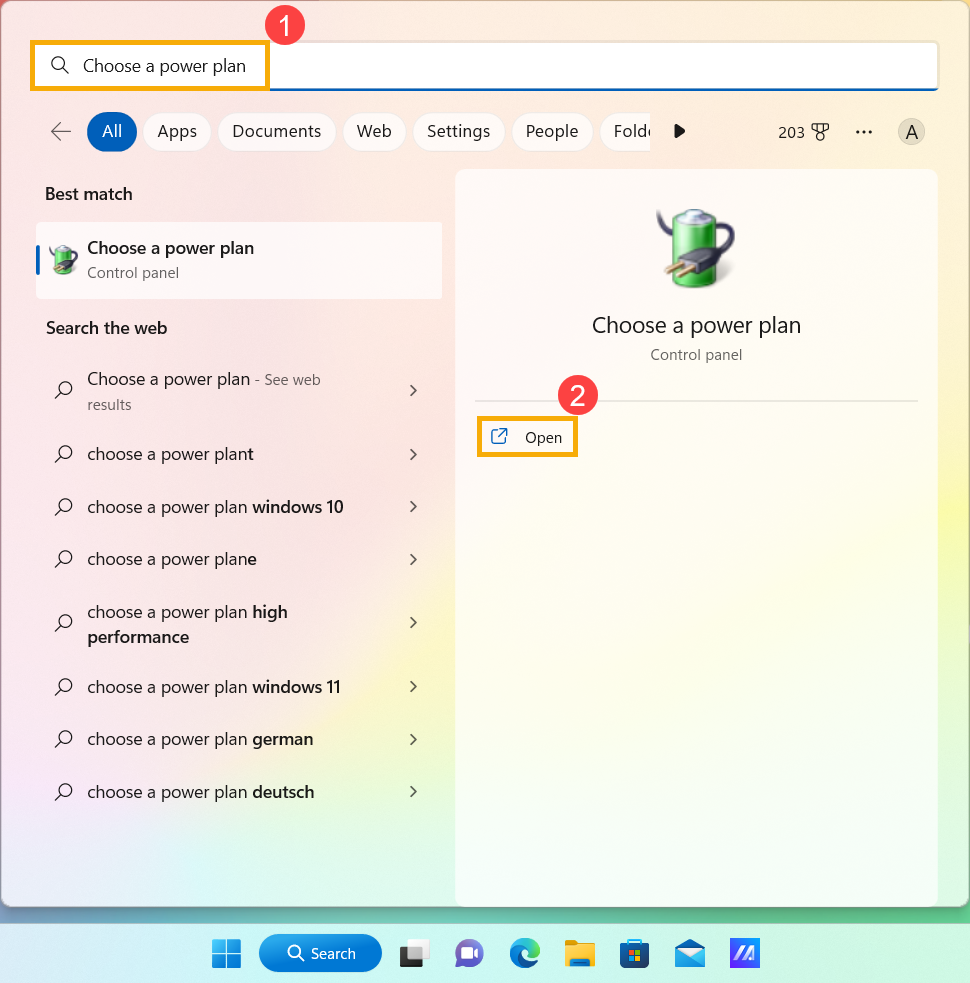
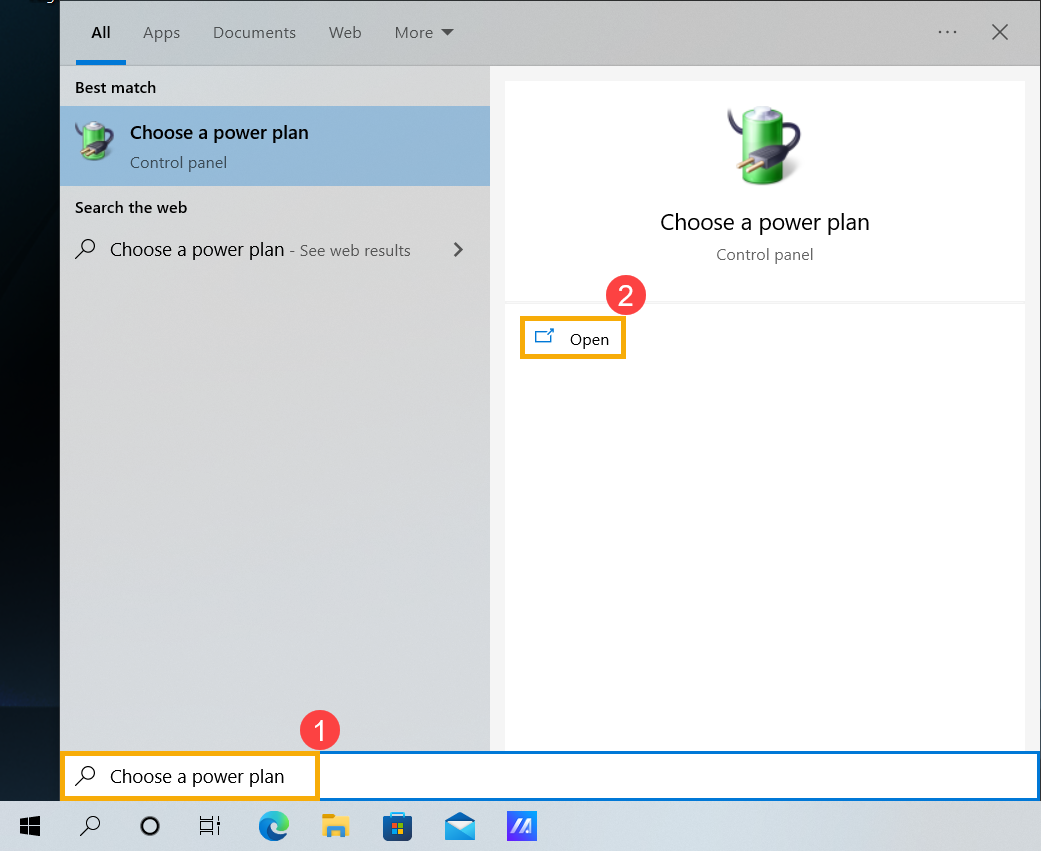
- Type and search [Choose a power plan] in the Windows search bar①, then select [Open]②.
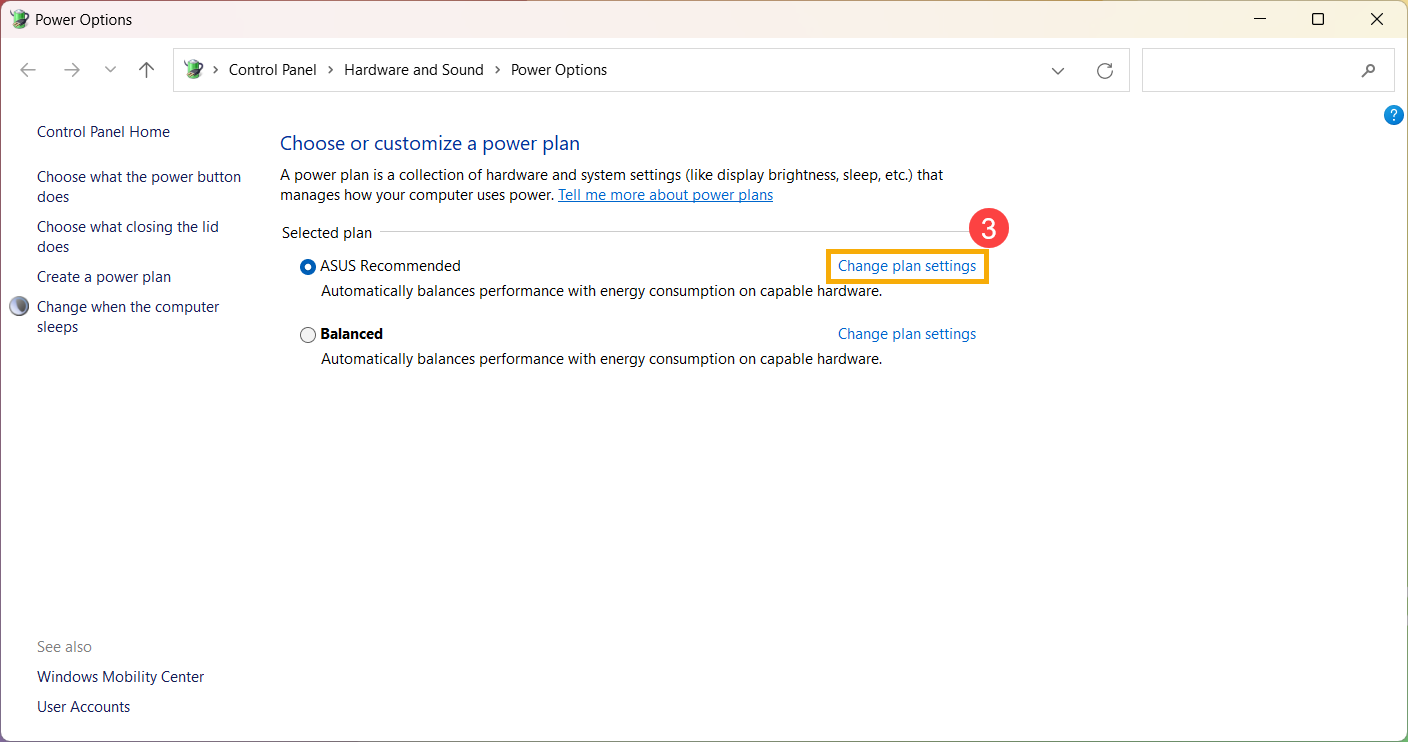
- Click [Change plan settings]③ next to the current power plan.
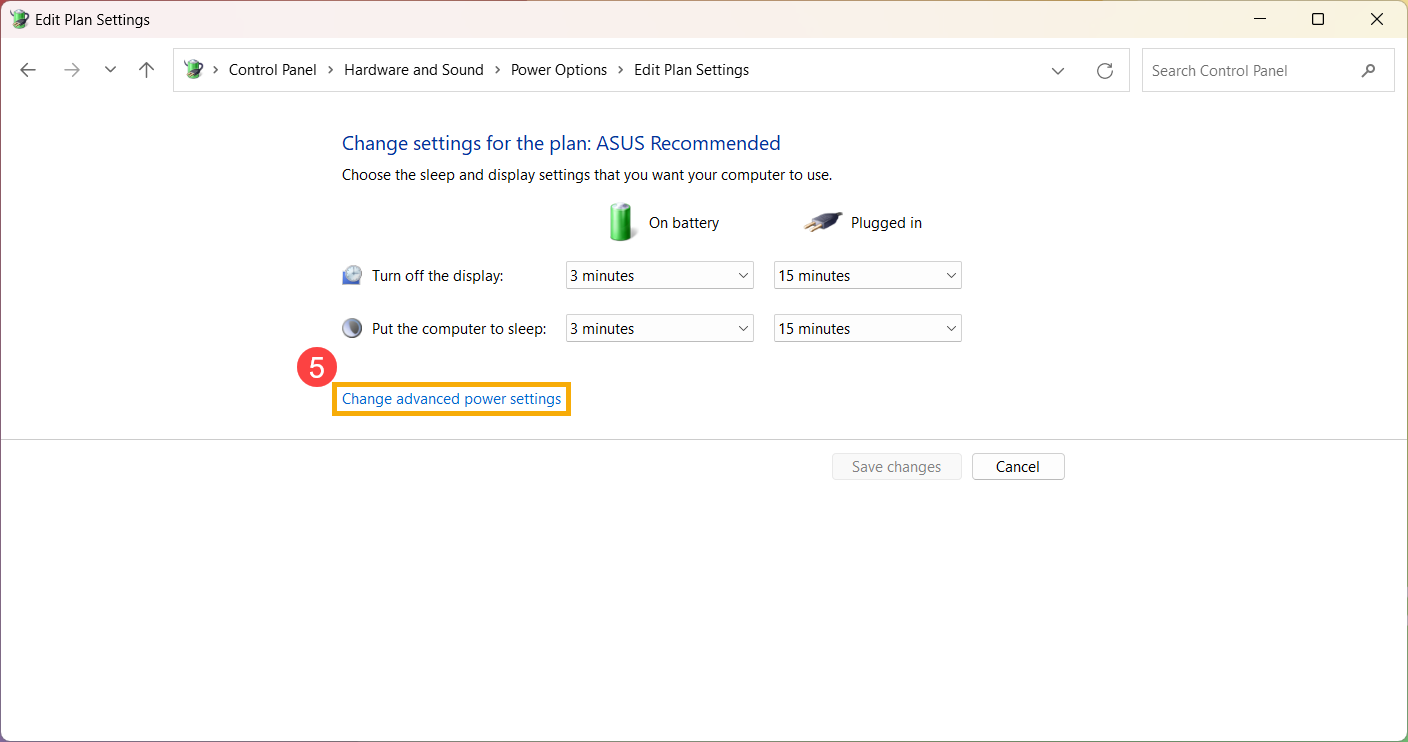
- In the Put the computer to sleep option, select the time setting to meet your requirement when the power is On battery and Plugged in④.

- Click [Change advanced power settings]⑤.
- Check the hard disk turning off time that none will be set to Never⑥. (Set 0 minutes will automatically change to Never.)
Note: If you set the hard disk is Never turned off, the device will not automatically go into Sleep or Hibernate mode.
Note: If there are fewer power options in your device, it may be a Modern Standby supported model. Here you can learn more about Why does my power options miss some settings. Please continue to the next troubleshooting.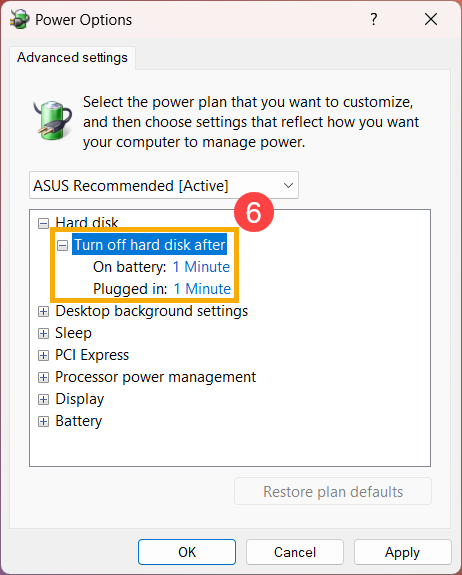
- Check the Allow wake timers meets your requirement⑦.
Note: This setting prevents programs from waking your device. If you want a scheduled task to wake your device, you have to change this setting back to Enable.
Note: If there are fewer power options in your device, it may be a Modern Standby supported model. Here you can learn more about Why does my power options miss some settings. Please continue to the next troubleshooting.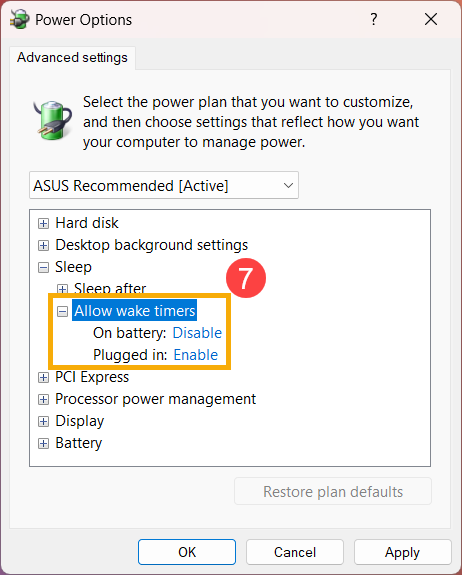
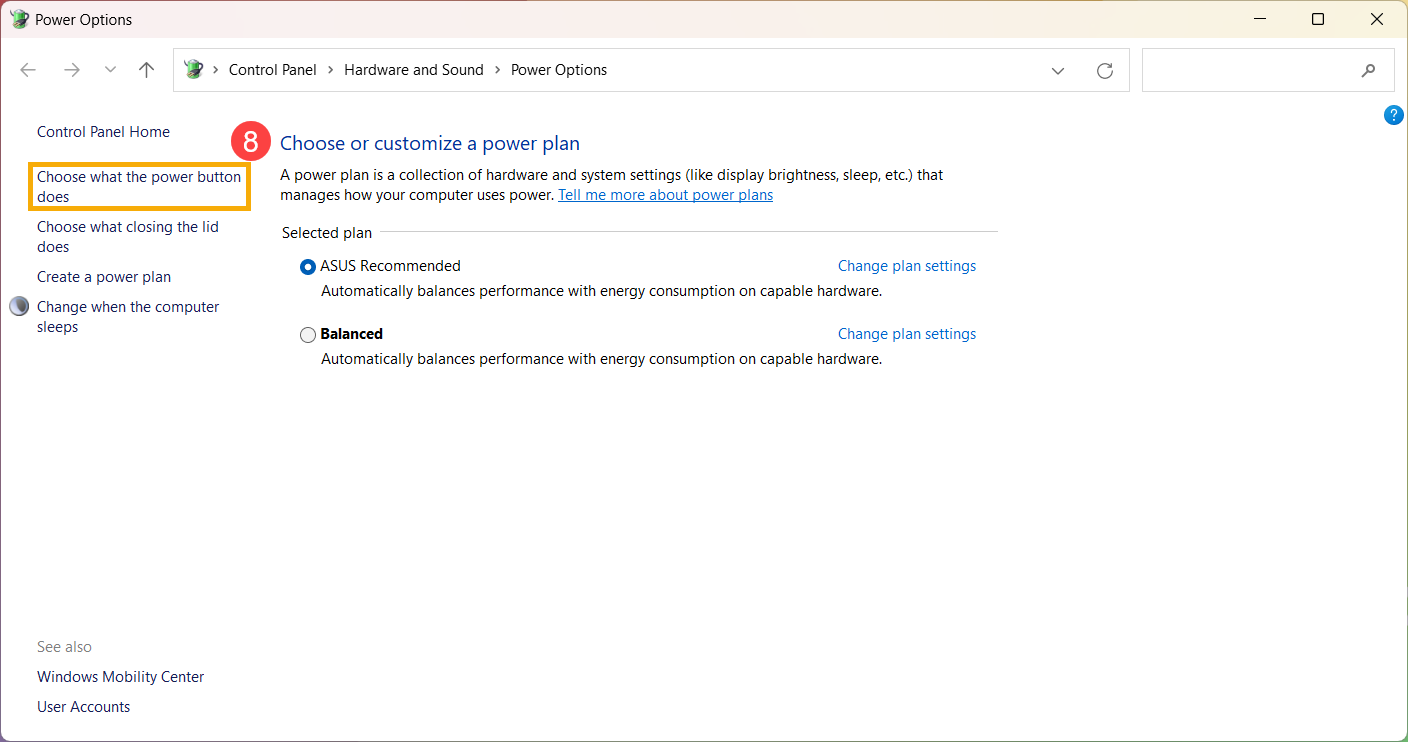
- Select [Choose what the power button does]⑧.
- Check the action of When I press the power button and When I close the lid to meet your requirements⑨.
Note: Desktop computers, All-in-One PCs, and gaming handhelds do not have the 「When I close the lid」 setting.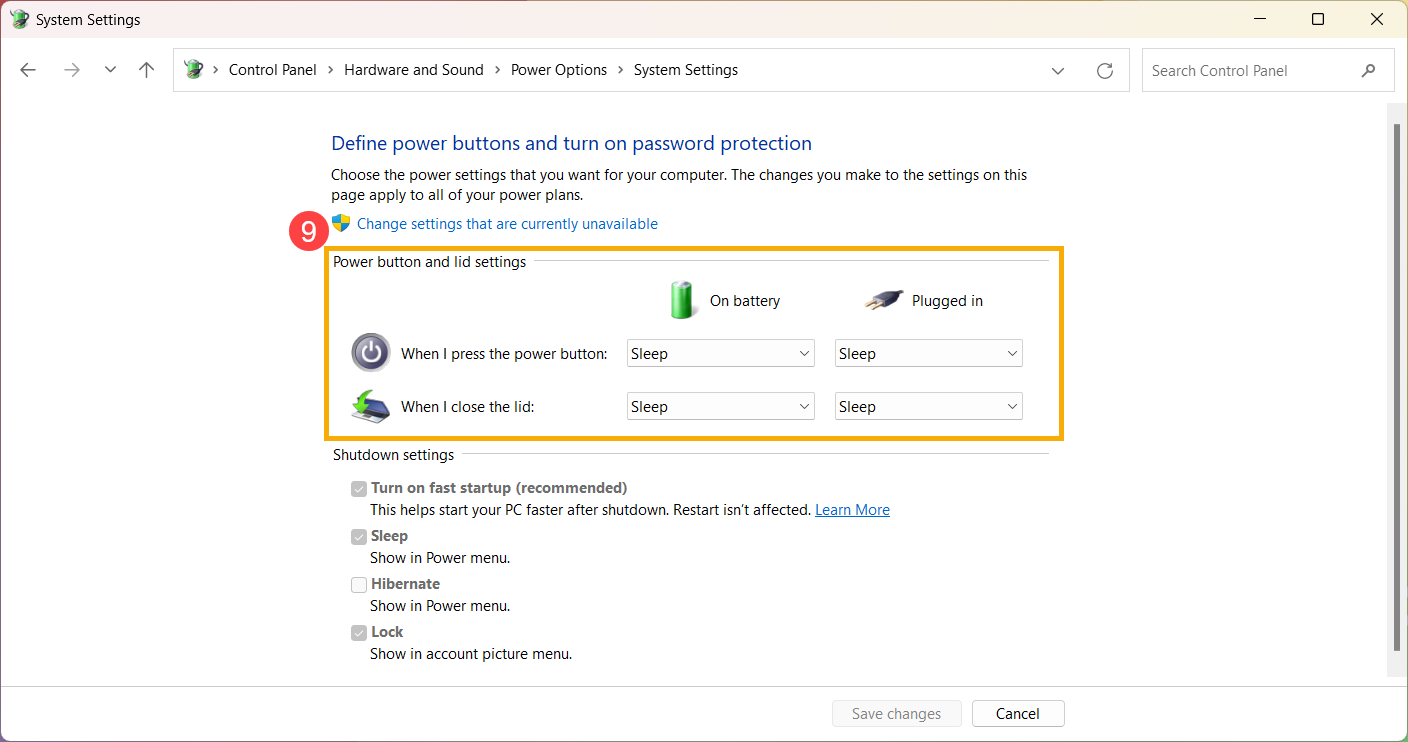
- If the hibernate option is not available as default in your device, click [Change settings that are currently unavailable]⑩.
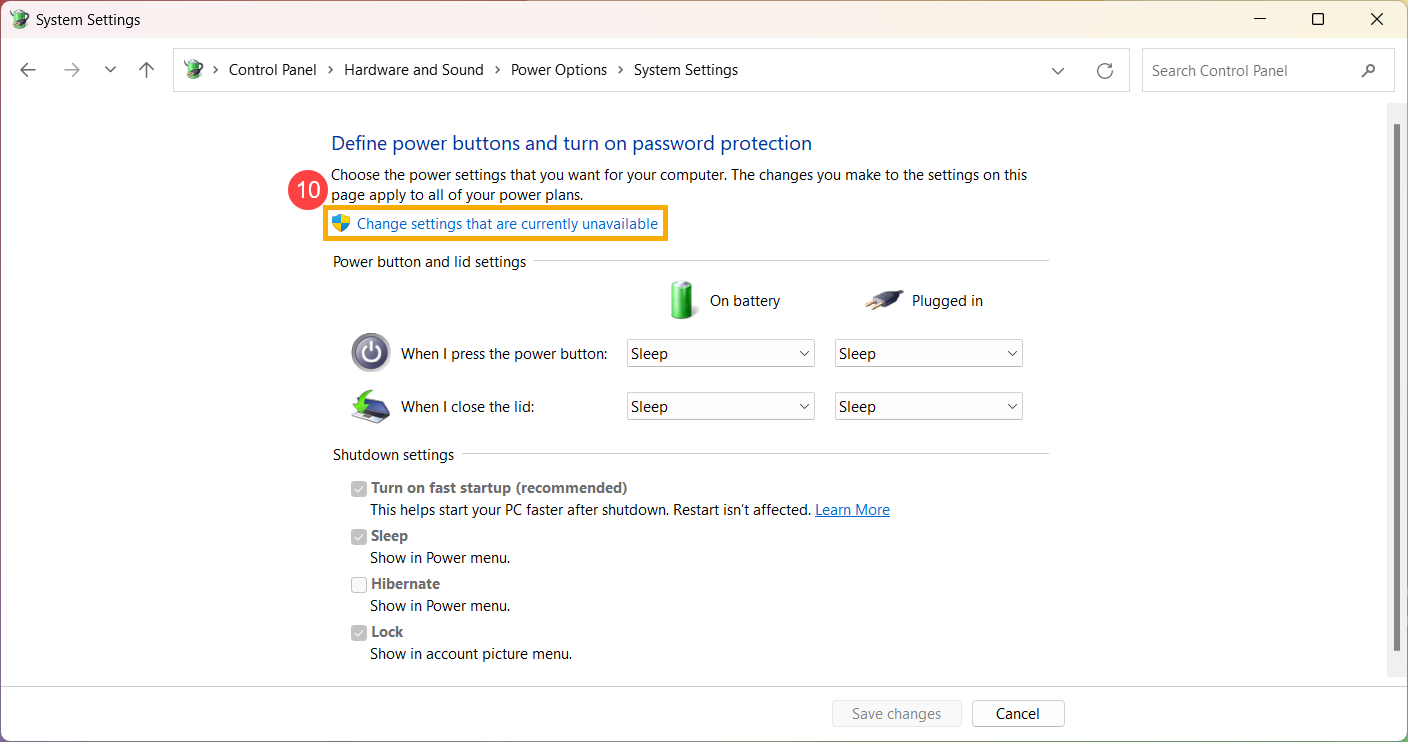
Check the box to Hibernate setting⑪, then select [Save changes]⑫. You will be able to choose Hibernate mode.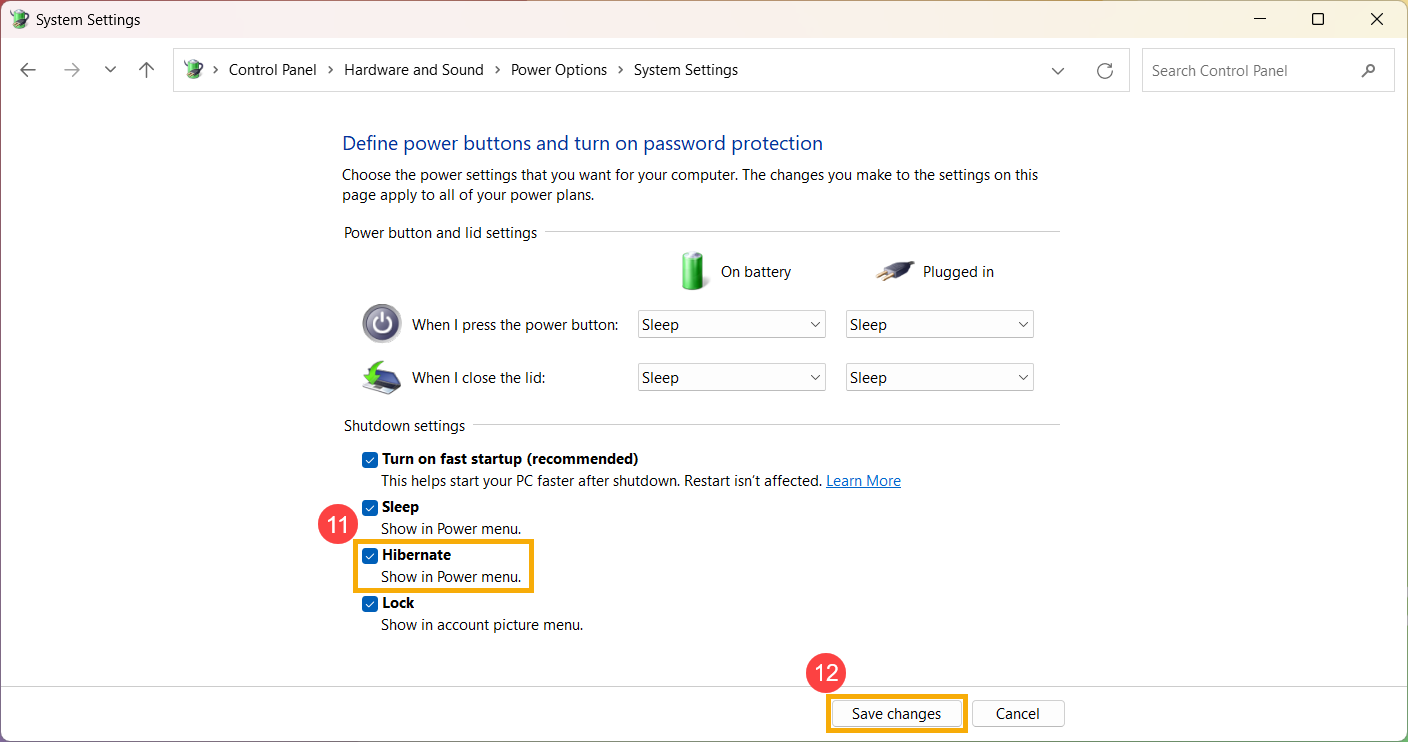
If the problem persists, please continue to the next troubleshooting.
Remove accessories and Update BIOS / Windows packages / drivers to the latest version
- Disconnect all external devices, including the keyboard, mouse, external hard drive, printer, memory cards, CDs in the optical drive, and any adapter cards in card readers. Sometimes, external devices might cause your system to malfunction.
Note: Also, disconnect all external displays. If it's a desktop computer, start with one external display to verify that your computer can boot and display properly.
Note: If your device supports Modern Standby mode, your external devices have to support the power-saving feature as well. Otherwise, your device may not go into Modern Standby mode. Here you can learn more about Modern Standby Introduction. - Regularly updating BIOS, Windows, and drivers can enhance system stability and performance. Ensure that your device is using the latest versions. Learn more about updating BIOS:
How to update the BIOS version in Windows system
How to use EZ Flash to update the BIOS version
(For desktop products, please refer to ASUS Motherboard EZ Flash 3 Introduction.)
Learn more about updating Windows and drivers:
How to execute Windows Update
How to update drivers via System Update in MyASUS
If the problem persists after you have updated BIOS/Windows packages/drivers to the date, please continue to the next troubleshooting.
Load BIOS default
If your device can't enter sleep or hibernation mode, it might be because the BIOS settings were changed. Try restoring the BIOS settings to their default values.
- Access the BIOS setup screen on the device.
When the device is not powered on, press and hold the [F2] key on the keyboard, then press the power button to turn on the device. Keep holding the [F2] key until the BIOS setup screen appears, then release the [F2] key. Learn more about How to enter the BIOS setup screen.
Note: For some older desktop models, you may need to press and hold the [Del] key during startup to access the BIOS configuration screen.
Note: For gaming handhelds, press and hold the [Volume Down] button and then press the power button. - Once in the BIOS setup screen, please refer to the article: How to restore BIOS settings.
- If the problem persists, please continue the next troubleshooting step If the problem persists, please continue to the next chapter for troubleshooting.
Check the background activity apps
Check if any apps are running or downloading/updating, such as Outlook is downloading mail, games update, Windows Update, Microsoft Store…etc., or antivirus software is scanning.
These may let your device not go into sleep or hibernate mode, and we recommend you wait to finish or close the app.
If the problem persists, please continue the next troubleshooting.
Use Troubleshooting tool in Windows
Note: Troubleshooter options may vary depending on the Windows version.
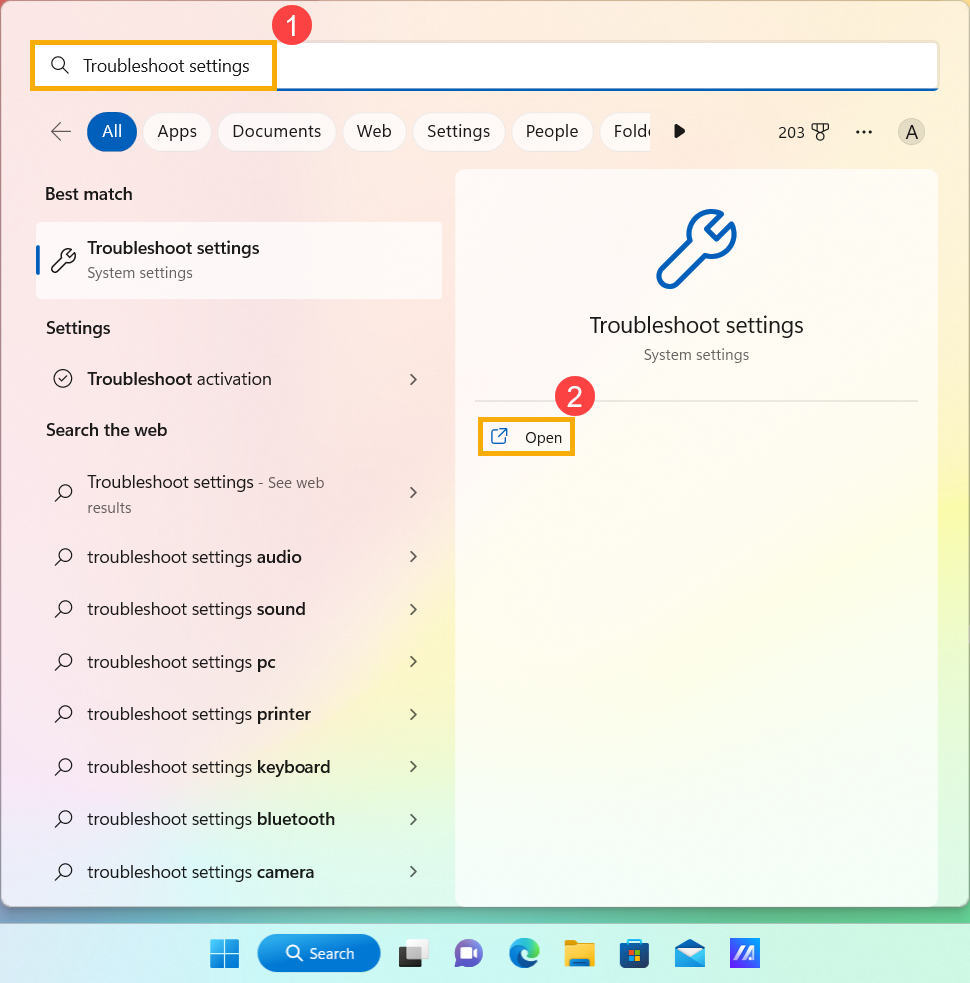
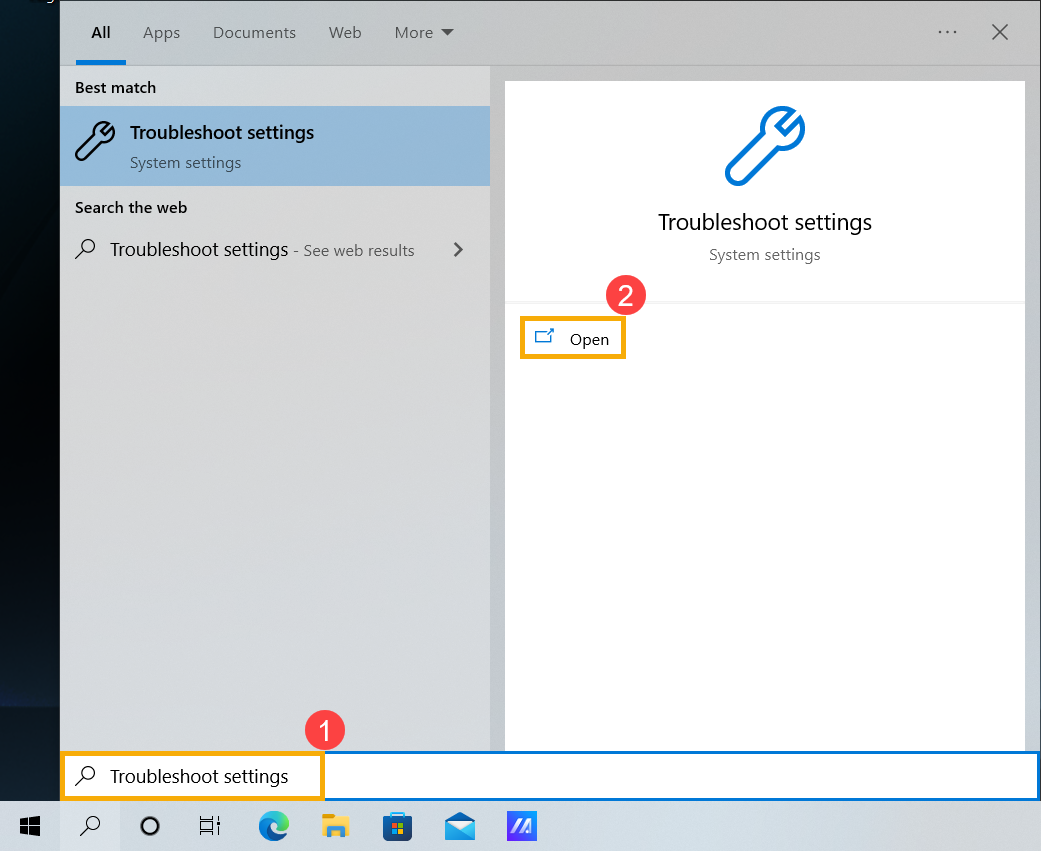
- Type and search [Troubleshoot settings] in the Windows search bar①, then click [Open]②.
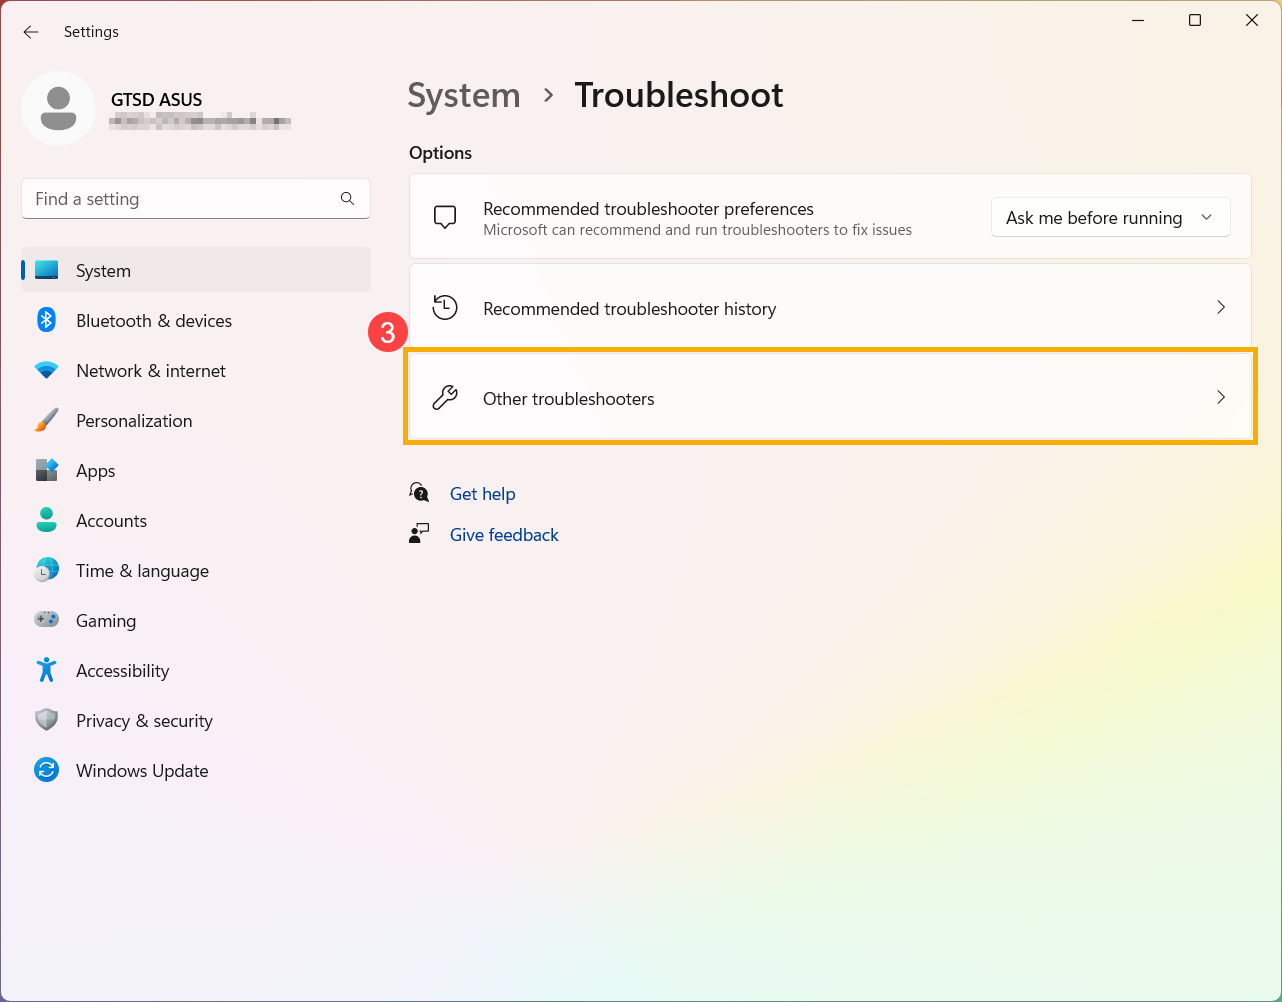
- Select [Other troubleshooters]③.
- Click [Run] on the Power option④.
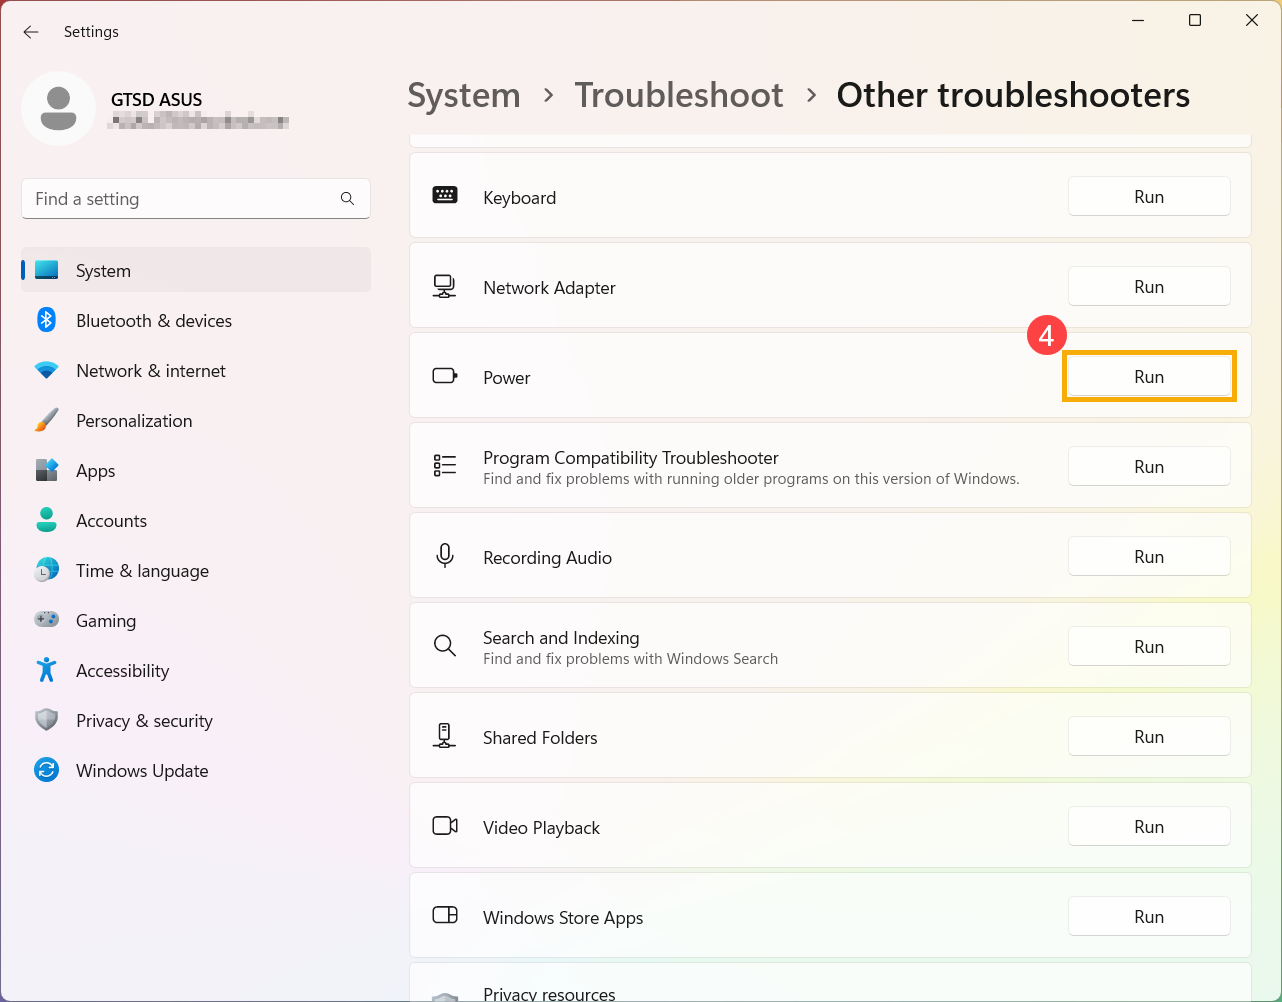
- Follow the on-screen instructions to complete the troubleshooting process. If the problem persists, please continue the next troubleshooting.
Perform a clean boot in Windows
A 「clean boot」 starts Windows with a minimal set of drivers and startup programs, so that you can determine whether a background program is interfering with your game or program. This is similar to starting Windows in Safe Mode, but provides you more control over which services and programs run at startup to help you isolate the cause of a problem. For more detail, please refer to How to perform a clean boot in Windows.
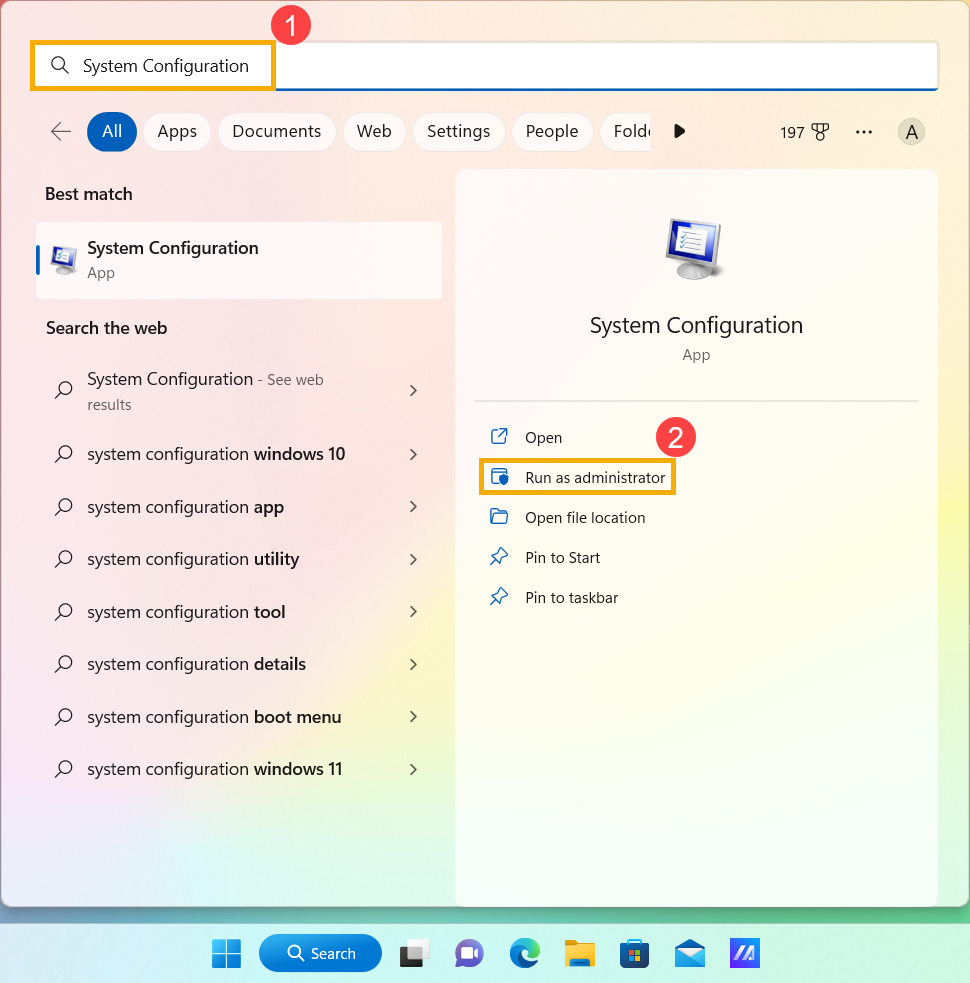
- Type and search [System Configuration] in the Windows search bar①, then click [Run as administrator]②.
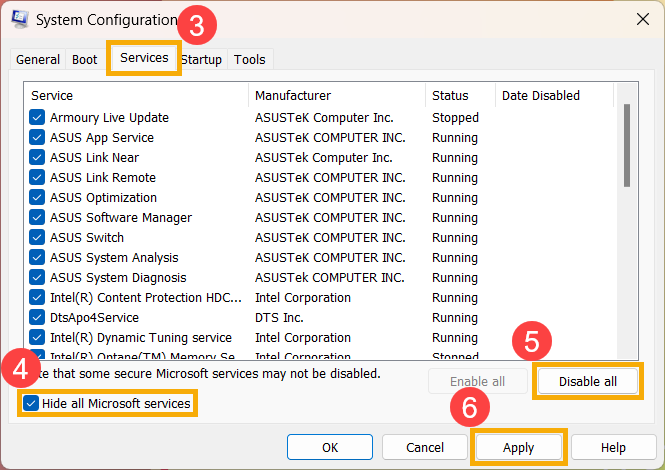
- On the [Services] tab of System Configuration③, check the box [Hide all Microsoft services]④, select [Disable all]⑤, then select [Apply]⑥.
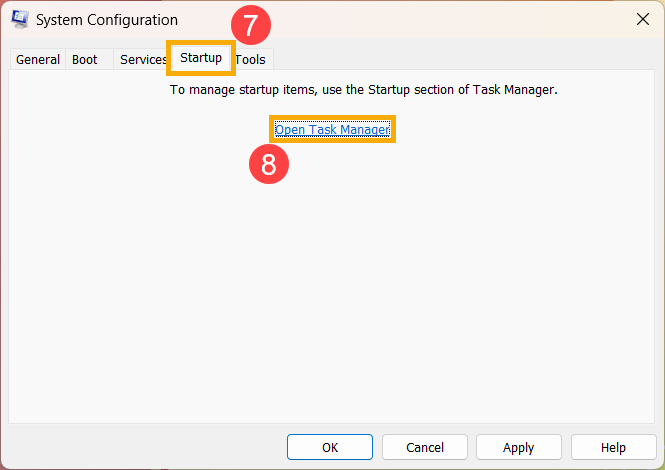
- On the [Startup] tab of System Configuration⑦, click [Open Task Manager]⑧.
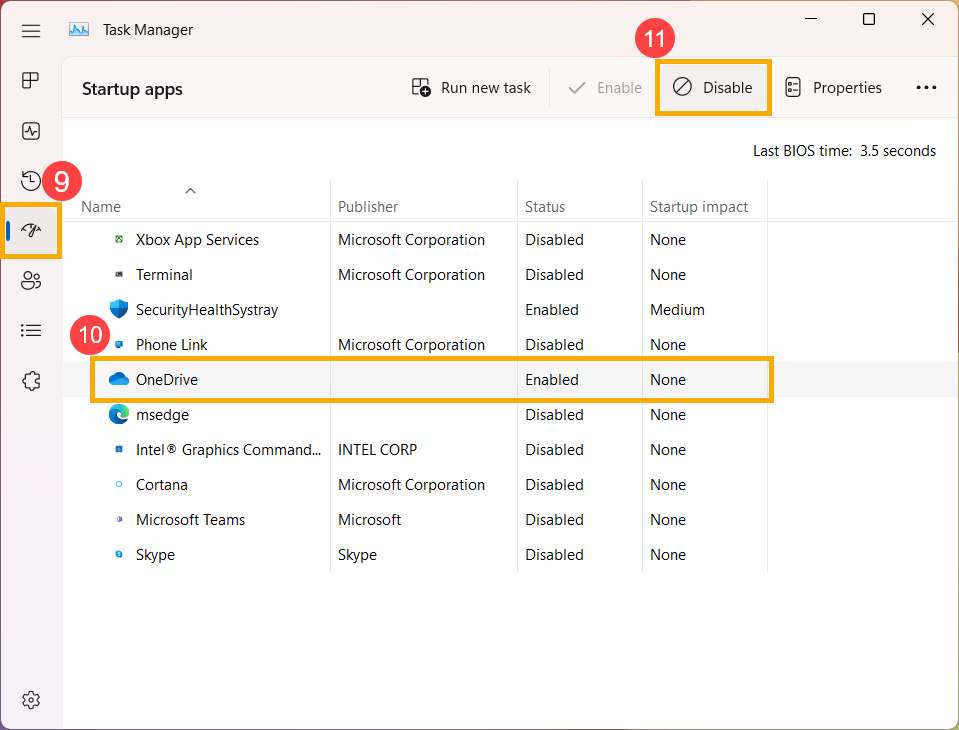
- On the [Startup] tab in Task Manager⑨, for each Enabled startup item, select the app⑩ and then select [Disable]⑪.
- Close Task Manager.
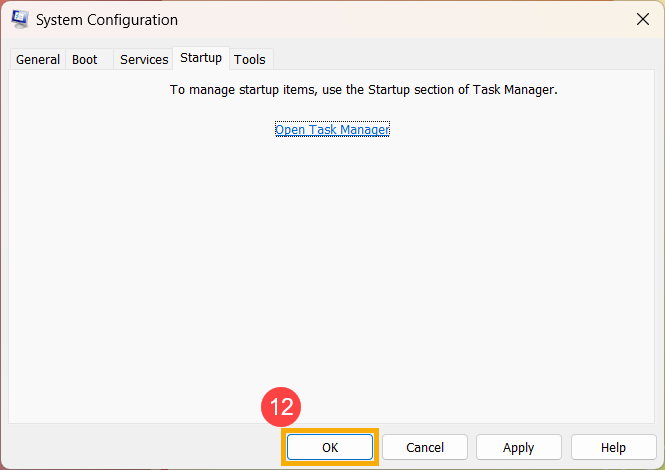
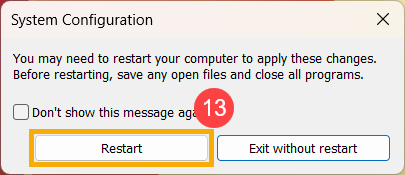
- On the Startup tab of System Configuration, select [OK]⑫, then select [Restart]⑬.
- When you restart the device, it will be in a clean boot environment. If your problem does not occur while the device is in a clean boot environment, then you can determine which startup application or service is causing the problem by systematically turning them on or off and restarting the device.
Turning on a single service or startup item and rebooting each time, repeat this process to find the problematic service or application - After you determine the startup item or the service that causes the problem, contact the program manufacturer to determine whether the problem can be resolved, or run Windows with the service unchecked or the Startup item Disabled.
Note: If you need to reset the device to start normally, please clear the check box [Hide all Microsoft services], select [Enable all], then select [Apply]. In Task Manager, enable all of the startup programs you had Disable before, select [OK] on the Startup table of System Configuration, then select [Restart].
If the problem persists, please continue to the next troubleshooting.
Restore the system from restore point
If the problem happens recently, and if you have ever created a restore point or there is an automatic system restore existed, try to restore the device to a point before the problem began to resolve the problem. Here you can learn more about How to use restore point to restore the system.
If the problem persists, please continue to the next chapter for troubleshooting.
Reset the system
If the problem persists after all troubleshooting steps are completed. Please backup your personal files, then reset the device to back to its original configuration. Here you can learn more about How to reset the system.
Windows 10 operating system
Table of Contents:
Check power plan settings
- Type and search [Choose a power plan] in the Windows search bar①, then select [Open]②.
- Click [Change plan settings]③ next to the current power plan.
- In the Put the computer to sleep option, select the time setting to meet your requirement when the power is On battery and Plugged in④.
- Click [Change advanced power settings]⑤.
- Check the hard disk turning off time that none will be set to Never⑥. (Set 0 minutes will automatically change to Never.)
Note: If you set the hard disk is Never turned off, the device will not automatically go into Sleep or Hibernate mode.
Note: If there are fewer power options in your device, it may be a Modern Standby supported model. Here you can learn more about Why does my power options miss some settings. Please continue to the next troubleshooting. - Check the Allow wake timers meets your requirement⑦.
Note: This setting prevents programs from waking your device. If you want a scheduled task to wake your device, you have to change this setting back to Enable.
Note: If there are fewer power options in your device, it may be a Modern Standby supported model. Here you can learn more about Why does my power options miss some settings. Please continue to the next troubleshooting. - Select [Choose what the power button does]⑧.
- Check the action of When I press the power button and When I close the lid to meet your requirements⑨.
Note: Desktop computers, All-in-One PCs, and gaming handhelds do not have the 「When I close the lid」 setting. - If the hibernate option is not available as default in your device, click [Change settings that are currently unavailable]⑩.
Check the box to Hibernate setting⑪, then select [Save changes]⑫. You will be able to choose Hibernate mode.
If the problem persists, please continue to the next troubleshooting.
Remove accessories and Update BIOS / Windows packages / drivers to the latest version
- Disconnect all external devices, including the keyboard, mouse, external hard drive, printer, memory cards, CDs in the optical drive, and any adapter cards in card readers. Sometimes, external devices might cause your system to malfunction.
Note: Also, disconnect all external displays. If it's a desktop computer, start with one external display to verify that your computer can boot and display properly.
Note: If your device supports Modern Standby mode, your external devices have to support the power-saving feature as well. Otherwise, your device may not go into Modern Standby mode. Here you can learn more about Modern Standby Introduction. - Regularly updating BIOS, Windows, and drivers can enhance system stability and performance. Ensure that your device is using the latest versions. Learn more about updating BIOS:
How to update the BIOS version in Windows system
How to use EZ Flash to update the BIOS version
(For desktop products, please refer to ASUS Motherboard EZ Flash 3 Introduction.)
Learn more about updating Windows and drivers:
How to execute Windows Update
How to update drivers via System Update in MyASUS
If the problem persists after you have updated BIOS/Windows packages/drivers to the date, please continue to the next troubleshooting.
Load BIOS default
If your device can't enter sleep or hibernation mode, it might be because the BIOS settings were changed. Try restoring the BIOS settings to their default values.
- Access the BIOS setup screen on the device.
When the device is not powered on, press and hold the [F2] key on the keyboard, then press the power button to turn on the device. Keep holding the [F2] key until the BIOS setup screen appears, then release the [F2] key. Learn more about How to enter the BIOS setup screen.
Note: For some older desktop models, you may need to press and hold the [Del] key during startup to access the BIOS configuration screen.
Note: For gaming handhelds, press and hold the [Volume Down] button and then press the power button. - Once in the BIOS setup screen, please refer to the article: How to restore BIOS settings.
- If the problem persists, please continue the next troubleshooting step If the problem persists, please continue to the next chapter for troubleshooting.
Check the background activity apps
Check if any apps are running or downloading/updating, such as Outlook is downloading mail, games update, Windows Update, Microsoft Store…etc., or antivirus software is scanning.
These may let your device not go into sleep or hibernate mode, and we recommend you wait to finish or close the app.
If the problem persists, please continue the next troubleshooting.
Use Troubleshooting tool in Windows
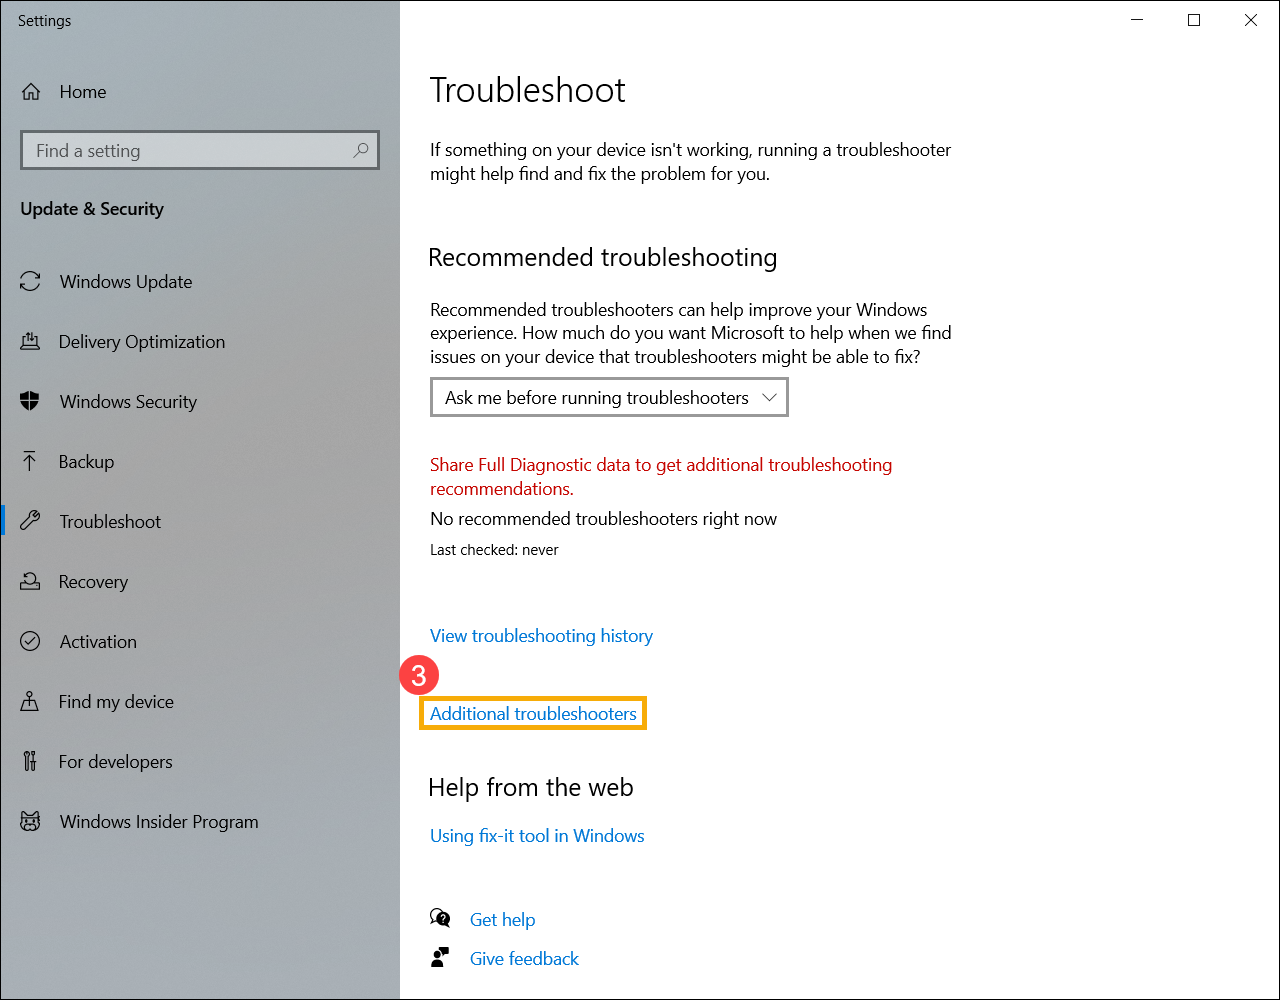
- Type and search [Troubleshoot settings] in the Windows search bar①, then click [Open]②.
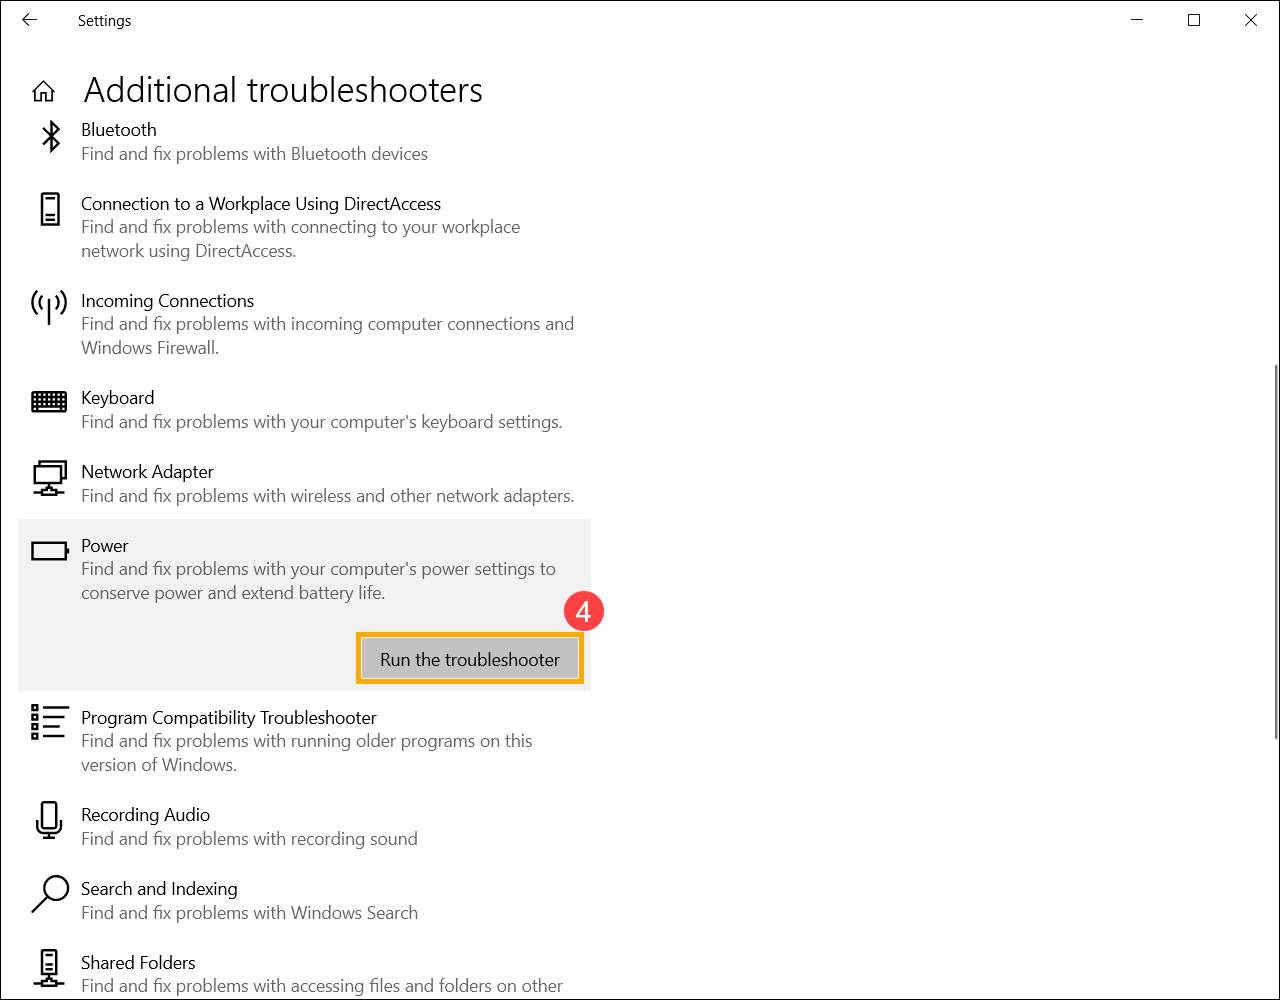
- Select [Additional troubleshooters]③.
- Click [Run the troubleshooter] on the Power option④.
- Follow the on-screen instructions to complete the troubleshooting process. If the problem persists, please continue the next troubleshooting.
Perform a clean boot in Windows
A 「clean boot」 starts Windows with a minimal set of drivers and startup programs, so that you can determine whether a background program is interfering with your game or program. This is similar to starting Windows in Safe Mode, but provides you more control over which services and programs run at startup to help you isolate the cause of a problem. For more detail, please refer to How to perform a clean boot in Windows.
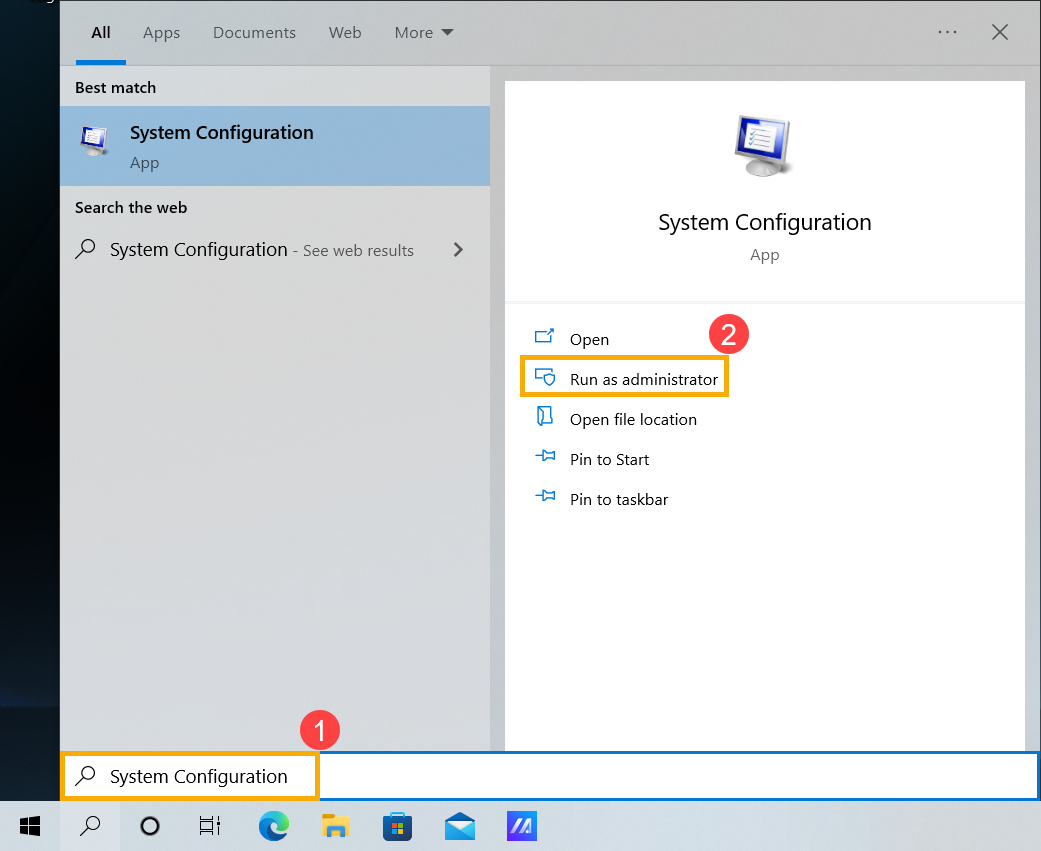
- Type and search [System Configuration] in the Windows search bar①, then click [Run as administrator]②.
- On the [Services] tab of System Configuration③, check the box [Hide all Microsoft services]④, select [Disable all]⑤, then select [Apply]⑥.
- On the [Startup] tab of System Configuration⑦, click [Open Task Manager]⑧.
- On the [Startup] tab in Task Manager⑨, for each Enabled startup item, select the app⑩ and then select [Disable]⑪.
- Close Task Manager.
- On the Startup tab of System Configuration, select [OK]⑫, then select [Restart]⑬.
- When you restart the device, it will be in a clean boot environment. If your problem does not occur while the device is in a clean boot environment, then you can determine which startup application or service is causing the problem by systematically turning them on or off and restarting the device.
Turning on a single service or startup item and rebooting each time, repeat this process to find the problematic service or application - After you determine the startup item or the service that causes the problem, contact the program manufacturer to determine whether the problem can be resolved, or run Windows with the service unchecked or the Startup item Disabled.
Note: If you need to reset the device to start normally, please clear the check box [Hide all Microsoft services], select [Enable all], then select [Apply]. In Task Manager, enable all of the startup programs you had Disable before, select [OK] on the Startup table of System Configuration, then select [Restart].
If the problem persists, please continue to the next troubleshooting.
Restore the system from restore point
If the problem happens recently, and if you have ever created a restore point or there is an automatic system restore existed, try to restore the device to a point before the problem began to resolve the problem. Here you can learn more about How to use restore point to restore the system.
If the problem persists, please continue to the next chapter for troubleshooting.
Reset the system
If the problem persists after all troubleshooting steps are completed. Please backup your personal files, then reset the device to back to its original configuration. Here you can learn more about How to reset the system.
If you still have problems, please contact ASUS Product Support for additional assistance.