Related Topics
[Notebook] Troubleshooting - Laptop Built-in Keyboard Issues
If the built-in keyboard on your laptop is experiencing abnormalities such as unresponsive keys, slow response when pressing keys, or issues with shortcut key functions, please refer to this article for troubleshooting steps. If you are using an external keyboard, please refer to this article: How to fix External Keyboard problems.
Please go to the corresponding instruction based on the current Windows operating system on your computer:
Some or all keys are not working
If you experience the keyboard is not working, please refer to the following troubleshooting steps:
Update and confirm BIOS / Windows packages / drivers with the latest version on your laptop
Updating software usually helps the system stability and optimization, so we recommend you check and often update to the latest version in your laptop. Here you can learn more about How to update BIOS:
How to update the BIOS version in Windows system
How to use EZ Flash to update the BIOS version
For executing Windows update and drivers update, here you can learn more about:
How to update drivers via System Update in MyASUS
If the problem persists after you have updated BIOS/Windows packages/drivers to the date, please continue to the next chapter for troubleshooting.
Reinstall driver in Device Manager
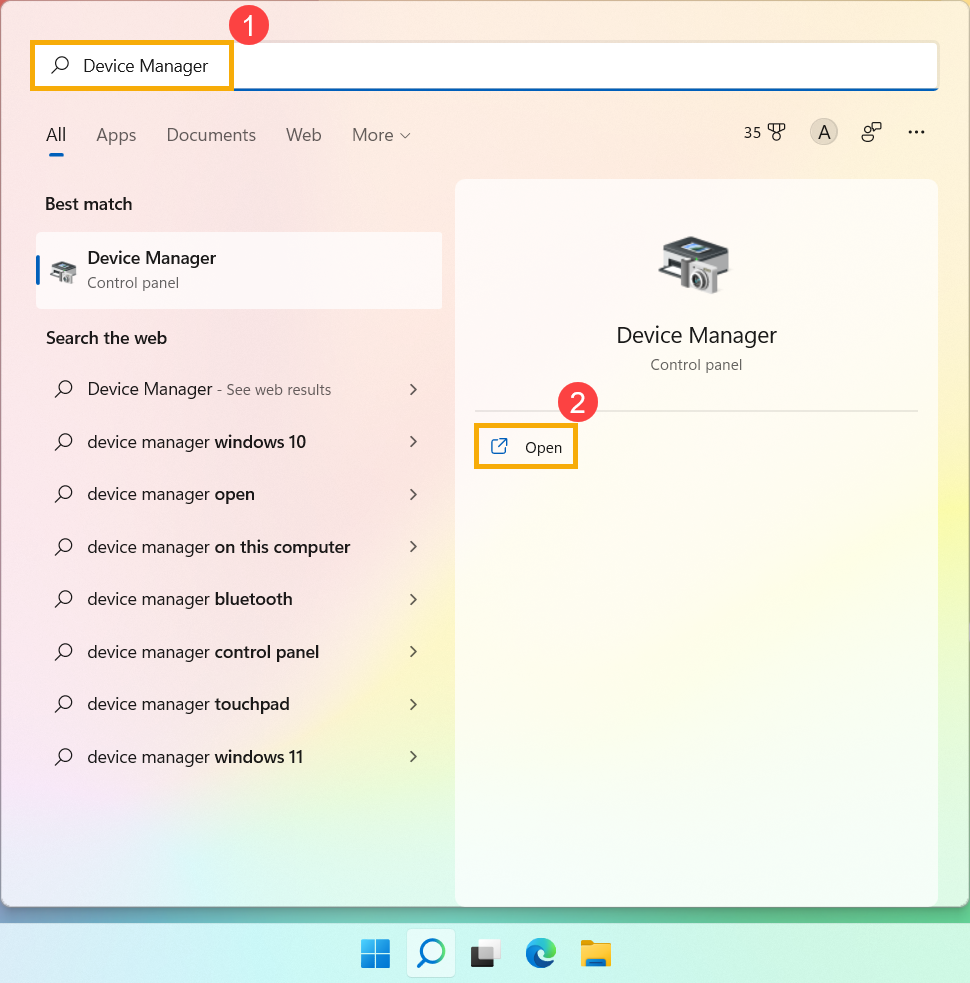
- Type and search [Device Manager] in the Windows search bar①, then click [Open]②.
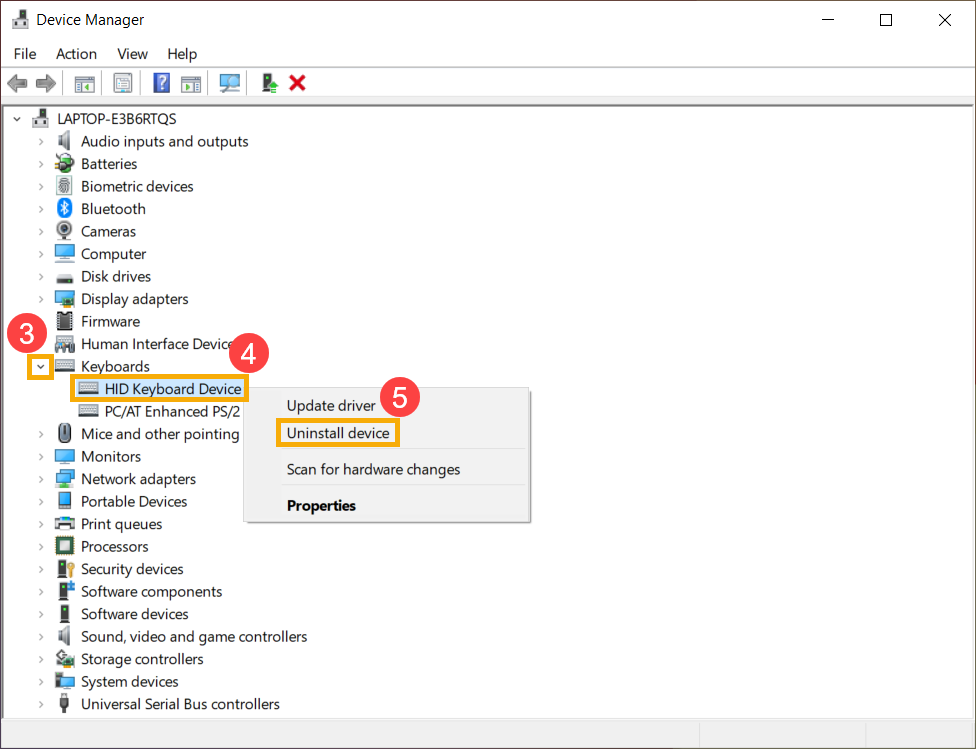
- Uninstall the driver of keyboards. Click the arrow next to [Keyboards]③, then right-click [keyboard name]④ and select [Uninstall device]⑤.
- Click [Uninstall]⑥.
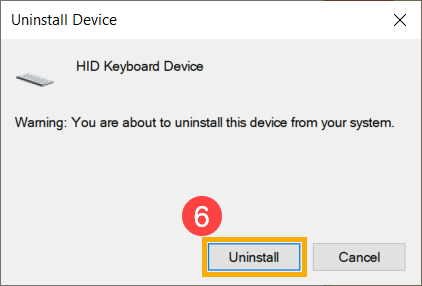
- Remove all devices in the keyboards category, then restart the computer. The driver will be automatically installed after the computer restarts. To test if the keyboard is working properly.
Use the keyboard troubleshooter
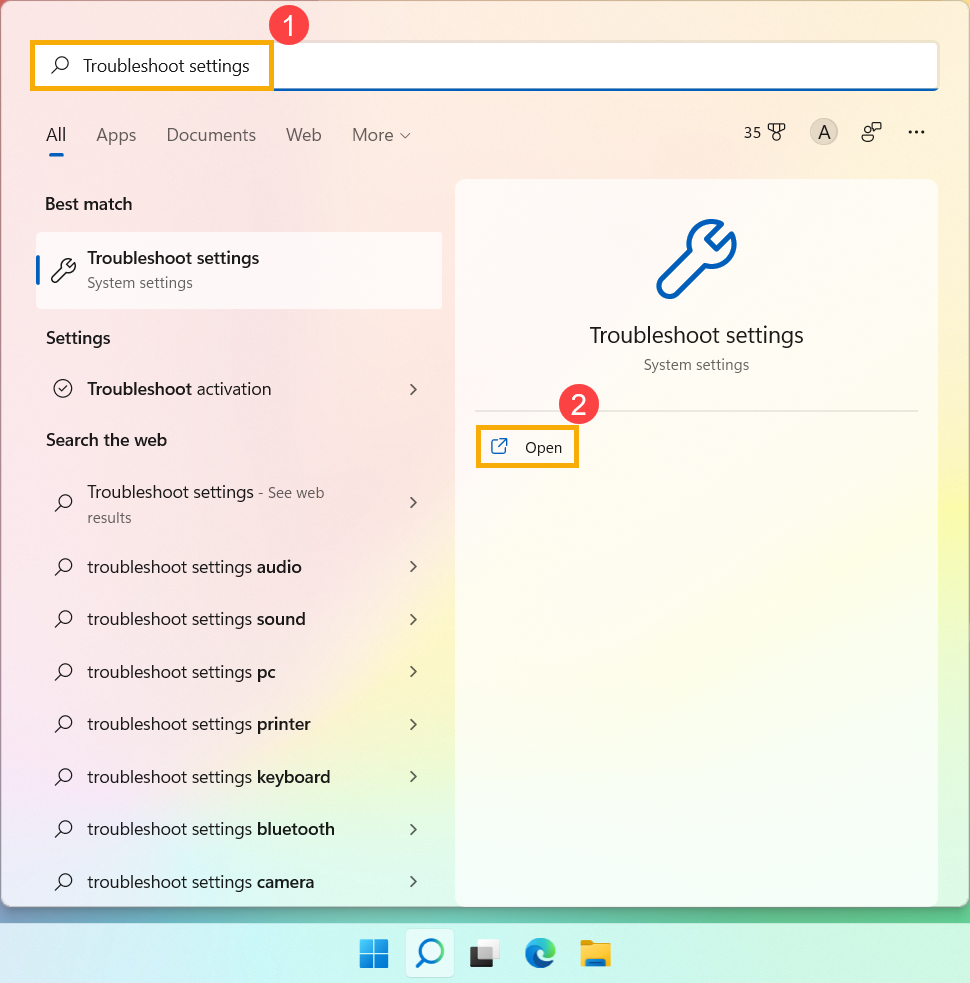
- Type and search [Troubleshoot settings] in the Windows search bar①, then click [Open]②.
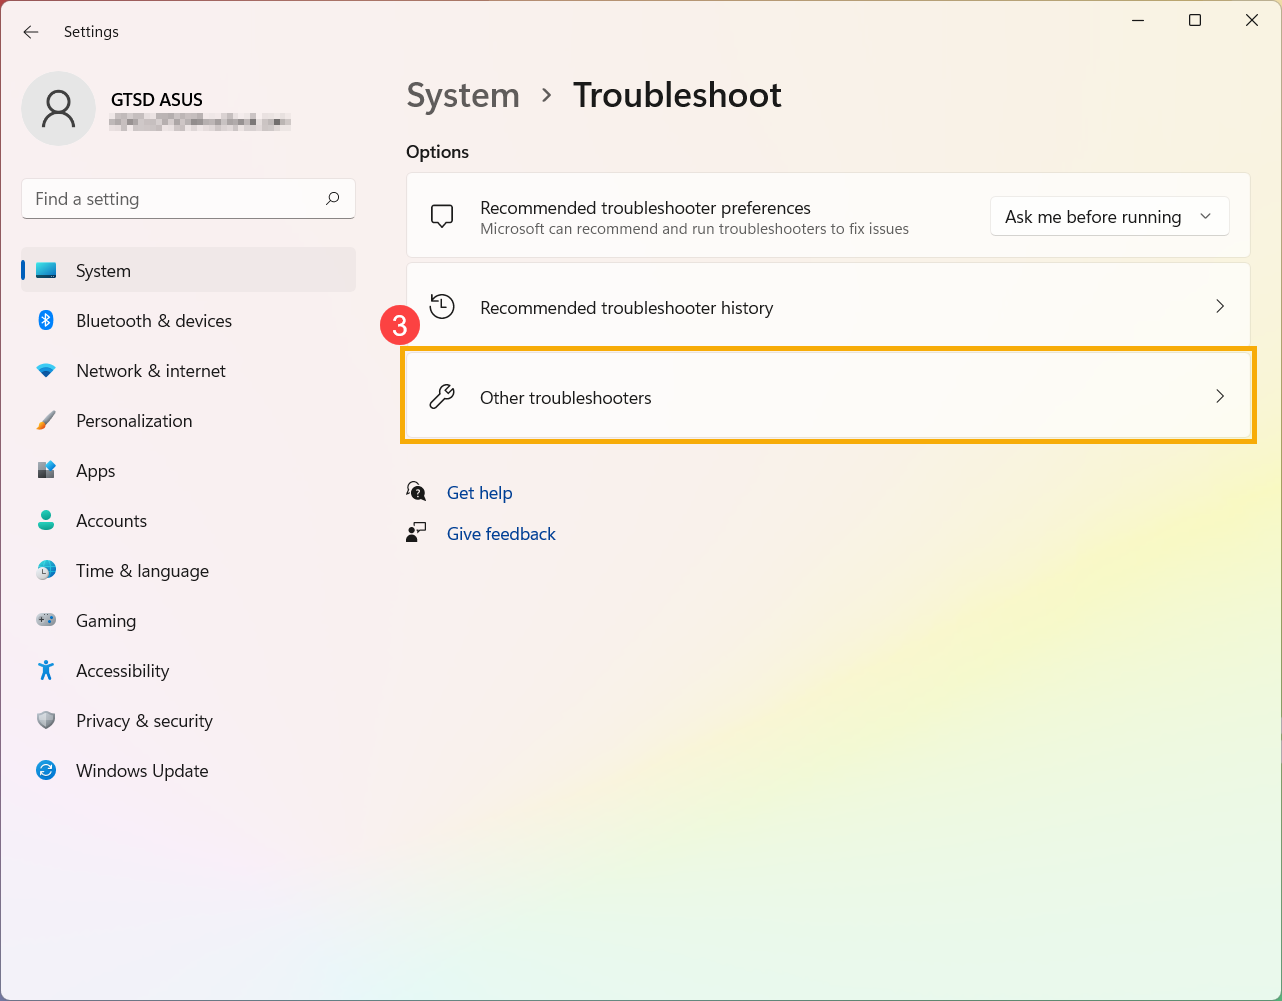
- In the troubleshoot window, select [Other troubleshooters]③.
- Click [Run] on the Keyboard item④.
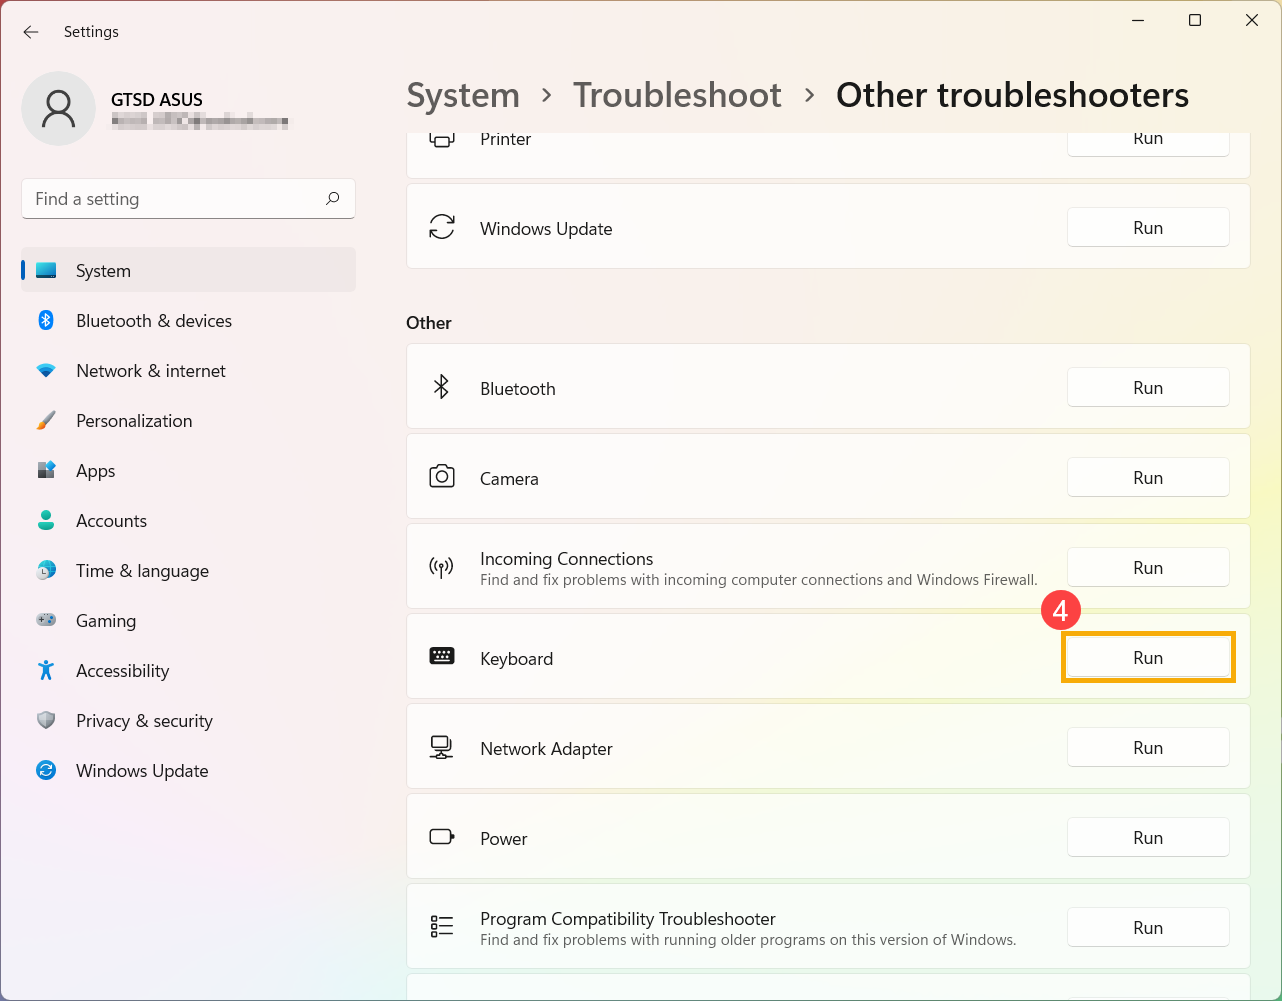
- Follow the on-screen prompts to detect and resolve problems. If the drive is still missing after using the troubleshooter, continue to the next step.
Restore the system from restore point
If the keyboard problem happens recently, and if you have ever created a restore point or there is an automatic system restore existed, try to restore the computer to a point before the problem began to resolve the problem. Here you can learn more about How to use restore point to restore the system.
If the problem persists, please continue to the next chapter for troubleshooting.
Reset your PC
If the problem persists after all troubleshooting steps are completed. Please backup your personal files, then reset the PC to back to its original configuration. Here you can learn more about: How to reset the system.
Keys are not sensitive
If you experience there is a short delay before the character displays on the screen when you press a key. The Filter keys function might be enabled. Try to disable Filter keys and check whether the key is more responsive.
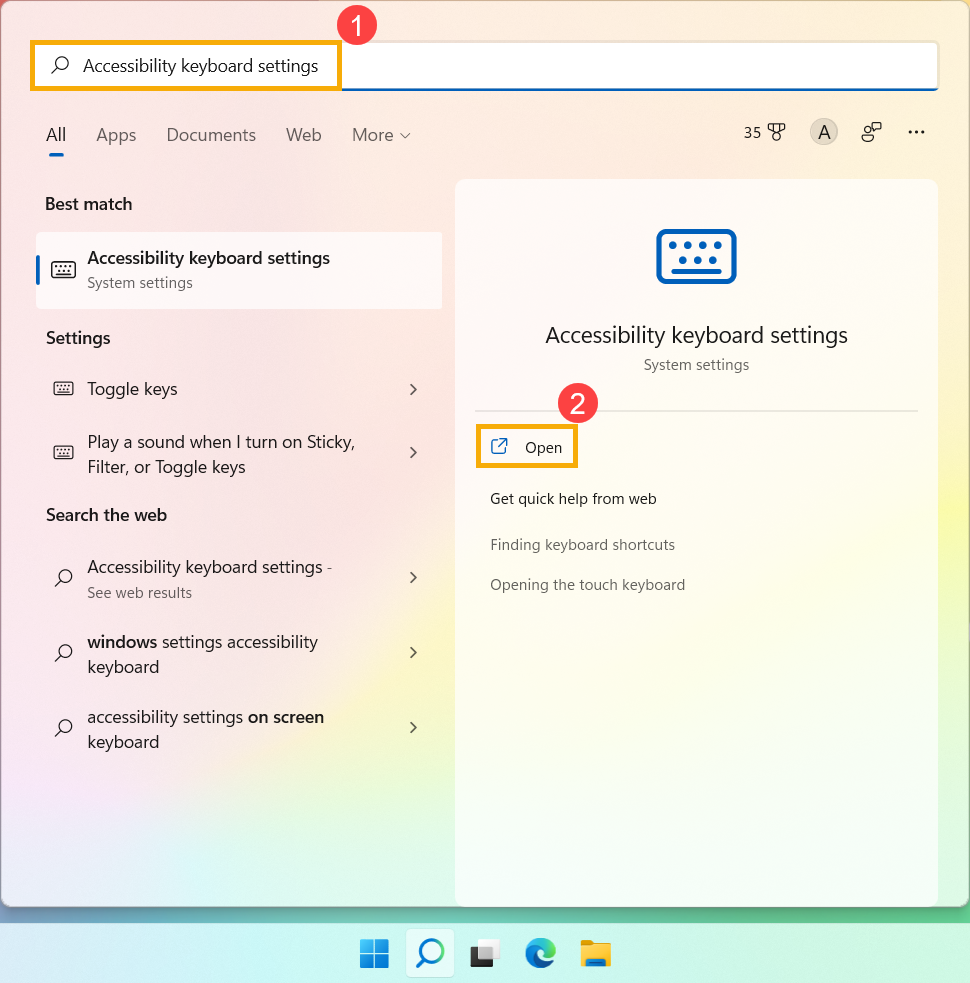
- Type and search [Accessibility keyboard settings] in the Windows search bar①, then click [Open]②.
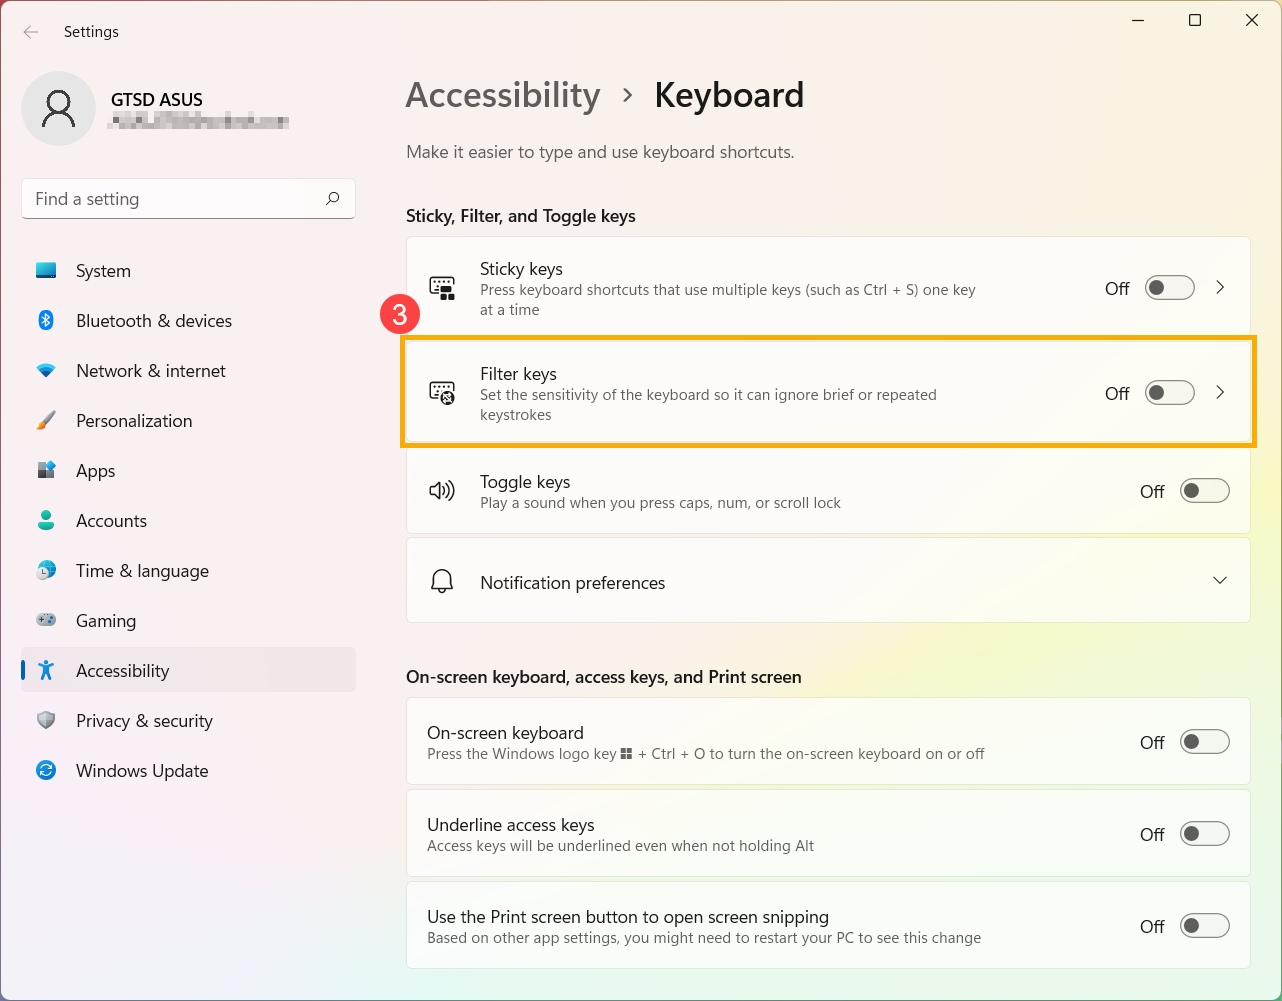
- Turn off the [Filter keys] function③.
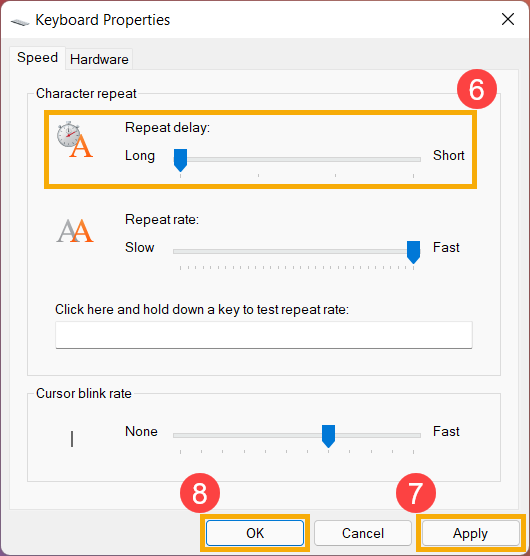
If you experience that when pressing a key once but two or more characters display on the screen, please try to adjust the key repeat delay.
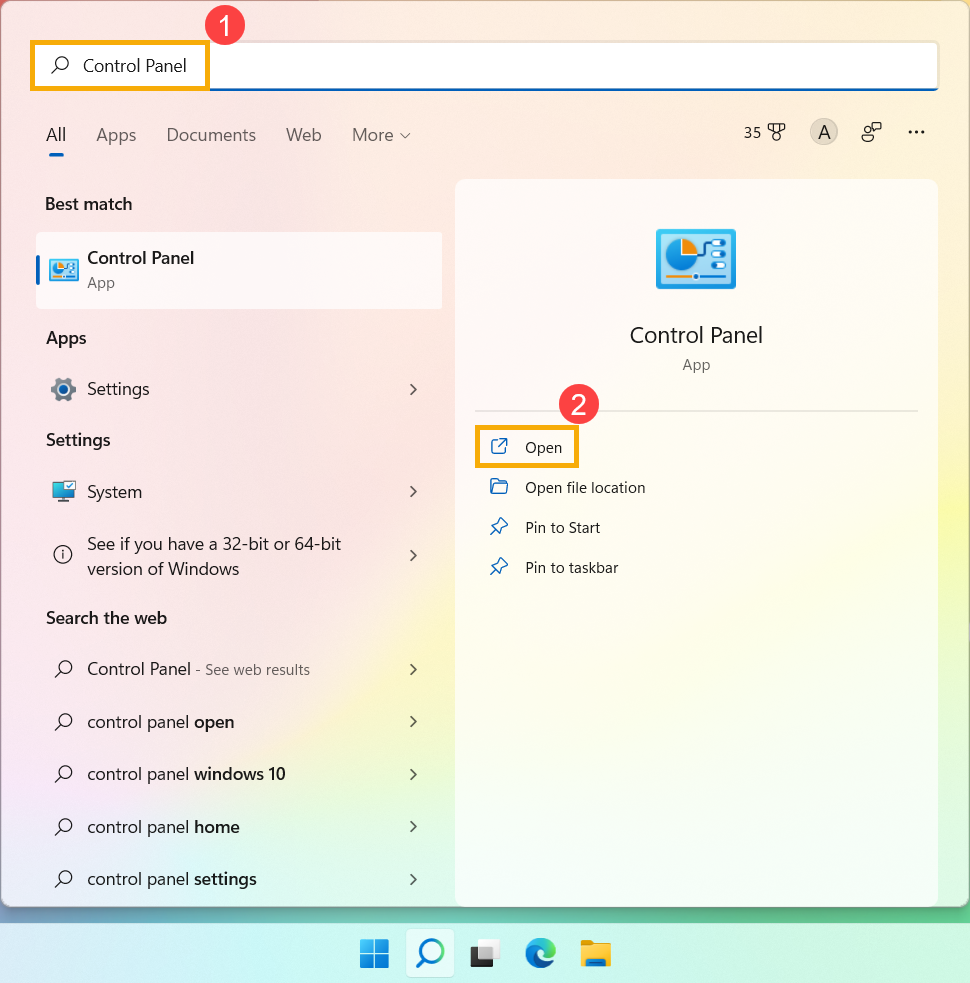
- Type and search [Control Panel] in the Windows search bar①, then click [Open]②.
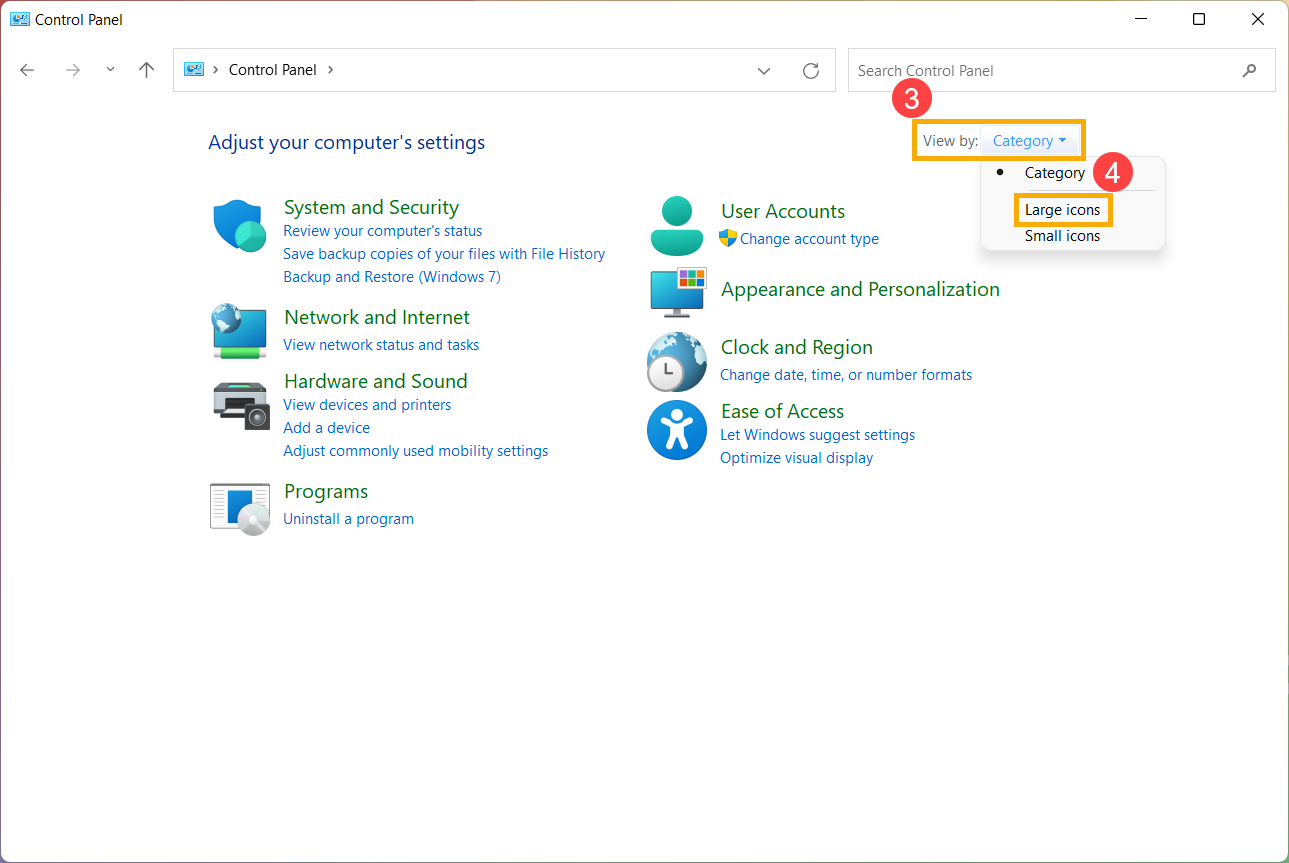
- Click [Category] on the right-up of screen③ and select [Large icons]④.
- Select [Keyboard]⑤.
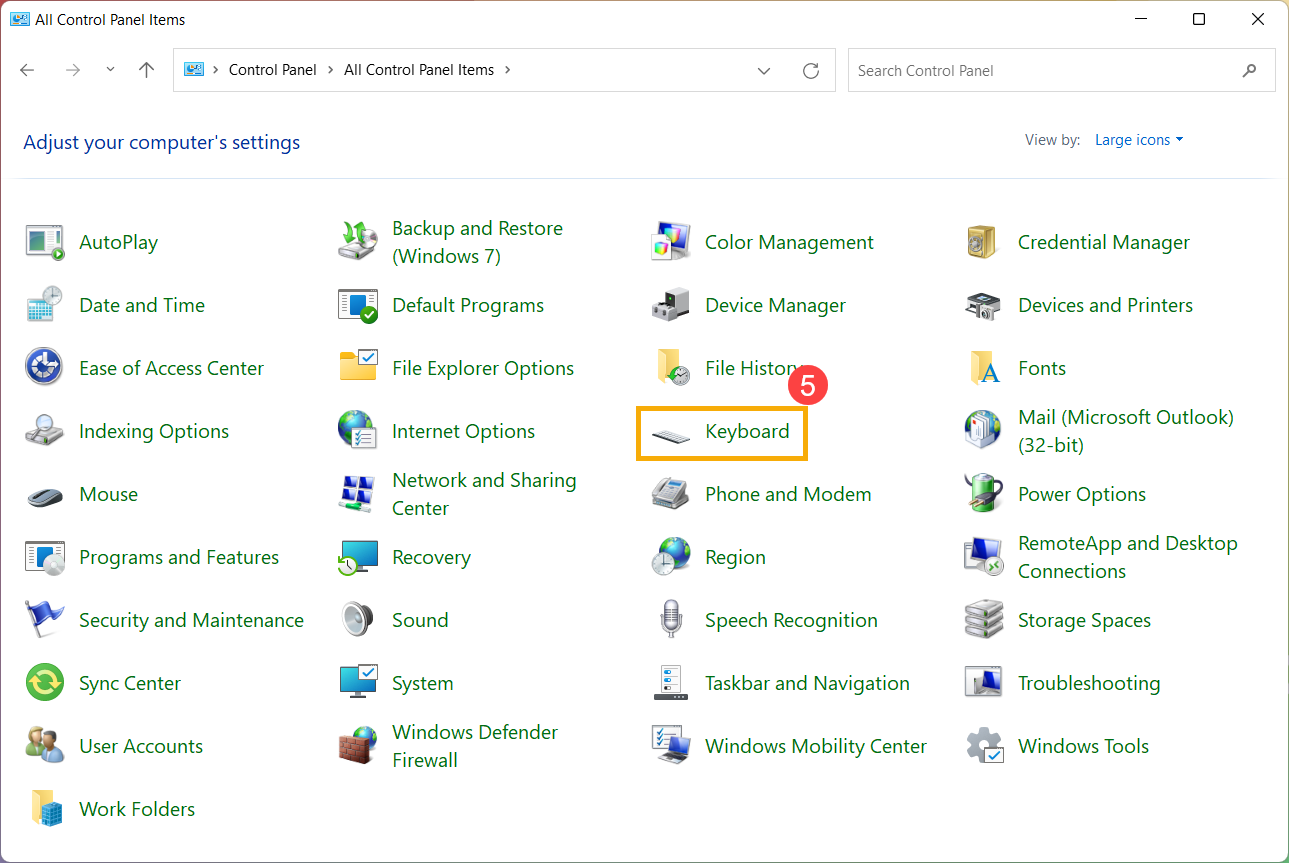
- Drag the [Repeat delay] slider to Long⑥, then click [Apply]⑦ and [OK]⑧.
What I type on the keyboard doesn’t match what I see on the screen
If you experience that when pressing some specific keys but the numeric characters display on the screen, the NumLock function might be disabled. Please try to enable the NumLock function and check whether the keys are working properly.
- Type and search [Run] in the Windows search bar①, then click [Open]②.
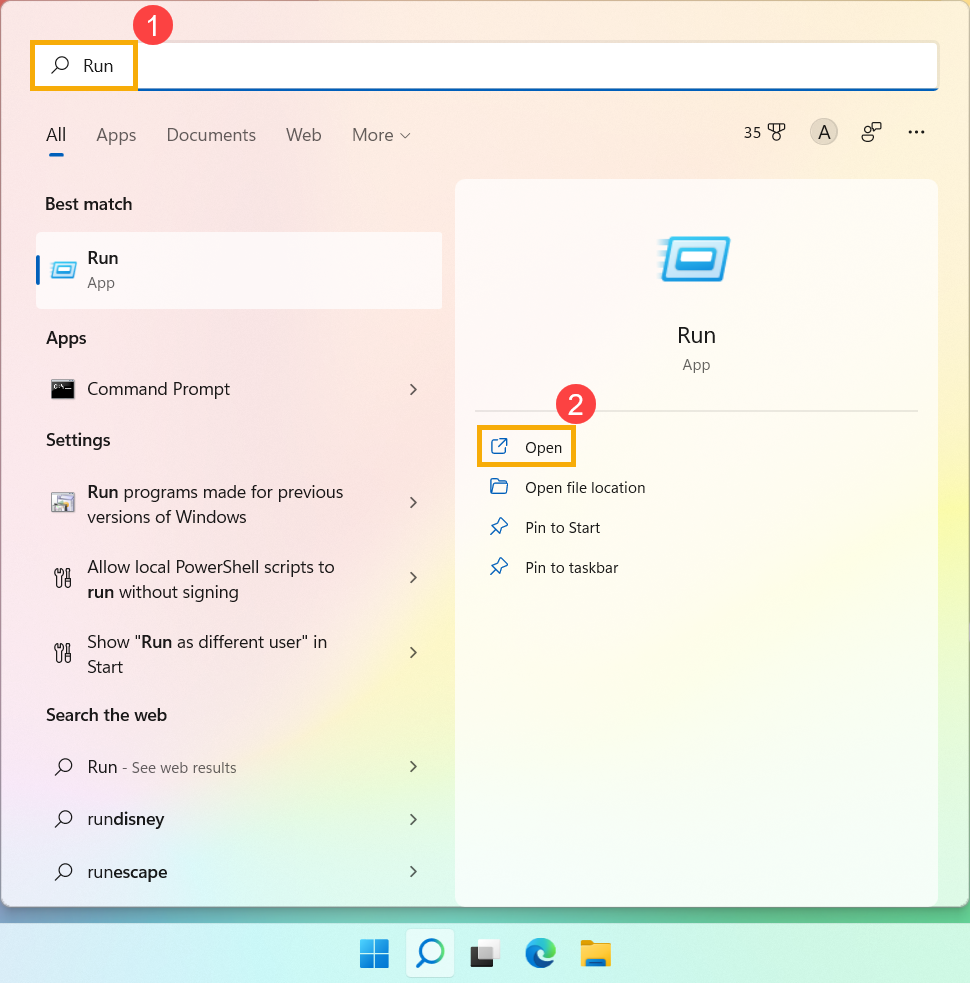
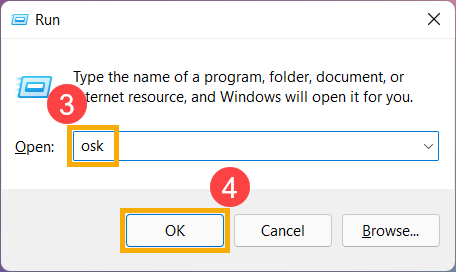
- Type [osk] in the Run window③, then click [OK]④.
- After opening the on-screen keyboard, click [Options]⑤.

- Check the box of [Turn on numeric key pad]⑥, then click [OK]⑦.
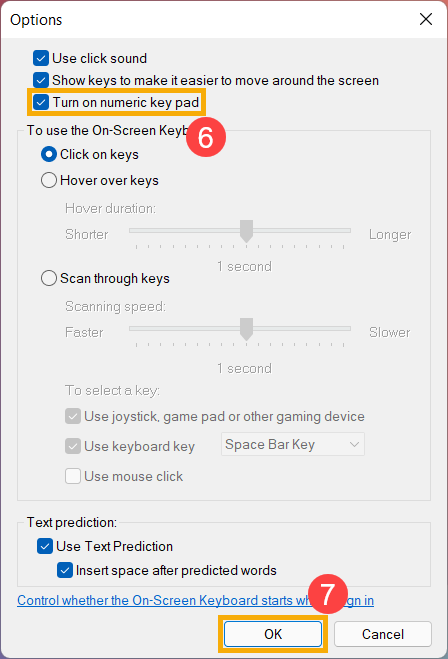
- Click [NumLock] in the on-screen keyboard⑧, highlight this key to enable the NumLock function.

If you experience that when pressing a key but the wrong character displays on the screen, please make sure whether the preferred language is correct.
- Type and search [Language settings] in the Windows search bar①, then click [Open]②.
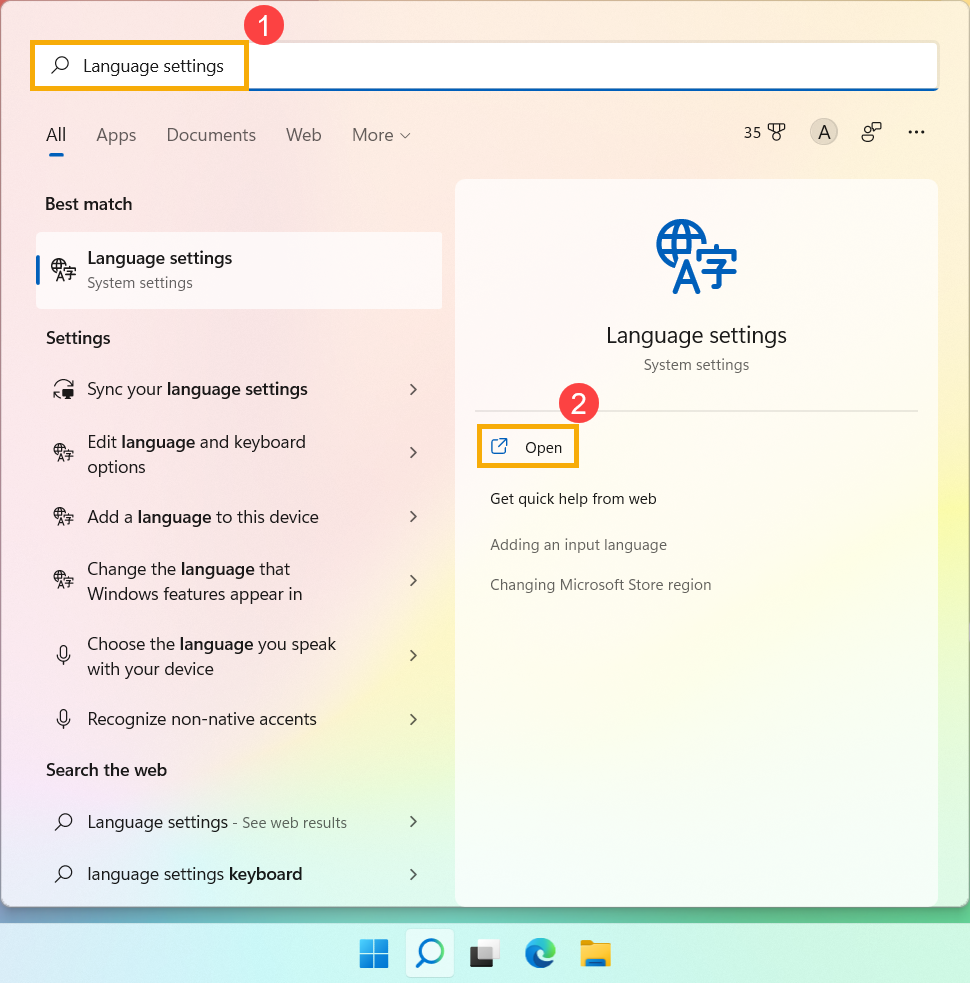
- Make sure whether the preferred language is correct③. If it is incorrect, please click on [Add a language]④.
Note: Make sure your laptop is in an available network environment, then connect to internet because it is an online update process.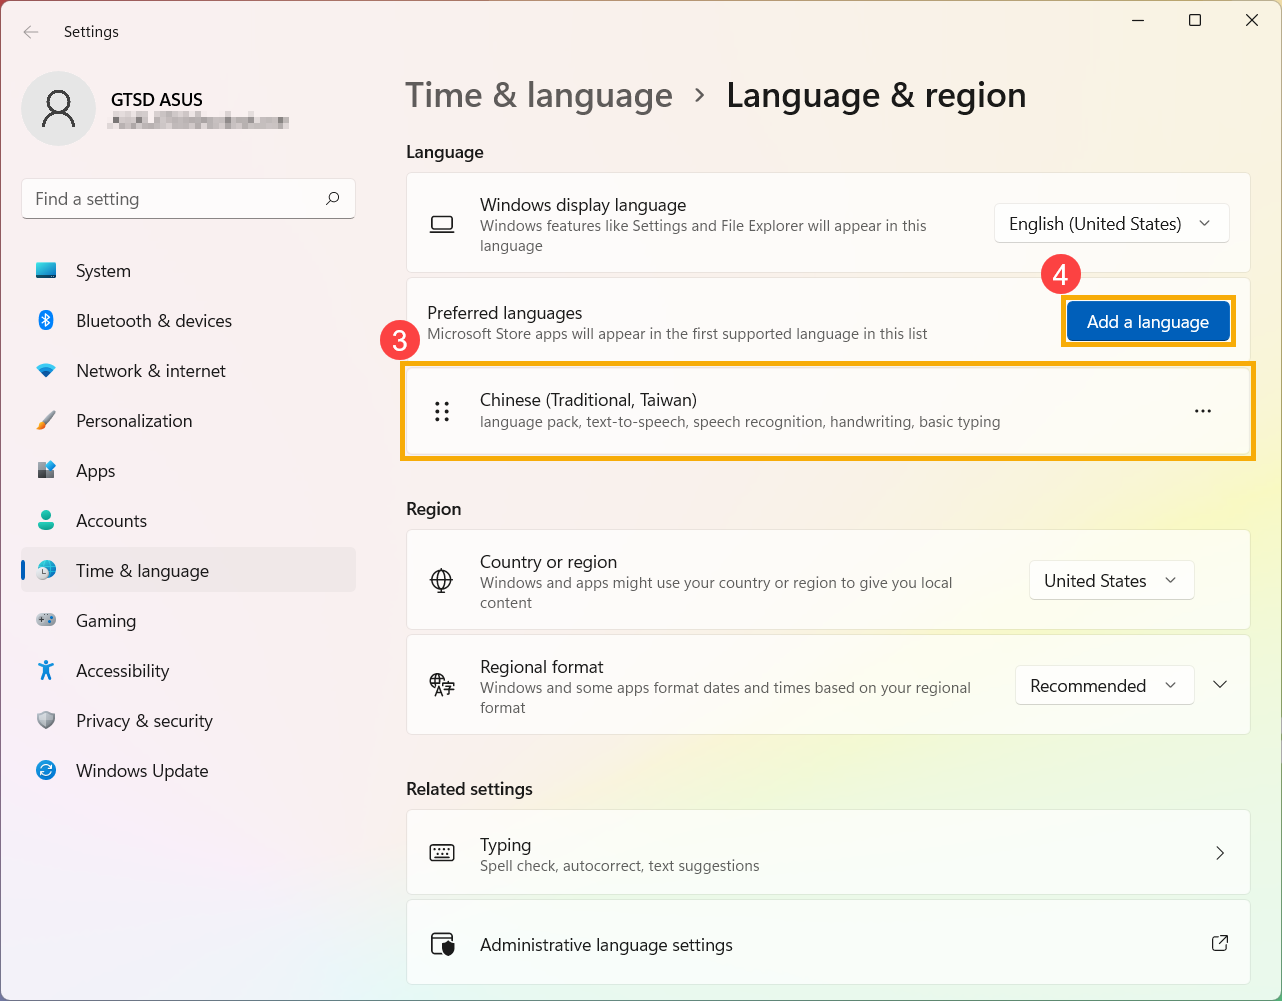
- Search for a language what you needed⑤, then click [Next]⑥.
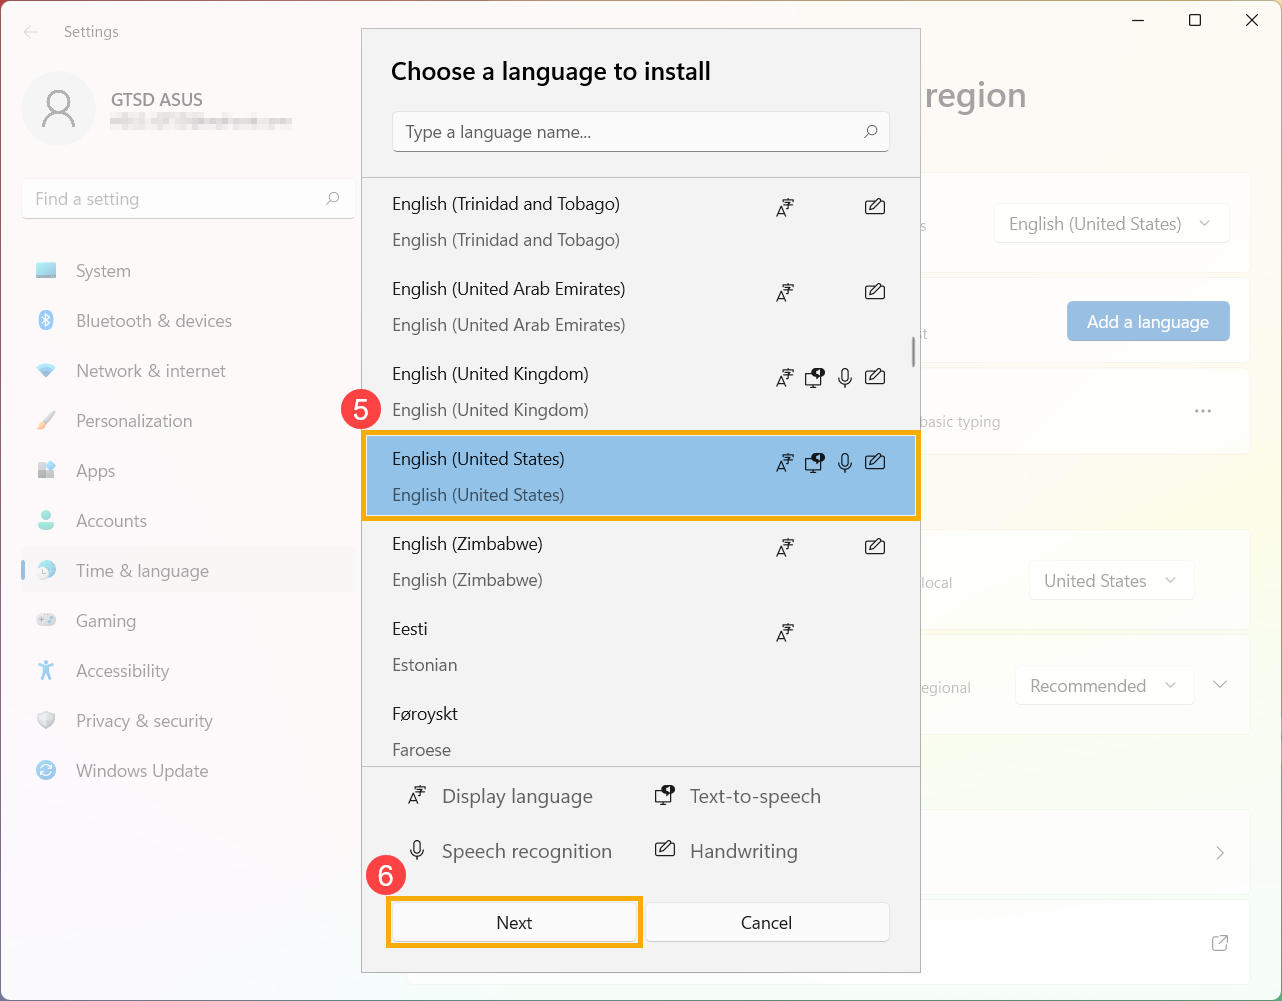
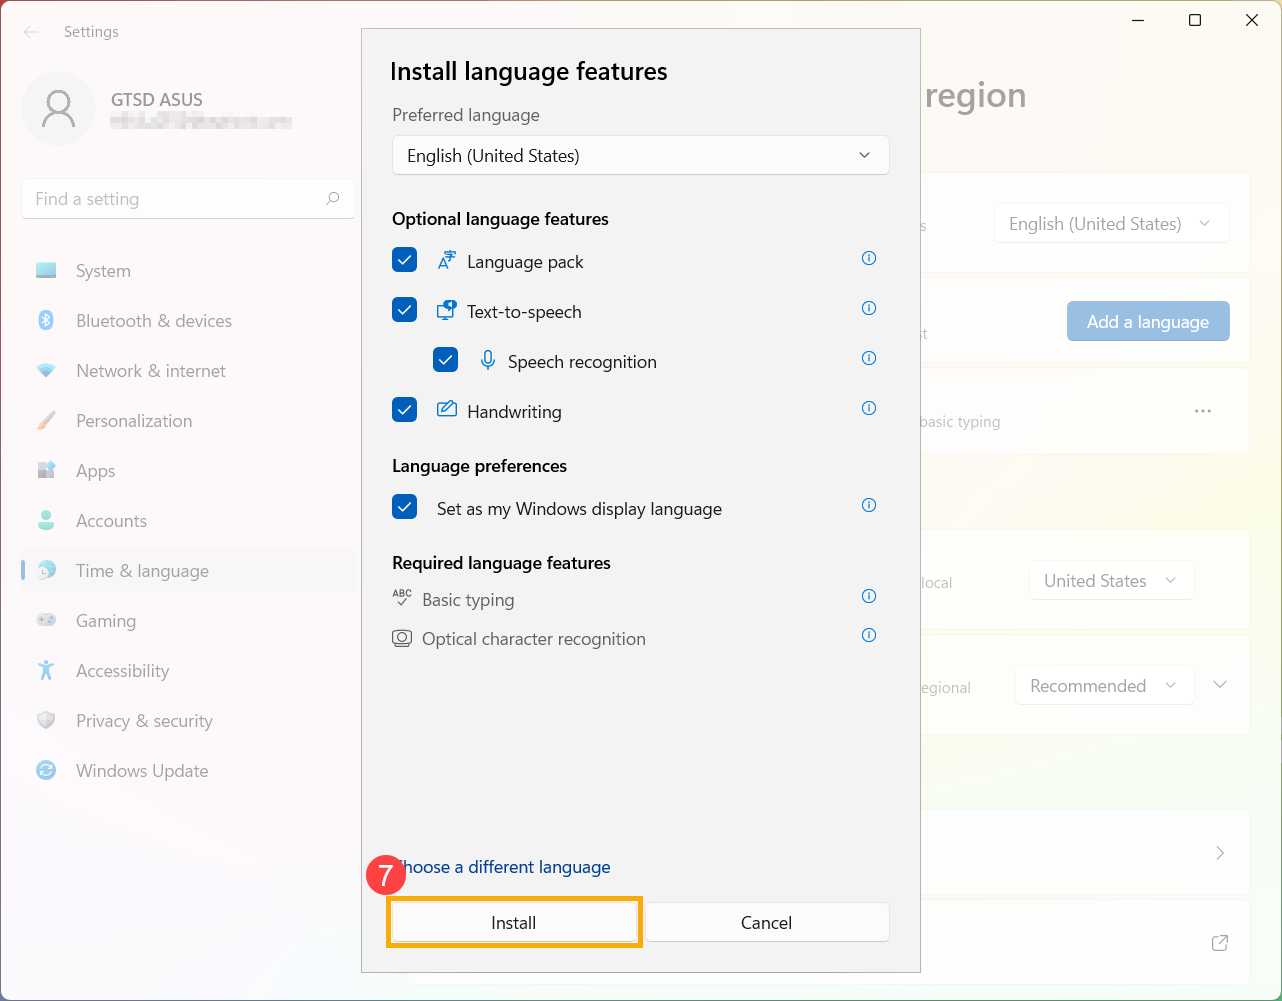
- Click [Install]⑦, the system will download and install automatically.
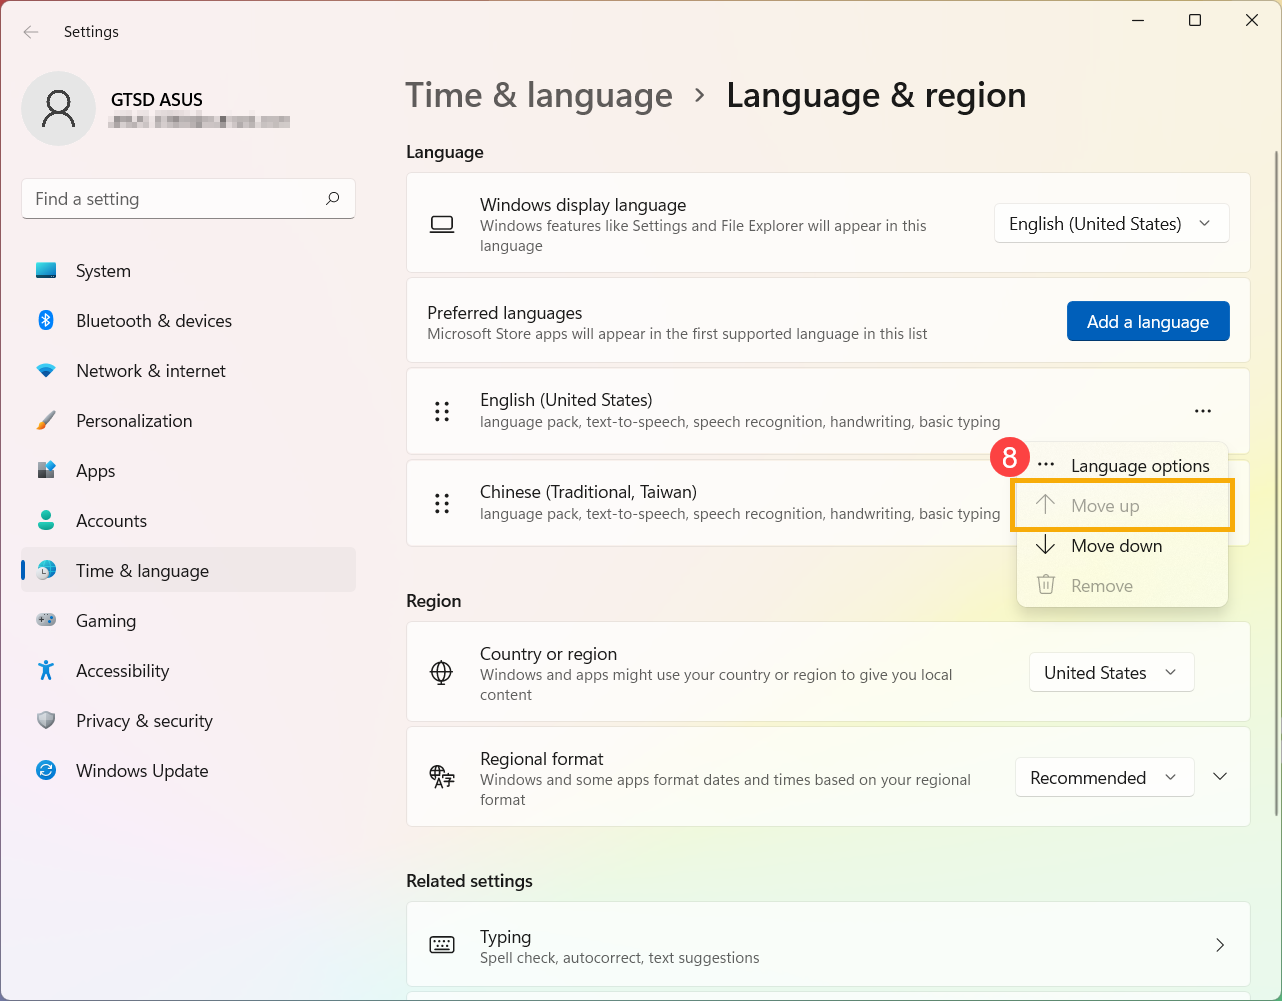
- If you have multiple input language, you are able to click the More
 icon next to the language, and then select [Move up]⑧ to set as default language.
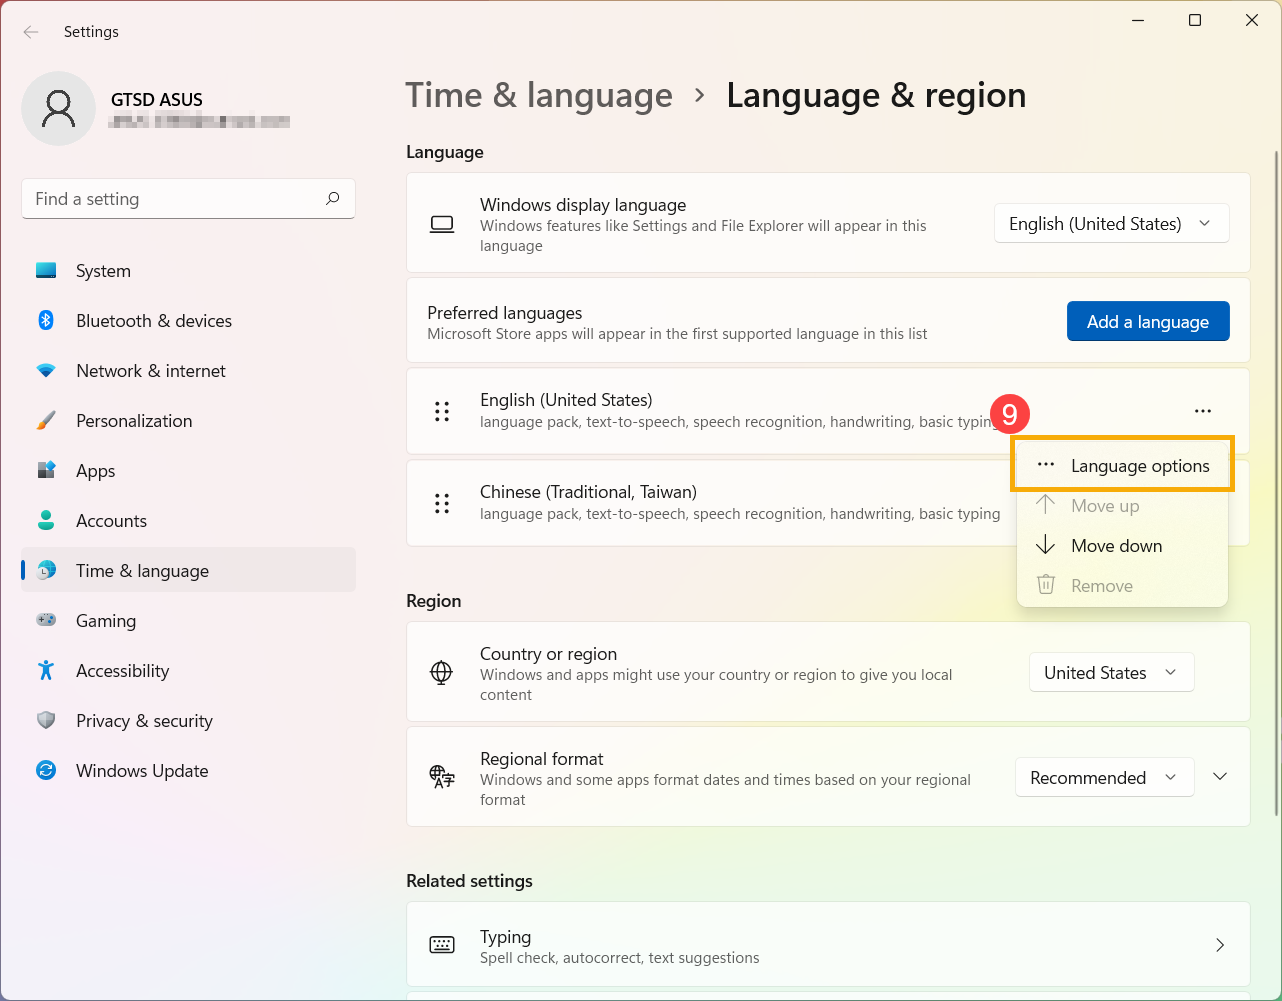
- After installation is completed, click the More
 icon next to the language you have installed, and then select [Language options]⑨.
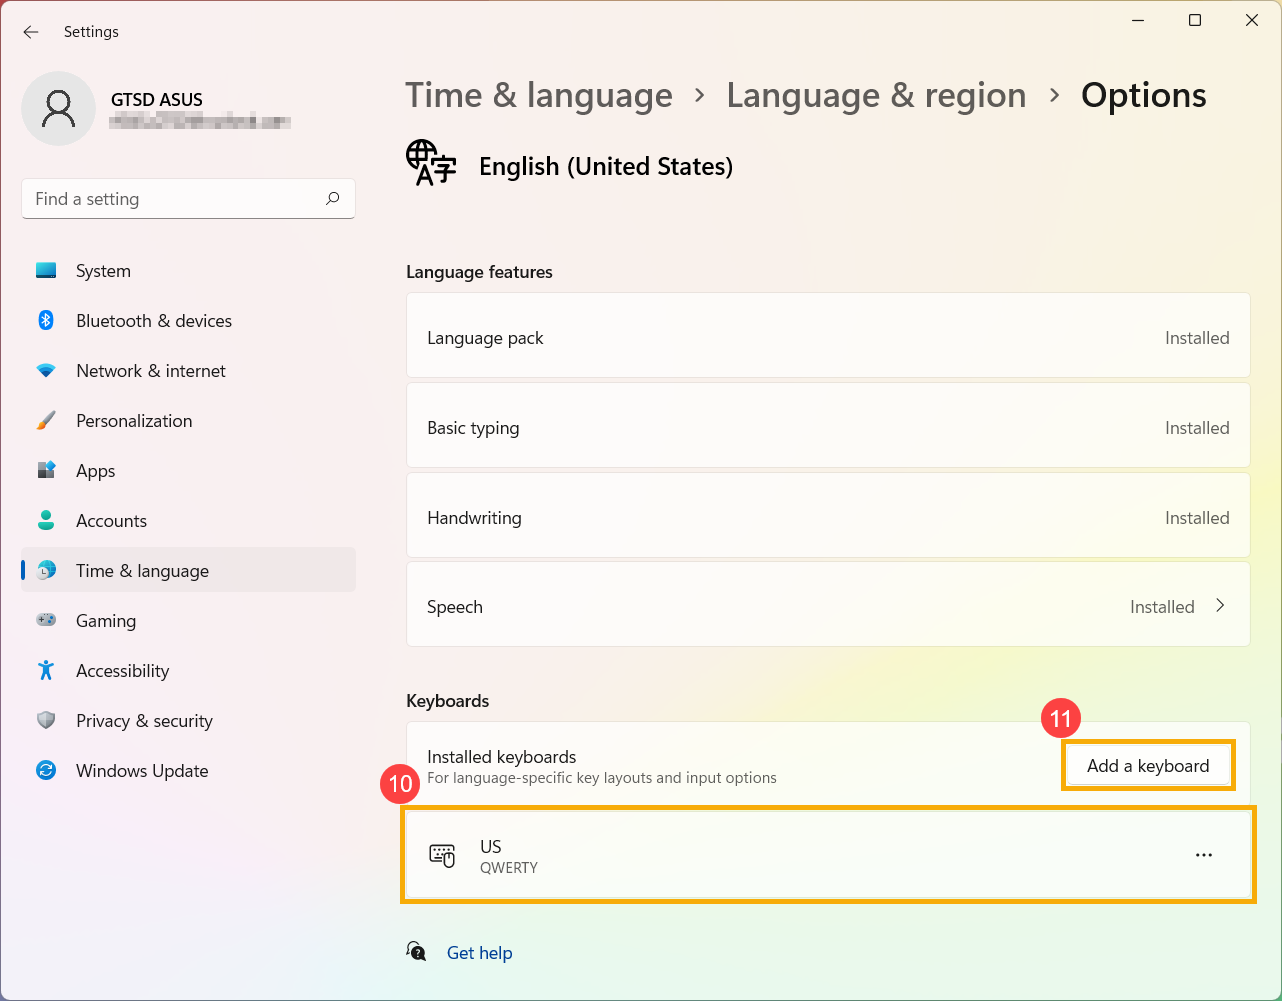
- Make sure whether the keyboard is correct⑩. If it is incorrect, please click [Add a keyboard]⑪.
Hotkeys not functioning properly
If the hotkeys of your ASUS notebook lose their function, you can automatically update the driver and utility via MyASUS to fix the problem. You can also manually download the latest driver and utility from the ASUS Official Website. Here you can learn more about How to search and download drivers.
This table lists some of the common hotkeys with their functions and required driver and utility to be downloaded and installed.
Note: The hotkeys functions may be different based on different models, please refer to the User Manuals.
| Hotkeys | Functions | Required Driver & Utility |
| F1/F2/F3 | Speaker volume/on & off | 1. Install ASUS System Control Interface driver 2. Install the driver for Audio |
| F4/F5 | Montior brightness | Installation of driver & utility is not required |
| F6 | Enable or disable touchpad | 1. Install ASUS System Control Interface driver 2. Install the driver for Touchpad |
| F10 | Enable or disable camera | 1. Install ASUS System Control Interface driver 2. Install the driver for Camera |
| Fn+Esc | Enable or disable function keys feature | Install ASUS System Control Interface driver |
Note: If the function of Monitor brightness/on & off/Toggle Display mode is failed, please try to check Windows Update, learn more about How to execute Windows Update.
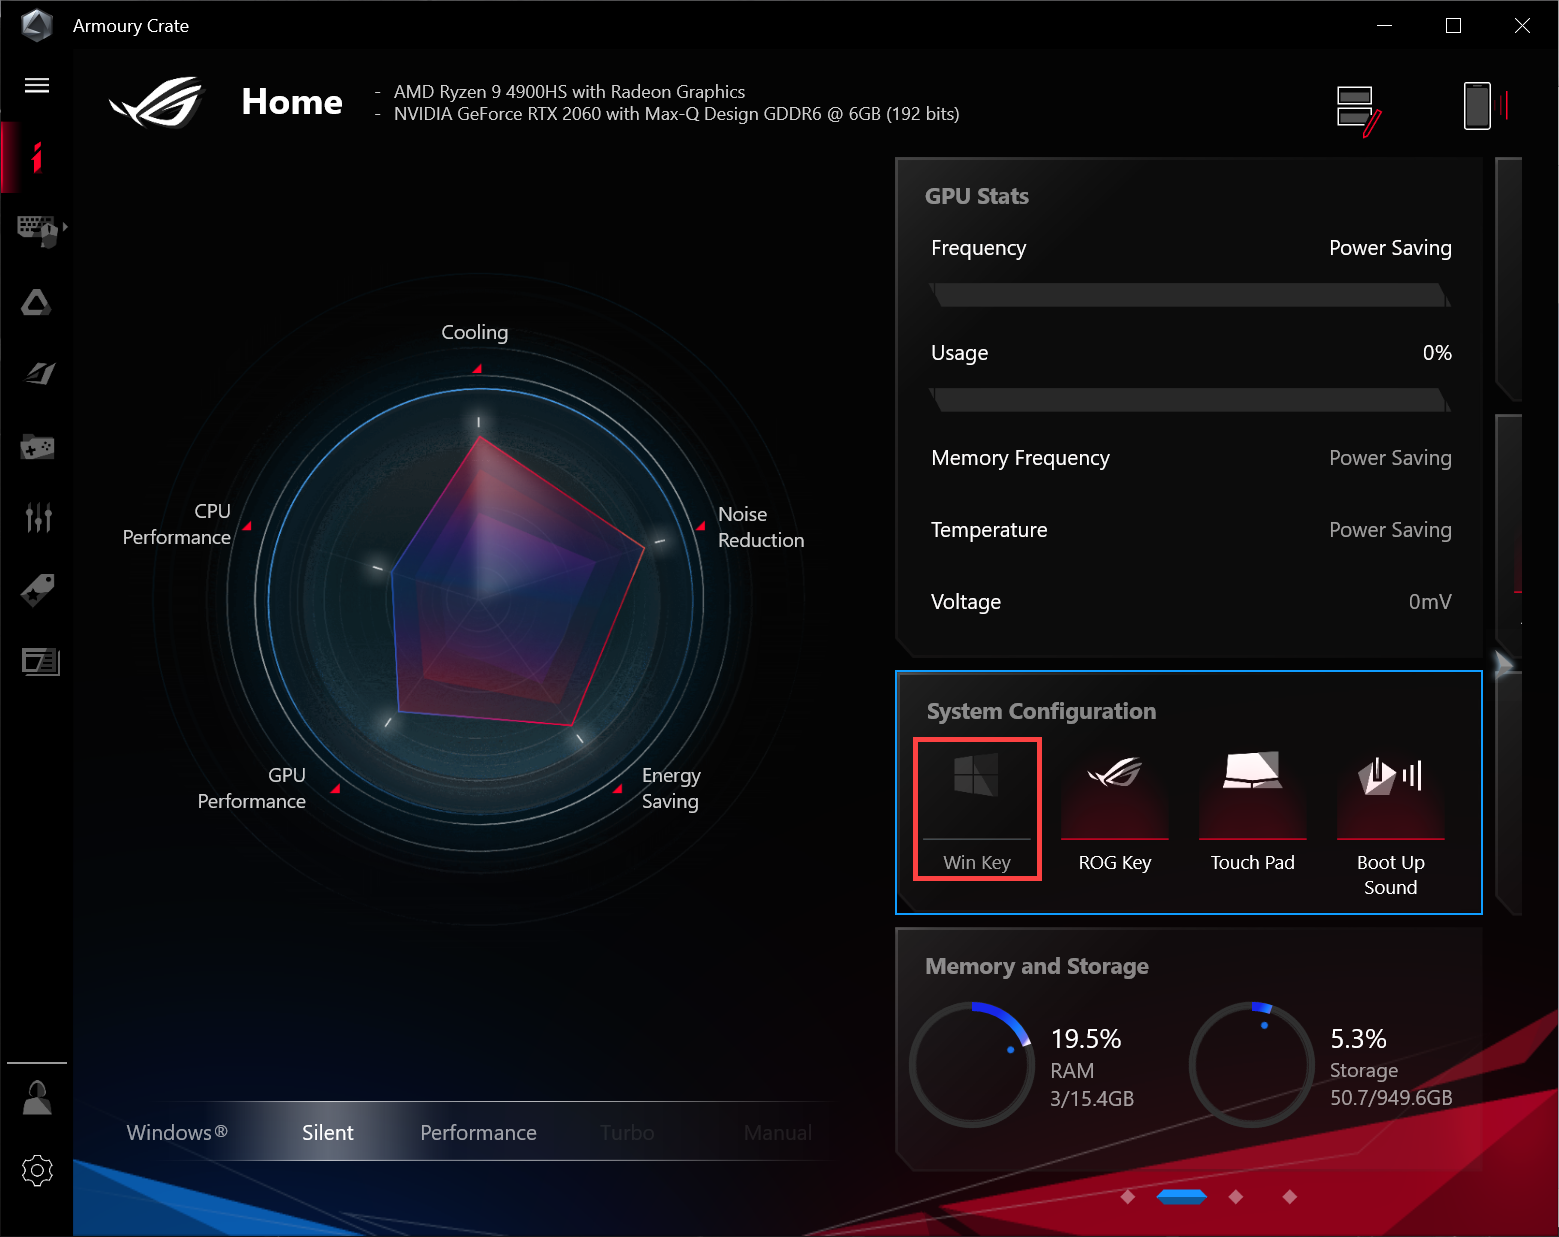
Note: If your laptop is Gaming NB series, and you encounter the issue of “Toggle display mode”, please check whether the Win key function is disabled in System Configuration of the Armoury Crate application. (Disable Win Key will disable the “Toggle display mode” function together.)
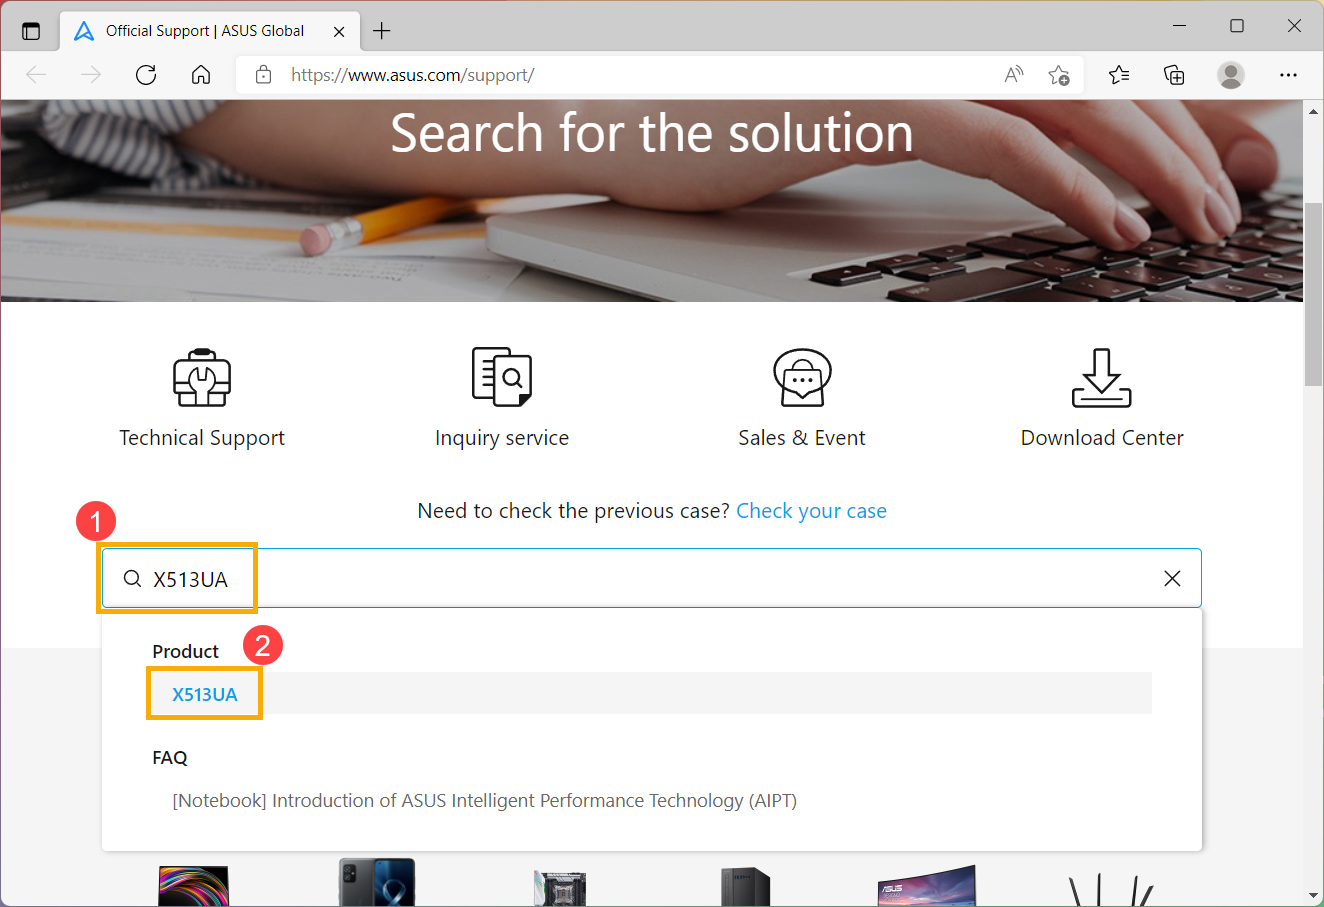
X513UA is used as an example in this article for finding and installing the driver and utility required to fix the problem when the touchpad hotkeys lose their function. Here you can learn more about How to check the model name.
- Please go to the ASUS Support page on the ASUS official site, and enter the model name X513UA in the search field①. Left-click the X513UA in the drop-down list②.
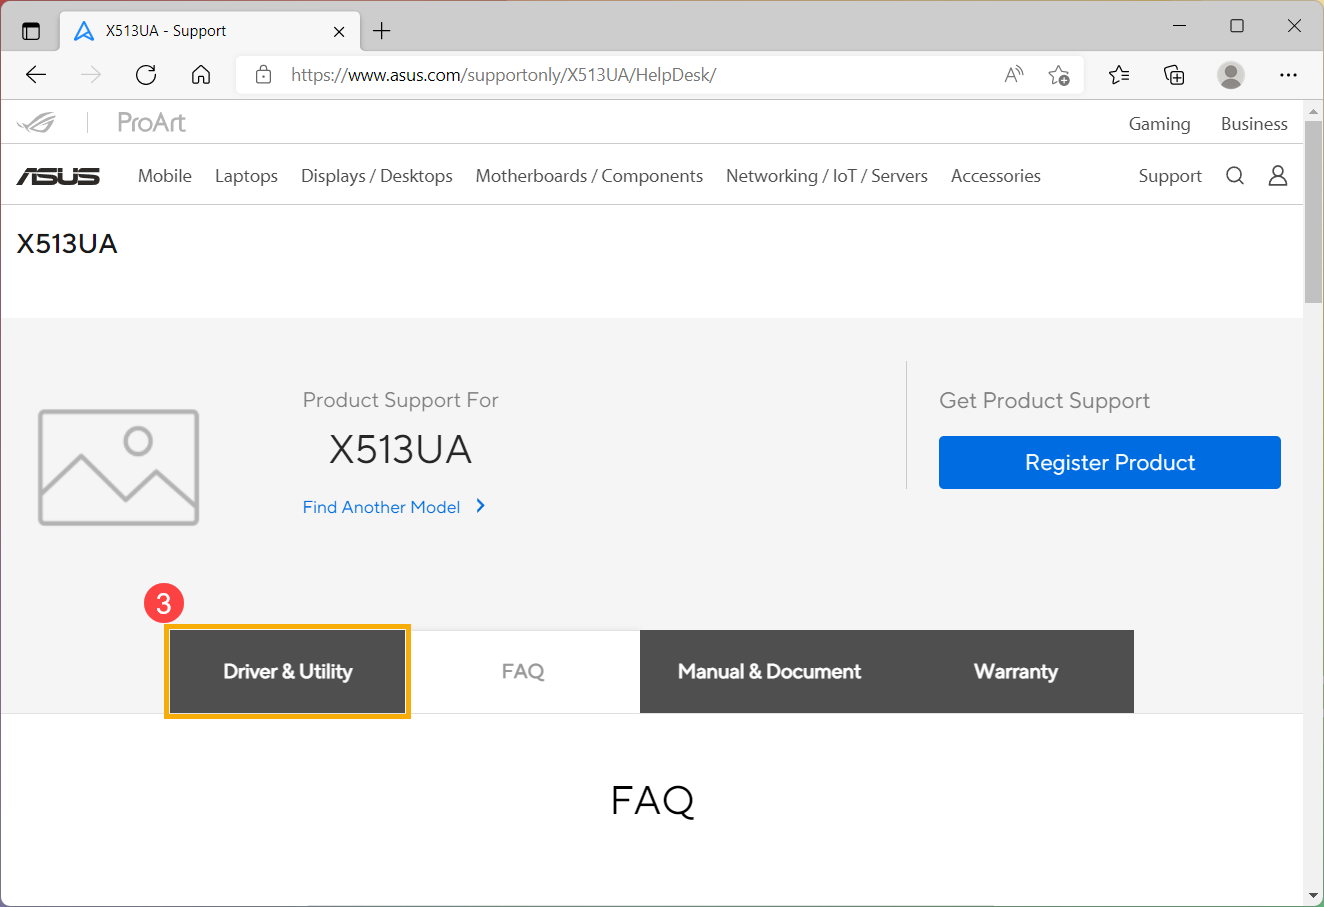
- On the Support Page of X513UA, Please click [Driver & Utility]③.
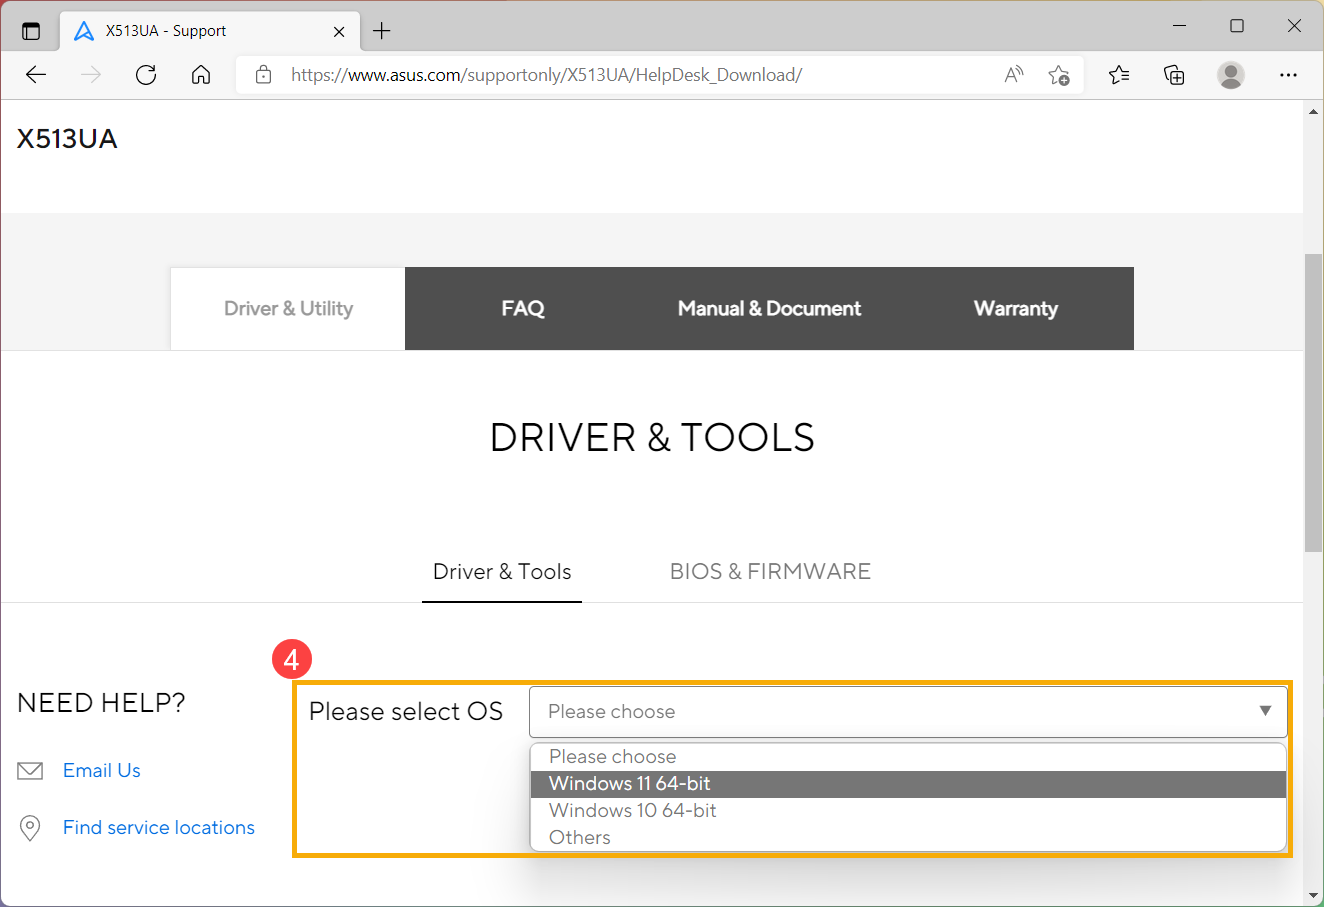
- Select the model and OS accordingly④.
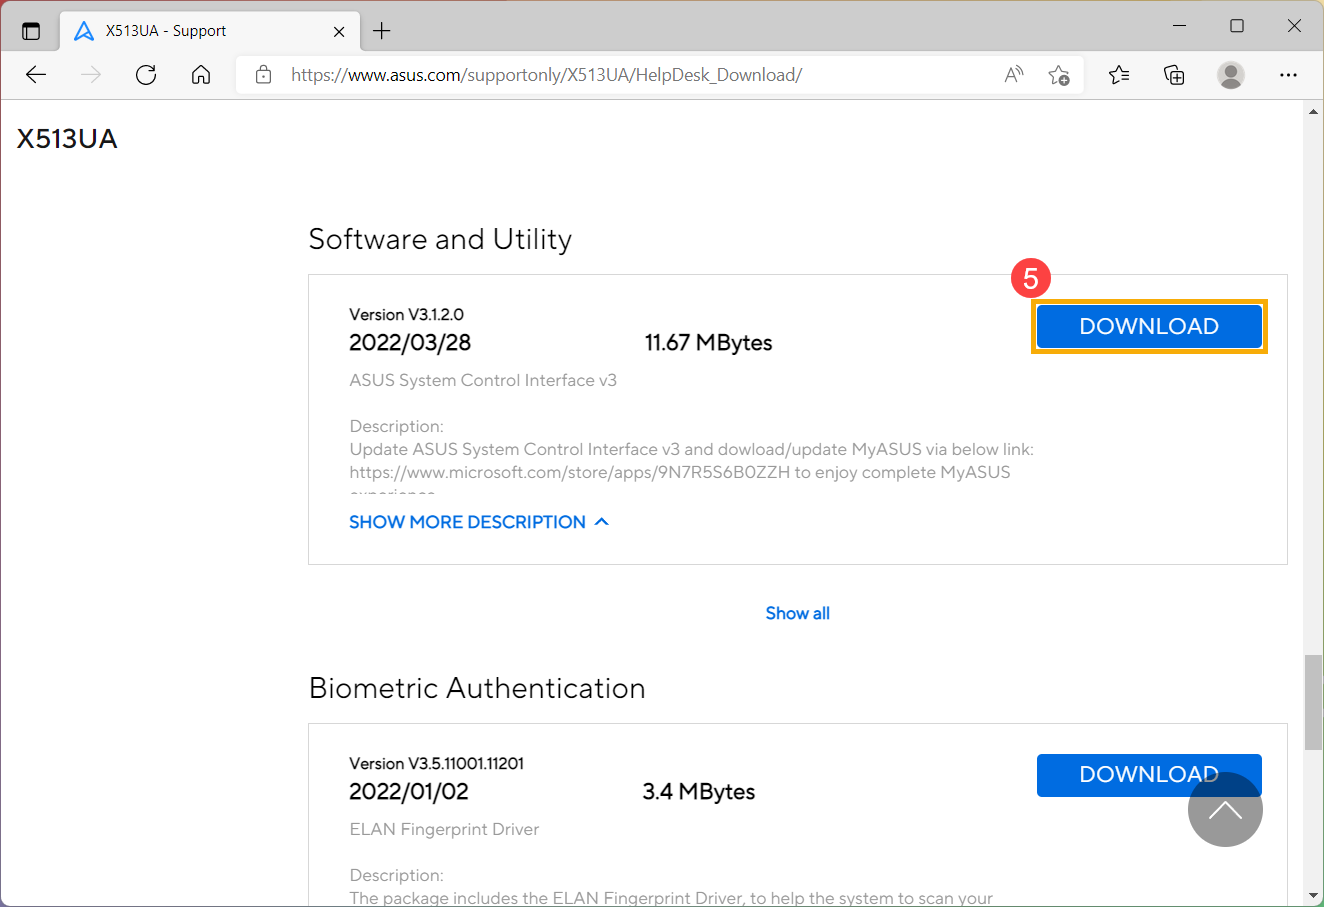
- Referring to the table above, the touchpad hotkey requires installation of [ASUS System Control Interface driver] and [driver for touchpad]. First, find the latest version of [ASUS System Control Interface driver] under the category of Software and Utility. Left-click the DOWNLOAD button to start download and complete the installation⑤.
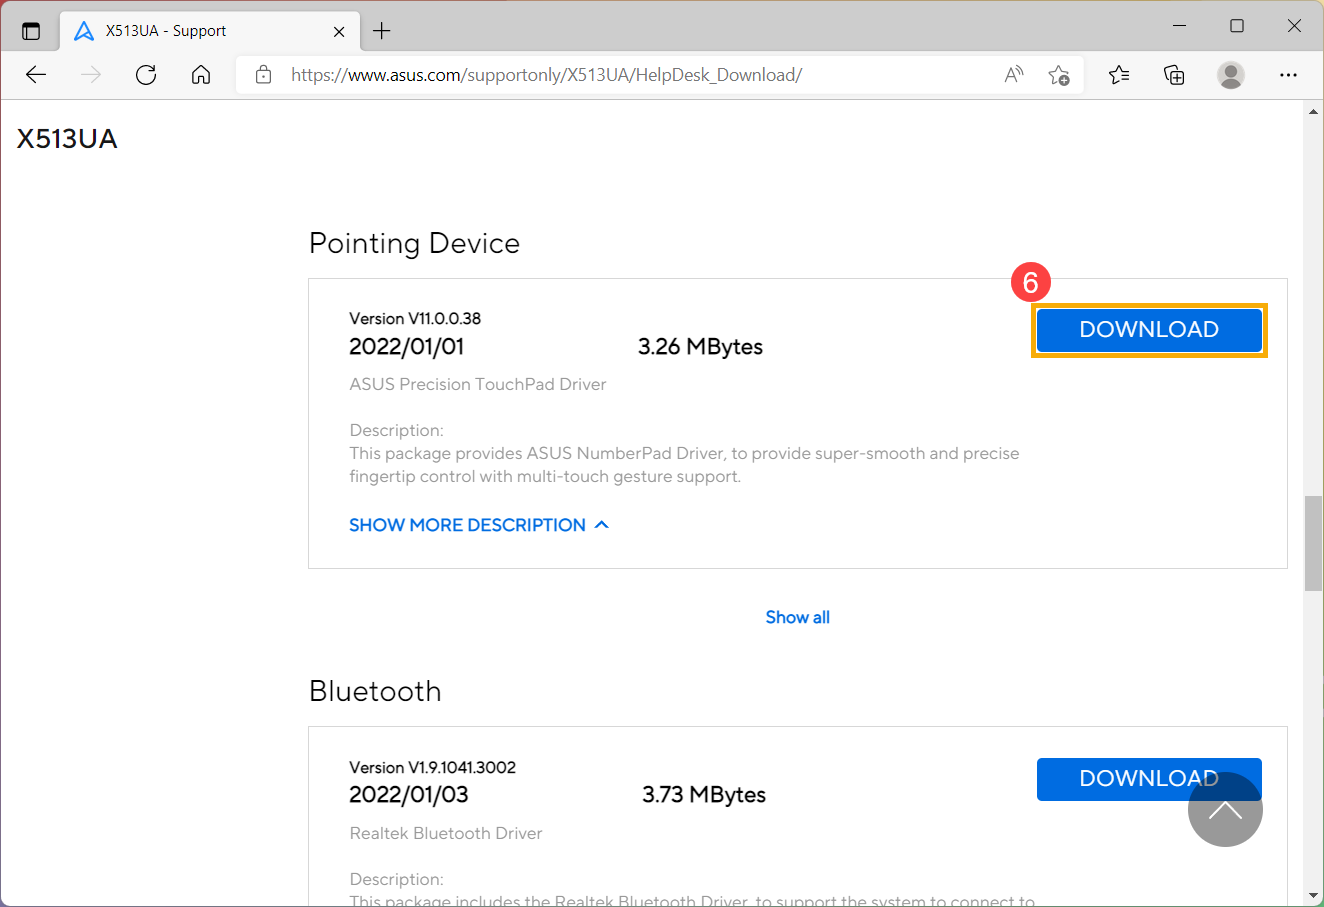
- Next, find the latest version of touchpad driver [ASUS Precision TouchPad driver] under the category of Pointing Device. Again, left-click the DOWNLOAD button to start download and complete the installation⑥.
- Once the download and installation are completed, restart your notebook and you can now press the hotkey F6 to toggle on/off the touchpad function.
Note: If the problem persists after updating the driver and utility, we suggest that you can uninstall the antivirus software if you already installed in your laptop.
Some or all keys are not working
If you experience the keyboard is not working, please refer to the following troubleshooting steps:
Update and confirm BIOS / Windows packages / drivers with the latest version on your laptop
Updating software usually helps the system stability and optimization, so we recommend you check and often update to the latest version in your laptop. Here you can learn more about How to update BIOS:
How to update the BIOS version in Windows system
How to use EZ Flash to update the BIOS version
For executing Windows update and drivers update, here you can learn more about:
How to update drivers via System Update in MyASUS
If the problem persists after you have updated BIOS/Windows packages/drivers to the date, please continue to the next chapter for troubleshooting.
Reinstall driver in Device Manager
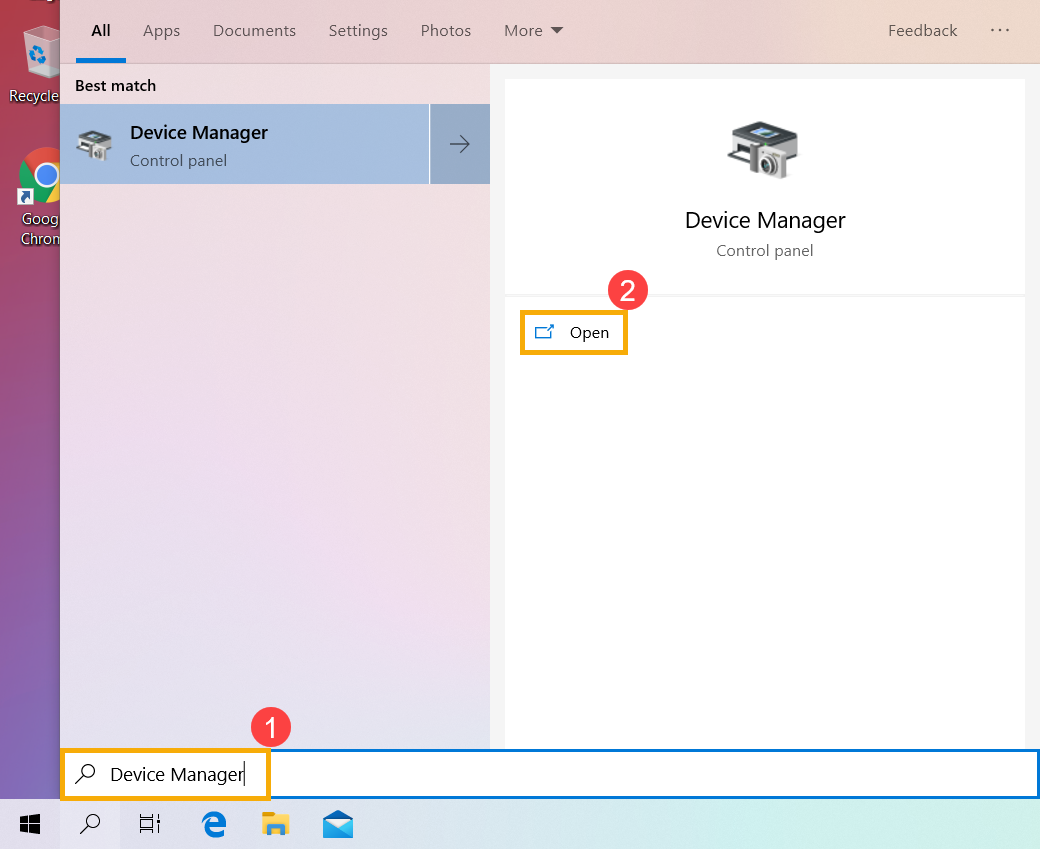
- Type and search [Device Manager] in the Windows search bar①, then click [Open]②.
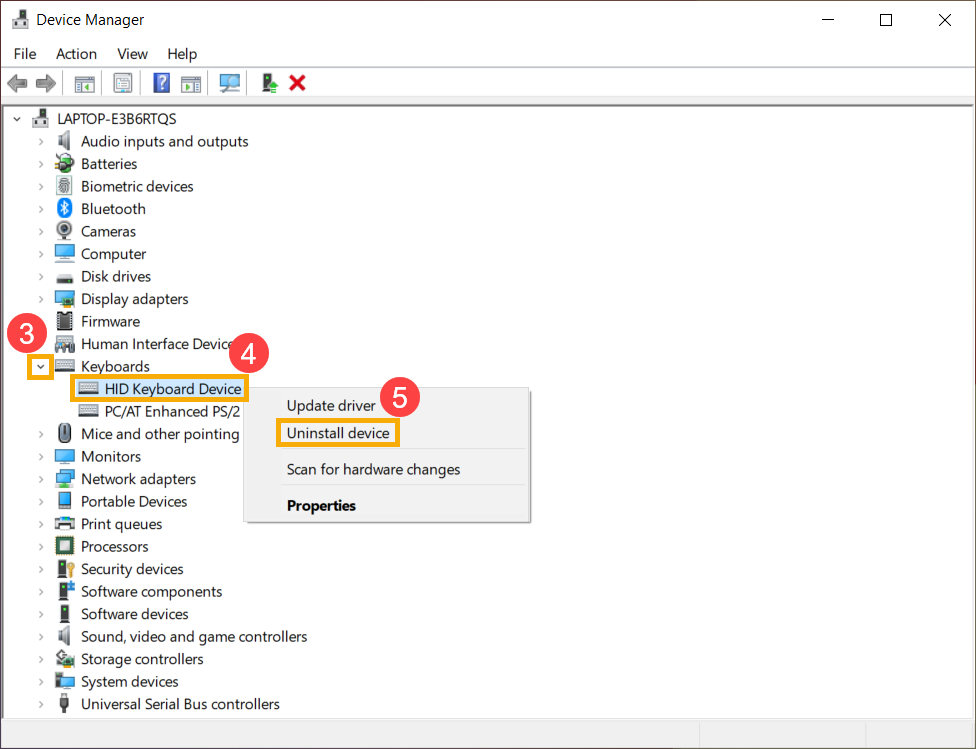
- Uninstall the driver of keyboards. Click the arrow next to [Keyboards]③, then right-click the [keyboard name]④ and select [Uninstall device]⑤.
- Click [Uninstall]⑥.
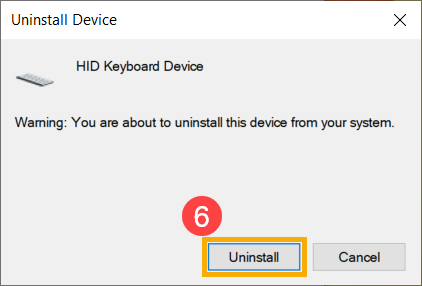
- Remove all devices in the keyboards category, then restart the computer. The driver will be automatically installed after the computer restarts. To test if the keyboard is working properly.
Use the keyboard troubleshooter
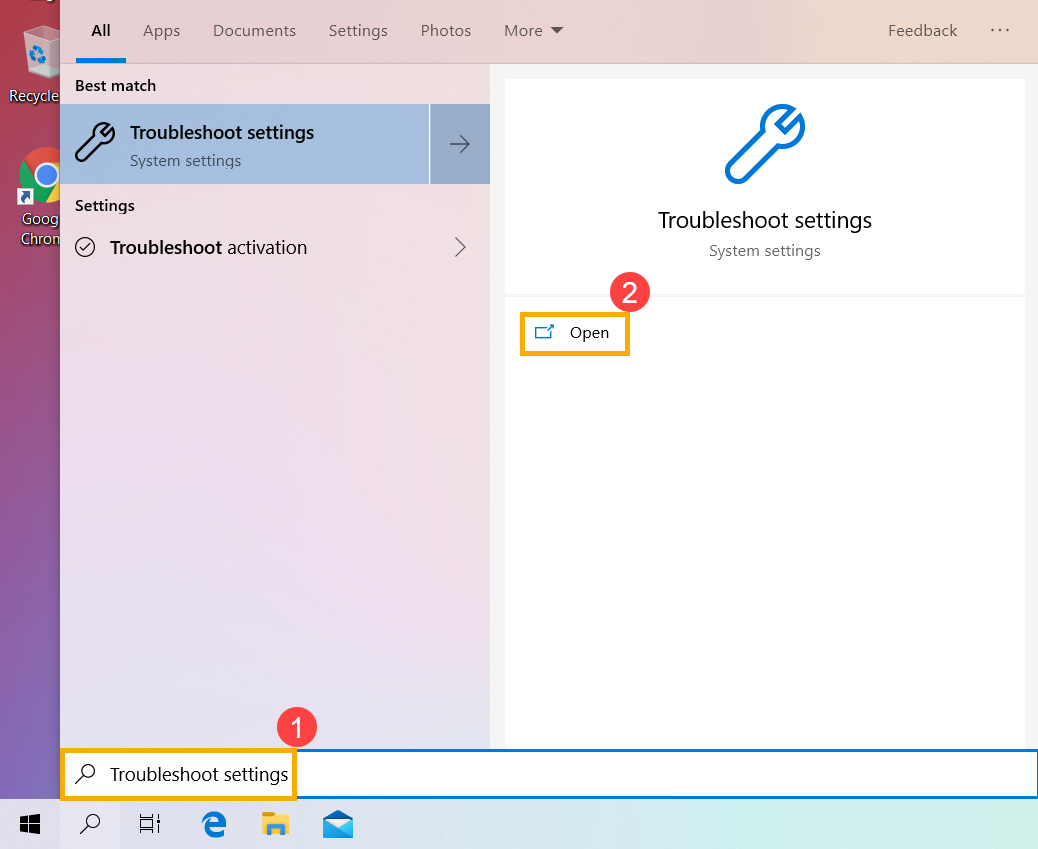
- Type and search [Troubleshoot settings] in the Windows search bar①, then click [Open]②.
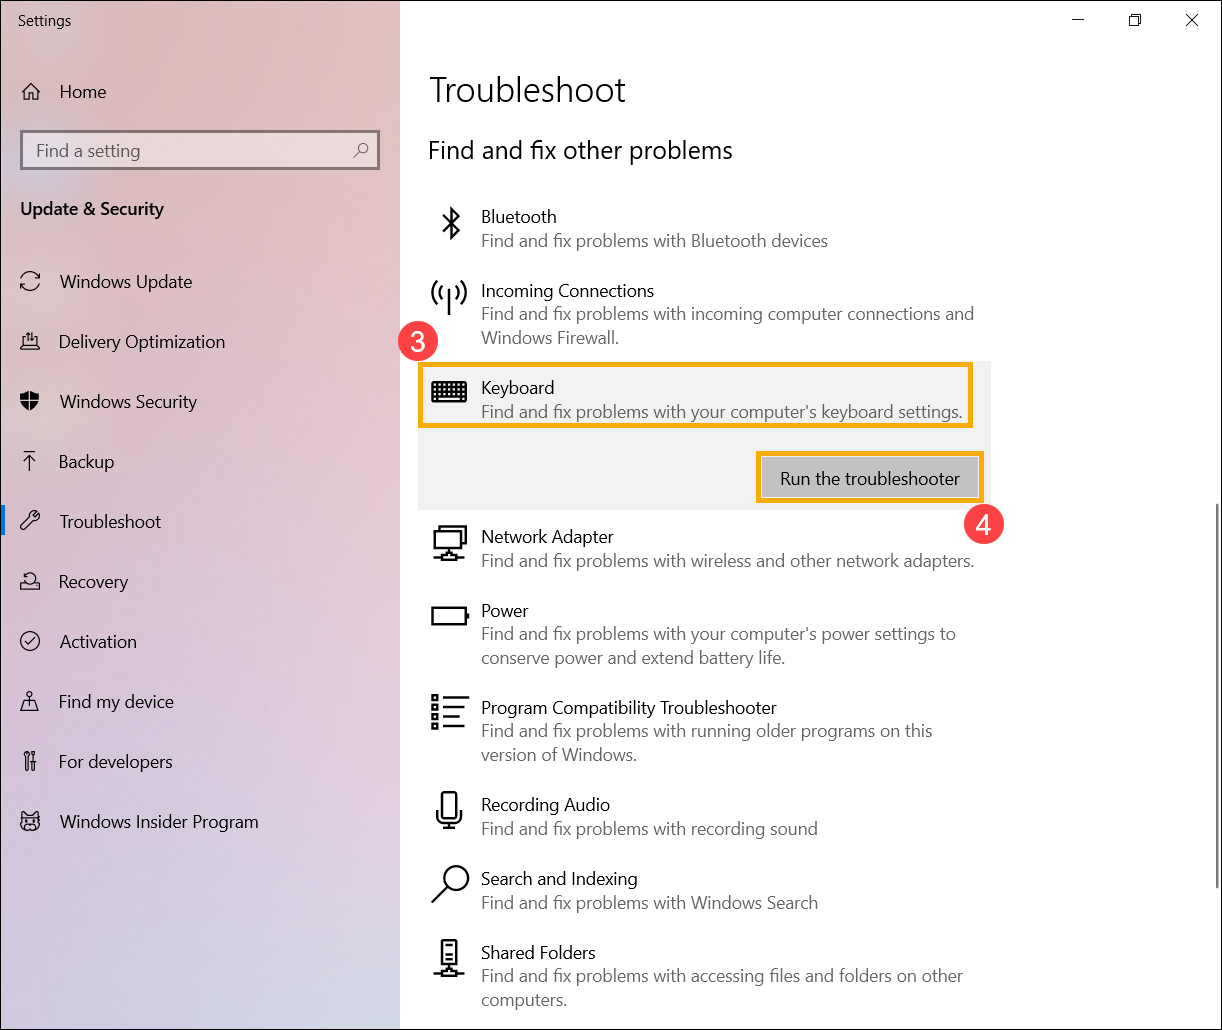
- In the troubleshoot window, select [Keyboard]③ and click [Run the troubleshooter]④.
- Follow the on-screen prompts to detect and resolve problems. If the drive is still missing after using the troubleshooter, continue to the next step.
Restore the system from restore point
If the keyboard problem happens recently, and if you have ever created a restore point or there is an automatic system restore existed, try to restore the computer to a point before the problem began to resolve the problem. Here you can learn more about How to use restore point to restore the system.
If the problem persists, please continue to the next chapter for troubleshooting.
Reset your PC
If the problem persists after all troubleshooting steps are completed. Please backup your personal files, then reset the PC to back to its original configuration. Here you can learn more about: How to reset the system.
Keys are not sensitive
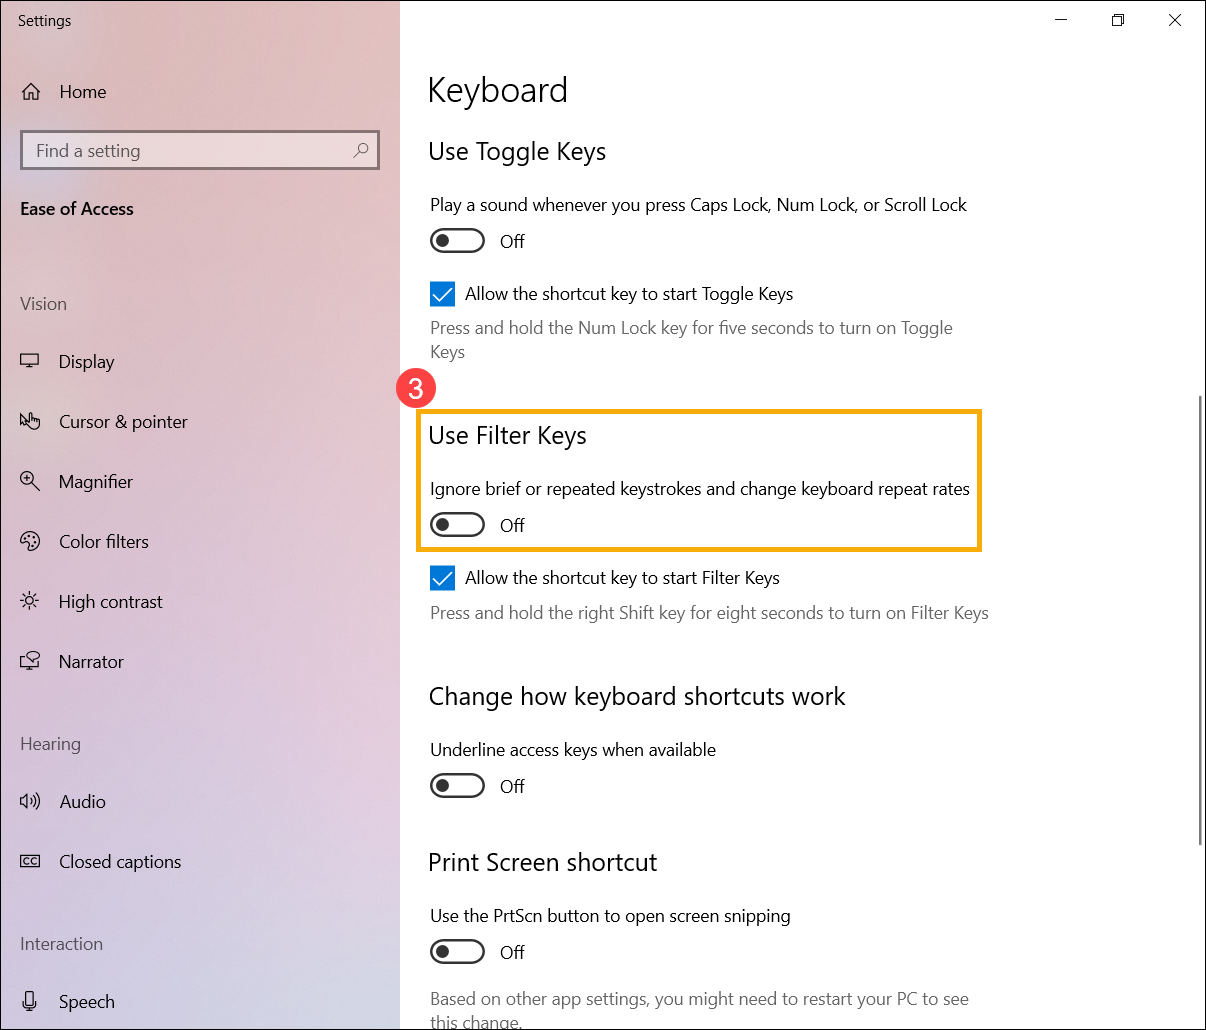
If you experience there is a short delay before the character displays on the screen when you press a key. The Filter keys function might be enabled. Try to disable Filter keys and check whether the key is more responsive.
- Type and search [Ease of Access keyboard settings] in the Windows search bar①, then click [Open]②.
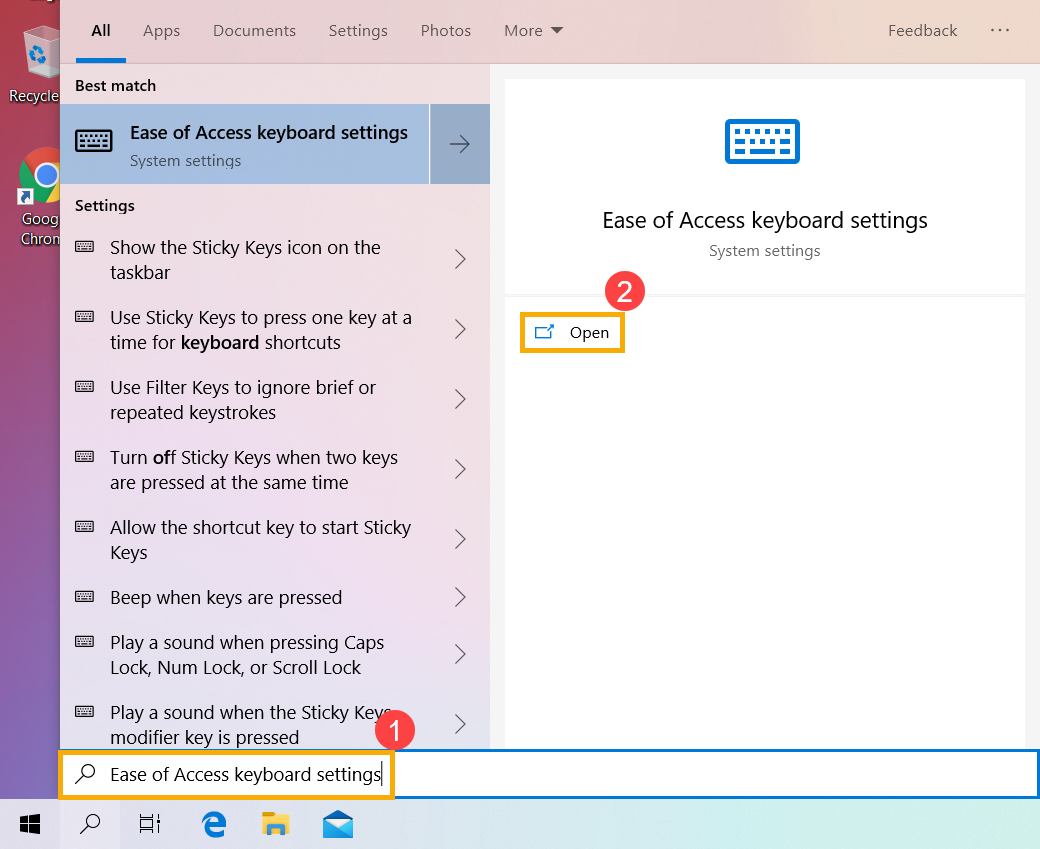
- Turn off the [Use Filter Keys] function③.
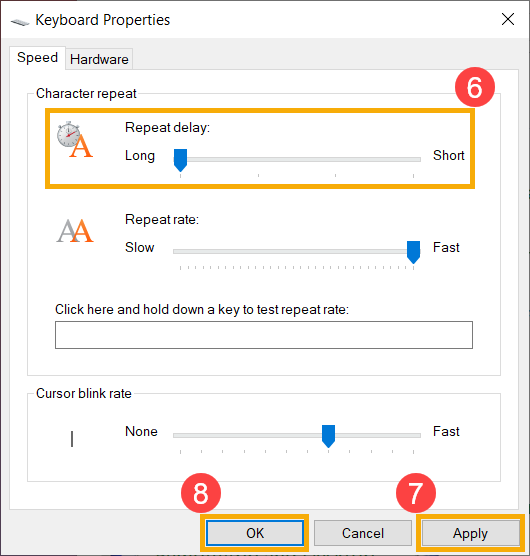
If you experience that when pressing a key once but two or more characters display on the screen, please try to adjust the key repeat delay.
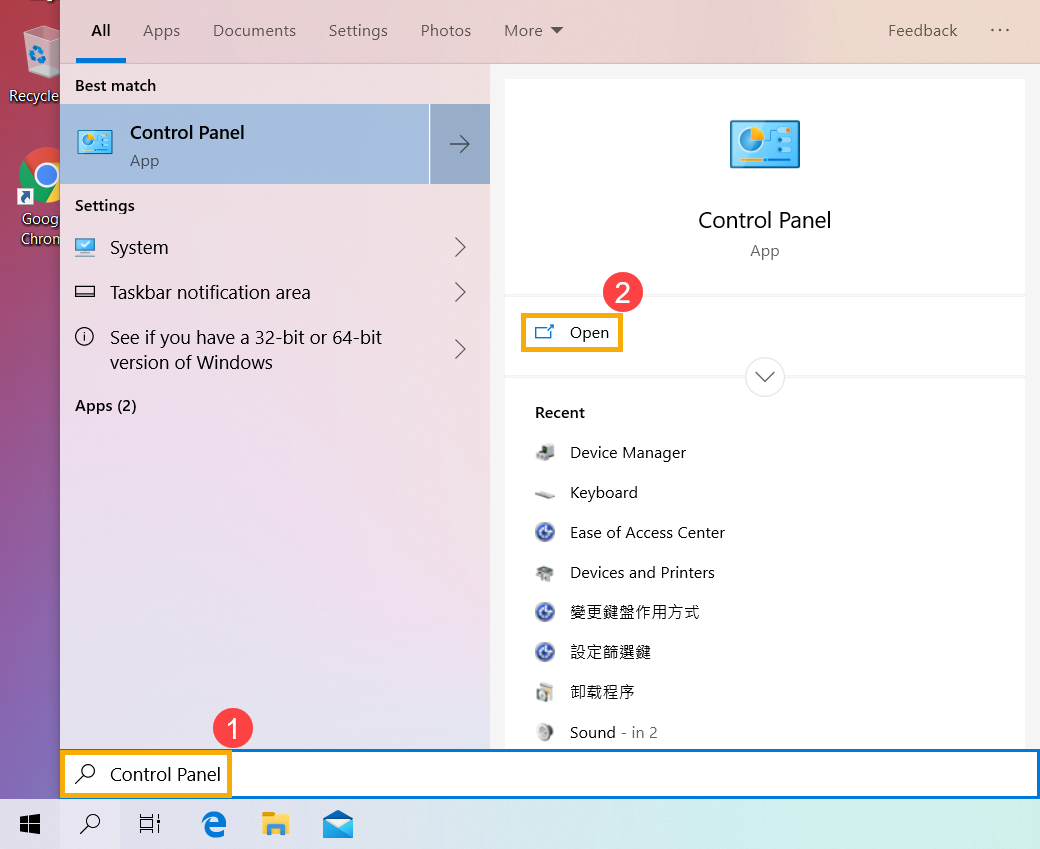
- Type and search [Control Panel] in the Windows search bar①, then click [Open]②.
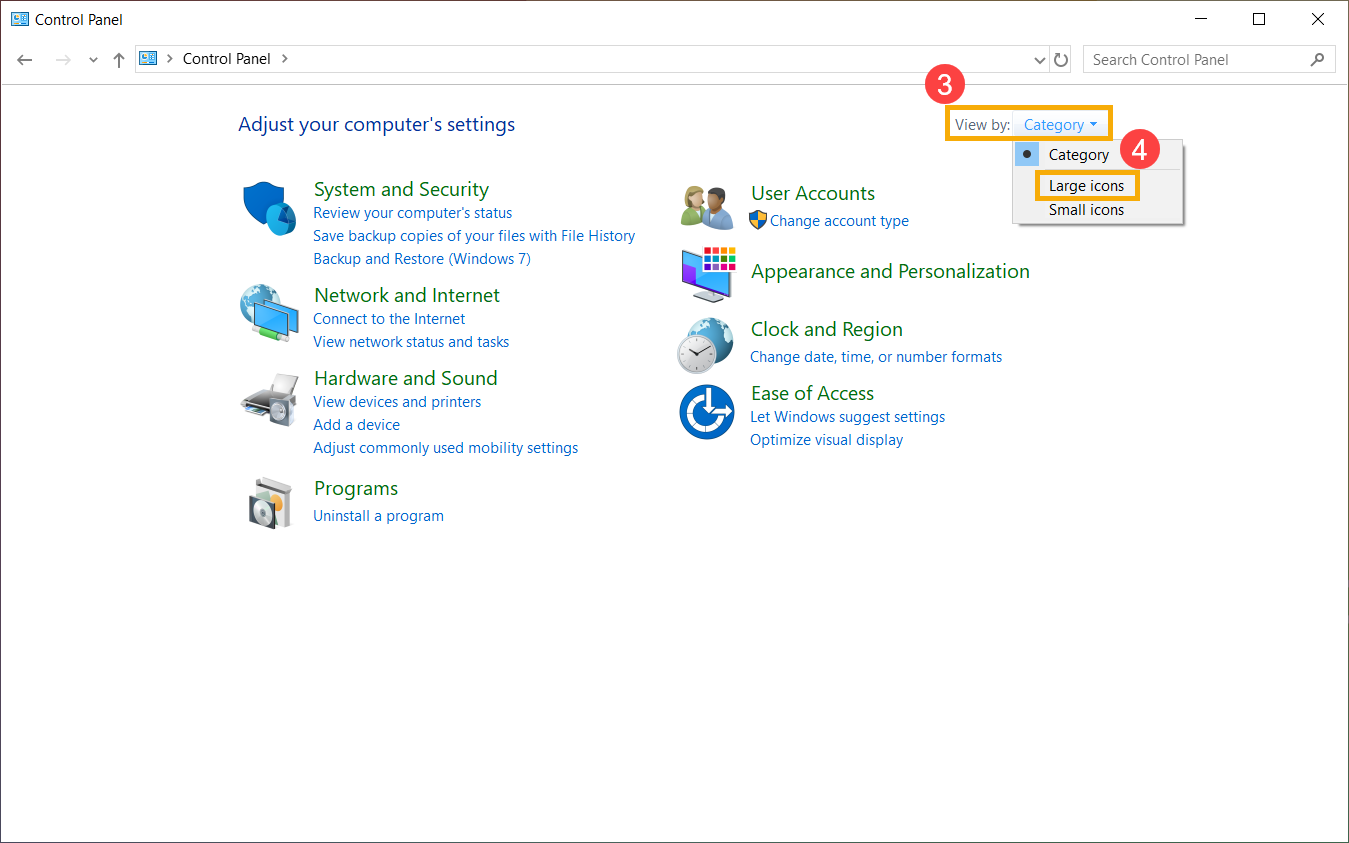
- Click [Category] on the right-up of screen③ and select [Large icons]④.
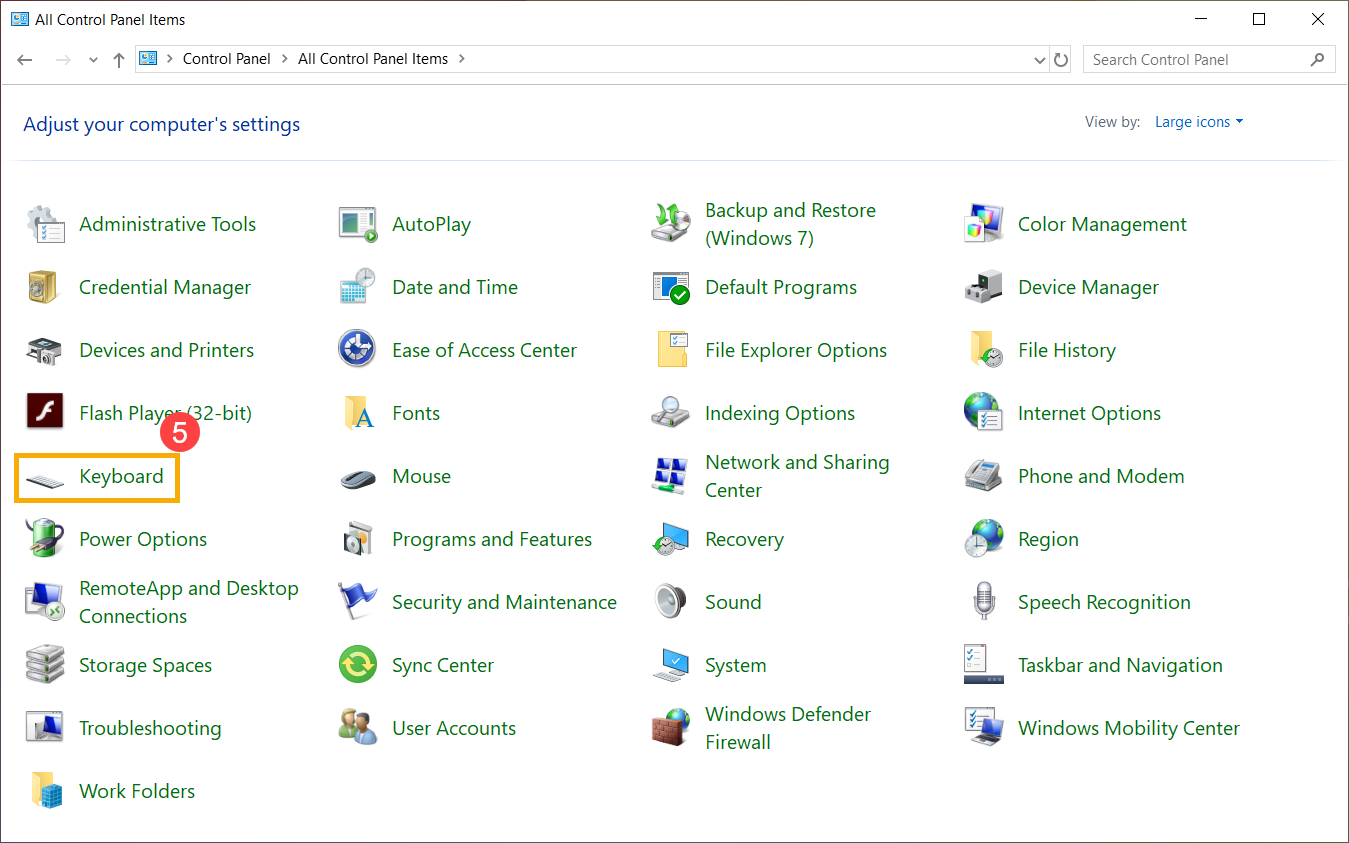
- Select [Keyboard]⑤.
- Drag the [Repeat delay] slider to Long⑥, then click [Apply]⑦ and [OK]⑧.
What I type on the keyboard doesn’t match what I see on the screen
If you experience that when pressing some specific keys but the numeric characters display on the screen, the NumLock function might be disabled. Please try to enable the NumLock function and check whether the keys are working properly.
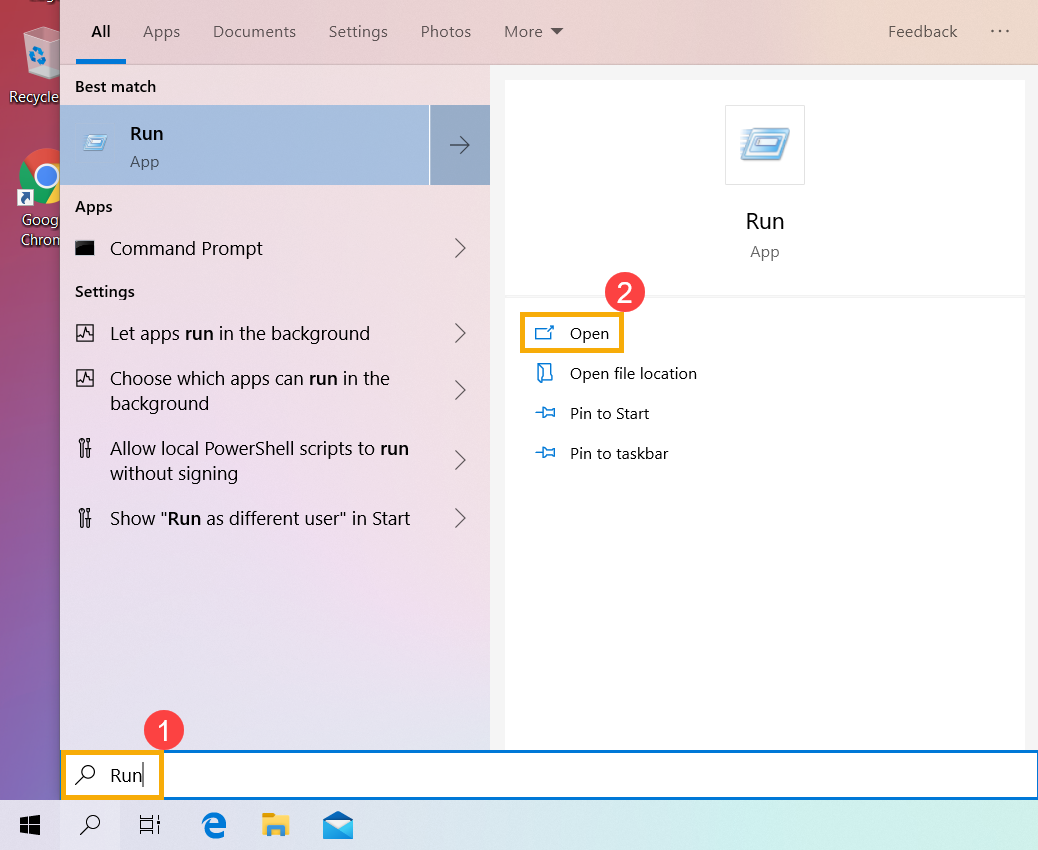
- Type and search [Run] in the Windows search bar①, then click [Open]②.
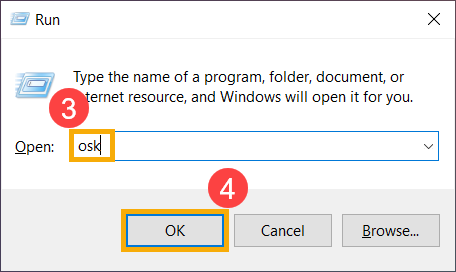
- Type [osk] in the Run window③, then click [OK]④.
- After opening the on-screen keyboard, click [Options]⑤.

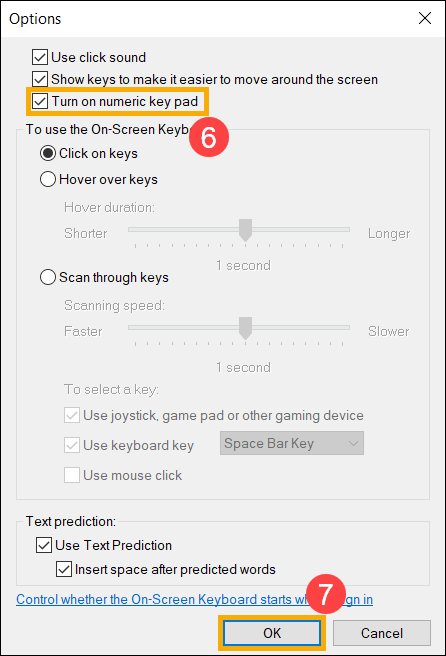
- Check the box of [Turn on numeric key pad]⑥, then click [OK]⑦.
- Click [NumLock] in the on-screen keyboard⑧, highlight this key to enable the NumLock function.

If you experience that when pressing a key but the wrong character displays on the screen, please make sure whether the preferred language is correct.
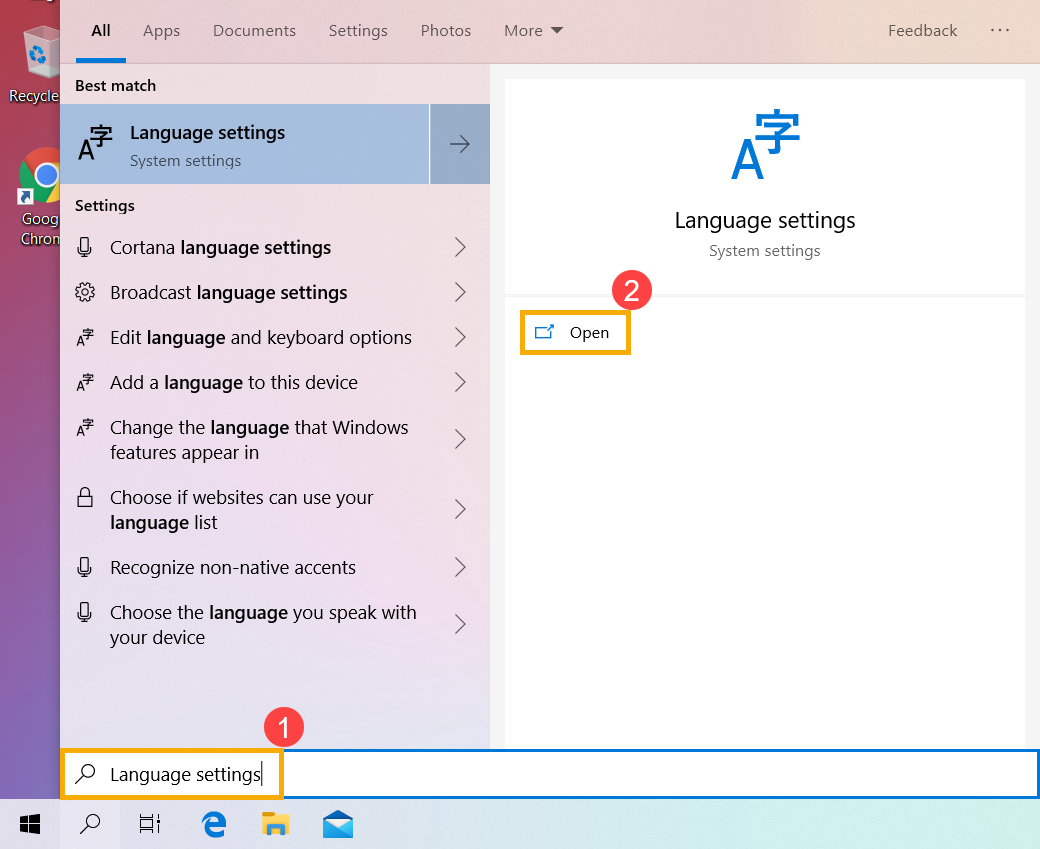
- Type and search [Language settings] in the Windows search bar①, then click [Open]②.
- Make sure whether the preferred language is correct③. If it is incorrect, please click [Add a preferred language]④.
Note: Make sure your laptop is in an available network environment, then connect to internet because it is an online update process.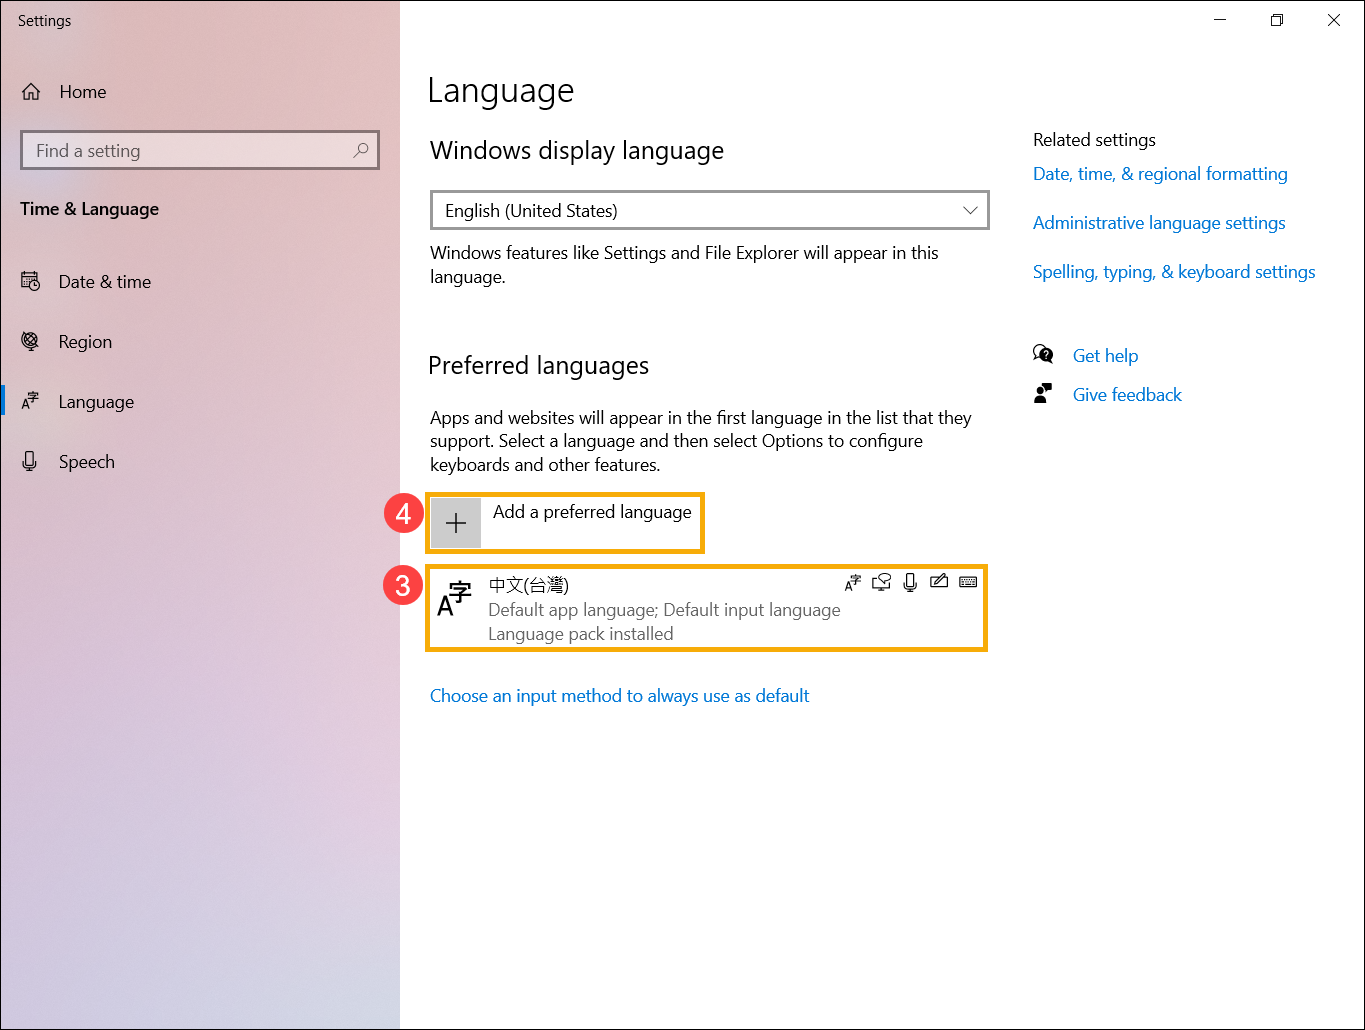
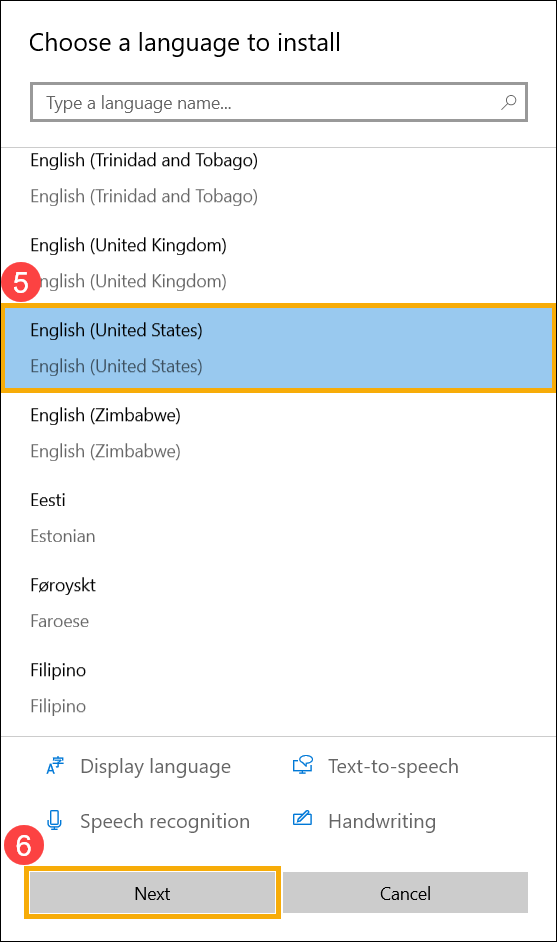
- Search for a language what you needed⑤, then click [Next]⑥.
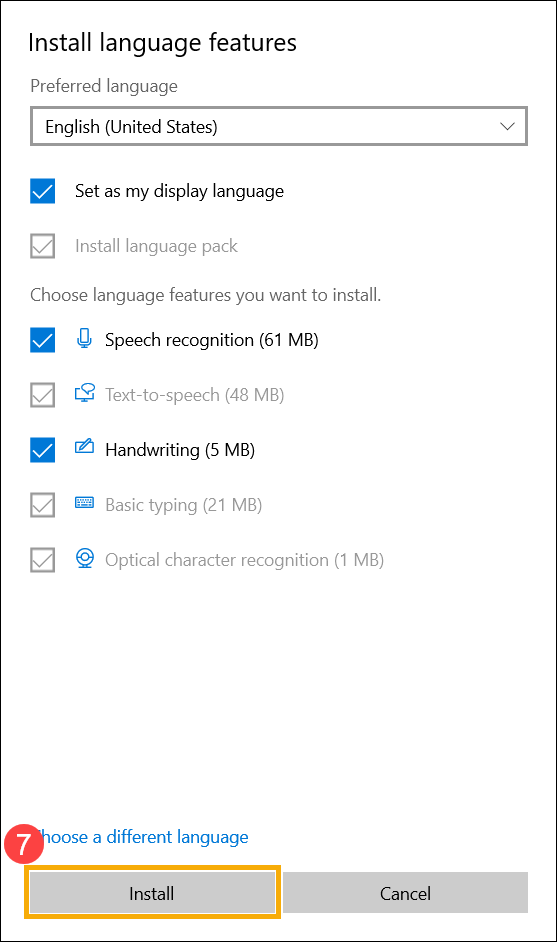
- Click [Install]⑦, the system will download and install automatically.
- If you have multiple input language, you are able to click the arrow
 to set as default⑧.
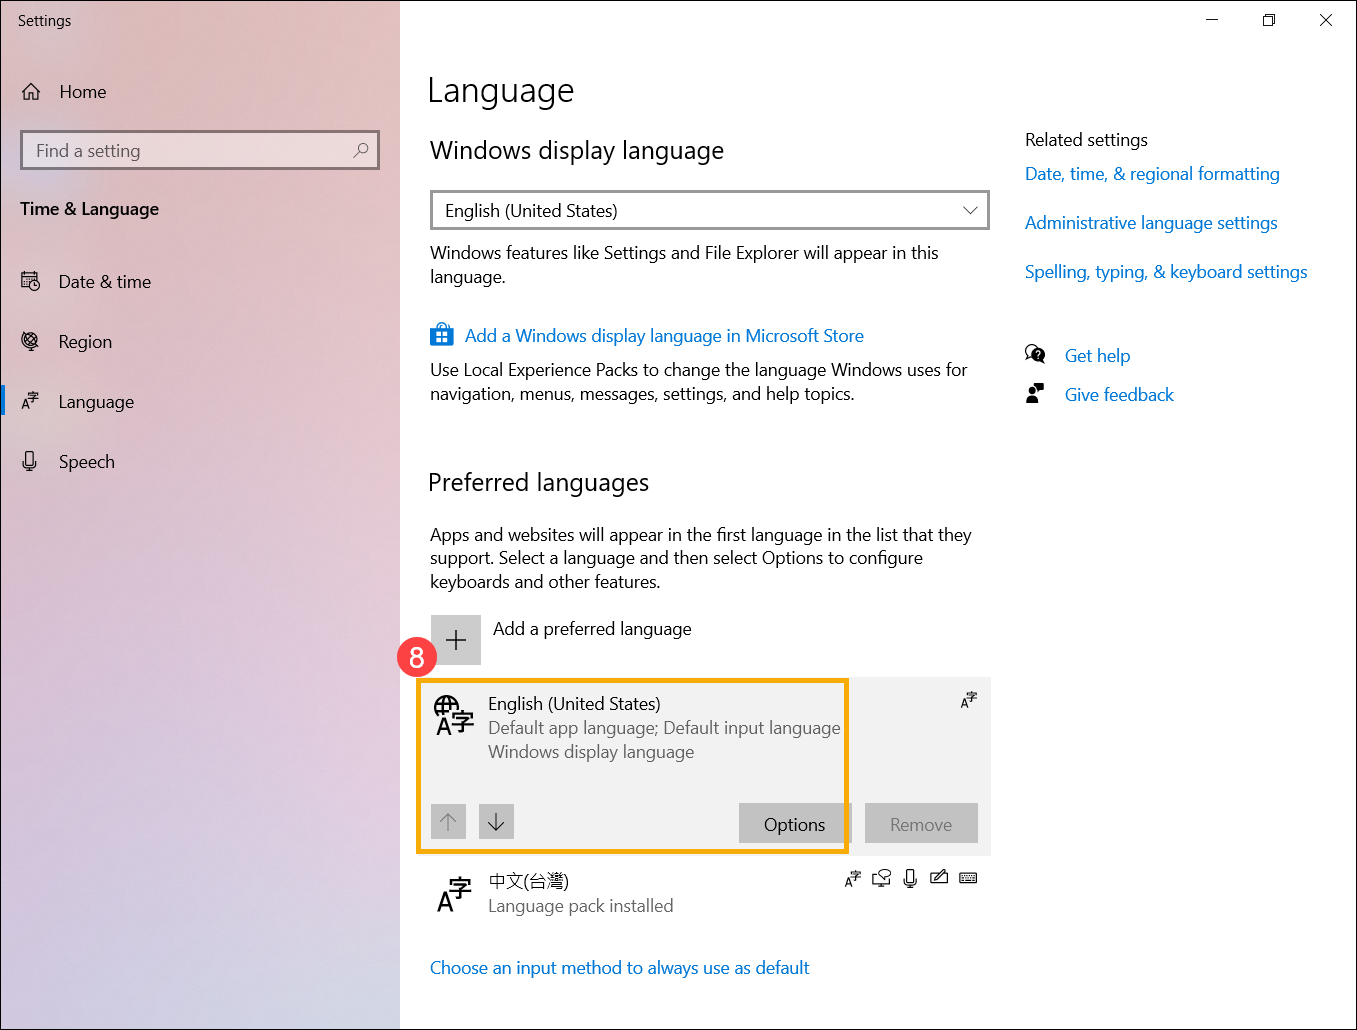
- After installation is completed, select the language you have installed⑨, then click [Options]⑩.
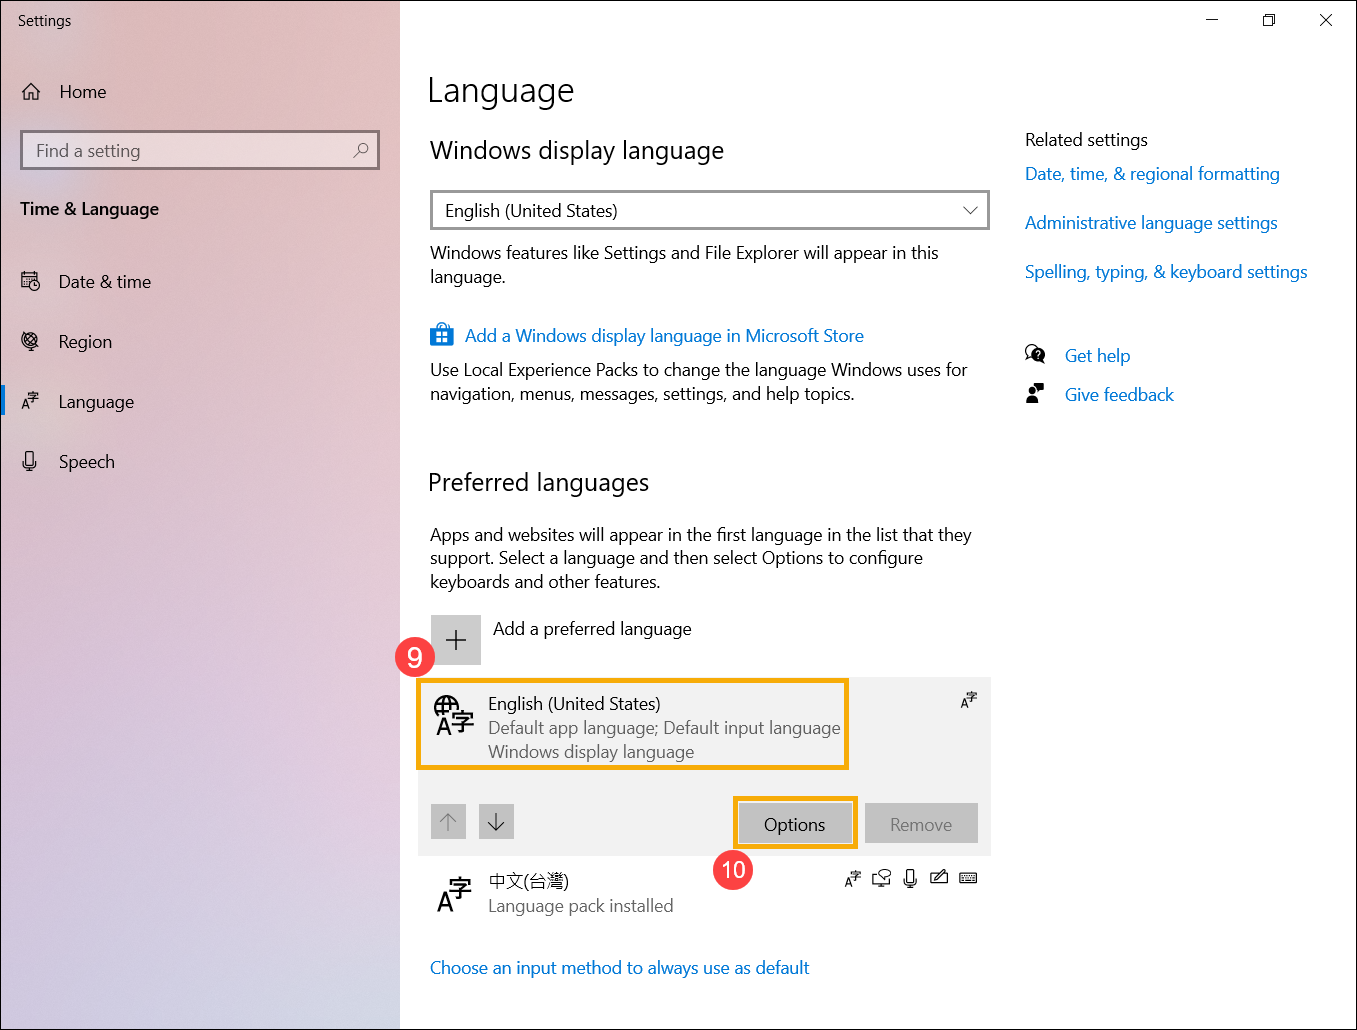
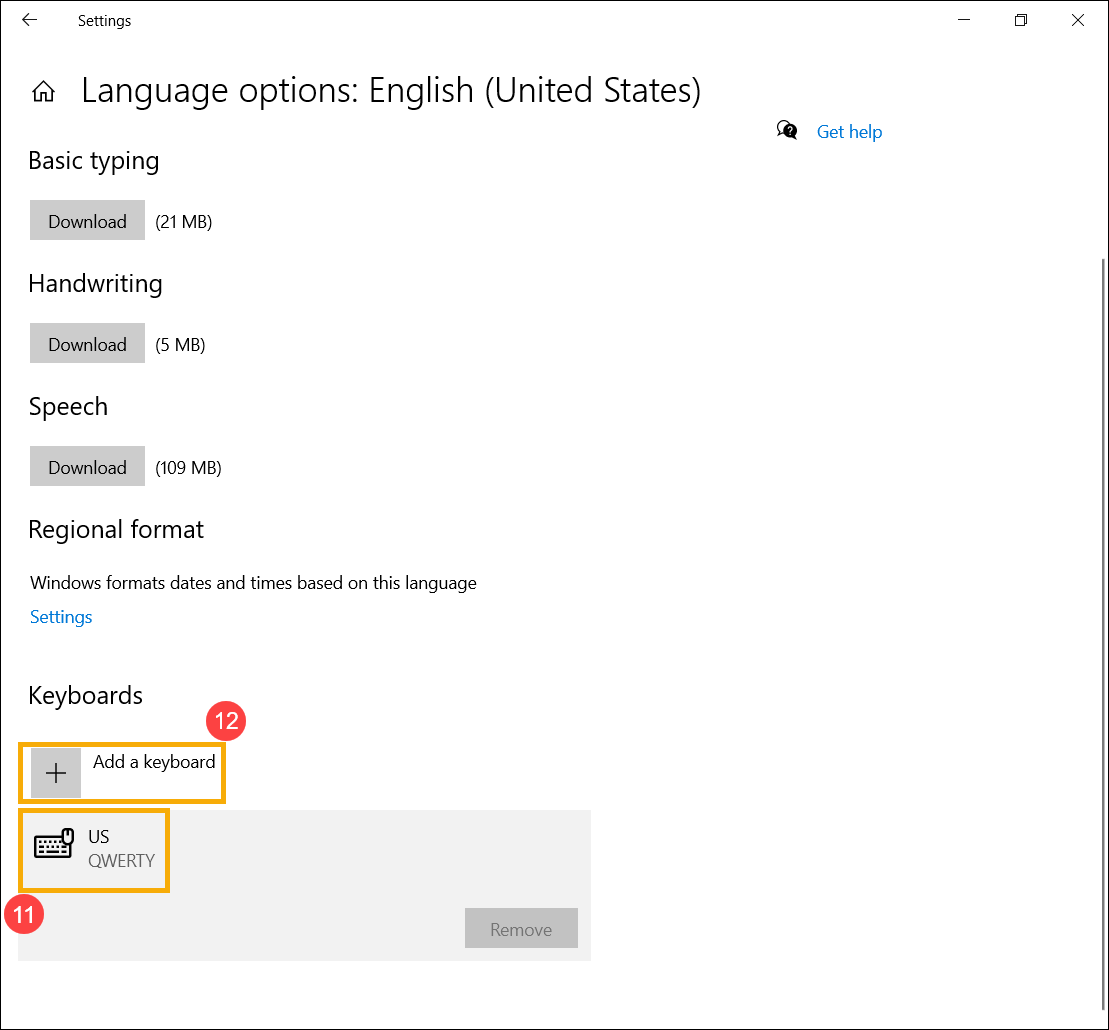
- Make sure whether the keyboard is correct⑪. If it is incorrect, please click [Add a keyboard]⑫.
Hotkeys not functioning properly
If the hotkeys of your ASUS notebook lose their function, you can automatically update the driver and utility via ASUS Live Update (or MyASUS) to fix the problem. You can also manually download the latest driver and utility from the ASUS Official Website.
This table lists some of the common hotkeys with their functions and required driver and utility to be downloaded and installed.
Note: The hotkeys functions may be different based on different models, please refer to the User Manuals.
| Hotkeys | Functions | Required Driver & Utility |
| Fn+F9 | Turn on/off touchpad | 1. Install ATKACPI driver and ATK hotkey tool 2. Install the driver for touchpad |
| Fn+F10/F11/F12 | Mute/Adjust volume | 1. Install ATKACPI driver and ATK hotkey tool 2. Install the driver for Audio |
| Fn+F5/F6/F7/F8 | Monitor brightness/on & off/Toggle Display mode | Installation of driver & utility is not required |
| Fn+C | Toggle "ASUS Splendid" mode | 1. Install ATKACPI driver and ATK hotkey tool 2. Install ASUS Splendid |
| Fn+F2 | Toggle Wi-Fi on/off | 1. Install ATKACPI driver and ATK hotkey tool 2. Windows 8/8.1/10: Install ASUS Wireless Radio Control Windows 7: Install Wireless Console3 |
Note: If the function of Monitor brightness/on & off/Toggle Display mode is failed, please try to check Windows Update, learn more about How to execute Windows Update.
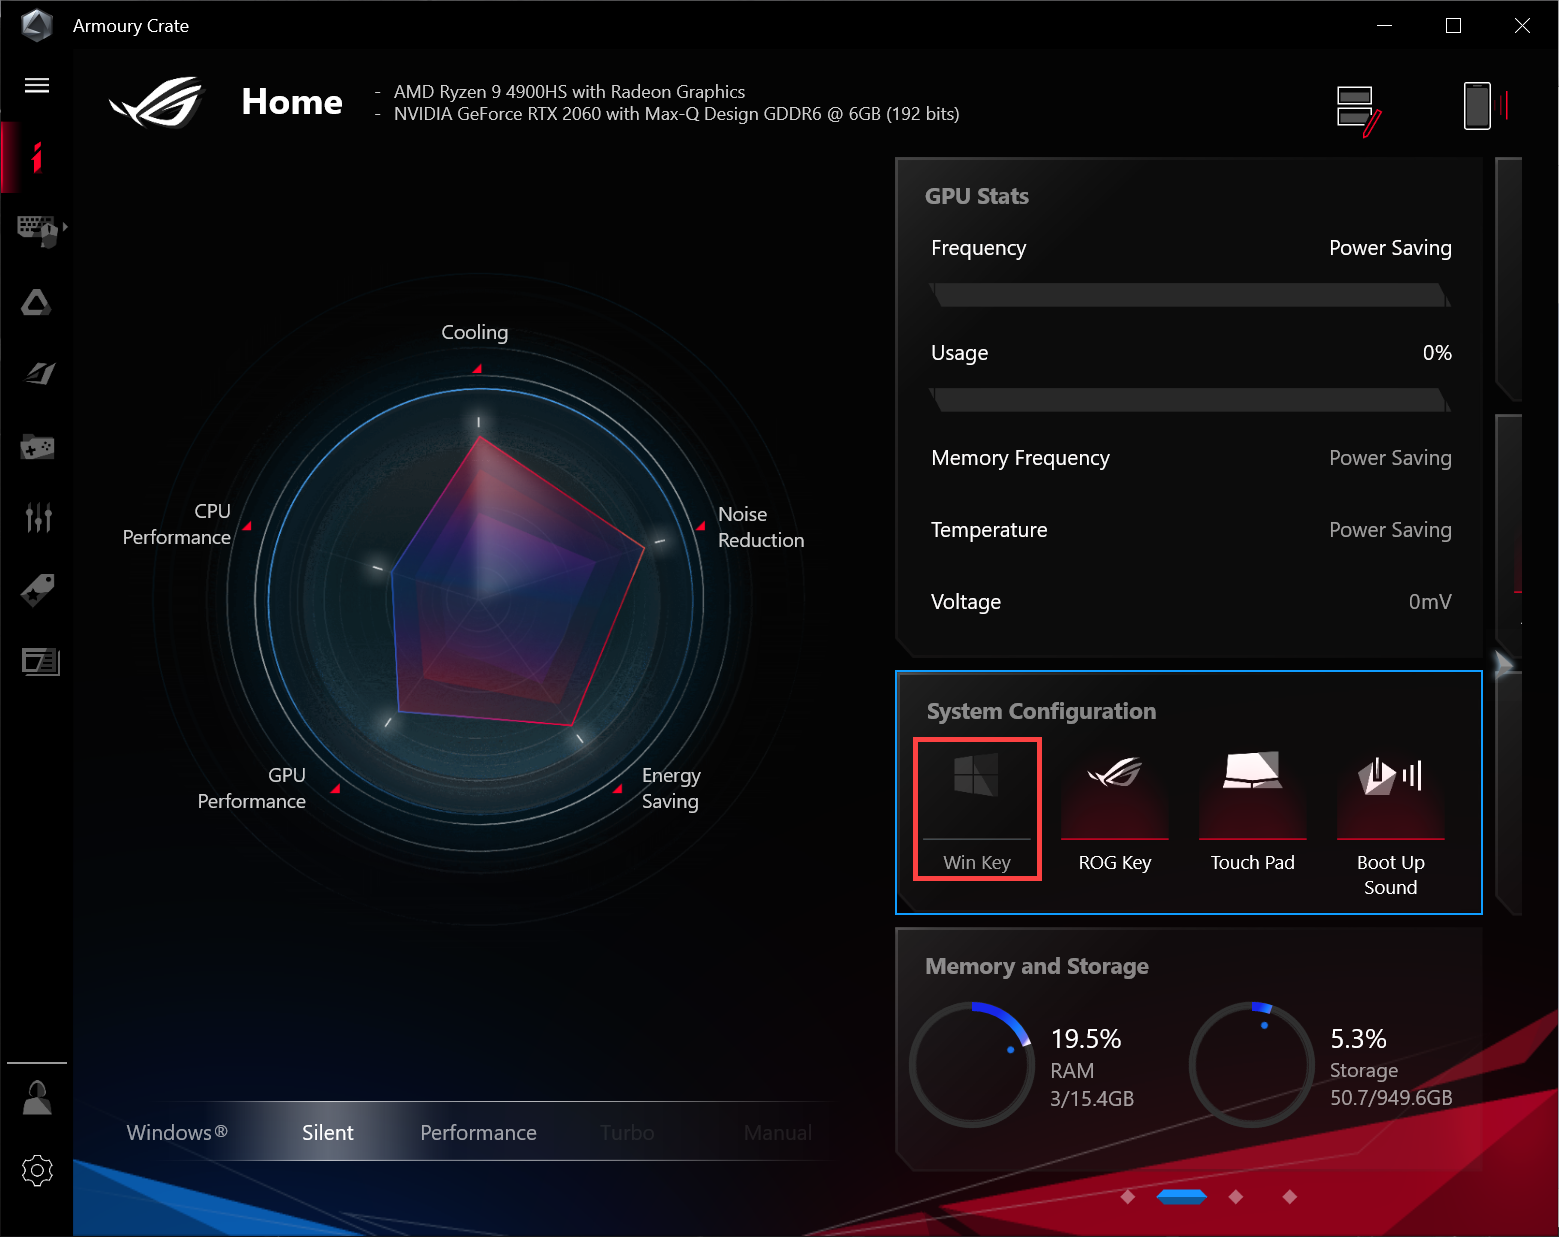
Note: If your laptop is Gaming NB series, and you encounter the issue of “Toggle display mode”, please check whether the Win key function is disabled in System Configuration of the Armoury Crate application. (Disable Win Key will disable the “Toggle display mode” function together.)
X756UQ is used as an example in this article for finding and installing the driver and utility required to fix the problem when the touchpad hotkeys lose their function.
- Please go to the ASUS Support page on the ASUS official site, and enter the model name X756UQ in the search field①. Left-click on the X756UQ in the drop-down list②.

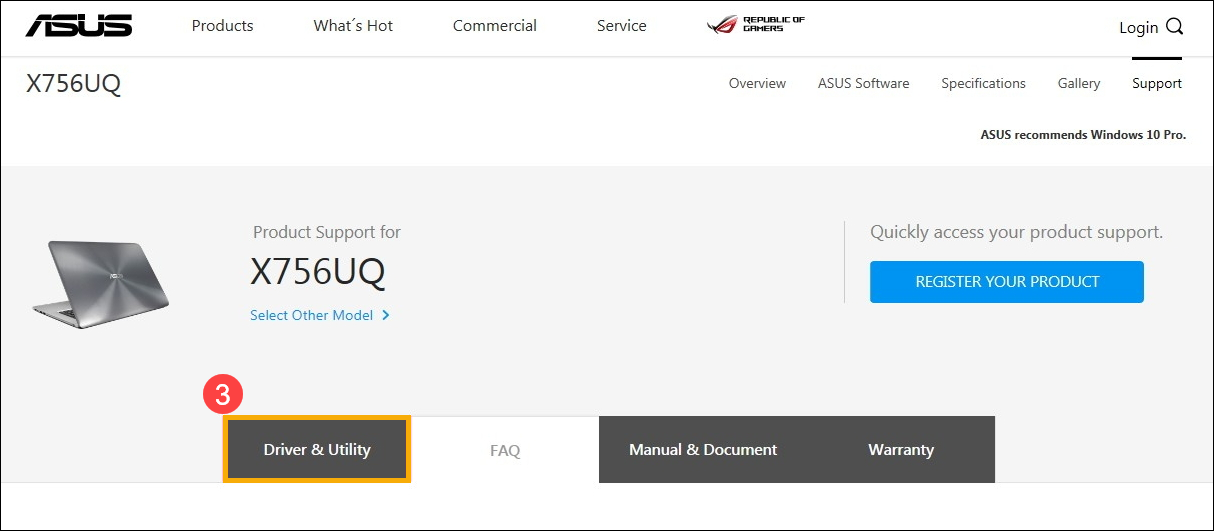
- On the Support Page of X756UQ, Please click [Driver & Utility]③.
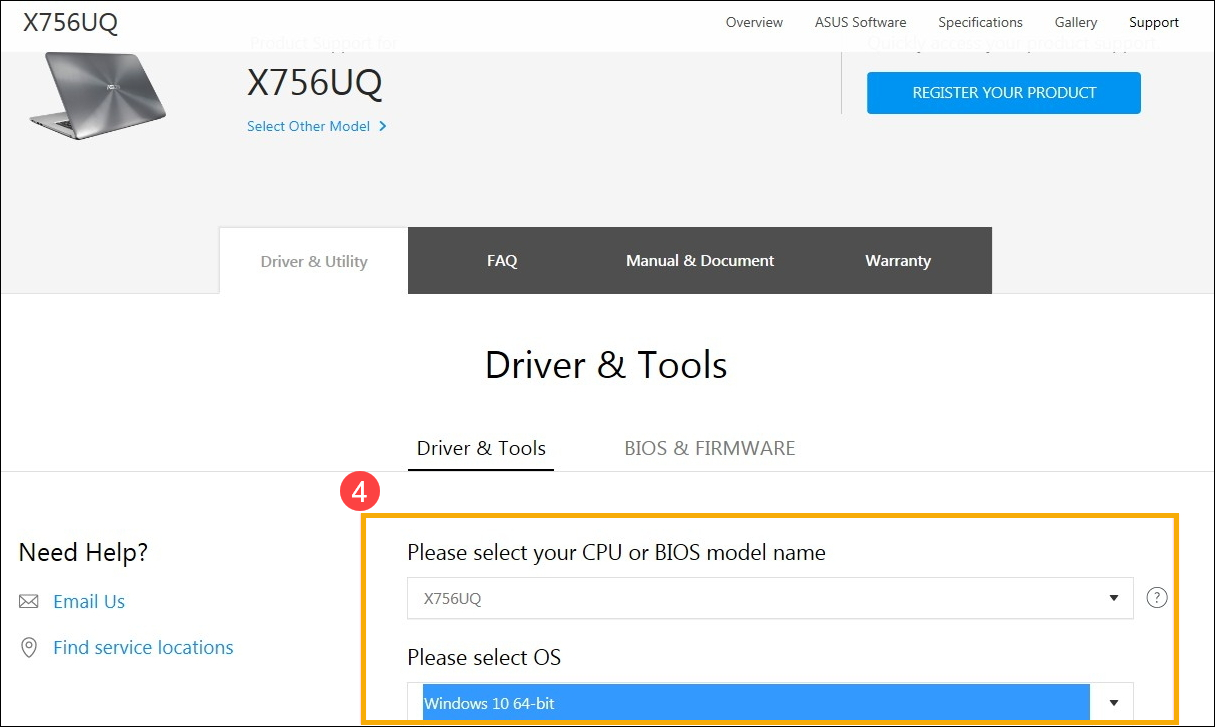
- Select the model and OS accordingly④. Windows 10 64-bit is selected below as an example.
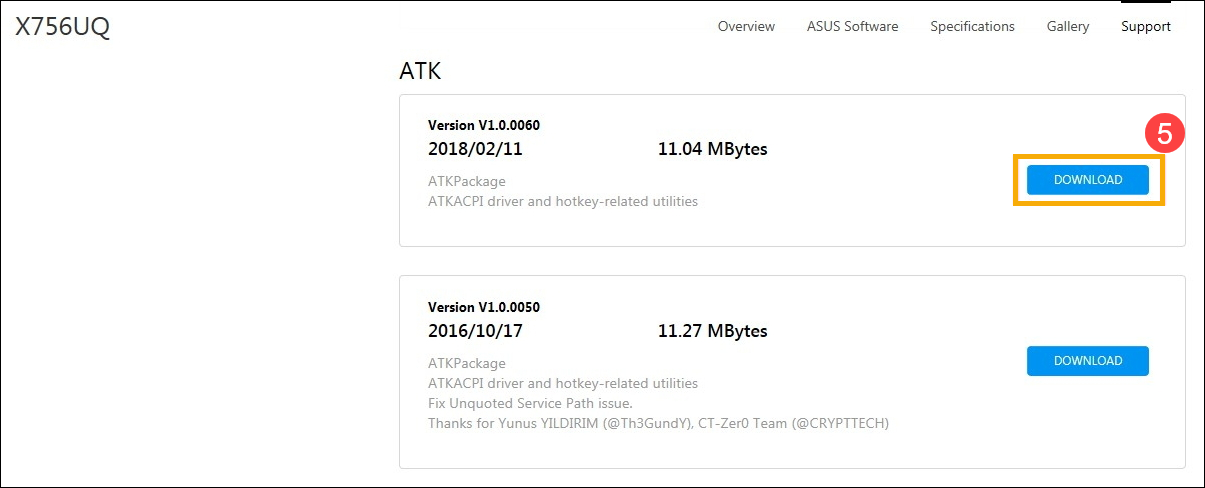
- Referring to the table above, the touchpad hotkey requires installation of [ATKACPI driver and ATK hotkey tool] and [driver for touchpad]. First, find the latest version of ATKPackage under the category of ATK. Left-click on the DOWNLOAD button to start download and complete the installation⑤.
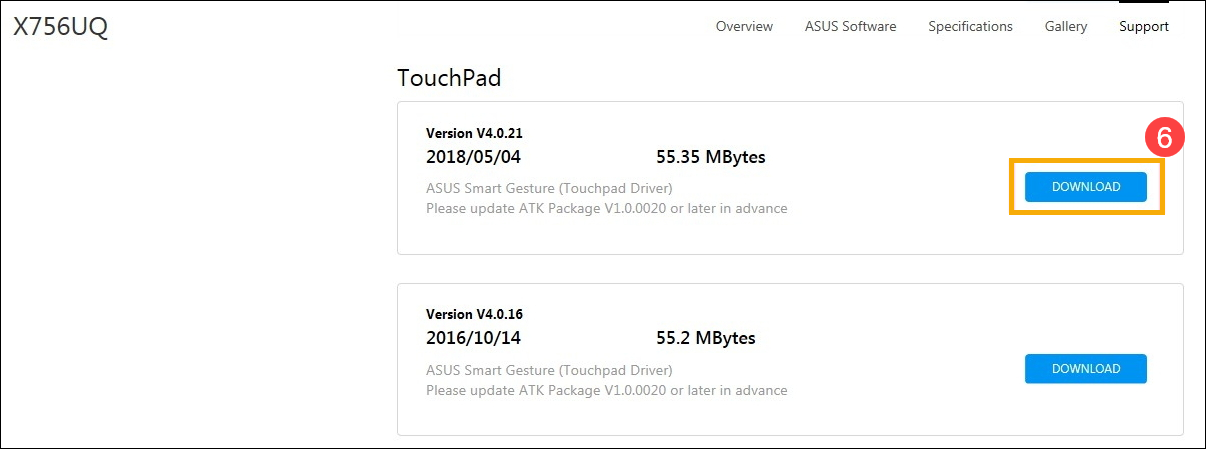
- Next, find the latest version of touchpad driver [ASUS Smart Gesture] under the category of TouchPad. Again, left-click the DOWNLOAD button to start download and complete the installation⑥.
- Once the download and installation are completed, restart your notebook and you can now press the hotkey (Fn+F9) to toggle on/off the touchpad function.
Note : If the problem persists after updating the driver and utility, we suggest that you can uninstall the antivirus software if you already installed in your laptop.
Q & A
Question : Why can't I find the ATKACPI driver on the ASUS Support Site?
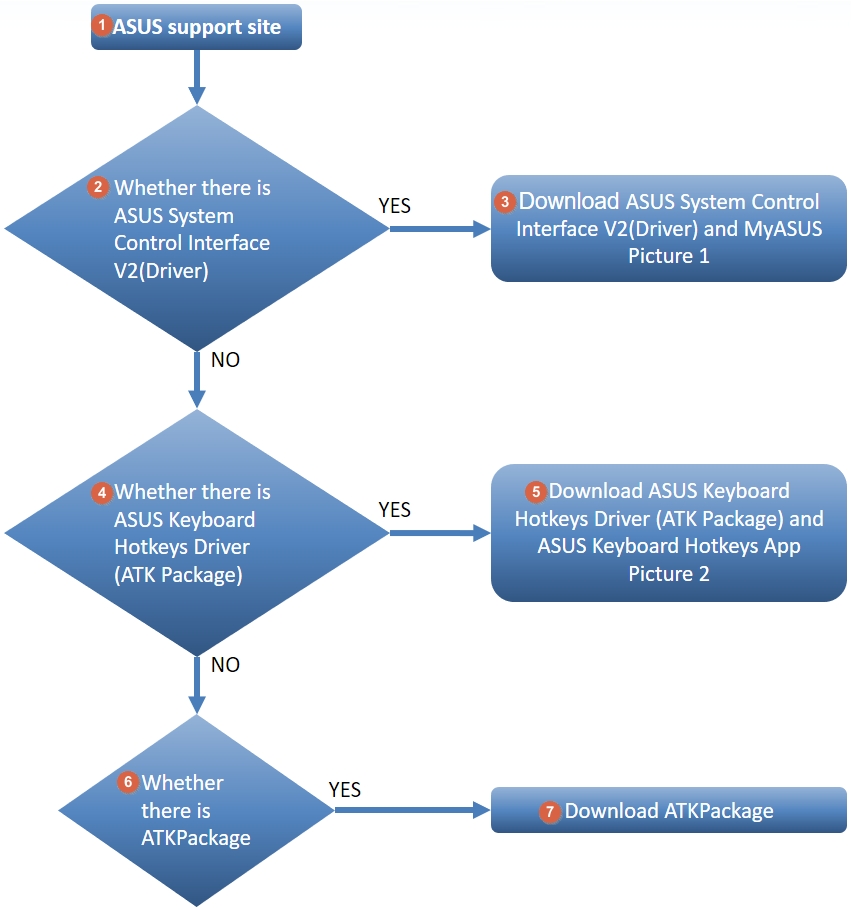
Answer : The hotkeys driver and utility are different in different generations of ASUS laptops. Please follow the below steps in flow chart to find the correct driver and utility on the ASUS support site.
Step ①②: From the ASUS Support Site, please check the demo video to find out whether there is ASUS System Control Interface V2 (Driver)
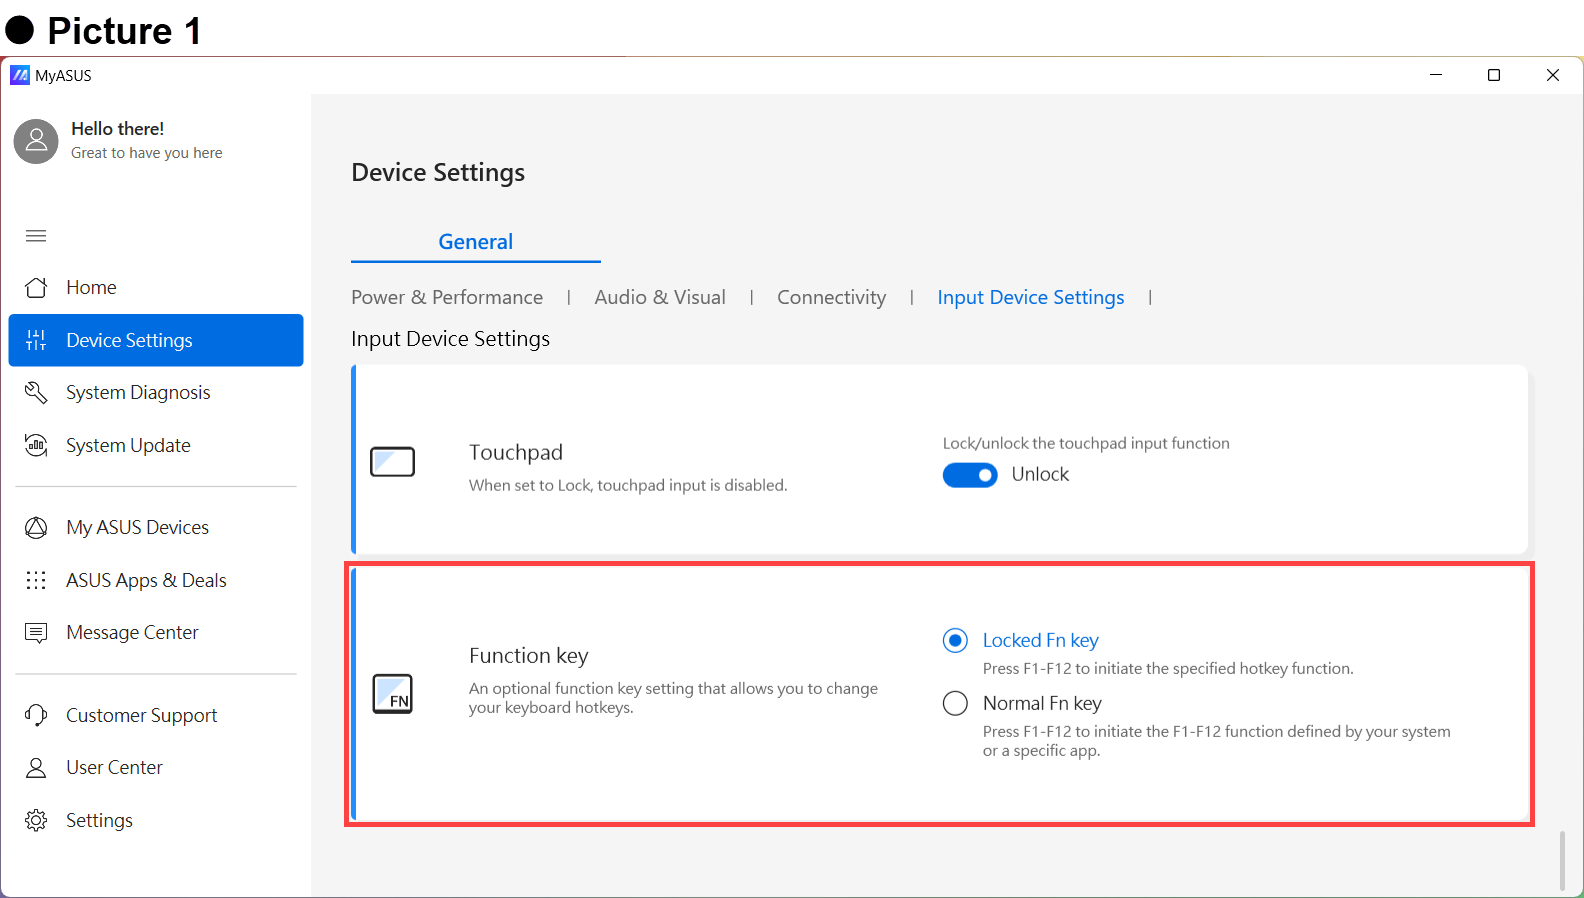
If yes ③, download ASUS System Control Interface V2 Driver and MyASUS. (as below Picture 1)
If no ④, check whether there is ASUS Keyboard Hotkey Driver (ATK Package)
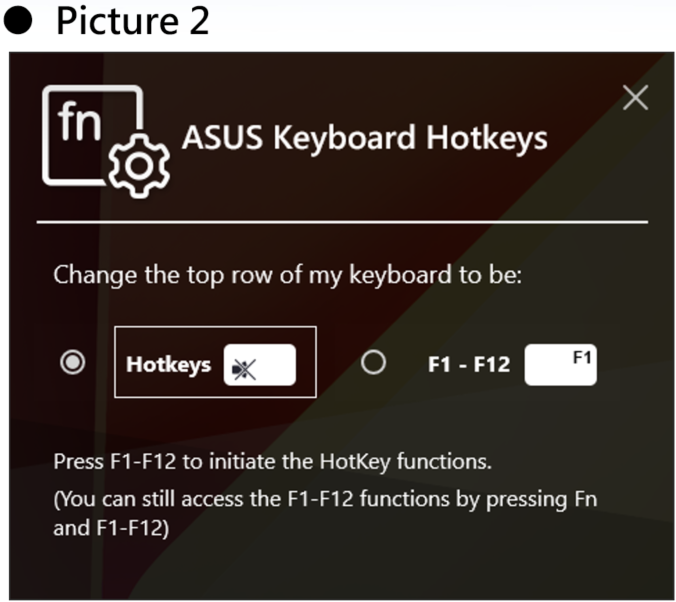
Step ⑤ : If there is, download ASUS Keyboard Hotkey Driver (ATK Package) and ASUS Keyboard Hotkeys App (as below Picture 2)
Step ⑥⑦: If there isn't ATK Package, please download it.
Click on the picture that will link to Microsoft store to download the utility, learn more about ASUS keyboard hotkeys introduction.
The following are the reference of drivers:
- ASUS System Control Interface V2(driver)

- ASUS Keyboard Hot keys Driver(ATK Package)

- ATKPackage

If you still cannot resolve your problem, download MyASUS and try the System Diagnosis for troubleshooting. Click below!
