MyASUS คำถามที่พบบ่อย (FAQ)
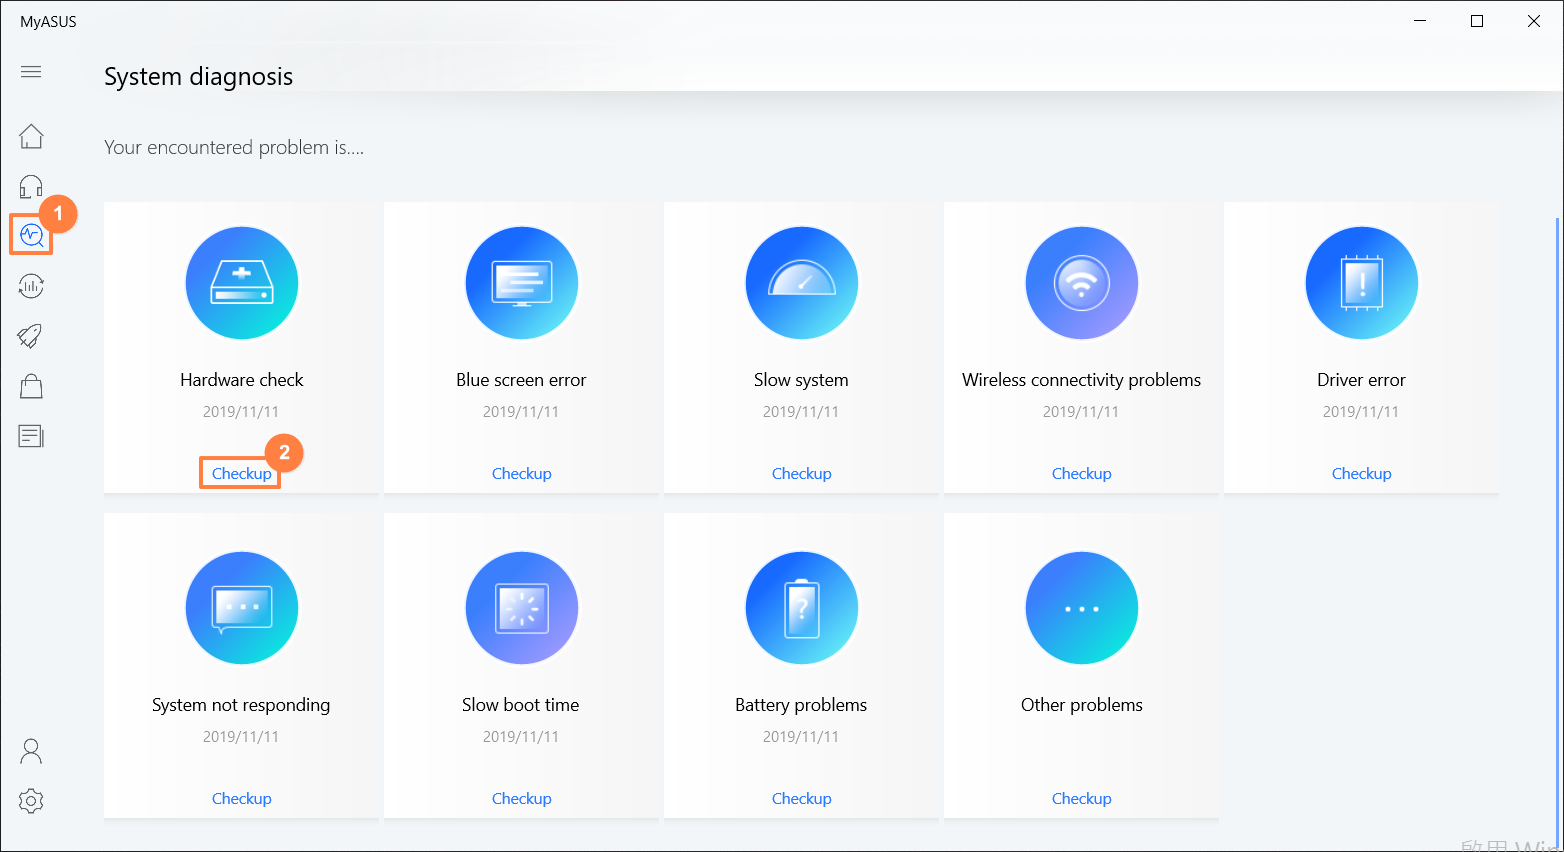
- คุณสามารถเลือกรายการที่คุณต้องการตรวจสอบในการวินิจฉัยที่กำหนดเอง ① จากนั้นคลิก [ตรวจสอบ] เพื่อเริ่มตรวจสอบ ② หรือคลิกสถานการณ์ด้านล่างของการวินิจฉัยระบบเพื่อดูรายละเอียดเพิ่มเติมของรายการตรวจสอบ (ต่อไปนี้ใช้การวินิจฉัยแบบ Customized เป็นตัวอย่าง)
เวลาที่ต้องใช้ในการทำการทดสอบจะแตกต่างกันไป ดังนั้นโปรดอดทนรอ เนื่องจากบางรายการอาจใช้เวลาหลายนาที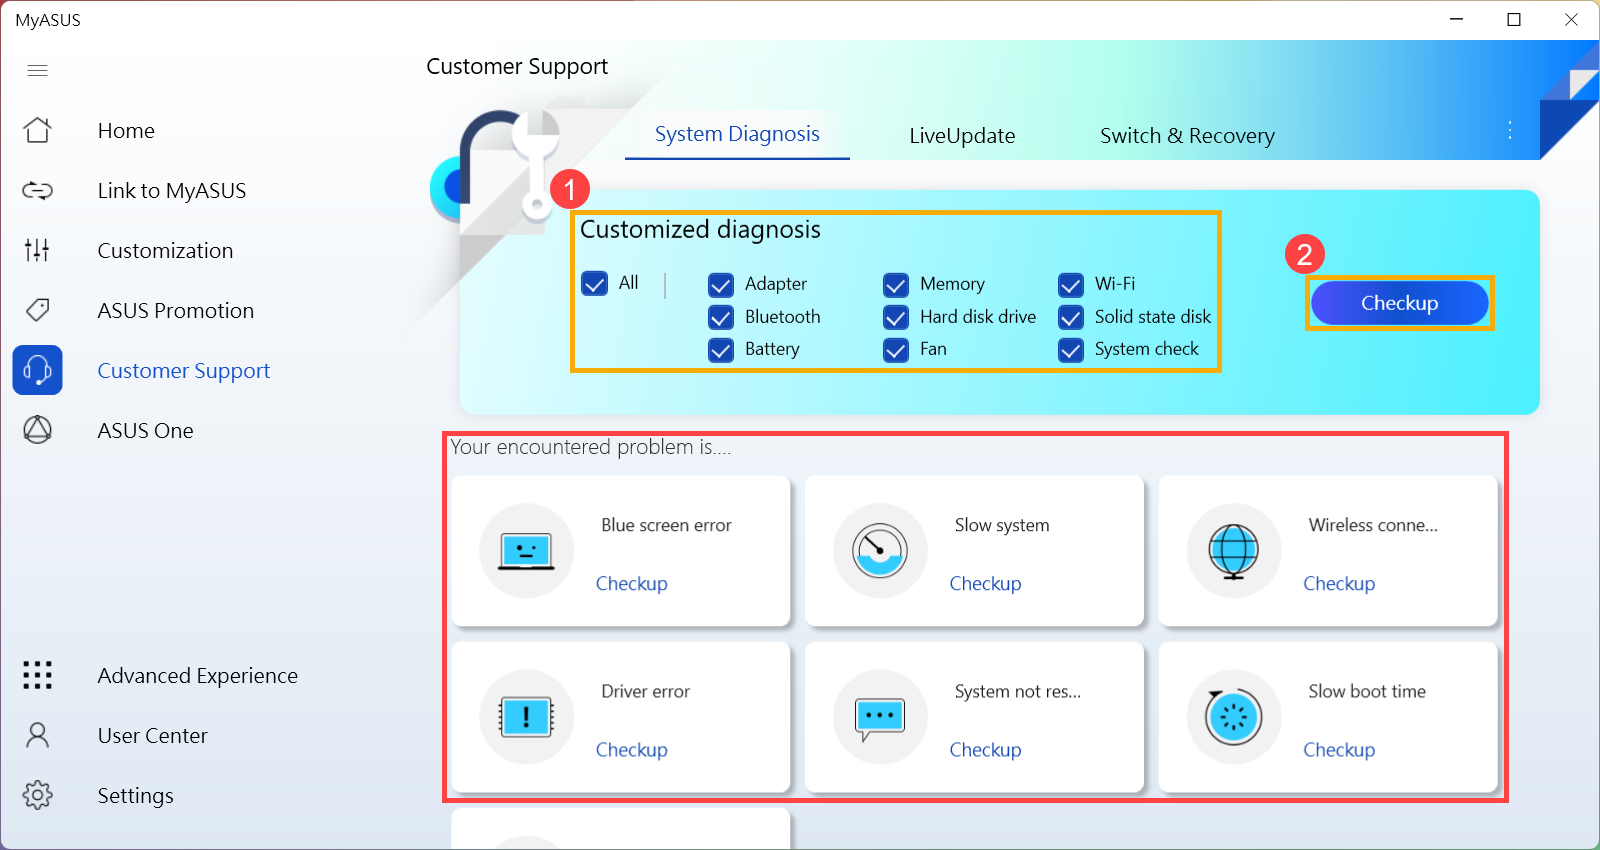
- คลิก [Result] หลังจากการทดสอบเสร็จสิ้น③.
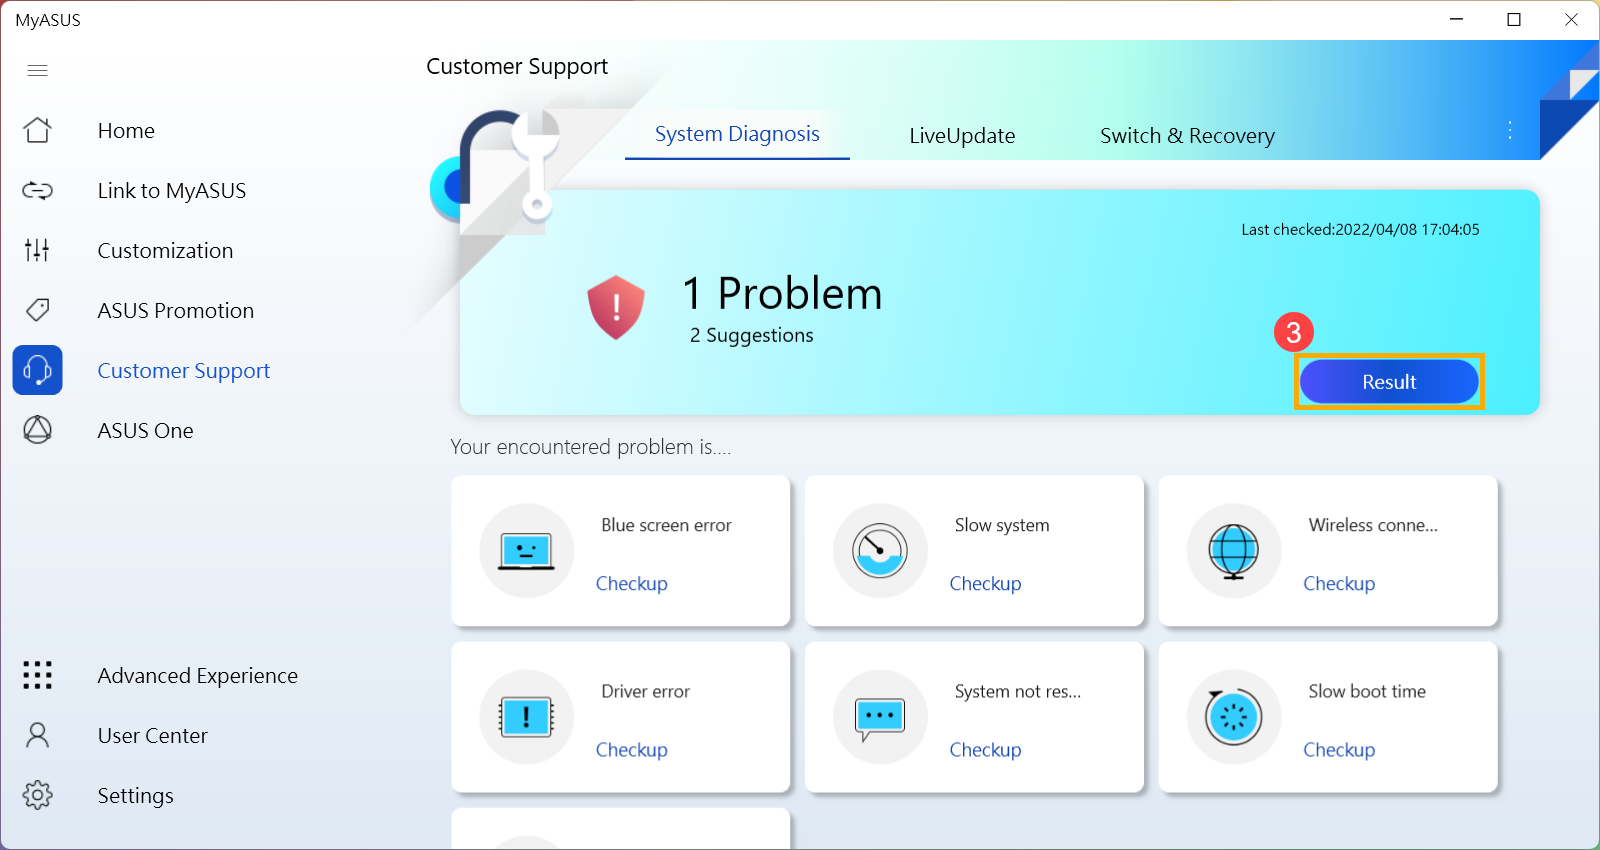
- หากมีข้อผิดพลาดใดๆ เกิดขึ้นหลังจากการทดสอบเสร็จสิ้น จะมีรายการข้อผิดพลาด คำแนะนำในการแก้ไขปัญหา และแนวทางที่เป็นไปได้ในการแก้ไขปัญหา④
หมายเหตุ: โปรดทราบว่าบางสถานการณ์อาจจำเป็นต้องทำการอัพเดต Windows ซึ่งอาจนำไปสู่การกู้คืน BitLocker เราขอแนะนำให้คุณบันทึกคีย์การกู้คืน BitLocker หรือปิดใช้งาน BitLocker ก่อนดำเนินการ Windows Update คุณสามารถดูบทความนี้เพื่อเรียนรู้เพิ่มเติม: https://www.asus.com/support/FAQ/1042922/.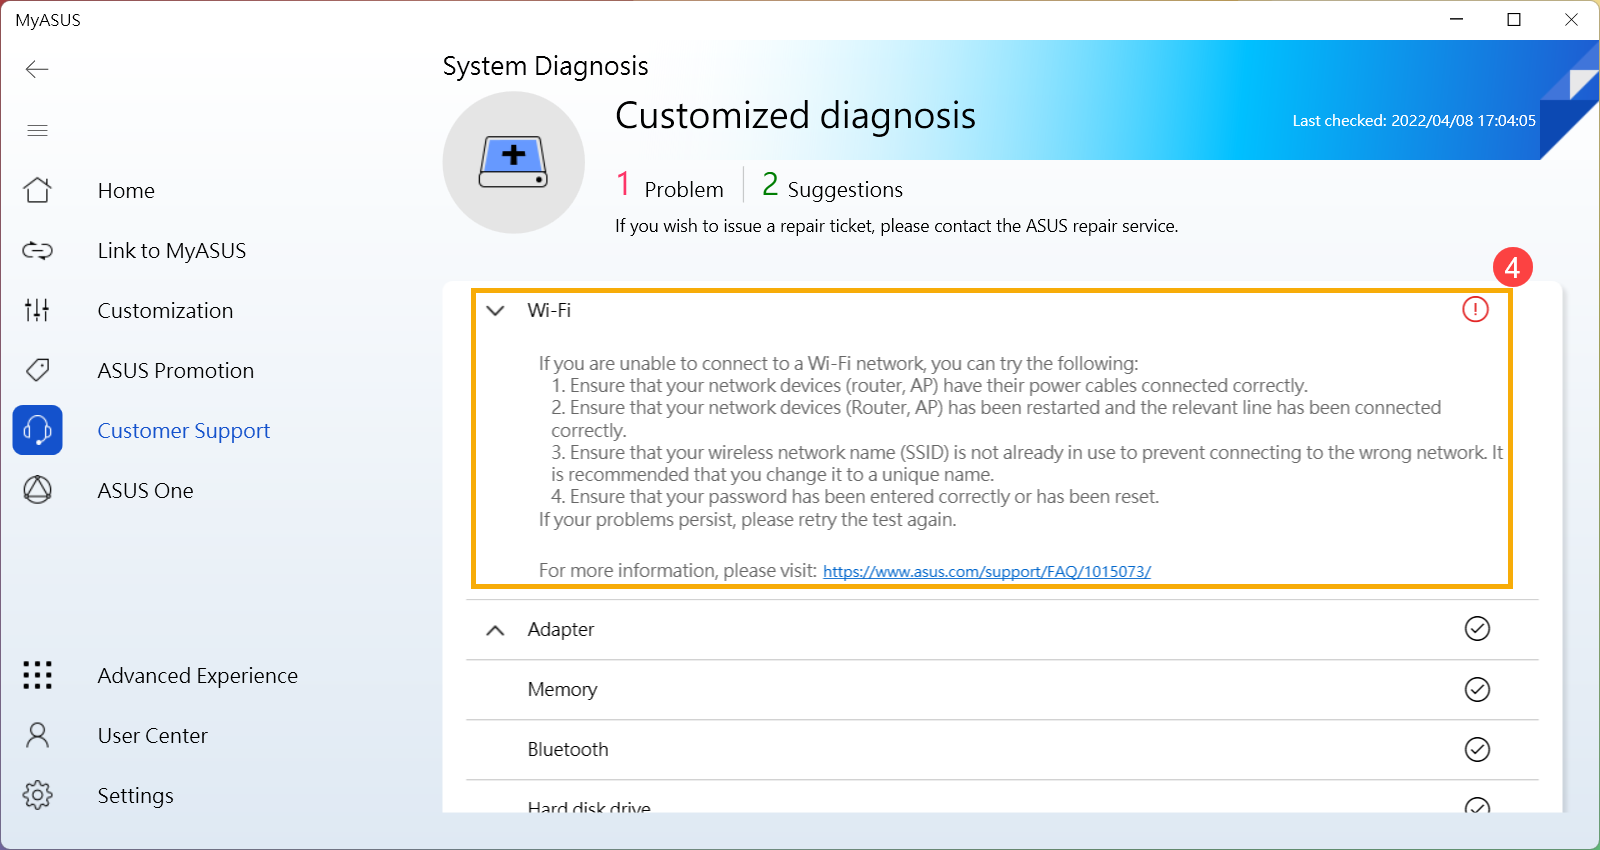
หากไม่พบปัญหา แต่คุณยังคงมีปัญหาเกี่ยวกับฮาร์ดแวร์/ซอฟต์แวร์ ให้ลองคืนค่าพีซีของคุณเพื่อแก้ไขปัญหา โปรดคลิก [วิธีการคืนค่าพีซีของคุณ] เพื่อเรียนรู้เพิ่มเติมเกี่ยวกับการแนะนำกระบวนการคืนค่า หรือคลิก [เริ่มต้น] ที่จะเรียกใช้กระบวนการกู้คืนโดยตรง⑤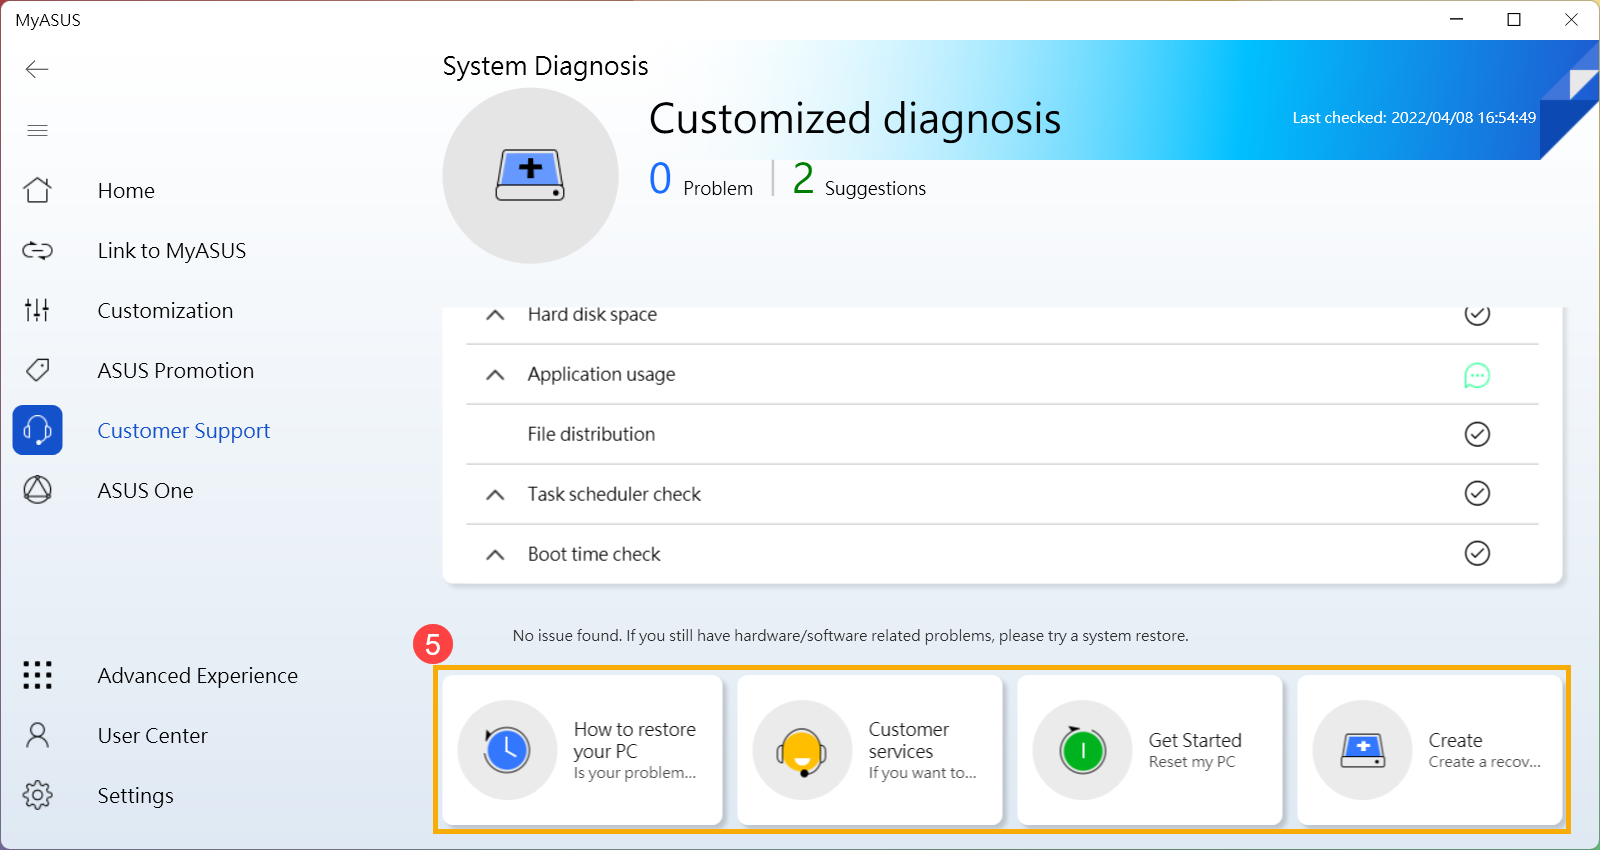
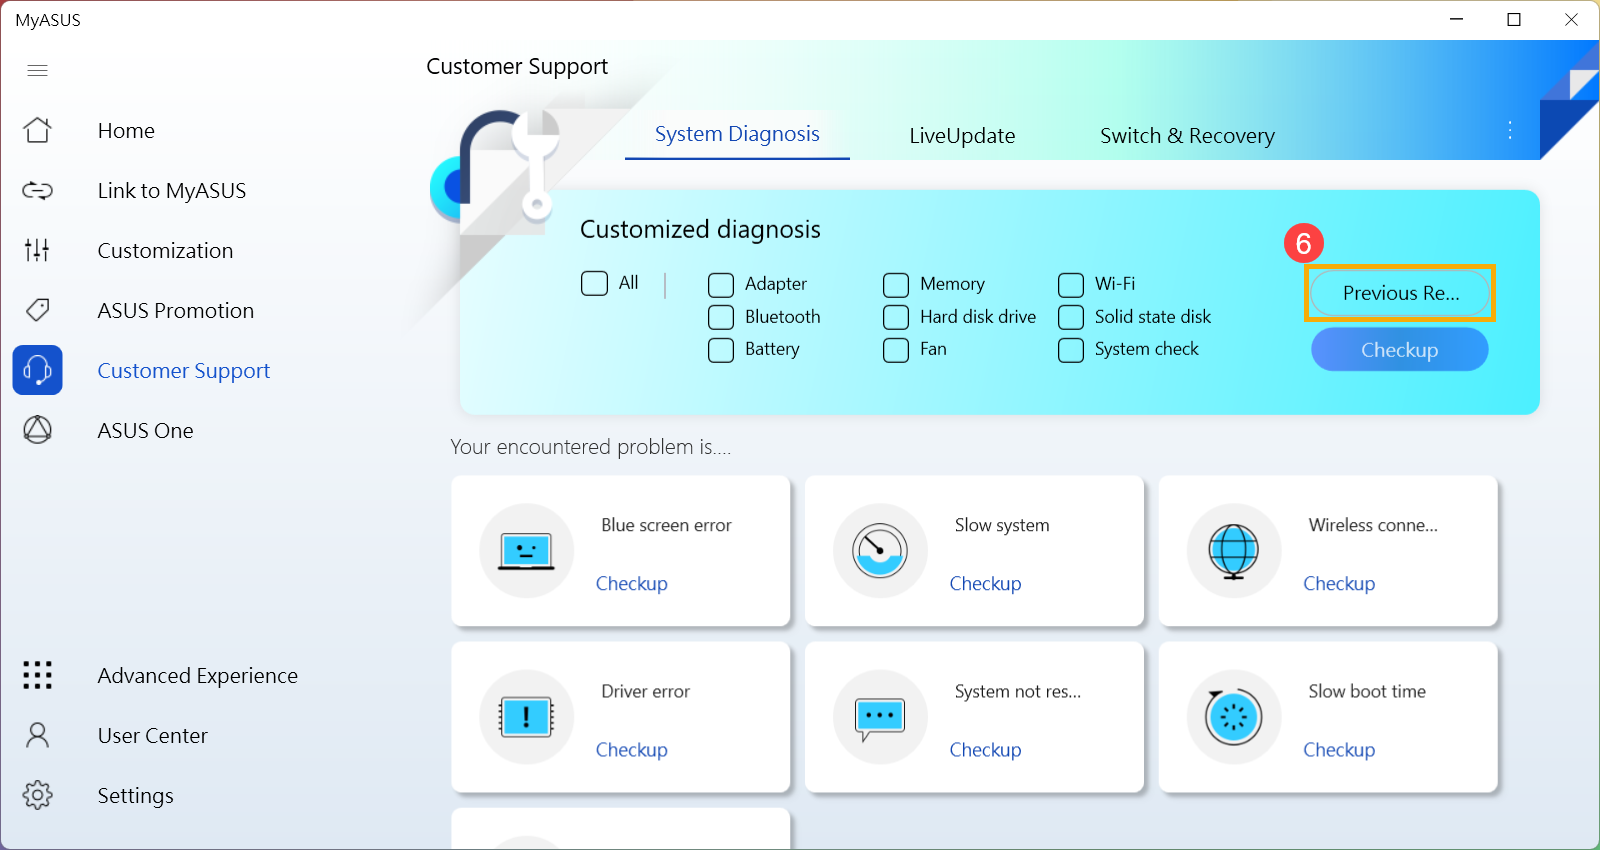
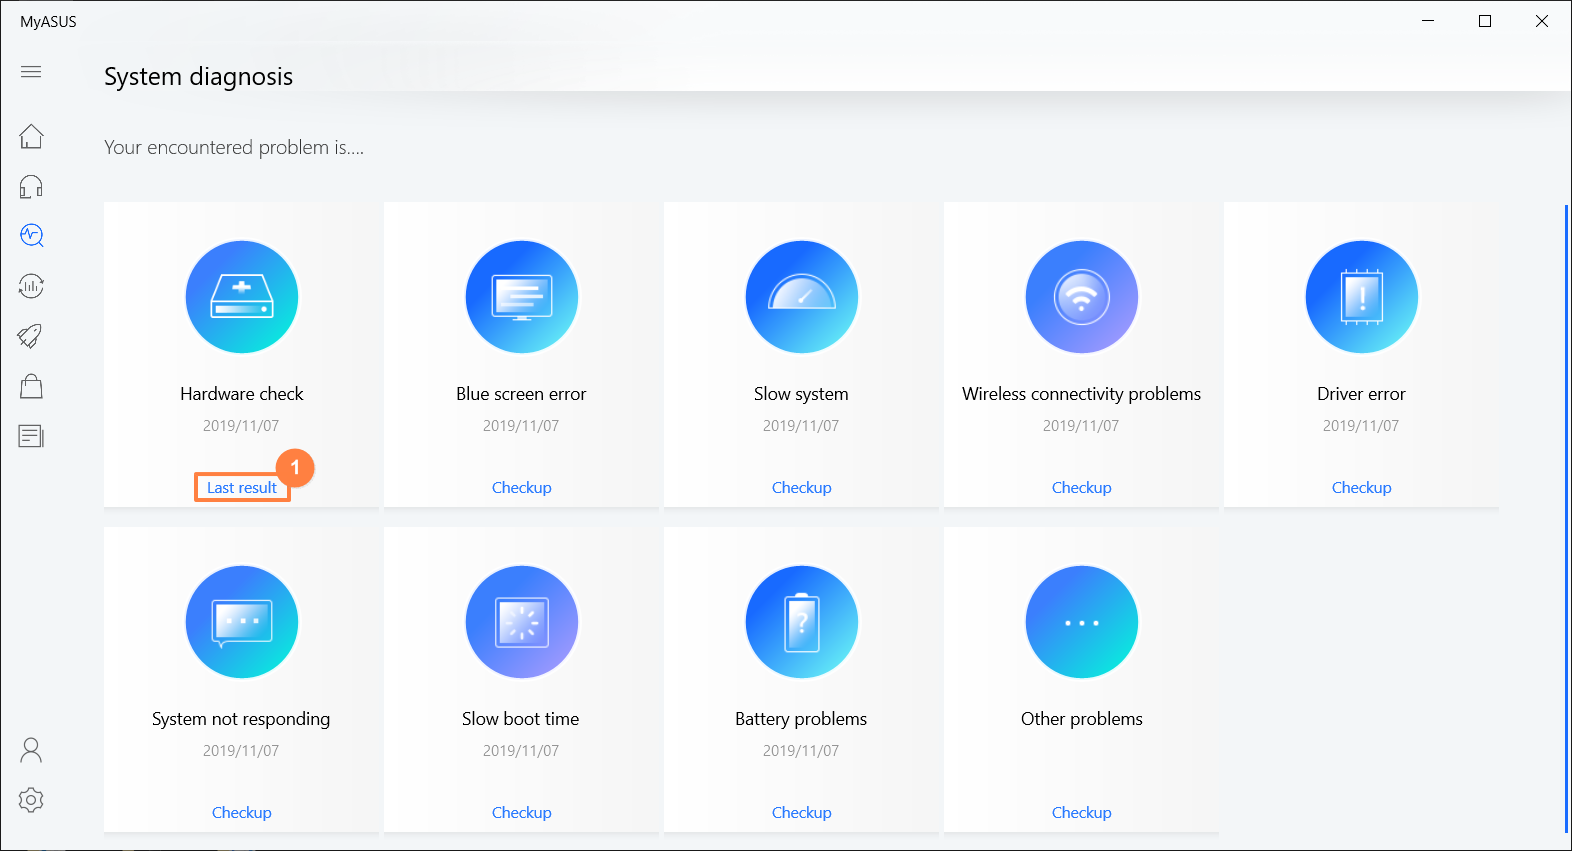
- ใน System Diagnosis คุณยังสามารถคลิก [Previous Record] เพื่อดูผลการทดสอบล่าสุด⑥
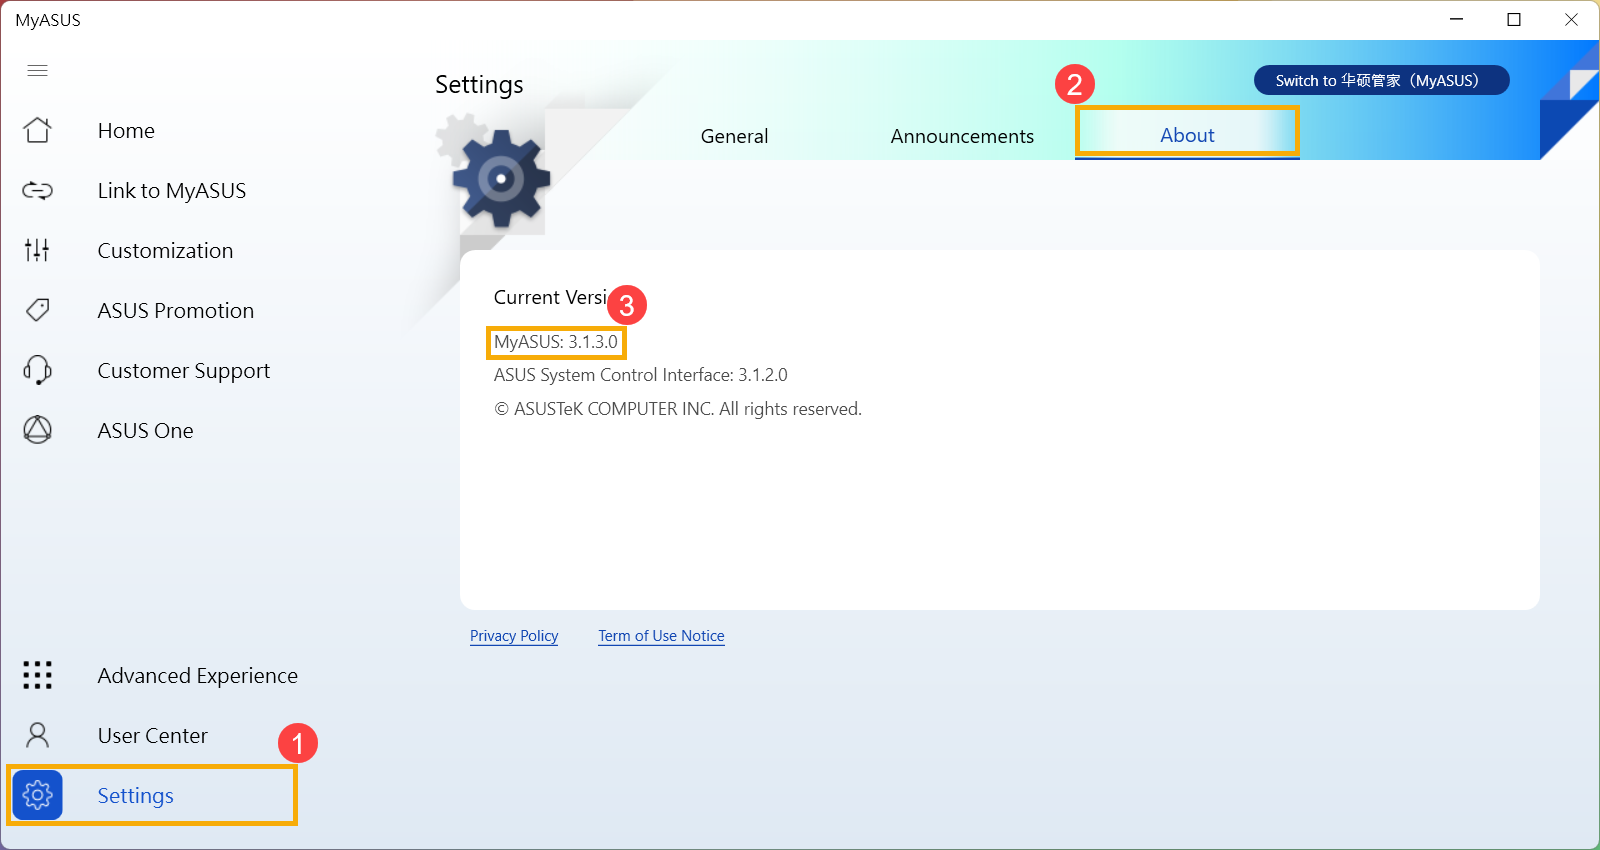
Q1: จะตรวจสอบเวอร์ชั่น MyASUS ได้อย่างไร?
A1: กรุณาคลิก [Settings] จากเมนูด้านซ้าย① จากนั้นเลือก [เกี่ยวกับ] จากด้านบน ② คุณจะพบหมายเลขเวอร์ชันของ MyASUS ที่ติดตั้งในเวอร์ชันปัจจุบัน ③
Q2: ฉันสามารถทำการวินิจฉัยระบบของ MyASUS ในโหมดเครื่องบินได้หรือไม่?
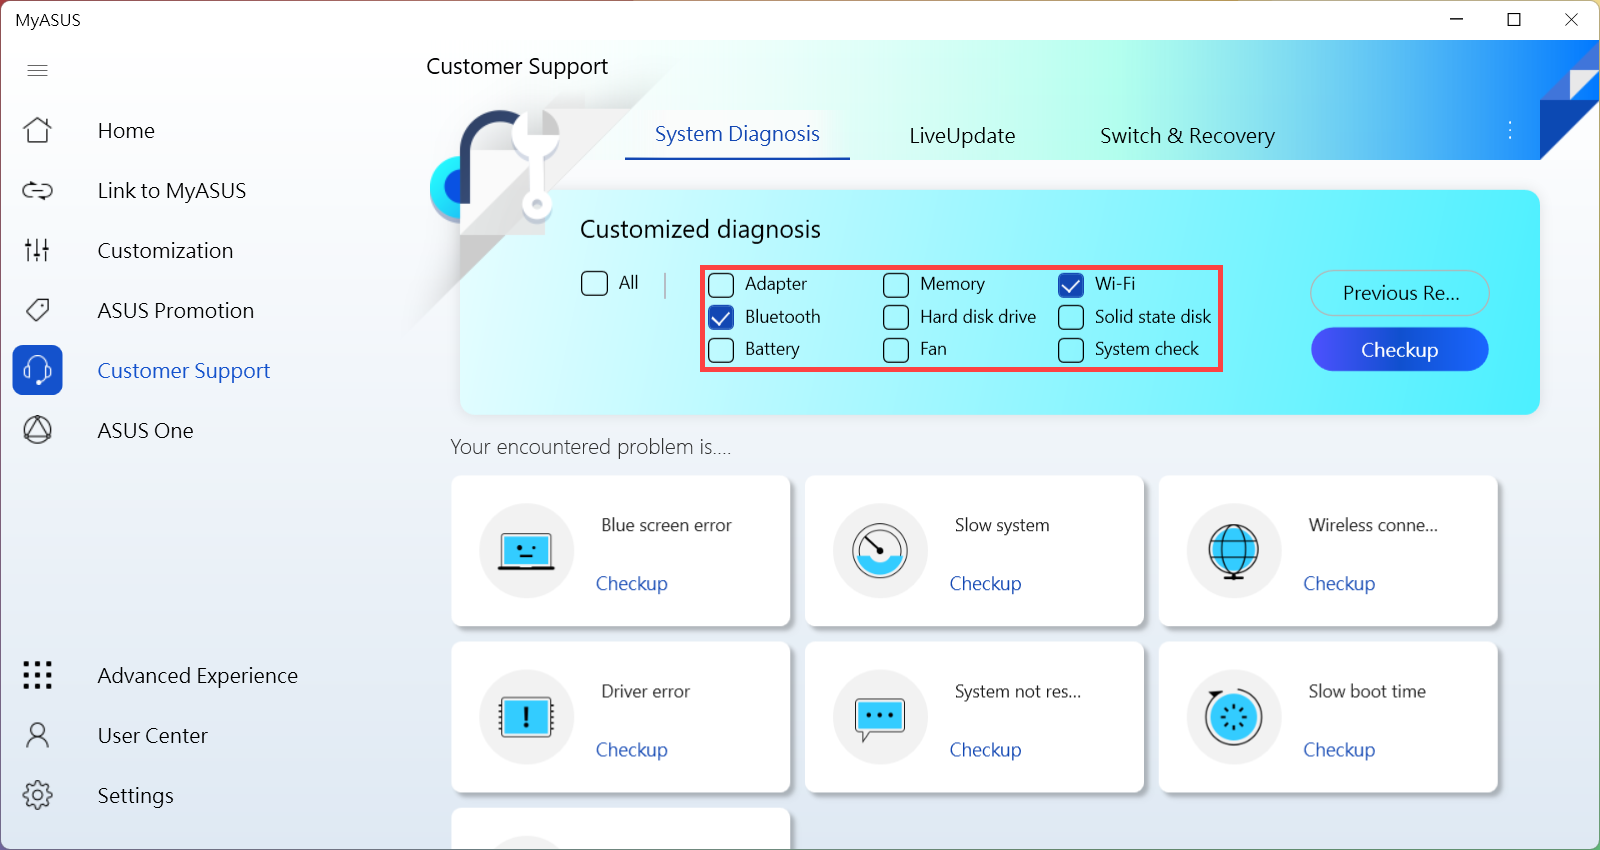
ตอบ 2: ยกเว้น Wi-Fi และ Bluetooth ของการวินิจฉัยที่กำหนดเองและปัญหาการเชื่อมต่อไร้สาย การทดสอบอื่นๆ สามารถทำได้ในโหมดเครื่องบิน
Q3: จะใช้คำขอซ่อมแซมได้อย่างไรหลังจากทำ Hardware Diagnostic บน MyASUS
A3: คุณสามารถเรียนรู้เพิ่มเติมได้ที่นี่ How to apply the repair request after doing Hardware Diagnostic on MyASUS.
Q4: เหตุใดฉันจึงเห็นเฉพาะฟีเจอร์ "ฝ่ายสนับสนุนลูกค้า" ในแอป MyASUS เท่านั้น
A4: เมื่อคุณดาวน์โหลด MyASUS จาก Microsoft Store คุณอาจพบว่ามันรองรับเฉพาะฟังก์ชัน "การสนับสนุนลูกค้า" เท่านั้น เป็นเพราะผลิตภัณฑ์ของคุณไม่ได้ติดตั้งไดรเวอร์ “ASUS System Control Interface” หรือเวอร์ชันไดรเวอร์ไม่รองรับฟังก์ชันการทำงานเต็มรูปแบบของ MyASUS สำหรับข้อมูลเพิ่มเติม โปรดดูที่นี้ article.
[Notebook] วิธีการติดตั้งแอพพลิเคชั่น MyASUS
โปรดไปที่คำแนะนำที่เกี่ยวข้องตามระบบปฏิบัติการ Windows ปัจจุบันบนคอมพิวเตอร์ของคุณ:
ระบบปฏิบัติการวินโดวส์ 11
ก่อนที่จะติดตั้ง MyASUS คุณต้องตรวจสอบว่าคอมพิวเตอร์ของคุณได้รับการติดตั้งไดรเวอร์ ASUS System Control Interface ก่อนหรือไม่ จากนั้นจึงเริ่มติดตั้ง MyASUS
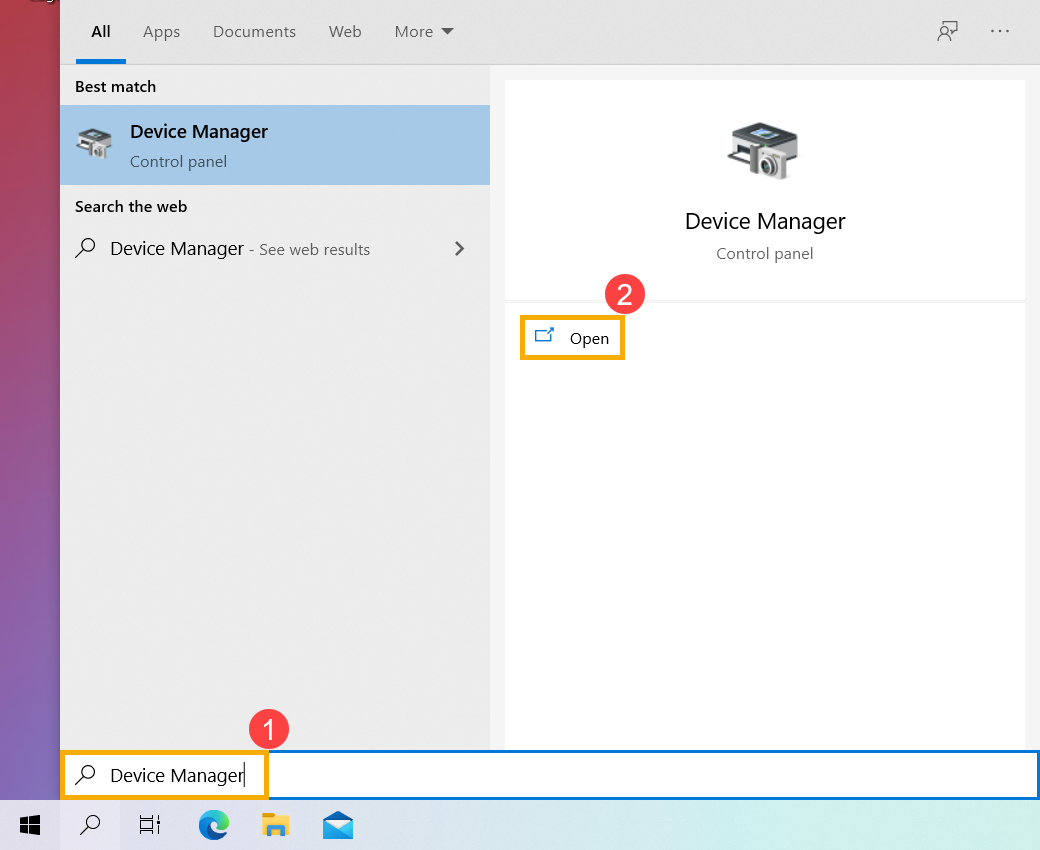
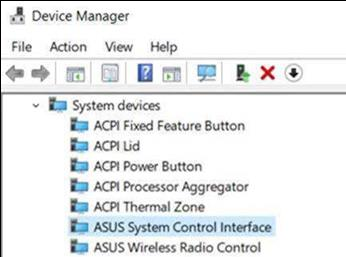
- พิมพ์และค้นหา [Device Manager] ในแถบค้นหาของ Windows①, จากนั้นคลิก [Open]②.
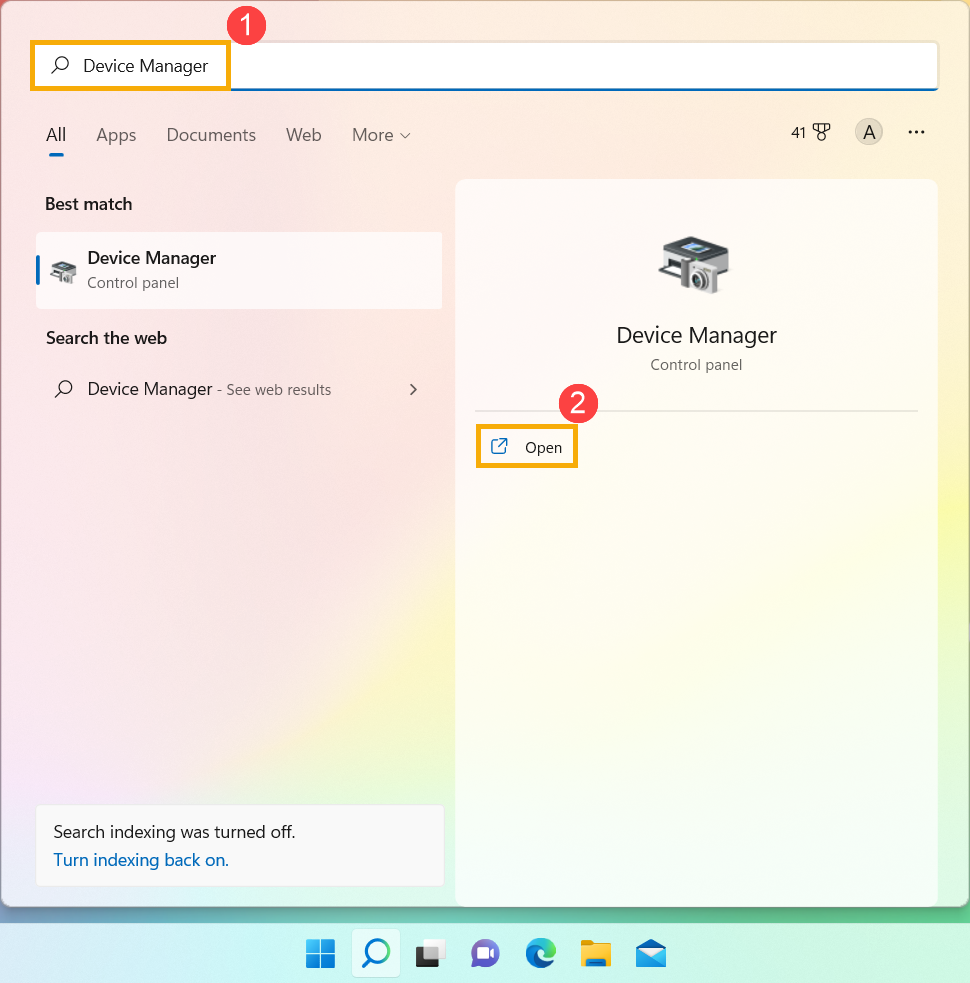
- ตรวจสอบลูกศรถัดจาก [อุปกรณ์ระบบ]③ จากนั้นยืนยันว่าไดรเวอร์ [ASUS System Control Interface] ได้รับการติดตั้งแล้ว④ (มีเวอร์ชัน V1 หรือ V3 ขึ้นอยู่กับรุ่นที่แตกต่างกัน และตัวเลือกที่รองรับใน MyASUS จะถูกกำหนดโดยเวอร์ชันไดรเวอร์นี้)
หากคอมพิวเตอร์ของคุณได้รับการติดตั้งไดรเวอร์นี้แล้ว โปรด คลิกที่นี่เพื่อทราบวิธีการติดตั้ง MyASUS
หากคอมพิวเตอร์ของคุณยังไม่ได้ติดตั้งไดรเวอร์นี้ โปรด คลิกที่นี่เพื่อทราบวิธีการดาวน์โหลดและติดตั้งไดรเวอร์ ASUS System Control Interface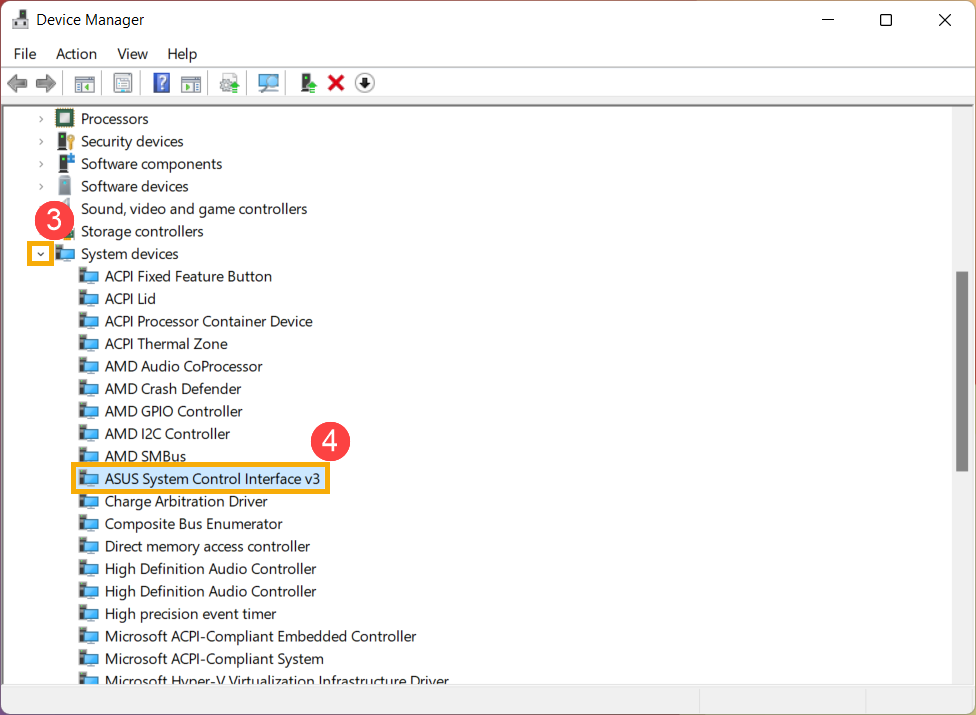
วิธีดาวน์โหลดและติดตั้งไดรเวอร์ ASUS System Control Interface
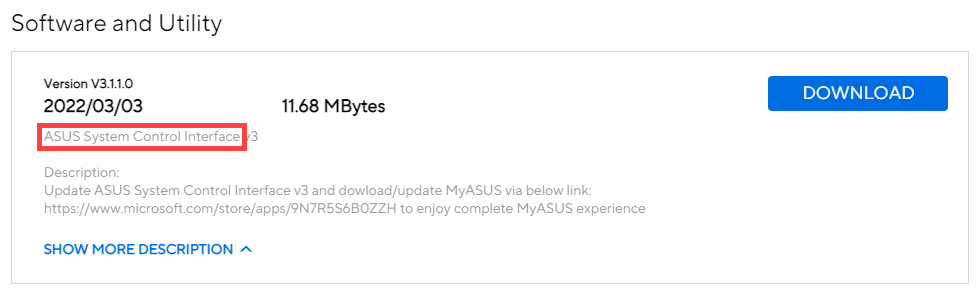
กรุณาไปที่ ASUS support site, จากนั้นดาวน์โหลดและติดตั้งไดรเวอร์ ASUS System Control Interface ในหมวดซอฟต์แวร์และยูทิลิตี้ ที่นี่คุณสามารถเรียนรู้เพิ่มเติมเกี่ยวกับ How to search and download drivers.
หากคุณไม่พบไดรเวอร์ ASUS System Control Interface บนไซต์สนับสนุน ASUS ของคอมพิวเตอร์รุ่นของคุณ นั่นหมายความว่าคอมพิวเตอร์ของคุณไม่รองรับคุณสมบัติส่วนใหญ่ใน MyASUS ที่นี่คุณสามารถเรียนรู้เพิ่มเติมเกี่ยวกับ Why can I only see the “Customer Support” feature in the MyASUS app.
หลังจากการดาวน์โหลดเสร็จสิ้น โปรดไปที่คำแนะนำในการติดตั้งที่เกี่ยวข้องโดยอิงตามรุ่นไดรเวอร์บนคอมพิวเตอร์ของคุณ
| รุ่นไดร์เวอร์ | Support Model | ติดตั้งคำสั่ง |
| ASUS System Control Interface V3 | Model list | Click to paragraph |
| ASUS System Control Interface V1 | Model list | Click to paragraph |
ติดตั้งไดรเวอร์ ASUS System Control Interface V3 ล่าสุด
หมายเหตุ: รูปภาพต่อไปนี้เป็นเวอร์ชันปัจจุบันเพื่อใช้อ้างอิง โปรดดาวน์โหลดเวอร์ชันล่าสุดจากเว็บไซต์สนับสนุนของ ASUS
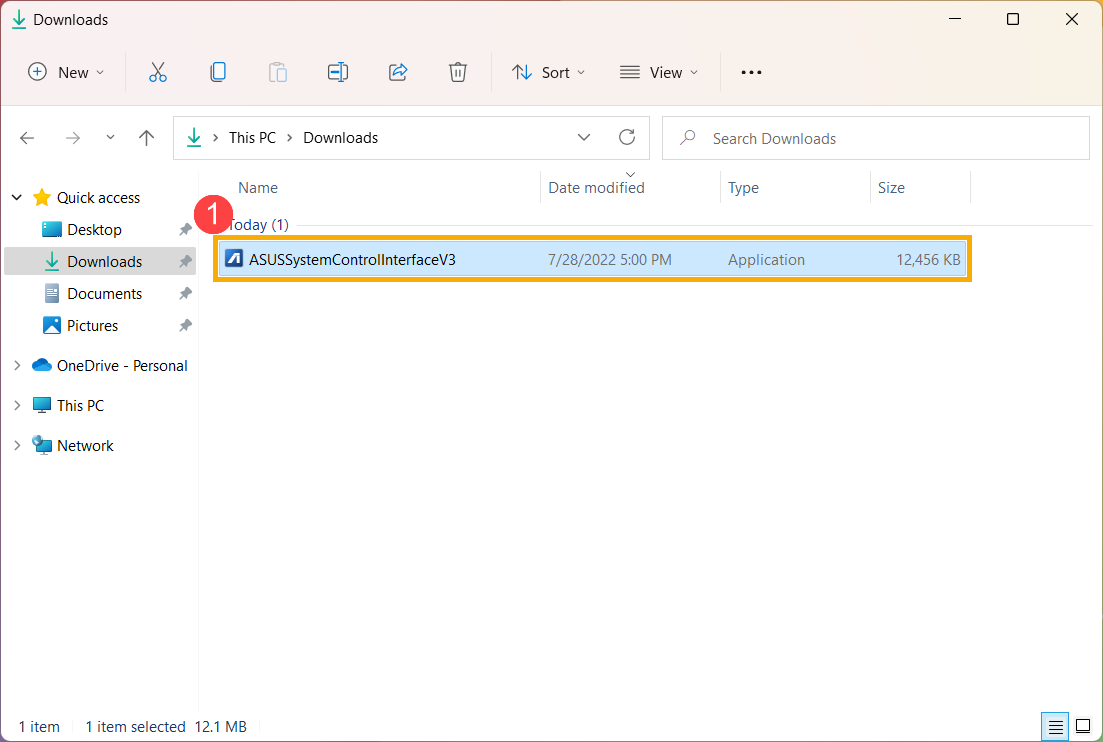
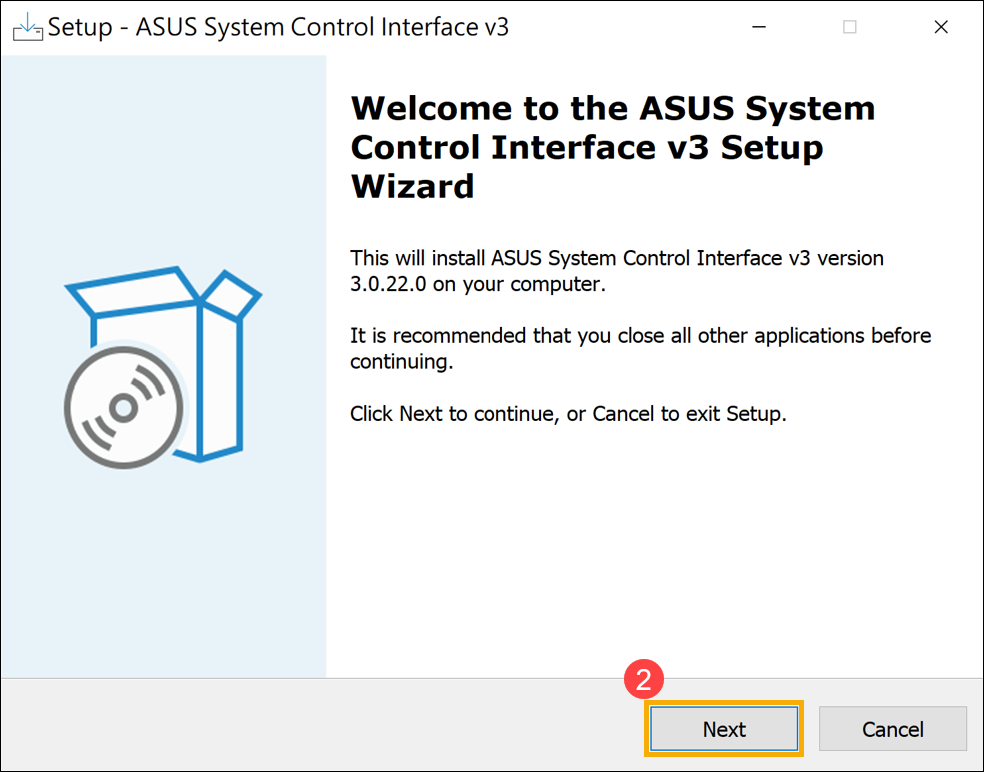
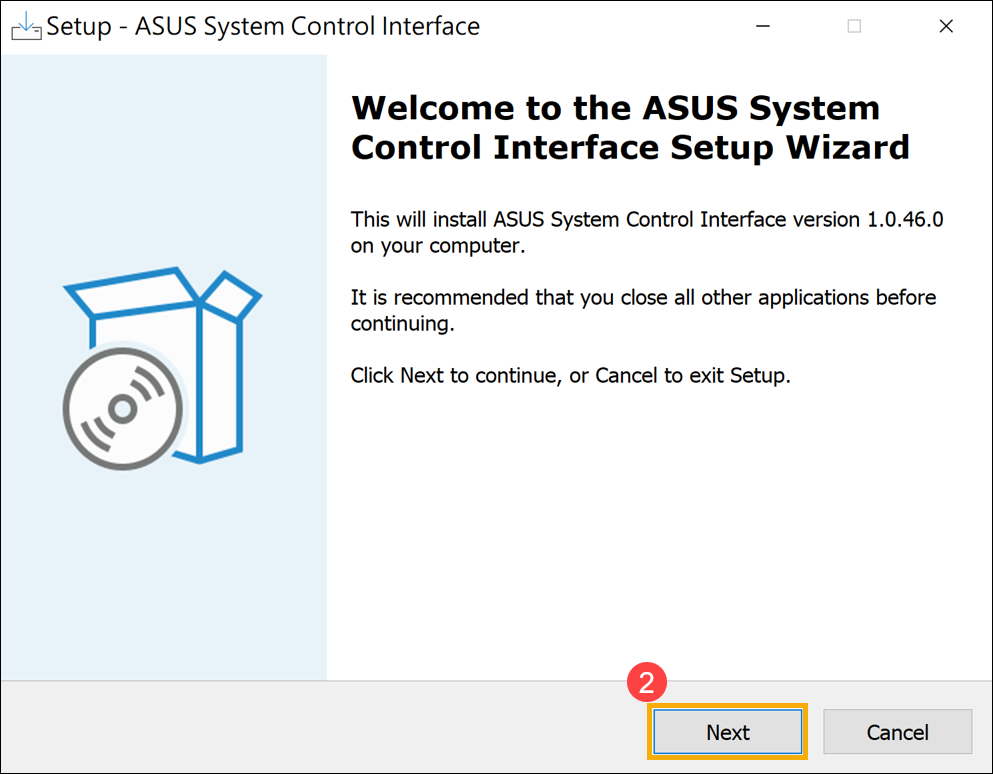
- หลังจากดาวน์โหลดไฟล์แล้ว ให้ดับเบิลคลิกที่ไฟล์ [ASUSSystemControlInterfaceV3.exe] เพื่อเริ่มการติดตั้ง①
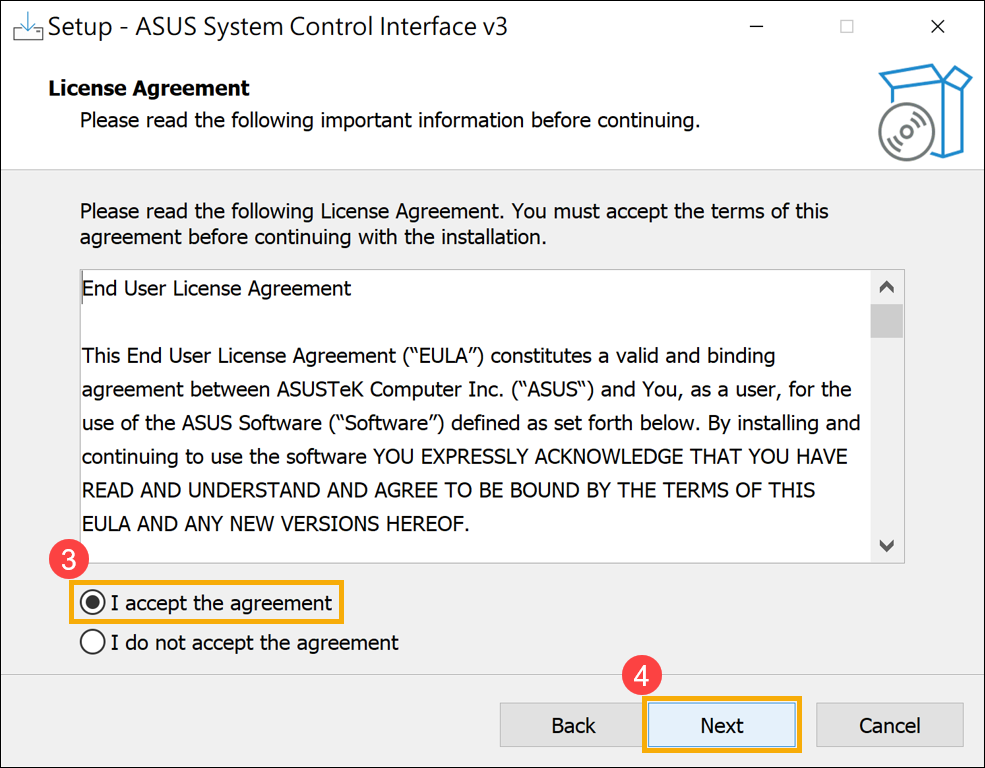
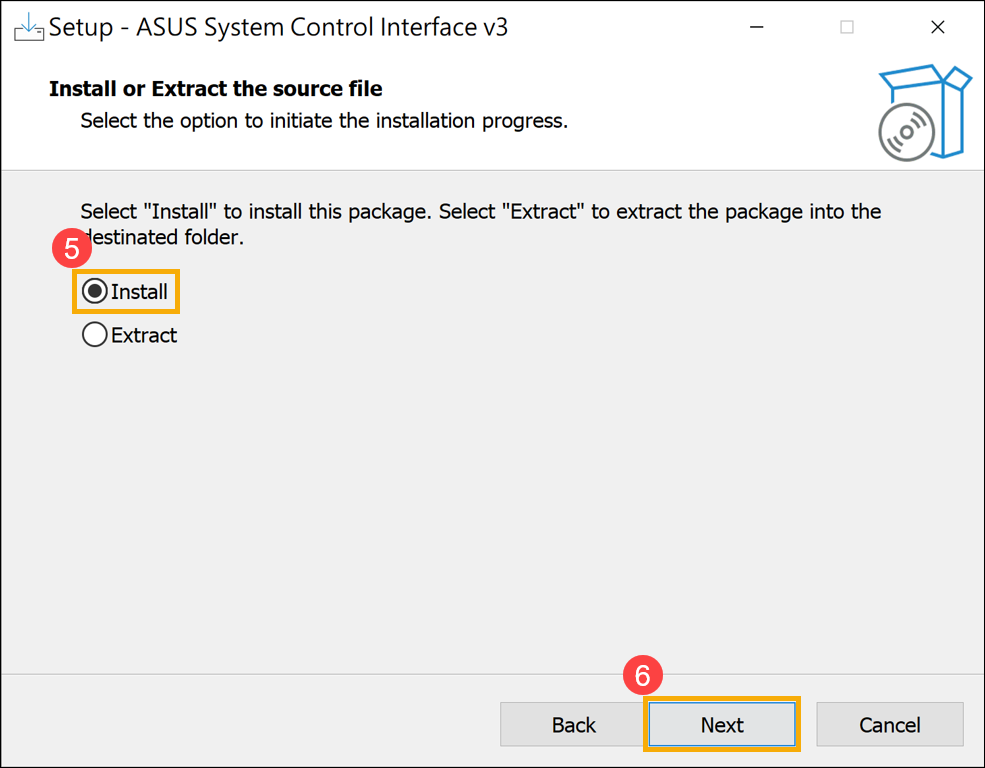
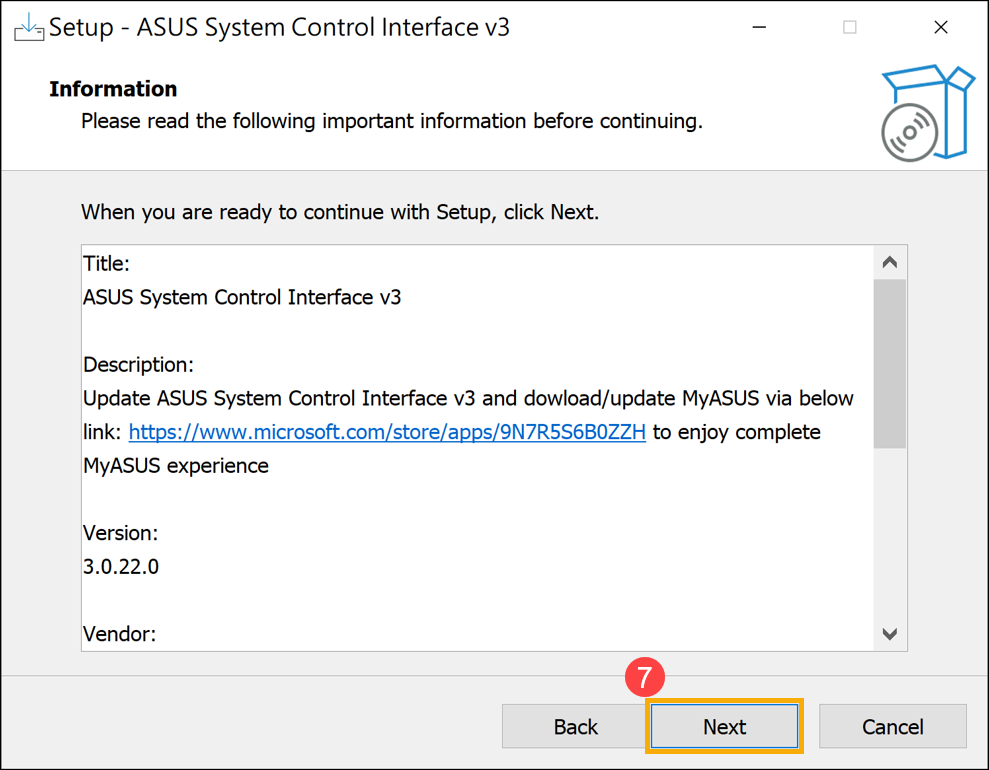
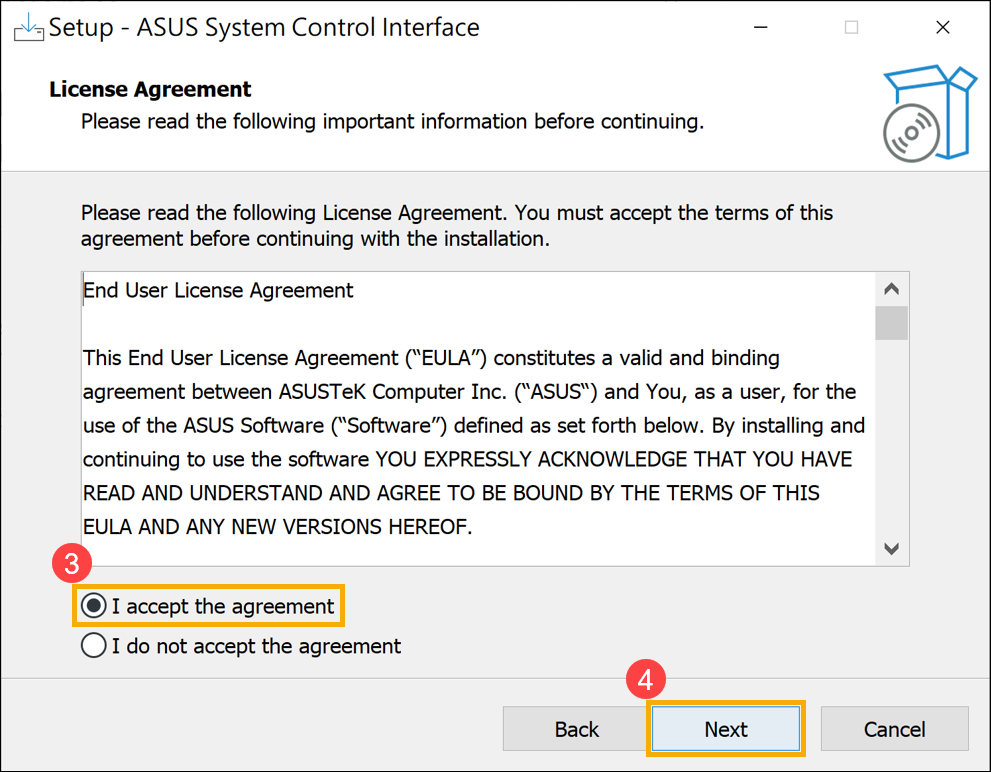
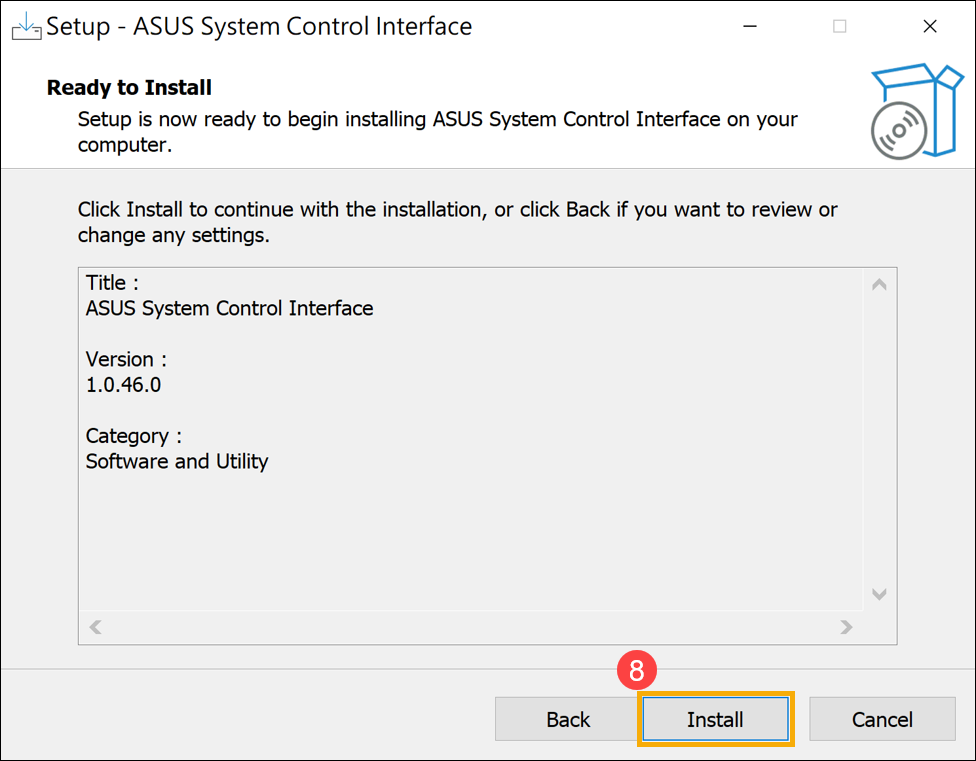
- ปฏิบัติตามตัวบ่งชี้เพื่อยอมรับข้อตกลงใบอนุญาตและดำเนินการติดตั้ง
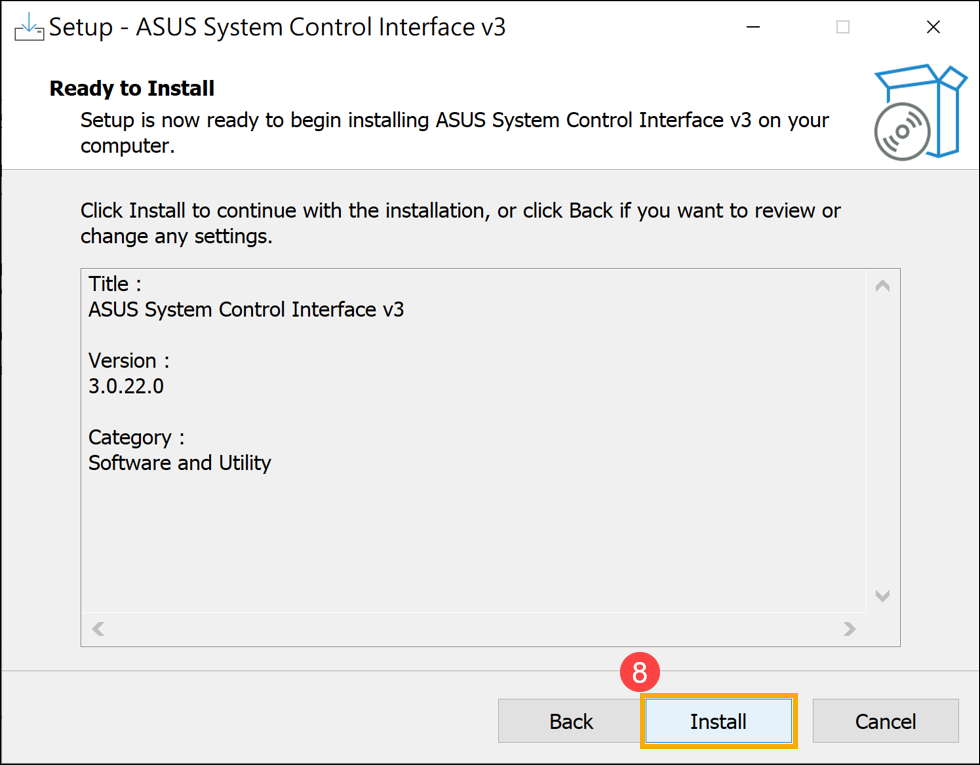
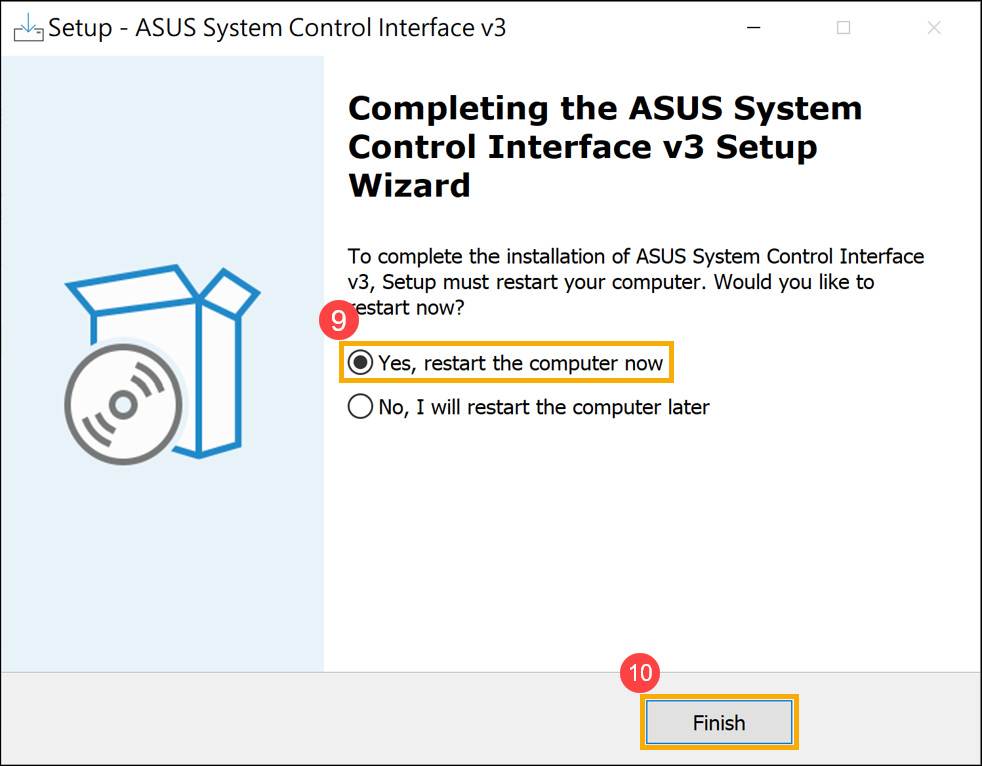
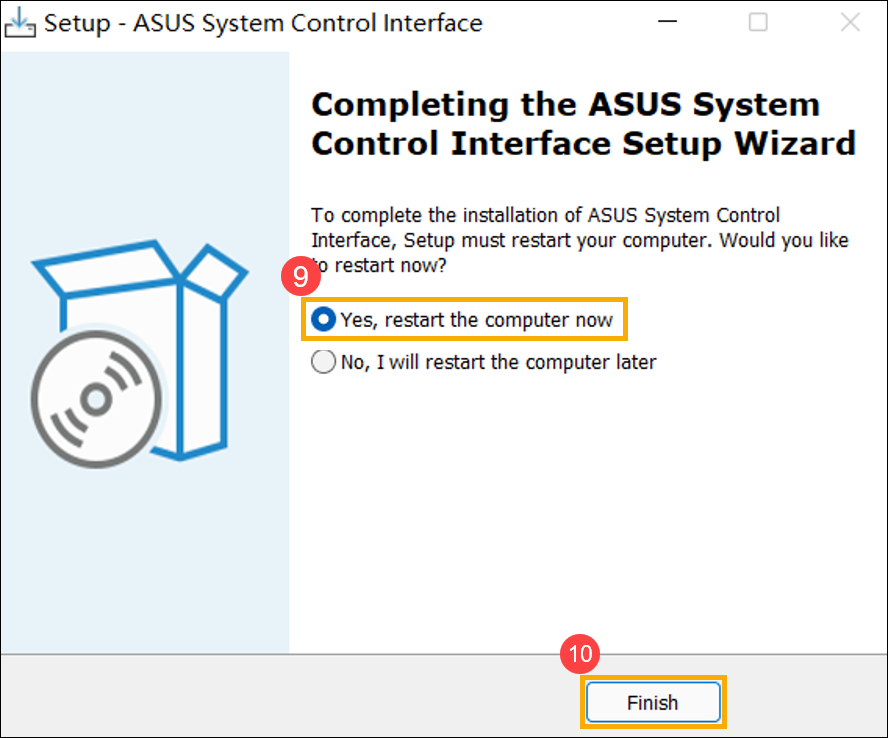
- คลิก [Finish]⑩ และรีสตาร์ทอุปกรณ์ของคุณเพื่อทำการติดตั้งให้เสร็จสิ้น
- หลังจากรีบูตให้คลิกขวาที่ไฟล์ [Start]
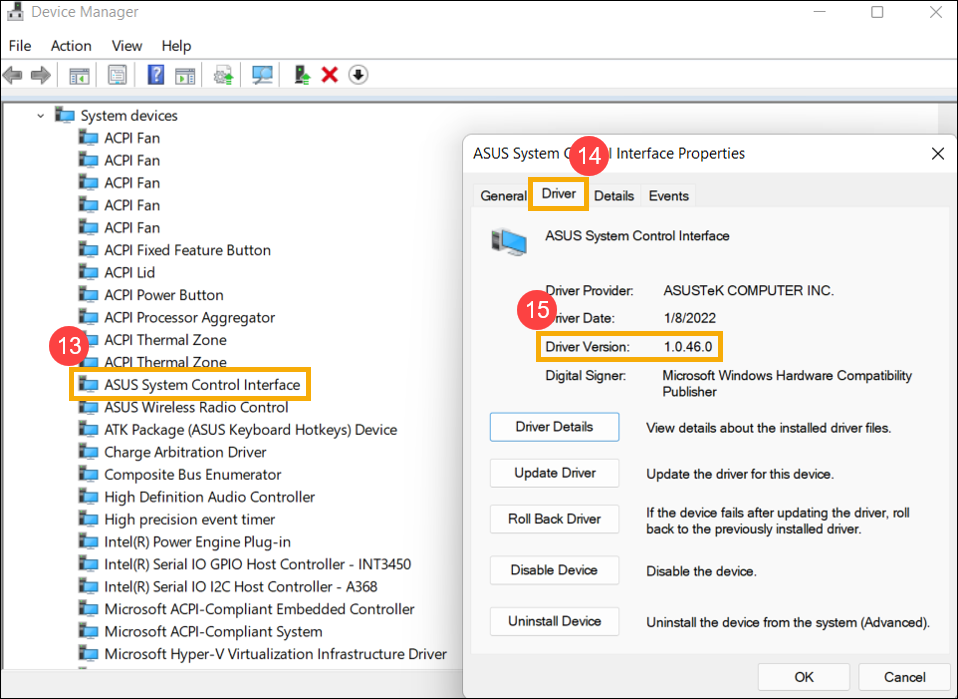
 ไอคอน⑪, จากนั้นเลือก [Device Manager]⑫.
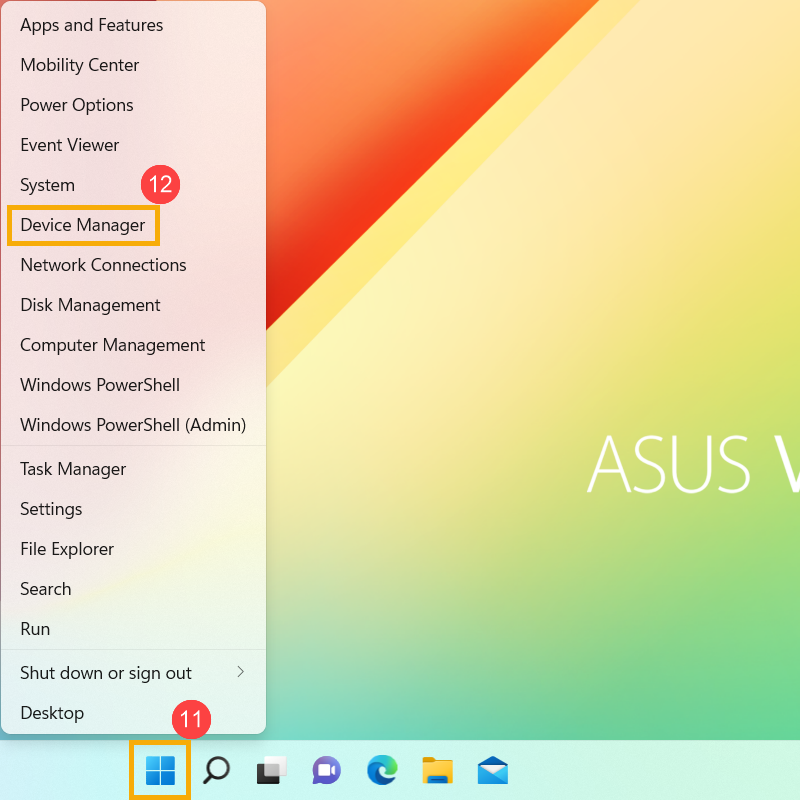
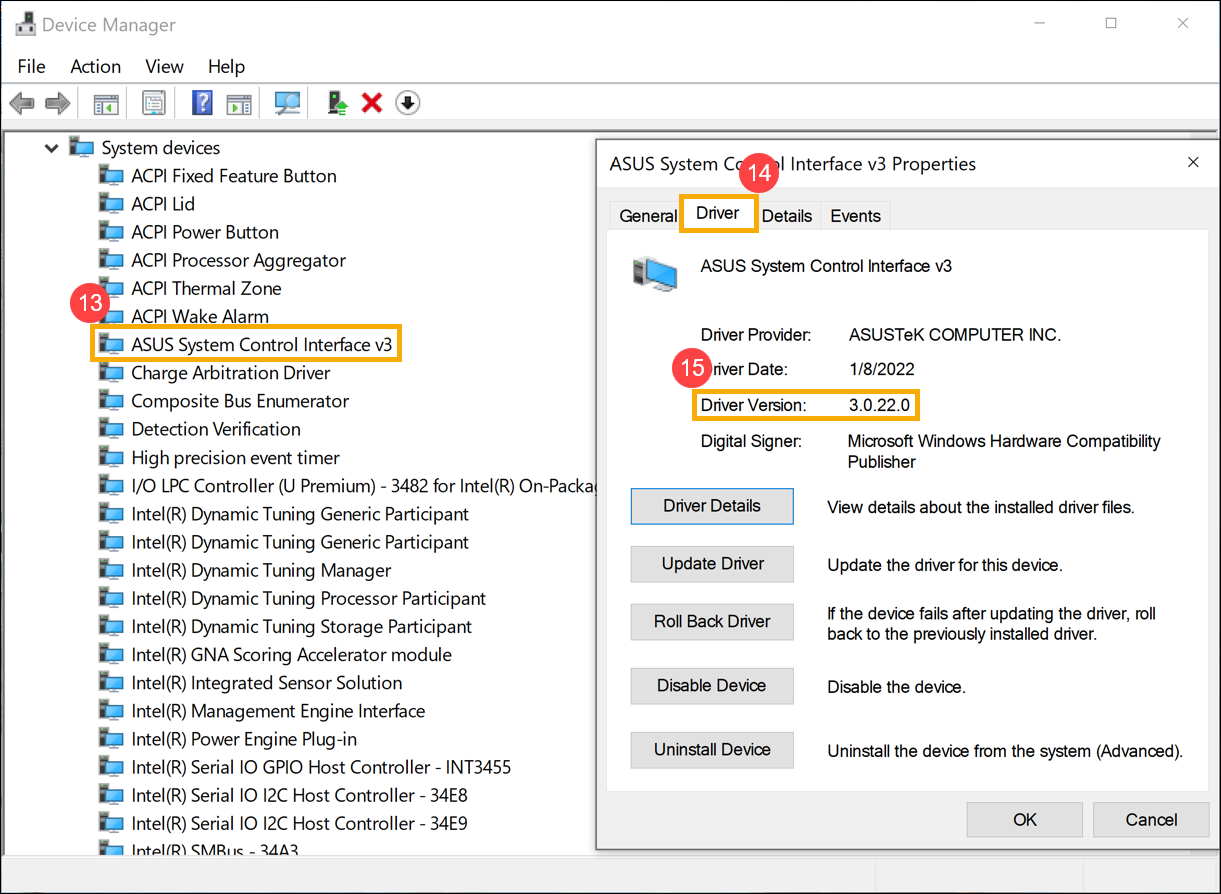
- ในหมวดอุปกรณ์ระบบ ดับเบิลคลิกที่ [ASUS System Control Interface]⑬, จากนั้นเลือก [Driver] แตะ⑭ เพื่อตรวจสอบ [Driver Version]⑮.
- หลังจากการติดตั้งไดรเวอร์ ASUS System Control Interface เสร็จสิ้น, click here to know How to install MyASUS.
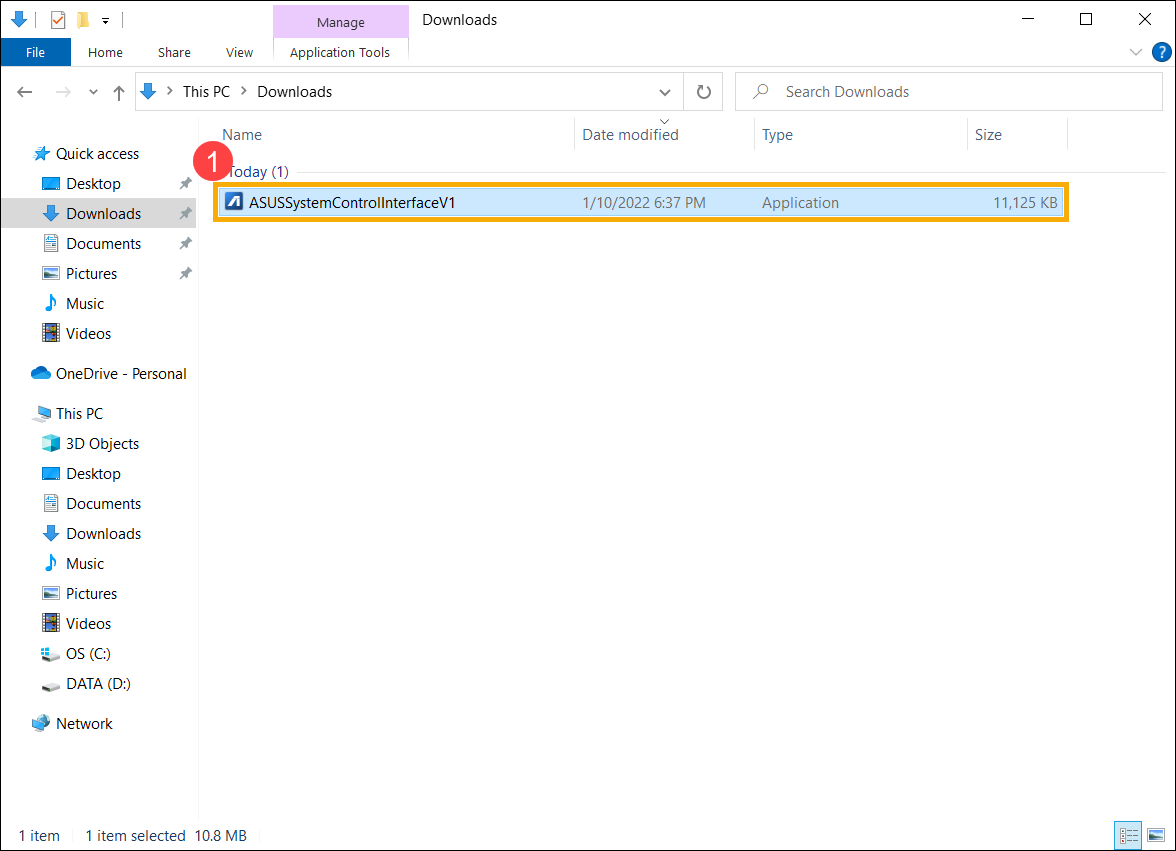
ติดตั้งไดรเวอร์ ASUS System Control Interface V1 ล่าสุด
หมายเหตุ: รูปภาพต่อไปนี้เป็นเวอร์ชันปัจจุบันเพื่อใช้อ้างอิง โปรดดาวน์โหลดเวอร์ชันล่าสุดจากเว็บไซต์สนับสนุนของ ASUS
- หลังจากดาวน์โหลดไฟล์แล้วให้ดับเบิลคลิกที่ไฟล์ [ASUSSystemControlInterfaceV1.exe] ไฟล์เพื่อเริ่มการติดตั้ง①.

- ปฏิบัติตามตัวบ่งชี้เพื่อยอมรับข้อตกลงใบอนุญาตและดำเนินการติดตั้ง


- คลิก [Finish]⑩ และรีสตาร์ทอุปกรณ์ของคุณเพื่อทำการติดตั้งให้เสร็จสิ้น
- หลังจากรีบูตให้คลิกขวาที่ไฟล์ [Start] ไอคอน⑪, tจากนั้นเลือก [Device Manager]⑫.
- ในหมวดอุปกรณ์ระบบ ดับเบิลคลิกที่ [ASUS System Control Interface]⑬, จากนั้นเลือก [Driver] แตะ⑭ เพื่อตรวจสอบ [Driver Version]⑮.
- After the installation of ASUS System Control Interface driver is complete, click here to know How to install MyASUS.
โปรดทำตามขั้นตอนด้านล่างเพื่อค้นหาแอปพลิเคชัน MyASUS และติดตั้ง
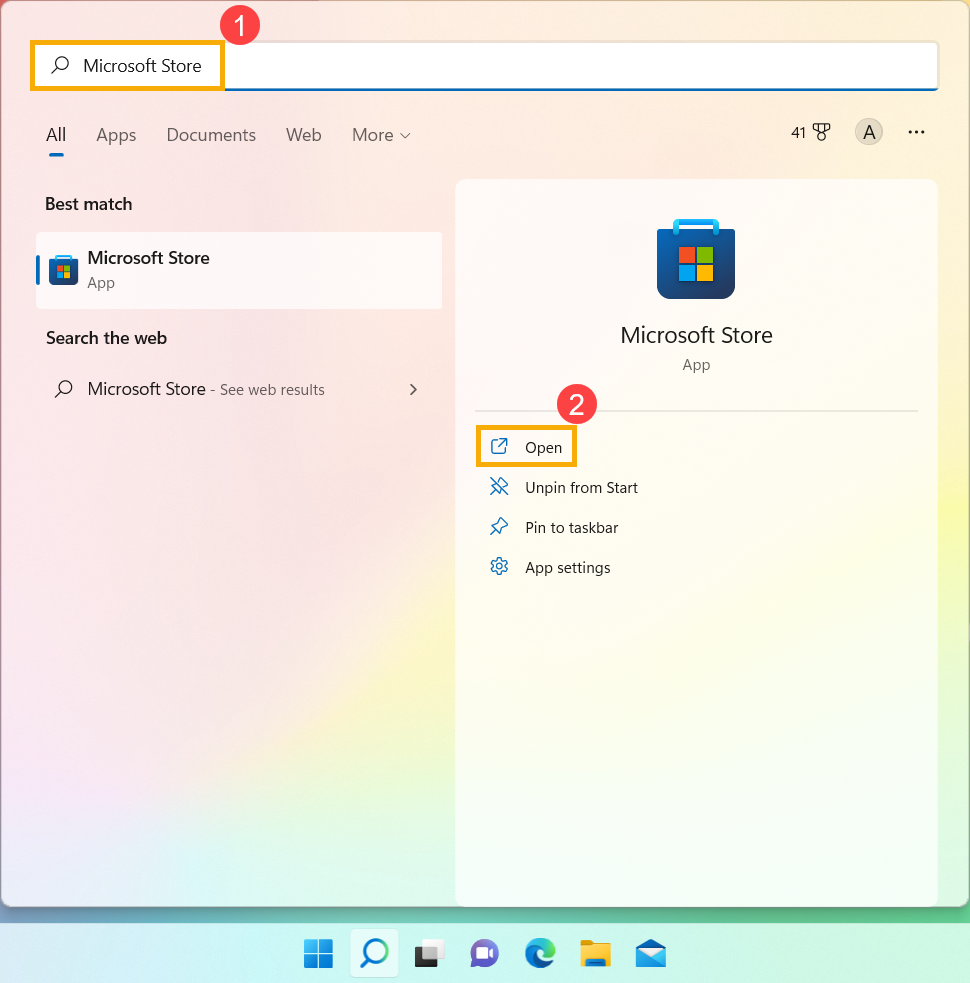
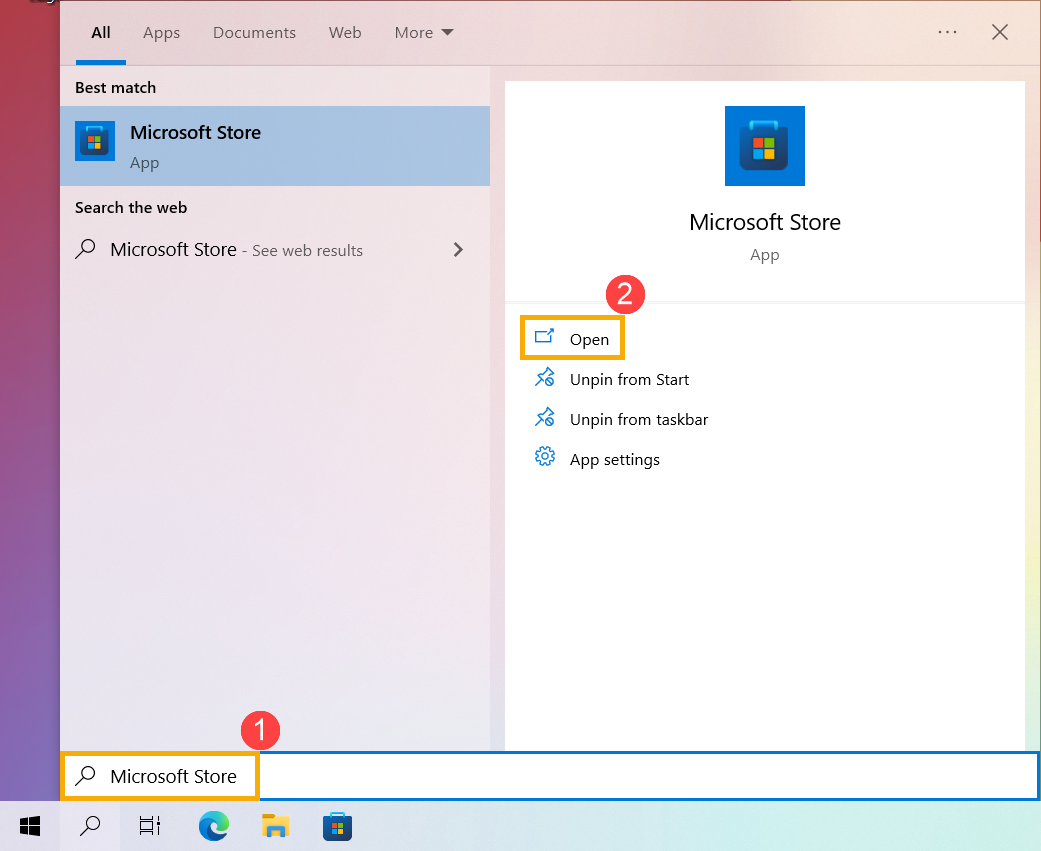
- พิมพ์และค้นหา [Microsoft Store] ในแถบค้นหาของ Windows①, จากนั้นคลิก [Open]②.
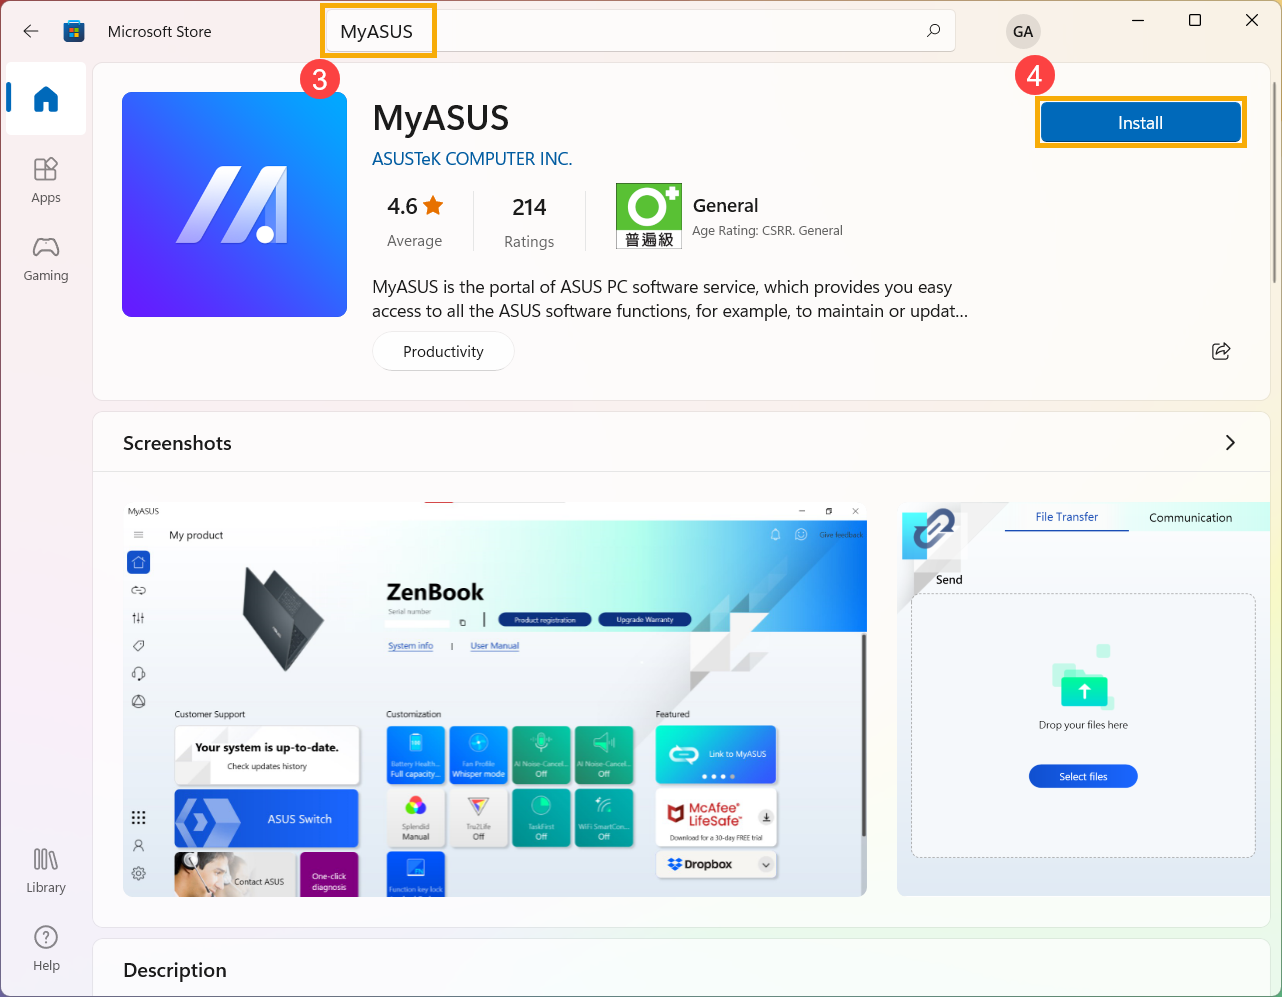
- พิมพ์และค้นหา [MyASUS] ในแถบค้นหาของ Microsoft Store③, จากนั้นคลิก [Install]④ เพื่อเริ่มการดาวน์โหลดและติดตั้ง MyASUS
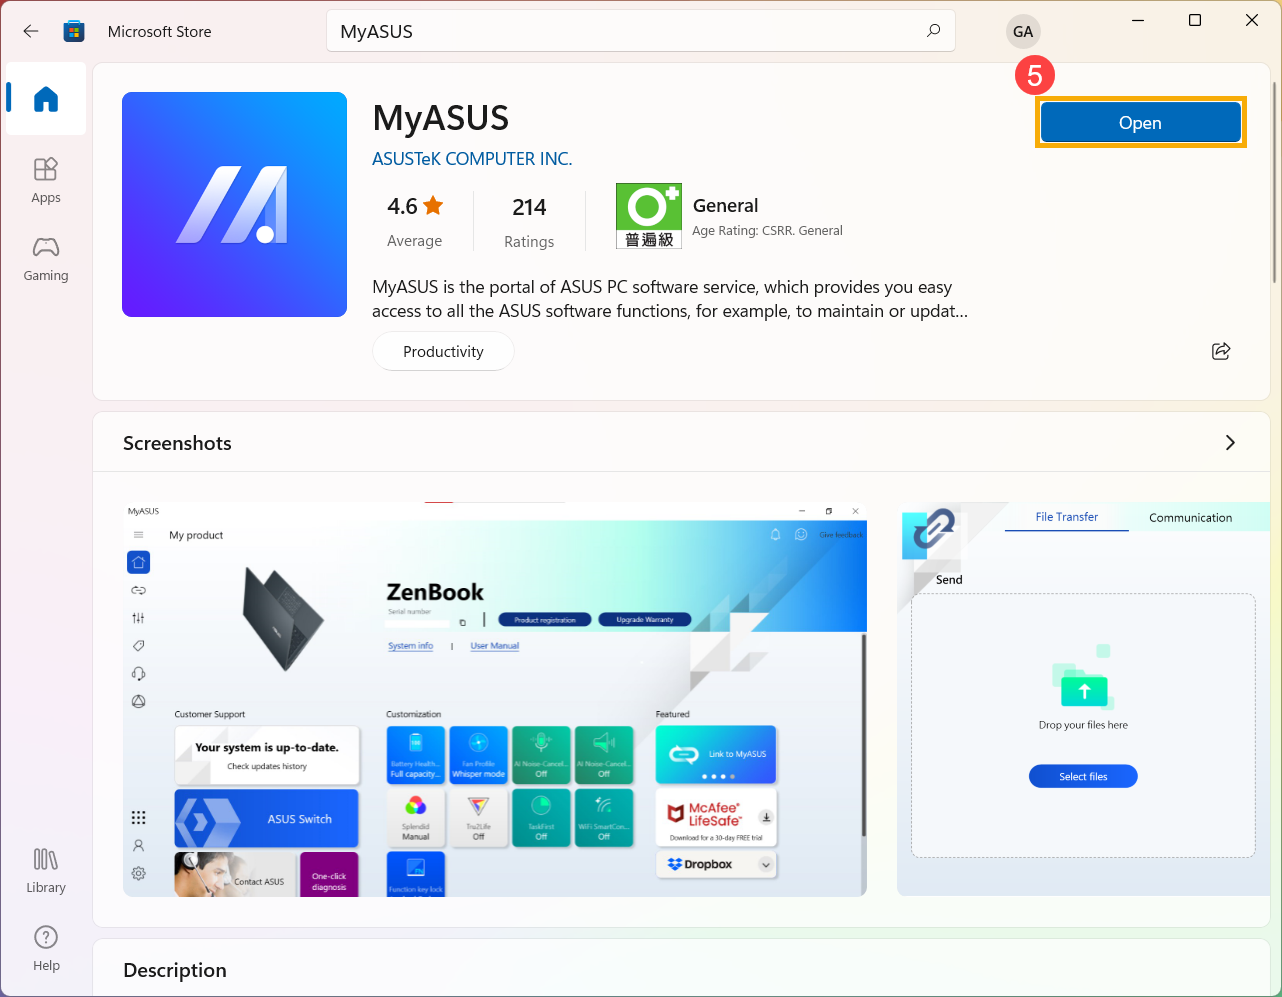
- กรุณารอจนกว่าการดาวน์โหลดและการติดตั้งจะเสร็จสิ้น หลังจากติดตั้งเสร็จแล้ว คลิก [Open]⑤ เพื่อเพลิดเพลินกับ MyASUS
ดาวน์โหลด MyASUS ตอนนี้เพื่อสัมผัสประสบการณ์บริการที่สมบูรณ์แบบ . Click below!

ระบบปฏิบัติการวินโดวส์ 10
ก่อนที่จะติดตั้ง MyASUS คุณต้องตรวจสอบว่าคอมพิวเตอร์ของคุณได้รับการติดตั้งไดรเวอร์ ASUS System Control Interface ก่อนหรือไม่ จากนั้นจึงเริ่มติดตั้ง MyASUS
- พิมพ์และค้นหา [Device Manager] ในแถบค้นหาของ Windows①, จากนั้นคลิก [Open]②.
- ตรวจสอบลูกศรถัดจาก [อุปกรณ์ระบบ]③ จากนั้นยืนยันว่าไดรเวอร์ [ASUS System Control Interface] ได้รับการติดตั้งแล้ว④ (มีเวอร์ชัน V1 หรือ V3 ขึ้นอยู่กับรุ่นที่แตกต่างกัน และตัวเลือกที่รองรับใน MyASUS จะถูกกำหนดโดยเวอร์ชันไดรเวอร์นี้)
If your computer had been installed this driver, please คลิกที่นี่เพื่อทราบวิธีการติดตั้ง MyASUS
หากคอมพิวเตอร์ของคุณยังไม่ได้ติดตั้งไดรเวอร์นี้ โปรด คลิกที่นี่เพื่อทราบวิธีการดาวน์โหลดและติดตั้งไดรเวอร์ ASUS System Control Interface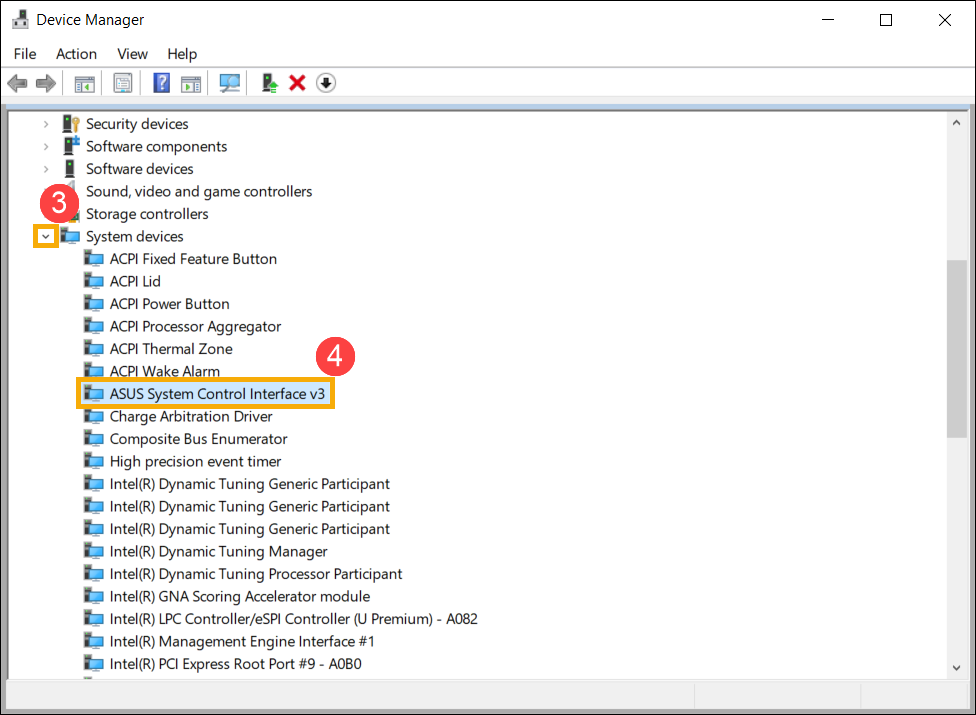
วิธีดาวน์โหลดและติดตั้งไดรเวอร์ ASUS System Control Interface
โปรดไปที่ไซต์สนับสนุนของ ASUS จากนั้นดาวน์โหลดและติดตั้งไดรเวอร์ ASUS System Control Interface ในหมวดหมู่ซอฟต์แวร์และยูทิลิตี้ ที่นี่คุณสามารถเรียนรู้เพิ่มเติมเกี่ยวกับ วิธีค้นหาและดาวน์โหลดไดรเวอร์
หากคุณไม่พบไดรเวอร์ ASUS System Control Interface บนไซต์สนับสนุน ASUS ของคอมพิวเตอร์รุ่นของคุณ นั่นหมายความว่าคอมพิวเตอร์ของคุณไม่รองรับคุณสมบัติส่วนใหญ่ใน MyASUS ที่นี่คุณสามารถเรียนรู้เพิ่มเติมเกี่ยวกับ เหตุใดฉันจึงเห็นเฉพาะฟีเจอร์ “การสนับสนุนลูกค้า” ในแอป MyASUS
หลังจากการดาวน์โหลดเสร็จสิ้น โปรดไปที่คำแนะนำในการติดตั้งที่เกี่ยวข้องโดยอิงตามรุ่นไดรเวอร์บนคอมพิวเตอร์ของคุณ
| รุ่นไดร์เวอร์ | รุ่นที่รองรับ | คำแนะนำการติดตั้ง |
| ASUS System Control Interface V3 | Model list | Click to paragraph |
| ASUS System Control Interface V1 | Model list | Click to paragraph |
ติดตั้งไดรเวอร์ ASUS System Control Interface V3 ล่าสุด
หมายเหตุ: รูปภาพต่อไปนี้เป็นเวอร์ชันปัจจุบันเพื่อใช้อ้างอิง โปรดดาวน์โหลดเวอร์ชันล่าสุดจากเว็บไซต์สนับสนุนของ ASUS
หลังจากดาวน์โหลดไฟล์แล้ว ให้ดับเบิลคลิกที่ไฟล์ [ASUSSystemControlInterfaceV3.exe] เพื่อเริ่มการติดตั้ง①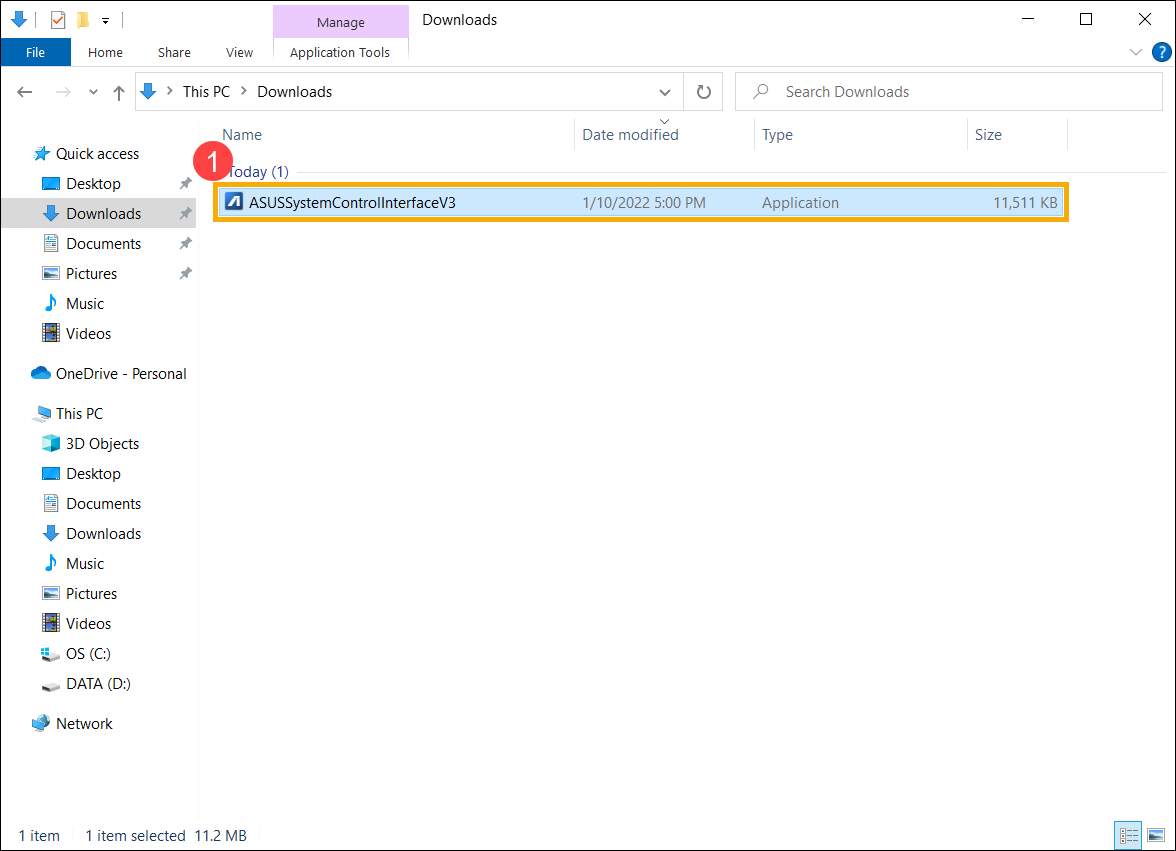
- ปฏิบัติตามตัวบ่งชี้เพื่อยอมรับข้อตกลงใบอนุญาตและดำเนินการติดตั้ง
- คลิก [Finish]⑩ และรีสตาร์ทอุปกรณ์ของคุณเพื่อทำการติดตั้งให้เสร็จสิ้น
- หลังจากรีบูตให้คลิกขวาที่ไฟล์ [Start]
 ไอคอน⑪, จากนั้นเลือก [Device Manager]⑫.
- ในหมวดอุปกรณ์ระบบ ดับเบิลคลิกที่ [ASUS System Control Interface]⑬, จากนั้นเลือก [Driver] แตะ⑭ เพื่อตรวจสอบ [Driver Version]⑮.
- หลังจากการติดตั้งไดรเวอร์ ASUS System Control Interface เสร็จสิ้น, click here to know How to install MyASUS.
ติดตั้งไดรเวอร์ ASUS System Control Interface V1 ล่าสุด
หมายเหตุ: รูปภาพต่อไปนี้เป็นเวอร์ชันปัจจุบันเพื่อใช้อ้างอิง โปรดดาวน์โหลดเวอร์ชันล่าสุดจากเว็บไซต์สนับสนุนของ ASUS
- After downloading the file, double-click on the [ASUSSystemControlInterfaceV1.exe] ไฟล์เพื่อเริ่มการติดตั้ง①.
- ปฏิบัติตามตัวบ่งชี้เพื่อยอมรับข้อตกลงใบอนุญาตและดำเนินการติดตั้ง
- คลิก [Finish]⑩ และรีสตาร์ทอุปกรณ์ของคุณเพื่อทำการติดตั้งให้เสร็จสิ้น
- หลังจากรีบูตให้คลิกขวาที่ไฟล์ [Start] ไอคอน⑪, จากนั้นเลือก [Device Manager]⑫.
- ในหมวดอุปกรณ์ระบบ ดับเบิลคลิกที่ [ASUS System Control Interface]⑬, จากนั้นเลือก [Driver] แตะ⑭ เพื่อตรวจสอบ [Driver Version]⑮.
- หลังจากการติดตั้งไดรเวอร์ ASUS System Control Interface เสร็จสิ้น, คลิกที่นี่เพื่อทราบวิธีการติดตั้ง MyASUS
โปรดทำตามขั้นตอนด้านล่างเพื่อค้นหาแอปพลิเคชัน MyASUS และติดตั้ง
หมายเหตุ: ความต้องการของระบบคือ Windows 10 RS3 (เวอร์ชัน 1709) หรือเวอร์ชันที่ใหม่กว่า
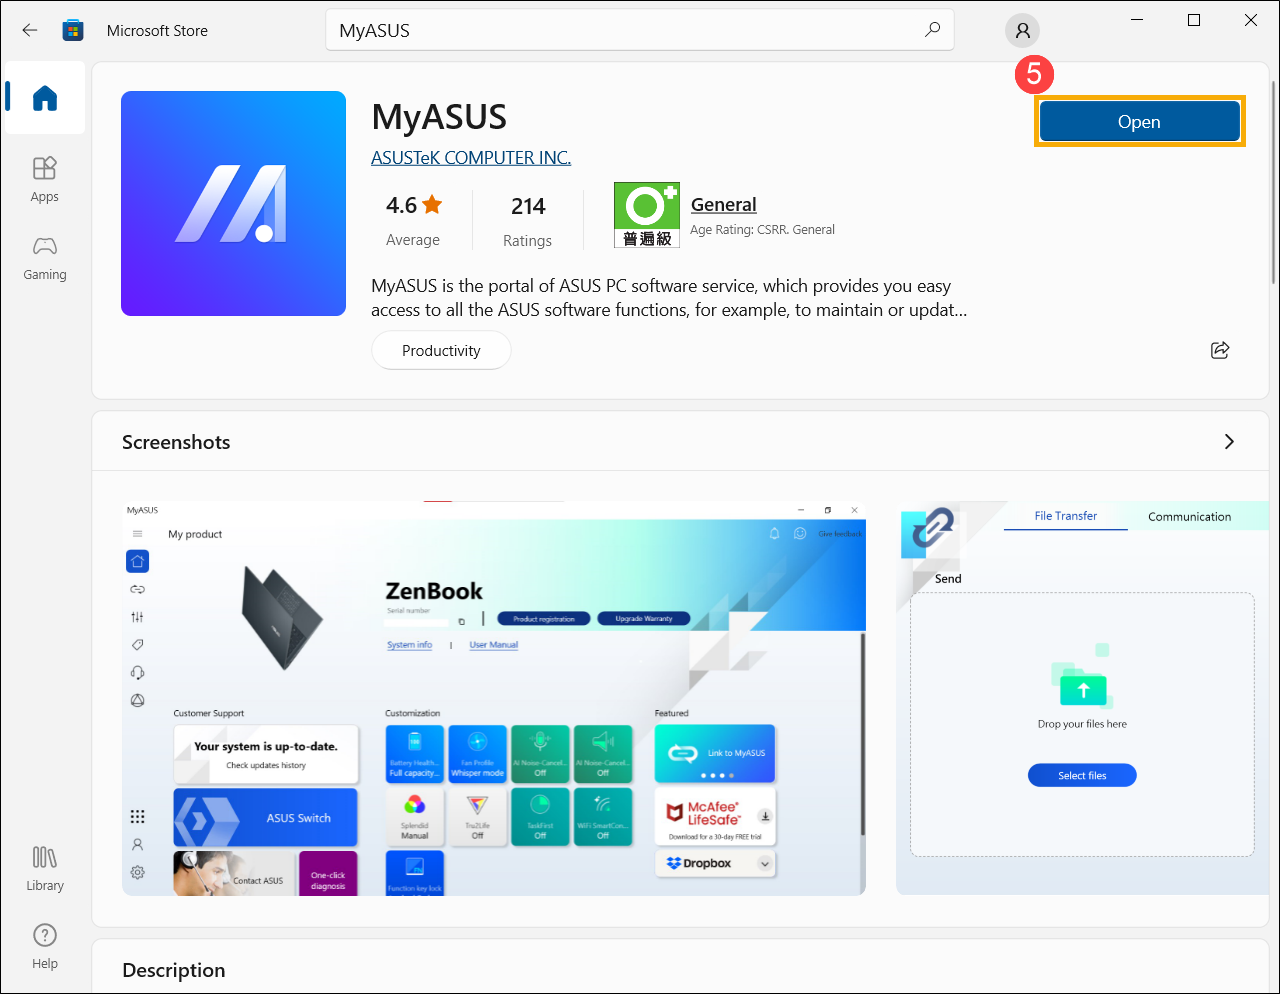
- พิมพ์และค้นหา [Microsoft Store] ในแถบค้นหาของ Windows①, จากนั้นคลิก [Open]②.
- พิมพ์และค้นหา [MyASUS] ในแถบค้นหาของ Microsoft Store③, จากนั้นคลิก [Get]④ เพื่อเริ่มการดาวน์โหลดและติดตั้ง MyASUS
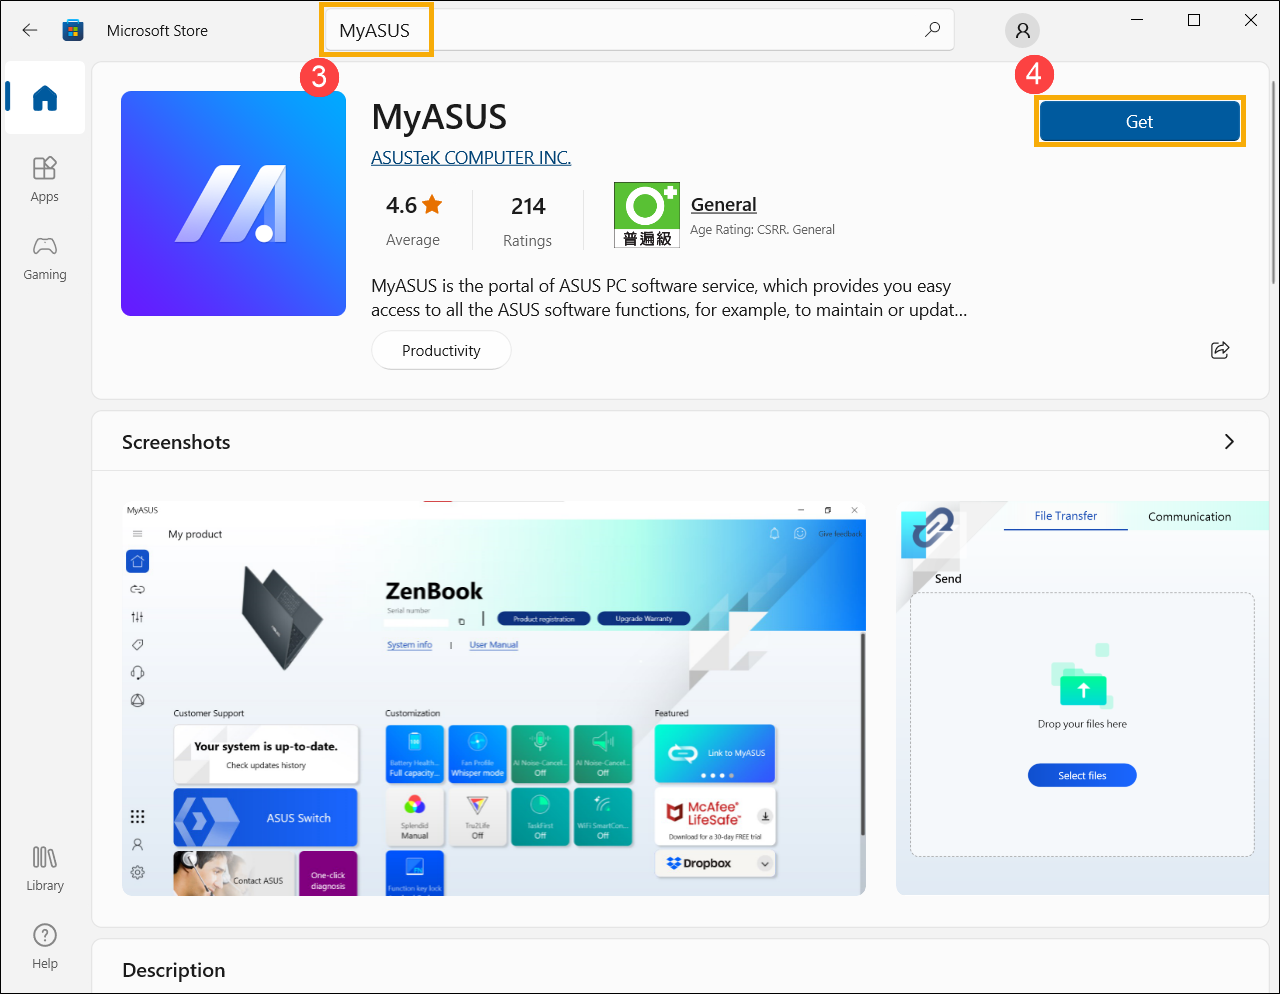
- กรุณารอจนกว่าการดาวน์โหลดและการติดตั้งจะเสร็จสิ้น หลังจากติดตั้งเสร็จแล้ว คลิก [Open]⑤ เพื่อเพลิดเพลินกับ MyASUS
[Phone] จะดาวน์โหลดแอป MyASUS ได้อย่างไร?
คุณสามารถรับแอป MyASUS สำหรับอุปกรณ์ของคุณได้จากแอป Google Play Store แอป Play Store ติดตั้งมาล่วงหน้าบนอุปกรณ์ Android ที่รองรับ Google Play
ดาวน์โหลดแอป MyASUS จาก Google Play Store
1. แตะ " Play Store app "。
2. แอปจะเปิดขึ้นและคุณสามารถค้นหาได้ MyASUS และดาวน์โหลด
ดาวน์โหลดแอป MyASUS จาก App Store (iOS)
หากต้องการดาวน์โหลดแอป MyASUS จาก App Store คุณต้องมี Apple ID Apple ID ของคุณคือบัญชีที่คุณใช้เข้าถึงบริการของ Apple
หากคุณเคยใช้บริการอื่นๆ ของ Apple เช่น iCloud ให้ลงชื่อเข้าใช้ App Store ด้วย Apple ID เดียวกัน หากไม่มี Apple ID คุณสามารถสร้างได้
บนหน้าแรกของ App Store > คลิก "ค้นหา" ที่มุมล่างขวา จากนั้นคุณสามารถป้อน "MyASUS" เพื่อค้นหาแอป
เมื่อคุณพบแอป MyASUS ให้ดาวน์โหลดลงในอุปกรณ์ของคุณ:
1. แตะที่แอป MyASUS เพื่อดูหน้าผลิตภัณฑ์ของแอป MyASUS
2. เพื่อรับแอป MyASUS, แตะ Get.
[Notebook] จะอัพเดต MyASUS ได้อย่างไร?
เมื่อ MyASUS เวอร์ชันใหม่พร้อมให้ดาวน์โหลด คุณจะพบการแจ้งเตือนการอัปเดตหลังจากเปิดใช้งาน MyASUS (ตามที่แสดงด้านล่าง)
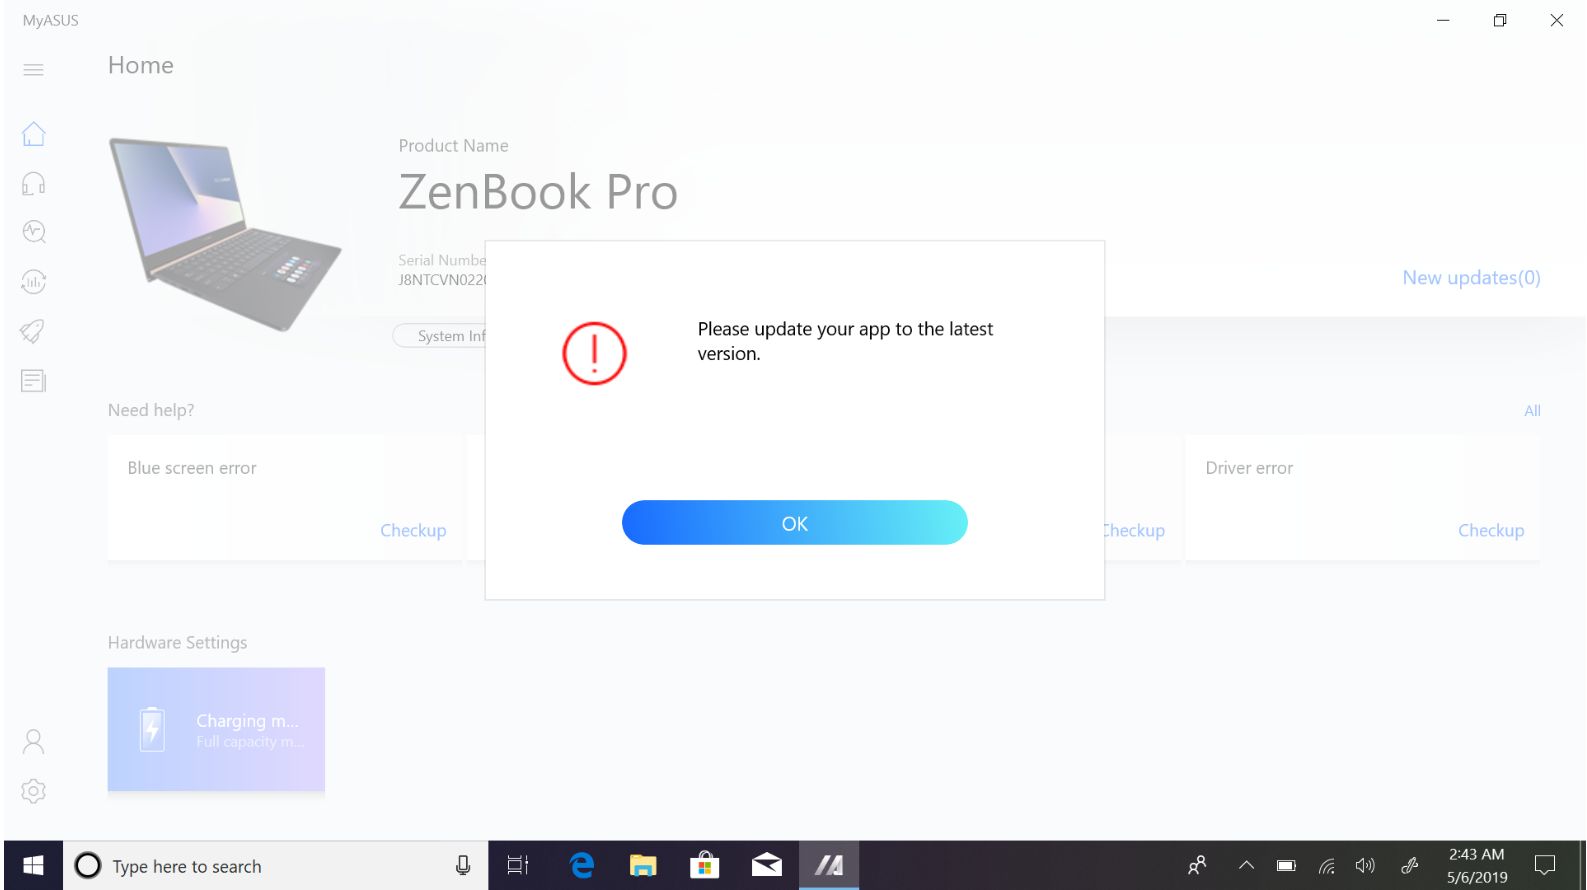
คลิกตกลงแล้วคุณจะถูกนำไปที่หน้า Microsoft Store โปรดดาวน์โหลด MyASUS เวอร์ชันใหม่จาก Microsoft Store
นอกจากนี้คุณยังสามารถคลิกไอคอนเมนูที่ด้านบนขวาและเลือกดาวน์โหลดและอัปเดตเพื่อดูว่ามีเวอร์ชันที่ใหม่กว่าให้ดาวน์โหลดหรือไม่
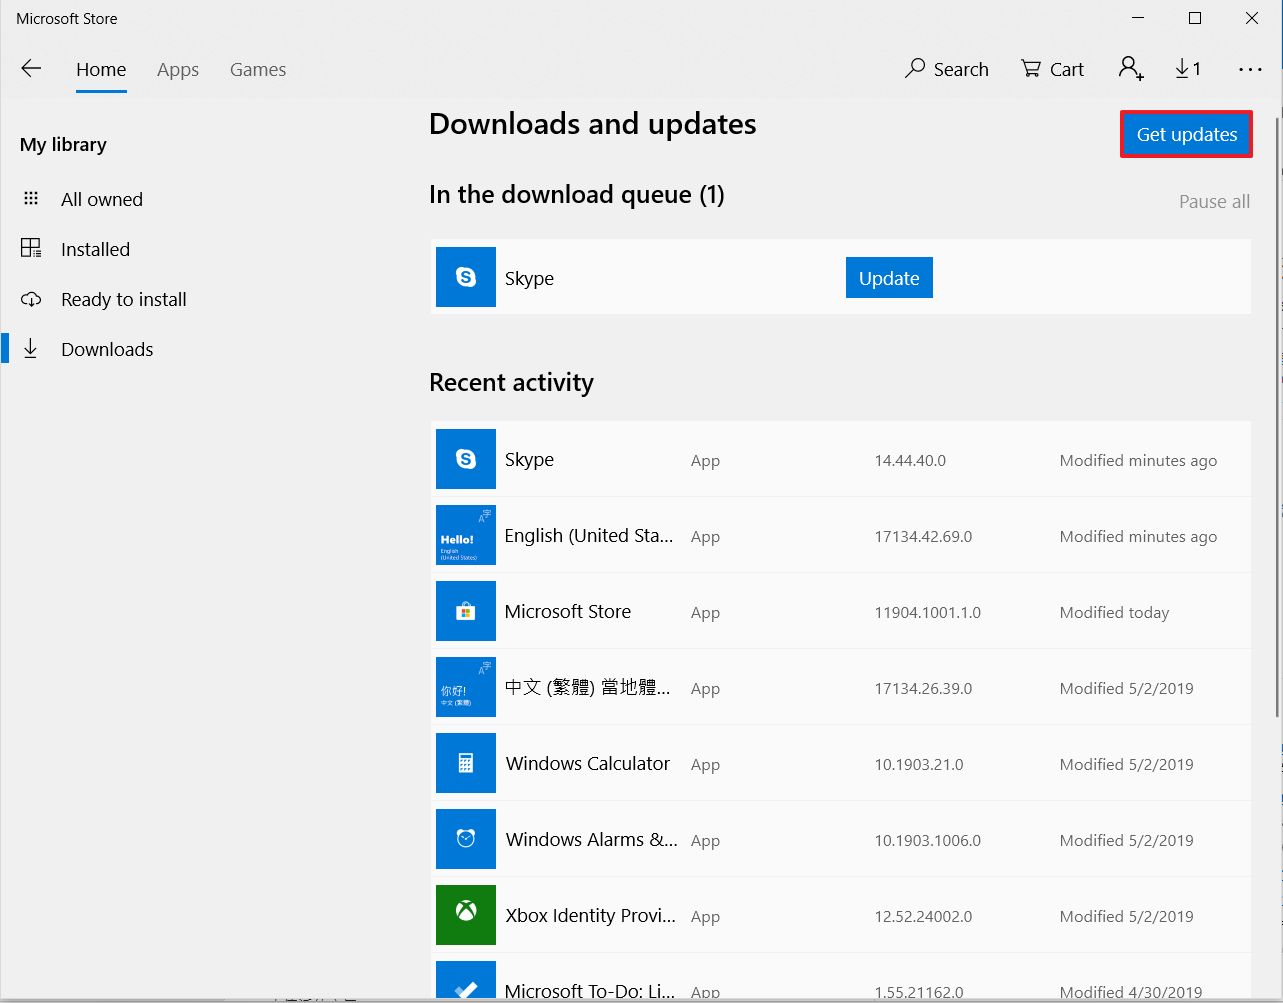
1. คลิก  ที่มุมขวาบนแล้วเลือก Downloads and Updates.
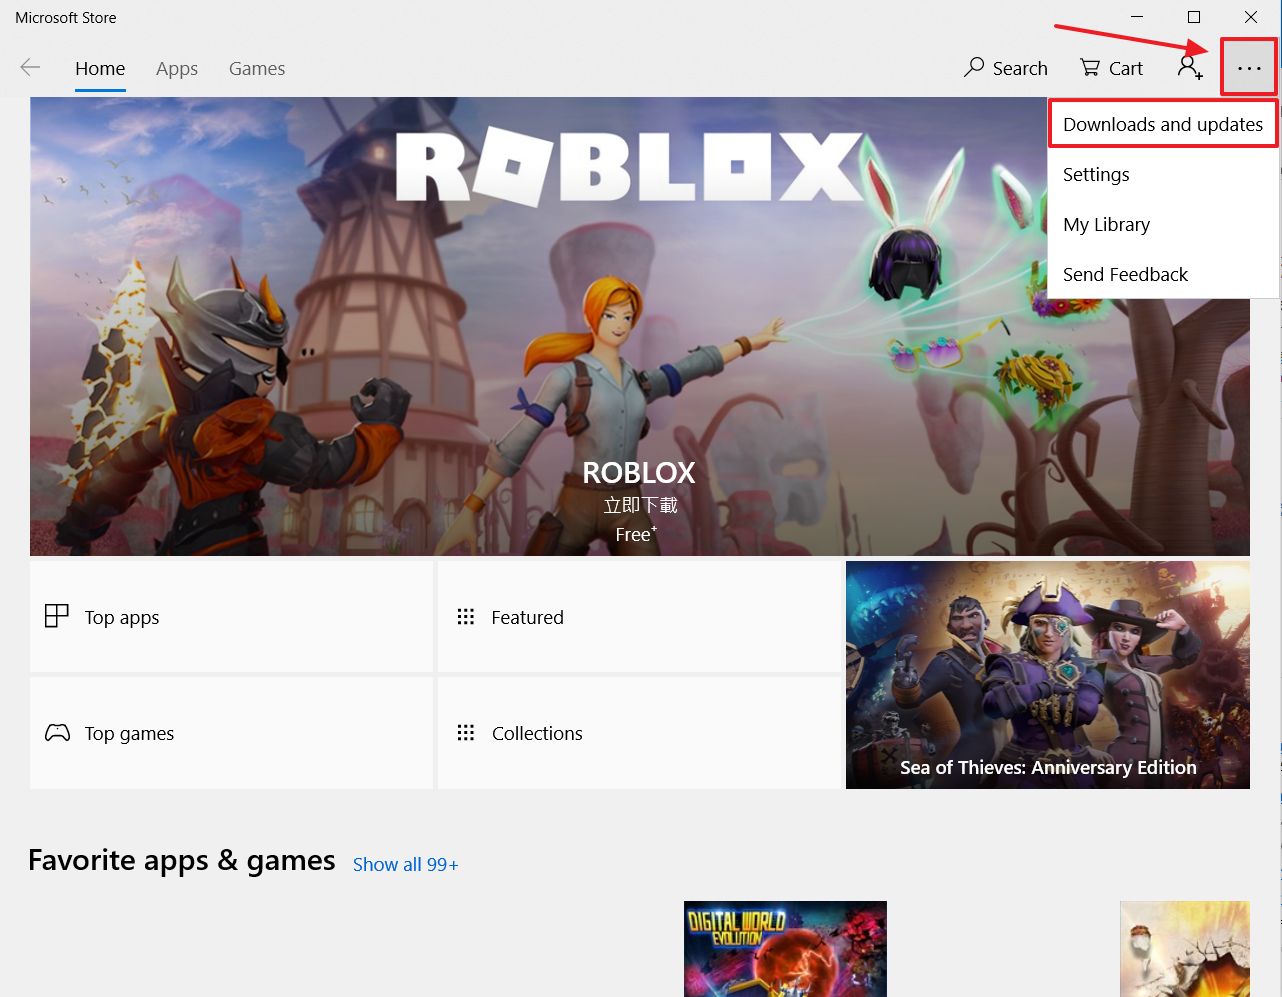
2. คลิกรับการอัปเดตเพื่อดาวน์โหลดและติดตั้ง MyASUS เวอร์ชันล่าสุดโดยอัตโนมัติทุกครั้งที่ตรวจพบ
คุณสามารถอัปเดตไดรเวอร์ได้ via the Windows update ,และอัปเดตแอป MyASUS ด้วย from the Windows Store.
อ้างอิง : จะใช้ Windows Update ในระบบปฏิบัติการได้อย่างไร?
[Notebook] MyASUS - Why can I only see the partial features in the MyASUS app?
When you download MyASUS from the Microsoft Store, you may find it only supports partial functions, excluding System diagnosis, Live update, and Customization.
It is because your product does not equip with “ASUS System Control Interface” driver or the driver version does not support the full functionality of MyASUS.
If your model supports V3 driver, please click here to download the Install Wizard to help you install the driver.
For more information, please refer to the below table:
| Features | Without ASUS System Control Interface | With ASUS System Control Interface V1 | With ASUS System Control Interface V3 | |
| Supported Models | Click here to check the list. | Click here to check the list. | ||
| Home | V | V | ||
| Link to MyASUS | V | V | ||
| Customization | V | V | ||
| ASUS Promotion | App Deals | V | V | |
| News | V | V | ||
| Customer Support | System diagnosis | V | V | |
| Live Update- Essentials | V | V | ||
| Live Update- Latest | V | V | ||
| Switch & Recovery | V | V | ||
| ASUS One | V | V | V | |
| Advanced Experience | V | V | V | |
| User Center | V | V | V | |
| Settings | V | V | V | |
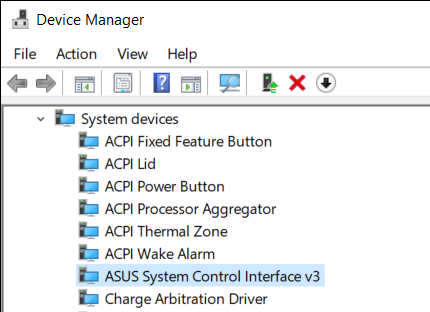
You can check the version of [ASUS System Control Interface] from [Device Manager] > [System Devices].
If you cannot find ASUS System Control Interface in Device Manager, it means your device belongs to old model and MyASUS only supports ASUS Promotion and limited Customer Support.
To get more information about drivers and MyASUS installation, please refer to [Notebook] How to install MyASUS application.
Check and Update the version of MyASUS as well as ASUS System Control Interface
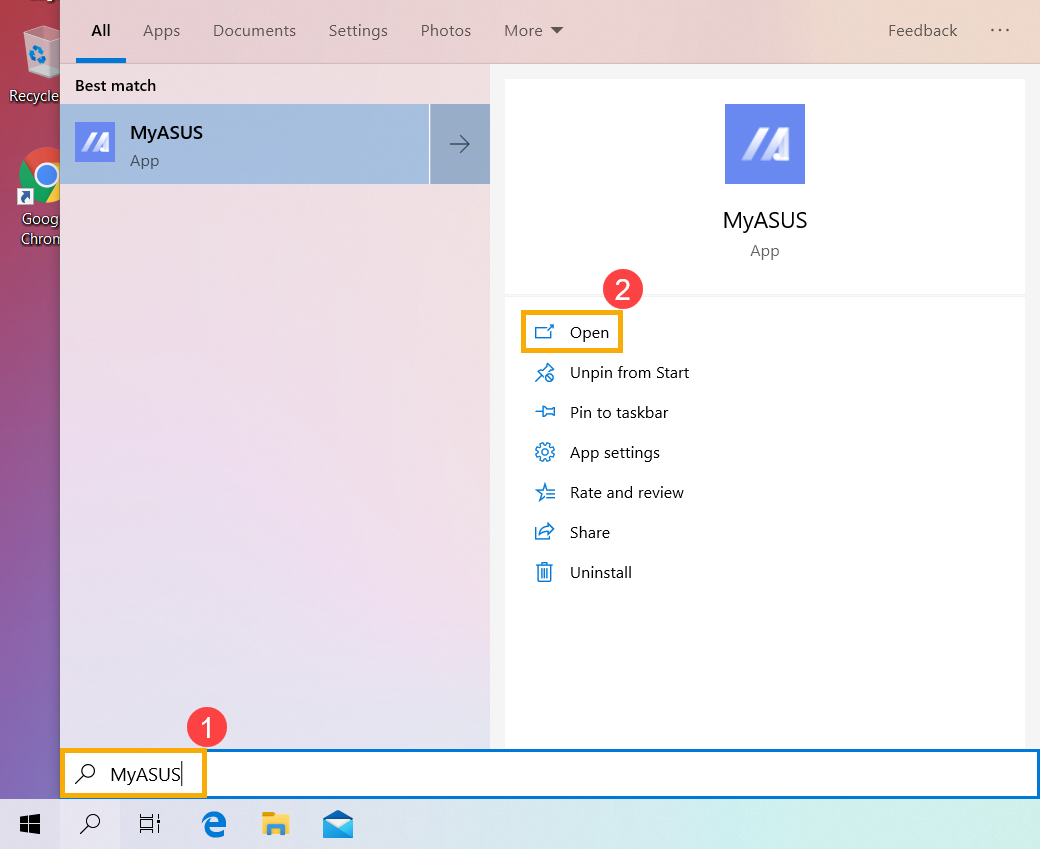
- Type and search [MyASUS] in the Windows search bar①, then click [Open]②.
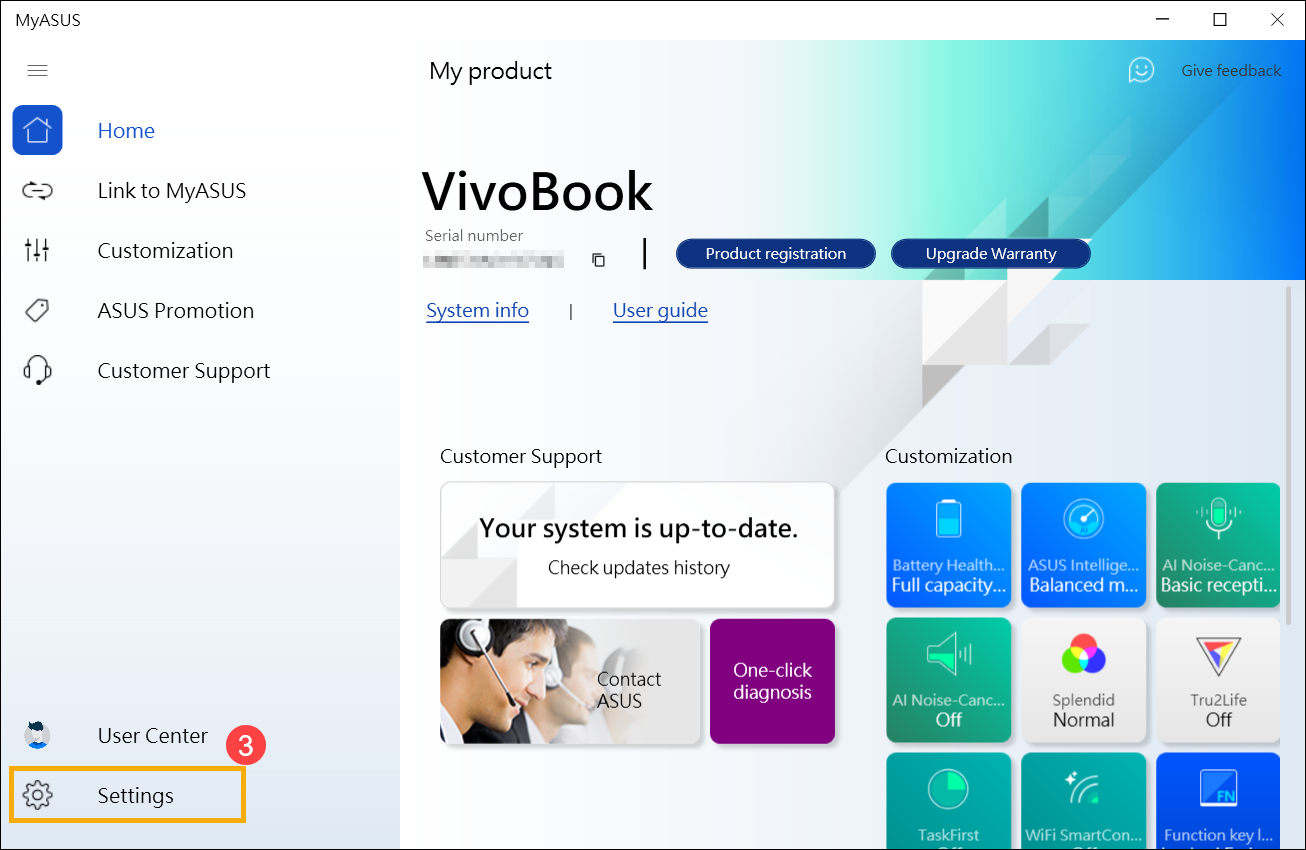
- In MyASUS, select [Settings]③.
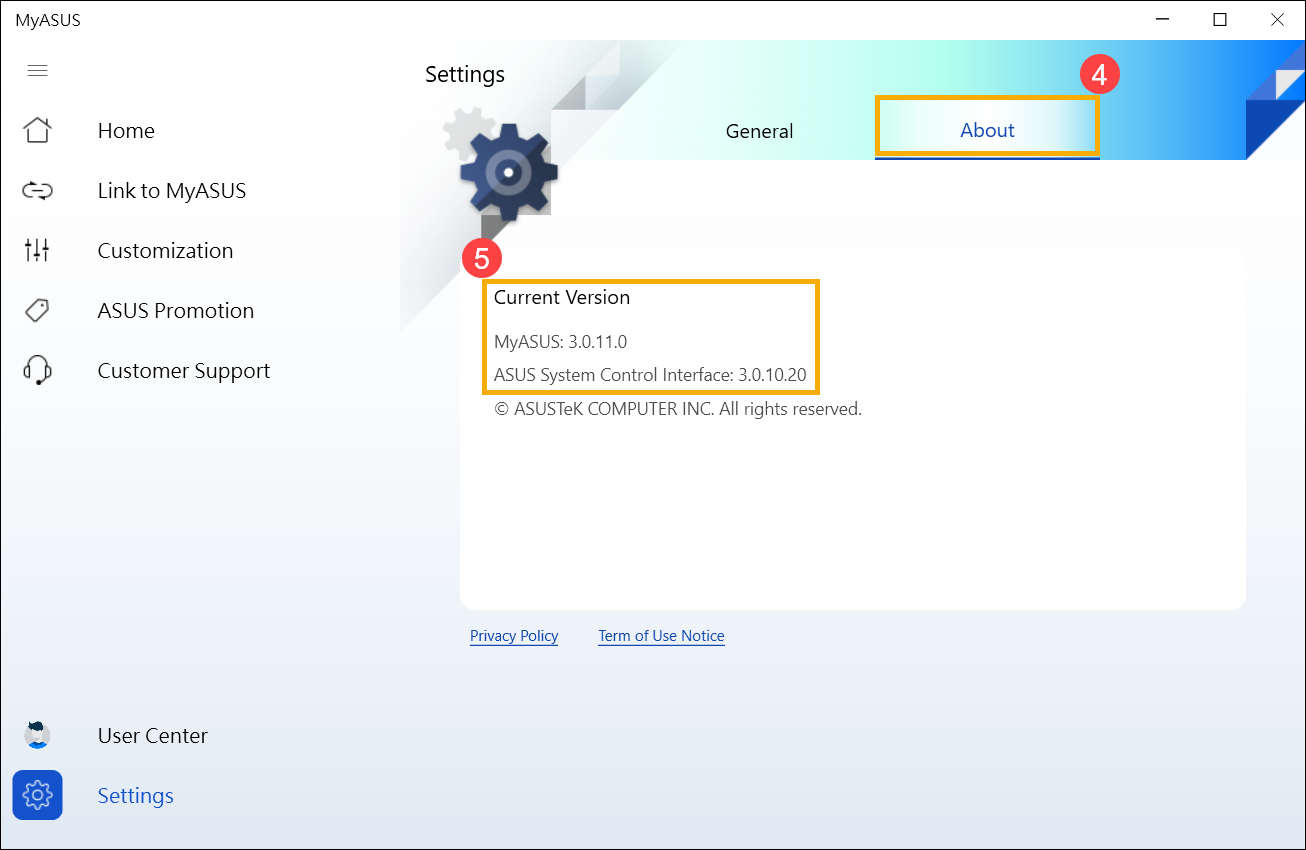
- Select [About]④ to check the current version of MyASUS and ASUS System Control Interface⑤.
- You can update MyASUS via Microsoft Store, here you can learn more about How to update MyASUS.
You can update ASUS System Control Interface driver via Windows Update, here you can learn more about How to execute Windows Update. Or, update it manually, learn more about How to search and download drivers.
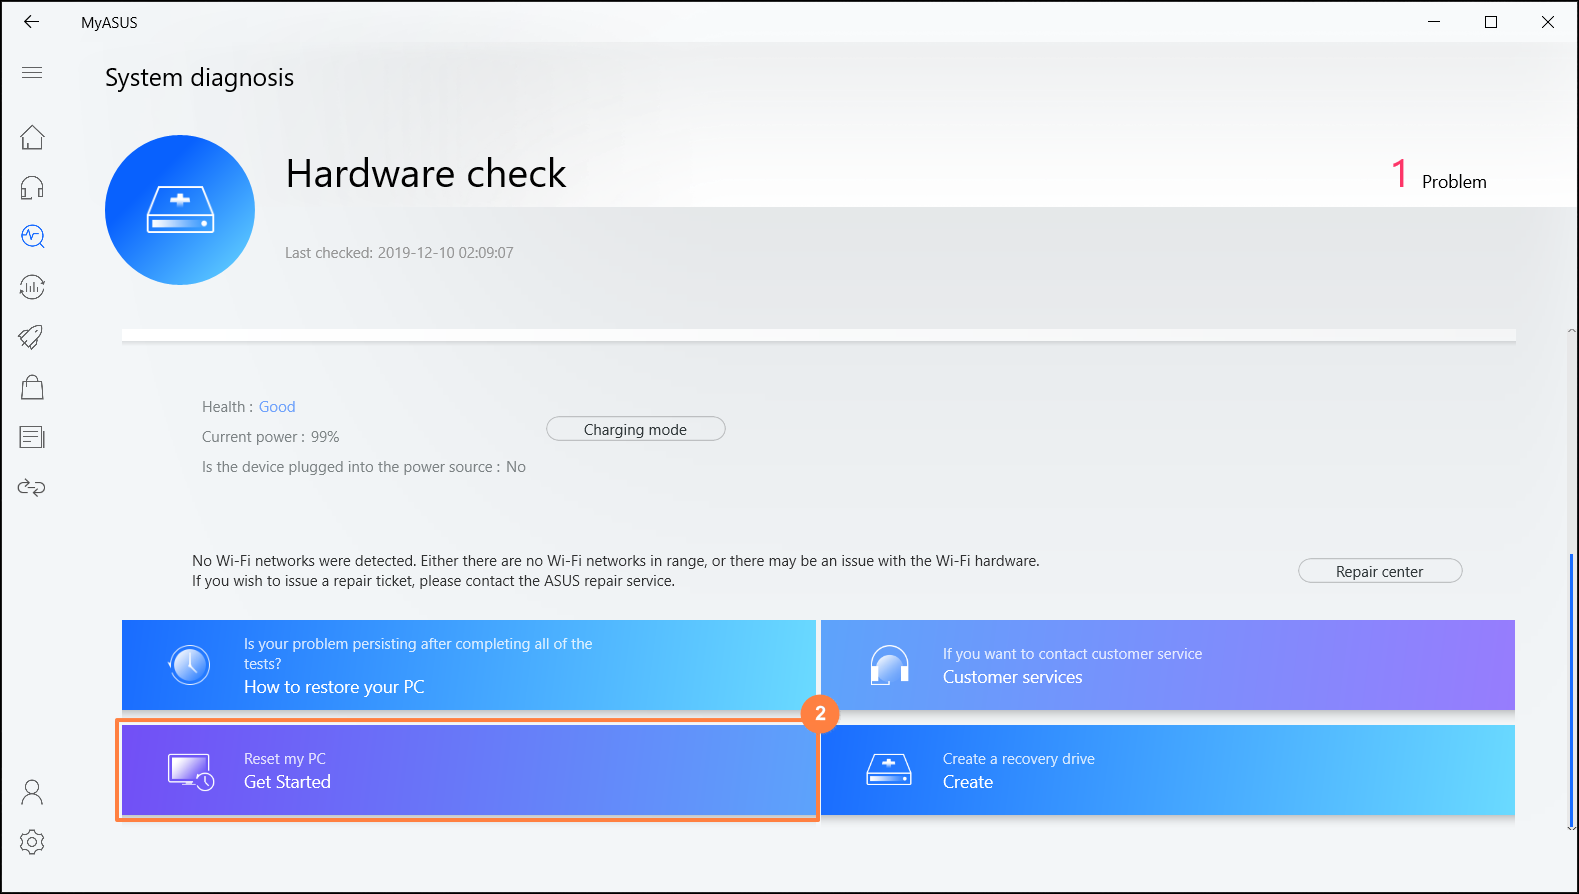
[Notebook/Desktop/AIO] MyASUS System Diagnosis - Reset my PC and create a recovery drive
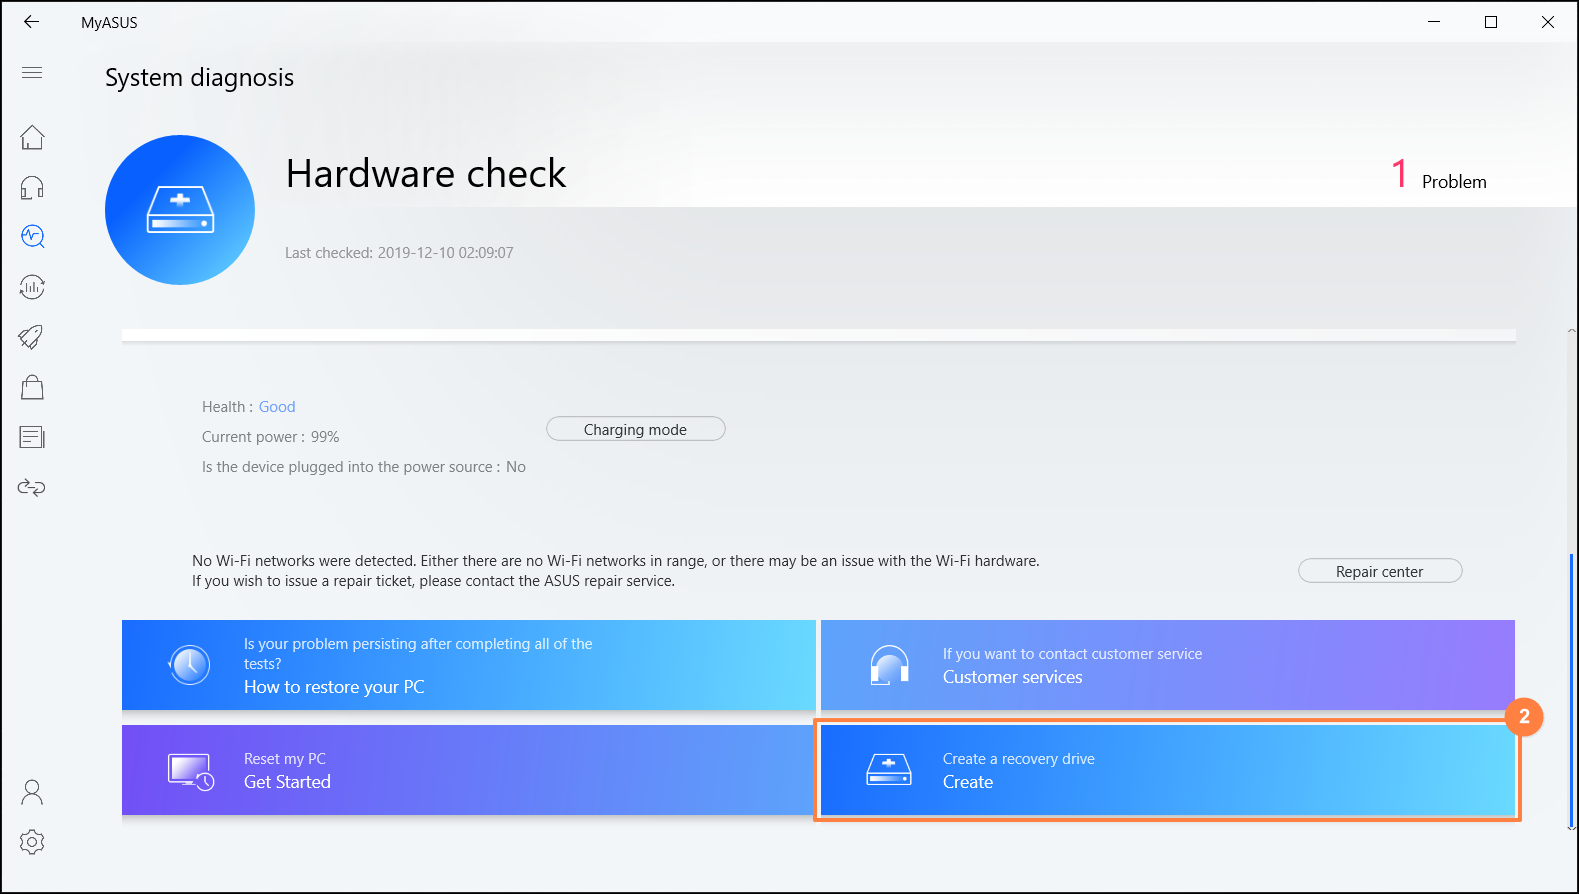
- After entering MyASUS, click on the [Customer Support] from the left menu①. Select the items you want to check in Hardware diagnostic② and click [Checkup]③.
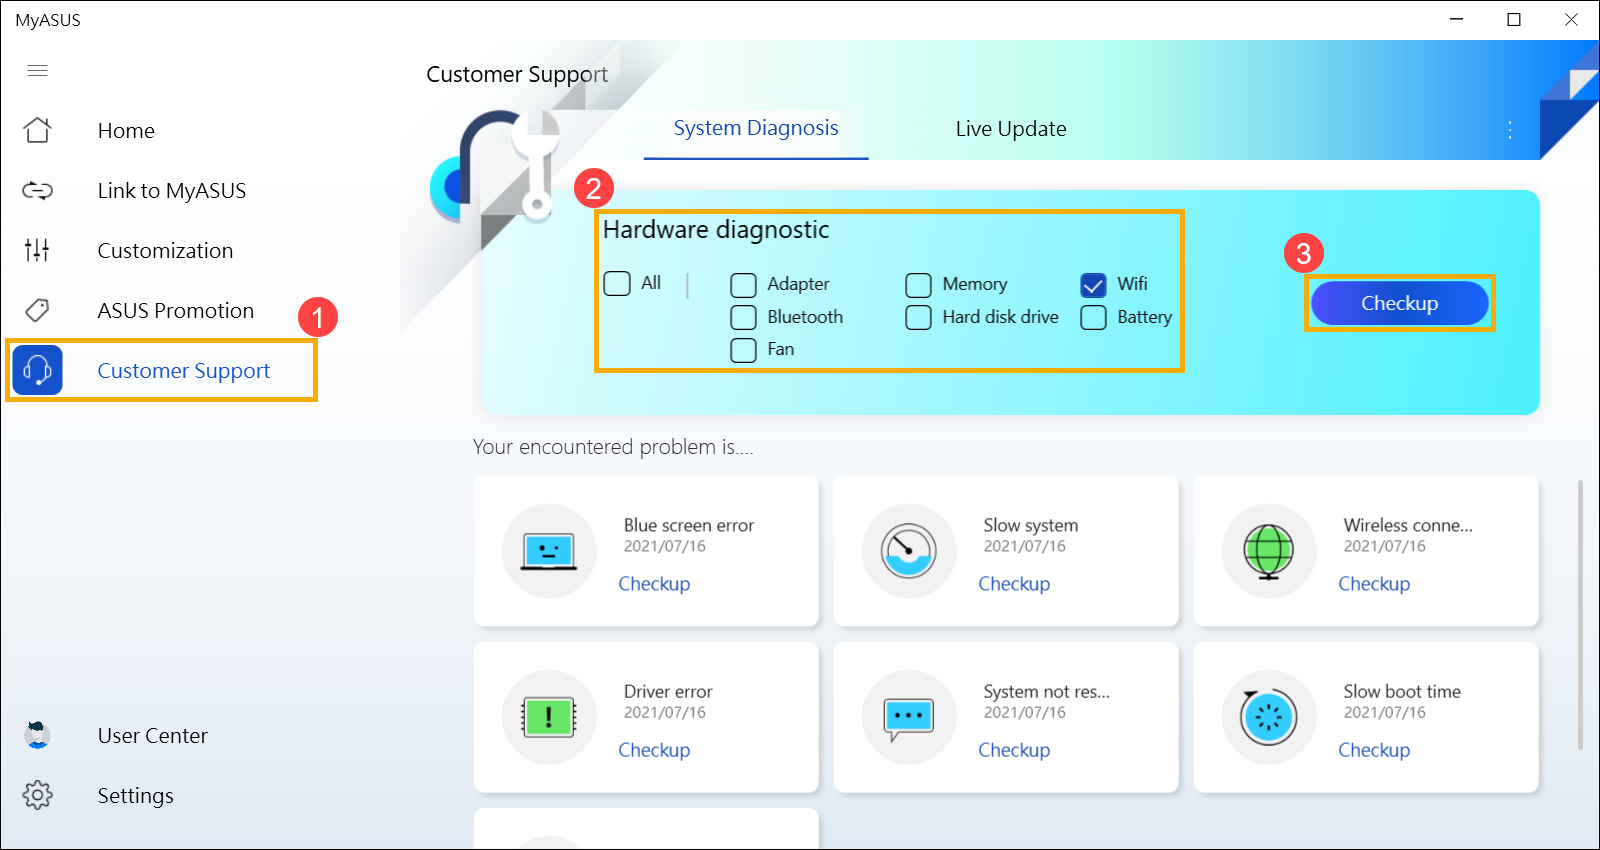
- As soon as the test is completed, click on the [Result]④.

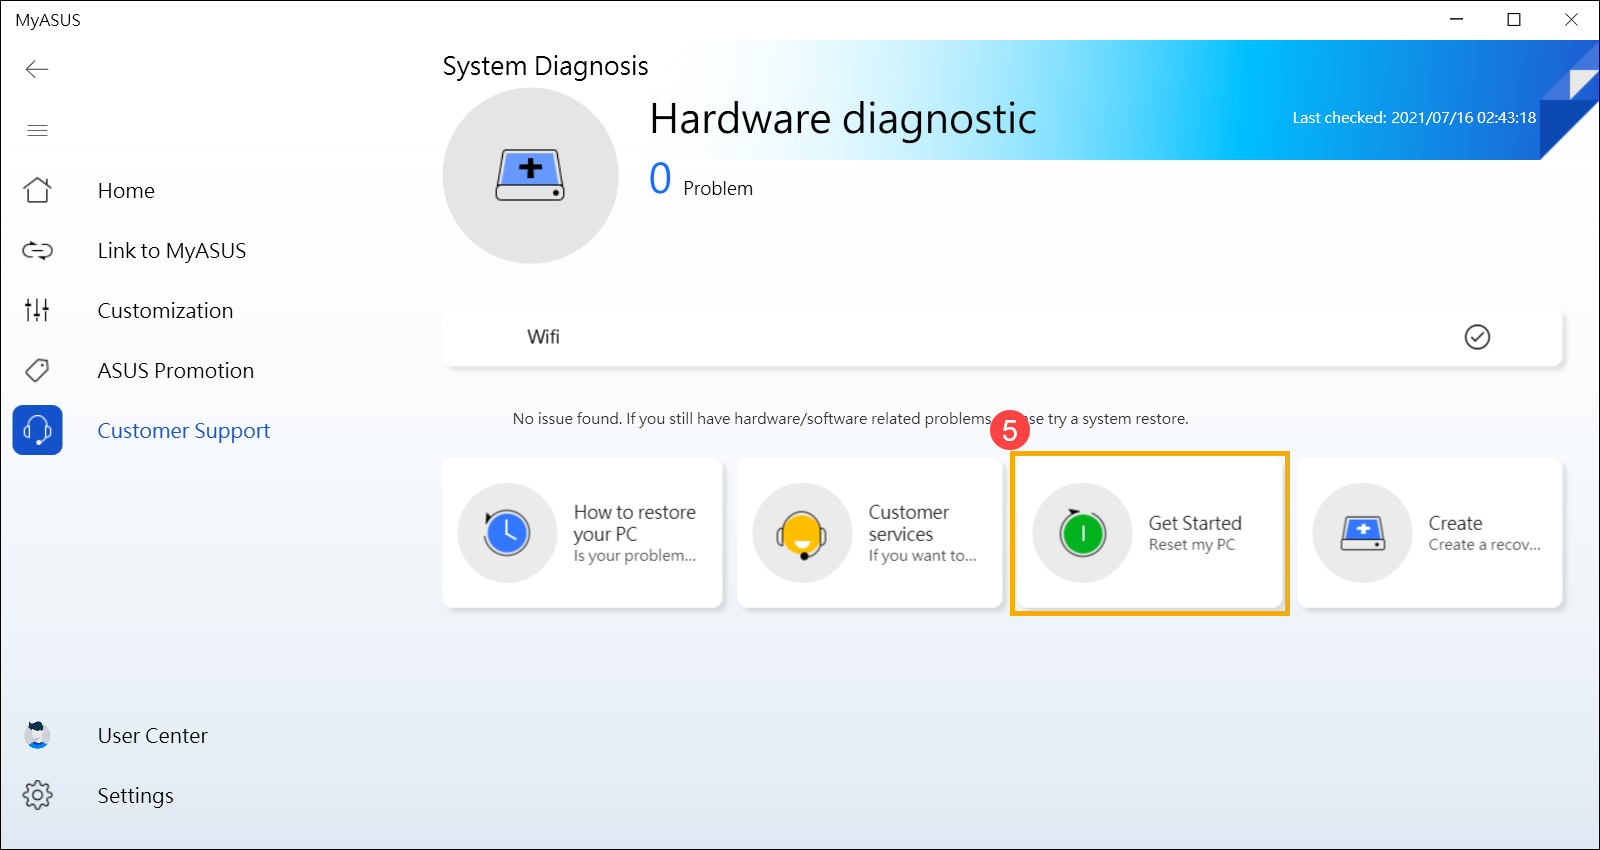
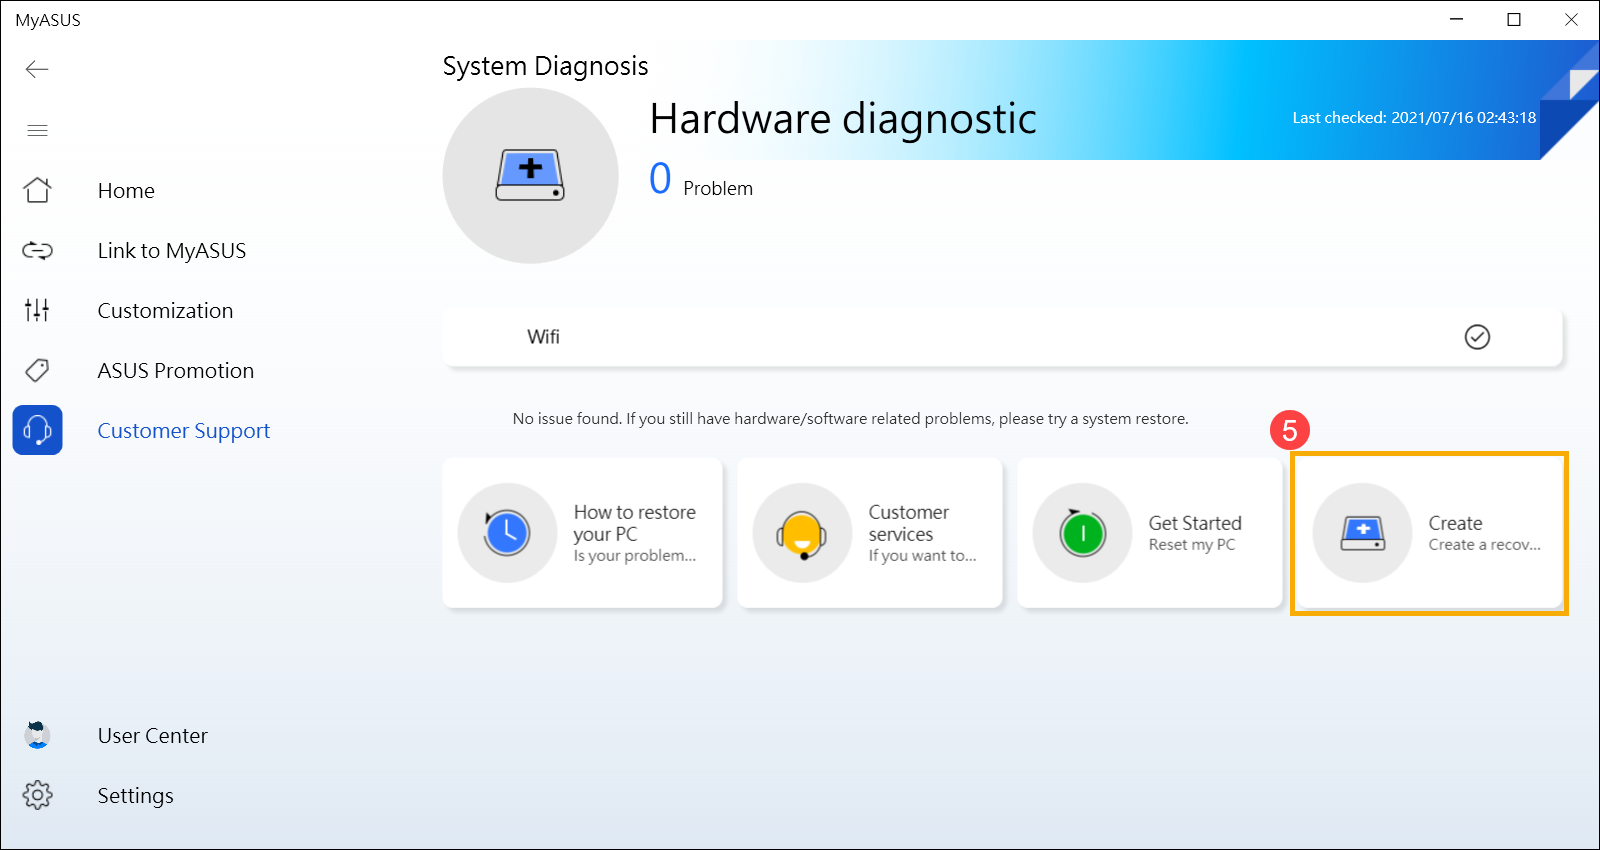
- Scroll down to the very bottom of the page. Click [Reset my pc]⑤.
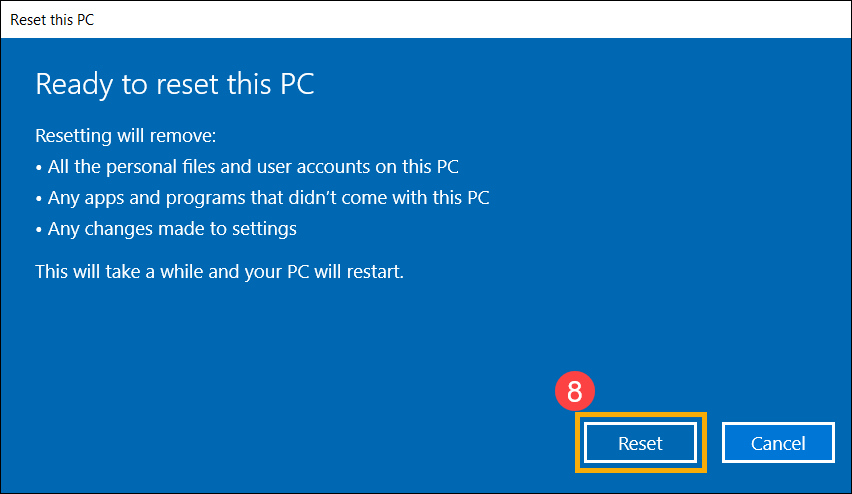
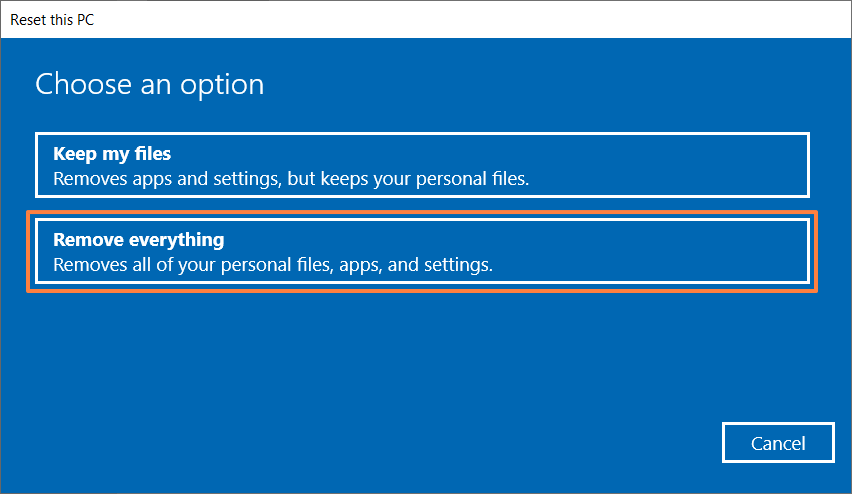
- The following step will delete all the personal files. Please be sure to back up all your files if necessary. Click on [Remove everything]⑥.

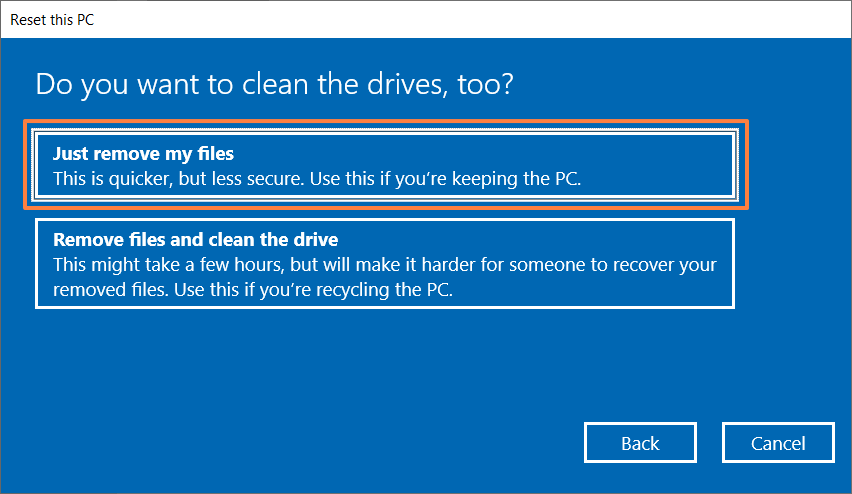
- Click [Just remove my files]⑦.

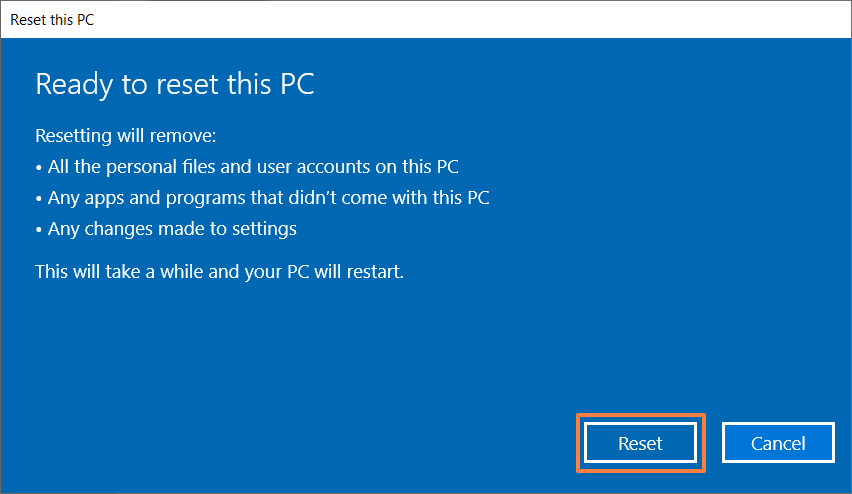
- Click [Reset]⑧ to start resetting the PC, then the system will restart for several times. As soon as it's completed, the PC will start the initialization.
- After entering MyASUS, click on the[Customer Support] from the left menu①. Select the items you want to check in Hardware diagnostic② and click [Checkup]③.
- As soon as the test is completed, click on the [Result]④.
- Scroll down to the very bottom of the page. Click [Create a recovery drive]⑤.
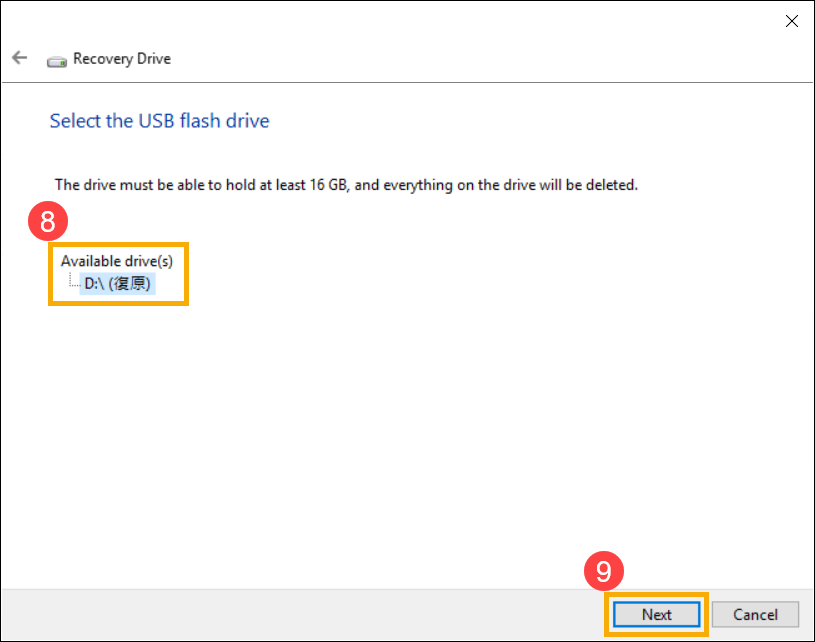
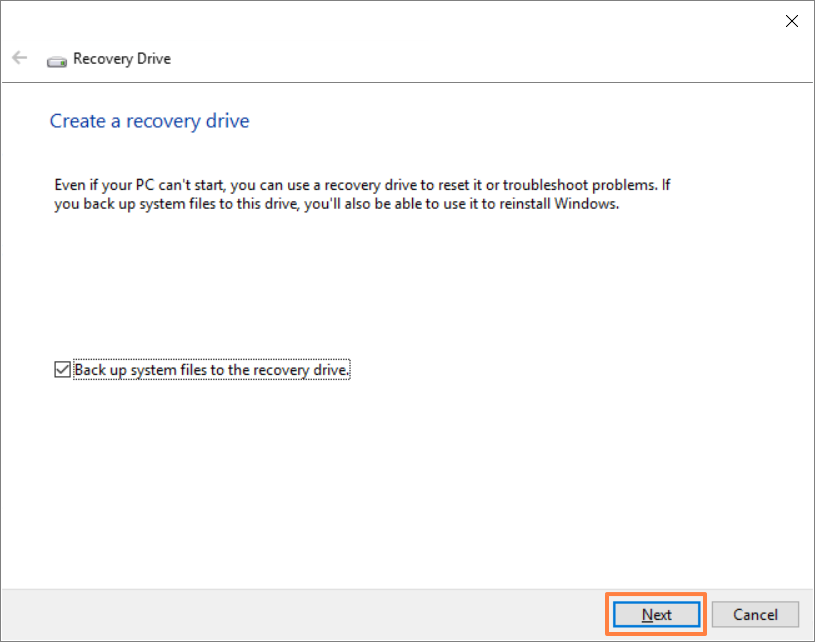
- A window pop-up will appear on the desktop for creating a recovery drive. Insert a USB flash drive with the storage capacity at least 16GB to the PC. Be aware that everything on the drive will be totally deleted after this process. Select [Back up system files to the recovery drive]⑥, then click on [Next]⑦ and wait for a few minutes.

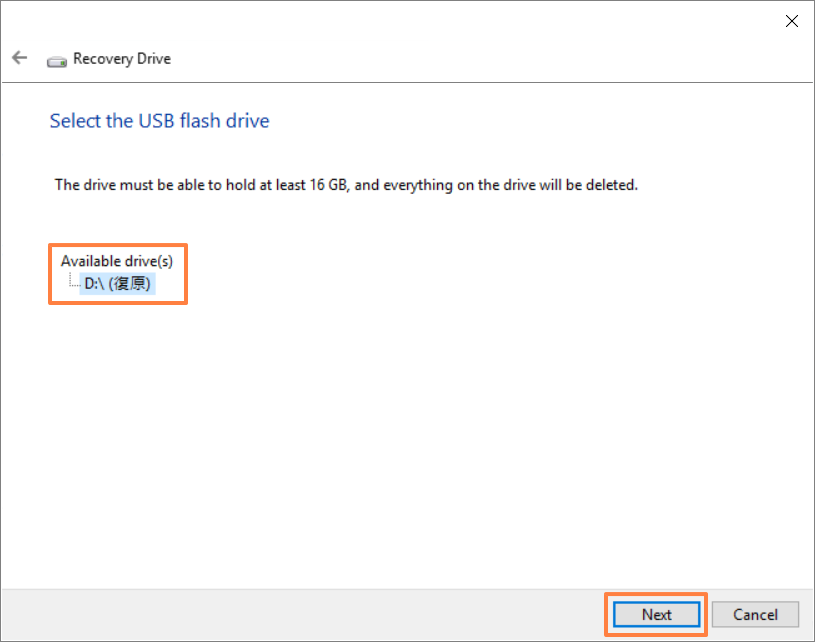
- Please confirm the drive letter of the USB flash drive is the one intended for creating the recovery drive (drive D: is assigned to the USB flash drive, as shown)⑧, in order to prevent data or files from being mistakenly deleted in the wrong USB flash drive. Click [Next]⑨.
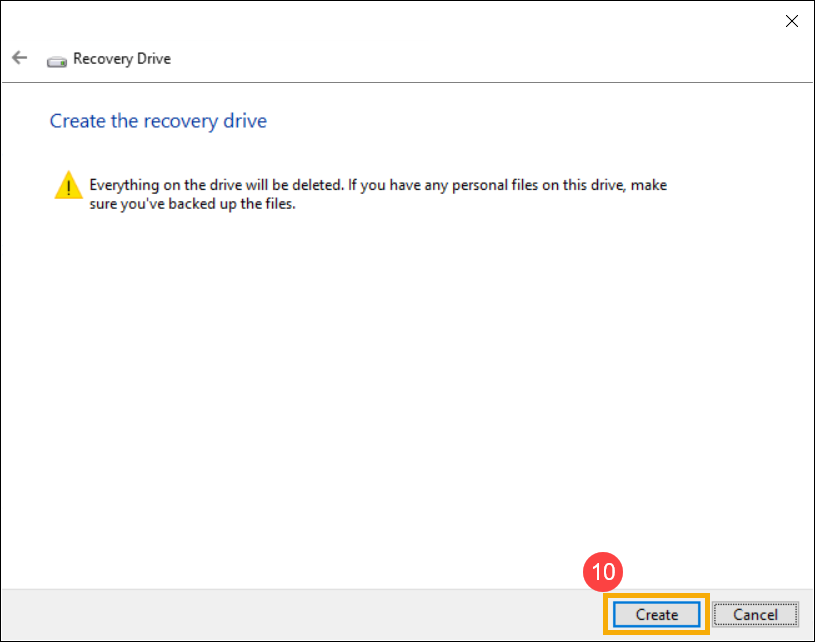
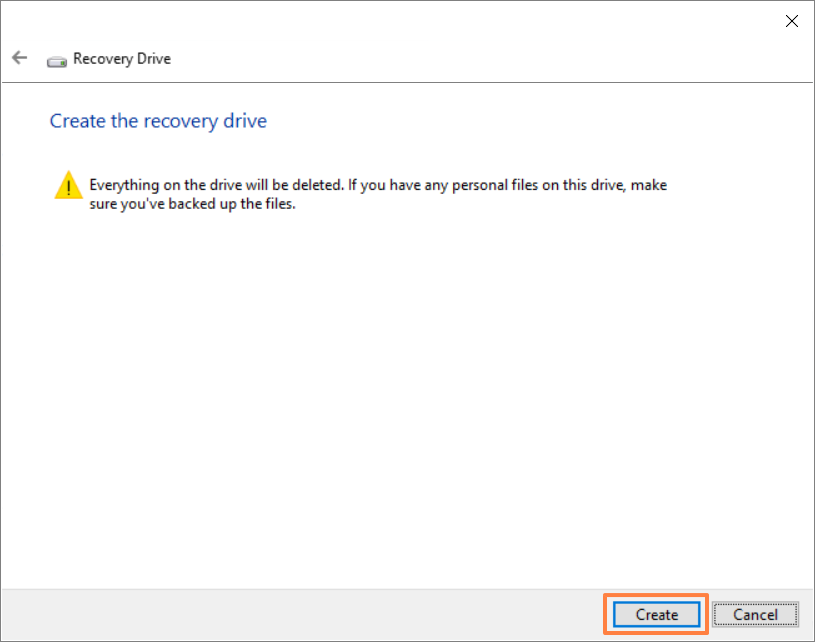
- This notification is the warning that everything will be deleted throughout the process. Please make sure the file has been backed-up. Click [Create]⑩ to proceed.
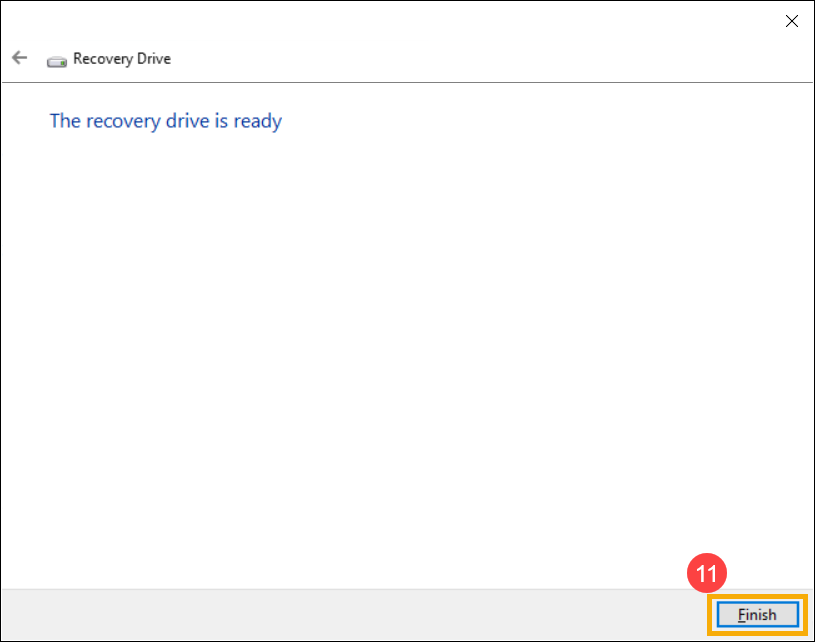
- Wait until the process is completed and click [Finish]⑪ to end the process.
[Notebook] MyASUS-Unable to reset GPU mode to default value
MyASUS provides customized settings of "MUX switch" for models that support MUX switch microchips. This setting is preset to [MSHybrid] mode, which provides your best configuration according to the battery status.
If you adjust to [Discrete GPU] mode to optimize the fluency of games and other intensive work according to your needs, but delete the MyASUS application, this setting will not be reset to the default value.
To solve this problem, you can download and install MyASUS again in the Microsoft Store, and enter the [Customization] page to readjust the settings.
You can refer to [How to get MyASUS] from here to reinstall MyASUS.
How to apply the repair request after doing Hardware Diagnostic on MyASUS?
1. When system is detected with hardware problem after the Hardware Diagnostic on MyASUS, click “Repair Request”.
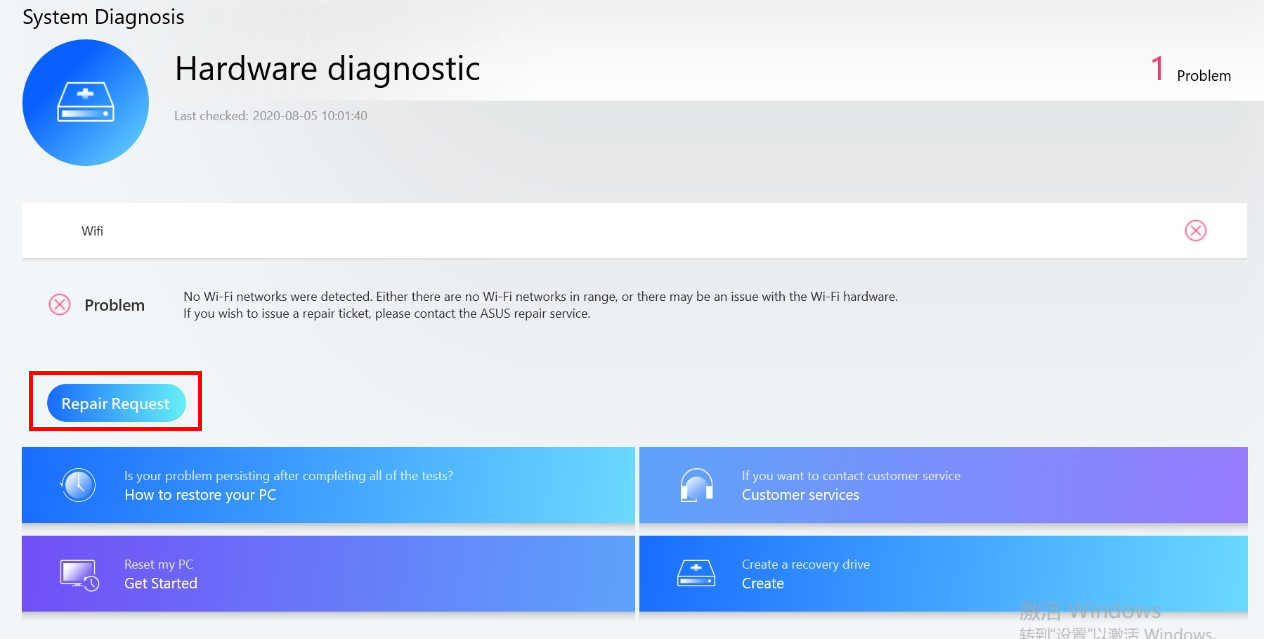
2. The serial number of your device will be automatically shown on the RMA application page (If you agree with the Privacy Policy)
If you don’t click Agree on the Privacy Policy, you will need to key in the Serial number of the device by yourself.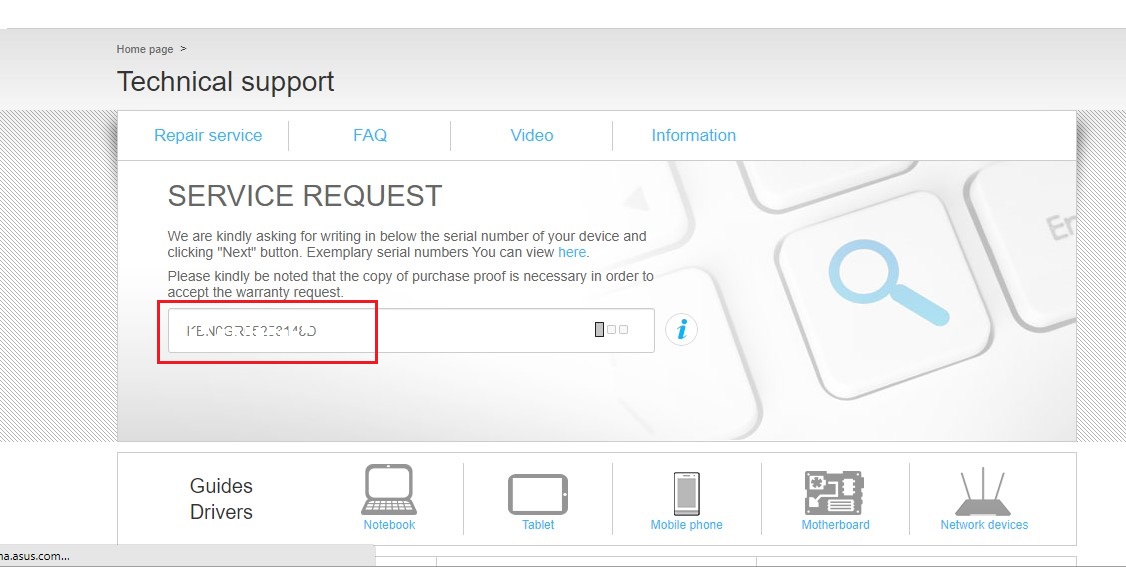
3. Select you're a personal user or commercial user.
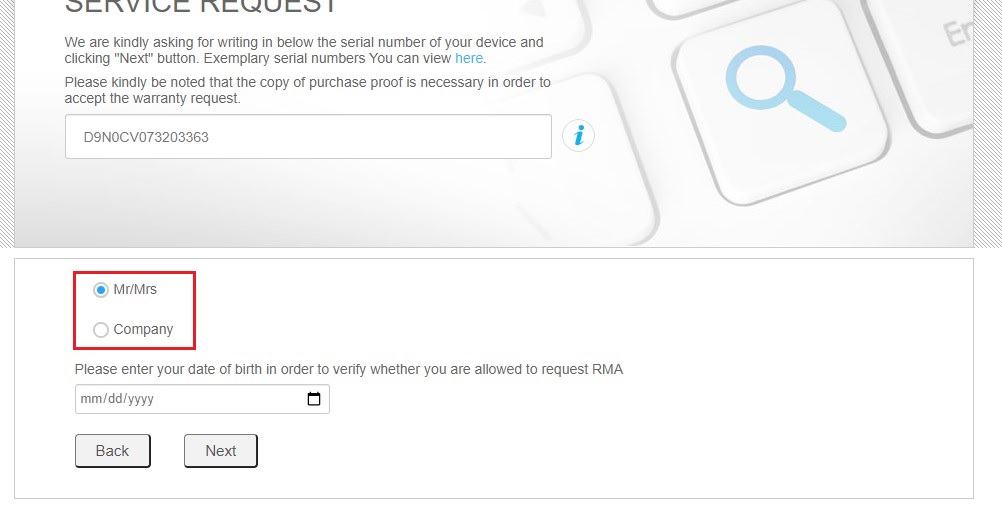
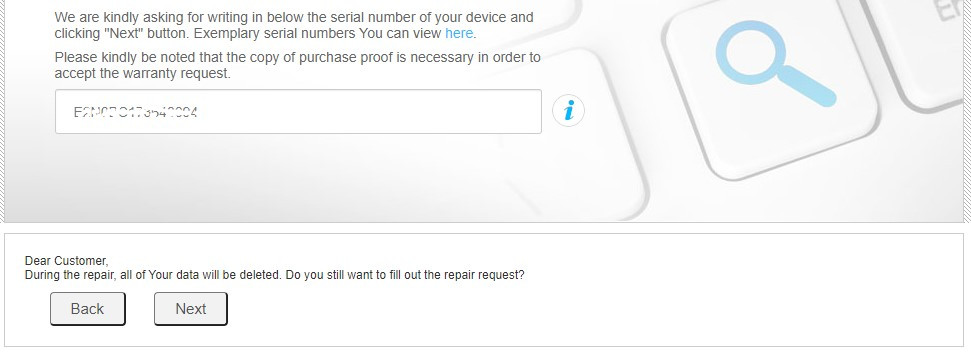
4. Confirm that you have backed-up your device before the repair.
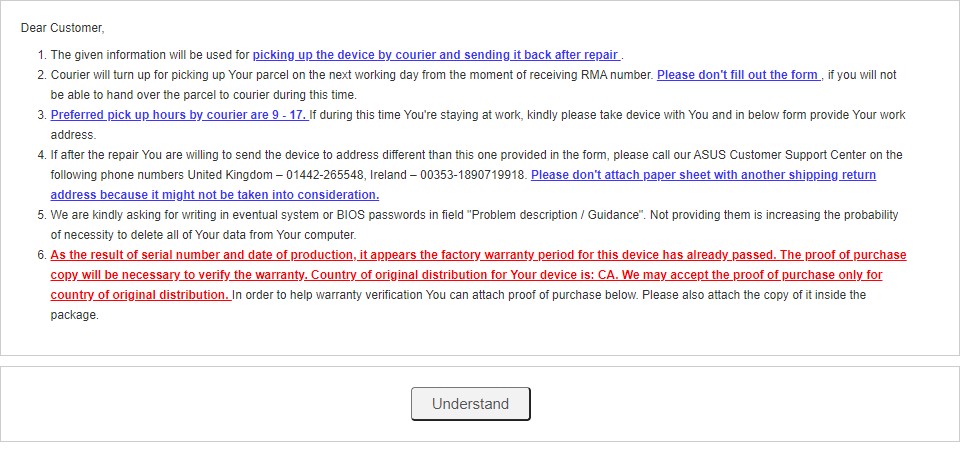
5. Read the local Service Terms and Policy.
6. The error code generated after the diagnosis will be carried to the RMA application page.
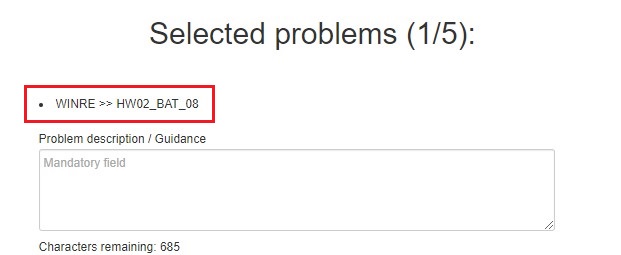
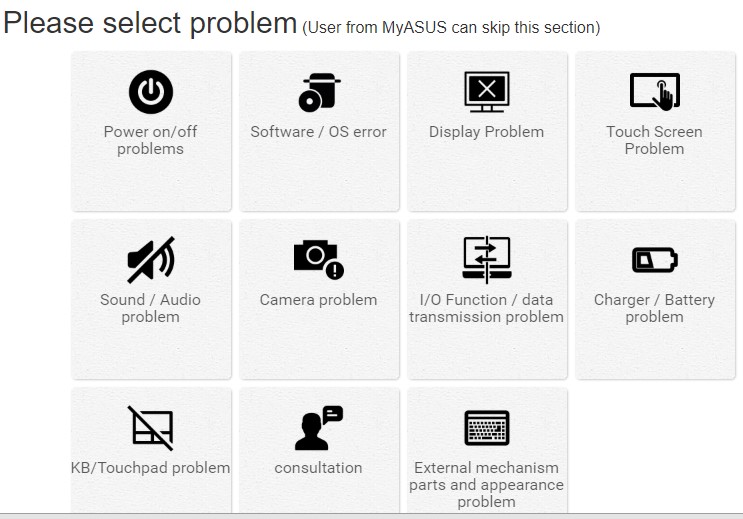
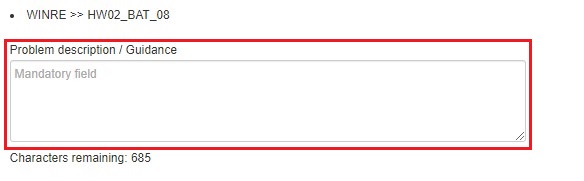
7. You can also add more problem description/options below based on your requirement.
8. Fill the problem description in the field
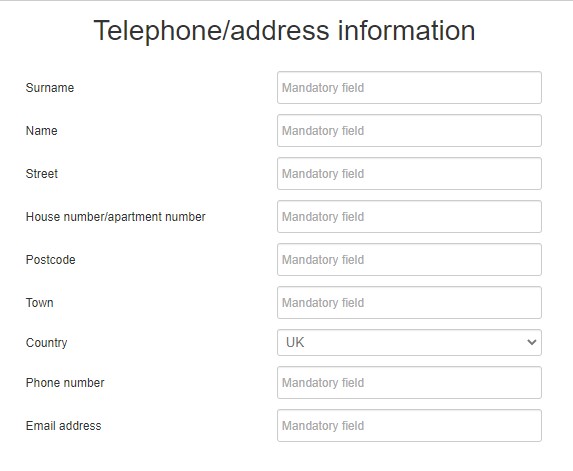
9. Fill in the contact and shipping information
10. Fill in the product information
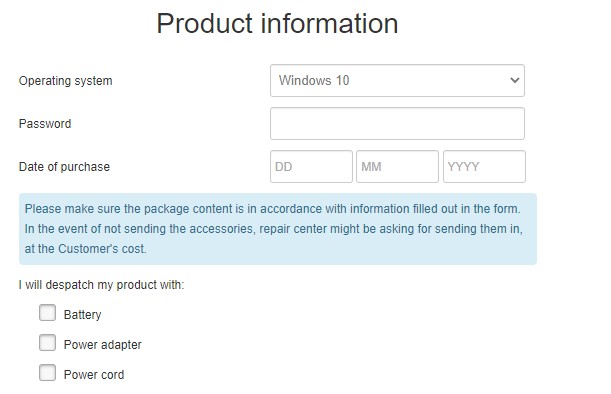
11. Agree with the T&C and Privacy policy.
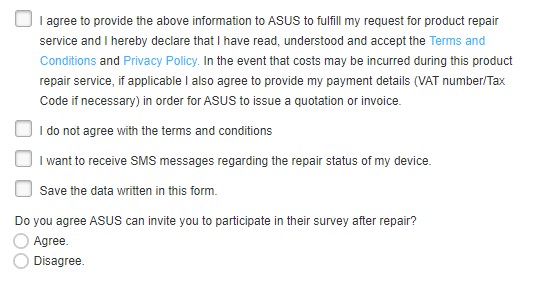
12. Click ”Next” or ”Submit” to send out the request.

[ProArt Series] MyASUS System Diagnosis - Reset my PC and create a recovery drive V2.0
After the Checkup in System diagnosis has been performed, MyASUS provides the features to recover your PC (Reset my PC), or to create a recovery drive to reinstall Windows 10 (Create a recovery drive). This article briefly explains the steps on how to proceed with these features.
Contents:
• Reset my PC
• Create a recovery drive
Reset my PC
1. After entering MyASUS, click on the System diagnosis from the left menu and click [Checkup] on any of the tests.
2. As soon as the test is completed, click on the [Last result] and scroll down to the very bottom of the page. Click [Reset my pc].
3. The following step will delete all the personal files. Please be sure to back up all your files if necessary. Click on [Remove everything].
4. Click [Just remove my files].
5. Click [Reset] to start resetting the PC, then the system will restart for several times. As soon as it's completed, the PC will start the initialization.
Create a recovery drive
1. After entering MyASUS, click on the System diagnosis from the left menu and click [Checkup] on any of the tests.

2. As soon as the test is completed, click on the [Last result] and scroll down to the bottom of the page. Click on the [Create a recovery drive].

3. A window pop-up will appear on the desktop for creating a recovery drive. Insert a USB flash drive with the storage capacity at least 16GB to the PC. Be aware that everything on the drive will be completely deleted after this process. Click on [Next] and wait for a few minutes.
4. Please confirm the drive letter of the USB flash drive is the one intended for creating the recovery drive (drive D: is assigned to the USB flash drive, as shown). With this confirmed, you can prevent data or files from being mistakenly deleted in the wrong USB flash drive.
5. This notification is the warning that everything will be deleted throughout the process. Please make sure the file has been backed-up. Click [Next] to proceed.
6. Wait until the process is completed and click [Finish] to end the process.

[MyASUS] Warranty extension package Purchase Process
Purchase ASUS Premium with one click
- ASUS Warranty Extension Package must be purchased and activated within the warranty period of your ASUS products.
- ASUS other services (Local Accidental Damage Protection/ Battery Service Package/ Hard Disk Drive Retention/ On-Site Service) must be purchased and activated within 180 days of your ASUS product invoice date.
- Only Notebook/ Commercial Notebook/ Gaming Notebook can be purchased for extended warranty within the machine warranty period, and the total warranty is limited to a maximum of three years.
- Please select MyASUS location in the settings to be in line with the region where you purchased the ASUS product.
- ASUS Premium Care can only be purchased once. ASUS will not provide Premium Care on the same ASUS product twice.
- When you've completed the purchase via MyASUS, your ASUS Premium Care will be activated automatically. You don't need to activate it via the official ASUS website.
- To the maximum extent permitted by law, the ASUS Premium Care cannot be refunded after purchase.
Warranty extension package Purchase Process
- Type and search [MyASUS] in the Windows search bar①, then click [Open]②.
If there is no result searched that means your computer may not install it, refer to How to install MyASUS.
- Select [User Center]③, and then login to MyASUS with your ASUS account④.
If you do not have an ASUS account yet, please register it now!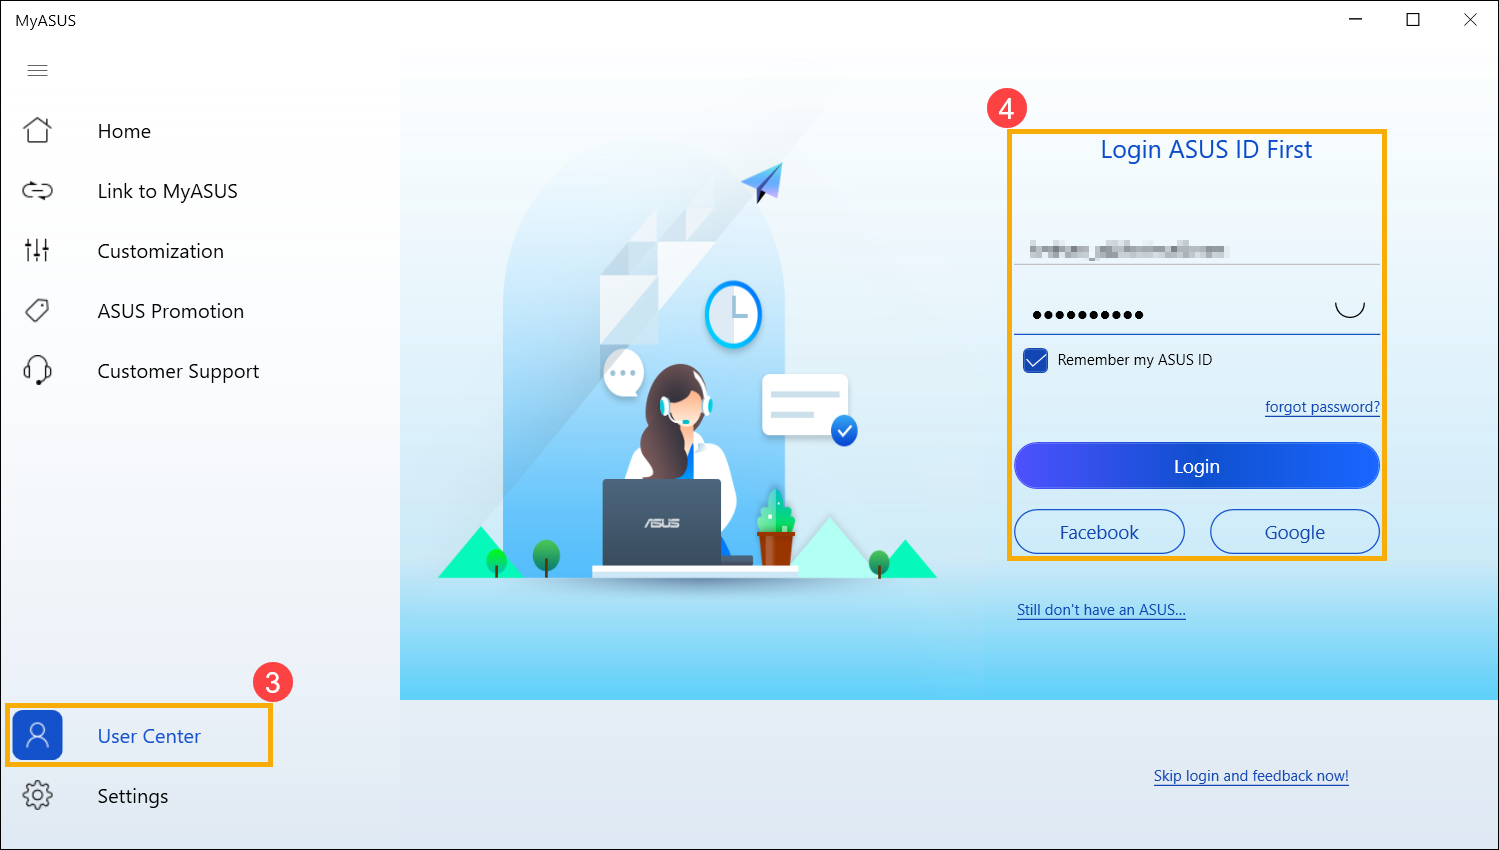
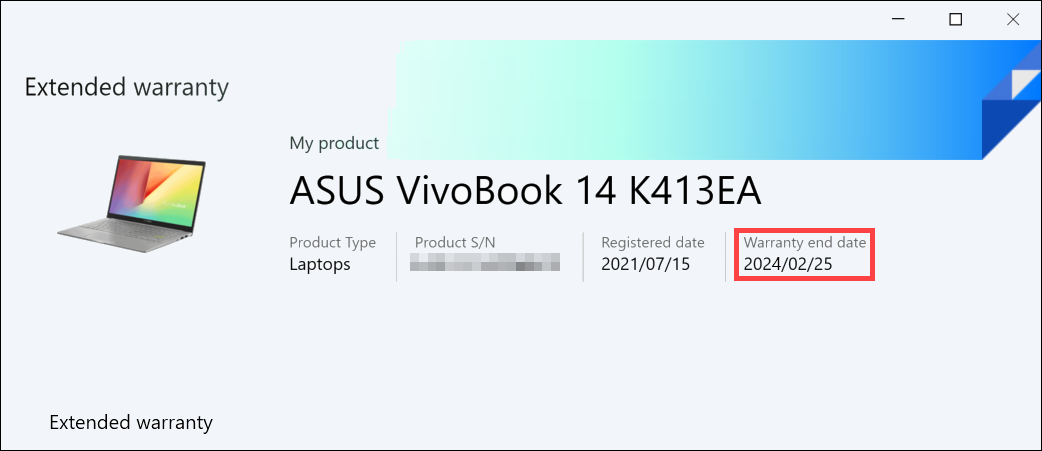
- Select an existing product that you would like to extend warranty⑤.
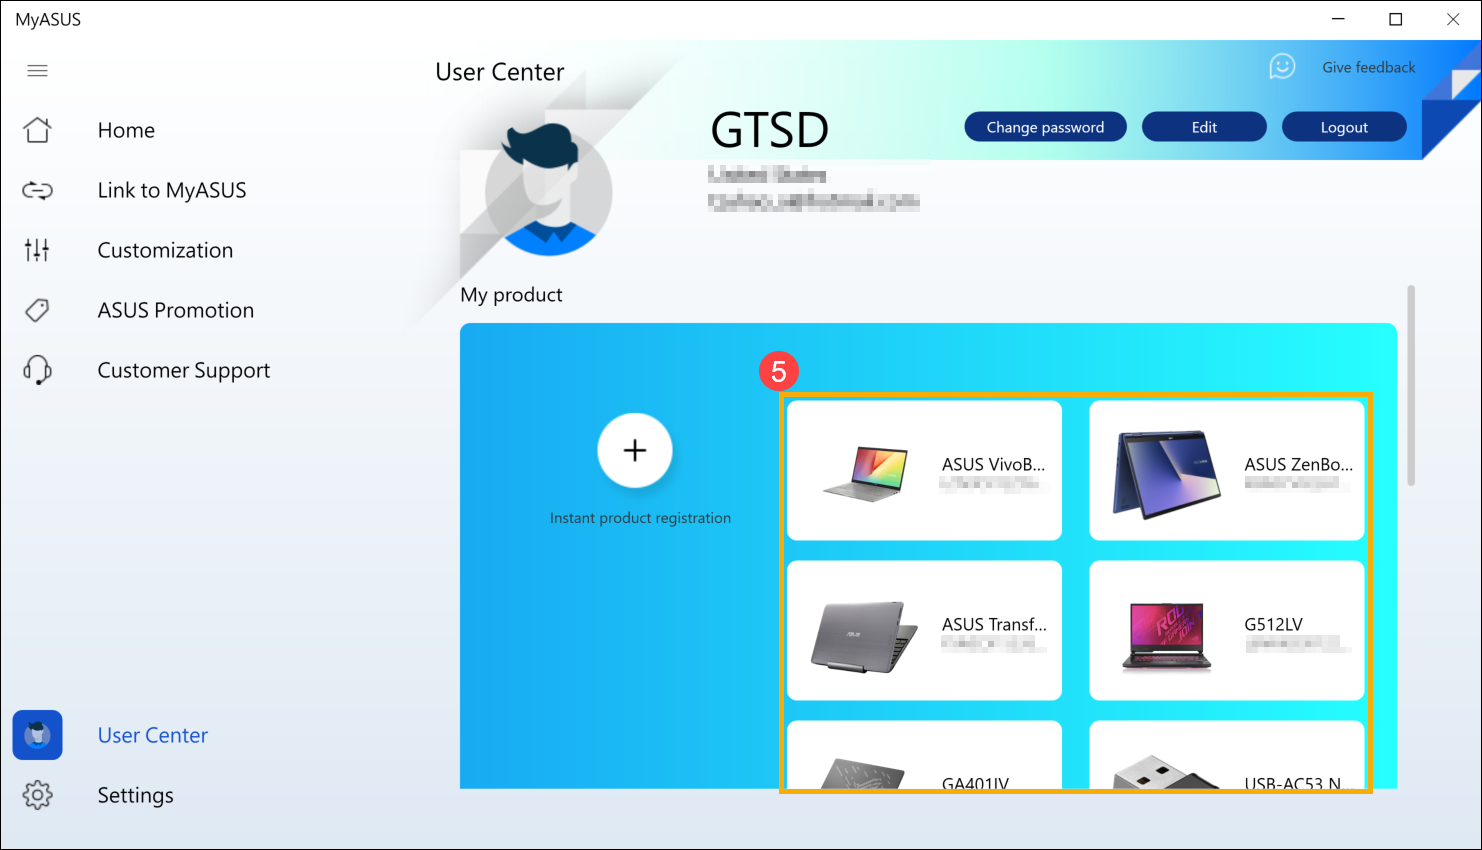
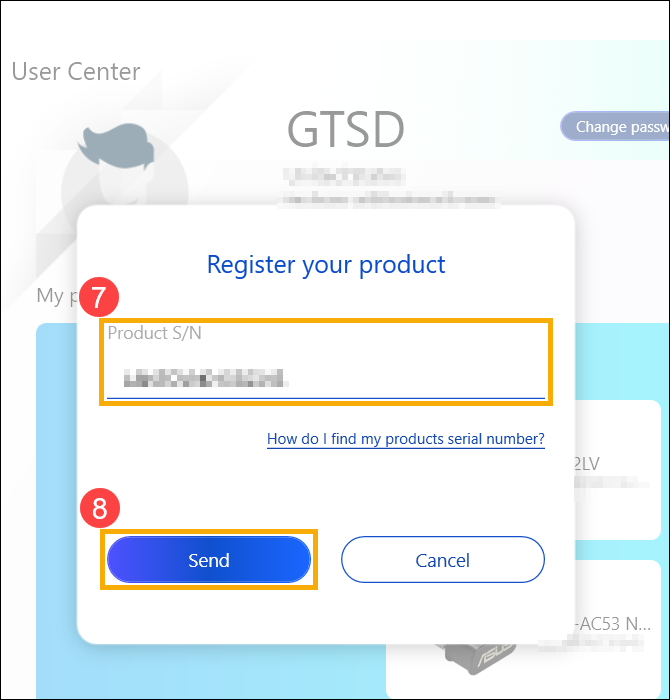
If you do not register your product yet, please select [Instant product registration]⑥, then input Serial Number⑦ and click [Send]⑧.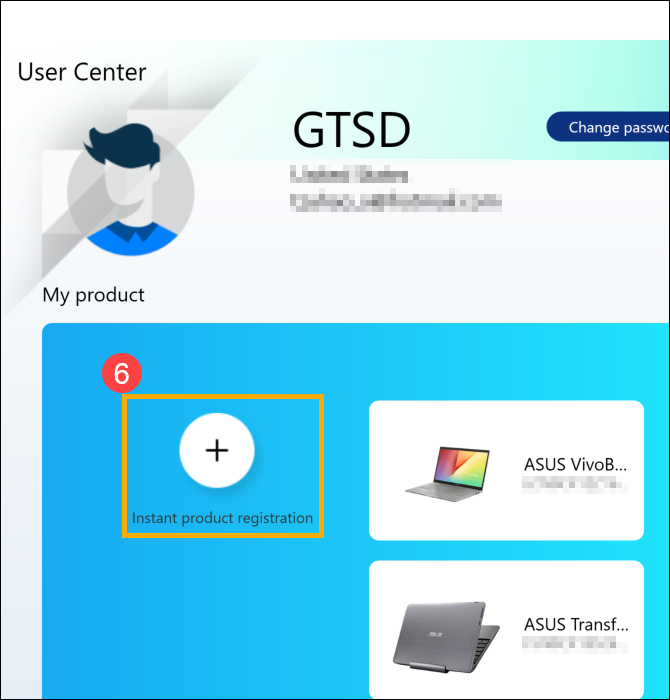
- Please select your warranty options⑨, and then select [I have read and agree to the terms and conditions ASUS Premium Care]⑩
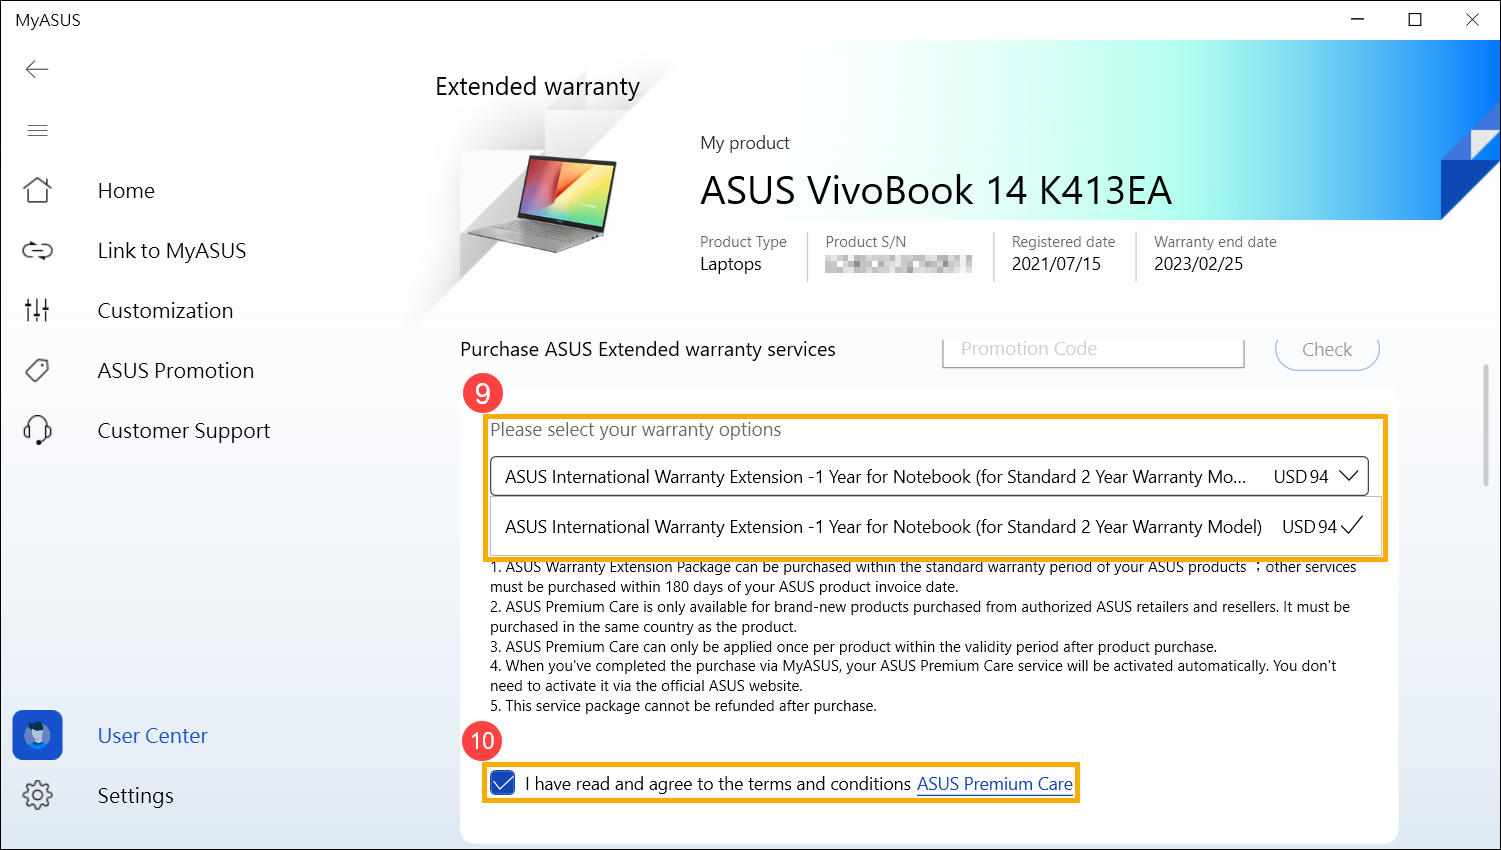
If your product isn't qualified for purchasing a Warranty extension package, MyASUS will show we haven't provided ASUS Premium Care yet at the moment.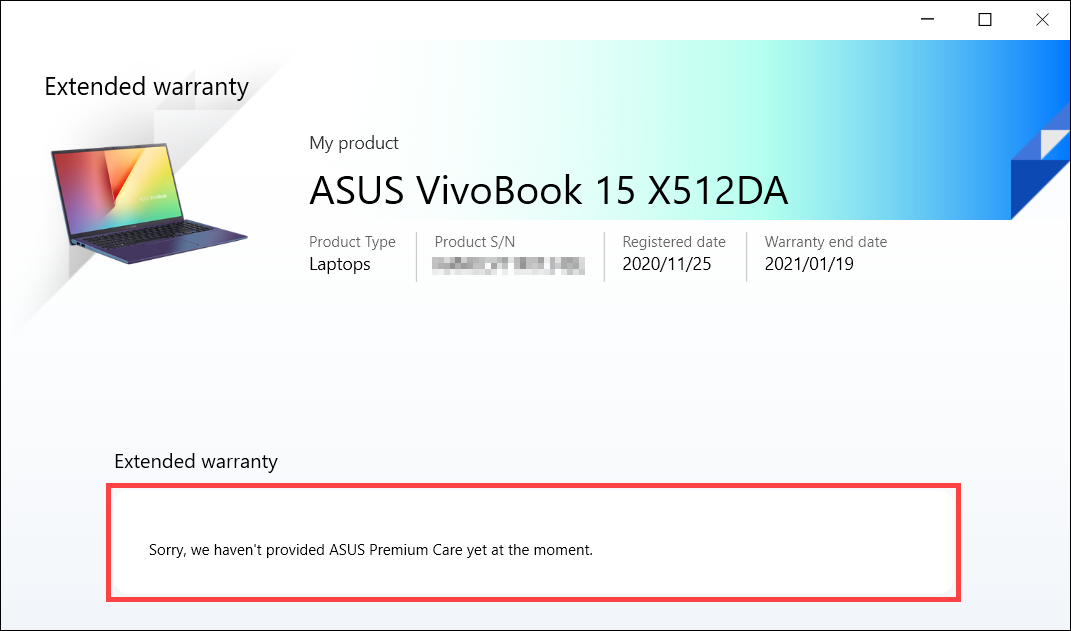
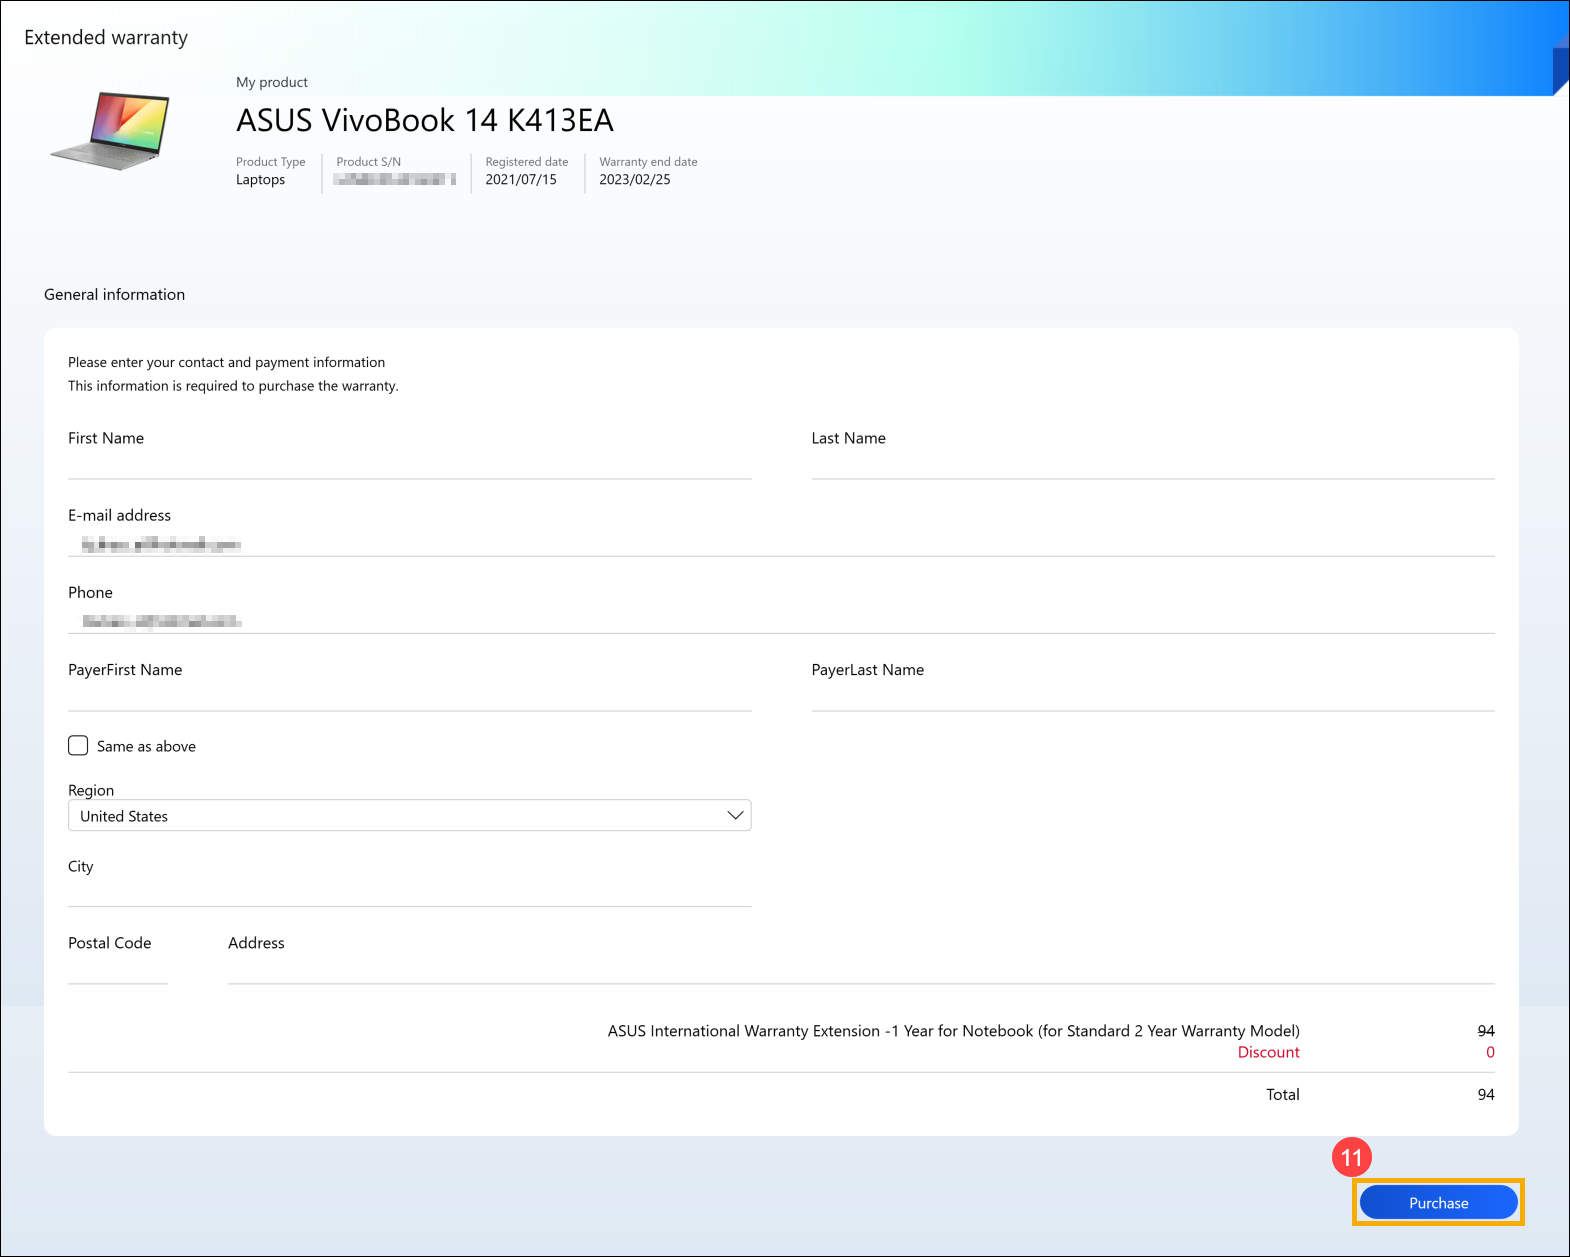
- Fill in your contact and payment information to purchase, and then click [Purchase]⑪.
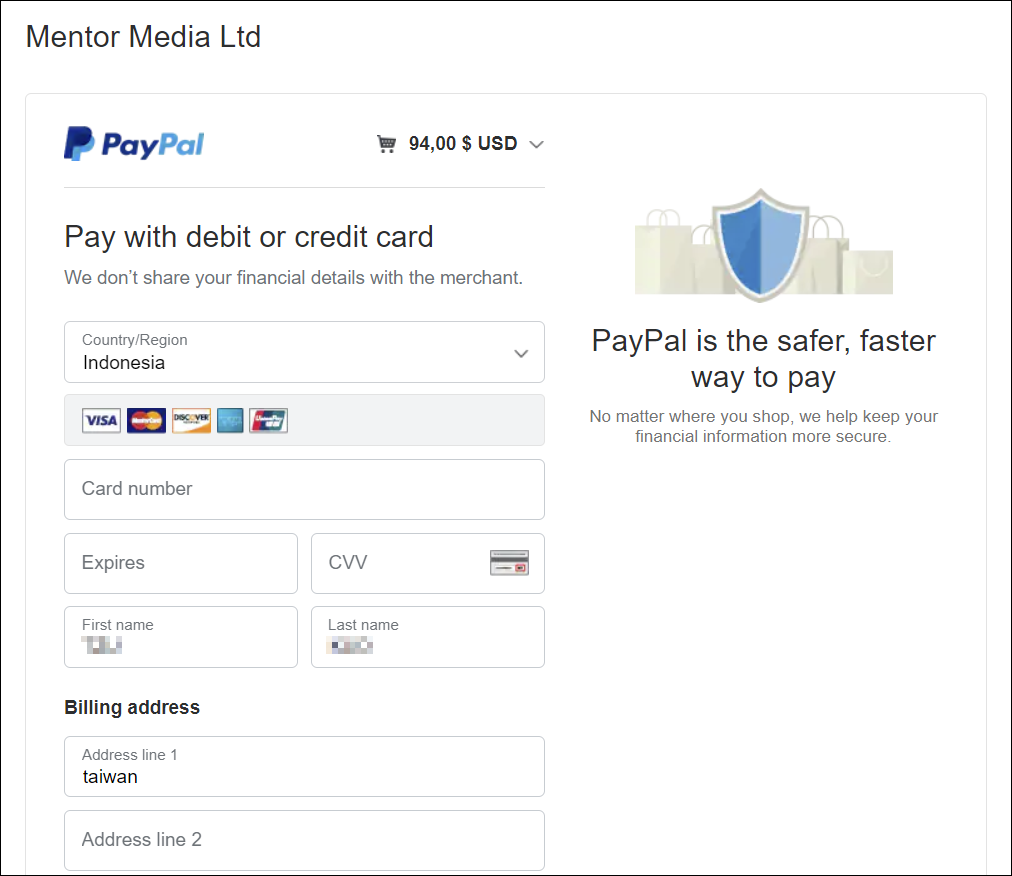
- MyASUS will automatically enter a payment website, and you can pay with PayPal account or credit card.

- Back to User Center, and click the product you have purchased the warranty extension⑫.

- Warranty extension package is activated for your device successfully!
[Notebook] Troubleshooting MyASUS issues
Please try these troubleshooting steps if you experience problems with MyASUS:
1. Updating the Windows driver : Please refer to How to use Windows Update in OS system.
2. How to check for MyASUS driver updates : Please refer to [Notebook] How to update MyASUS?
3. Uninstall and re-install MyASUS: Please refer to [Notebook] How to install MyASUS ?