(FAQ) Pertanyaan yang Sering Diajukan ScreenXpert
[Notebook] ScreenXpert 3 - Pengenalan
[Notebook] ScreenPad Plus with ScreenXpert 3 - Pengenalan
[Notebook] ASUS ScreenXpert (Screenpad 2.0) - Pengenalan
[Notebook] ScreenXpert 3 - Pengenalan
Sebelumnya, ScreenXpert 2 digunakan sebagai aplikasi untuk mendukung dan membantu model layar ganda ASUS, namun kini ScreenXpert 3 memperluas dukungannya sehingga pengguna umum juga dapat menggunakannya pada model layar tunggal umum. Kami berharap dapat memberikan pengalaman yang lebih efisien kepada pengguna model ASUS saat menangani pengoperasian terkait multi-jendela. Dalam versi layar tunggal ScreenXpert 3, kami menggabungkan bahasa desain paling populer dengan elemen fungsional ScreenXpert di masa lalu, memberikan akses cepat ke layar beranda model pengguna, dan menampilkan semua fungsi ScreenXpert yang telah kami siapkan untuk versi layar tunggal. -model layar. Pengguna juga dapat menyesuaikan dan memilih daftar fungsi yang disajikan di dalamnya dari pengaturan, yang kami yakini dapat memberikan fleksibilitas dan pengalaman pengoperasian yang lebih tinggi kepada pengguna.
- Buka ScreenXpert
- Aplikasi Switcher
- Aplikasi Navigator
- Camera
- Microphone
- Settings
- ScreenXpert Download and Uninstall
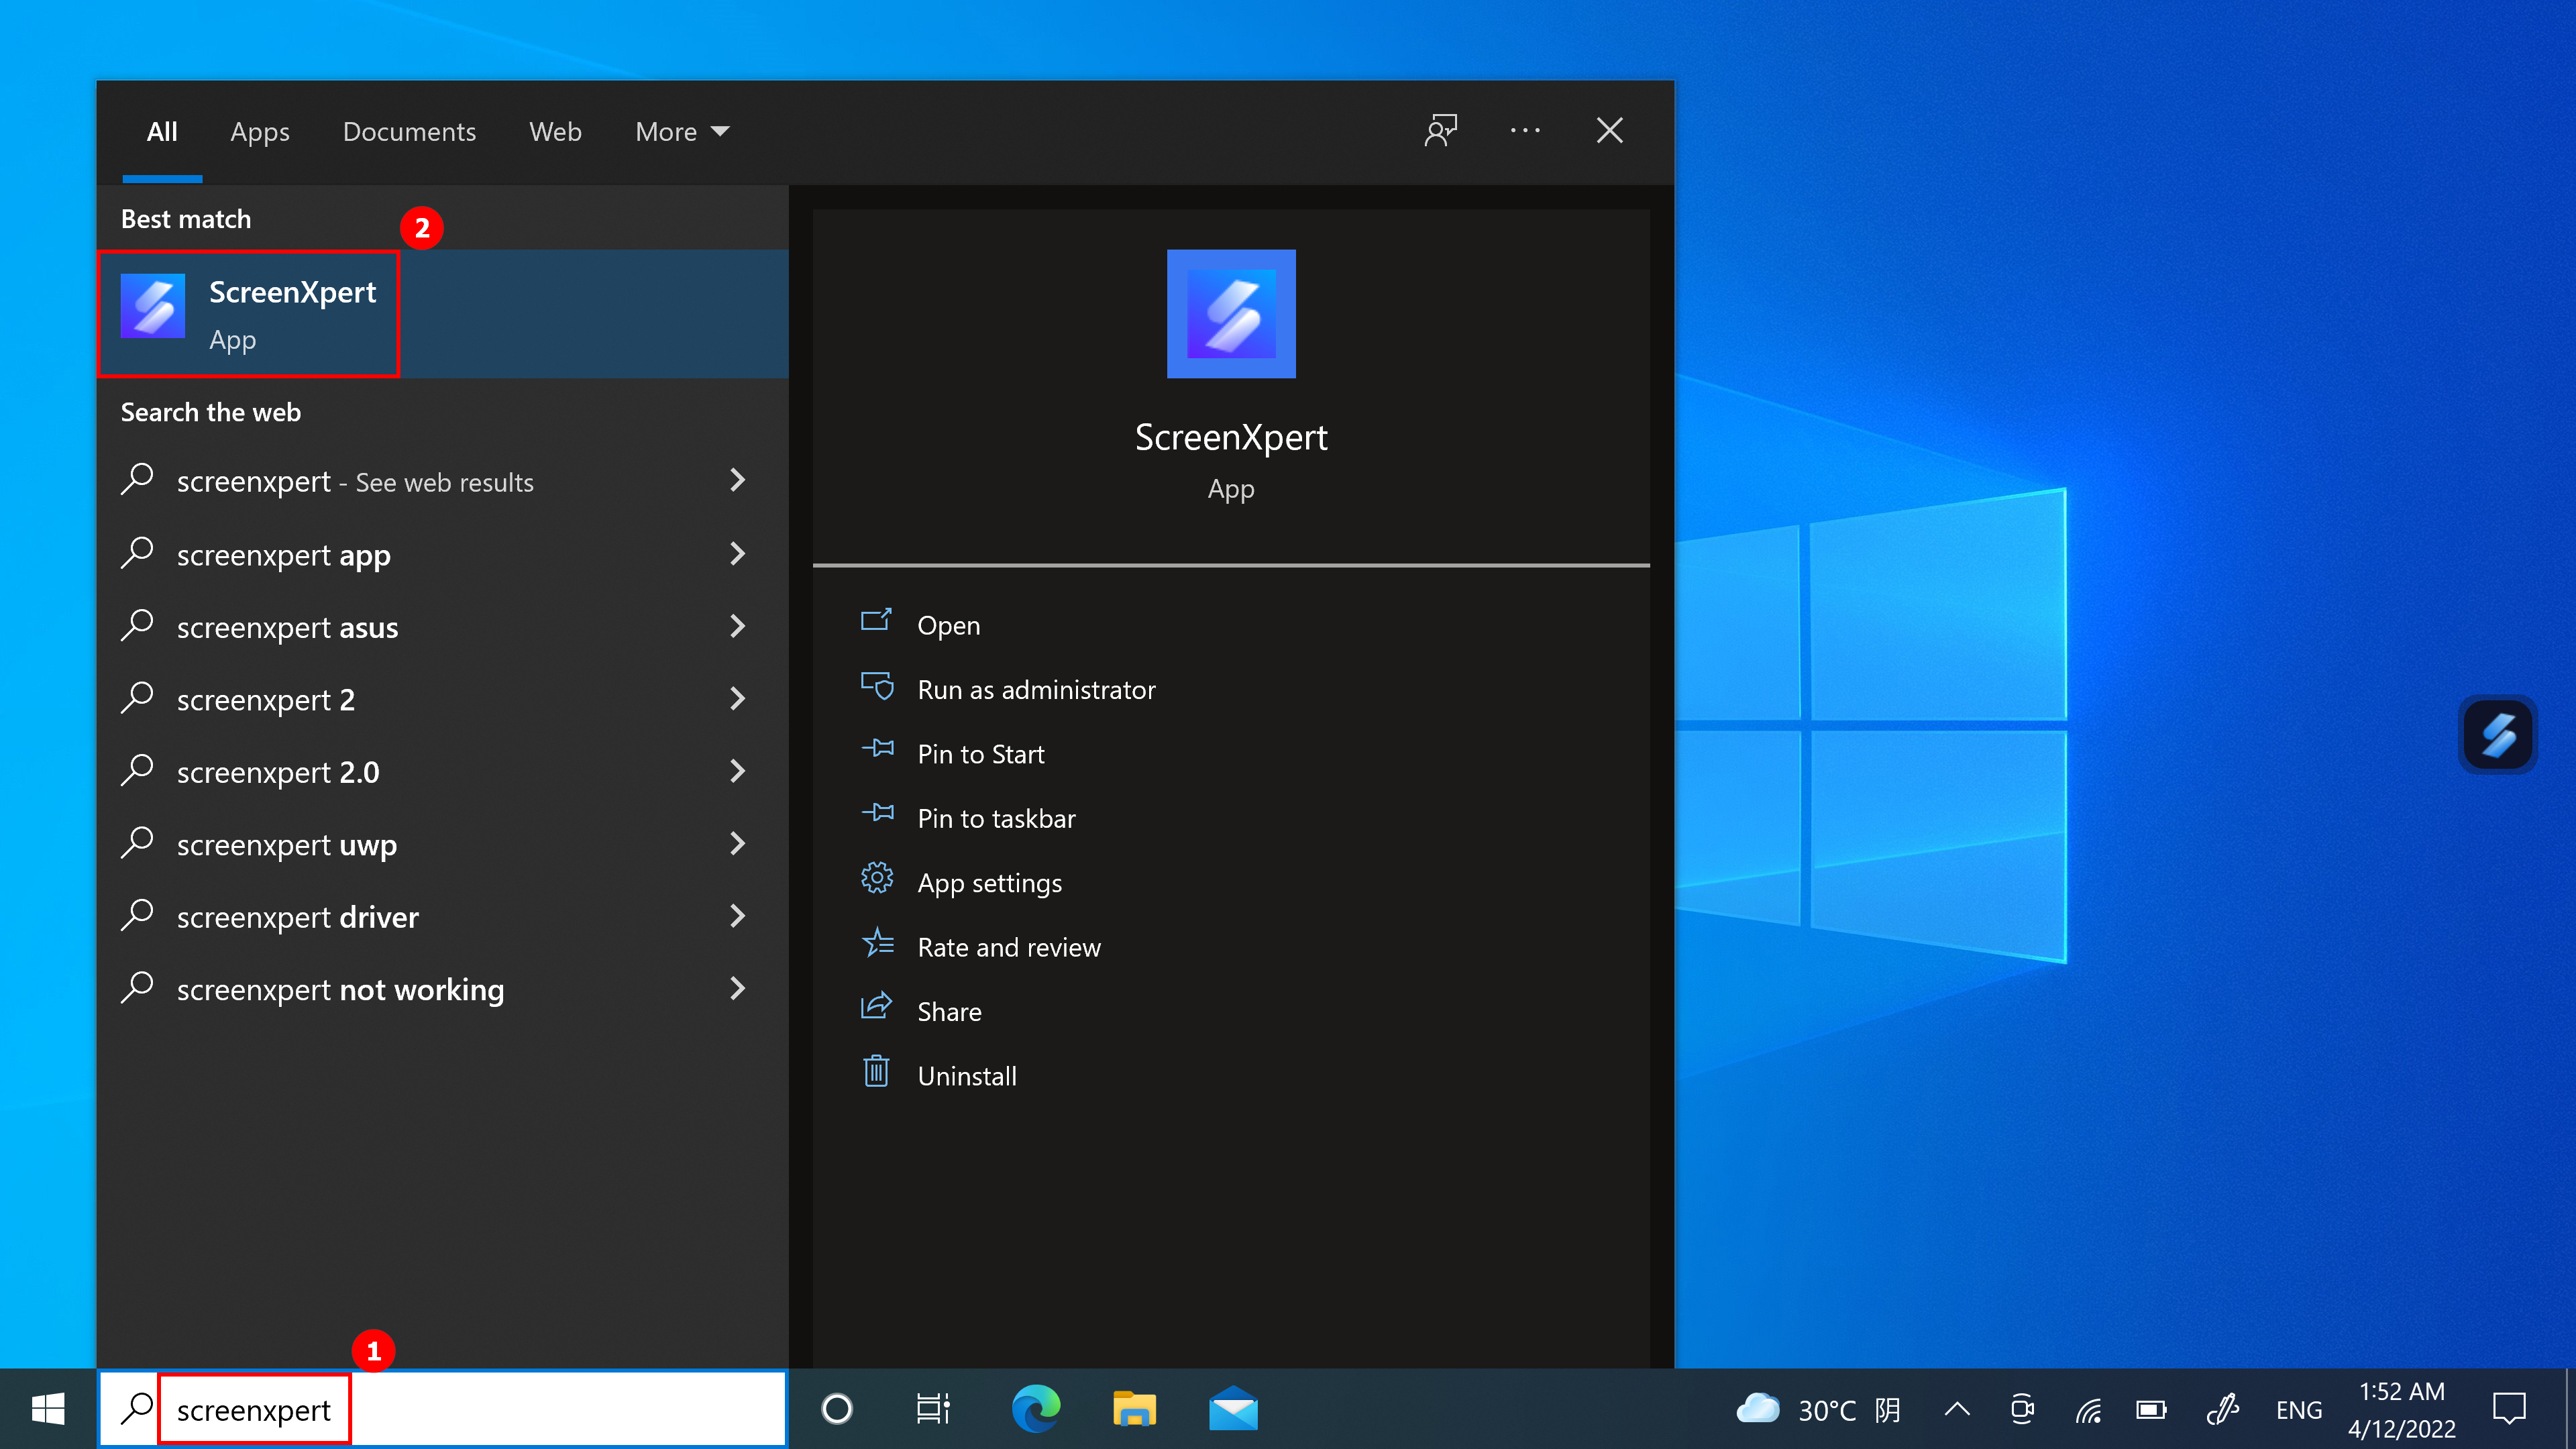
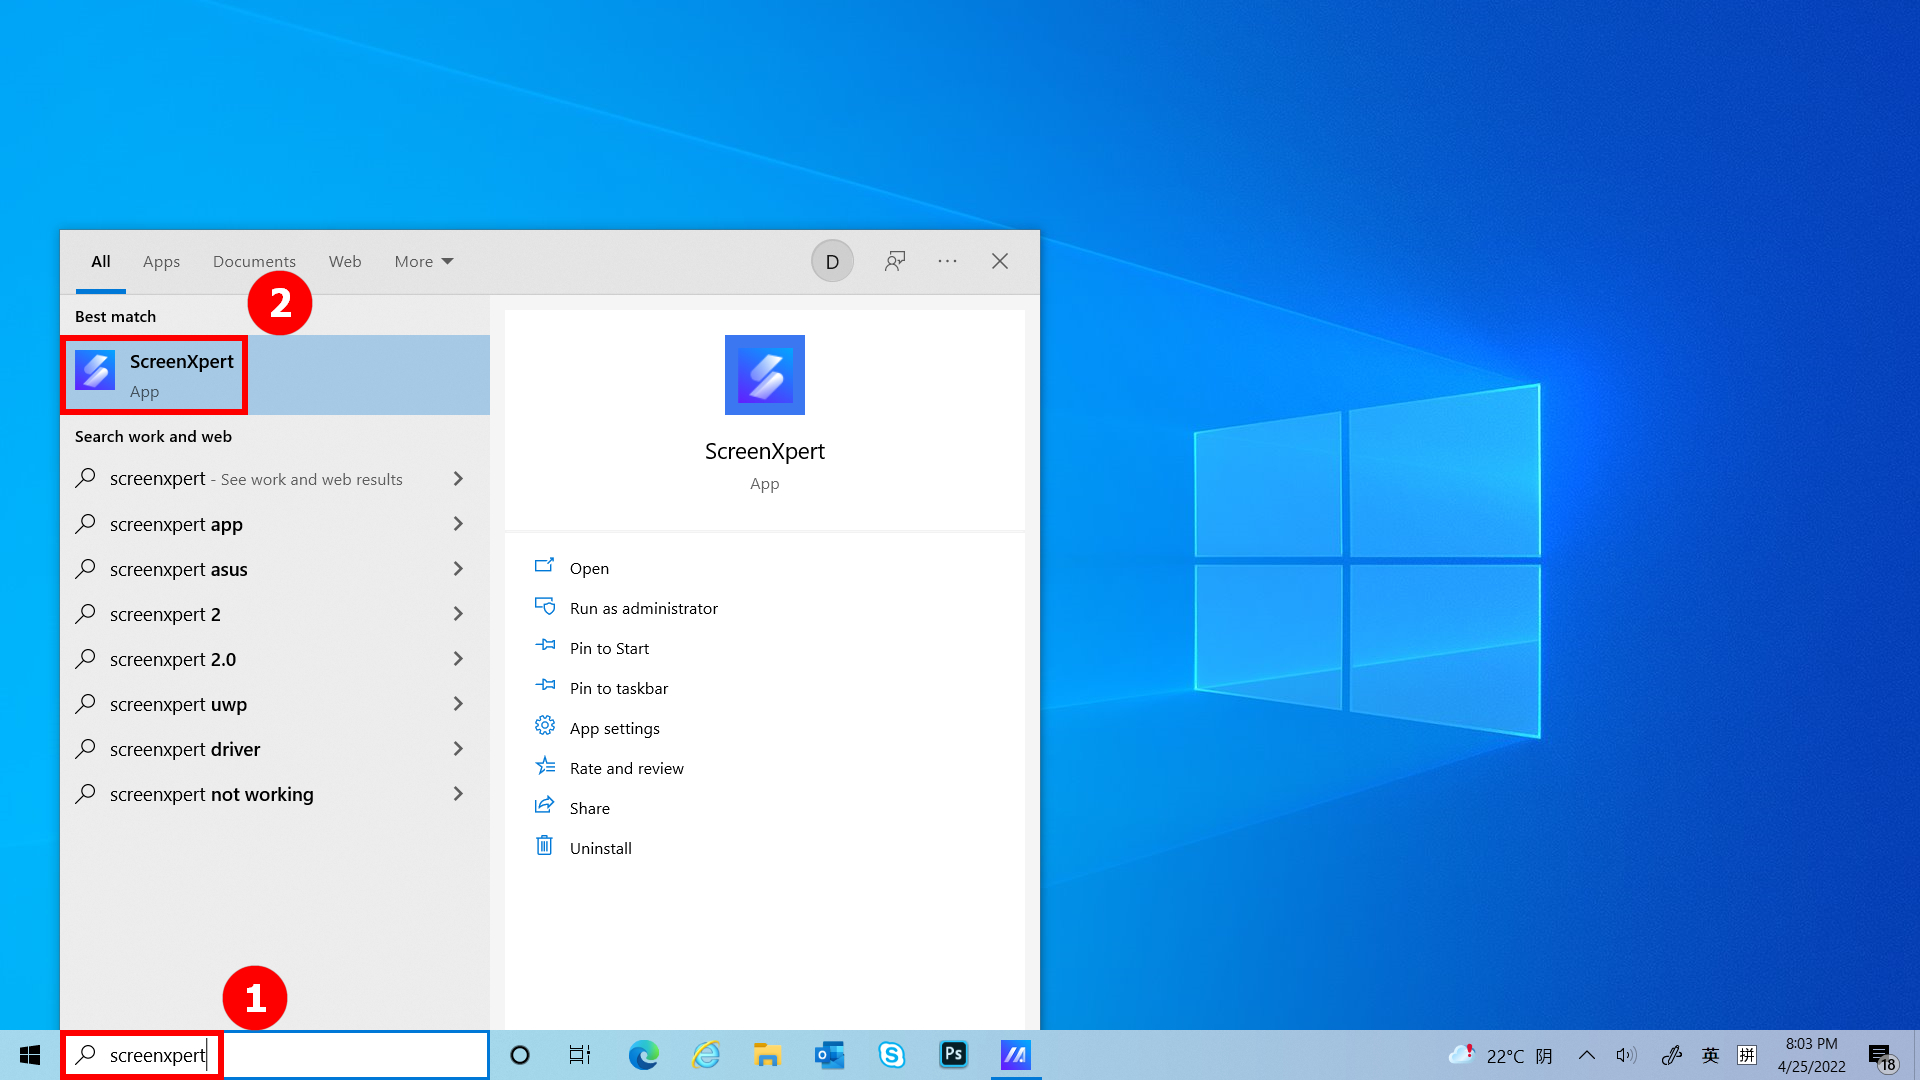
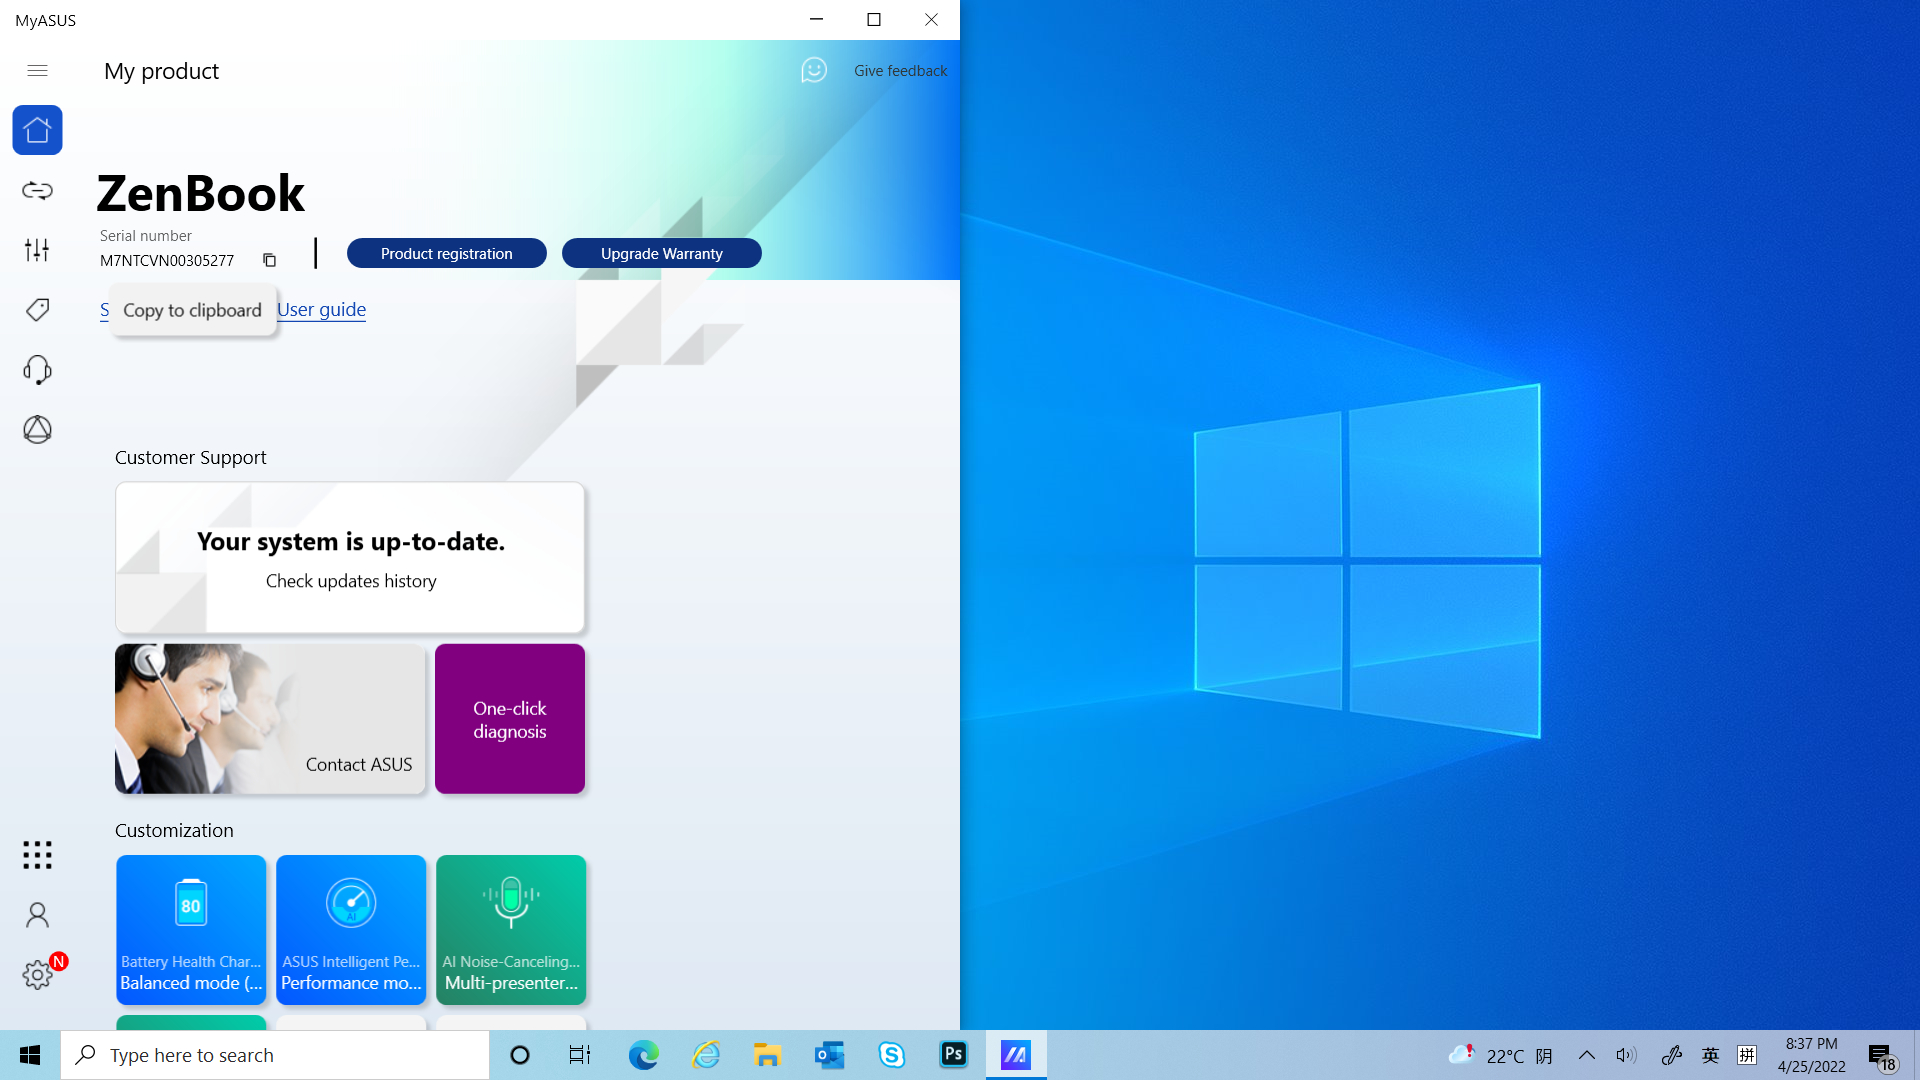
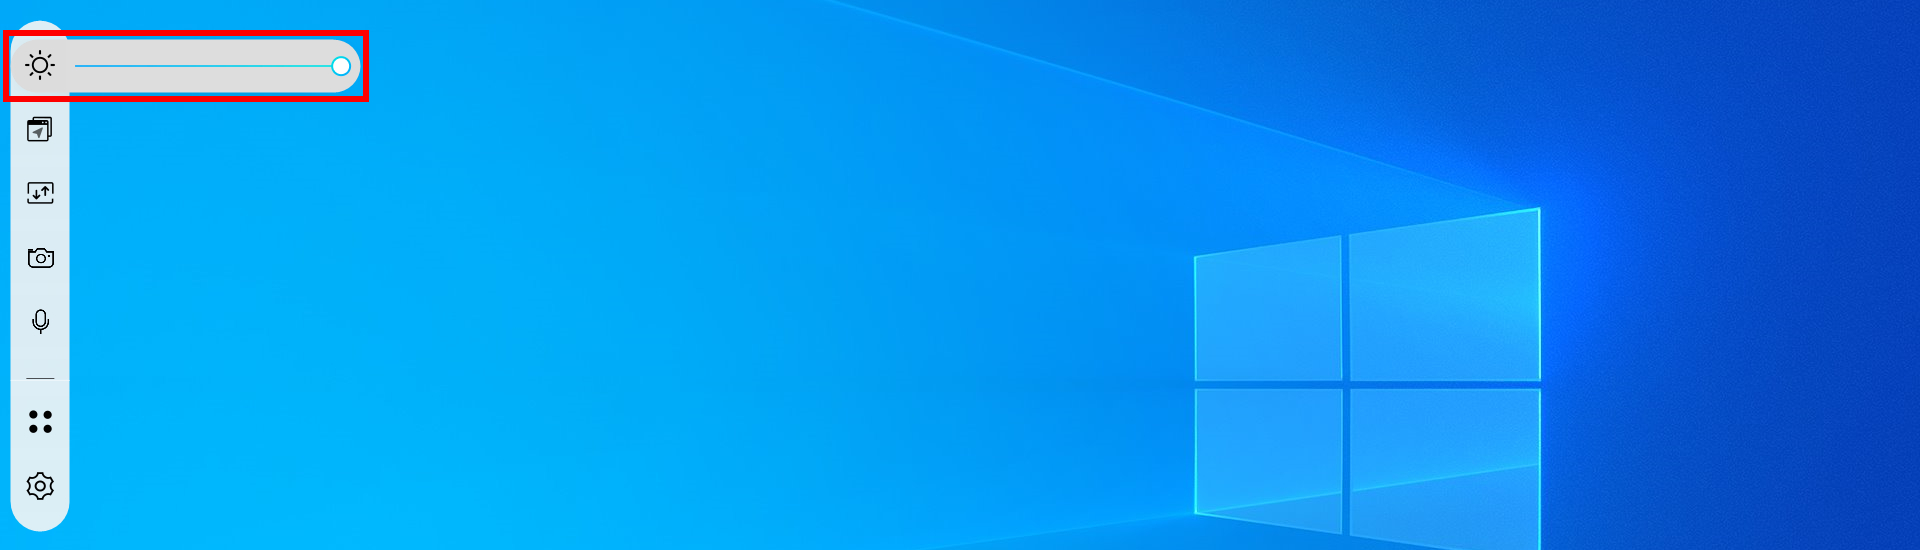
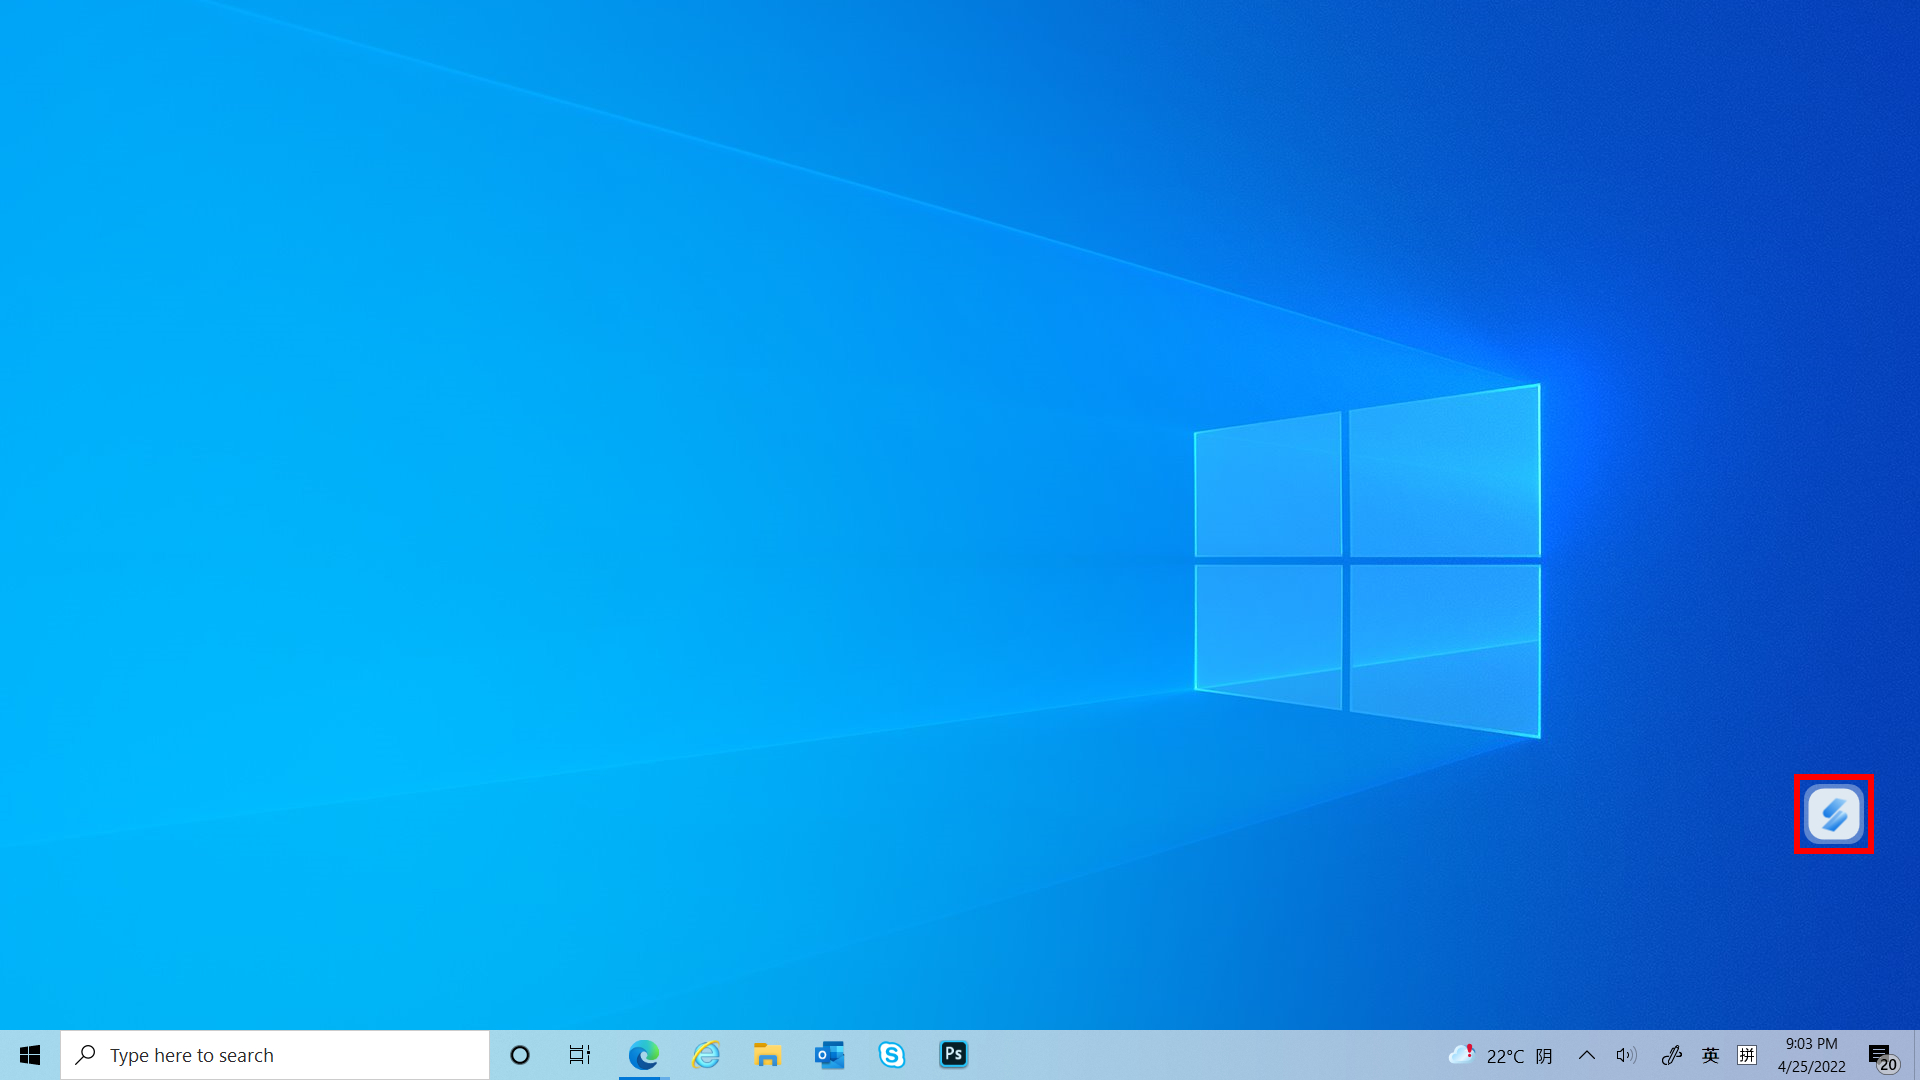
(1) Masukan ①[ScreenXpert] di bilah pencarian di sudut kiri bawah desktop. Klik ②[ScreenXpert], dan ScreenXpert akan aktif.
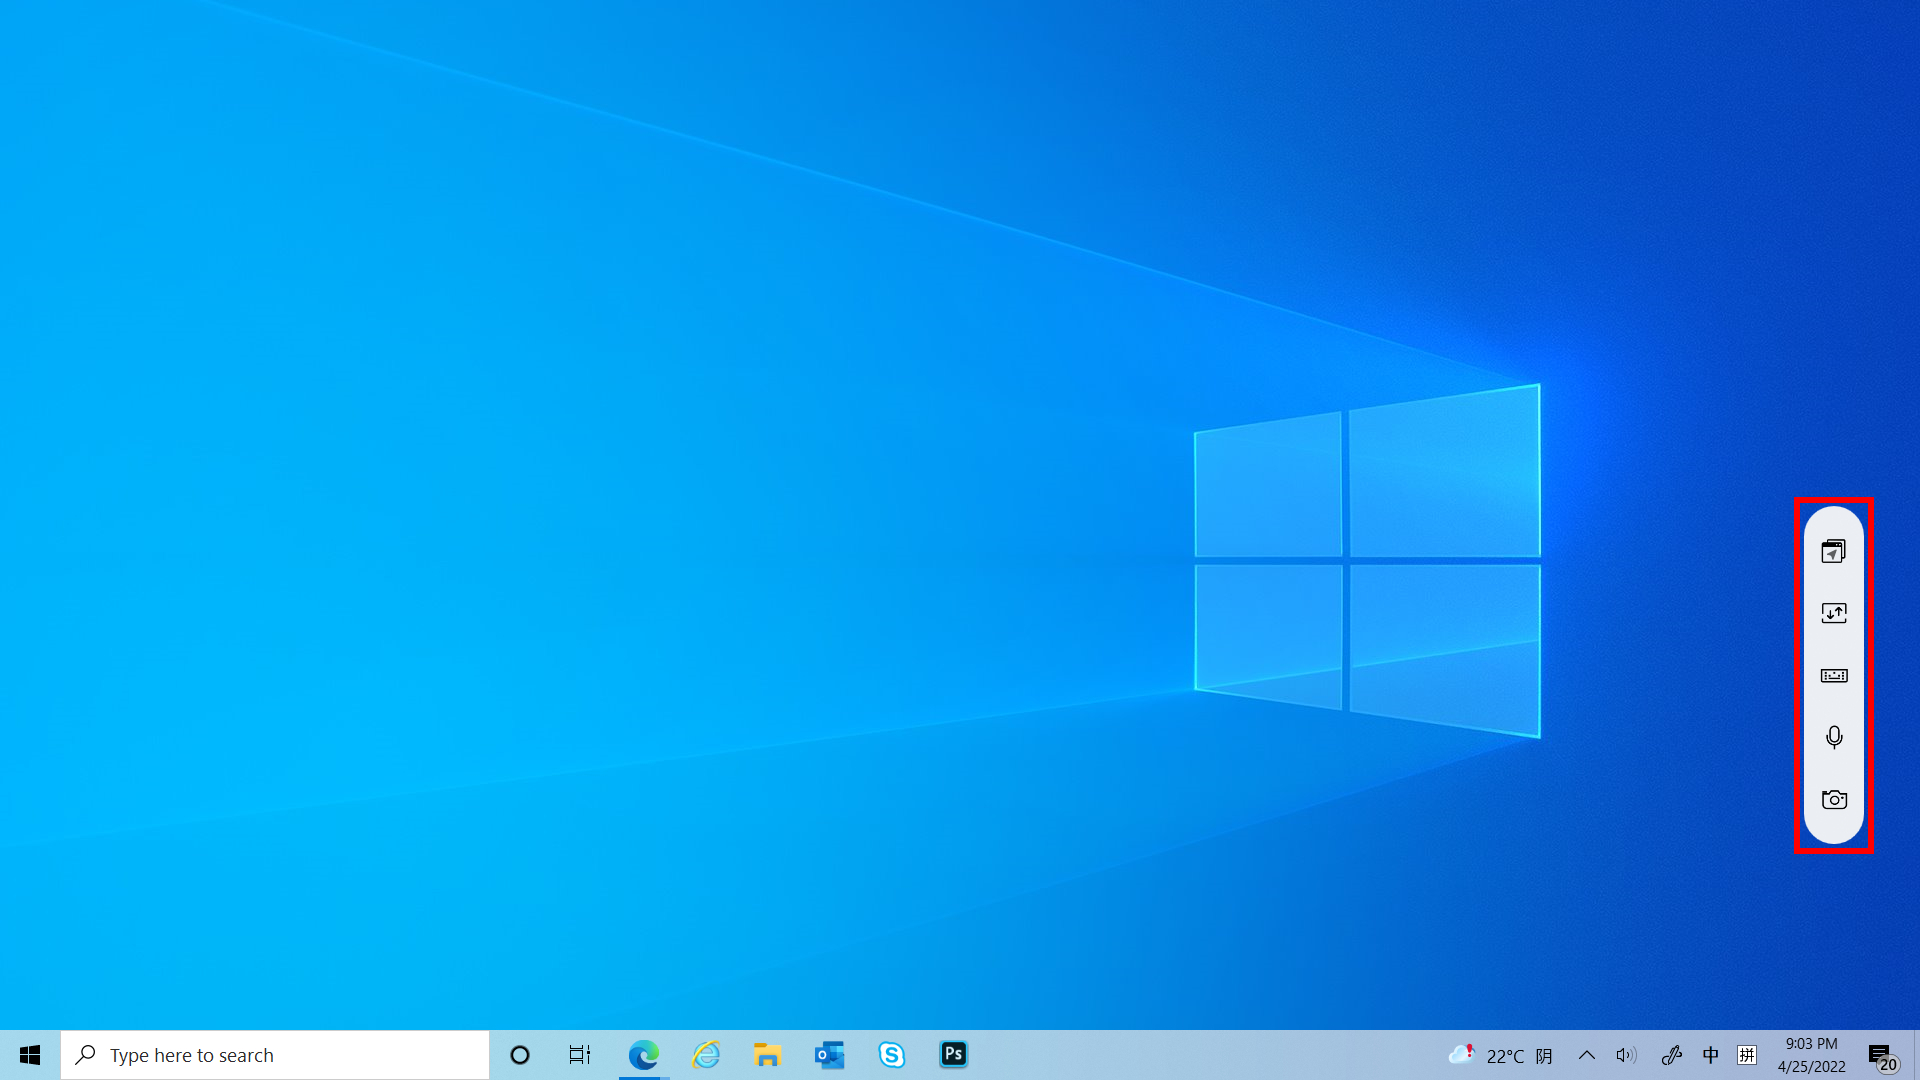
(2) Klik ikon dan Anda dapat melihat empat ikon diperluas. Dari kiri ke kanan: App Navigator, Camera, Microphone, Settings.

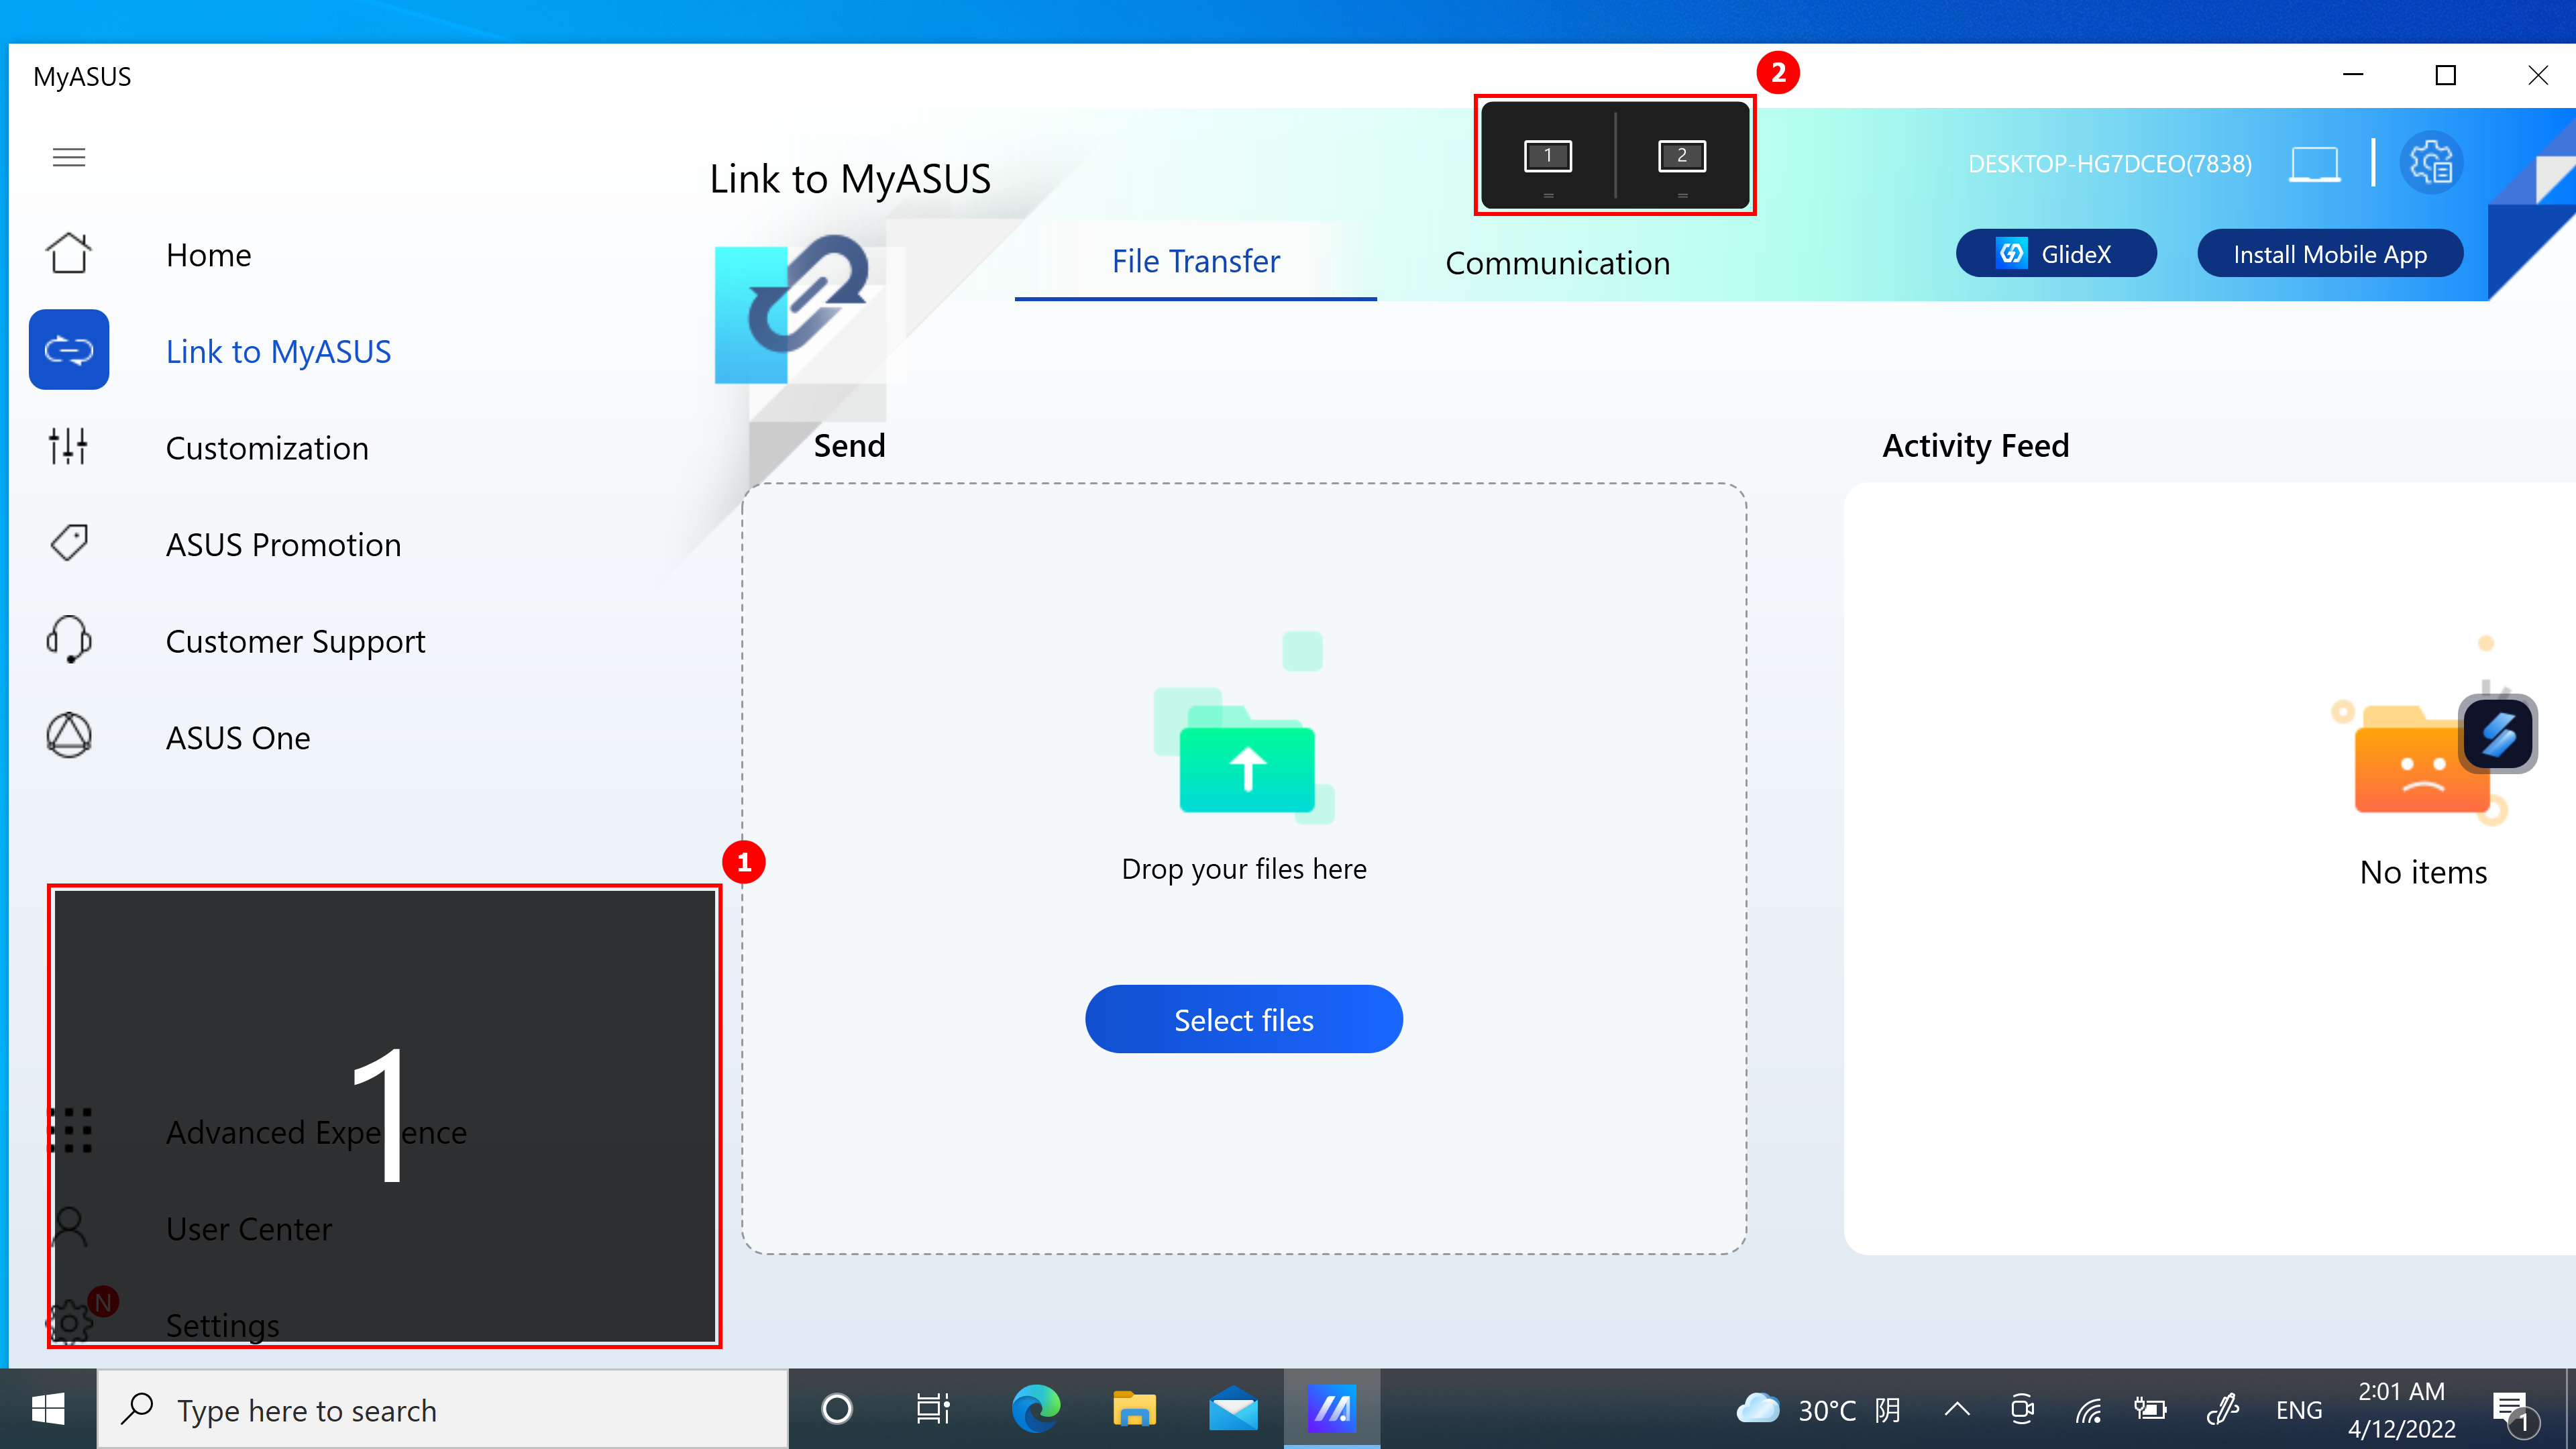
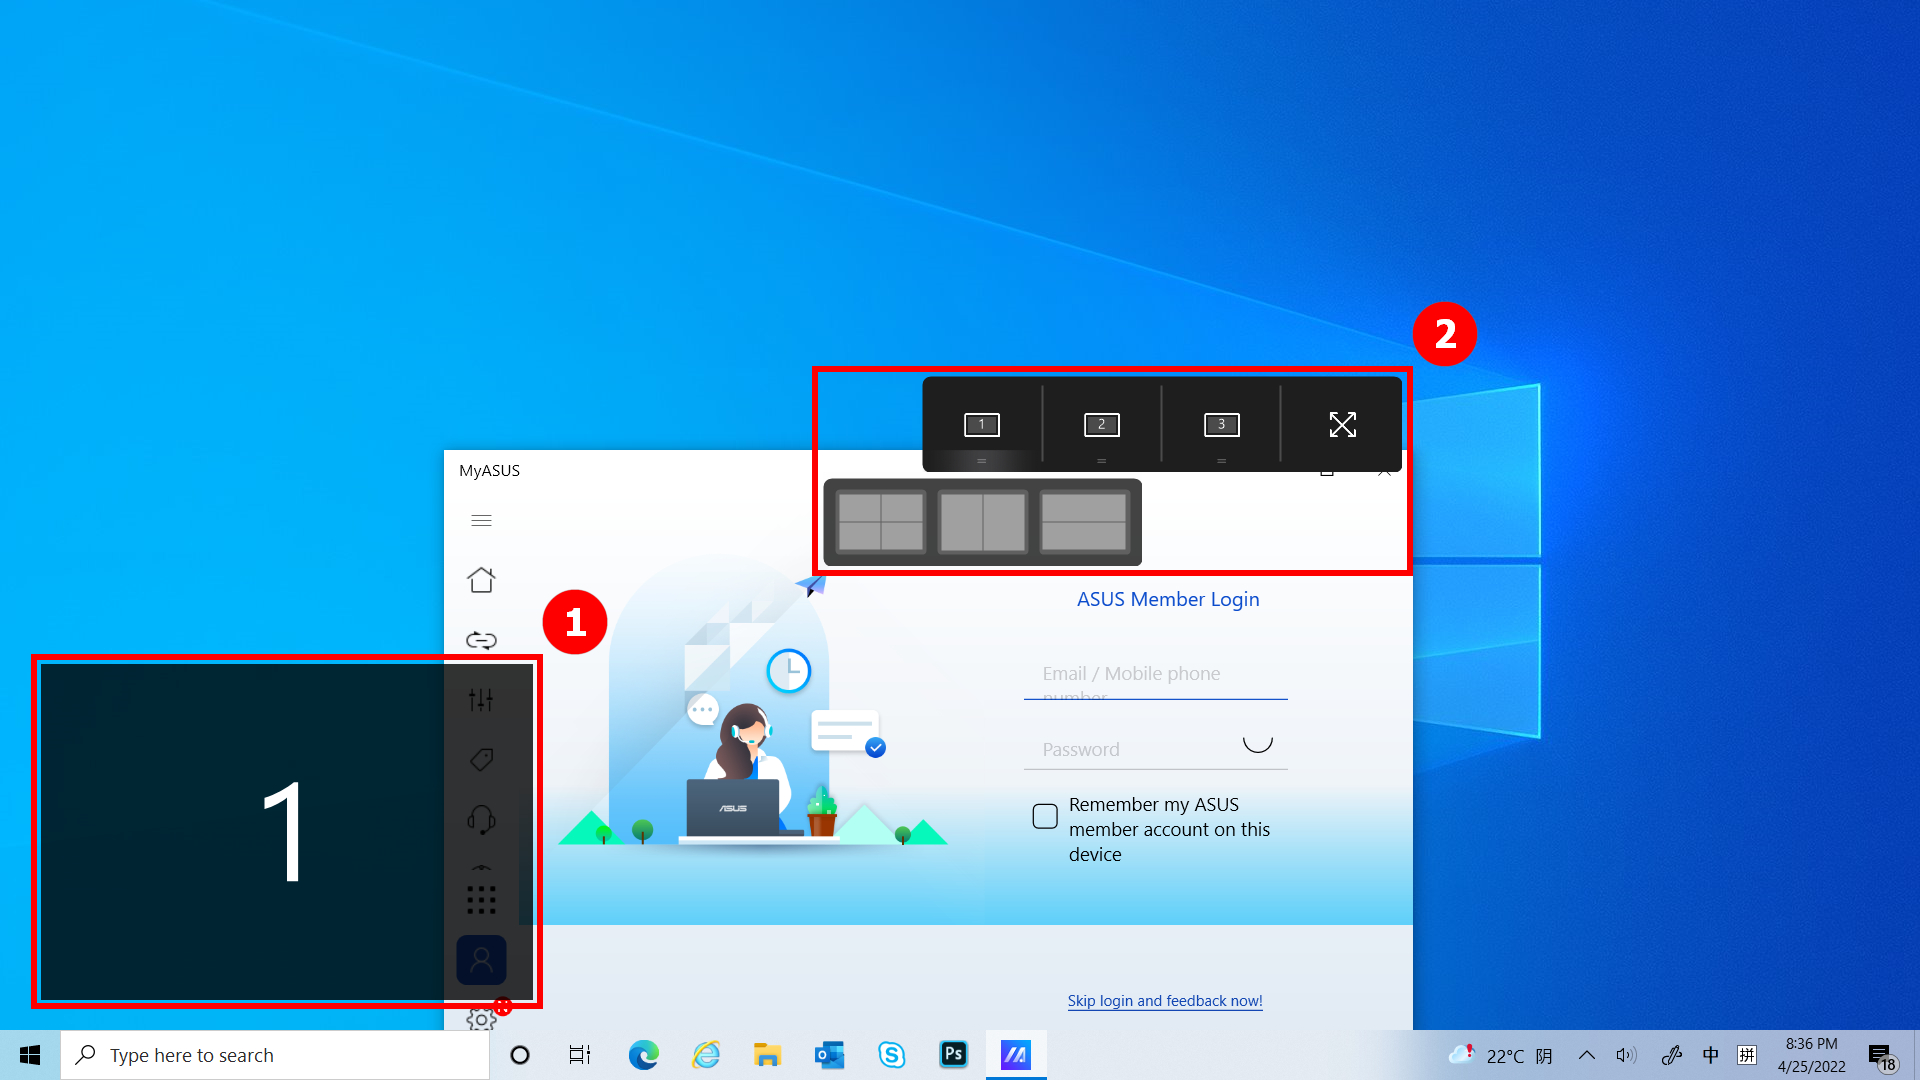
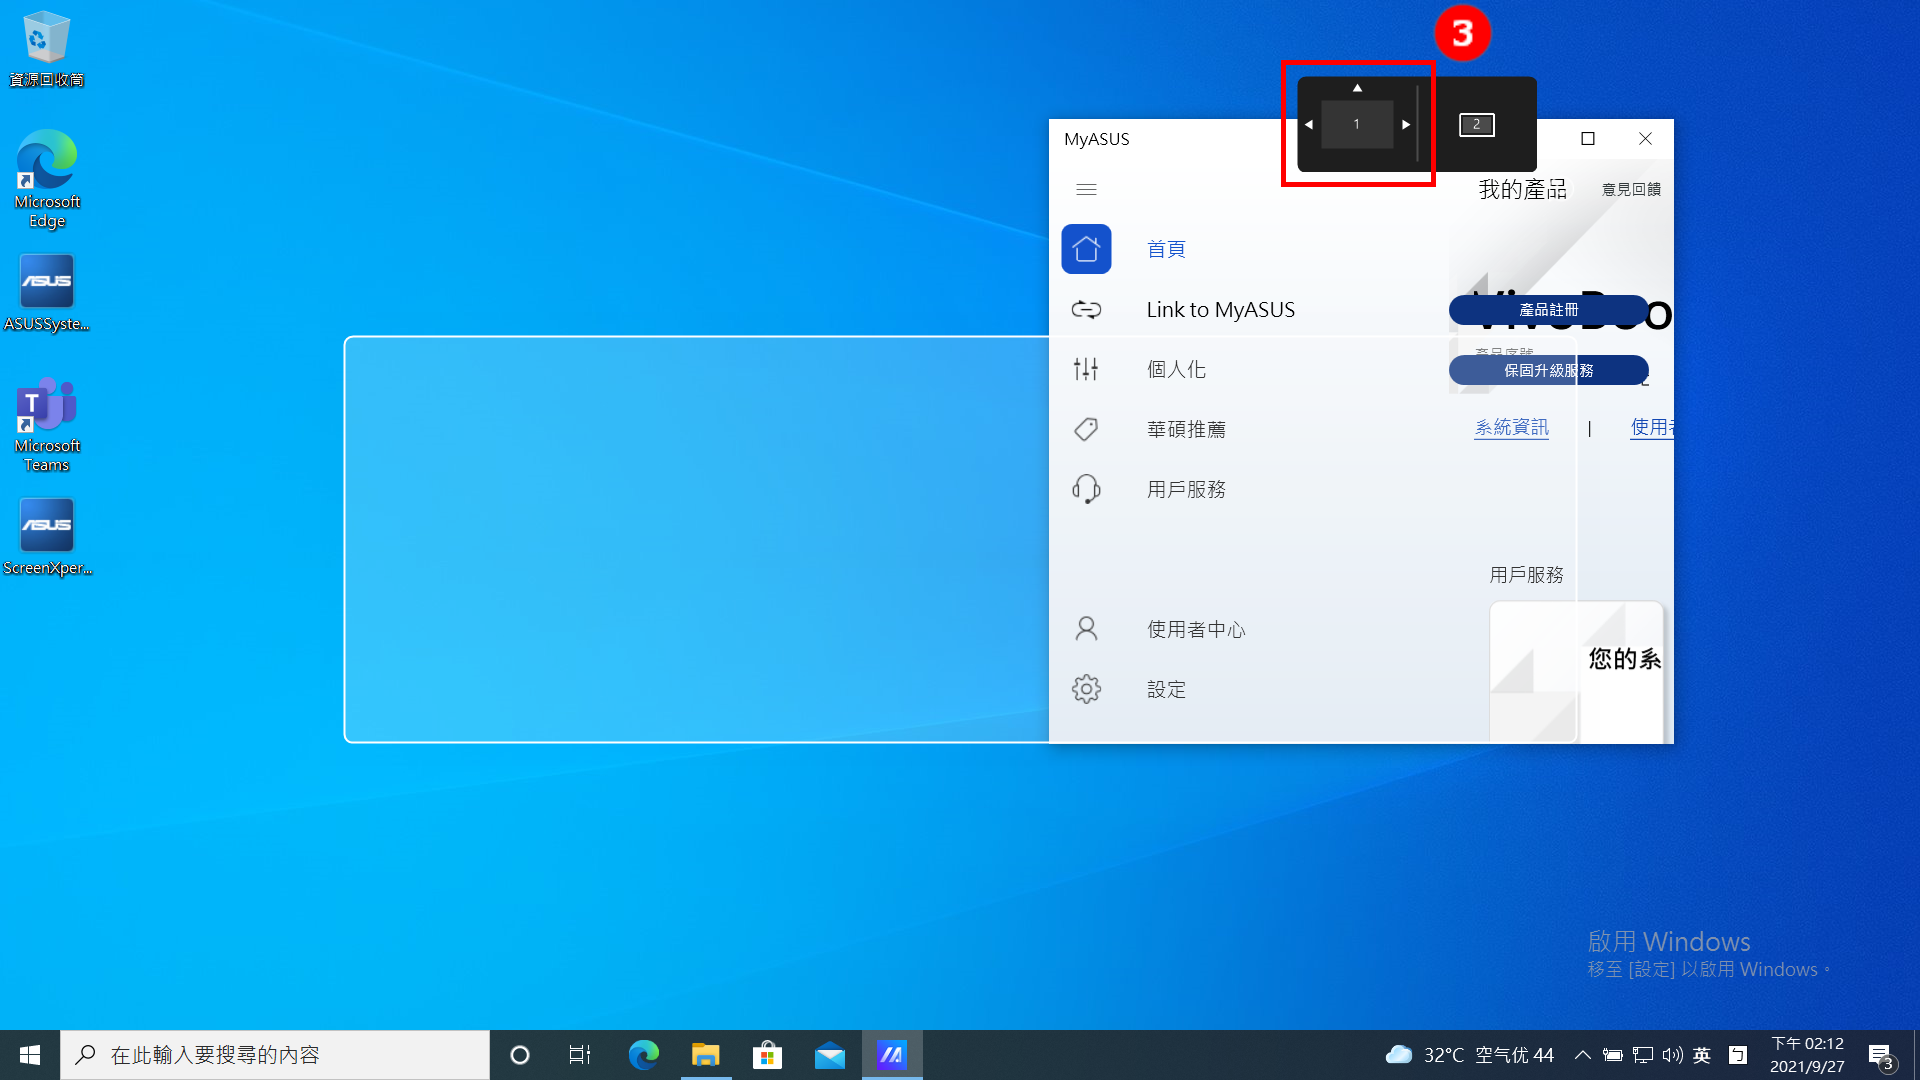
(1) Jika komputer Anda dapat mengontrol lebih dari satu layar, saat Anda menyeret jendela Aplikasi di layar utama, ①[Screen Markings] akan menampilkan dan memungkinkan Anda mengonfirmasi lokasi layar. Fungsi menu ②[App Switcher] juga ditampilkan, yang berisi ikon layar 1 dan layar 2. (Dalam contoh, komputer memiliki dua layar)
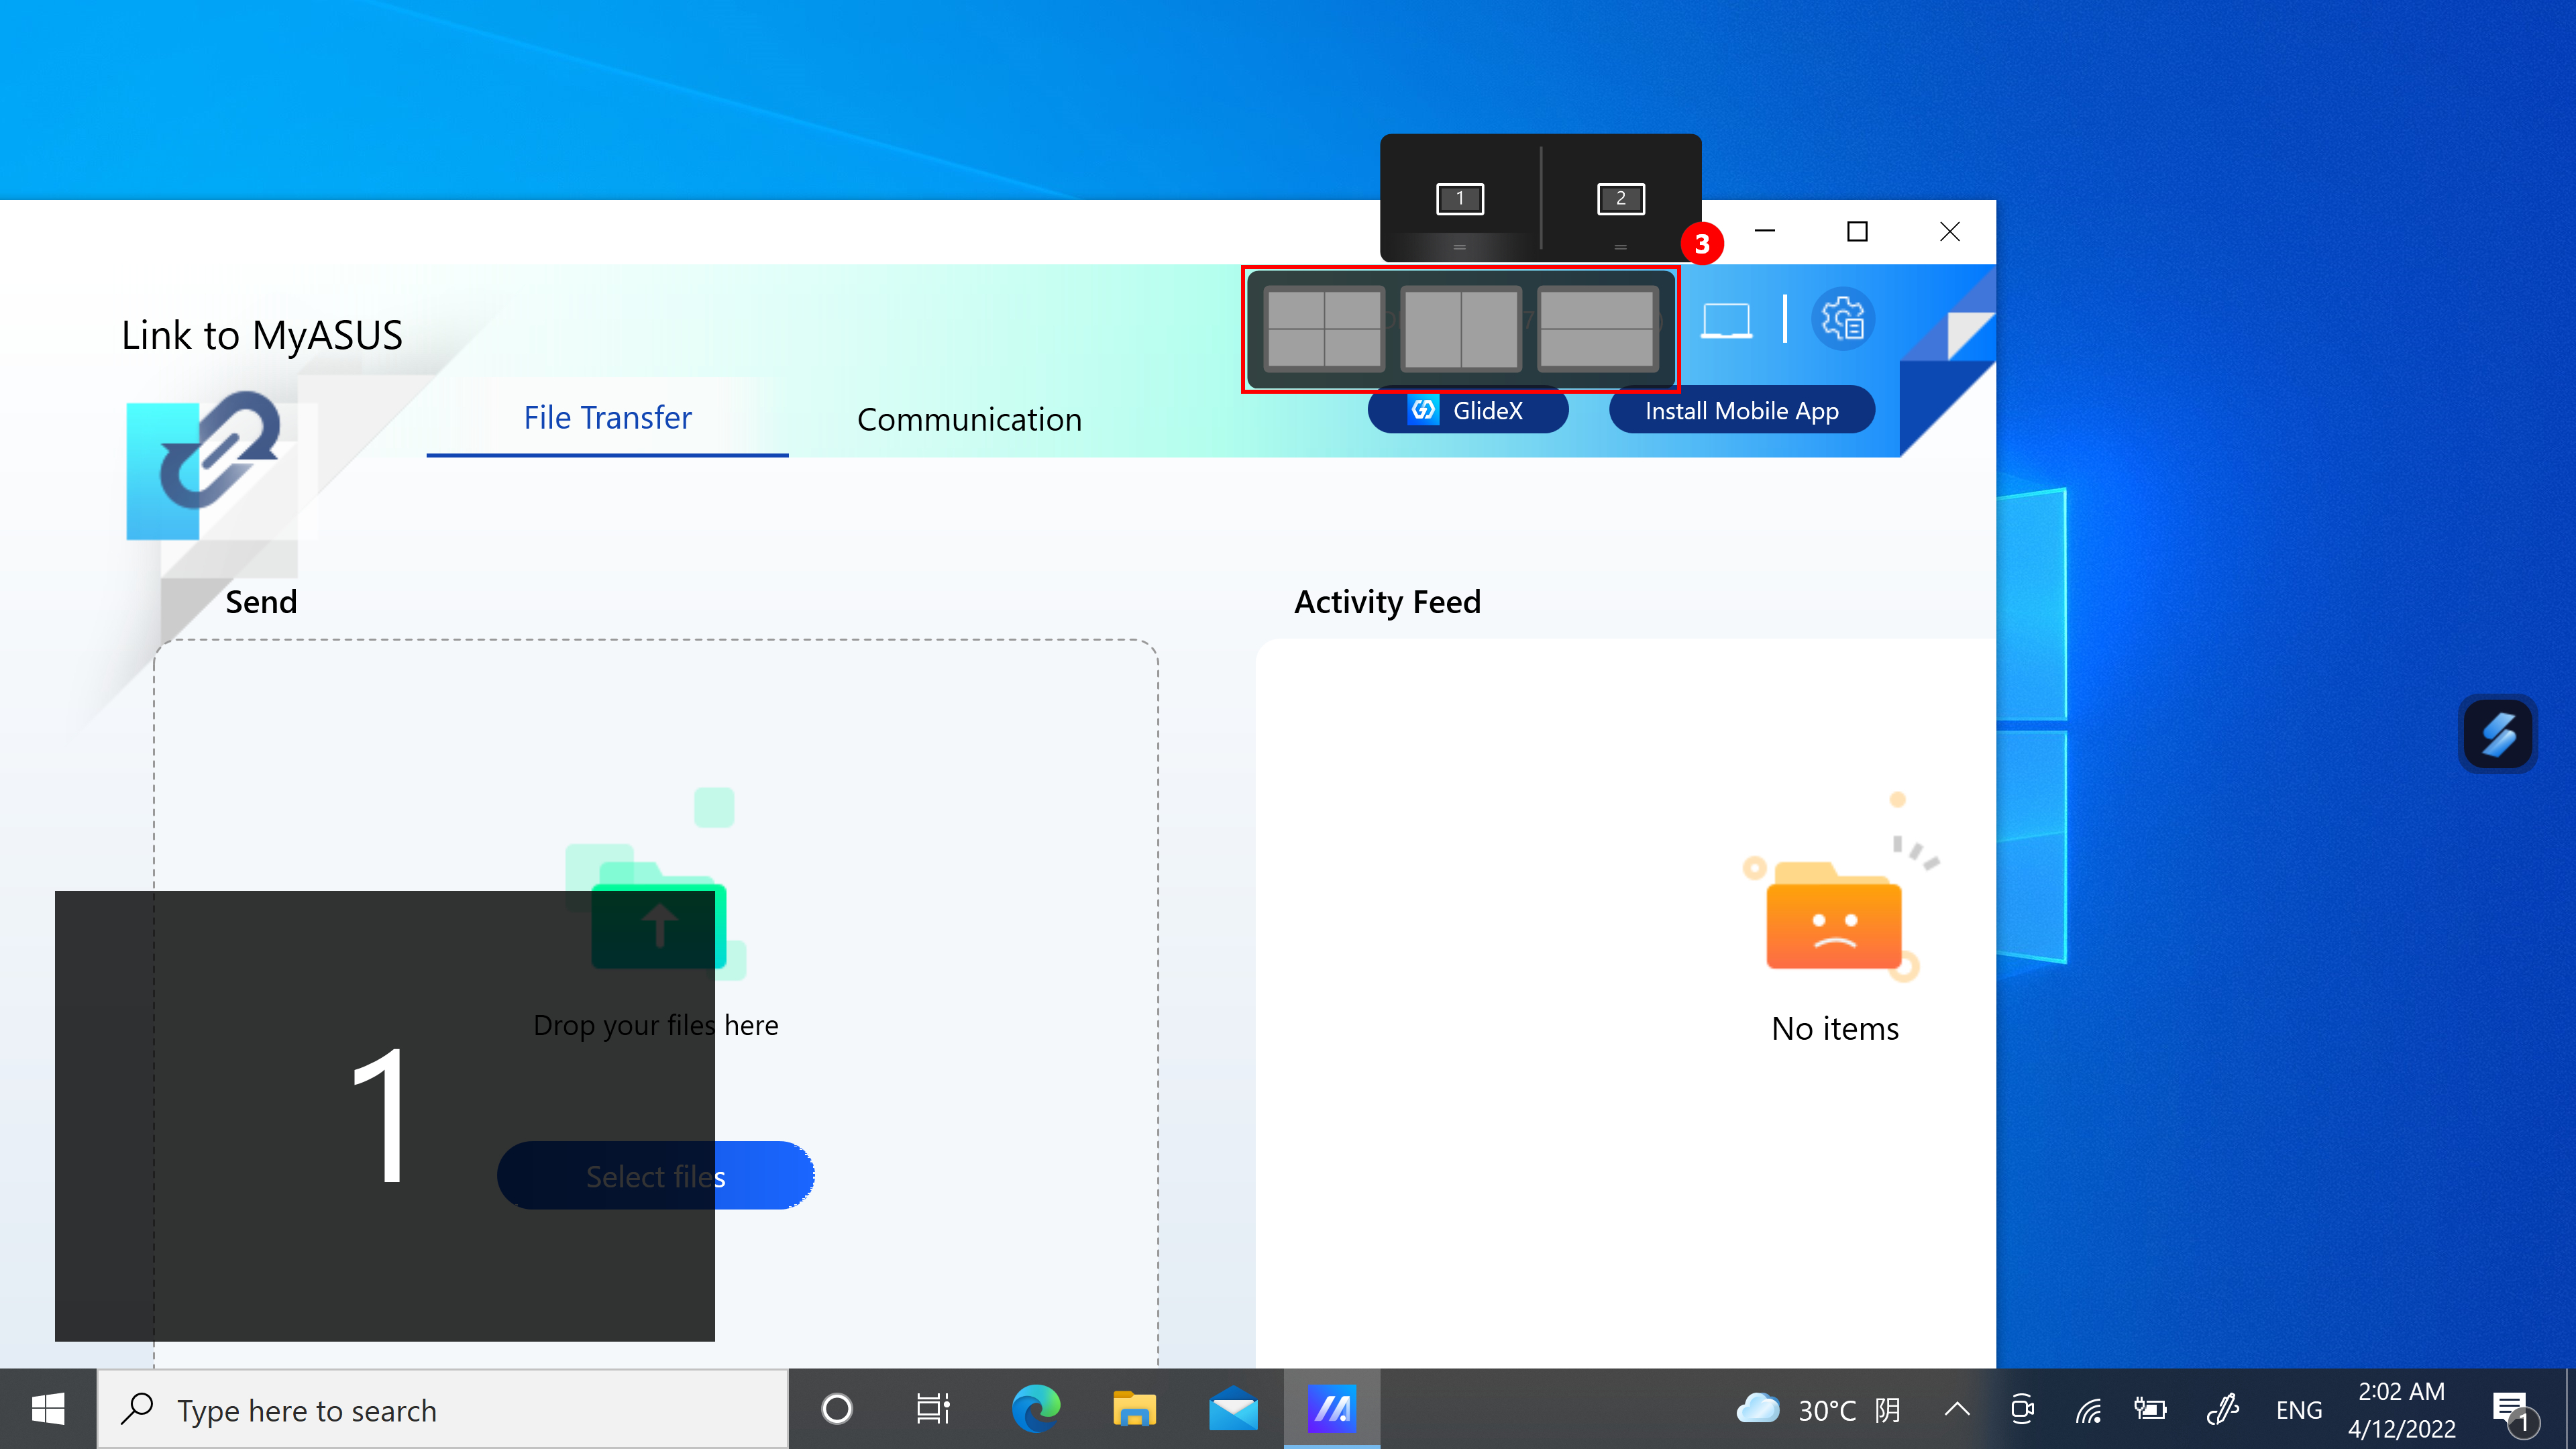
(2) ScreenXpert mendukung interaksi antara satu atau beberapa layar. Saat Anda menyeret jendela di desktop, ikon [Aplikasi Swicher] muncul. Jika Anda menyeret mouse ke kisaran ③[Screen 1], 3 ikon yang dapat digunakan akan ditampilkan. Anda juga dapat menyeret mouse ke [Screen 2] dan jendela akan ditransfer ke [Screen 2] untuk ditampilkan.

- Seret mouse ke dalam ①, dan jendela Aplikasi akan ditampilkan di layar 1 dan menempati seperempat layar.
- Tarik mouse ke ②, dan jendela Aplikasi akan ditampilkan di layar 1 dan menempati separuh kiri dan kanan layar.
- Seret mouse ke dalam ③, dan jendela Aplikasi akan ditampilkan di layar 1 dan menempati setengah bagian atas dan bawah layar.
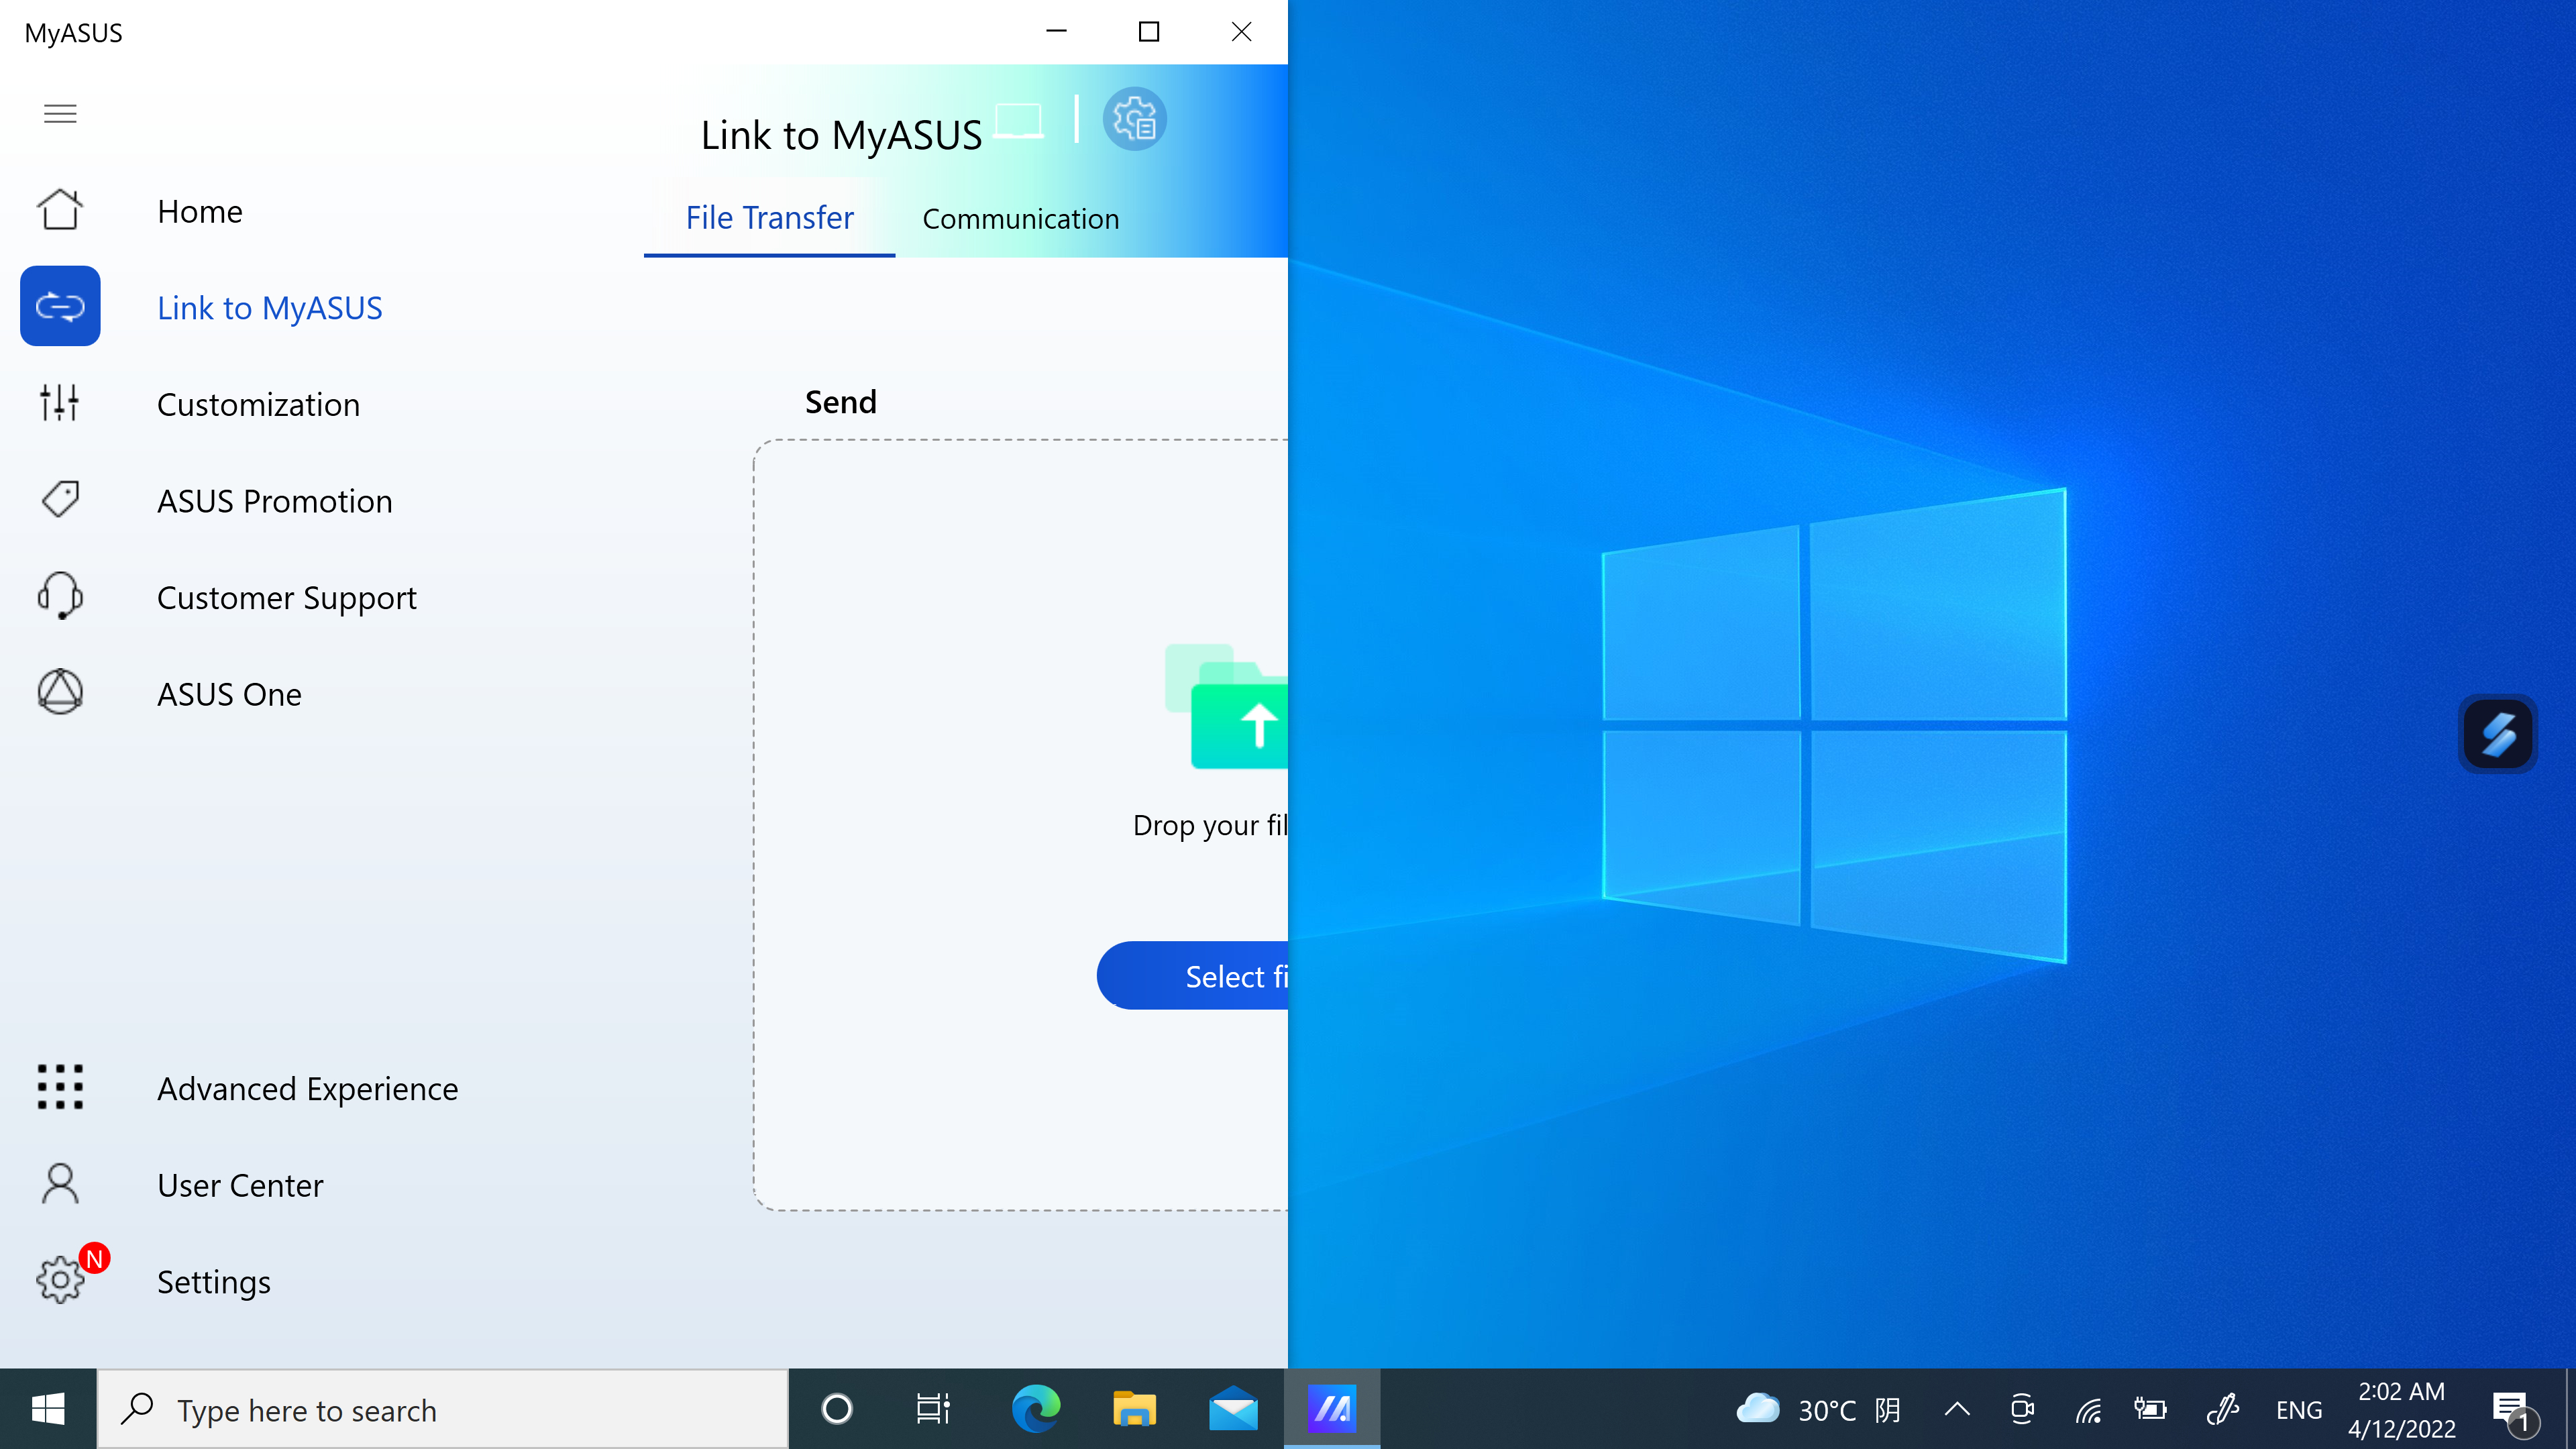
(3) Jendelanya sudah masuk [Screen 1], menempati separuh kiri layar.
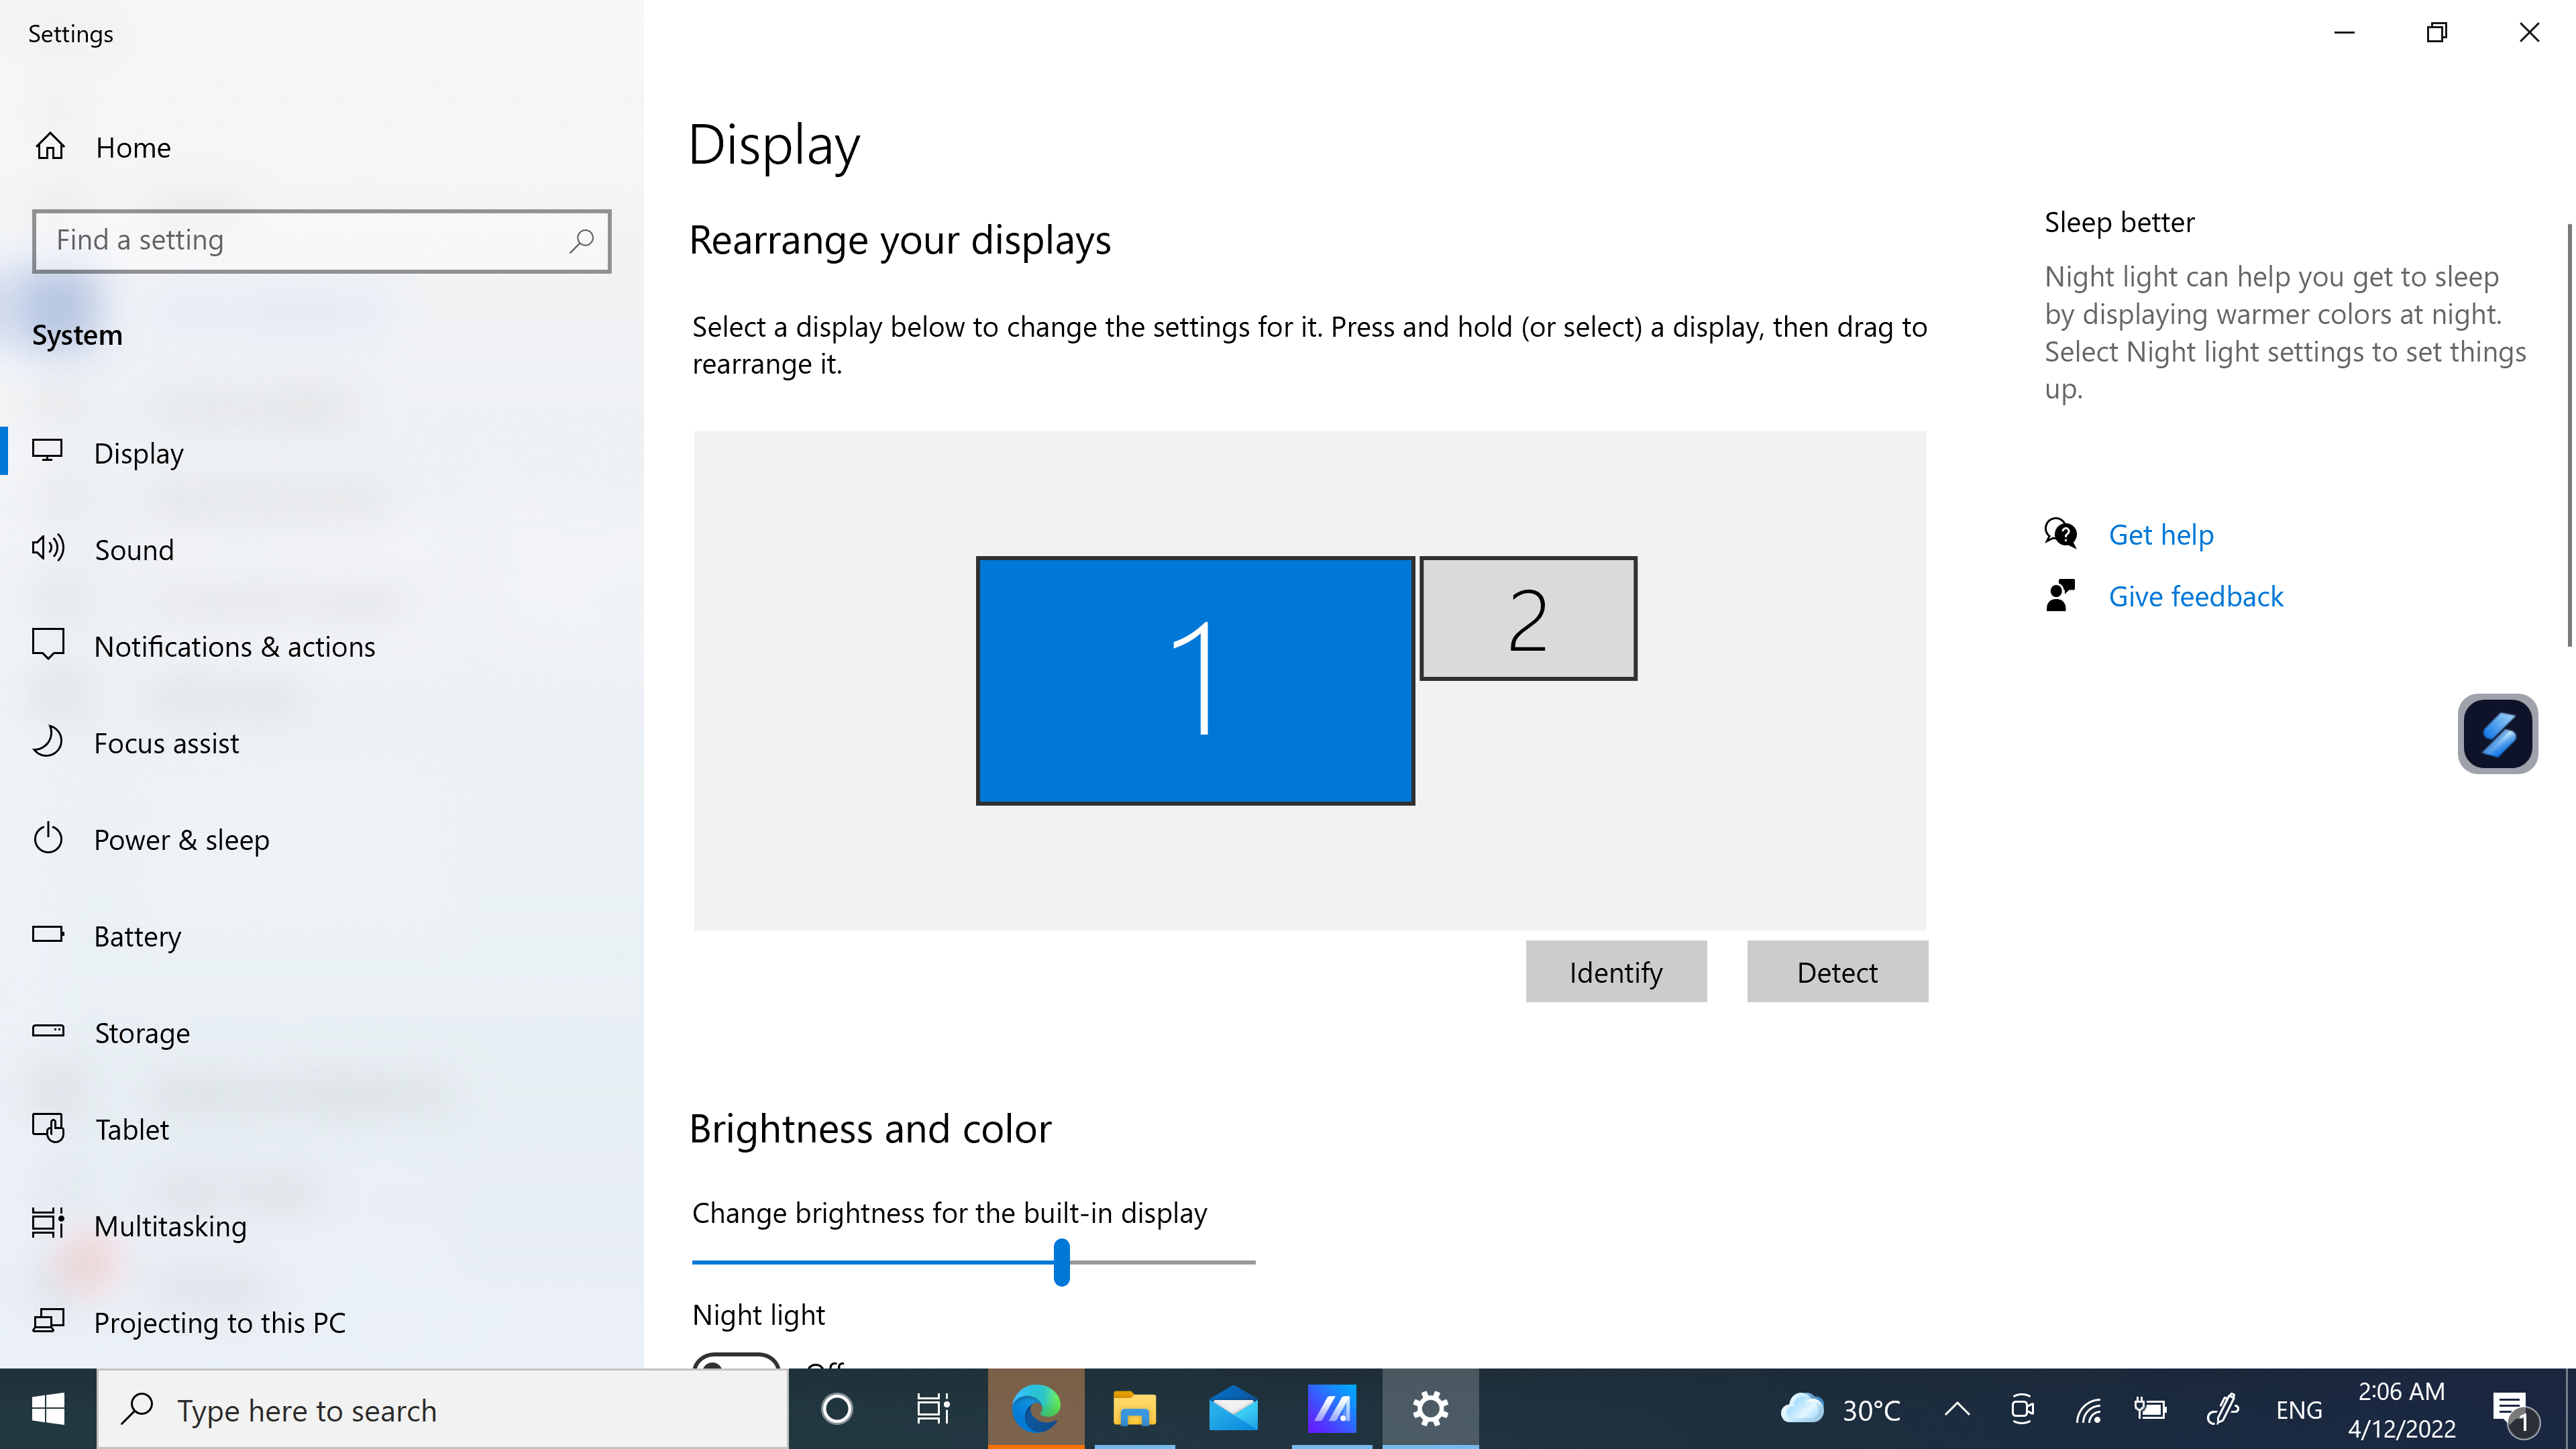
(4) Jika Anda menggunakan dua layar saat ini namun label yang ditampilkan di kedua layar adalah 1. Anda perlu mengklik kanan pada desktop lalu mengklik Setelan Tampilan. Pada halaman Pengaturan Tampilan, Anda dapat melihat bahwa kedua layar Anda berfungsi sebagai layar duplikat.
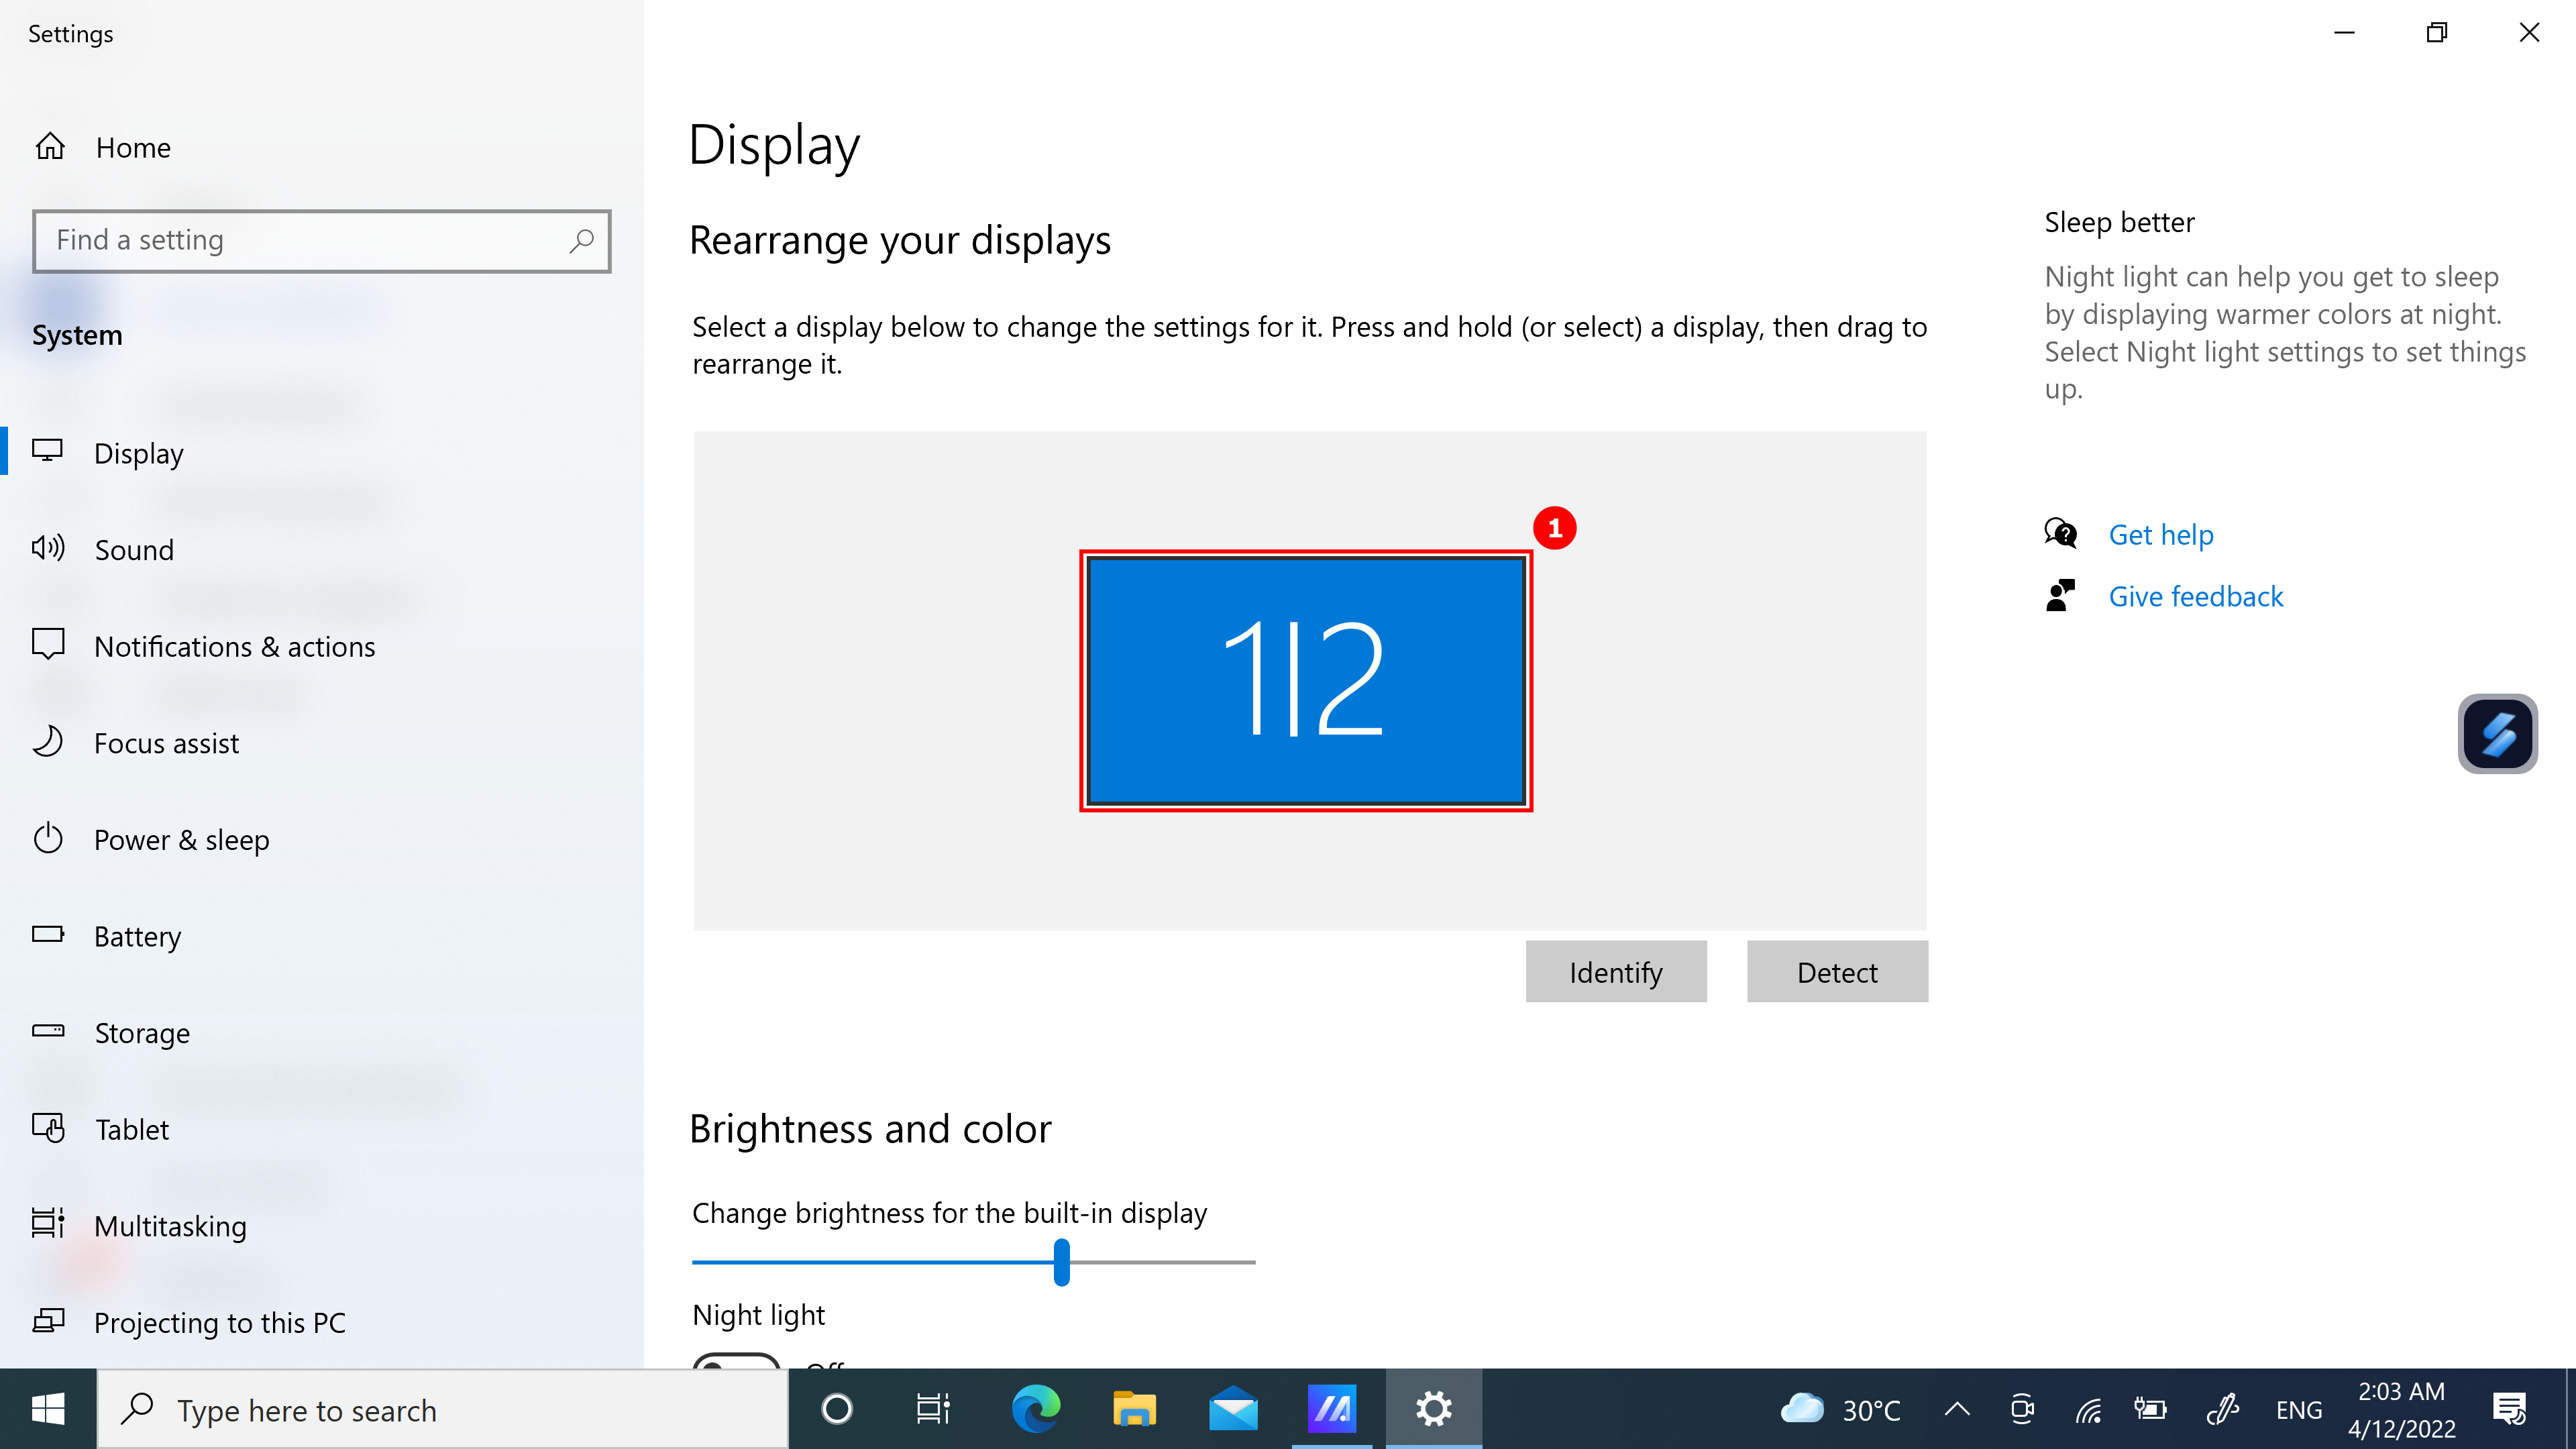
(5) Silakan gulir ke bawah halaman untuk melihat fungsi ②[Multiple displays] , Pilih ③[Extend these displays], seret jendela di desktop, dan ikon layar akan ditampilkan secara normal.

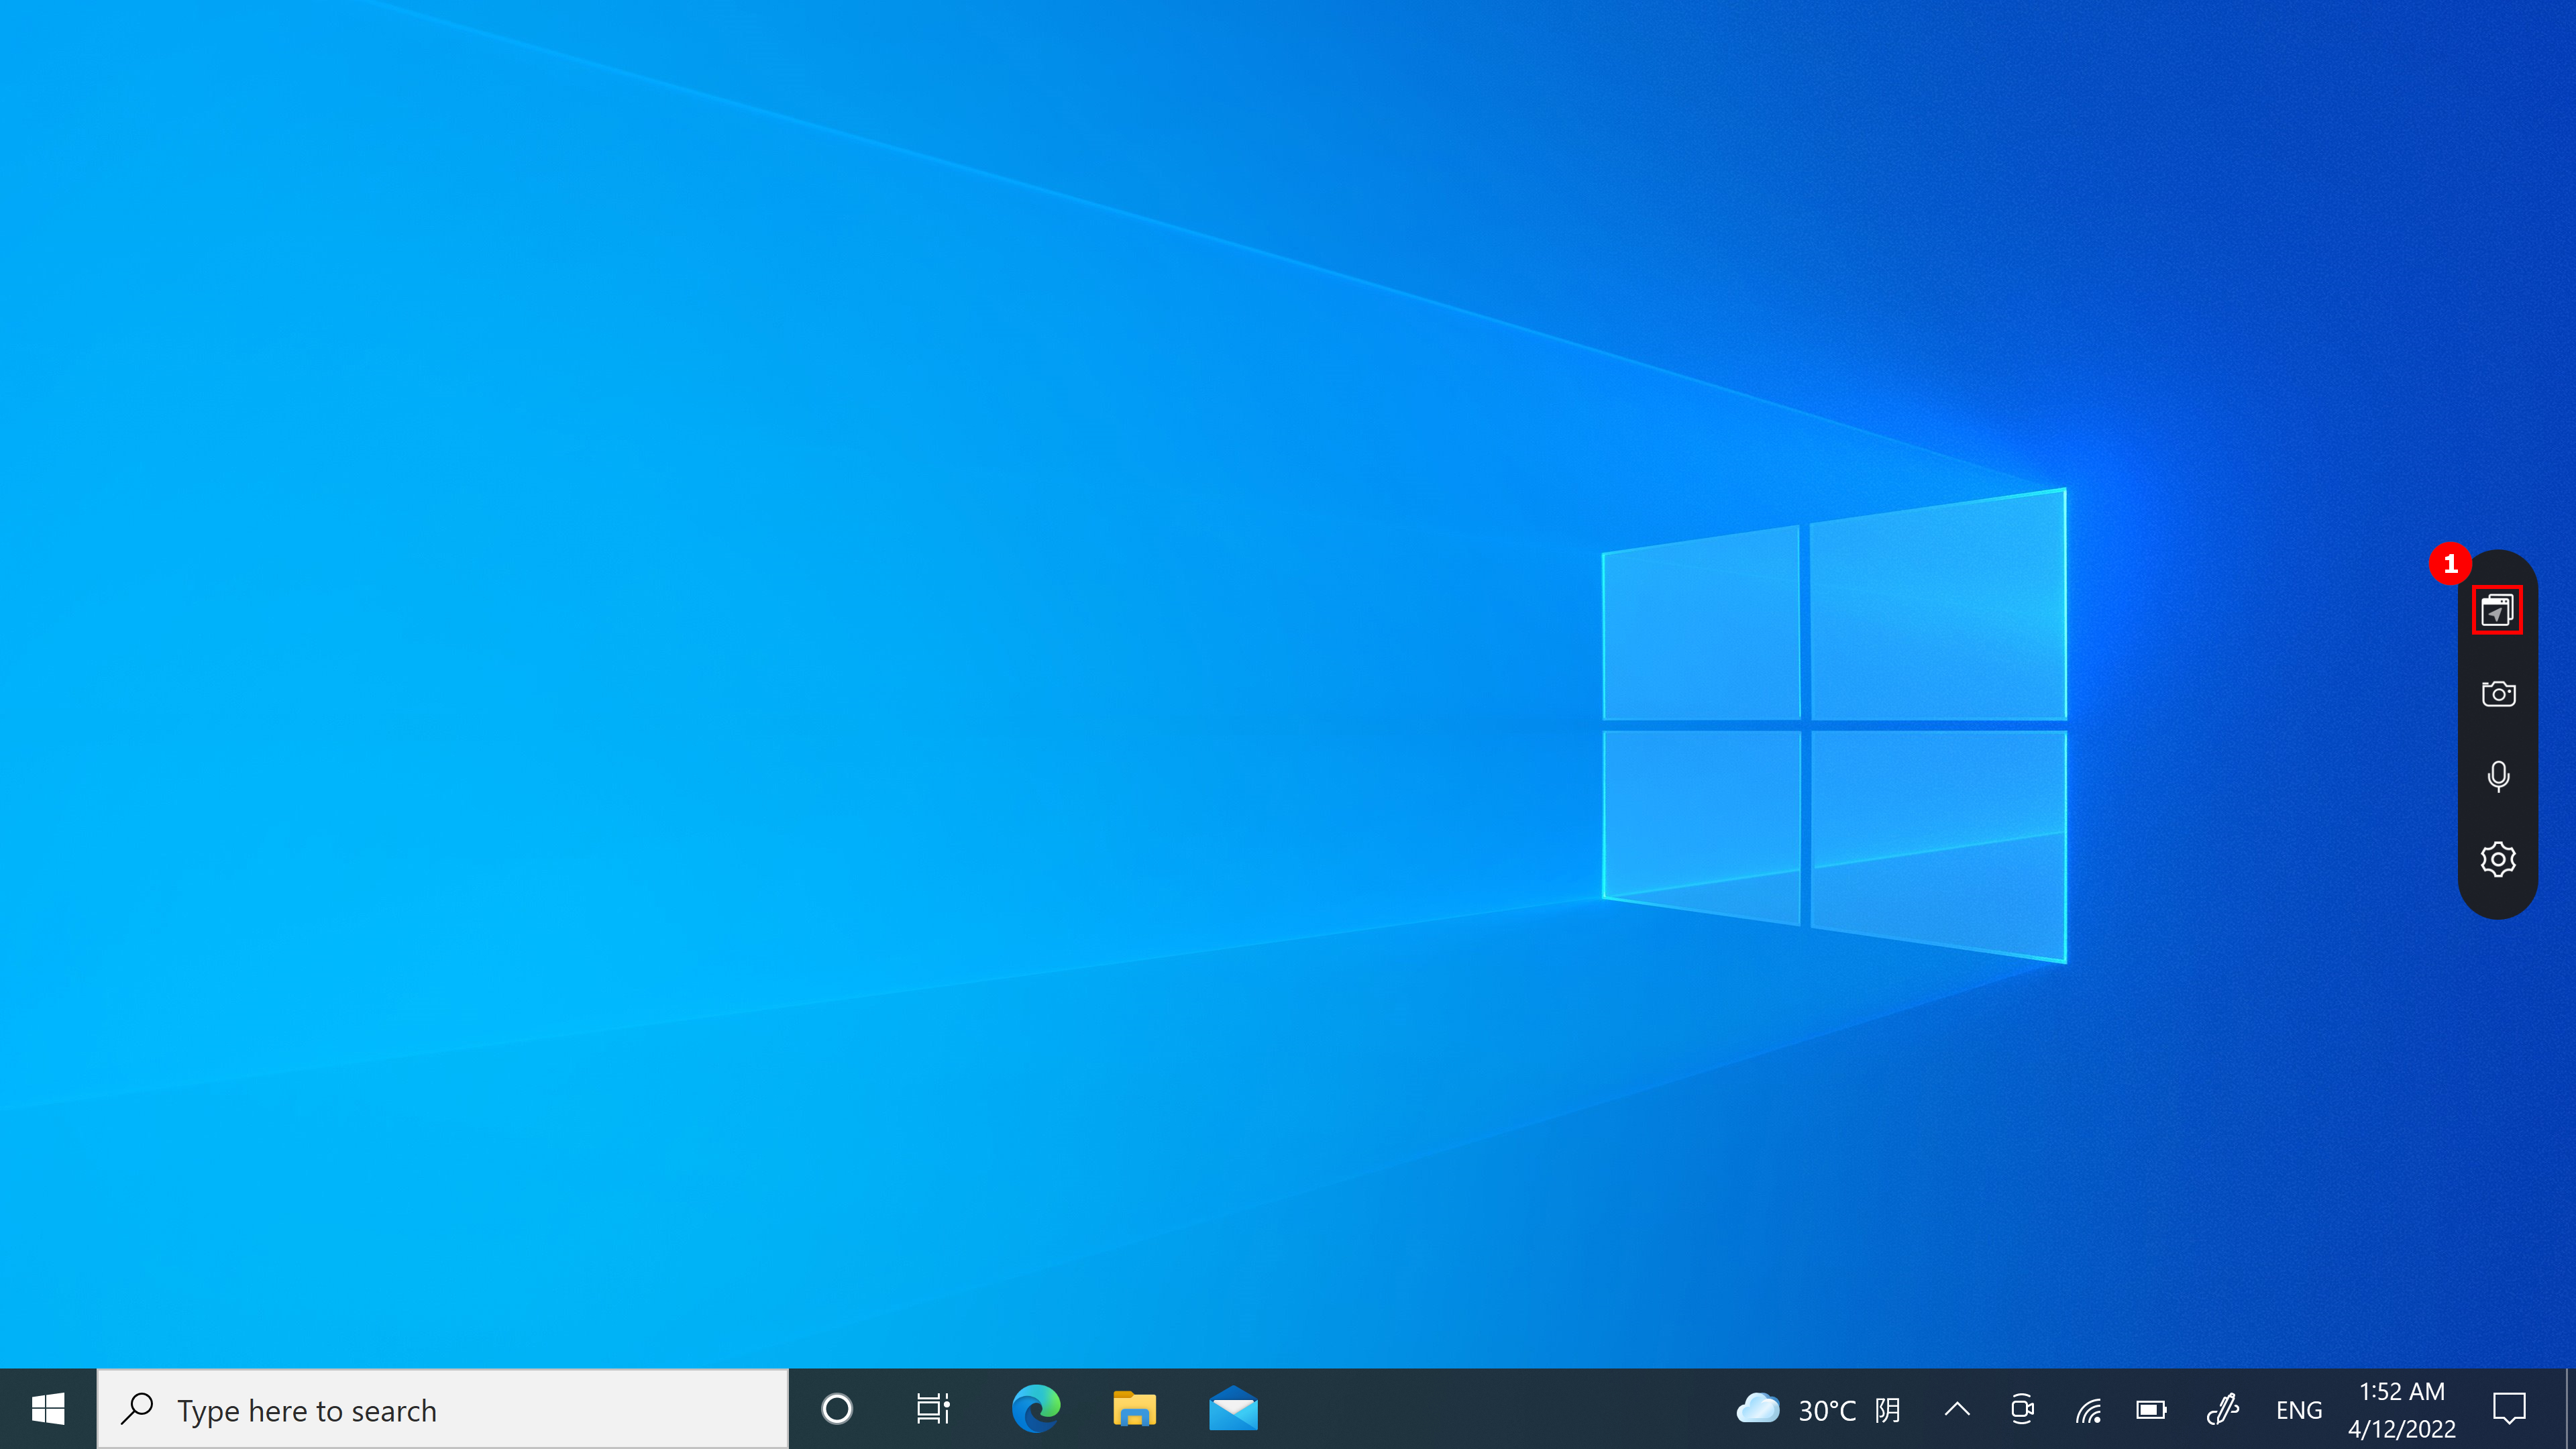
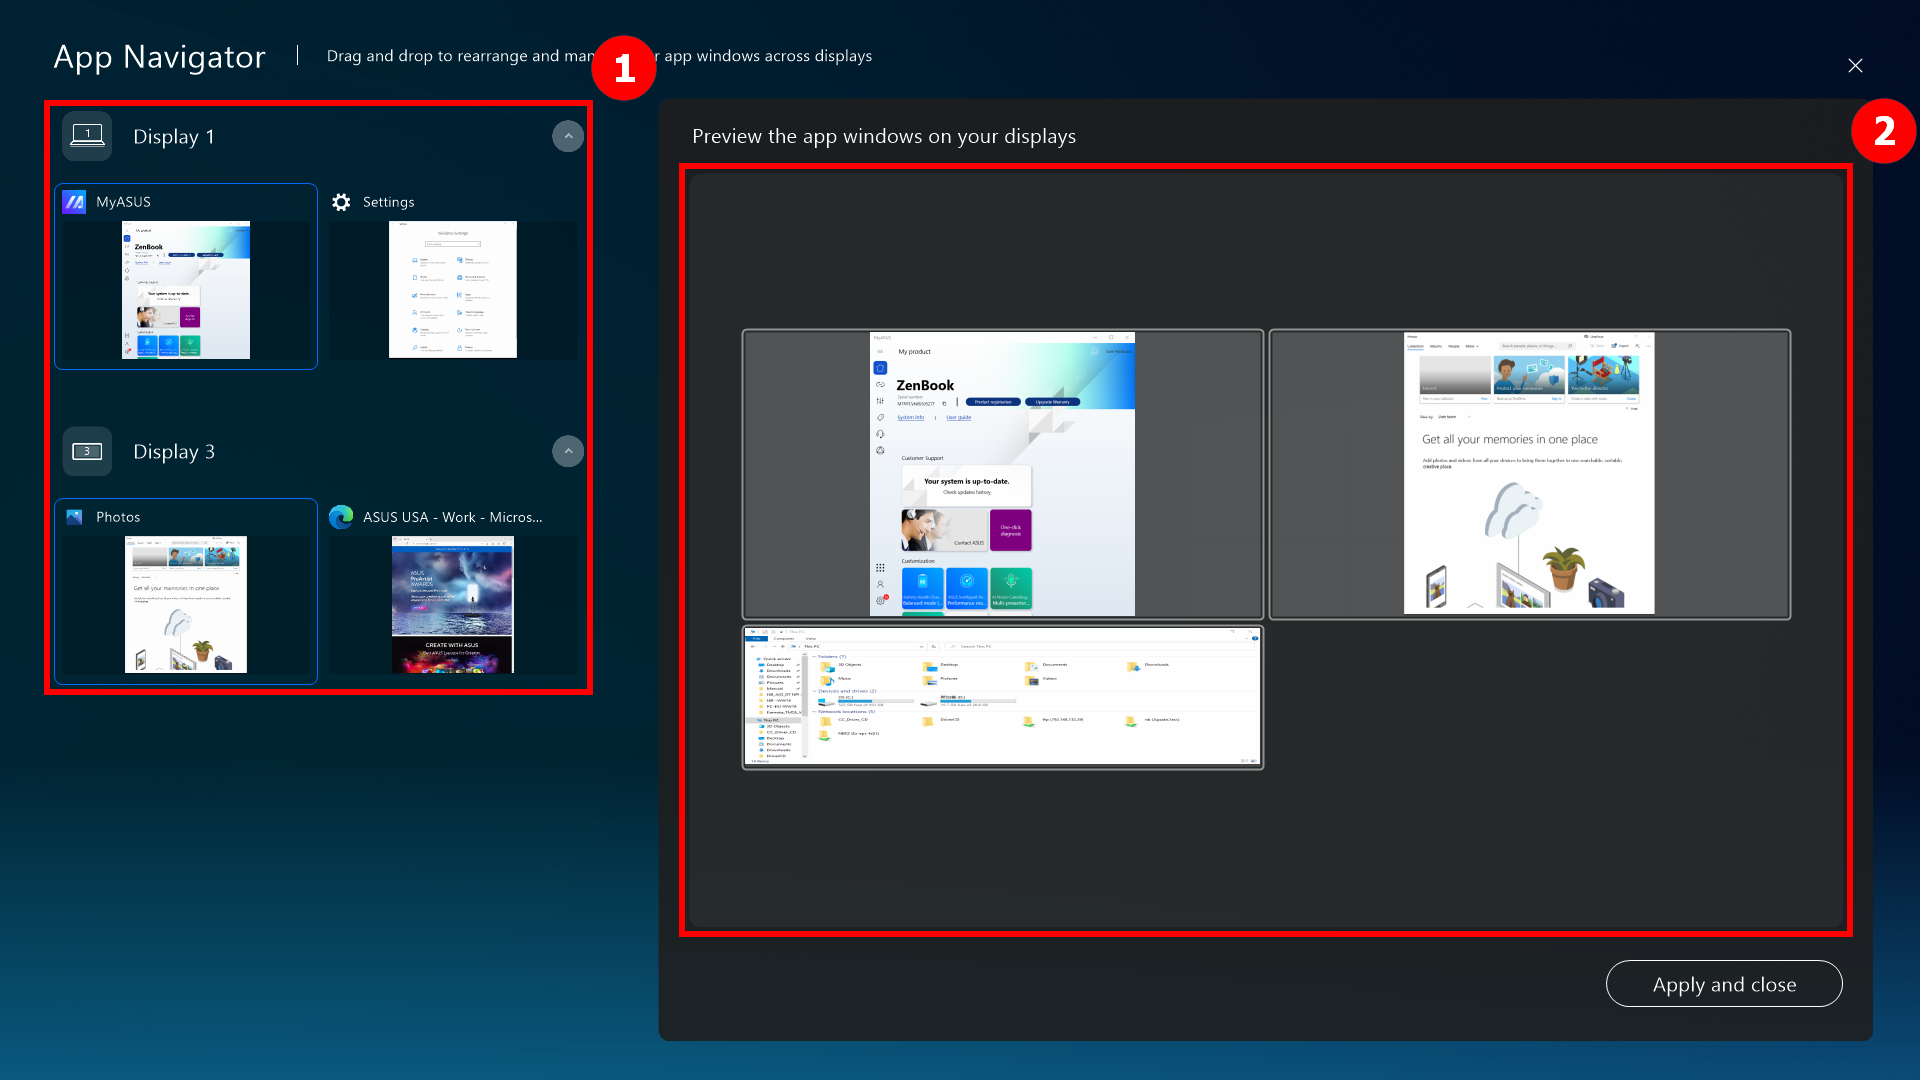
(1) Jika Anda memiliki beberapa jendela yang terbuka di komputer dan ingin dengan cepat beralih jendela antar layar yang berbeda, gunakan fungsi App Navigator dan klik ①[App Navigator].
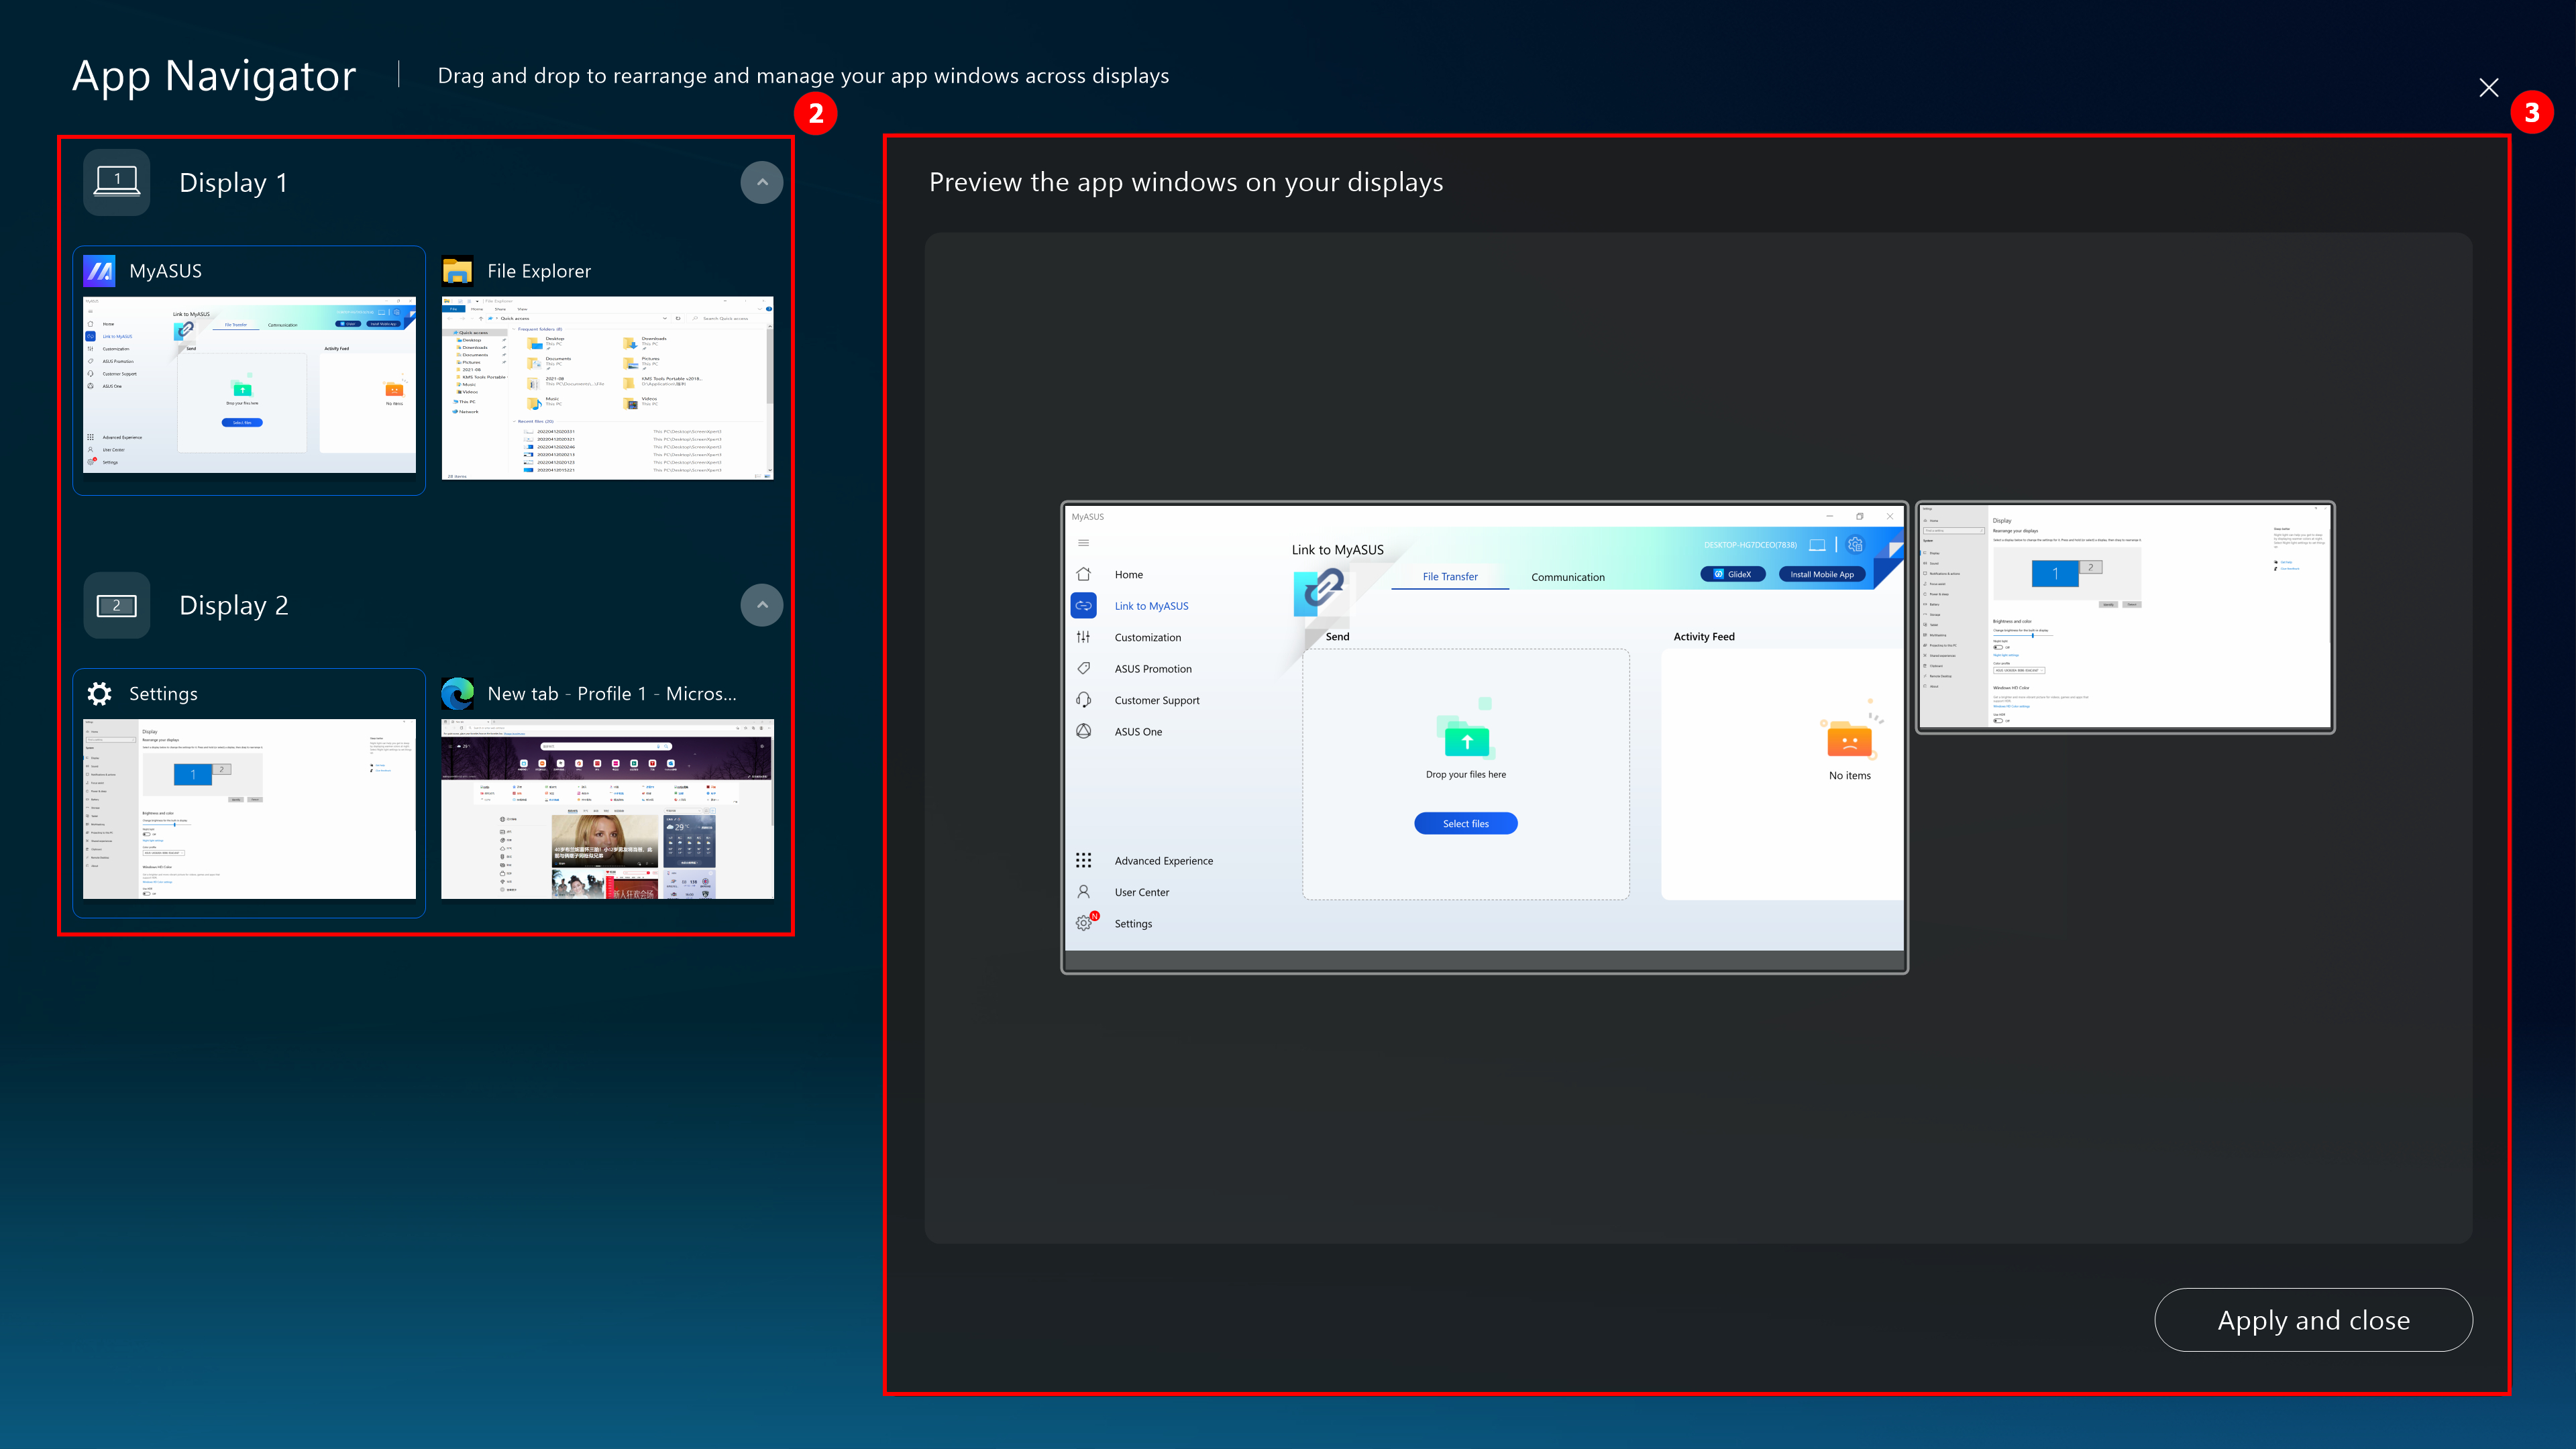
(2) Saat App Navigator dibuka, ②[Area] adalah area yang ditandai oleh layar di komputer, dan ③[Area] adalah jendela yang ditampilkan di layar.
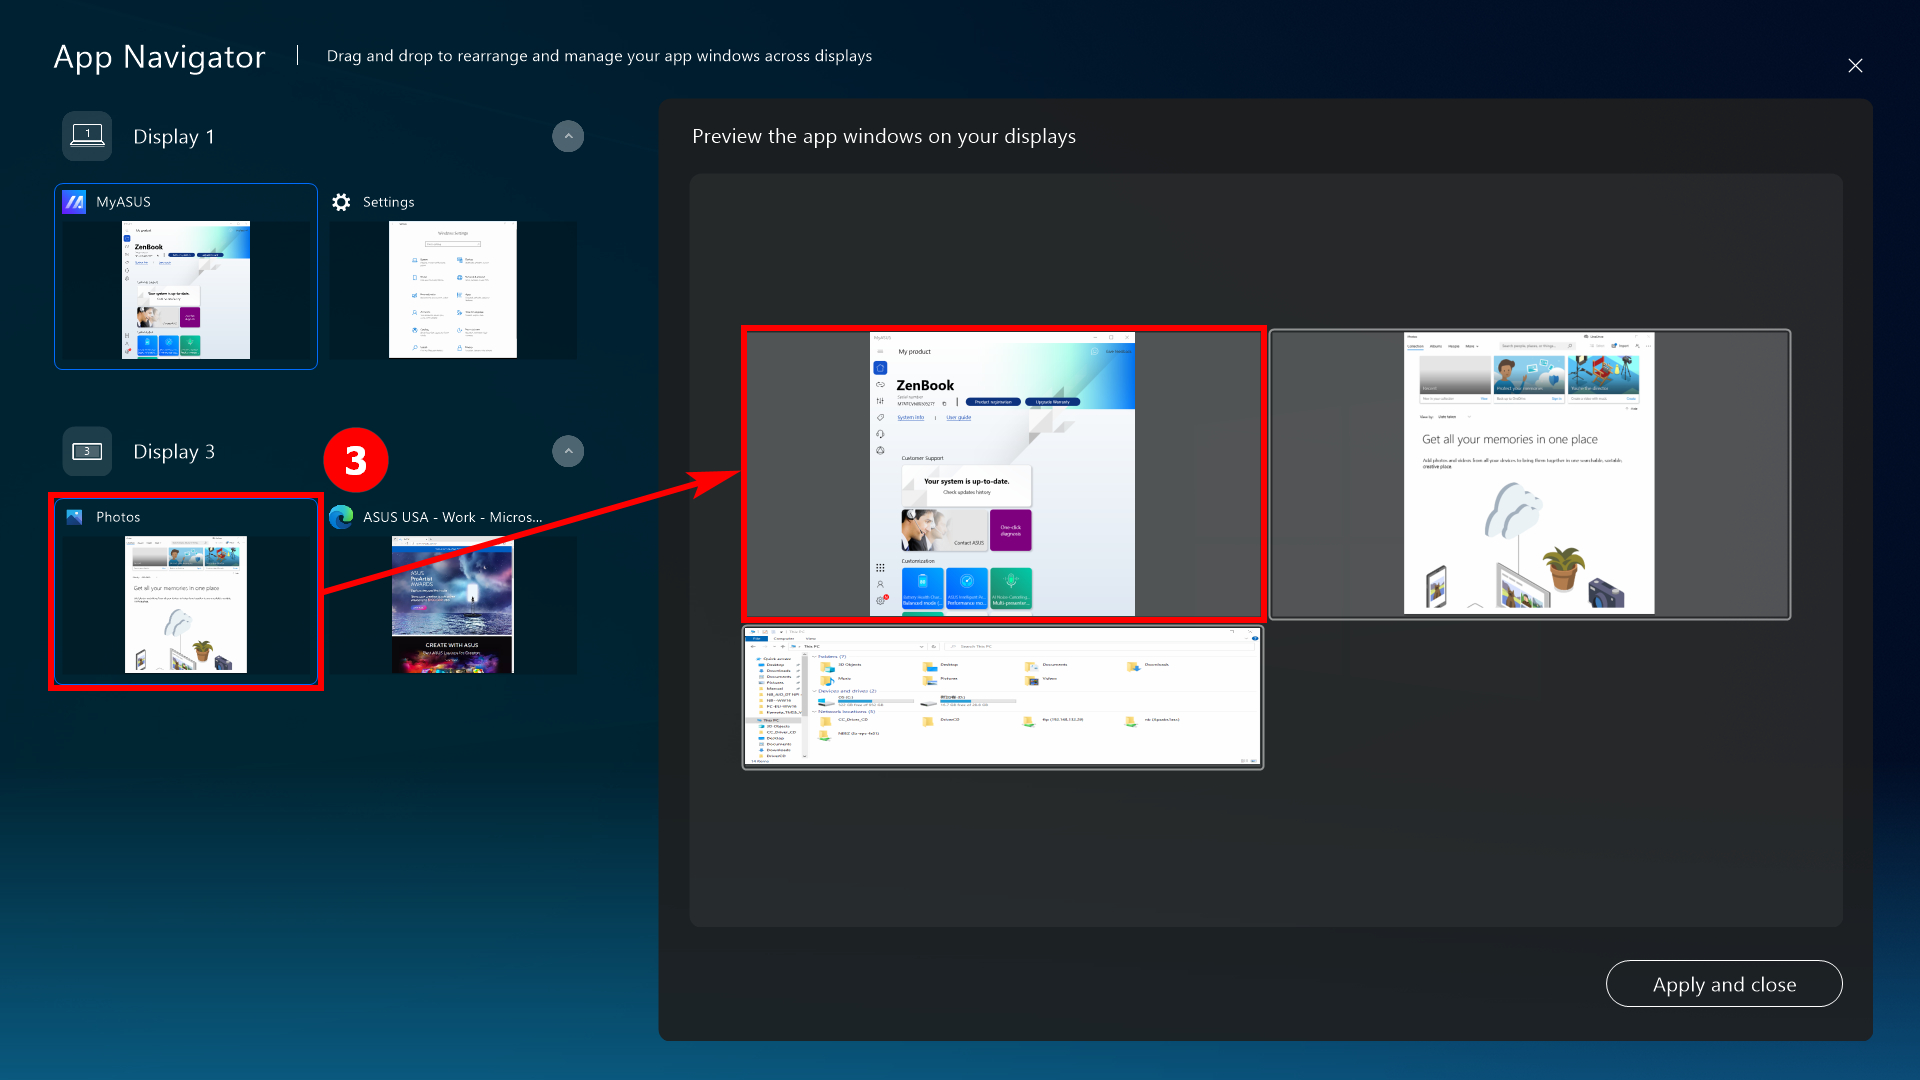
(3) Menyeret ④[Window] ditampilkan di [Screen 2] ke [Screen 1].
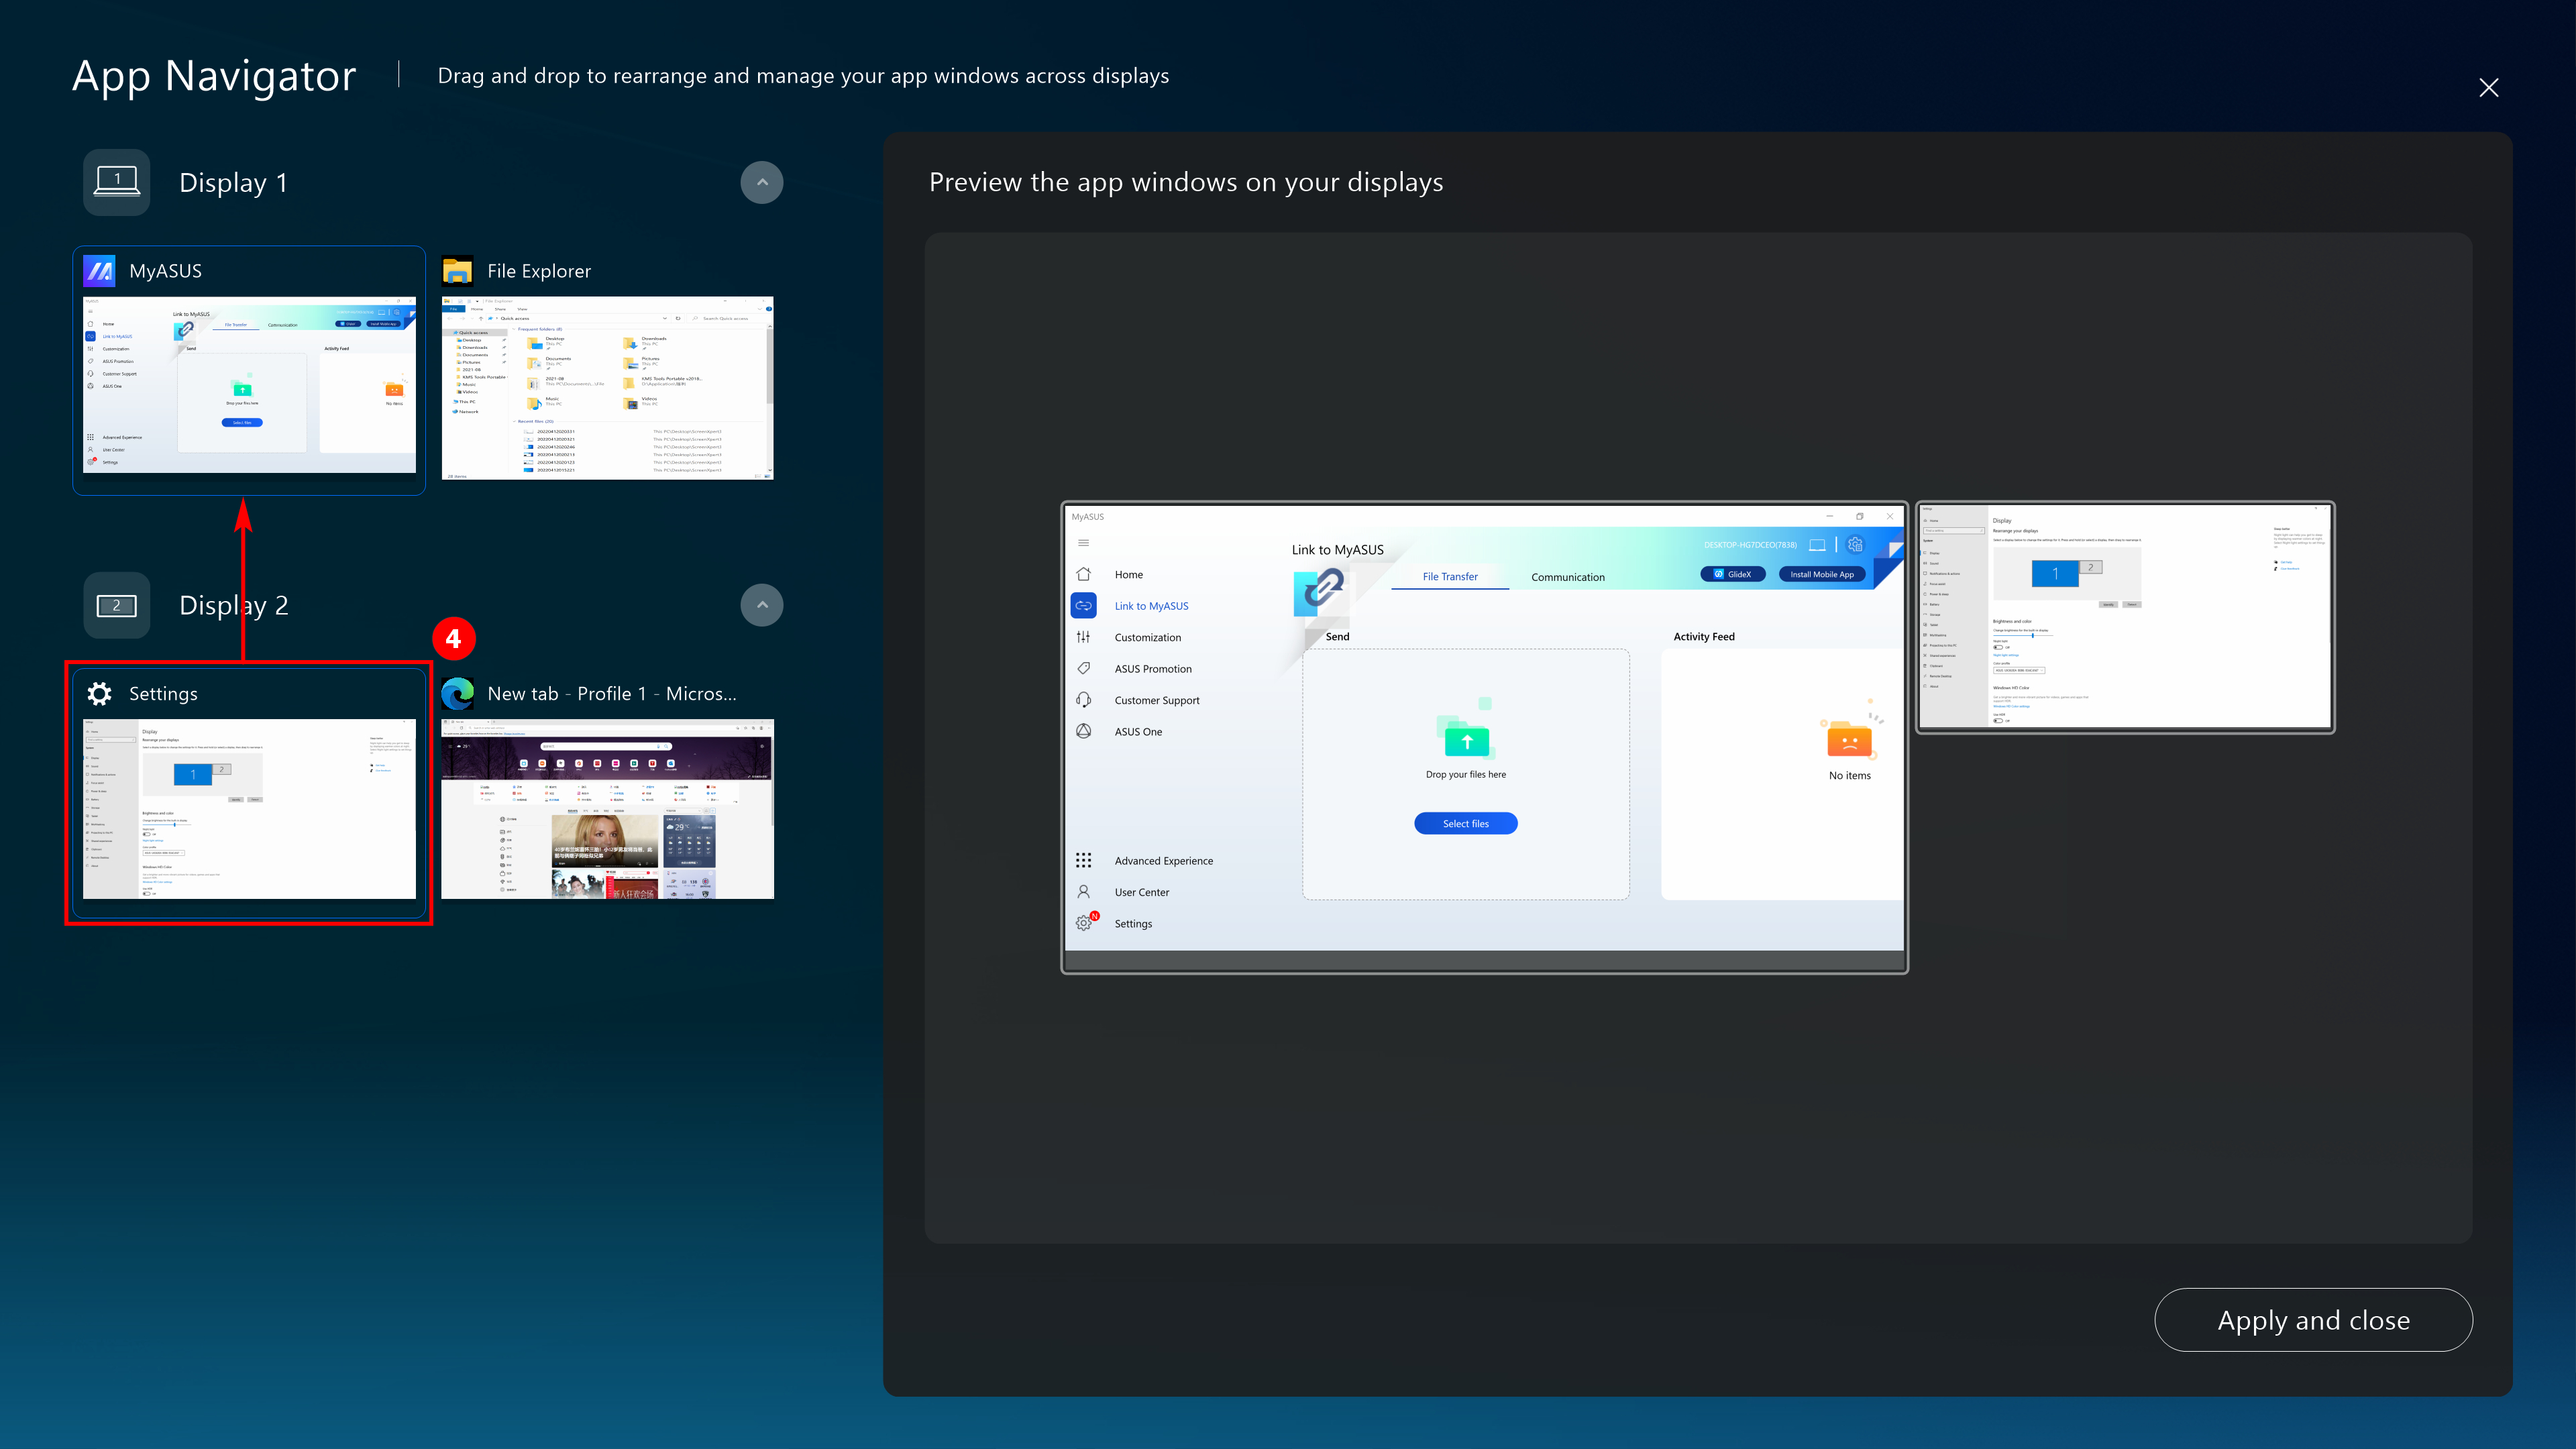
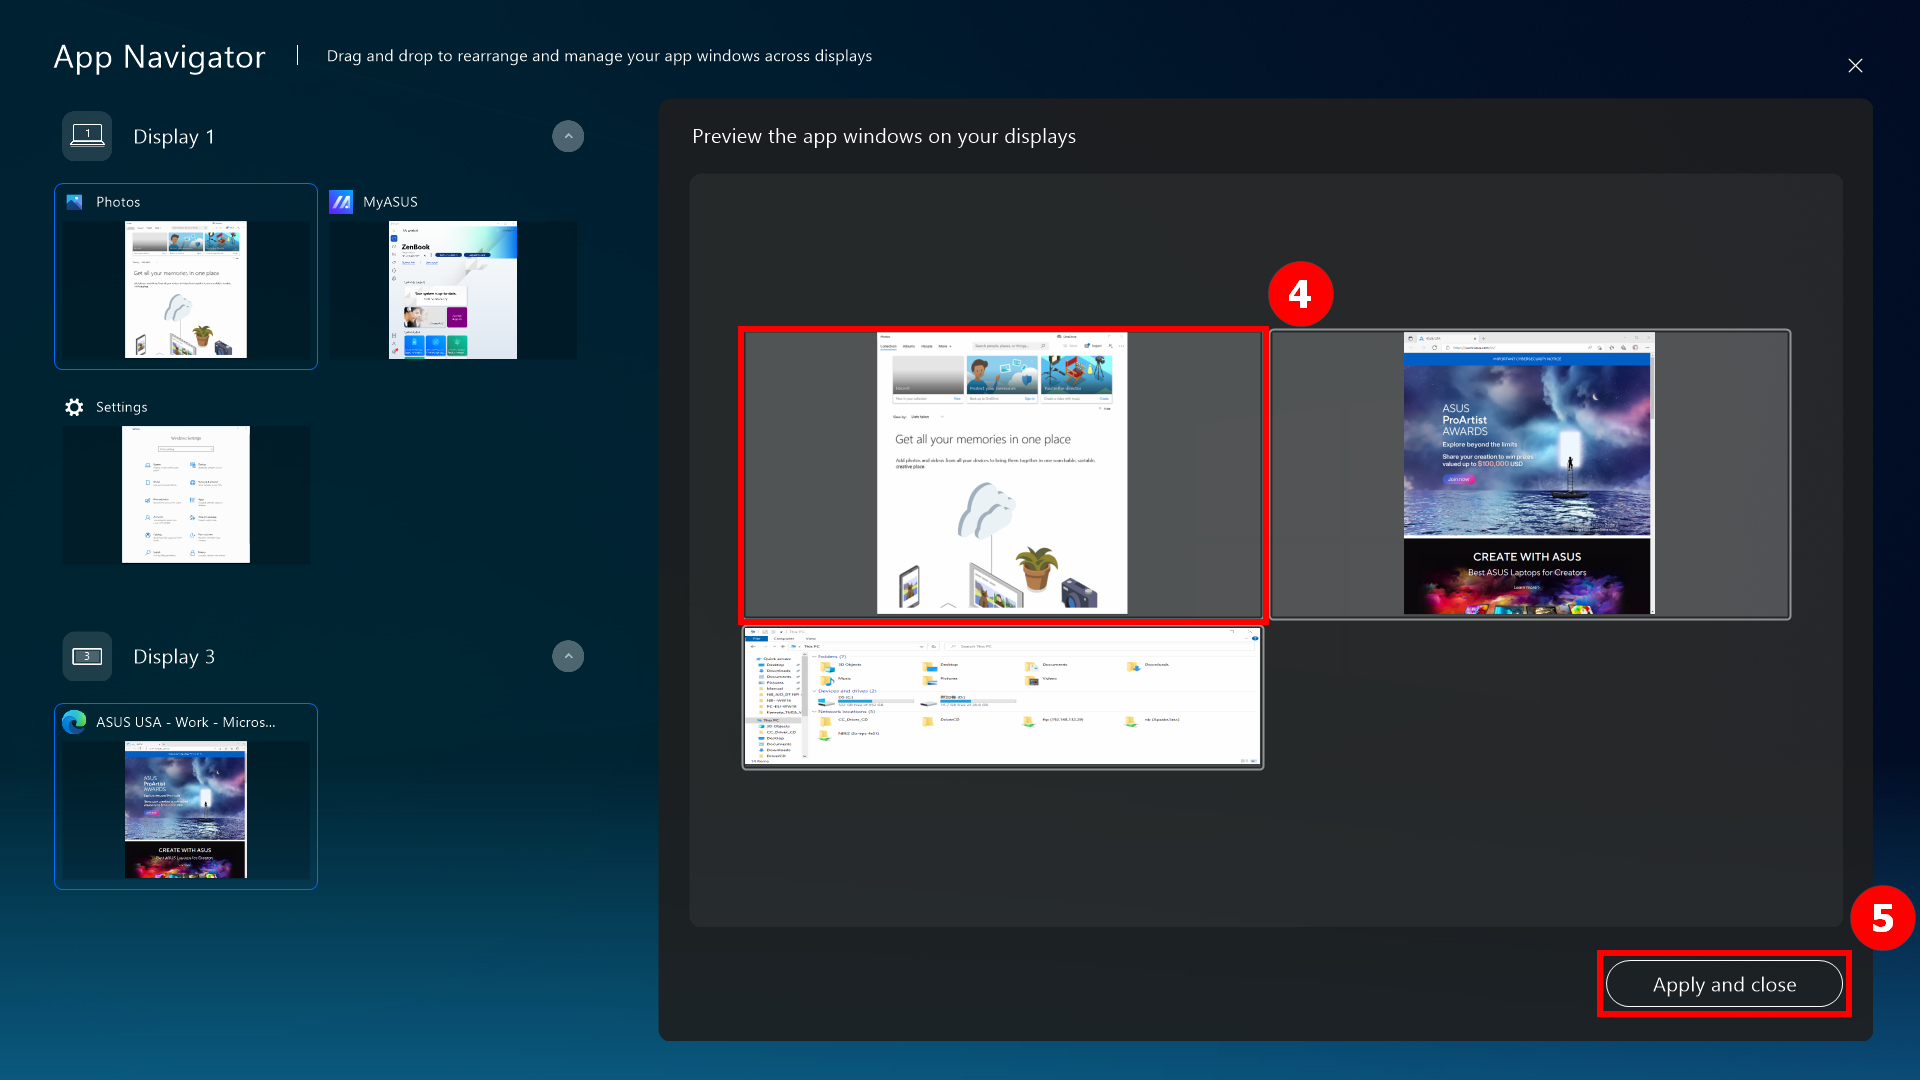
(4) ⑤[window] sudah ditampilkan di bagian depan [Screen 1]. Klik ⑥[Apply an close] untuk menutup App Navigator.
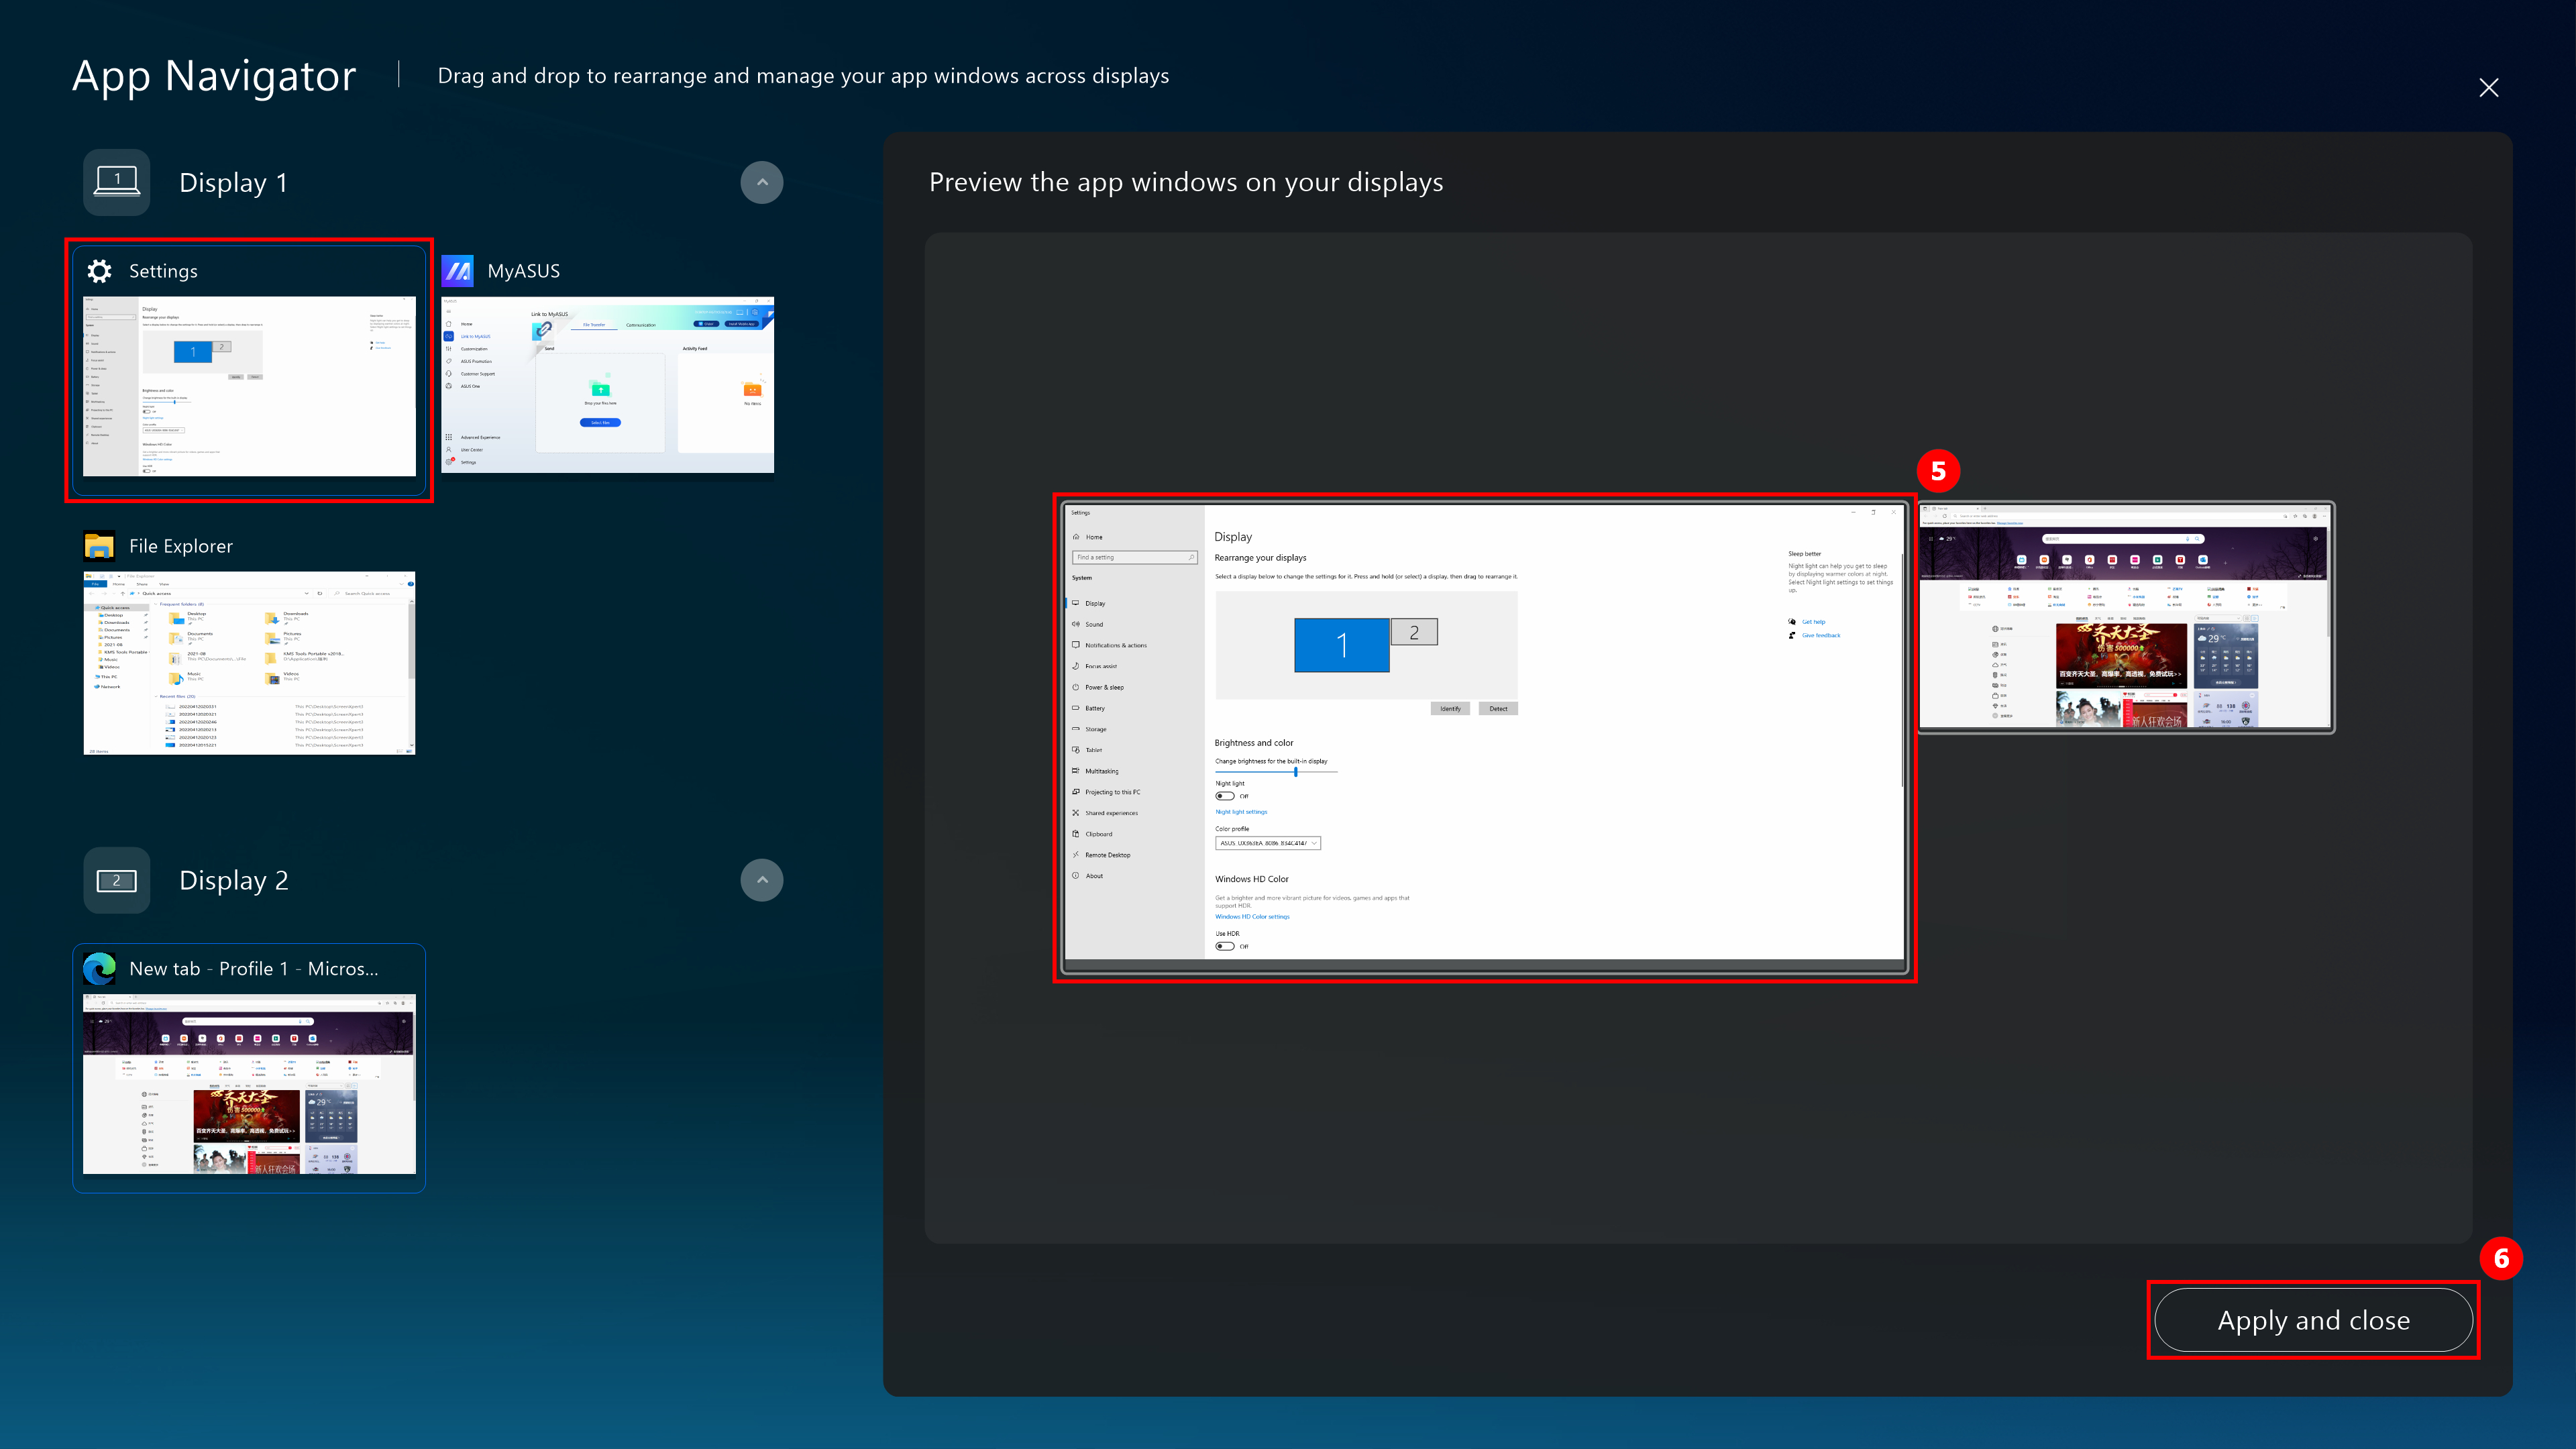
(5) Jendela ini sudah berada di tengah di depannya [Screen 1].
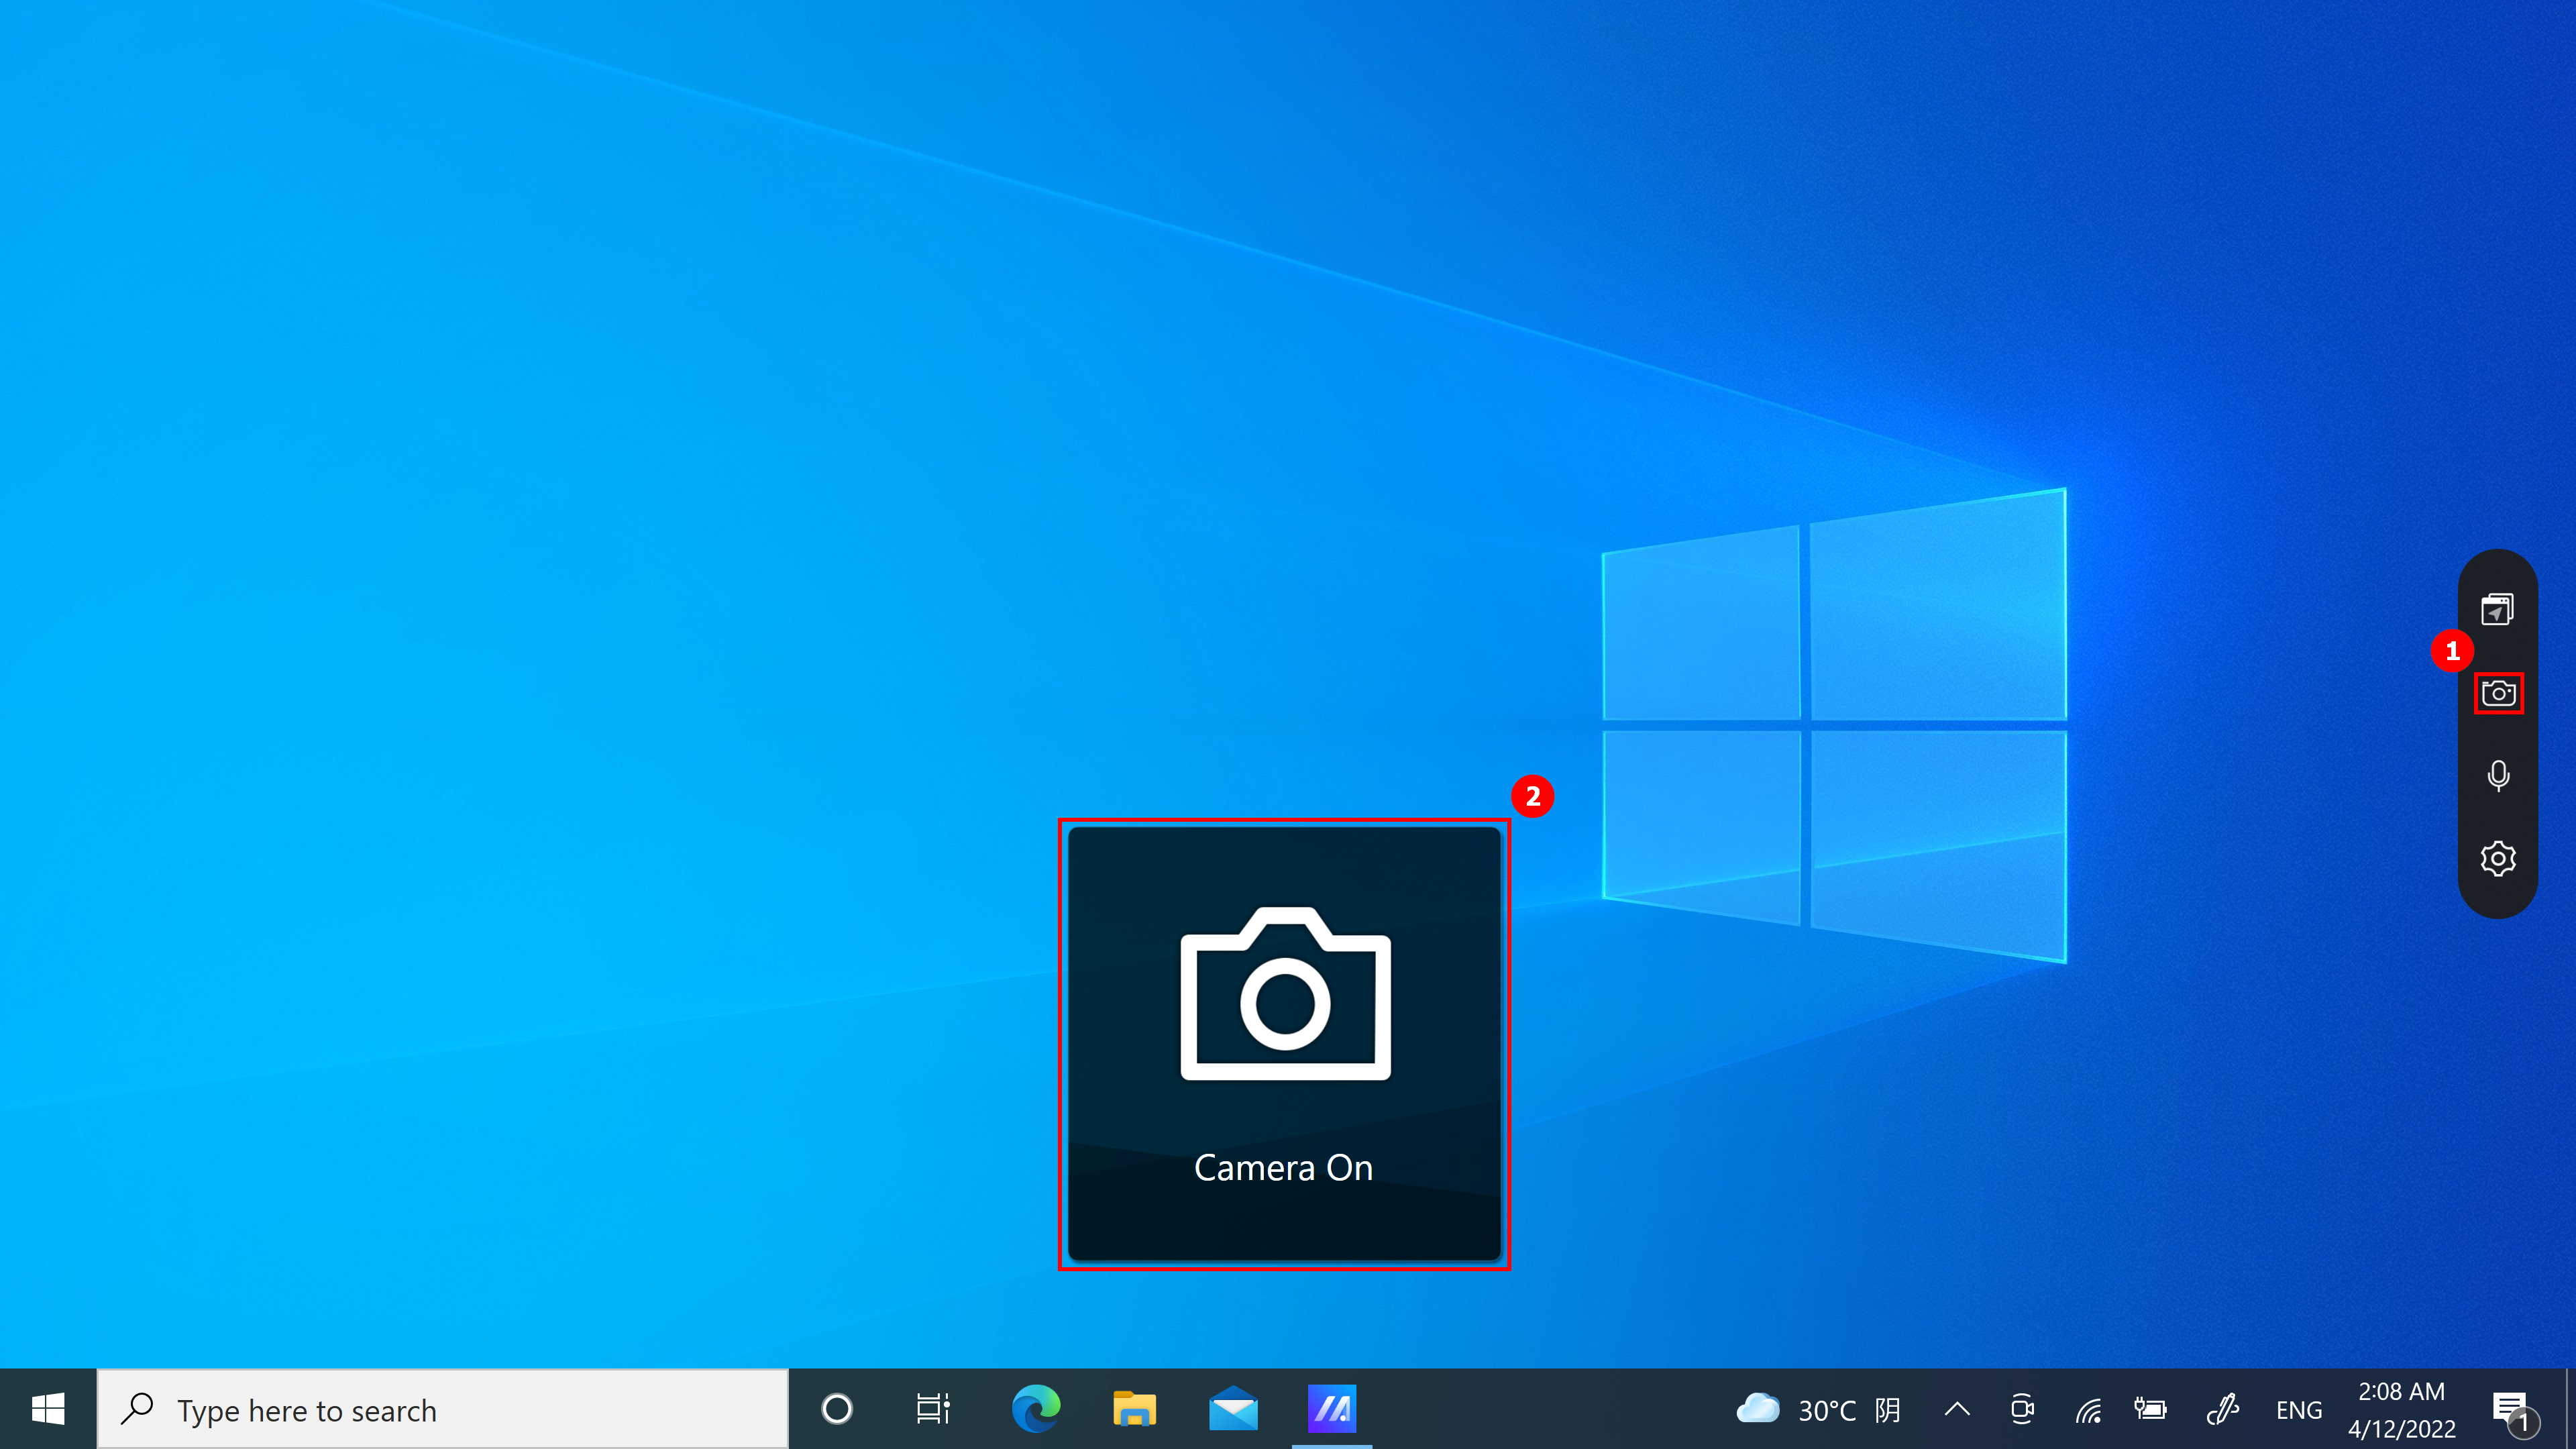
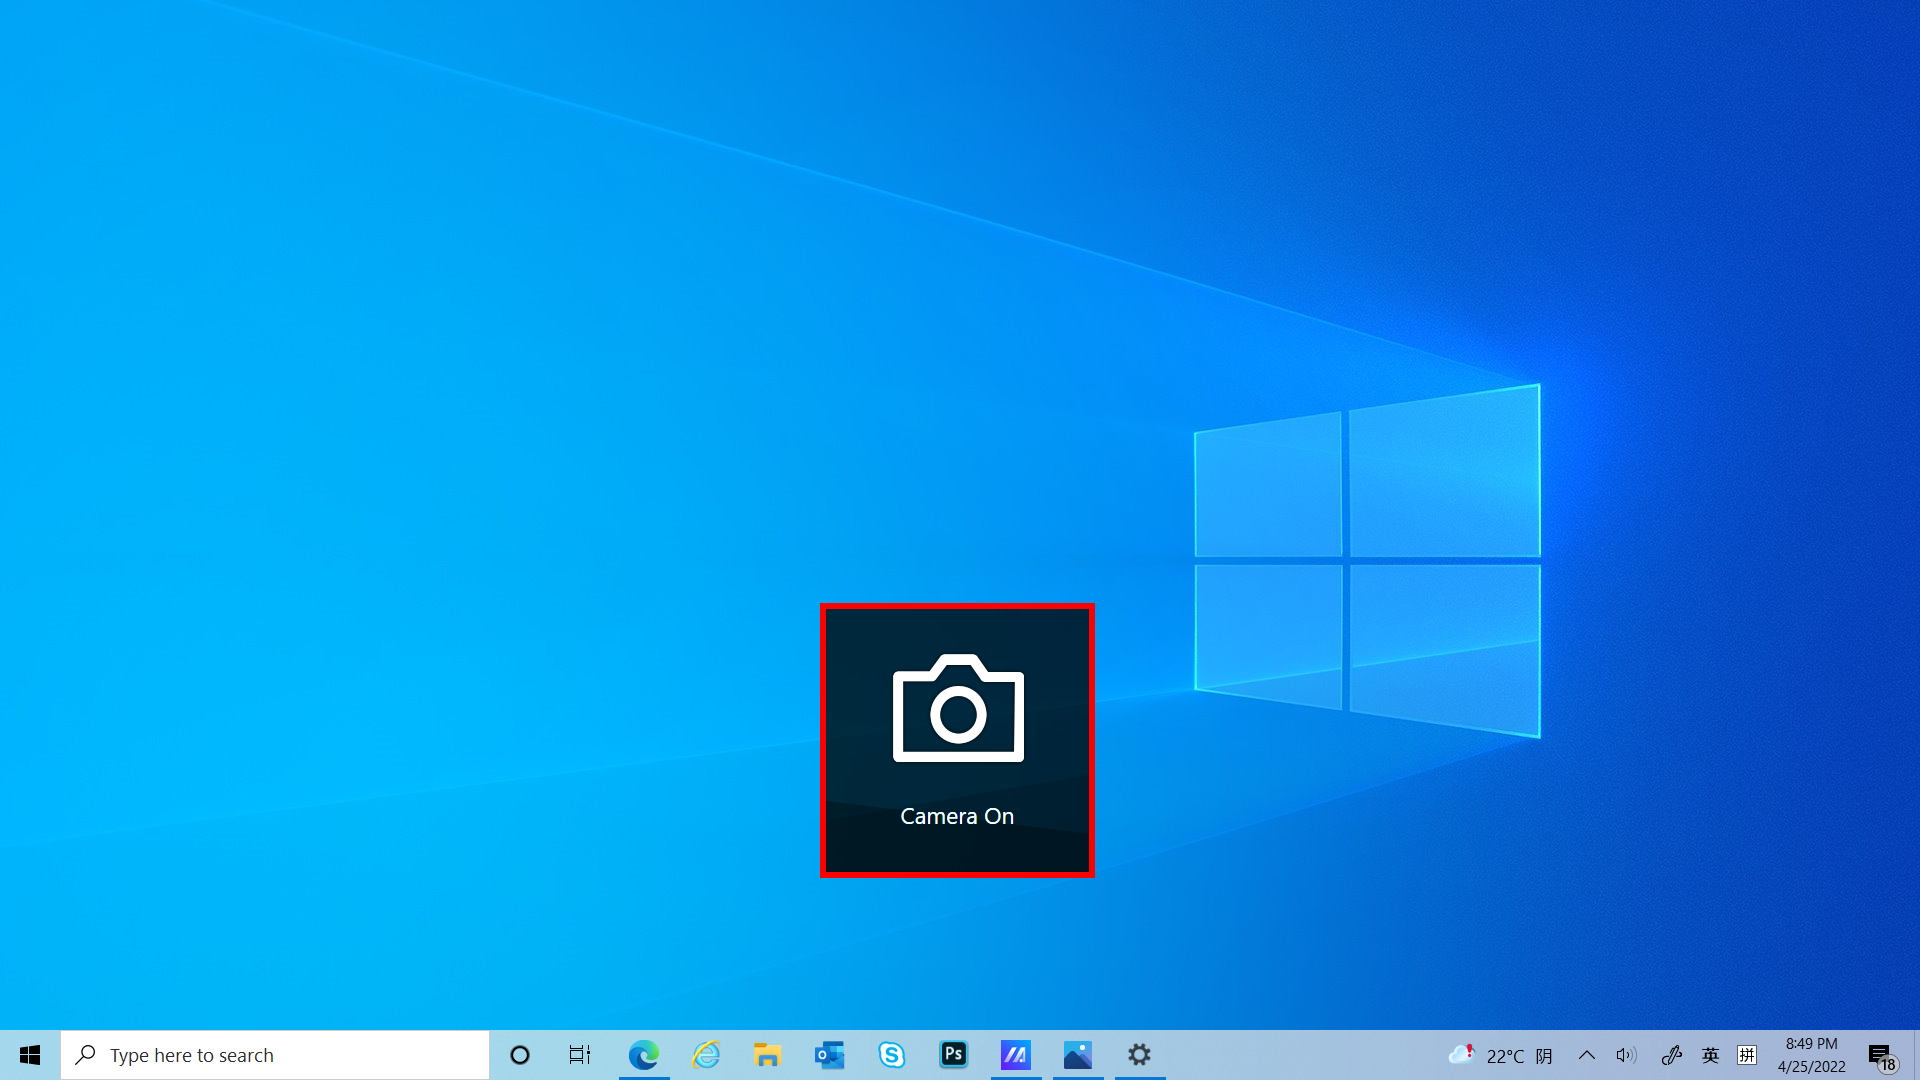
(1) Klik ① [Camera] untuk dengan cepat mengalihkan fungsi Kamera, dan ②[Camera On/Off] akan ditampilkan di desktop.
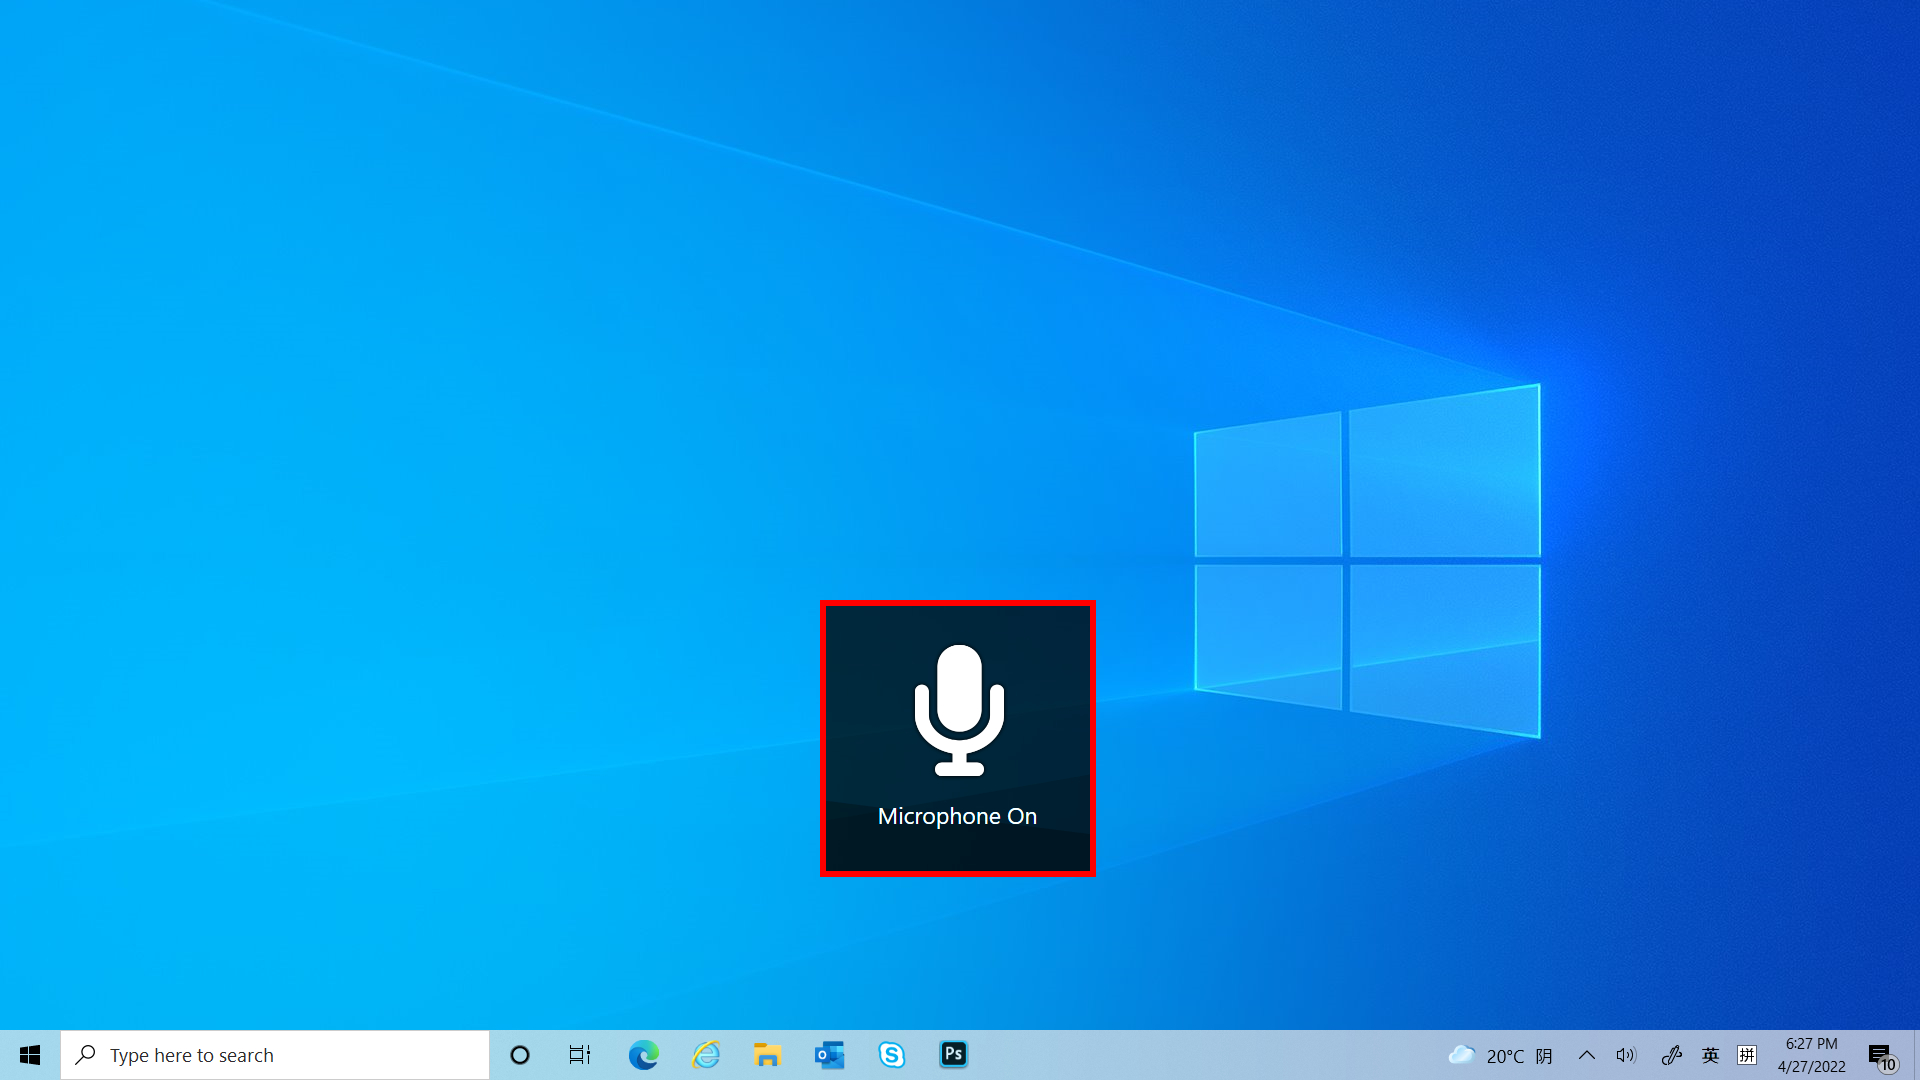
(1) Klik ①[Microphone] untuk mengaktifkan dan menonaktifkan fungsi Mikrofon dengan cepat, dan ②[Microphone On/Off] akan ditampilkan di desktop.

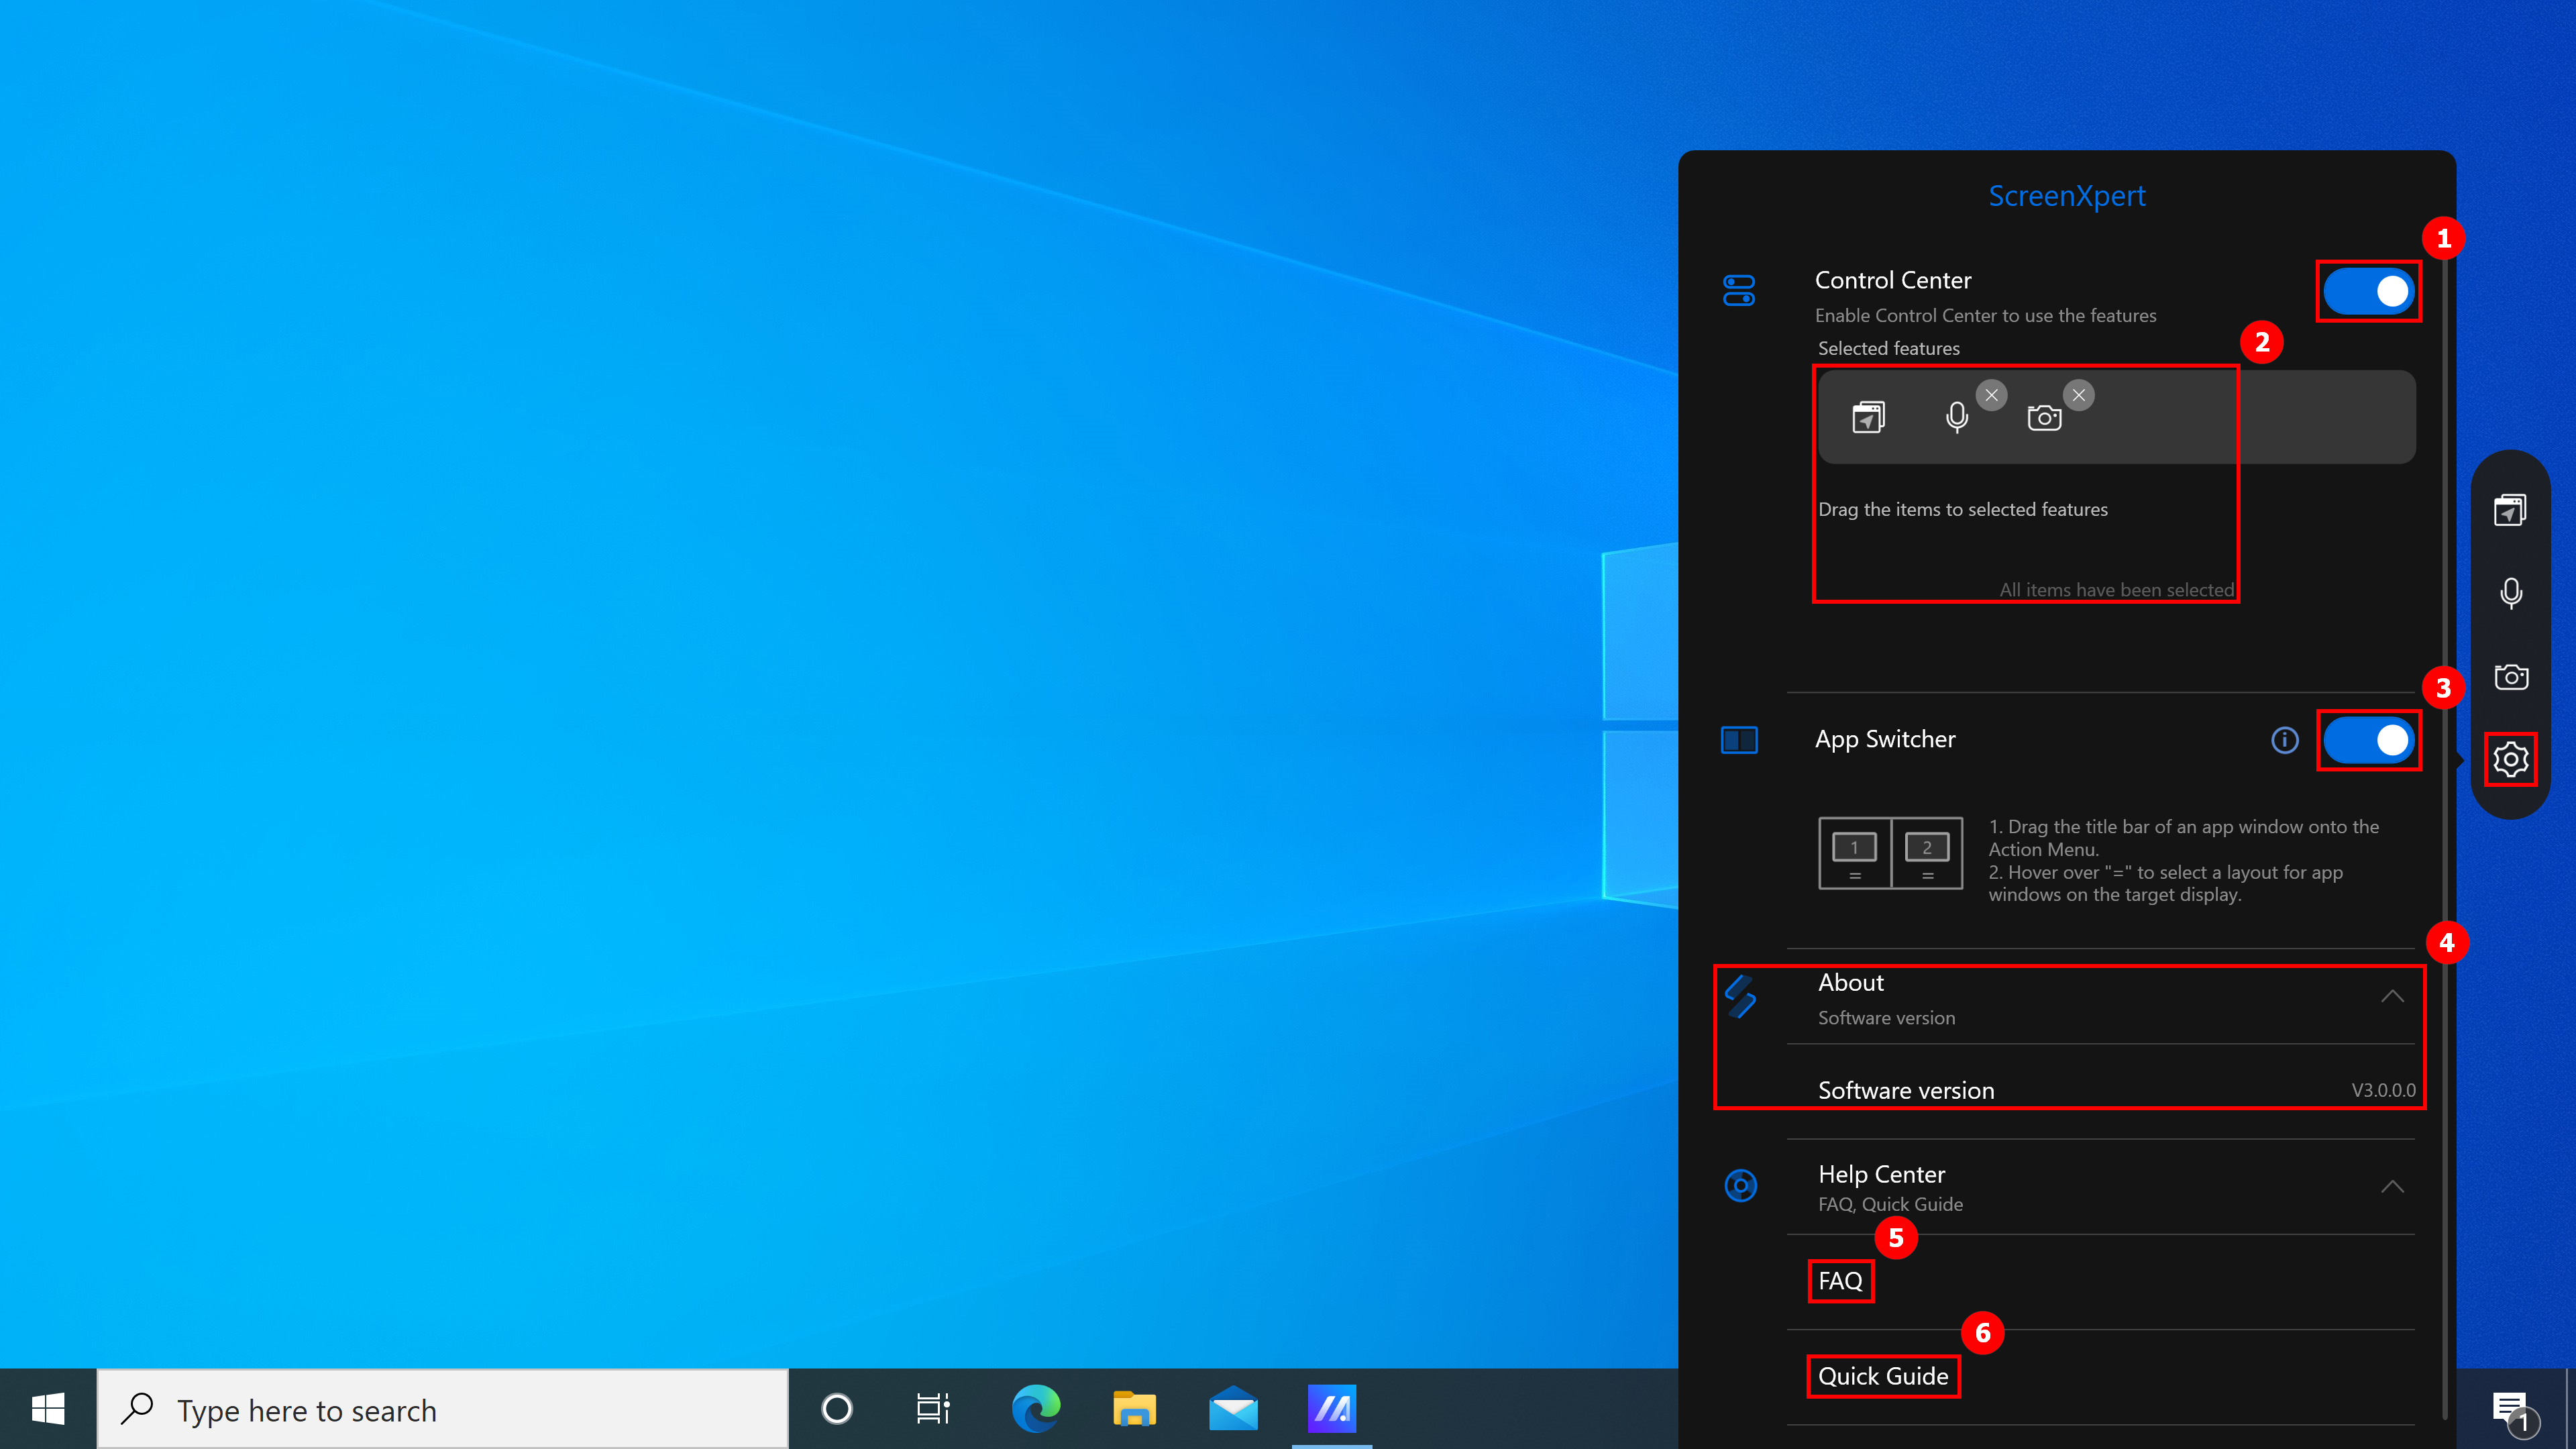
Fitur berikut tersedia di halaman pengaturan:
- Klik ①[Control Center] ikon kecil di desktop akan hilang. Jika Anda ingin mengaktifkan ikon desktop, ikuti petunjuk di bagian pertama artikel ini untuk mengaktifkan ScreenXpert secara manual, lalu mengaktifkan Pusat Kontrol.
- Di ②[Selected features], Anda dapat mengaktifkan atau menonaktifkan Mikrofon dan Kamera, atau mengubah posisinya..
- Aktifkan atau nonaktifkan ③[App Switcher].
- Versi Perangkat Lunak dapat dilihat di ④[About].
- Mengklik ⑤[FAQ] akan segera membuka artikel ini menggunakan browser.
- Klik ⑥[Quick Guide] untuk membuka Panduan ScreenXpert.
7. Download dan unintall ScreenXpertinstall
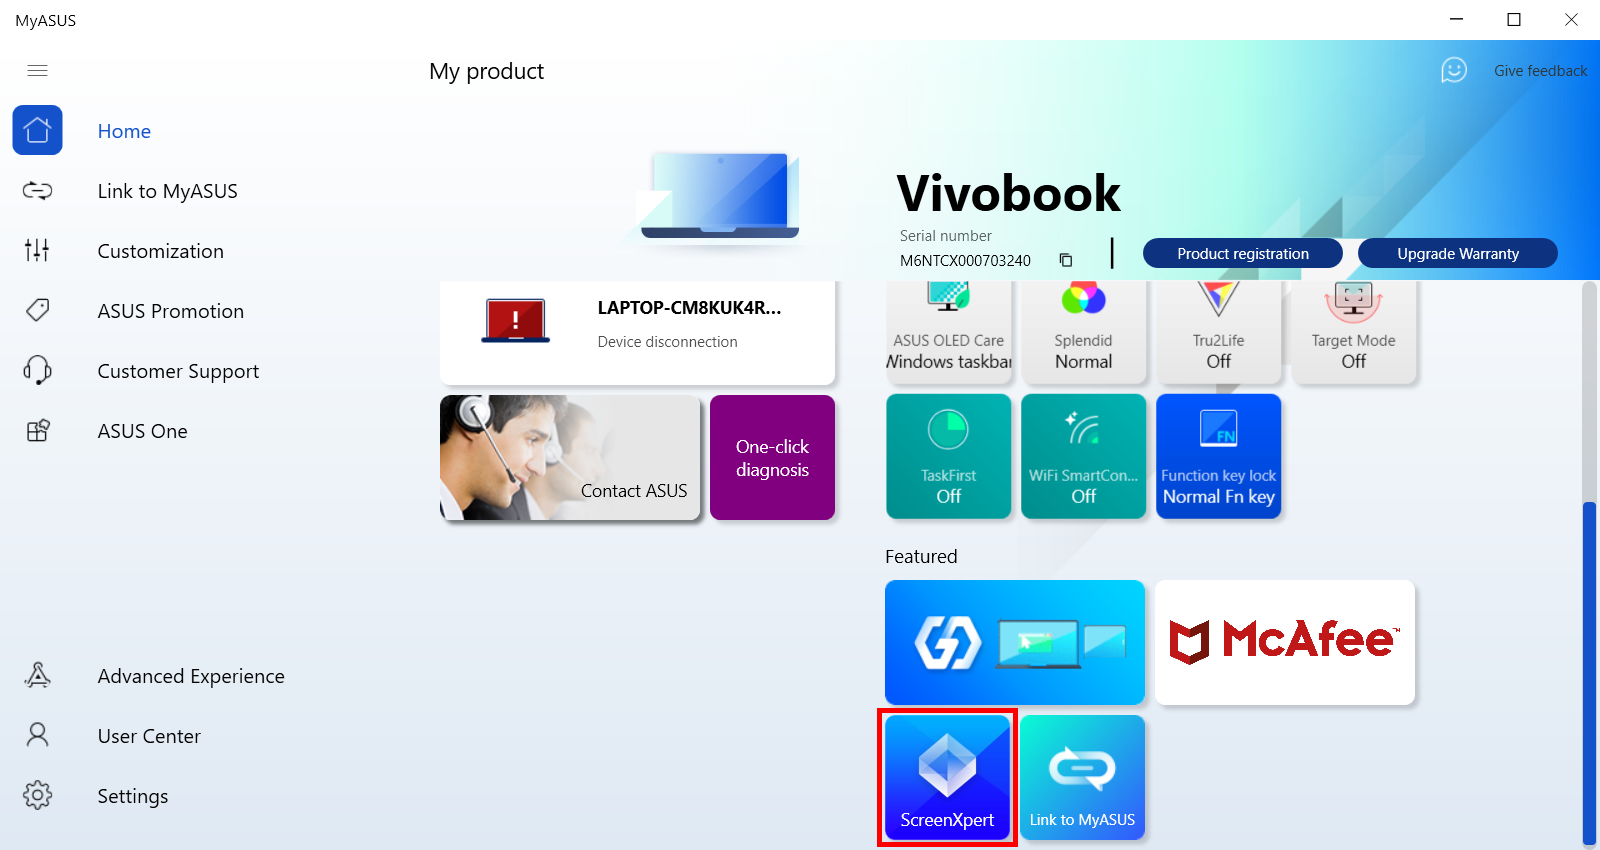
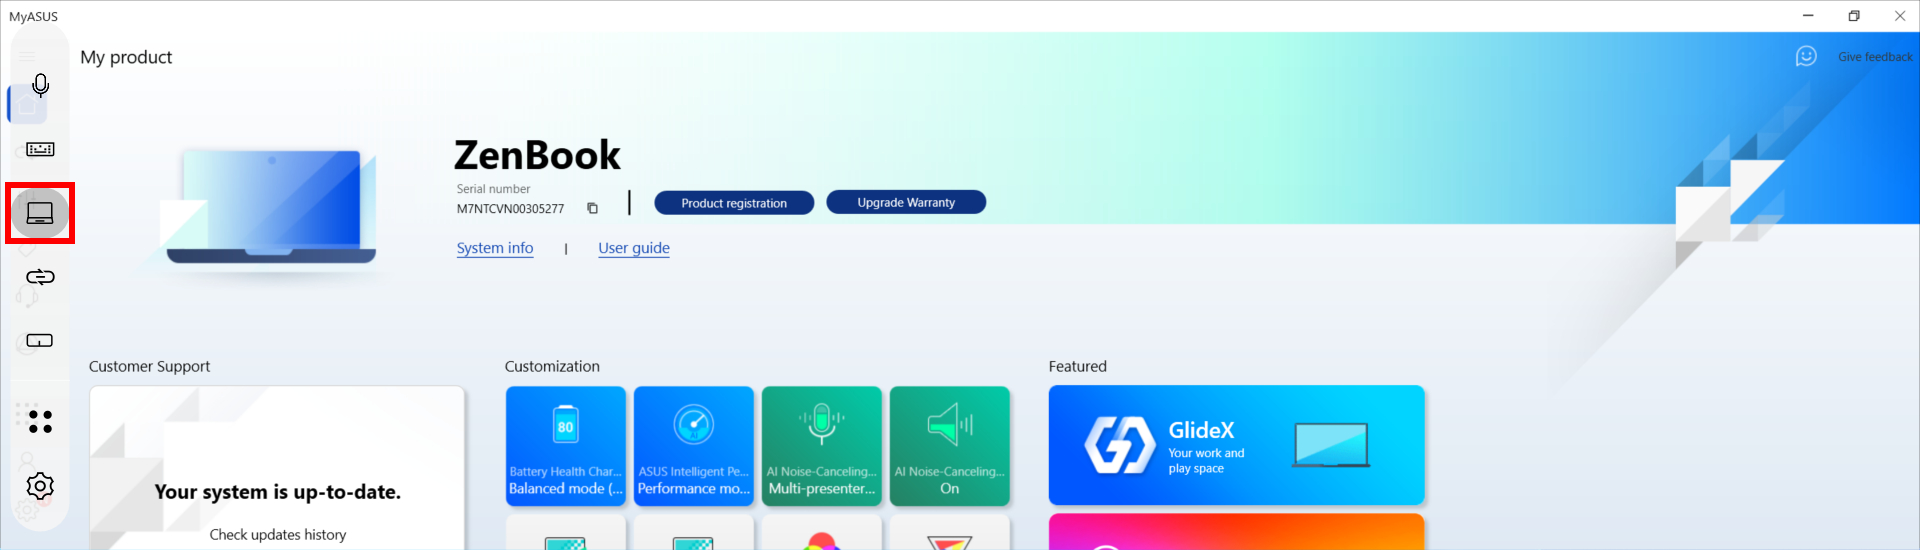
(1) Silakan masuk ke beranda MyASUS, cari dan klik ScreenXpert pada kolom unggulan, dan Anda akan dibawa ke Microsoft App Store untuk mengunduh ScreenXpert.
(2)Untuk uninstall ScreenXpert, klik link tersebut untuk informasi lebih lanjut.
[Notebook] ScreenPad Plus with ScreenXpert 3 - Pengenalan
Dirancang untuk memberikan Anda keunggulan dalam efisiensi alur kerja, layar sentuh sekunder ASUS ScreenPad™ Plus lebar penuh yang unik bekerja secara mulus dengan layar utama. ScreenPad Plus yang interaktif meningkatkan produktivitas Anda dan memungkinkan kemungkinan tanpa batas menggunakan koleksi kontrol cepat praktis yang disempurnakan untuk interaksi intuitif antara layar utama dan ScreenPad Plus. Sekarang Anda dapat menyeret aplikasi terpisah atau toolbar dalam aplikasi apa pun ke ScreenPad Plus untuk memberi Anda lebih banyak ruang untuk bekerja di tampilan utama.
- Persyaratan sistem
- Layar Utama dan ScreenPad Plus
- Membuka ScreenPad Plus
- App Switcher
- Brightness
- Aplikasi Navigator
- Task Swap
- Camera
- Microphone
- Keyboard Lock
- Show Desktop
- Phone Call
- TouchPad
- Launcher
- Settings
- Install & Uninstall ScreenXpert
1. ScreenPad Xpert memerlukan driver dan persyaratan versi Aplikasi, serta cara downoad dan instal
- ScreenXpert UWP: v3.0.1.0 (Unduh atau tingkatkan di Microsoft store)
- ScreenXpert Driver: v2.0.30.0 (Download atau upgrade in the MyASUS)
- ASUS Control Panel Toolkit: v1.0.14.0 (Download atau upgrade in the MyASUS) (For Control Panel Setting)
- ASUS System Control interface V3: v3.0.24.0 (Download atau upgrade in the MyASUS)
2. Main Screen dan ScreenPad Plus
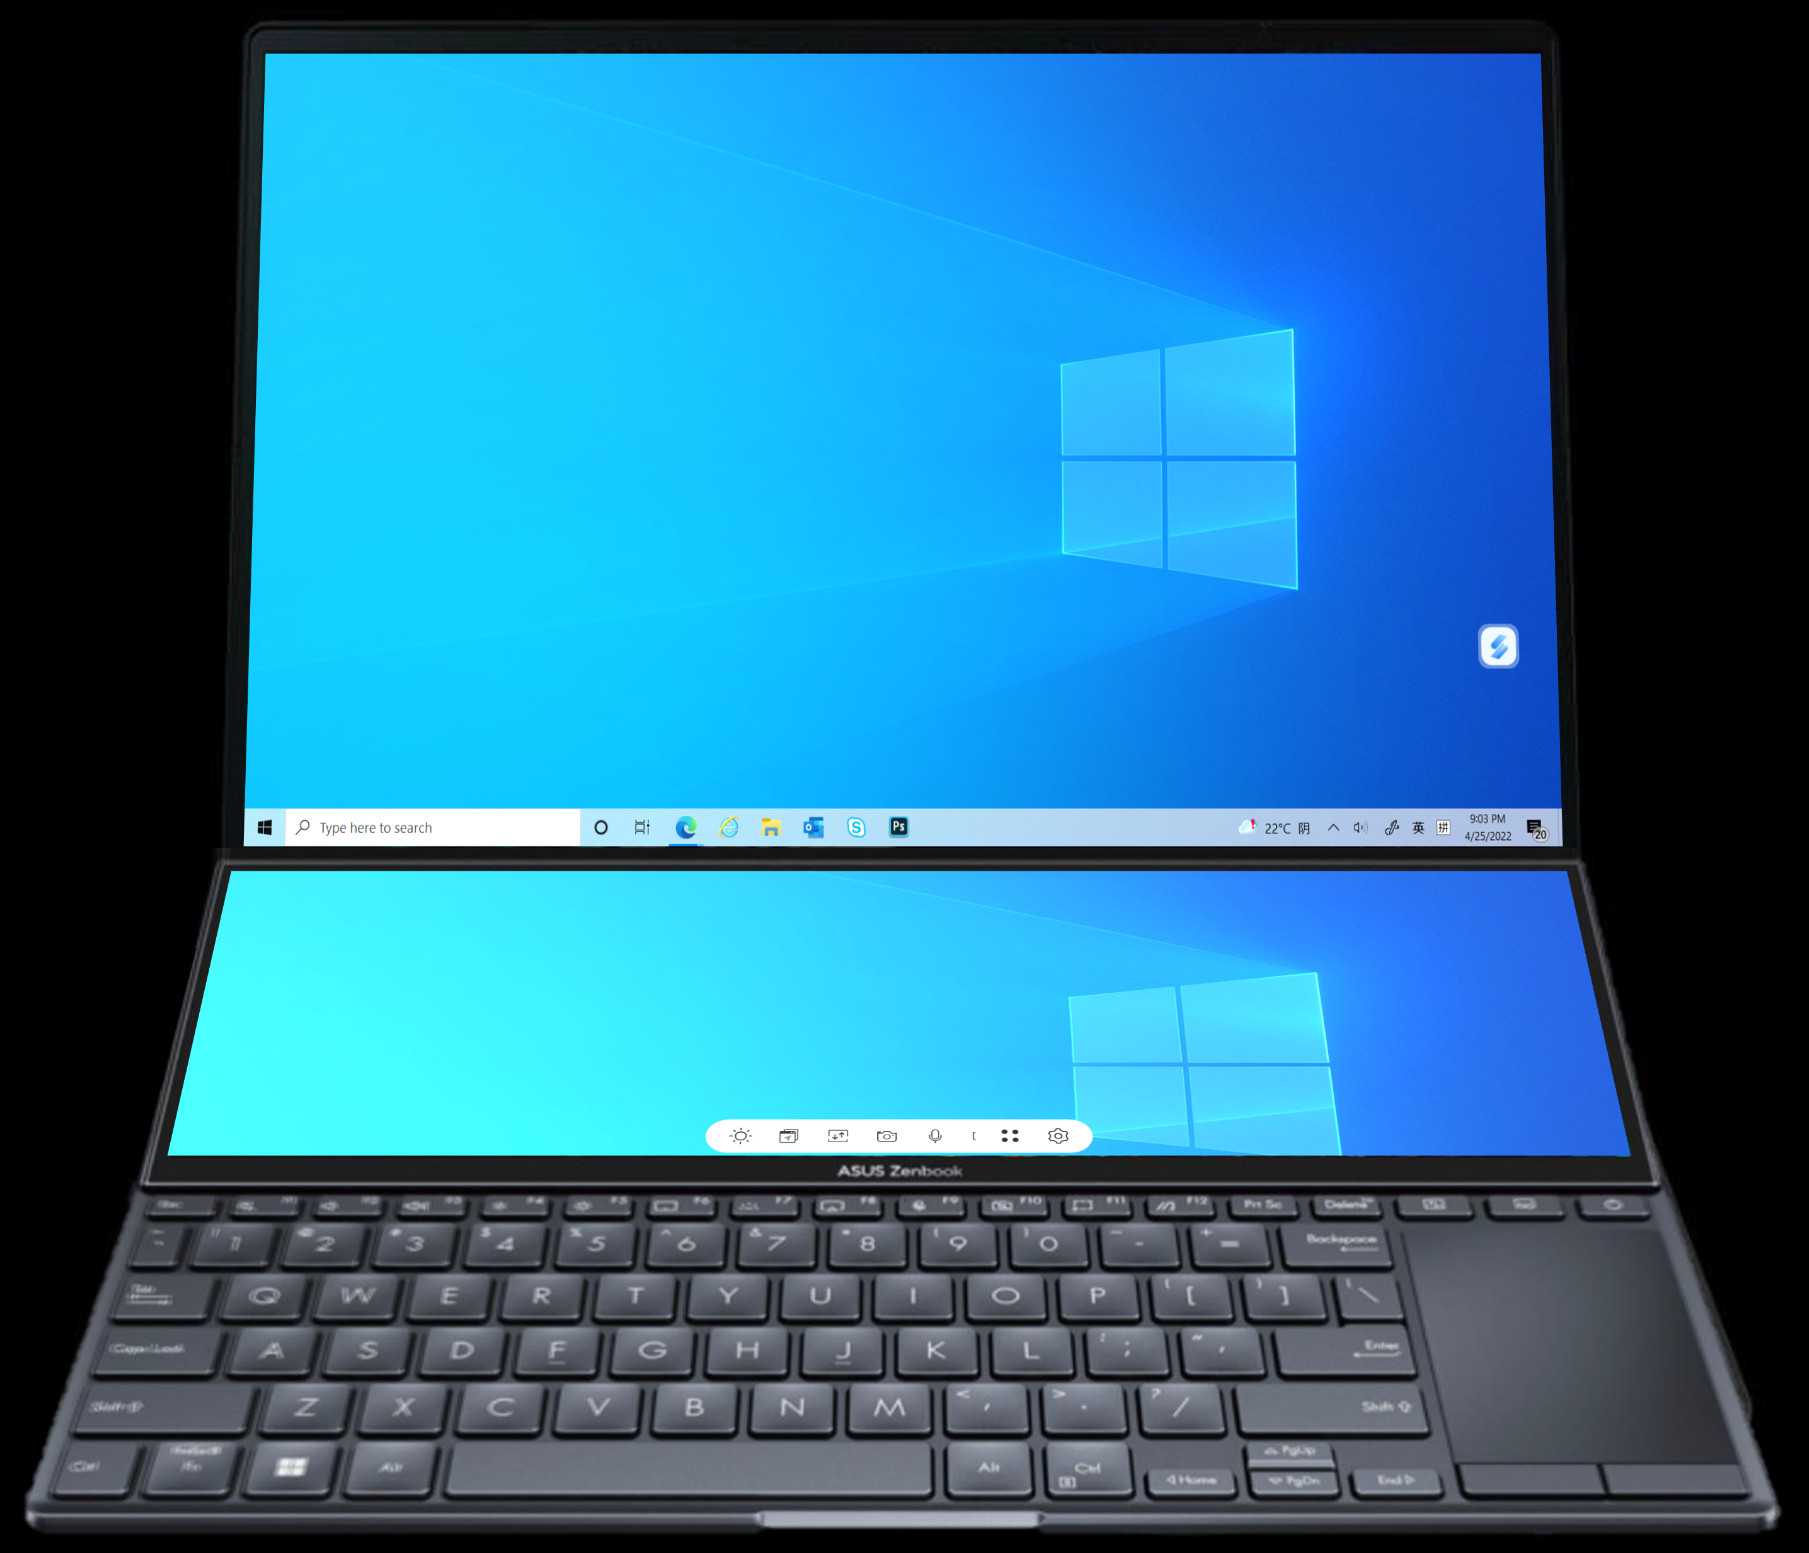
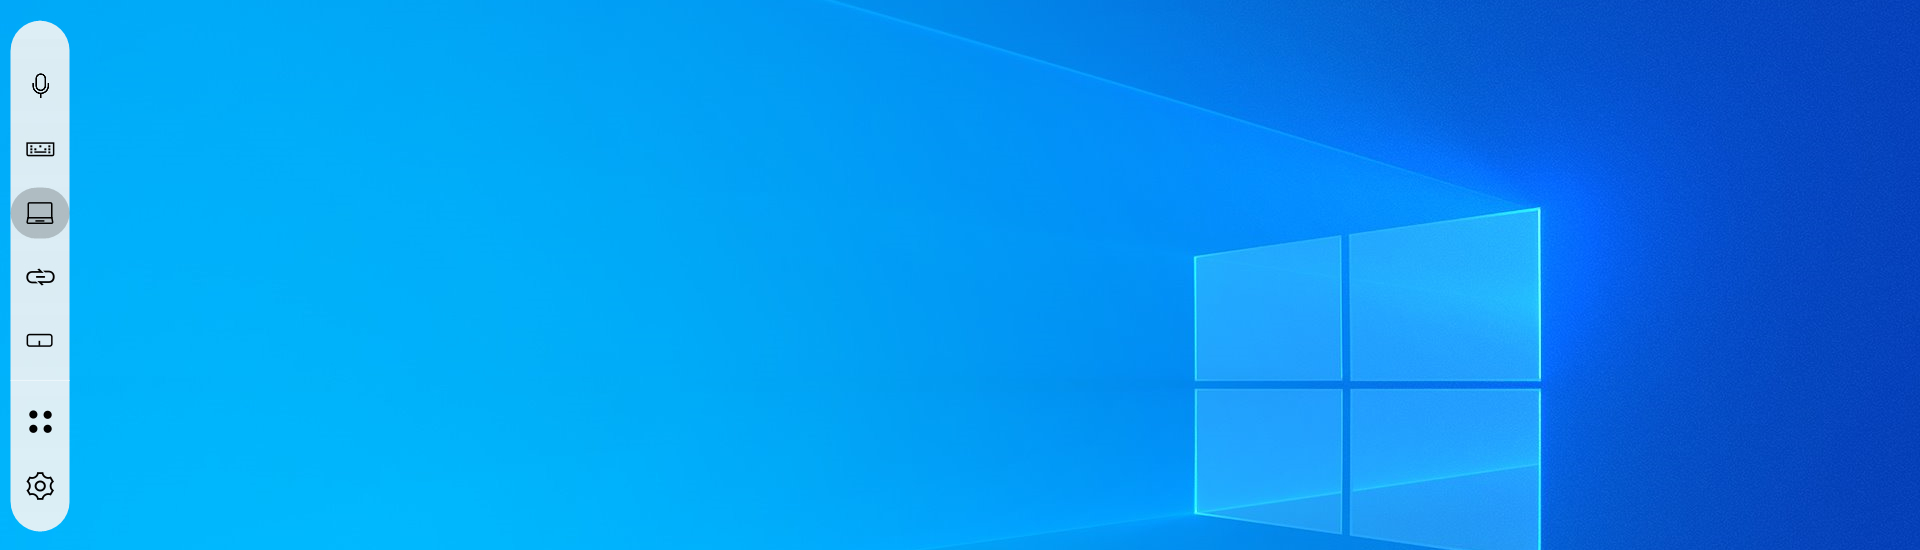
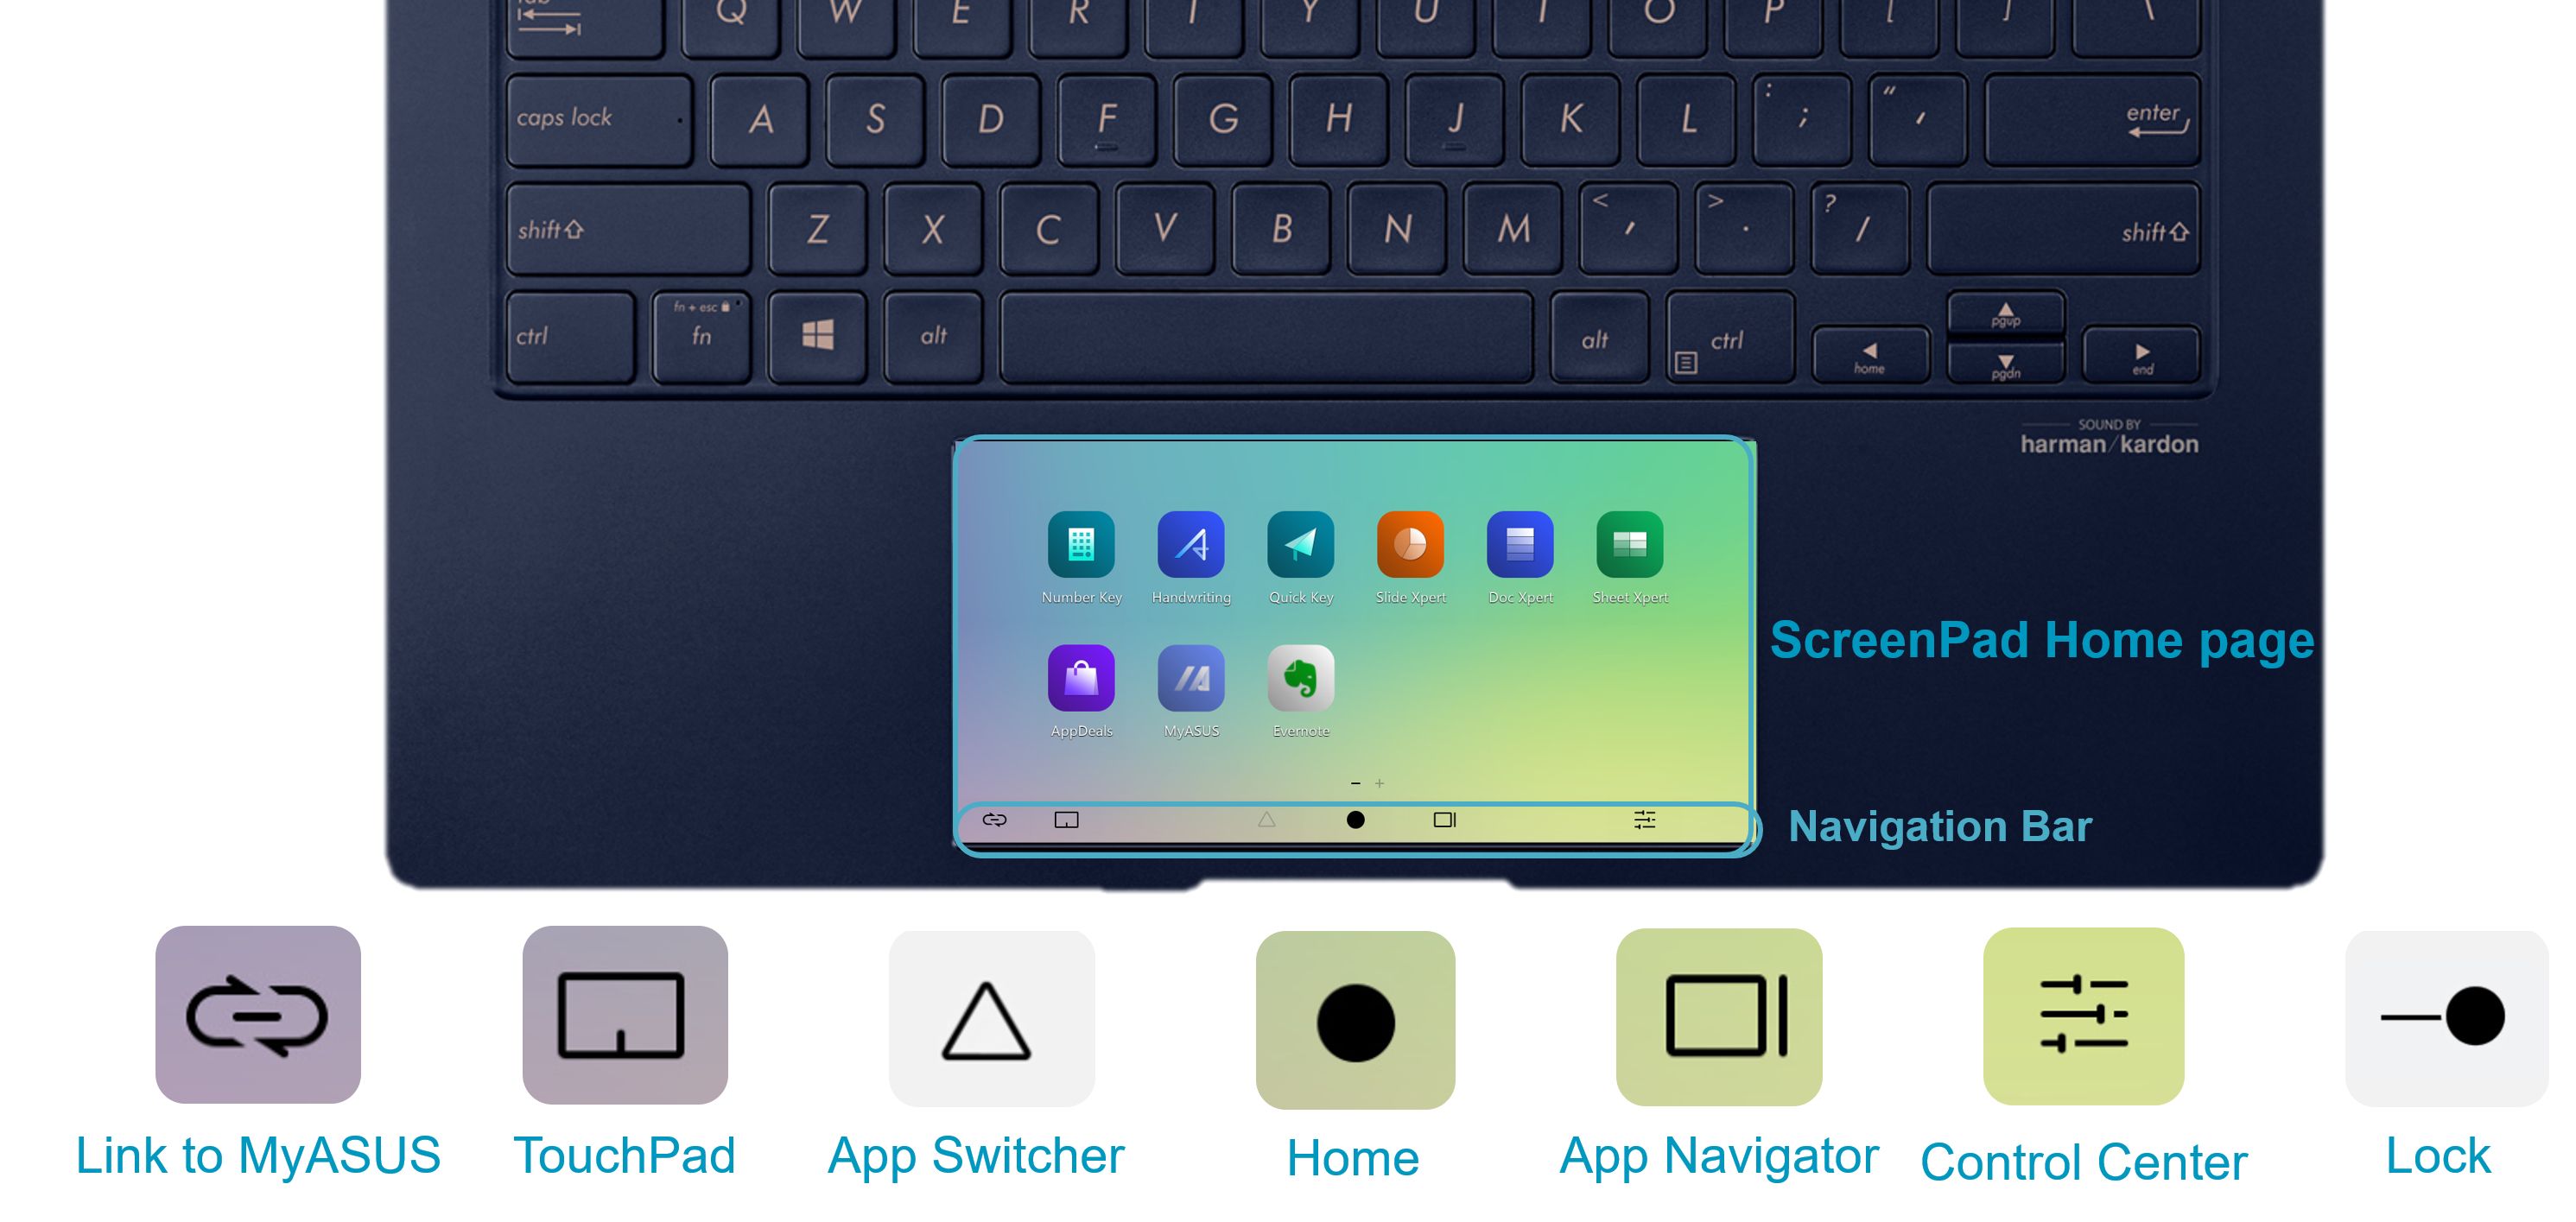
Dari kiri ke kanan: Brightness, App Navigator, Task Swap, Camera, Microphone, Keyboard Lock, Show Desktop, Link to MyASUS, TouchPad, Utilities, Settings.

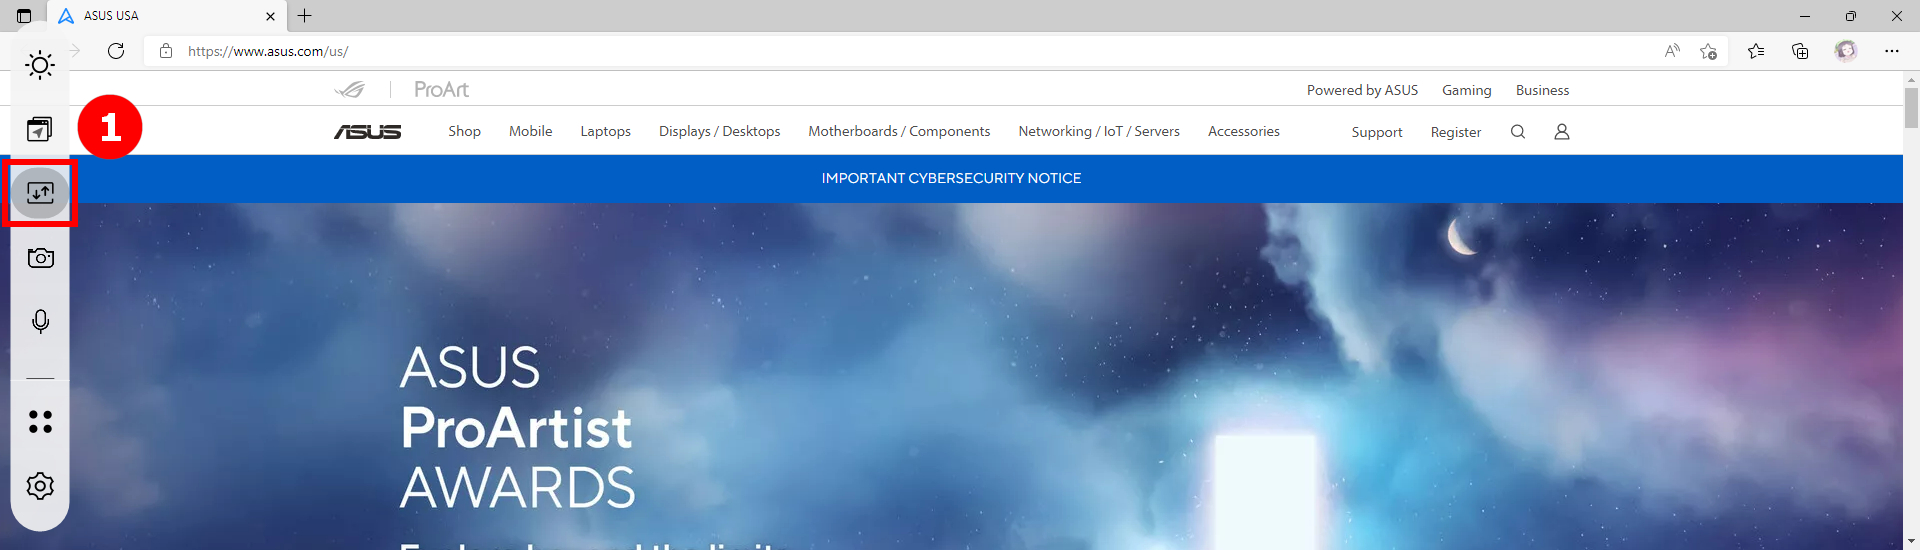
(1) Masukan ①[ScreenXpert] di bilah pencarian di sudut kiri bawah desktop. Klik ②[ScreenXpert], dan ScreenPad Plus akan aktif.
(1) Saat Anda menyeret jendela Aplikasi di layar Utama, ①[Screen Markings] akan ditampilkan dan memungkinkan Anda mengonfirmasi lokasi layar. Fungsi menu ②[App Switcher] uga ditampilkan, yang berisi ikon Layar 1, Layar 2, Layar3 dan ViewMax. (Dalam contoh, komputer memiliki layar yang diperluas)
(2) ScreenXpert mendukung interaksi antar layar. Saat Anda menyeret jendela di desktop, ikon [App Switcher] muncul. Jika Anda menyeret jendela ke ①[Screen], ②[ViewMax], jendela akan ditampilkan dalam layar penuh di Layar Utama dan Screen Pad Plus.
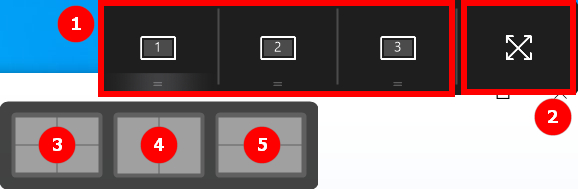
- Tarik mouse ke ③, dan jendela Aplikasi akan ditampilkan dalam layar 1 untuk menempati seperempat layar.
- Tarik mouse ke ④, dan jendela Aplikasi akan ditampilkan di layar 1 menempati setengah bagian kiri dan kanan layar.
- Tarik mouse ke ⑤, dan jendela Aplikasi akan ditampilkan di layar 1 menempati setengah bagian atas dan bawah layar.
Tarik mouse ke ④, dan jendela Aplikasi akan ditampilkan di layar 1 untuk menempati setengah bagian kiri layar.
(3) Tarik jendela ke [ViewMax], jendela akan ditampilkan dalam layar penuh di Layar Utama dan Screen Pad Plus. Jendela pop-up Lokasi Taskbar akan muncul, klik [Windows Settings] untuk mengubah Taskbar dengan cepat.
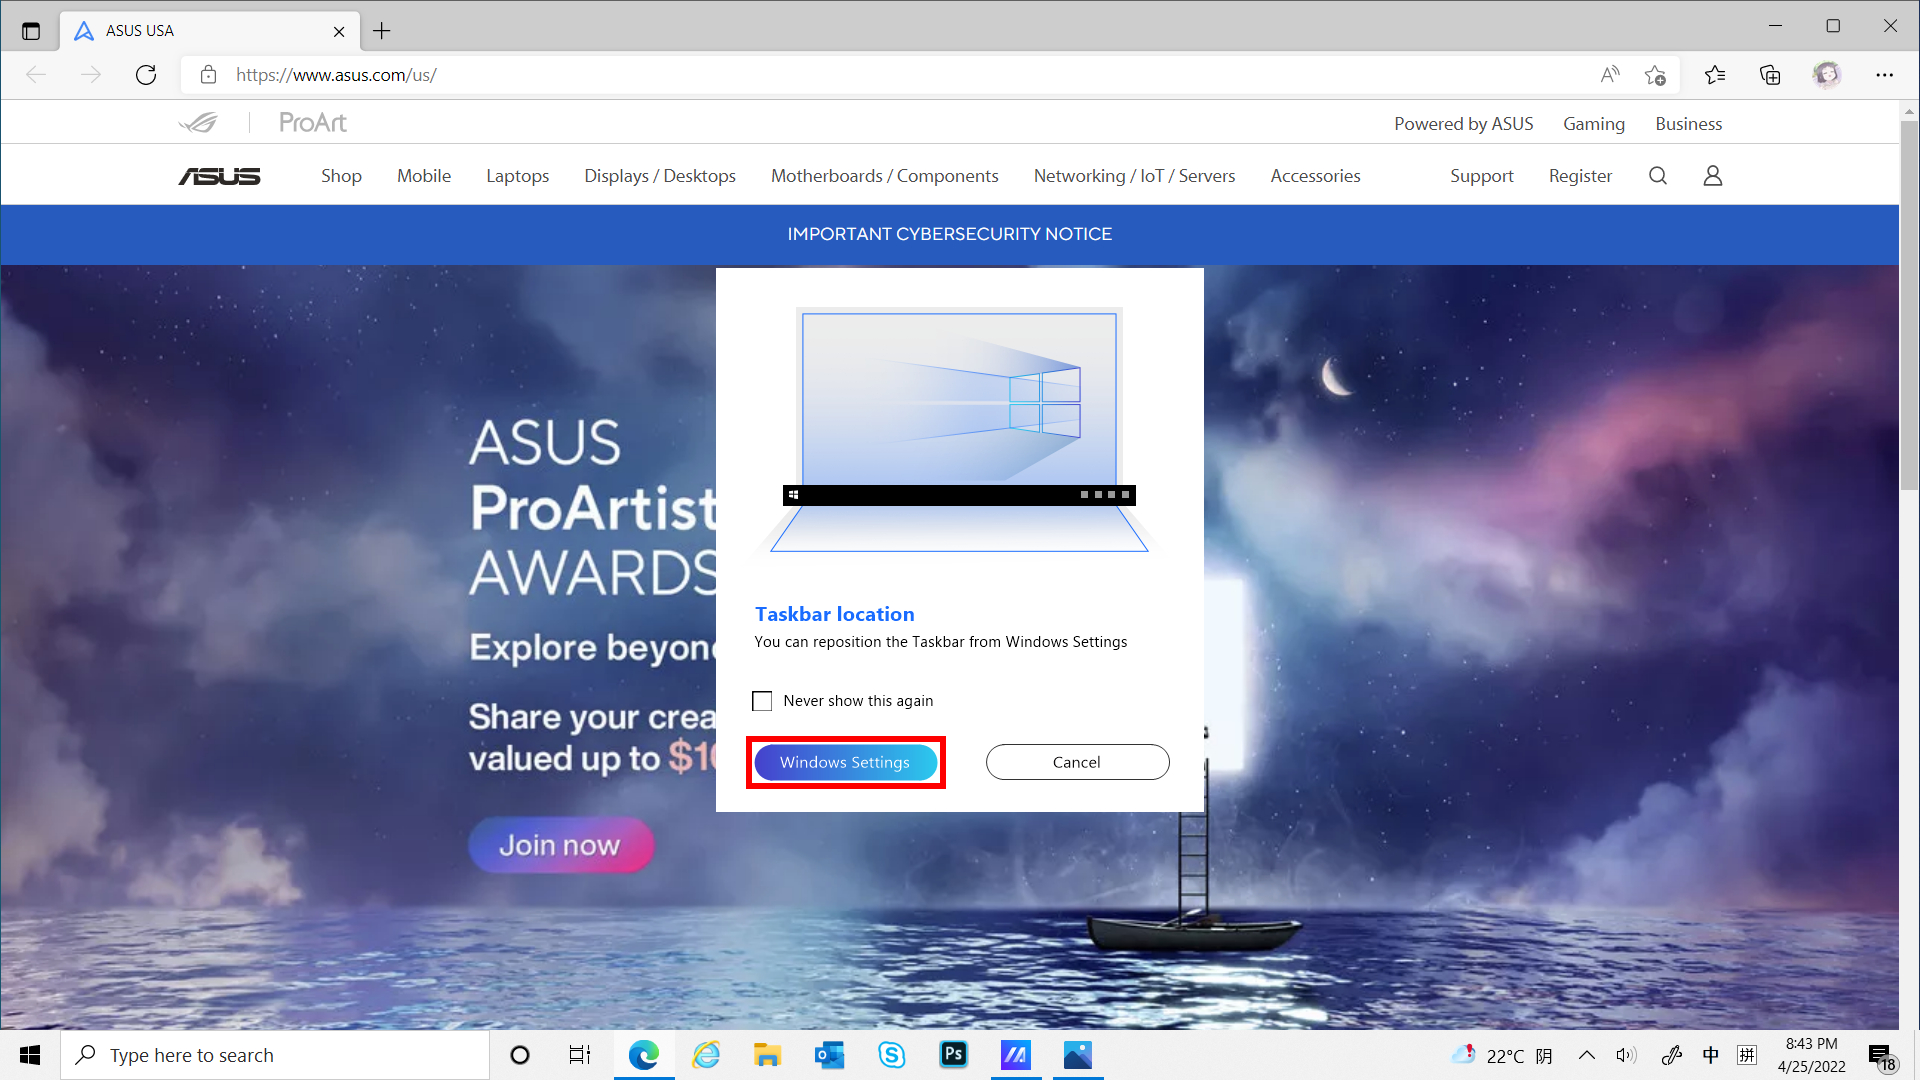
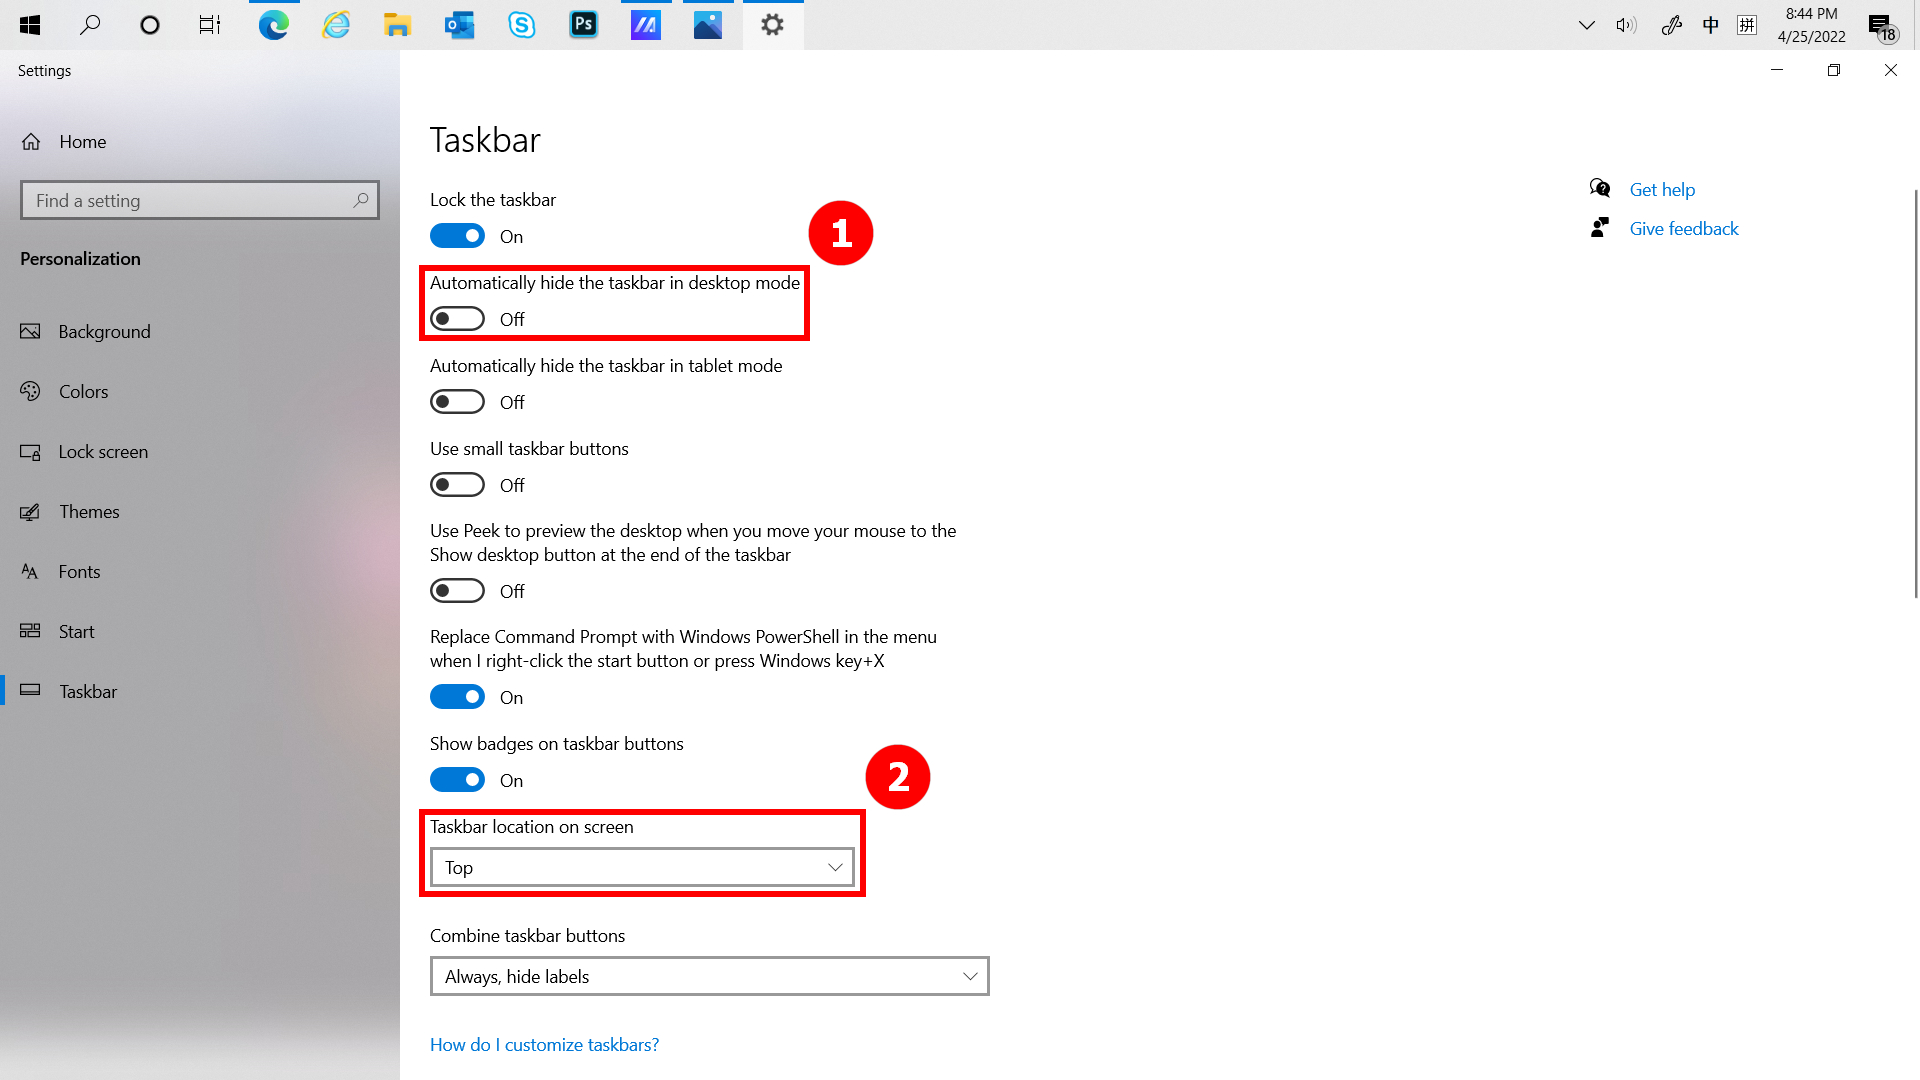
(4) Anda dapat mengubah lokasi Taskbar di ①[Secara otomatis menyembunyikan taskbar dalam mode desktop] atau ②[Lokasi bilah tugas di layar] untuk meningkatkan pengalaman Anda saat menggunakan fitur ViewMax.
Klik Kecerahan untuk menyesuaikan kecerahan Screenpad Plus dengan cepat.
(1) Saat Anda membuka beberapa jendela di komputer dan ingin dengan cepat beralih jendela antar layar yang berbeda, gunakan fungsi App Navigator dan klik [App Navigator]. Saat App Navigator dibuka  [App Navigator]. Saat App Navigator dibuka, ①[Area] adalah area yang ditandai oleh layar di komputer, dan ②[Area] iadalah jendela yang ditampilkan di layar.
(2) Seret③[Window] yang ditampilkan di [Screen 2] ke [Screen 1].
(3) ⑤[window] sudah ditampilkan di depan ④[Screen 1]. Klik ⑤[Apply and close] untuk menutup App Navigator.
(4) Jendela ini sudah berada di tengah di depannya [Screen 1].
(1) Klik① [Task Swap] untuk memindahkan jendela yang ditampilkan di ScreenPad Plus agar ditampilkan dalam layar penuh di Layar Utama.
(2) Jendela sudah ditampilkan dalam layar penuh di Layar Utama.
Klik [Camera] untuk beralih fungsi Kamera dengan cepat, dan [Camera On/Off] akan ditampilkan di desktop.
Klik  [Microphone] untuk mengaktifkan dan menonaktifkan fungsi Mikrofon dengan cepat, dan [Microphone On/Off] akan ditampilkan di desktop.
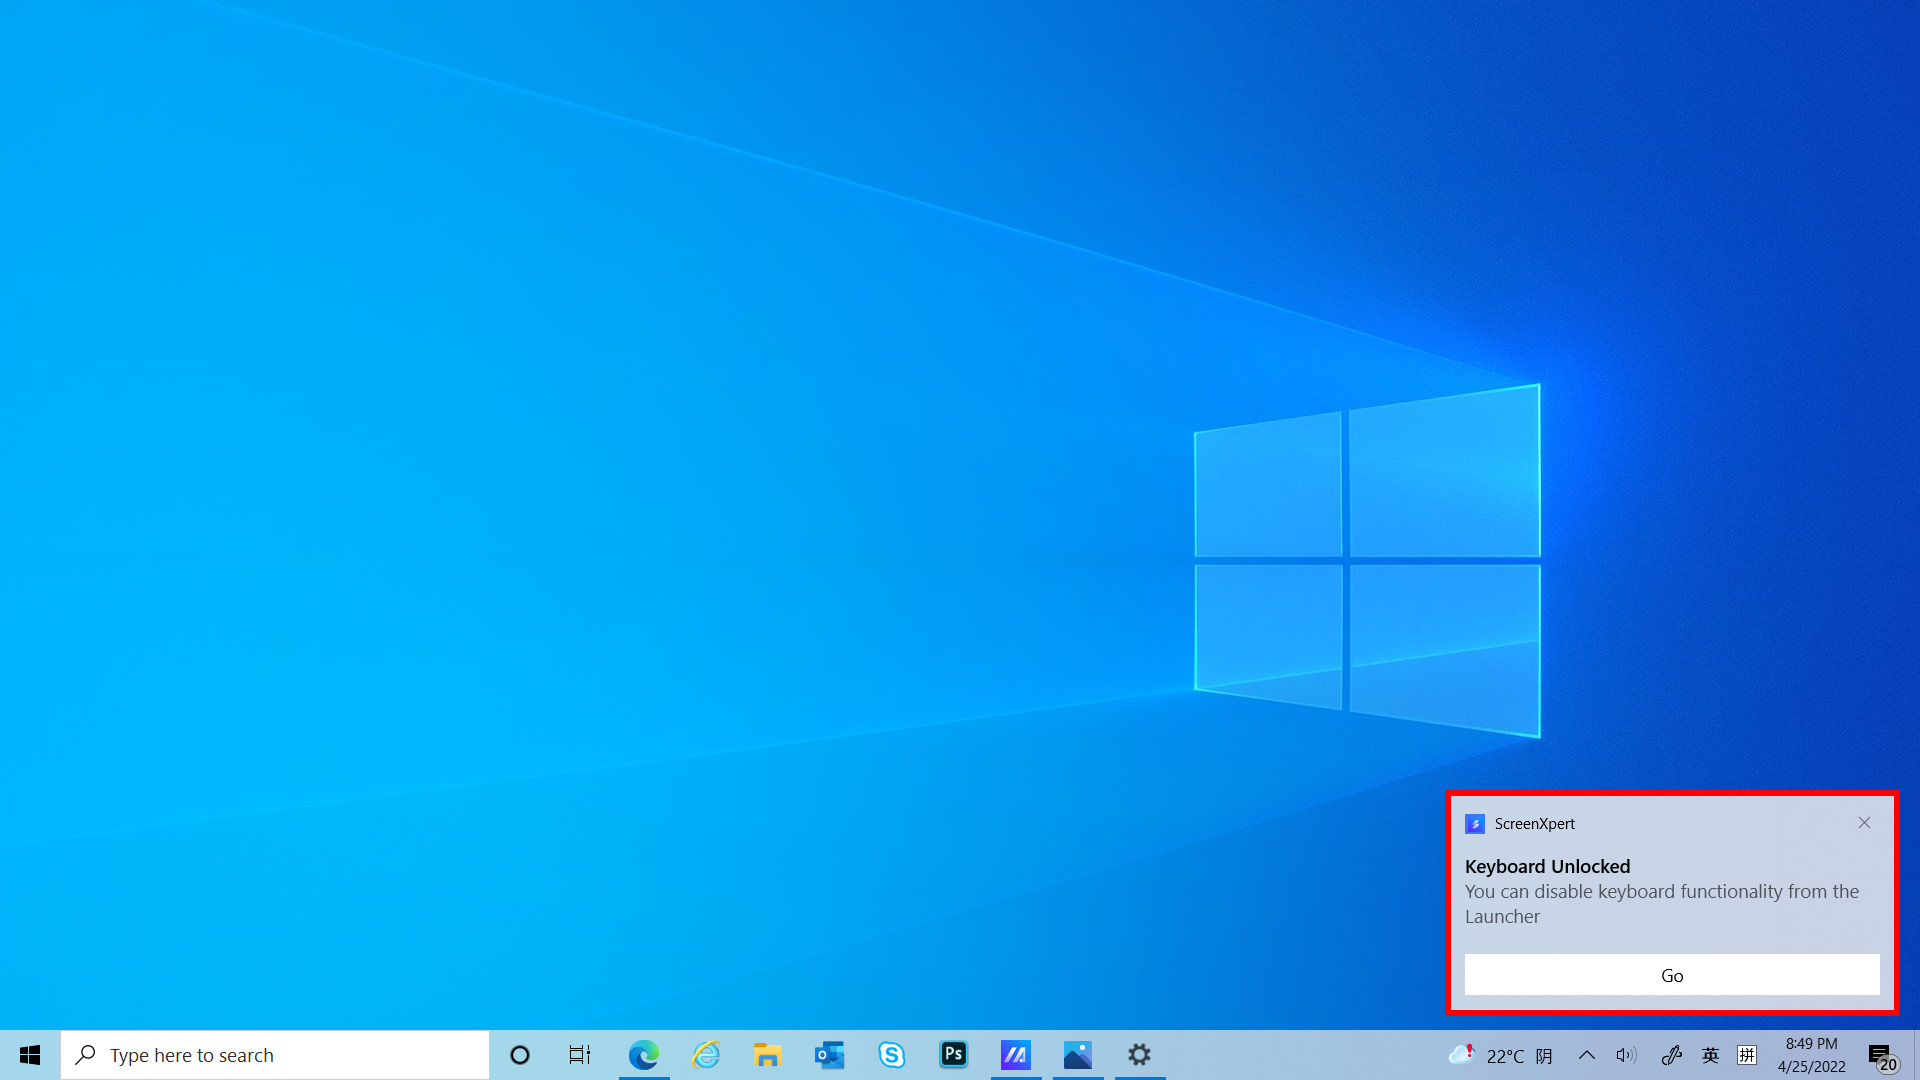
Klik  [Keyboard] untuk dengan cepat mengalihkan kunci dan buka kunci fungsi Keyboard, dan [Keyboard Lock/Unlock] akan ditampilkan di desktop.
Jika sebuah jendela ditampilkan di ScreenPad Plus, Anda dapat dengan cepat meminimalkan jendela tersebut dengan mengklik [Show Desktop].
ScreenPad Plus already shows the desktop.
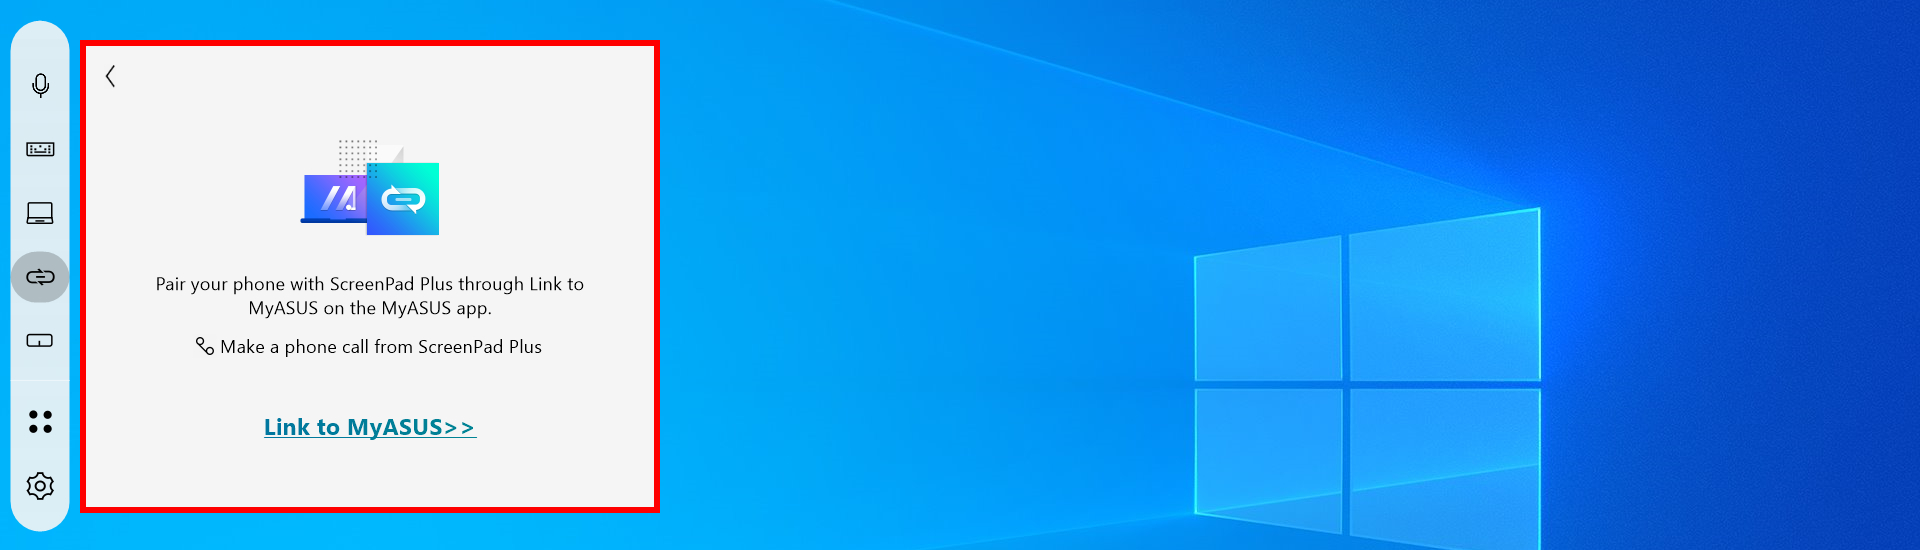
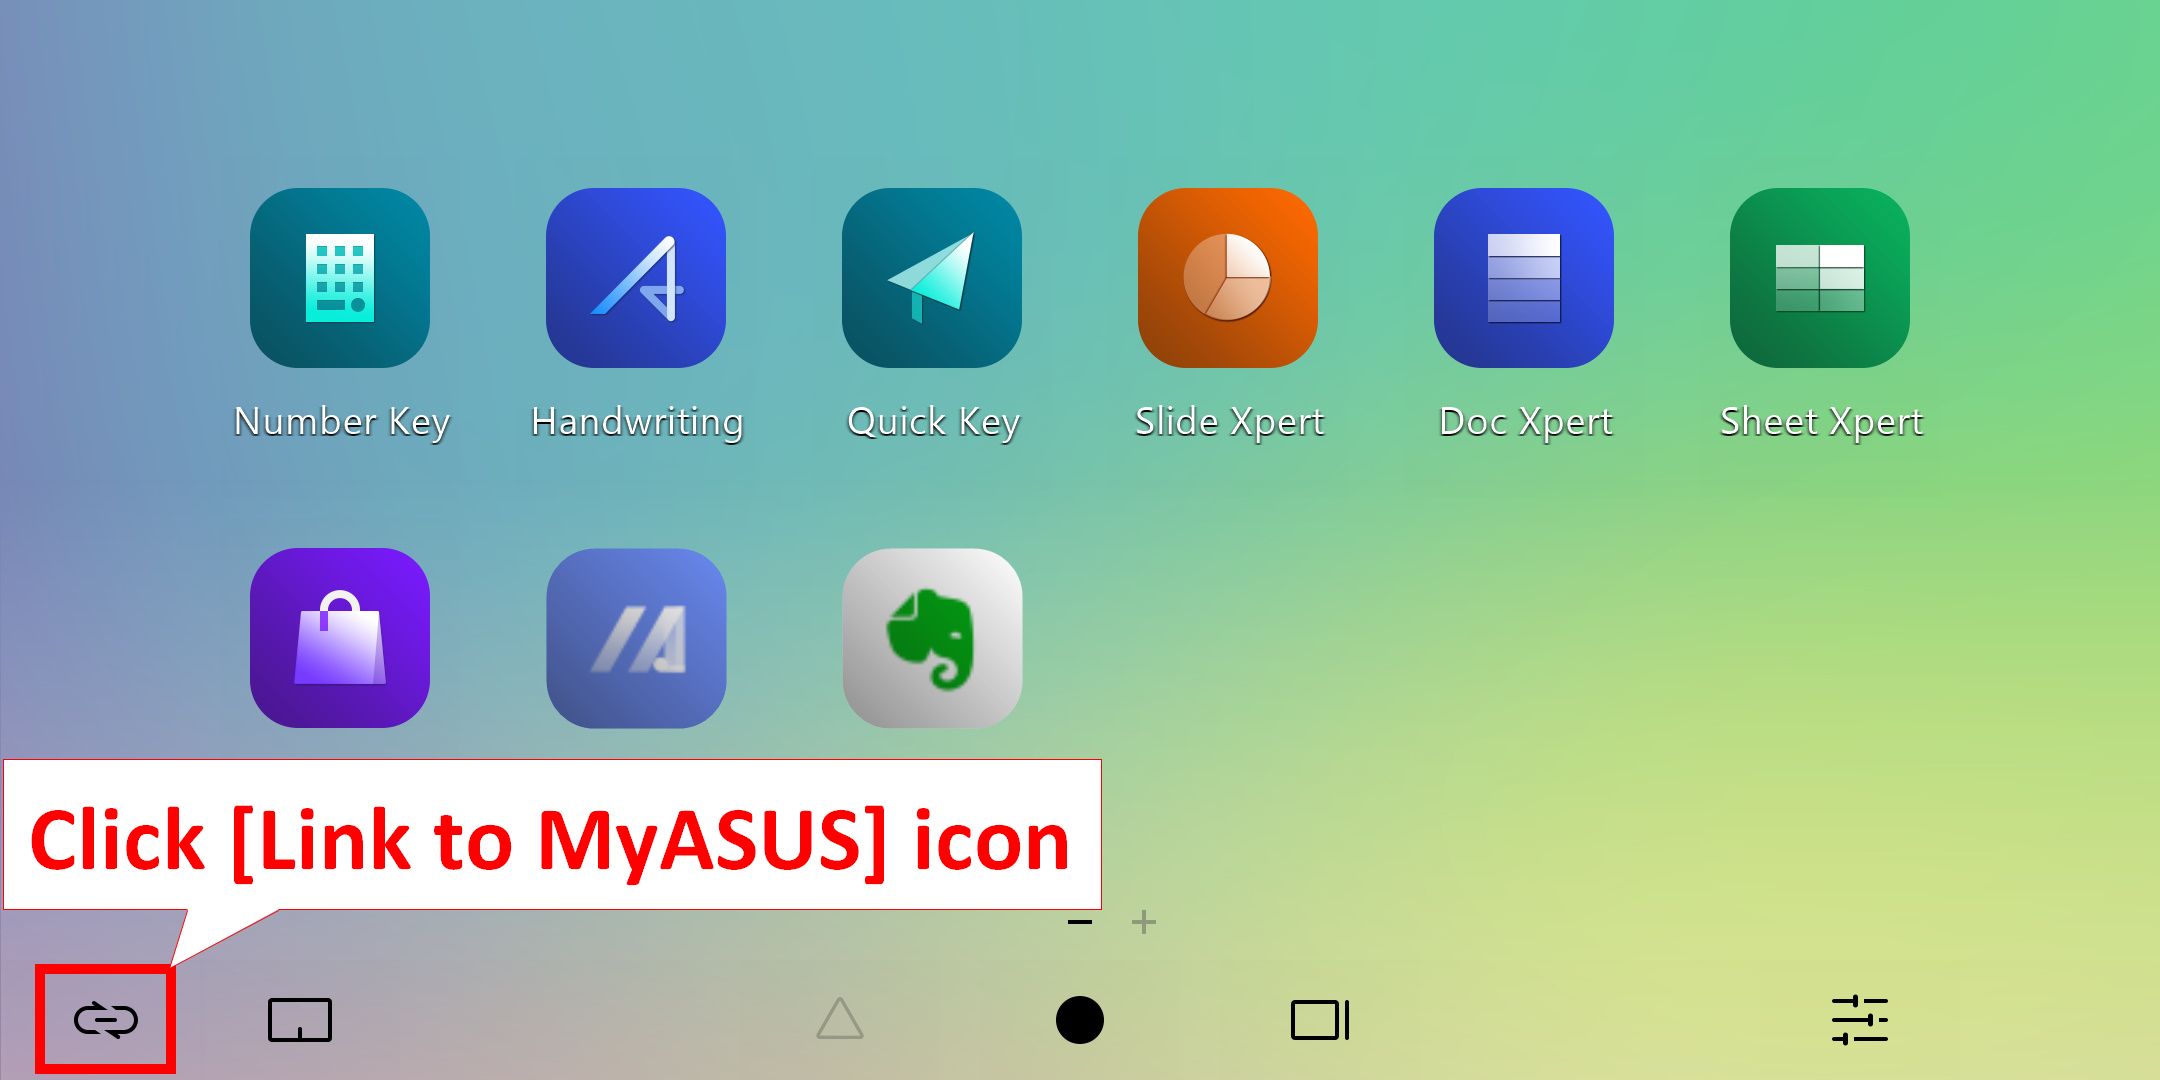
Mengklik  [Link to MyASUS] memungkinkan Anda dengan cepat membuka jendela untuk melakukan panggilan telepon, jika Anda ingin mempelajari lebih lanjut tentang Link to MyASUS, silakan klik disini.
Klik  [TouchPad] akan mengaktifkan mode TouchPad ScreenPad Plus, yang dapat Anda matikan dengan mengetuk X di sudut kanan atas.

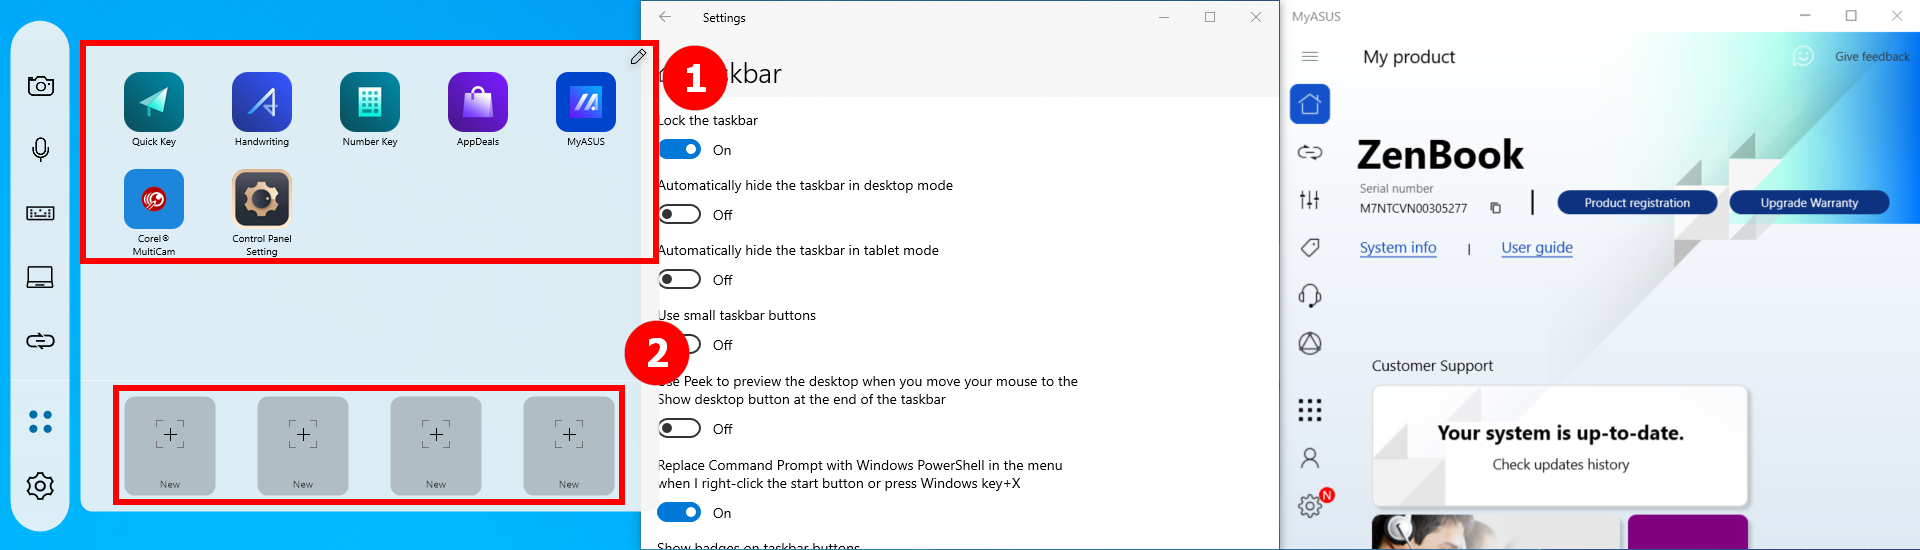
(1) Klik [Utilities]. Anda dapat melihat ①[Asus Built-in Apps], di mana Anda dapat menambahkan ikon aplikasi tambahan, atau Anda dapat menghapus atau mengubah lokasi aplikasi. Klik ②[+] untuk menambahkan Grup Tugas baru.
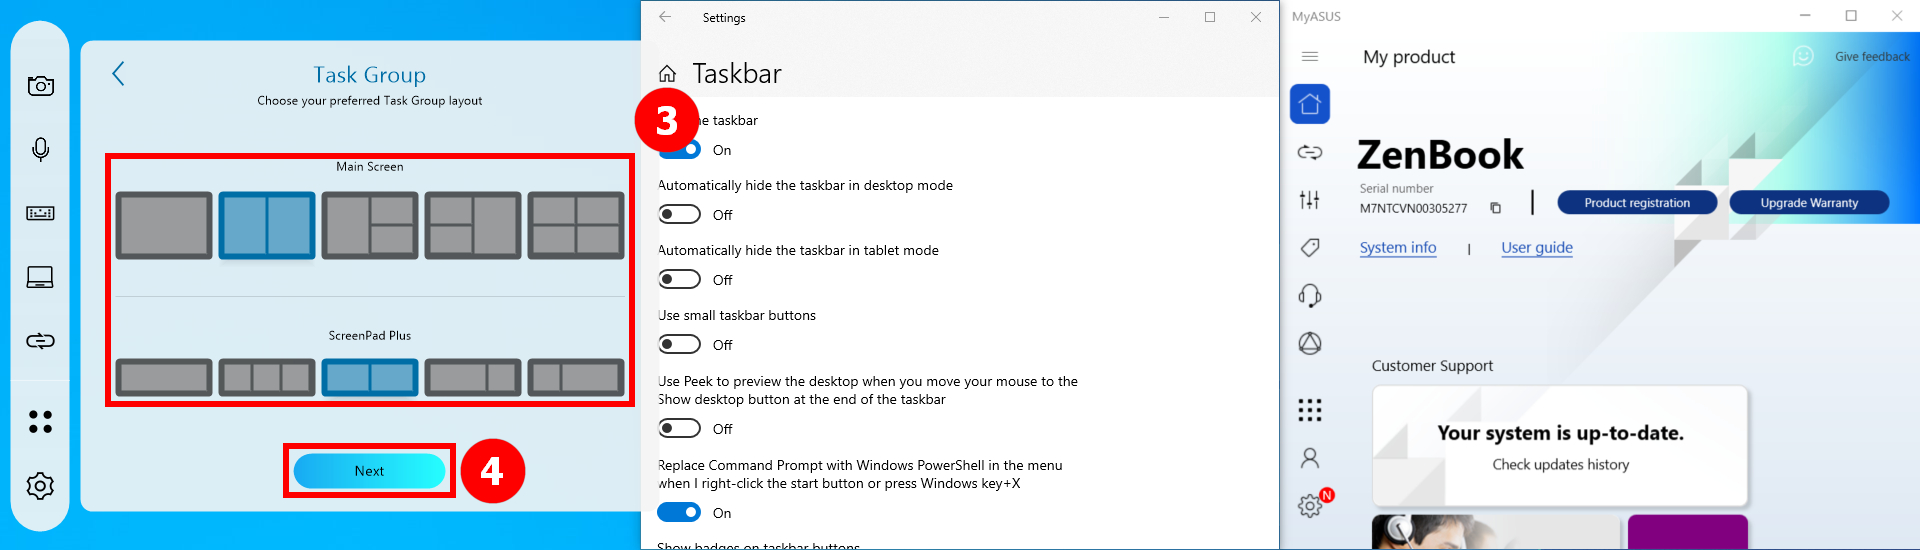
(2) Di ③[area], pilih tata letak Task Gourp pilihan Anda dan klik ④[Next].
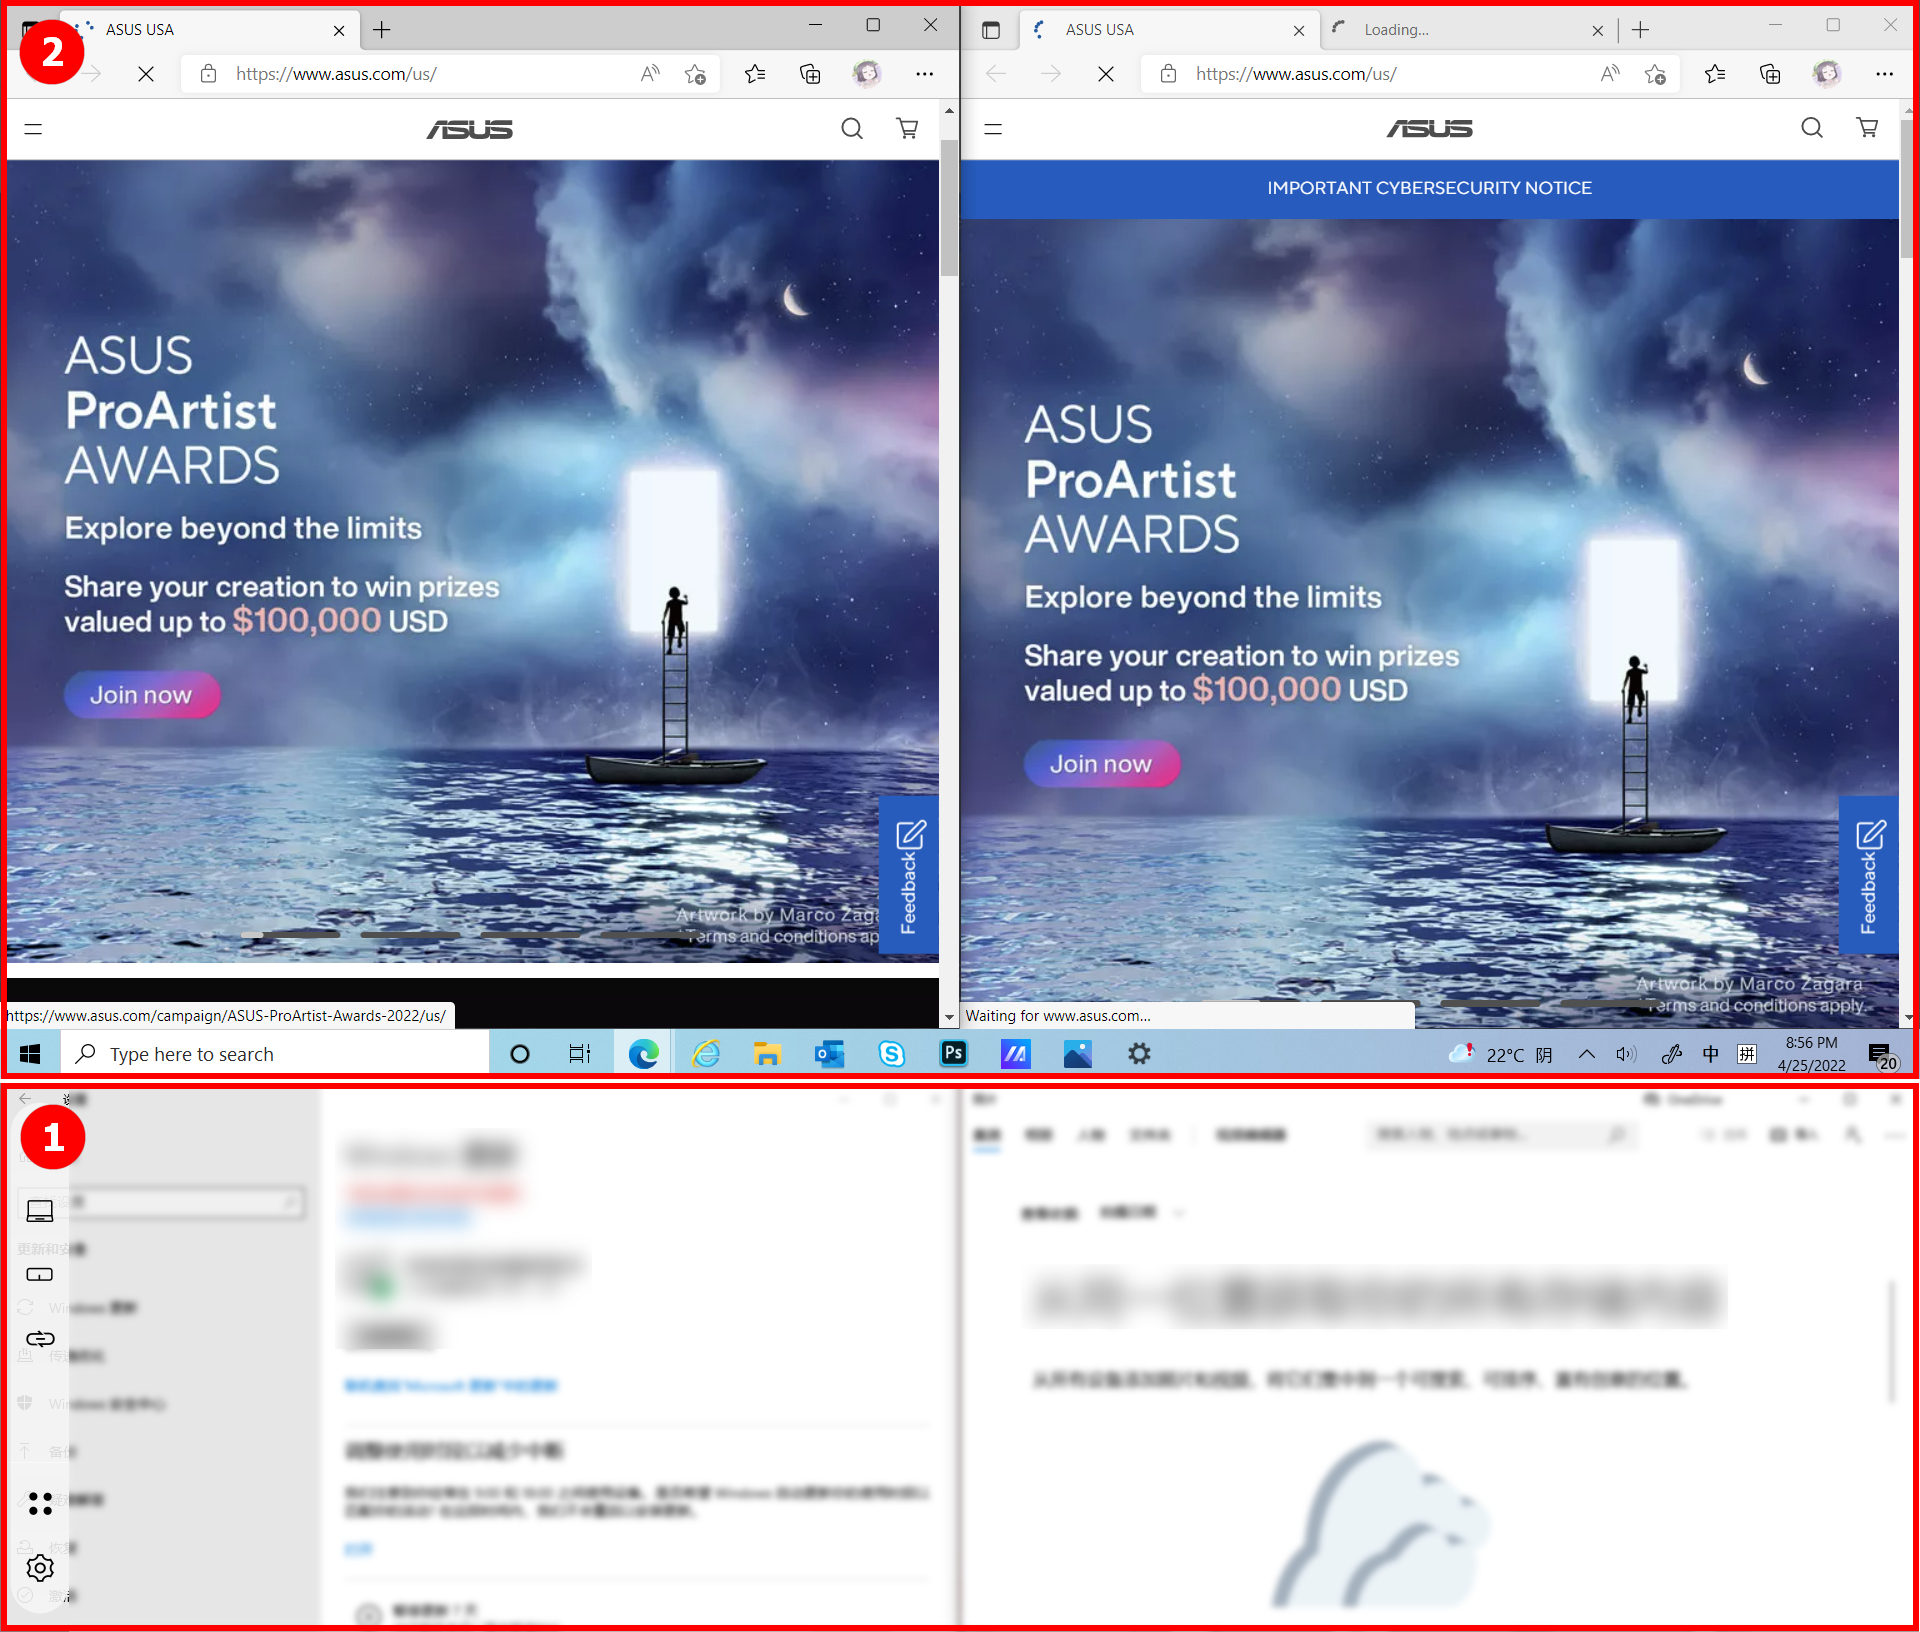
(3) Klik ⑤[Capture].
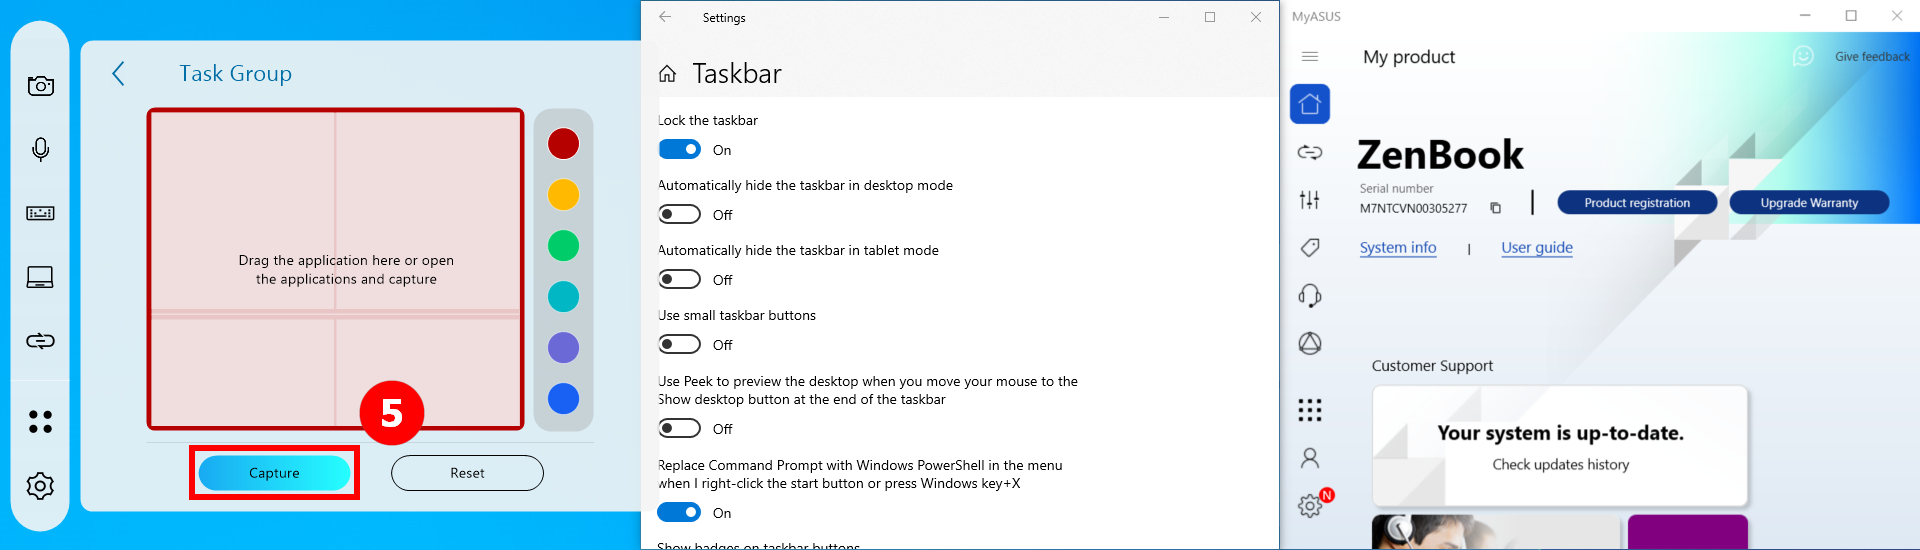
(4) Jendela yang muncul di komputer Anda akan diambil, seperti ⑥[Area], di mana Anda dapat menghapus atau mengubah posisi aplikasi, atau mengubah nama Grup Tugas. Setelah selesai mengedit, klik ⑦[Done].
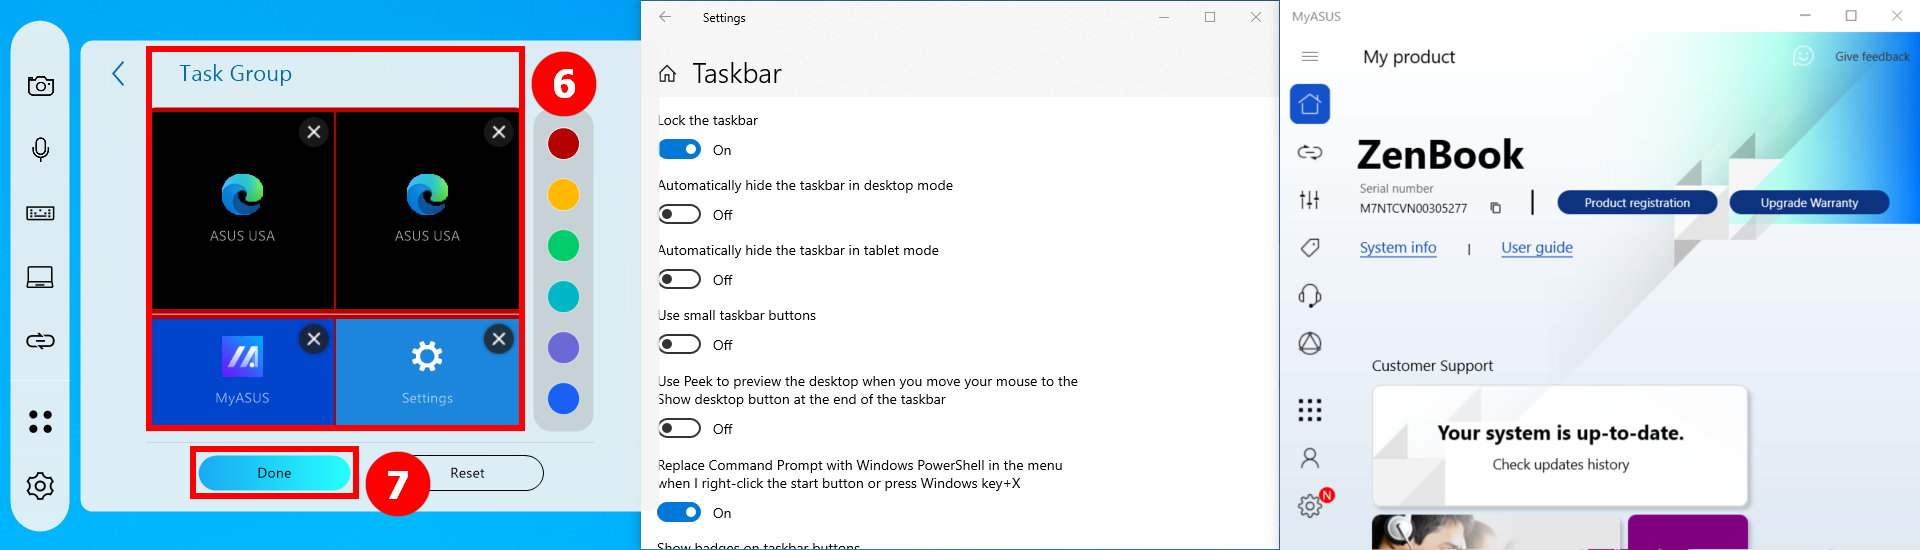
(5) Grup Tugas sudah dibentuk, klik ⑧[Task Group].
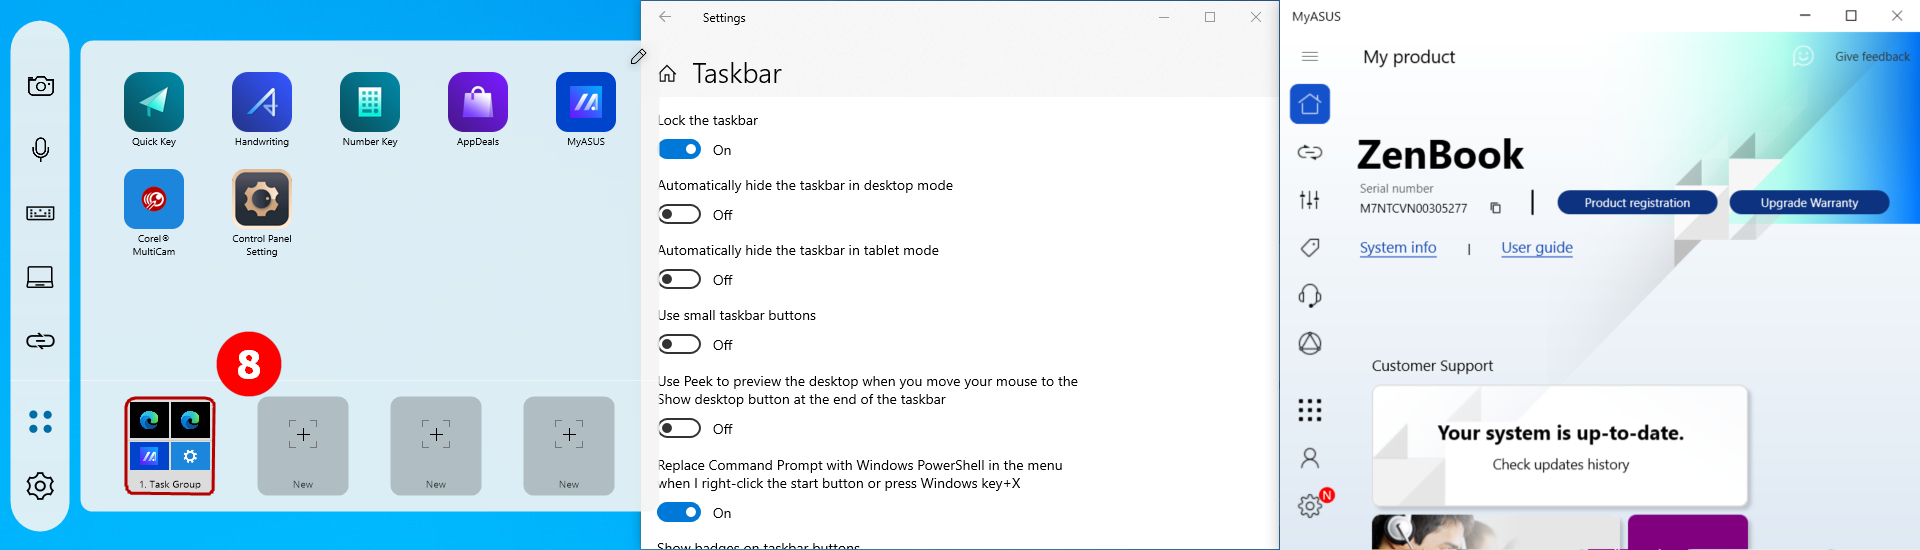
(6) Komputer ②[Main Screen] dan ①[ScreenPad Plus] akan menekan pengaturan Anda sebelumnya untuk menampilkan aplikasi.
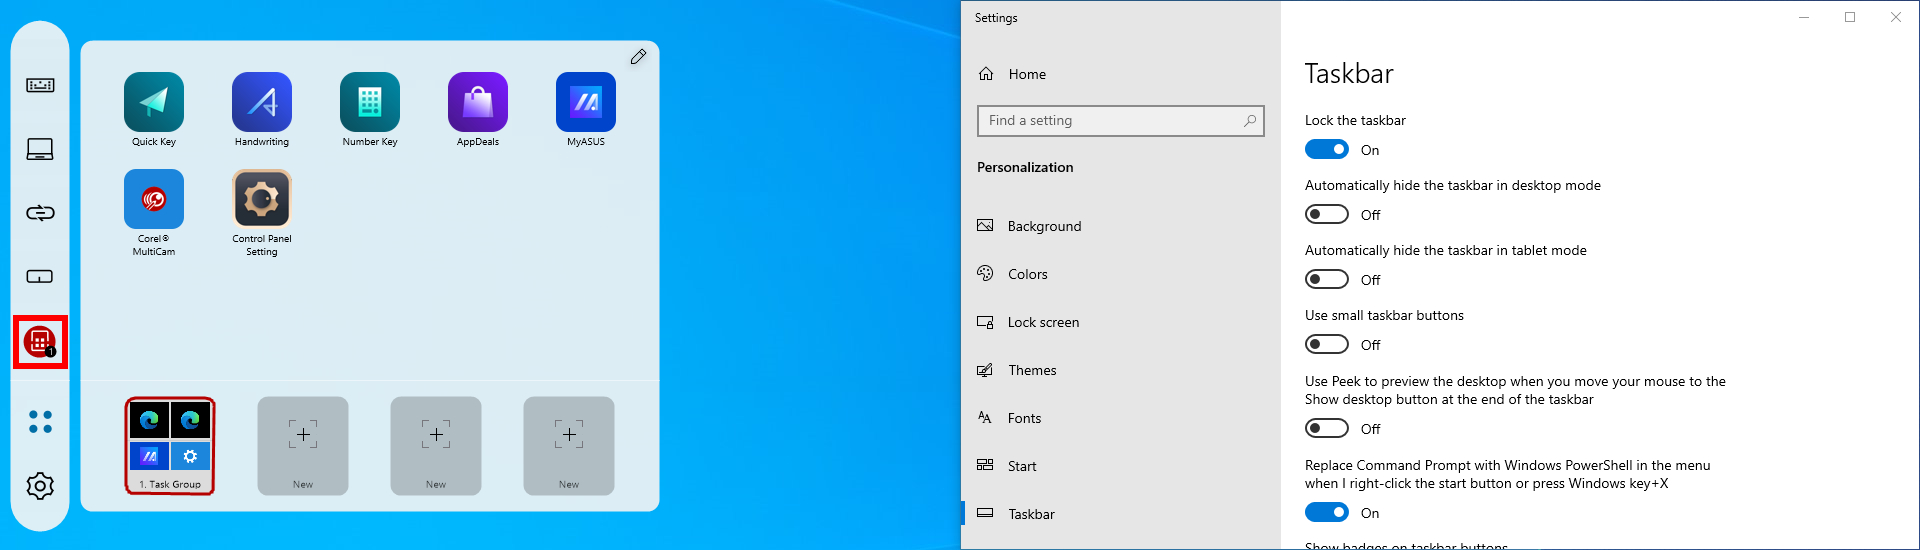
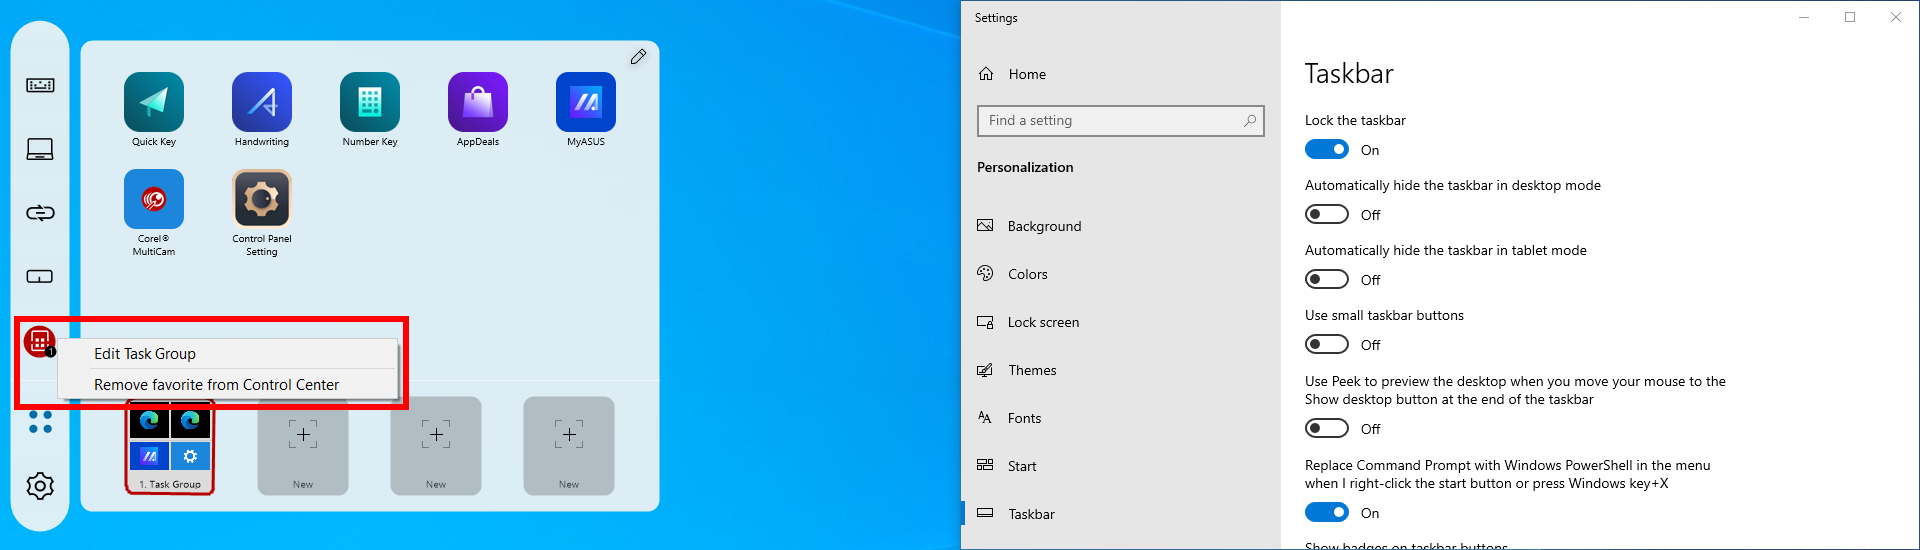
(7) Klik kanan [Task Group], klik [Add as favorite to Control Center].

(8) Anda dapat melihat ikon [Task Group], yang ditampilkan di toolbar. Anda dapat menggunakan fitur ini dengan cepat dan mudah dengan mengklik ikon [Task Group] di toolbar.
(9) Klik kanan ikon [Task Group] klik [Remove favorite from control center]untuk menghapus ikon [Task Group] dari TheTolbbar.
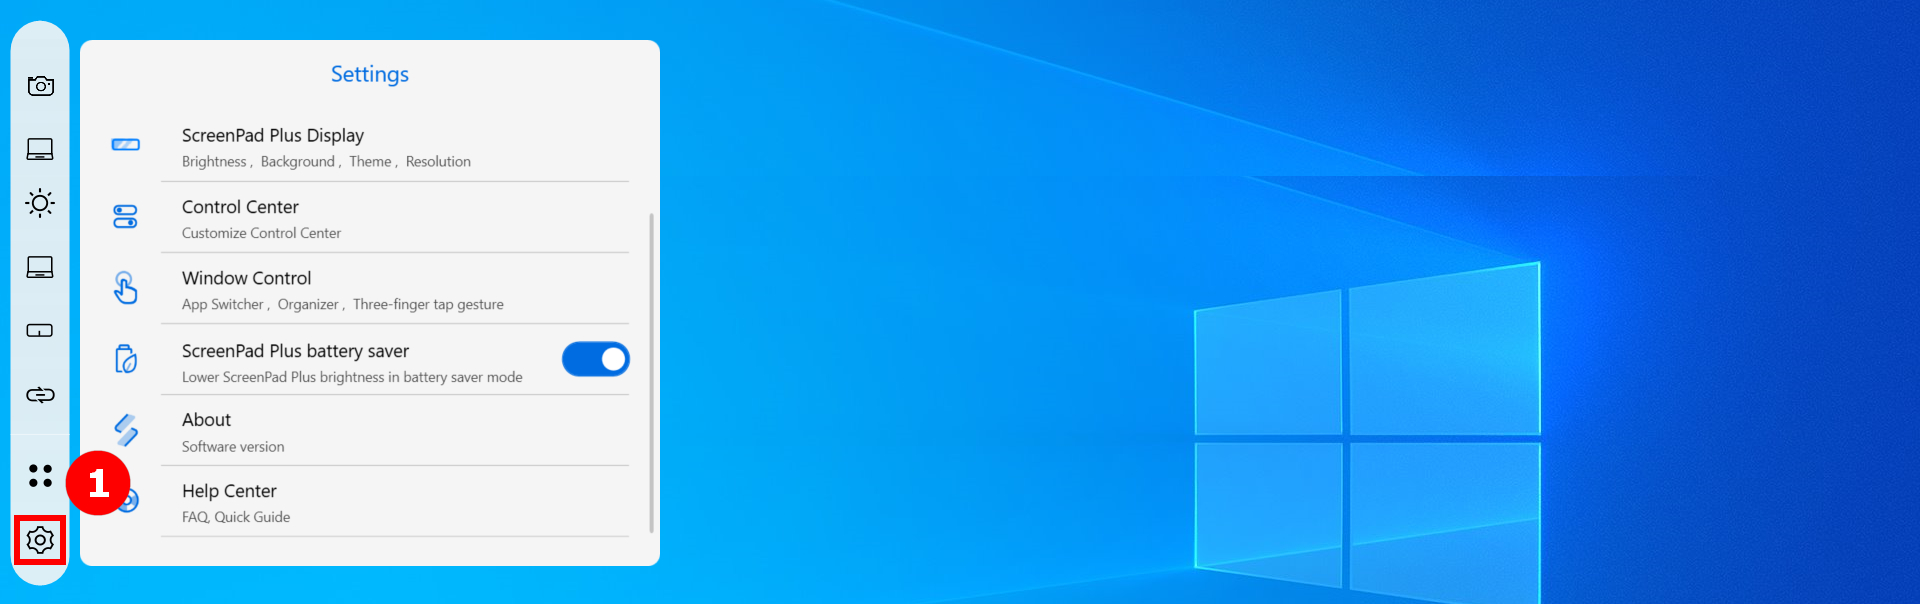
(1) Klik [Settings].
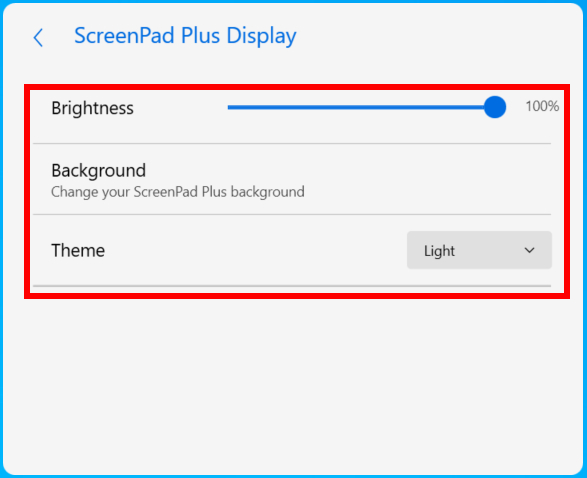
(2) di [ScreenPad Plus Display], Anda dapat mengatur kecerahan, mengubah latar belakang, memodifikasi tema.
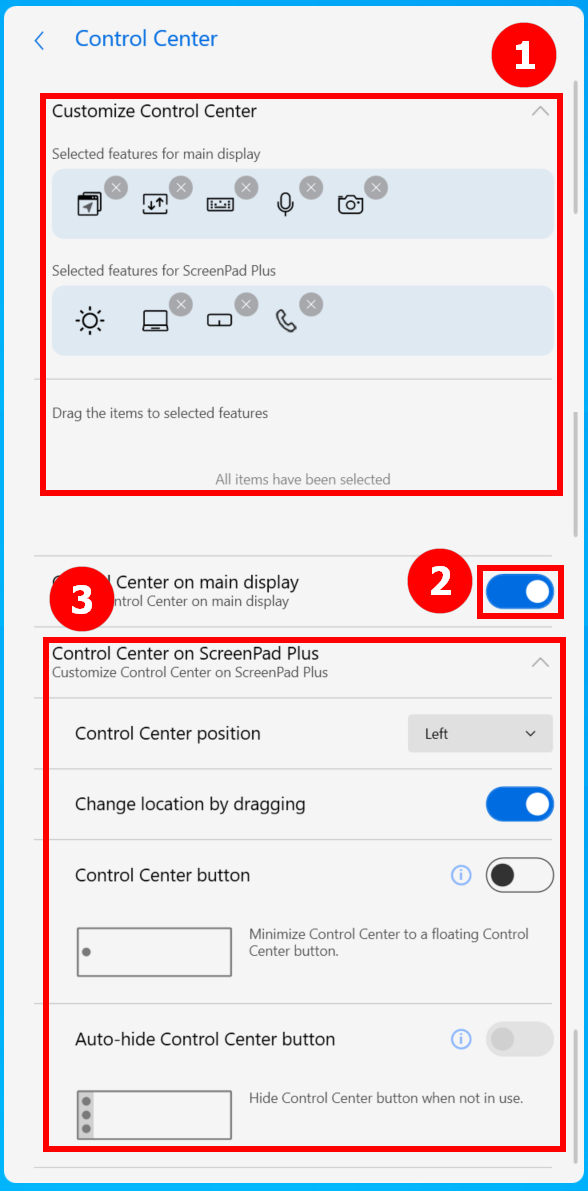
(3) Di [Control Center]. Di ①[Customisze Control Center]. Toggle ②[Control Center on main display]. Modifikasi pada ikon Pusat Kontrol sedang dilakukan ③[Control Center on ScreenPad Plus].
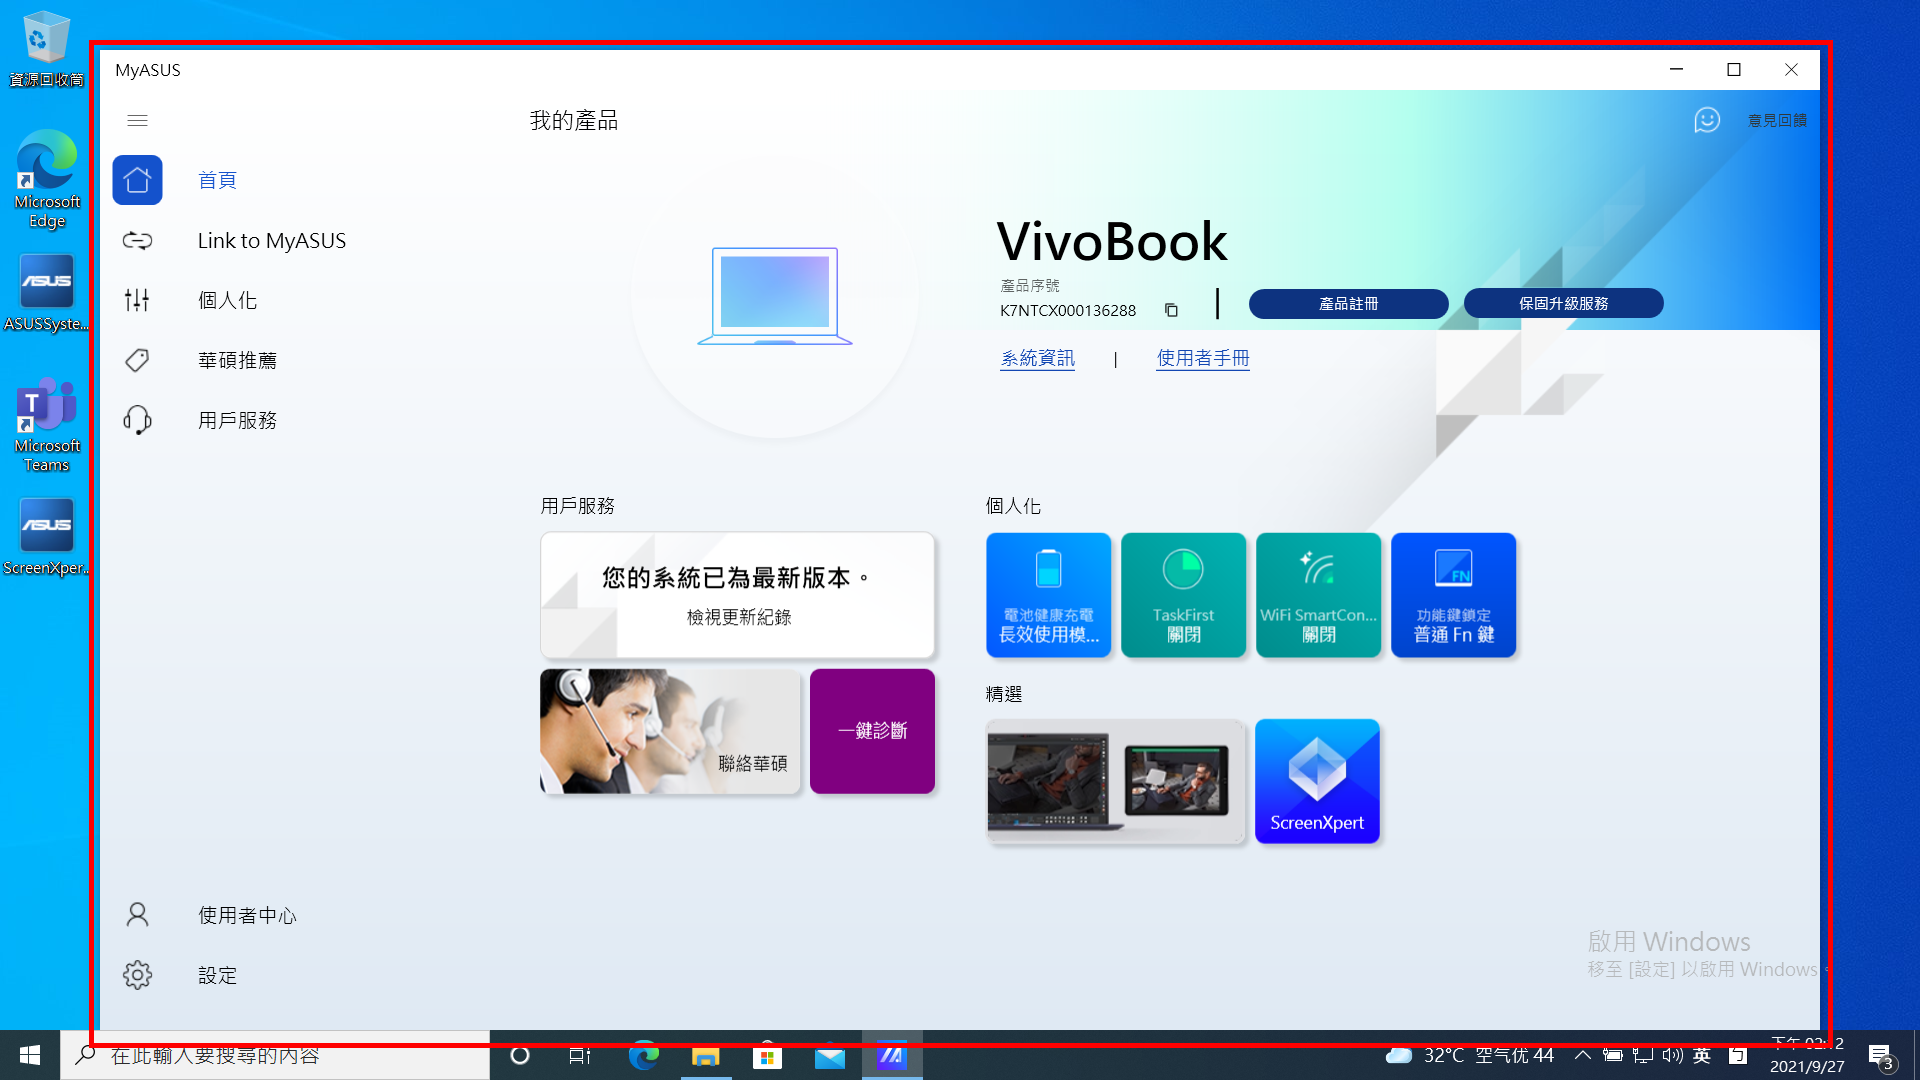
(5) Ikon Pusat Kontrol sudah ditampilkan di layar utama, klik [Control Center].
(6) Anda dapat melihat bahwa fitur pengaturan sudah ditampilkan di layar utama.
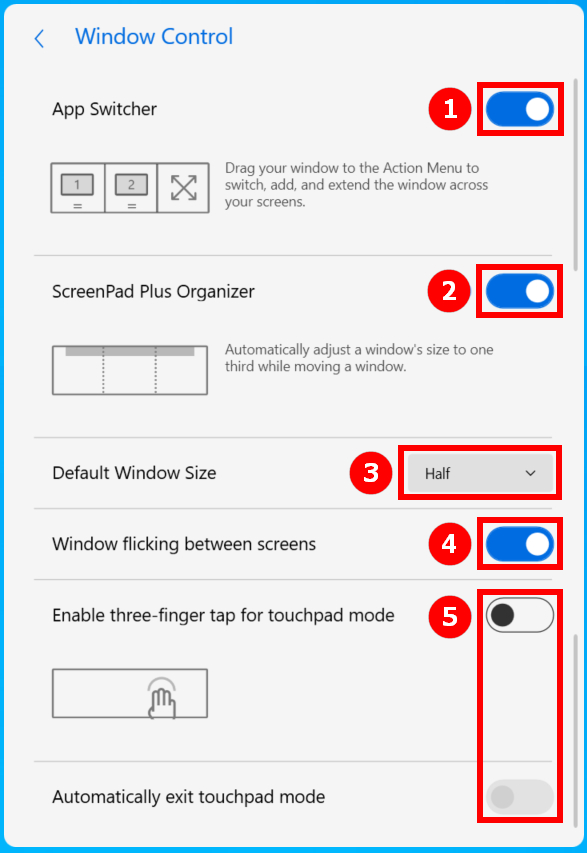
(7) Di [Window Control], alihkan ①[App Switcher], alihkan②[ScreenPad Origanizer], alihkan ③[Default Window Size], alihkan ④[Window Flicking between screens], alihkan ⑤[Enable three-finger tap for touchpad mode].
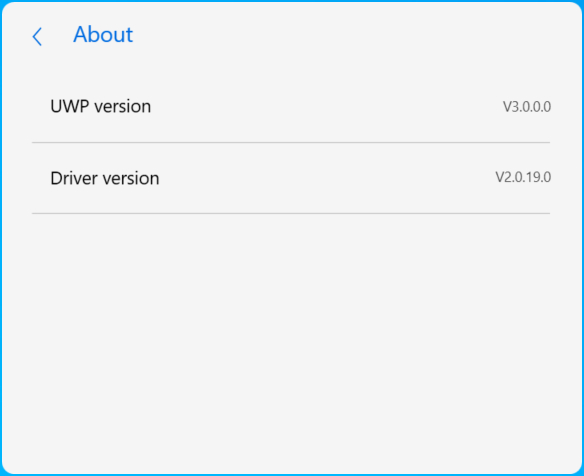
(8) Di [About], anda dapat melihat versi UWP dan Driver.
(9) Di [Help], Anda dapat mengklik FAQ untuk mengakses artikel ini dengan cepat, atau klik panduan cepat.
16. Install & Uninstall ScreenXpert
Untuk menginstal aplikasi dan driver ScreenXpert:
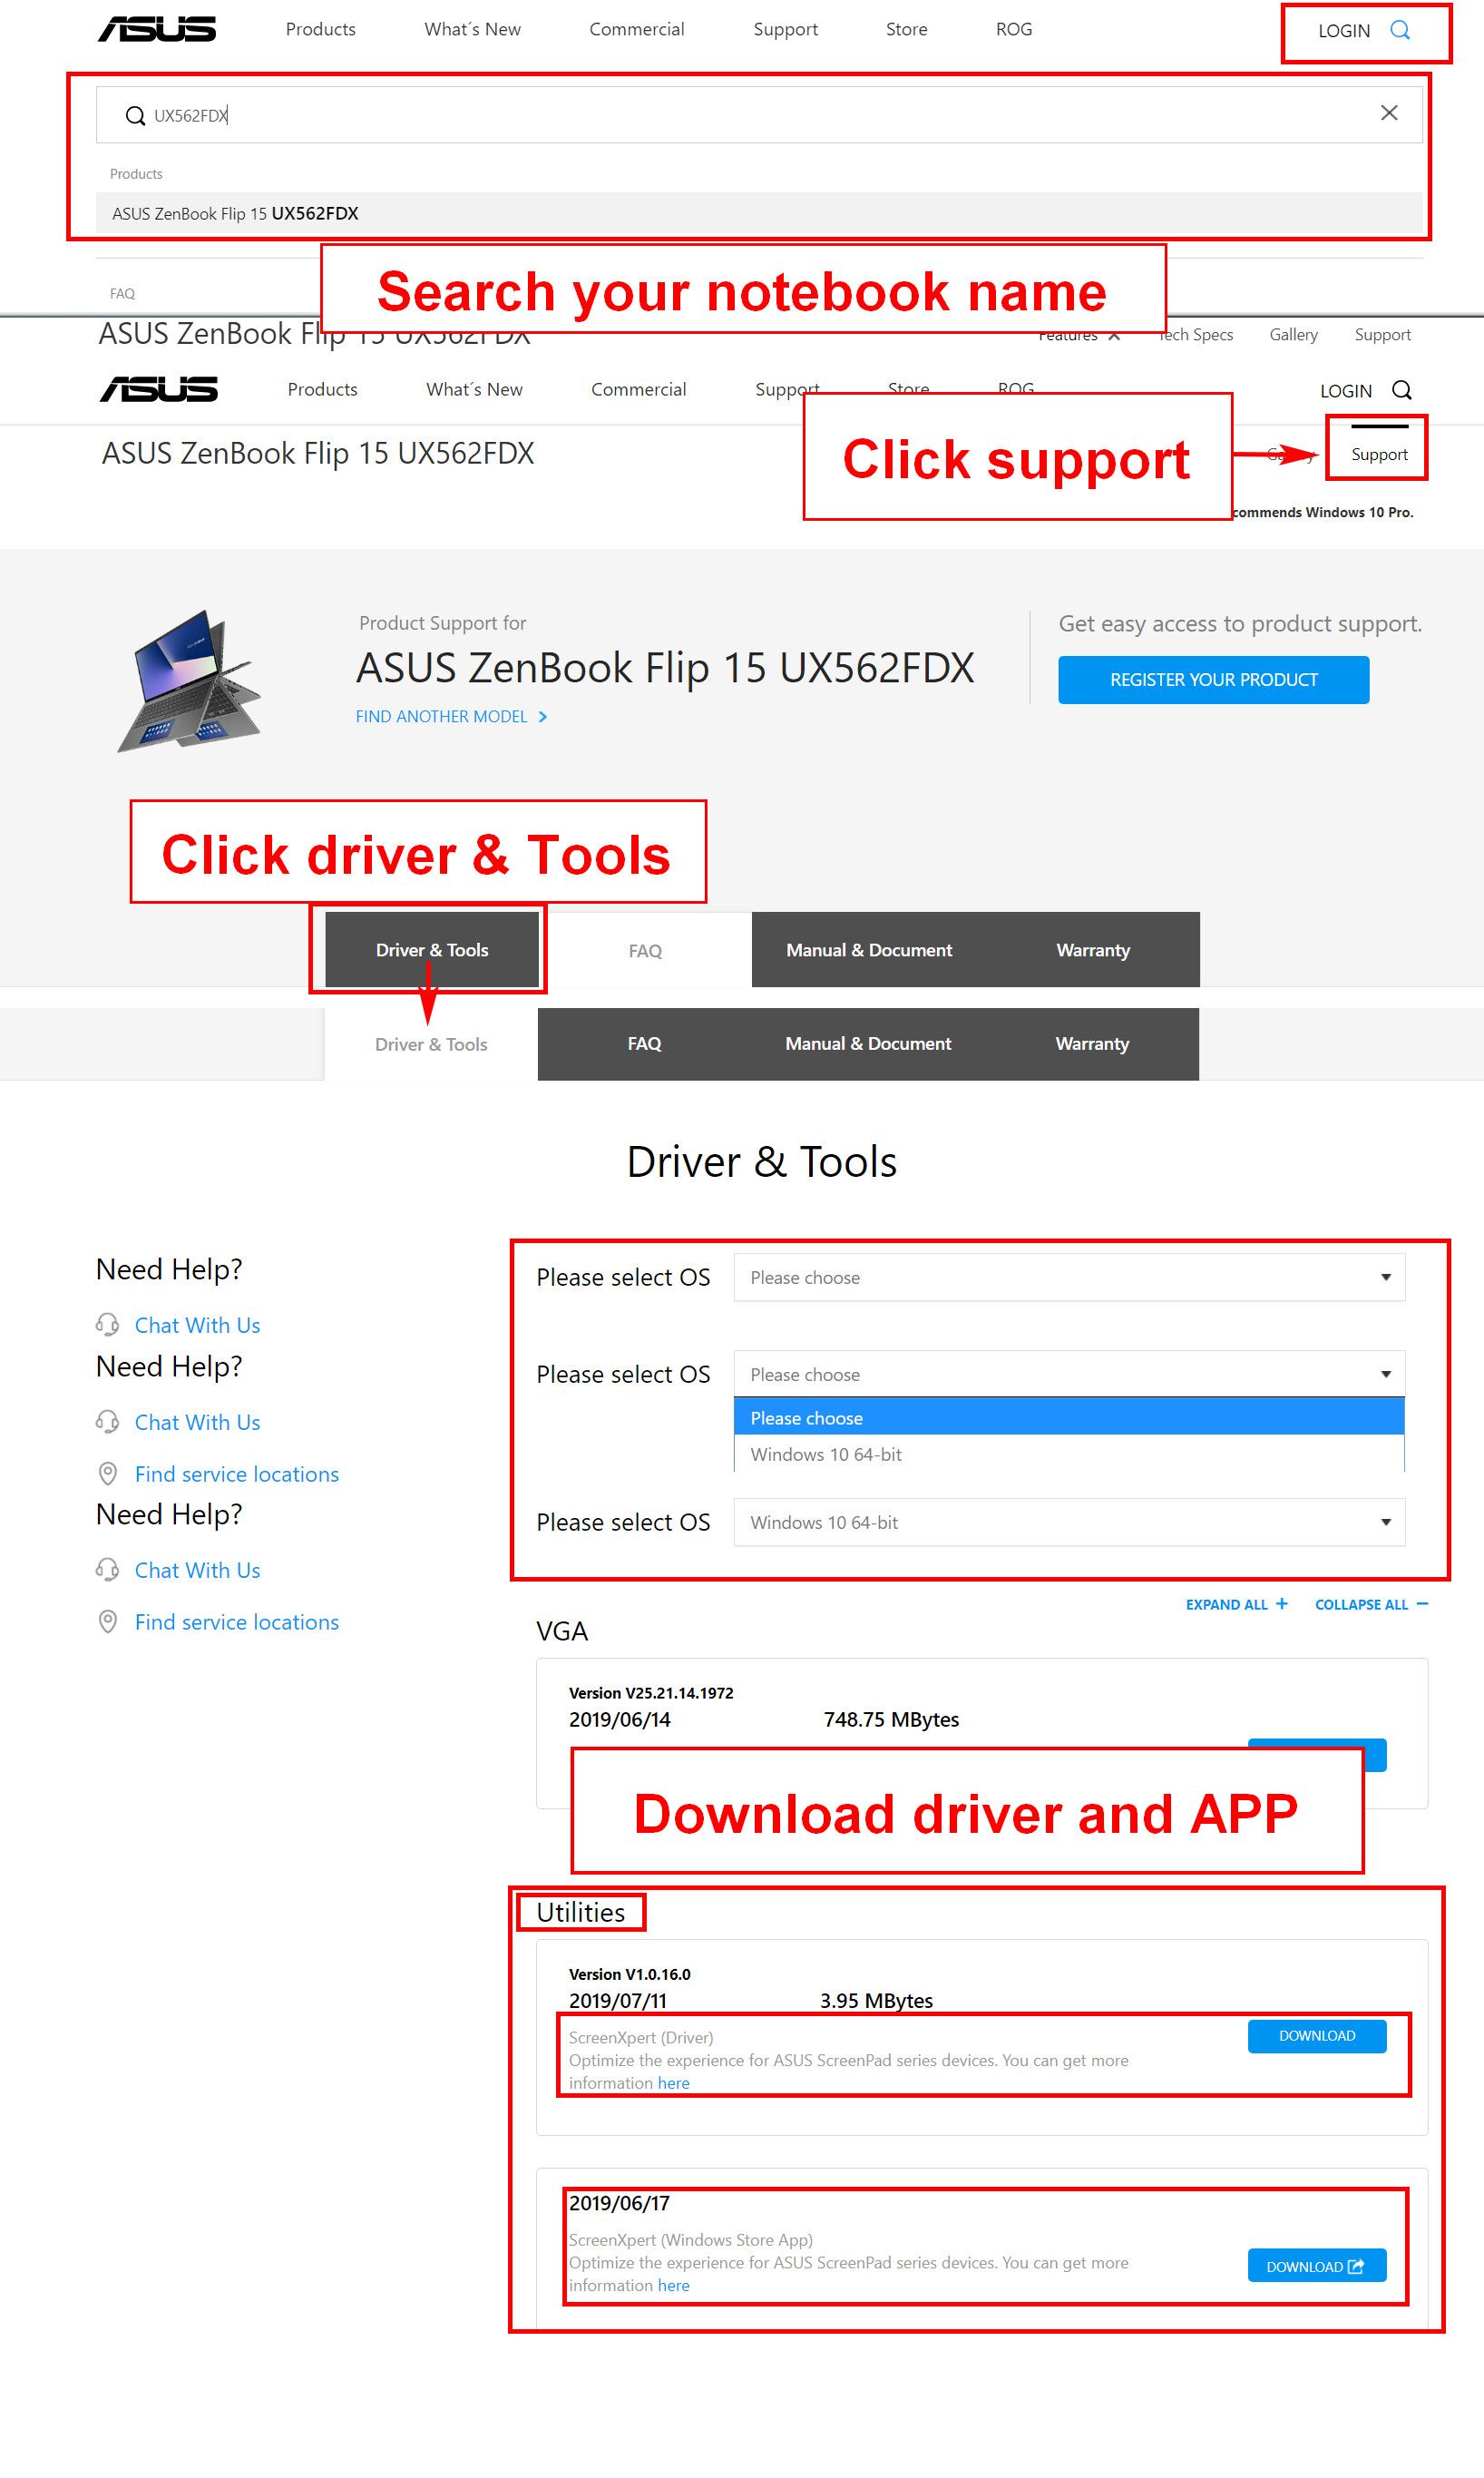
1.Kunjungi ASUS Official website dan cari nama model notebook anda.
2.Klik [support] kemudian [Driver & Tools].
3.Pilih OS notebook Anda.
4.Download driver dan aplikasinya, lalu instal keduanya.
Anda dapat menghapus instalasi ScreenXpert dari konten yang disediakan di tautan berikut:https://www.asus.com/id/support/faq/1013598
[Notebook] ASUS ScreenXpert (Screenpad 2.0) - Pengenalan
Didukung oleh perangkat lunak ScreenXpert baru, ScreenPad 2.0 kini memiliki layar sentuh lebih besar yang menawarkan banyak fitur dan manfaat baru. Layar sentuh sekunder interaktif ini meningkatkan produktivitas, memungkinkan alur kerja lebih efisien. Ini mencakup kumpulan utilitas ASUS yang berguna untuk meningkatkan produktivitas: Quick Key memungkinkan otomatisasi satu ketukan pada urutan keyboard yang rumit, Tulisan Tangan untuk input teks alami, dan Number Key untuk entri data cepat. Antarmuka mirip ponsel pintar yang direvisi lebih intuitif untuk meningkatkan kemudahan penggunaan. Pengembang pihak ketiga juga dapat menggunakan ASUS API untuk mengoptimalkan perangkat lunak dan pengalaman pengguna mereka untuk ScreenPad. Perangkat kerasnya kini juga lebih hemat energi dibandingkan pendahulunya, sehingga memungkinkan masa pakai baterai lebih lama saat ScreenPad digunakan.
Harap Dicatat: Office Xpert (Doc Xpert, Sheet Xpert, Slide Xpert) telah dihapus dari layanan setelah V2.2.6.0 dan versi yang lebih baru.
Jika Anda ingin terus menggunakan Office Xpert, Anda dapat mengklik link untuk mendownloadnya, mengekstraknya, dan menginstalnya. Setelah instalasi selesai, silakan restart komputer Anda.
Jika fungsi Office Xpert tidak normal setelah instalasi selesai, harap konfirmasi apakah Aplikasi ScreenXpert adalah 2.2.10.0 dan yang lebih baru, dan apakah Driver Antarmuka ASUS ScreenXpert adalah 2.0.22.0 dan yang lebih baru. Jika salah satu versi driver tidak memenuhi persyaratan, silakan buka bagian kedua artikel ini "Persyaratan Versi Aplikasi dan Driver" untuk mengunduh driver versi terbaru.
- Konten tampilan utama ScreenPad
- Persyaratan versi aplikasi dan driver
- Link to MyASUS
- TouchPad
- App Switcher
- Home
- Task View
- Control center
- Navigation bar lock
- Added App icon and homepage editing in ScreenPad
- Touch function & External screen
- Fungsi aplikasi Built-in ScreenPad
- Install & Uninstall ScreenXpert
- Komparasi antaraScreenPad 1.0 & ScreenPad 2.0
- FAQ
Konten tampilan utama ScreenPad
Versi minimum driver untuk aplikasi ScrfeenPad terbaru seperti di bawah ini:
ScreenXpert App V2.0.9.0 dan diatasnya (updated di Microsoft store)
MyASUS App V2.2.35.0 dan diatasnya (updated di Microsoft store)
ScreenXpert Driver V2.0.9.0 dan diasatanya (Cara updatenya ada di akhir artikel ini, Anda bisa klik di sini untuk sampai ke sana dengan cepat)
ASUS System Control Interface V2 Driver v2.2.27.0 dan diatasnya (cara updatenya ada di akhir artikel ini, Anda bisa klik di sini untuk sampai ke sana dengan cepat)
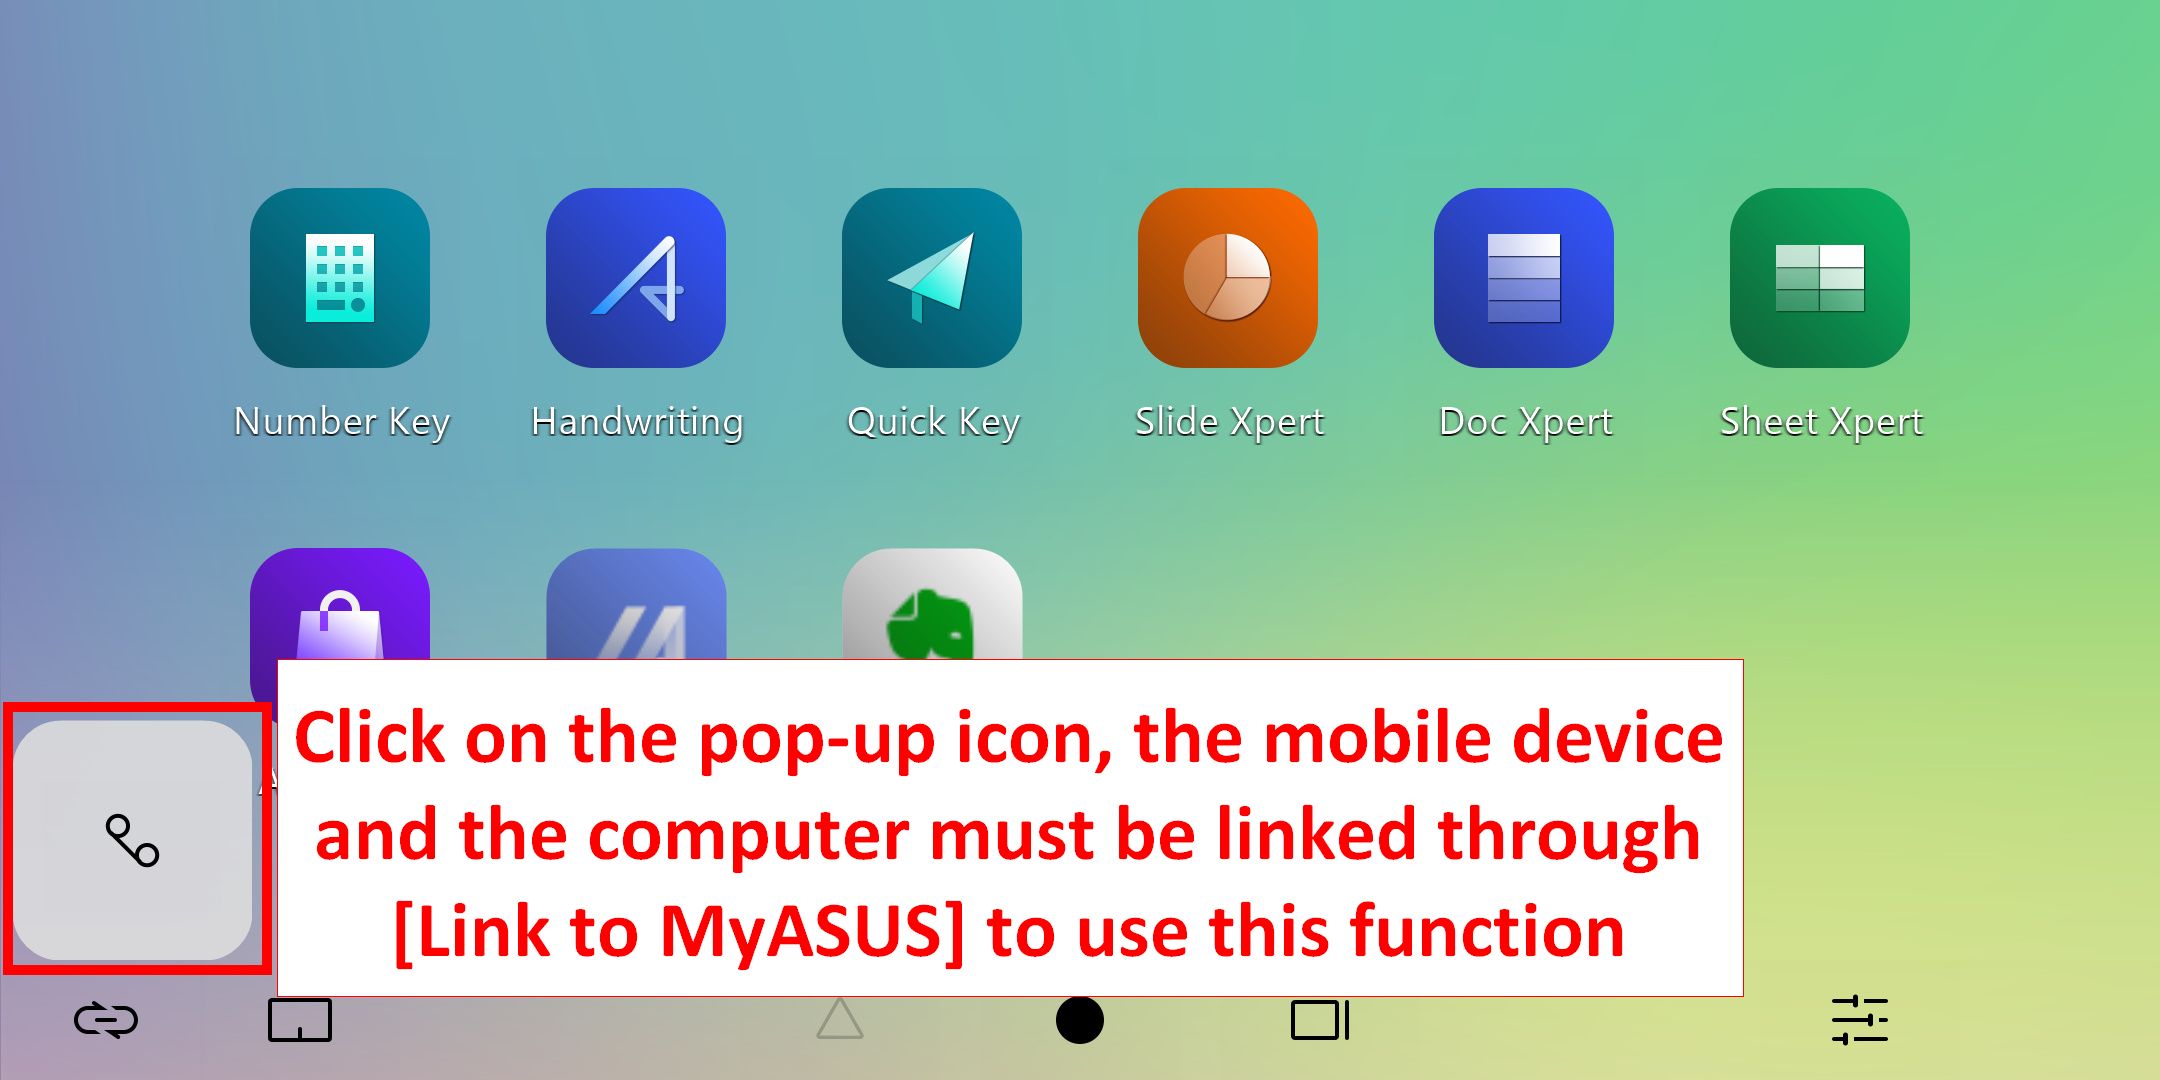
1.  [Link to MyASUS] menyediakan fungsi seperti buku alamat, log panggilan, dan panggilan. (Perangkat seluler harus dapat melakukan panggilan dan terhubung ke la[top melalui Tautan ke MyASUS)
(Cara menghubungkan Link ke laptop MyASUS ke perangkat seluler dan cara menggunakan fungsi ini silakan merujuk ke konten di tautan: https://www.asus.com/id/support/FAQ/1041686/)
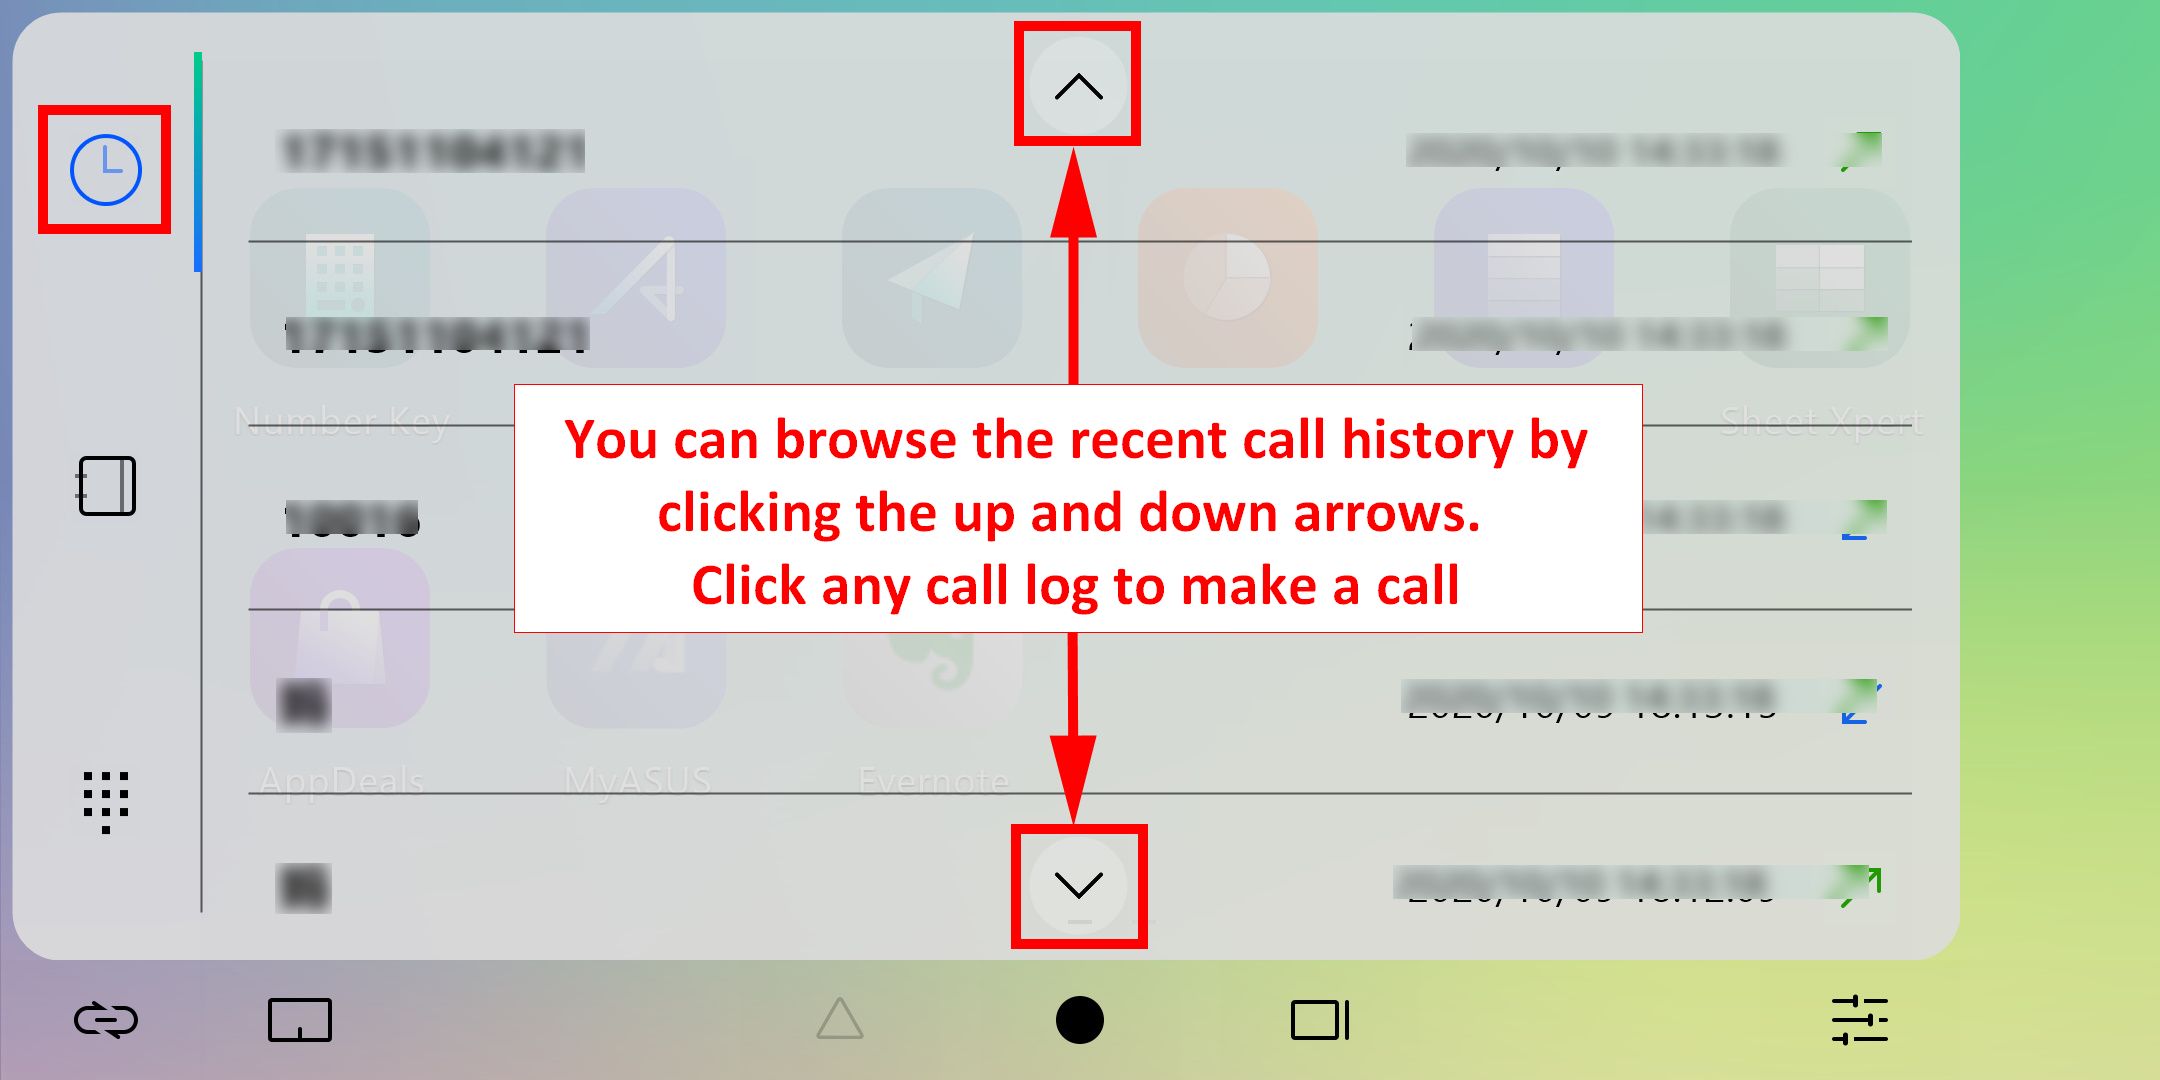
1.1 Klik ikon [Call History] untuk menelusuri riwayat panggilan perangkat seluler. Klik panah kecil di bagian atas dan bawah untuk menelusuri riwayat panggilan ke atas dan ke bawah, dan klik riwayat panggilan mana pun untuk melakukan panggilan. (Fungsi ini memerlukan perangkat seluler Anda untuk mengaktifkan izin terkait. Untuk pengoperasian tertentu, Anda dapat mengklik disni untuk menelusuri pertanyaan terkait tentang izin Tautan ke MyASUS dan SOP pengoperasian lengkap)
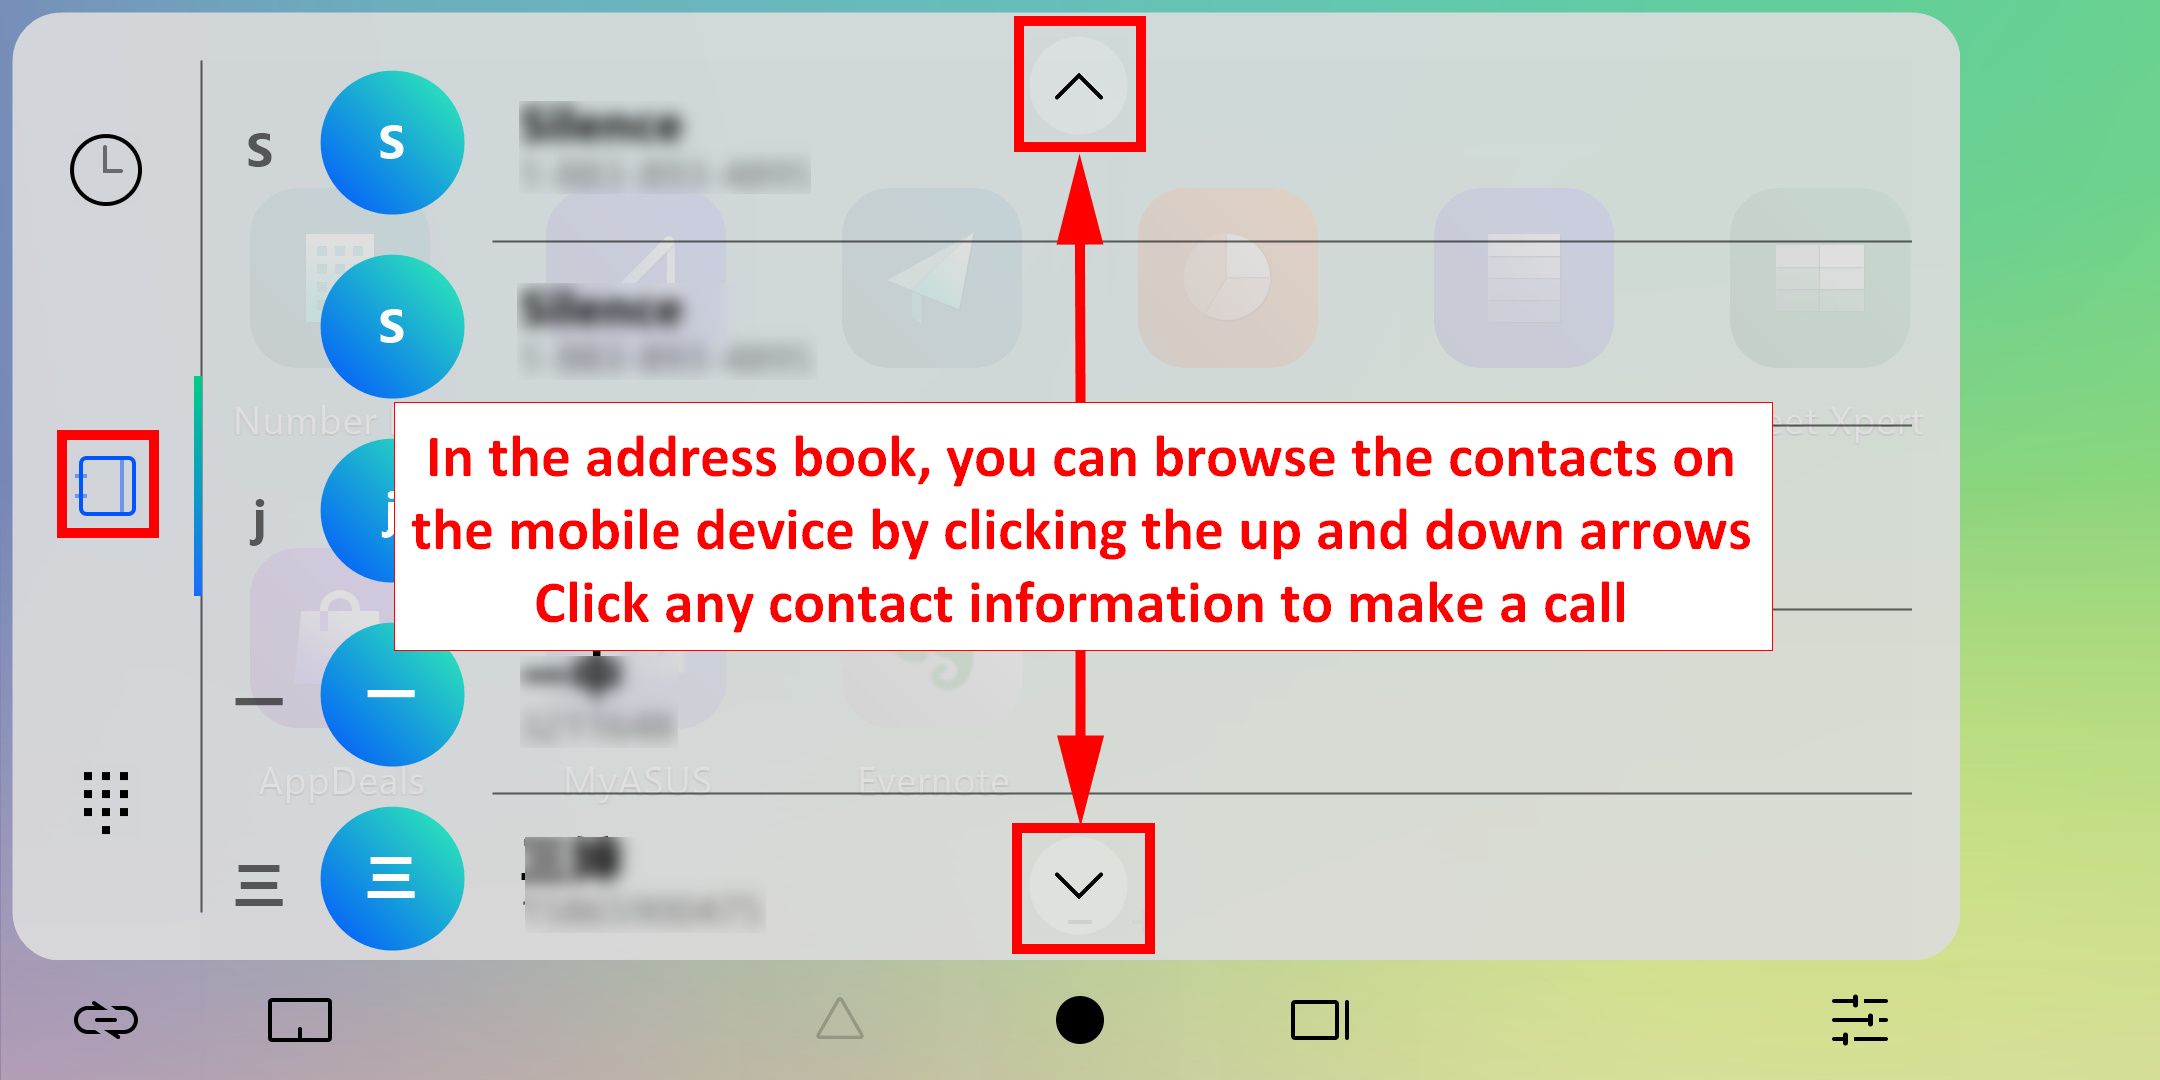
1.2 Klik ikon [Address Book] untuk menelusuri daftar kontak di perangkat seluler. Klik panah kecil di bagian atas dan bawah untuk menelusuri kontak di perangkat seluler ke atas dan ke bawah. Klik kontak mana pun untuk melakukan panggilan. (Fungsi ini memerlukan perangkat seluler Anda untuk mengaktifkan izin terkait. Untuk pengoperasian tertentu, Anda dapat mengklik di sini untuk menelusuri pertanyaan terkait tentang izin Tautan ke MyASUS dan SOP pengoperasian lengkap)
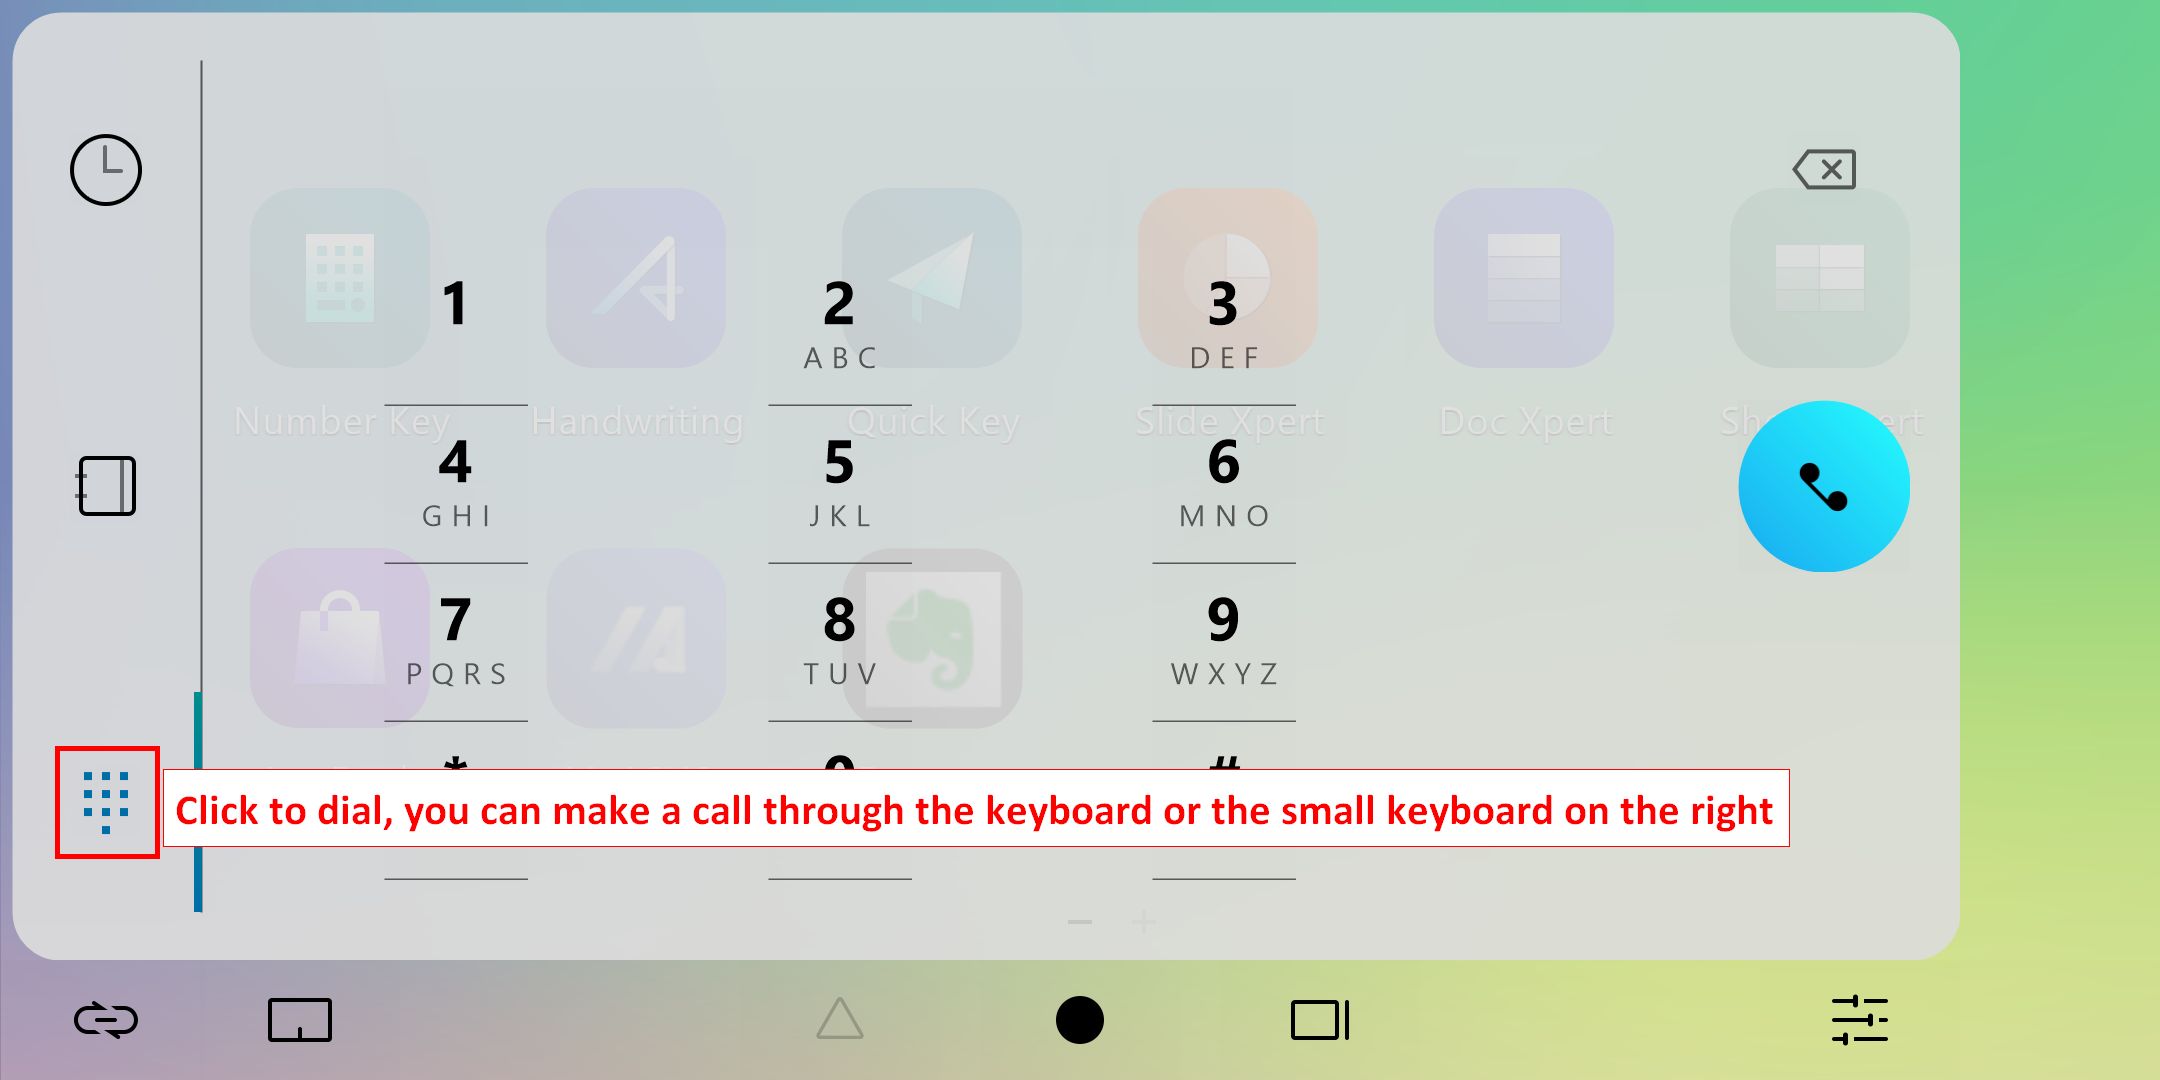
1.3 Klik [Dial] untuk melakukan panggilan melalui laptop. Perlu dicatat bahwa komunikasi antara perangkat seluler dan laptop terhubung melalui Bluetooth, dan kualitas panggilan akan dipengaruhi oleh kualitas koneksi.
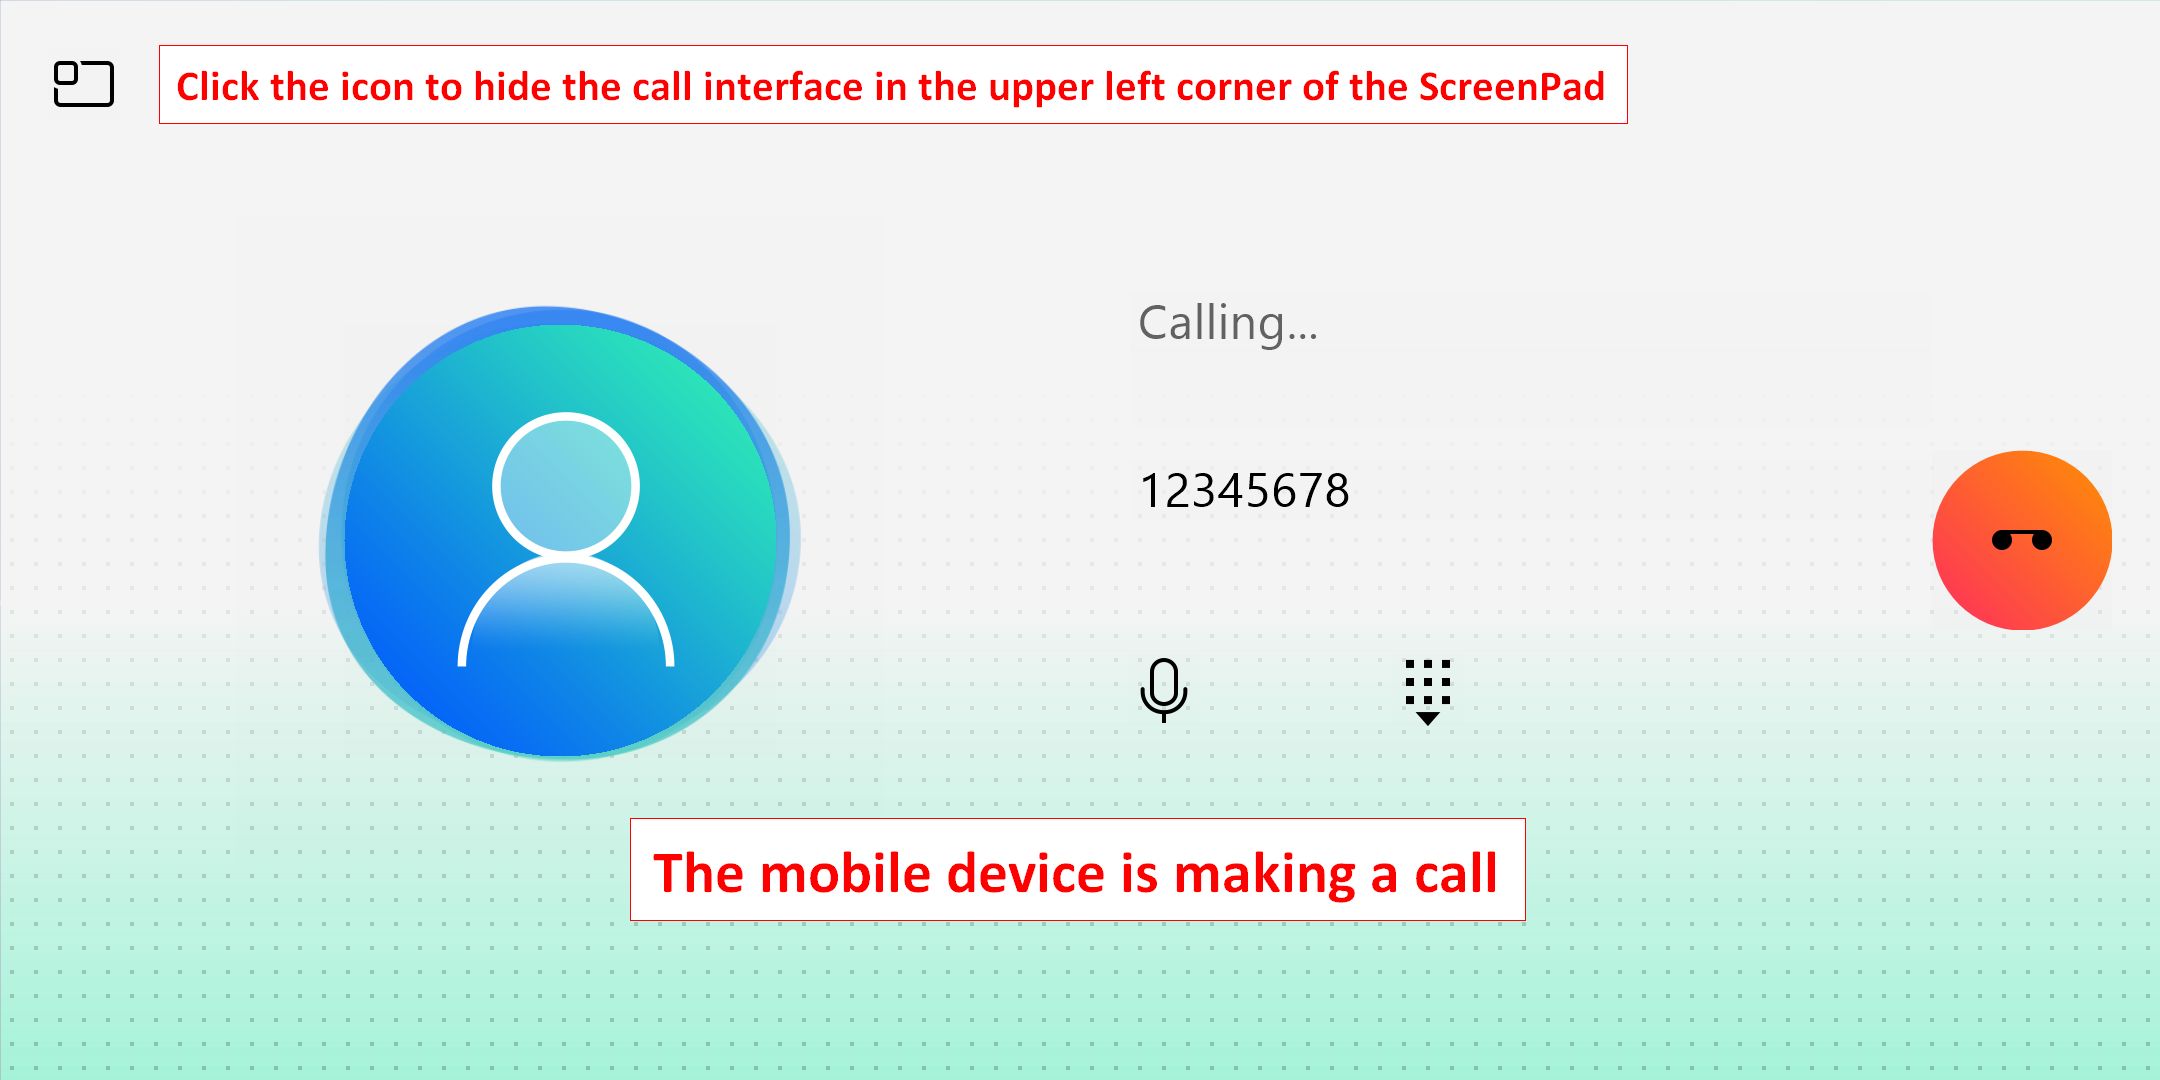
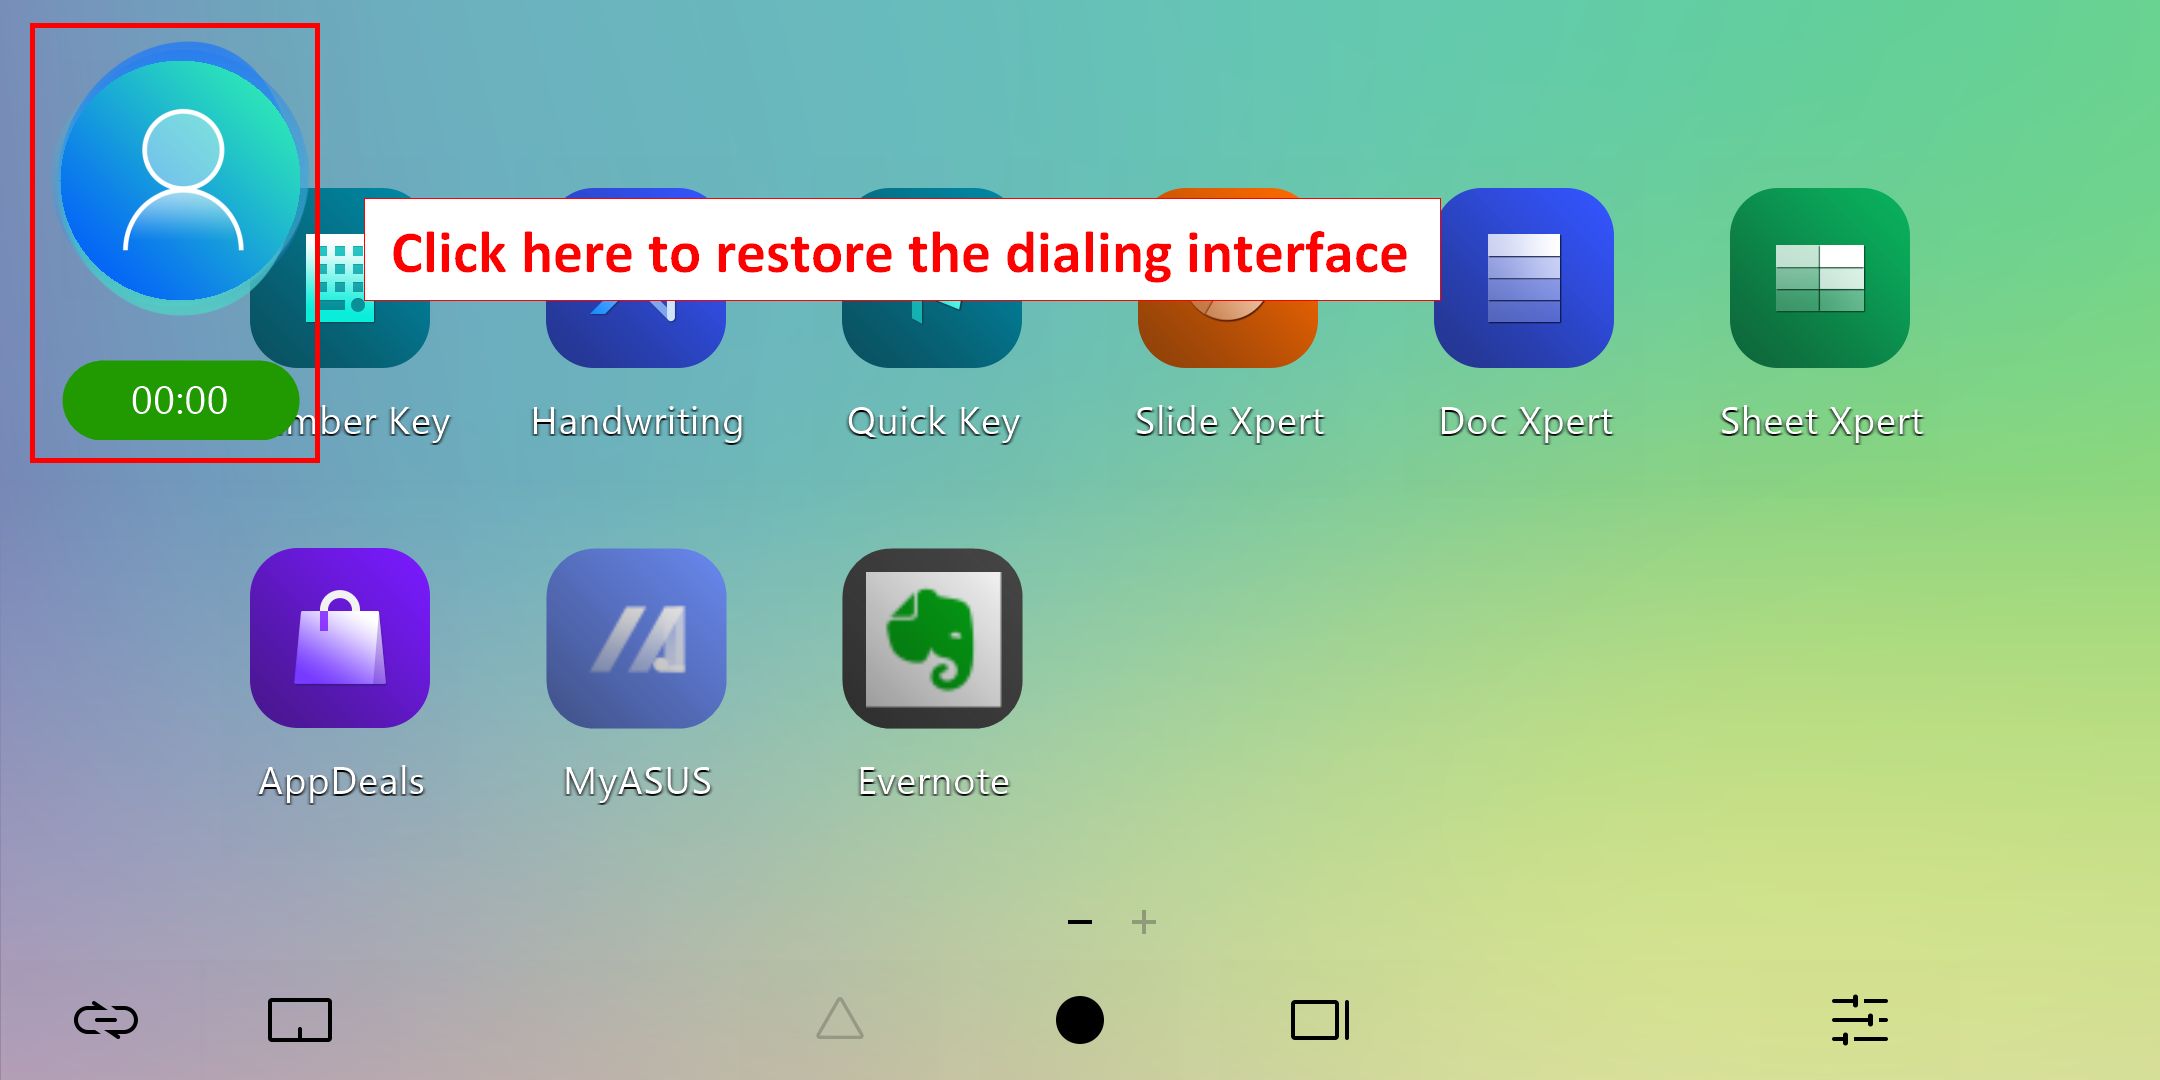
2.  [TouchPad]
2.1 Setelah mengklik ikon tersebut, layar akan mengaktifkan fungsi touchpad.
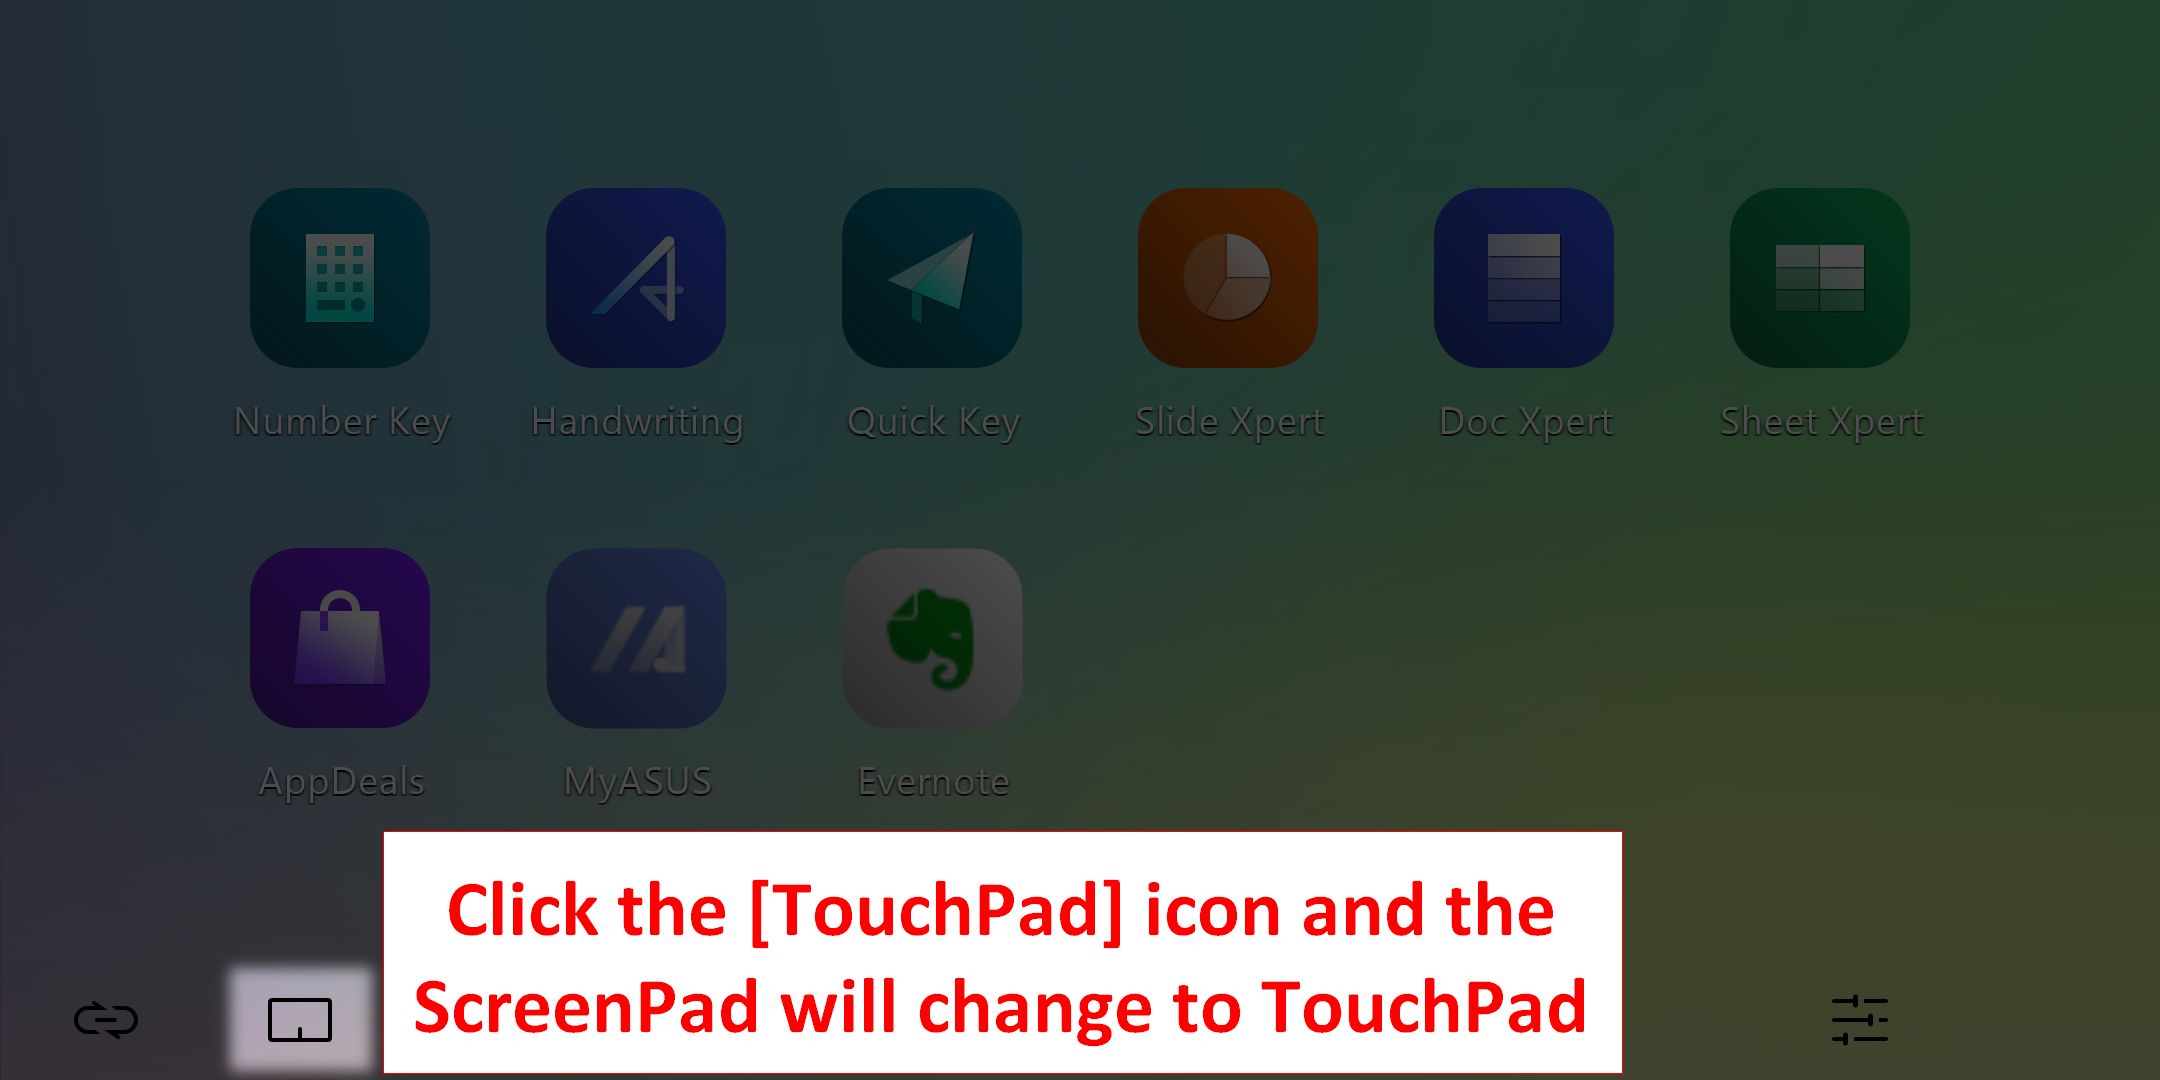
Anda dapat menonaktifkan fungsi touchpad dengan mengklik tanda [x] di pojok kanan atas.

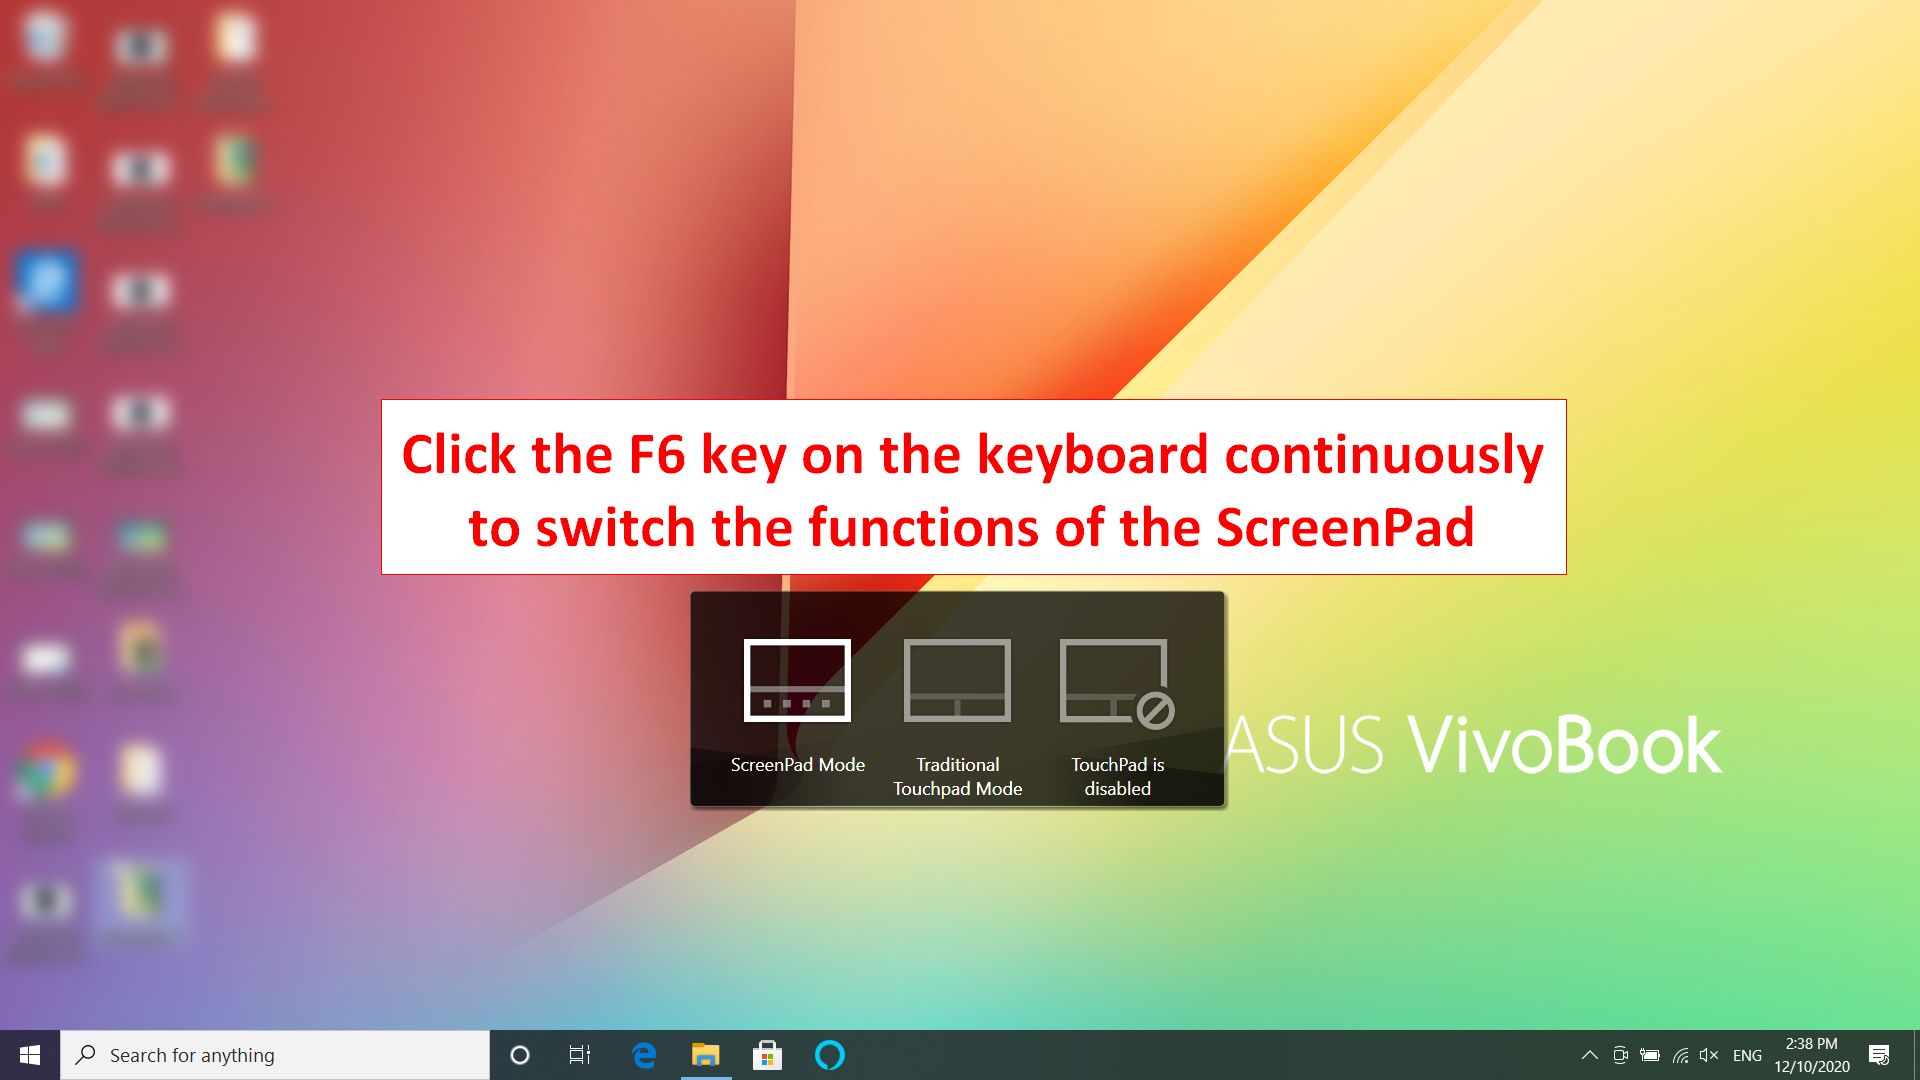
2.2 Anda juga dapat mengklik tombol keyboard F6 untuk memilih mode ScreenPad, mode touchpad tradisional, dan touchpad menonaktifkan tiga mode ScreenPad.
3.  [App Switcher]
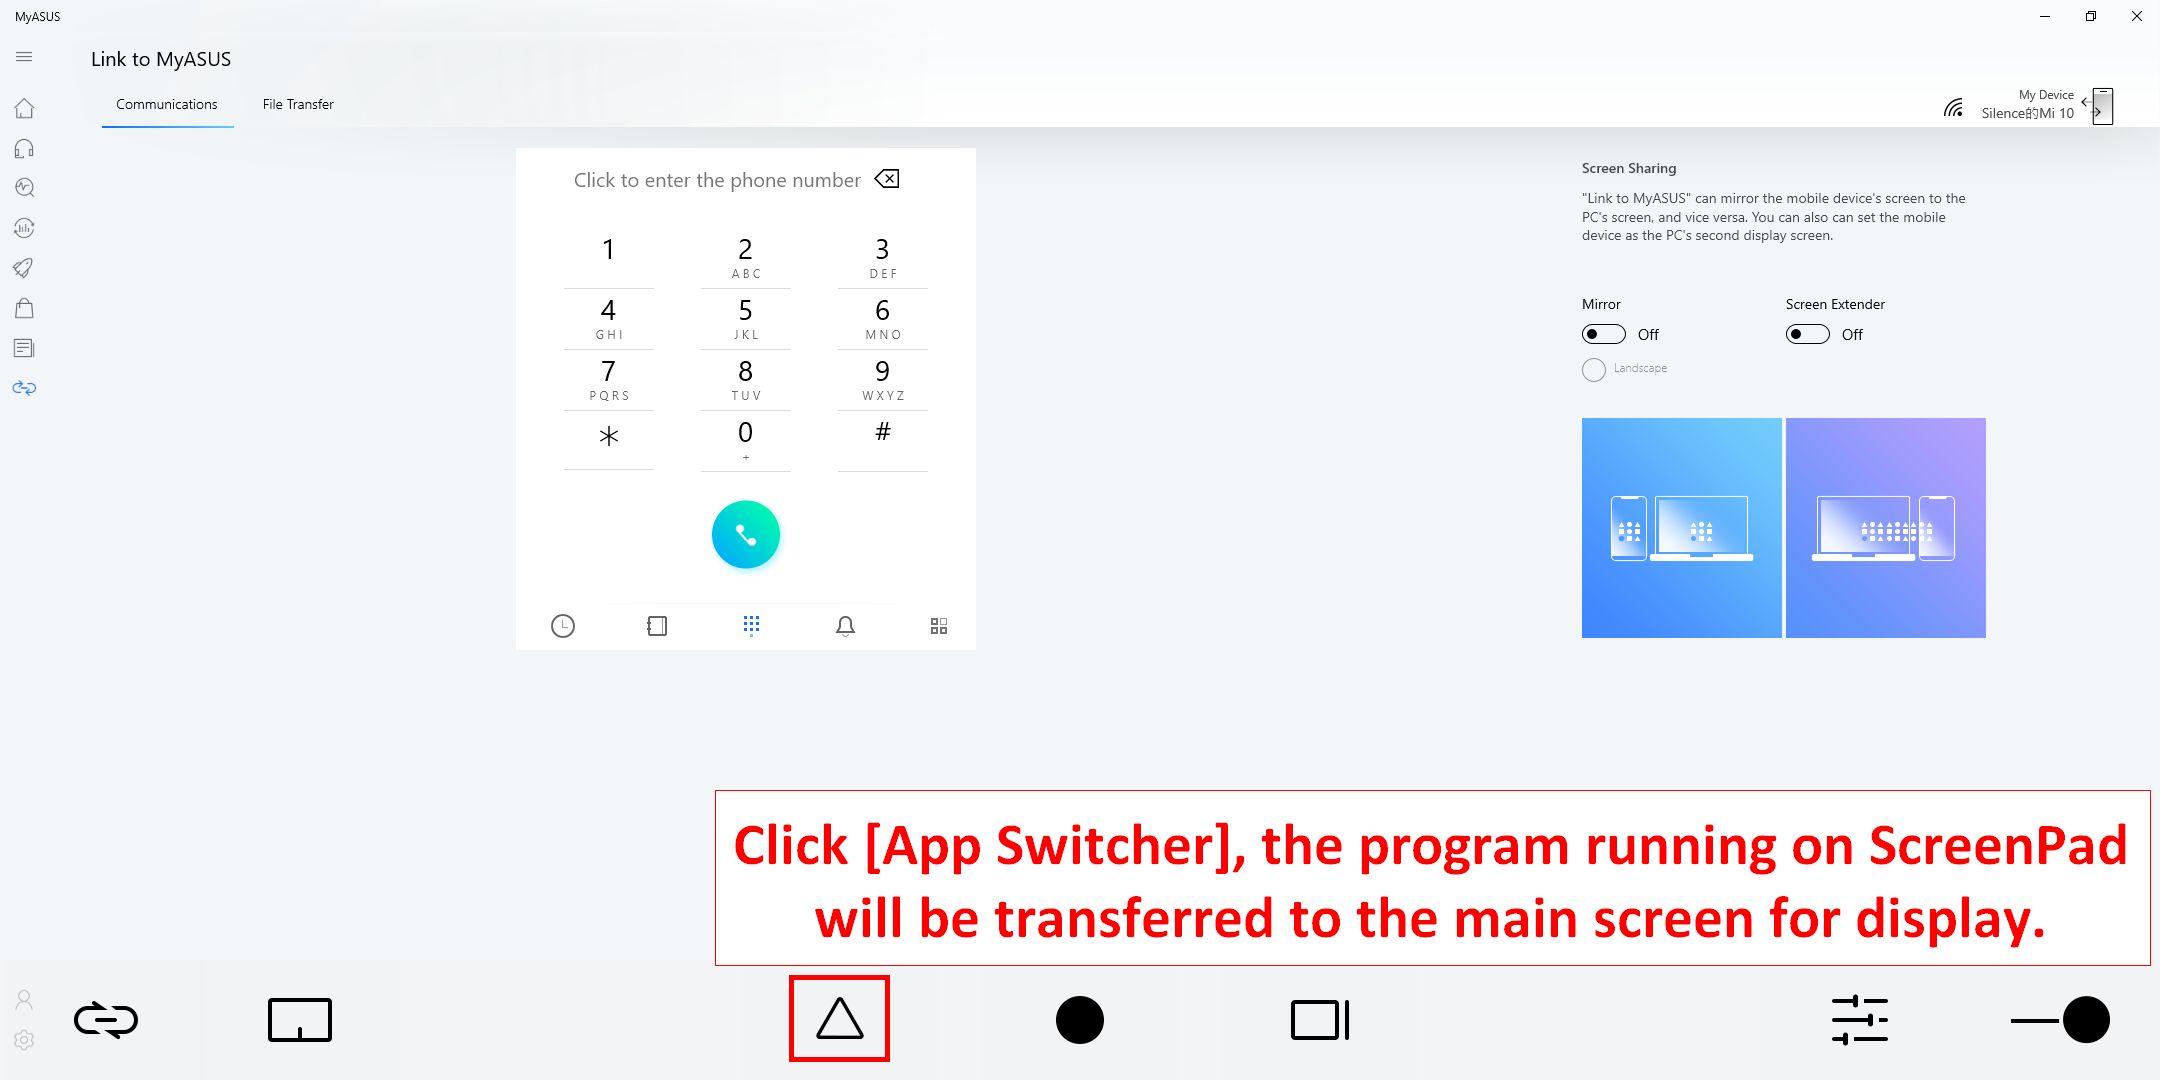
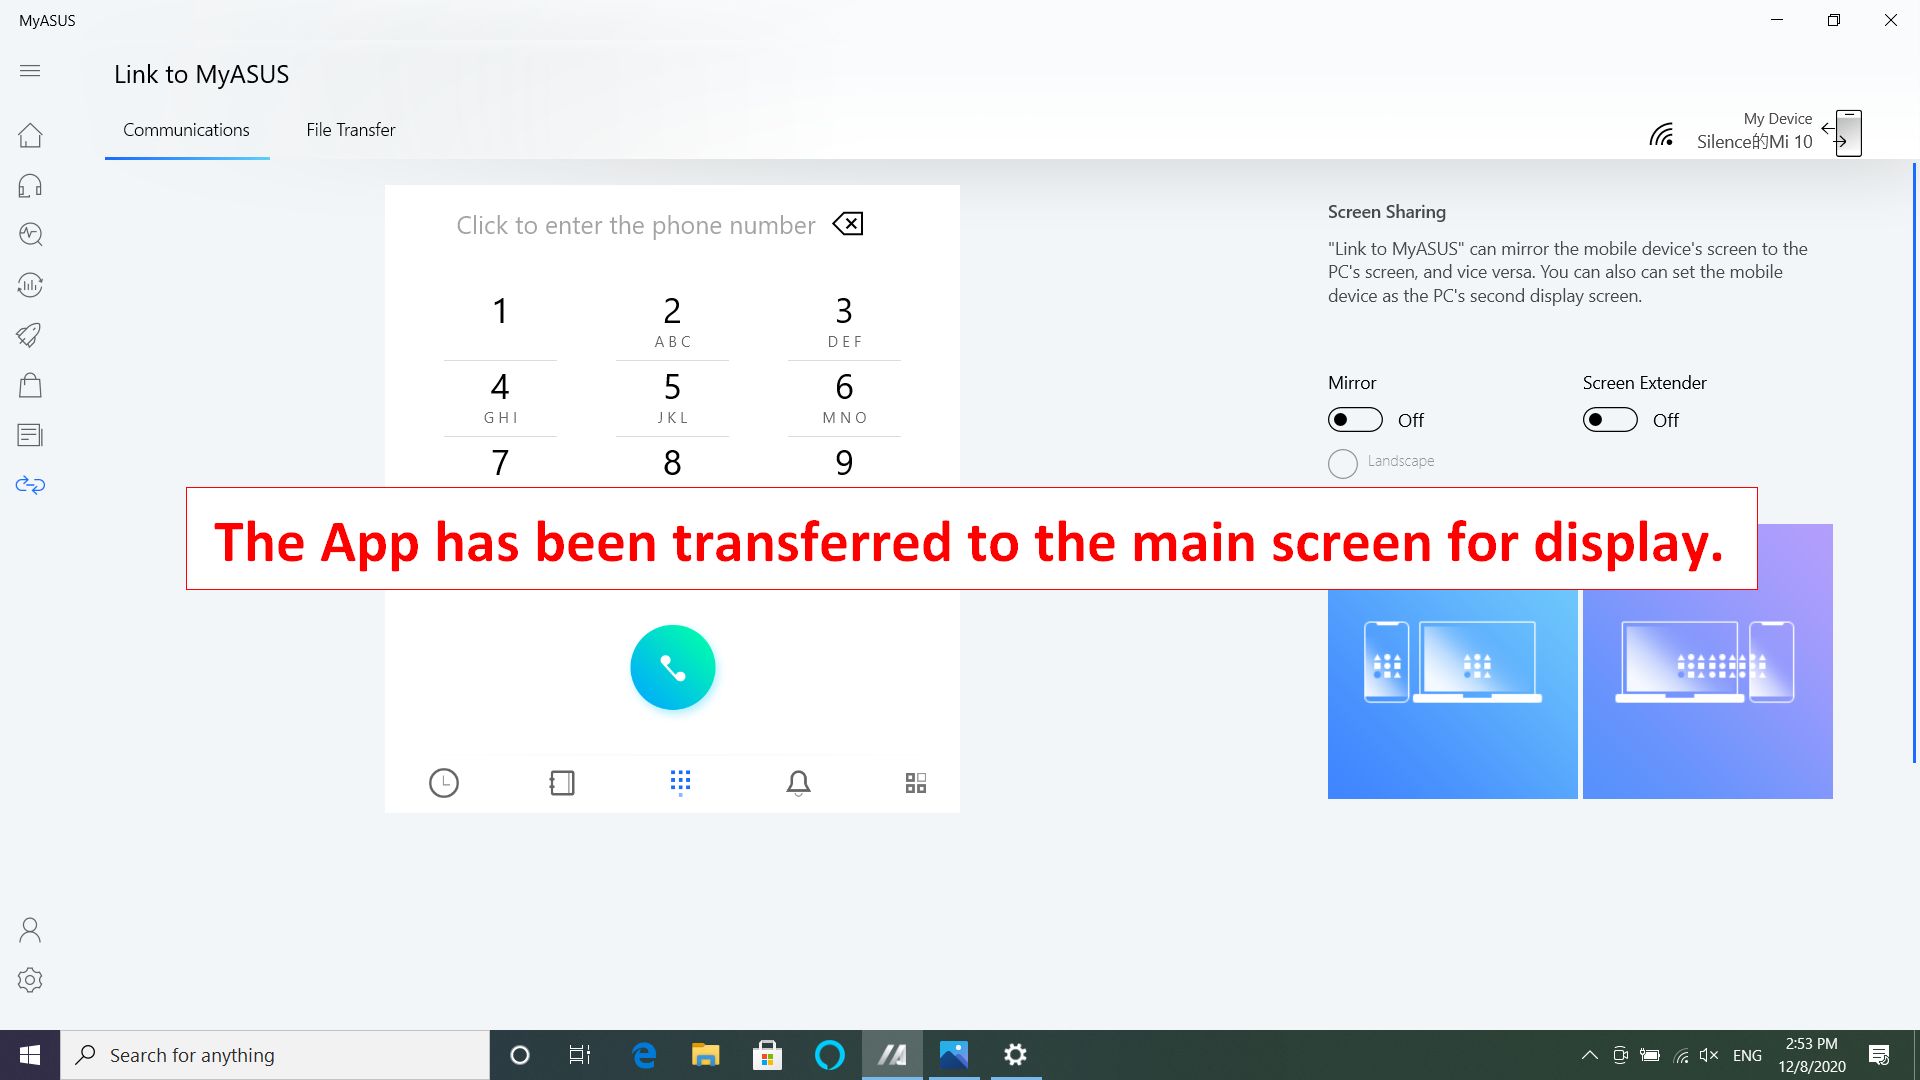
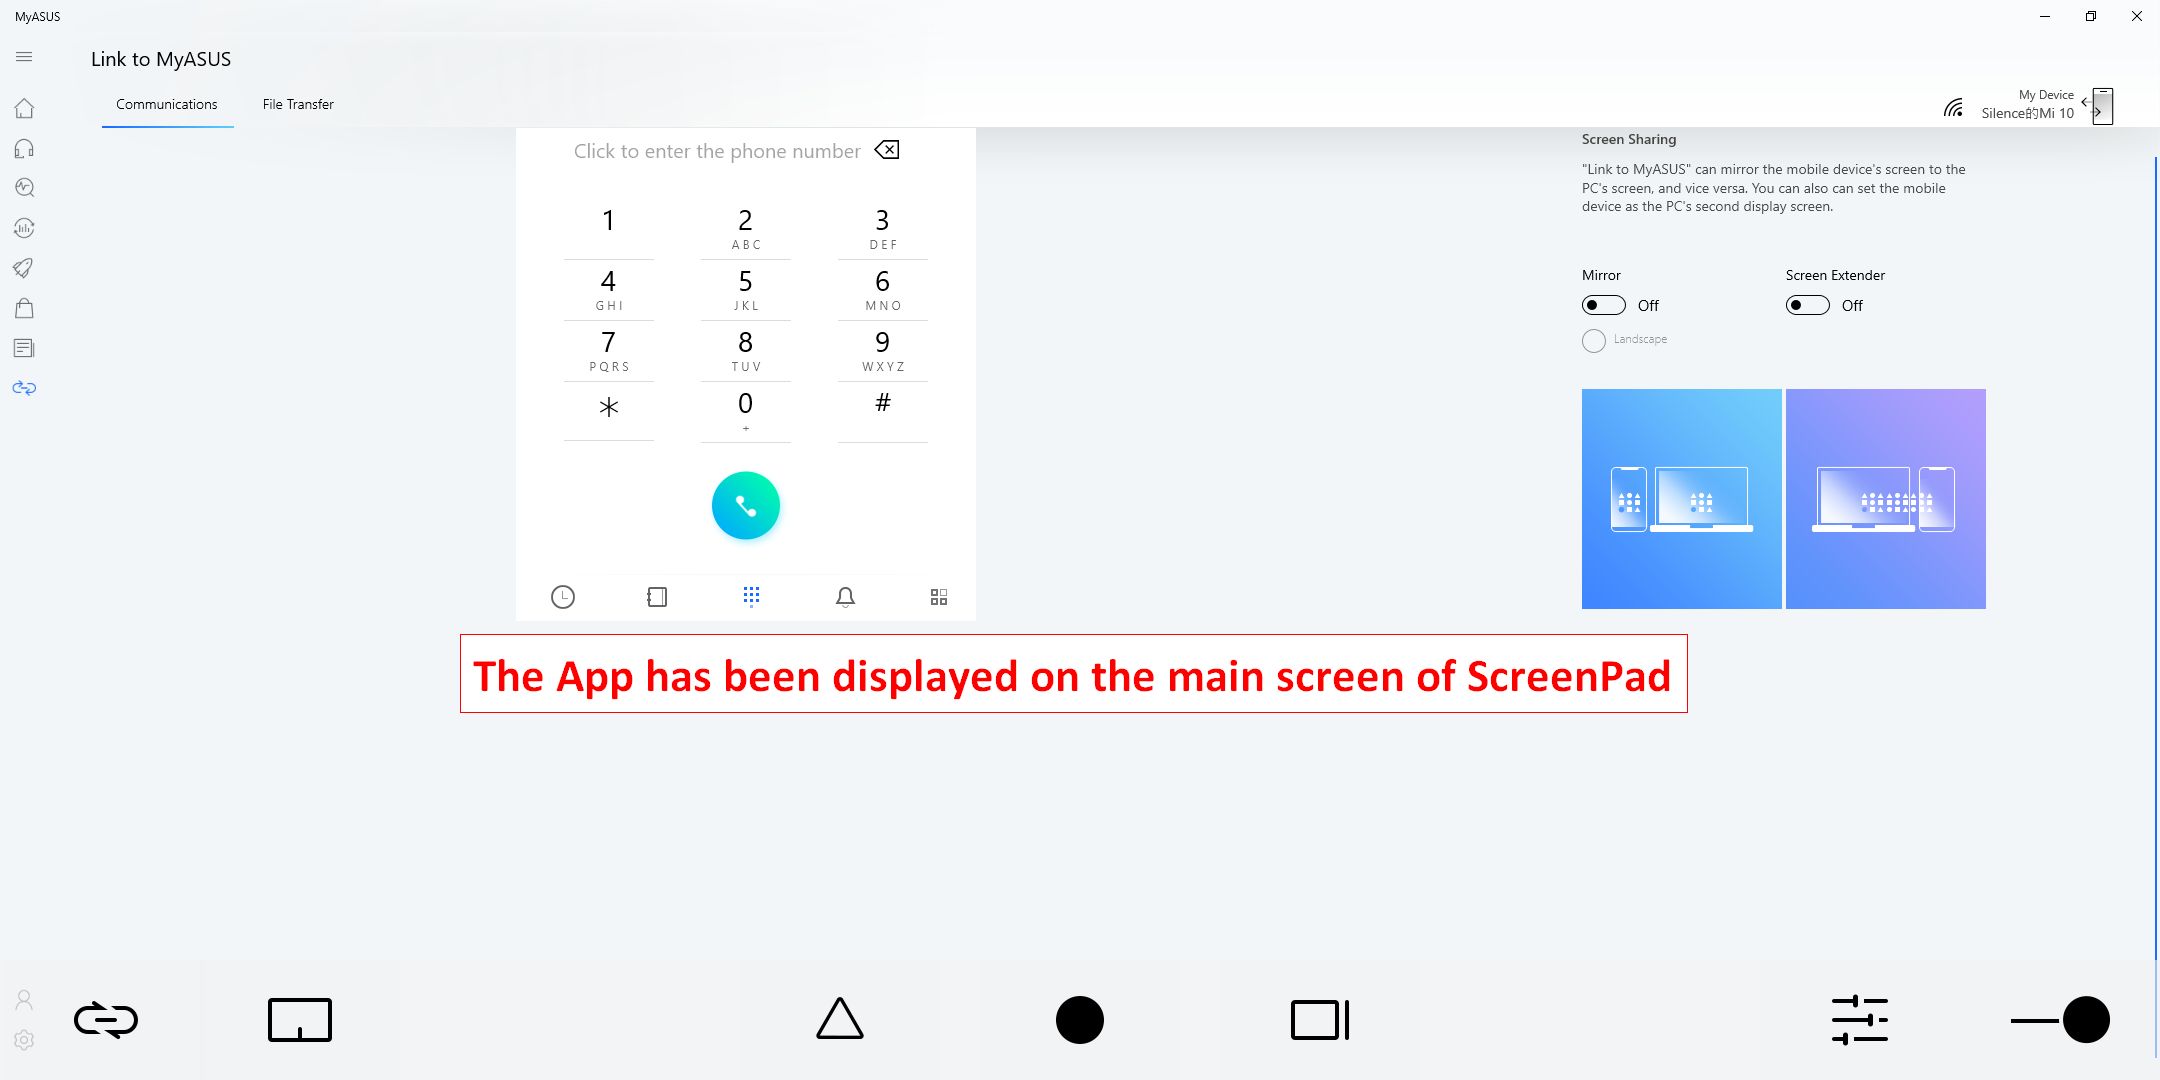
3.1 Klik [App Switcher],program yang berjalan di ScreenPad akan dipindahkan ke layar utama untuk ditampilkan.
3.2 Menyeret jendela Aplikasi di layar utama akan menampilkan ①[Screen Indicator] untuk mengonfirmasi lokasi layar. Ini juga akan menampilkan fitur menu ②[App Switcher] yang berisi ikon layar 1 dan layar 2.
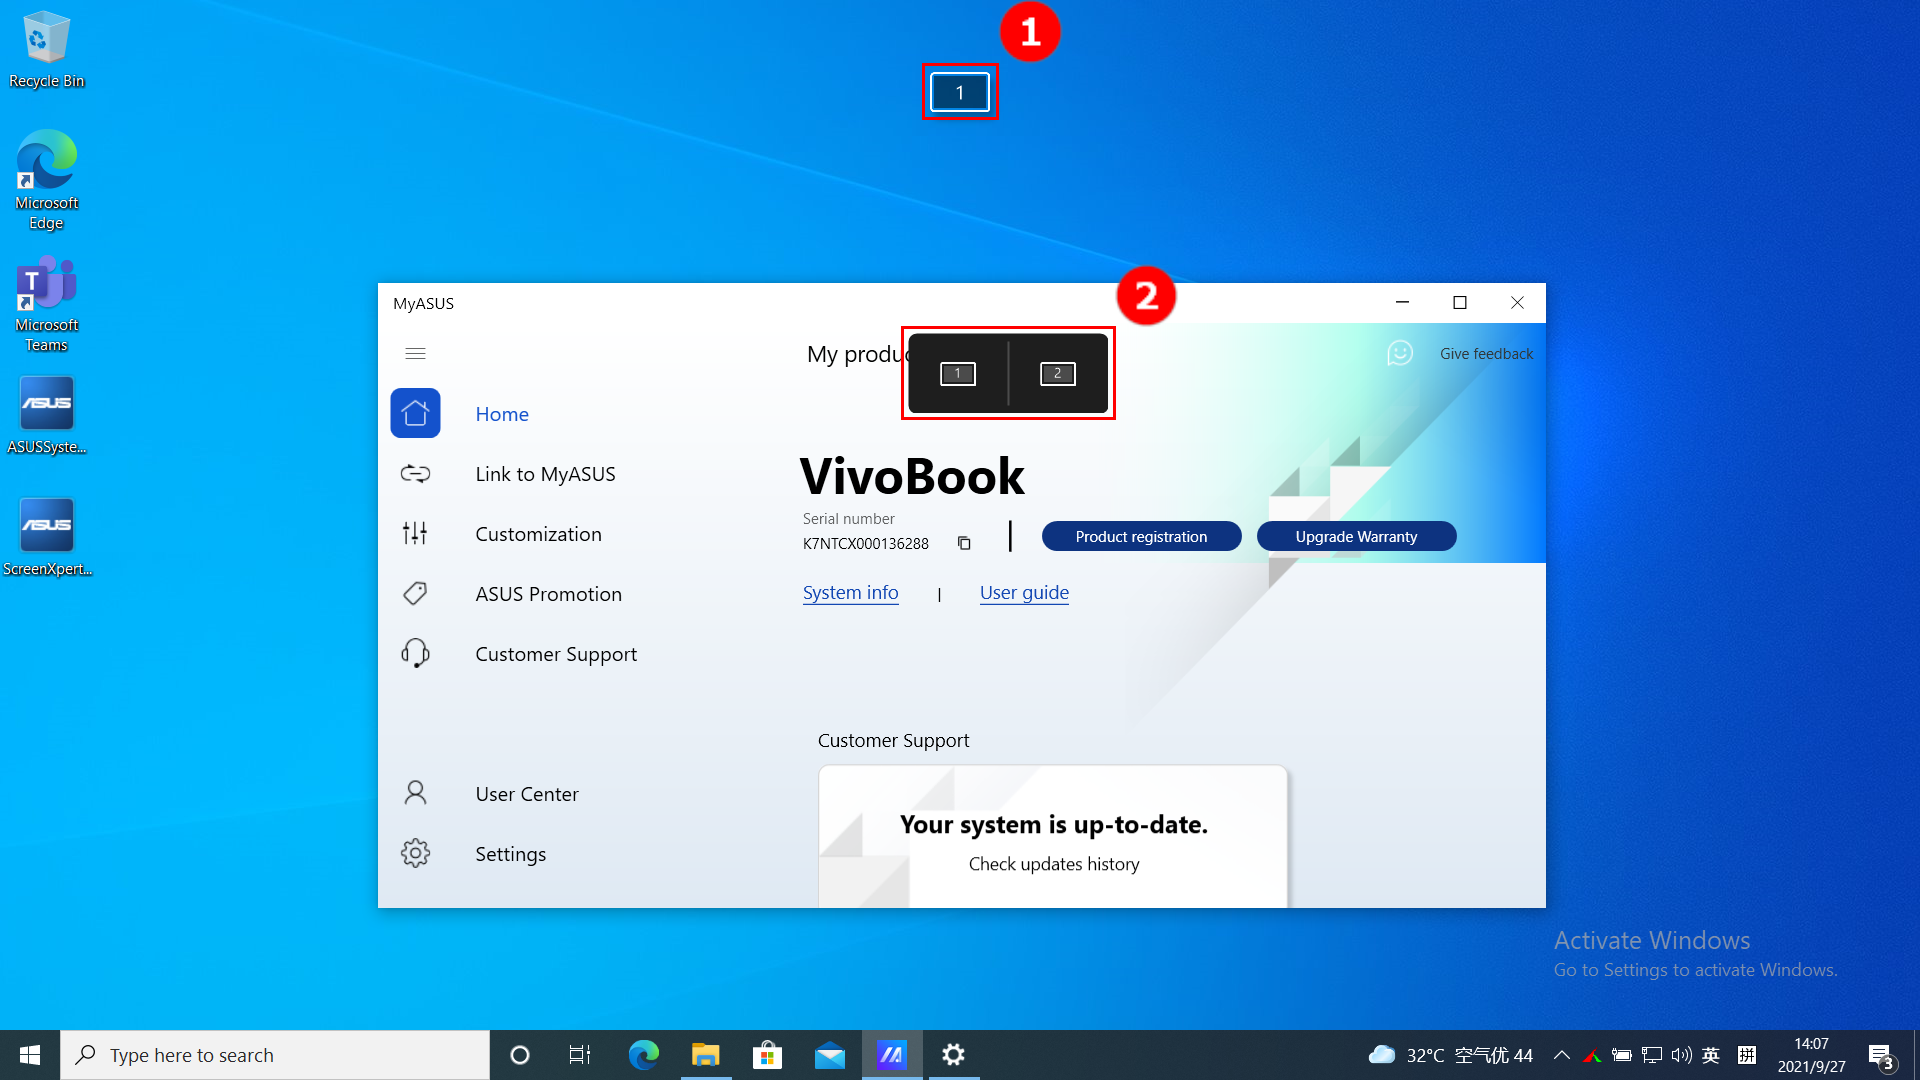
3.3 Jika Anda menyeret mouse ke kisaran ③[Screen 1], empat ikon yang dapat digunakan akan ditampilkan.
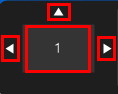
Tarik mouse ke daam [Left Arrow], dan jendela aplikasi akan muncul di Layar 1 untuk menempati separuh sisi kiri layar.
Tarik mouse ke dalam [Up Arrow], dan jendela aplikasi akan ditampilkan dalam layar penuh dalam Layar 1.
Tarik mouse ke dalam [Right Arrow], dan jendela aplikasi akan muncul di Layar 1 menempati separuh sisi kanan layar.
Tarik mouse ke dalam [Middle Area] dan jendela aplikasi akan berada di tengah Layar 1. Gambar berikut akan diilustrasikan sebagai contoh [Middle Area].
3.4 Jendela aplikasi sudah berada di tengah Layar 1.
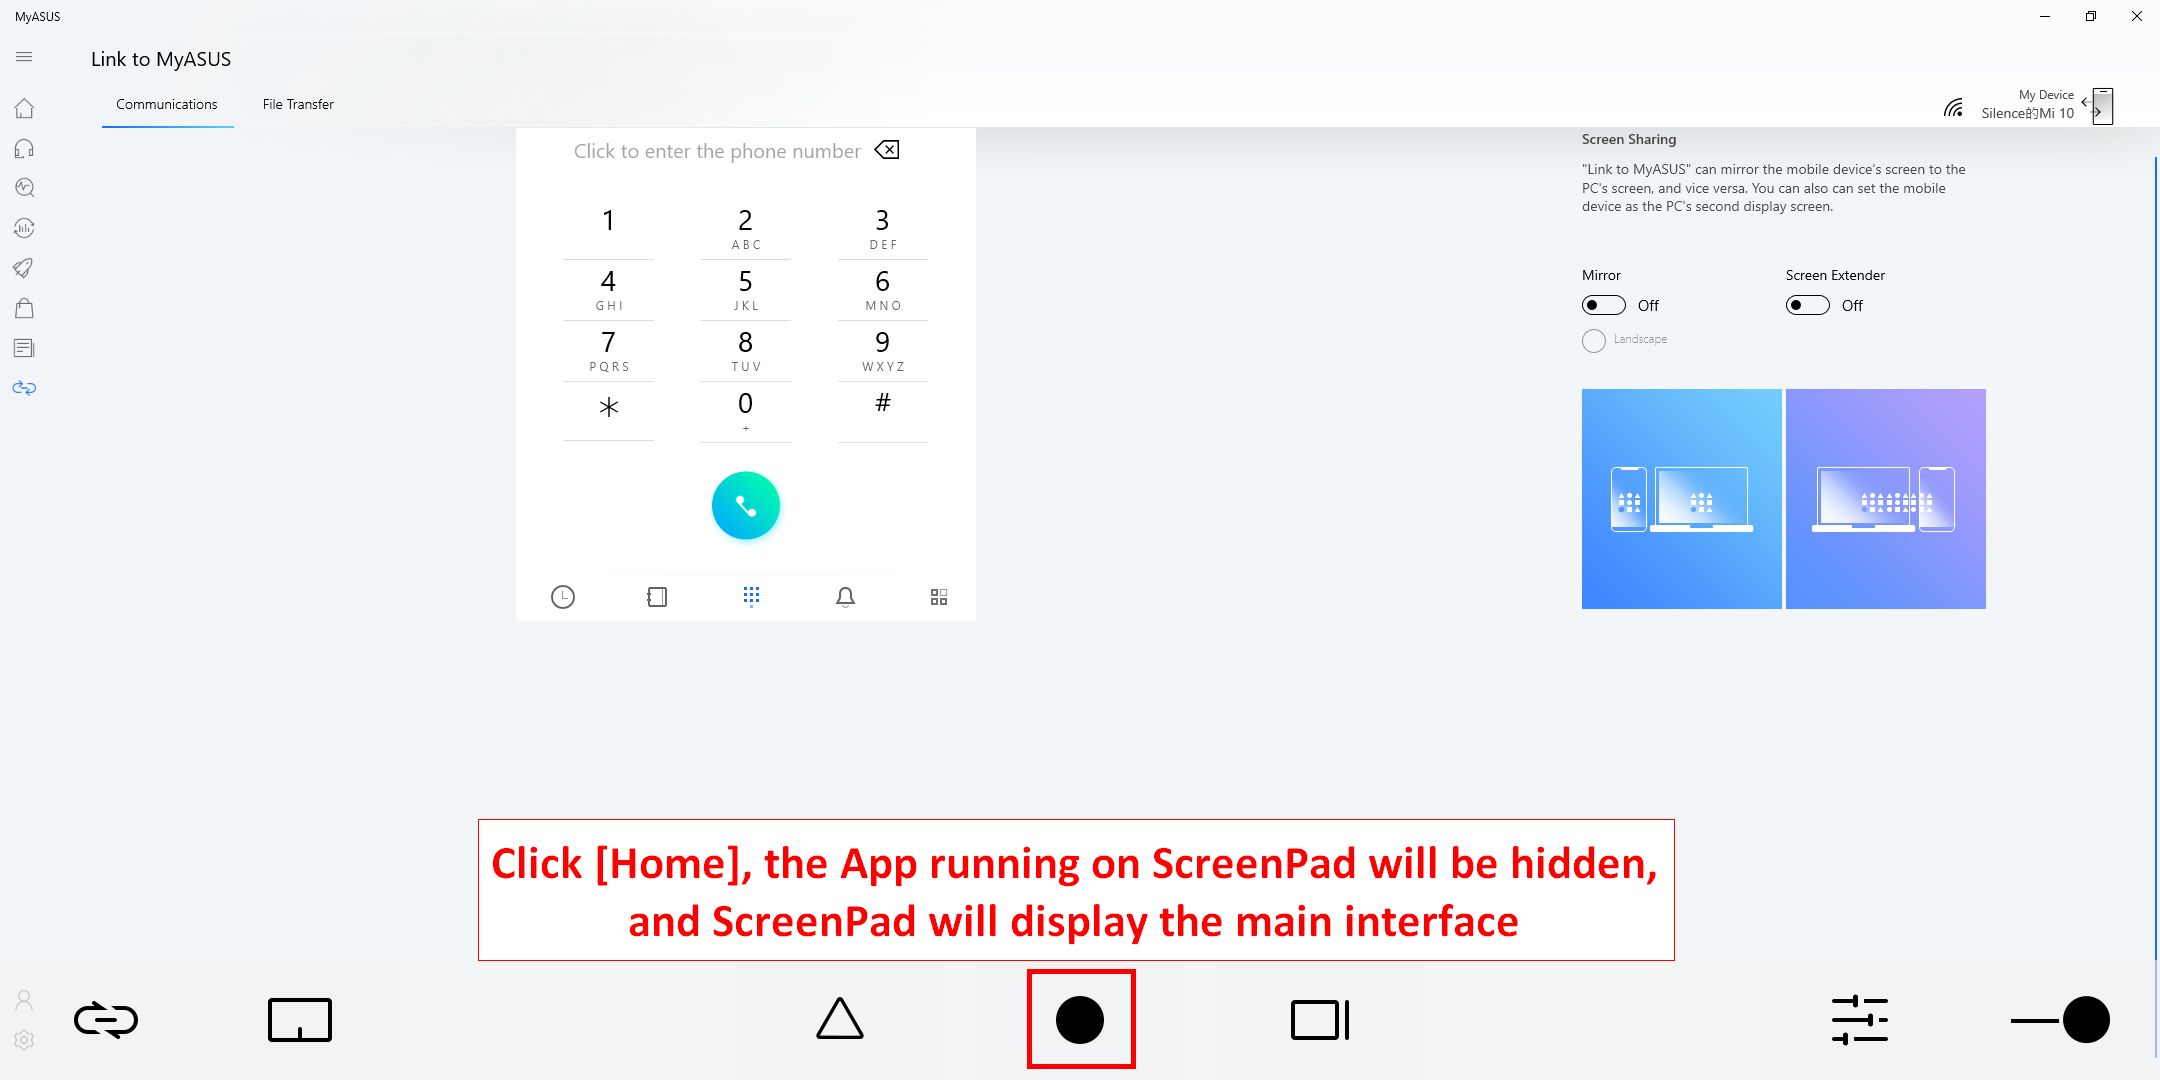
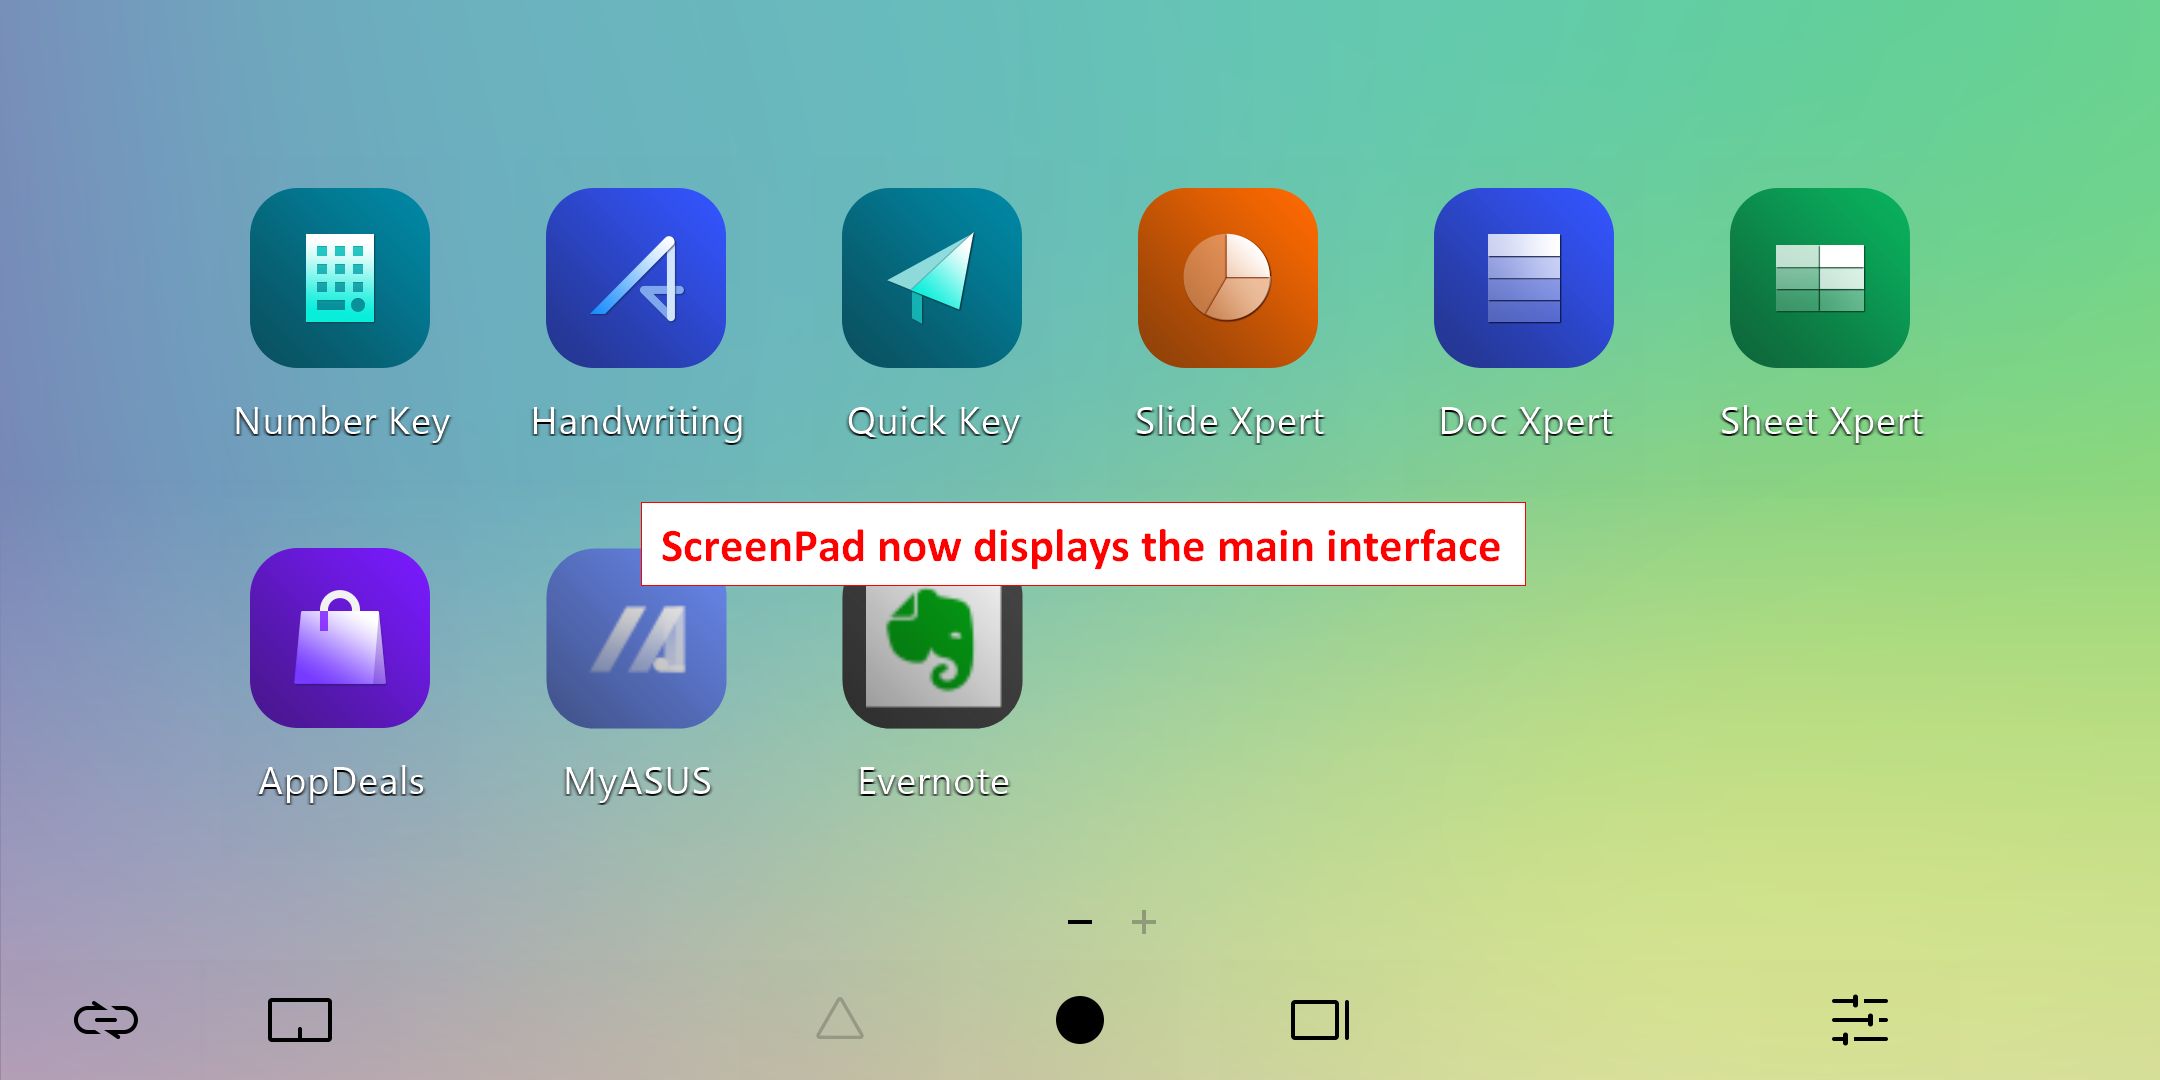
4.  Ikon [Homepage], ketika sebuah jendela ditampilkan di ScreenPad, klik ikon tersebut, ScreenPad akan kembali ke antarmuka utama.
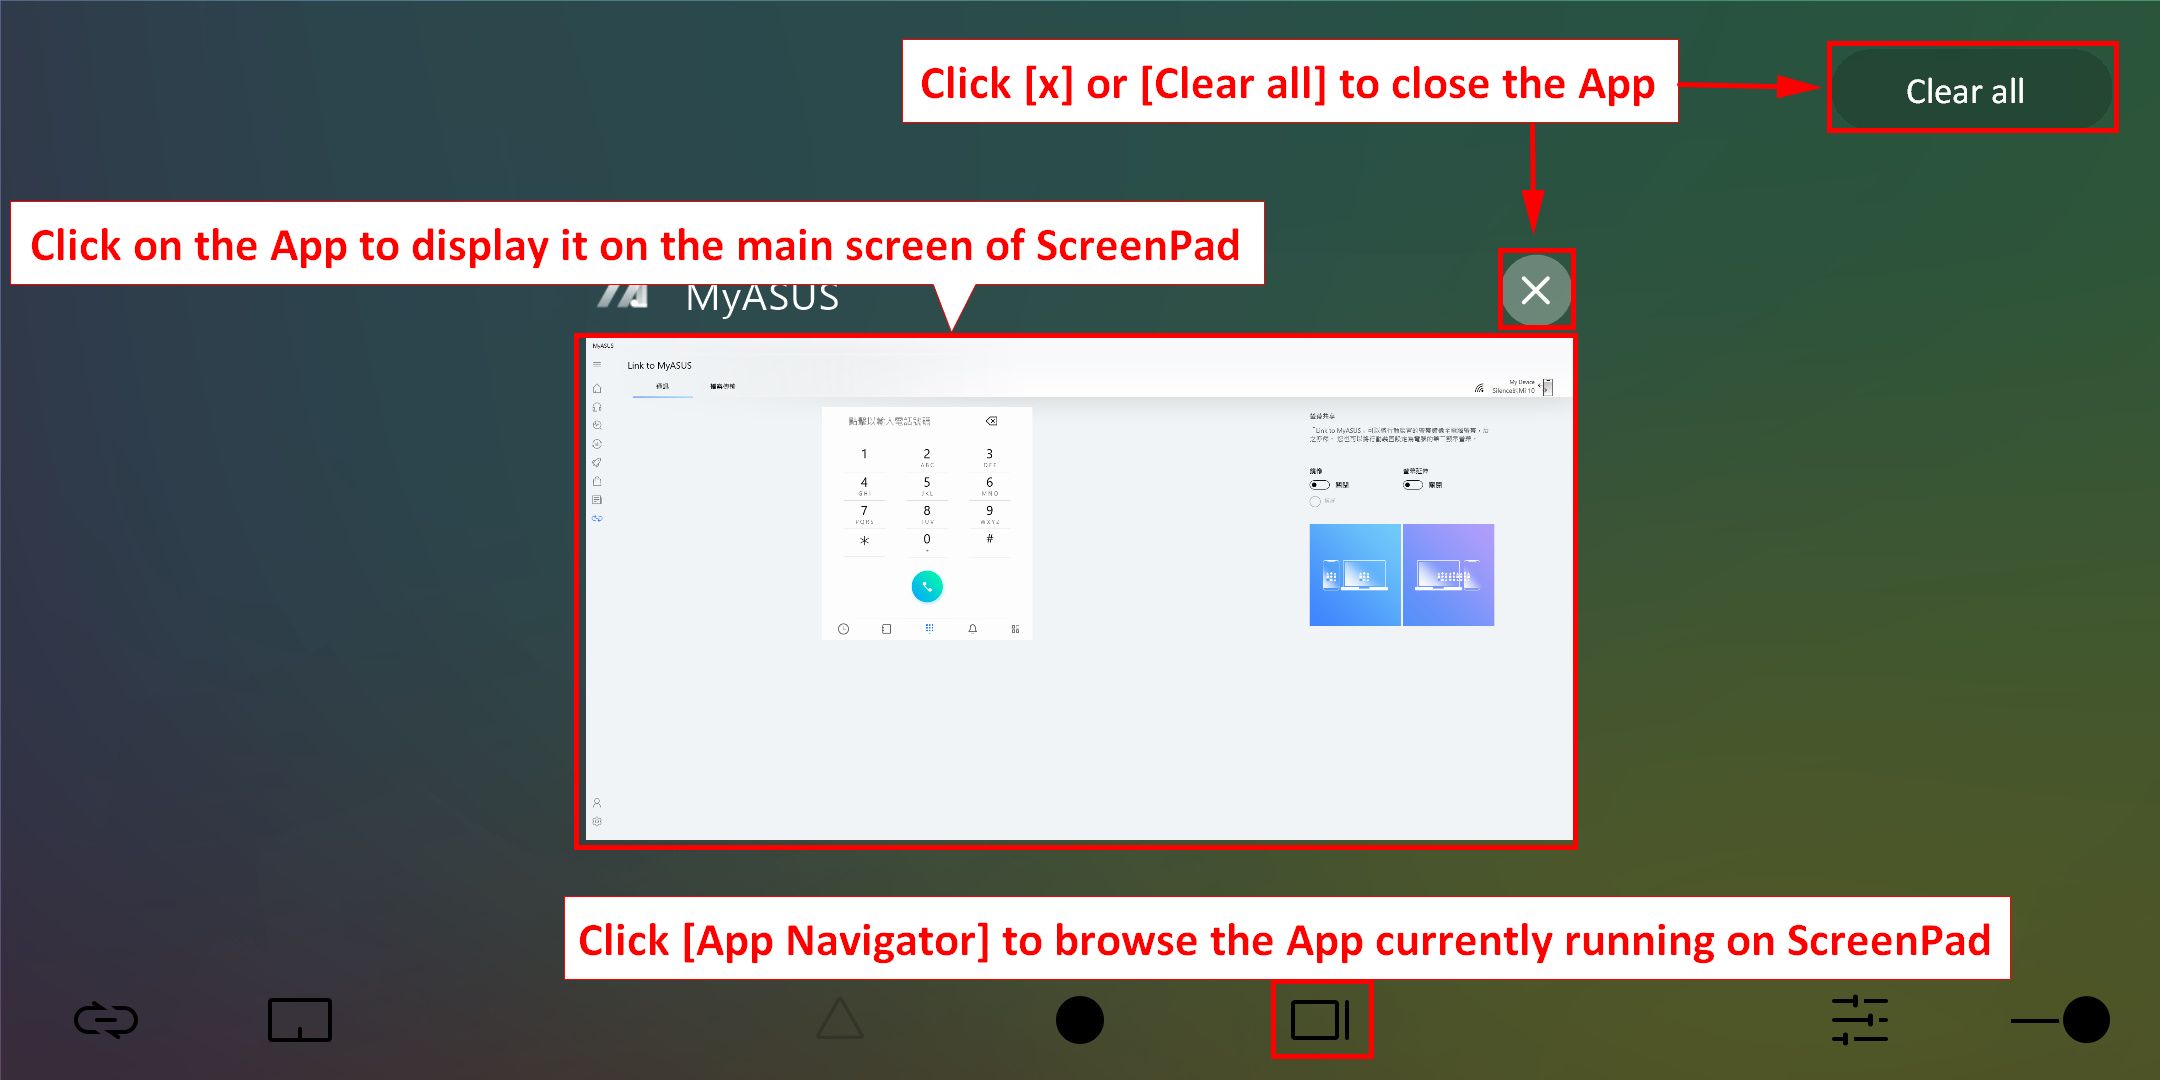
5.  Ikon [App Navigator] Anda dapat menelusuri Aplikasi yang berjalan di ScreenPad saat ini. Anda dapat mengklik aplikasi untuk menampilkannya di ScreenPad, atau klik [X] atau [Clear All] i pojok kanan atas untuk menutup aplikasi yang berjalan di ScreenPad.
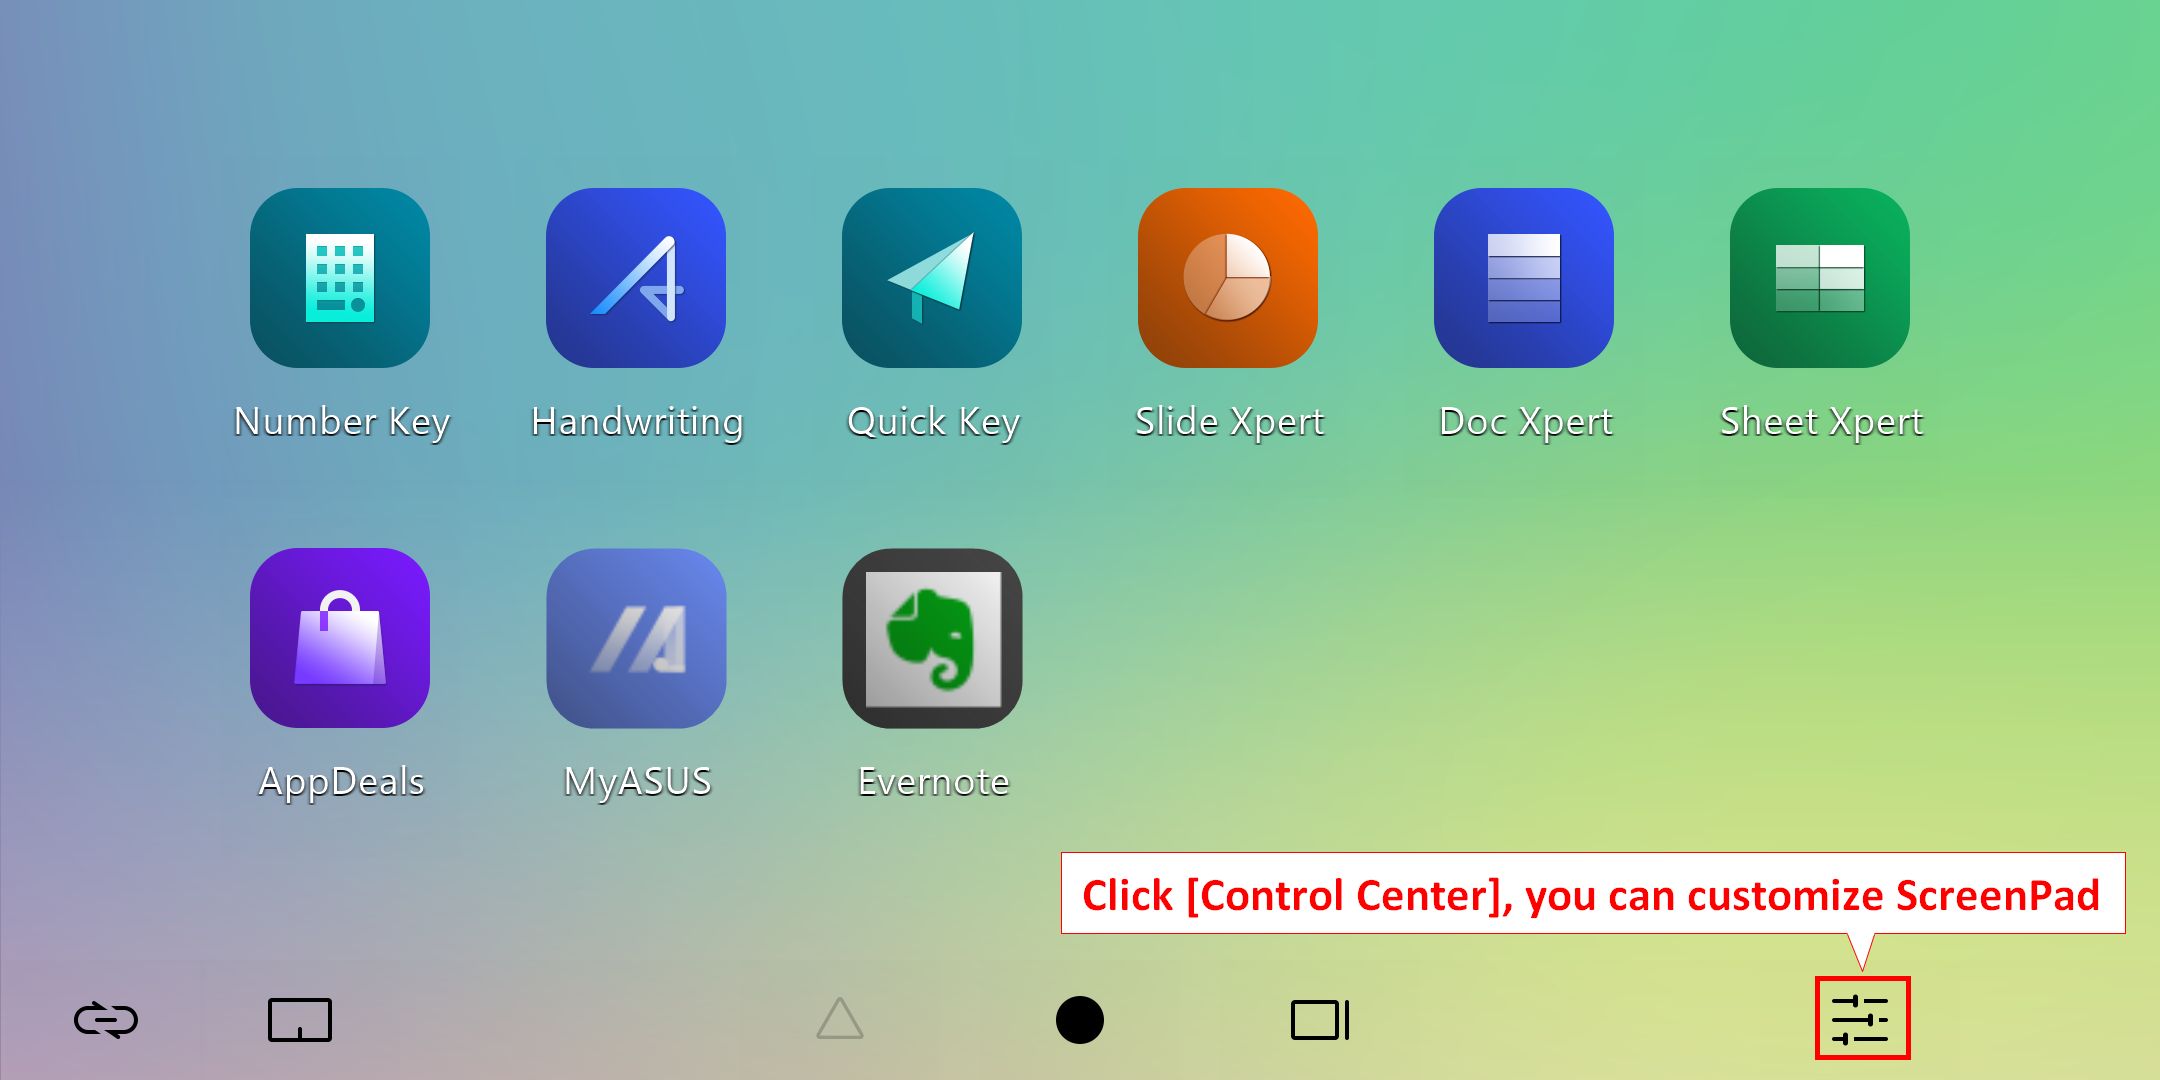
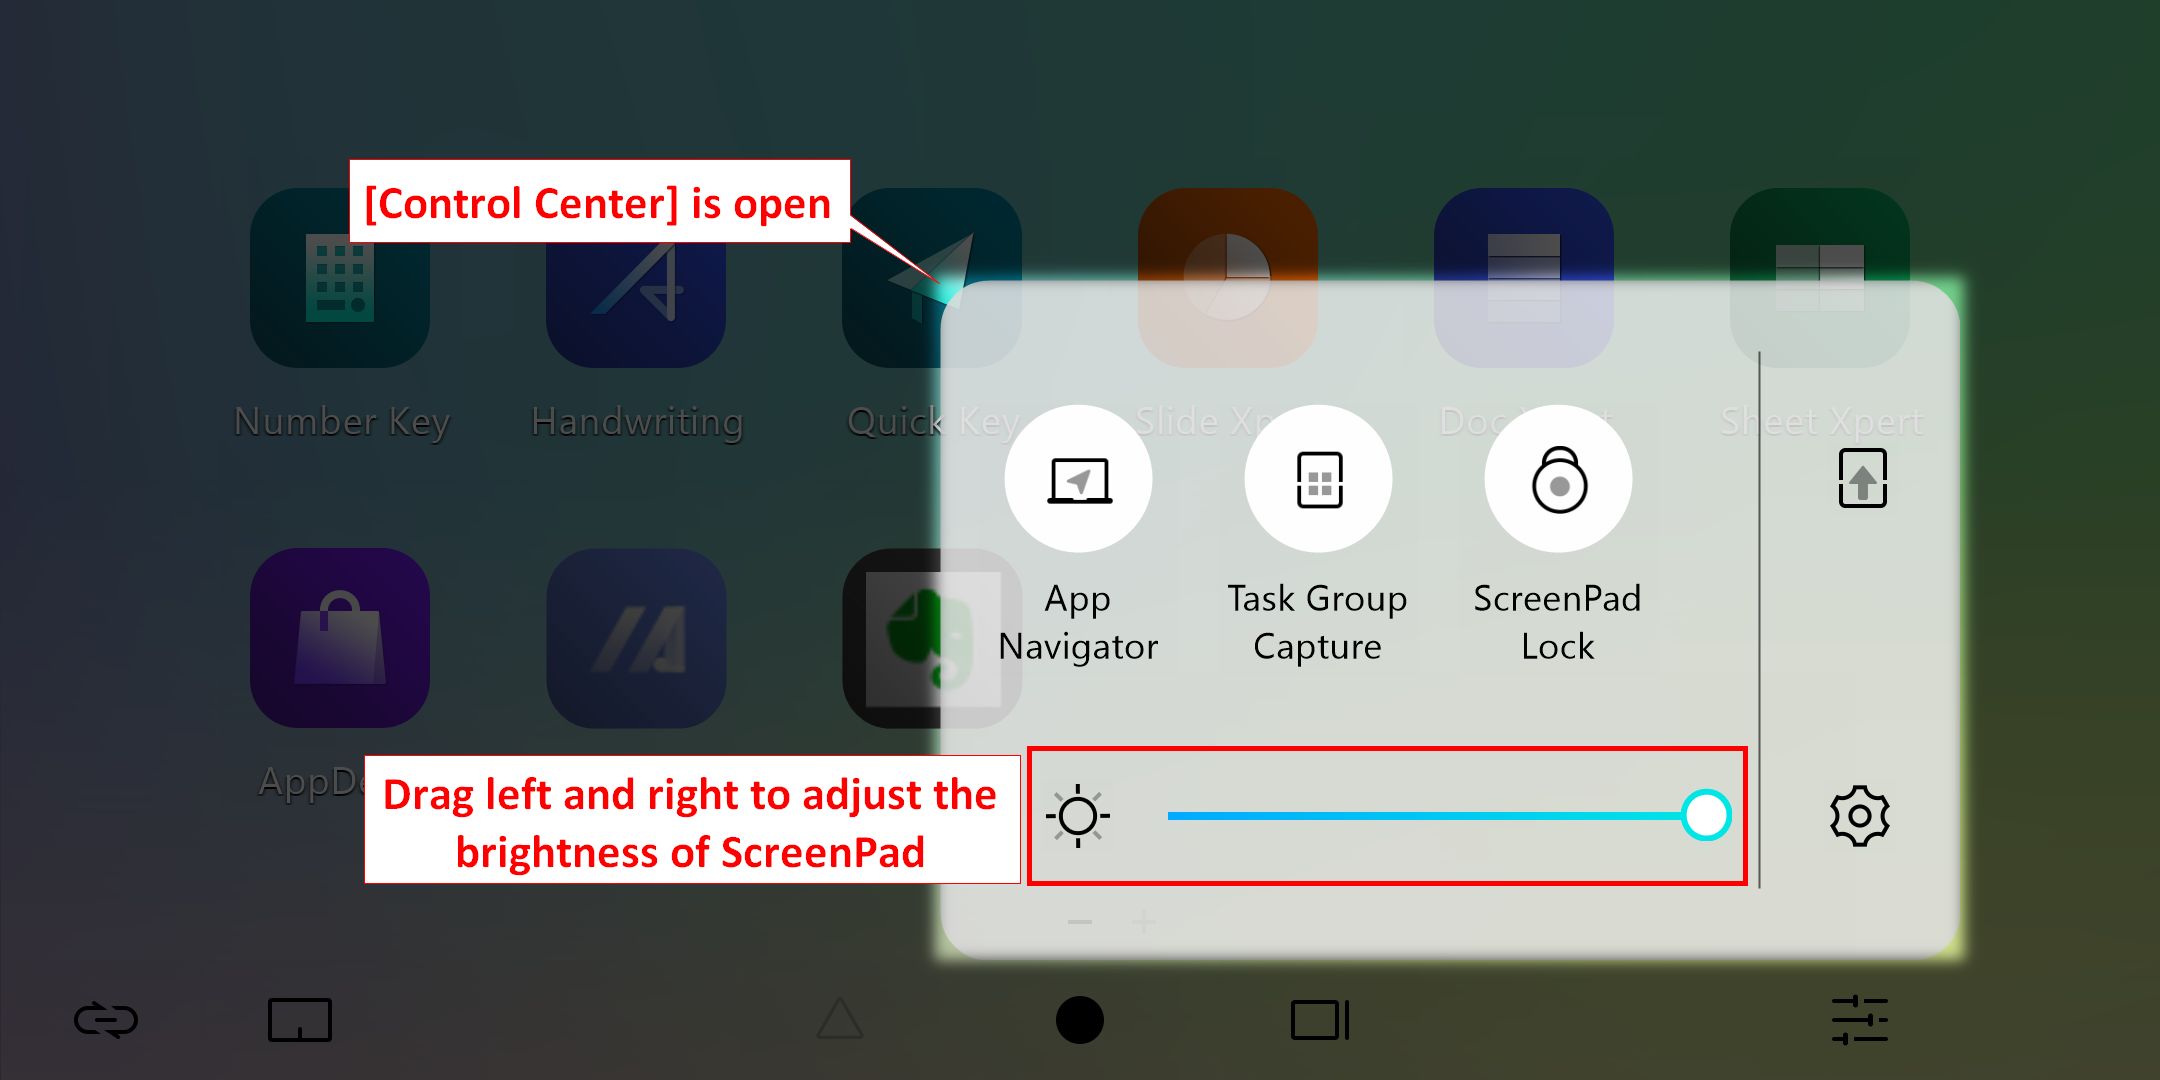
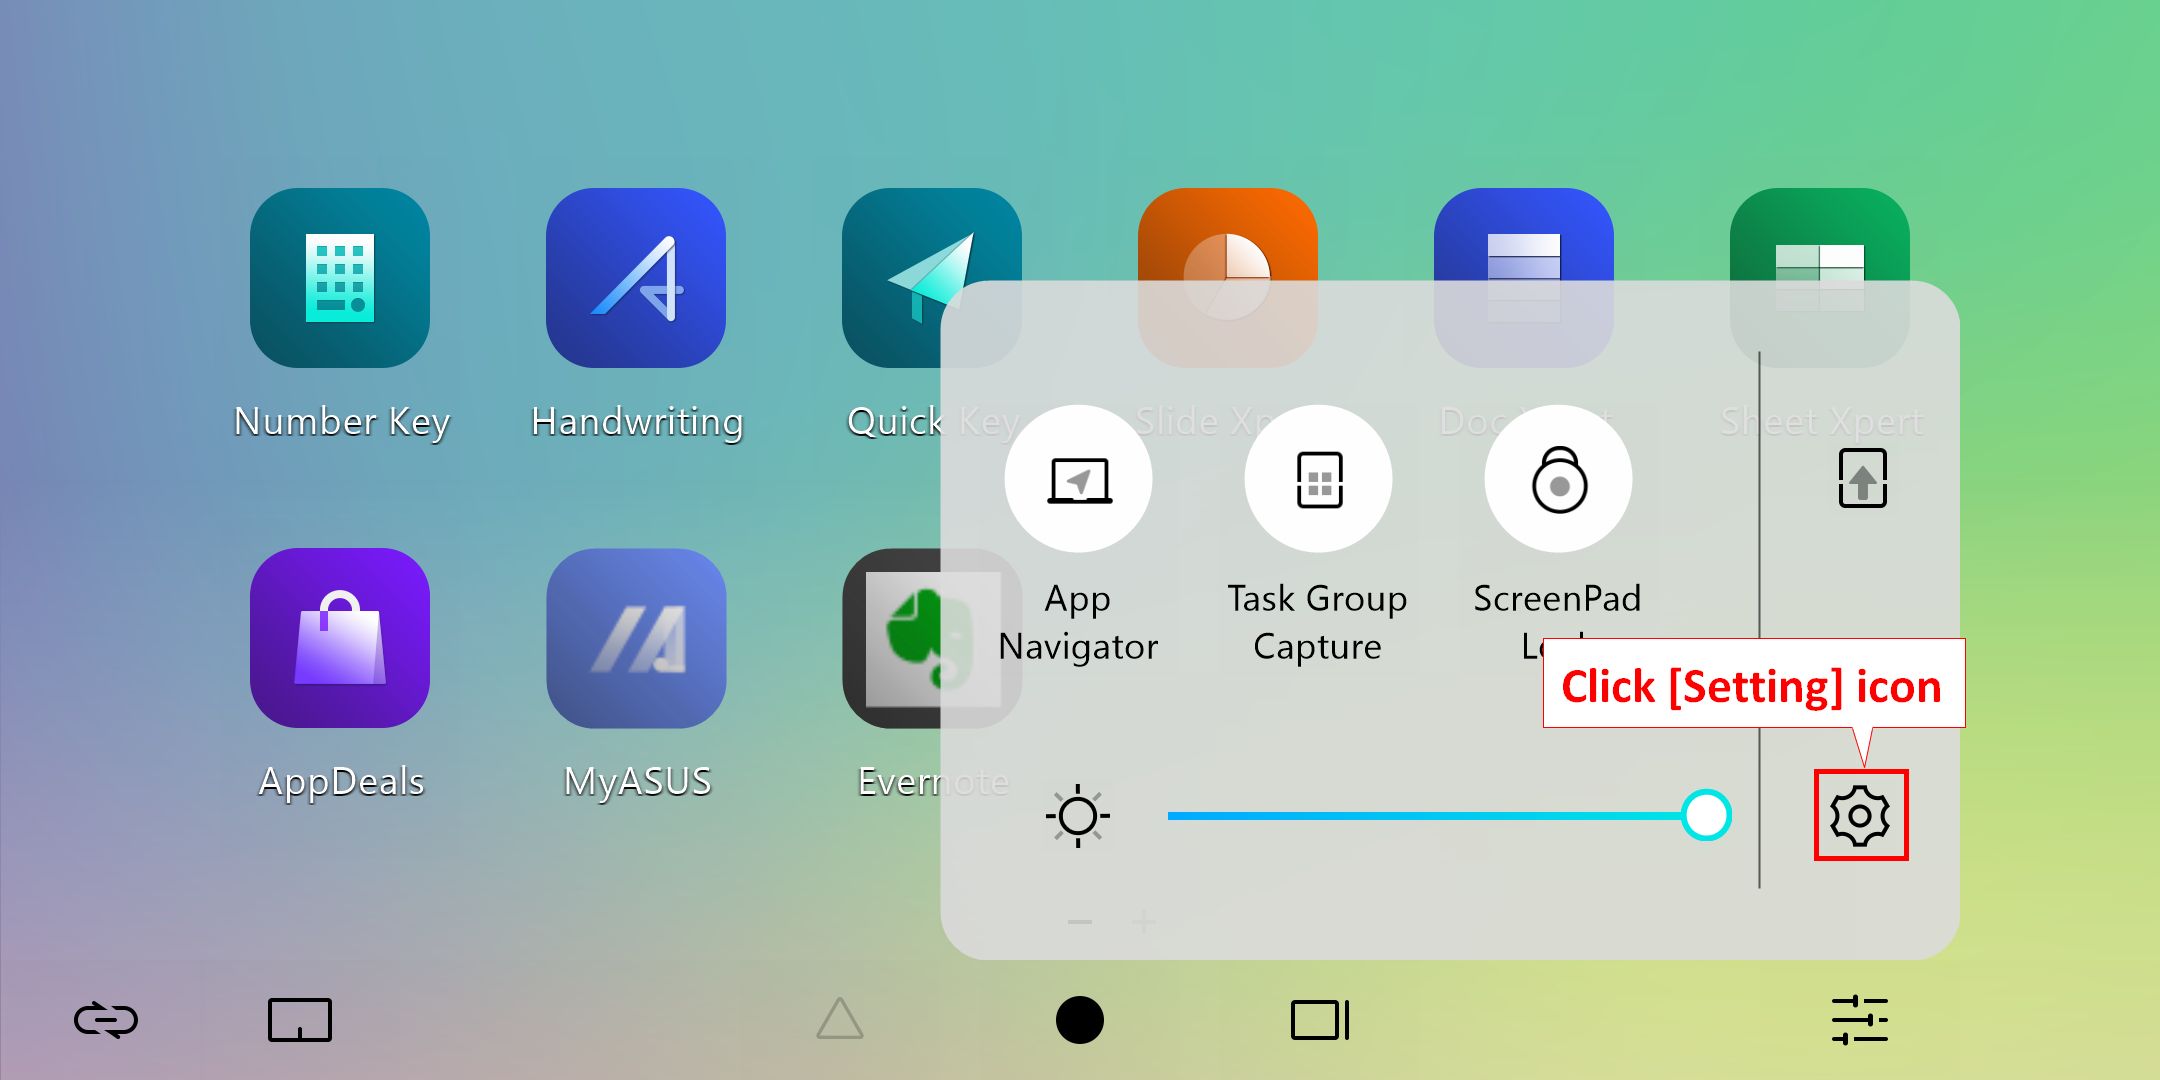
6.  Ikon [Control Center] untuk mengatur dan mempersonalisasi ScreenPad Anda.
6.1 Seret ke kiri dan kanan dengan jari Anda untuk menyesuaikan kecerahan ScreenPad.
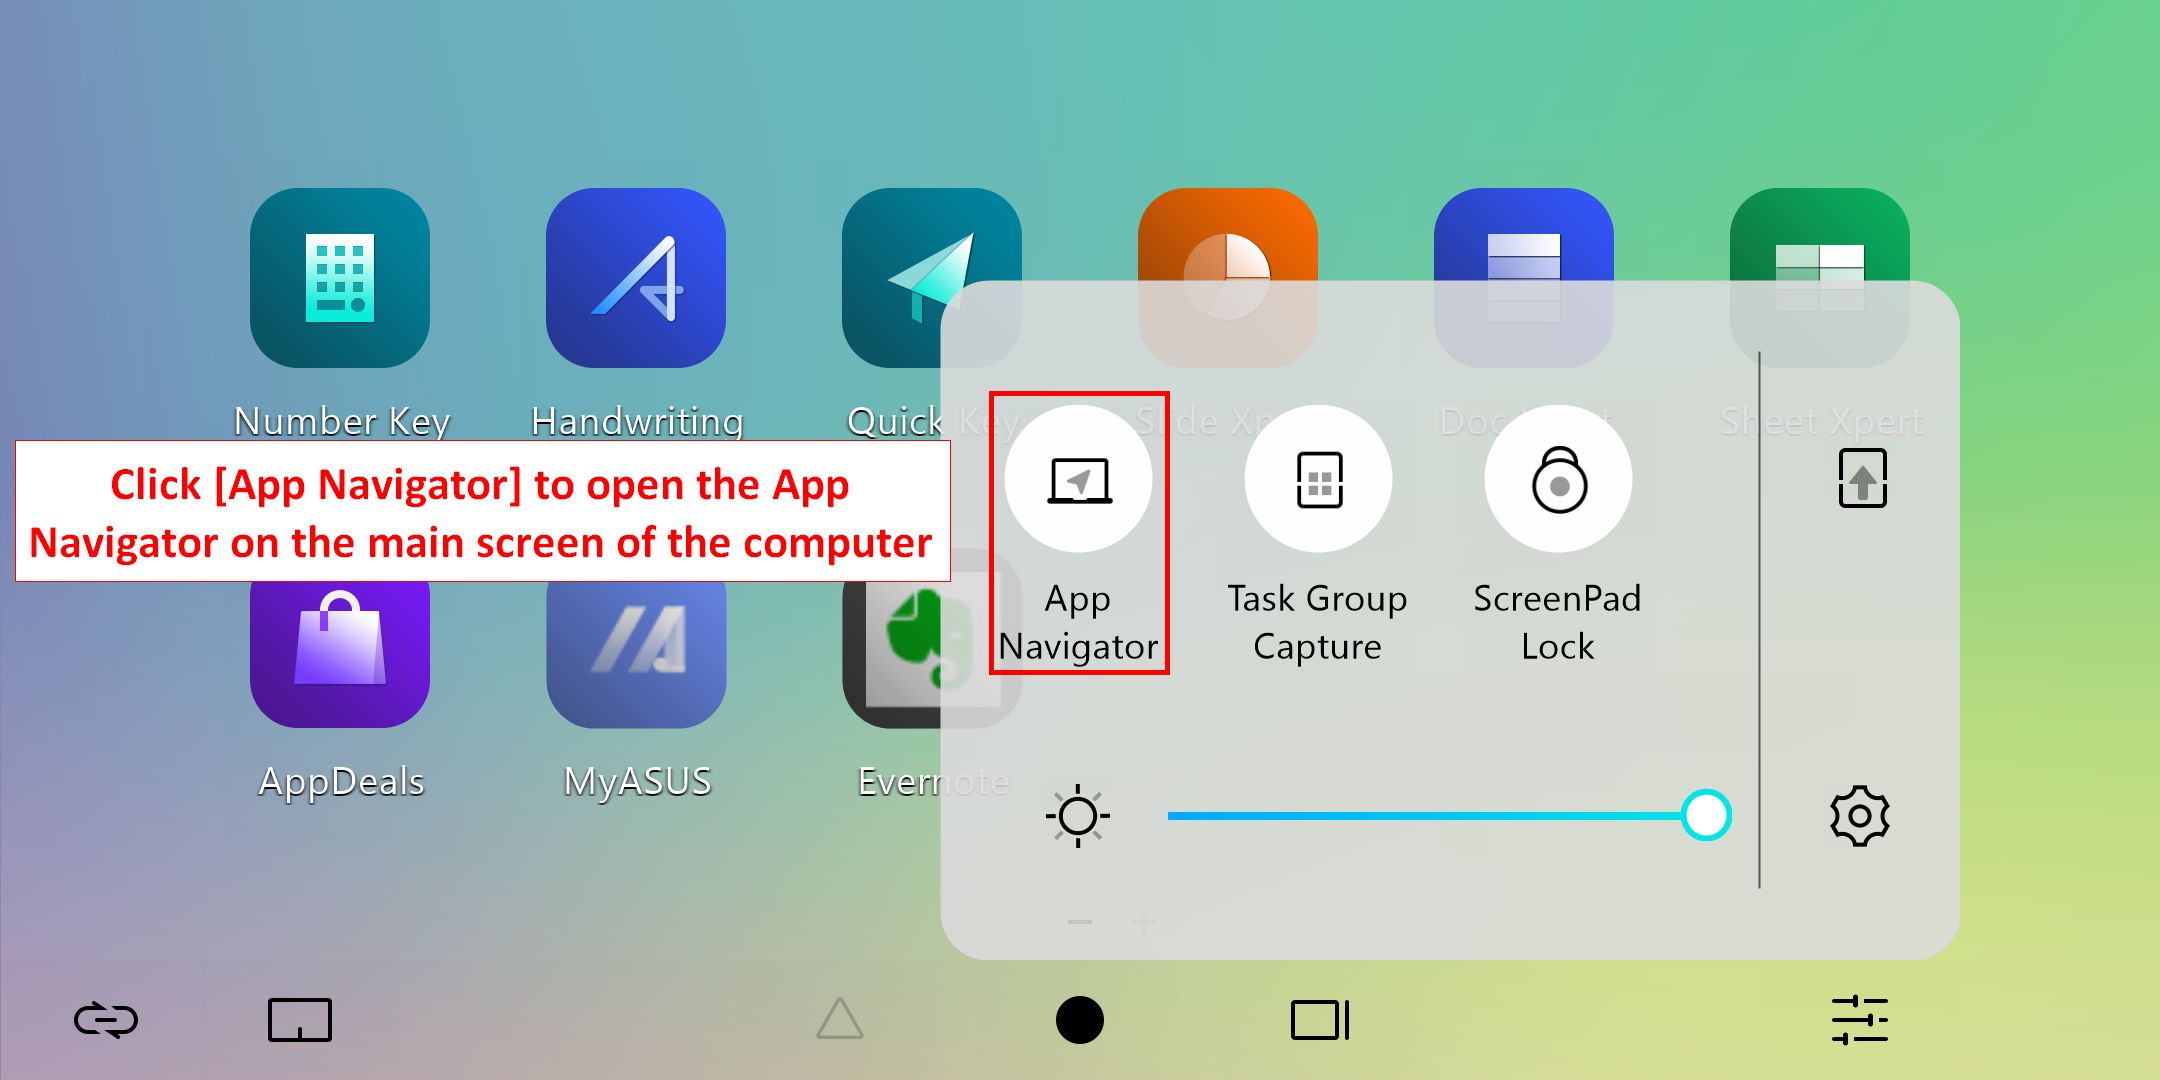
6.2.1 Klik [App Navigator] untuk membuka App Navigator di layar utama laptop
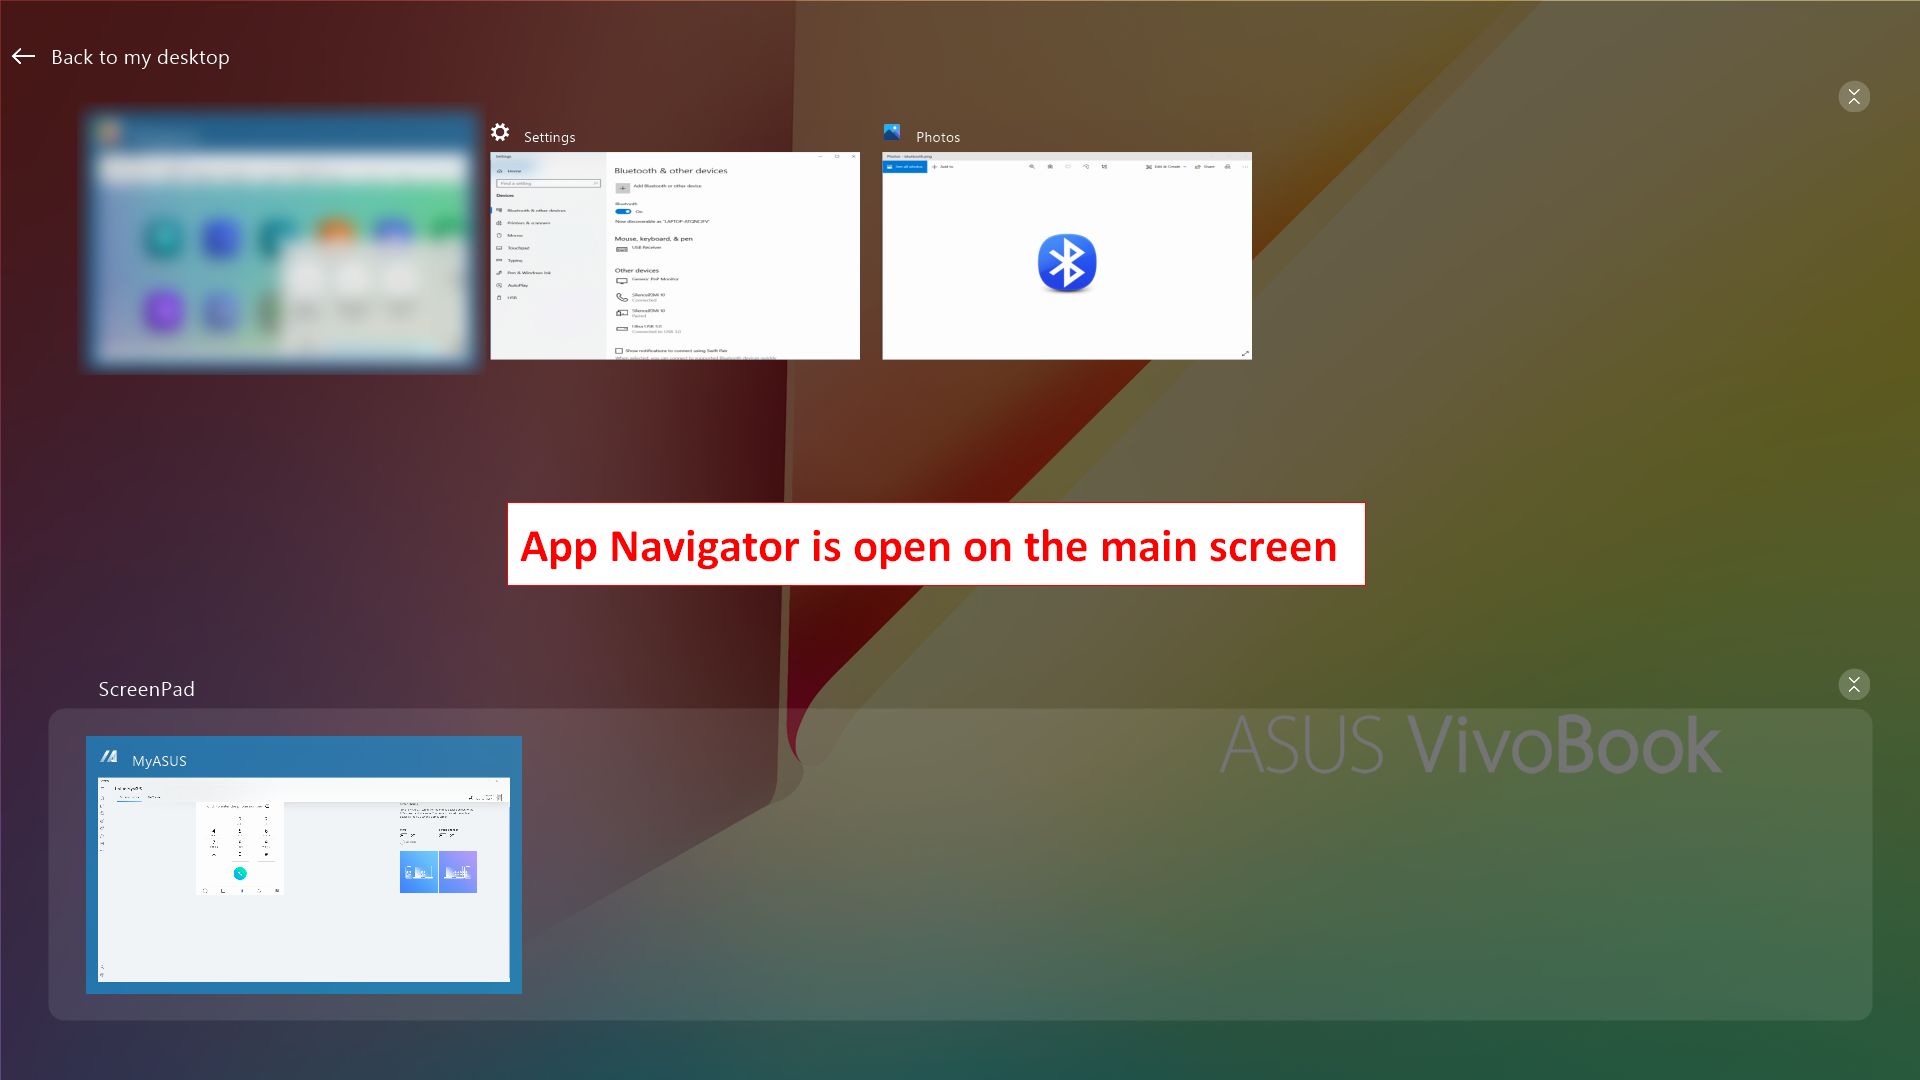
6.2.2 App Navigator telah terbuka di layar utama laptop. Bagian atas merupakan area tampilan layar utama laptop, dan bagian bawah merupakan area tampilan ScreenPad. Anda dapat menyeret aplikasi dengan mouse untuk memutuskan apakah akan ditampilkan di layar utama atau ScreenPad.
6.3.1 Klik [Task Group Capture] untuk menata semua aplikasi yang sedang berjalan di laptop dalam satu grup agar Anda dapat membuka aplikasi tersebut dengan cepat.
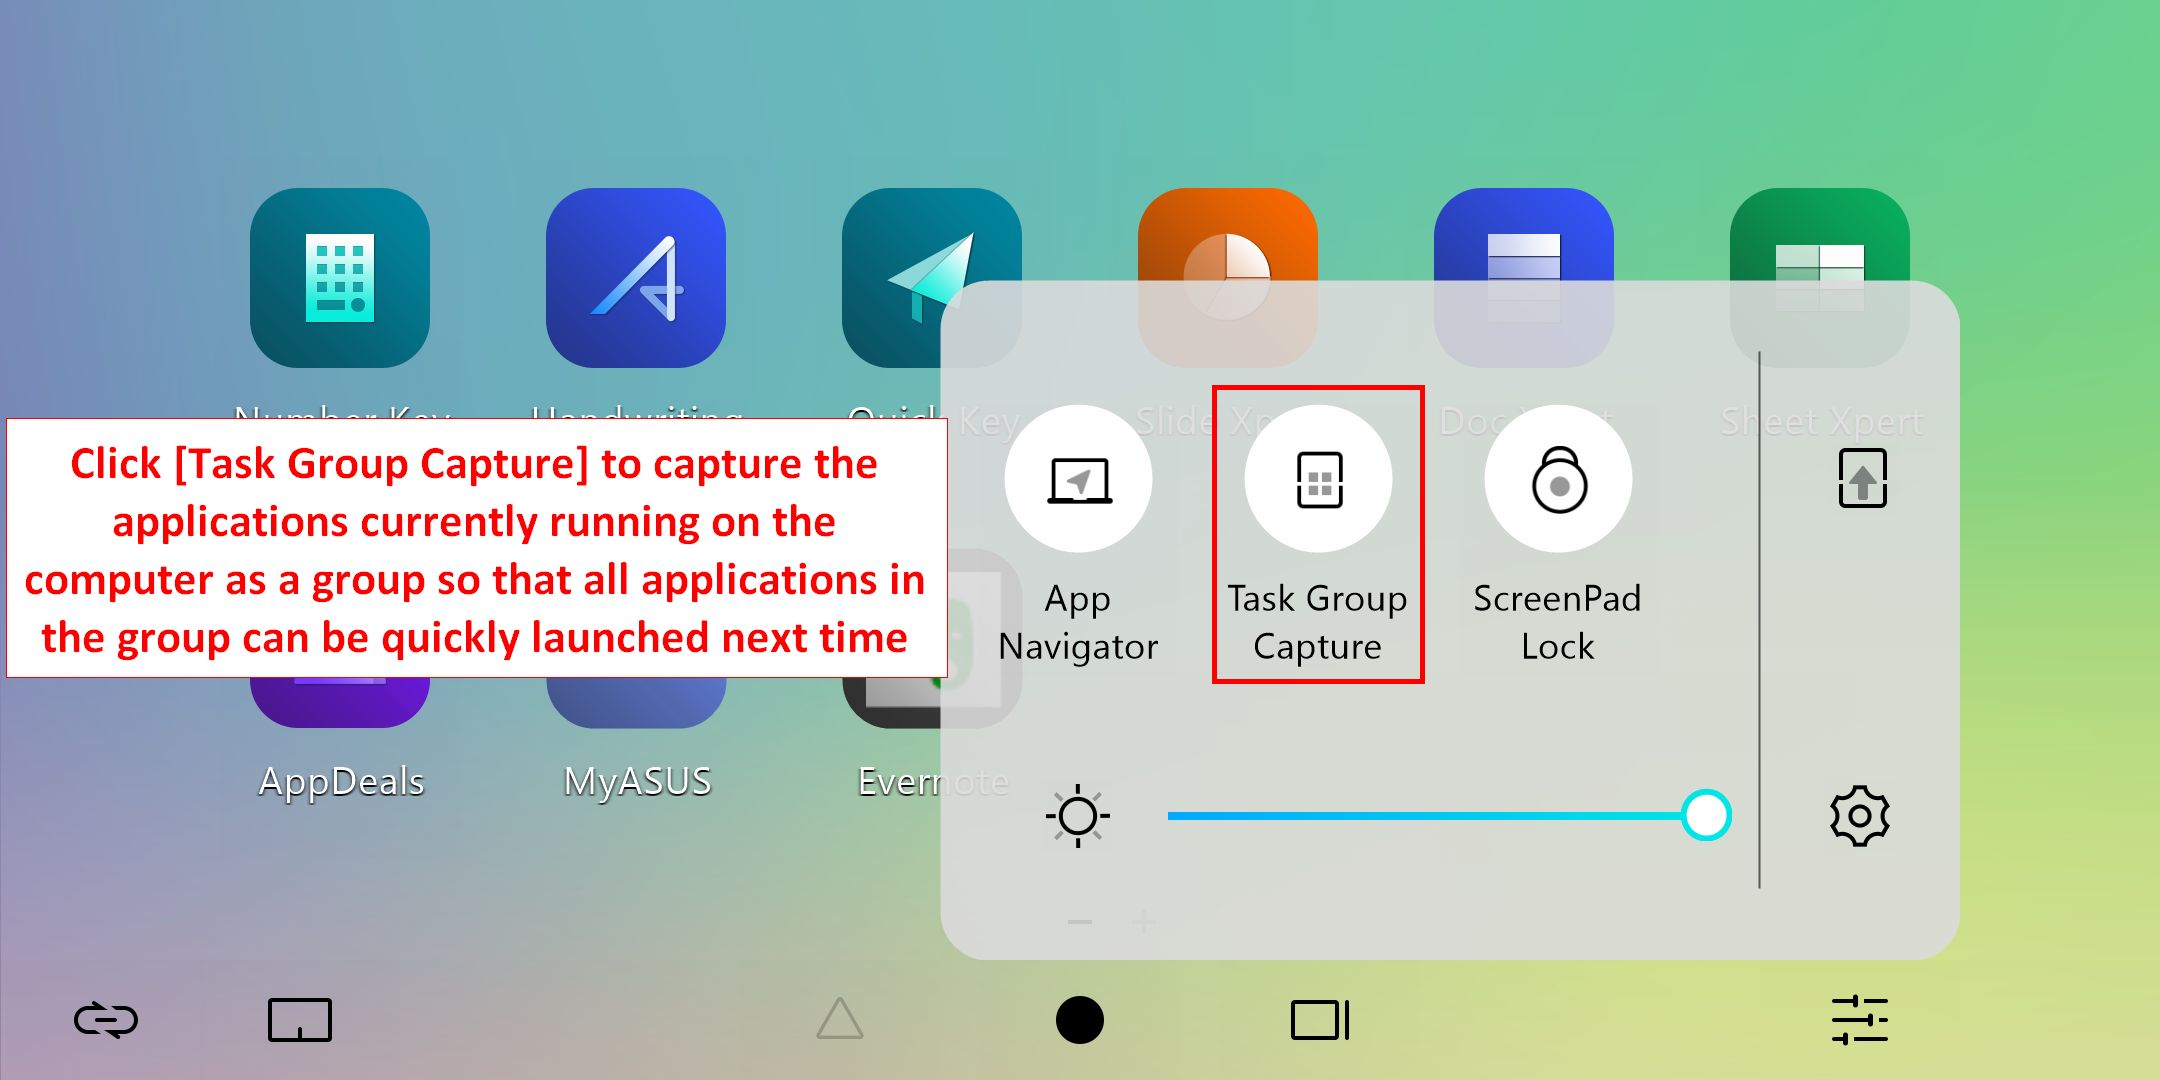

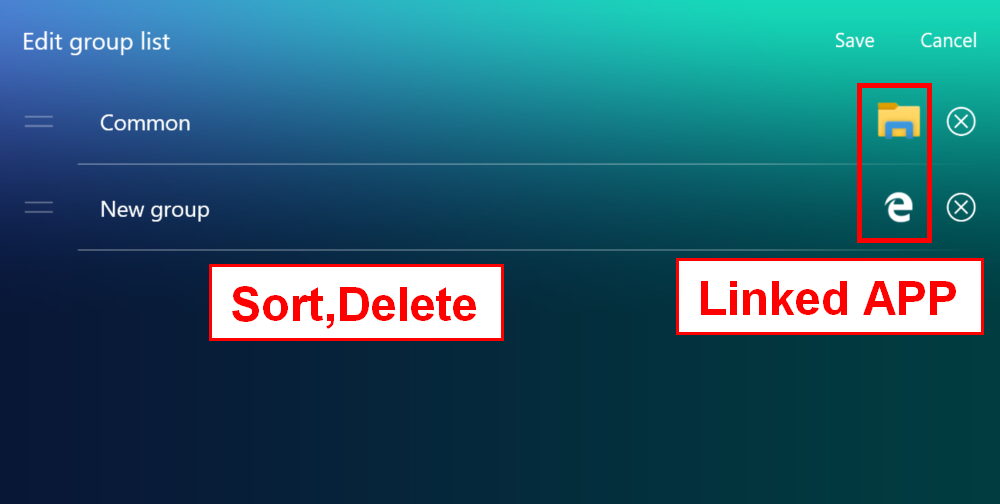
6.3.2 Geser jari Anda ke kanan pada ScreenPad utama untuk membuka antarmuka pengeditan grup. Klik grup mana saja untuk membuka semua program dalam grup di laptop. Klik ikon [+] untuk menambahkan semua aplikasi yang sedang berjalan di laptop Anda sebagai satu grup, sehingga Anda dapat dengan cepat meluncurkan aplikasi tersebut di lain waktu.

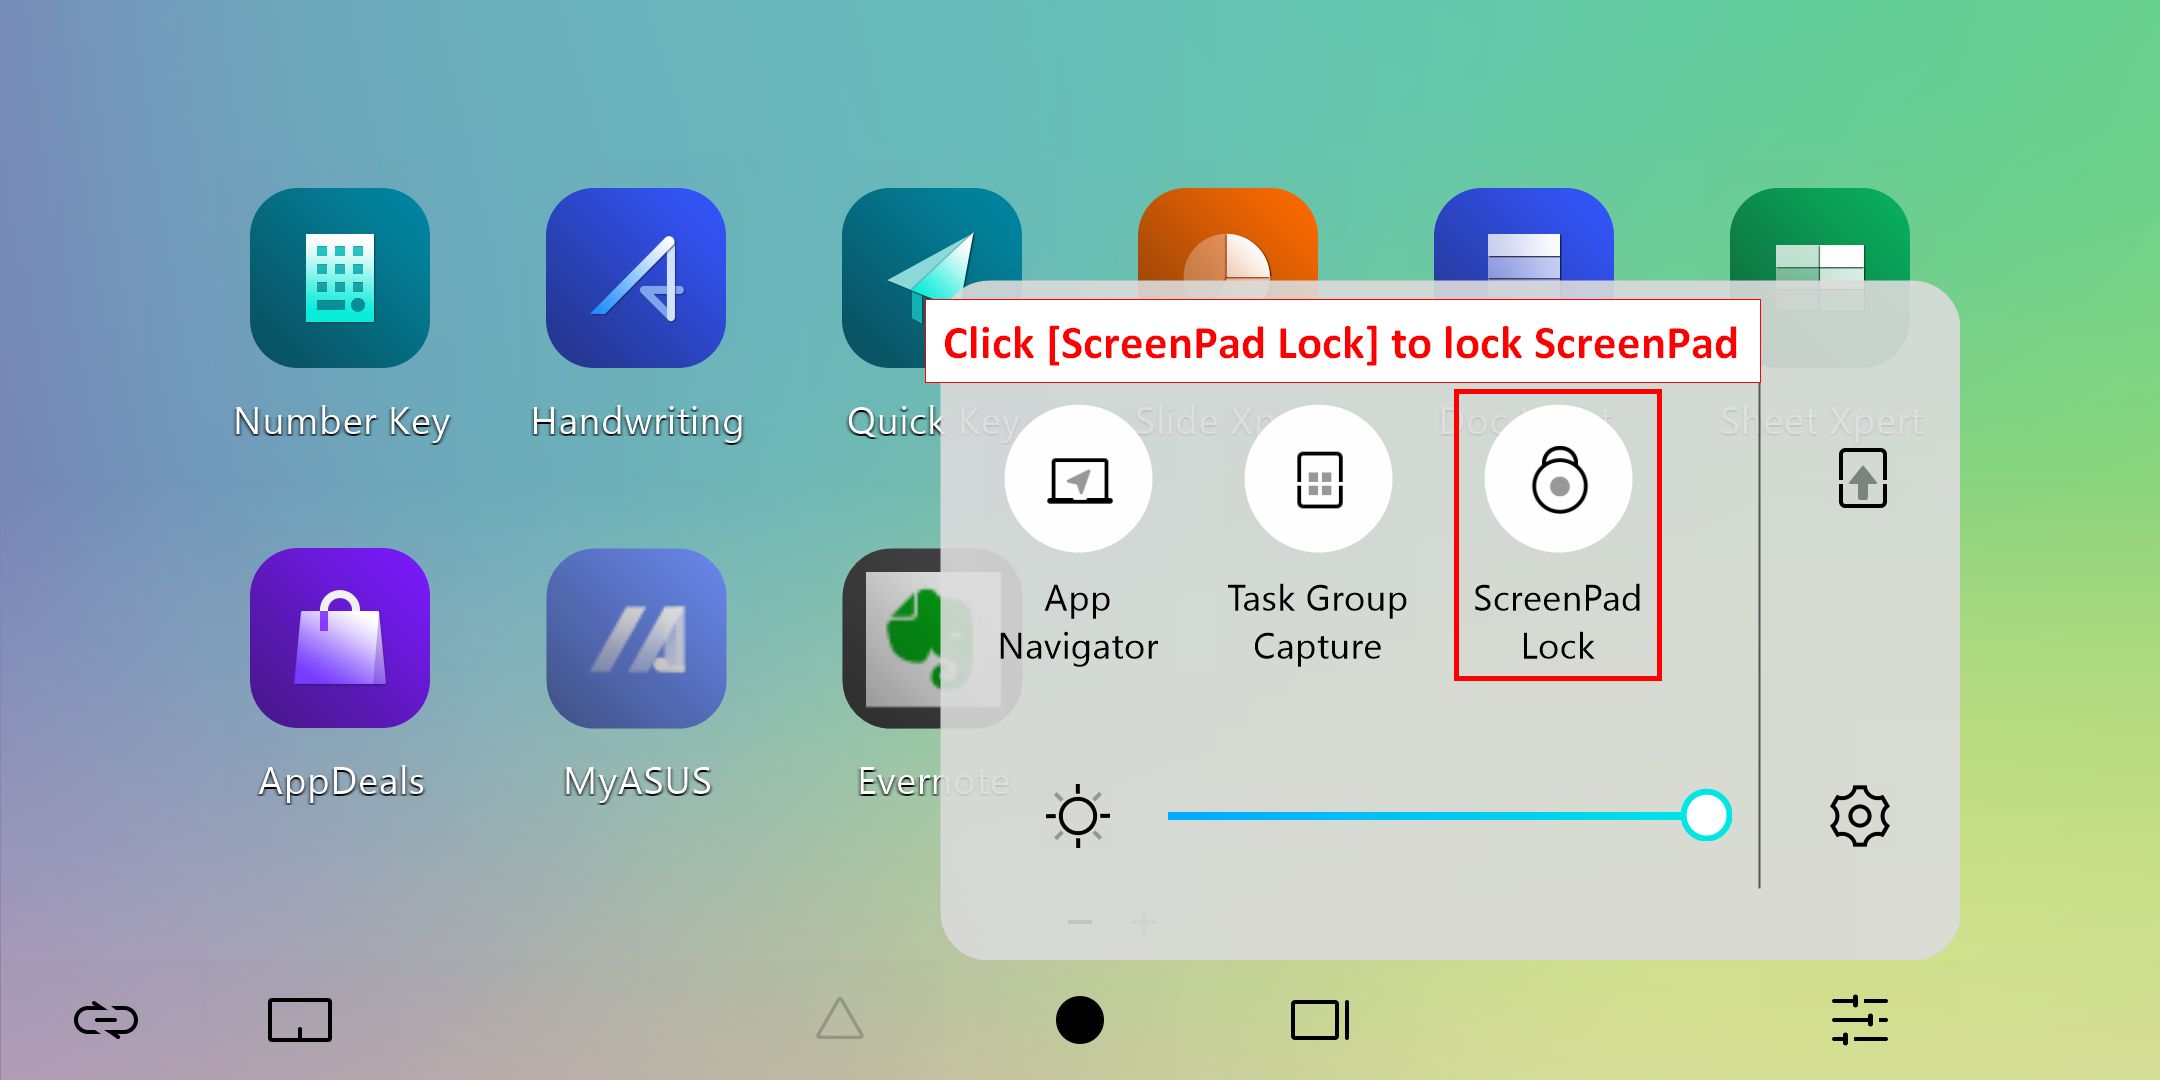
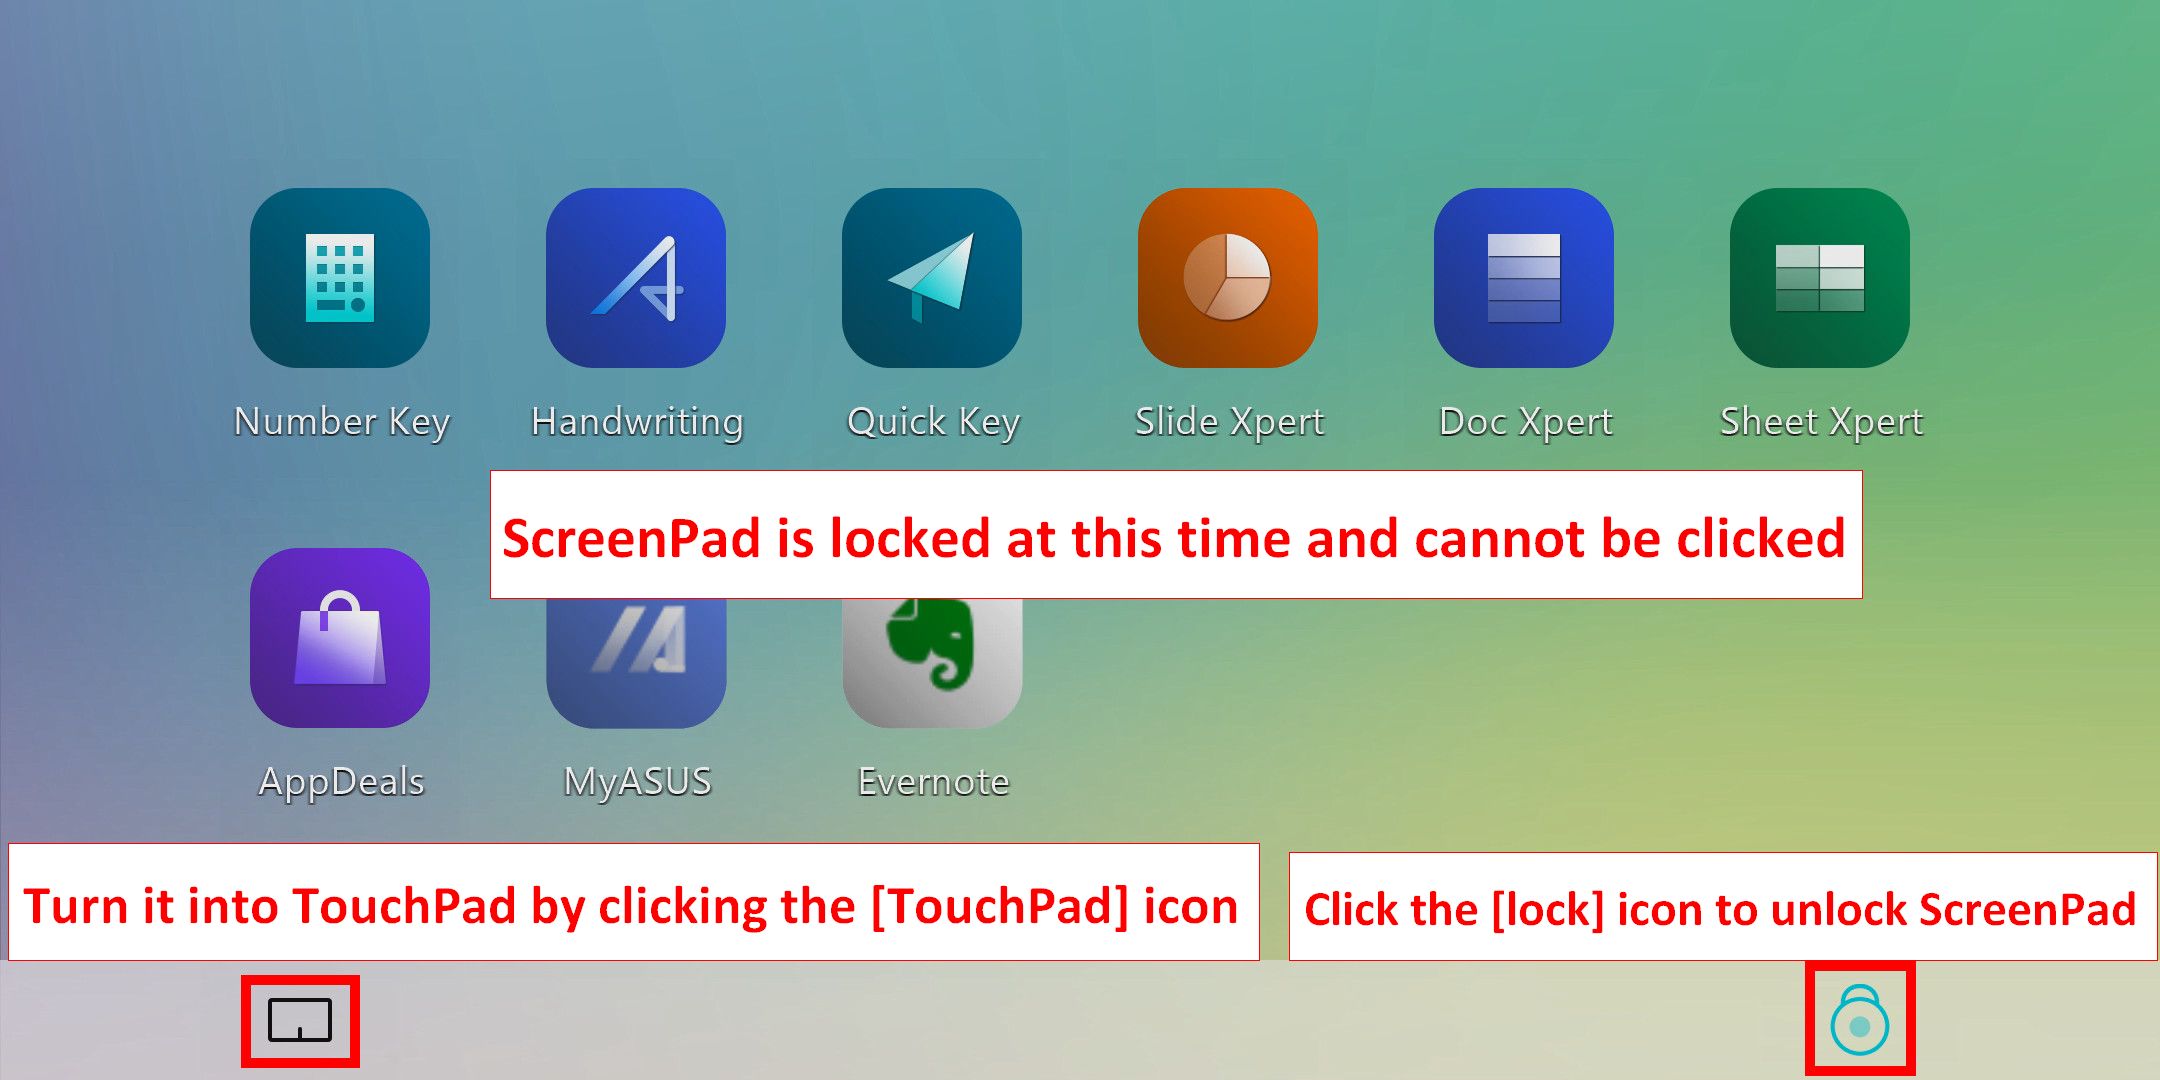
6.4Klik [ScreenPad Lock] untuk mengunci atau membuka kunci fungsi sentuh ScreenPad.. Klik ikon [TouchPad] di pojok kiri bawah untuk mengaktifkan TouchPad, dan klik ikon [Lock] di pojok kanan bawah untuk membuka kunci ScreenPad.
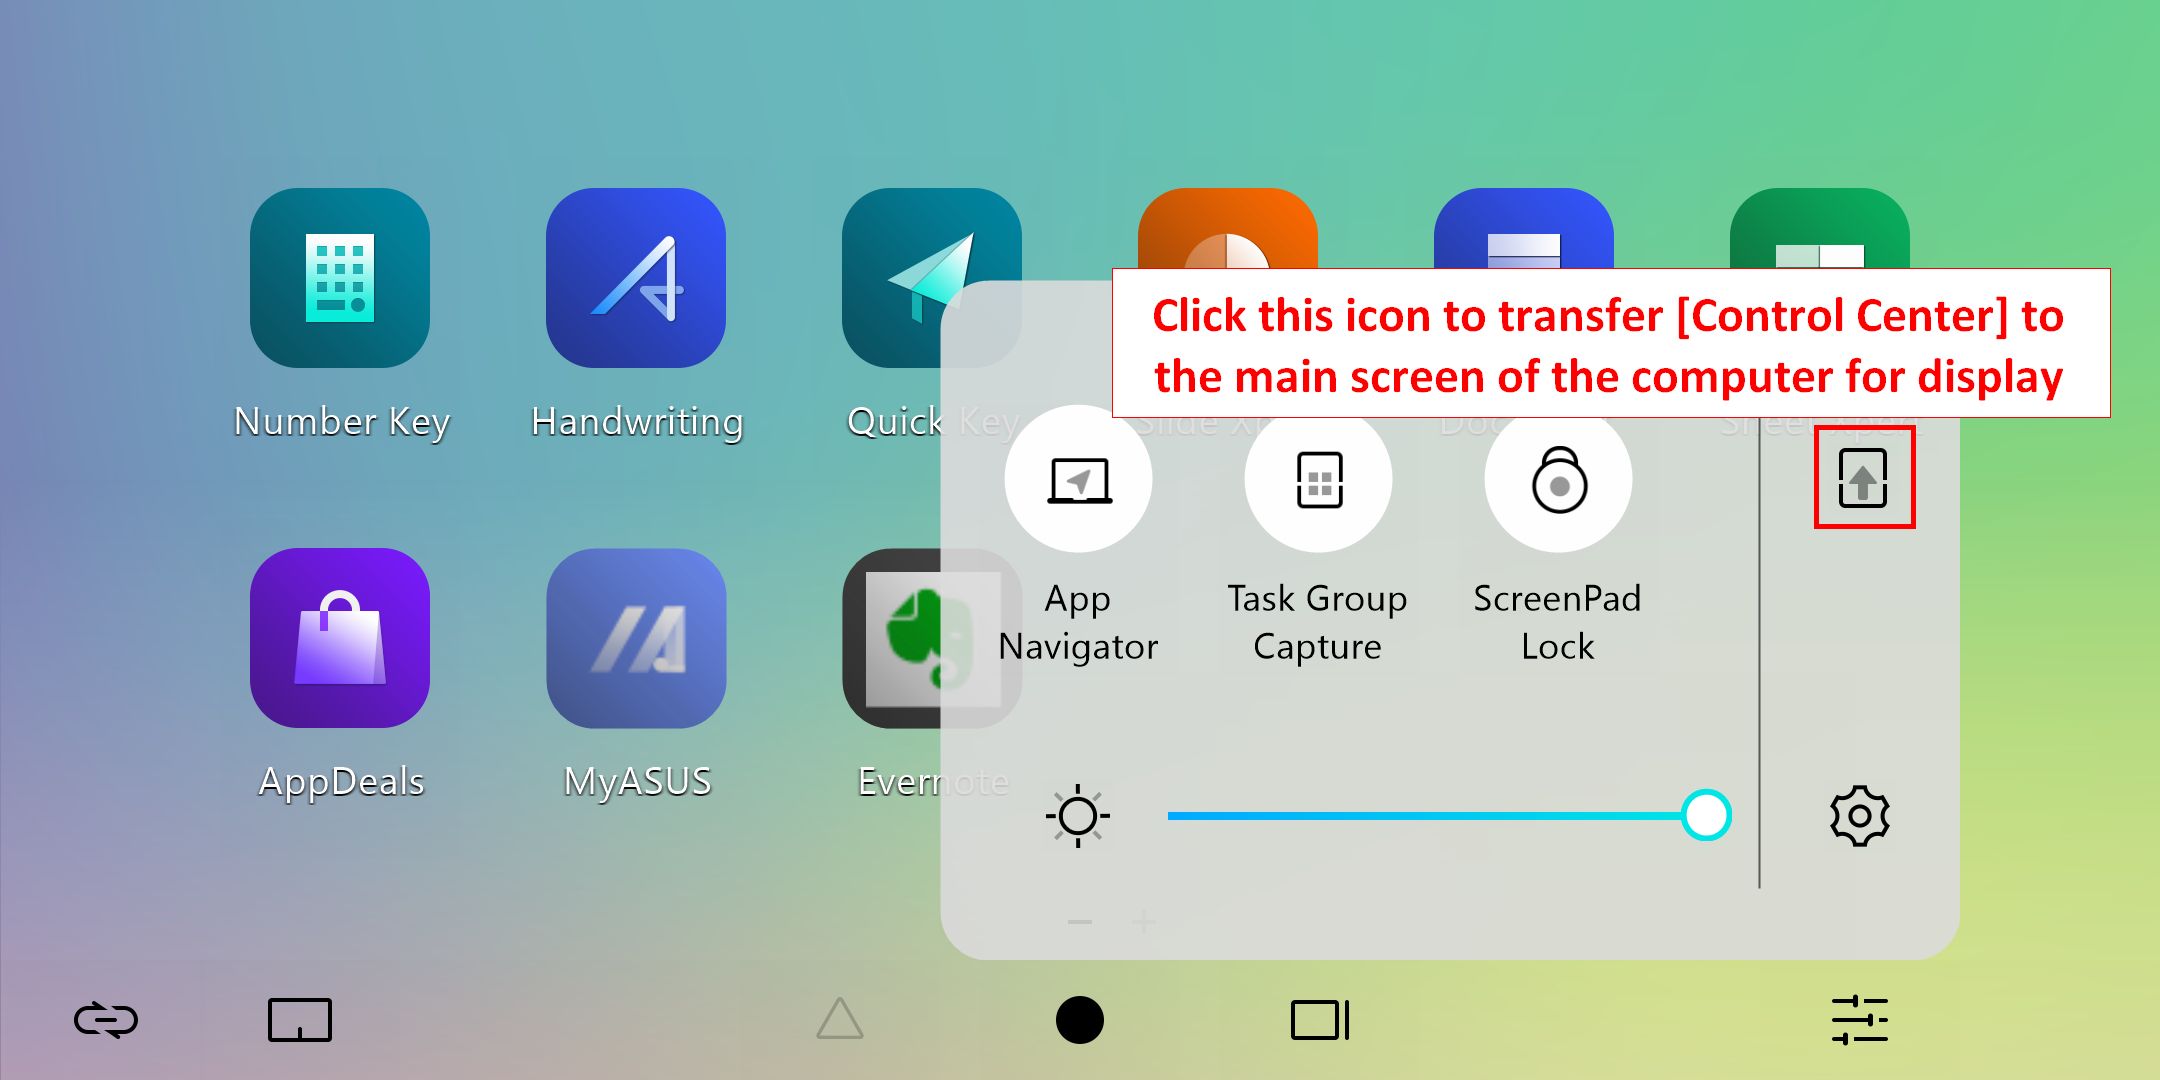
6.5.1 Klik  untuk mentransfer tampilan [Control Center] ke layar utama laptop.
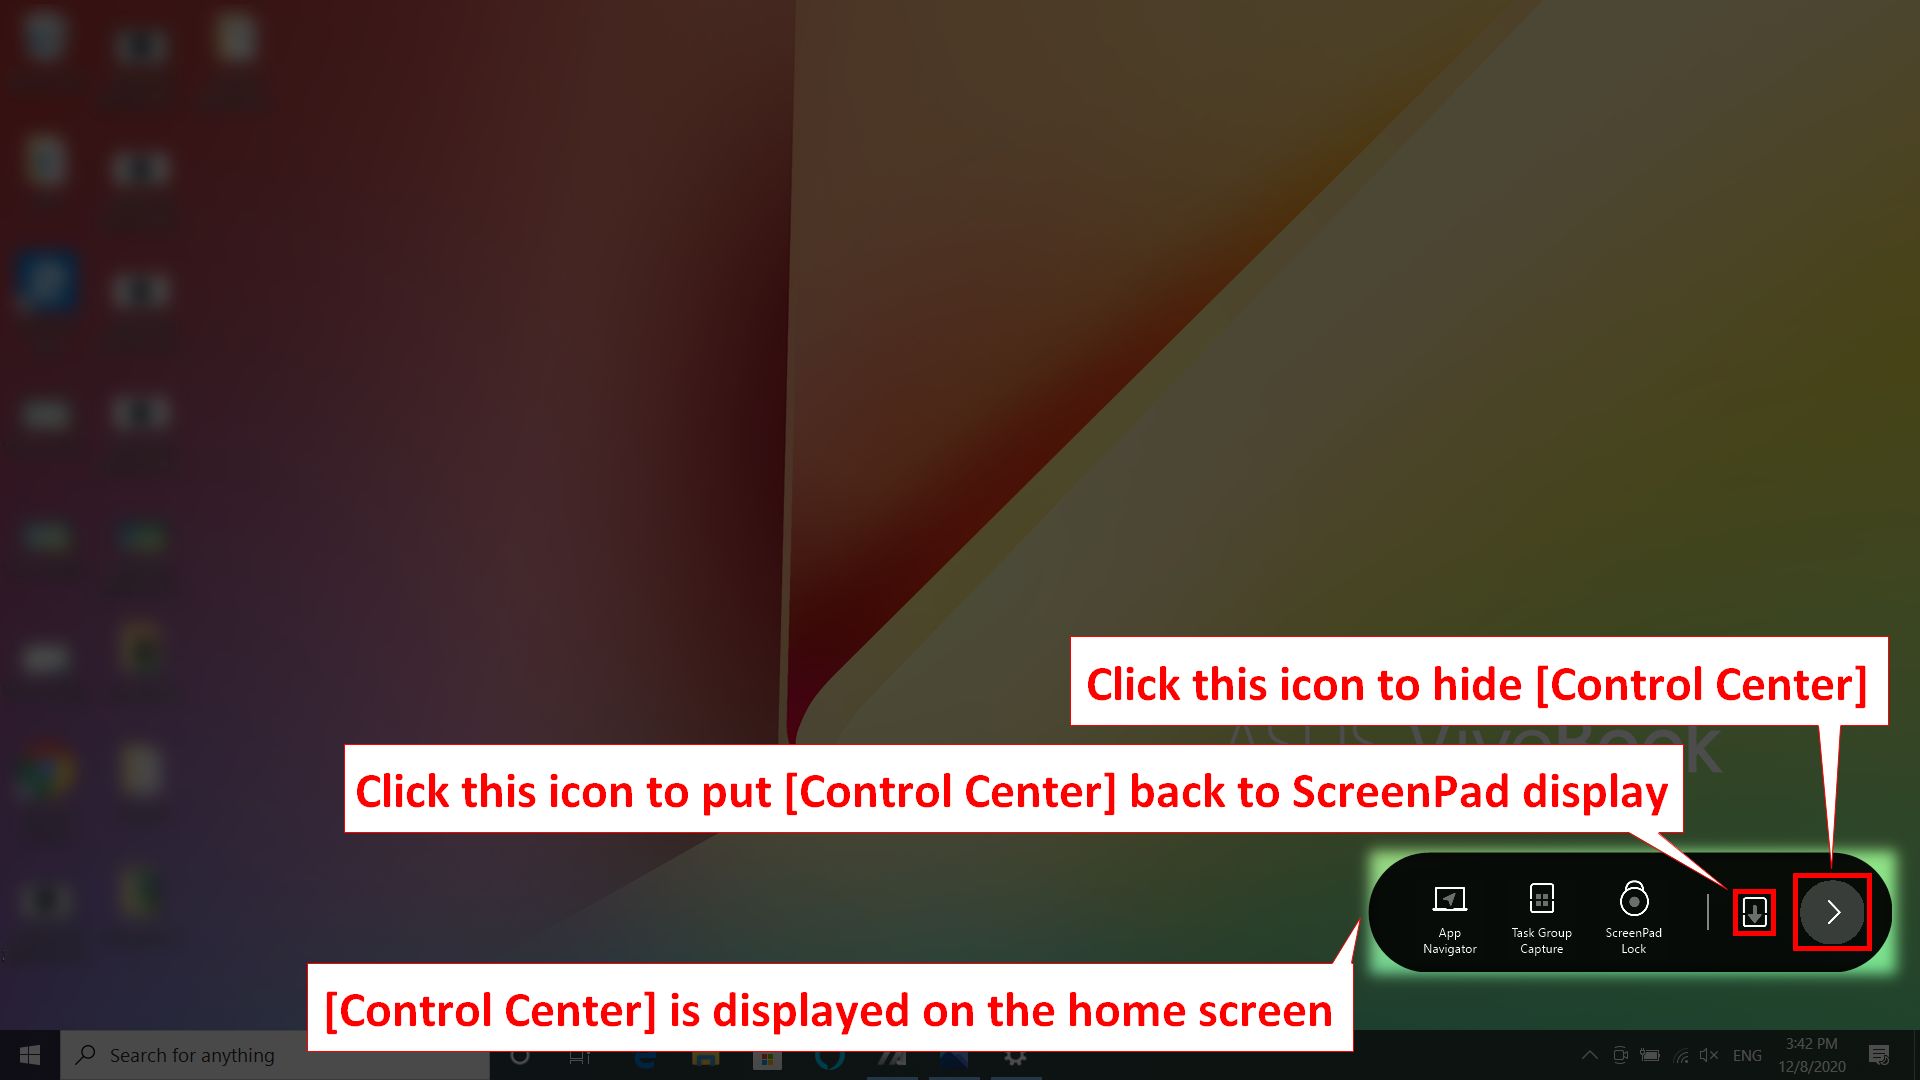
6.5.2 Klik  to transfer [Control Center] tampilan ke ScreenPad. Klik
  untuk menyembunyikan [Control Center] di layar utama laptop di pojok kanan bawah.
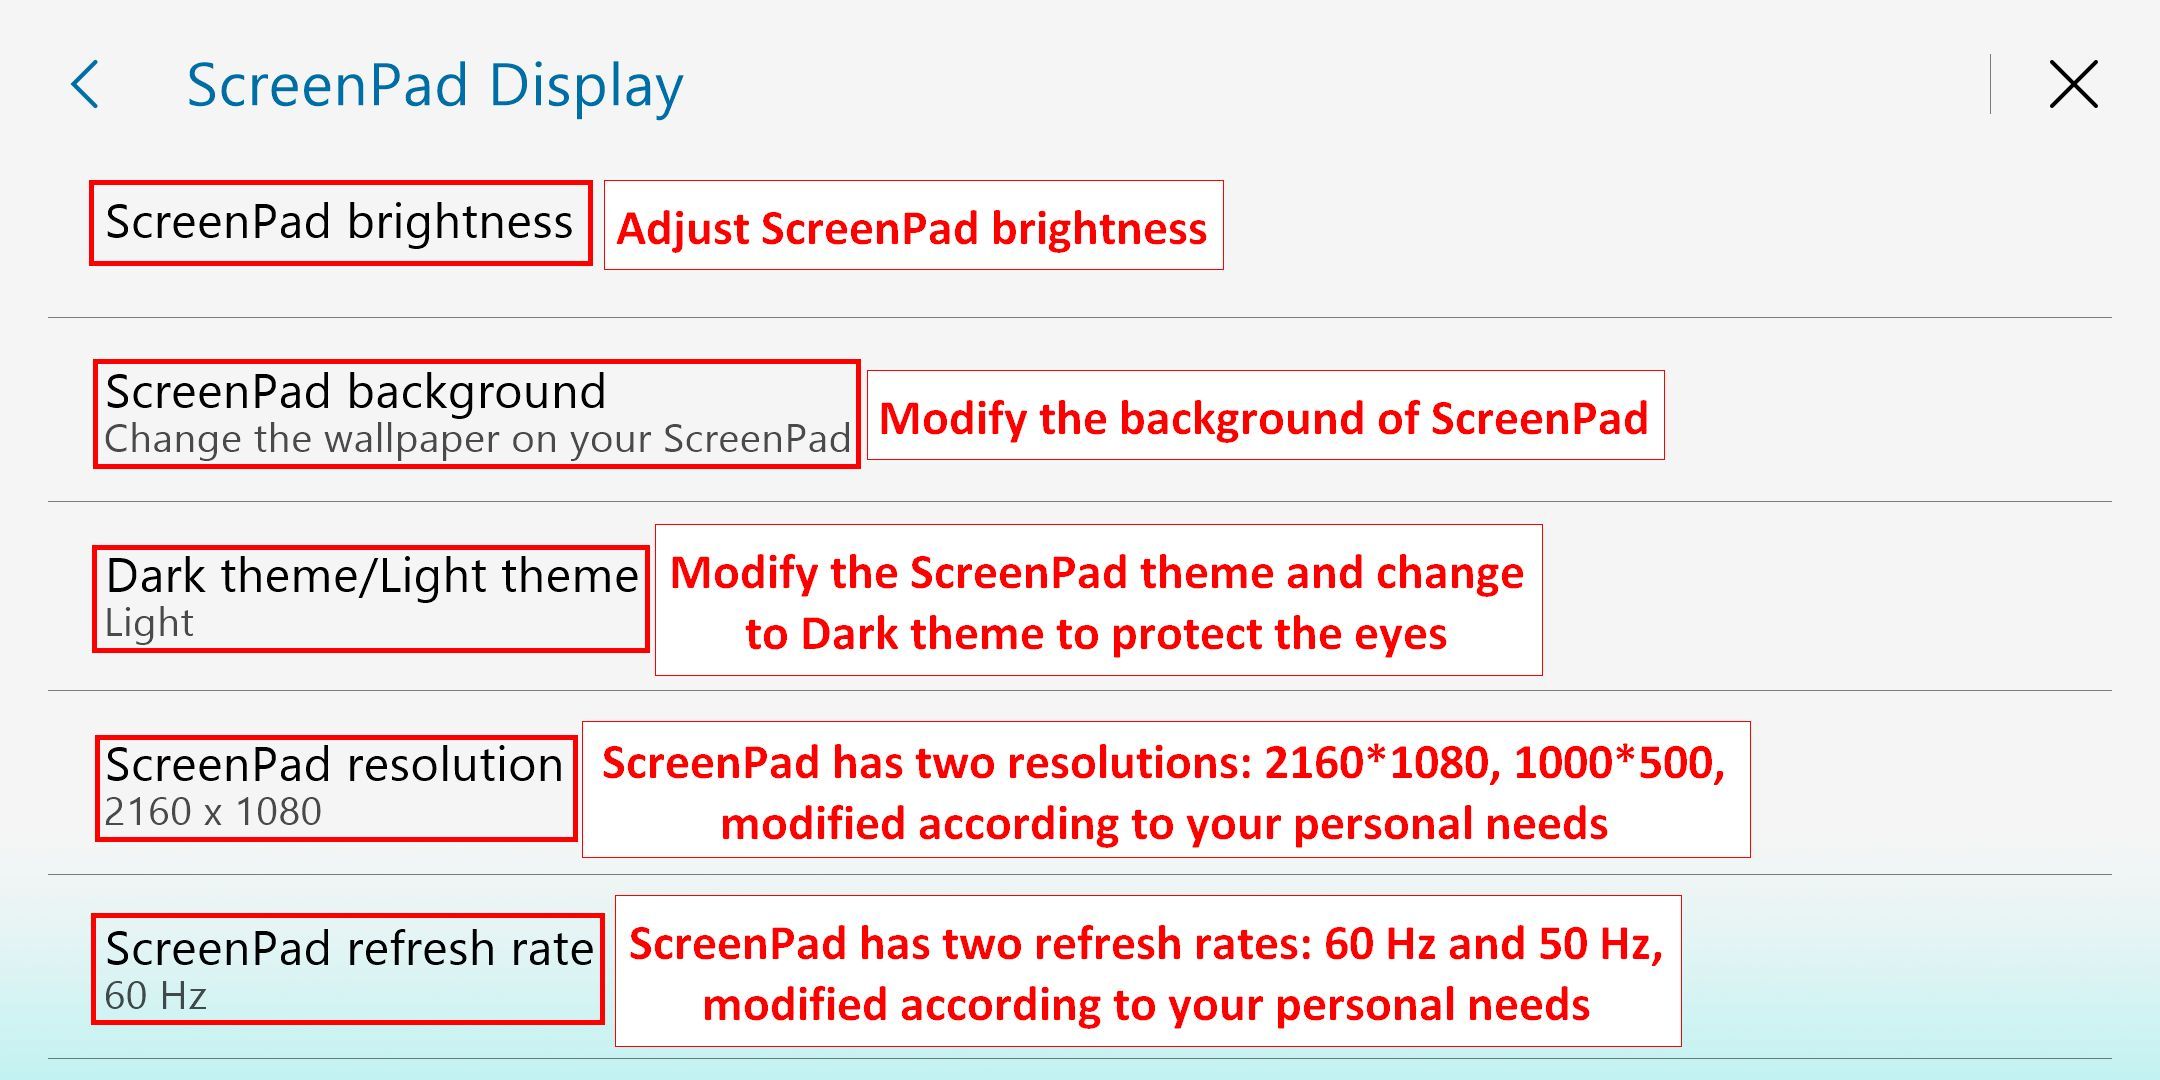
6.6.1 Klik [Settings] untuk mengatur ScreenPad dan mempersonalisasi kecerahan, latar belakang, dan lainnya.
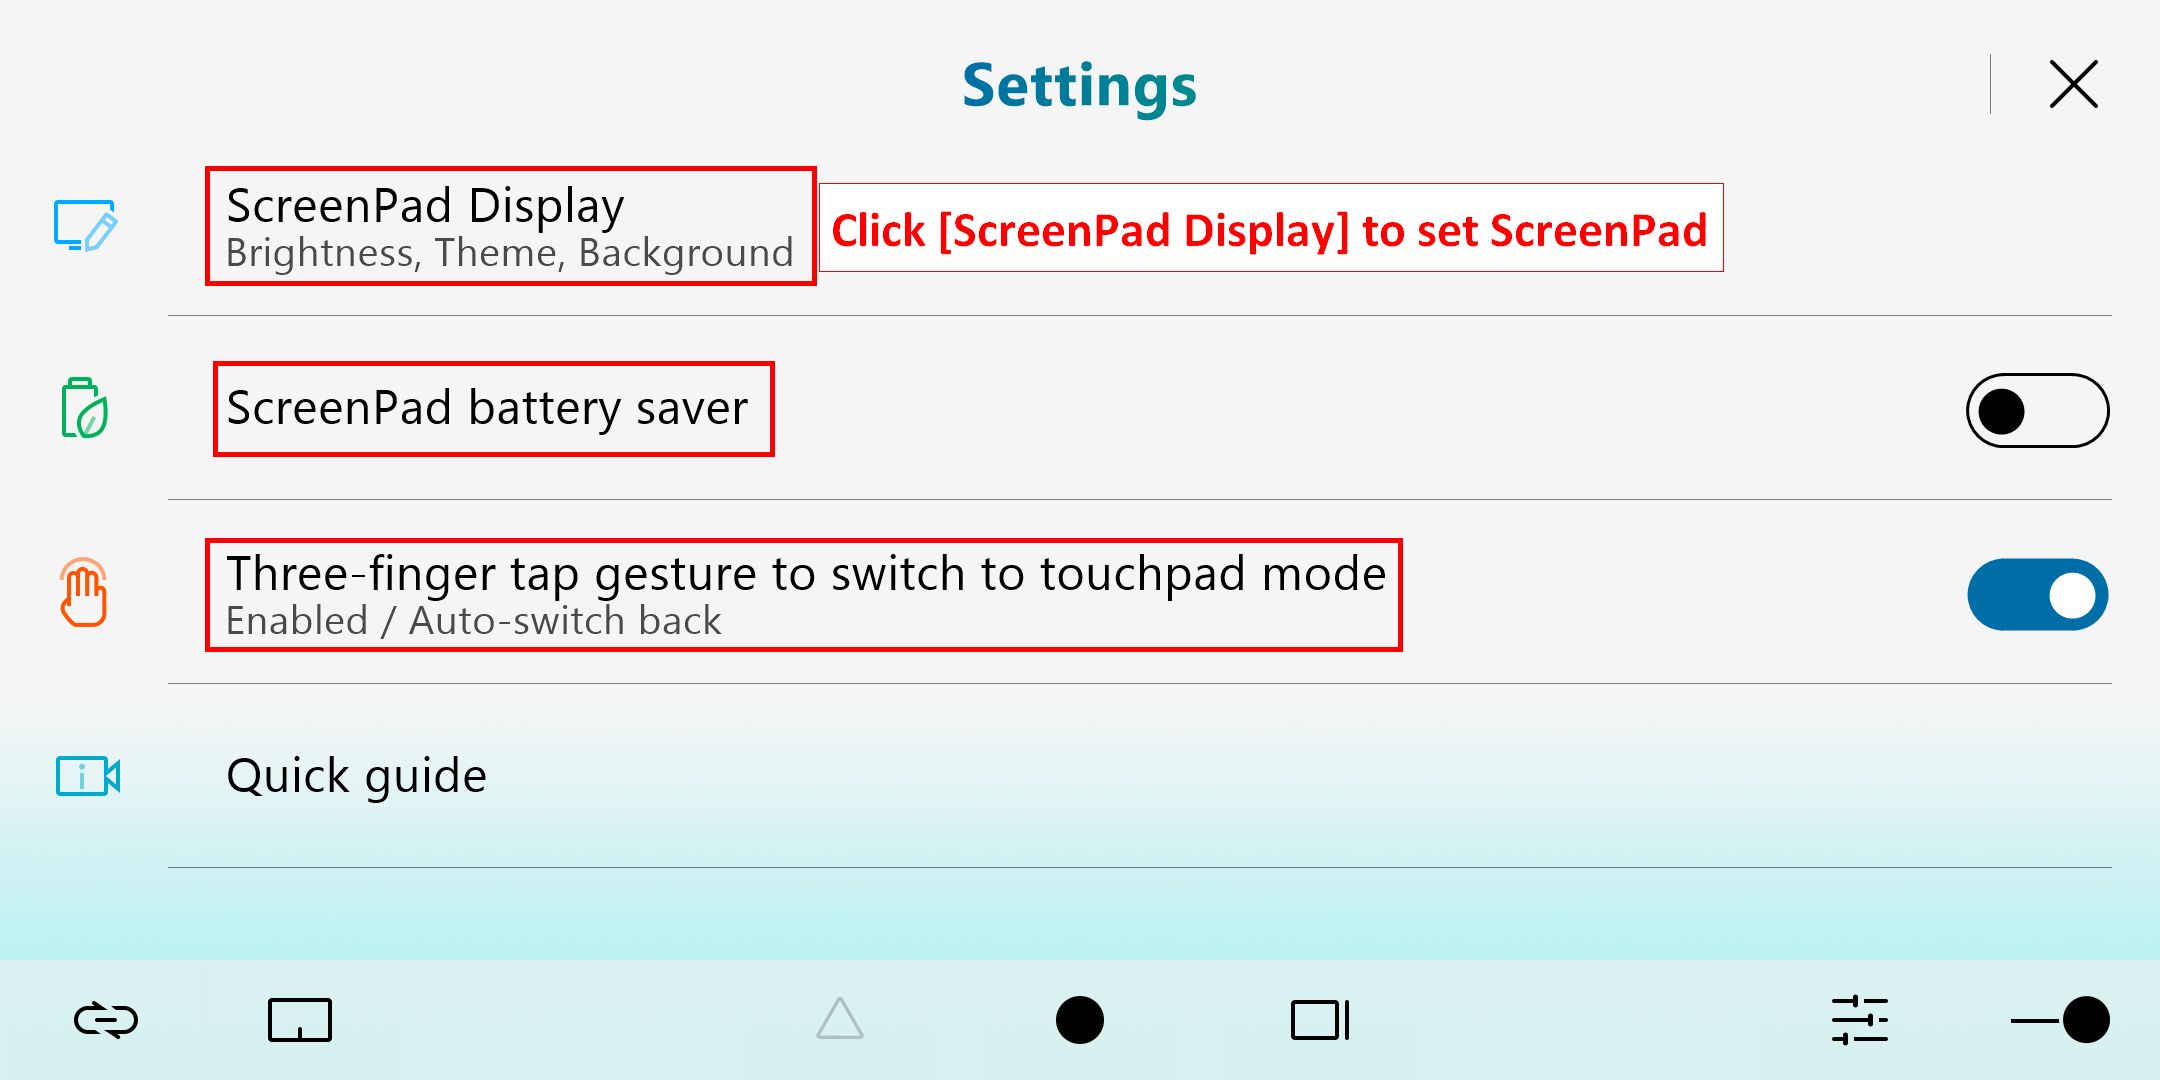
6.6.2 Setelah mengklik tampilan ScreenPad, akan muncul opsi pengaturan berikut.
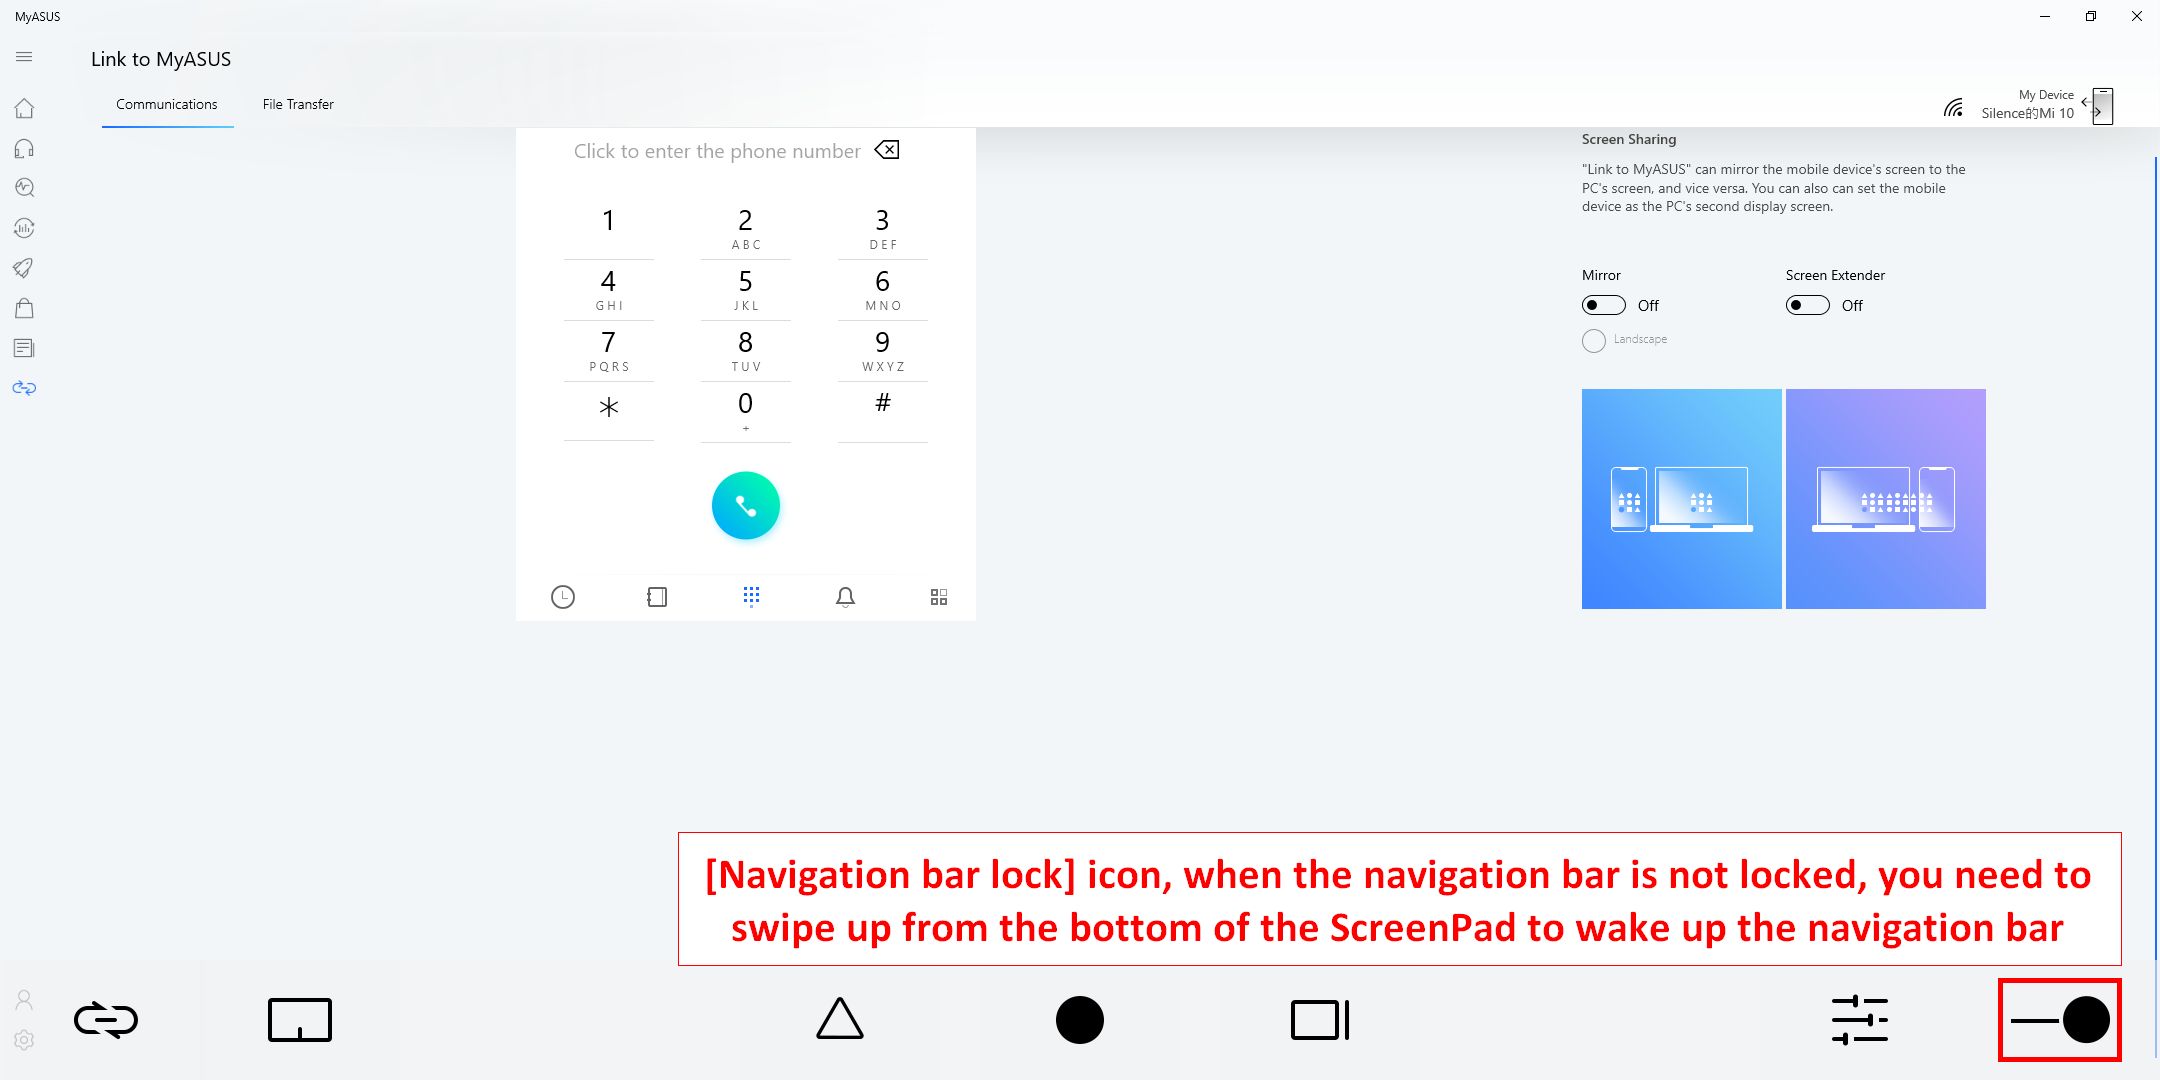
7.  Klik ikon [Navigation Bar Lock] ketika ada aplikasi yang ditampilkan di ScreenPad, maka bilah navigasi di bagian bawah akan tetap ditampilkan. Jika Anda tidak mengaktifkan kunci, Anda perlu menggesek ke atas dari bagian bawah ScreenPad untuk mengaktifkan bilah navigasi.
8. Added App icon and homepage editing in ScreenPad
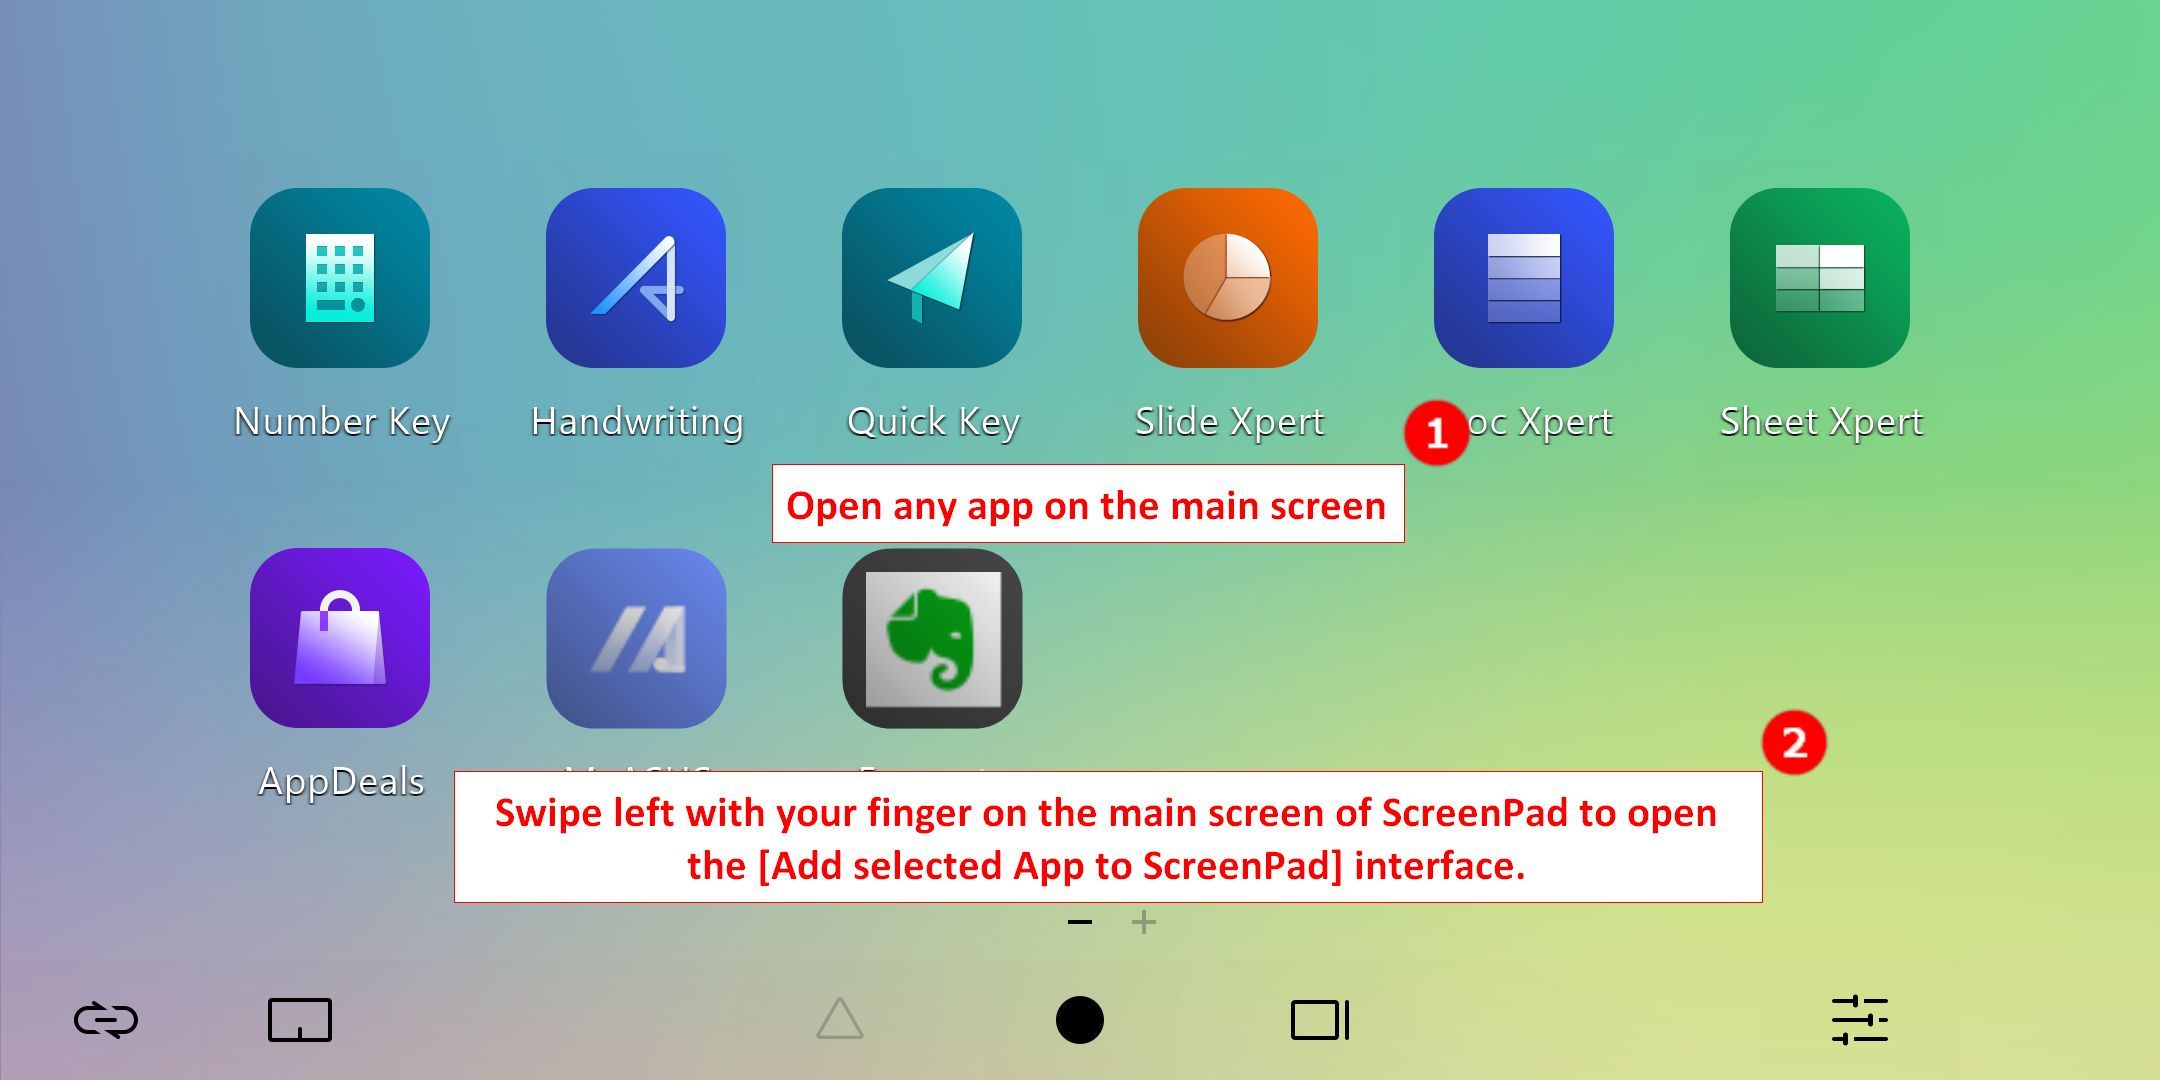
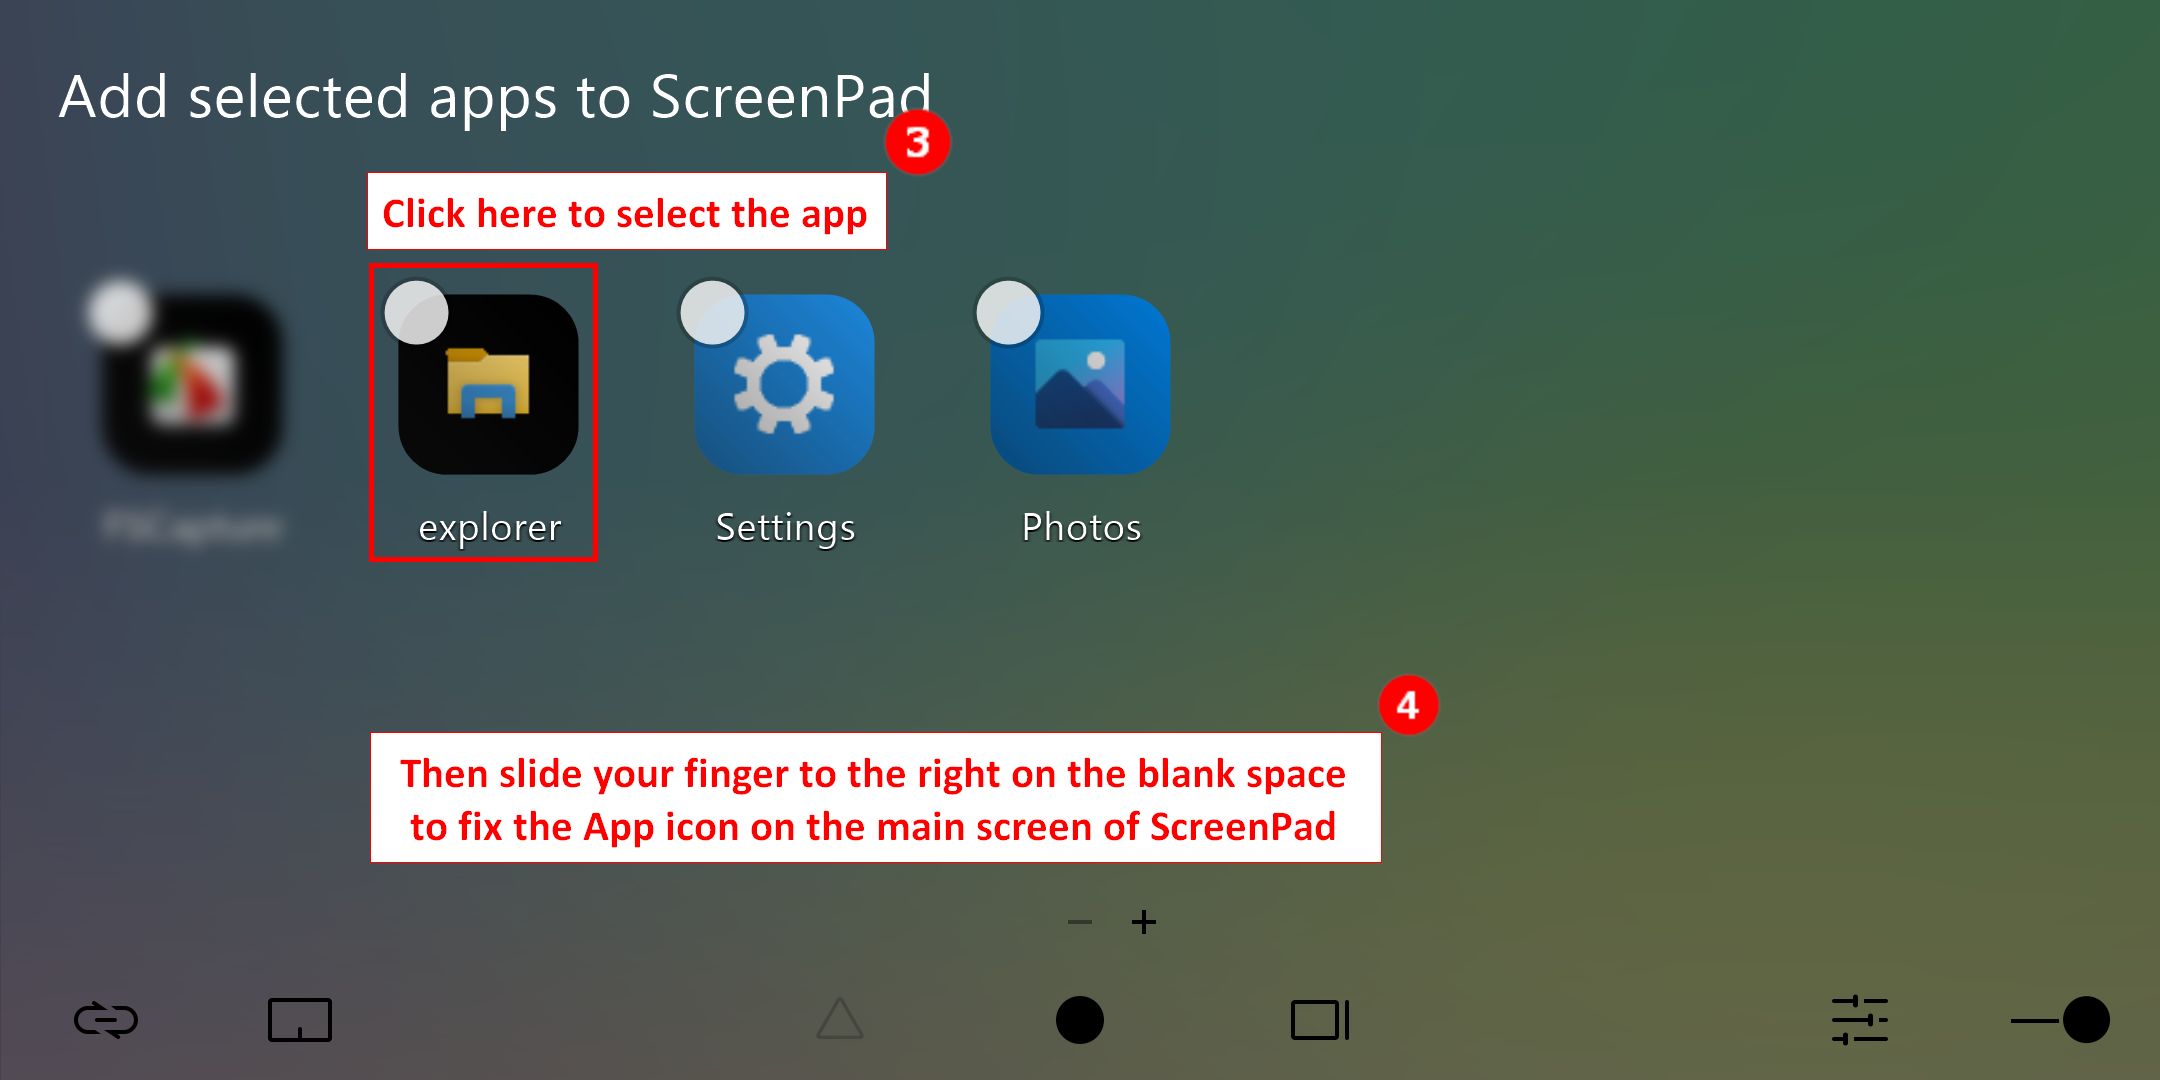
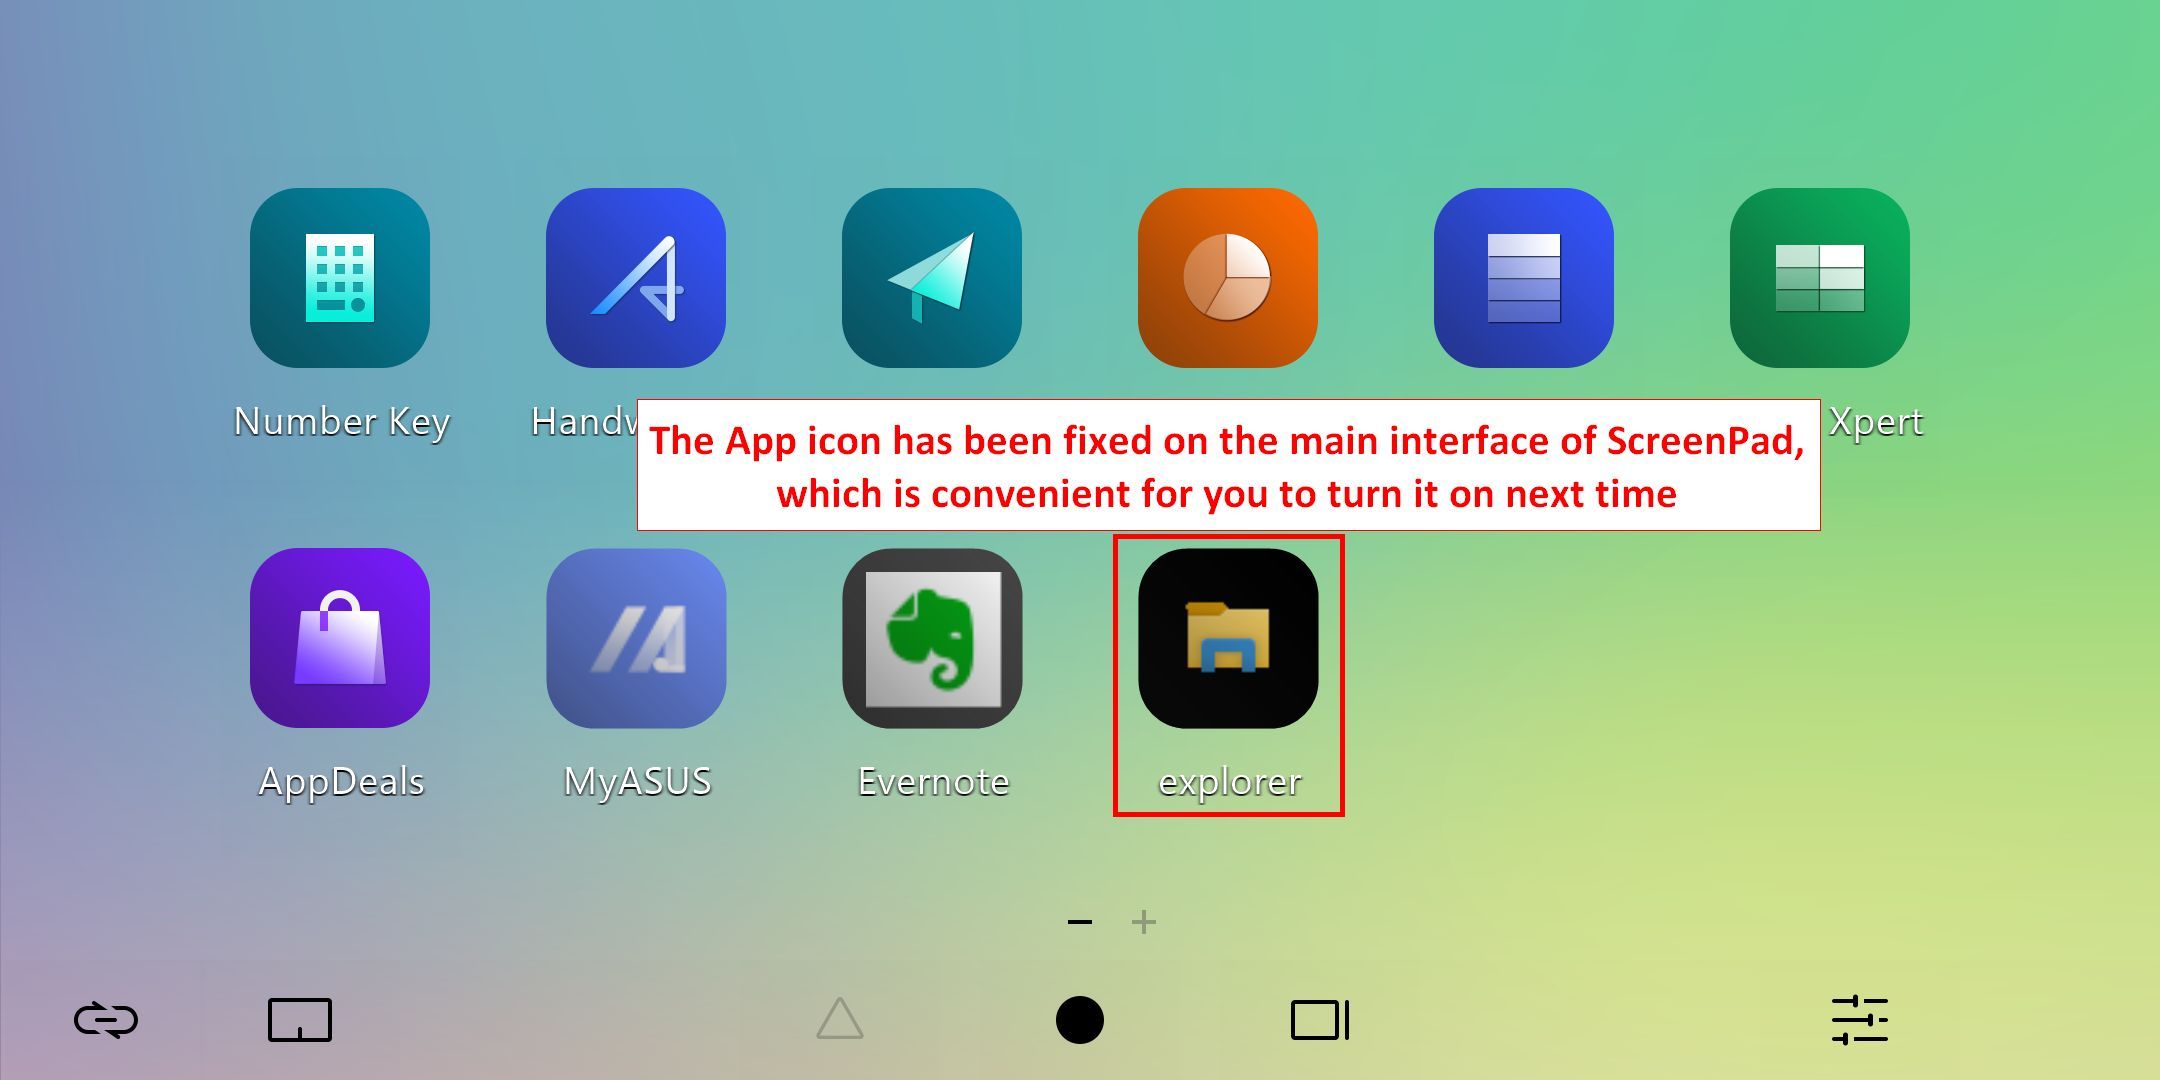
8.1 If you want to fix any App icon on the main ScreenPad interface, you need to ①open the application on the main screen, and then ②swipe your finger to the left on the main ScreenPad interface to open [Add selected app to ScreenPad]. In the interface, click the ③application icon, and ④slide your finger to the right on the blank space to fix the application icon on the main screen of the ScreenPad, so that you can quickly open the application on the ScreenPad next time.
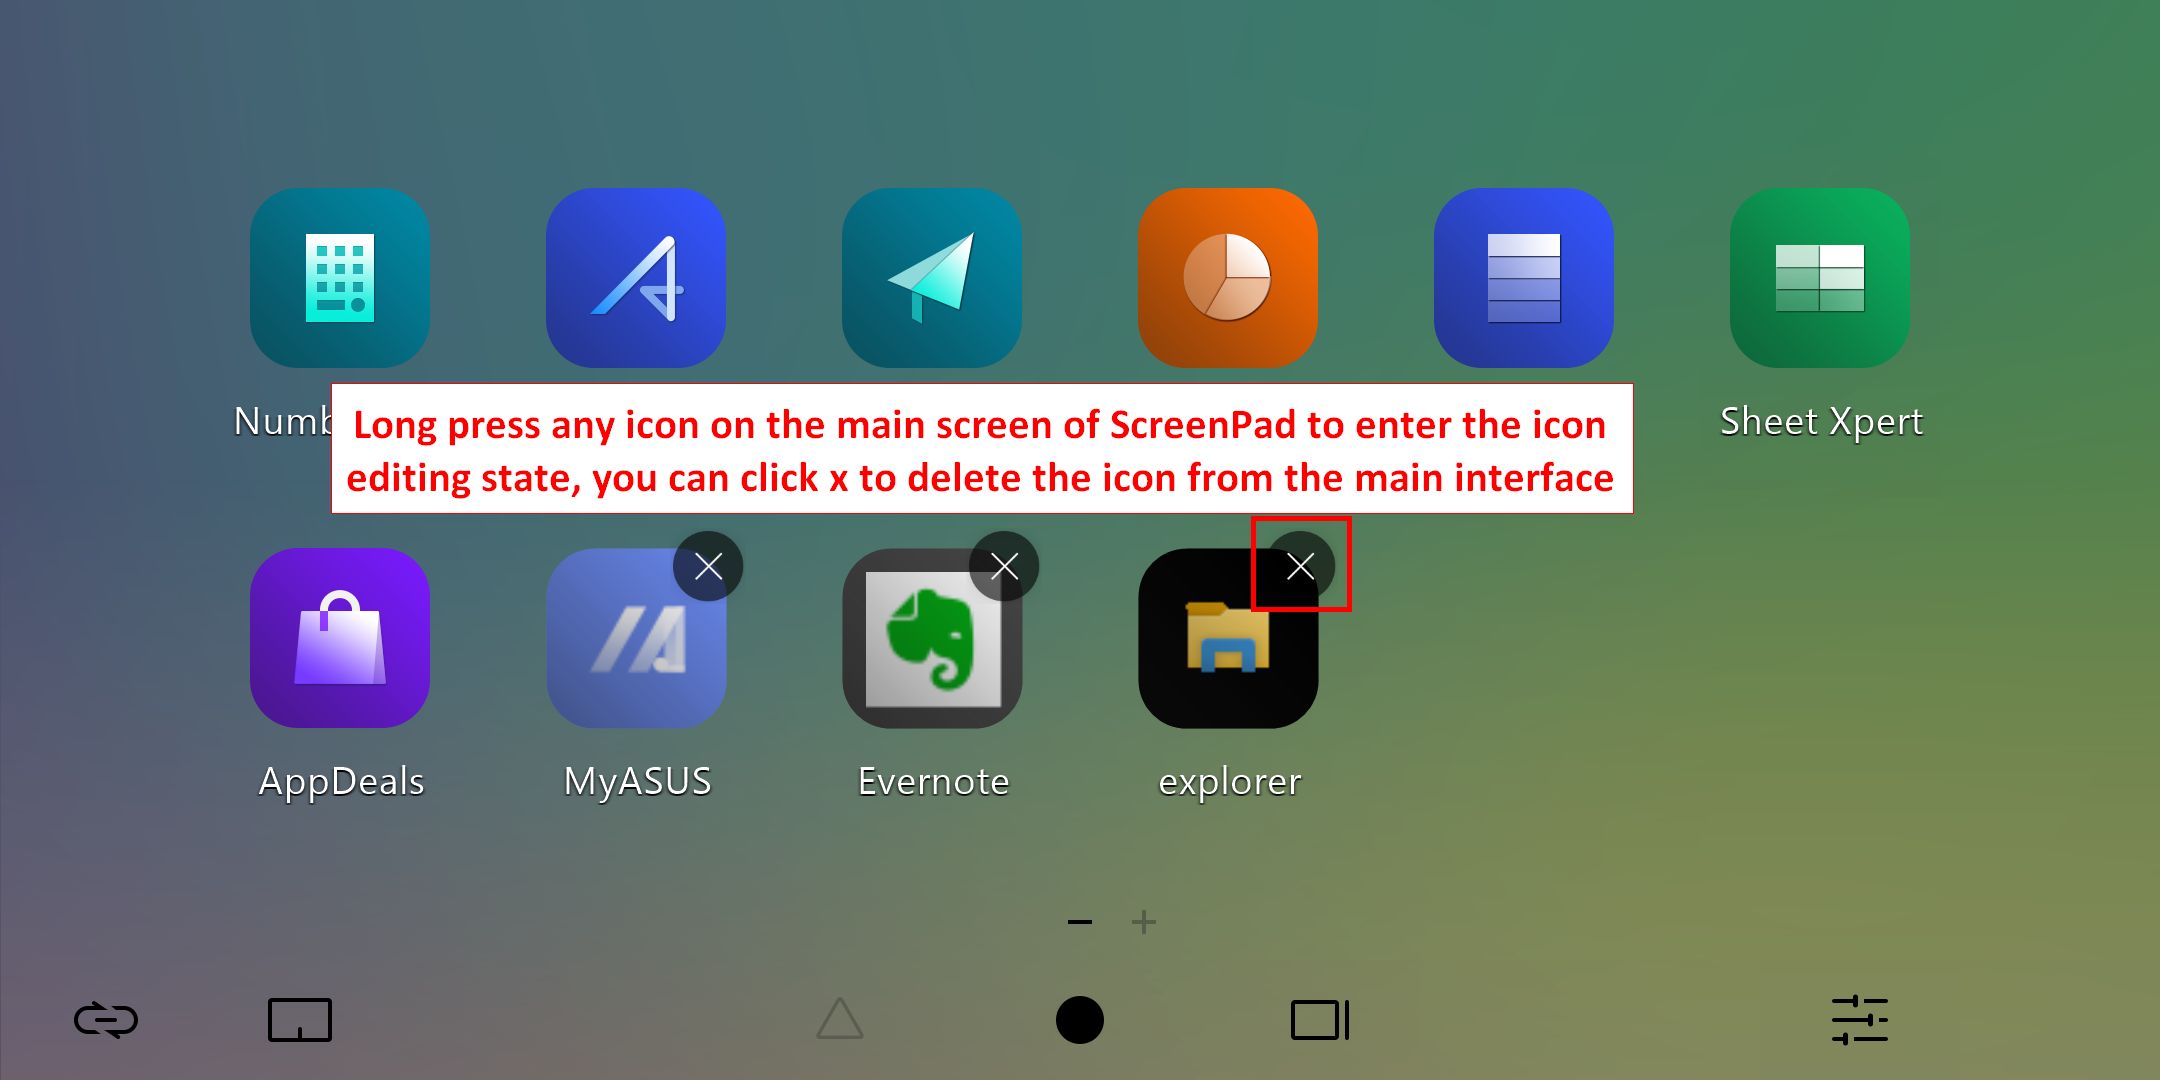
8.2 Press and hold any icon on the ScreenPad main interface to enter the icon editing state. You can click [X] to delete the icon from the main interface, or drag the icon with your finger to sort it.
Touch function & External screen
1. This screen supports up to 5 touch points.
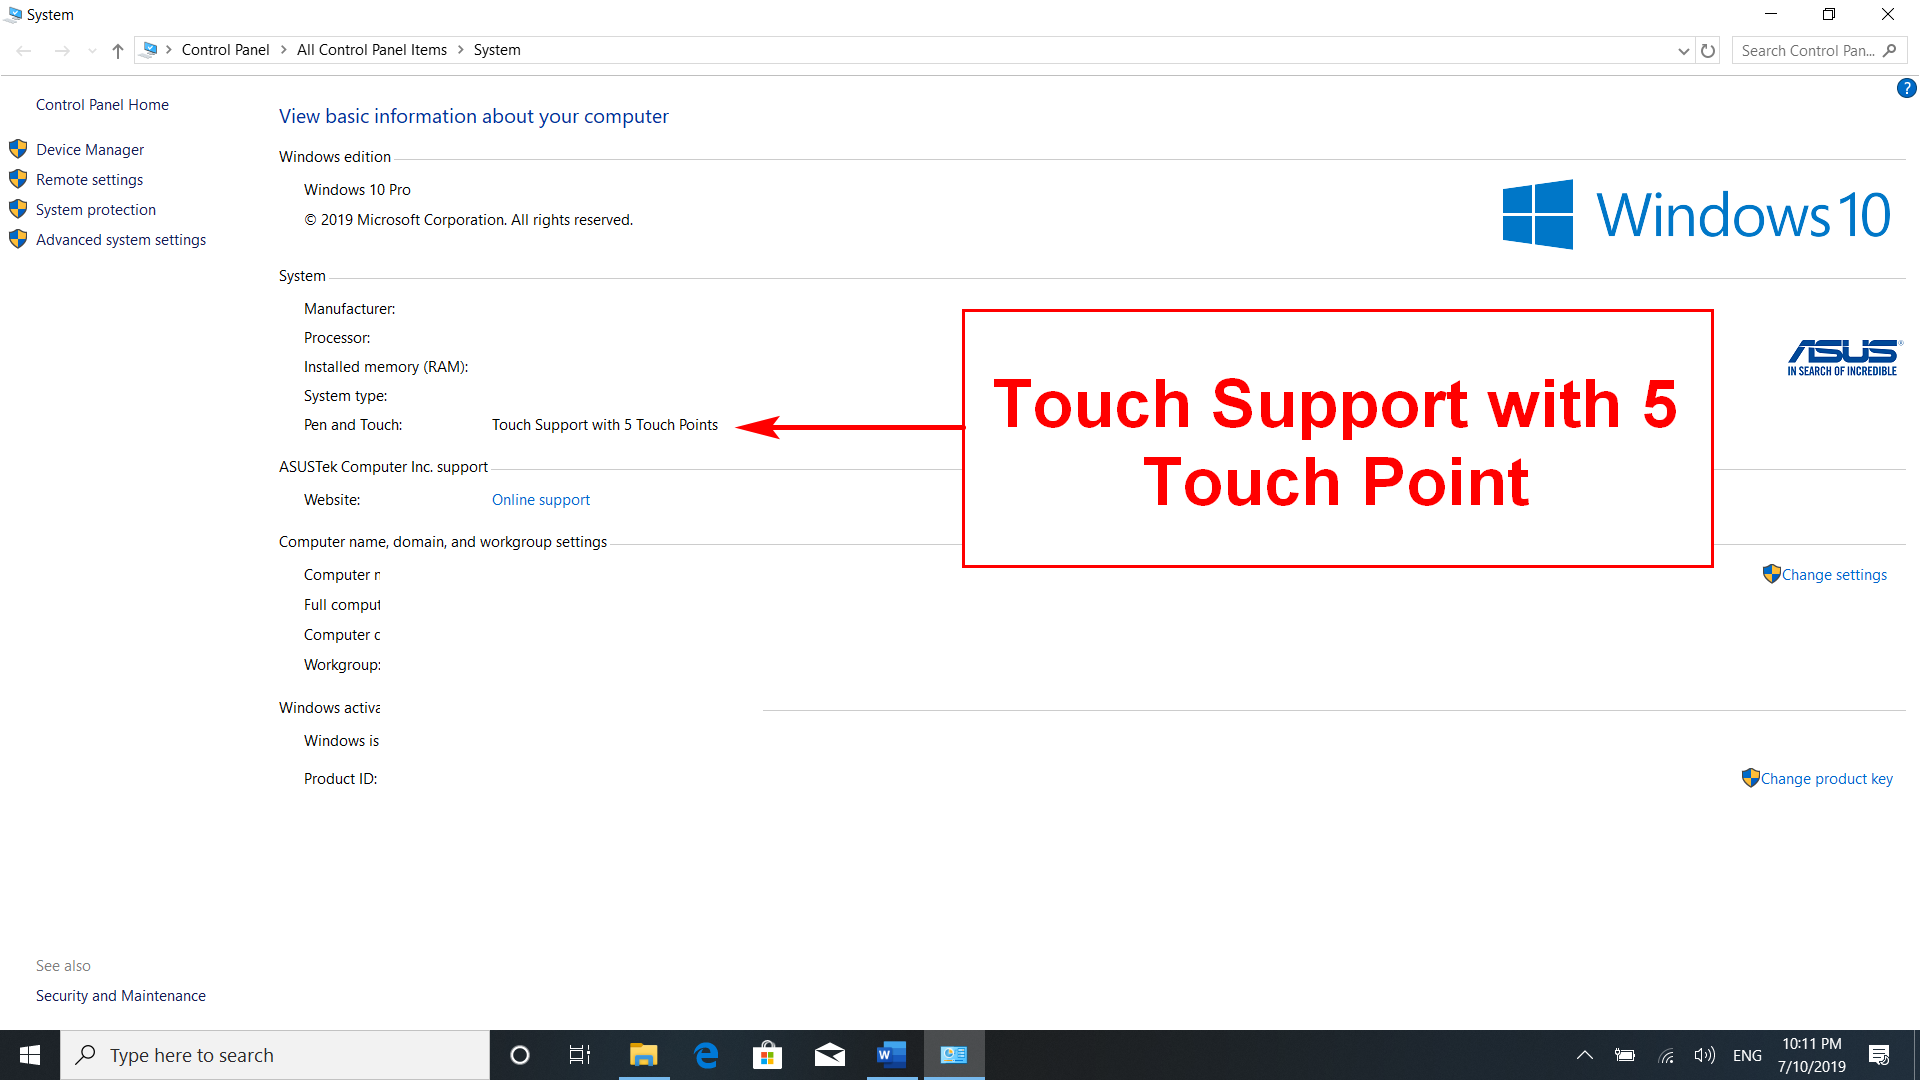
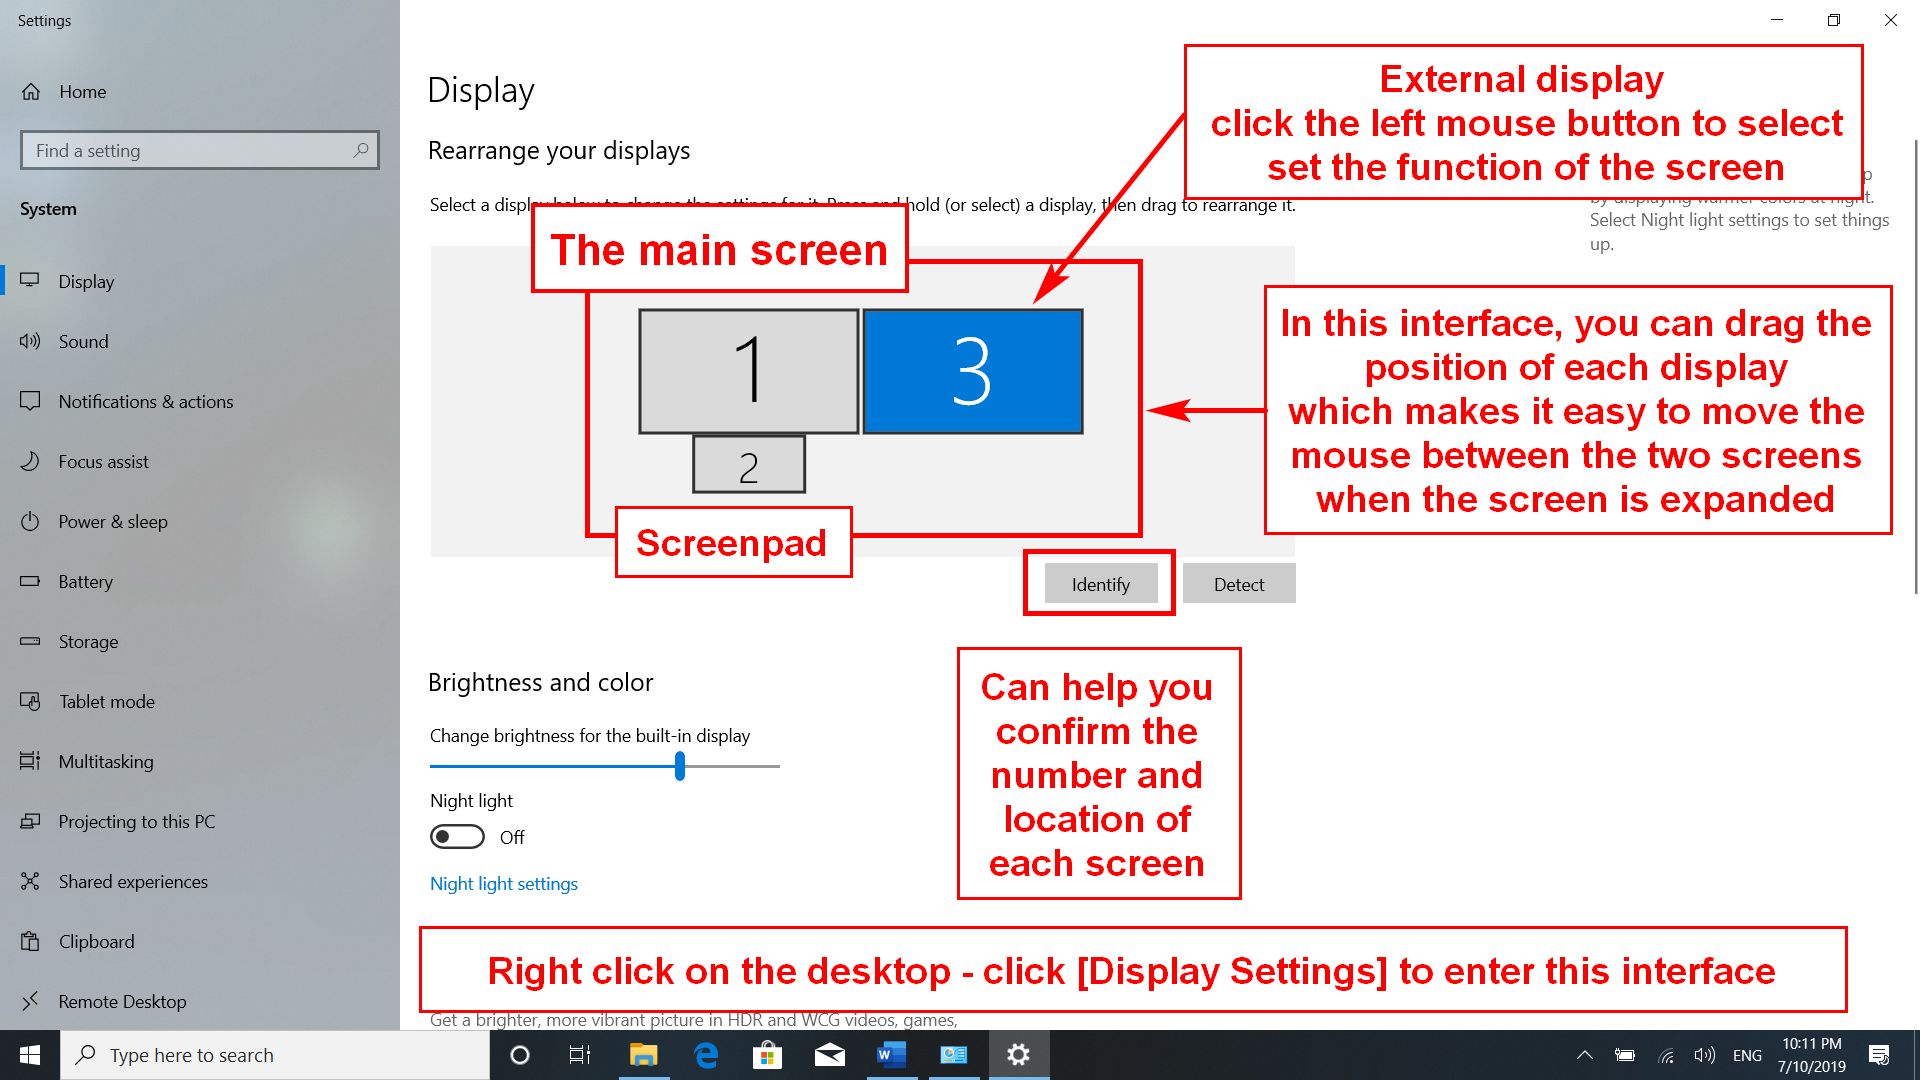
2. Windows defines this screen as the extended one for the main screen. It is also the second screen of the system. When you connect to the external screen, it becomes the third screen of the system. You can access the system in [Display Settings].

ScreenPad Built-in App function
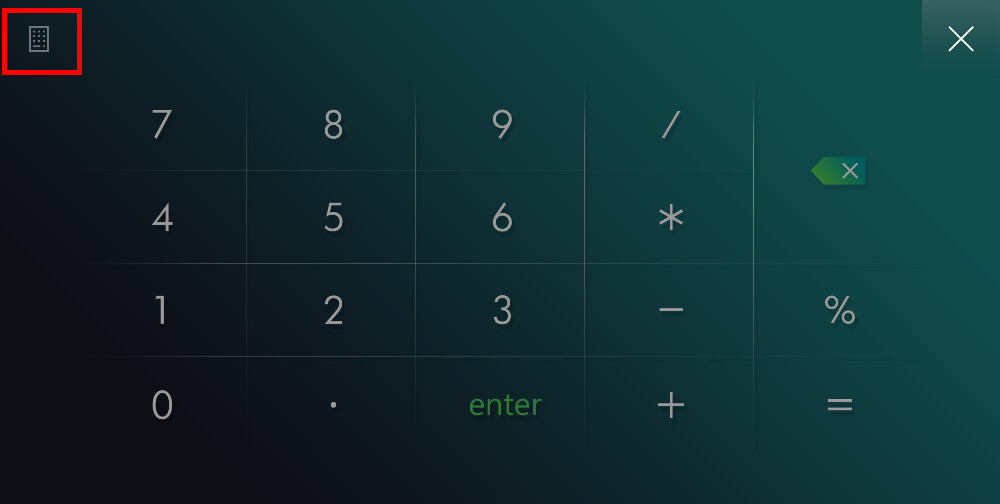
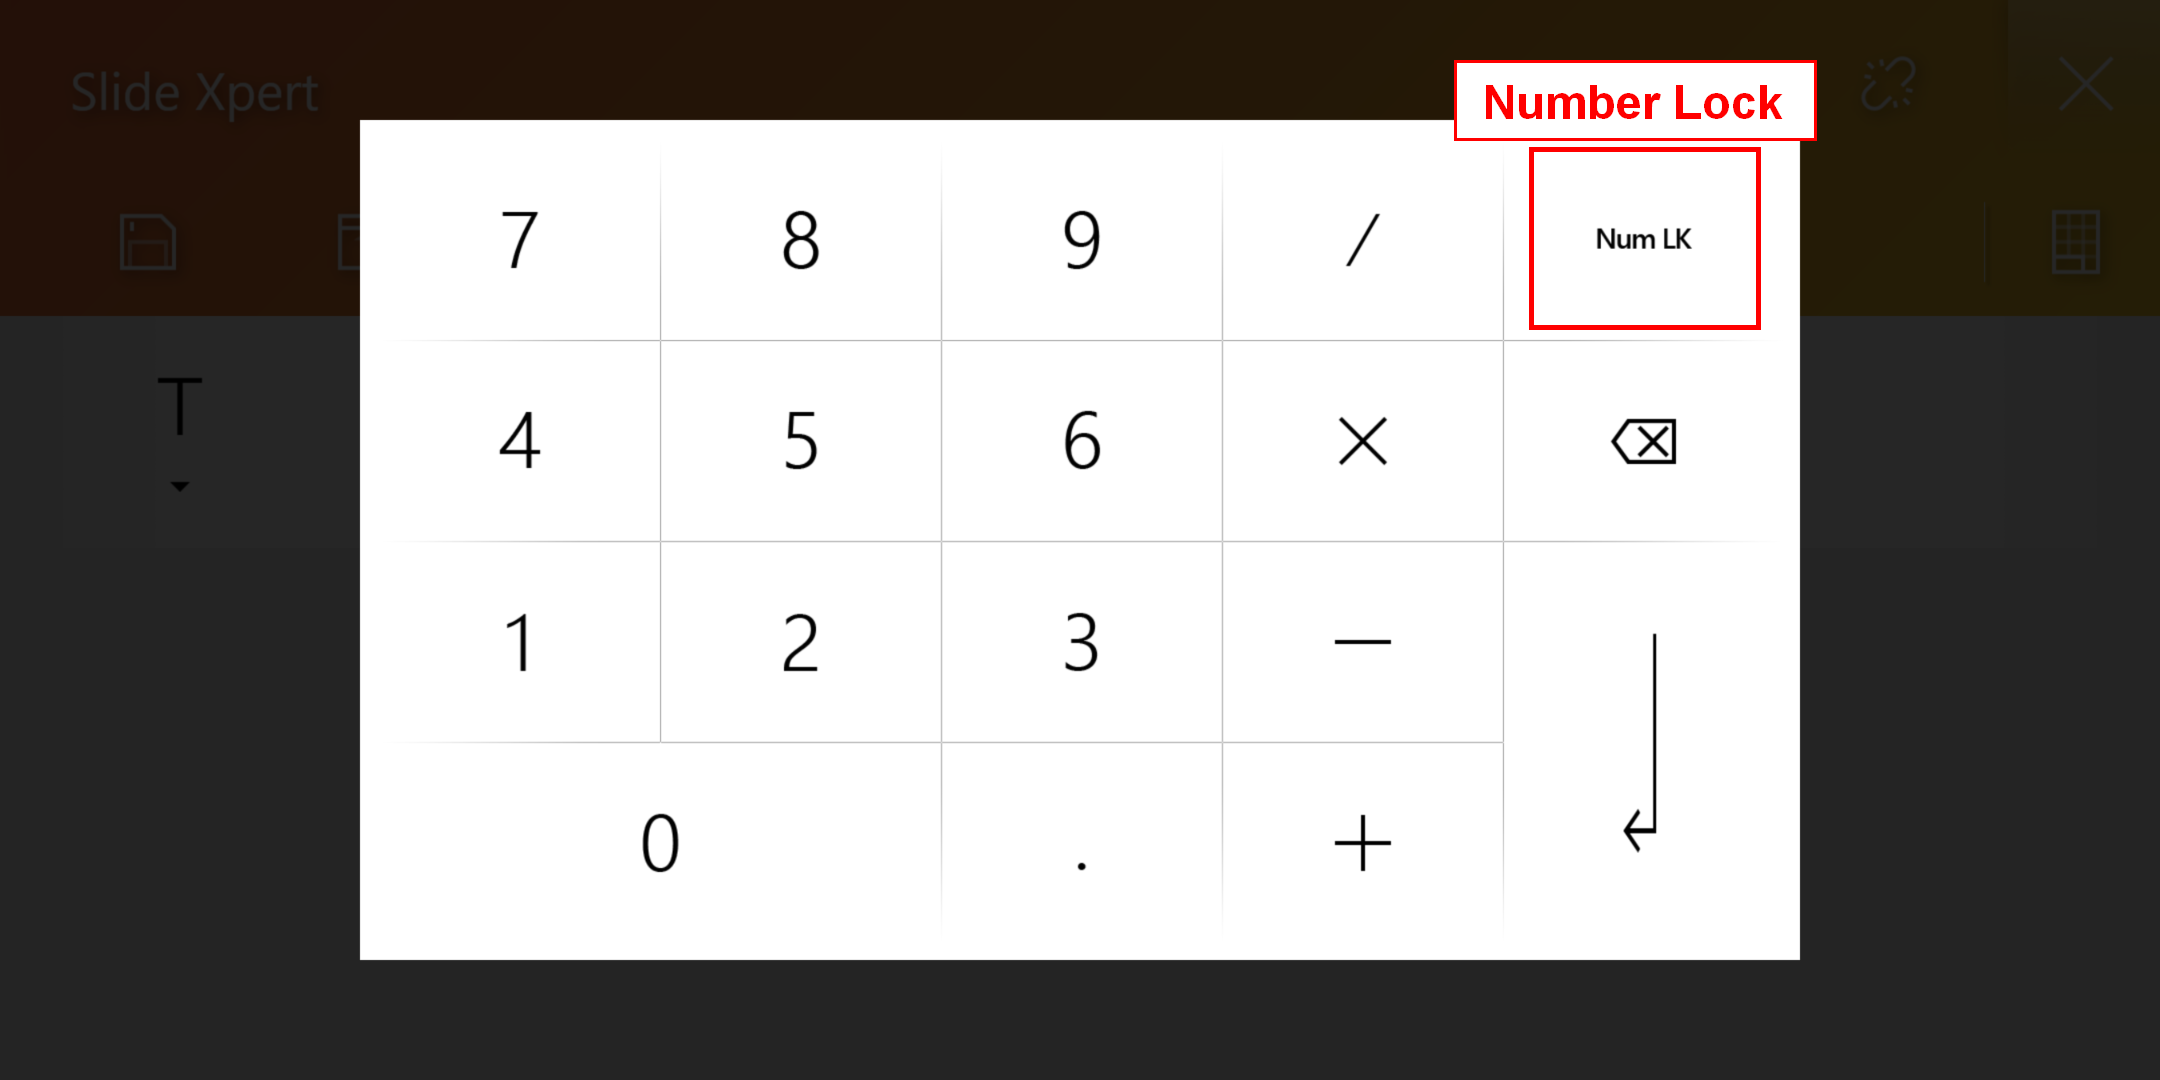
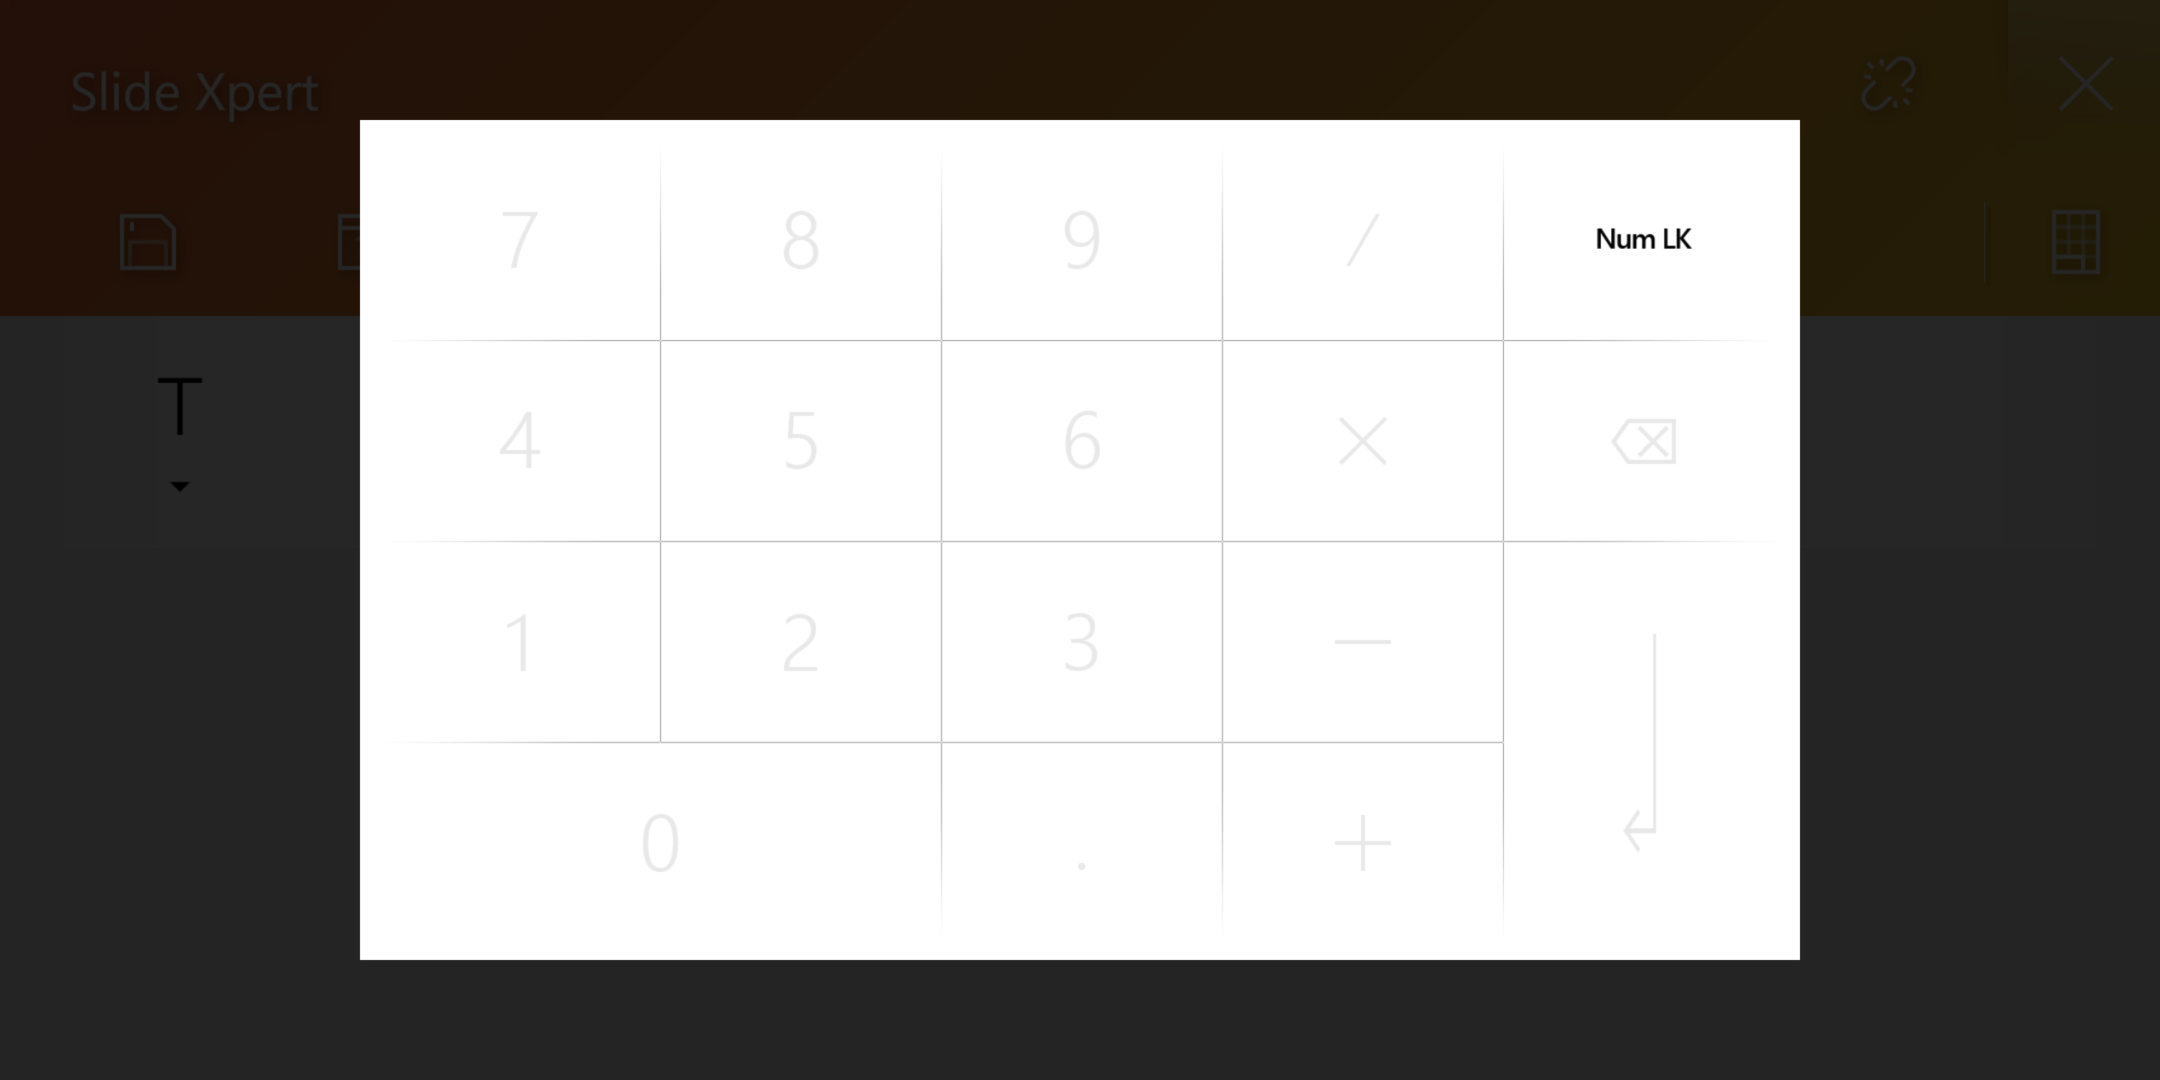
1.  Number Key
Click the Number Key icon on the main interface of ScreenPad to use the number key function on the ScreenPad.
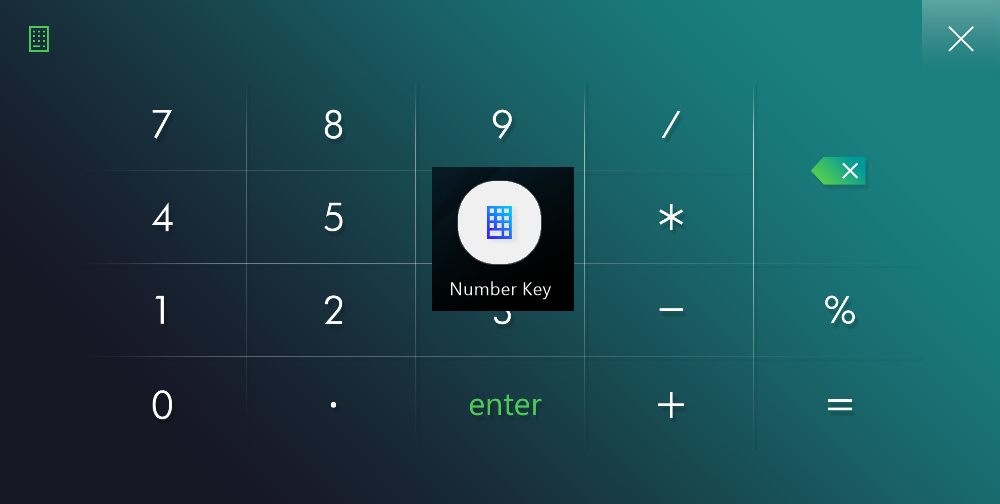
After clicking this icon, the Number Key function will be disabled to restrict any accidental touch
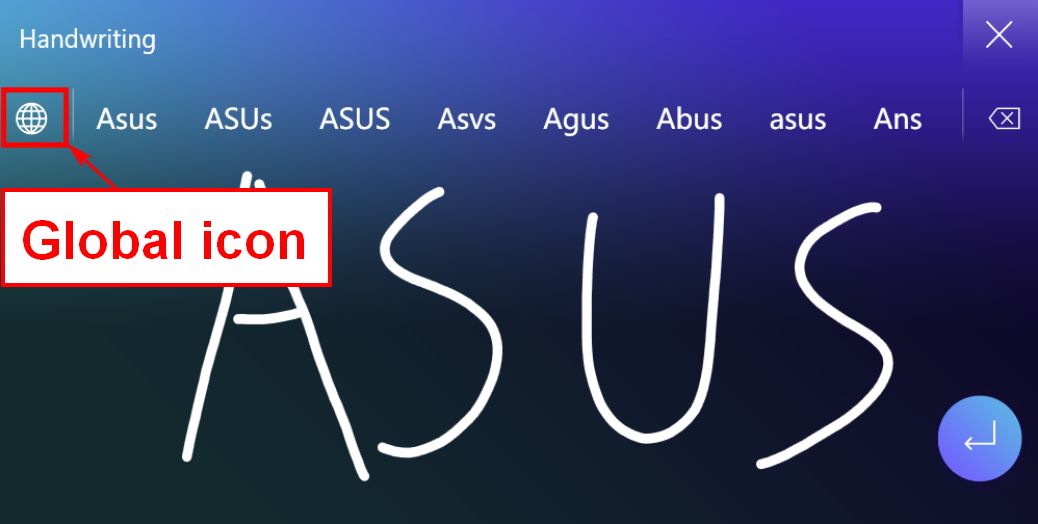
2.  Handwriting Click the Handwriting icon on the main interface to execute the handwriting function on the ScreenPad.
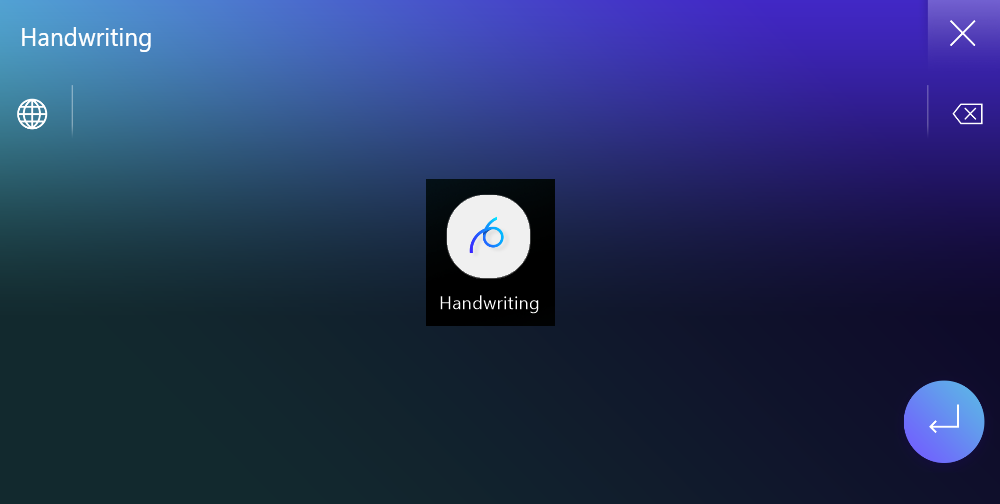
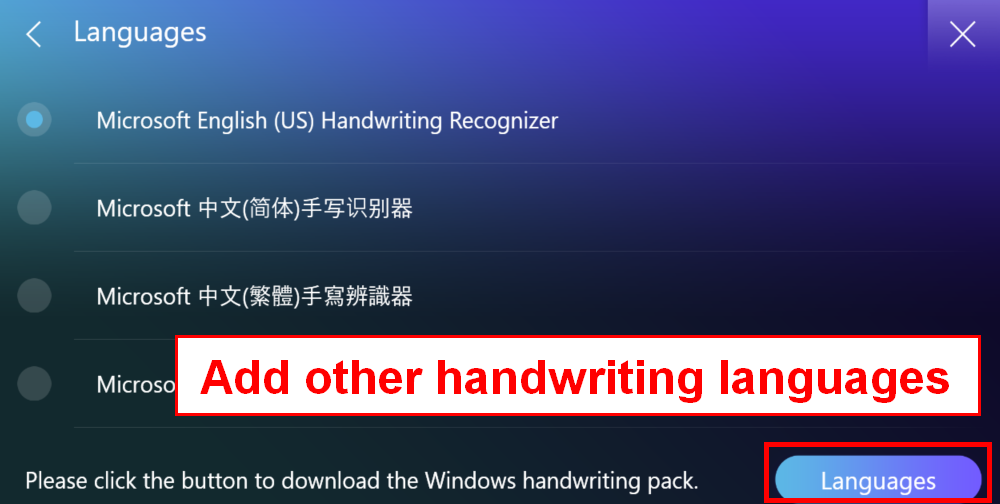
You can click on the Global icon to select a preferred language.

3.  Quick Key Click the [Quick Key] icon in the ScreenPad to enable the [Quick Key] function
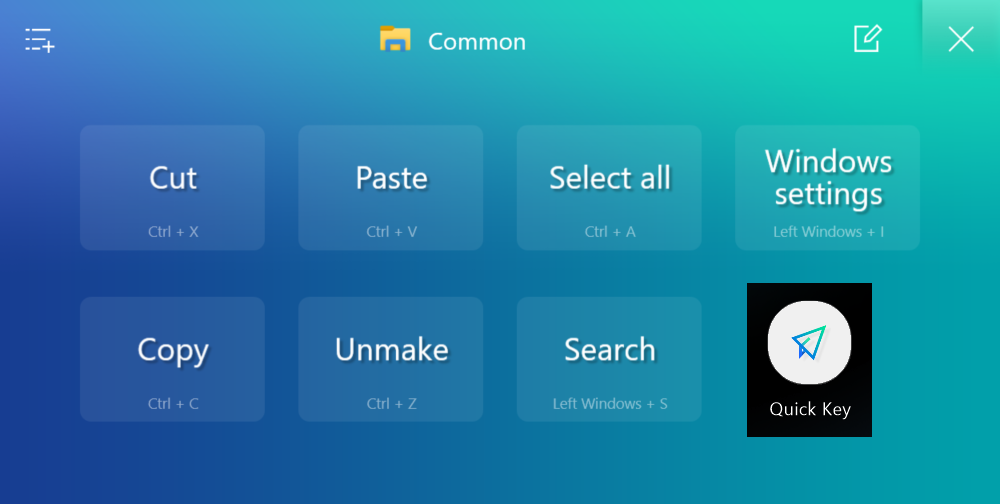
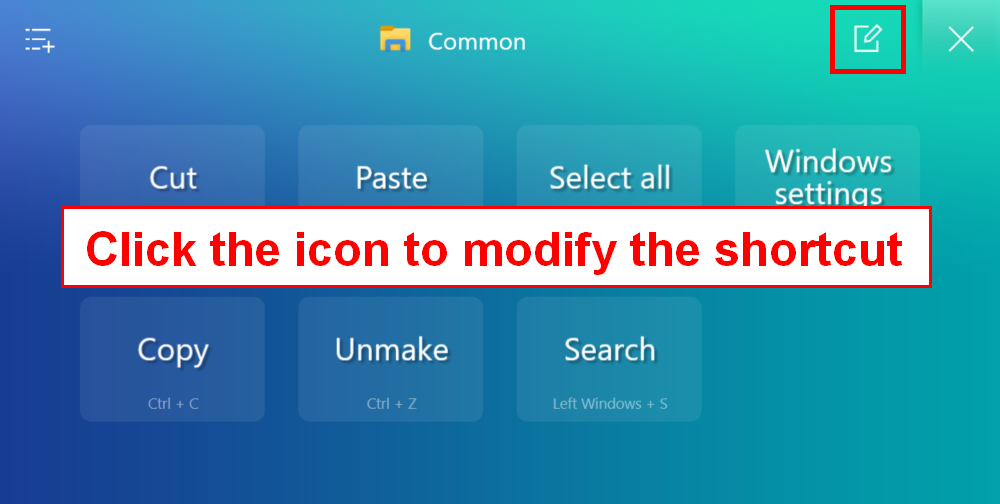
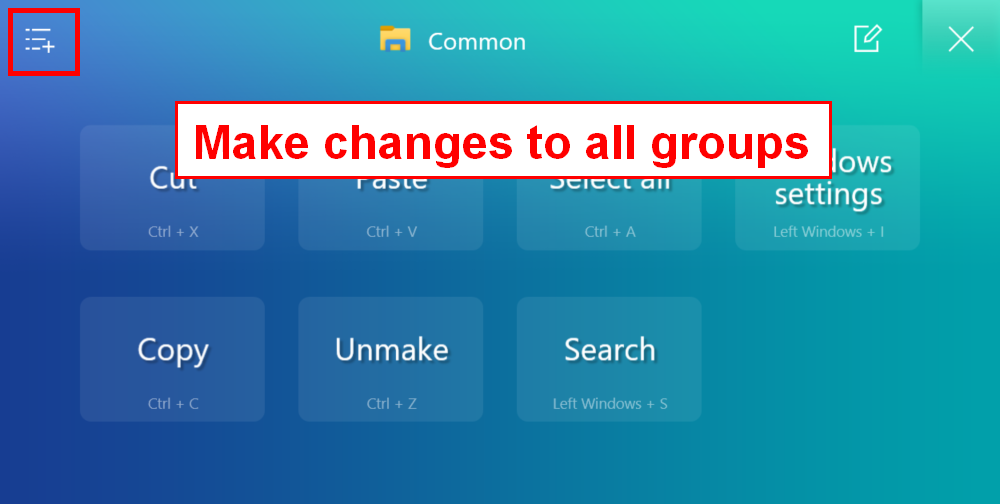
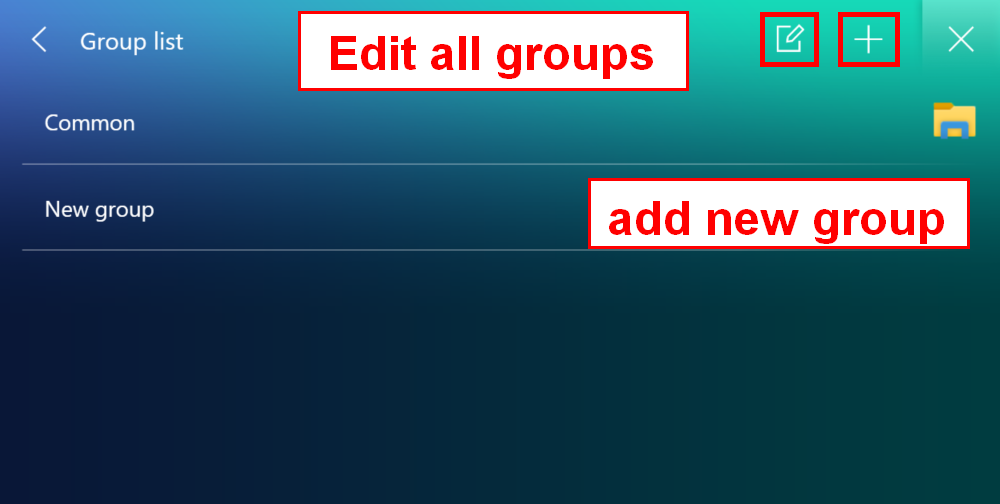
Modify the shortcut keys for this group.

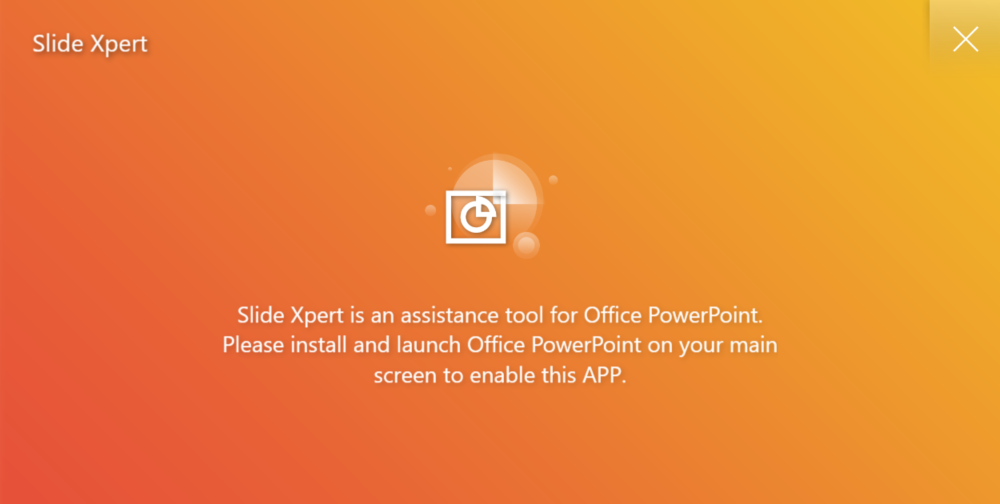
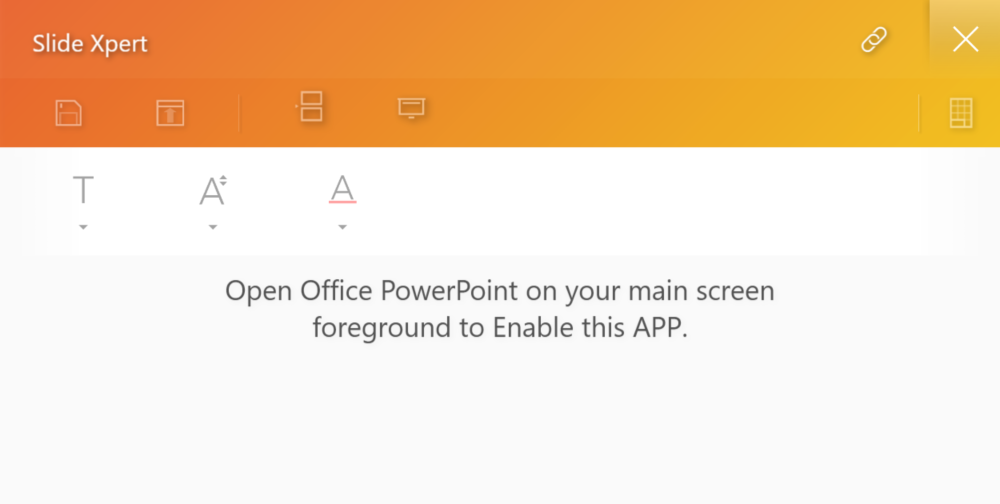
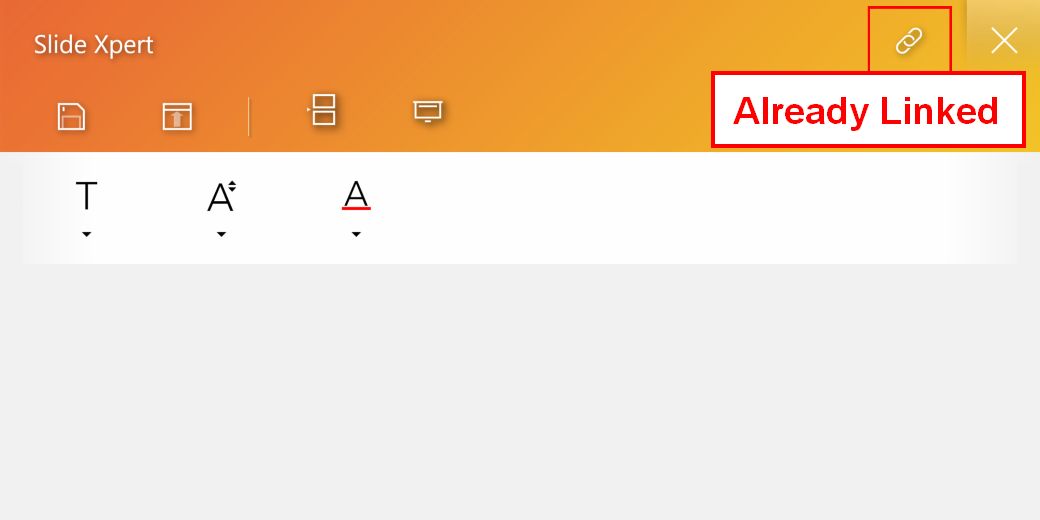
4.  Slide Xpert, an efficient Power Point auxiliary application.
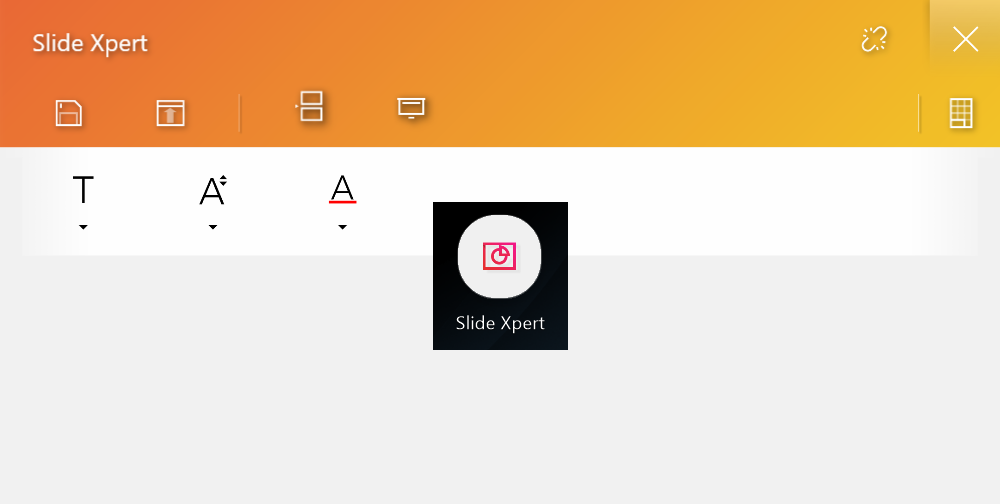
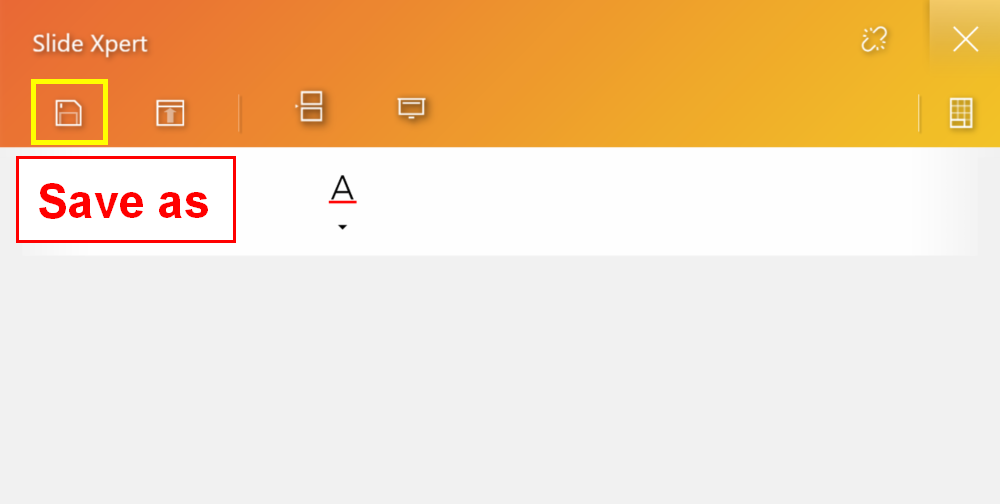
Save icon.
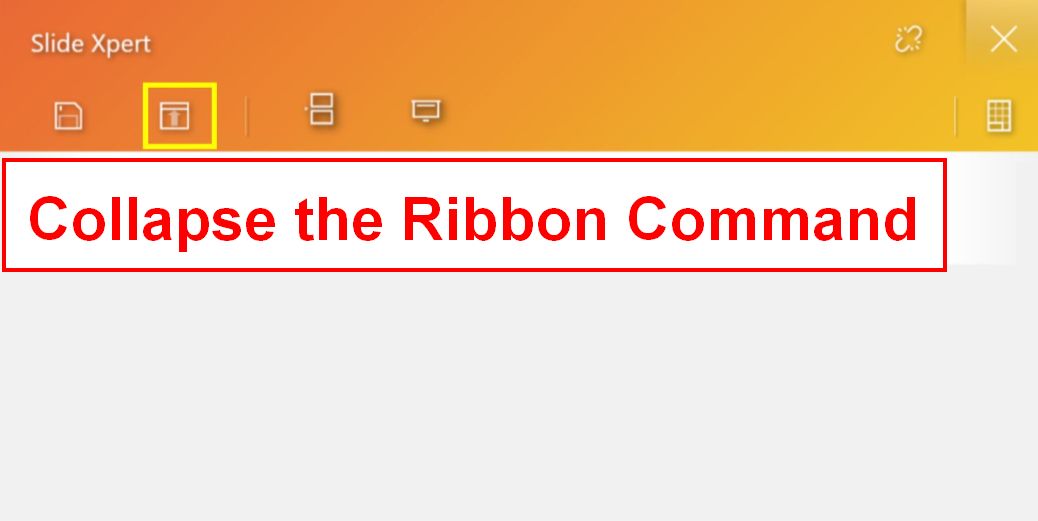
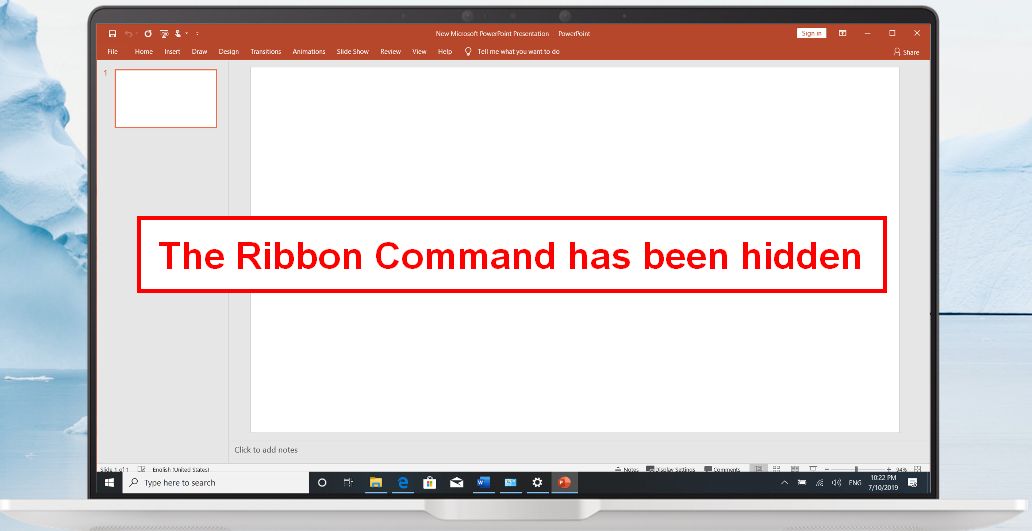
Collapse the Ribbon Command.
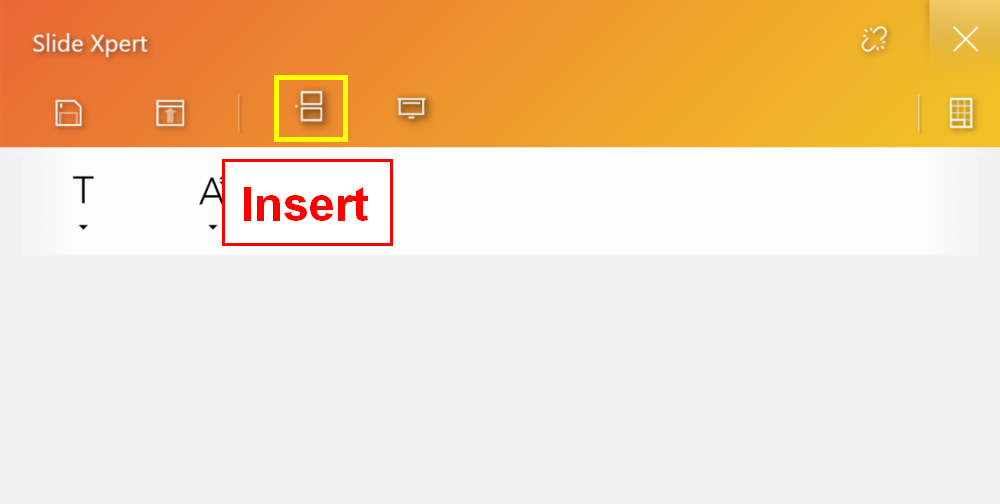
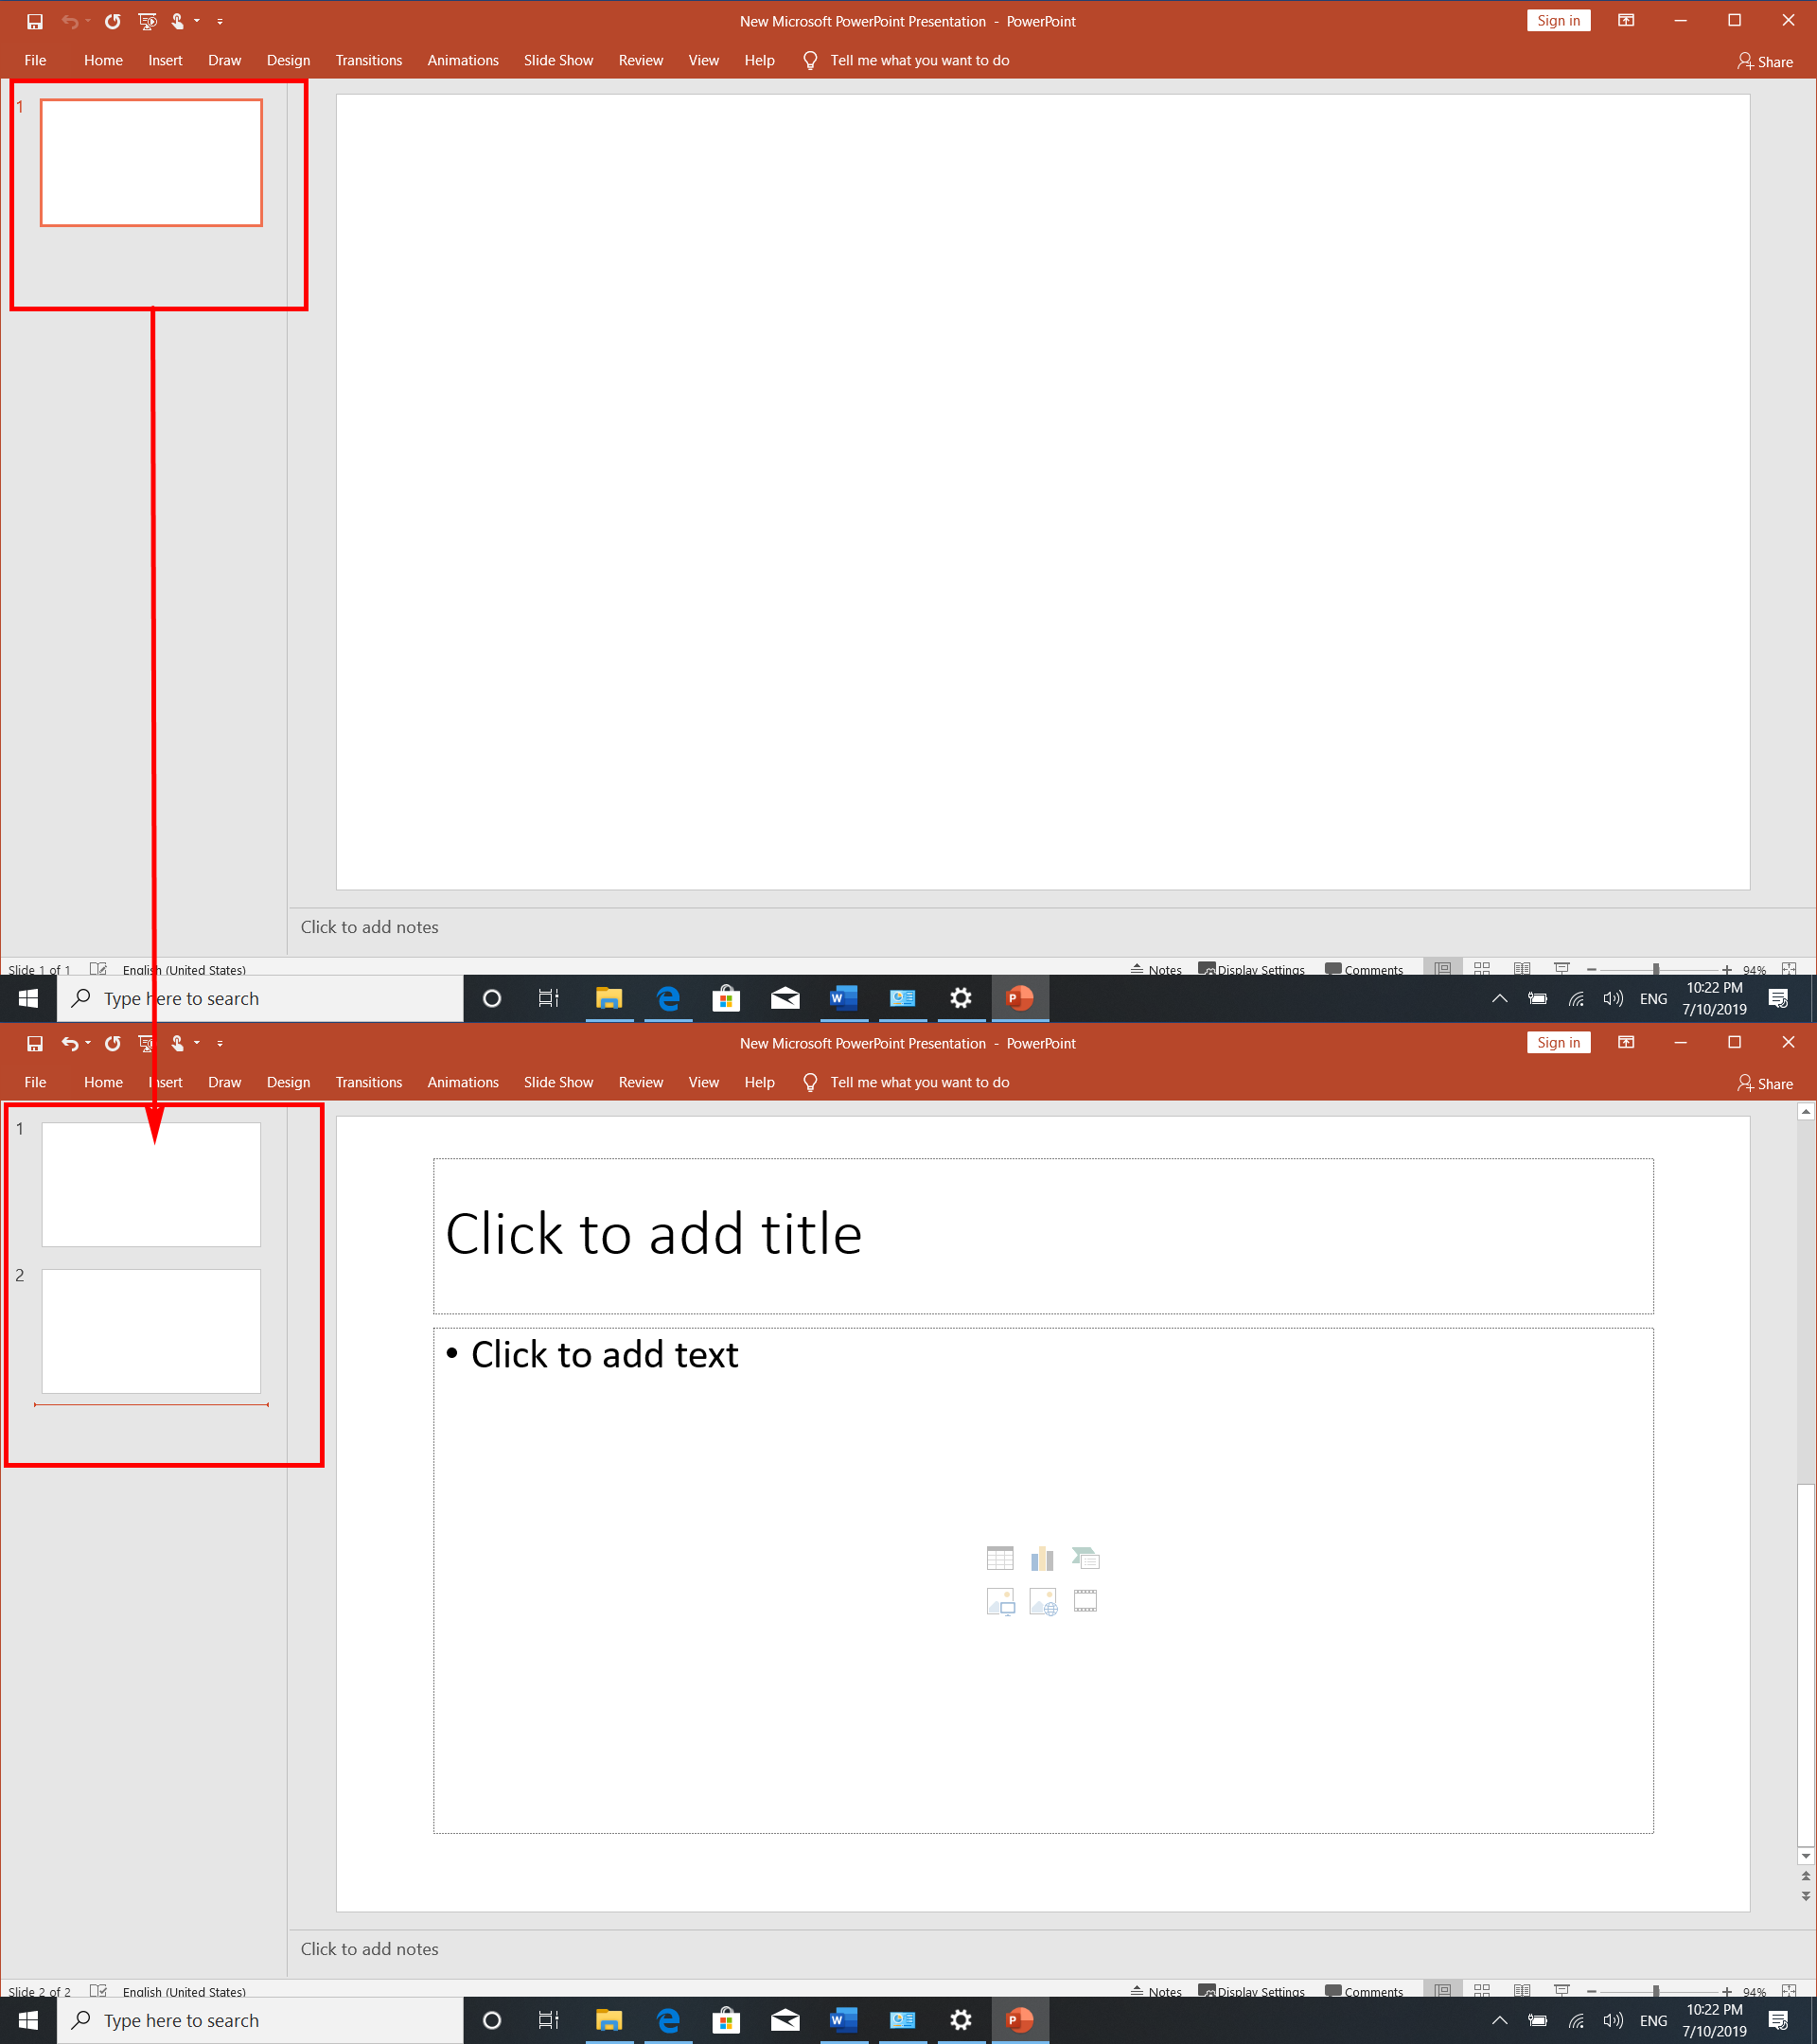
Insert icon, you can quickly add a new slide in the PPT.
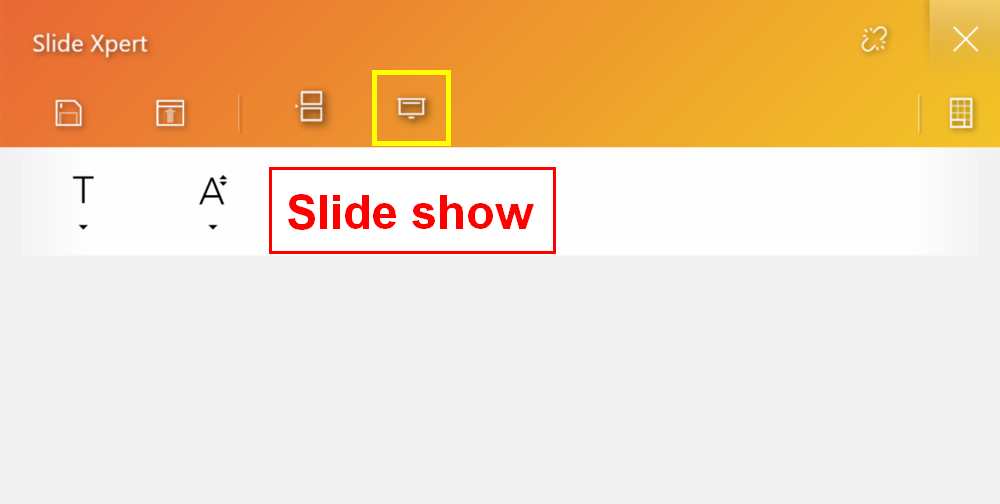
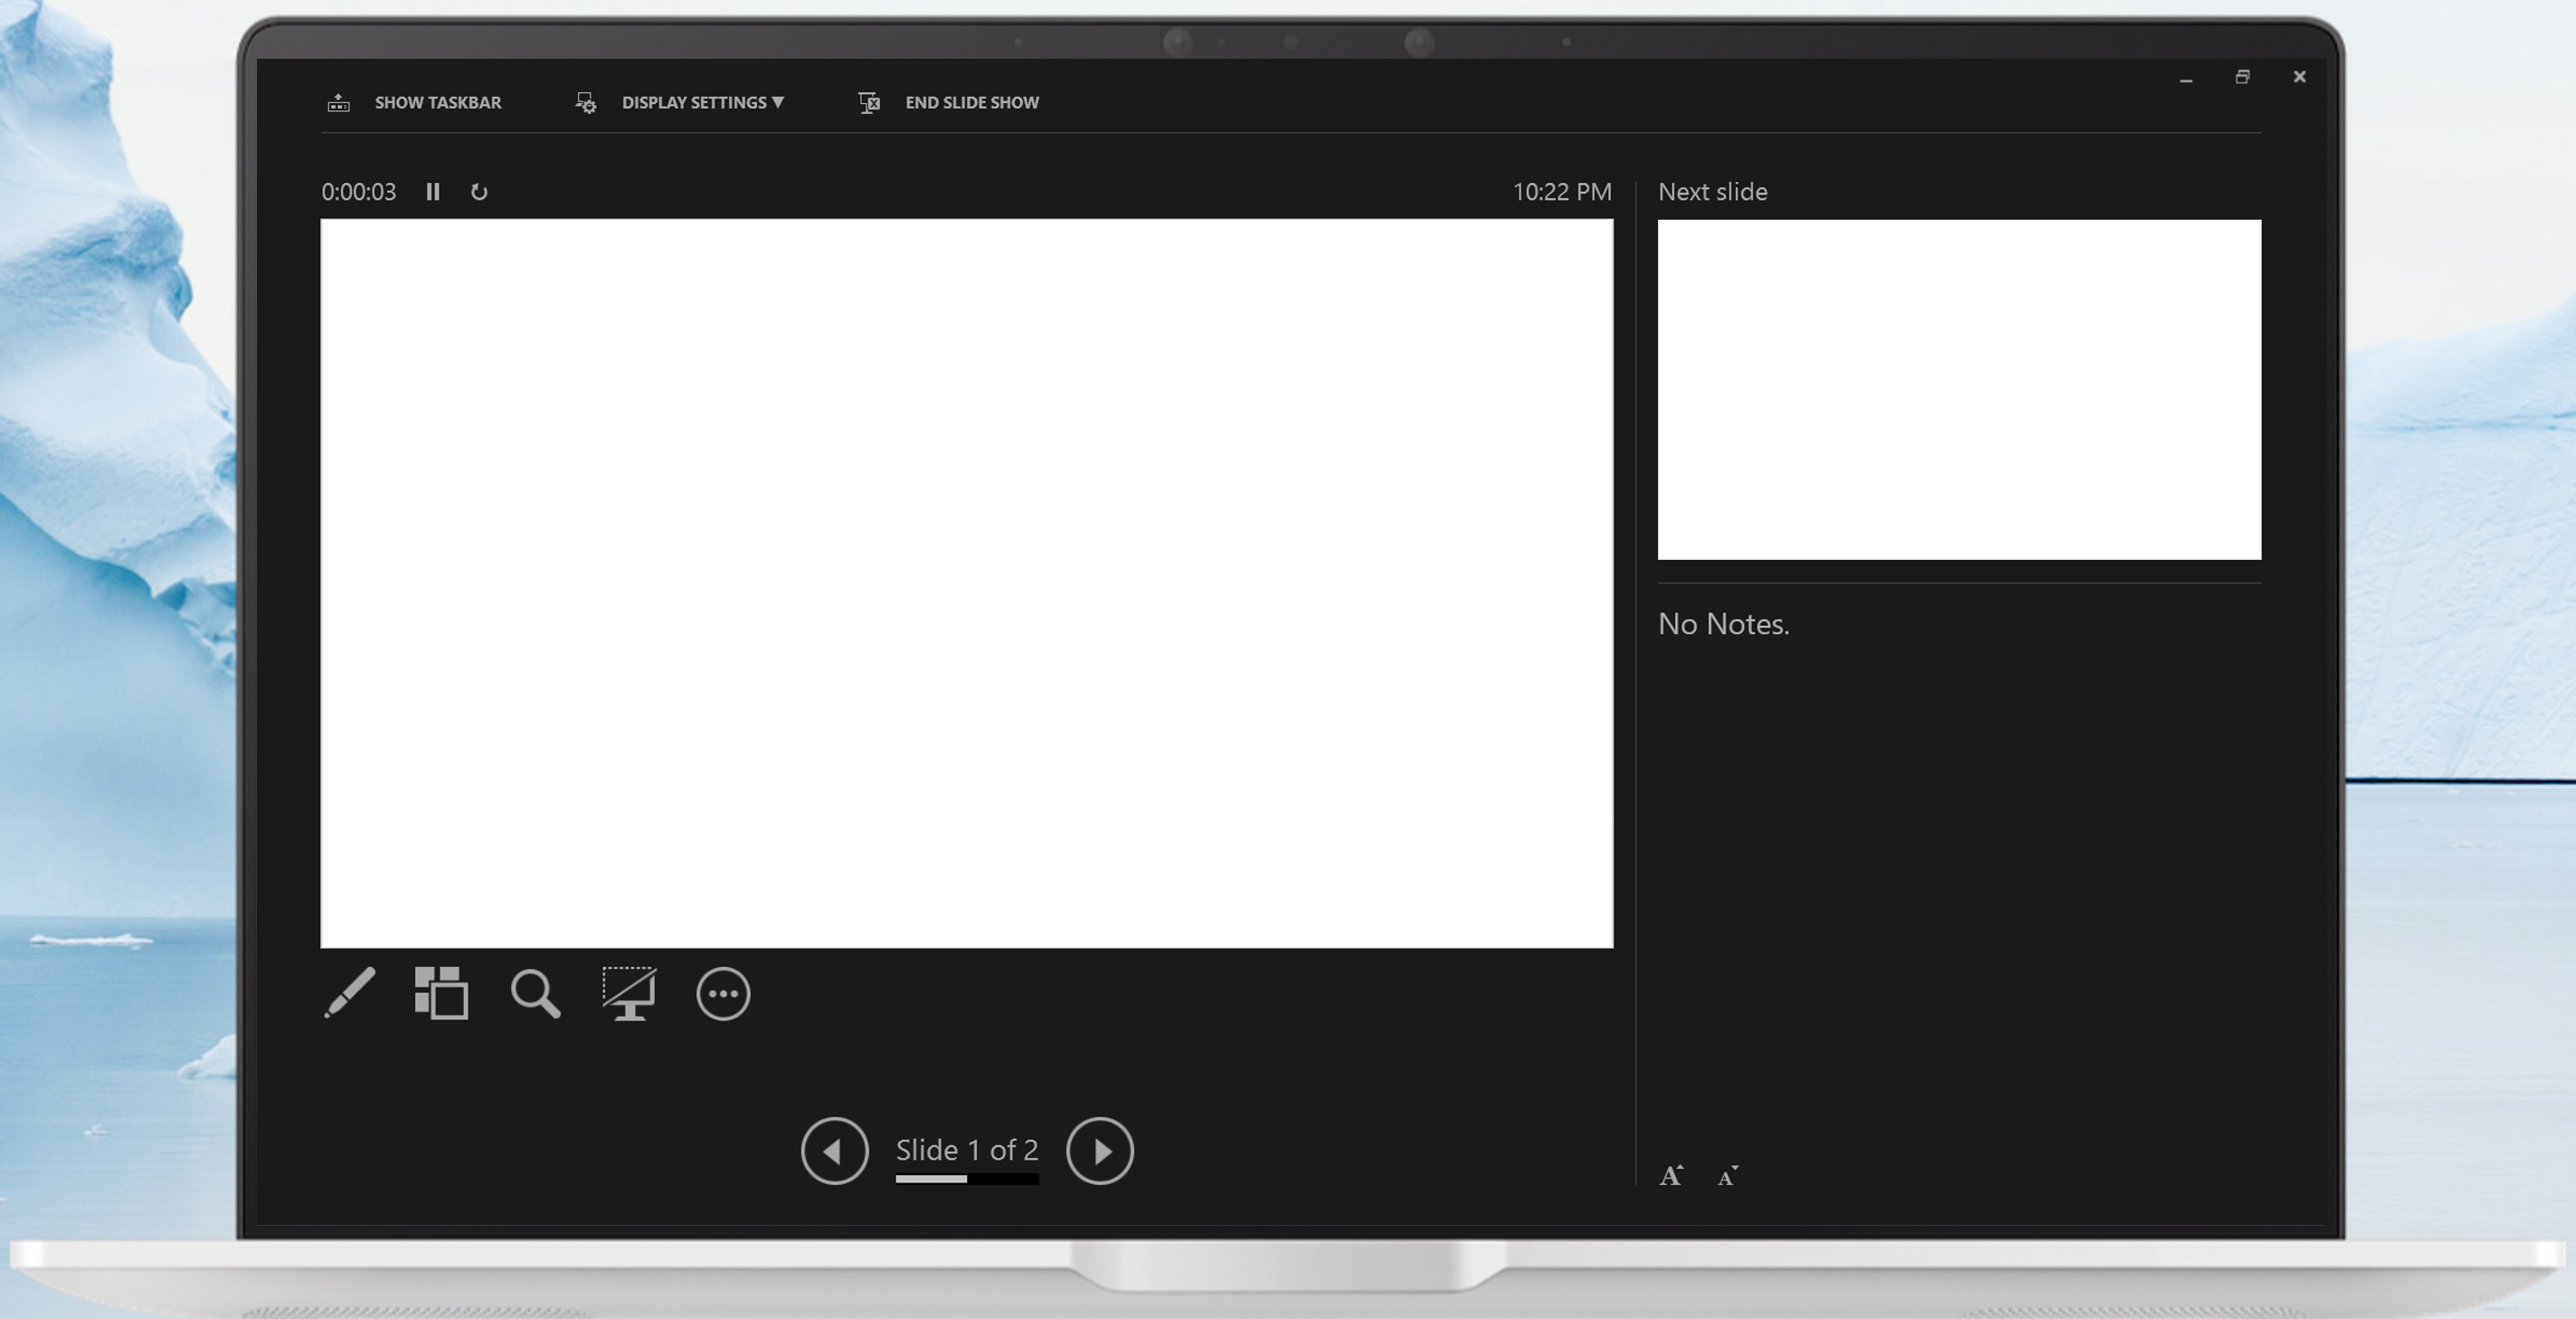
The Slide show icon, you can quickly open the slide show function.
Toolbar, you can quickly modify the font options.
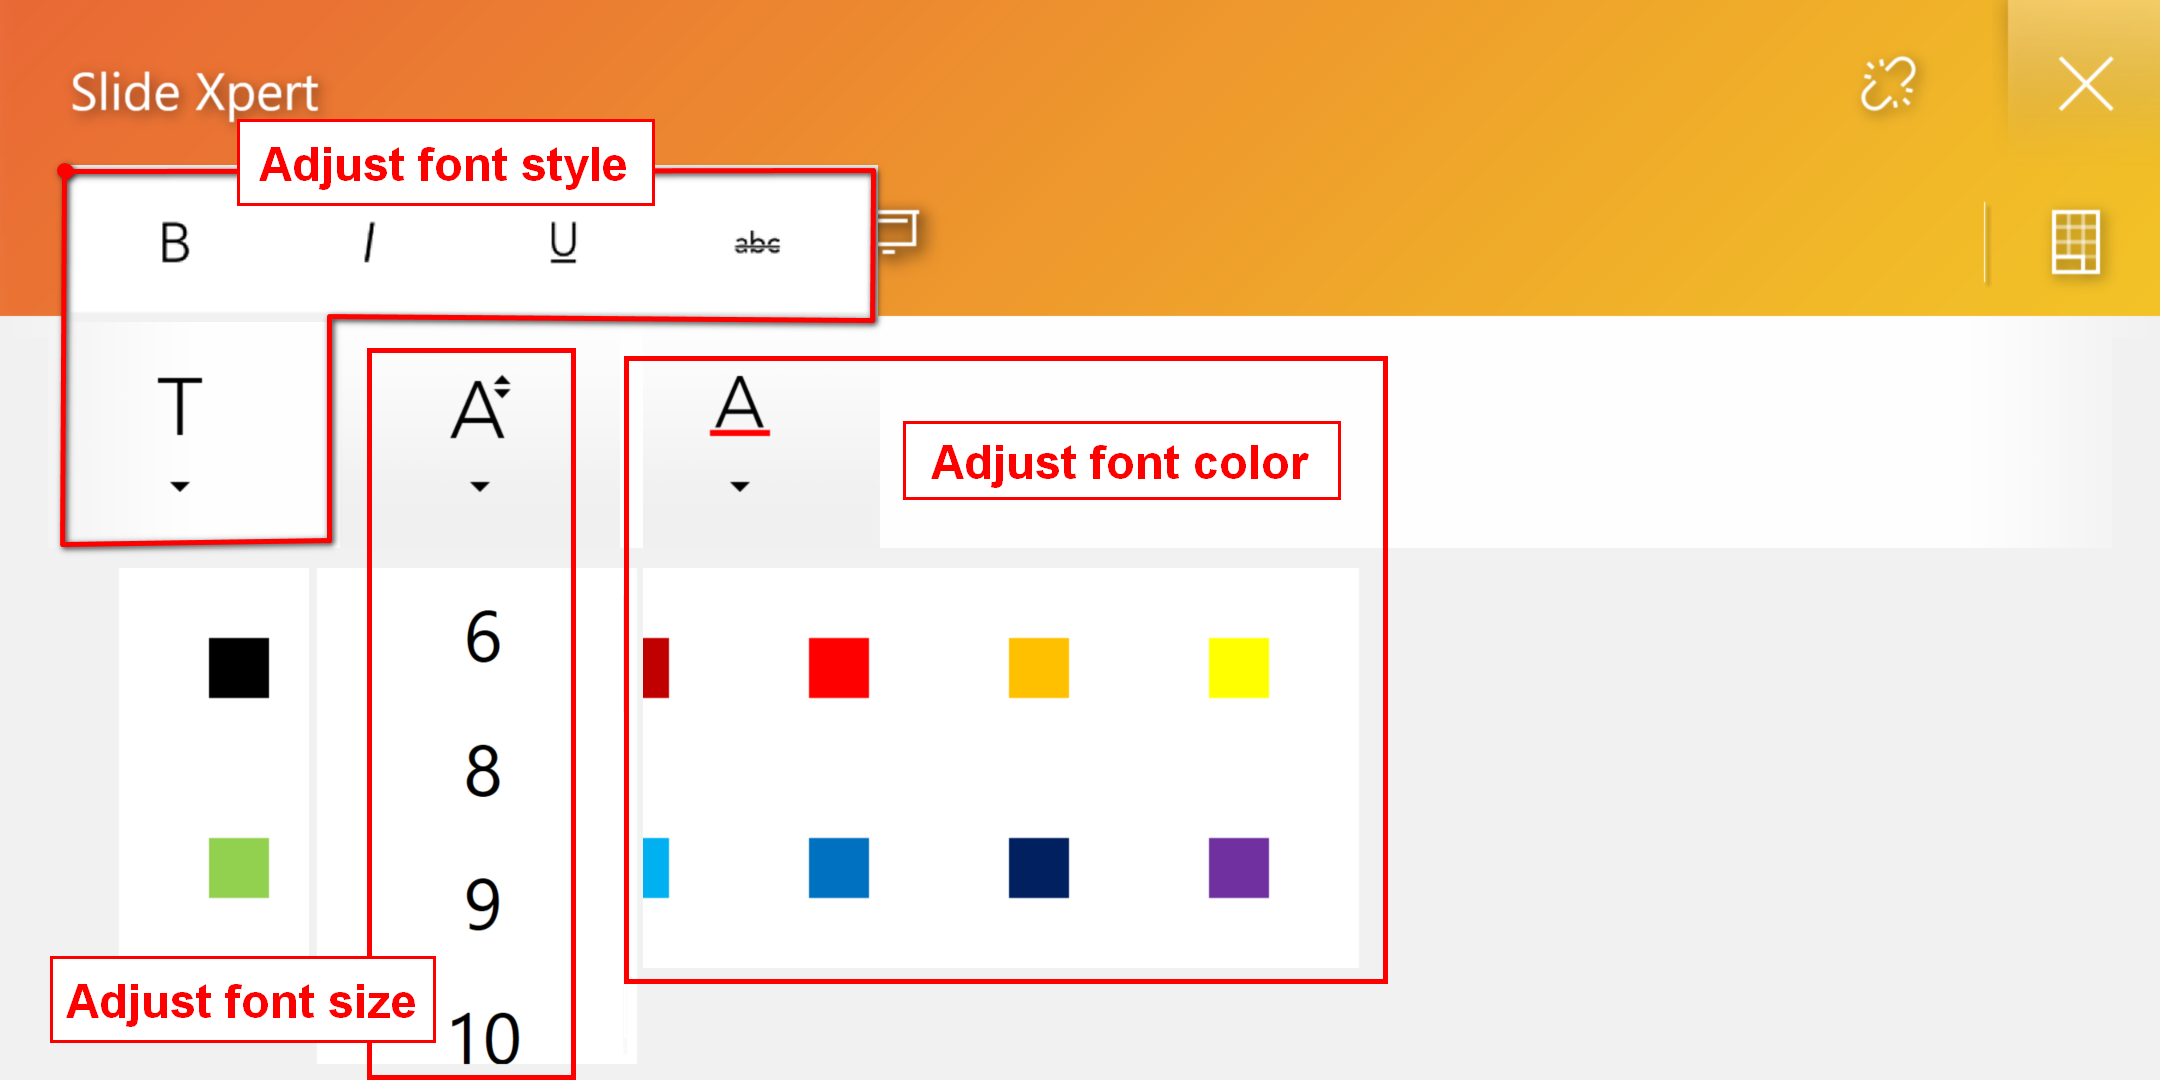
Number Key icon, digital keypad.
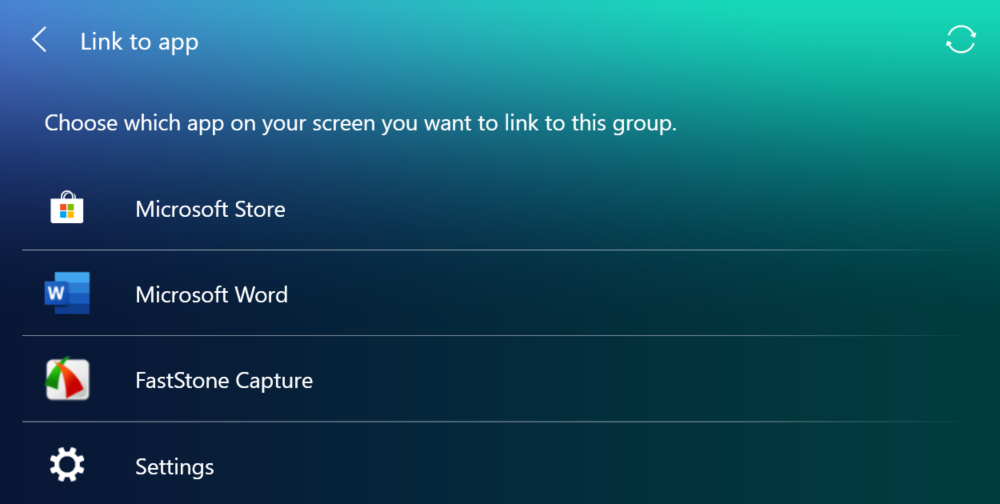
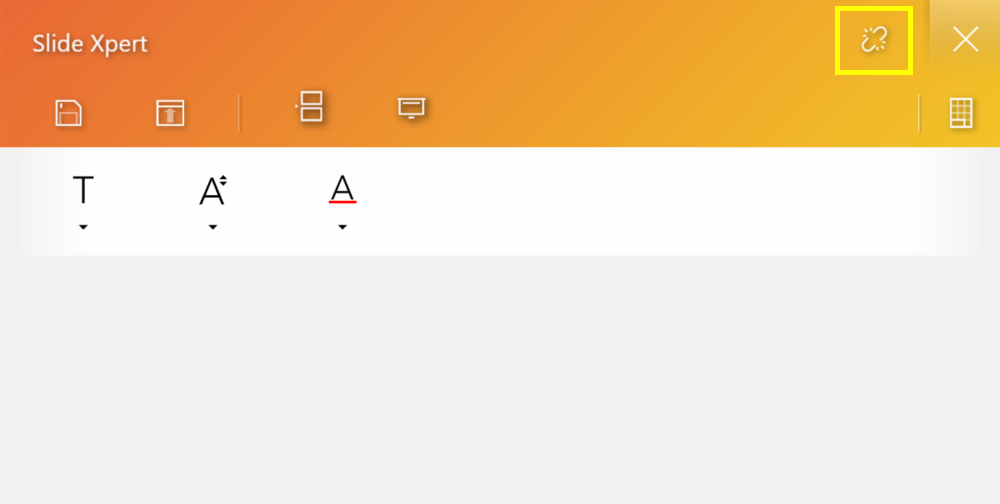
Link icon, when switching to PowerPoint on the main screen, ScreenPad will automatically open Slide Xpert.

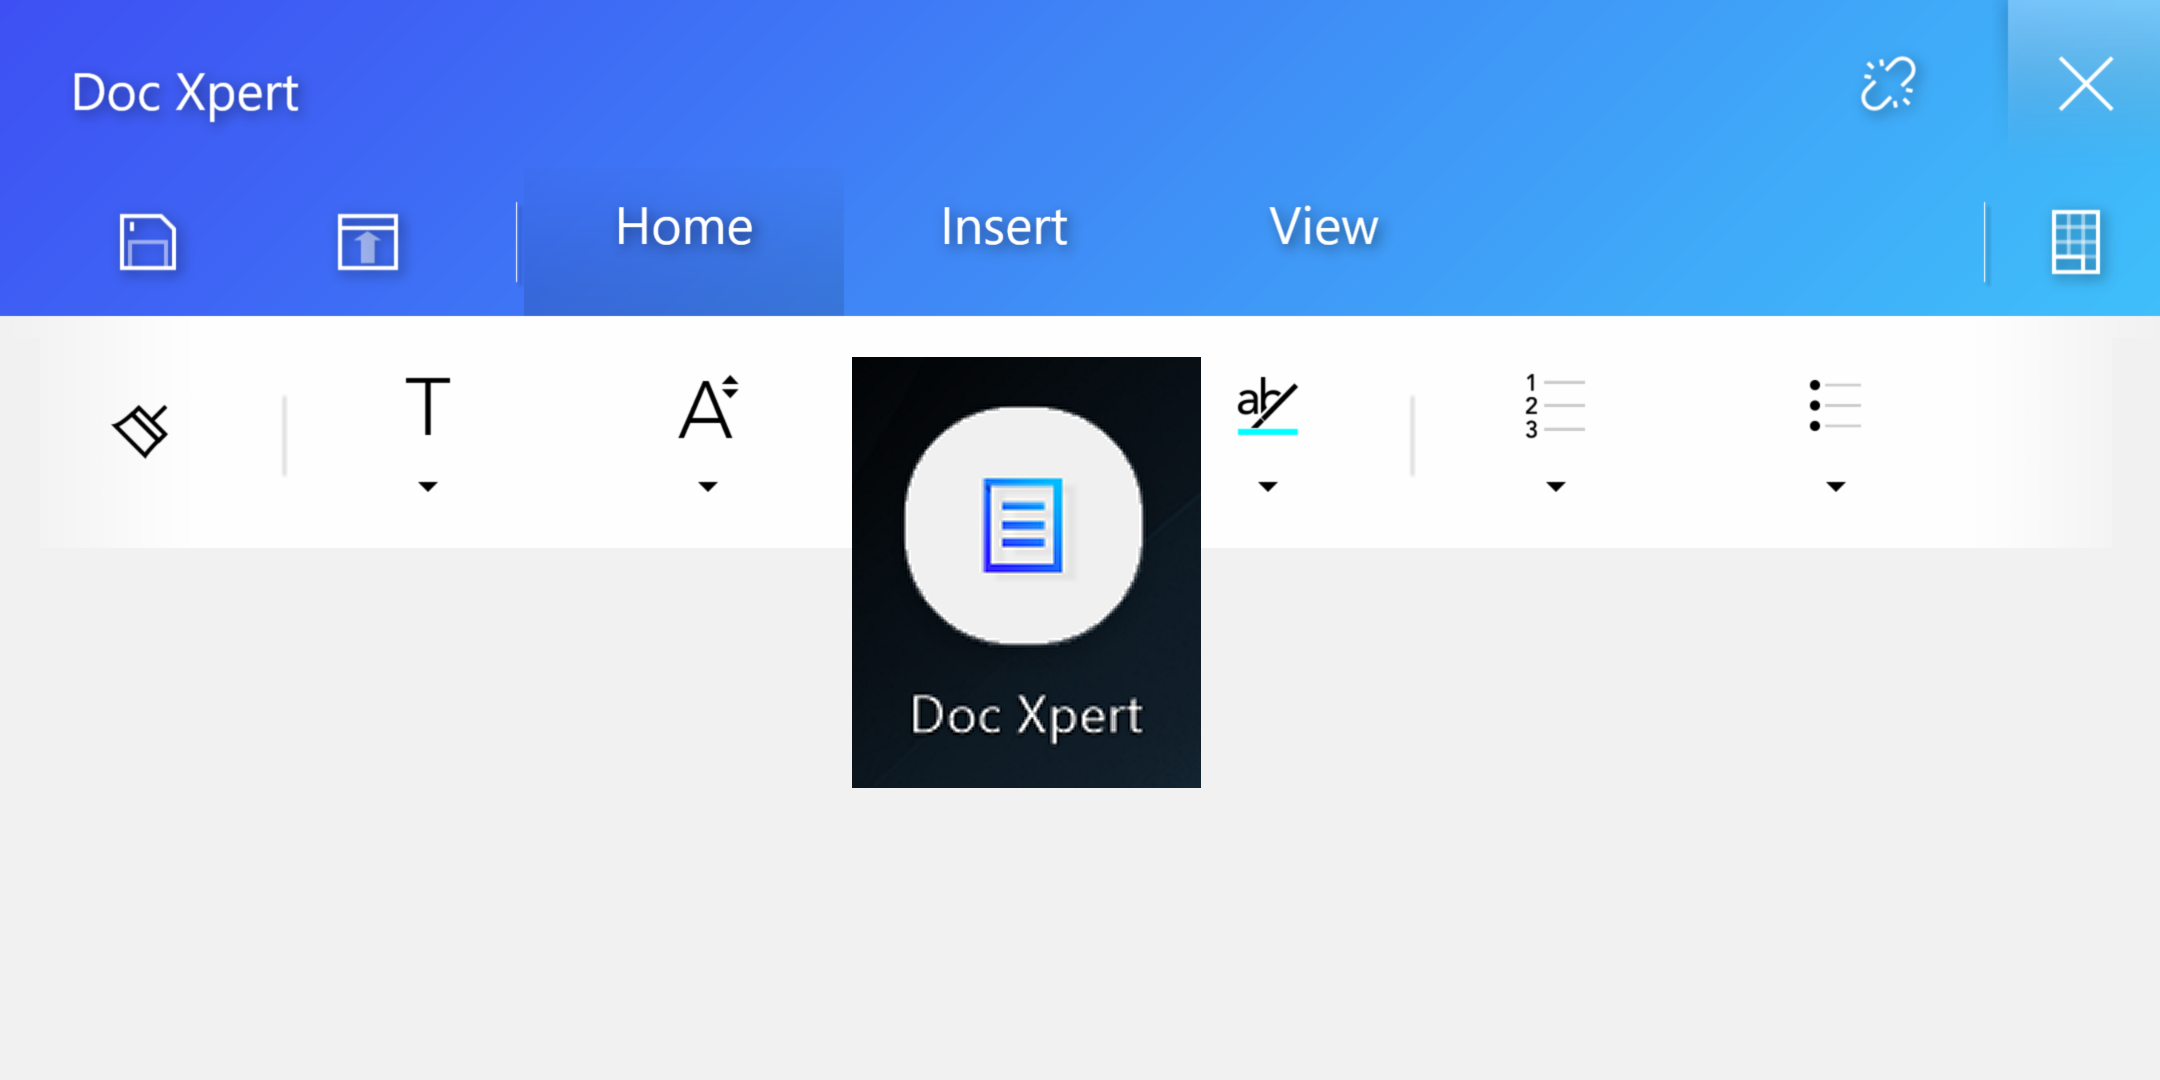
5.  Doc Xpert is an efficient Word auxiliary application. (The built-in functions of the App are very similar to Slide Xpert, please refer to the introduction of Slide Xpert)
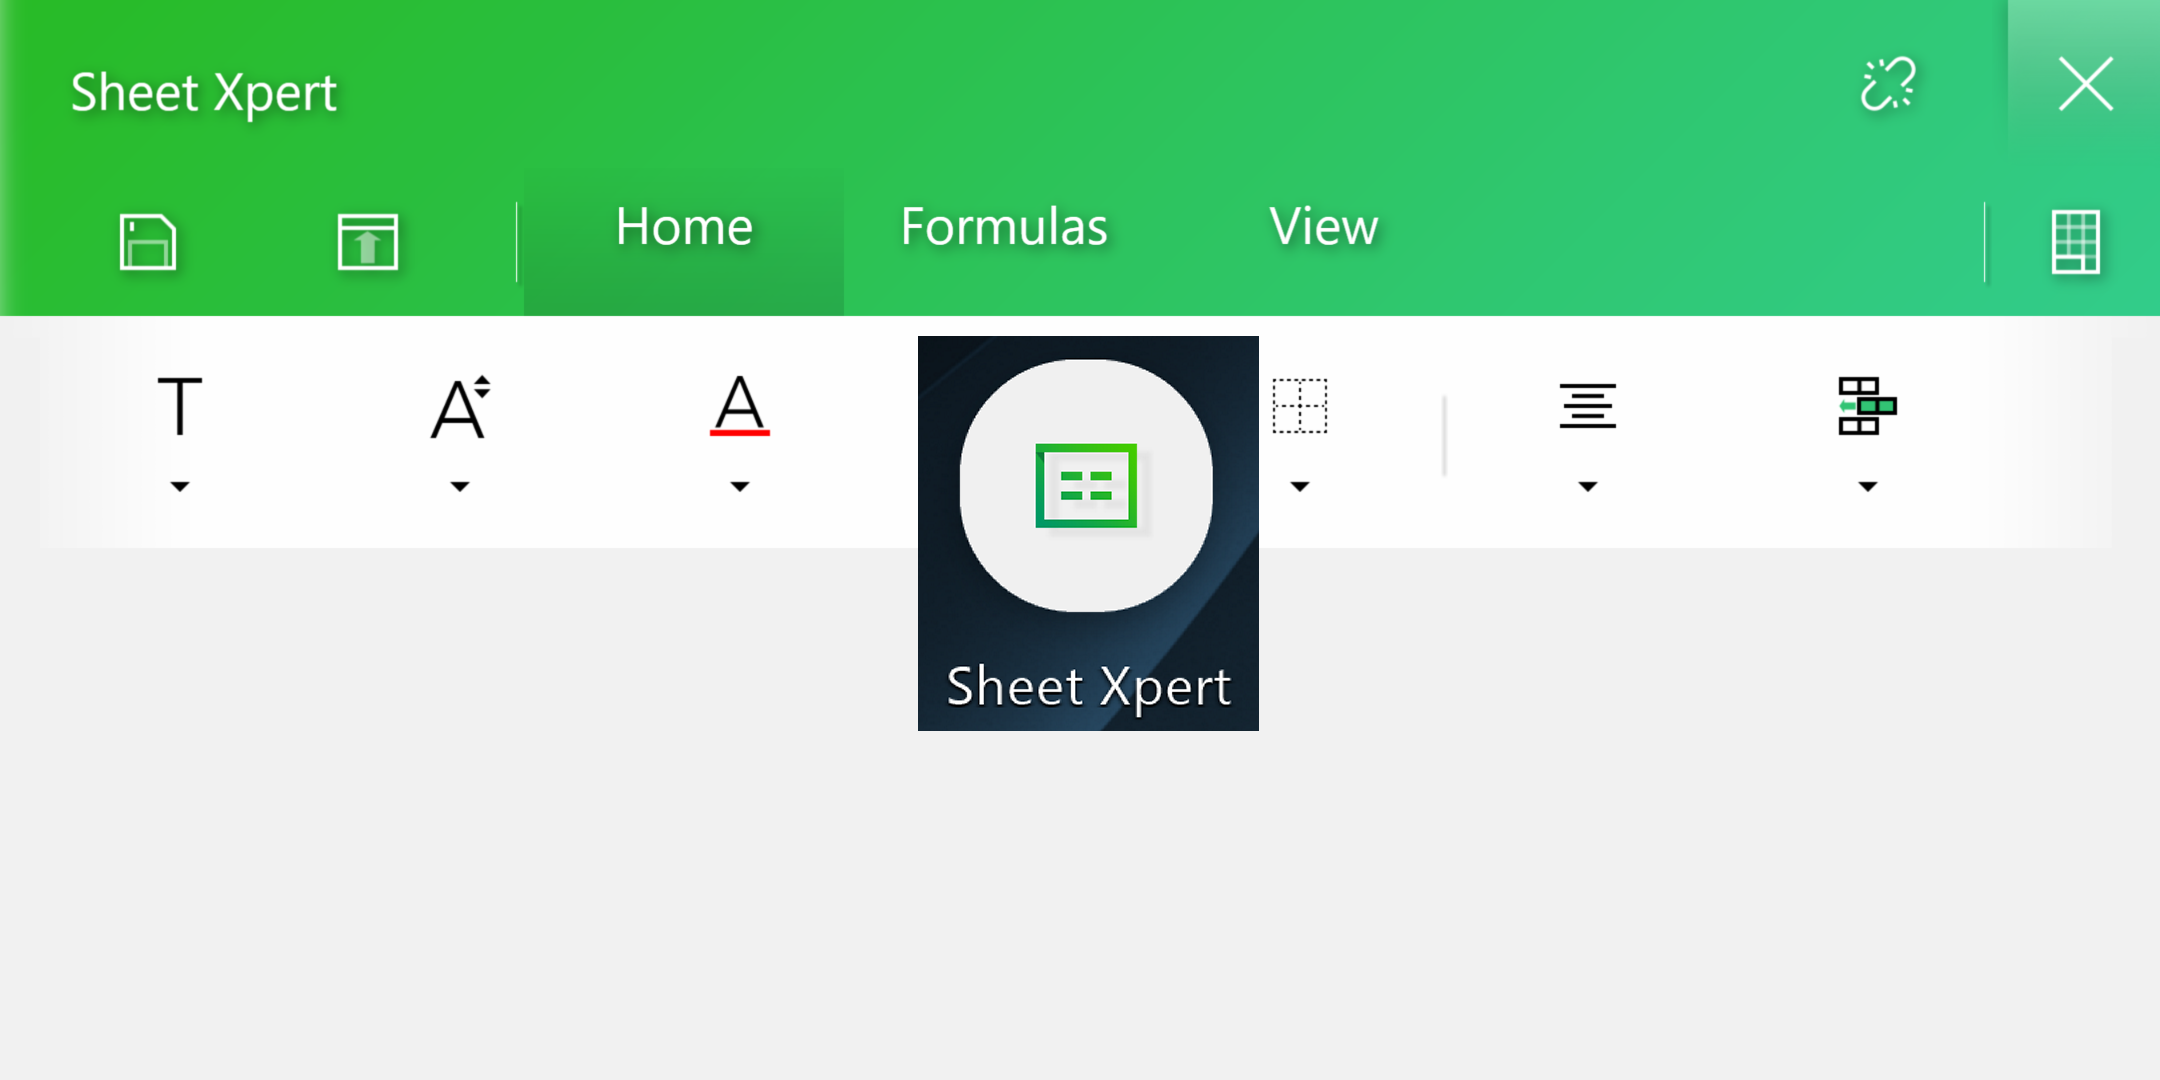
6.  Sheet Xpert is an efficient Excel auxiliary application. (The built-in functions of the App are very similar to Slide Xpert, please refer to the introduction of Slide Xpert)
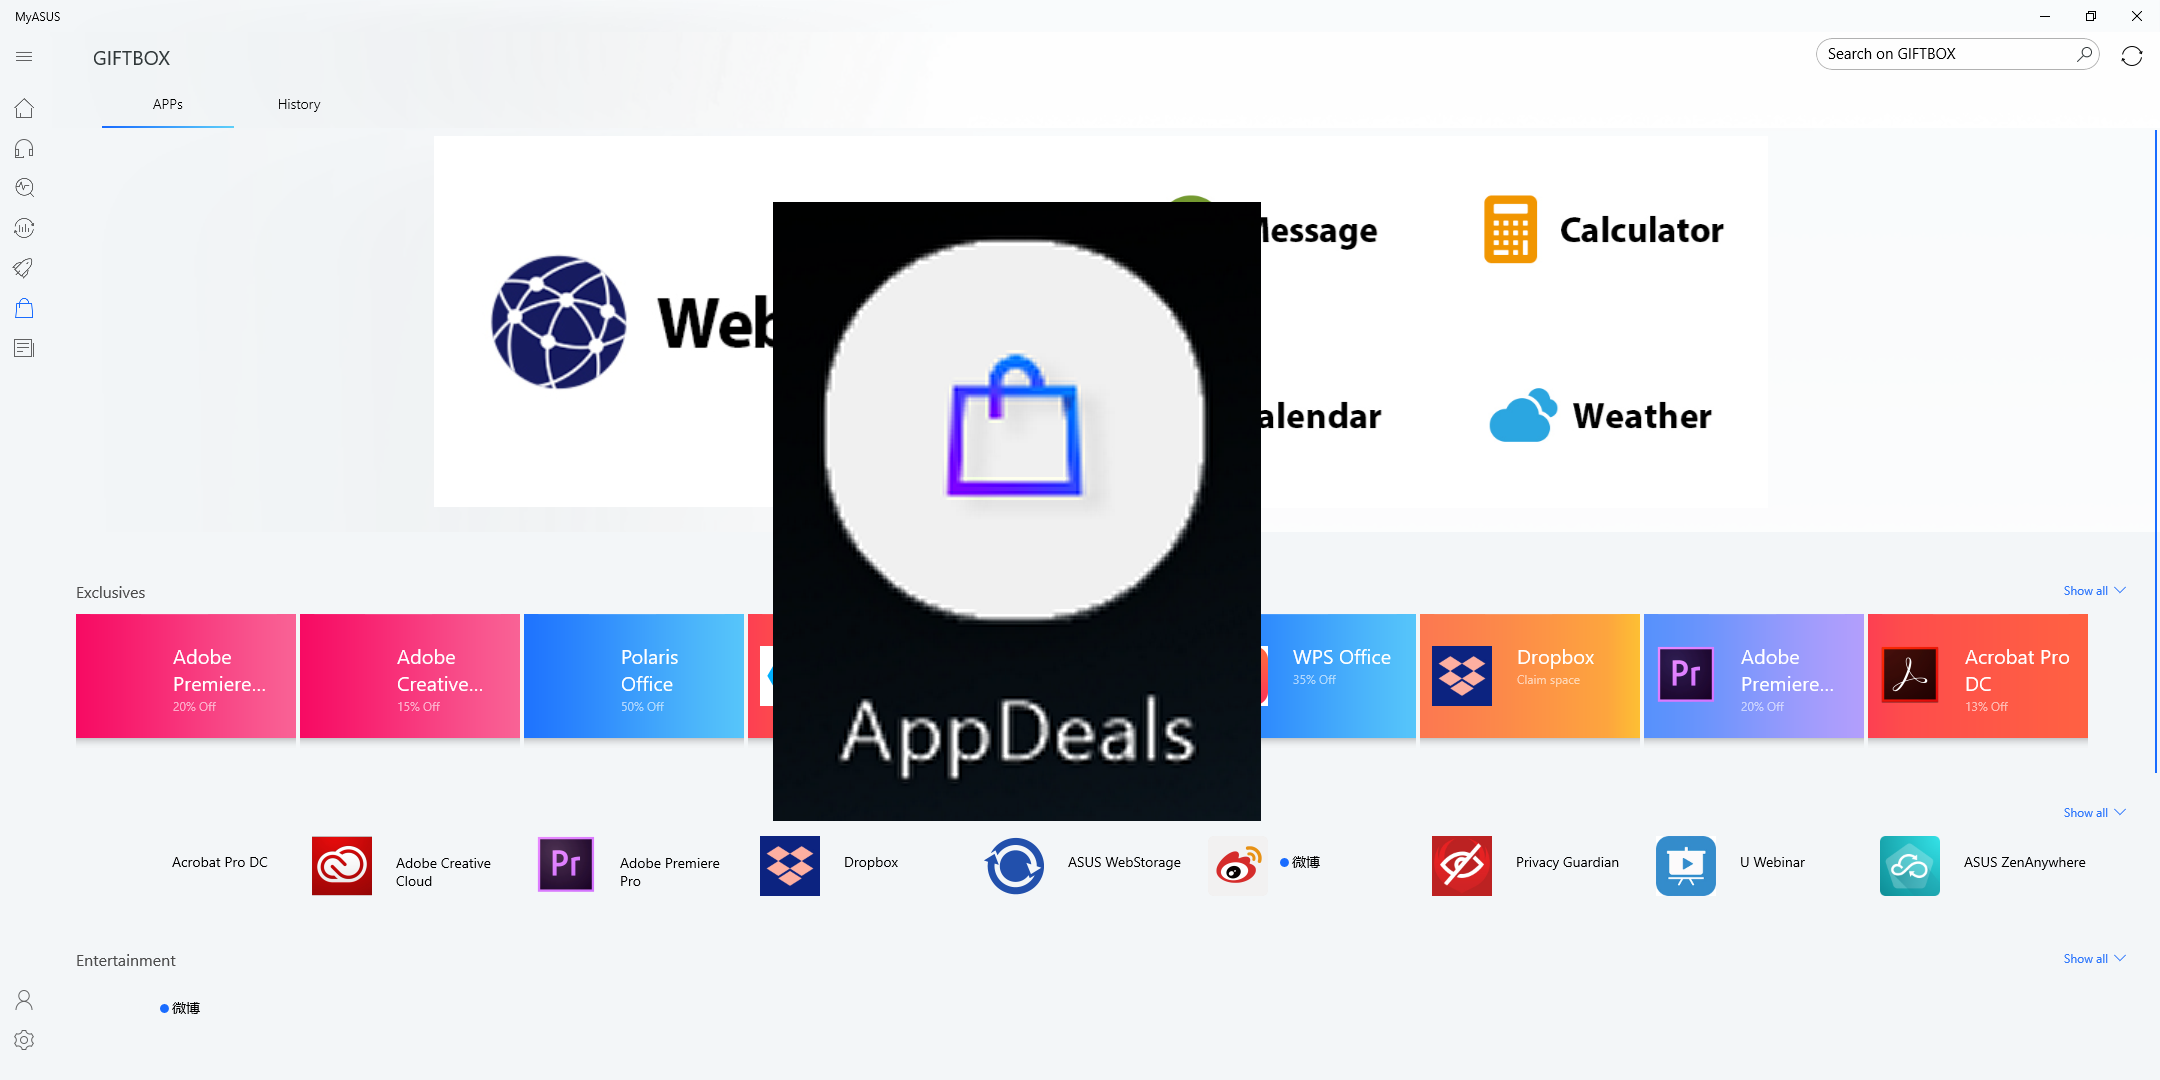
7.  App Deals. In the AppDeals, you can manually download the application you want and then pin it onto the main screen of the ScreenPad for quick startup and improve your efficiency.
You can refer to this FAQ for the detailed introduction of AppDeals : https://www.asus.com/support/FAQ/1031975
Install & Uninstall ScreenXpert
To install the ScreenXpert app ond driver:
1.Go to the ASUS Official website and search your notebook model.
2.Click [support] then click [Driver & Tools]
3.Choose your notebook OS
4.Download the driver and app, then install both.
You can uninstall ScreenXpert from the content provided at the following link:https://www.asus.com/support/faq/1013598
Comparison between ScreenPad 1.0 & ScreenPad 2.0
| No. | AP Name (Feature) | ScreenPad 1.0 | ScreenPad 2.0 |
| 1 | Music player (offline) | V | X |
| 2 | Calendar | V | X |
| 3 | Number Key | V | V |
| 4 | Calculator | X | V |
| 5 | Word | V | V |
| Excel | V | V | |
| PowerPoint | V | V | |
| 6 | ASUS sync | V | X |
| 7 | Spotify | X | V |
| 8 | Adobe sign | V | X |
| 9 | Youtube | X | V |
| 10 | Launcher | V | X |
| 11 | Handwriting | X | V |
| 12 | Quick Key | V | V |
| 13 | KKBox | X | V |
| 14 | AppDeals | X | V |
| 15 | MyASUS | X | V |
| 16 | Alarms & Clocks | X | V |
| 17 | Weather | X | V |
| 18 | Movies & TV | X | V |
| 19 | Voice Recorder | X | V |
| 20 | Solitaire | X | V |
1. Q: The ScreenPad is blinking when 1) I plug in/remove the power source ,2) plug the external screen into my laptop and remove, or 3) when the laptop wakes up or restarts. Is it the normal situation?
A: It is normal that ScreenPad is defined as the external screen of the system, and when you do the above actions, you will let the operating system detect the screen hardware, which will cause the screen to be black or flash. Similar flickers occur when your la[top uses an HDMI external screen.
2. Q: Is it normal for your laptop make sounds when powered-off and powered on, or when ScreenPad switches to laptop Screen Only mode?
A: It is normal phenomenon. To make ScreenPad more power-saving, ScreenPad is power-off when it's not used, turn on. This tone is a power-on tone When the laptop uses USB external device, there will be a similar tone.
3. Q: What should I do when the ScreenPad resolution (2160x1080) is higher than the resolution of an app?
A: It is recommended to use 1000x500 resolution and 2160x1080 resolution in special situations such as watching movies.
4. Q: When using the ScreenPad, the text appears blurry.
A: The ScreenPad resolution can be adjusted to 2160 x 1080, which is 2K resolution. You can also manually adjust the resolution in your laptop's Display Settings.
5. Q: When I watch a movie, sometimes I feel a slight lag, what do I do?
A: In the ScreenPad settings you can adjust the screen refresh rate, the factory default 50Fps, which is based on power saving considerations. You can manually change to 60Fps so there isn't any lag.
6. Q: When an app is displayed full-screen on ScreenPad, system notifications (such as headphone plug-in, etc.) are hidden, what should I do?
A: To locate the hidden notification feature (Windows 1903 version), please right-click the Start menu, select System and go into Focus Assistant to set full-screen mode to still receive notifications.
7. Q: Mouse down on ScreenPad is not easy to find, what should I do?
A: When using the Home screen instead of using ScreenPad, you can temporarily switch to TouchPad Mode via the TouchPad icon or the F6 shortcut.
8. Q: When setting "only second screen" by setting the "Fn" and "F8" shortcut when the function key is locked, the main screen is displayed on the ScreenPad, when the external monitor is connected and "only second screen" is switched. Is it OK that the picture is still displayed on the ScreenPad instead of the external monitor?
A: Because the system defines ScreenPad as the second screen and the external display as the third screen, the main screen display is normal on screenpad when switching "only second screen" mode. You can go to Show Settings to adjust the screen order settings.
9. Q: What can I do to switch other modes by setting "Computer Screen Only" by setting "Fn" and "F8" shortcuts when the function key is locked, and then using "Win + P" may not be effective?
A: Due to the "Computer Screen Only" mode ScreenPad power loss, please go to the Display Settings to adjust the screen order settings and use the F6 shortcut (or function key lock with the "Fn" and "F6" shortcut) to switch mode. To avoid this, you can update the ScreenXpert driver to 1.0.26.0, the ScreenXpert App to 1.0.20.0 or higher.
10. Q: What if I switch the display screen with the F8 shortcut (or the function key lock when you lock it) and get stuck in "Only Second Screen" or "Computer Screen Only"?
A: Because "Computer Screen Only" mode will power off the ScreenPad, re-powering back to the pre-power-off state, and the F8 shortcut can only be switched sequentially, so it is stuck between "second screen only" or "computer screen only" mode. At this point, please switch to another mode by "Win + P", or use the F6 shortcut (or the "Fn" and "F6" shortcut when the function key is locked). To avoid this, you can update the ScreenXpert driver to 1.0.26.0 and the ScreenXpert App to 1.0.20.0 or higher.
11. Q: When I play the game on the full screen, if I touch the second screen, the game will automatically jump back to the desktop?
A: If you want to use the second screen synchronously when you play the game on the main screen, it is recommended that the main screen enters the window mode (including the infinite mode); if you do not need to use the second screen, in the full screen mode, in order to avoid accidental touch, it is recommended to close the second screen.
12. Q: Why do I open my laptop after it goes to sleep, and the window originally displayed on the second screen will be displayed on the main screen?
A: In order to make the model with the ScreenPad more power-saving, the system is designed to be powered off when the ScreenPad is not in use, and is powered on when it is turned on. Therefore, when the notebook is sleeped, the window displayed on the second screen will be transferred to the main screen display due to the power failure of the second screen.
13. Q: The ScreenPad will blink a few times when the notebook is turned on. Is this normal?
A: It is normal, if your notebook uses HDMI external screen, the external screen will also flash, the same reason.
14. Q: When dragging some Microsoft applications on the main screen, you may not be able to open the two functions of "Windows Switcher" and "Add to Launcher". Why?
A: The reason why some Microsoft applications do not have open permissions. however, ASUS provides other alternatives. For details, refer to this article "Drag the window on the main screen."
15. Q: Why is it that after my laptop updates the Windows system, I find that ScreenXpert cannot start automatically after booting up? Why?
A: The startup of ScreenXpert requires the support of Windows Service. the service startup speed of the upgraded Windows system is slower than that of ScreenXpert, which will cause ScreenXpert to fail to start automatically. solution as below :
1. Manually open ScreenXpert after the laptop is turned on.
2. Roll back the system. Go to Settings > Update & Security > Windows Update, Click on "Recovery" in Left hand column, Click “Get Started” under Go Back to the Previous Version of Windows 10.
If you had the OS re-installed, installed with an OS other than the preinstalled version, updated Windows, or due to any circumstances the ScreenPad Plus fails to work properly(such as ScreenPad Plus not responding, error on the screen, function inside the ScreenPad Plus not working, touch not working), please follow the steps below to re-install the ScreenPad Plus. If you experience the ScreenPad display or user interface issues after the computer upgrades to Windows 11, version 22H2, please refer to here.
Note: Please download and install the necessary drivers and utility programs in the order shown below:
Model Supported: The article is only applicable to ASUS notebook equipped with ScreenPad Plus. Please visit ASUS website and search for your product model. Click [Tech Specs] to check whether your model supports ScreenPad Plus.
First of all, install the [Intel Graphic] Driver with version 26.20.100.6952 or above. Please go to Device Manager and check the driver version first.
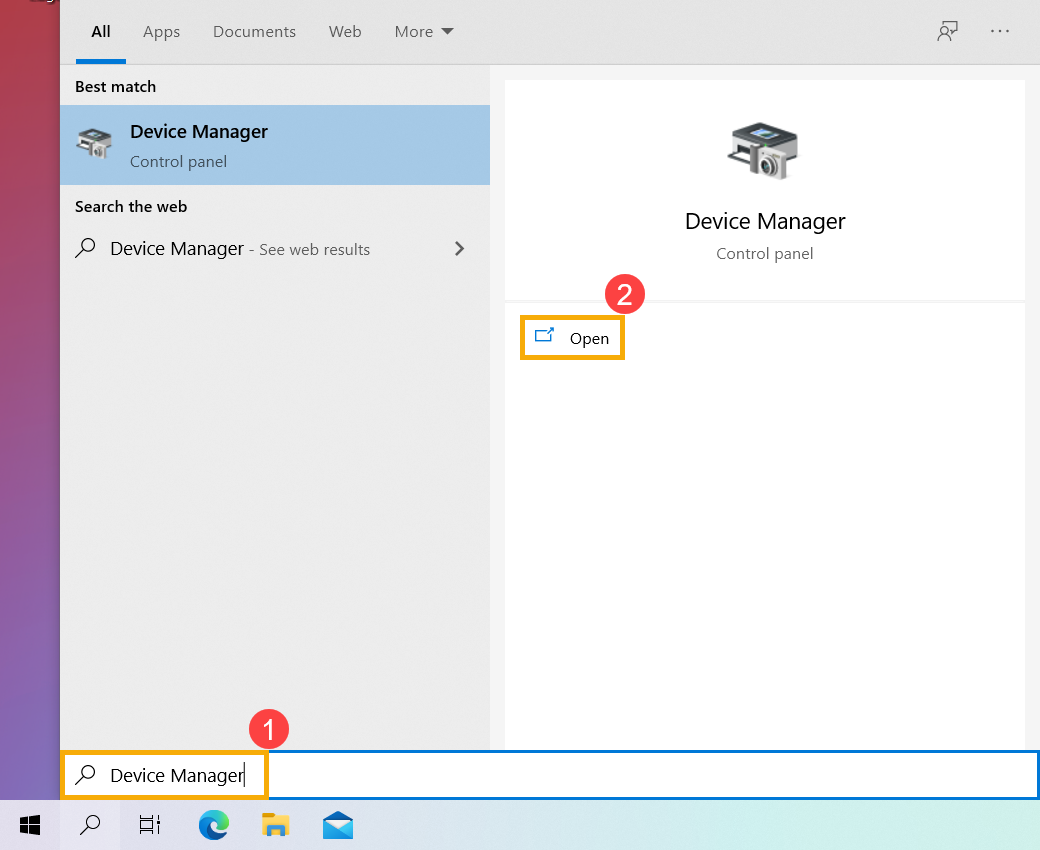
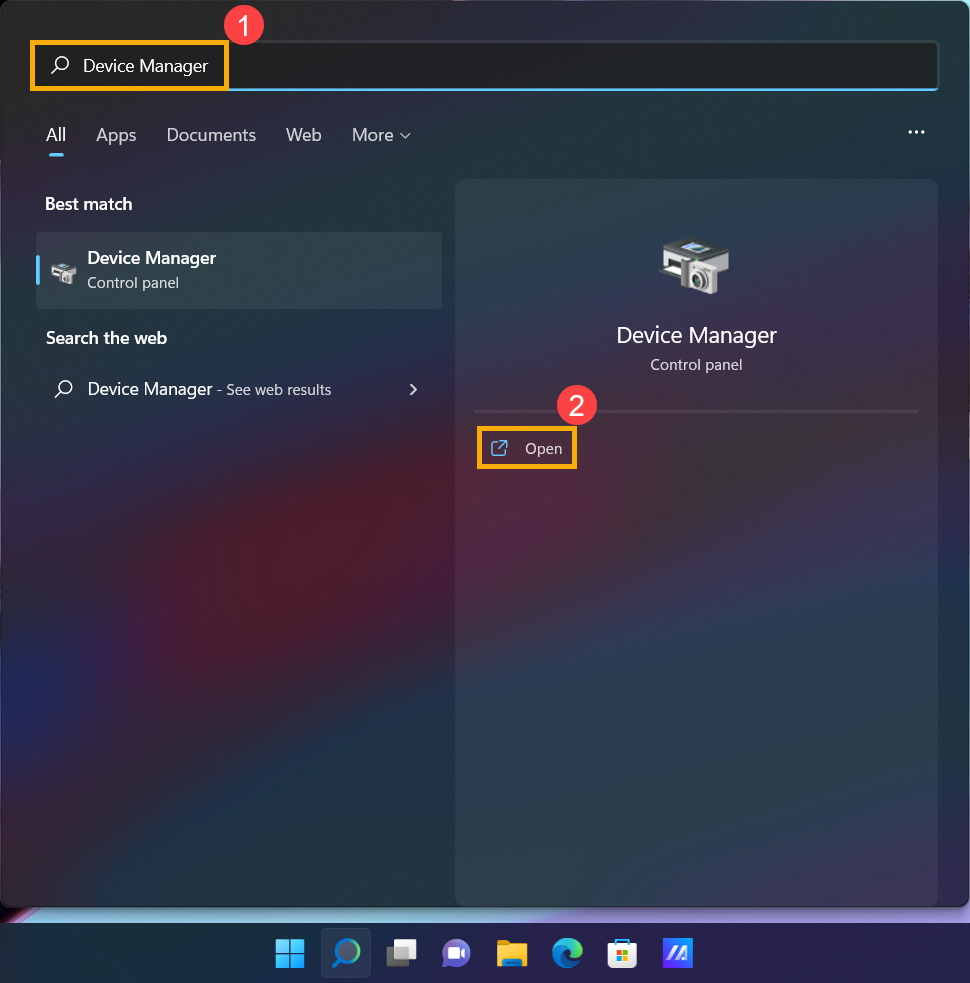
- Type and search [Device Manager] in the Windows search bar①, then click [Open]②. (The left-side search illustration below is in Windows 11, and the right-side is Windows 10.)

- In the Device Manager, find the [Display adapters] and right click on the [Intel UHD Graphics]③. On the drop-down menu, select [Properties]④.
Note: The device name may be different based on different models.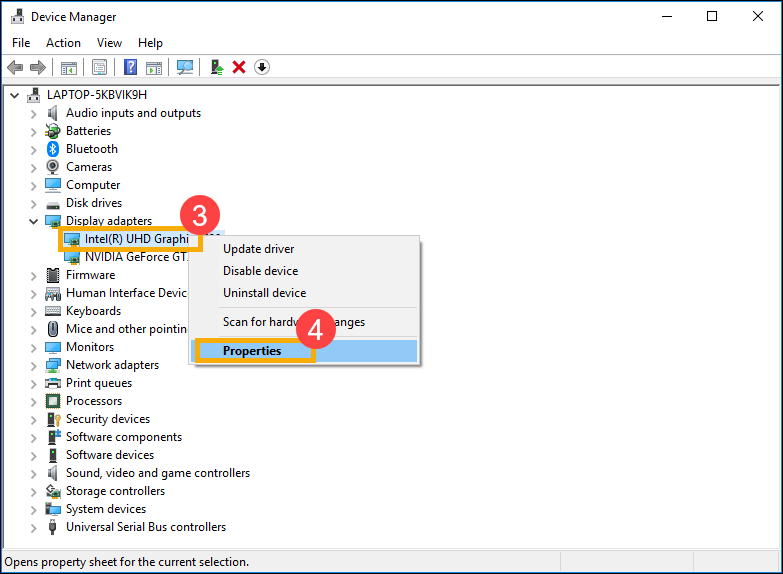
- Select [Driver] tab⑤, then check the [Driver Version]⑥.
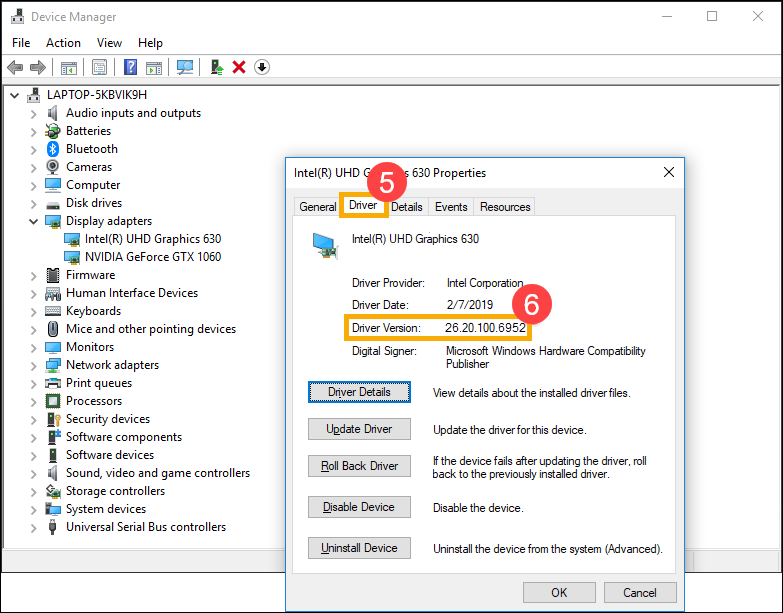
- If the driver version is higher than the version 26.20.100.6952, please go to the next chapter to download and install the necessary drivers and utility programs.
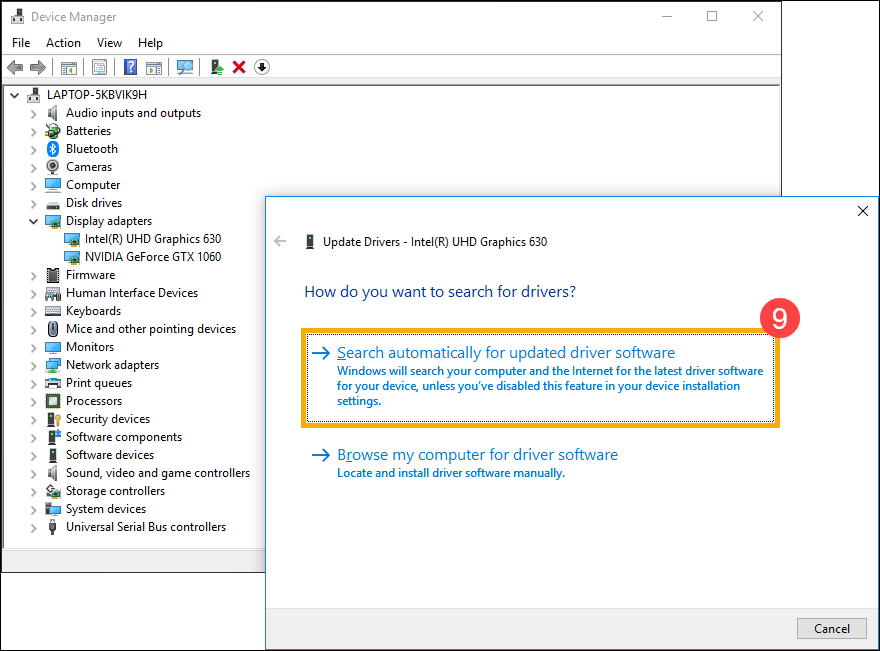
If the driver version is lower than the version 26.20.100.6952, please go back to the Device Manager and right click on the [Intel UHD Graphics]⑦, then select [Update driver]⑧.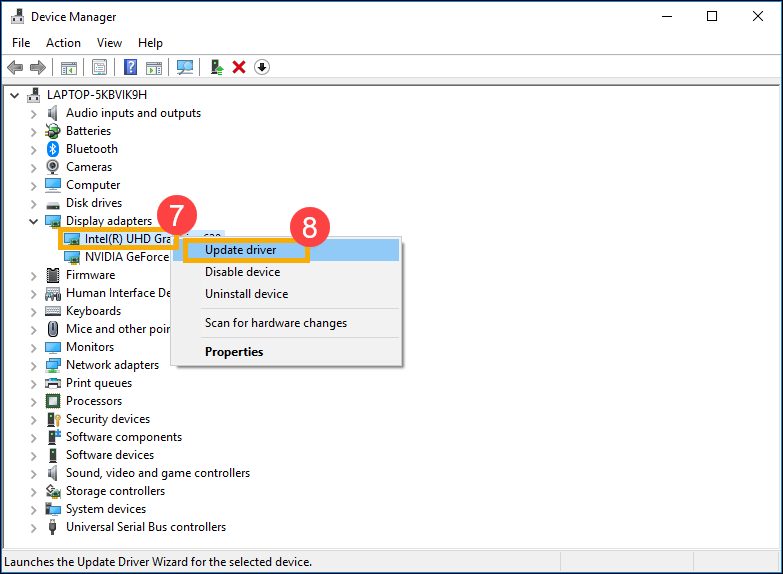
- Click on [Search automatically for updated driver software]⑨ to update drivers online.
Please go to the ASUS Support Site to download and install the necessary drivers and utility programs, here you can learn more about How to search and download drivers and utilities. (The following pictures are the current version as a reference, please download the latest version from the ASUS Support Site.)
Note: Please follow the below order to download and install the drivers and utilities program.
- Please download and install [Intel(R) Serial IO I2C driver] driver.

- Please download and install [ScreenXpert (Windows Store App)] utility program.
Note: You will go to the Microsoft Store to download and install this utility program after clicking the DOWNLOAD button.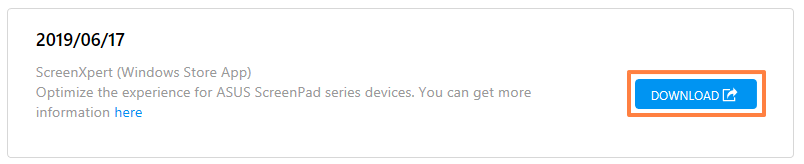
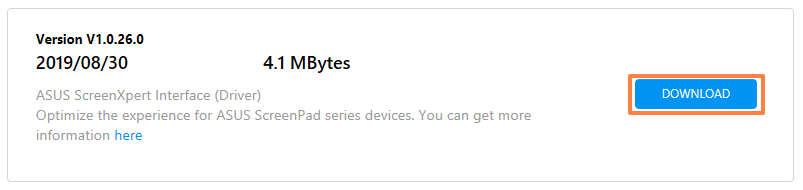
- Please download and install [ASUS ScreenXpert Interface (Driver)] driver.

- Please download and install [MyASUS (Windows Store App)] utility program.
Note: You will go to the Microsoft Store to download and install this utility program after clicking the DOWNLOAD button.**
- Please download and install [ASUS System Control Interface V3(Driver)] driver.

- Please download and install [ScreenPad2 Optimizer] correction program. Click here to download ScreenPad Optimizer.
Note: This tool will be able to correct the ScreenPad Plus resolution, rotation, ScreenPad Plus abnormal display, and ScreenPad Plus cannot operate, in order to ensure the operation of ScreenPad Plus.
Q1: Why the UI of 2nd panel is abnormal?
A1: Because of the behavior of Windows 11, version 22H2 changed, it caused 'Active signal mode' to be changed. If a user changes ScreenPad Plus resolution or FPS, the UI on ScreenPad Plus becomes abnormal. You can choose the following either to solve this issue.
- Update the ASUS ScreenXpert Interface driver to V.3.0.2.0 or the latest version, then reboot your computer.
- Click here to download and excute ScreenPad Optimizer to V1.2.3.0 or the latest version.
Q2: Why the UI of ScreenXpert App Switcher and Microsoft Snap layouts overlapping?
A2: When a user drags the application window, it will show Snap layouts from the top of the screen. This is Microsoft Windows 11, version 22H2 new feature. The pop-up UI will overlap with ScreenXpert App Switcher.
You could turn off snap layouts function form Windows Settings > System > Multitasking > Snap window and uncheck "Show snap layouts when I drag a window to the top of my screen".
[Notebook] How to install ScreenXpert boot up animation
- Please go to the ASUS support website, then search your product model. Here you can learn more about How to check the model name.
- Go to the Driver & Utility download page, and find the ScreenXpert boot up animation in the Software and Utility category, then click download. Here you can learn more about How to search and download utilities.
(The following takes Zenbook Pro Duo 15 OLED UX582 as a reference, please download the available file from your product page.)
- After downloading, double-click the file and then follow the on-screen instruction of the setup wizard to install the ScreenXpert boot up animation.
If you had the OS re-installed, installed with an OS other than the preinstalled version, updated Windows, or due to any circumstances the ScreenPad 2.0 fails to work properly (such as ScreenPad not responding, error on the screen, function inside the ScreenPad not working, touch not working), please follow the steps below to re-install the ScreenPad 2.0. If you experience the ScreenPad display or user interface issues after the computer upgrades to Windows 11, version 22H2, please refer to here.
Note: Please download and install the necessary drivers and utility programs in the order shown below:
Model Supported: The article is only applicable to ASUS notebook equipped with ScreenPad 2.0. Please visit ASUS website and search for your product model. Click [Tech Specs] to check whether your model supports ScreenPad 2.0.
First of all, install the [Intel Graphic] Driver with version 25.20.100.6619 or above. Please go to Device Manager and check the driver version first.
- Type and search [Device Manager] in the Windows search bar①, then click [Open]②. (The left-side search illustration below is in Windows 11, and the right-side is Windows 10.)
- In the Device Manager, find the [Display adapters] and right click on the [Intel UHD Graphics]③. On the drop-down menu, select [Properties]④.
Note: The device name may be different based on different models. - Select [Driver] tab⑤, then check the [Driver Version]⑥.

- If the driver version is higher than the version 25.20.100.6619, please go to the next chapter to download and install the necessary drivers and utility programs.
If the driver version is lower than the version 25.20.100.6619, please go back to the Device Manager and right click on the [Intel UHD Graphics]⑦, then select [Update driver]⑧. - Click on [Search automatically for updated driver software]⑨ to update drivers online.
Please go to the ASUS Support Site to download and install the necessary drivers and utility programs, here you can learn more about How to search and download drivers and utilities. (The following pictures are the current version as a reference, please download the latest version from the ASUS Support Site.)
Note: Please follow the below order to download and install the drivers and utilities program.
- Please download and install [Intel(R) Serial IO I2C driver] driver.
Note: If you cannot search for Intel(R) Serial IO I2C driver on the ASUS support site that is meant some models have been built-in I2C driver in Windows, so, you don't need to install it manually.
- Please download and install [ScreenXpert (Windows Store App)] utility program.
Note: You will go to the Microsoft Store to download and install this utility program after clicking the DOWNLOAD button.
- Please download and install [ASUS ScreenXpert Interface (Driver)] driver.
- Please download and install [MyASUS (Windows Store App)] utility program.
Note: You will go to the Microsoft Store to download and install this utility program after clicking the DOWNLOAD button.
- Please download and install [ASUS System Control Interface V3 (Driver)] driver.
- Please download and install [ScreenPad2 Optimizer] correction program. Click here to download ScreenPad Optimizer.
Note: This tool will be able to correct the ScreenPad 2.0 resolution, rotation, ScreenPad 2.0 abnormal display, and ScreenPad 2.0 cannot operate,in order to ensure the operation of ScreenPad 2.0.
Q1: Why the UI of 2nd panel is abnormal?
A1: Because of the behavior of Windows 11, version 22H2 changed, it caused 'Active signal mode' to be changed. If a user changes ScreenPad resolution, it will show a black screen on the ScreenPad. You can choose the following either to solve this issue.
- Update the ASUS ScreenXpert Interface driver to V.3.0.2.0 or the latest version, then reboot your computer.
- Click here to download and excute ScreenPad Optimizer to V1.2.3.0 or the latest version.
Q2: Why the UI of ScreenXpert App Switcher and Microsoft Snap layouts overlapping?
A2: When a user drags the application window, it will show Snap layouts from the top of the screen. This is Microsoft Windows 11, version 22H2 new feature. The pop-up UI will overlap with ScreenXpert App Switcher.
You could turn off snap layouts function form Windows Settings > System > Multitasking > Snap window and uncheck "Show snap layouts when I drag a window to the top of my screen".
Q3: Why the Start menu will show up together when I swipe up from the ScreenPad bottom to call the navigation bar?
A3: ASUS change the ScreenXpert swiping up gesture to clicking an arrow icon for showing the navigation bar. Please update ScreenXpert App to V3.0.7.0 or the latest version, then get a better experience.