Related Topics
[Windows 11/10] Troubleshooting - External Display Connection Issues
Applicable Products: Notebook, Desktop, All-in-One PC, Gaming handheld, Motherboard, MiniPC
If you experience the problem of external monitors, such as abnormal display or audio is not working, please refer to the troubleshooting in this article.
Before troubleshooting, please make sure you have set up your external monitors properly. Here you can learn more about How to connect one or more external monitors.
Note: Press the function key Windows key + P to make sure that you have selected the option you want.
Please go to the corresponding instruction based on the current Windows operating system on your device:
Windows 11 operating system
Update BIOS, Windows packages, drivers
Regularly updating BIOS, Windows, and drivers can enhance system stability and performance. Ensure that your device is using the latest versions. Learn more about updating BIOS:
How to update the BIOS version in Windows system
How to Update BIOS with ASUS Firmware Update/EZ Flash
(For desktop products, please refer to ASUS Motherboard EZ Flash 3 Introduction.)
Learn more about updating Windows and drivers:
How to update drivers via System Update in MyASUS
If the problem persists after you have updated BIOS/Windows packages/drivers to the date, please continue to the next chapter for troubleshooting.
Check the hardware devices of your external monitors and cables
- Sometimes, the external devices connected to your device can be the cause of external monitor problems, so please try to remove them, including the keyboard, mouse, external hard drives, printers, any optical discs in the CD/DVD drive, and any adapter cards in card readers, and so on. After that, restart your device.
Note: Also, remove any external monitors. If it's a desktop, connect to an external monitor to ensure the computer can boot properly and display a screen.
If you don’t experience the issue after restarting your device, the external device may be the cause of the problem. We recommend that you do not use this device and contact your device manufacturer for support. - Make sure the cable connecting your device to your external monitor is secure. Try changing the cable connecting the external monitor. If the new one works, you know the previous cable was faulty.
- Make sure the input resource on the external monitor is the same as your using connector/cable. Such as the input resource is HDMI.
- Try using the external monitor with a different device. This can help to isolate whether the issue is with the monitor or the device.
If the problem persists after checking the basic hardware, please continue to the next chapter for troubleshooting.
Reset the display settings
Try using the following Microsoft hotkeys: Windows key + Ctrl + Shift + B to reset the display settings.
If the problem persists, please continue to the next chapter for troubleshooting.
Perform CMOS clear (EC reset)
Perform an Embedded Controller (EC Reset) or Real-Time Clock (RTC) reset to restore the hardware in your device to its default state. You can refer to the following articles to understand how to clear it:
- For Notebook/All-in-One PC/Gaming Handheld: How to Reset Embedded Controller (EC Reset), Real-Time Clock (RTC), and Hard Reset
- Desktop PC: How to clear CMOS
If the issue persists after performing the CMOS clear (EC reset), please continue to the next chapter for troubleshooting.
Check the audio settings for the external monitor
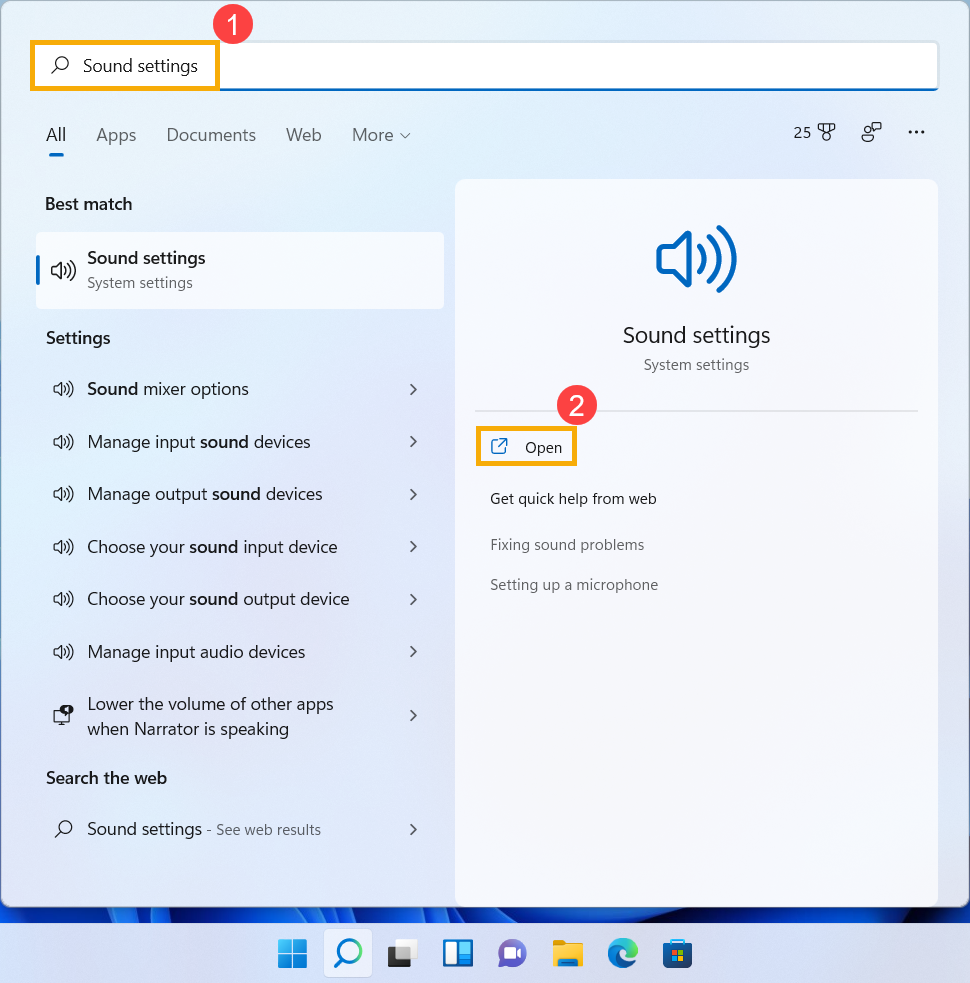
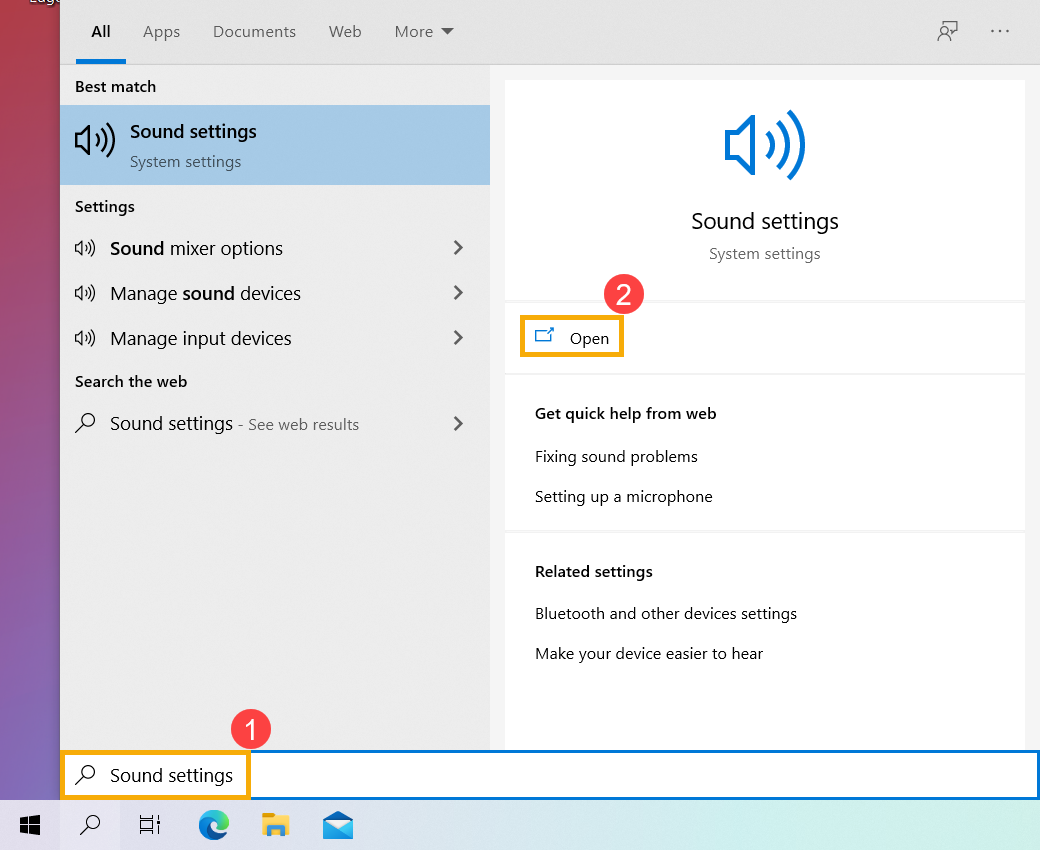
- Type and search [Sound settings] in the Windows search bar①, then click [Open]②.
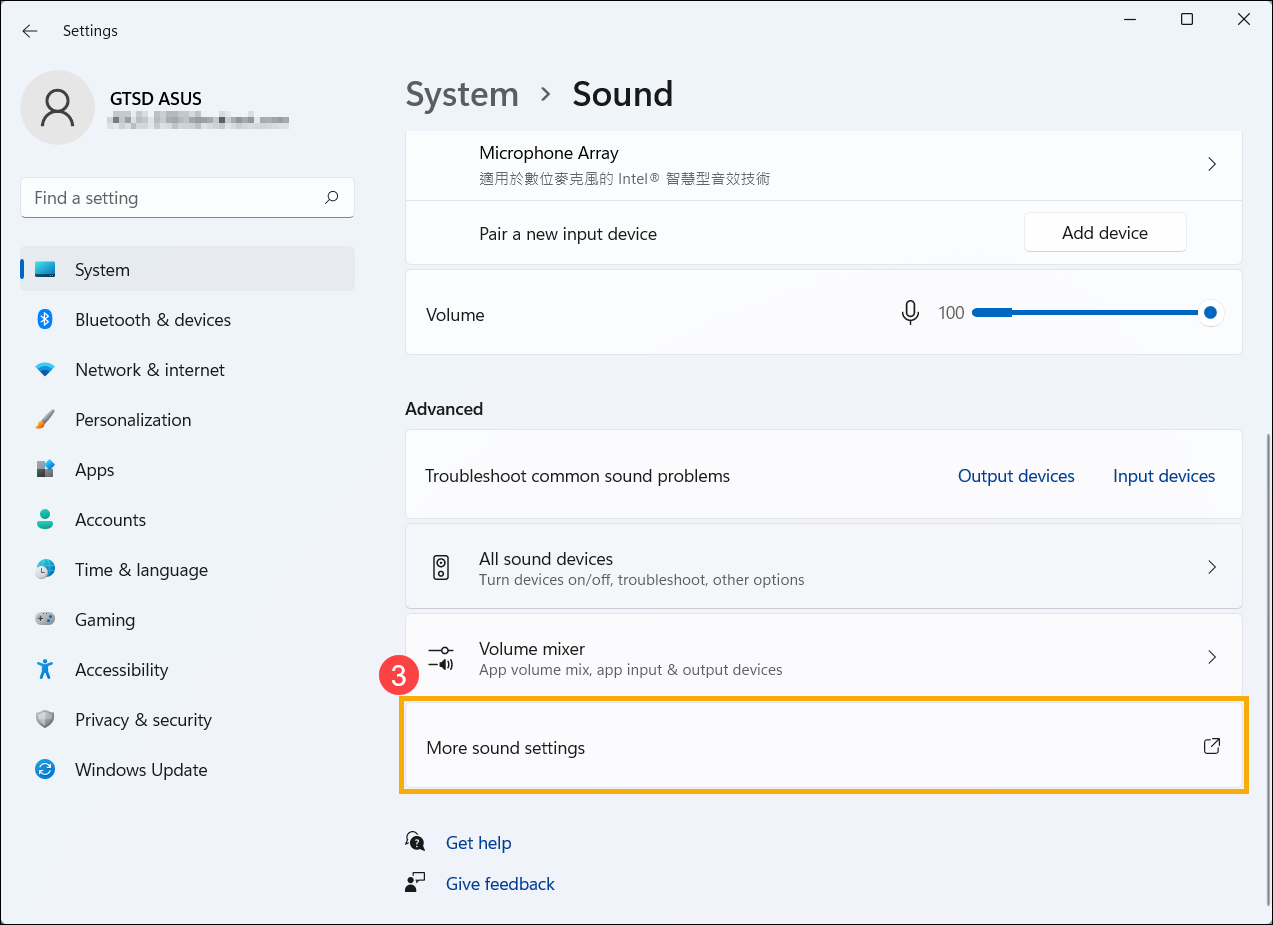
- Scroll down to the bottom of this page, then select [More sound settings]③.
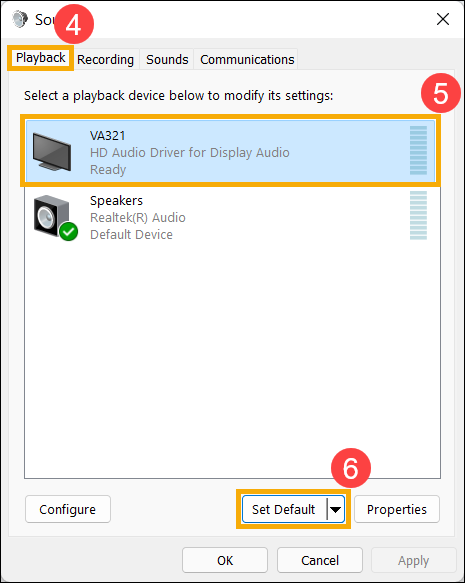
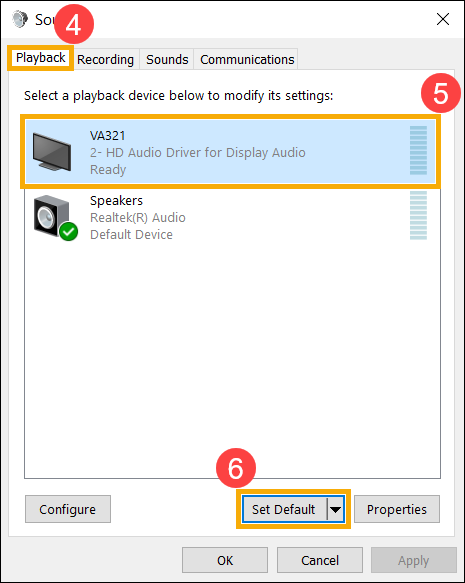
- Select [Playback] tab④, choose the external monitor you connected⑤, then select [Set Default]⑥.
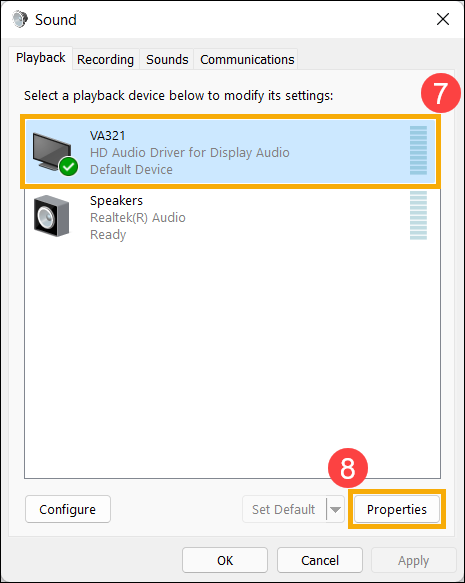
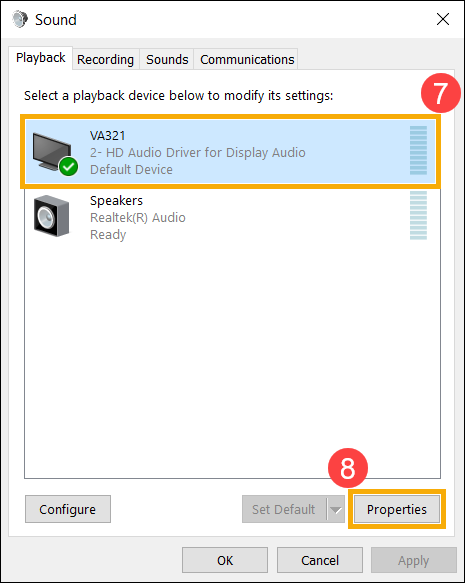
- Choose the external monitor you connected⑦, then select [Properties]⑧.
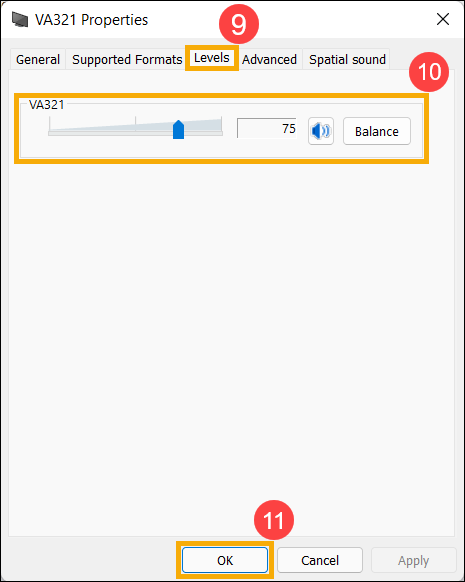
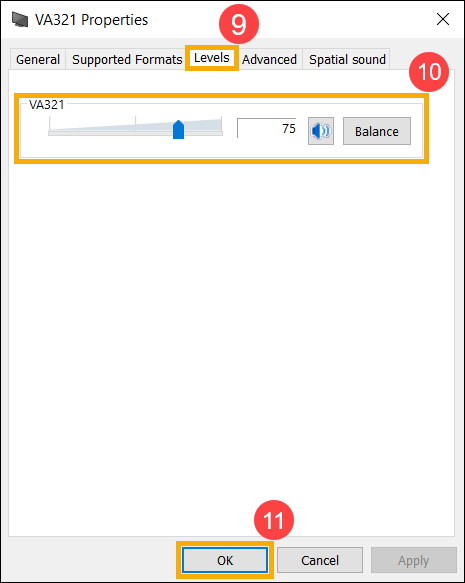
- Select [Levels]⑨, make sure the volume levels of the external monitor meet your expectation⑩, then select [OK]⑪.
Run Windows Troubleshooter
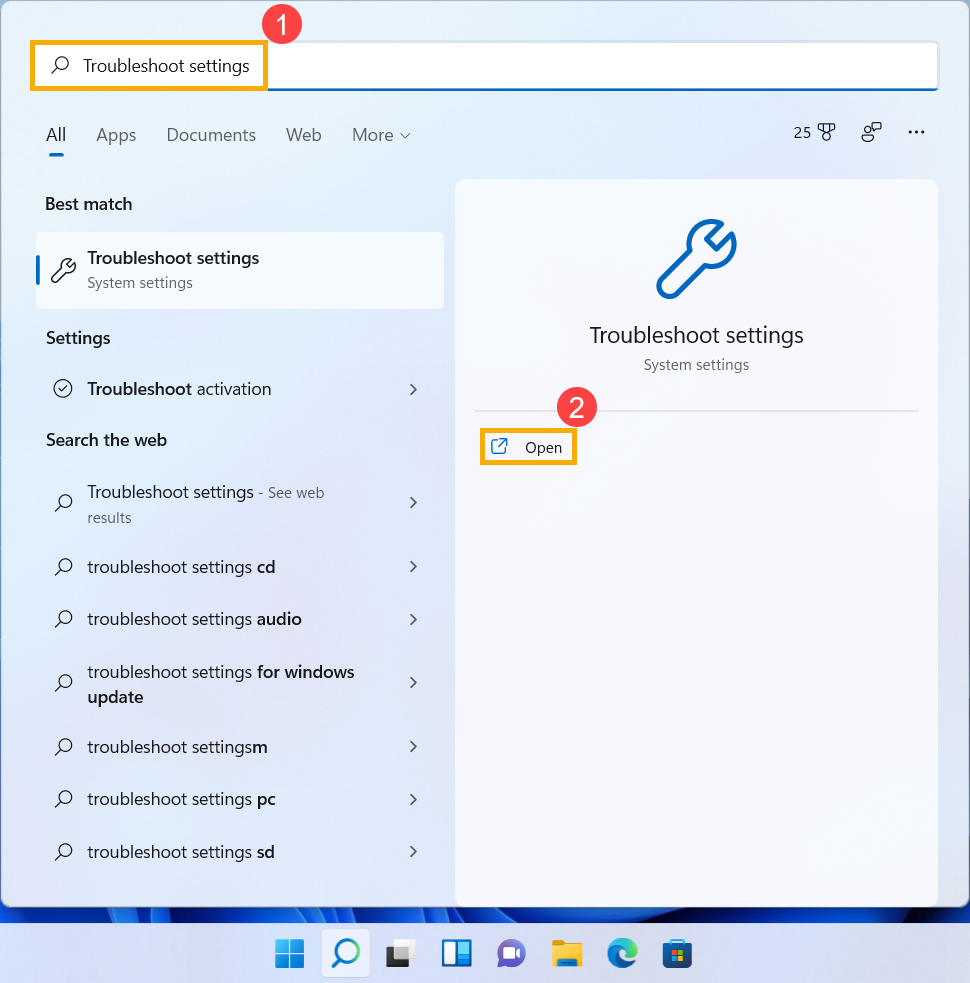
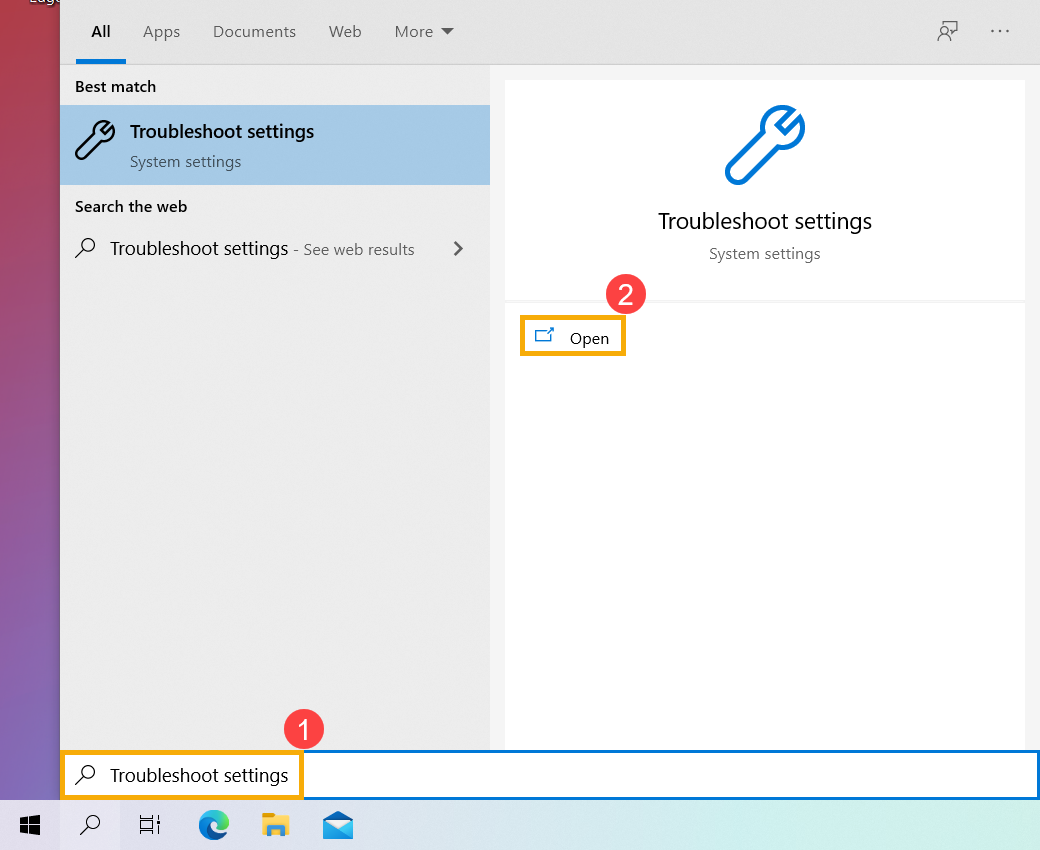
- Type and search [Troubleshoot settings] in the Windows search bar①, then click [Open]②.
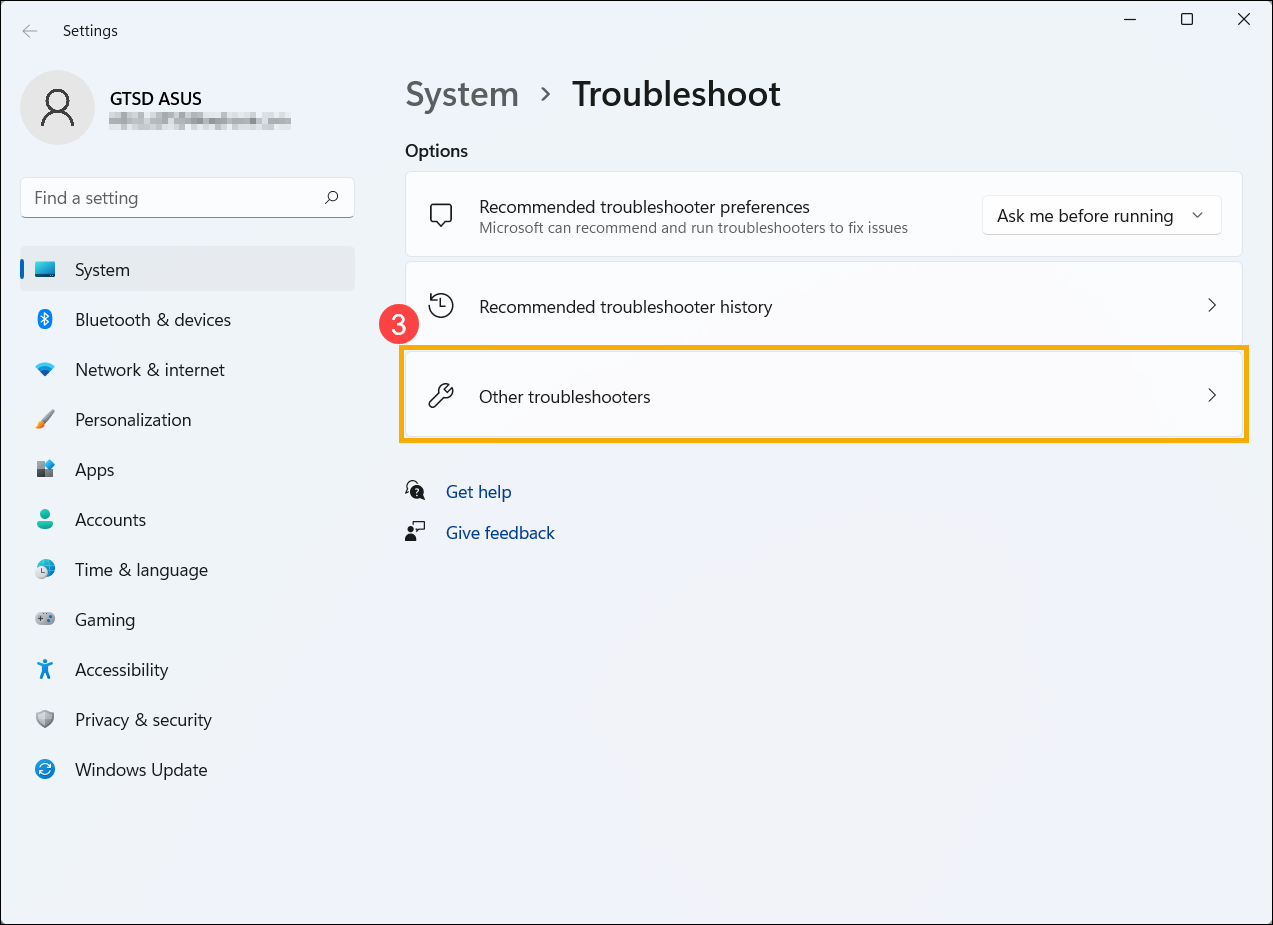
- Select [Other troubleshooters]③.
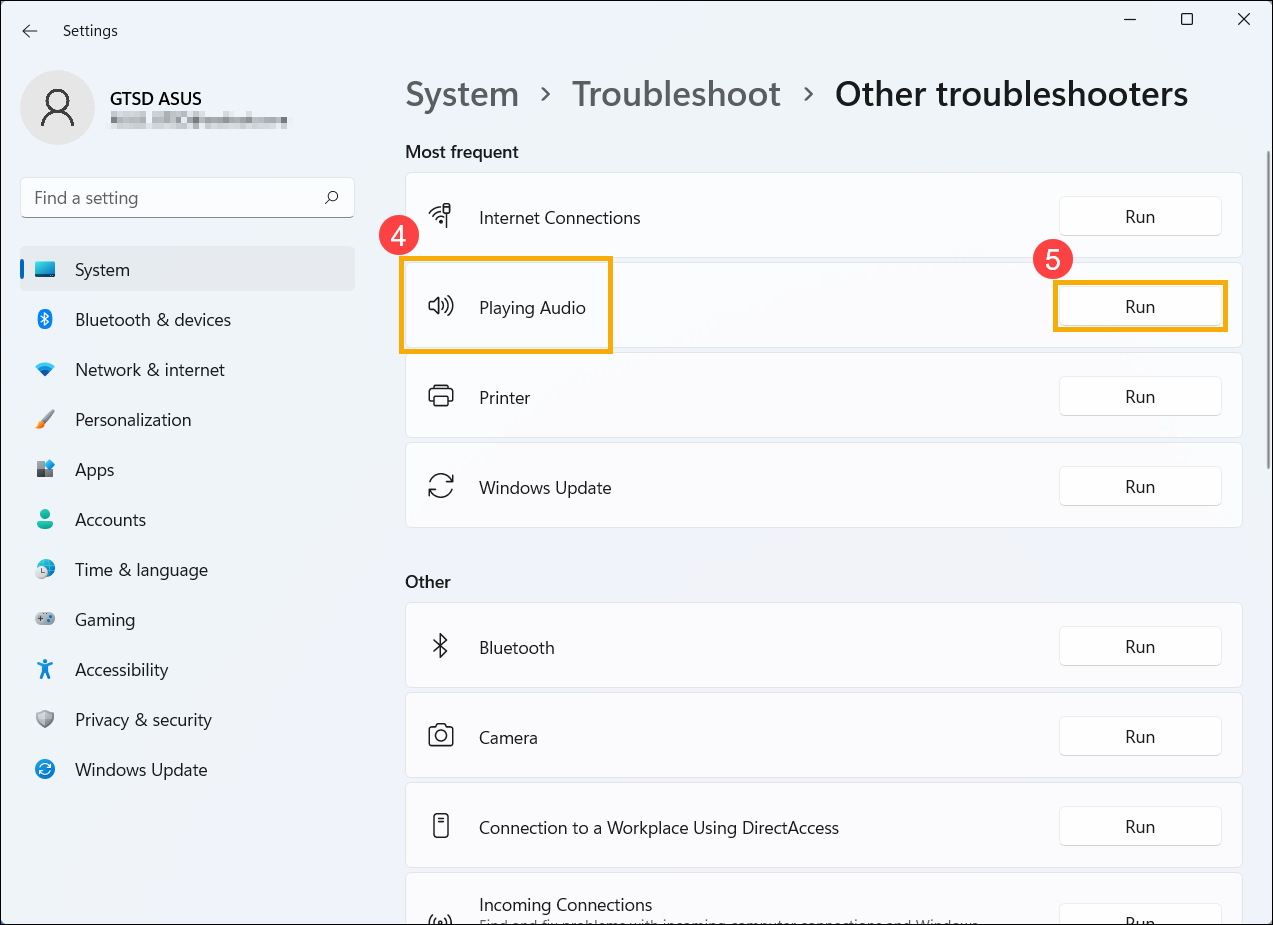
- Select [Playing Audio]④, then click [Run]⑤.
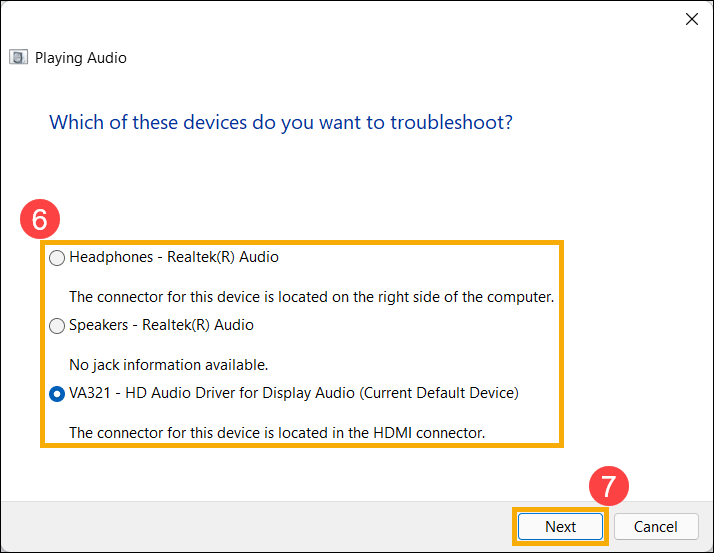
- Choose the external monitor you want to troubleshoot⑥, then select [Next]⑦.
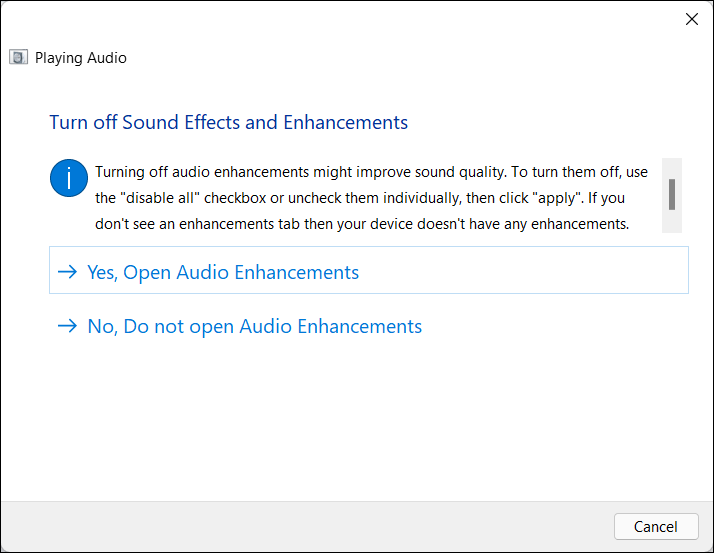
- Please read and follow the on-screen prompts to troubleshoot the connection problem of the external monitor.
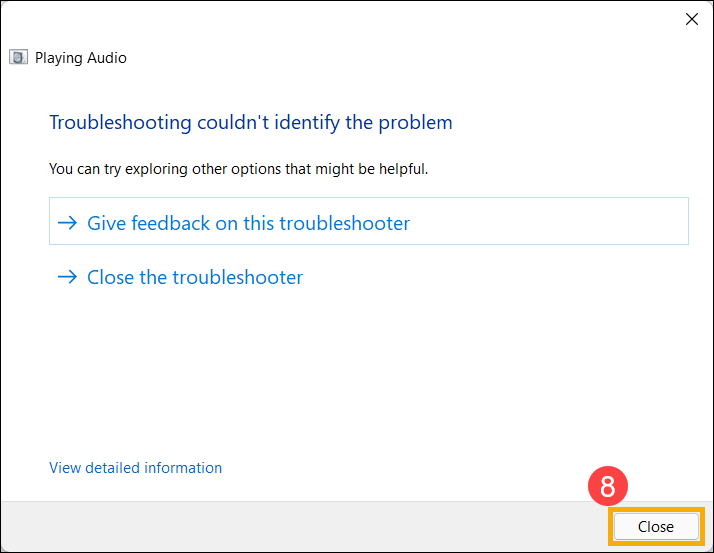
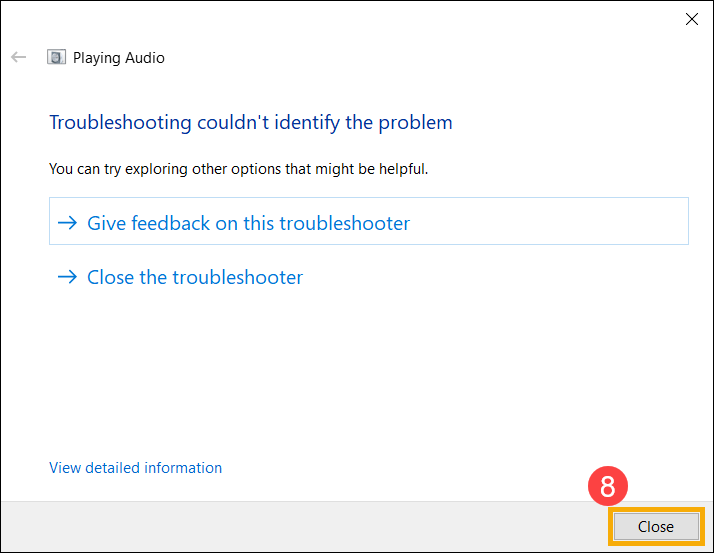
- If the problem persists after following the troubleshooter, please select [Close]⑧ and then continue to the next chapter for troubleshooting.
Reinstall graphics driver
Note: If your device is AMD platform of graphics, please refer to How to uninstall AMD chipset driver, otherwise, please refer to the following steps.
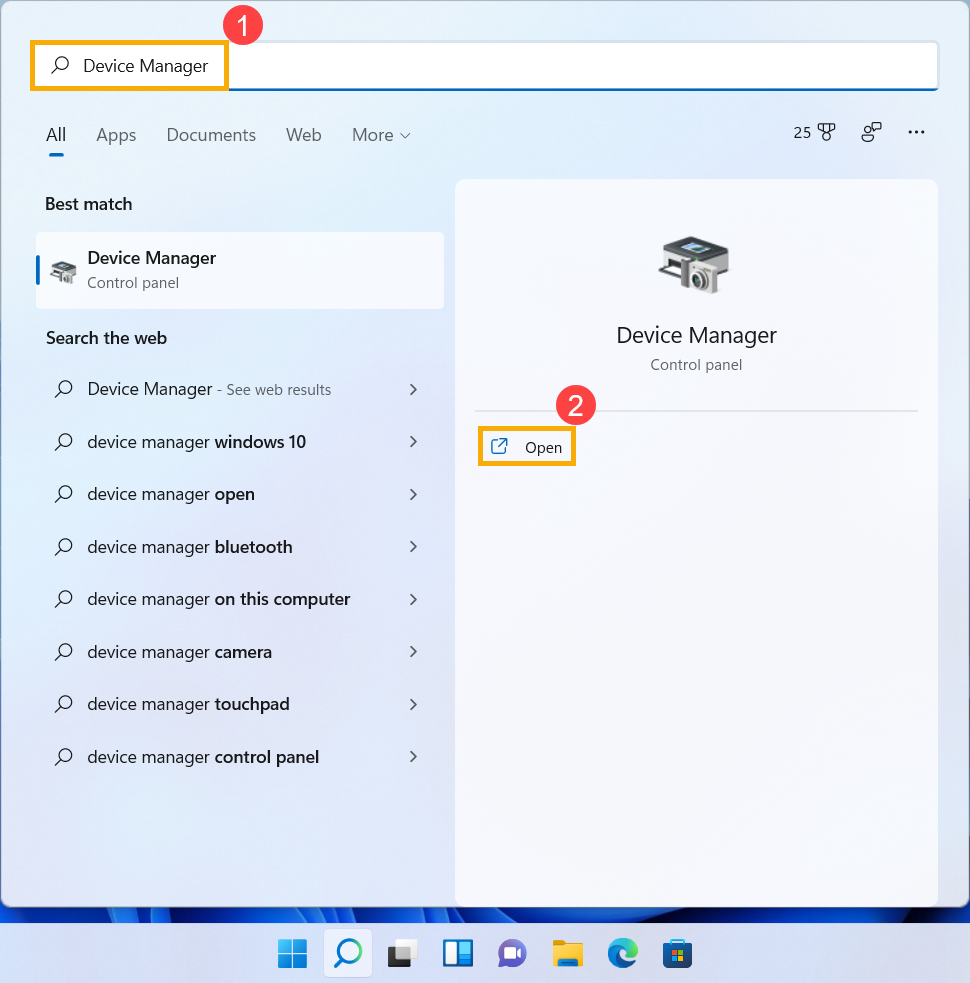
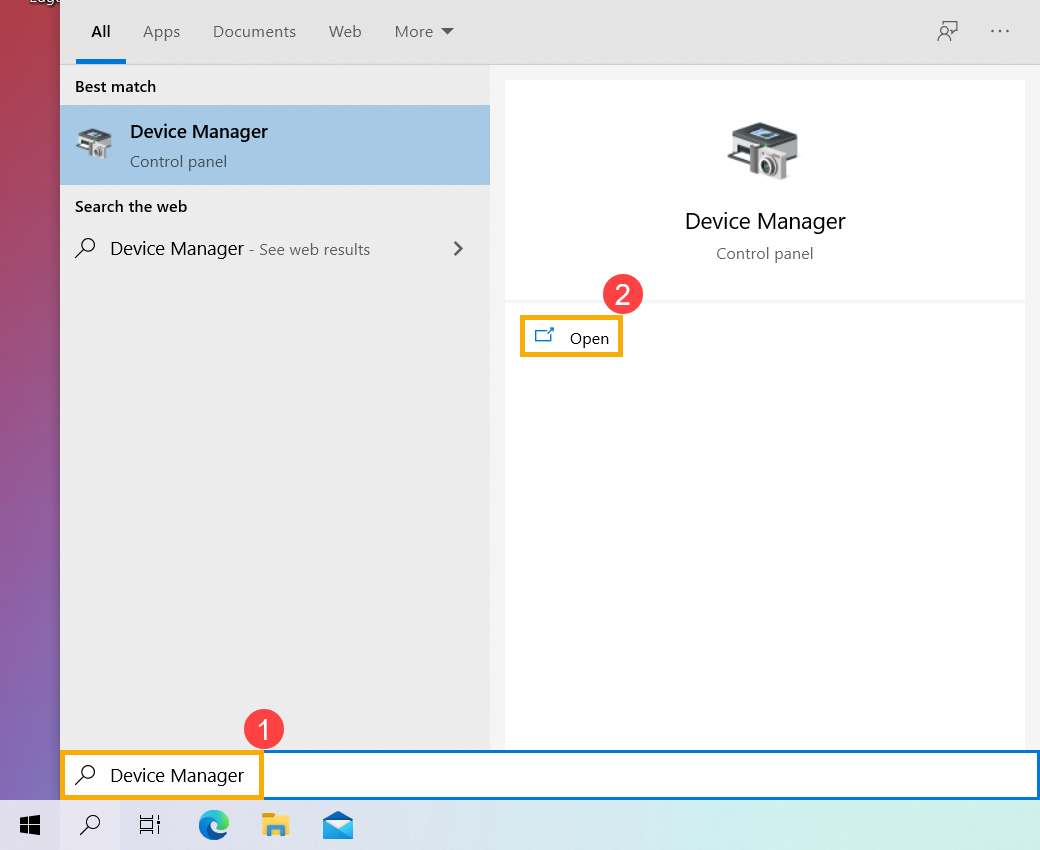
- Type and search [Device Manager] in the Windows search bar①, then click [Open]②.
- Click the arrow next to [Display adapters]③, then right-click [your graphics]④ and select [Uninstall device]⑤.
Note: Some models possess both two graphics (so-called integrated & dedicated graphics, such as Intel & NVIDIA) and both can be seen in Device Manager. We suggest that you can follow step 2 and 3 to uninstall each graphics driver.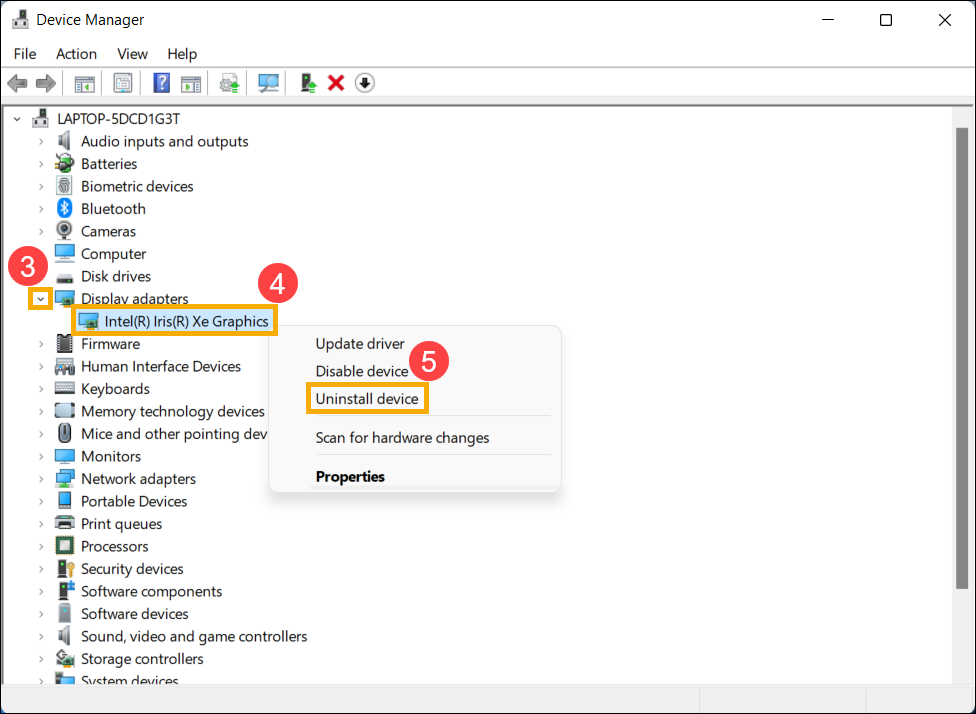
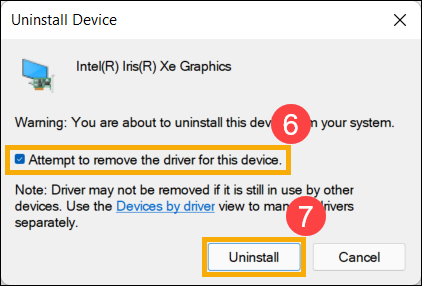
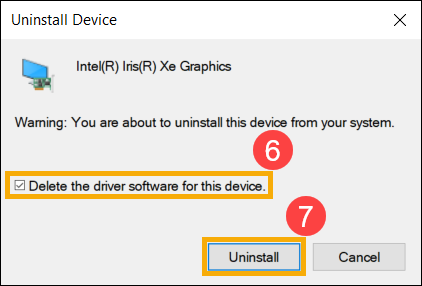
- Select [Attempt to remove the driver for this device]⑥, then select [Uninstall]⑦.
- After the graphics driver is uninstalled, please go to the ASUS support site to download and install the Graphics driver. Here you can learn more about How to search and download drivers.
Note: The following pictures are the current version as a reference, and please download the latest version from the ASUS Support Site.
Note: If your device is with two graphics, please reinstall both drivers.
- If the problem persists after reinstalling the graphics driver, please continue to the next chapter for troubleshooting.
Use System Restore to Restore the System
If the issue started recently and you have previously created a system restore point or if the system has created an automatic restore point, you can try restoring the system to a point in time before the issue occurred. Learn more about How to restore the system from a created system restore point.
If the problem persists, please continue to the next chapter for troubleshooting.
Perform a Windows System Restore
If all troubleshooting steps have been completed but the issue persists, back up your personal files and perform a system restore to return your device to its original configuration. Learn more: How to Restore (Reinstall) the System.
Windows 10 operating system
Update BIOS, Windows packages, drivers
Regularly updating BIOS, Windows, and drivers can enhance system stability and performance. Ensure that your device is using the latest versions. Learn more about updating BIOS:
How to update the BIOS version in Windows system
How to Update BIOS with ASUS Firmware Update/EZ Flash
(For desktop products, please refer to ASUS Motherboard EZ Flash 3 Introduction.)
Learn more about updating Windows and drivers:
How to update drivers via System Update in MyASUS
If the problem persists after you have updated BIOS/Windows packages/drivers to the date, please continue to the next chapter for troubleshooting.
Check the hardware devices of your external monitors and cables
- Sometimes, the external devices connected to your device can be the cause of external monitor problems, so please try to remove them, including the keyboard, mouse, external hard drives, printers, any optical discs in the CD/DVD drive, and any adapter cards in card readers, and so on. After that, restart your device.
Note: Also, remove any external monitors. If it's a desktop, connect to an external monitor to ensure the computer can boot properly and display a screen.
If you don’t experience the issue after restarting your device, the external device may be the cause of the problem. We recommend that you do not use this device and contact your device manufacturer for support. - Make sure the cable connecting your device to your external monitor is secure. Try changing the cable connecting the external monitor. If the new one works, you know the previous cable was faulty.
- Make sure the input resource on the external monitor is the same as your using connector/cable. Such as the input resource is HDMI.
- Try using the external monitor with a different device. This can help to isolate whether the issue is with the monitor or the device.
If the problem persists after checking the basic hardware, please continue to the next chapter for troubleshooting.
Reset the display settings
Try using the following Microsoft hotkeys: Windows key + Ctrl + Shift + B to reset the display settings.
If the problem persists, please continue to the next chapter for troubleshooting.
Perform CMOS clear (EC reset)
Perform an Embedded Controller (EC Reset) or Real-Time Clock (RTC) reset to restore the hardware in your device to its default state. You can refer to the following articles to understand how to clear it:
- For Notebook/All-in-One PC/Gaming Handheld: How to Reset Embedded Controller (EC Reset), Real-Time Clock (RTC), and Hard Reset
- Desktop PC: How to clear CMOS
If the issue persists after performing the CMOS clear (EC reset), please continue to the next chapter for troubleshooting.
Check the audio settings for the external monitor
- Type and search [Sound settings] in the Windows search bar①, then click [Open]②.
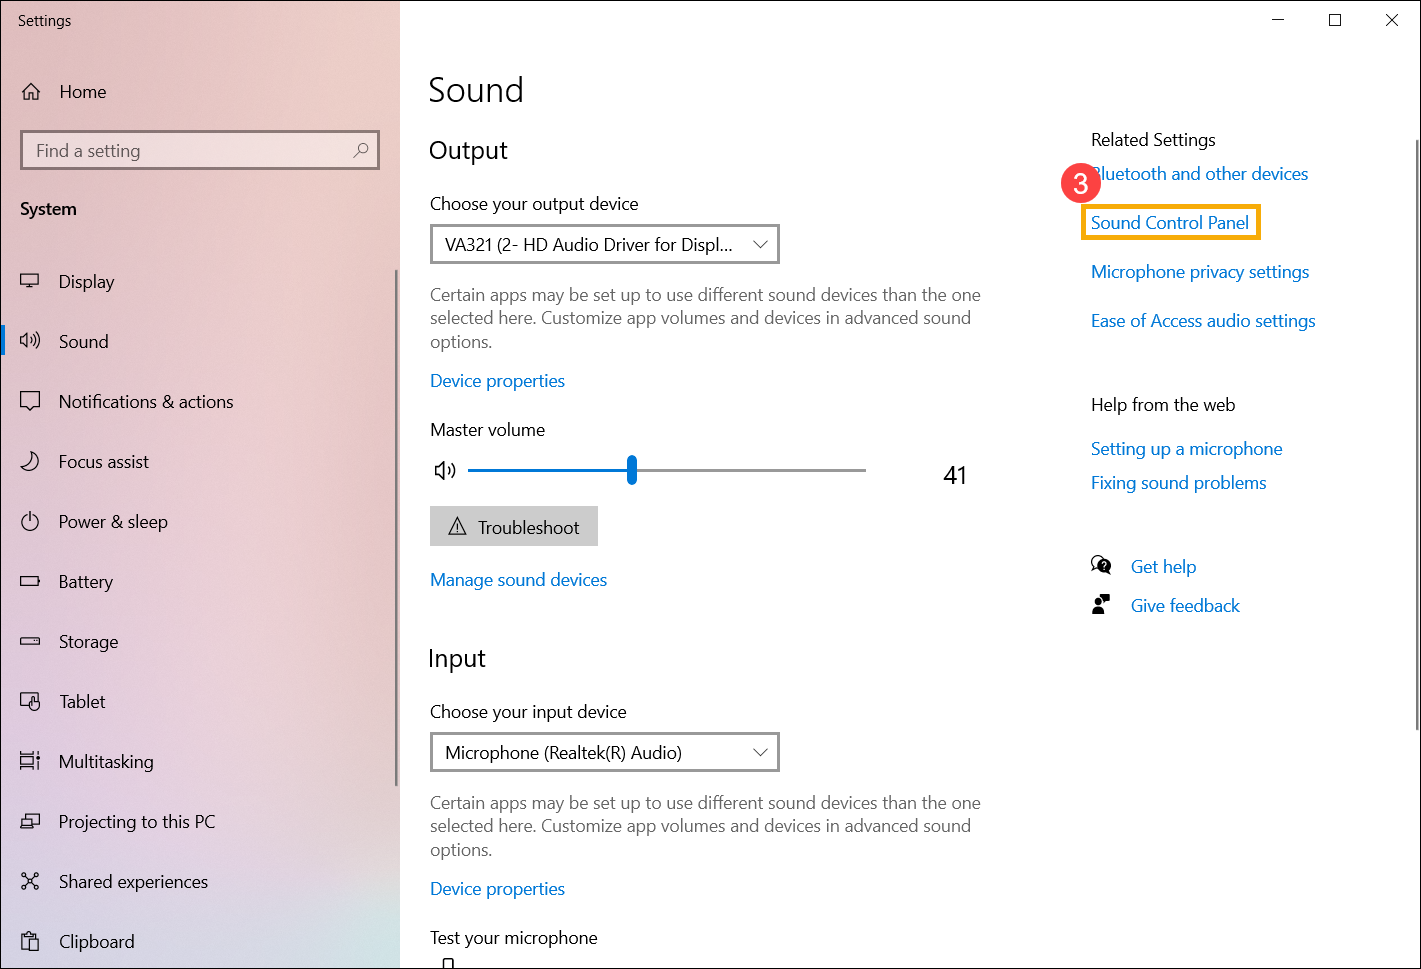
- Select [Sound Control Panel]③.
- Select [Playback] tab④, choose the external monitor you connected⑤, then select [Set Default]⑥.
- Choose the external monitor you connected⑦, then select [Properties]⑧.
- Select [Levels]⑨, make sure the volume levels of the external monitor meet your expectation⑩, then select [OK]⑪.
Run Windows Troubleshooter
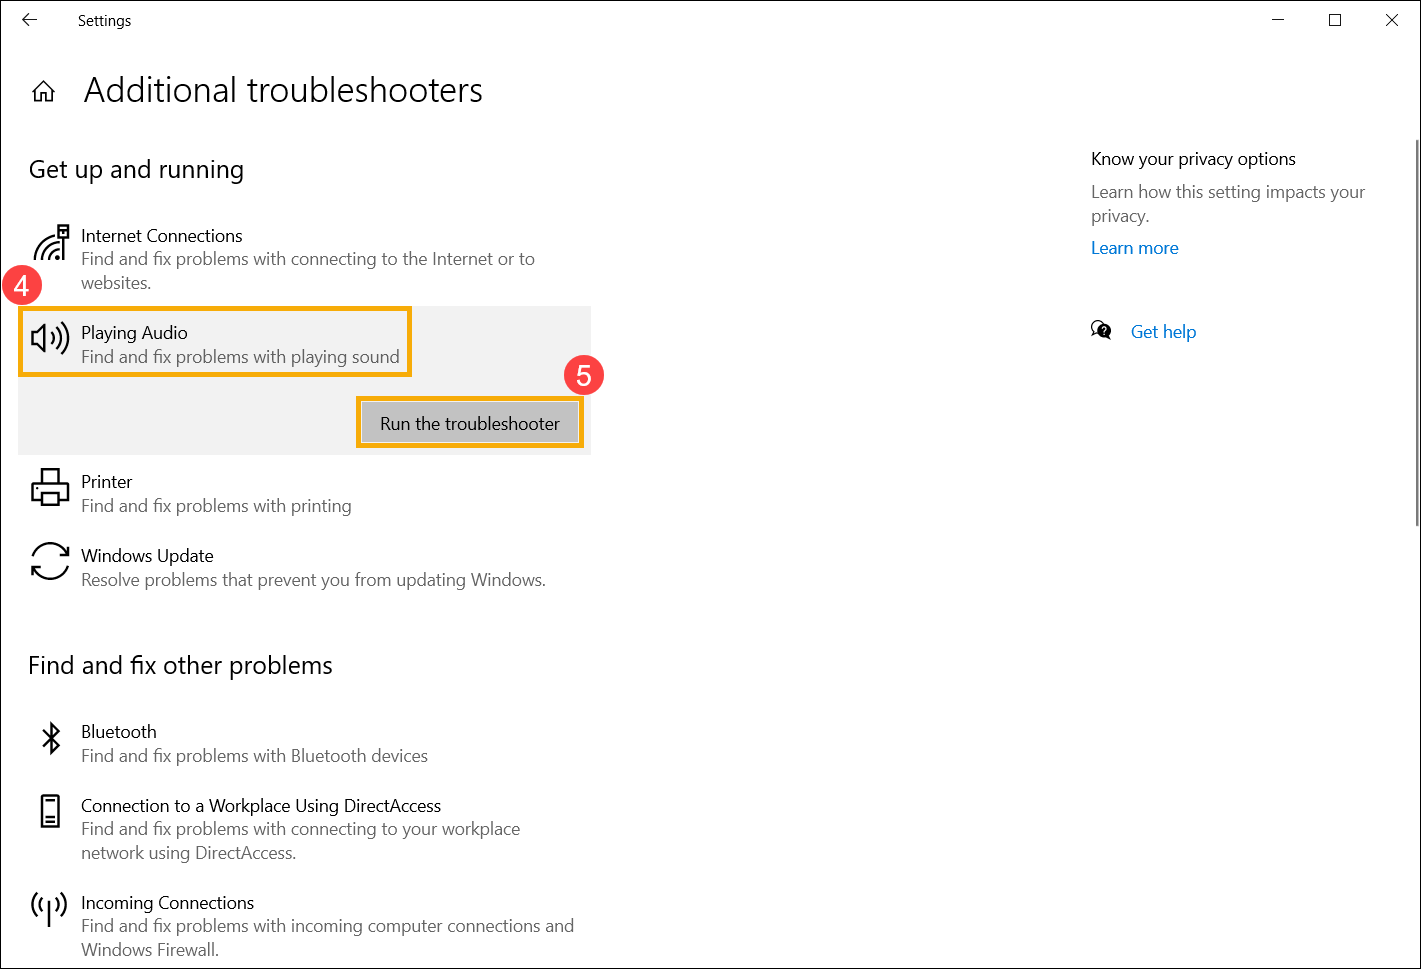
- Type and search [Troubleshoot settings] in the Windows search bar①, then click [Open]②.
- Select [Additional troubleshooters]③.
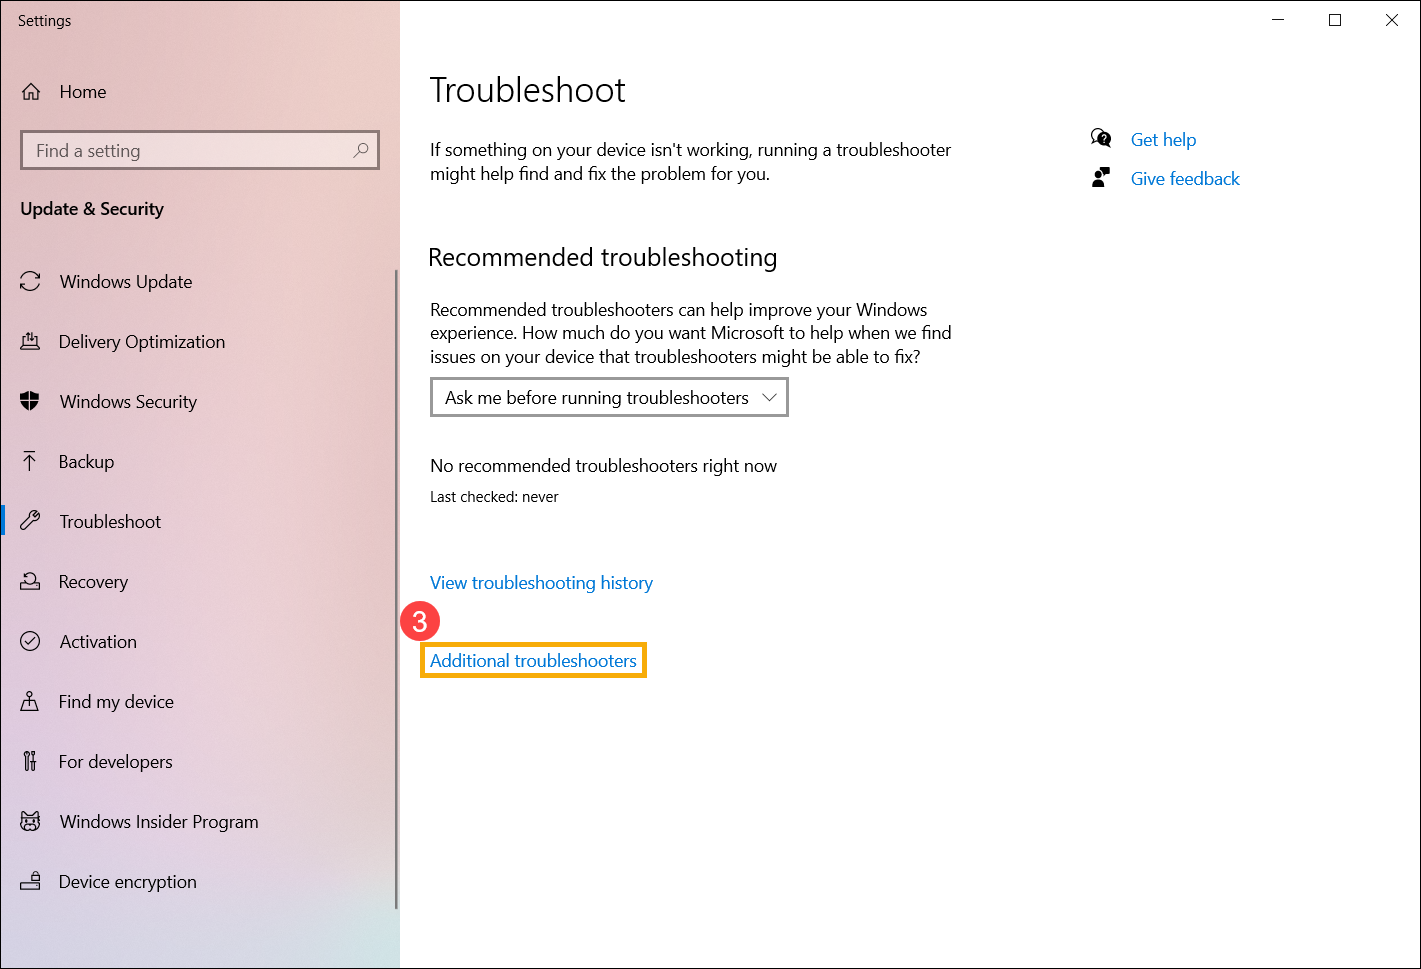
- Select [Playing Audio]④, then click [Run the troubleshooter]⑤.
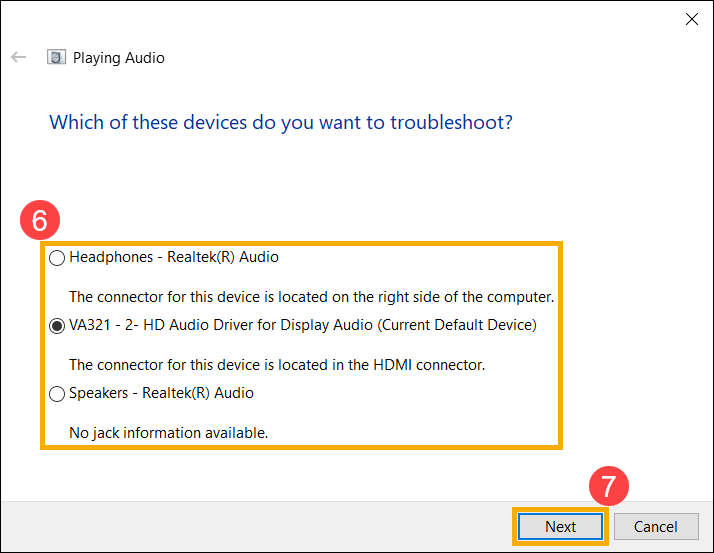
- Choose the external monitor you want to troubleshoot⑥, then select [Next]⑦.
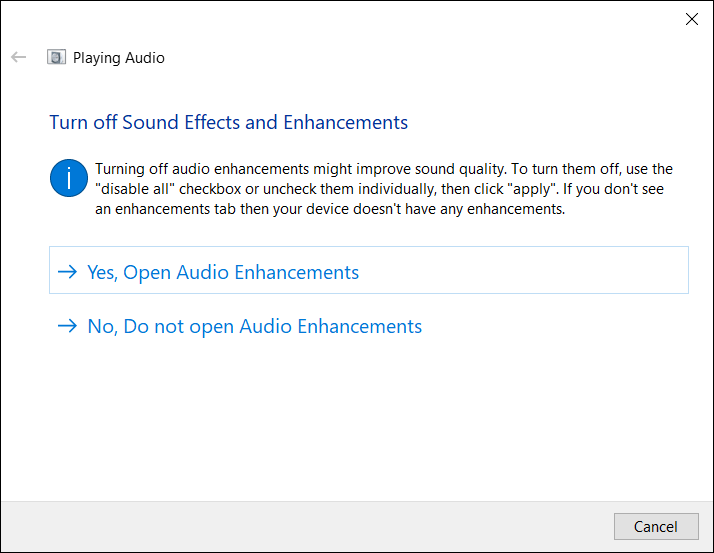
- Please read and follow the on-screen prompts to troubleshoot the connection problem of the external monitor.
- If the problem persists after following the troubleshooter, please select [Close]⑧ and then continue to the next chapter for troubleshooting.
Reinstall graphics driver
Note: If your device is AMD platform of graphics, please refer to How to uninstall AMD chipset driver, otherwise, please refer to the following steps.
- Type and search [Device Manager] in the Windows search bar①, then click [Open]②.
- Click the arrow next to [Display adapters]③, then right-click [your graphics]④ and select [Uninstall device]⑤.
Note: Some models possess both two graphics (so-called integrated & dedicated graphics, such as Intel & NVIDIA) and both can be seen in Device Manager. We suggest that you can follow step 2 and 3 to uninstall each graphics driver.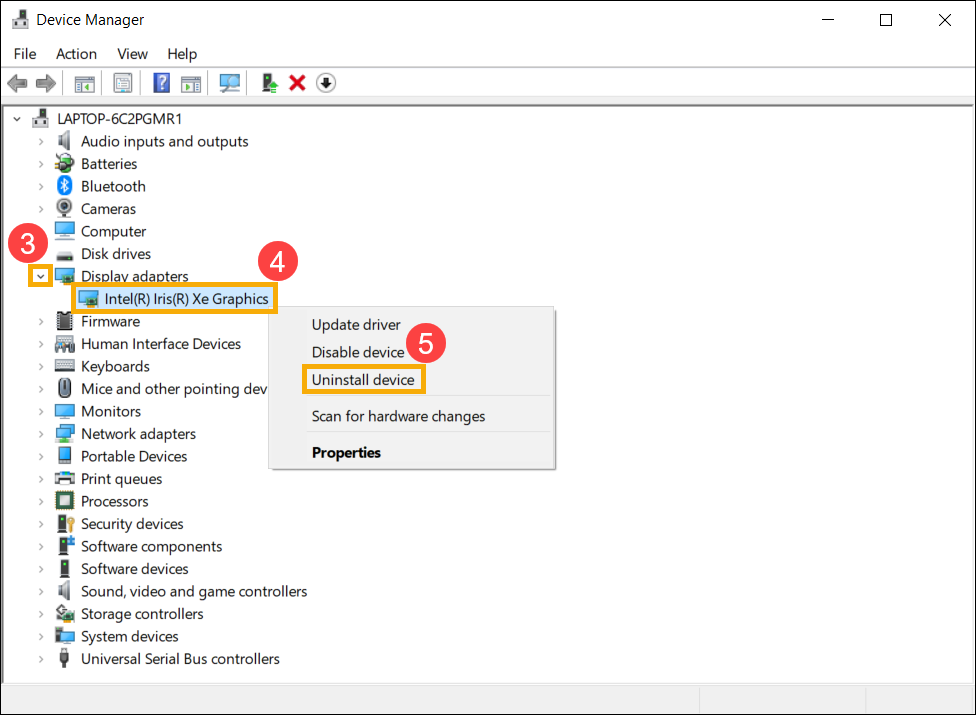
- Select [Delete the driver software for this device]⑥, then select [Uninstall]⑦.
- After the graphics driver is uninstalled, please go to the ASUS support site to download and install the Graphics driver. Here you can learn more about How to search and download drivers.
Note: The following pictures are the current version as a reference, and please download the latest version from the ASUS Support Site.
Note: If your device is with two graphics, please reinstall both drivers.
- If the problem persists after reinstalling the graphics driver, please continue to the next chapter for troubleshooting.
Use System Restore to Restore the System
If the issue started recently and you have previously created a system restore point or if the system has created an automatic restore point, you can try restoring the system to a point in time before the issue occurred. Learn more about How to restore the system from a created system restore point.
If the problem persists, please continue to the next chapter for troubleshooting.
Perform a Windows System Restore
If all troubleshooting steps have been completed but the issue persists, back up your personal files and perform a system restore to return your device to its original configuration. Learn more: How to Restore (Reinstall) the System.
If your problem is not worked out with above solution and information, please contact ASUS customer service center for further information.