[Gaming NB/DT] Armoury Crate Application Introduction
Armoury Crate Introduction (Ver5.0)
Armoury Crate Introduction (Ver4.0)
Armoury Crate Mobile Version Introduction (Android/ iOS)
Armoury Crate - Installation SOP
AniMe Matrix™ Display - Introduction
Two-Way AI Noise Cancelation Setup Guide
Armoury Crate - GameVisual Introduction
ROG XG Mobile instruction Guide
ROG BOOST GPU Overclock (O.C.) Technolog
Armoury Crate Introduction (Ver5.0)
Armoury Crate Install& Uninstall
*The article is applicable to Armoury Crate version 5.0 and above.
1. Armoury Crate Introduction
Armoury Crate is an integration application developed for ROG series and TUF series of gaming laptop and desktop by integrating NB ROG Gaming Center and DT AEGIS III functions. Gamers can use Armoury Crate platform to launch system performance adjustments on their homepage and set up related applications and obtain system information. The lighting and AURA Sync integrated by Armoury Crate can also be used to set various lighting effects on the laptop& desktop, and the supported external devices.
Support ROG series and TUF series of gaming laptop and desktop, please refer to Armoury Crate Compatible Devices for more details.
*Armoury Crate application required V5.4 or above version, and more information in Armoury Crate Website.
3. Application Install& Uninstall
How to get and install the application program,please refer to ASUS official website
How to uninstall application program,please refer to ASUS official website
4-1 How to Start Armoury Crate
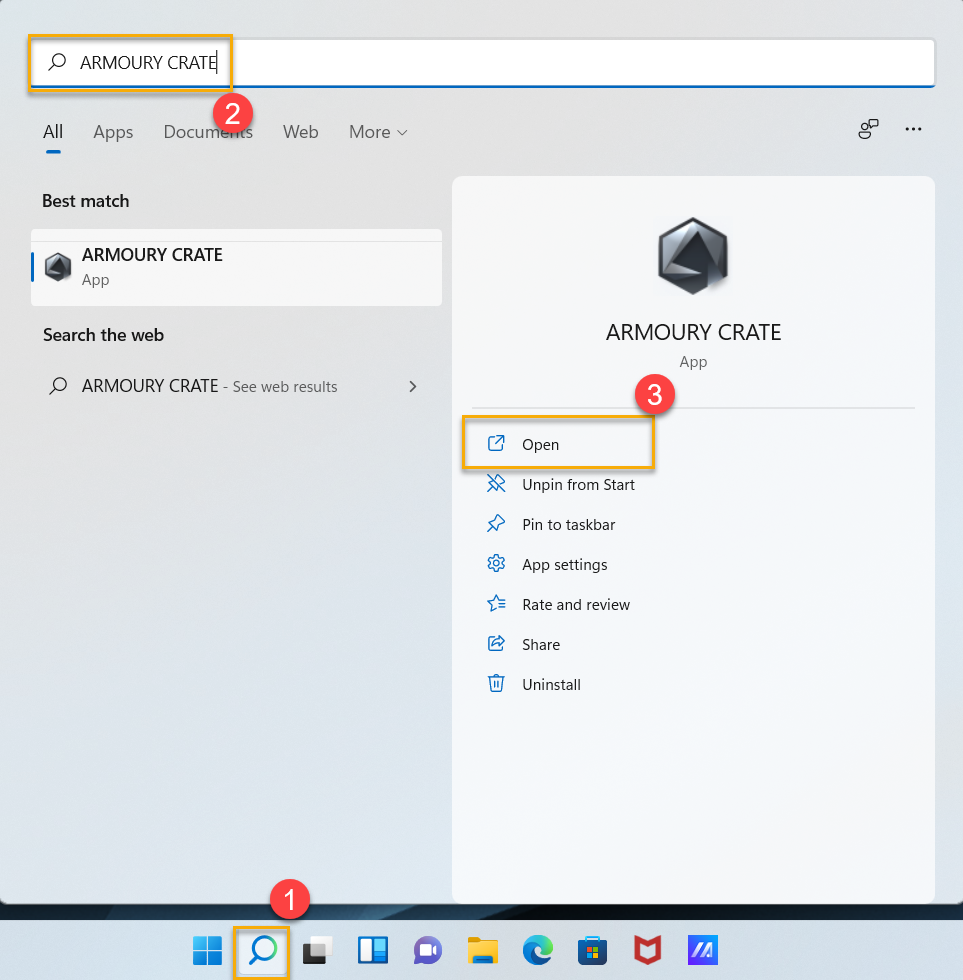
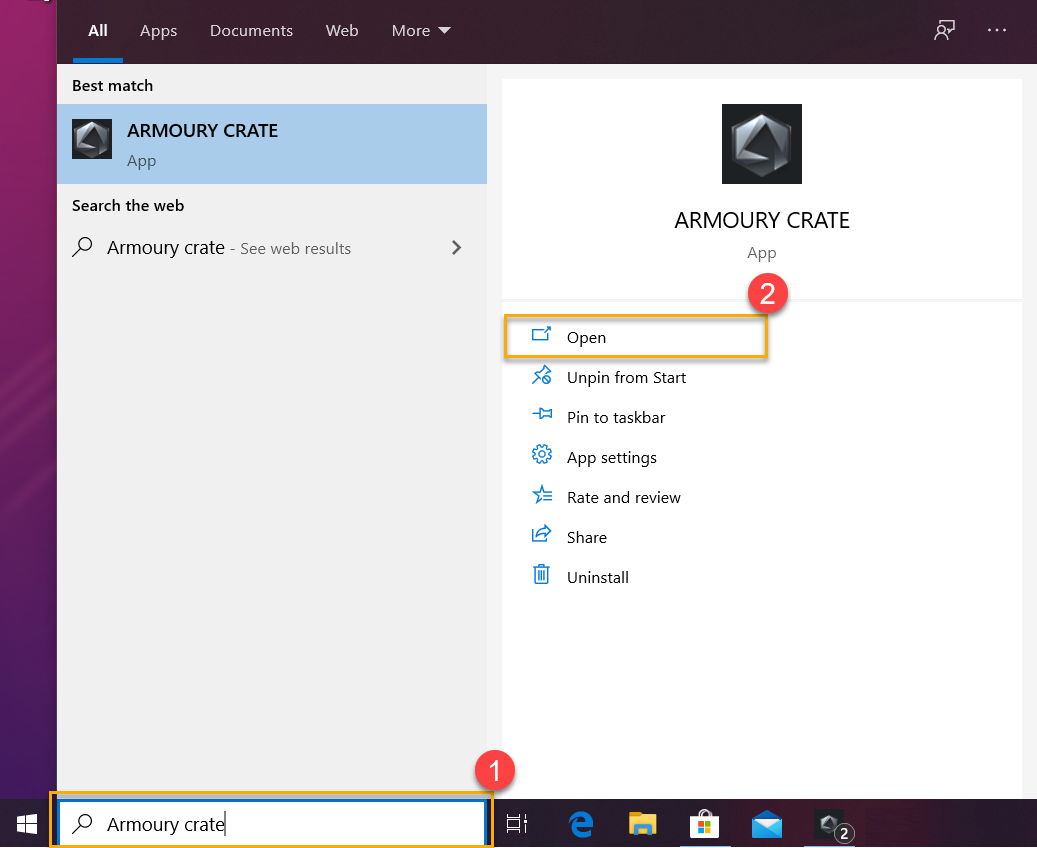
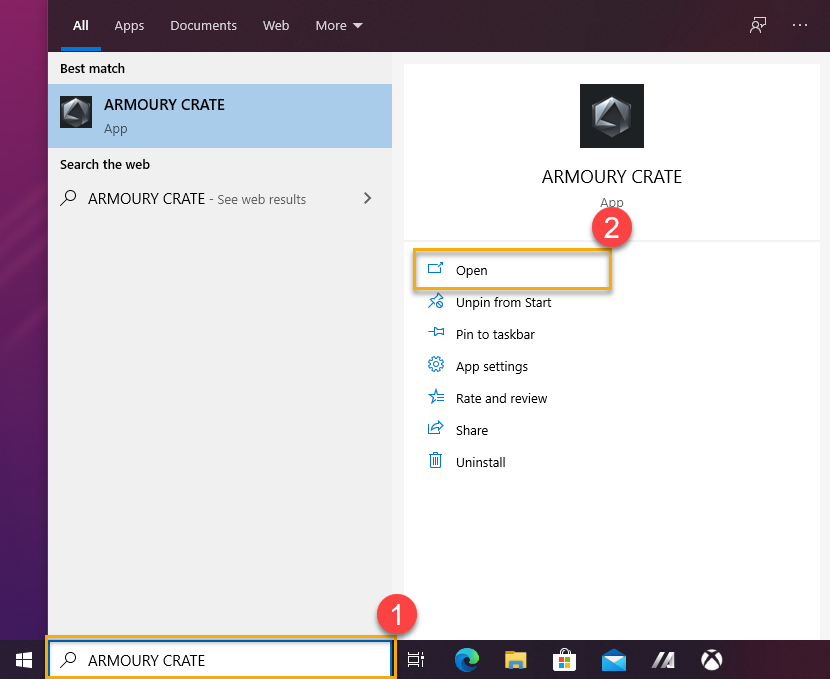
Please click [Search Bar]① then type [ARMOURY CRATE]②, and then click [Open]③ to get into Armoury Crate Home page.
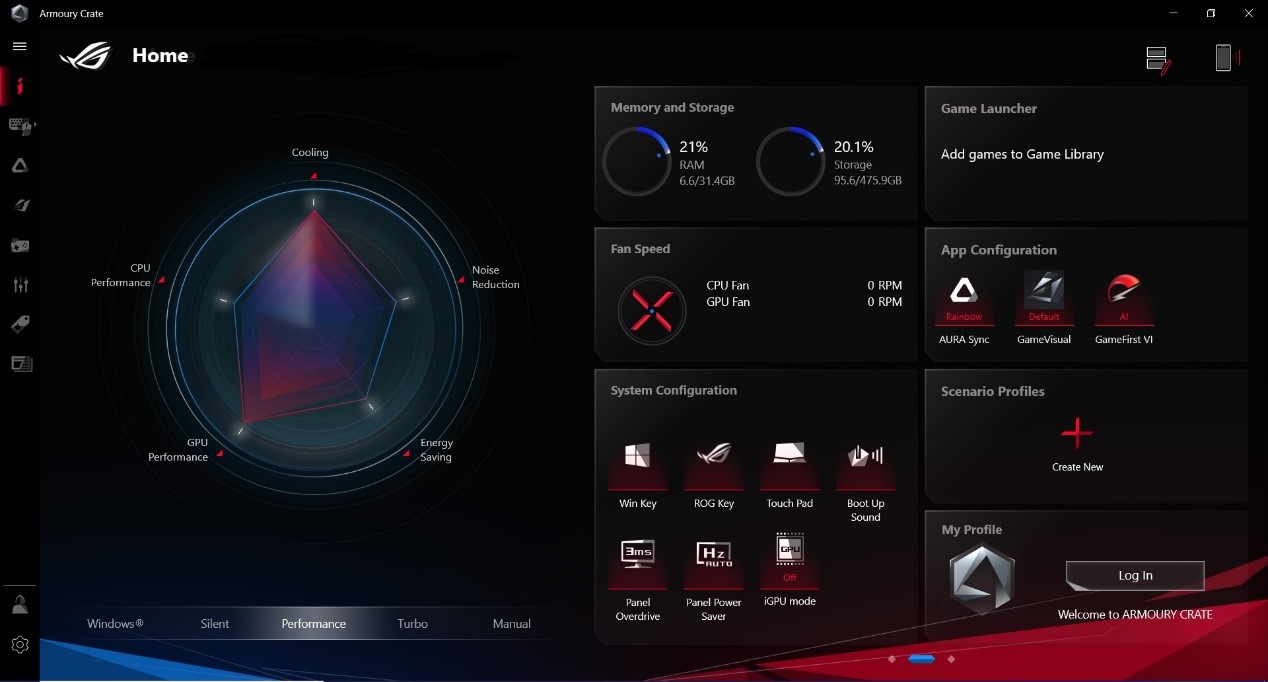
4-2 Armoury Crate Home
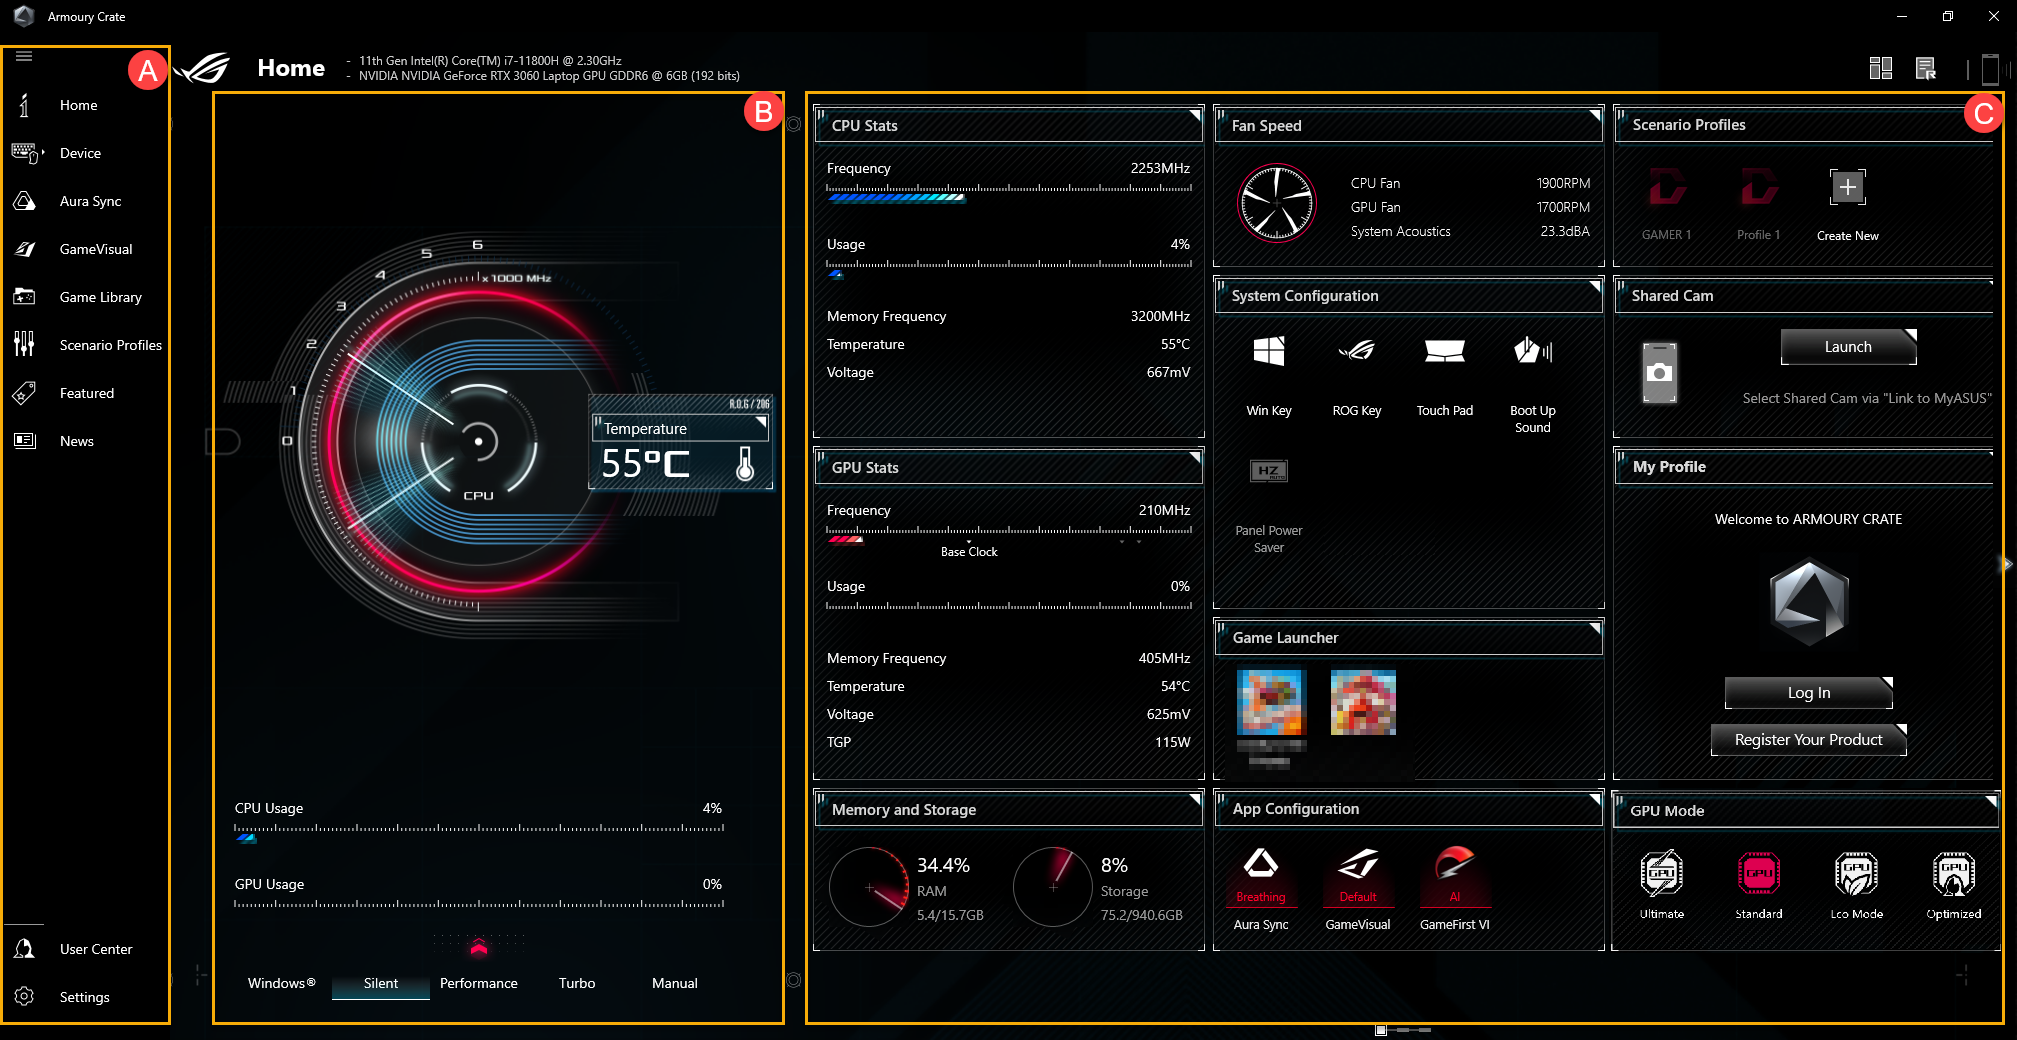
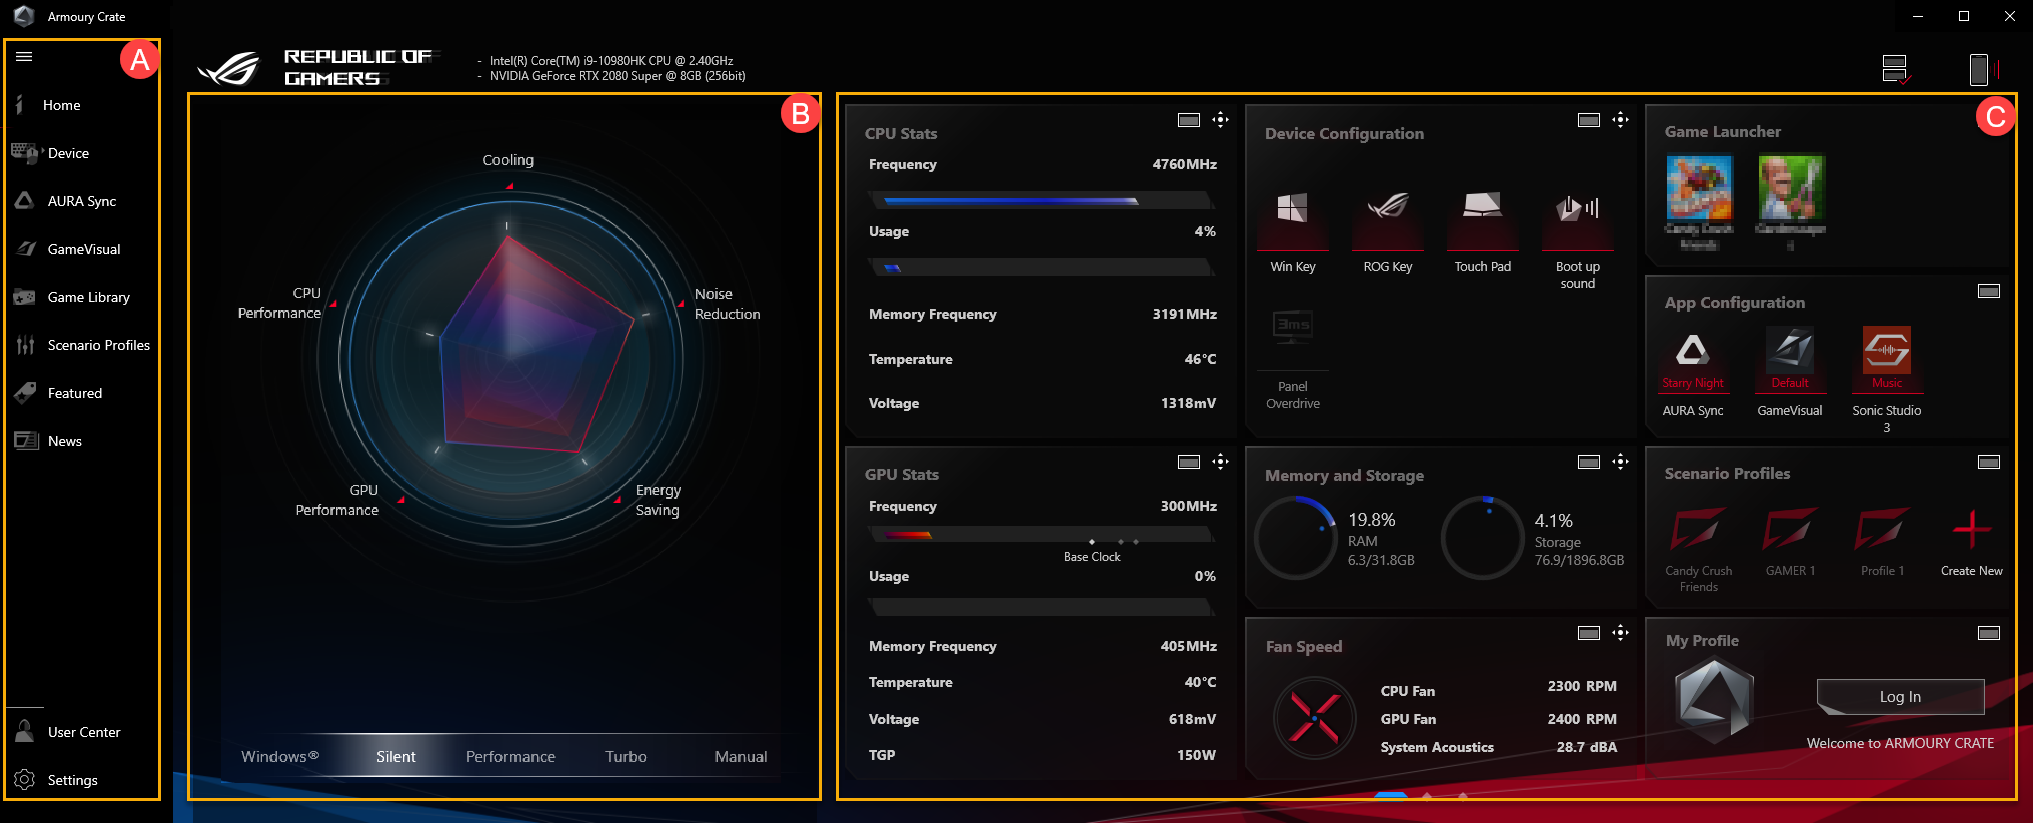
Main Menu(A): To display Armoury Crate main features and page switch.
Operating Mode(B): To provide gamers a quick system performance adjustments, and each mode is with different CPU&GPU performance、Cooling、Noise Reduction and Energy Saving default setting, for example Windows®、Silent、Performance、Turbo、Manual and Tablet/Vertical mode.
* Please refer to Operating Mode Category for more details.
System Info Display Blocks(C): It Includes CPU&GUP Stats、Memory and Storage、Fan Speed、System Acoustics、System Configuration*、GPU Mode、Game Launcher、App Configuration、Scenario Profiles、Shared Cam and My Profile. It provides gamers having a quick view with system relative info, and then clicking the icon in System Configuration can turn on/off or switching icon function.
*System Configuration
MUX Switch: MUX Switch and MSHybrid Mode integrate with GPU Mode after Armoury Crate V5.2.12 updated, please go to Armoury Crate [Home] or [GPU Mode] in [GPU Power Saving] function to apply Ultimate.
 Display Profile: Gamers will be able to click [Display Profile] icon to switch Dual Spec Panel, please refer Q&A [Display Profile] for more detail.
 Backlight Control: This function (Multi-Zone) can automatically adjust the backlight of certain areas to obtain better contrast and image quality, please refer Q&A [Backlight Control] for more details.
 CPU Overclocking Mode: Click this option to switch between overclocking modes. In BIOS mode, you can overclock the CPU from your machine's BIOS settings. In Software mode, you can overclock the CPU from Armoury Crate Manual Mode (Must under Charging Mode). You can only use one of these methods at a time, the feature, the feature can only support G733CW/CX series models.
5. Device(D)
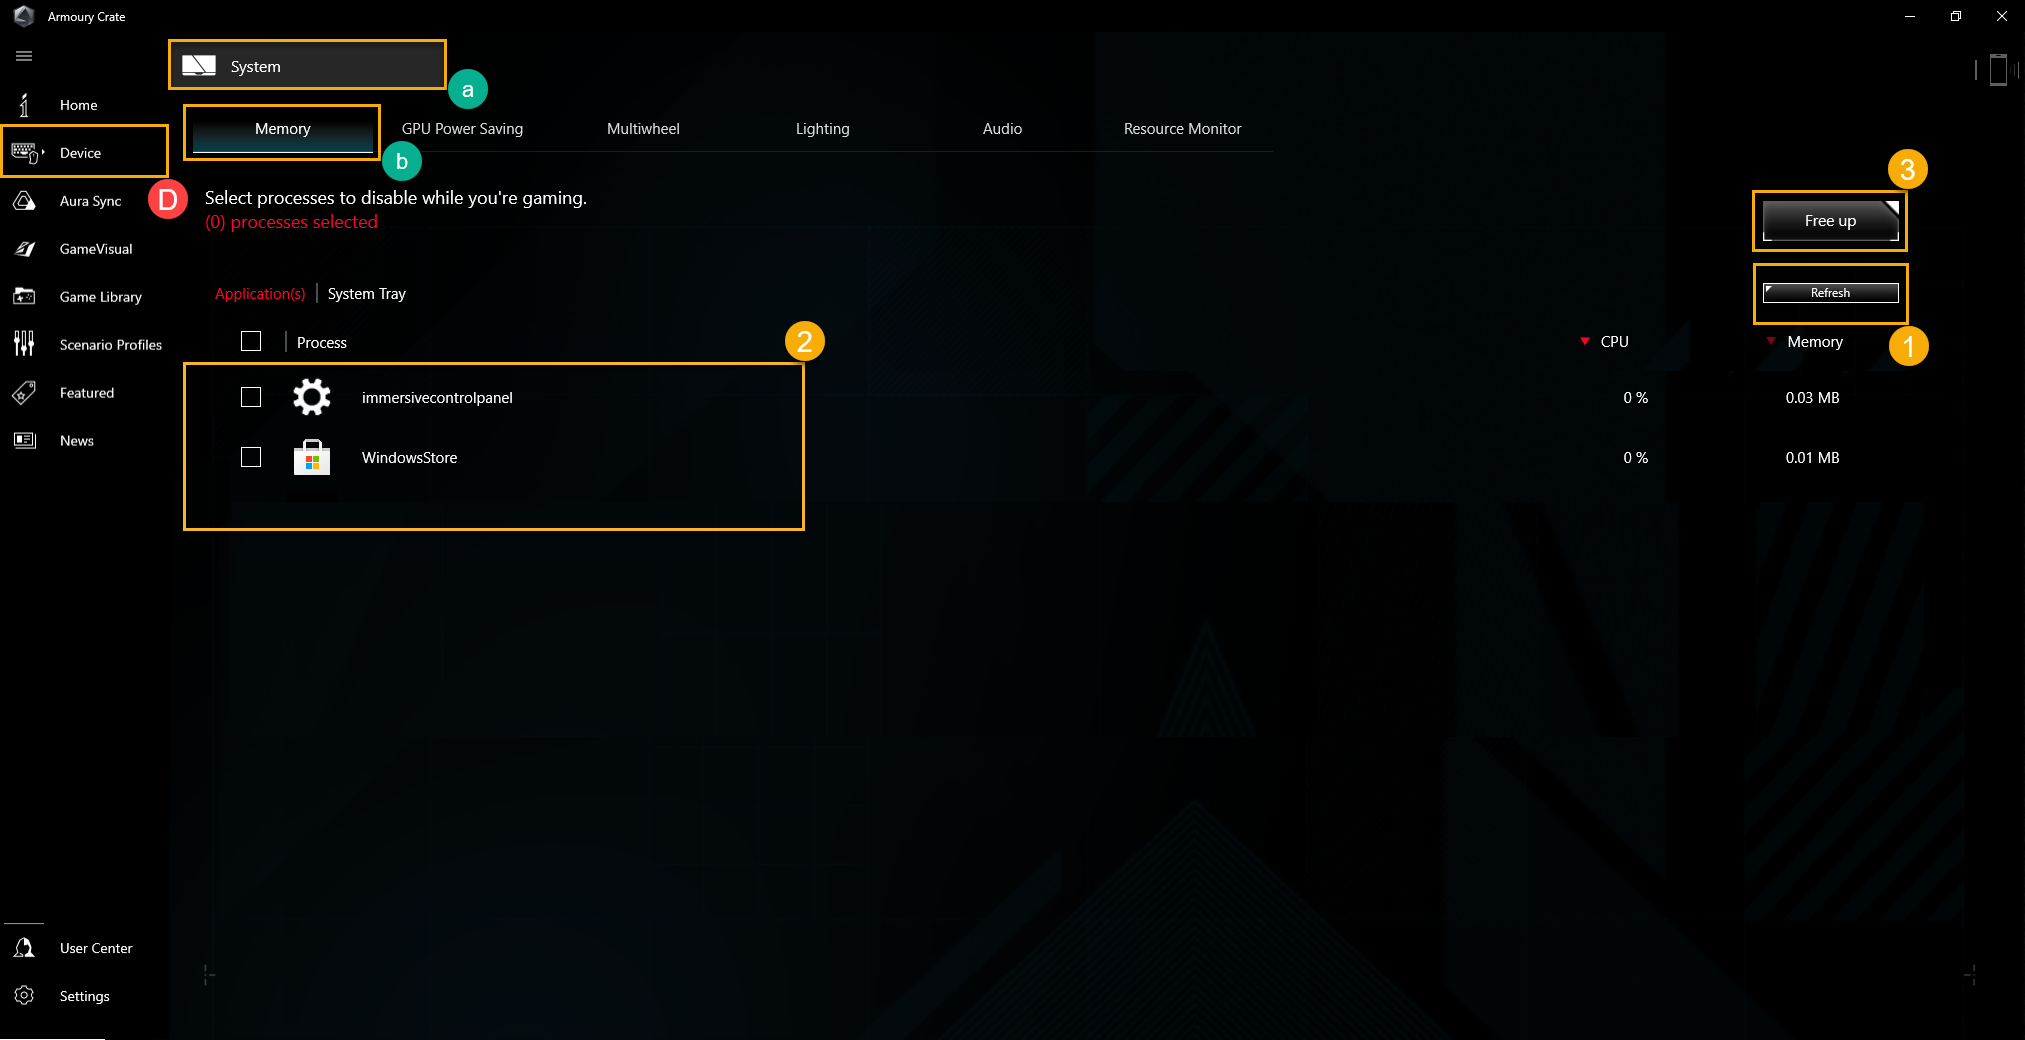
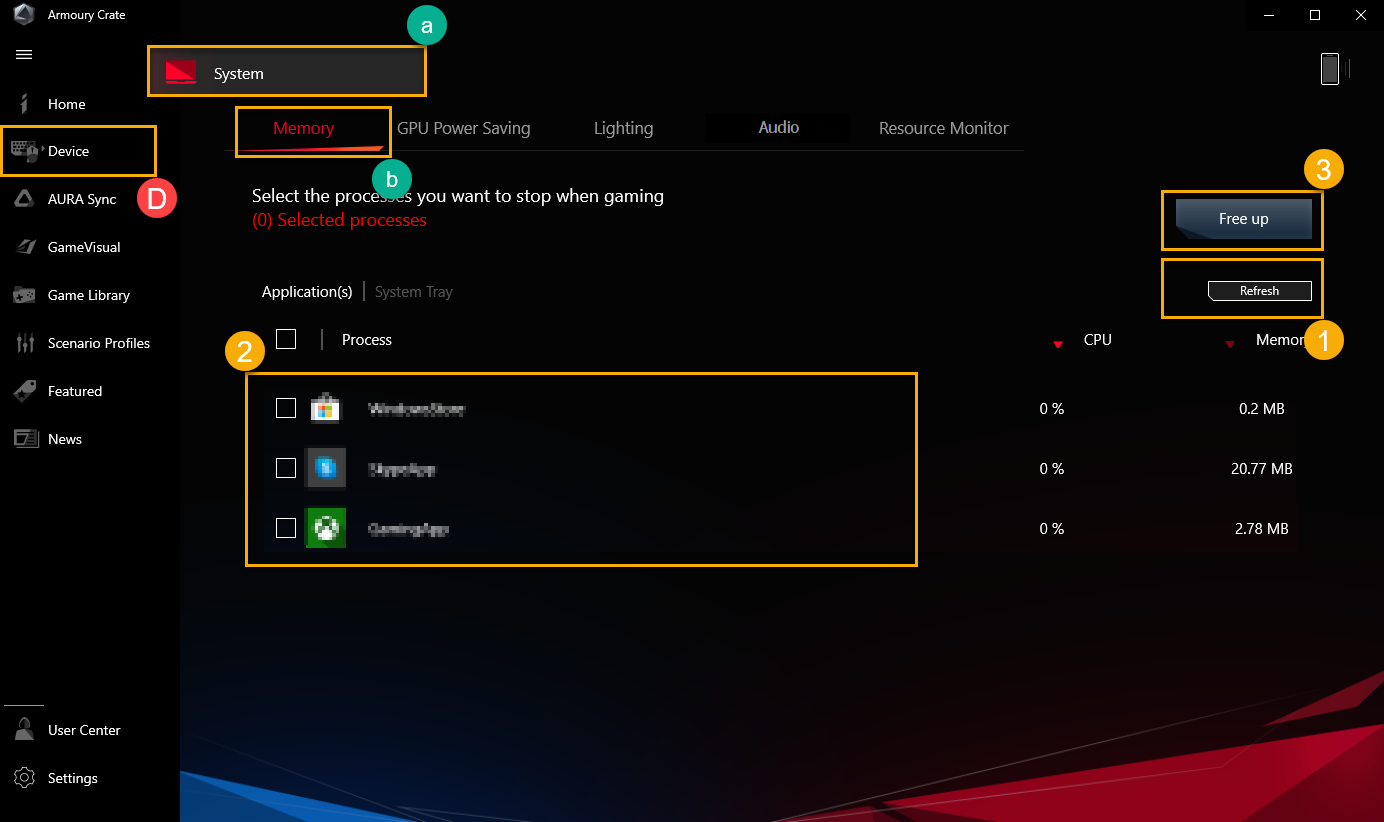
System(a) - Memory(b): Gamers can select the Apps and release those occupied memory while game playing.
Refresh①: To select “Refresh”,it will list the Apps currently occupying memory.
Applications②: To display the Apps list which is with currently occupying memory.
Free Up③: To select “Free Up”,the memory occupied by the selected application will be released.
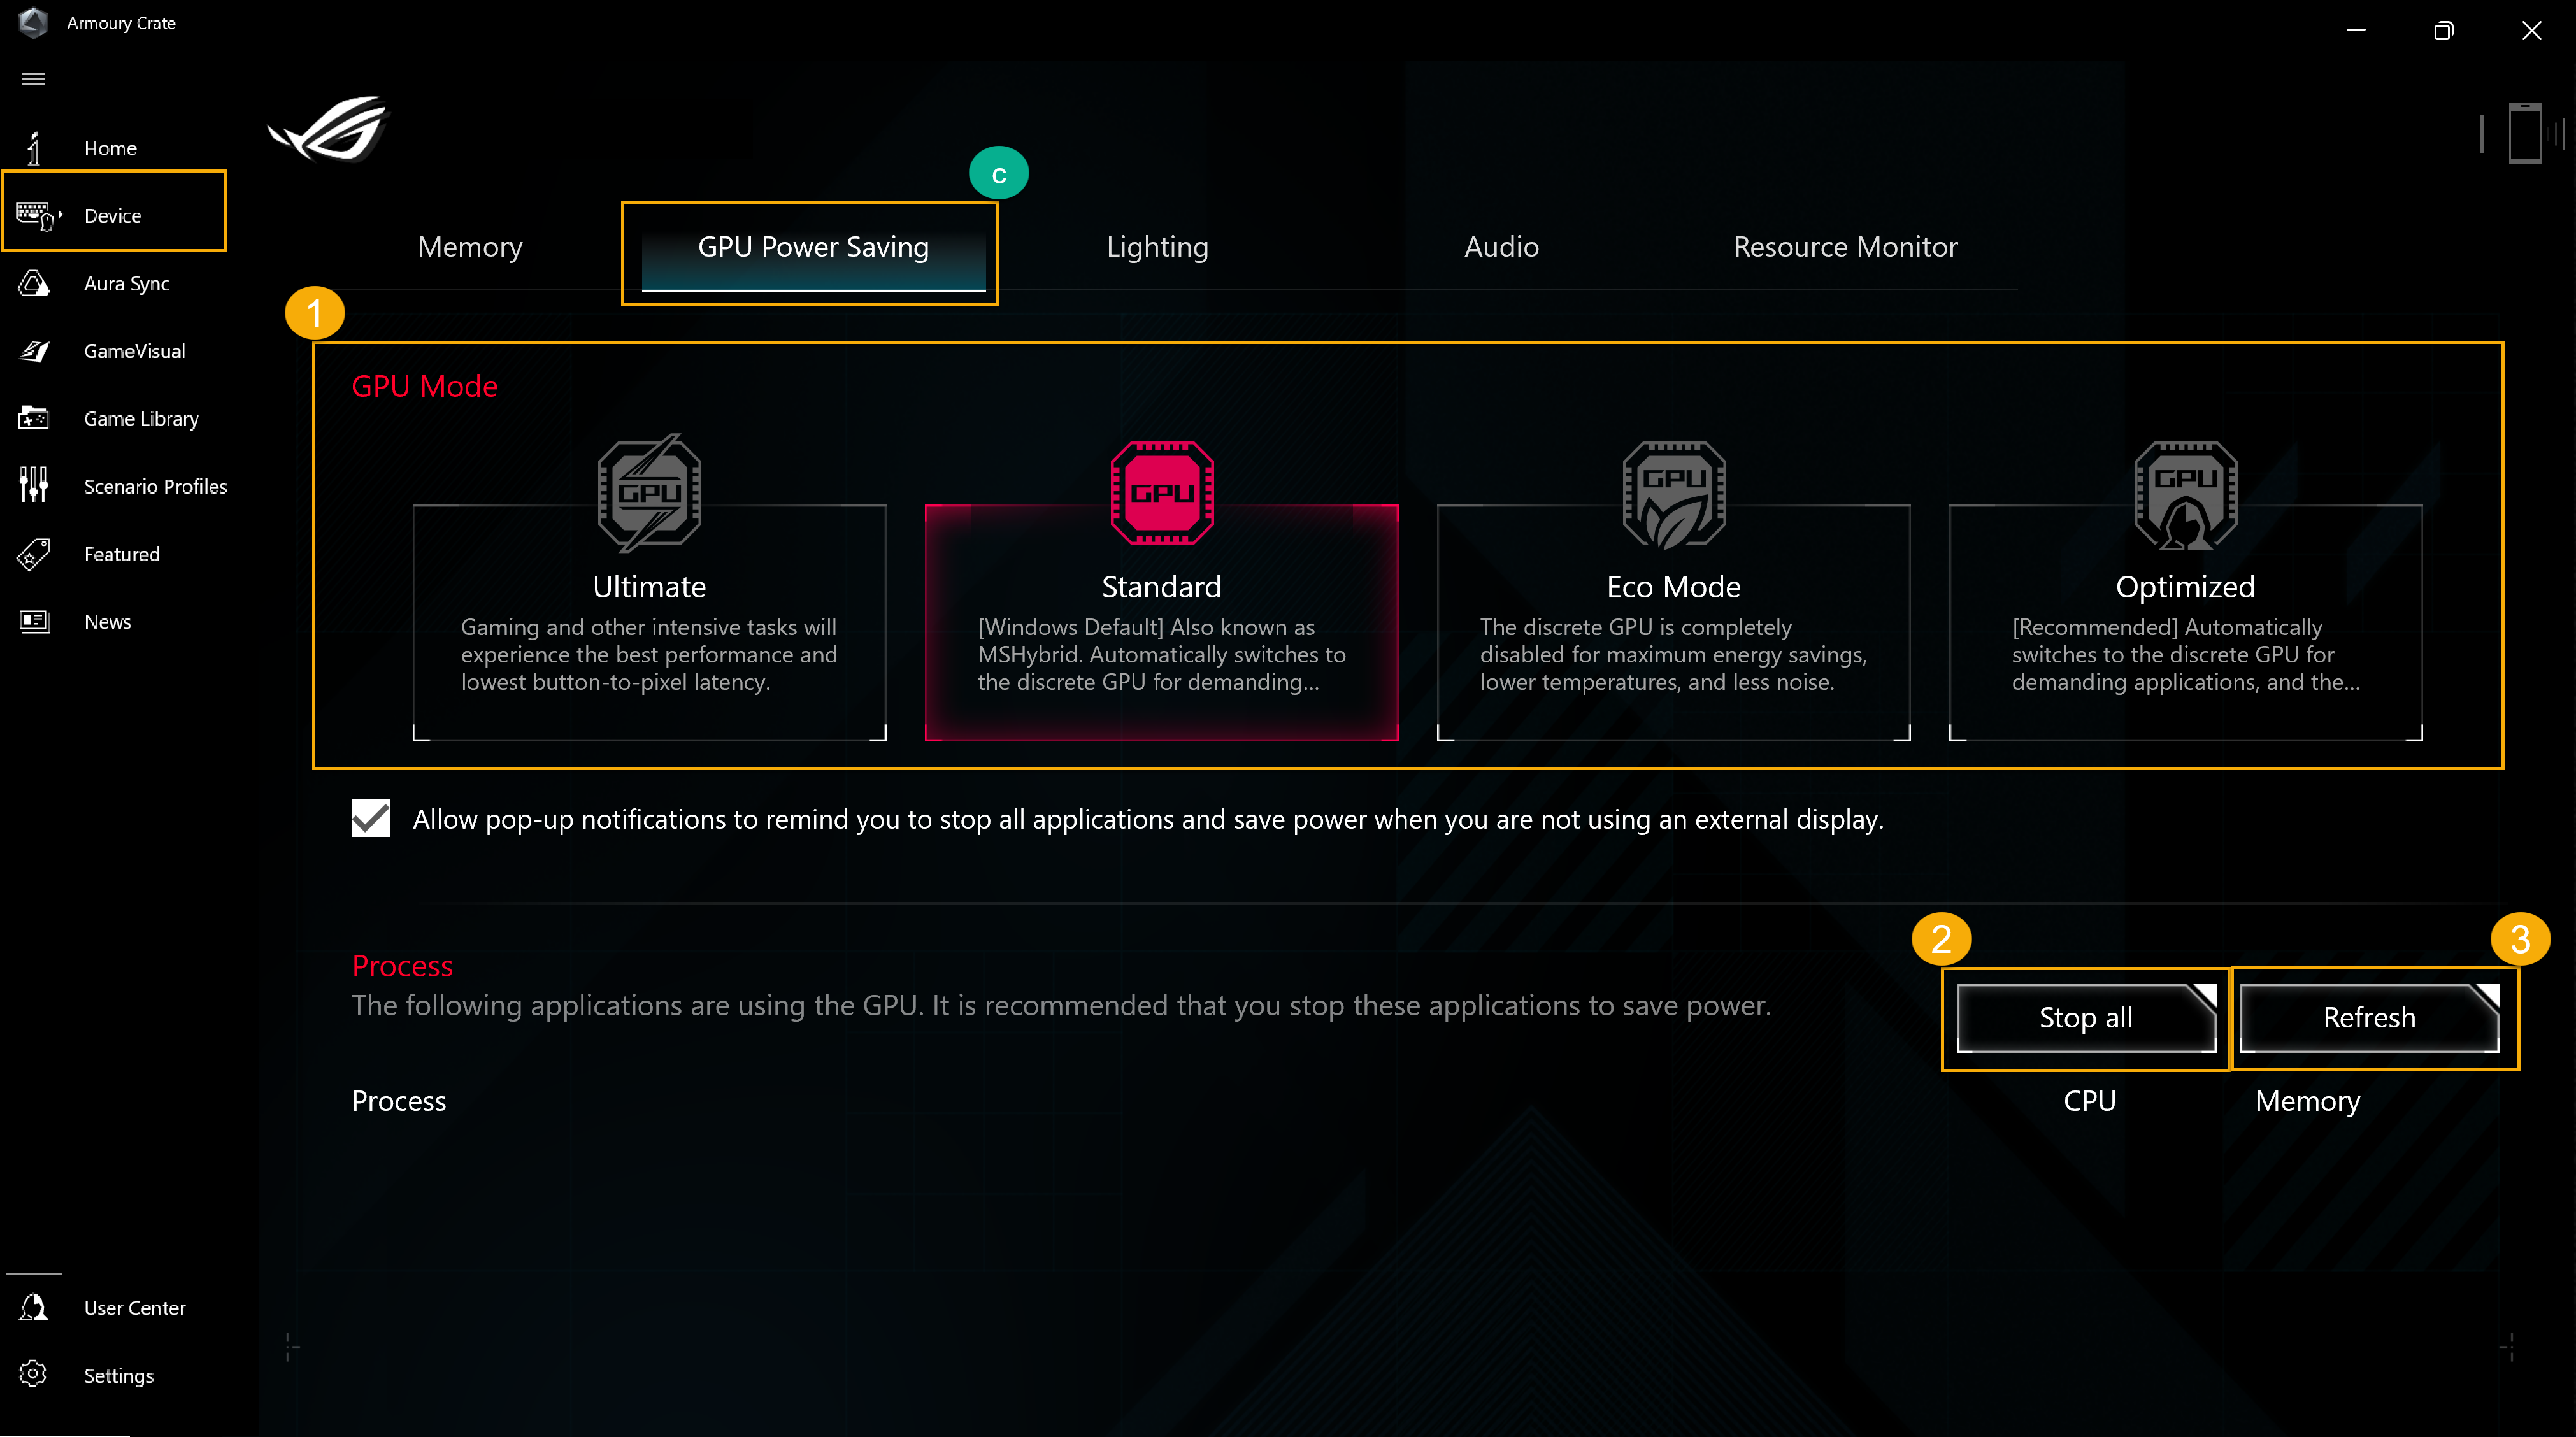
Gamers can switch GPU Mode or close application(s) which is using GPU currently for power saving.
GPU Mode①: Thru the GPU mode switching, gamers can select in the good performance or a long battery life by personal needs.
Stop All②: To select “Stop All”, all applications using GPU currently will be stopped.
Refresh③: To select “Refresh”, it will list the Apps currently running on GPU.
*Switching GPU Mode may cause BitLocker encryption protection, If require BitLocker recovery, please refer to [Troubleshooting - How to fix it shows BitLocker recovery screen after power on] and [Device encryption & Standard BitLocker encryption] for more helps.
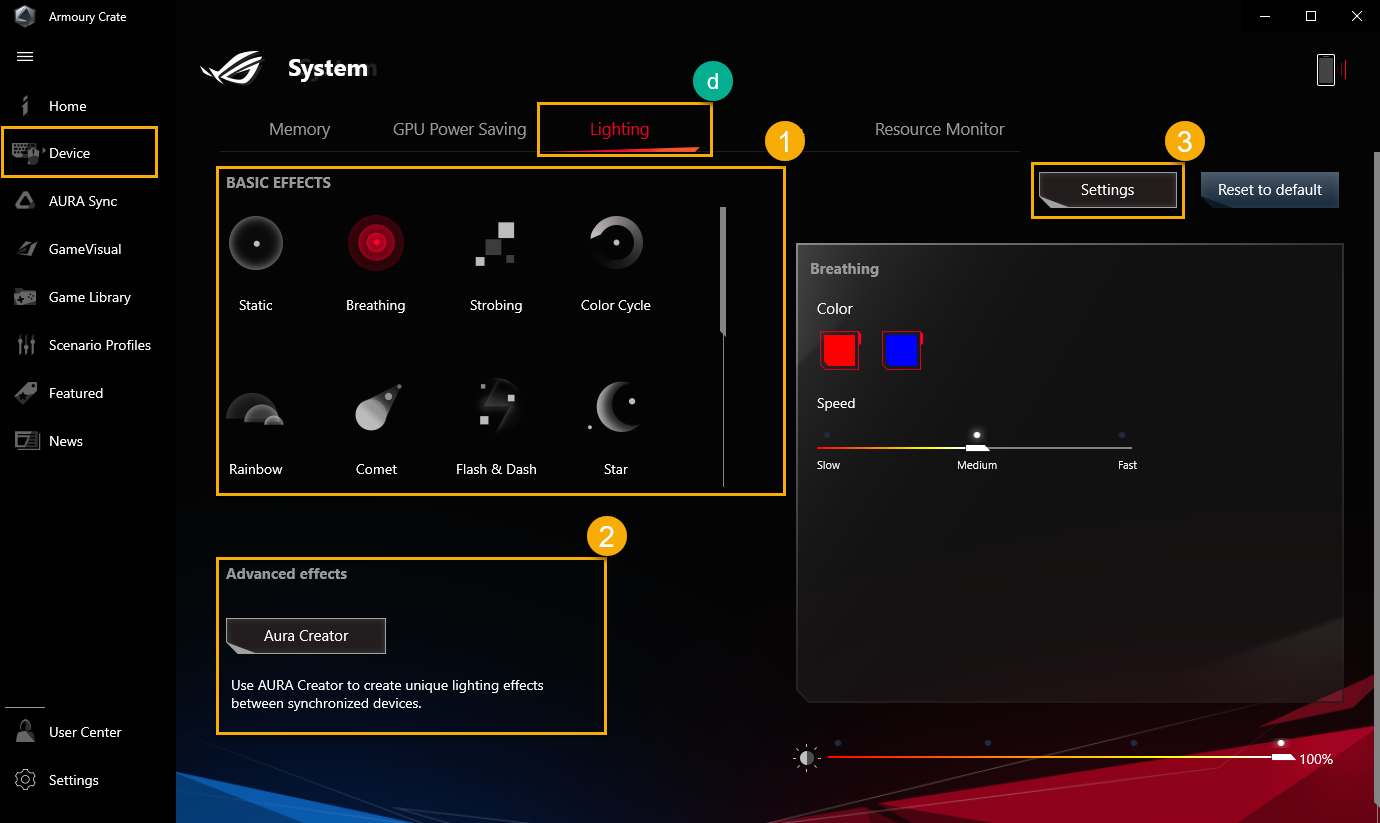
Lighting(d)
To setup device lighting effects.
Basic Effects①: To setup device lighting effects, the lighting effects will vary depending on the device.
Advanced Effects②: Using ARUA Creator to create unique lighting effects, please refer to AURA Creator Introduction for more details.
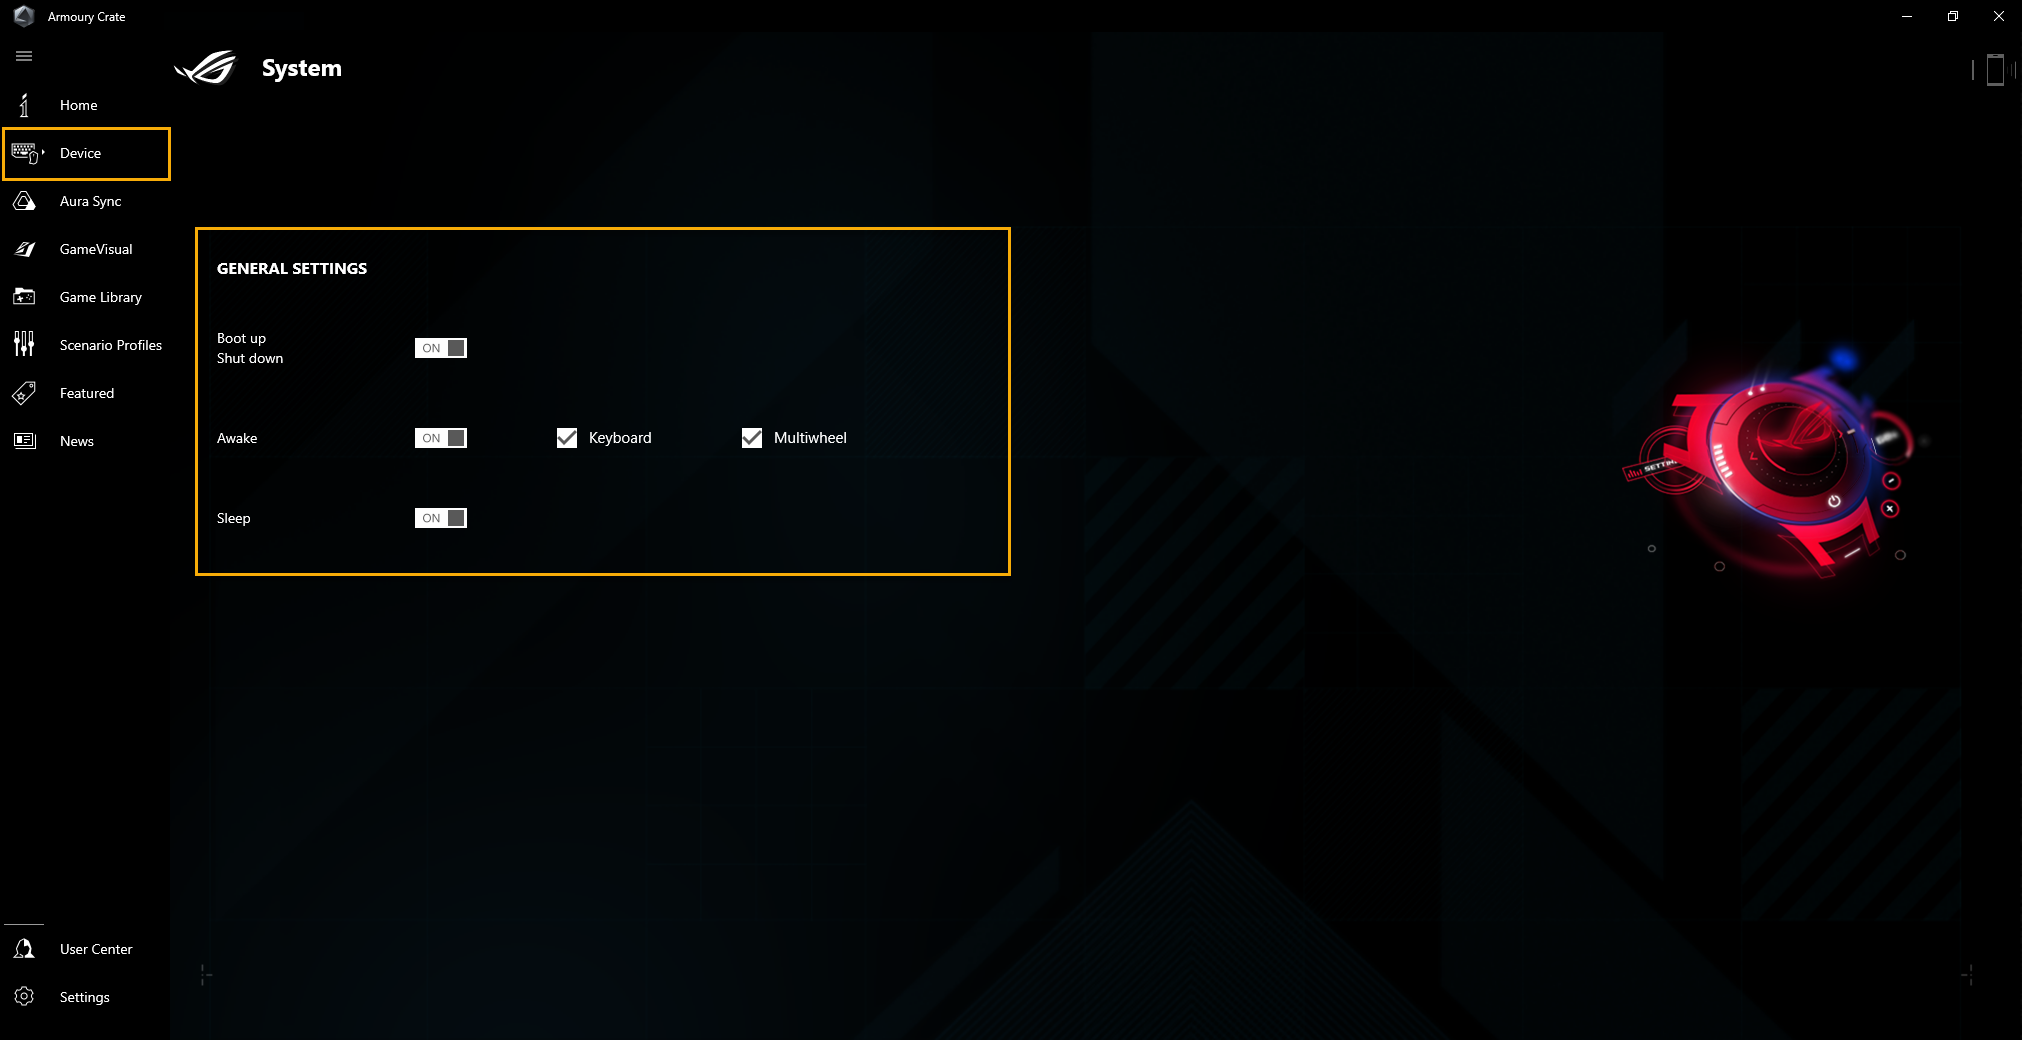
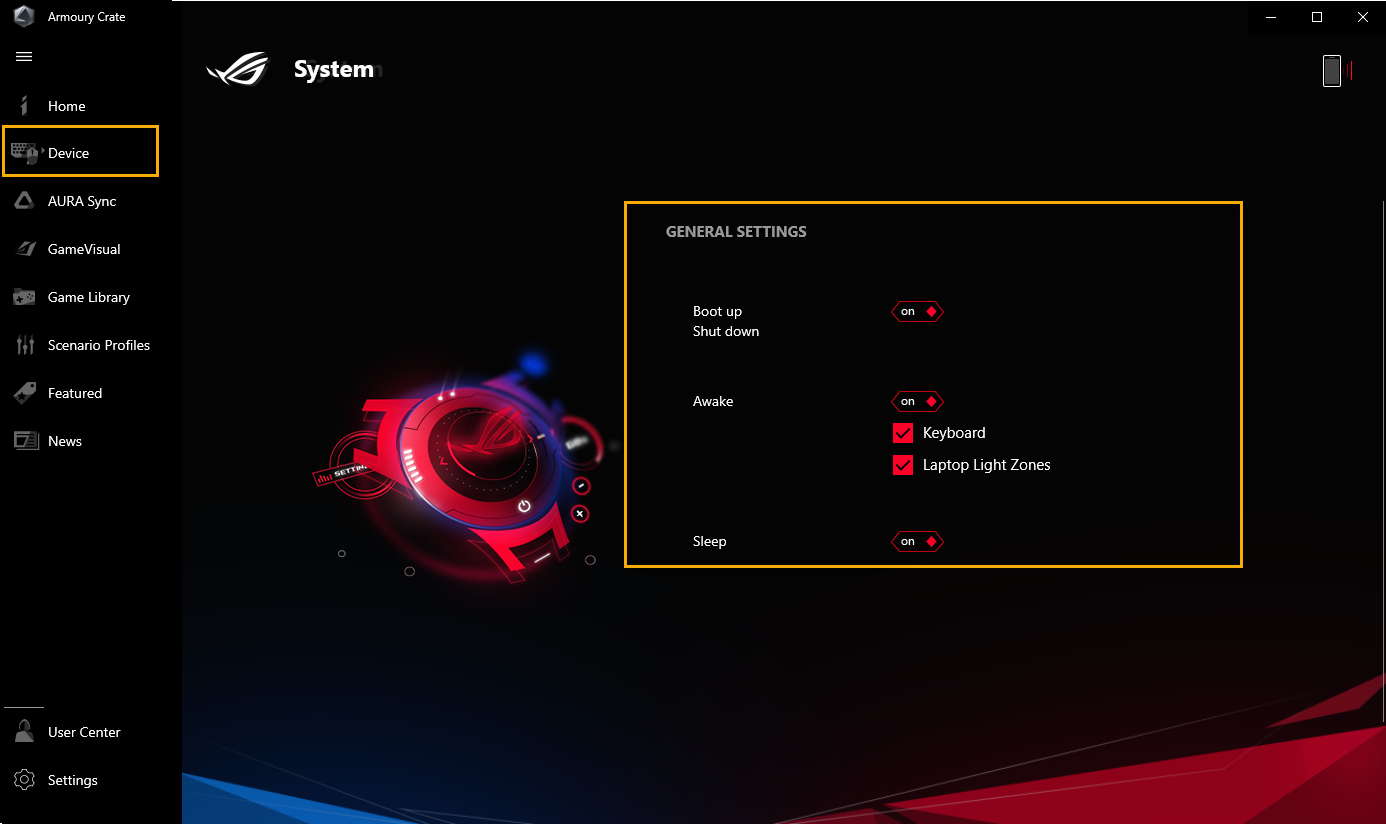
Settings③: To select “Setting” to get into General Settings* page, and gamers can turn on/ off device lighting effects.
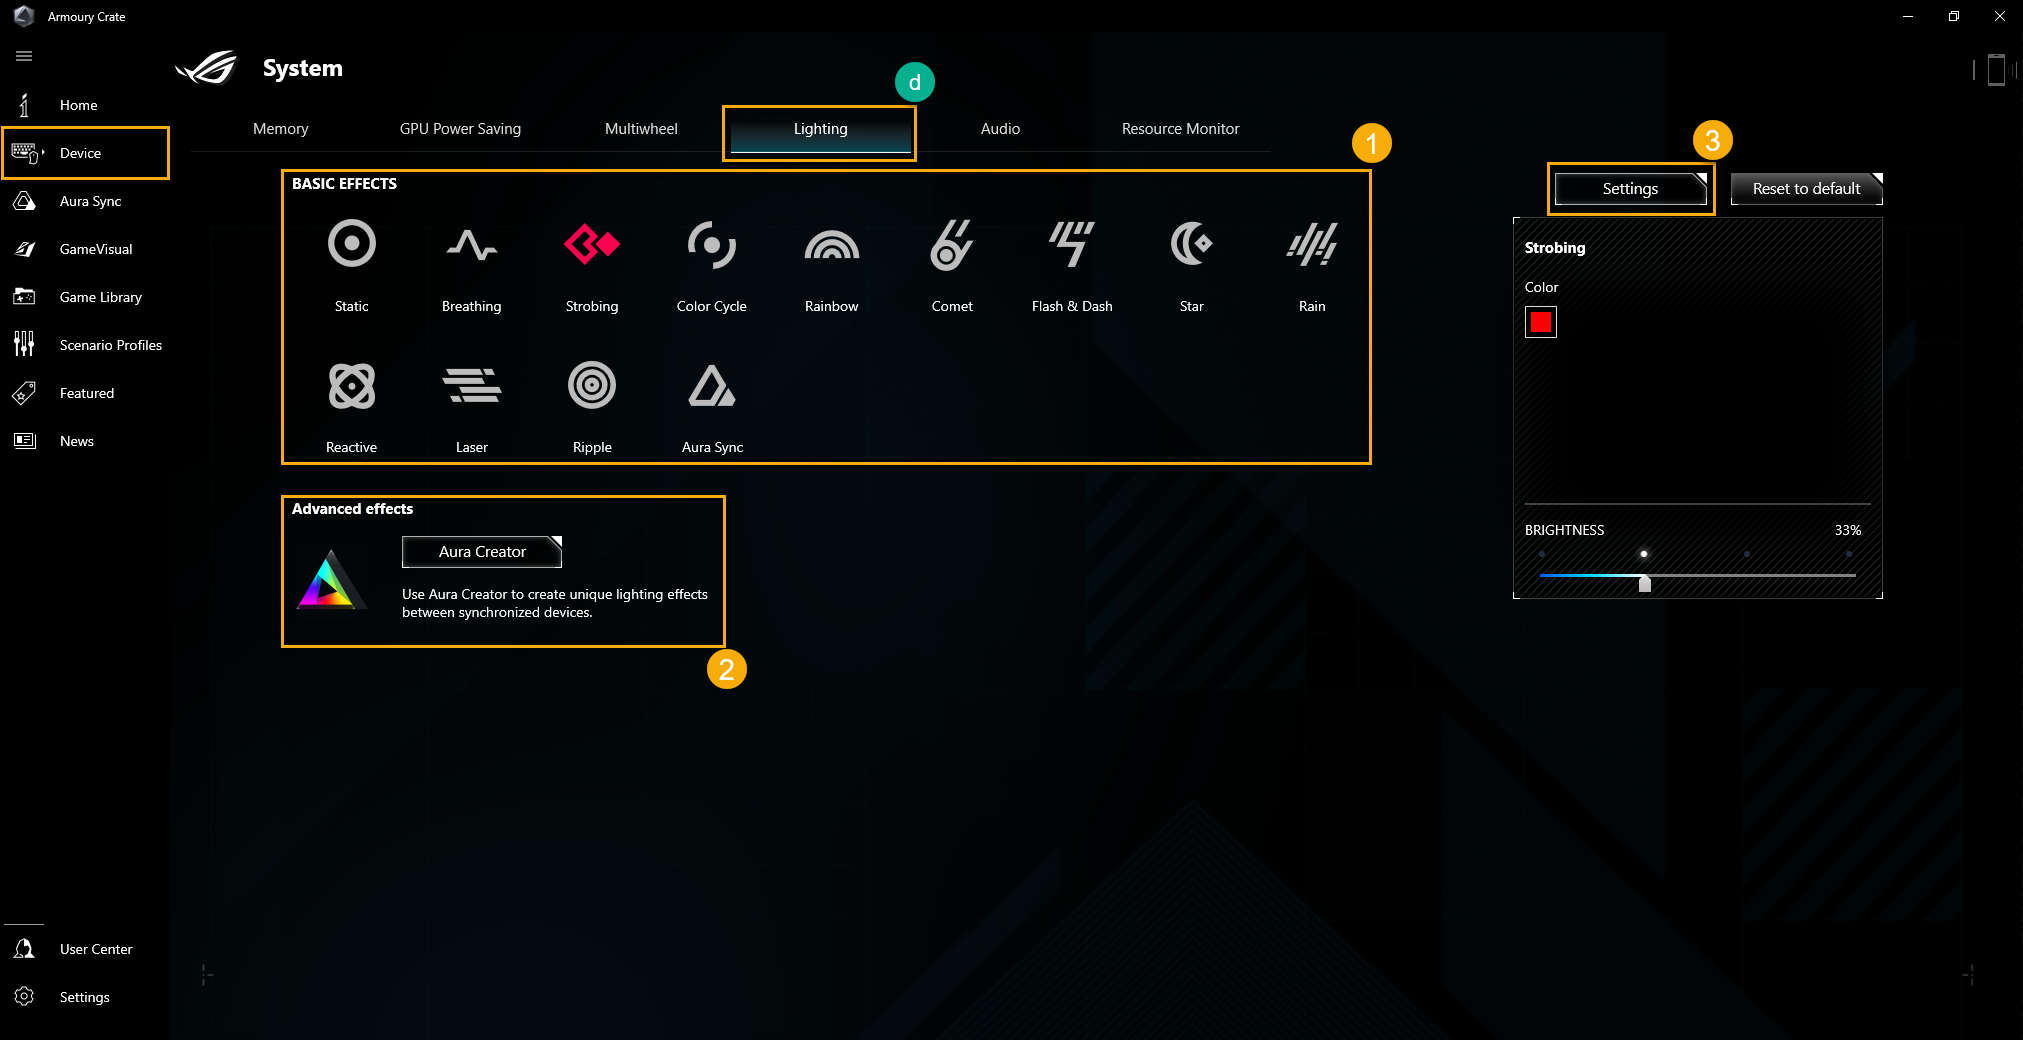
*General Settings: Gamers can enable or disable the AURA lighting effects for Keyboard & Laptop Light Zone under the status (Boot Up/ Shut Down/ Awake/ Sleep), the available lighting effects will vary depending on the device.
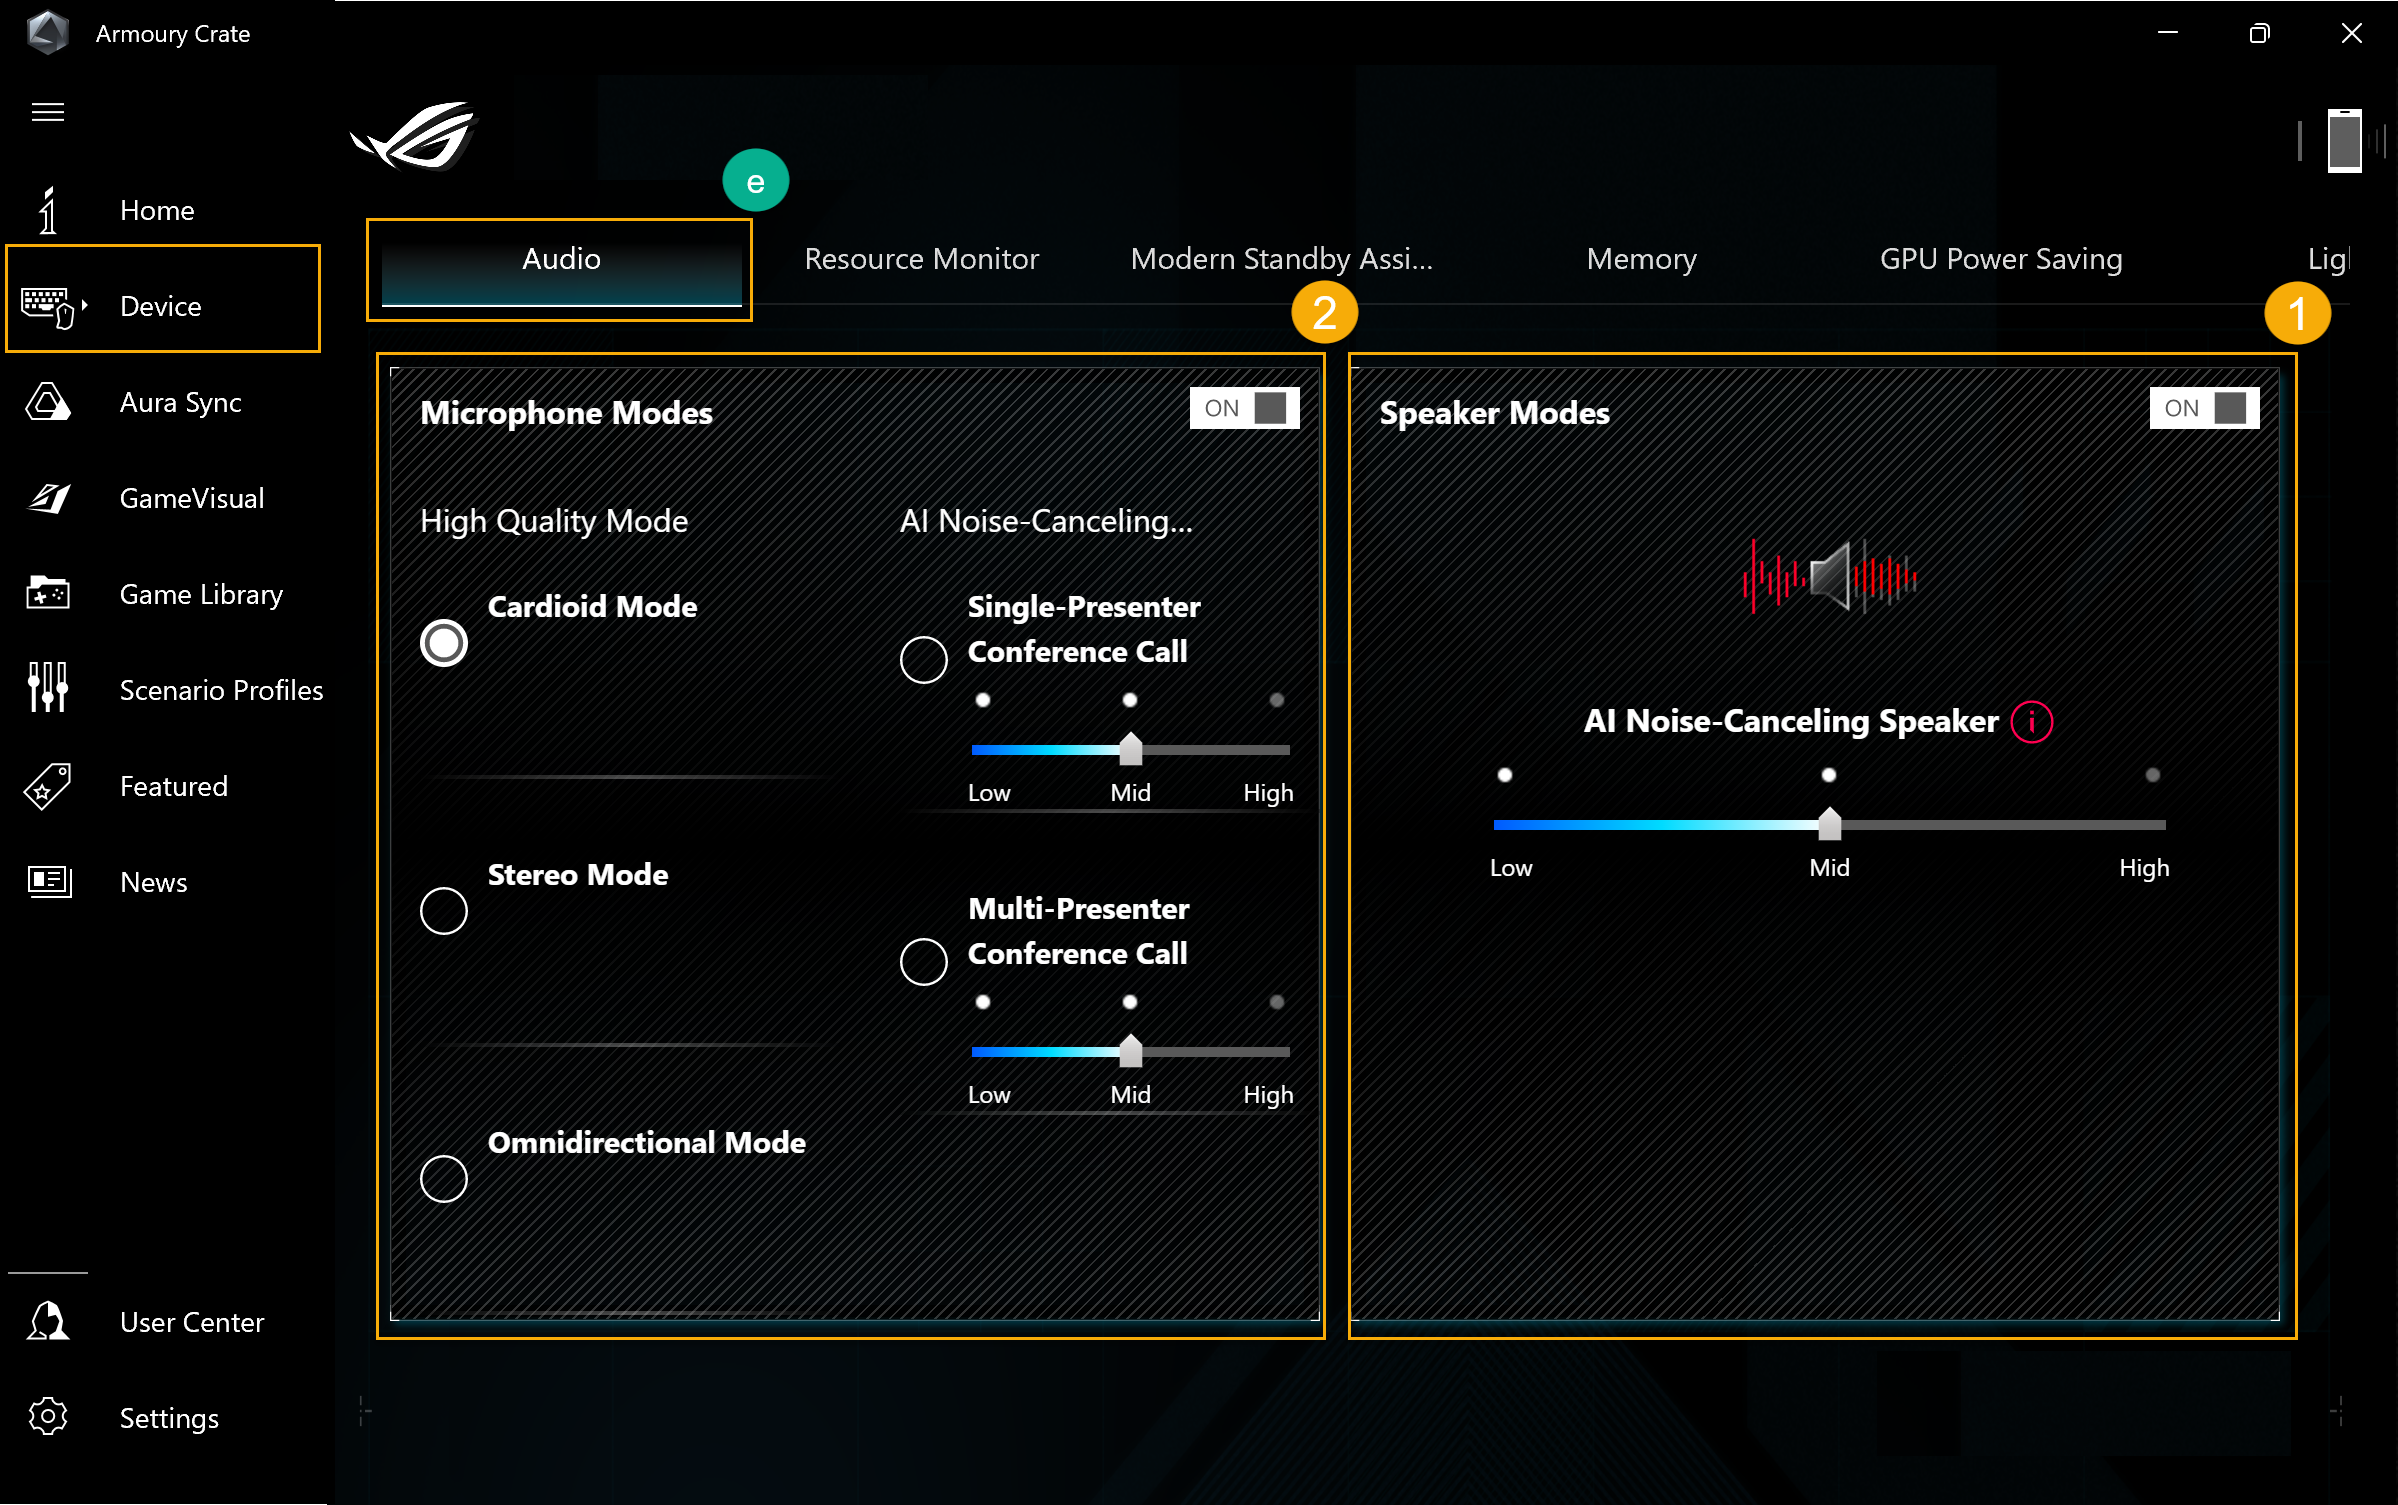
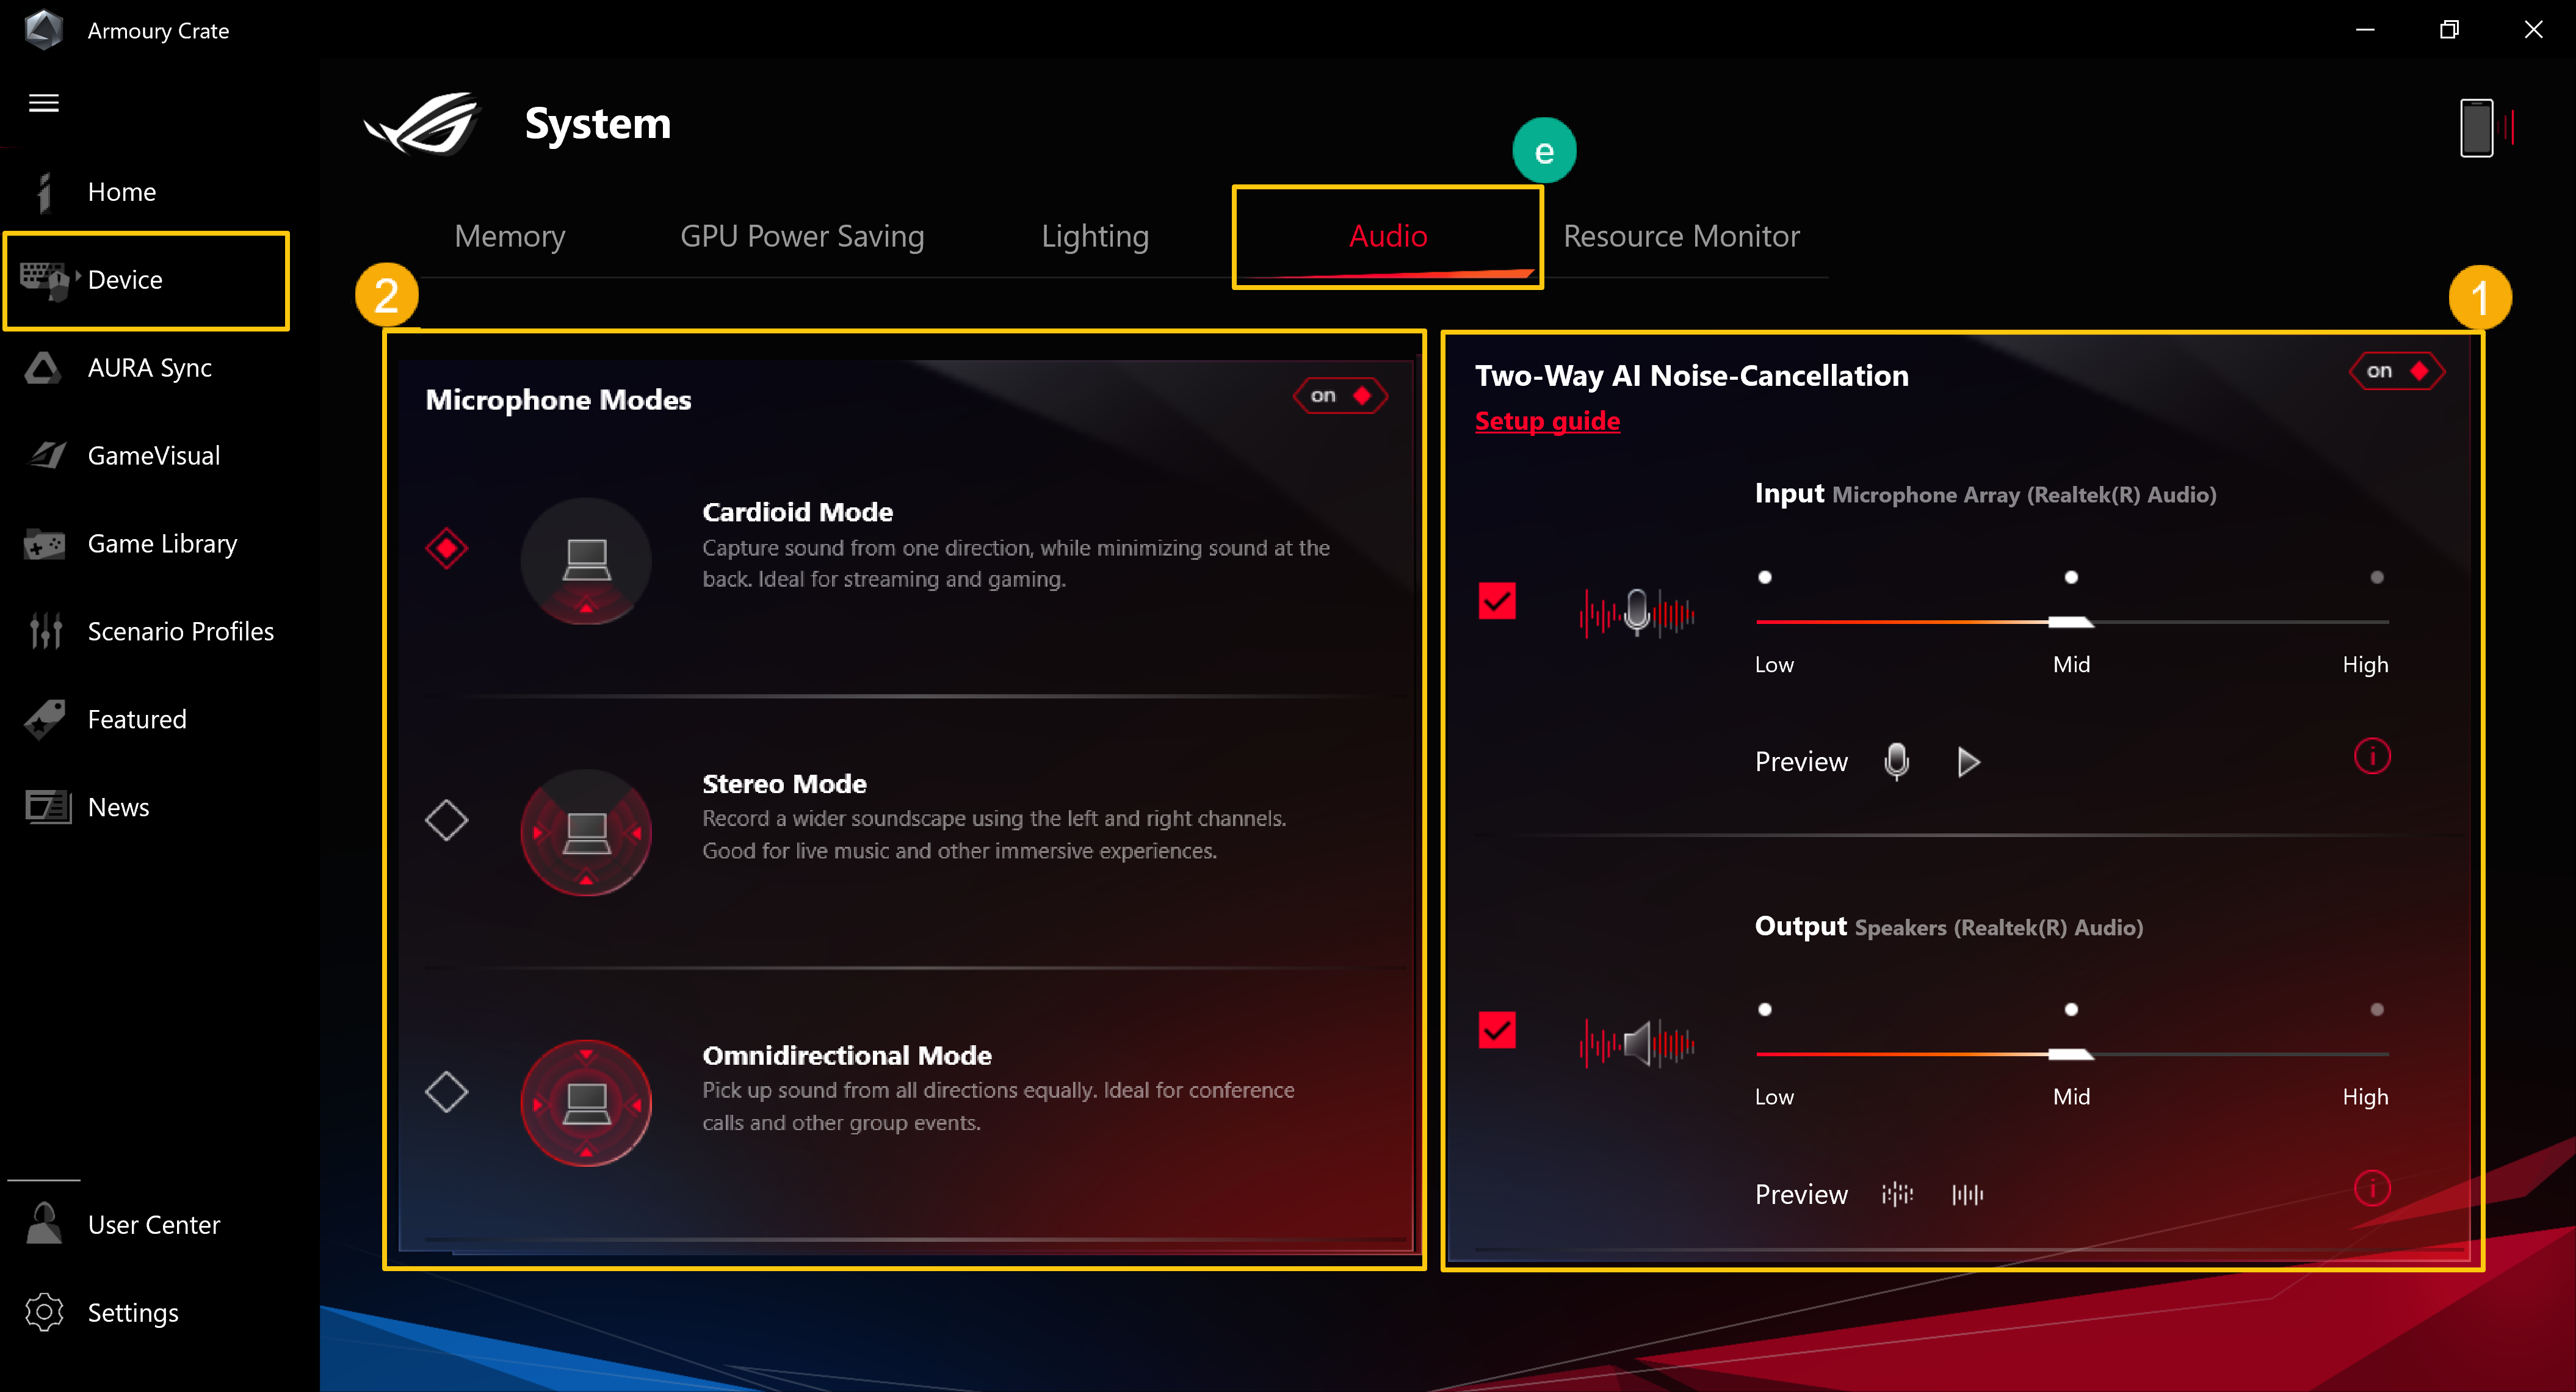
Audio(e)
Speaker Modes①:
AI Noise Cancelation, through the massive deep-learning database, the utility leverages to preserve your voice while filter out all sound except human voices from the laptop speaker. Notice: Enabling AI noise canceling may lead to higher battery consumption and change in music quality; therefore, it is recommended to be used in conference calls.
Single-Presenter Conference Call: AI noise canceling that ambient noise and other voices, allowing only the voice of the person in front of the PC to be heard clearly.
Multi- Presenter Conference Call: AI noise canceling that ambient noise whilst identifying multiple voice from varying directions and distances, enabling the listener to hear all the voice more clearly and ate the same volume level.
CARDIOID Mode: Capture sound from one direction, while minimizing sound at the back. Ideal for streaming and gaming.
STEREO Mode: Record a wider soundscape using the left and right channels. Good for live music and other immersive experience.
OMNI Mode: Pick up sound from all directions equally.
*This operation interface will be applicable to 2023 new series gaming laptop. For previous [Audio] operation interface, please refer to Two-Way AI Noise Cancelation Setup Guide.
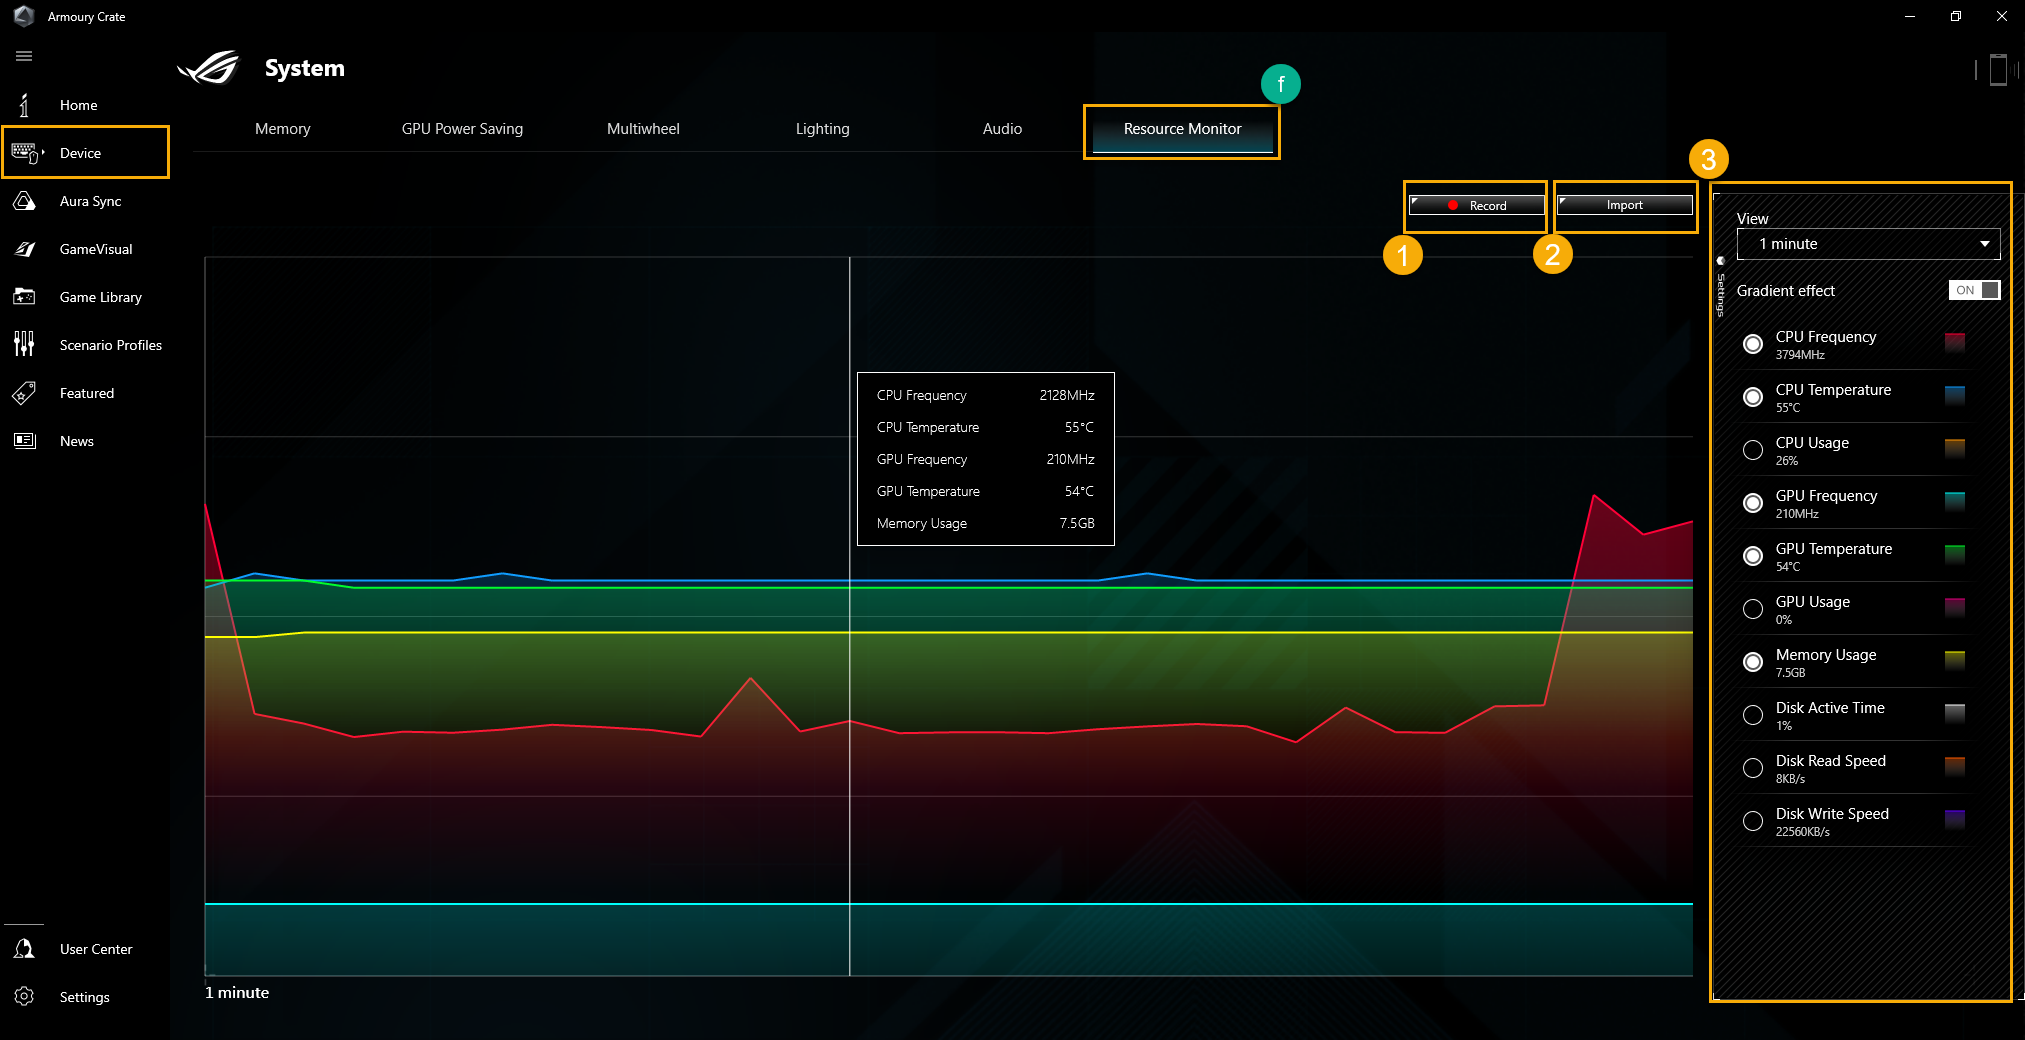
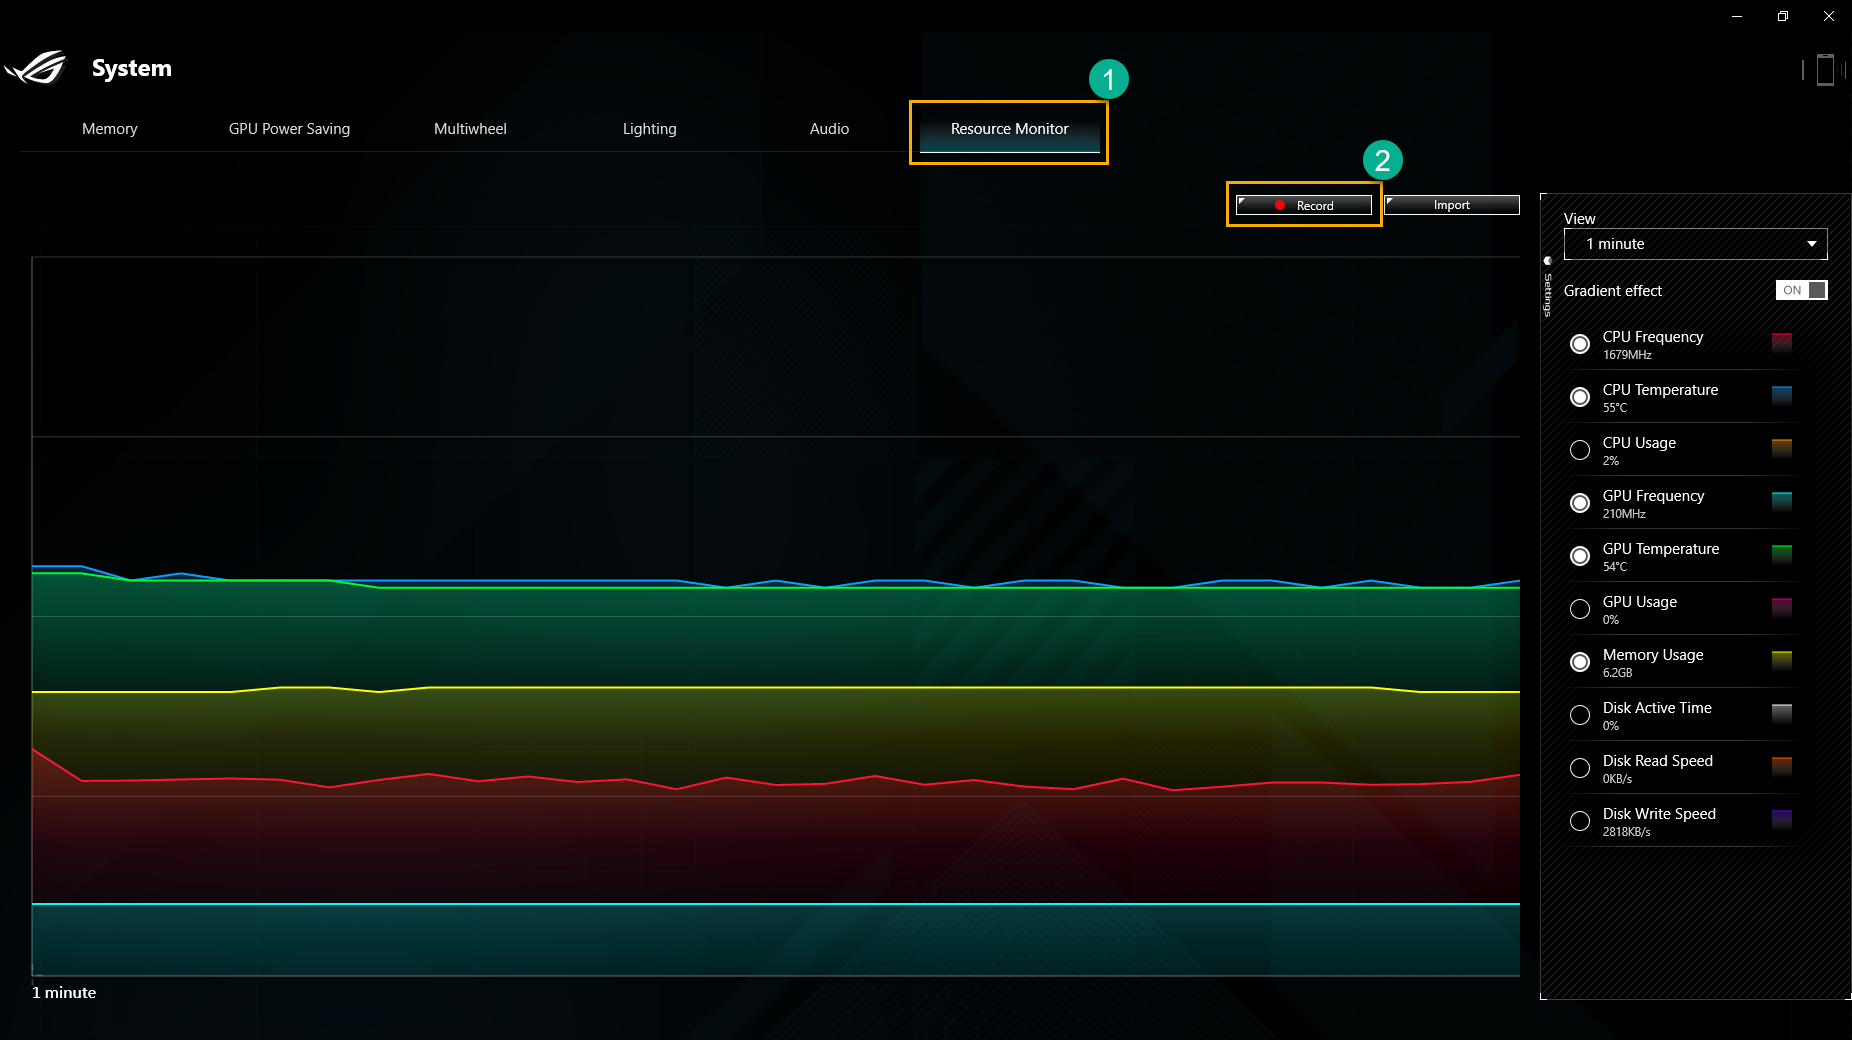
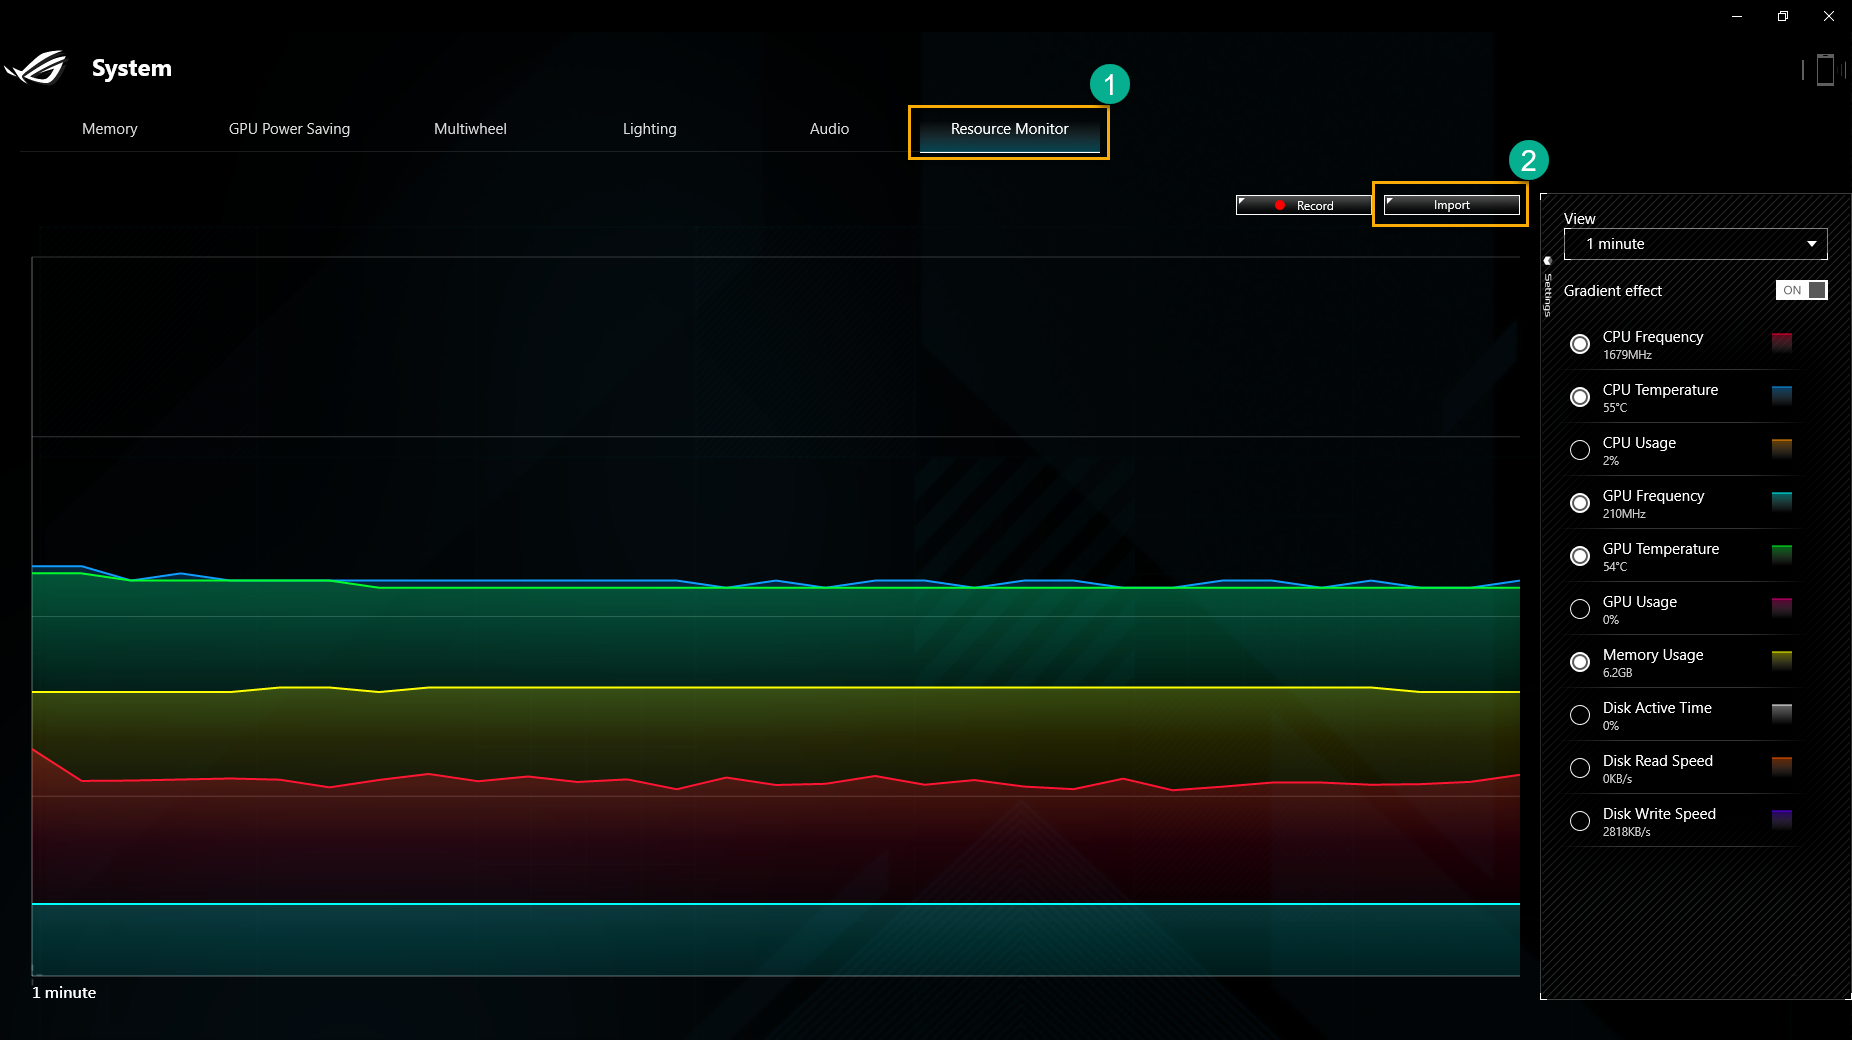
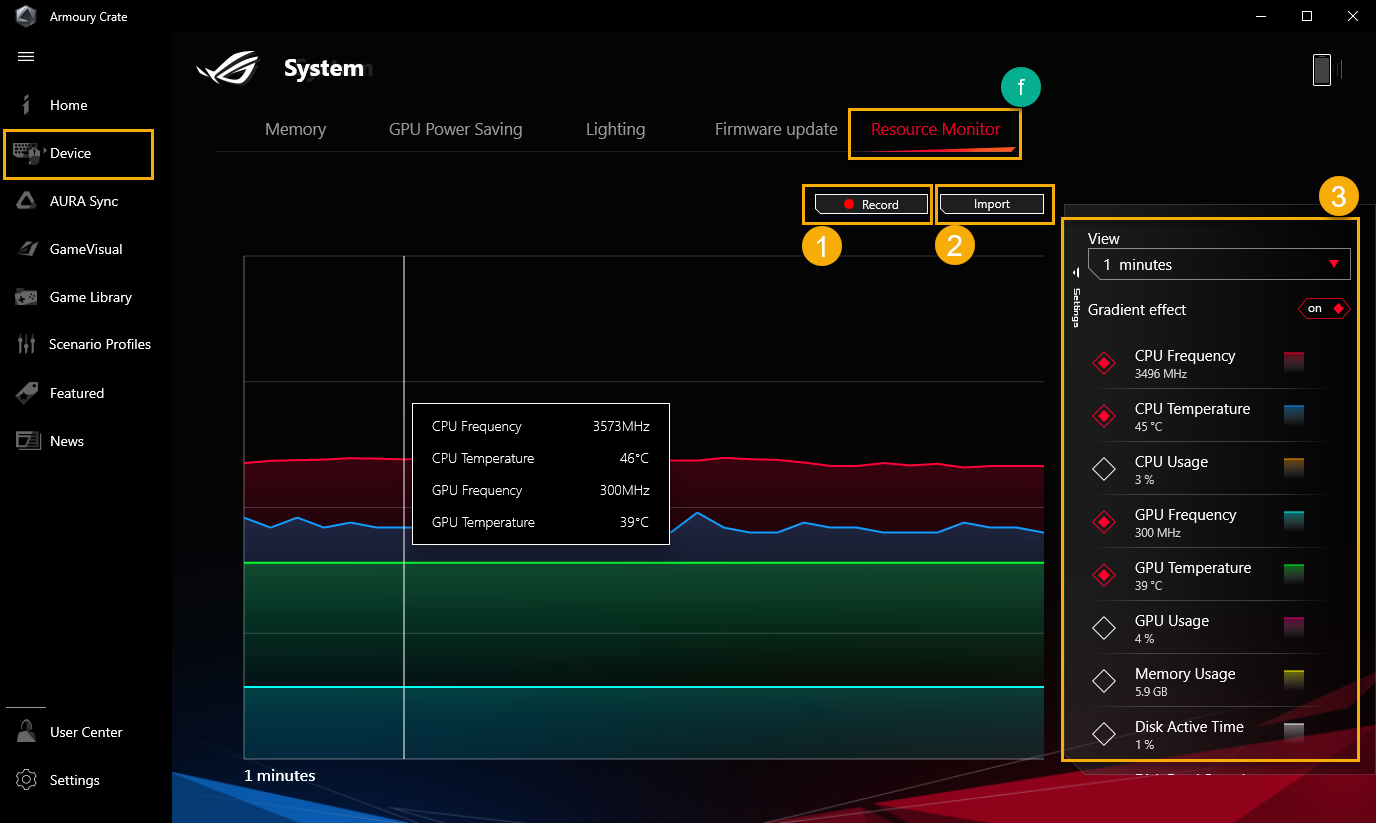
Resource Monitor(f)
To view and monitor system information for CUP、GPU、Memory、Disk relative resource.
Record①: Gamers can record CPU、GPU、Memory and Disk resource information.
Import②: Gamers can import previous resource record, and check those resource details.
Setting③: Gamers can adjust timer view、Gradient effect and resource items.
*For more details, please refer to Using "Record" and "Import" function in Resource Monitor
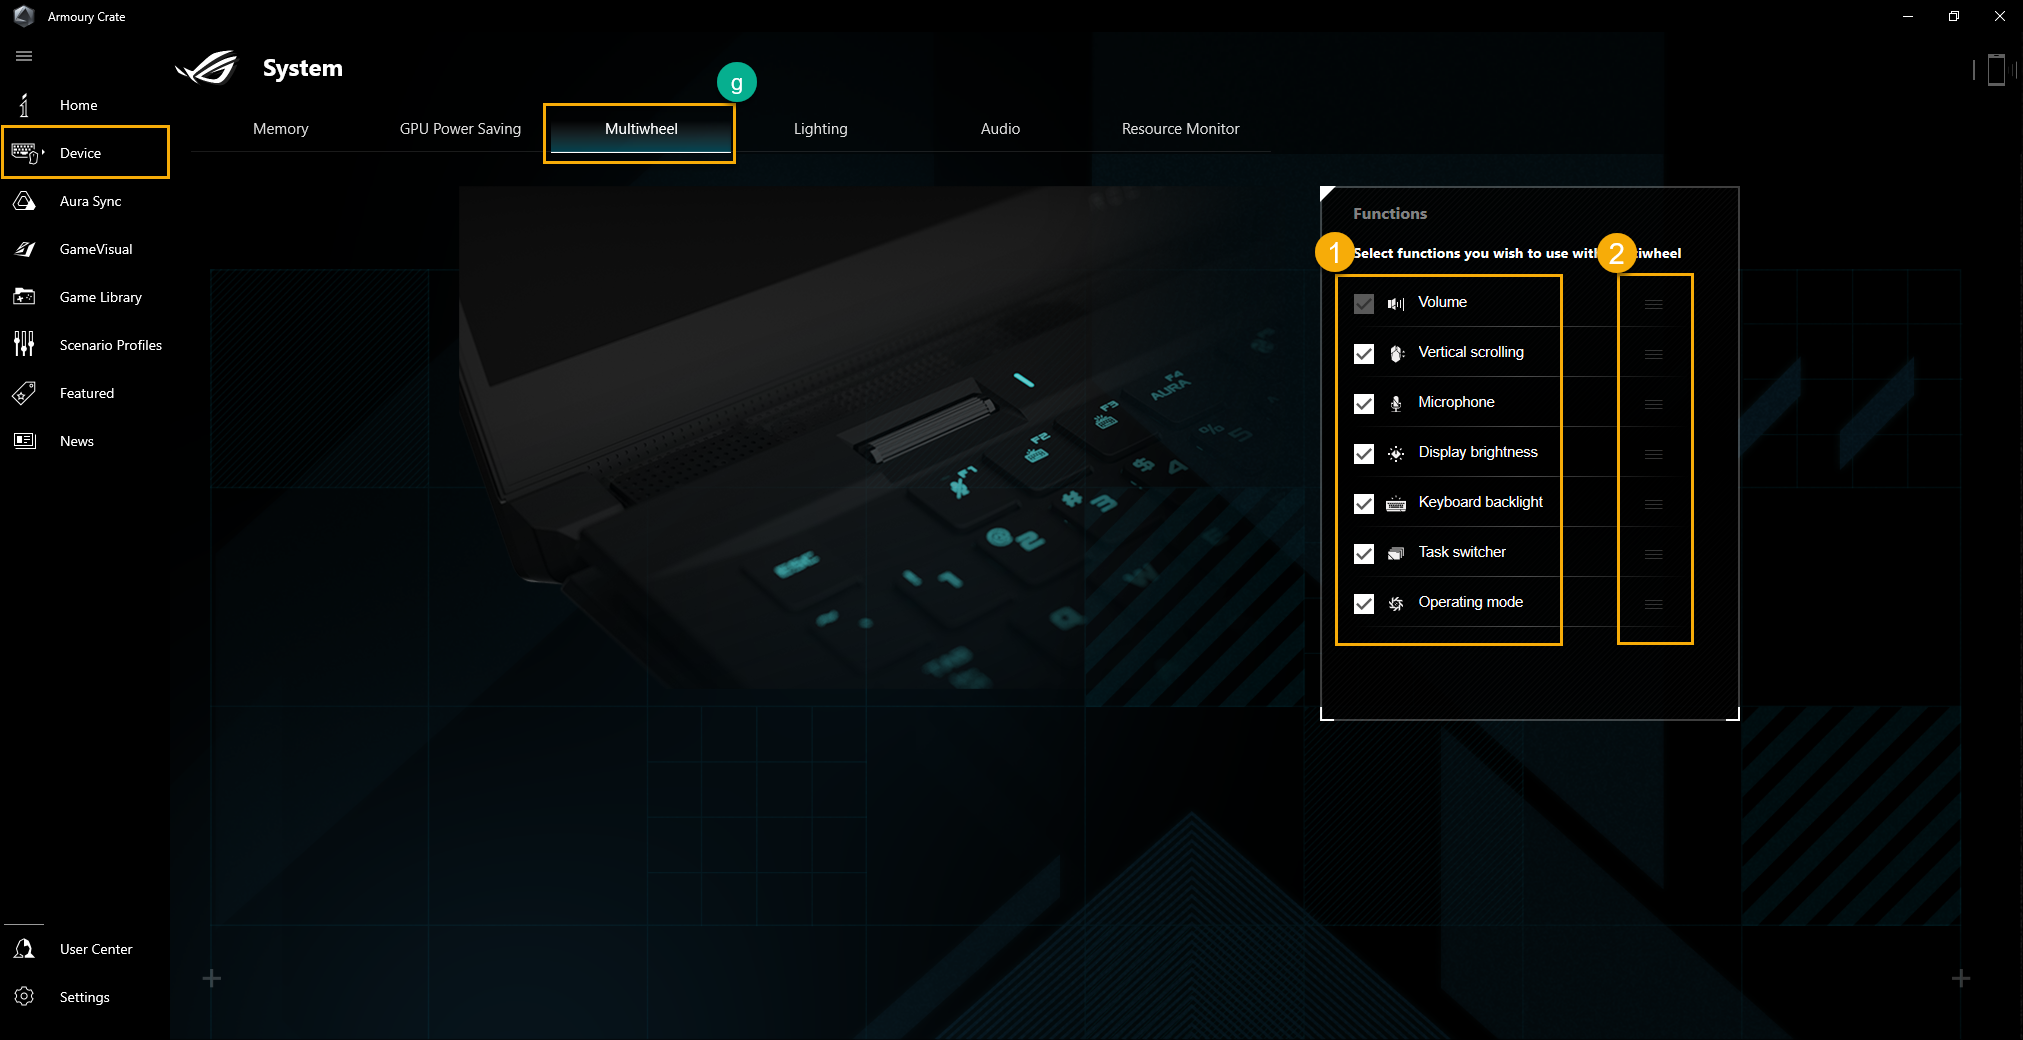
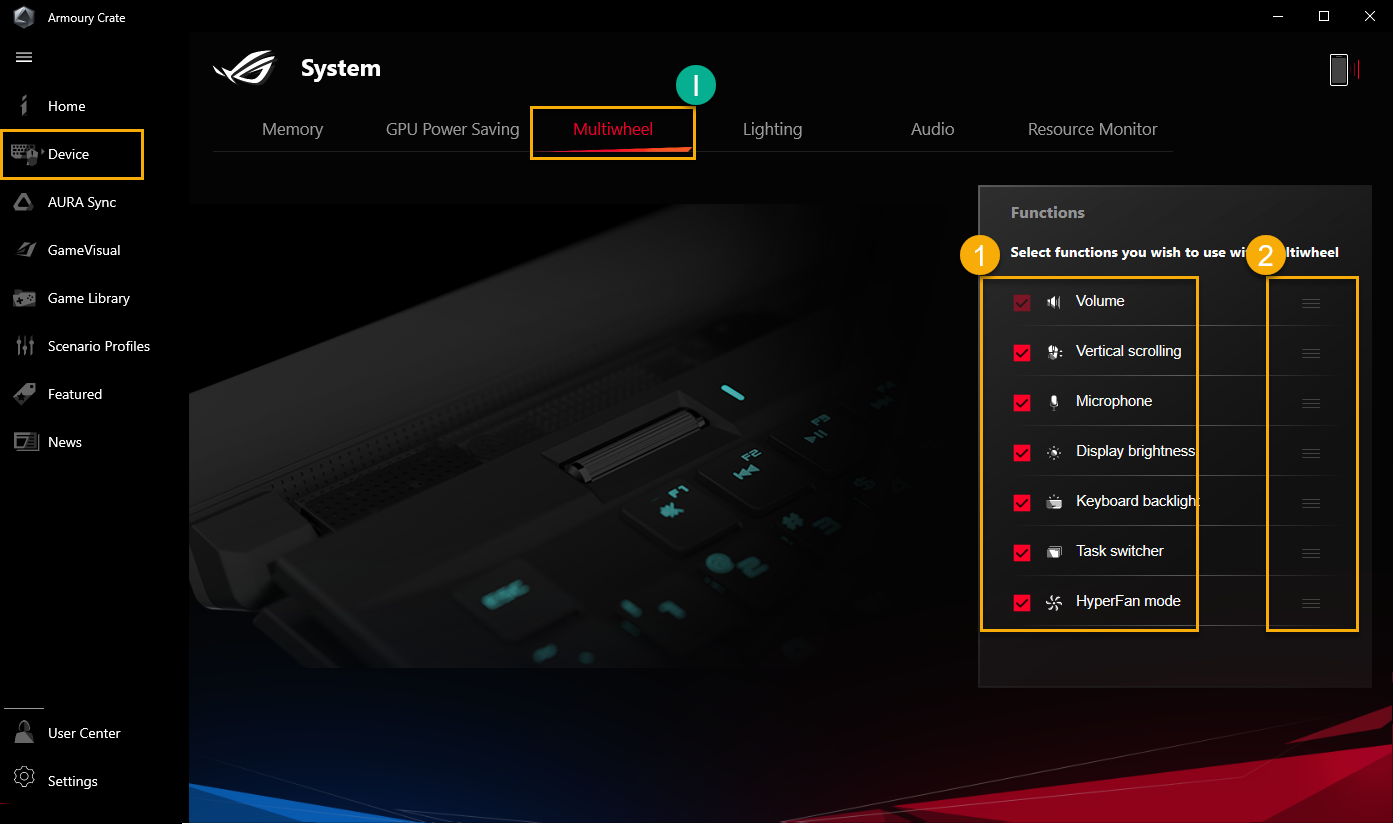
Multiwheel(g)
The Multiwheel provides more advanced functions than previous Volume wheel, and gamers can optimize the operation process with function customizable. Long press to trigger setting bar, and then scroll and click Multiwheel to select function you need. After that, scrolling the Multiwheel for the function adjustment. Besides, gamers can also make more settings through the Armoury Crate application.
Function menu①: Gamers can click or unclick the item to add or reduce the Multiwheel function to display, the Volume item is default.
Order adjustment②: Thru dragging the function items, gamers can adjust function order to display.
*Only available on laptop equipped with the Multiwheel (GX703 Series), and please refer to ROG Official Website for more details.
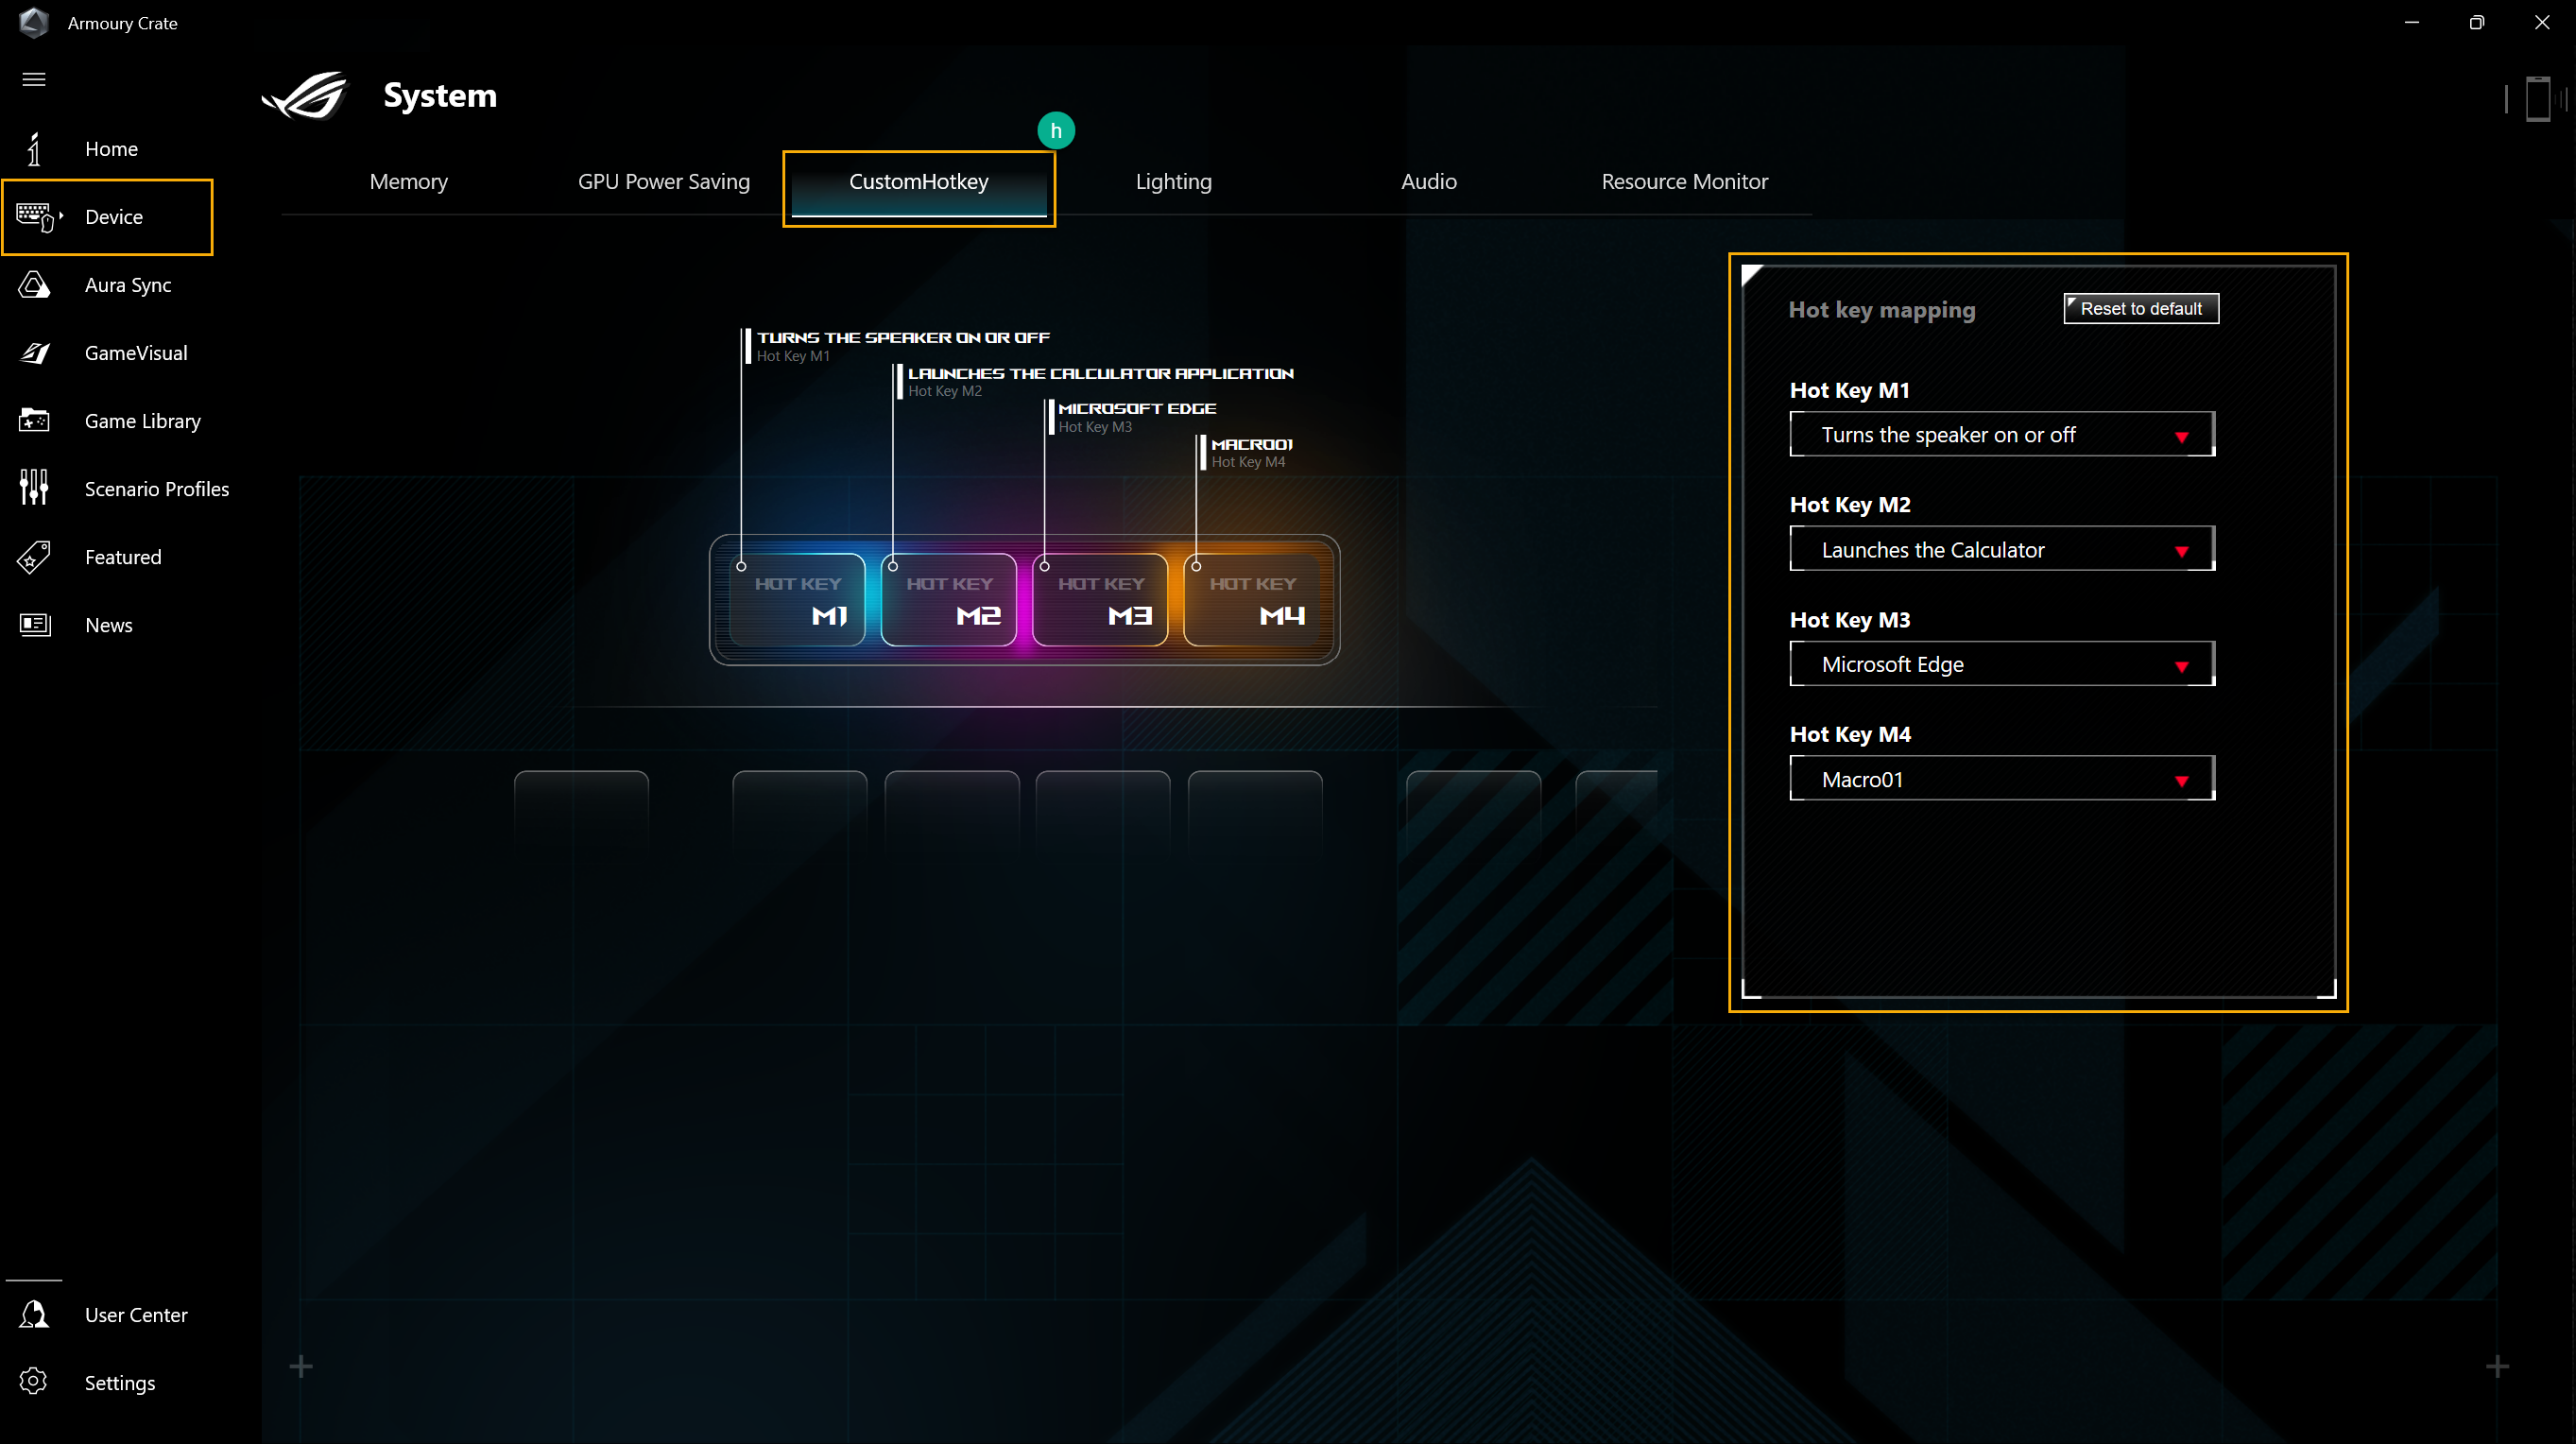
Device- Customizable Hotkey(h)
Customizable Hotkey setting. Depending on the model、hotkey amount and arrangement of the hotkeys will be different. Players can set the Function Key , activate applications and key combinations for each hotkey by themselves.
*The feature can only support 2022 new ROG series models.
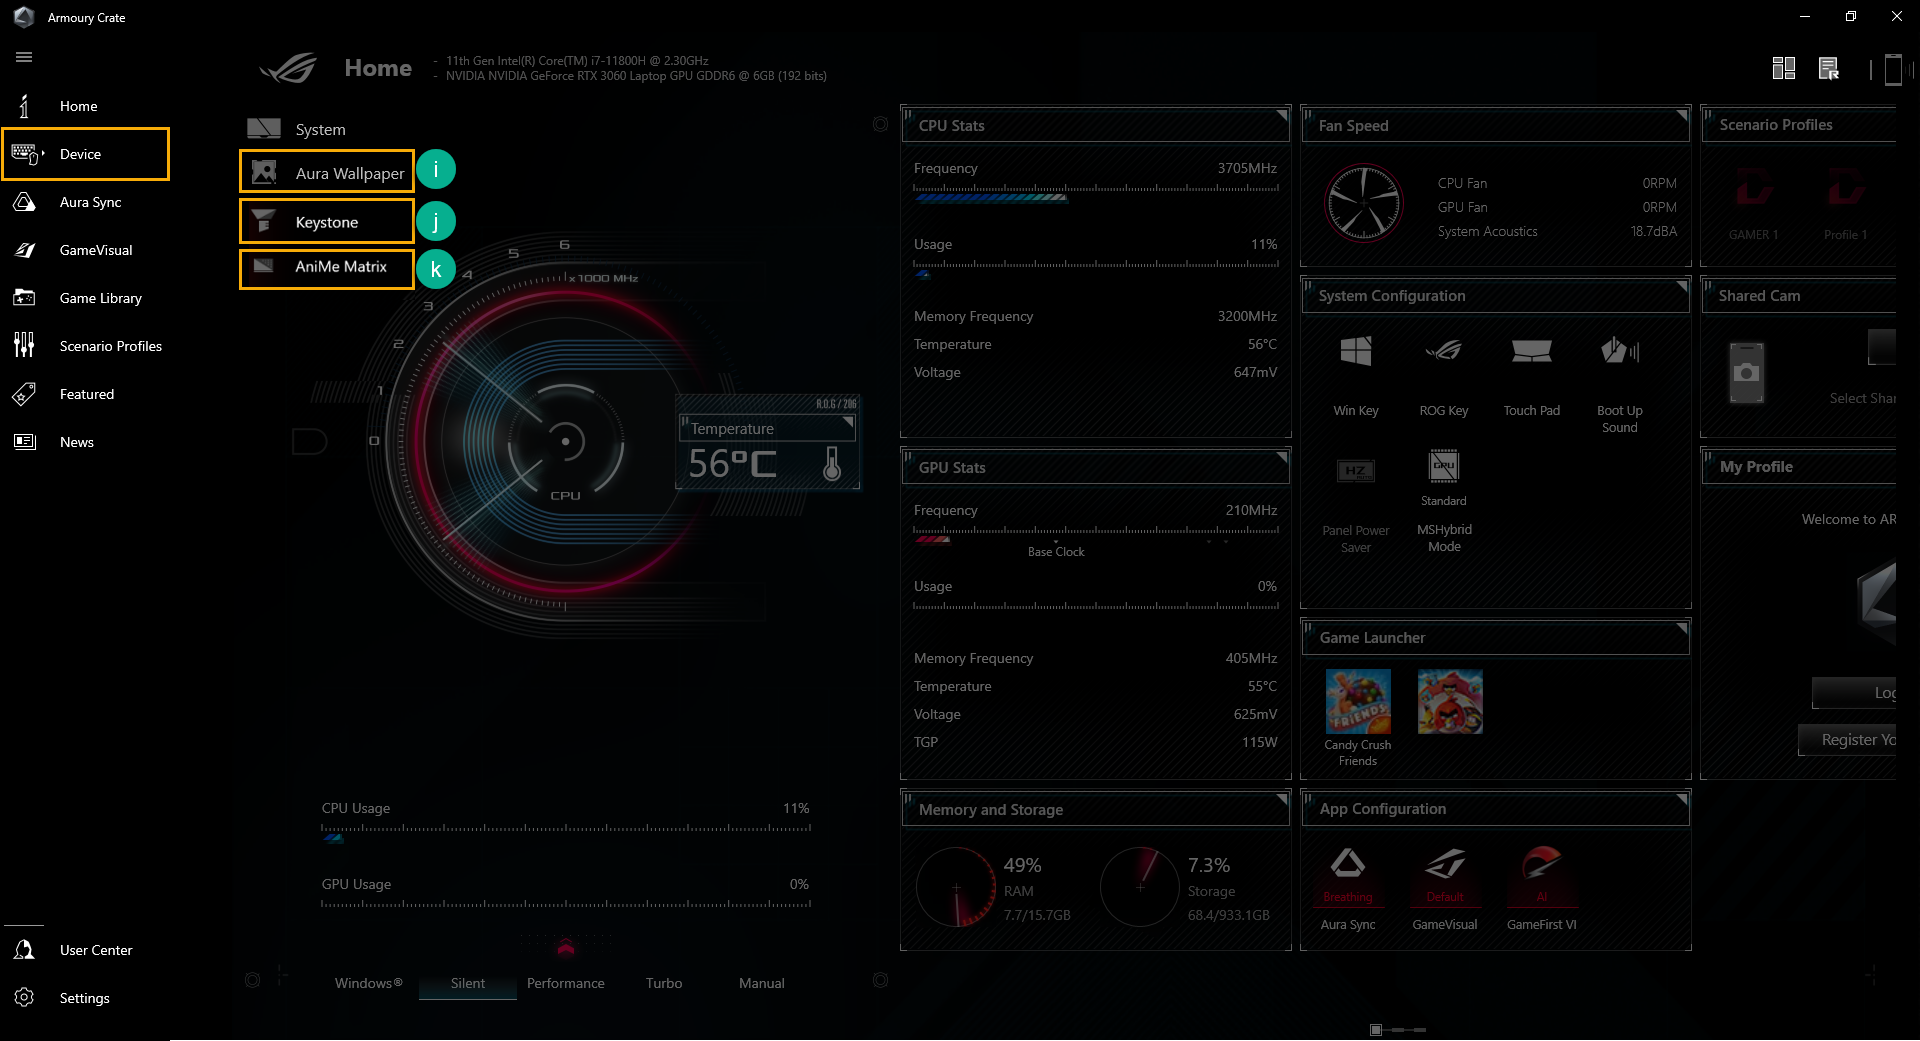
Device- Aura Wallpaper(i)
Aura Wallpaper is an extension application of the Armoury Crate platform, and turns entire desktop into an RGB device. Aura Wallpaper allows user to set up the exclusive wallpaper and select of the RGB lighting on the wallpaper, and that can also synchronize the wallpaper with other Aura Sync compatible devices. Through synchronizing Wallpaper、laptop and peripheral devices lighting effect perfectly combined to create a personal gaming style.
*Please refer to Aura Wallpaper Introduction for operation detail.
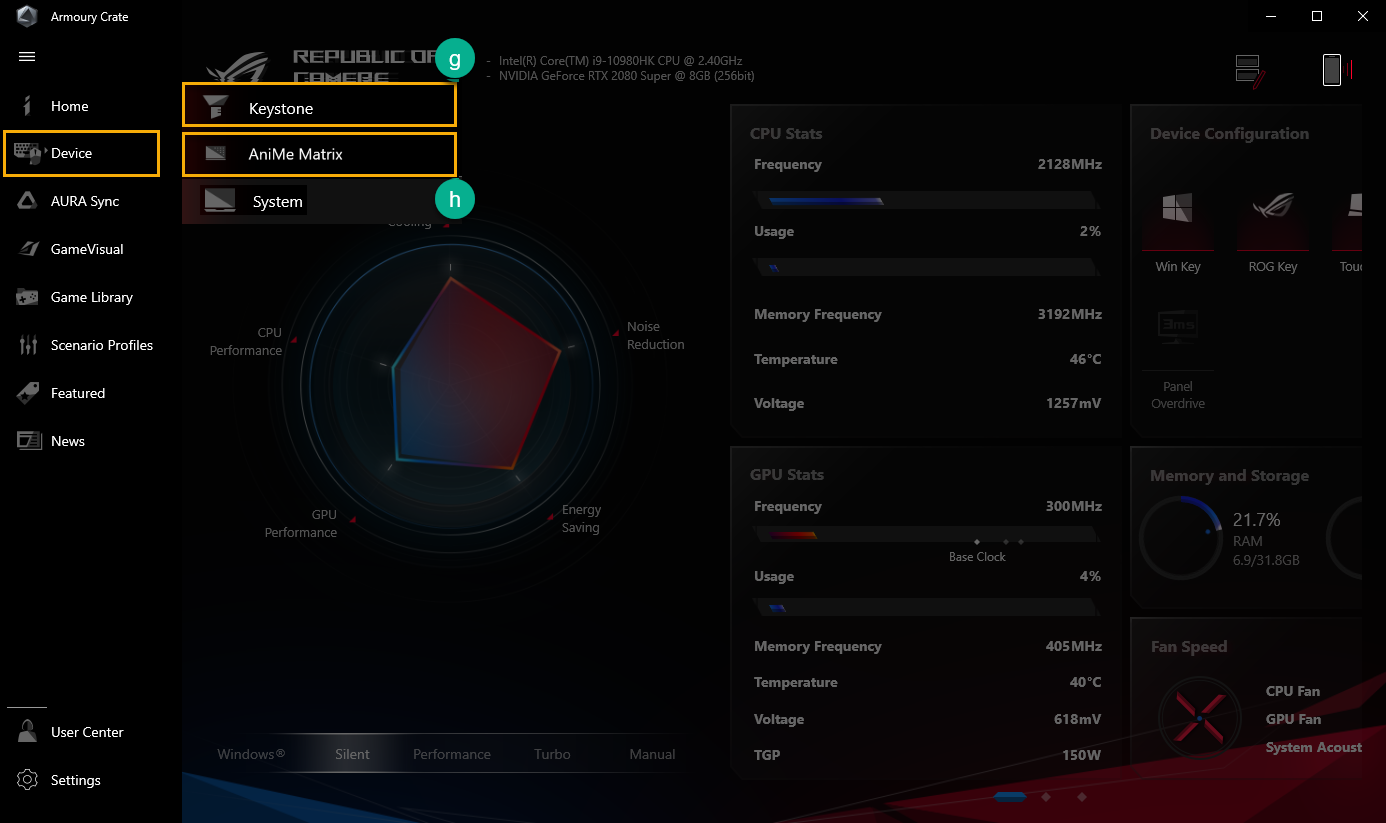
Device- Keystone(j)
Keystone can easily personalize your gaming laptop and desktop. The pluggable keystone attracts the exclusive slot on the right side of the keyboard by magnetic force. When keystone docked, It can apply lighting effects、sound effects and activate Shadow Drive storage capacity.
*The function can only support some models, please refer to Keystone Introduction for operation detail.
Device- AniMe Matrix(k)
Creators can freely express your creativity through the AniMe Matrix™ setup with custom patterns、GIF animations or visual animations of sound effects that change with the rhythm of the music, and can also display the status of the system battery level.
*The function can only support some models, please refer to AniMe Matrix™ Introduction for operation detail.
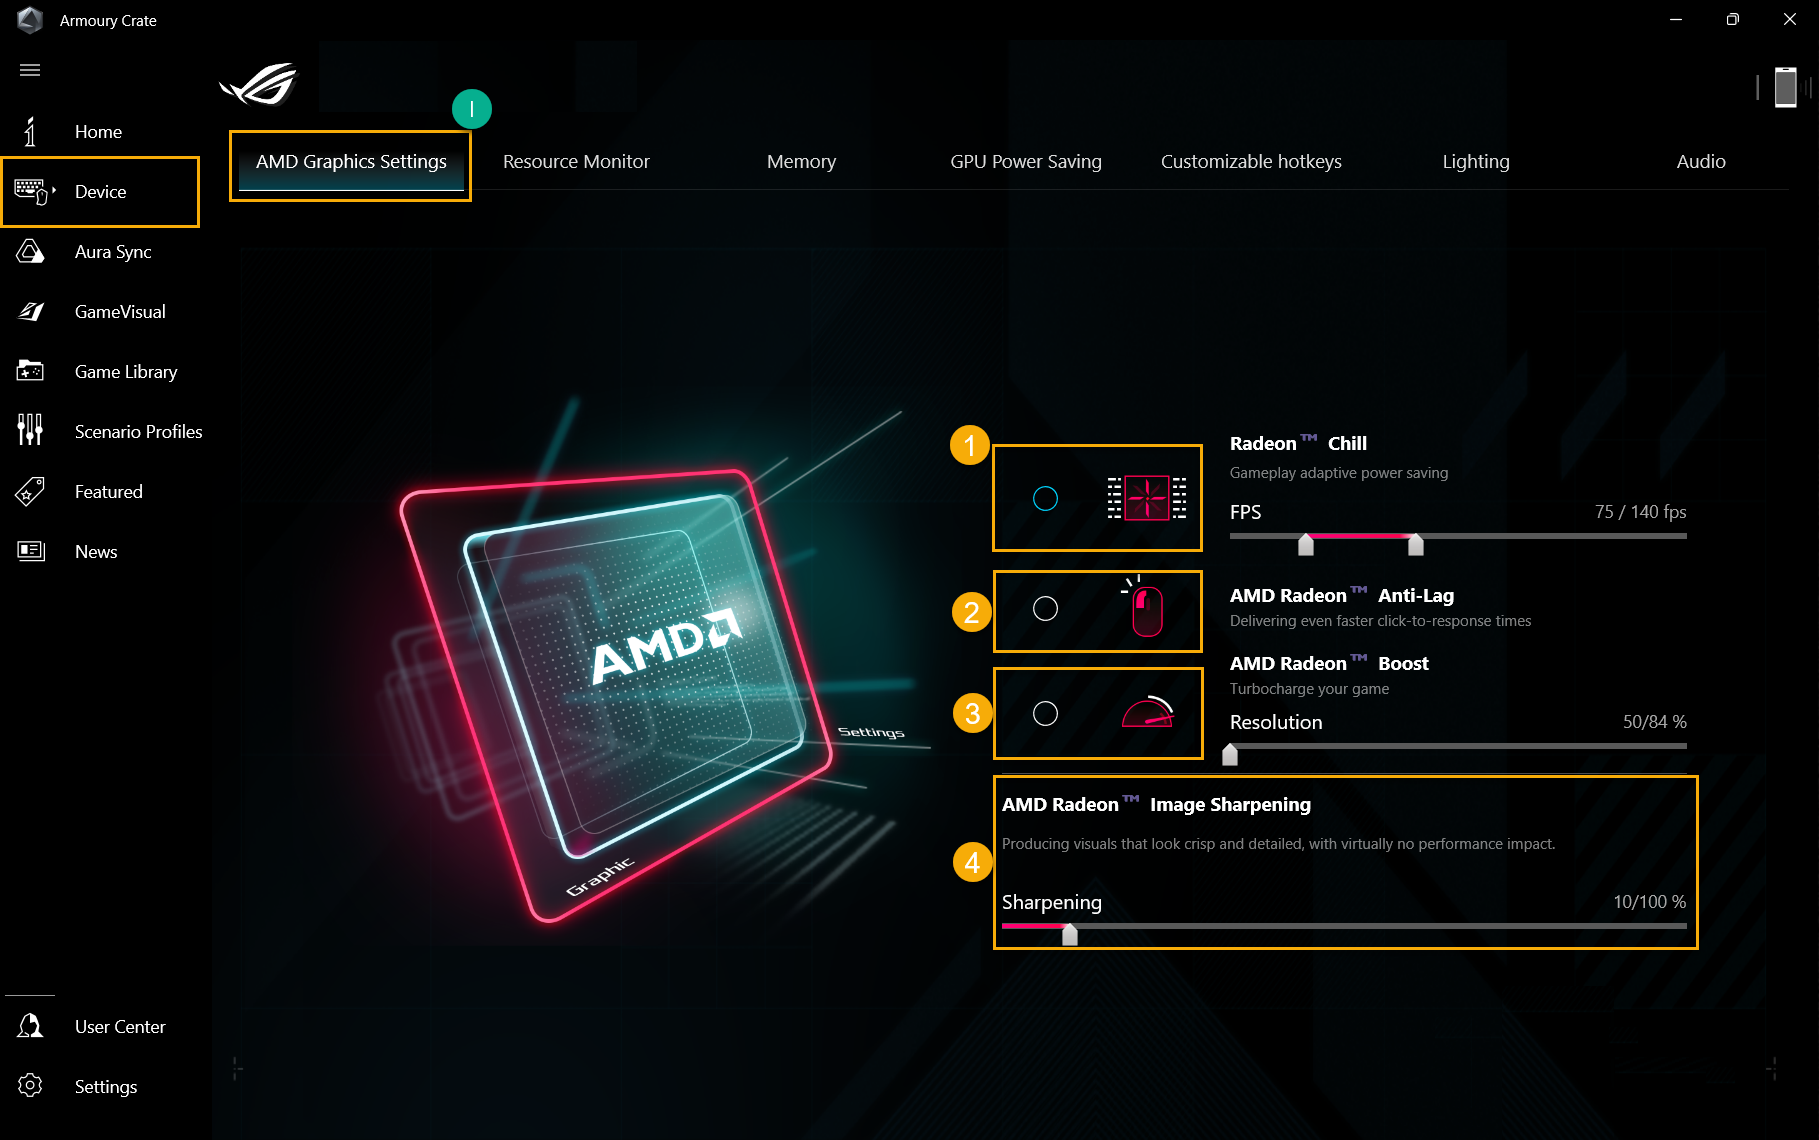
AMD Graphics Setting(l)
Radeon™ Chill①: To control and adjust FPS for power conserving.
AMD Radeon™ Anti-Lag②: To reduce input lag, delivering even faster click-to-response times.
AMD Radeon™ Boost③: To control and adjust resolution for performance improving.
AMD Radeon™ Image Sharpening④: To adjust sharpening to produce visuals that look crisp and detailed.
*The feature can only support device equipped both AMD CPU and AMD discrete GPU.
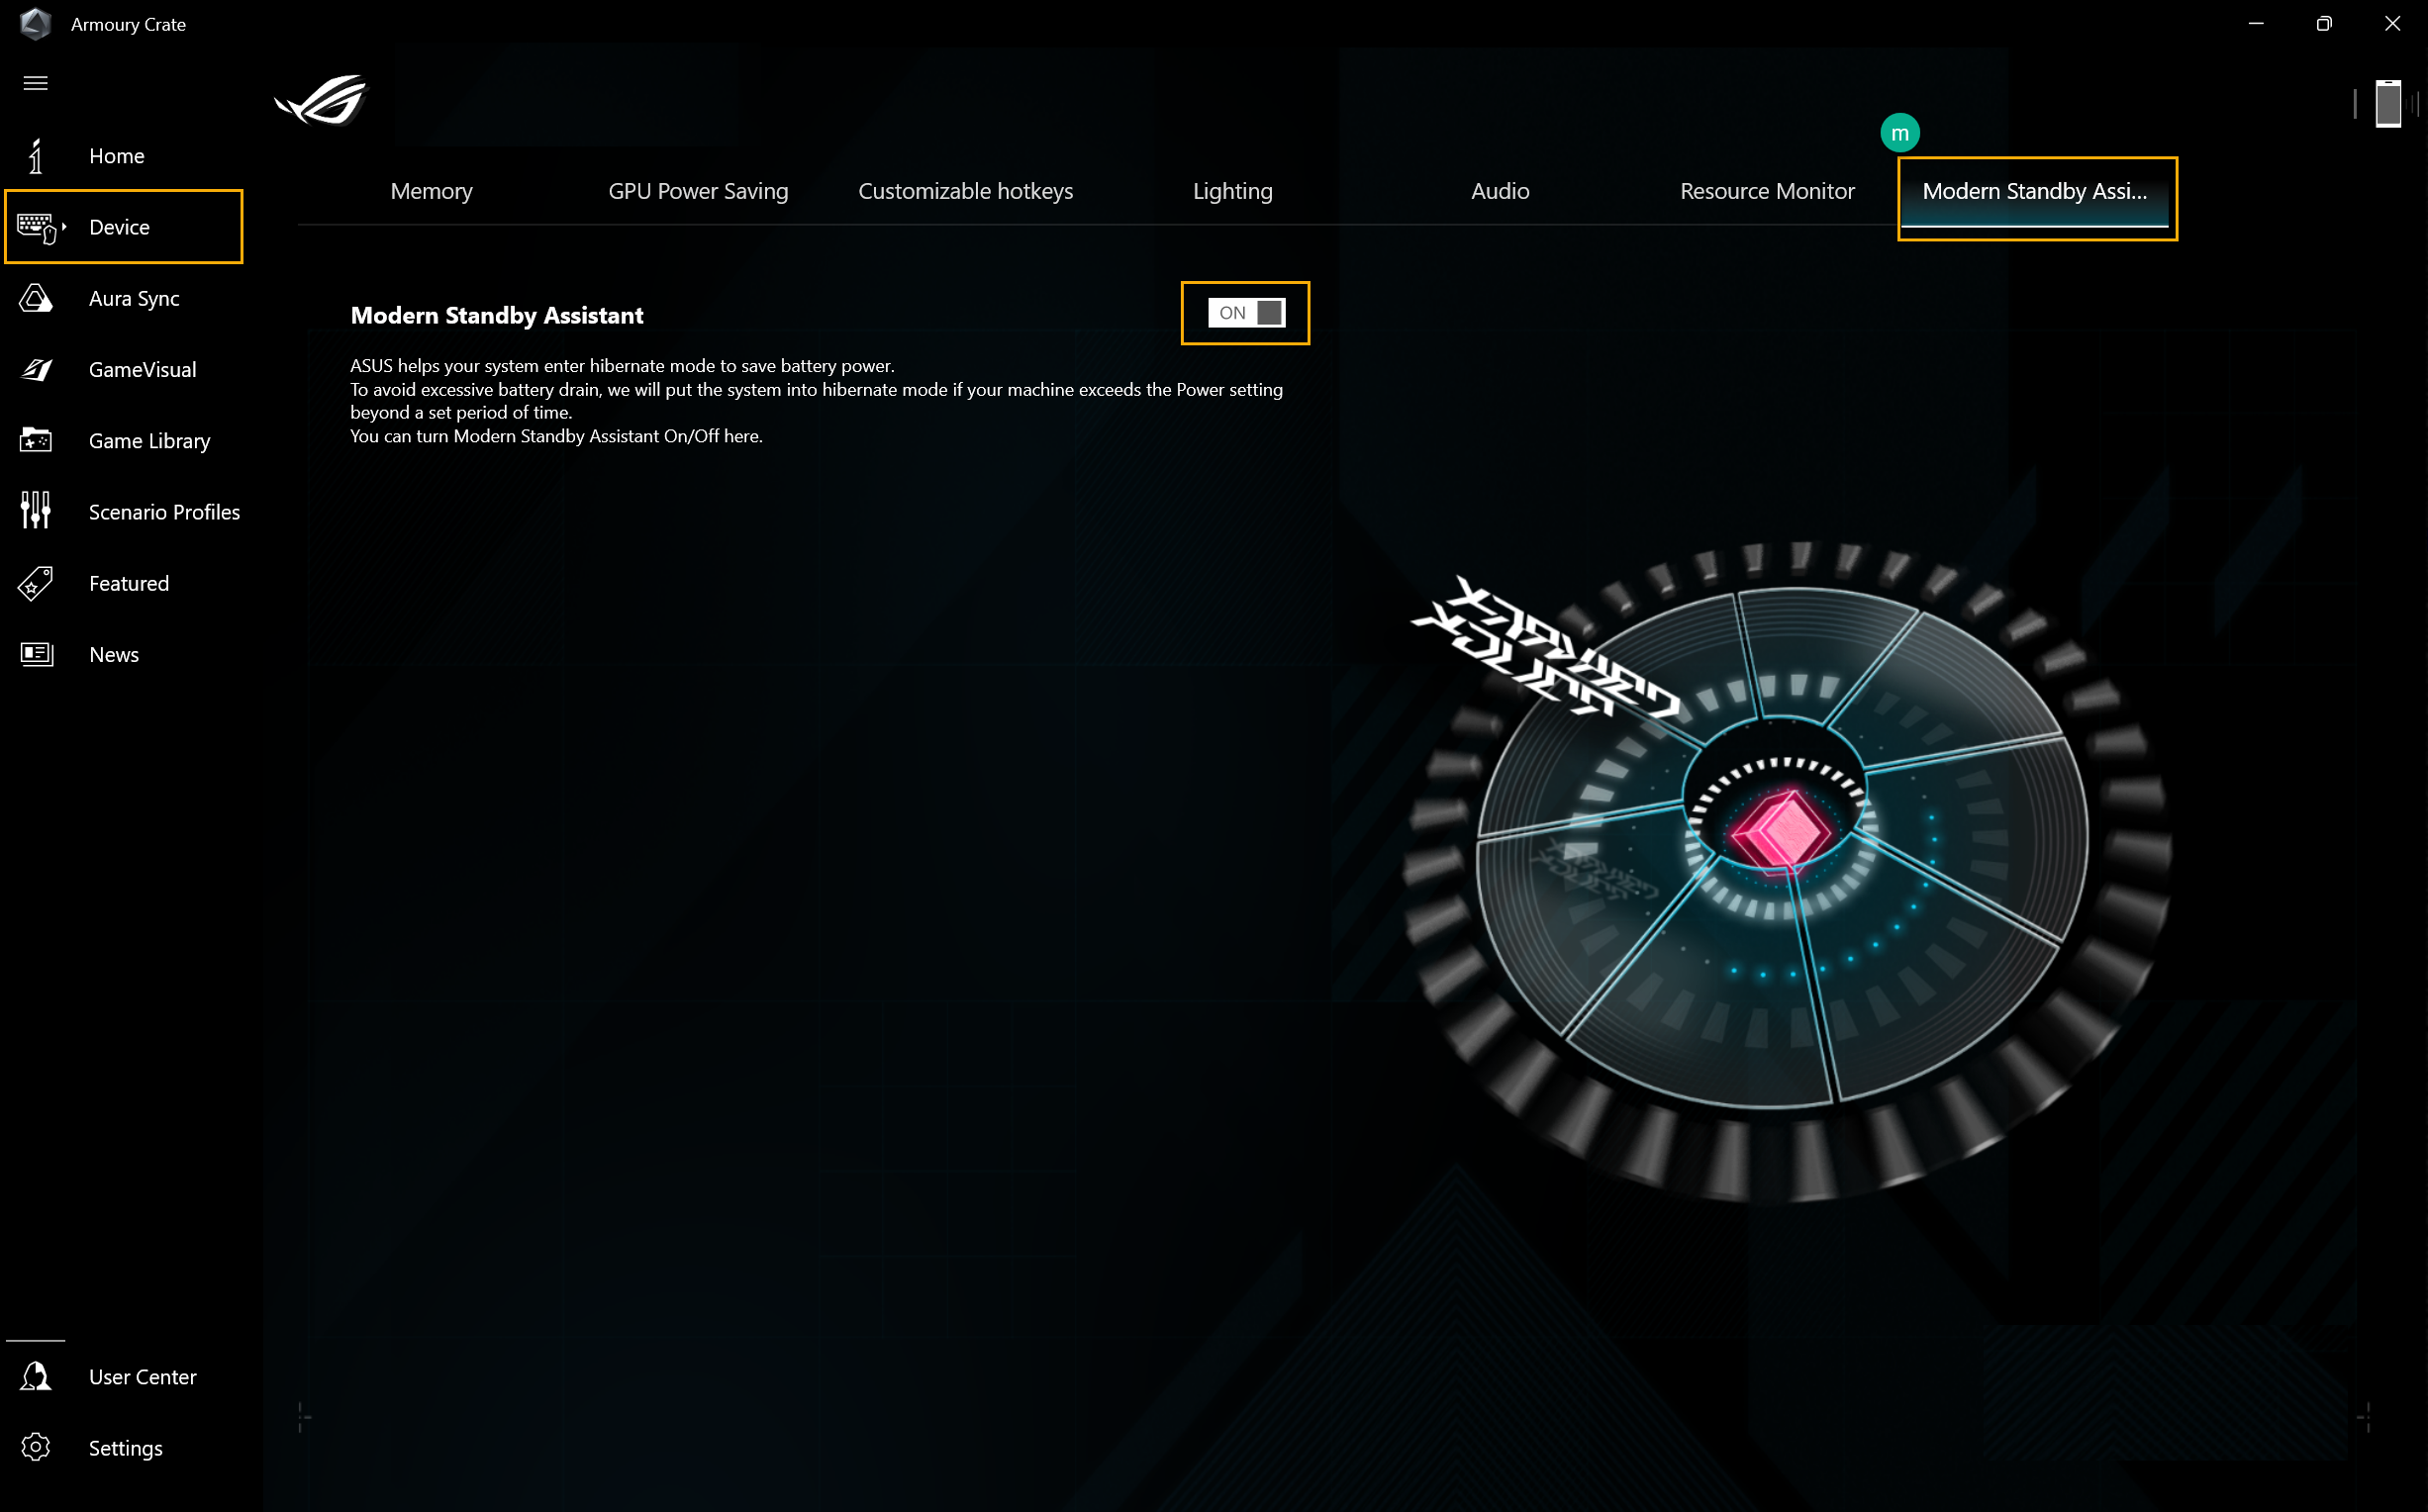
Modern Standby Assistant(m)
It helps your system enter hibernate mode to save battery power. To avoid excessive battery drain, we will put the system into hibernate mode if your machine exceeds the power setting beyond a set period of time. You can turn Modern Standby Assistant On/Off here.
*The feature can only support 2023 new gaming laptop series models.
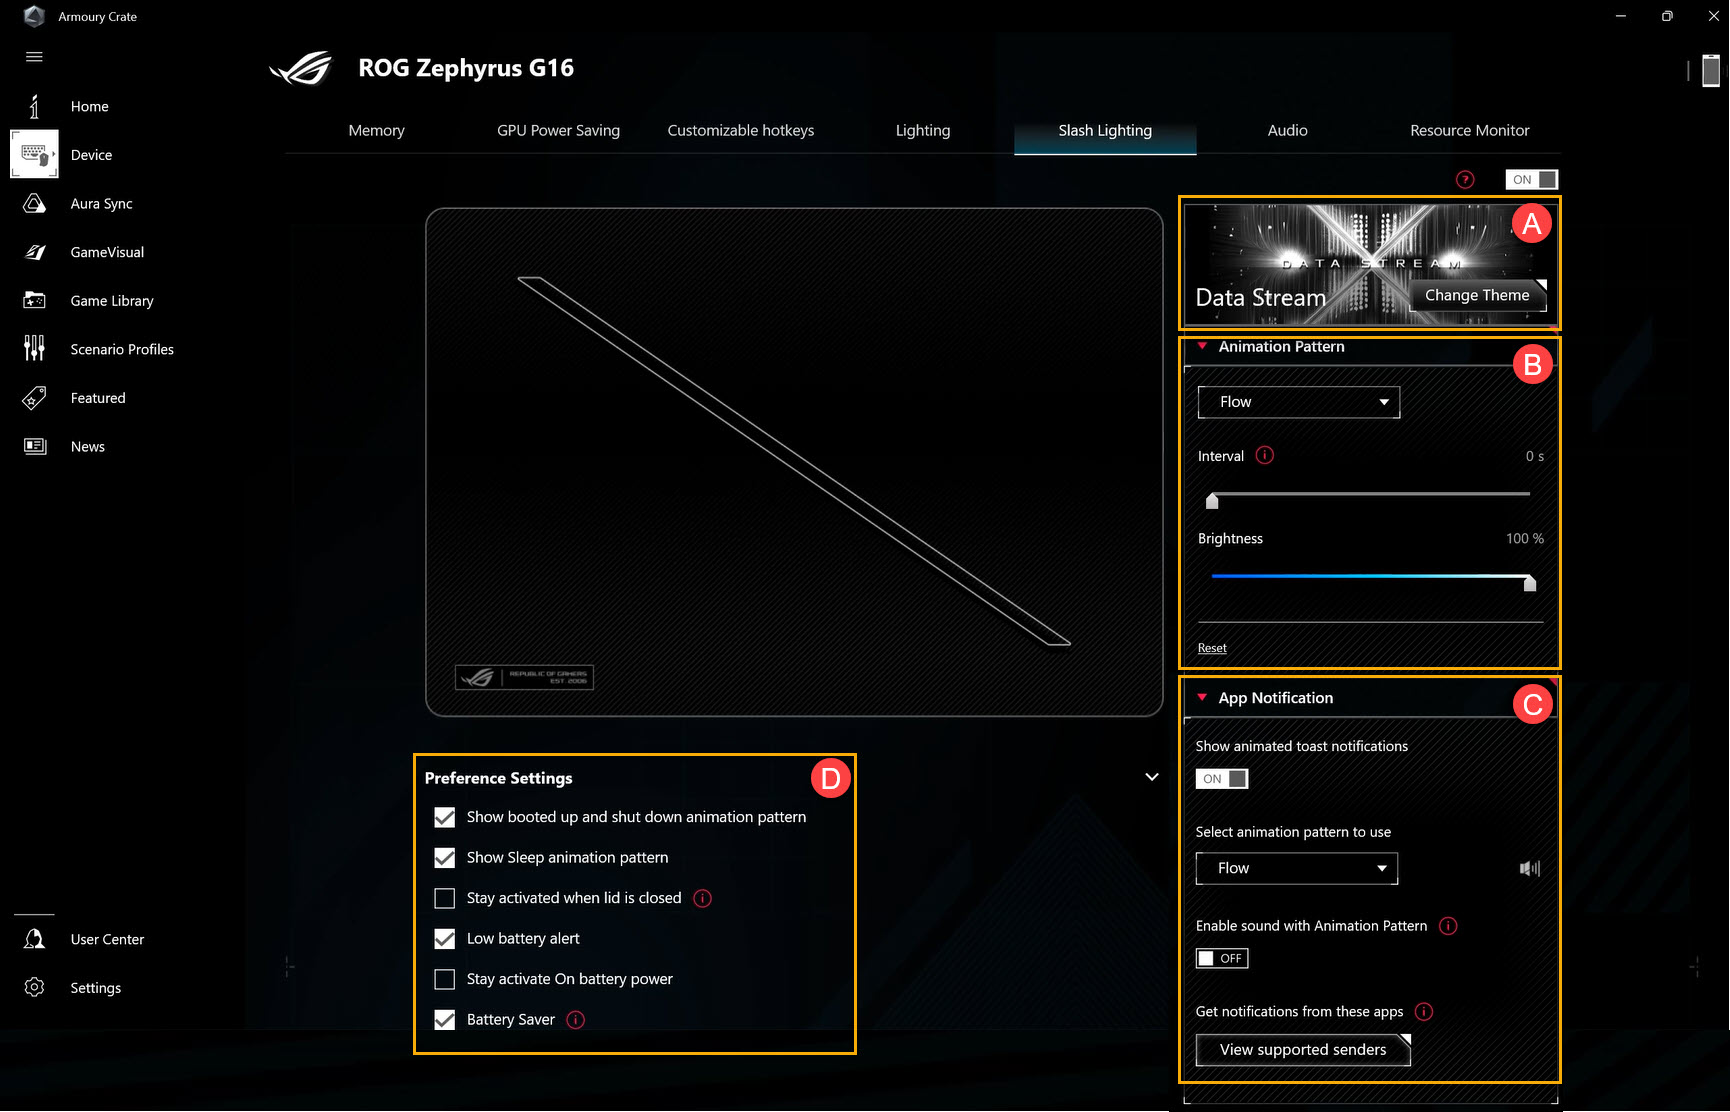
Slash Lighting (n)
Slash Lighting LED is on the back side of LCD cover, it made by 28 mini-LEDs to create a customized experience.
User can thru Armoury Crate to setup, and it is allowing users to customize their own lighting experience basing on different needs.
A Change Theme: User can select one theme to apply for.
B Animation pattern: Make the basic adjustments to Interval time of light effect and brightness.
C App Notification: Setup the light effect when received App notification.
D Preference Settings: According to personal preference settings for the lighting effects of your laptop in different states.
*Only available on laptop equipped with Slash Lighting bar (GU604& GA403 Series),
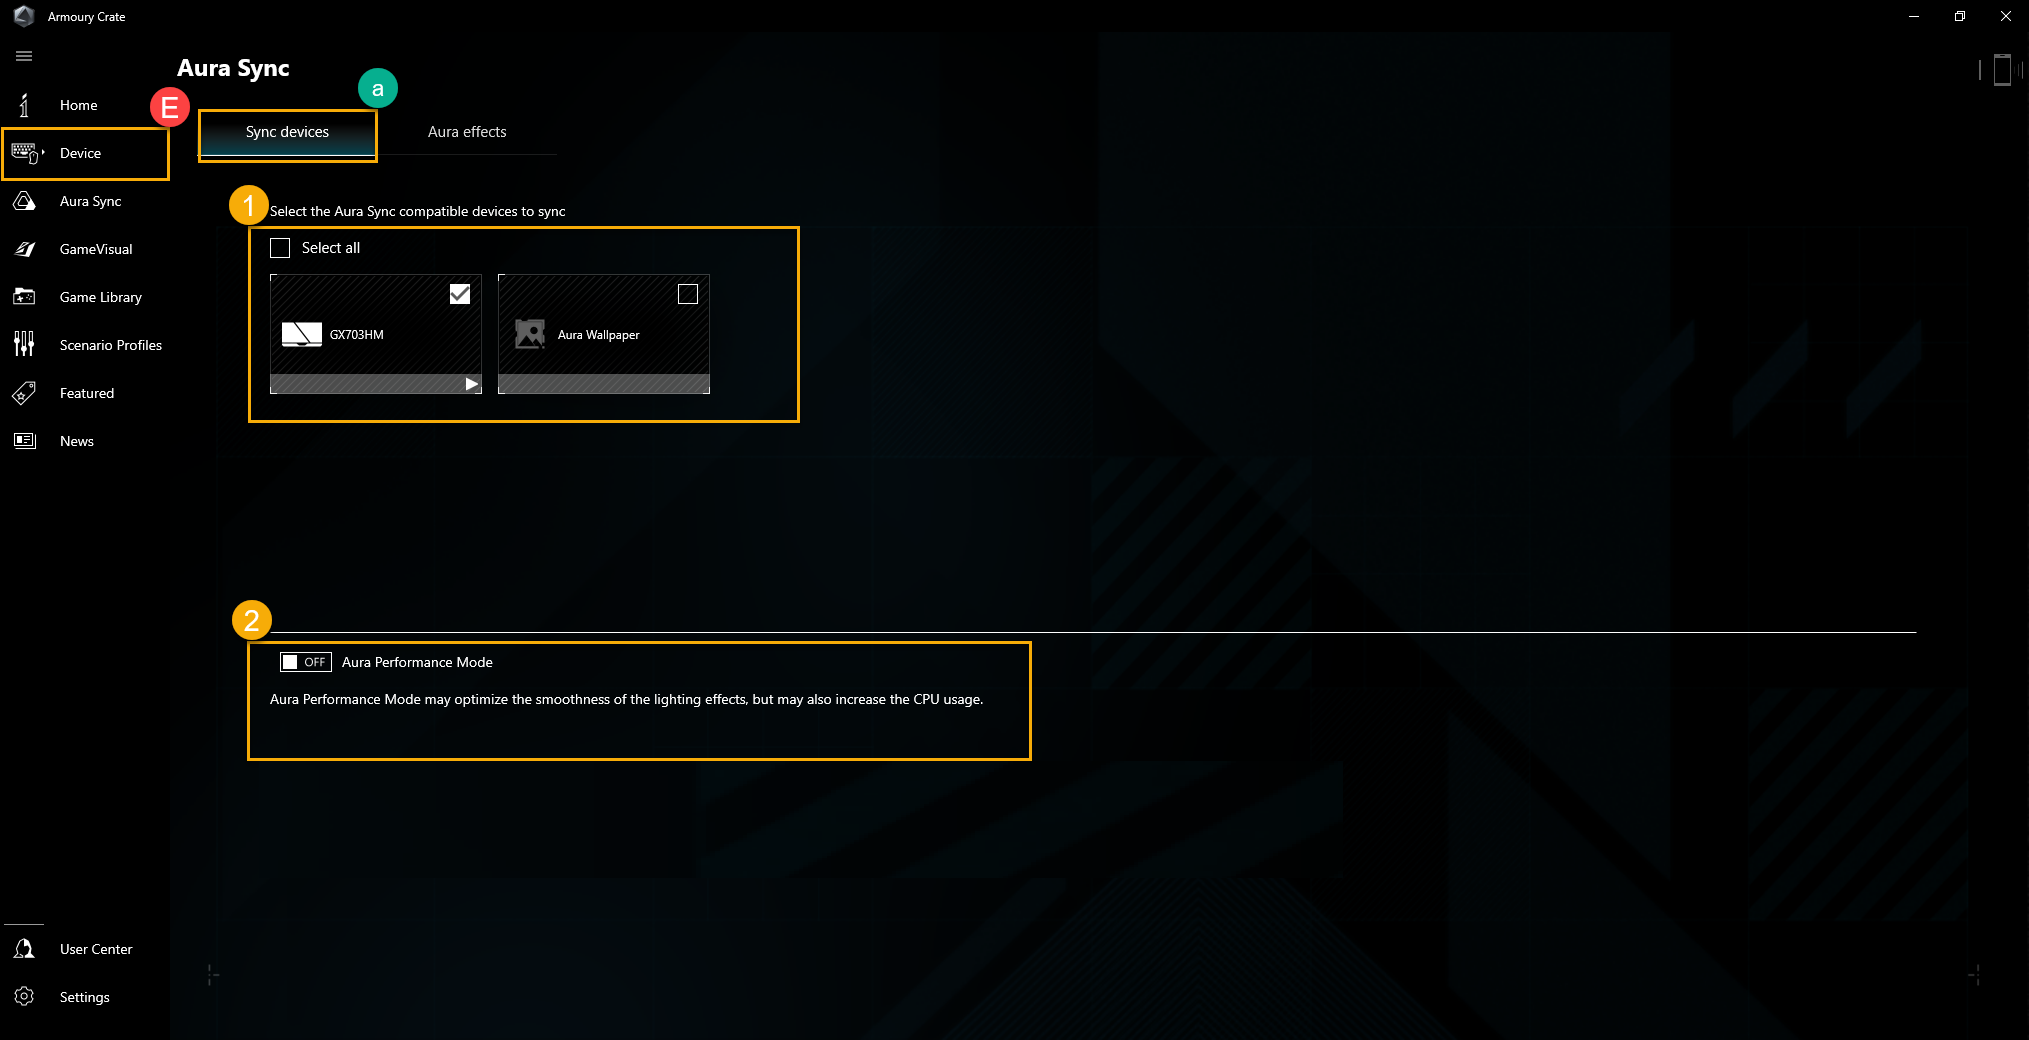
6. Aura SYNC(E)
The Aura SYNC can support compatible devices to sync Aura effects, and launch individual application Aura Creator to create unique lighting effects between synchronized devices in advanced effects.
SYNC Devices(a)
SYNC Device select①: To select Aura SYNC compatible devices to sync.
Aura Performance Mode②: To optimize the smoothness of the lighting effects.
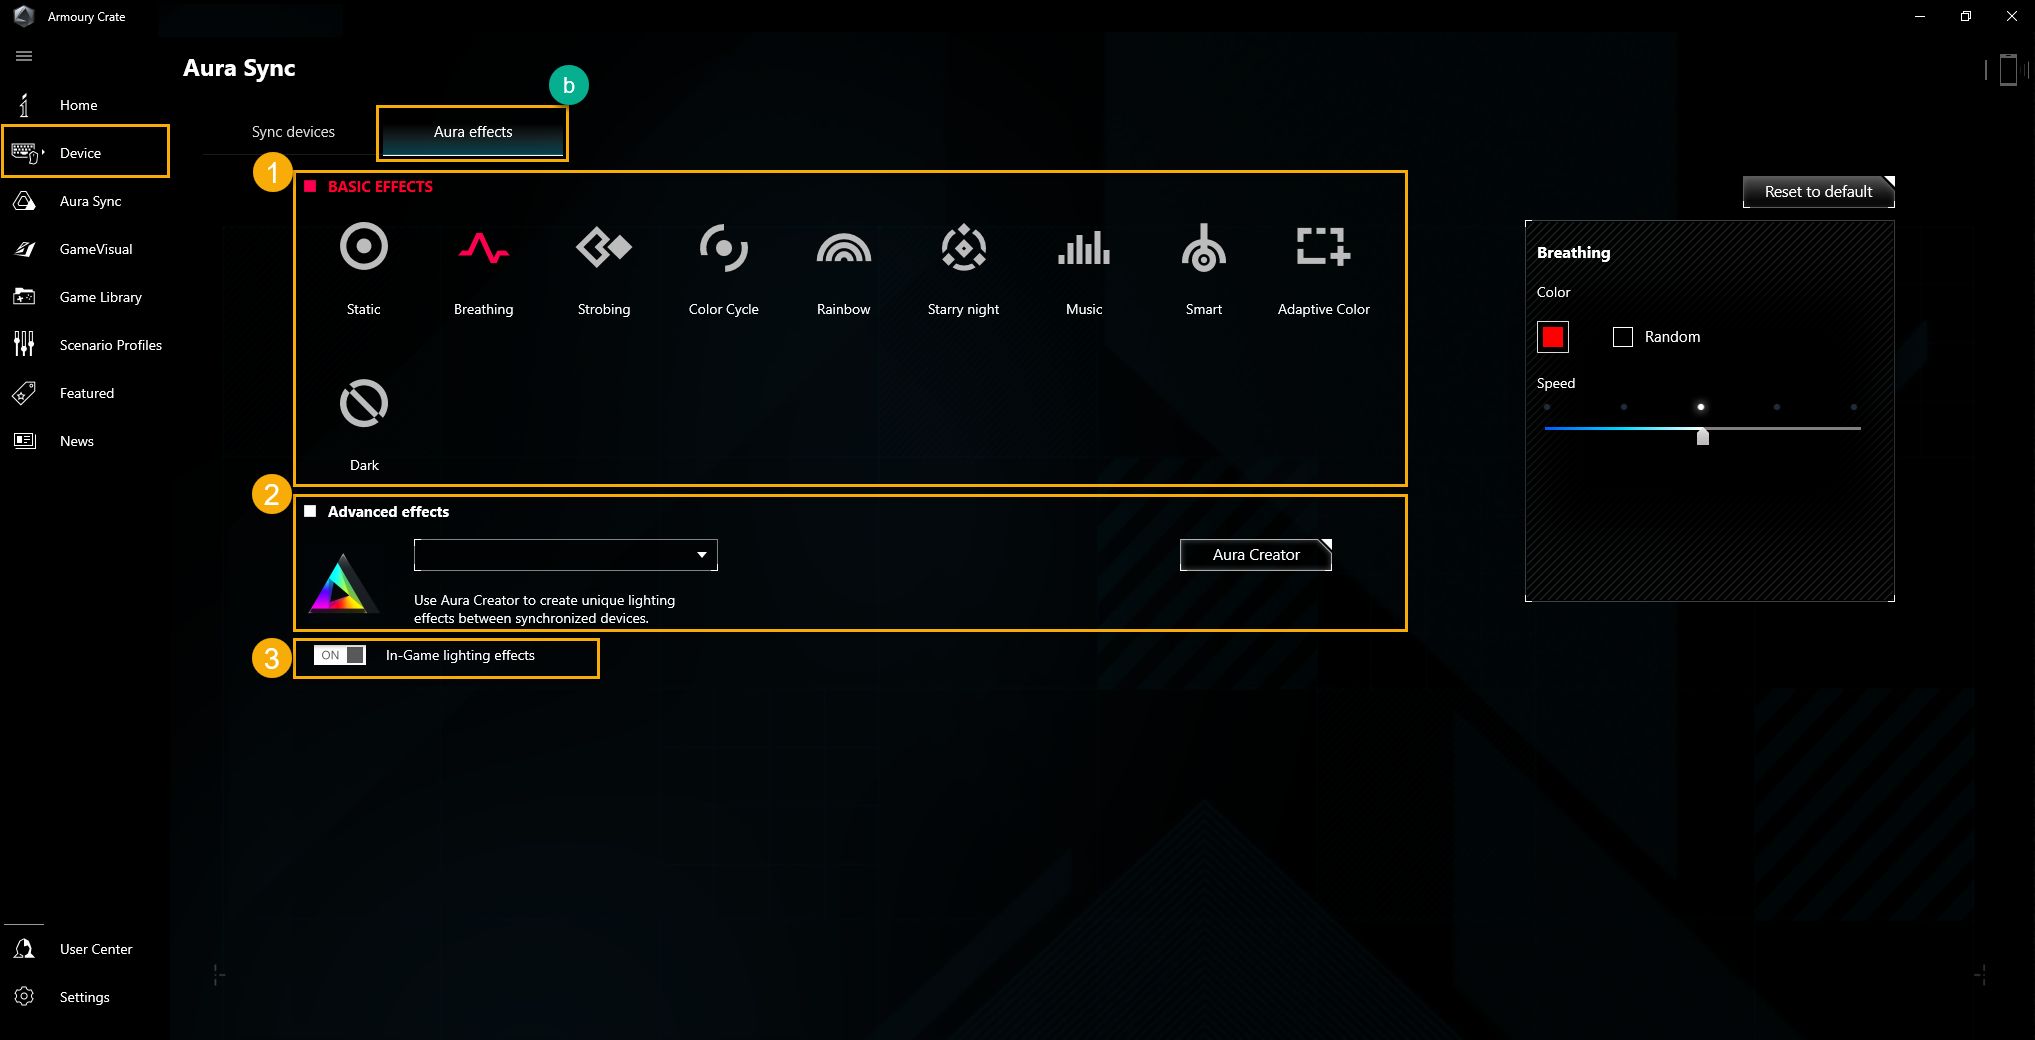
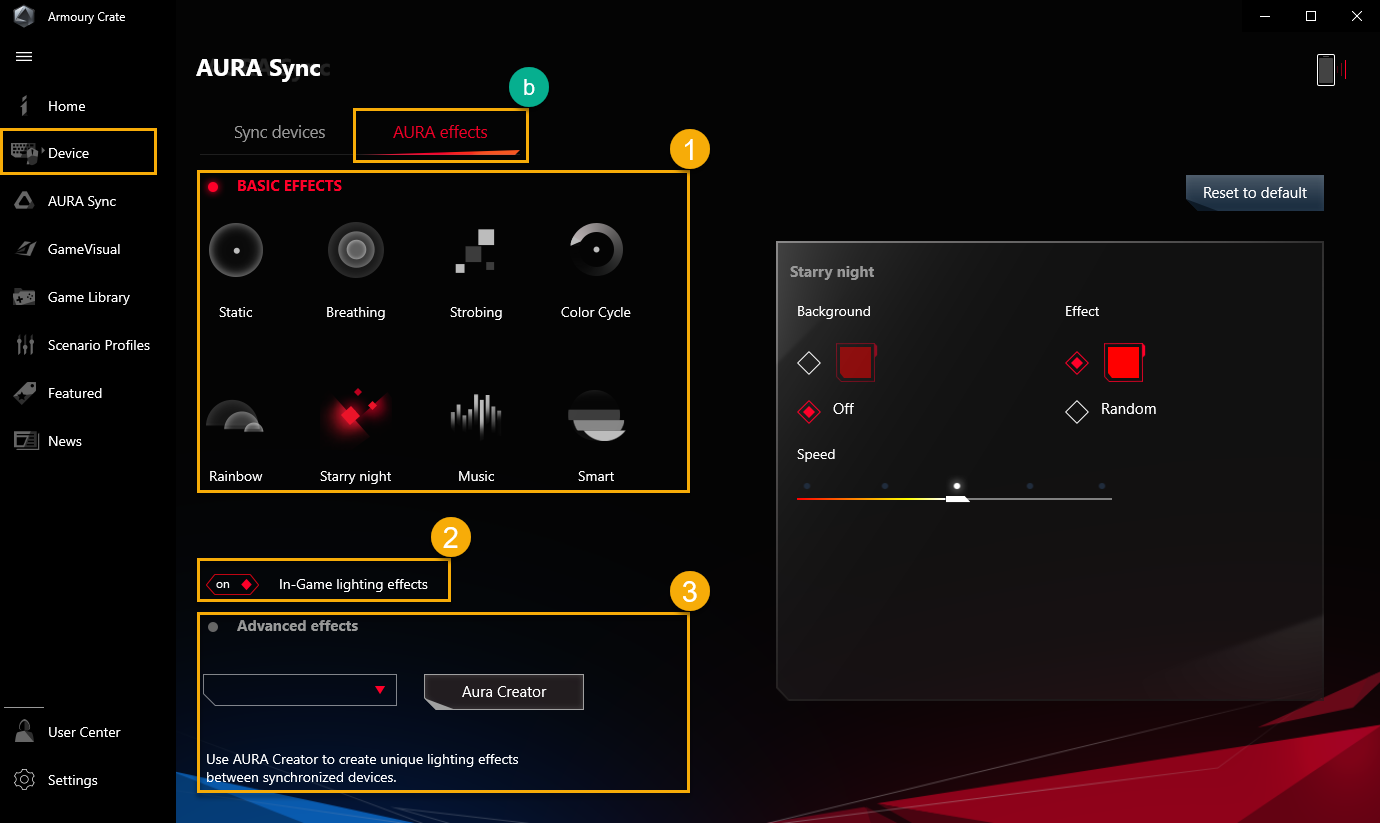
Aura Effects(b): To setup devices for Aura SYNC basic lighting effects.
Basic effects①: To setup compatible devices to sync lighting effects, the type of lighting effects will vary depending on the device.
Advanced Effects②: Using Aura Creator to create unique lighting effects between synchronized devices in advanced effects, please refer to Aura Creator Introduction for more details.
In-Game Lighting effects③: Aura cooperates with game providers to provide ROG gamers with a unique lighting experience, which gamers can achieve through devices that support Aura Sync, please refer to ASUS Aura Website for more details.
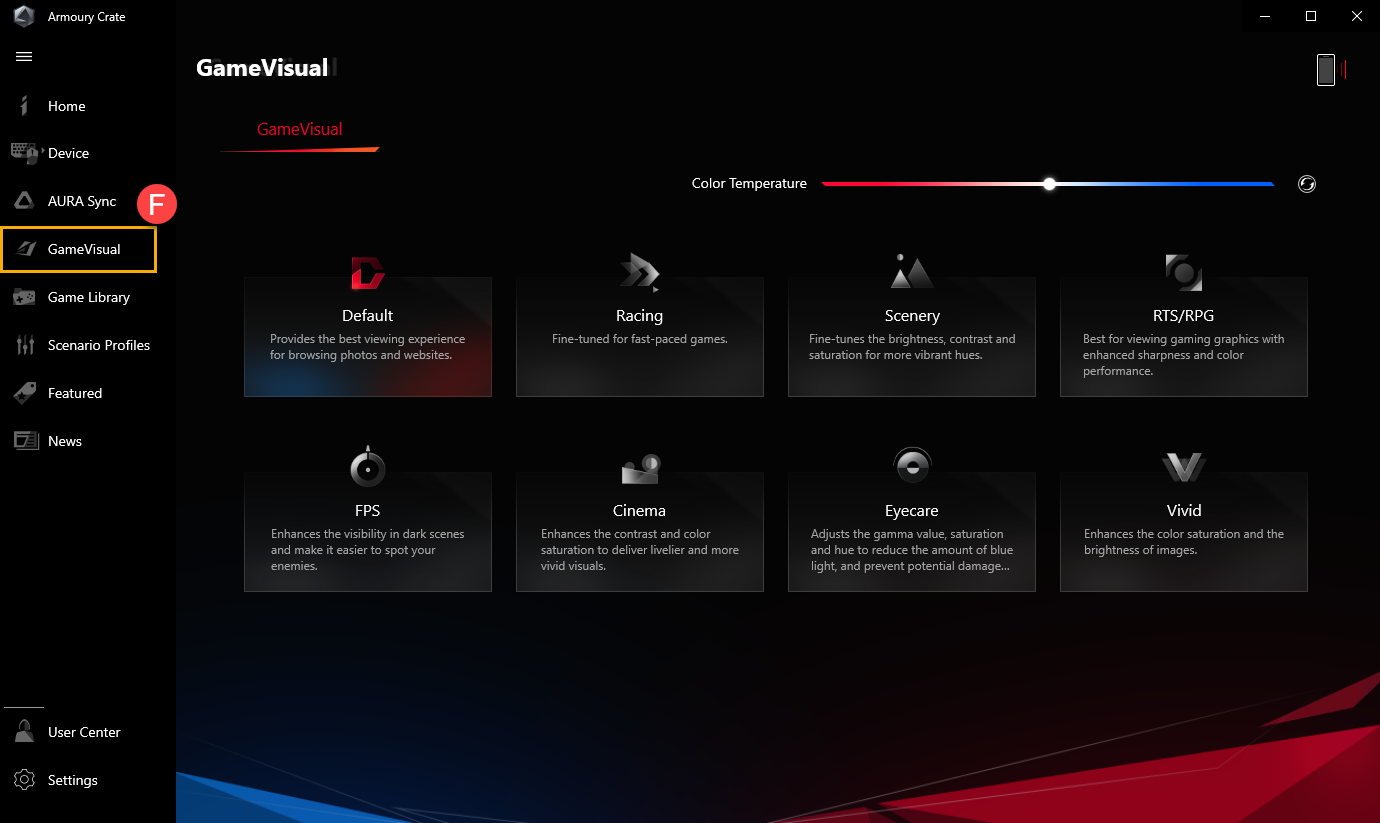
GameVisual(a)
GameVisual is a screen color management tool that provides a variety of screen color scenarios to bring players the best personal visual experience.
*This feature can only support gaming laptop products, please refer to Game Visual Introduction for operation detail.
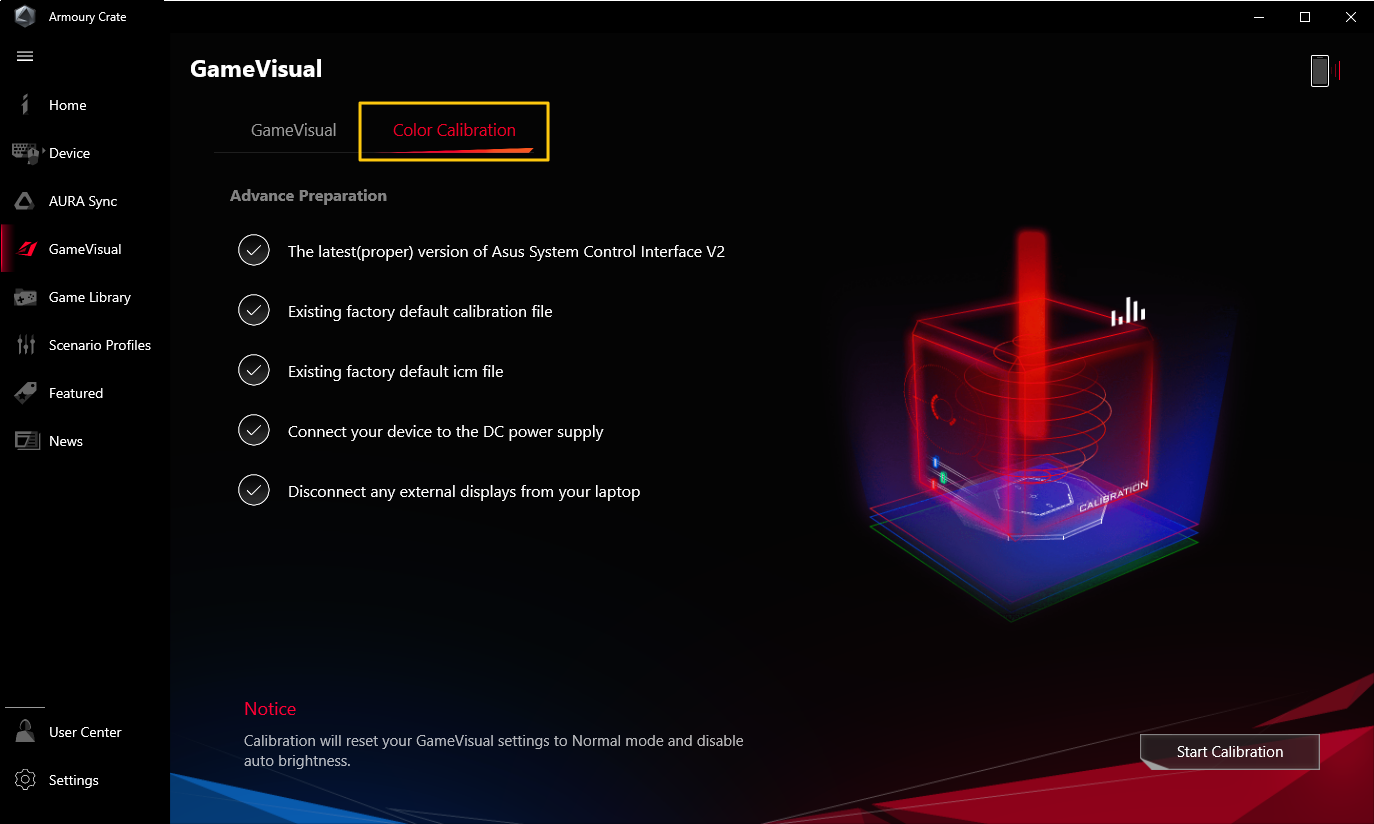
Color Calibration(b)
Through GameVisual Color Calibration and color calibrator, it can provide gamers for a basic calibration with high level of color accuracy on ROG gaming laptop screen.
*This feature can only support some gaming laptop products, and must work with color calibrator (X-Rite i1Display Pro、Display Plus HL、Display Pro HL、ClolorChecker Display Plus、ColorChecker Pro), please refer to Game Visual Introduction for more details.
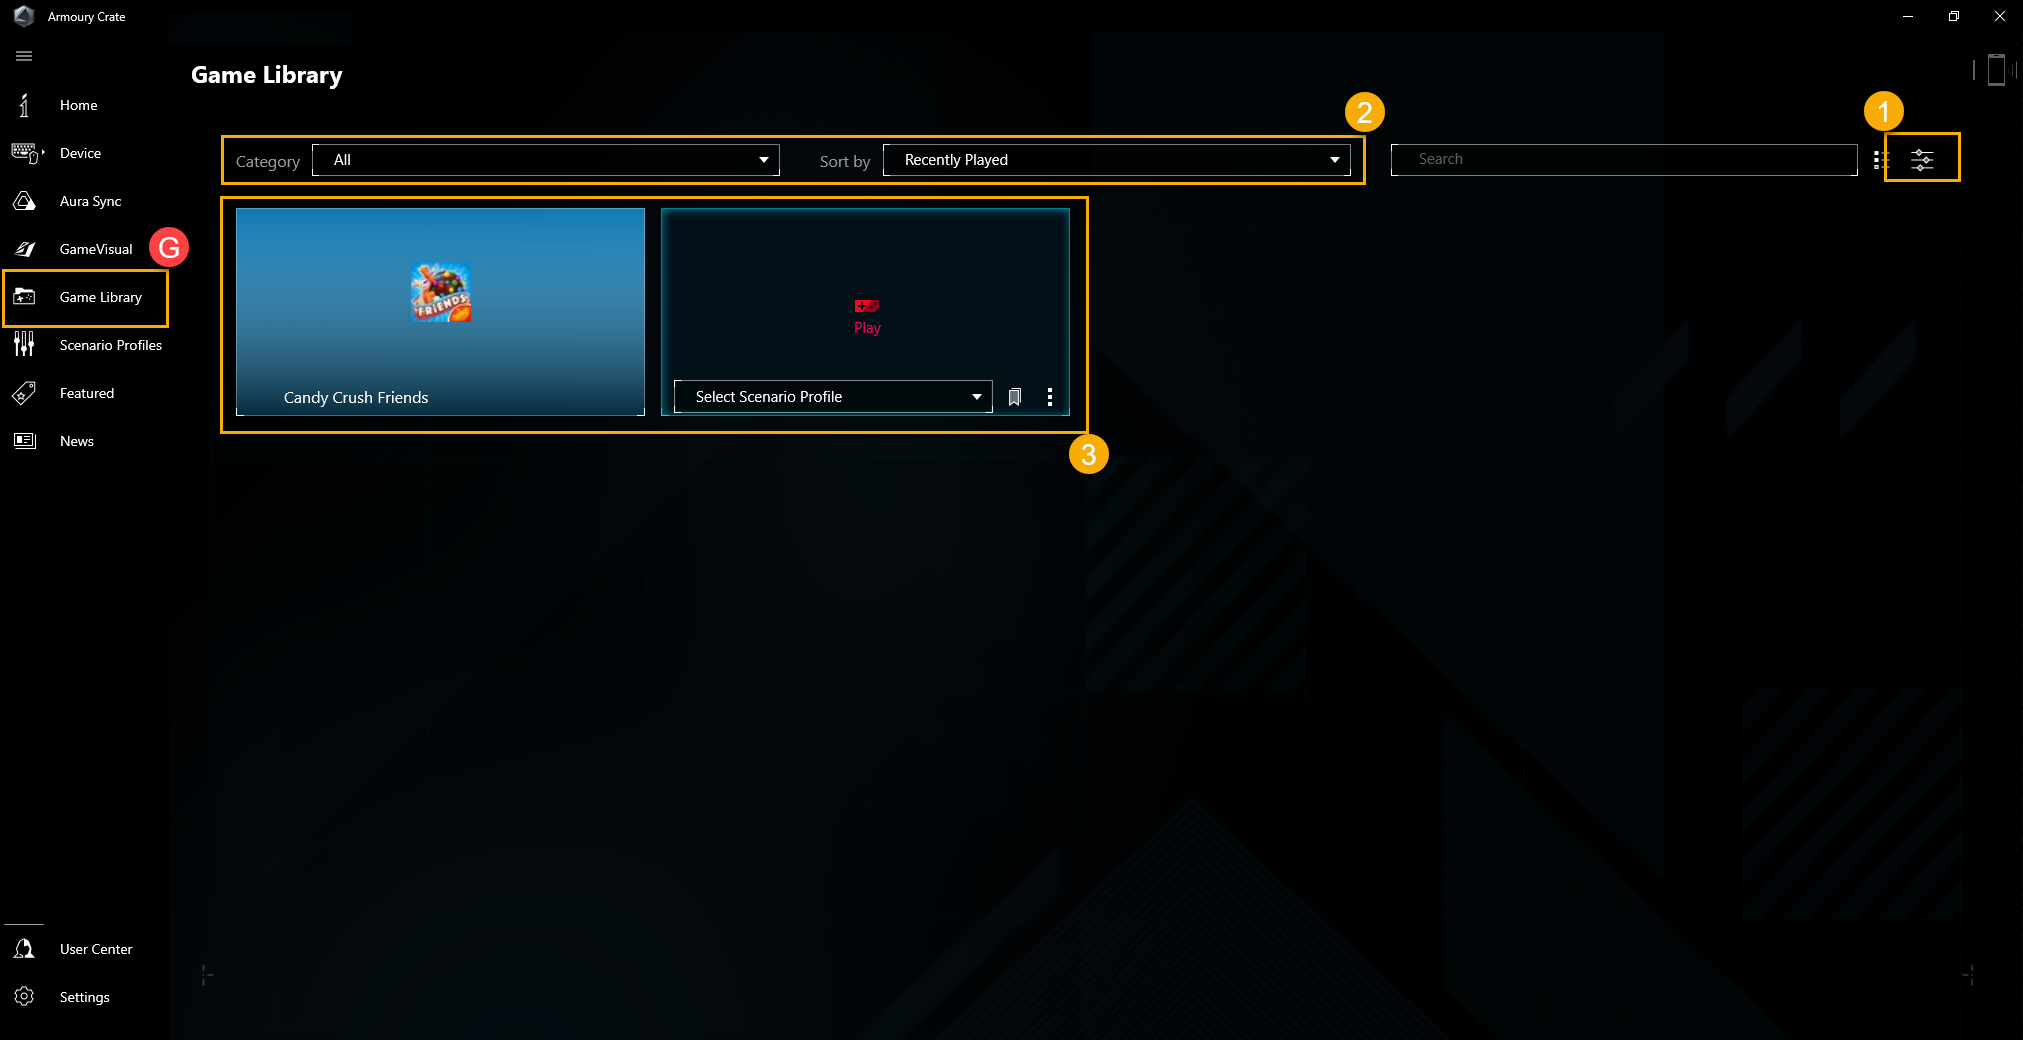
To scan the games and applications by gamers In order to program sort or Scenario profiles apply.
Add or scan games①: Gamers can select auto scan or manual add to create the games or applications into game library.
Games sort and category②: To filter and sort the games and applications in library.
Apply③: Gamers can select the games and applications to apply scenario profile or add tag. While clicking “Play”, gamers can launch game directly.
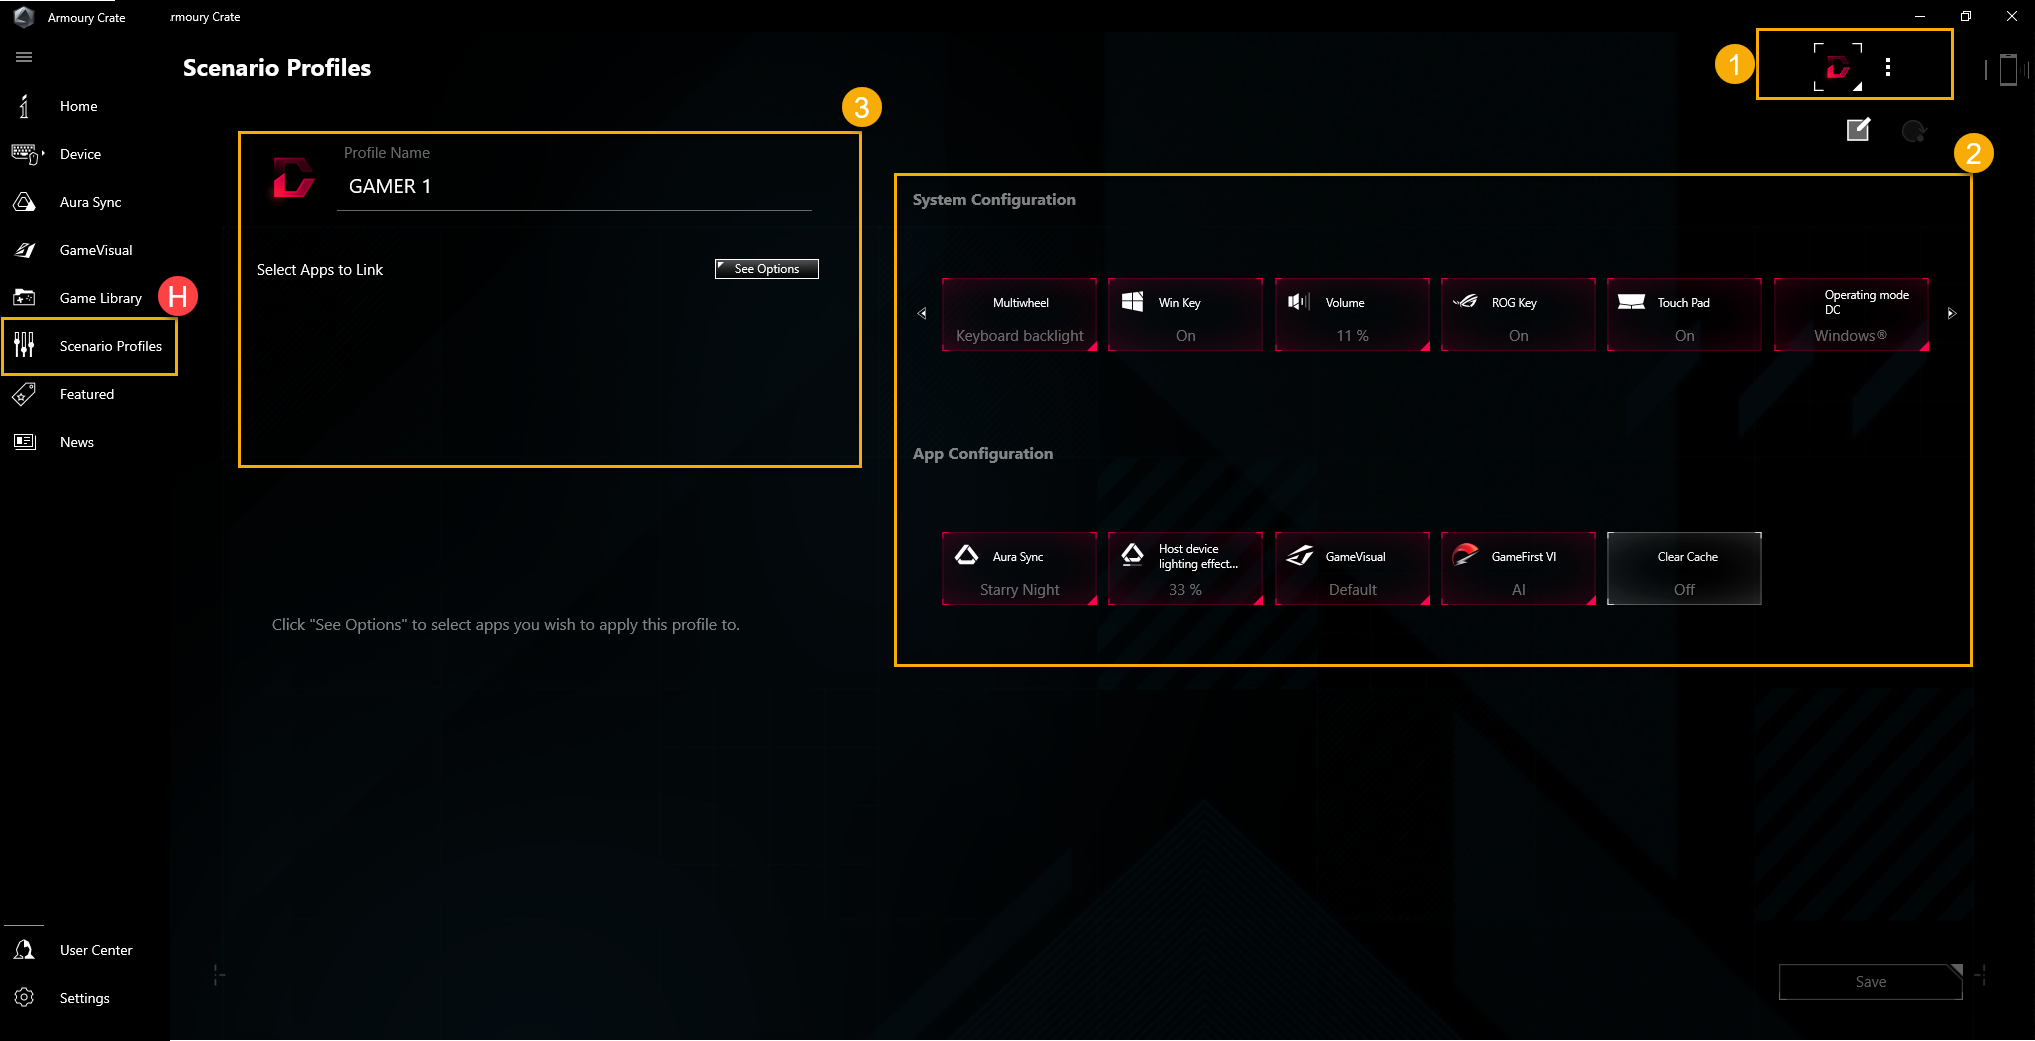
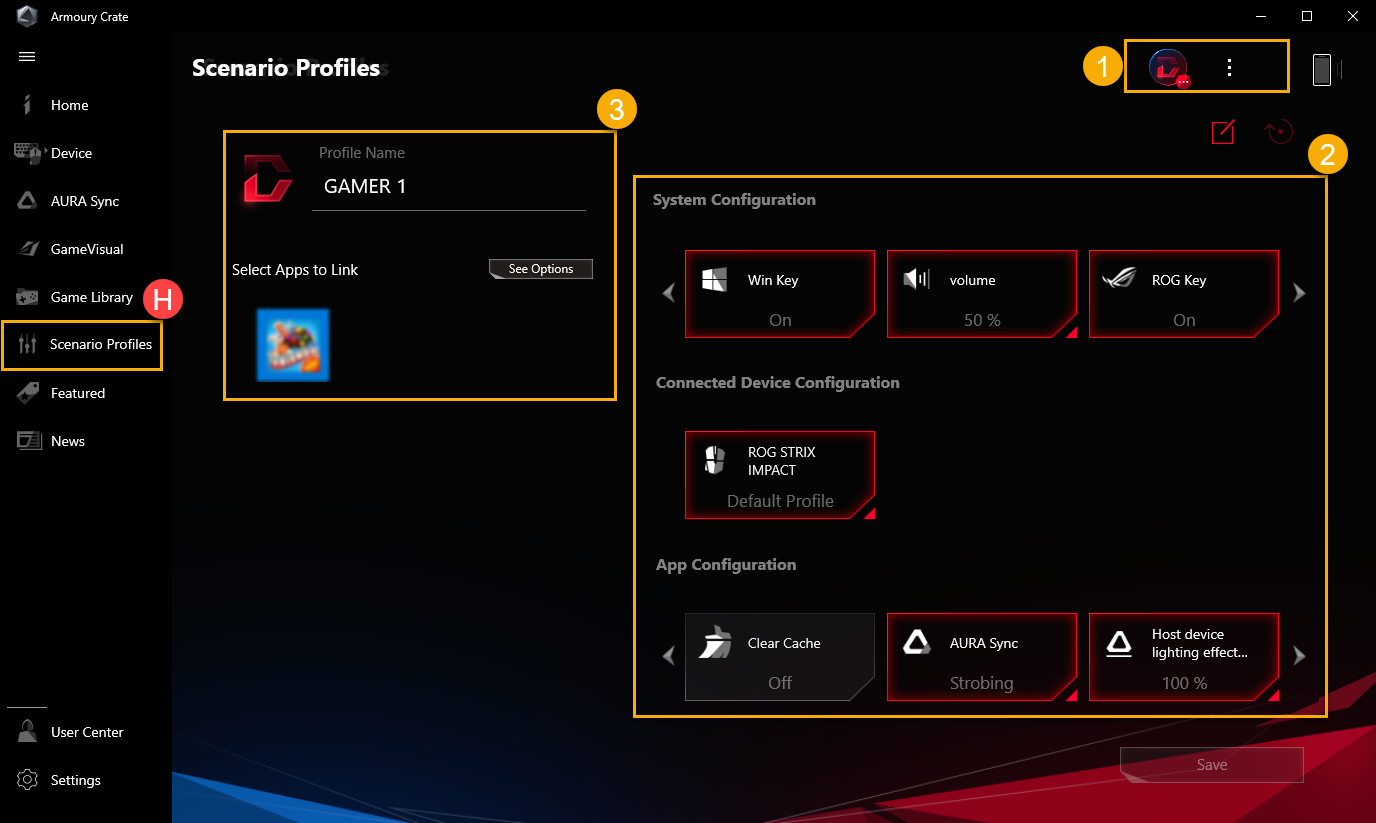
According to the personal required, gamers can setup system configuration and save as profiles, in order to link selected the games and applications.
Create Profiles①: To create and delete personal scenario profiles.
System Configuration②: According to the personal required, gamers can setup system configuration, for example system configuration、Connected Device configuration and App configuration.
Profiles Name③: To modify profile name or select "See Options" to link the games or applications.
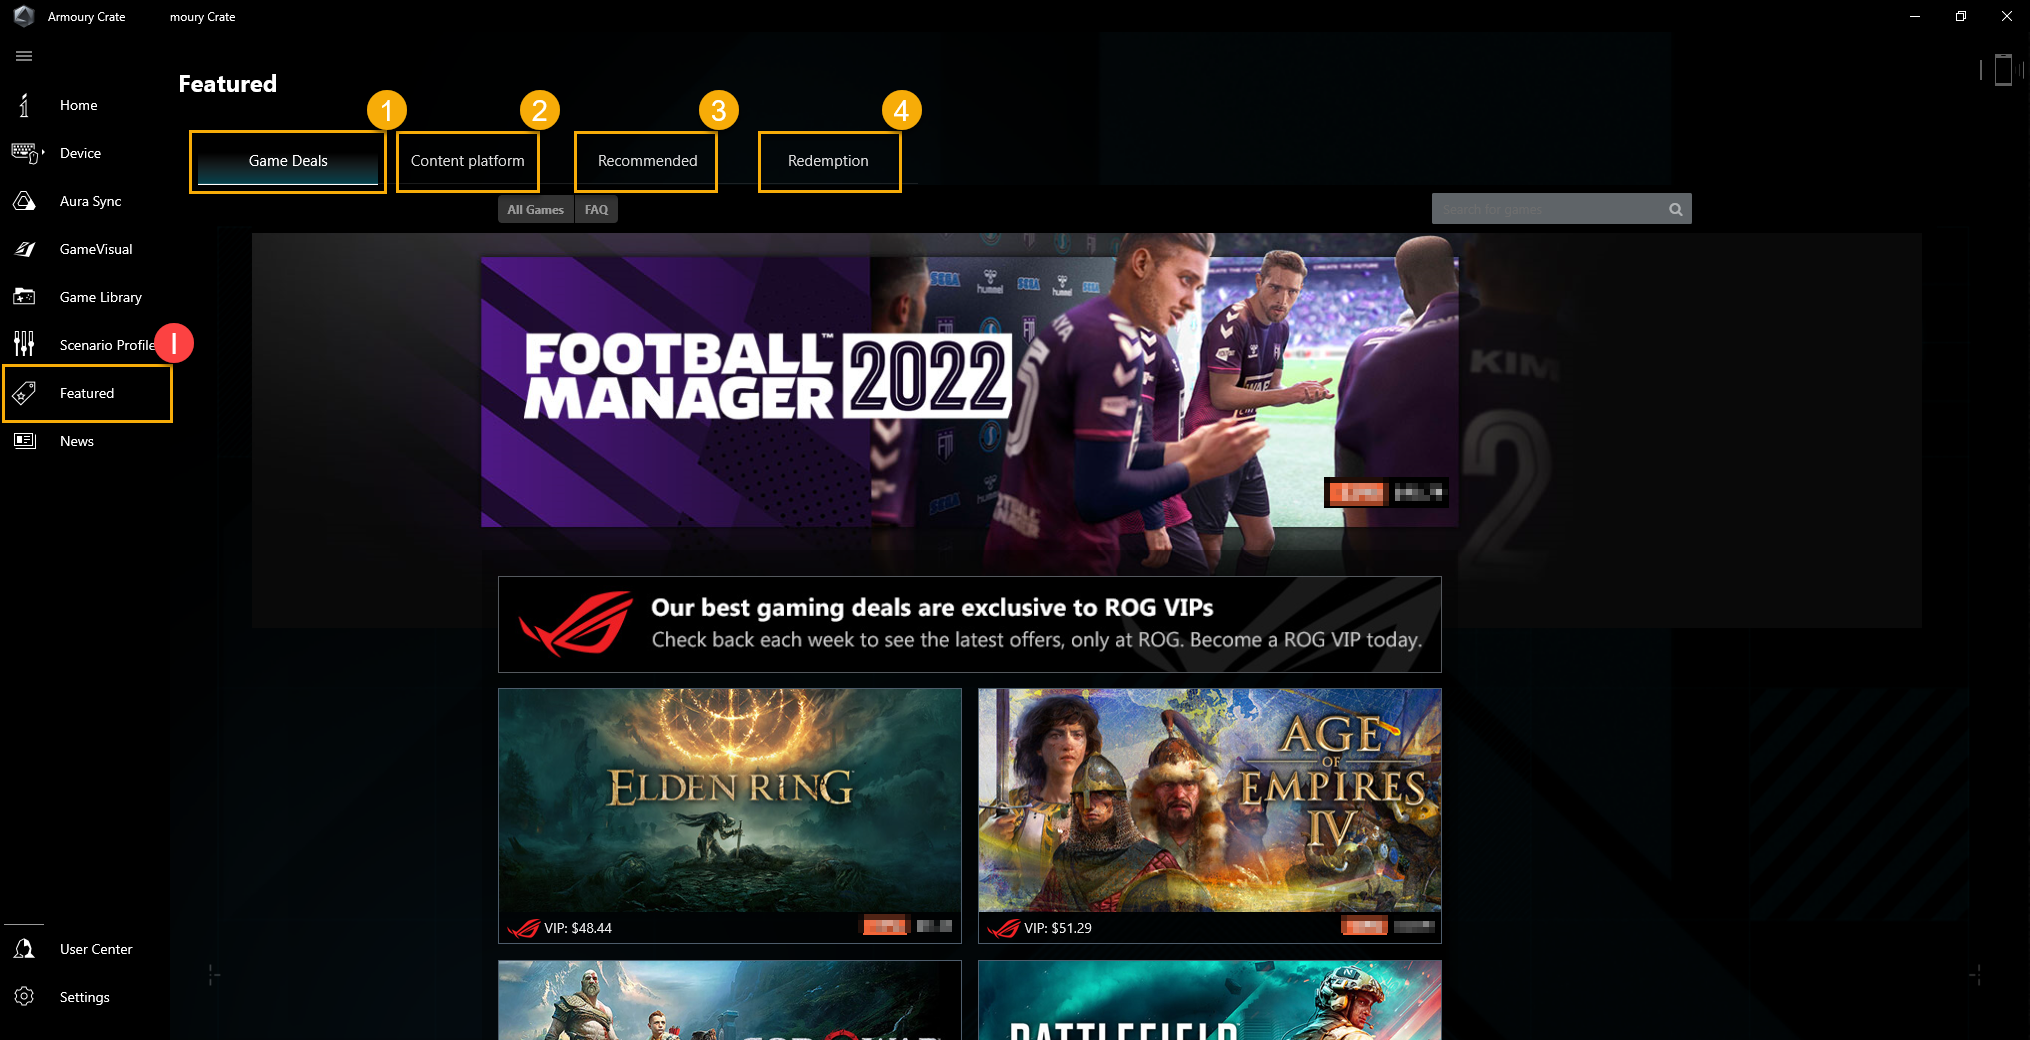
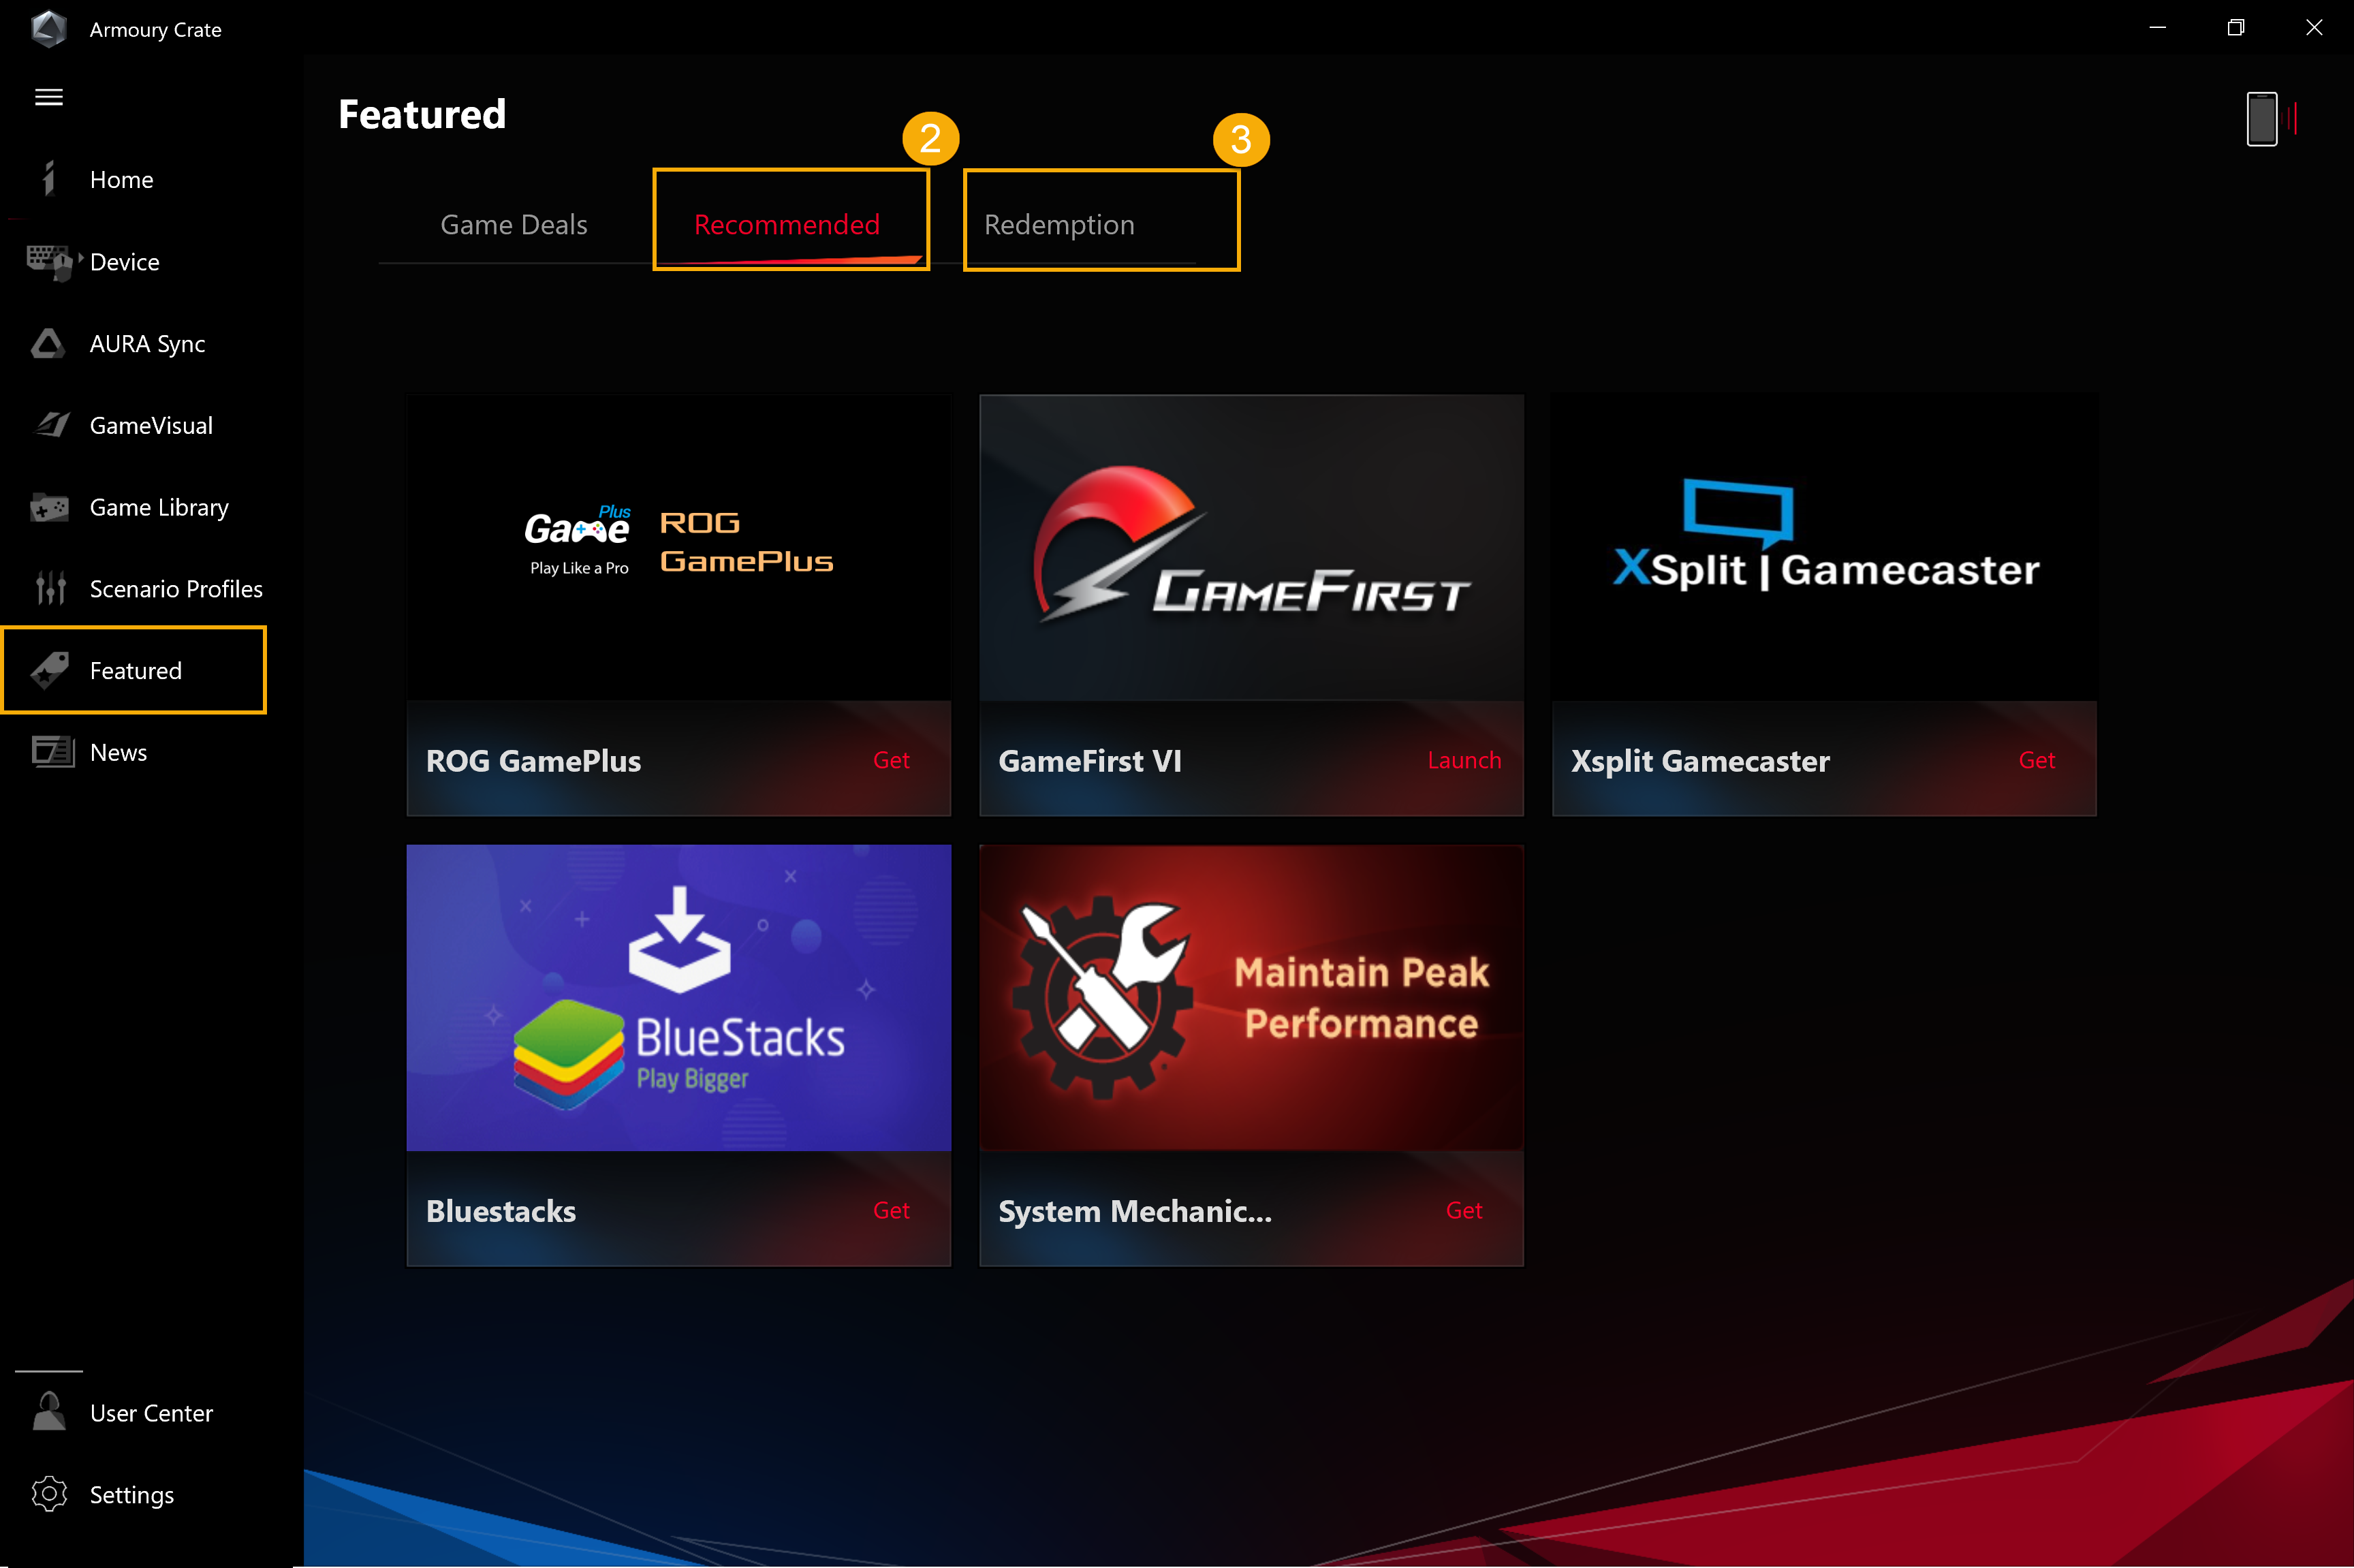
10. Featured(I)
Game Deals①: Discover, explore, and pick-up great games at online with Game Deals.
Content Platform②: Through content platform, gamers can download more exclusive Gaming series products Aura wallpaper 、Static wallpaper and AniMe Matrix™ lighting.
Recommended③: To display related applications recommended or supported for your ROG devices.
Redemption④: Log in to ASUS member account, gamers can review contents or records of eligible redemption activities.
*For how to register an ASUS member account, please refer to Link.
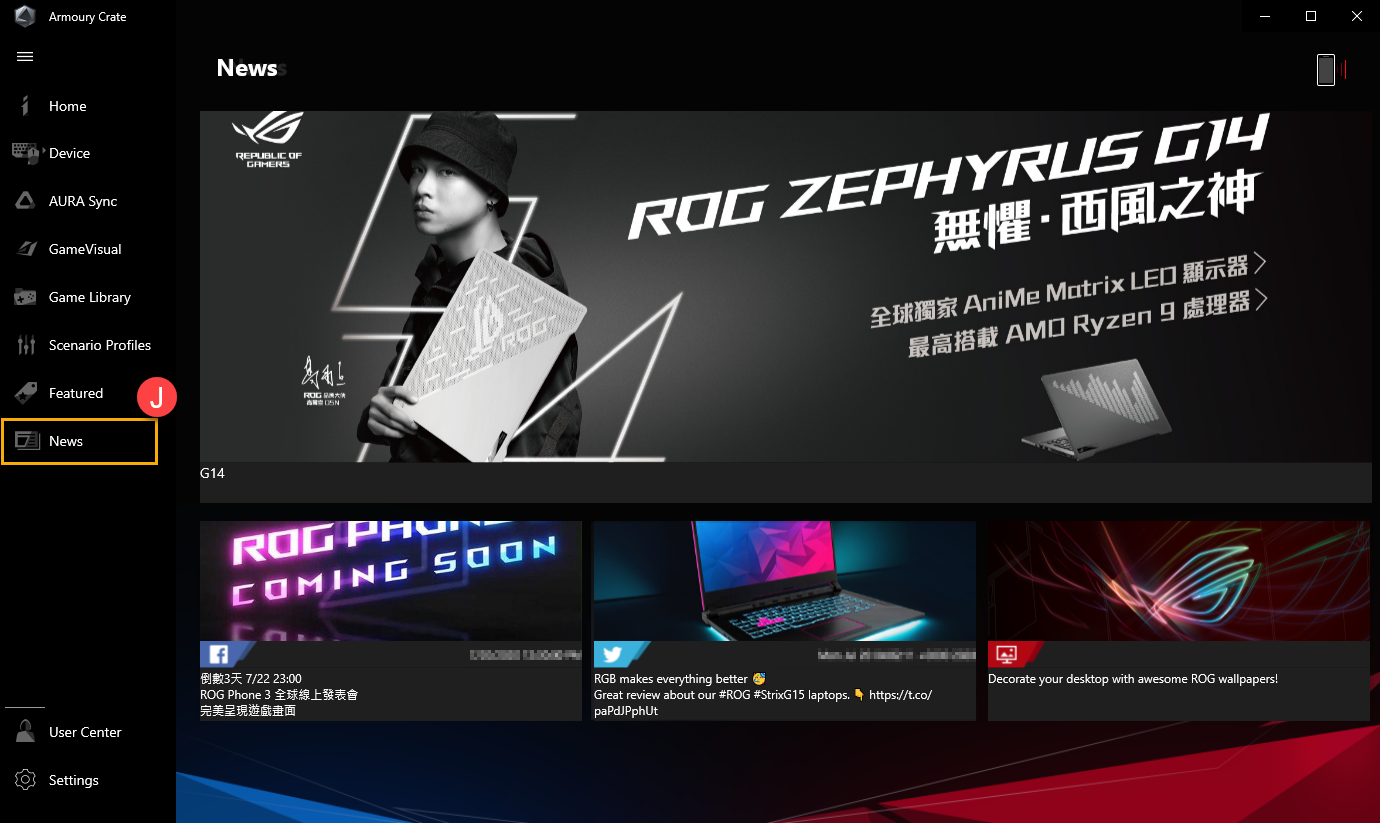
11. News(J)
To display global and local ROG recommended articles, events and product information.
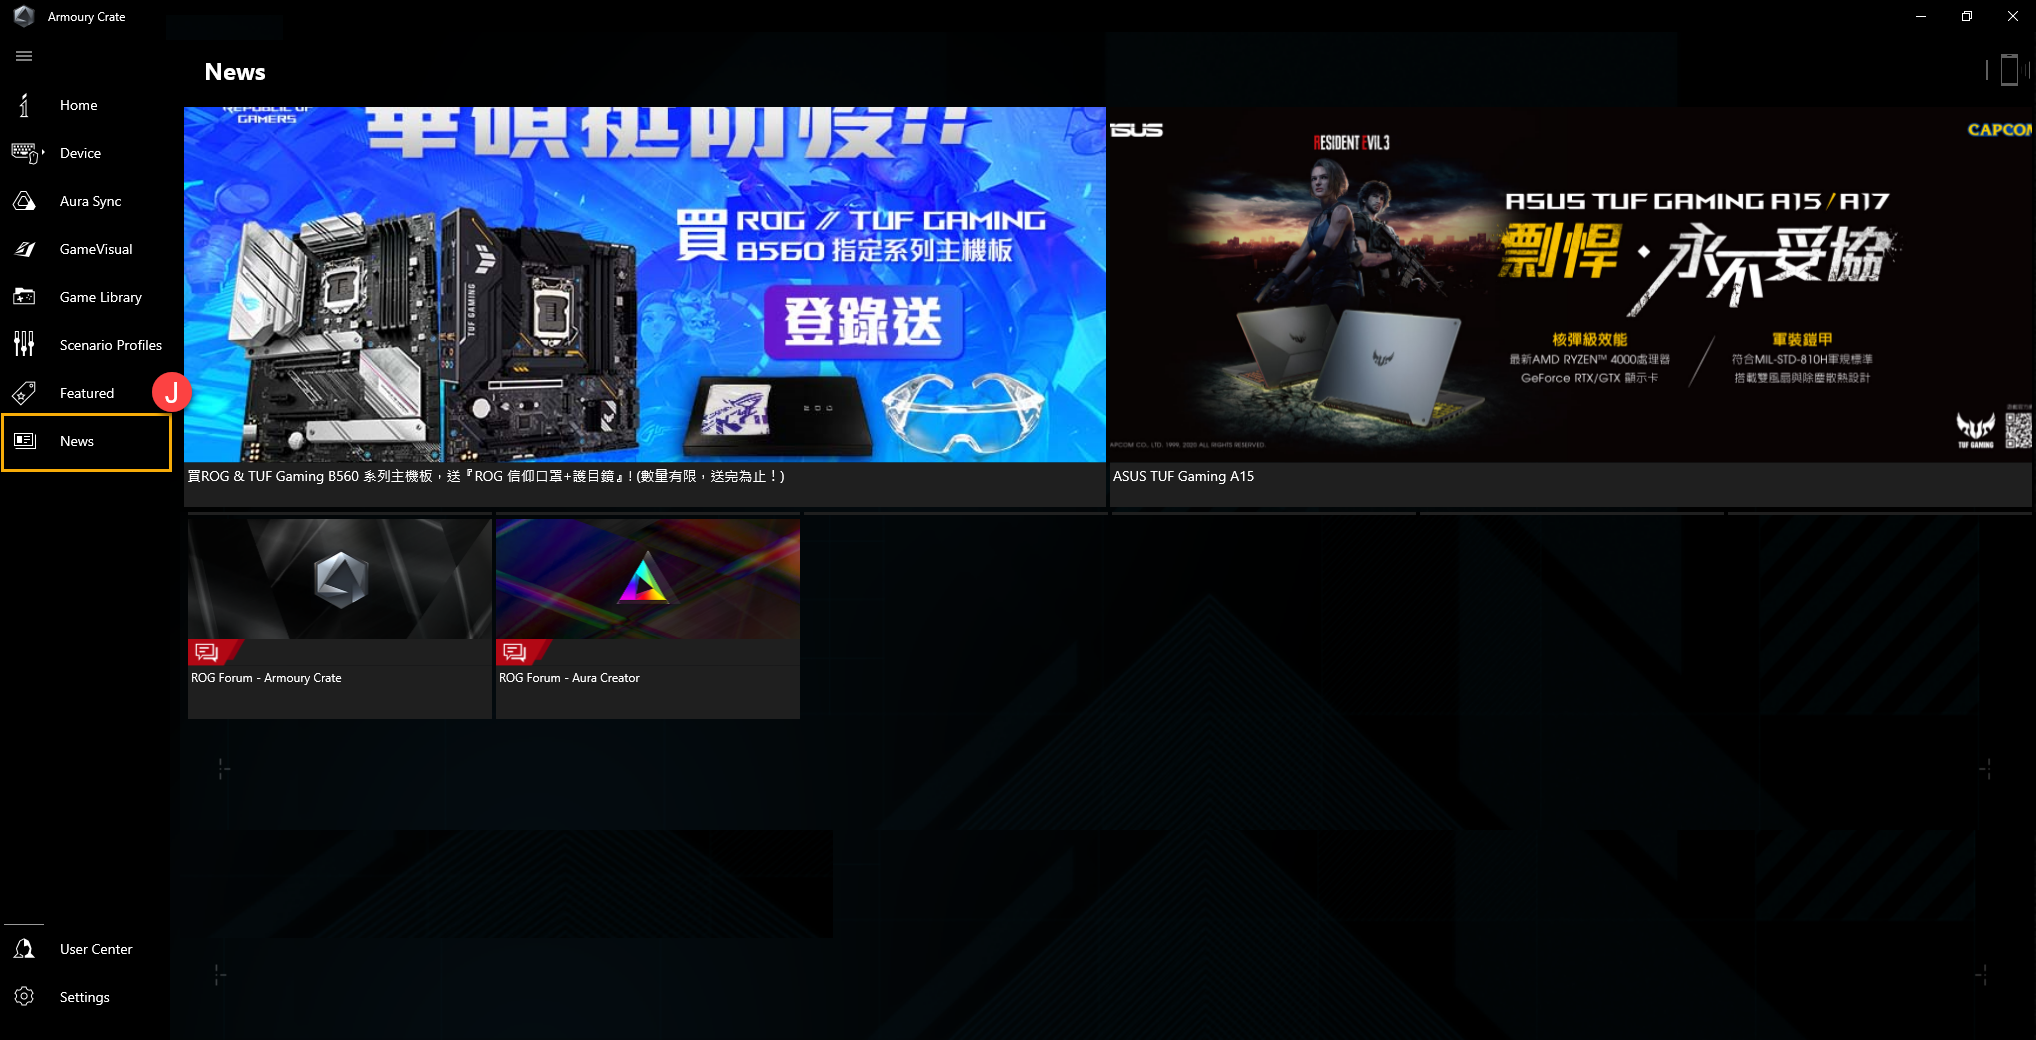
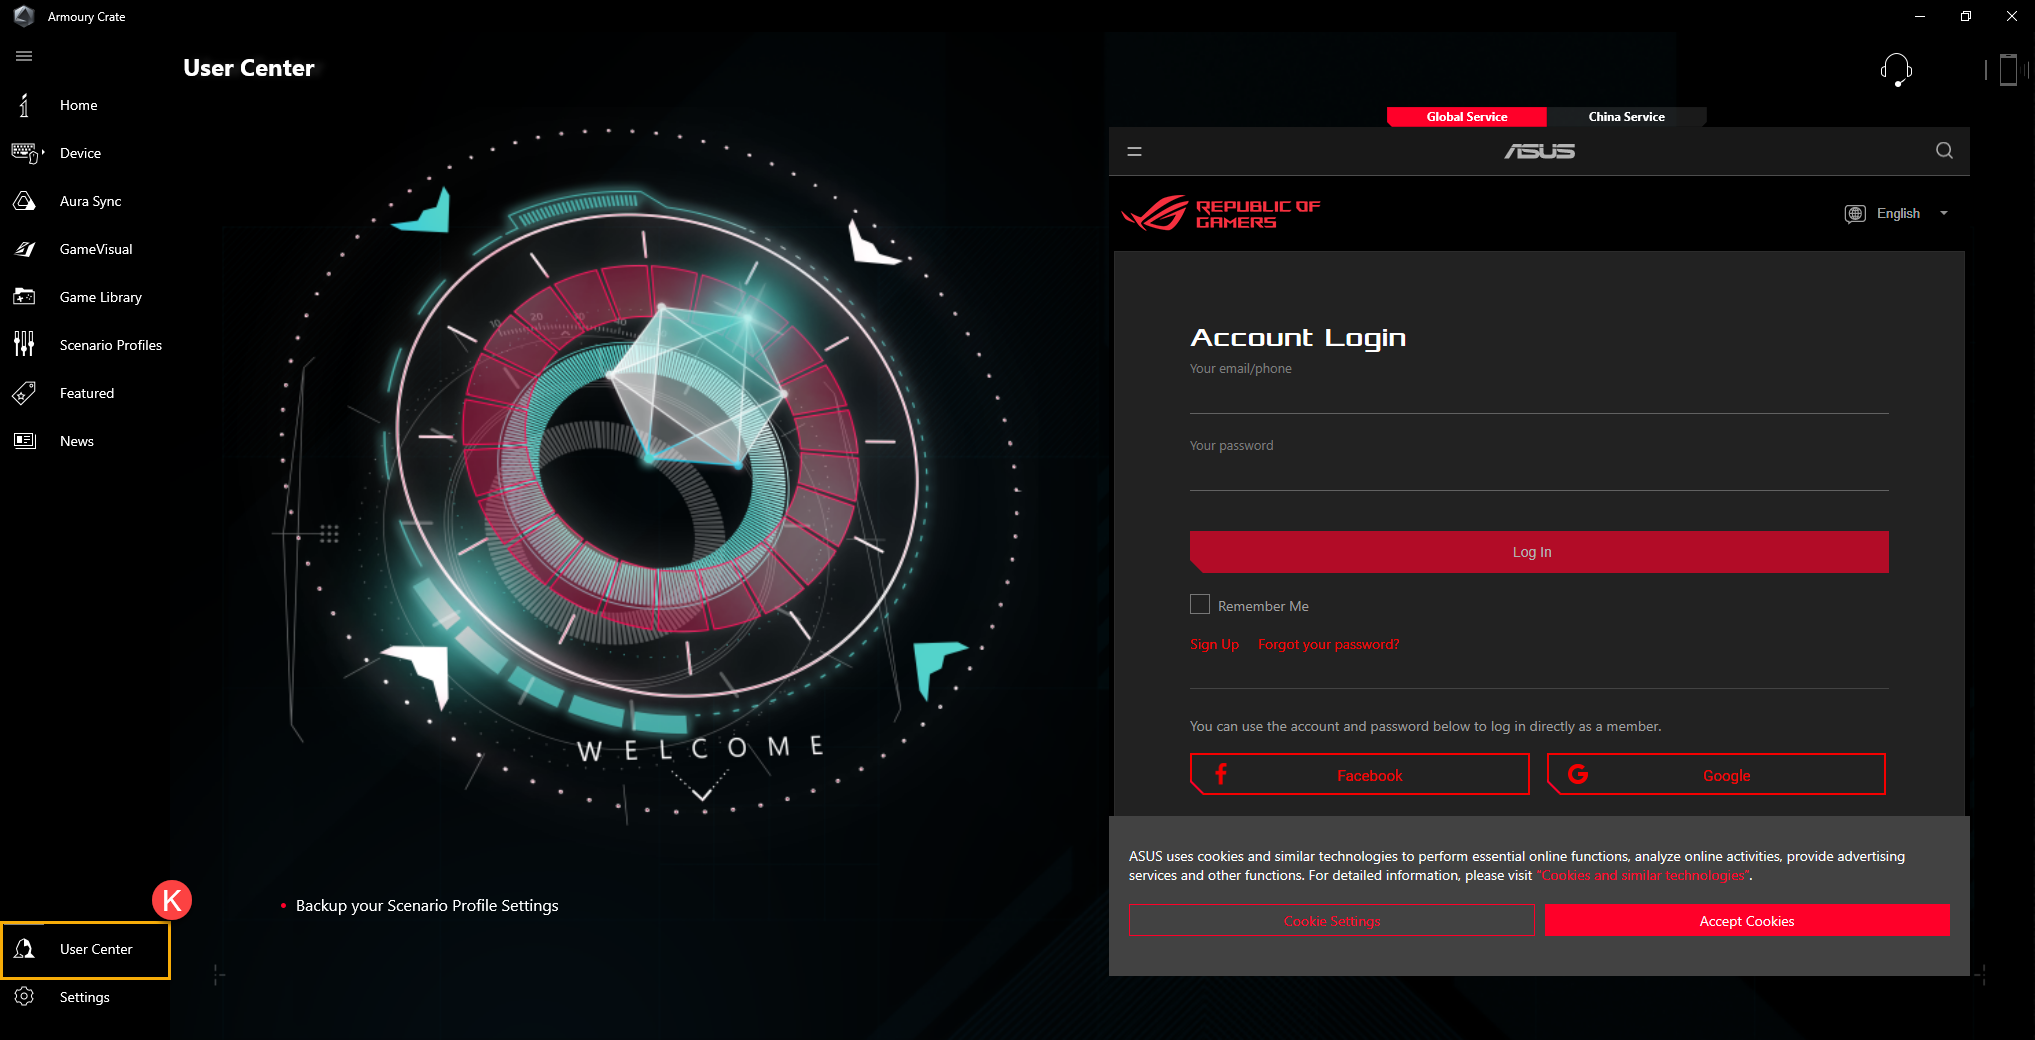
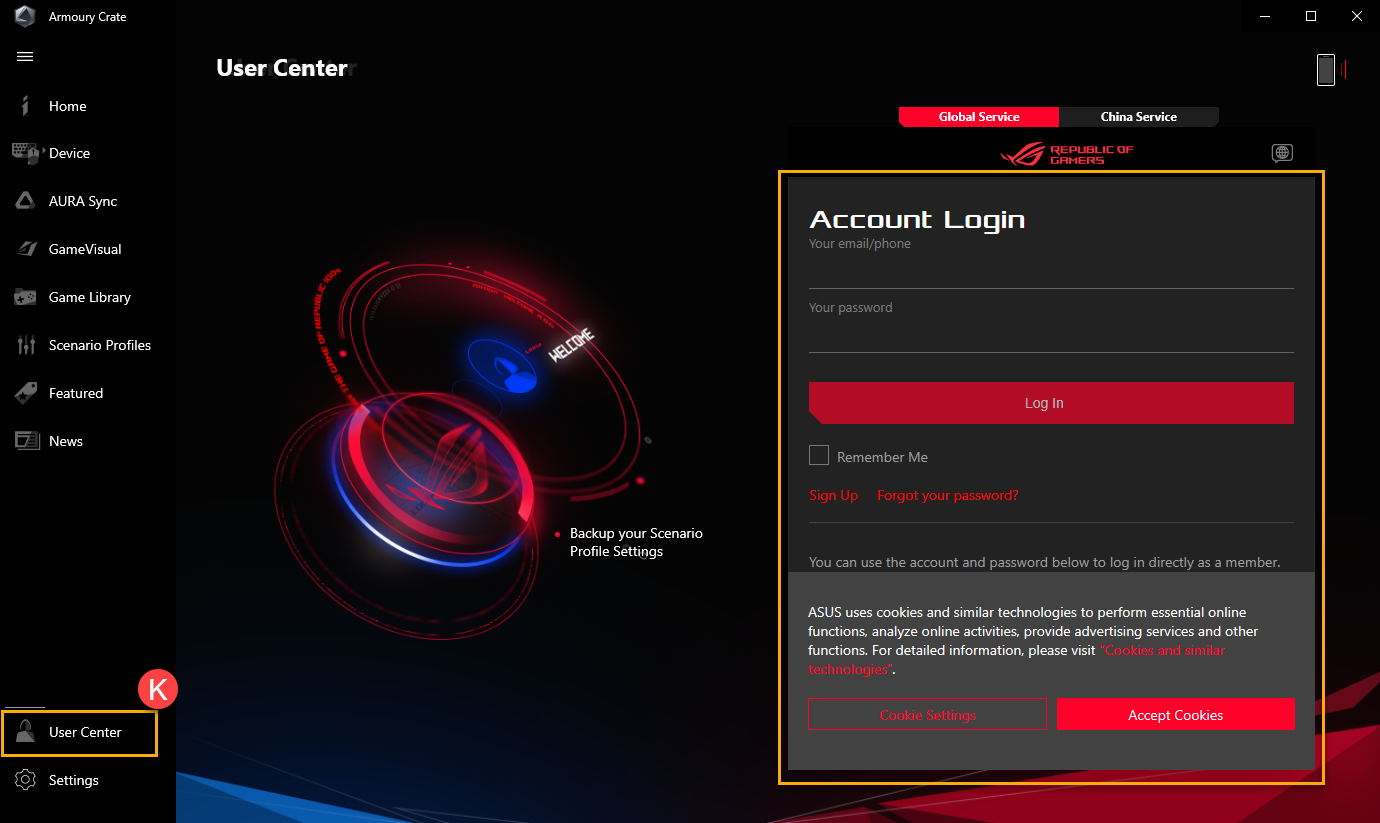
Log in to ASUS member account, the page will show My Profile、My Products、Registered Events、Notification and Join Elite.
*For how to register an ASUS member account, please refer to Link.
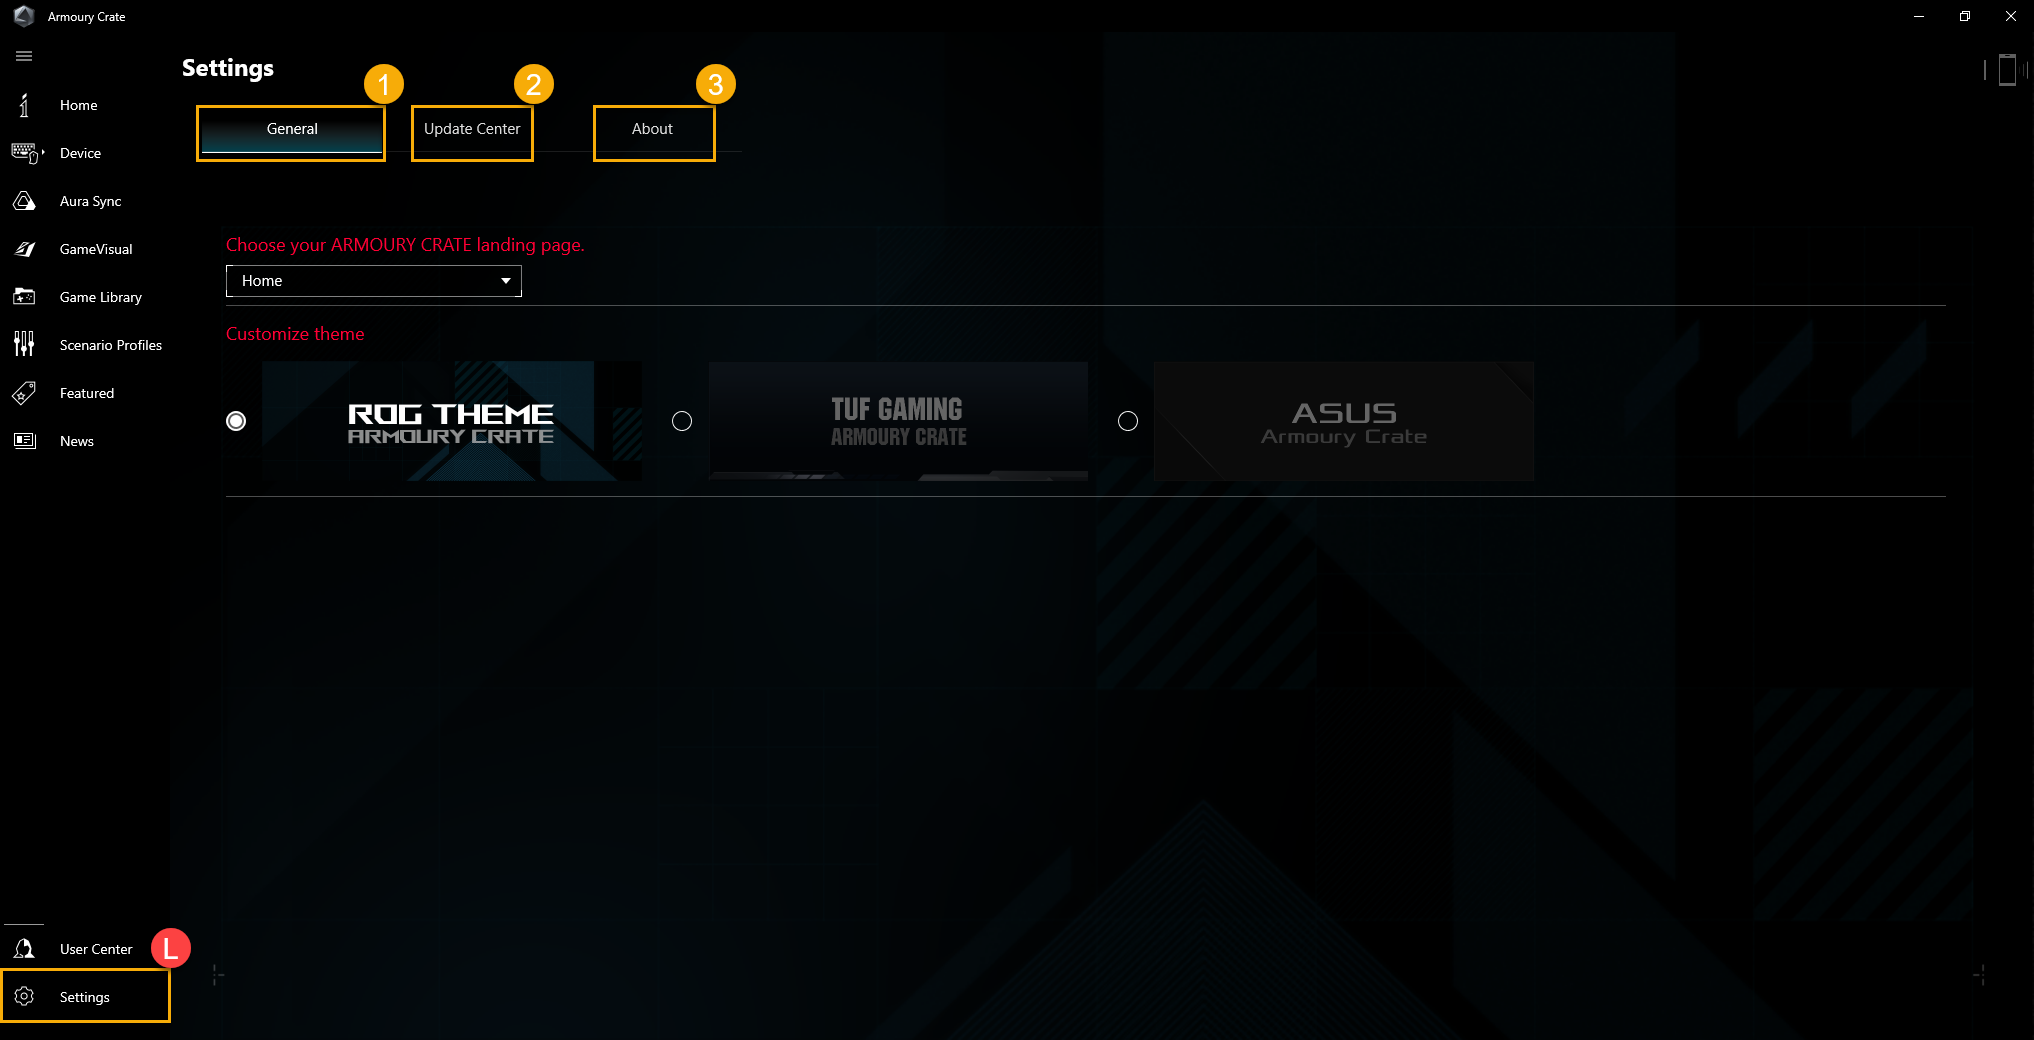
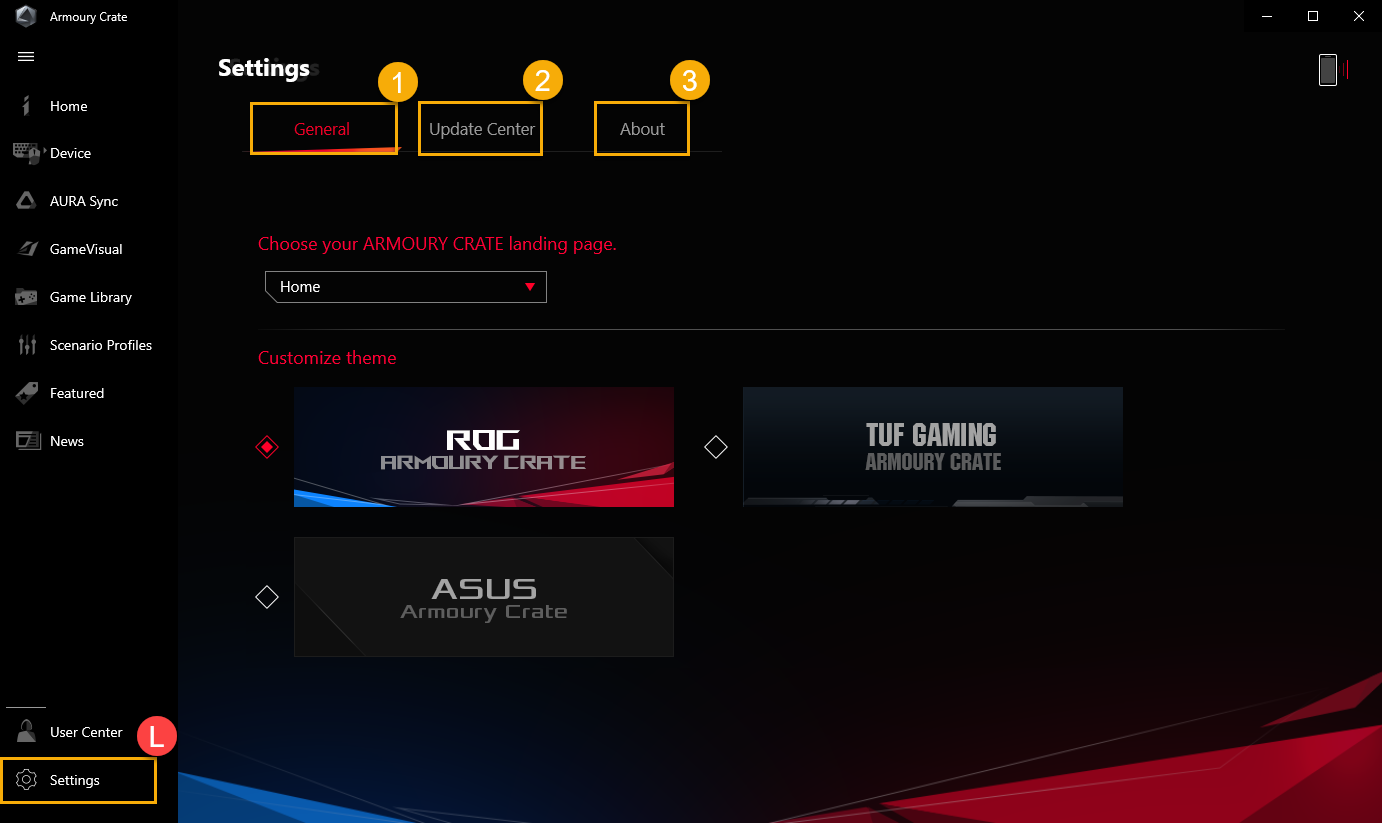
13. Settings(L)
General①: Gamers can choose Armoury Crate landing page, and customize theme.
Update Center②*: To select “Check for Update”, utility will display the driver or firmware that need to be updated will be listed for gamers to choose.
About③: To display Armoury Crate Version、Service Version、App Diagnostics、Privacy Policy and FAQ.
*Before processing the update, ensure that your laptop is plugged in with charger.
Q1: Operating mode category and Introduction
A1:
Windows® Mode: According to Windows operating system power plan to set up.
Silent Mode: The system silence is first. The fan will keep on low speed for noise reduction, but the performance will be limited.
Performance Mode: The performance is a balance between silent and Turbo.
Turbo Mode: The system Turbo is first, and keep in high performance (Only available in charging mode).
Manual Mode*: To provide manual adjustment for Fan Curve and CPU/GPU overclock.
Tablet/Vertical Mode**: When Tablet/ Vertical mode detected, the performance will be optimized for Tablet/ Vertical mode only.
*Support most of ROG series, it can launch under AC Mode (Charging Mode) only. (Selected models only)
**It supports ROG FLOW series of gaming laptop only.
Q2: What is Operating Mode supported for Gaming laptop(NB) and desktop(DT)?
A2:
| Windows® | Silent | Performance | Turbo | Manual |
ROG Series NB | P | P | P | P | P |
ROG Series DT | P |
| P | P | **P |
TUF Series NB | P | P | P | P | *P |
TUF Series DT | P |
| P | P |
|
*The feature can only support 2022 new series models and after.
**The feature doesn't support G35CZ and G15CK seroes models.
Q3: What is Operating Mode supported for Gaming laptop(NB) in the different power mode?
A3:
| Power Mode | Windows® | Silent | Performance | Turbo | Manual | Table/Vertical |
ROG Series NB | Charging Mode | P | P | P | P | P | |
Battery Mode | P | P | P |
| *P | ||
TUF Series NB | Charging Mode | P | P | P | P | *P | |
Battery Mode | P | P | P |
| *P | ||
ROG Flow Series NB
| Charging Mode | P | P | P | P | P | P |
Battery Mode | P | P | P | *P | P |
*The feature can only support 2022 new series models and after.
Q4: Manual mode function introduction in Operating Mode
A4:
※Fan Curve : Gamers can manually adjust fan speed according to own need.
a. The X-axis is Temperature and the Y-axis is fan speed percentage, and there are 3 default optionss for gamers.
b. In each Fan Curve default option, 8 points are provided for gamers to adjust within the temperature range, and the fan speed of each point must be greater than the previous point.
c. Gamers can click "Apply" to keep the settings after adjustment at any time, and click "Undo" to back previous applied.
d. Gamers can create their own manual mode and save it for quick switching.
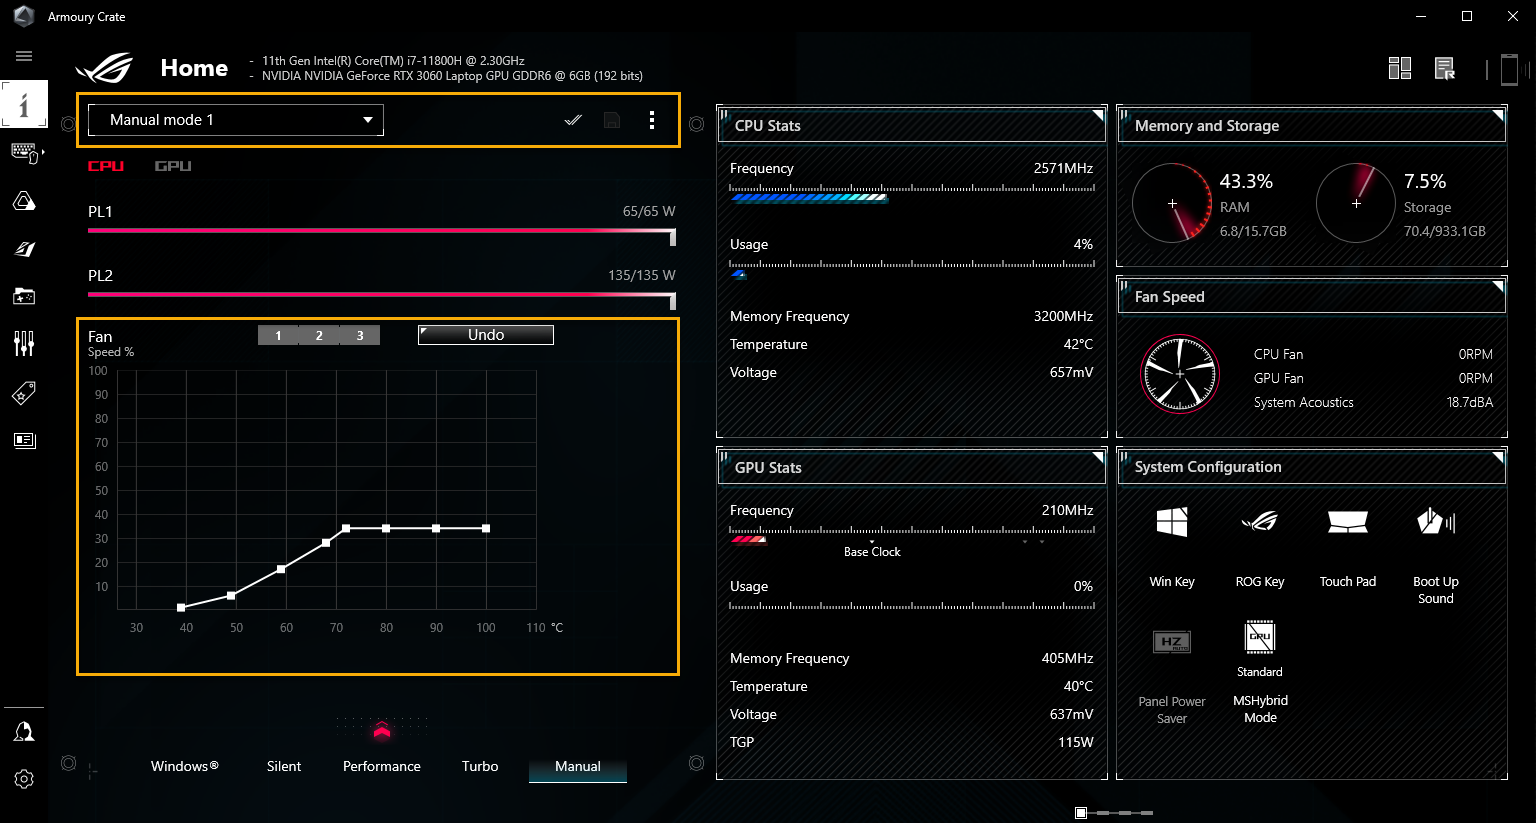
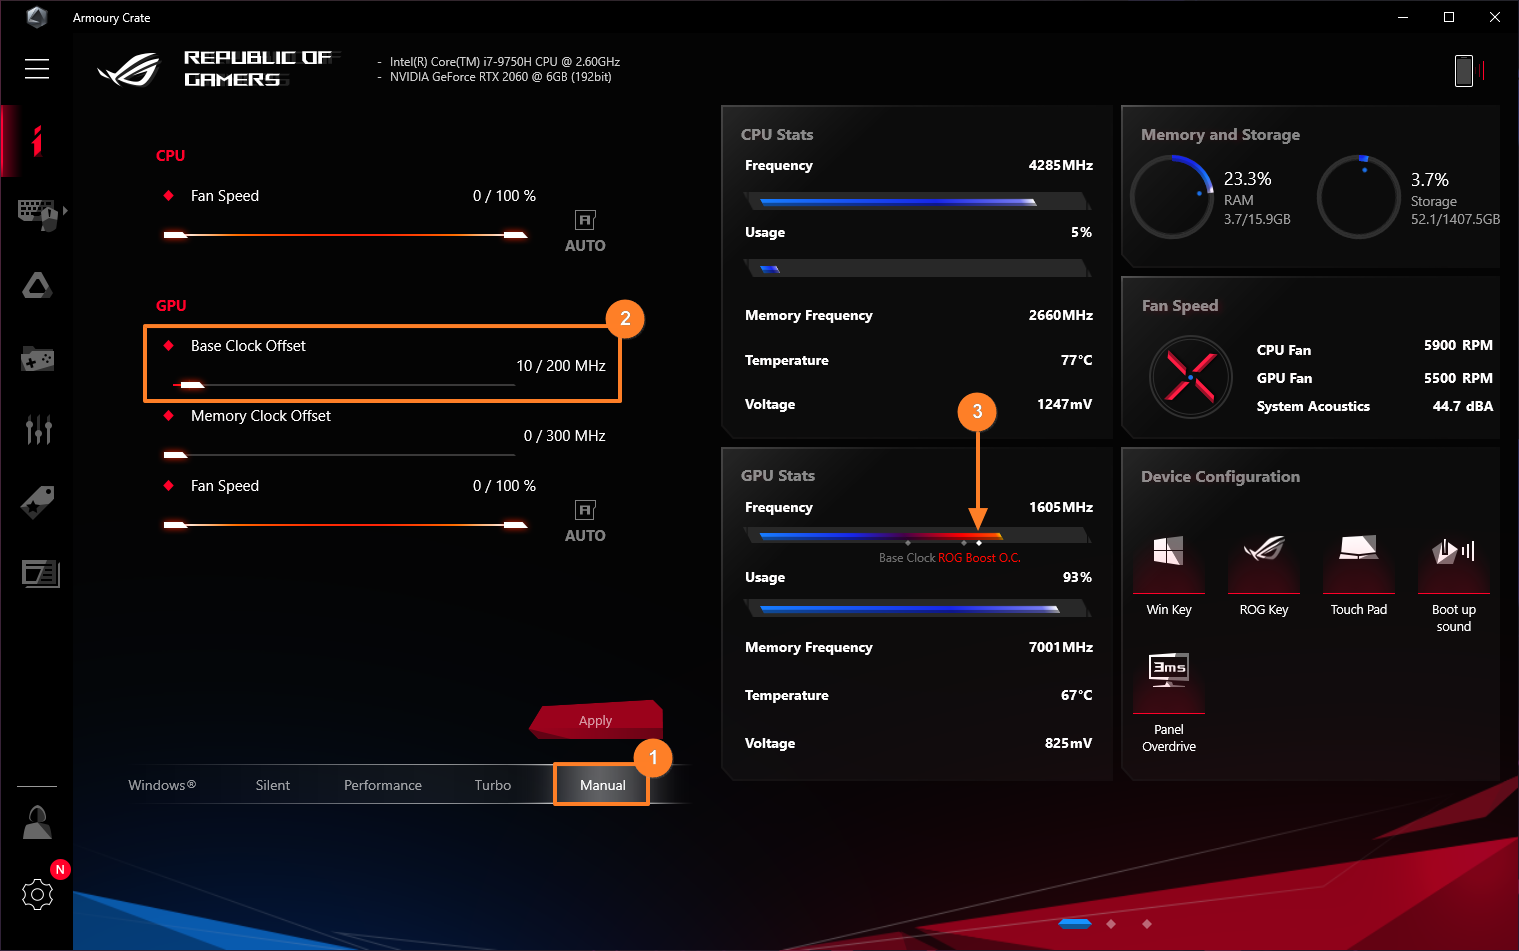
※CPU/GPU Overclock: Gamers can manually adjust the core clock frequency for CPU/GPU to achieve performance improvements.
a. CPU
On Intel platform machines, PL2 denotes the highest power target your CPU is capable of. However, it is only capable of boosting this high for 2 minutes, after which it will ramp down to its PL1 value, which it can sustain indefinitely.
On AMD platform machines, FPPT denotes the maximum power limit, which the CPU can sustain for 10 seconds. It can sustain power up to the SPPT value for up to 2 minutes, and SPL indefinitely.
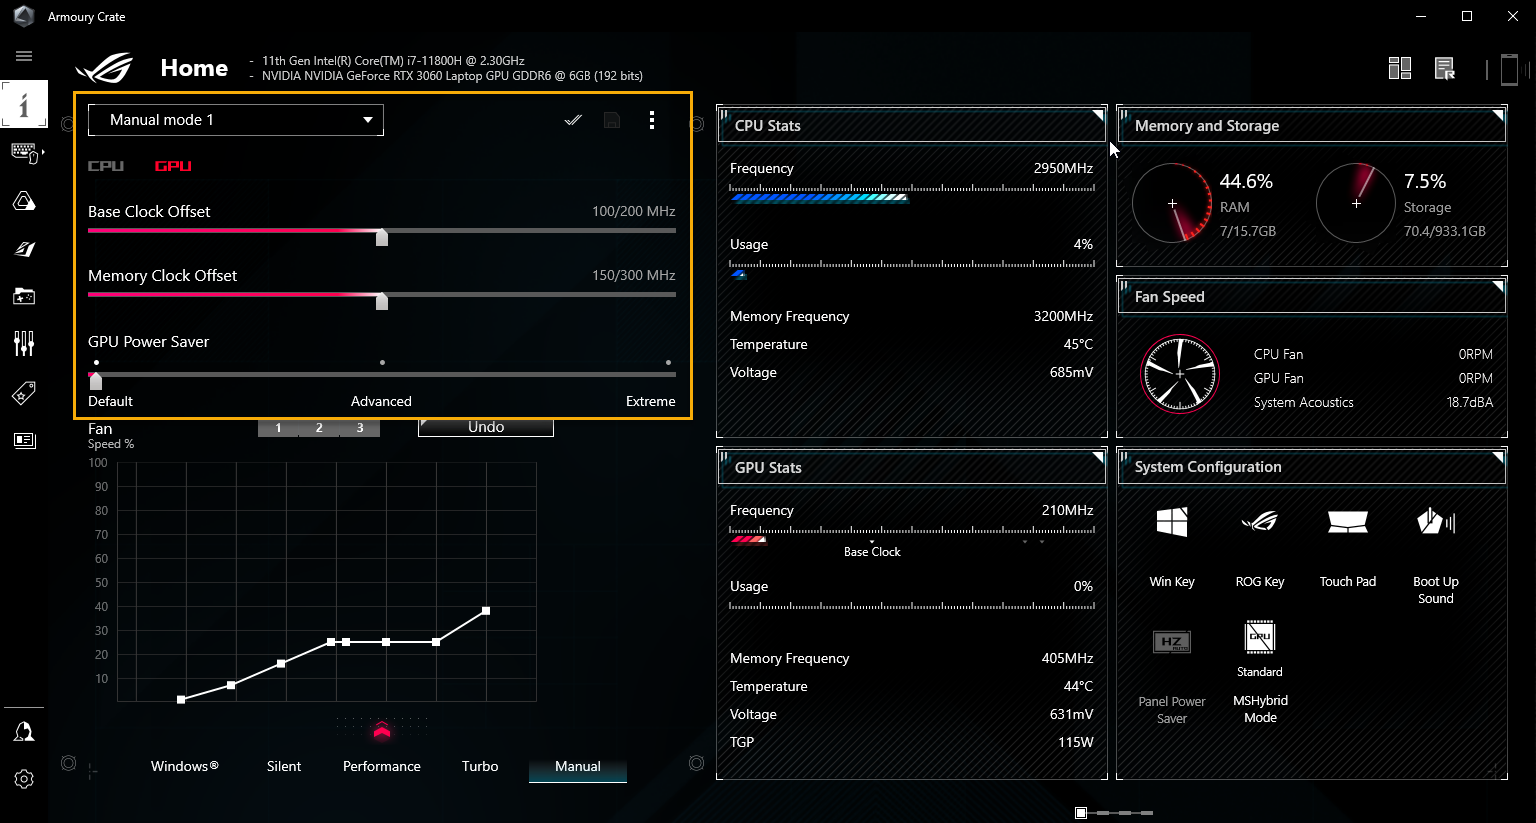
b. GPU
Base Clock Offset allows you to boost the GPU's core clock for higher performance. The Memory Clock Offset boosts the clock speed of the VRAM. Note that higher values may decrease stability.
On NVIDIA GPUs, Dynamic Boost allows the system to dynamically shift power from the CPU to the GPU for higher gaming performance. The higher this value, the more wattage the system can shift from CPU to GPU.
The Thermal Target denotes the target temperature of the GPU when under high load. If the temperature exceeds this target, the GPU will ramp down its clock speeds to sustain the target temperature.
GPU Power Saver: This setting is with lowers power usage to improve cooling, battery life, and fan acoustics. The Default setting allows the laptop to use its full power, while Advanced lowers power usage to hit a 60 frame-per-second performance target, and Extreme aims for 40 frames per second.
*If the model does not support overclocking, there is only Fan Curve provide.
*If GPU overclocking settings are adjusted via ASUS GPU Tweak, the corresponding controls in Armoury Crate will be disabled. Resetting ASUS GPU Tweak to default or uninstalling ASUS GPU Tweak and deleting the file path [C:\ProgramData\ASUS\GPU Tweak II\config.ini] are necessary to use Armoury Crate for GPU overclocking adjustments.
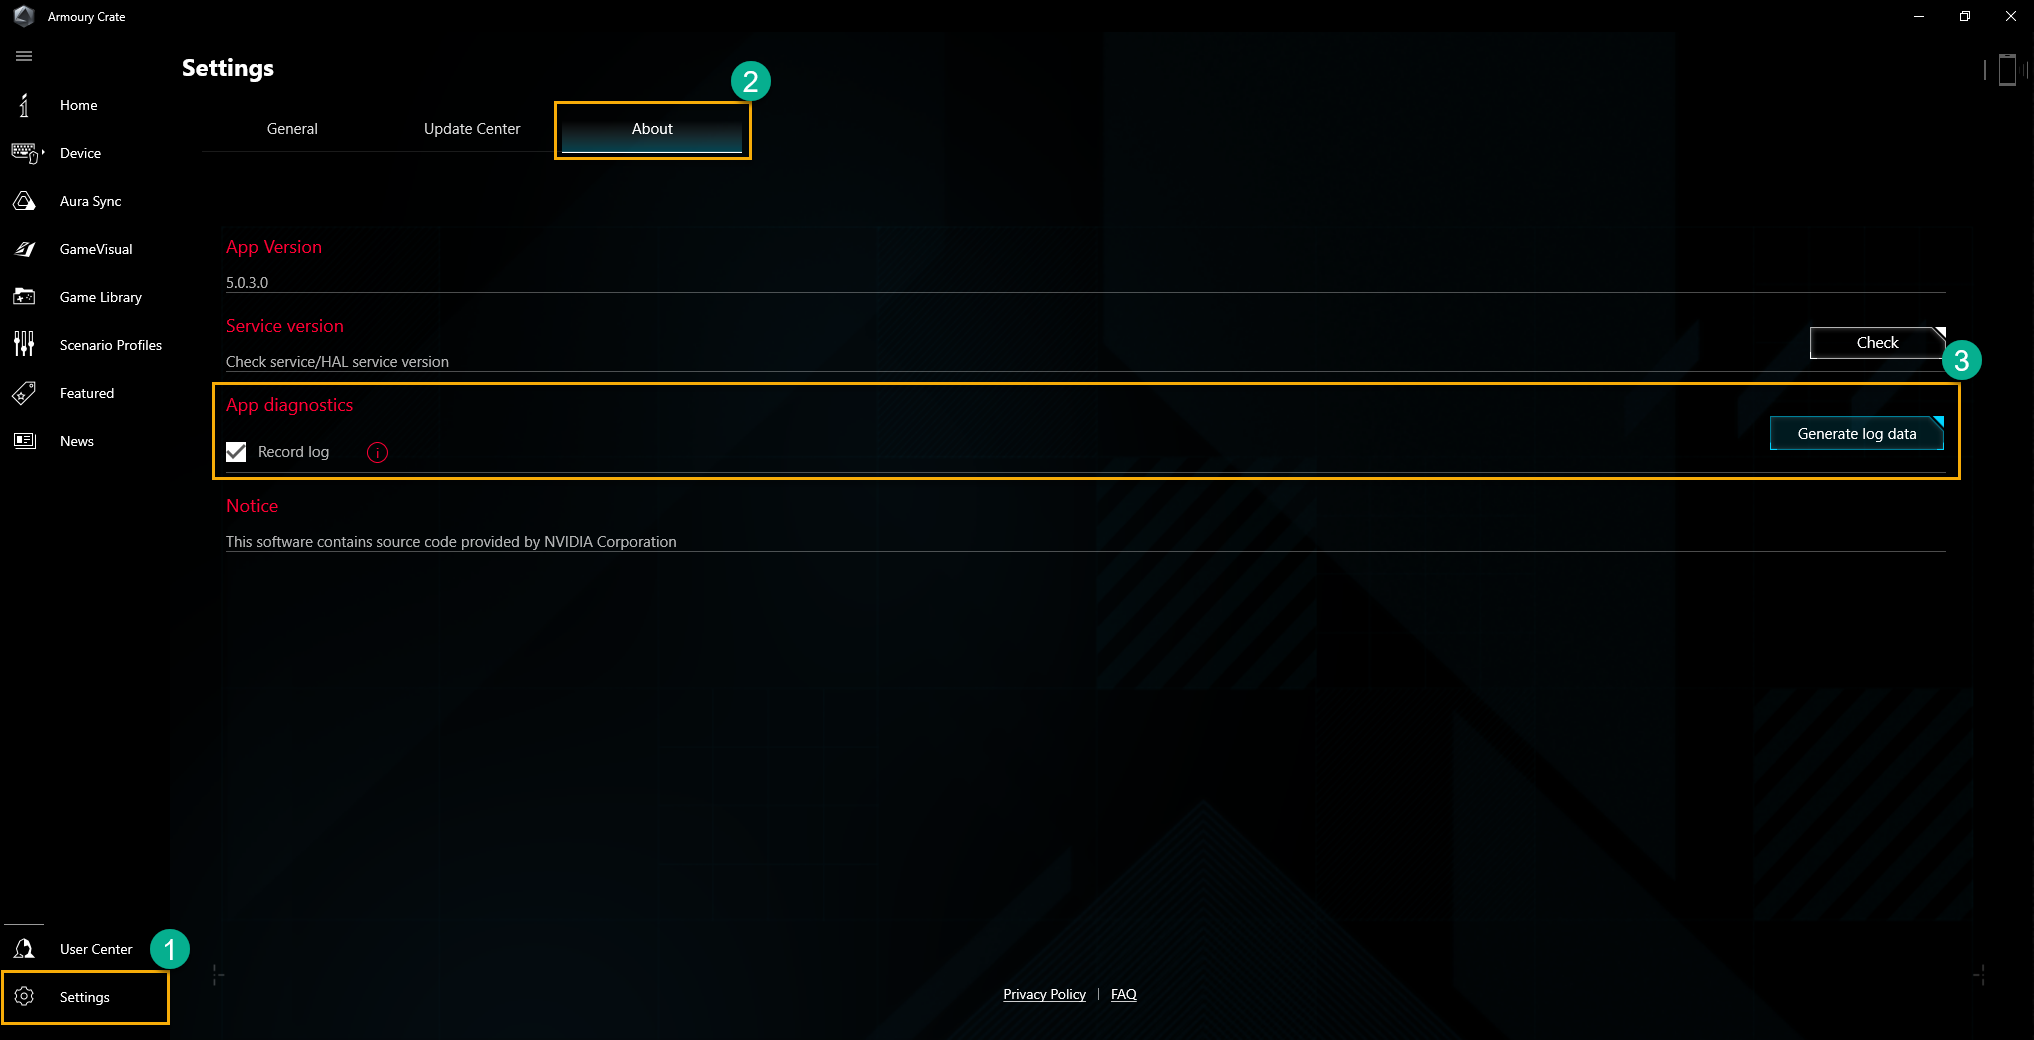
Q5: What is App Diagnostics? (New Feature)
A5: In Armoury Crate "Settings"① and check "About"② page, If clicking App Diagnostics "Record Log"③, the Privacy Policy Statement will pop out. Once user agreed statement, the Armoury Crate will start to collect problem log. After that, please start to duplicate the problem you have, then back to this page to click "Generate log data"③ to generate the log file with encrypted (ASUS log file). After log saved, user can provide it to the repair center or technical supporter for further Armoury Crate problem diagnostics.
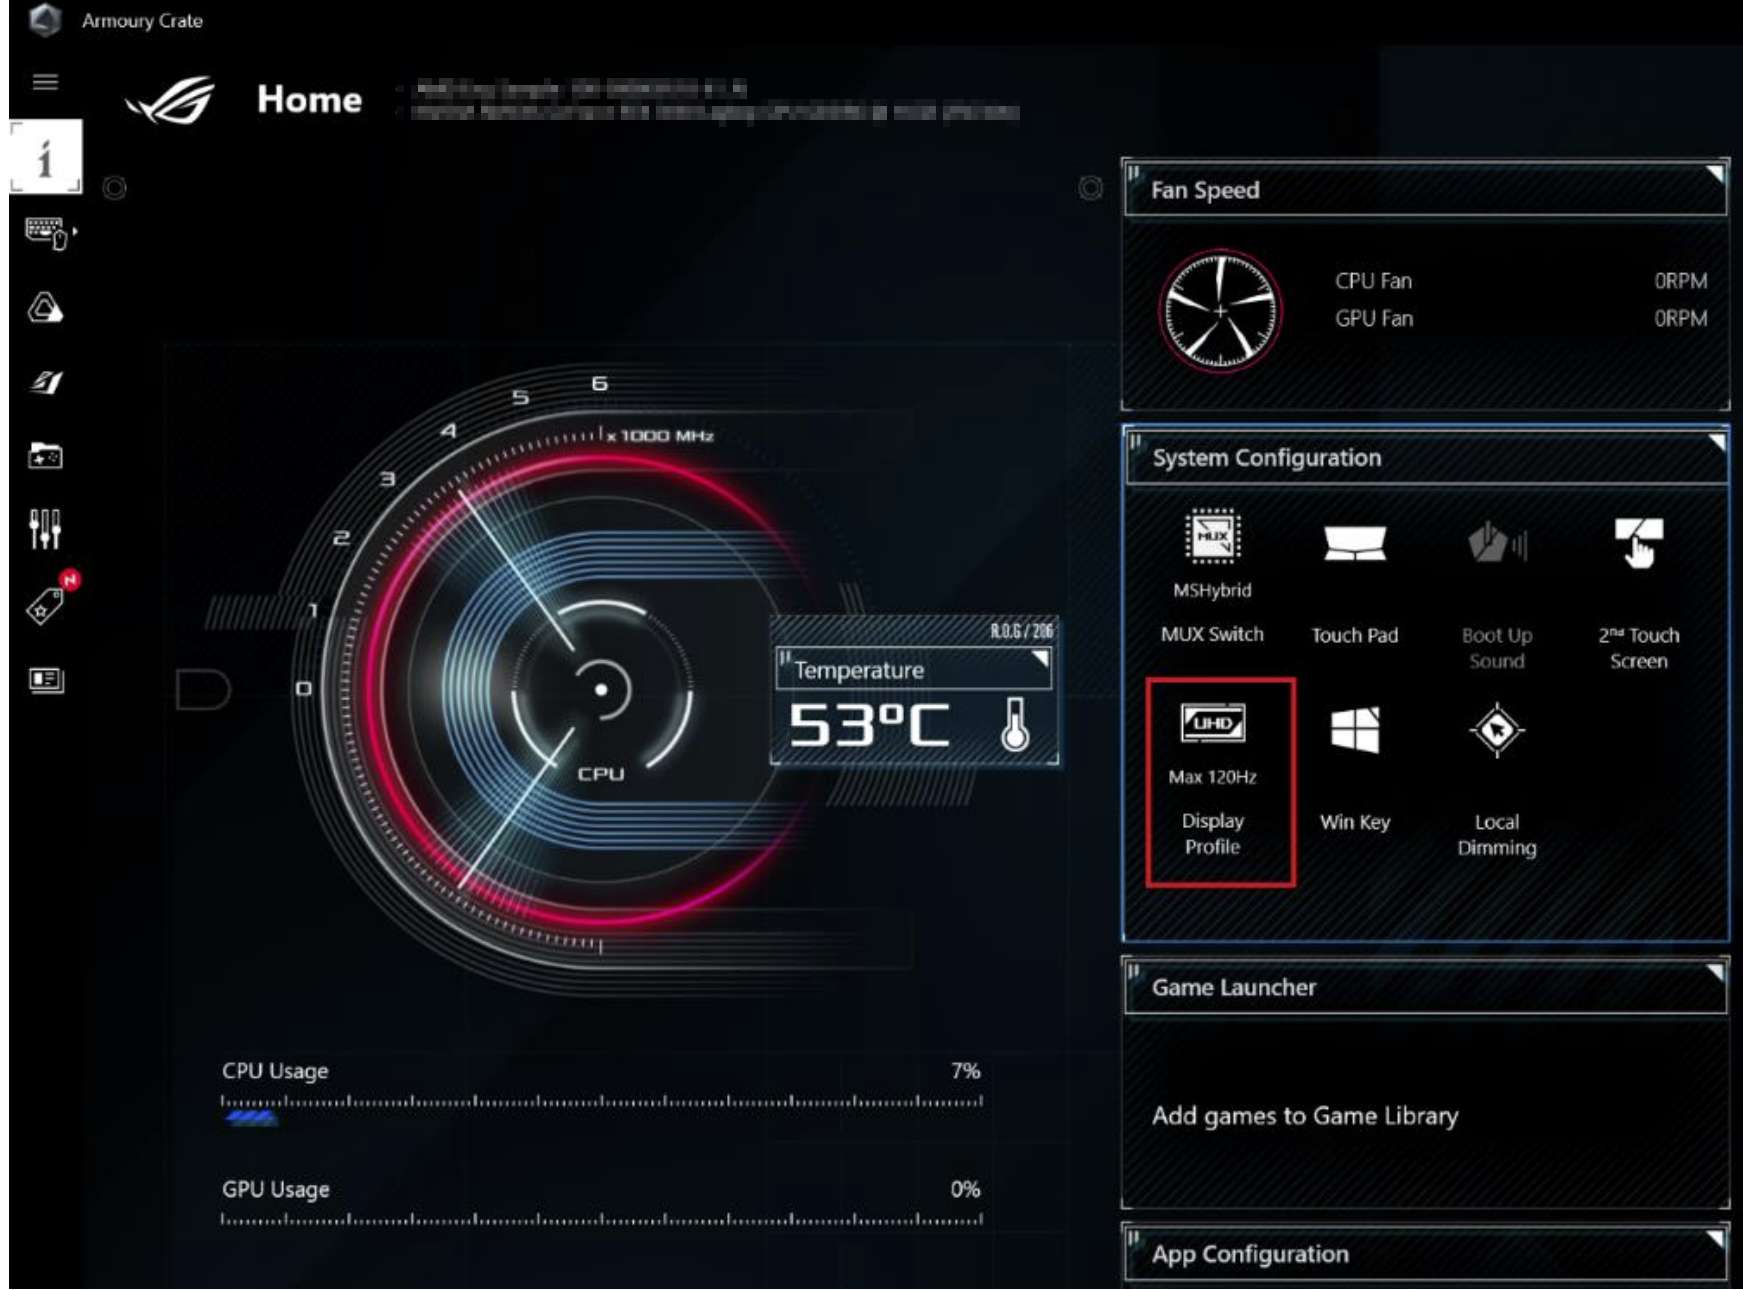
Q6: What does the Display Profile option do?
A6: For devices with a Dual Spec Panel, the [Display Profile] icon will appear under System Configuration in Armoury Crate. Gamers will be able to click the [Display Profile] icon to switch between 4K/120Hz and 1080p/240Hz modes.
*When you change your Display Profile, a system restart is required.
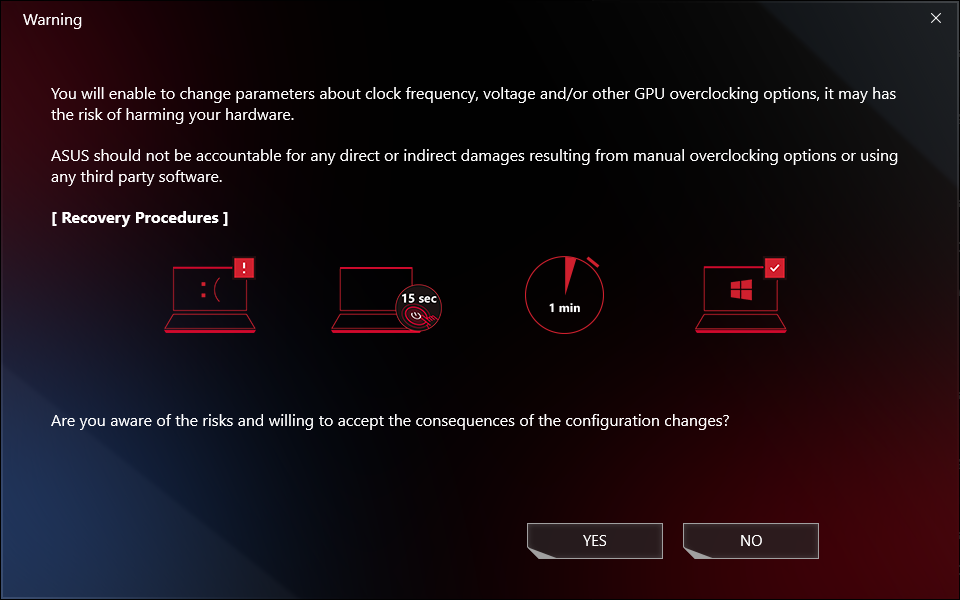
Q7: Why does warning window pop out while applying Fan Curve and CPU/GPU overclock?
A7: The warning window is to remind gamers that may has the risk of harming your hardware, while parameters adjusted, and how to do the Recovery Procedures.
[Recovery Procedures] Once facing Auto Shutdown or Blue Screen of Death, please pressing power key for 15 second and then waiting for a minute. After that, try to reboot your computer again.
Q8: Why I cannot execute GPU Power Saving to stop process?
A8: Once the process cannot be stopped at the time, please try to confirm below:
1. The process is using external display and cannot be stop.
2. The process cannot be stopped while your computer is on AC power supply.
Q9: How to connect the Armoury Crate application with using a mobile device?
A9: Using your mobile device to connect to Armoury Crate and modify the settings of your computer, please refer to the Link for details.
Q10: Why I cannot upgrade my previous Armoury Crate application to the version 3.0 or above?
A10: Please try to restart your computer and launch the Armoury Crate again. If it still cannot be upgraded, please refer to the Link to download Armoury Crate application and install it manually.
Q11: When external display is connected to HDMI or Display Port on laptop, will it affect the GPU processing performance?
A11: No, the graphics processing performance will process and present the final result according to [GPU Mode] setup in the system.
Q12: How to fix it shows BitLocker recovery screen after power on?
A12: If you experiences that the computer shows BitLocker recovery screen after power on, it means that the HDD/SDD has been encrypted, and you need to provide a recovery key to solve this problem. Please refer to [How to fix it shows BitLocker recovery screen after power on].
Q13: How should I apply GPU Mode?
A13:
Ultimate*: Gaming and other intensive tasks will experience the best performance and lowest button-to-pixel latency. This mode is ideal when your laptop is plugged in, since it uses significantly more power, which leads to reduced battery life.
Standard: [Windows Default] Also know as MSHybrid. Automatically switches to the discrete GPU for demanding applications, and the integrated graphics for other tasks. This results in good performance when gaming, and long battery life during non-intensive tasks.
Eco Mode**: The discrete GPU is completely disabled for maximum energy savings, lower temperatures, and less noise. Gamers can still play games using integrated graphics, but performance will be significantly lower.
Optimized: [Recommended] Automatically switches to the discrete GPU for demanding applications, and the integrated graphics for other tasks when on AC power. This results in good performance when gaming, and long battery life during non-intensive tasks. When on battery power, the discrete GPU is automatically disabled for maximum battery life.
*The feature can only support 2022 new series models. Under [Ultimate Mode], the setup must switch to [Standard] first, then [Eco Mode] and [Optimized] are available to apply.
**Under [Eco Mode], the discrete graphics information will not appear in Windows® Display Adapters item.
Q14: How to use "Record" and "Import" function in Resource Monitor?
A14:
※Resource Monitor "Record"
In Resource Monitor①,clicking "Record"② to start record function, and the Save As screen will pop out.
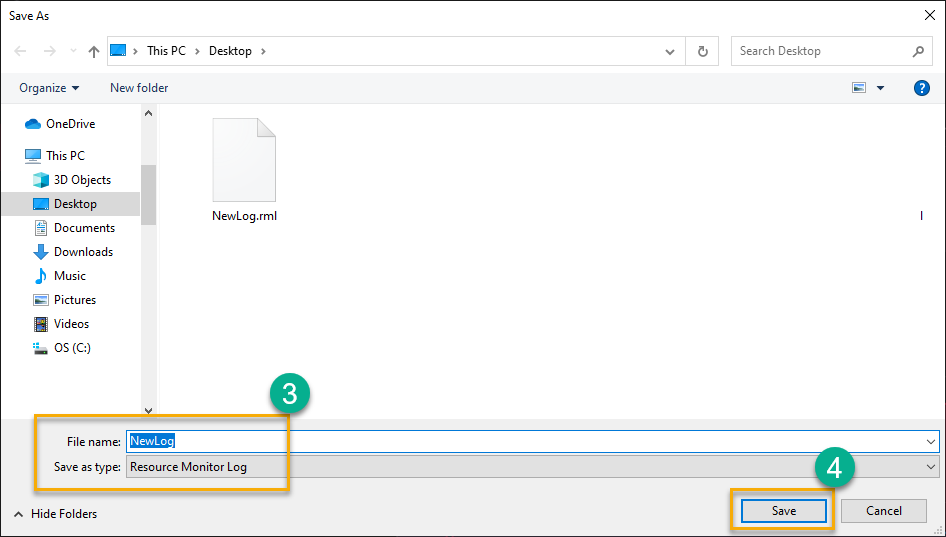
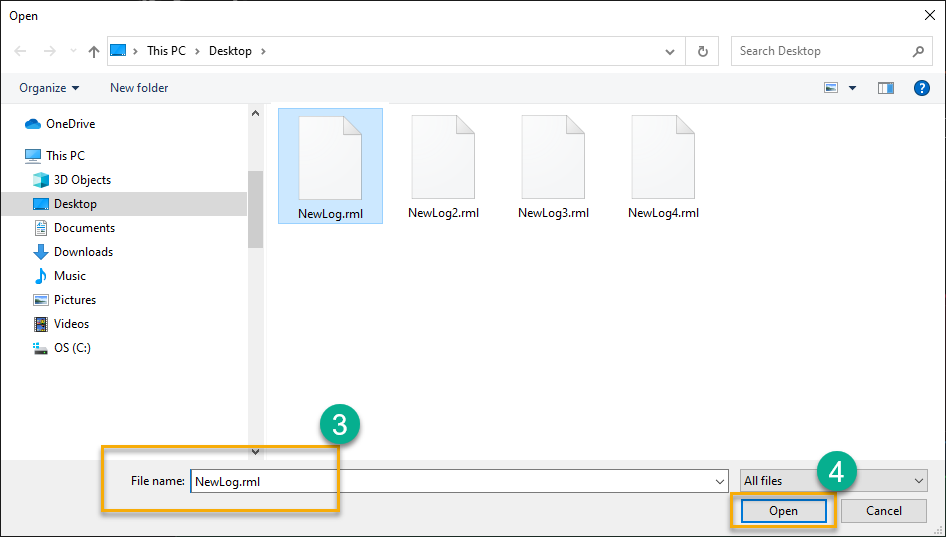
In the Save As screen, you can name the file③ and click "Save"④ to designate the file (*.RML File) to save.
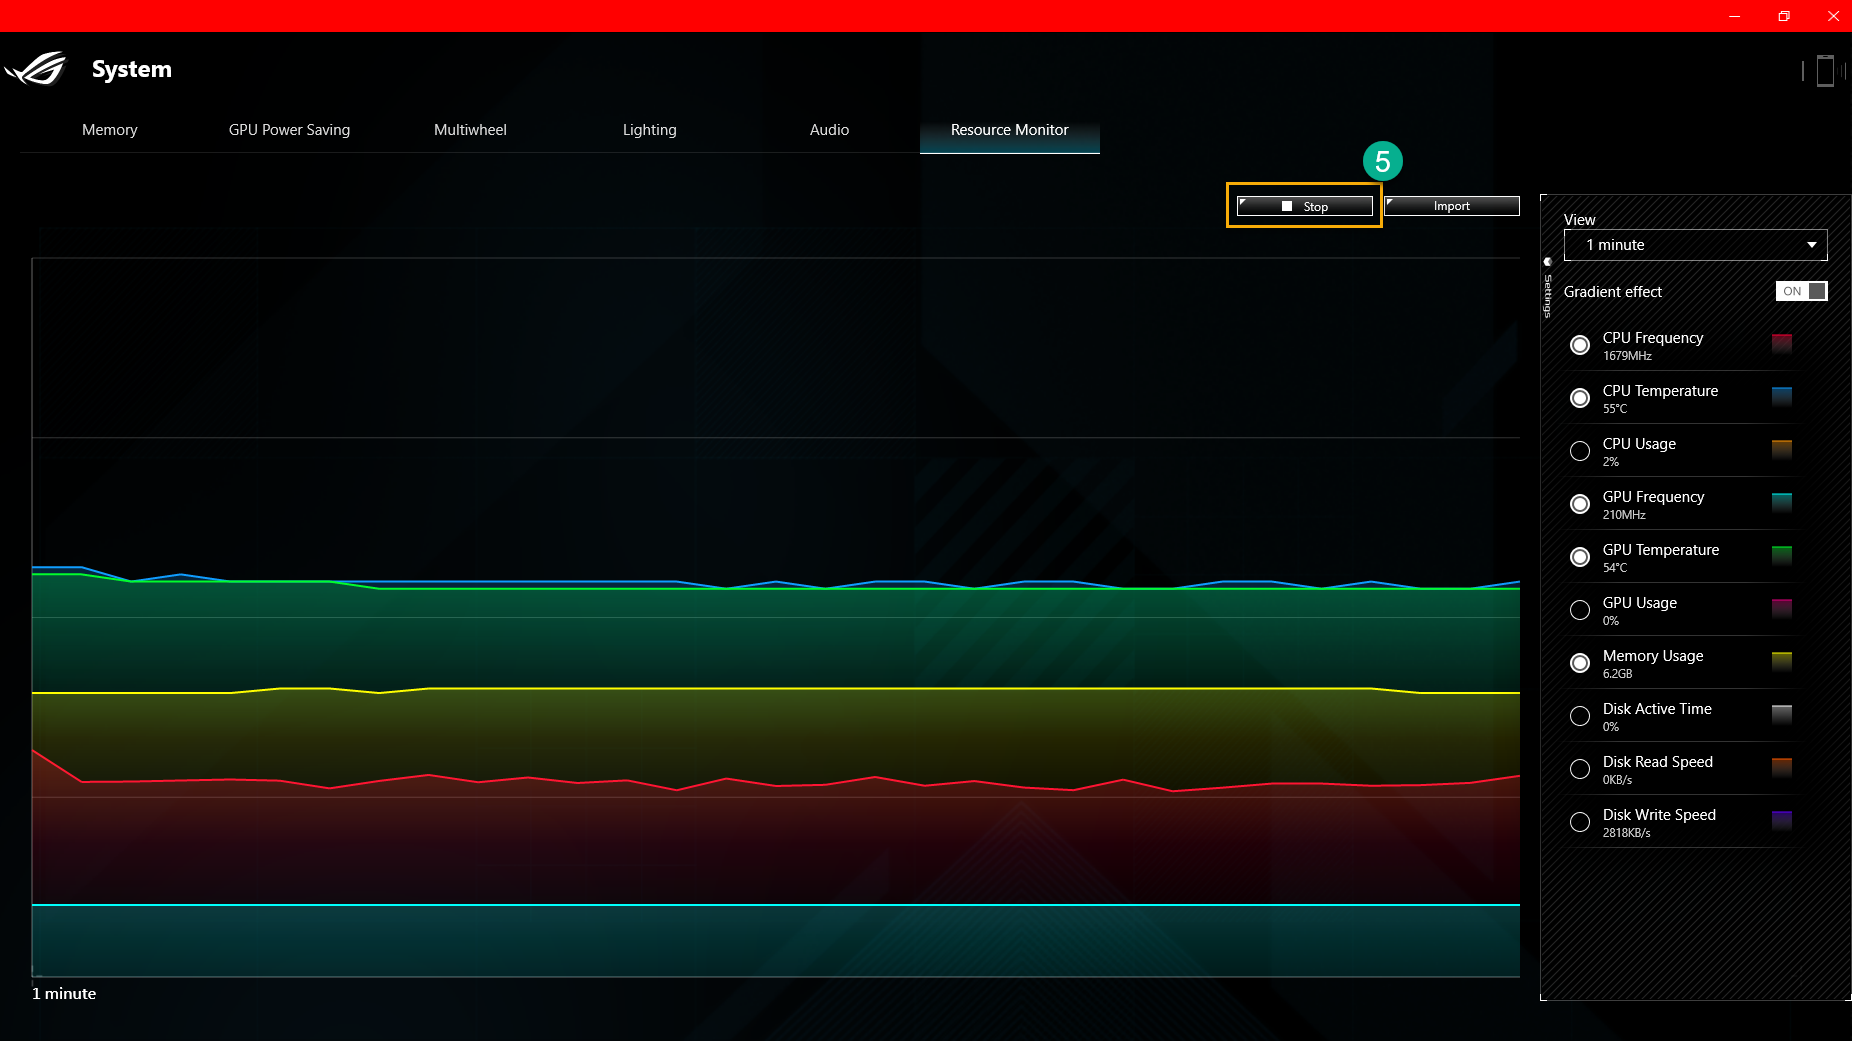
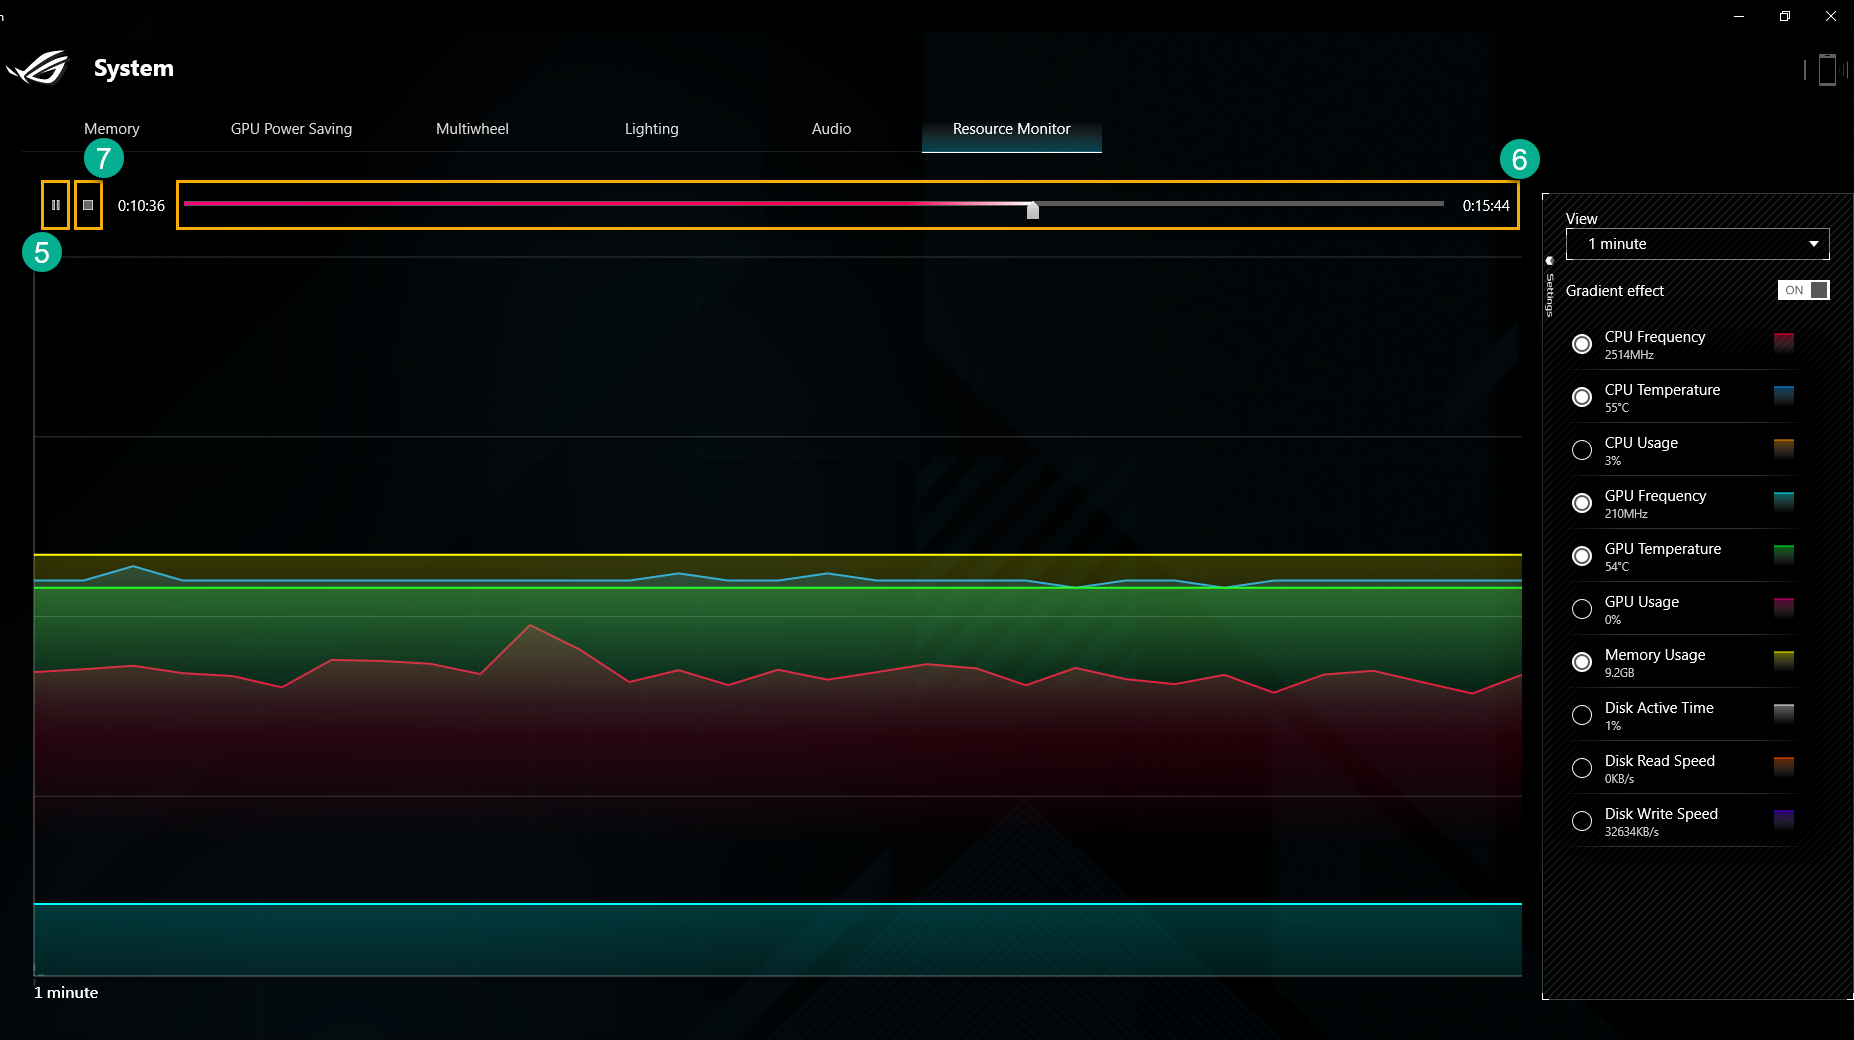
During recording, once click "Stop"⑤, the recording will stop immediately.
※Resource Monitor "Import"
In Resource Monitor①,clicking "Import"② to import previous file, and the Open screen will pop out.
In the Open screen, you can select the file③ (*.RML File) you need, and click "Open"④.
While watching previous record, you can control screen via "Play/Pause"⑤、"Timeline"⑥ and "Stop"⑦ button.
Q15: How to edit and apply "Macro" function?
A15:
※Edit "Macro"
In Armoury Crate Device①, selecting "Macro"② to launch Macro action setting page.
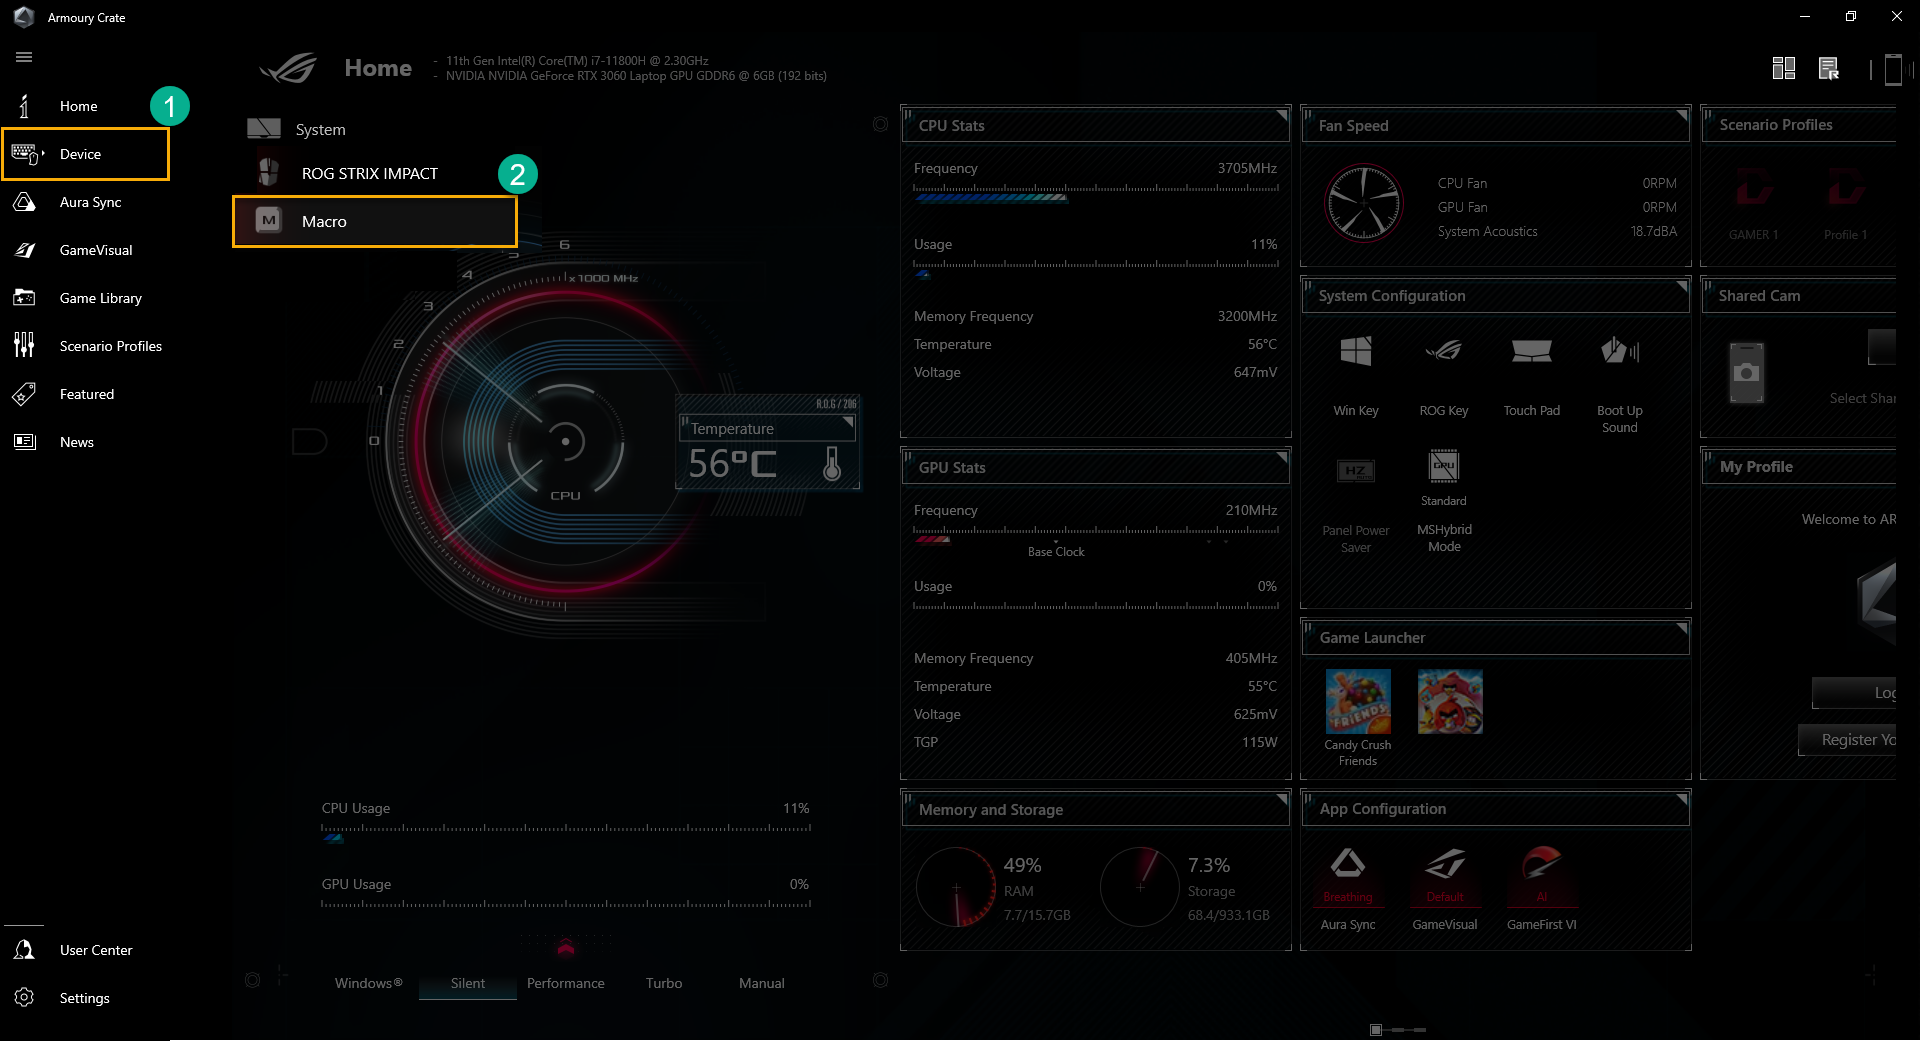
*The macro function requires peripheral devices that support ASUS ROG.
In Macro action setting page, gamer can modify Macro actions, and edit a series of keystroke and mouse click actions into one step.
Macro Files③: To create and rename Macro files.
Record④: Recording your real keystroke and mouse click actions.
Insert⑤: To indert the keystroke and mouse click actions.
Save⑥: Once Macro action edit completely, you can click "Save" to save the content.

※Apply "Macro"
*The Macro function can only support with ASUS ROG peripheral devices, and below are using ROG STRIX IMPACT mouse for demonstration.
In Armoury Crate Device①, selecting ROG STRIX IMPACT② to launch setting page.

To select "Buttons"③,and choose mouse function key④ you would like to apply, for example choosing "Scroll click"
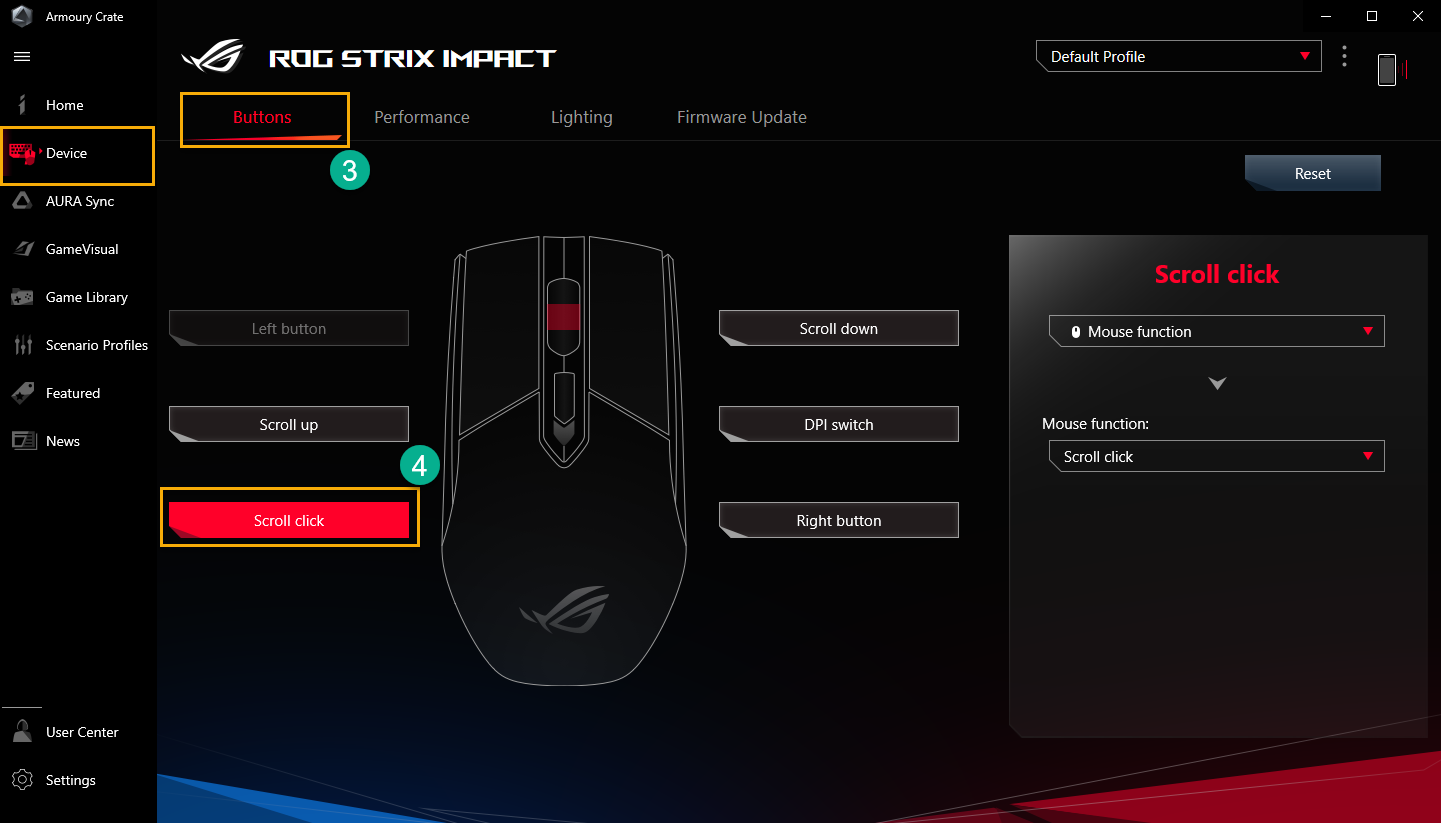
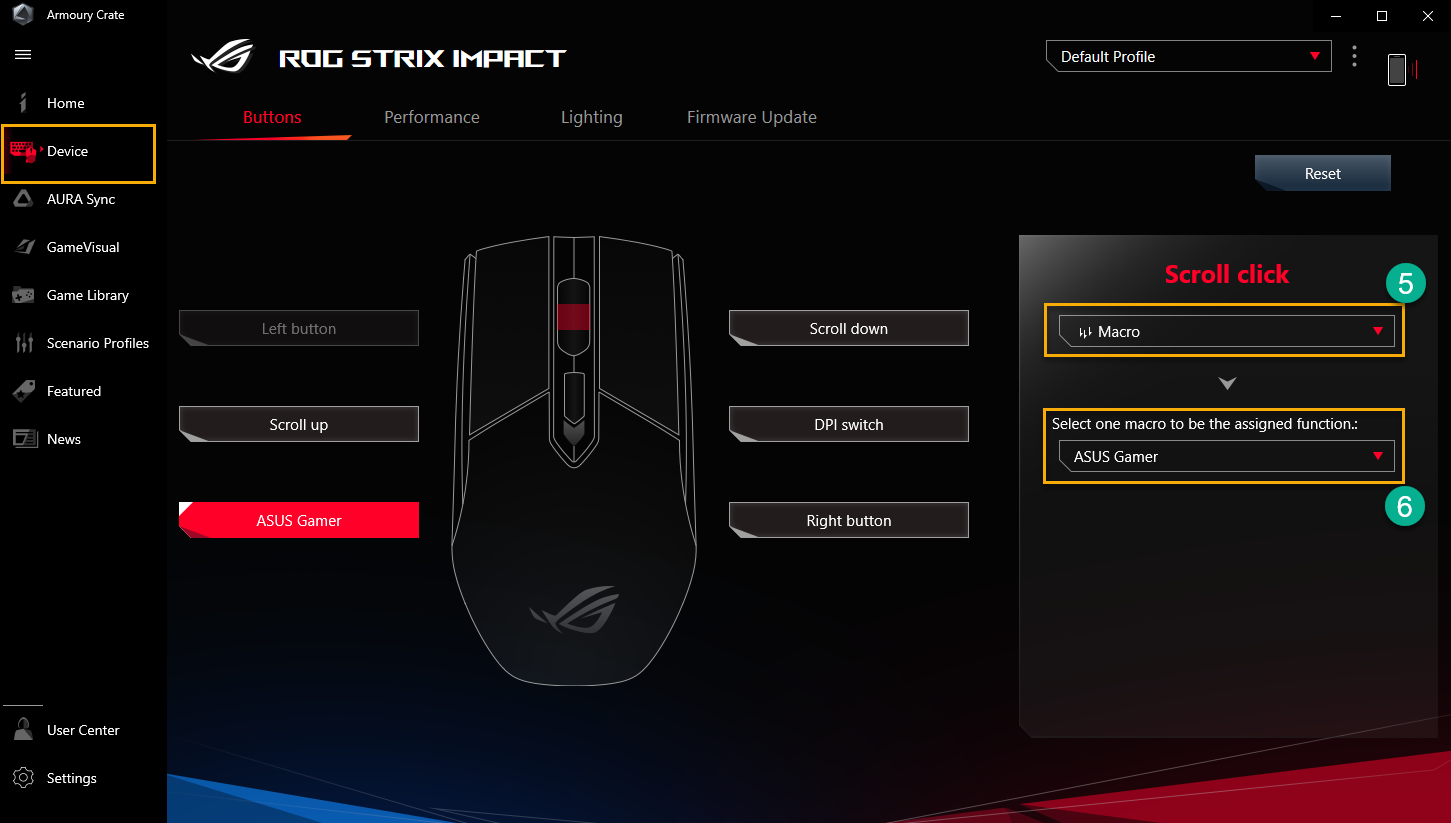
Once mouse function key selected, you can select Macro⑤ and also assign the function⑥ which you saved in Macro before.
Q16: How to enable NVIDIA® MAX-Q Dynamic Boost*?
A16:
1. Gamers have to enable MAX-Q Dynamic Boost* function in NVIDIA® Control Panel,please refer to NVIDIA® official website about How to Enable or Disable Dynamic Boost in the NVIDIA Control Panel.
2. In Armoury Crate application setup, the Operating mode should be under Turbo or Manual mode.
*The feature can only support the model equipped NVIDIA® MAX-Q Dynamic Boost.
Q17: Why my [Panel OverDrive] icon turn grayed out??
A17: 
*Please make sure you connect laptop to the DC power supply.
*Please go to ASUS Support website to download and update the latest [Refreshrate Service] driver.
[How to search and download drivers, utilities, BIOS and user manuals]
Q18: How should I solve the game with DRM issue via Armoury Crate setting?
A18: 
If Games affected by DRM issue, please try to enable item “Legacy DRM Compatibility”. Once “Legacy DRM Compatibility” enable, the setting will block use of the CPU's E-cores to improve game compatibility.
WARNING: Enabling this feature may reduce performance and/or battery life.
Q19: Why is my recording quality abnormal with device sound weakness and the human voice intermittence?
A19: Once record scenario is own device sound with human voice or ambient sound collecting, also own device volume is greater than or equal to the external volume, gamers might feel that the sound quality is not as expected. Please try to turn off [Microphone Modes], if you have the above-mentioned special recording needs.
In the "Audio" page of "System" in the Armoury Crate application,
[Microphone Modes] is the directional technology of the built-in microphone, and the default mode is "Omnidirectional Mode". "Omnidirectional Mode" technology has extremely high echo cancellation and can provide excellent voice isolation effect. It is suitable for situations such as live broadcast, game communication and conference calls, providing you with clear audio quality.
Q20: What is CPU AUX Fan and System Fan?
A20: CPU AUX Fan is a CPU auxiliary fan which work the same as CPU fan. It is specific fan for the UMA (Unified Memory Architecture) laptop. Also, System Fan is third fan which can support CPU & GPU fan and work with them together for a better thermal solution inside of laptop.
Q21: What is Backlight Control* [Multi-Zone] and [One Zone] in System Configuration?
A21:
[Multi-Zone]
Hundreds of mini-LED zones operate independently, dimming dark areas of the scree for deeper blacks and bright areas for vibrant, punchy colors. This mode is ideal for gaming and watching movies. When turning on HDR will automatically enable Multi-Zone backlight.
[One Zone]
All mini-LED backlight zones operate as one, like a traditional laptop panel. This offers a consistent color accurate experience, which can be important for content creation. Note: HDR is not available in single zone backlight mode.
*Only available on laptop equipped with Mini-LED display.
Q22: How should I toggle CPU Overclocking Mode setting to BIOS Mode?
A22: When CPU Overclocking Mode icon turn grayed out (under Software Mode), gamer needs to toggle setting to BIOS Mode in BIOS configuration.
Please enter BIOS configuration. In BIOS configuration, please select [Ai Tweaker] under [Advance] option.
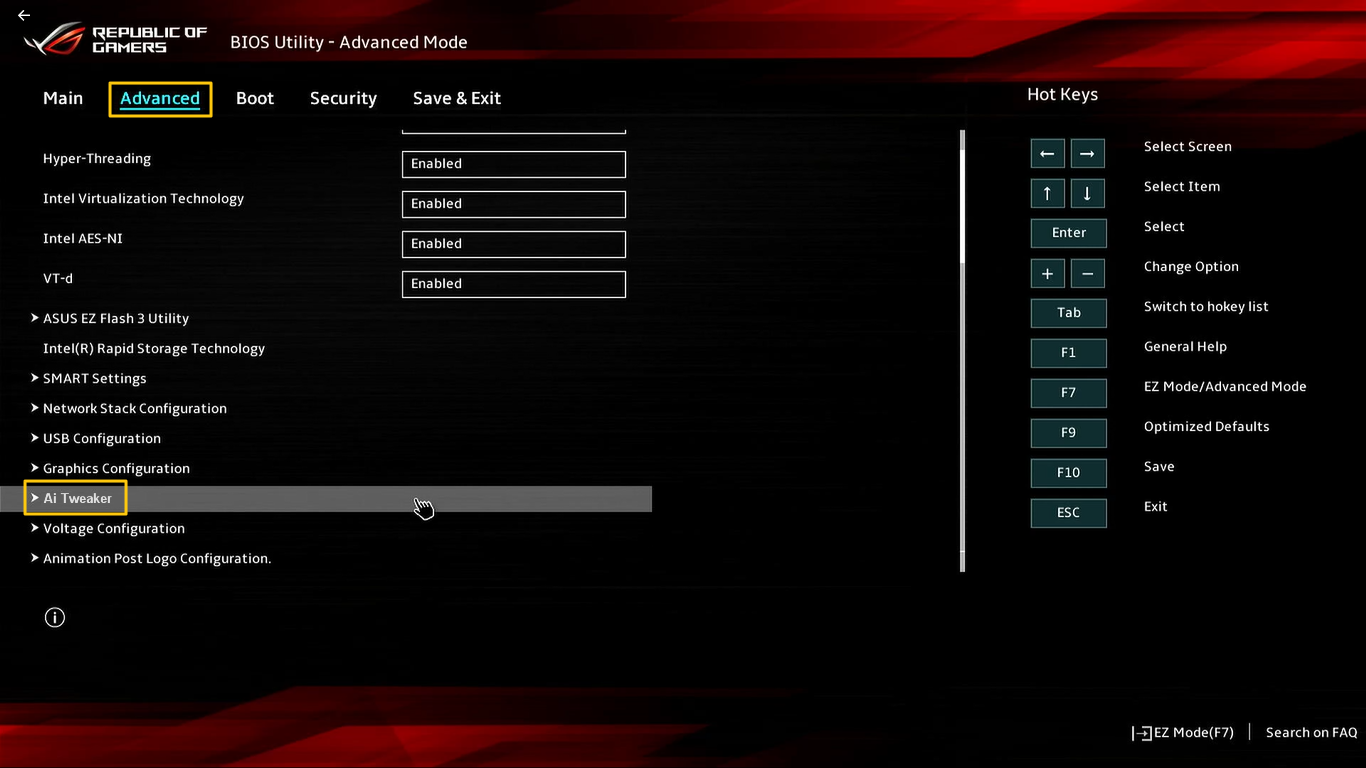
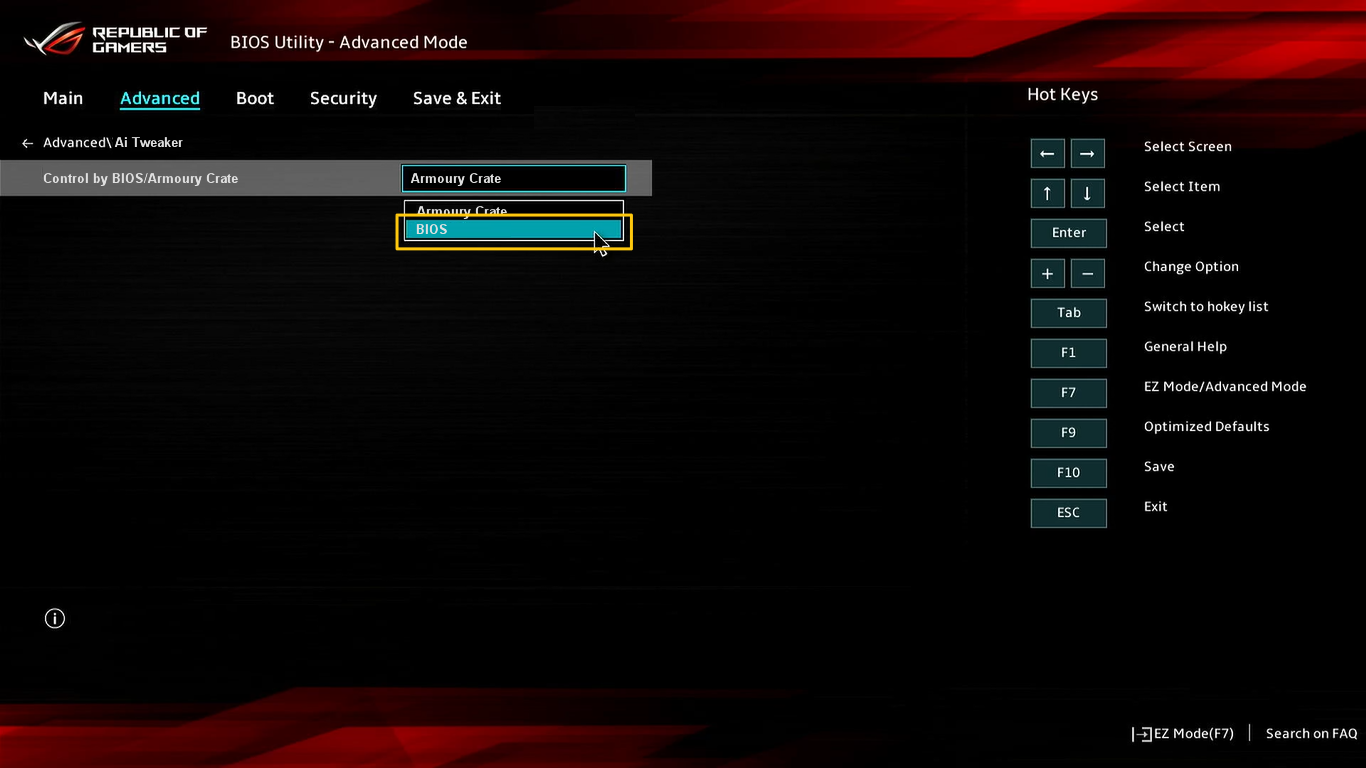
In [Ai Tweaker] setup, please select [BIOS] under [Control by BIOS/ Armoury Crate] option. After that, press [F10] key to save configuration and exit, and then it will be done after system restart.
Q23: How to disable Armoury Crate & Aura Creator auto-updates?
A23: To stop the Armoury Crate UWP and the Aura Creator UWP apps from updating automatically, please follow below steps.
*Note: When auto-update is disabled, this setting applies to all installed apps from the Microsoft Store (not exclusively to Armoury Crate and Aura Creator).
1.Go to Microsoft Store.
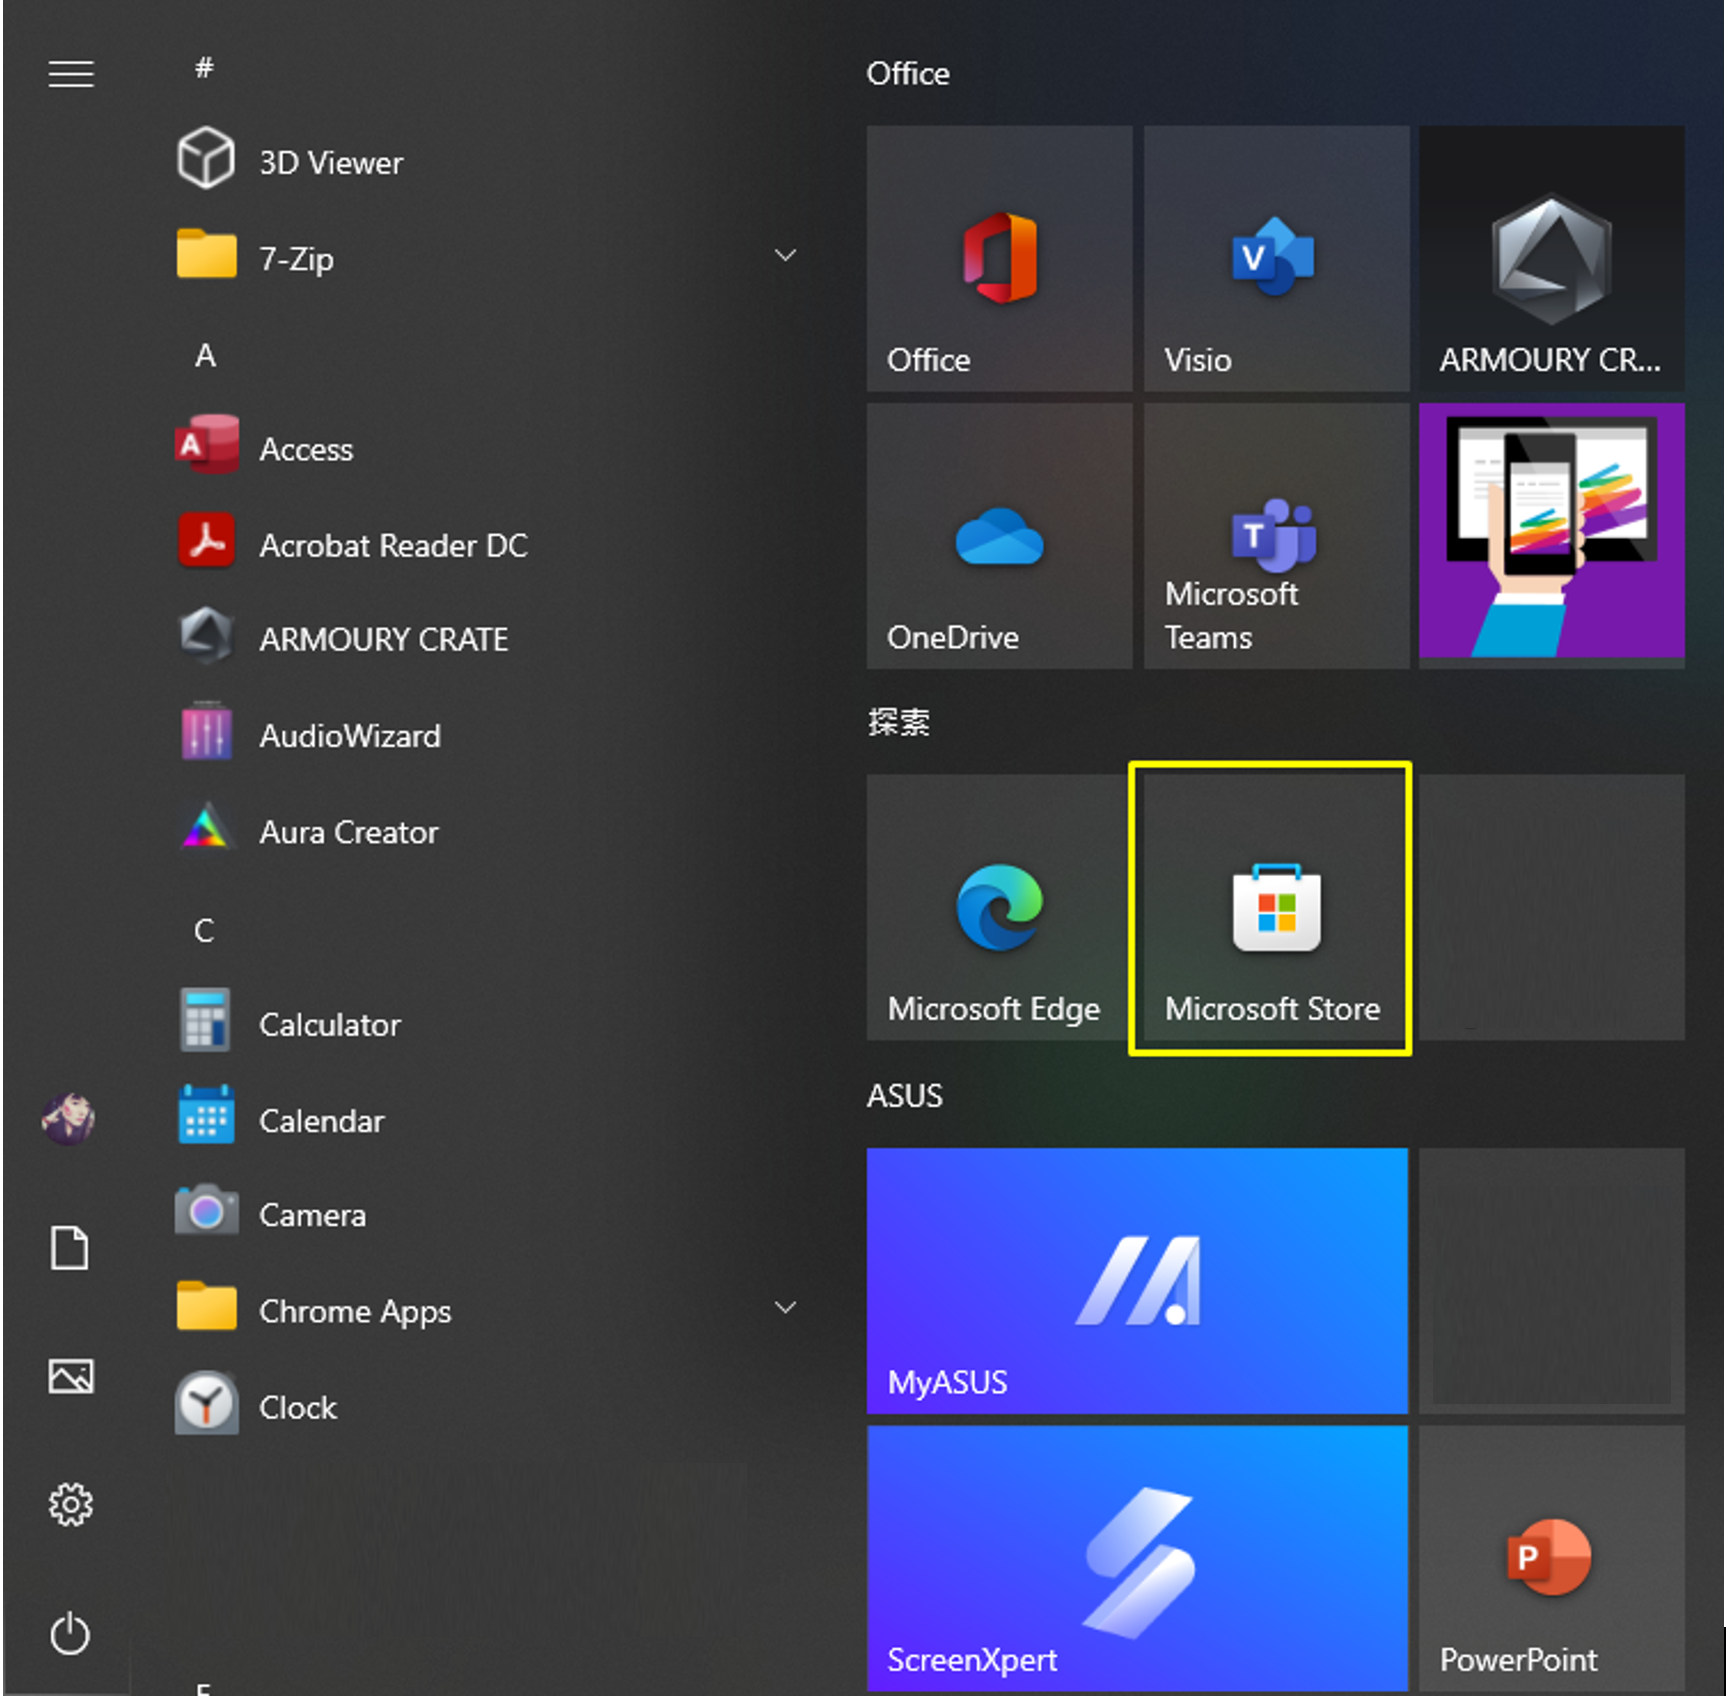
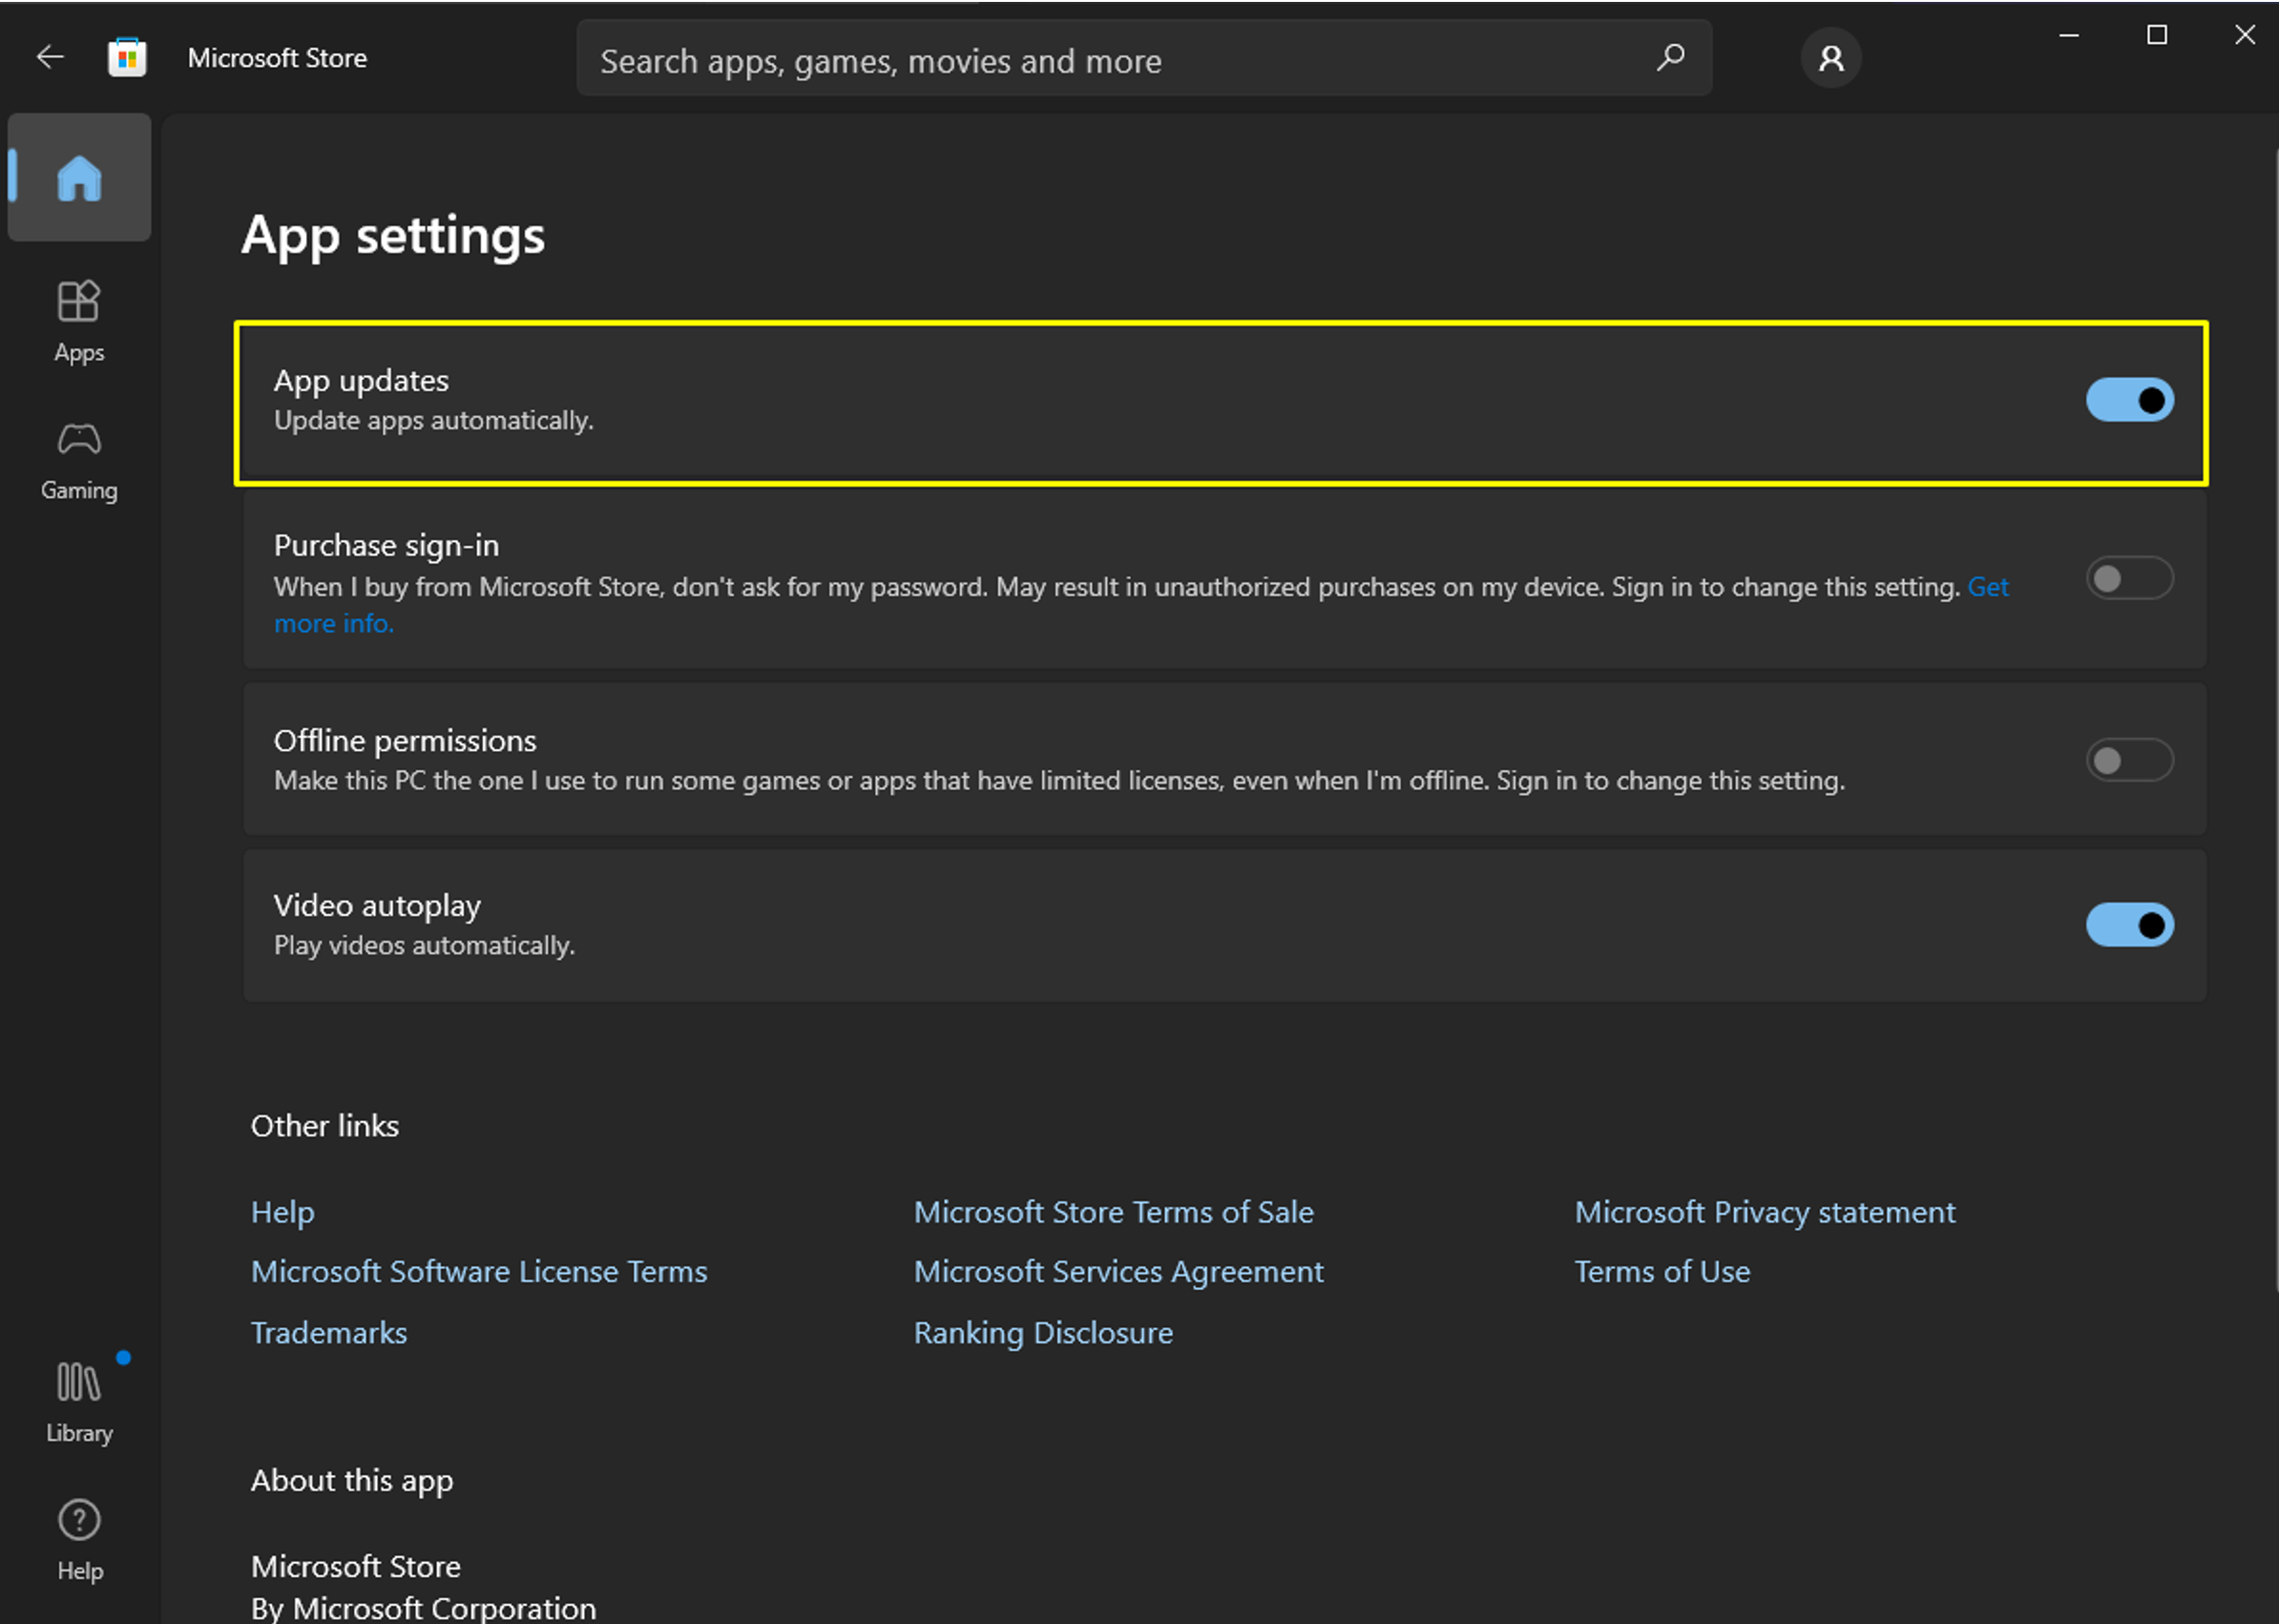
2.Click the “Sign in” icon on the right of the title bar, and then click on “App settings”.

3.Disable “App updates” to turn off the automatic update.
*Note: When auto-update is disabled, this setting applies to all installed apps from the Microsoft Store (not exclusively to Armoury Crate and Aura Creator).
Q24: Why does the AMD AFMF function fail to operate correctly after opening Armory Crate's Resource Monitor?
A24: AMD AFMF is AMD's latest frame generation technology. At present, it does not accommodate third-party performance monitoring tools. Enabling any third-party performance monitoring tool that overlays onto the game screen, it will disrupt AFMF functions, including Xbox Game Bar, Armoury Crate's Resource Monitor...etc. If AFMF is activated and you wish to access metrics like FPS, we recommend utilizing AMD Software In-Game Performance Overlay.
※According to your product and application version, the operation and interface may have differences.
※According to your location, ASUS may provide different product function and information.
*If you have any questions, please contact ASUS Support for further assistance.
Armoury Crate Introduction (Ver4.0)
Armoury Crate Install& Uninstall
1. Armoury Crate Introduction
Armoury Crate is an integration application developed for ROG series and TUF series of gaming laptop and desktop by integrating NB ROG Gaming Center and DT AEGIS III functions. Gamers can use Armoury Crate platform to launch system performance adjustments on their homepage and set up related applications and obtain system information. The lighting and AURA Sync integrated by Armoury Crate can also be used to set various lighting effects on the laptop& desktop, and the supported external devices.
Support ROG series and TUF series of gaming laptop and desktop, please refer to Armoury Crate Compatible Devices for more details.
*The article is applicable to Armoury Crate Ver4.xx version only.
3. Application Install& Uninstall
How to get and install the application program,please refer to ASUS official website
How to uninstall application program,please refer to ASUS official website
4-1 How to Start Armoury Crate
Please type and search [ARMOURY CRATE]① in Windows Search Box , and then click [Open]②,the Home page will pop out.

4-2 Armoury Crate Home
Main Menu(A): To display Armoury Crate main features and page switch.
HyperFan Mode(B): To provide gamers a quick system performance adjustments, and each mode is with different CPU&GPU performance、Cooling、Noise Reduction and Energy Saving default setting, for example Windows®、Silent、Performance、Turbo、Manual and Tablet/Vertical mode.
* Please refer to HyperFan Mode Category for more details.
System Info Display Blocks(C): To provide gamers having a quick view for system relative info, for example CPU&GUP Stats、Memory and Storage、Fan Speed、System Acoustics、Device Configuration、Game Launcher、App Configuration、Scenario Profiles and My Profile.
5. Device(D)
*System(a) - Memory(b): Gamers can select the Apps and release those occupied memory while game playing.
Refresh①: To select “Refresh”,it will list the Apps currently occupying memory.
Applications②: To display the Apps list which is with currently occupying memory.
Free Up③: To select “Free Up”,the memory occupied by the selected application will be released.
GPU Power Saving(c)
Gamers can stop application(s) which is using GPU currently to save power.
IGPU Mode①: This feature is able to extend your battery life. The system will disable the discrete GPU applications, and only use internal GPU. This mode is not recommended for gaming or require intensive GPU usage.
Stop All②: To select “Stop All”, all applications using GPU currently will be stopped.
Refresh③: To select “Refresh”, it will list the Apps currently running on GPU.

Lighting(d)
To setup device lighting effects.
Basic Effects①: To setup device lighting effects, the lighting effects will vary depending on the device.
Advanced Effects②: Using ARUA Creator to create unique lighting effects, please refer to AURA Creator Introduction for more details.
Settings③: To select “Setting” to get into General Settings* page, and gamers can turn on/ off device lighting effects.
*General Settings: Gamers can enable or disable the AURA lighting effects for Keyboard & Laptop Light Zone under the status (Boot Up/ Shut Down/ Awake/ Sleep), the available lighting effects will vary depending on the device.
Audio(e)
Two-Way AI Noise Cancelation①:
It is exclusively featured on ASUS gaming laptops and desktops. Through the massive deep-learning database, the utility leverages to preserve the sound of your voice while eliminating distracting keyboard clatter, mouse clicks, and other forms of environmental noise. It only occupies a slight load on the CPU, and ensures the least impact on gaming performance.
*The function can only support some models, please refer to Two-Way AI Noise Cancelation for operation detail.
**In Audio setup, gamers can not turn on both of Two-Way AI Noise Cancelation and Microphone Modes function at the same time.
Microphone Modes②:
CARDIOID Mode: Records sound source directly in front of the microphone, and delivers rich sound. It’s perfect for game streaming or vocal performers.
STEREO Mode: Stereo mode uses left and right channels to capture wider and more realistic sound impression. For example: ASMR, guitar or choir.
OMNI Mode: OMNI mode picks up sound equally from everywhere around the mic. This setting is perfect for conferance call and other group events.
*Only available on laptop equipped with 3D-MIC Array (GA503、GU603 and GX703 Series), and please refer to ROG Official Website for more details.
Resource Monitor(f)
To view and monitor system information for CUP、GPU、Memory、Disk relative resource.
Record①: Gamers can record CPU、GPU、Memory and Disk resource information.
Import②: Gamers can import previous resource record, and check those resource details.
Setting③: Gamers can adjust timer view、Gradient effect and resource items.
*For more details, please refer to Using "Record" and "Import" function in Resource Monitor
*Device- Keystone(g)
Keystone can easily personalize your gaming laptop and desktop. The pluggable keystone attracts the exclusive slot on the right side of the keyboard by magnetic force. When keystone docked, It can apply lighting effects、sound effects and activate Shadow Drive storage capacity.
*The function can only support some models, please refer to Keystone Introduction for operation detail.
*Device- AniMe Matrix(h)
Creators can freely express your creativity through the AniMe Matrix™ setup with custom patterns、GIF animations or visual animations of sound effects that change with the rhythm of the music, and can also display the status of the system battery level.
*The function can only support some models, please refer to AniMe Matrix™ Introduction for operation detail.
Multiwheel(I)*
The Multiwheel provides more advanced functions than previous Volume wheel, and gamers can optimize the operation process with function customizable. Long press to trigger setting bar, and then scroll and click Multiwheel to select function you need. After that, scrolling the Multiwheel for the function adjustment. Besides, gamers can also make more settings through the Armoury Crate application.
Function menu①: Gamers can click or unclick the item to add or reduce the Multiwheel function to display, the Volume item is default.
Order adjustment②: Thru dragging the function items, gamers can adjust function order to display.
*Only available on laptop equipped with the Multiwheel (GX703 Series), and please refer to ROG Official Website for more details.
6. AURA SYNC(E)
The AURA SYNC can support compatible devices to sync AURA effects, and launch individual application AURA Creator to create unique lighting effects between synchronized devices in advanced effects.
Sync Device(a): To select AURA SYNC compatible devices to sync.

AURA Effects(b): To setup devices for AURA SYNC basic lighting effects.
Basic effects①: To setup compatible devices to sync lighting effects, the type of lighting effects will vary depending on the device.
In-Game Lighting effects②: AURA cooperates with game providers to provide ROG gamers with a unique lighting experience, which gamers can achieve through devices that support Aura Sync, please refer to ASUS AURA Website for more details.
Advanced Effects③: Using AURA Creator to create unique lighting effects between synchronized devices in advanced effects, please refer to AURA Creator Introduction for more details.
GameVisual is a screen color management tool that provides a variety of screen color scenarios to bring players the best personal visual experience, for example Default、Racing、Scenery、RTS/RPG、FPS、Cinema、Eyecare and Vivid mode.
*This feature can only support gaming laptop products, please refer to Game Visual Introduction for operation detail.
Color Calibration
Through GameVisual Color Calibration and color calibrator (X-Rite i1 Display Pro), it can provide gamers for a basic calibration with high level of color accuracy on ROG gaming laptop screen.
*This feature can only support some gaming laptop products, and must work with color calibrator X-Rite i1Display Pro, please refer to Game Visual Introduction for more details.
To scan the games and applications by gamers In order to program sort or Scenario profiles apply.
Add or scan games①: Gamers can select auto scan or manual add to create the games or applications into game library.
Games sort and category②: To filter and sort the games and applications in library.
Apply③: Gamers can select the games and applications to apply scenario profile or add tag. While clicking “Play”, gamers can launch game directly.

According to the personal required, gamers can setup system configuration and save as profiles, in order to link selected the games and applications.
Create Profiles①: To create and delete personal scenario profiles.
System Configuration②: According to the personal required, gamers can setup system configuration, for example system configuration、Connected Device configuration and App configuration.
Profiles Name③: To modify profile name or select "See Options" to link the games or applications.
10. Featured(I)
Game Deals①: Discover, explore, and pick-up great games at online with Game Deals.

Recommended②: To display related applications recommended or supported for your ROG devices.
Redemption③: Log in to ASUS member account, gamers can review contents or records of eligible redemption activities.
*For how to register an ASUS member account, please refer to Link.
11. News(J)
To display global and local ROG recommended articles, events and product information.
Log in to ASUS member account, the page will show My Profile、My Products、Registered Events、Notification and Join Elite.
*For how to register an ASUS member account, please refer to Link.
13. Settings(L)
General①: Gamers can choose Armoury Crate landing page, and customize theme.
Update Center②*: To select “Check for Update”, utility will display the driver or firmware that need to be updated will be listed for gamers to choose.
About③: To display Armoury Crate Version、Service Version、App Diagnostics、Privacy Policy and FAQ.
*Before processing the update, ensure that your laptop is plugged in with charger.
Armoury Crate Mobile Version Introduction (Android/ iOS)
Gamers can use mobile version Armoury Crate to monitor PC device status and adjust some part PC Armoury Crate relevant settings.
System Prerequisites
Mobile Armoury Crate support Android (5.0 or above), and iOS (10.3 or above) version.
*Note: The PC Armoury Crate required version V3.0.4 or above.
Launch Device Connection
1. Launch PC Armoury Crate
Please type and search [Armoury Crate]① in the Windows Search Box, and then click on [Open]②.

In Armoury Crate [Home]③,clicking the [Mobile Connection]④ icon on the upper right to start the steps of mobile device connection.
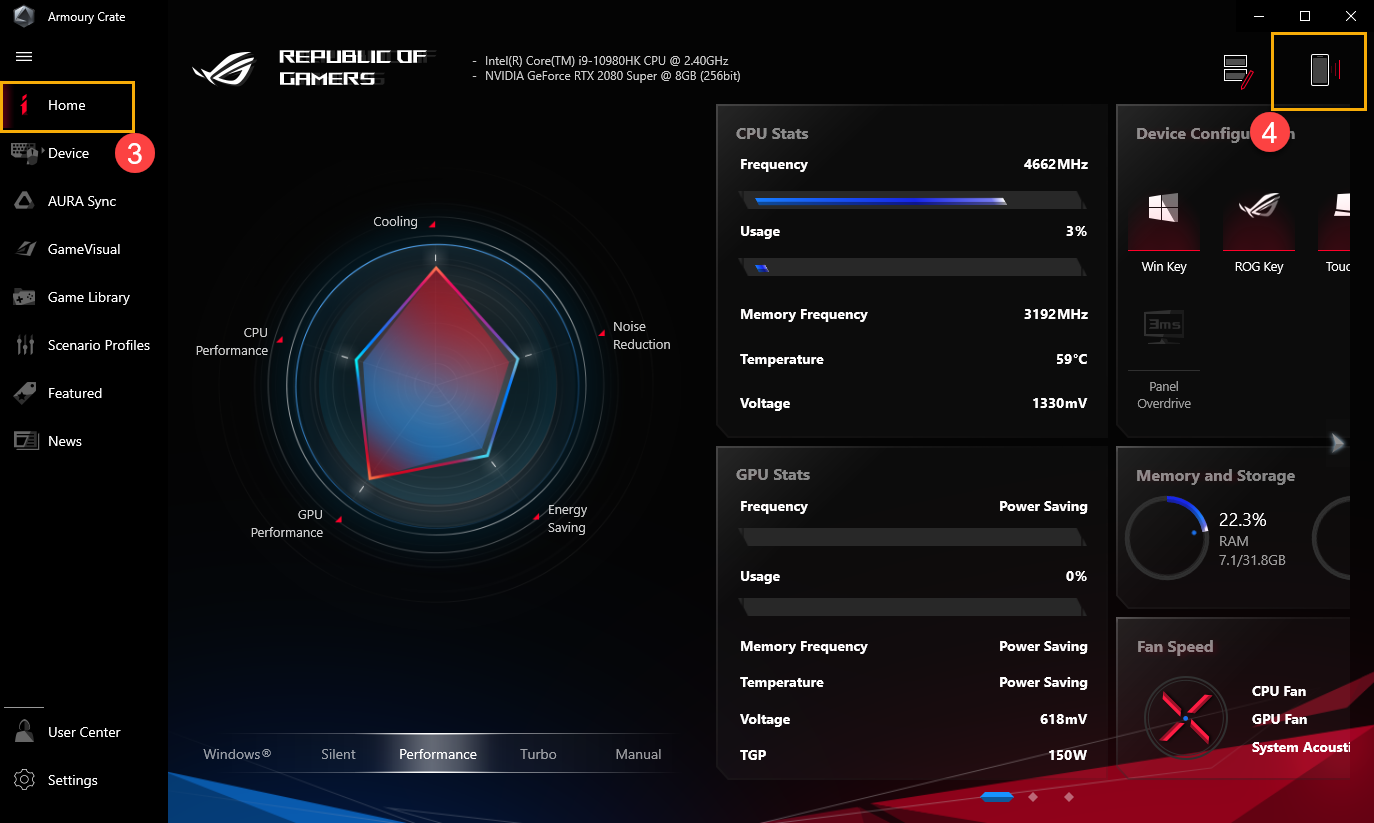
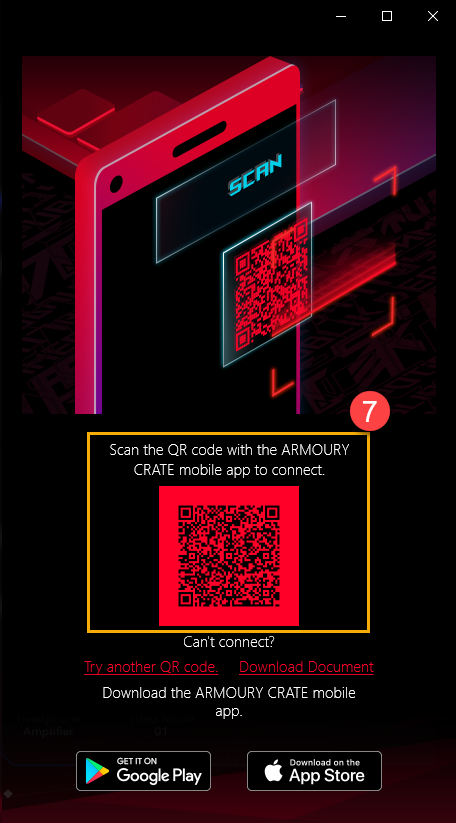
Clicking [Google Play] or [App Store]⑤ icon to download mobile Armoury Crate APP. After APP downloaded, clicking [Connect Device]⑥, and start to scan [QR Code]⑦ with Armoury Crate mobile APP to connect.
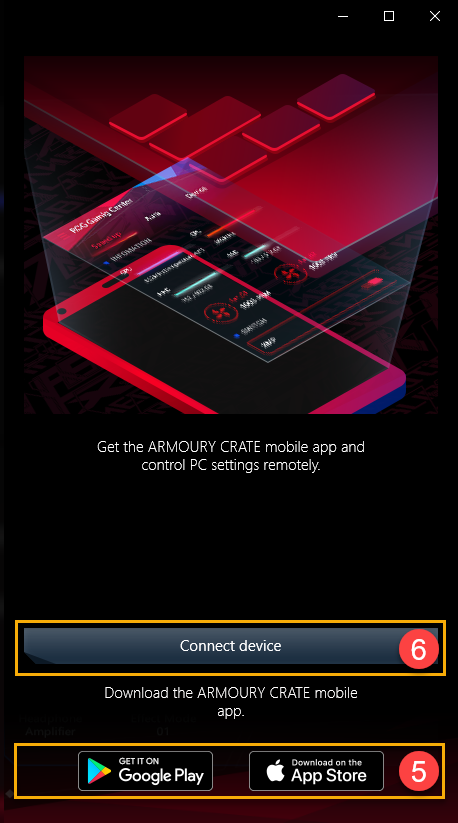
*Please notice that Android system download APP via Google Play, but iOS system download APP via App Store.
2. Launch mobile Armoury Crate 
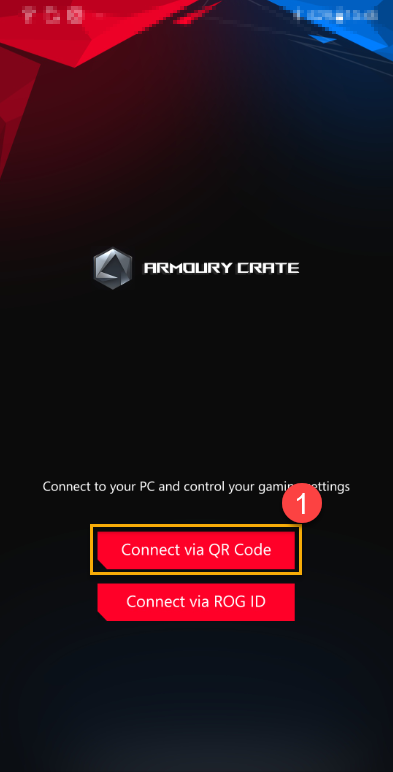
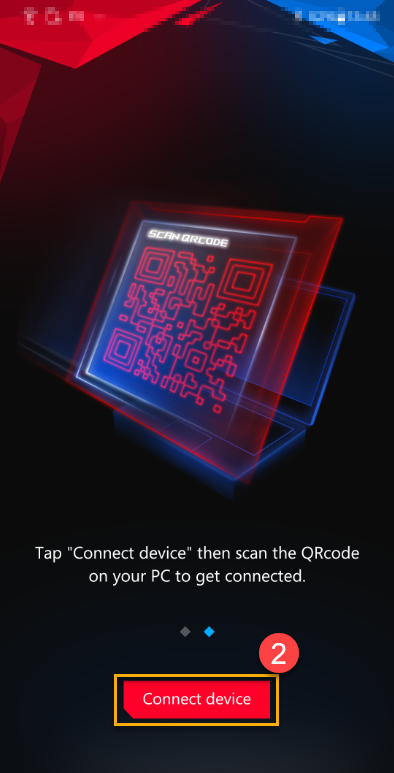
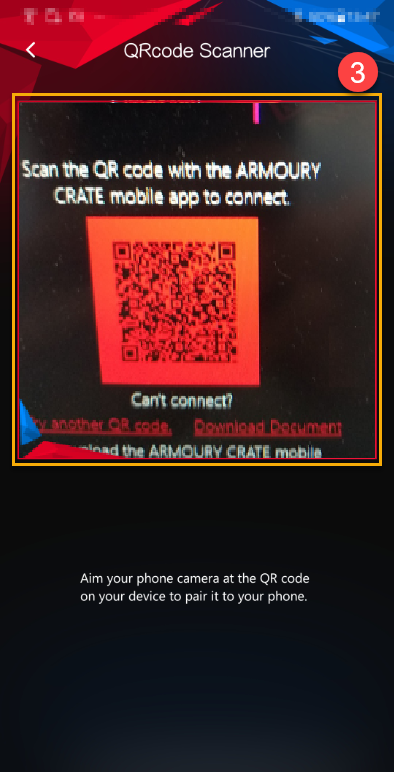
Please launch mobile Armoury Crate App in your device, clicking [Connect via QR Code]①, and must turn on Wi-Fi and Bluetooth connection. After that, clicking [Connect Device]② and scan PC QR Code③ with Armoury Crate mobile APP to connect.
3. Mobile Armoury Crate Introduction
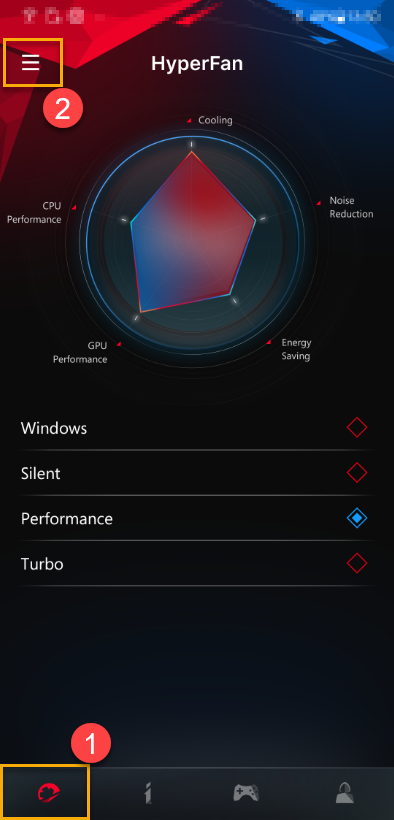
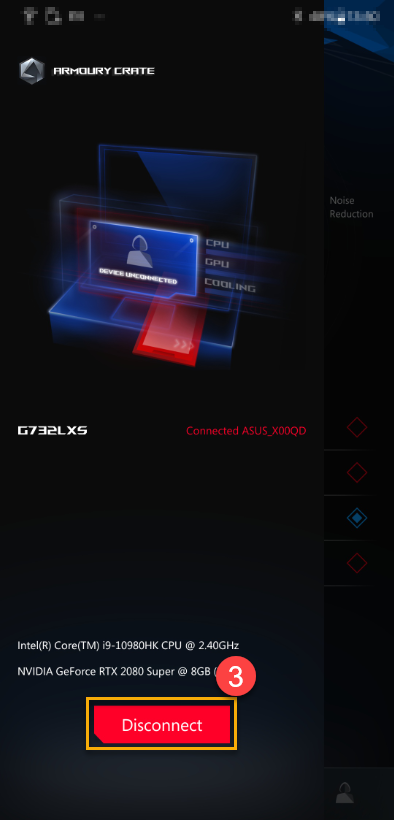
3-1 HyperFan Mode①: Gamers can adjust device performance while playing game, for example Windows、Silent、Performance or Turbo mode. Clicking the icon  ② on the upper left for checking device connection status and [Disconnect]③ option.
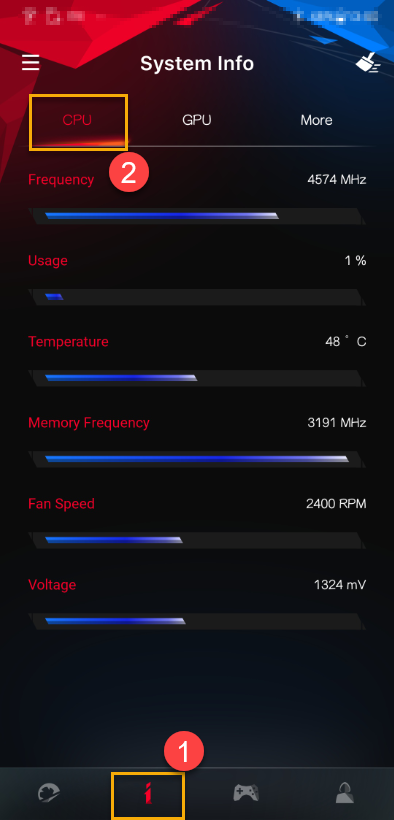
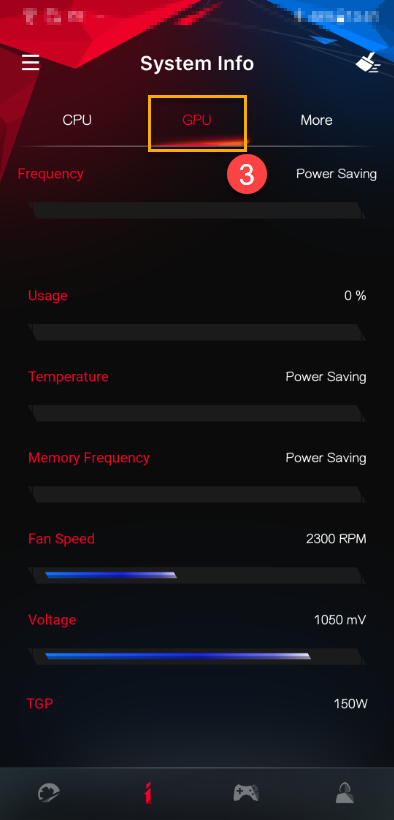
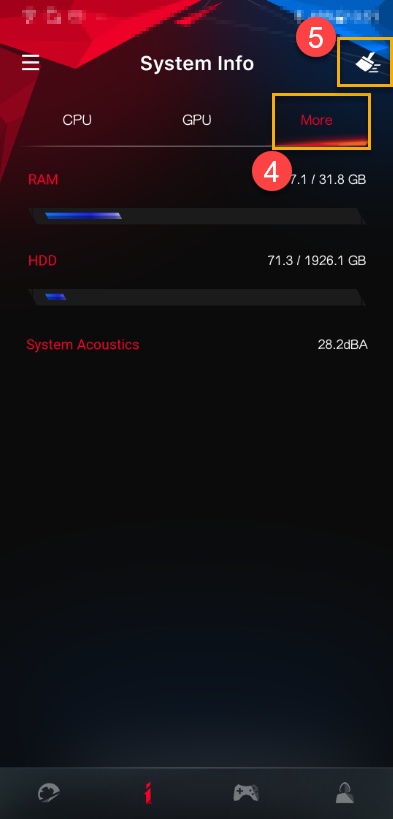
3-2 System Info①: The page displays system information about CPU②、GPU③ and More④. Clicking the icon  ⑤ on the upper right to free up memory.
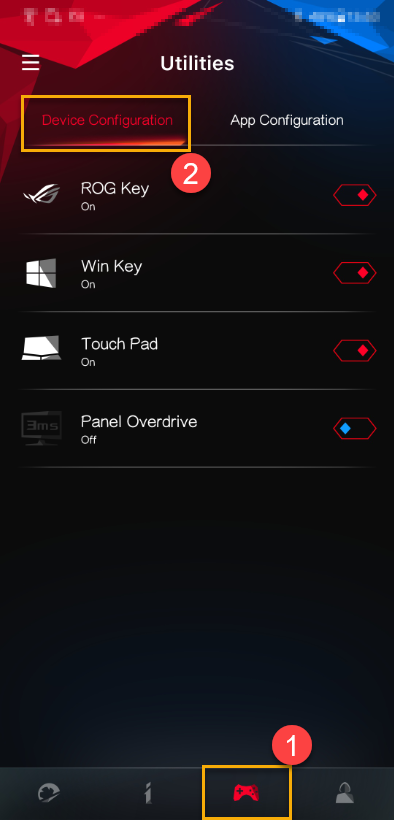
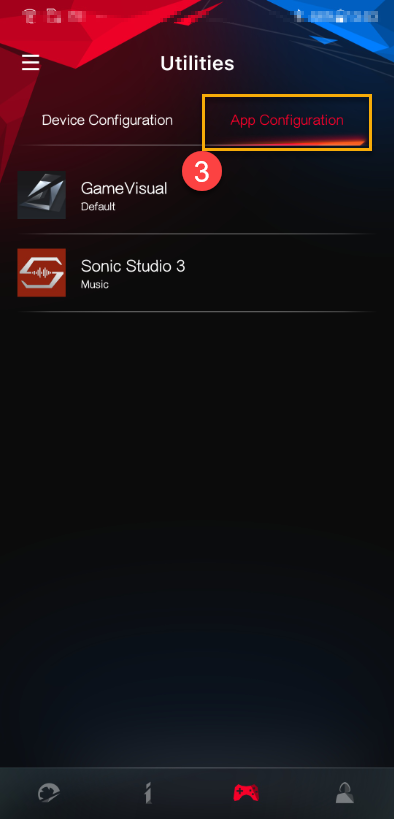
3-3 Utilities①
Device configuration②: Gamers can enables or disables ROG Key、Win key、Touch Pad and Panel Overdrive Settings.
App configuration③: Gamers can directly change the related application configuration.
3-4 User Center①: After logging into ASUS member account, the page will show the Email and the last login time.
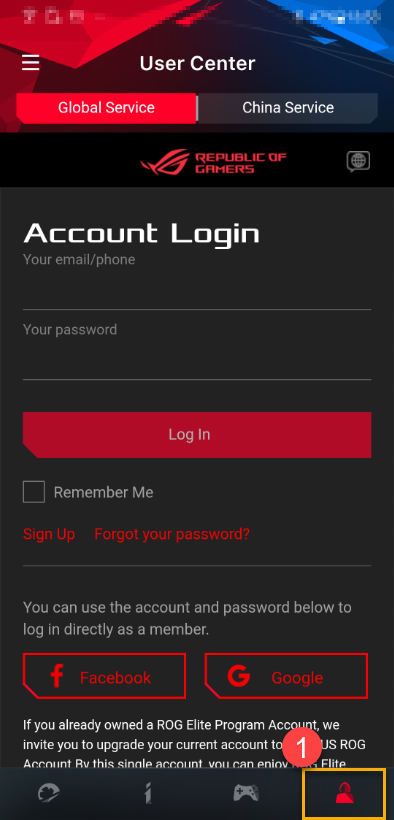
*For how to register an ASUS member account, please refer to Link.
4. Connection Troubleshooting
Please refer to ARMOURY CRATE (Mobile) Connection Troubleshooting
Q&A
Q1: Where can I download ARMOURY CRATE mobile app?
A1: You can search ARMOURY CRATE on Google Play or App Store, or you can scan the QR code of your PC ARMOURY CRATE to download.
Q2: Why should I download the mobile ARMOURY CRATE?
A2: You can adjust HyperFan Mode, App or Device Configurations ,and monitor System Information during playing game.
Q3: I can't connect my device through scanning the QR code of PC Armoury Crate.
A3: Please make sure both of your PC & mobile device connect to the same Wifi domain or your Bluetooth device is enabled and connected.
Armoury Crate - Installation SOP
Support ROG series and TUF series of gaming laptop and desktop, please refer to Supported Model List for more details.
Armoury Crate Installation
Step 1 : Download the Driver& Utility from the ASUS Official Support Site. For more details, please refer to the Link.
Select Model Name -> OS ->Software and Utility : Armoury Crate& AURA Creator Installer
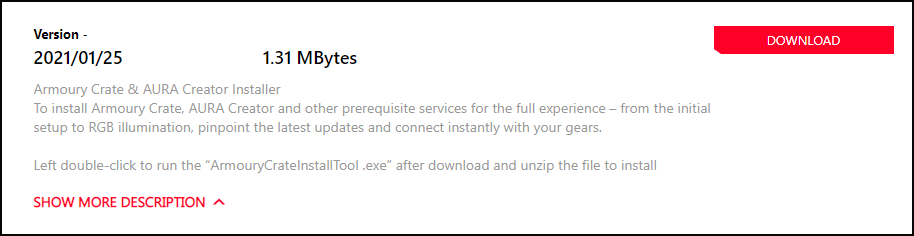
Step 2 : Unzip ArmouryCrateInstaller.ZIP downloaded file, and click ArmouryCrateInstaller.EXE to execute installation.
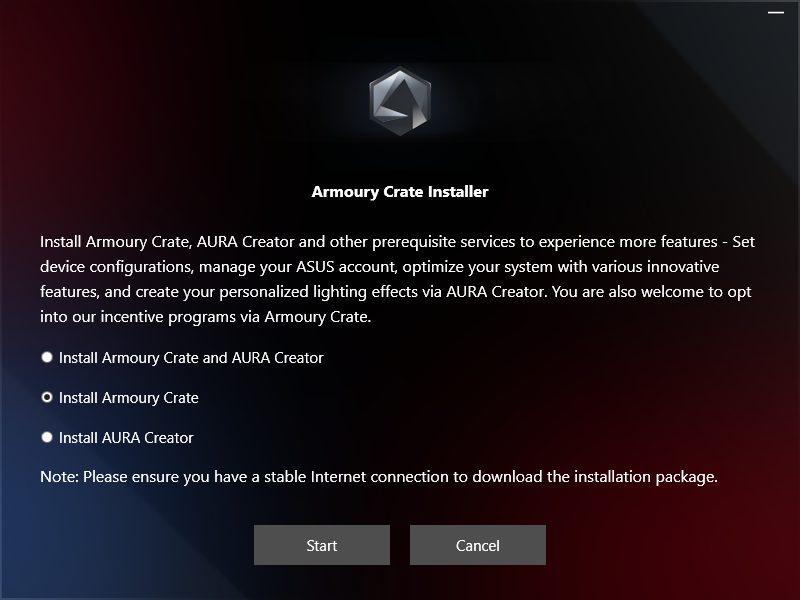
Step 3 : Select [Install Armoury Crate], and click Start.
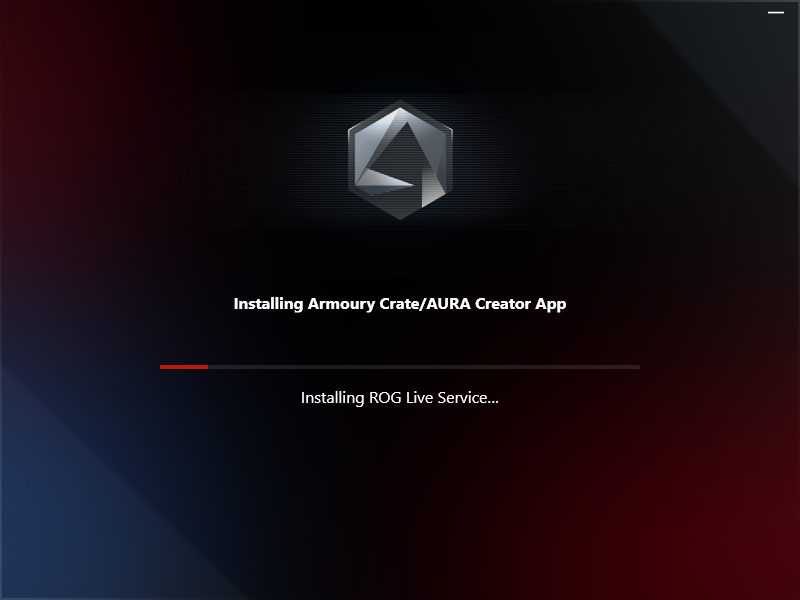
Step 4 : After that, the utility will install automatically.Once installation completely, restart your computer.
Step 5: Please update Windows Opreation System for relative drivers, and also install MyASUS UWP and ASUS System Control Interface V2/3 to ensure all functions are working properly.
Armoury Crate Uninstallation
Please download [Armoury Crate Uninstall Tool] at Product Support website and follow the instruction to uninstall Armoury Crate, or refer to Armoury Crate FAQ.
*Please refer to Armoury Crate Official Website for more information.
AniMe Matrix™ Display - Introduction
Contents:
4. AniMe Matrix™ - Application System Settings
5. AniMe Matrix™ - Animation Mode
6. AniMe Matrix™ - System Mode
8. Q & A
Featuring a first-of-its-kind AniMe Matrix™ display which offers deep personalization in a truly unique way.
The groundbreaking display is made up of thousand individual mini-LEDs that can be used to display customized images, animations ,and expresses your creativity, audio visualizations that match the music playback. The status notifications keeps you in the loop on new messages, battery life, and more.
| Animation Mode | System Mode | Audio Mode |
 |  |  |
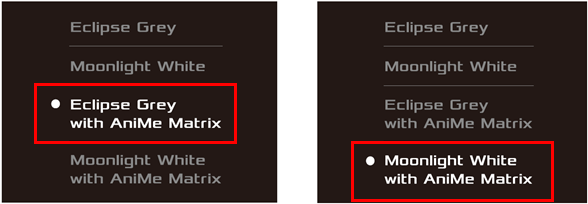
2. Models Supported: ROG Zephyrus G14 (GA401 and GA402 series with AniMe Matrix™ Display supported) and ROG Zephyrus M16 (2023 GU604V with AniMe Matrix™ Display supported)
※ Note: Not all GA401、GA402 and GU604V series products come with AniMe Matrix™ Display supported. You can check the label on the giftbox. If it shows as [Eclipse Grey with AniMe Matrix] or [Moonlight White with Anime Matrix], it means the AniMe Matrix Display is supported on your laptop.
AniMe Matrix™ Display application has been integrated into the Armoury Crate application. The custom settings of AniMe Matrix™ Display need to be adjusted via Armoury Crate.
Version supported: Armoury Crate application V2.6.14 or above

(If AniMe Matrix™ Display is not supported on your laptop, the settings of AniMe Matrix™ Display will not show up even if you have updated Armoury Crate up to V2.6.14 or above.)
Please refer to the introduction of Armoury Crate. Learn more at How to install and update Armoury Crate.
4. AniMe Matrix™ - Application System Settings
4-1. How to run AniMe Matrix ?
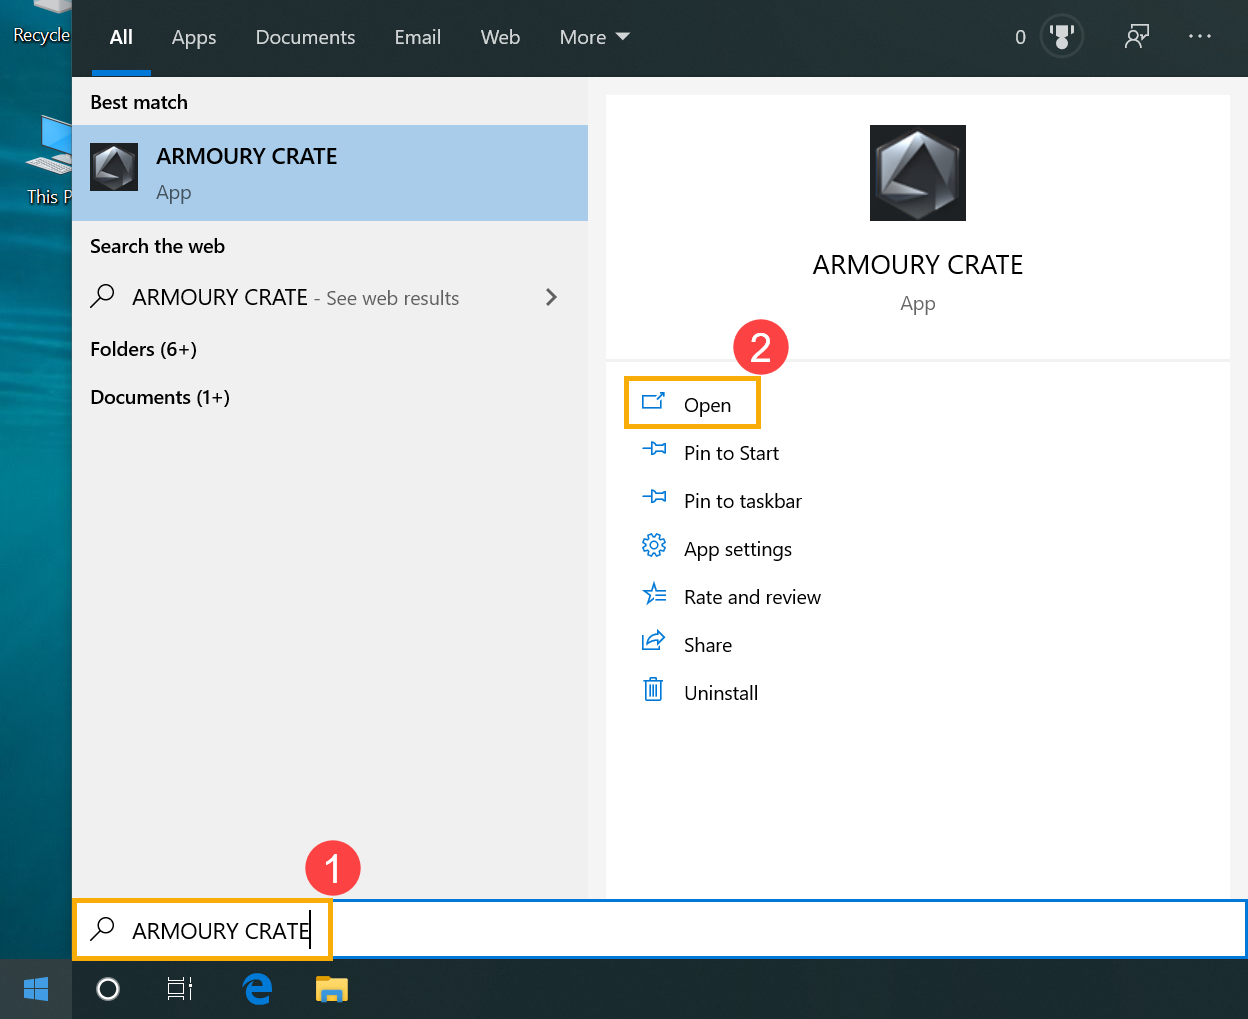
4-1-1. Type and search [ARMOURY CRATE] in the Windows search bar(1), then click on [Open](2).
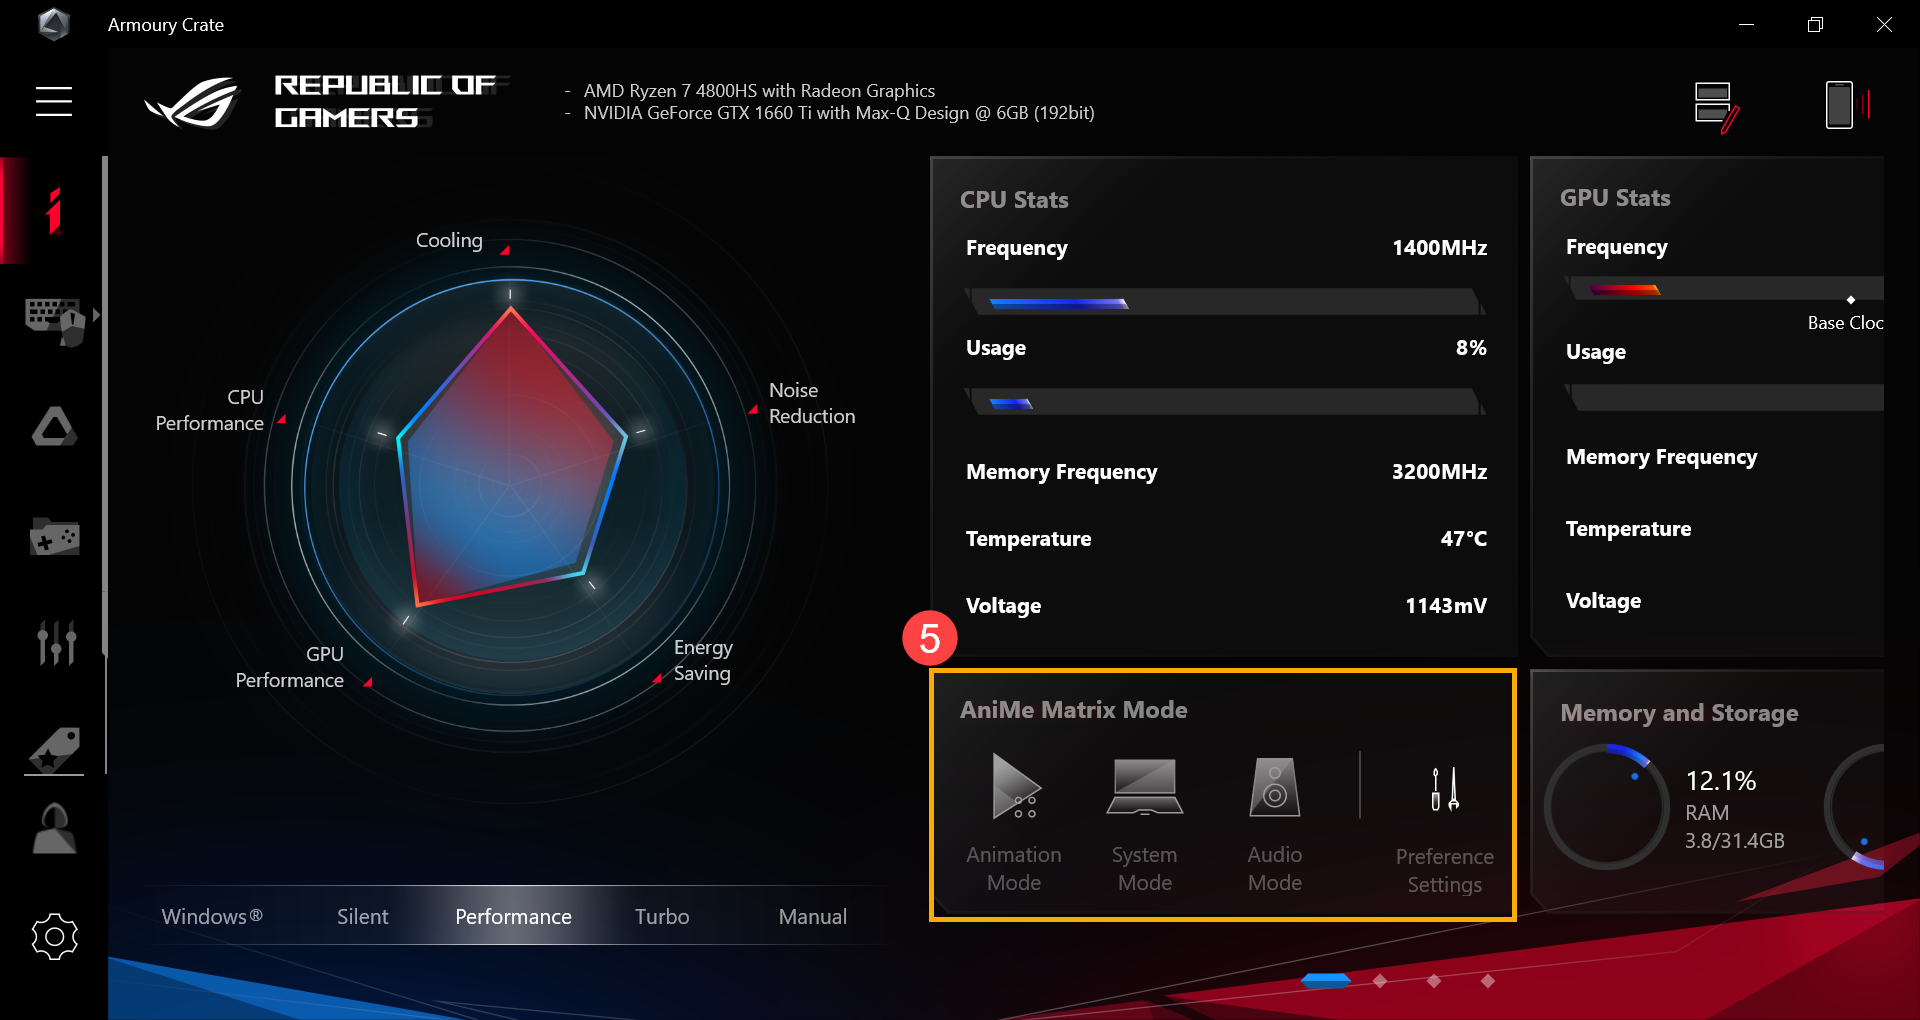
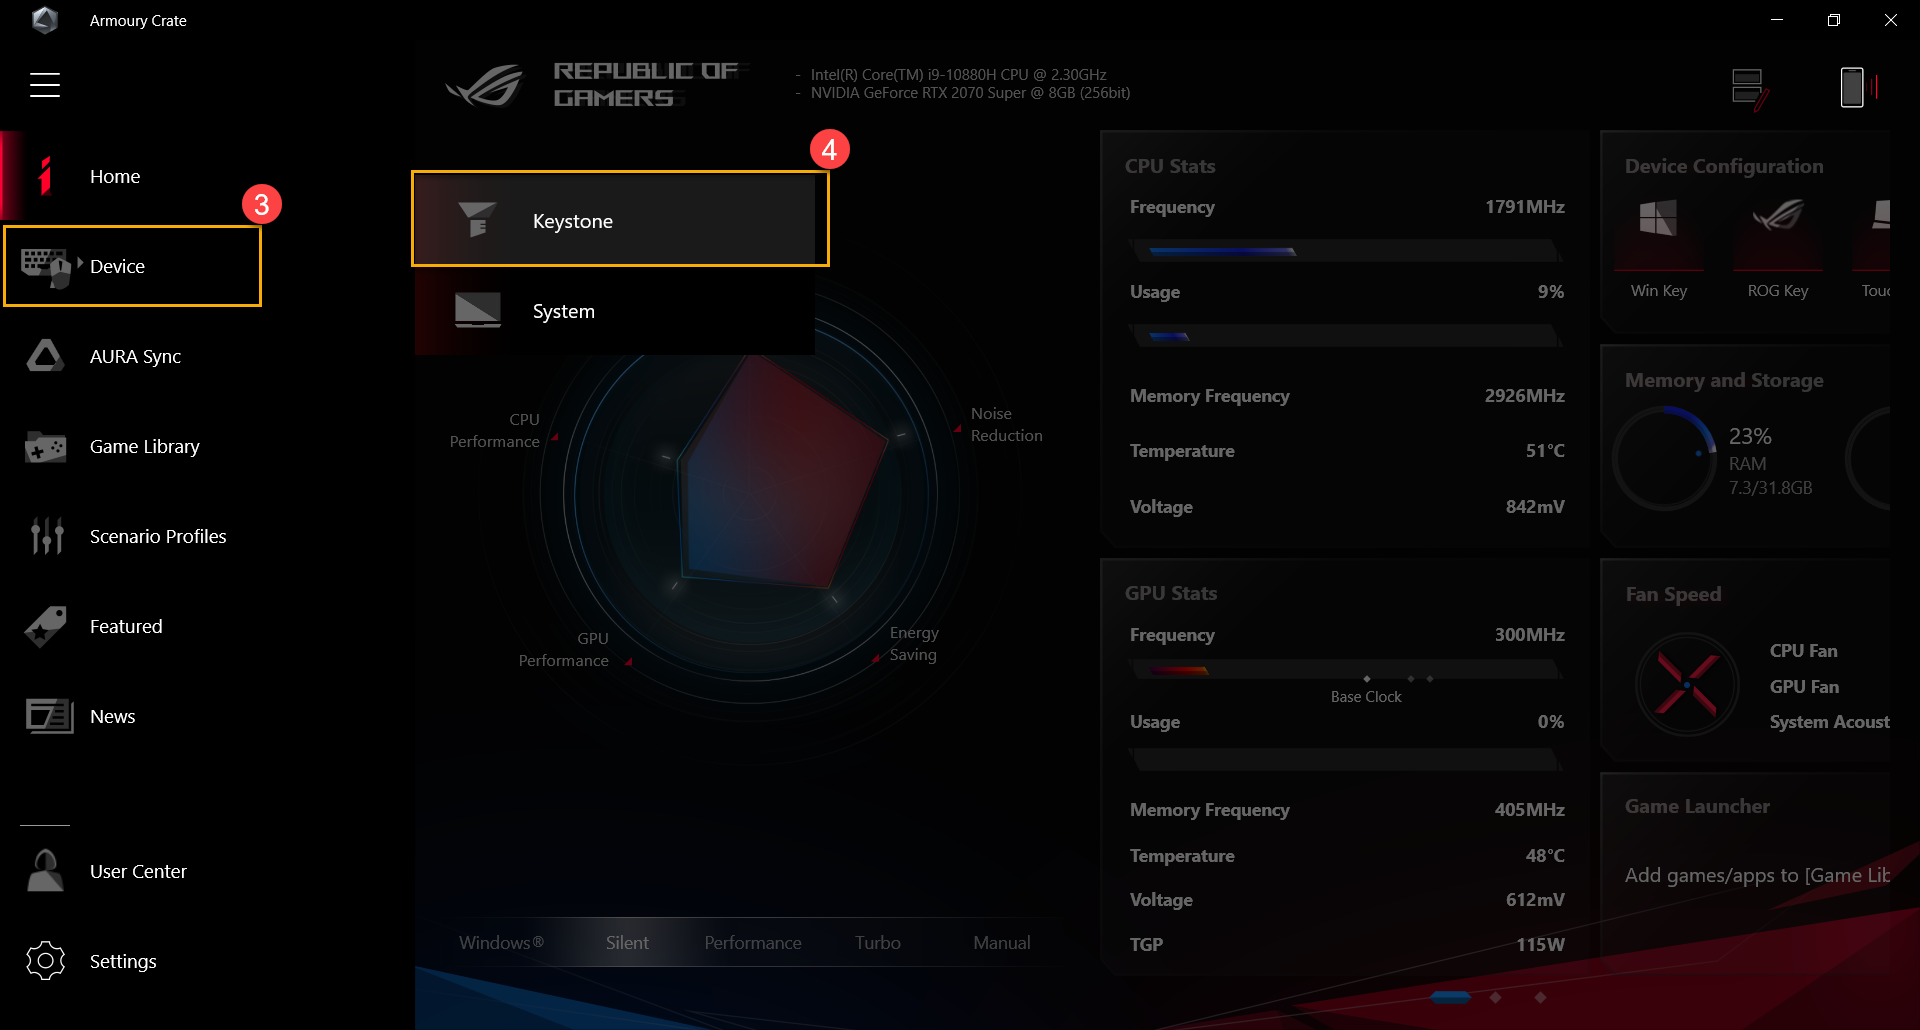
4-1-2. Method 1: Select [Device](3), then select [AniMe Matrix](4) to get into the main page of AniMe Matrix Display application.

4-1-3. Method 2: Click the [Quick link of AniMe Matrix](5) from the main page of Armoury Crate, which will take you to the main page of AniMe Matrix Display application.
4-2. AniMe Matrix™ - Introduction of Preference Settings
※ Note: Power will drop rapidly if lighting is always on.
4-2-1. Select [Preference Settings]  (1) on the Main page of AniMe Matrix, and you will enter the Preference Settings page.
4-2-2. After you enter the Preference Settings page, you will be able to start the scenario settings.
For details of (2) (3) (4) icons, please refer to the detailed description from 4-2-3 to 4-2-5 items.

4-2-3. [AniMe Matrix Lighting](2): When the switch is set to [on], the AniMe Matrix Lighting will turn on.

4-2-4. [Power and Sleep Settings](3): You can adjust the lighting status of the AniMe Matrix depending on the following three system functions:
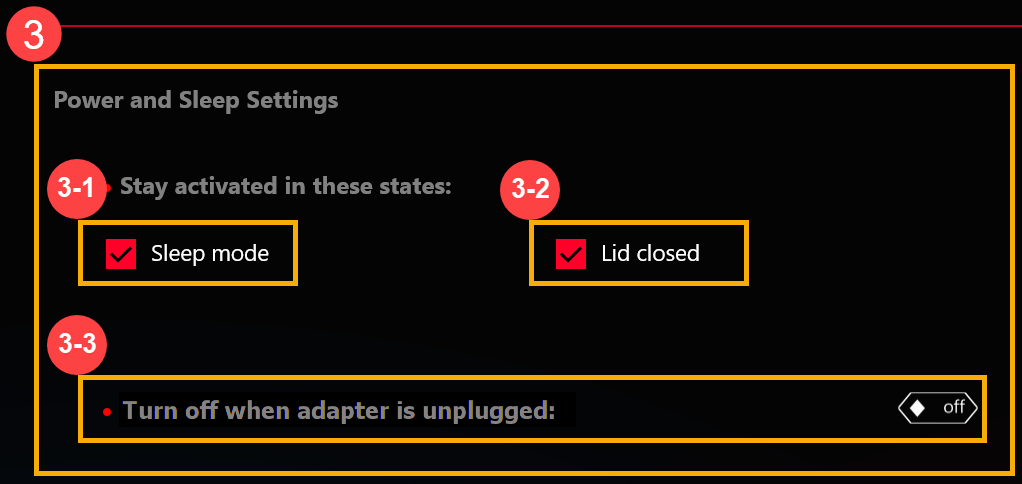
● [Sleep mode](3-1): [Tick] this switch, AniMe Matrix Lighting will display the customized lighting settings after the system goes to Sleep mode.
If this switch is unticked, AniMe Matrix Lighting will display the default lighting effect (shooting star) after the system goes to Sleep mode (when the computer is connected to AC adapter).
● [Lid closed](3-2): [Tick] this switch, AniMe Matrix Lighting will display the customized lighting settings after the Lid is closed.
If this switch is unticked, AniMe Matrix Lighting will display the default lighting effect (shooting star) after the Lid is closed (when the computer is connected to AC adapter).
● [Turn off when adapter is unplugged](3-3):
When this switch sets to [off], AniMe Matrix Lighting will stay activated after the device is unplugged (the coumputer uses battery power). (If [Sleep Mode] or [Lid closed] switch is unticked, AniMe Matrix Lighting will not stay activated after adapter is unplugged.)
When this switch sets to [on], AniMe Matrix Lighting will not stay activated after adapter is unplugged (the coumputer uses battery power). (Even [Sleep Mode] or [Lid closed] switch sets LEDs to stay activated, AniMe Matrix Lighting will not stay activated after adapter is unplugged.)
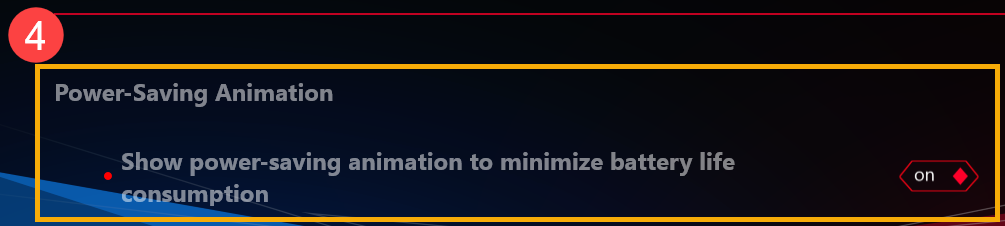
4-2-5. [Power-Saving Animation](4): When this switch is set to [on], it will turn off the customized lighting settings and change to power-saving animation to minimize the battery consumption. This switch will automatically turn [off] after you adjust the custom lighting settings. .
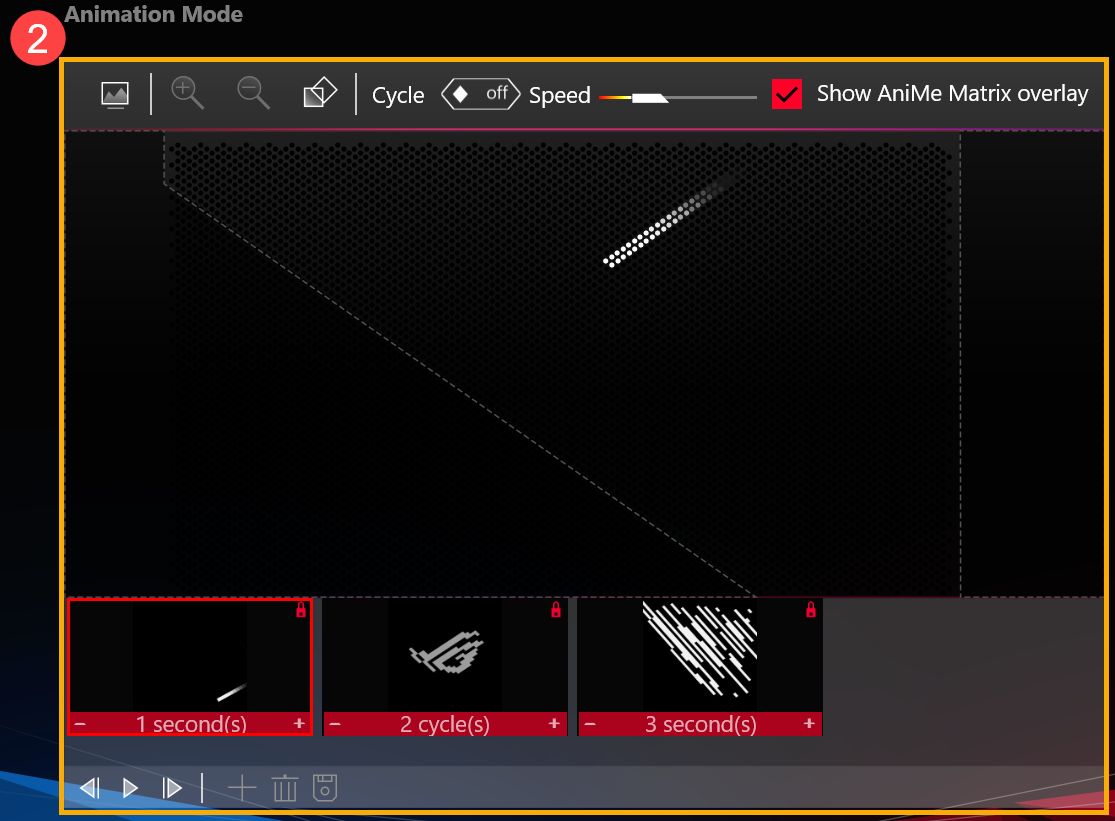
5. AniMe Matrix™ - Animation Mode
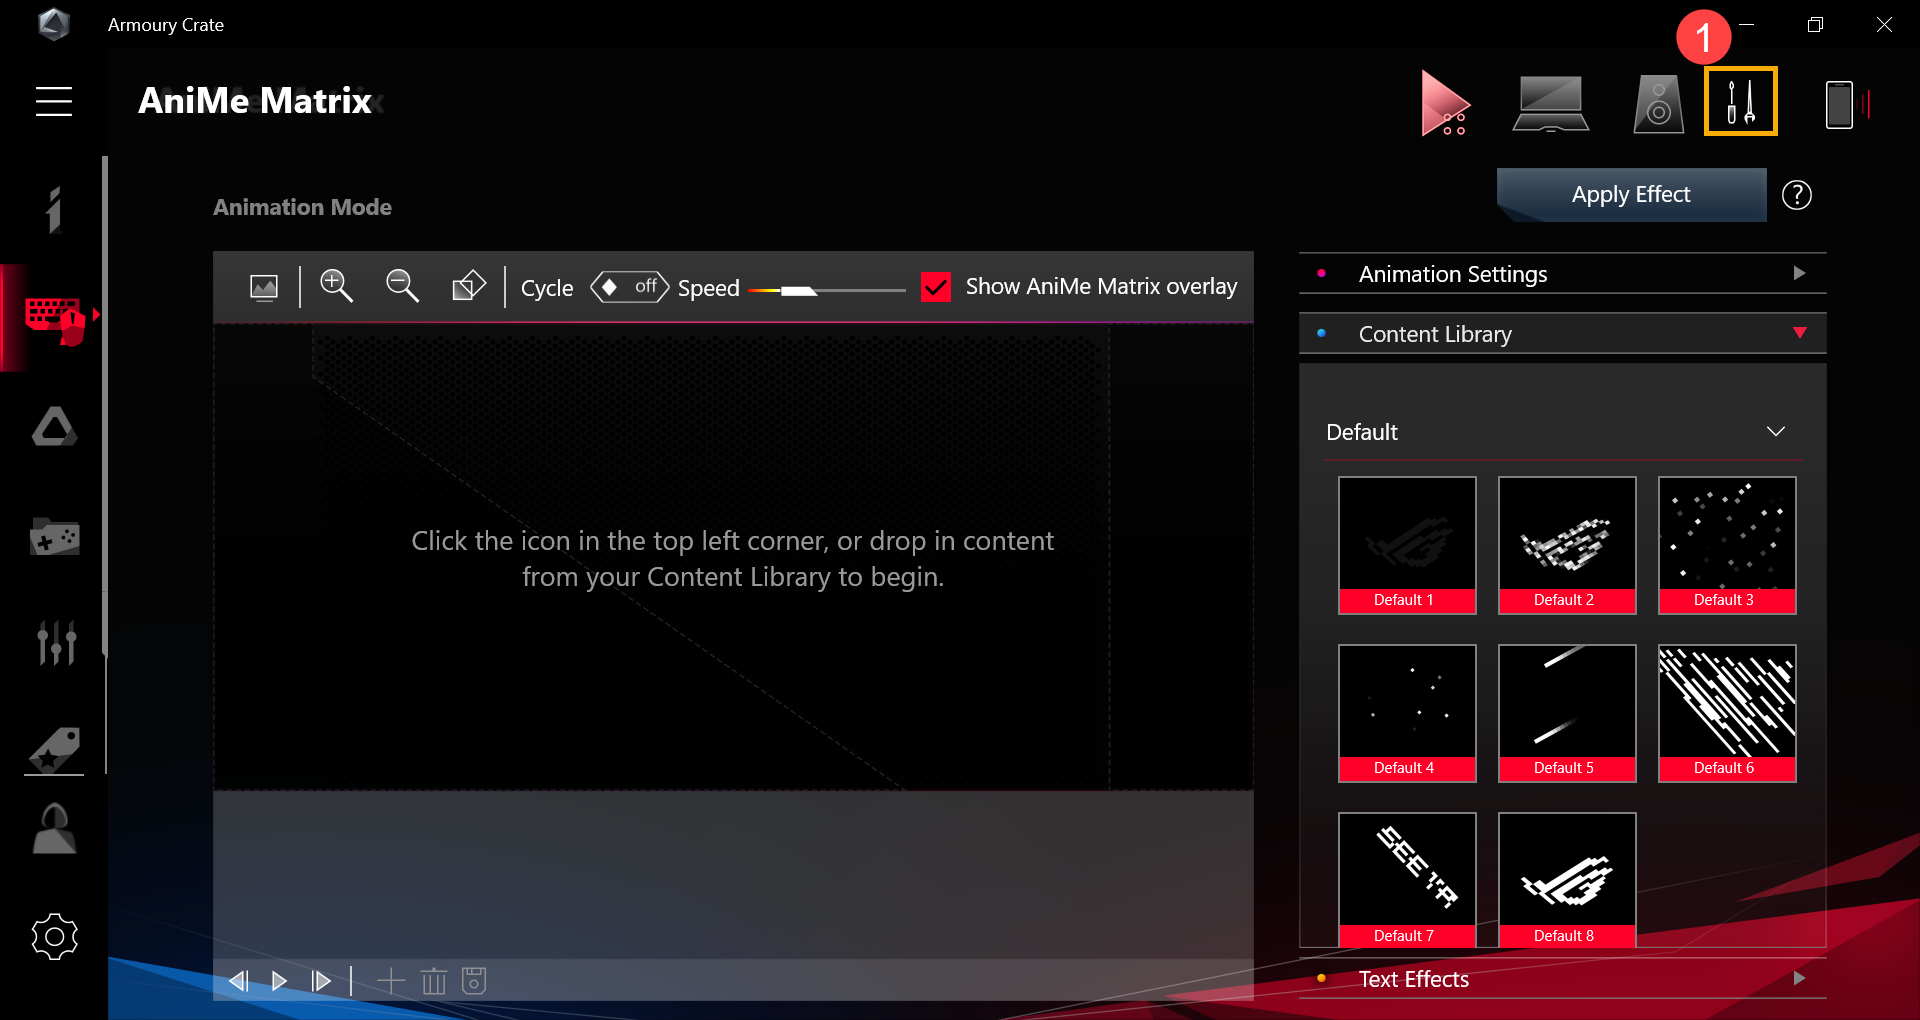
5-1. Select [Animation Mode]  (1) on the main page of AniMe Matrix, you will enter the Animation Mode page. For (2) to (5) icons, please refer to the detailed description from item 5-2 to 5-5.

5-2. Canvas & Preview & Edit Toolbar(2) – User Interface introduction
5-2-1. [Insert Image]  : You can insert a customized image. (It only supports one image at a time. Supported image formats: JPEG, PNG, BMP, GIF.)
5-2-2. [Scale up / down]  : Image scaling only supports proportional scaling. If you scale the image beyond the canvas edges, the LEDs will only display the portion of the image within the canvas edges.
5-2-3. [Rotation]  : Switch image angle. (It only supports 45-degree rotation.)
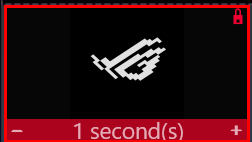
5-2-4. [Cycle]  :
:
When this switch sets to [on], it will change the GIF runtime unit of current slot as cycle time. (Use + - keys to adjust.)
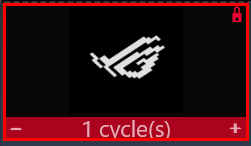
When this switch is set to [off], it will change the GIF runtime unit of the current slot as seconds time. (Use + - keys to adjust.)
5-2-5. [Speed]  : Change the GIF runtime speed of the current slot. (Use the slider bar to adjust.)
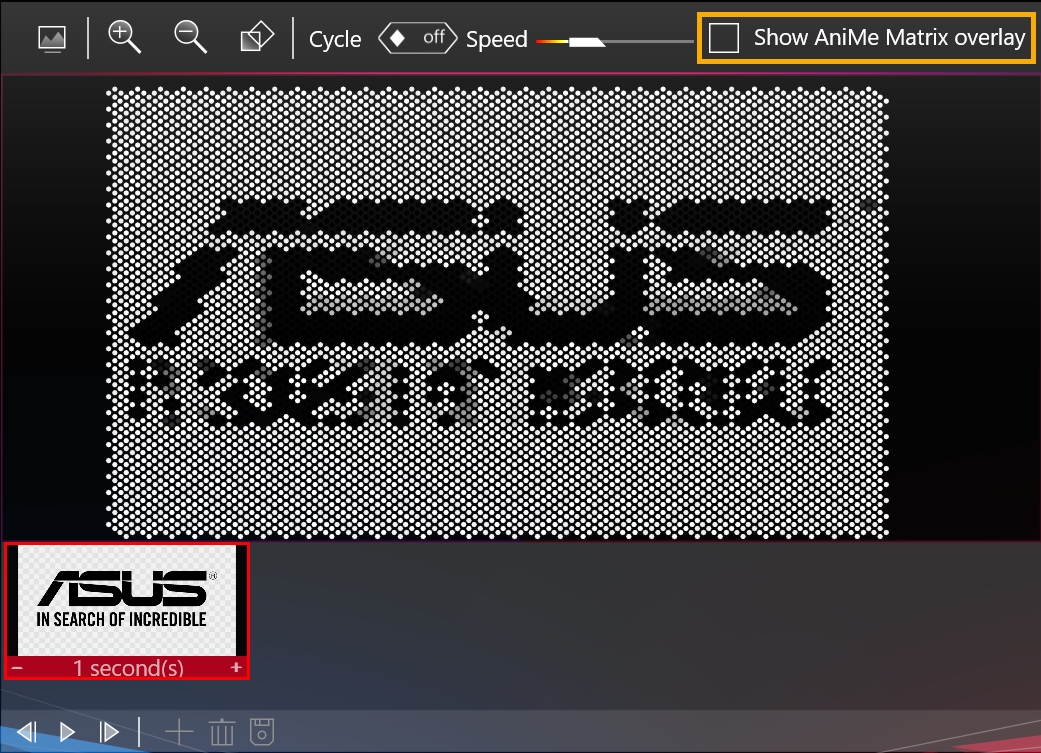
5-2-6. [Show AniMe Matrix overlay]  : Enable / Disable AniMe Matrix overlay and let you know where the actual LEDs on the canvas is. (The gray highlighted area is out of the actual LEDs area.)
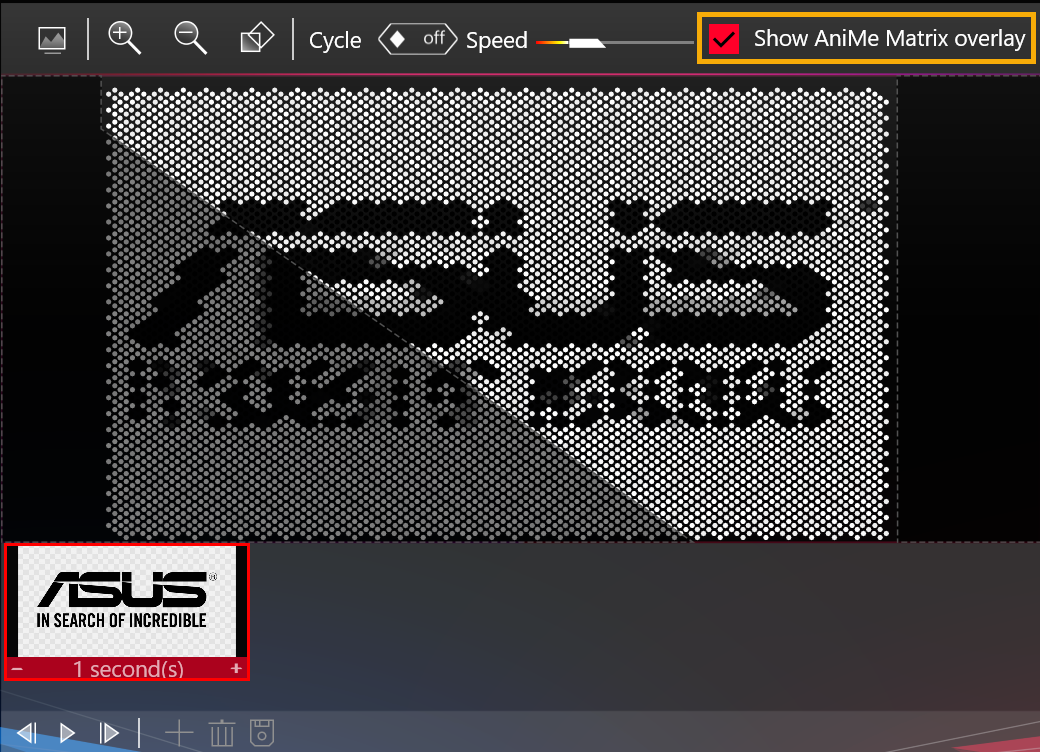
5-2-7. [Canvas]:
Click the [Insert Image] icon in the top left corner or drop in content from [Content Library] to the canvas.
For the customized image, you can click the mouse and press and hold the image to change its position. (For the Default Content, you cannot change the position.)
5-2-8. Preview Toolbar:
● [Jump to first slot]  : Move focus to the first slot.
● [Play preview]  : Play the animation that you have set.
● [Jump to last slot]  : Move focus to the last slot.
5-2-9. Animation Toolbar:
● [Add Empty Slot]  : Add an empty slot.
● [Delete Selected Slot]  : Delete the current focused slot.
● [Save to Content Library]  : Save the customized content to Saved Library. (For Saved Library, please refer to the detailed description at item 5-4-2.)
5-3. Animation Settings(3) – User Interface introduction
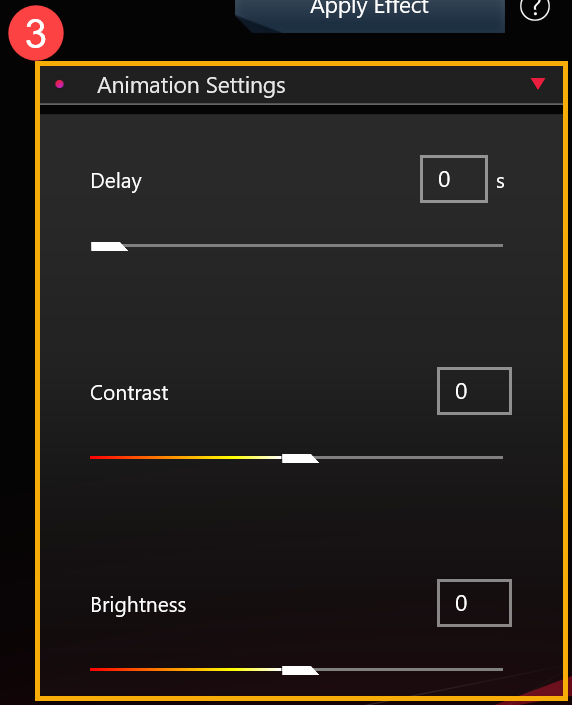
5-3-1. [Delay]: Change the delay time between every slot (All delay time is fixed between each slot.). The default delay time is 0 second.
5-3-2. [Contrast]: Change the contrast on the canvas. Use the slider bar or enter the values to adjust, and the default contrast value is 0. (The contrast can be adjusted as positive or negative values.)
5-3-3. [Brightness]: Change the brightness on the canvas. Use the slider bar or enter the values to adjust, and the default brightness value is 0. (The brightness can be adjusted as positive or negative values.)
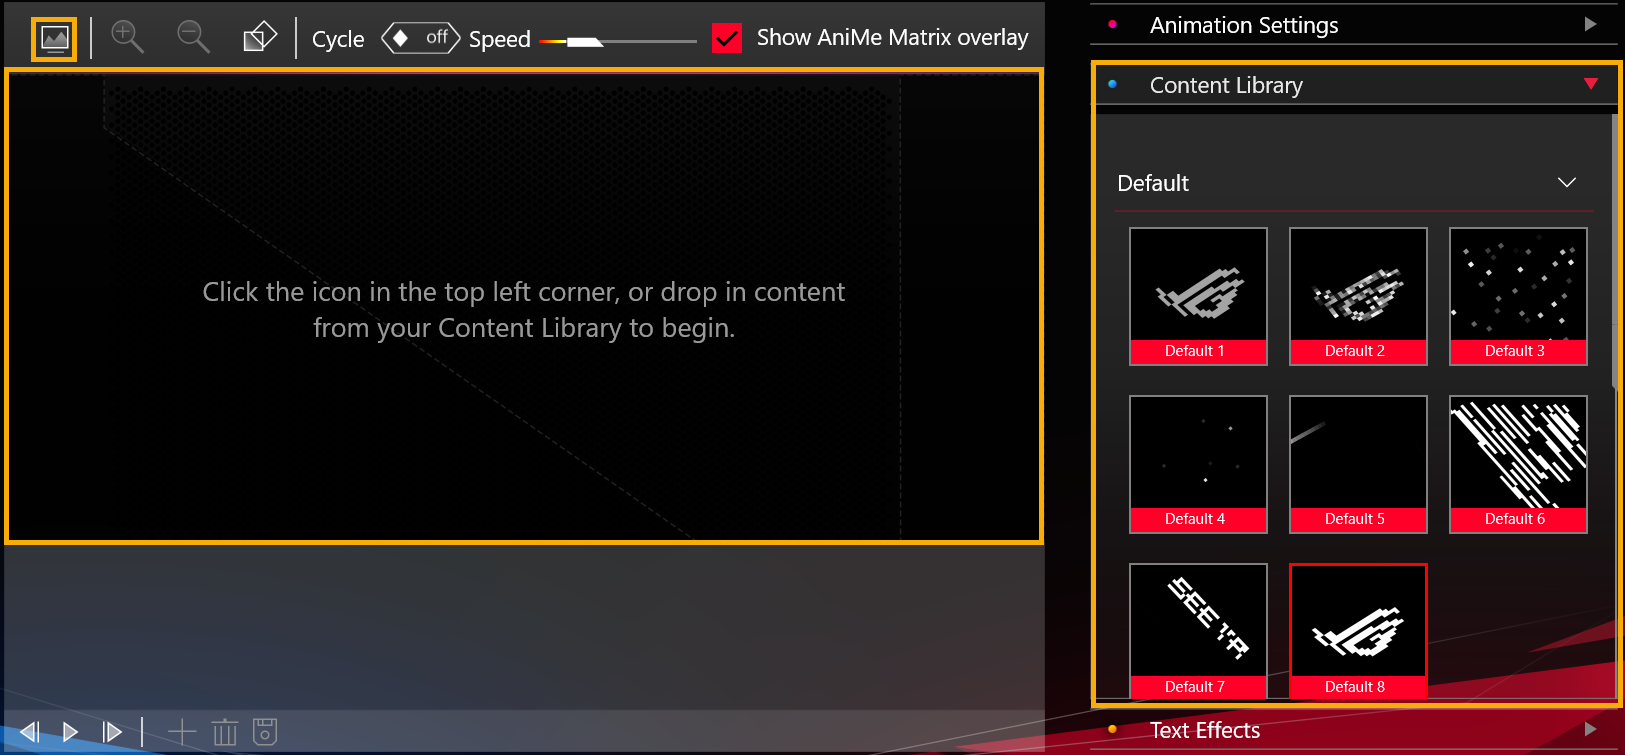
5-4. Content Library(4) – User Interface introduction

5-4-1. [Default]: The default animation contents ASUS provided. (Select and drop in content from the library to activate the animation on the canvas.)
5-4-2. [Saved]: The contents saved by yourself. (Select and drop in content from the library to activate the animation on the canvas.)
[Delete]  : Delete the selected file permanently from Saved Library.
5-5. Text Effects(5) – User Interface introduction
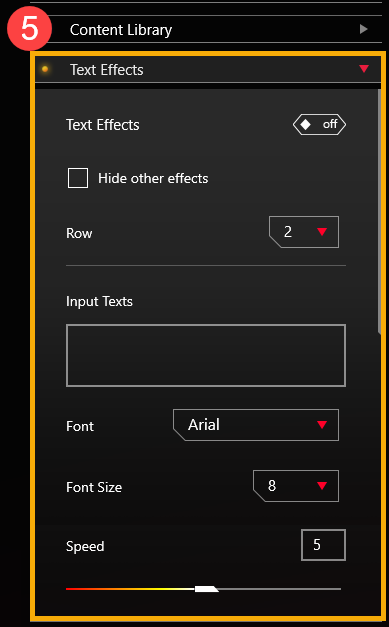
5-5-1. [Text Effects]: When you set this switch to [on], it will turn on the text effect.
5-5-2. [Hide other effects]: With this switch [Selected], other effects will be invisible and it only displays the text effect on the LEDs.
5-5-3. [Row]: Select how many text rows you would like to display on the LEDs. The default amount is 2 rows. (You can select between 2, 3, 5, and 6 rows.)
5-5-4. [Input Texts]: Input the texts you would like to display on the LEDs.
5-5-5. [Font]: Select the type of fonts you would like to display on the LEDs.
5-5-6. [Font Size]: Select the font sizes you would like to display on the LEDs. The default font size is 8. (There is a fixed row size for each row, the text will be cut-off if the font size is higher than row size.)
5-5-7. [Speed]: Set the speed of scrolling text. You can use the slider bar or enter the values to adjust, and the default speed value is 5.
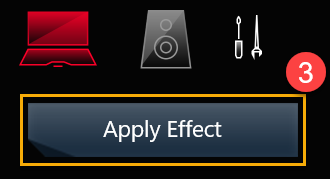
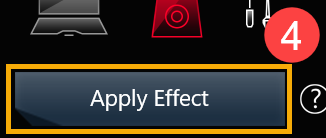
※ After all of the settings are completed, please click [Apply Effect](6) button so that your customized lighting effects will appear on the LEDs properly.

6. AniMe Matrix™ - System Mode
6-1. Select [System Mode] (1) on the main page of AniMe Matrix, and you will enter the System Mode page.
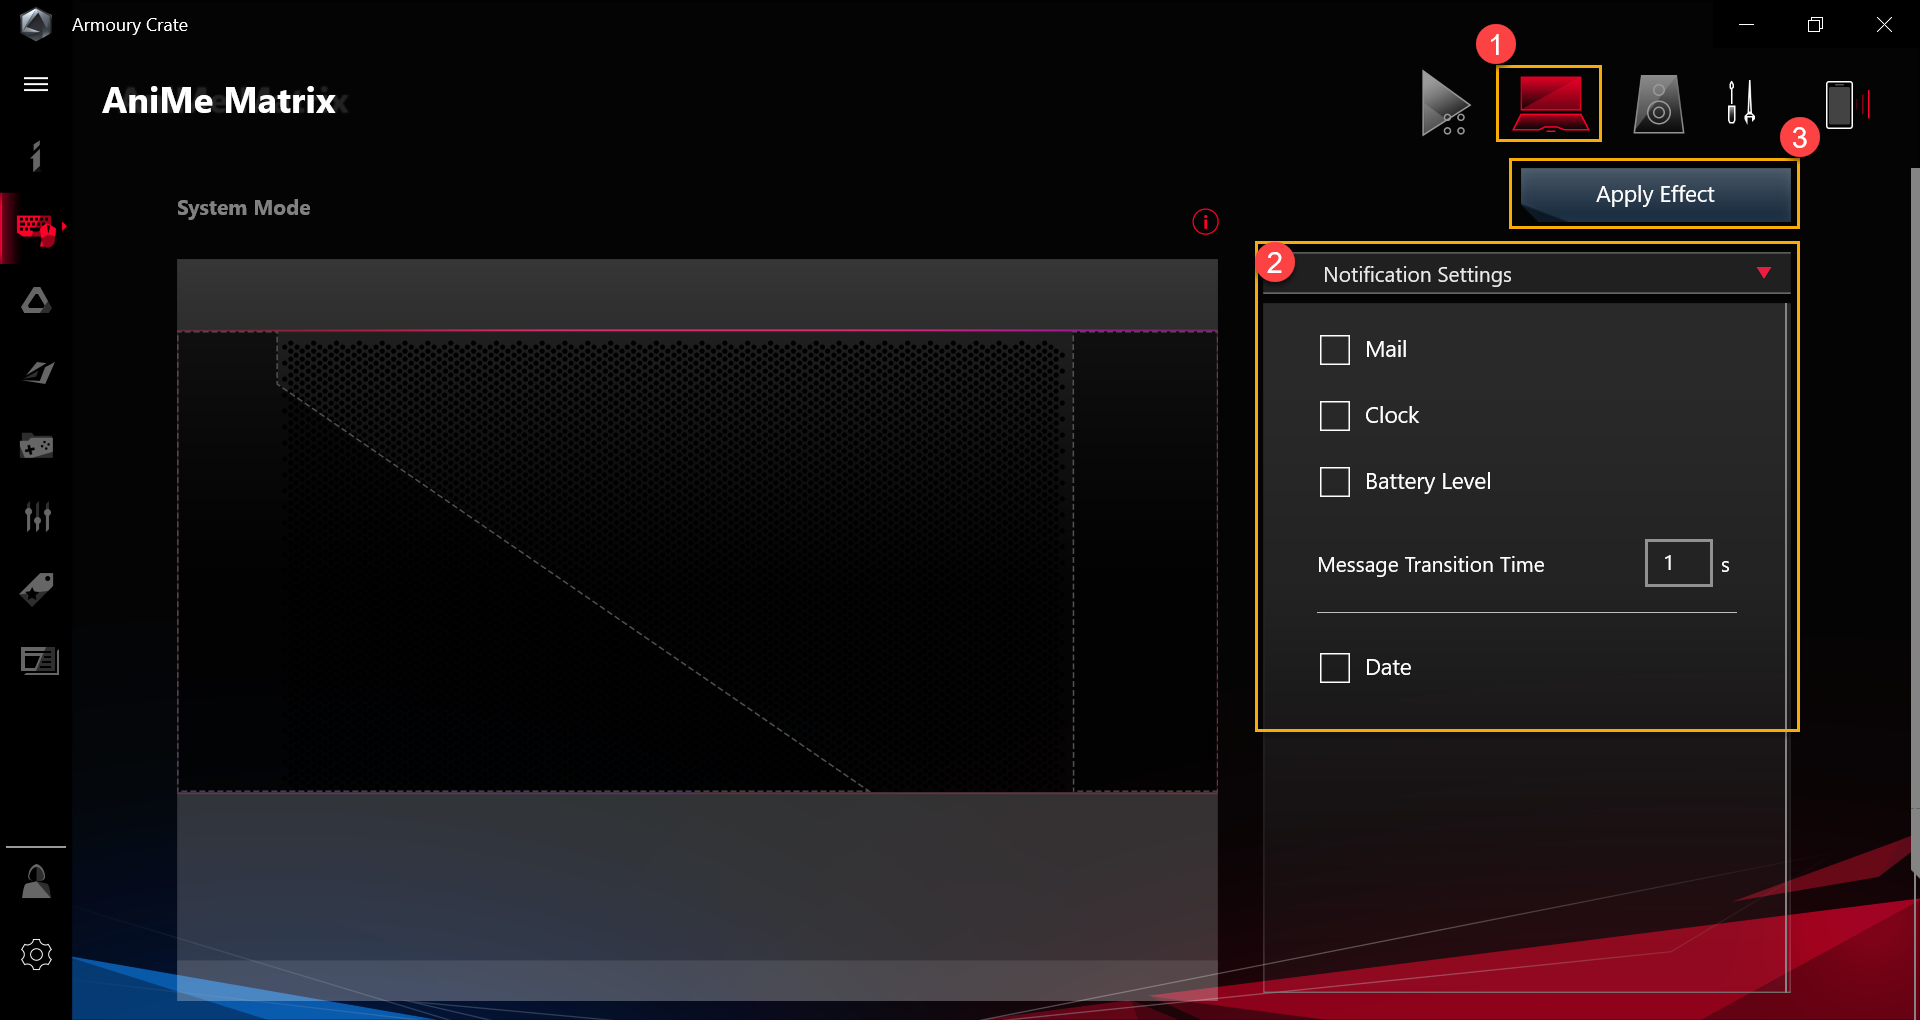
6-2. Notification Settings(2) – User Interface Introduction
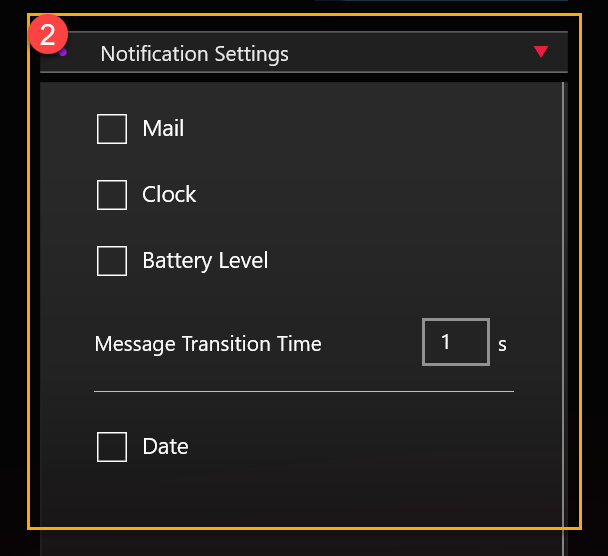
6-2-1. [Mail]: [Select] With this switch, and select mail notification to display on the LEDs.
6-2-2. [Clock]: [Select] this switch, it will display the system time on the LEDs.
6-2-3. [Battery Level]: [Select] this switch, it will display the battery level on the LEDs.
6-2-4. [Message Transition Time]: Set the length of display period for each app notification. (It can only display one app notification at a time.)
6-2-5. [Date]: [Select] this switch, it will display the system date on the LEDs.
※ After all of the settings are completed, please click [Apply Effect](3) button so that your customized lighting effects will be performed on the LEDs properly.
You can choose any application to play the audio file, and make sure there is sound output. After that, select the [Device] with the sound output, then it will preview Audio Mode effect on the canvas.
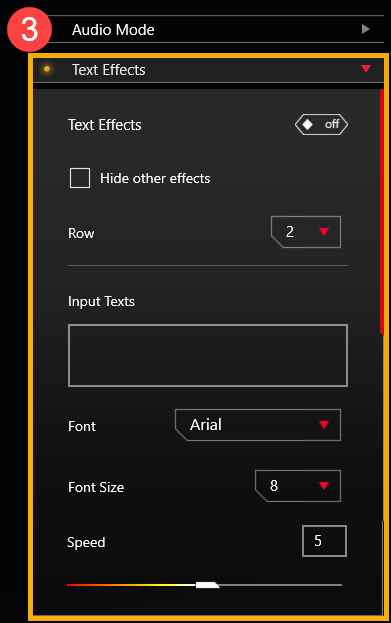
7-1. Select [Audio Mode]  (1) on the main page of AniMe Matrix, then you will enter the Audio Mode page. For (2) and (3) icons, please refer to the detailed description on item 7-2 and 7-3.
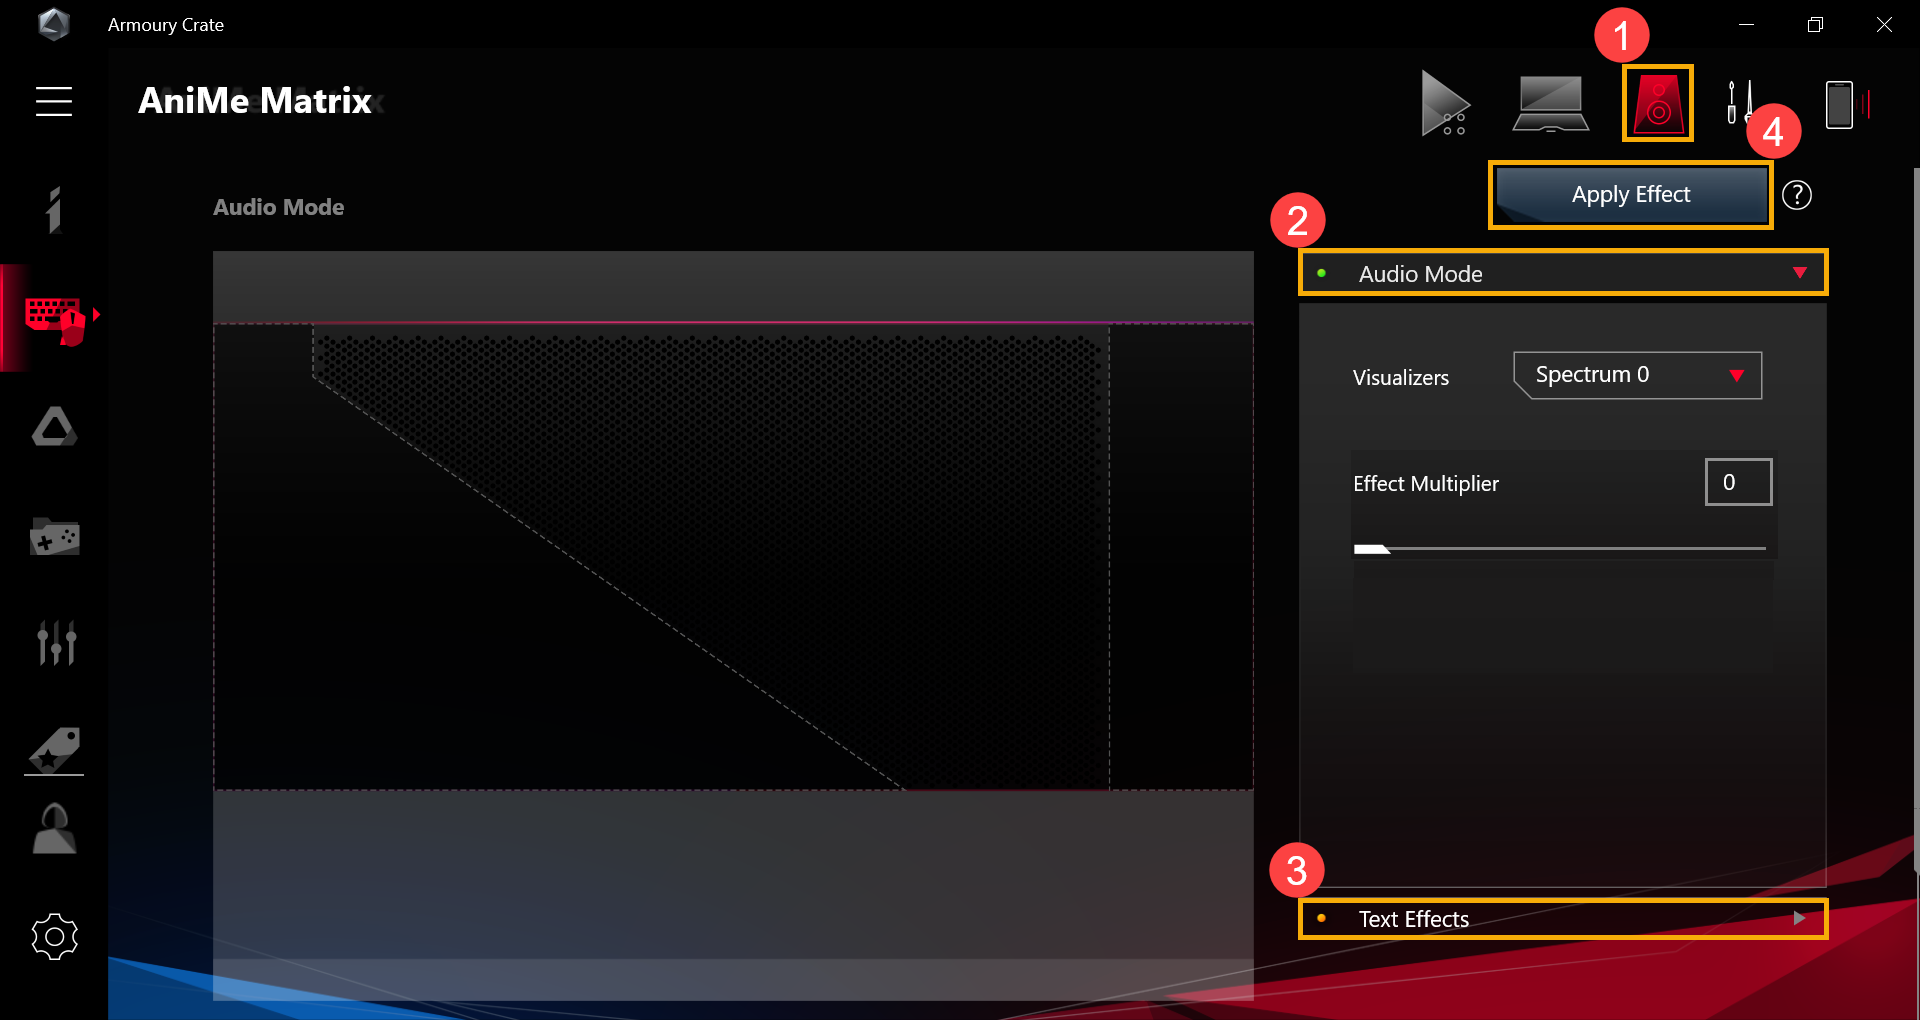
7-2. Audio Mode(2) – User Interface introduction
7-2-1. [Visualizers]: There are 6 spectrums for you to select the audio effect.
7-2-2. [Effect Multiplier]: Set the effect multiples of LED animation. Use the slider bar or enter the values to adjust, the default effect multiplier value is 0.
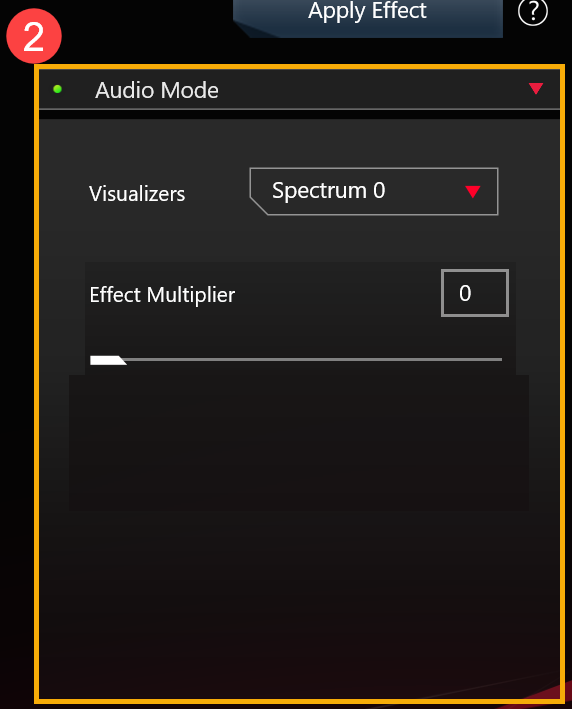
7-3. Text Effects(3) – User Interface introduction
7-3-1. [Text Effects]: When this switch sets to [on], it will turn on the text effect.
7-3-2. [Hide other effects]: With this switch [Selected] , other effects will be invisible and it only displays the text effect on the LEDs.
7-3-3. [Row]: Select how many text rows you would like to display on the LEDs. The default amount is 2 rows. (You can select between 2, 3, 5, and 6 rows.)
7-3-4. [Input Texts]: Input the texts you would like to display on the LEDs.
7-3-5. [Font]: Select the type of fonts you would like to display on the LEDs.
7-3-6. [Font Size]: Select the font size you would like to display on the LEDs. The default font size value is 8. (There is a fixed row size for each row. The text will be cut-off if the font size is bigger than row size.)
7-3-7. [Speed]: Set the speed of scrolling text. Use the slider bar or enter the values to adjust, and the default speed value is 5.
※ After all of the settings are completed, please click [Apply Effect](4) button so that your customized lighting effects will appear on the LEDs properly.
8. Q & A
Question 1: Why the lighting doesn't work after it goes to Sleep mode even though I've set the lighting to stay activated in Sleep mode ?
Answer 1: In the following scenarios, the lighting effects are not supported in sleep mode.
Scenario 1: The lighting effect is not supported when the system enters Sleep mode via pressing the power button.
Scenario 2: The lighting effect is not supported when connecting your device to the AC adapter after the system enters Sleep mode. (Even when the switch [Turn off LEDs when device is unplugged] has been set to [on].)
Question 2: How to get more information about operation steps in AniMe Matrix?
Answer 2: While operating, you can click  "Quick Tips" for more information about operation steps.
Question 3: Why AniMe Matrix Lighting will stay activated or is not like the customized settings I set up after the system goes to Sleep/Hibernate mode or the Lid is closed?
Answer 3: You can refer to 4-2-4. [Power and Sleep Settings] for more detailed lighting settings in the system state.
Connecting to AC adapter: AniMe Matrix Lighting will display your customized lighting settings or the default lighting effect (shooting star) after the system goes to Sleep/Hibernate mode or the Lid is closed mode.
Using Battery power: AniMe Matrix Lighting will display your customized lighting settings or not stay activated (if the switch is unticked) after the system goes to Sleep/Hibernate mode or the Lid is closed mode.
Application Install& Uninstall
Keystone, is an actual physical key designed for gamers to set up their gear for an immersive experience. Keystone connects to the exclusive slot on the right side of the keyboard by magnetic force. When Keystone is docked, It can apply lighting effects, sound effects and activate Shadow Drive storage capacity.
Models currently equipped with Keystone:
G531/G731 series (ROG Strix SCAR III& ROG Strix Hero III), G35DX (ROG Strix GA35) ROG Gaming Laptops& Desktop,
G532/G732 series(ROG Strix SCAR 15/17), G35CZ (ROG Strix GT35) ROG Gaming Laptops& Desktop,
G533/G733 series(ROG Strix SCAR 15/17) ROG Gaming Laptops.
* For more details on supported models, please refer to ASUS Official Website.
* Due to differences in model support functions, please refer to this table for more details.
The Keystone utility has been integrated into the Armoury Crate application. Users need to configure the Keystone settings through the Armoury Crate application. Support Windows 10 OS, and Armoury Crate application version must be higher than V3.0.4 above.
*Please refer to Link for more details about Armoury Crate Introduction.
4. Application Install& Uninstall
To get and install the application program,please refer to ASUS official website
To uninstall application program,please refer to ASUS official website
5-1 How to start Keystone
Please type and search [Armoury Crate]① in the Windows Search Box, and then click on [Open]②.
In Armoury Crate click [Device]③,and select [Keystone]④ into setting page.
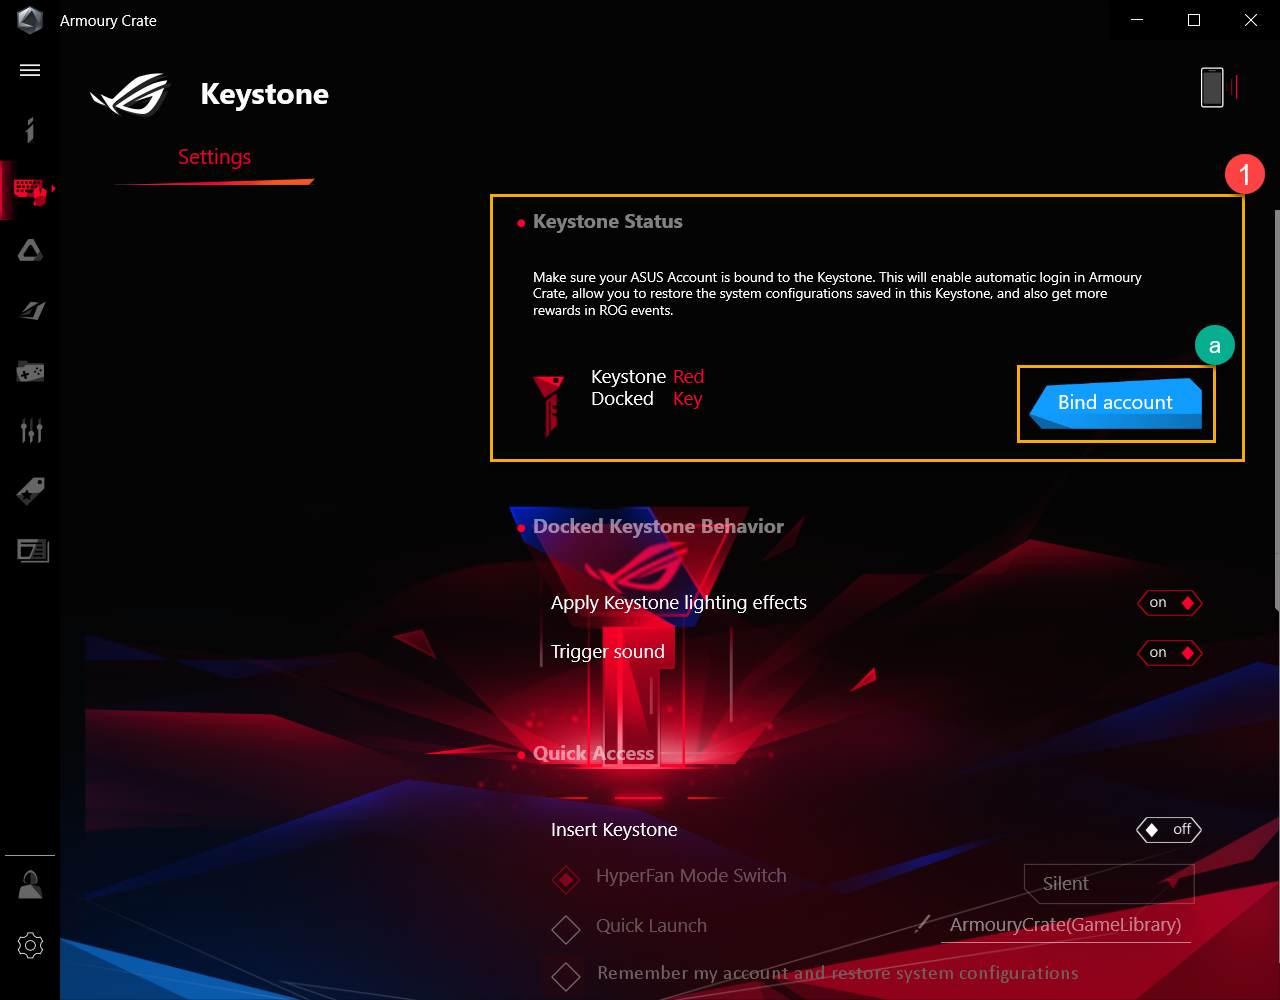
5-2 Keystone Settings
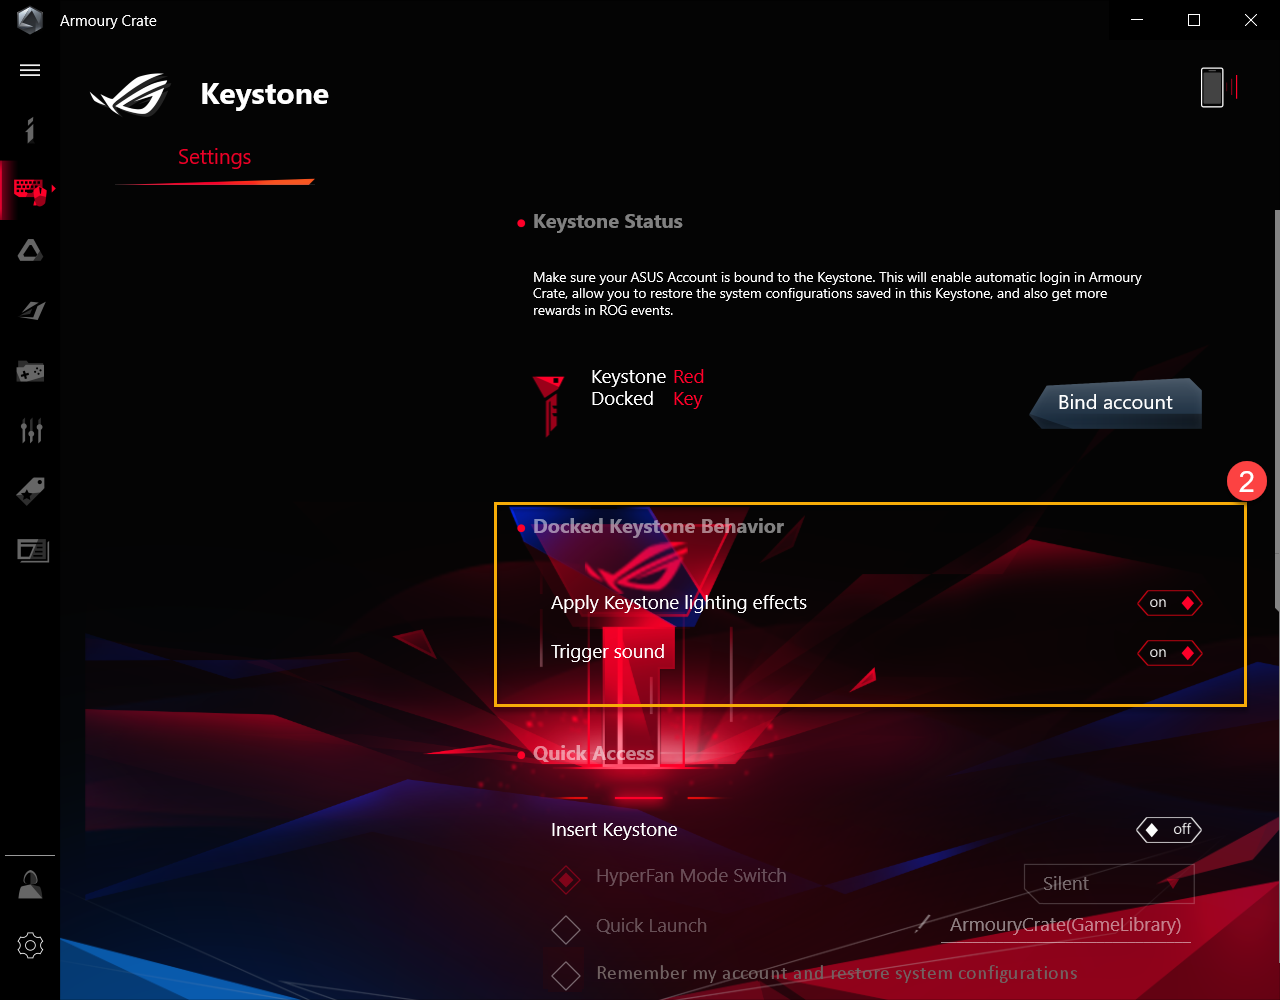
*Keystone Status
The area shows Keystone current status ①, for example Docked/ No detected, or Bind/ no bind account.
Bind Account*: Please dock the Keystone first, then click [Bind Account](a). After that, the login window will pop up.
*This function does not support G531 and G731 series (SCAR III & Hero III), G35DX (ROG Strix GA35)
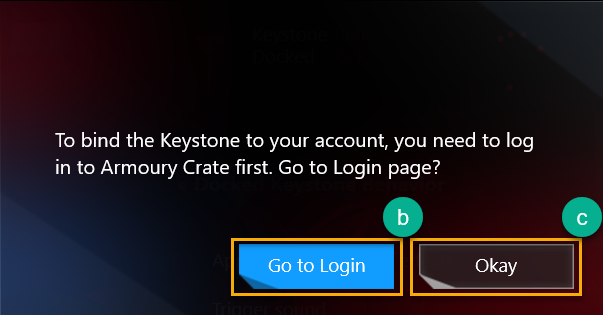
Click [Go to Login](b), the Armoury Crate login window will pop out.
*If already logged in to Armoury Crate before, click [Okay](c) and then the "Bind your account window" will pop out.
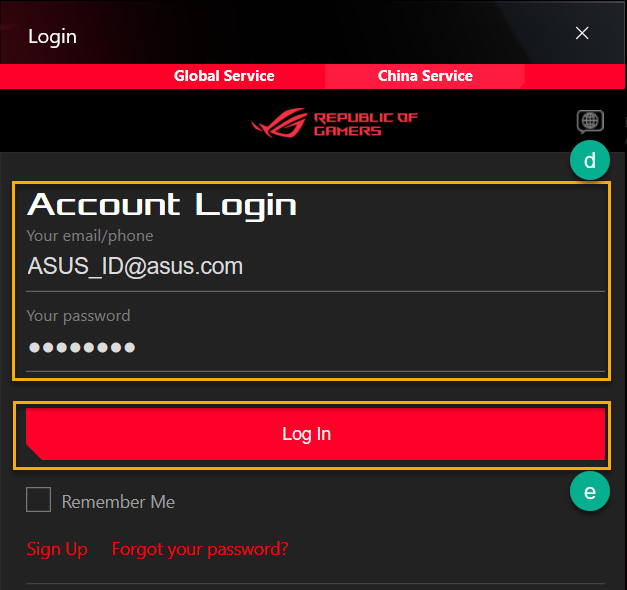
In login window,enter your ASUS Account and Password(d),after that click [Log In](e),and then Bind your account window will pop out.
In the Login window, enter your ASUS Account and Password(d), click [Log In] (e), then the Bind your account window will pop out.
*For how to register an ASUS member account, please refer to this Link
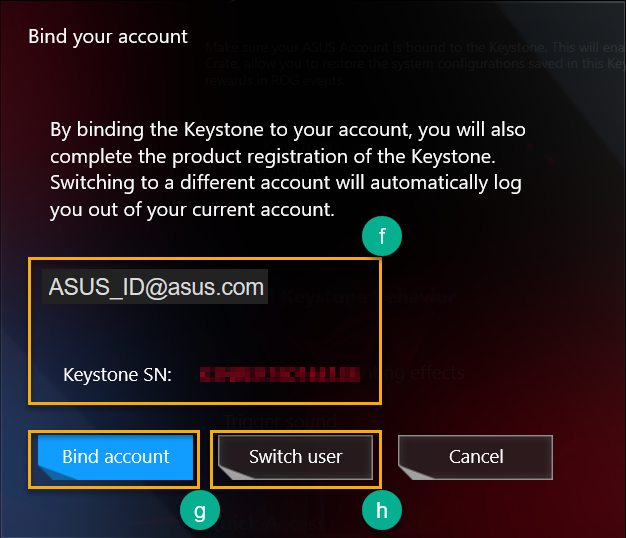
In the "Bind your account" window, you can confirm the Account ID and Keystone SN(f). Click [Bind account](g) to complete.
*If you need to login with another Account ID, click [Switch user](h).
IMPORTANT: To activate this feature, your PC must be connected to the Internet and the Keystone must also be docked.
Apply Keystone lighting effects: While docking Keystone, the system preset light effect will be turned on.
Trigger sound: While docking Keystone, the sound effect will be turned on.
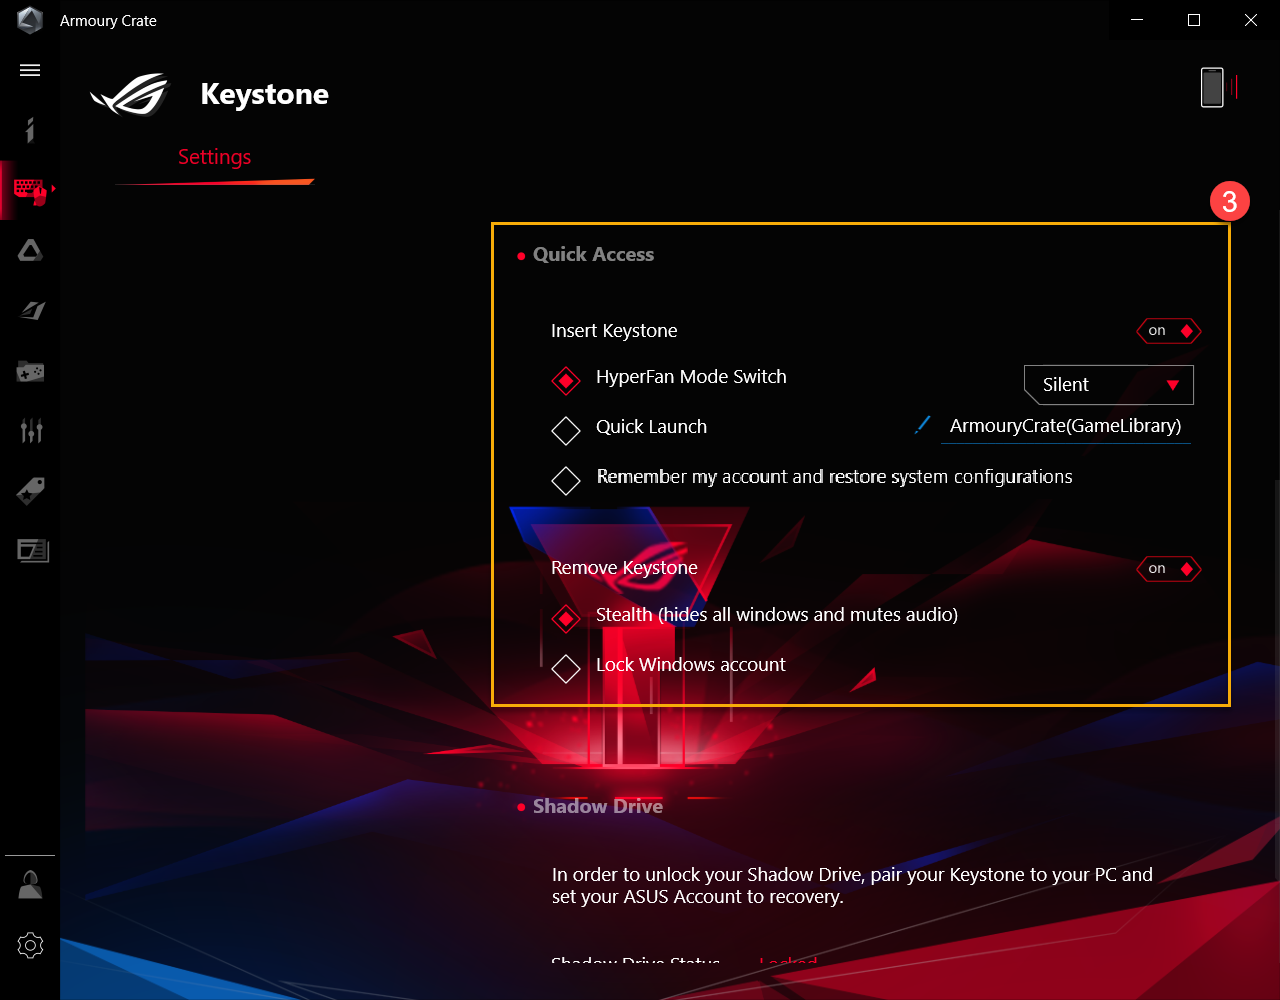
*Quick Access③
HyperFan Mode Switch: Customized fan settings for laptop performance: Silent/ Performance/ Turbo/ Windows®, while the Keystone is inserted.
Quick Launch: Allows the quick launch of an application program, while the Keystone is inserted.
Remember my account and restore system configurations*: To setup whether log in to My account bound to Keystone and restore system configurations after inserted Keystone.
*The function can only be enabled after Keystone is bound an account
Remove Keystone
Stealth (Hides all windows and mutes audio): All windows will minimize and audio will be muted, while the Keystone is removed.
Lock Windows account: Windows account will automatically lock, while the Keystone is removed.
Shadow Drive provides a hidden storage partition. When the keystone is docked into the slot, the hidden storage partition reveals itself and data within the storage becomes accessible.
*Once need to execute [Reset the PC and keep my personal files] or [Reset the PC and remove all of my personal files, apps and settings], gamers must back up the files in Shadow Drive first, and then reset Shadow Drive after.
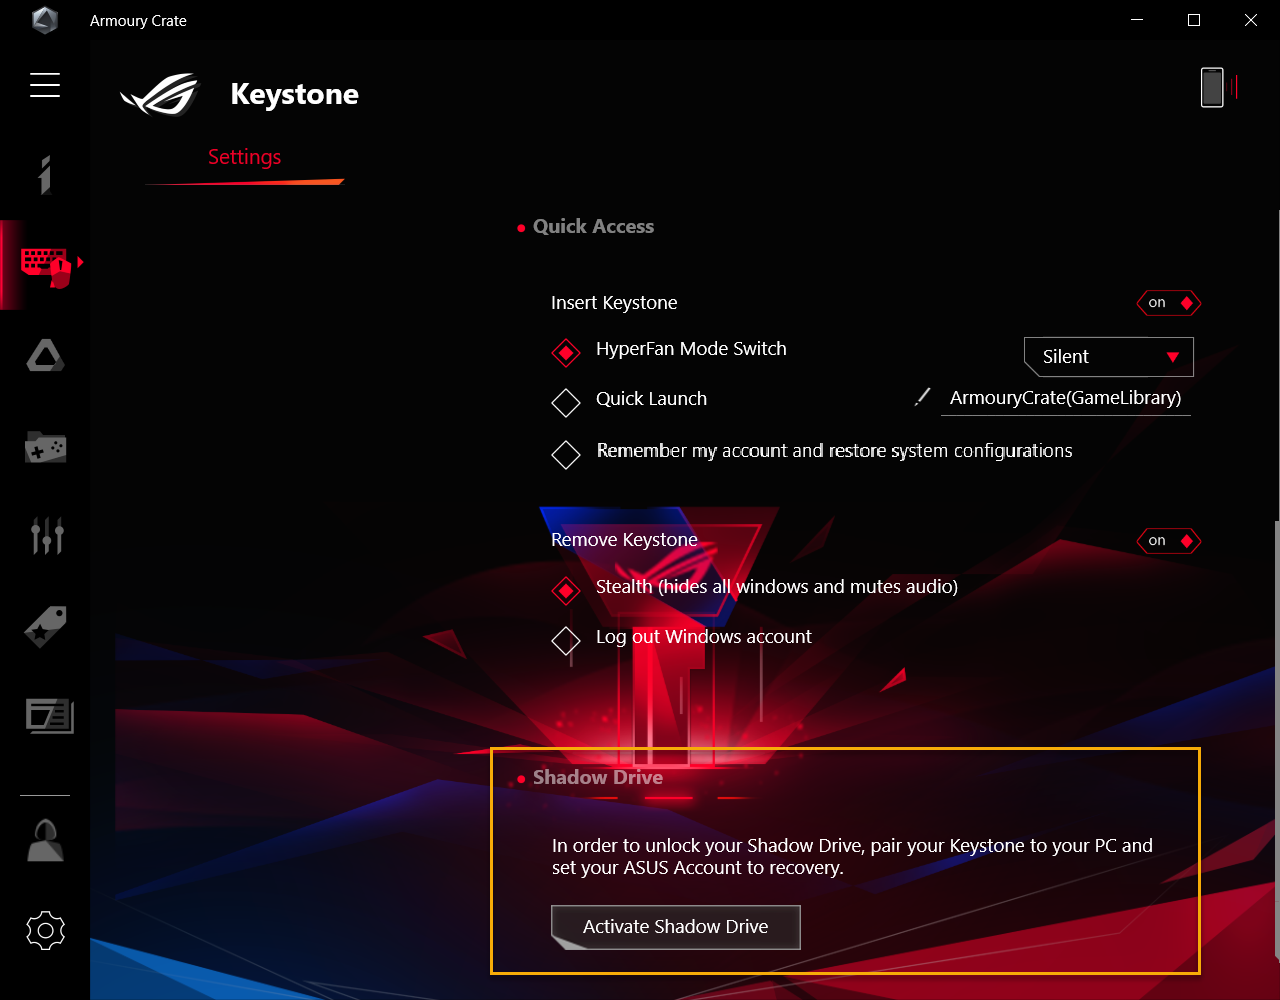
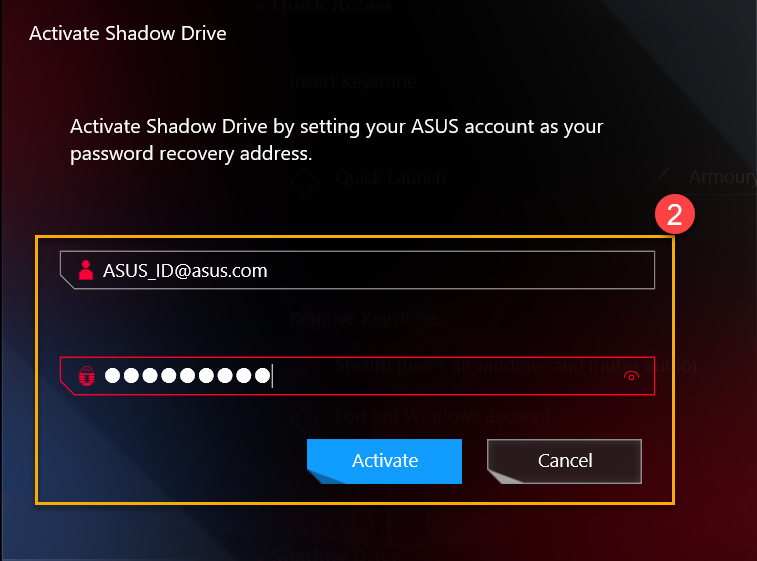
6-1 Activate Shadow Drive
Click [Activate Shadow Driver]①, and then Activate Shadow Drive window will pop out.

In Activate Shadow Drive window, enter your ASUS Account and Password, after that click [Activate]②.
For how to register an ASUS member account, please refer to this Link
IMPORTANT: Your PC must be connected to the Internet to activate this feature.
IMPORTANT: Your PC must be connected Internet to activate this feature.
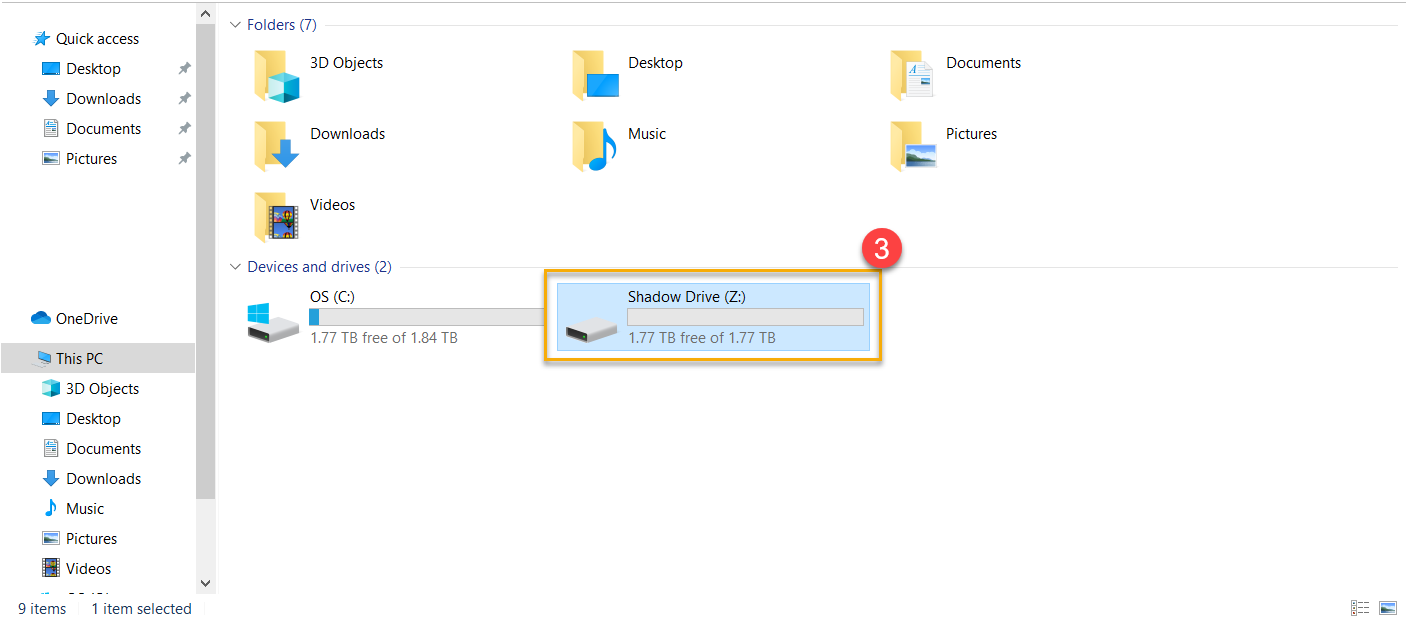
The Shadow Drive storage capacity [Shadow Drive(Z:)]③ will now be activated.
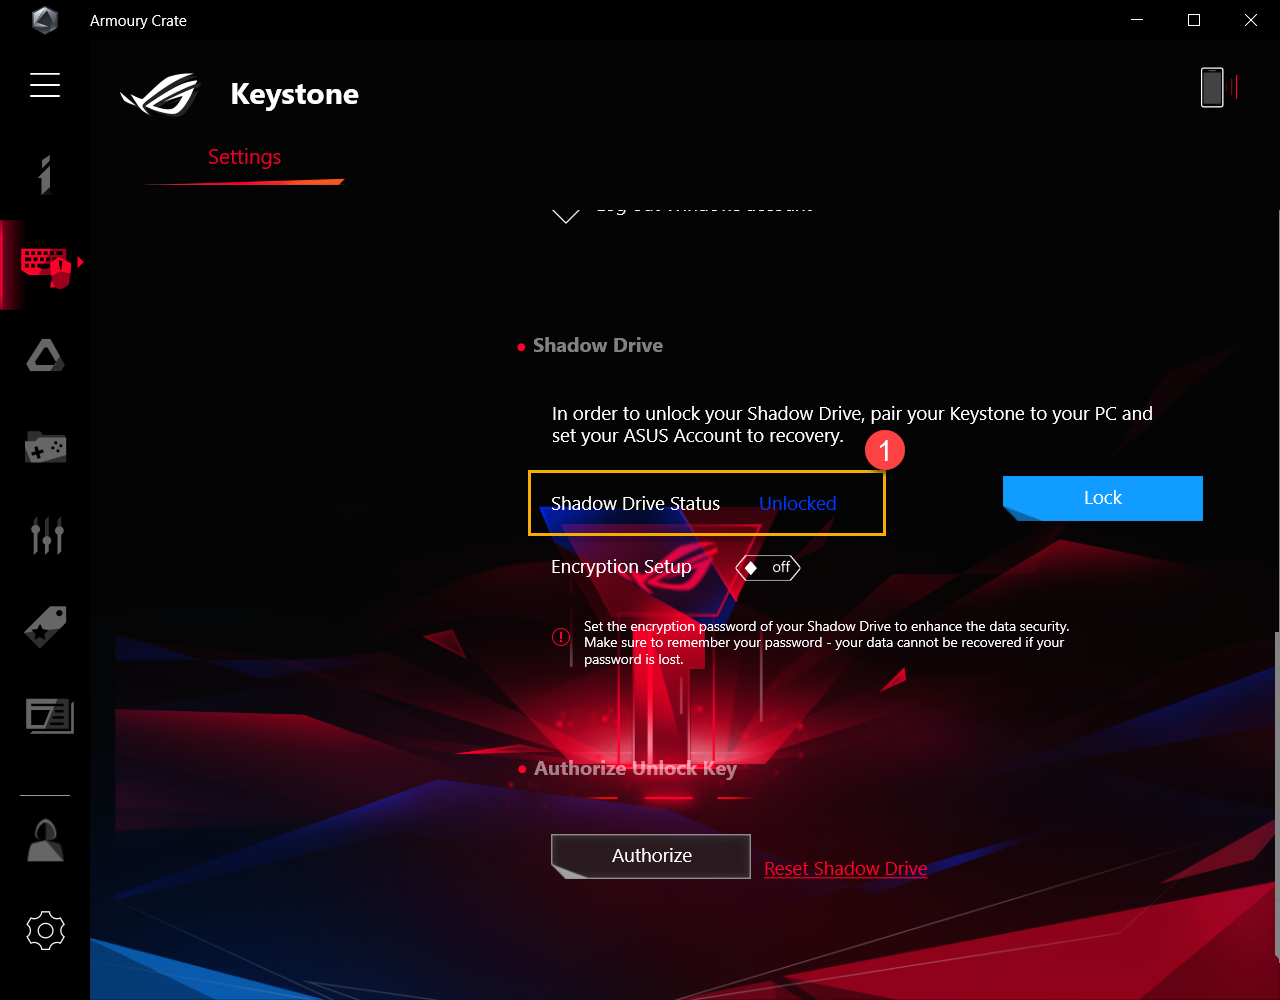
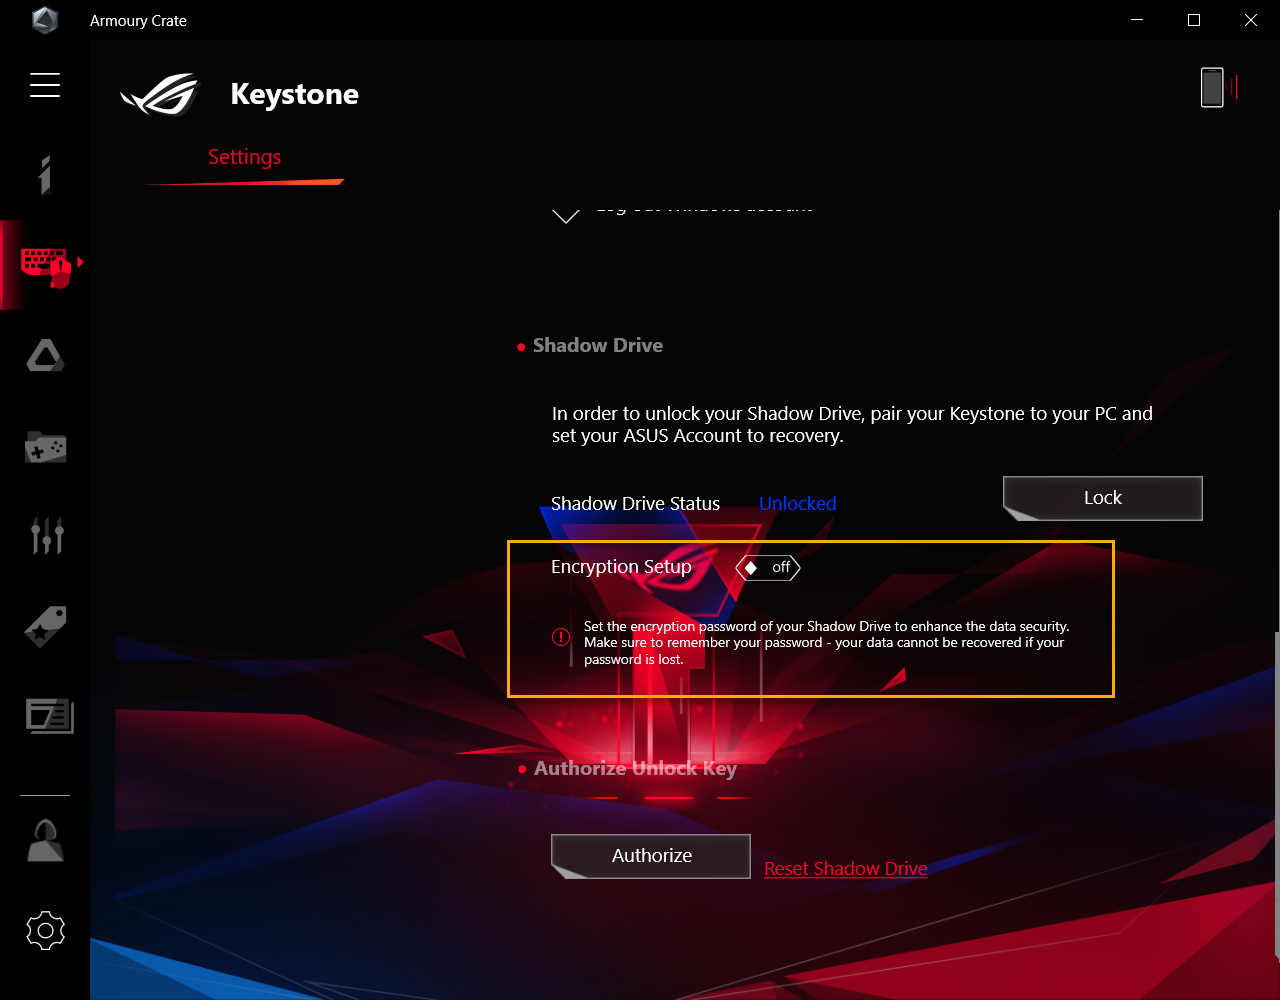
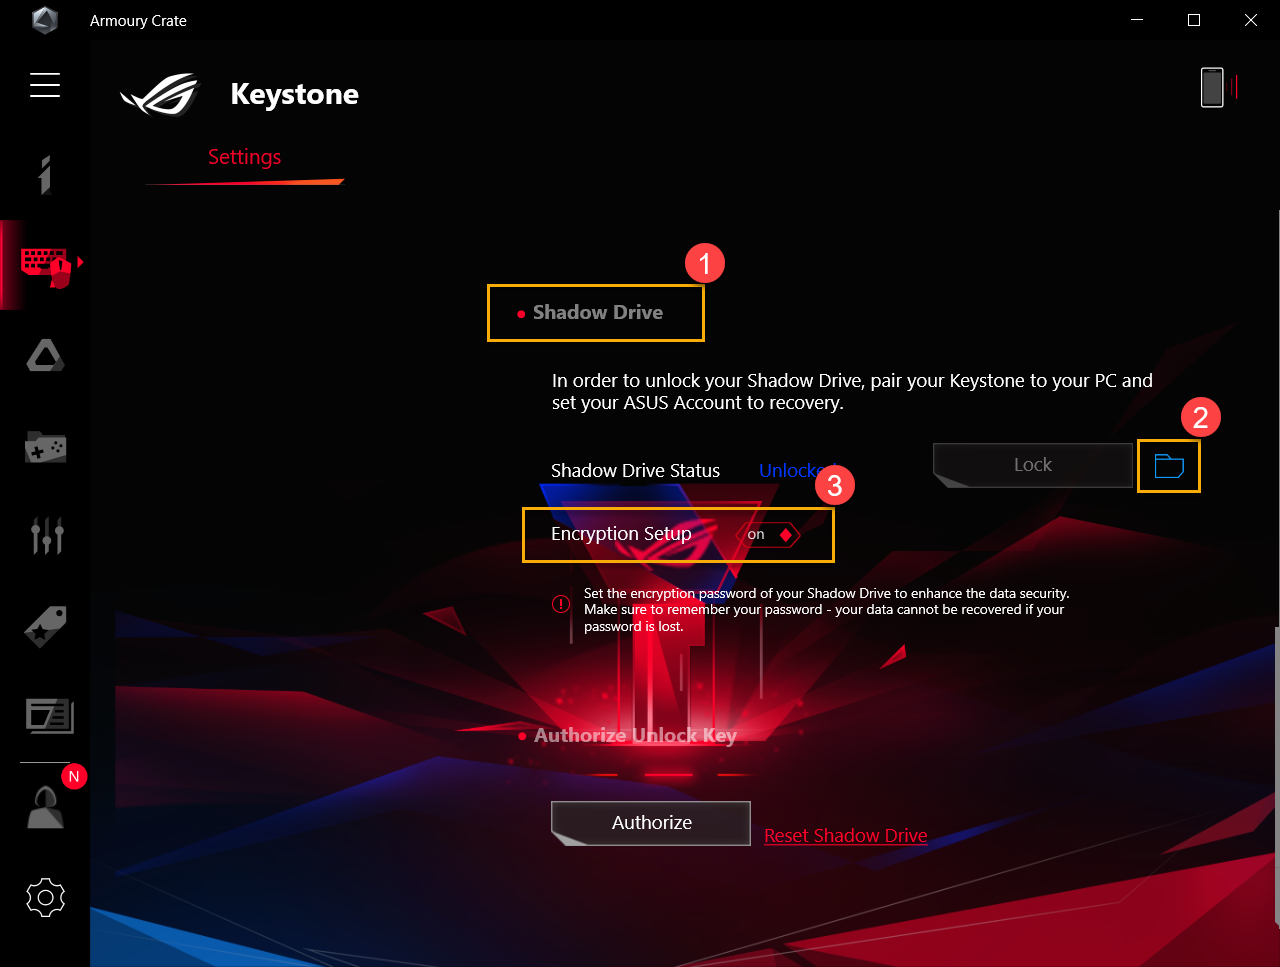
6-2 Shadow Drive Status①
To display current Shadow Drive storage status, select [Unlocked].
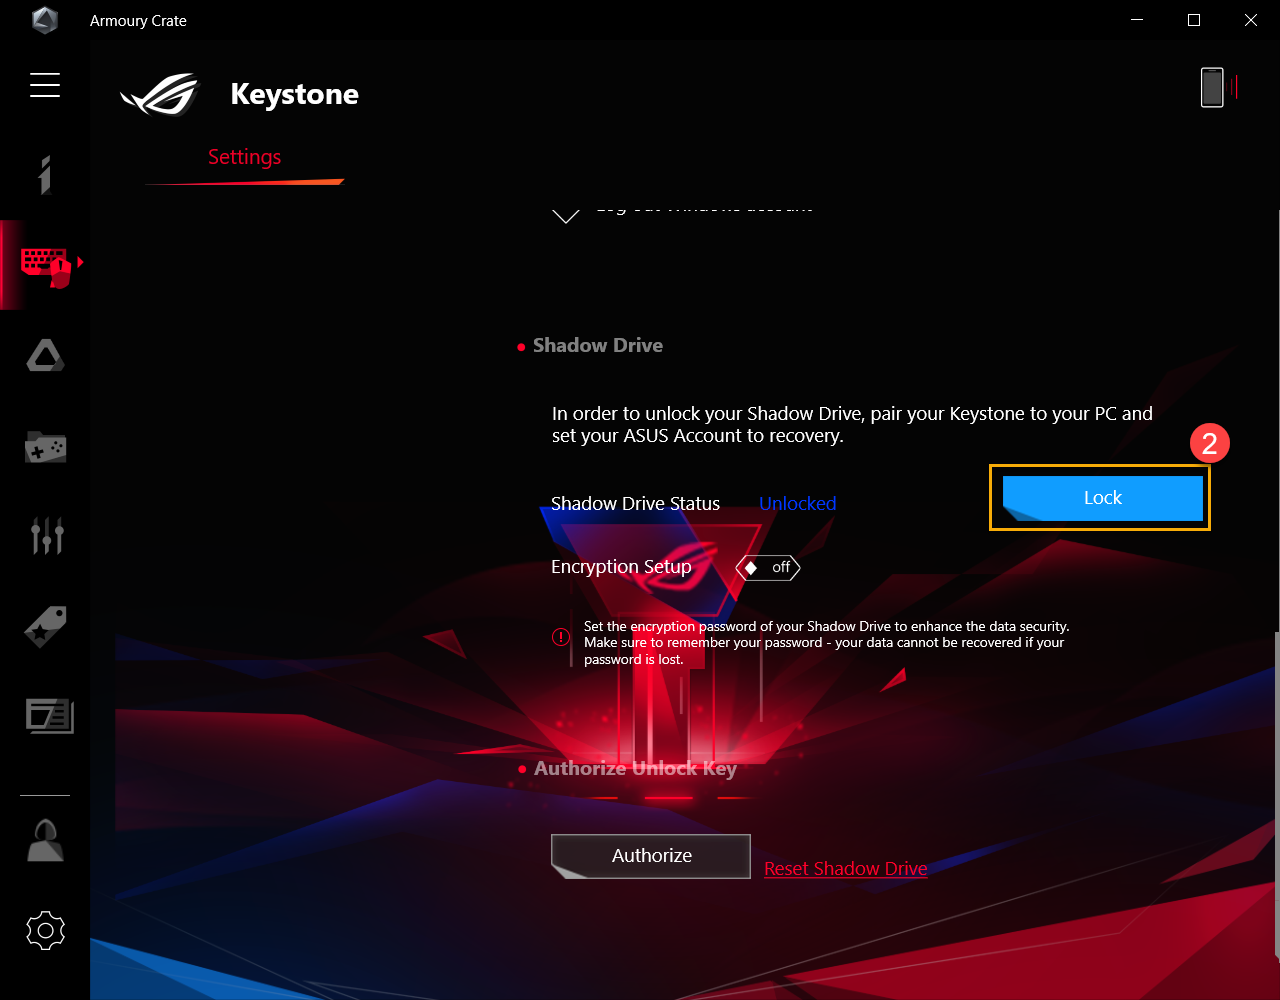
Lock Shadow Drive
Click [Lock]② to lock and hide Shadow Drive storage capacity.
Unlock Shadow Drive
Click [Unlock Shadow Drive]③ , and then Unlock Shadow Drive window will pop out.
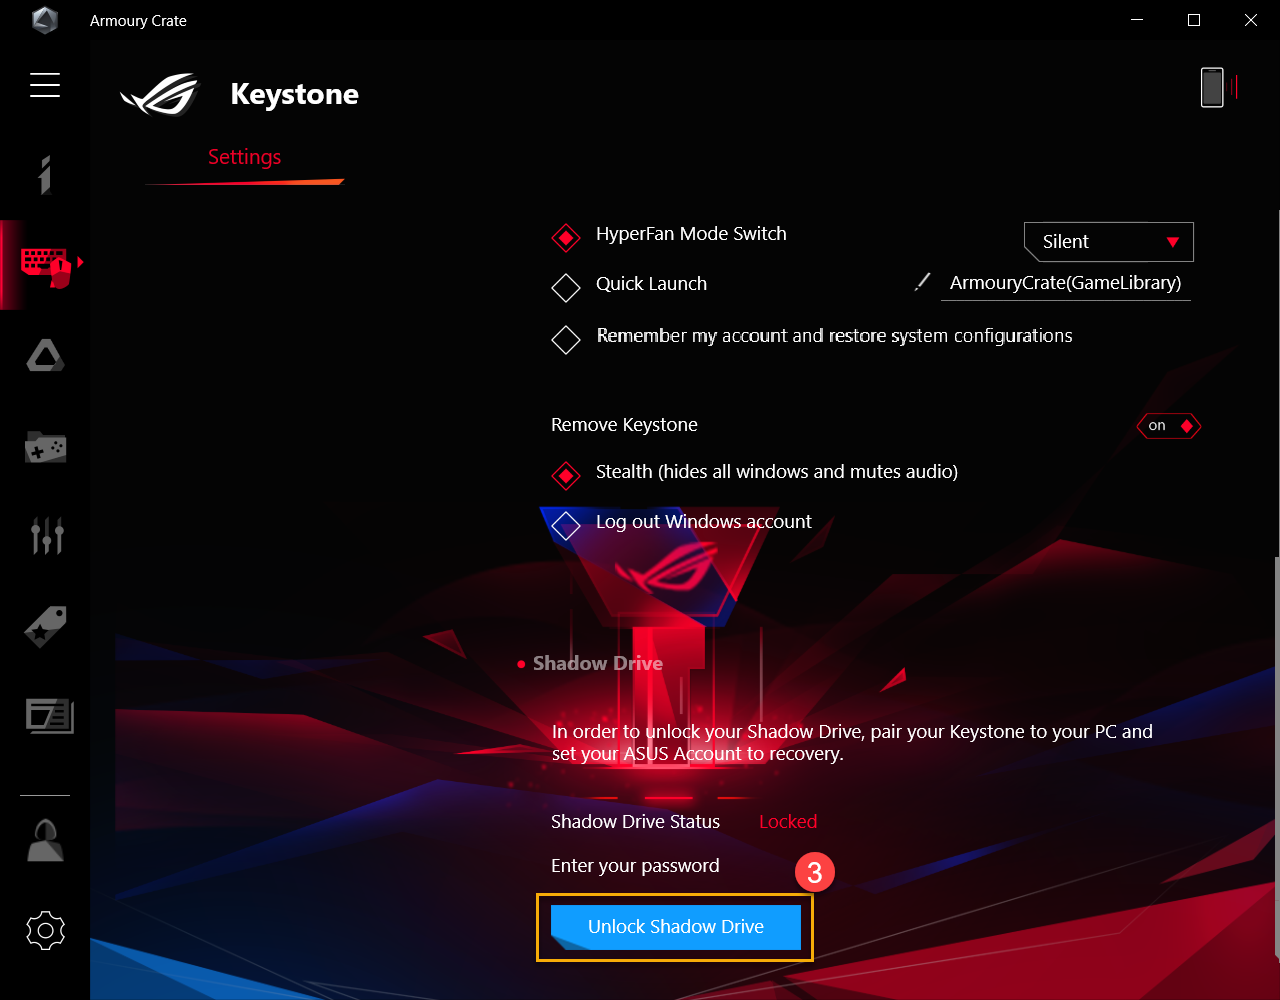
In Unlock Shadow Drive window, enter your ASUS Account password④, after that, click [OK] to unlock Shadow Drive storage capacity.
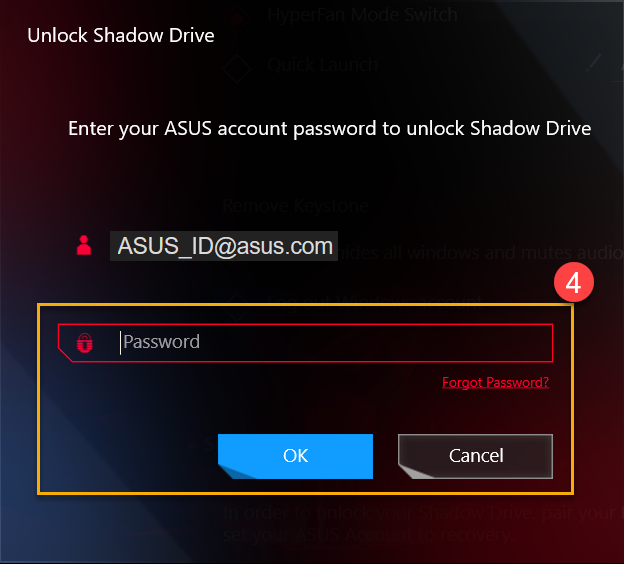
IMPORTANT: Your PC must be connected to Internet to activate this feature.
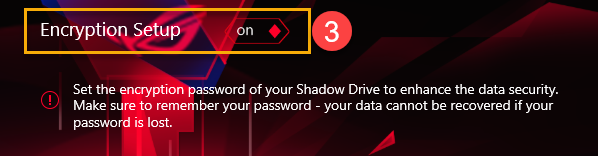
6-3 Shadow Drive Encryption Setup
To set Shadow Drive encryption password for enhanced data security. (For Windows 10 Pro environment only)
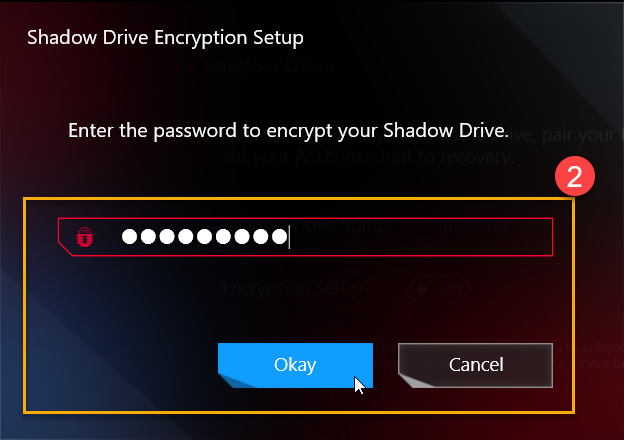
Encryption Setup On
Switch Encryption Setup to [On] ① and the Shadow Drive Encryption Setup window will pop out.
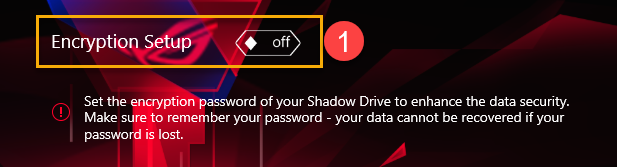
In Shadow Drive Encryption Setup window, please setup your own password② (minimum of 8 characters required), then click [Okay].
*Please make sure to remember your password - your data cannot be recovered if your password is lost.
Encryption Setup - Off
Switch Encryption Setup to [Off] ③ and the encryption function will be turned off.
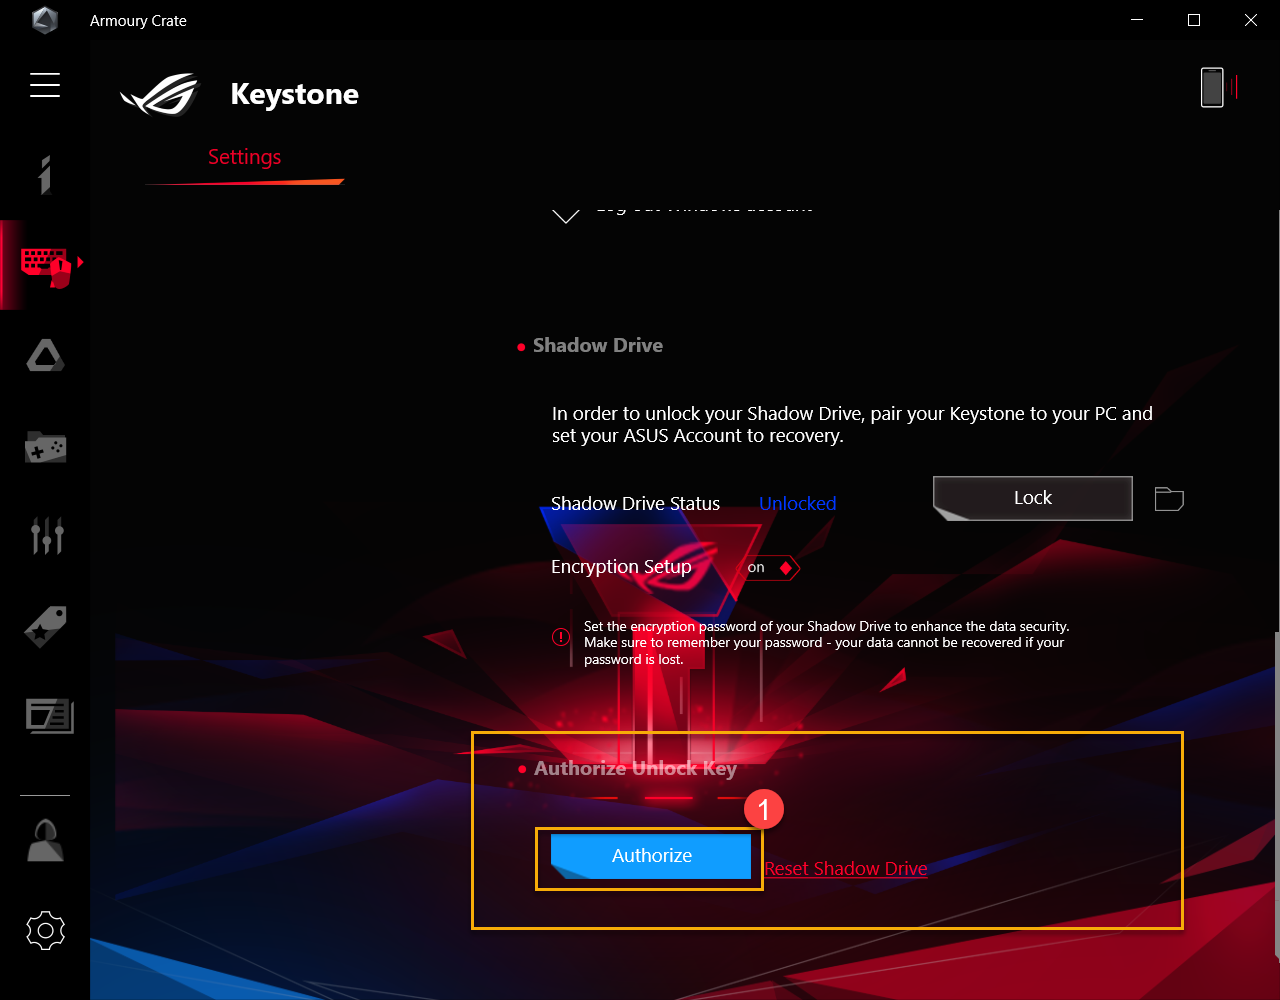
6-4 Authorize Unlock Key - Authorize
Authorizing the paired Keystone to unlock the Shadow Drive on this PC.
Click [Authorize]①, the login window will pop out.
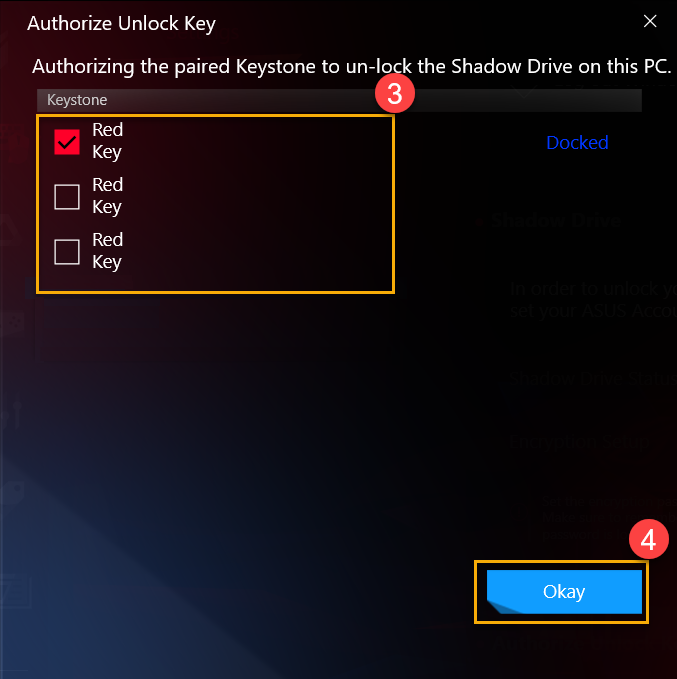
In login window, enter your ASUS Account Password②, after that click [OK] to Authorize Unlock Key window

IMPORTANT: Your PC must be connected to the Internet to activate this feature.
In the Authorize Unlock Key window, select any paired Keystone③ to authorize unlocking the Shadow Drive storage capacity, and then click [Okay]④.
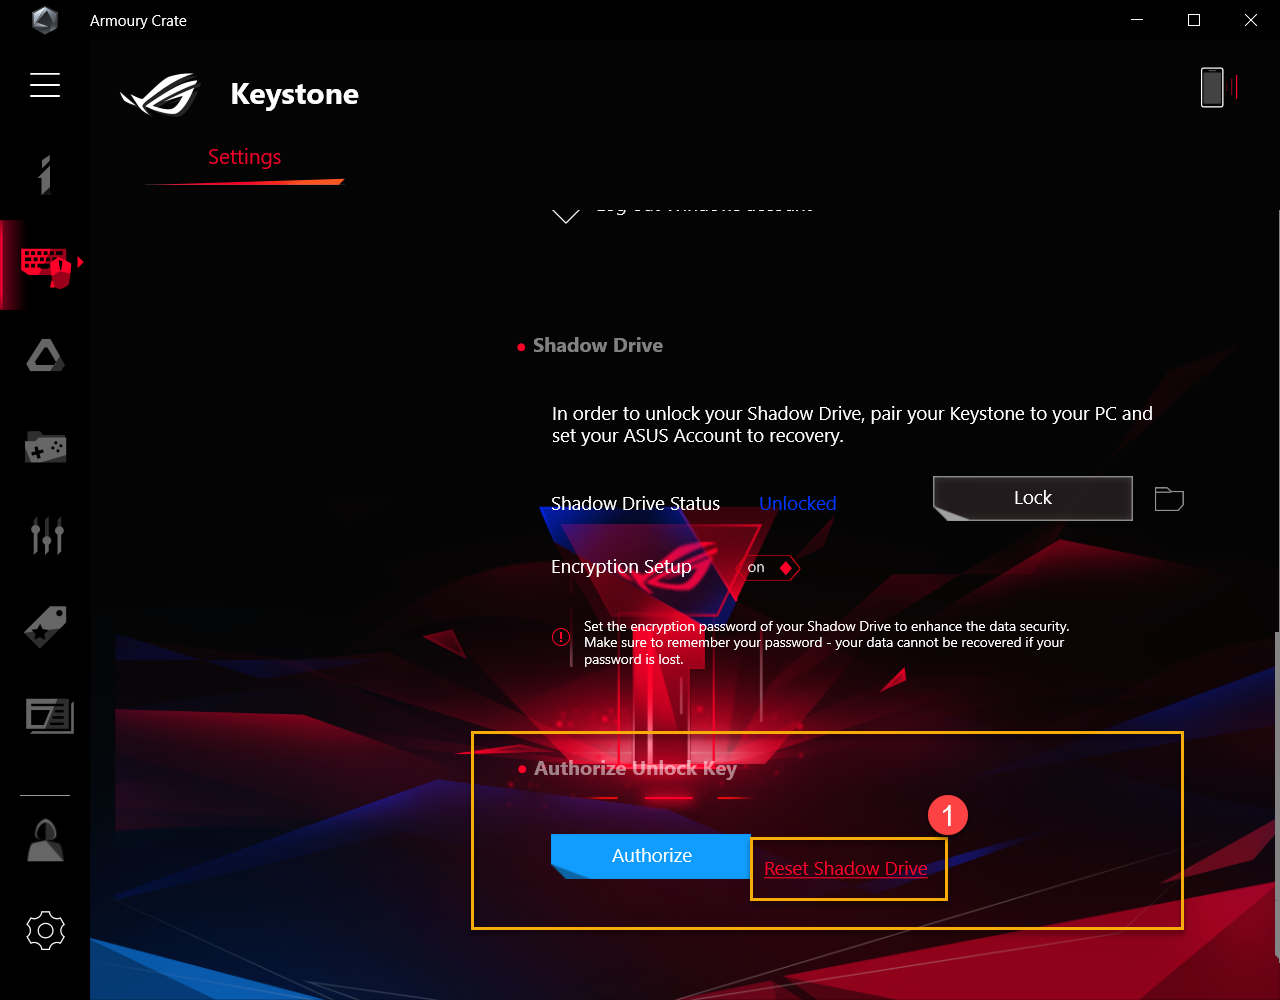
6-5 Authorize Unlock Key - Reset Shadow Drive
To reset Keystone authorization setup and shutdown the Shadow Drive.
IMPORTANT: Reseting the Shadow Drive may delete all its documents and files
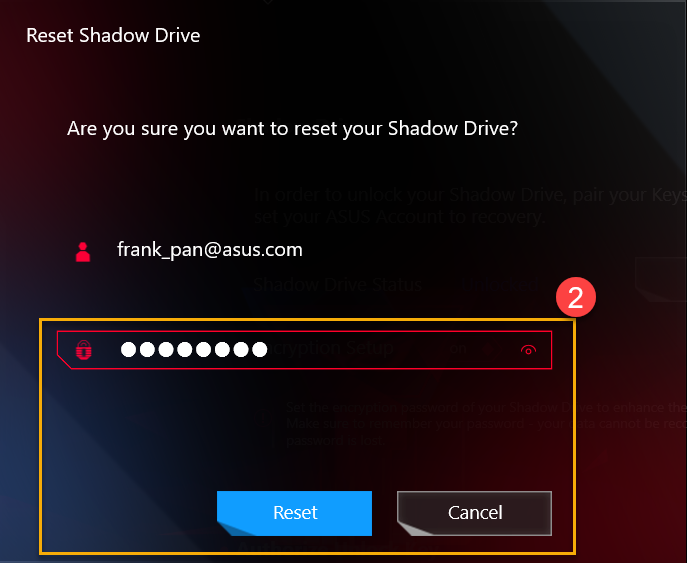
Clicking [Reset Shadow Drive]①, and then Reset Shadow Drive window will pop out.
In the Reset Shadow Drive window, enter your ASUS Account Password②, then click [Reset] to complete.
IMPORTANT: Your PC must be connected to the Internet to activate this feature.
Q1: How to unlock the Shadow Drive with Encryption is enabled?
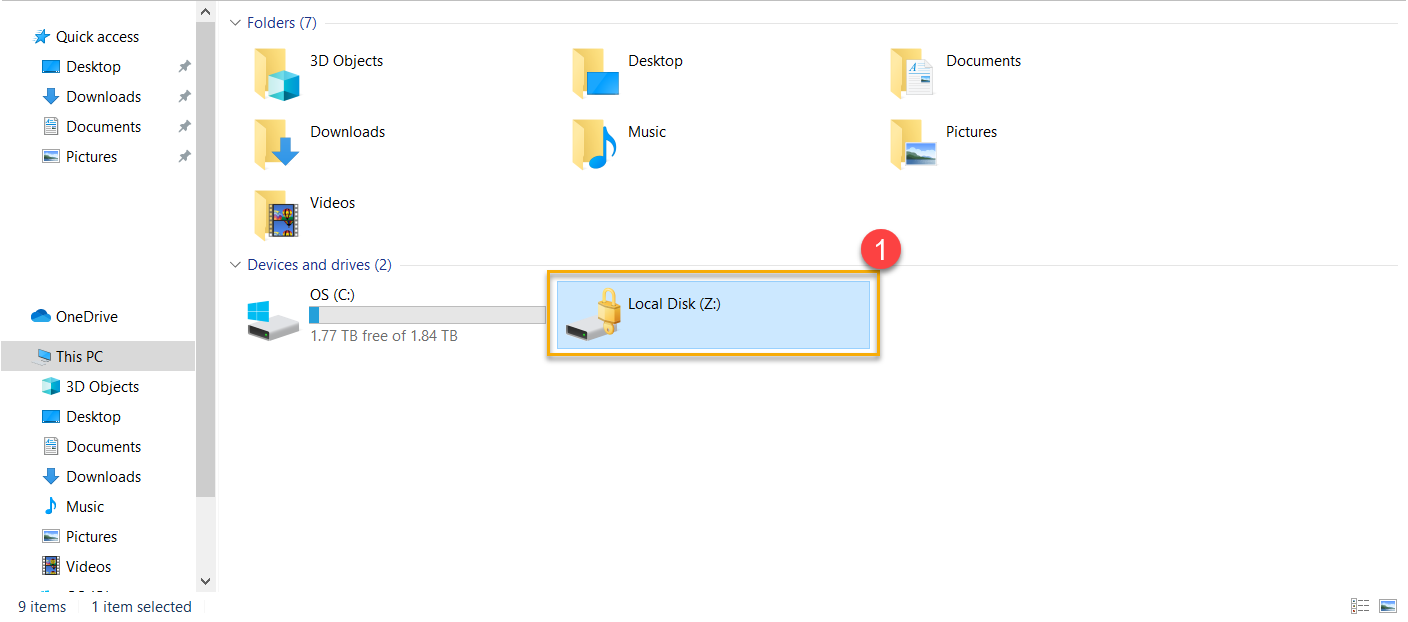
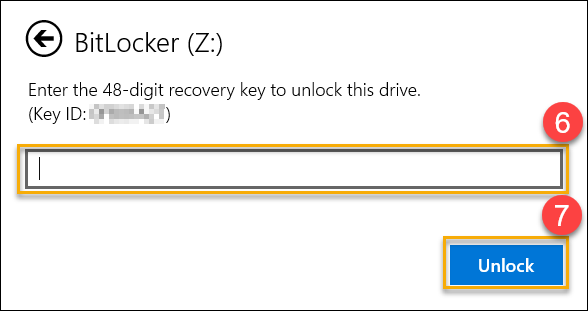
A1: If the Shadow Drive has encryption enabled, the Local Disk(Z:) will be locked with the icon below. Please click Local Disk(Z:) icon①, and then the BitLocker(Z:). The unlock window will pop out.
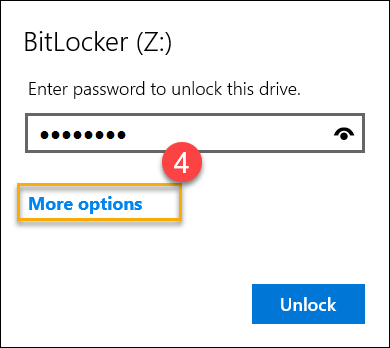
Enter your password② which was set in the Encryption Setup, then click [Unlock]③.

If forget your encryption password, you can select [More options]④, and click [Enter recovery key]⑤.
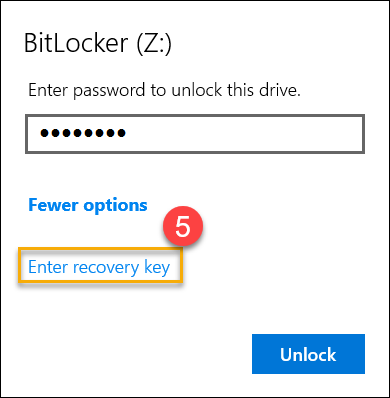
Enter the 48 digit recovery key⑥, and click [Unlock]⑦ to unlock this drive.
Q2: How to get the Recovery Key?
A2: In Shadow Drive① Settings, the download site② for the Recovery Key will show up, while the Encryption Setup③ is on. Click the download site to save the Recovery Key text file (Preset file name is "ShadowDrivePasswordBackup.TXT").
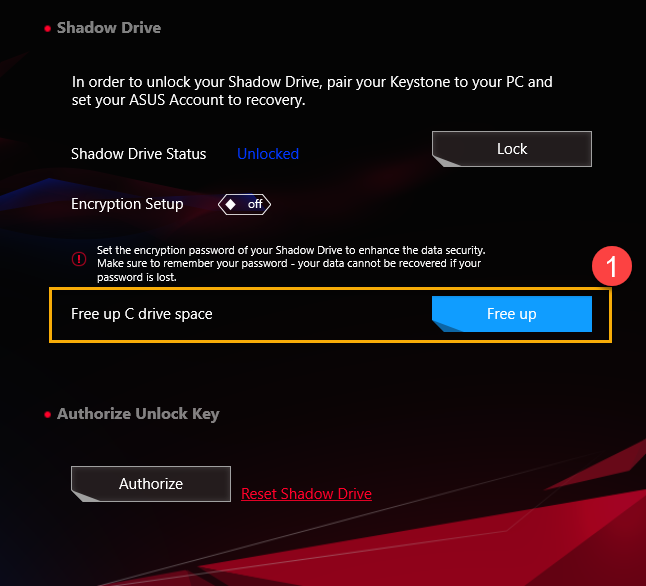
Q3: Why (C :) disk drive space does not recover after I delete files in the Shadow Drive?
Q3: Since Shadow Drive uses Windows Dynamic Disk design, it is a normal phenomenon with design.
*You can use "Reset Shadow Drive" to recover disk drive space, but all ducuments in Shadow Drive will be deleted, once the Shadow Drive is reset.
*Or, you can select "Free up C drive space"① to free up the drive space.
Q4: The keystone support function table
A4:
G531/G731& G35DX | G532/G732& G35CZ | G533/G733 | |
| Keystone Bind Account | V | V | |
| Docked Keystone Behavior | V | V | V |
| Quick Access | V | V | V |
| Shadow Drive | V | V | V |
| Recover Key | V | V | V |
Q5: Why is there no sound or lighting effect after inserting Keystone?
A5: Please try to confirm Keystone utility setup , for example "Docked Keystone Behavior" or "Insert Keystone" in Quick Access whether is turn on or off. If still no reaction, please try to upgrade Armoury Crate to the latest version, or reinstall ASUS NFC Driver. If you still have the problem, please contact with local ASUS repair center for repair service.
Two-Way AI Noise Cancelation Setup Guide
Two-Way AI Noise Cancelation Introduction
• Two-Way AI Noise Cancelation software is exclusively featured on ASUS gaming notebooks& desktops. Through the massive deep-learning database, the utility leverages to preserve the sound of your voice while eliminating distracting keyboard clatter, mouse clicks, and other forms of environmental noise. It only occupies a slight load on the CPU, and ensures the least impact on gaming performance.
•This software offers both Input/ Output solutions. User may enable Output noise cancelling function when teammates are in the noisy environment which enhances gaming experience.
•User can set Input/ Output in different apps separately. For example, playing music, having a MOBA match, and communicating with friends with Ai noise cancelation on via voice call app at the same time.
System requirements
• Two-Way AI Noise Cancelation utility has been integrated into the Armoury Crate application. Users need to configure the settings through the Armoury Crate application. Support Windows 10 OS or later OS, and Armoury Crate application version must be higher than V3.0 above.
Model supported
• This feature will be applicable to ROG and TUF series of gaming laptop& desktops models released after January of 2021.
For more details, please refer to ASUS Official Website.
Utility Install and Uninstall
• Please refer to Link for how to install and uninstall utility.
Two-Way AI Noise Cancelation: Setup Guide
Step 1. Open and Enter Armoury Crate.
Step 2. Click “Device” and choose "System".
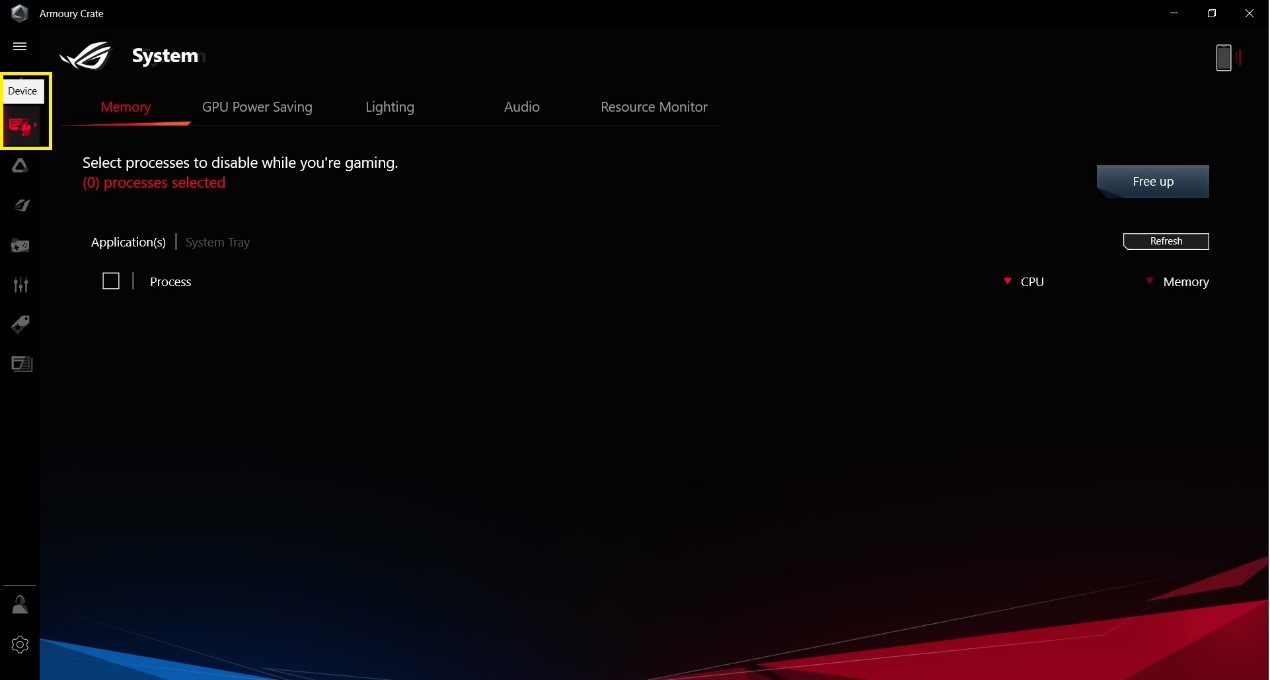
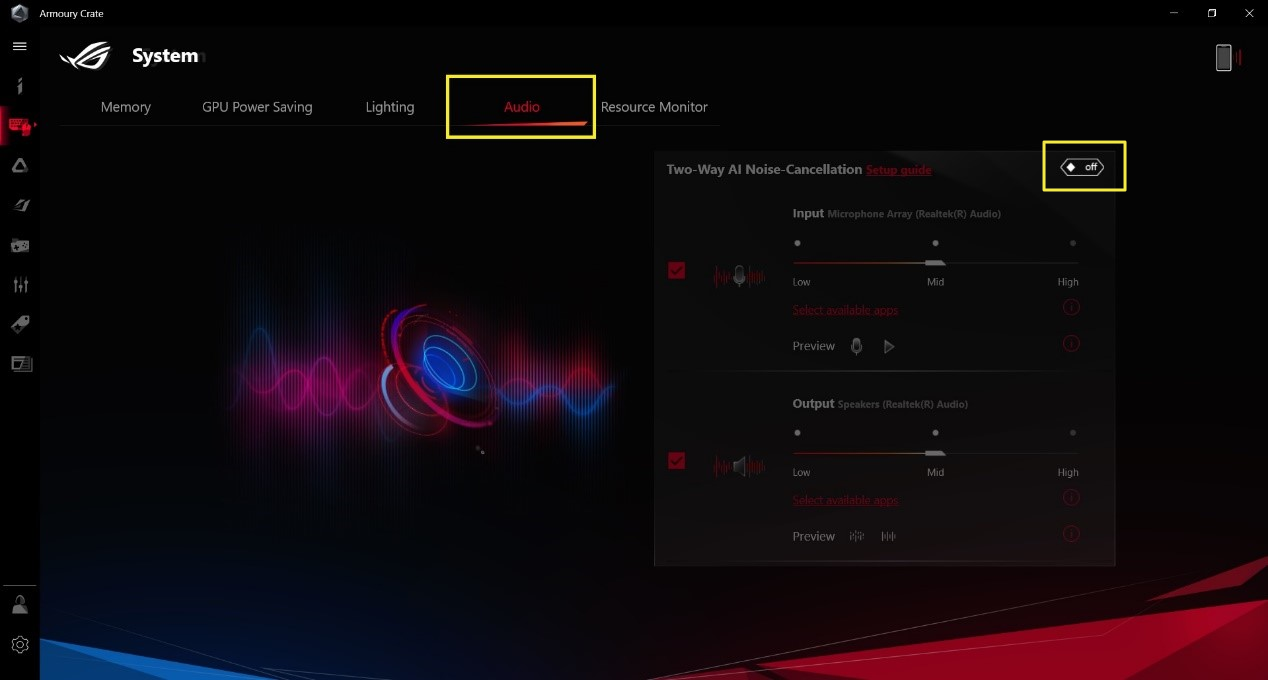
Step 3. Click “Audio”, and turn on Two-Way AI Noise Cancelation.
Step 4. The Realtek Enhance Voice notification will pop out. Please click [OK], and then get into Realtek Audio Console setup page.
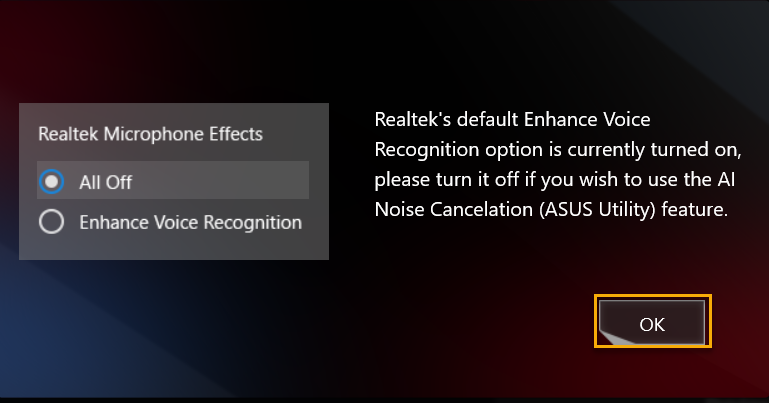
*If Realtek notification doesn't pop out, it means the device is closed or unnecessary to be closed, and then please go to Step 6 to continue.
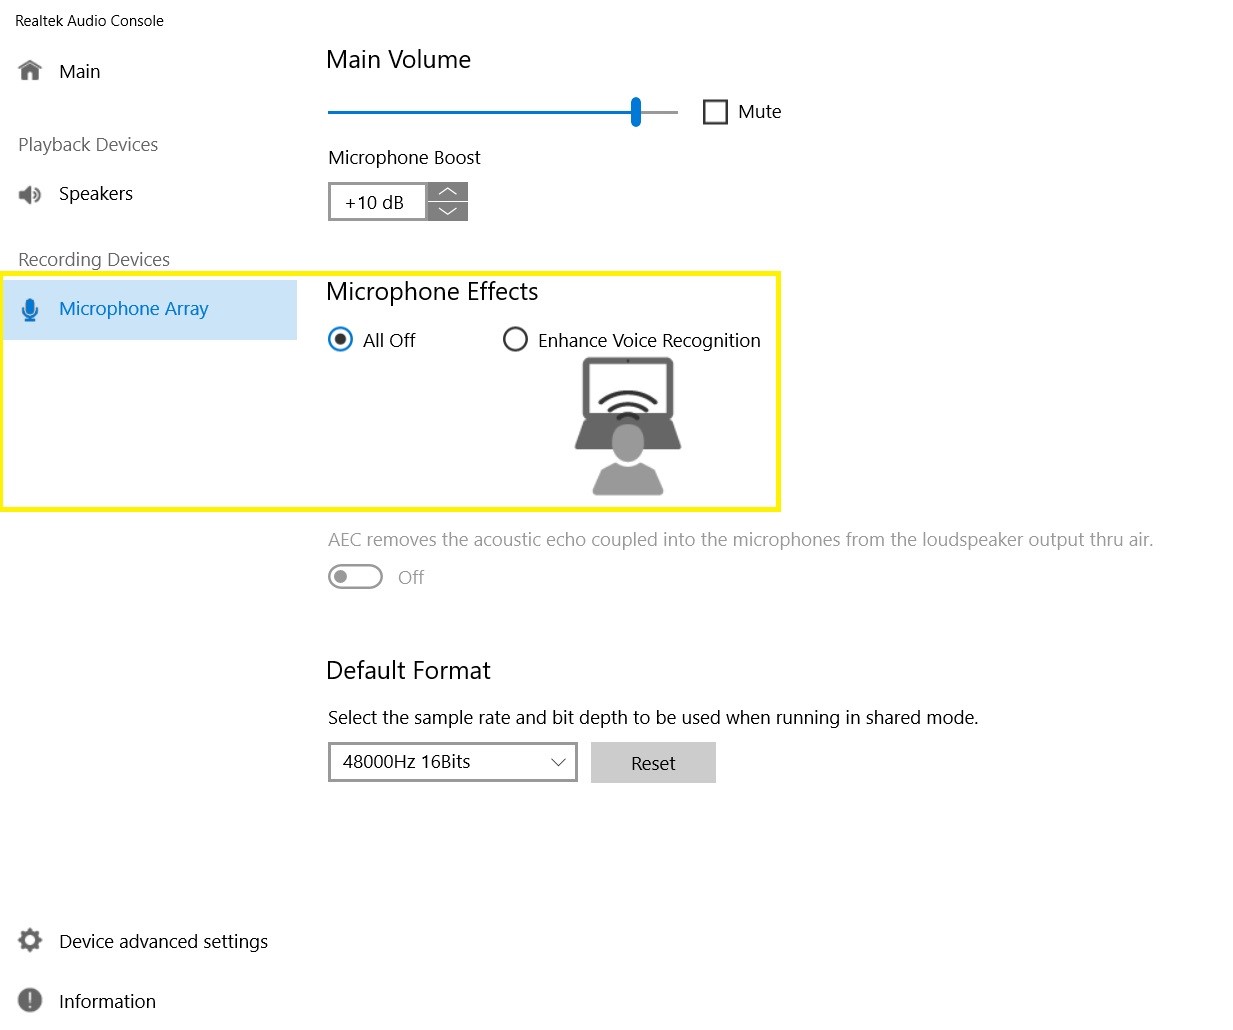
Step 5. Please select [All Off] to turn off the “Realtek Enhance Voice Recognition”, if you wish to use Two-Way AI Noise Cancelation, while Realtek Audio Console screen pop out.
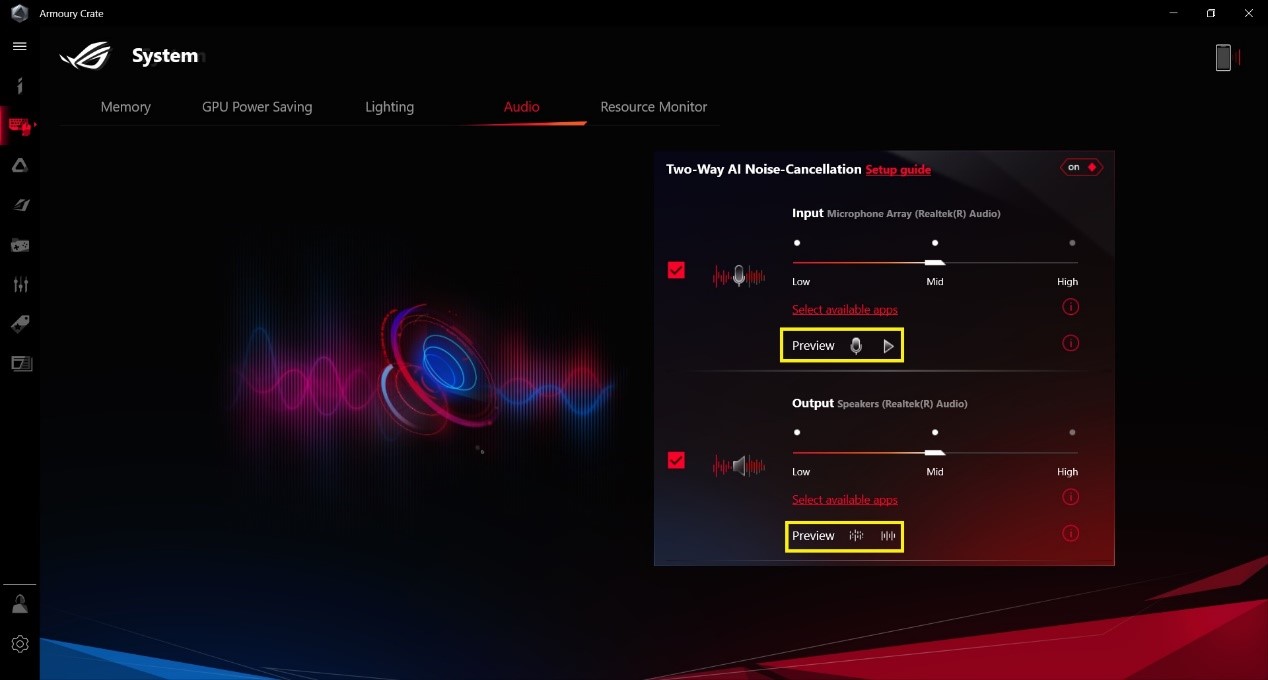
Step 6. Turn on Two-Way AI Noise Cancelation and tick the checkbox to enable/ disable Input& Output solutions. System can detect the device what you’re using automatically.
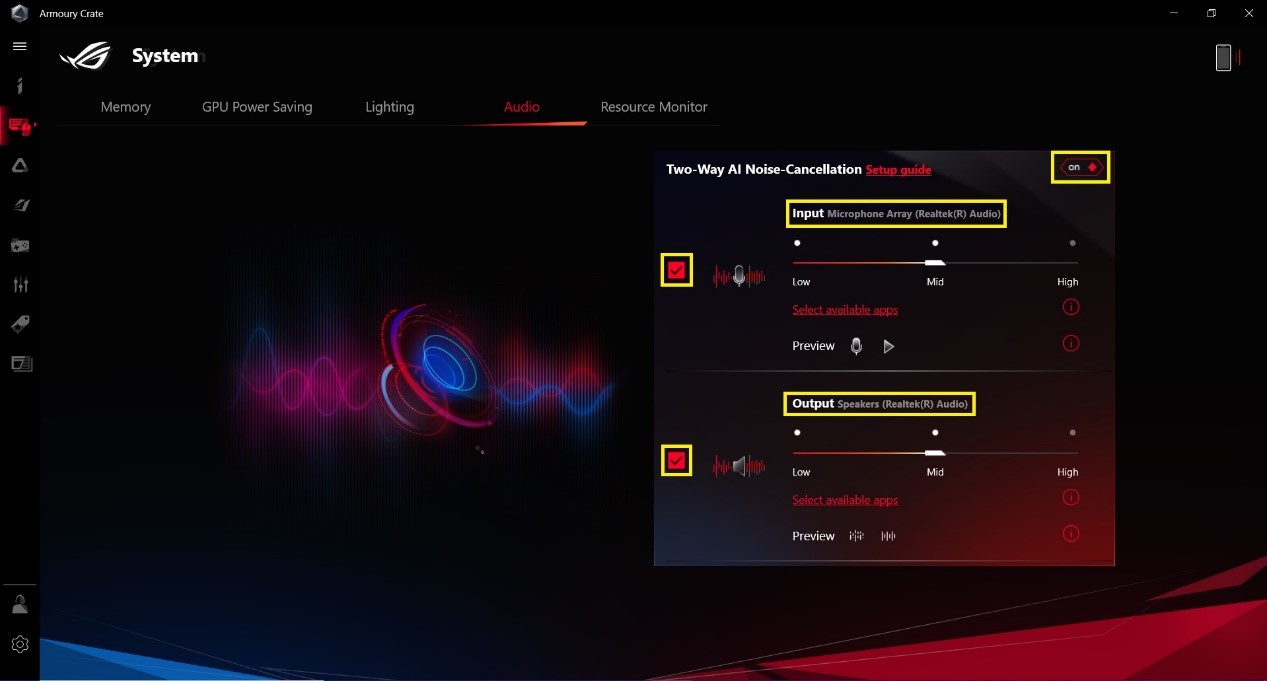
Step 7. Adjust the AI Noise-Cancelling level, depending on the environment you are in.
* For the suggested Noise Type, please refer to the table below.
Level | User scenario | Noise Type |
Low | Slightly disturbed by the background noise during the call | e.g. Keyboard typing, Mouse clicking, Fan sound, Talking sound in the office etc. |
Middle | Interference caused by background noise during the call. User needs to repeat for clear conversation | e.g. Sound of kids playing , Chit-chatting, Background noise in a cafe |
High | Can't hear your voice during the call. The noise has seriously interfered the call. | e.g. Construction works, House renovation, Vacuuming floor, etc. |
Step 8. Continue to set up for the communication or Live streaming apps. For more details, please refer to below common App configuration.
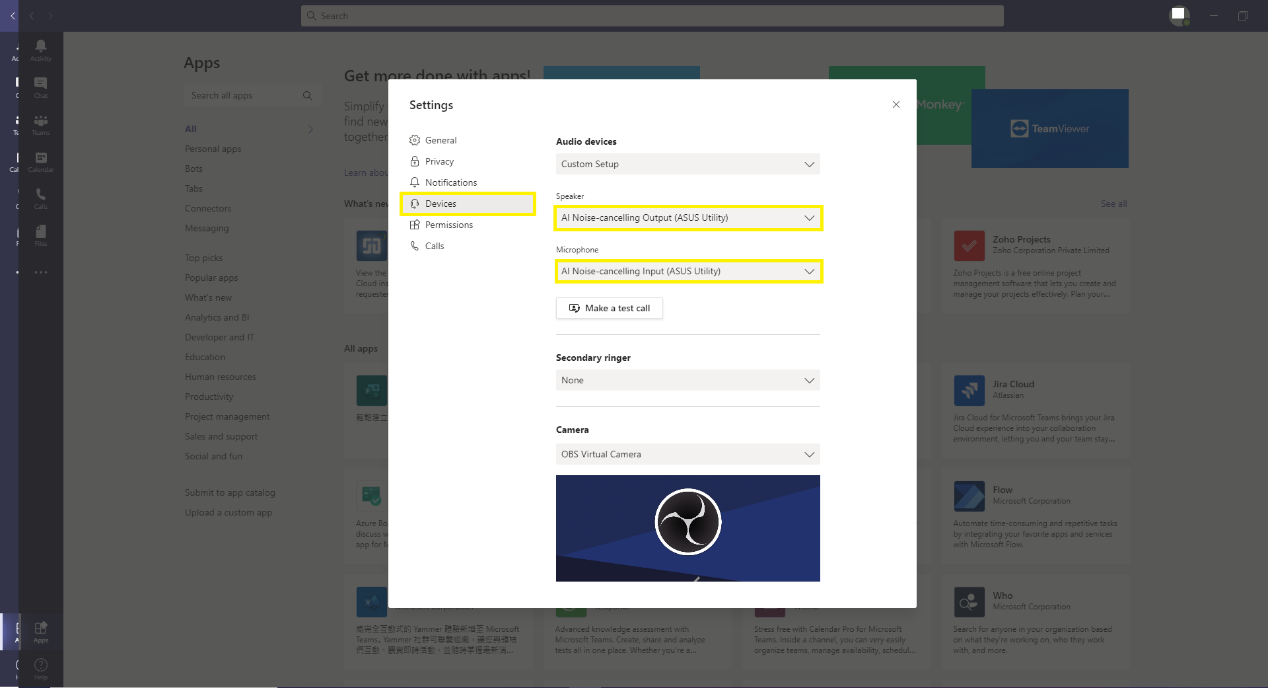
a. Microsoft Teams
Step a1. Click “Settings”.

Step a2. Click “Devices”.
Step a3. Select “AI Noise-Cancelling Input (ASUS Utility)” in the Microphone list and“AI Noise-Cancelling Output (ASUS Utility)” in the Speaker list.
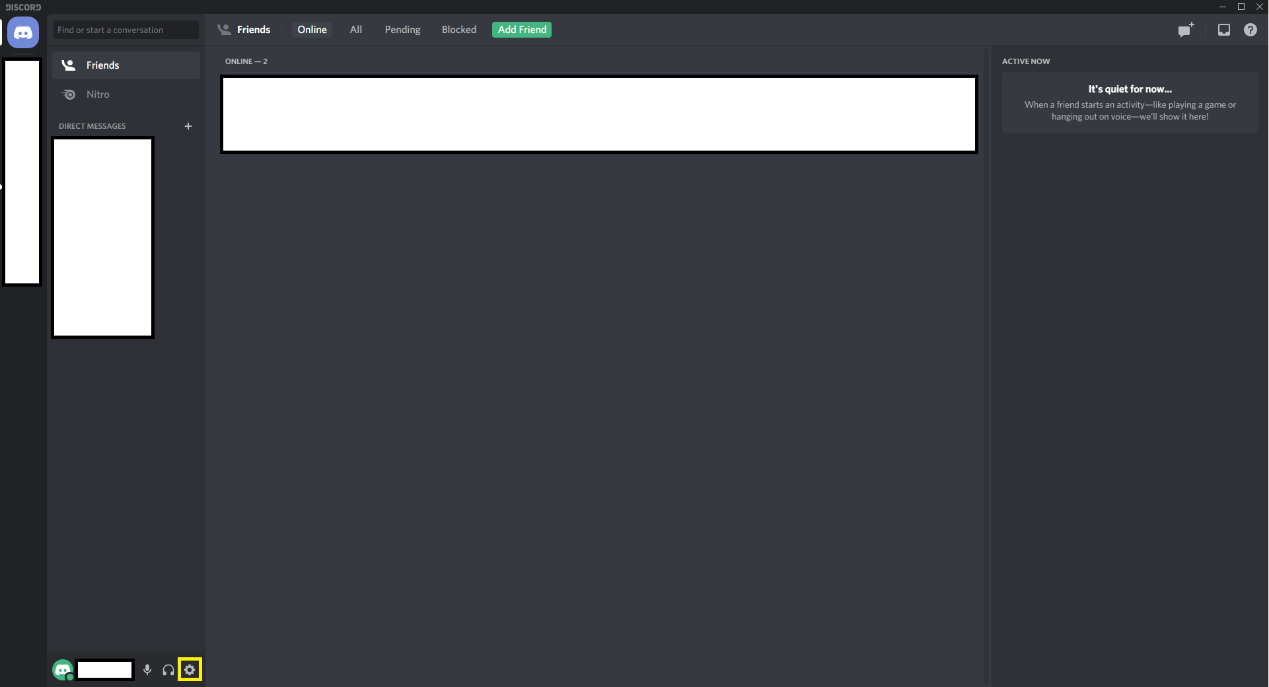
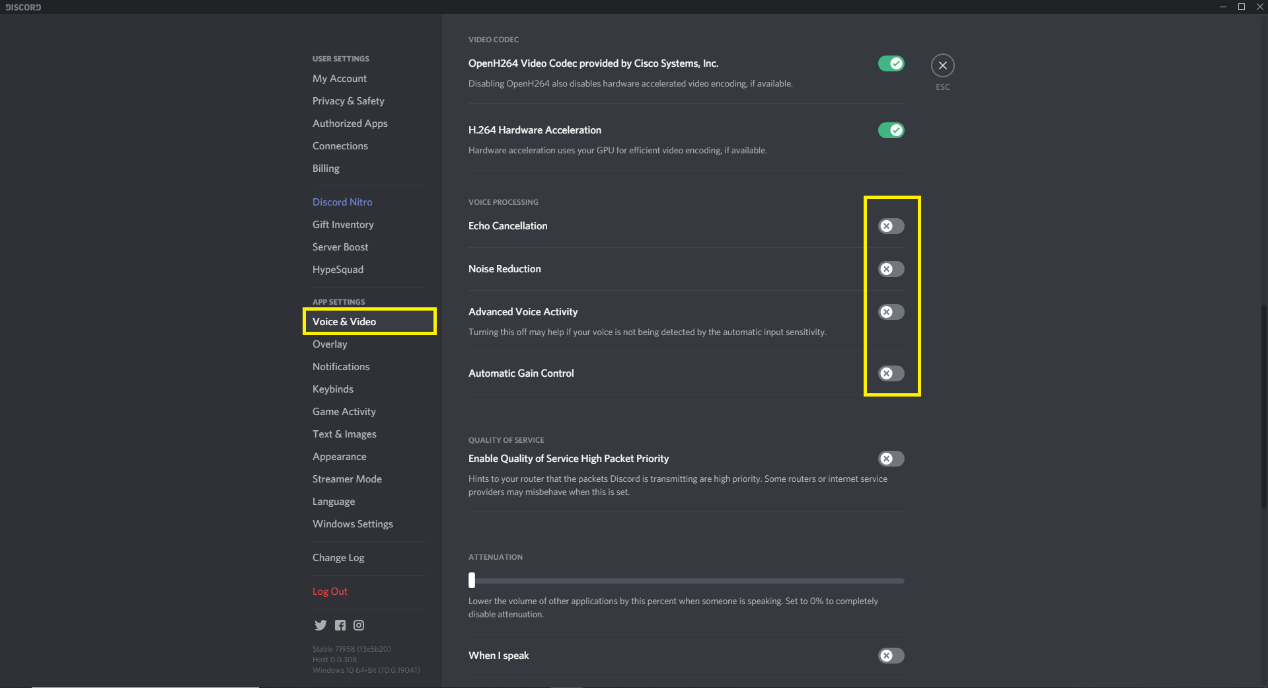
b. Discord
Step b1. Click “Settings”.
Step b2. Click “Voice & Video”.
Step b3. Select “AI Noise-Cancelling Input (ASUS Utility)” in INPUT DEVICE list and “AI Noise-Cancelling Output (ASUS Utility)” in the INPUT DEVICE list.
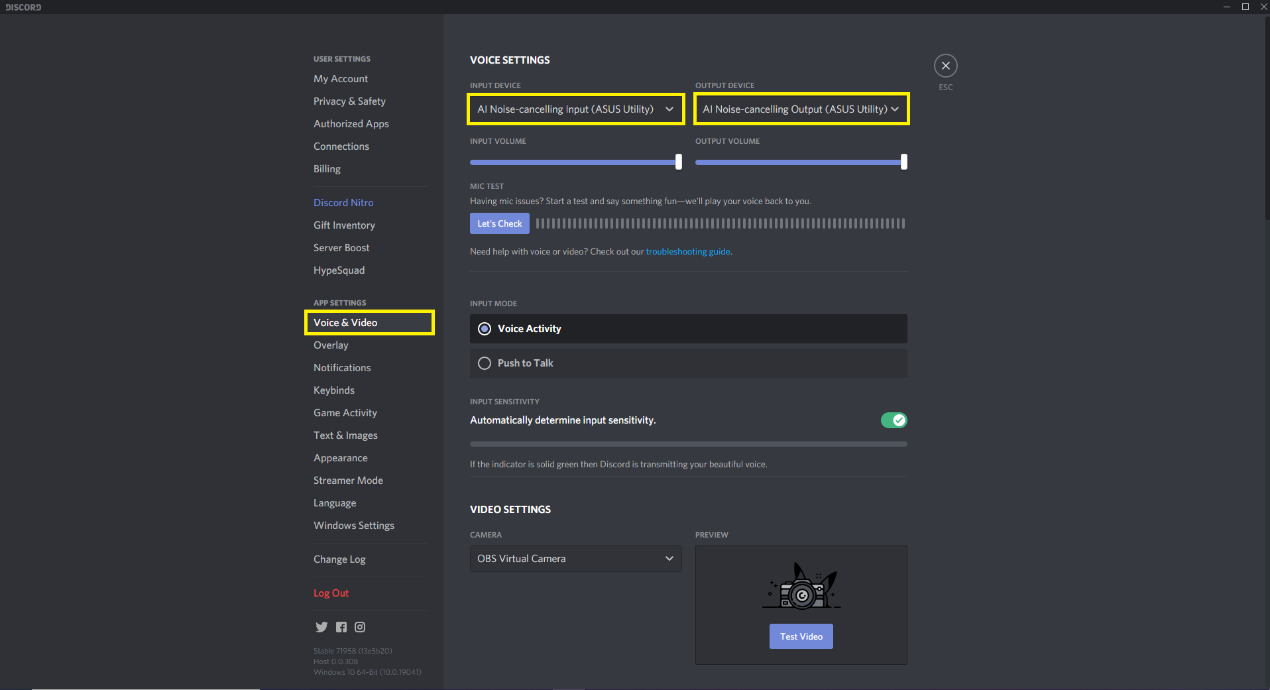
Step b4. For the best quality, make sure that you disable any noise cancelling/removal effects in Discord.
c. Zoom
Step c1. Click “Settings” icon.

Step c2. Click “Audio” tab.
Step c3. Select “AI Noise-Cancelling Input (ASUS Utility)” in the Microphone list and “AI Noise-Cancelling Output (ASUS Utility)” in the Speaker list. 
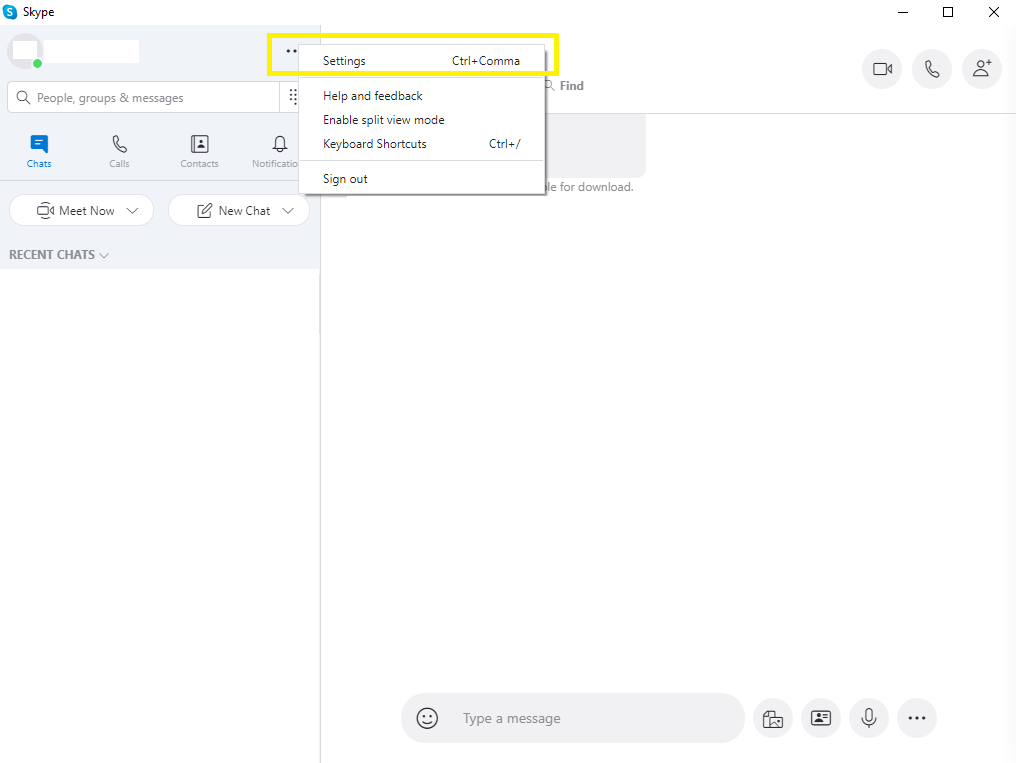
d. Skype
Step d1. Click "Settings".
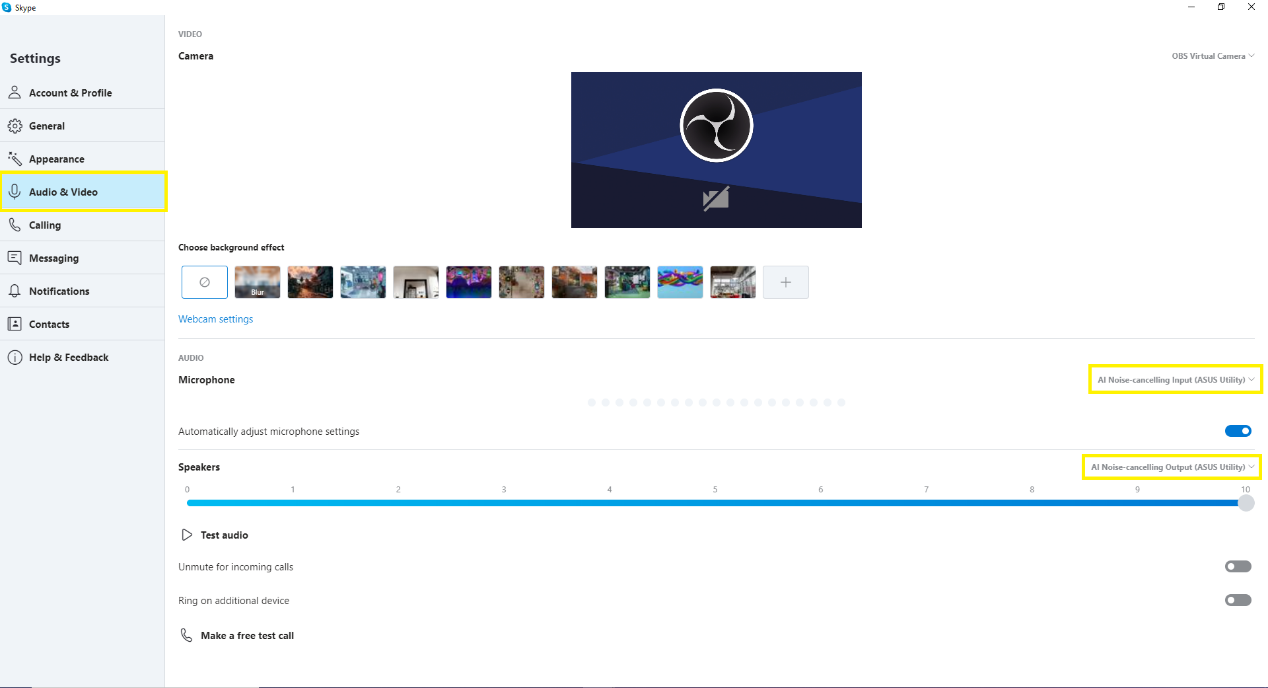
Step d2. Click “Audio & Video”.
Step d3. Select “AI Noise-Cancelling Input (ASUS Utility)” in the Microphone list and “AI Noise-Cancelling Output (ASUS Utility)” in the Speaker list.
Step 9. After the communication or live streaming apps set up completely, you can start to preview the AI Noise Cancelation effect.
Armoury Crate - GameVisual Introduction
Application Install& Uninstall
GameVisual is a screen color management tool that provides a variety of screen color scenarios to bring players the best personal visual experience.
Supports ROG and TUF series Gaming laptop, and equipped with ASUS System Control Interface V2 or above version.
*The feature can only support Laptop built-in display.
The GameVisual utility has been integrated into the Armoury Crate application. Users need to configure the GameVisual settings through the Armoury Crate application.
Supported Version: Armoury Crate application version must be higher than V2.7.13 above, and equipped with ASUS System Control Interface V2 or above version.
*Please refer to Link for more details about Armoury Crate Introduction.
4. Application Install& Uninstall
How to get and install Armoury Crate,please refer to ASUS official website
How to uninstall Armoury Crate,please refer to ASUS official website
5-1 How to start GameVisual
Please type and search [ARMOURY CRATE]① in the Windows Search Box, and then click on [Open]②.
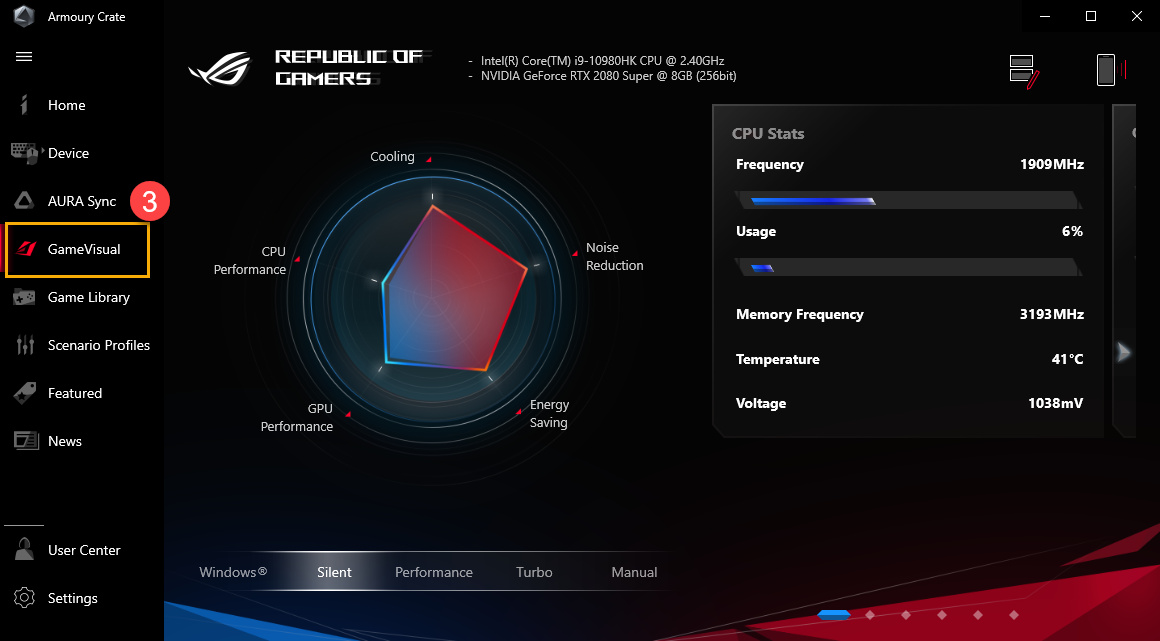
In Armoury Crate homepage, selecting [GameVisual]③ and you will enter GameVisual setting page.
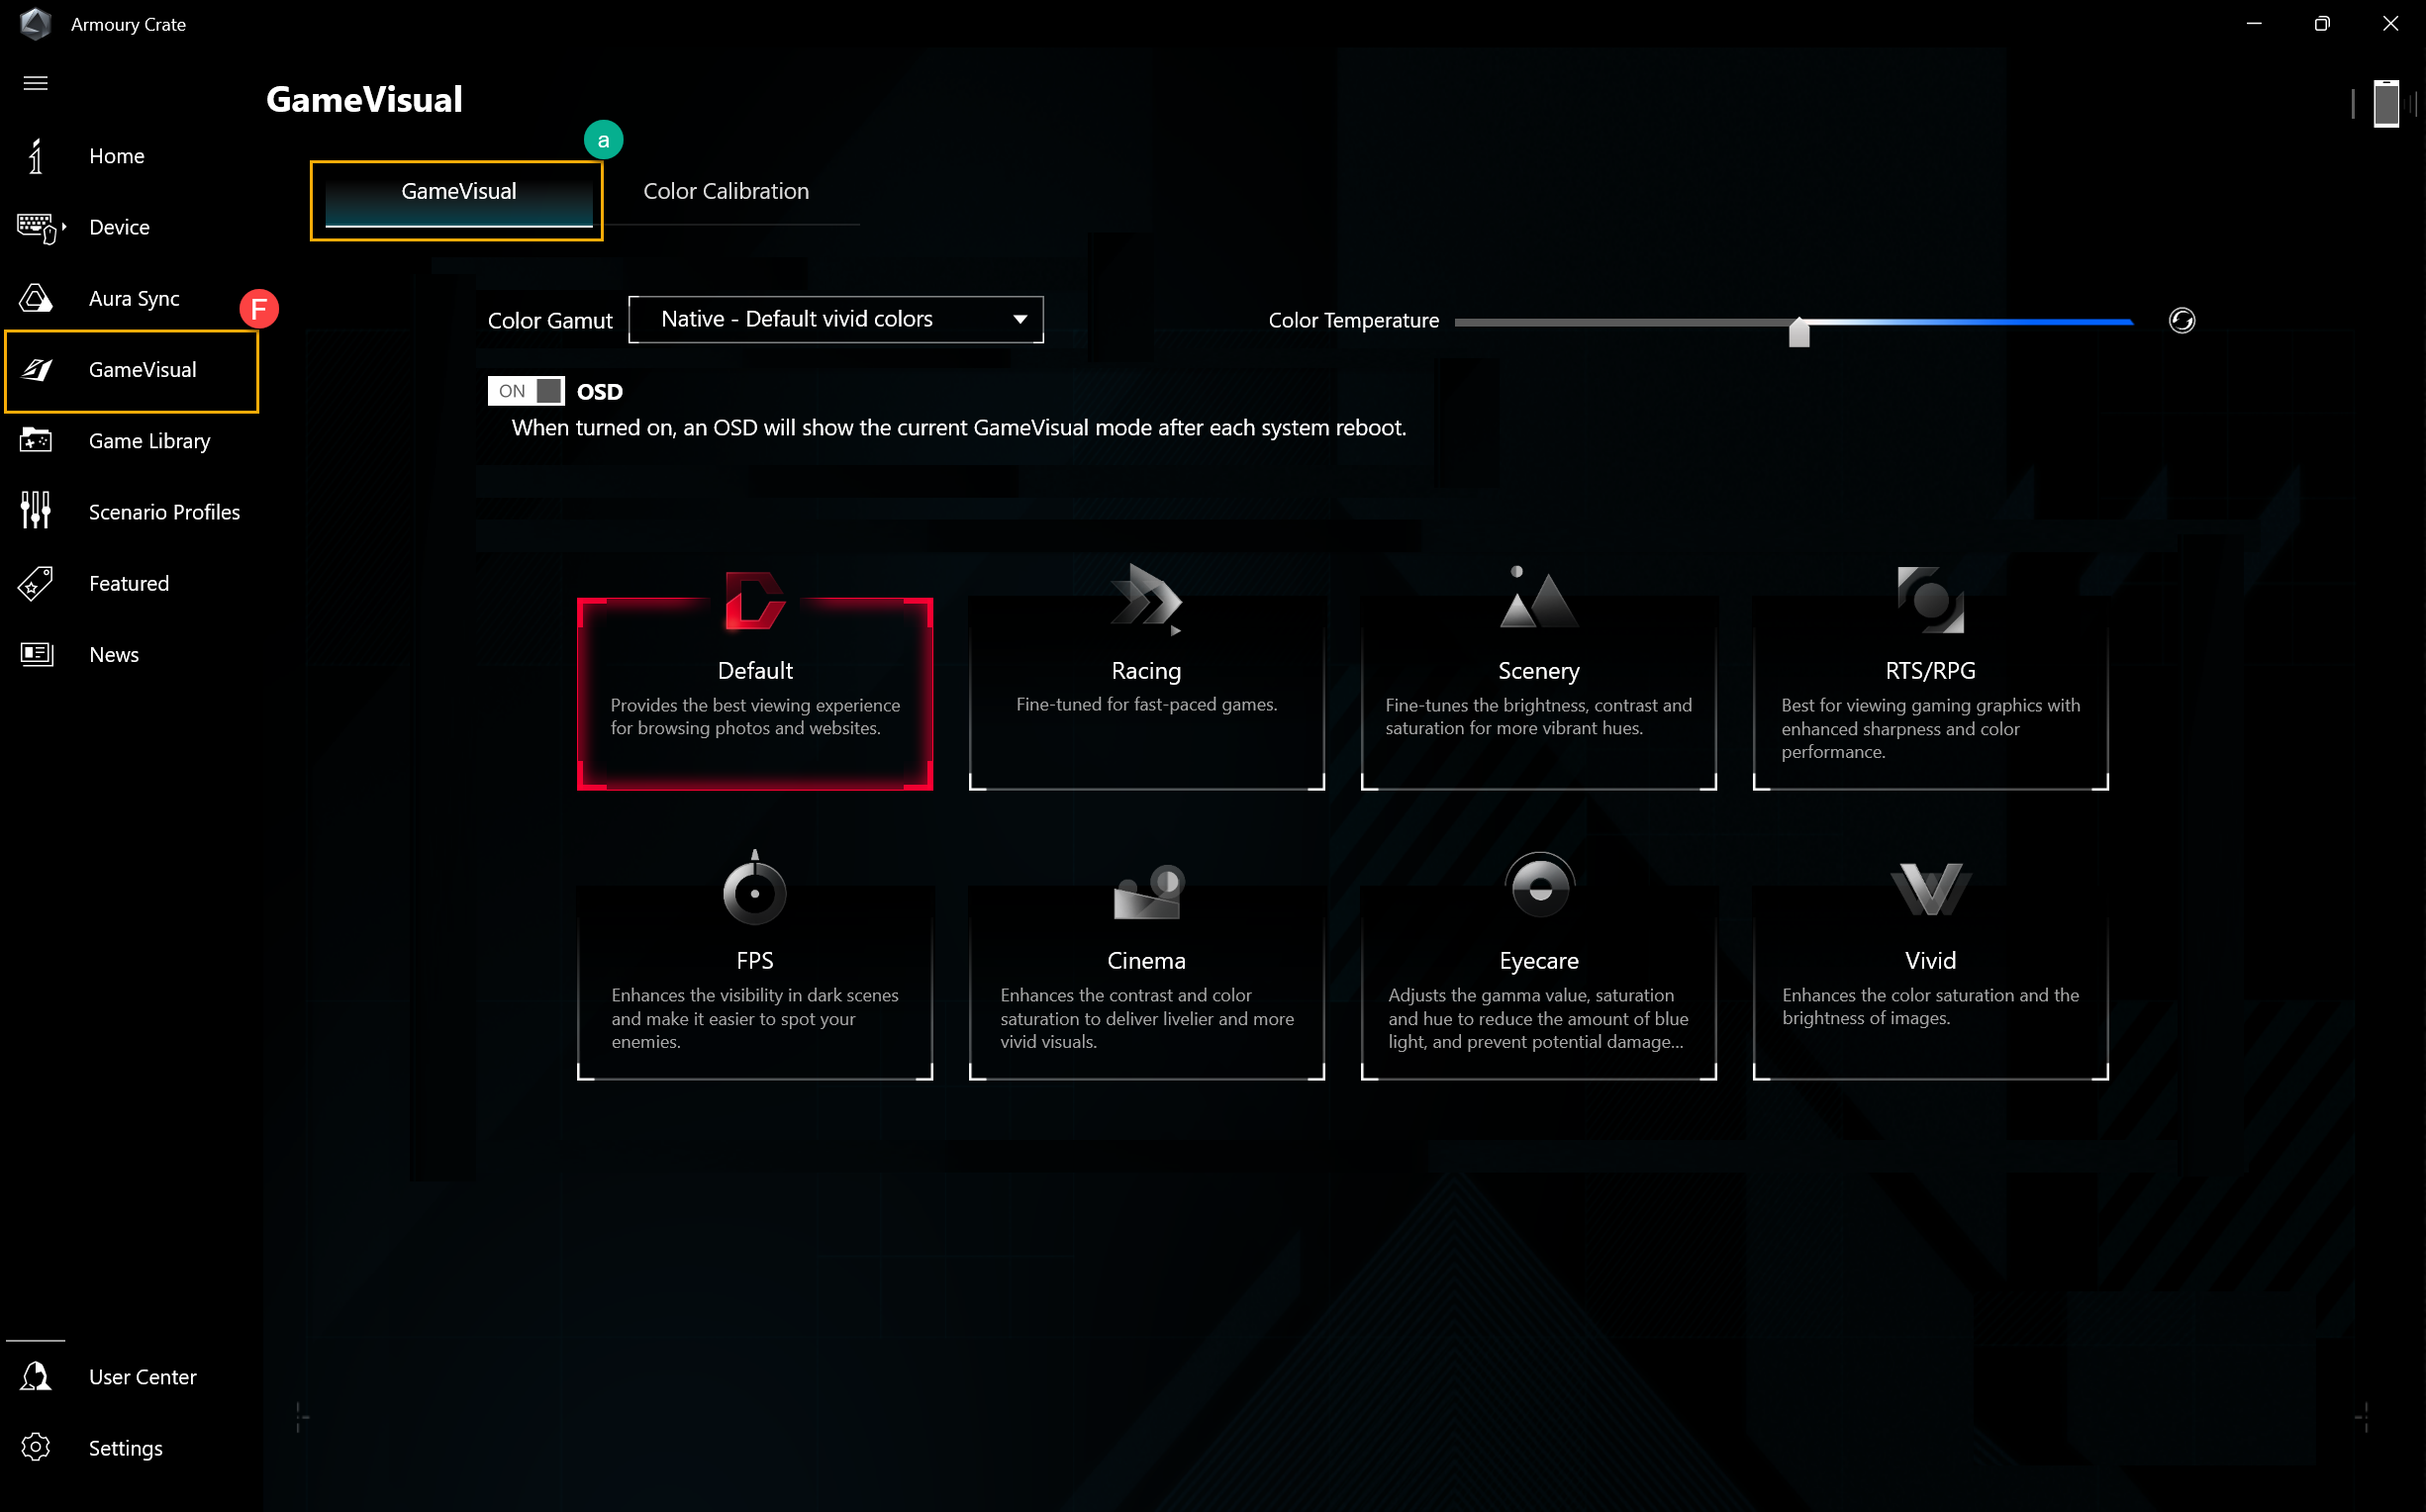
5-2 GameVisual Setting Page
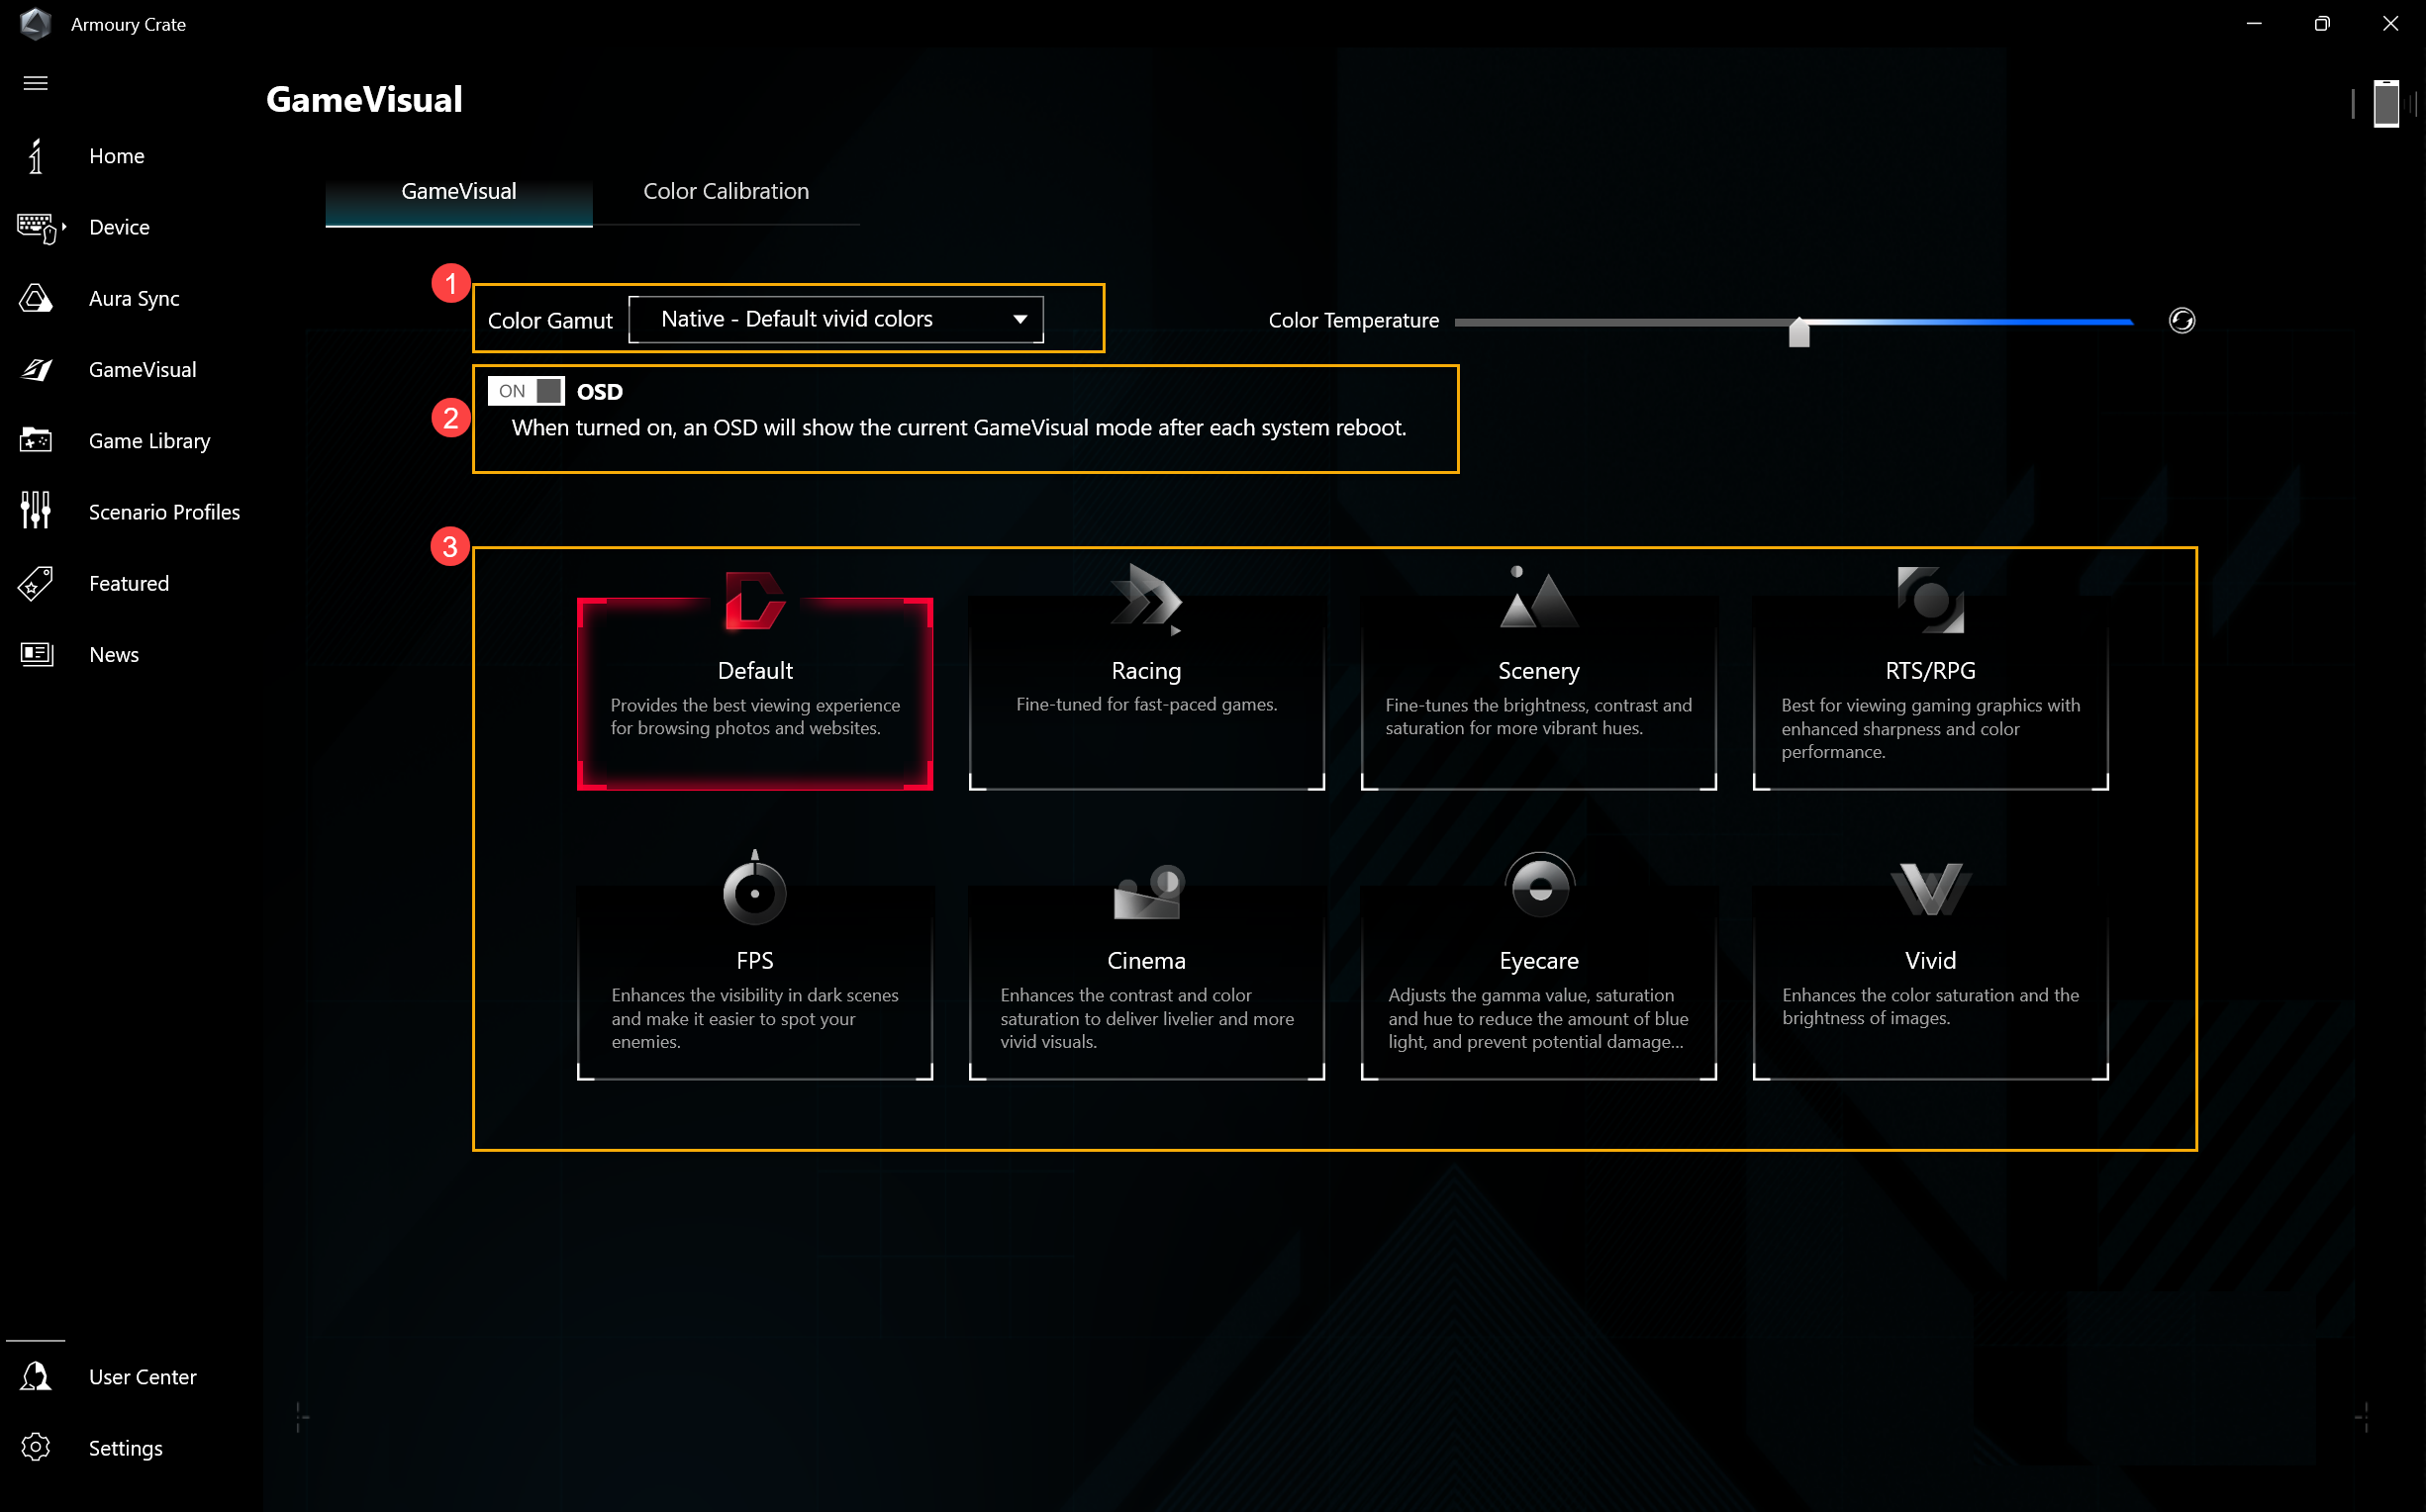
①Color Gamut: Gamer can follow their own preference to select Color Gamut to apply.
②OSD switch: When turn on, an OSD will show the current GameVisual mode after each system reboot.
③GameVisual*: To provide a variety of screen color scenarios for gamer can follow their own preference to select in time.
*GameVisual screen color scenarios
Racing: Fine-tuned for the fast moving gaming applications.
Scenery: By tweaking on the brightness range, the contrast gradations and tuning color saturation for greener land and bluer sea. Scenery mode is the best choice for looking through the scenery photo.
RTS/RPG: It enhances the sharpness and color performance for the best gaming scenes. This is the best choice for Real-Time Strategy and Role-Playing Game.
FPS (First Person Shooter): Enhance your visibility even in the dark scenes so you are able to gain the advantage over your enemies. This is the best choice for First Person Shooter game playing.
Cinema: Enhance the contrast and color saturation of the image. It also delivers more vivid visuals. This is the best choice for video watching.
Eyecare: Change the Gamma、Saturation and Hue to reduce the amount of Blue light to avoid the potential for retinal injury.
Vivid: Gain the color saturation and brightness when Vivid mode is activated.
Through GameVisual Color Calibration and color calibrator (X-Rite i1Display Pro), it can provide gamers for a basic calibration with high level of color accuracy on ROG gaming laptop screen.
The Color Calibration function can only support X-Rite i1Display Pro. Please refer to X-Rite website for more information about i1Display Pro Overview& Video、Support and User Guides.
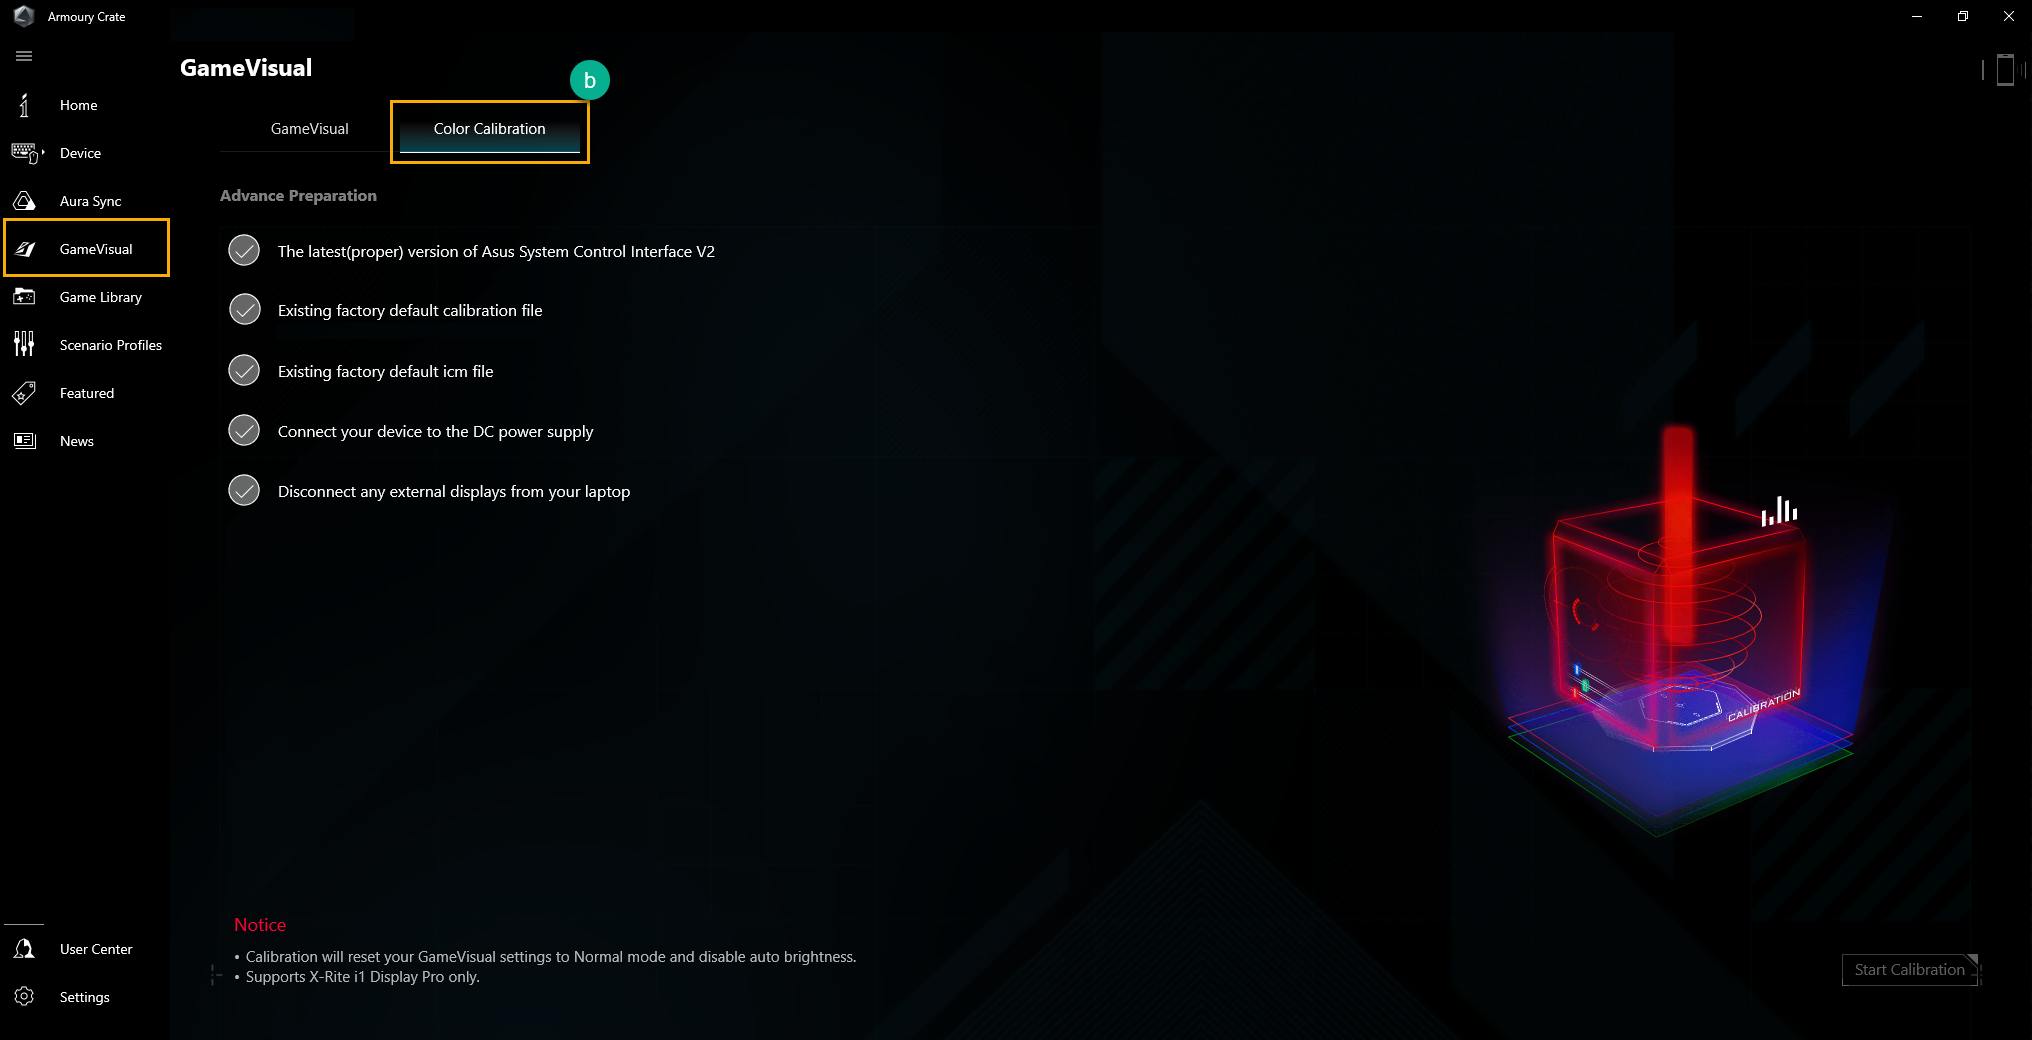
6-1 Launch Color Calibration
In Armoury Crate homepage, selecting [GameVisual]① and then [Color Calibration]② get into operation page.
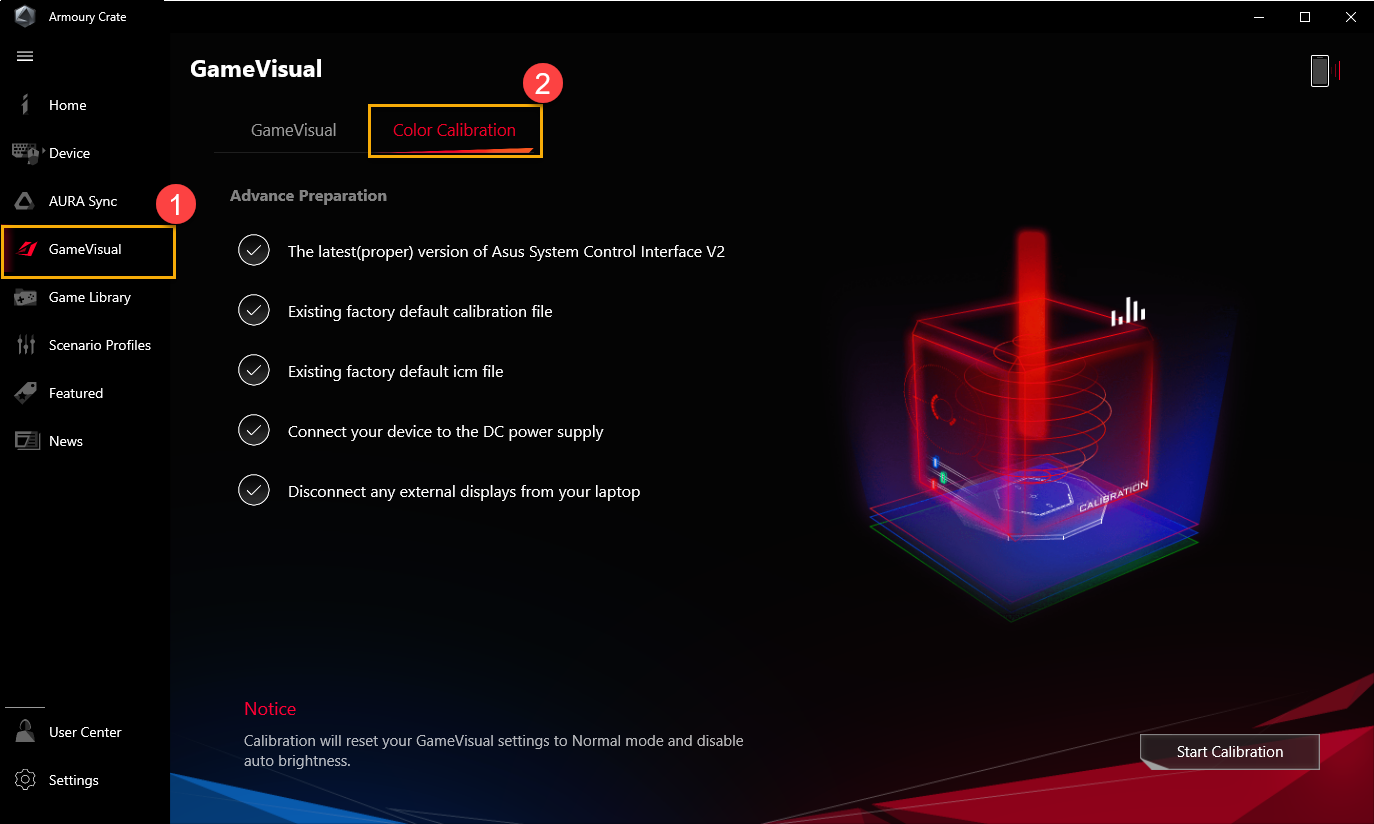
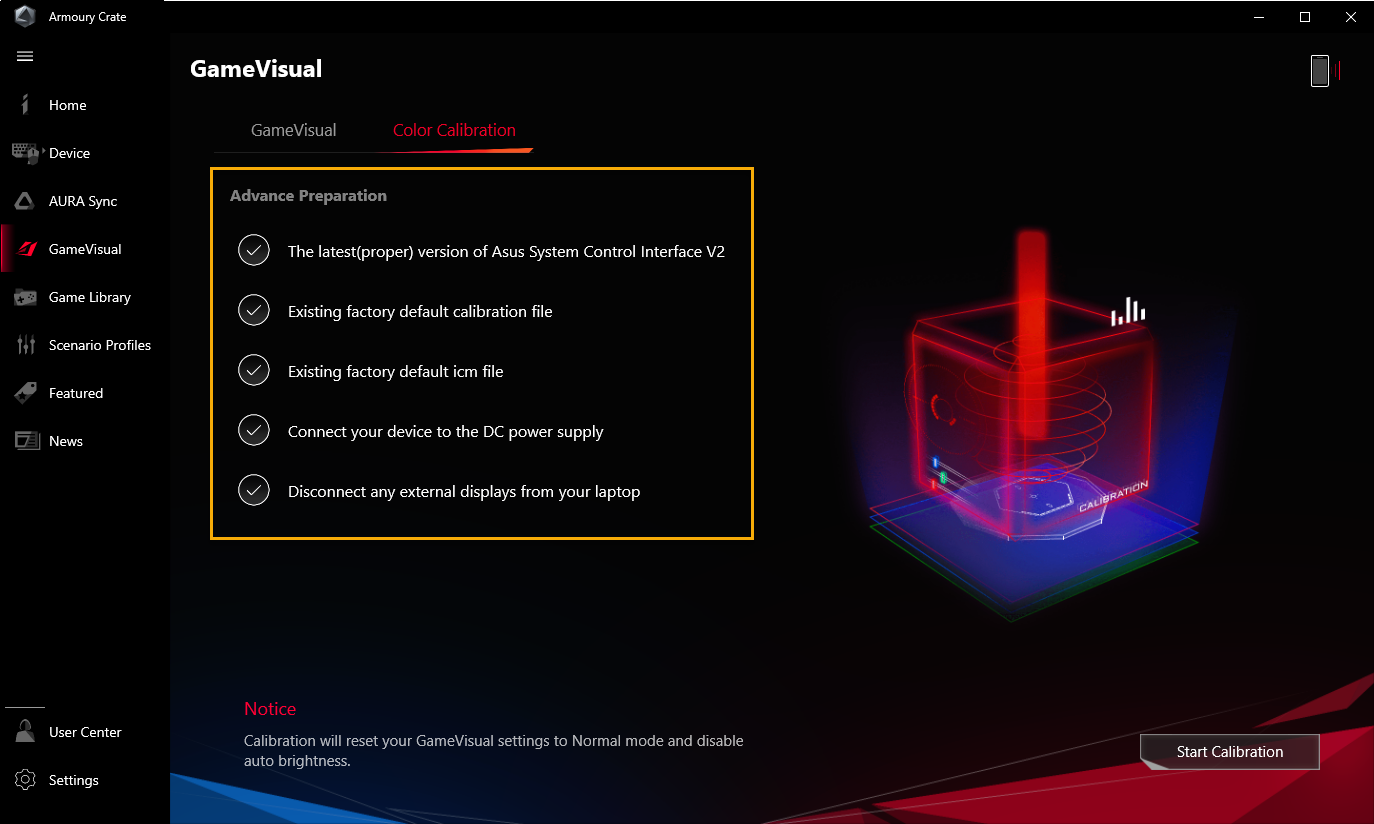
6-2 Advance Preparation
At Color Calibration homepage, the system will automatically check all Advance Preparation items before start calibration. When the condition is met, a white check mark  is displayed, and a red exclamation mark
  will appear for items that do not meet the requirements. If there is a red exclamation mark in Advance Preparation, please refer to Q&A 4.
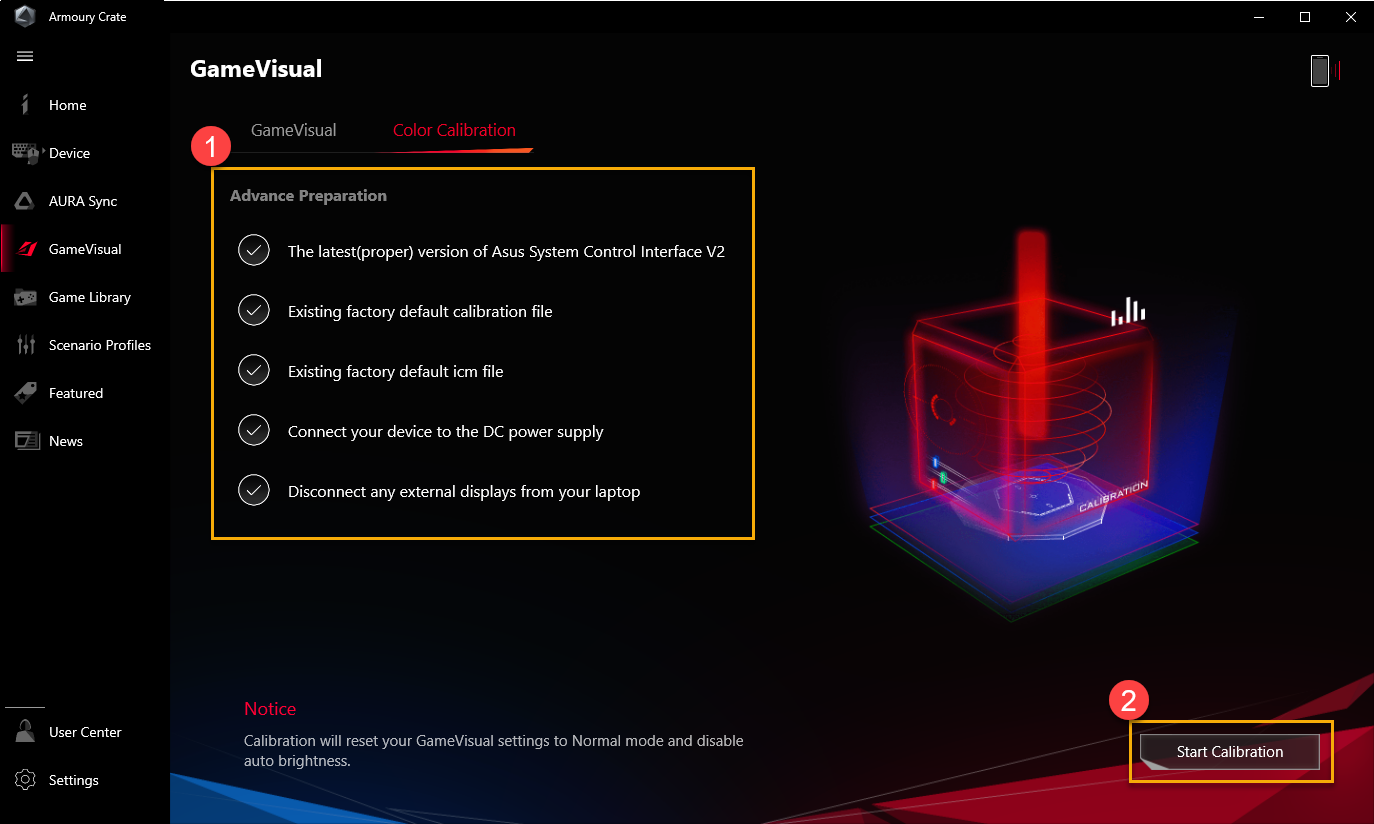
6-3 Start Color Calibration
Please confirm all Advance Preparation① are with the white check mark  , and then you are allowed to click [Start Calibration]②.
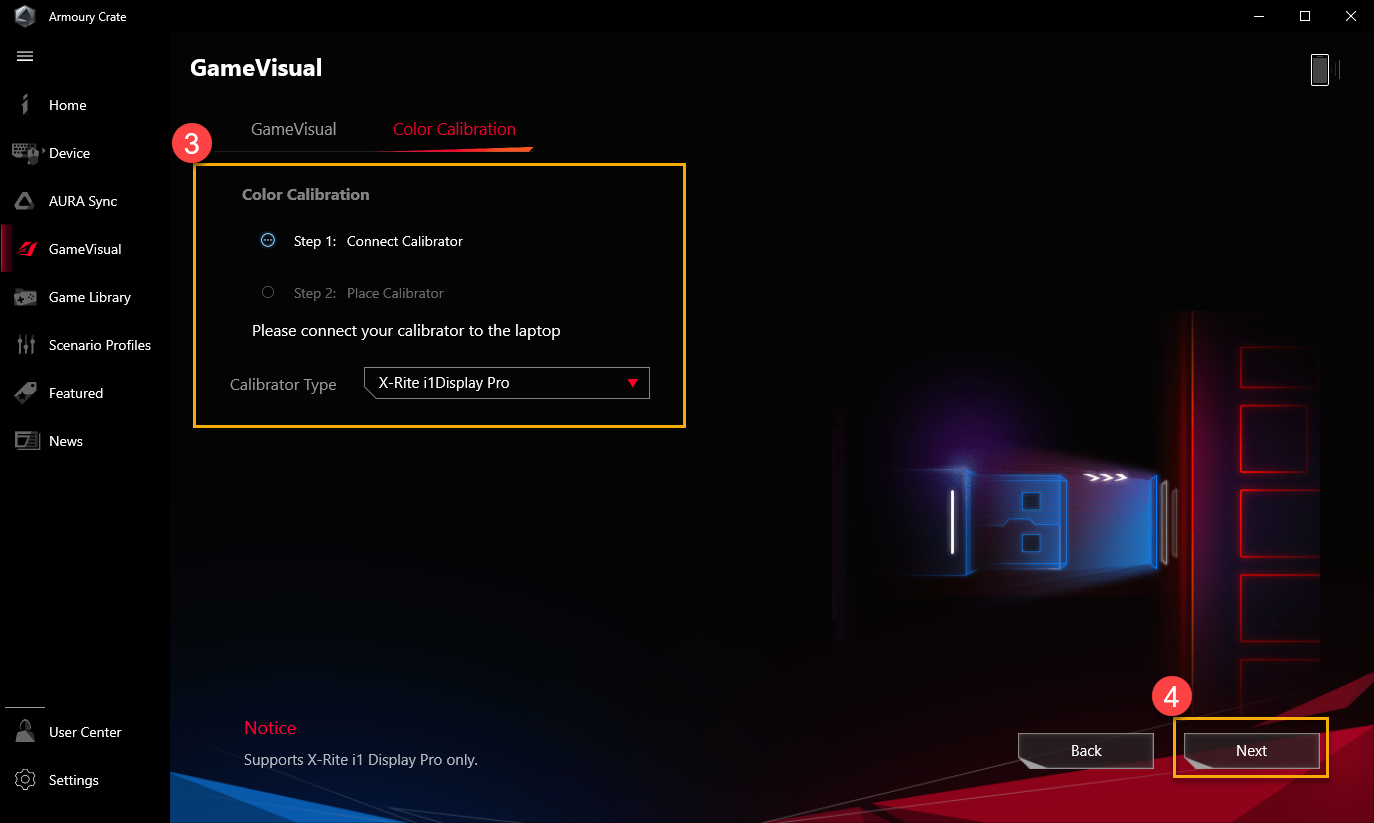
Connect calibrator (X-Rite i1Display Pro)③ to your laptop's USB port, and then click [Next]④.
Please follow the instruction to turn on the measuring lens of the color calibrator (X-Rite i1Display Pro) and place it tightly in the red circle⑤ on the screen, and click [Next]⑥ to start color calibration.
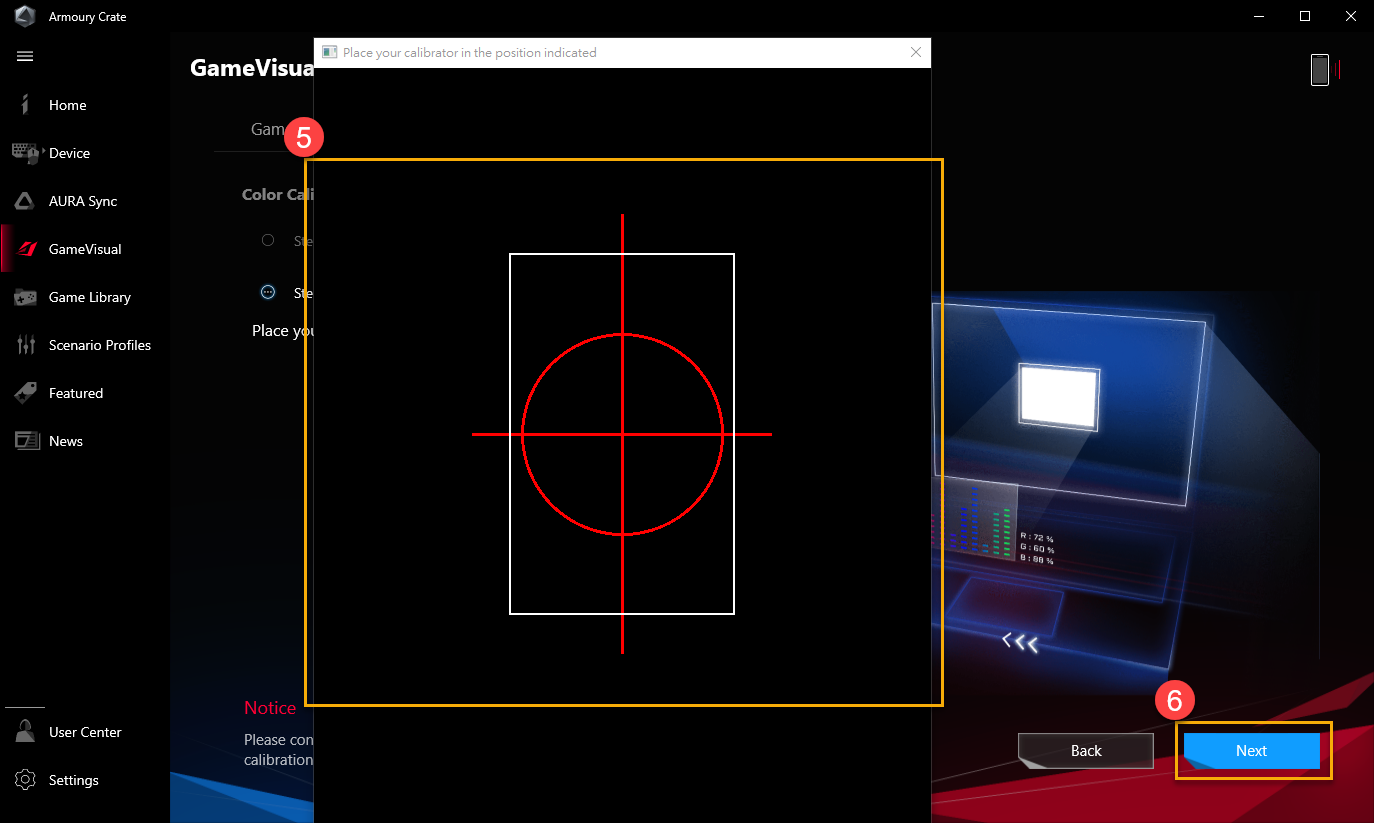
During color calibration, the screen will continue to change colors and flashing. After completion, the color calibration result will be showed in Color Calibration Report.
6-4 Color Calibration Report
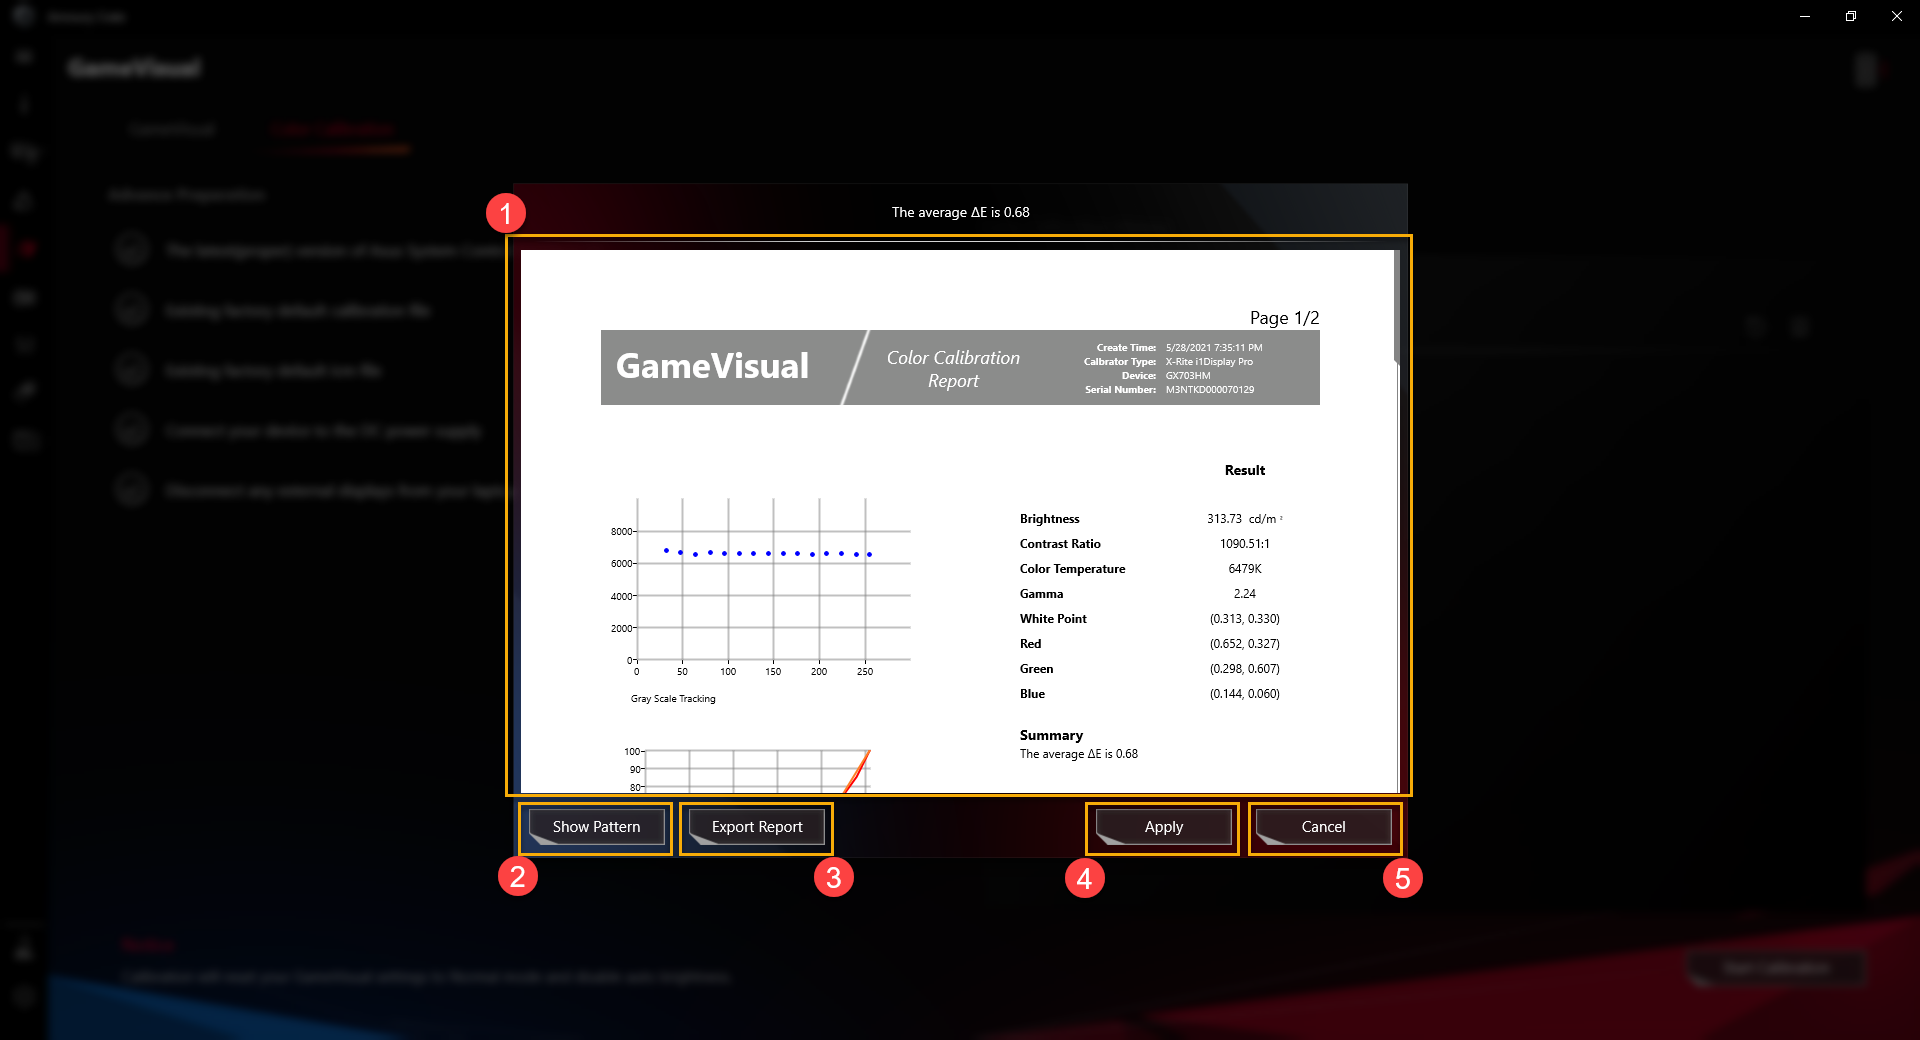
①Color Calibration Report: Through the color calibration report, gamers can review the calibration result.
②Show Pattern: Clicking [Show Pattern], gamers can look through the image to see the difference between Before and After correction on display.
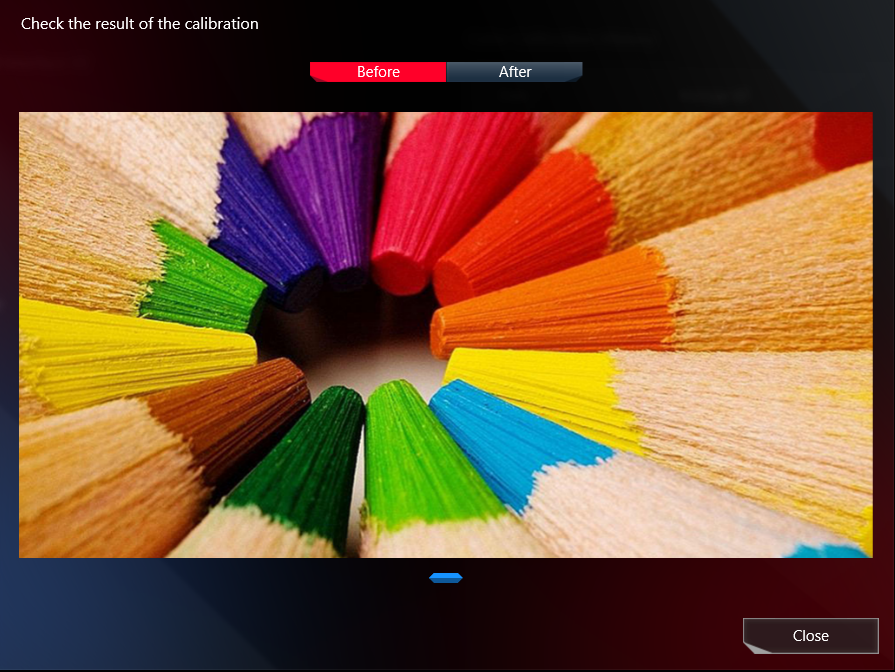
③Export Report: Clicking [Export Report] to export and save the calibration result file.
④Apply: Clicking [Apply] to apply the current calibration result.
⑤Close: Back to the Color Calibration homepage.
Q1: What is Color Temperature?
A1: Color temperature is a phenomenon that describes light's temperature changing, and the light's color will also change accordingly. It can also be simply understood as "the change in color temperature of light". The user can change the color temperature through the setting bar in the page below.
* Except Eyecare mode, you can fine-tune the screen Color Temperature for each screen color mode.
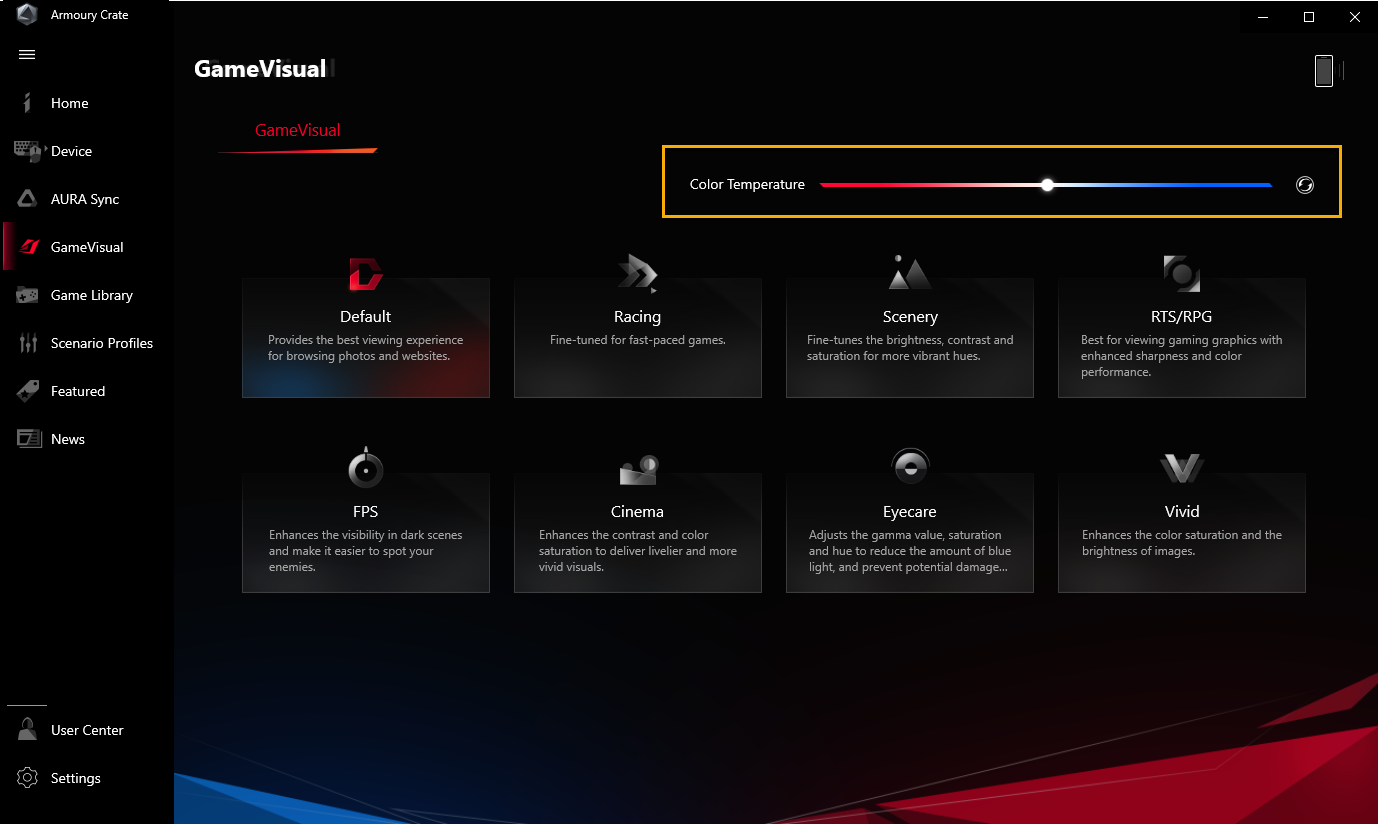
Q2: Can I install GameVisual individually?
A2: Once your device is with ASUS system control interface V2 installed, the GameVisual utility will be integrated into the Armoury Crate application, and you can install and setup GameVisual through Armoury Crate application only.
Q3: How can I use Keyboard shortcuts to switch GameVisual mode?
A3: Gamers can use  to switch GameVisual mode.
Q4: How should I do when Advance Preparation appears a red exclamation mark  ?
?
A4:
*The latest (proper) version of ASUS System Control Interface V2: Please update the latest ASUS System Control Interface V2 version, and refer to [How to check and update the version of MyASUS and ASUS System Control Interface].
*Existing factory default calibration file: It is a factory default. If there is a red exclamation mark appears, please contact ASUS service center for support.
*Existing factory default ICM file: It is a factory default. If there is a red exclamation mark appears, please contact ASUS service center for support.
*Connect your device to the DC power supply: Please check whether your device connect DC power supply, or refer to [Laptop Frequently Asked Question].
*Disconnect any external displays from your laptop: Please check whether disconnect all external displays from your laptop.
ROG XG Mobile instruction Guide
Application Install& Uninstall
Home Page Information and Setup
The ROG XG Mobile reinvents external graphics by combining performance and versatility with true portability. Multi-function I/O hub and ASUS exclusive ROG XG Mobile interface which direct PCIe® 3.0 x8 connection to CPU for bring higher bandwidth. With an integrated 280-330W adapter that powers the ROG XG Mobile and laptop simultaneously. Combined with the XG Mobile’s space-saving standing design, this airflow-optimized cooling system enables more power in a super small form factor. The XG Mobile provides a desktop-class experience wherever you go.

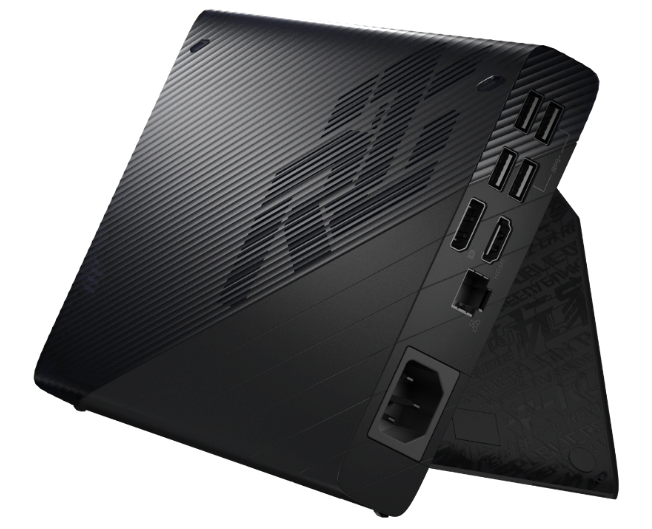
ROG XG Mobile (GC31/GC32) supports ROG Flow X13 and ROG Flow Z13 series of gaming laptop.
*For more details, please refer to the ASUS ROG Official Website.
The ROG XG Mobile setup has been integrated into the Armoury Crate Application. Users need to configure ROG XG Mobile settings through the Armoury Crate application, and Armoury Crate application version must be higher than V3.4.x above.
*Armoury Crate Application will automatically update itself to the latest version after user installed.
Application Install& Uninstall
To get the application program and install, please refer to ASUS official website.
To uninstall application program, please refer to ASUS official website.
※Installation Step
1. Plug in ROG XG Mobile connector.
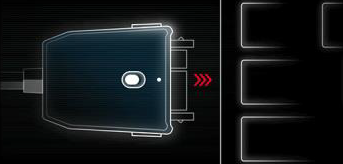
2. Push the lock switch on the connector to lock it.

3. Click OK to launch connection.

4. After the activation process is complete, the connector status indicator will turn to Red, and then connection complete.
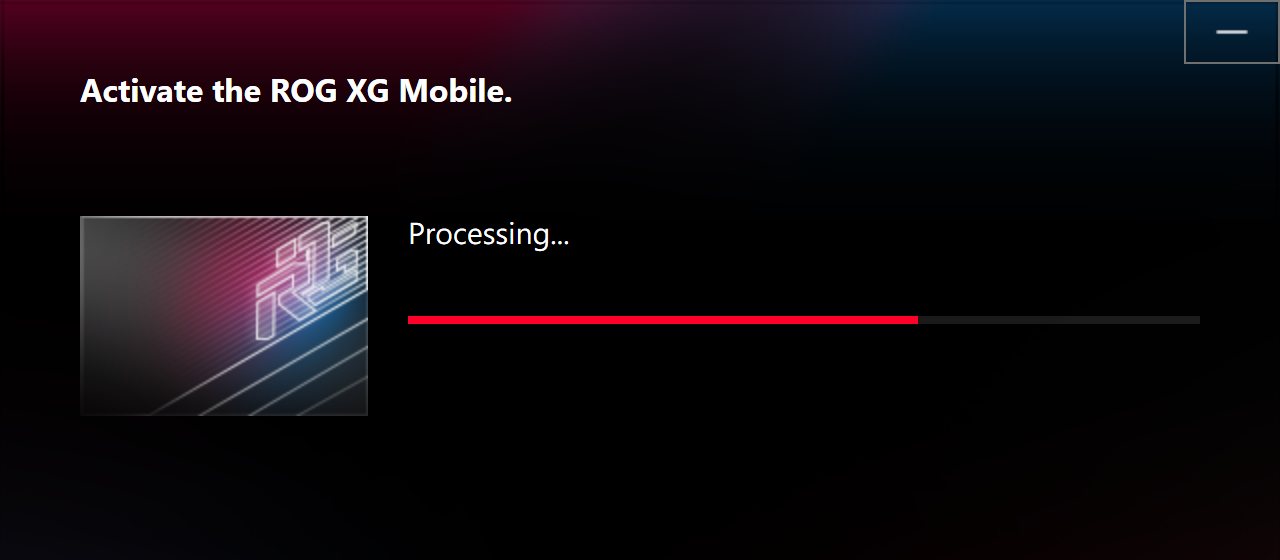
※Uninstallation Step
1. Click ROG XG Mobile icon  in Windows® desktop lower right corner taskbar.
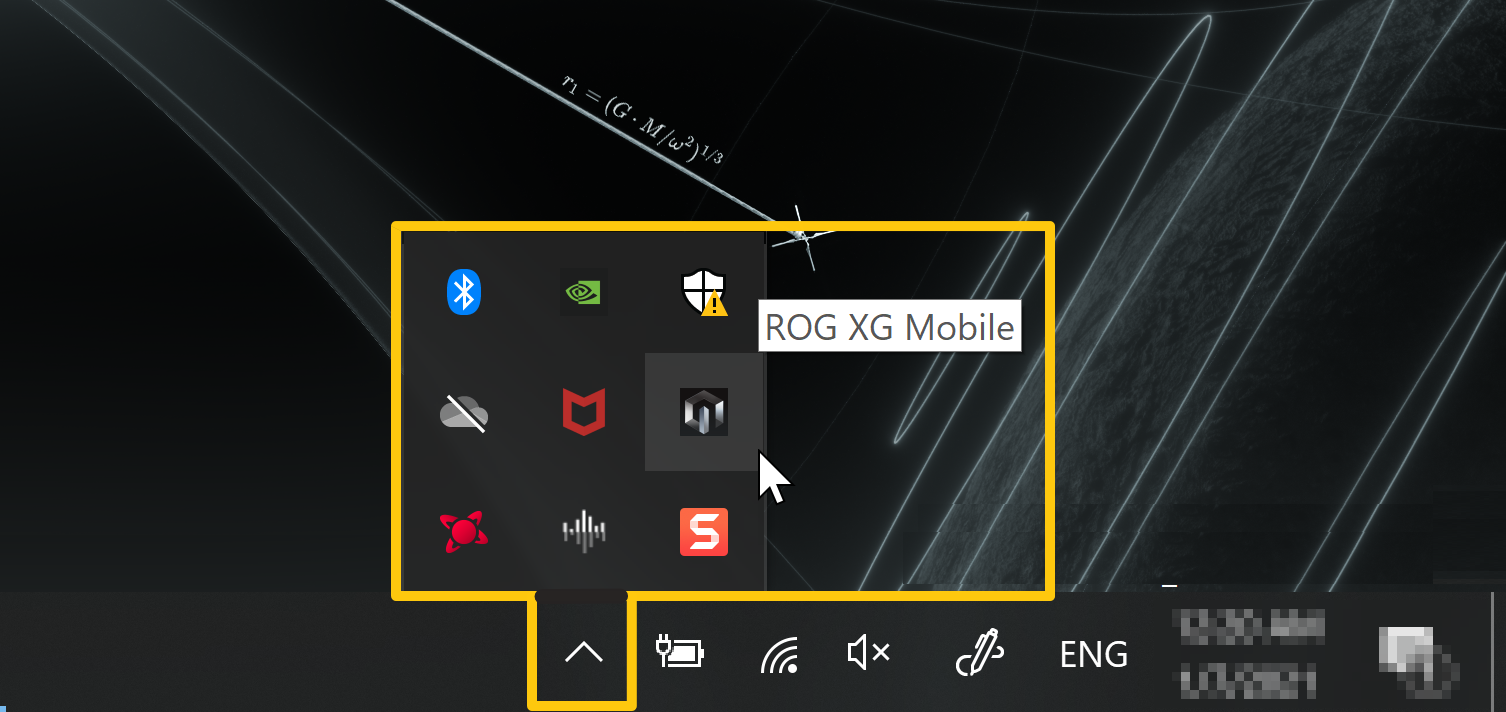
2. Click OK to disconnect.
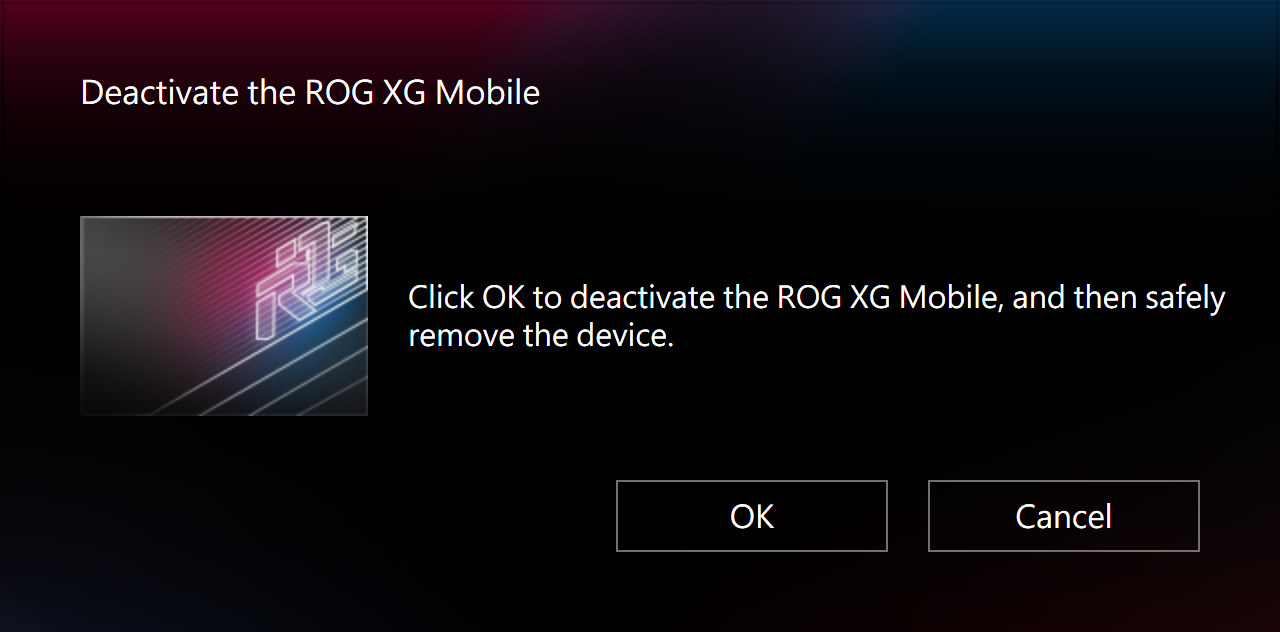
3. Wait for the deactivation to finish.

4. When the connector status indicator turn to White, you can push the lock switch to unlock and then remove the connector.
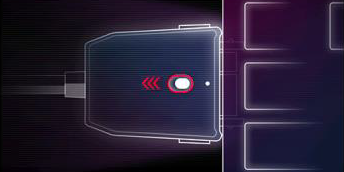
*If remove ROG XG Mobile connector incorrectly, it might cause unsaved data loss.
Home Page Information and Setup
When installing and launching ROG XG Mobile, gamers have to setup and confirm the following information thru the Armoury Crate application.
*Please refer to Armoury Crate Introduction for more details.
①Operating Mode: To select “Manual”(A) Mode and “ROG XG Mobile”(B), gamers can adjust Base Clock and Memory Clock frequency according to own needs. The FanCurve (C) can help gamers to adjust fan speed manually.
②Fan Speed: Gamers can check ROG XG Mobile fan and acoustics.
③System Configuration: Gamers can on/off XG Mobile LED light thru button “XG Mobile LED”.
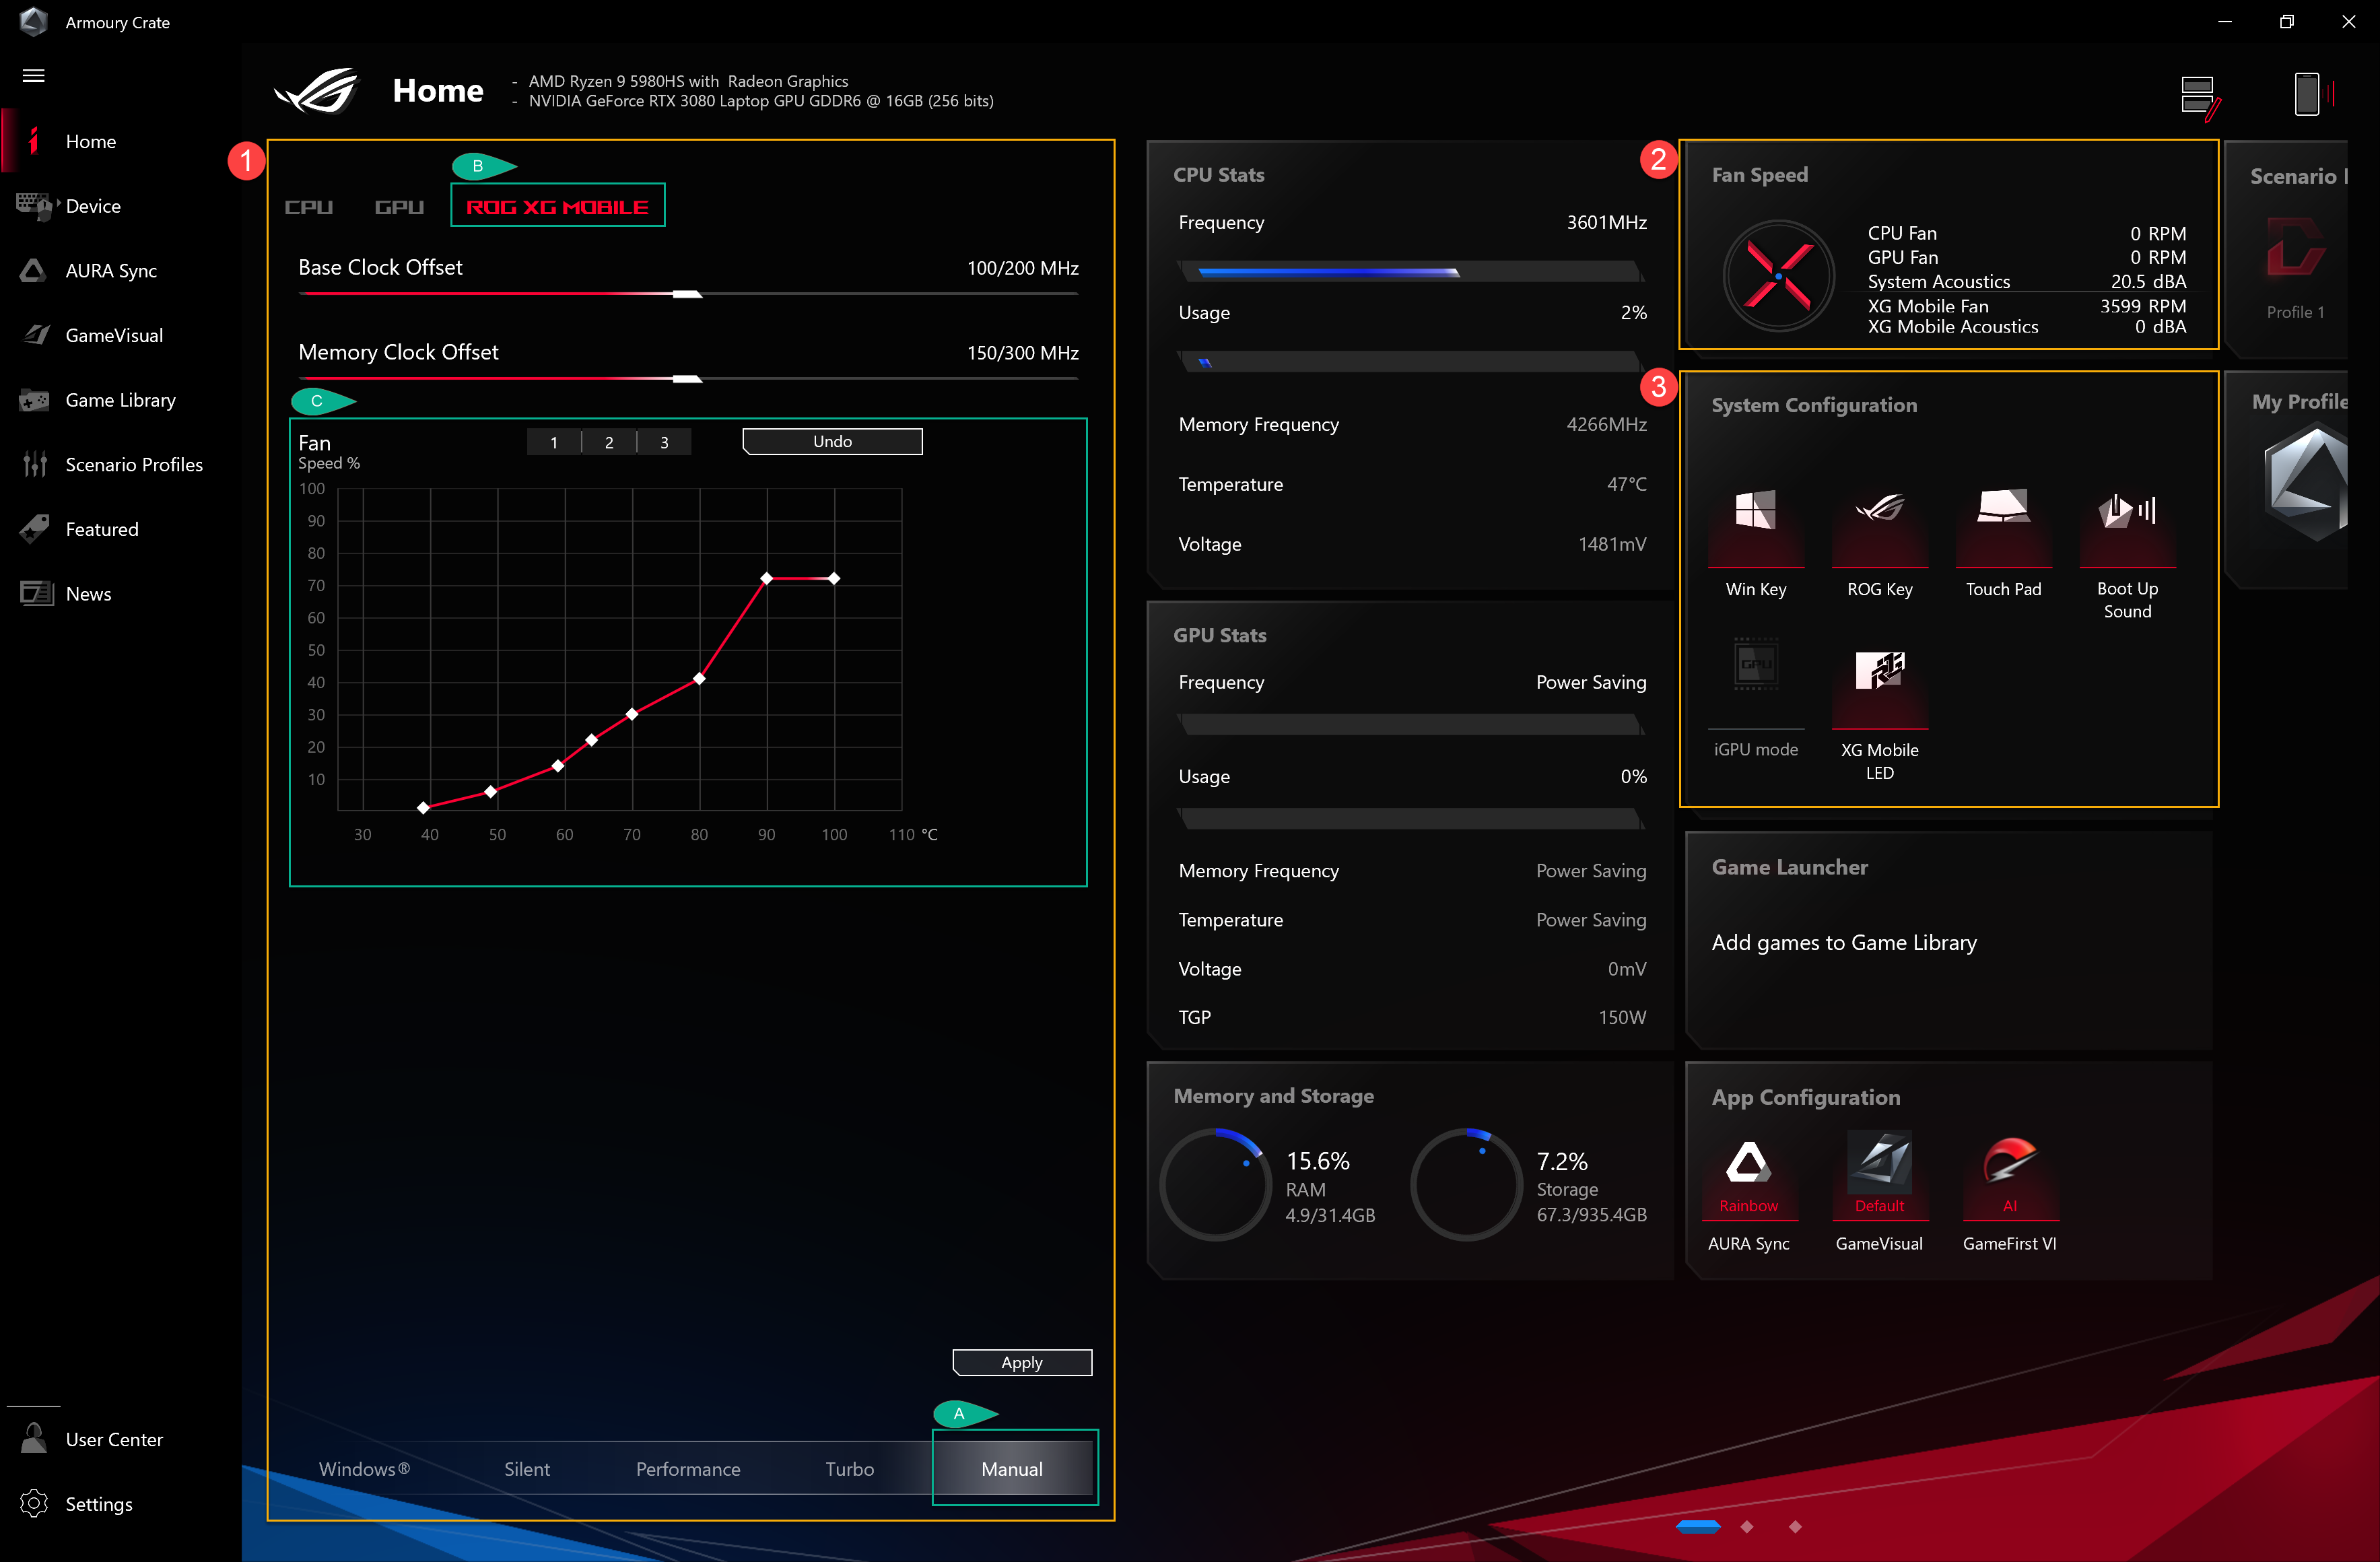
Q1: Operating mode categories and introduction
A1: Windows® Mode: According to Windows operating system power plan to set up.
Silent Mode: The system silence is first. The fan will stay on low speed for noise reduction, but the performance will be limited.
Performance Mode: The fan setting will balance between Silent and Turbo.
Turbo Mode*: The system Turbo is first, and the fan will run in high performance.
Manual Mode*: Provides manual adjustments for Fan Curve and CPU/GPU overclock.
Tablet/Vertical Mode**: When Tablet/Vertical mode is detected, the performance will be optimized for Tablet/Vertical mode only.
*It can launch under AC Mode (Charging Mode) only. (Selected models only)
**It supports ROG FLOW series of gaming laptops only.
Q2: How to confirm ROG XG Mobile status with indicator light?
A2:
ROG XG Mobile White light (Charging/ No NB connection): it's able to remove connector.
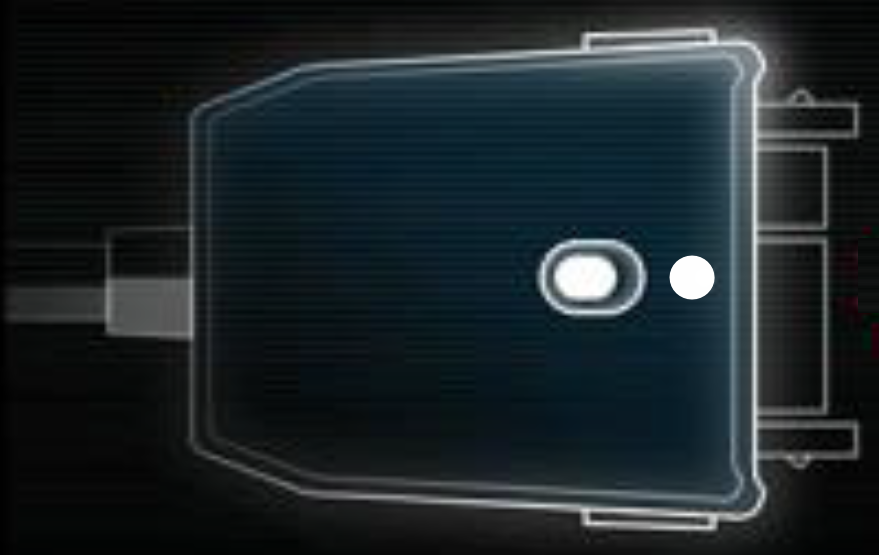
ROG XG Mobile Red light (Charging/ NB connected): It's unable to remove connector.

ROG XG Mobile No light (No Power)
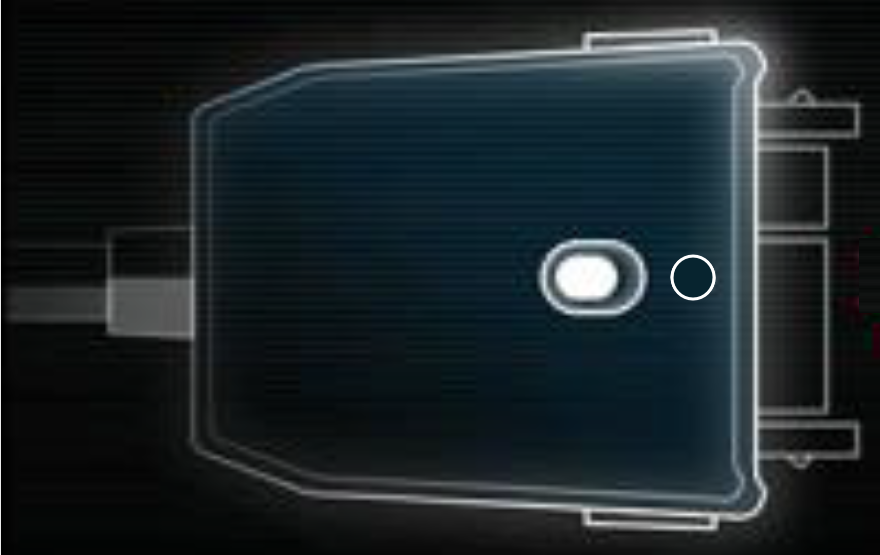
Q3: Why is my laptop showing the message "XG Mobile not detected"?
A3: If the ROG XG Mobile connector was not correctly disconnected in sleep mode or while shutting down, please follow the directions to connect ROG XG Mobile connector again. Then click "Y" button to boot laptop safely, to avoid unsaved data loss.
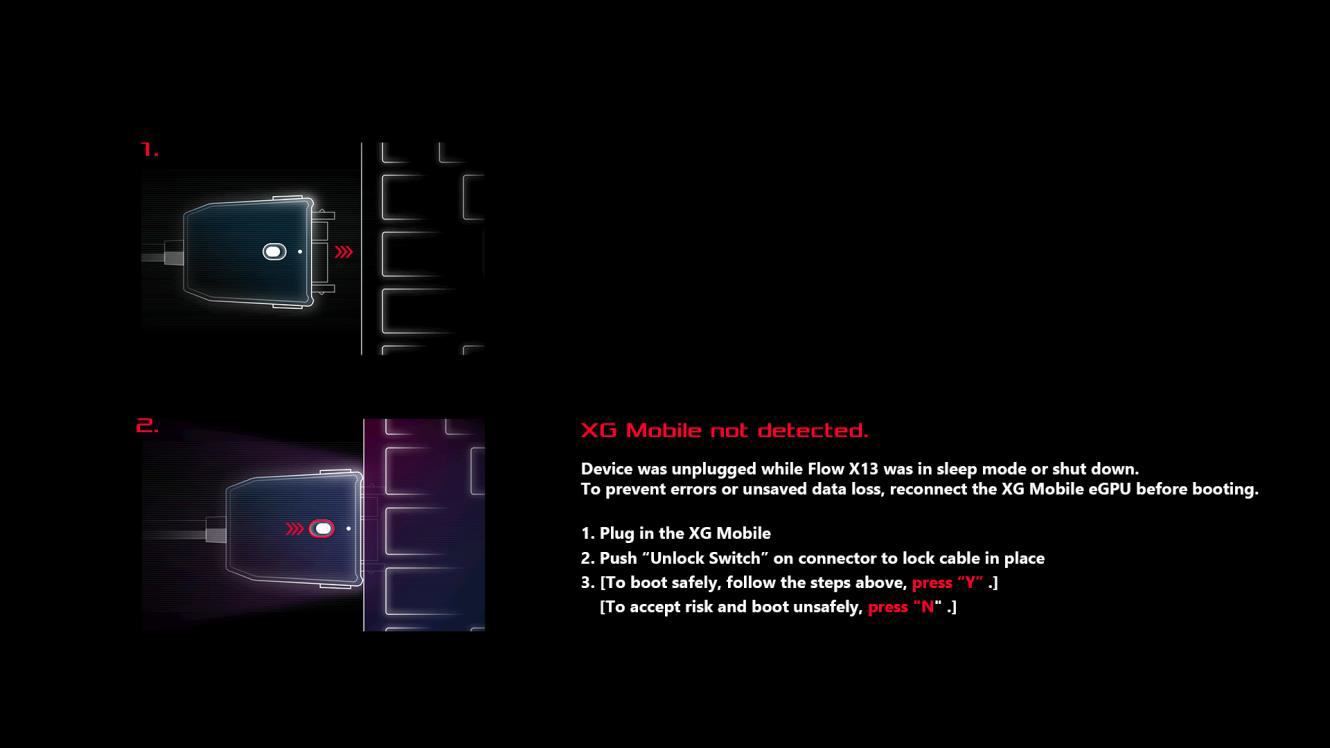
Q4: Why can't I switch MSHybrid Mode after ROG XG Mobile connected?
A4: MShybrid mode is for Integrated Graphics Processing Unit setup and the ROG XG Mobile is an External Graphics Processing Unit. So when ROG XG Mobile launches, gamers are unable to setup for MShybrid mode in GPU Power Saving.
Q5: What is ASUS exclusive interface for ROG XG Mobile?
A5: The ASUS exclusive ROG XG Mobile interface. Its direct PCIe® 3.0 x8 connection to the CPU dedicated 63Gb/s of bandwidth just to the graphics processor, beating Thunderbolt™ by 57.5%*. A separate USB 3.2 Gen 2 link adds 10Gb/s for the I/O hub and prevents peripheral traffic from impeding graphics performance.The 41cm cable gives you the flexibility to position the eGPU freely.
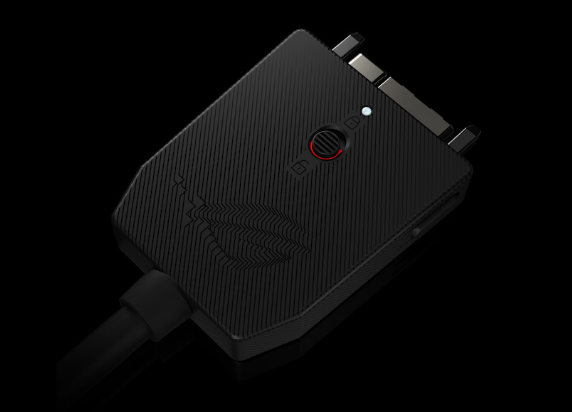
*Figures refer to the peak theoretical bandwidth of PCIe 3.0 x8 over (63Gb/s) standard Thunderbolt 4 (40Gb/s). Real world performance may vary.
ROG BOOST GPU Overclock (O.C.) Technology
ROG Boost GPU Overclock (O.C.) technology is the exclusive GPU overclocking technology made for models with Nvidia GPU. Through Armoury Crate Turbo Mode and Manual Mode, the system is capable of boosting the GPU frequency, giving an instant step-up on the graphics performance.
Models Supported: GX502 and other ROG notebook series (including G, GX, GU, GA, GZ notebook series). For more supported models please visit the Gaming Series Notebook Product from ASUS official website.
Note: Please make sure the bundled power adapter is inserted, in order to run Armoury Crate Turbo Mode and Manual Mode.
1) With Armoury Crate Turbo Mode , the ROG Boost
 brings an instant boost of performance to the end user. The GPU clocks up to a higher frequency and delivers remarkably smooth performance for even the most graphically demanding titles.
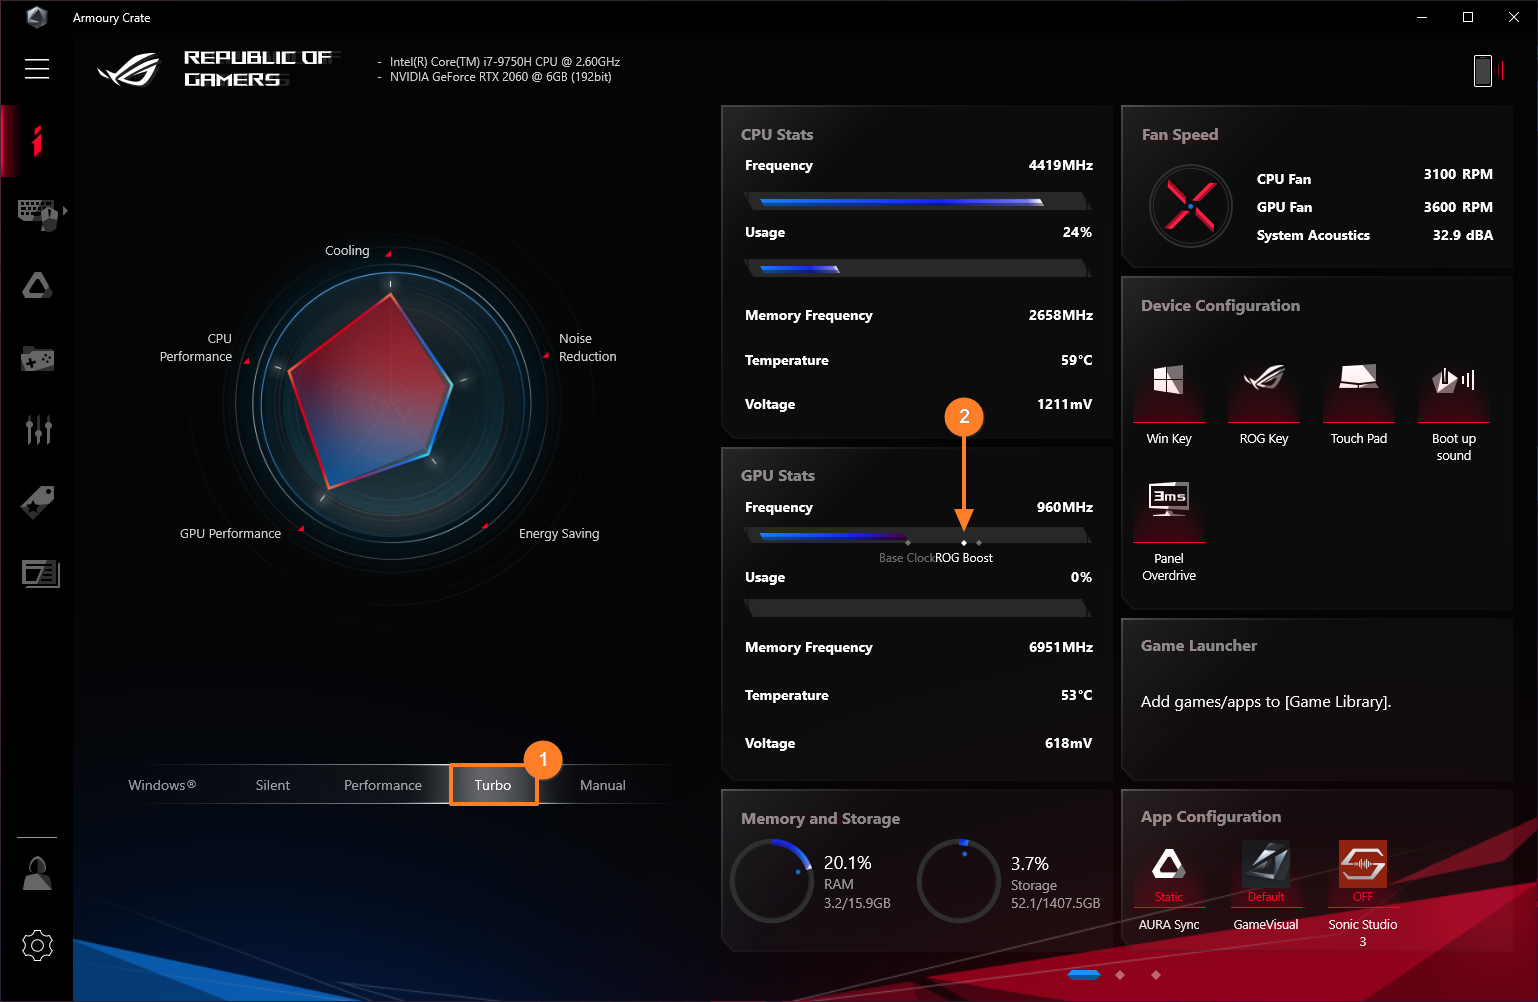
2) With Armoury Crate Manual Mode, by adjusting the GPU Base Clock Offset, additionally overclocking capability allows user to freely fiddle with the clock offset (ROG Boost O.C ) for unique experience.