[Notebook] ASUS Dial - Introduction
ASUS Dial can be used with any installed application on your computer, and a number of customizable, personalized features allow you to build your own knob application. If you use Adobe software, you can use software compatible with Adobe version 2020 and later (such as Adobe Photoshop, illustrator, Photoshop Lightroom classic, Premiere Pro, and After Effects). With ASUS Dial and Control Panel software on ASUS, you can access customizable shortcuts to zoom in/out and adjust brush size/brightness settings. You can even customize the default interface according to your personal work style. At the same time, turn the ASUS Dial in the Windows operating environment to adjust the volume, adjust the brightness or perform other functions.
1. ASUS Dial supports products
2. How to operate ASUS Dial
2.1 How the physical ASUS Dial operates
2.2 How the virtual ASUS Dial on touchpad operates
3. How to use ASUS Dial within Adobe software
4. Open ASUS Dial function setting software
5. How to set up the functionality of ASUS Dial
6. How to add or edit applications
6.1 Installed applications
6.2 Running applications
7.1 Edit an existing function
7.2 Group
7.3 Add Function
10. Disable ASUS Dial function
12. How to upgrade or download and uninstall the ASUS Dial control software
1. ASUS Dial supports products
ASUS Dial is available in three versions: physical and virtual.
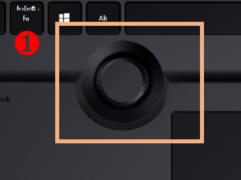
(1) The computer equipped with a physical knob is shown below:

(2) The computer equipped with a physical knob is shown below:

(3) The computer equipped with virtual touchpad knob is shown below:
You can also go to the [Overview] page on the official ASUS website to check if the laptop is equipped with ASUS Dial.
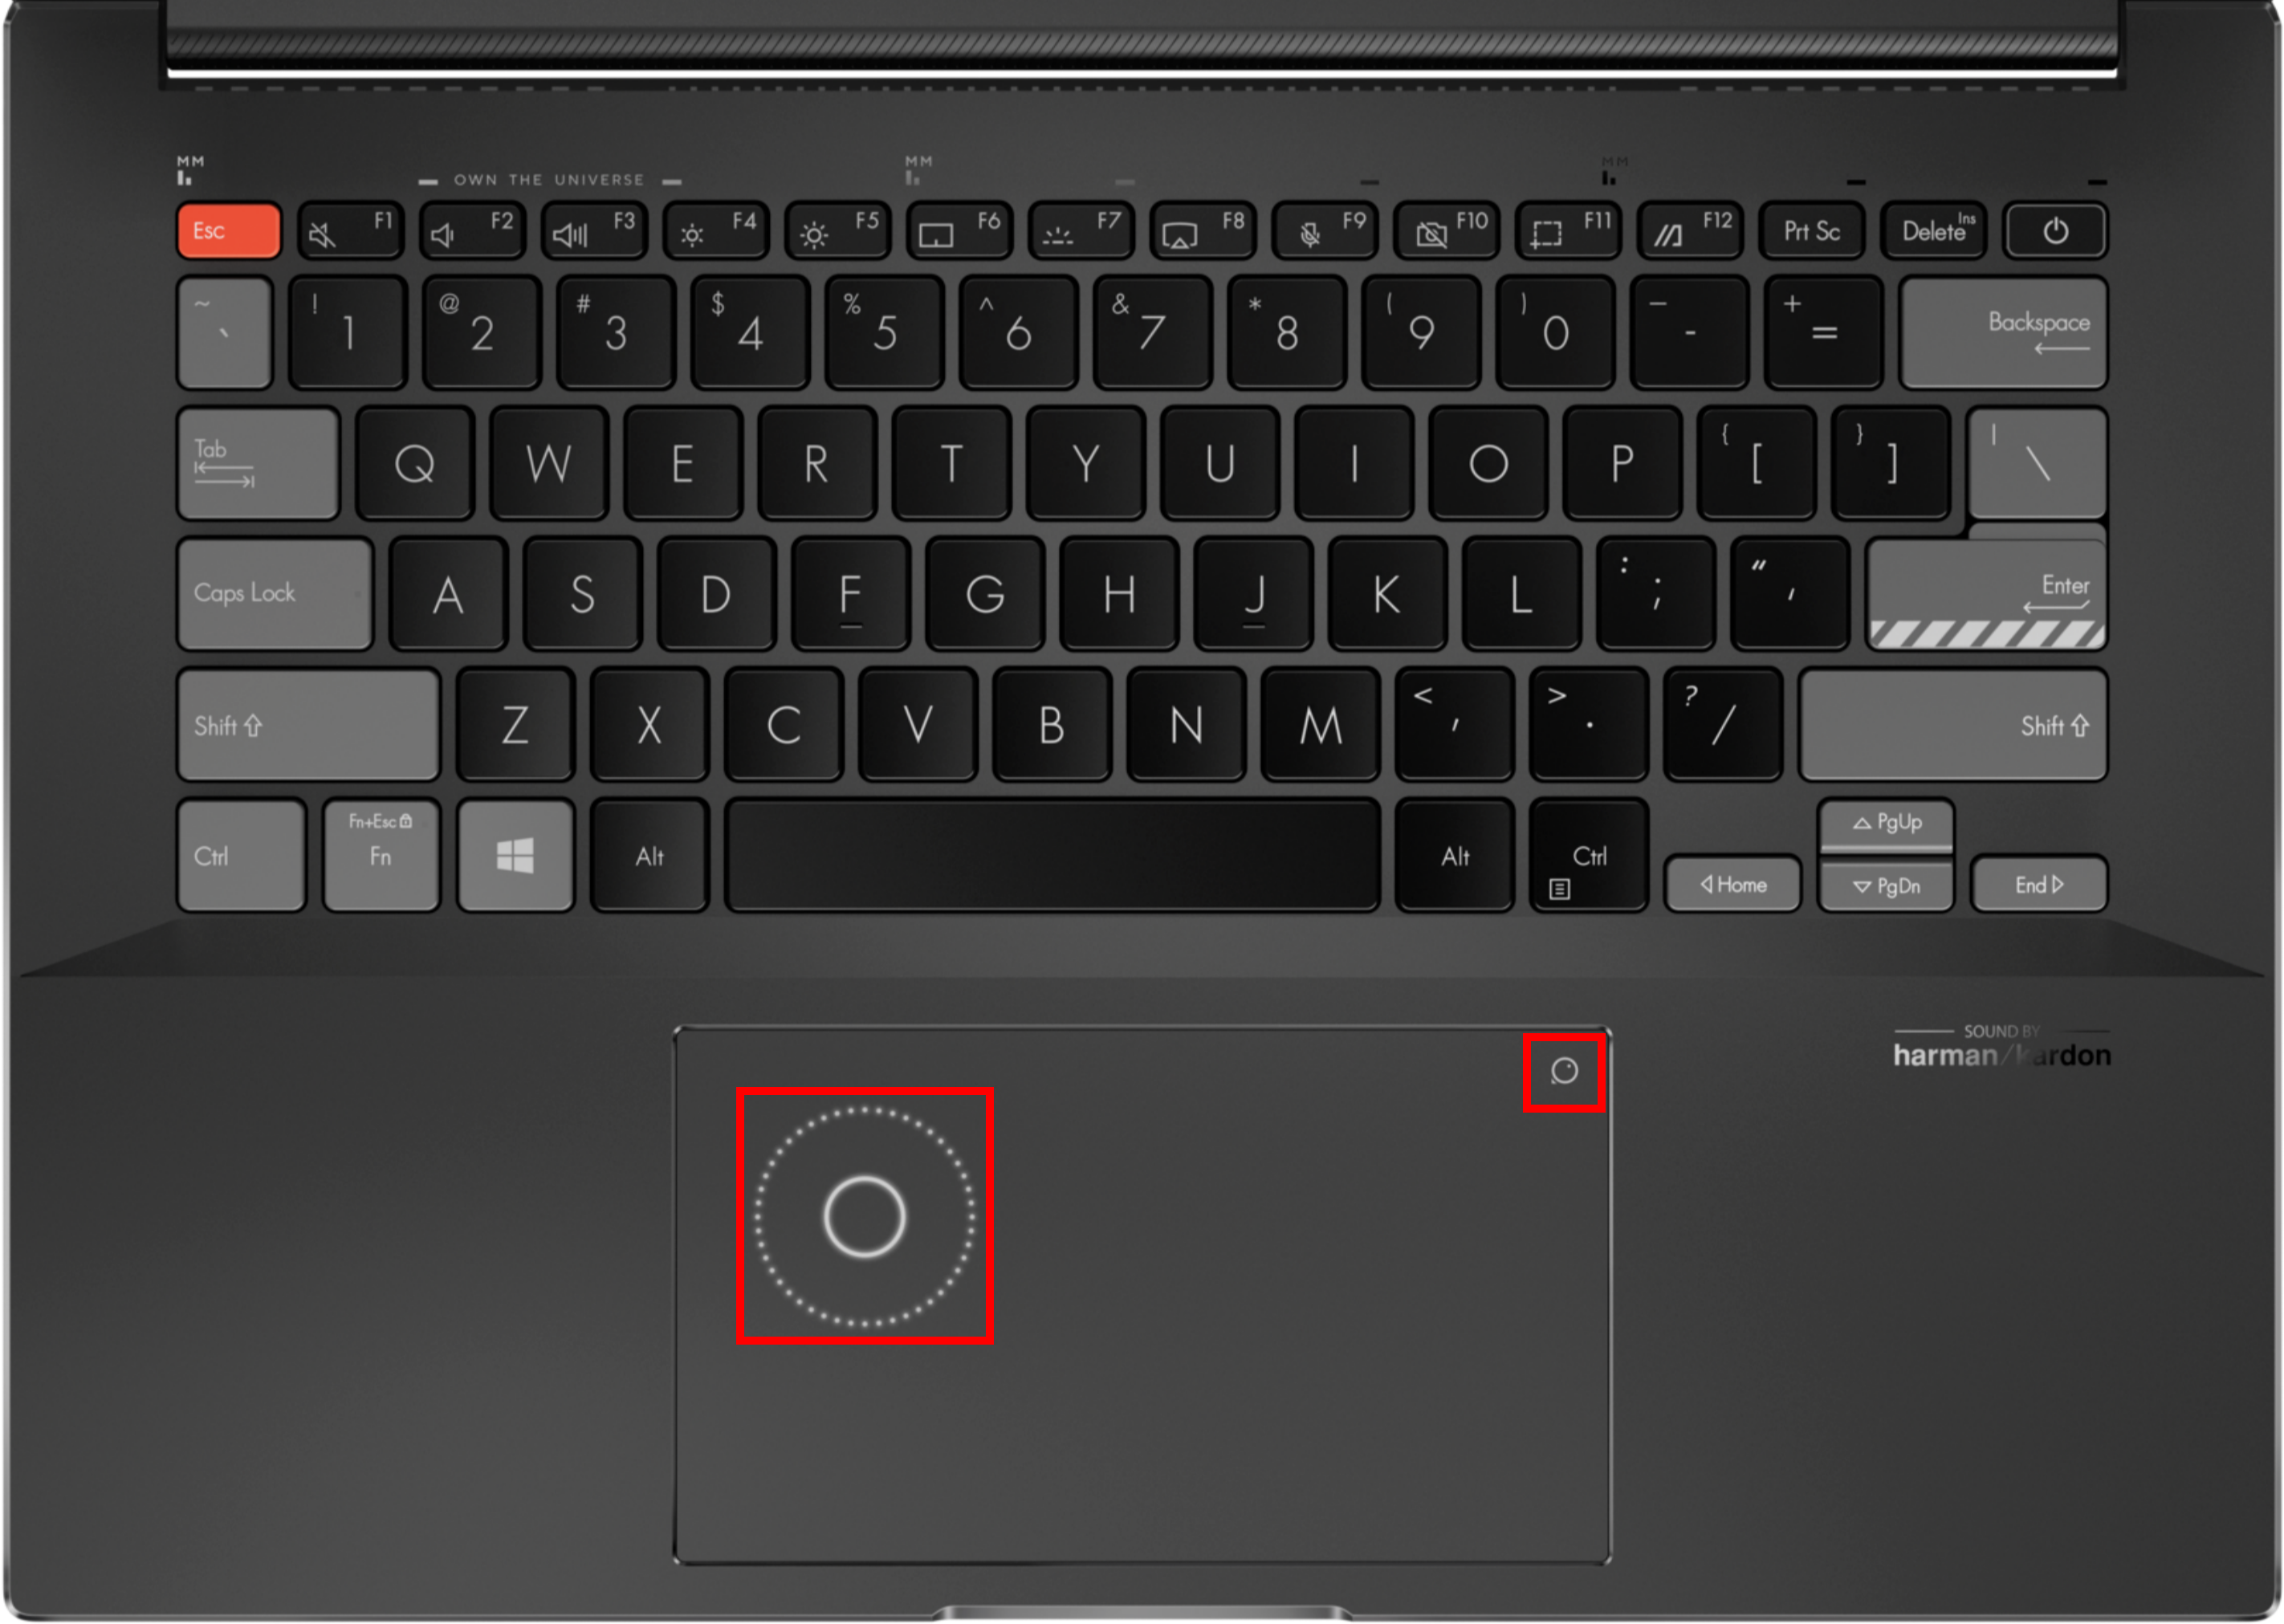
2.1 How the physical ASUS Dial operates:
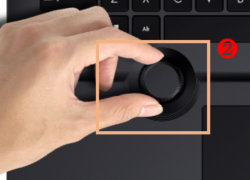
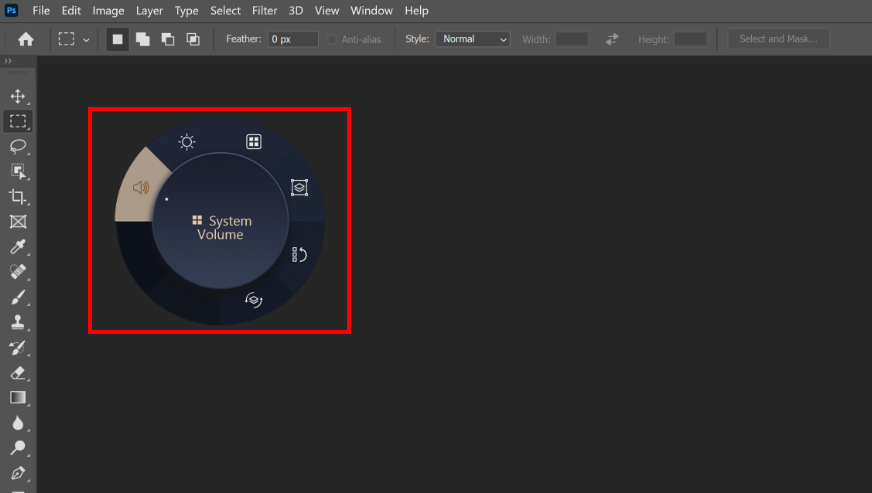
(1) Press with your finger ①[Knob], [ASUS Dial function selection screen] will appear on the computer screen, and when the operation screen appears, the ASUS Dial function selection screen can be dragged and moved by the mouse.

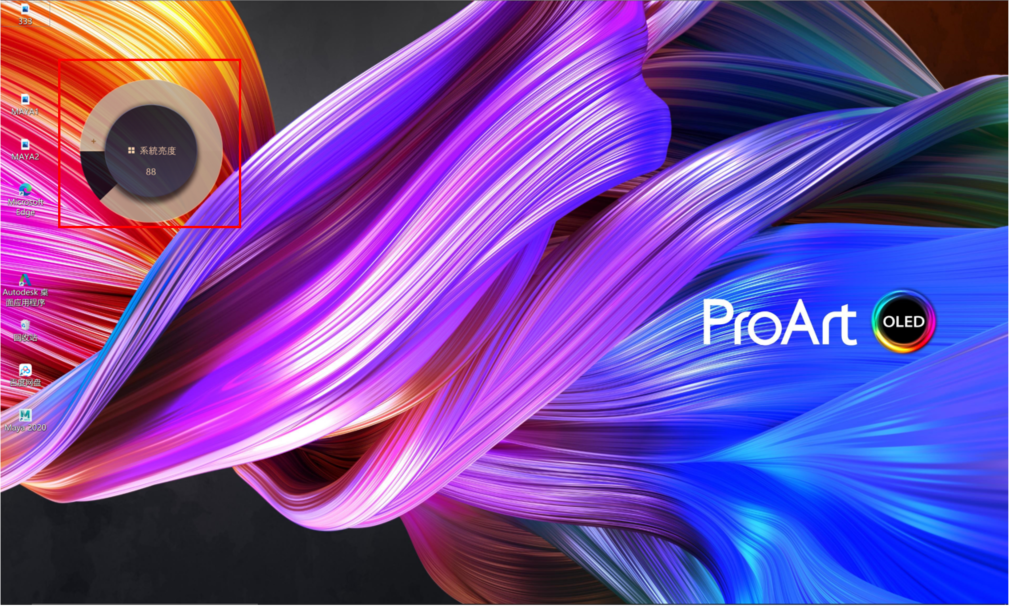
(2) Select the function you need by ②[Turn knob], and select the function again ③[Press knob]. Take the [Adjust brightness] function as an example, adjust the brightness of the screen by turning the knob.
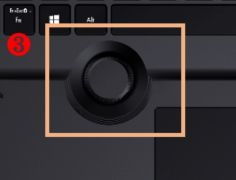

(3) To switch to other knob functions, press the knob again. After not using the knob for a period of time, the display icon of the knob will automatically disappear from the display, and the display icon will appear again when the knob is touched again.
2.2 Virtual ASUS Dial on touchpad operates
(1) Place your finger on ④[touchpad marker].
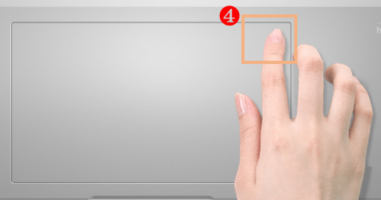
(2) Slide to the bottom left ⑤[Finger], [ASUS Dial virtual touchpad knob] will appear in the upper left corner of the touchpad as shown below.

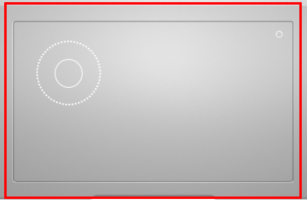
(3) After the virtual touchpad knob appears on the touchpad, press the ⑥[Area] computer screen on the touchpad shown below to appear [ASUS Dial function selection screen].

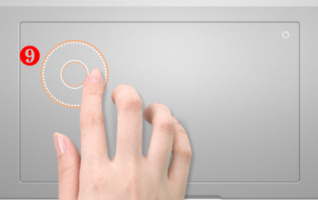
(4) Slide ⑦[Finger] clockwise or counterclockwise in the ring area on the touchpad shown in the figure below to select the function you want, and press ⑧[Area] on the touchpad again to select the function.

(5) Take the [Adjust brightness] function as an example, adjust the brightness of the screen by sliding your finger clockwise or counterclockwise in ⑨[Ring area].
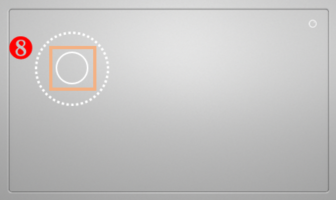
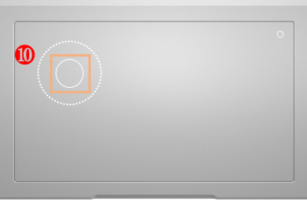
(6) After not using the knob for a period of time, the display icon of the knob will automatically disappear on the display screen. Slide your finger over the area of the virtual touchpad knob on the touchpad again and the display icon will appear again. To switch between other quick features, press ⑩[Area] on the touchpad again. Turning off the virtual touchpad knob on the touchpad works the same way as bringing up the knob.
3. How to use ASUS Dial within Adobe software
(1) Taking the Photoshop 2020 software as an example, after opening the Photoshop 2020 software and pressing the knob, the function selection interface of ASUS Dial is as follows:
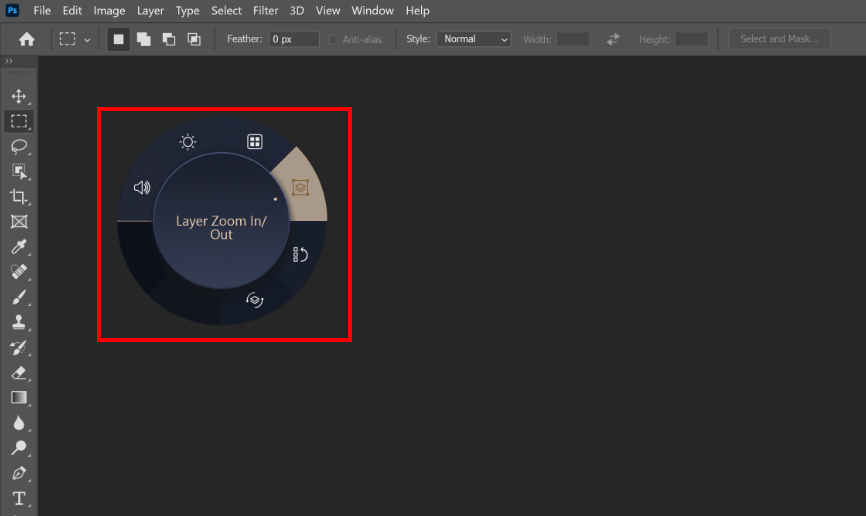
(2) Turn ①[Knob] to select the ASUS Dial's shortcut function according to your needs.
(3) Press again ②[Knob] to select the function.
(4) Take the [Brush size] function as an example, you can adjust the size of the brush by turning the knob after selecting this function.

※Because the difference between the virtual touchpad knob and the physical knob is only whether there is a real knob, and their display screen and operation steps in Adobe software are the same, please refer to the physical knob for the operation steps of the virtual touchpad knob.
4. Open ASUS Dial function setting software
You can quickly wake up the ASUS Dial & Control Panel app by pressing and holding the ASUS Dial.
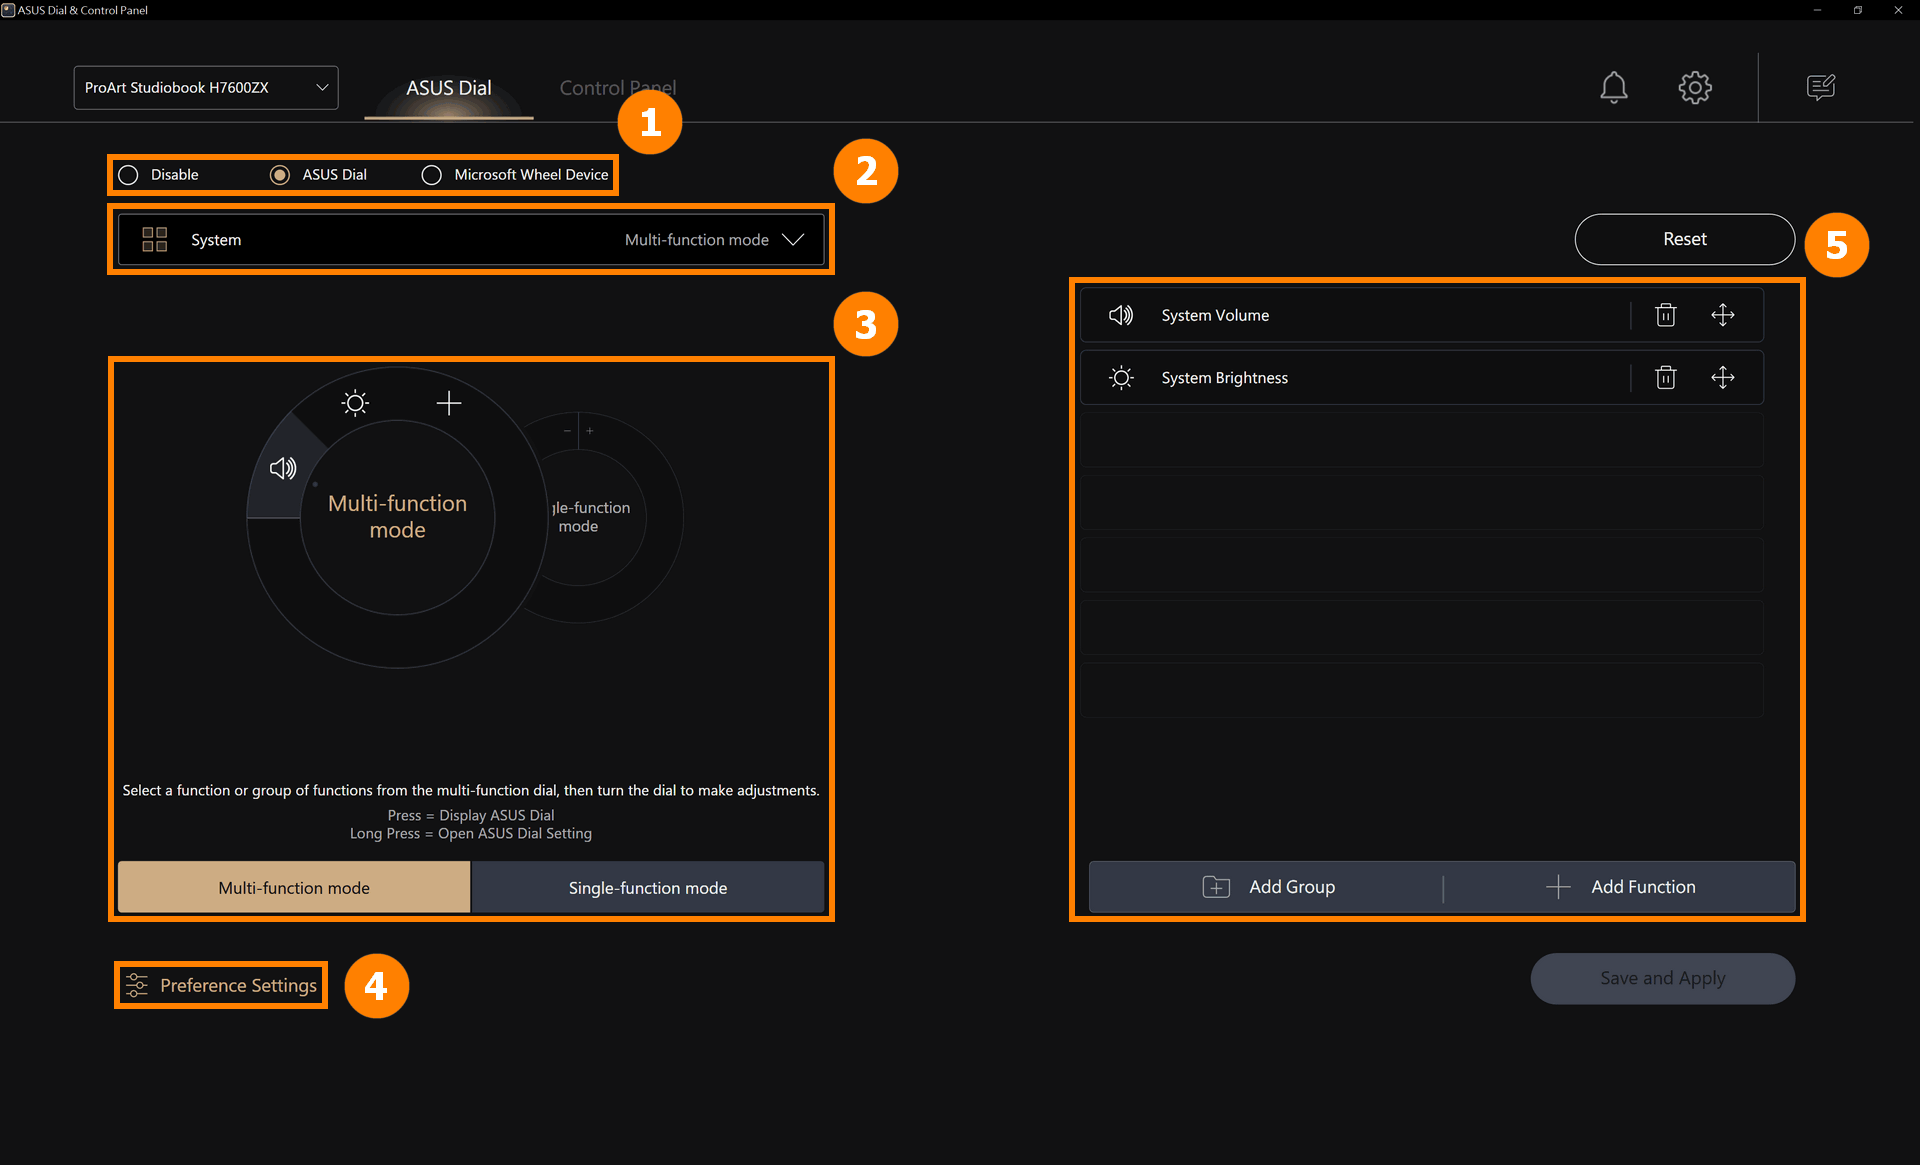
5. How to set up the functionality of ASUS Dial
The ProArt Creator Hub control settings page contains five important sections: ①[Knob mode switching], ②[Editing to application], ③[ASUS Dial function mode switching], ④[Preference Settings], and ⑤[Function editing].
6. How to add or edit applications
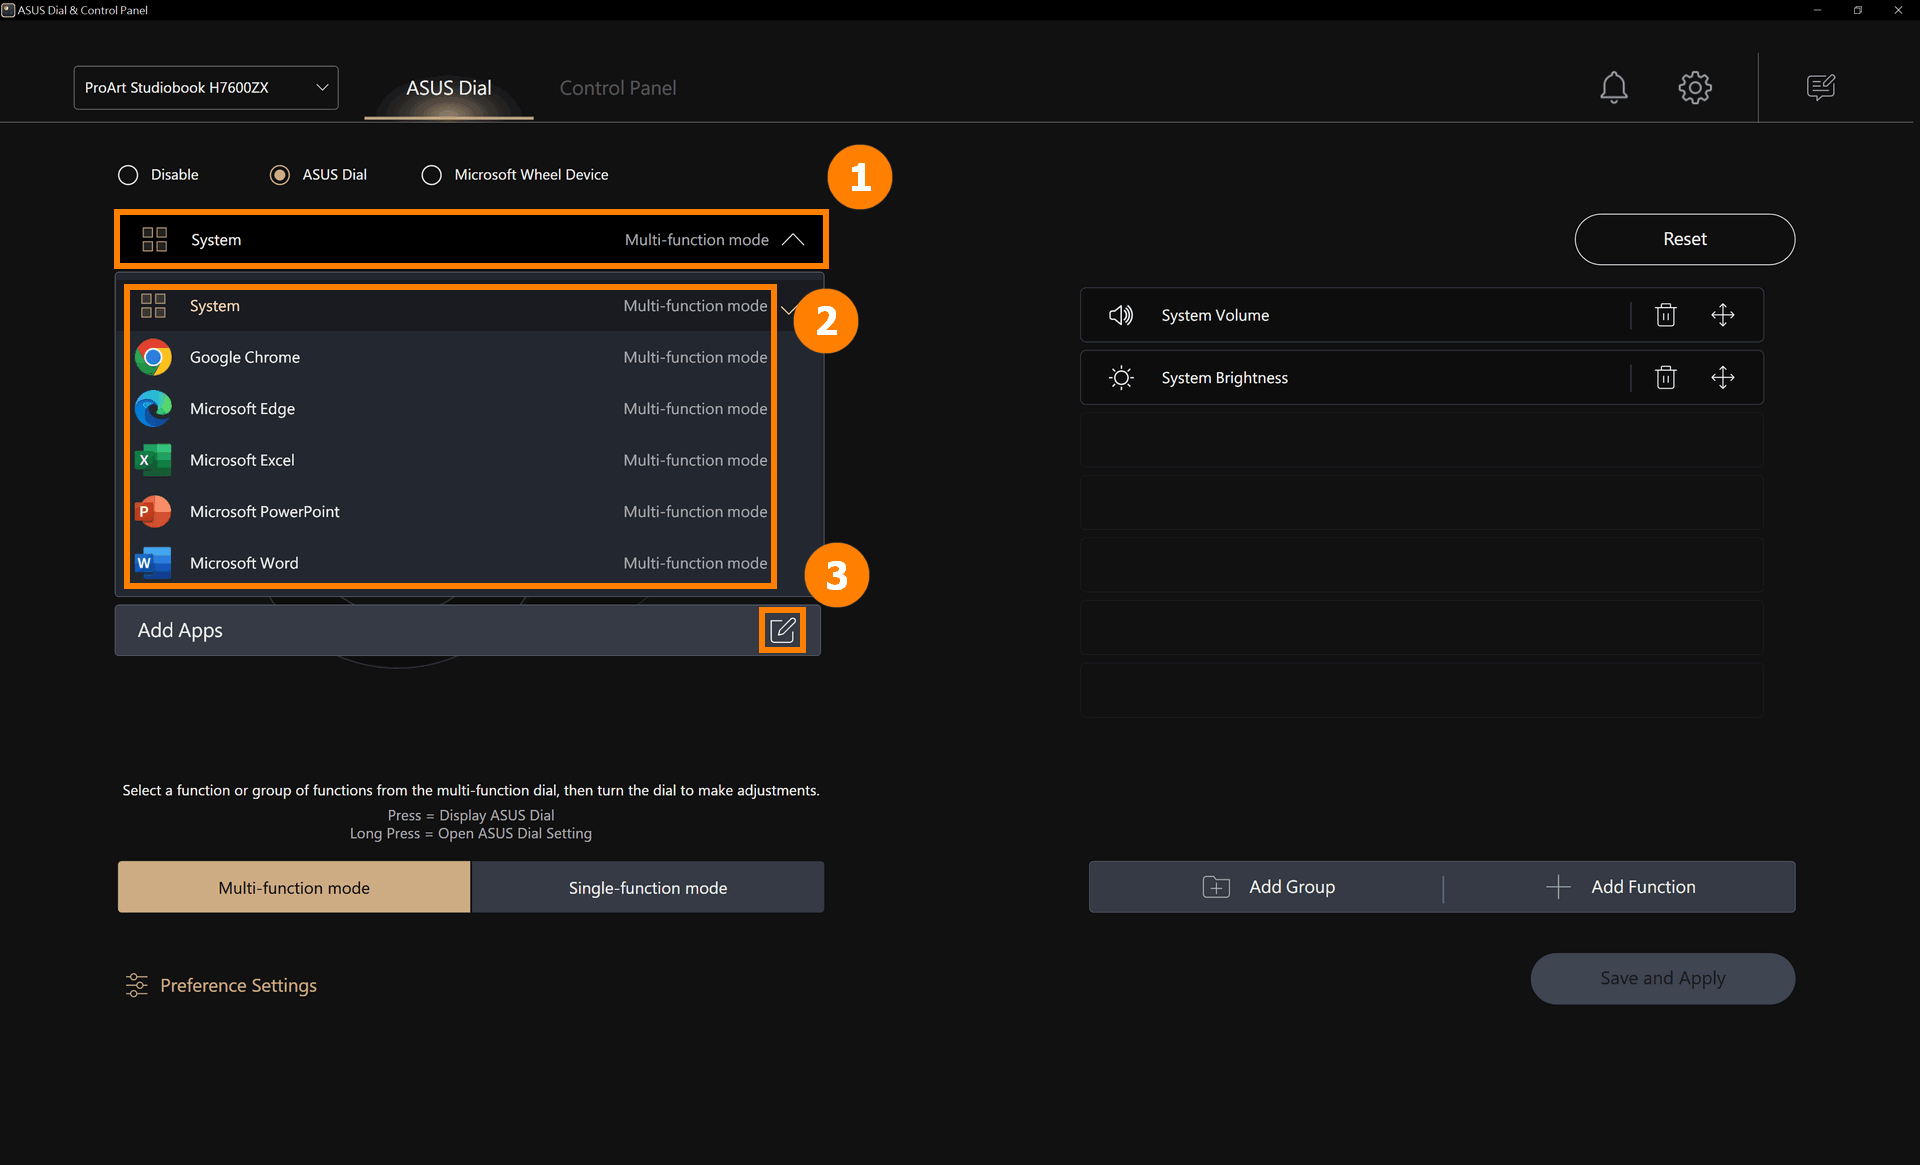
(1) Click ①[Application Edit], ②[Default Application] is the software supported by ASUS Dial, you can click ③[Edit] to add another application.
The significance of independent editing for different applications is that when you use an application that has edited ASUS Dial, such as Microsoft Edge, you can perform the function you edited by turning the ASUS Dial.
If you have not edited the ASUS Dial feature of Microsoft Edge, when you open Microsoft Edge and rotate the ASUS Dial, the ASUS Dial will use the function set by System.
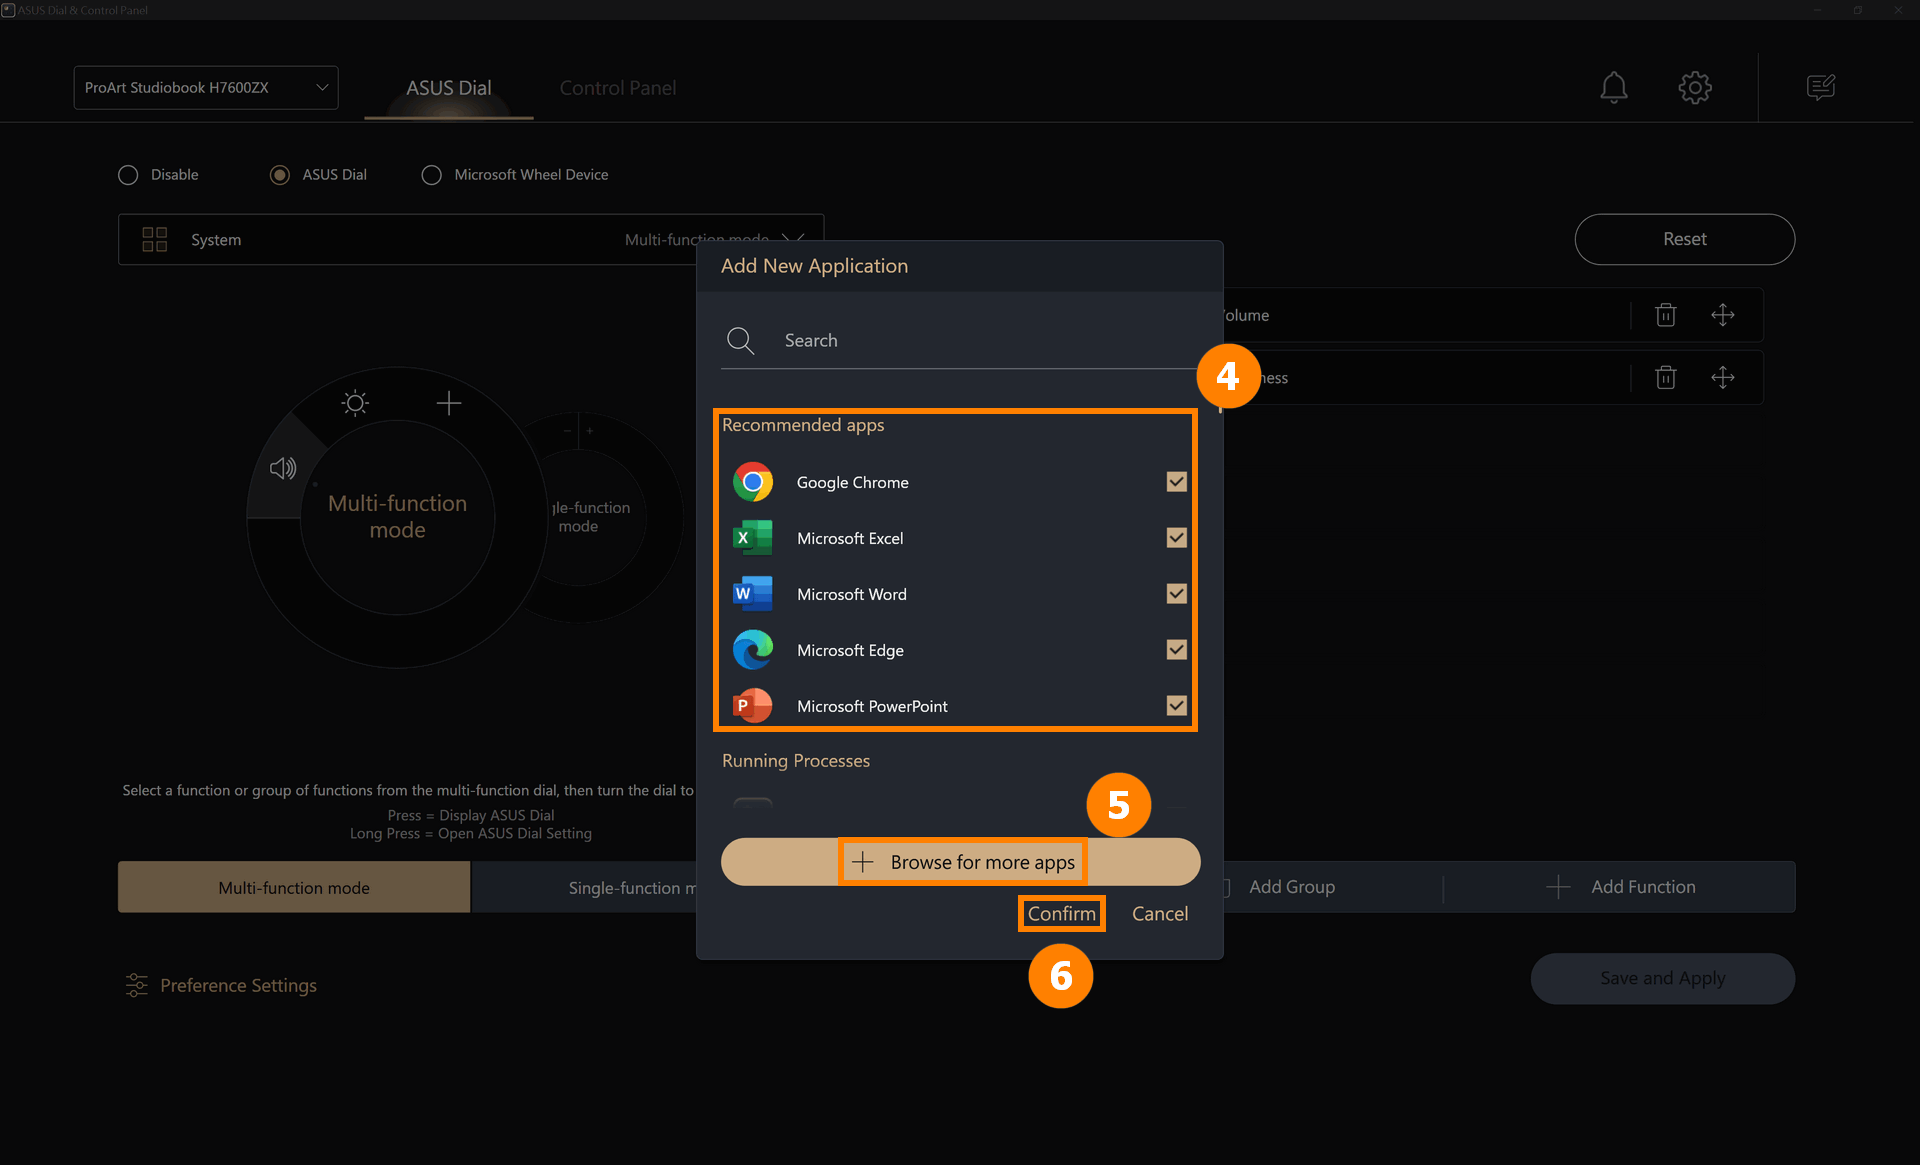
(2) In ④[Area], you can add applications that are already installed in the system, or you can click ⑤[Browse for more apps] to add applications that are not installed in the system, and click ⑥[Confirm] to complete the modification.
※ Add more apps: If you don't find the app you want to add, you can click [Add more apps] to add a program (only for programs with the suffix exe).
(1) When any application is running, rotate the ASUS Dial to the far right and you will see the [+] mark. Press the ASUS Dial to enter the add application page.
(2) On this page, you can directly edit the ASUS Dial function of the application without having to manually find the application and then add it.
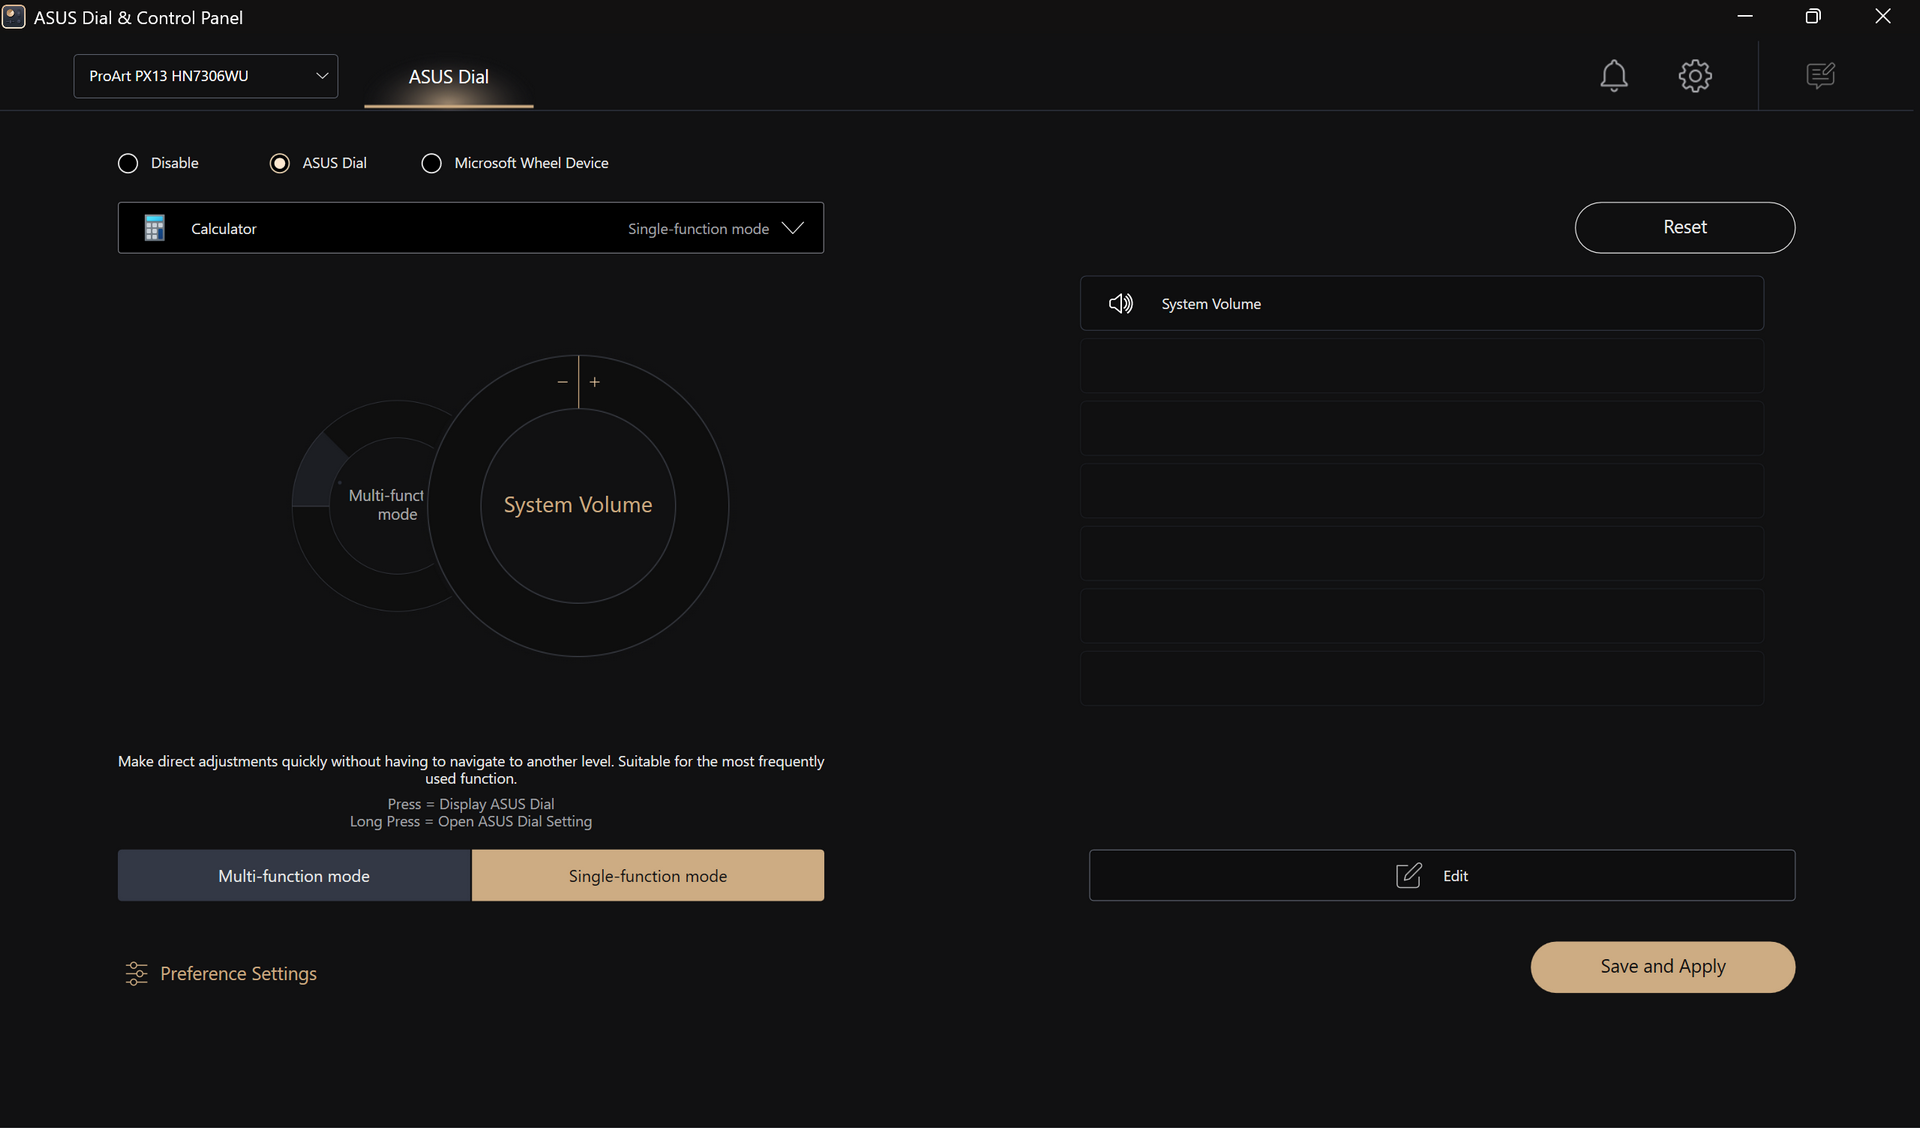
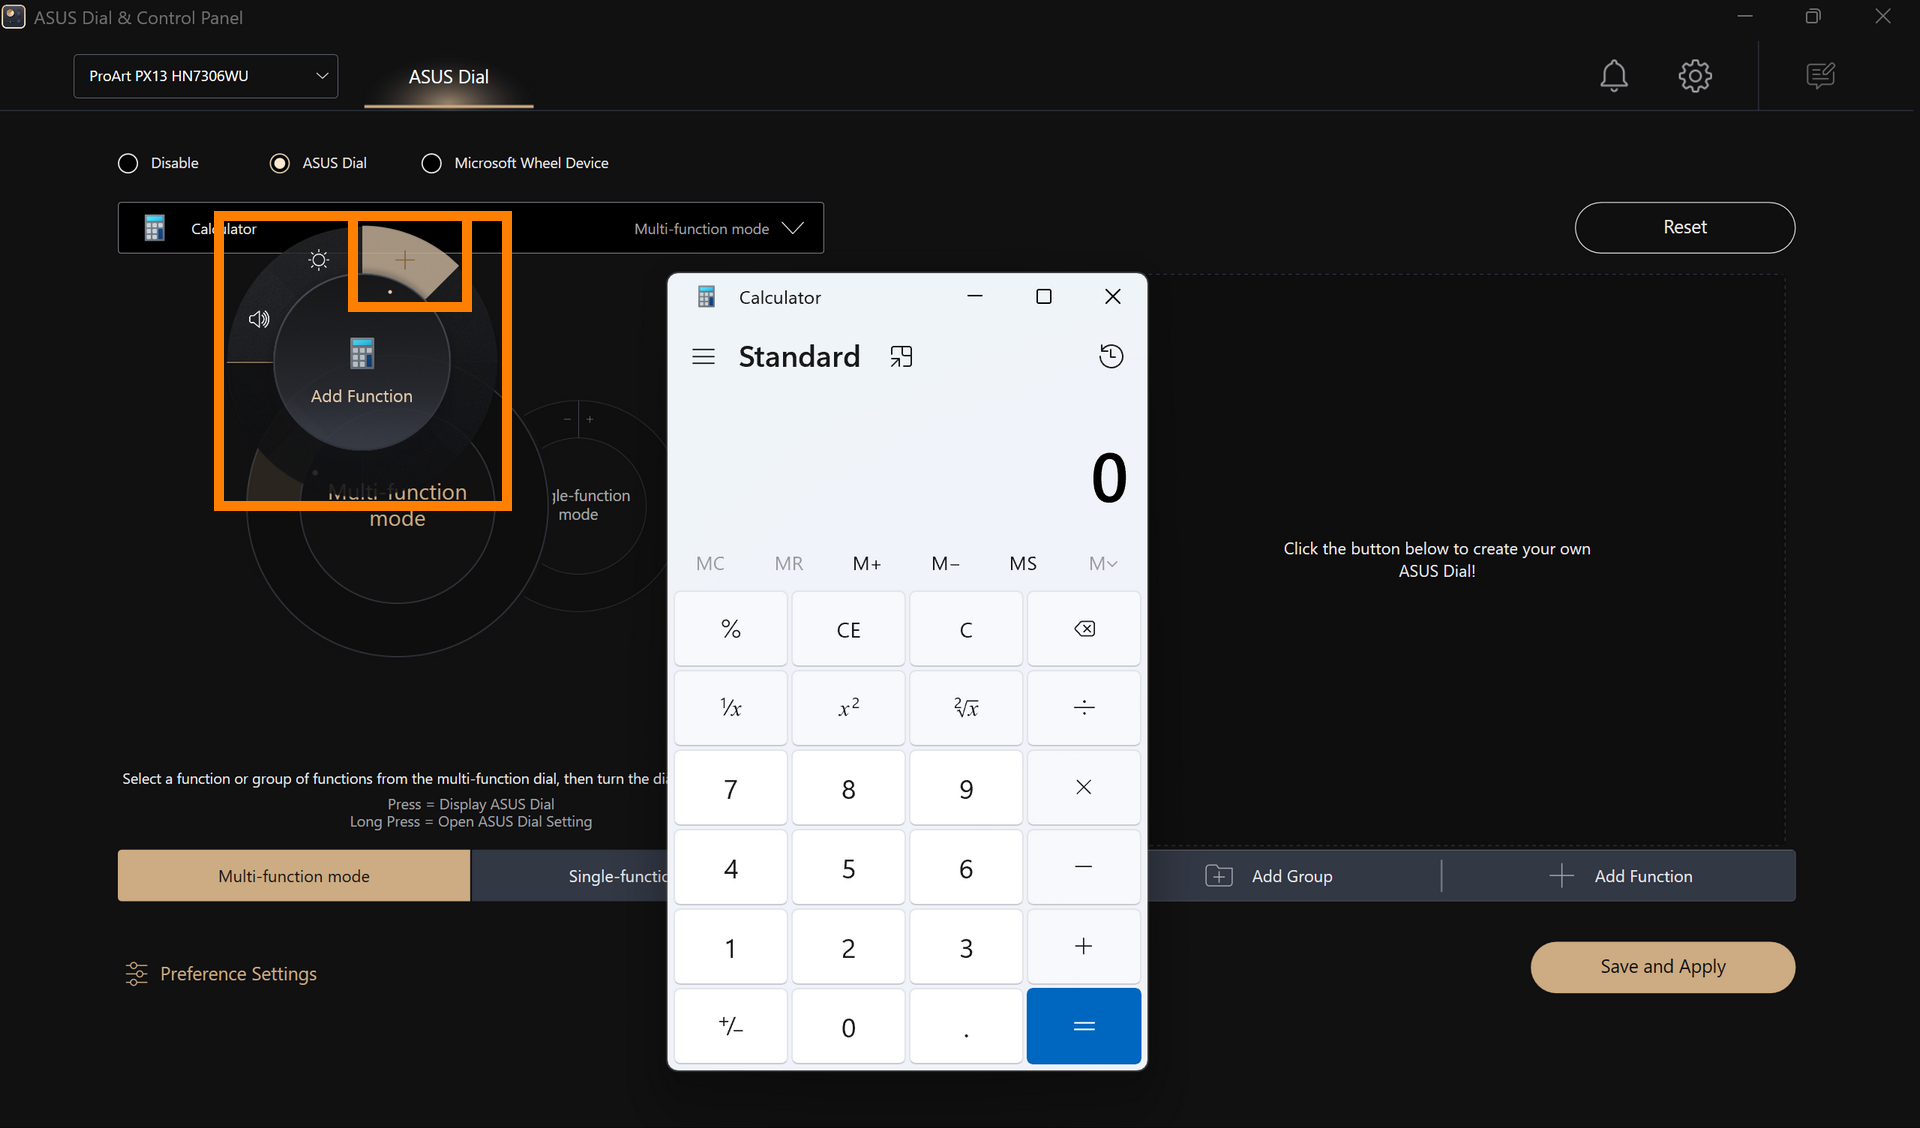
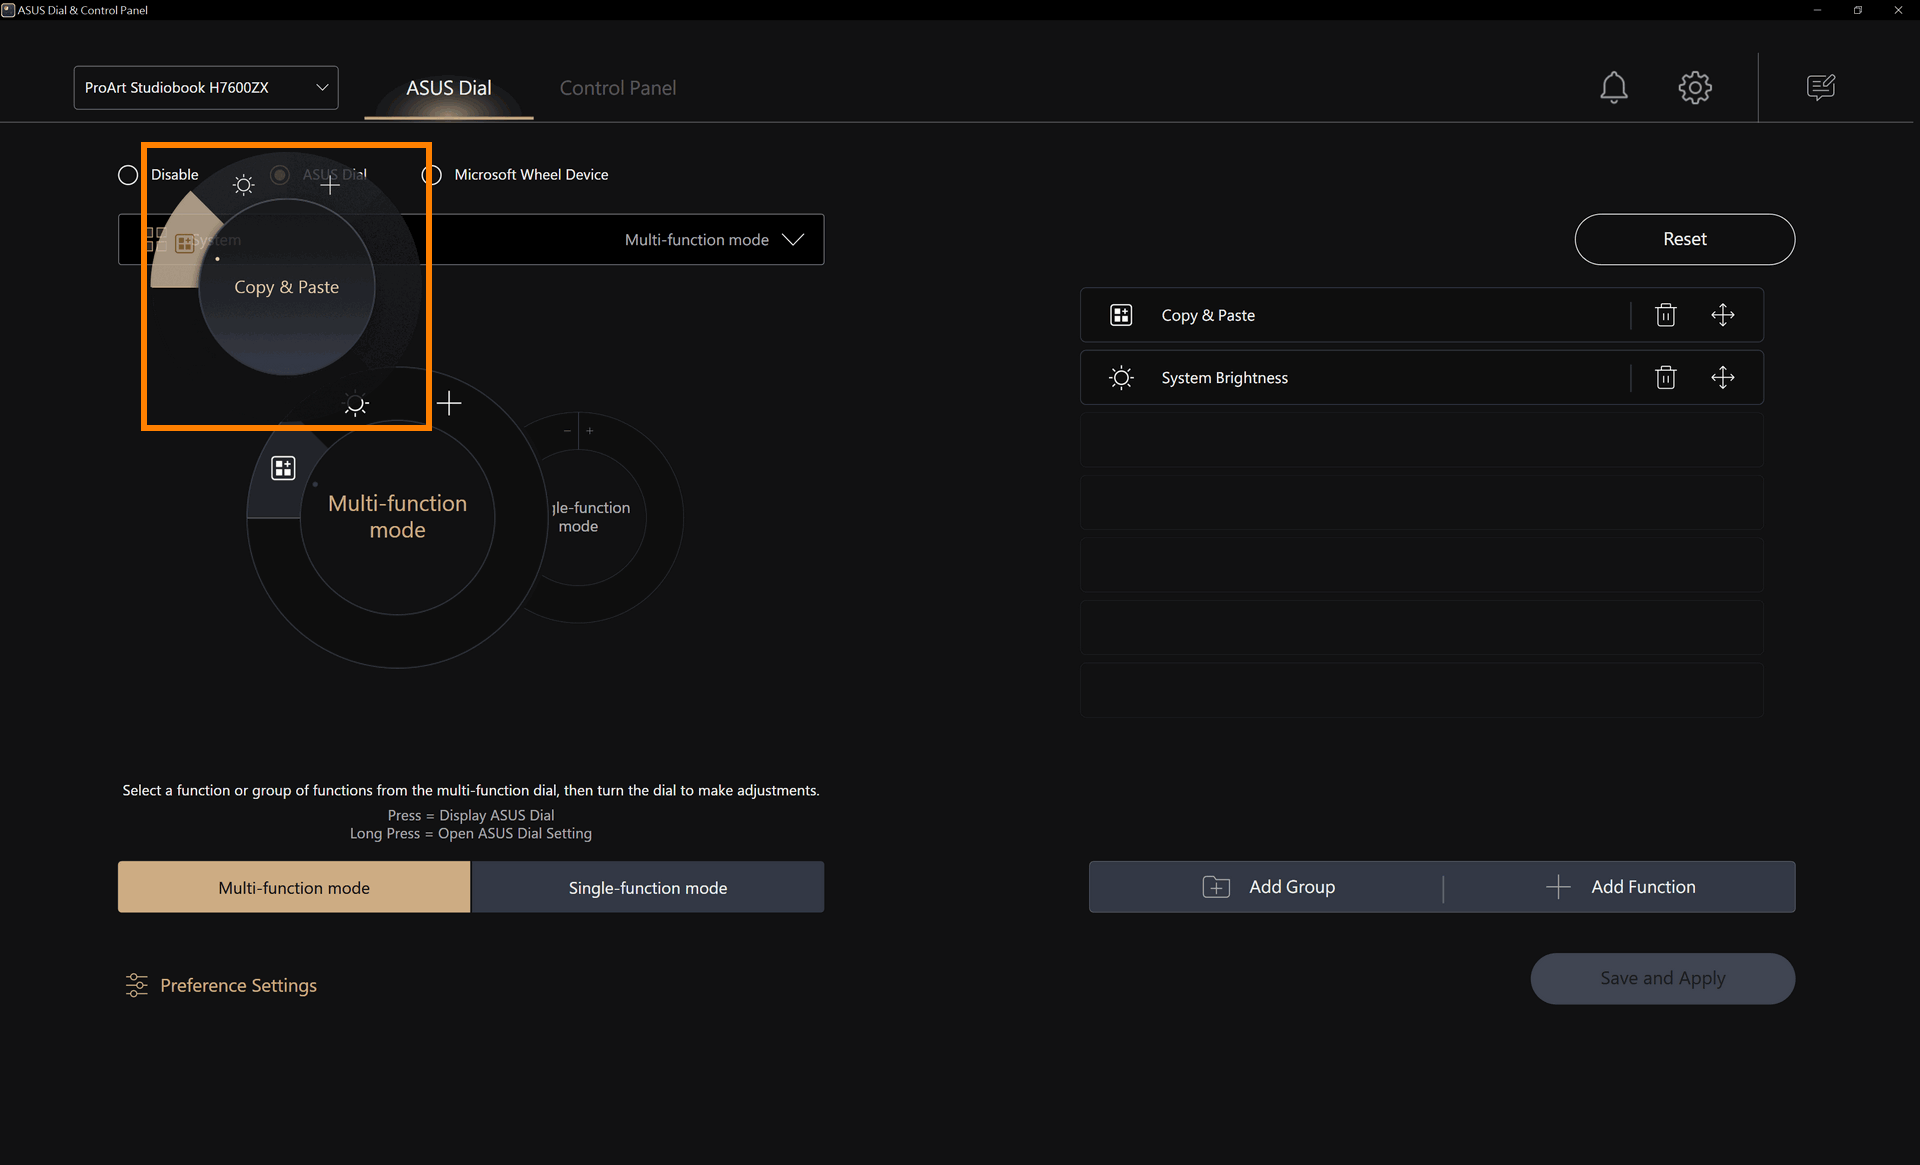
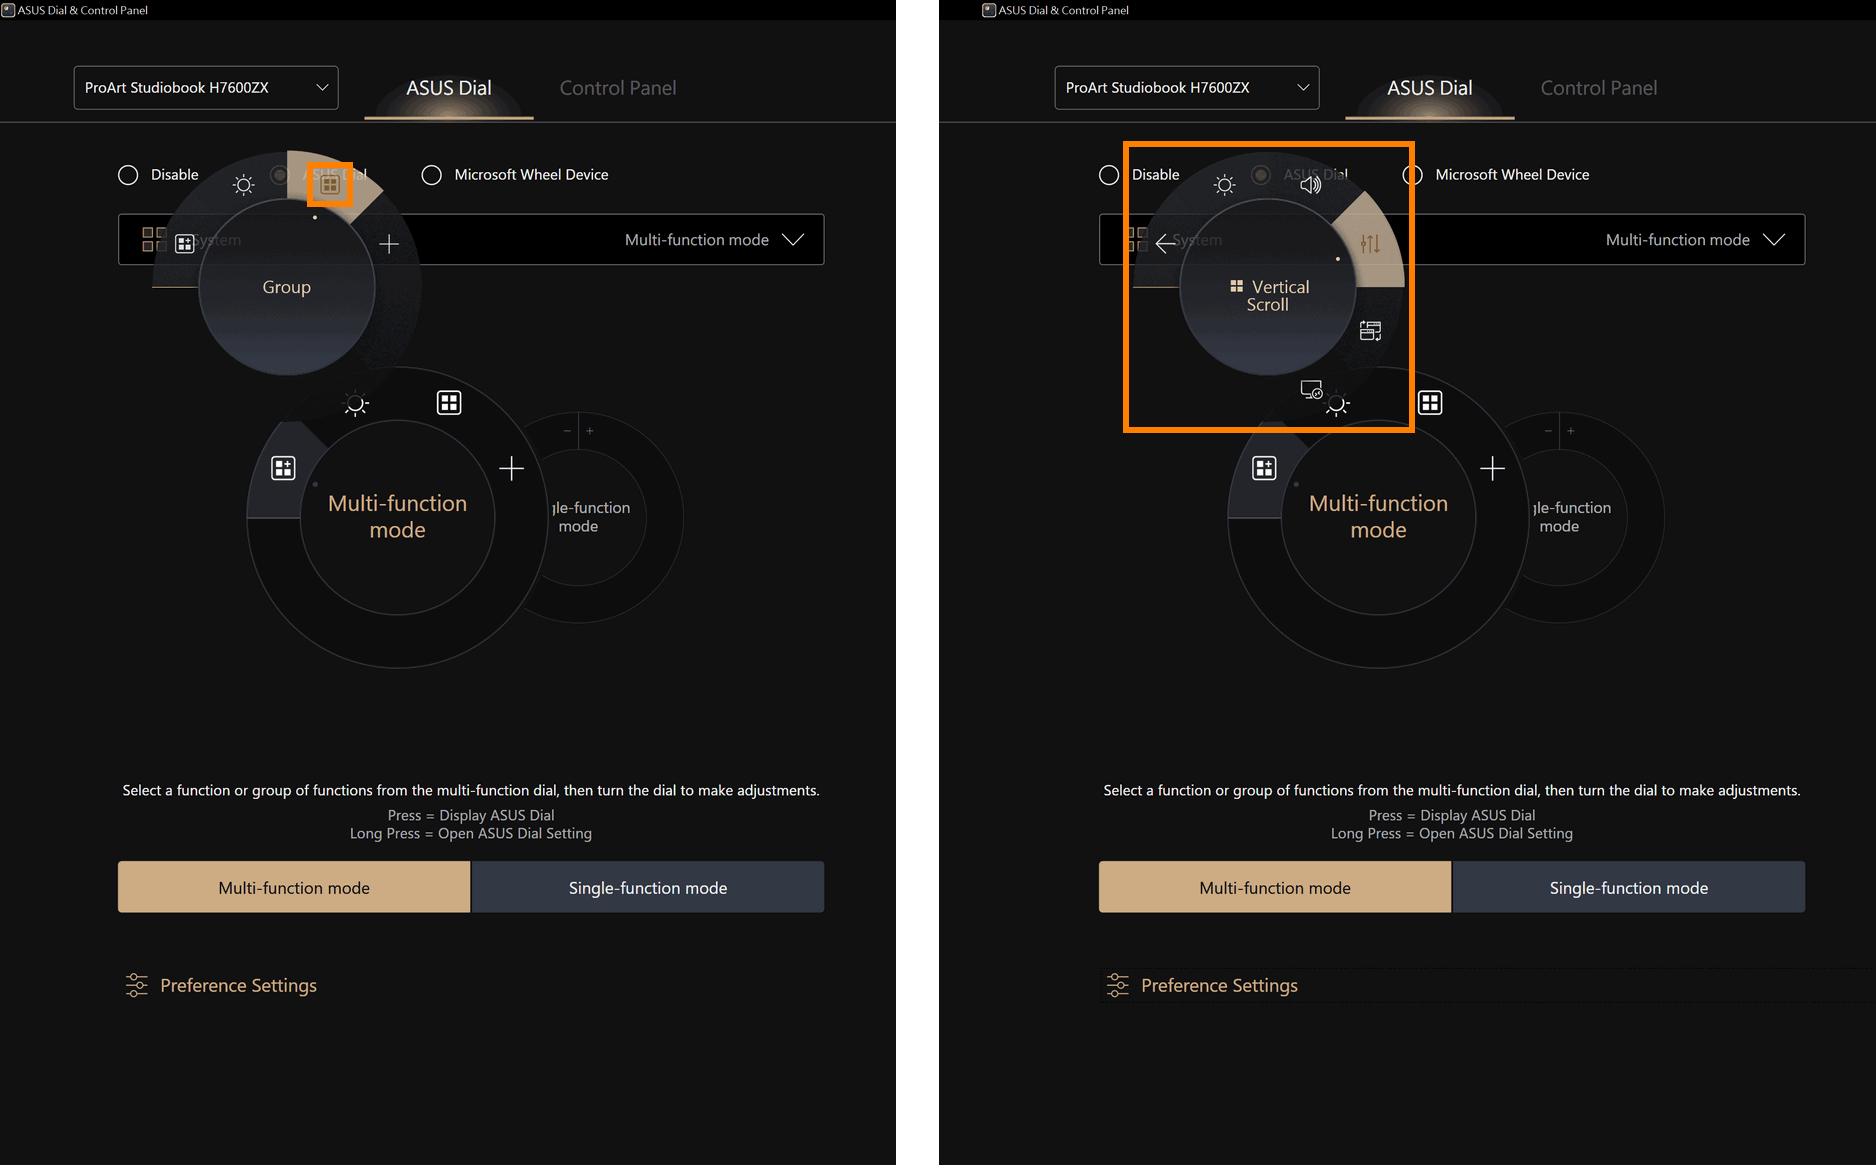
(1) Click ①[Multi-function mode], click ②[System volume] to edit the function, click ③[Delete] to delete the function, and click ④[Move] to adjust the position of the function.
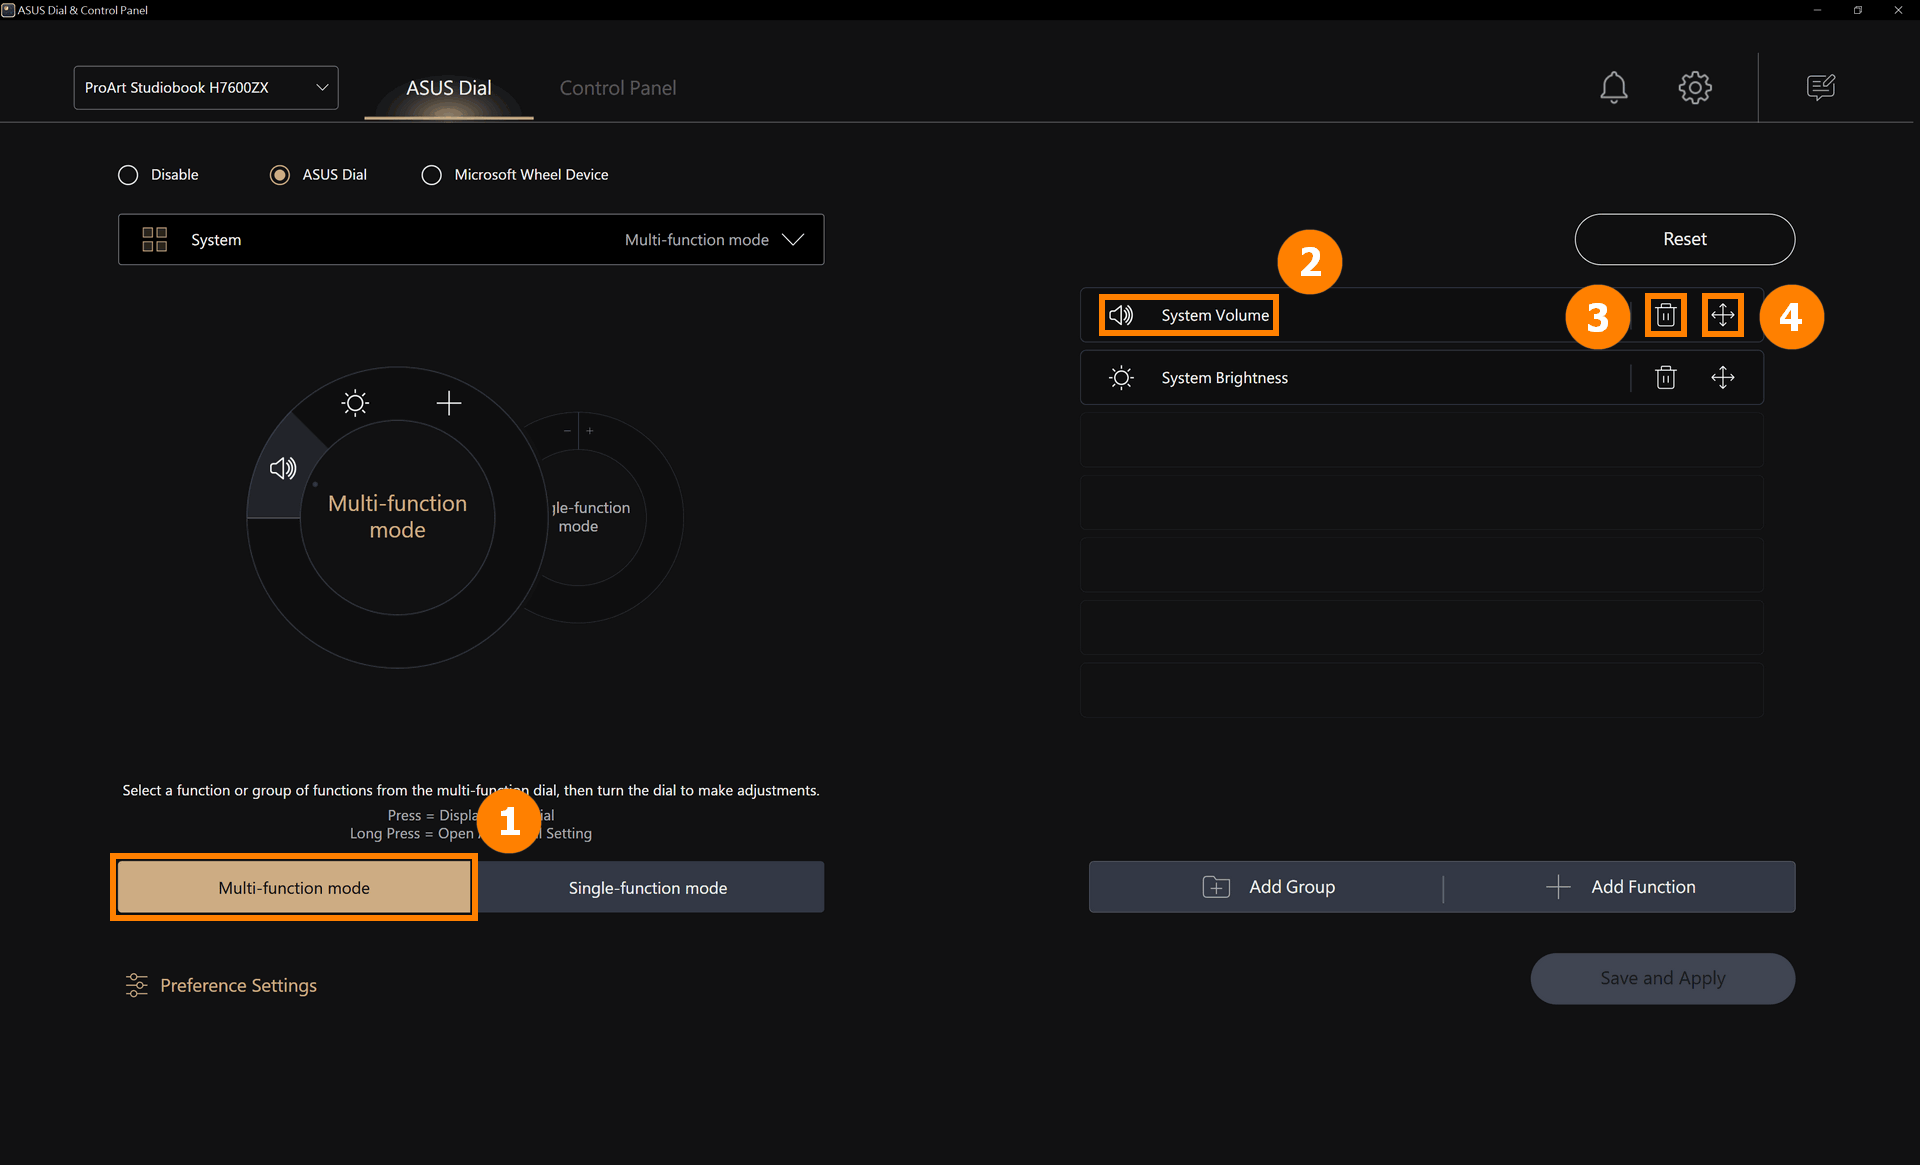
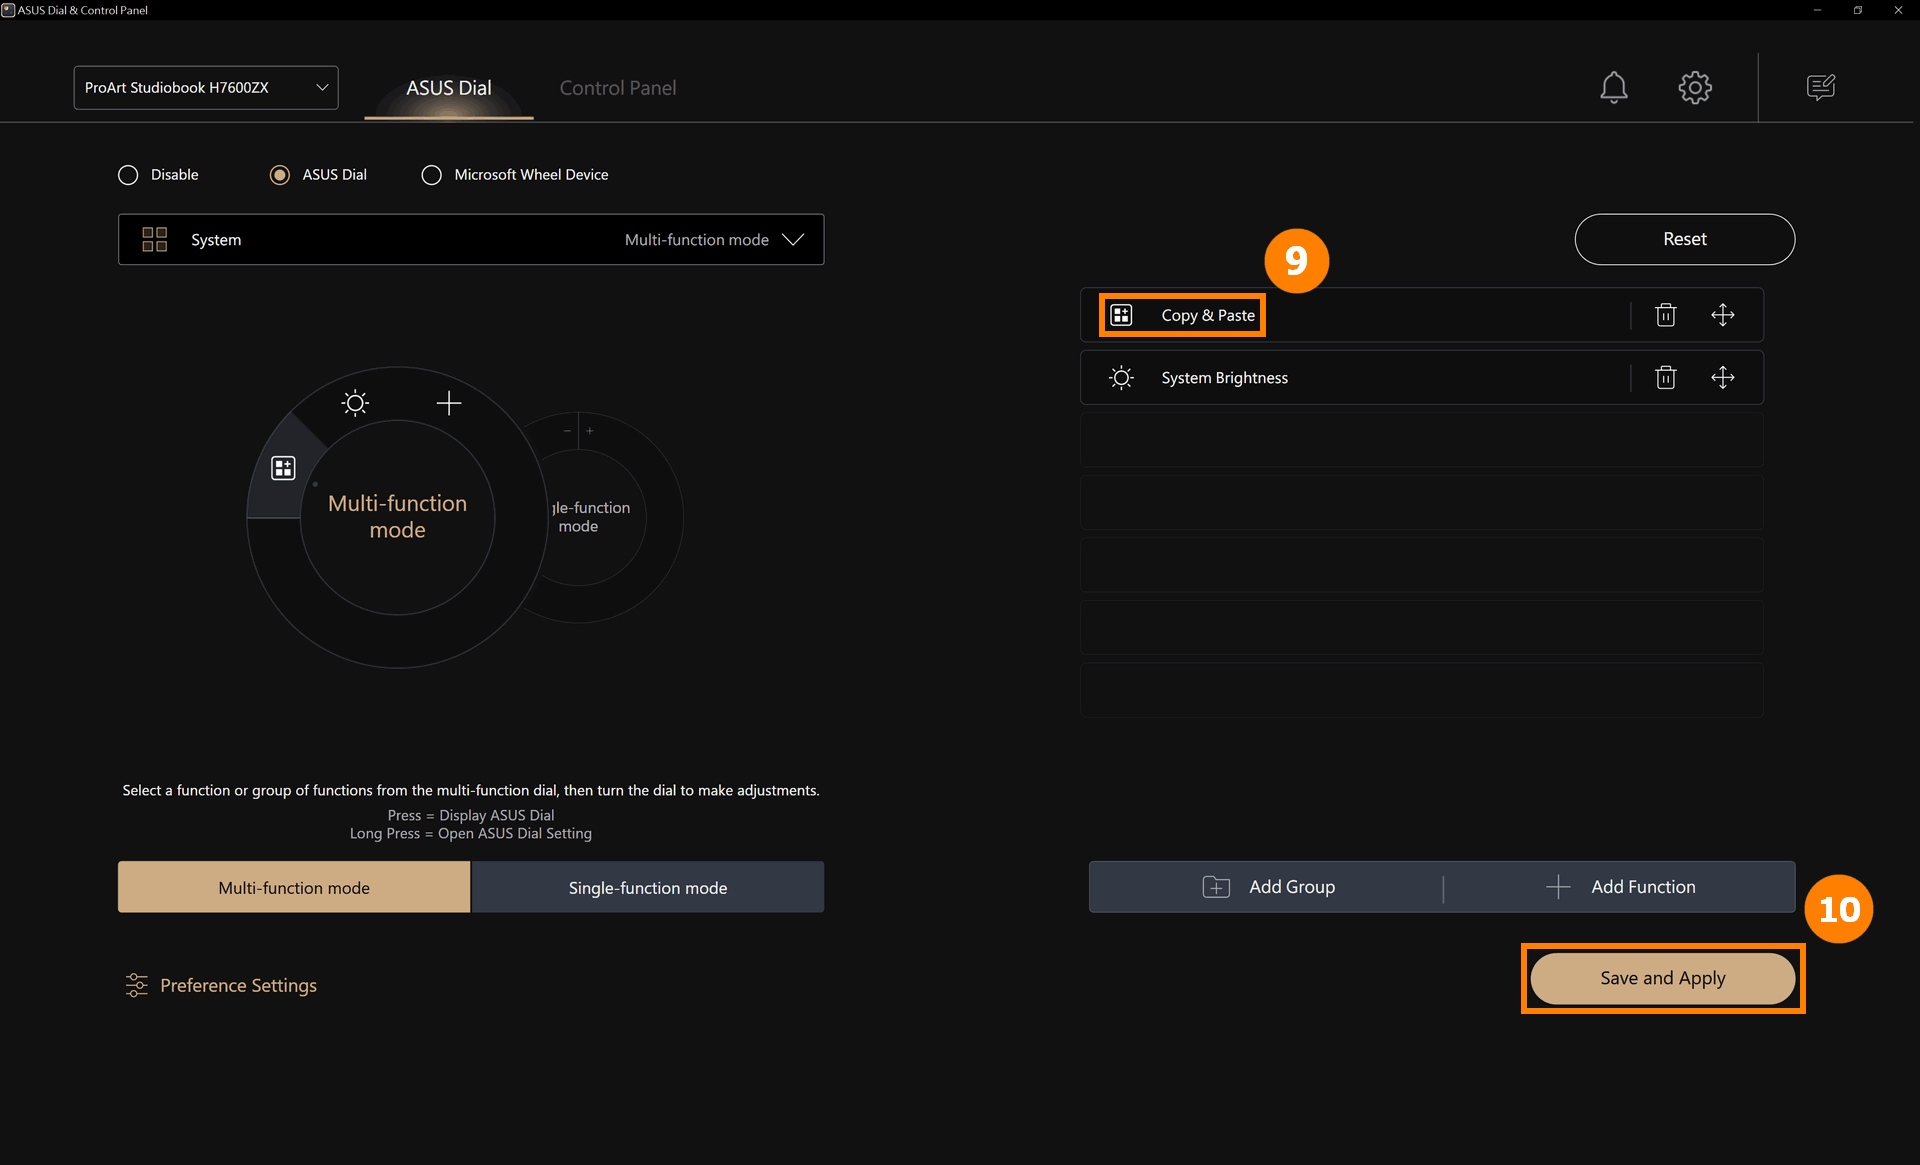
(2) You can replace the System Volume function by looking for other ASUS Dial default functions in ⑤[Area]. You can also set up custom functions, click ⑥[Add] to edit the custom function ⑦[function name and function content]. For example, in the figure below, you can rotate the ASUS Dial to the left to copy, click the mouse in the edit box, and then press the Ctrl key and the C key on the keyboard. click ⑧[Confirm] to finish editing.
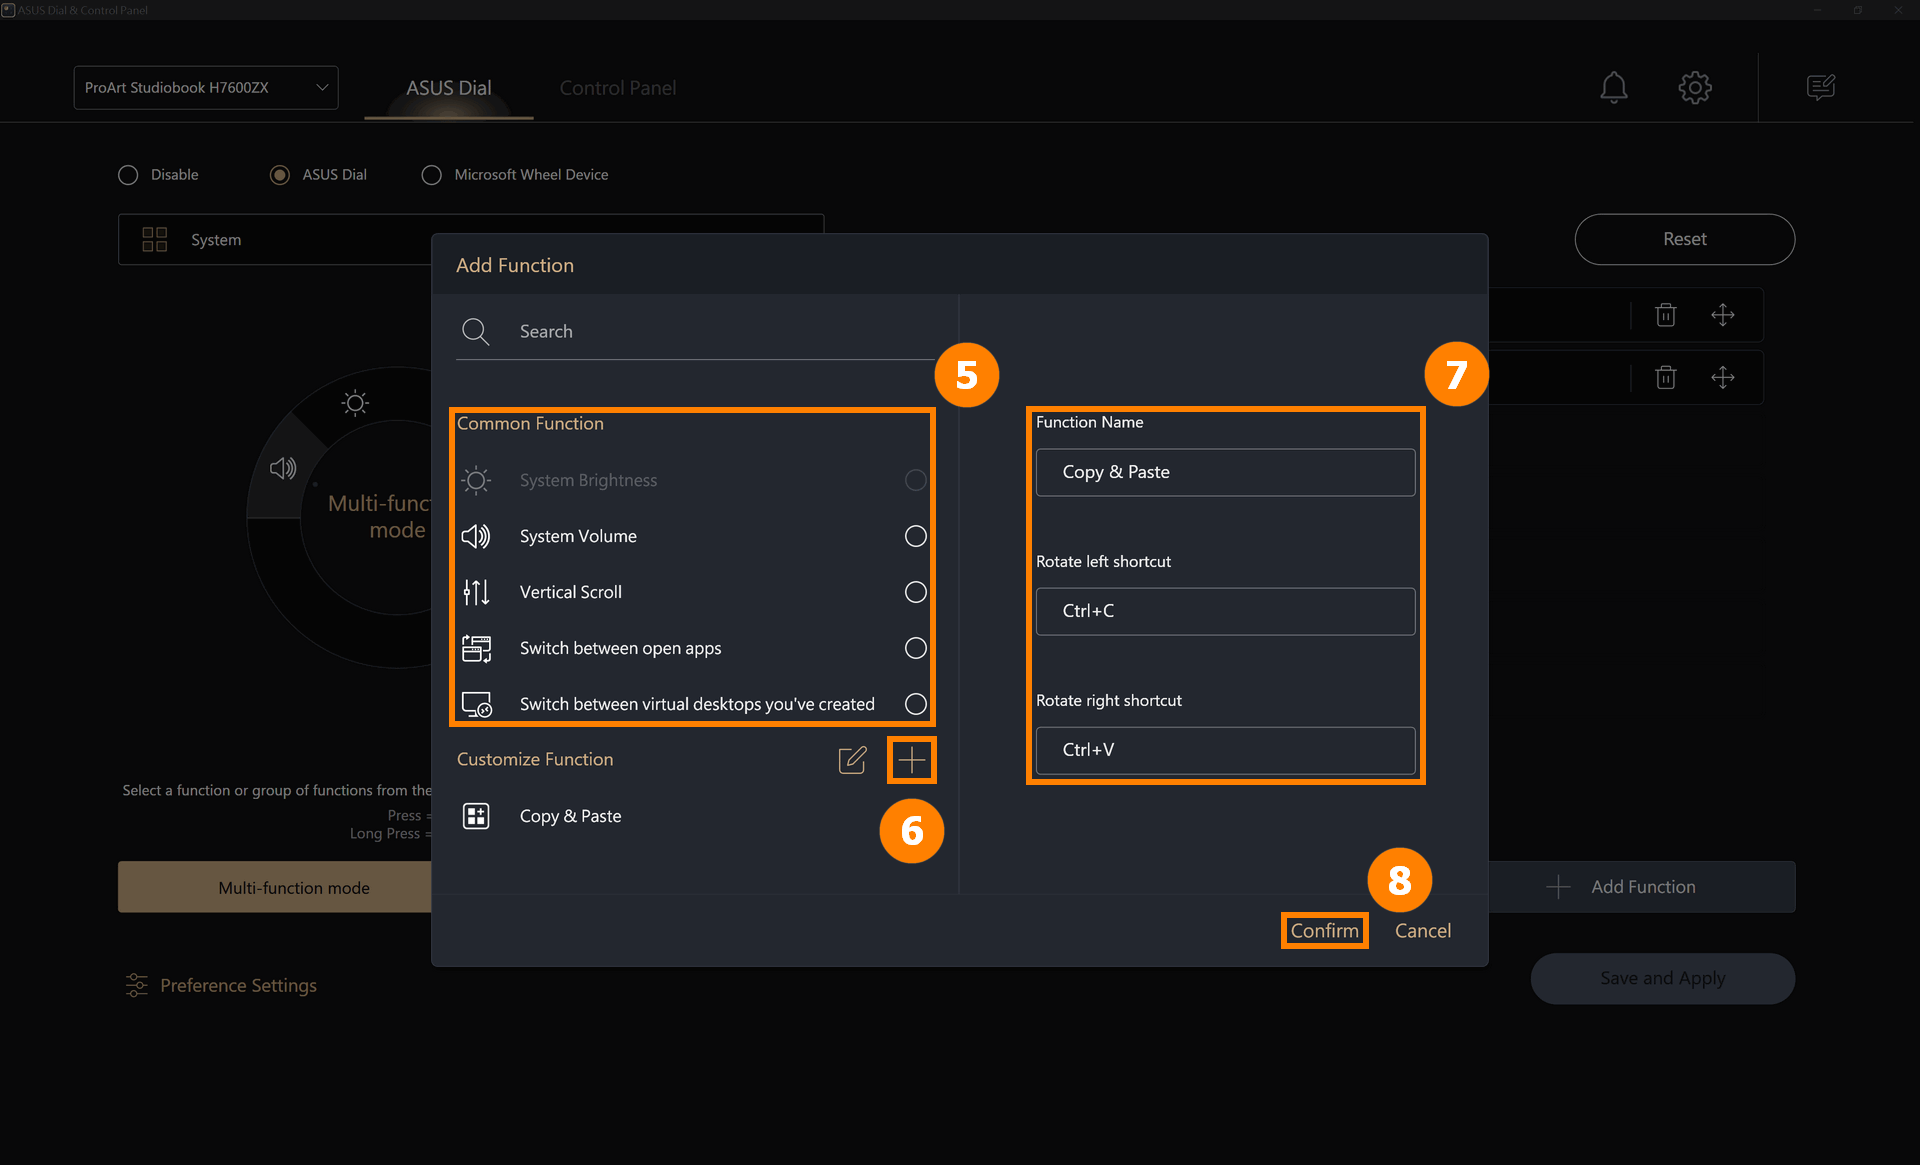
(3) Modified function ⑨[Copy and Paste] has been added, click ⑩[Save and Apply].
(4) Rotate the ASUS Dial to see that the new [Copy and Paste] function has been enabled.
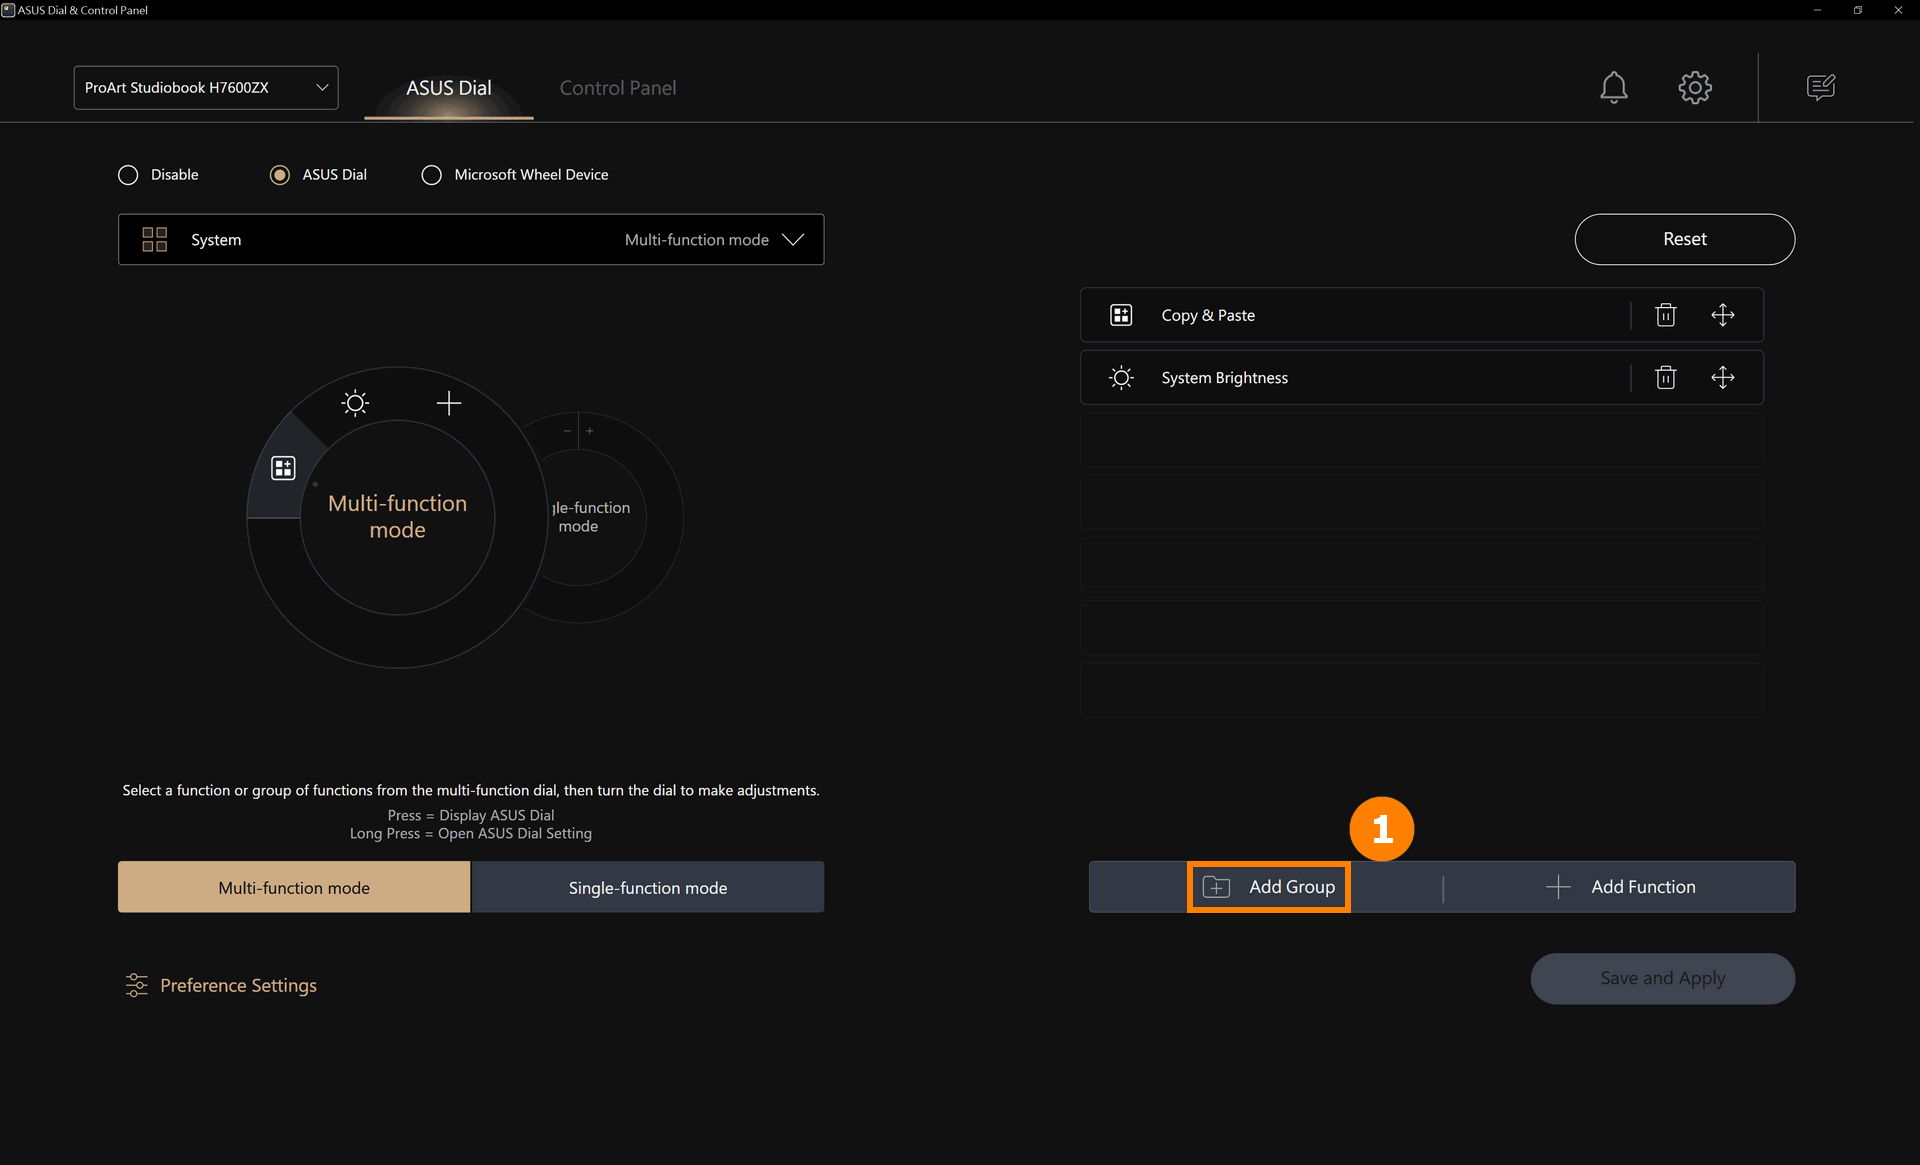
(1) Click ①[Add group].
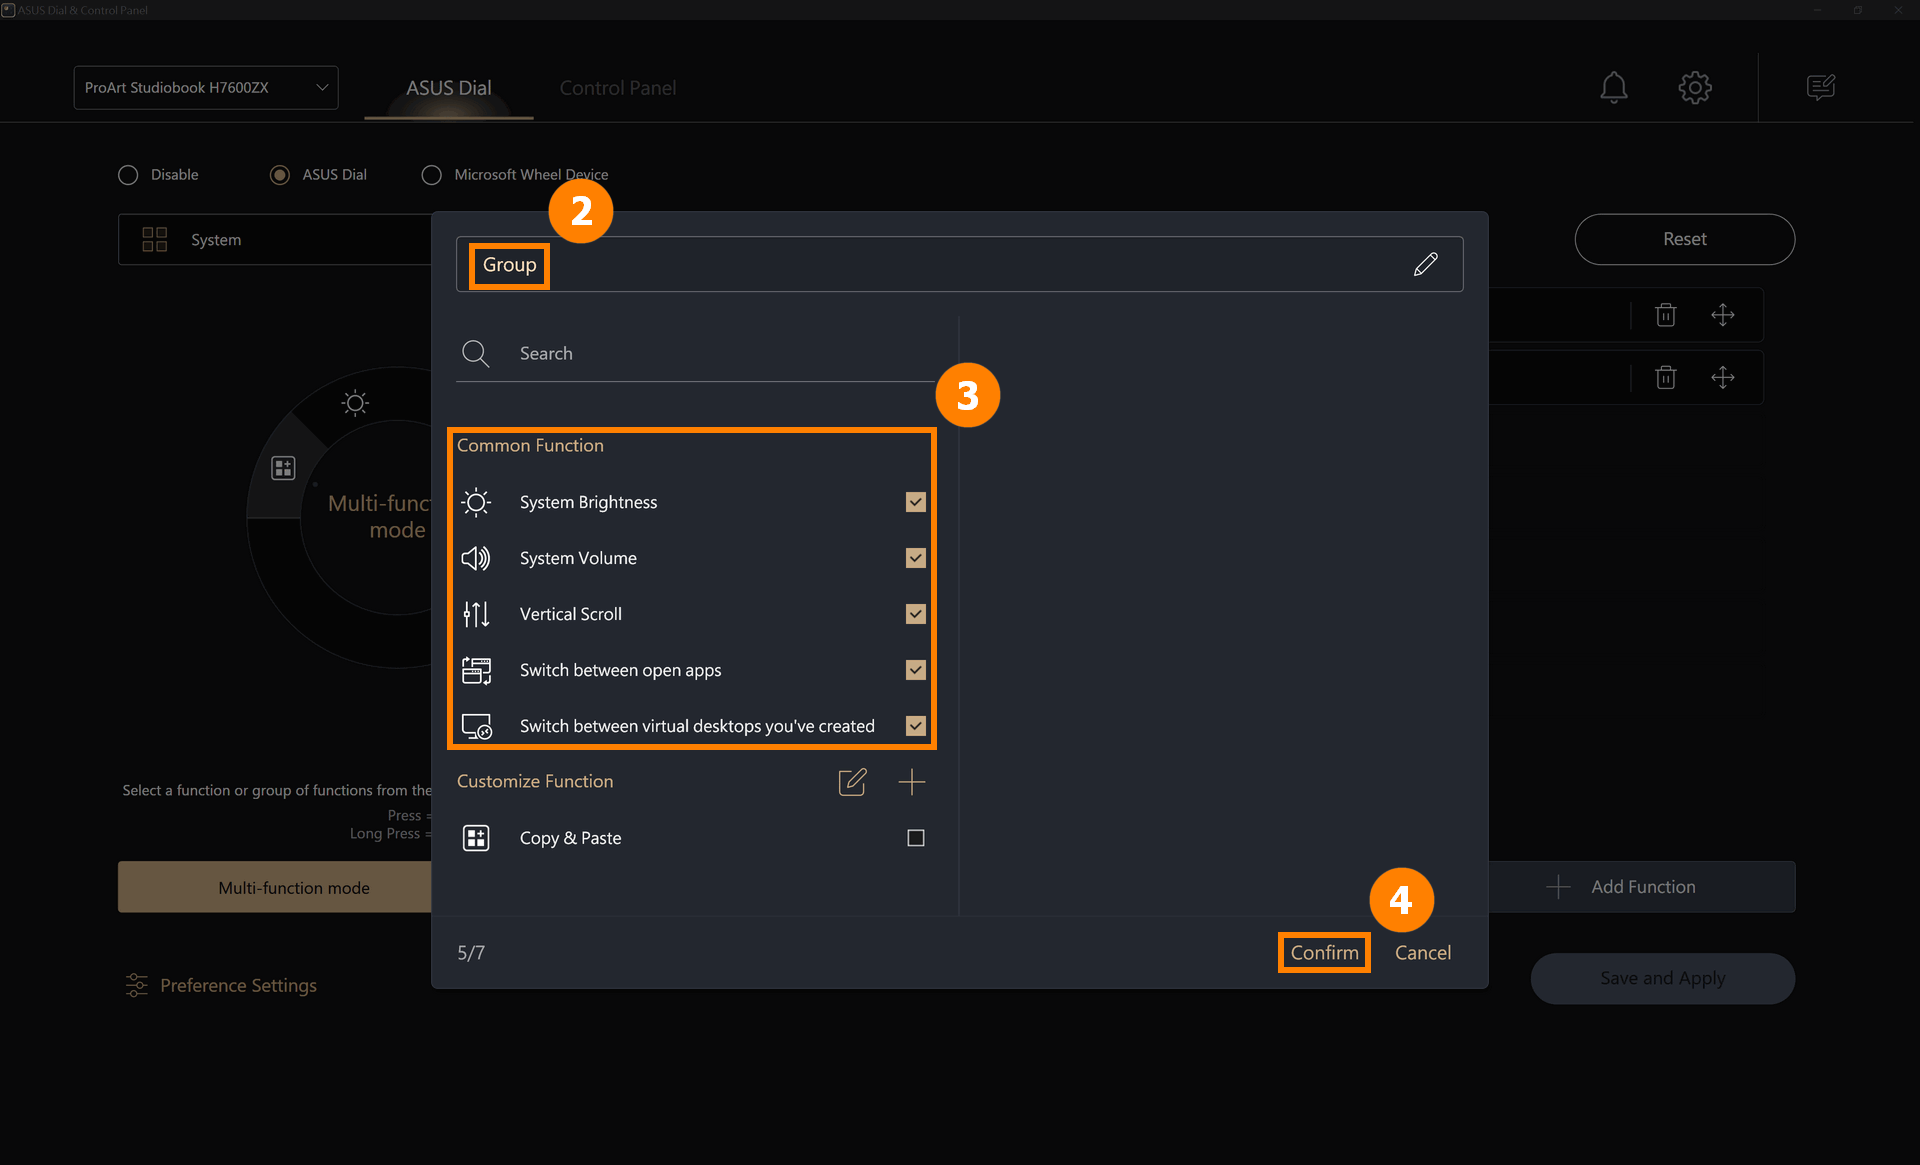
(2) Edit ②[Group name], select the ③[Function] you want, and then click ④[Confirm].
(3) The newly added group ⑤[Group] has been added, click ⑥[Save and Apply].
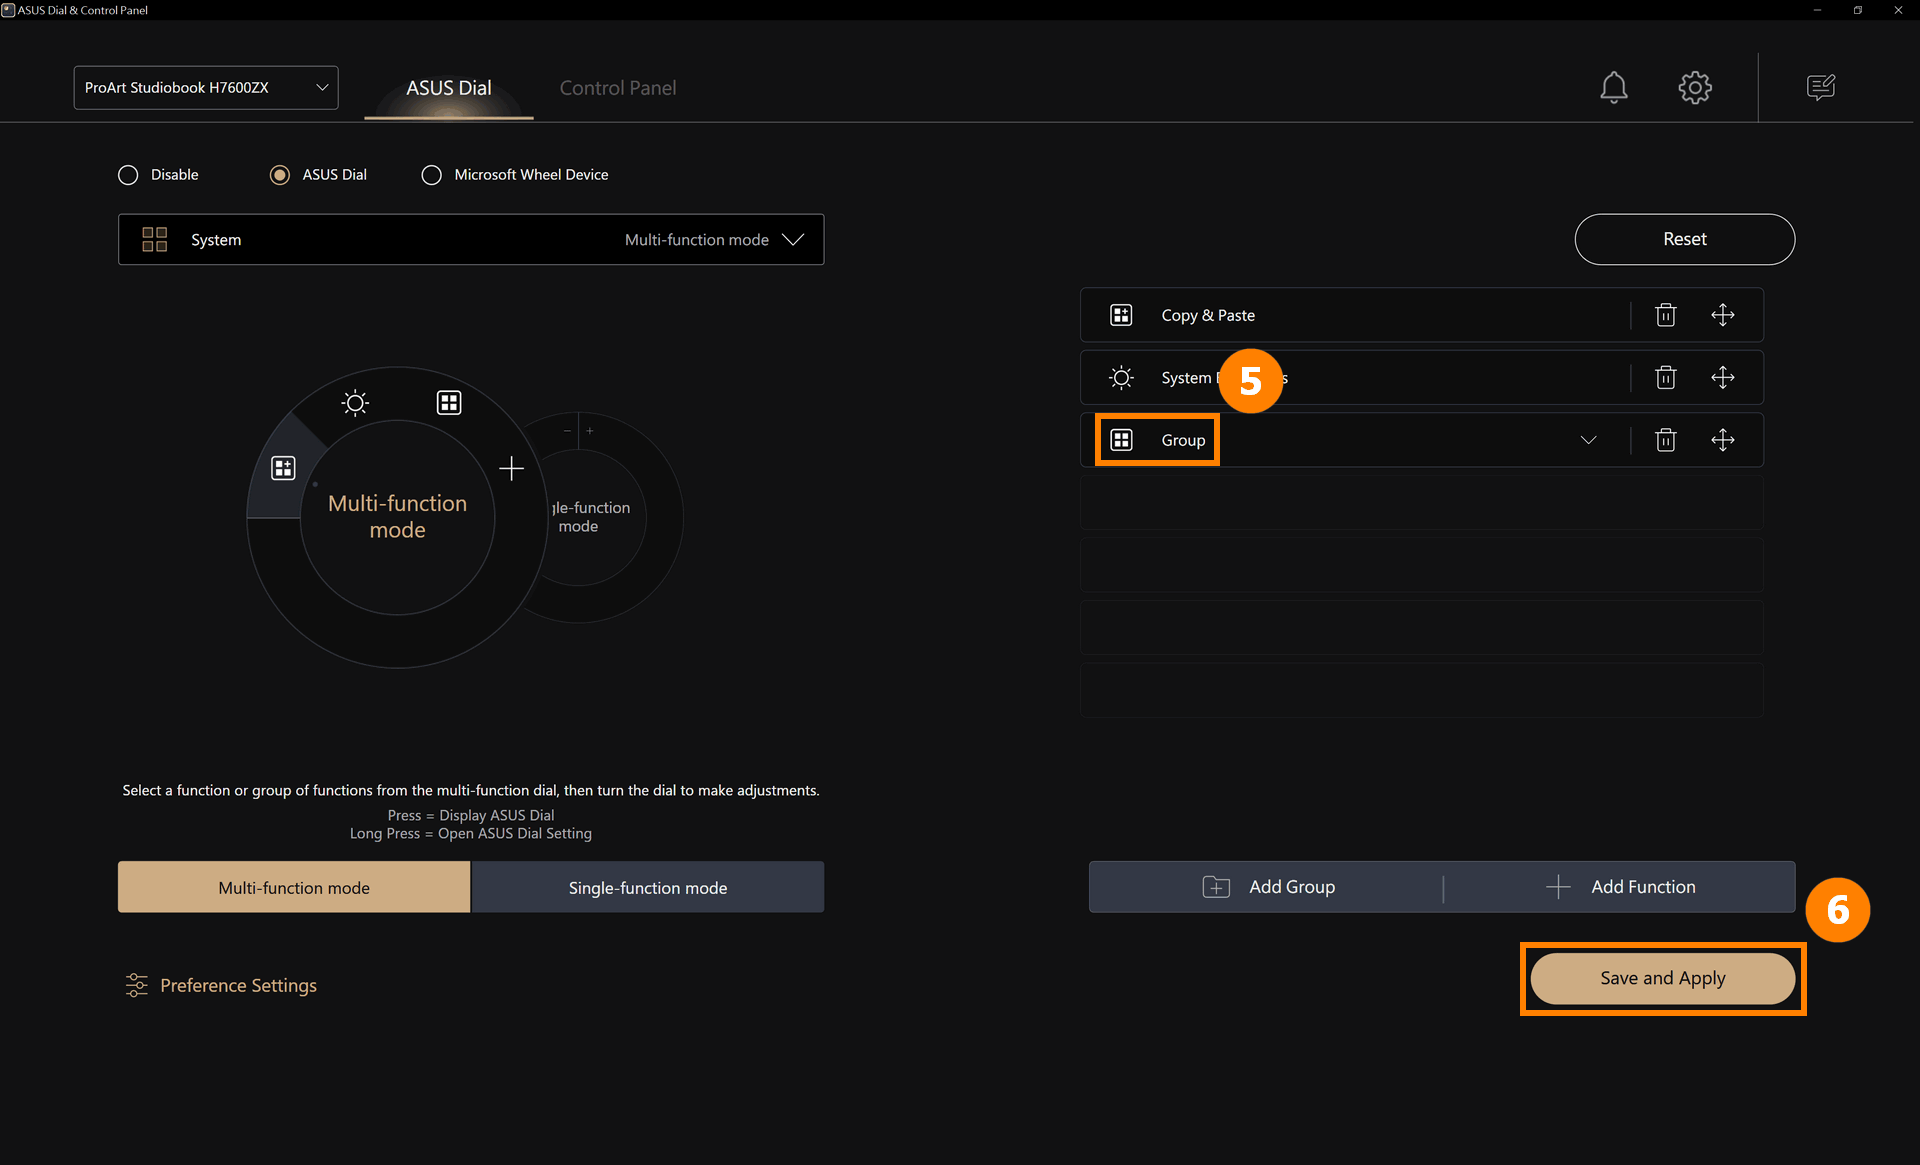
(4) Rotate the ASUS Dial to see that the new [System Function Key] function has been enabled, press the ASUS Dial with your finger to expand the functions in the group, and then use them.
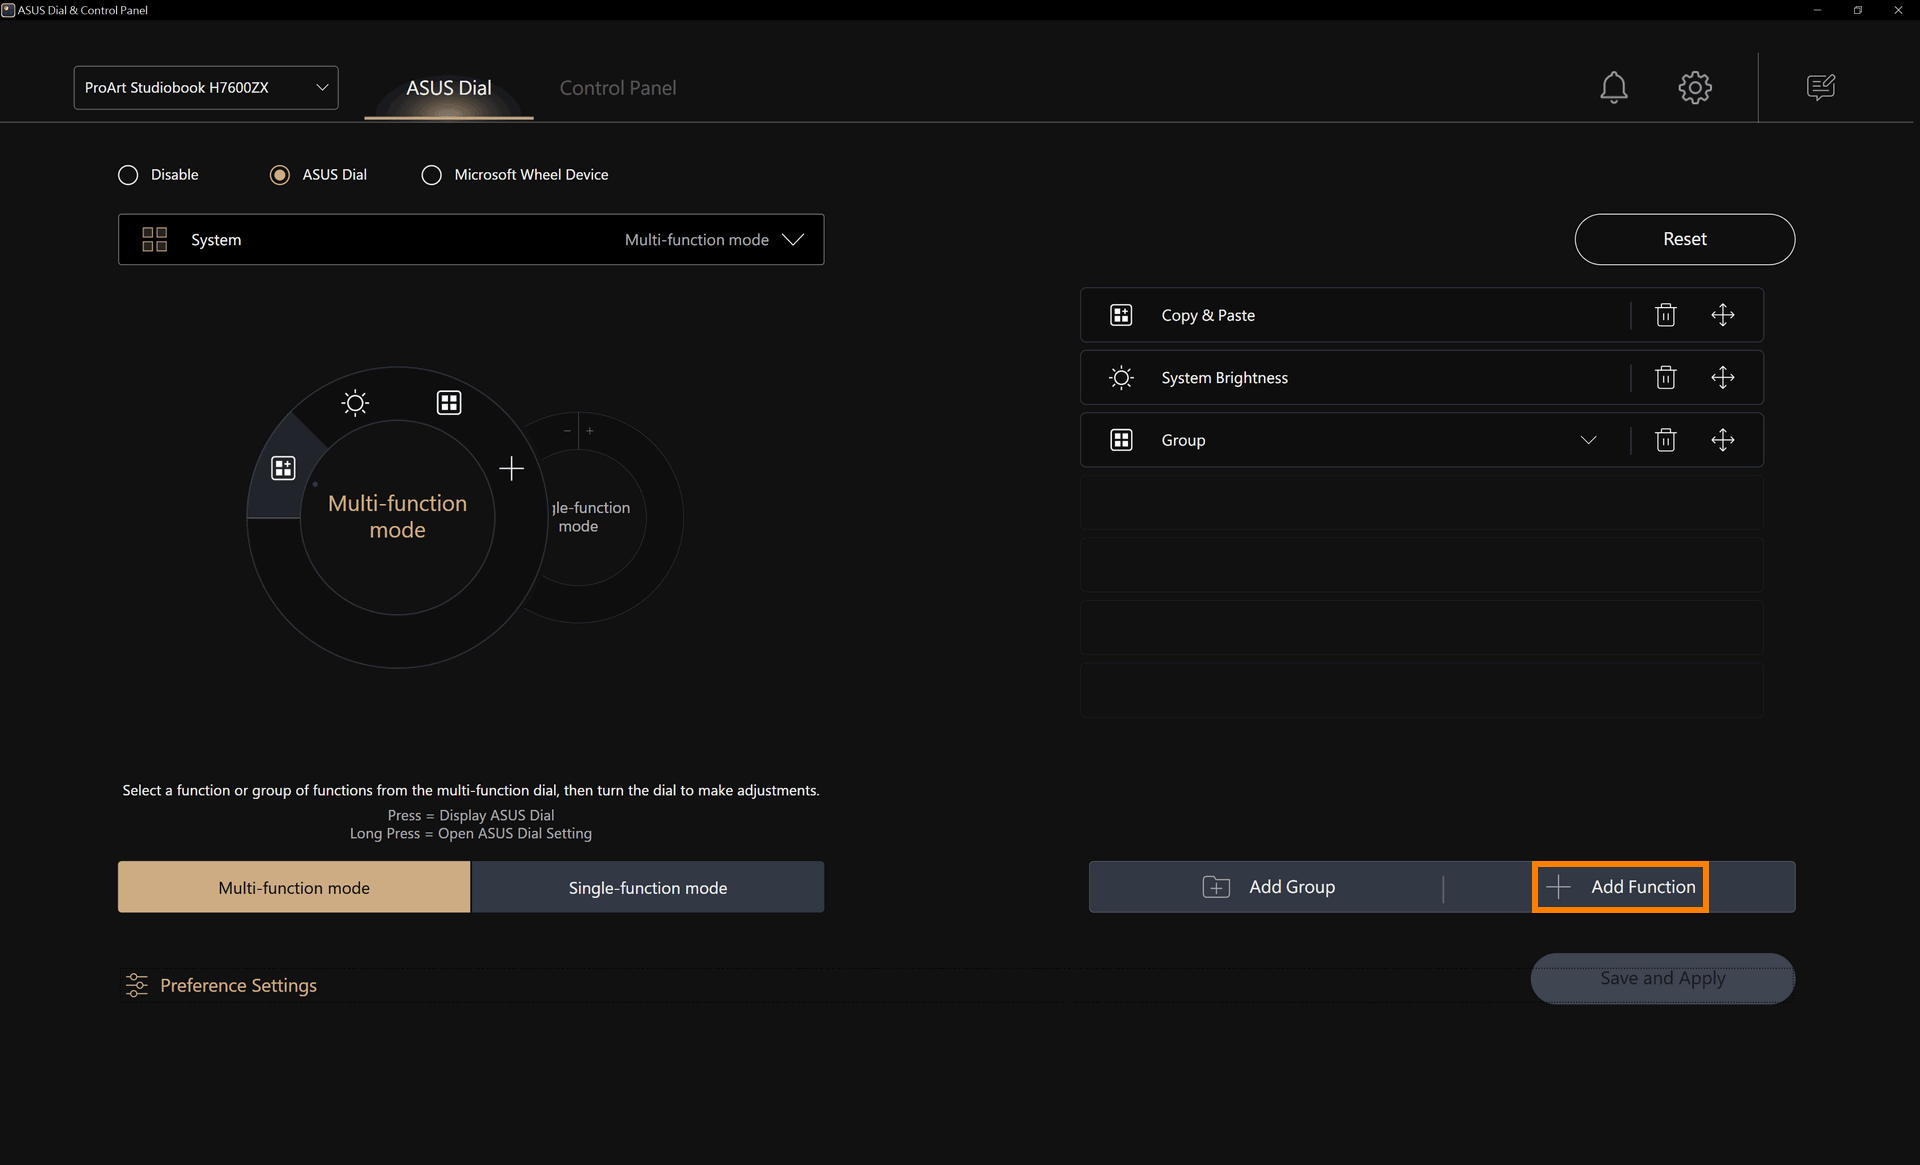
The steps for adding new functions are the same as those for [Edit an existing feature], please refer to the [Edit an existing feature] section.
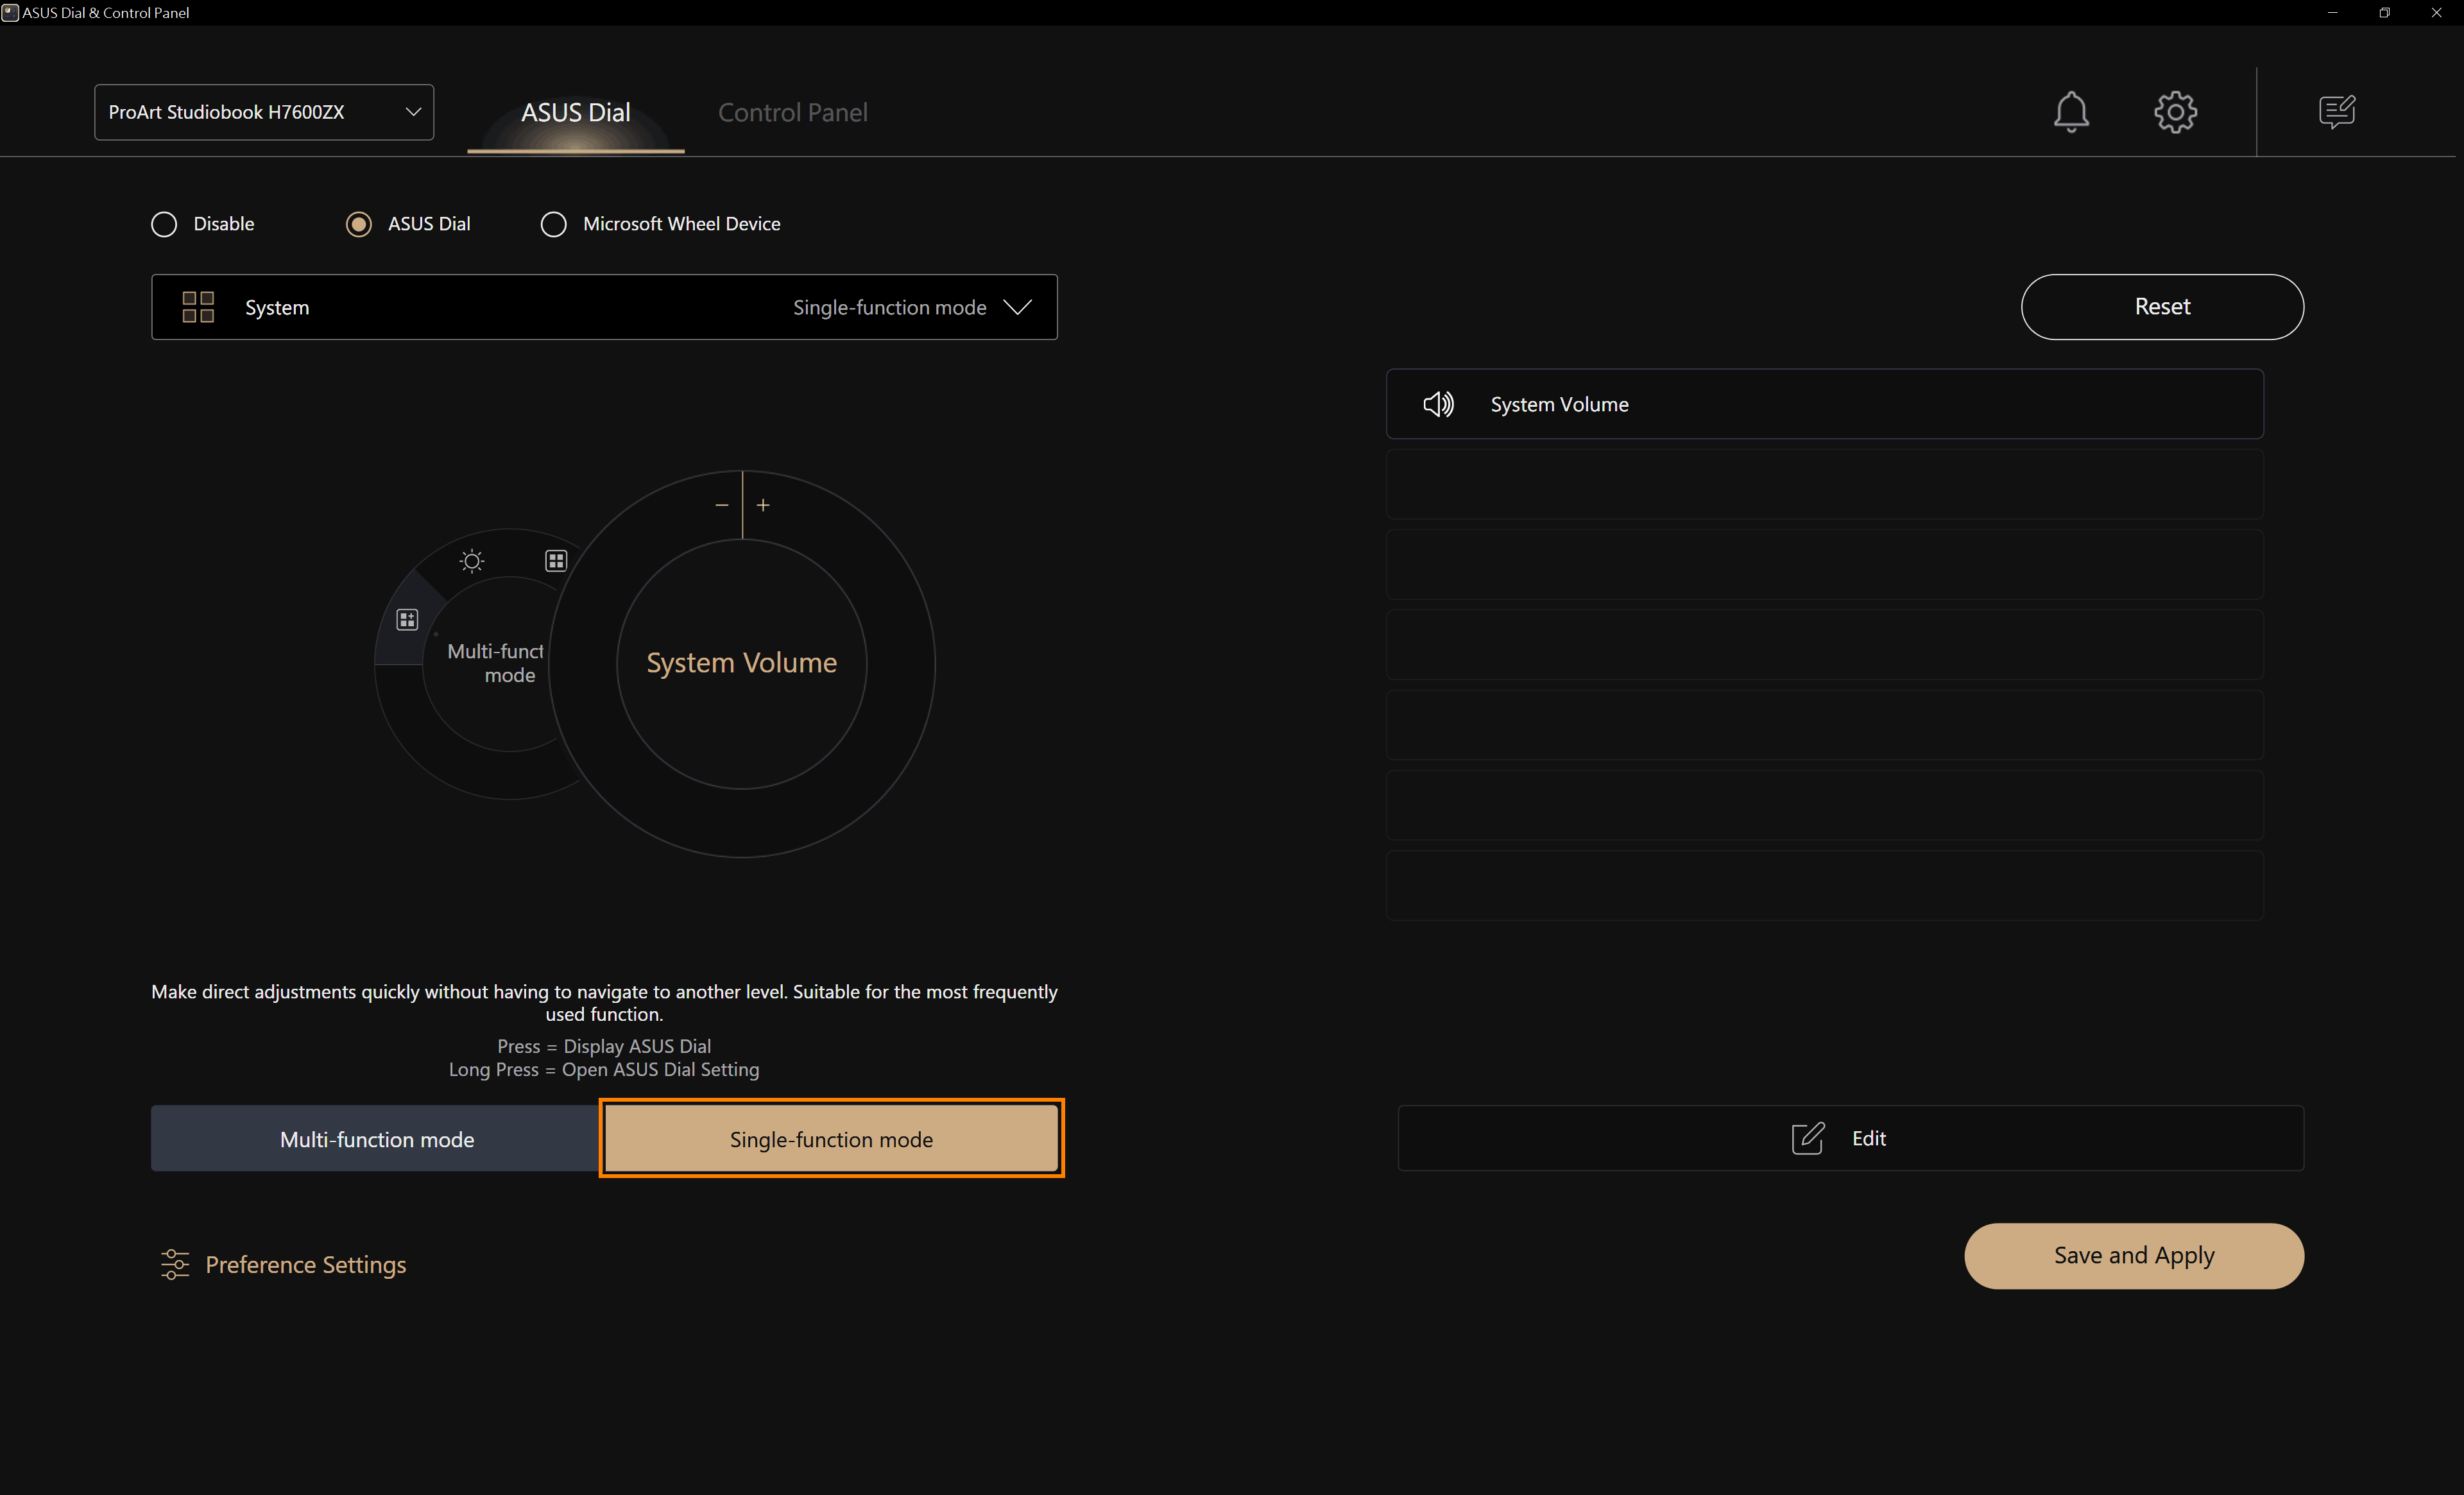
The creation and editing of the Single-function mode is the same as that of the Multi-select function mode, and will not be repeated. The Single-function mode only supports the use of one function, but when you support rotating the Dial, you can use the function without having to select it.
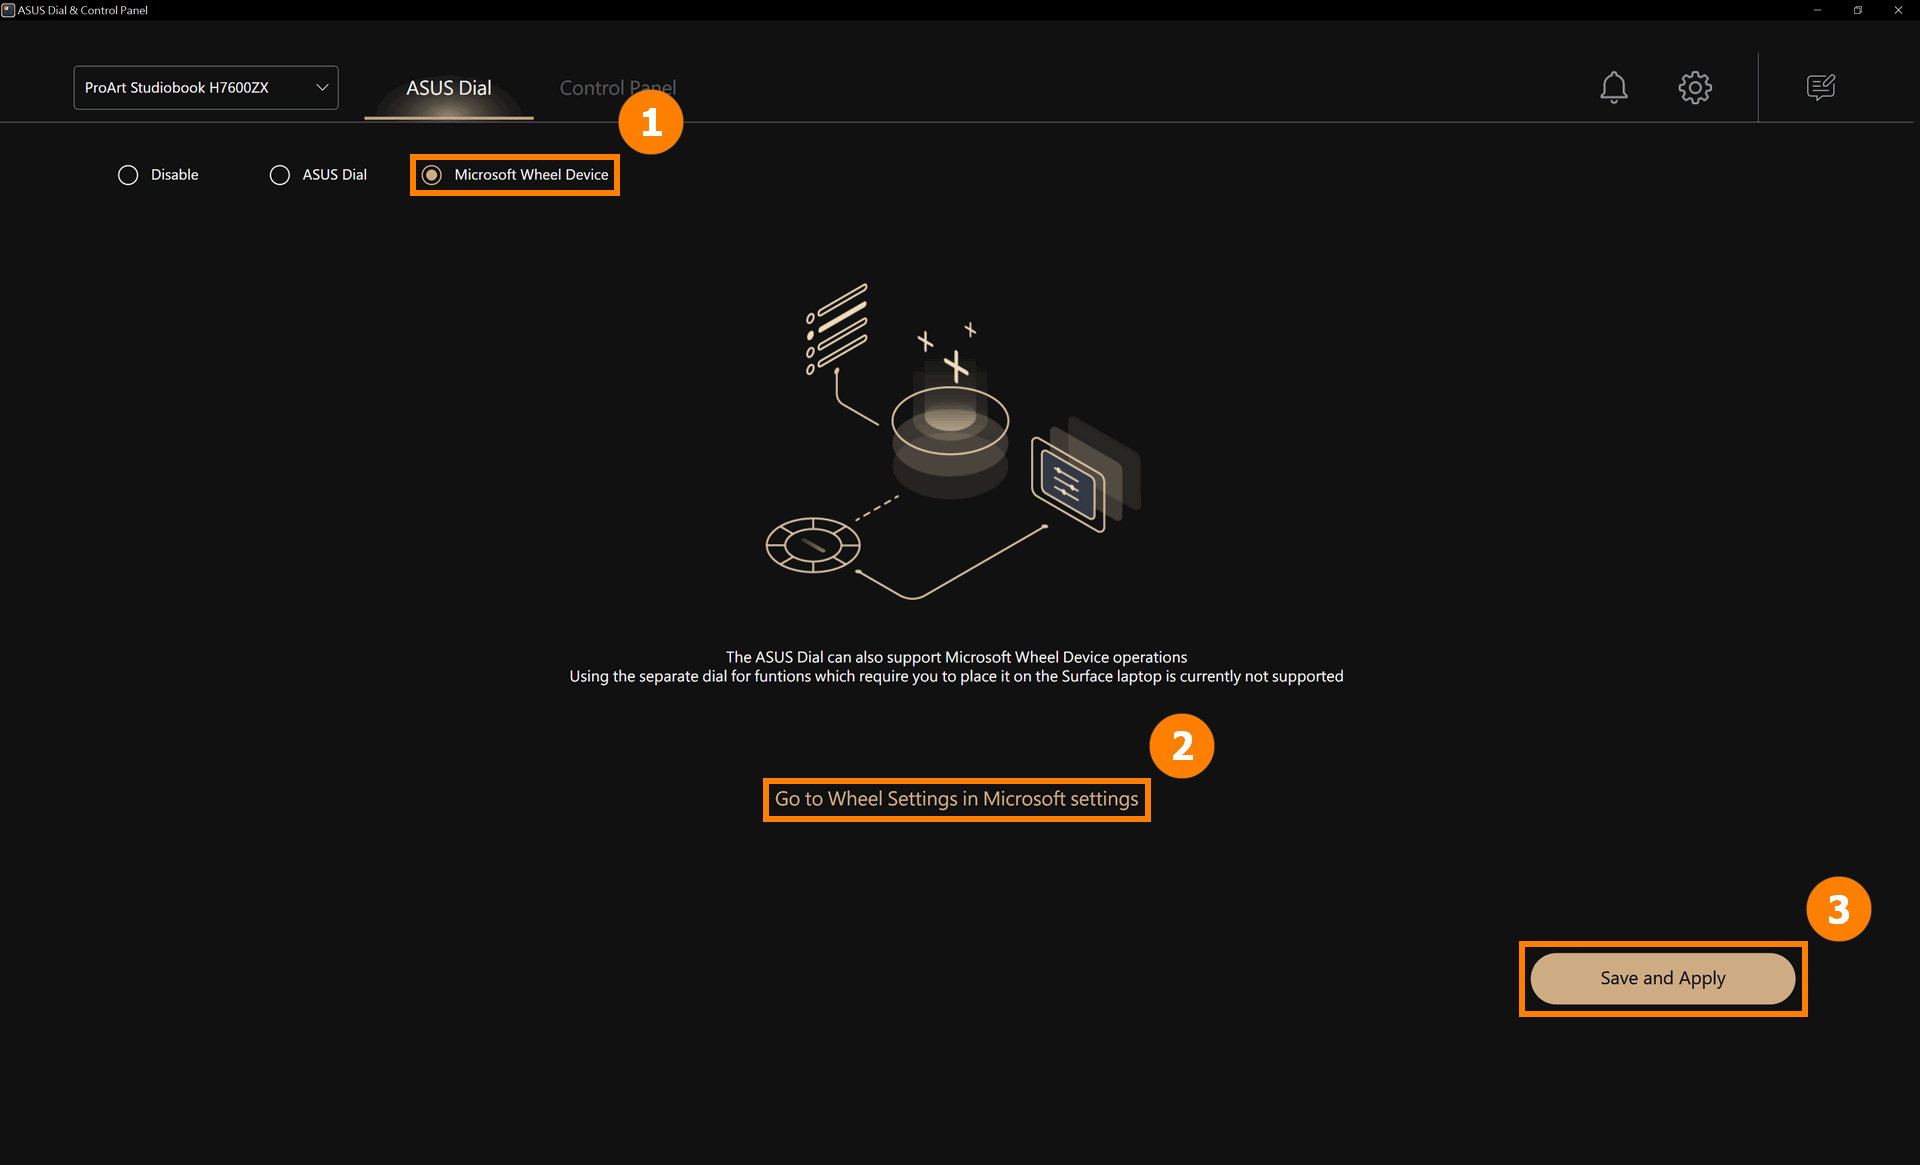
(1) Tap ①[Microsoft Wheel Device], tap ②[Save and apply]. [Microsoft Wheel Device] is a built-in function for the Windows system, click ③[Go to Wheel Settings in Microsoft settings] to modify the functions performed by ASUS Dial.
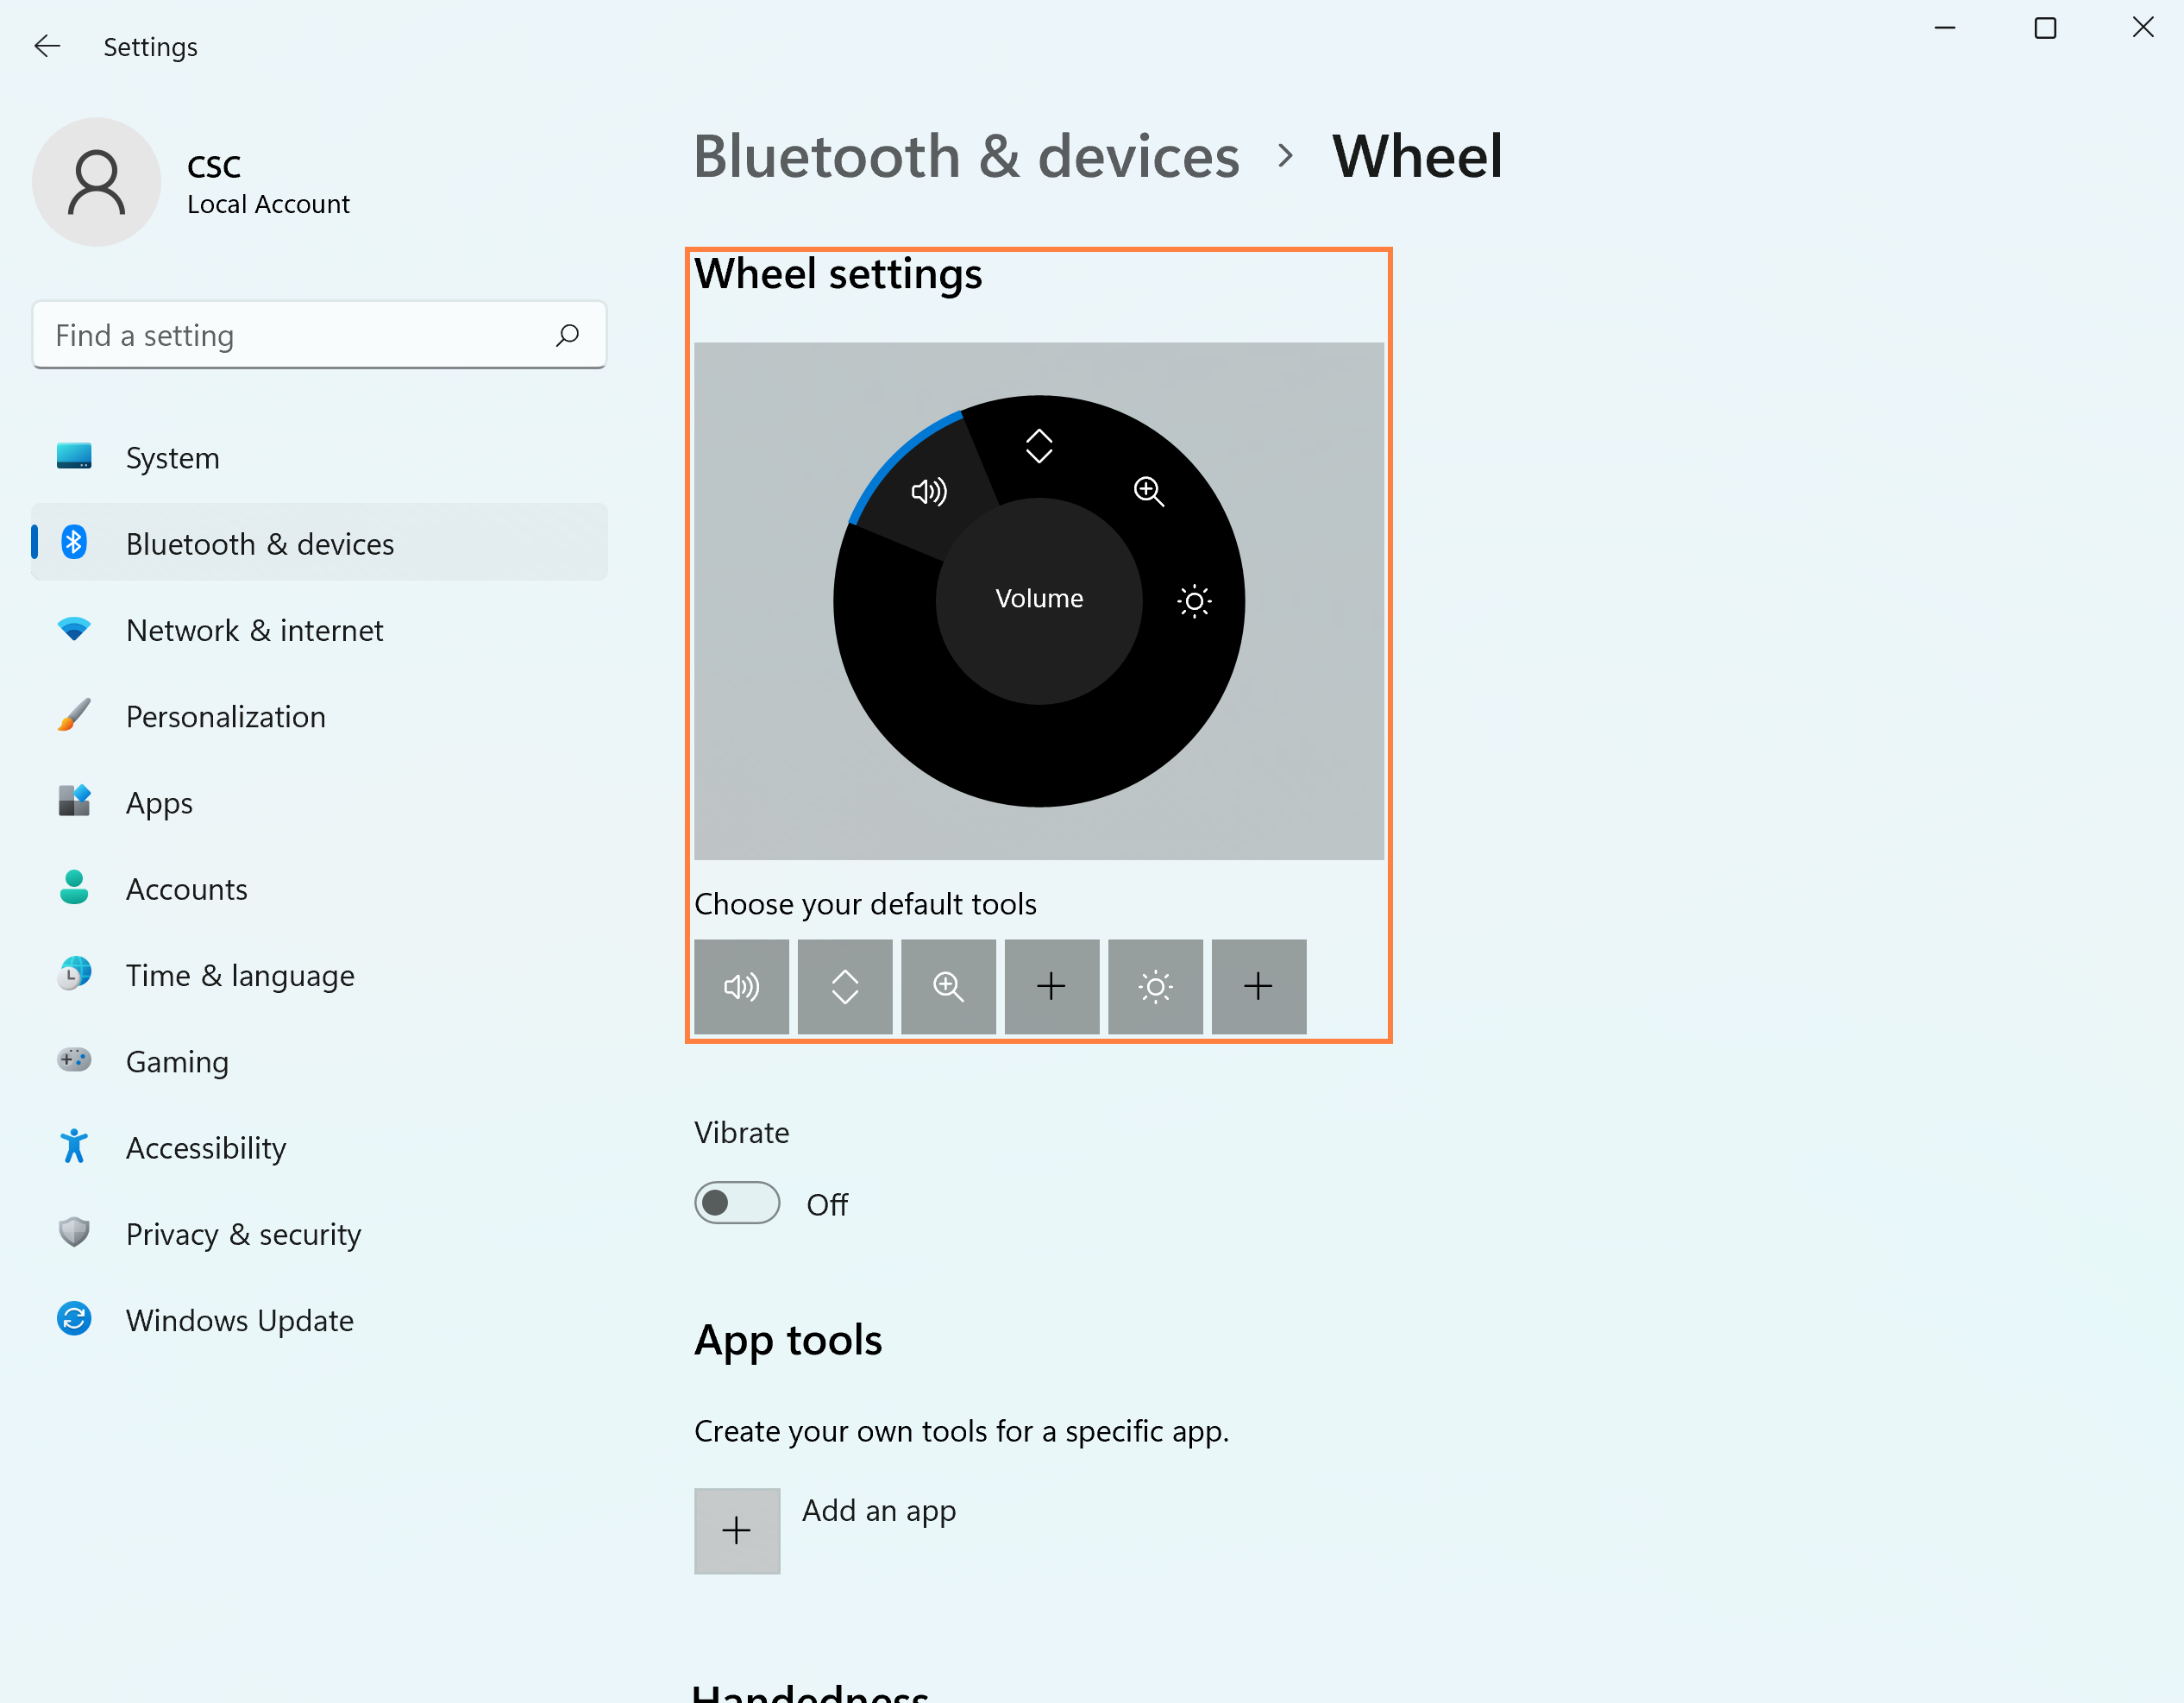
(2) Edit [Wheel settings].
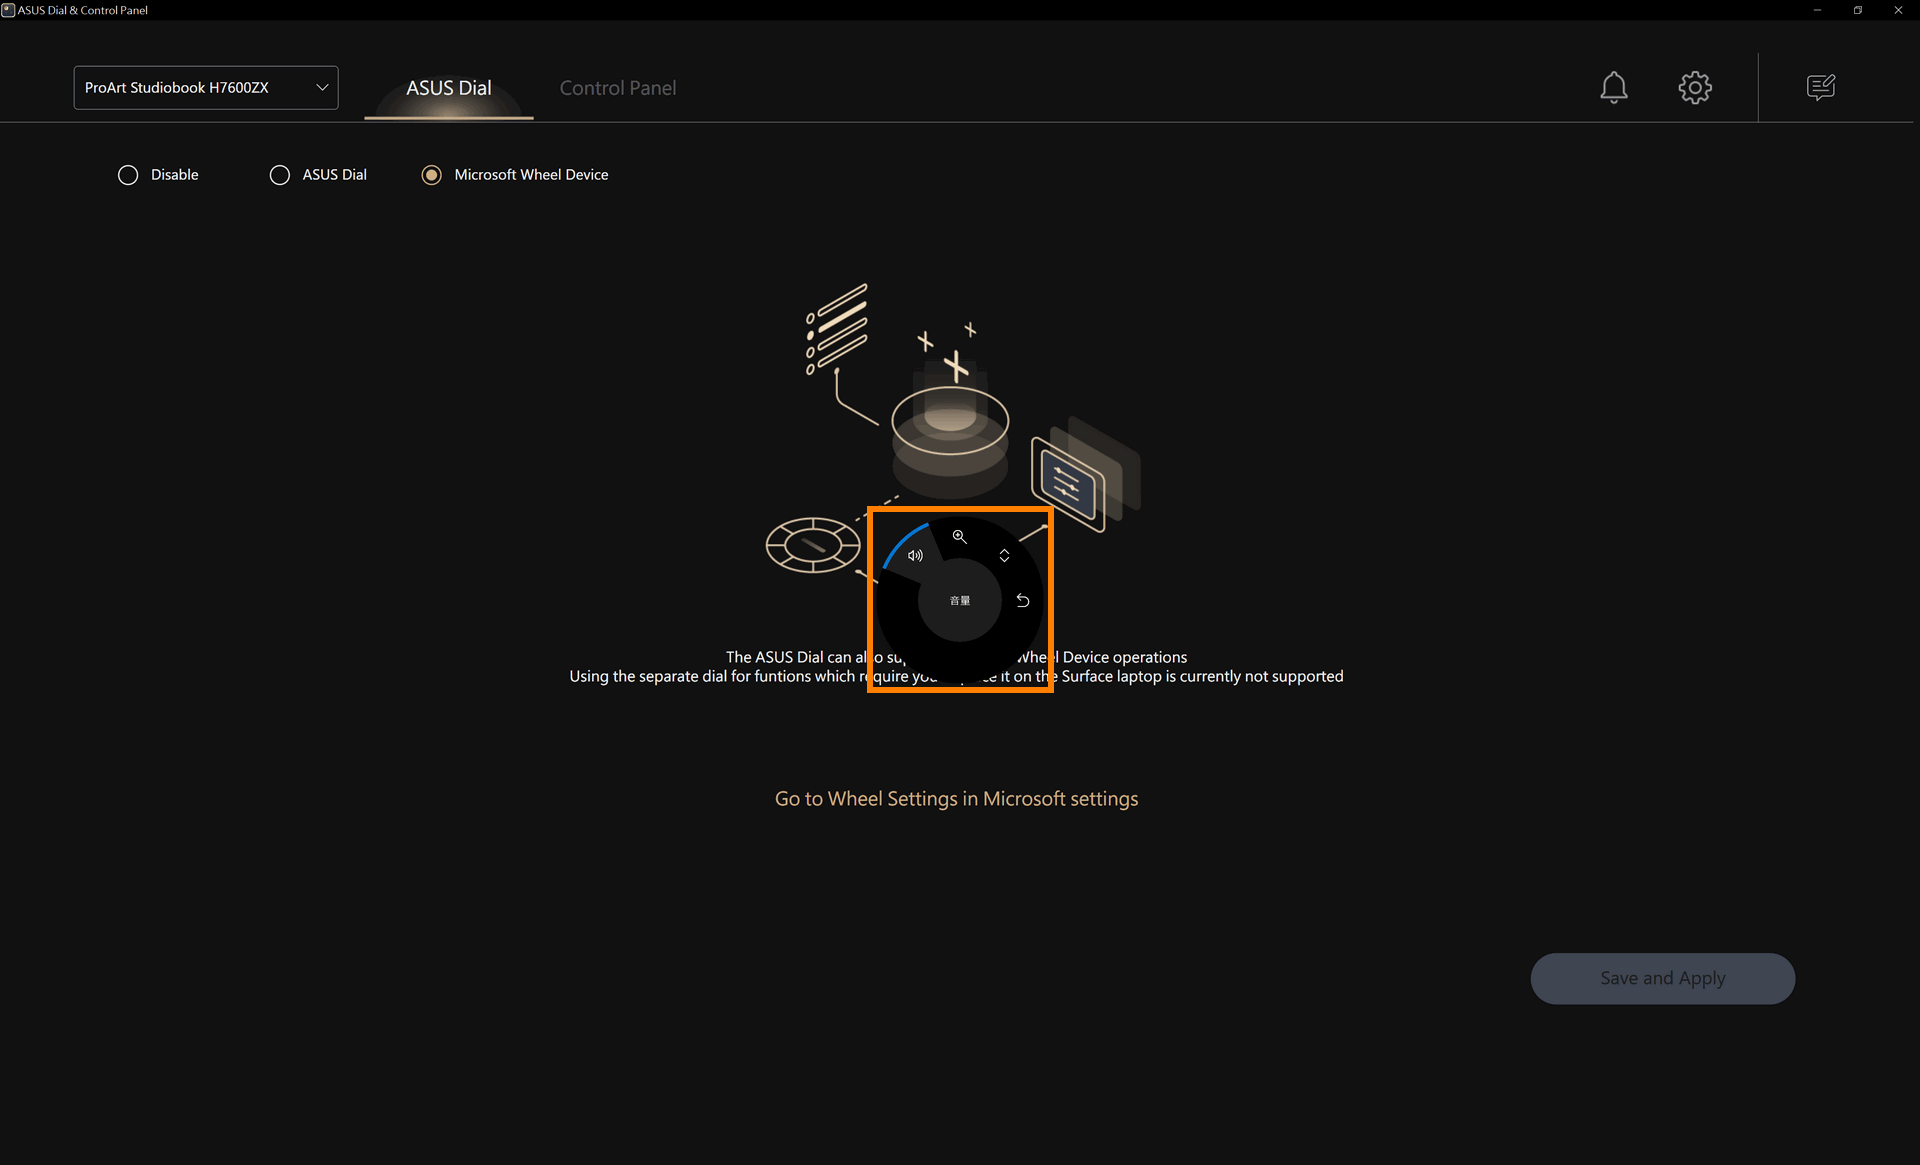
(3) After modification, rotate ASUS Dial, the Microsoft Wheel page will be brought up, rotate ASUS Dial left and right, select the volume adjustment function, and then press ASUS Dial.
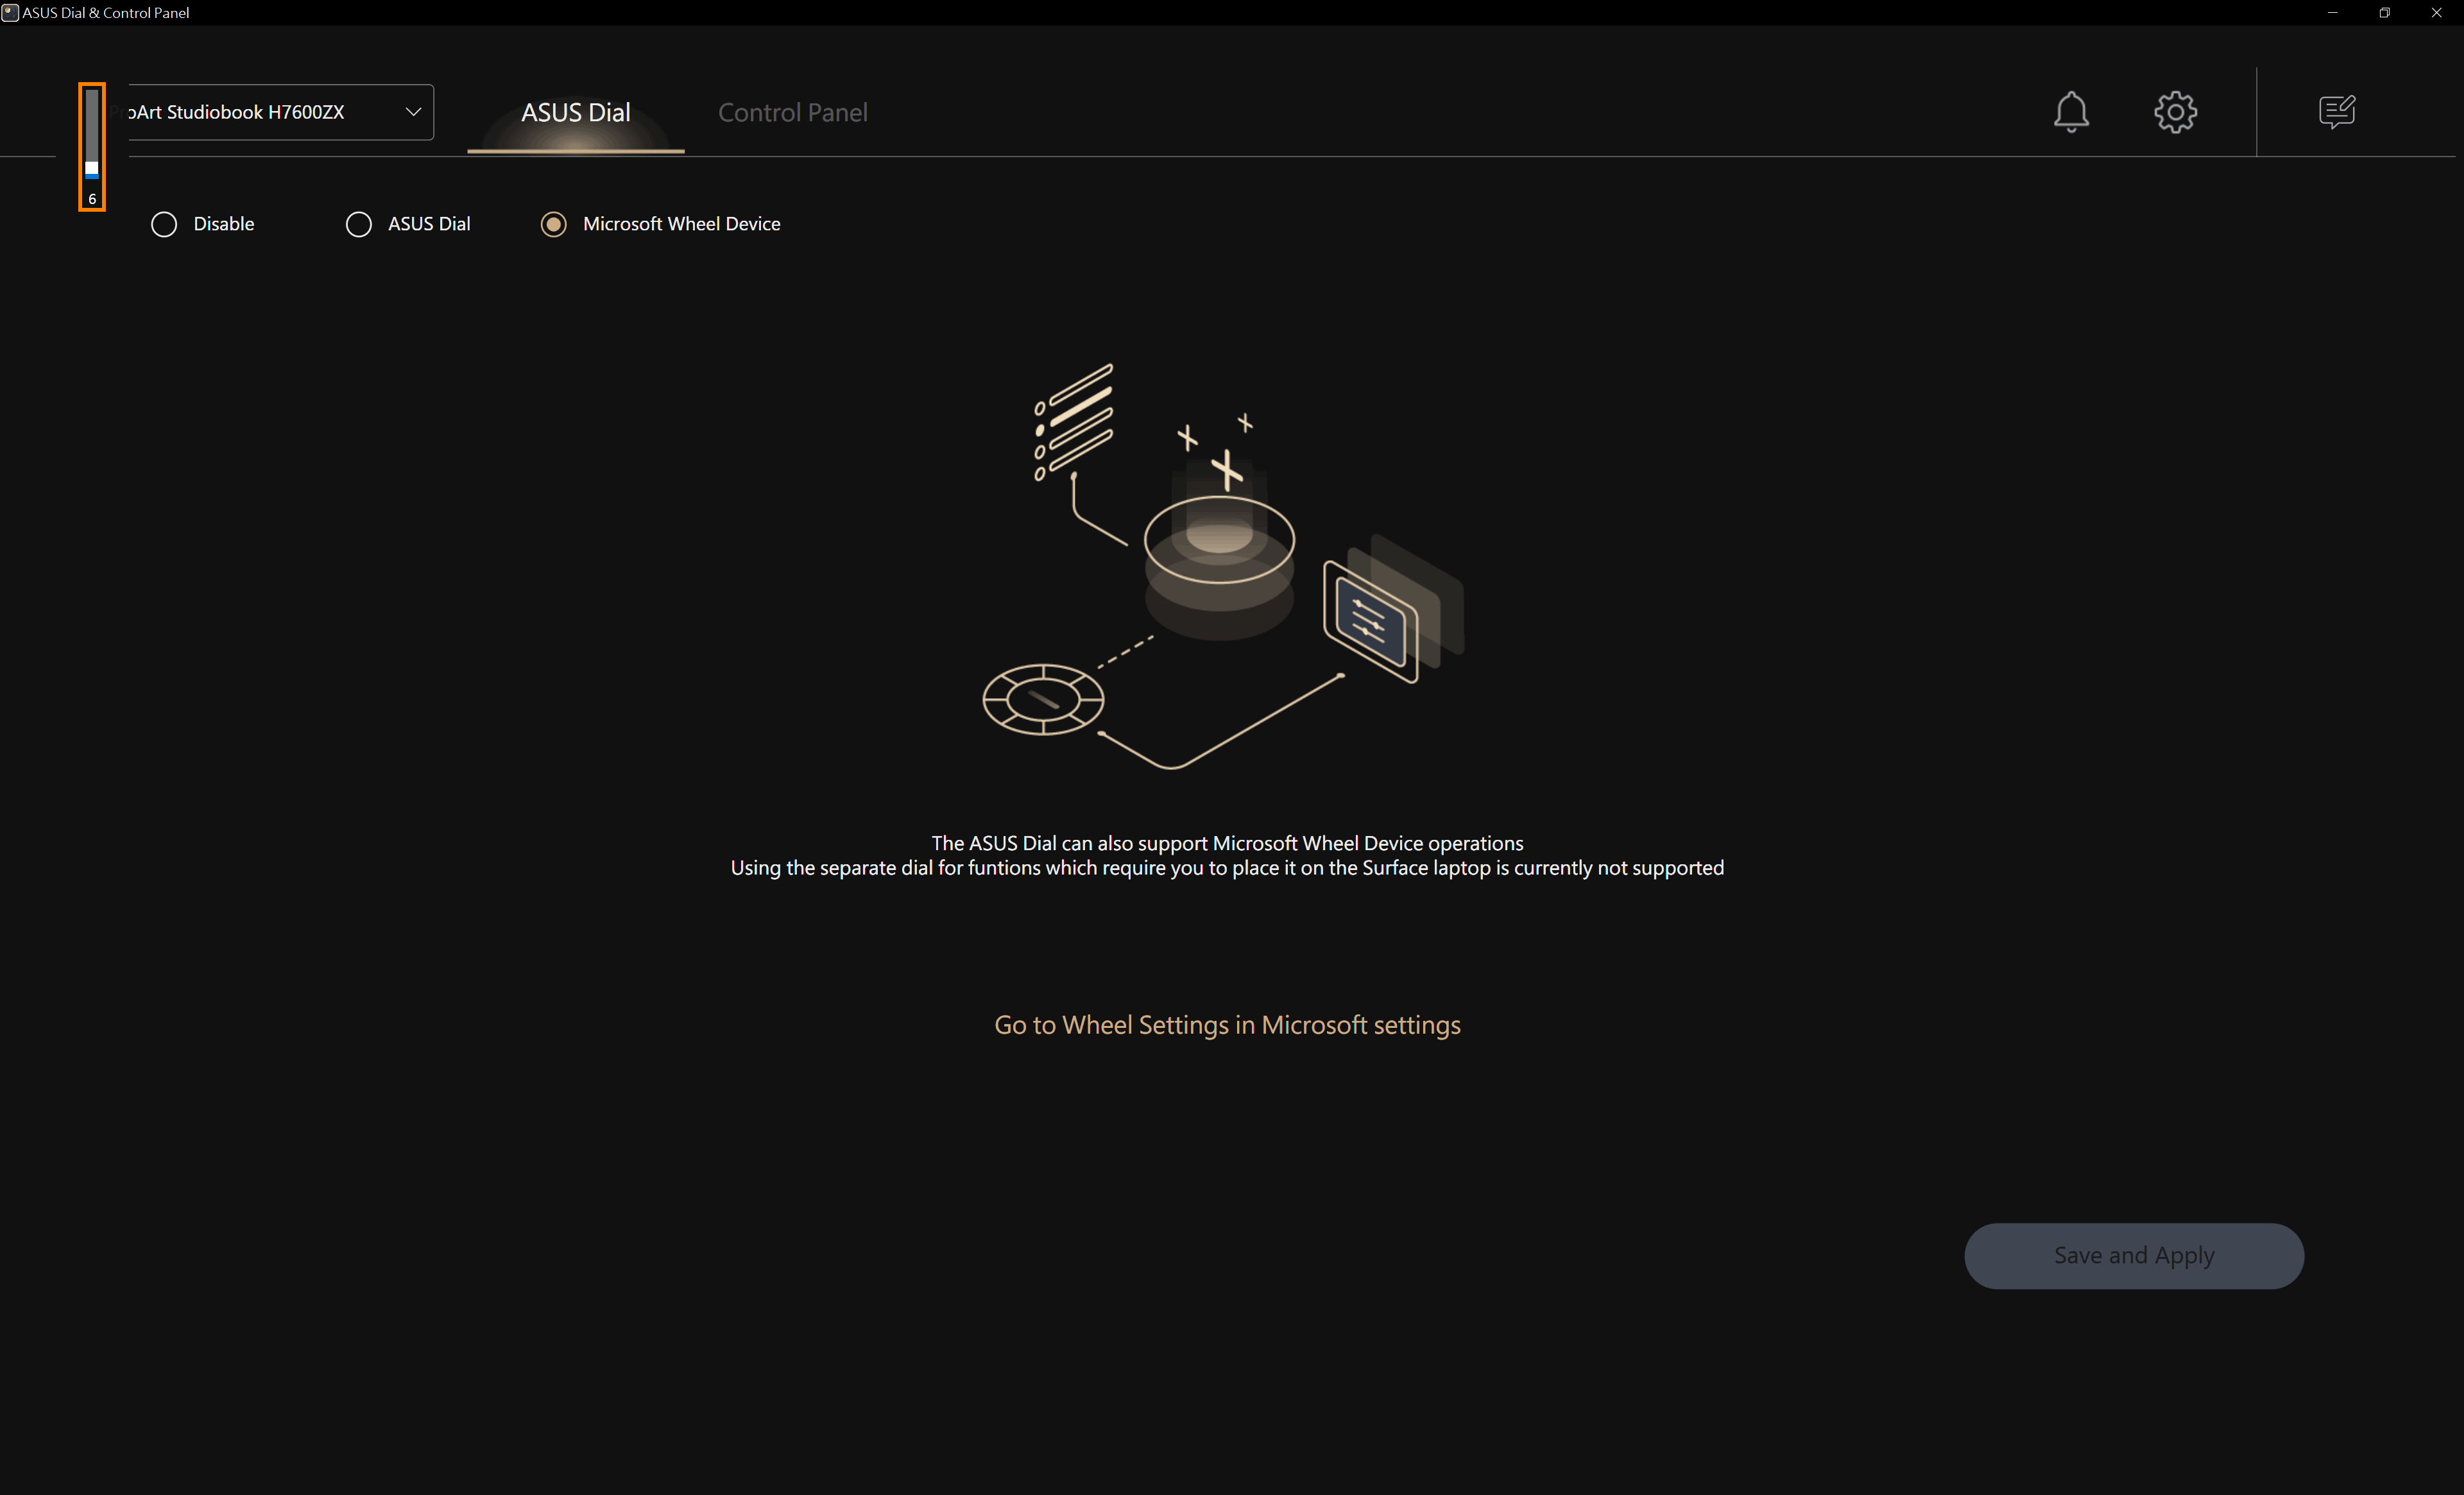
(4) Continue to rotate the ASUS Dial left and right to adjust the system volume. The next rotation of the ASUS Dial will directly adjust the system volume. However, if you want to use other functions, you need to press the ASUS Dial to wake up the selection page and reselect the other functions.
For more information, please click Information about Microsoft Wheel Devices.
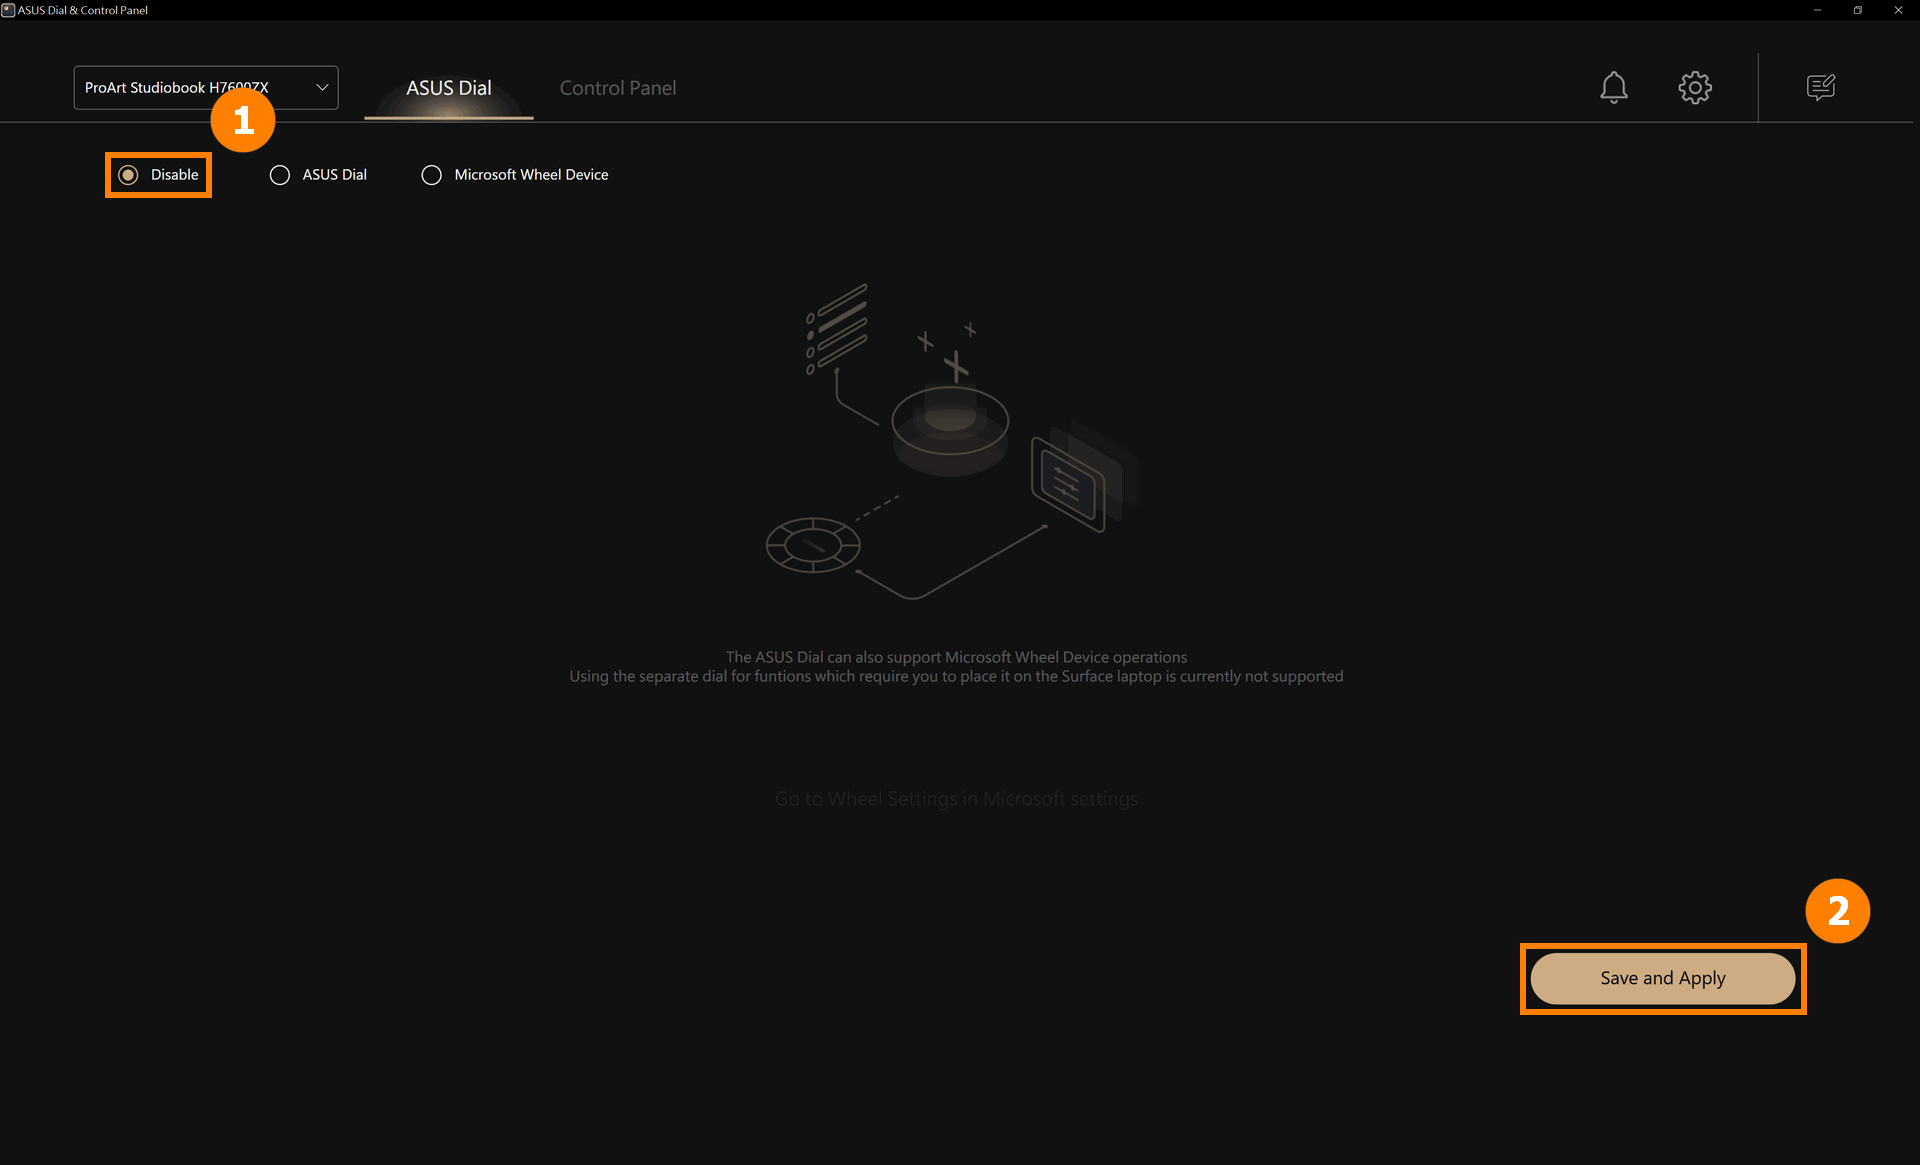
10. Disable ASUS Dial function
Click ①[Close], click ②[Save and Apply] to disable the ASUS Dial button function. When operating the ASUS Dial, there will be no response.
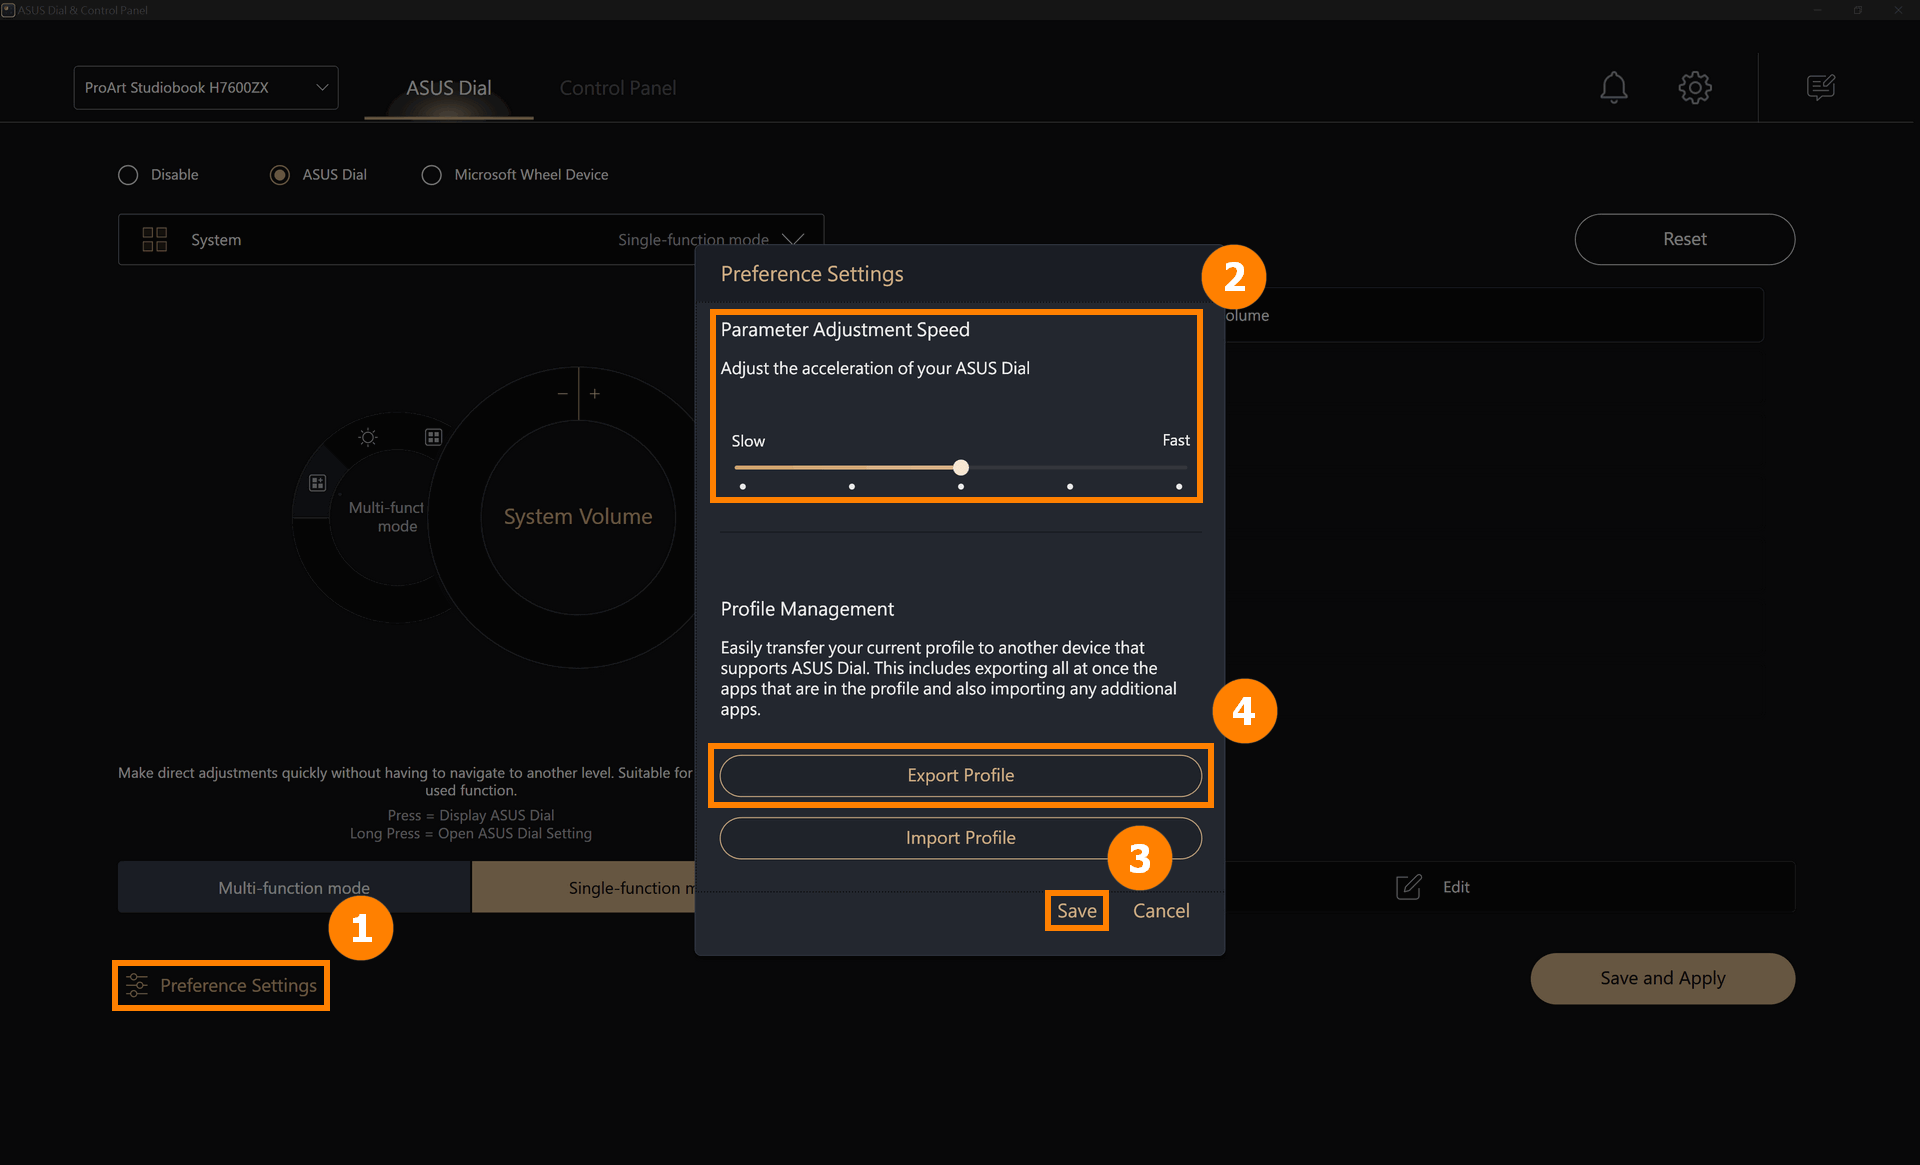
(1) Click ①[Preferences Settings], you can adjust the acceleration of your ASUS Dial in ②[Parameter Adjustment Speed], and click ③[Save] to save your changes. You can also click ④[Export Profile] to save your edits to ASUS Dial.
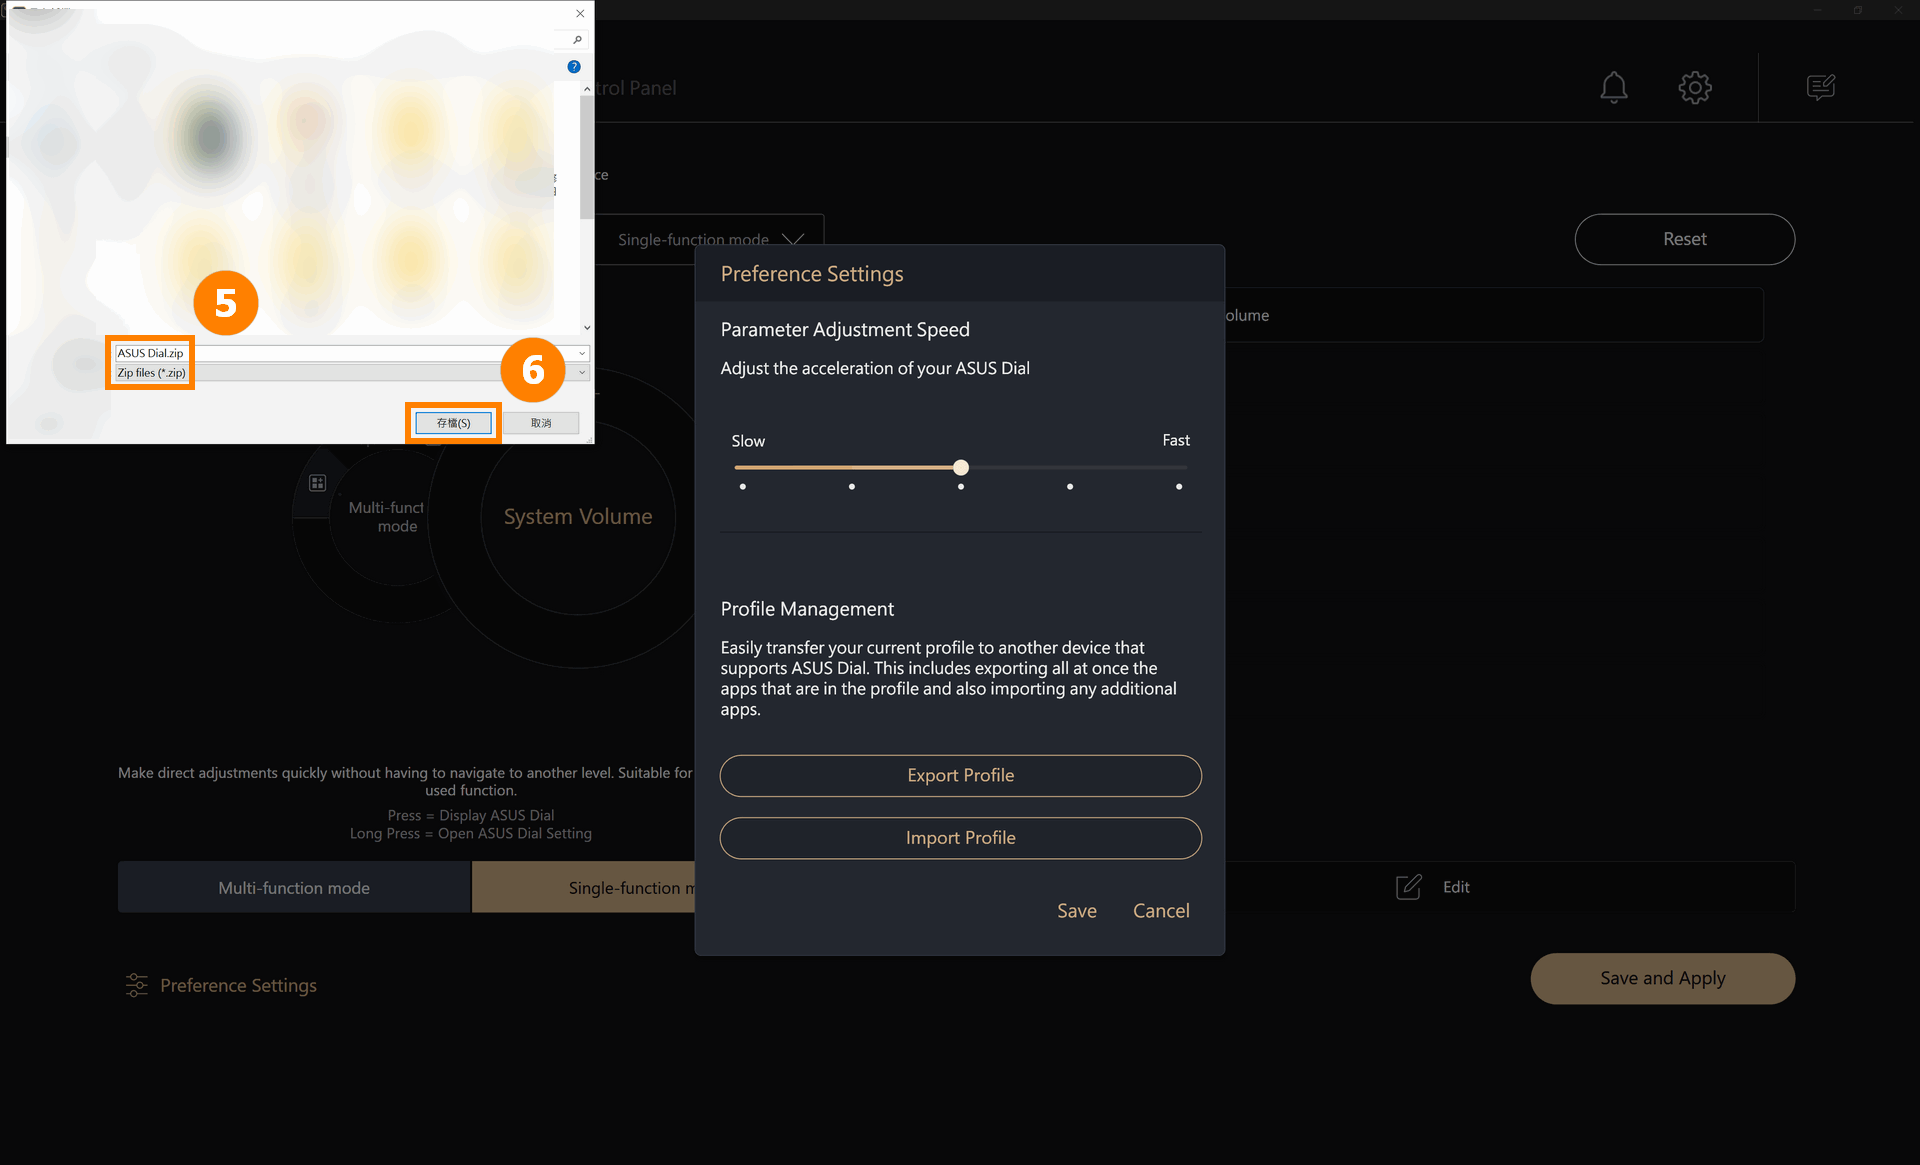
(2) Edit ⑤[File name], and then click ⑥[Save].
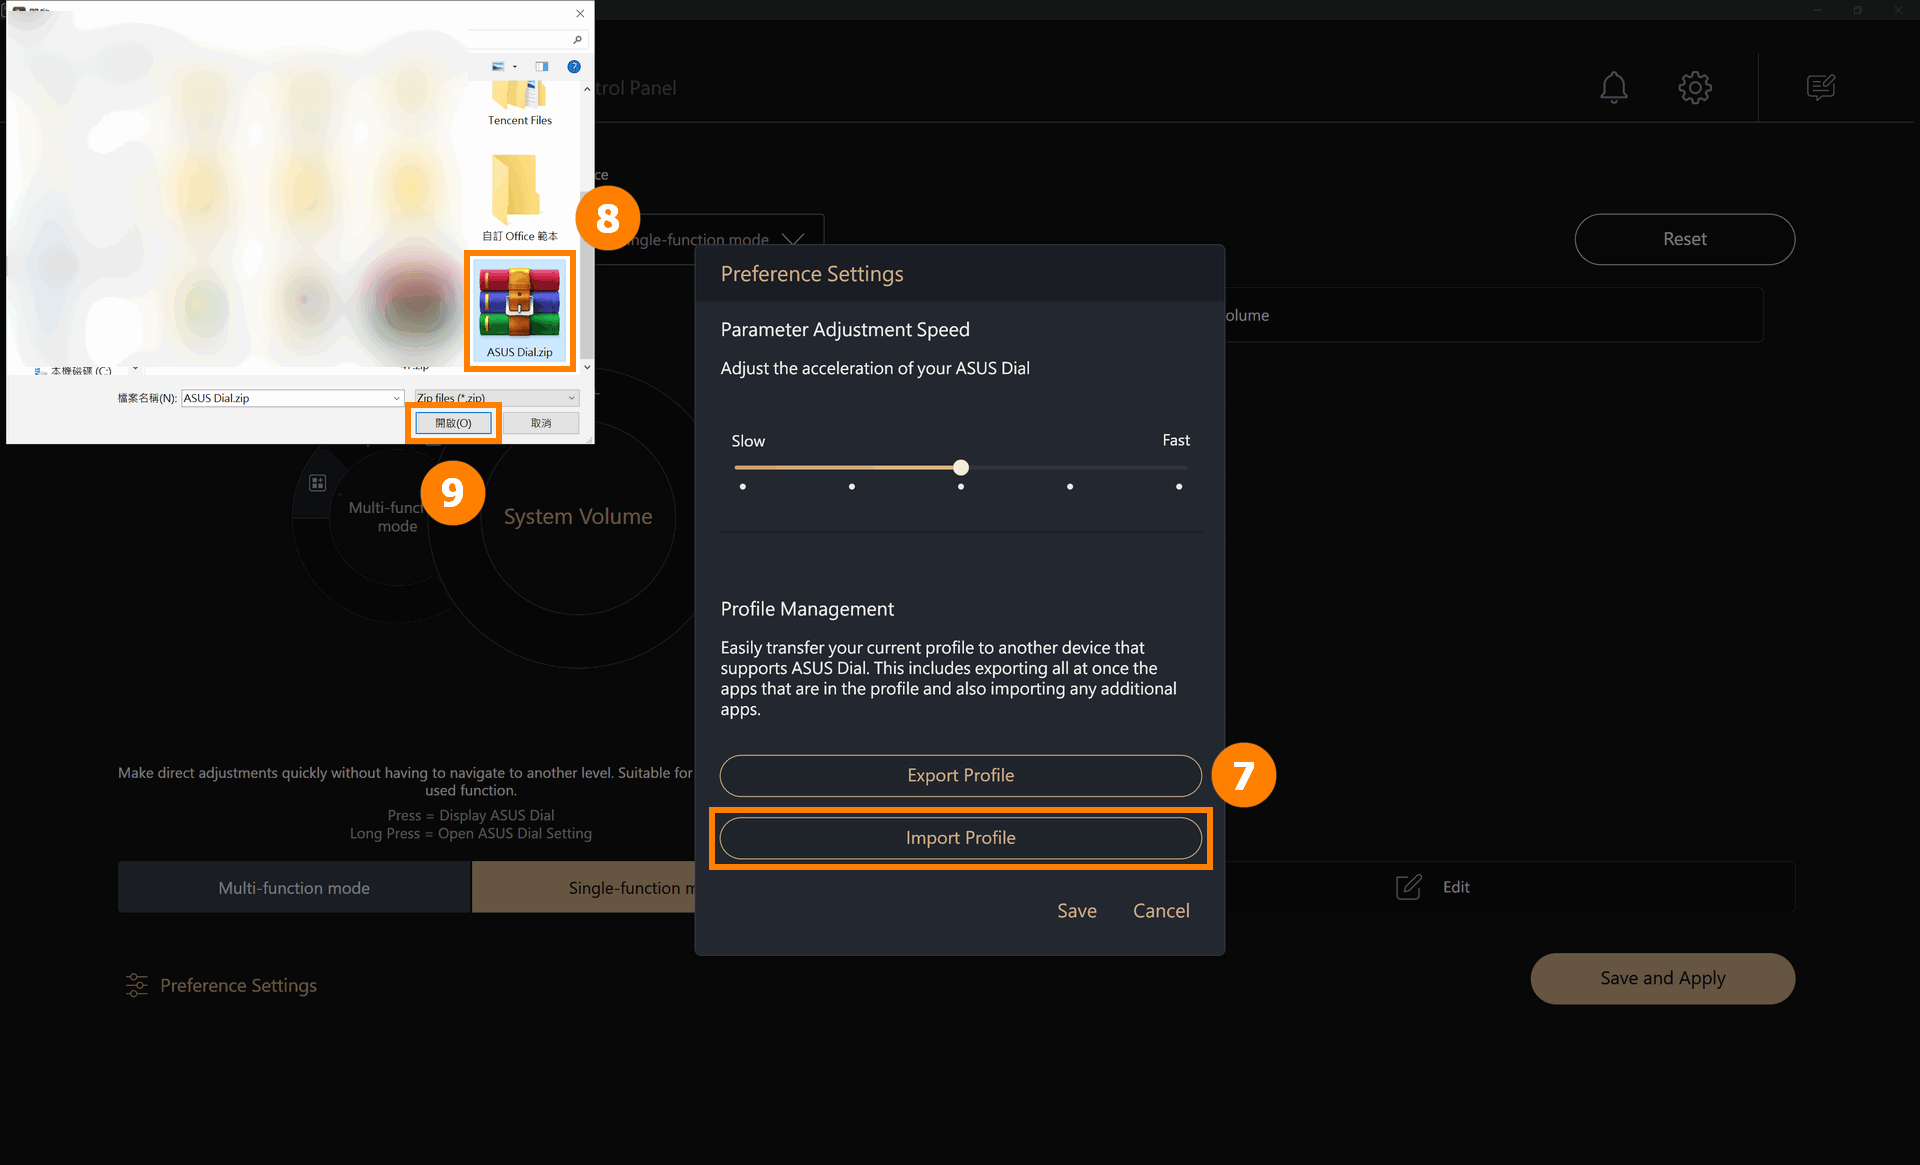
(3) When you reset Windows or replace your computer with a new one, you can click ⑦[Import Profile]. Select the ⑧[Profile] that you saved earlier, and then click ⑨[Open].
12. How to upgrade or download and uninstall the ASUS Dial control software
12.1 Upgrade ASUS Dial Control Software
ASUS Dia will automatically update to the latest version when you connect to the Internet.
12.2 When you reset your Windows system and need to reinstall the ASUS Dial control software, please go to the Microsoft App Store to download and install.
12.3 How to uninstall the ASUS Dial Control Software:
You may uninstall the ASUS Dial Control Software by following the information provided at the following link: [Windows 11/10] How to uninstall Apps, Windows installed updates, Drivers | Official Support | ASUS Global
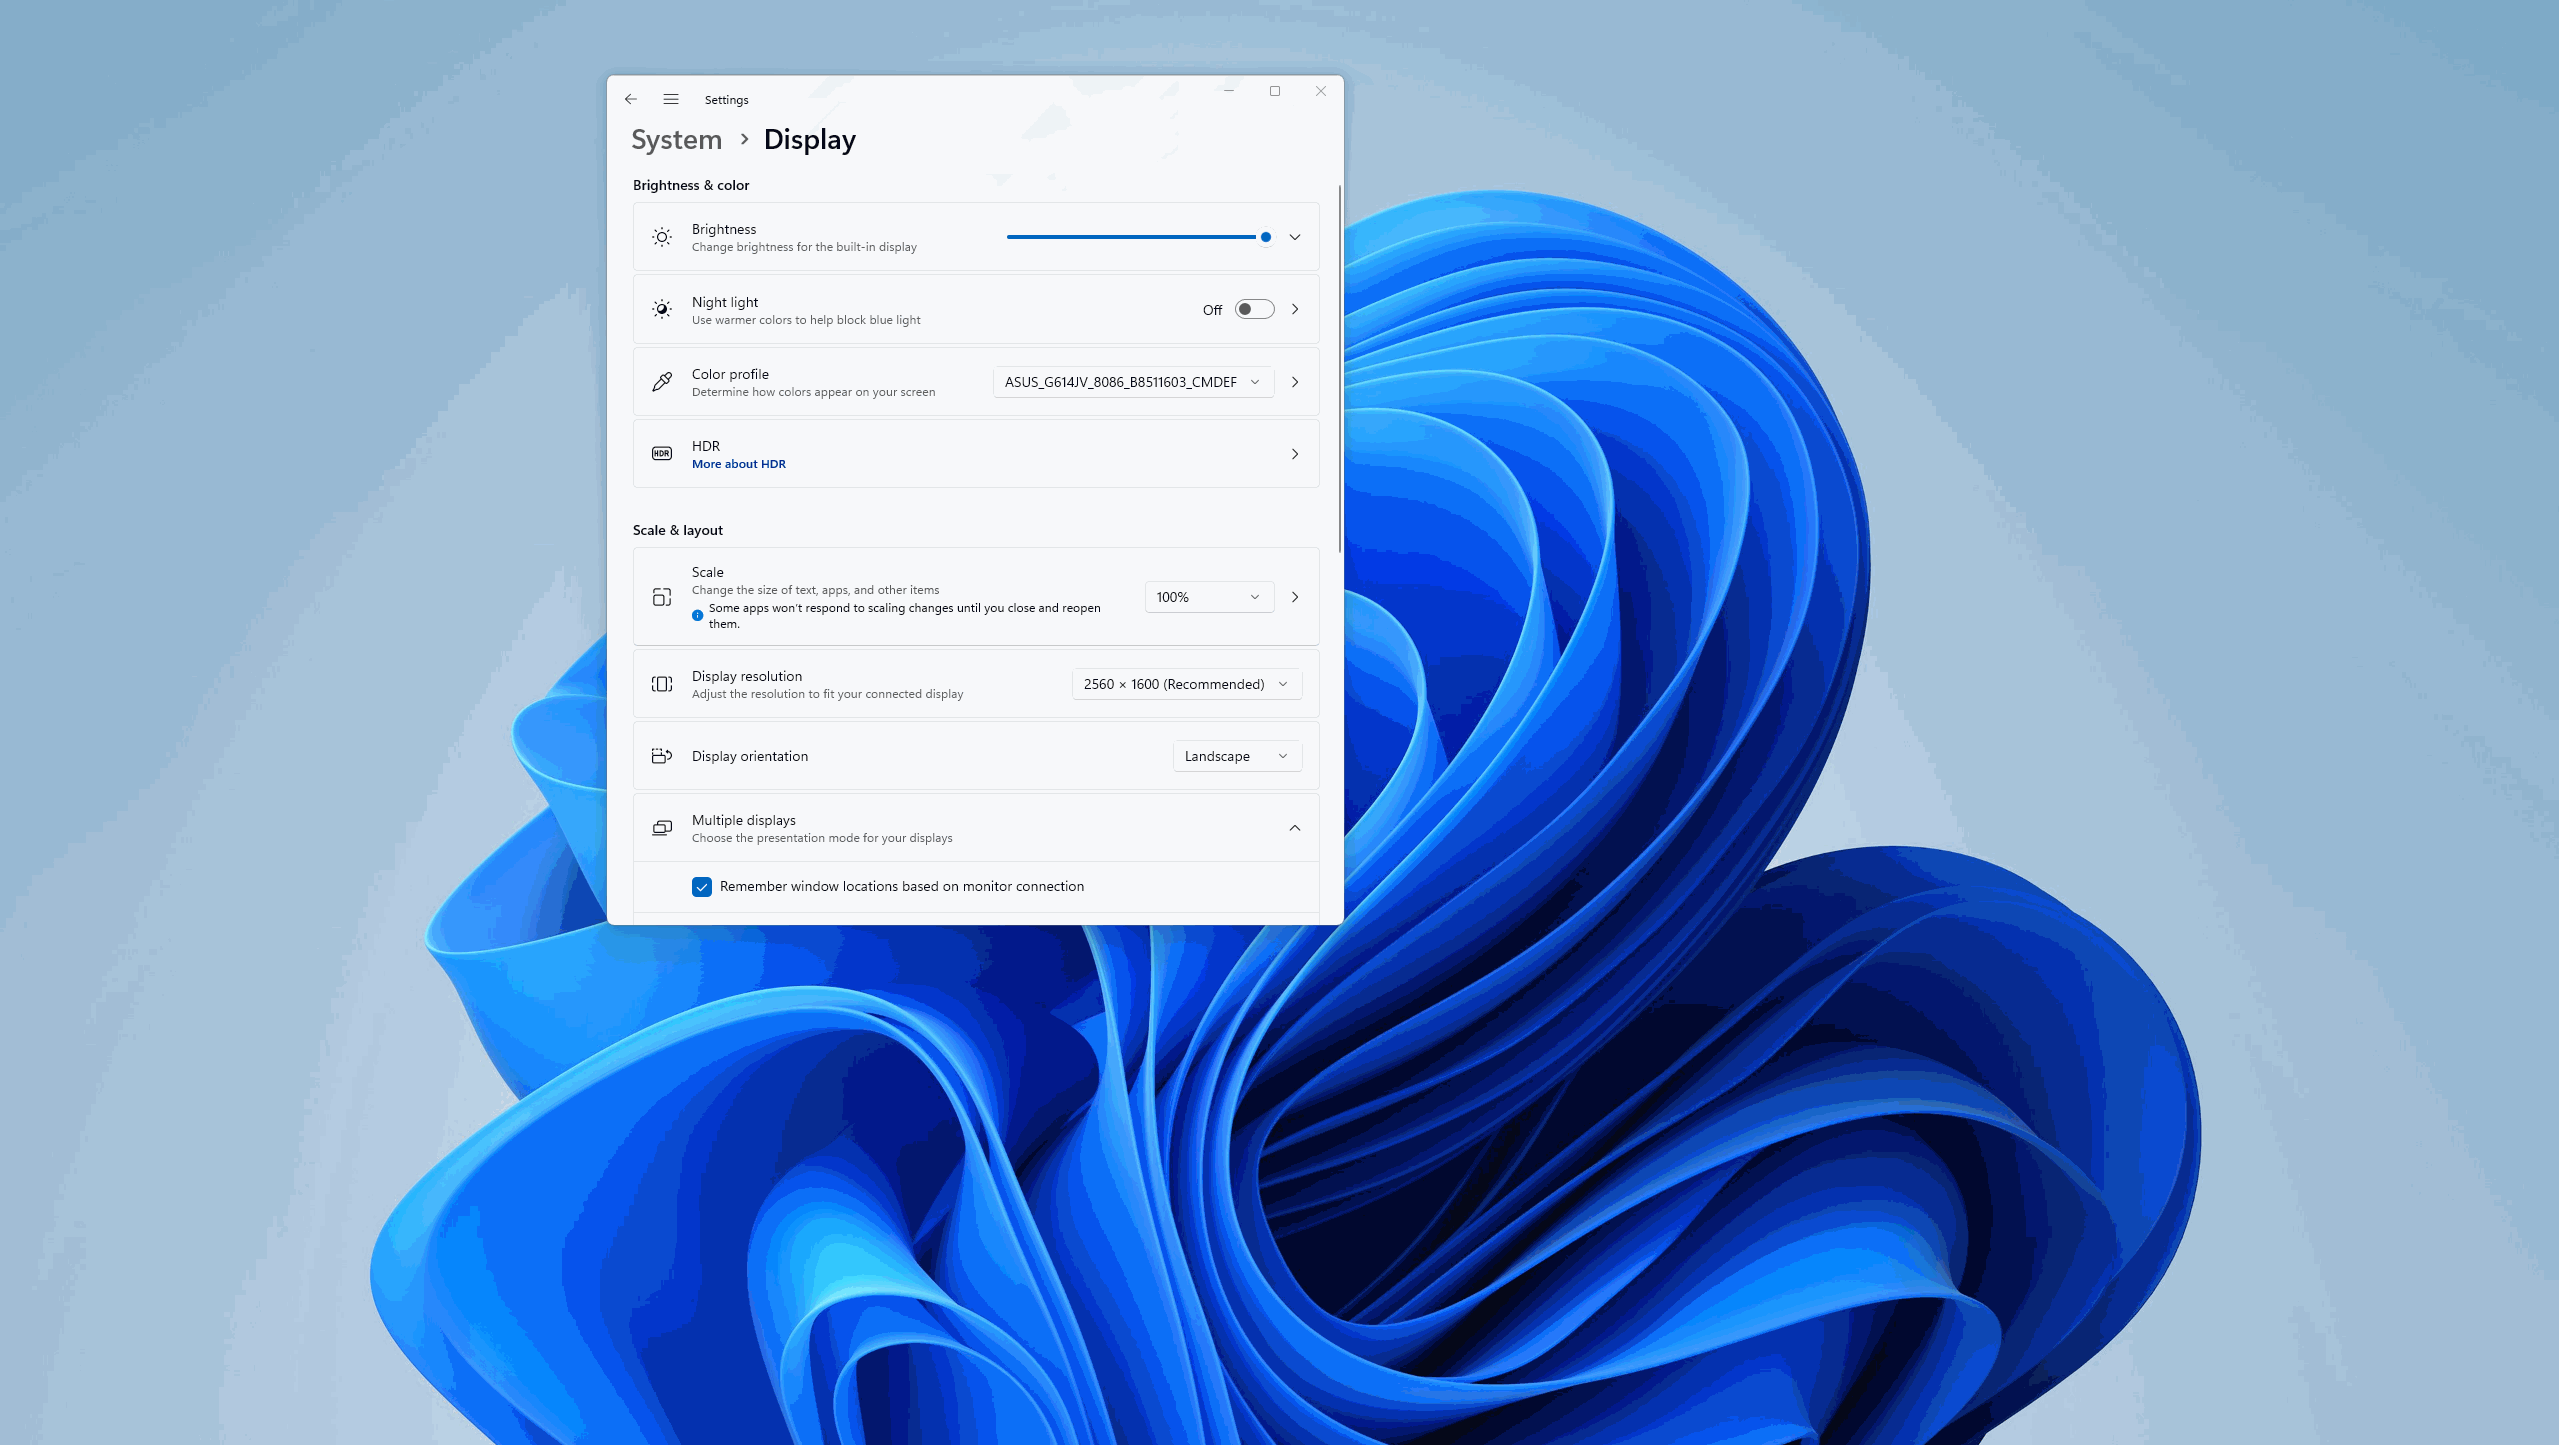
Question1 : How to enlarge the font of ASUS Dial?
Answer 1: Right-click the computer desktop, left-click [Display settings], and select the size you want in Scale & Layout.