[Motherboard/Graphics Card]How to install the graphics card on motherboard
To provide you more detailed instruction, you can also click ASUS YouTube video link below to know more about How to install the graphics card on motherboard
https://www.youtube.com/watch?v=LwAqHjDDpIE
If you are purchasing a new graphics card or replacing an old one, you can follow the installation steps below:
*Note: Please ensure that your power supply unit is turned off and the power cord is removed from the power outlet before proceeding.
Contents:
I. Installing the Graphics Card
II. Graphics Card Power Connector Connection Method
III. Q&A
Q1: Removing the Graphics Card
Q2: Troubleshooting: No Display or Display Issues After Installing the Graphics Card
Q3: How to Choose an Adequate Power Supply Unit for the Graphics Card
Q4: Precautions When Installing a Heavier Graphics Card
Q6: Precautions when installing the graphics card to the motherboard?
Q8:When installing a graphics card into a computer case, please refer the steps in the case's user manual?
Q9: There is a protective film attached to the graphics card. How should it be handled?
I. Installing the Graphics Card: Remove the chassis panel, locate the PCIe slot on the motherboard, and insert the graphics card correctly.
1. If you are installing a graphics card in a newly purchased computer chassis, you need to first remove the slot cover from the expansion slot on the chassis according to the graphics card's installation position.
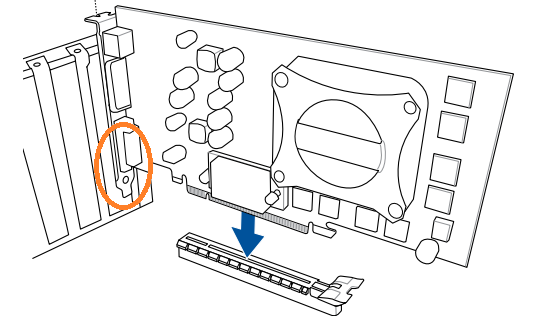
2. Align the notch on the graphics card's gold fingers with the protrusion on the motherboard's PCIe slot, as shown in Figure step1.
Insert the graphics card vertically downward into the motherboard's PCIe slot until a click is heard.
The motherboard's PCIe slot latch will automatically lock as shown in Figure step2, indicating that the graphics card is successfully inserted into the slot.
For example, the motherboard below: ROG MAXIMUS Z690 EXTREME GLACIAL 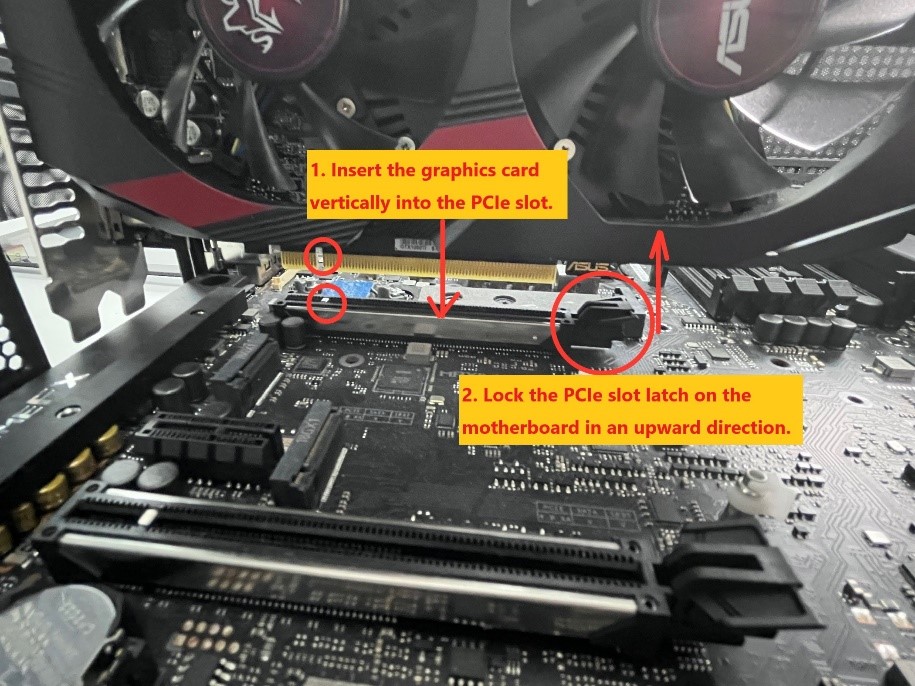
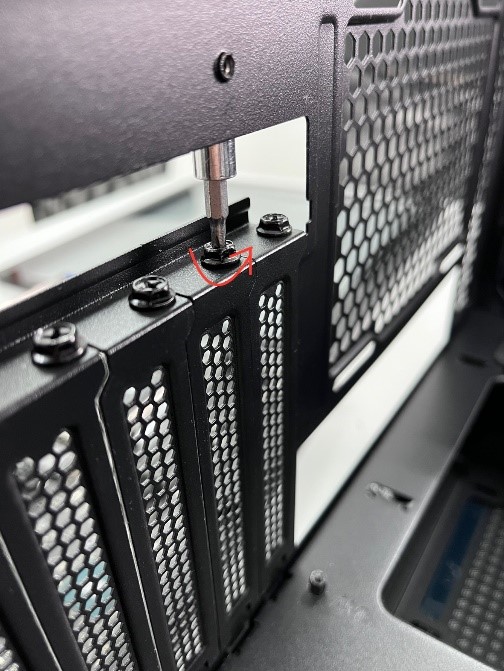
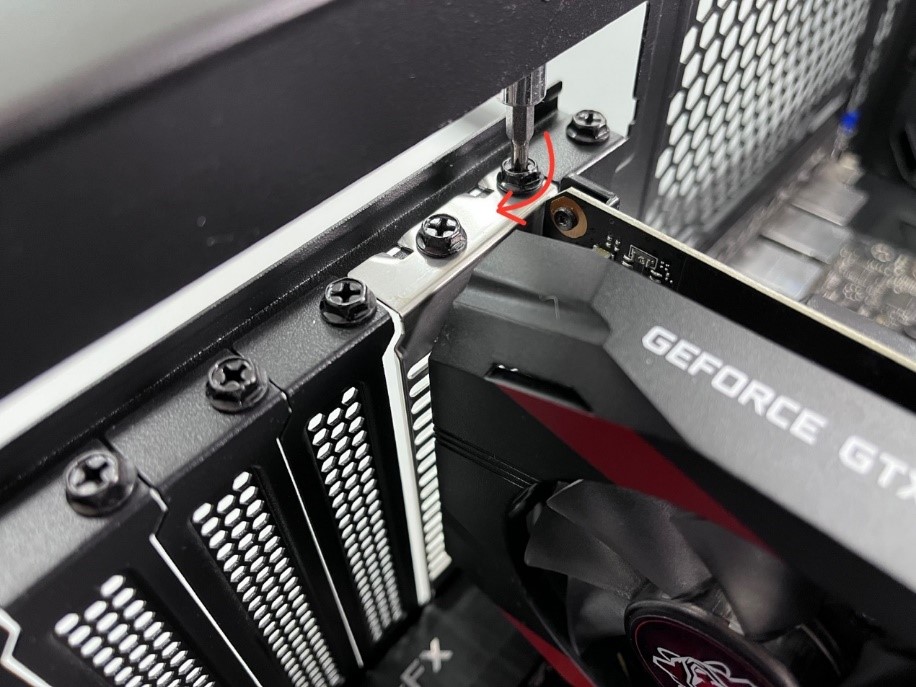
3. Secure the graphics card to the chassis with screws.
II. Connection Method for the Graphics Card's Independent Power Connector
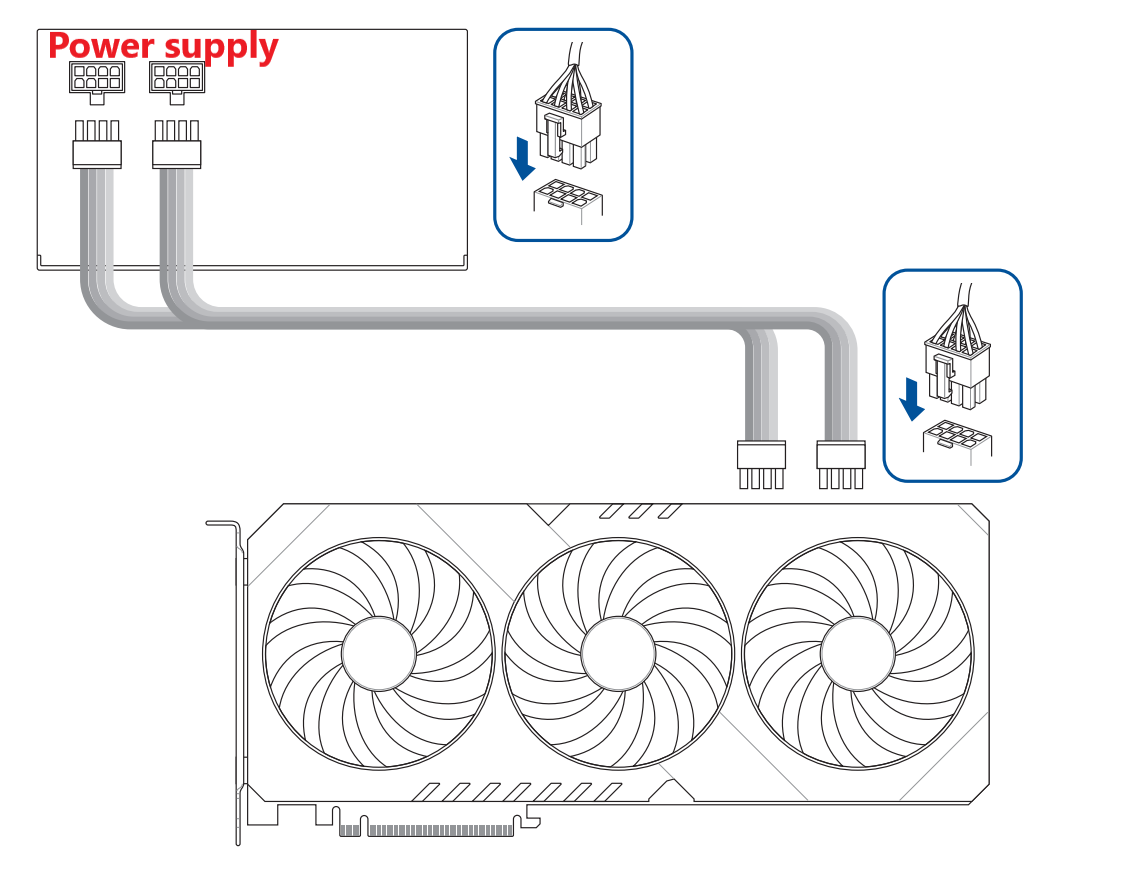
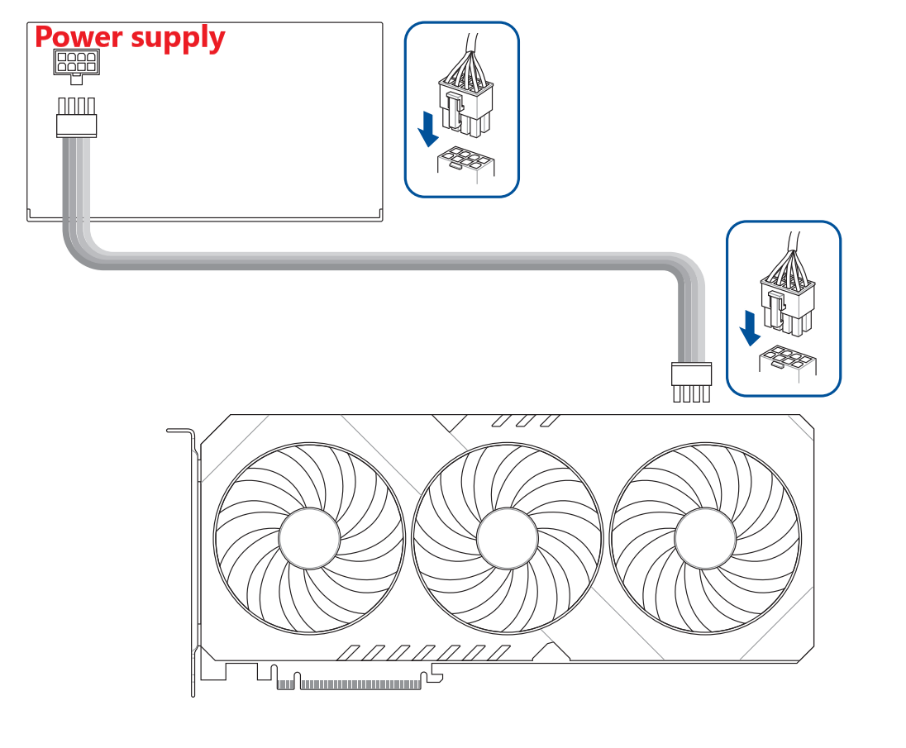
If your graphics card features auxiliary power connector(s), connect the PCIe power connectors from the power supply unit (PSU) to the graphics card.
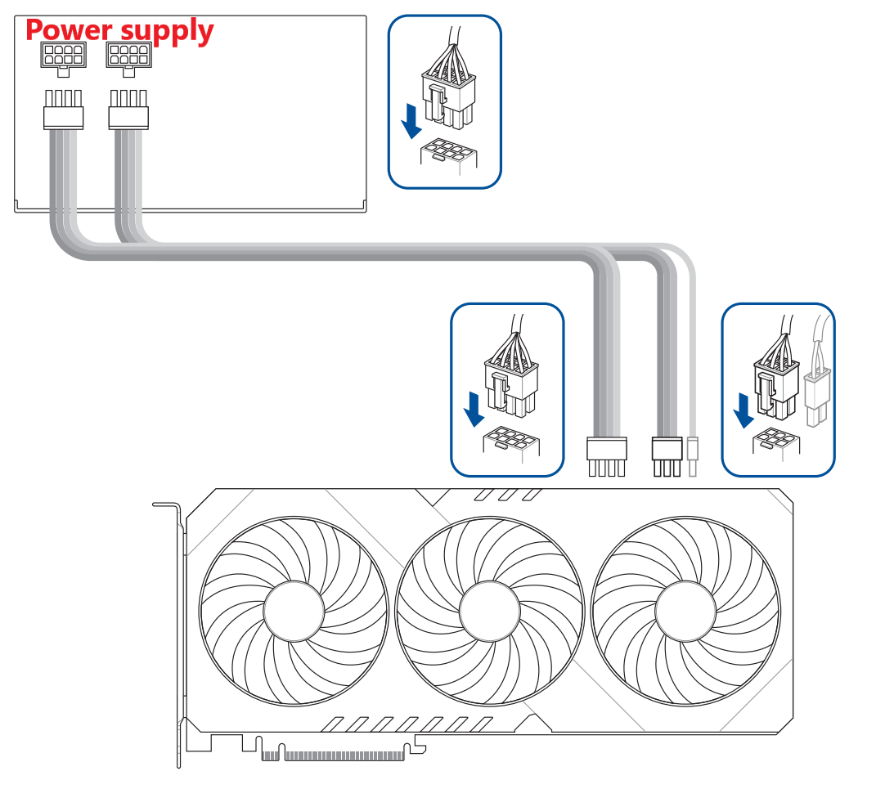
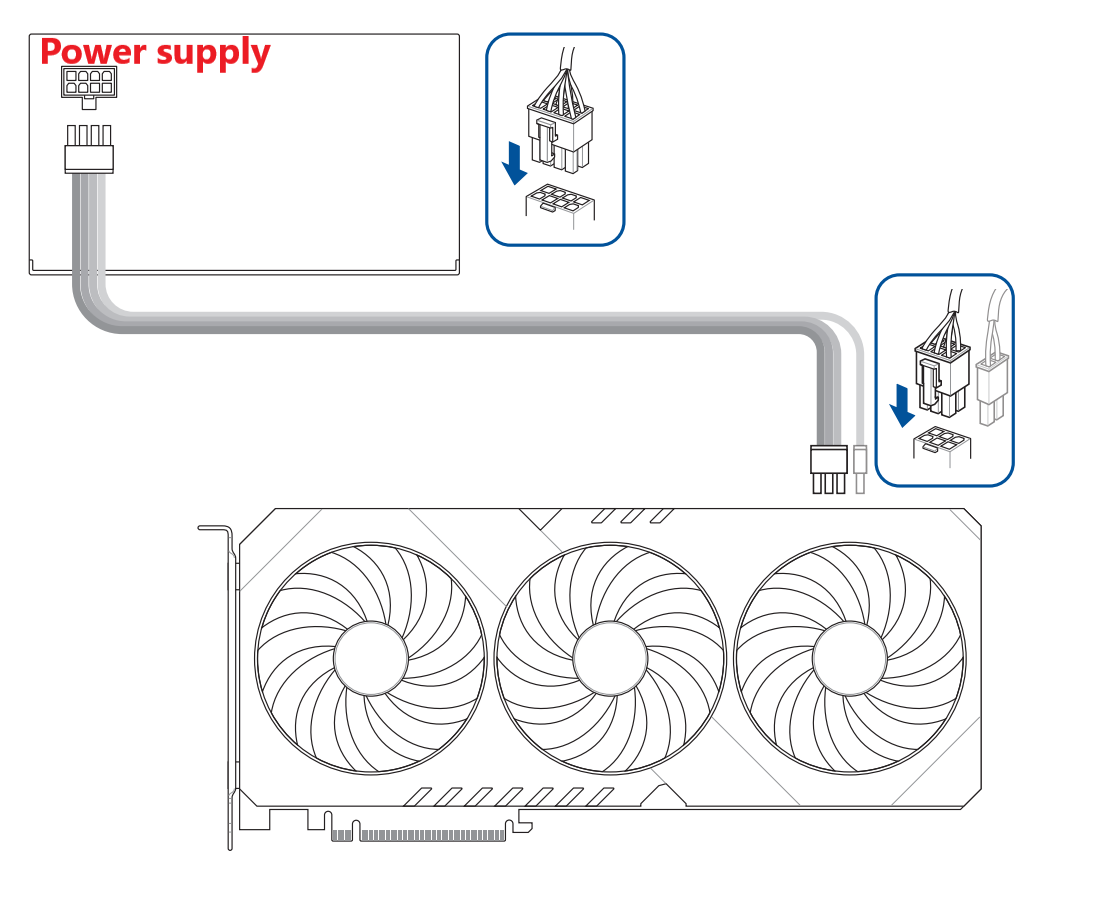
If your graphics card features an additional power adapter cable, please make sure to use the adapter cable to connect the graphics card and the PSU.
Note:
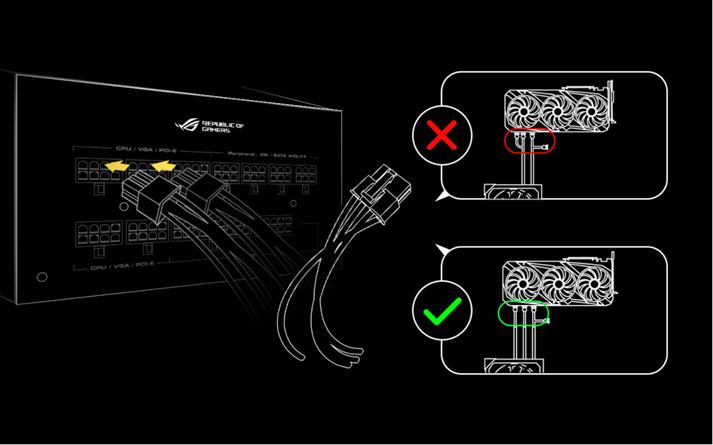
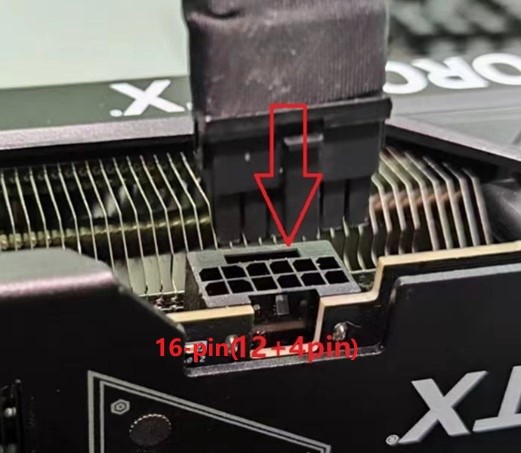
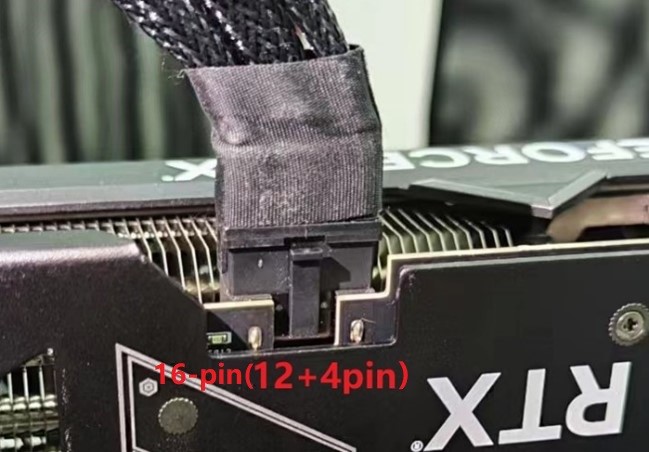
a. After connecting the power connector, you need to ensure that it is securely attached, and all pins are properly aligned with (the connector on the power supply / the connector on the graphics card / the connector on the power adapter cable).
properly connected pins: 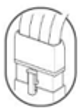
not properly connected pins: 
b. For the graphics card's power connector or the power connector on the power adapter cable, please use a separate PCIe power cable from the power supply unit. Do not connect the same power connector to two or more independent power ports simultaneously.
Connecting both ends of the PCIe splitter cable simultaneously may result in damage
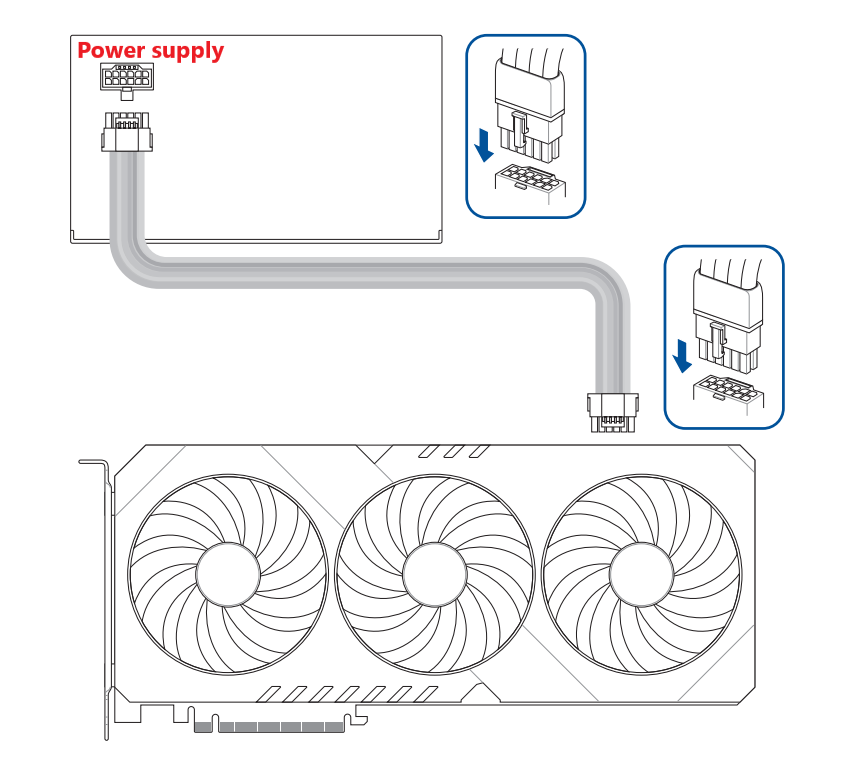
The specific connection method for the graphics card's power connector or the power adapter cable can be referred to as follows:
.1*16-pin(12+4pin)
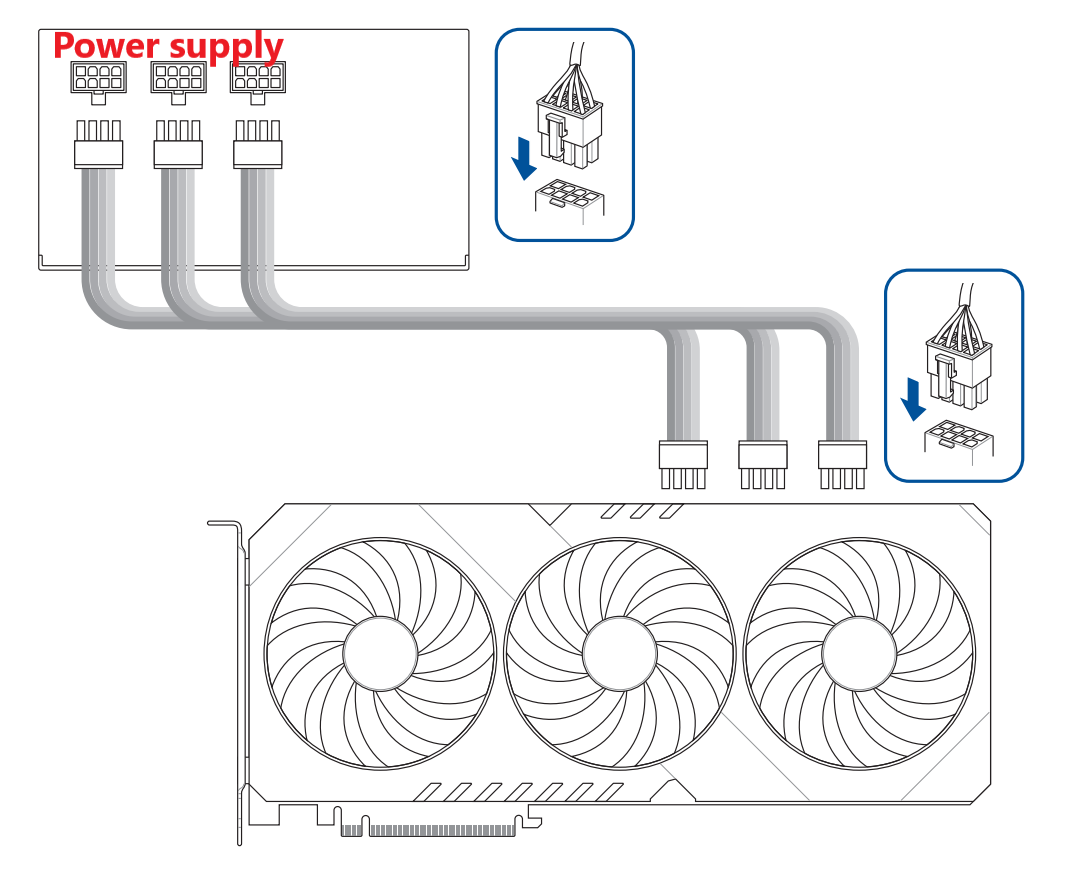
.3*8-pin
.2*8-pin
.1*8-pin
.1*8-pin+1*6-pin
.1*6-pin
 -->
--> 
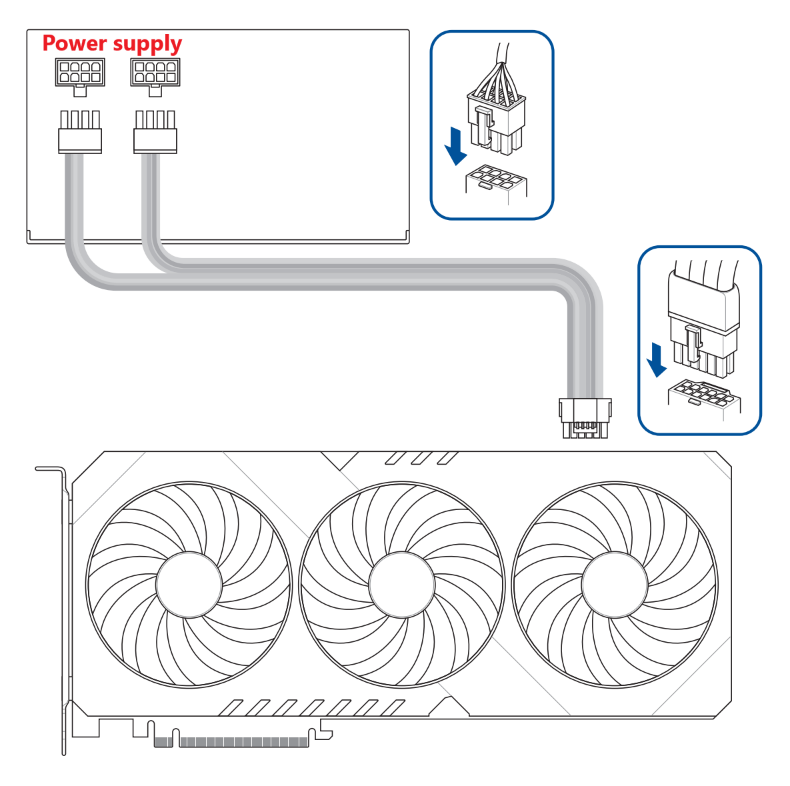
a. 1*16-pin(12+4pin) to 1*16-pin(12+4pin)
b. 2*8-pin to 1*16-pin(12+4pin)
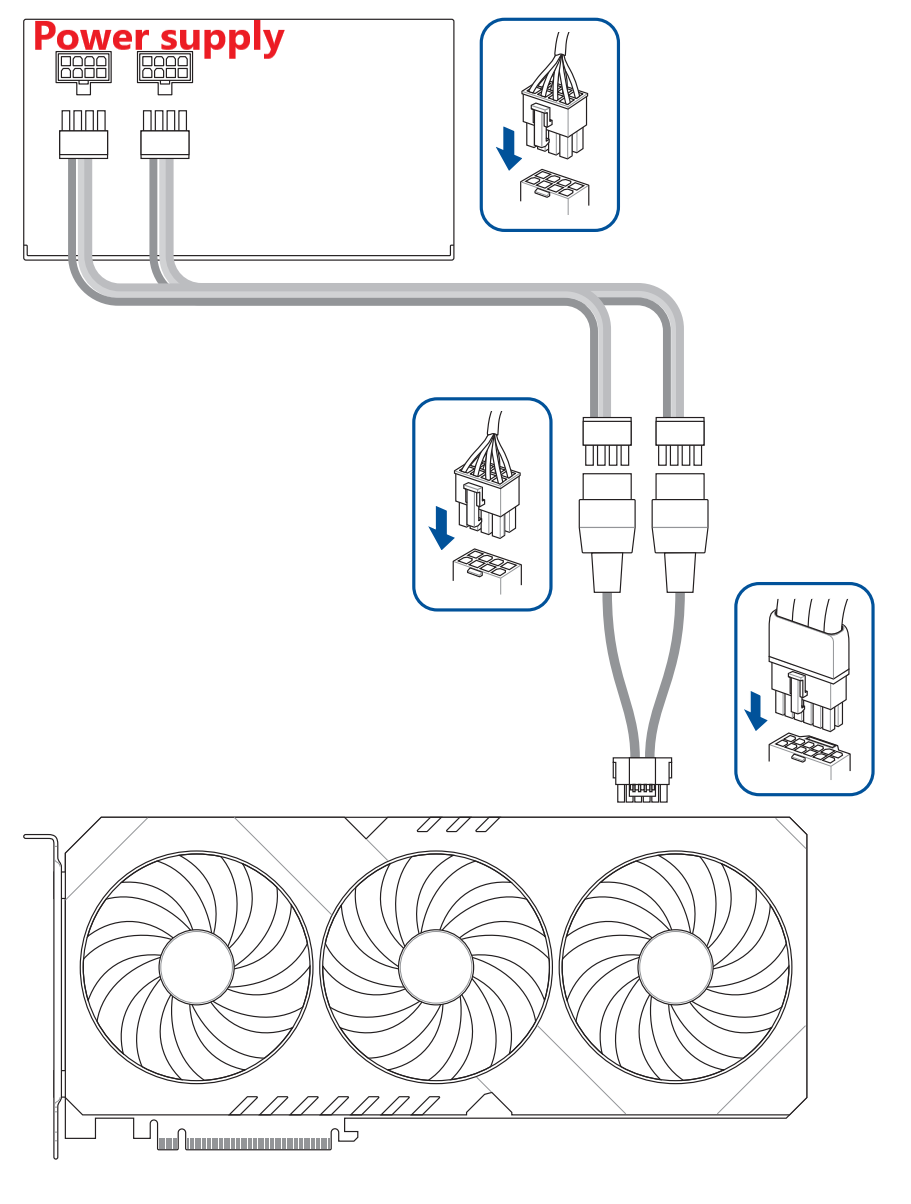
c. 2*8-pin to 1*16-pin(12+4pin) with adapter cable
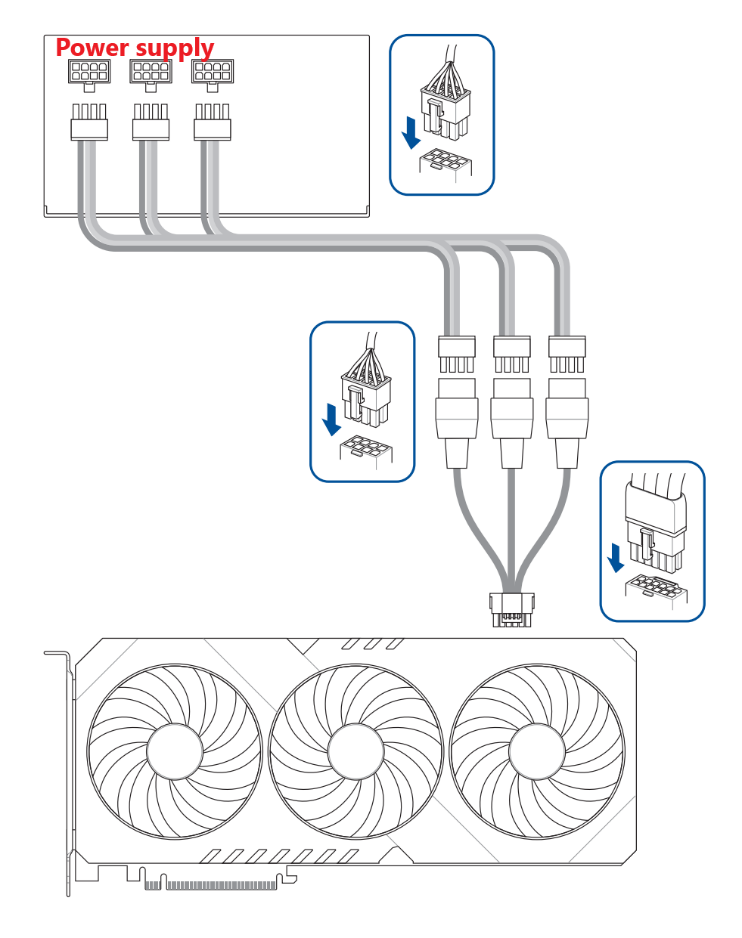
d. 3*8-pin to 1*16-pin(12+4pin) with adapter cable
e. 4*8-pin to 1*16-pin(12+4pin) with adapter cable

III. Q&A
Q1. How to remove the graphics card from the PCIe slot on the motherboard
A1:
1. Remove the PCIe power connector from the power supply unit (PSU) as shown in the graphics card installation step 4 above.
2. Remove the screws securing the graphics card to the chassis 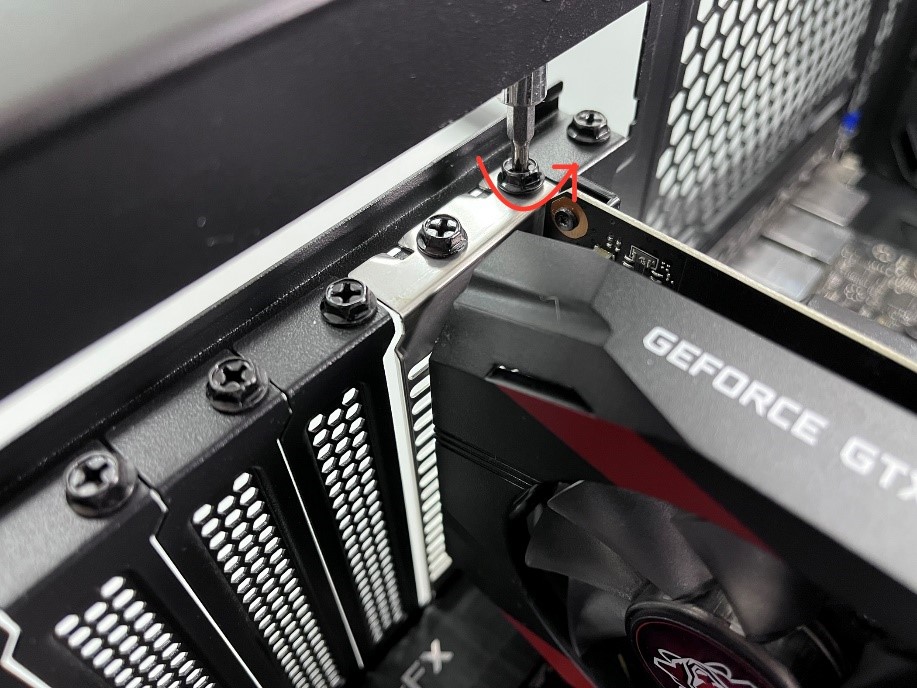
3. Press down on the latch at the end of the motherboard's PCIe slot
Note: Be cautious and use appropriate force to press down on the latch; do not forcibly pull out the graphics card to avoid damaging the motherboard and the card's latch 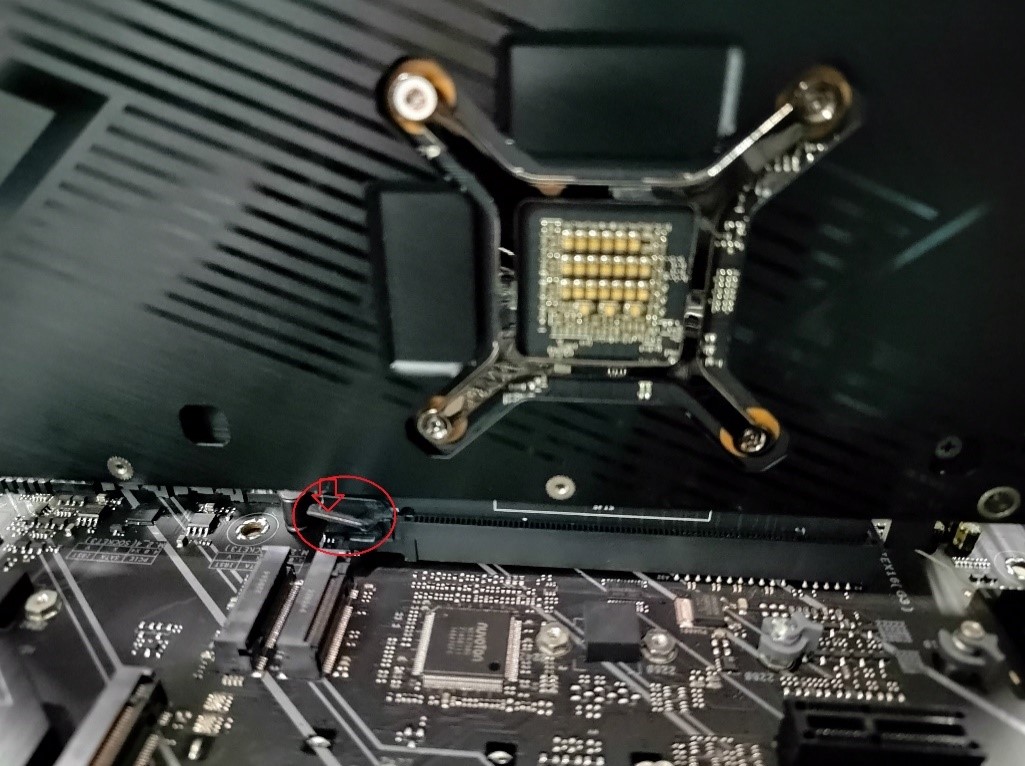
4. Remove the graphics card by lifting it straight up vertically.
Q2: If there is no display or abnormal display after inserting the graphics card, what should be done?
A2: You can disconnect the system power cord, follow the above steps to reinstall the graphics card and the PCIe power connectors from the power supply unit (PSU), and then verify. If the issue persists, please refer to the FAQ for further troubleshooting: [Graphics card]No display on the monitor or abnormality(crapped display) troubleshooting
Q3:How do I choose a adequate power supply unit for the graphics card?
A3:You can confirm the recommended power supply unit wattage for your graphics card in below ways to enhance stability between the graphics card and the motherboard
Note: Ensure that the system power cord is disconnected when installing or removing the graphics card
Method One:
1. Login into ASUS Official Website,enter the model name of the graphics card you want to search for in the top right corner search box 🔍 and click.
For example, the graphics card below:ROG-STRIX-RTX4090-O24G-GAMING·
2. On the graphics card's page for this model, click on [Tech Specs].

3. Check the recommended power supply unit wattage for your graphics card in the "Recommended PSU" column
The recommended power supply unit is 1000W. 
Method Two:
1. Login into ASUS Official Website,enter the model name of the graphics card you want to search for in the top right corner search box 🔍 and click.
For example, the graphics card below:ROG-STRIX-RTX4090-O24G-GAMING·
2. On the graphics card's page for this model, click on[Support] 
3. In [Manual & Document], Click [RECOMMENDED PSU TABLE]
As shown in the example below, for the RTX 4090 series graphics card used in combination with different CPU models, the recommended power supply unit wattage may vary. 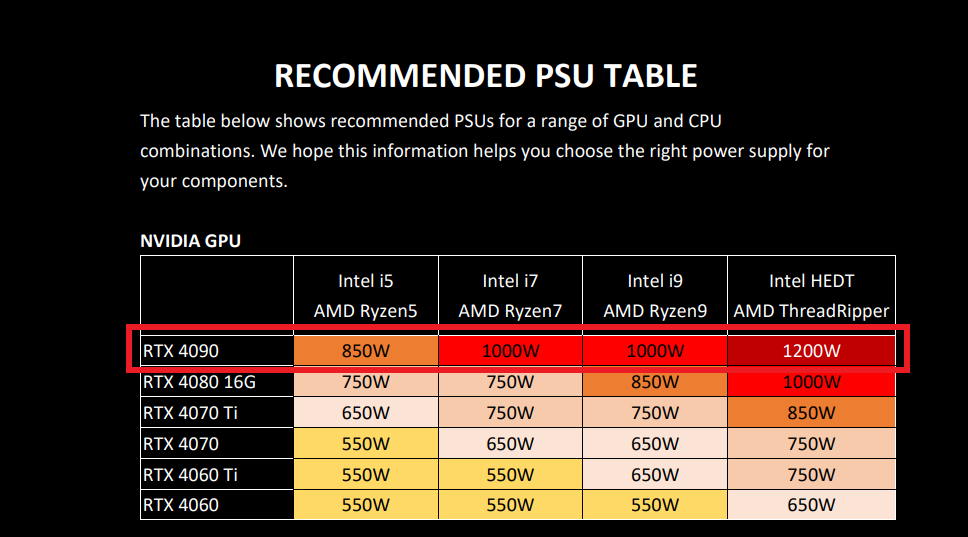
Method Three:
Choose the right PSU wattage for your build with the calculator below.

Q4: Precautions When Installing a Heavier Graphics Card
A4: Due to the weight of the graphics card, it is recommended to remove it for separate packaging before transporting it to prevent damage to the card within the chassis during transit. When handling the computer chassis while the graphics card is installed, please exercise caution to avoid any damage. You can also enhance the graphics card's stability by installing a graphics card bracket inside the chassis.
For more information on graphics card brackets, you can refer to the official website:ROG Herculx Graphics Card Holder
A5: Please refer to this FAQ: [Motherboard] How to install motherboard drivers and utilities?
Q6: Precautions when installing the graphics card to the motherboard?
A6: When inserting the graphics card downwards into the motherboard PCIE slot, the metal baffle on the lower left side of the graphics card should be aligned with the gap between the chassis and the motherboard. The metal baffle should not touch or hit the surface of the motherboard to avoid damaging the parts on the motherboard.
A7:Please first make sure that the power supply cable of the graphics card is securely plugged in. If it is already plugged in, then check if the LED light at the connection point of the power supply cable of the graphics card is constantly red in operate system. If it is constantly red, you can try replacing the power connector cable and then recheck.
A8: For example, consider the ASUS ROG Strix Helios (GX601). Please refer to the FAQ. [Computer Chassis] Assembly Instructions for Graphics Card
Q9: There is a protective film attached to the graphics card. How should it be handled?
A9: If a transparent protective film is found on the exterior before installing the graphics card, be sure to remove it first. This prevents the film from adhering to the surface of the graphics card and leaving residue due to increased temperatures during use.