[Motherboard]ROG FPS-II Card and ROG STRIX HIVE Function Introduction
Related topic :
[Motherboard] How to use the USB BIOS FlashBack™ function?
[Motherboard] ASUS Q-LED Troubleshooting No Power/No Boot/No Display
[Motherboard] What are the steps to Clear CMOS?
[Motherboard] ROG FPS-II card and ROG STRIX HIVE function introduction
ROG FPS-II CARD: Combines I/O on a vertically mounted card, saving valuable host board space and organizing cable management. Connections can be made before the card is installed, greatly simplifying installation in tight spaces. The board features two SATA ports, front panel headers, two USB 2.0 headers, a CPU_OV jumper for overclocking, a clear CMOS header for resetting the BIOS to factory defaults, and more.
ROG Strix Hive: The controller has audio connectors, S/PDIF optical output, and volume knob. In addition to audio effects, it provides USB expansion ports, Q-LED troubleshooting lights, Flexkey custom shortcut keys, and BIOS Flashback key functions.
ROG FPS-II CARD ROG STRIX HIVE
Table of contents:
- ROG FPS-II card installation and function introduction
- ROG STRIX HIVE installation and function introduction
ROG FPS-II card installation and function introduction:
ROG FPS-II CARD Installation:
ROG FPS-II CARD needs to be installed in the SATA_M_CON and PANEL_M_CON USB Type-C positions of the motherboard to use the CARD function (as shown in the picture)
(Example: ROG STRIX X670E-I GAMING WIFI motherboard)
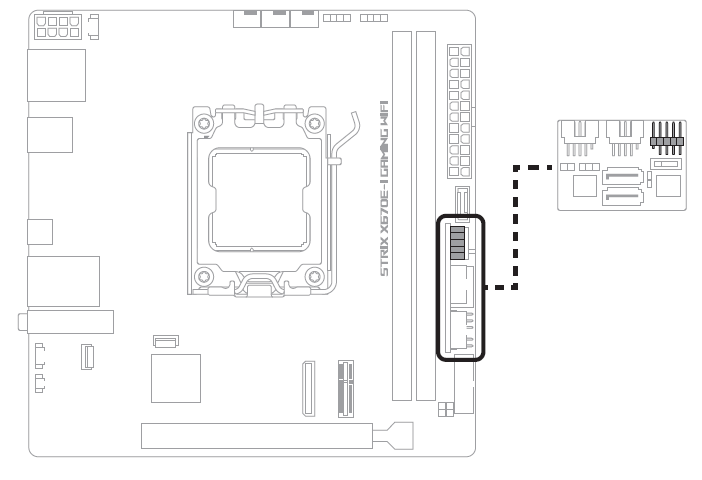
• The ROG FPS-II card can only be installed correctly in one direction, please do not force the ROG FPS-II card into the USB Type-C® slot only to avoid damage to the ROG FPS-II card and the USB Type-C slot.
• The two USB Type-C slots (SATA_M_CON and PANEL_M_CON) on the motherboard are for ROG FPS-II card only. Do not connect devices other than ROG FPS-II cards to these slots.

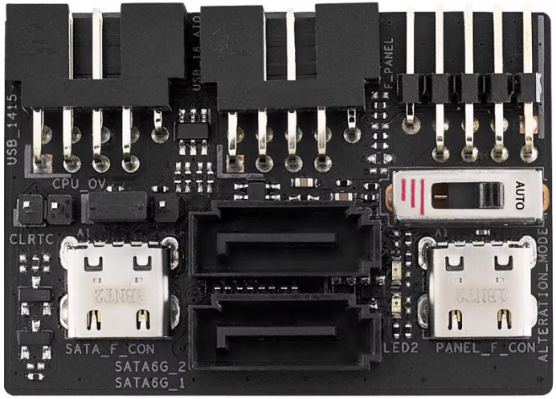
ROG FPS-II card appearance introduction:
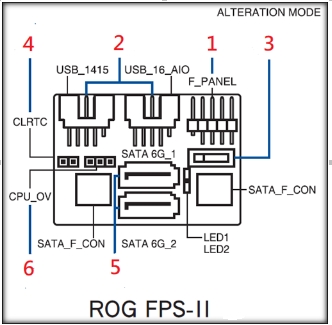
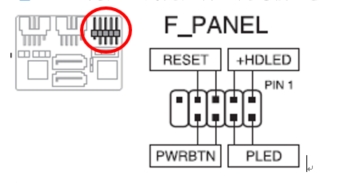
1. F_PANEL: Provides the connection position of the motherboard control panel
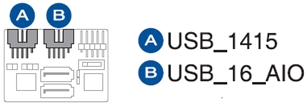
2. USB 2.0 header: The 2 USB slots support the USB 2.0 specification and support transfer rates up to 480 Mb/s. (The USB expansion kit module cable on the front panel of the chassis can be connected to this slot)
*USB_16_AIO slot only supports expansion of 1 set of external USB ports (4PIN is the valid USB connection PIN)*

3. Alteration Mode switch: The PCIe signal of the CPU can be switched to 1st (Gen4) or 2nd (Gen3)
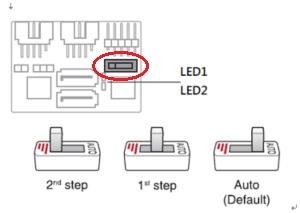
When set to Auto, the PCIe signal of the CPU is Default, and the LED is off.
When set to 1st setp, the PCIe signal of the CPU is Gen4, and LED1 will light up green at the same time
When set to 2nd setp, the PCIe signal of the CPU is Gen3, and LED2 will light yellow at the same time
*Data transfer rate of PCIe 3.0(Gen3), data transfer rate of PCIe 4.0(Gen4)
4. CLRTC: Clear CMOS RTC RAM data and BIOS settings to restore default values.。

Please refer to: [Motherboard] What are the steps to Clear CMOS?
5. STAT Connector: Supports using 2 SATA 6.0 Gb/S ports to connect SATA hard drives

6. CPU_OV: CPU overclocking
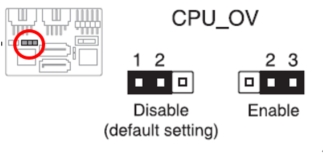
This jumper cap allows you to set a higher processor voltage for a more flexible overclocking system depending on the type of processor installed. For more processor voltage, set the jumper cap pins to 2-3, to restore the default processor voltage setting, move the jumper cap pins back to the 1-2 position.
*For related overclocking, please refer to AMD website: https://www.amd.com/zh-hant/technologies/ryzen-technologies
ROG STRIX HIVE installation and appearance introduction:
ROG STRIX HIVE installation
1. ROG STRIX HIVE needs to be connected with a USB Type-A to Type-C cable through the designated USB PORT of the motherboard (the Type-A end of the cable is connected to the motherboard)
(Example: ROG STRIX X670E-I GAMING WIFI motherboard as shown)
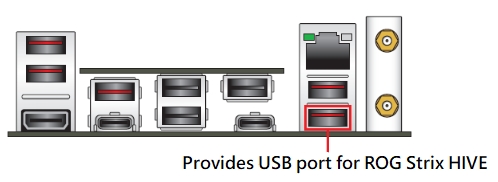
*For other models, please refer to the USB port in the motherboard manual
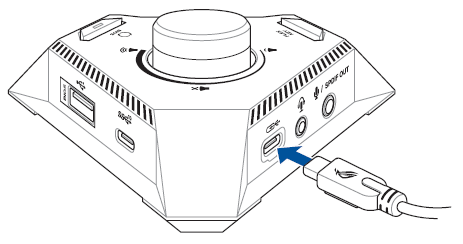
2. Connect the Type-C end of the cable to the ROG STRIX HIVE USB port on the motherboard.
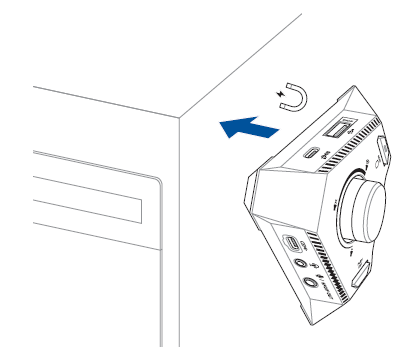
3. The bottom of ROG STRIX HIVE is magnetic and can be placed according to individual needs
ROG STRIX HIVE DO ON/OFF?
A: Press F7 in the BIOS screen to enter Advanced Mode and select the path: Advanced-->USB Settings USB Single Port Control can be used as an on/off option

ROG STRIX HIVE appearance introduction:
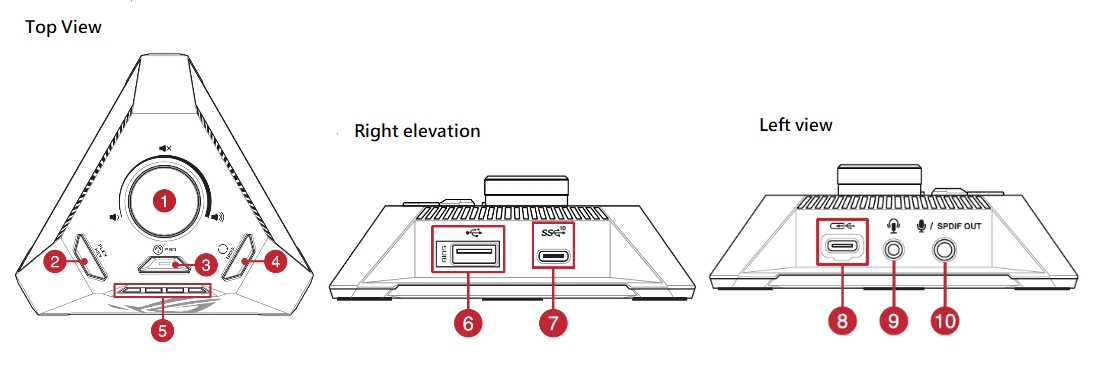
1. Volume adjustment knob and mute button: under Windows system, you can control the volume of the sound / press the knob to mute
2. FlexKey button: Single function button that can be set through BIOS (Reset/Aura switch/DirecKey)
3. EZ Mode PBO button: Provides CPU overclocking function button
4. BIOS FlashBack button: ([Motherboard] How to use the USB BIOS FlashBack™ function?), please insert the USB flash drive
5. Q-LED: Boot Debug light
6. USB 2.0 port: USB flash drive slot for BIOS FlashBack
7. USB 3.2 Gen 2 Type-C Port: Provides support for USB 10Gbps transmission
8. USB Type-C Port: ROG STRIX HIVE connects to the motherboard USB Port
9. Headphone jack: supports headphone jack (including microphone input)
10.S/PDIF OUT jack: supports optical digital audio output and microphone input jack
2. FlexKey button:
How to configure ROG STRIX HIVE FlexKey button function in BIOS:
A: On the BIOS screen, press F7 to enter Advanced Mode→Tools option, you can set one of the three functions of FlexKey.
1.Reset: Restart the system
2.Aura on/off: Turn on/off the Aura indicator, this setting is not synchronized with BIOS/software options
3.DirectKey: Directly boot into BIOS
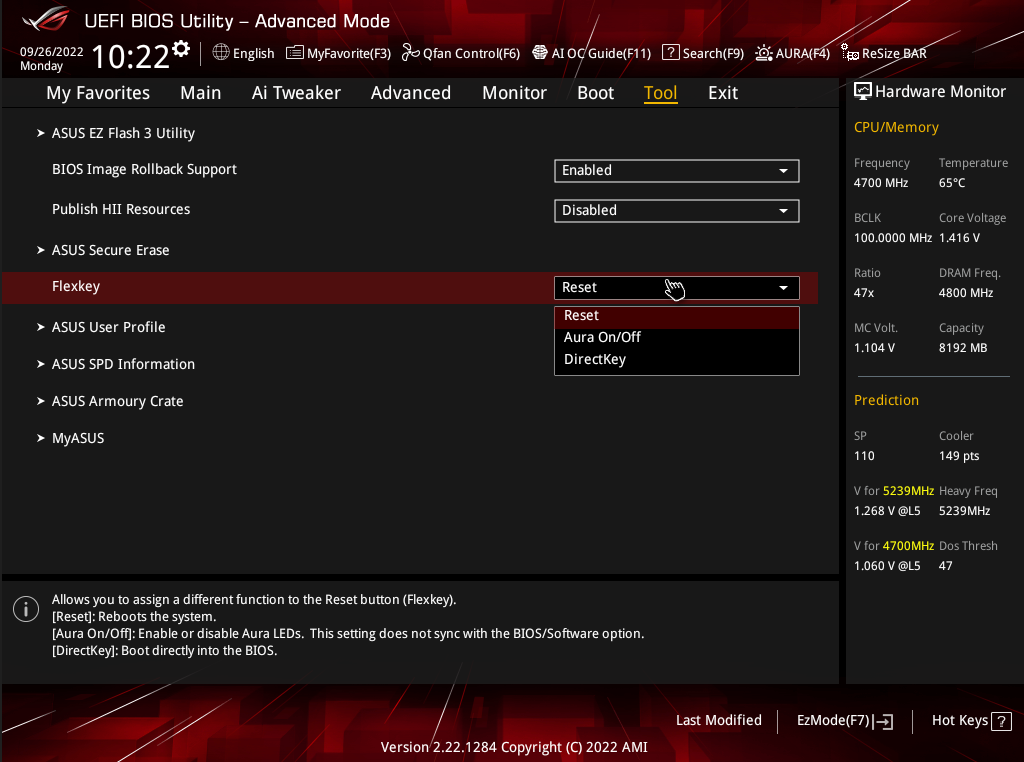
*Aura on/off: mainly controls ASUS AURA keyboard and mouse lighting effects
3. EZ Mode PBO button:
PBO function on/off?
A: After entering the BIOS, press F7 to enter Advanced MODE and select the path: Advanced-->AMD overclocking-->Accept-->Precision Boost Overdrive and you can choose according to your needs
AUTO : Automatically adjust overclocking
Disable : Turn off the PBO function
Enabled : Enable PBO function
Advanced : Custom Mode
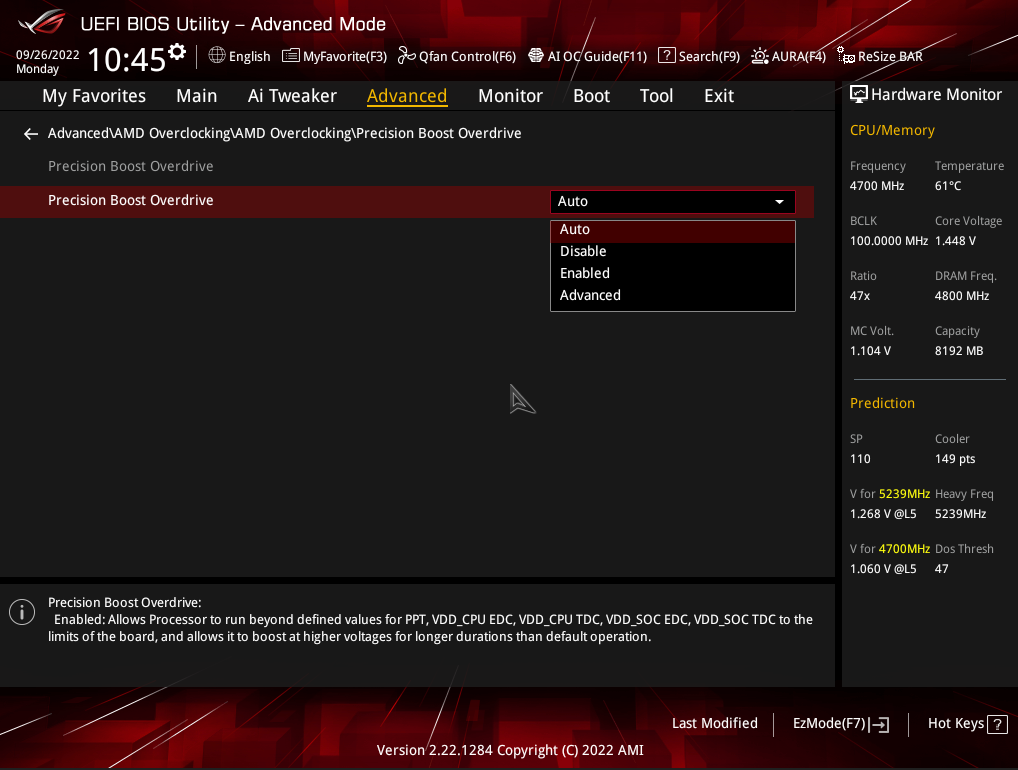
*Please refer to AMD website for overclocking: https://www.amd.com/zh-hant/technologies/ryzen-master
5. ROG STRIX HIVE Q-LED:
What is the Debug Q-LED light?
A. 1. Red --> CPU related problems (prompt no CPU or CPU error)
2. Yellow --> DRMA related problems (prompt no memory or memory error)
3. White --> VGA (display card) related problems (prompt no display card or display card error)
4. Yellow-green --> Complete the power-on state

Reference: [Motherboard] ASUS Q-LED Troubleshooting No Power/No Boot/No Display