GlideX Frequently Asked Question (FAQ)
[Notebook/Desktop/AIO] GlideX - Introduction
[GlideX] GlideX device edition problems
[GlideX] How to enable USB debugging for Android devices?
[GlideX] How to connect device(s) via Wi-Fi or USB cable
[GlideX] Cannot use GlideX Remote Desktop?
[GlideX] GlideX login to the same ASUS member account can be directly connected
[GlideX] Learn how to send feedback to GlideX
[GlideX] Cannot connect your devices to use Shared Cam in third-party video-communication services?
[GlideX] Cannot find the device you want to connect in the device list on GlideX?
[GlideX] Bluetooth pairing problems
[GlideX] Cannot connect your Devices via Bluetooth to use Communication in GlideX?
[GlideX] How to download and install GlideX on macOS?
[GlideX] How to Use Screen Mirror PC Control
[GlideX] How to switch from 2.4GHz to 5GHz for a better screen sharing experience?
[Notebook/Desktop/AIO] GlideX - Introduction
GlideX - is a cross-device screen sharing solution. Wired or wireless connections can be used to create a larger and better space for work or play. GlideX optimizes your workflow in the blink of an eye!
※ GlideX supports linkage with ASUS Control Panel, please refer to ASUS Control Panel - Introduction | Official Support | ASUS Global
※ The Unify Control function now supports functions such as senseless file transfer between devices, senseless sharing of copied text, etc. Click here to go to the Unify Control function introduction.
Before you start reading this article, we recommend that you watch our introductory video.
1. Requirements for computer and mobile devices
2. Open GlideX for the first time
3. Permission management
3.1 Android devices
3.2 iOS devices
6. Cross-device operation
6.1 Mirror
6.2 Extend
6.3 Unify Control
7. File Transfer & URL Sharing
7.1 File Transfer - Computer to Mobile
7.2 File Transfer - Mobile to Computer
7.3 URL Sharing - Computer to Mobile
7.4 URL Sharing - Mobile to Computer
8.1 Pairing PC and Mobile
8.2 Hands-free calling
8.3 Message
8.4 Notification
9. Remote Access
9.1 Pairing on PC and Mobile
9.2 Remote File Access
9.3 Remote Desktop
1. Requirements for computer and mobile devices:
computer device:
·Supports computers with Windows operating system, LAN, Wi-Fi and USB
·Windows operating system: Windows 10/11 64-bit (version 1909 and later) (please note that GlideX does not support Windows S mode)
·Graphics driver supports H.264 codec
Mobile device:
·iOS devices require 14.0 and above,
·Android devices require 9.0 and above
Network requirements: Mobile internet, Wi-Fi, Personal Hotspot and Bluetooth
Supported mobile devices: iPhone, iPad, Android Phone, Android Pad
2. Open the GlideX App for the first time
Tap ①[Agree] End User License Agreement and GlideX Terms and Conditions, and then tap ②[OK]. Tap ③[I am above the age of 14 years], and tap ④[OK]. Download the GlideX App if your device does not have GlideX installed, if you already have GlideX installed, tap ⑤[Got it]. Tap ⑥[OK] agree to Request Nearby devices permission. Tap ⑦[Allow all the time] to allow discover and connect to nearby devices. Tap ⑧[Allow all the time] to allow notifications to be sent. GlideX goes to the main page.
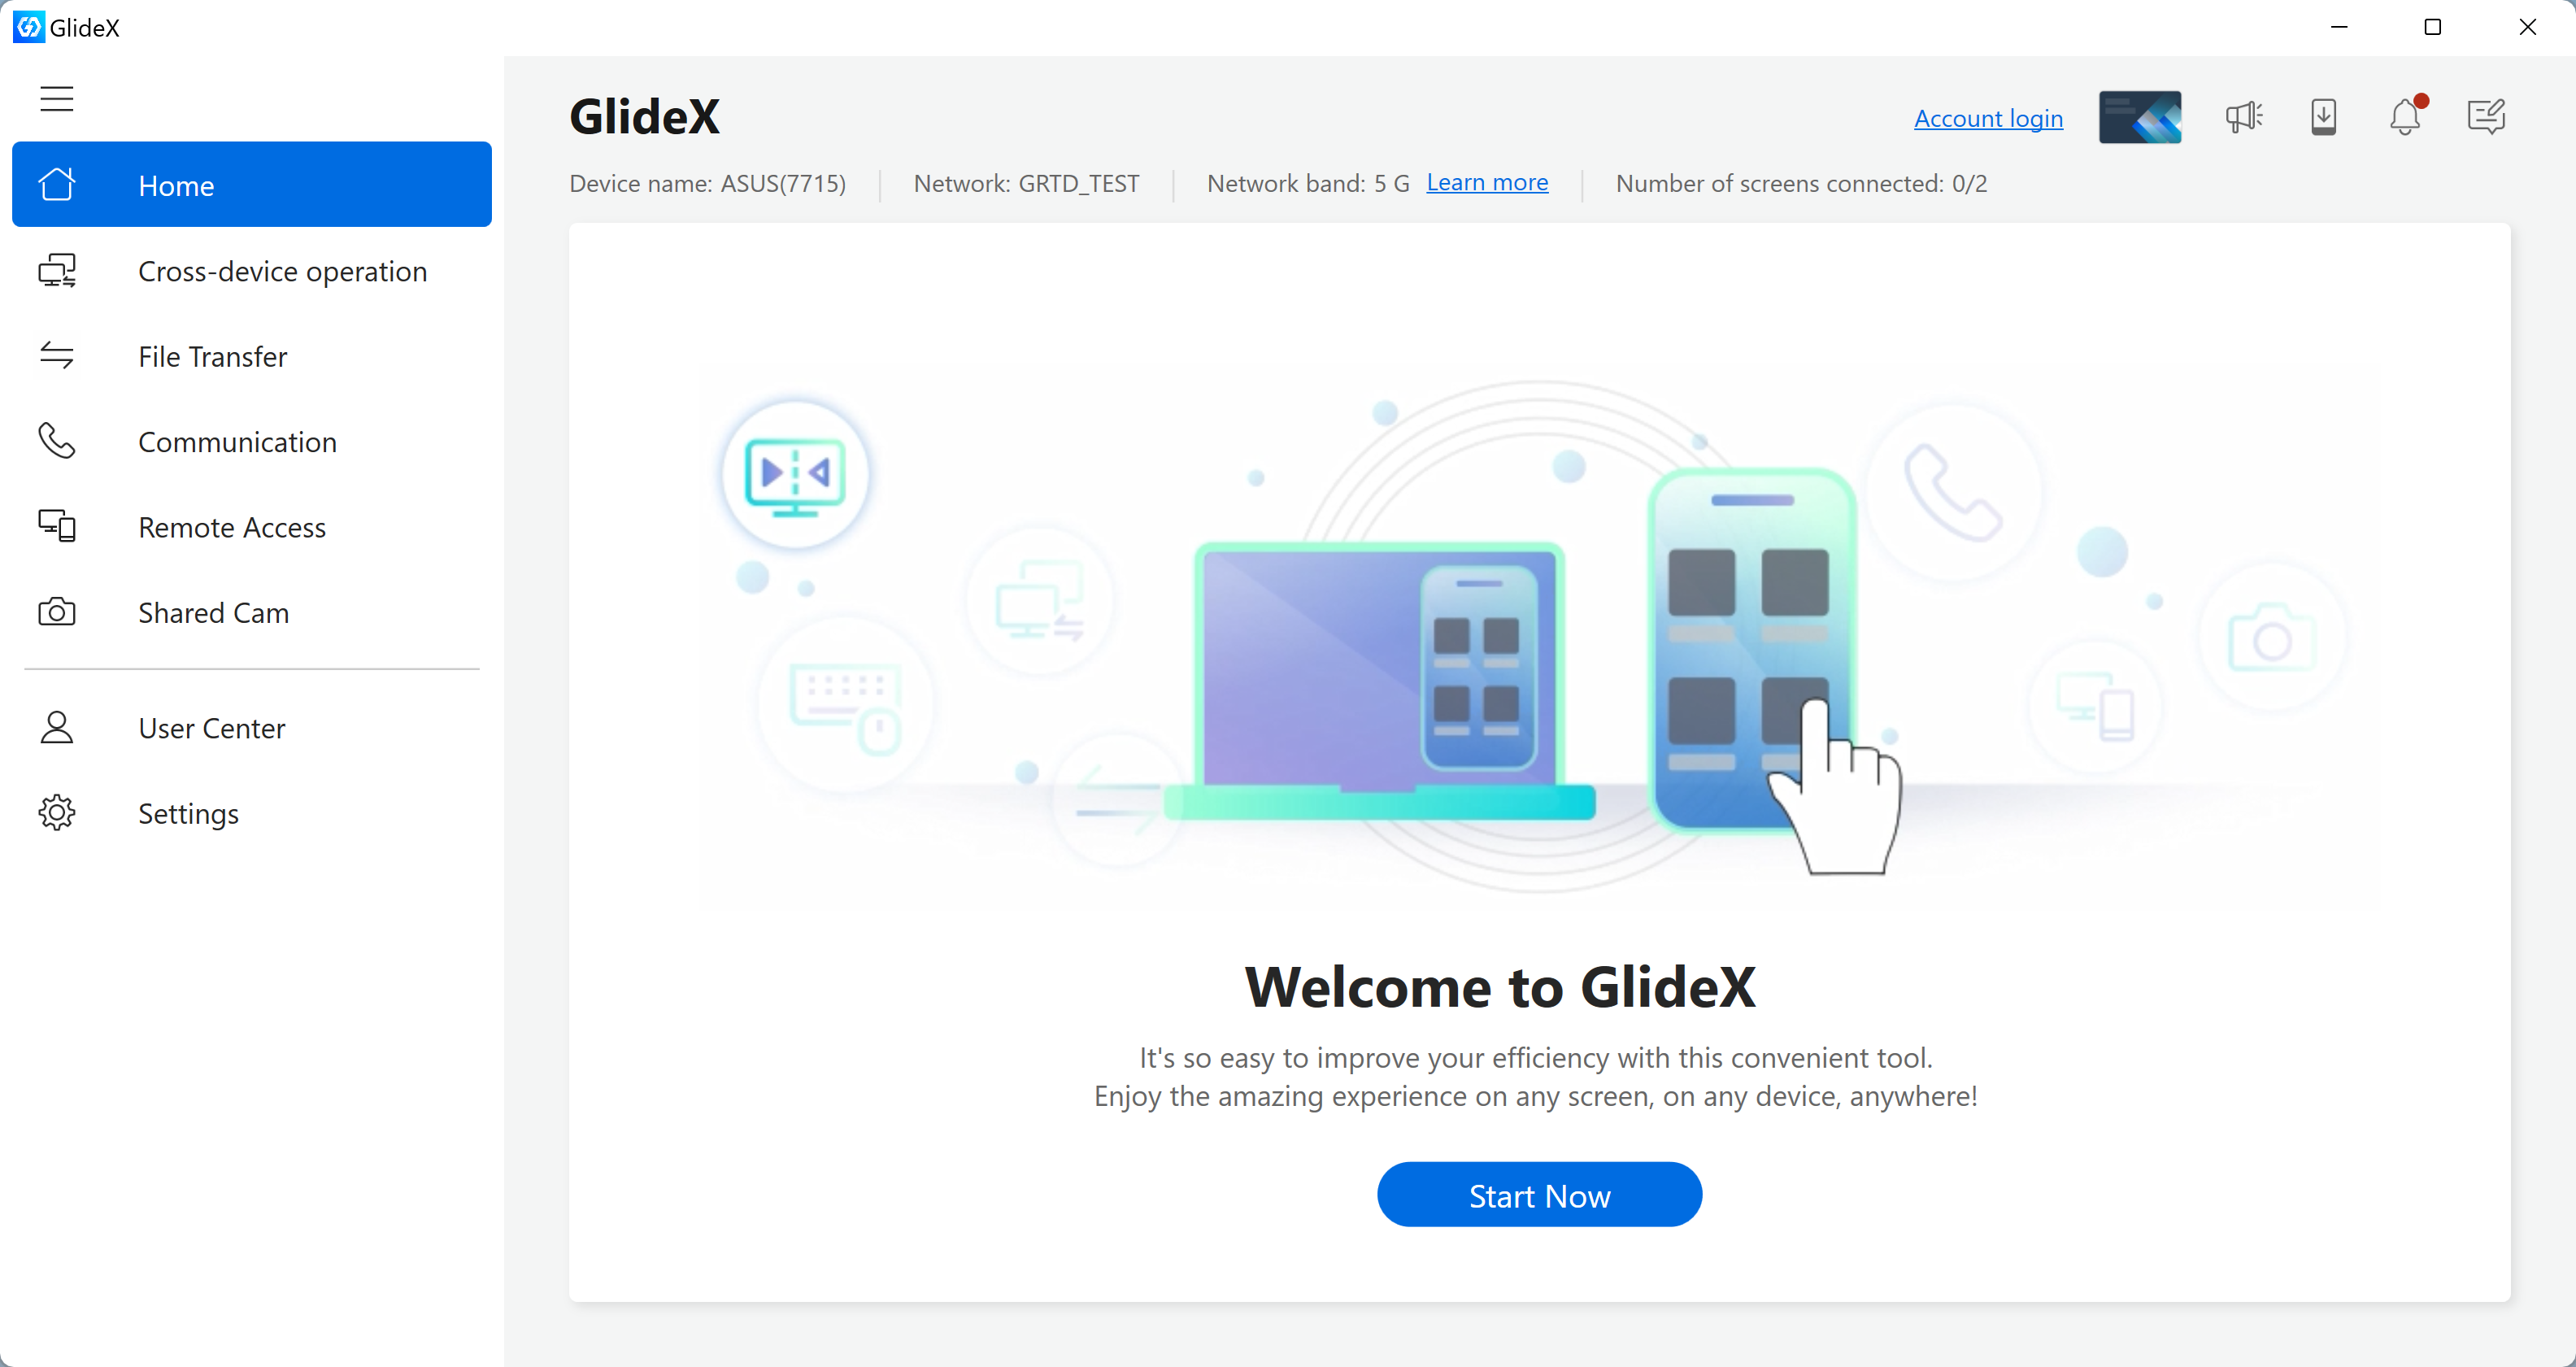
(1) Search for ①[GlideX] in the search bar, and then click ②[GlideX], GlideX will open.
(2) On the End User Software License Agreement and GlideX Terms and Conditions, click ③[I acknowledge and agree to the above], and then click ④[Confirm].
(3) On the Privacy page, click ⑤[I am above the age of 14 years & I agree] and click ⑥[Confirm].
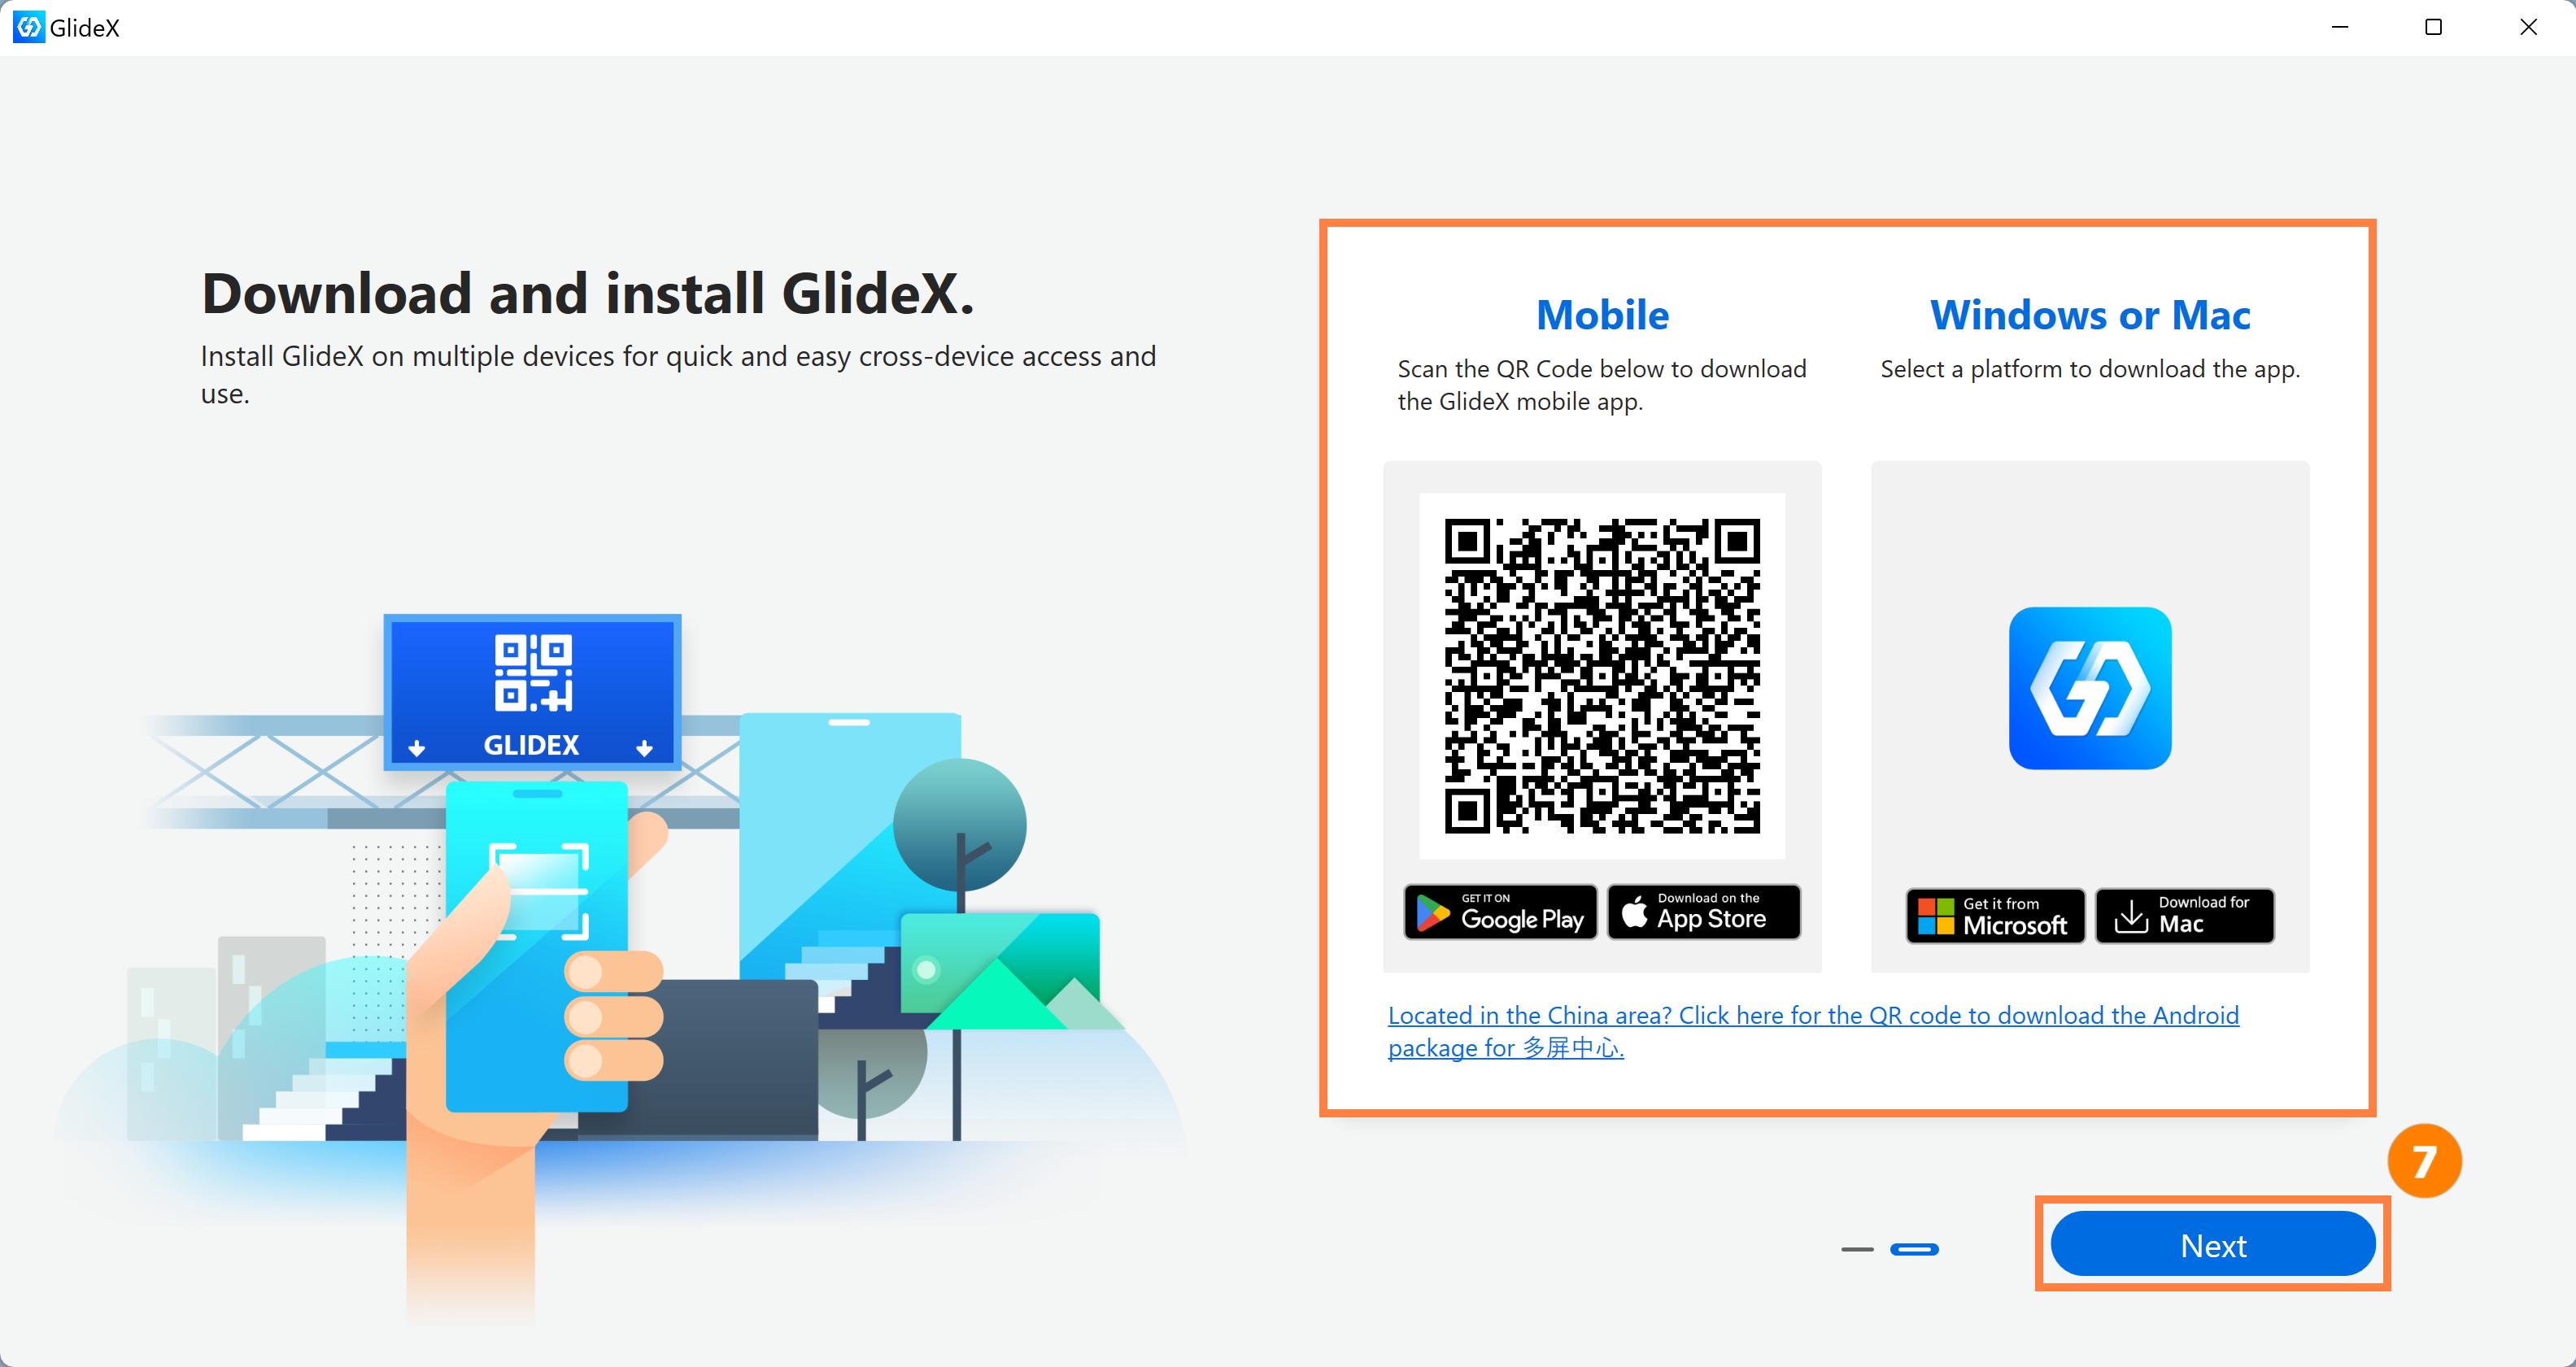
(4) In the Download GlideX app page, download the GlideX app if your device does not have GlideX installed. Click ⑦[Next].
(5) GlideX will enter the main page.
GlideX on the mobile device is used normally, and the permissions that should be enabled on the mobile device.
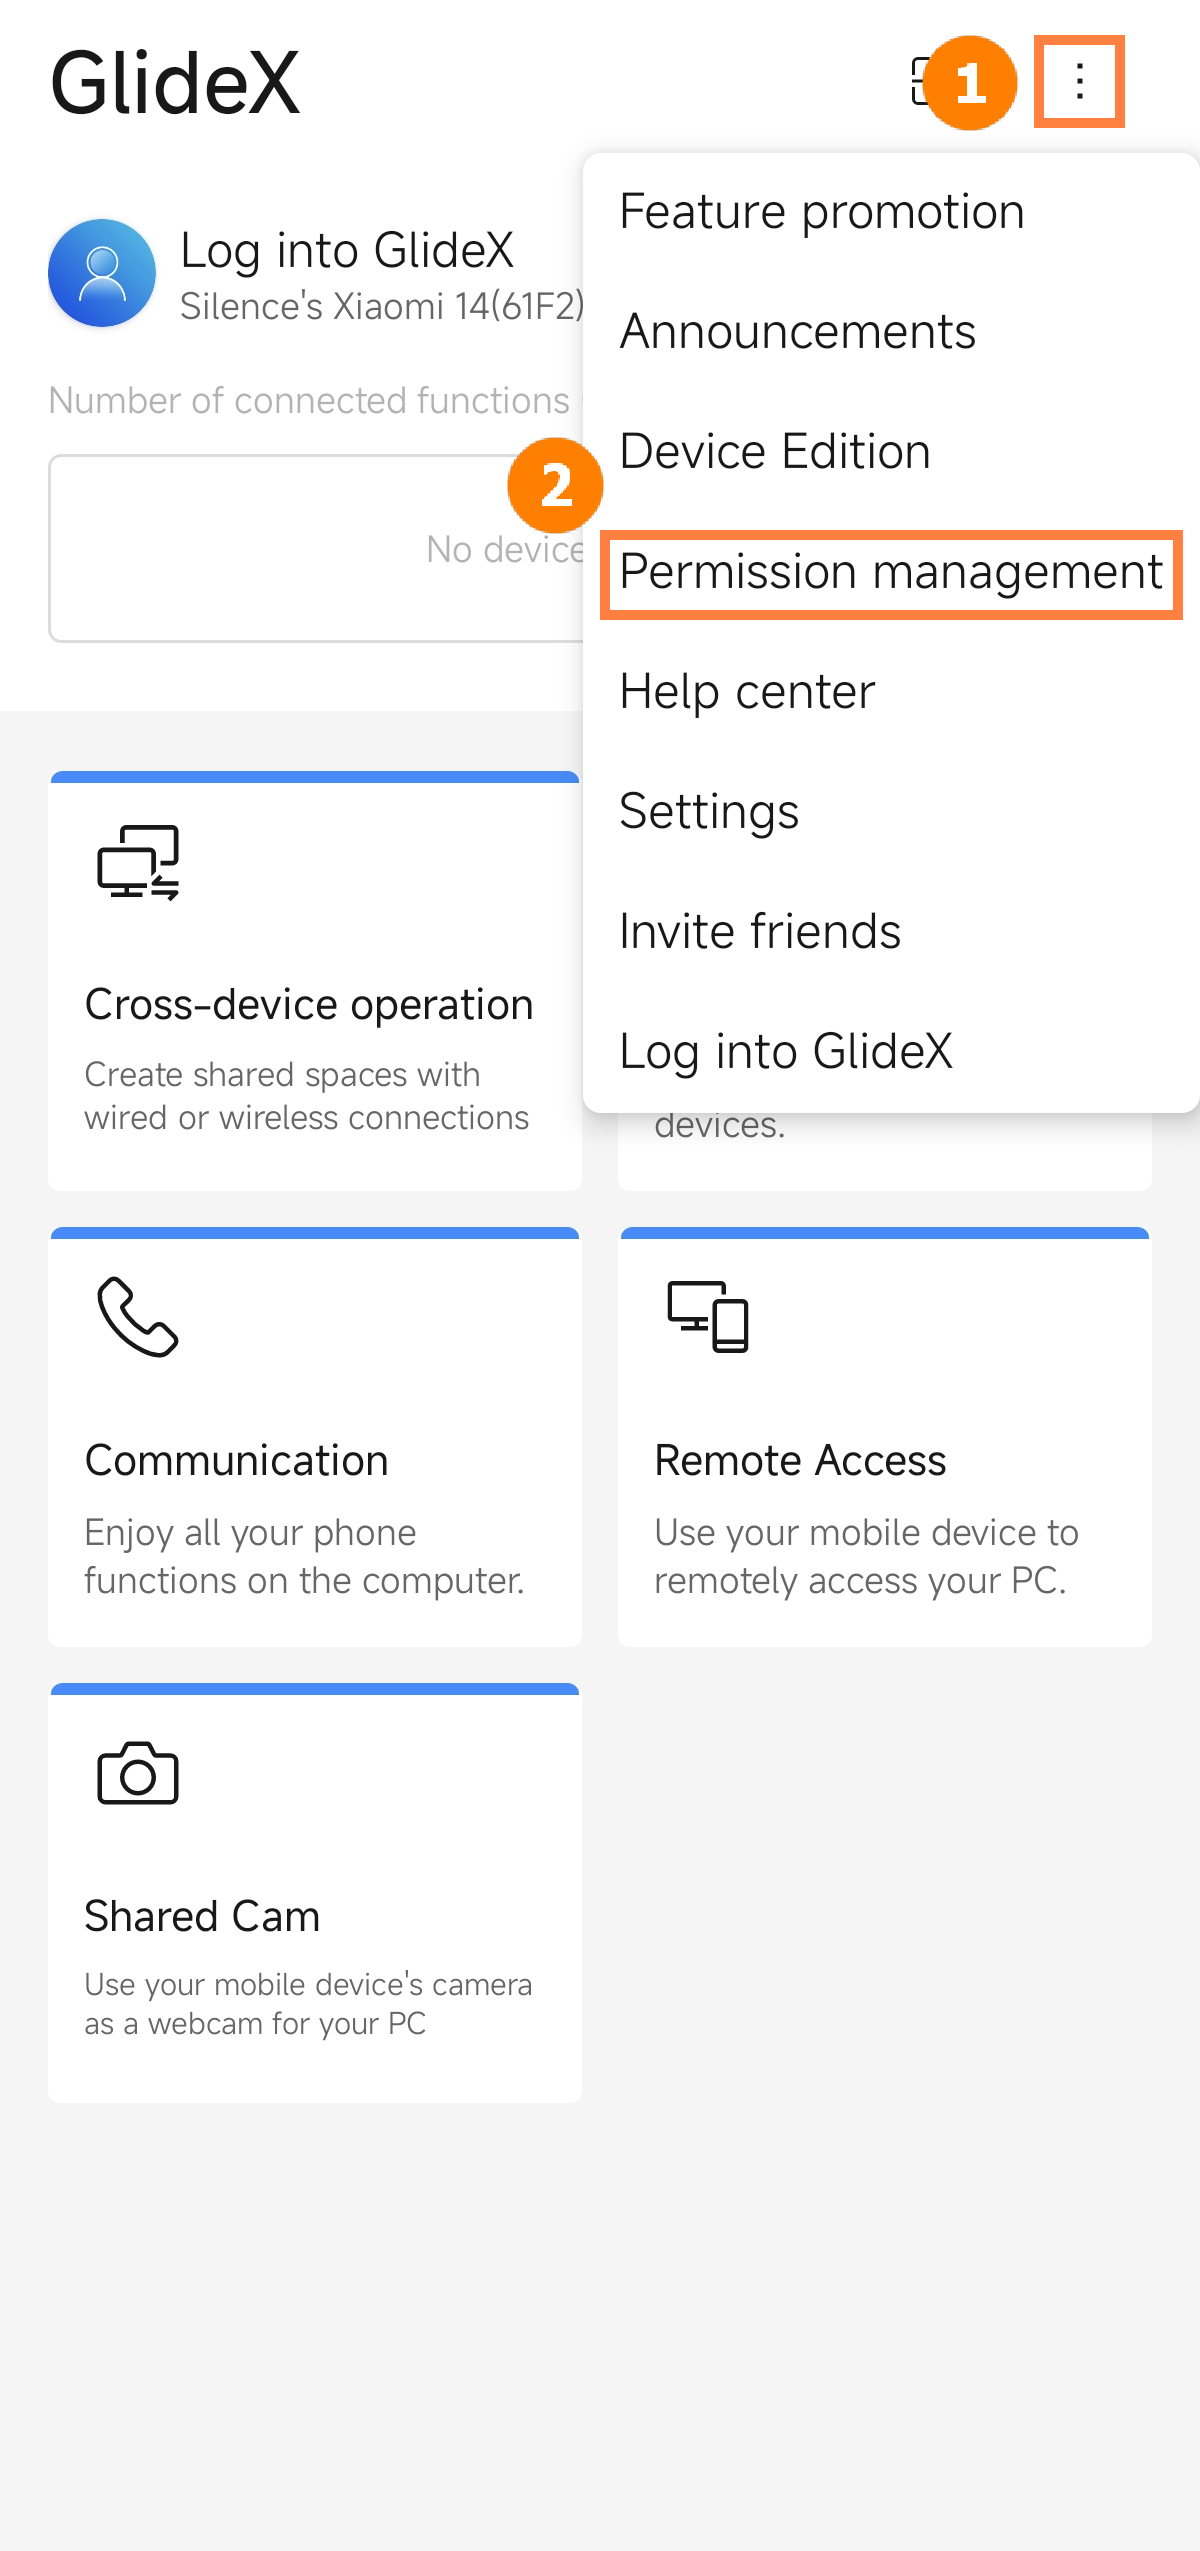
Tap ①[More] in the upper right corner, click ②[Permission Management] to open the Permission Management page.
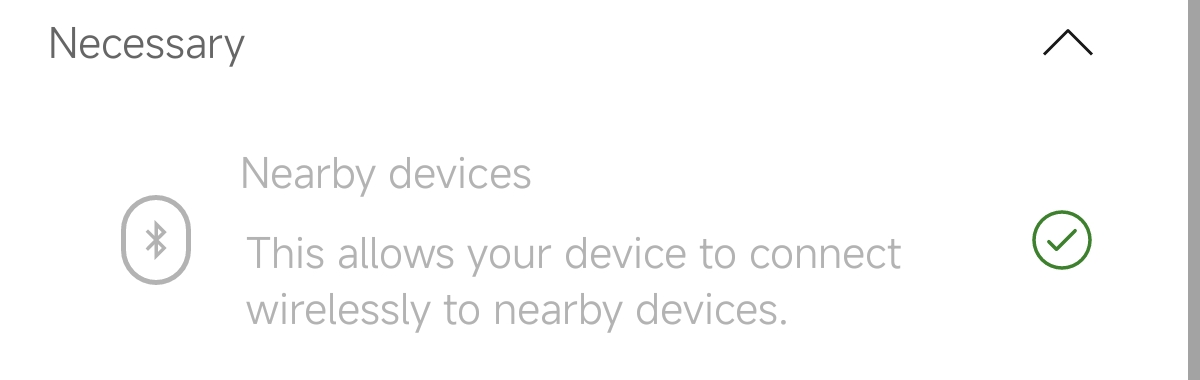
(1) Necessary Permission - Nearby Devices
Nearby Device permission is necessary permission, which you have enabled when you first launched the GlideX App.
※ Turn on the Nearby Device permission, this allows your device to connect wirelessly to nearby devices.
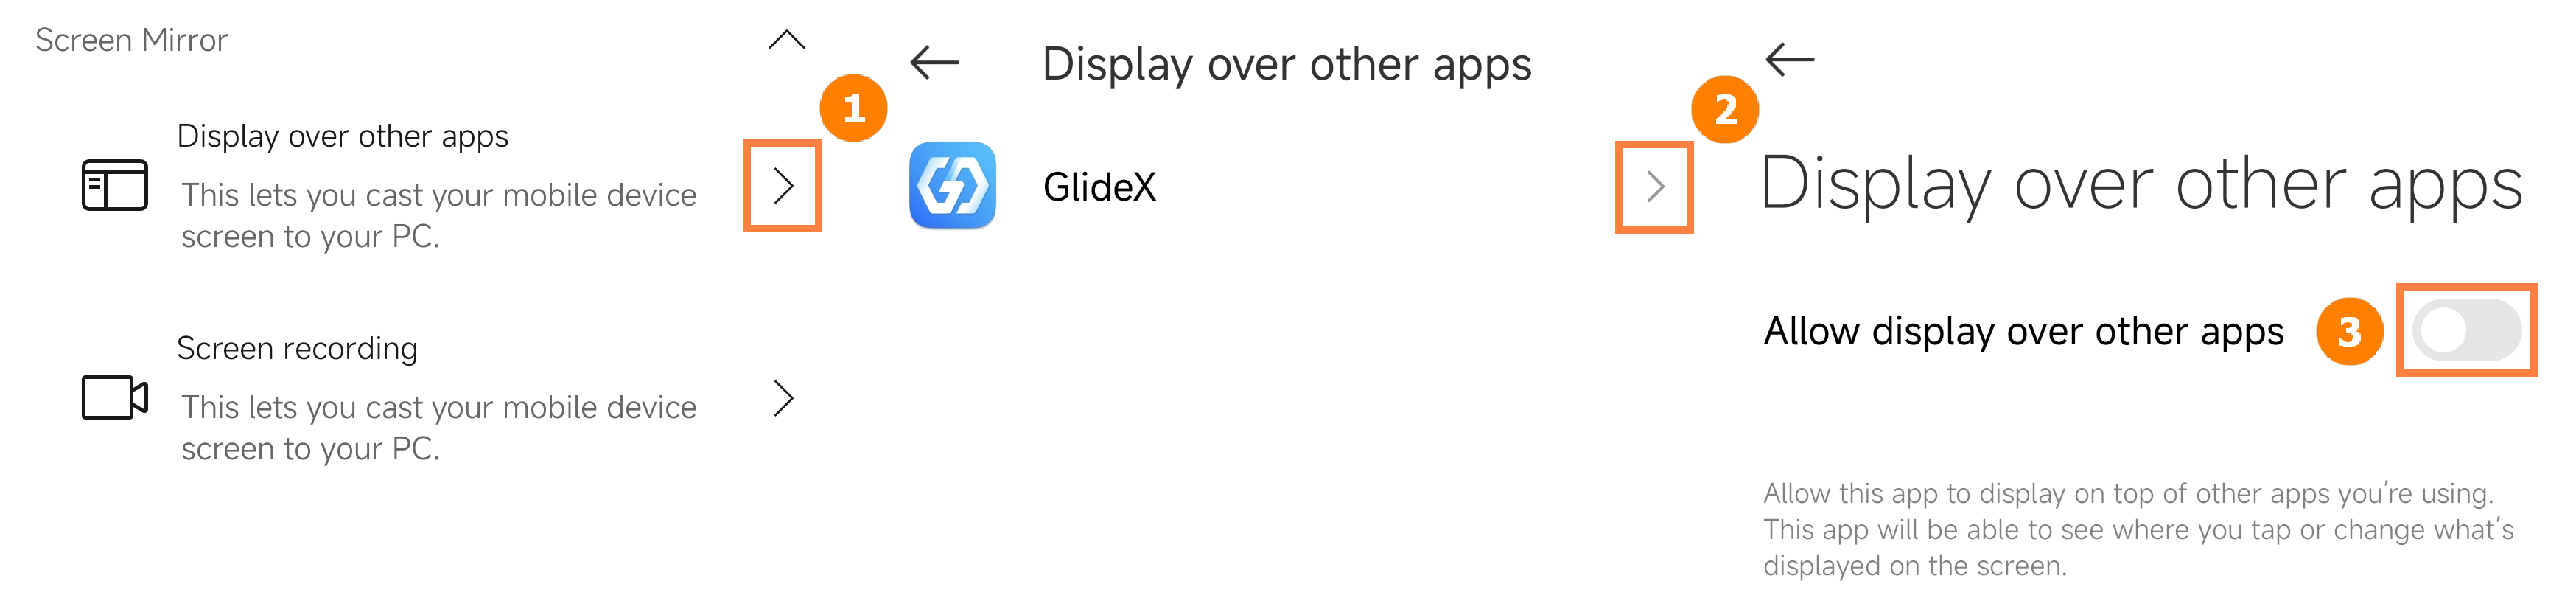
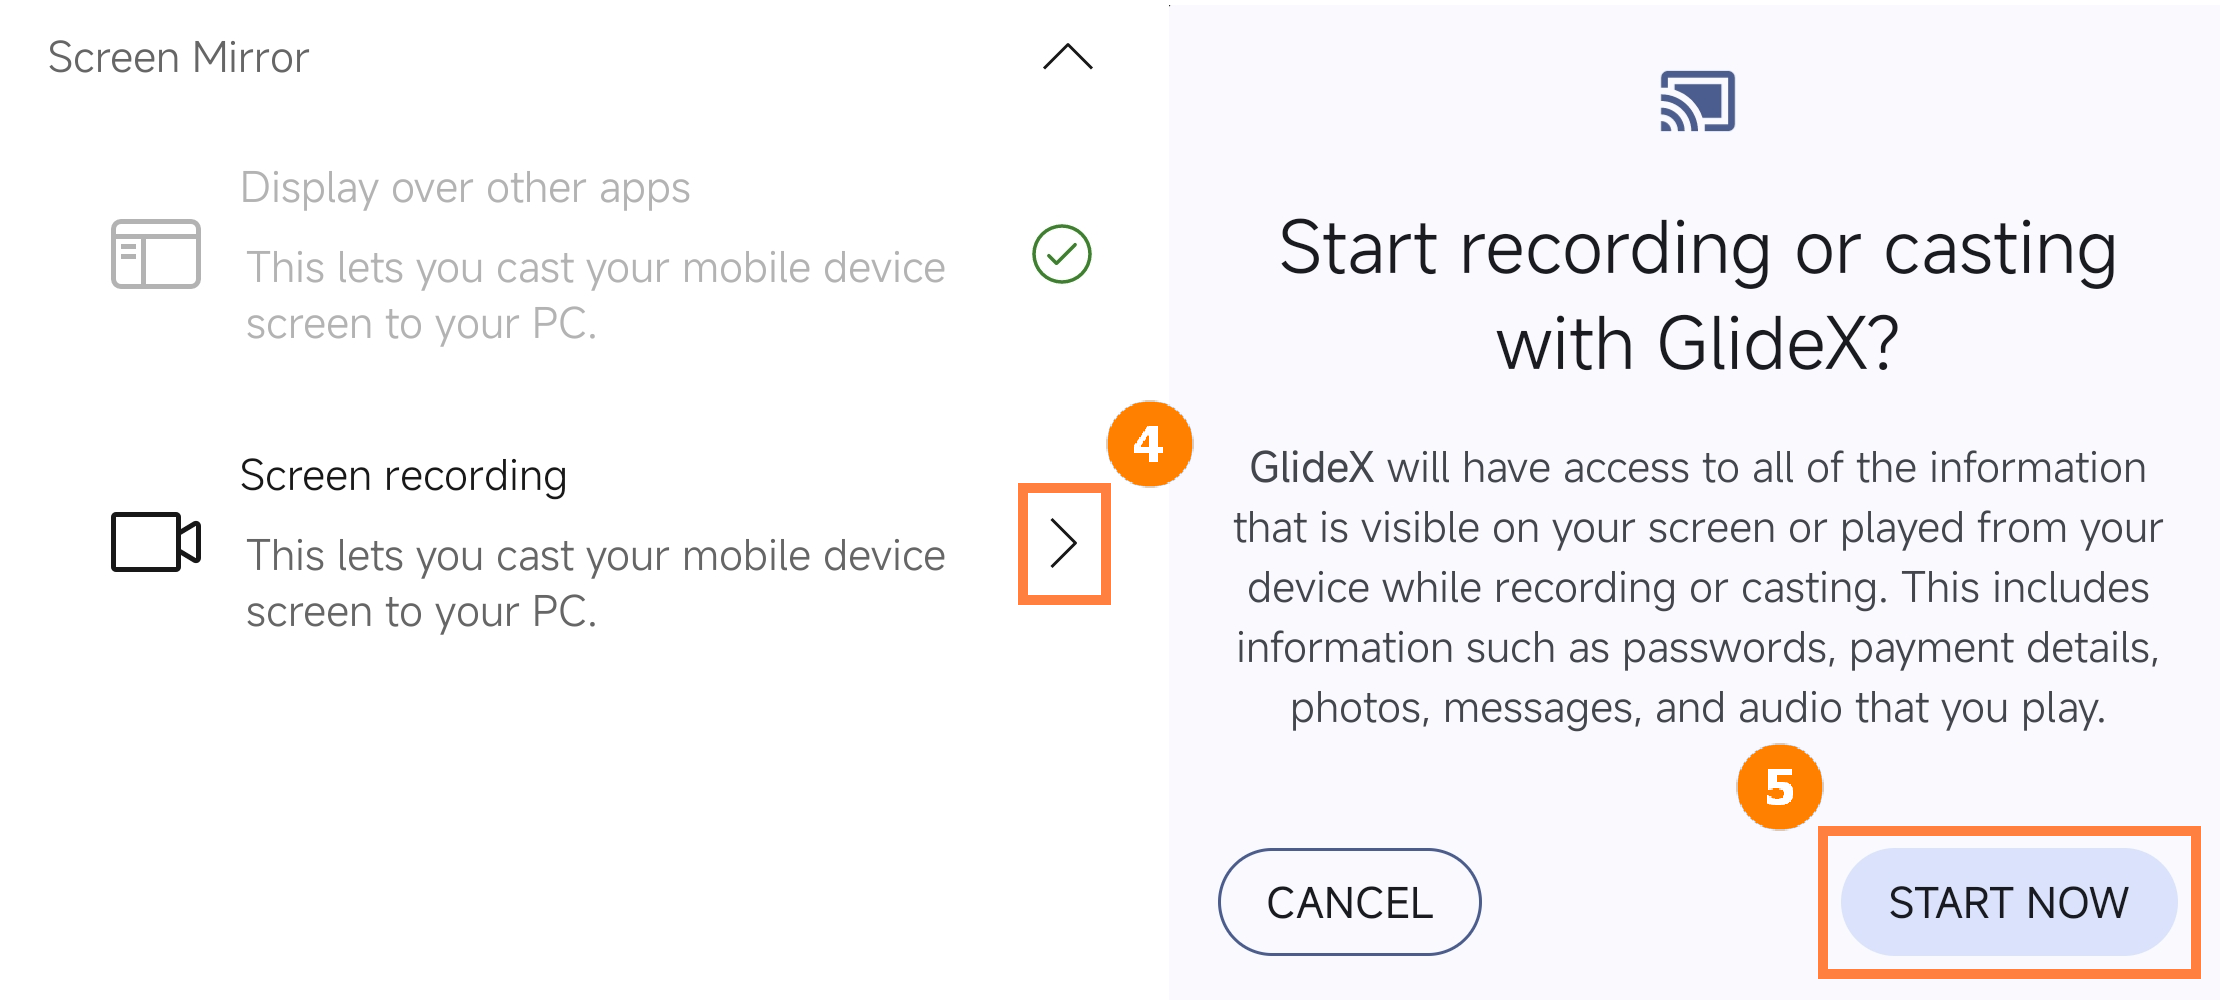
(2) Screen Mirror - Display over other apps and Screen Recording
Tap ①[Display over other apps], find and tap ②[GlideX], and tap to turn on ③[Allow display over other apps]. Go back to the permissions management page, tap ④[Screen Recording], and tap ⑤[Start Now].
※ Turn on the Display over other apps permission, this lets you cast your mobile device screen to your PC.
※ Turn on the Screen Recording permission, this lets you cast your mobile device screen to your PC.
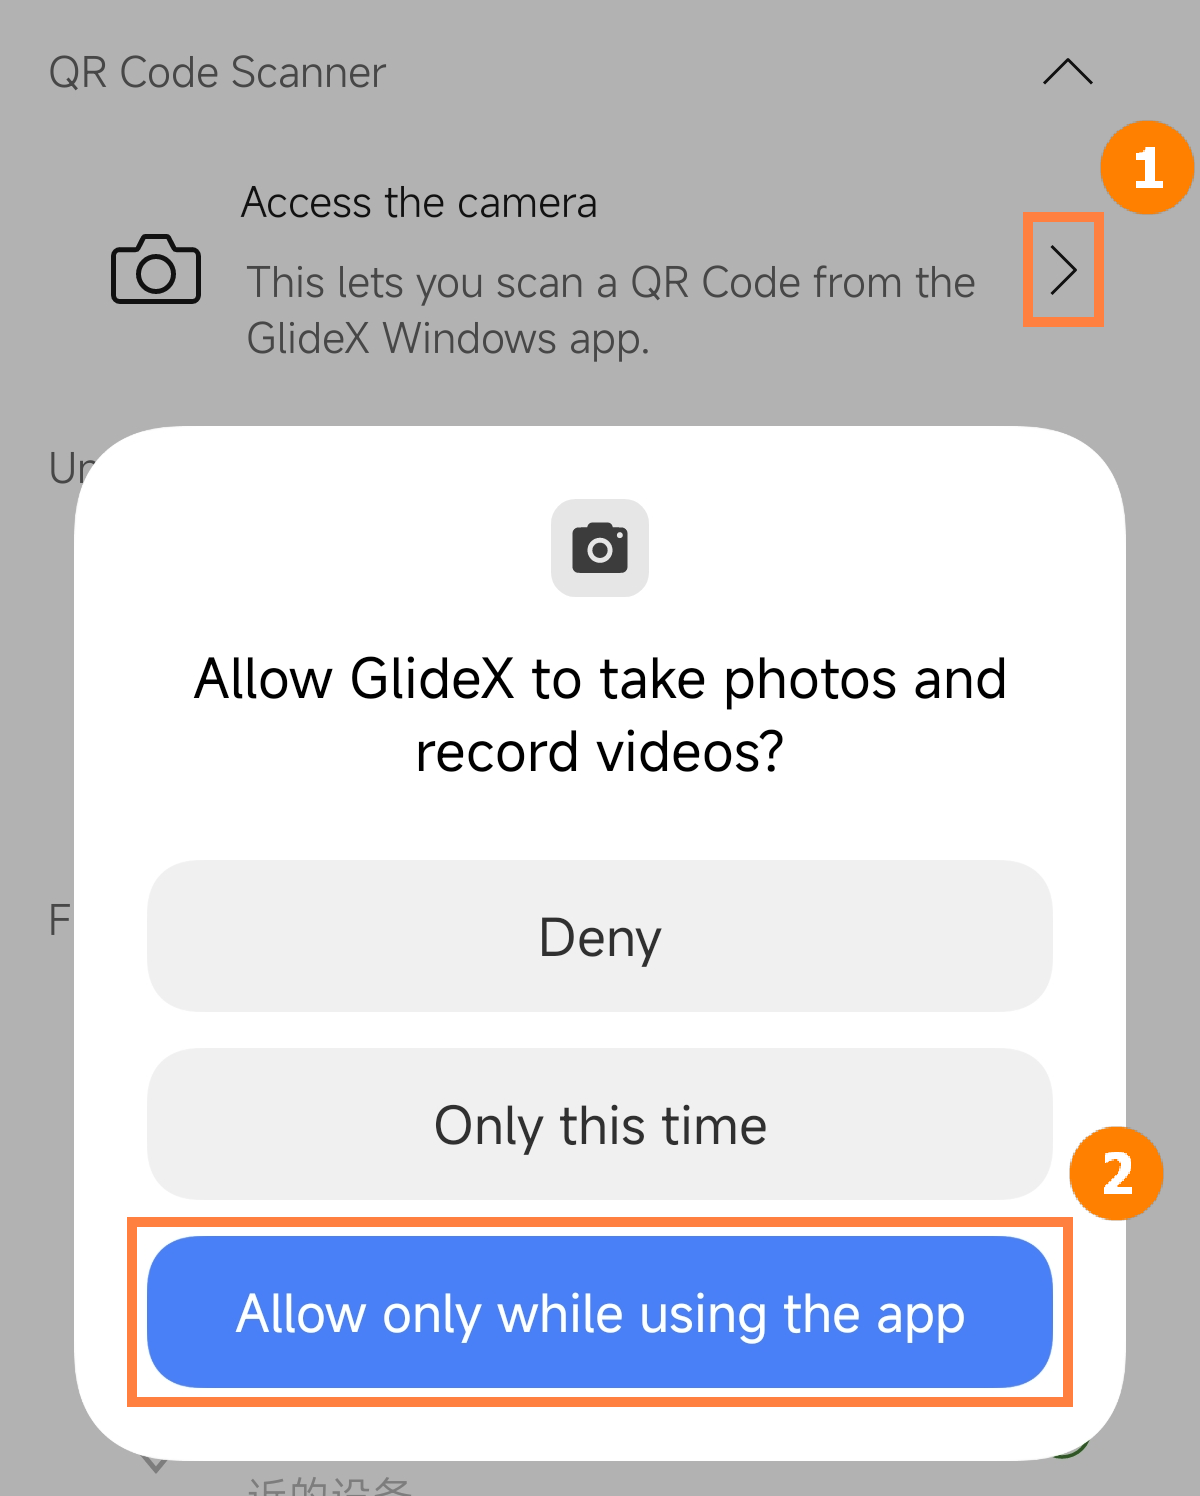
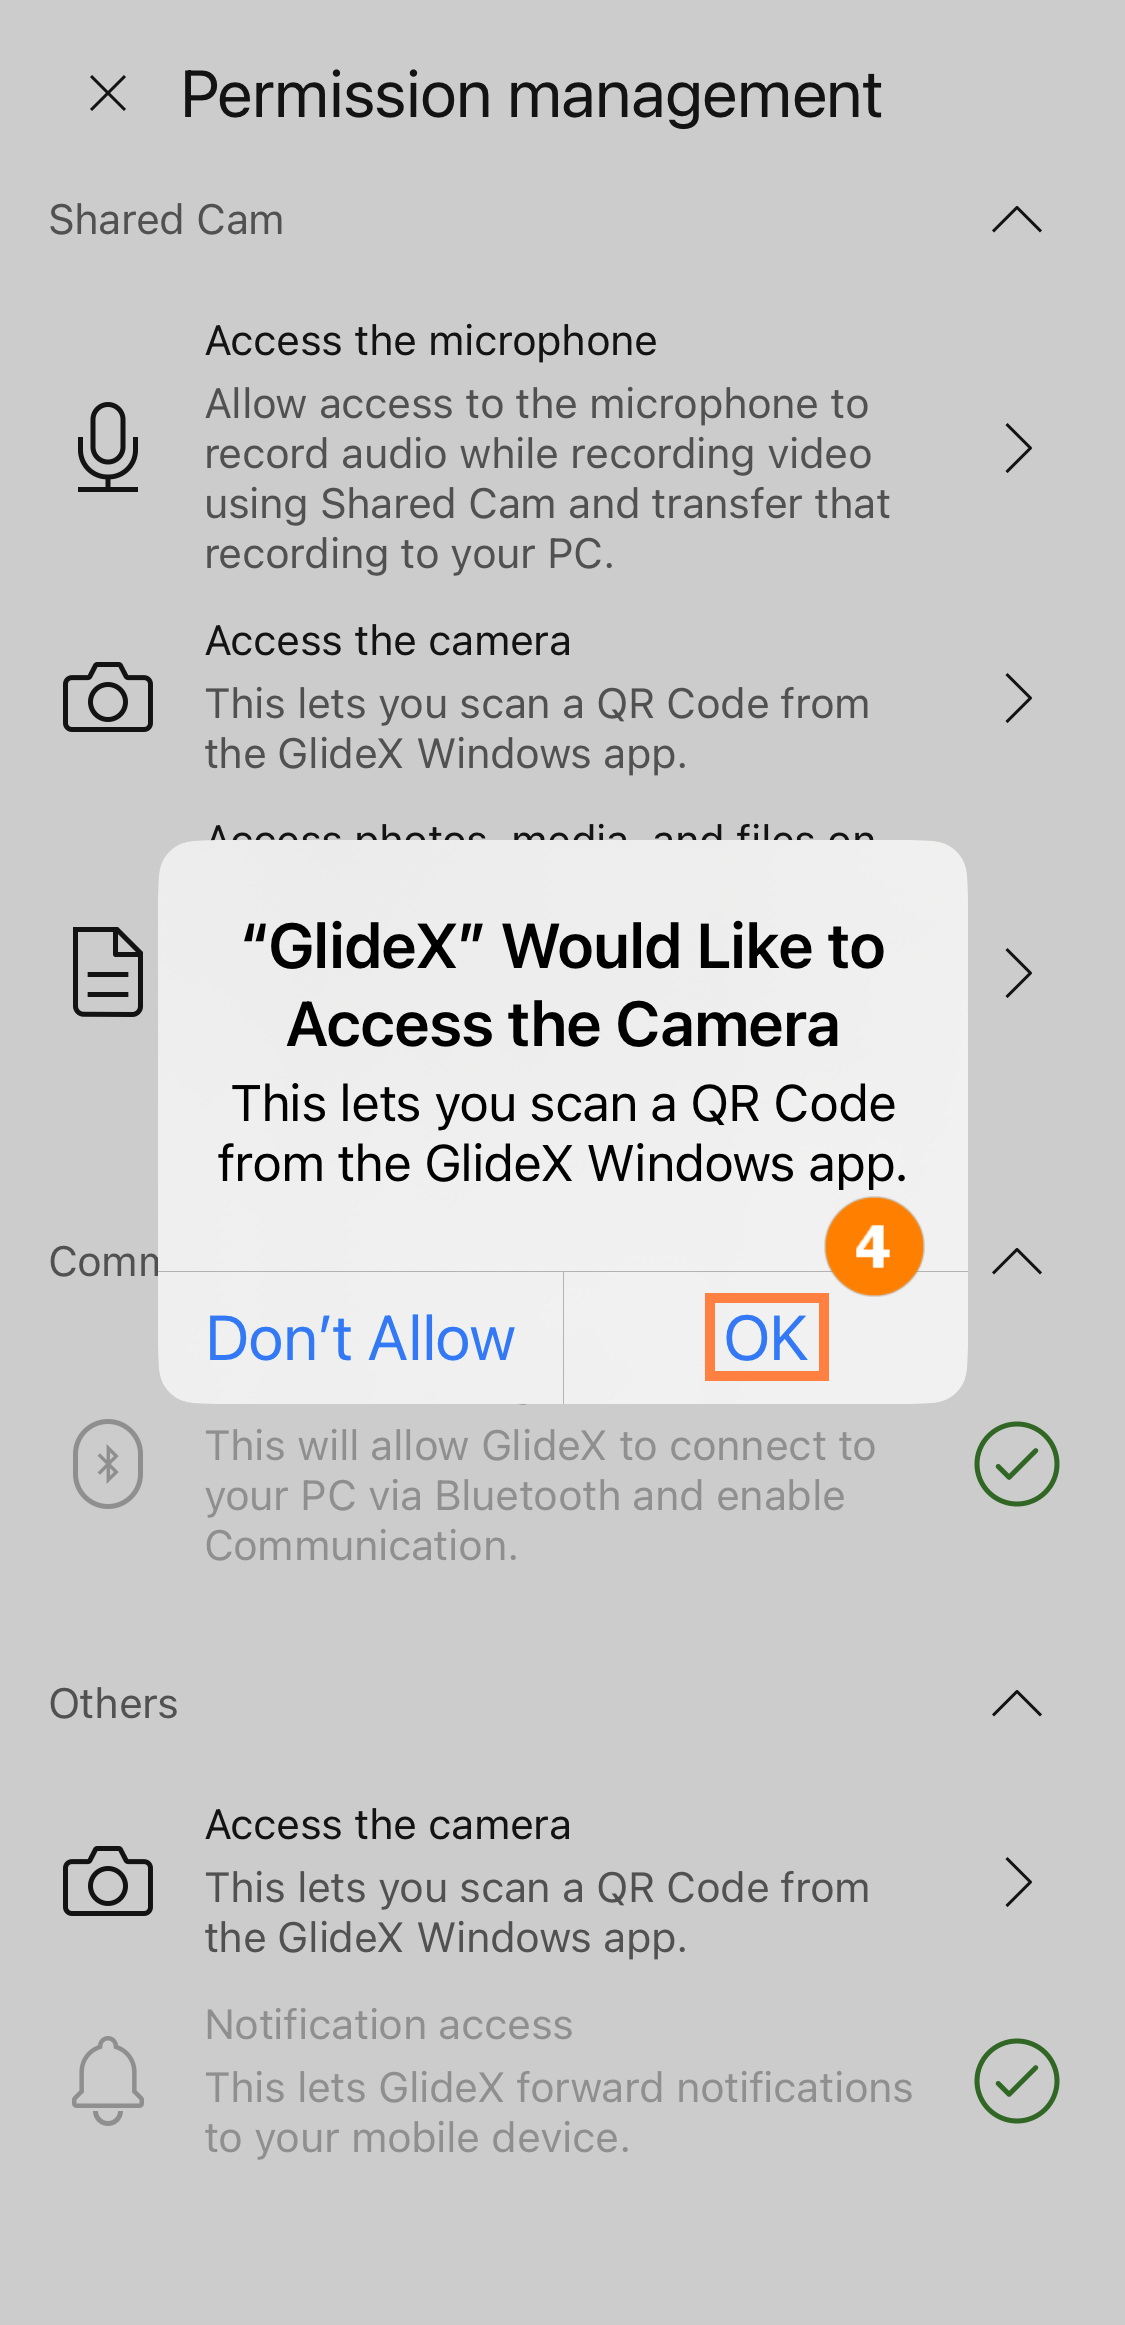
(3) QR Code Scanner - Access Camera
Tap ①[Access the Camera], tap ②[Allow only while using the app].
※ Turn on the Access the Camera permission, this lets you scan a QR Code from the Glidex Windows app.
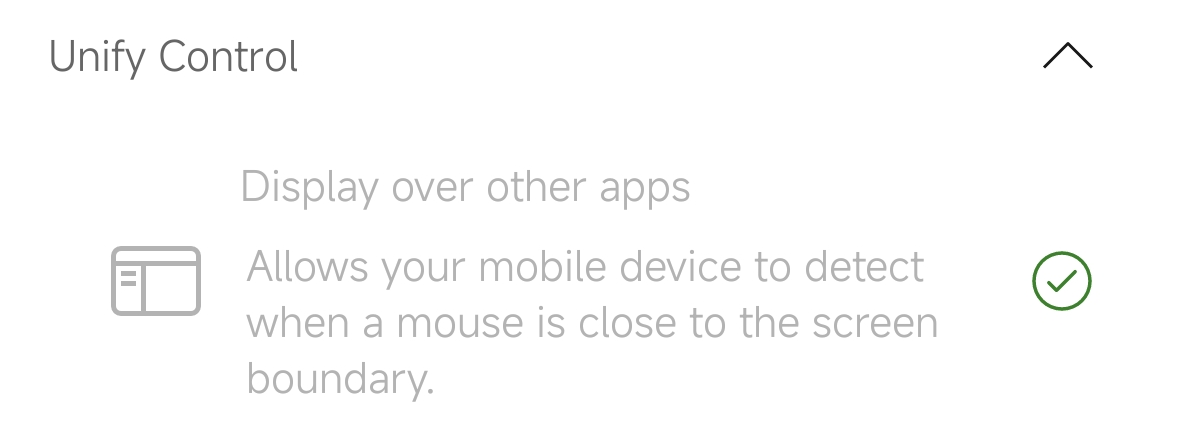
(4) Unify Control - Display over other apps
Display over other apps, enabled in the previous step.
※ Turn on the Display over other apps permission, allows your mobile device to detect when a mouse is close to the screen boundary.
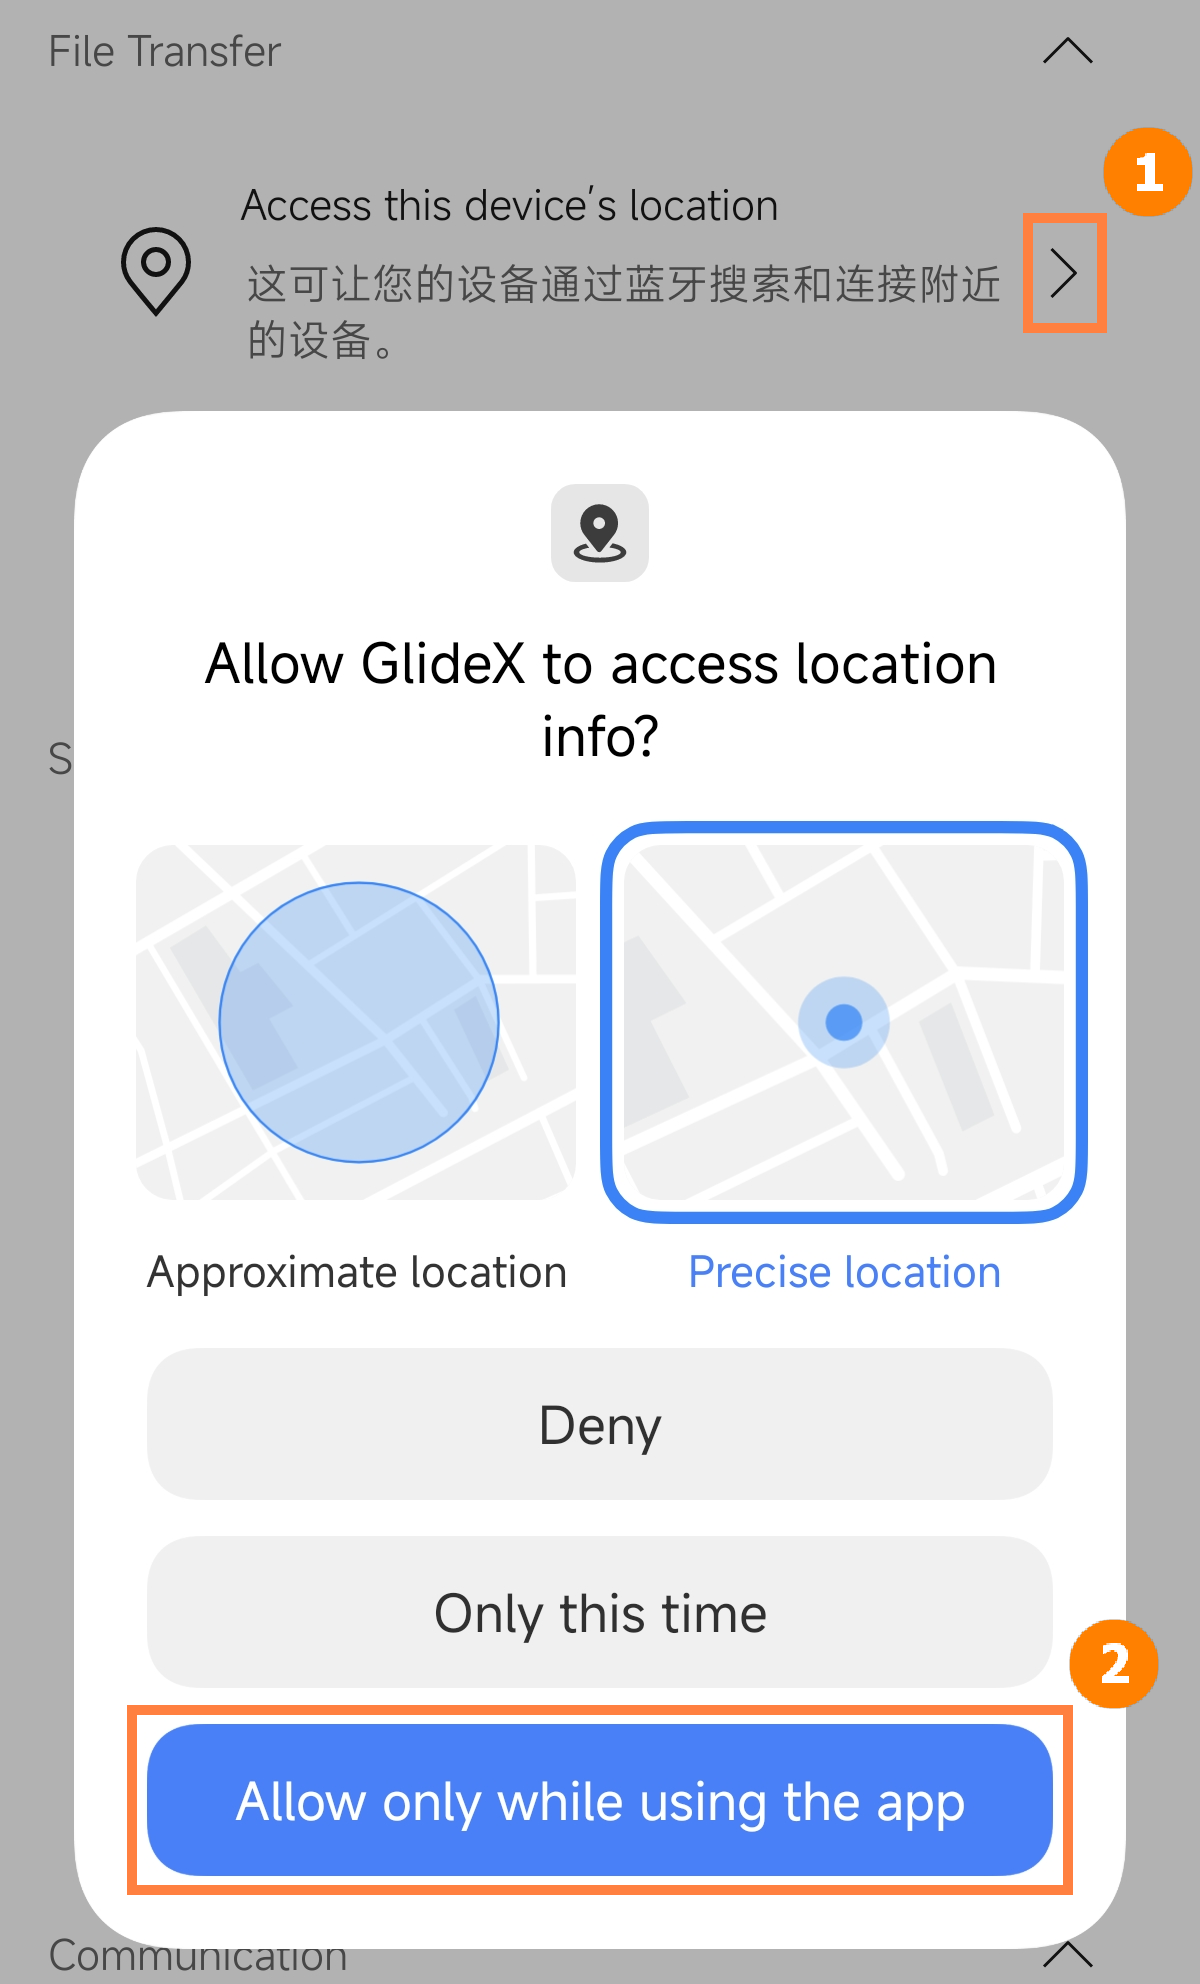
(5) File Transfer - Access this device's location
Tap ①[Access this device's location], tap ②[Allow only while using the app]. The Use location information permission was turned on in the previous step.
※ Turn on the Access this device's location permission, which allows your device to search and connect to nearby devices via Bluetooth.
※ Turn on the Use location information permission, which let your device search and connect to nearby devices via Wi-Fi.
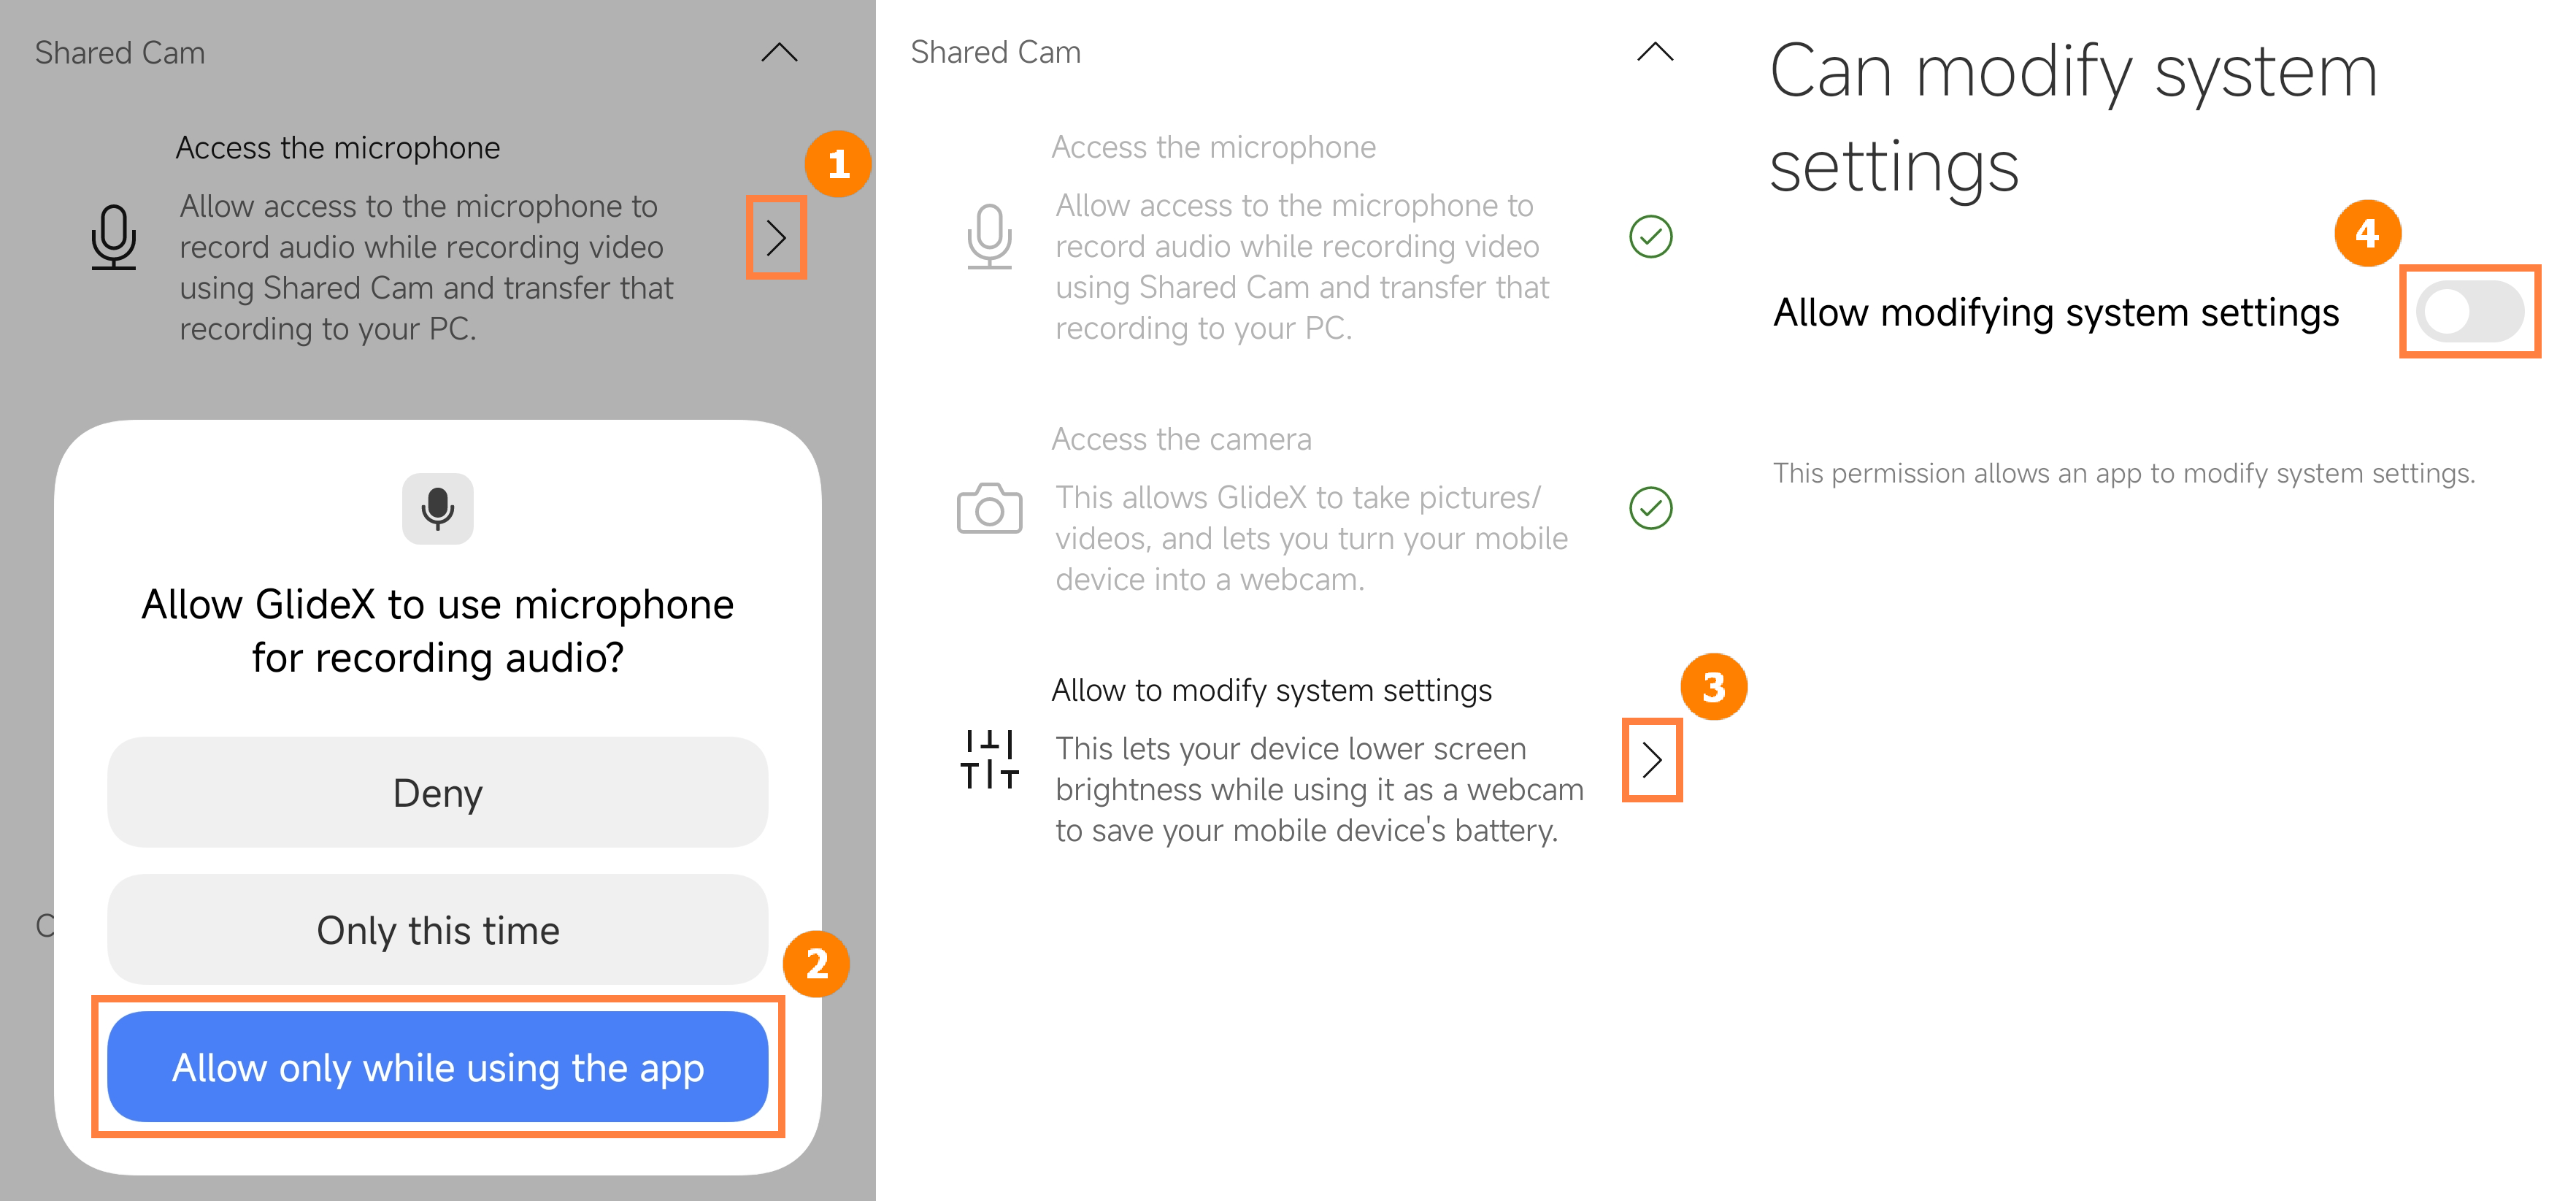
(6) Shared Camera - Access the microphone, Access the camera and Allow to modify system settings.
Tap ①[Access the microphone], tap ②[Allowed only while using the app]. The permission to Access the camera was enabled in the previous step. Click ③[Allow to modify system settings], and then click to open ④[Allowed only while using the app].
※ Turn on the Access the microphone permission, which allow access to the microphone to record audio while recording video using Shared Cam and transfer that recording to your PC.
※ Turn on the Access the camera permission, which allow Glidex to take picture/videos, and lets you turn your mobile device into a webcam.
※ Turn on the Allow to modify system settings permission, which lets your device lower screen brightness while using it as a webcam to save your mobile device's battery.
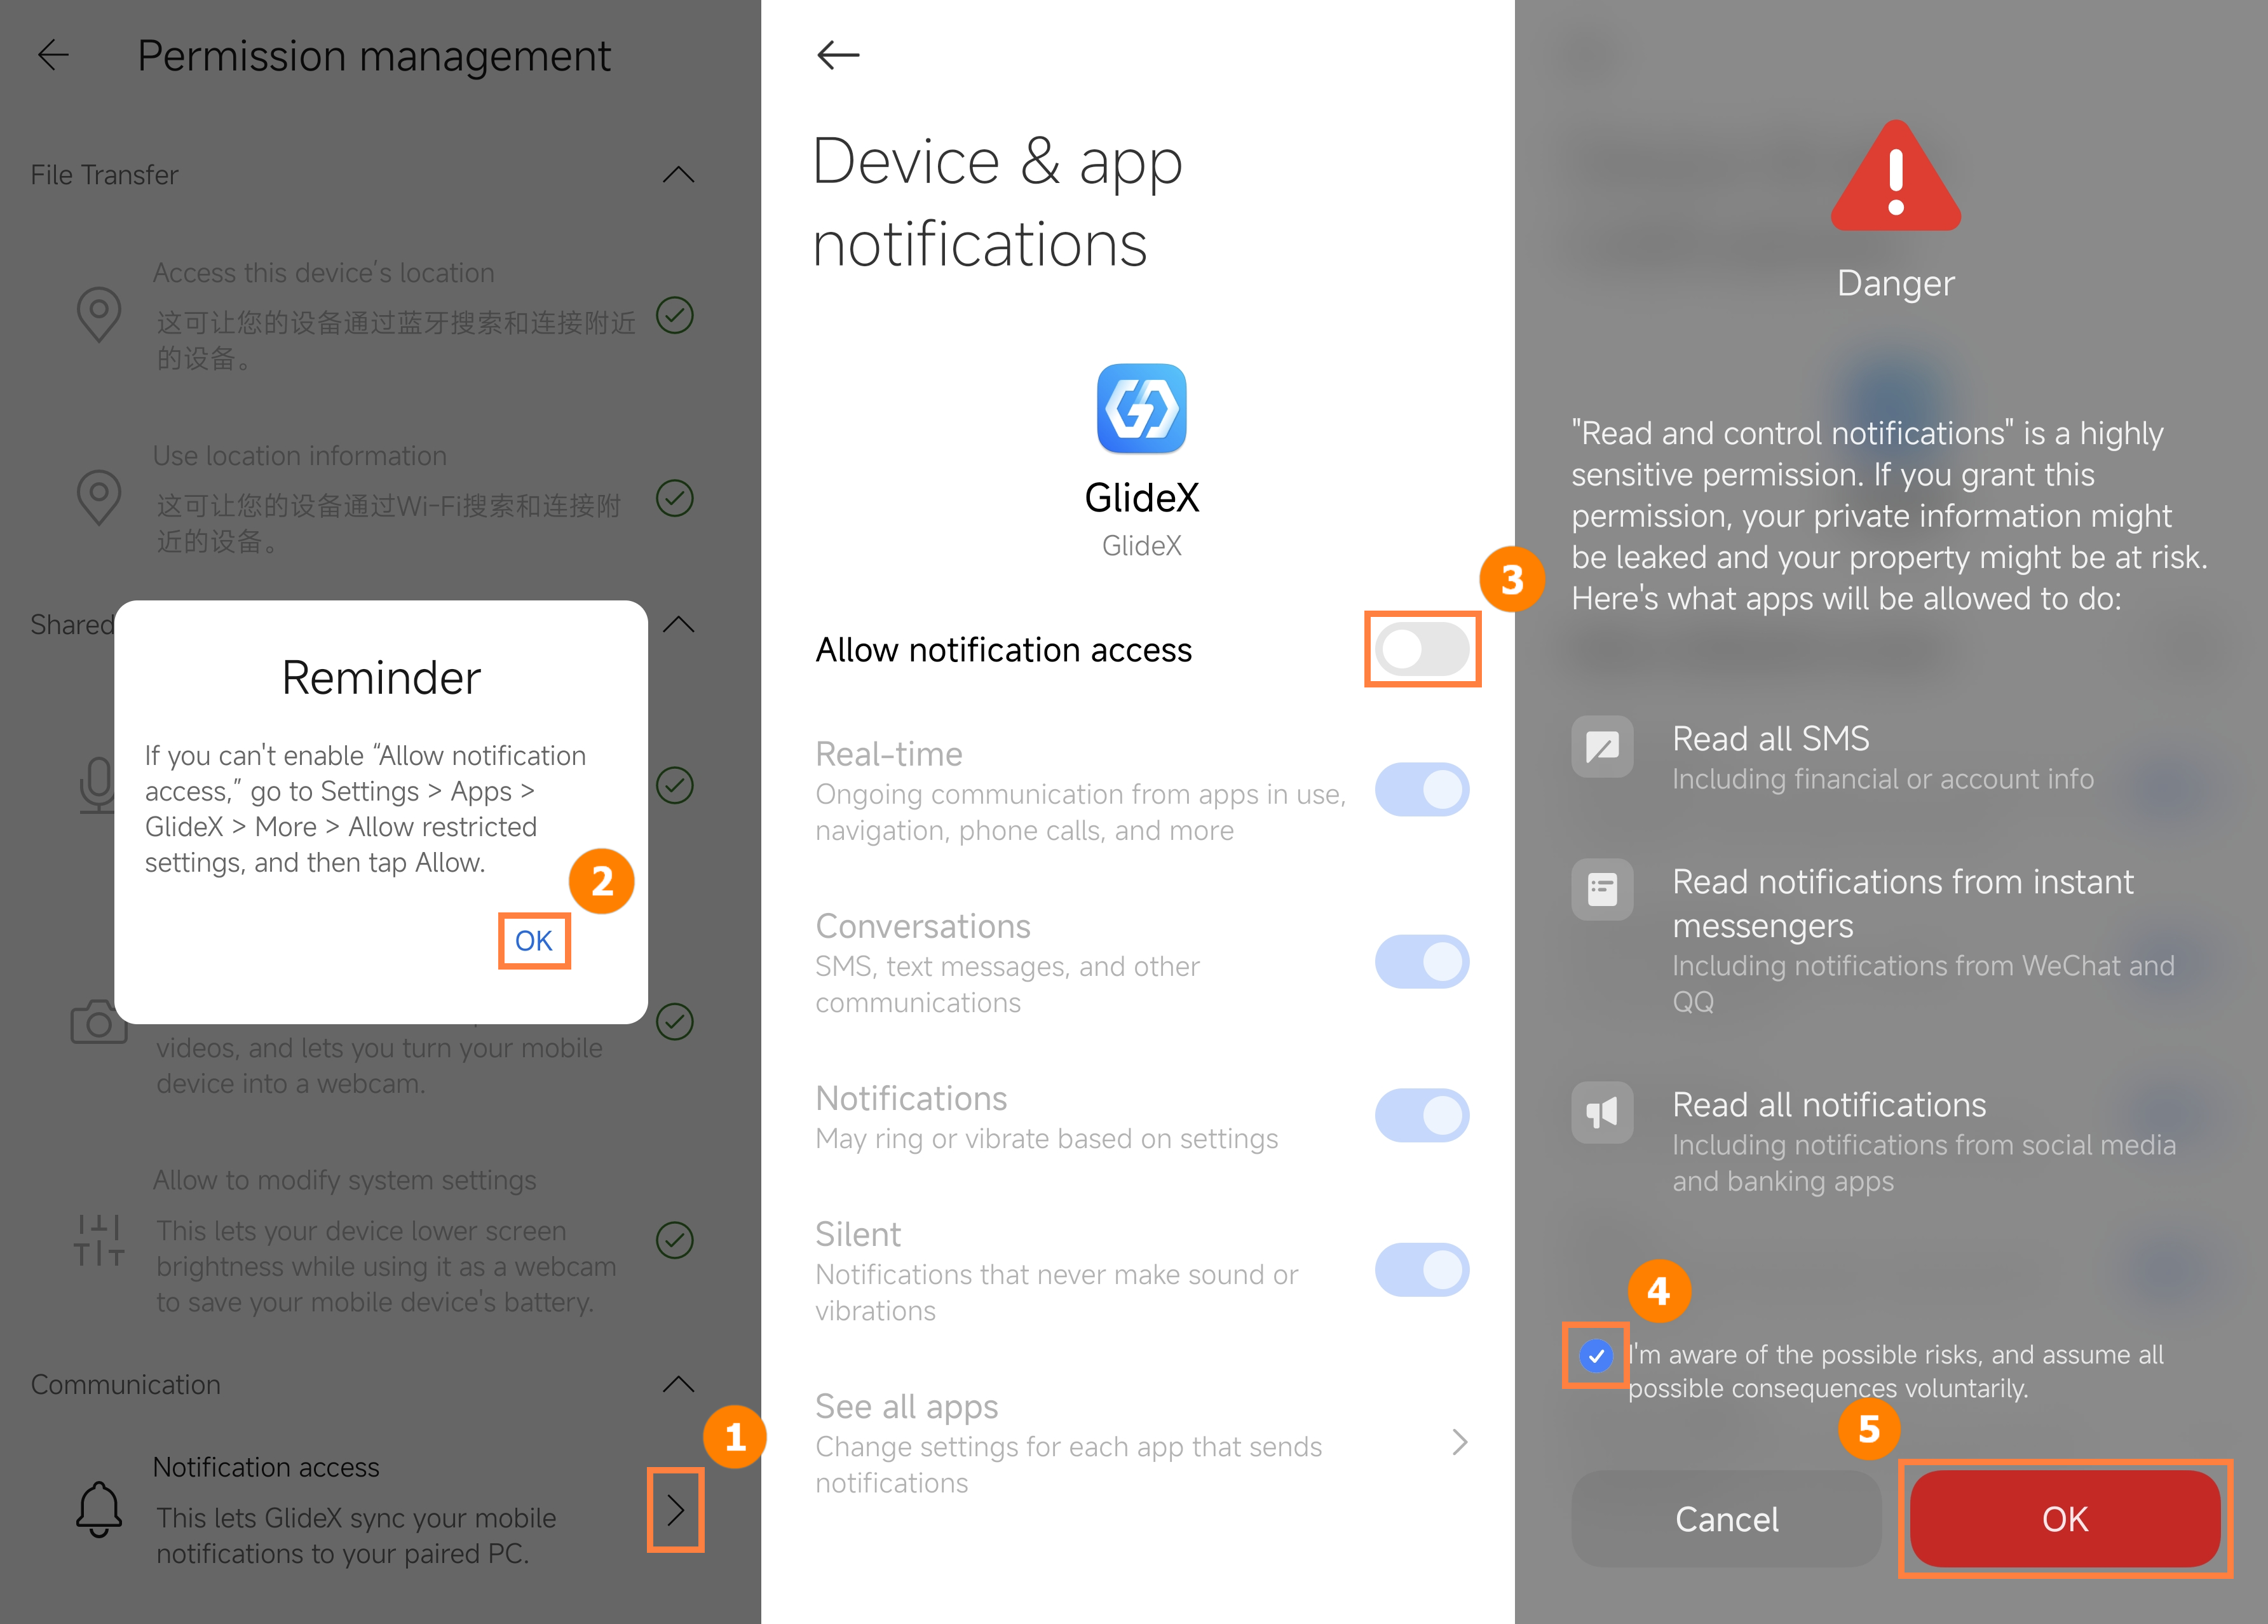
(7) Communication - Notification access
Tap ①[Notification Access], tap ②[OK], tap ③[Grant Notification Access], tap ④[I know], tap ⑤[OK].
※ Turn on the Notification access permission, lets GlideX sync your mobilenotifications to your paired PC.
(1) Tap ①[Allow] to allow GlideX's local network access, then tap ②[OK] to get Bluetooth permissions, and tap ③[Allow] to get Notification permissions.
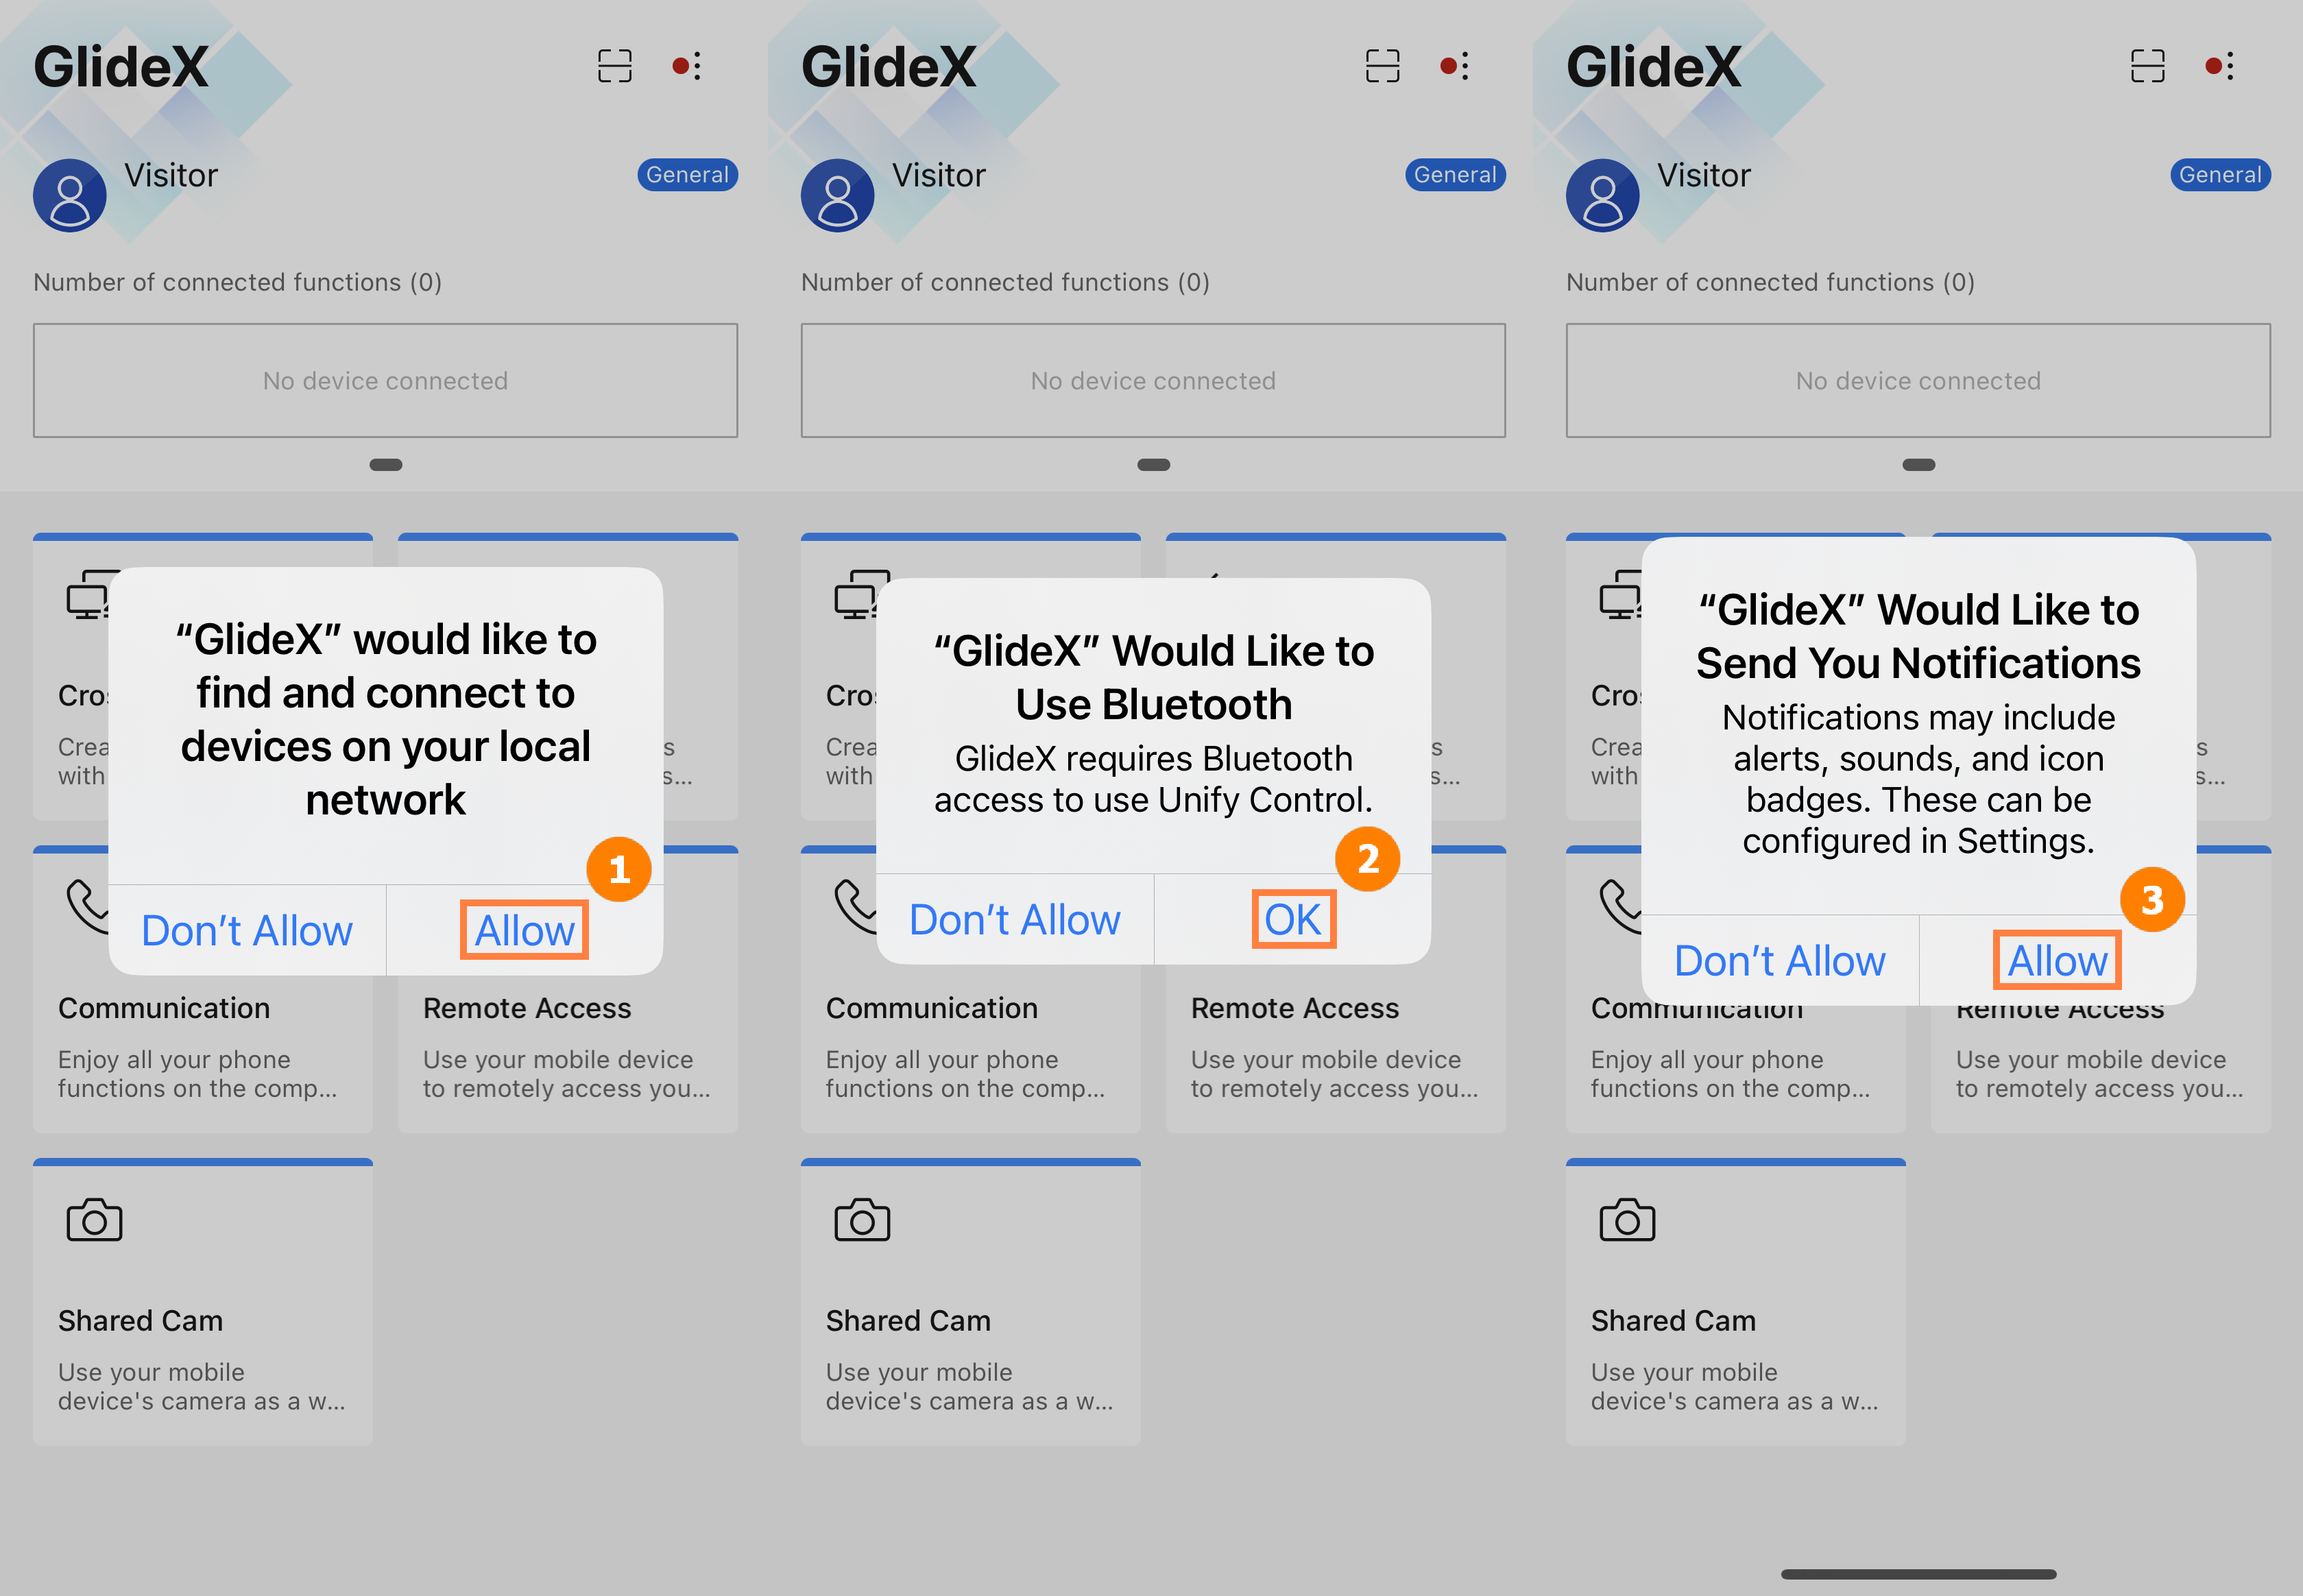
(2) To scan the QR code from the GlideX app on your computer, open the side menu> [Permission Management], tap [Access Camera] and tap ④[OK] to allow permissions.
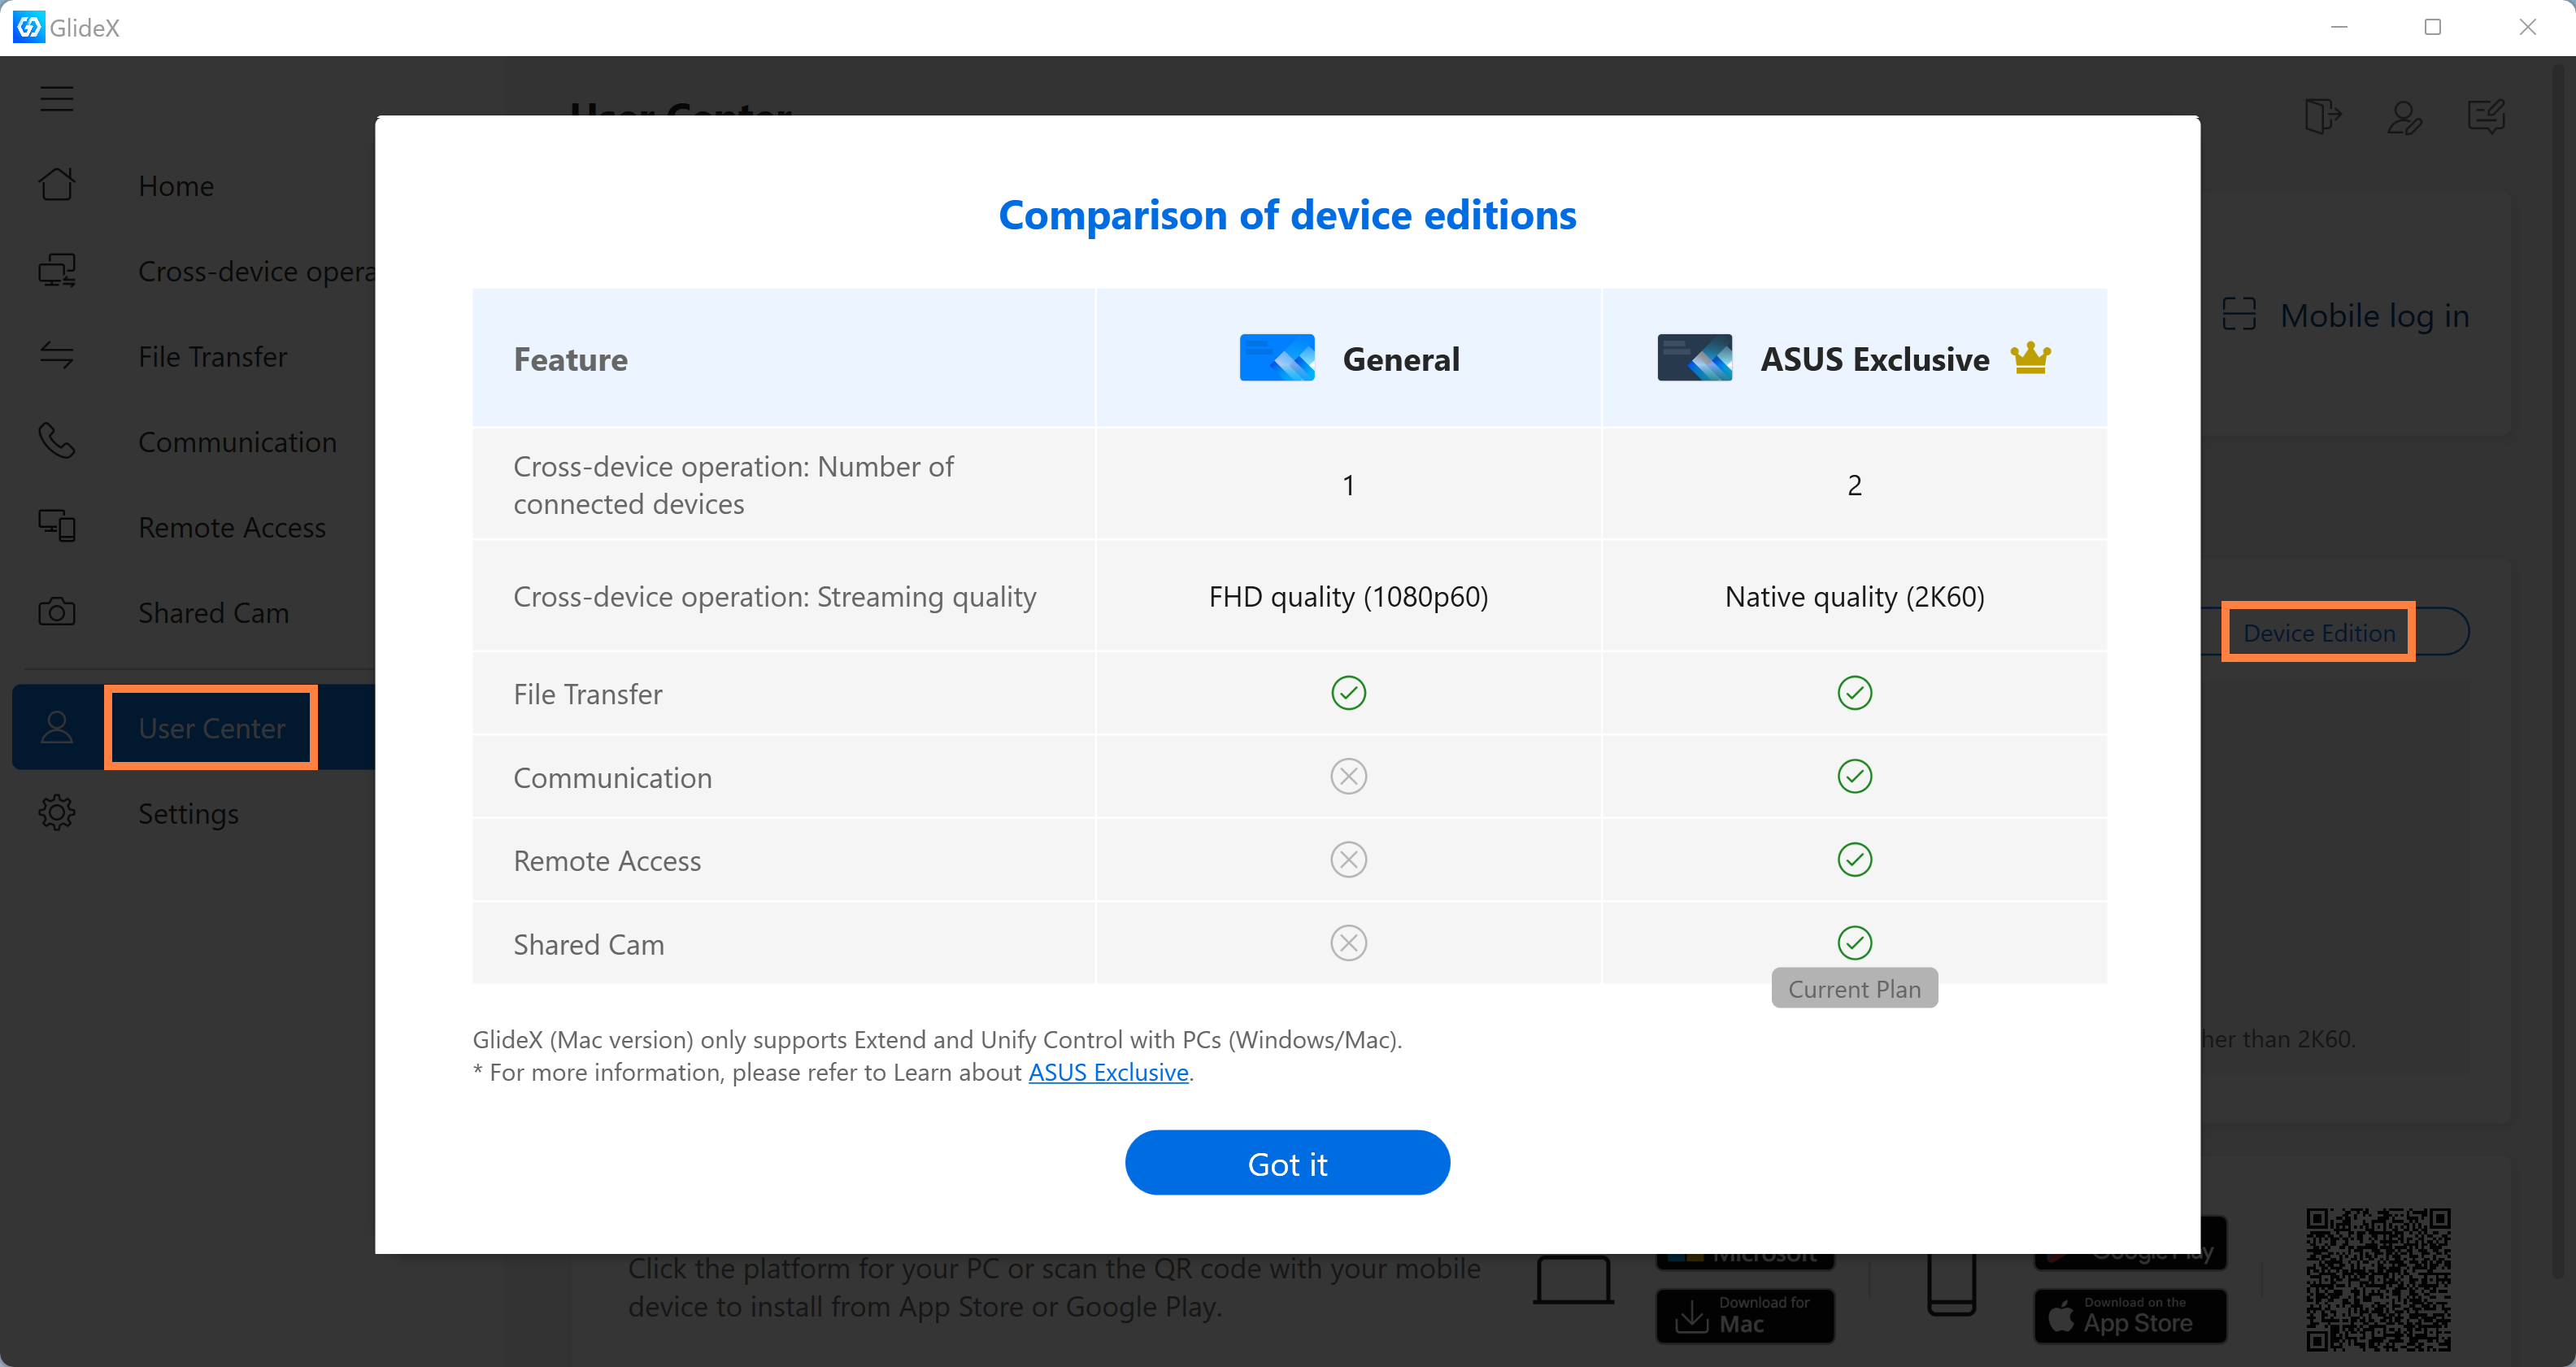
The GlideX version is divided into ASUS Exclusive version and General version.
You can enjoy the ultimate and complete software features with the Exclusive version.
Please install GlideX first, click on [User Center], and then click on [Device Edition] to check the device edition for your current GlideX device.
You can obtain ASUS Exclusive version by purchasing ASUS products that can install GlideX.
The ASUS Exclusive version offers more features than the General version:
(1) Device Connection count: The ASUS Exclusive version can connect two devices, while the General version can only connect one device.
(2) Image transmission quality: The ASUS Exclusive version can enjoy up to 2K60Hz image quality, while the General version can only use 1080p60Hz image quality.
(3) The ASUS Exclusive version can use Communication, Remote Access, and Shared Cam functions, which are not available in the General version.
※ As for the Native quality, the resolution and refresh rate may actually be higher than 2K / 60 Hz depending on your network and hardware capability.
※ The ASUS Exclusive Plan is tied to your device, and you can get the ASUS Exclusive Plan by purchasing an ASUS product that can install GlideX. For example, you have an ASUS Zenfone-9 phone and Microsoft Surface. When you are using Microsoft Surface, the current plan is the General version. When you connect your ASUS Zenfone-9 to Microsoft Surface, the Microsoft Surface Cross-Device operation: Streaming quality feature will be temporarily upgraded to Native quality (2K60), and will revert to FHD quality (1080p60Hz) after disconnection. If you want to use the full functionality (ASUS Exclusive Edition), it is recommended to use it with an ASUS computer connection.
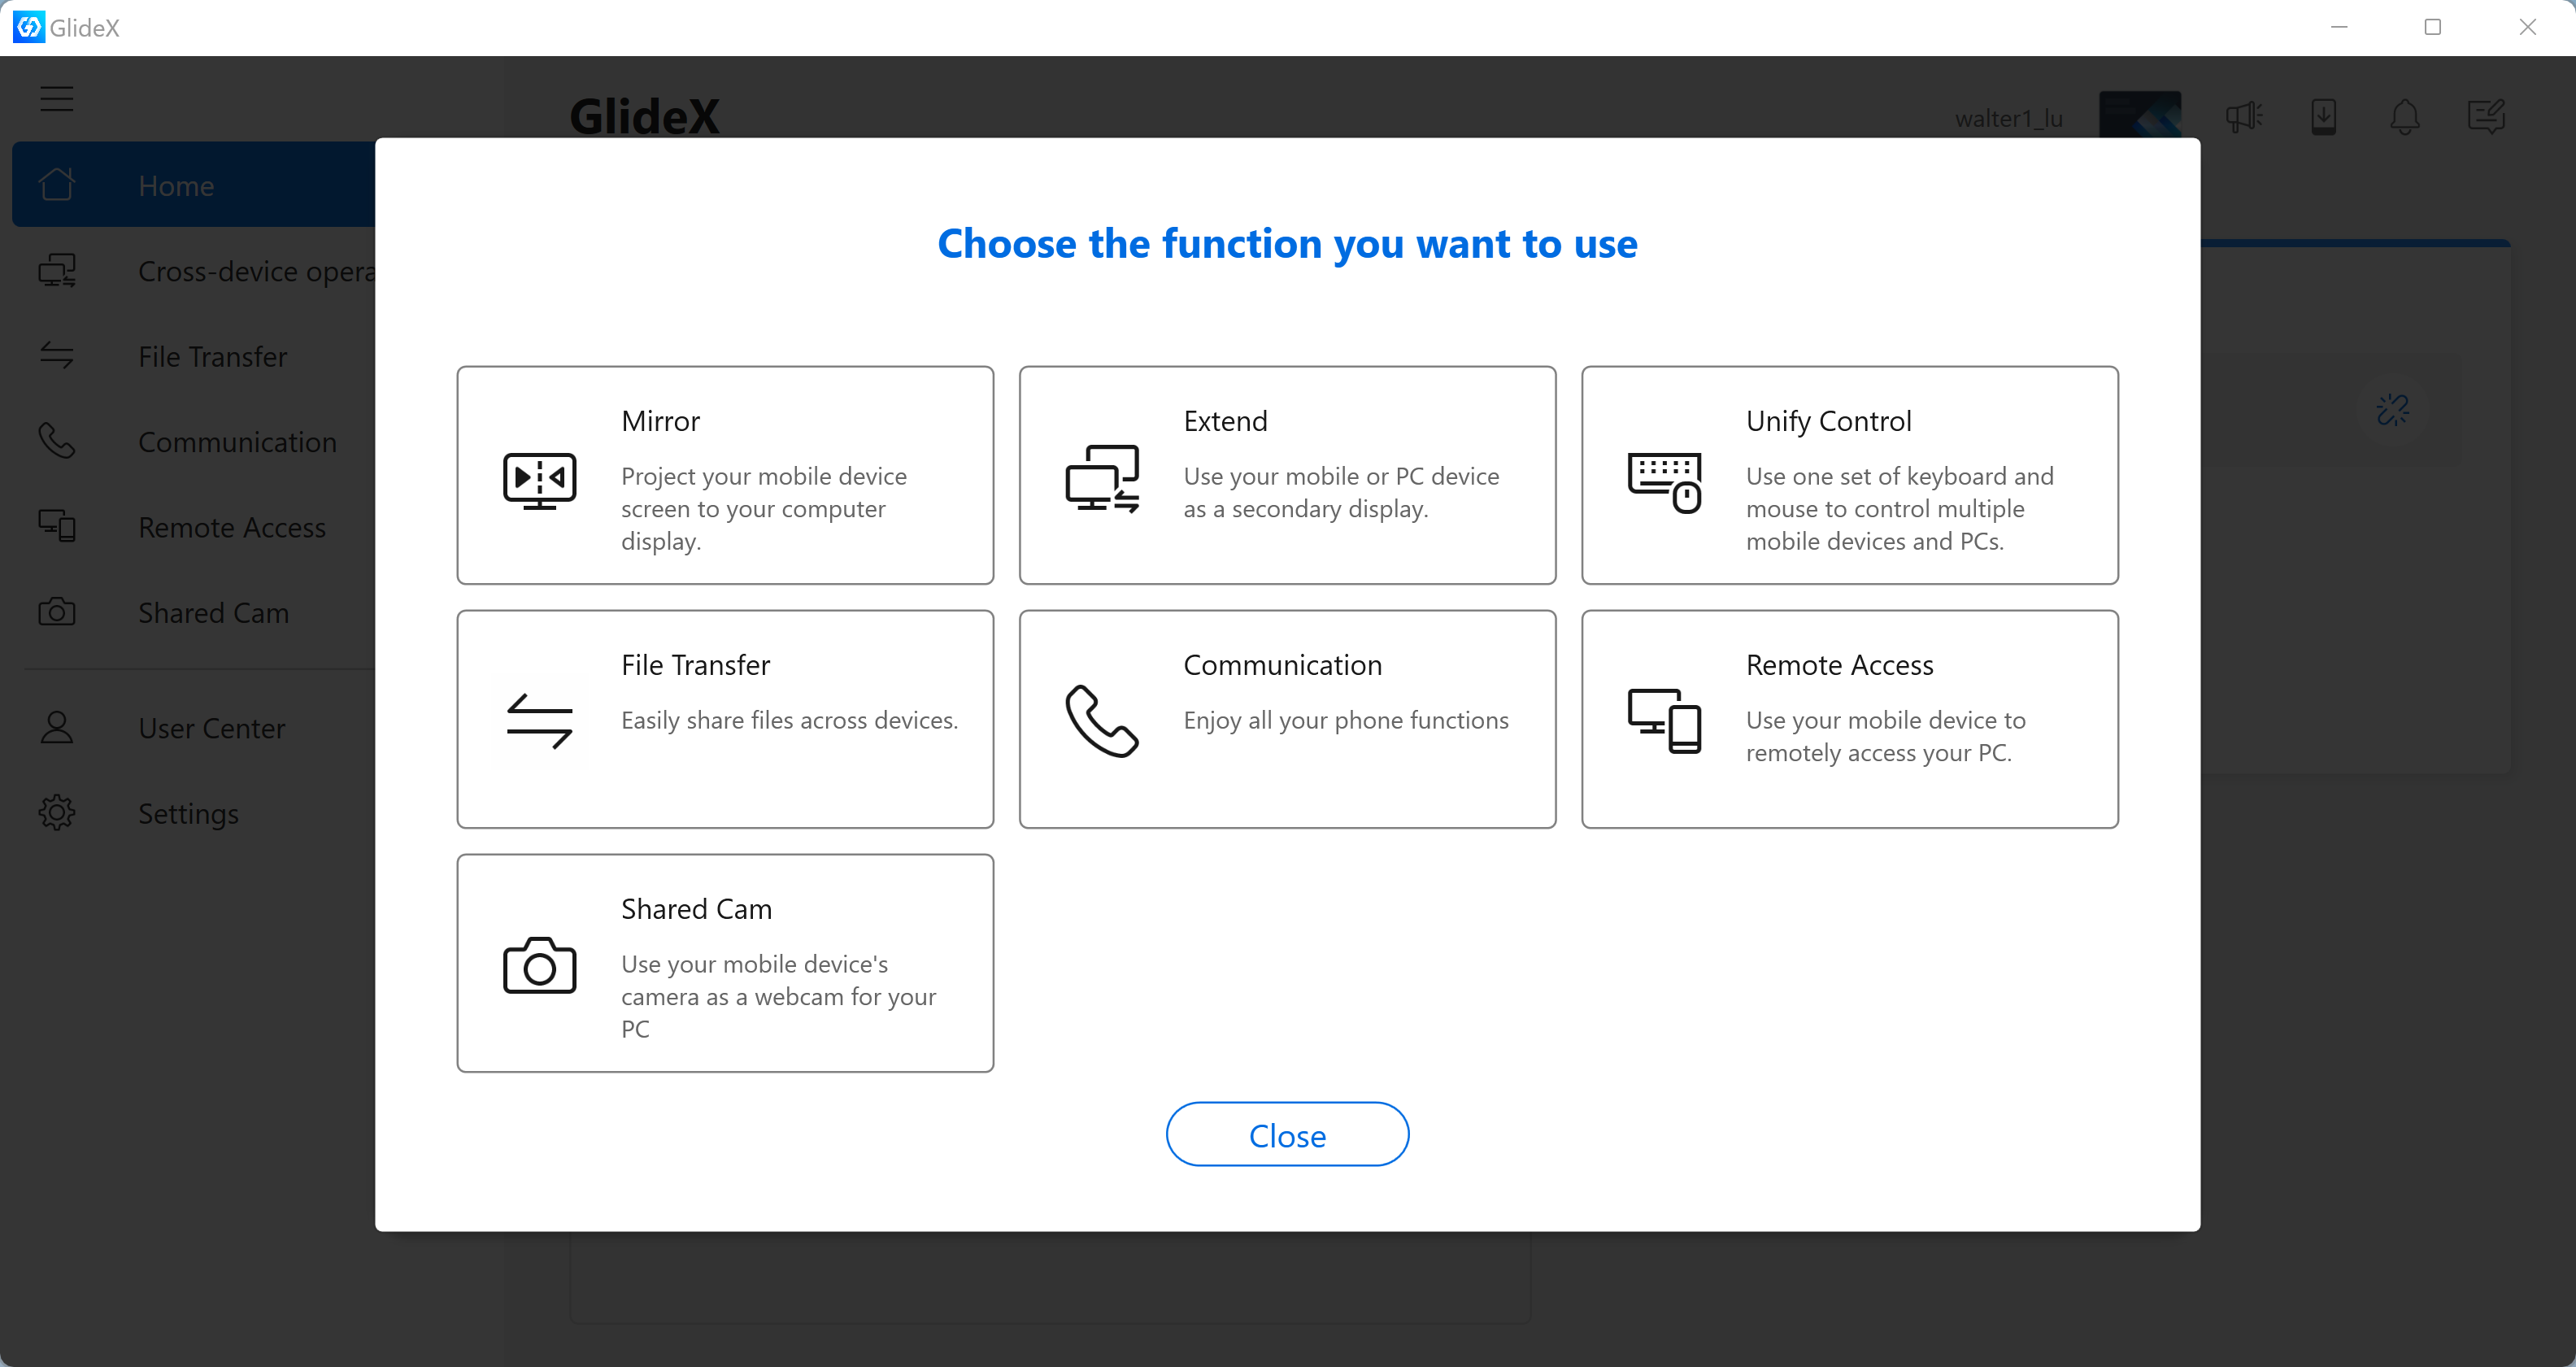
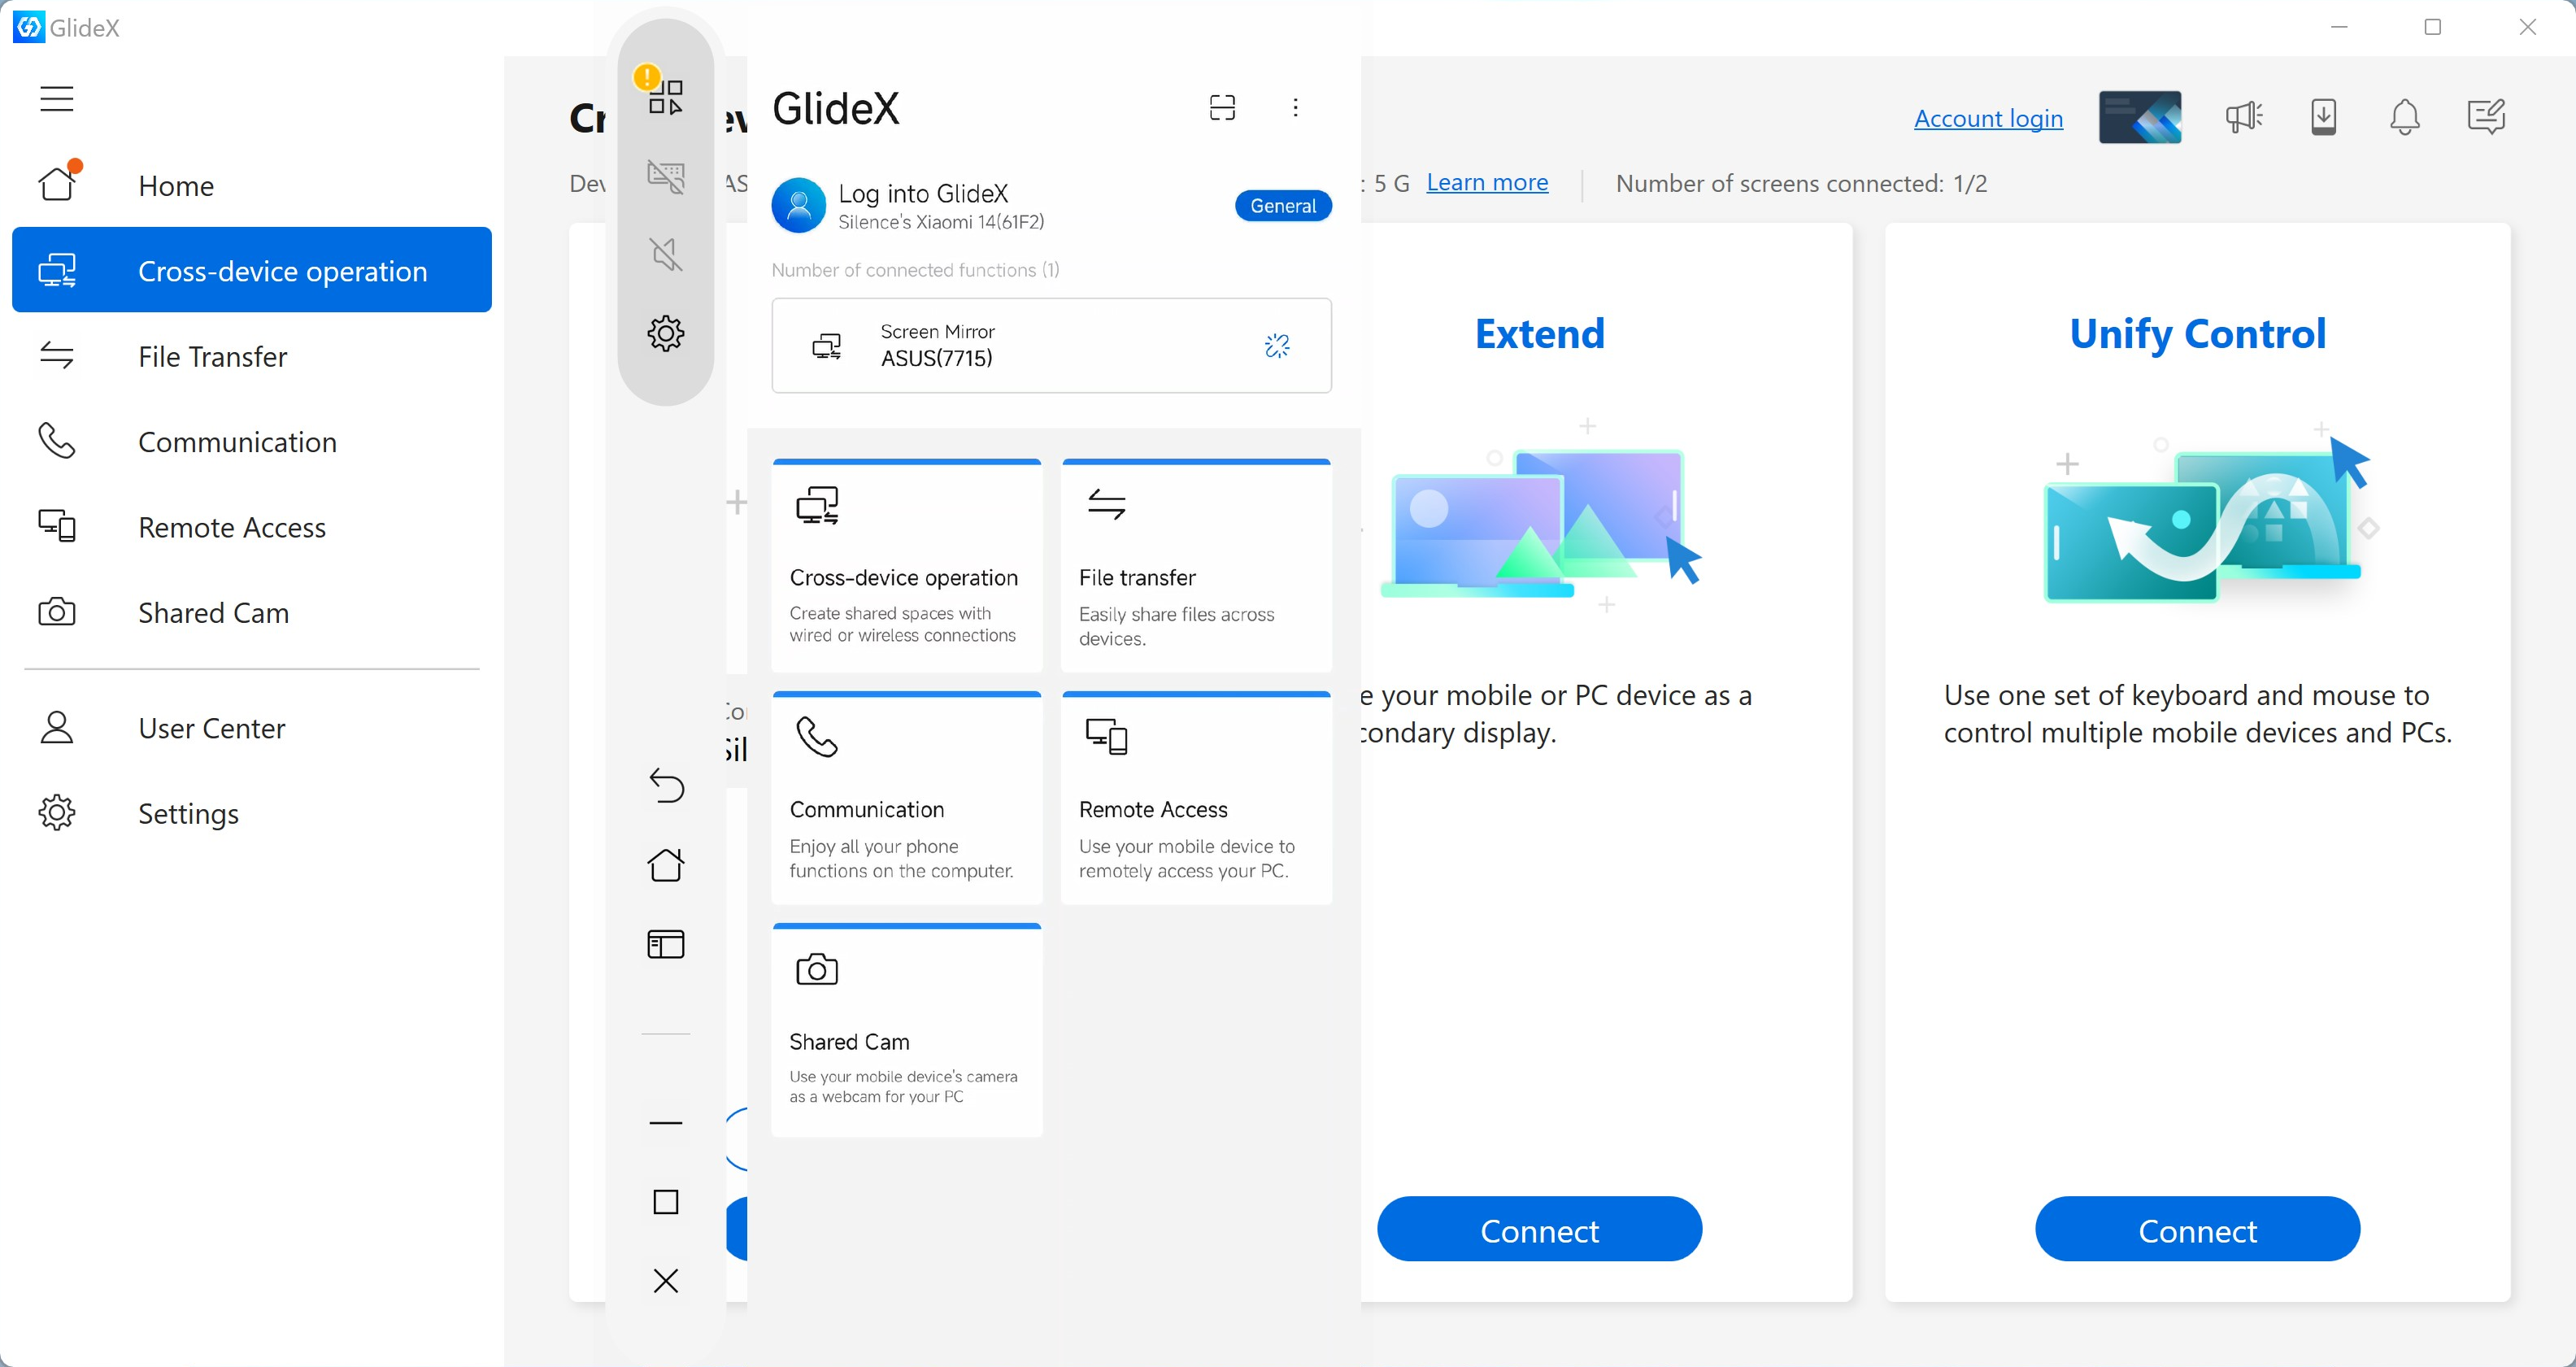
(1) The Homepage will display the ①[Functions] that GlideX has enabled, and you can quickly and easily operate the enabled functions. You can click ②[Add] to quickly enable the new feature.
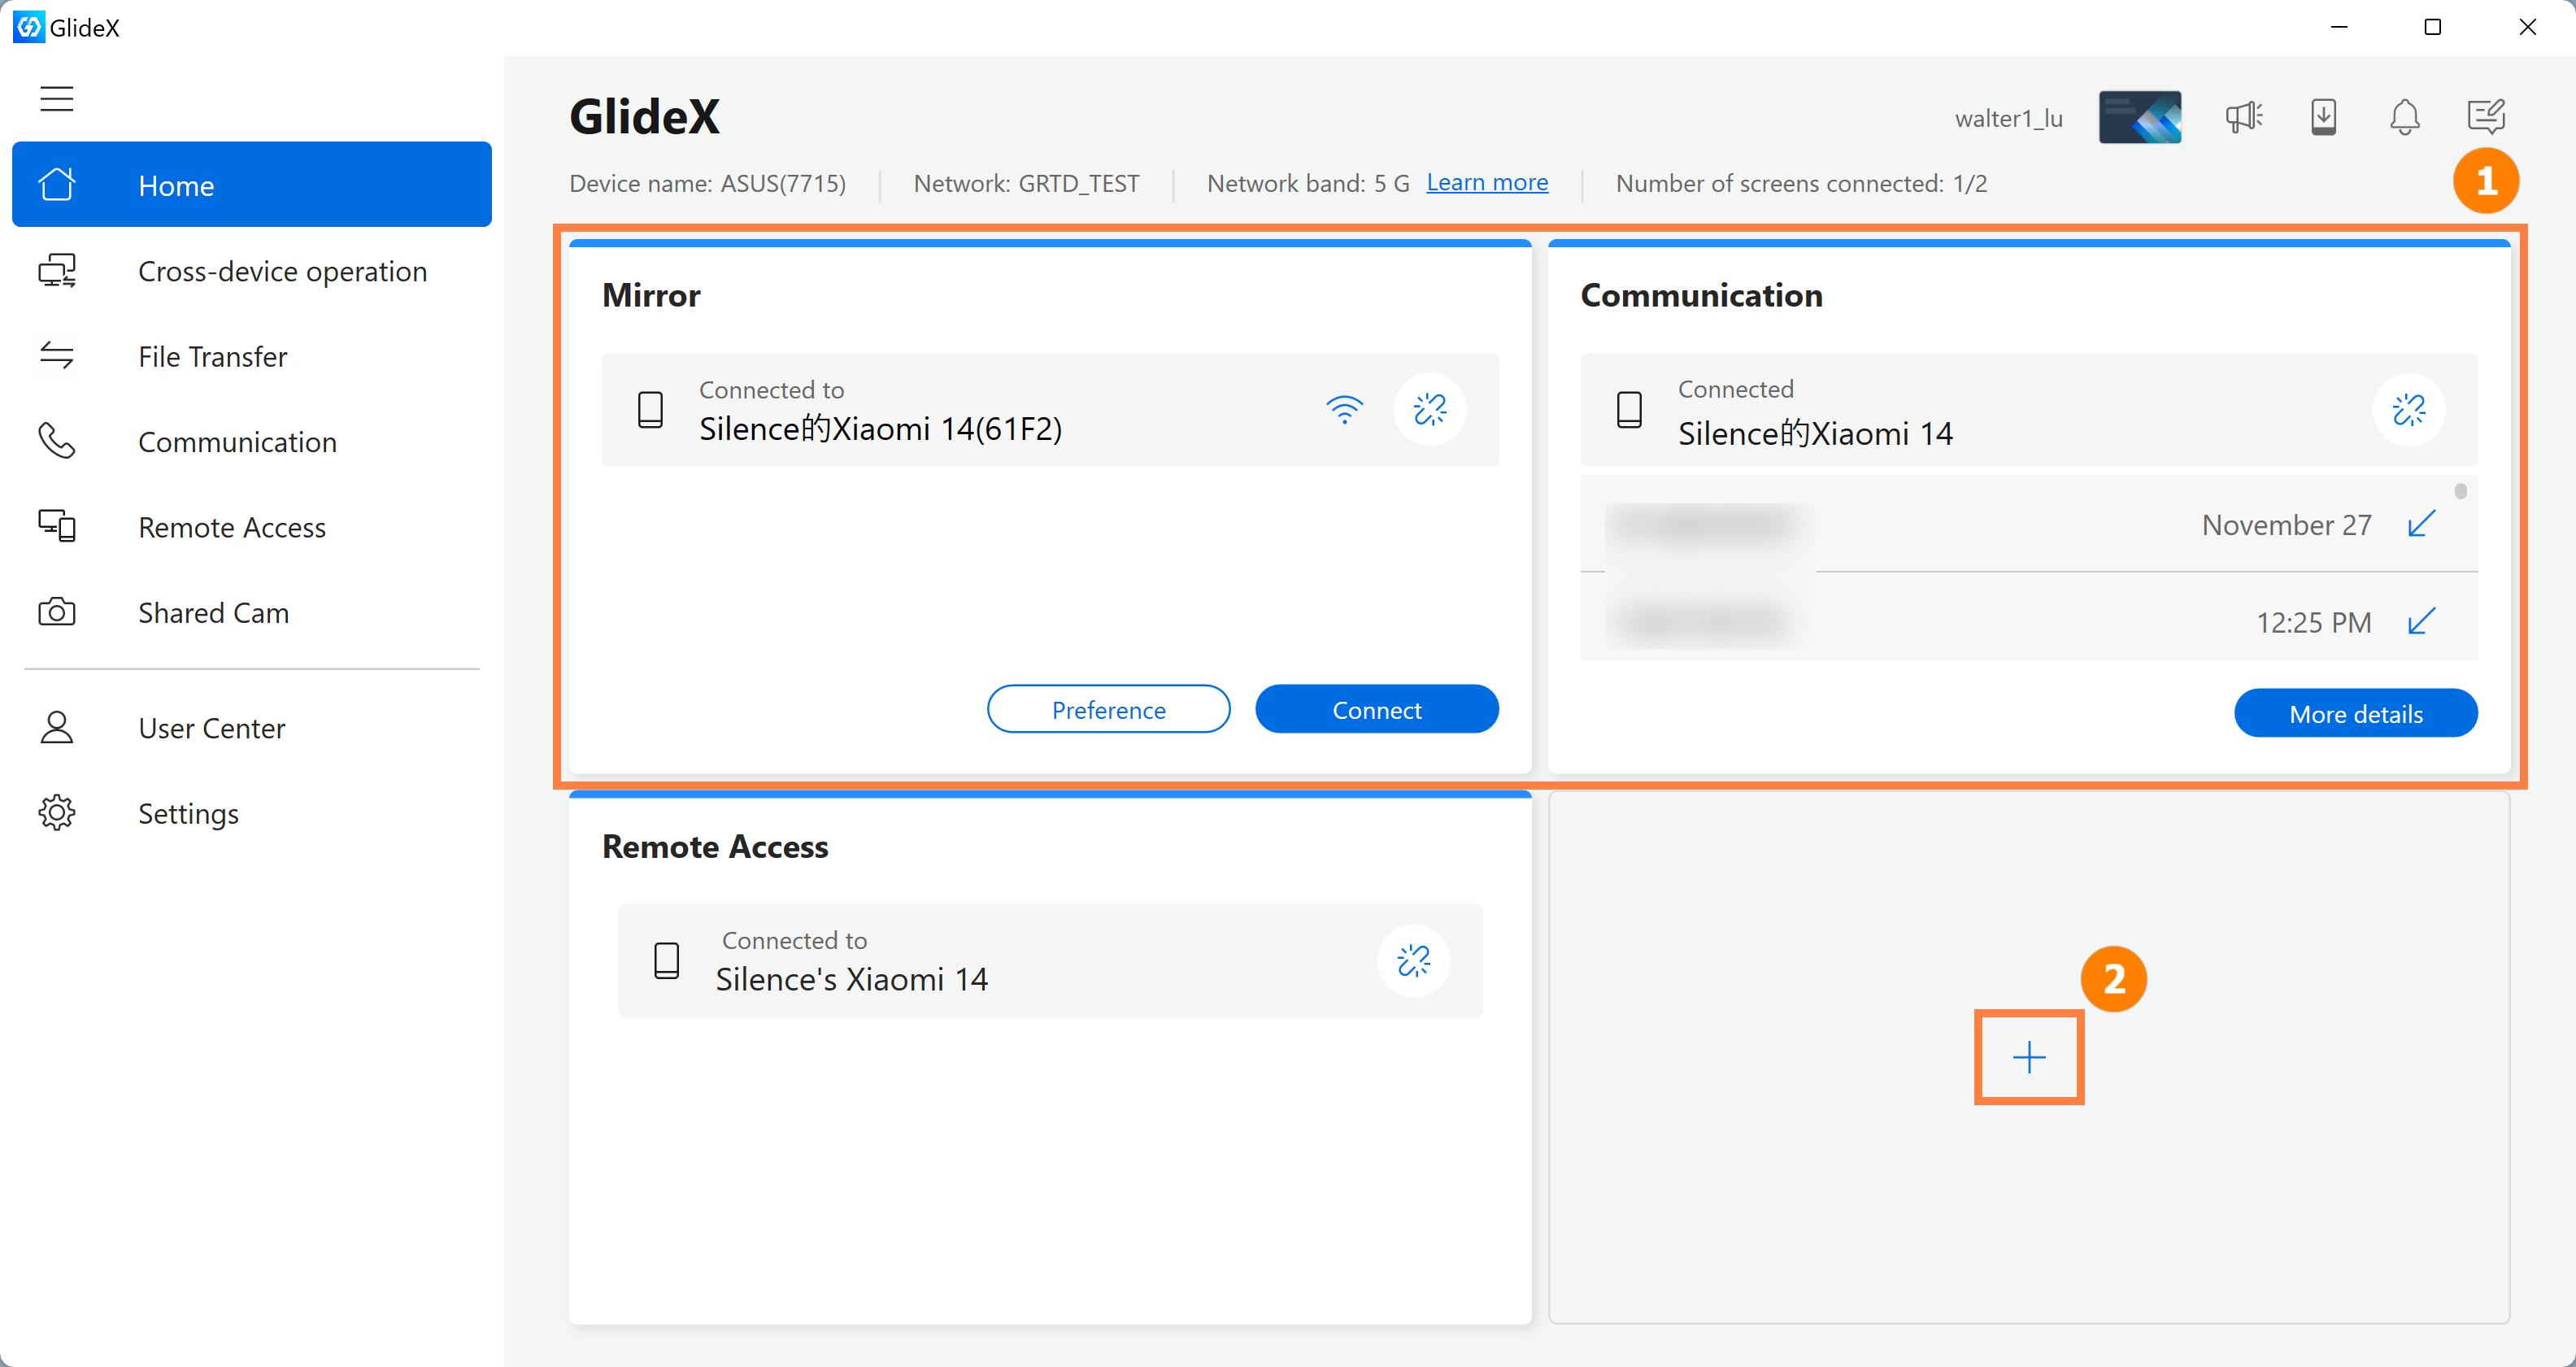
(2) Select the feature you want to use and enable it.
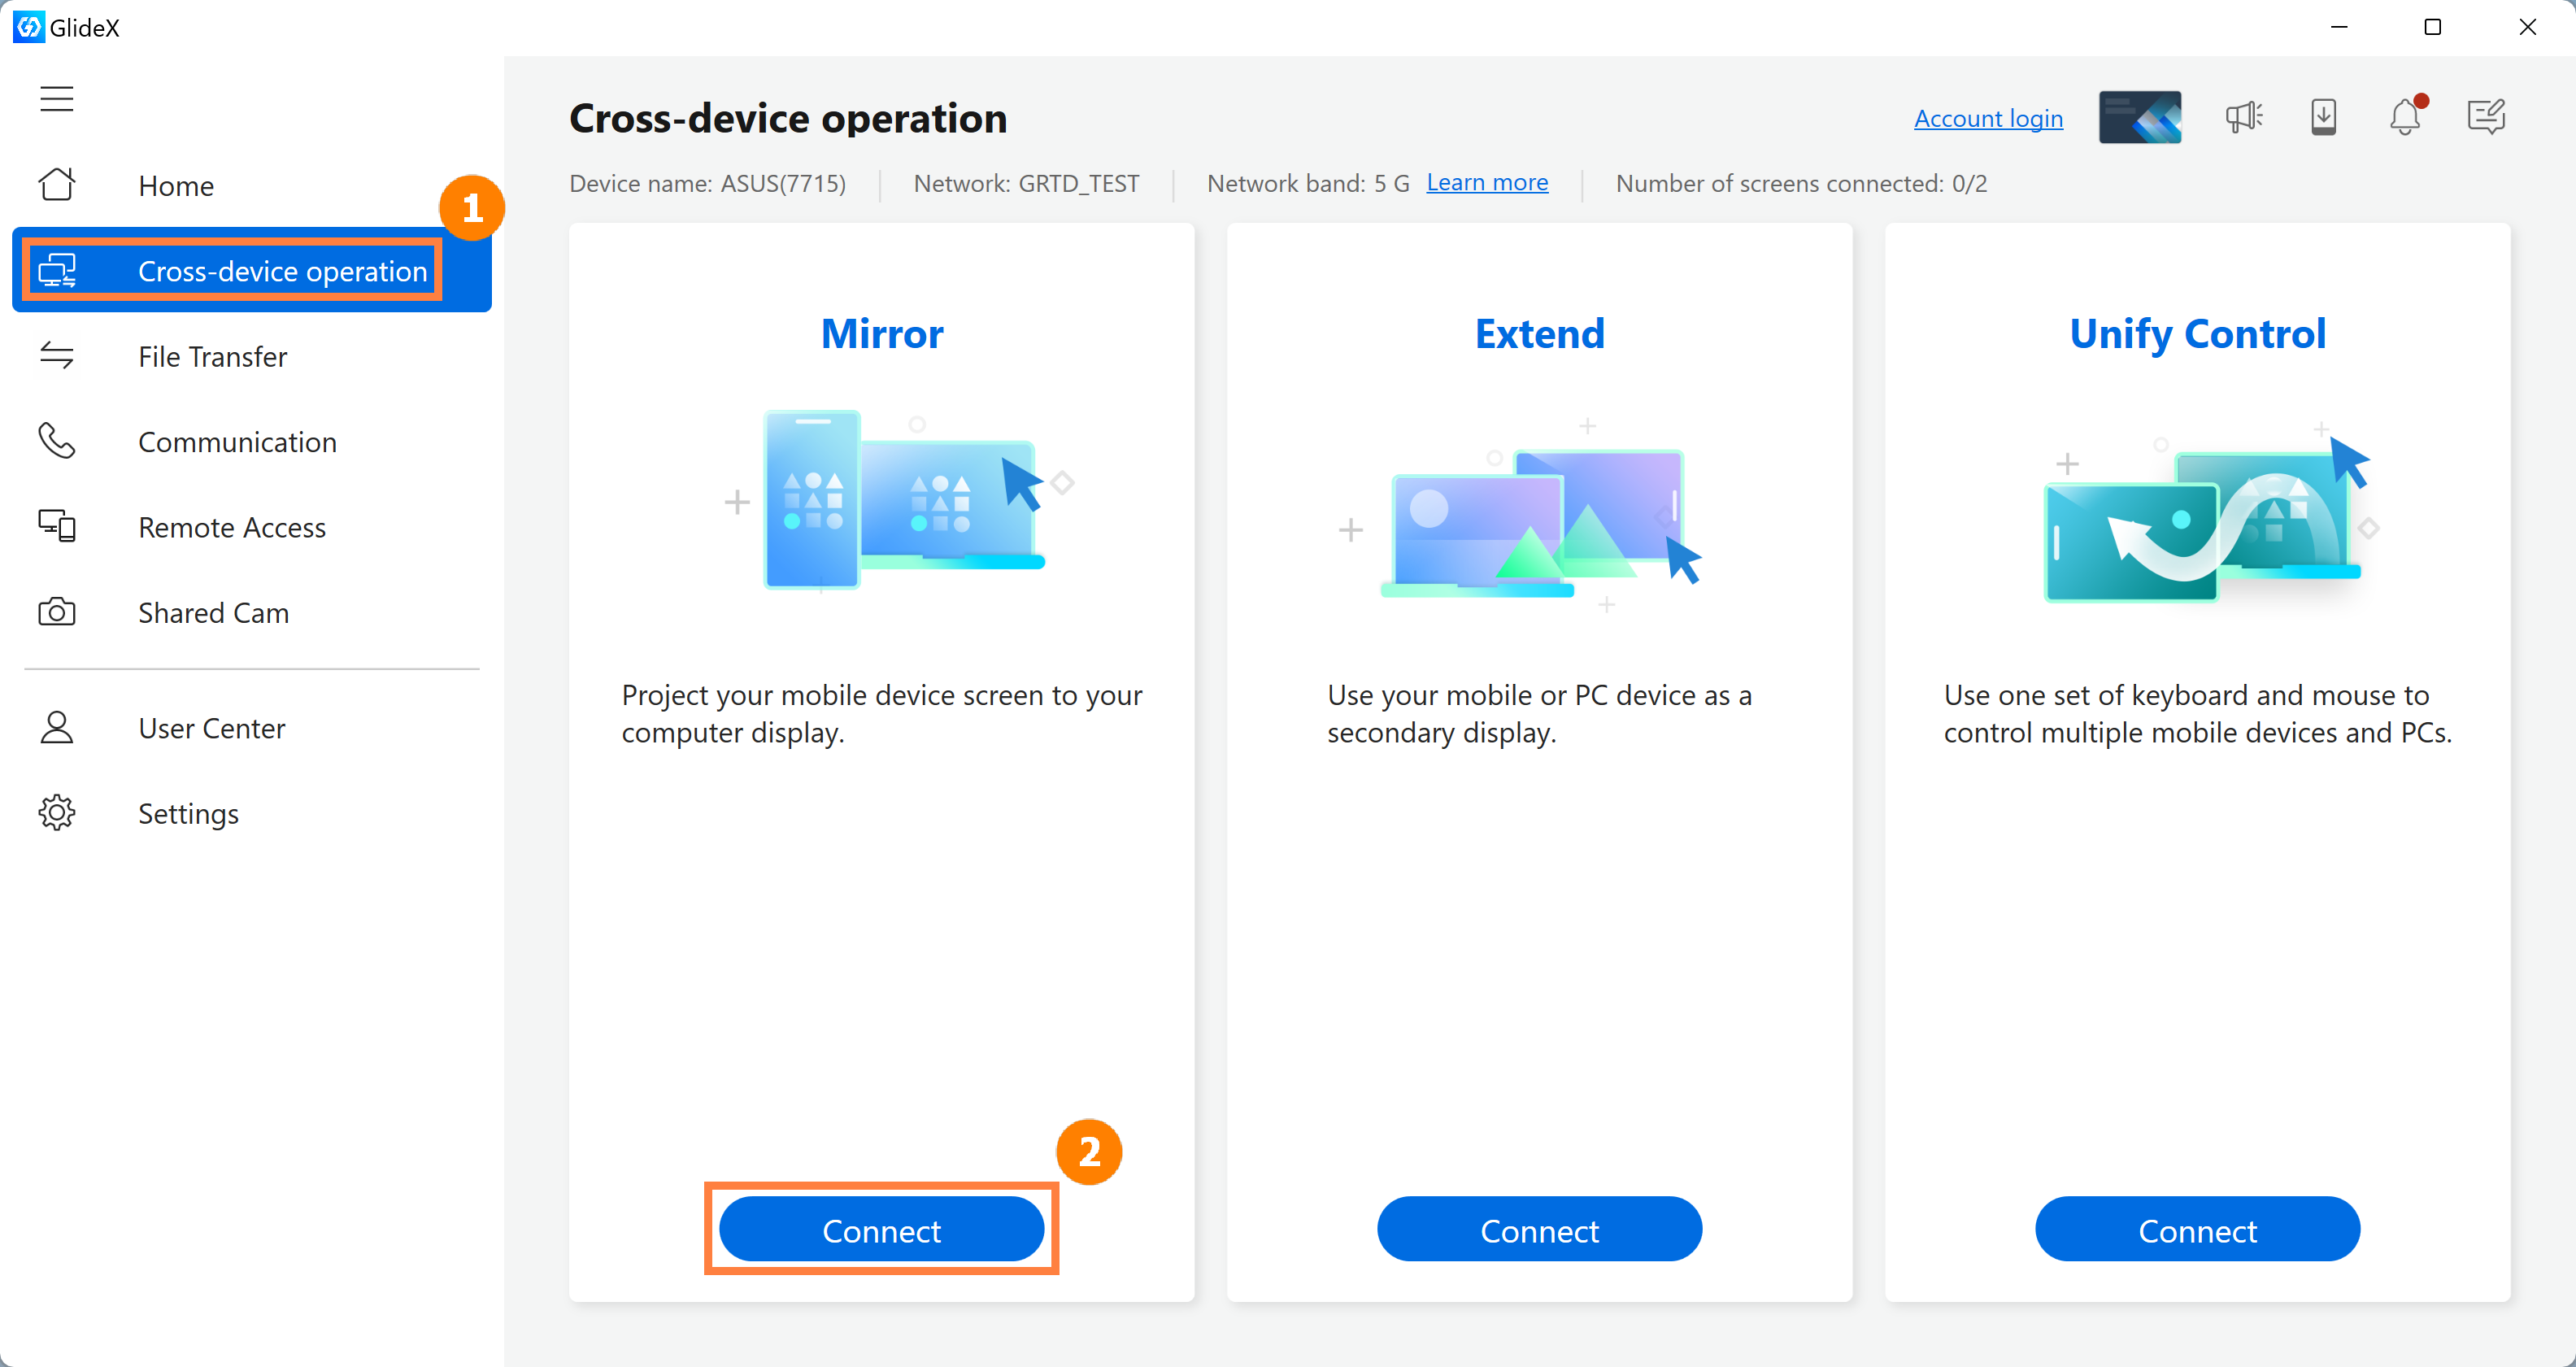
(1) On the main page of GlideX, Click ①[Cross-device operation], and then click ②[Connect].
If you are logged in to the same ASUS member account on your computer and mobile device, notifications from the receiving device will be omitted, please refer to: [GlideX] GlideX login to the same ASUS member account can be directly connected | Official Support | ASUS Global
If your computer is connected to a 2.4G Wi-Fi, please click the following connection to switch the Wi-Fi to 5G: [GlideX] How to switch from 2.4GHz to 5GHz for a better screen sharing experience? | Official Support | ASUS Global
If you are using an Android device to connect to your computer via USB wired and need to enable the USB debugging setting first, please click the following connection: [GlideX] How to enable USB debugging for Android devices? | Official Support | ASUS Global
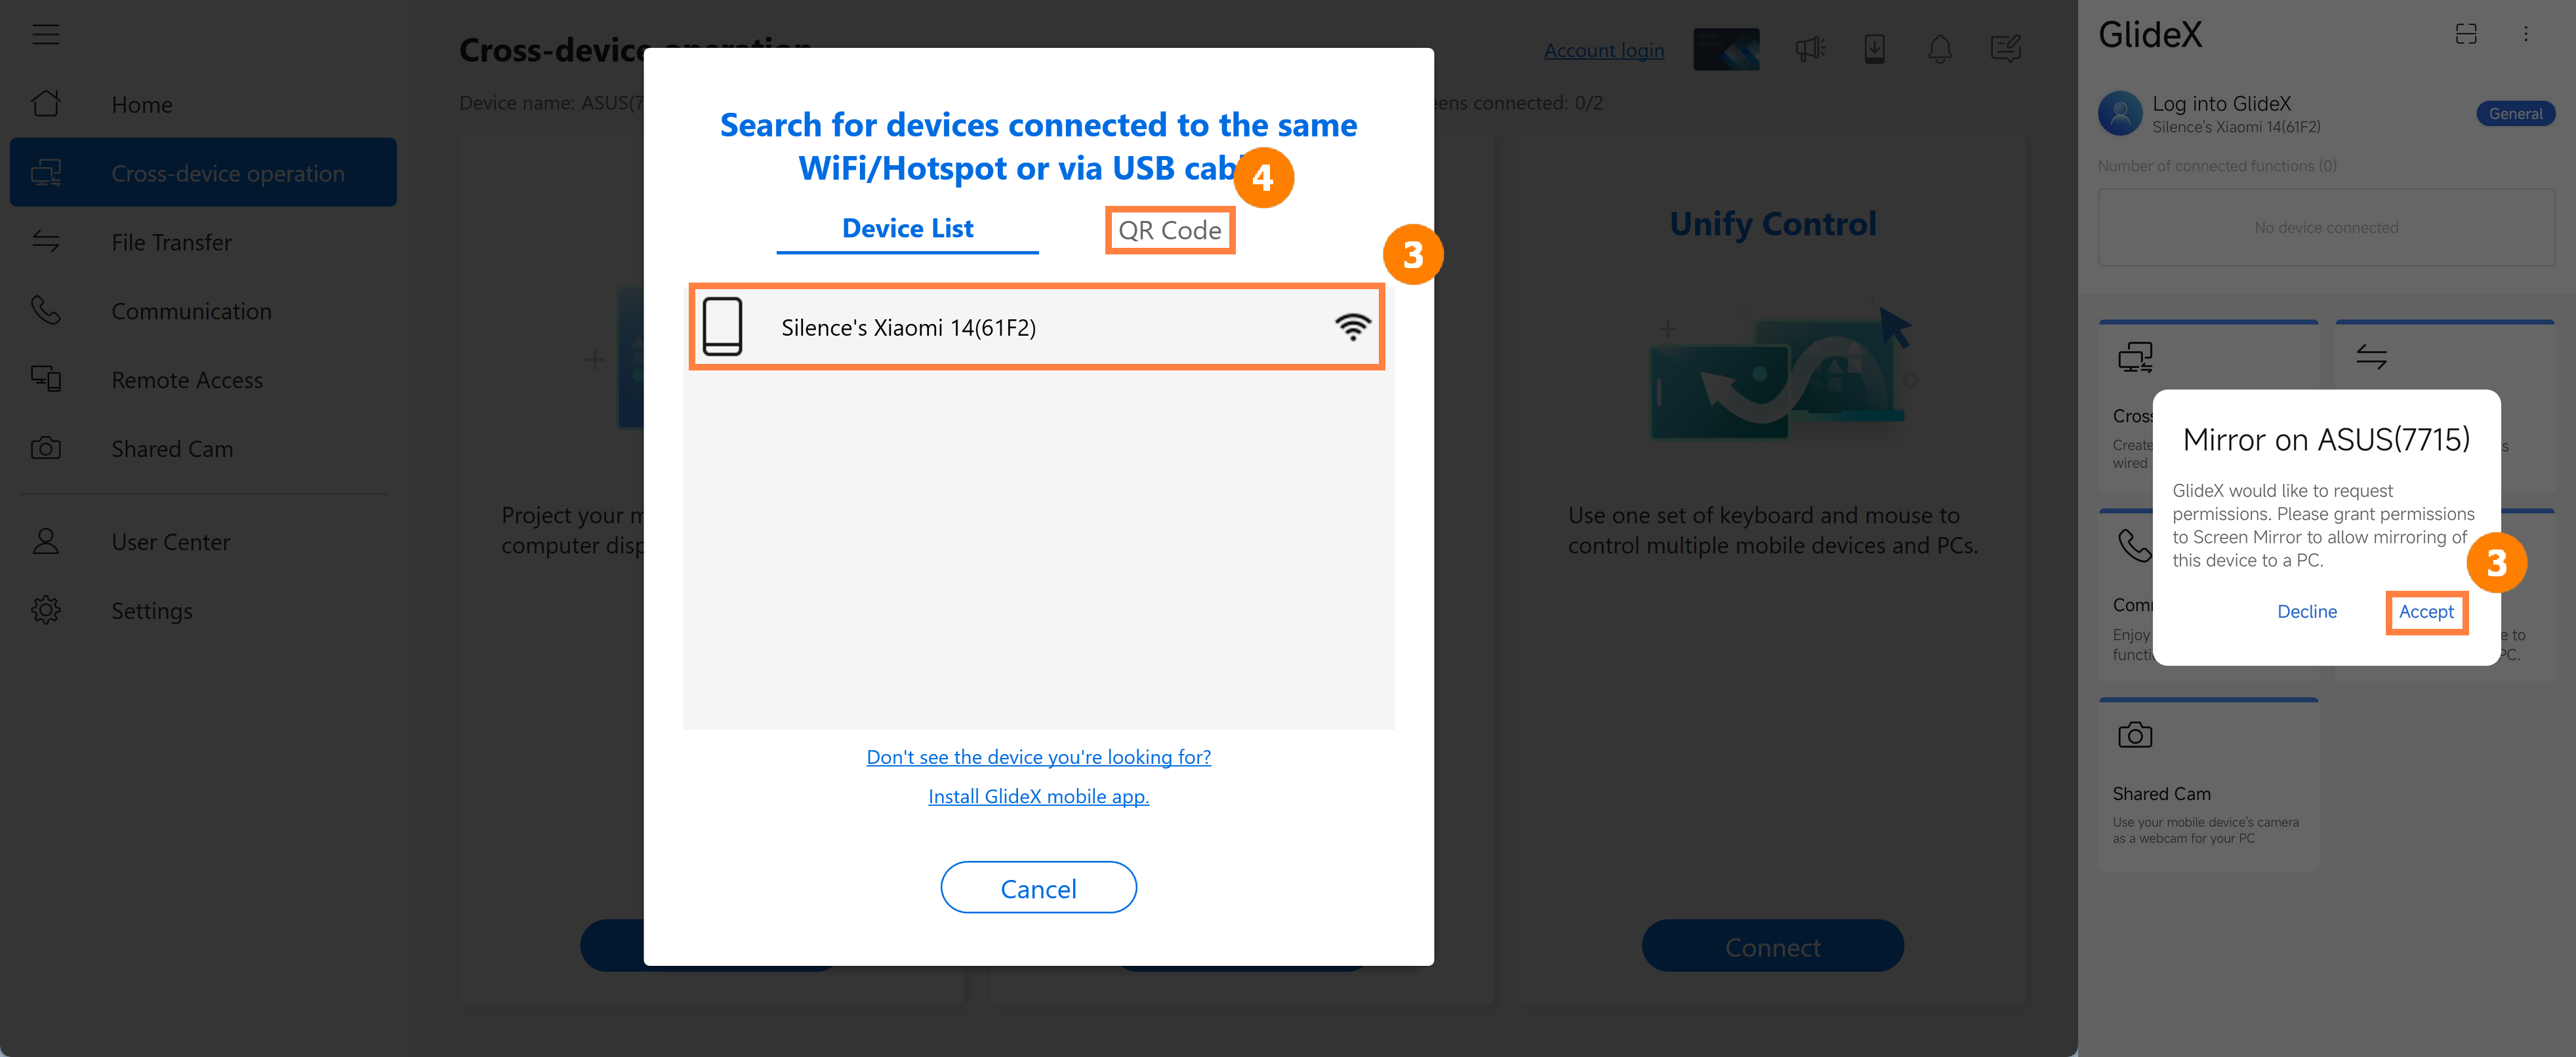
(2) Click ③[Device] on the computer, and a Mirror notification will appear on the mobile device, click ③[Accept]. You can also click ④[QR Code] to scan the QR Code connection via the camera on your mobile device. If you are logged in to the same ASUS membership account on your desktop and mobile device, notifications will be omitted on your mobile device and your desktop and mobile device will be directly linked.
※If you are logged in to the same ASUS member account on your computer and mobile device, the [Accept] notification on the mobile device will be omitted, and the computer and mobile device will be directly connected.
※ The connection method of Extend, Unify control and other functions is similar to the steps of Mirror, and will not be repeated in the future.
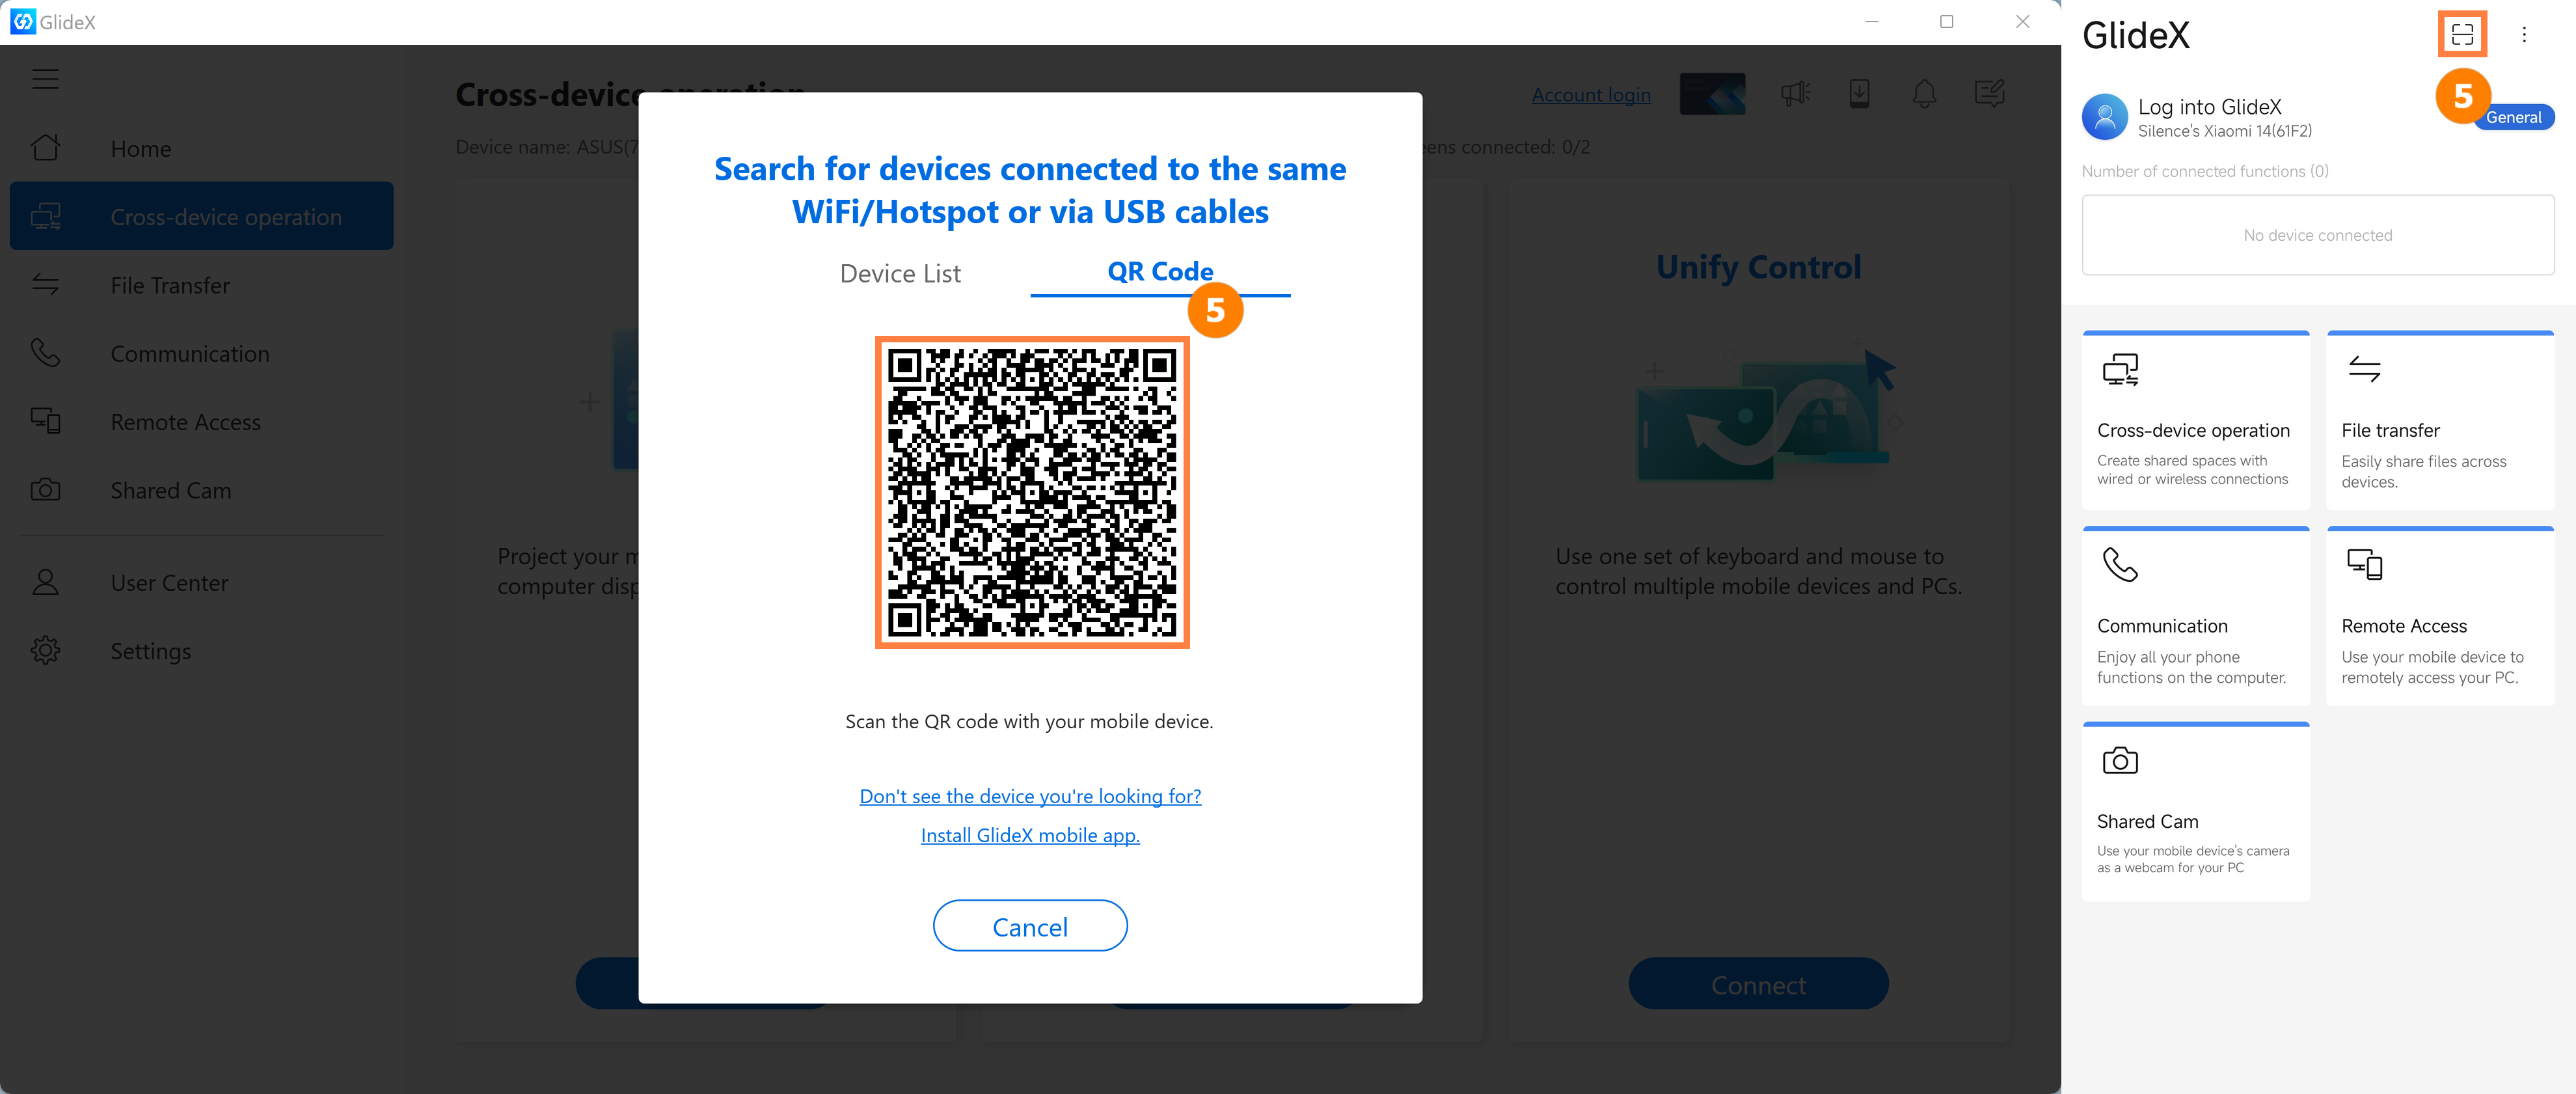
(3) Click ⑤[Scan] on your mobile device and scan ⑤[QR Code] displayed on your computer to quickly connect.
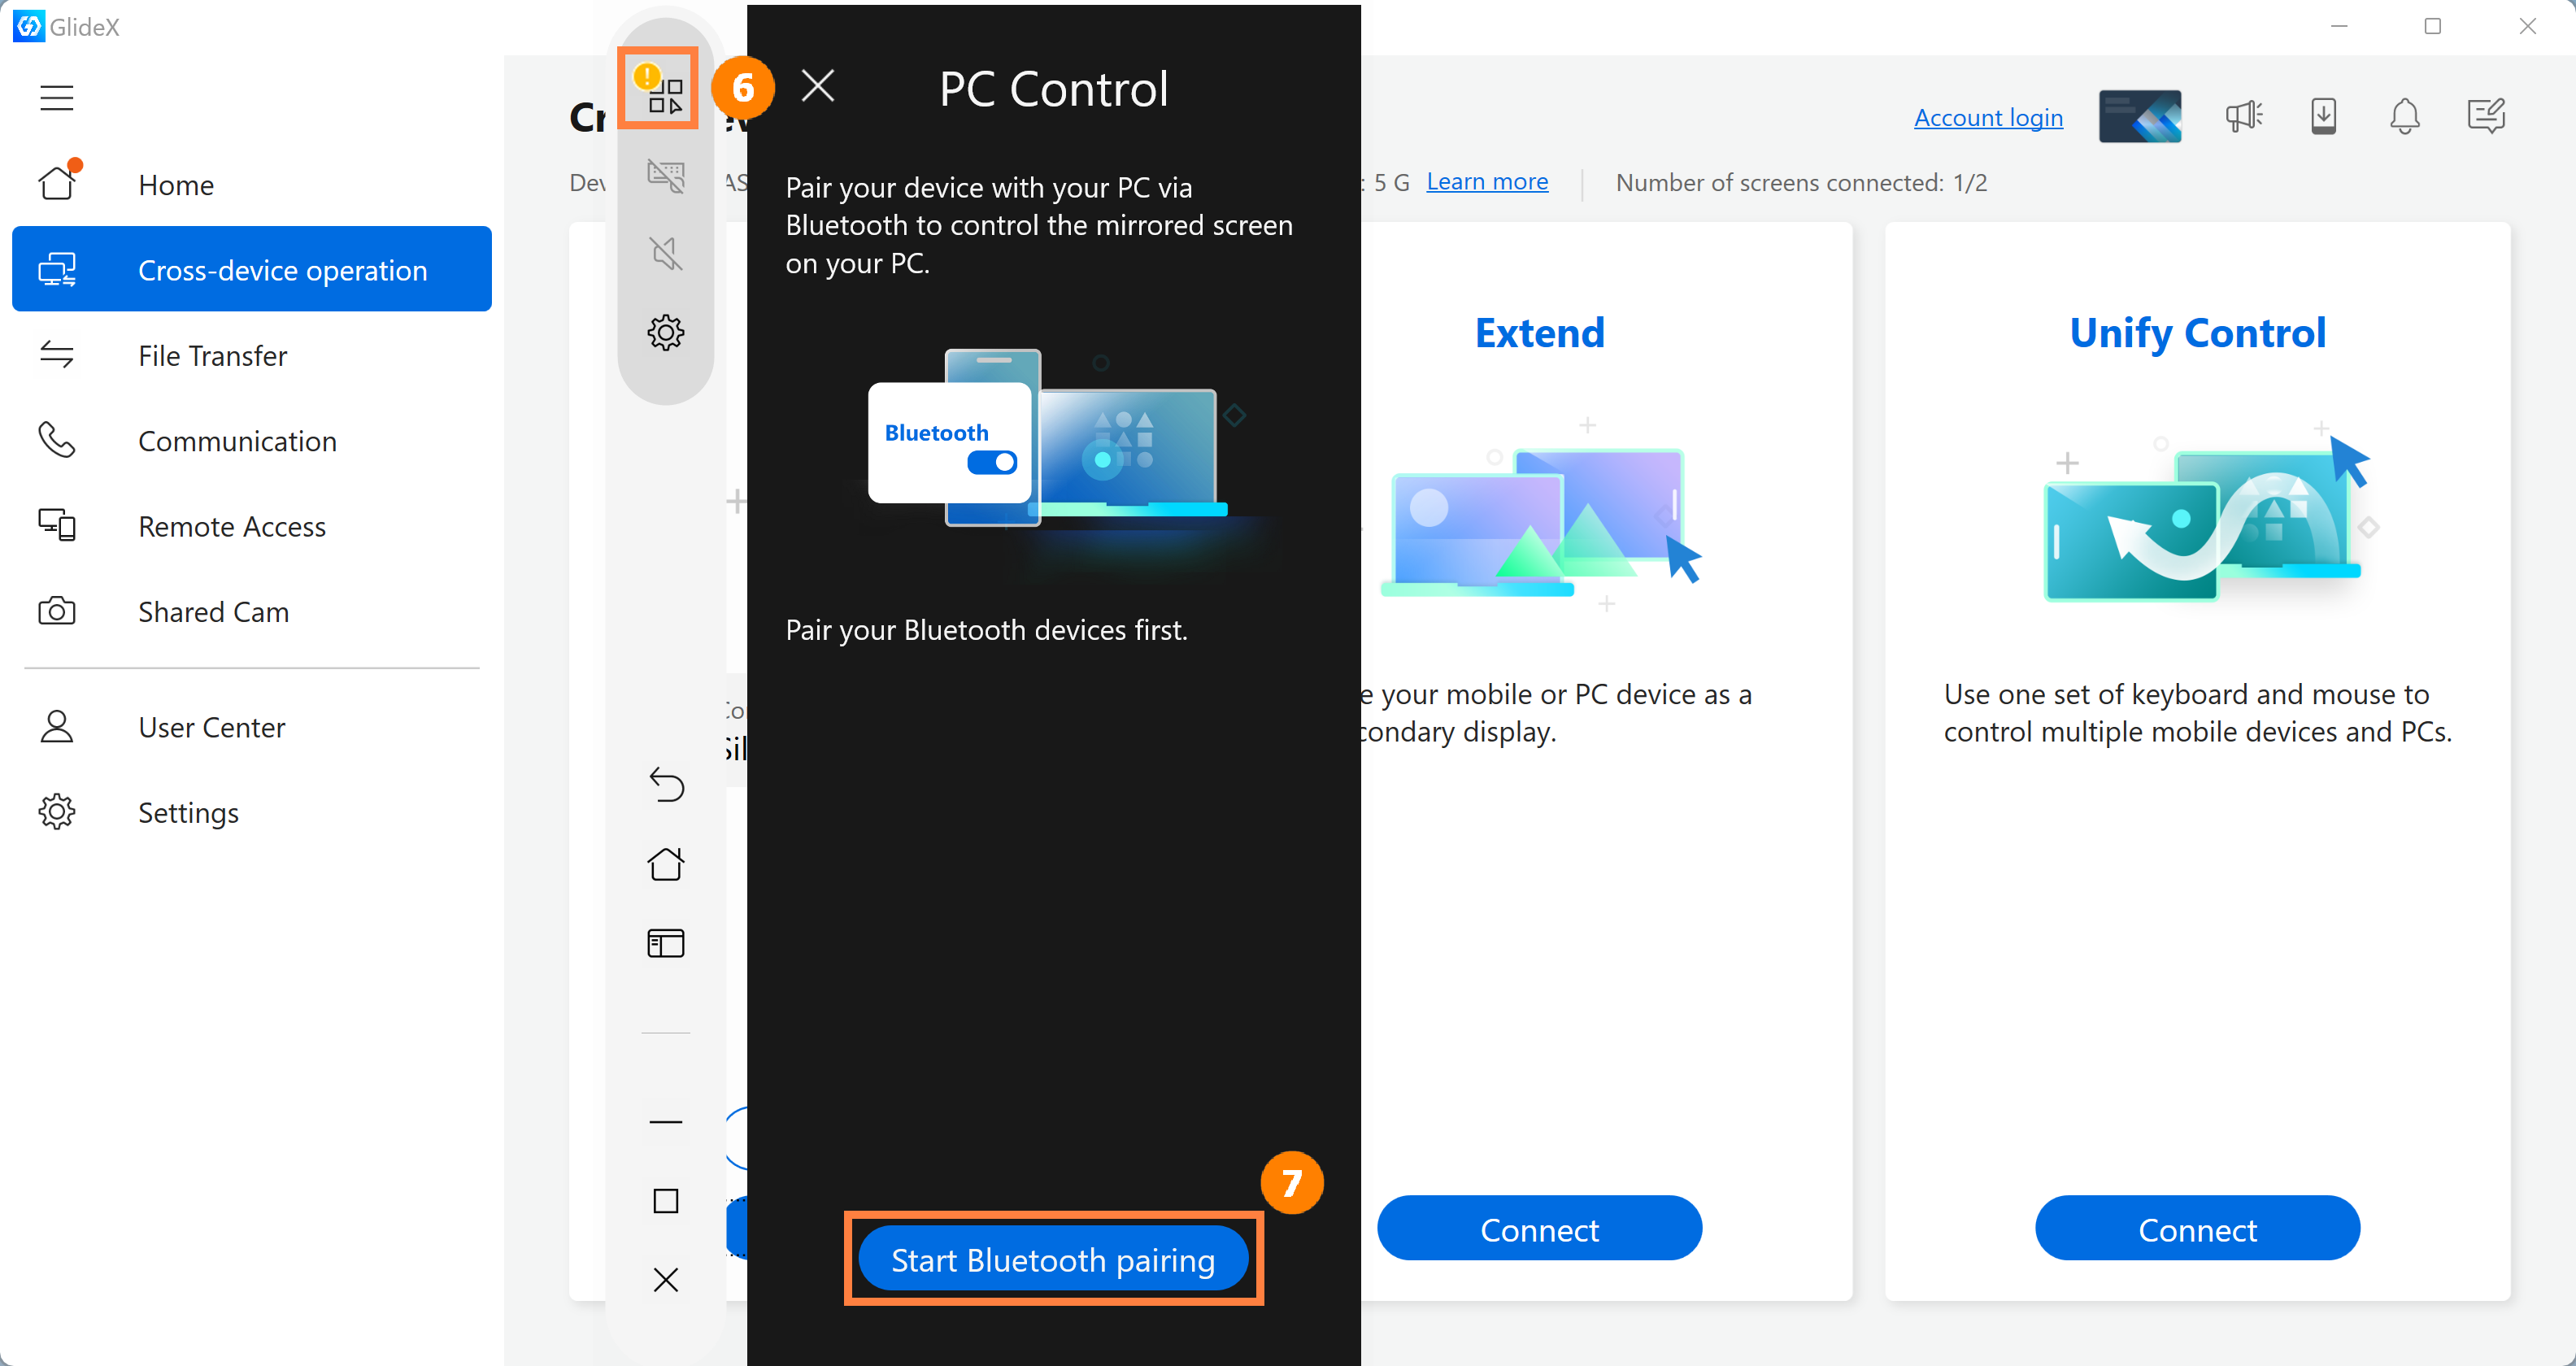
(4) If you want to use the mouse or keyboard on the computer to control the mobile device, or use the speakers of the computer to play the media sound of the mobile device, please click the ⑥[Computer Control] button on the left, and then click ⑦[Start Bluetooth pairing].
If you encounter problems using this function, please refer to: [GlideX] Bluetooth pairing problems | Official Support | ASUS Global
(5) A pop-up window will appear on the mobile device, please confirm whether the [pairing code] on the computer and mobile device are the same, and then tap ⑧[Pairi] on the computer and mobile device. If pairing fails, please unpair both sides on the Bluetooth pairing page of the computer and mobile device, and then pair manually on the Bluetooth pairing page.
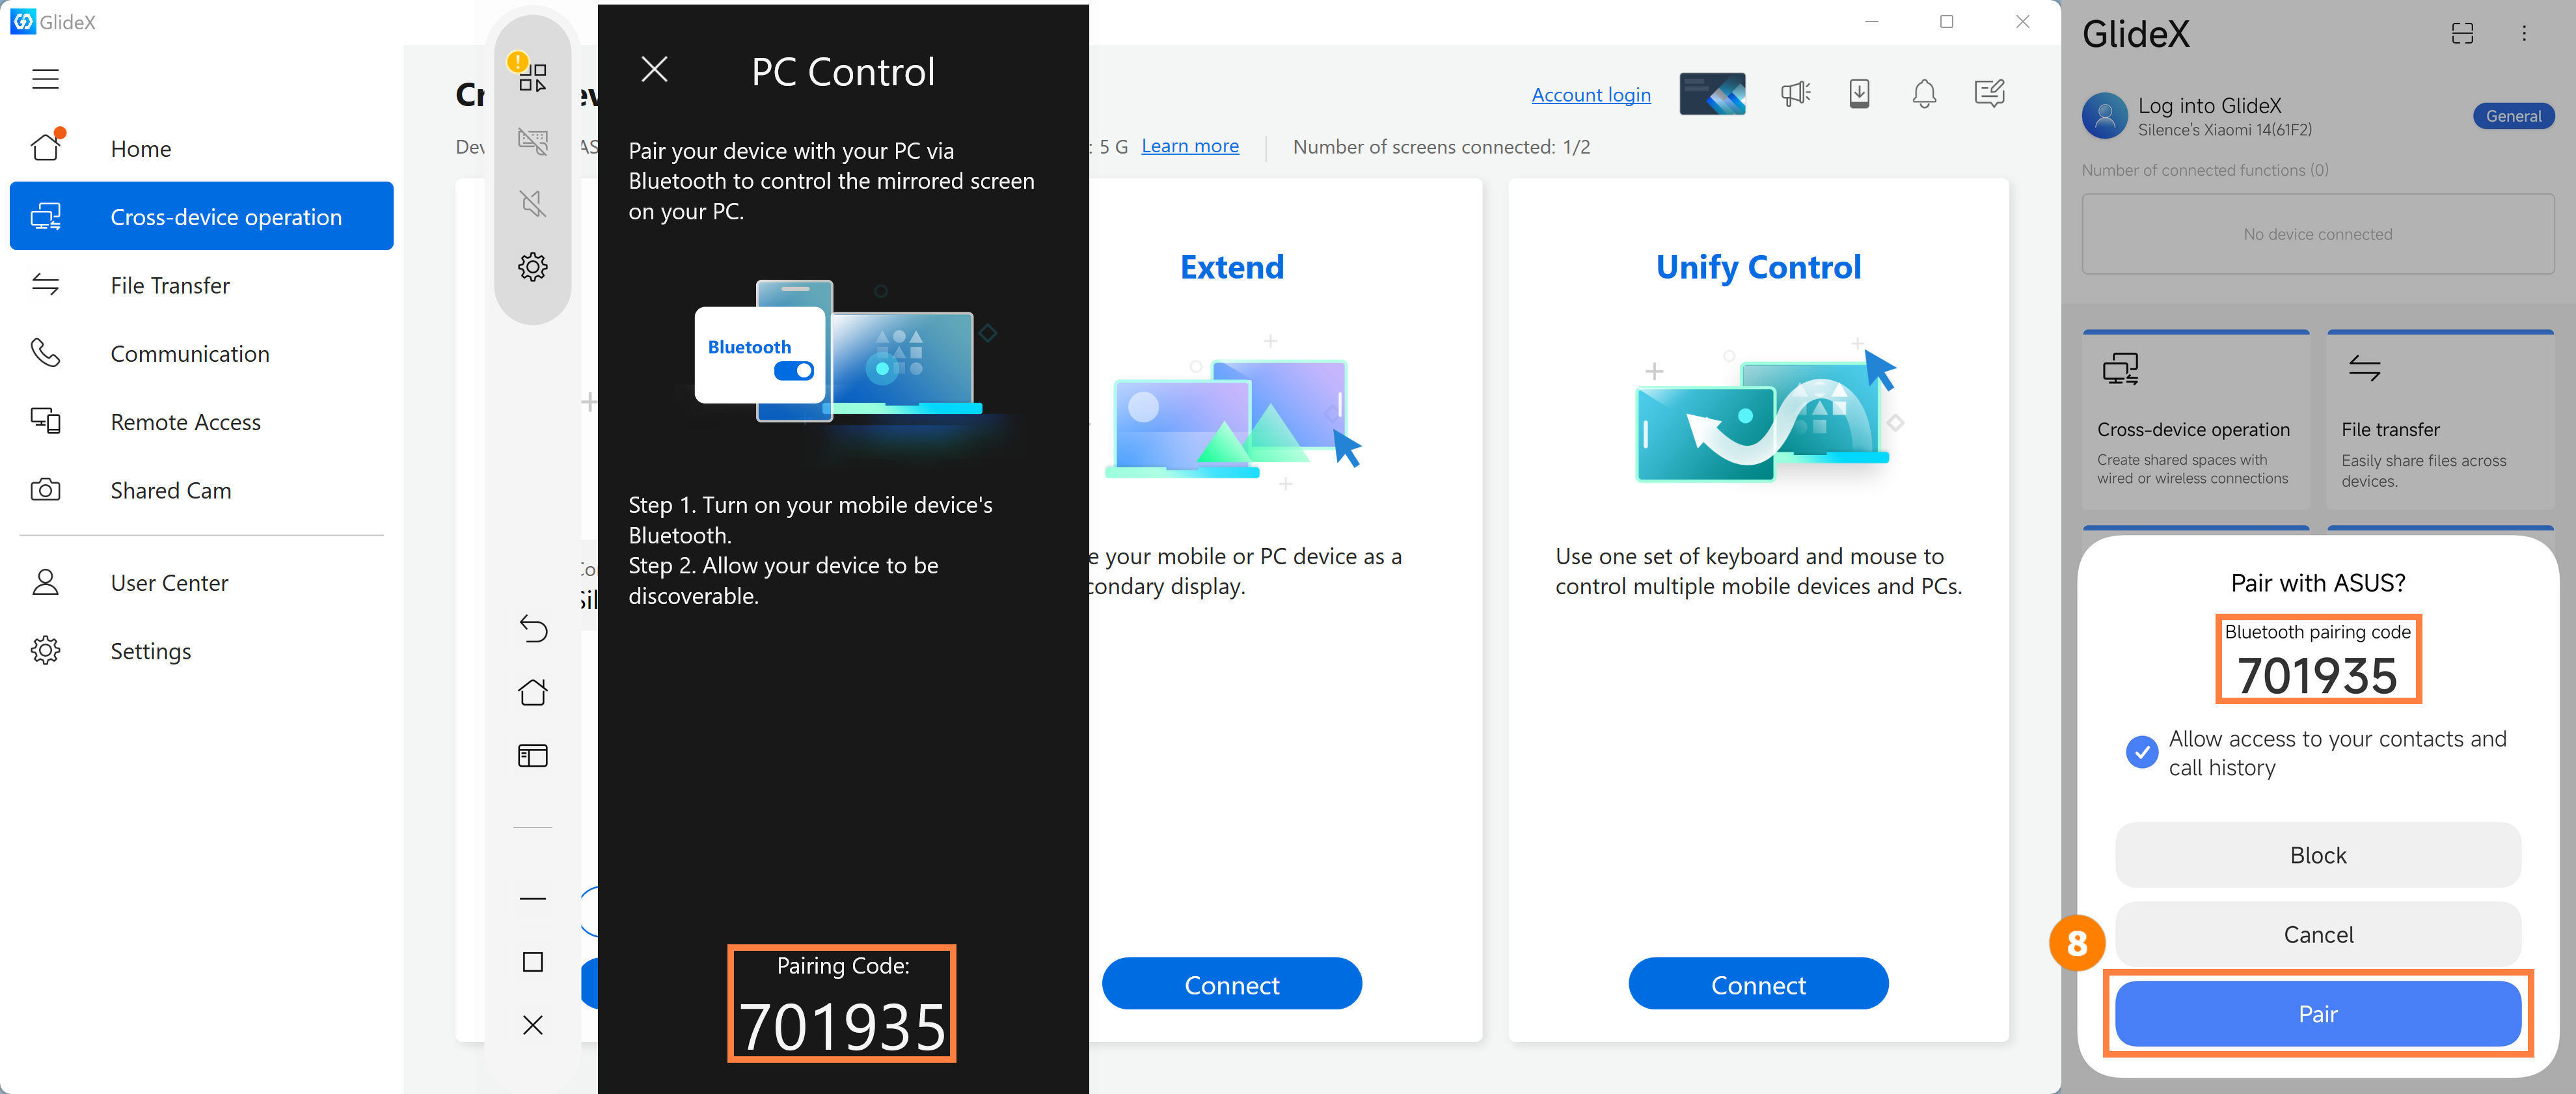
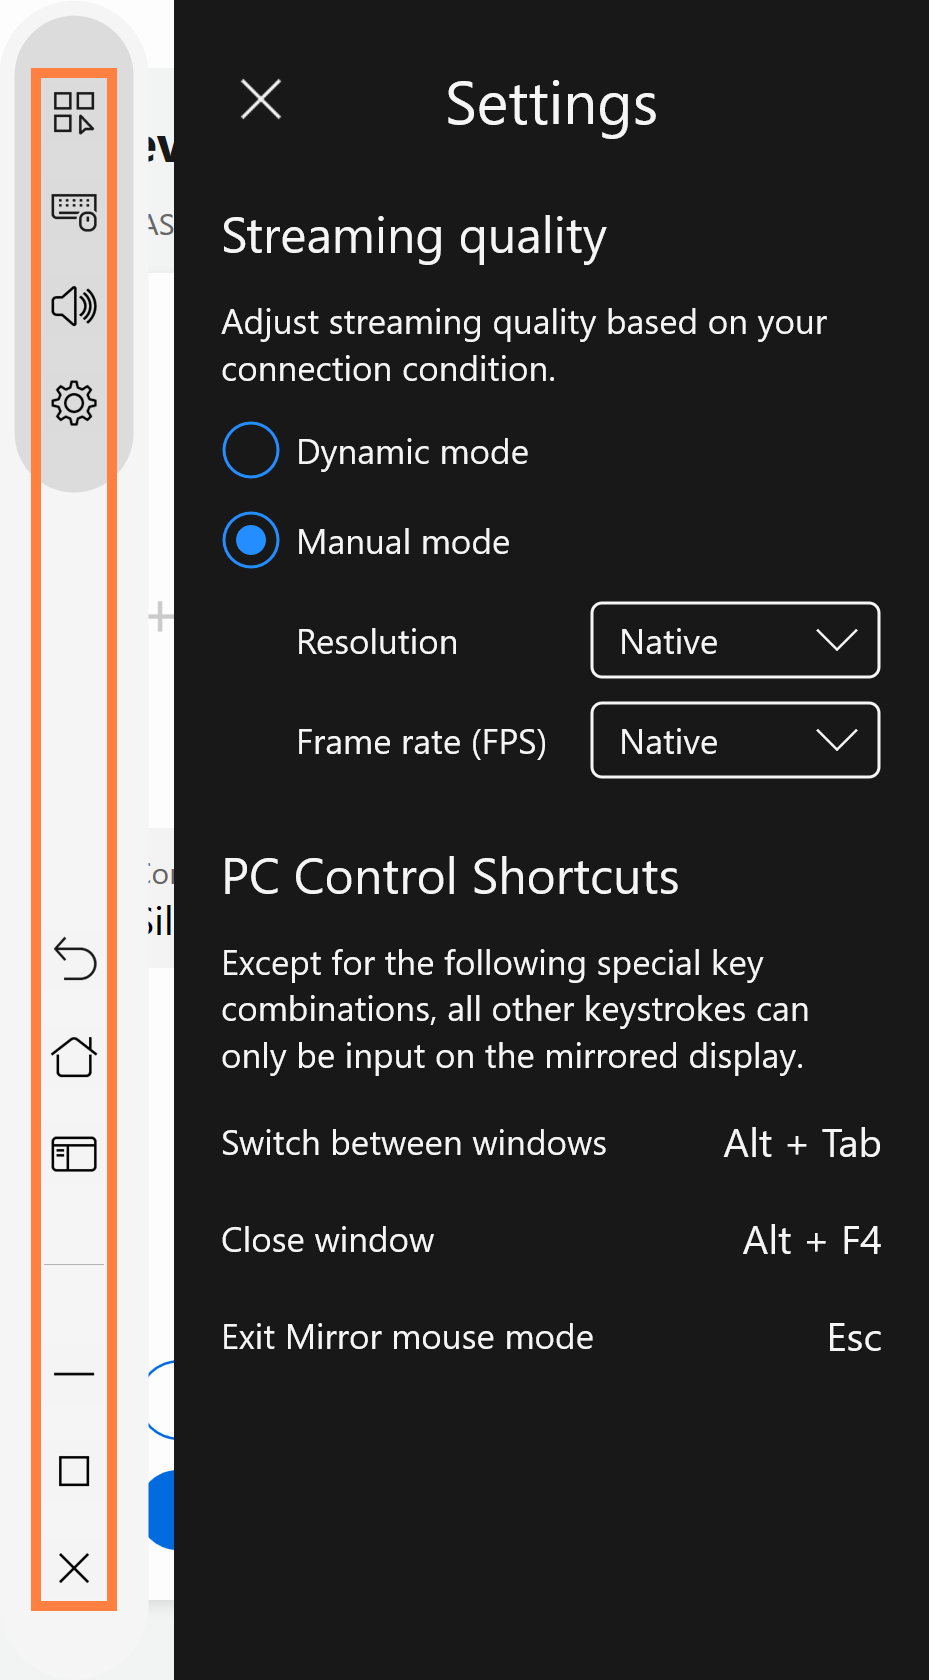
(6) After the computer is successfully paired, the following screen will be displayed. When the computer control function is turned on, go to the sidebar on the left side of your mobile device from top to bottom [PC Control] function, including [Keyboard & Mouse] switch button, [Audio] switch button, [Settings] button, [Mobile device control] button, and [Control] button.
To use PC's mouse on the mobile device*, switch to Mirror mouse mode by clicking on the mirrored screen. To exit from that mode, press Esc. Moreover, you can also customize your pointer speed based on the mobile systems:
·Android devices: Click the [Settings] button to adjust the speed.
·iOS devices: Go to your mobile device [Settings] > [General] > [Trackpad & Mouse]. We recommend you drag the "Tracking Speed" slider to the lowest. At the same time, turn off the [Natural Scrolling] setting to maintain your scrolling behavior on the computer.
* Go to your mobile device [Settings] > [Accessibility] > [Touch] > Turn on [AssistiveTouch], or ask Siri to [Turn on AssistiveTouch].
Audio - This function requires PC later than 20H1 devices. If it is a lower version, it is recommended that you upgrade the operating system for this function. Currently, GlideX supports streaming stereo music.
(7) When your mobile device is displayed in landscape orientation (for example, when you watch a video), the computer's mirror page is also displayed in landscape orientation. At this point, you can play the sound on your mobile device on your computer and watch the video on your computer.
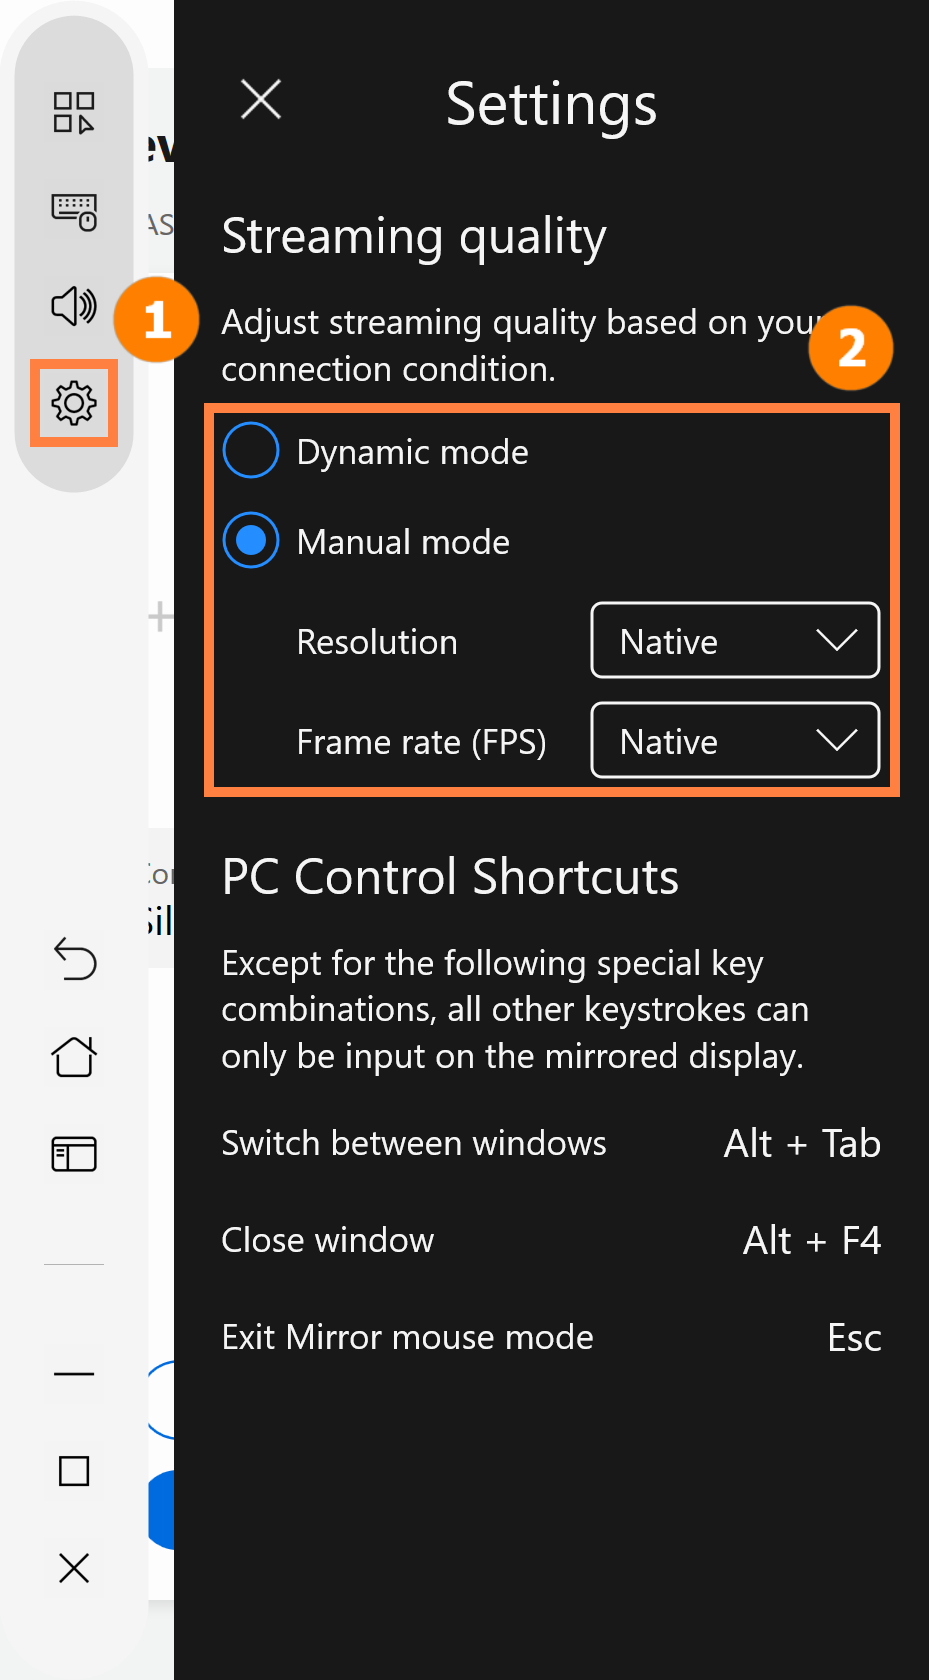
(8) How to switch your mirrored or extended picture quality? If your network is unstable, we recommend that you switch to 5 GHz WiFi, or tap①[Settings] to use dynamic adjustment mode in ②[Image Quality] or connect with a USB cable to enjoy a better experience.
※ GlideX supports linkage with ASUS Control Panel, please refer to ASUS Control Panel - Introduction | Official Support | ASUS Global
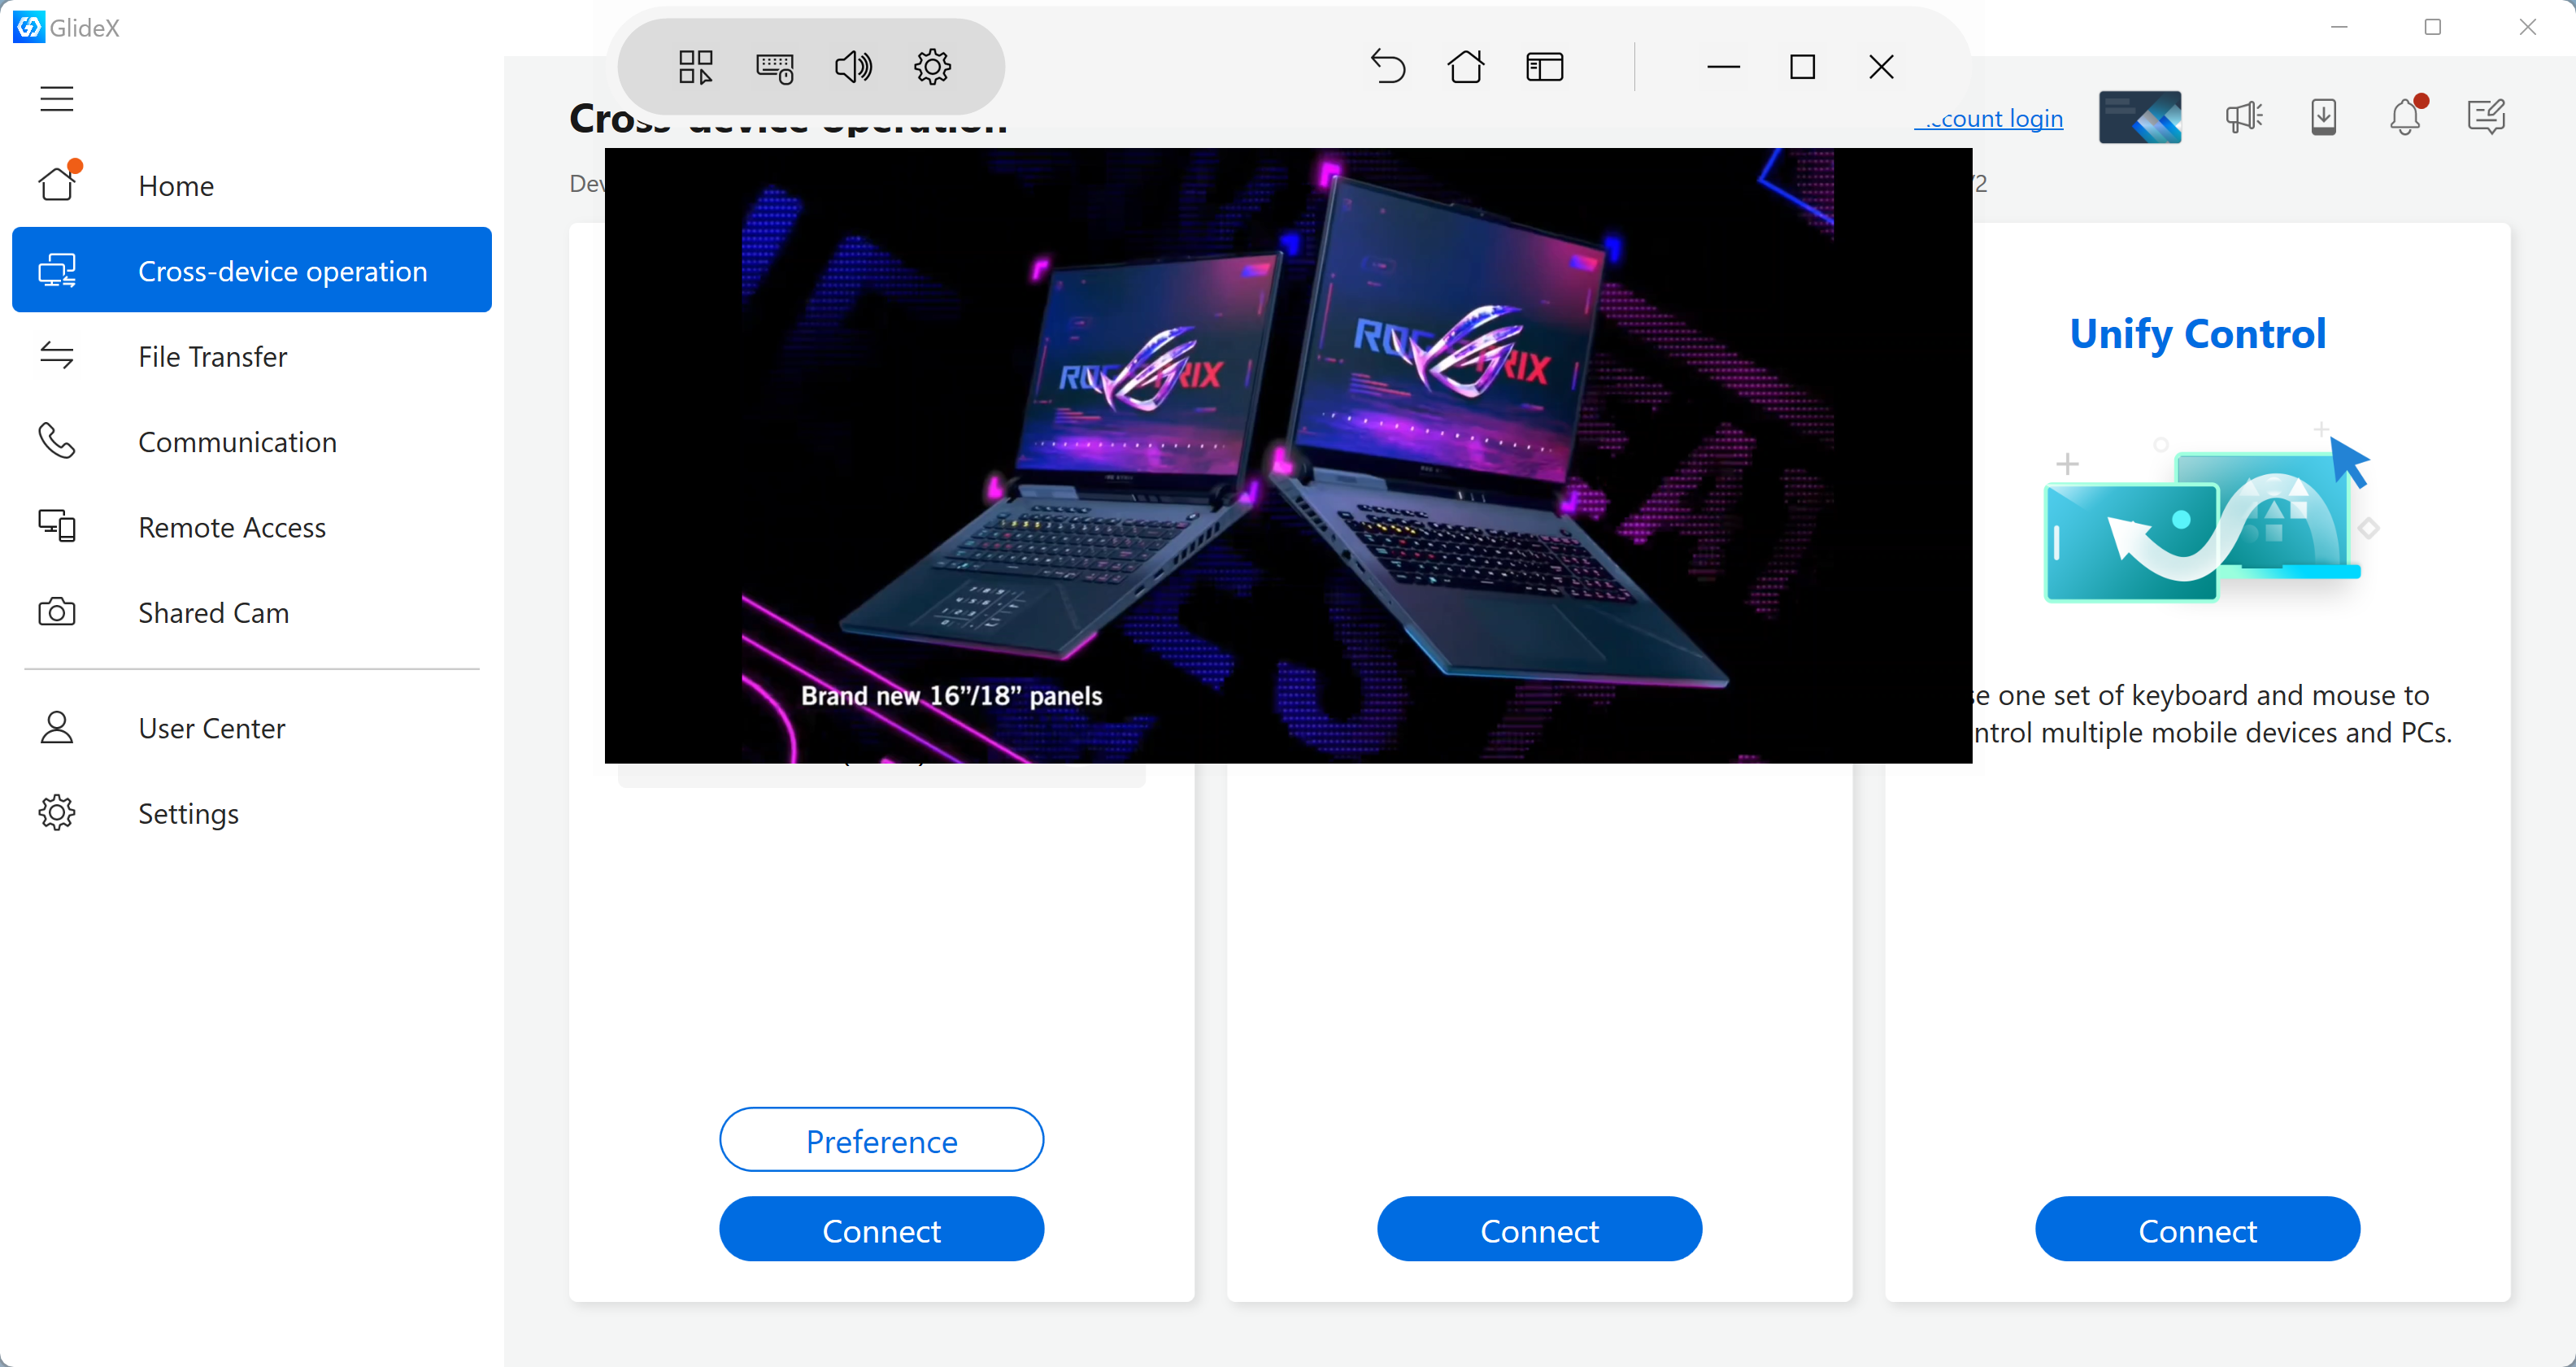
(1) On the main screen of GlideX, tap ①[Cross-device operation] and then tap ②[Connect].
※ The Extended function allows ASUS Exclusive users to connect two devices at the same time, and the devices can be another computer or mobile device.
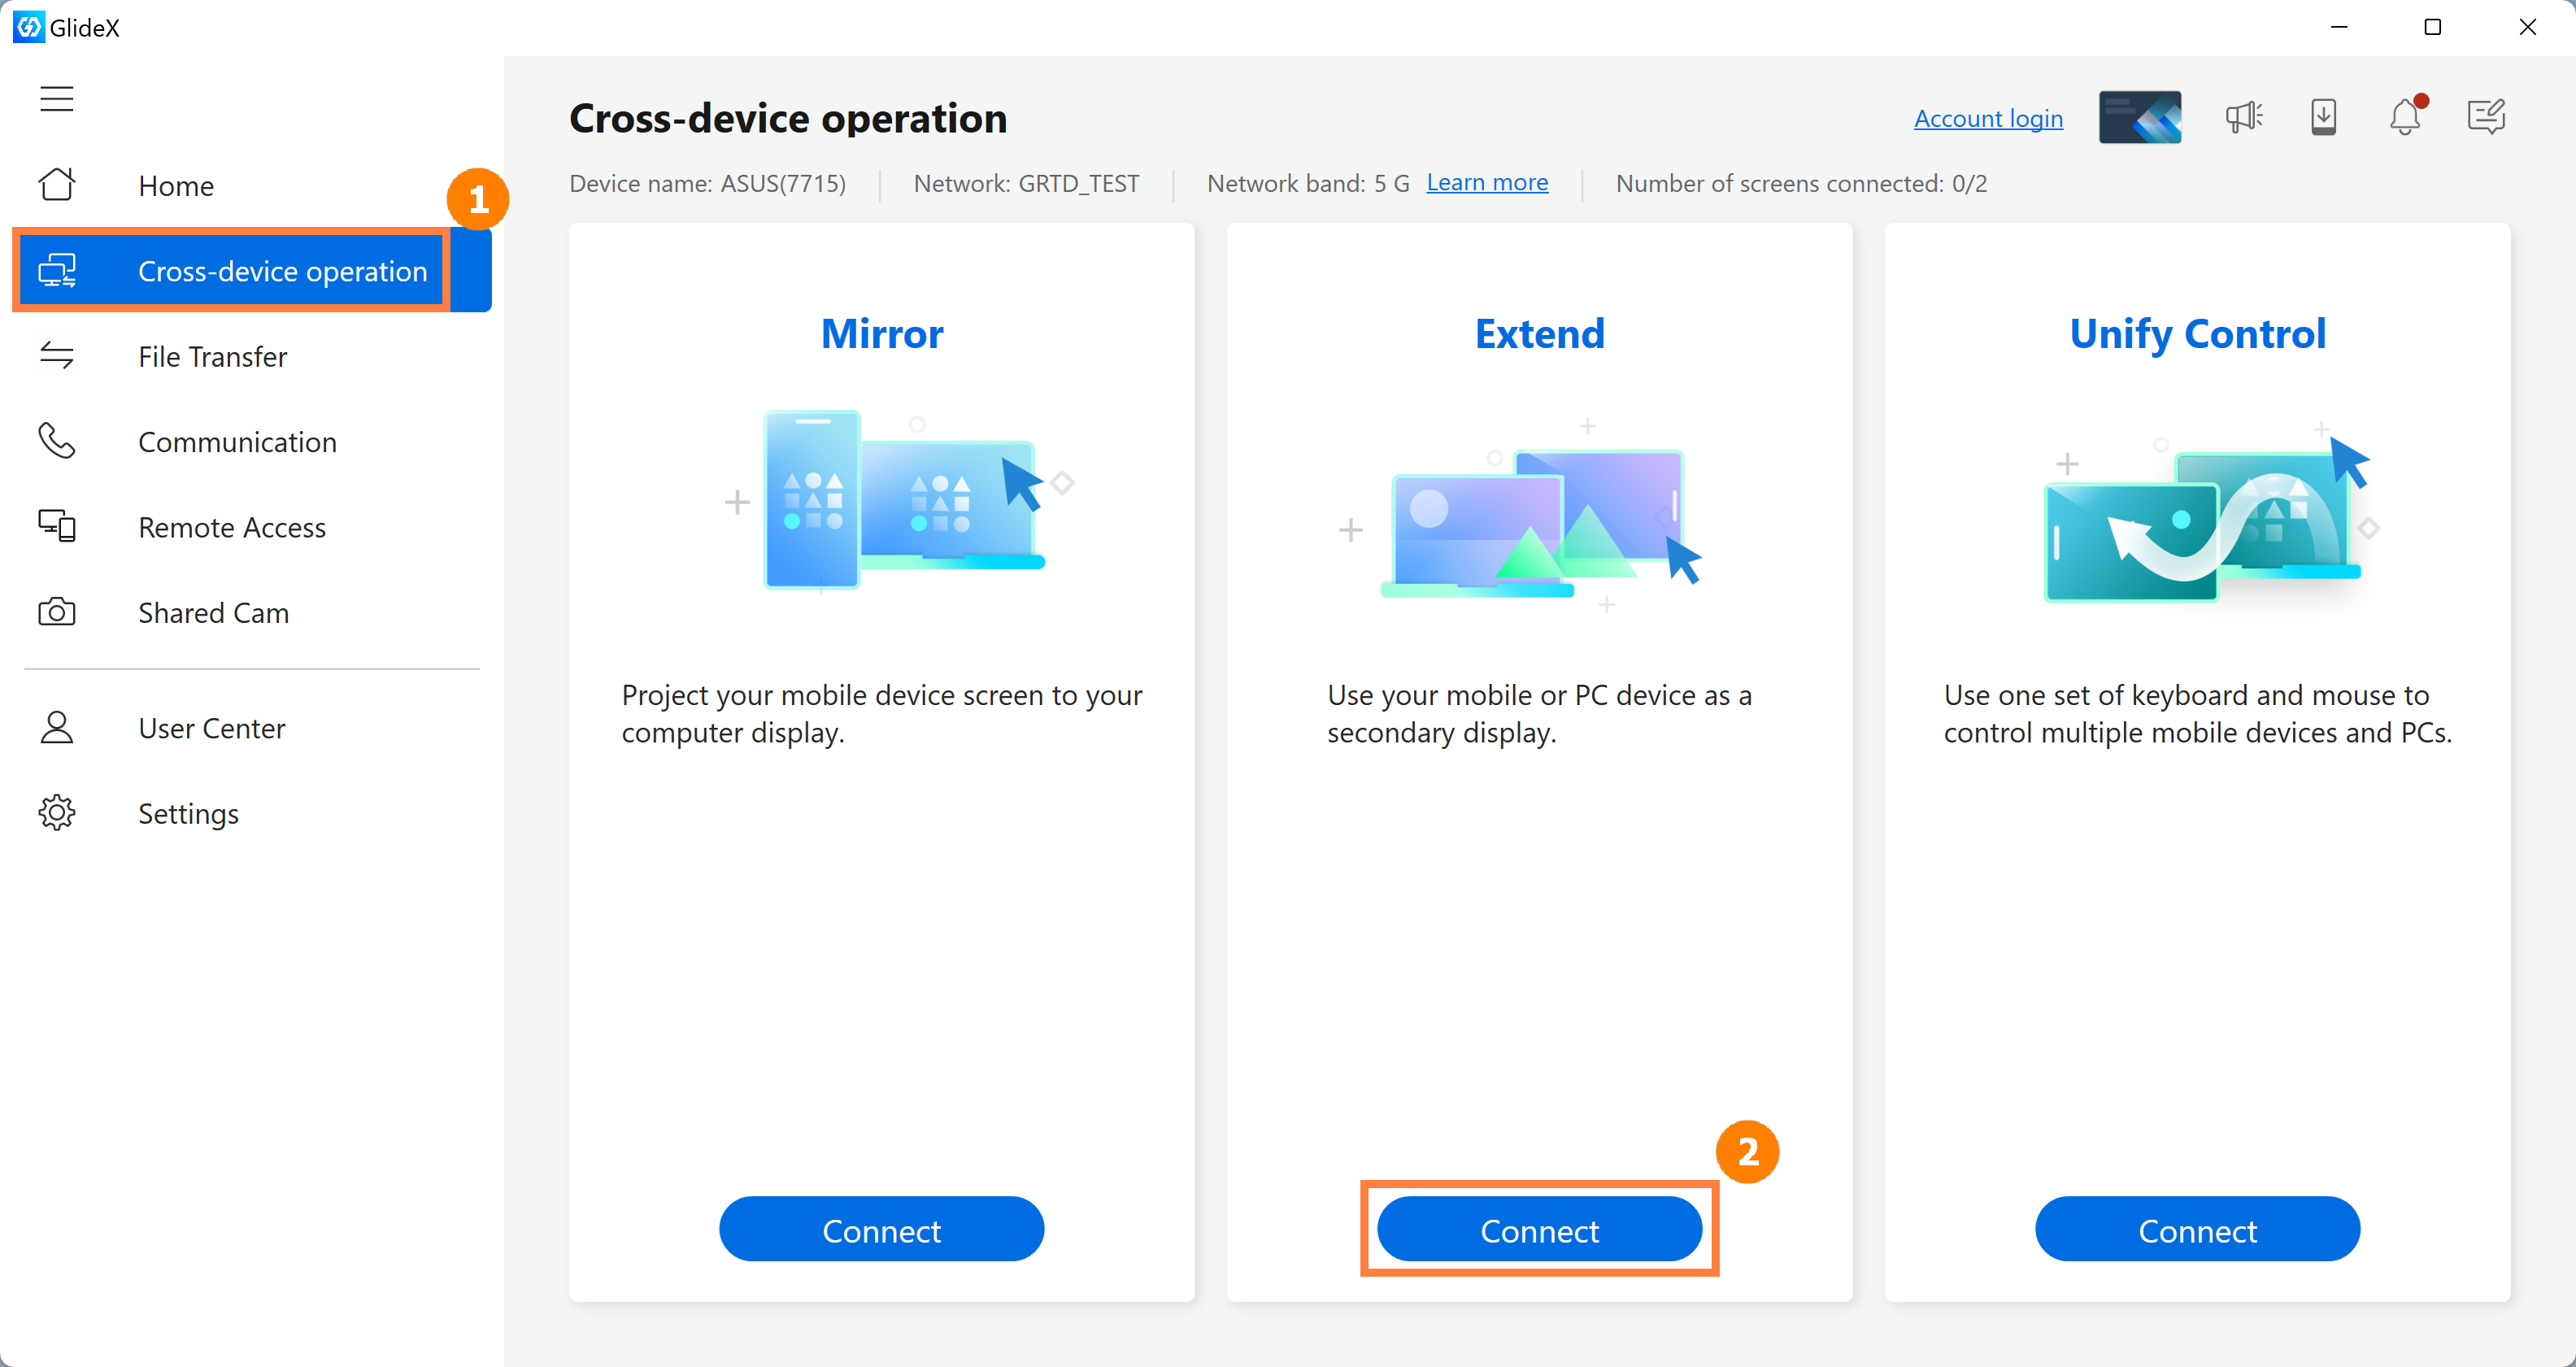
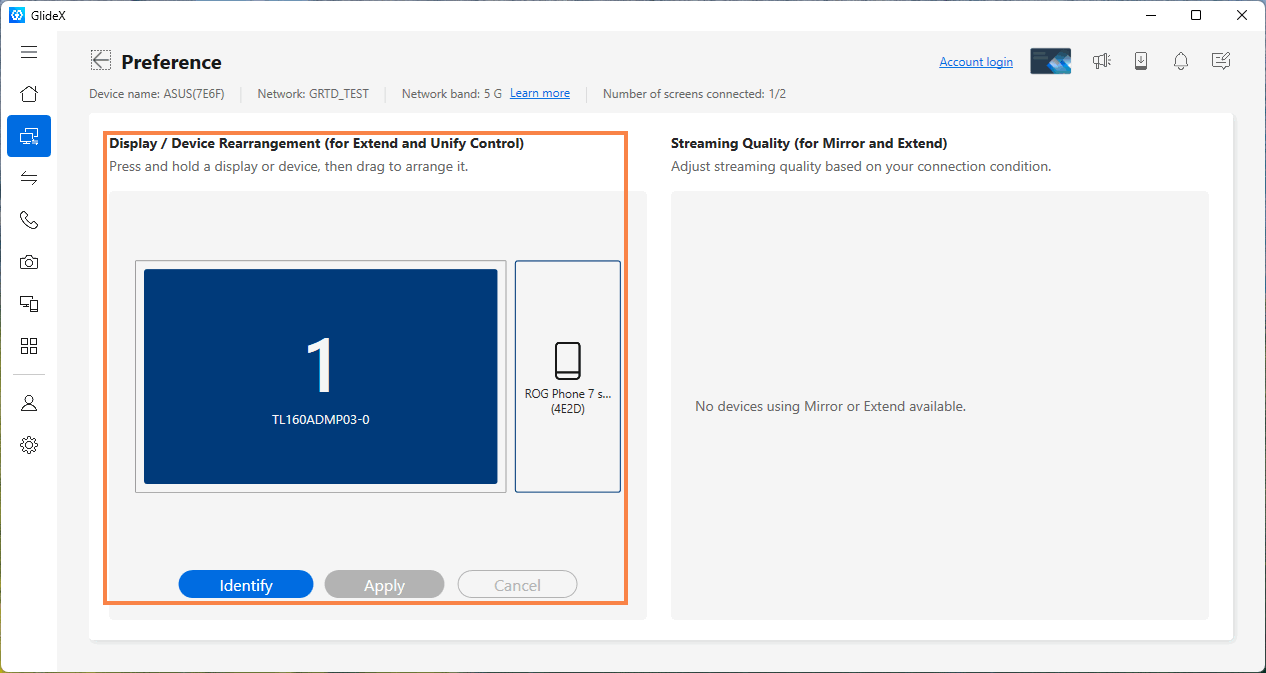
(2) The connection is complete. Now GlideX can connect two devices at the same time, click ③[Connect] to connect the second device. We can click on ③[Preference].
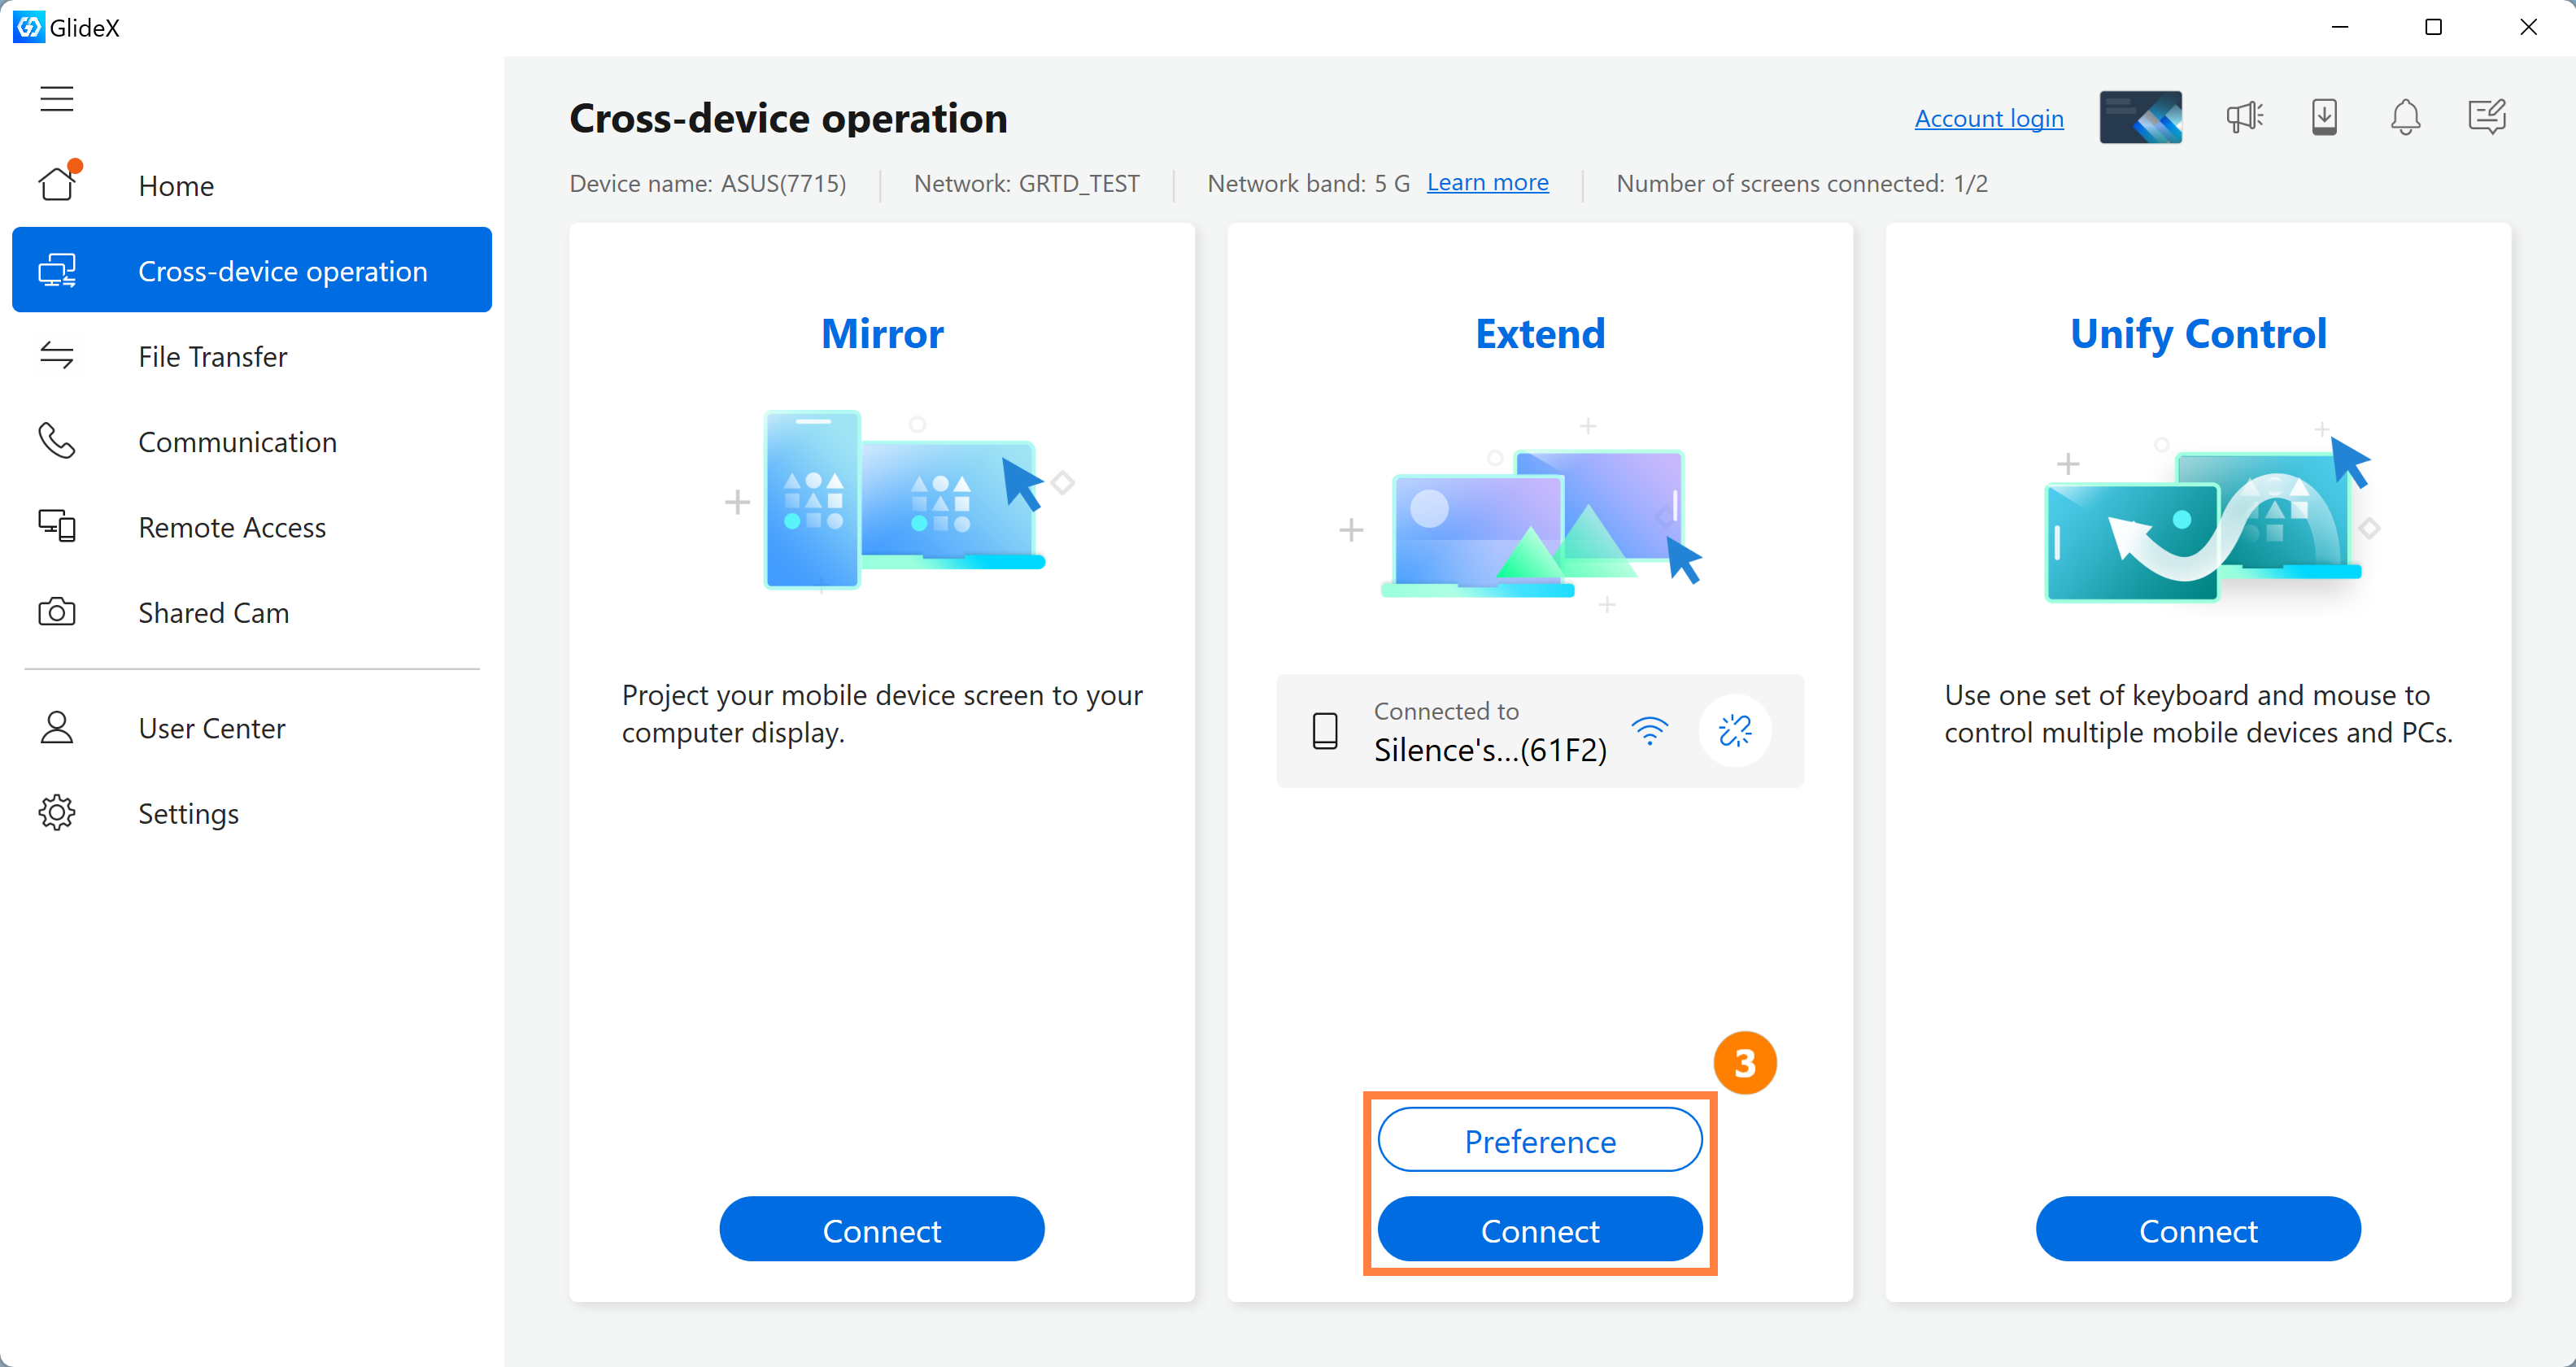
(3) In ④[Display/Devices Rearrangement] on the left, you can set the relative position of the screen. In ⑤[Image Quality] on the right, you can set the image quality of the two extended screens. At this point, the position of ⑥[Extended Screen] relative to the Home screen is shown in the following figure.

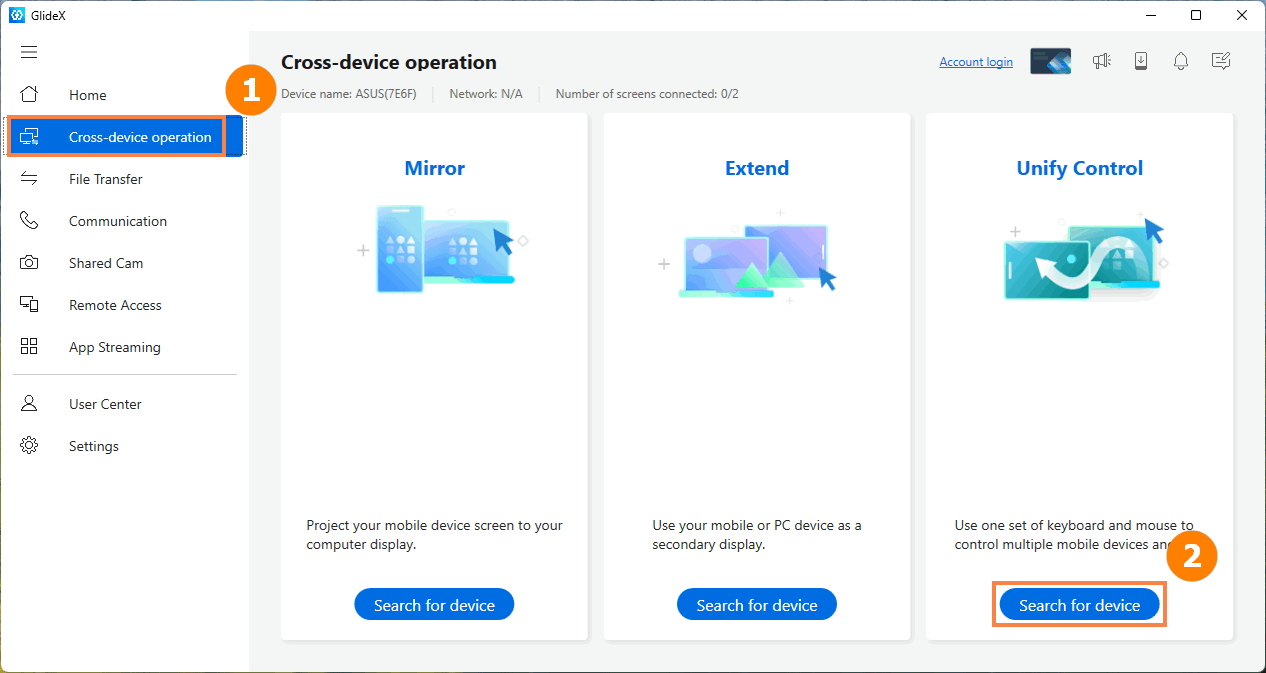
(1) On the main page of GlideX, click ①[Cross-device operation], then click ②[Search for device].
※ The Unify Control function supports ASUS exclusive solution users to connect two devices at the same time. The devices can be other computers or mobile devices.
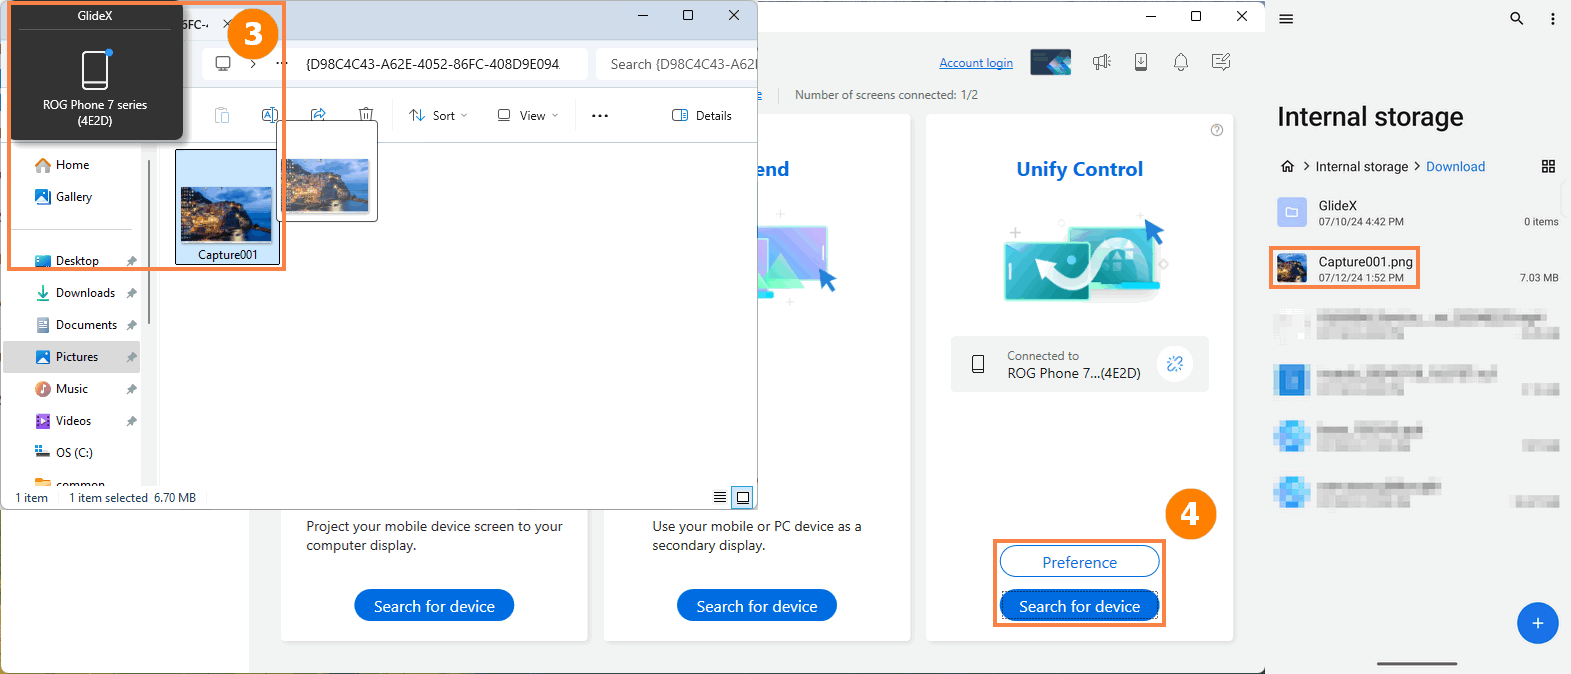
(2) After the device connection is completed, the following screen will appear. Drag the file on the desktop and ③[Device Icon] will appear. You can drag the file into the icon to realize quick file transfer between devices. The file is in the [File Management->Download] folder of the receiving device. We can click ④[Device Preferences] to edit connected devices.
Unify Control also supports dragging files to the connected device folder, and the files can be directly transferred to the folder. The folder of the transferred device is not selected, and the received files are in the [File Management->Download] folder of the receiving device.
※ The Unify Control transmission function will use the bandwidth of the wireless network to transmit content and will not consume your LTE traffic, so please feel free to use it.
※ The Unify Control transfer function does not limit the size of files to be transferred, and the transfer speed varies depending on your network.
(3) Adjust the relative position between devices in ⑤[Displays/Devices rearrange].
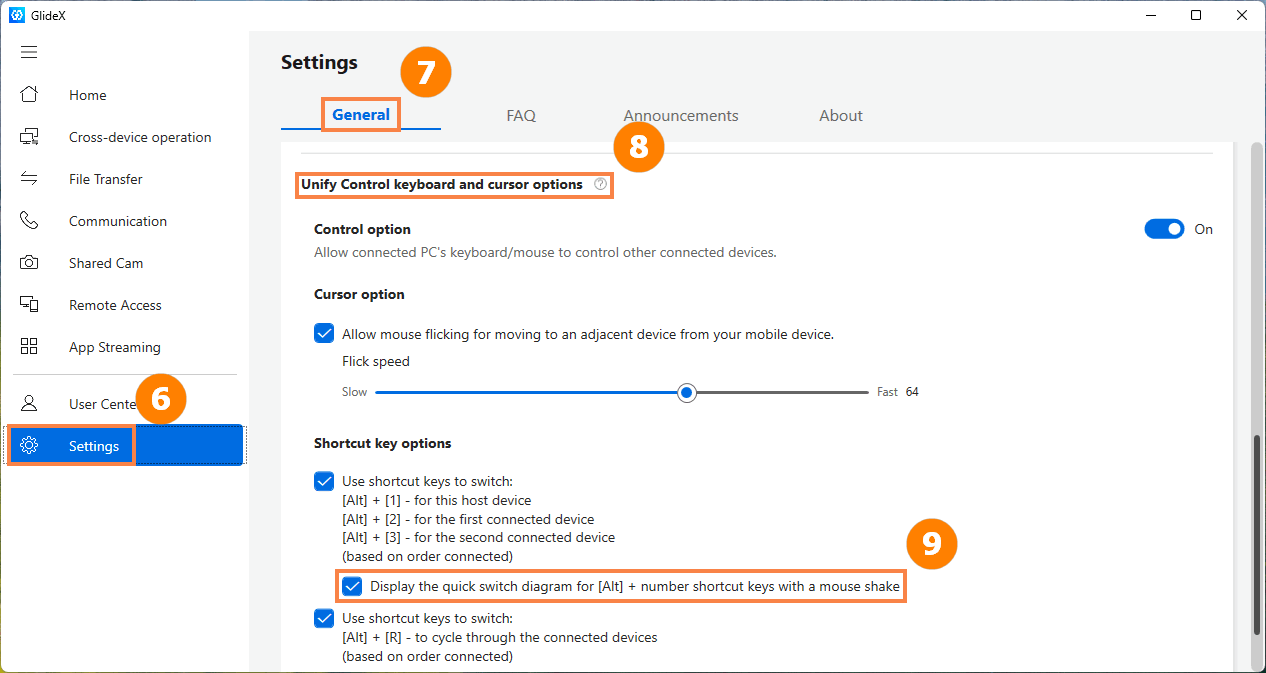
(4) When using the Unify Control function, you may encounter problems such as not being able to find the mouse. Please click ⑥[Settings], click ⑦[General], and adjust the mouse or keyboard switching options in ⑧[Unify Control and cursor Options].
※ The new version of GlideX supports the display function when shaking the mouse to help you confirm which display device the mouse is currently on. If you do not want this function to appear, please turn it off in Settings ⑨[Options].

(5) The new version of GlideX supports the senseless copy function. For example, if you purchase an activation code for a game on your mobile phone, you need to manually enter the long activation code on your computer. It is easy to make mistakes.
Now with GlideX's invisible copy function, you can copy the text to be copied from any device, and then use Paste on another device to senseless paste the text you just copied.
※ The senseless copy function of collaborative control currently only supports the interaction between Windows operating system computers and Android devices.
7. File Transfer & URL Sharing
The File Transfer & URL Sharing feature requires two devices to be connected to the network, or have been connected via Bluetooth, and the [Searchable] function is turned on, and the [File Transfer] function is turned on.
If you encounter problems using this function, please refer to: [GlideX] Cannot find the device you want to connect in the device list? | Official Support | ASUS Global
7.1 File transfer - computer to mobile device transfer
※ There are two types of file transfer:
· Transfer files from the computer to other devices (the receiving device is a computer or a mobile device)
· Transfer files from a mobile device to other device (the receiving device is a computer or a mobile device)
(1) Click ①[File Transfer] and drag ②[File] to the dialog box, or manually select ②[File] and click ③[Send].

(2) In the new pop-up dialog box, we can select ④[Select nearby devices], the steps are similar to the introduction of the mirror function, and will not be repeated.
Or we can click ④[Please enter the pairing code displayed on the receiving device], and then on the receiving device, tap ⑤[File Transfer], ⑥[Receive], and fill in the ⑦[Pairing Code] displayed on the device to the App on the file sender.
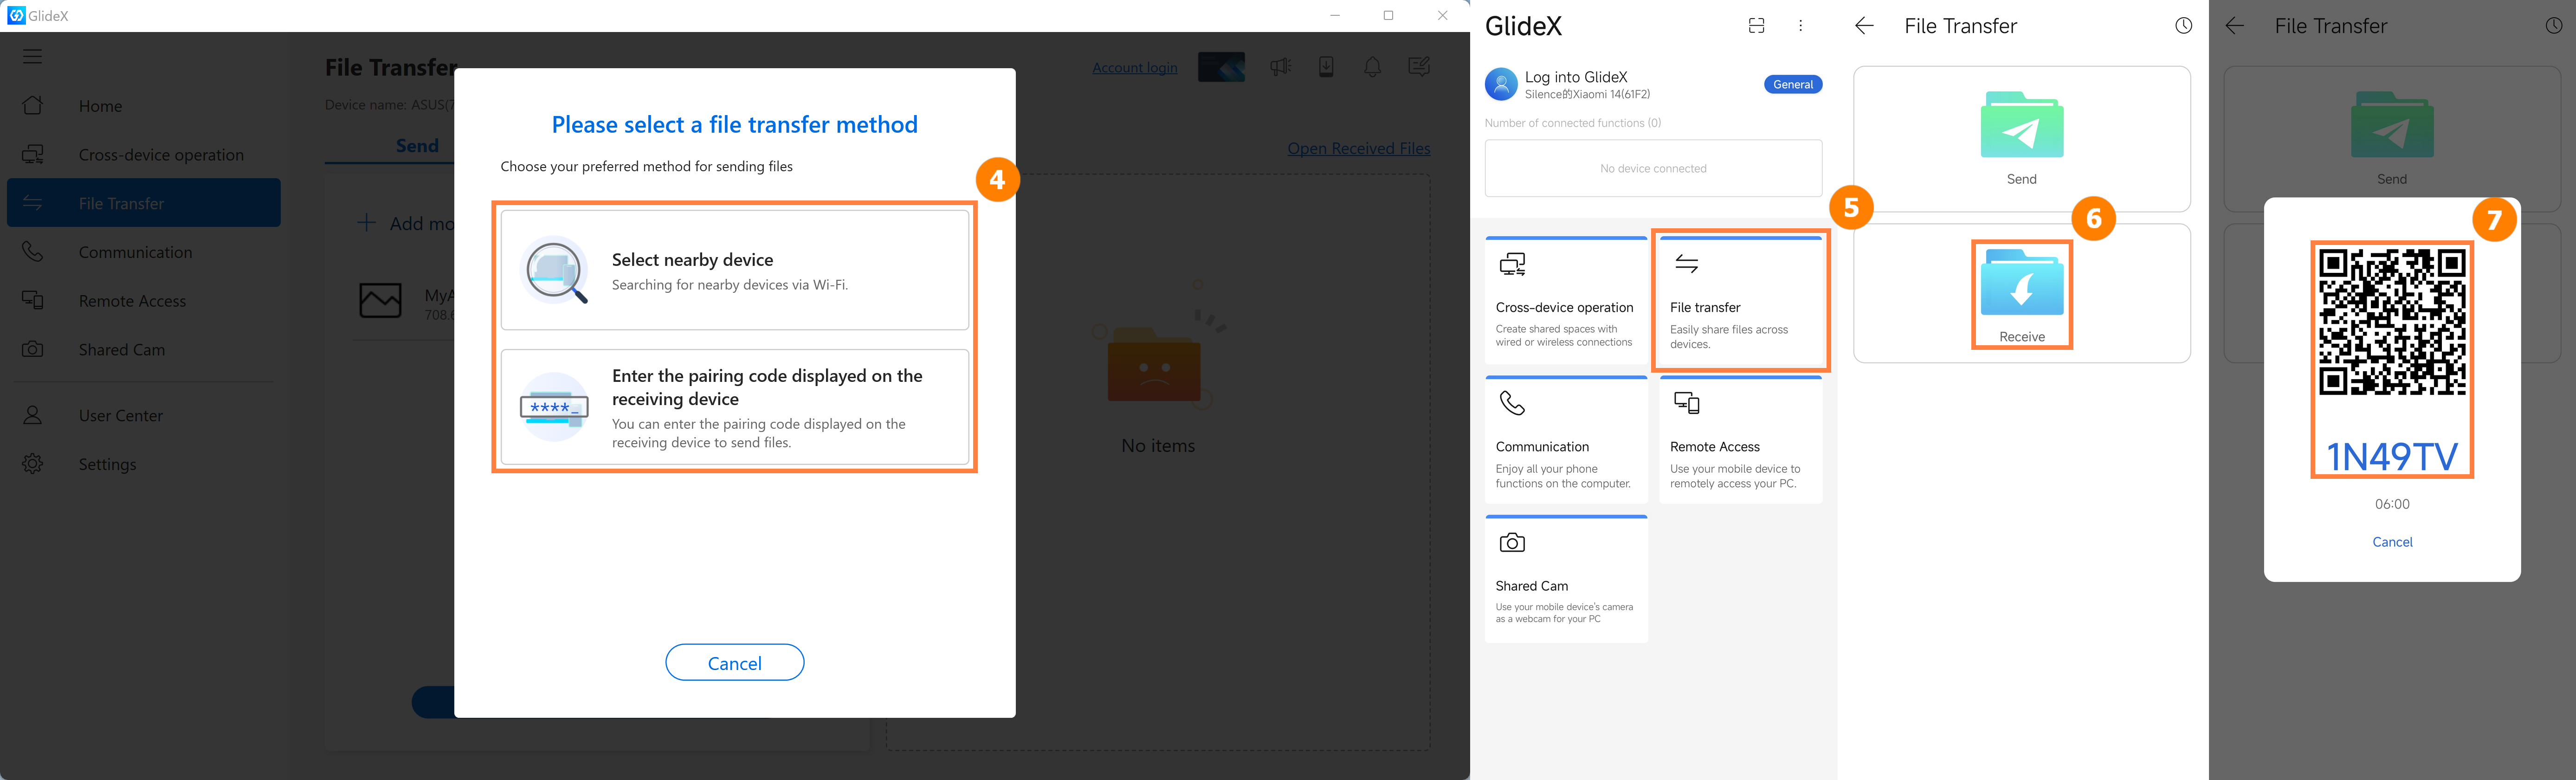
(3) When the file transfer is complete, tap ⑧[History] on the receiving device to open the received [File].

7.2 File Transfer - Transfer from Mobile Device to Computer
(1) Click ①[File transfer], click ②[Send], click ③[File] to be transferred, click ④[Send].

(2) In the new pop-up dialog box, we can select ⑤[Select nearby devices], the steps are similar to those introduced in the Mirror, and will not be repeated.
Or we can tap ⑤[Enter the pairing code displayed on the receiving device], and then on the receiving device, click ⑦[File Transfer], ⑧[Receive], and fill in the ⑨[Pairing Code] displayed on the device to ⑥[bar], or scan ⑨[QR Code] with ⑥[Camera].

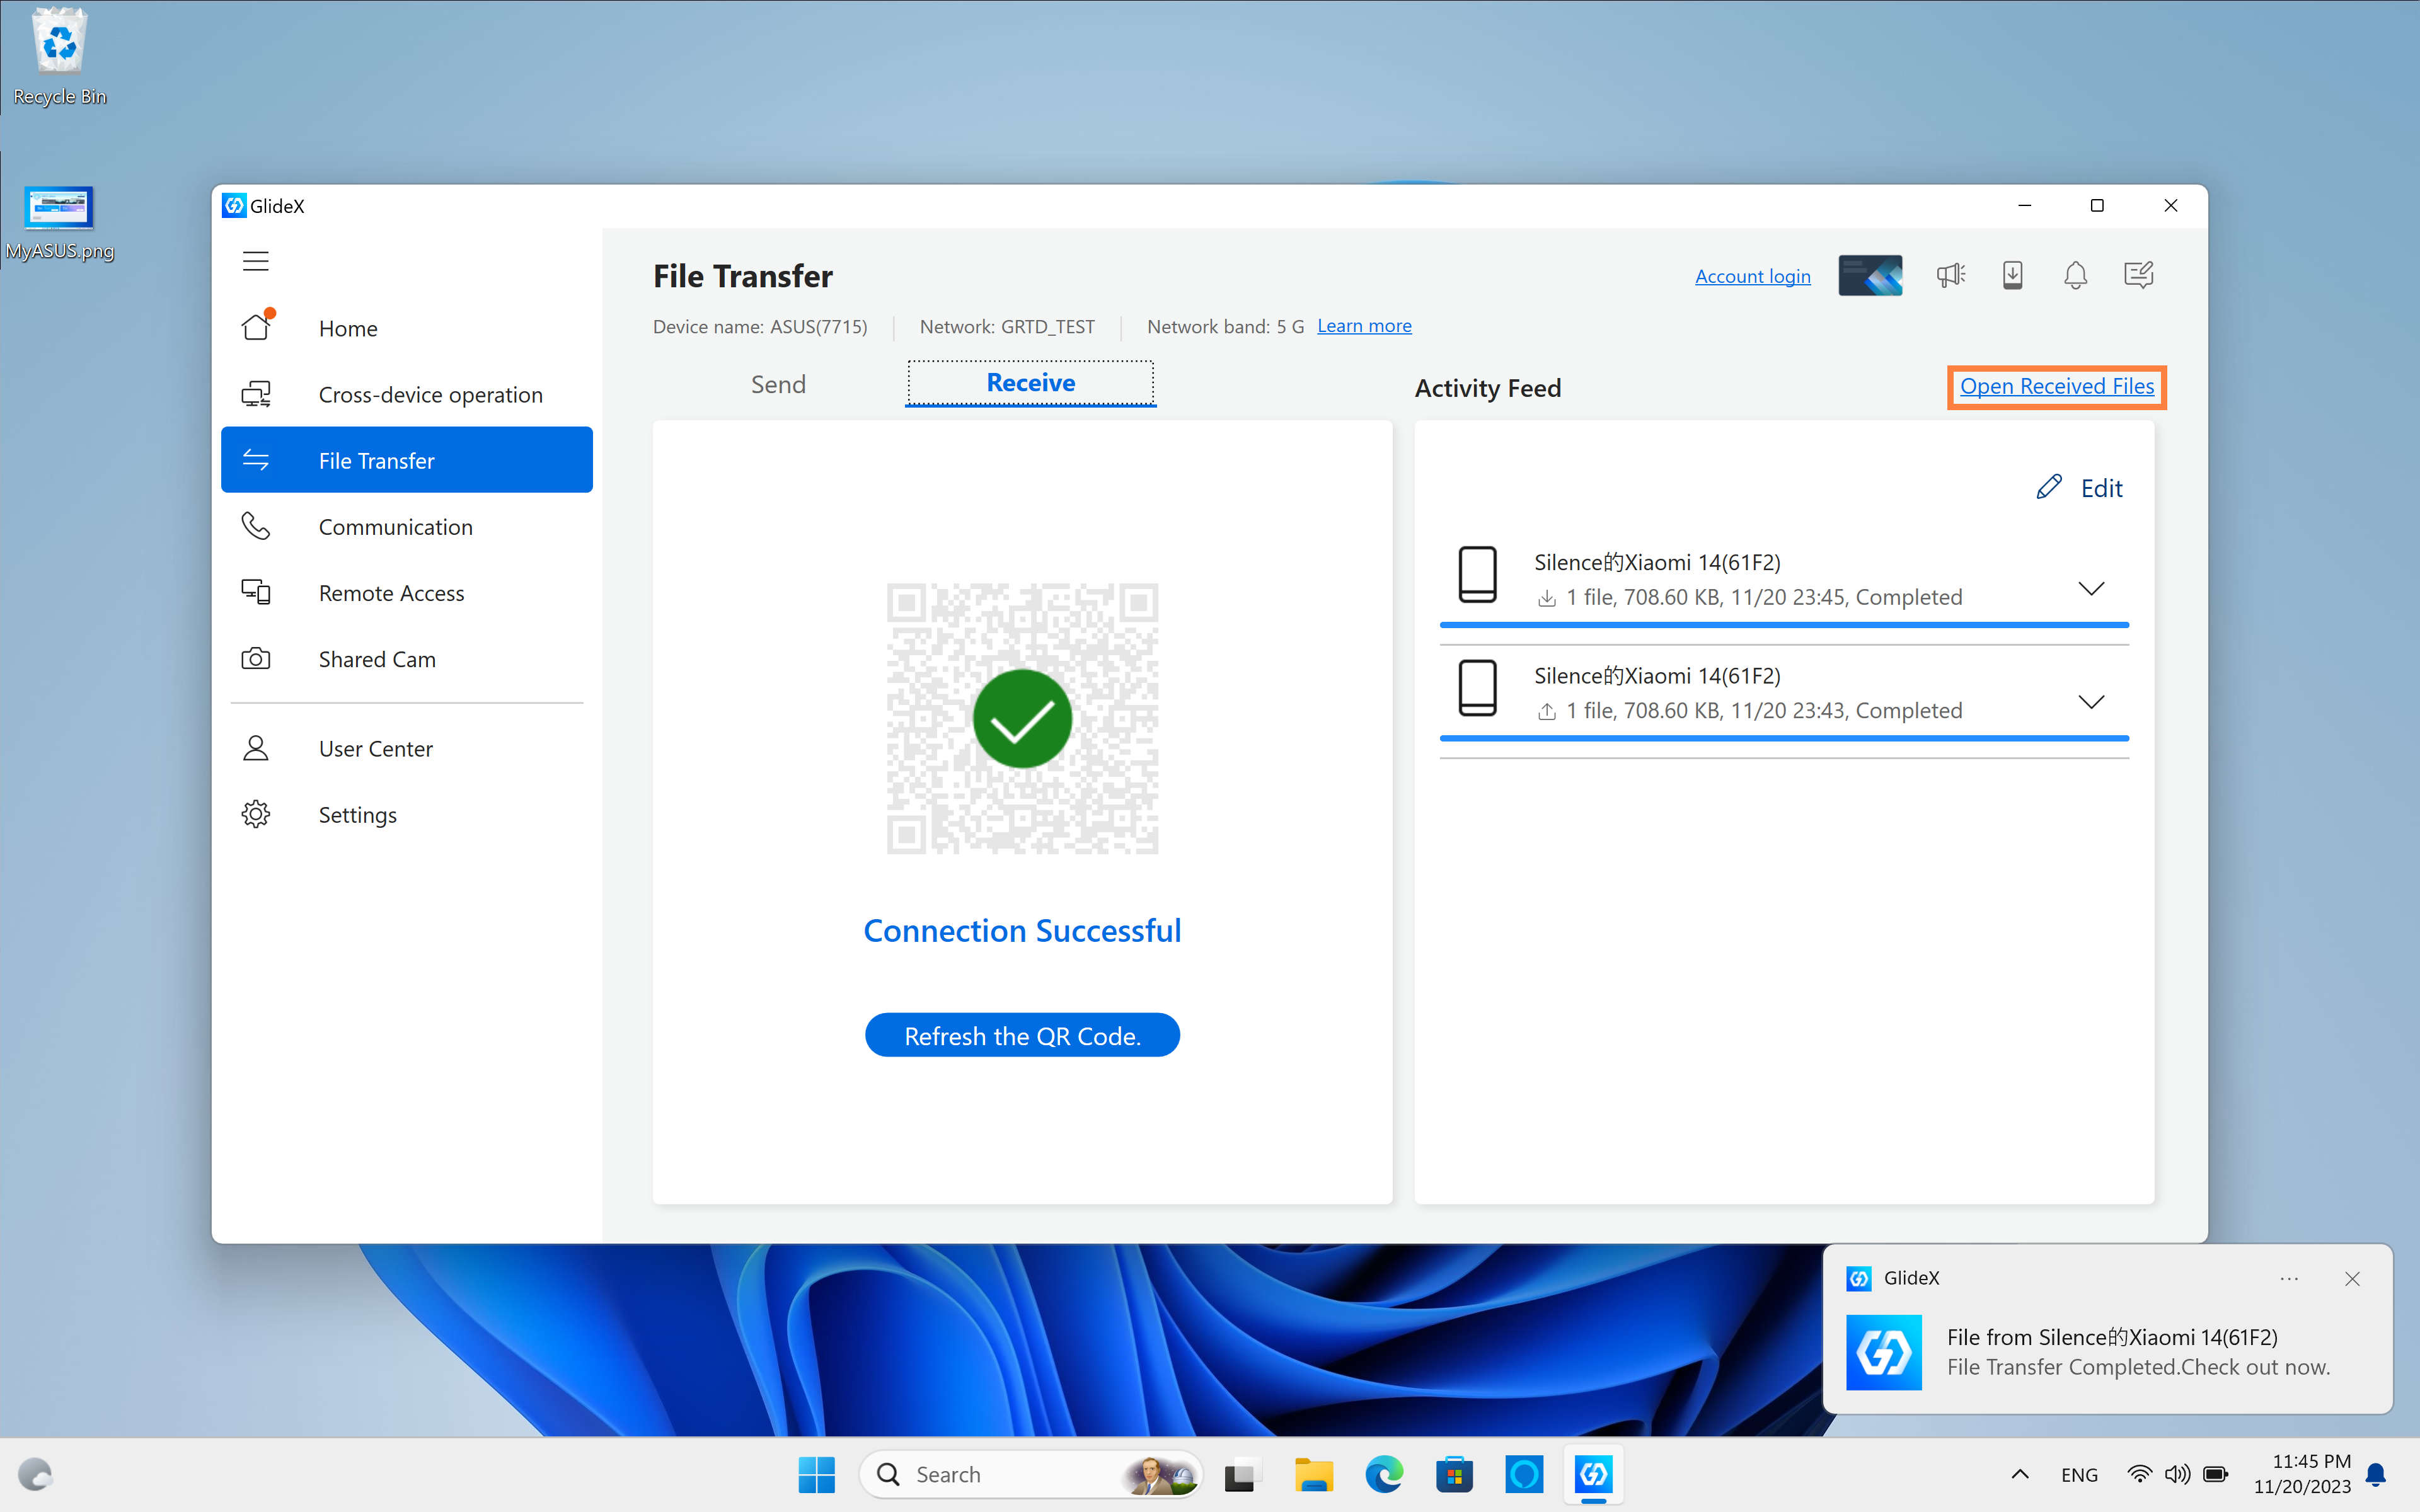
(3) After the file transfer is complete, click [Open Received Files] on the receiving device to open the received [Files].
7.3 URL Sharing - Share from Computer to Mobile
※ There are two types of URL sharing:
· Share URLs from Computer to other devices (the receiving device is a computer or mobile device)
· Share URLs from Mobile to other devices (the receiving device is a computer or mobile device)
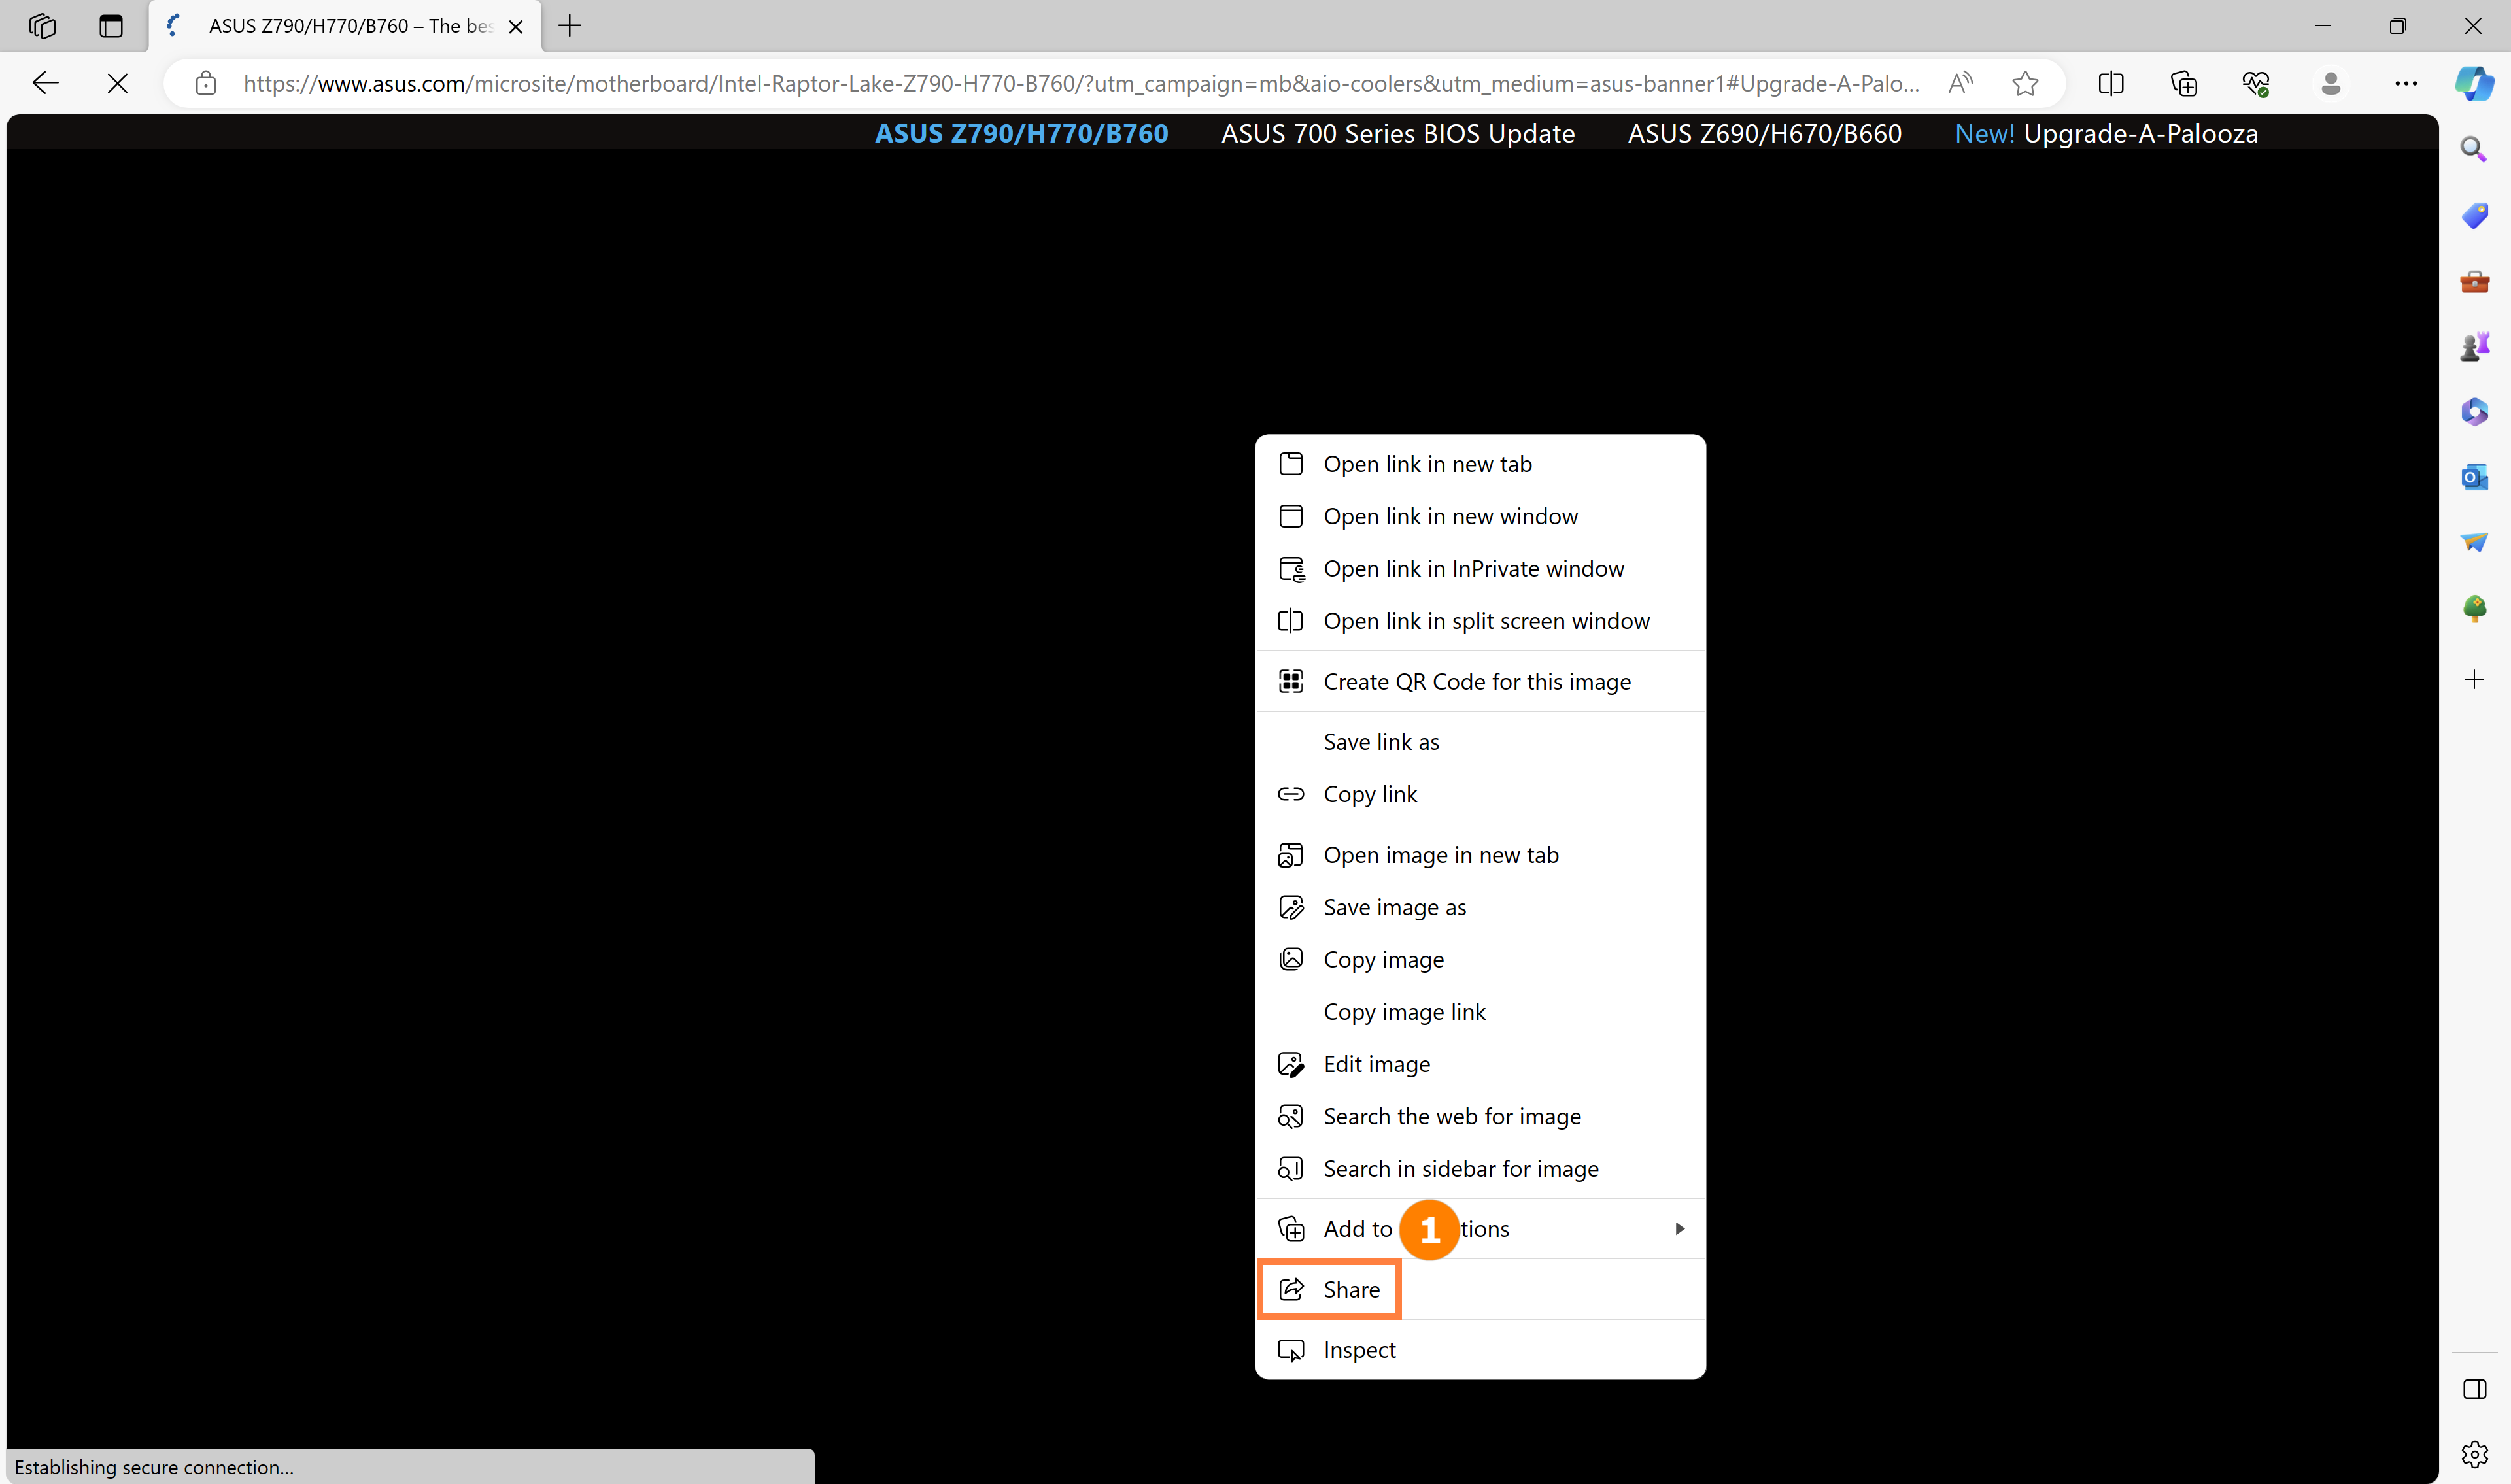
Computer URL sharing is limited to Microsoft Edge browser.
(1) Right-click on the webpage, then click ①[Share].
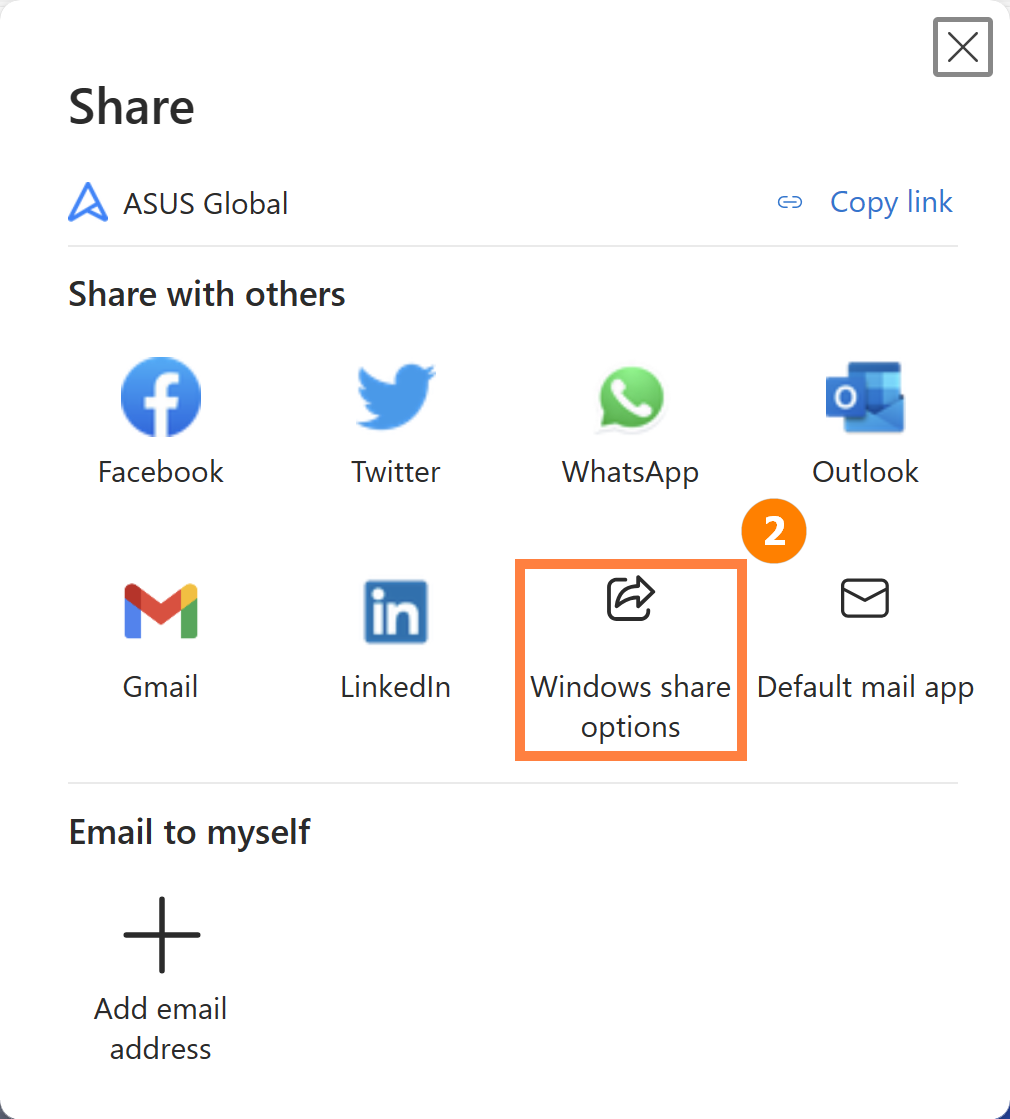
(2) A new sharing pop-up will appear, then Click ②[Windows Share Options].
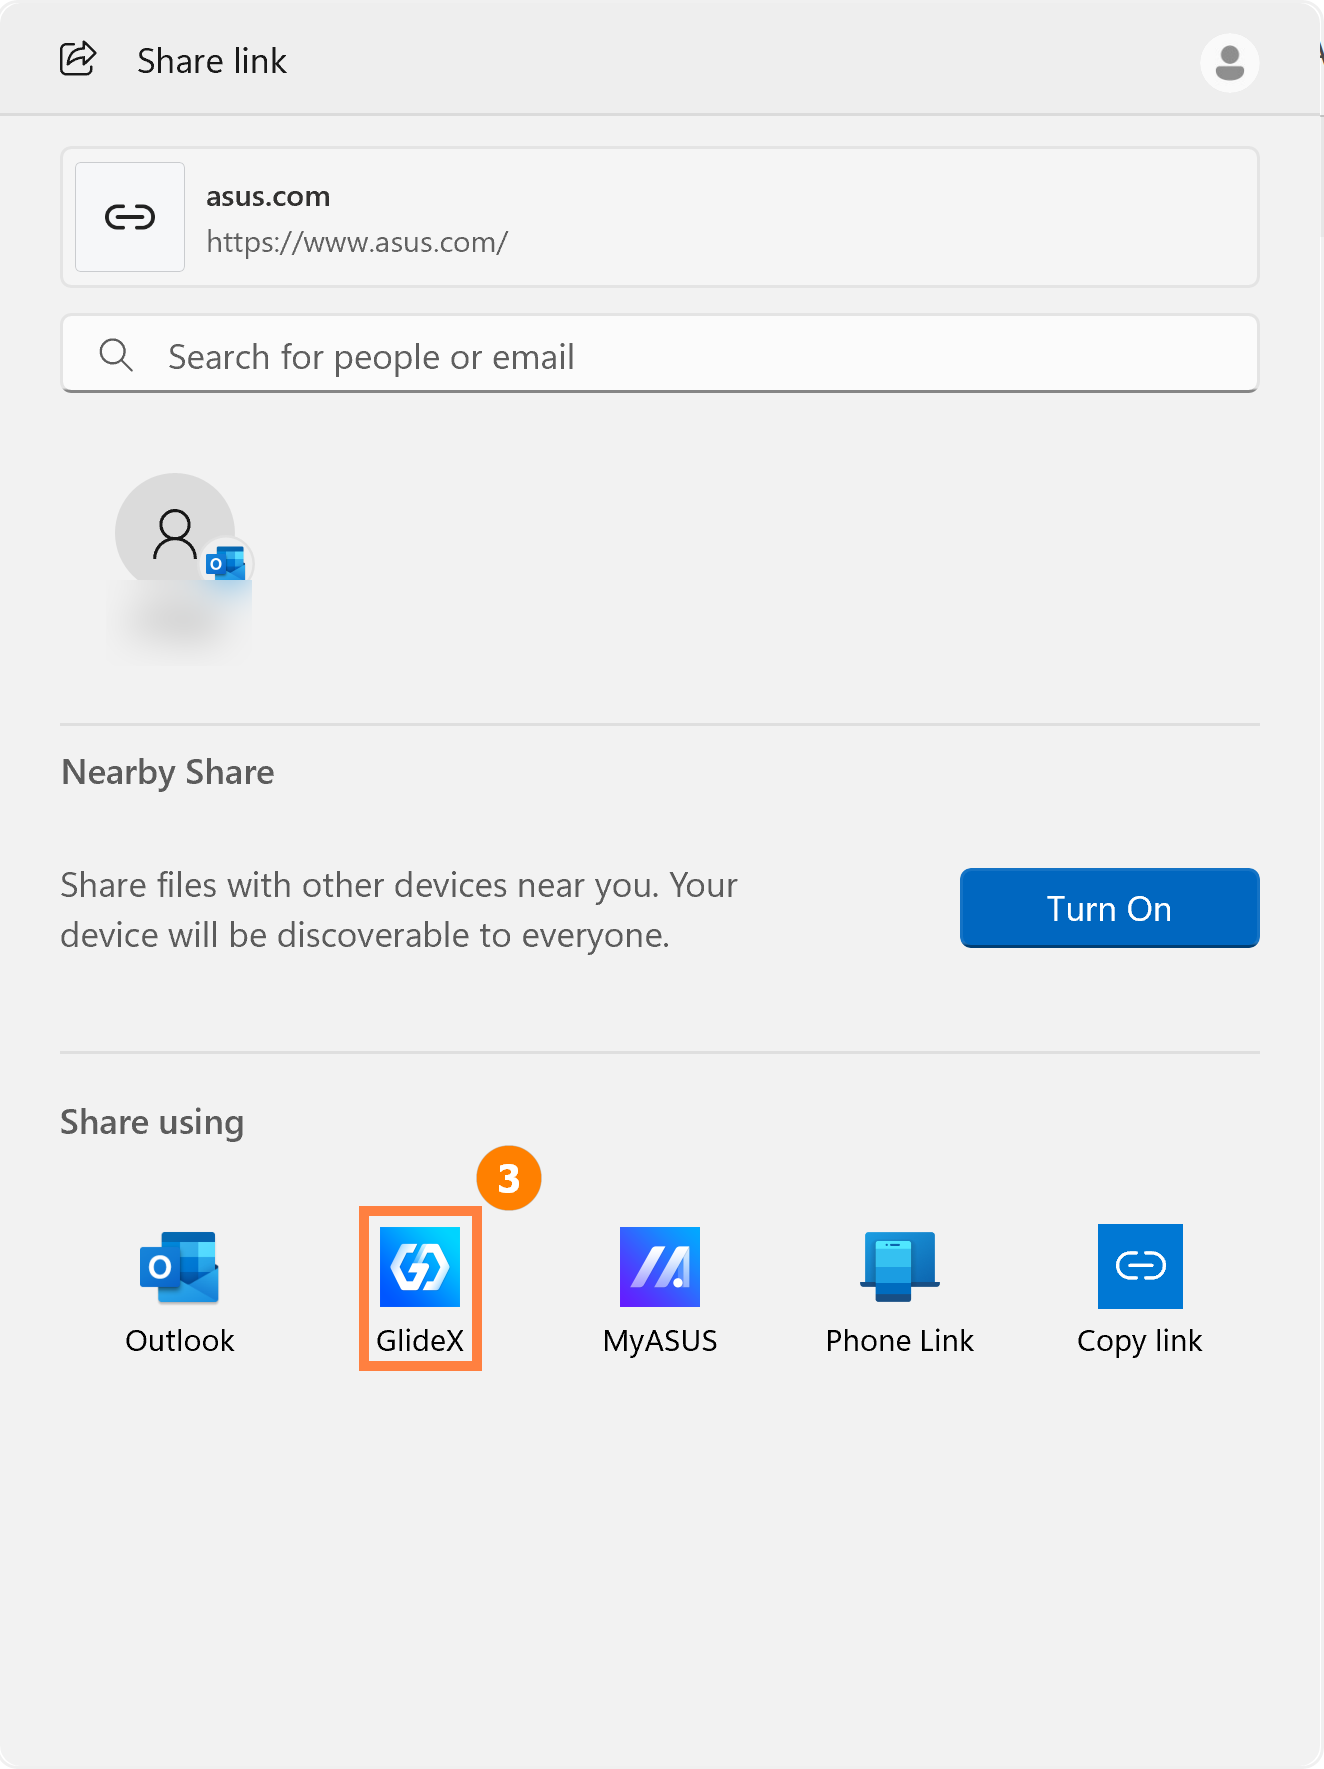
(3) A new share pop-up will appear, then click ③[GlideX].
(4) GlideX will pop up, click ④[Device] to share, click ⑤[Accept] on mobile device, and the browser on mobile device will open shared URL.
7.4 URL Sharing - Share from Mobile to Computer
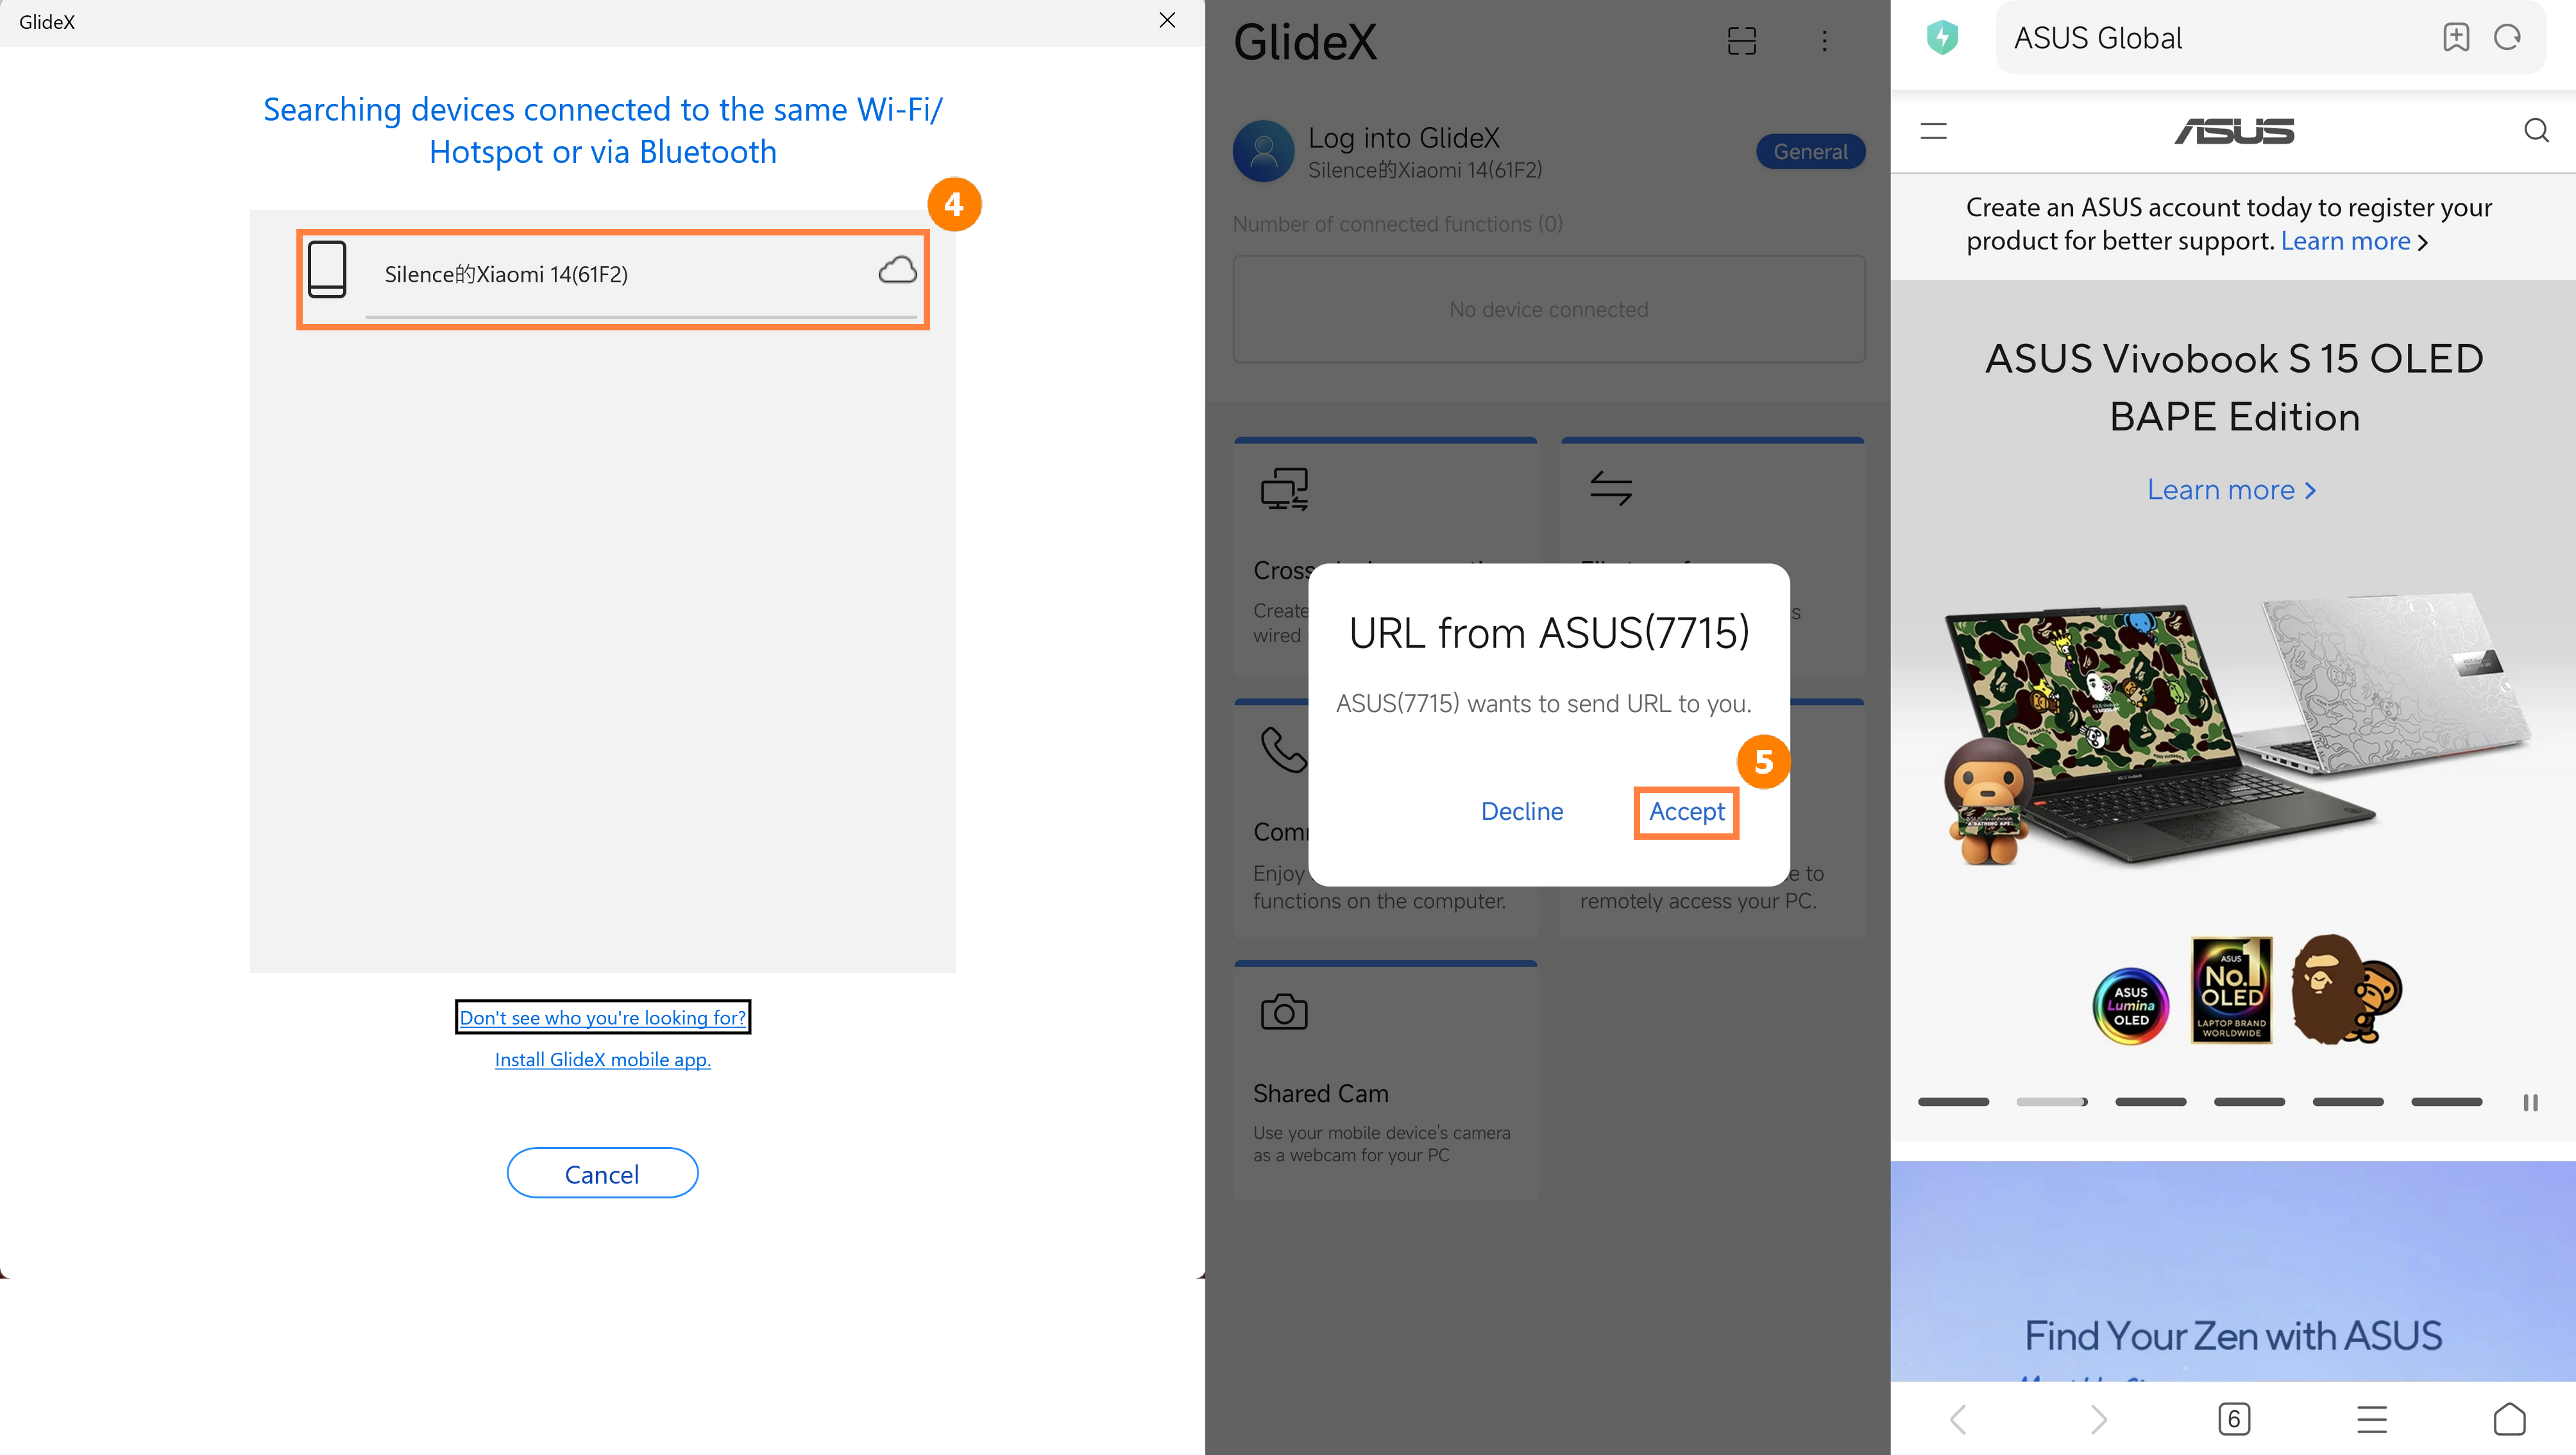
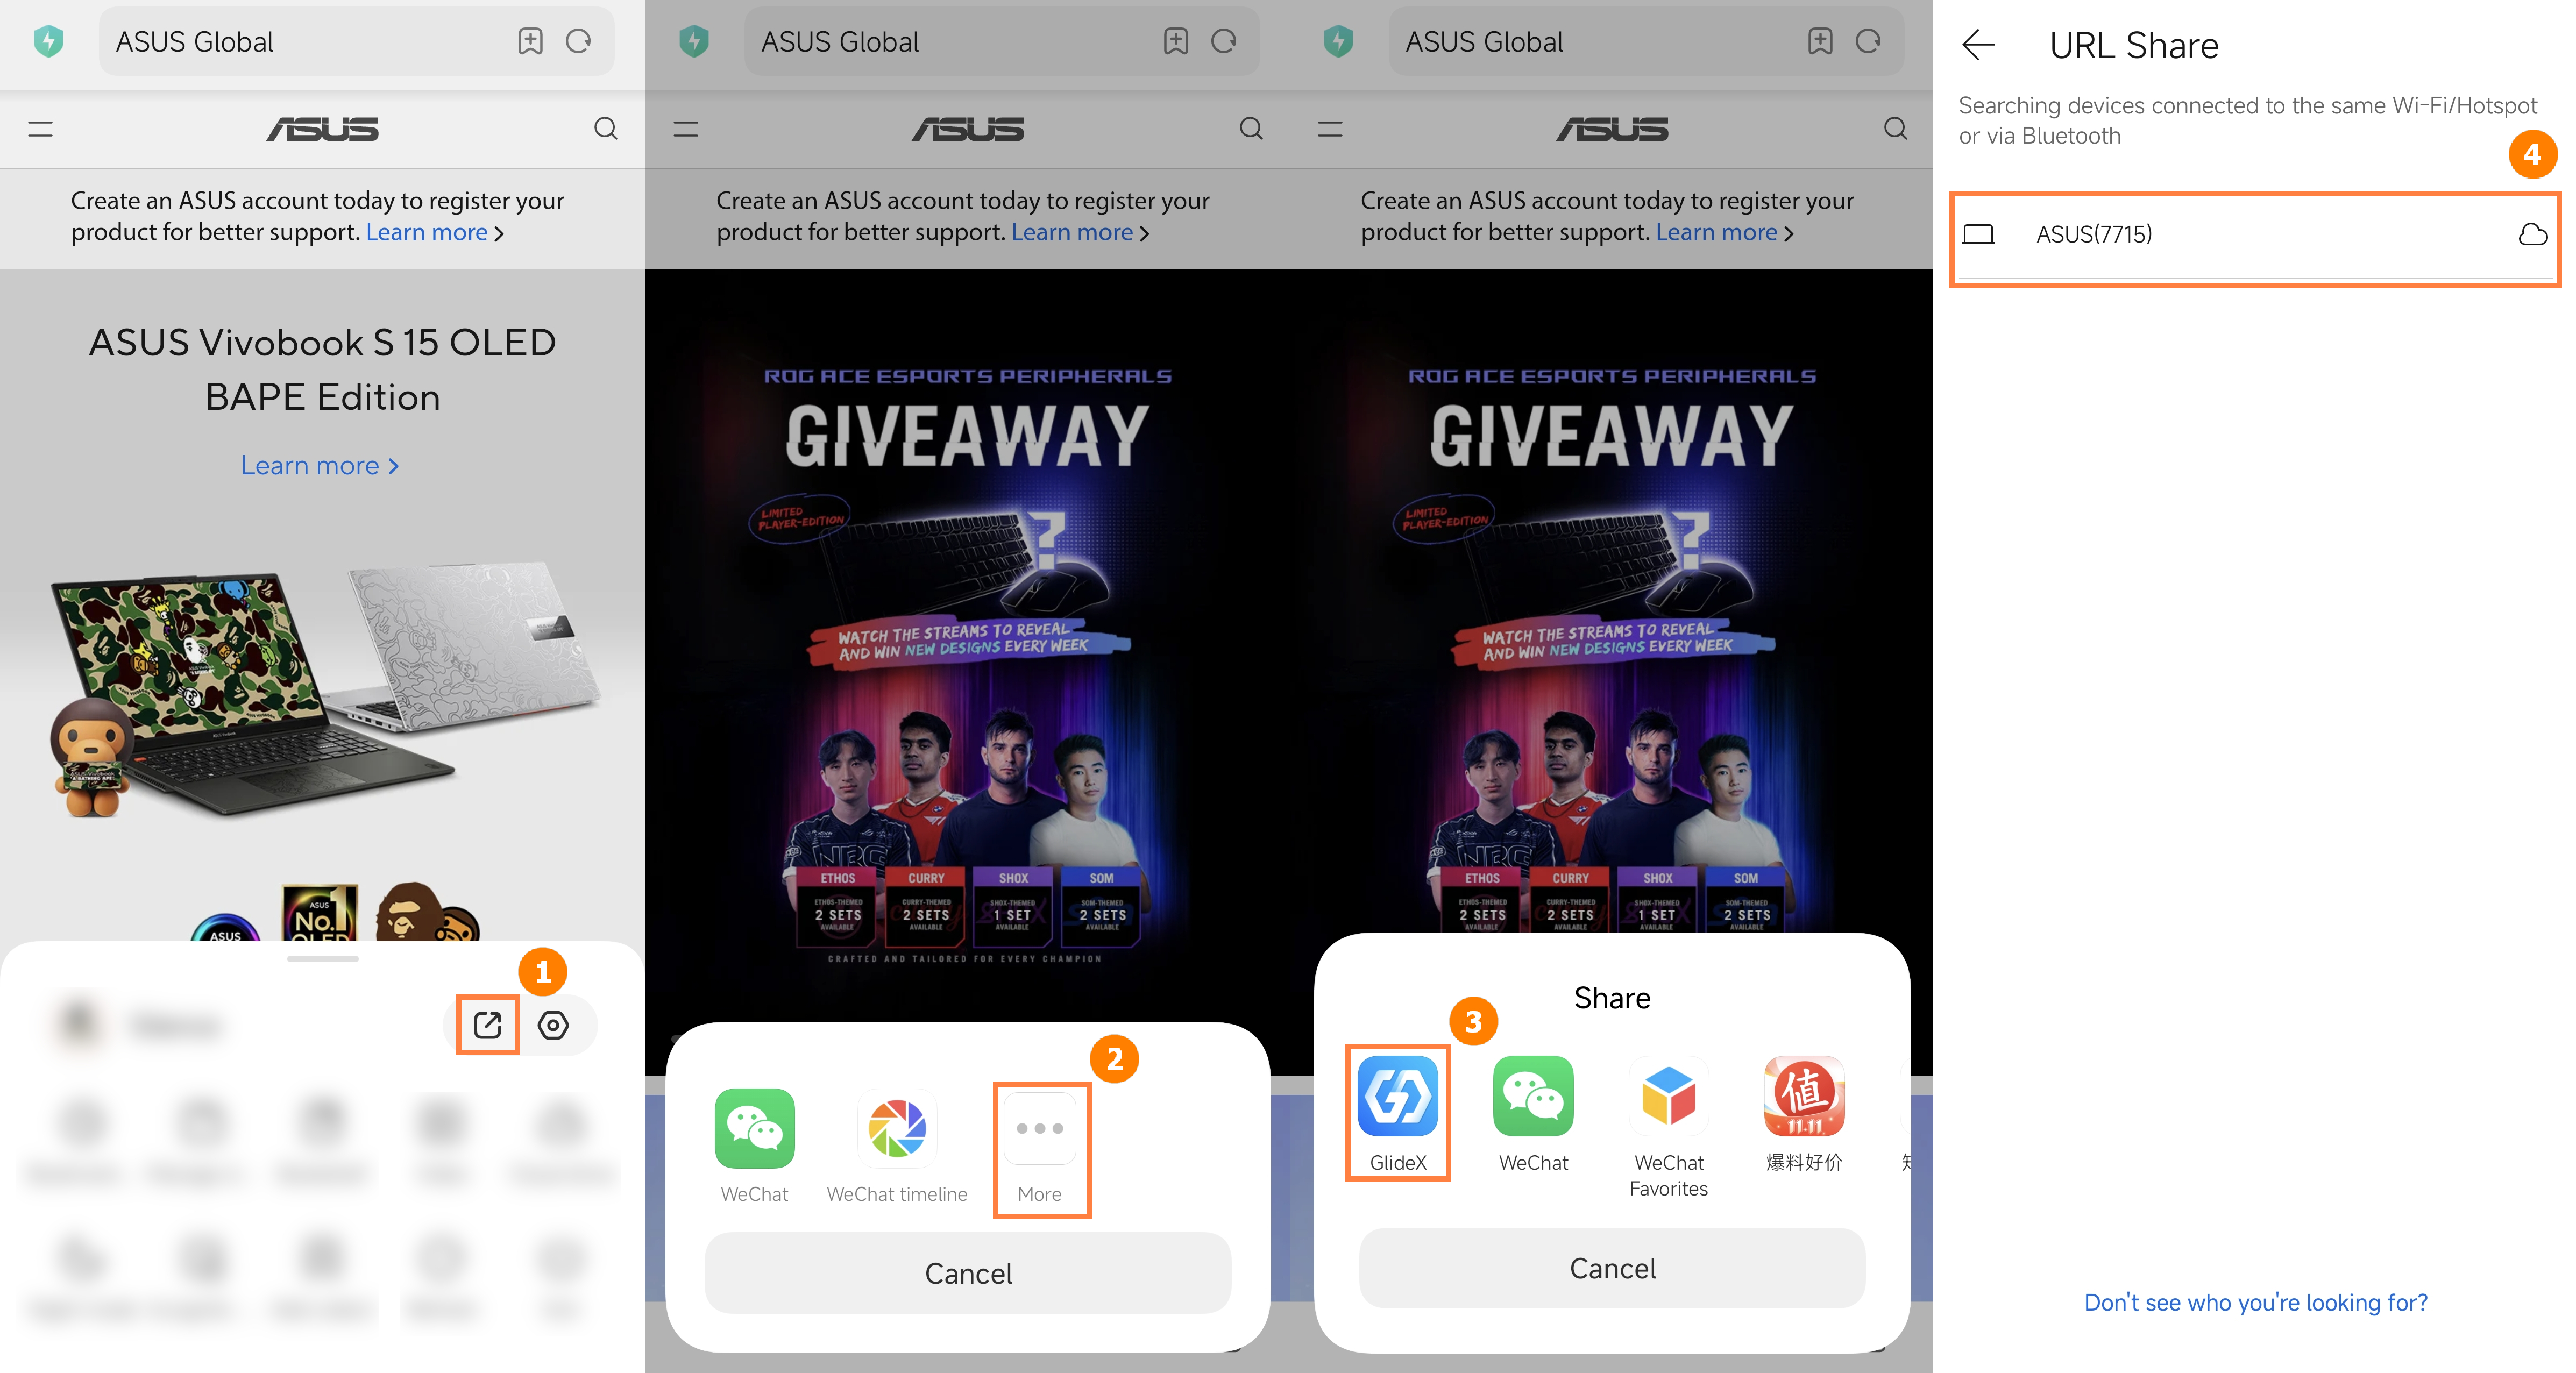
(1) In a browser on a mobile device, tap ①[Share], tap ②[More], tap ③[GlideX], tap ④[Device] to share.
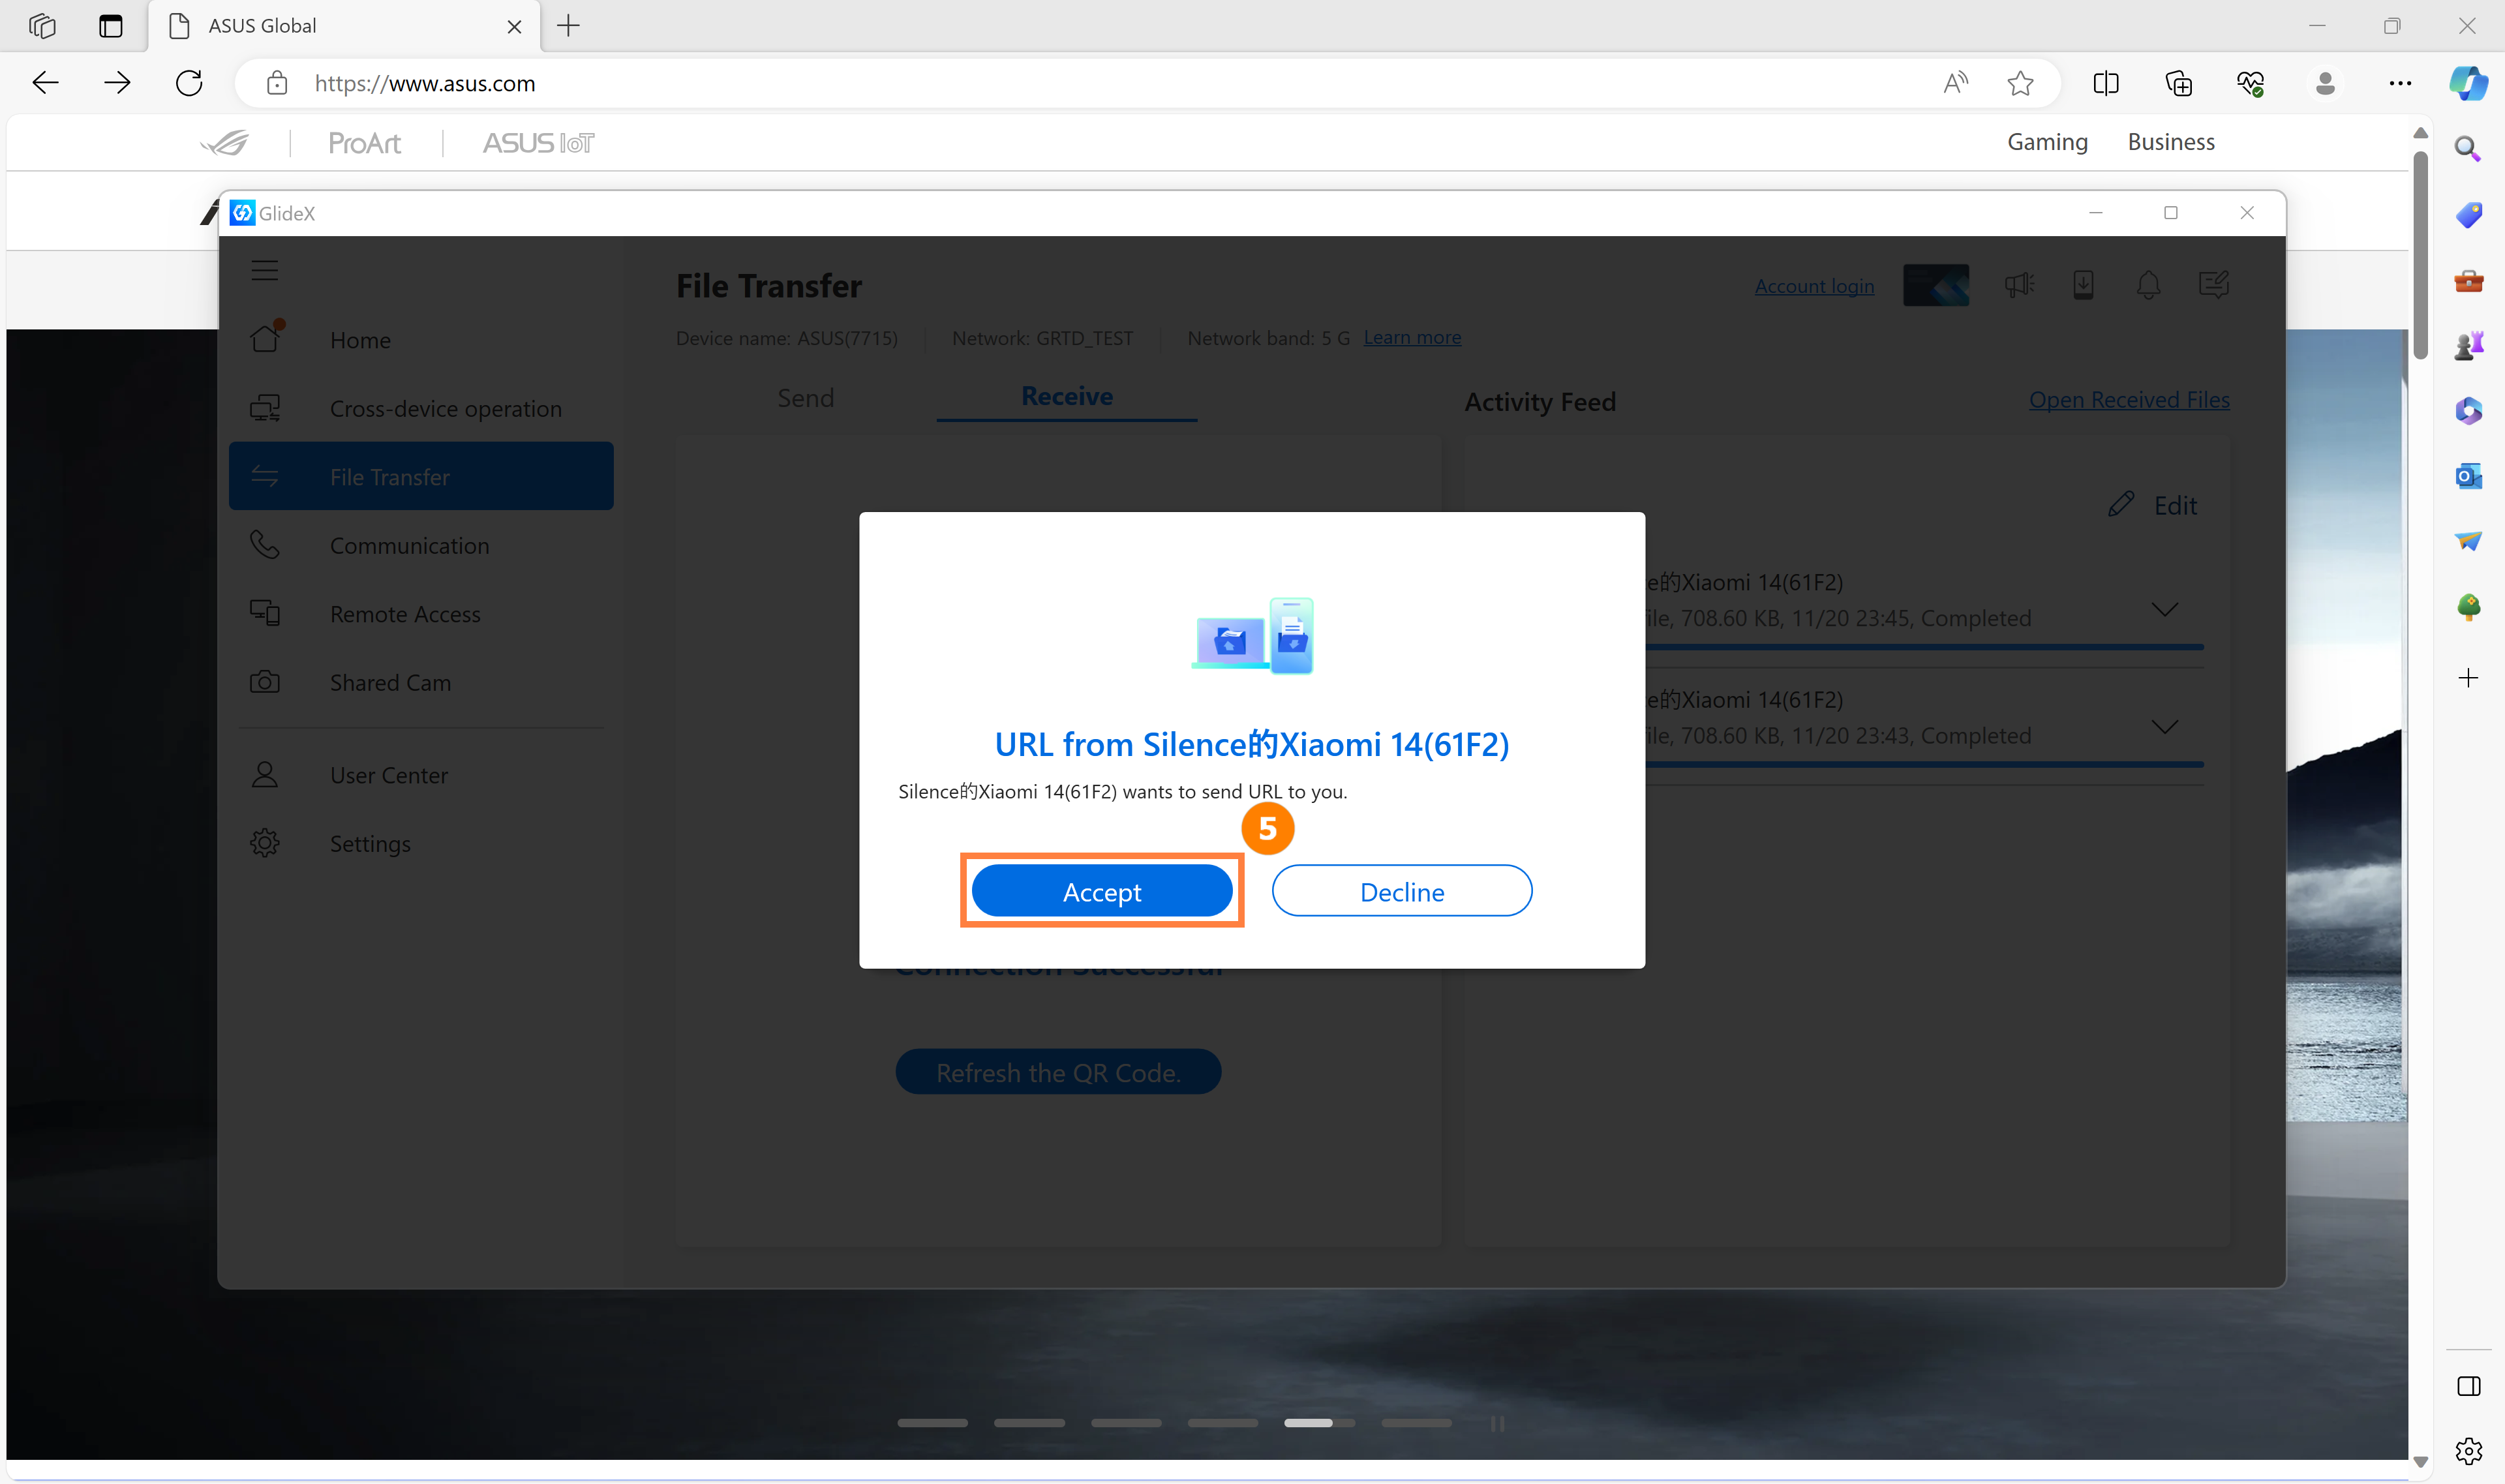
(2) A pop-up window will appear on your computer, click ⑤[Accept]. The Computer will use the system's default browser to open the shared web page.
If you encounter problems using this function, please refer to: [GlideX] Cannot connect your Devices via Bluetooth to use Communication? | Official Support | ASUS Global
8.1 Pairing between PC and mobile devices
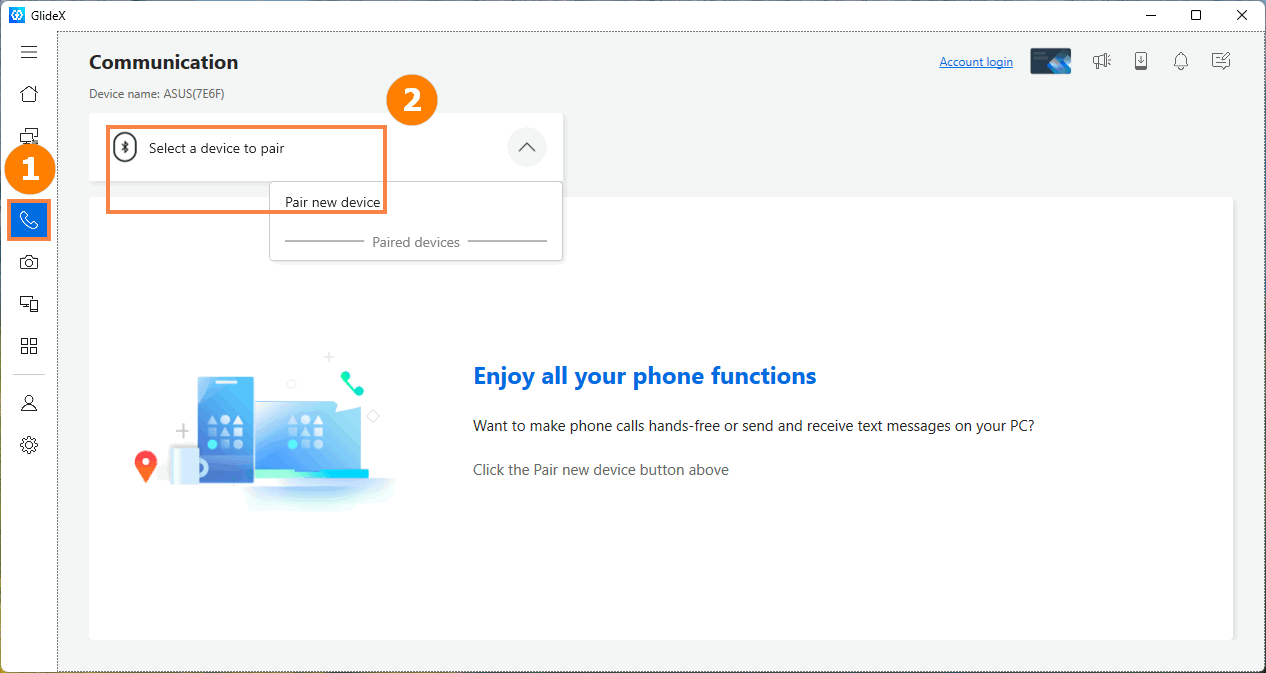
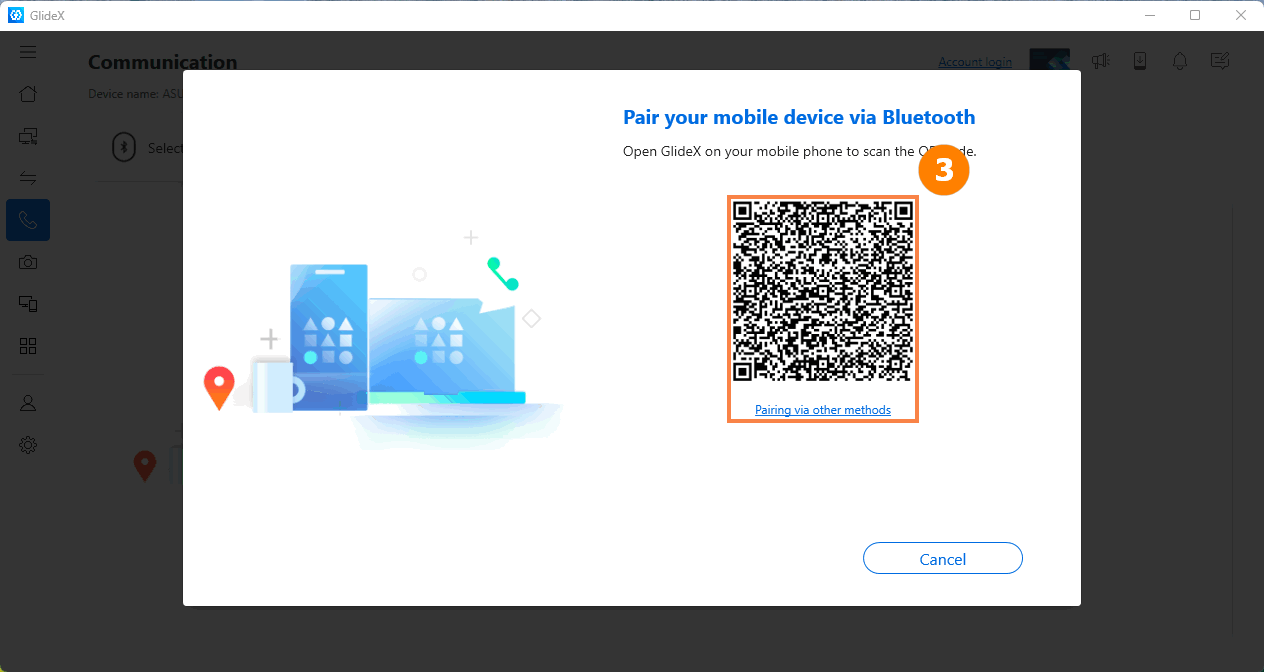
(1) Click ①[Communication], click ②[Select a device to pair].
(2) Open scanning on the homepage of the mobile device and scan the ③[QR Code] displayed on the computer.
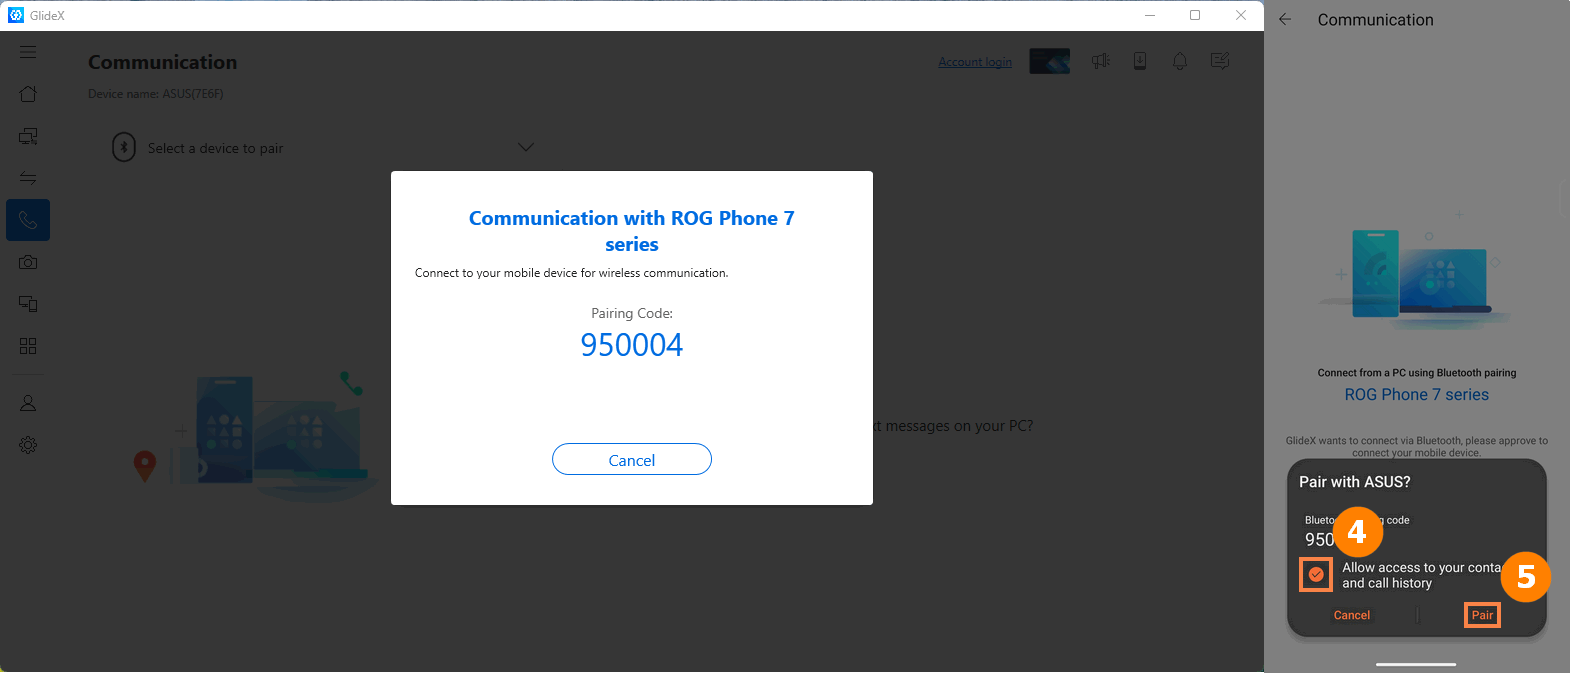
(3) A pairing pop-up window will appear on the mobile device. Click ④[Allow access to your contacts and call history], click ⑤[Pair], and the pairing is successful.
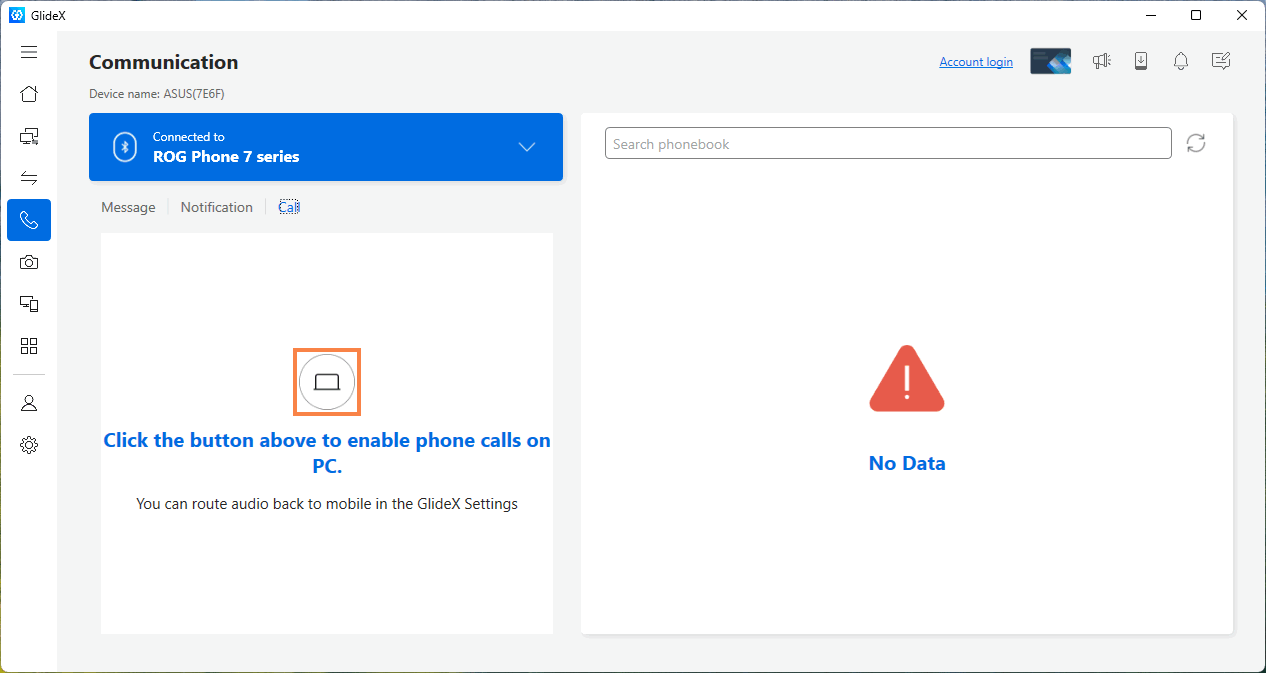
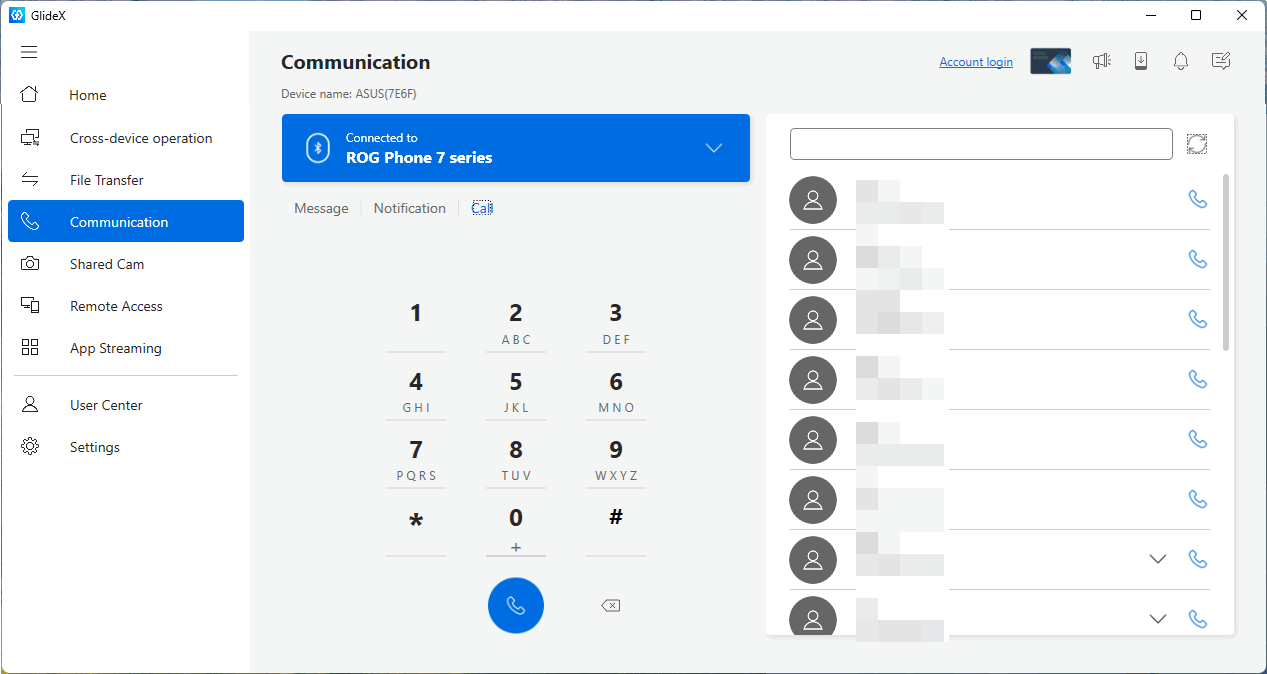
(1) Click the ①[Hands-free] icon.
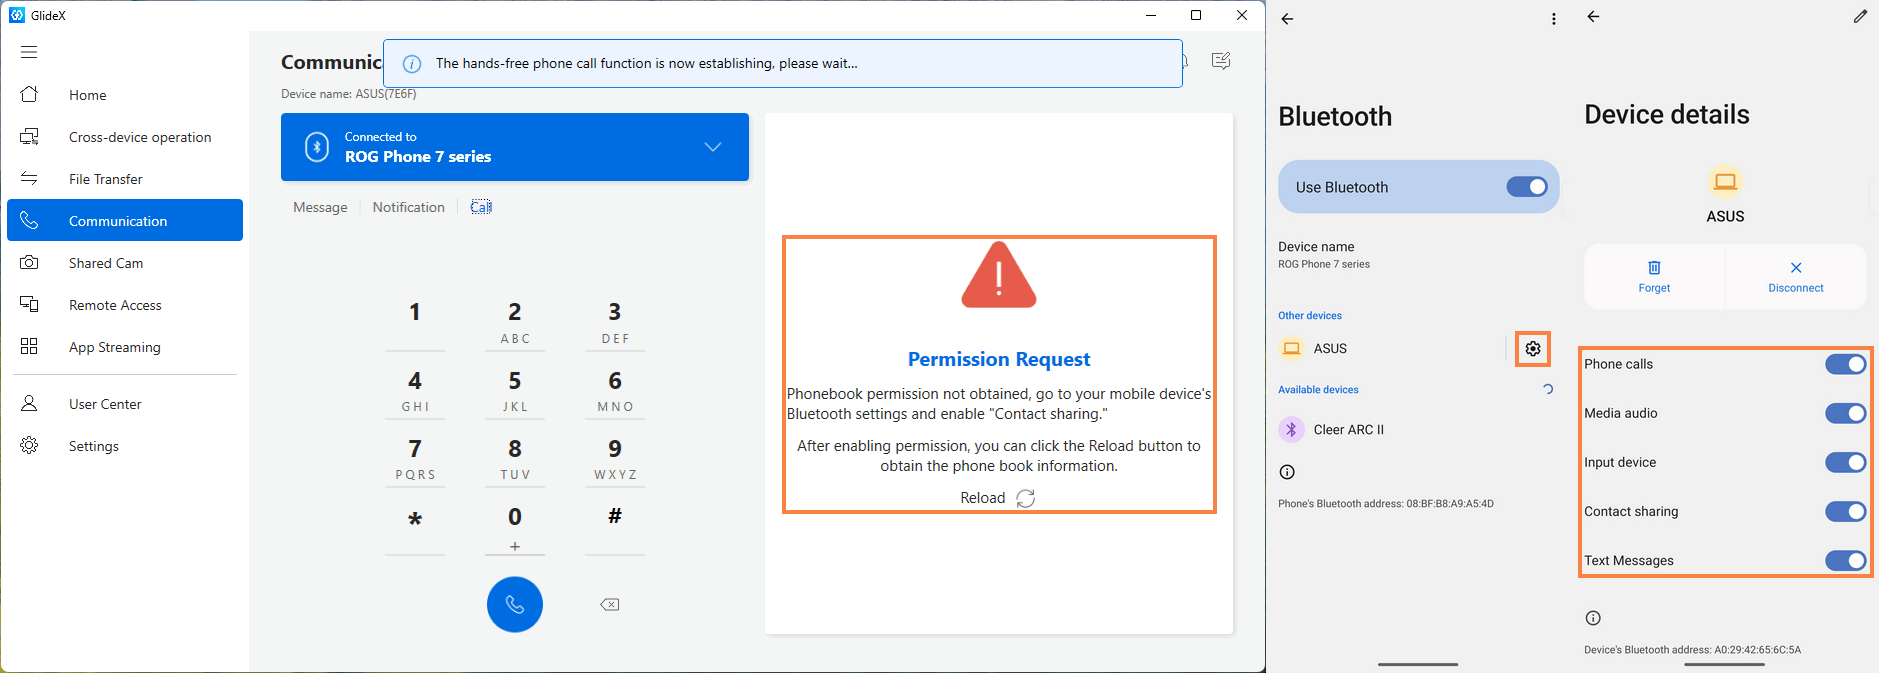
(2) If you still cannot use this function after clicking [Hands-free], please go to the Bluetooth setting interface of the mobile device, click ①[Connected computer device], and then change ②[Call, media audio, etc. Options] is turned on.
(3) Return to the communication page, and you can make dial-up calls using the GlideX App on the computer normally.
※ Because when calling, the system will use Bluetooth to transmit sound by default, that is, use the microphone and speaker on the computer to make a call. If you want to make a call using a device on your mobile device, go to [Bluetooth] -> [Select Answering Method] -> [Handset] on the mobile device call page.
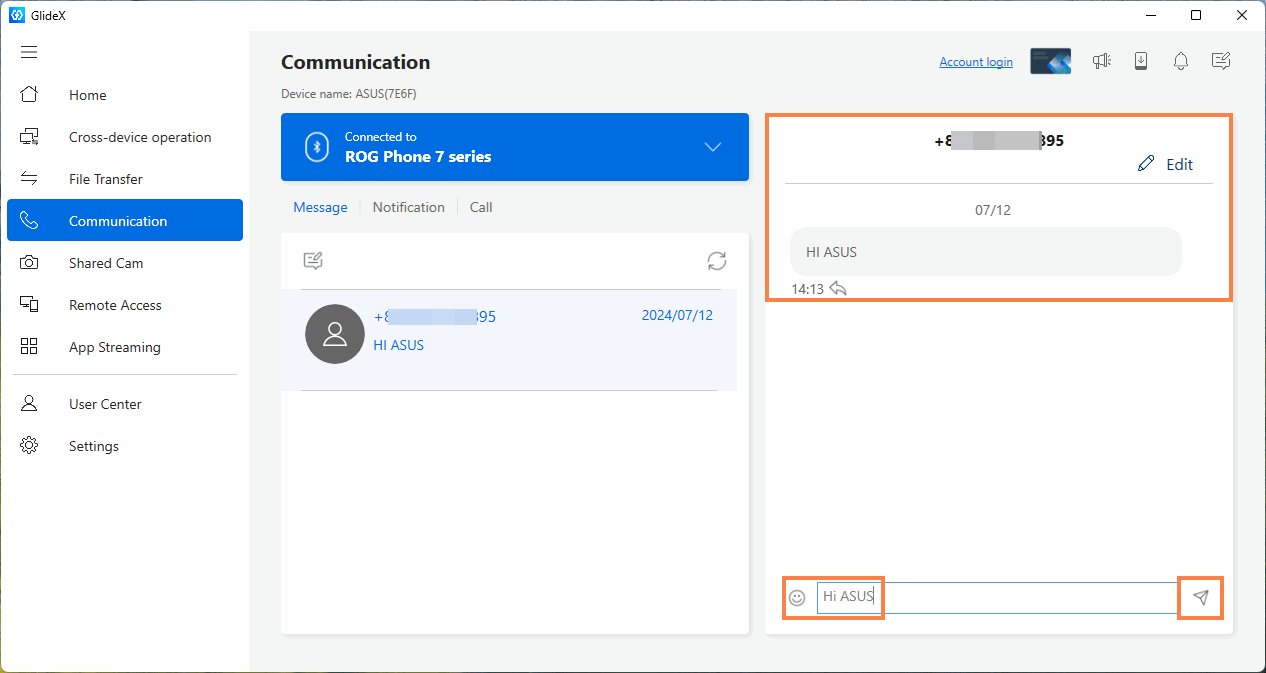
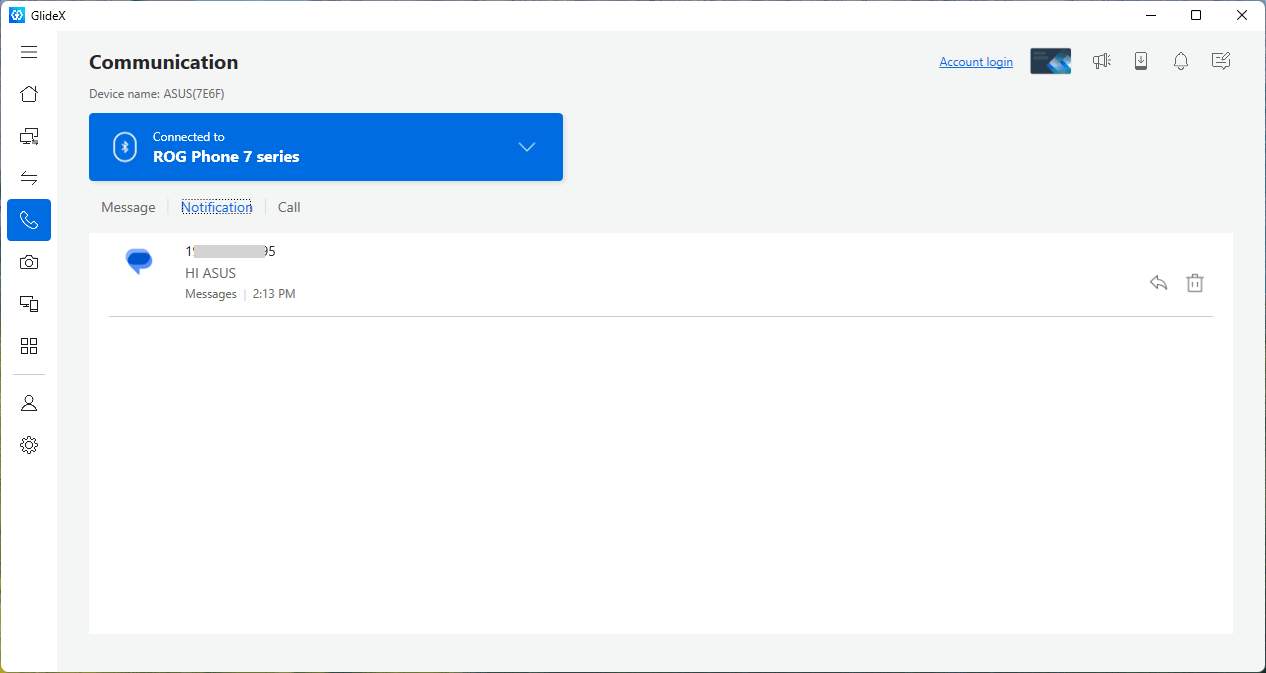
(1) In message, you can browse message and click the [Add] button on the left to draft a message.
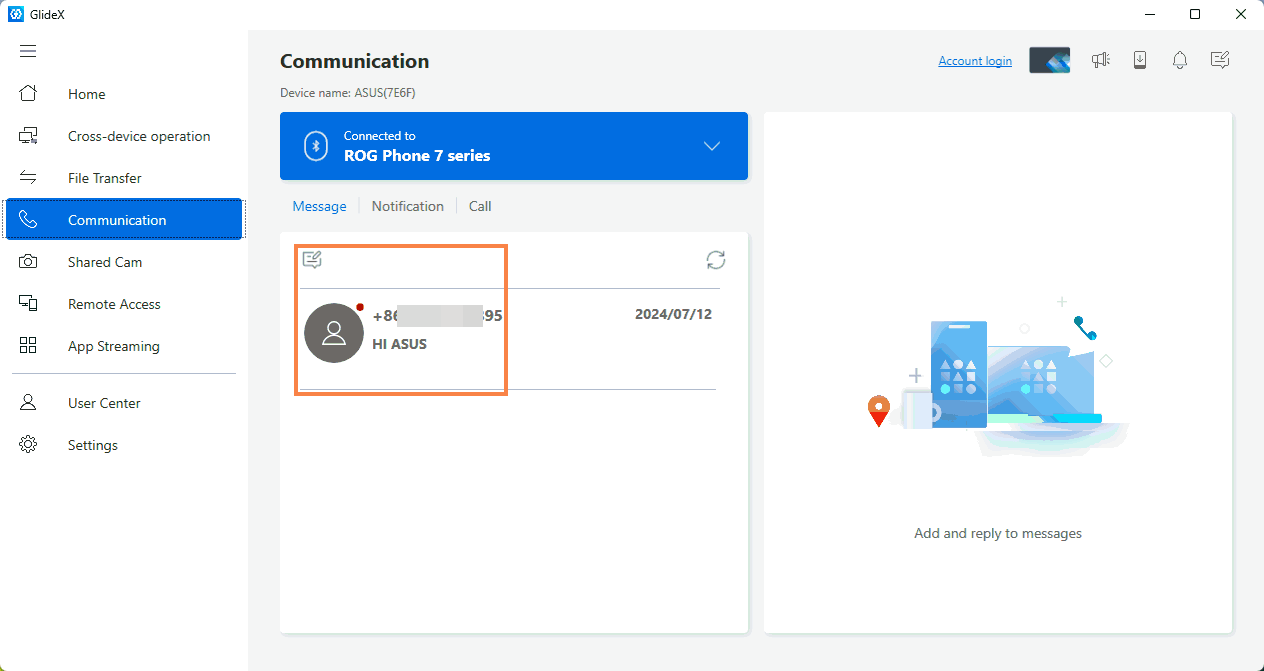
(2) Enter or select the contact you want to send, enter the message you want to send, and click Send to quickly send the message on your computer.
(1) If you turn on the notification function for the first time, a situation such as "No data" appears and the function cannot be used. Click [Settings] on the PC App, click [General], and click to enable [Receive mobile device notifications on PC].
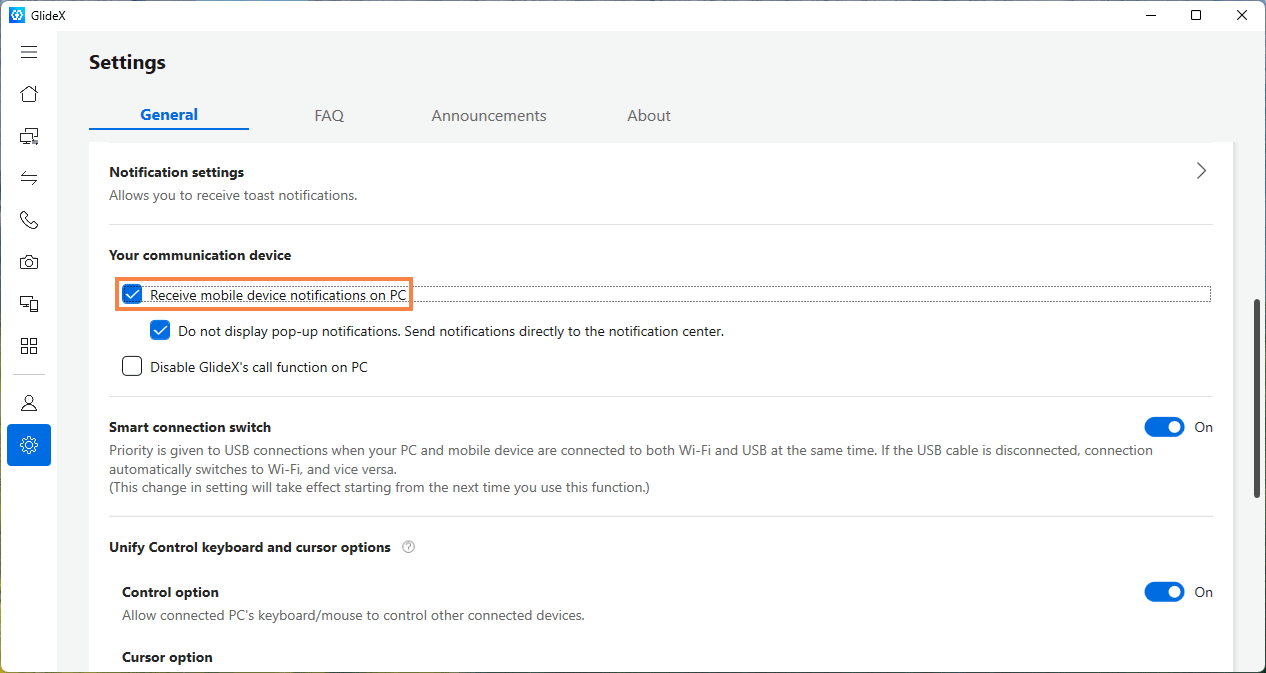
(2) The notification function is enabled. Notification message on the mobile device will be displayed here, and new notifications from the App will also be displayed in the lower right corner of the desktop. With the Mirror function, notification message on mobile devices can be quickly processed.
Remote Access requires both the computer and the mobile device to log in to the same ASUS member account, and the remote access function on the computer has been enabled.
When you use the remote access function for the first time, the system will send an email to your mailbox, and you need to manually click on the mailbox to turn on the remote access function (because it will access your computer data, so confirm that it is you who operate, to prevent privacy leakage).
Every time you use the remote access function on the mobile device, the system will send a notification email to your mailbox to ensure your privacy and security.
If you encounter problems using this function, please refer to: [GlideX] Cannot use Remote Desktop? | Official Support | ASUS Global
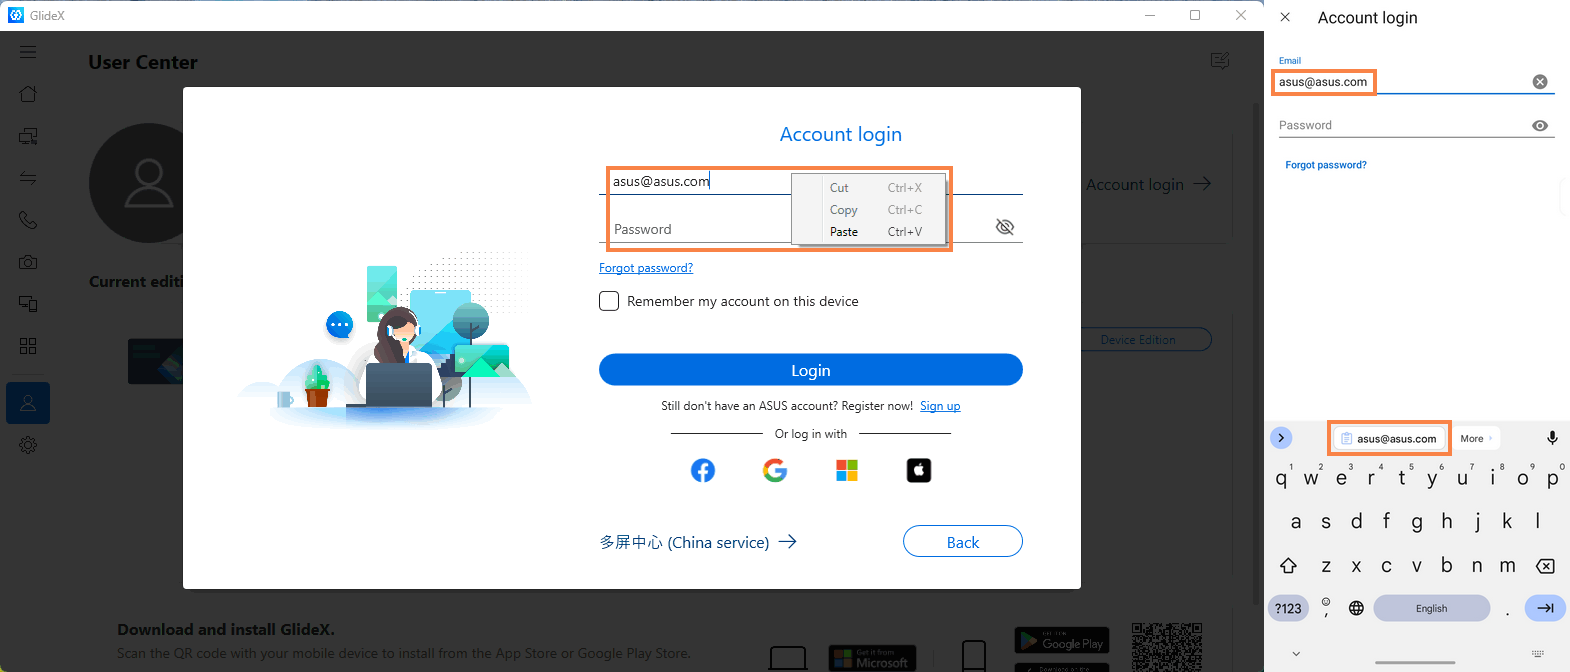
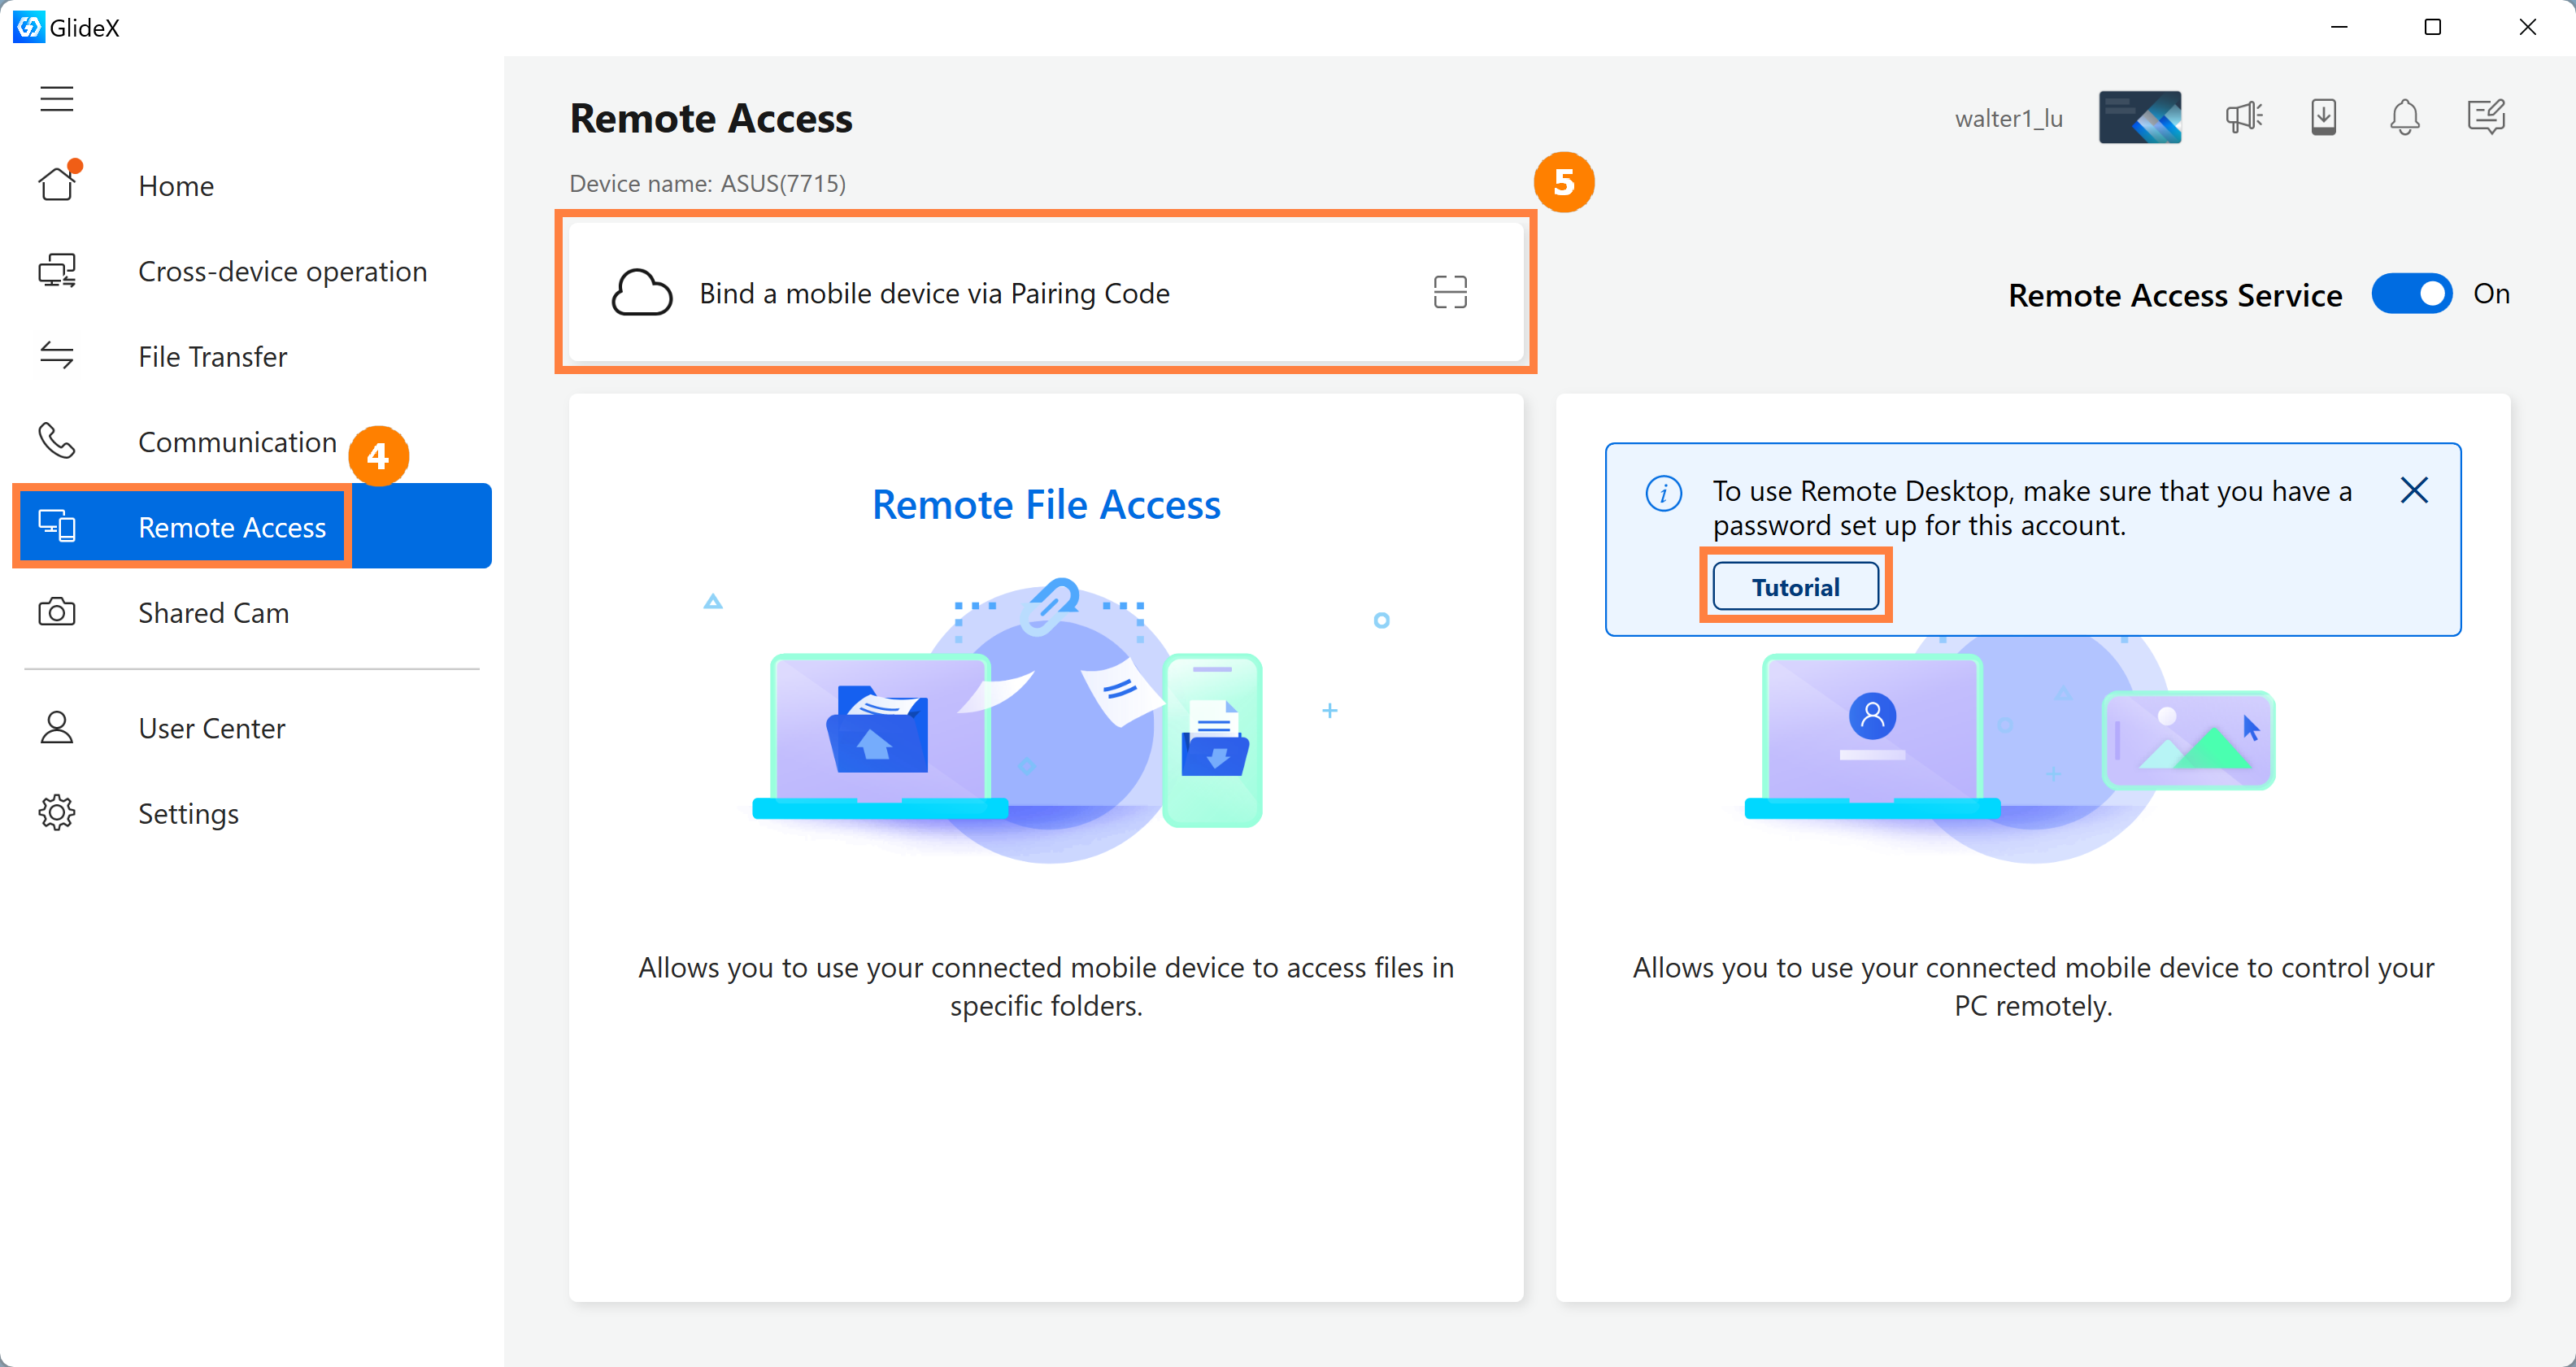
(1) Click ①[User Center] on PC GliedX App, ①[Login] on mobile device, enter your ASUS ②[Member ID and password], and then click ③[Login].

(2) Click ④[Remote Access] function, Click ⑤[Bind a mobile device via pairing code].
※ The use of the remote desktop function requires your computer to open the account password setting, if your computer does not open the account password setting, please click [Tutorial] to open the account password setting.
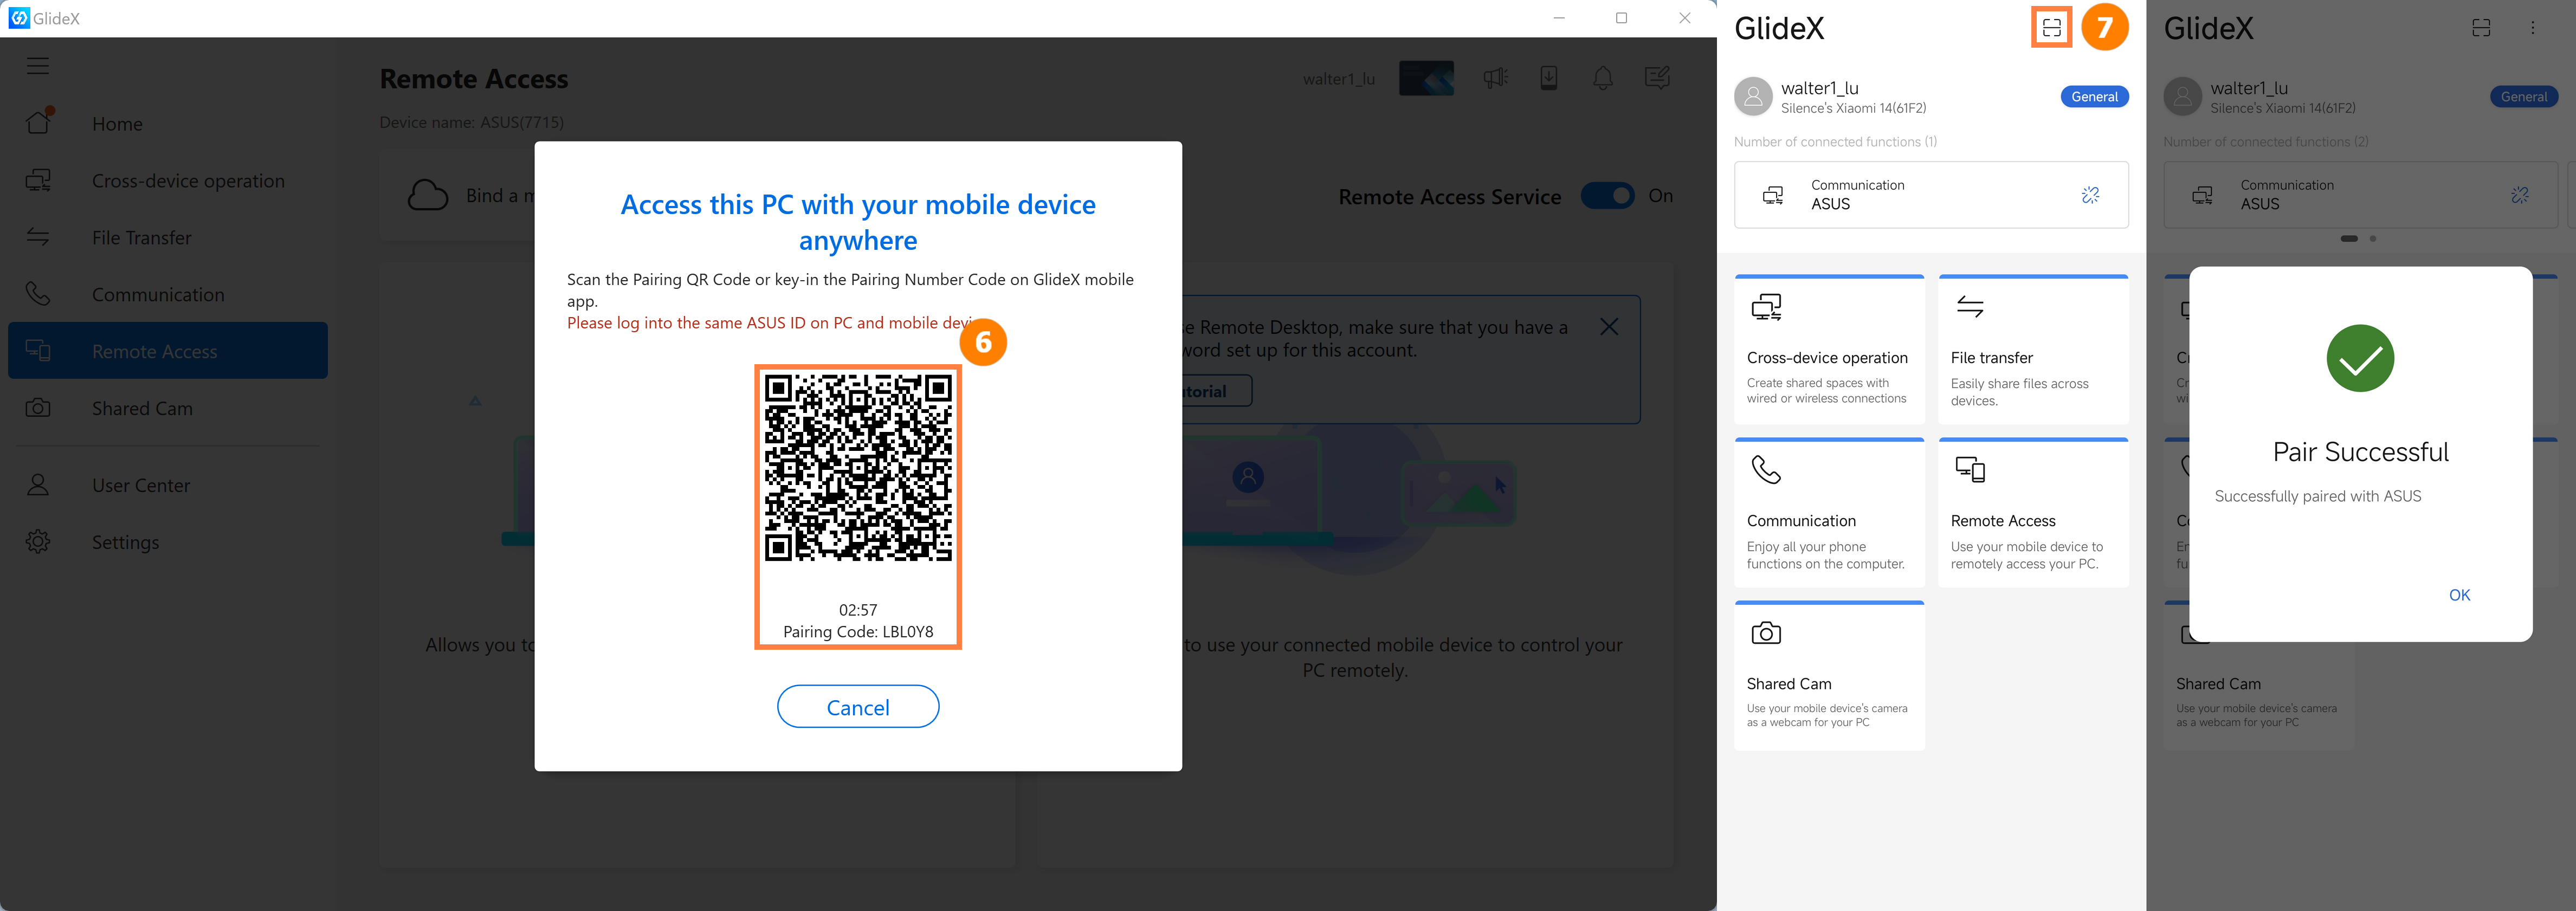
(3) The computer will generate ⑥[QR Code]. On the mobile device, tap ⑦[Camera] to scan the QR Code displayed on the computer, and the pairing is successful.
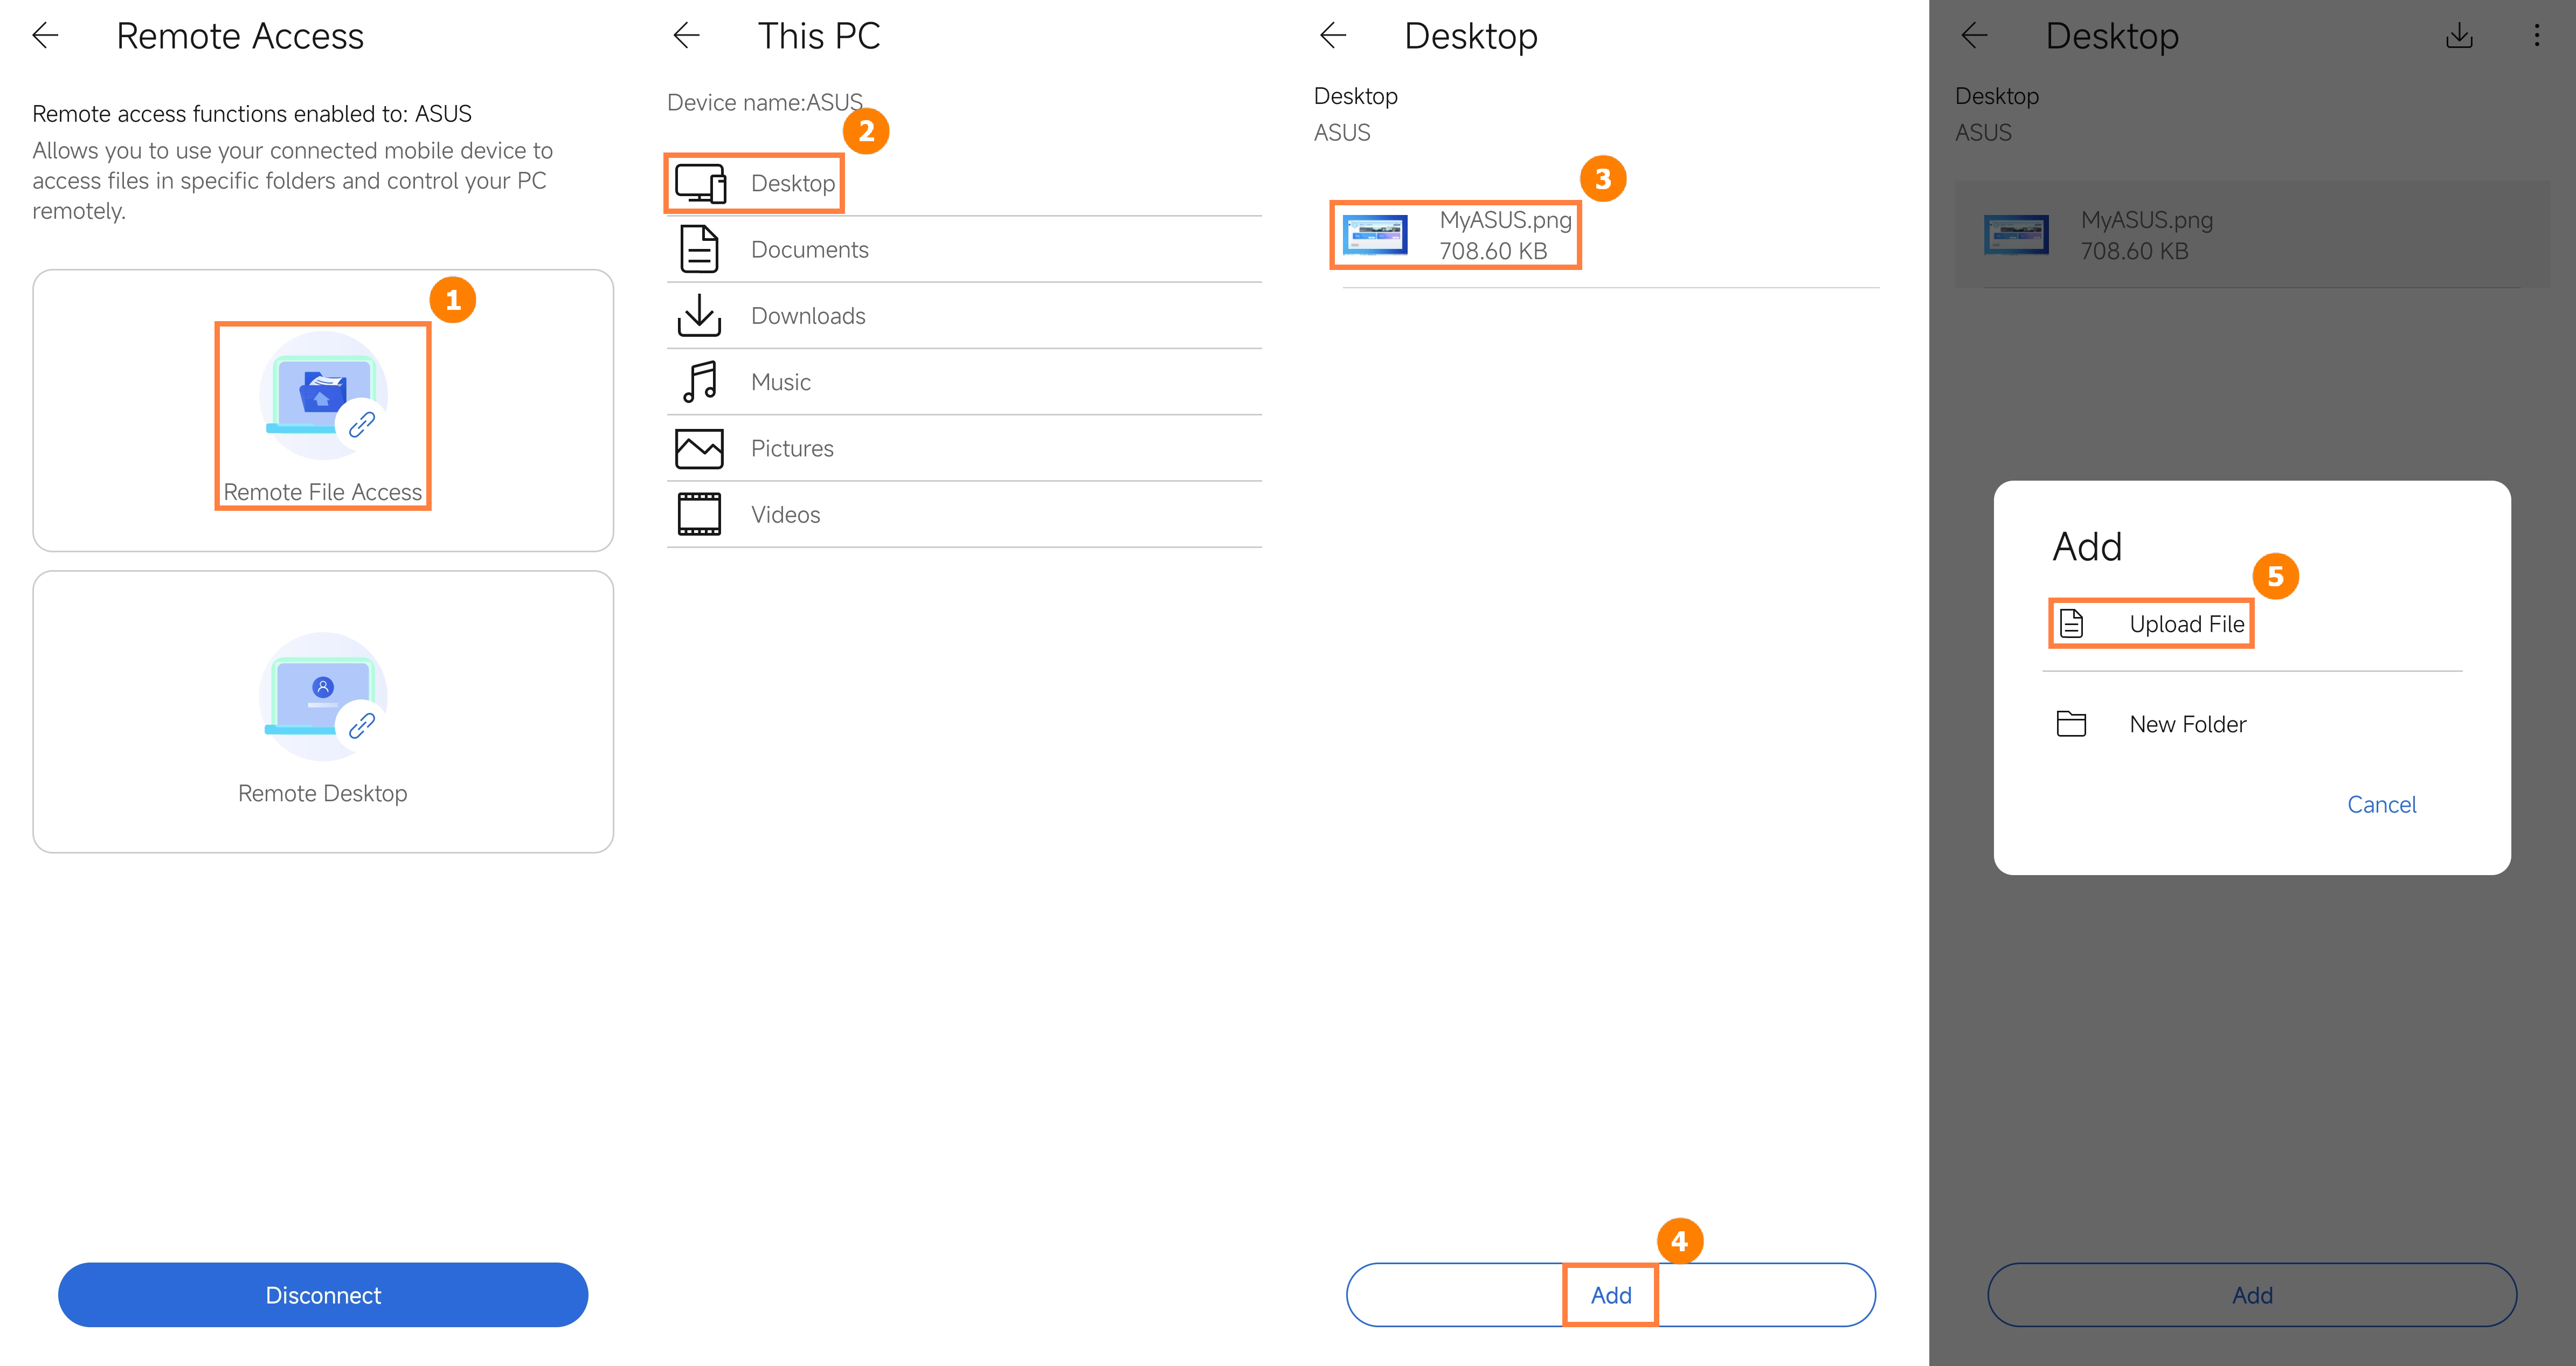
Click ①[Remote File Access], click ②[Folder], you can download ⑤[File] from your computer to your mobile device, or tap ④[New] in this folder, click ⑤[Upload File] to upload the files from your mobile device to your computer.
(1) Click [Remote Desktop], enter the [Login Password] of the computer, and click [Login].
※ When you use the remote access function for the first time, the system will send an email to your mailbox, and you need to manually click on the mailbox to turn on the remote access function (because it will access your computer data, so confirm that it is you who operate, to prevent privacy leakage).
※ Every time you use the remote access function on the mobile device, the system will send a notification email to your mailbox to ensure your privacy and security.
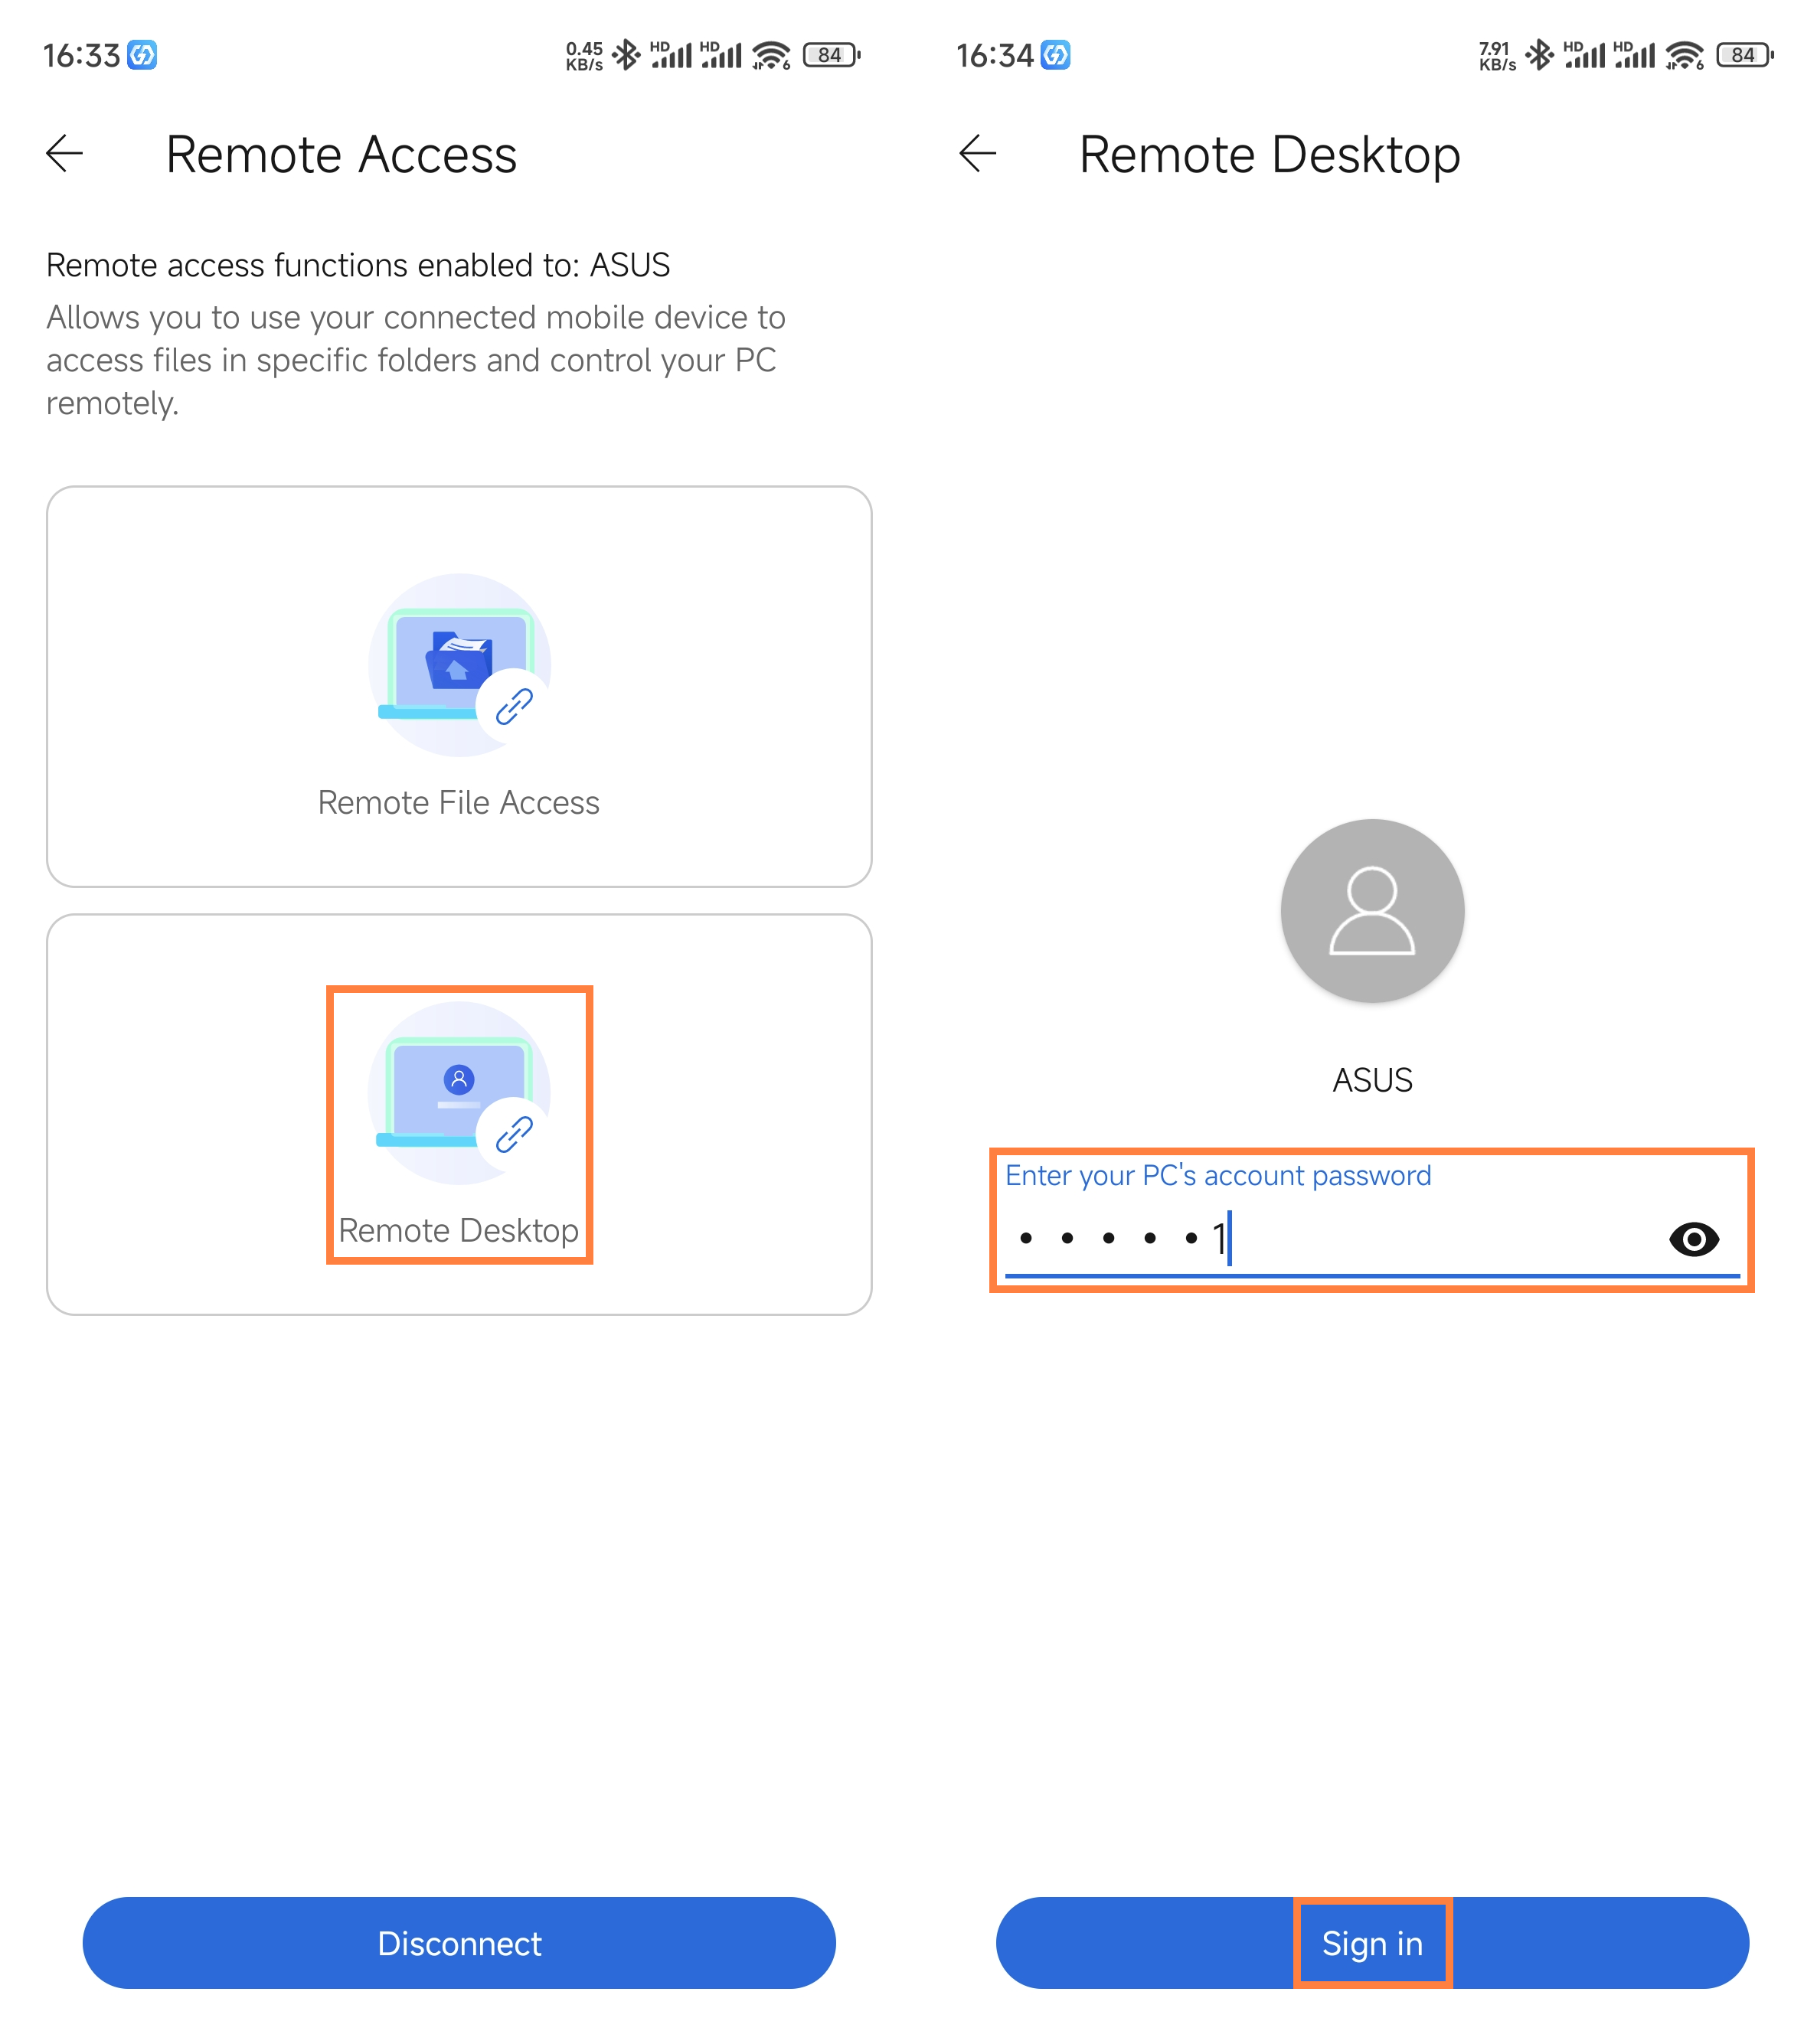
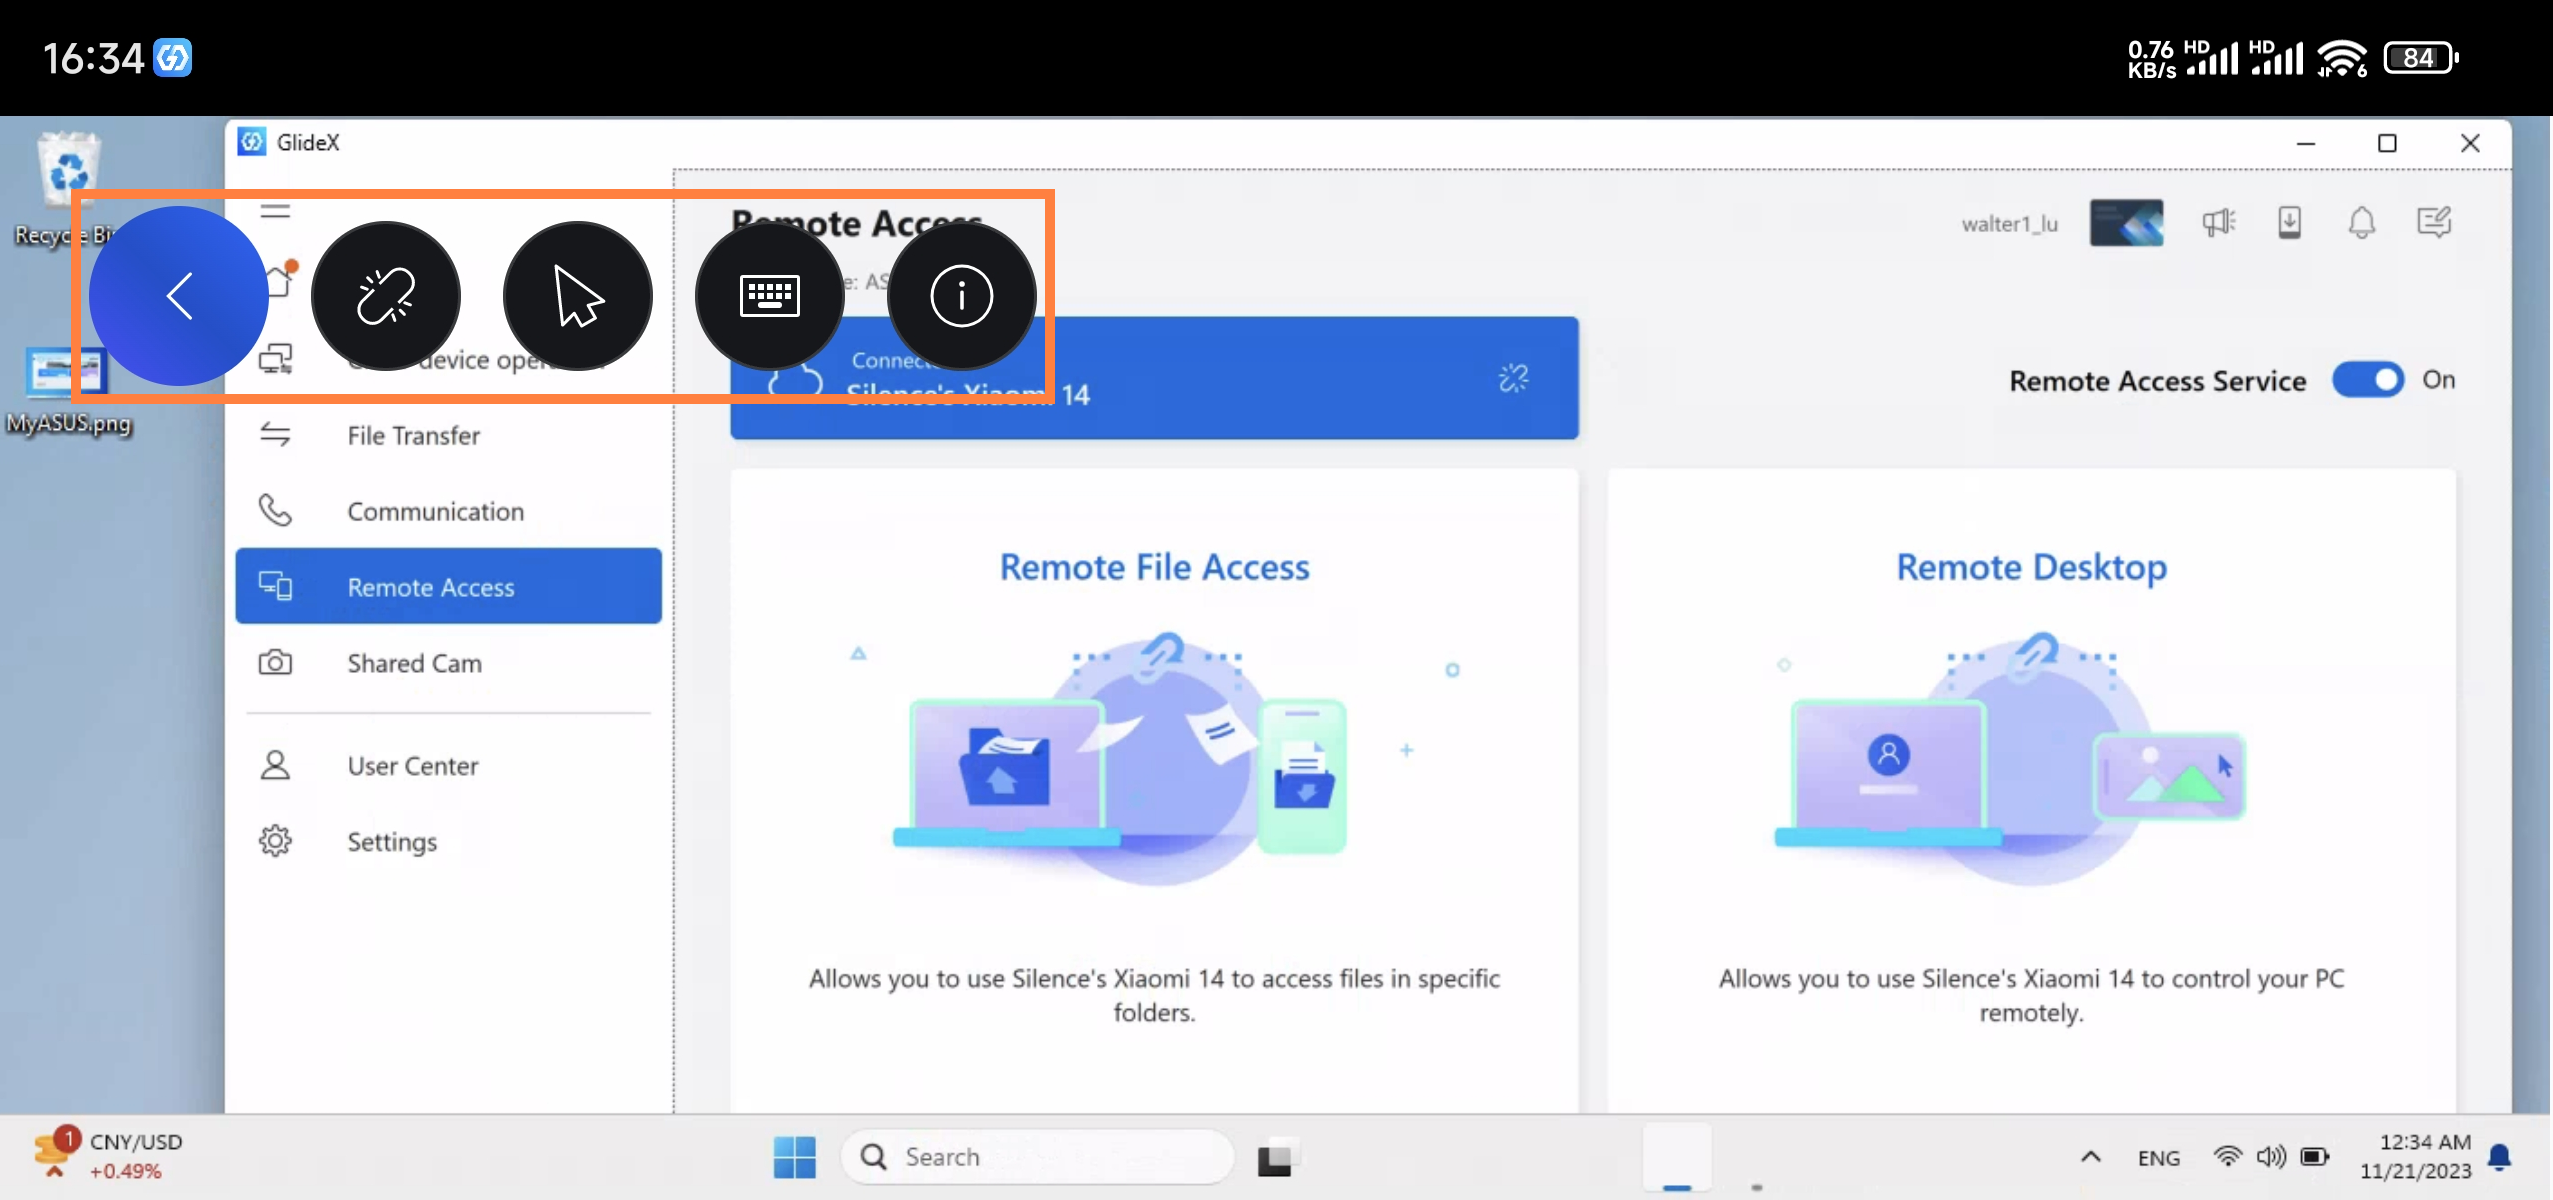
(2) The screen will be locked on the computer, and the computer screen will be displayed on the mobile device. In the menu bar from left to right: Disconnect, Enable Mouse, Enable Keyboard, and Operate Boot.
※ Remote access requires both the computer and the mobile device to log in to the same ASUS member account at the same time, and the remote access function on the computer has been enabled.
The Shared Camera feature uses your mobile device's camera as a lens for your computer through a device connection, allowing you to use this feature as a camera source on a third-party video service.
The Shared Camera feature requires the device to be connected to the same network. If you're having trouble using this feature, please refer to: [GlideX] Cannot connect your devices to use Shared Camera in third-party video-communication services? | Official Support | ASUS Global
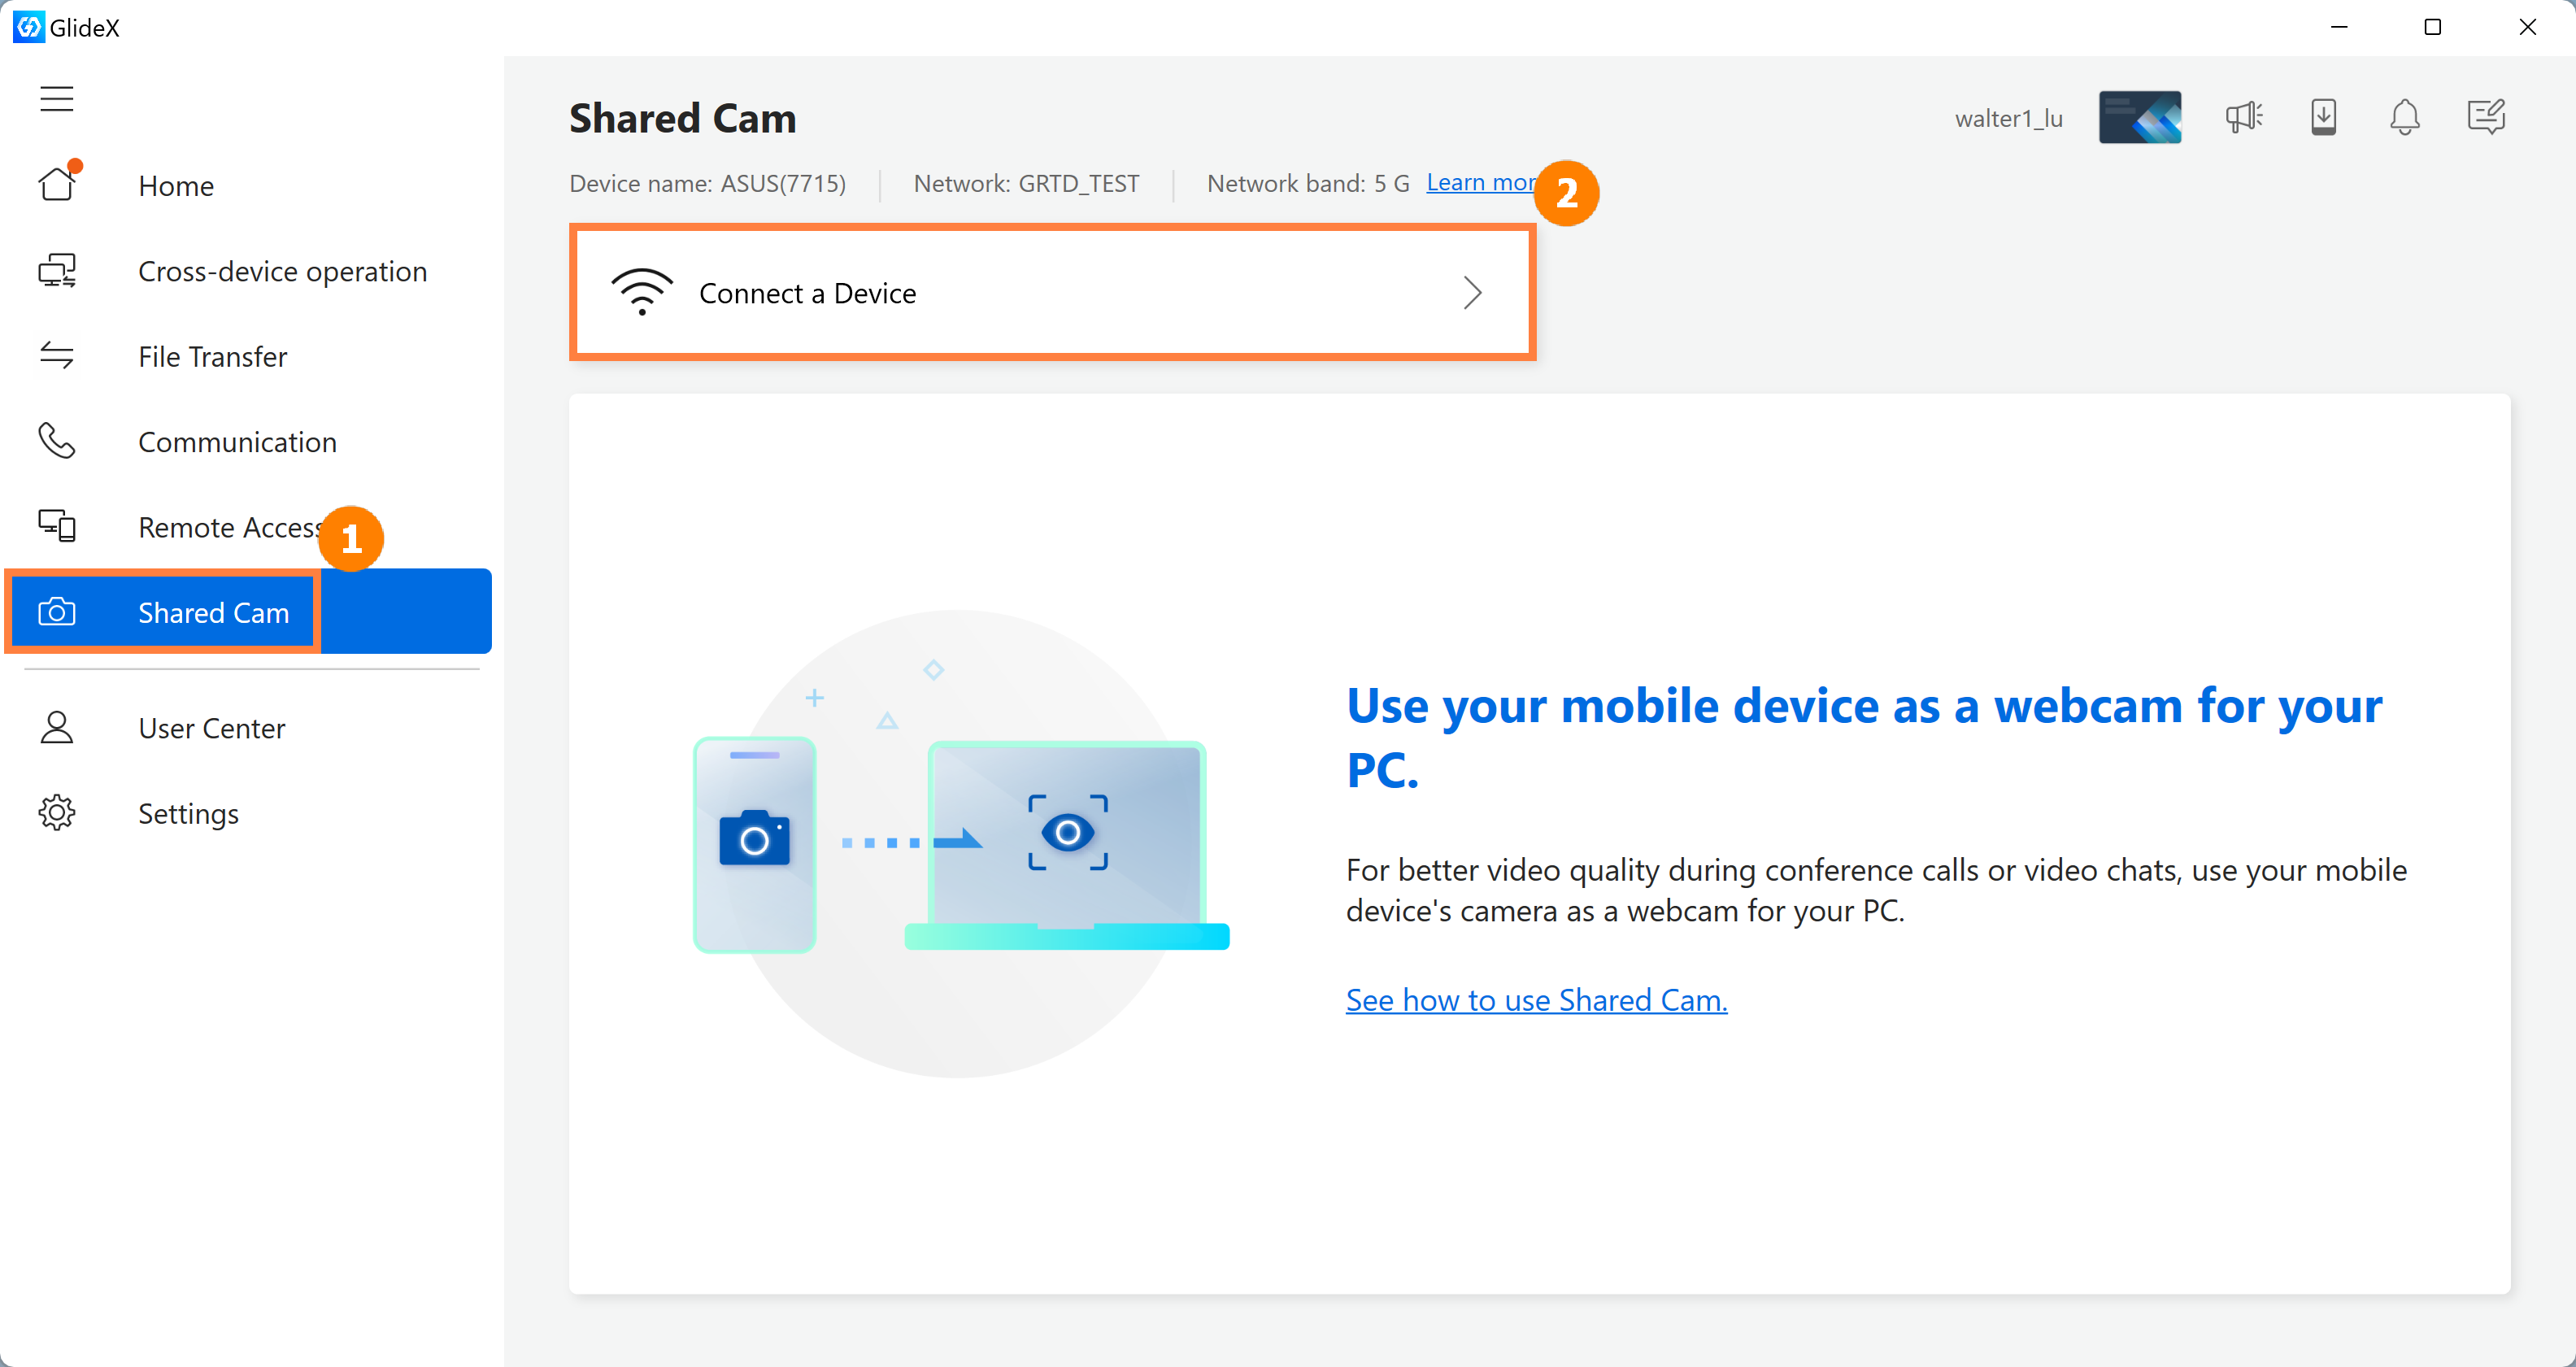
(1) Click ①[Share Camera], Click ②[Connect Device].
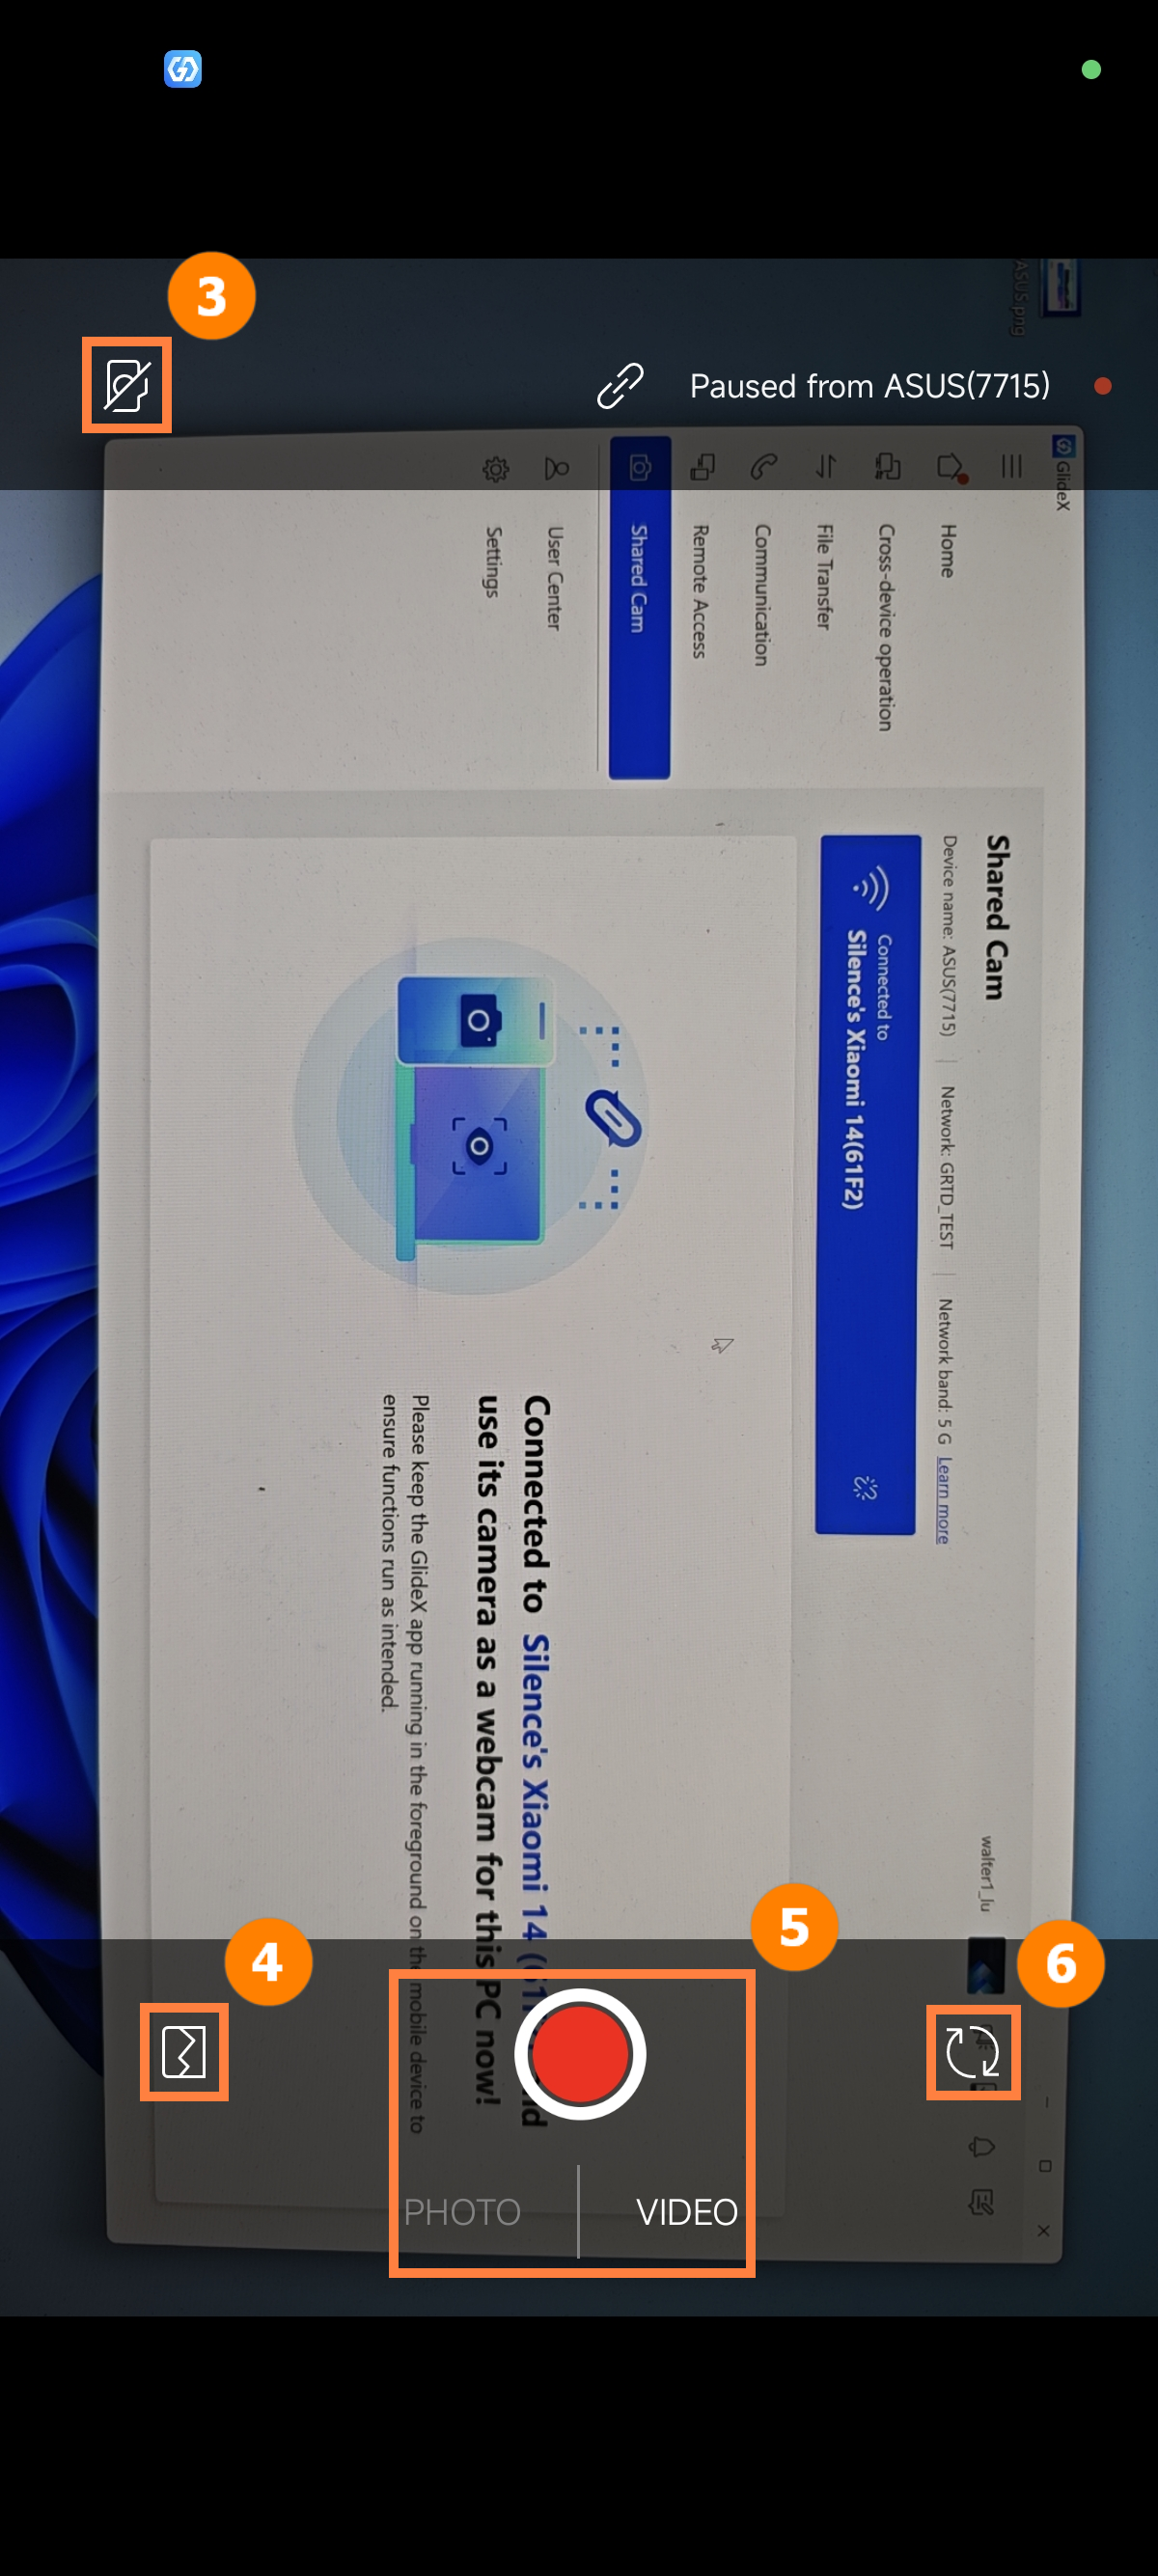
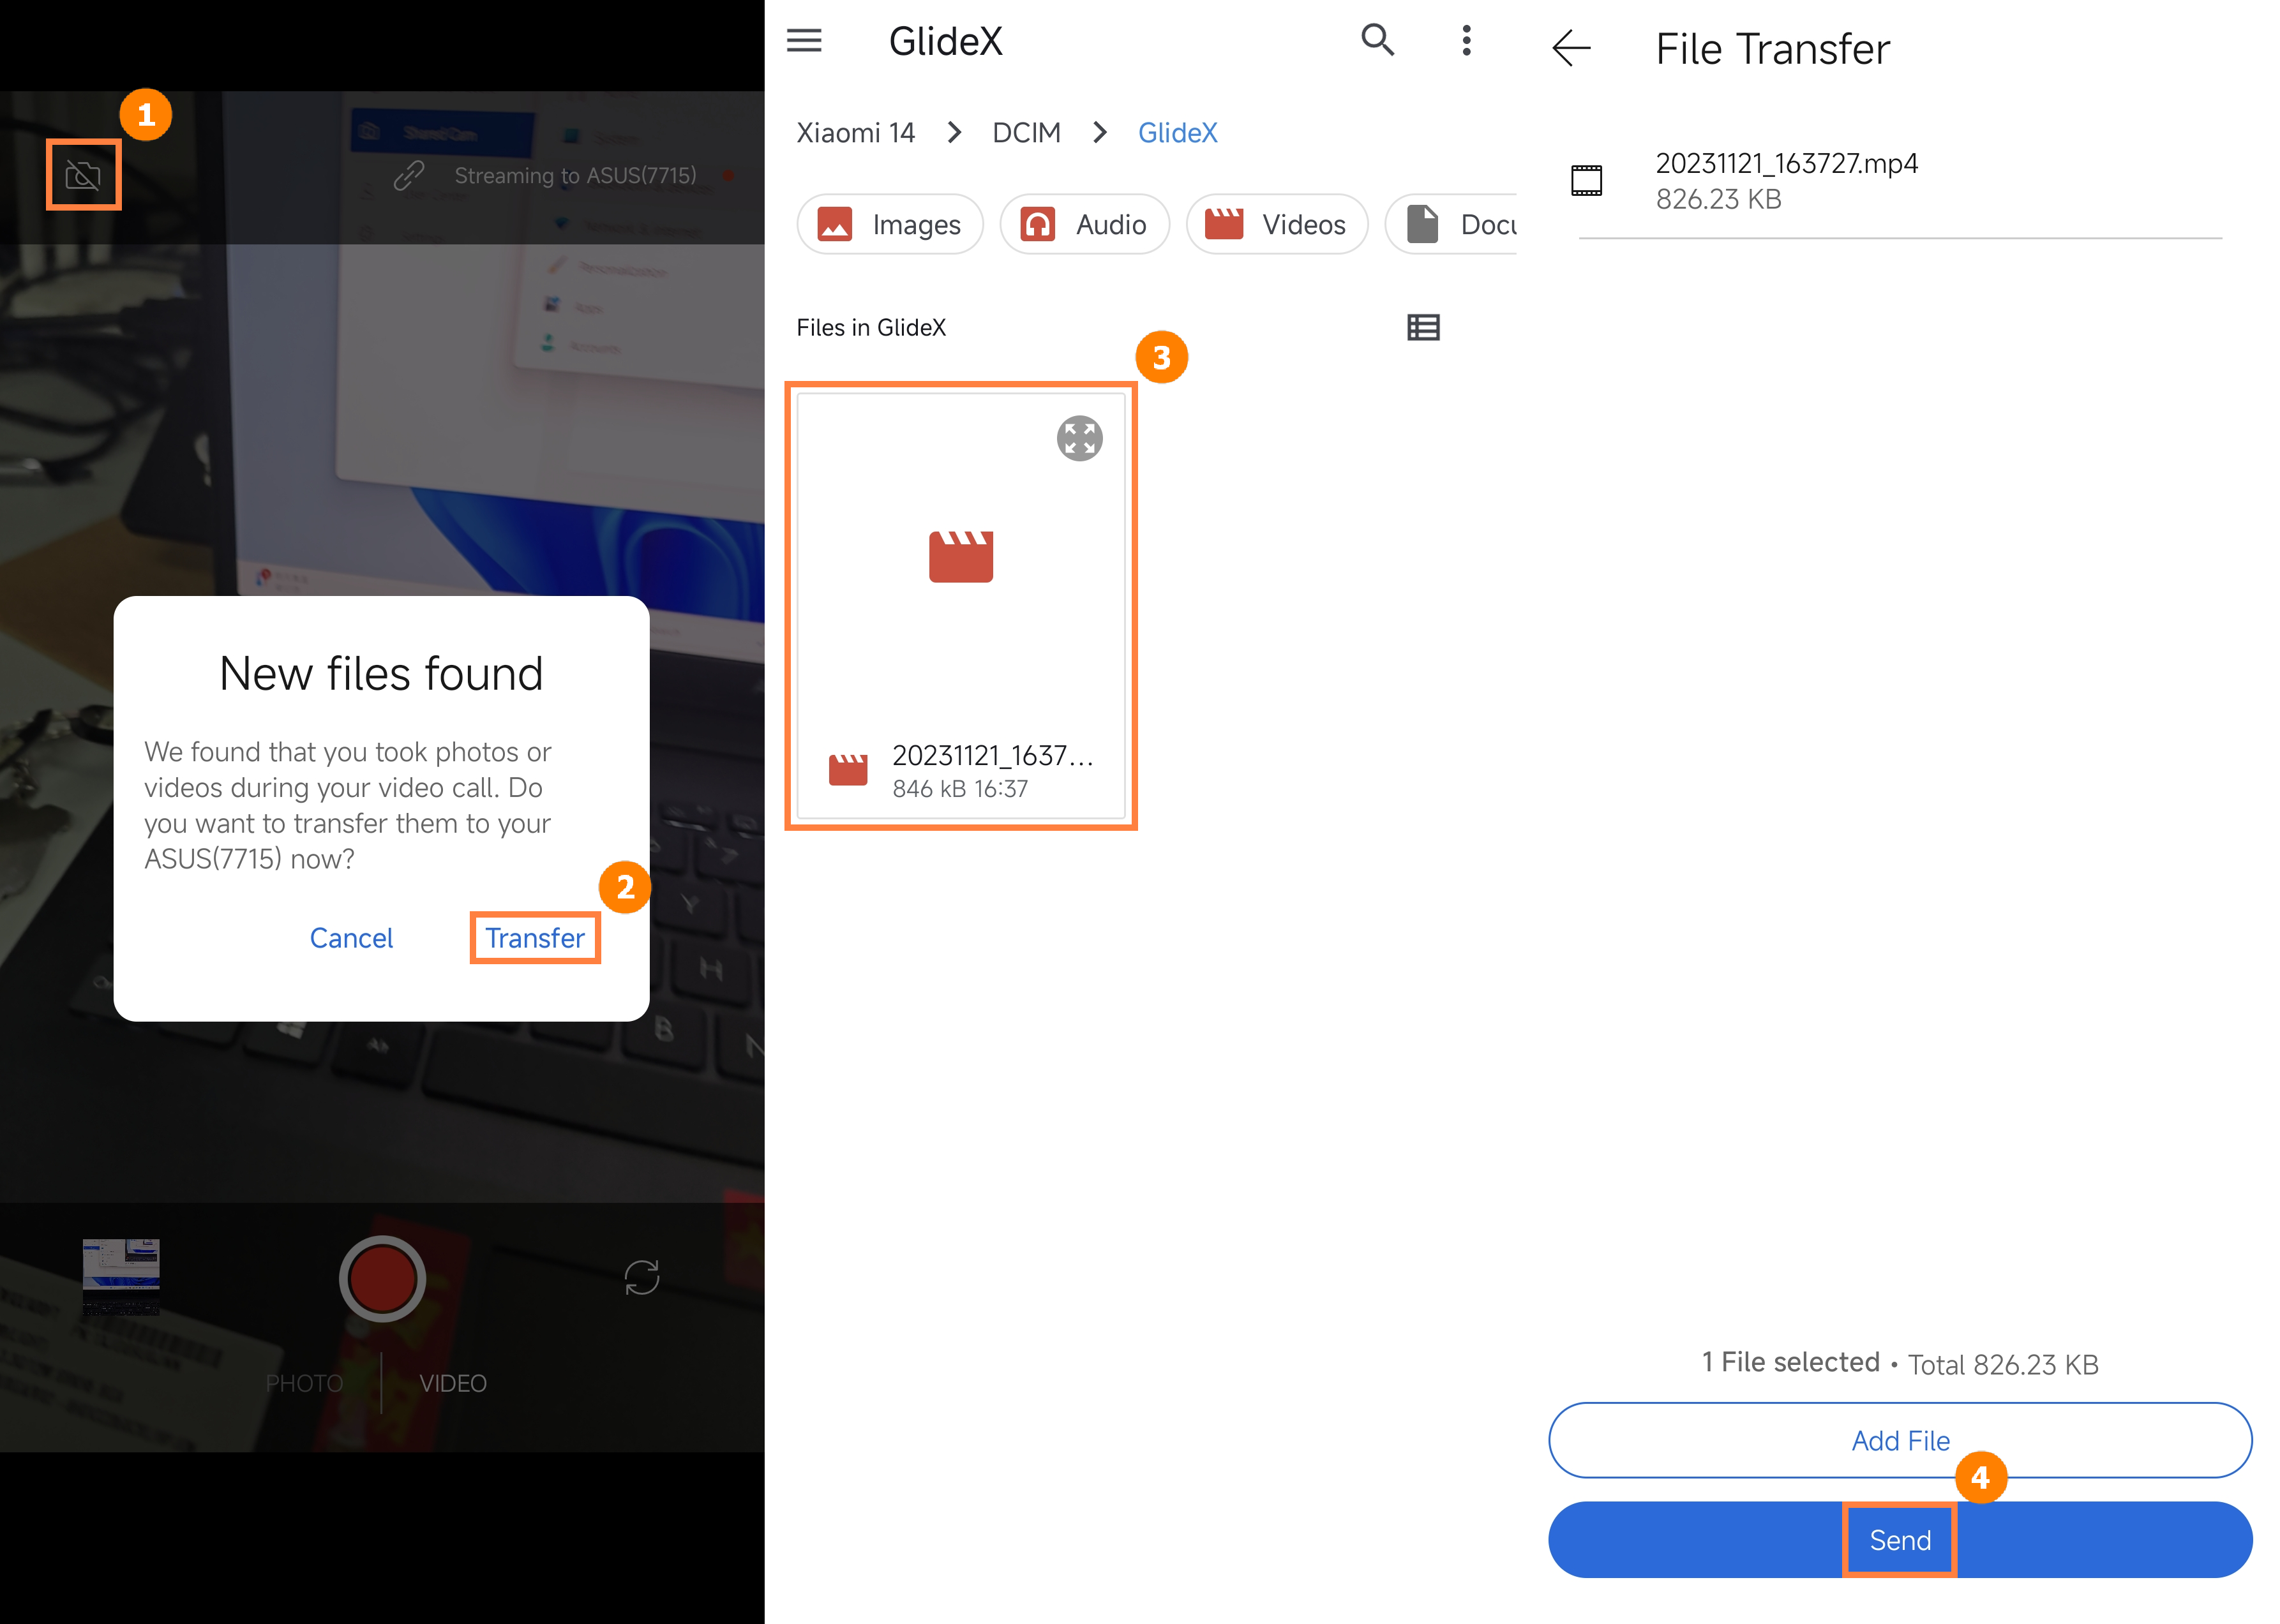
(2) The connection is successful. On the Share Camera page on the mobile device, ③[End Camera Sharing], ④[Taken Photos or Videos], ⑤[Select to take Photos or Videos], ⑥[Flip Camera].
※ When you use the mobile device to share the camera function, in order to save the power of your mobile device, when the mobile device screen timed out for more than 1 minute, it will enter idle mode, you only need to click the mobile device screen to return to the camera sharing function.
※ [Select to take a photo or video], this function allows you to take a photo or video during the use of the video service, and transfer your notes or works to your computer in real time through the file transfer function, and share it with others.
(3) Taking the system camera as an example, on the system camera preview page, we can choose the video capture source as [GlideX SharedCam], and we can add the video from the mobile device camera to the video when we use third-party software to broadcast or record the video.

(4) When you tap ①[End Camera Sharing], if you take a photo or video while using it, you will be reminded whether to transfer the file you just shot to your computer. If you want to transfer the captured file, click ②[Transfer], ③[Photo or video to send], and ④[Send].
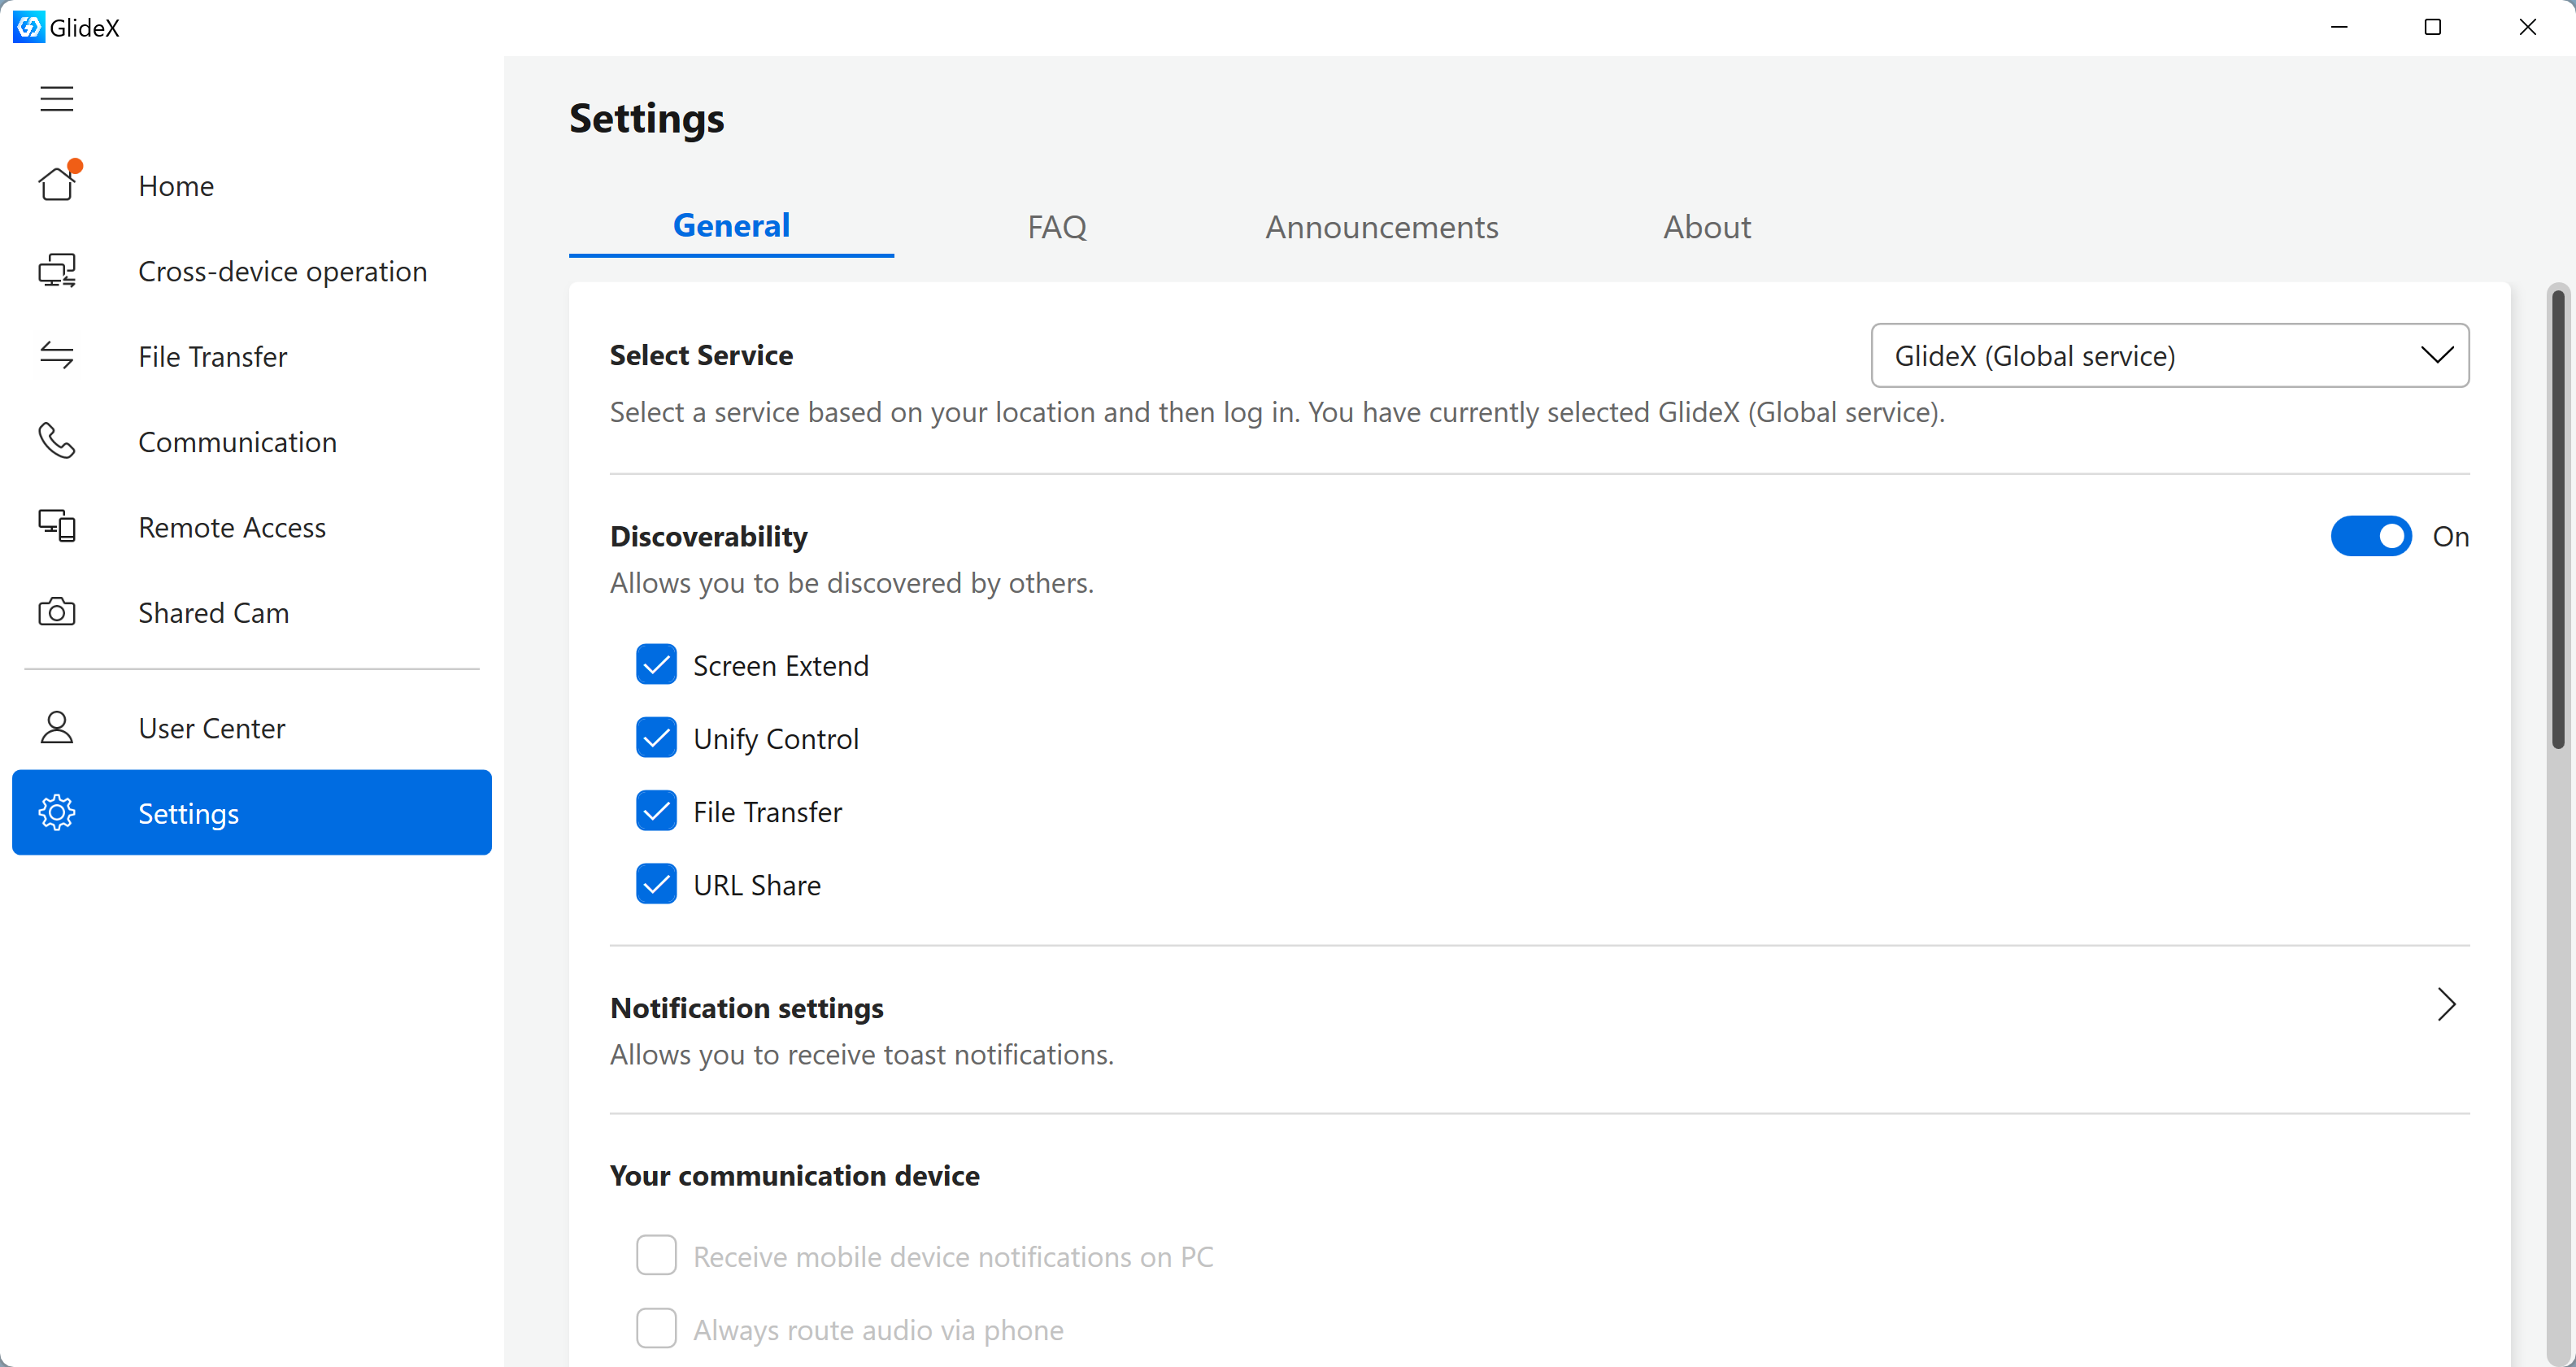
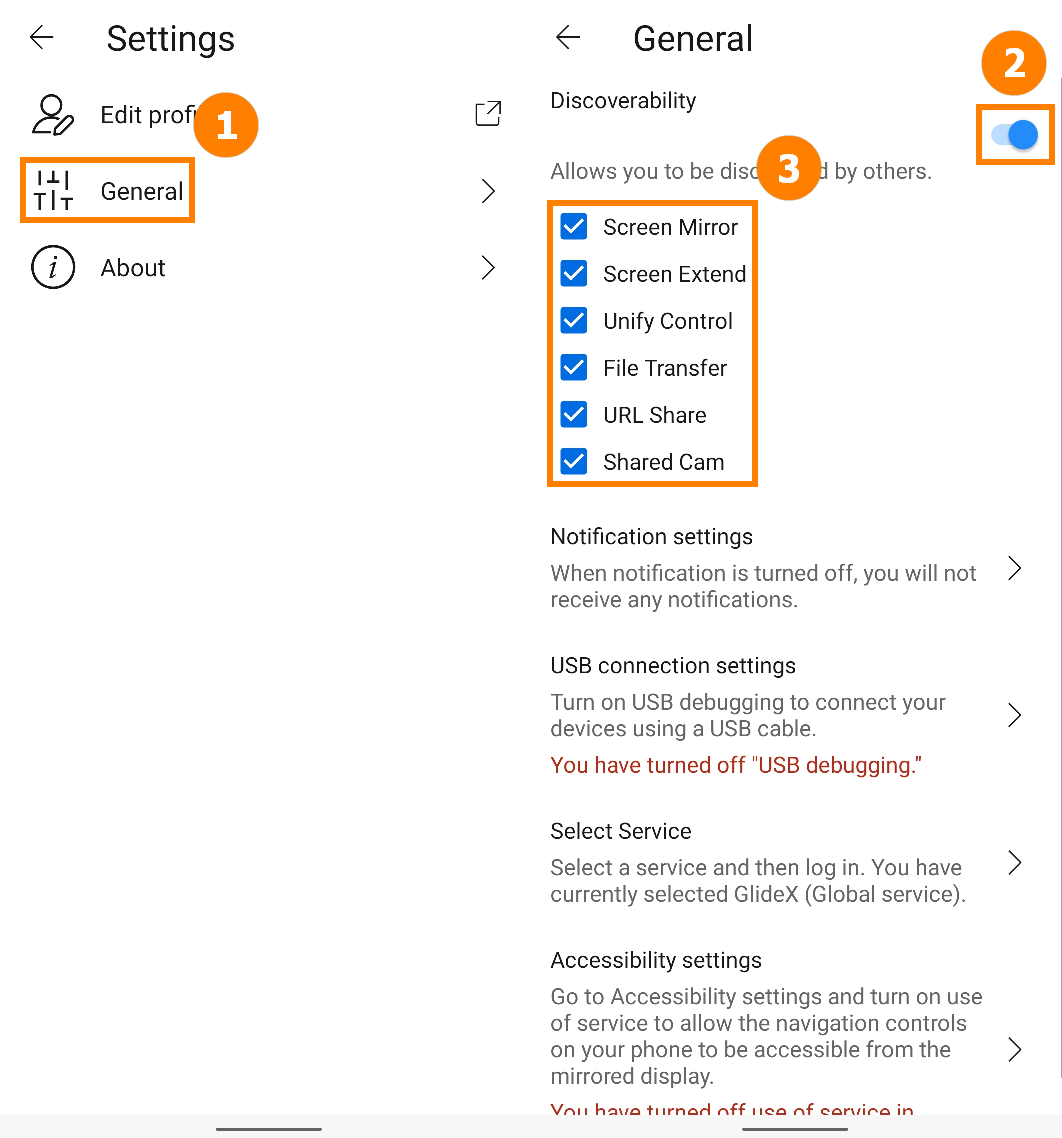
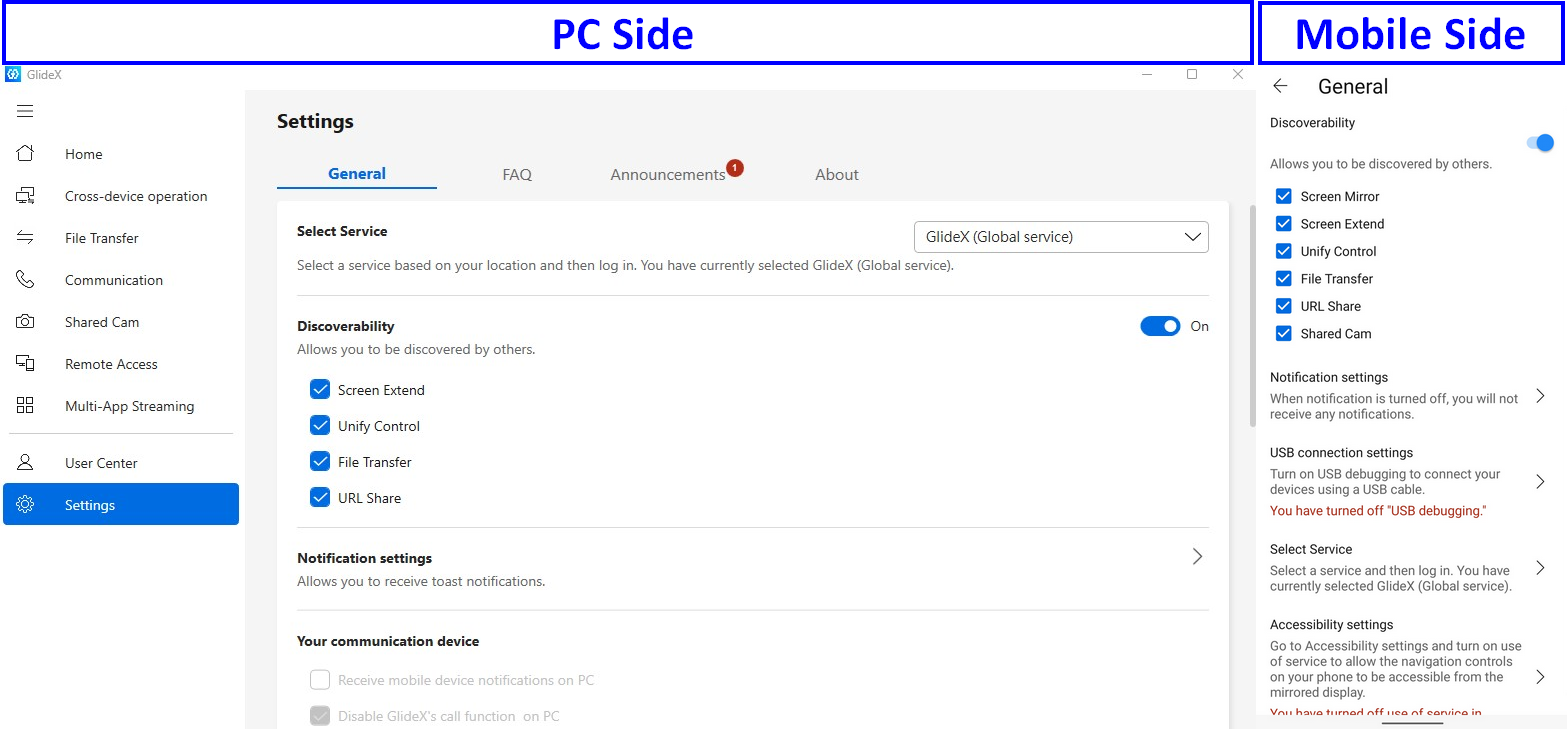
Please make sure that [Discoverability] is turned on, if it is not enabled, functions such as Screen Extend will not be available.
You can check the common problems and corresponding solutions when using the GlideX App.
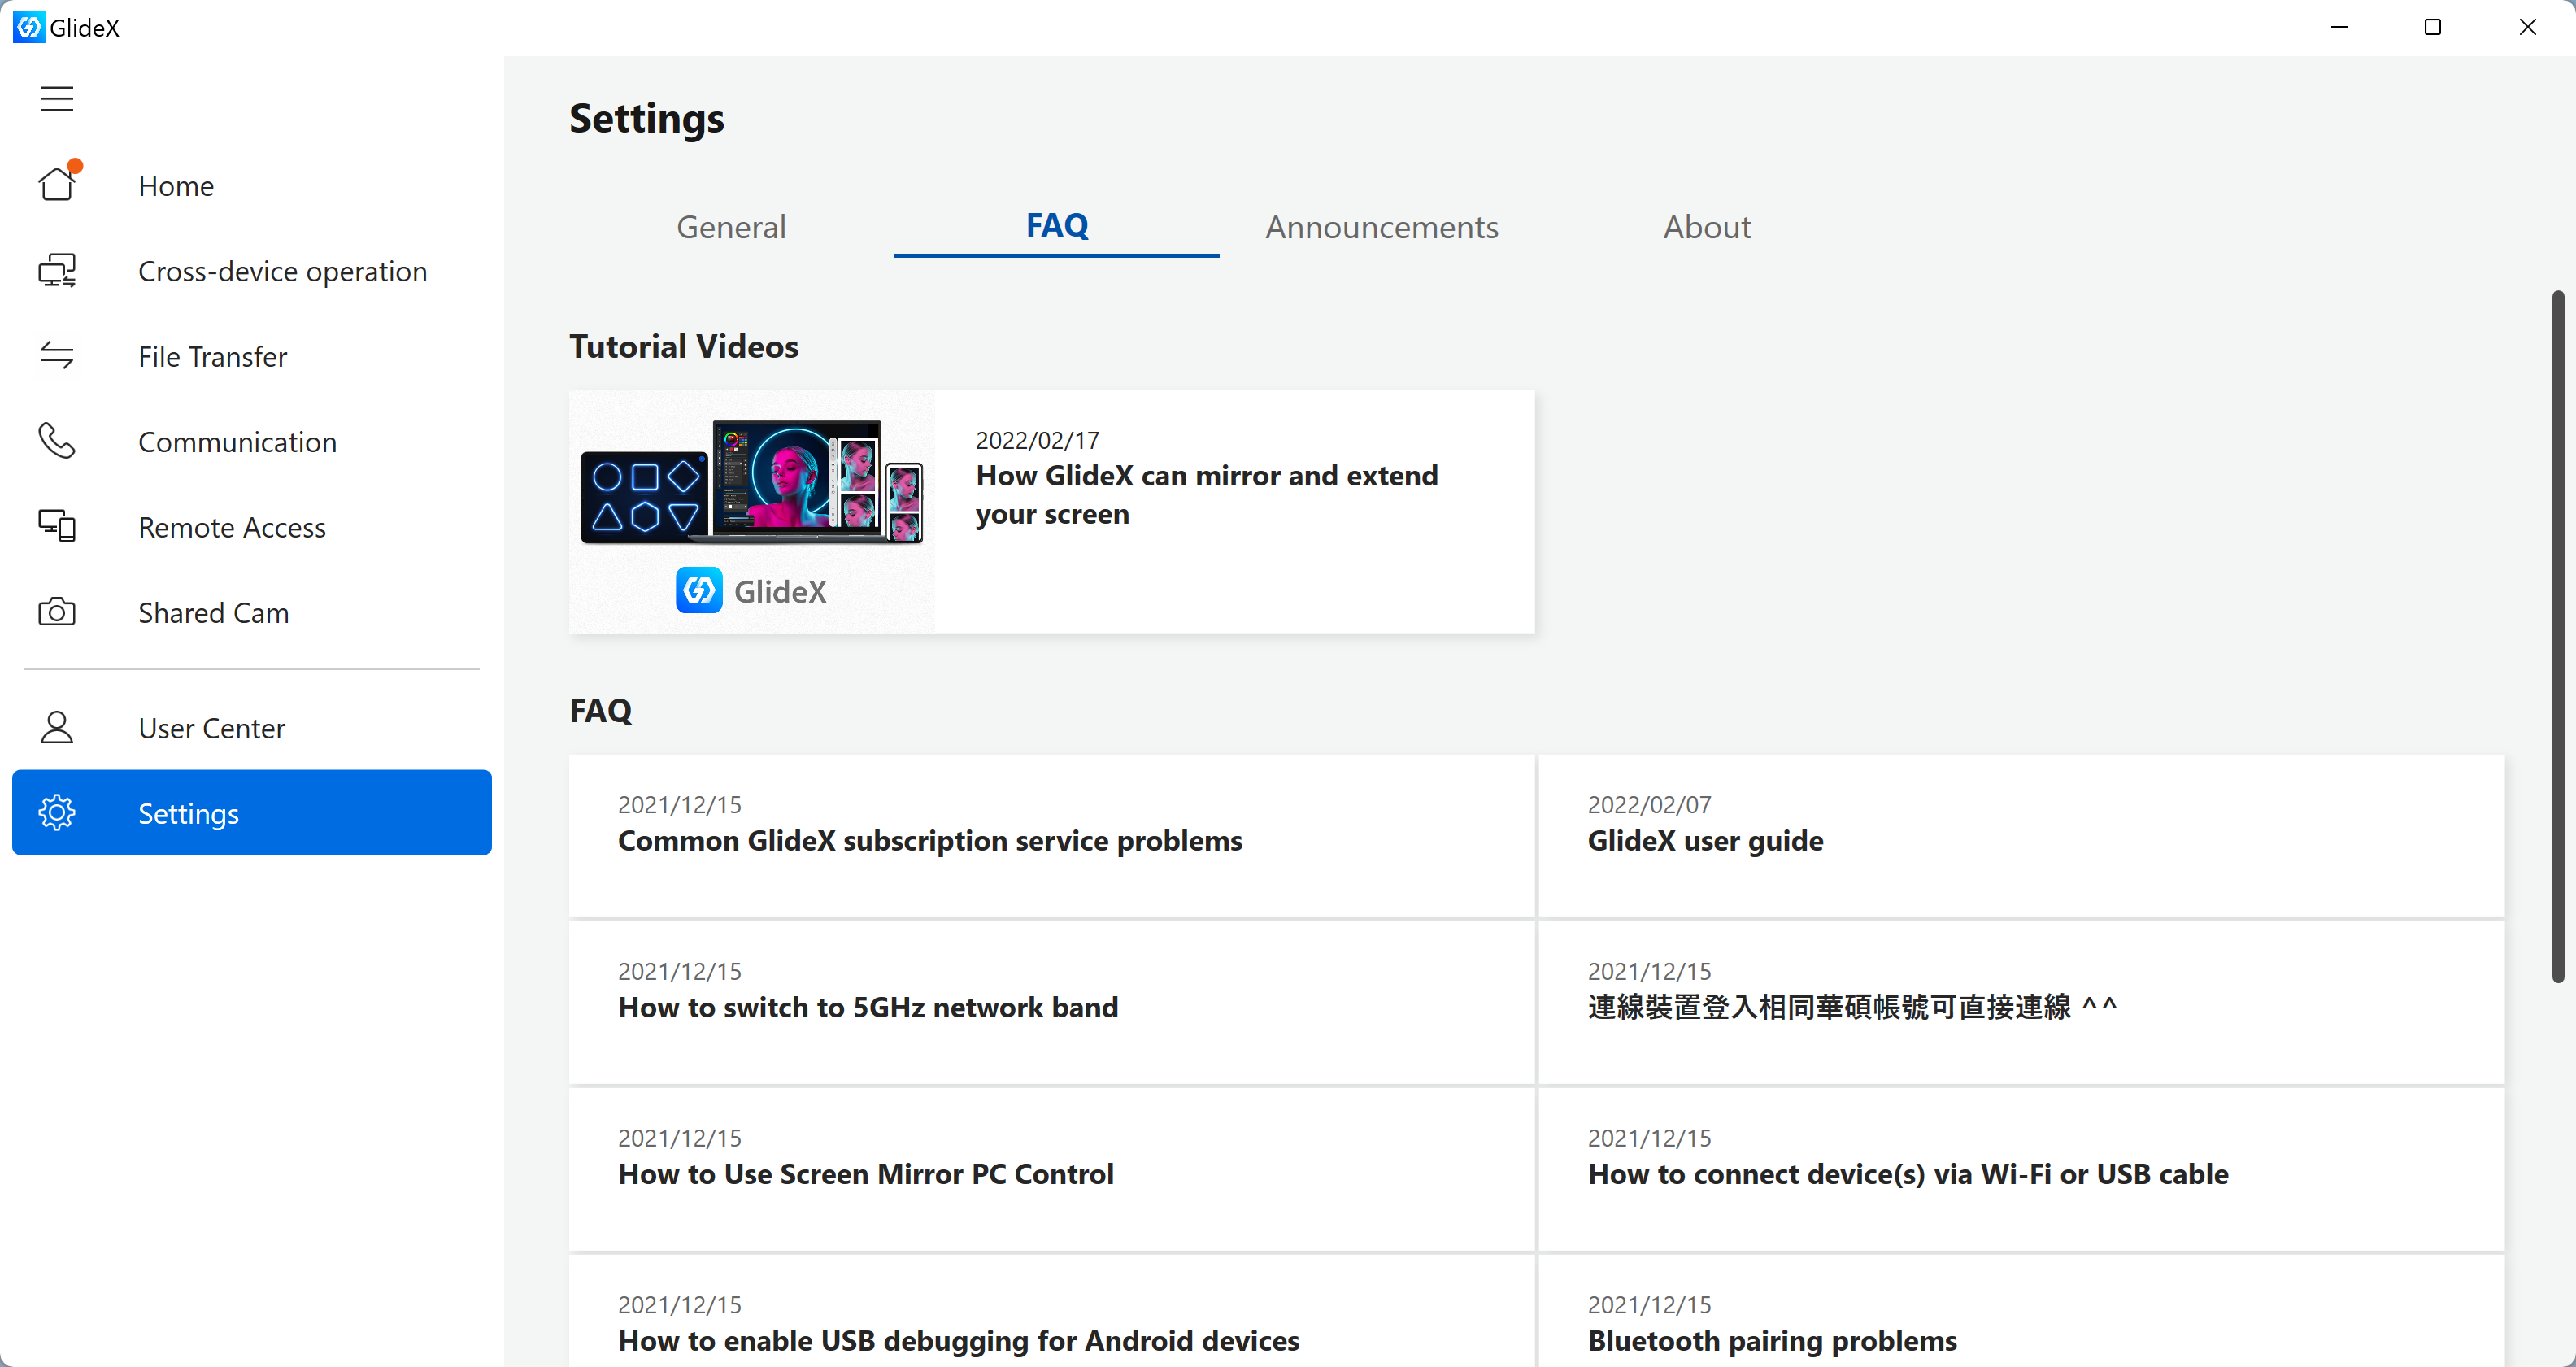
If you find any issues or have any feedback on GlideX, please provide feedback via the desktop or mobile app, please refer to: [GlideX] Learn how to send feedback to GlideX | Official Support | ASUS Global
Question 1 : How to enlarge the font of GlideX?
Answer 1: Right-click the computer desktop, left-click [Display settings], and select the size you want in Scale & Layout.
[GlideX] GlideX device edition problems
The GlideX edition is divided into ASUS Exclusive and General editions.
Pair with ASUS devices to enjoy the most extreme and complete software features.
You can upgrade from the General edition to the ASUS Exclusive edition by purchasing ASUS Laptops, Desktops, and ROG Allys.
Click [User Center] and click [Device Edition] to query the current plan used by GlideX.
※ For connected devices, only one party needs to be ASUS Exclusive edition, and both devices will enjoy ASUS exclusive edition.
[GlideX] How to enable USB debugging for Android devices?
To connect your Android mobile device and your personal computer with a USB cable, please make sure you complete the following steps:
- Enable the [Developer option]
- Enable the [USB debugging settings]
- Allow [USB debugging] when plugging in the USB cable
Steps required to enable USB cable connection vary depending on the brand of your device.
- Samsung, Google, Sony, OnePlus: Go to Settings > Tap About Phone > Tap Build number 7 times to enable Developer options. Then go to System > Developer options > Turn on USB debugging, and tap OK on the Allow USB debugging pop-up dialog.
- Huawei: Go to Settings > Tap About Phone > Tap Build number 7 times to enable Developer options. Then go to System & updates > Developer options > Turn on USB debugging. And turn on the Allow USB debugging pop-up dialog after plugging your phone with USB cable.
- Mi: Go to Settings > Tap My device > Tap All specs > Tap MIUI version 7 times and go back. Then go to Additional Settings > Developer options, and turn on Developer options > Turn on USB debugging. And tap Accept for the pop-up dialog after counting. Turn on Install via USB and USB debugging (Security settings), and tap Next step after counting > Tap Accept after counting.
- Oppo: Go to Settings > Tap About Phone > Tap Build number 7 times to enable Developer options. Then go to Additional Settings > Developer options, and turn on USB debugging, and tap OK on the Allow USB debugging pop-up dialog.
- Realme: Go to Settings > Tap About Phone > Tap Version > Tap Build number 7 times to enable Developer options. Then go to Additional Settings > Developer options > Turn on USB debugging, and tap OK on the Allow USB debugging pop-up dialog.
- Vivo: Go to Settings > Tap More settings > Tap About phone > Tap Software version 7 times. Then go to Developer options > Turn on Developer options and tap OK for development settings. Next, turn on USB debugging, and tap OK on the Allow USB debugging pop-up dialog.
- LG: Ensure the developer menu is enabled in system About phone > Software info and tap Builder number for several times. And ensure USB debugging is enabled in the developer menu. Then go to Settings > Tethering & networks and switch on USB tethering.
In the following, take ASUS Zenfone for example:
Make sure that the developer options and USB debugging of your mobile device have been configured, and you allow USB debugging after plugging in the USB cable.
Swipe left on GlideX [Home], tap on [USB Connection Settings], tap on the [Developer Options]. In [Software Information] page, and tap on [Build Number] seven times in a row to turn on the developer options.
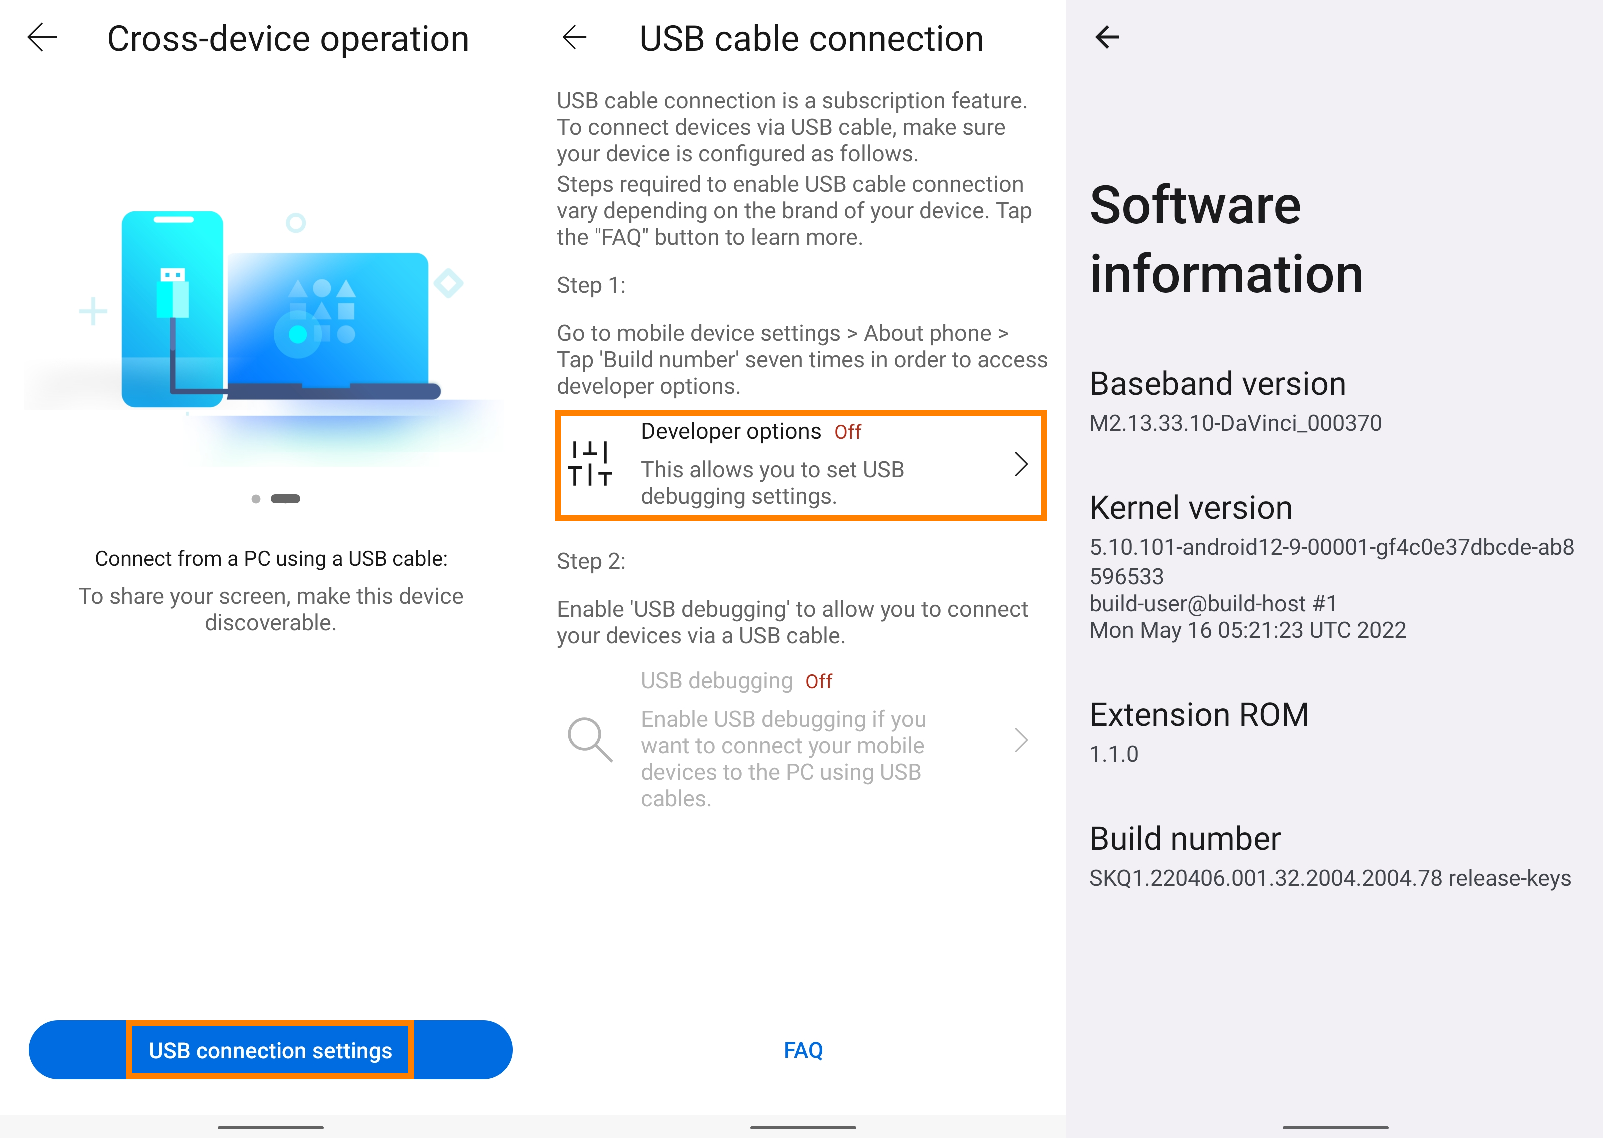
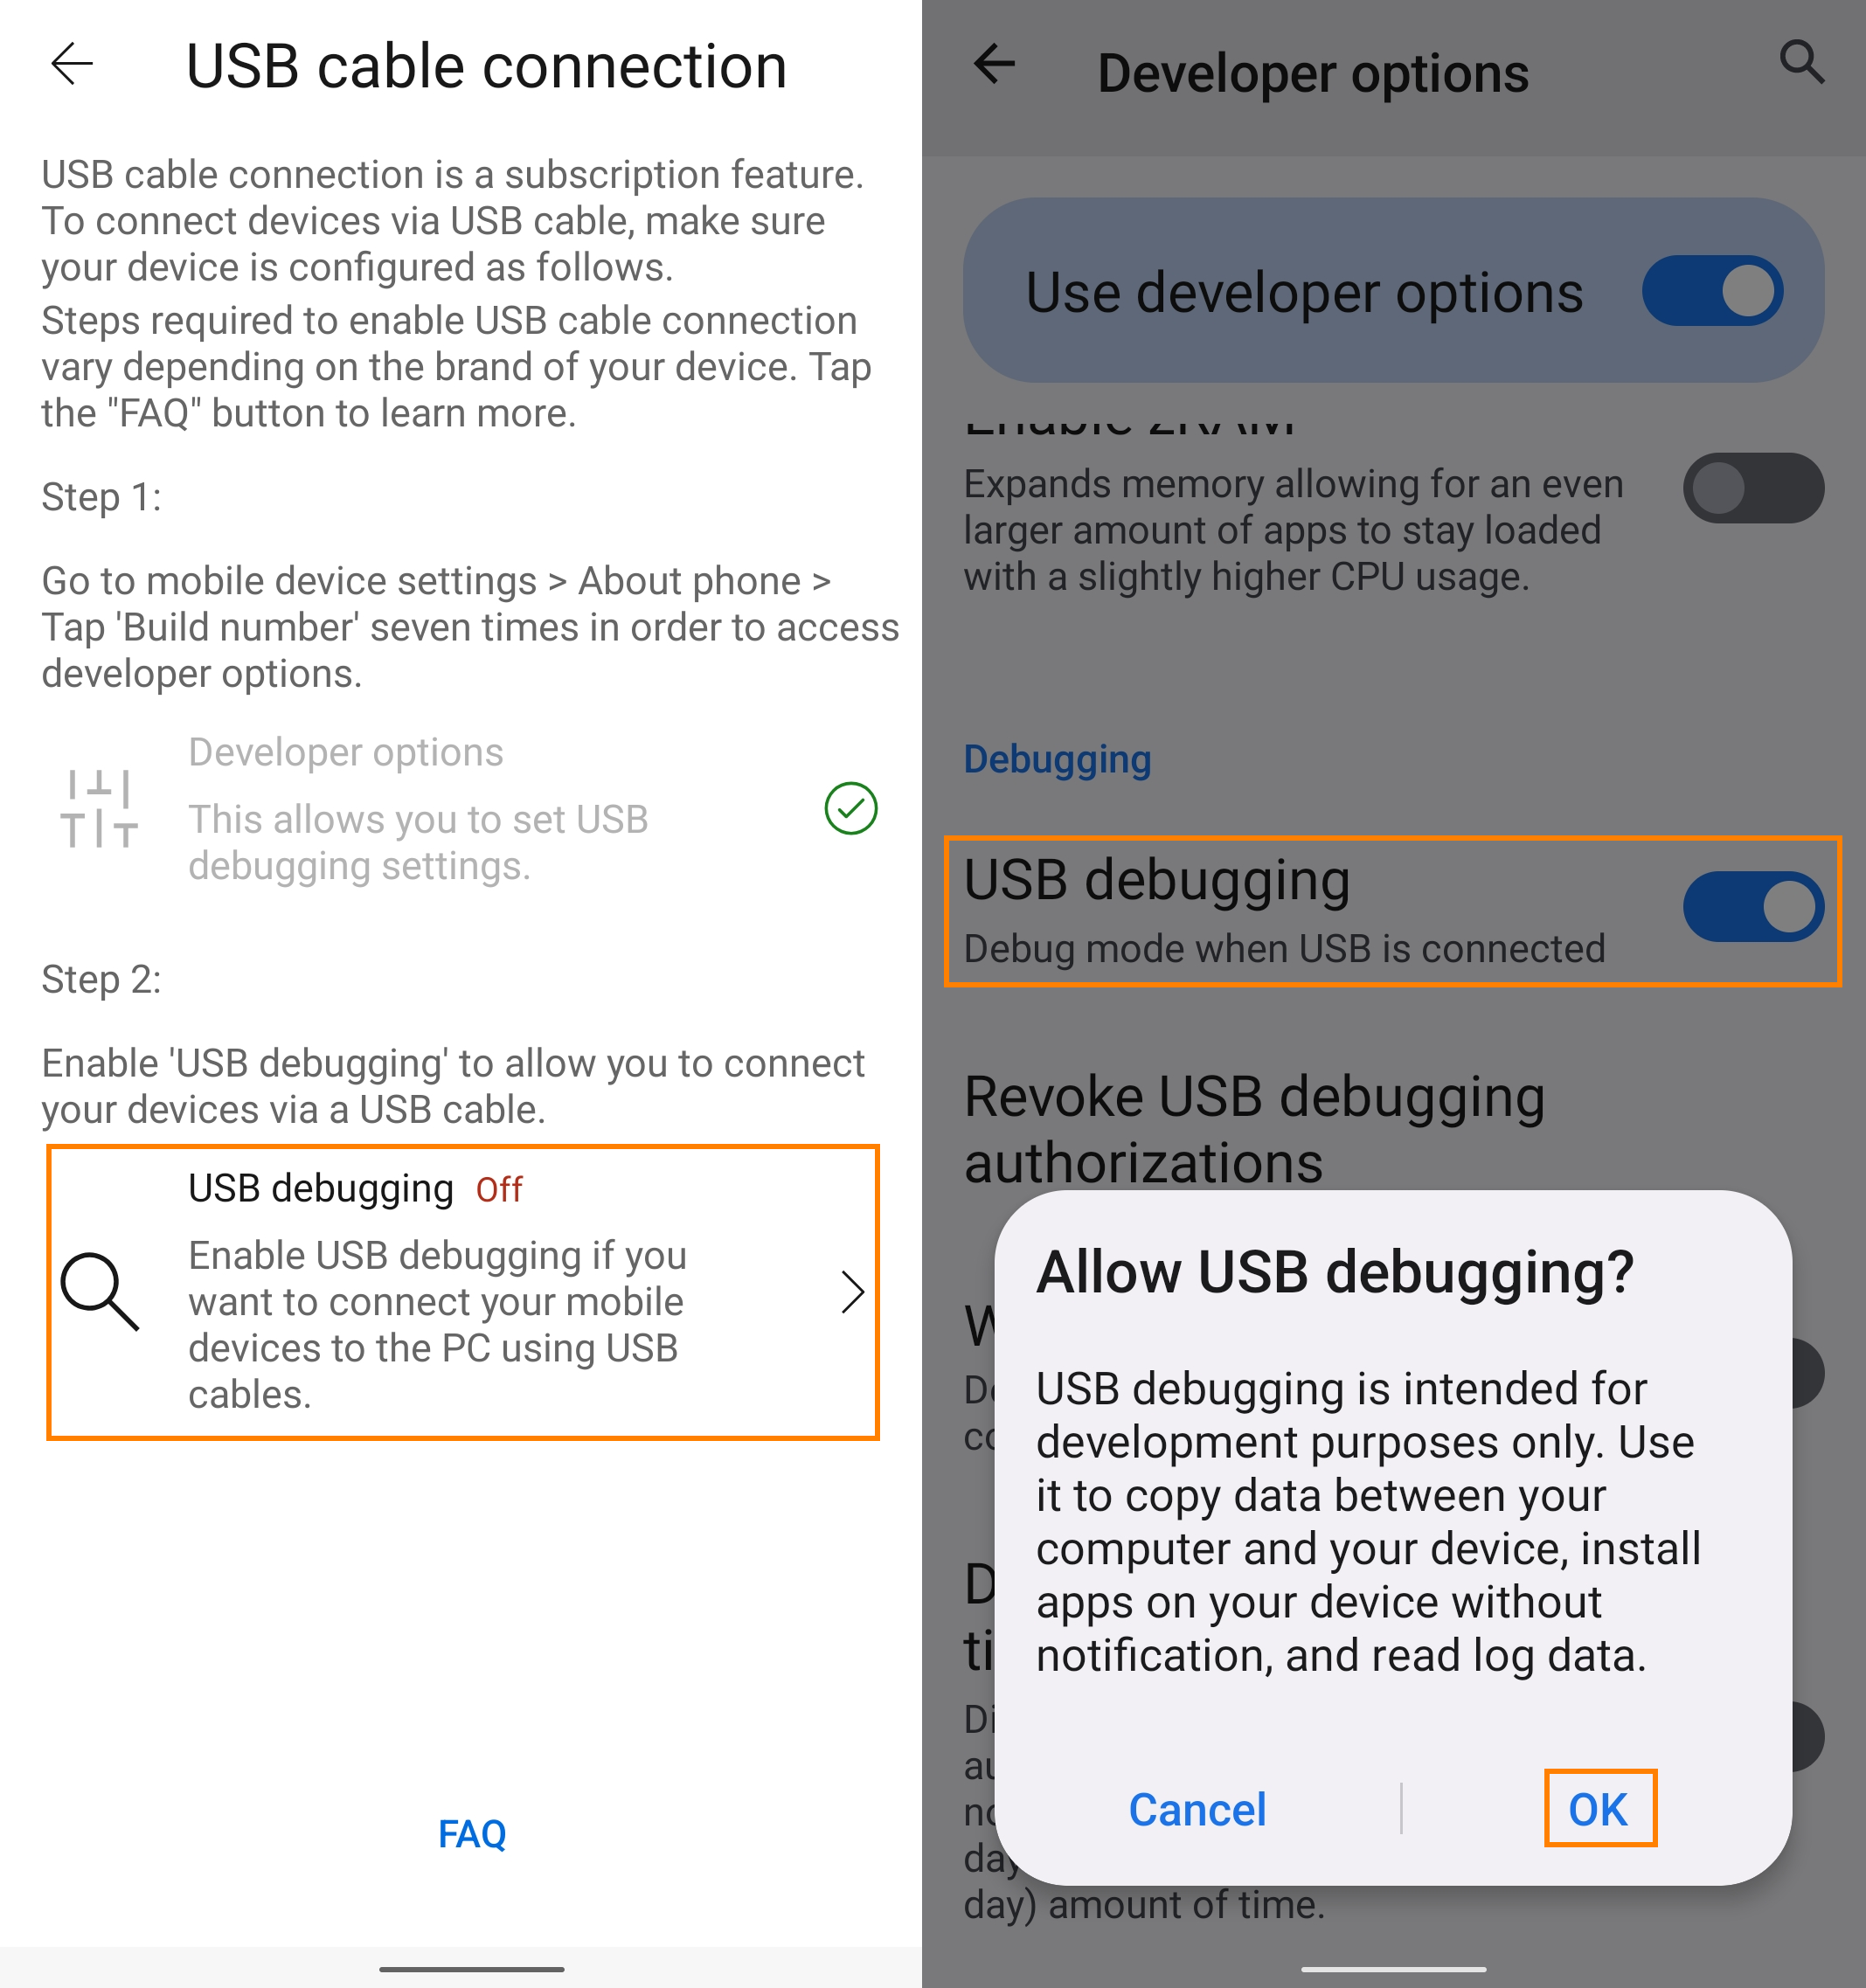
When the developer options is turned on, go back to the USB cable connection page. Tap on [USB debugging], or in [Developer options] and tap on [USB Debugging], a pop-up window will appear, tap on [OK], and USB Debuging detection will turn on. Connect your computer and mobile device by using a USB cable, and a pop-up window will appear on the mobile device, tap on [Always allow from this computer], then tap [Allow], and then tap [Yes] to connect your computer and mobile device.
[GlideX] How to connect device(s) via Wi-Fi or USB cable
To enable Screen Mirror and Screen Extend, connect to your mobile device from a PC that is on the same Wi-Fi network or using a USB cable. Please be noted that the connection via the same Wi-Fi is limited in some network environment, for example, office or school environment using public hotspot. We suggest you use the trusted Wi-Fi.
Troubleshooting for iOS device users
Troubleshooting for Android device users
Troubleshooting for iOS device users
Please make sure iOS device meets the requirements below:
(1) The discoverability for Screen Mirror and Screen Extend is turned on.
(2) Your GlideX mobile app is enabled so that it is visible to PC, and that the screen of the mobile device is not locked.
Choose the connection method
1. Connect a device from a PC that is on the same Wi-Fi
You can connect to your iOS device directly.
2. Connect a device from a PC using a USB cable.
Download and install iTunes (Windows 64 bit) on your computer. You must use Apple or MFi-certified Lightning Cable to connect an Apple iPhone or iPad to your PC. Please make sure that your iPhone or iPad is recognized in iTunes on Windows. (If you are stuck at this step, please refer to Apple support for help and restart AMDS accordingly.) And then, tap [Trust] on the [Trust This Computer?] dialog.
When you connect your mobile device to the GlideX on your computer, your mobile device is displayed and a USB-connected icon appears.
2. Troubleshooting for Android device users
Please make sure you meet the requirements below:
(1) Tap on the [Discoverability] function, and turn on the [Screen Mirror & Screen Extend] function.
(2) Your GlideX mobile app is open so that it is visible to PC, and that the screen of the mobile device is not locked.
Choose the connection method
1. Connect a device from a PC that is on the same Wi-Fi
You can connect to your Android device directly.
2. Connect a device from a PC using a USB cable.
Make sure that the developer options and USB debugging of your mobile device have been configured, and you allow USB debugging after plugging in the USB cable.
Swipe left on GlideX [Home], tap on [USB Connection Settings], tap on the [Developer Options]. In [Software Information] page, and tap on [Build Number] seven times in a row to turn on the developer options (Opening the "Developer options" varies from mobile device to mobile device, search the web for how your mobile device opens or click here.).
When the developer options is turned on, go back to the USB cable connection page. Tap on [USB debugging], or in [Developer options] and tap on [USB Debugging], a pop-up window will appear, tap on [OK], and USB Debuging detection will turn on. Connect your computer and mobile device by using a USB cable, and a pop-up window will appear on the mobile device, tap on [Always allow from this computer], then tap [Allow], and then tap [Yes] to connect your computer and mobile device.
When you connect your mobile device to the GlideX on your computer, your mobile device is displayed and a USB-connected icon appears.
[GlideX] Cannot use GlideX Remote Desktop?
If you want to use the GlideX Remote Desktop function, please confirm whether the computer and mobile device meet the following requirements:
- The computer operating system needs to be Windows 10/11 Pro version
- GlideX PC App and GlideX Mobile App have logged in to the same ASUS member account
- The system login password has been set on the computer
- The Remote Desktop function of the system has been turned on on the computer
*GlideX Remote Desktop function currently only supports Windows 10/11 Pro version*
*GlideX Remote Desktop currently is exclusively available for Windwos 10 local user account (an offline account)*
1. In GlideX side please click the [Information] (" " symbol) icon to enter the [Password] interface in the system settings and add an account password. (If you have already set the account password, please ignore this step)
2. After setting the password, please click the GlideX side [Open Settings], go to the [Remote Desktop] interface in the system settings, and click to enable the Remote Desktop function.
3. If you are using the Remote Desktop function for the first time, a pop-up window [Mail Sent] will appear, please go to your mailbox and click the Activation link.
4. Please click GlideX side [Bind a mobile device via Pairing Code], a new window will pop up. Please also click [Bind a computer via pairing code] on the mobile device side, and then scan the [QR code] on the computer screen, or fill in [pairing code].
5. After the pairing is successful, the computer and mobile devices will display the following screen.
6. When using the Remote Desktop function, please make sure your computer is in standby mode and keep internet connection.
[GlideX] GlideX login to the same ASUS member account can be directly connected
After version 3.1.0.0, GlideX can support the service of no confirmation after logging into the same ASUS member account. That is, if your devices are all logged into the same ASUS member account, they will be considered as your own devices. When you connect, the confirmation step of the receiving device will be omitted to optimize the efficiency of the device connection.
Take the Mirror function as an example, your mobile device is in a locked state because all of your devices are logged into the same ASUS member account. You can quickly unlock the mobile device through the mouse and keyboard (without manually unlocking it first), and then use the Mirror function.
Not logged into the same ASUS member account
Taking the Mirror function as an example, at this time, the device has not logged into the same ASUS member account. After click [Mobile Device] on the computer, you need to tap [Accept] on the mobile device to enable the mirror function.

Login to the same ASUS member account
(1) Click ①[User Center], enter ②[ASUS Member Account and Password], and click ③[Login].
(2) Turn on the Mirror function again, and at this time, the mobile device can activate the Mirror function without confirmation.
[GlideX] Learn how to send feedback to GlideX
If you encounter problems or have any feedback on GlideX, please follow the instructions below to provide feedback through the GlideX Windows and Mobile App for further assistance from the GlideX team:
※ At present, the feedback function of GlideX is only available on the computer side, please use the camera on the mobile device to scan the QR Code generated by the computer to continue to report your problem, so that ASUS engineers can solve your problem more accurately.
※ If you have a second computer using GlideX, you can enter the report code generated by the first computer to quickly report your problem without having to fill it in again.
- Feedback from the GlideX App on computer side
- Enter the Report Code into GlideX on another computer
- Feedback from the GlideX App on mobile side
Feedback from the GlideX App on computer side
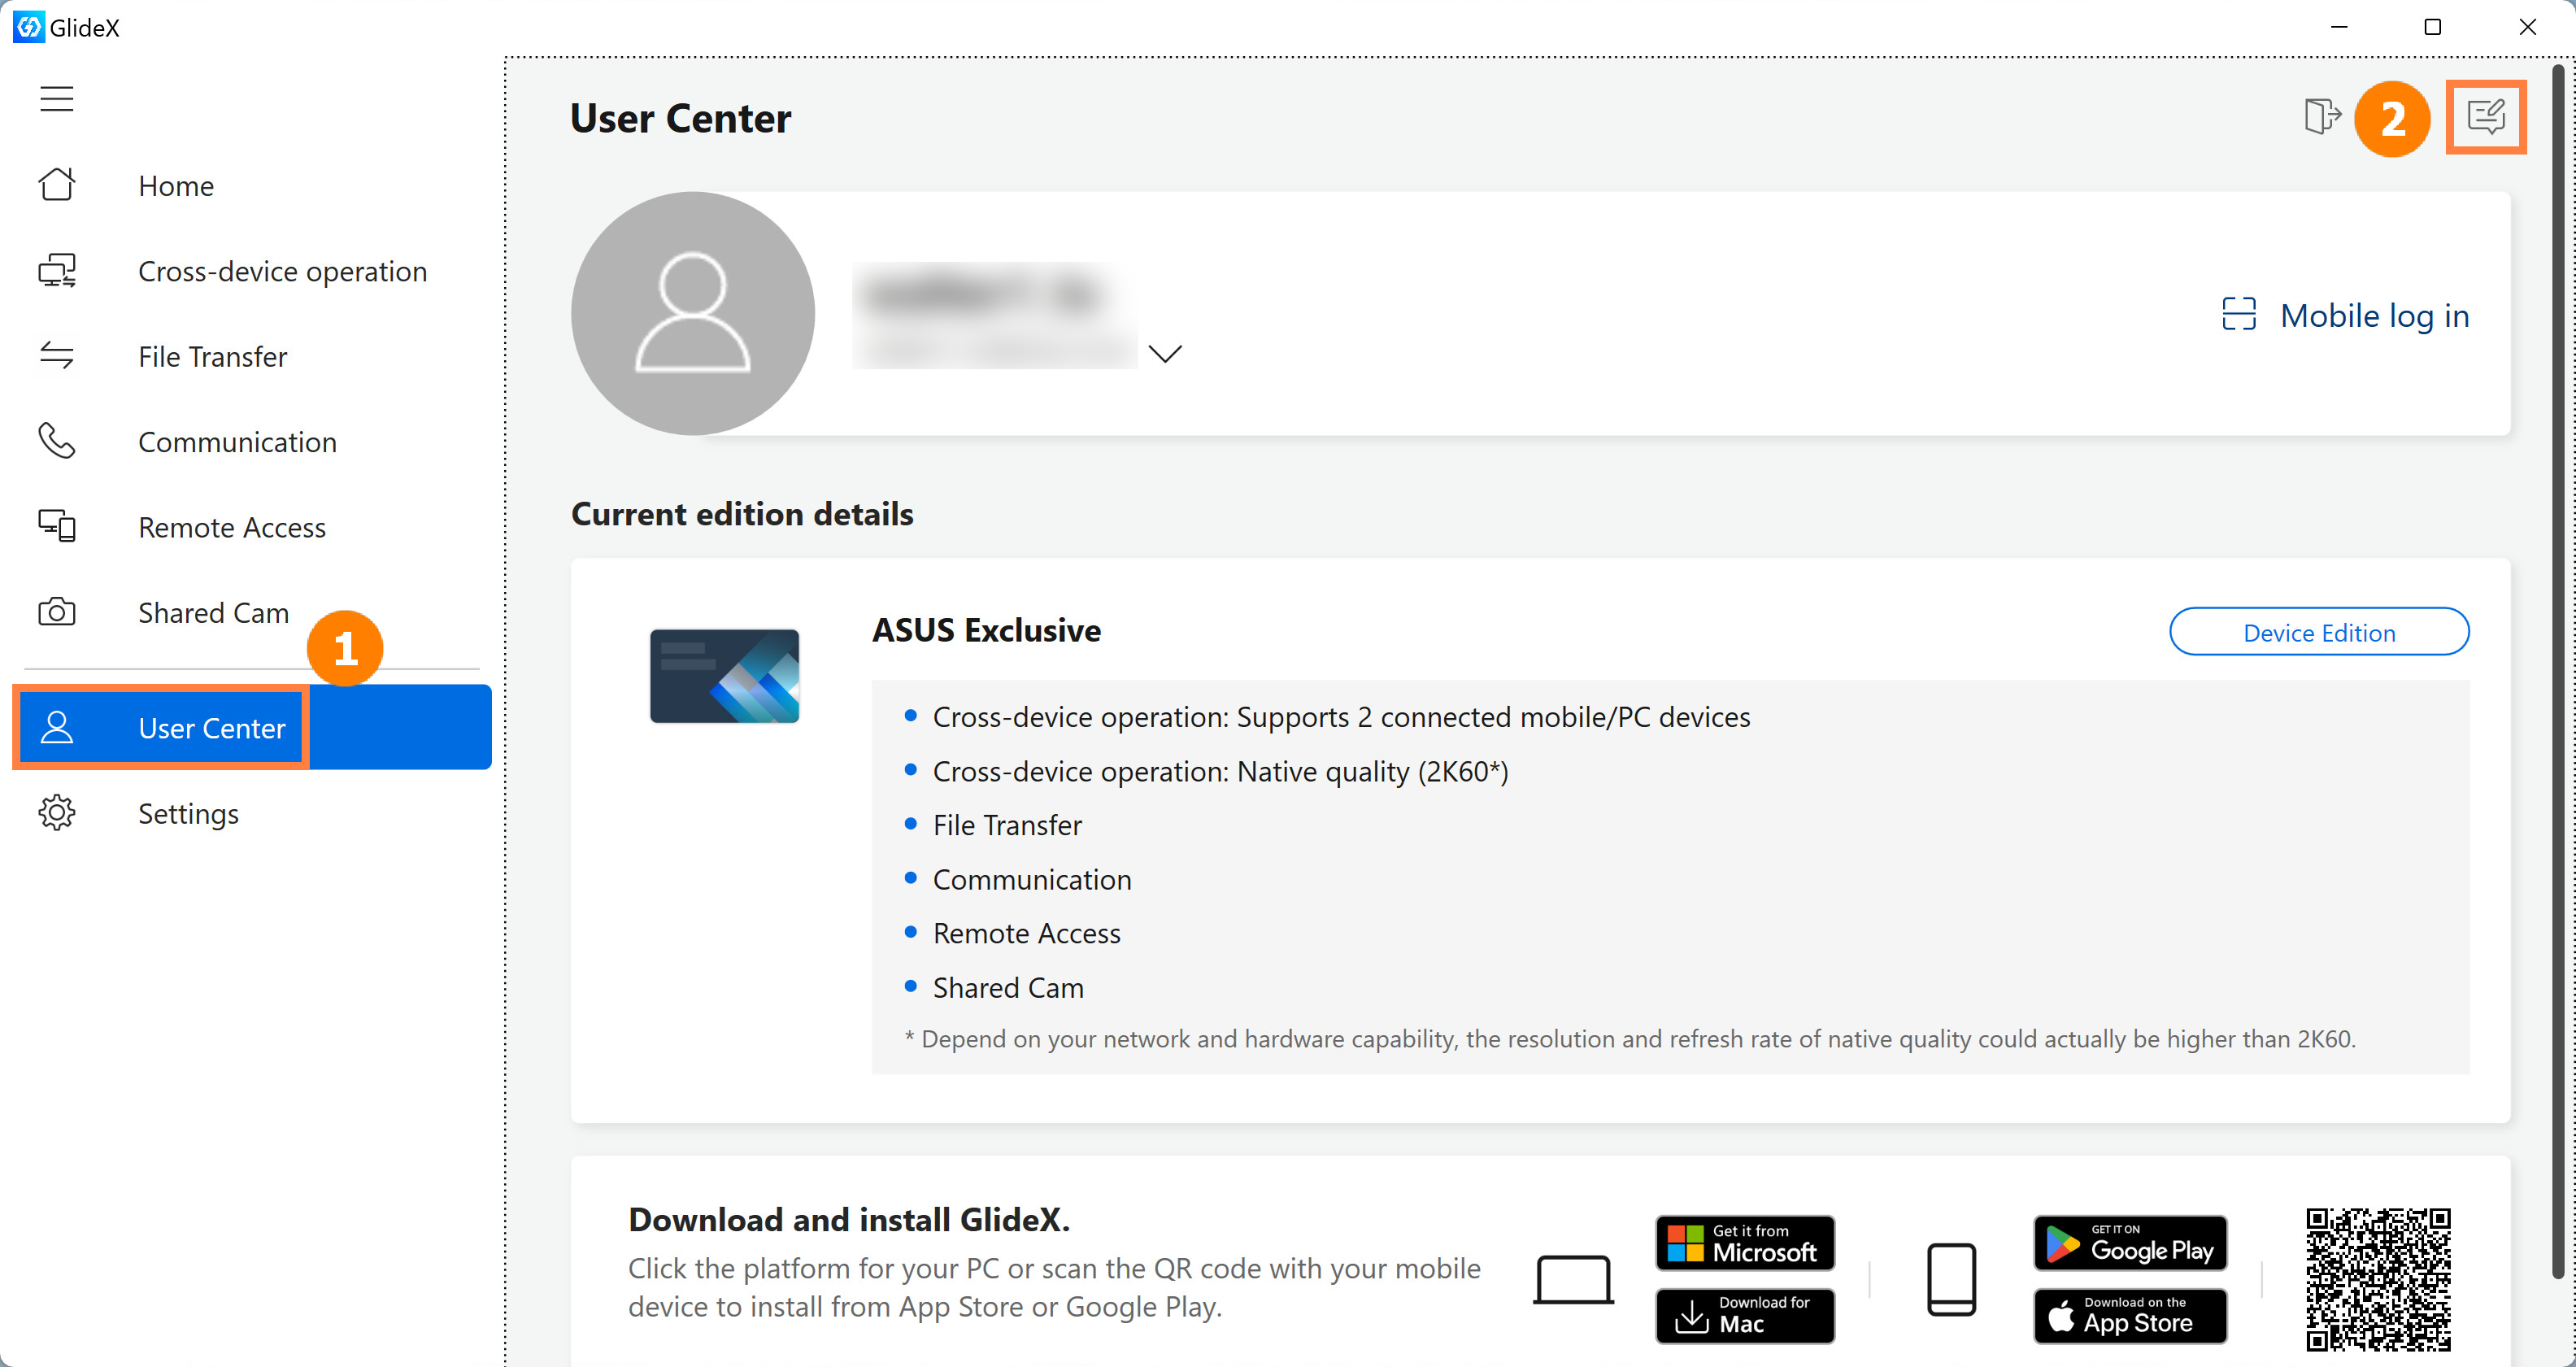
(1) Go to ①[User Center] and click ②[Feedback] in the upper right corner of the page.
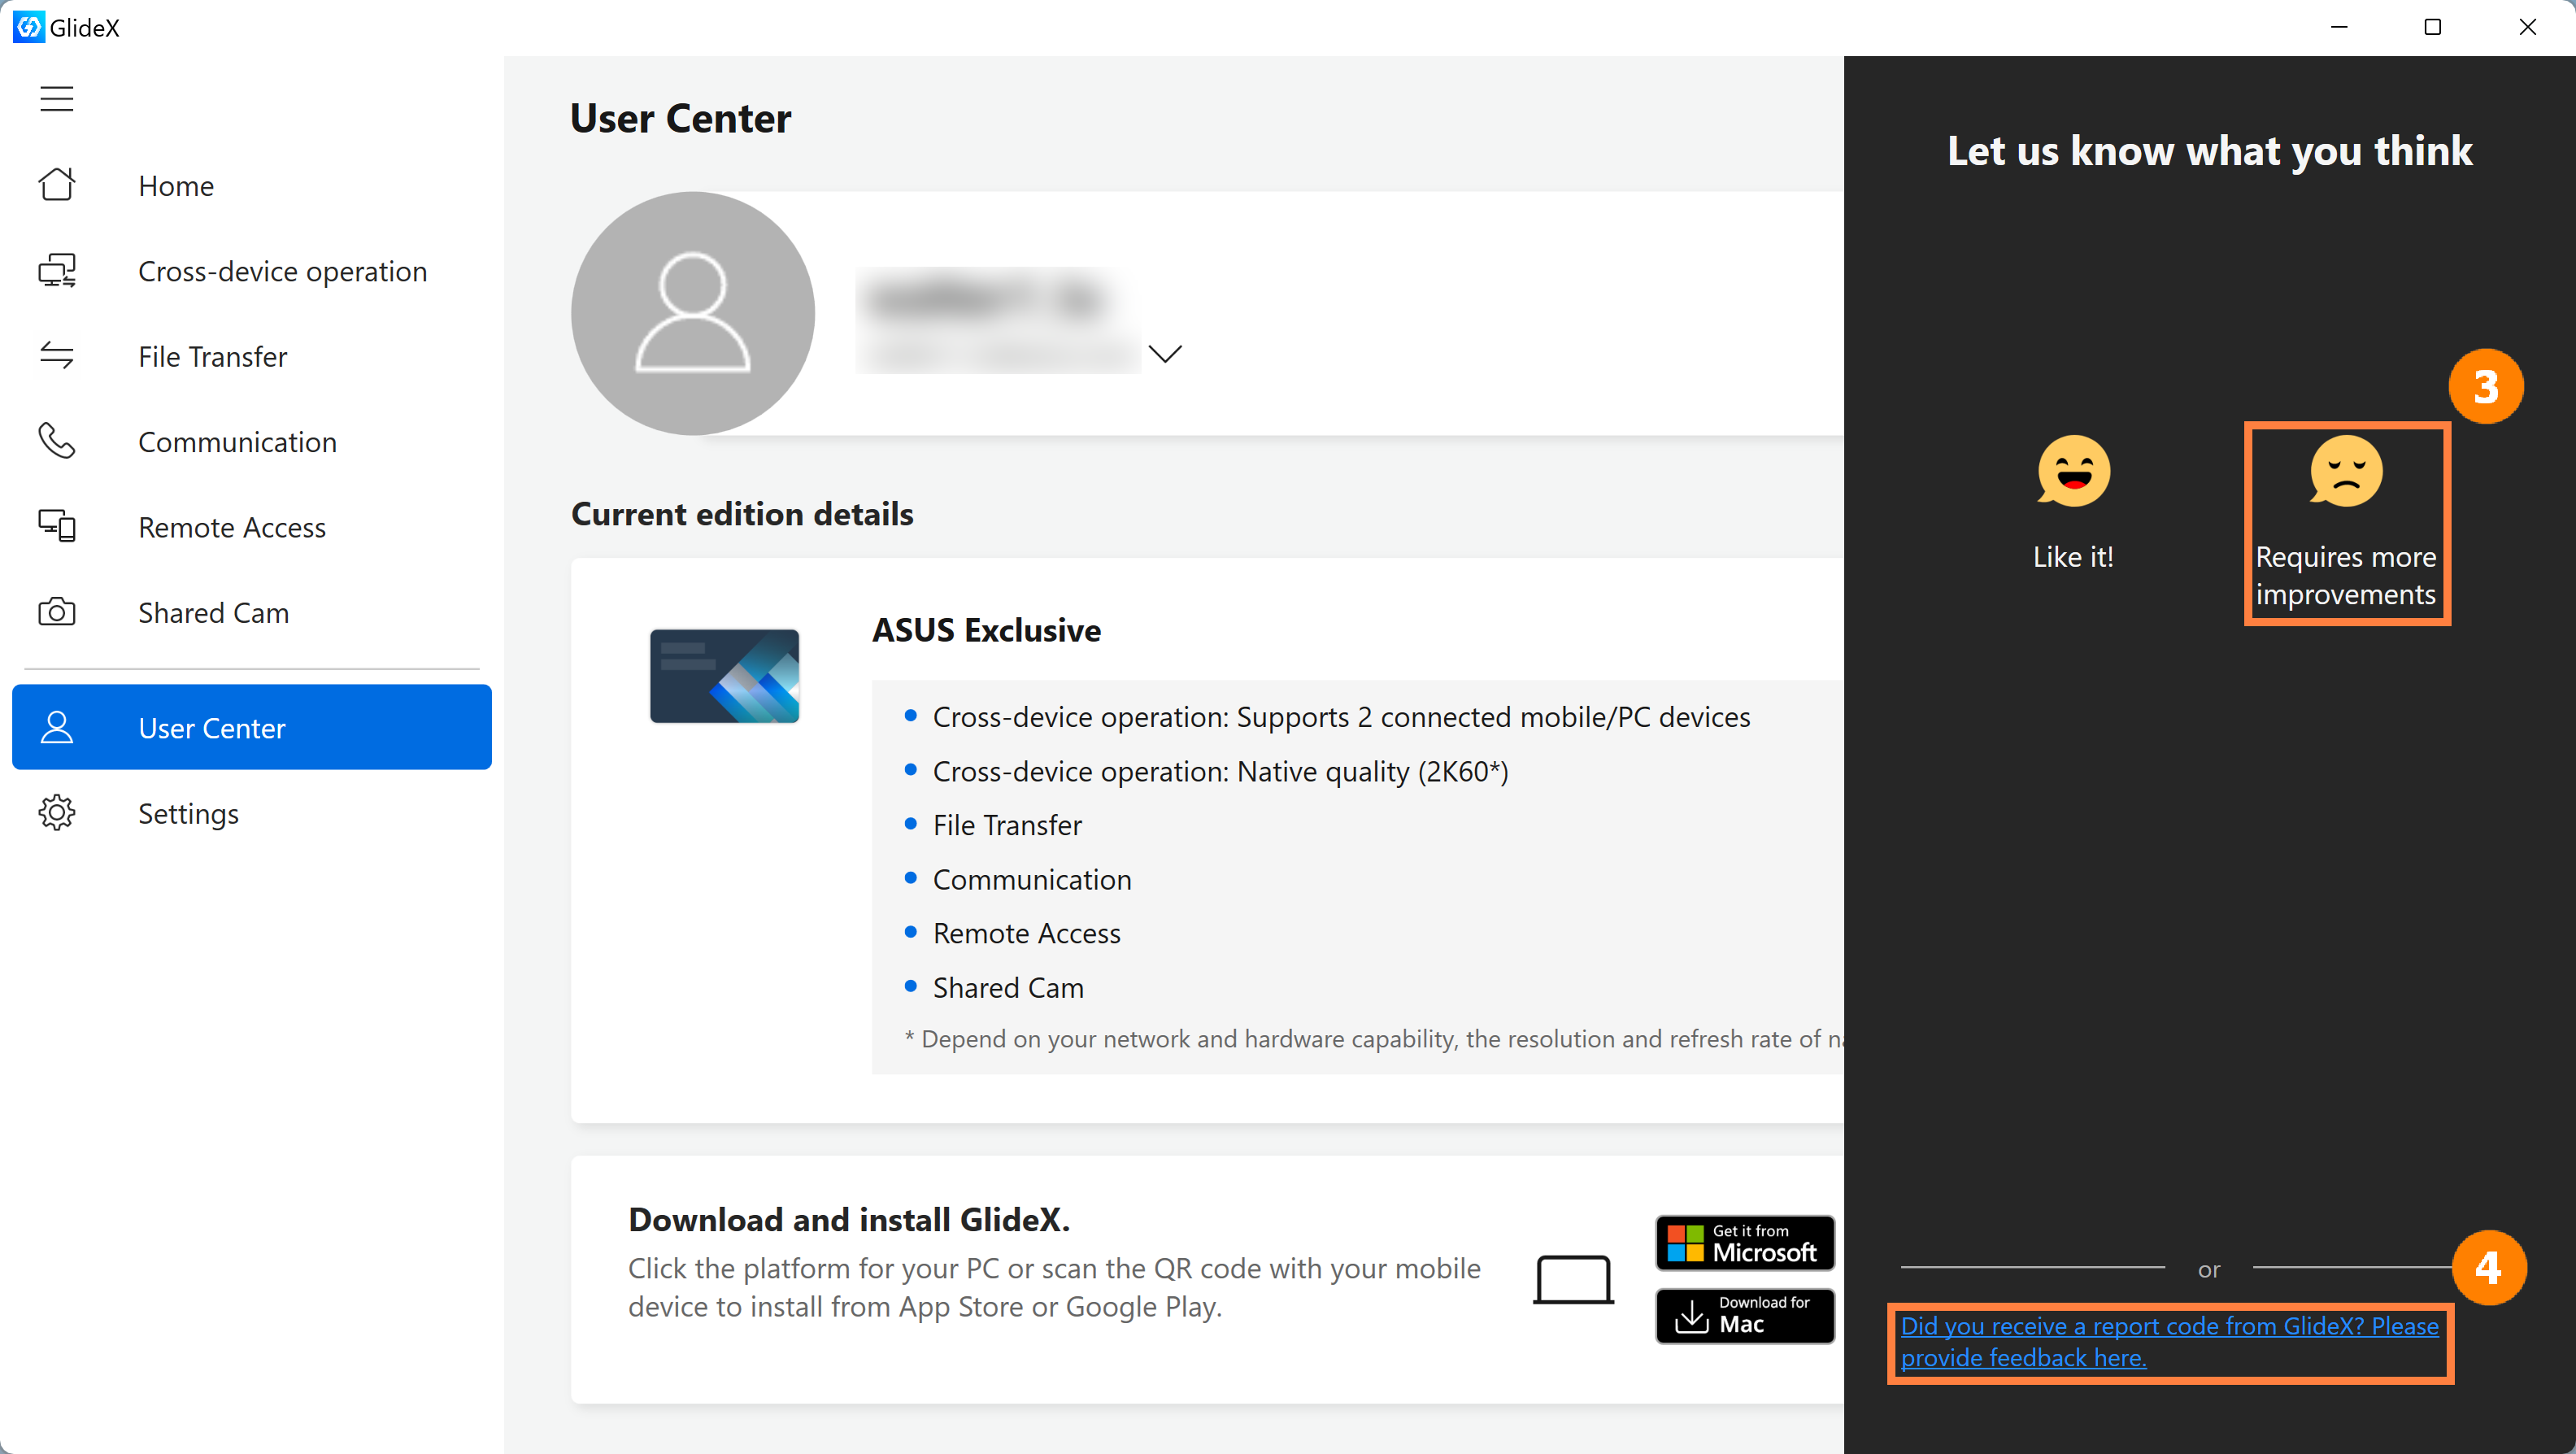
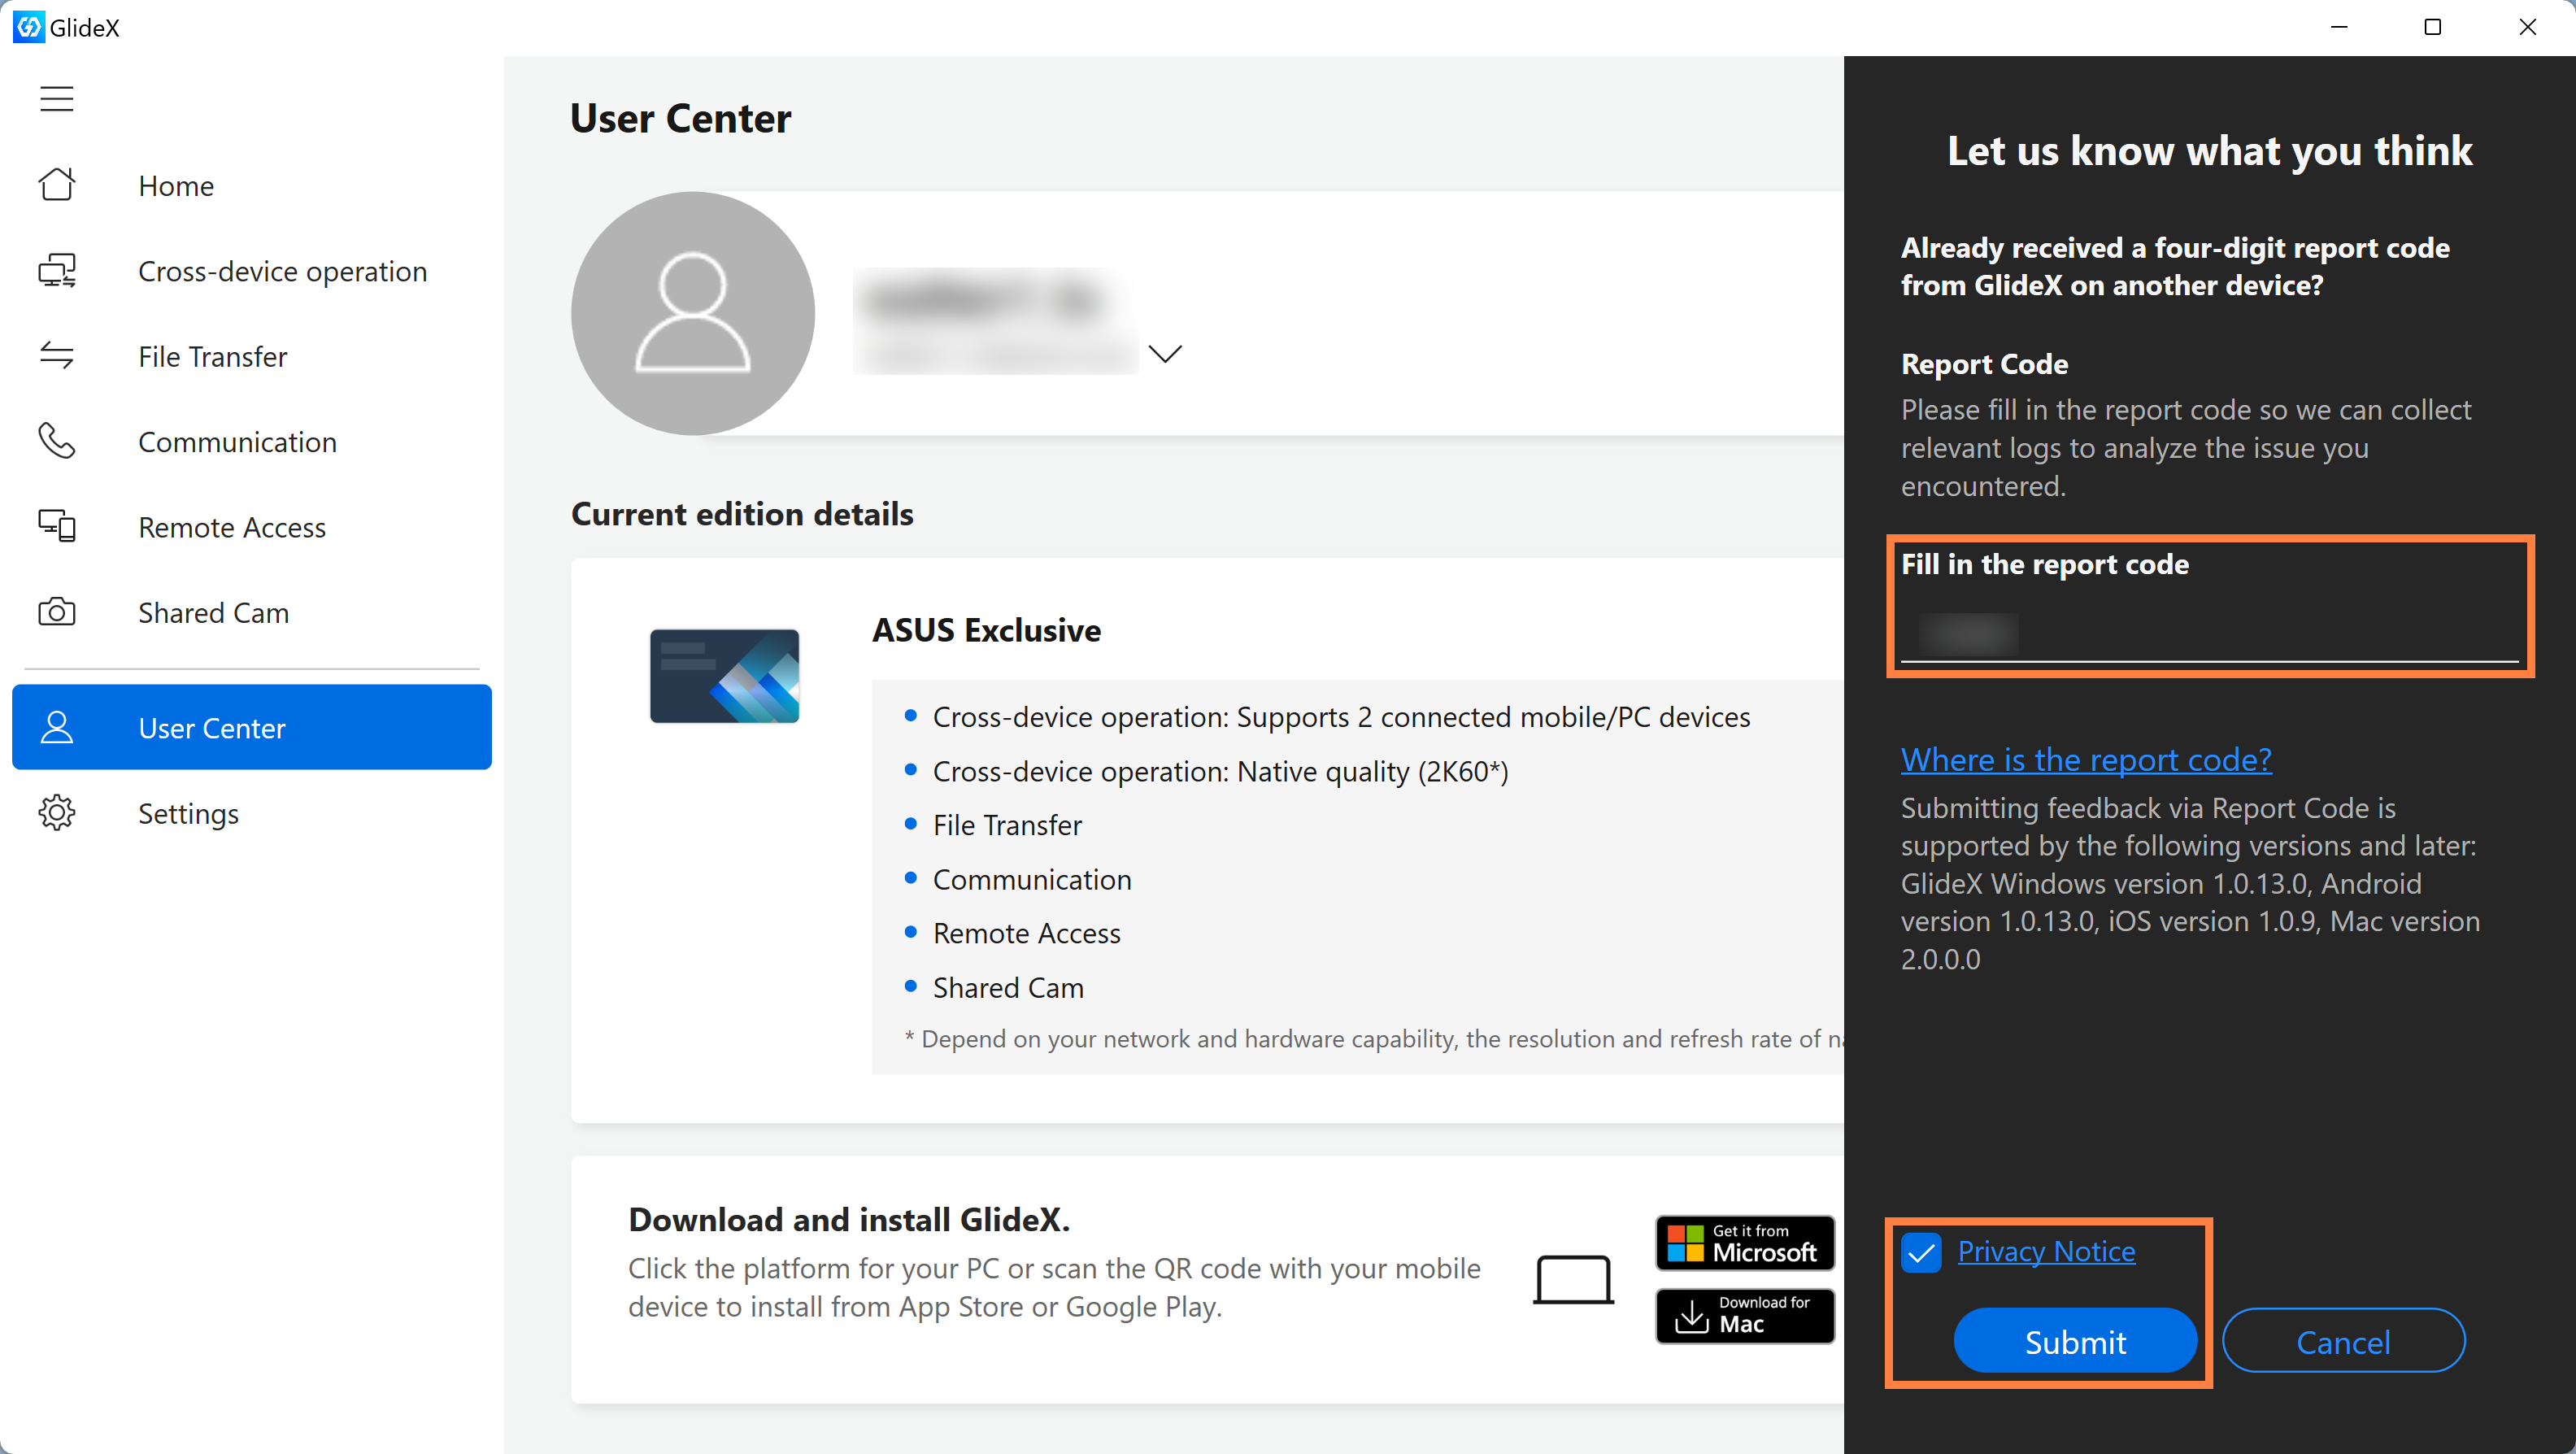
(2) If you have not yet received a Report Code from the GlideX Mobile App, select ③[Requires more improvements], and if you already have a Report Code, select ④[Did you receive a report code from GlideX? Please provide feedback here].
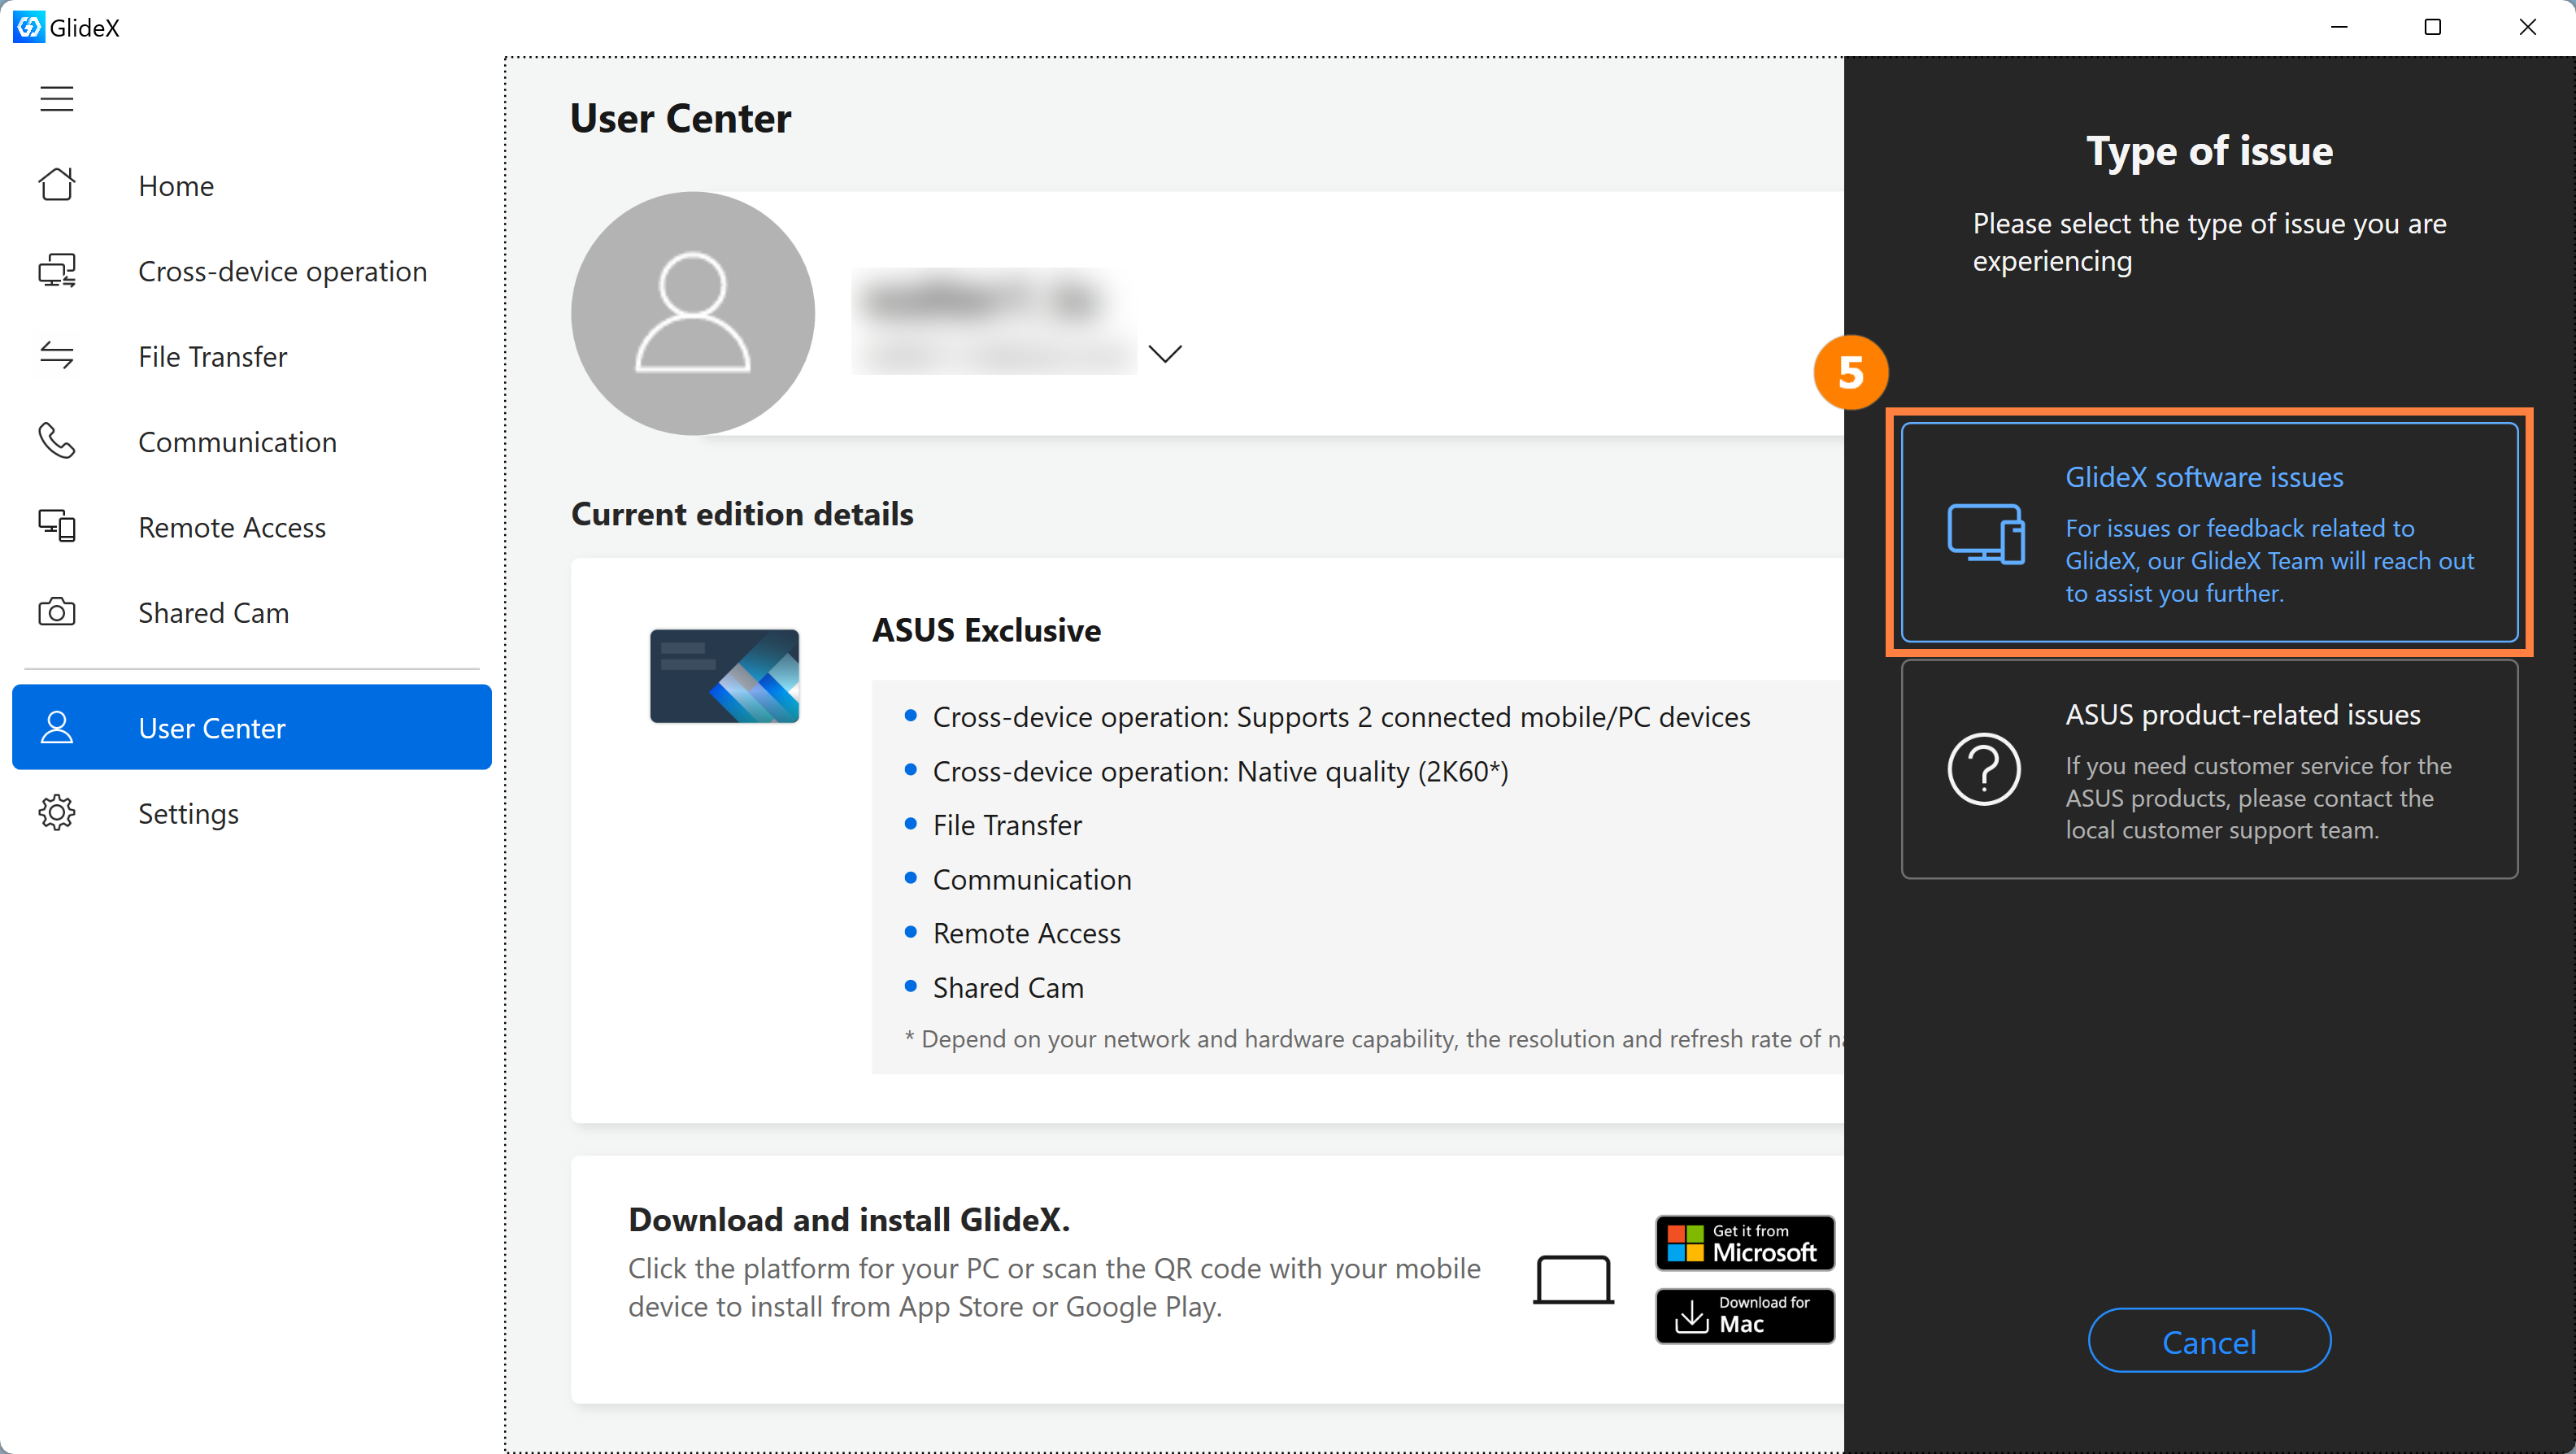
(3) Click ⑤[GlideX software isssues].
(4) Fill in your contact information and the problem you encounter in the ⑥[input box], and click agree ⑦[Privacy Notice & Submit].
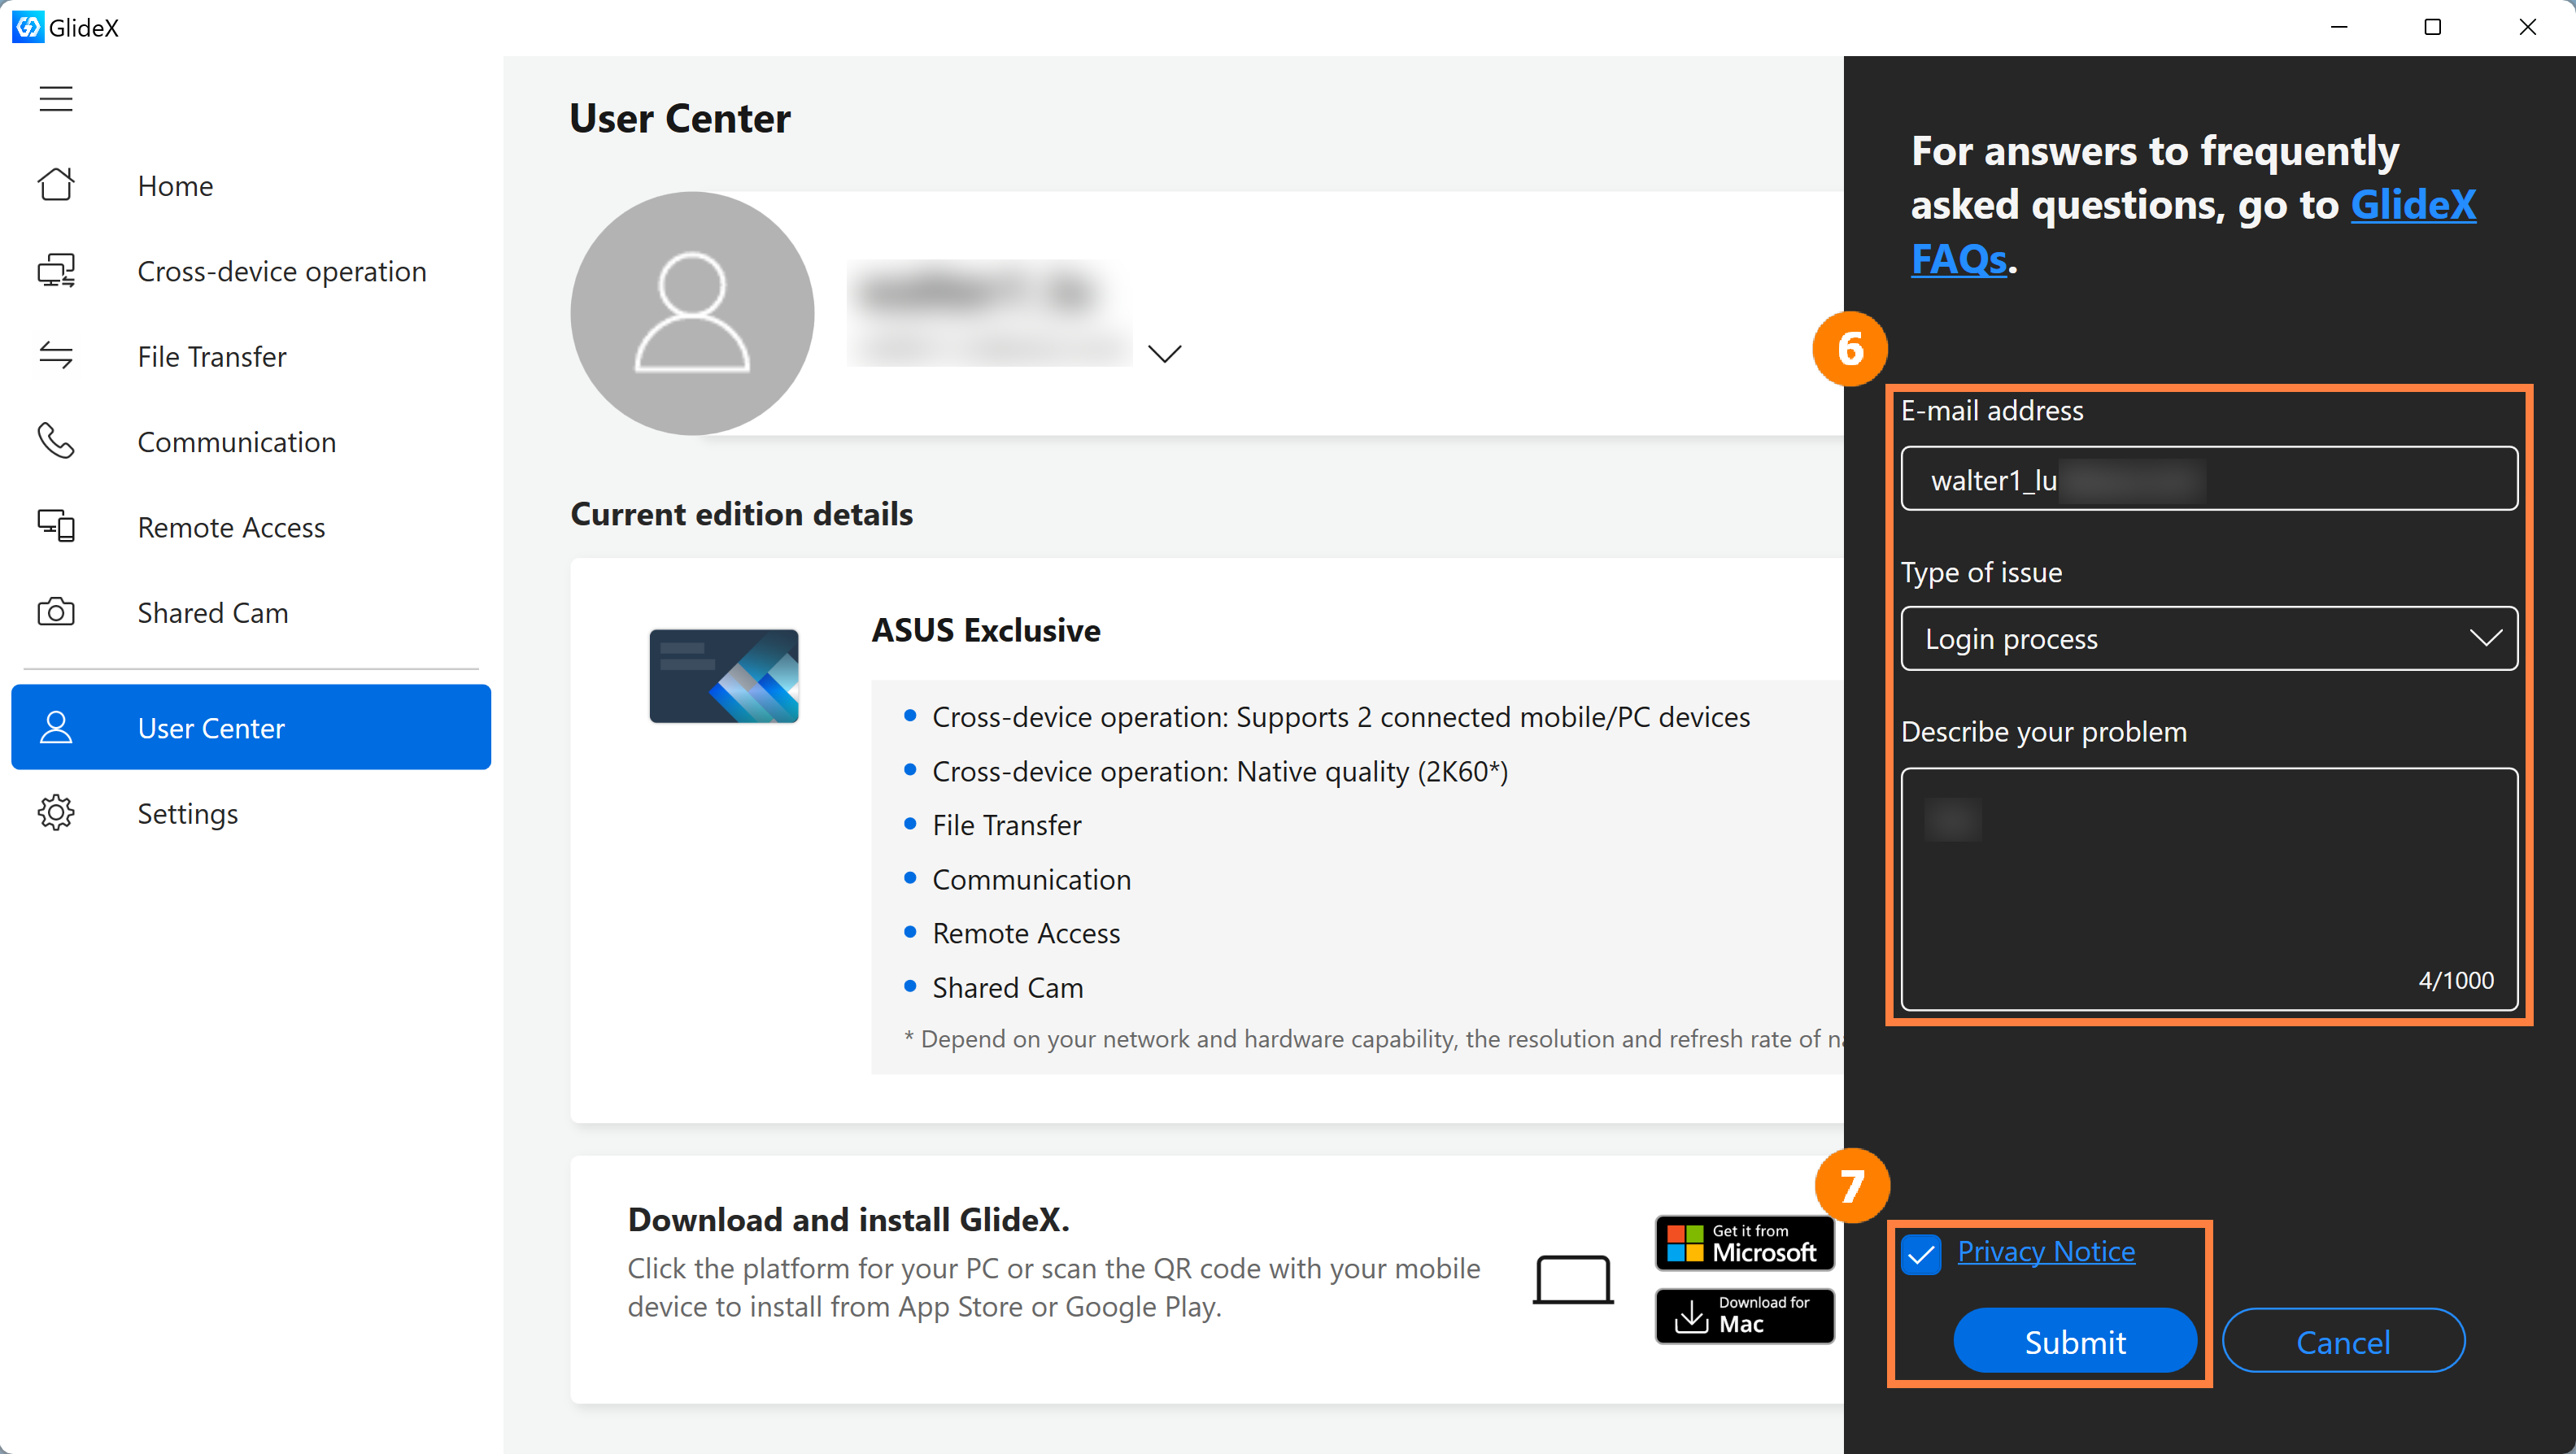
(5) You will receive a Report Code, please go to other devices using GlideX to continue to report your problem.
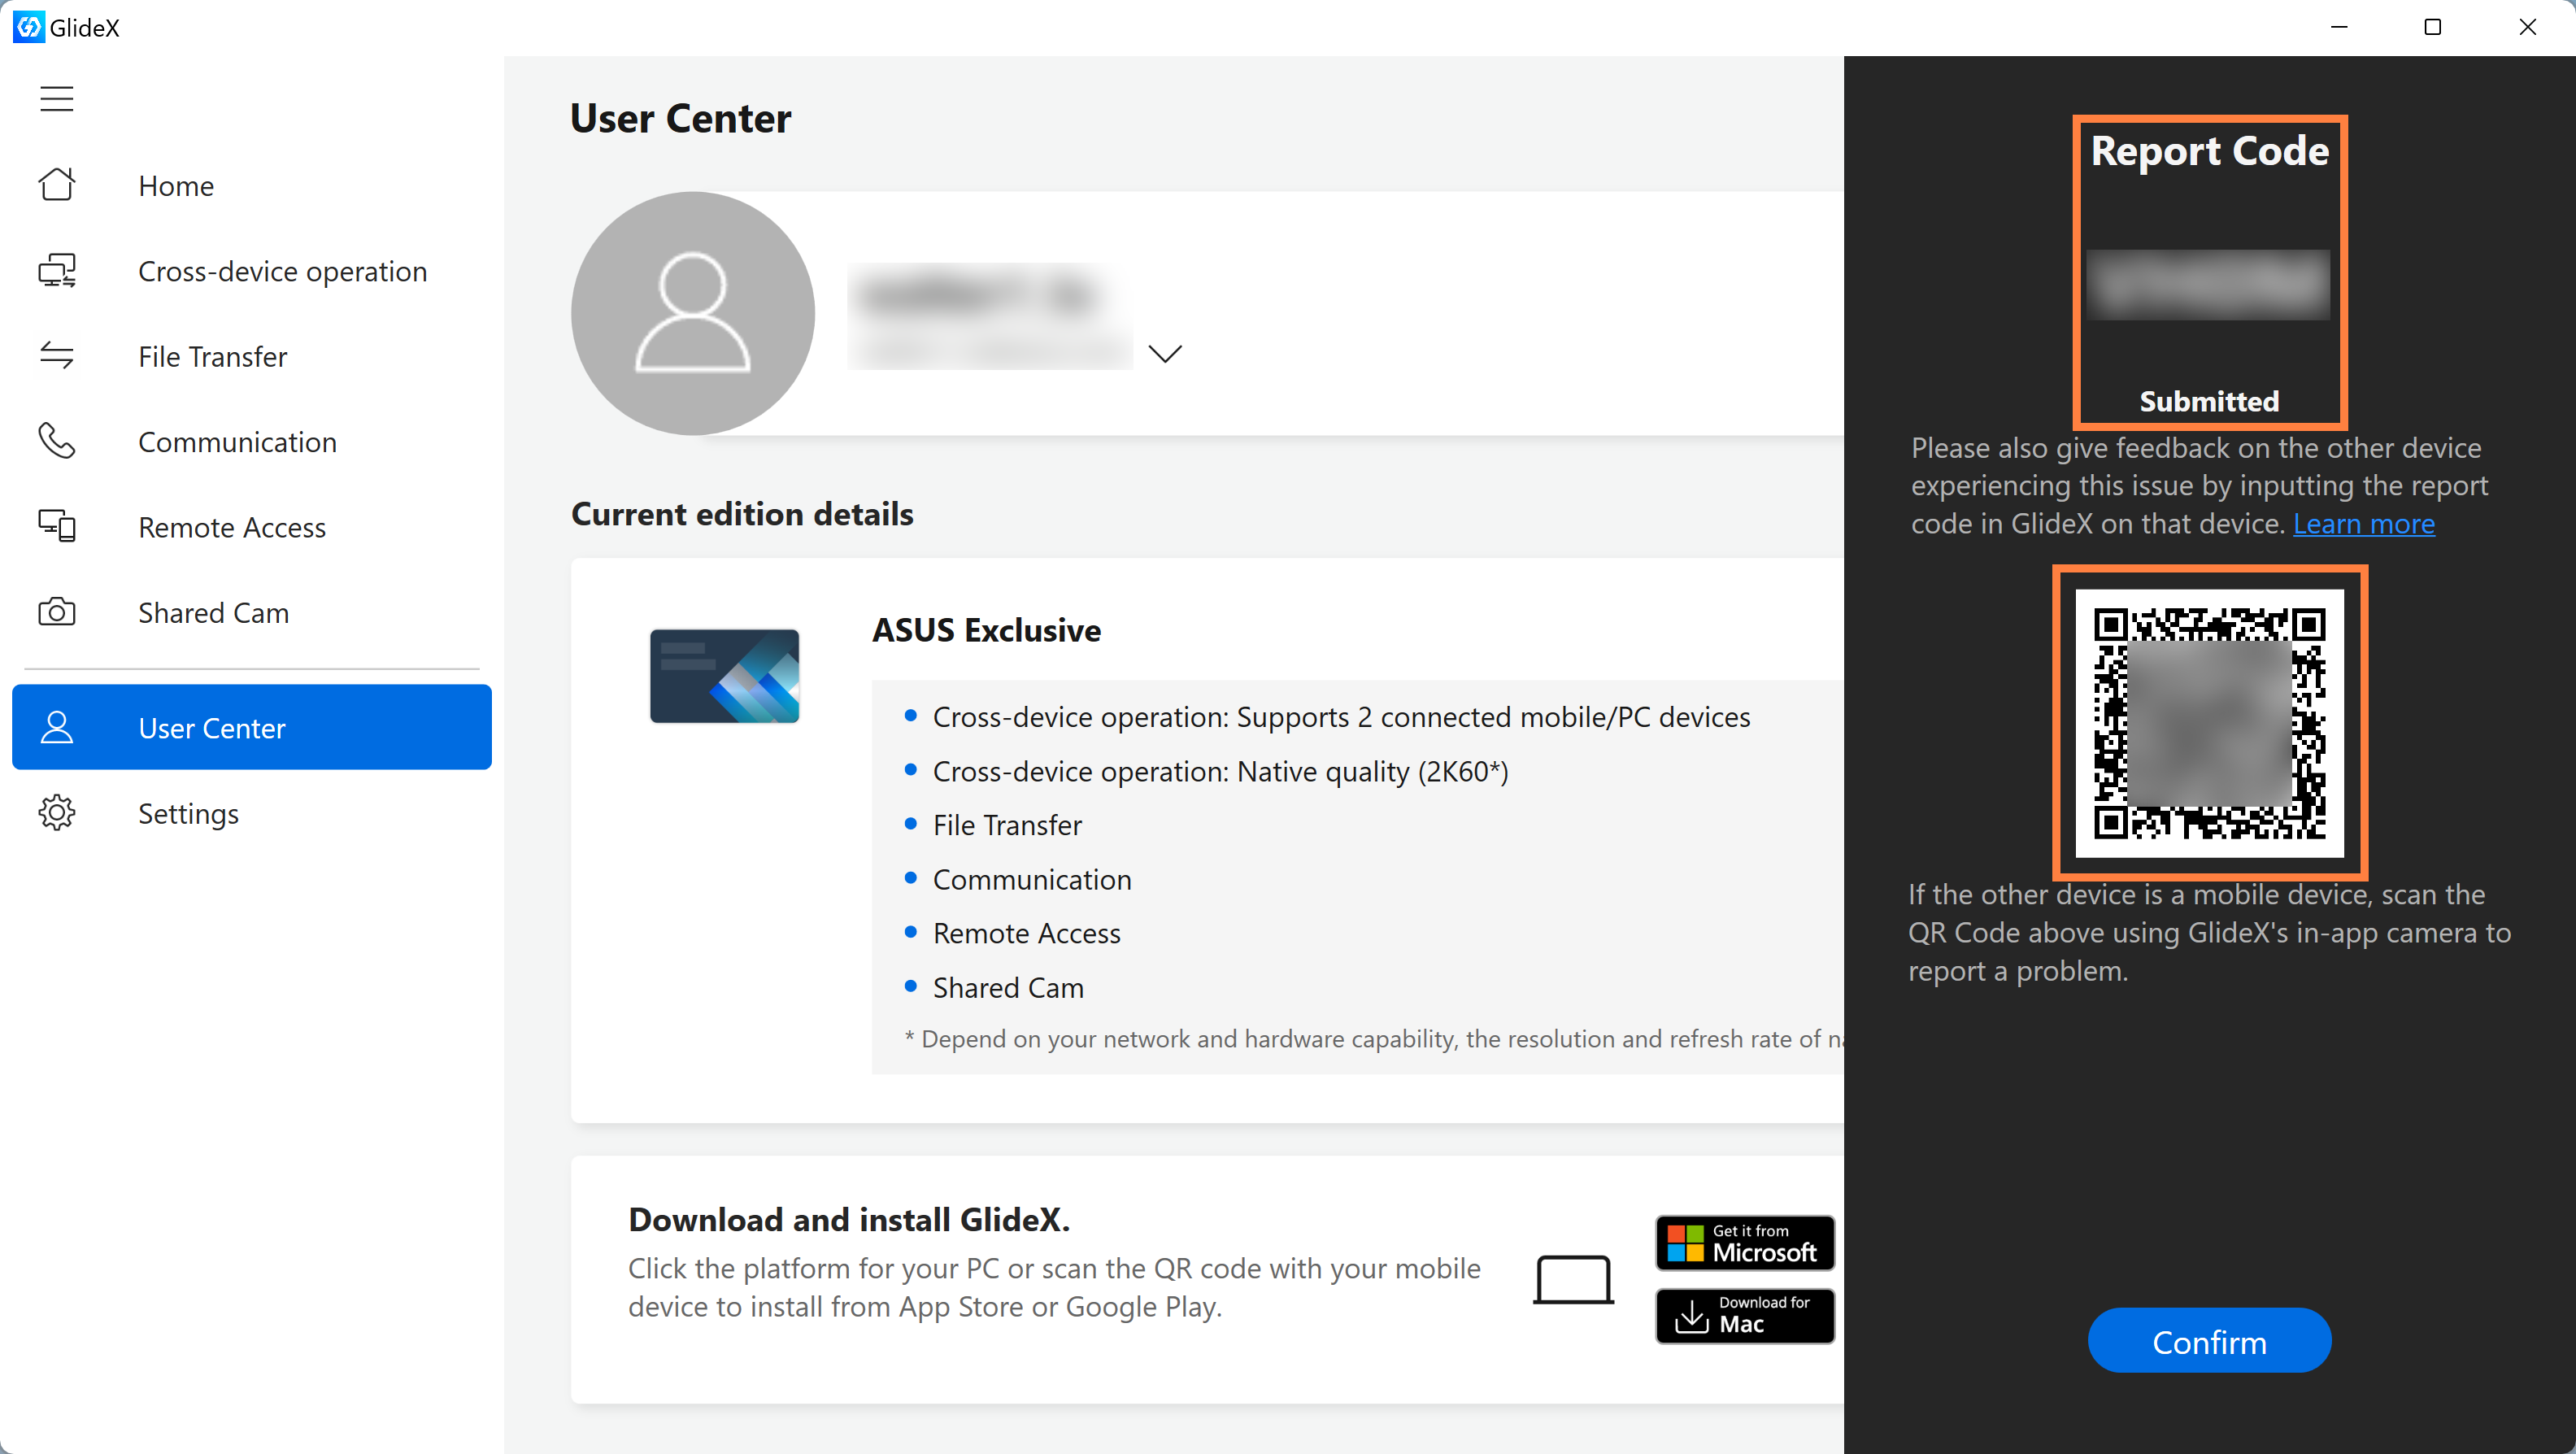
2. Enter the Report Code into GlideX on another computer
If you click [Did you receive a report code from GlideX? Please provide feedback here] on another computer, you will be taken to the following screen, please enter the [Report Code] on this page, and then click [Privacy Notice & Submit].
3. Feedback from the GlideX App on mobile side
Click ①[Scan] to scan the QR Code displayed on the computer, and the system will automatically fill in ②[Report Code], click ③[Agree to ASUS Privacy Notice], and click ④[Submit].

[GlideX] Cannot connect your devices to use Shared Cam in third-party video-communication services?
Please first ensure that GlideX PC application requires 3.1.0.0 or later version; ASUS System Control Interface 3.0.9.30 or later version, and that GlideX mobile device application requires Android: 2.2.1.10 or later version;iOS: 2.2.2 or later version. Besides, the third-party communication app you use supports higher resolution*.
*Currently, GlideX Shared Cam supports 1080p resolution.
1. Before using GlideX Shared Cam to start your meeting, video chatting, or live streaming in a third-party video-communication service, please set up the following:
①Go to GlideX Settings > Shared Cam, and connect a device.
Please connect your PC and mobile device to the same Wi-Fi, and make your mobile device discoverable in GlideX mobile device app > Settings > switch on the toggle of Discoverability > enable Shared Cam.
②Please select Link to GlideX -Shared Cam in a third-party communication app > Settings > Video device.
③Please allow the permissions of GlideX Shared Cam.
④Please ensure that there are no other applications enabling a camera device.
2. If your devices can not be connected and a pop-up dialog showing that "Connection Failed" on a third-party communication app, please follow the instructions:
①You might forget to accept the connection request in the notification on your selected mobile device.
Please select your mobile device again and accept the connection request.
②Your selected mobile device and PC might be accidentally under different Wi-Fi.
Please ensure your devices connect to the same Wi-Fi, and try it again.
3. If you want to use GlideX-Shared Cam, but your video picture does not show on the window of video-communication service, please follow the instructions:
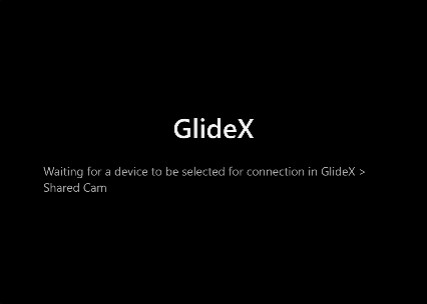
①If you see the screenshot below, it means that you have not connected your devices. Please go to GlideX Settings > Shared Cam, and connect a device.
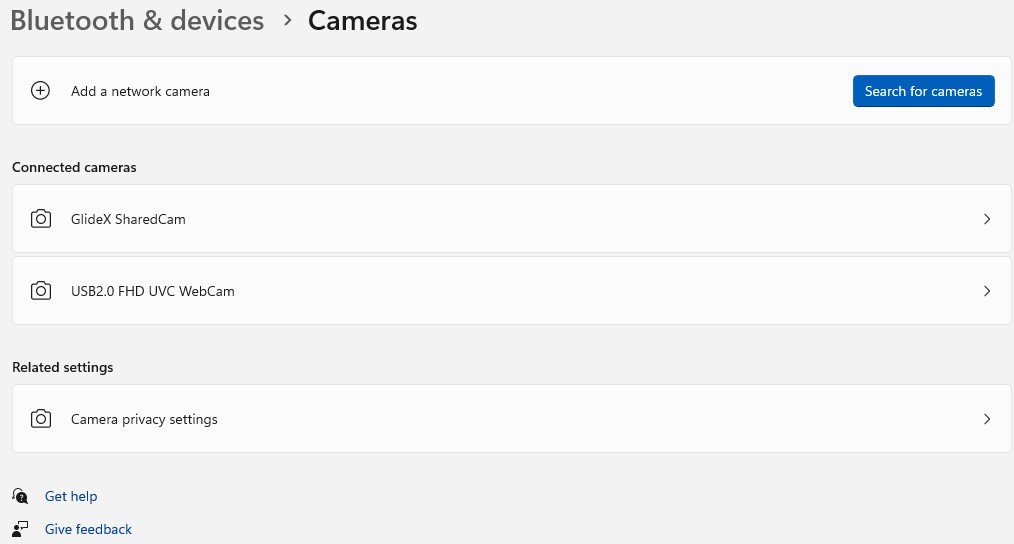
②If you see the screenshot below, it means that you have not opened the GlideX Shared Cam page. Please go back to the Shared Cam page to ensure your video picture is transferred to the connecting PC.

[GlideX] Cannot find the device you want to connect in the device list on GlideX?
Before you send and receive files or URL, please make sure your device and the PC or mobile device you want to connect satisfy the following conditions:
- It has turned on Discoverability in Settings on GlideX.
- It has Wi-Fi turned on.
- It has Bluetooth turned on and within Bluetooth range.
- If it is an Android device, please grant GlideX permission for “location access” to allow the device to be discovered.
- If it is an iOS (iPad/iPhone) device, please keep GlideX mobile app in the foreground.
[GlideX] Bluetooth pairing problems
If you want to use the GlideX Screen Mirror [PC Control] function, please make sure that your devices are connected successfully. If not, please try to follow below instructions.
1. Pair devices in the correct way to pair device's Bluetooth.
After enabling Screen Mirror, select [PC Control ] button > click [Start Bluetooth Pairing] button to connect devices; if you have successfully paired the devices via Bluetooth, please also click [Start Bluetooth Pairing] button to enable function connection.
1.1 If you are an Android user
- Make sure you allow your mobile devices to be visible to other devices during the pairing process.
- If you failed to pair, please go to mobile device [Settings] > [Bluetooth] device list, and make sure that the PC device you are going to pair is showed. Then, tap the device to trigger the connection with the PC.
1.2 If you are an iOS user
- Make sure you open and stay on the Bluetooth Settings screen until you complete the steps to pair your PC.
- If you failed to pair, please go to mobile device [Settings] > [Bluetooth] device list, and make sure that the PC device you are going to pair is showed. Then, tap the device to trigger the connection with the PC
If the screen shows the “Keyboard & Mouse” and “Audio” functionalities, that means the Bluetooth paired successful.

2. You have paired devices successfully before, but cannot paired them again?
Please go to Bluetooth system page on the PC and mobile device to remove the devices. After completely removing, try to pair them again. Please refer to the steps below:
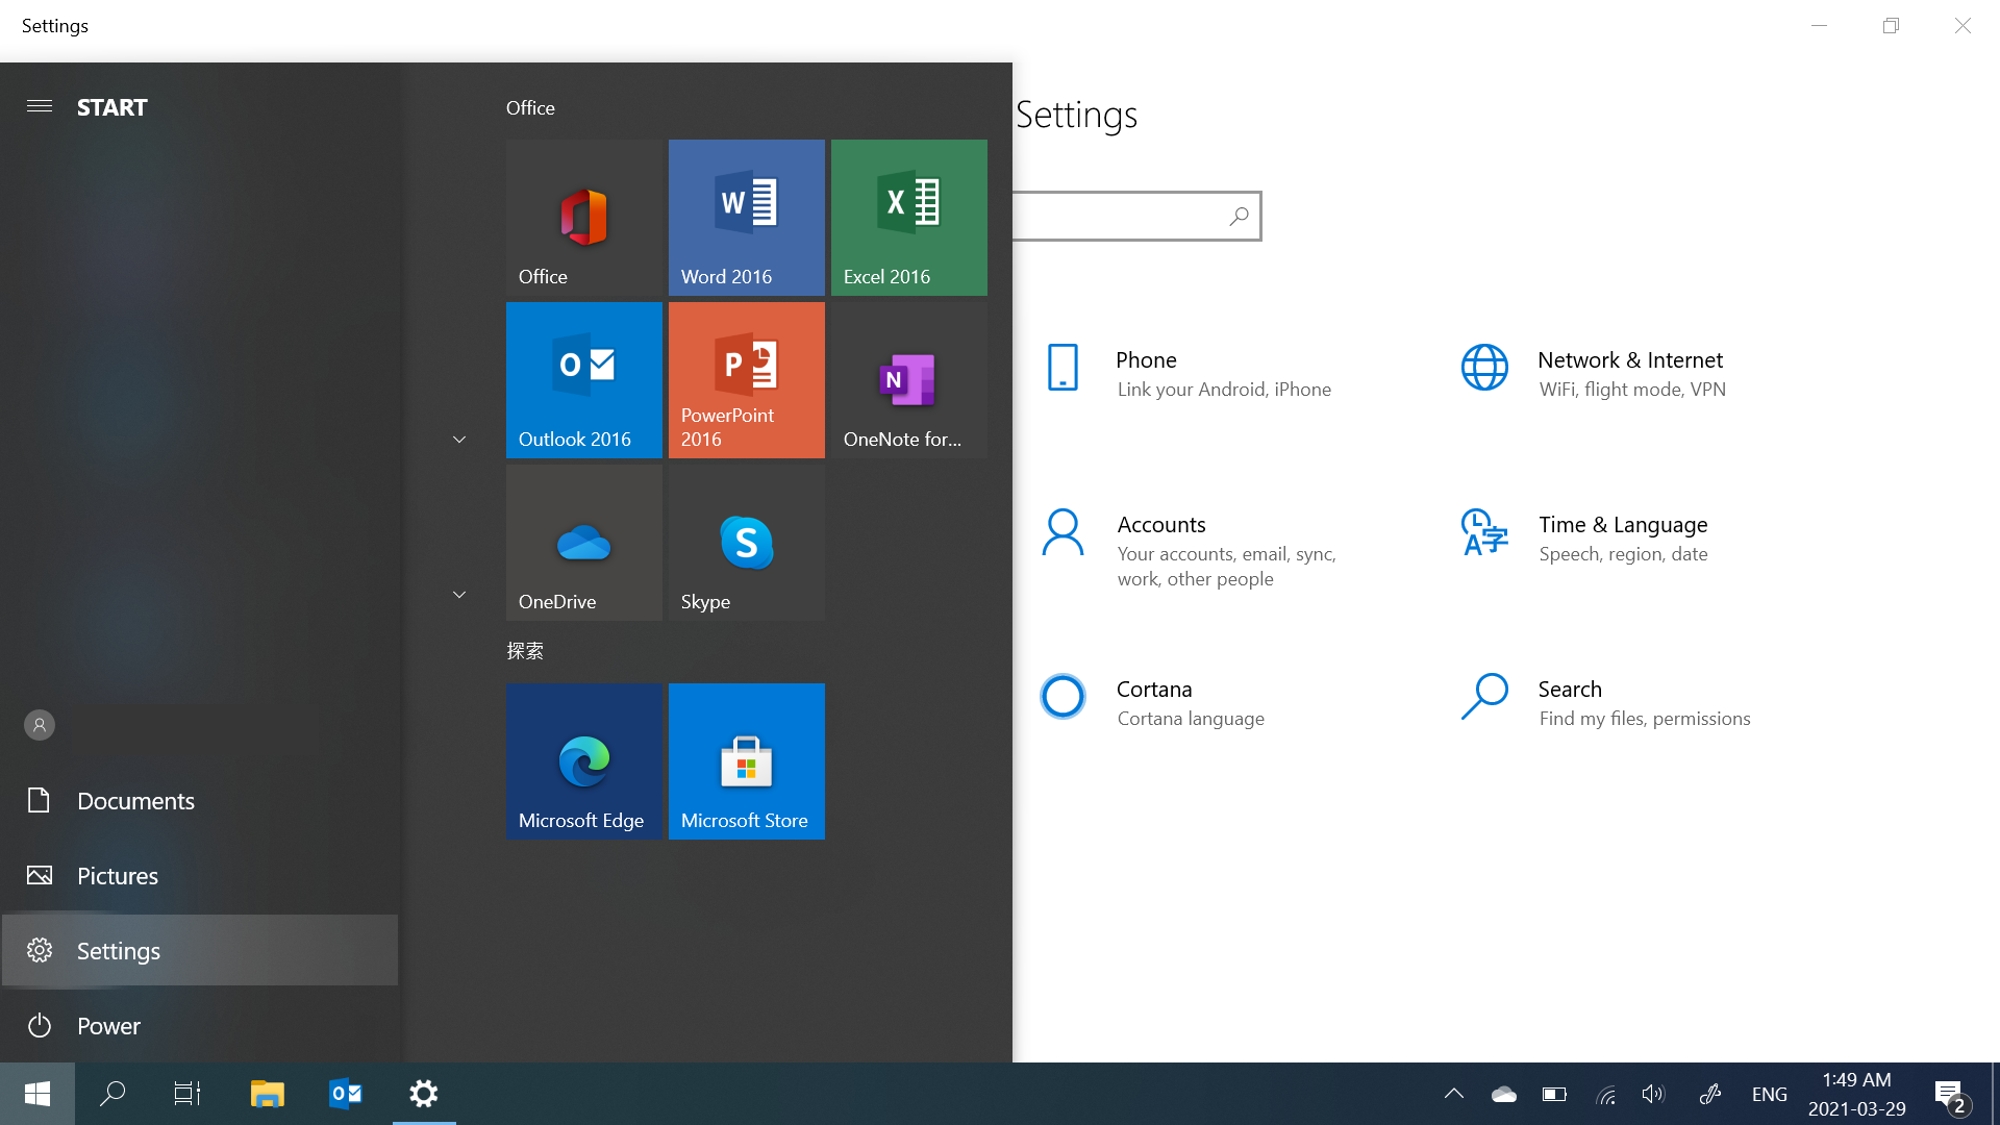
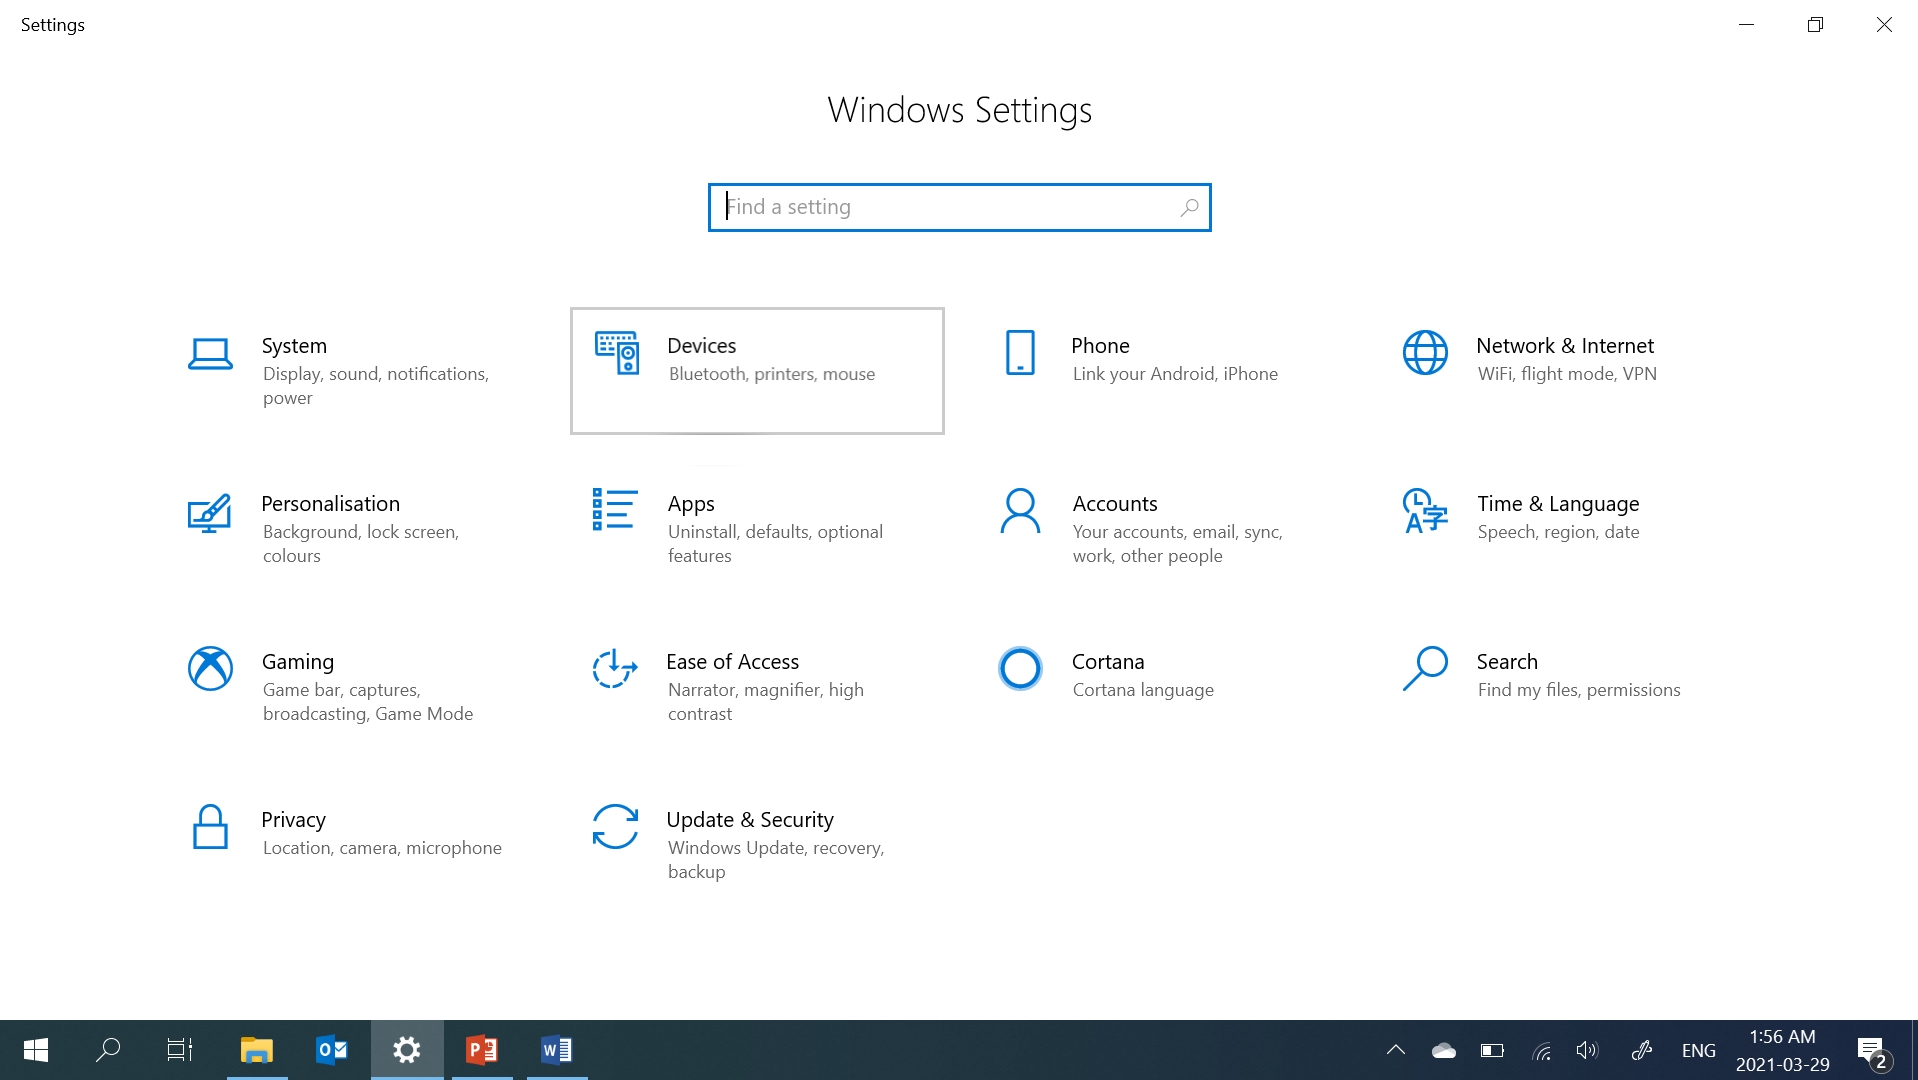
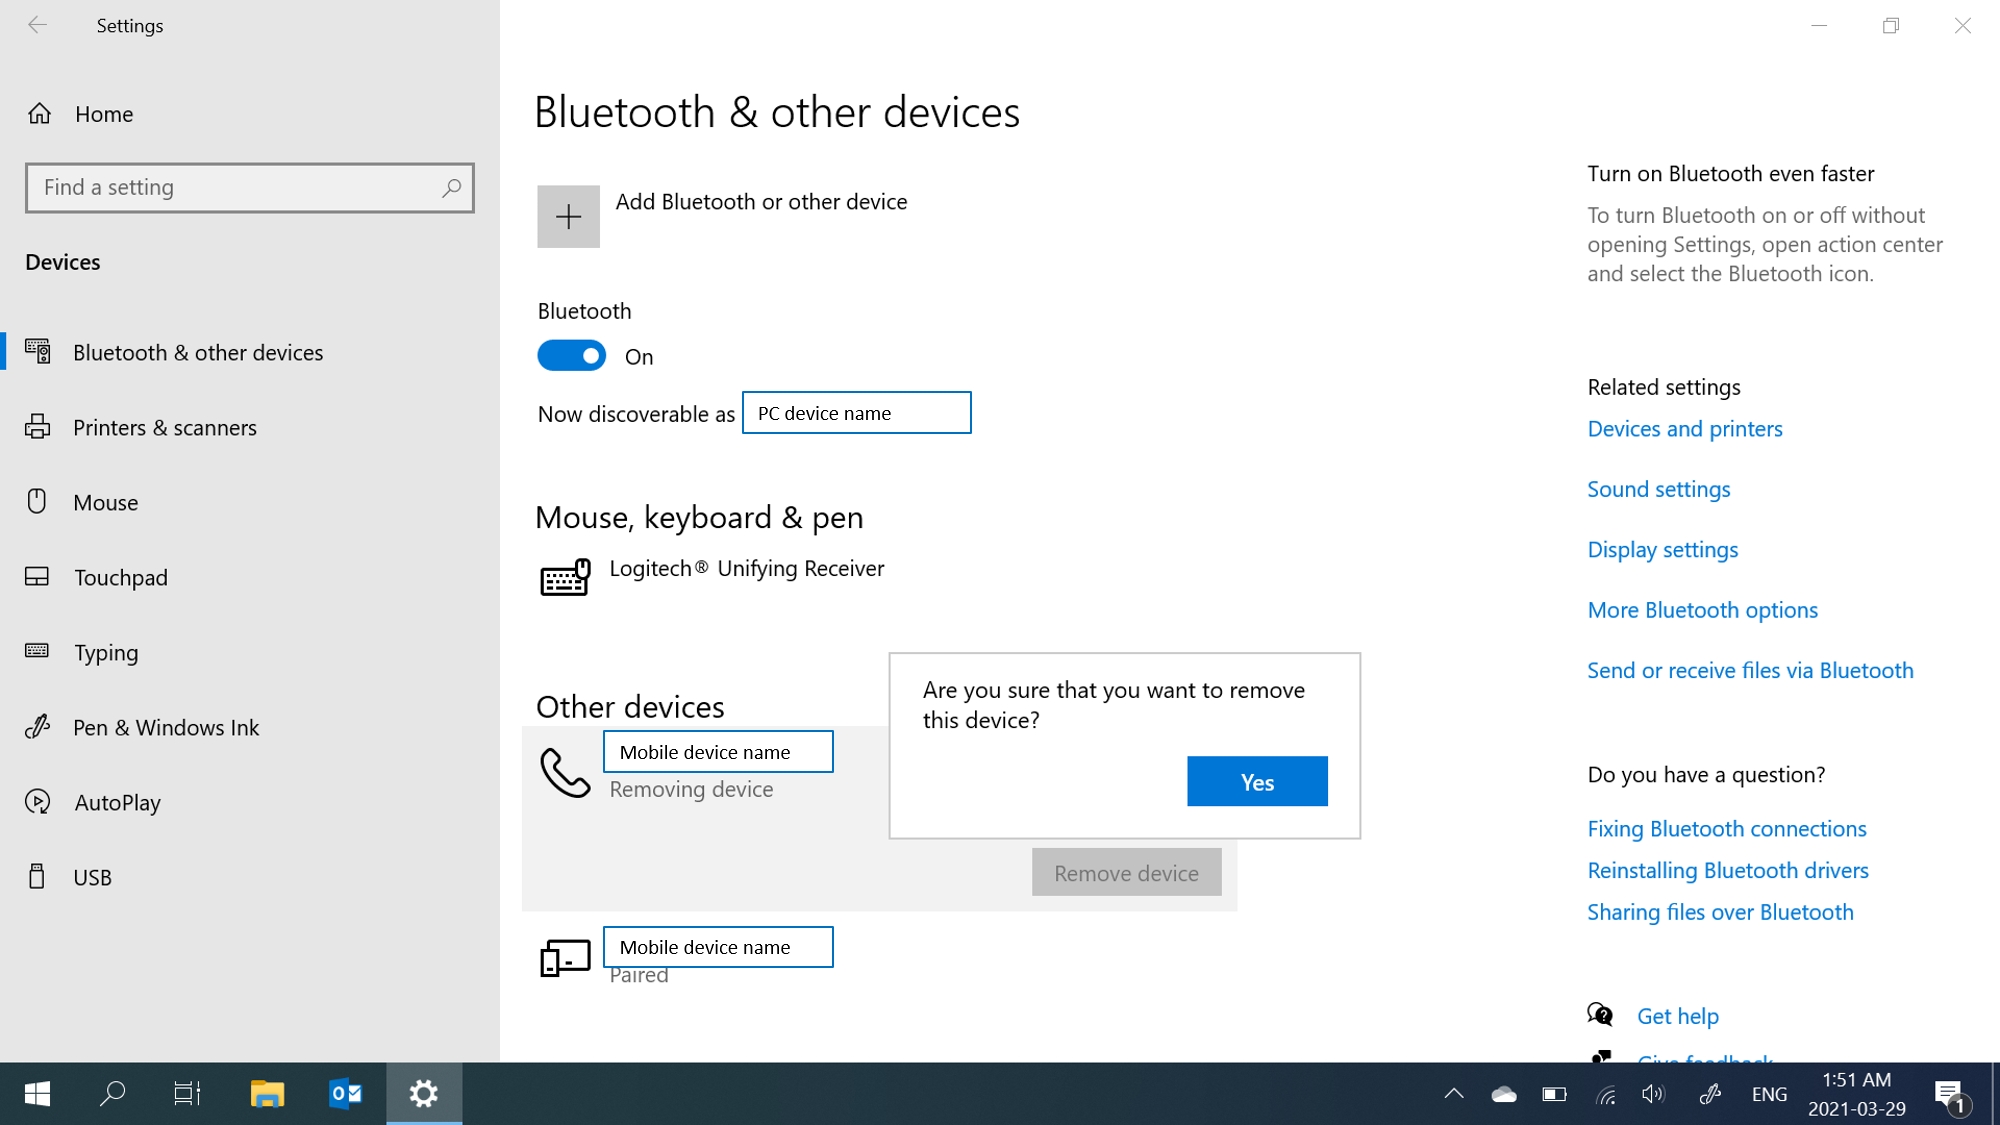
2.1 PC Side - Remove the device in the Settings: Select [Start], then select [Settings] > [Devices] > [Bluetooth & other devices]. In Bluetooth, select the device you’re having problems connecting to, and then select [Remove device] > [Yes].
2.2 Mobile device side - Remove the device in the Settings: Go to the Bluetooth Settings page on mobile > Tap the connected PC > Tap [Unpair]. After removing the Bluetooth device, then pair devices again
2.3 Confirm that there is no paired device you had problems connected to on the Bluetooth setting page of the PC and the mobile device side, which means that the Bluetooth pairing is completely done. Please try to pair the devices again.
※ If re-pairing does not solve the problem, please turn off Bluetooth on your computer and mobile device and turn it on and try to pair the device again.
3. When Bluetooth does not work, or Bluetooth is lost
- Reset Bluetooth settings: Turn off your PC's and Mobile's Bluetooth settings, and turn them on again.
- Make sure airplane mode is off: Select [Start], then select [Settings] > [Network & Internet] > [Airplane mode]. Make sure “Airplane mode” is turned off. Then, turn Bluetooth on: Select [Start], then select [Settings] > [Devices] > [Bluetooth & other devices].
- Make sure Bluetooth works: Please check in the taskbar and select [action center] in the bottom right corner or go to [Settings] to ensure that your PC supports Bluetooth, and that Bluetooth is not missing. If the Bluetooth button is missing, please try to update to the latest driver or restart your PC.
- If you encounter the notification request of Bluetooth pairing repeatedly pops up, please restart your PC and try again.
*For more information about the Bluetooth problem, please refer to Microsoft official information to repair Bluetooth device.
[GlideX] Cannot connect your Devices via Bluetooth to use Communication in GlideX?
If you want to use the GlideX Communication function, please make sure that your devices are connected successfully. If not, please try to follow below instructions.
1. When Bluetooth does not work or Bluetooth is lost
- Make sure airplane mode is off: Select Start, then select Settings > Network & Internet > Airplane mode. Make sure Airplane mode is turned off. Then, turn Bluetooth on: Select Start, then select Settings > Devices > Bluetooth & other devices.
- Make sure Bluetooth works: Please check in the taskbar, and select “action center” in the bottom right corner or go to “Settings” to ensure that your PC supports Bluetooth, and that Bluetooth is not missing. If the Bluetooth button is missing, please try to update to the latest driver or restart your PC.
- If you encounter the notification request of Bluetooth pairing repeatedly pops up, please restart your PC and try again.
*For more information about the Bluetooth problem, please refer to Microsoft official information to repair Bluetooth device.
2. Pair devices in the correct way in GlideX
2.1 If you are an Android user
Please open the GlideX mobile device application tap “Start to connect to computer via Bluetooth” in “Communications”.
2.2 If you are an iOS user
Please open the Link to GlideX mobile device application “Side menu” > tap “Start to connect to computer via Bluetooth” in “Communications”.
3. You have paired devices successfully before, but cannot paired them again? Please go to GlideX and the Bluetooth system page on the PC and mobile device to remove the devices. After completely removing, try to pair them again. Please refer to the steps below:
3.1 PC Side
- Disconnect the device in GlideX:
Open the “GlideX” PC App > Click the drop-down list of connected devices on the “Communication” page, select the currently connected device, and click the “Disconnect” button.
*If your device is an iOS system, GlideX Communication does not support the "App" function.
- Remove the device in the Settings:
Select “Start”, then select “Settings” > “Devices” > “Bluetooth & other devices”. In Bluetooth, select the device you’re having problems connecting to, and then select “Remove device” > “Yes.”
3.2 Mobile device side
- Unpair the device on GlideX:
Open “GlideX” mobile app > Tap the connected device > Tap “Unpair” button.
- Remove the device in the Settings:
Go to the Bluetooth Settings page on mobile > Tap the connected PC > Tap “Unpair”.
4. After removing the Bluetooth device, then pair devices again. Confirm that there is no paired device you had problems connected to on the Bluetooth setting page of the PC and the mobile device side, which means that the Bluetooth pairing is completely done. Please follow the GlideX steps to try to pair the device again.
[GlideX] How to download and install GlideX on macOS?
GlideX is a convenient cross-device, cross-platform screen-sharing, and screen-control solution. It gives you more space to work — or play! — using wired or wireless connections between your devices, and you can control all your devices with a single keyboard and mouse.
GlideX supports Windows, Mac, Android, and iOS systems. This article is the download and installation process for macOS. If you do not have a Mac system, please go to the corresponding platform to download Microsoft Store, Google Play Store, Android APK, and Apple App Store (GlideX mobile devices).
Download GlideX for macOS
First, click this link to download the GlideX mac installer (about 22 MB) to your macOS. After the download is complete, you will see the file GlideX-Mac_x.x.x(x).dmg1.
Note1: x.x.x.(x) in the file name will display the latest version number of the current GlideX application.
Install GlideX for macOS
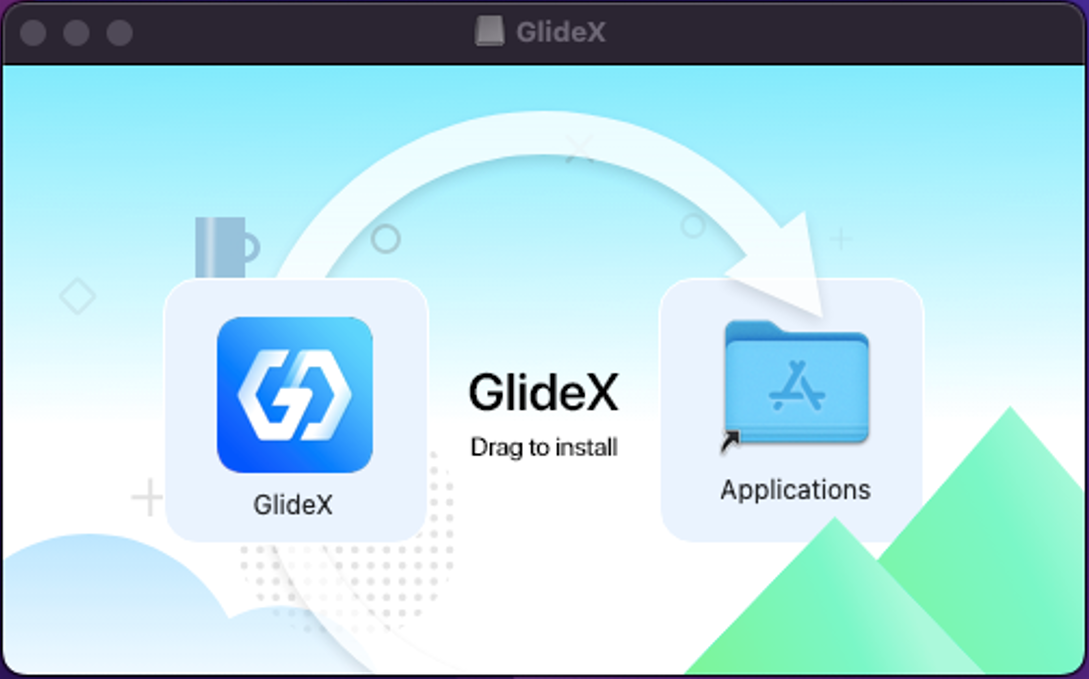
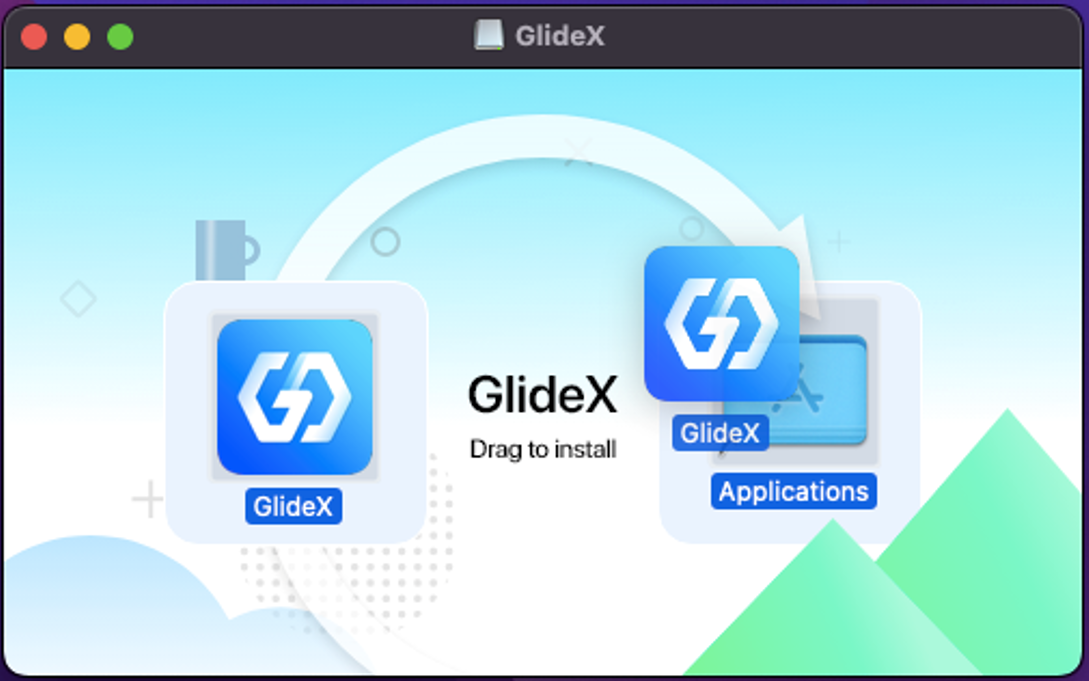
Double-click the downloaded GlideX-Mac_x.x.x(x).dmg file in the download path, you will see the (Figure 1) window; then, drag GlideX to the application folder (Figure 2) to complete the installation process.
(Figure 1)
(Figure 2)
[GlideX] How to Use Screen Mirror PC Control
How to Use Screen Mirror PC Control
The “PC Control” function of the Screen Mirror allows users to use the computer mouse to control the mobile device on the computer, use the keyboard for input, and also output the sound of the mobile device from the speaker on the computer. If you encounter the difficulties, please seek troubleshooting based on the type of device you are using.
- The “PC Control” function requires your computer with Bluetooth 3.0 or above, and it will be enabled after your mobile device’s and PC's Bluetooth being paired.
- One of the PC Control functions, “audio” function, requires your computer operating system to be 20H1 or later. If it is a lower version, it is recommended that you upgrade the operating system to use this function. Currently, GlideX supports streaming stereo music.
Troubleshooting for iOS device users
Troubleshooting for Android device users
Troubleshooting for iOS device users
1. Function connection failed
If you enter the [PC Control ] function page, it shows that the function connection failed
 , please click the [Retry] button of the mirror window function. If the connection is still not successful, please try to pair the devices' Bluetooth again.
2. Use the mouse to control the mobile device on the computer
2.1 Enable [AssistiveTouch] - To display the cursor on the mirrored window, please go to your mobile device [Settings] > [Accessibility] > [Touch] > Turn on [AssistiveTouch], or ask Siri to [Turn on AssistiveTouch].
2.2 Adjust the speed of the Trackpad & Mouse - To have the better user experience, go to your mobile device [Settings] > [General] > [Trackpad & Mouse], we recommend that you drag the "Tracking Speed" slider to the lowest. At the same time, turn off the [Natural Scrolling] setting to maintain your scrolling behavior on the computer.
2.3 Confirm to unlock the [screen orientation] - To avoid the mouse operated unexpectedly, please make sure that the “screen orientation” is unlocked. You can swipe down from the upper right corner of the screen to open "Control Center" and tap the [screen orientation] button to confirm that the function is unlocked.
3. Use the keyboard to input
The computer keyboard is the Bluetooth keyboard of your mobile device. If you want to use the hotkey to switch languages, you can press [Ctrl + Space] keys to switch. If you want to quickly return to the homepage of your mobile device, you can press the [Ctrl + H] keys, or click the home button on the side menu of the mirrored window.
Troubleshooting for Android device users
1. Function connection failed
If you enter the [PC Control] function page, it shows that the function connection failed, please enter the mobile device [Bluetooth] settings, select the current [paired device] name, enter the device's [Settings], and turn on the corresponding [Audio] or [Input Device] permission, and then click the [Retry] button on the [PC Control] function page of the mirrored window. If the connection is still not successful, please try to pair the devices’ Bluetooth again.
2. Use the mouse to control the mobile device on the computer
To adjust the pointer speed, you can click the [PC Control] button from the side menu of the mirrored window and click the [Pointer Speed] [Settings] button on the [Keyboard & Mouse ] tab to enter the mobile device [Mouse and trackpad speed] system page, you can customize the speed according to your personal preference.
3. Use the keyboard to input
The computer keyboard is the Bluetooth keyboard of your mobile device. If you want to use the hotkey to switch languages, you can press [Shift + Space] key to switch, for example, switch from English to Chinese; if you want to switch the input method, press [Shift + Alt] to switch, for example, switch from Samsung keyboard to Google keyboard.
[GlideX] How to switch from 2.4GHz to 5GHz for a better screen sharing experience?
Differences between 2.4GHz and 5GHz networks
Note: Channels supported by 2.4GHz and 5GH vary according to regional/national regulatory restrictions.
By distance comparison, the transmission distance of 2.4GHz signal is farther than 5GHz, but the speed is slower than 5GHz, and although the signal transmission distance is short, it can be faster. In terms of frequency band usage, in addition to WiFI will use 2.4 GHz band, Bluetooth, home wireless phones are in use, some household appliances such as flulights, microwave ovens, refrigerators may be in this band, and thus produce interference to wireless channels, so the connection in the 2.4GHz band, network transmission is unstable or vulnerable to interference leading to poor quality of the connection. Routers and personal hotspots are therefore recommended to use a 5GHz network.
The WiFi router
1. Check whether your router supports 5GHz.
2. Set up 5GHz as instructed by your router's user manual.
3. Connect your computer and mobile device to the 5GHz band of your set-up router, and your computer and mobile device will have better speed, better characterization, and better screen sharing when connected to the same WiFi network and using 5GHz. (compared to 2.4 GHz WiFi network)
Turn on and set up the computer's 5GHz hotspot
If your computer supports WiFi and has 5GHz hotspot sharing, you can share it through your computer's 5GHz hotspot, so that your mobile device can connect to your computer hotspot.
(At this point, the mobile device will use the computer's network, please note the network traffic consumption).
1. Click on the [Start]① icon at the bottom of your desktop and click on [Settings]②.

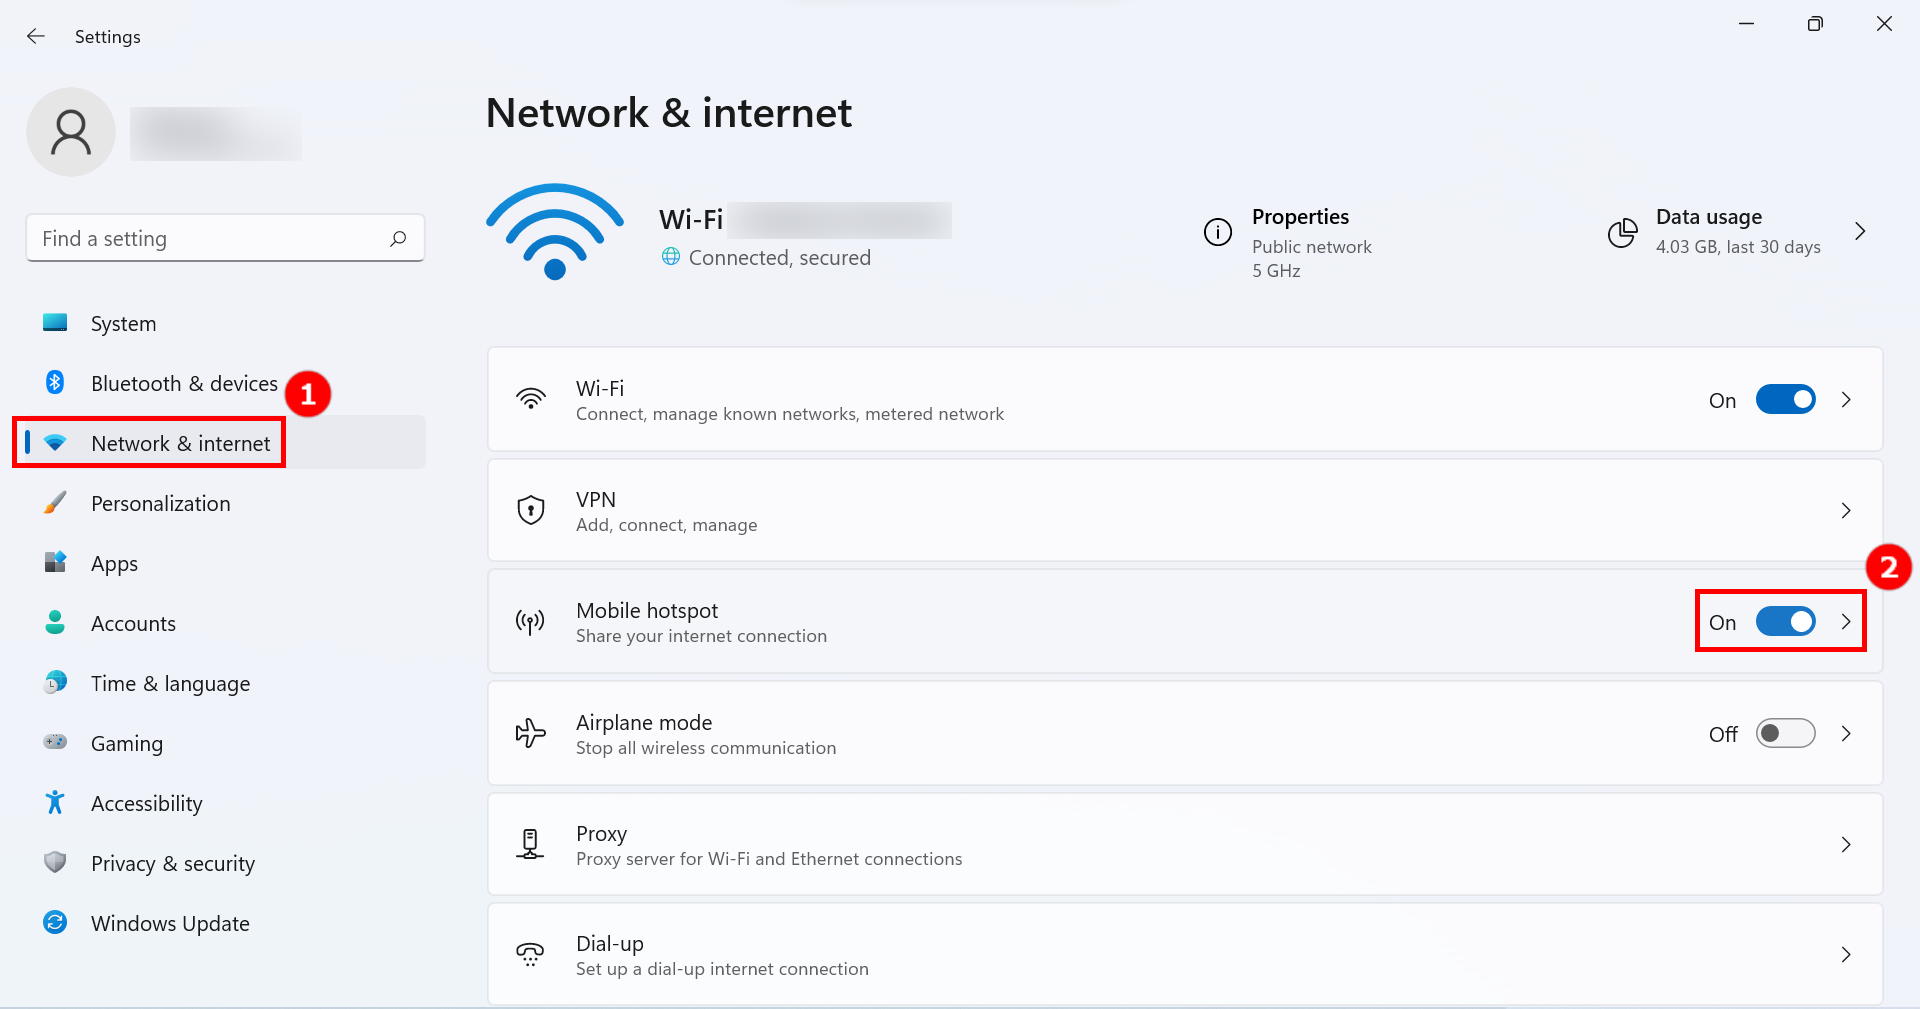
2. Click on [Network & Internet]① on the left side of the settings page, switch on the [Mobile Hotspots]② toggle, and then click on the small arrow on the right side of the [toggle] to open the Mobile Hotspot Settings page.
3. Click [Edit]① at the bottom of the mobile hotspot page.
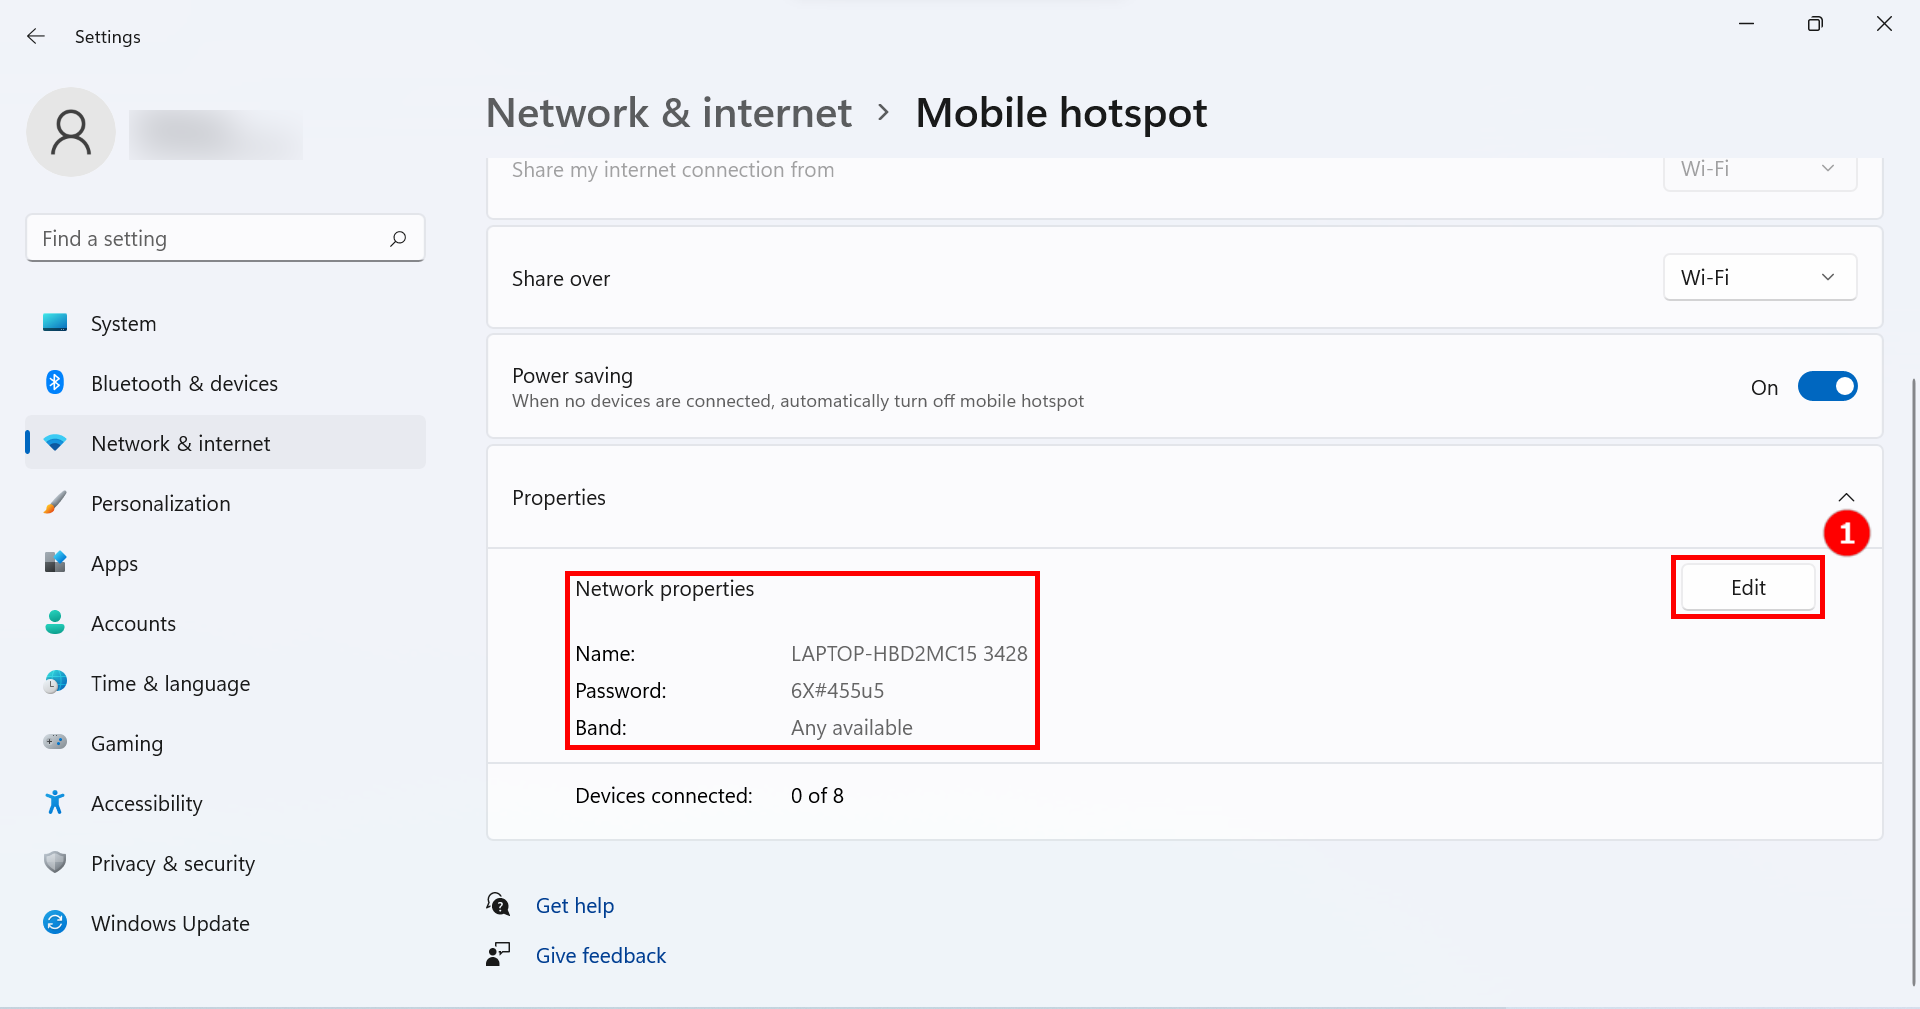
4. Click on the [Network Band]①, click on [5 GHz]③ and click on [Save]④ to complete the modification.
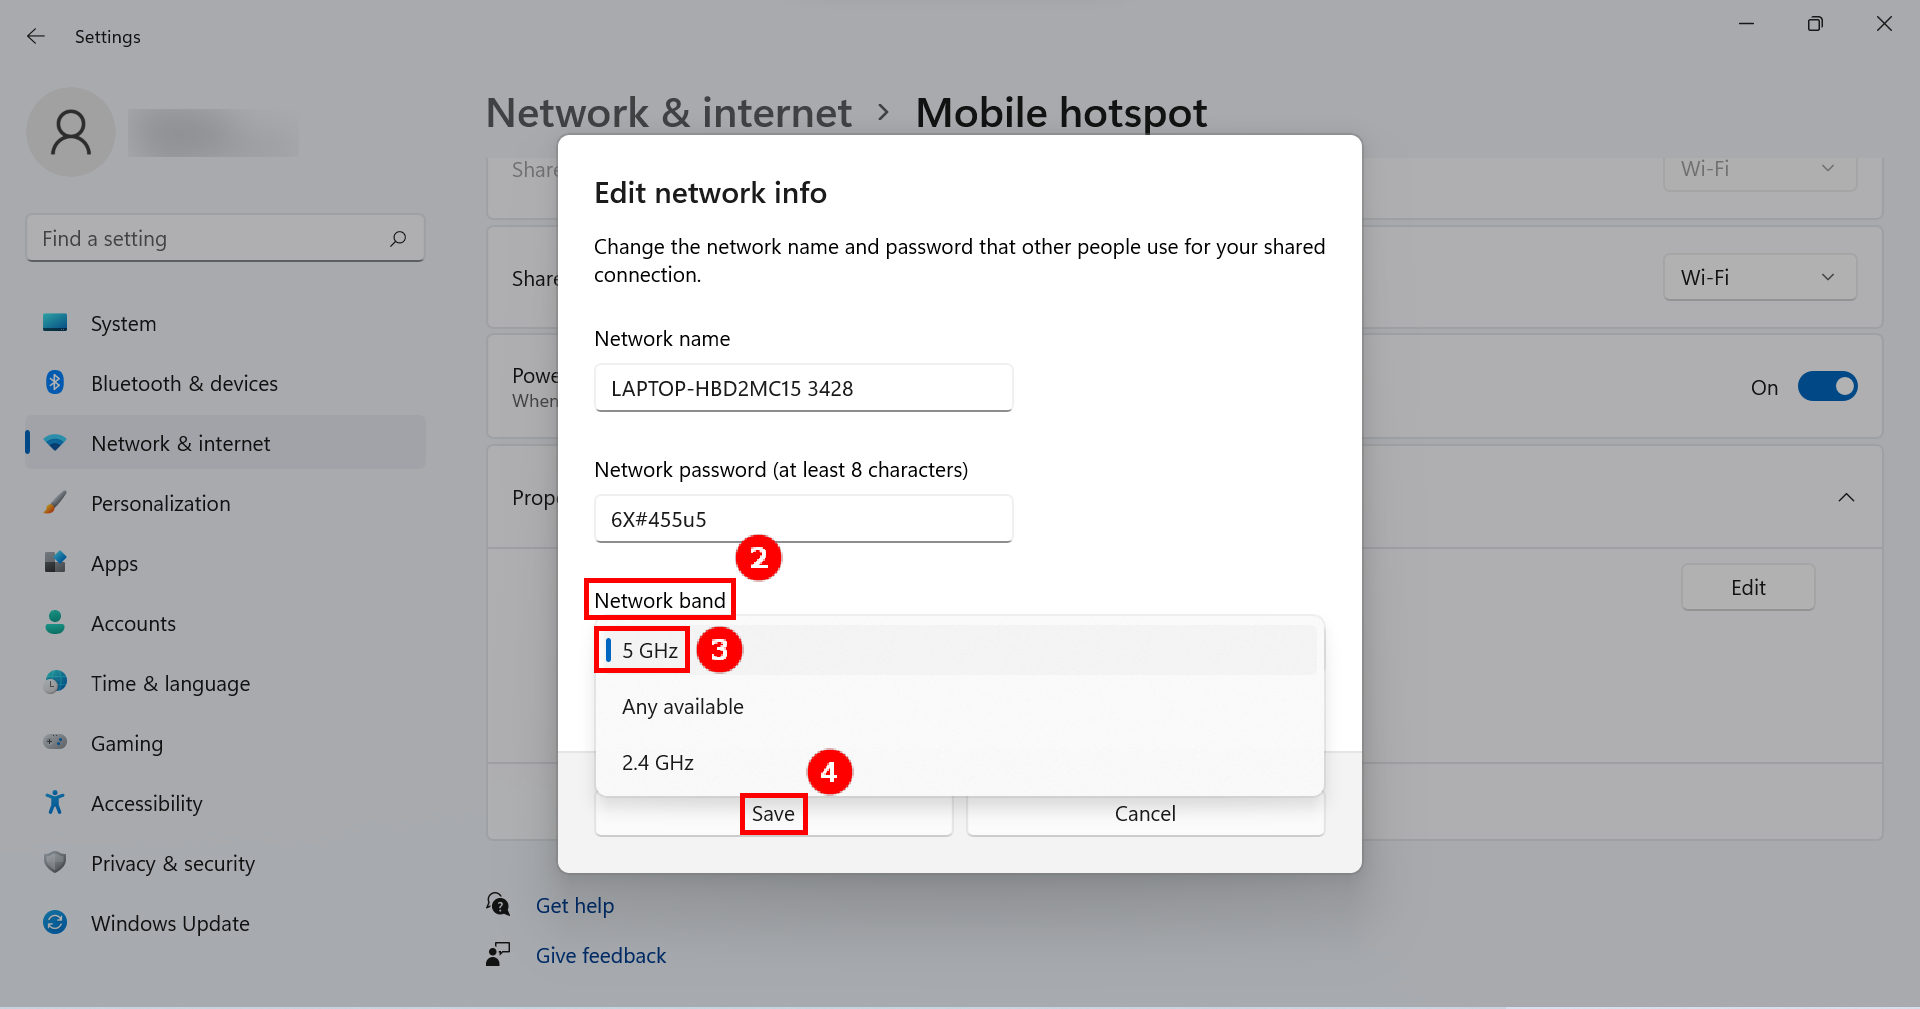
5. On your mobile device, select the 5GHz hotspot sharing connection you just set up on your computer. At this point, operating the computer side of the GlideX connected mobile device for Screen Mirror & Screen Extend, there will be better connection speed, better stability, better screen sharing experience.
Turn on and set up the 5GHz hotspot on the mobile device side
If your mobile device supports 5GHz hotspot sharing, you can connect your PC to your mobile device hotspot through your mobile device's 5GHz hotspot sharing.
(At this point, the computer will use the mobile device's network, please note the network traffic consumption).
1. On the mobile device settings page, tap [Network & Internet]①, tap on [Hotspot & Tethering]②, tap[toggle]③ to turn on Wi-Fi hotspot, tap on [Wi-Fi hotspot]④, tap [AP band]⑤, select the [5.0 GHz band]⑥ in the bottom pop-up window.
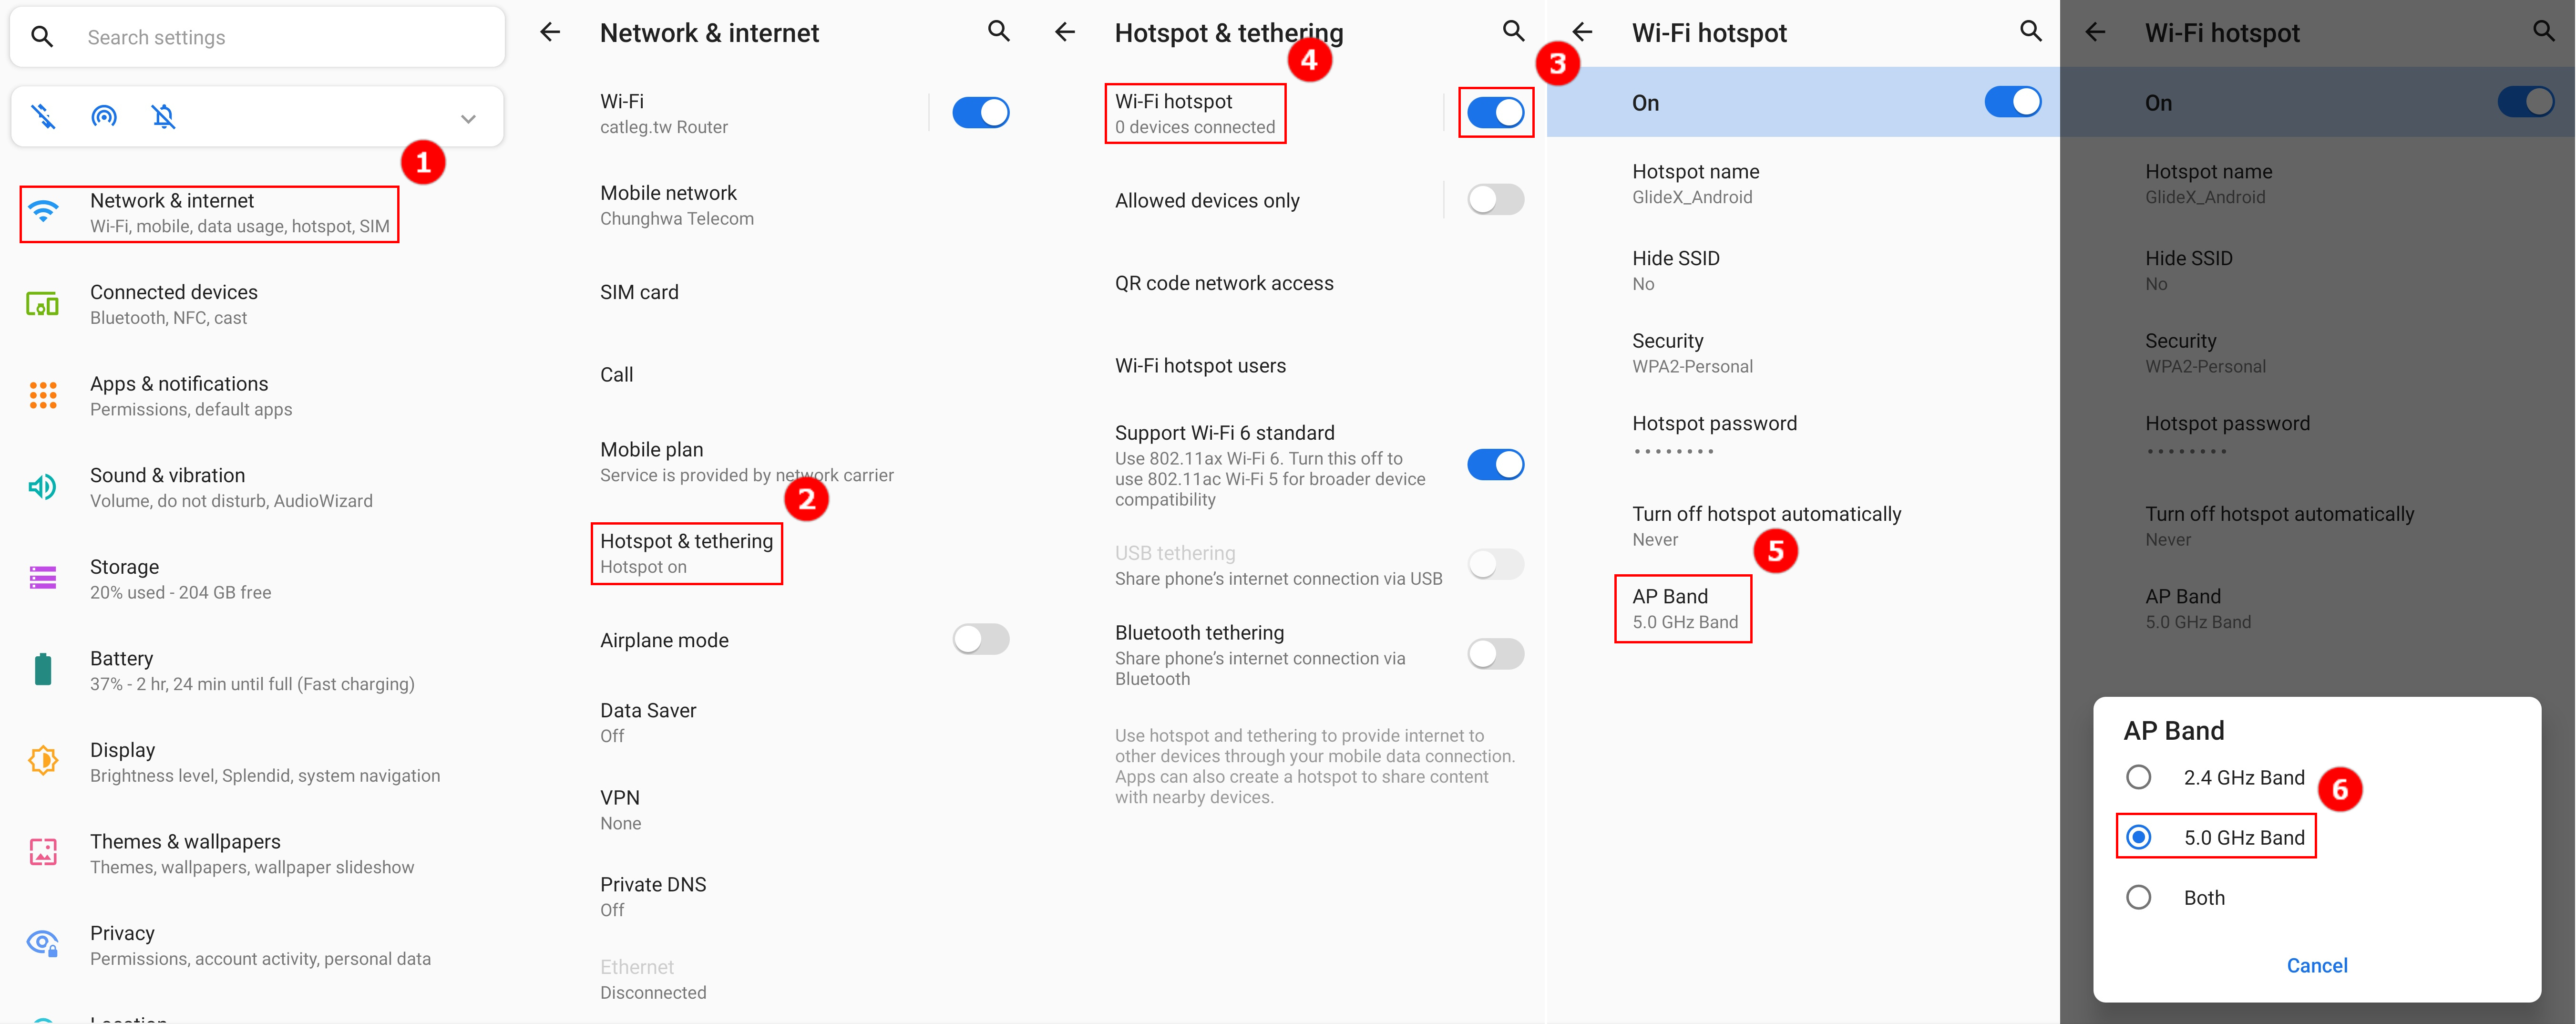
2. On your computer, select the 5GHz hotspot sharing connection just set up by your mobile device. At this point, operating the computer side of the GlideX connected mobile device for Screen Mirror & Screen Extend, there will be better connection speed, better stability, better screen sharing experience.