Tinker Board

tinker board

tinker your way to the future

Tinker Board is a Single Board Computer (SBC) in an ultra-small form factor that offers class-leading performance while leveraging outstanding mechanical compatibility. The Tinker Board offers makers, IoT enthusiasts, hobbyists, PC DIY enthusiasts and others a reliable and extremely capable platform for building and tinkering their ideas into reality.
1 Micro USB power-in
(5V/2~2.5A power is required)

2 HDMI
3 MIPI CSI
4 192K/24bit
HD Audio

5 GbE LAN
6 PWM
7 S/PDIF
8 MIPI DSI
9 Upgradable i-PEX antenna header
(MHF4)

10 802.11 b/g/n Wi-Fi &
Bluetooth 4.0 + EDR

11 40-pins GPIO header
12 USB 2.0 Ports

Features & Functionality

Class-Leading Performance

With its powerful and modern quad-core ARM-based processor — the Rockchip RK3288 — Tinker Board offers significantly improved performance versus other popular SBC boards. To provide the flexibility needed for different builds and projects, Tinker Board features 2GB of LPDDR3 dual-channel memory. Tinker Board is also equipped with an SD 3.0 interface that offers significantly faster read and write speeds to expandable microSD cards used for the OS, applications and file storage.

Robust GPU Performance & Functionality

Featuring a powerful but energy-efficient design, Tinker Board supports next-generation graphics and GPU computing API's. Powered by an ARM-based Mali™-T764 GPU, Tinker Board's GPU and fixed-function processors allow for a wide range of uses, including high-quality media playback, gaming, computer vision, gesture recognition, image stabilization and processing, as well as computational photography and more. Multimedia enthusiasts will appreciate the fixed-function H.264 and H.265 playback support, including playback of HD and UHD video*.

*HD & UHD video playback at 30 fps on Tinker Board is currently only available via the included media player. Third-party video players and applications may not offer hardware acceleration, which will result in limited or unstable playback performance. Please refer to the FAQs for more information.

HD Audio Quality

Further improving on key areas found lacking on many SBC boards, Tinker Board is equipped with an HD codec that supports up to 24-bit/192kHz audio. Its integrated audio jack supports audio output and a microphone in, without an extension module.

Maker-Friendly, with IoT Connectivity

Tinker Board features standard maker connectivity options, including a 40-pin GPIO interface that allow for interfacing with a range inputs from buttons, switches, sensors, LEDs, and much more. Tinker Board is equipped with one DSI MIPI connection for displays and touchscreens. The secondary CSI MIPI connection is for connection to compatible cameras allowing for computer vision, and much more.

Tinker Board also features Gbit LAN for Internet and network connectivity. A dedicated bus resource designed for the LAN port ensures consistent Ethernet performance. The integrated Wi-Fi and Bluetooth controller on the Tinker Board is shielded with a metal cover to ensure minimal interference and improved radio performance. An integrated IPEX antenna header allows for easy antenna replacement or upgrades.

Tinker Board also features a full-size HDMI output. Additionally, it includes four USB 2.0 ports for extensive peripheral and accessory connectivity.

Enhanced DIY Design

Careful consideration went into the design and development of the Tinker Board to ensure that it provides a superior user experience for first-time builders or for seasoned hobbyists. Builders will appreciate the color-coded GPIO header, which makes it easy to recognize respective pin headers.

The PCB dimensions and topology of the Tinker Board align with standard SBC boards, allowing support for a wide range of chassis and physical accessories. The PCB features silk-screening with a connection header and location callouts, for improved connection clarity. The onboard MIPI headers also feature color-coded pull tabs.

Tinker Board also includes a heatsink, which helps improve heat dissipation under heavy loading or in hot ambient environments.

TinkerOS ‧ Supported OS ‧ Applications

A Debian-based distribution ensures a smooth and functional experience, directly out of the box. Whether it's browsing the web, watching videos, or writing scripts, TinkerOS is a great starting point for your next project or build.

Furthermore TinkerOS has been carefully designed to be extremely lightweight and responsive. Running on top of the base Debian 9 is a the LXDE desktop environment. This GUI is optimized specifically for SBC boards. It also features plug & play NTFS support allowing for easy access to Windows based flash drives and external hard drives. The included web browser has also been carefully selected and optimized. It based on Chromium allowing for speed and stability along with a number of extensions. The ASUS team has help to enable hardware acceleration of the browser allowing for improved web rendering and video playback including HD resolutions in YouTube.

TinkerOS also includes a number of popular applications allowing for easy programming and development. These include IDLE / Python as well as Squeak / Scratch.

Beyond TinkerOS and its Debian Linux offering Tinker Board also support the Android Operating system. This allows for an entirely different usage scenarios ranging from media playback, gaming, and much more.

Tinker board is also working closely with a wide range of popular applications to enable support & optimize functionality.

Tinker Board Performance

CPU Performance

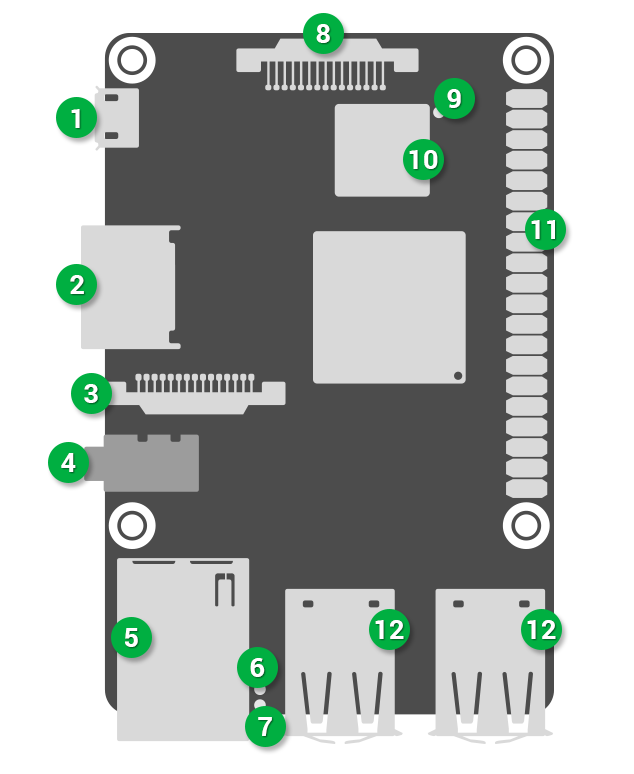
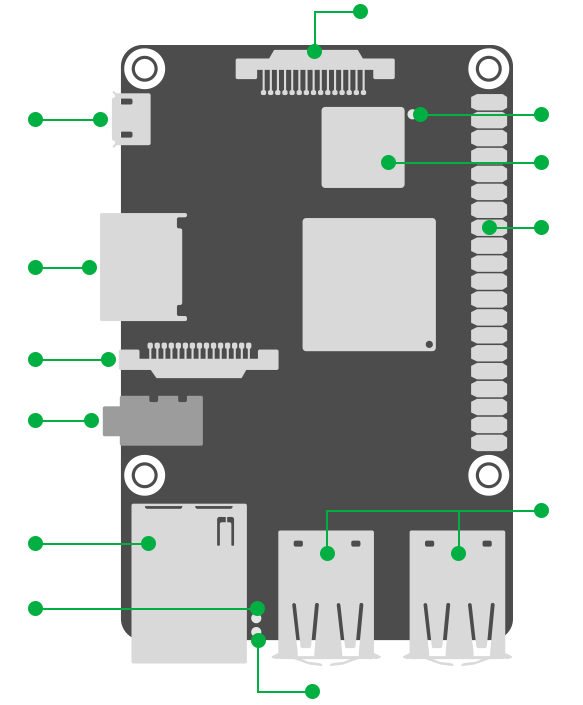
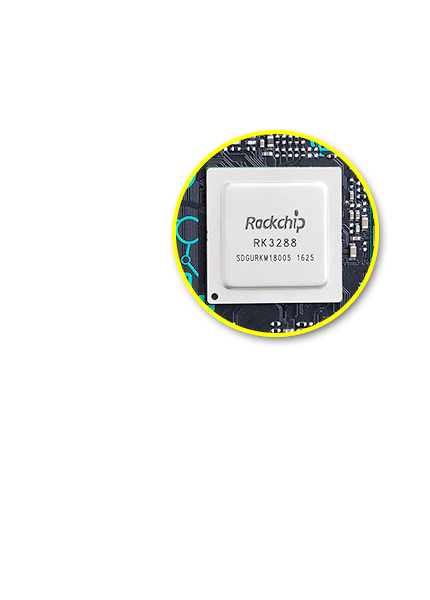
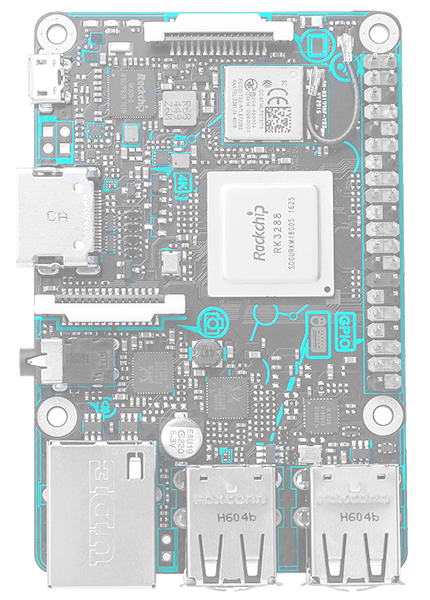
Tinker Board features an ARM-based RK3288 SoC and is equipped with four cores to enhance multithread application performance. It operates at frequencies of up to 1.8GHz, improving performance across all applications. This increase in CPU core count, along with an increase in processor frequency, helps to enable significantly faster performance across a wide range of applications, extending and enhancing project capabilities. As a result, typical PC tasks are faster and more responsive.

GPU Performance

Tinker Board's GPU is based on the Mali™-T764 GPU. It offers up 4 cores and a 600MHz clock speed. When compared to competitor SBC GPUs, Tinker Board offers better GPU computing and GPU acceleration performance.

Stream and Memory Performance

Tinker Board offers dual-channel DDR3 which delivers better memory bandwidth versus competitor devices that offer only a single-channel DDR2.

SD Card Read/Write Speed

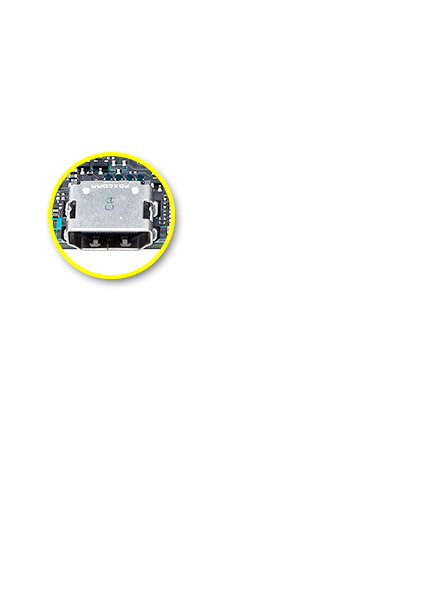
Tinker Board has a microSD slot for onboard expandable storage. It supports the SD 3.0 standard, so it can use higher capacity microSD cards that offer significantly faster read and write performance.

.Read speeds: up to 89% faster
.Write speeds: up to 40% faster

*Card spec: ADATA Premier UHS-I C10 64GBexFAT

Network/Audio Specifications

Specification Wi-Fi Audio Format
/ Sample Rate
Audio Function
Tinker Board 
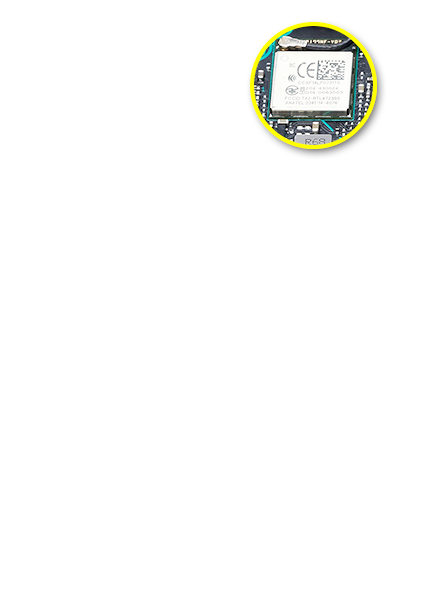
802.11 b/g/n with upgradable IPEX antenna Play: 24bit/192KHz, Record: 24bit/96KHz Audio output, Microphone input
Competitor SBC 802.11 b/g/n 16bit/48KHz Audio output only

Networks Performance

Tinker Board features gigabit Ethernet, which offers significantly improved throughput versus competitor SBCs that are equipped with 10/100 Ethernet.

.Transfer/receive speeds
Tinker Board's dedicated controller and non-shared bus design ensure superior packet delivery and reception. LAN performance remains the same on the Tinker Board during USB transfers versus LAN performance of competitor SBC's which experience up to an 18% reduction in speed during USB transfer.

.LAN performance with USB transfer

USB Speed

Tinker Board offers superior read and write performance with external storage drives, allowing quicker read and write speeds. This improves workflow, copying, backups and overall file usage.

.Read speeds: up to 154% faster
.Write speeds: up to 6% faster

*Card spec: Kingston DataTraveler 64GB USB3.0

Wi-Fi Performance (Signal Loss)

Tinker Board Wi-Fi performance is more robust than most competitor devices, allowing for improved signal reception.
Location: OctoScope platform
Target AP: ASUS RT-AC66U (Broadcom)
Standard: b/g/n mixed
Channel: 6
Bandwidth: 20MHz
Security: none

*Tinker Board - OS: Linux 4.4.0+ armv7l l Image Version: V20170113 l Memory Type: 2GB l CPU Type, Speed[GHz]: Cortex-A17 Quad-core 1.8GHz l GPU Type, Speed[MHz]: Mali™ T-764
*Competitor SBC - OS: Linux 4.4.11+ armv7l l Memory Type: 1GB l CPU Type, Speed[GHz]: Cortex-A53 Quad-core 1.2GHz l GPU Type, Speed[MHz]: VideoCore IV

Community ‧ Contact Us

For inquiries relating to product qualification & validation and application support or peripheral & accessory support, please contact us at TinkerBoard@asus.com


Share your idea with us via

Documentation

Getting started

Requirement:

1 x Micro SD card with at least 8GB capacity
.1 x Micro USB cable and a 5V/2~2.5A USB power adapter with LPS marking
.1 x Monitor with HDMI cable
.1 x Keyboard and Mouse set
Note: To enhance the system stability, using high-speed SD card (Class 10 or above) is highly recommended.
1. Insert the microSD card into a Linux PC
2. Rename the image to output.img and then put the file into the FlashUSB folder
3. Execute FlashUSB.sh
===============================================
Select the disk you want to flash:
sdc -Multiple_Flash_Reader_058F63616476-0:1
sdb -Generic-_Compact_Flash_058F63616476-0:0
Enter the number:0
dd if=/home/yihsin/Rockchip/aa7-demo/out/target/output.img of=/dev/sdc seek=0 bs=16M conv=notrunc
flash start!
flash end!
===============================================
Insert the microSD card into the slot on the Tinker Board.
Connect the power supply, keyboard, mouse and your monitor. Now boot it up!


1. Insert the microSD card into a Windows PC
2. Download and run the "Win32DiskImager" application
2.1 Browse and select the source image file to be flashed (Image File)
2.2 Select the microSD card as the destination (Device)
2.3 Click "Write"


3. Safely remove the microSD card with the new bootable image, then insert into the microSD card slot on the Tinker Board.
4. Connect the power supply, keyboard, mouse and your monitor. Now boot it up!

Insert the bootable micro SD card into your Tinker Board, then connect the power supply, keyboard, mouse, and monitor to boot up


Hardware

The tinker board requires 5V/2~2.5A power via the micro-USB port. The exact amount of current (mA) the tinker board requires will depend on what's connected to it. For general use, a 2A power supply from a reputable retailer will provide ample power to run your tinker board.

Typically, tinker board uses between 700 to 1000mA, depending on which peripherals are connected. It may use as little as 500mA when no peripherals are attached. Maximum power for the tinker board is 1A. If you need to connect a USB device to bring power requirements above 0.5A, then you must connect to it via an externally powered USB hub.


The tinker board is equipped with four USB 2.0 ports. These are connected to the GL852G USB Hub from the upstream USB port via the RK3288.

The USB ports enable the attachment of peripherals such as keyboards, mice and webcams. This provides the board with additional functionality.

There are some differences between the USB hardware on the tinker board and the USB hardware on desktop computers, laptops and tablets.

The USB host port inside the tinker board is for power supply only, RK3288, was originally intended to be used in the mobile market, e.g. the single USB port on a phone for connection to a PC, or to a single device. In essence, the OTG hardware is simpler than the equivalent hardware on a PC.

OTG typically supports communication to all types of USB devices, but to provide an adequate level of functionality for most of the USB devices that one might plug into a tinker board, the system software has to do more work.


Learn More

Supported Devices

In general, every device supported by Linux can be used with the tinker board (exceptions are detailed below). Linux offers a comprehensive driver database that supports legacy hardware for most operating systems. TinkerOS and it's Debian kernel have a large number of inbox drivers for common peripherals & devices.

If you have a device and wish to use it with a tinker board, then plug it in. Chances are that it will be compatible. If you're running a graphical interface (such as an LXDE desktop environment in the OS), then it's likely that an icon or other message will pop up to announce the new device.


Port Power Limits

The device advertises its own power requirements to the USB host when it is first connected. In theory, the actual power consumed by the device should not exceed stated specification.
It should be noted that hot-swapping high-powered devices into the tinker board's USB ports may result in a brownout, which may cause the tinker board to reset.


back

One powerful feature of the Tinker Board is the row of available GPIO (general purpose input/output) pins along the edge of the board. These pins are a physical interface between the Tinker Board and the outside world. At the simplest level, you can think of them as switches that can be turned on or off. Of the 40 pins, 28 are GPIO pins (shared with SPI/UART/I2C pins). The Tinker Board is equipped with one SPI bus that offers two chip selects. The SPI bus is available on the onboard 40-pin header.


GPIO API

Python

Python is a programming language that lets you work quickly and integrate systems more effectively.

1. Open a terminal and Install dependency package.
sudo apt-get update
sudo apt-get install python-dev python3-dev

2. Download Python GPIO library*
git clone http://github.com/TinkerBoard/gpio_lib_python.git

3. Navigate to folder
cd gpio_lib_python/

4. Install Python GPIO library for Tinker Board S
sudo python setup.py install
sudo python3 setup.py install 

5. Reference codes
There're few sample codes under this folder /gpio_lib_python/test

*If get “git command not found”, please install git first by apt with follow commands. sudo apt-get update
sudo apt-get install git

C

C is a general-purpose, imperative computer programming language, supporting structured programming, lexical variable scope and recursion, while a static type system prevents many unintended operations.

1. Open a terminal and download C GPIO library*
git clone http://github.com/TinkerBoard/gpio_lib_c.git

2. 2. Navigate to folder
cd gpio_lib_c/

3. Install C GPIO library for Tinker Board S
sudo ./build

4. Check install success or not
gpio -v
gpio readall

5. Reference codes
There're few sample codes under this folder /gpio_lib_c/examples

*If get “git command not found”, please install git first by apt with follow commands.
sudo apt-get update
sudo apt-get install git

GPIO pinout

If you would like to control GPIO's SPI, I2C or serial(UART) with Python, it is recommended to use 3rd party or open source Python library, such as spidev, smbus2 or pySerial.
GPIO.Setmode
(GPIO.ASUS)
GPIO.Setmode
(GPIO.BOARD)
Pinout Physical Pin
Number
Pinout GPIO.Setmode
(GPIO.BOARD)
GPIO.Setmode
(GPIO.ASUS)
1 VCC3.3V_IO
12 VCC5V_SYS
2
252 3 GP8A4_I2C1_SDA
34 VCC5V_SYS
4
253 5 GP8A5_I2C1_SCL
56 GND
6
17 7 GP0C1_CLKOUT
78 GP5B1_UART1TX
8 161
9 GND
910 GP5B0_UART1RX
10 160
164 11 GP5B4_SPI0CLK_UART4CTSN
1112 GP6A0_PCM/I2S_CLK
12 184
166 13 GP5B6_SPI0_TXD_UART4TX
1314 GND
14
167 15 GP5B7_SPI0_RXD_UART4RX
1516 GP5B2_UART1CTSN
16 162
17 VCC33_IO
1718 GP5B3_UART1RTSN
18 163
257 19 GP8B1_SPI2TXD
1920 GND
20
256 21 GP8B0_SPI2RXD
2122 GP5C3
22 171
254 23 GP8A6_SPI2CLK
2324 GP8A7_SPI2CSN0
24 255
25 GND
2526 GP8A3_SPI2CSN1
26 251
233 27 GP7C1_I2C4_SDA
2728 GP7C2_I2C4_SCL
28 234
165 29 GP5B5_SPI0CSN0_UART4RTSN
2930 GND
30
168 31 GP5C0_SPI0CSN1
3132 GP7C7_UART2TX_PWM3
32 239
238 33 GP7C6_UART2RX_PWM2
3334 GND
34
185 35 GP6A1_PCM/I2S_FS
3536 GP7A7_UART3RX
36 223
224 37 GP7B0_UART3TX
3738 GP6A3_PCM/I2S_SDI
38 187
39 GND 3940 GP6A4_PCM/I2S_SDO 40 188

* We strongly recommend that you regularly backup all data stored in the device. ASUS shall not be liable for any damage to or loss of programs or data stored in the Tinker Board series, and shall not be responsible for data recovery, backup, or any charges arising therefrom.


* In no event shall ASUS be liable for any defect, damage or data loss arising from product repair or replacement.

  • Overview
  • 3rd Party Partners
  • Performance
  • Community ‧ Contact Us
  • Videos
  • Documentations ‧ Download
comparison icon
Compare (0)