[Projector] ASUS ZenBeam L2 installation method and function introduction
The ASUS ZenBeam L2 projector is equipped with an Android TV box, providing you with a completely new experience. Through a simple and quick setup process, you can easily enjoy exciting content from popular platforms like Netflix, Disney+, Amazon Prime Video, and more. This integrated design allows you to have a delightful viewing experience anytime, anywhere, even while you're traveling.
To provide you more detailed instruction, you can also click ASUS YouTube video link below to know more about How to install ZenBeam L2 Android TV box.
https://www.youtube.com/watch?v=SLrs83-oo-s.
To provide you more detailed instruction, you can also click ASUS YouTube video link below to know more about How to use ZenBeam L2 remote control.
Contents:
1. Accessories In the Box.
2. How to Install the Android TV Box Included with ZenBeam L2.
3. How to Connect Devices (Desktop Computer/Laptop).
4. Setting up.
5. Q&A.
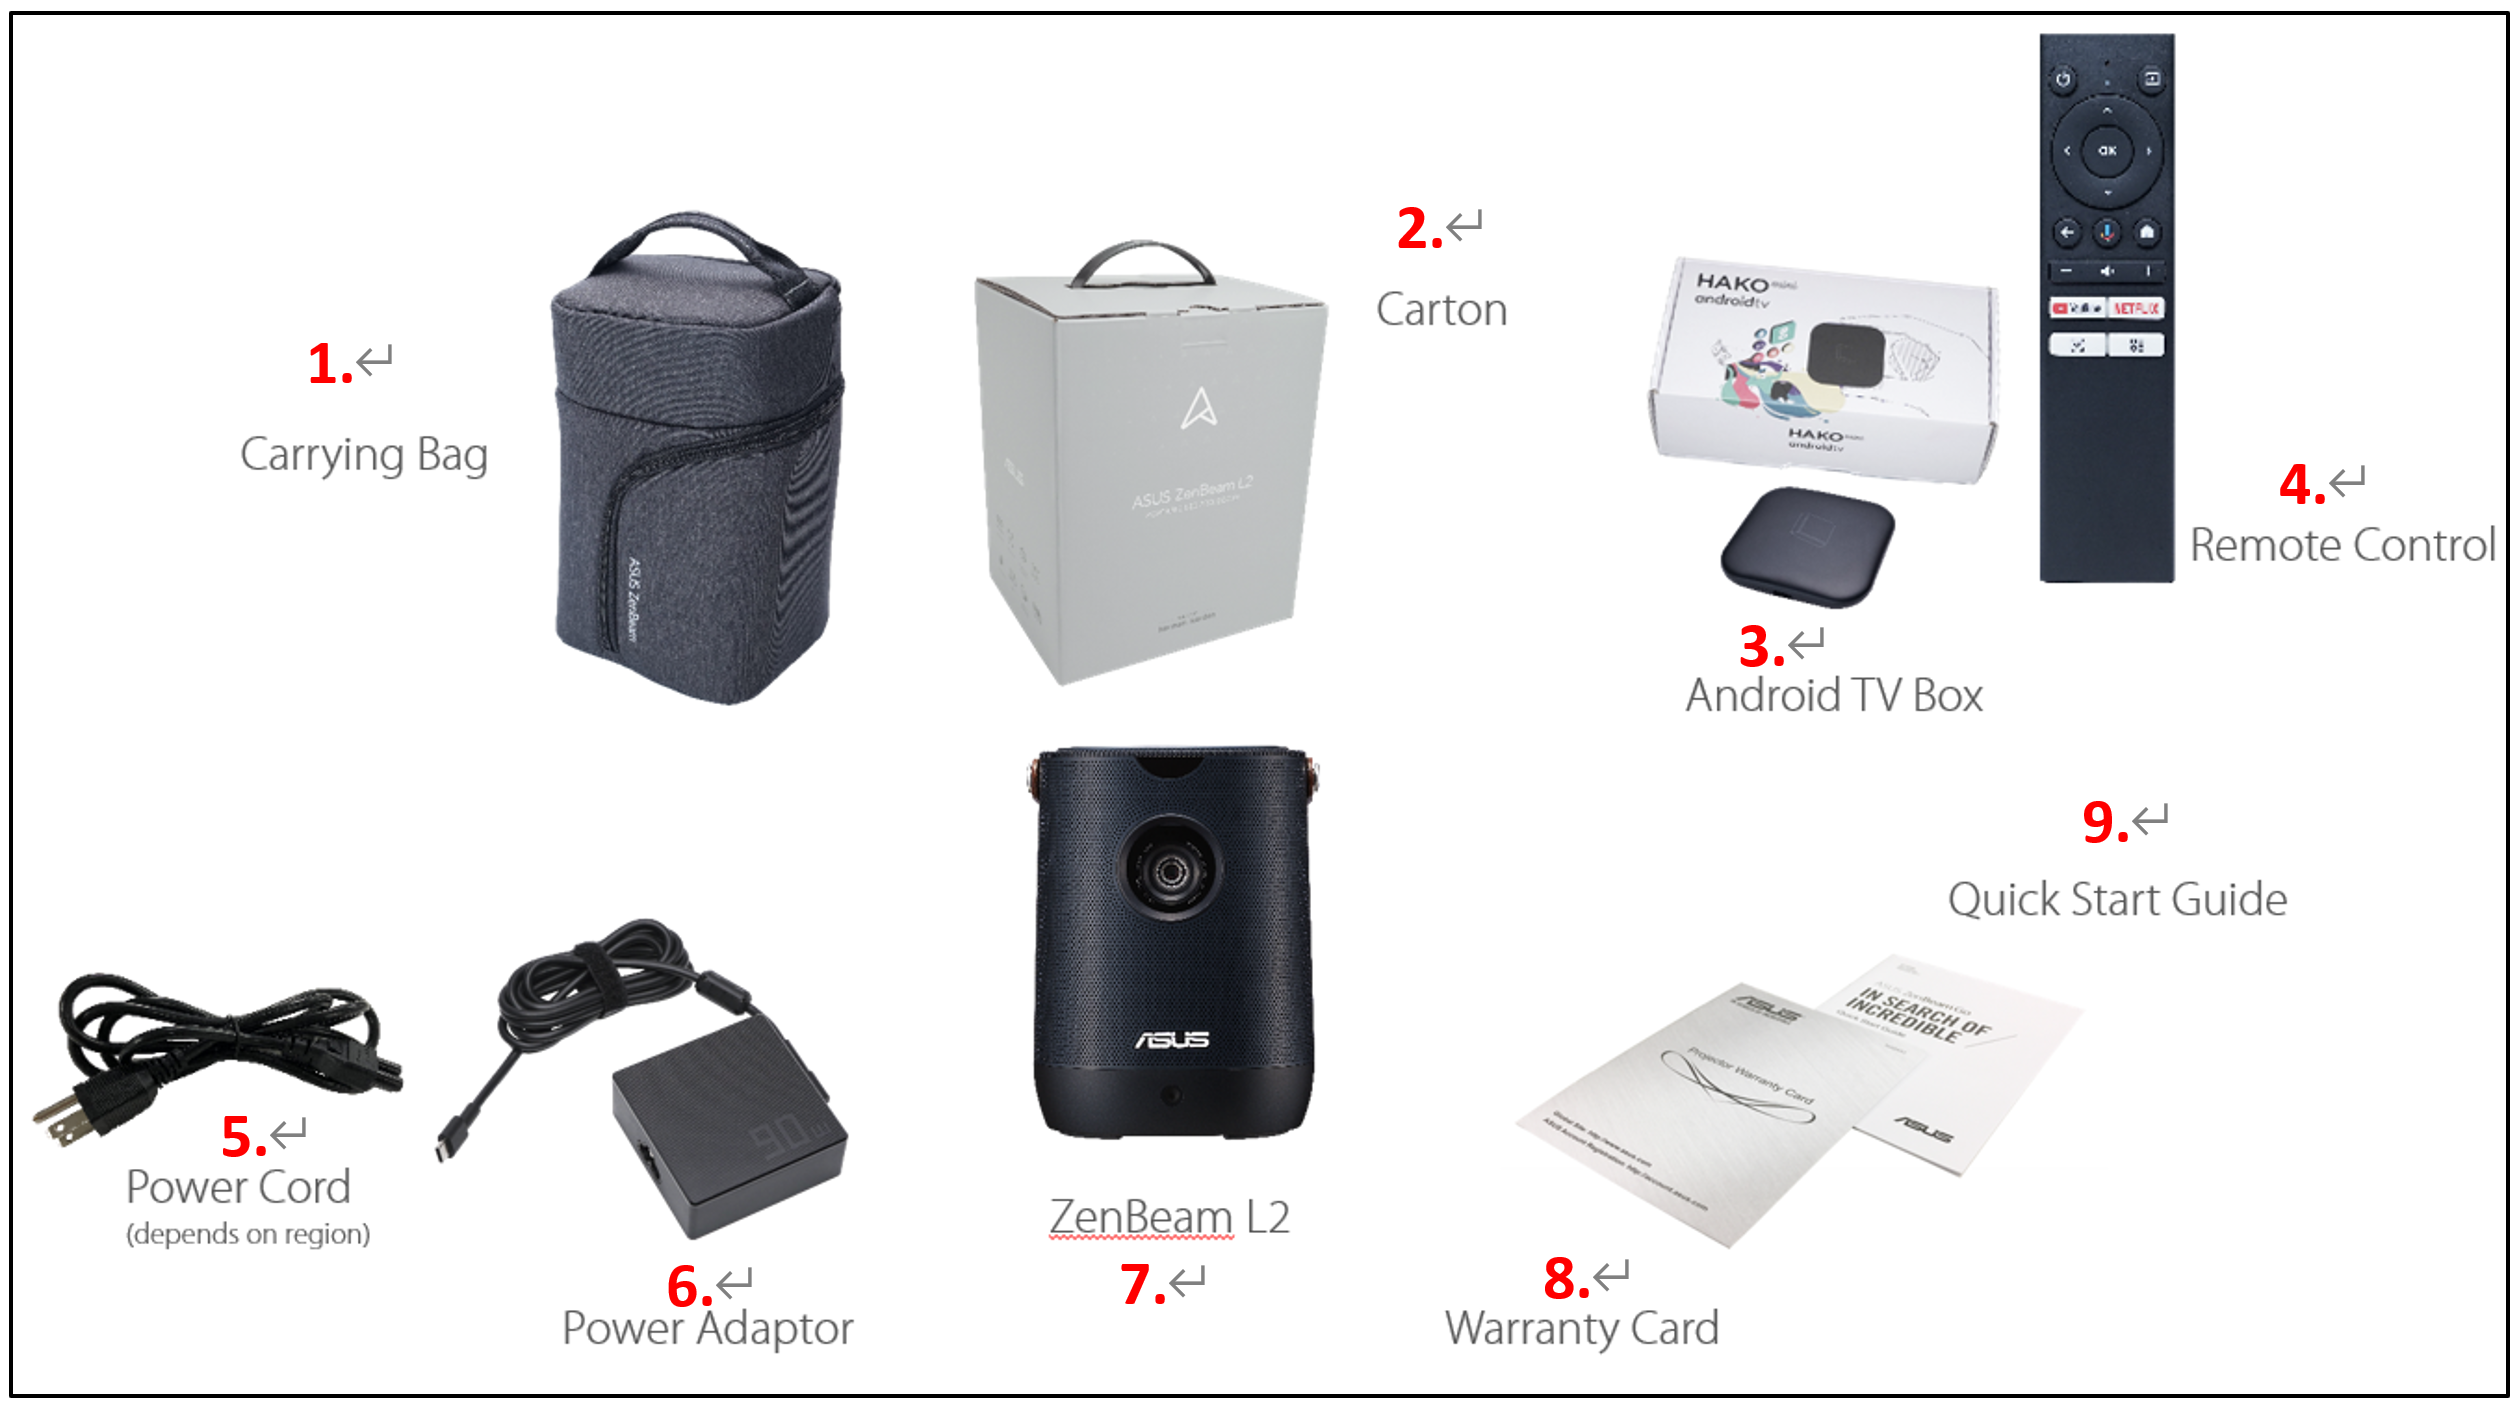
1. Accessories In the Box
1. Carrying Bag 2. Carton 3.Android TV BOX 4. Remote Control 5. Power Cord 6.Power Adapter 7. Power Adaptor 8. Warranty Card
9. Quick Start Guide
1-1. Top view:
① Projector Cover: This removable magnetic cover allows access to the connectors for installing the Android TV box bundled with your LED projector.
② Input: This button is used to change the input source. Available options: Android TV, HDMI, and USB-C.
③ Splendid: This button is used to access the Splendid menu to select one of preset display modes.
④ Back: This button is used to return to the previous menu or page.
⑤ Joystick Navigation button: This button allows you to navigate the on-screen display menu and select menu settings and also corresponds to specific projector settings as indicated below. 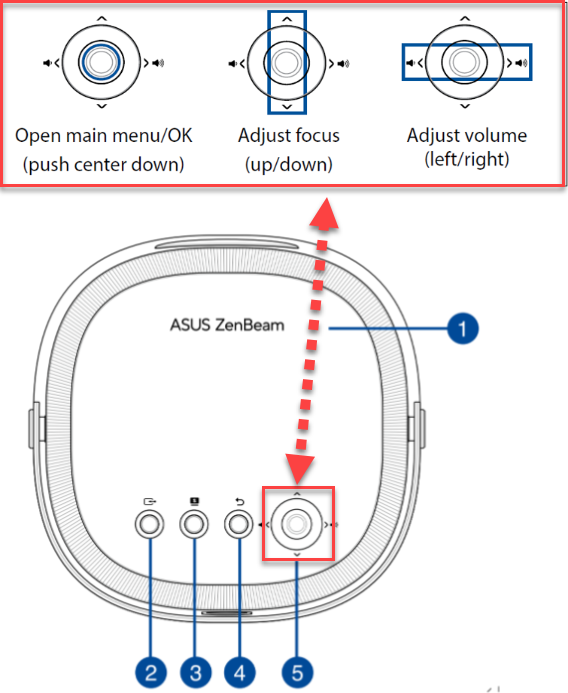
2.How to Install the Android TV Box Included with ZenBeam L2.
For your safety and to maintain the quality of this unit, refer to the following steps when operating your LED projector.
Install the Android TV Box
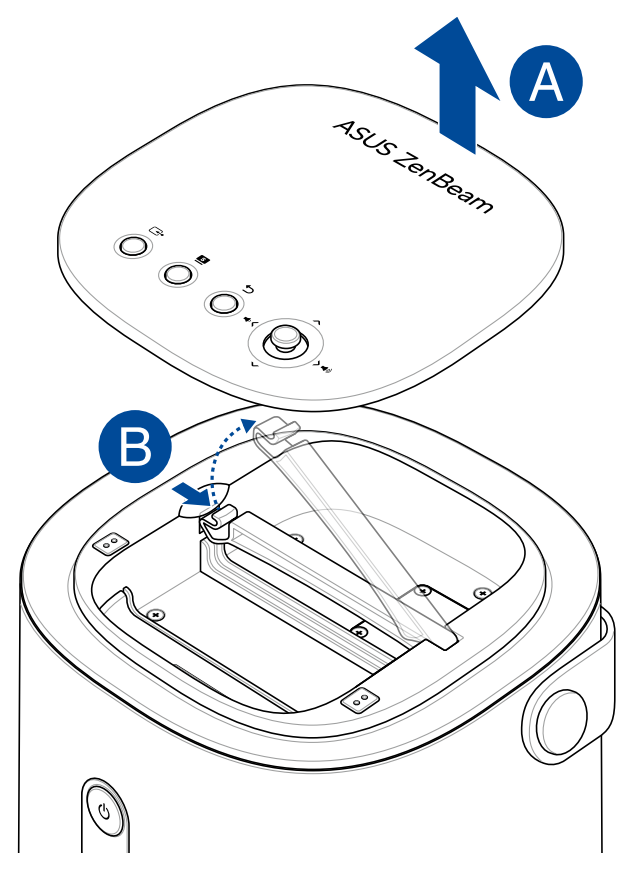
A. Wedge your fingers under the edge of the magnetic projector cover and use the tips of your fingers to lift the cover from the body.
B. Unlock the retaining clip and rotate it into a vertical position to allow access to the cavity for the Android TV box.
C. Connect the mini USB cable from your LED projector to the micro USB port on the Android TV box.

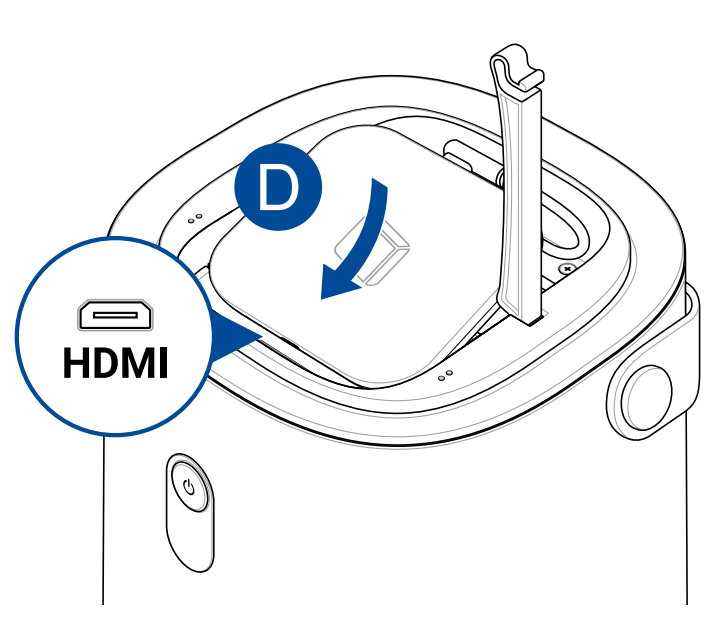
D. Align and connect the HDMI port on the Android TV to the HDMI connector on your LED projector by gently sliding the Android TV box towards the HDMI connector.
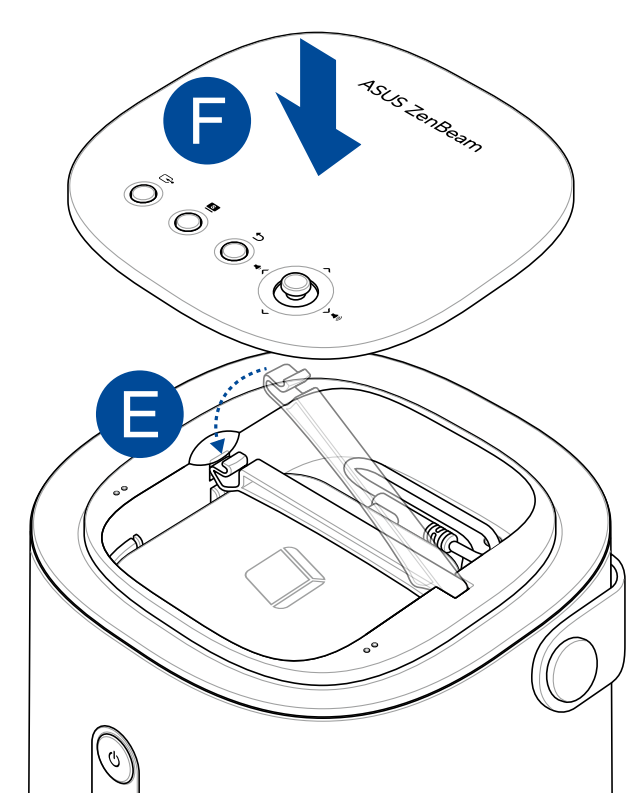
E. Return the retaining clip to its original horizontal position and press down until you hear a soft click.
F. Replace the magnetic project cover.
NOTE: The cable and connectors within the top cavity are designed to work only with the bundled Android TV box.
3. How to Connect Devices (Desktop Computer/Laptop)
A. USB Type-C(DP Alt mode) 
B.Audio output jack 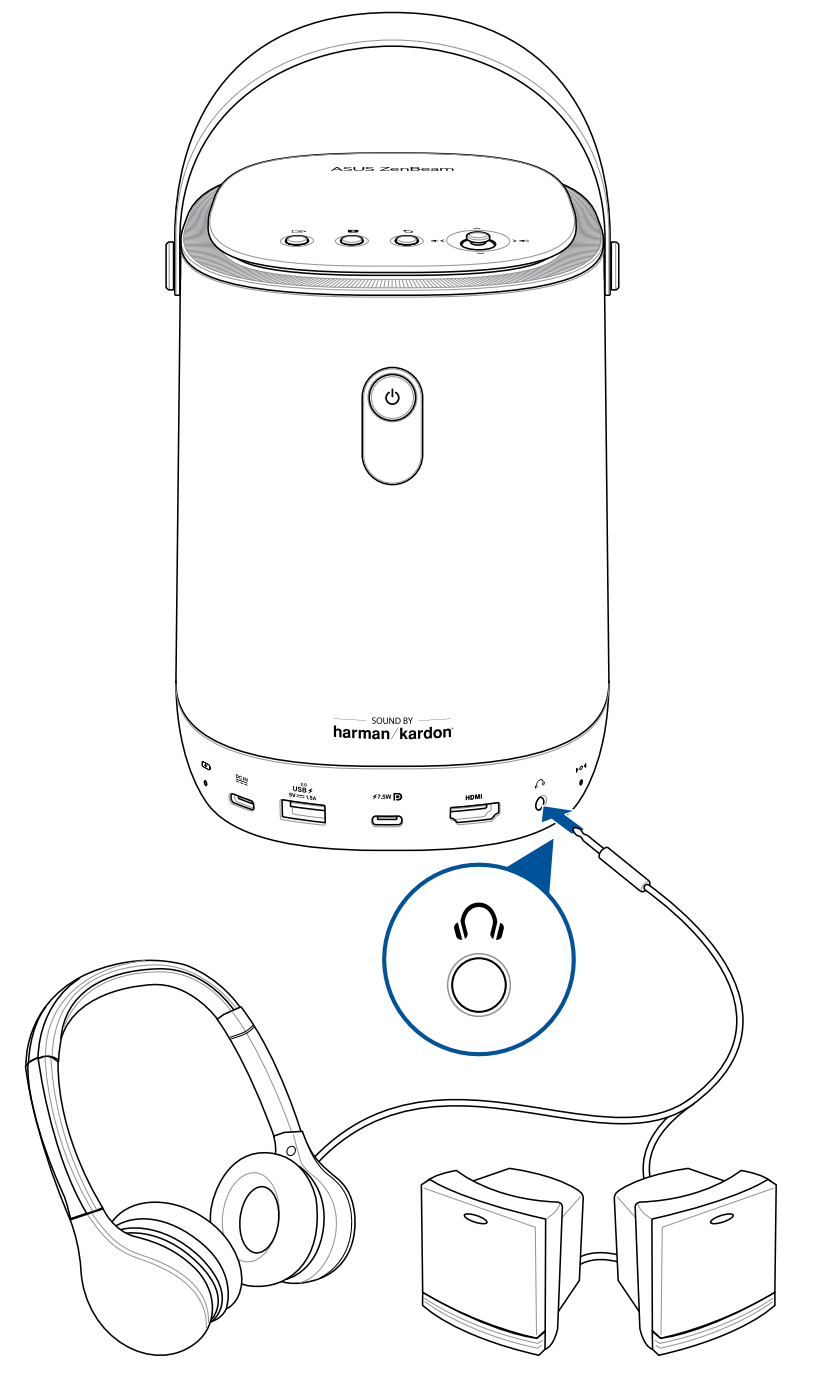
C. HDMI™ input 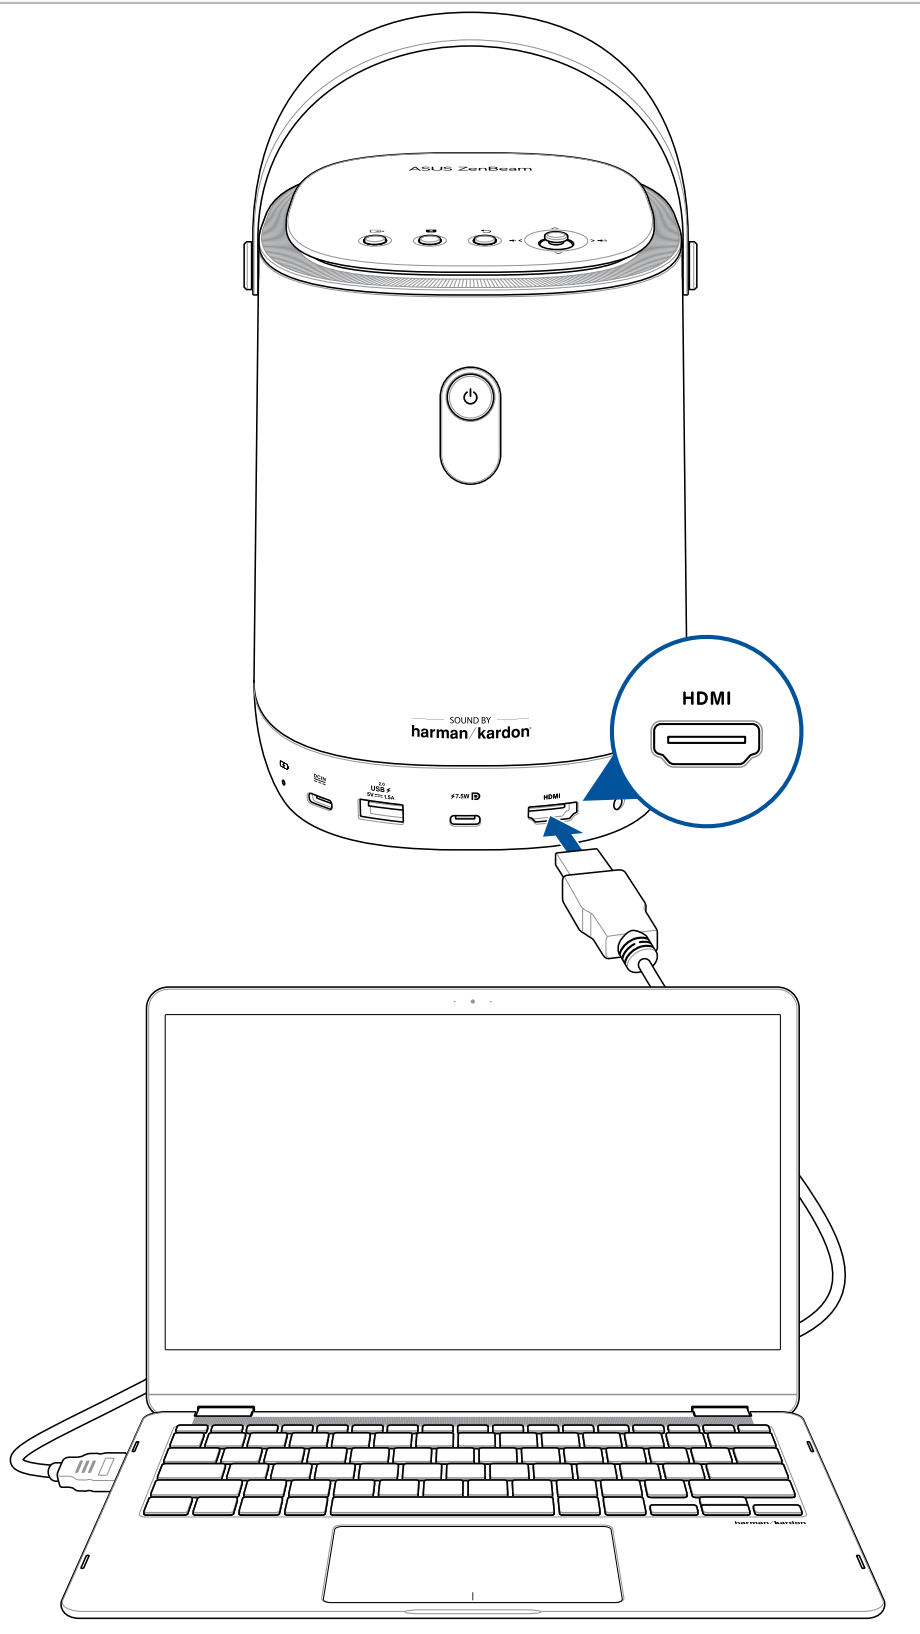
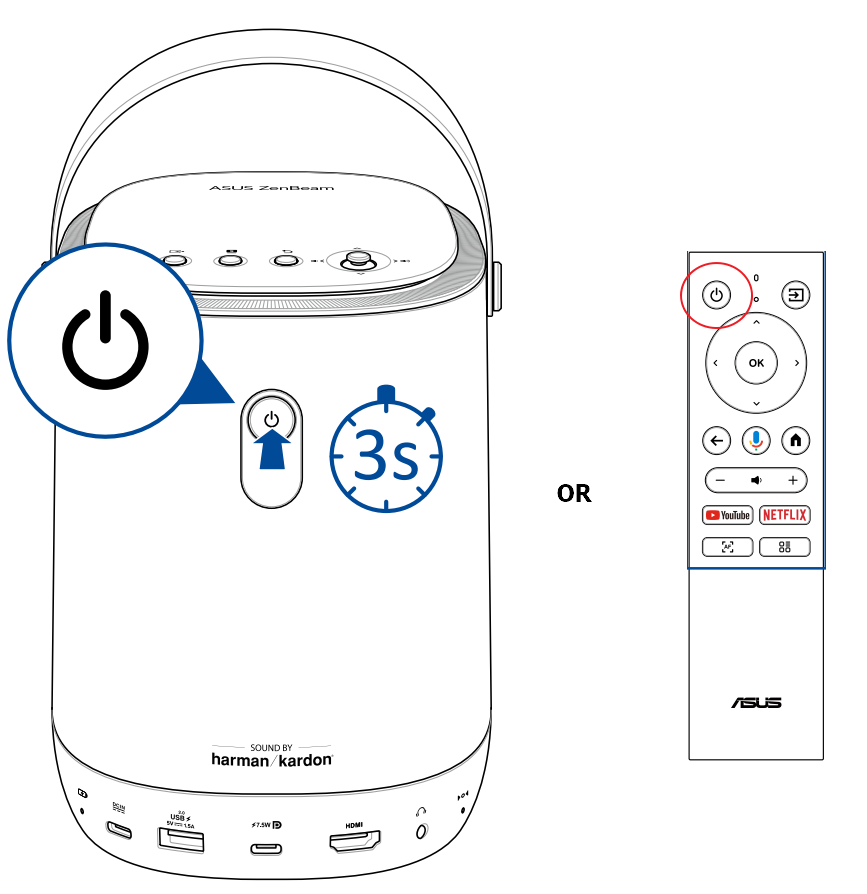
4. Setting up
1). Power On: You can either press the power button for 3 seconds or use the remote control to turn it on.
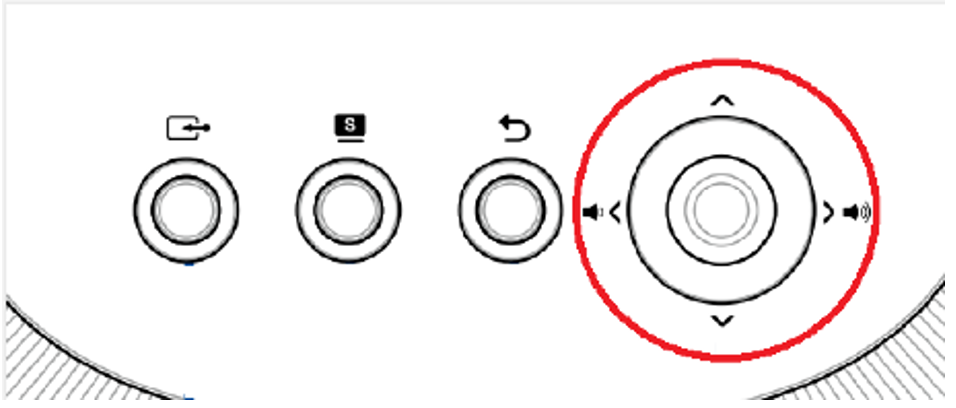
2). Adjust the image focus
Each time that you power on or move your LED projector while it is on triggers autofocus. After autofocus is complete, it will automatically switch and remain in manual focus mode for 3 seconds to allow you to manually adjust the focus as needed.
2-1. Push up and down on the joystick navigation button (refer to the Top view section for the location of the joystick navigation button) to further adjust the focus of the image.
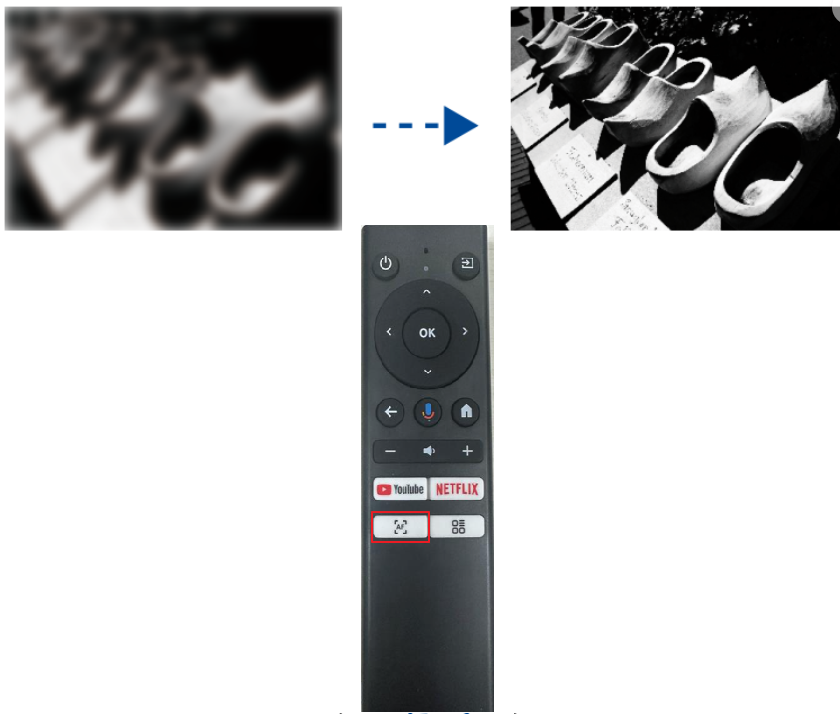
2-2. Press the Autofocus button on the remote control at any time to trigger autofocus.
*L2 top joystick button :
*Remote control:
3). Pairing the Android TV Box with the Bluetooth Remote Control.
Pairing can be done through Android TV/Settings/Remote Control and Accessories/New Accessories.
When pairing, the OK and the Volume - (reduce) buttons on the remote control need to be simultaneously pressed.


* The default remote control device name is RemoteB307.
*To remove a device: Go to Android TV Settings > Remotes & Accessories > Add Accessory, and you can remove paired Bluetooth devices.
4) Main Screen Overview
You can access all the various functions through the main screen of the LED projector. You can navigate the main screen using either the remote control or the buttons on the LED projector itself. 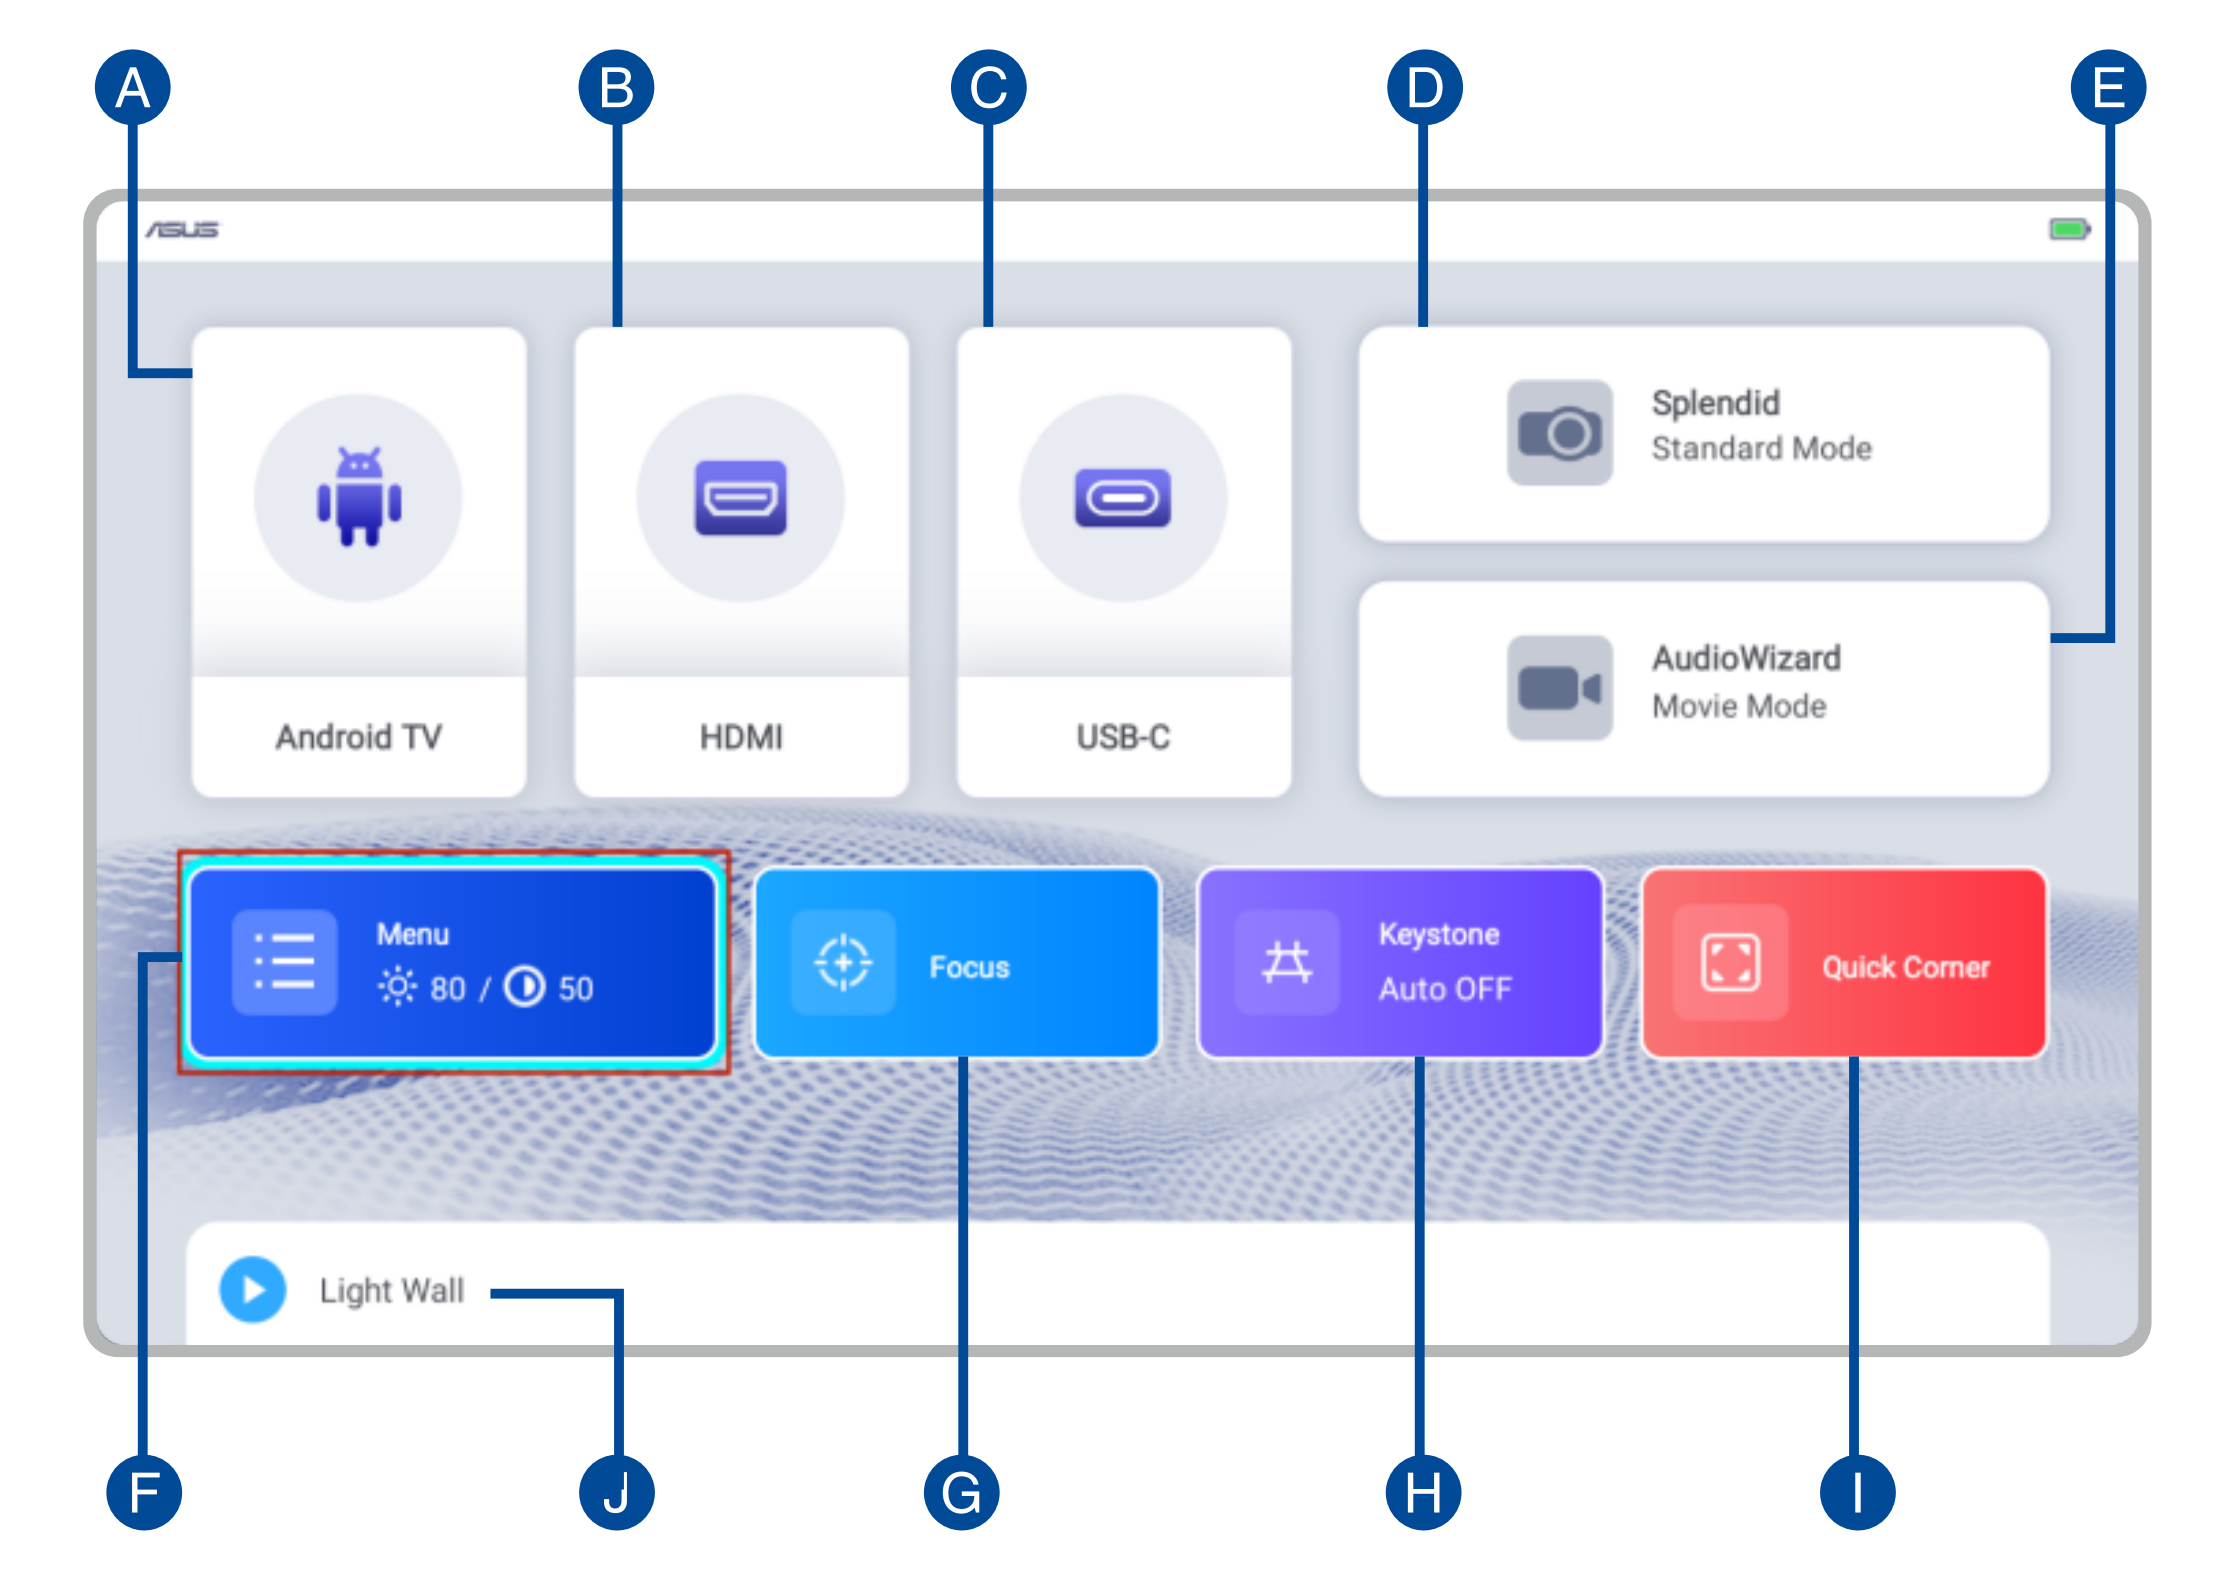
A. Android TV: Quick access to Android TV.
B. HDMI: Toggle to input from an HDMI source.
C. USB-C®: Toggle to accept input from a USB-C source with support for USB-C DP Alt Mode data/video transfers and 7.5 W (5 V / 1.5 A) power delivery.
D. Splendid: Select one of the preset display modes.
E. AudioWizard: Select an preset audio mode.
F. Menu: Opens up a menu to configure settings for your LED projector. Refer to the Configuration menu options section for details of each option.
G. Focus: Allows you to manually adjust focus.
H. Keystone: Allows you to correct distorted images resulting from an angled projection.
I. Quick Corner: Allows you to adjust each corner of your projection onscreen.

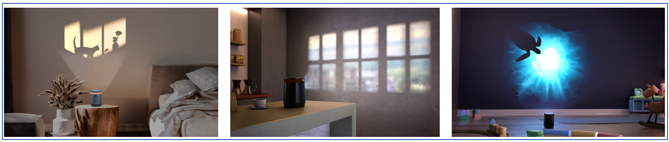
J. Light Wall: Helps you set the mood for the room you are in with special ambient lighting effects.
5.Q&A :
1. To mirror your Android device screen:
① Make sure that the Wi-Fi on your Android device is turned on and connected to the same Wi-Fi network as your LED projector.
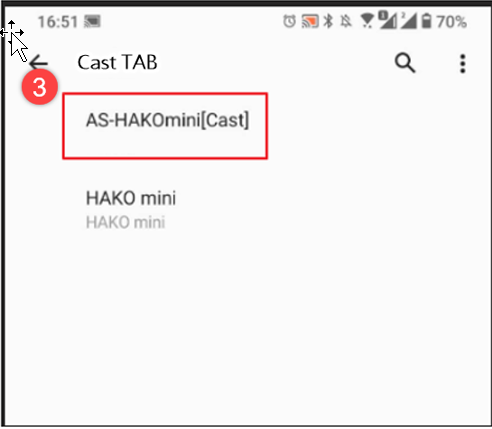
② Click "Screen Cast."
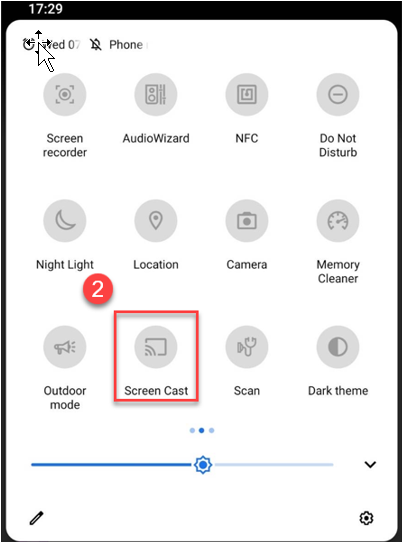
③ Choose the screen you want to mirror, then click on the casting device "AS-HAKOmini[Cast]" to complete the process.
2.For iOS devices:
To mirror your iOS device screen:
1. Make sure that the Wi-Fi on your iOS device is turned on and connected to the same Wi-Fi network as your LED projector.
2. Download and install a third-party app, such as AirScreen, on your LED projector.
3. Once installed, open the app and follow the on-screen instructions.
4. When you see a QR code displayed on the projected image, scan it with your iOS device to connect to your LED projector.
5. Swipe down from the upper-right corner of your iOS device’s screen to open Control Center, and then tap Screen Mirroring.
6. From the device list, select AS-HAKOmini[AirPlay], and your entire iOS device screen should be mirrored onto the projection onscreen.
3. For Laptop/Desktop(Windows):
To mirror your Laptop/Desktop screen:
1, Make sure that the Wi-Fi on your iOS device is turned on and connected to the same Wi-Fi network as your LED projector.
2,Click“Google Chrome” .
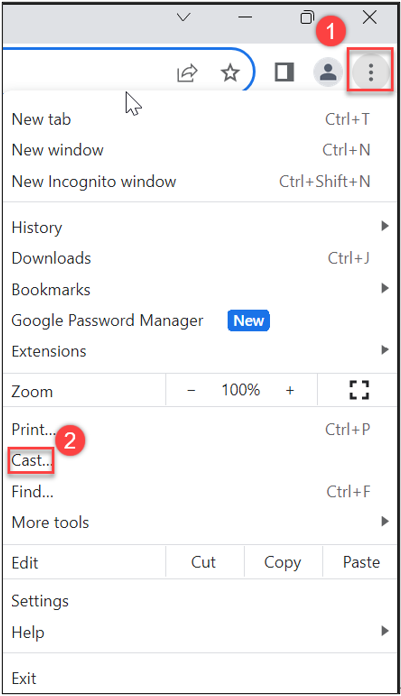
① Click .
.
② Click "Cast".
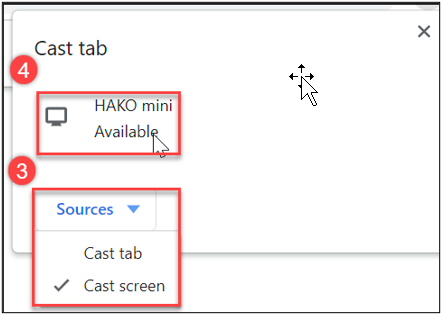
③ Click on the source to select the cast method.
④ Click on the released device "HAKO mini" to complete.
4. If No Signal from ATV Box
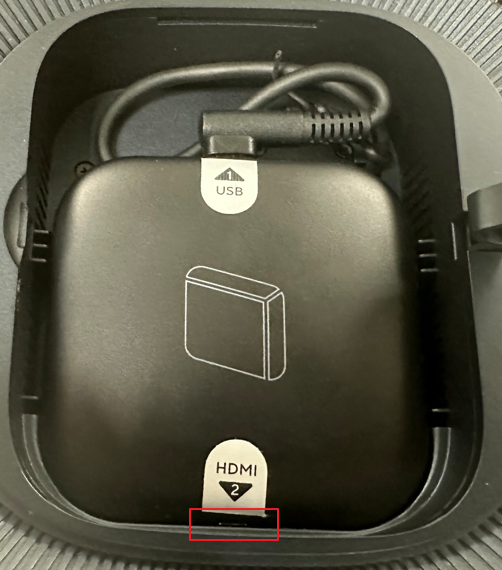
①Please confirm if the Micro HDMI of ATV Box is plugged in.
② Check whether or not the power supply works and whether or not the LED indicator light of ATV Box is blue after power on. 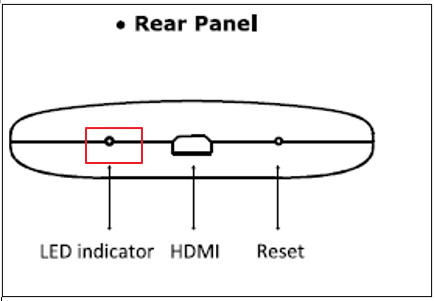
5.Reboot ATV Box
-Plug the ATV Box to the power supply and press the Reset hole with a sharp object until it restarts.

6.Android TV Box restore to Default Settings
Android TV/Settings/Device/About/Factory reset.
*Note: This will clear all data from the device's internal storage. Your Google Account, system and application data and settings, as well as downloaded applications, will be removed.
7. Connect Android TV Box to another Display device such as a TV or Projector. 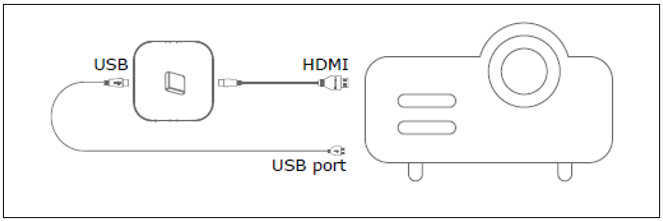
7-1Additional accessories required (* Need to purchase them on your own.) are as follows:
①.HDMI to Micro HDMI cable.
②.Micro USB cable and connect it to a USB port that can provide at least 5V/1.5A.
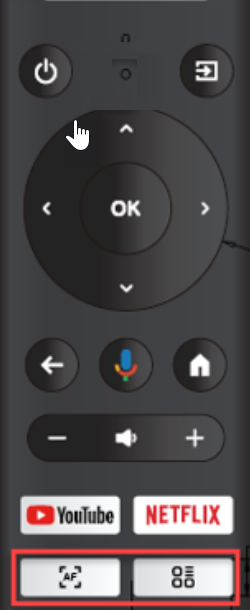
7-2 Switching the Remote Control Between L2 Mode and ATV Box Independent Use Mode.
Simultaneously press the Auto Focus and Projector Setting buttons at the bottom of the remote control.
In L2 (IR) control mode, the indicator light will flash red.
In ATV Box independent use mode: The indicator light will turn blue (Bluetooth).
8. Pairing With External Bluetooth Accessories.
ATV Box can be paired with Bluetooth accessories such as a mouse, a headphone or external Bluetooth speakers through Android TV/Settings/Remote Control and Accessories/New Accessories.
* The paired device needs to be in the pairing mode first.
9.Auto Obstacle Avoidance
Automatically avoiding obstacles in front of the projection screen ensures excellent visual performance.
*Unable to accurately avoid shadows generated by obstacles between the projector and the wall.
(Menu->Display->Smart Avoidance) 
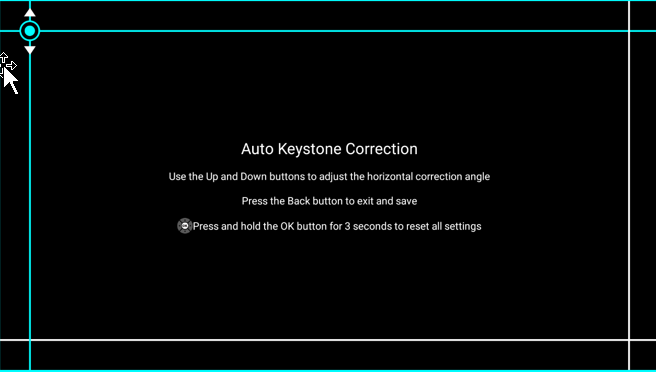
10. Automatic Horizontal/Vertical Trapezoidal Correction.
L2 can automatically adjust the rectangle of the screen based on the location where it is placed. To fine tune the results of the automatic correction, choose the Quick Corner function to fine tune the four corners of the screen.
If the parameters of Keystone or Quick Corner are manually adjusted, the system will temporarily store the settings and turn off the automatic trapezoidal correction function. If the projector is removed, the automatic trapezoidal correction function will be restarted.
* To keep the automatic trapezoidal correction function off for a long time, turn it off through Menu/Display/Auto Keystone. Then, you need to manually adjust the parameter values of Keystone and Quick Corner.
Automatic Trapezoidal Correction Compensation
If not satisfied with the system's trapezoidal correction results, you may make minor adjustments to the settings/automatic trapezoidal correction compensation. After storing the adjustments, the system will make compensation for the automatic trapezoidal correction according to your preference.
11. Screen Alignment
If the projection screen is larger than the projection curtain (or exceeds the border lines), L2 can automatically reduce the projection screen to the size of the projection curtain.
12. System Volume Adjustment
It is recommended to turn the volume of the Android TV to its maximum after Bluetooth pairing, in order to maximize the L2 volume.
The adjustment method is as follows:
The method of switching to the Bluetooth mode of the remote control is as follows:
12-1. Press the Autofocus and Projector Setting buttons at the bottom of the remote control simultaneously for about 5 seconds and wait for the indicator light on top of the remote control to display in blue.
12-2. Press the volume button + on the remote control and the ATV green volume status column will appear; then adjust the volume to the far right (loud)

12-3. Press the Autofocus and Projector Setting buttons again for about 5 seconds and wait for the indicator light on top of the remote control to turn red.
12-4. The volume adjustment interface figure shown below is for L2 volume adjustment.

13. HDR in USE
After installation, if there is no HDR video playing but Splendid and Picture always displays HDR in USE and parameter settings cannot be adjusted: 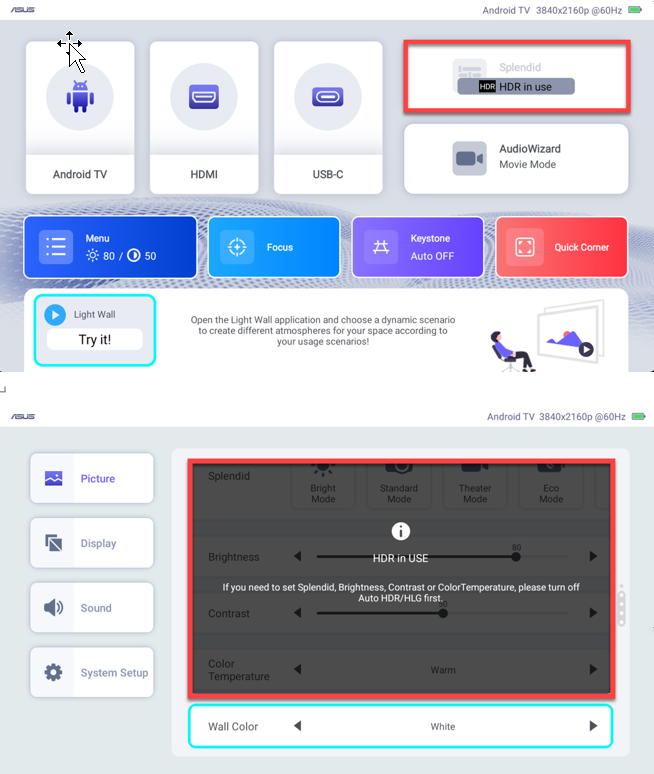
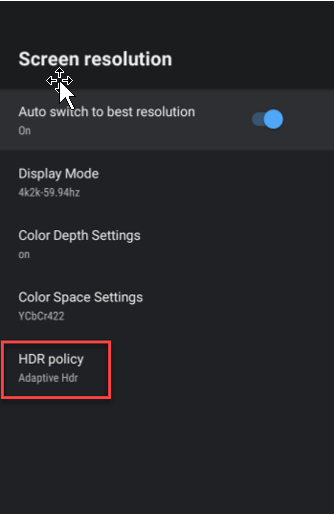
It is recommended to adjust the following settings of ATV: Setup->TV settings-> Display->Screen resolution
ATV settings/TV settings/Display/Screen resolution/HDR policy and select Adaptive HDR.
HDR
When Display/AUTO HDR/HLG is on, L2 will automatically detect whether or not the content is in HDR/HLG format.
When L2 automatically detects a film playing in HDR format, the Picture related settings and Splendid settings of L2 cannot be selected; the HDR settings will be followed and HDR in USE will be displayed.
14. What is the version of Hako mini's Android TV?
For Hako mini produced in July 2023, the version is Android TV 10.0.
15. Will it be updated to Android TV 11?
A: It is expected to be updated to Android TV 12.0 in the future.
16. System Update
When installing and setting up Android TV for the first time, it is recommended to check for any new system updates and upgrade the version to 10.2.14 or above (the system will notify the user of any update and the user needs to manually agree to the update).
Android TV path: Settings/Device preferences/About/System updates check for update.
17. ZenBeam L2 System Update process:
17-1. Download System Update file from ASUS support site.
https://www.asus.com/displays-desktops/projectors/portable/zenbeam-l2/helpdesk_download/
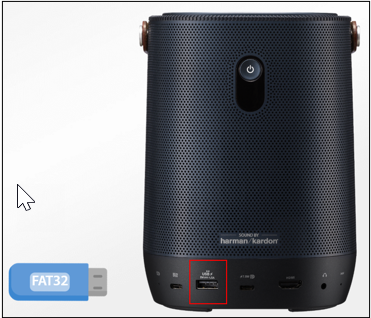
17-2. Unzip the archive and save L2Upgrade.bin to USB Drive.
*The USB drive format should be FAT32.
17-3. Insert the USB drive to L2 USB A port.
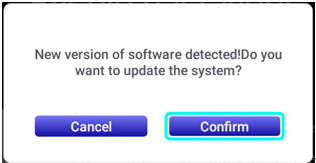
17-4. Go to Menu->Setup->System Update 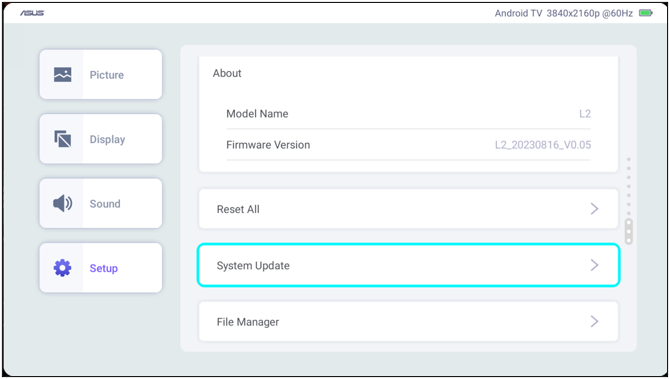
17-5. confirm and start update process.