[Notebook] Link to MyASUS - Introduction
We announced end of support for Link to MyASUS application on 2023/12, the last version is 3.0.0.0.
All the features of Link to MyASUS have been transferred to GlideX, and you can download GlideX to continue using all features.
https://play.google.com/store/apps/details?id=com.asus.glidex
https://apps.apple.com/tw/app/id1574809969
For more information about GlideX's functions, please refer to: [Notebook/Desktop/AIO] GlideX - Introduction | Official Support | ASUS Global
Link to MyASUS, one of the features in MyASUS, is a software solution that creates an integrated experience cross different operating system, including Windows, Android, and iOS, allowing you to connect the computer with a mobile device to create an integrated experience.
By using Link to MyASUS, you can make or receive Calls through the computer's speakers and microphone, send and receive text Messages, access to contacts, get mobile notifications on the computer, share files or URL with each other. Moreover, you can also remotely control your PC. Link to MyASUS aims to improve the ease of use, productivity and convenience between your computer and mobile device.
*If the computer-side MyASUS version is 3.0.33.0 and above, the Screen Sharing feature and the App function under the Communication feature are transferred to the GlideX app in Dec, 2021.
3. Permissions and corresponding functions that mobile device require to allow
4. File Transfer and URL Share
- 4.1 File Transfer
- 4.1.1 Transfer Files from the computer to the mobile device
- 4.1.2 Transfer Files from the mobile device to the computer
- 4.1.3 Transfer files via pairing code or QR code
- 4.2 URL Share
- 4.2.1 Share the URL from the computer to the mobile device
- 4.2.2 Share the URL from the mobile device to the computer
- 5.1 Pairing the computer and mobile devices
- 5.2 Call history
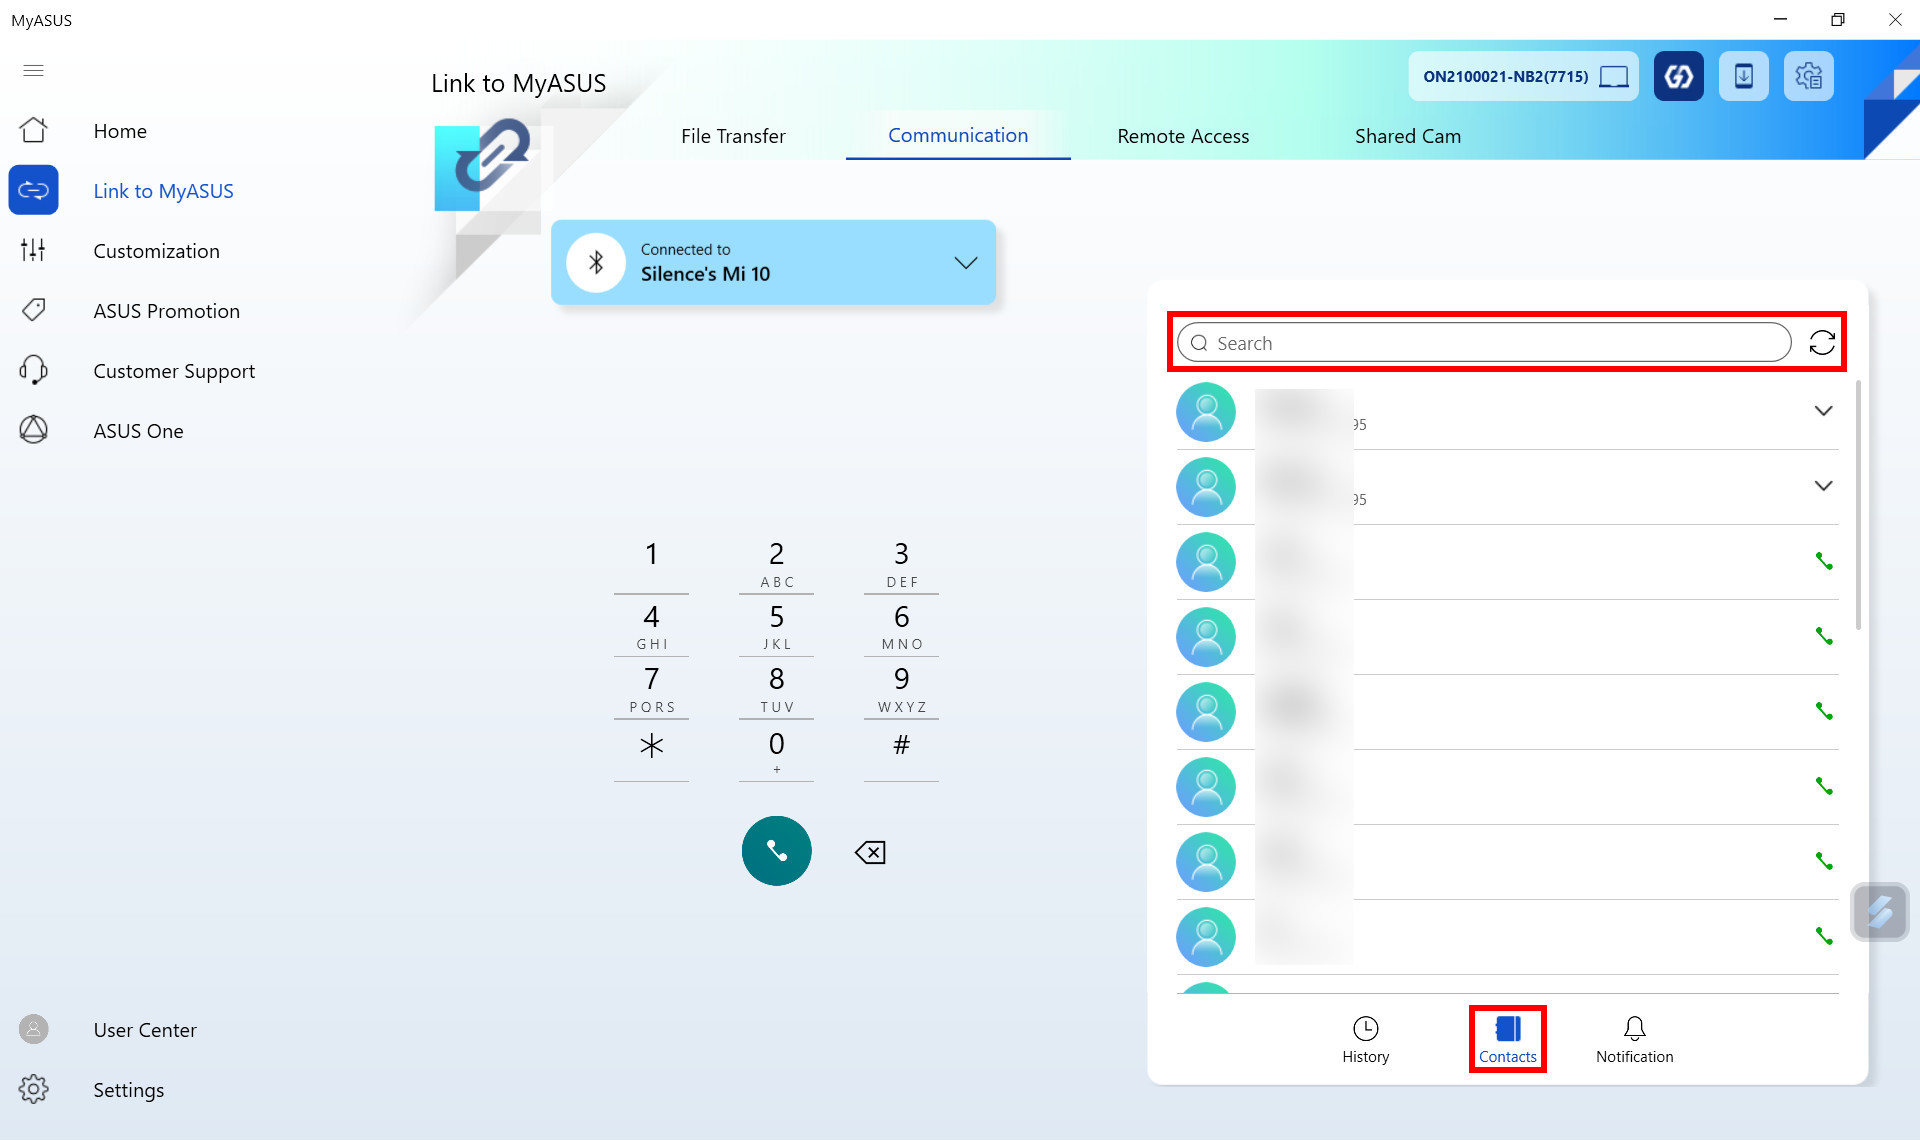
- 5.3 Contact person
- 5.4 Notification
- 5.5 Dial
- 5.6 Settings during a call
Computer side:
- Windows operating system: Windows 10/11 64-bit (version 1809 and later) (Note that Link to MyASUS is NOT available in Windows in S mode)
- MyASUS App requirements on the computer: 3.0.11.0 or higher (go to the Microsoft App Store to download or upgrade MyASUS App, you can also click the link)
- ASUS System Control Interface v3: 3.0.9.20 or higher (please download ASUS System Control Interface v3 in this link) (If your computer cannot install ASUS System Control Interface v3, this model does not support Link to MyASUS)
- Network requirements: LAN, Wi-Fi and Bluetooth
Mobile device side:
- iOS mobile device operating system: iOS 13 or higher
- Android mobile device operating system: Android 9 or higher
- Link to MyASUS App on iOS: 2.2.1 or higher (download or install in the Apple App Store, please click the link)
- Link to MyASUS App on Android: MyASUS mobile app on version 2.2.1.10 or higher (download or install in the Google Play store, please click the link)
- Network requirements: mobile network, Wi-Fi, personal hotspot and Bluetooth
- Supported mobile devices: iPhone, iPad, Android Phone, Android Pad
(1) When opening MyASUS for the first time, the following picture will open as shown below, click ①[I am above the age of 14 years], and click ②[I agree. Start MyASUS].

(2) Enter your ③[ASUS member account and password] to log in, and click ④[Login].
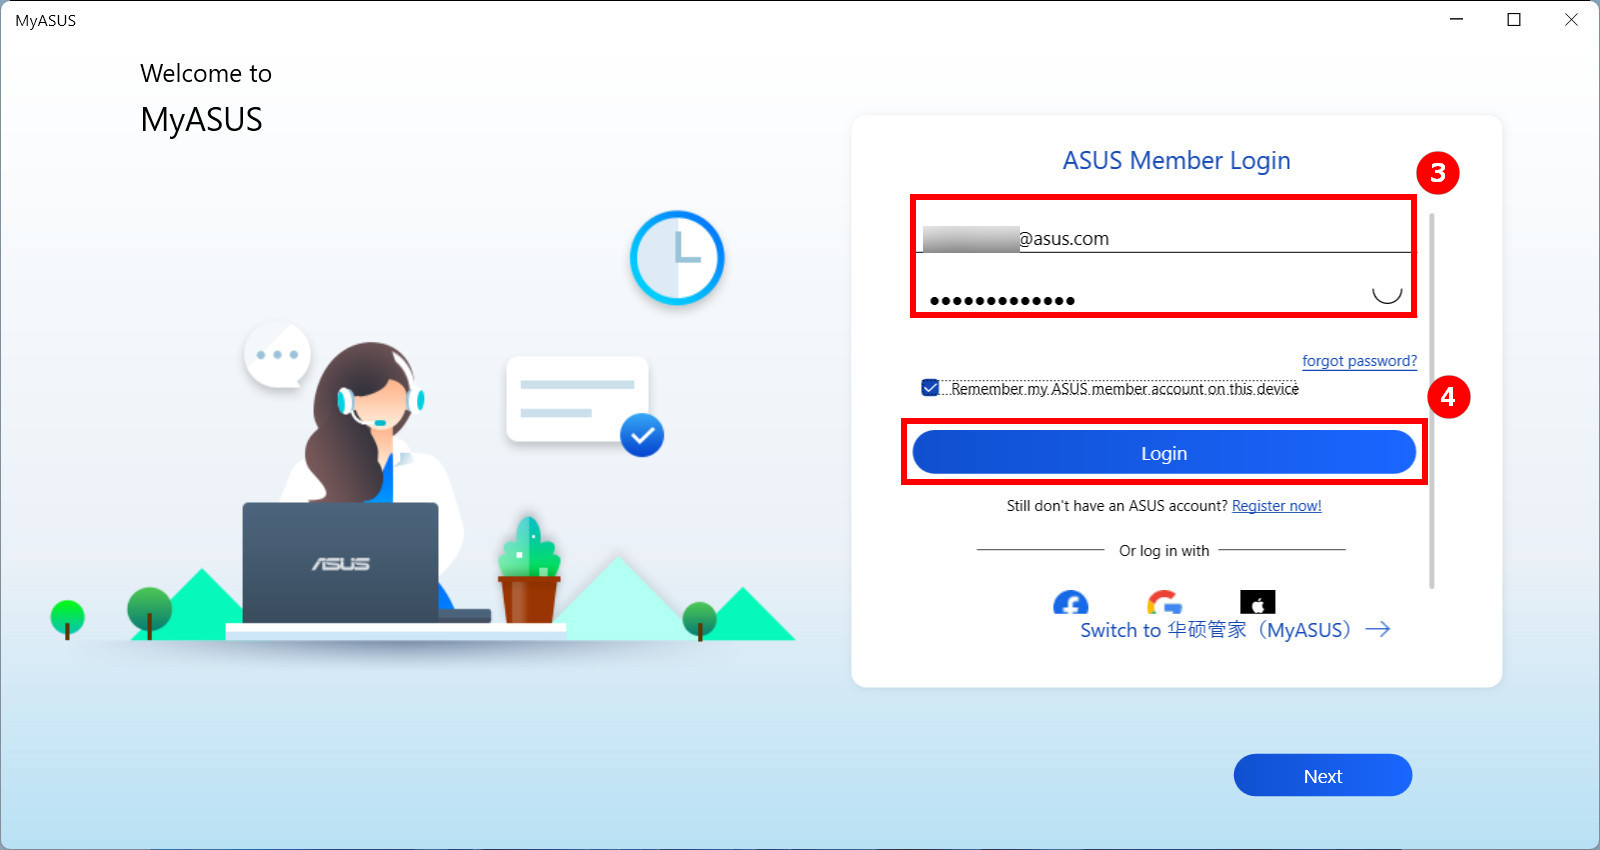
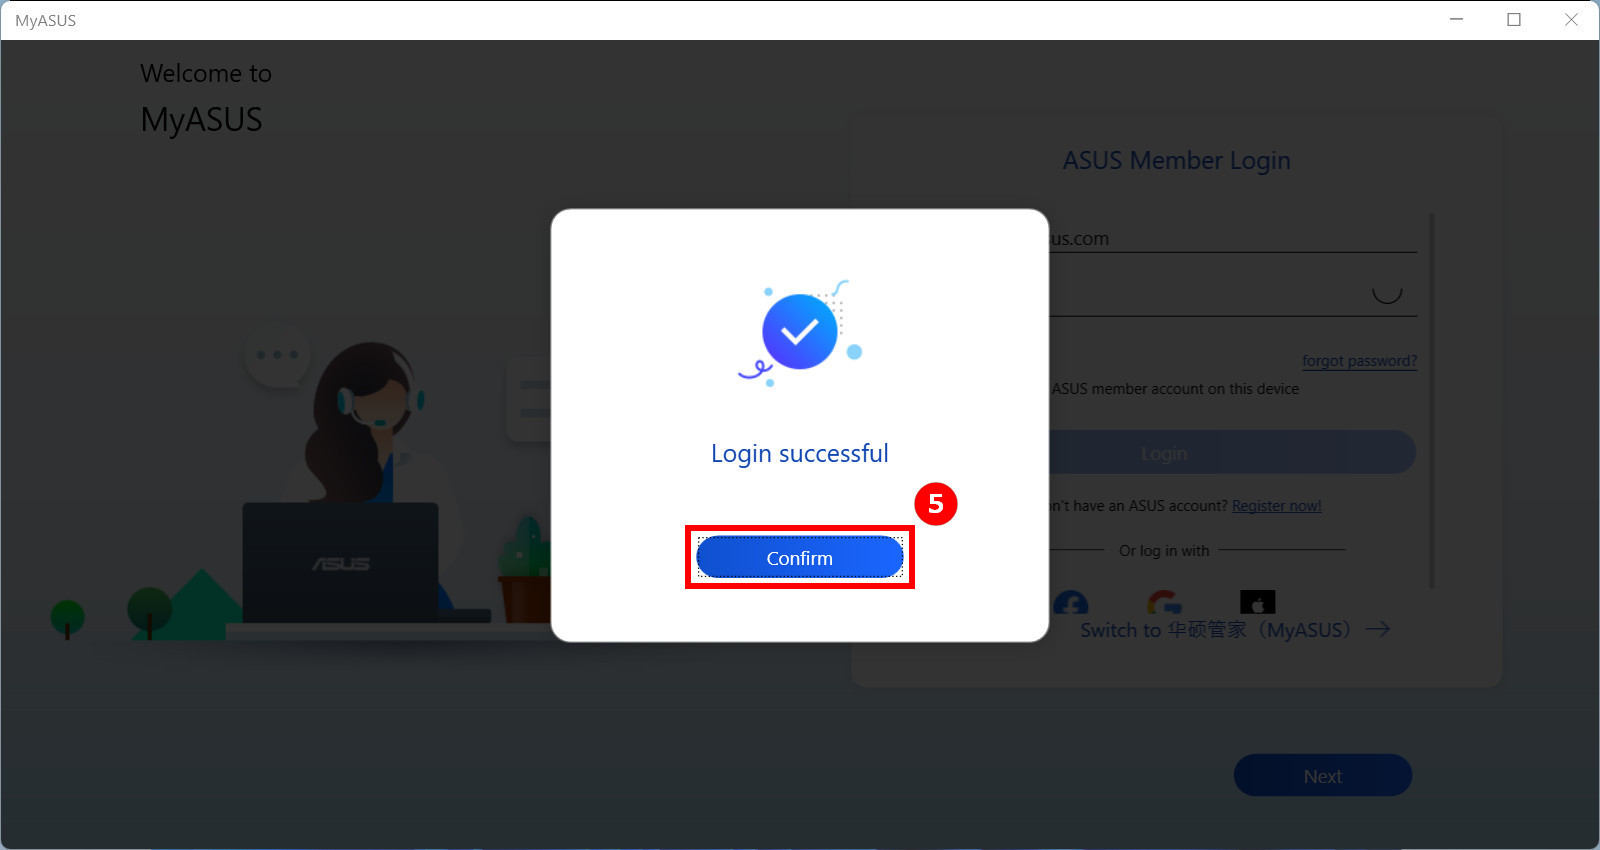
(3) The computer side has been logged in, click ⑤[Confirm].
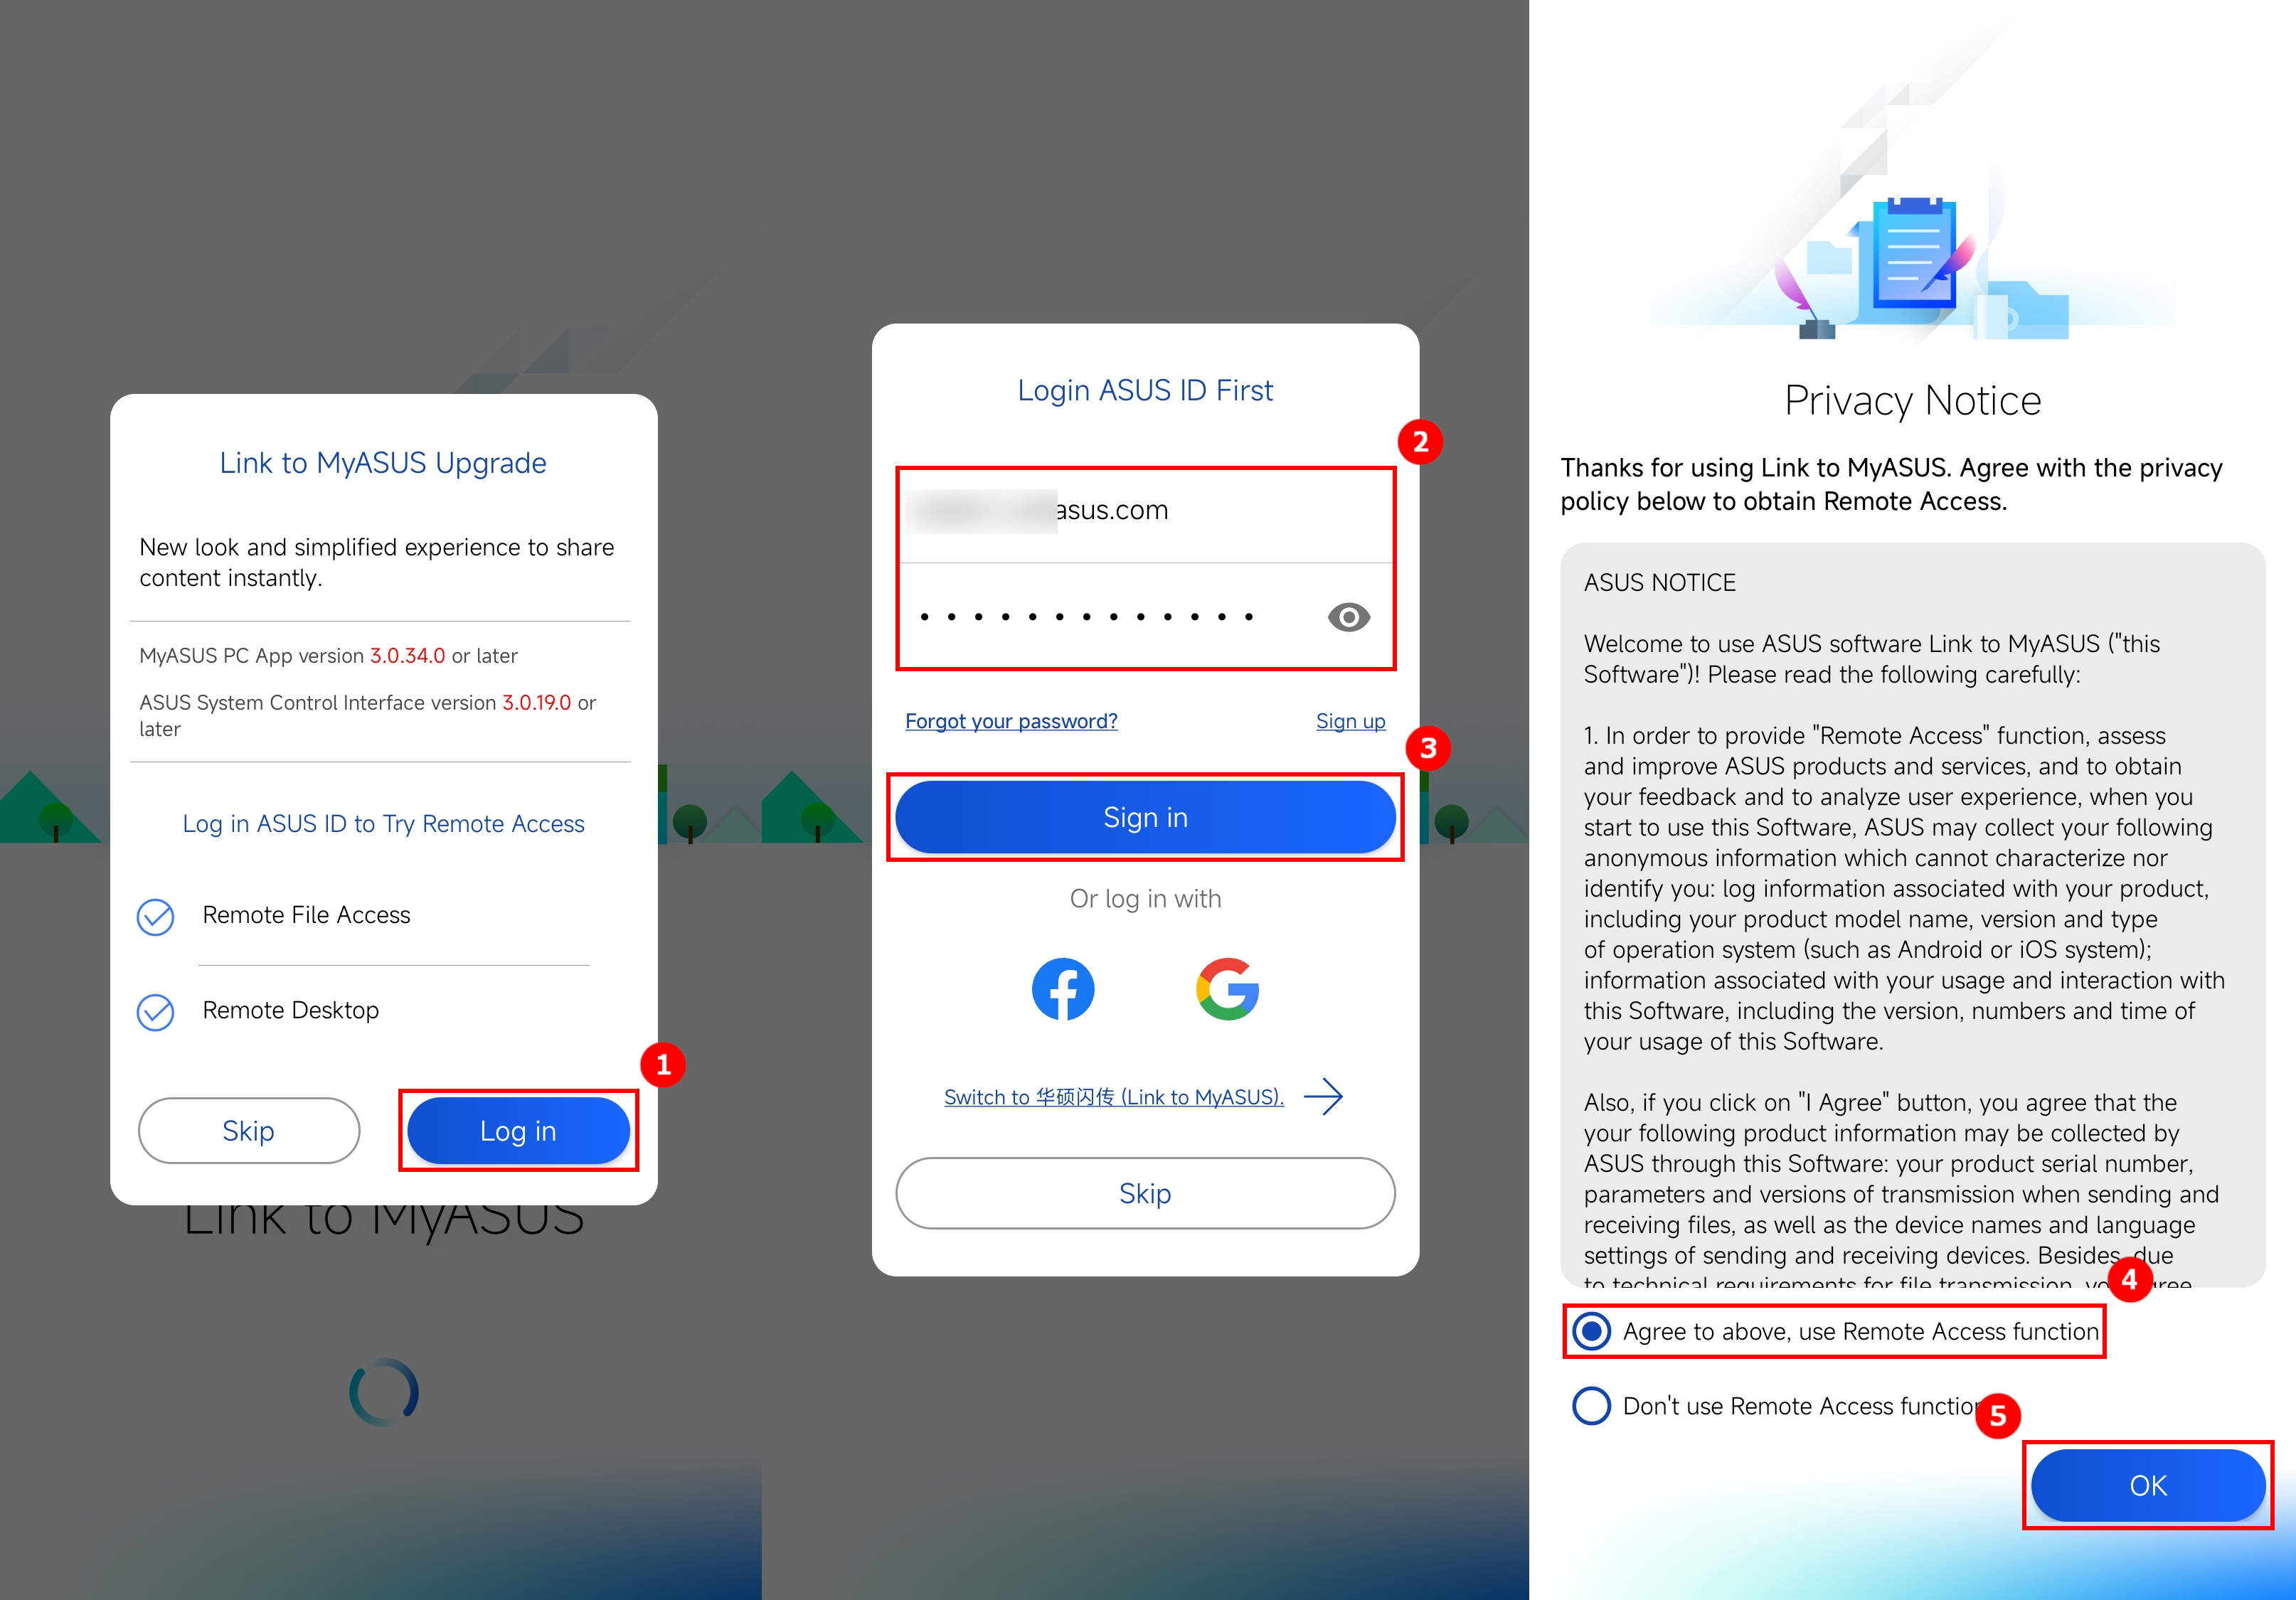
When using Link to MyASUS on the mobile device for the first time, please click ①[Log in], enter the same ②[ASUS member account and password] as the computer side, click ③[Sigh in], click ④[Agree], click ⑤[OK].
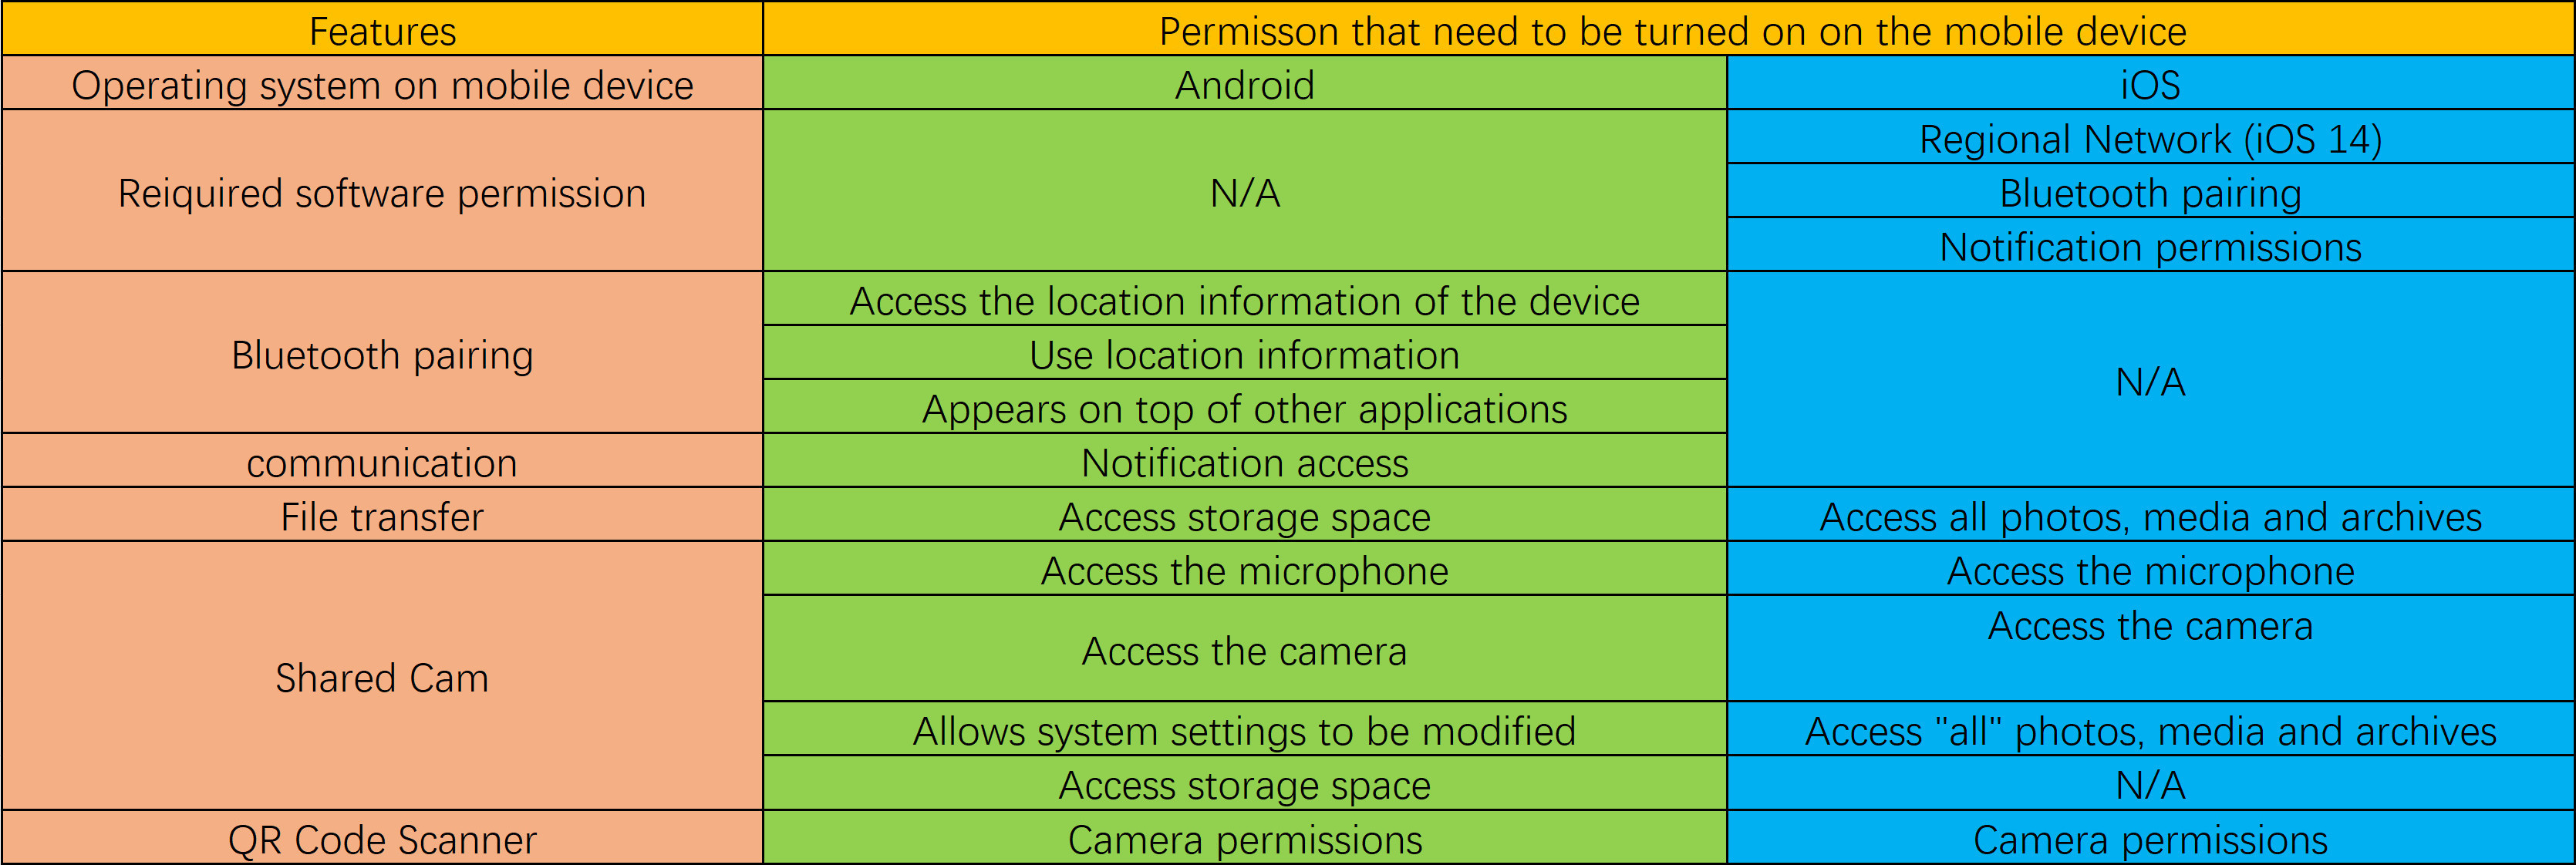
3. Permissions and corresponding functions that mobile devices need to open
Link to MyASUS needs to open the permissions. Take the Android mobile device as an example. If you only need to use the "QR Code Scanner" function, you only need to enable the "Camera Permissions" on the mobile device.
For the use of functions such as "Communication", the mobile device will remind you that Link to MyASUS requires you to enable higher privacy permissions. This is normal. Please enable the relevant permissions normally and use the relevant functions.
4. File Transfer and URL Share
The File Transfer and URL Share functions require two devices to be connected to the same network or have been connected via Bluetooth (please refer to section 8.1 of this article for the use of the Bluetooth connection function), and the [Discoverability] function is enabled, [File Transfer] function is turned on.
Because it is impossible to confirm whether the receiving device is a device under your control when connected through the same network, the receiving end requires you to manually confirm.
And the device connected via Bluetooth has been authorized by you to connect, so you do not need to confirm twice when transferring files. this is a step to be set from the perspective of protecting your privacy.
If you encounter problems when using this feature, please click on the link first and read the text to try to solve your problem.
There are two types of file transmission: the computer transmits files to other devices (the receiving device is a computer or mobile device), and the mobile device transmits files to other devices (the receiving device is a computer or mobile device).
4.1.1 Transfer files from the computer to the mobile device
(1) Click ①[Select Files], click ②[File] in the pop-up window, then click ③[Open].
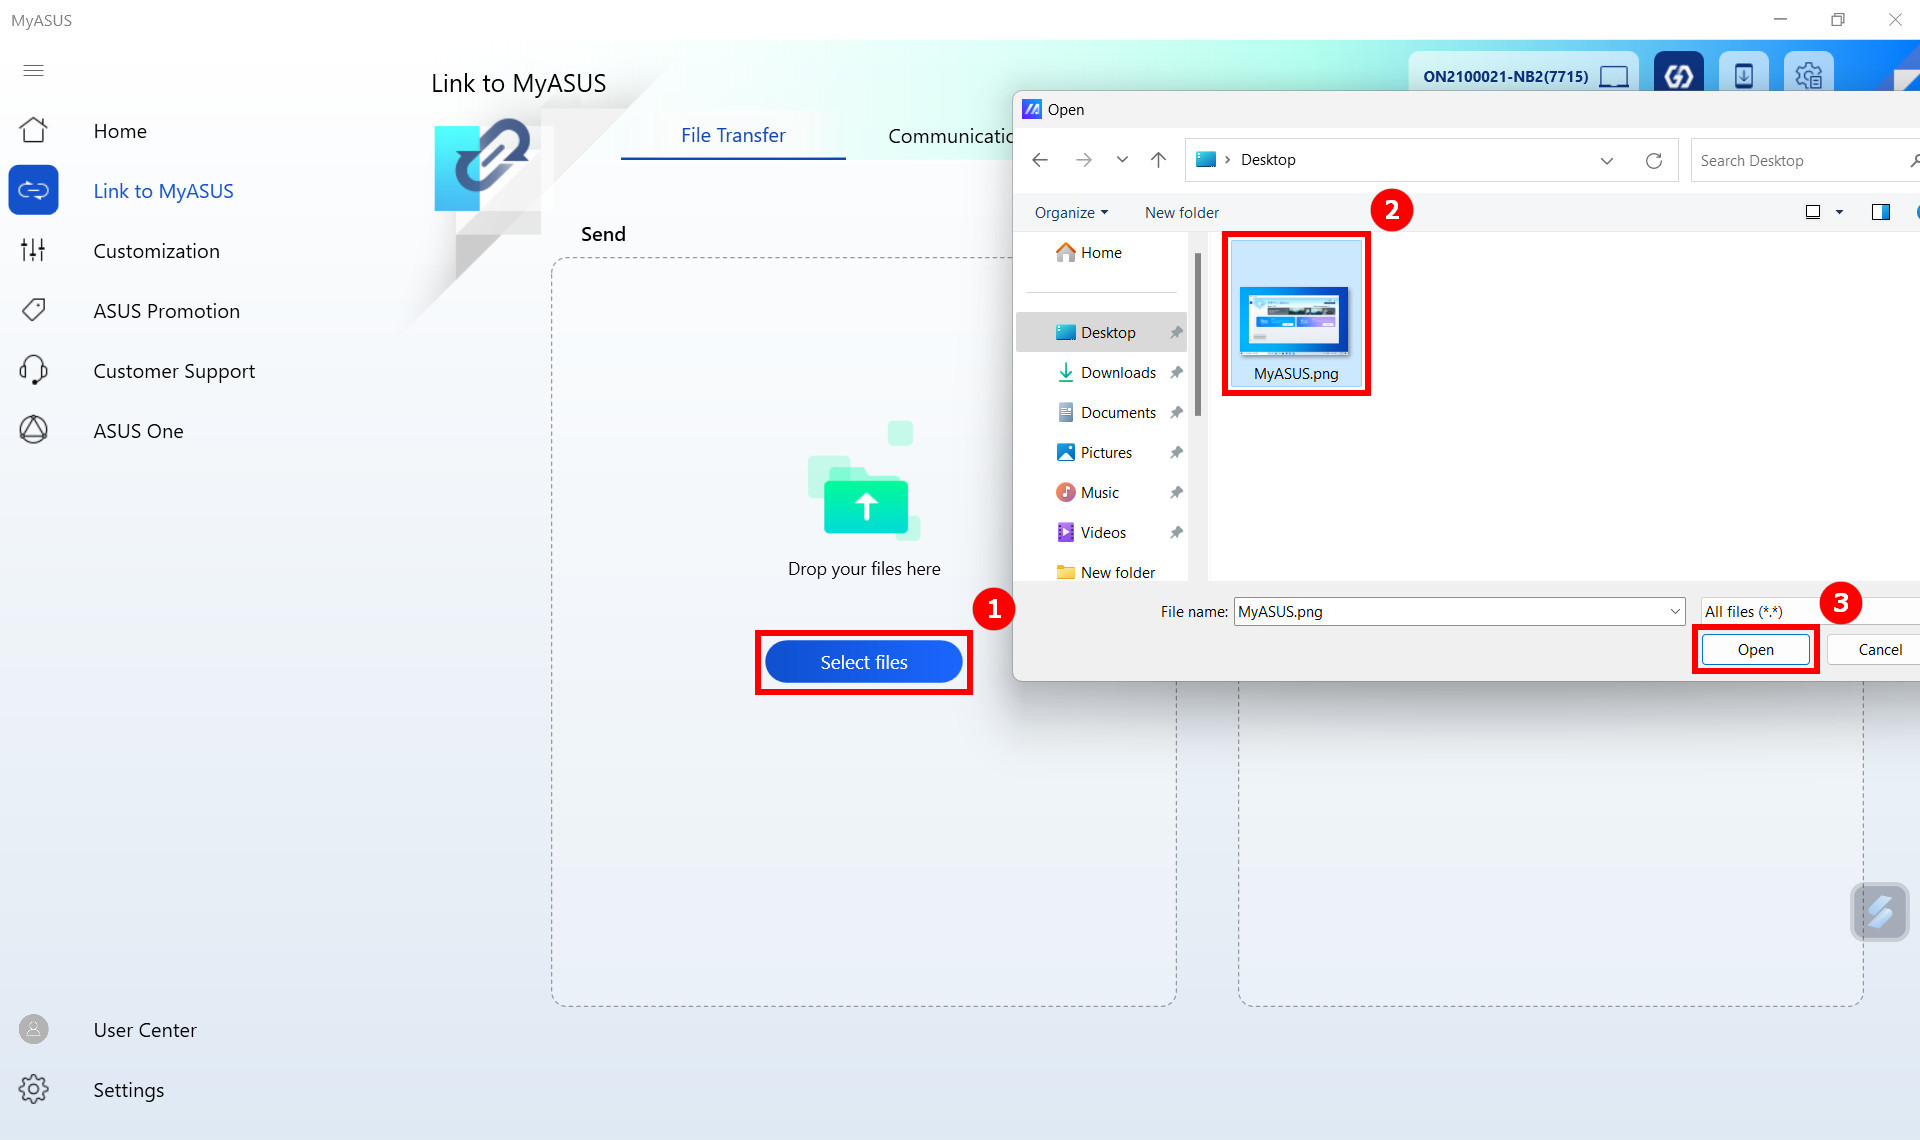
(2) Click ④[Send].
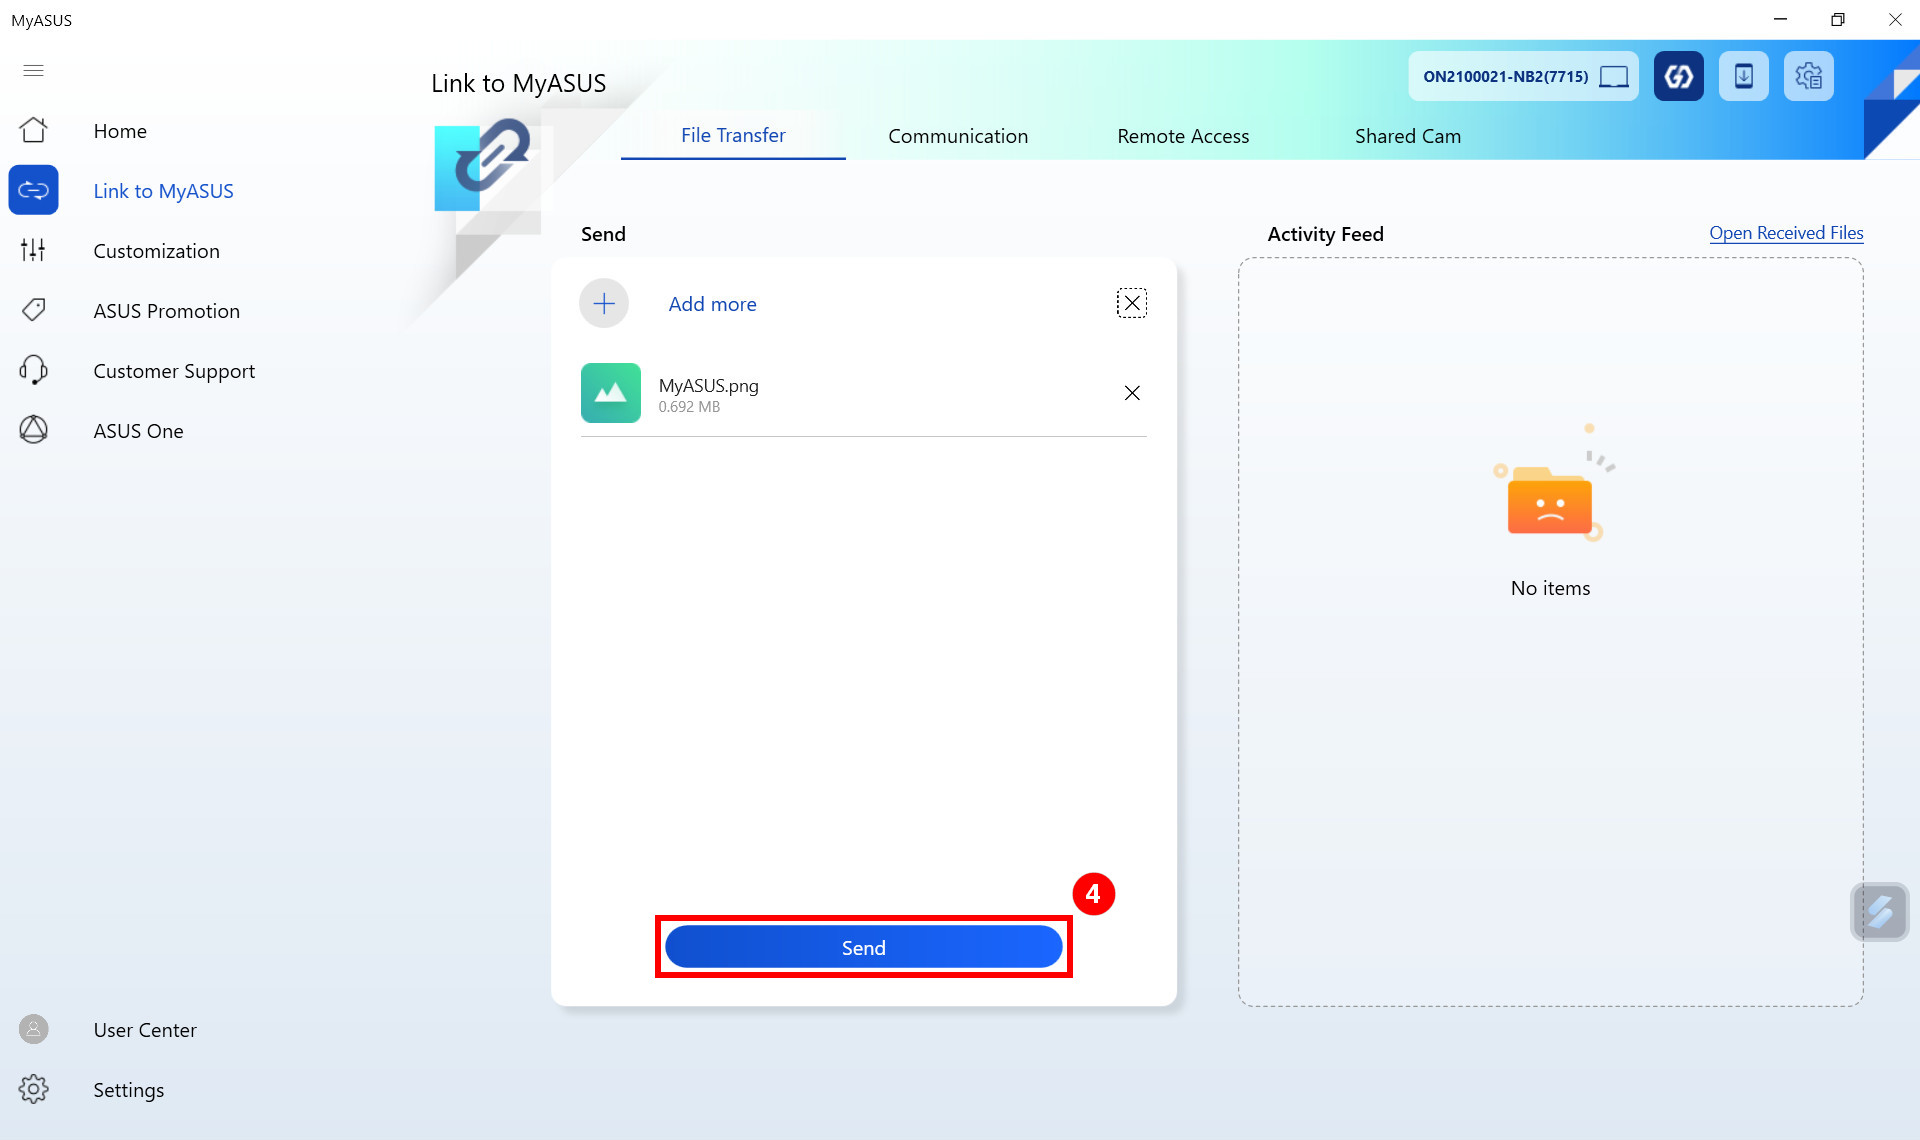
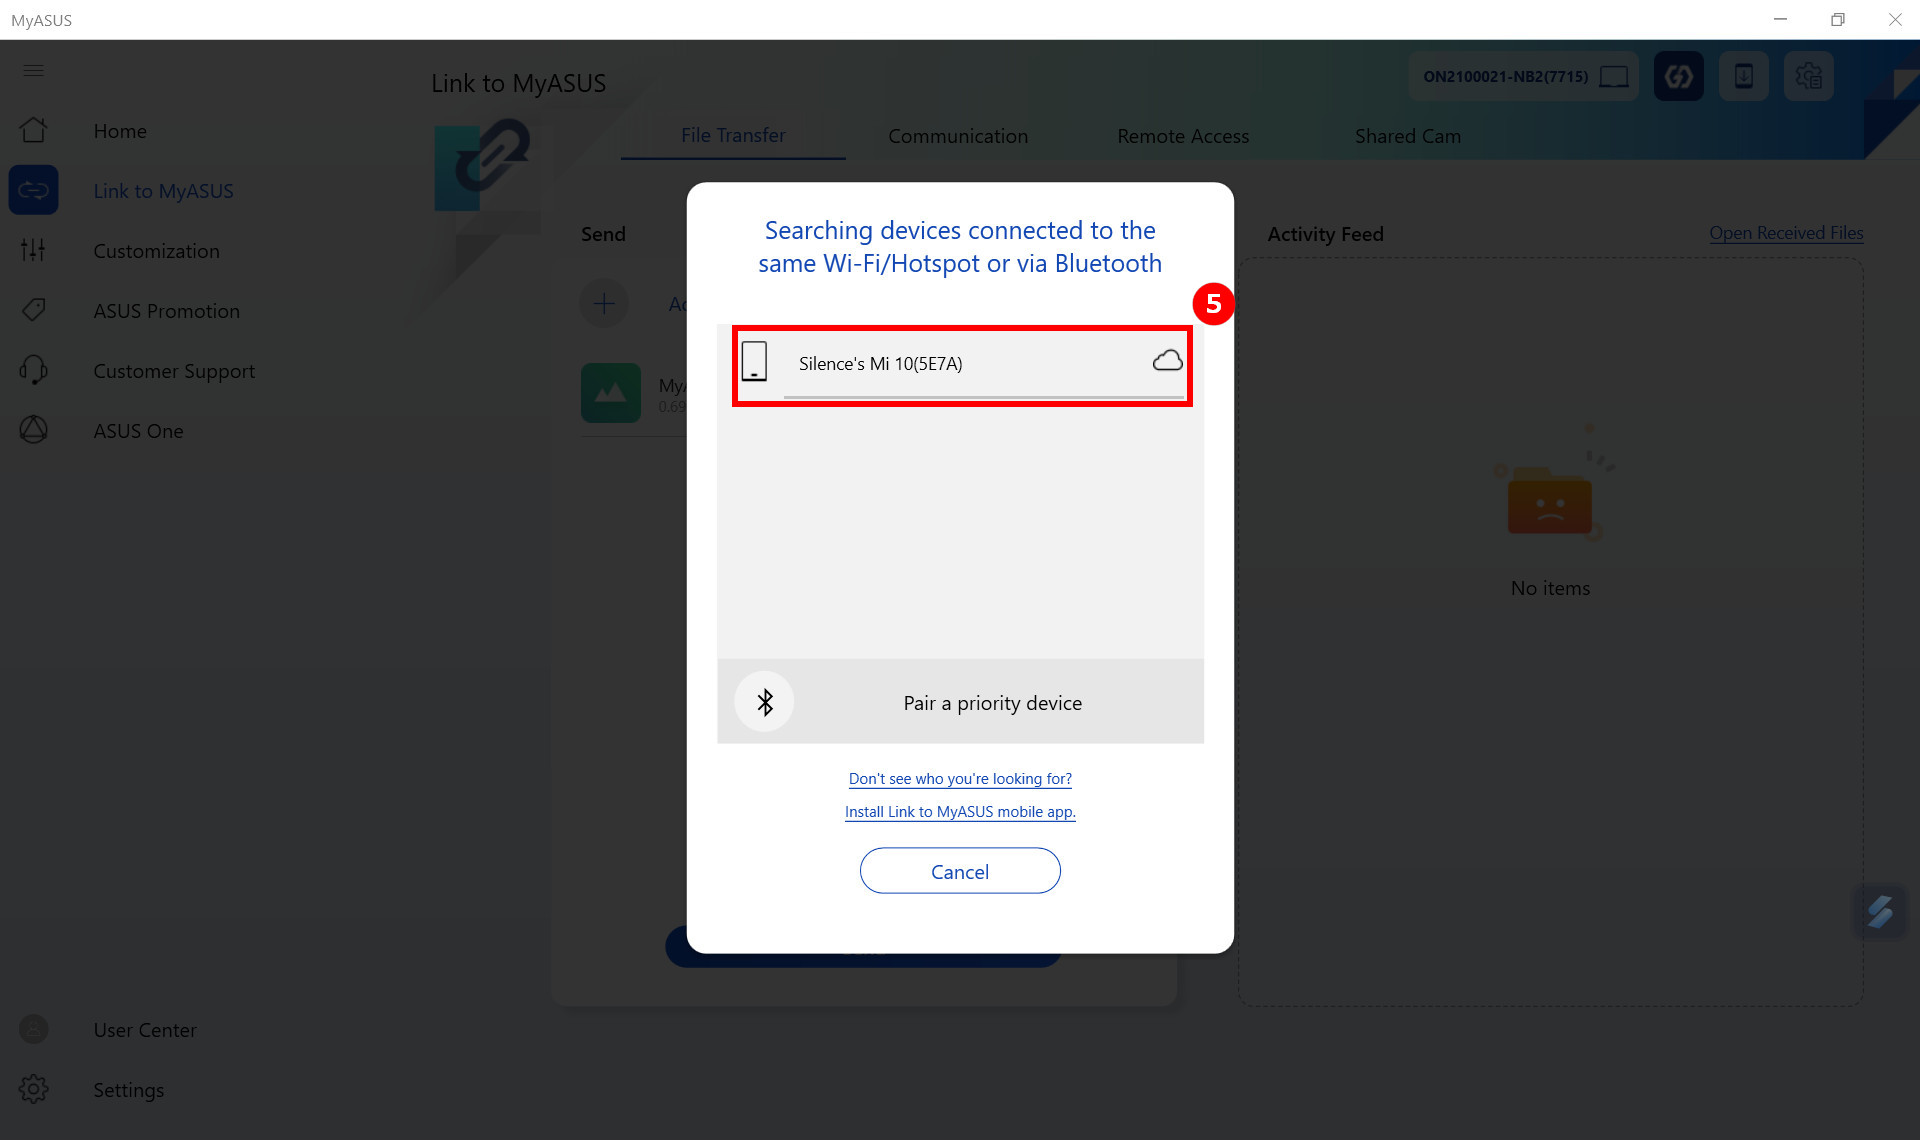
(3) Click your ⑤[Device]
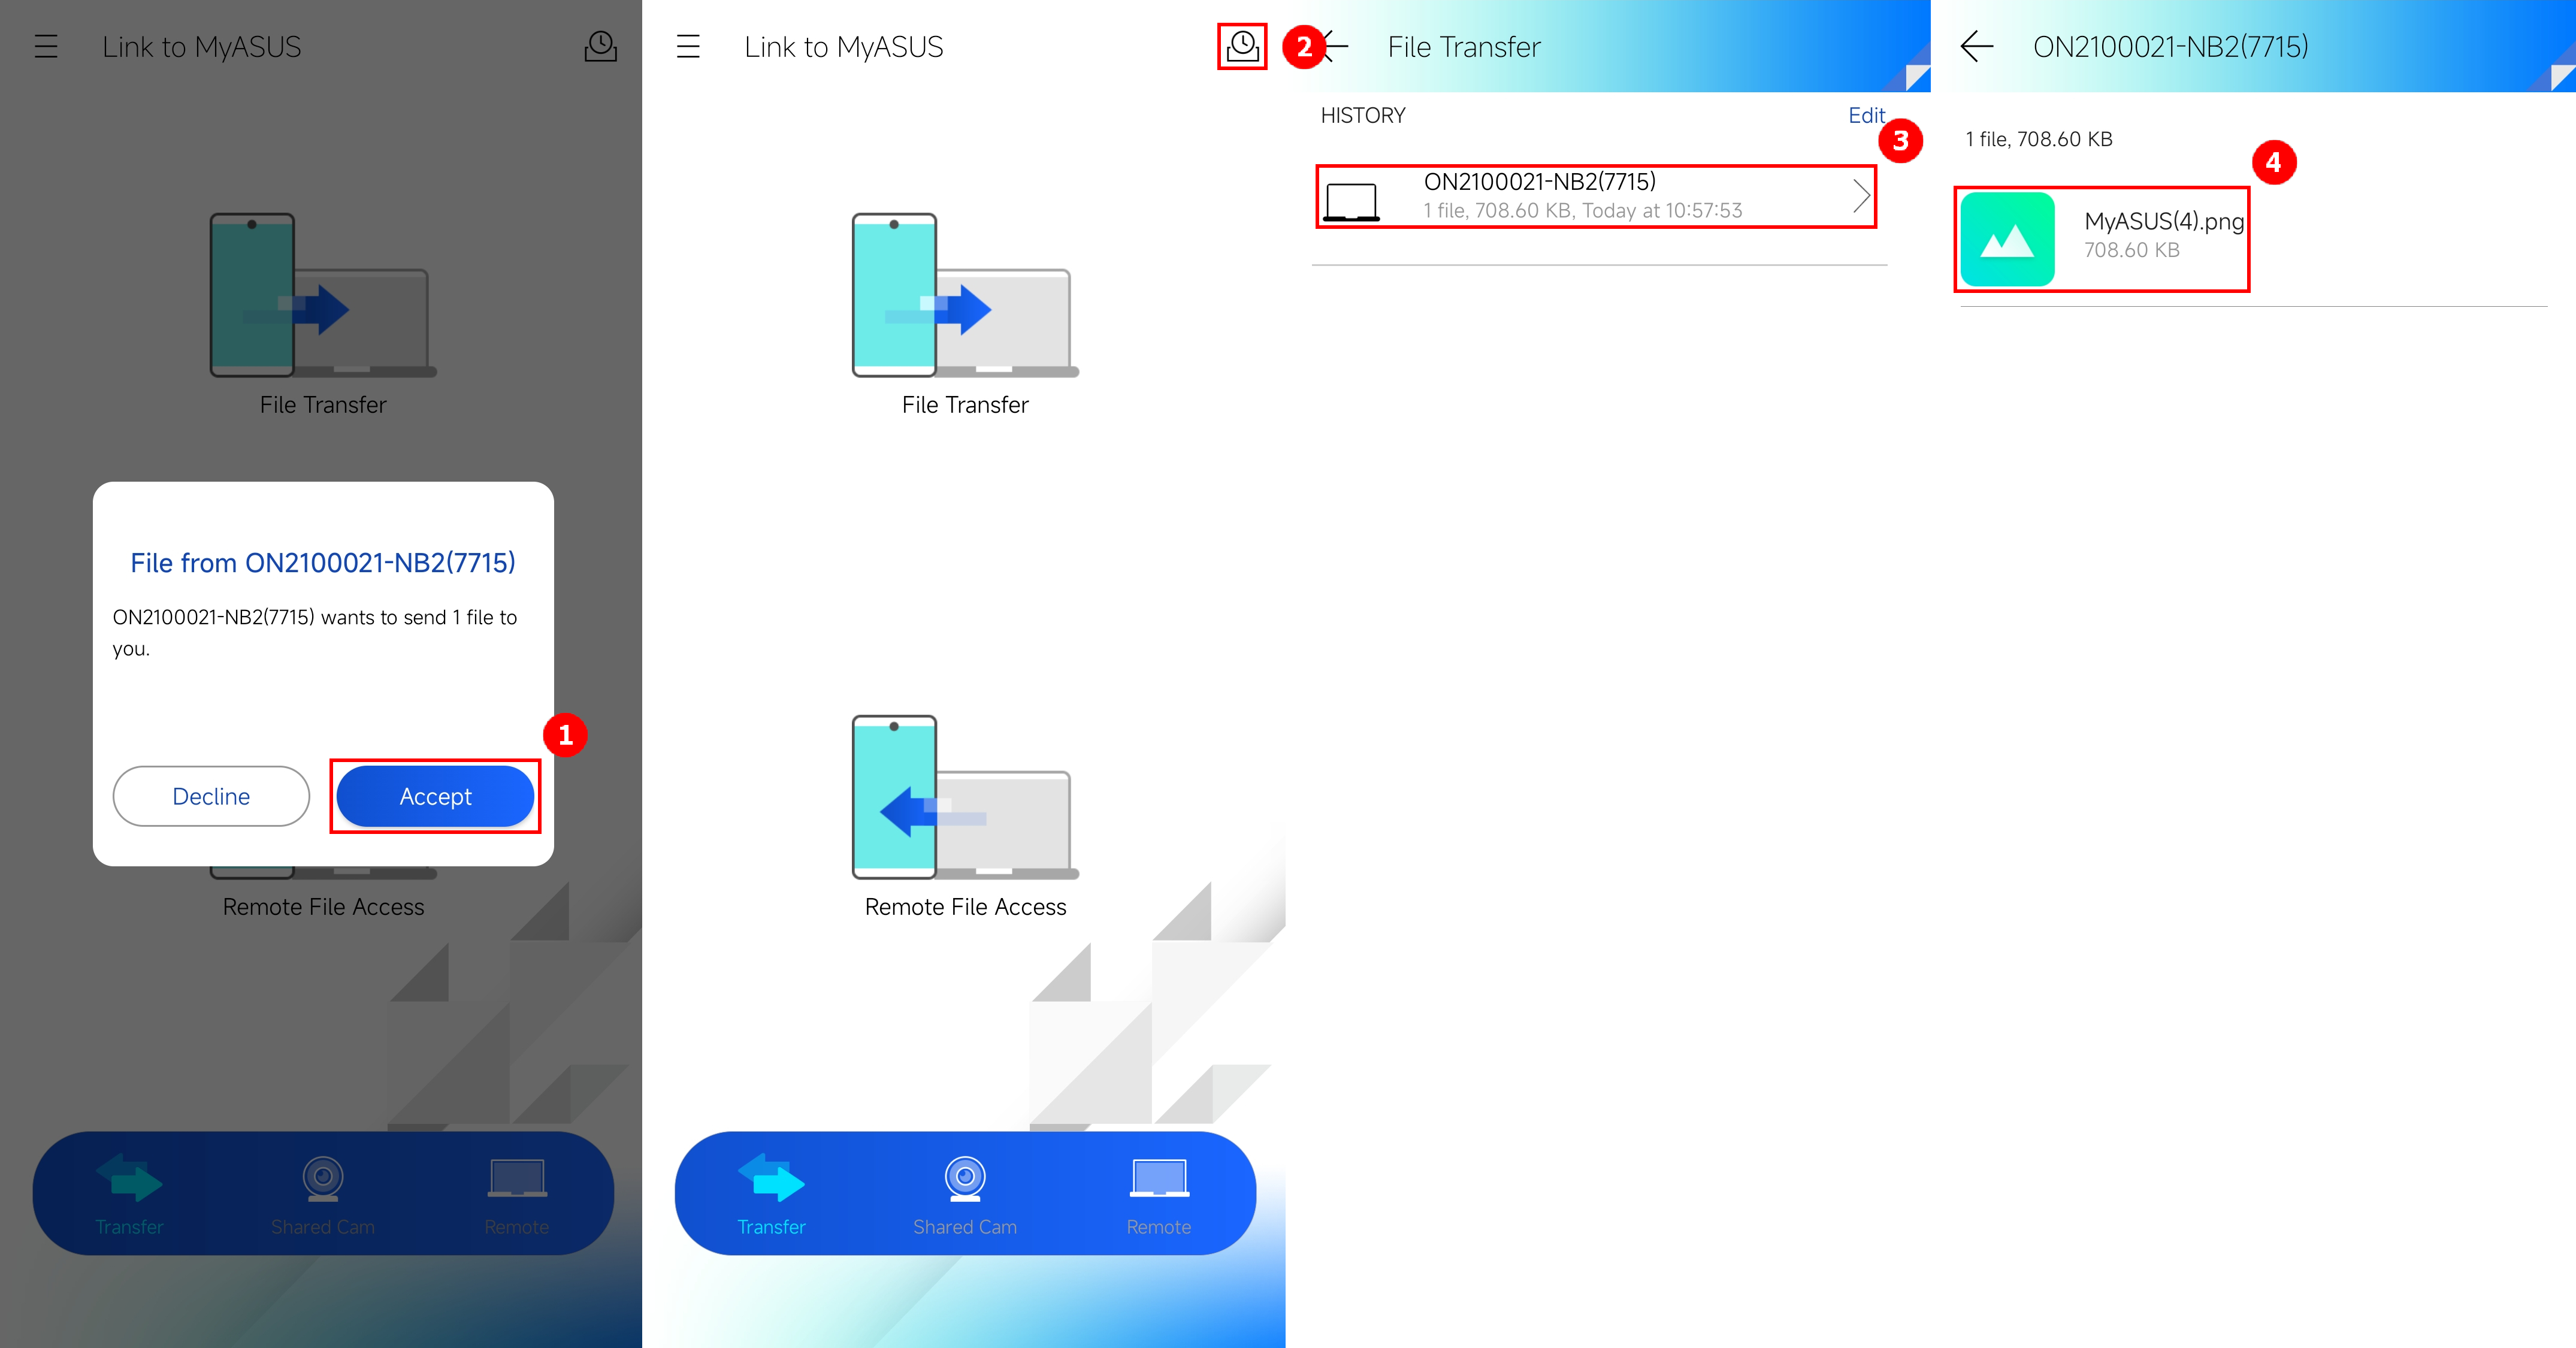
(4) Click ①[Accept], click ②[History] on the main interface, and click ③[Computer Name], you can see the received ④[File].
4.1.2 Transfer files from the mobile device to the computer
(1) Click ①[File Transfer] on the main interface of Link to MyASUS on the mobile device side, click ②[File] to be transferred, click ③[Send], click ④[Computer].
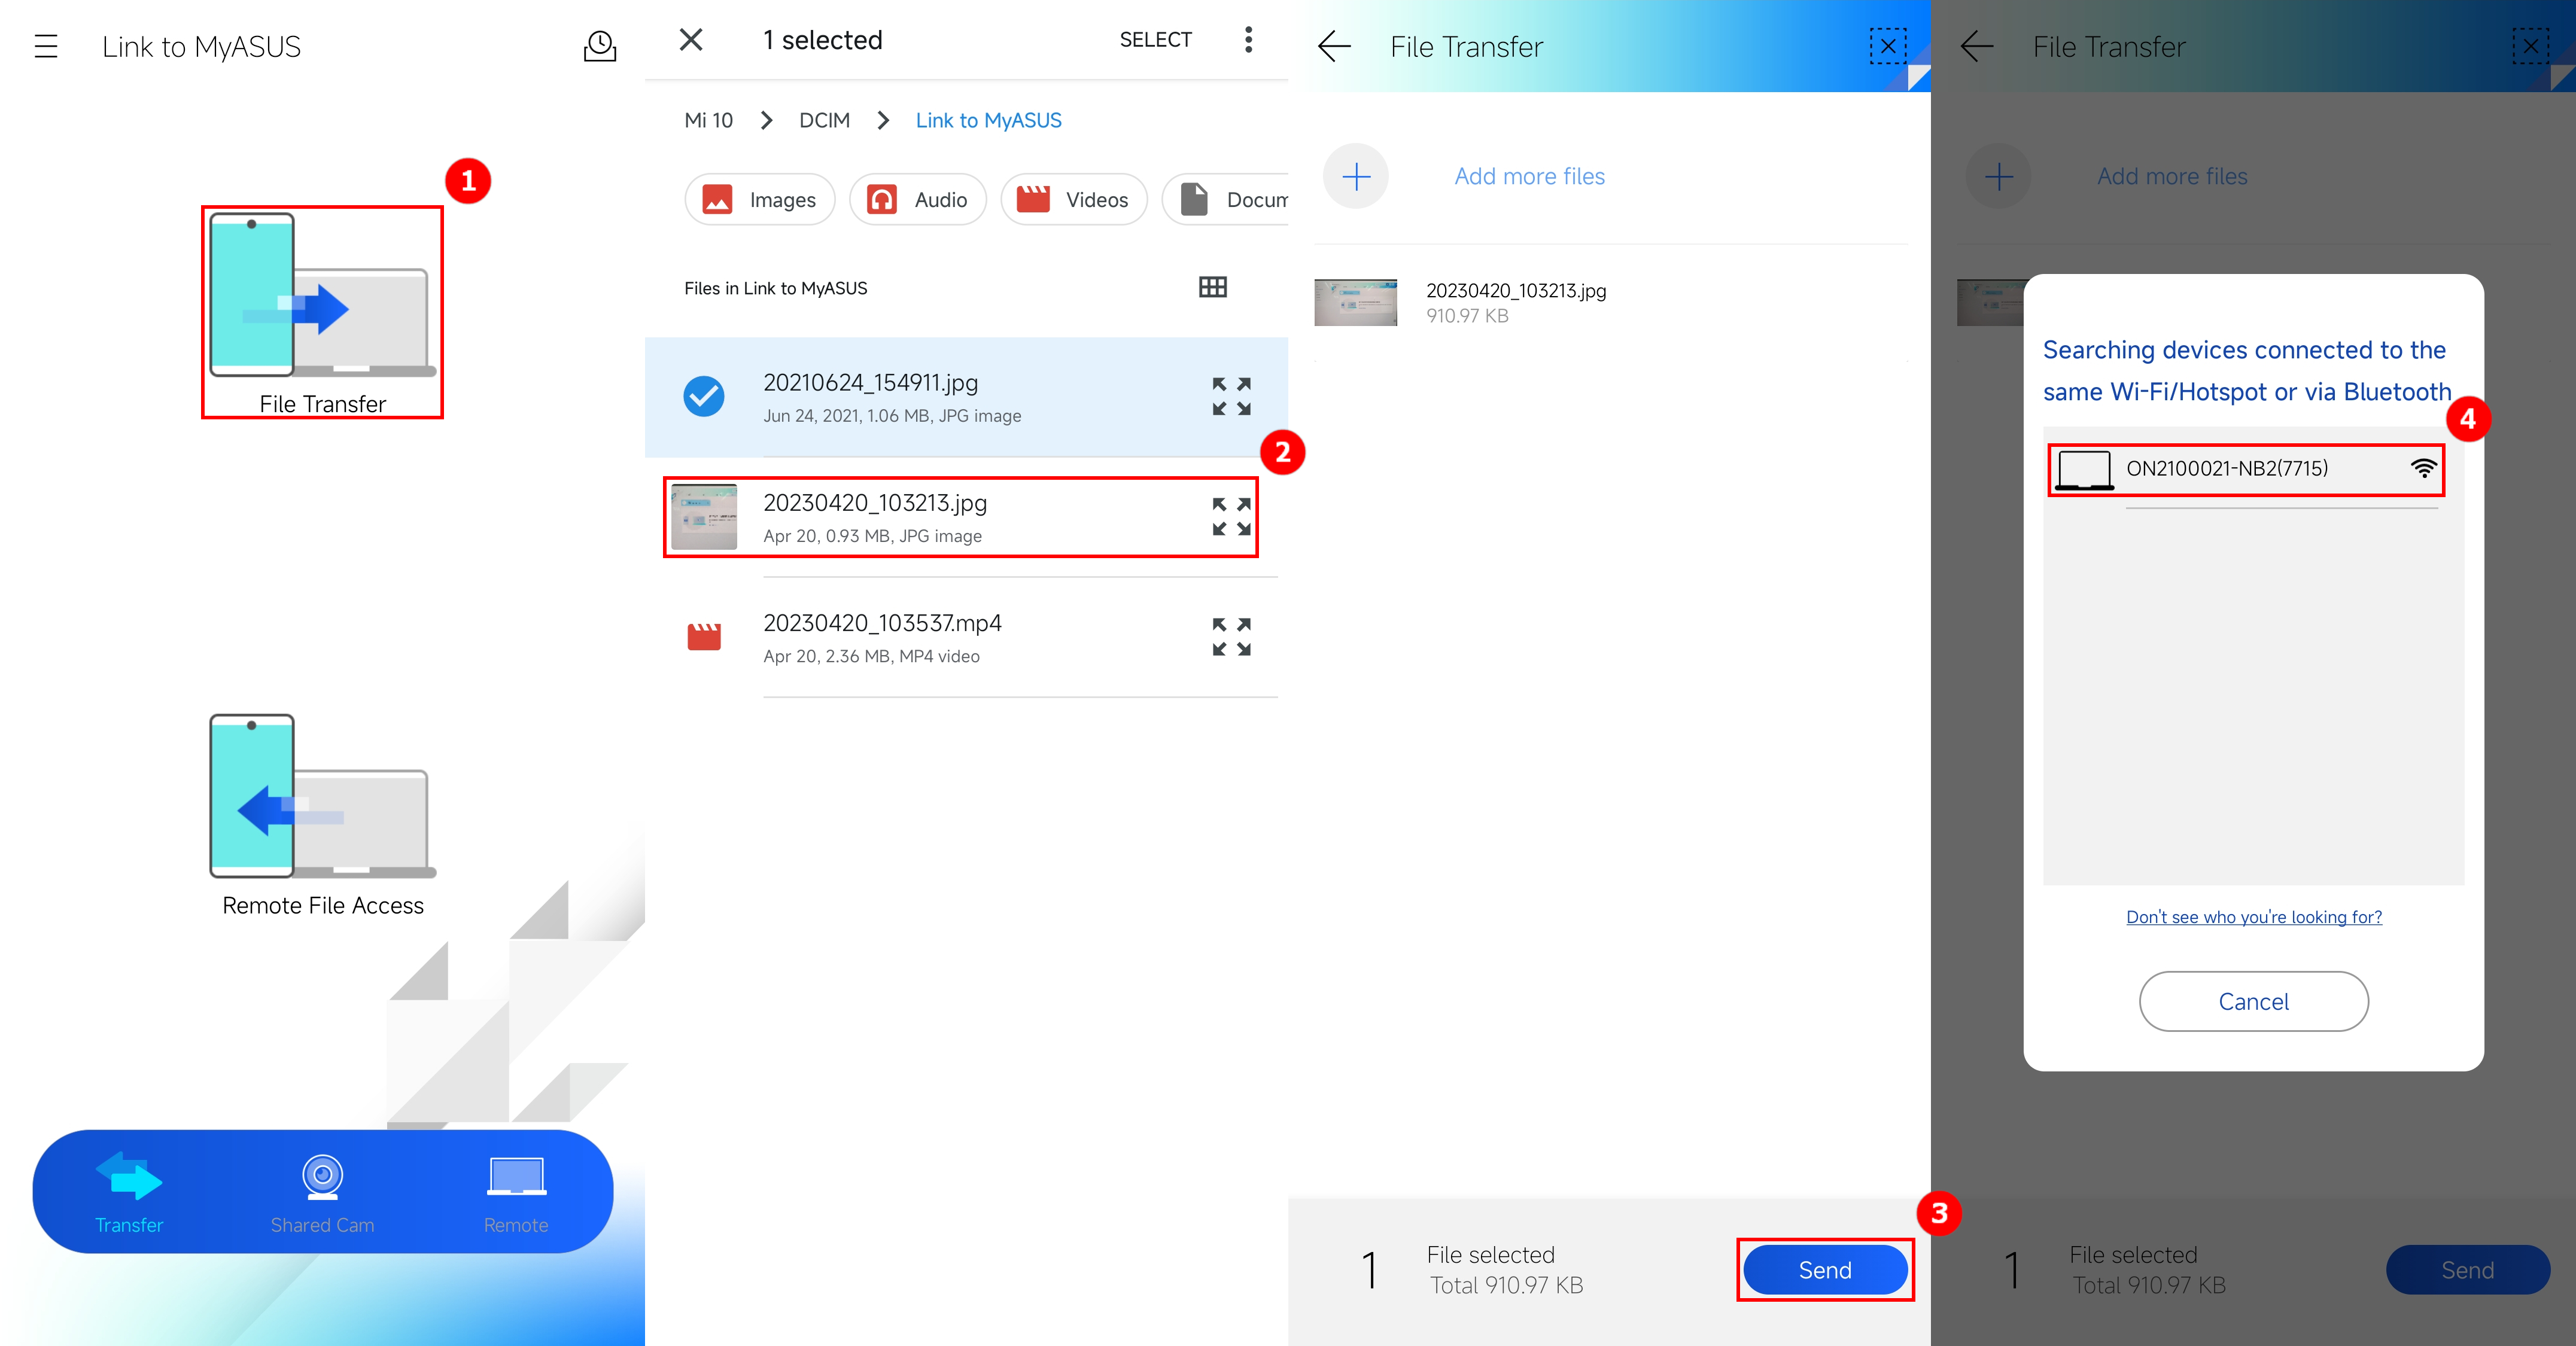
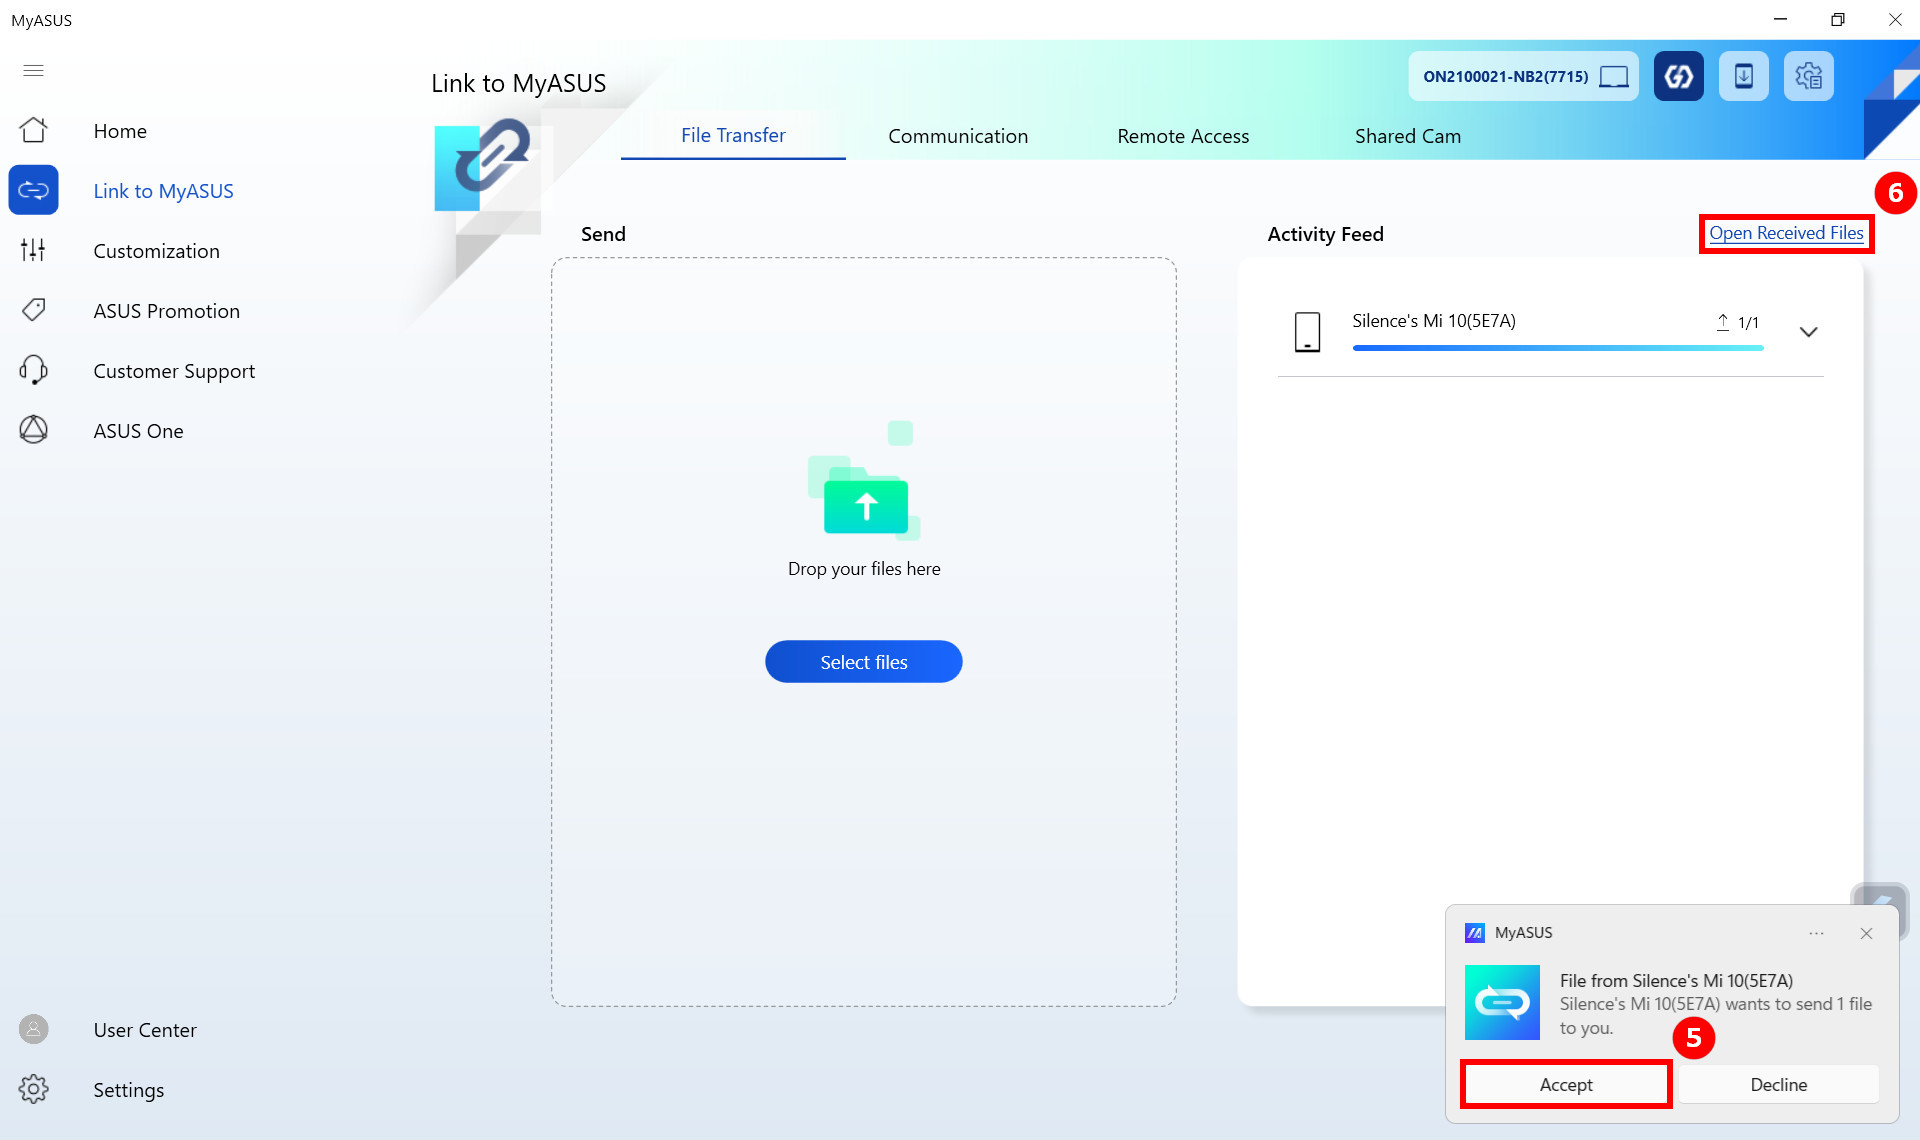
(2) A window will pop up in the lower right corner of the computer, click ⑤[Accept] to complete the transfer. Click ⑥[Open Rceived Files].
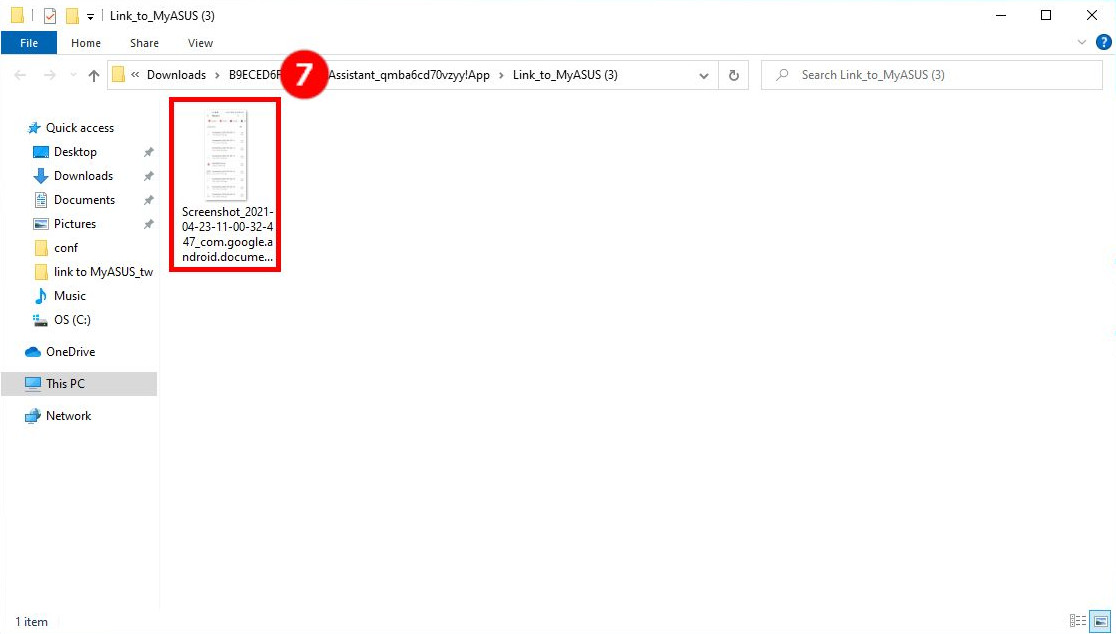
(3) A new window will pop up, and you can see the received ⑦[File]
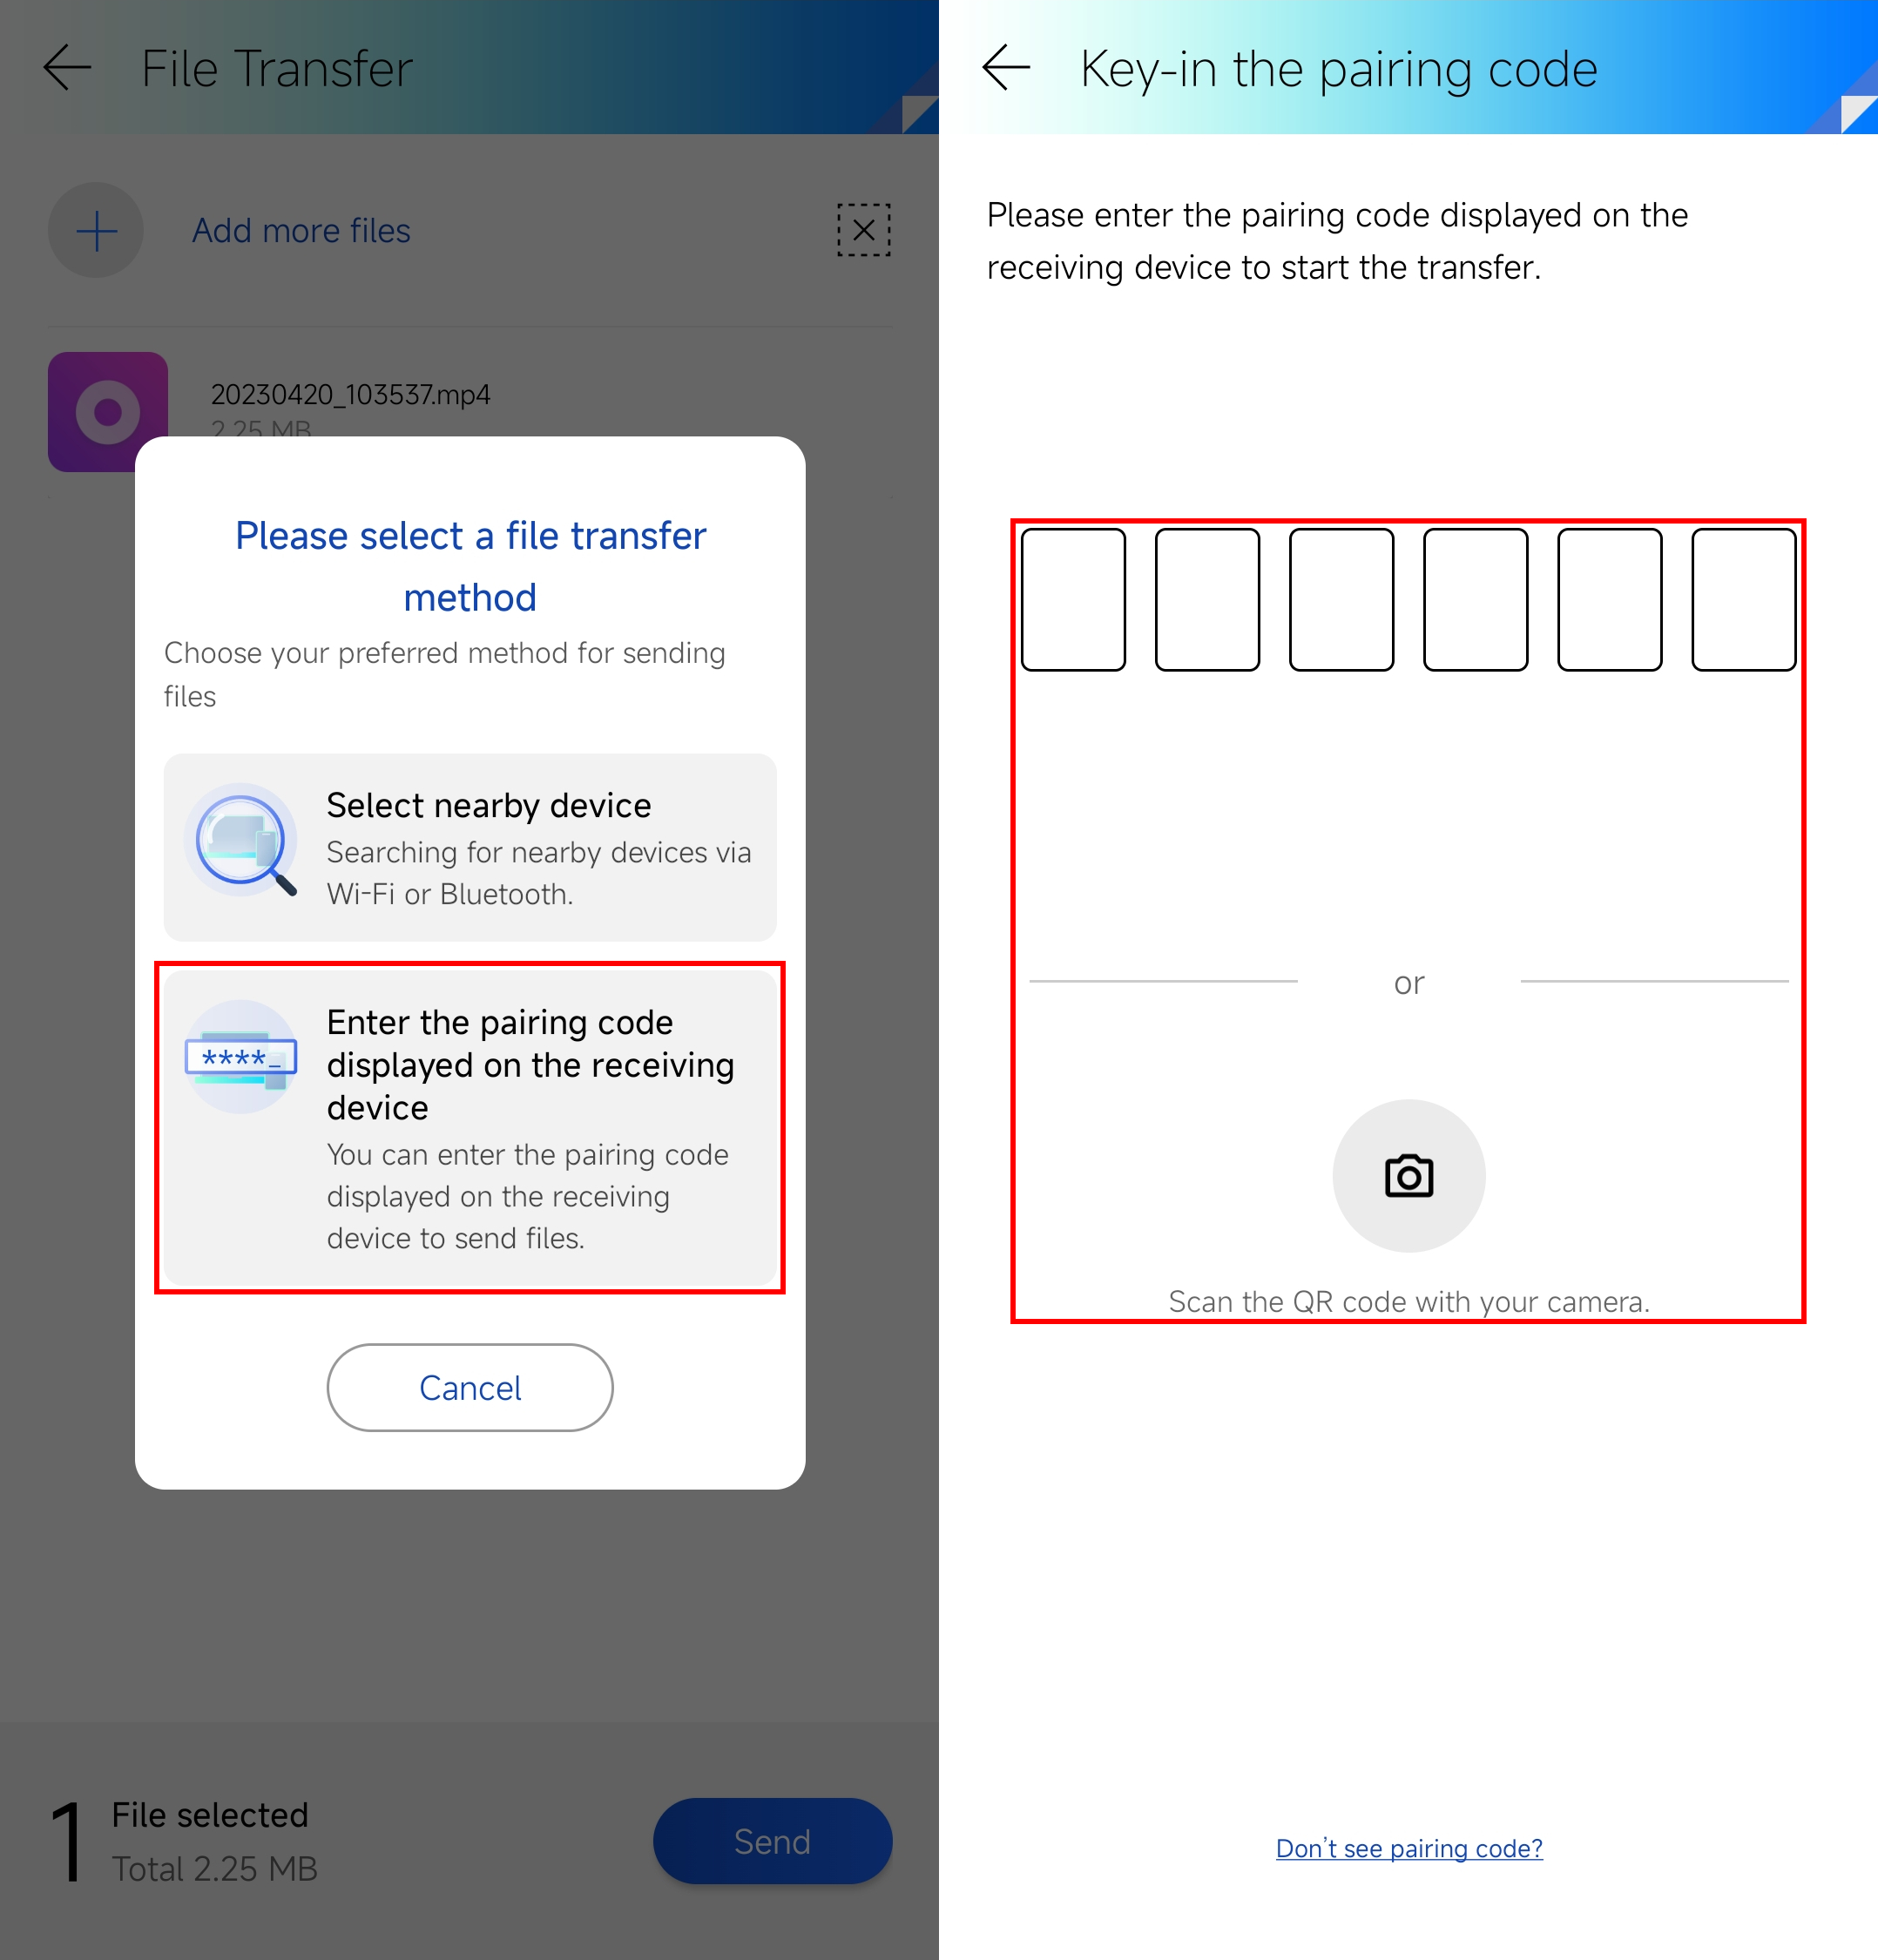
4.1.3 Transfer files via pairing code or QR code
※ When using this function, the device needs to be connected to the network.
※ Only the pairing code is supported when transferring files from the computer to the mobile device.
※ This function supports transferring files between mobile devices and computers.
(1) Click [Receive] on the main interface of Link to MyASUS on the computer side, and the computer will generate [Pairing code or QR code].
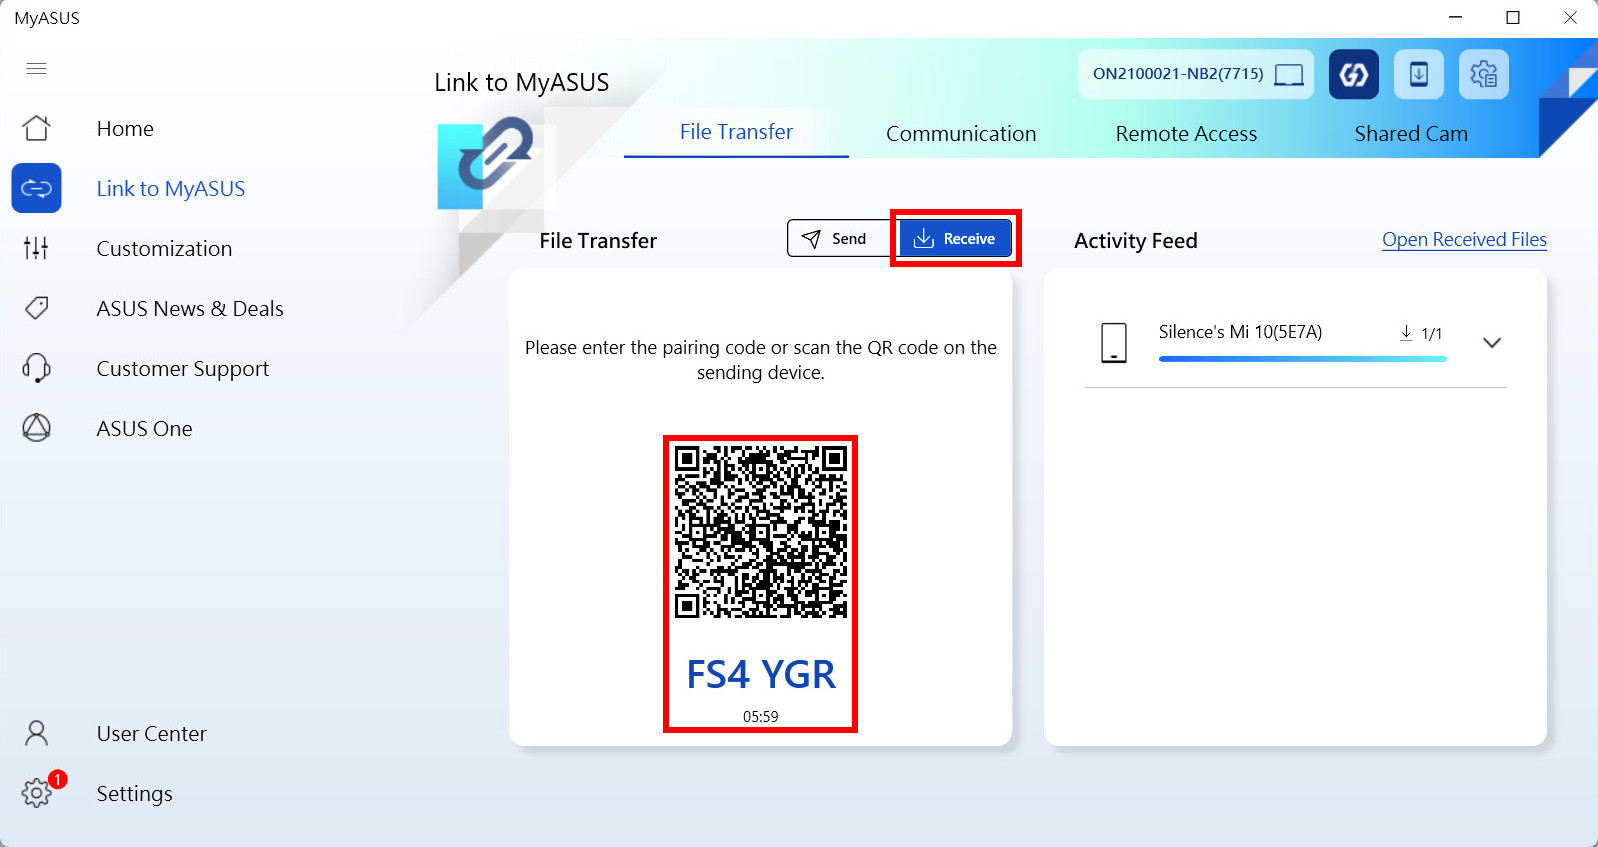
(2) When transferring files, select [Enter the pairing code displayed on the receiving device], enter [Pairing code] or scan [QR code] with the camera on the mobile device.
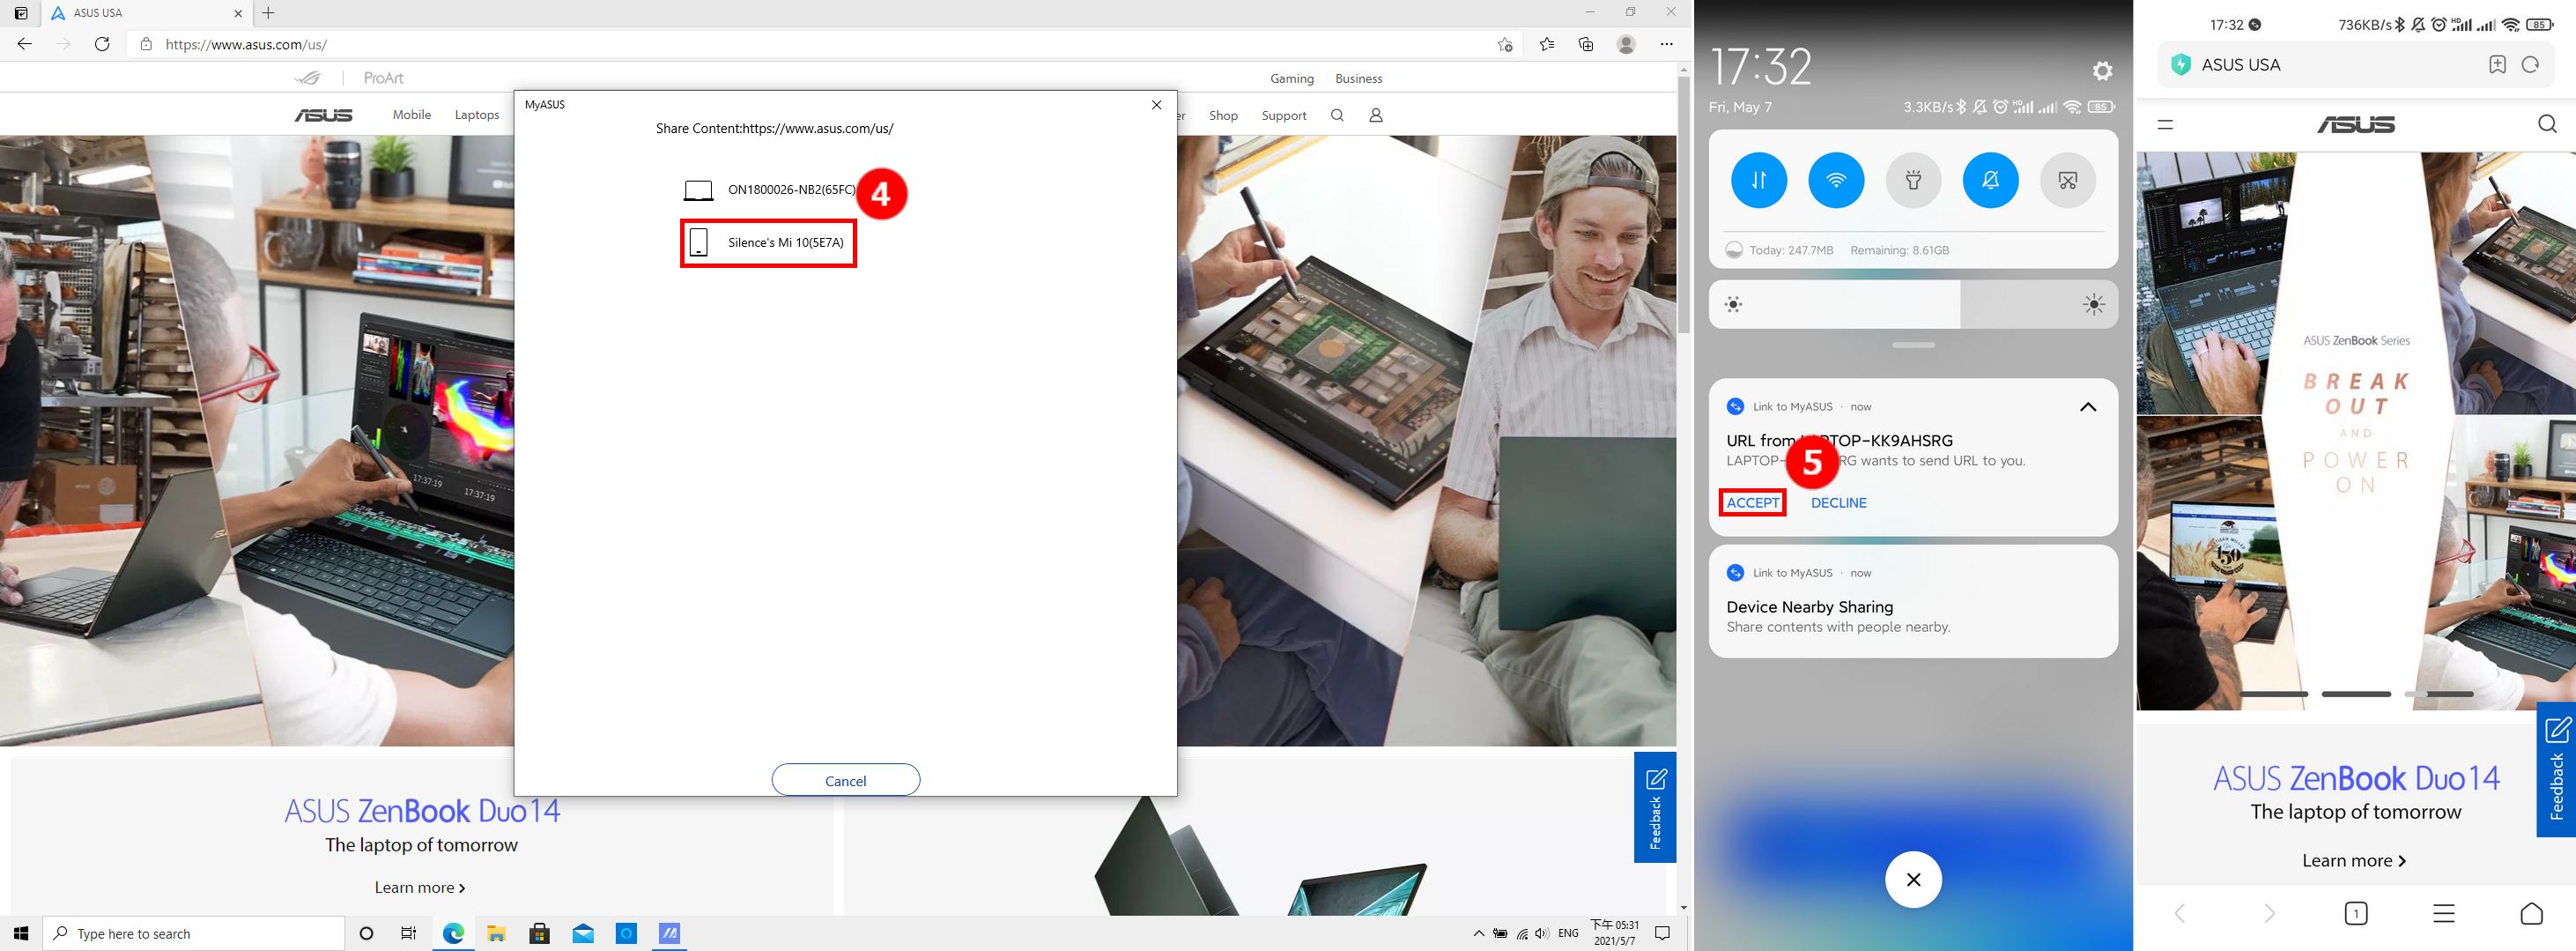
4.2.1 Share the URL from the computer to the mobile device
Computer-side URL Share is limited to the Microsoft Edge browser.
(1) Click ①[upper right corner of the browser], and click ②[Share] in the pop-up drop-down menu.
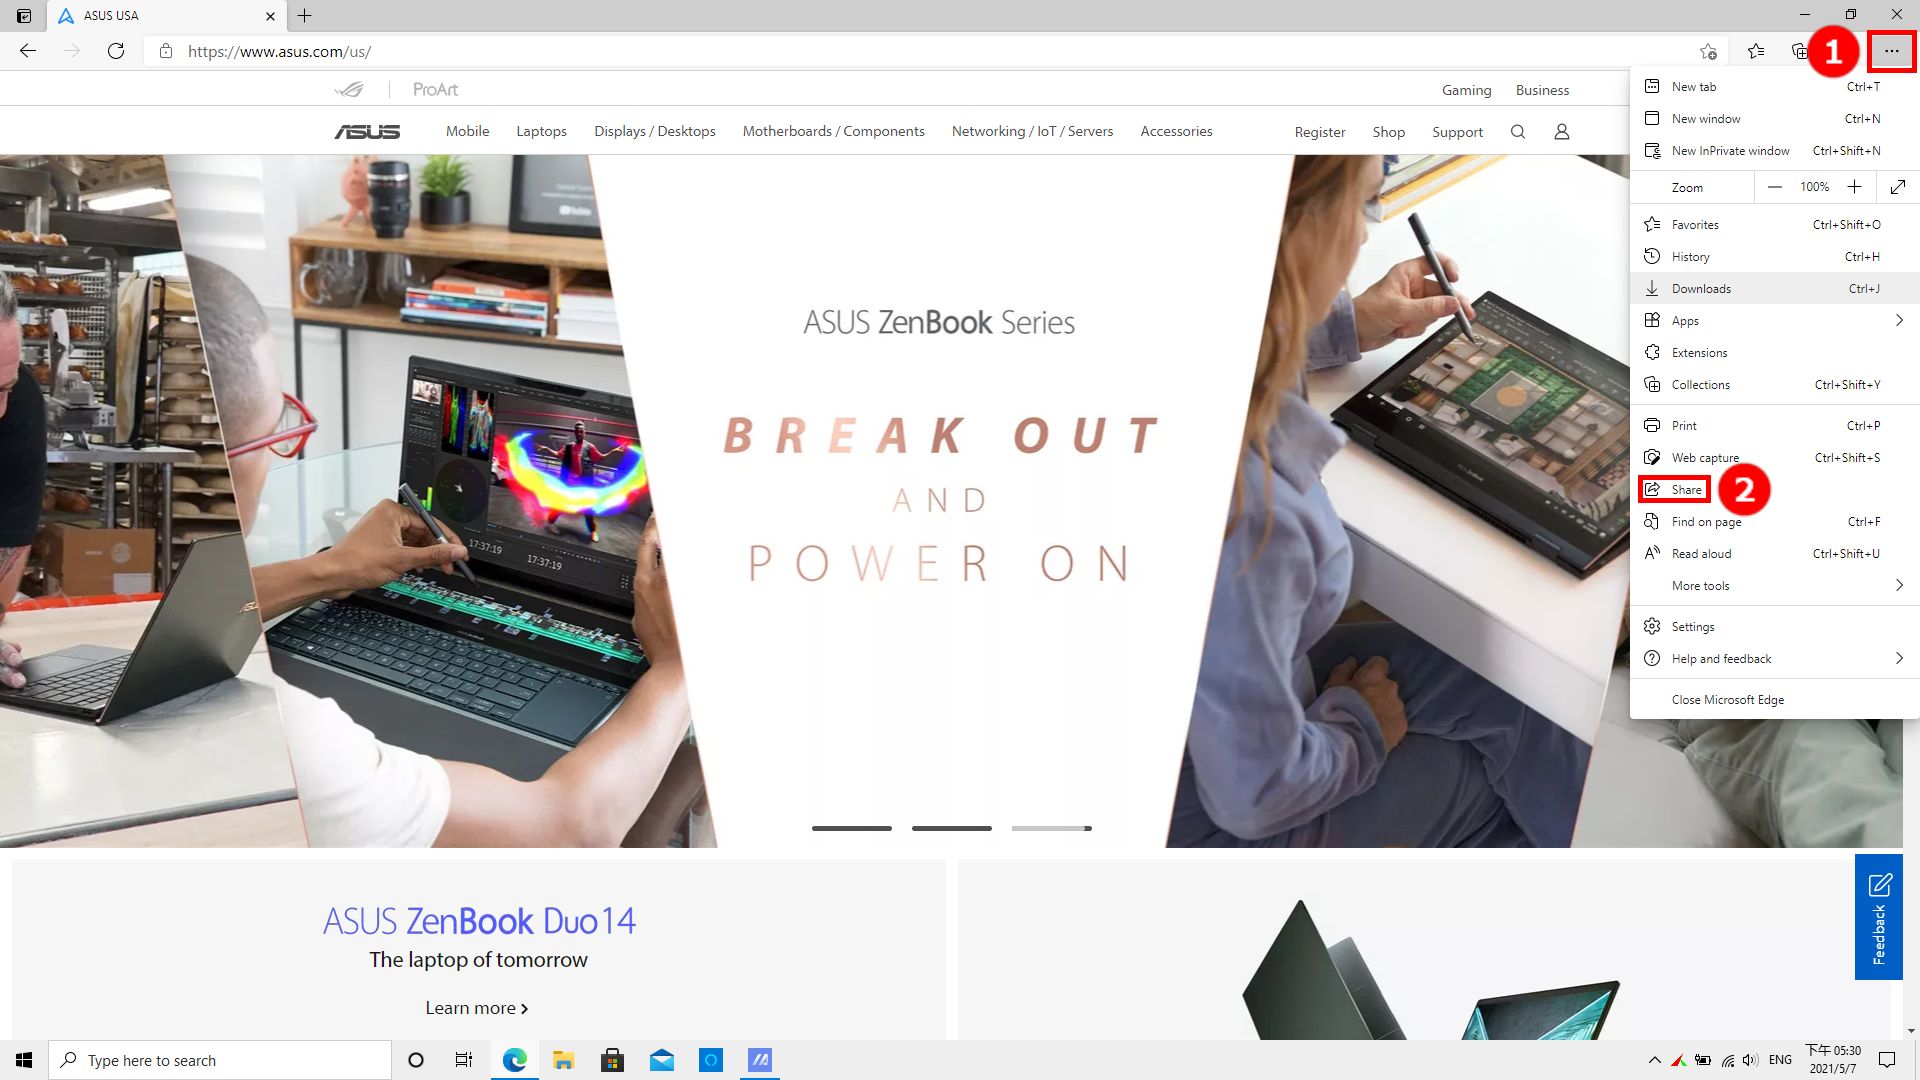
(2) A new sharing pop-up window will appear, then click ③[MyASUS].
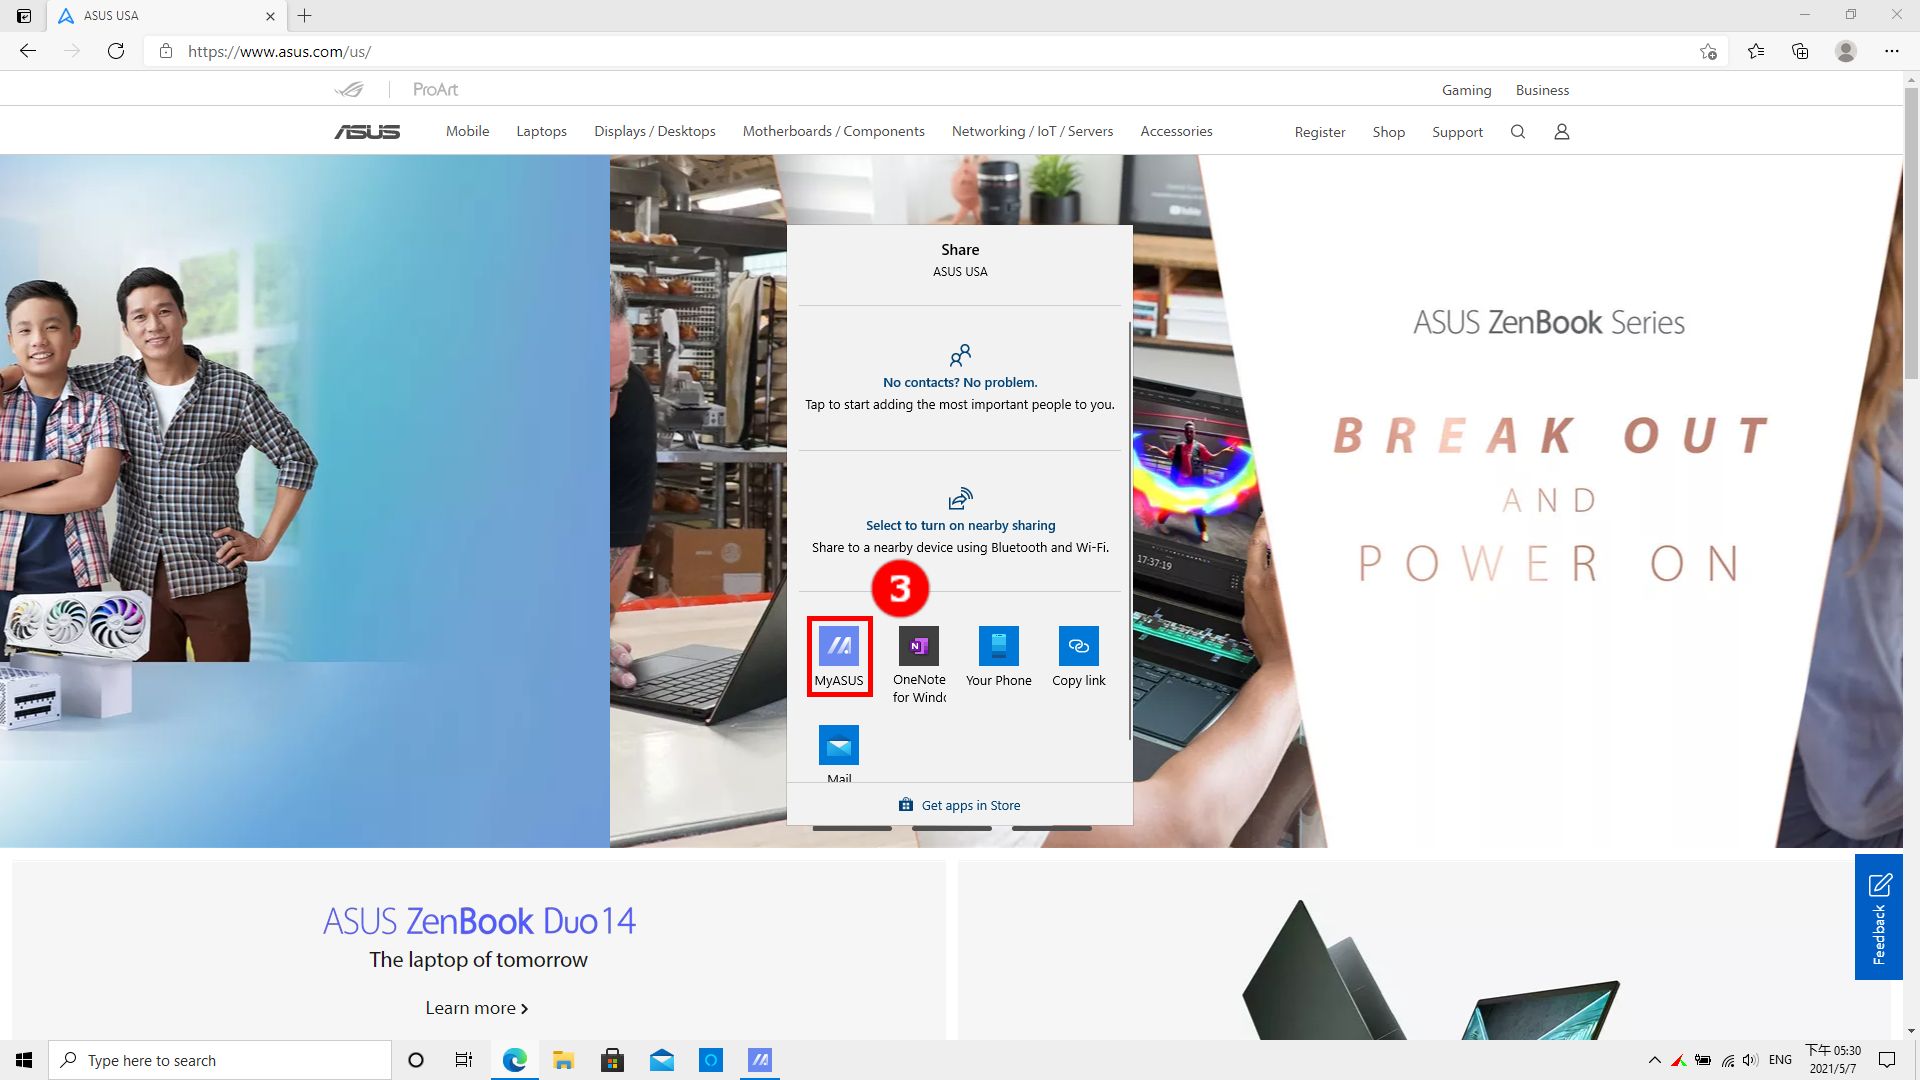
(3) A new pop-up window will appear, click ④[Devices that need to be shared], click ⑤[Accept] in the notification bar of the mobile device, and the browser of the mobile device will open and open the shared URL.
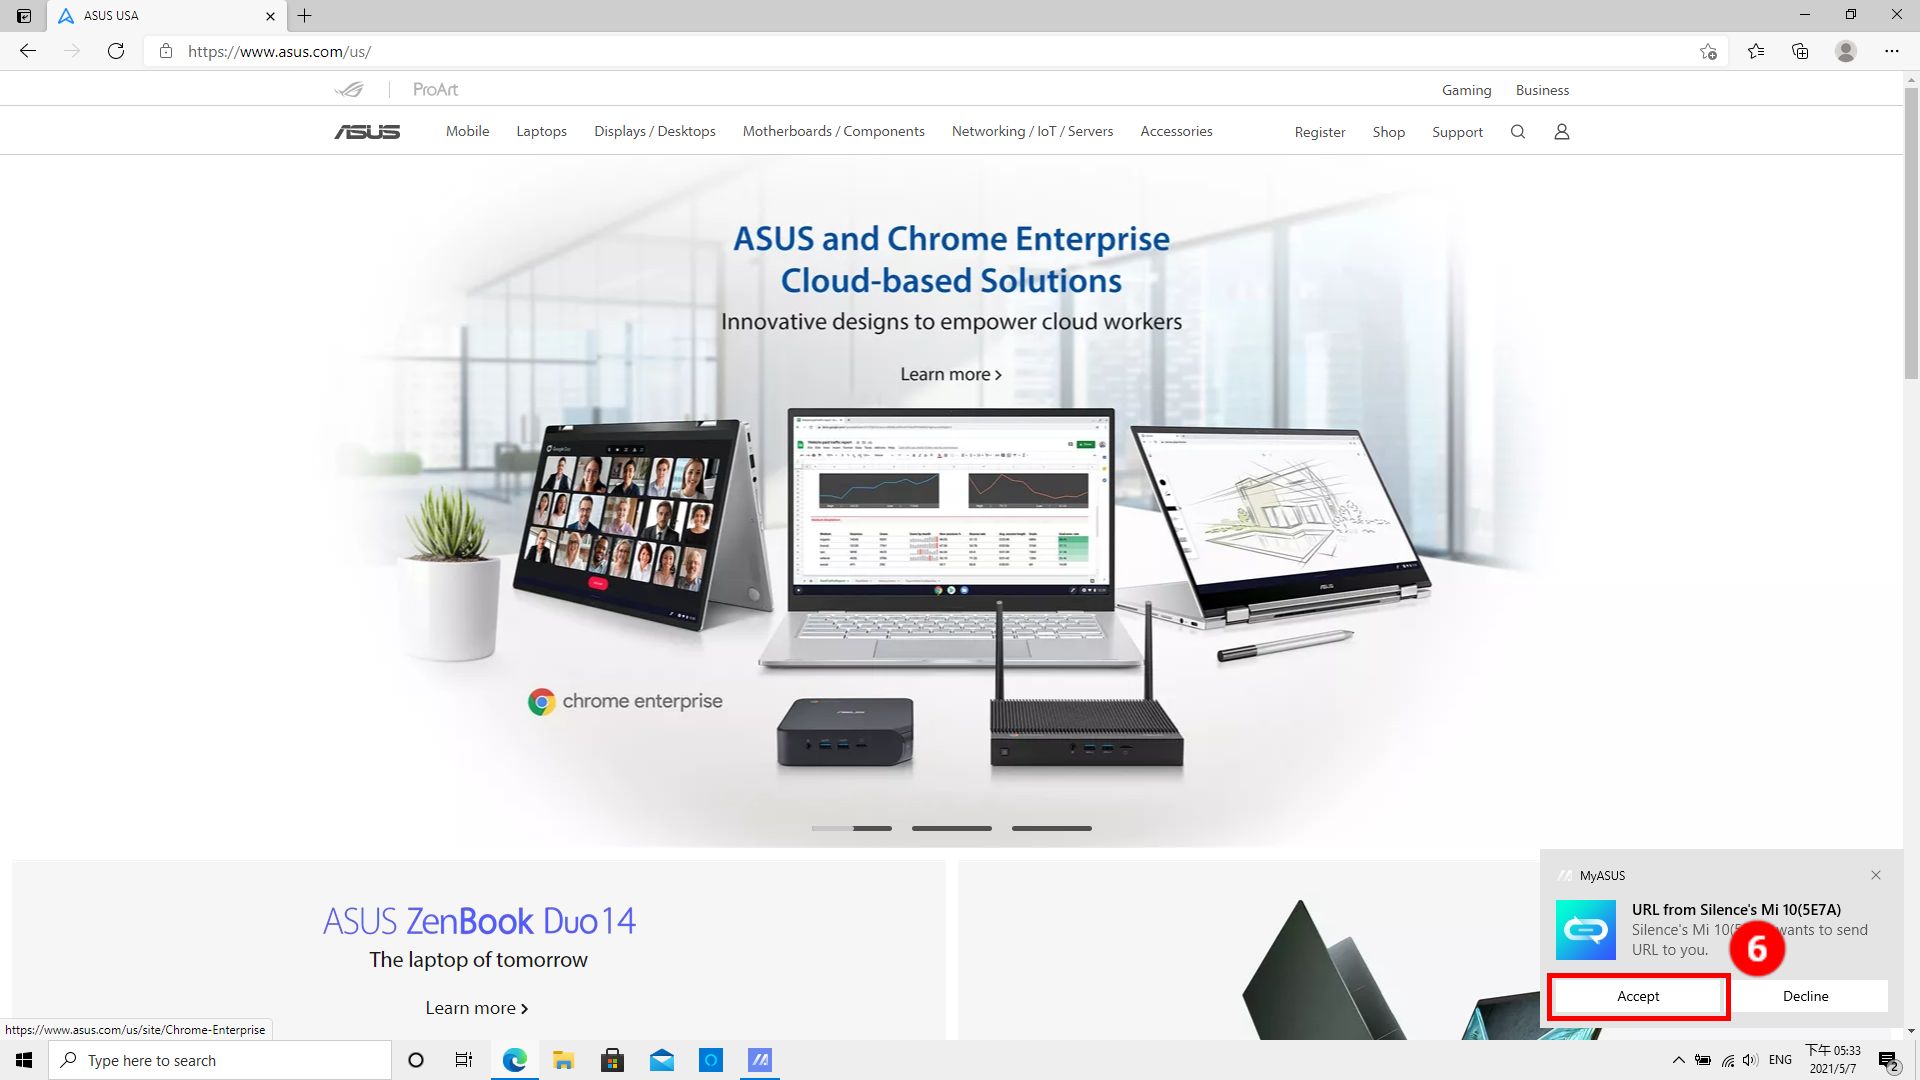
4.2.2 Share URL from mobile device to computer
(1) At the bottom of the browser on the mobile device, click ①[Icon], click ②[Share], click ③[More], click ④[Link to MyASUS], click ⑤[Computer name].
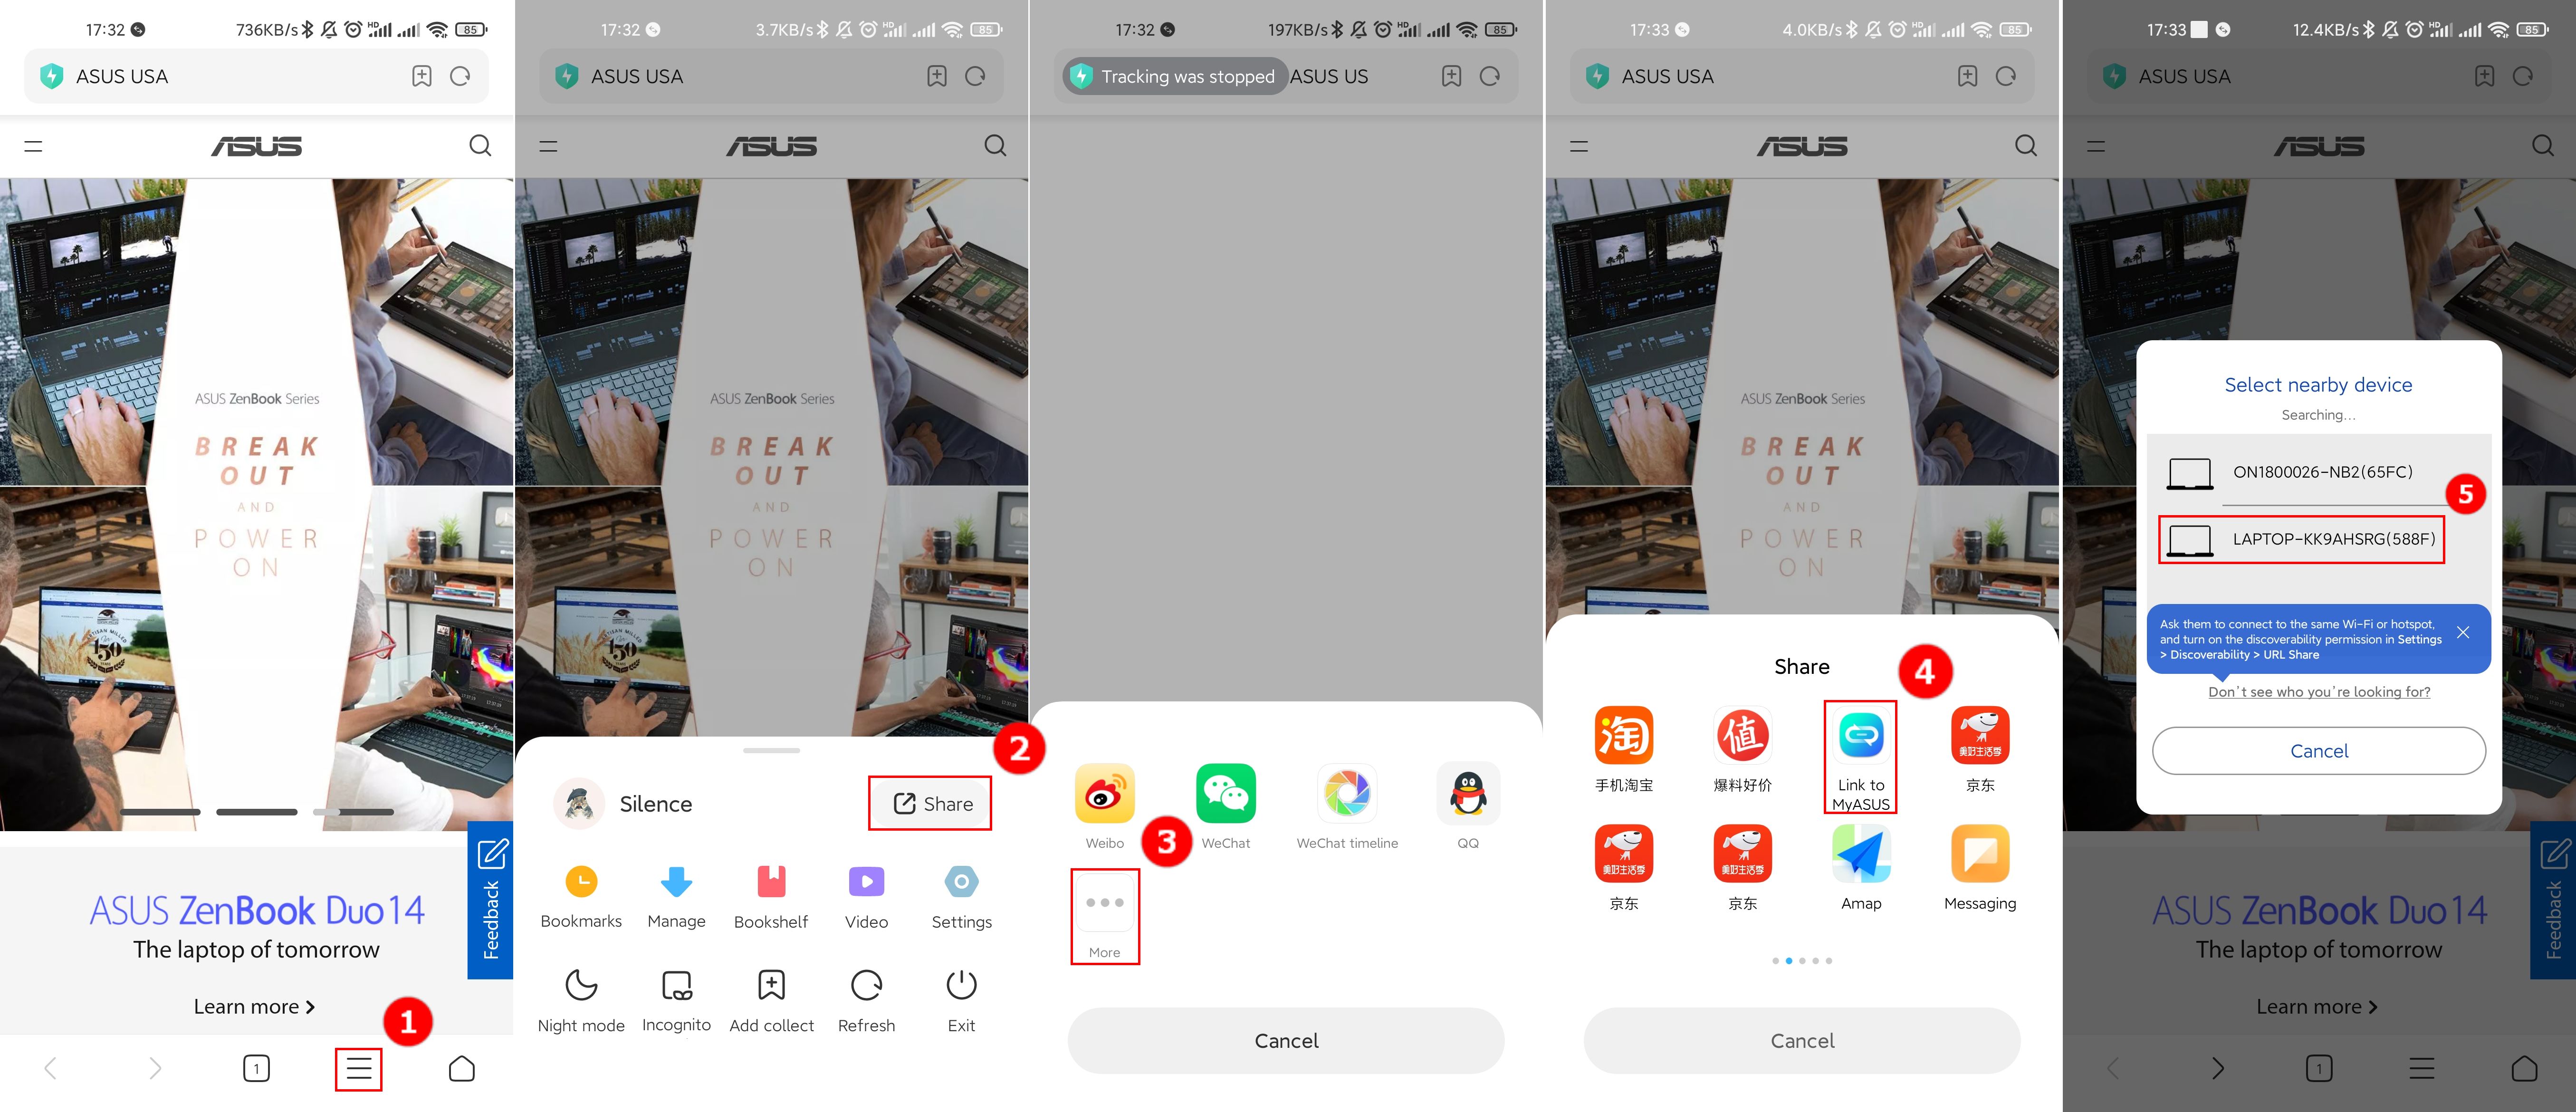
(2) A pop-up window will be displayed on the computer side, click ⑤[Accept].
If you encounter problems when using this feature, please click on the link first and read the text to try to solve your problem.
5.1 Computer and mobile device pairing
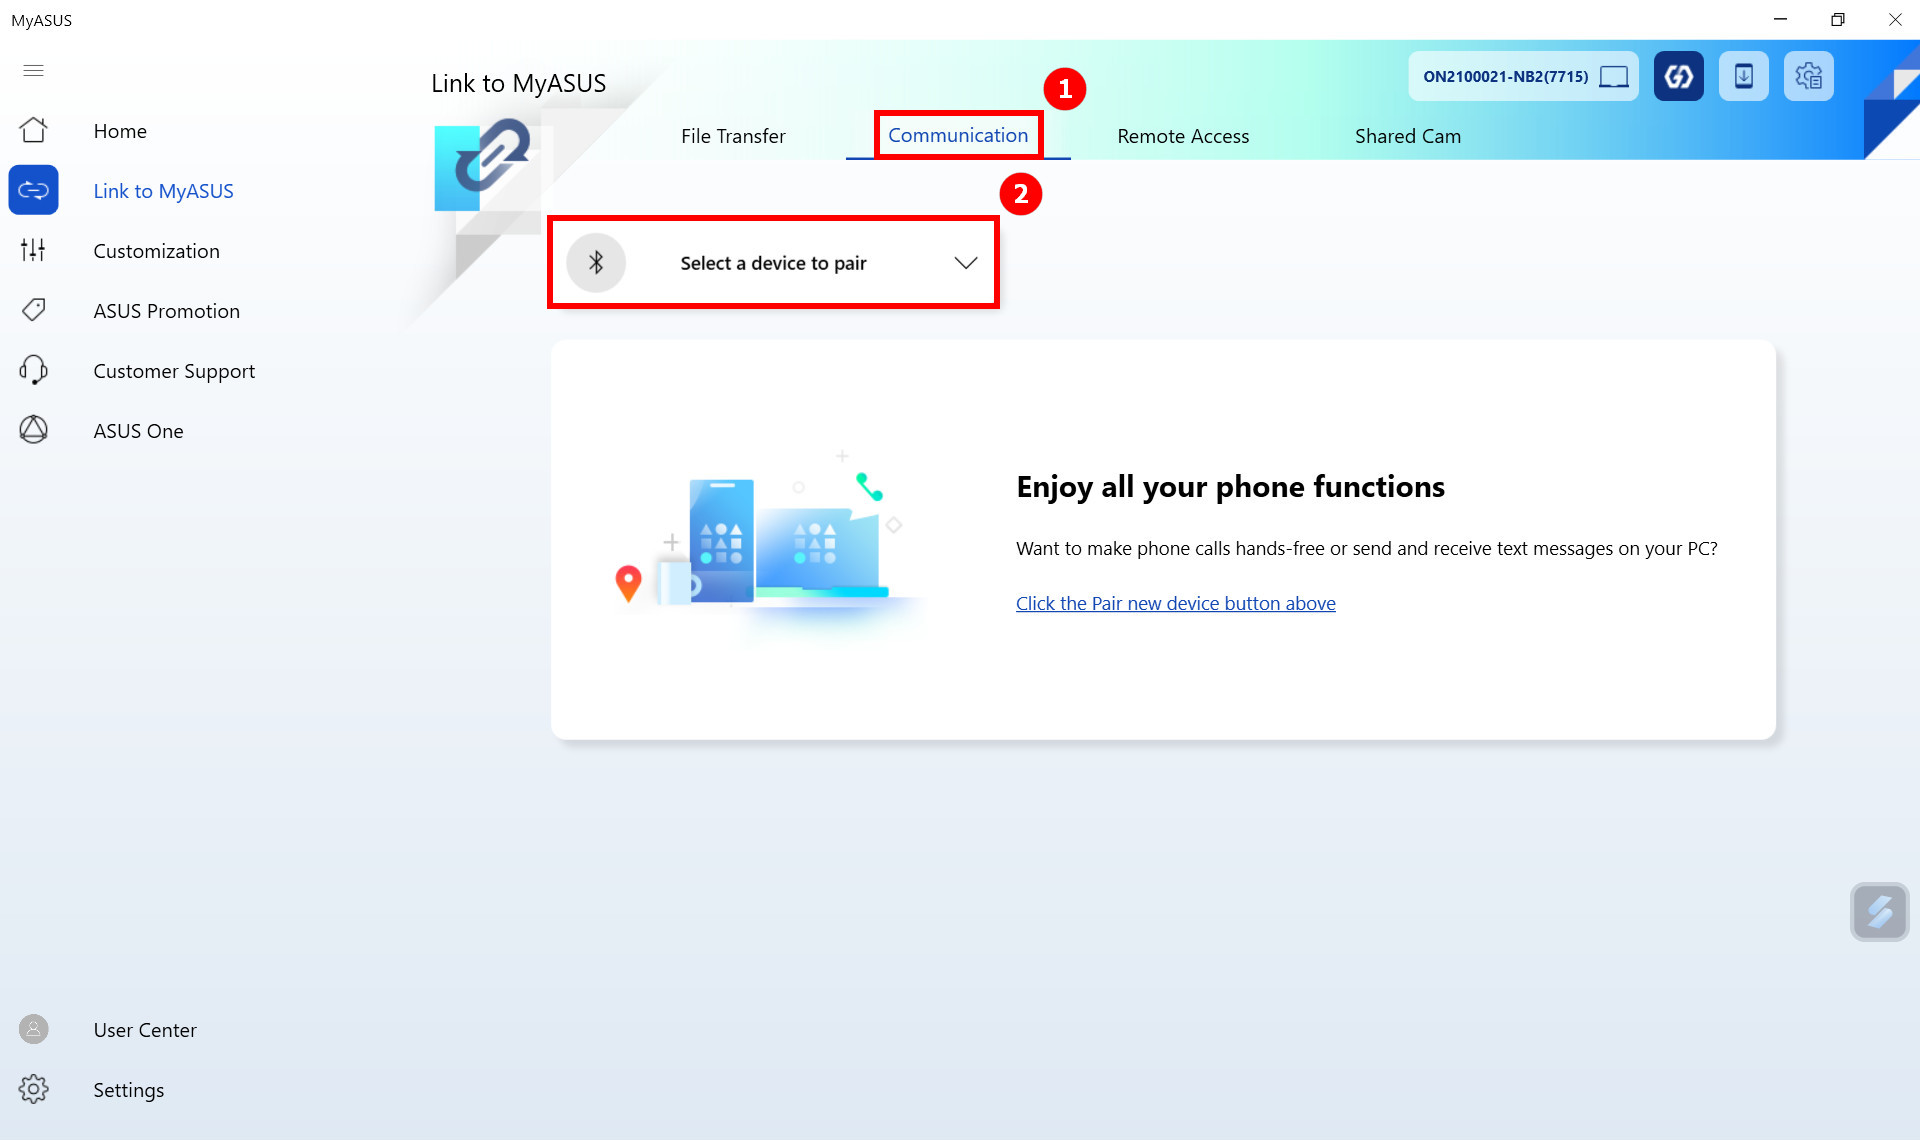
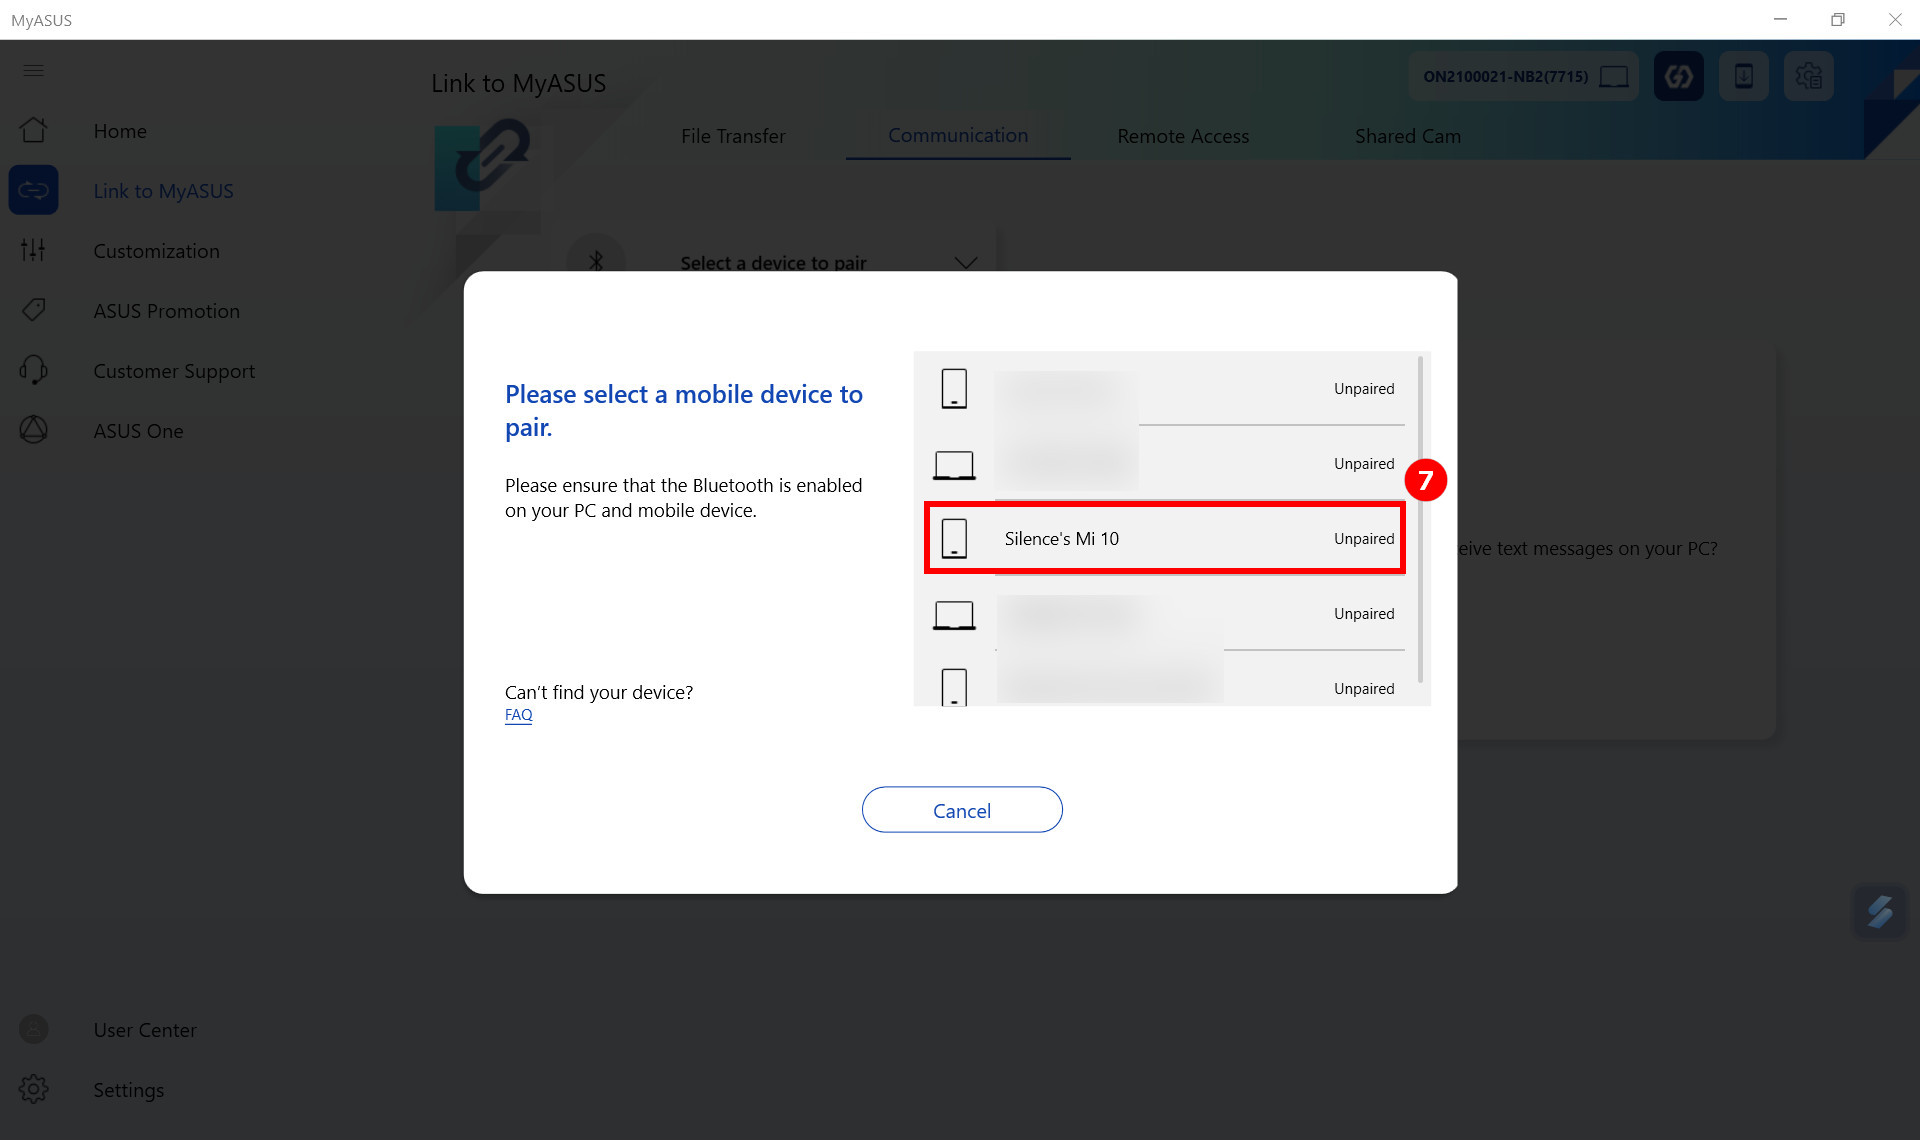
(1) Link to MyASUS on the computer terminal, click ①[Communication], and click ②[Pair New Device].
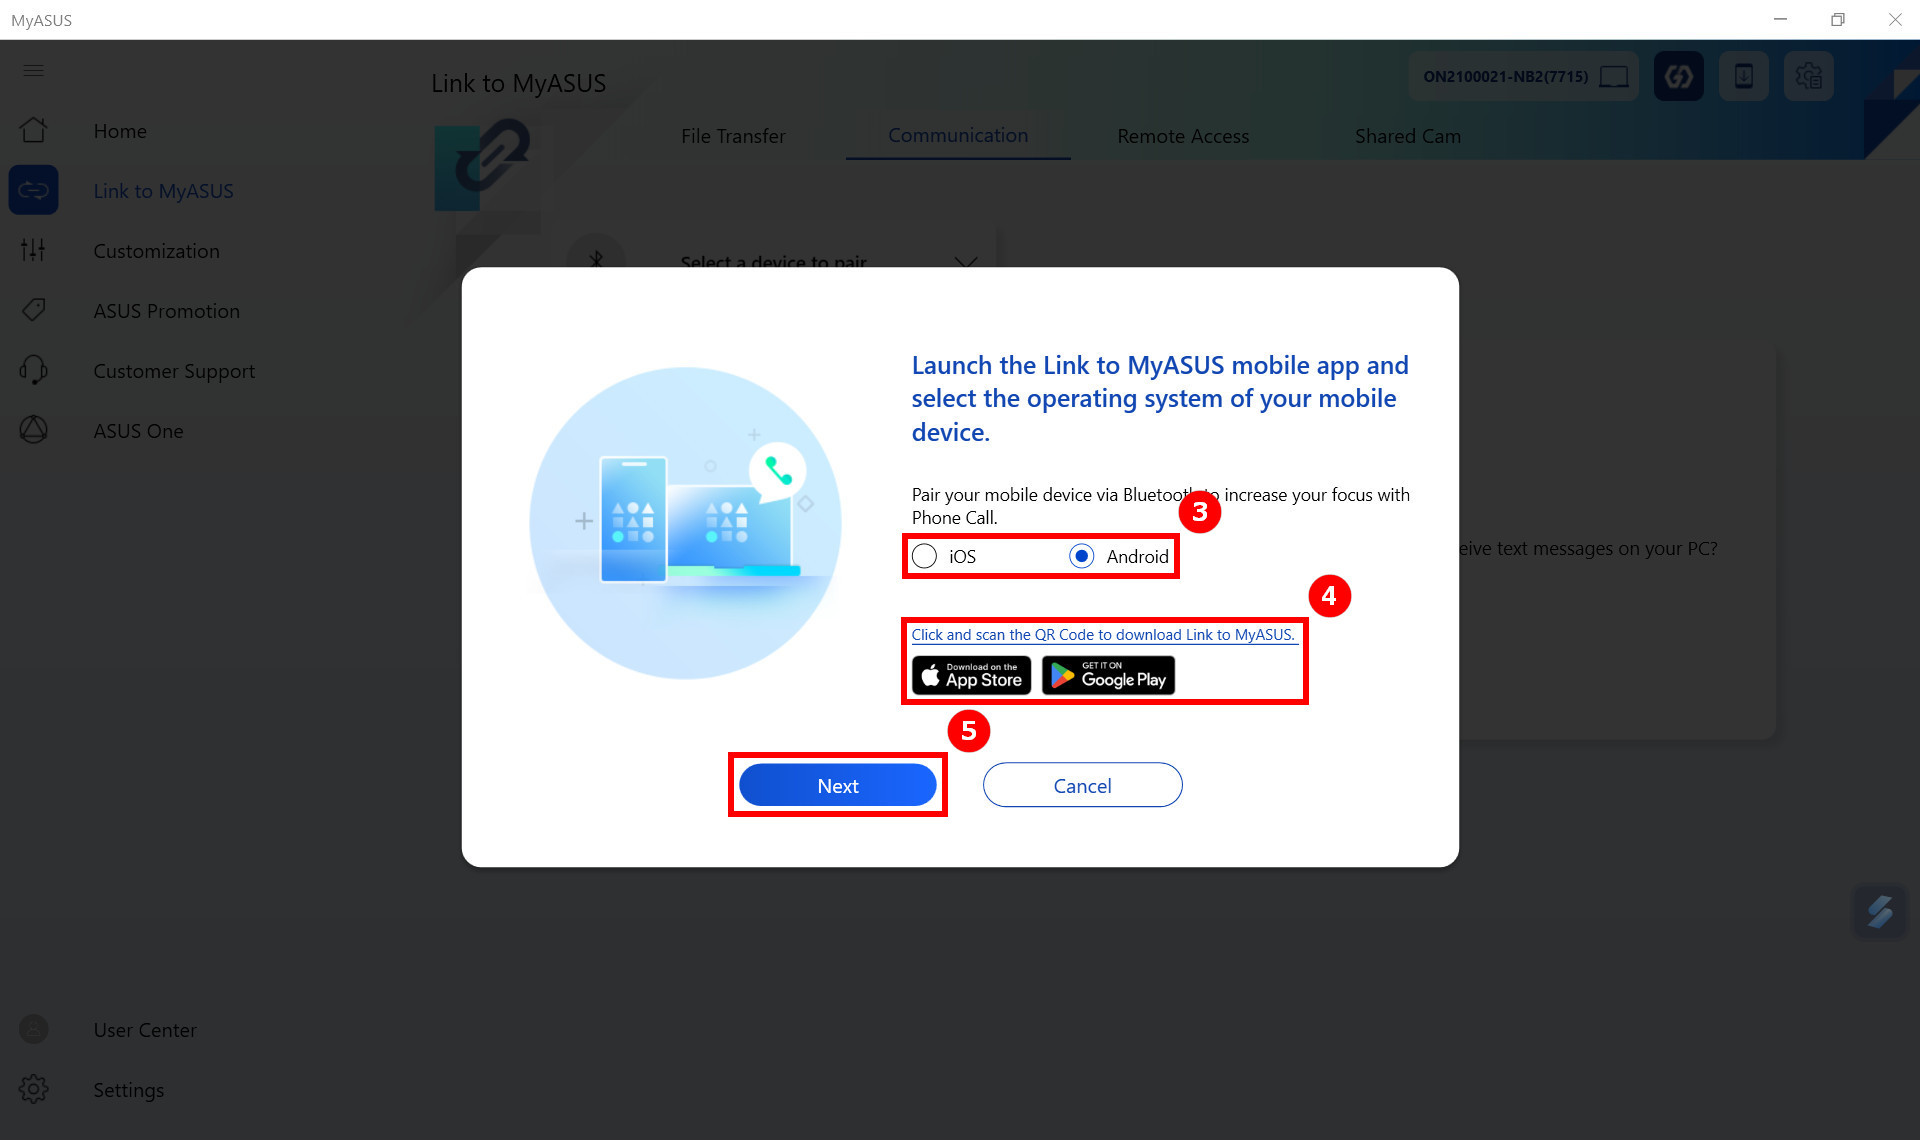
(2) Choose your ③[Device Type], if your mobile device does not have Link to MyASUS App installed, you can click ④[Download Link to MyASUS App] according to your mobile device type, and click ⑤[Next].
(3) According to the pop-up prompt, click ⑥[Next].
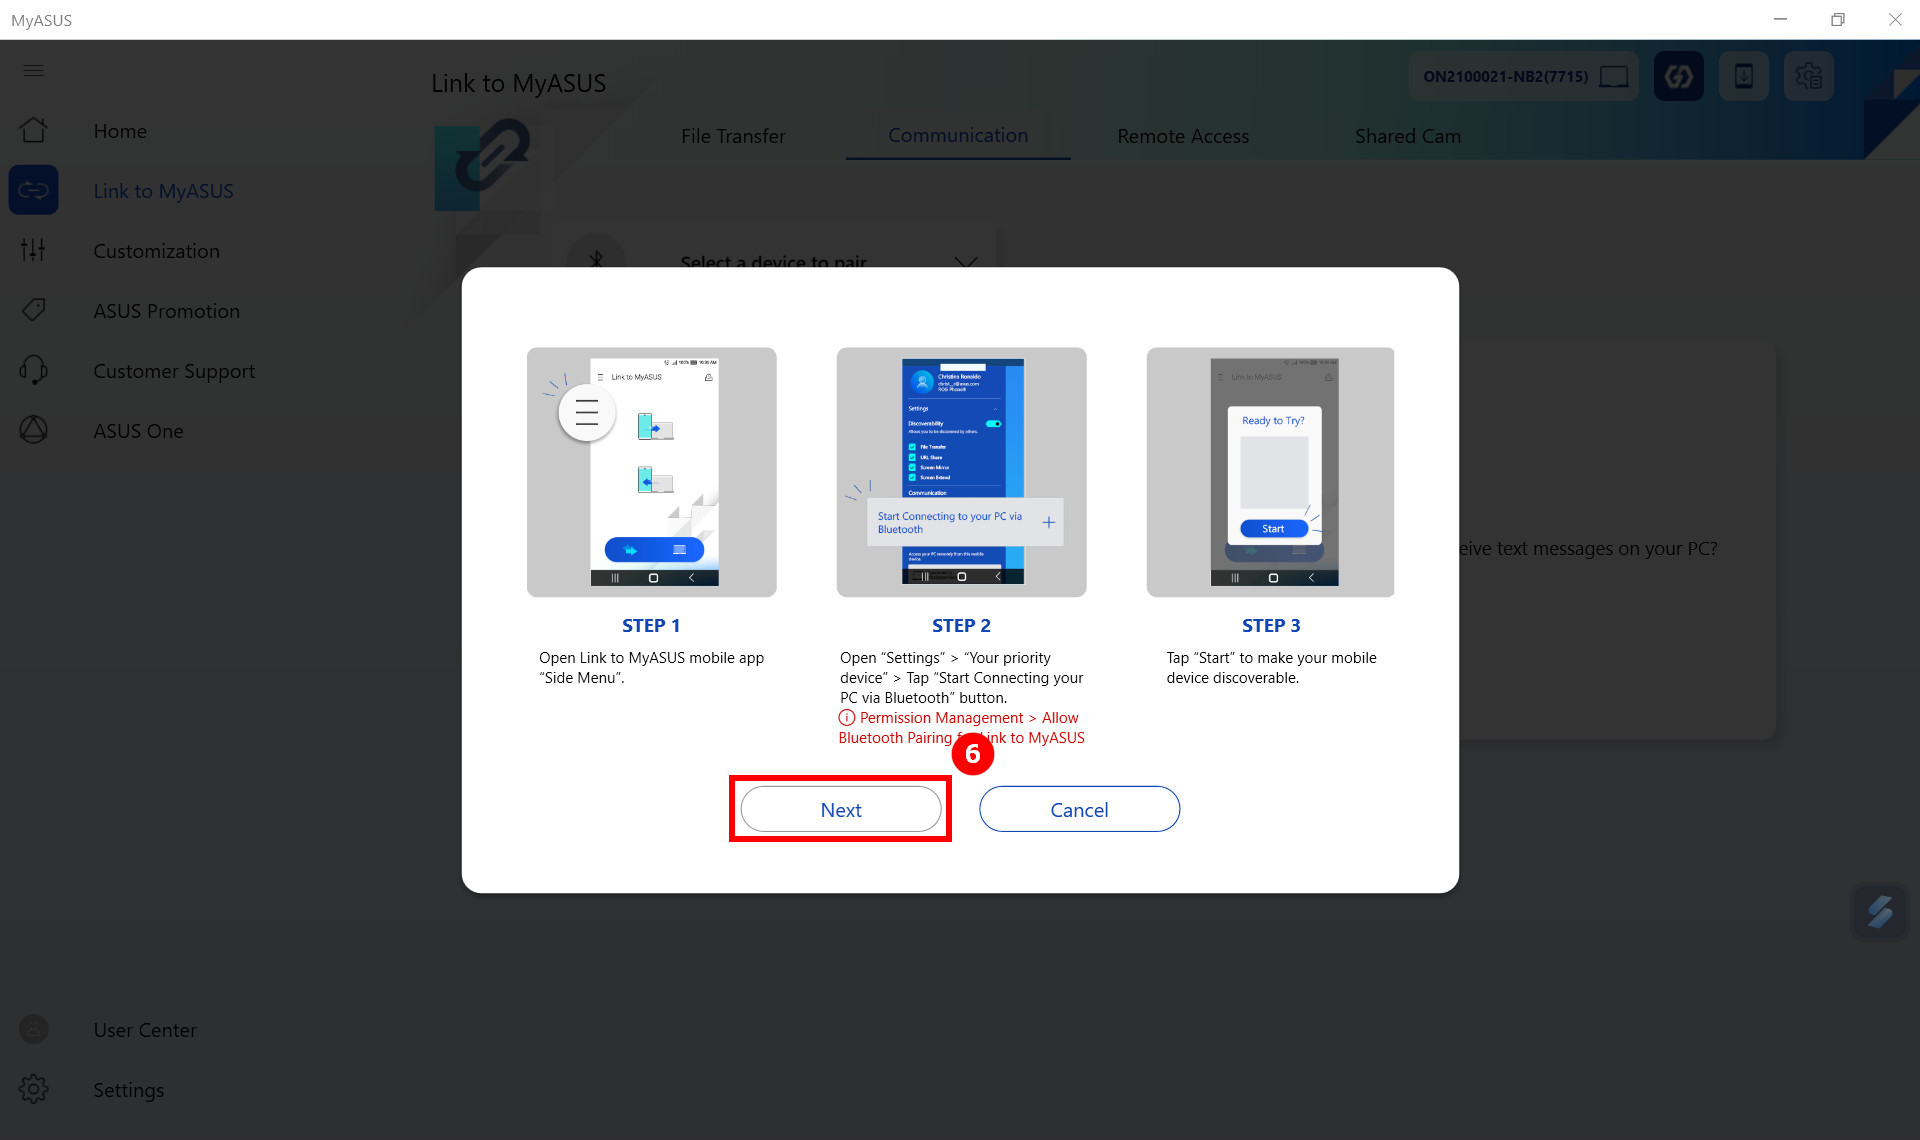
(4) Tap your ⑦[Mobile Device].
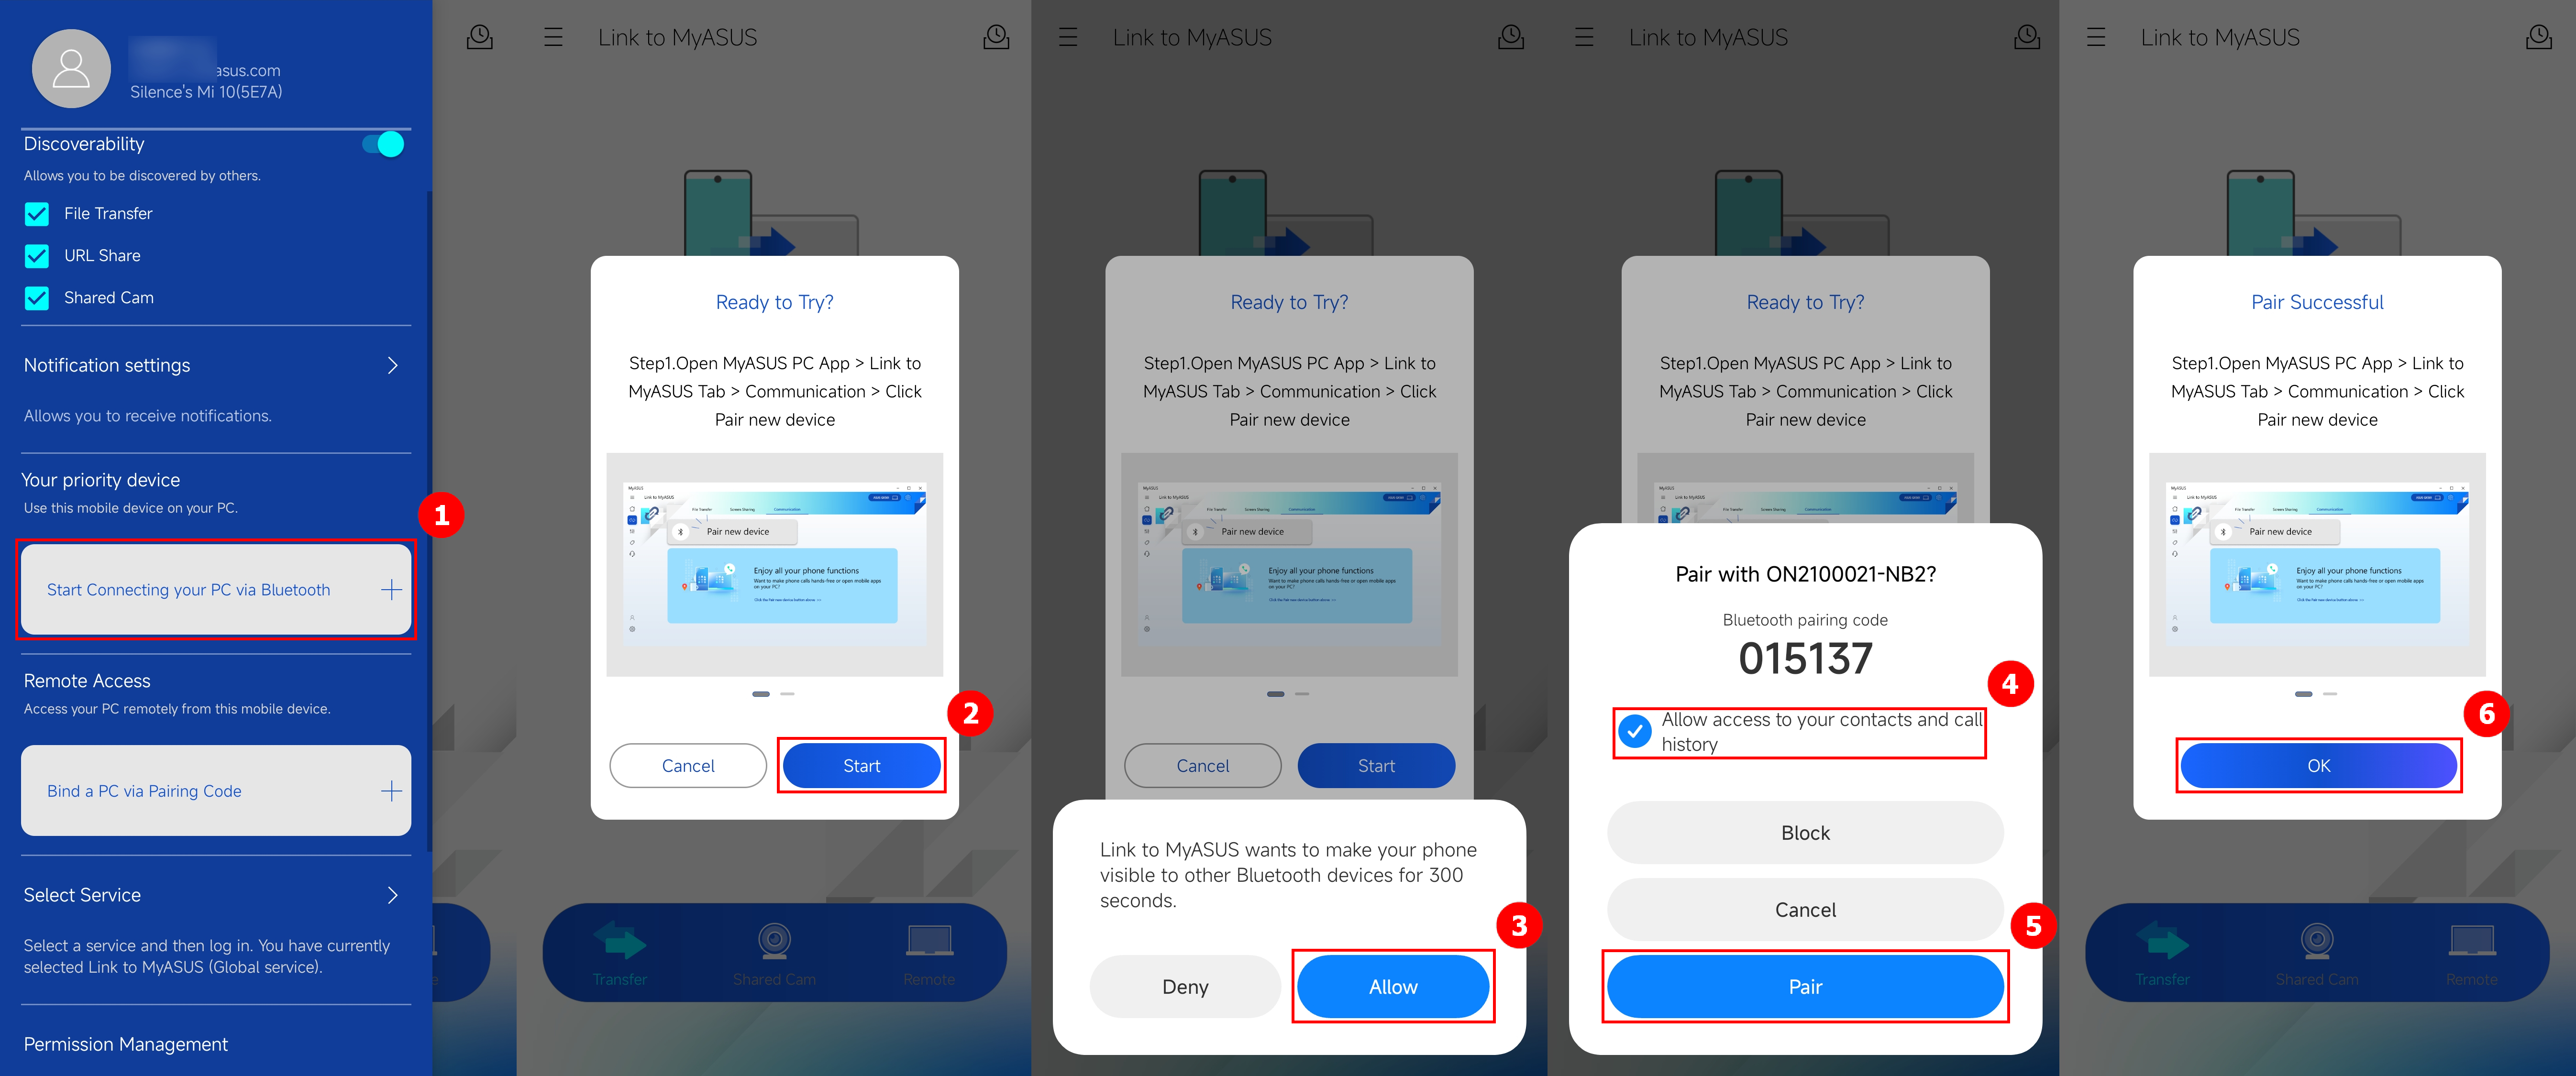
(5) On the mobile device, click ①[Start to connect to the computer via Bluetooth], click ②[Start], click ③[Allow], click ④[Allow access to your contacts and call records], click ⑤[Pair], the pairing is successful, click ⑥[OK].
(6) The connection is established.
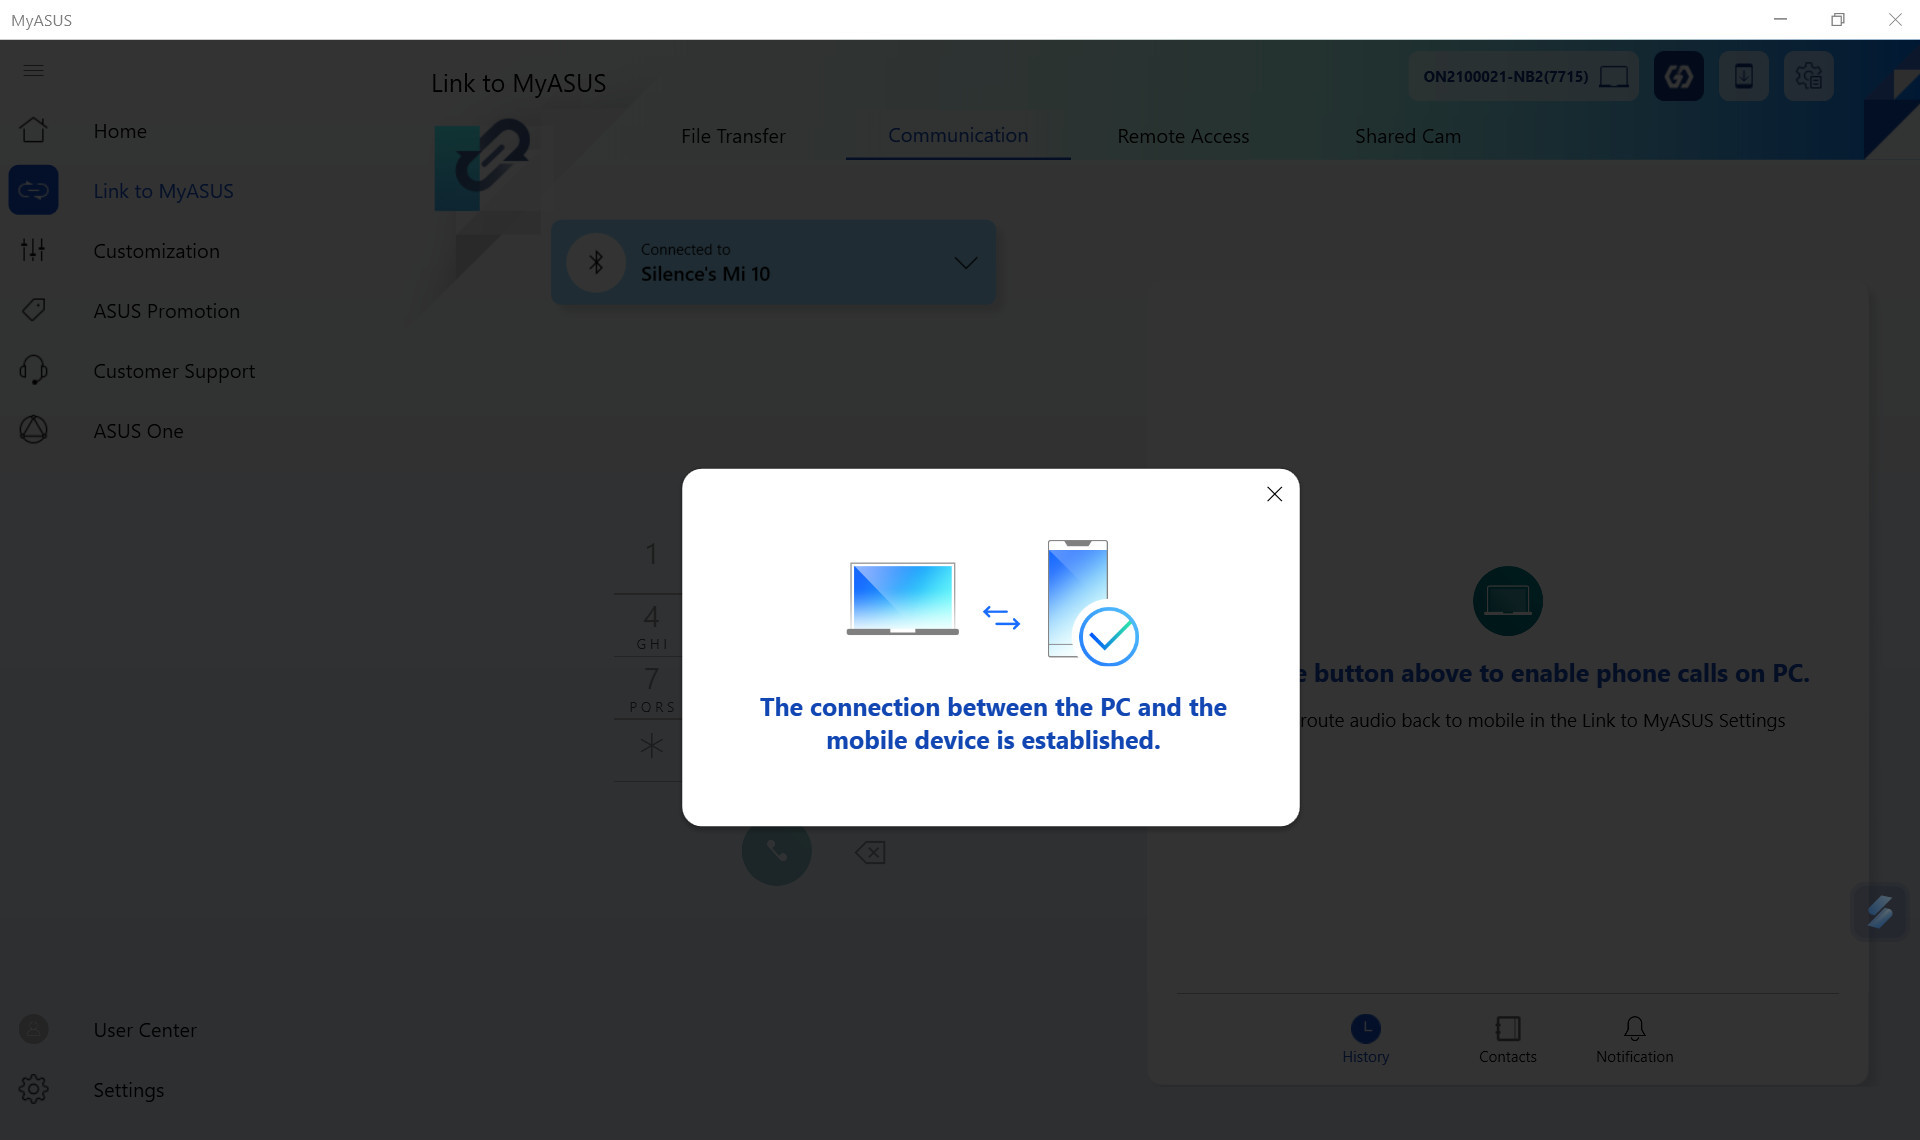
(7) Click the ⑧[ ] icon to turn on functions such as history and contacts. Please go to "Communications" on the computer if you find that you can't turn on this function. Please turn on "Receive mobile device notifications on PC" and "Always route audio via phone" on the computer side. Please go to 5.1.7 to manually enable this function on the mobile device side.
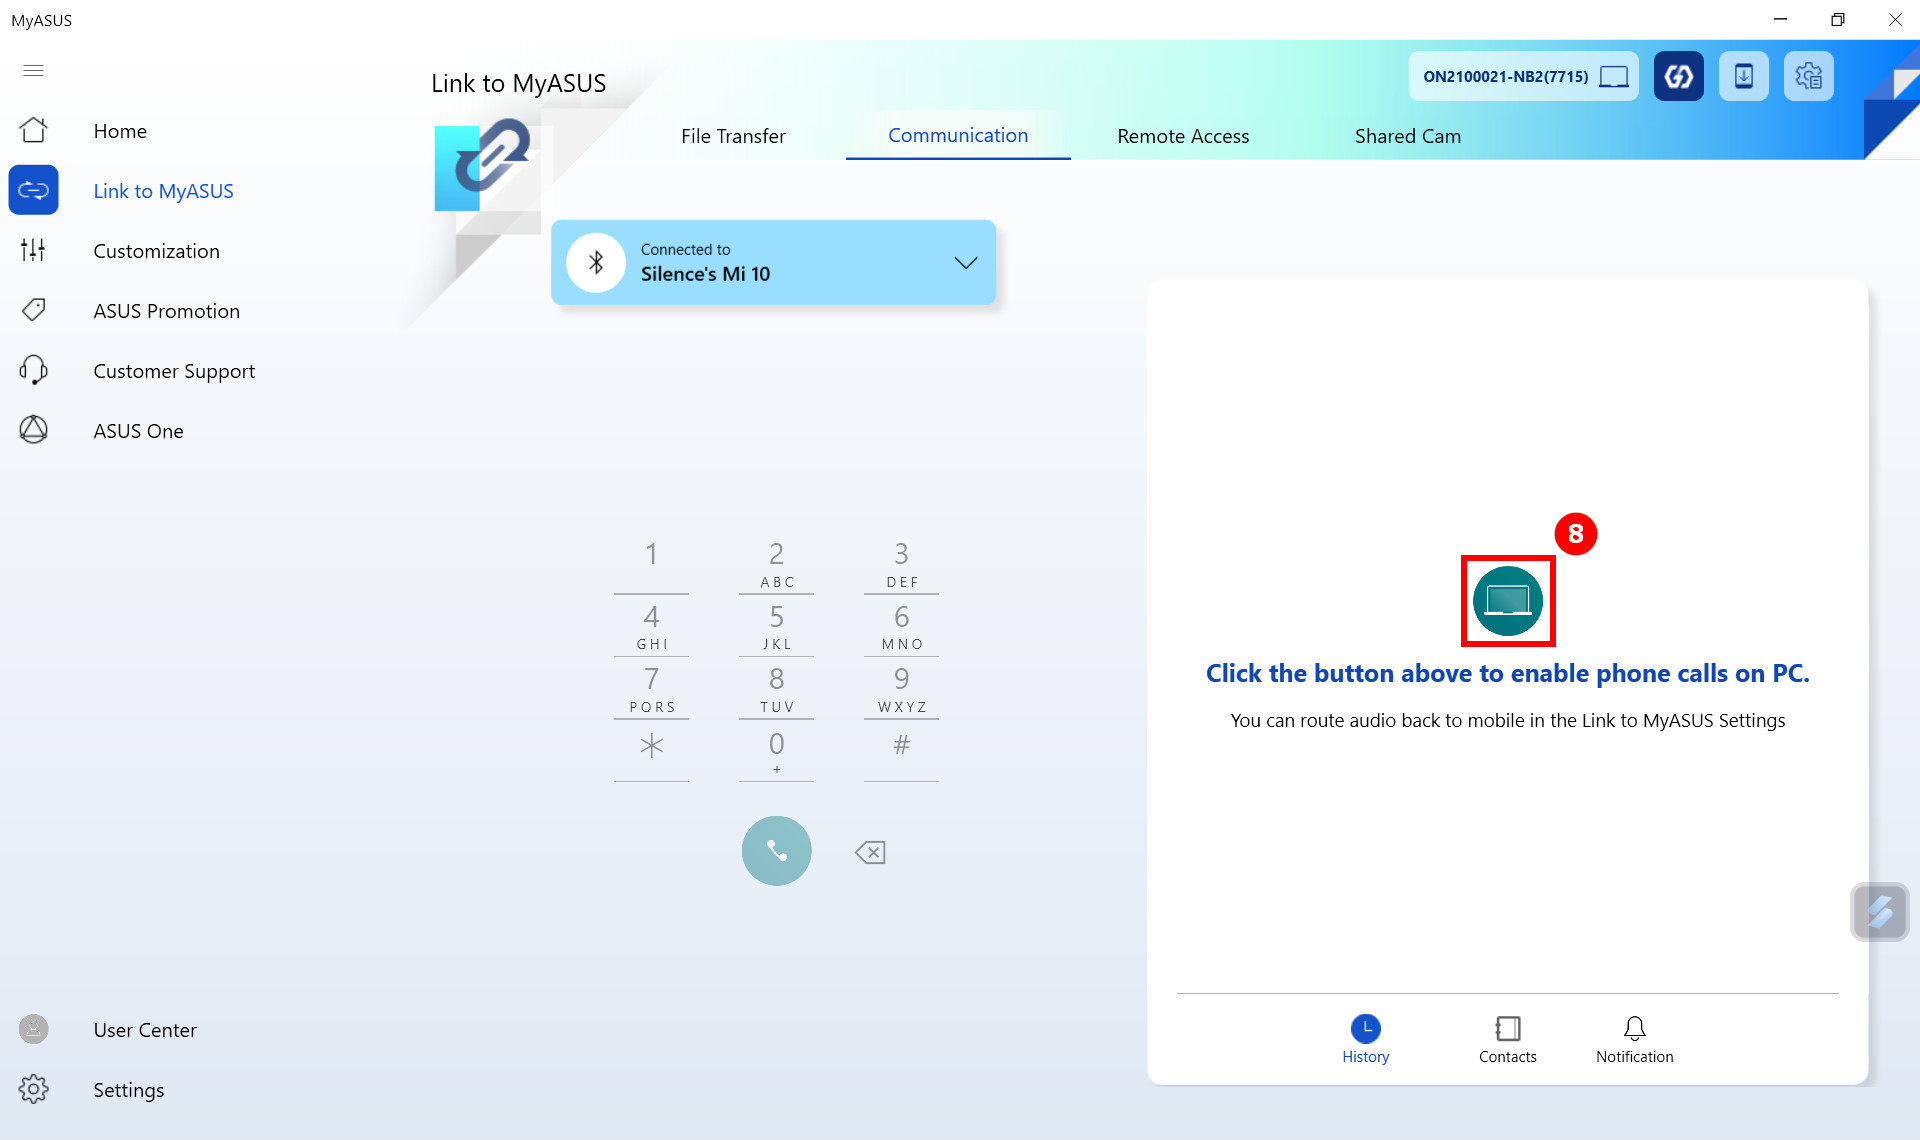
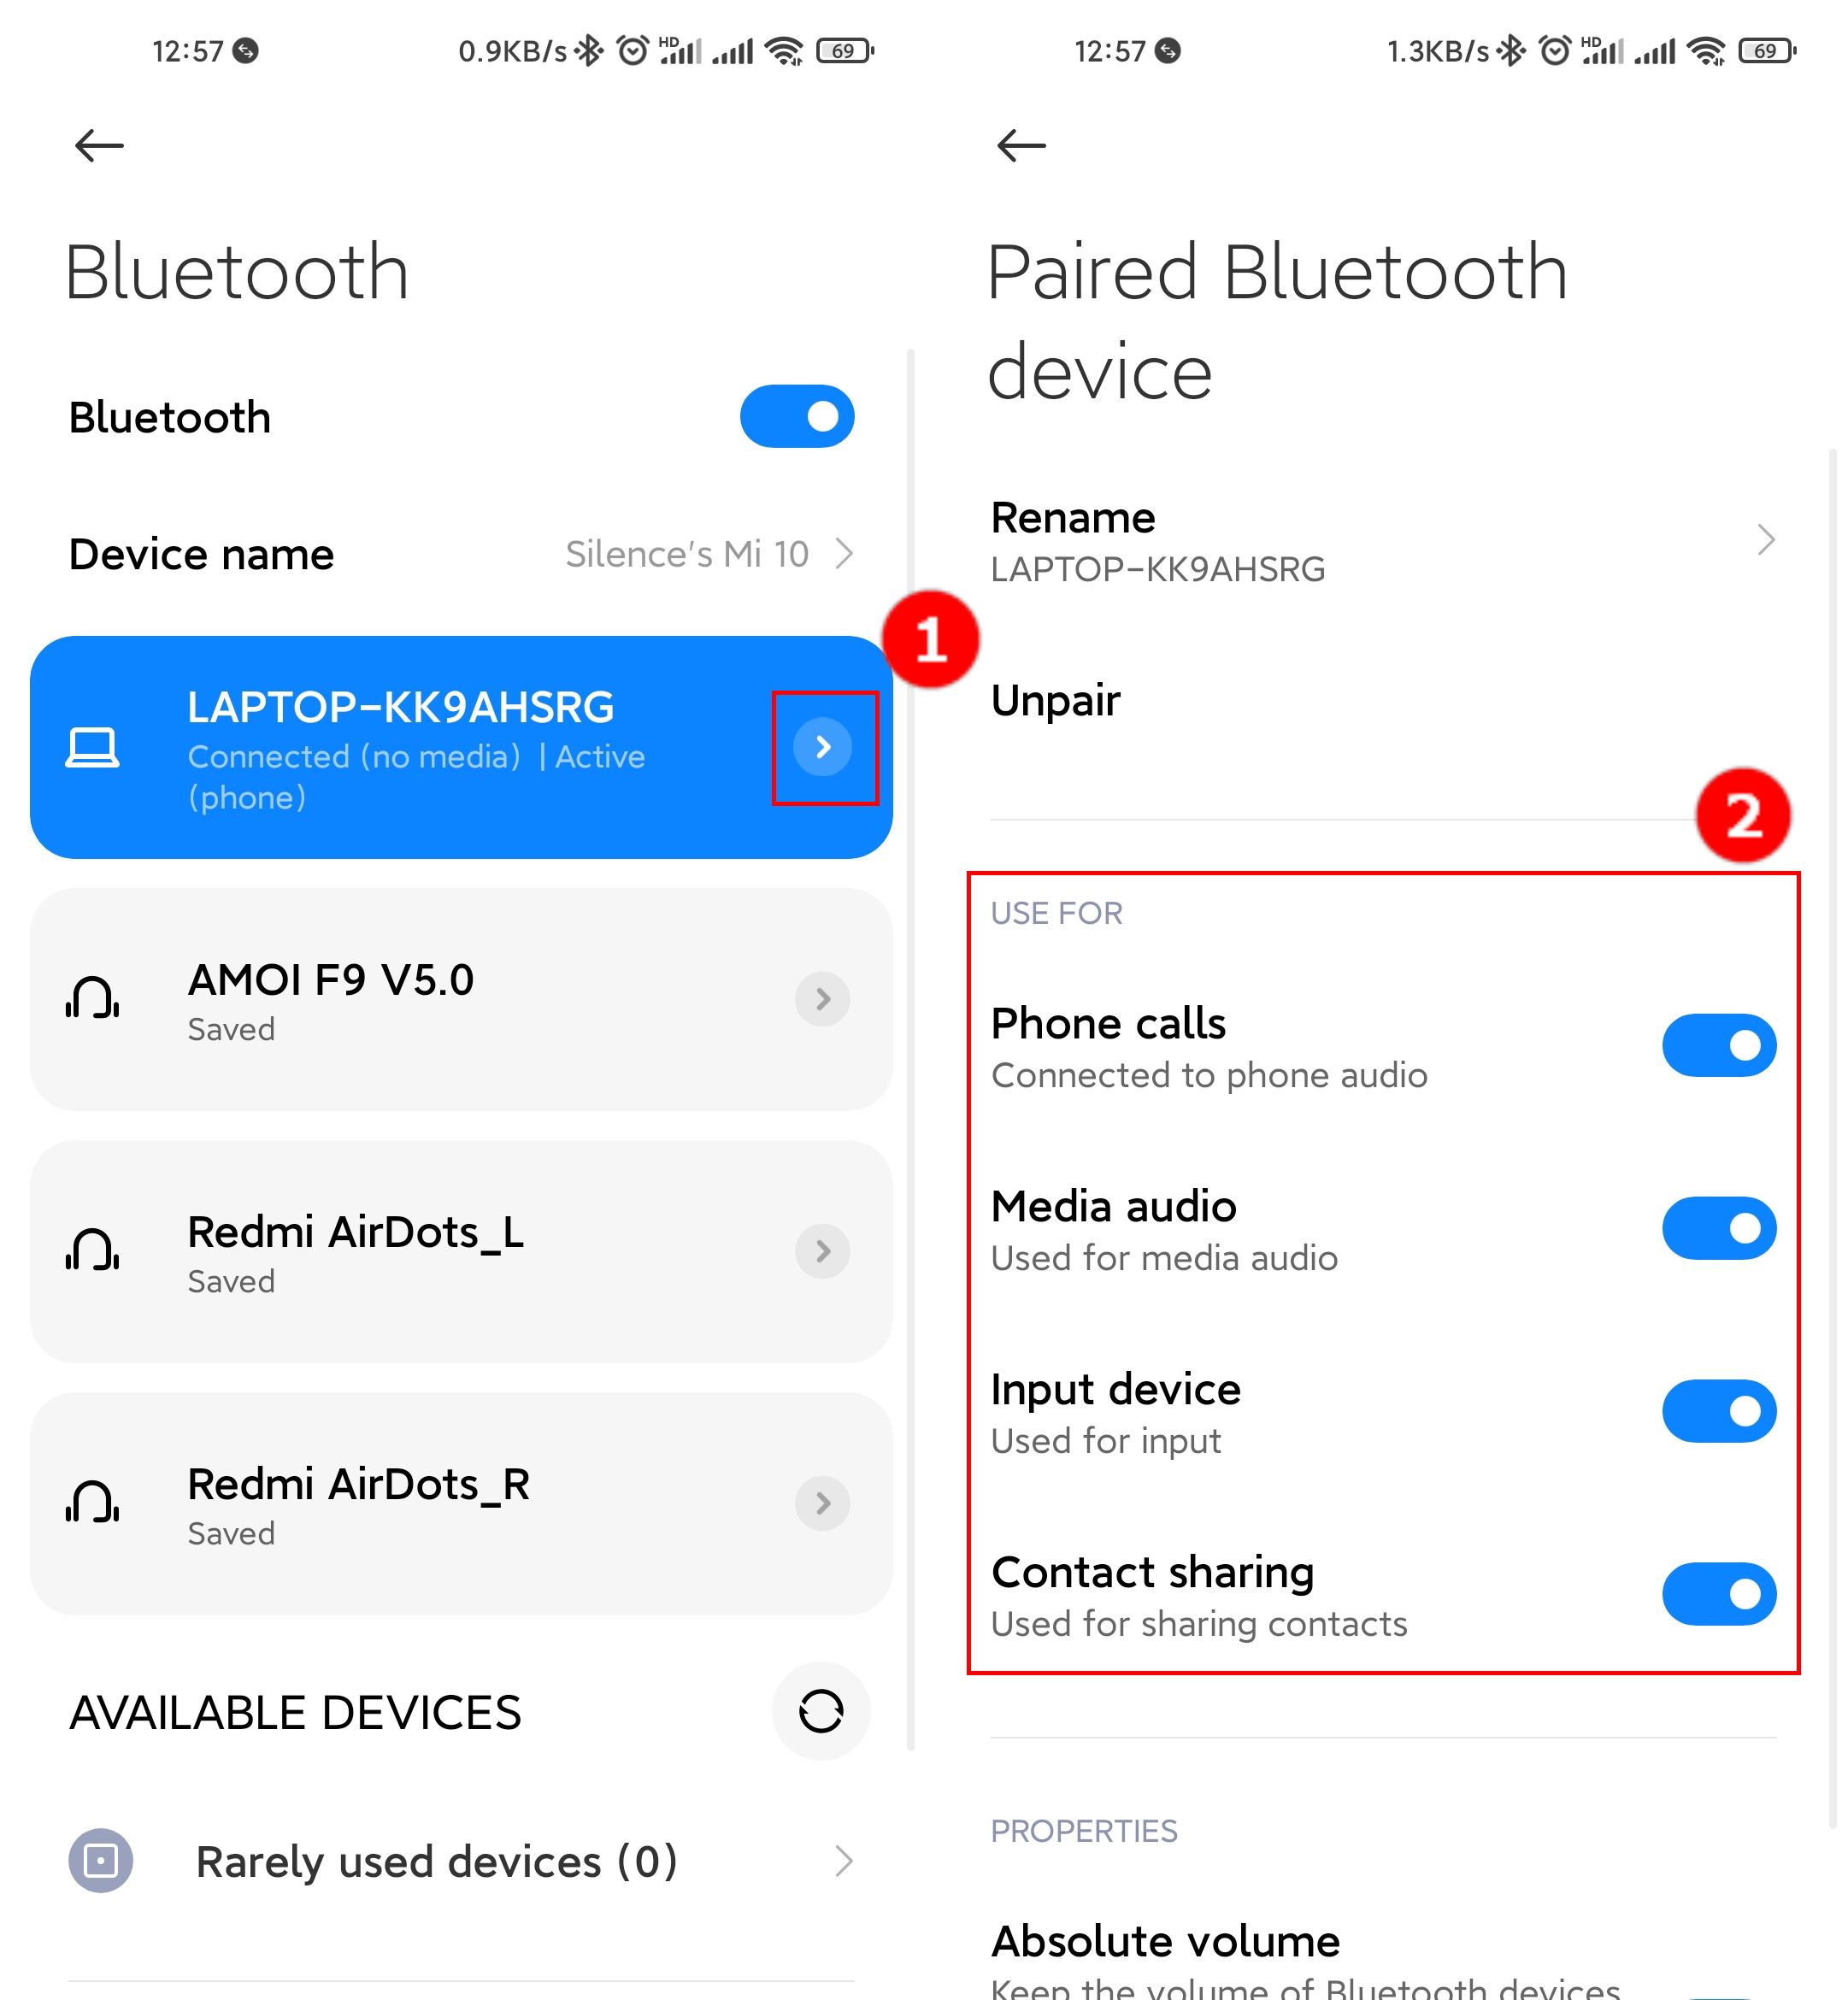
(8) Go to the Bluetooth setting page of the mobile device, click ①[Connected computer device], and then turn on ②[Mobile music and other functions].

5.4 Notification, the mobile device App notification message will be displayed on this tab.
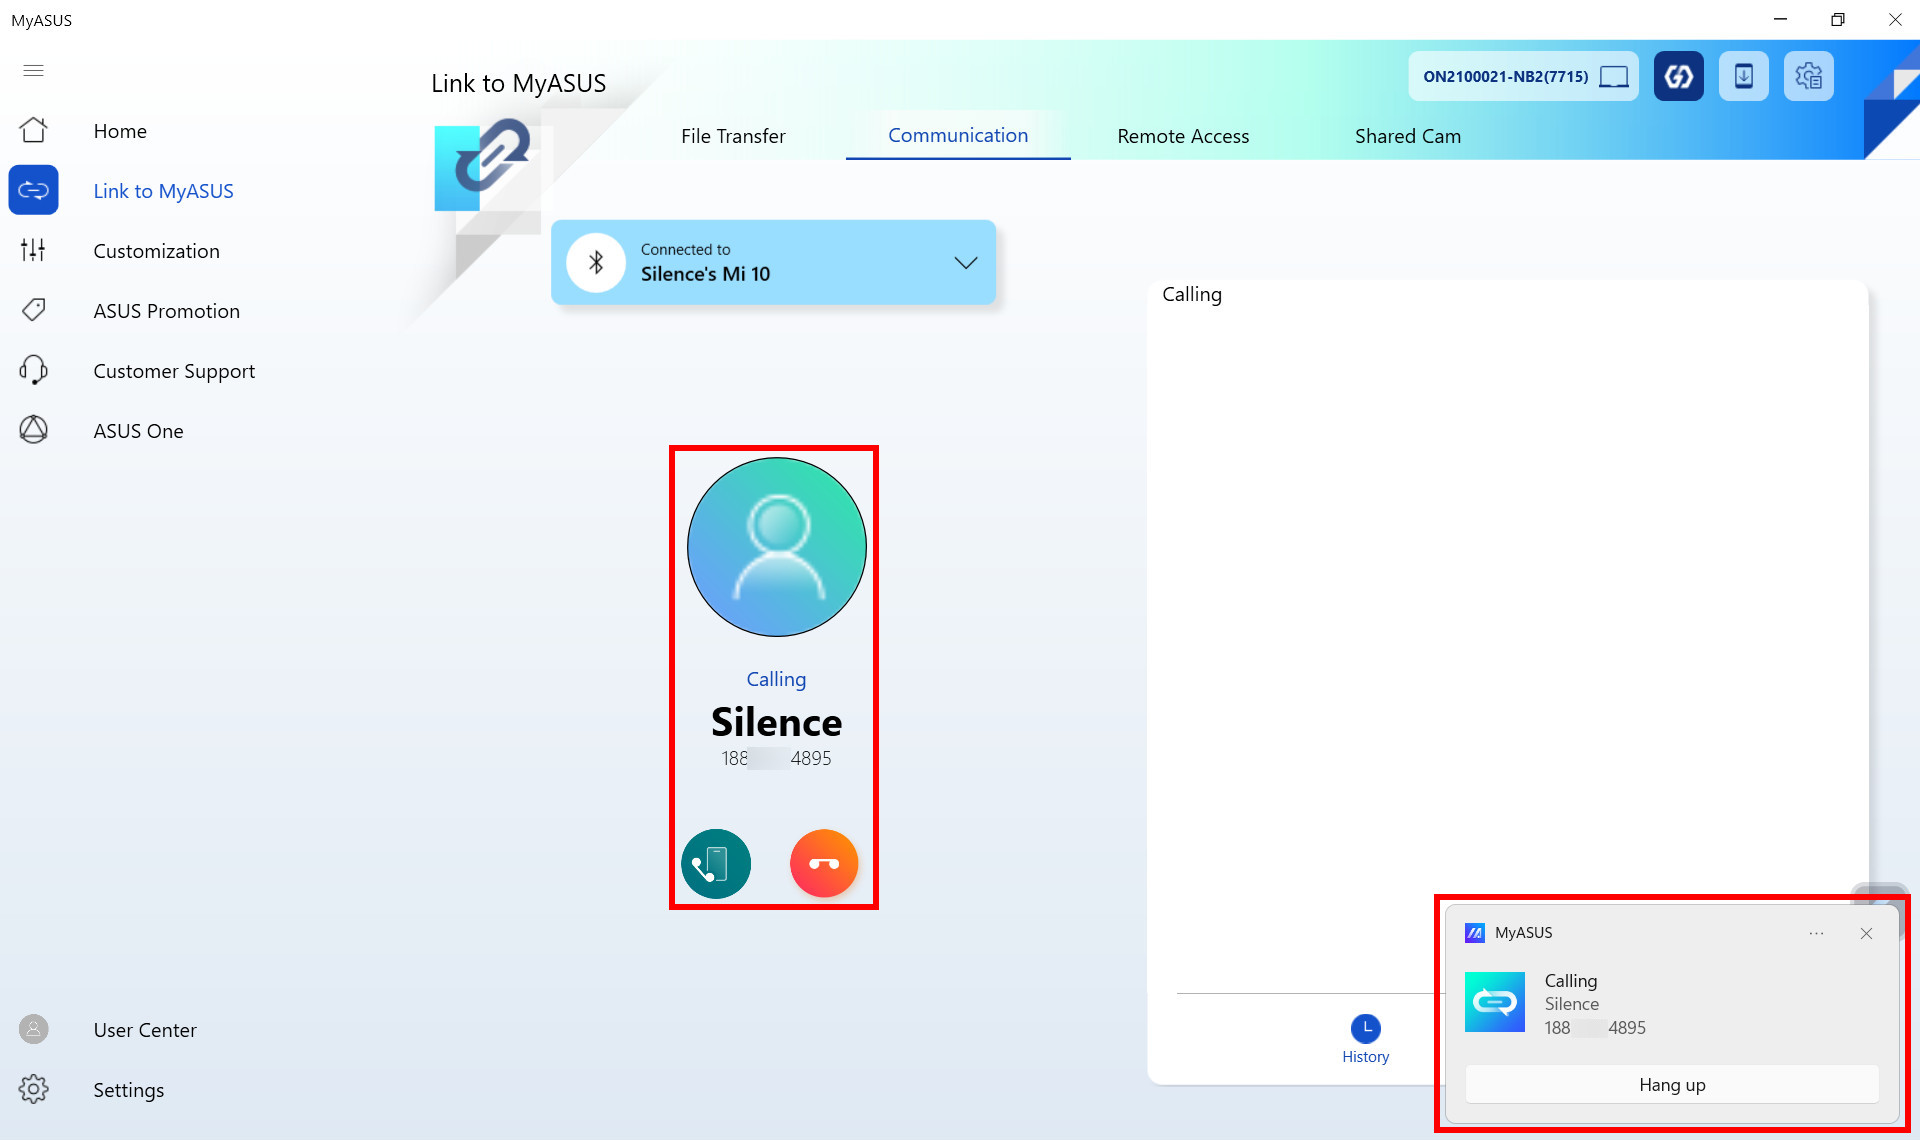
(1) Make a call on the keypad.
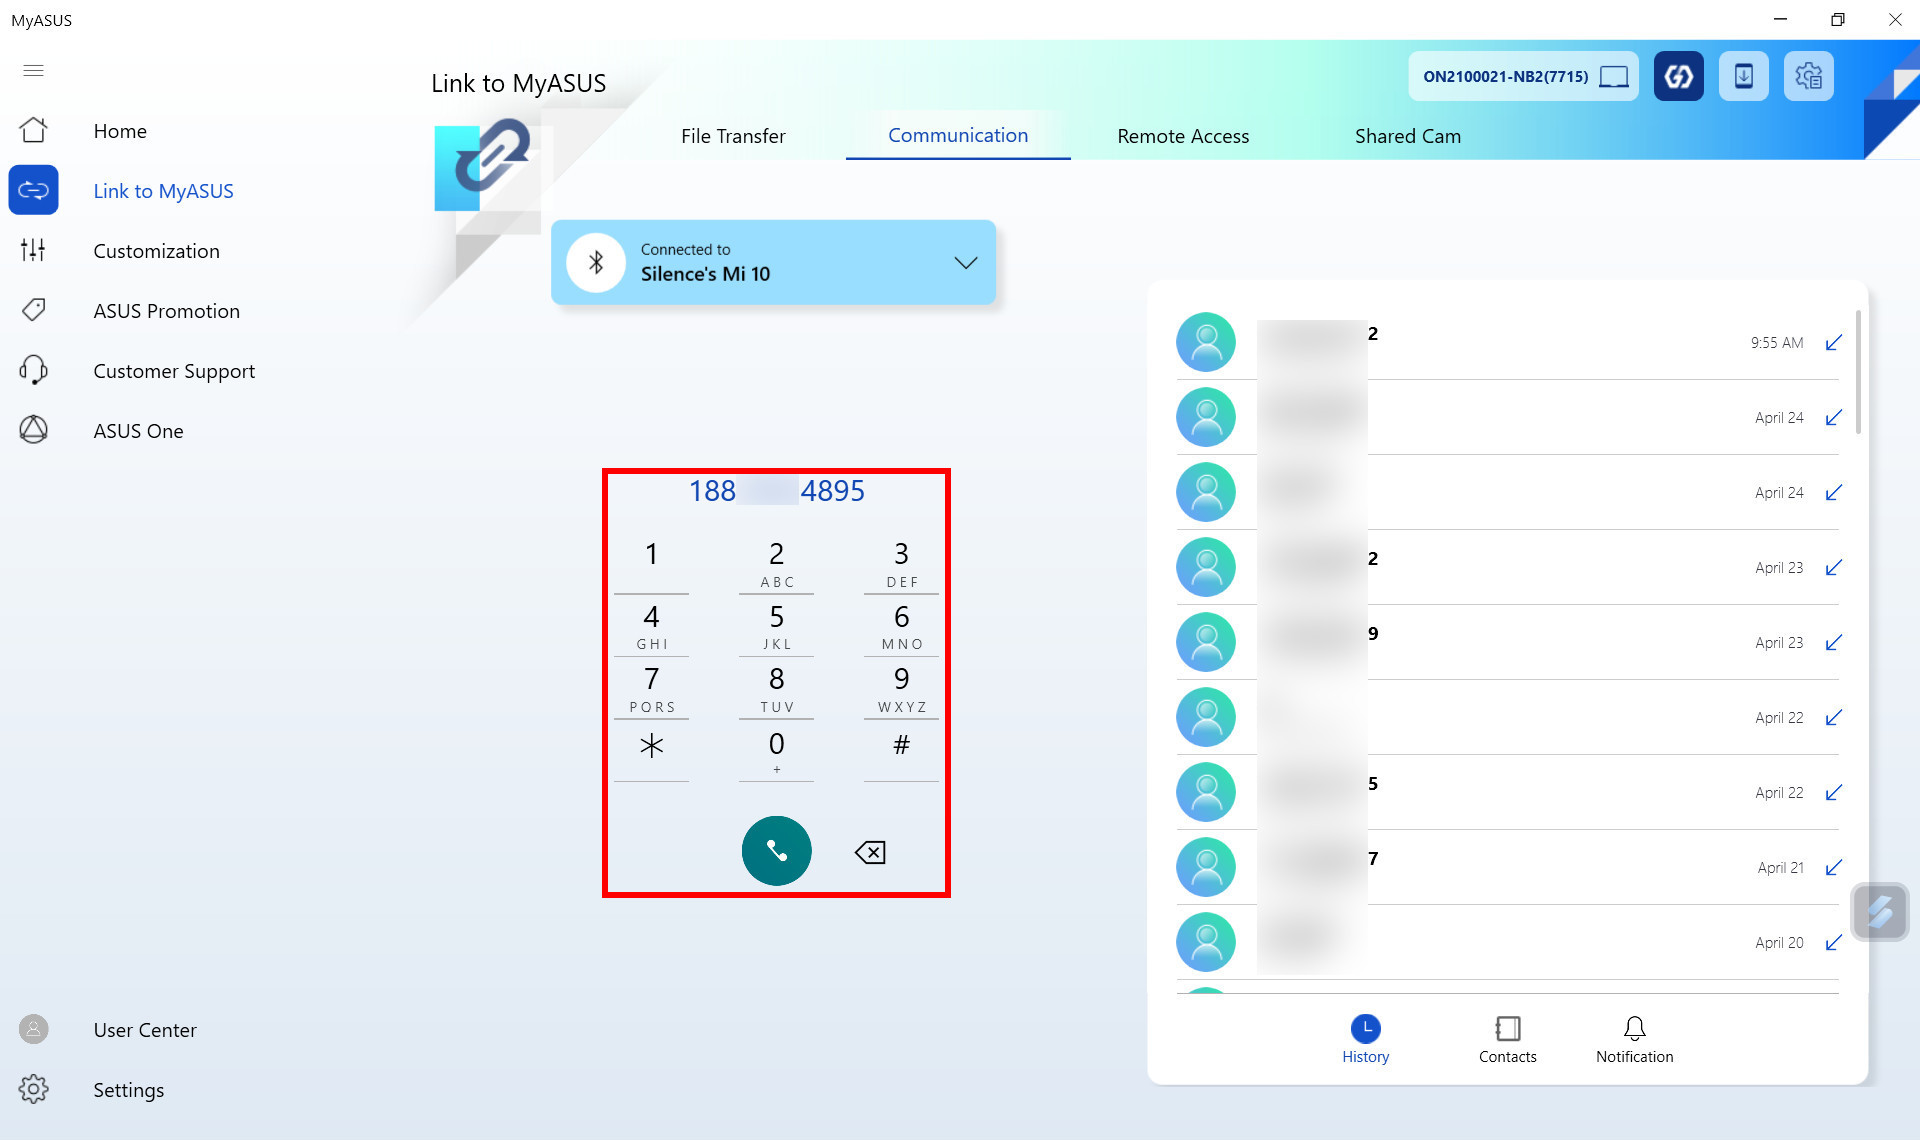
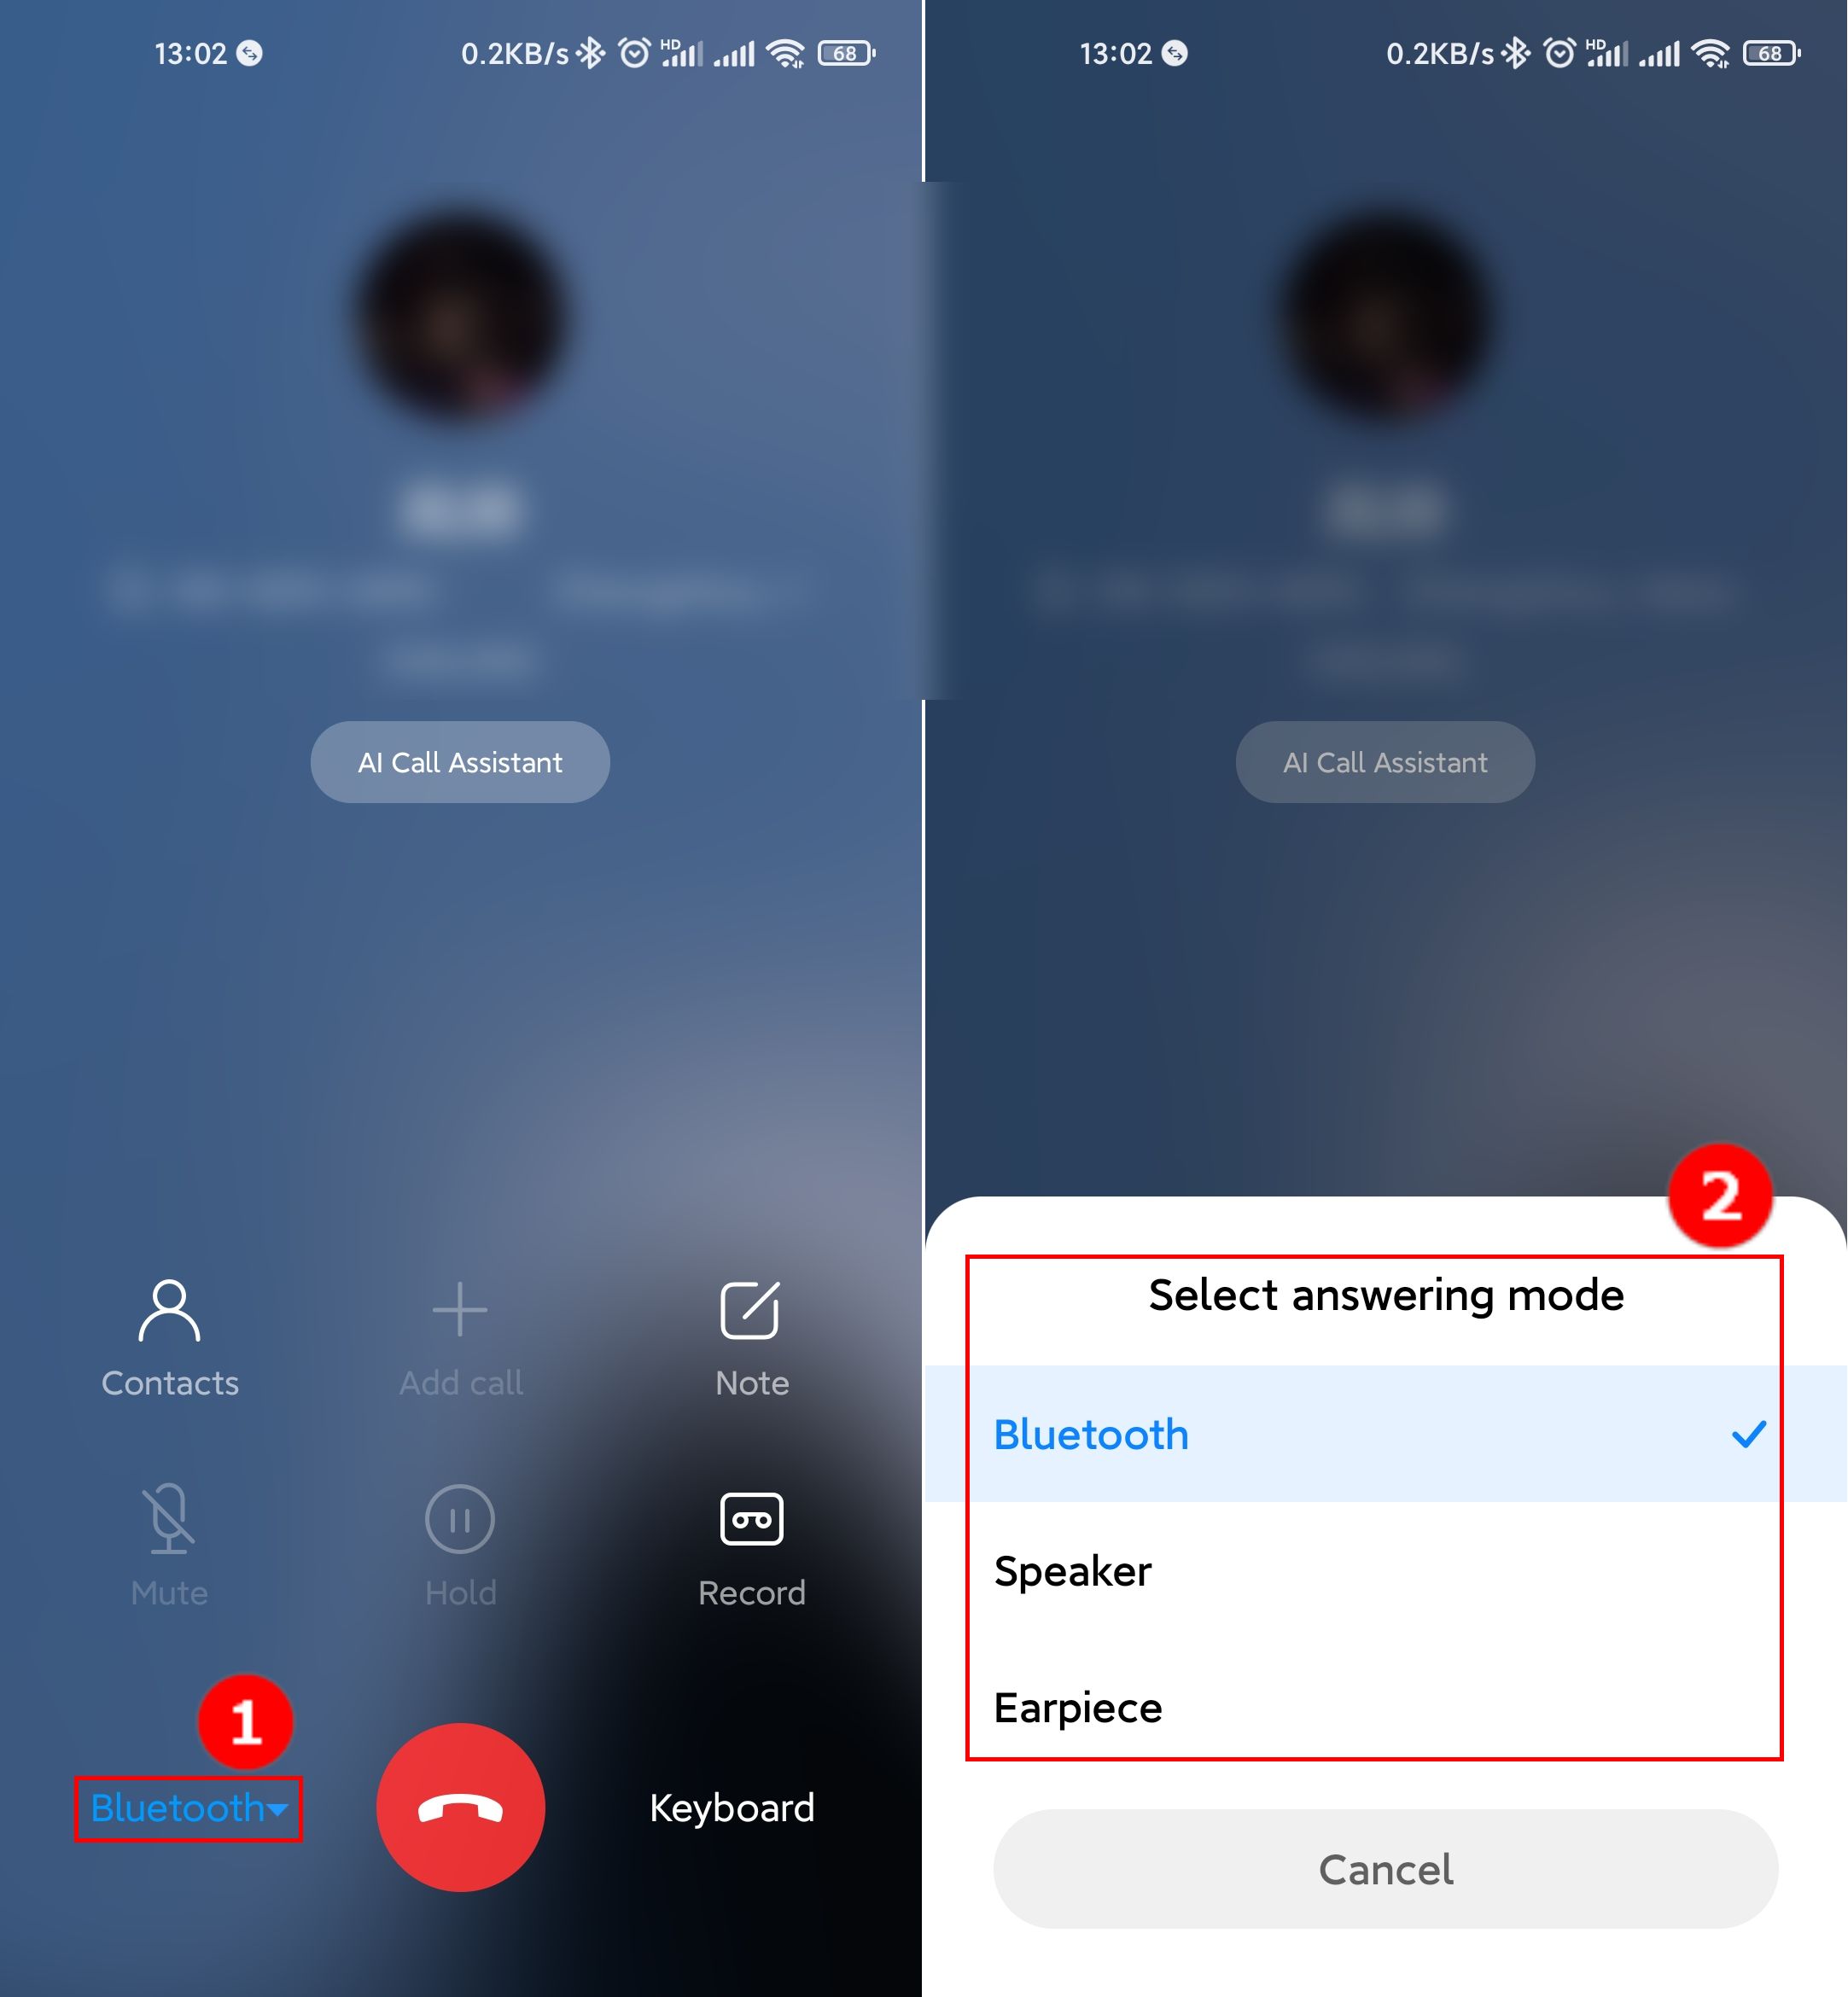
(2) You can choose to transfer the call to your mobile device or hang up.
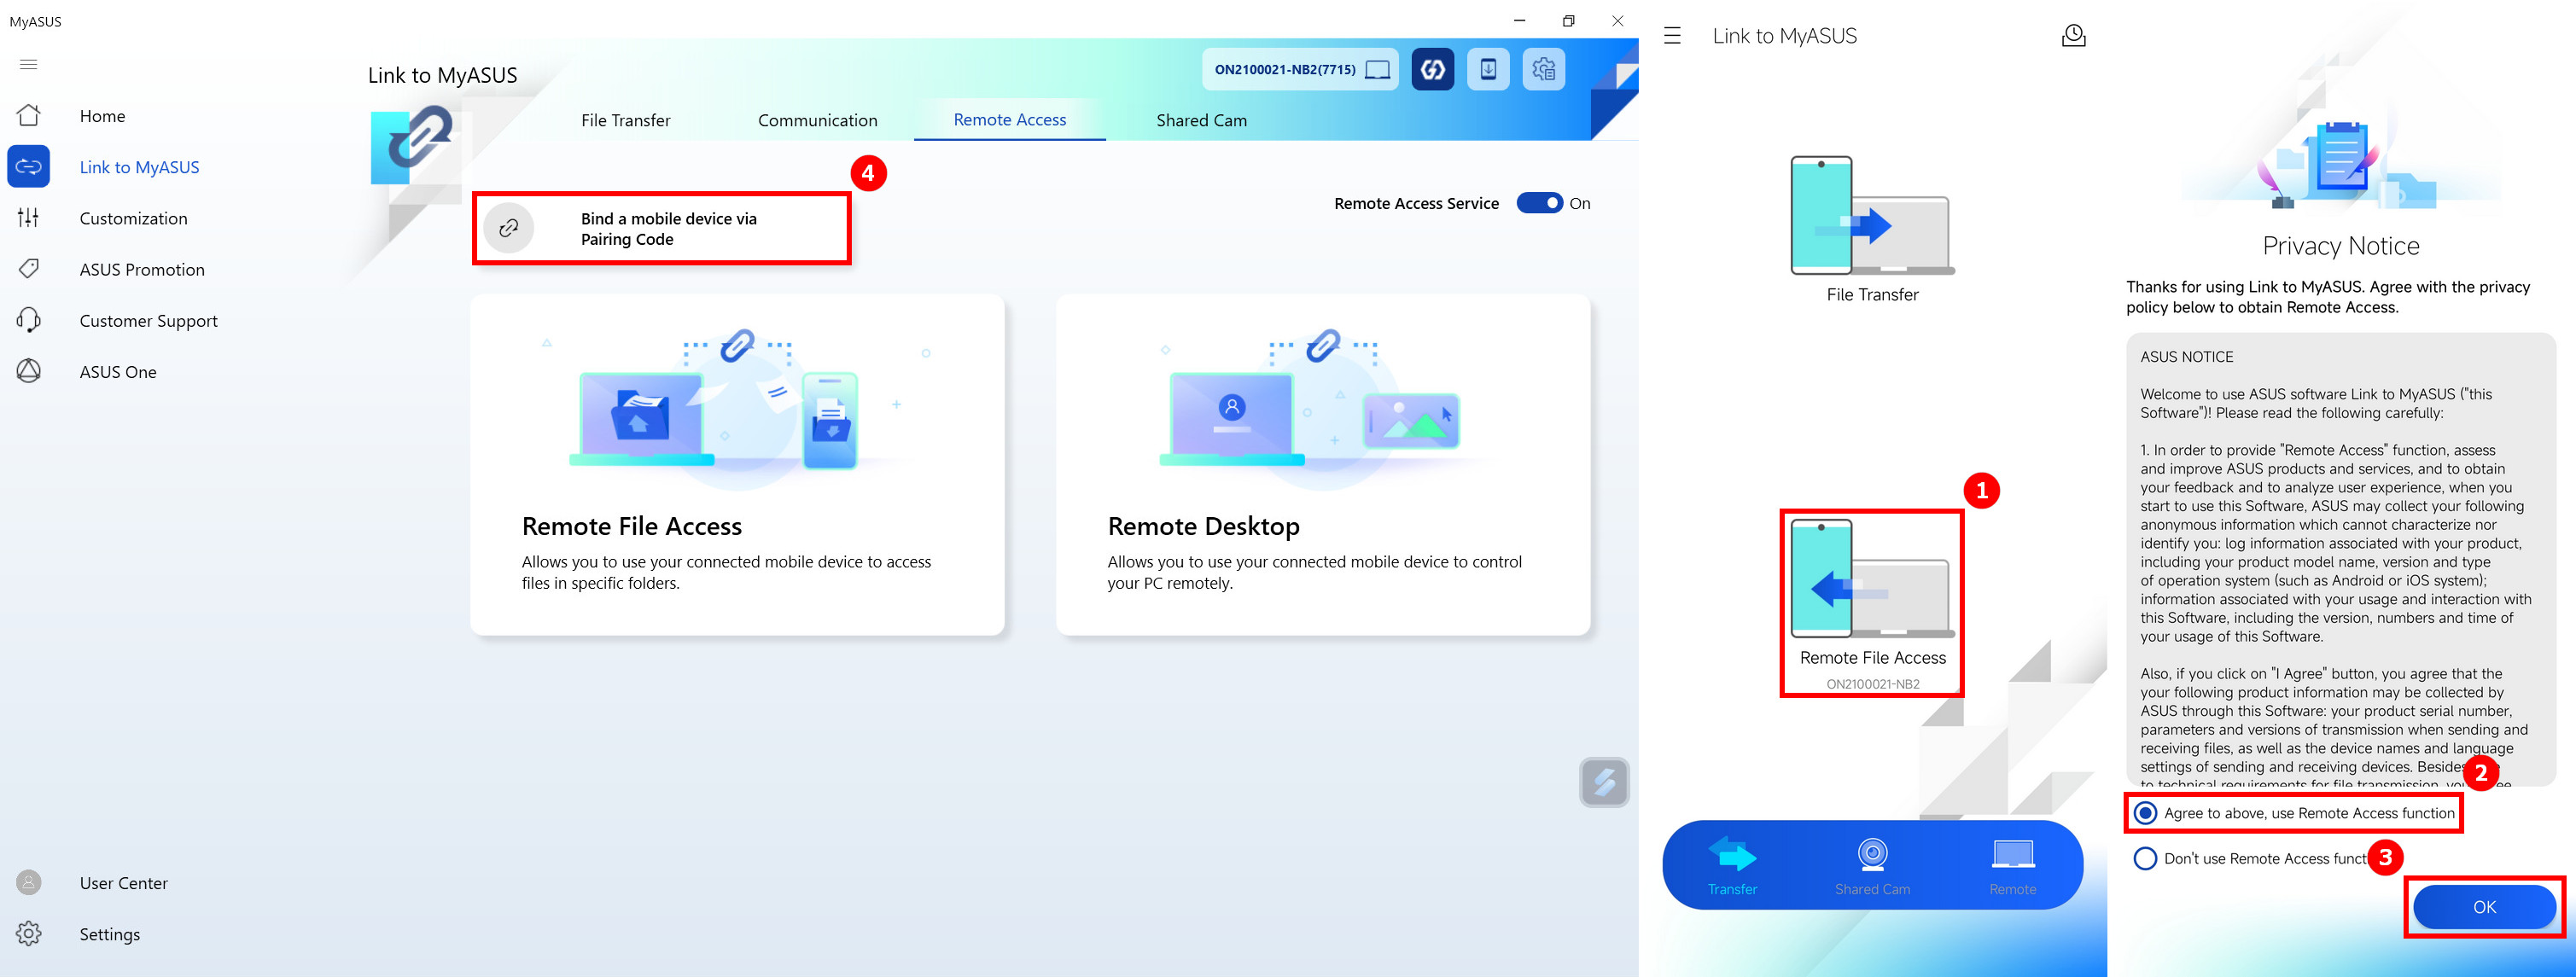
Remote Access requires both the computer and the mobile device to log in to the same ASUS member account, and the Remote Access function of the computer is already enabled.
When you use the Remote Access function for the first time, the system will send an email to your mailbox, you need to manually click in the mailbox to turn on the Remote Access function (Because it will access your computer-side data, it is necessary to confirm that it is your own operation to prevent leakage of privacy).
Every time you use the Remote Access function on the follow-up device, the system will send a notification email to your mailbox to ensure your privacy.
If you encounter problems when using this feature, please click on the link first and read the text to try to solve your problem.
5.1 Pairing the computer and mobile devices
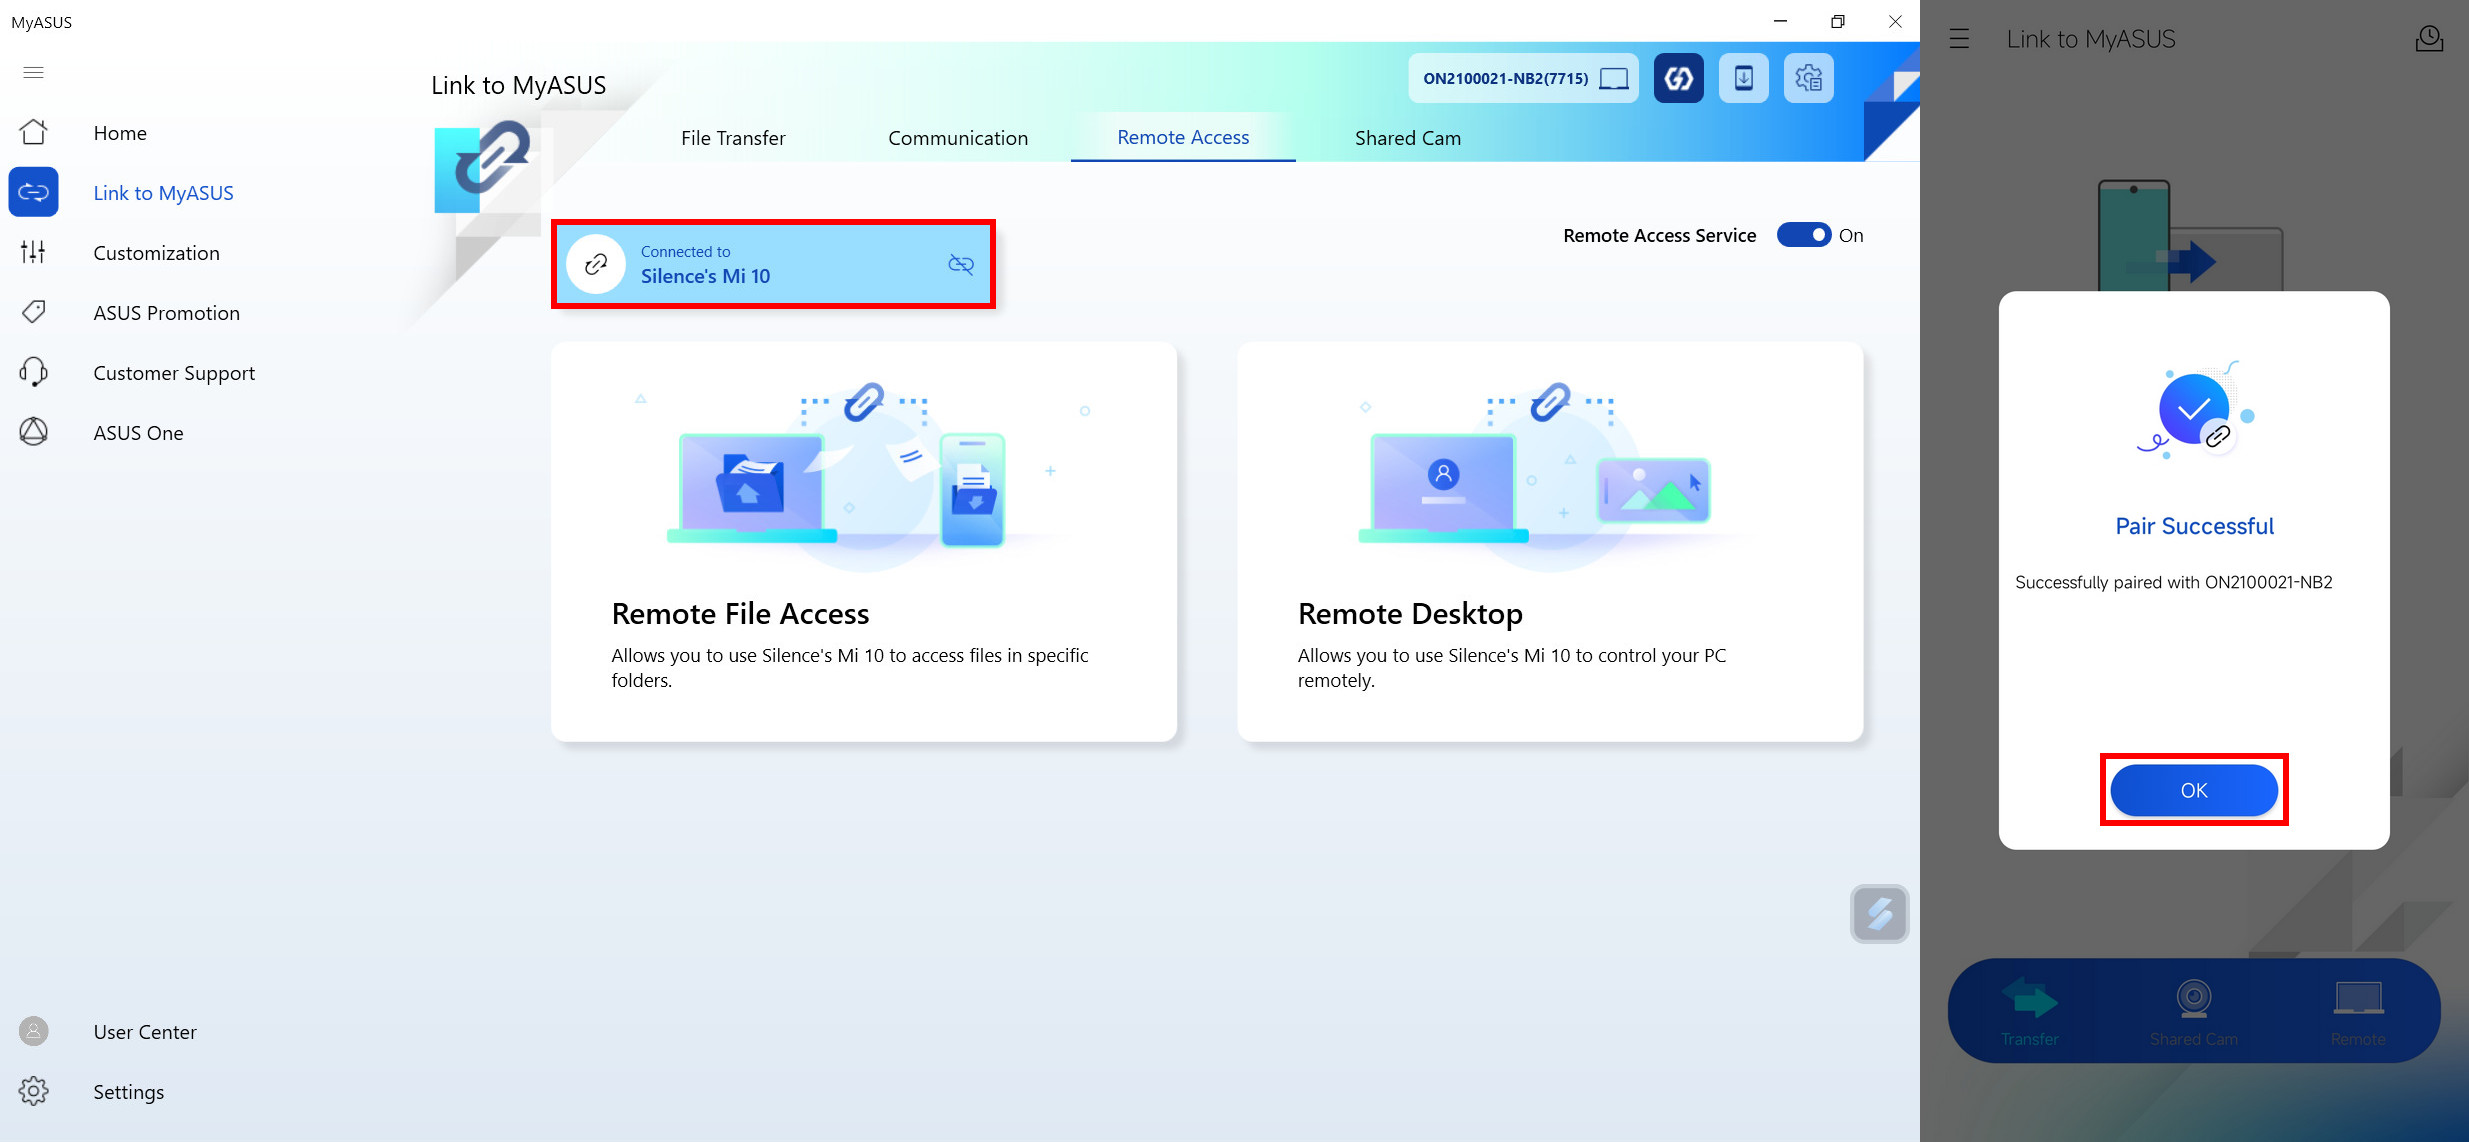
(1) Click to enable ①[Remote Access] function, click ②[Agree to above, use Remote Access function], click ③[OK], and click ④[bind mobile device with pairing code] on the computer.
(2) The desktop side will generate ⑤[QR Code and Pairing Code], and the mobile terminal will fill in the new pop-up window with ⑤[Pairing Code].
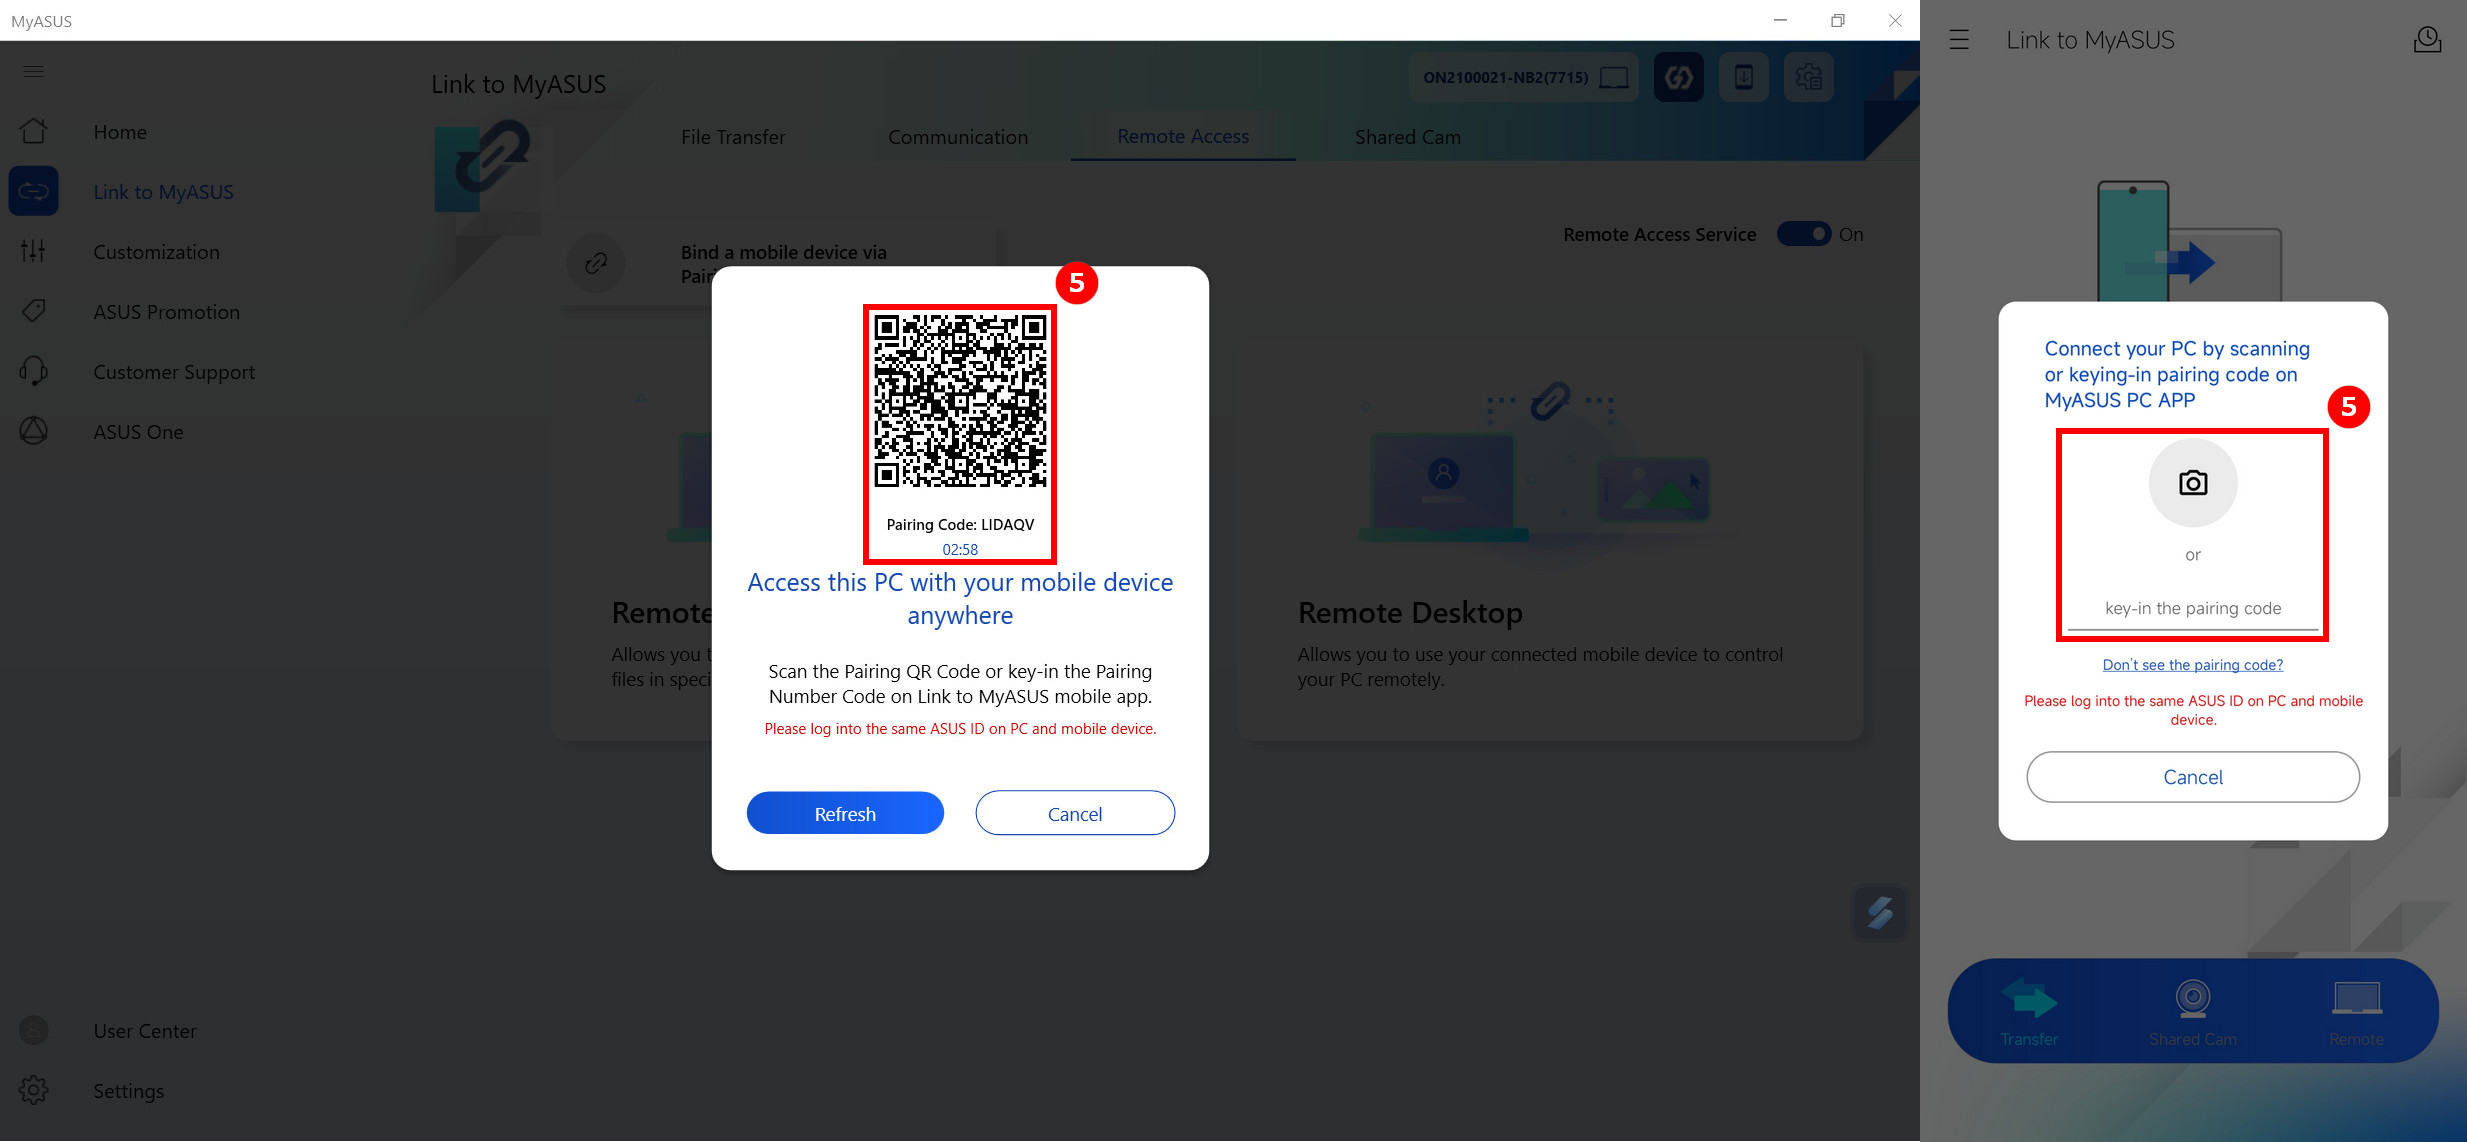
(3) The computer and mobile device have been paired successfully.
5.2 Use of Remote Access function
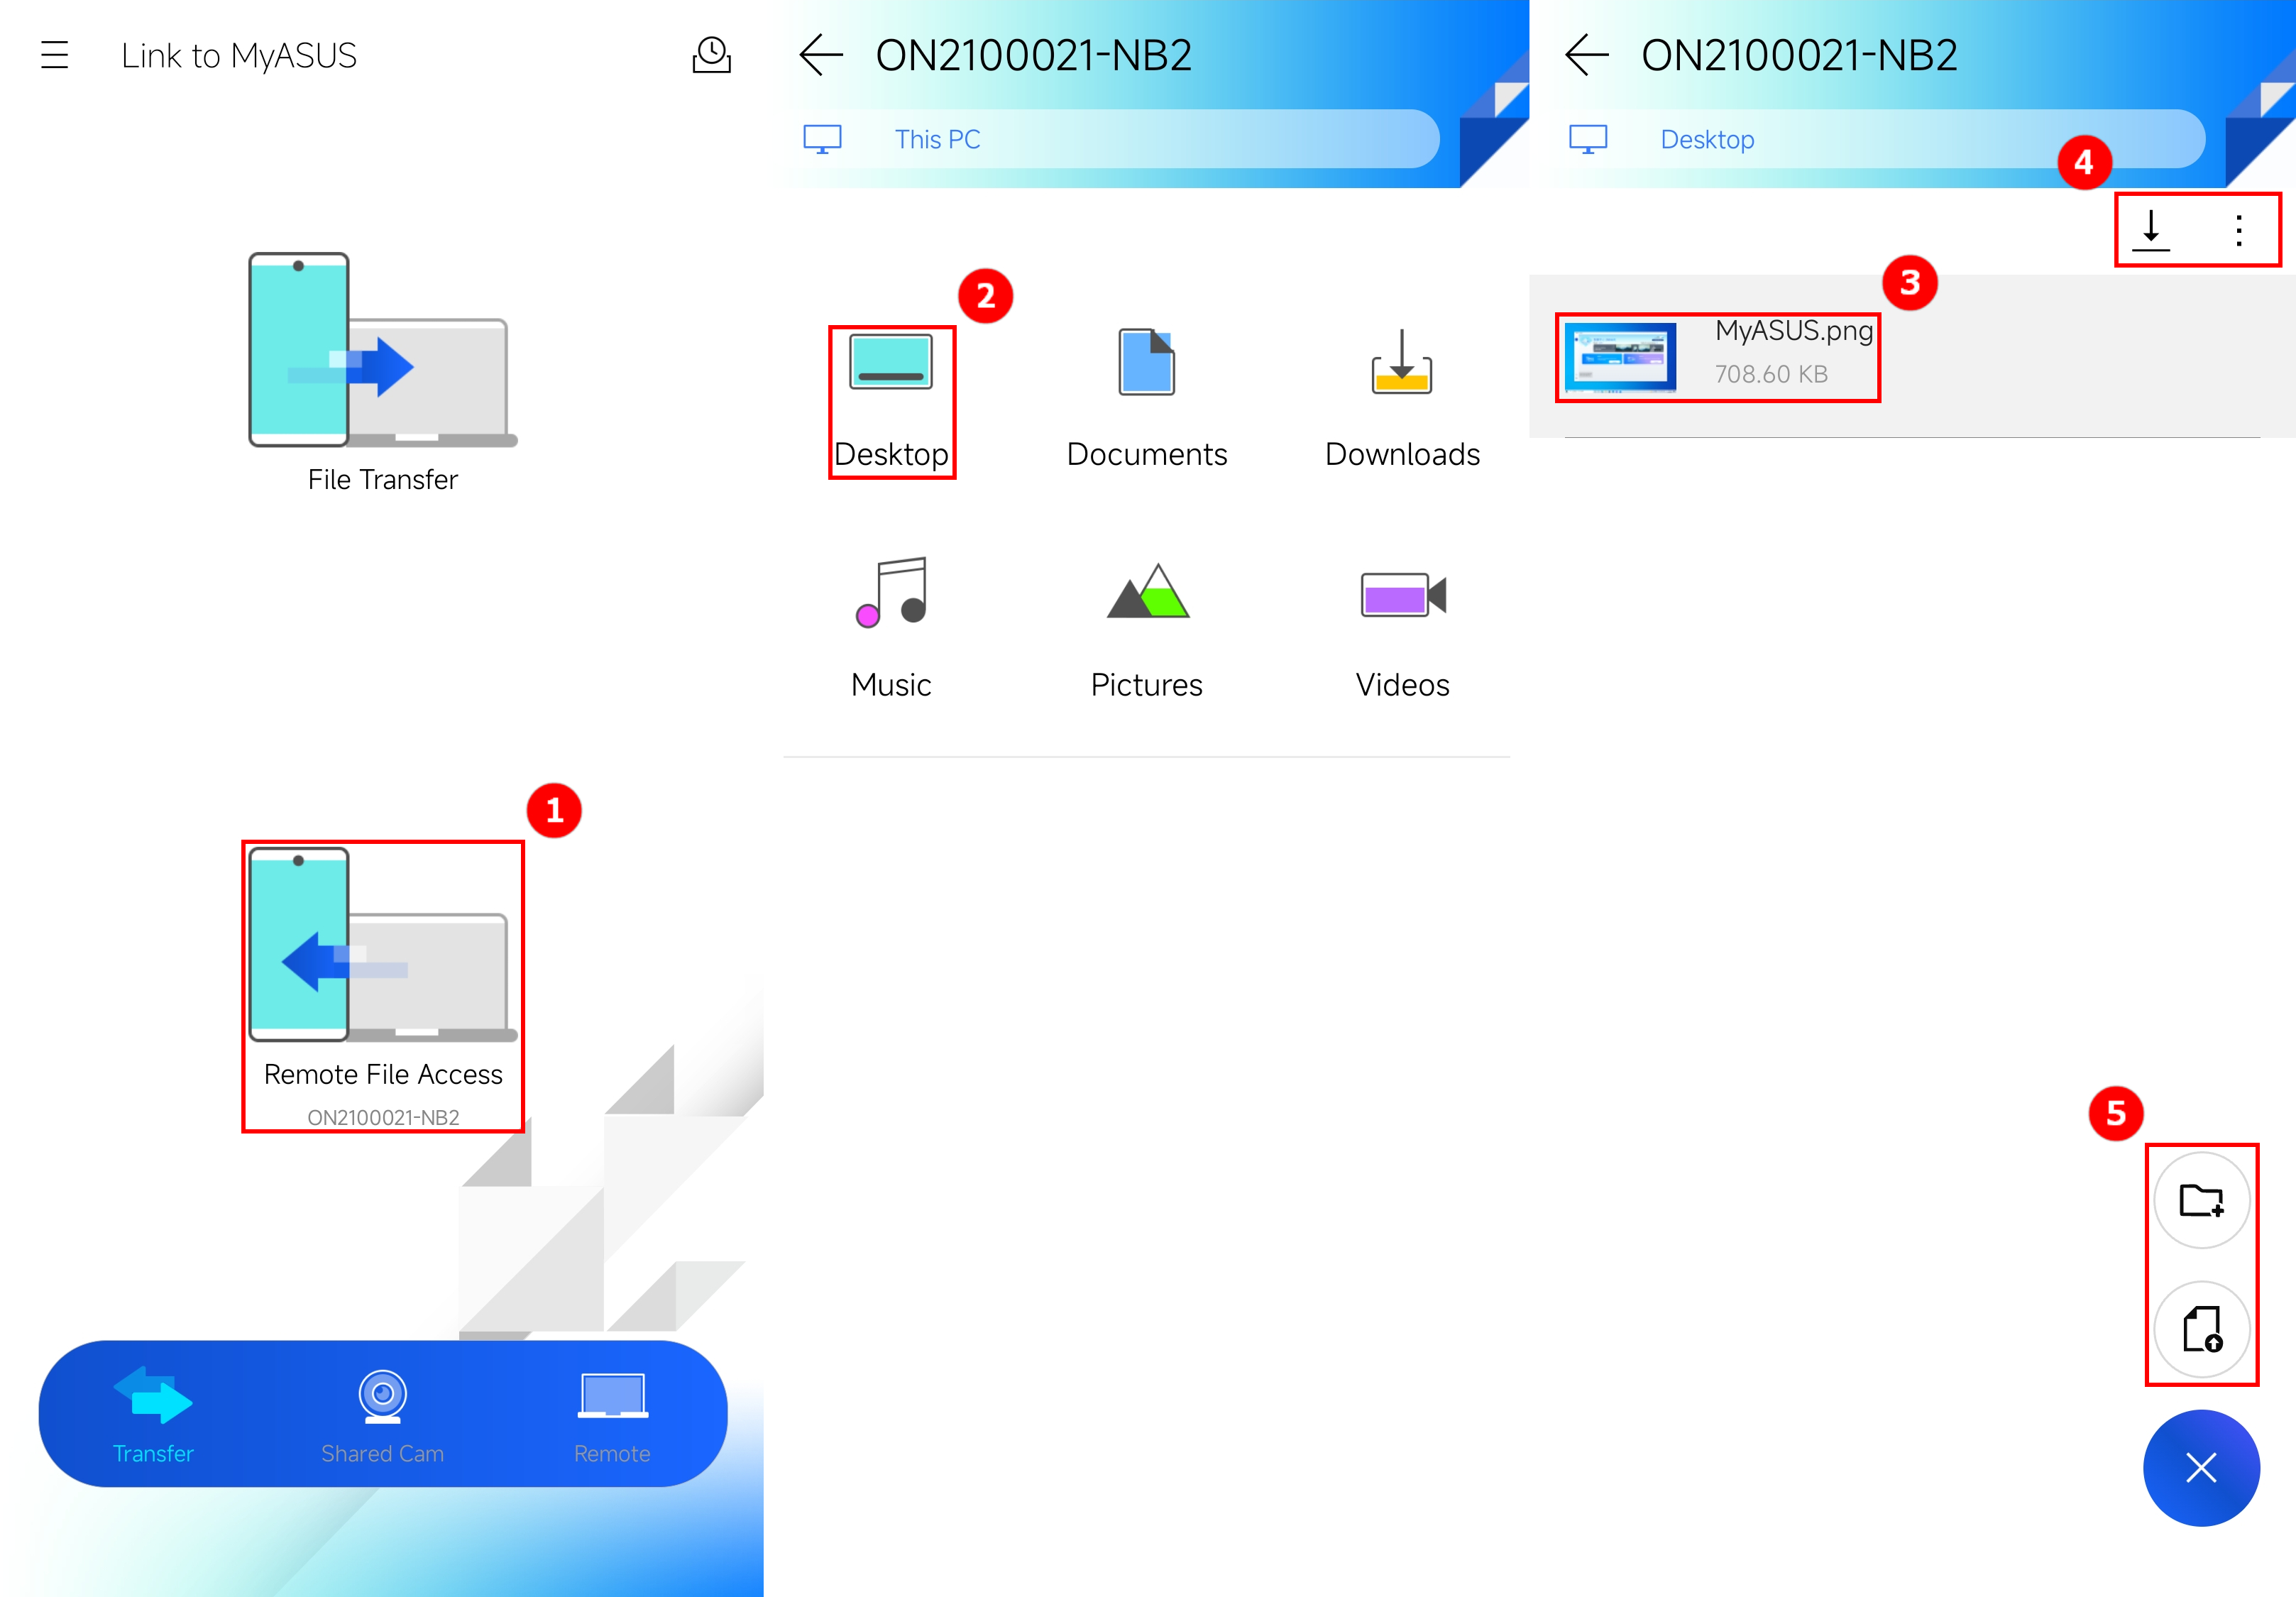
(1) Click ①[Remote File Access] on the mobile device, click ②[Folder], click ③[File], ④[Download to phone or other functions], ⑤[Upload Files to computer or add new folders].
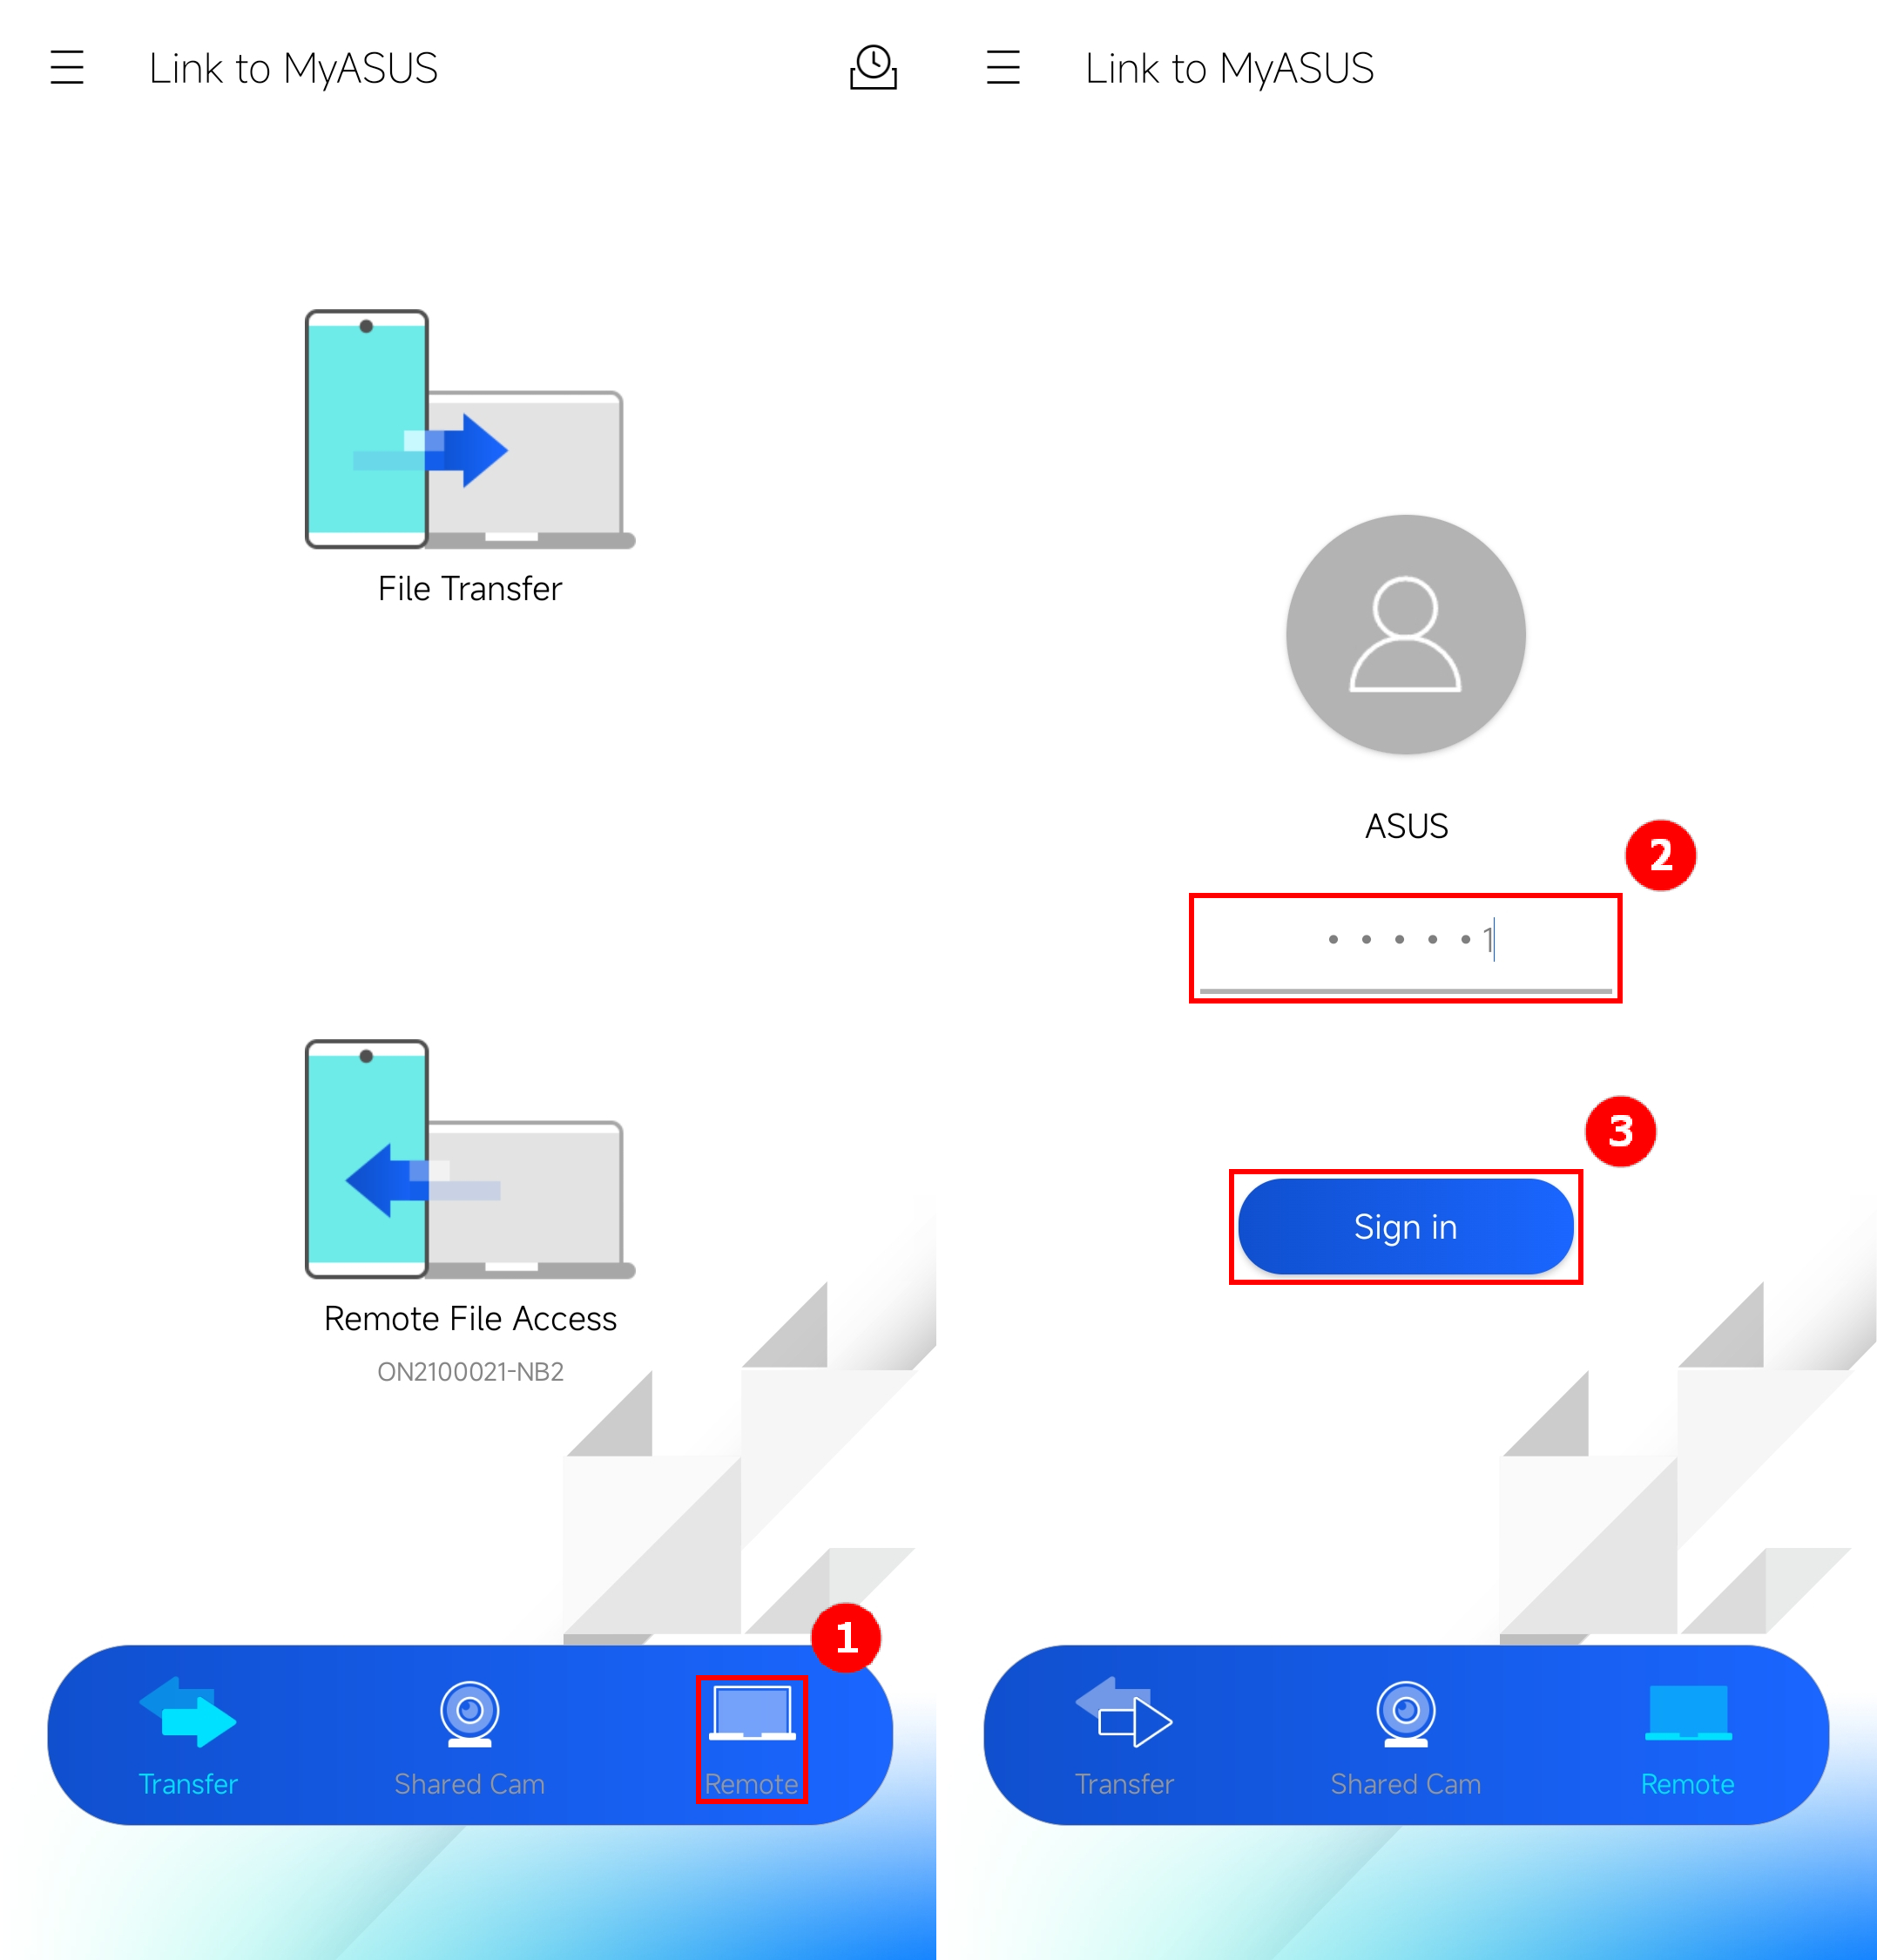
The use of the Remote Desktop function requires the computer to set a power-on password.
(2) Click ①[Remote Desktop] of Link to MyASUS on the mobile device side, fill in ②[Computer power-on password], and click ③[Login].
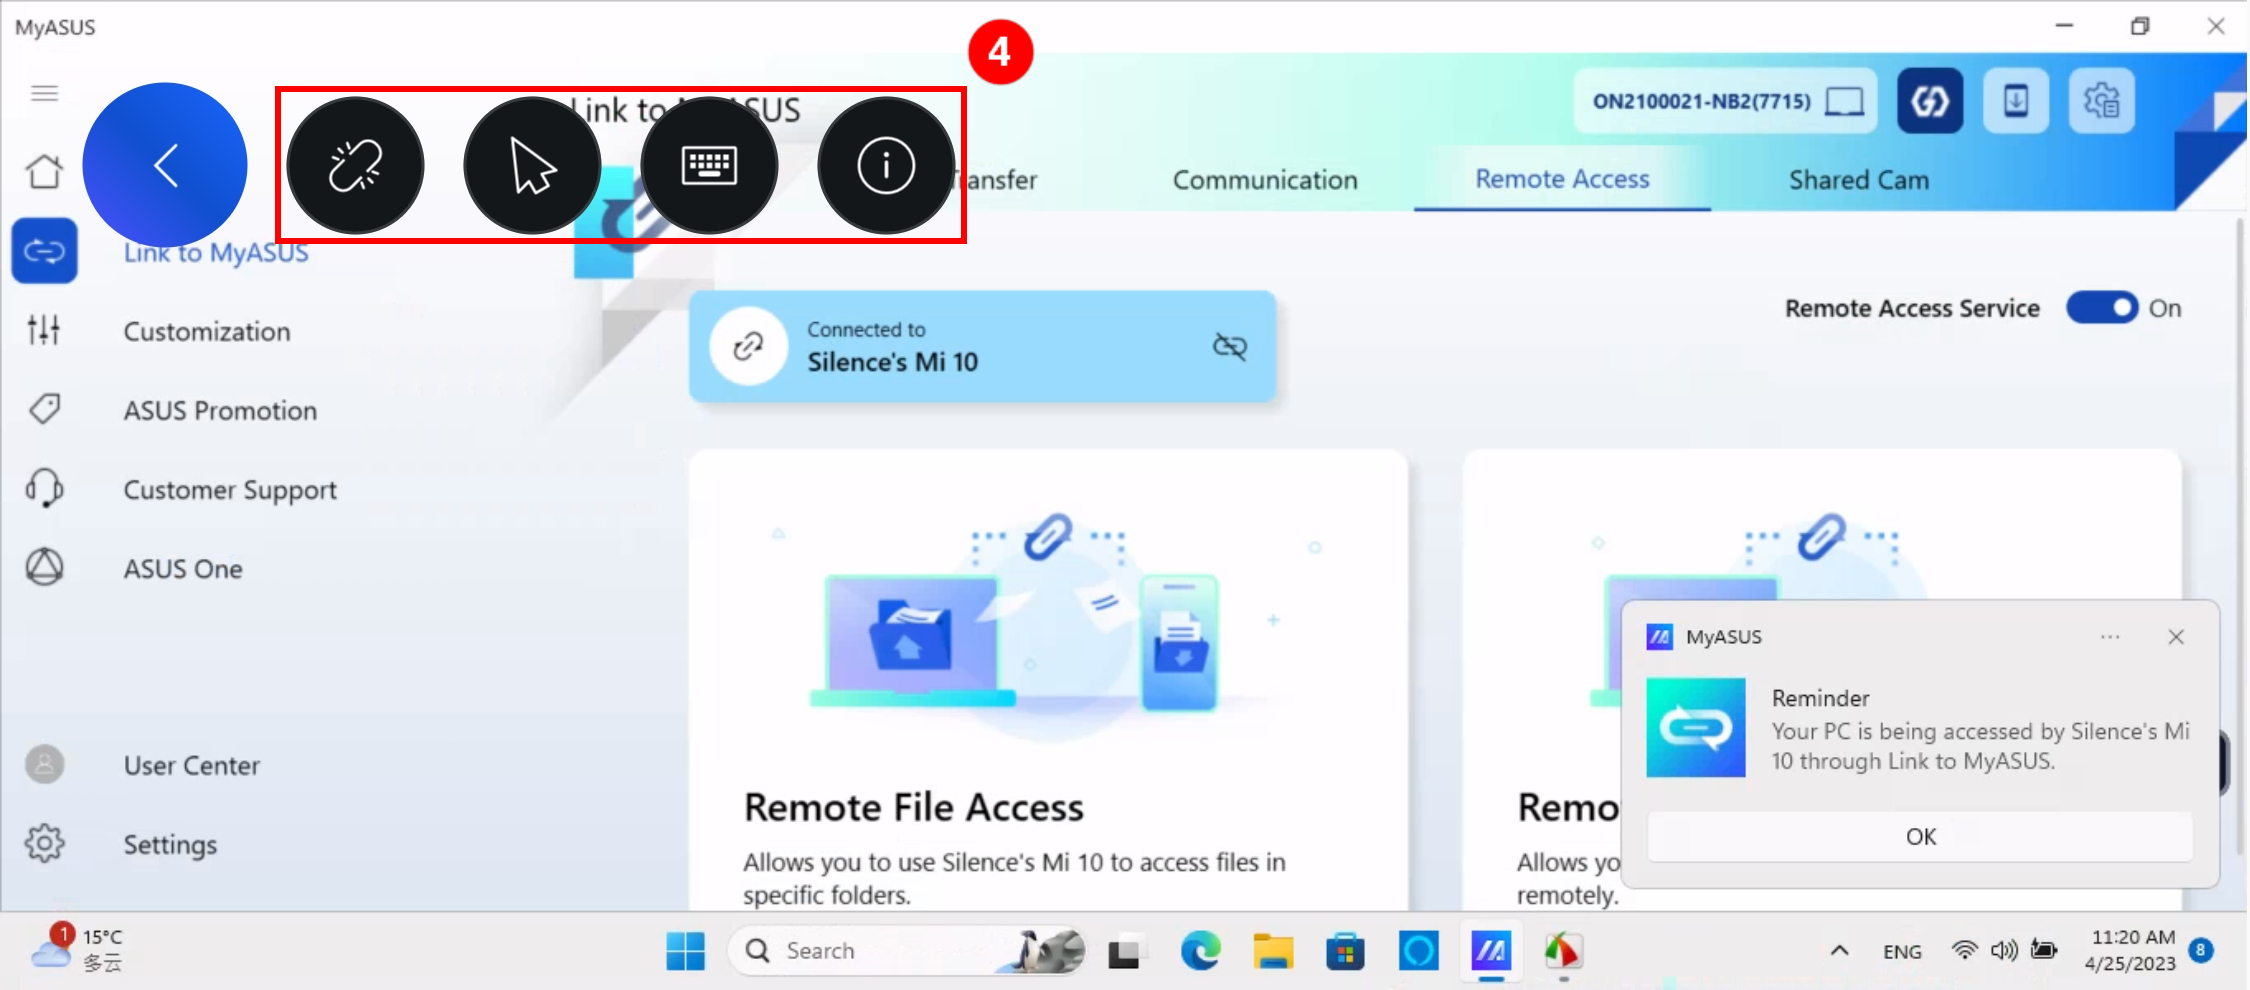
(2) The mobile device will display the screen of the computer side, and various operations can be performed. At this time, the lock screen will be displayed on the computer side to prevent privacy leakage. In ④[drop-down menu], from top to bottom, disconnect the Remote Desktop function, activate the mouse, activate the keyboard, and help.
The Shared Cam function turns your mobile device's camera as a PC's webcam through the device connection, allowing you to use this function as a camera source in a third-party video service.
If you encounter problems when using this feature, please click the link or link first and read the text to try to solve your problem.
7.1 Turn on the Shared Cam function
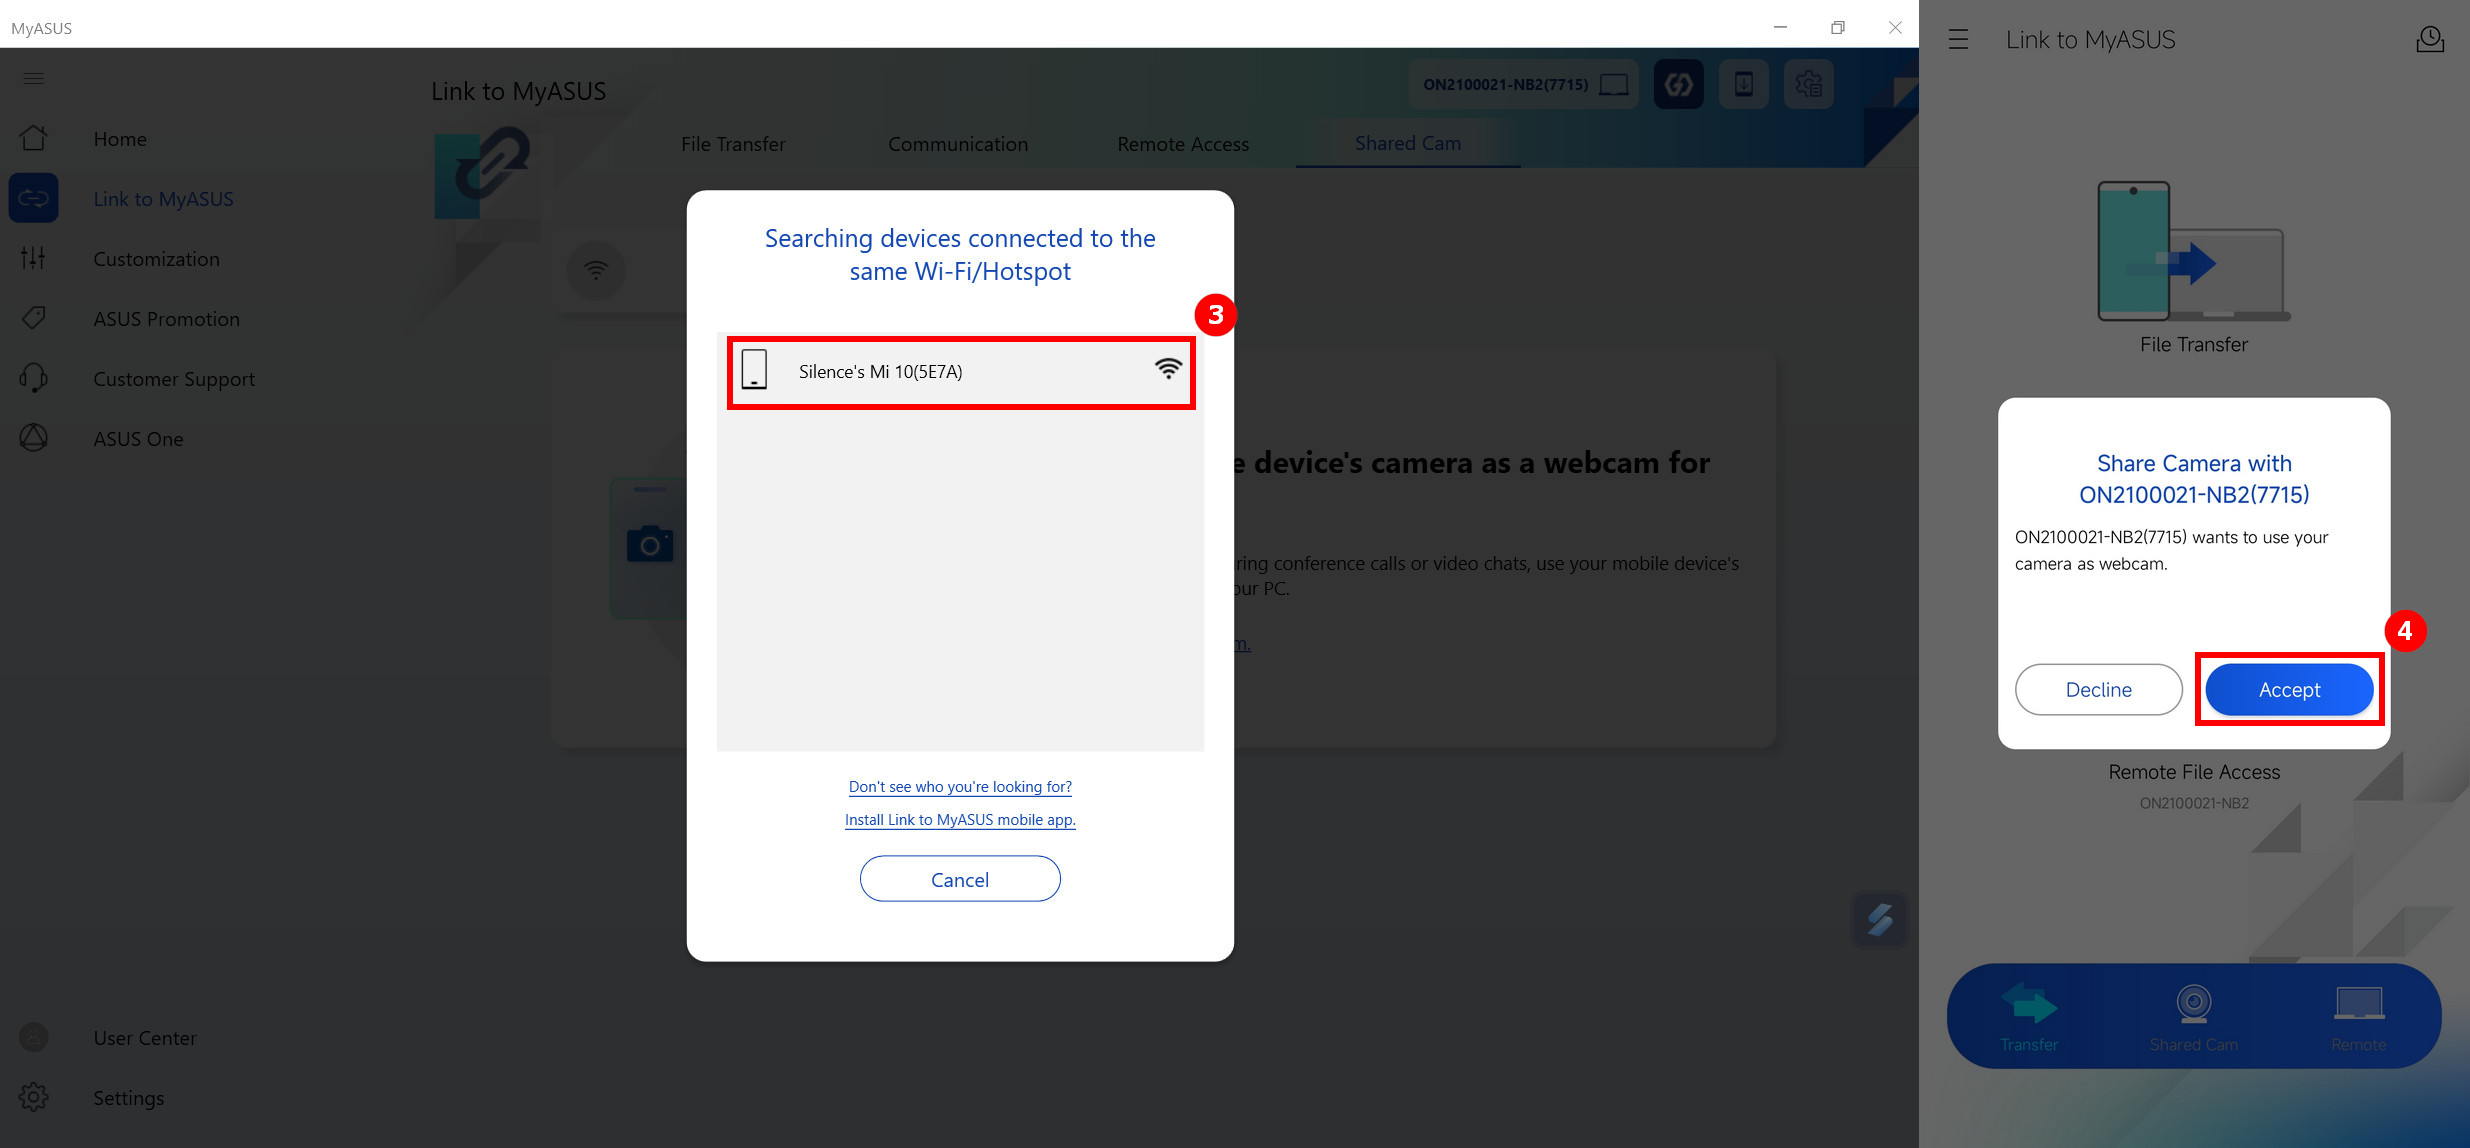
(1)Click ①[Shared Cam], click ②[Connect a Device].
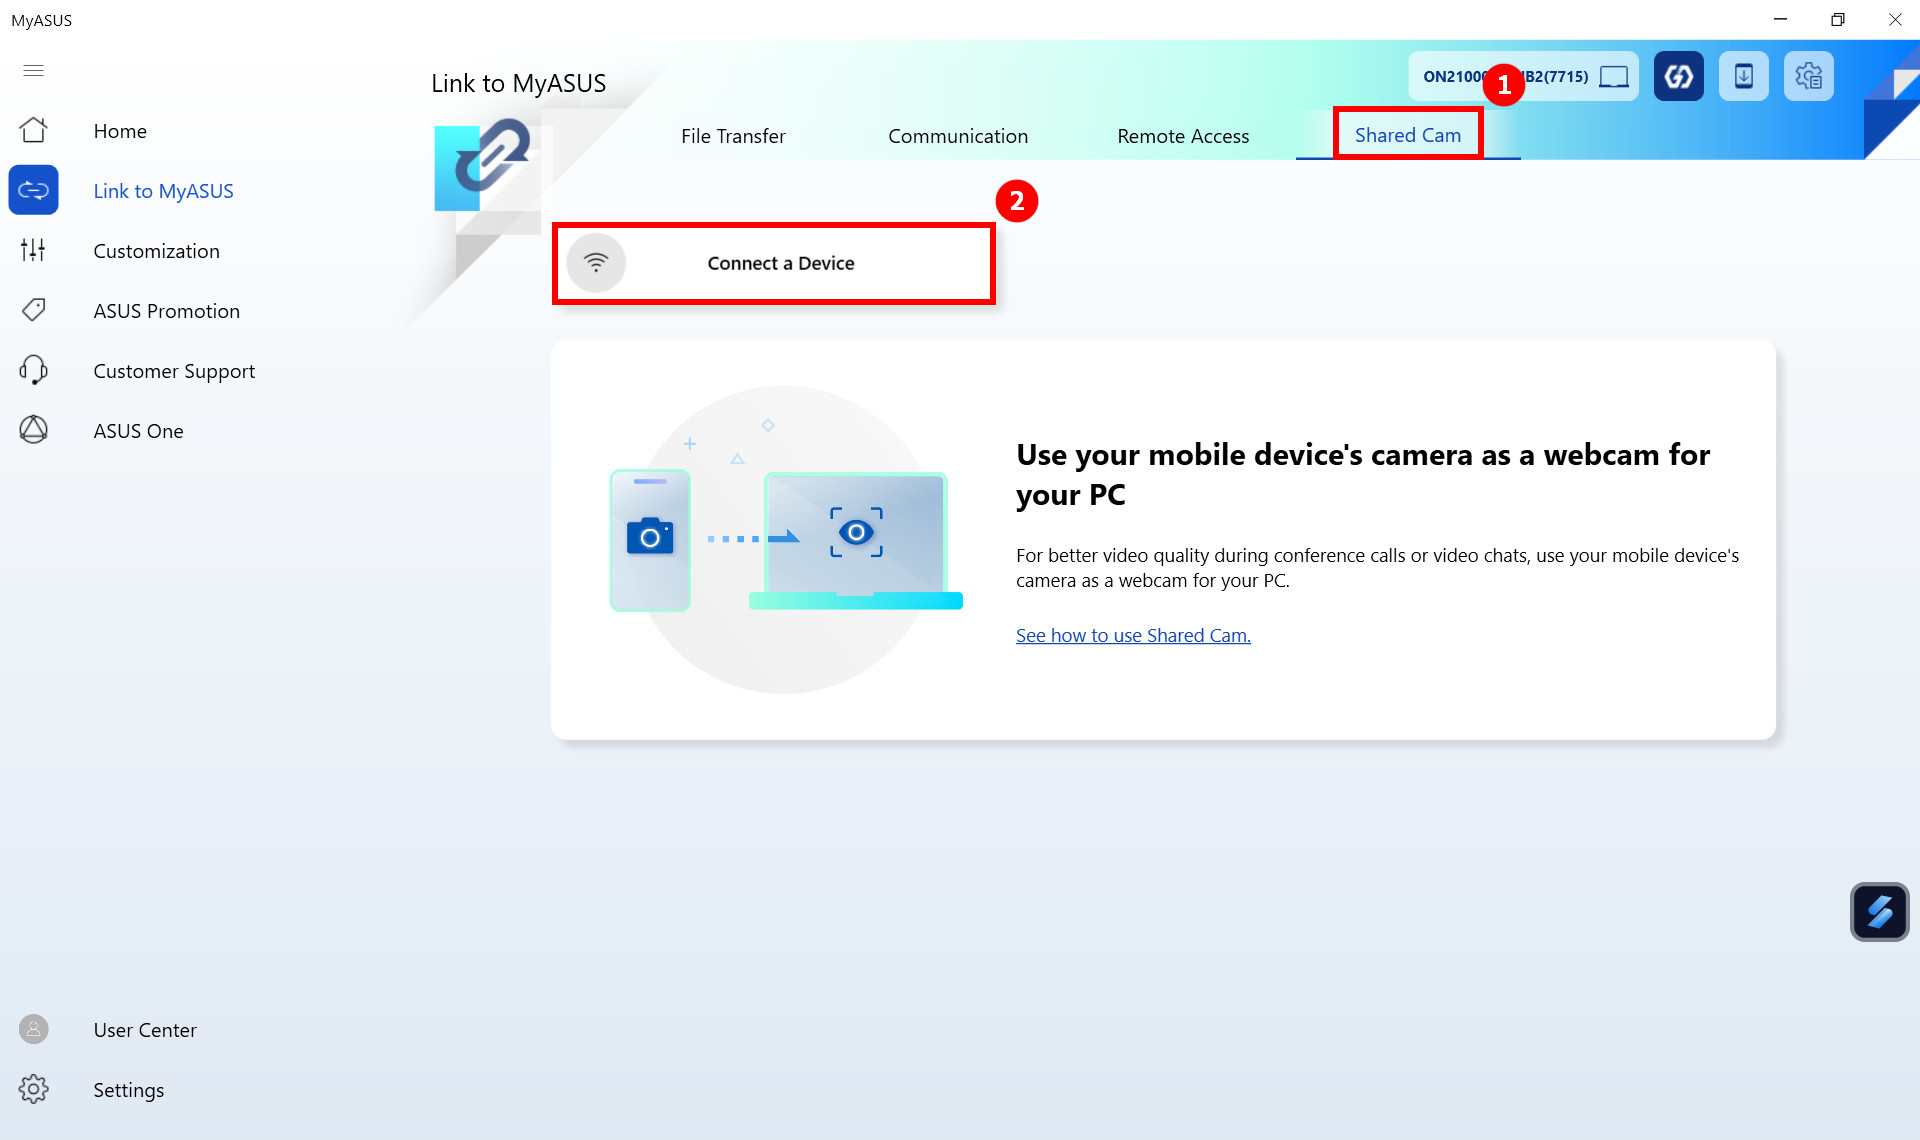
(2) Click ③[Your mobile device], mobile device side tap ④[Accept].
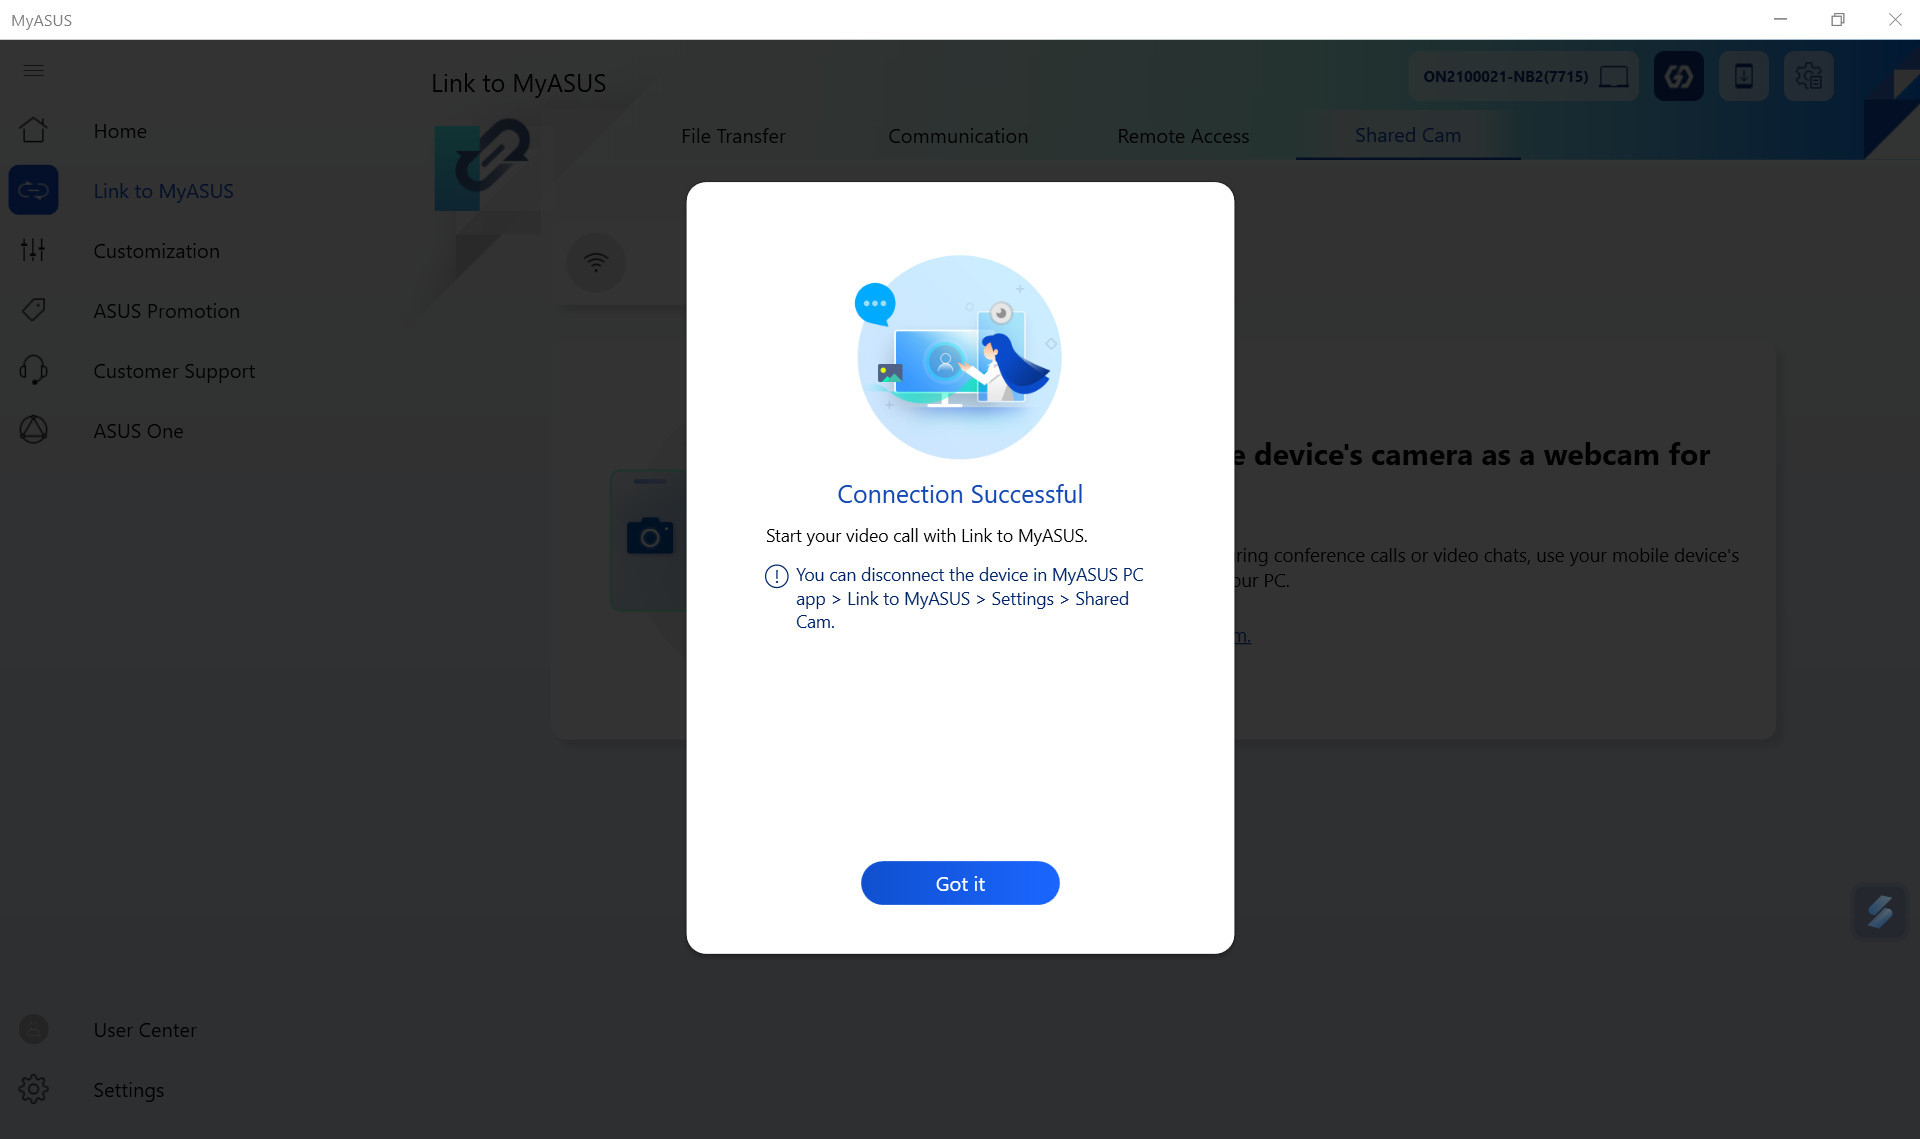
(3) After the connection is successful, the pop-up window of [Connection Successful] will be displayed on the computer side, click [Got it].
7.2 How to use the Shared Cam function
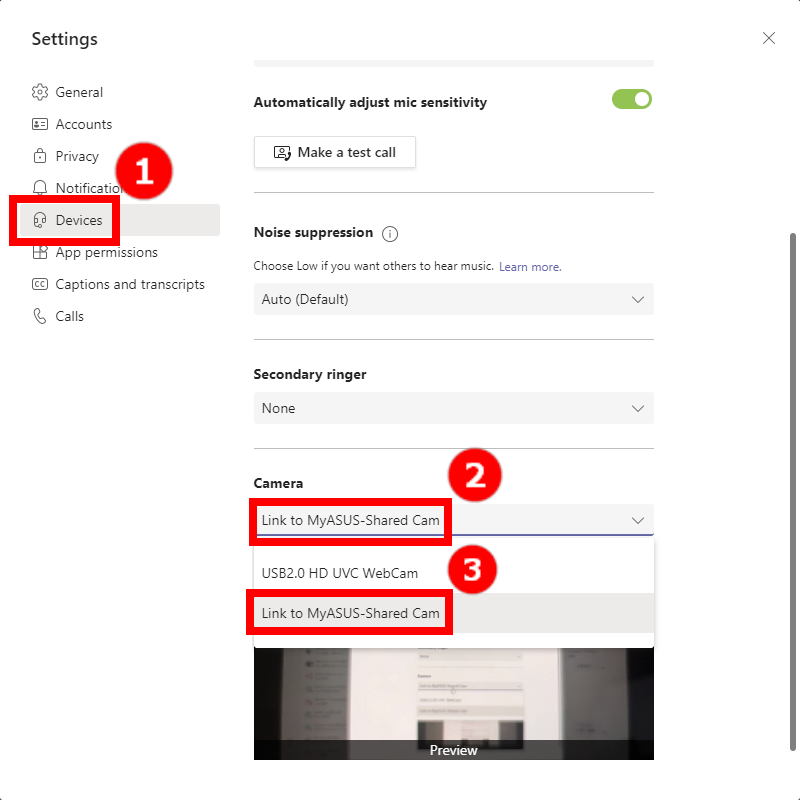
(1) Take the Teams communication software as an example, on the Teams setting page, click ①[Devices], select ②[Camera], click ③[Link to MyASUS-Shared Cam], the communication software will use the camera of the mobile device to transmit images during video communication.
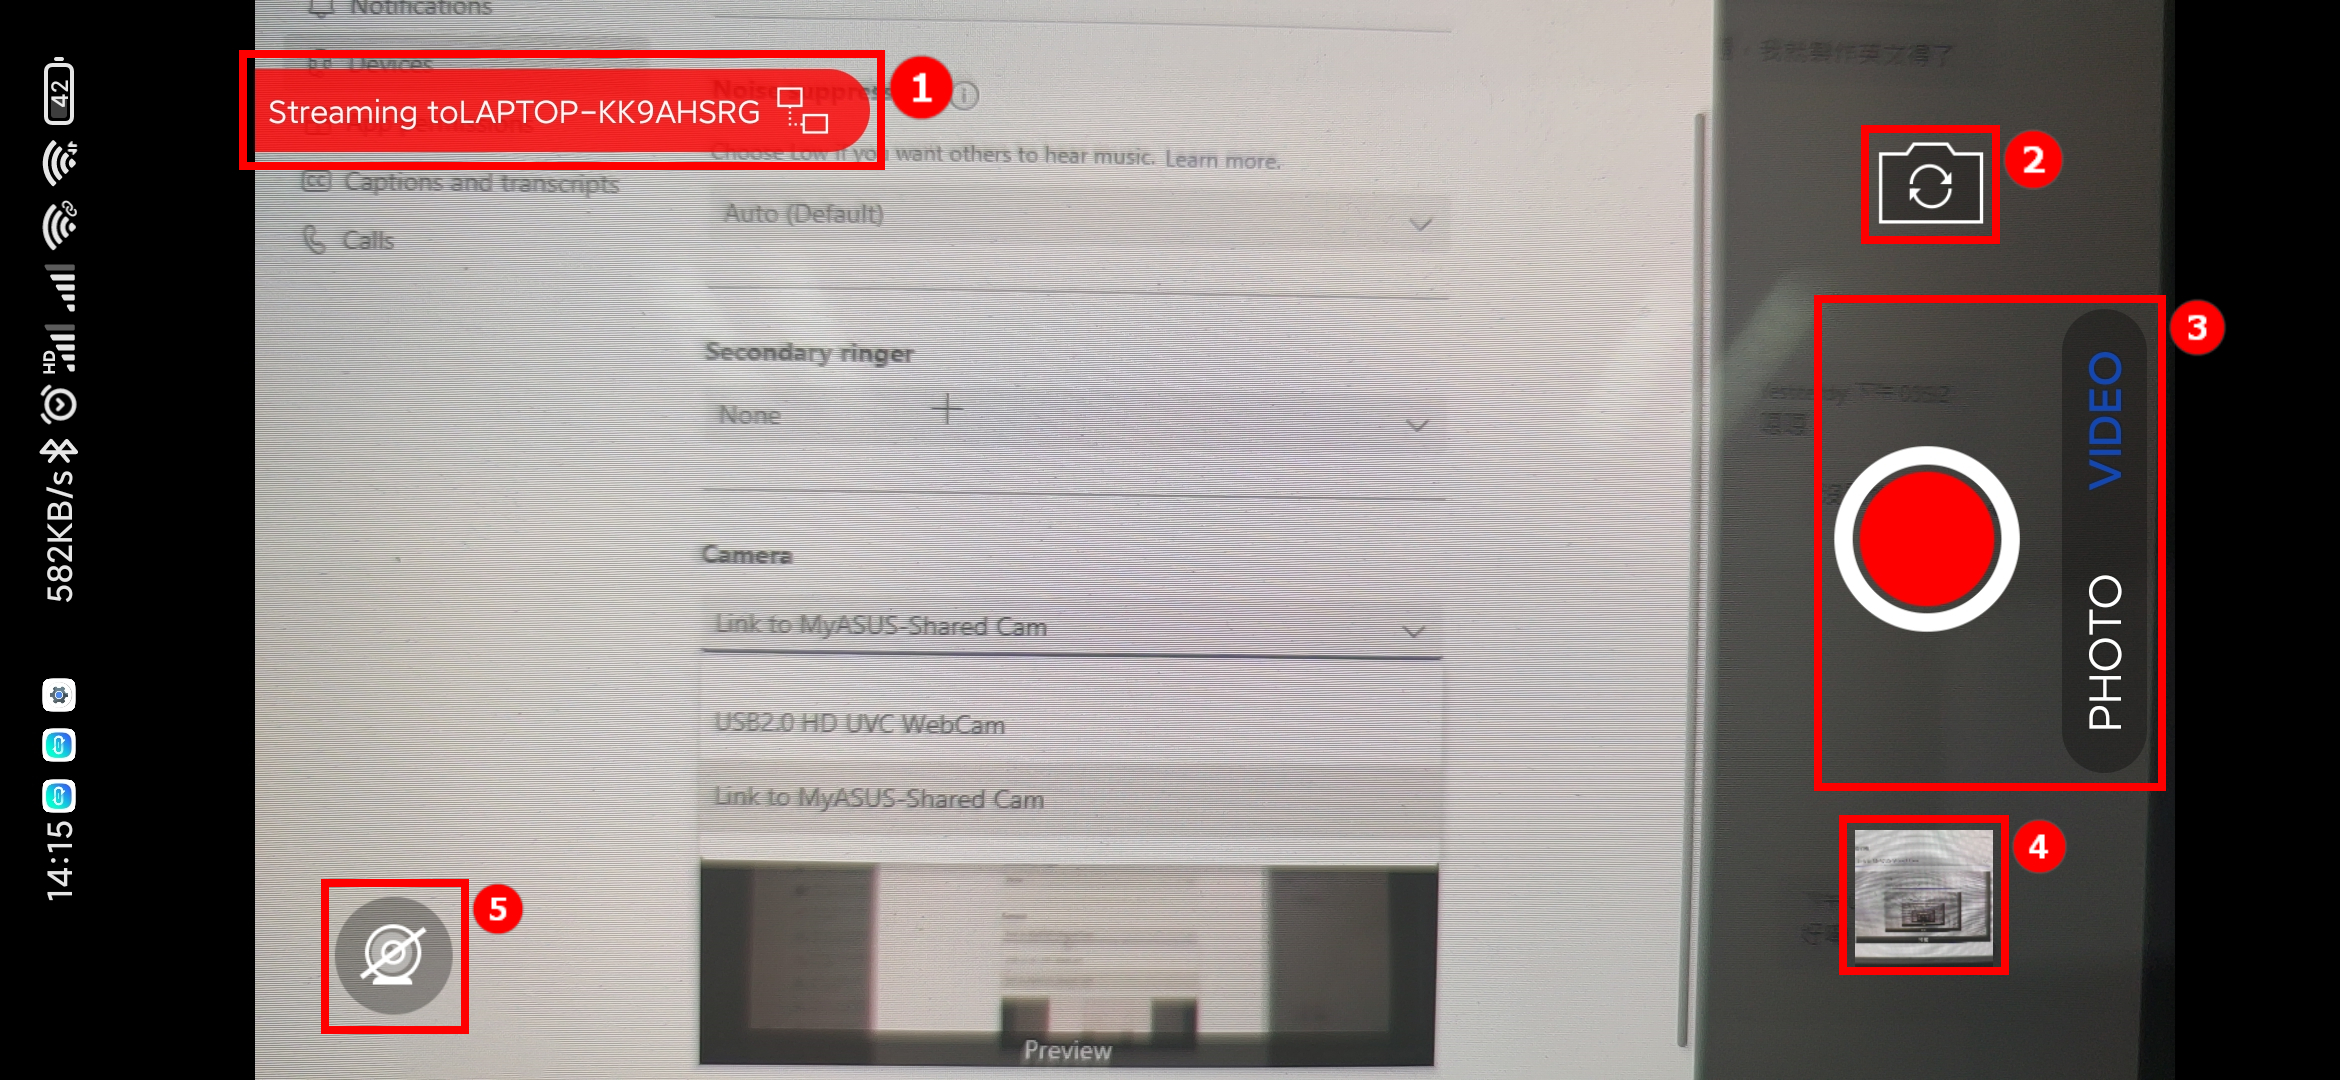
(2) On the Shared Cam page of the mobile device, there are five components, ①[Computer connection status], ②[Switch camera icon], ③[Camera modes], ④[Gallery], ⑤[End camera sharing].
[Computer connection status] shows the video transmission status of the mobile device and the connected PC. There are two status: a. Video streaming and b. Video interruption, depending on whether the video communication service is enabled on the computer when the device is connected. Basically, the former means that you are using the video service and that the image captured by the mobile device is being transferred to the computer; the latter means that your computer is not using the video service and the screen is not being transferred to the computer.
[Camera modes], this function allows you to take photos or videos while using the video communication service, and the notes or works you take can be instantly sent to your PC through the File Transfer function, which lets you share with others..
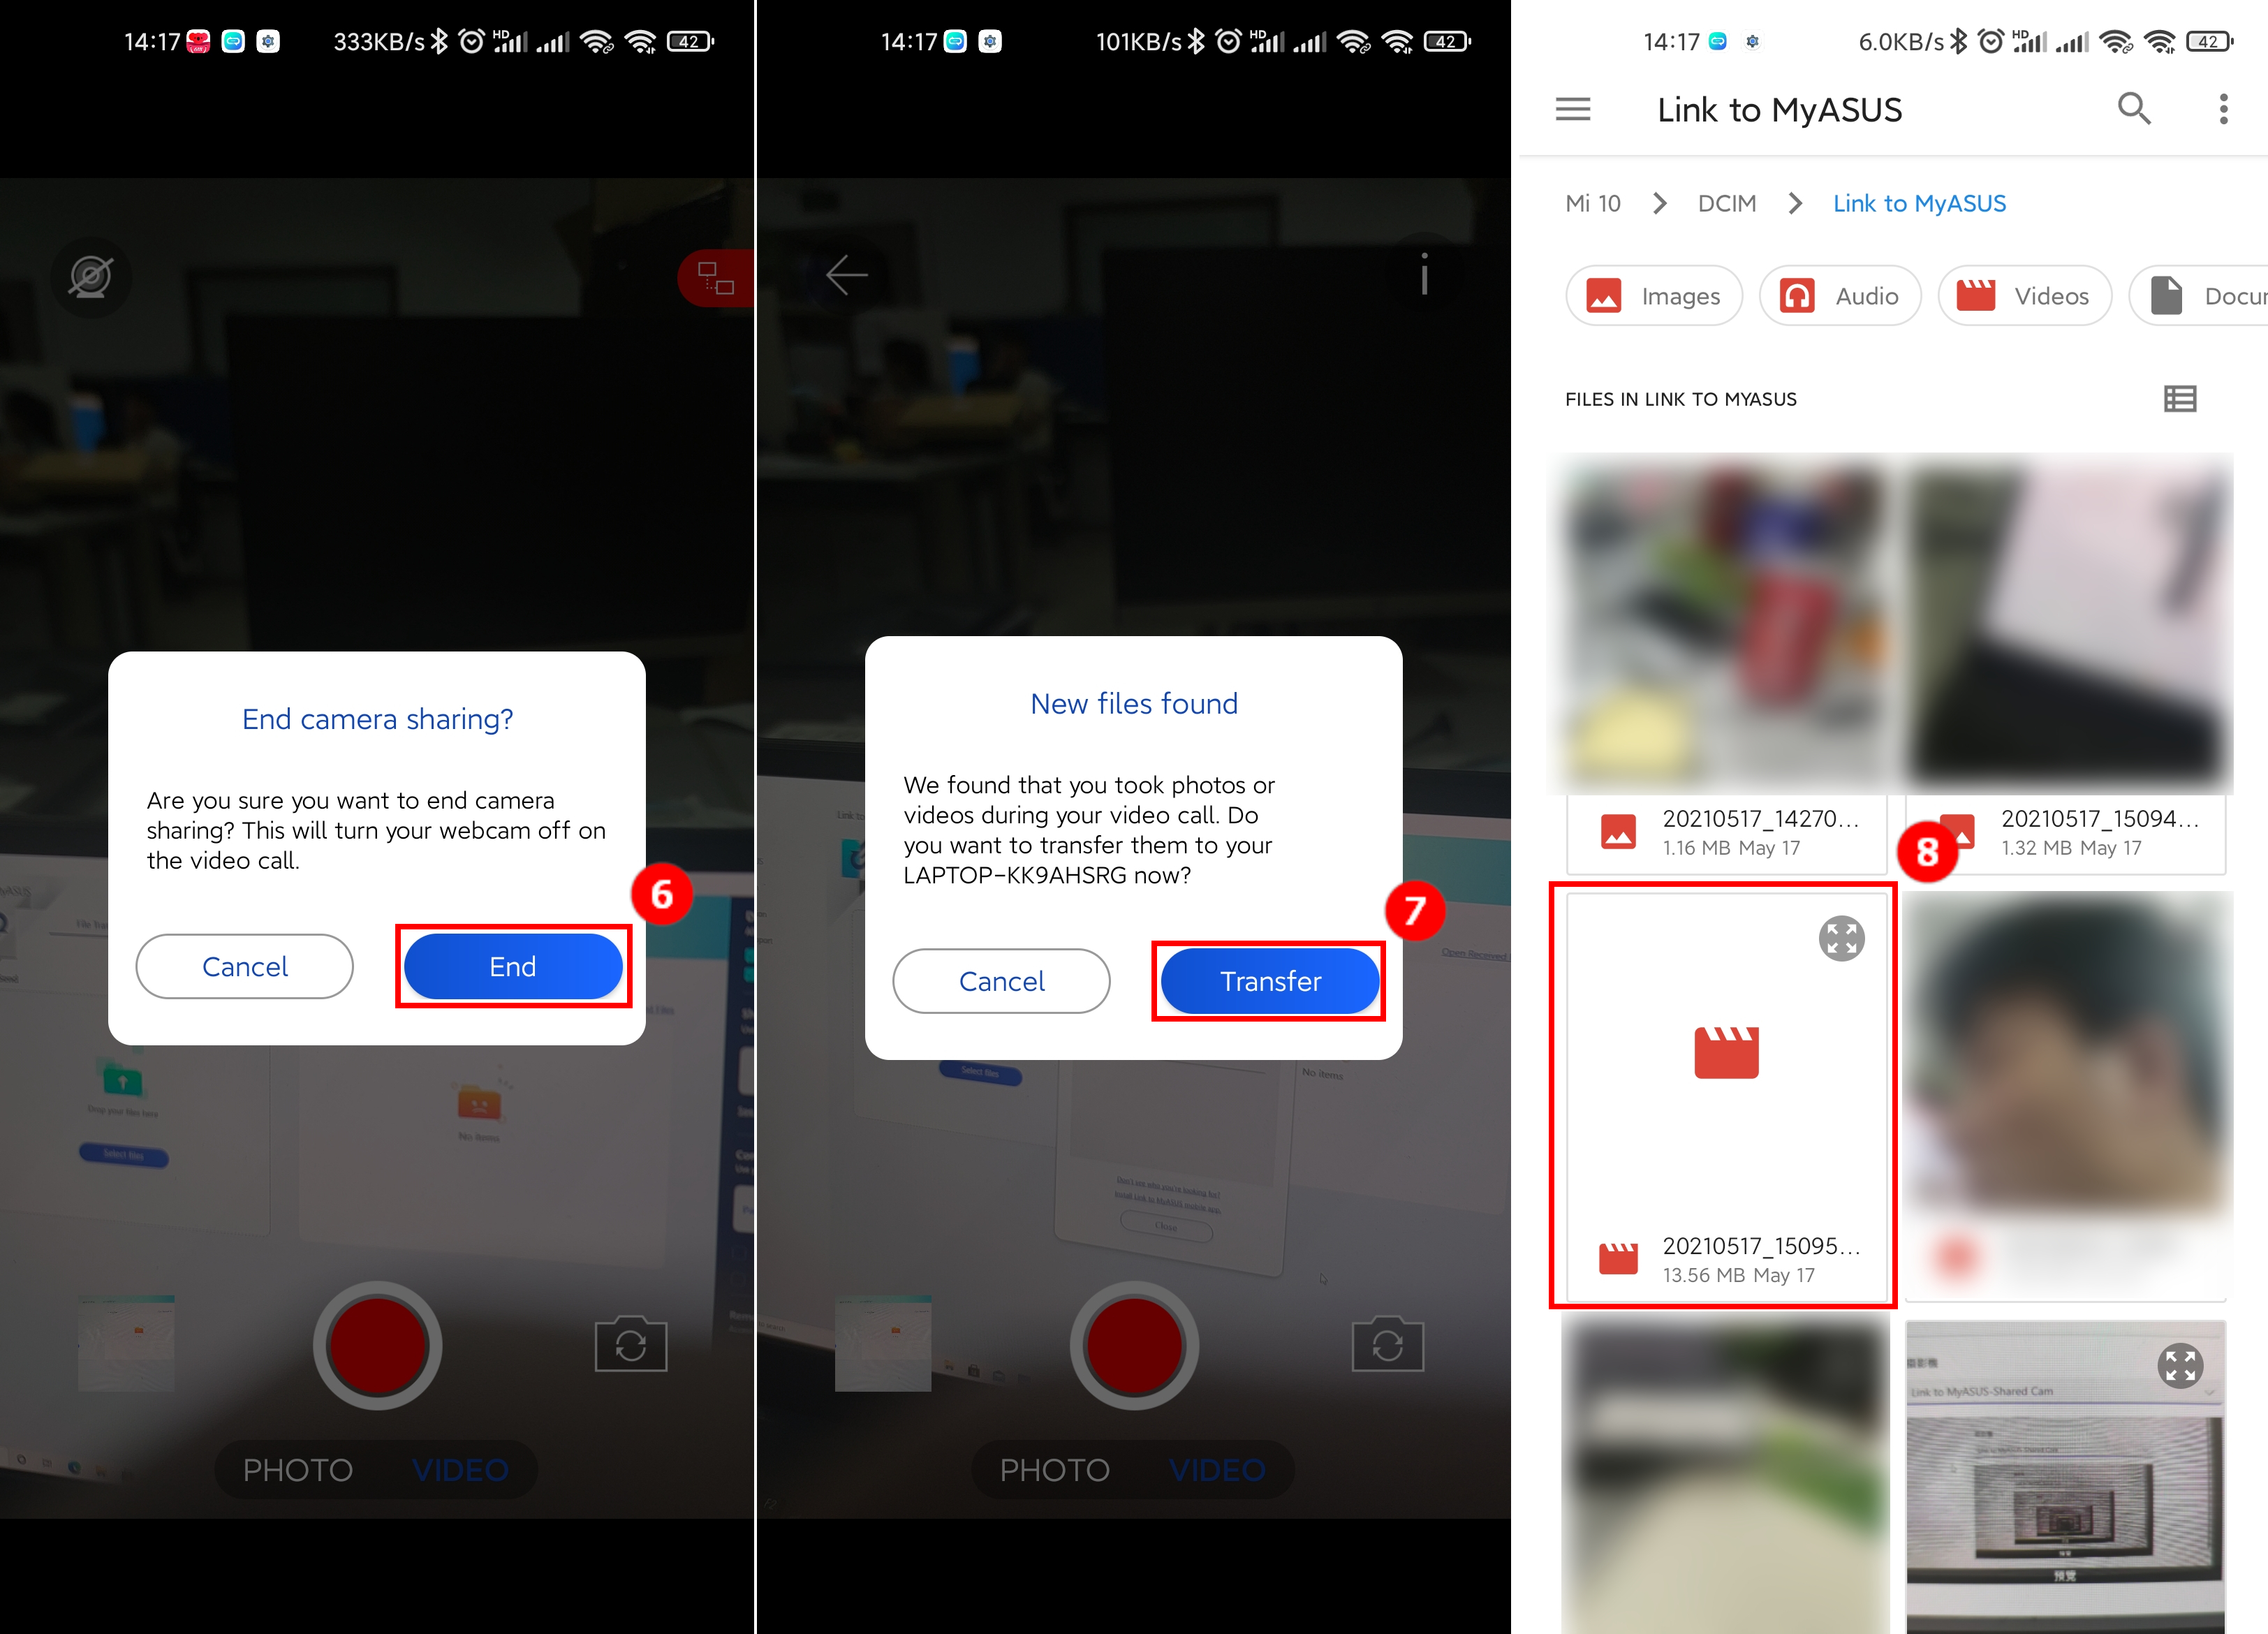
(3) After tapping [End camera sharing], tap ⑥[End]. If you take photos or videos during use, you will be reminded whether to transfer the files you just shot to the computer. If you need to transfer the captured files, please tap ⑦[Transfer], and tap ⑧[Photos or Videos to Send].
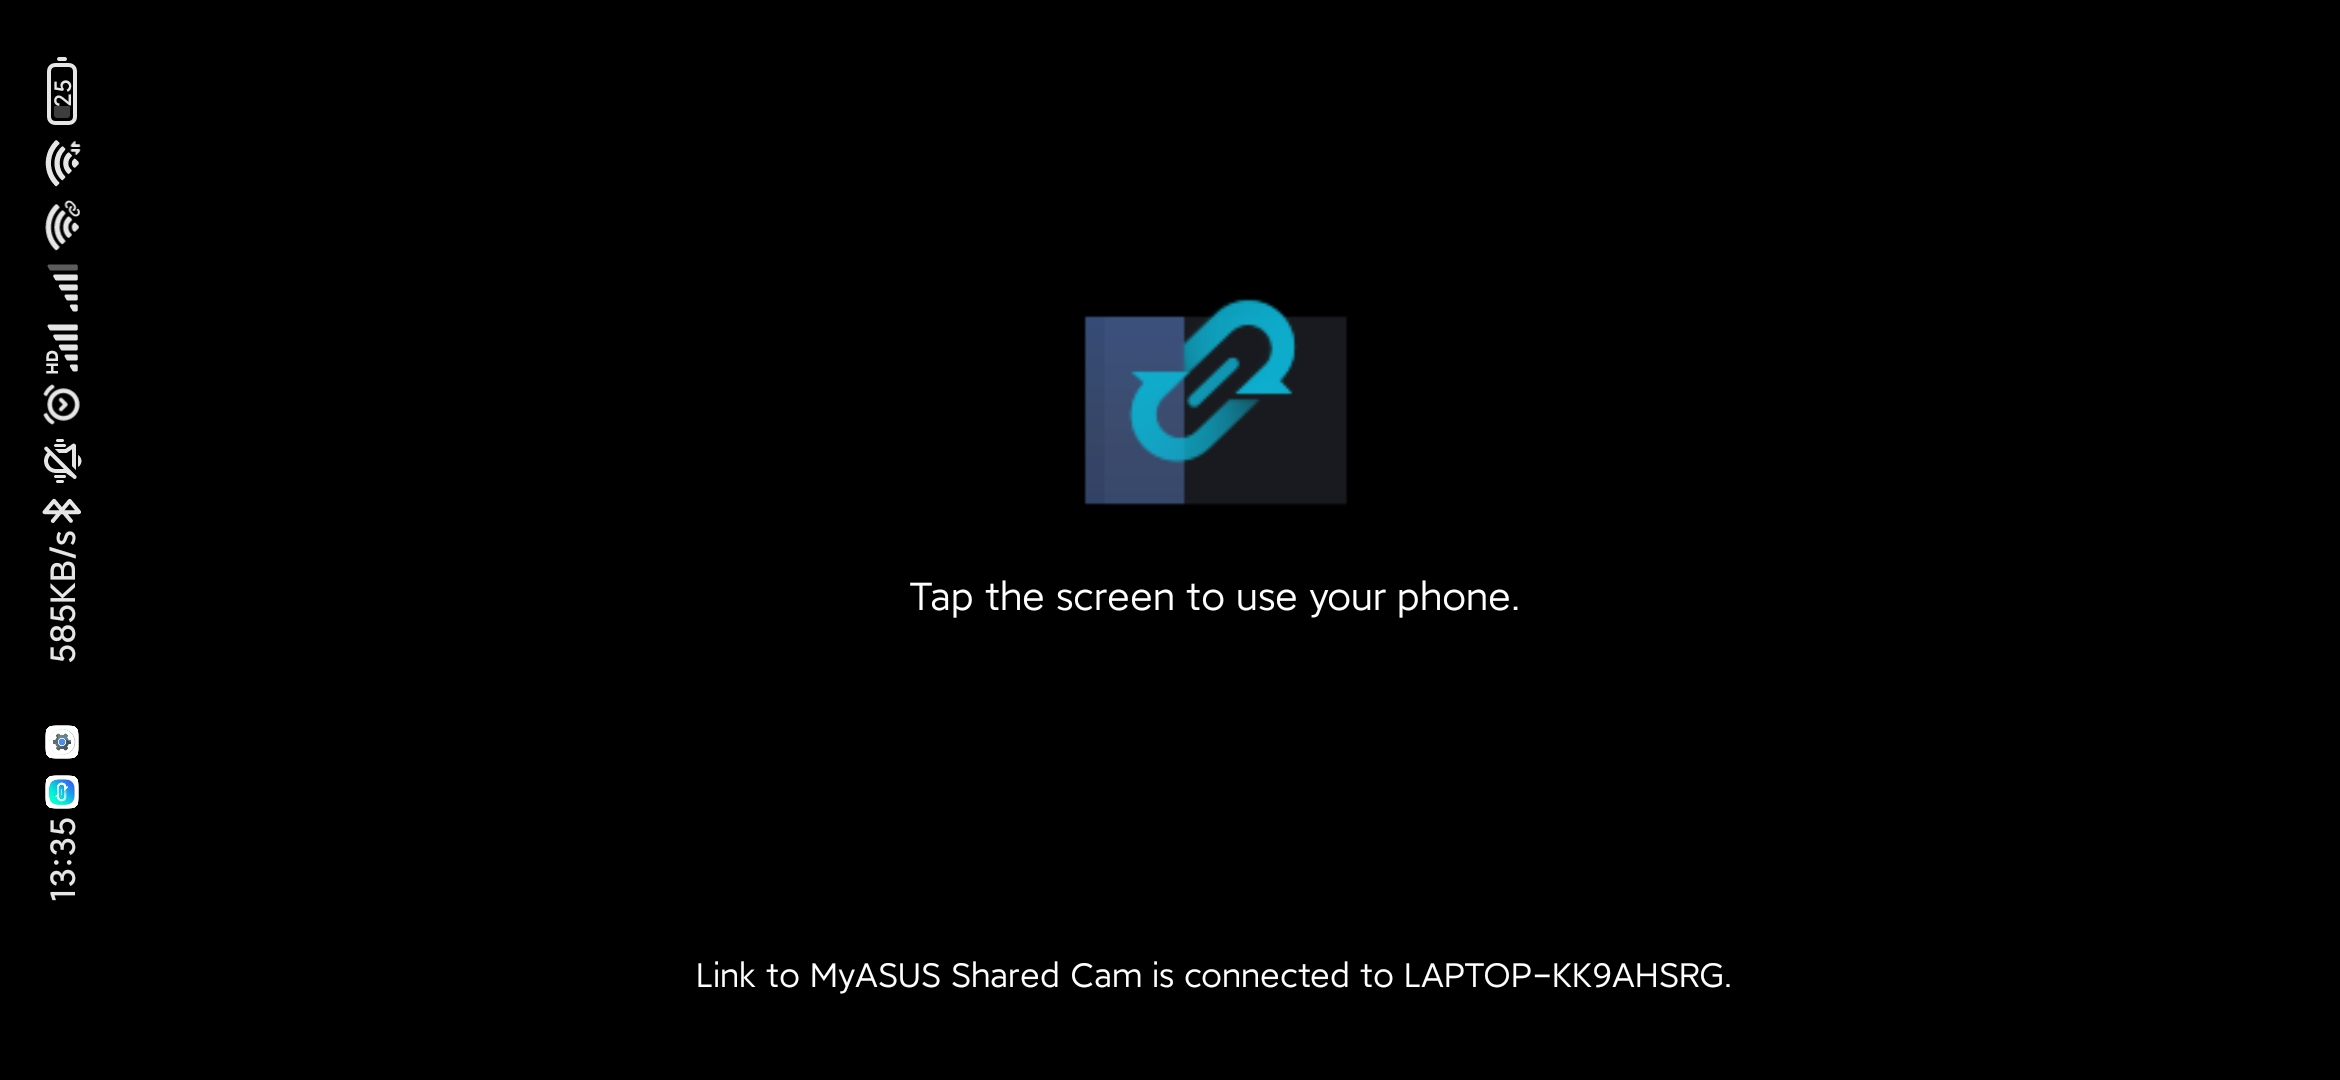
(4) When you use the mobile device to share the camera function, in order to save the power of your mobile device, when the screen of the mobile device is not operated for more than 1 minute, it will enter the idle mode, and the following screen will be displayed at this time, you only need to Tap the screen of the mobile device to return to the Shared Cam function.
Download MyASUS now to experience perfect service. Click below!
